Sony Group RMNU1 NETWORK REMOTE CONTROLLER User Manual RMN U1
Sony Corporation NETWORK REMOTE CONTROLLER RMN U1
User manual
RMN-U1
E:\AXISIM\4192581111\4192581111RMNU1U\01GB-RMNU1U\010COV.fm
masterpage: Cov
RMN-U1
4-192-581-11(1)
Network Remote
Controller
Operating Instructions
Getting started
Network connections
Enjoying content via an
infrared device
Additional information
Troubleshooting
Enjoying music content
on your home network
Using Activity
Precautions/
specifications
Enjoying video/photos content
on your home network
010COV.book Page 1 Thursday, October 21, 2010 2:24 PM
E:\AXISIM\4192581111\4192581111RMNU1U\01GB-RMNU1U\020REG.fm
masterpage: Left_3col
RMN-U1
4-192-581-11(1)
2
GB
To reduce the risk of fire or
electric shock, do not
expose this apparatus to
rain or moisture.
To reduce the risk of fire, do not
cover the ventilation opening of the
apparatus with newspapers,
tablecloths, curtains, etc.
Do not place the naked flame sources
such as lighted candles on the
apparatus.
To reduce the risk of fire or electric
shock, do not expose this apparatus
to dripping or splashing, and do not
place objects filled with liquids, such
as vases, on the apparatus.
As the main plug is used to
disconnect the unit from the mains,
connect the unit to an easily
accessible AC outlet. Should you
notice an abnormality in the unit,
disconnect the main plug from the
AC outlet immediately.
Do not install the appliance in a
confined space, such as a bookcase
or built-in cabinet.
Do not expose batteries or apparatus
with battery-installed to excessive
heat such as sunshine, fire or the like.
The unit is not disconnected from the
mains as long as it is connected to
the AC outlet, even if the unit itself
has been turned off.
For customers in the
United States and
Canada
RECYCLING LITHIUM-
ION BATTERIES
Lithium-Ion batteries are recyclable.
You can help preserve our
environment by returning your used
rechargeable batteries to the
collection and recycling location
nearest you.
For more information regarding
recycling of rechargeable batteries,
call toll free
1-800-822-8837, or visit
http://www.rbrc.org/
Caution: Do not handle damaged or
leaking Lithium-Ion batteries.
For customers in the
United States
Owner’s Record
The model and serial numbers are
located on the rear of the unit.
Record these numbers in the space
provided below. Refer to them
whenever you call upon your Sony
dealer regarding this product.
Model No.
Serial No.
Important Safety
Instructions
1) Read these instructions.
2) Keep these instructions.
3) Heed all warnings.
4) Follow all instructions.
5) Do not use this apparatus near
water.
6) Clean only with dry cloth.
7) Do not block any ventilation
openings. Install in accordance
with the manufacturer’s
instructions.
8) Do not install near any heat
sources such as radiators, heat
registers, stoves, or other
apparatus (including amplifiers)
that produce heat.
9) Do not defeat the safety purpose
of the polarized or grounding-
type plug. A polarized plug has
two blades with one wider than
the other. A grounding type plug
has two blades and a third
grounding prong. The wide blade
or the third prong are provided
for your safety. If the provided
plug does not fit into your outlet,
consult an electrician for
replacement of the obsolete
outlet.
10)Protect the power cord from
being walked on or pinched
particularly at plugs, convenience
receptacles, and the point where
they exit from the apparatus.
11)Only use attachments/accessories
specified by the manufacturer.
12)Use only with the cart, stand,
tripod, bracket, or table specified
by the manufacturer, or sold with
the apparatus. When a cart is
used, use caution when moving
the cart/apparatus combination to
avoid injury from tip-over.
13)Unplug this apparatus during
lightning storms or when unused
for long periods of time.
14)Refer all servicing to qualified
service personnel. Servicing is
required when the apparatus has
been damaged in any way, such
as power-supply cord or plug is
damaged, liquid has been spilled
or objects have fallen into the
apparatus, the apparatus has been
exposed to rain or moisture, does
not operate normally, or has been
dropped.
The following FCC
statement applies only
to the version of this
model manufactured for
sale in the U.S.A. Other
versions may not
comply with FCC
technical regulations.
NOTE:
This equipment has been tested and
found to comply with the limits for a
Class B digital device, pursuant to
Part 15 of the FCC Rules. These
limits are designed to provide
reasonable protection against
harmful interference in a residential
installation. This equipment
generates, uses and can radiate radio
frequency energy and, if not installed
and used in accordance with the
instructions, may cause harmful
interference to radio
communications. However, there is
no guarantee that interference will
not occur in a particular installation.
If this equipment does cause harmful
interference to radio or television
reception, which can be determined
by turning the equipment off and on,
the user is encouraged to try to
correct the interference by one or
more of the following measures:
–Reorient or relocate the receiving
antenna.
–Increase the separation between
the equipment and receiver.
WARNING
010COV.book Page 2 Thursday, October 21, 2010 2:24 PM
E:\AXISIM\4192581111\4192581111RMNU1U\01GB-RMNU1U\020REG.fm
masterpage: Right_3col
RMN-U1
4-192-581-11(1)
3
GB
–Connect the equipment into an
outlet on a circuit different from
that to which the receiver is
connected.
–Consult the dealer or an
experienced radio/TV technician
for help.
CAUTION
You are cautioned that any changes
or modifications not expressly
approved in this manual could void
your authority to operate this
equipment.
This equipment must not be
co-located or operated in conjunction
with any other antenna or
transmitter.
The available scientific evidence
does not show that any health
problems are associated with using
low power wireless devices.
There is no proof, however, that
these low power wireless devices are
absolutely safe. Low power Wireless
devices emit low levels of radio
frequency energy (RF) in the
microwave range while being used.
Whereas high levels of RF can
produce health effects (by heating
tissue), exposure of low-level RF
that does not produce heating effects
causes no known adverse health
effects. Many studies of low-level
RF exposures have not found any
biological effects. Some studies have
suggested that some biological
effects might occur, but such
findings have not been confirmed by
additional research. [Network
Remote Controller (RMN-U1)] has
been tested and found to comply
with FCC radiation exposure limits
set forth for an uncontrolled
environment and meets the FCC
radio frequency (RF) Exposure
Guidelines in Supplement C to
OET65.
For customers in
Canada
This Class B digital apparatus
complies with Canadian ICES-003.
Operation is subject to the following
two conditions:
(1) this device may not cause
interference, and (2) this device must
accept any interference, including
interference that may cause
undesired operation of this device.
The available scientific evidence
does not show that any health
problems are associated with using
low power wireless devices.
There is no proof, however, that
these low power wireless devices are
absolutely safe. Low power Wireless
devices emit low levels of radio
frequency energy (RF) in the
microwave range while being used.
Whereas high levels of RF can
produce health effects (by heating
tissue), exposure of low-level RF
that does not produce heating effects
causes no known adverse health
effects. Many studies of low-level
RF exposures have not found any
biological effects. Some studies have
suggested that some biological
effects might occur, but such
findings have not been confirmed by
additional research. [Network
Remote Controller (RMN-U1)] has
been tested and found to comply
with IC radiation exposure limits set
forth for an uncontrolled
environment and meets RSS-102 of
the IC radio frequency (RF)
Exposure rules.
For customers in Europe
Notice for customers:
the following
information is only
applicable to equipment
sold in countries
applying EU directives.
The manufacturer of this product is
Sony Corporation, 1-7-1 Konan
Minato-ku, Tokyo, 108-0075 Japan.
The Authorized Representative for
EMC and product safety is Sony
Deutschland GmbH, Hedelfinger
Strasse 61, 70327 Stuttgart,
Germany.
For any service or guarantee matters,
please refer to the addresses given in
separate service or guarantee
documents.
Hereby, Sony Corp., declares that
this equipment is in compliance with
the essential requirements and other
relevant provisions of Directive
1999/5/EC.
For details, please access the
following URL:
http://www.compliance.sony.de/
This product is intended to be used in
the following countries.
AT, BE, CH, CZ, DE, DK, ES, FI,
FR, GB, GR, HU, IE, IT, NL, NO,
PL, PT, RO, SE, SK
For customers who use
this product in the
following countries:
Norway:
Use of this radio equipment is not
allowed in the geographical area
within a radius of 20 km from the
centre of Ny-Alesund, Svalbard.
France:
The WLAN feature of this Network
Remote Controller shall exclusively
be used inside buildings.
Any use of the WLAN feature of this
Network Remote Controller outside
of the buildings is prohibited on the
French territory. Please make sure
that the WLAN feature of this
Network Remote Controller is
disabled before any use outside of
the buildings. (ART Decision 2002-
1009 as amended by ART Decision
03-908, relating to radio-frequencies
use restrictions.)
Italy:
Use of the RLAN network is
governed:
•with respect to private use, by the
Legislative Decree of 1.8.2003,
no. 259 (“Code of Electronic
Communications”). In particular
Article 104 indicates when the
prior obtainment of a general
authorization is required and Art.
105 indicates when free use is
permitted;
•with respect to the supply to the
public of the RLAN access to
telecom networks and services, by
the Ministerial Decree 28.5.2003,
as amended, and Art. 25 (general
authorization for electronic
communications networks and
services) of the Code of electronic
communications.
010COV.book Page 3 Thursday, October 21, 2010 2:24 PM
E:\AXISIM\4192581111\4192581111RMNU1U\01GB-RMNU1U\020REG.fm
masterpage: Left_3col
RMN-U1
4-192-581-11(1)
4
GB
Disposal of
Old Electrical
& Electronic
Equipment
(Applicable in
the European
Union and other
European countries
with separate
collection systems)
This symbol on the product or on its
packaging indicates that this product
shall not be treated as household
waste. Instead it shall be handed over
to the applicable collection point for
the recycling of electrical and
electronic equipment. By ensuring
this product is disposed of correctly,
you will help prevent potential
negative consequences for the
environment and human health,
which could otherwise be caused by
inappropriate waste handling of this
product. The recycling of materials
will help to conserve natural
resources. For more detailed
information about recycling of this
product, please contact your local
Civic Office, your household waste
disposal service or the shop where
you purchased the product.
Disposal of
waste
batteries
(applicable in
the European
Union and other
European countries
with separate
collection systems)
This symbol on the battery or on the
packaging indicates that the battery
provided with this product shall not
be treated as household waste.
On certain batteries this symbol
might be used in combination with a
chemical symbol. The chemical
symbols for mercury (Hg) or lead
(Pb) are added if the battery contains
more than 0.0005% mercury or
0.004% lead.
By ensuring these batteries are
disposed of correctly, you will help
prevent potentially negative
consequences for the environment
and human health which could
otherwise be caused by inappropriate
waste handling of the battery. The
recycling of the materials will help to
conserve natural resources.
In case of products that for safety,
performance or data integrity reasons
require a permanent connection with
an incorporated battery, this battery
should be replaced by qualified
service staff only.
To ensure that the battery will be
treated properly, hand over the
product at end-of-life to the
applicable collection point for the
recycling of electrical and electronic
equipment.
For all other batteries, please view
the section on how to remove the
battery from the product safely.
Hand the battery over to the
applicable collection point for the
recycling of waste batteries.
For more detailed information about
recycling of this product or battery,
please contact your local Civic
Office, your household waste
disposal service or the shop where
you purchased the product.
010COV.book Page 4 Thursday, October 21, 2010 2:24 PM
E:\AXISIM\4192581111\4192581111RMNU1U\01GB-RMNU1U\030INT.fm
masterpage: Right_L1
RMN-U1
4-192-581-11(1)
5
GB
Before operating this unit
About copyright protection
Music data cannot be used without the permission
of the copyright holder except when used solely
for personal enjoyment.
About the illustrations used in this
manual
Illustrations and screens used in this manual may
vary from the actual screens.
Malfunctions that occur during the normal use
of the unit will be repaired by Sony in
accordance with the conditions defined in the
limited warranty for this unit. However, Sony
will not be liable for any consequences arising
from a failure to play caused by a damaged or
malfunctioning unit.
010COV.book Page 5 Thursday, October 21, 2010 2:24 PM
E:\AXISIM\4192581111\4192581111RMNU1U\01GB-RMNU1U\010COVTOC.fm
masterpage: Left_L1_1col
RMN-U1
4-192-581-11(1)
6
GB
Table of contents
Before operating this unit .........................................................................5
Features of this unit..................................................................................9
Getting started
Checking the supplied accessories........................................................11
Guide to parts and controls ....................................................................12
Main unit .......................................................................................12
Display window ..............................................................................14
Basic operations ....................................................................................18
Charging the unit ............................................................................18
Turning this unit on/off .....................................................................18
Entering text...................................................................................19
Performing initial setup operations.........................................................21
Network connections
Connecting the unit to your home network (network settings) ................23
Checking the wireless LAN environment of your home network..............24
Searching for an access point and setting up a wireless network
(access point scan method) .........................................................24
Setting up a wireless network using an access point compliant
with WPS ..................................................................................26
Setting up the IP address/proxy server ...............................................28
Confirming the network settings ........................................................29
Setting the clock.....................................................................................30
Setting the clock via an Internet connection.........................................30
Enjoying music content on your home network
Playing music content on your server.....................................................32
Setting up the server .......................................................................32
Setting up a renderer (network controlled player) .................................35
Listening to audio content on your server............................................35
Changing the renderer (network controlled player) currently
being used ................................................................................38
010COV.book Page 6 Thursday, October 21, 2010 2:24 PM
E:\AXISIM\4192581111\4192581111RMNU1U\01GB-RMNU1U\010COVTOC.fm
masterpage: Right_1col
RMN-U1
4-192-581-11(1)
7
GB
Using the PARTY STREAMING function ...............................................39
Starting a new PARTY..................................................................... 39
Controlling the PARTY currently being held ........................................ 40
Useful functions.....................................................................................41
Controlling the volume of devices currently being controlled.................. 41
Searching for content using the Keyword Search function..................... 41
Operating other renderers (network controlled player).......................... 42
Enjoying video/photos content on your home
network
Watching/viewing content on your server ..............................................43
Setting up the server ....................................................................... 43
Setting up a renderer (network controlled player)................................. 43
Watching/viewing content on your server ........................................... 44
Changing the renderer (network controlled player) currently
being used ................................................................................ 46
Useful functions.....................................................................................47
Controlling the volume of devices currently being controlled.................. 47
Searching for content using the Keyword Search function
(Video only)............................................................................... 47
Operating other renderers (network controlled player).......................... 48
Enjoying content via an infrared device
Adding and using infrared devices ......................................................... 49
Adding an infrared device ................................................................ 49
Programming the desired remote code .............................................. 50
Useful function....................................................................................... 52
Using the Smart Select function ........................................................ 52
Using the unit as an infrared remote control ........................................ 52
Using Activity
Registering an Activity ...........................................................................53
About a DLNA Activity ..................................................................... 53
Registering a DLNA Activity on the HOME screen of the
“ Activity” tab.......................................................................... 53
About an infrared Activity ................................................................. 55
Registering an infrared Activity ......................................................... 55
Registering a device remote on the HOME screen of the
“ Activity” tab.......................................................................... 58
Using the Activity function......................................................................59
010COV.book Page 7 Thursday, October 21, 2010 2:24 PM
E:\AXISIM\4192581111\4192581111RMNU1U\01GB-RMNU1U\010COVTOC.fm
masterpage: Left_1col
RMN-U1
4-192-581-11(1)
8
GB
Additional information
Editing registered device information .....................................................60
Editing a registered Activity....................................................................62
Using an infrared device in a DLNA Activity.........................................63
Editing a registered remote control ........................................................65
Editing a device remote control .........................................................65
Editing an Activity remote control.......................................................66
Merging with an infrared device to a renderer (network controlled
player) ................................................................................................67
Changing settings..................................................................................68
Network Settings ............................................................................69
Common Settings ...........................................................................69
Language Settings..........................................................................69
Group Settings ...............................................................................69
System Update...............................................................................70
Device Details ................................................................................70
Updating the Firmware...........................................................................71
Updating the system application........................................................71
Troubleshooting
Troubleshooting.....................................................................................72
Precautions/specifications
Precautions ...........................................................................................76
Specifications ........................................................................................78
Glossary ................................................................................................79
Index......................................................................................................81
010COV.book Page 8 Thursday, October 21, 2010 2:24 PM
E:\AXISIM\4192581111\4192581111RMNU1U\01GB-RMNU1U\040FEA.fm
masterpage: Right_L1_1col
RMN-U1
4-192-581-11(1)
9
GB
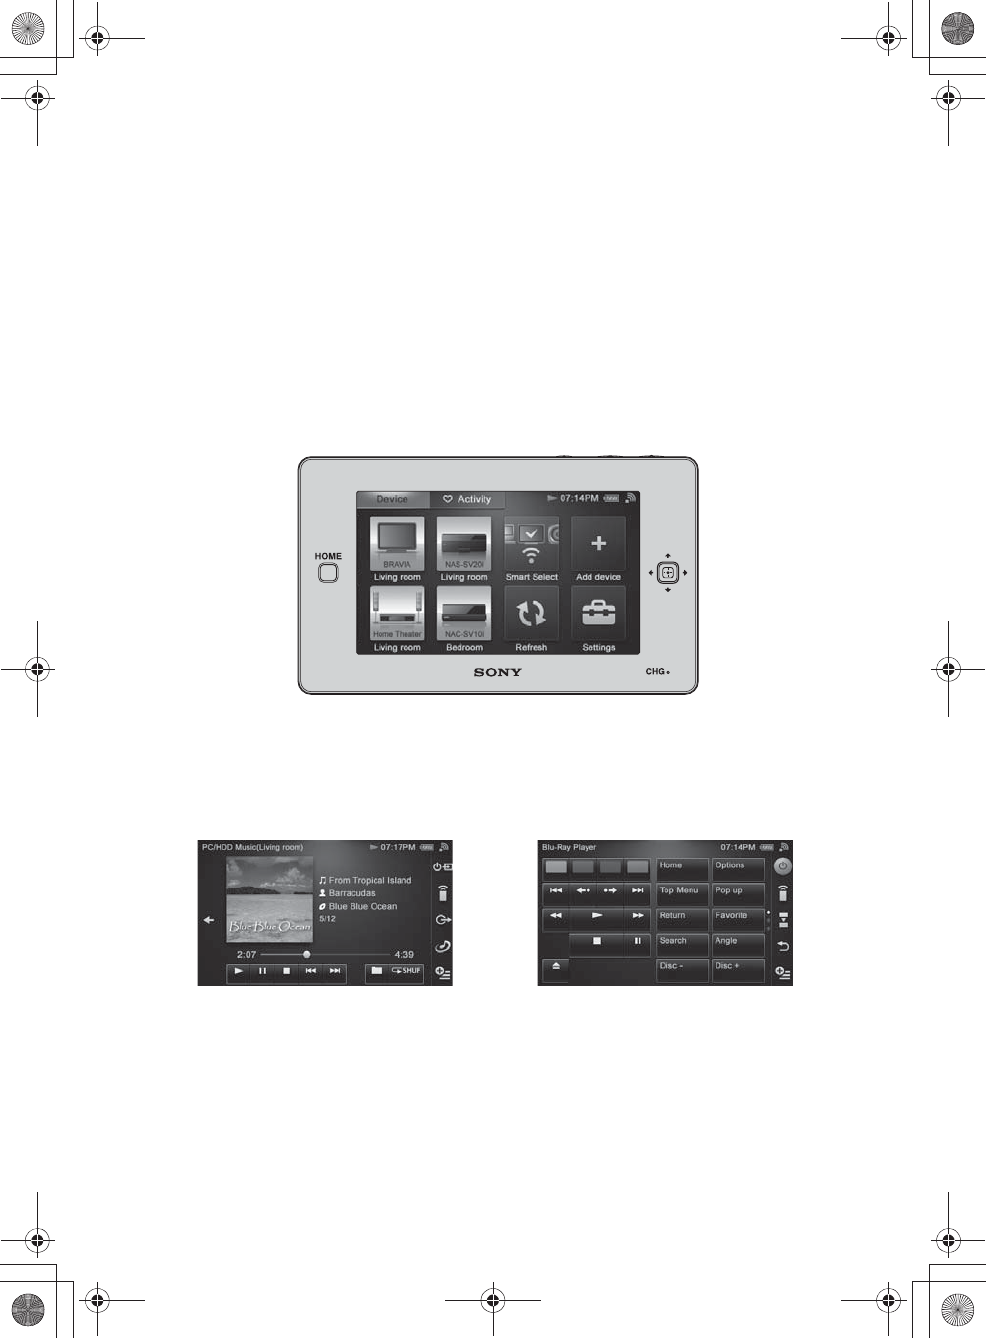
Features of this unit
RMN-U1 has a DLNA (Digital Living Network Alliance) controller function and an infrared remote
control function.
When you press the HOME button on the unit, DLNA devices that can be designated as a renderer
(network controlled player), or infrared devices that you have registered with this unit are displayed. You
can display the appropriate remote control easily by tapping the desired device icon or Activity icon.
The DLNA controller screen The infrared remote control screen
010COV.book Page 9 Thursday, October 21, 2010 2:24 PM
E:\AXISIM\4192581111\4192581111RMNU1U\01GB-RMNU1U\040FEA.fm
masterpage: Left
RMN-U1
4-192-581-11(1)
10
GB
You can use this unit as a DLNA-compliant controller.
•You can manage DLNA-compliant devices that are connected to your home network. For example, you
can play back audio content stored on the computer in the bed room, using this unit in the children's
room (page 35).
•You can enjoy audio content currently being played back on devices with the PARTY STREAMING
function on your home network at the same time (page 39).
•You can also manage video and photo content on your home network using this unit.
•This unit registers servers and renderers (network controlled player) on your home network
automatically, simply by starting up this unit after connecting DLNA-compliant devices to your
network.
You can use this unit as a DLNA controller without a registration process.
You can use this unit for centralised control of AV components.
•This unit is preset for the products most major venders as well as for Sony devices.
If you cannot find the vender name, the unit allows you to program the desired remote code by using the
learning function (page 50).
You can register a favorite Activity on the HOME screen of the “ Activity” tab.
The Activity function allows you to prepare devices and content, etc., to suit to your purpose by just
tapping the Activity icon (page 53).
010COV.book Page 10 Thursday, October 21, 2010 2:24 PM
E:\AXISIM\4192581111\4192581111RMNU1U\01GB-RMNU1U\050GET.fm
masterpage: Right_L0
RMN-U1
4-192-581-11(1)
11
GB
Getting started
Getting started
Checking the supplied accessories
❏Remote control charger (1)
❏AC power adaptor (1)
Models for the USA and Canada
Models for Europe (except model for the UK)
Model for the UK
❏Operating Instructions (1)
This manual provides full explanations of the
various settings, operations, and network
connection procedures.
This manual also contains precautions for the
safe use of the unit.
❏Quick Setup Guide (1)
This manual explains how to set up network
connections and use the functions that can be
used in conjunction with that network
connections.
010COV.book Page 11 Thursday, October 21, 2010 2:24 PM
E:\AXISIM\4192581111\4192581111RMNU1U\01GB-RMNU1U\050GET.fm
masterpage: Left_L1
RMN-U1
4-192-581-11(1)
12
GB
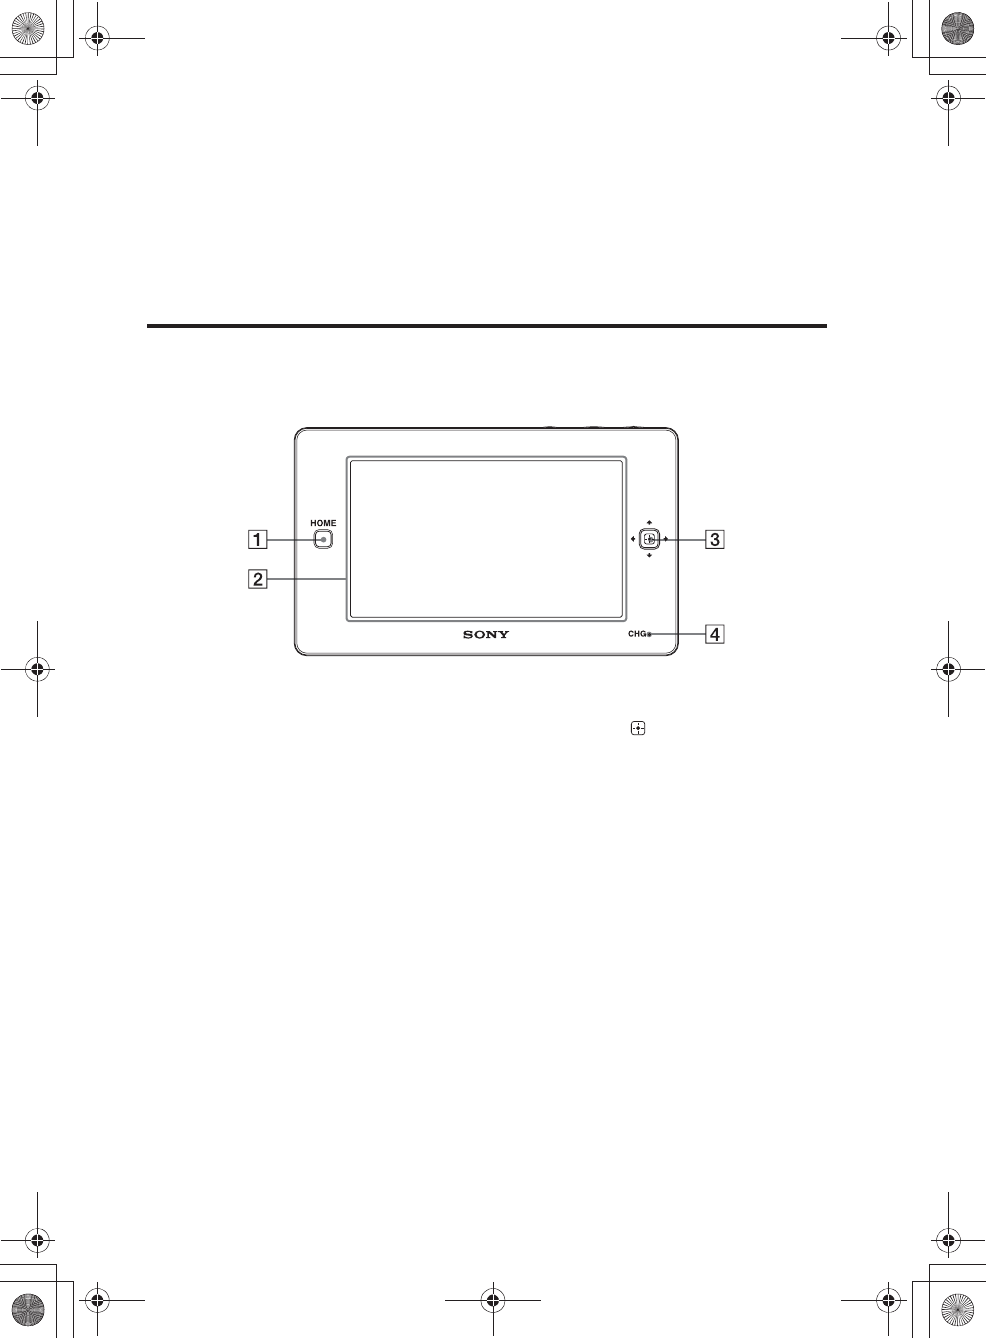
Guide to parts and controls
Main unit
Front
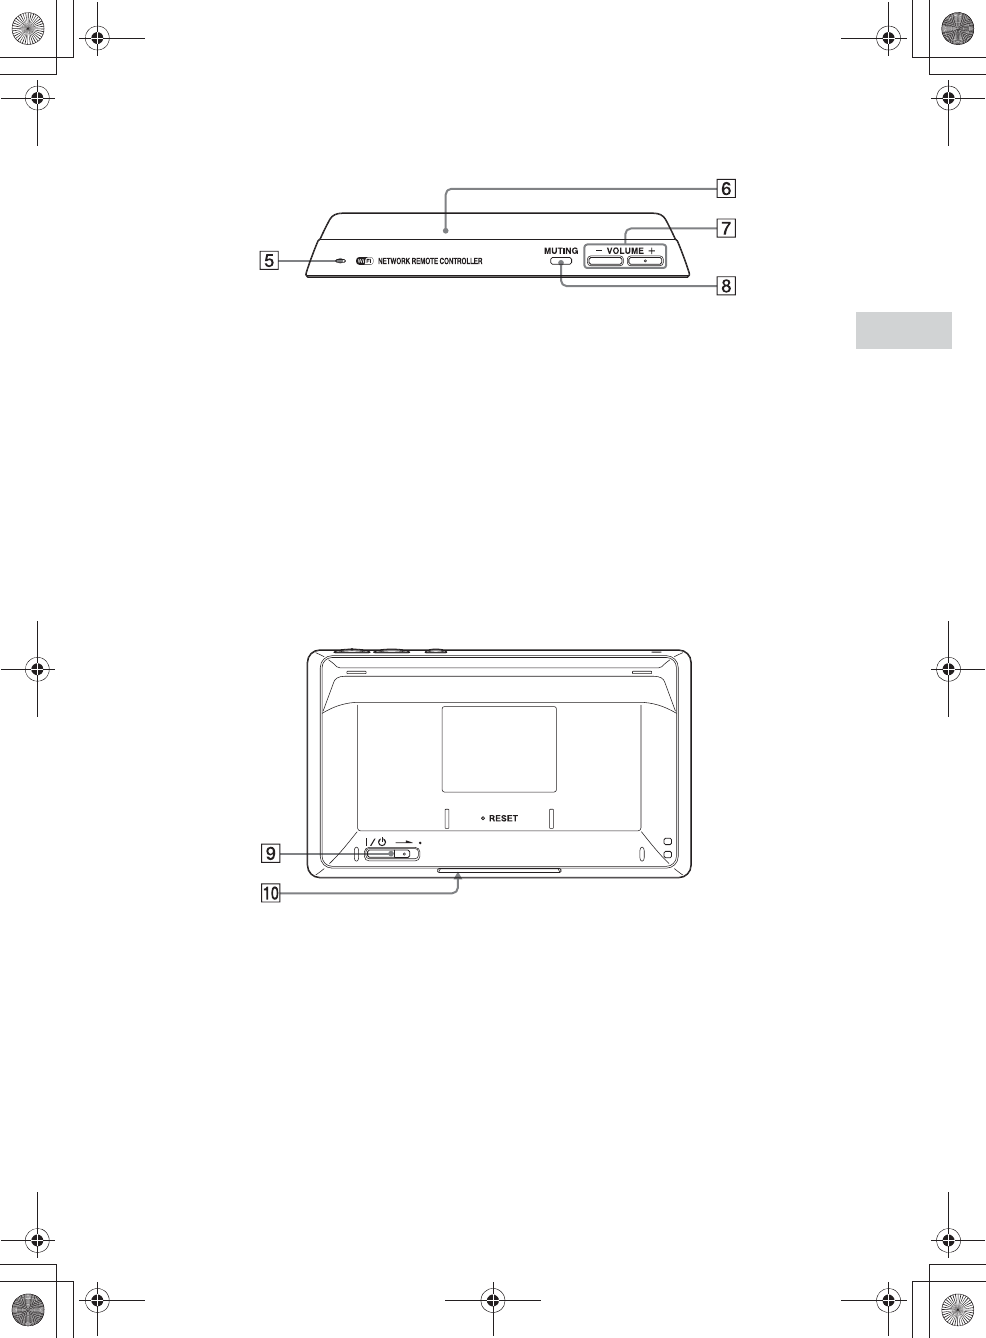
AHOME button
Press to display the HOME screen (page 14).
BLCD screen
Displays the touch panel screen for menu items
or the remote control. The remote screen
display depends on the status of the unit.
CDirection key/ (Enter) key
Use this key to select an item when you use this
unit as an infrared remote control. The key can
be used when it lights up.
DCHG (charging) indicator
Lights up in red while the unit is being charged
on the remote control charger. The indicator
turns off when charging has completed
(page 18).
010COV.book Page 12 Thursday, October 21, 2010 2:24 PM
E:\AXISIM\4192581111\4192581111RMNU1U\01GB-RMNU1U\050GET.fm
masterpage: Right
RMN-U1
4-192-581-11(1)
13
GB
Getting started
Top
ESpeaker
The operation sound is output.
FRemote transmitter
Sends infrared signals to other devices.
GVOLUME +/– button
Press to adjust the volume level of the
operating device (page 41).
HMUTING button
Press to turn off the sound of the operating
device temporarily. Press the button again to
restore the sound (page 41).
Rear
I?/1 (power) switch
Slide the switch to turn the power on or off
(page 18).
JRemote sensor
Receives infrared signals from a remote control
when you use the learning function (page 50).
010COV.book Page 13 Thursday, October 21, 2010 2:24 PM
E:\AXISIM\4192581111\4192581111RMNU1U\01GB-RMNU1U\050GET.fm
masterpage: Left
RMN-U1
4-192-581-11(1)
14
GB
Display window
This section introduces display windows that are
used frequently.
Header items
The following items are always displayed together
on an operation screen.
HOME screen (Device)
Appears when you tap the “Device” tab after
pressing the HOME button.
Tap a desired device or menu to select that item.
HOME screen ( Activity)
Appears when you tap the “ Activity” tab after
pressing the HOME button.
Tap a desired Activity or menu to select that item.
Item Description
Wireless LAN signal strength
indicator
This antenna icon indicates the
strength of the wireless LAN
signal. More segments indicate
a stronger signal.
t t t
appears when this unit is not
connected to your wireless
LAN router/access point.
Battery indicator shows the
approximate remaining battery
power.
(the battery is fully
charged) t … t t …
t (the battery is
drained)
When the battery is drained,
“There is no battery power left.
The power will be turned off.”
appears on the screen.
Current Time Displays the current time.
NDisplays the playback
operation status.
Displayed during internal
processing.
Displayed while infrared
signals are being sent.
Item Description
Device icon/
device name/group
name
Tap to select the desired device.
Smart Select Tap to select a device that is
located in front of this unit.
Add device Tap to add an infrared device.
Refresh Tap to update the HOME
screen information.
Settings Tap to make or change settings.
Item Description
Start PARTY Tap to start a new PARTY.
PARTY List Tap to control the PARTY
currently being held.
Current Activ. Tap to return to the screen of
the Activity currently selected.
Item Description
010COV.book Page 14 Thursday, October 21, 2010 2:24 PM
E:\AXISIM\4192581111\4192581111RMNU1U\01GB-RMNU1U\050GET.fm
masterpage: Right
RMN-U1
4-192-581-11(1)
15
GB
Getting started
DLNA controller screen
Appears when you are able to control a
DLNA-compliant device on your home network.
Music
The playback screen for PC/HDD Music is used
here in illustrations.
* The icon displayed is different depending on the
settings.
Video
The playback screen for PC/HDD Video is used
here in illustrations.
Activity icon/
Activity name/
group name
Tap to select the desired
Activity.
Add Activity Tap to add an Activity.
Settings Tap to make or change settings.
Item Description
Jacket information Displays the jacket of the audio
content that is currently being
played back.
Content
information
Displays information on the
audio content that is currently
being played back.
Current playback
time of content
Displays the playback time of
content currently played back.
You can move the playback
position by using the cursor
shown on the progress bar.
Total playback
time of content
currently being
played back
Displays the total playback
time of content currently being
played back.
Operation buttons Tap to operate the device
currently controlled.
* Tap to select the playback
range.
SHUF* Tap to select the playback
mode.
Tap to display the ?/1 and
input panel.
Tap to display the registered
device list.
Item Description
Tap to display the screen used
for switching the renderer
(network controlled player).
Tips
•This icon does not appear in the
following cases.
–During a PARTY
–While playing back content
that cannot be delivered
again by the server
• appears during a PARTY.
Tap to start a new PARTY, or
control the PARTY currently
being held.
Tap to display the option menu.
Tap to return to the content list.
Tip
The server list may appear
depending on the status of the
unit.
Item Description
Thumbnail Displays the thumbnail of the
video content that is currently
being played back.
Content
information
Displays information on the
video content that is currently
being played back.
Current playback
time of the content
Displays the playback time of
the video content currently
being played back.
You can move the playback
position by using the cursor
shown on the progress bar.
Item Description
010COV.book Page 15 Thursday, October 21, 2010 2:24 PM
E:\AXISIM\4192581111\4192581111RMNU1U\01GB-RMNU1U\050GET.fm
masterpage: Left
RMN-U1
4-192-581-11(1)
16
GB
Photos
The playback screen for PC/HDD Photo is used
here in illustrations.
Infrared remote control screen
Appears when you are able to control an infrared
device. There are two types remote control screen,
one for device control and one for Activity control.
The remote control screen can be changed to one
of the following three patterns.
•Play key page
•10 key page
•Input page
Device remote control
The screen of the play key page is used here in
illustrations.
Total playback
time of the content
currently being
played back
Displays the total playback
time of the video content
currently being played back.
Operation buttons Tap to operate the device
currently controlled.
Tap to display the ?/1 and
input panel.
Tap to display the registered
device list.
Tap to display the screen used
for switching the renderer
(network controlled player).
Tap to display the option menu.
Tap to return to the content list.
Tip
The server list may appear
depending on the status of the
unit.
Item Description
Photo image Displays the image of the photo
that is currently being
displayed.
Content
information
Displays information on the
photo that is currently being
displayed.
Operation buttons Tap to operate the device
currently controlled.
Tap N to display photos. Tap
x to cancel the display.
Tap to display the ?/1 and
input panel.
Tap to display the registered
device list.
Item Description
Tap to display the screen used
for switching the renderer
(network controlled player).
Tap to display the option menu.
Tap to return to the content list.
Tip
The server list may appear
depending on the status of the
unit.
Item Description
Tap to turn the device which is
currently being operated on or
off.
Tip
This icon appears when the device
control screen is displayed.
Tap to display the ?/1 and
input panel.
Tip
This icon appears when the
Activity control screen is
displayed.
Tap to display the registered
device list.
Tap to display the next page.
Item Description
010COV.book Page 16 Thursday, October 21, 2010 2:24 PM
E:\AXISIM\4192581111\4192581111RMNU1U\01GB-RMNU1U\050GET.fm
masterpage: Right
RMN-U1
4-192-581-11(1)
17
GB
Getting started
Tap to return to the previous
screen.
Tap to display the option menu.
Item Description
010COV.book Page 17 Thursday, October 21, 2010 2:24 PM
E:\AXISIM\4192581111\4192581111RMNU1U\01GB-RMNU1U\050GET.fm
masterpage: Left_L1
RMN-U1
4-192-581-11(1)
18
GB
Basic operations
Charging the unit
This unit is not fully charged when you first
unpack it after purchase. Make sure to fully charge
the unit before using it.
1
Connect one end of the AC power
adaptor to the DC IN jack of the
remote control charger and the
other end to a wall outlet.
2
Place the unit on the charger.
When you place the unit on the charger, the
CHG indicator lights up in red and charging
starts.
The CHG indicator turns off when the unit is
fully charged.
Turning this unit on/off
Slide the ?/1 (power) switch in the
direction of the arrow.
The last screen which was used when you used this
unit the last time appears.
The screen goes off automatically if you do not
operate this unit for a while. In this case, press any
button on the unit or tap the screen to turn the
screen on again.
Note
This unit is turned off automatically if you do not operate
this unit for certain period of time. In this case, tap the
screen, press any button on the unit, or slide the ?/1
switch in the direction of the arrow to turn it back on. It
takes a while to reboot.
To enter the standby mode
Set the unit to the standby mode when you are not
using it.
The standby mode makes the time shorter that
required for fully charging the unit on the charger
than that required when the unit is turned off.
Slide the ?/1 switch in the direction of
the arrow.
To boot up the unit, tap the display window or
press any button.
010COV.book Page 18 Thursday, October 21, 2010 2:24 PM
E:\AXISIM\4192581111\4192581111RMNU1U\01GB-RMNU1U\050GET.fm
masterpage: Right
RMN-U1
4-192-581-11(1)
19
GB
Getting started
Tip
The standby mode works as a low power
consumption mode.
To turn the unit off
Set the unit to off if you do not want the unit to be
turned on easily by tapping the display screen or
touching any button.
Slide the ?/1 switch in the direction of
the arrow until the display window goes
off.
To turn the unit on, slide the ?/1 switch in the
direction of the arrow again.
To set the screen off timer
1
Press HOME on the unit.
2
Tap “ Settings.”
3
Tap “Common Settings.”
4
Tap “Screen Off Timer.”
5
Tap the desired turn-off time.
6
Tap “Next b.”
The screen used for selecting whether or not
to activate the screen off timer when you
place the unit on the charger appears.
7
Tap the check box to select the
desired setting.
8
Tap “OK.”
Entering text
Entering text may be required during some setup
operations such as network settings. You can enter
text using the soft keyboard screen.
Full text input screen
1
Tap the desired letter or number.
2
Tap “OK” when you have entered
all letters or numbers.
Key Description
B b Tap to move the cursor.
Tap to delete the character just
entered.
@!? Displays the symbol input screen.
Caps Tap to switch the screen between
the all caps and small letters
screen.
âäá Displays special characters for
European languages.
Space Tap to create a blank space.
010COV.book Page 19 Thursday, October 21, 2010 2:24 PM
E:\AXISIM\4192581111\4192581111RMNU1U\01GB-RMNU1U\050GET.fm
masterpage: Left
RMN-U1
4-192-581-11(1)
20
GB
Screen for inputting numbers/IP
address
1
Tap the desired number.
2
Tap “OK” when you have entered all
numbers.
To cancel the input
Tap “Cancel” in step 2.
010COV.book Page 20 Thursday, October 21, 2010 2:24 PM
E:\AXISIM\4192581111\4192581111RMNU1U\01GB-RMNU1U\050GET.fm
masterpage: Right_L1
RMN-U1
4-192-581-11(1)
21
GB
Getting started
Performing initial setup operations
When the unit is turned on for the first time after
you purchase it, some basic set-up operations are
required, for example, initial settings and network
settings.
Entering characters will be needed during the setup
operations. For details on entering characters, see
“Entering text” (page 19).
1
Turn the DLNA (Digital Living
Network Alliance)-compliant
devices in your home on.
2
Slide the ?/1 switch in the
direction of the arrow if the unit is
turned off.
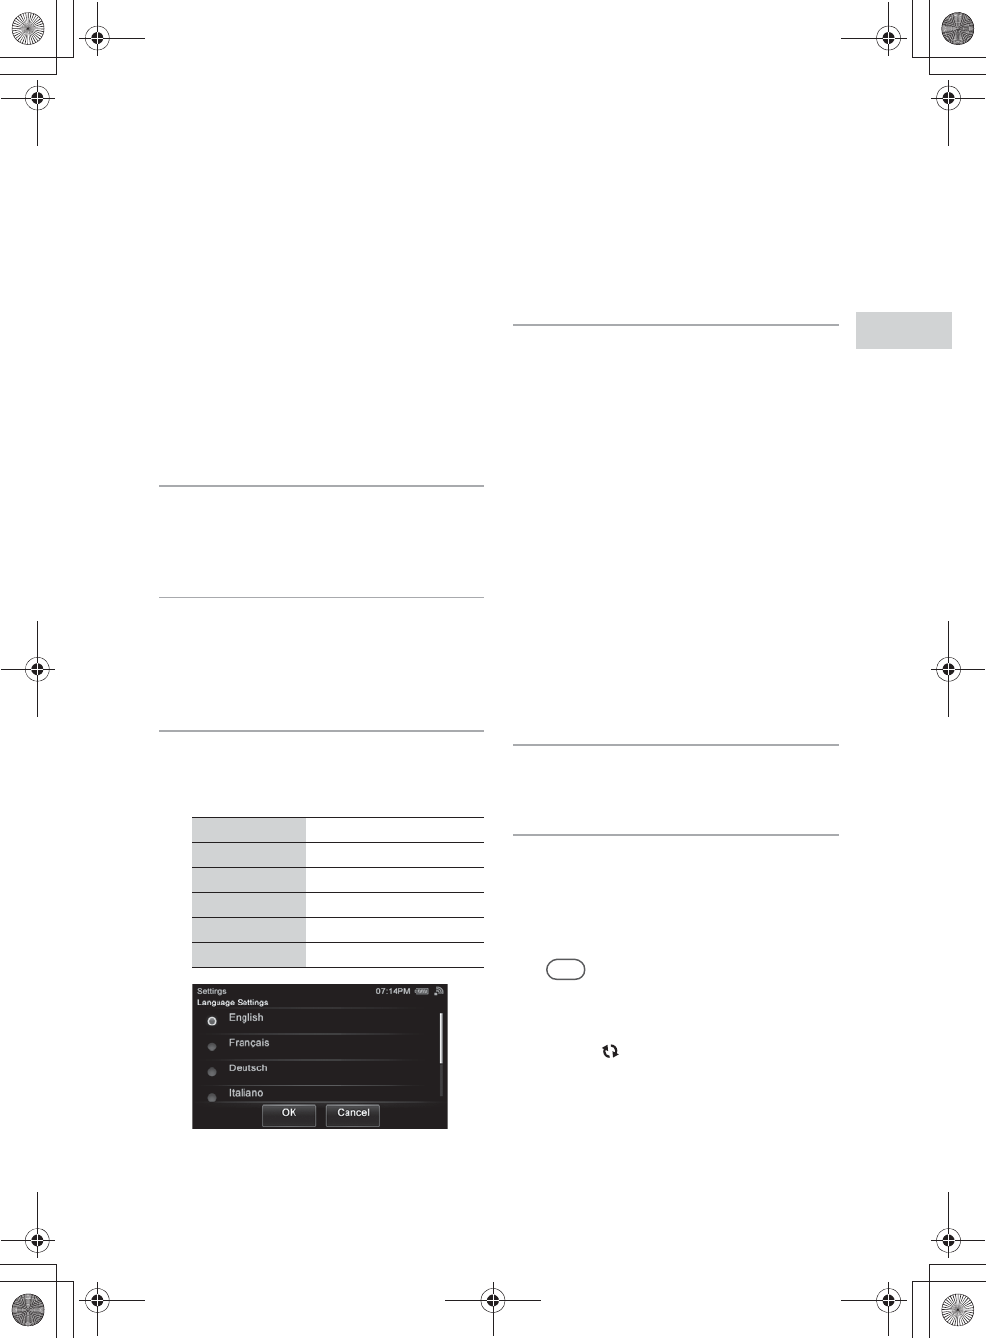
The language selection screen appears.
3
Tap the language you want to
select, then tap “OK.”
You can select from the following languages.
The screen is displayed in the selected
language.
4
Connect the unit to your home
network.
Set up the network after checking your
network environment. Refer to the following
explanation.
•If you use the access point scan method,
perform step 4 in “Searching for an access
point and setting up a wireless network
(access point scan method)” (page 24).
•If you use the WPS push button
configuration method, perform step 4 in
“Setting up a wireless network using the
WPS push button configuration method”
(page 26).
•If you use the PIN method, perform step 4
in “Setting up a wireless network using the
PIN code method” (page 27).
“Connection is complete.” appears when you
have completed the network connection.
5
Tap “Close.”
A confirmation screen appears.
6
Tap “OK.”
The unit starts registering the
DLNA-compliant devices that can be
recognized over the network, automatically.
This may take a while.
Tips
•You can register up to 20 servers and up to
30 renderers (network controlled players)
on this unit.
•Tap “ Refresh” to refresh the HOME
screen if the desired device is not
registered automatically.
Display Language
English English
Français French
Deutsch German
Italiano Italian
Español Spanish
010COV.book Page 21 Thursday, October 21, 2010 2:24 PM

E:\AXISIM\4192581111\4192581111RMNU1U\01GB-RMNU1U\050GET.fm
masterpage: Left
RMN-U1
4-192-581-11(1)
22
GB
To cancel initial settings
1
Tap “Cancel.”
“Setup will be cancelled. Functions that use a
network will be unavailable.” appears on the
screen.
2
Tap “OK.”
“Setup has been canceled. Do you want to
perform the setup at next startup?” appears on
the screen.
3
Tap “Yes” or “No.”
The HOME screen appears.
010COV.book Page 22 Thursday, October 21, 2010 2:24 PM
E:\AXISIM\4192581111\4192581111RMNU1U\01GB-RMNU1U\060NET.fm
masterpage: Right_L0_1col
RMN-U1
4-192-581-11(1)
23
GB
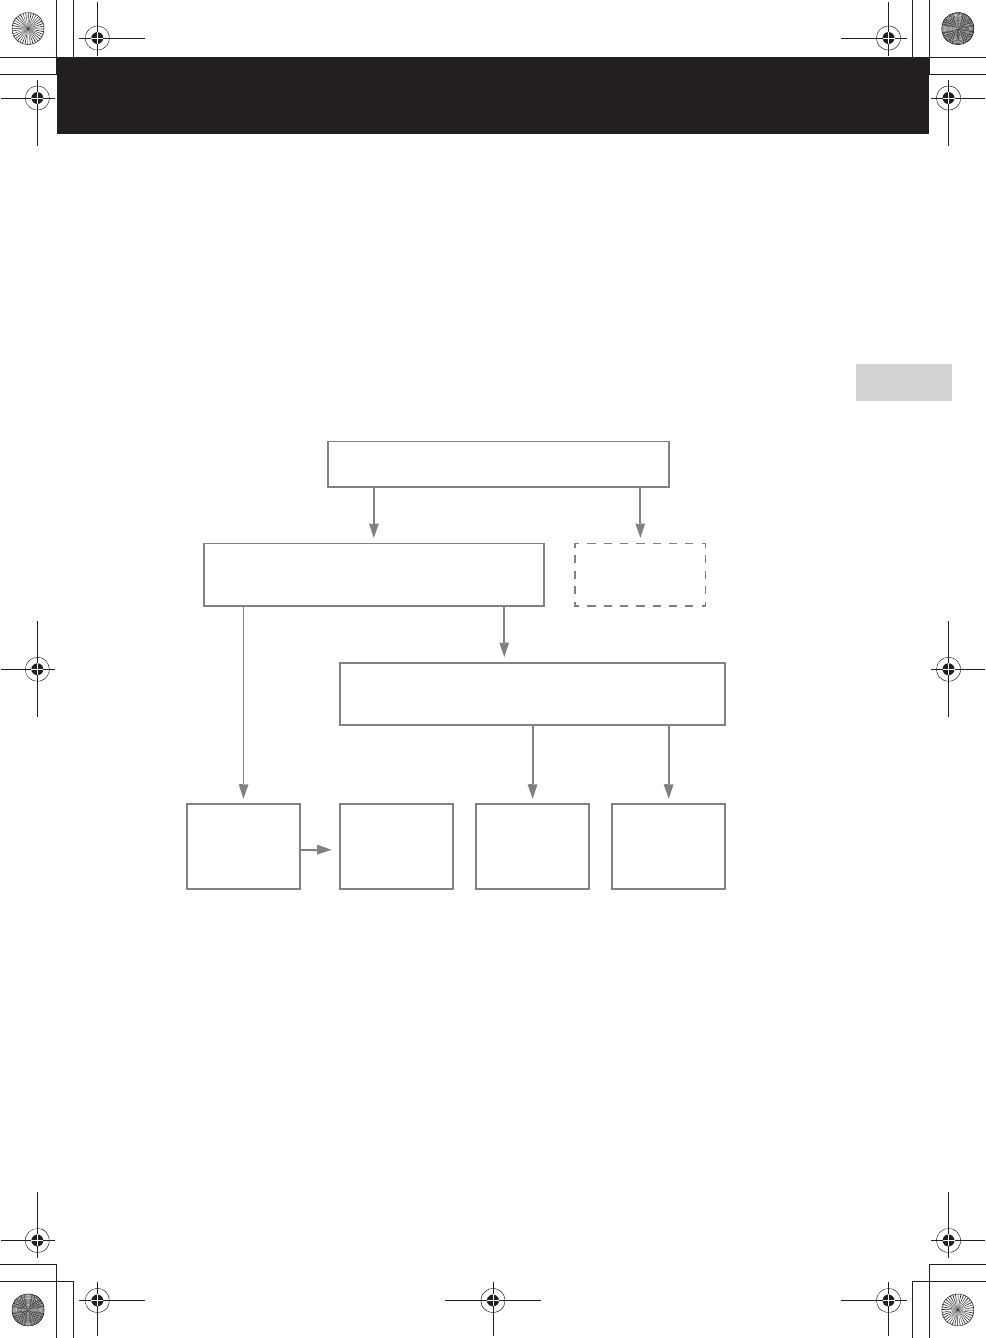
Network connections
Network connections
Connecting the unit to your home network
(network settings)
This section explains how to connect the unit to your home network.
Check your connection method using the chart below.
For details on which connection method your wireless LAN router/access point supports, refer to the
operating manual of your wireless LAN router/access point.
*1WPS (Wi-Fi Protected Setup) is a standard created by the Wi-Fi Alliance allowing you to setup a wireless network
easily and securely.
*2You can use the manual setup method when you cannot find the desired access point using the access point scan
method.
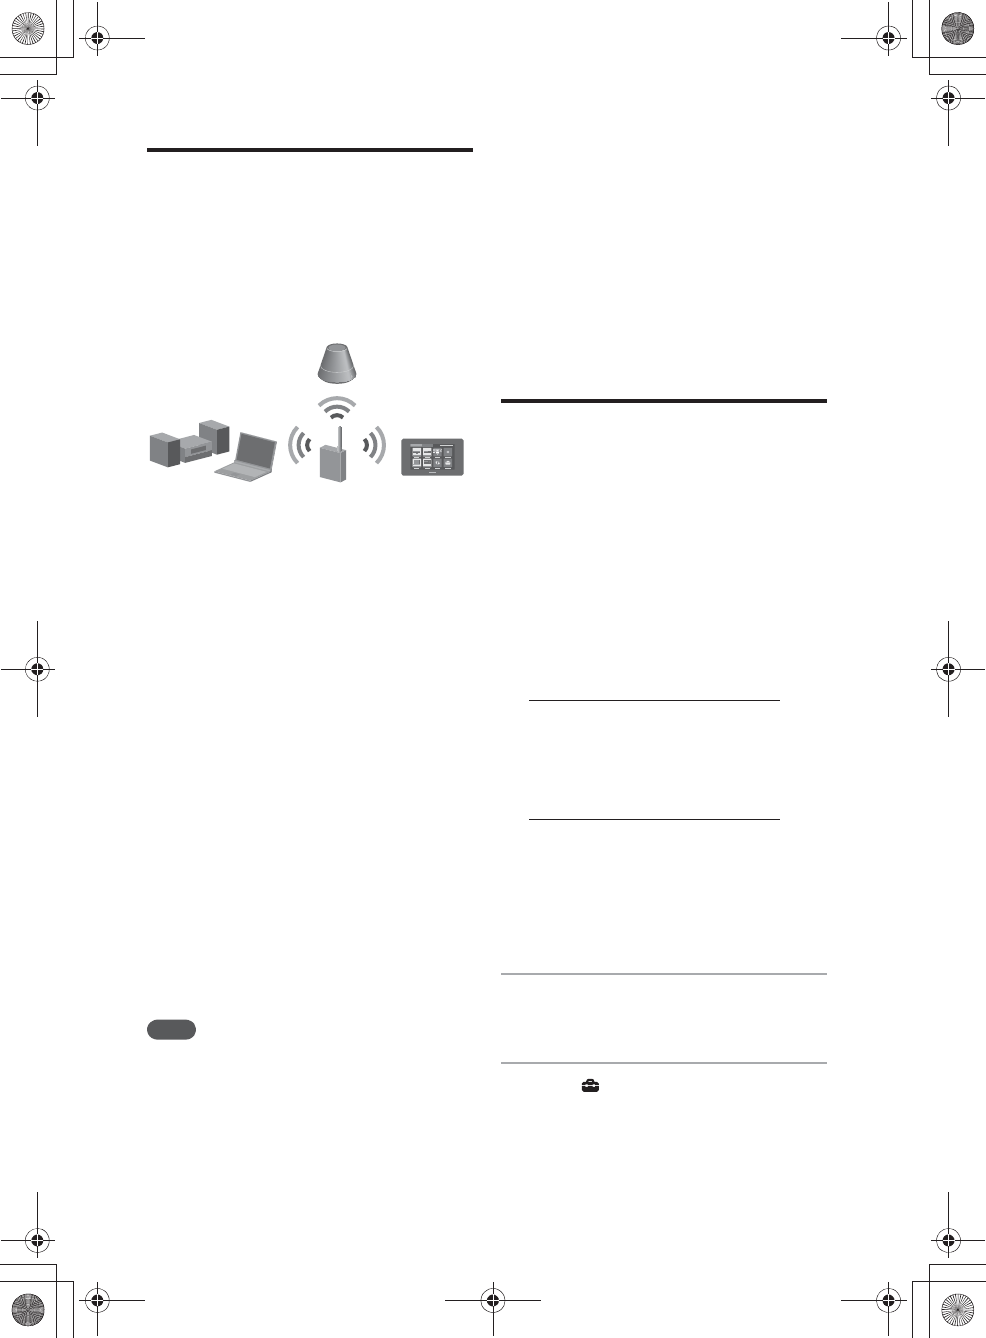
What the unit can do when connected to a network
This unit can control DLNA-compliant devices on your home network as a DLNA controller.
You need a wireless
LAN router/access
point.
Are you going to use a WPS*1 setting method to connect the unit
to your home network?
No
Go to “WPS Push-
button
Configuration”
(page 26).
Do you have a wireless LAN router/access point?
Yes
Yes No
Go to “Access Point
Scan” (page 24).
Go to “WPS PIN
Method” (page 27).
Which connection method do you intend to use, the WPS push button
configuration method or the WPS PIN code method?
Push button
configuration
method
PIN code
method
Go to “Manual
Registration”
(page 25).
*2
010COV.book Page 23 Thursday, October 21, 2010 2:24 PM
E:\AXISIM\4192581111\4192581111RMNU1U\01GB-RMNU1U\060NET.fm
masterpage: Left
RMN-U1
4-192-581-11(1)
24
GB
Checking the wireless
LAN environment of your
home network
Read the following first
You must have the following environment to enjoy
content on your home network. Confirm your
environment in advance.
❏A wireless LAN home network
environment must be available. (Make
sure that a wireless router is used.)
❏A device that can be used as a server (a
computer, etc.) must be connected to
your wireless LAN home network.*
❏A device that can be used as a renderer
(network controlled player) must be
connected to your wireless LAN home
network.
* For details on servers which are compatible with this
unit, see page 32.
There are several connection methods you can use
to set up a wireless network: searching for an
access point, using a WPS connecting method
(either the push button configuration method or the
PIN code method), or manual setting.
Select the connection method that can be used for
your home network using the chart on page 23.
Notes
•Make sure not to use the wireless LAN function in a
place where medical equipment (such as a pacemaker)
is used or the use of wireless communication is
prohibited.
•Before connecting to your home network, you need to
prepare a wireless LAN router/access point. For details,
refer to the operating manual of the device.
•Depending on your home network environment, the
wireless LAN router/access point may have been set up
such that it cannot be connected using WPS, even
though it is compatible with WPS. For details on
whether your wireless LAN router/access point is
compatible or not compatible with WPS, and on the
setup of a WPS connection, refer to the operating
manual of your wireless LAN router/access point.
•You may encounter setup difficulties if the unit and the
wireless LAN router/access point are located too far
from each other. If you do, move the devices closer to
each other.
Searching for an access
point and setting up a
wireless network
(access point scan
method)
You can set up a wireless network by searching for
the access point. Confirm you have the following
information in advance, as you will need it to set
up the network with this connection method.
❏The network name (SSID*1) that
identifies your network.*2 (This will be
needed in step 5.)
:
❏If your wireless home network is
secured by encryption, the security key
(WEP key, WPA/WPA2 key) for your
network.*2 (This will be needed in step
7.)
:
*1SSID (Service Set IDentifier) is a name that identifies a
particular access point.
*2This information should be available from a label on
your wireless LAN router/access point, from the
operating manual, from the person who set up your
wireless network, or from the information provided by
your Internet service provider.
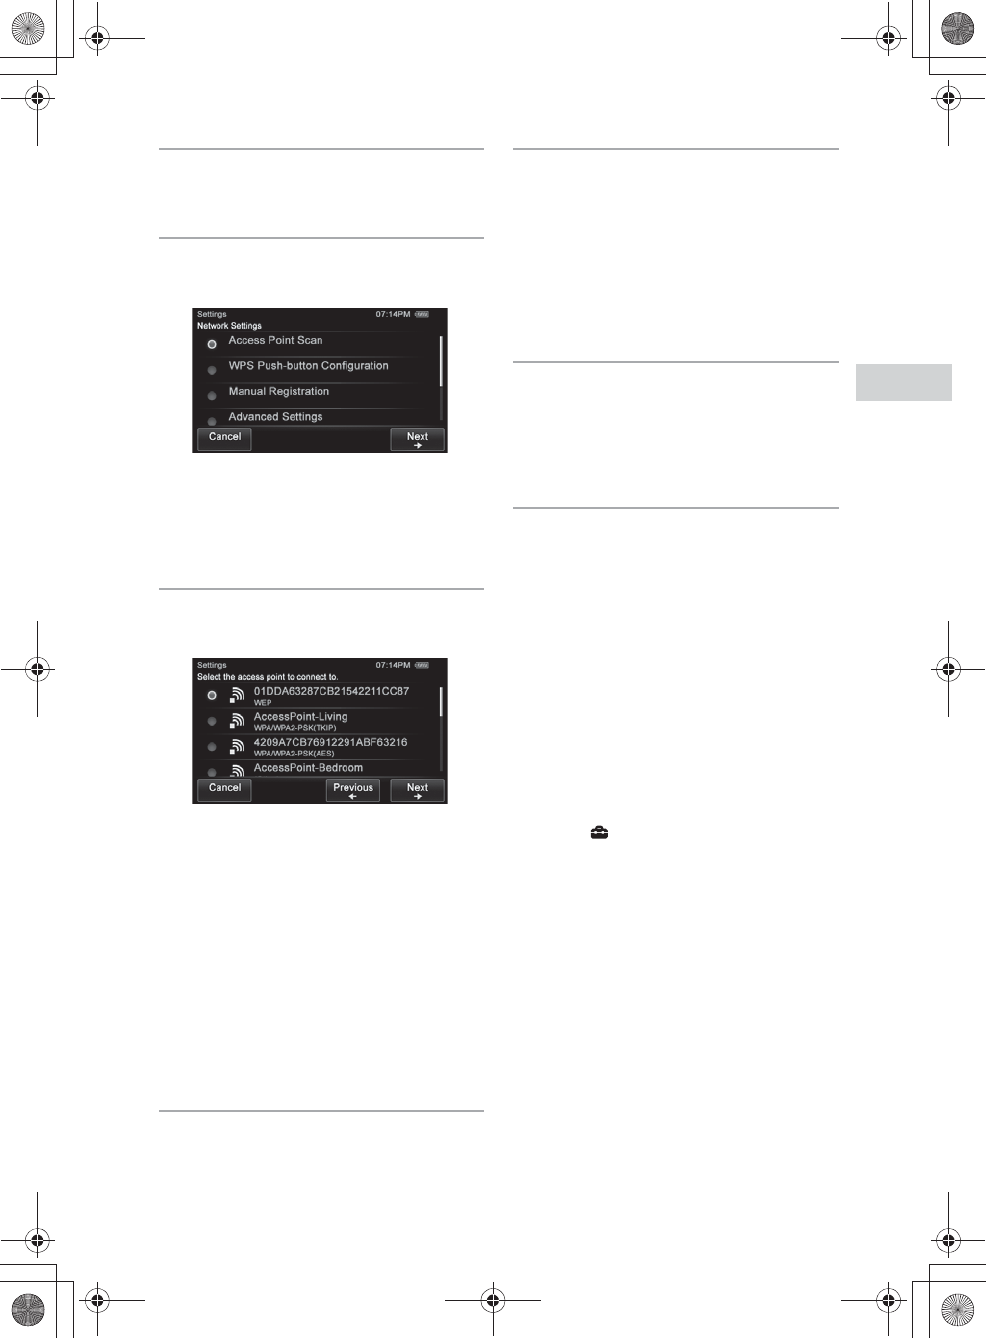
1
Press HOME on the unit.
The HOME screen appears.
2
Tap “ Settings.”
The settings menu appears.
Wireless LAN
router/access
point
Server (computer or
Network audio system,
etc.)
DLNA
Controller
(this unit)
Renderer (network controlled player)
(SA-NS300, etc.)
010COV.book Page 24 Thursday, October 21, 2010 2:24 PM
E:\AXISIM\4192581111\4192581111RMNU1U\01GB-RMNU1U\060NET.fm
masterpage: Right
RMN-U1
4-192-581-11(1)
25
GB
Network connections
3
Tap “Network Settings.”
The connection type screen appears.
4
Tap “Access Point Scan,” then tap
“Next b.”
The unit automatically starts searching for
access points and displays a list of all
available access points. The unit can display
a maximum of 20 access points in the list.
5
Tap the desired access point from
the list.
If the desired access point does not appear on
the screen, tap “Previous B” to return to step
4, then perform step 4 again.
If an access point cannot be detected and
“Access point not found.” appears on the
screen, tap “Close” so that the unit proceeds
to step 4 of the connection type display, then
perform step 4 again.
If the access point still does not appear or still
cannot be detected, you can input the access
point manually.
See “If you cannot find the desired access
point (manual setup method)” (page 25).
6
Tap “Next b.”
The security key input screen appears.
If the security key input screen does not
appear, proceed to step 8.
7
Tap the text box and enter the
security key (WEP Key, WPA/
WPA2 Key) for your network, then
tap “Next b.”
A confirmation screen appears.
For details on how to input characters, see
“Entering text” (page 19).
The security key appears as “*****.”
8
Tap “OK.”
“Connection is complete.” appears.
Refer to “Network connection” (page 72), if
you were unable to make the desired network
connections.
9
Make the server settings.
To enjoy content stored on the server over the
network that has been set up in this section,
you need to set up your server first (page 32).
If you cannot find the desired
access point (manual setup
method)
If the desired access point does not appear in the
list of available access points, you can enter the
access point manually.
1
Press HOME on the unit.
The HOME screen appears.
2
Tap “ Settings.”
The settings menu appears.
3
Tap “Network Settings.”
The connection type screen appears.
4
Tap “Manual Registration,” then tap
“Next b.”
5
Tap “SSID Input,” then tap “Next b.”
6
Tap the text box and enter the
network name (SSID), then tap
“Next b.”
For details on how to input characters, see
“Entering text” (page 19).
010COV.book Page 25 Thursday, October 21, 2010 2:24 PM
E:\AXISIM\4192581111\4192581111RMNU1U\01GB-RMNU1U\060NET.fm
masterpage: Left
RMN-U1
4-192-581-11(1)
26
GB
7
Tap the security setting.
You can select from “WPA/WPA2-PSK
AES,” “WPA/WPA2-PSK TKIP,” “WEP,”
or “None.”
Note
If you select “None,” the unit skips step 9 and goes
to step 10.
8
Tap “Next b.”
9
Tap the text box and enter your
security key, then tap “Next b.”
A confirmation screen appears.
For details on how to input characters, see
“Entering text” (page 19).
The security key appears as “*****.”
10
Tap “OK.”
“Connection is complete.” appears.
Refer to “Network connection” (page 72), if
you were unable to make the desired network
connections.
11
Make the server settings.
To enjoy content stored on the server over the
network that has been set up in this section,
you need to set up your server first (page 32).
Setting up a wireless
network using an access
point compliant with WPS
You can easily set up a wireless network using an
access point compliant with WPS. WPS setting can
be made either by the push-button configuration
method or the PIN (Personal Identification
Number) code method.
What is WPS (Wi-Fi Protected
Setup)?
WPS is a standard created by the Wi-Fi Alliance
allowing you to setup a wireless network easily
and securely.
Setting up a wireless network
using the WPS push button
configuration method
You can easily set up a WPS wireless connection
with one push of the designated button.
1
Press HOME on the unit.
The HOME screen appears.
2
Tap “ Settings.”
The settings menu appears.
3
Tap “Network Settings.”
The connection type screen appears.
4
Tap “WPS Push-button
Configuration,” then tap “Next b.”
5
Check the location of the WPS
button of the router/access point and
the instructions on how and when to
use the WPS button, then tap
“Next b.”
6
When the message that tells you to
press the WPS button on the access
point appears, press the WPS button
on the wireless LAN router/access
point for a few seconds, within two
minutes.
A confirmation screen appears.
It may take a while for the unit to complete
the network settings.
WPS button on the
wireless LAN
router/access point
010COV.book Page 26 Thursday, October 21, 2010 2:24 PM
E:\AXISIM\4192581111\4192581111RMNU1U\01GB-RMNU1U\060NET.fm
masterpage: Right
RMN-U1
4-192-581-11(1)
27
GB
Network connections
7
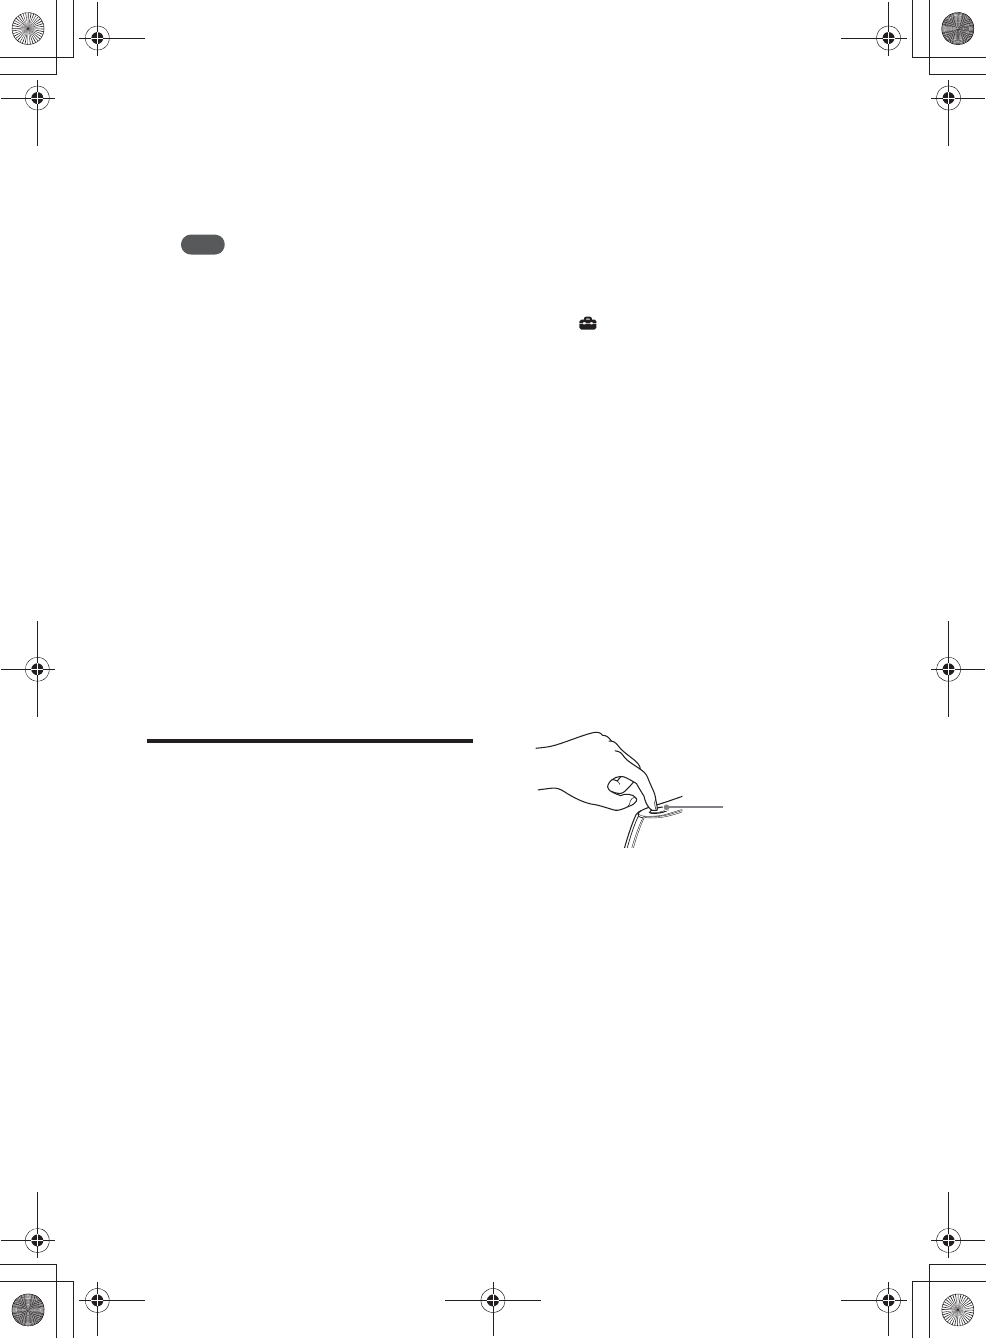
Tap “OK.”
“Connection is complete.” appears.
Refer to “Network connection” (page 72), if
you were unable to make the desired network
connections.
8
Make the server settings.
To enjoy content stored on the server over the
network that has been set up in this section,
you need to set up your server first (page 32).
Setting up a wireless network
using the PIN code method
If the access point supports the WPS PIN (Personal
Identification Number) code connection, you can
set up a WPS wireless connection by entering the
unit’s PIN code into the wireless LAN router/
access point.
1
Press HOME on the unit.
The HOME screen appears.
2
Tap “ Settings.”
The settings menu appears.
3
Tap “Network Settings.”
The connection type screen appears.
4
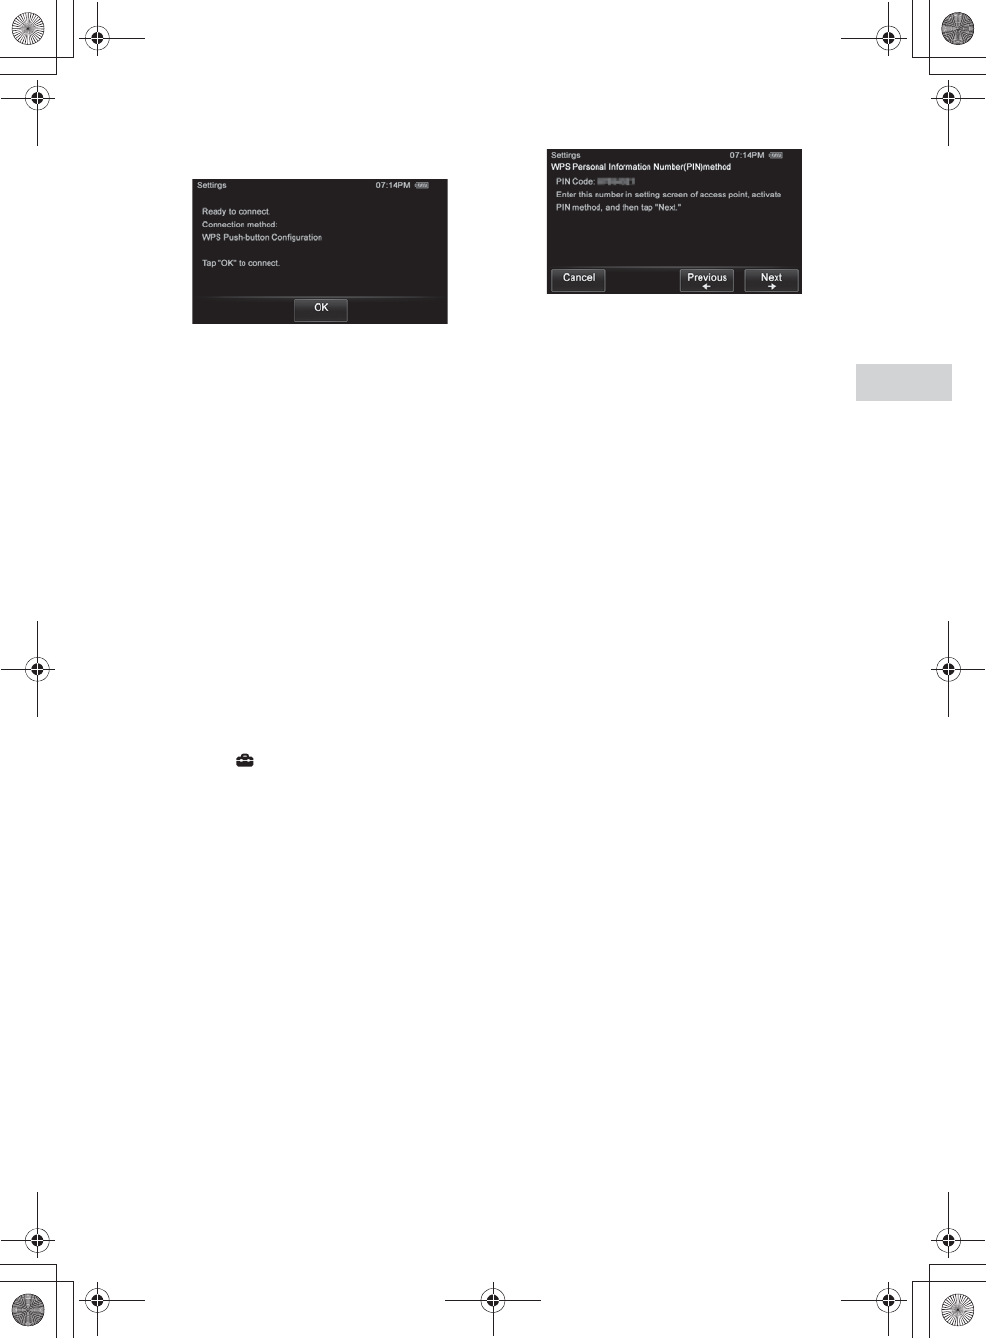
Tap “Manual Registration,” then tap
“Next b.”
5
Tap “WPS PIN Method,” then tap
“Next b.”
The unit’s PIN code (8 digits) is displayed.
Keep the PIN code display on the screen until
you finish entering the PIN code in the
wireless LAN router/access point. (A
different PIN code will be displayed each
time you perform this operation.)
6
Input the unit’s PIN code into the
wireless LAN router/access point.
For details on entering the PIN code, refer to
the operating manual of the wireless LAN
router/access point.
7
Tap “Next b.”
A confirmation screen appears.
It may take a while for the unit to complete
the network settings.
8
Tap “OK.”
“Connection is complete.” appears.
Refer to “Network connection” (page 72), if
you were unable to make the desired network
connections.
9
Make the server settings.
To enjoy content stored on the server over the
network that has been set up in this section,
you need to set up your server first (page 32).
010COV.book Page 27 Thursday, October 21, 2010 2:24 PM
E:\AXISIM\4192581111\4192581111RMNU1U\01GB-RMNU1U\060NET.fm
masterpage: Left
RMN-U1
4-192-581-11(1)
28
GB
Setting up the IP address/
proxy server
You may have to use a fixed IP address and proxy
server, depending on your home network settings,
or the specifications of the Internet service
provider.
For details on the input values in the following
procedures, refer to the operating manual of the
respective device or the information provided by
the person who set up your wireless network or
your Internet service provider.
To use a fixed IP address
The unit is set to obtain the IP address
automatically as the factory setting, however, you
can use a fixed IP address, depending on your
network settings.
1
Press HOME on the unit.
The HOME screen appears.
2
Tap “ Settings.”
The settings menu appears.
3
Tap “Network Settings.”
The connection type screen appears.
4
Tap “Advanced Settings,” then tap
“Next b.”
5
Tap “DHCP Setting,” then tap
“Next b.”
6
Tap “Manual,” then tap “Next b.”
7
Enter the values for “IP Address,”
“Subnet Mask” and “Default
Gateway.”
For details on how to input characters, see
“Entering text” (page 19).
8
Tap “Next b.”
9
Enter the values for the “Primary
DNS” and “Secondary DNS”
settings.
For details on how to input characters, see
“Entering text” (page 19).
10
Tap “Next b.”
A confirmation screen appears.
11
Tap “OK.”
“Connection is complete.” appears.
Refer to “Network connection” (page 72), if
you were unable to make the desired network
connections.
12
Make the server settings.
To enjoy content stored on the server over the
network that has been set up in this section,
you need to set up your server first (page 32).
Tip
If you want to obtain the IP address automatically using
DHCP, select “Auto” for the IP address settings in step 6.
If you select “Auto” in step 6, the DNS settings selection
screen appears. In this case, select “Auto” or “Manual” for
DNS settings and enter the respective values following the
instructions that appear on the display.
To use a proxy server
If you need to use a proxy server (for example,
when you are instructed to use a proxy server by
your Internet service provider), be sure to prepare
the proxy address and the port number in advance.
1
Press HOME on the unit.
The HOME screen appears.
2
Tap “ Settings.”
The settings menu appears.
3
Tap “Network Settings.”
The connection type screen appears.
4
Tap “Advanced Settings,” then tap
“Next b.”
5
Tap “Proxy Setting,” then tap
“Next b.”
6
Tap “Use,” then tap “Next b.”
7
Enter the values for “Address:” and
“Port:”
For details on how to input characters, see
“Entering text” (page 19).
8
Tap “Next b.”
A confirmation screen appears.
9
Tap “OK.”
“Connection is complete.” appears.
Refer to “Network connection” (page 72), if
you were unable to make the desired network
connections.
010COV.book Page 28 Thursday, October 21, 2010 2:24 PM
E:\AXISIM\4192581111\4192581111RMNU1U\01GB-RMNU1U\060NET.fm
masterpage: Right
RMN-U1
4-192-581-11(1)
29
GB
Network connections
10
Make the server settings.
To enjoy content stored on the server over the
network that has been set up in this section,
you need to set up your server first (page 32).
Confirming the network
settings
You can confirm the network status and settings.
1
Press HOME on the unit.
The HOME screen appears.
2
Tap “ Settings.”
The settings menu appears.
3
Tap “Network Settings.”
The connection type screen appears.
4
Tap “Connection Status,” then tap
“Next b.”
The result of the connection diagnosis
appears.
5
Tap the item you want to check.
You can select from following items.
Wireless LAN/This unit/DHCP/Default
Gateway/Primary DNS/Secondary DNS/
Proxy Server
6
Tap “Close.”
010COV.book Page 29 Thursday, October 21, 2010 2:24 PM
E:\AXISIM\4192581111\4192581111RMNU1U\01GB-RMNU1U\060NET.fm
masterpage: Left_L1
RMN-U1
4-192-581-11(1)
30
GB
Setting the clock
The clock can be set either automatically by
connecting the unit to the Internet, or manually.
Setting the clock via an
Internet connection
You can set the clock by connecting the unit to the
NTP (Network Time Protocol) server on the
Internet. Before using this function, make sure the
network settings have already been made properly.
1
Press HOME on the unit.
The HOME screen appears.
2
Tap “ Settings.”
3
Tap “Common Settings.”
4
Tap “Clock Settings.”
5
Tap “Date&Time Settings.”
6
Tap “NTP Settings,” then tap
“Next b.”
If you want to set the clock manually, see “To
set the clock manually” (page 31).
7
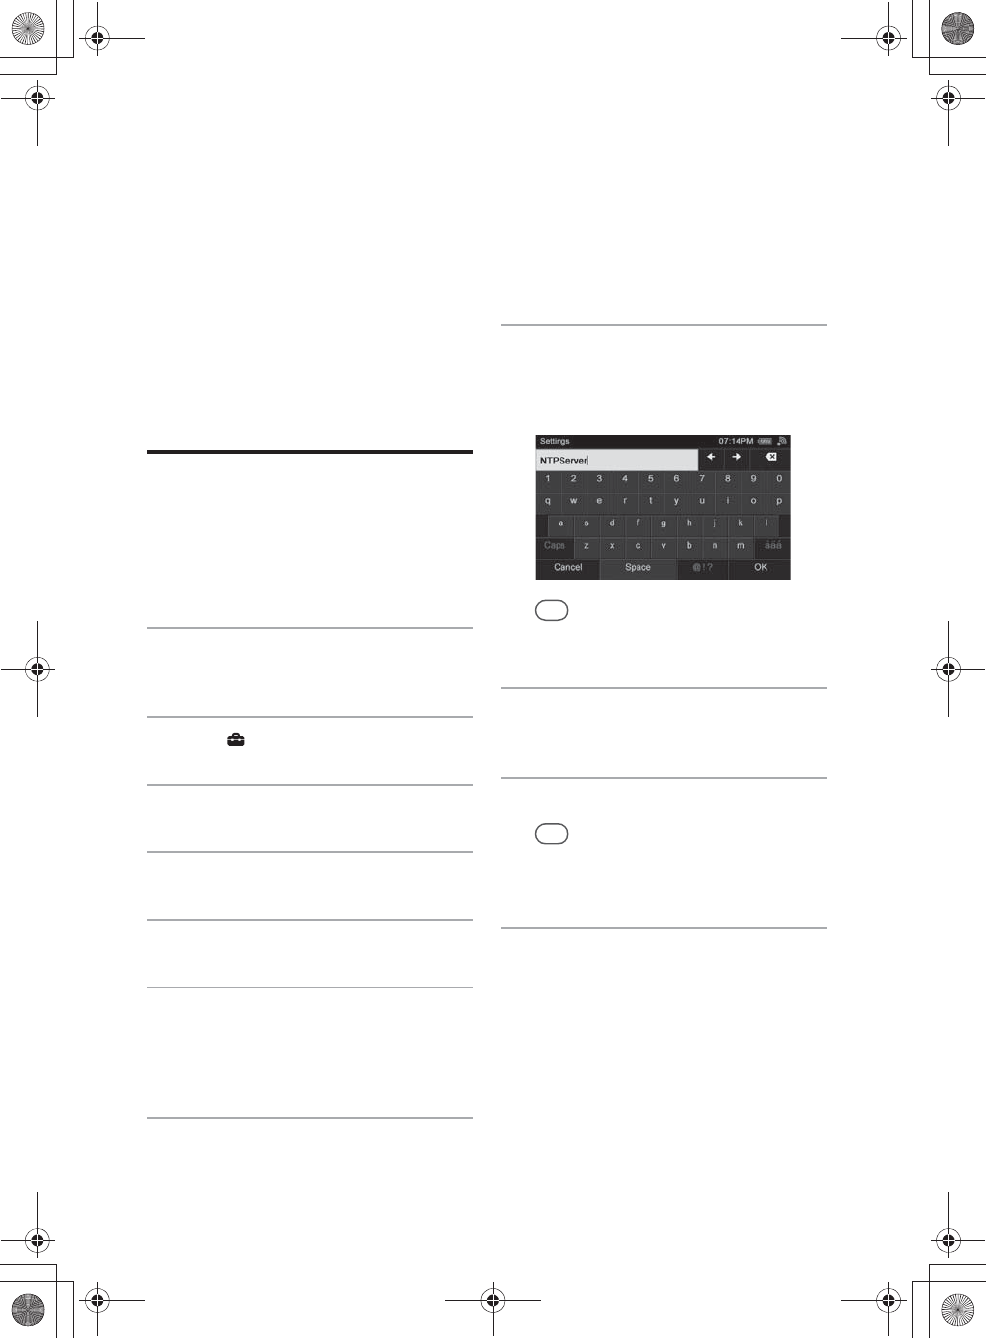
Tap the text box that is below
“NTP Server Name:.”
8
Enter the name or IP address of
the NTP Server.
For details on entering text during the setup,
see “Entering text” (page 19).
Tip
The unit connects to the default server when you tap
“OK” without changing the server name.
9
Tap the text box that is below
“Time Zone:.”
10
Tap the desired time zone.
Tip
If the desired city does not appear in the “Time
Zone:,” select a city that is within the same time
zone as the desired city.
11
Tap “OK.”
A list of available time zones
The following items appear in step 10. Select the
city where the unit is being used.
GMT+13 Nukualofa
GMT+12 Auckland
GMT+11 Noumea
GMT+10 Sydney, Port Moresby
GMT+9:30 Adelaide
GMT+9 Tokyo, Seoul
GMT+8 Beijing, Singapore
010COV.book Page 30 Thursday, October 21, 2010 2:24 PM
E:\AXISIM\4192581111\4192581111RMNU1U\01GB-RMNU1U\060NET.fm
masterpage: Right
RMN-U1
4-192-581-11(1)
31
GB
Network connections
GMT+7 Bangkok, Jakarta
GMT+6:30 Yangon
GMT+6 Dhaka
GMT+5:45 Kathmandu
GMT+5:30 New Delhi
GMT+5 Karachi, Islamabad
GMT+4:30 Kabul
GMT+4 Abu Dhabi, Tbilisi
GMT+3:30 Teheran
GMT+3 Moscow, Riyadh
GMT+2 Athens, Helsinki
GMT+1 Paris, Berlin
GMT+0 London, Lisbon
GMT-1 Azores
GMT-2
GMT-3 Sao Paulo, Buenos Aires
GMT-3:30 St. John’s
GMT-4 Halifax, Santiago
GMT-5 New York, Toronto
GMT-6 Chicago, Mexico City
GMT-7 Denver, Calgary
GMT-8 Los Angeles, Vancouver
GMT-9 Anchorage
GMT-10 Honolulu, Papeete
GMT-11 Pago Pago
GMT-12
To set the clock manually
1
Press HOME on the unit.
The HOME screen appears.
2
Tap “ Settings.”
3
Tap “Common Settings.”
4
Tap “Clock Settings.”
5
Tap “Date&Time Settings.”
6
Tap “Date&Time Manual Settings,”
then tap “Next b.”
7
Enter the year, month, day, hour,
and minute.
8
Tap “OK.”
To set the daylight saving time
setting
1
Press HOME on the unit.
The HOME screen appears.
2
Tap “ Settings.”
3
Tap “Common Settings.”
4
Tap “Clock Settings.”
5
Tap “Daylight Saving.”
6
Tap “Daylight Saving.”
7
Tap “OK.”
010COV.book Page 31 Thursday, October 21, 2010 2:24 PM
E:\AXISIM\4192581111\4192581111RMNU1U\01GB-RMNU1U\070ENJ.fm
masterpage: Left_L0
RMN-U1
4-192-581-11(1)
32
GB
Enjoying music content on your home network
Playing music content on your server
You can enjoy audio content from anywhere by
controlling the DLNA-compliant devices on your
home network.
Setting up the server
To enjoy listening to audio content stored on your
server with this unit, you must set up the server in
advance.
The following server devices are compatible with
this unit.
•VAIO Media plus 2.0
•NAS-S500HDE, NAS-S55HDE* HDD
Network Audio System
•NAS-SV20i/SV20Di* Network Audio System/
Server
•NAC-SV10i* Network Audio Component/
Server
•Microsoft Windows Media Player 12 installed
on Windows 7 (page 32)
•Microsoft Windows Media Player 11 installed
on Windows Vista/XP (page 34)
* These models may not be available in some countries/
areas.
If the server has a function that limits access from
other devices, you must change the setting on the
server to allow the unit to access the server.
This section explains how to set up Windows
Media Player when using it as a server.
For details on the settings of other server devices,
refer to the operating manuals or help of the
respective devices or applications.
Note
The items displayed on the computer may be different
from the ones shown in this section, depending on the
version of the operating system or the computer
environment. For details, refer to the help of your
operating system.
xWhen using a computer
equipped with Windows 7
This section explains how to set up a
manufacturer-installed version of Windows Media
Player 12 for Windows 7 as a server to use with
this unit.
For details on how to operate Windows Media
Player 12, refer to the help of Windows Media
Player 12.
1
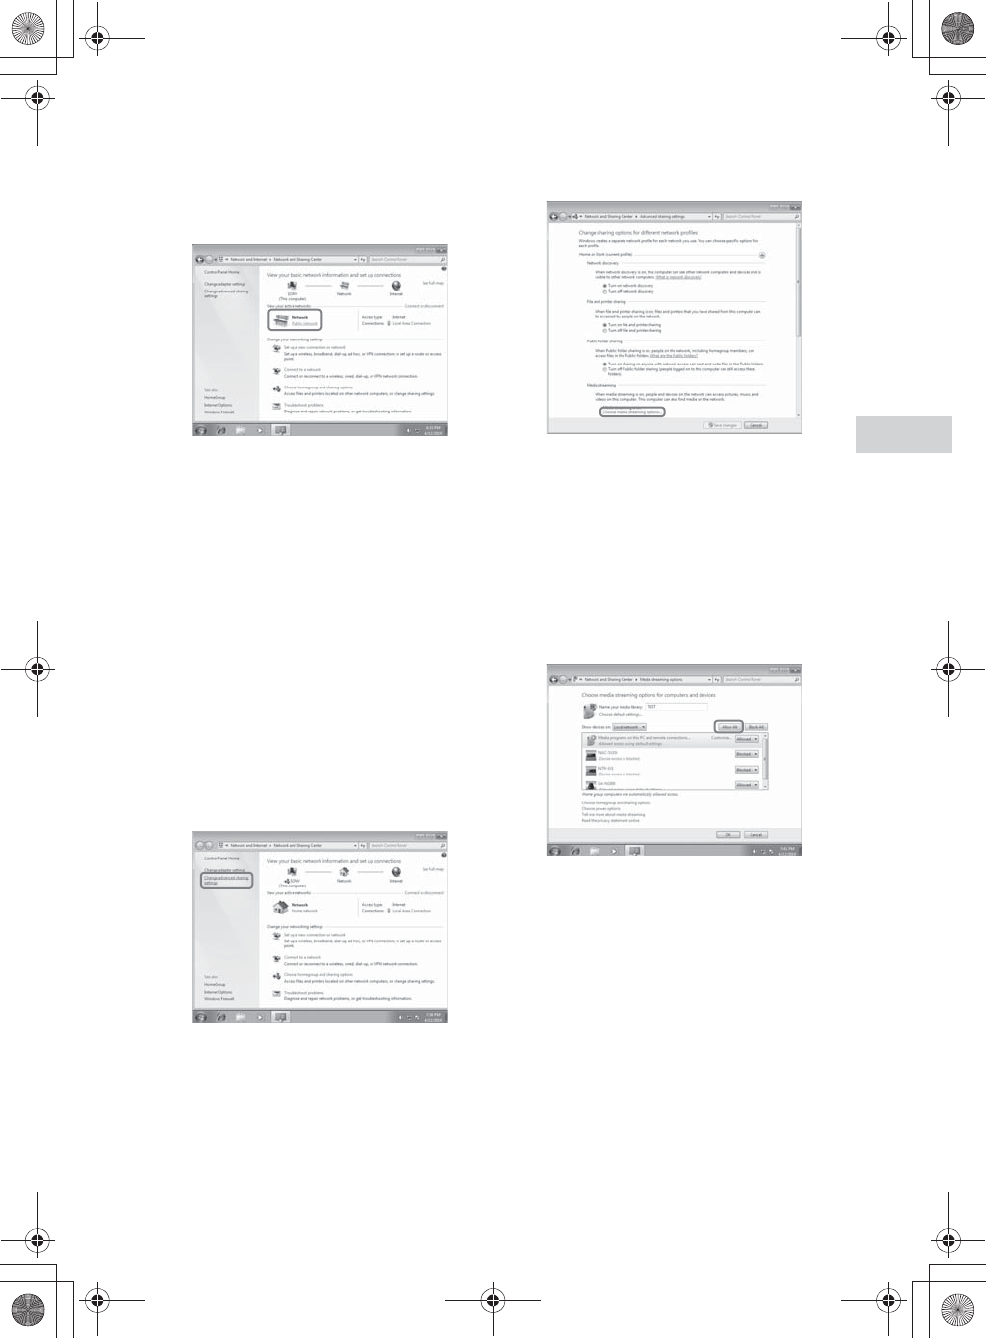
Go to [Start] - [Control Panel].
2
Select [View network status and
tasks] under [Network and Internet].
The [Network and Sharing Center] window
appears.
Tip
If the desired item does not appear in the computer
display, try to change the display type used by the
Control Panel.
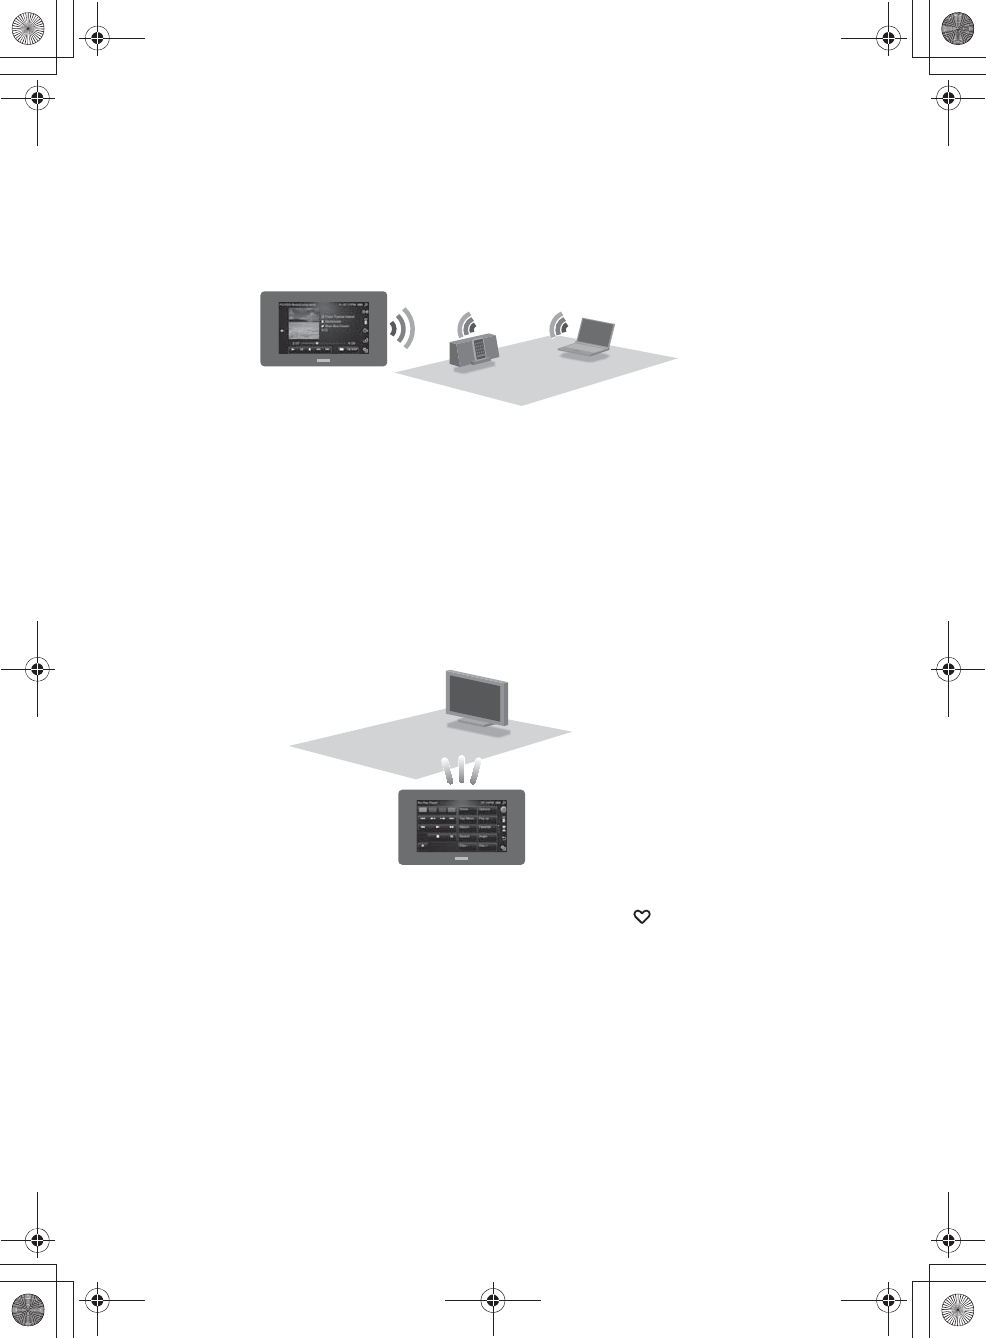
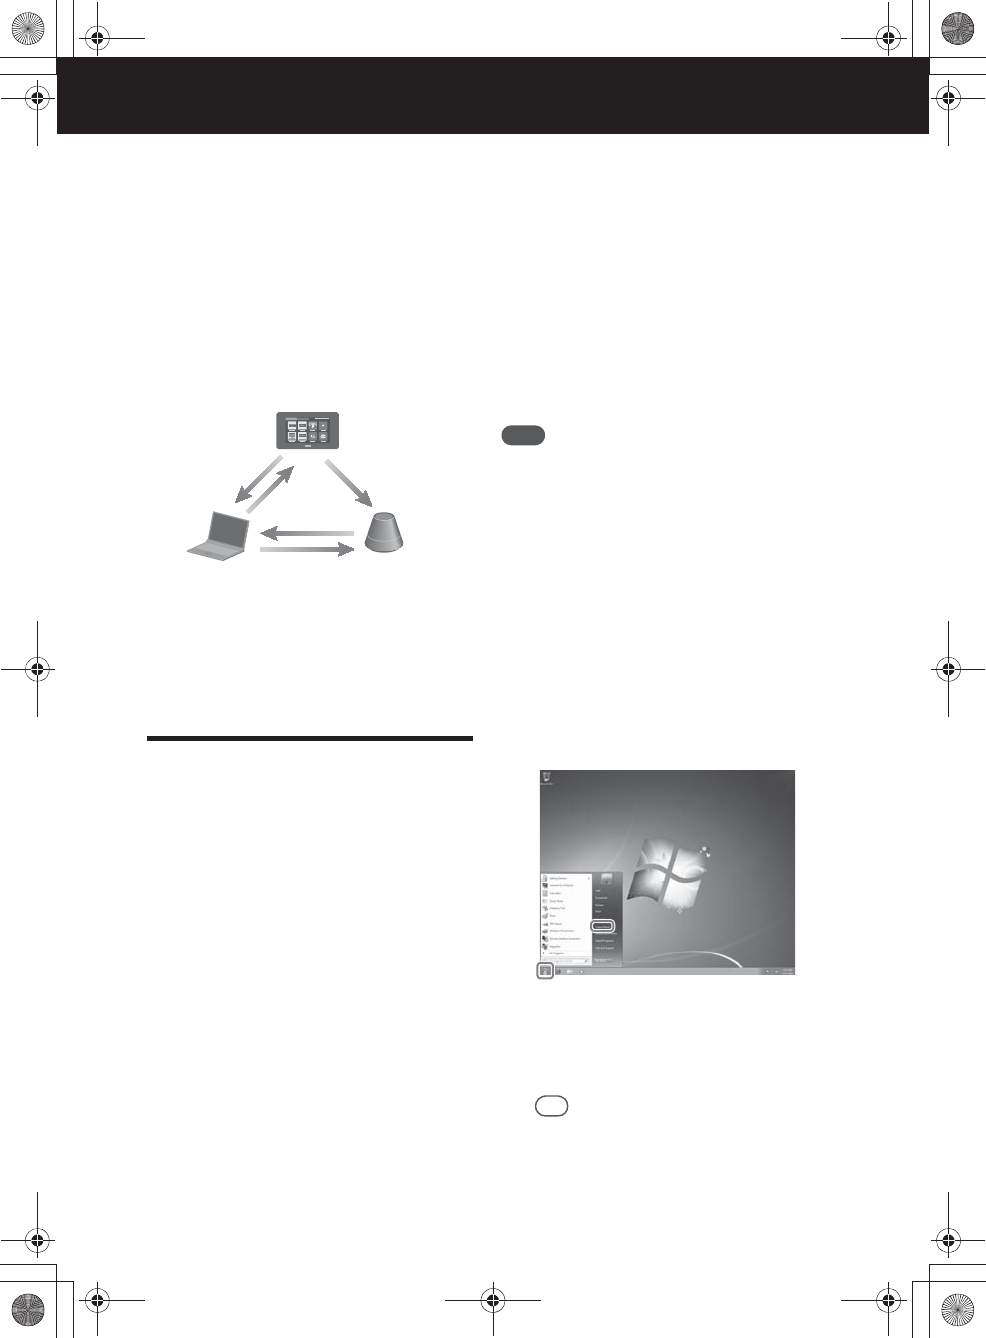
DLNA Controller (this unit)
Control
Server (computer or
Network audio system, etc.)
Network controlled player
(SA-NS300, etc.)
Deliver
Access
Access
Browse
010COV.book Page 32 Thursday, October 21, 2010 2:24 PM
E:\AXISIM\4192581111\4192581111RMNU1U\01GB-RMNU1U\070ENJ.fm
masterpage: Right
RMN-U1
4-192-581-11(1)
33
GB
Enjoying music content on your home network
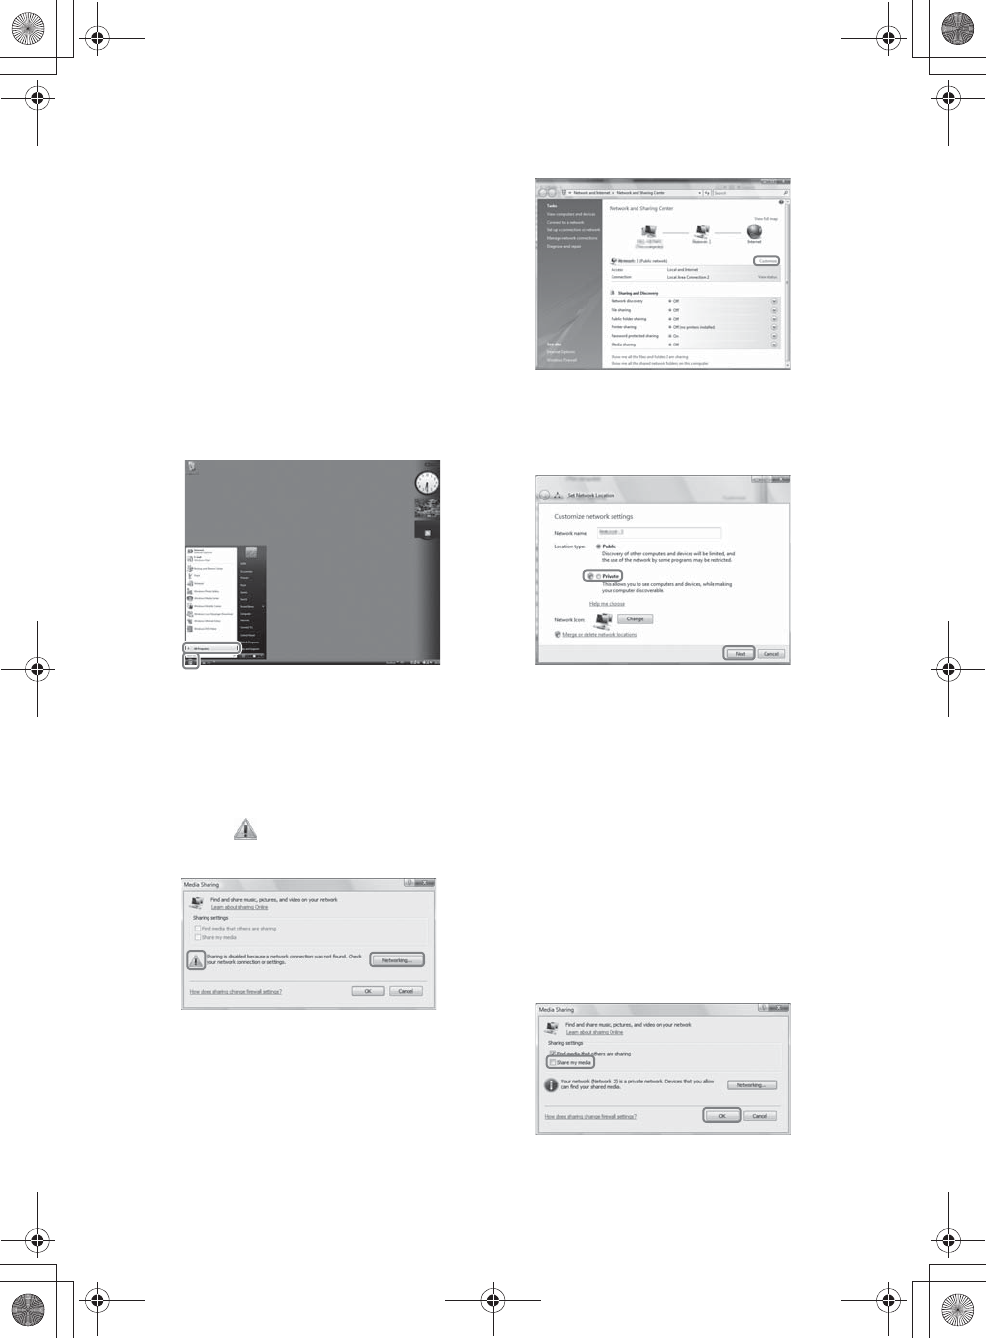
3
Select [Public network] under [View
your active networks].
If it shows other than [Public
network], go to step 6.
The [Set Network Location] window appears.
4
Select [Home network] or [Work
network] according to the
environment in which the unit is
being used.
5
Follow the instructions that appear
on the computer display according to
the environment in which the unit is
being used.
When the settings have been completed,
confirm that the item under [View your active
networks] has been changed to [Home
network] or [Work network] in the [Network
and Sharing Center] window.
6
Select [Change advanced sharing
settings].
7
Select [Choose media streaming
options...] from [Media streaming].
8
If [Media streaming is not turned on]
appears in the Media streaming
options window, select [Turn on
media streaming].
9
Select [Allow All].
The [Allow All Media Devices] window
opens. If all the devices in the local network
are set to [Allowed], select [OK] and close
the window.
10
Select [Allow all computers and
media devices].
11
Select [OK] to close the window.
Refer to “Listening to audio content on your
server” (page 35) or “Watching/viewing
content on your server” (page 44) for
instructions on how to select the server.
010COV.book Page 33 Thursday, October 21, 2010 2:24 PM
E:\AXISIM\4192581111\4192581111RMNU1U\01GB-RMNU1U\070ENJ.fm
masterpage: Left
RMN-U1
4-192-581-11(1)
34
GB
xWhen using a computer
equipped with Windows Vista/
Windows XP
This section explains how to set up Windows
Media Player 11 installed on Windows Vista/
Windows XP*, as a server to connect with this
unit.
For details on how to operate Windows Media
Player 11, refer to the help of Windows Media
Player 11.
* Windows Media Player 11 is not manufacturer-
installed on Windows XP. Access the Microsoft web
site, download the installer, and then install Windows
Media Player 11 on your computer.
1
Go to [Start] - [All Programs].
2
Select [Windows Media Player].
Windows Media Player 11 starts up.
3
Select [Media Sharing...] from the
[Library] menu.
If you are using Windows XP, go to step 9.
4
When is displayed, select
[Networking...].
The [Network and Sharing Center] window
appears.
5
Select [Customize].
The [Set Network Location] window appears.
6
Add a check mark next to [Private]
and select [Next].
7
Confirm that the [Location type] has
been changed to [Private] and select
[Close].
8
Confirm that [(Private network)] is
displayed in the [Network and
Sharing Center] window and close
the window.
9
If a check mark is not shown next to
[Share my media] in the [Media
Sharing] window that is displayed in
step 3, add a check mark next to
[Share my media], then select [OK].
A list of connectable devices is displayed.
10
Select [Settings...] that appears
beside [Share my media to:].
010COV.book Page 34 Thursday, October 21, 2010 2:24 PM
E:\AXISIM\4192581111\4192581111RMNU1U\01GB-RMNU1U\070ENJ.fm
masterpage: Right
RMN-U1
4-192-581-11(1)
35
GB
Enjoying music content on your home network
11
Add a check mark next to [Allow new
devices and computers
automatically] and select [OK].
Refer to “Listening to audio content on your
server” (page 35) or “Watching/viewing
content on your server” (page 44) for
instructions on how to select the server.
Note
Uncheck this item after you confirm that the unit
can connect to the server and audio content on the
server.
Setting up a server other than
Windows 7, Windows Vista or
Windows XP
The set-up method is different depending on the
server. Refer to the operating instructions of your
server.
Setting up a renderer
(network controlled
player)
The set-up method is different depending on the
device. Refer to the operating instructions of your
device.
1
Turn the renderer (network
controlled player) on.
2
Connect the renderer (network
controlled player) to your home
network.
3
Permit access from this unit on the
renderer (network controlled
player) side.
Listening to audio
content on your server
You can listen to audio content from the desired
device. How to select “PC/HDD Music” as an
Activity is explained in this section.
1
Press HOME on the unit.
The HOME screen appears.
2
Tap the “Device” tab.
3
Tap the desired renderer (network
controlled player).
Activities that can be played back with the
selected renderer (network controlled player)
are displayed.
4
Tap “PC/HDD Music.”
Item Description
Now Playing Tap to display the playback
screen.
PC/HDD
Music*1Tap to listen to “PC/HDD
Music.”
Music
Services*1Tap to listen to “Music
Services.”
iPod & iPhone*1Tap to listen to “iPod &
iPhone.”
DAB/DAB+*1*2Tap to listen to “DAB/
DAB+.”
Audio IN*1Tap to listen to “Audio IN.”
Use remote (IR) Tap to display the infrared
remote control screen of the
selected device.
010COV.book Page 35 Thursday, October 21, 2010 2:24 PM
E:\AXISIM\4192581111\4192581111RMNU1U\01GB-RMNU1U\070ENJ.fm
masterpage: Left
RMN-U1
4-192-581-11(1)
36
GB
*1Activities displayed on the list may change
depending on the capability of the renderer
(network controlled player) and the type of
content supported by the server on your network.
*2DAB/DAB+ is a service available only in the
UK.
The server selection screen appears.
Step 5 may be skipped if you select iPod &
iPhone, DAB/DAB+, Audio IN or Music
Services in this step. In this case, the device
selected in step 3 is selected as the server
automatically.
Notes
•The playback screen of the Activity is displayed
and you can check the content information if the
selected Activity in step 4 is already being
performed.
•You can perform the Activity even if the renderer
(network controlled player) that is needed for the
selected Activity has already joined a PARTY.
•When the selected Activity involves holding a
PARTY, the playback screen of the PARTY host
is displayed and you can check the information
on the content currently being played.
Tip
The last audio content is played back automatically
until you change the server.
5
Tap the desired server.
The folder/album list of the server appears.
6
Tap folders/albums until you find
the desired content.
Tip
You can display the server list by tapping
“Previous B” if you did not select a server in step 5.
7
Tap the desired content.
Playback starts and the playback screen
corresponding to the selected Activity
appears.
Playback screen
The display items and operations available may
change depending on the server, renderer (network
controlled player), or playback content.
PC/HDD Music
Appears when you select “PC/HDD Music” in step
4.
iPod & iPhone
Appears when you select “iPod & iPhone” in step
4.
Music Services
Appears when you select “Music Services” in step
4.
010COV.book Page 36 Thursday, October 21, 2010 2:24 PM
E:\AXISIM\4192581111\4192581111RMNU1U\01GB-RMNU1U\070ENJ.fm
masterpage: Right
RMN-U1
4-192-581-11(1)
37
GB
Enjoying music content on your home network
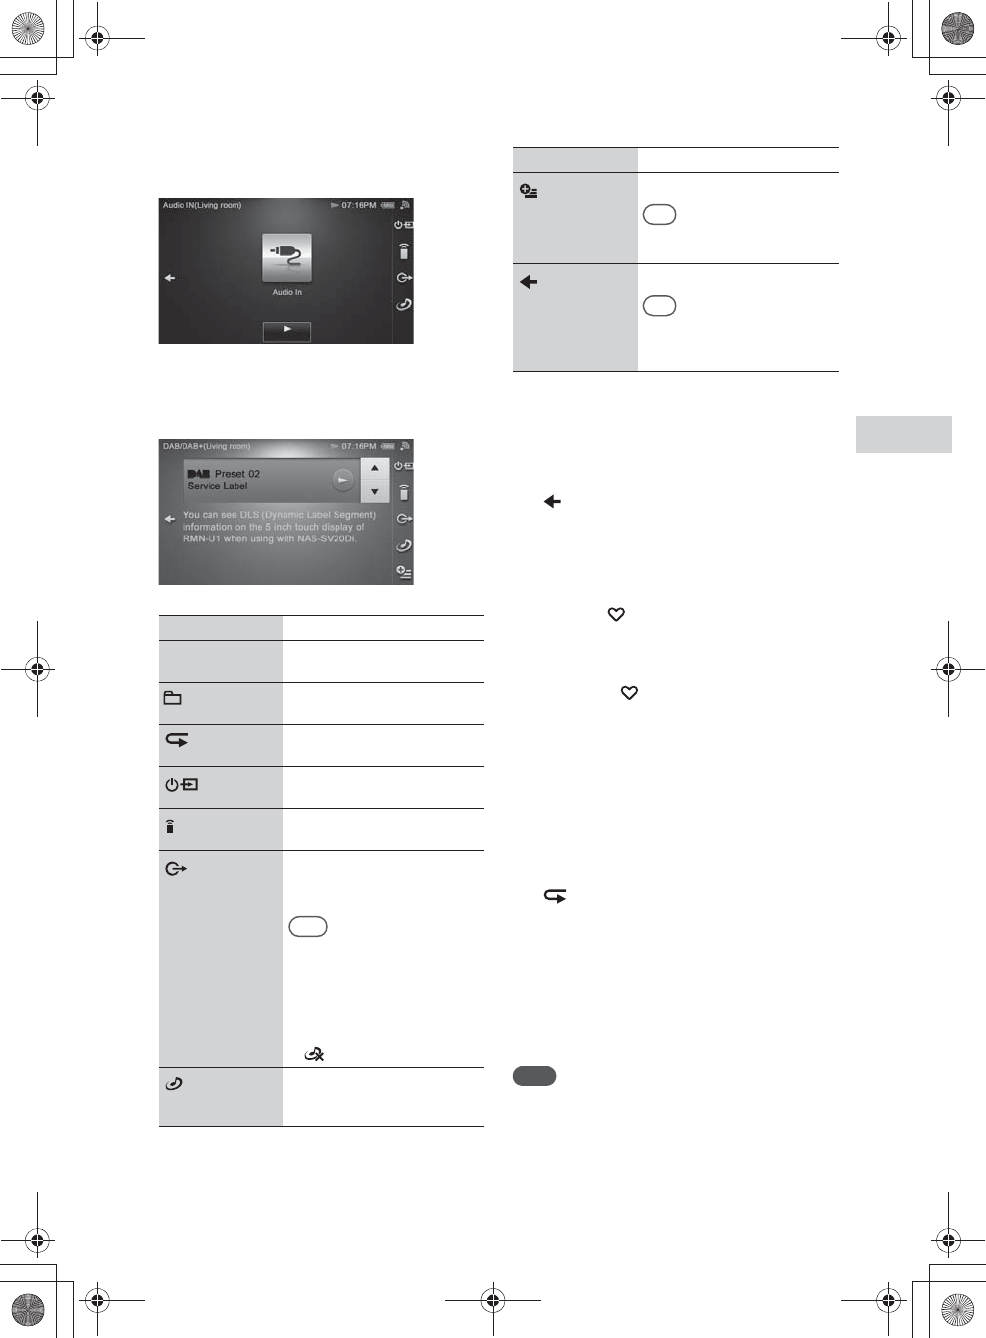
Audio IN
Appears when you select “Audio IN” in step 4.
DAB/DAB+
Appears when you select “DAB/DAB+” in step 4.
DAB/DAB+ is a service available only in the UK.
* The icon displayed is different depending on the
settings.
To change the audio content
currently being played back
Tap on the playback screen, then select the
desired content.
To change the Activity
Register your favorite Activities on the HOME
screen of the “ Activity” tab (page 53).
1
Press HOME on the unit.
The HOME screen appears.
2
Tap the “ Activity” tab.
3
Tap the desired Activity.
To adjust the volume level
Refer to “Controlling the volume of devices
currently being controlled” (page 41).
To change the playback mode
Tap to change the playback mode.
The following play back modes are available:
•Normal
•Repeat
•Repeat 1 Song
•Random
•Shuffle
•Shuffle&Repeat
Note
Some playback modes may not be available depending on
the renderer (network controlled player).
Item Description
Operation buttons Tap to operate the device
currently controlled.
* Tap to select the playback
range.
SHUF* Tap to select the playback
mode.
Tap to display the ?/1 and
input panel.
Tap to display the registered
device list.
Tap to display the screen used
for switching the renderer
(network controlled player).
Tips
•This icon does not appear in the
following cases.
–During a PARTY
–While playing back content
that cannot be delivered
again by the server
• appears during a PARTY.
Tap to start a new PARTY, or
control the PARTY currently
being held.
Tap to display the option menu.
Tip
This icon does not appear if you
select “Audio IN” in step 4.
Tap to return to the content list.
Tip
The server list may appear
depending on the status of the
unit.
Item Description
010COV.book Page 37 Thursday, October 21, 2010 2:24 PM
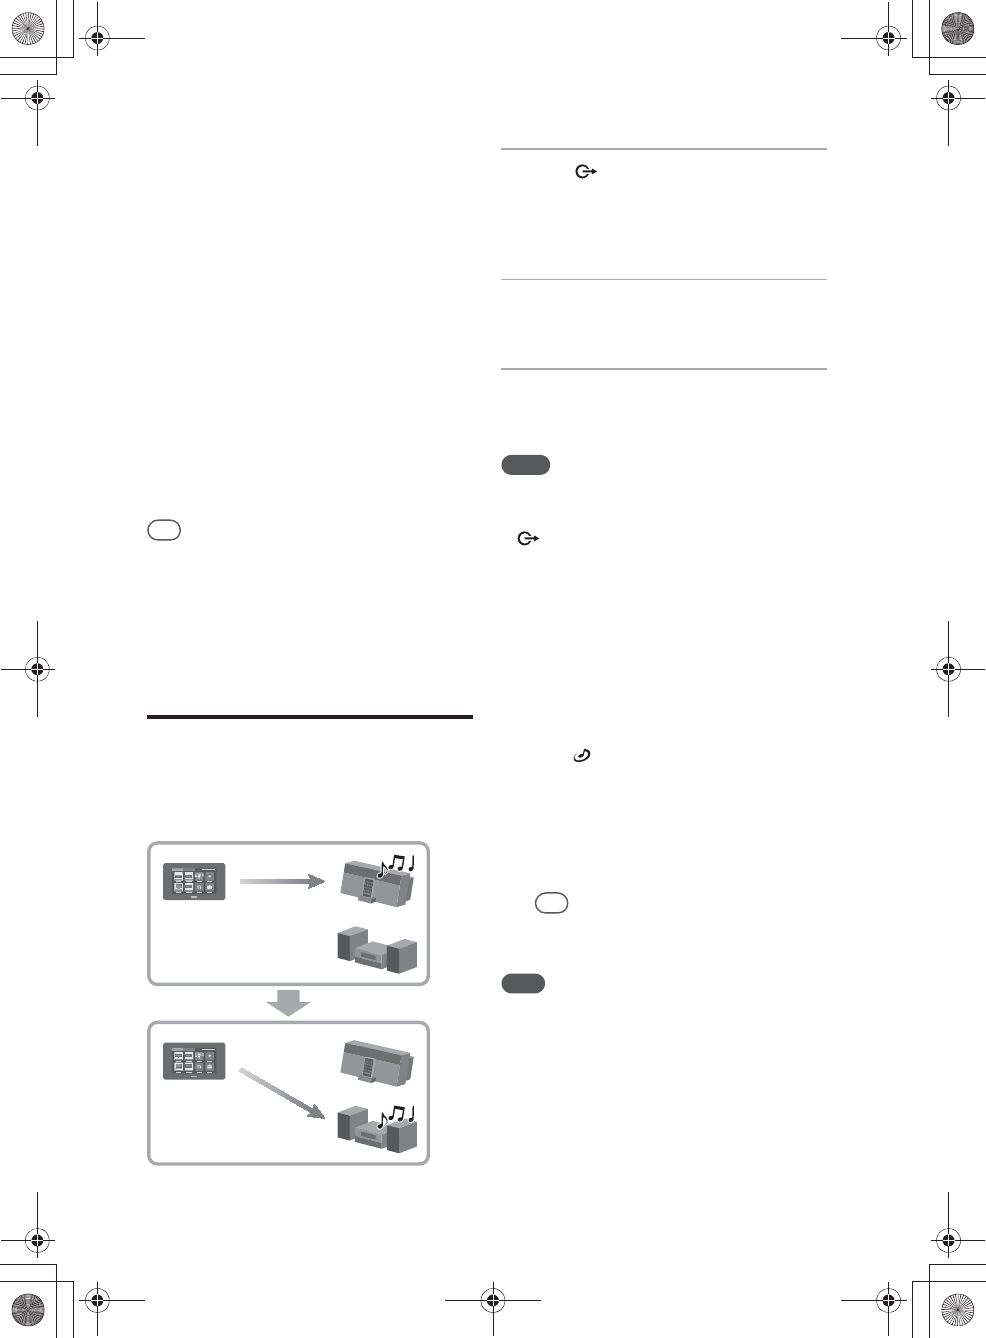
E:\AXISIM\4192581111\4192581111RMNU1U\01GB-RMNU1U\070ENJ.fm
masterpage: Left
RMN-U1
4-192-581-11(1)
38
GB
To change the playback range
Tap the playback range icon to change the
playback range.
The following playback ranges are available:
•Current Folder
•Parent Folder
To delete a server
You can delete a server you do not want to display
on the screen.
1
Tap and hold the server you want to
delete in step 5 of “Listening to audio
content on your server” (page 35).
A menu appears.
2
Tap “Delete.”
The selected server is deleted.
Tip
The server on your home network is displayed on the
server list of this unit even if you have deleted it before.
Disconnect your server if you do not want to display it on
the server list from your home network. Refer to the
operating manual of your server for details.
Changing the renderer
(network controlled
player) currently being
used
1
Tap on the side menu while
playing back content.
The renderer (network controlled player) list
appears.
2
Tap the desired renderer (network
controlled player).
3
Tap “OK.”
The audio content is played back on the
selected device.
Notes
•You may not be able to change the renderer (network
controlled player) if the selected content has restrictions
on streaming.
• does not appear in the following cases.
–During a PARTY
–While playing back content that cannot be delivered
again by the server
To add a renderer (network
controlled player)
You can add a device with the PARTY
STREAMING function as a renderer (network
controlled player).
1
Tap on the side menu while
playing back content.
The list of devices that are utilizing the
PARTY STREAMING function is displayed.
2
Select the desired renderer (network
controlled player).
Tip
All devices are selected with the default setting.
3
Tap “OK.”
Note
You cannot select a device which has joined another
PARTY or is turned off.
010COV.book Page 38 Thursday, October 21, 2010 2:24 PM
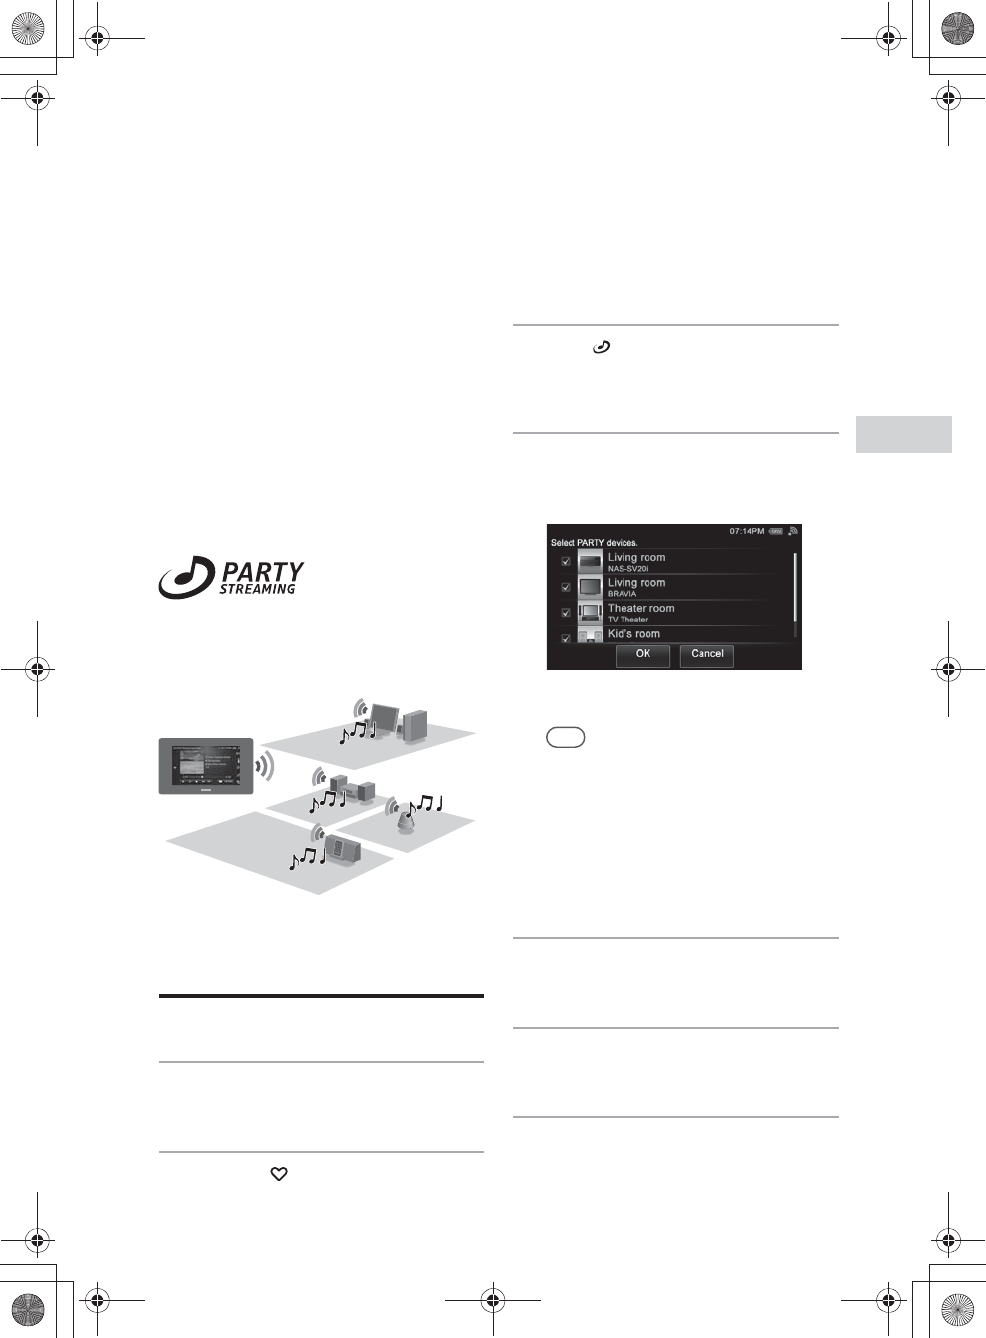
E:\AXISIM\4192581111\4192581111RMNU1U\01GB-RMNU1U\070ENJ.fm
masterpage: Right_L1
RMN-U1
4-192-581-11(1)
39
GB
Enjoying music content on your home network
Using the PARTY STREAMING function
The PARTY STREAMING function is explained
below.
•You can listen to the audio content that is
currently being played back on the PARTY host
(delivers audio content) for PARTY guests
(receives audio content from the PARTY host).
•You can deliver audio content to multiple
PARTY guests.
PARTY STREAMING is a convenient function
allowing you to enjoy audio content via multiple
devices at the same time.
You can enjoy the PARTY STREAMING
function with other devices that have this
PARTY STREAMING logo.
Starting a new PARTY
1
Press HOME on the unit.
The HOME screen appears.
2
Tap the “ Activity” tab.
3
Tap “ Start PARTY.”
The list of devices that are utilizing the
PARTY STREAMING function is displayed.
4
Select the device that you want to
allow to participate the PARTY,
then tap “OK.”
The list for the PARTY appears.
Tips
•All devices are selected with the default setting.
•Devices that do not support the PARTY
STREAMING function or the selected music
content are not displayed.
•You cannot select a device that is participating in
a PARTY or is turned off.
•You can start another PARTY by selecting
devices are available, even if you are already
holding a PARTY.
5
Tap the desired Activity.
The PARTY starts and the server list appears.
6
Tap the desired server.
The content list of the server appears.
7
Tap folders/albums until you find
the desired content.
010COV.book Page 39 Thursday, October 21, 2010 2:24 PM
E:\AXISIM\4192581111\4192581111RMNU1U\01GB-RMNU1U\070ENJ.fm
masterpage: Left
RMN-U1
4-192-581-11(1)
40
GB
Notes
•You can also start the PARTY by tapping during
playback of audio content on a renderer (network
controlled player). Refer to “To add a renderer
(network controlled player)” (page 38).
•Only devices with the PARTY STREAMING function
are displayed.
•You cannot select a device which has joined another
PARTY or is turned off.
Controlling the PARTY
currently being held
1
Press HOME on the unit.
The HOME screen appears.
2
Tap the “ Activity” tab.
3
Tap PARTY List.
The PARTY icon list of the devices that are
holding a PARTY appears.
4
Tap the desired PARTY from the
list.
The DLNA controller screen of the selected
PARTY appears.
5
Control the PARTY you want.
To change devices currently
participating in the PARTY
1
Tap on the side menu during the
PARTY.
The renderer (network controlled player) list
appears.
2
Tap the desired renderer (network
controlled player).
3
Tap “OK.”
The audio content is played back on the
selected device.
To close the PARTY
Press on the side menu during the PARTY.
Tip
You can close a PARTY by tapping “Close PARTY” on
the option menu list after first tapping on the side
menu during the PARTY.
You can also close the PARTY by selecting “Close
PARTY” on the menu list by pressing the desired PARTY
for a few seconds in step 4.
To adjust the volume level
Refer to “Controlling the volume of devices
currently being controlled” (page 41).
010COV.book Page 40 Thursday, October 21, 2010 2:24 PM
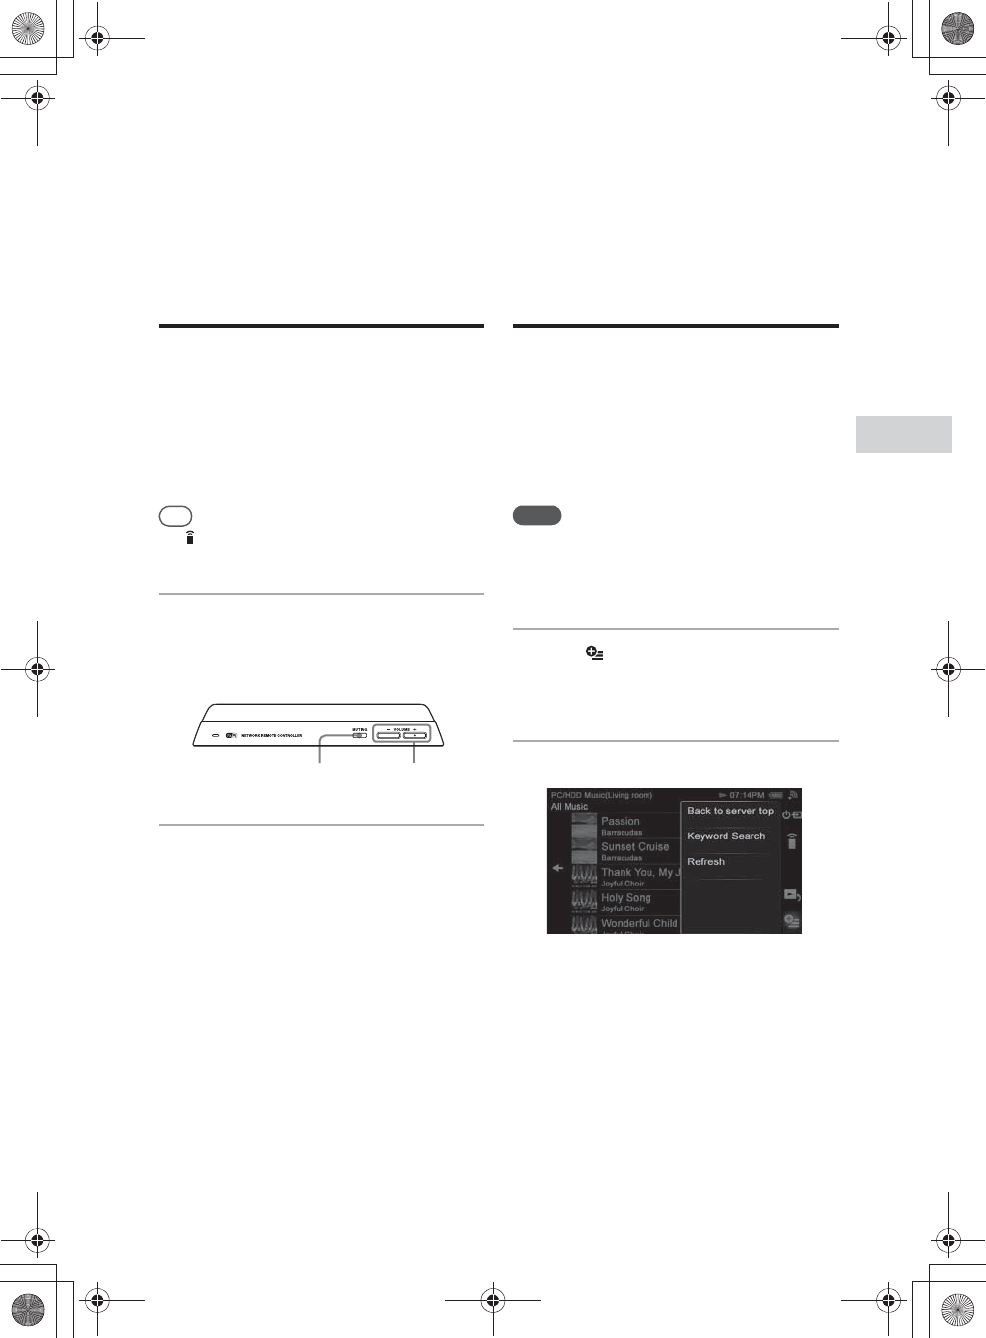
E:\AXISIM\4192581111\4192581111RMNU1U\01GB-RMNU1U\070ENJ.fm
masterpage: Right_L1
RMN-U1
4-192-581-11(1)
41
GB
Enjoying music content on your home network
Useful functions
Controlling the volume of
devices currently being
controlled
You can adjust the volume level of all devices
currently being controlled at the same time. You
can also adjust the volume level of each device
separately.
Tip
Tap on the side menu if you are listening to audio
content via an infrared device.
1
Press the VOLUME +/– or
MUTING button on the unit.
The screen used for adjusting the volume
appears.
2
Tap the screen to adjust the
volume level.
You can also adjust the volume using the
VOLUME +/– button on the unit.
To turn off the sound of all
devices currently being controlled
Press the MUTING button on the unit.
Searching for content
using the Keyword
Search function
You can enter a keyword to search for the desired
item. This function can be used while the content
list of the “PC/HDD Music” screen is displayed.
The scope for search is all content on the server.
Notes
•You cannot use this function with a server that does not
have the content search by keyword function.
•You can search only for content within Windows Media
Player 12 when it is used as a server.
1
Tap on the side menu when the
list of an item (artist list, track list,
etc.) is displayed.
2
Tap “Keyword Search.”
A keyword text box appears.
VOLUME +/–MUTING
010COV.book Page 41 Thursday, October 21, 2010 2:24 PM
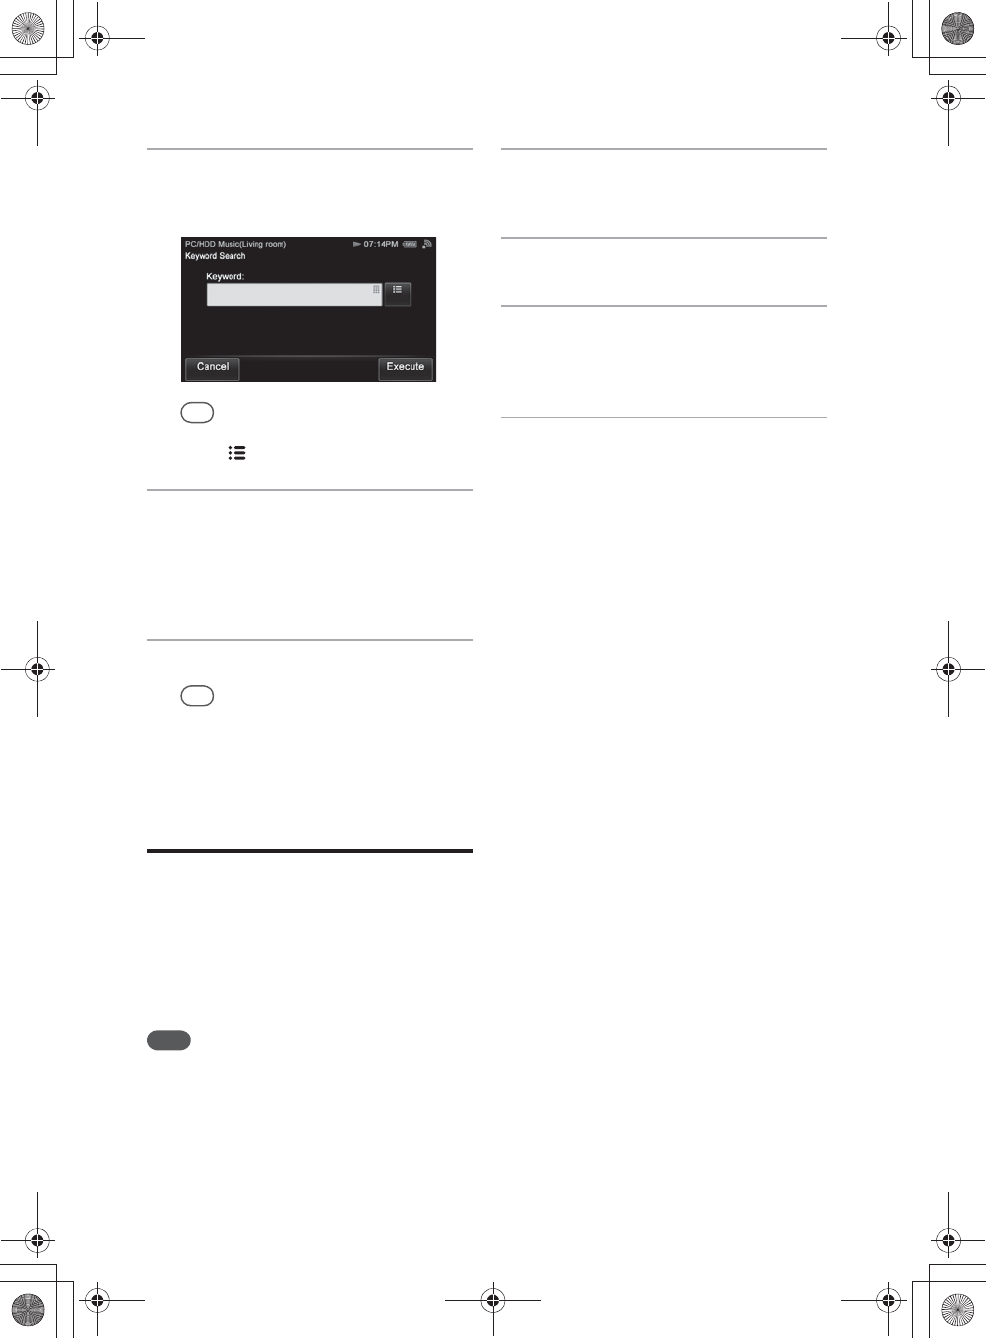
E:\AXISIM\4192581111\4192581111RMNU1U\01GB-RMNU1U\070ENJ.fm
masterpage: Left
RMN-U1
4-192-581-11(1)
42
GB
3
Enter a keyword.
For details on how to input characters, see
“Entering text” (page 19).
Tip
You can select a keyword from the input history by
tapping .
4
Tap “Execute” when you finish
entering a keyword.
“Searching...” appears. When the unit
finishes searching, items that match the
keyword appear.
5
Tap the desired item.
Tip
The content list of the folder appears when you tap
“B” while the playback screen is displayed after you
have selected content in this step.
Operating other
renderers (network
controlled player)
You can check the status of the specified device by
displaying the playback screen on the unit. Using
this screen, you can also adjust the volume level
and perform playback operations.
Note
You cannot use this function in the following cases:
–The renderer (network controlled player) has set access
limitations
–The specified device is not playing back anything
1
Press HOME on the unit.
The HOME screen appears.
2
Tap the “Device” tab.
3
Tap the device which is currently
playing back content.
The Activity list appears.
4
Tap “Now Playing.”
The playback screen of the selected device
appears.
010COV.book Page 42 Thursday, October 21, 2010 2:24 PM
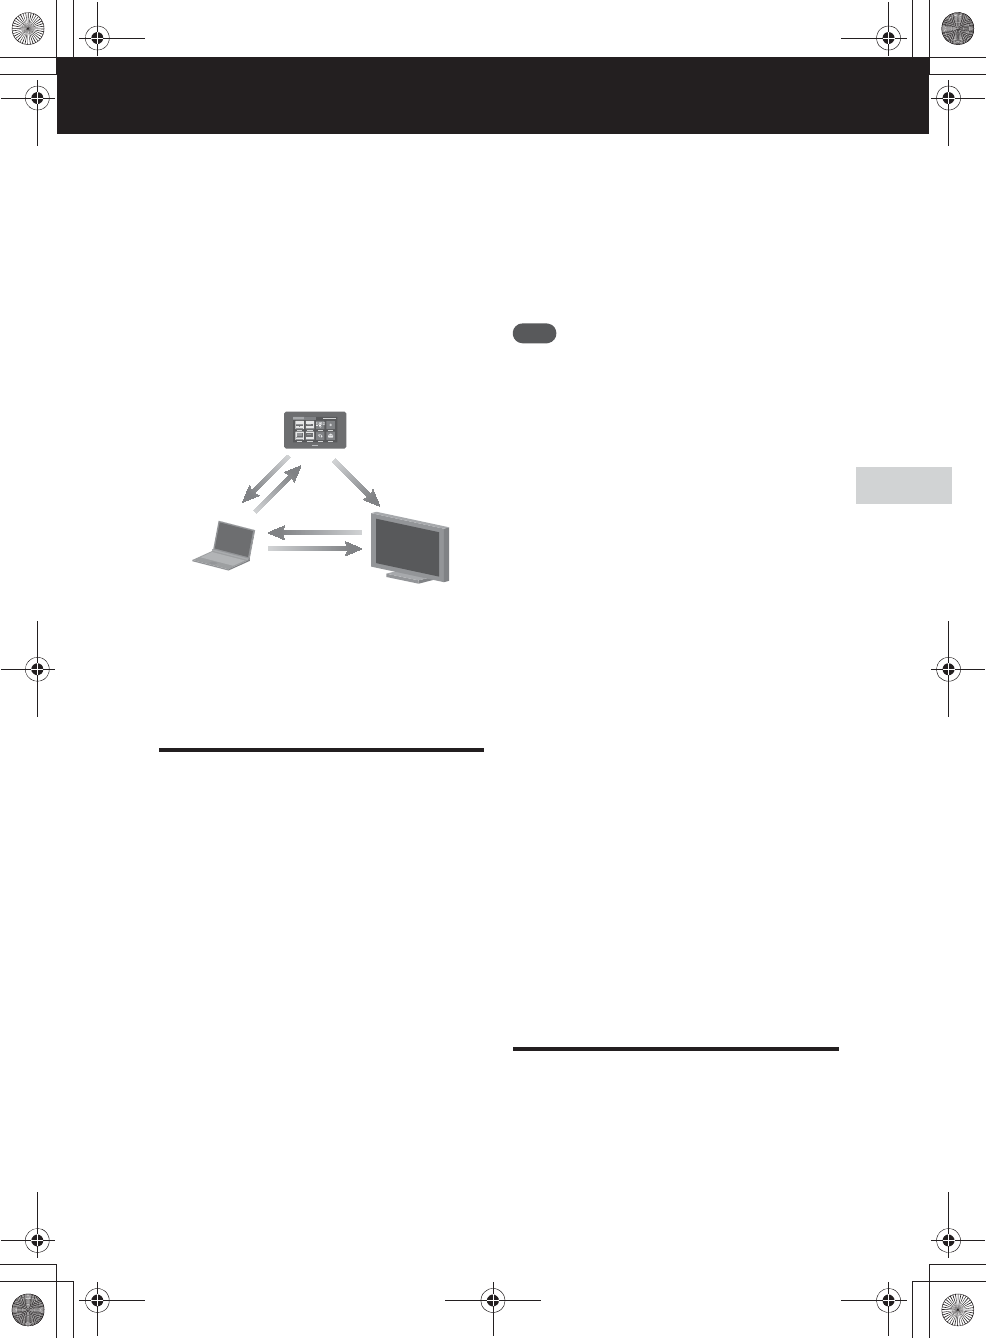
E:\AXISIM\4192581111\4192581111RMNU1U\01GB-RMNU1U\080ENJ.fm
masterpage: Right_L0
RMN-U1
4-192-581-11(1)
43
GB
Enjoying video/photos content on your home network
Enjoying video/photos content on your home network
Watching/viewing content on your server
You can enjoy video/photo content from anywhere
by controlling the DLNA-compliant devices on
your home network.
Setting up the server
To enjoy watching video content or viewing
photos stored on your server with this unit, you
must set up the server in advance.
The following server devices are compatible with
this unit.
•VAIO Media plus 2.0
•Microsoft Windows Media Player 12 installed
on Windows 7 (page 43)
•Microsoft Windows Media Player 11 installed
on Windows Vista/XP (page 43)
If the server has a function that limits access from
other devices, you must change the setting on the
server to allow the unit to access the server.
This section explains how to set up Windows
Media Player when using it as a server.
For details on the settings of other server devices,
refer to the operating manuals or help of the
respective devices or applications.
Note
The items displayed on the computer may be different
from the ones shown in this section, depending on the
version of the operating system or the computer
environment. For details, refer to the help of your
operating system.
xWhen using a computer
equipped with Windows 7
Perform the steps outlined in “When using a
computer equipped with Windows 7” (page 32).
If you have already finished the settings, go to
“Watching/viewing content on your server”
(page 44).
xWhen using a computer
equipped with Windows Vista/
Windows XP
Perform the steps outlined in “When using a
computer equipped with Windows Vista/Windows
XP” (page 34).
If you have already finished the settings, go to
“Watching/viewing content on your server”
(page 44).
Setting up a server other than
Windows 7, Windows Vista or
Windows XP
The set-up method is different, depending on the
server. Refer to the operating instructions of your
server.
Setting up a renderer
(network controlled
player)
The set-up method is different, depending on the
device. Refer to the operating instructions of your
device.
DLNA Controller (this unit)
Control
Server (computer or
Network audio system, etc.)
Network controlled player
Deliver
Access
Access
Browse
010COV.book Page 43 Thursday, October 21, 2010 2:24 PM
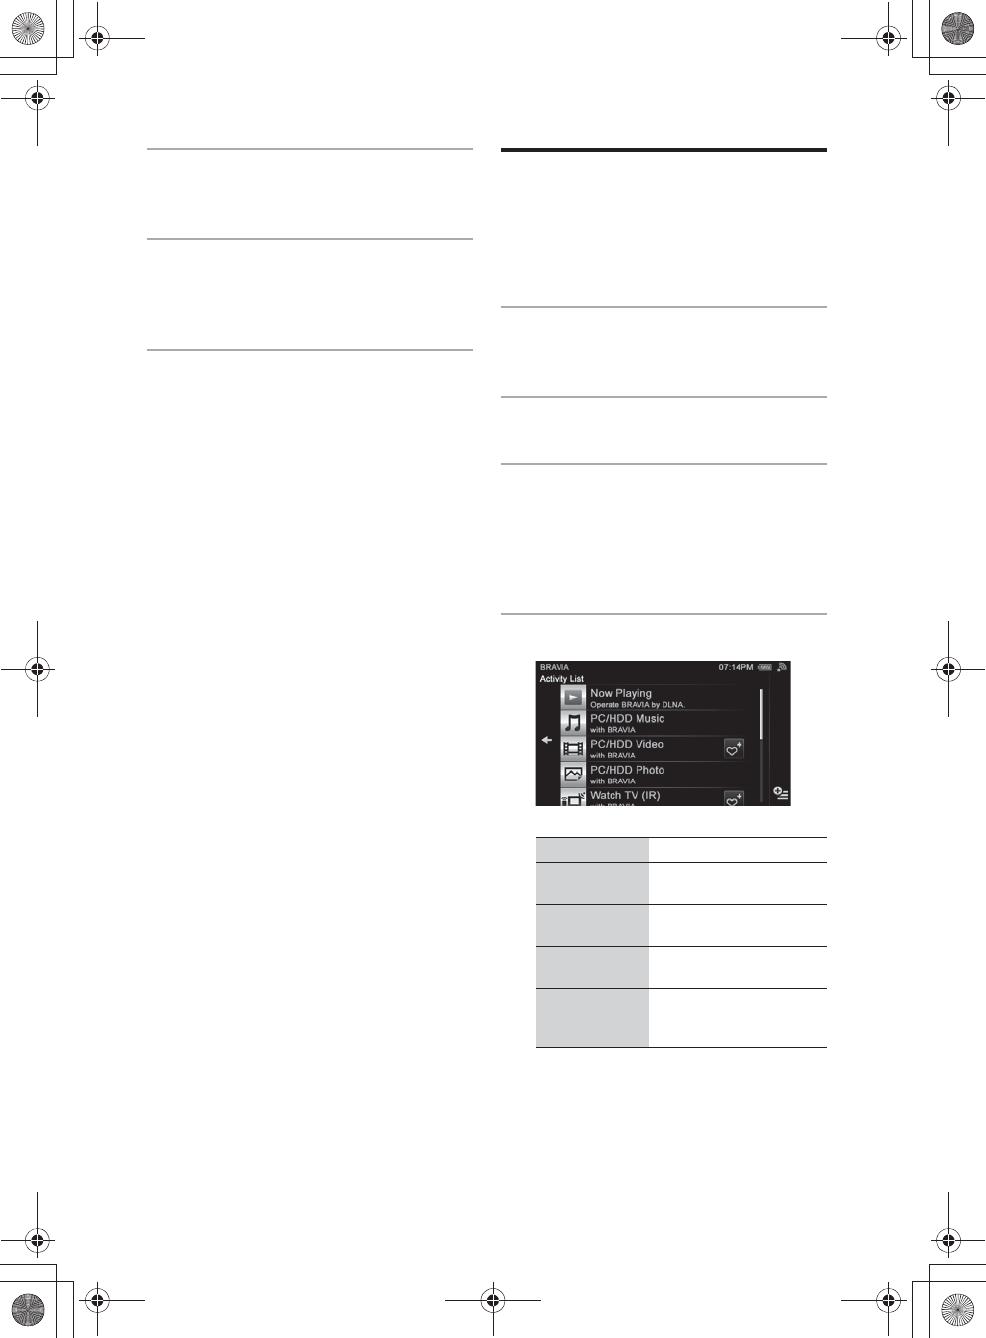
E:\AXISIM\4192581111\4192581111RMNU1U\01GB-RMNU1U\080ENJ.fm
masterpage: Left
RMN-U1
4-192-581-11(1)
44
GB
1
Turn the renderer (network
controlled player) on.
2
Connect the renderer (network
controlled player) to your home
network.
3
Permit access from this unit on the
renderer (network controlled
player) side.
Watching/viewing
content on your server
You can watch video content or view photos from
the desired device. Selecting “PC/HDD Video” as
an Activity is explained in this section.
1
Press HOME on the unit.
The HOME screen appears.
2
Tap the “Device” tab.
3
Tap the desired renderer (network
controlled player).
Activities that can be played back with the
selected renderer (network controlled player)
are displayed.
4
Tap the desired Activity.
The server selection screen appears.
Item Description
Now Playing Tap to display the playback
screen.
PC/HDD Video Tap to play back “PC/HDD
Video.”
PC/HDD Photo Tap to display “PC/HDD
Photo.”
Use remote (IR) Tap to display the infrared
remote control screen of the
selected device.
010COV.book Page 44 Thursday, October 21, 2010 2:24 PM
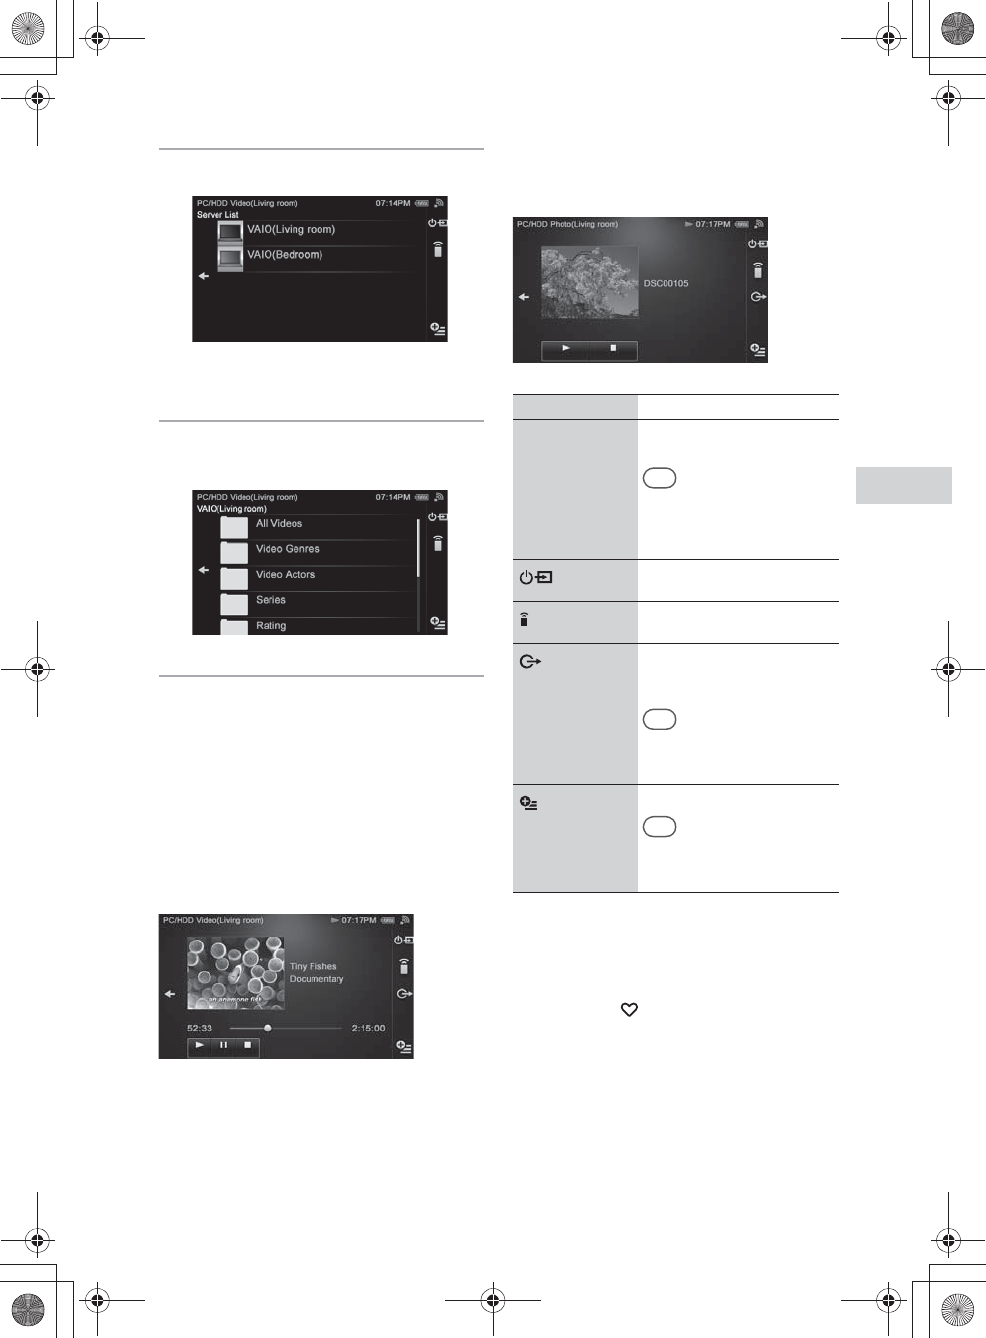
E:\AXISIM\4192581111\4192581111RMNU1U\01GB-RMNU1U\080ENJ.fm
masterpage: Right
RMN-U1
4-192-581-11(1)
45
GB
Enjoying video/photos content on your home networkEnjoying video/photos content on your home network
5
Tap the desired server.
The content list of the server appears.
6
Tap folders until you find the
desired content.
7
Tap the desired content.
Playback starts and the playback screen
corresponding to the selected Activity
appears.
Playback screen
PC/HDD Video
Appears when you select “PC/HDD Video” in step
4.
PC/HDD Photo
Appears when you select “PC/HDD Photo” in step
4.
To change the Activity
1
Press HOME on the unit.
The HOME screen appears.
2
Tap the “ Activity” tab.
3
Tap the desired Activity.
To adjust the volume level
Refer to “Controlling the volume of devices
currently being controlled” (page 47).
Item Description
Operation buttons Tap to operate the device
currently controlled.
Tip
You can hide the photo image by
tapping x. The photo image
re-appears when you tap N
again.
Tap to display the ?/1 and
input panel.
Tap to display the registered
device list.
Tap to display the screen used
for switching the renderer
(network controlled player).
Tip
This icon does not appear while
playing back content that cannot
be delivered again.
Tap to display the option menu.
Tip
The server list may appear
depending on the status of the
unit.
010COV.book Page 45 Thursday, October 21, 2010 2:24 PM
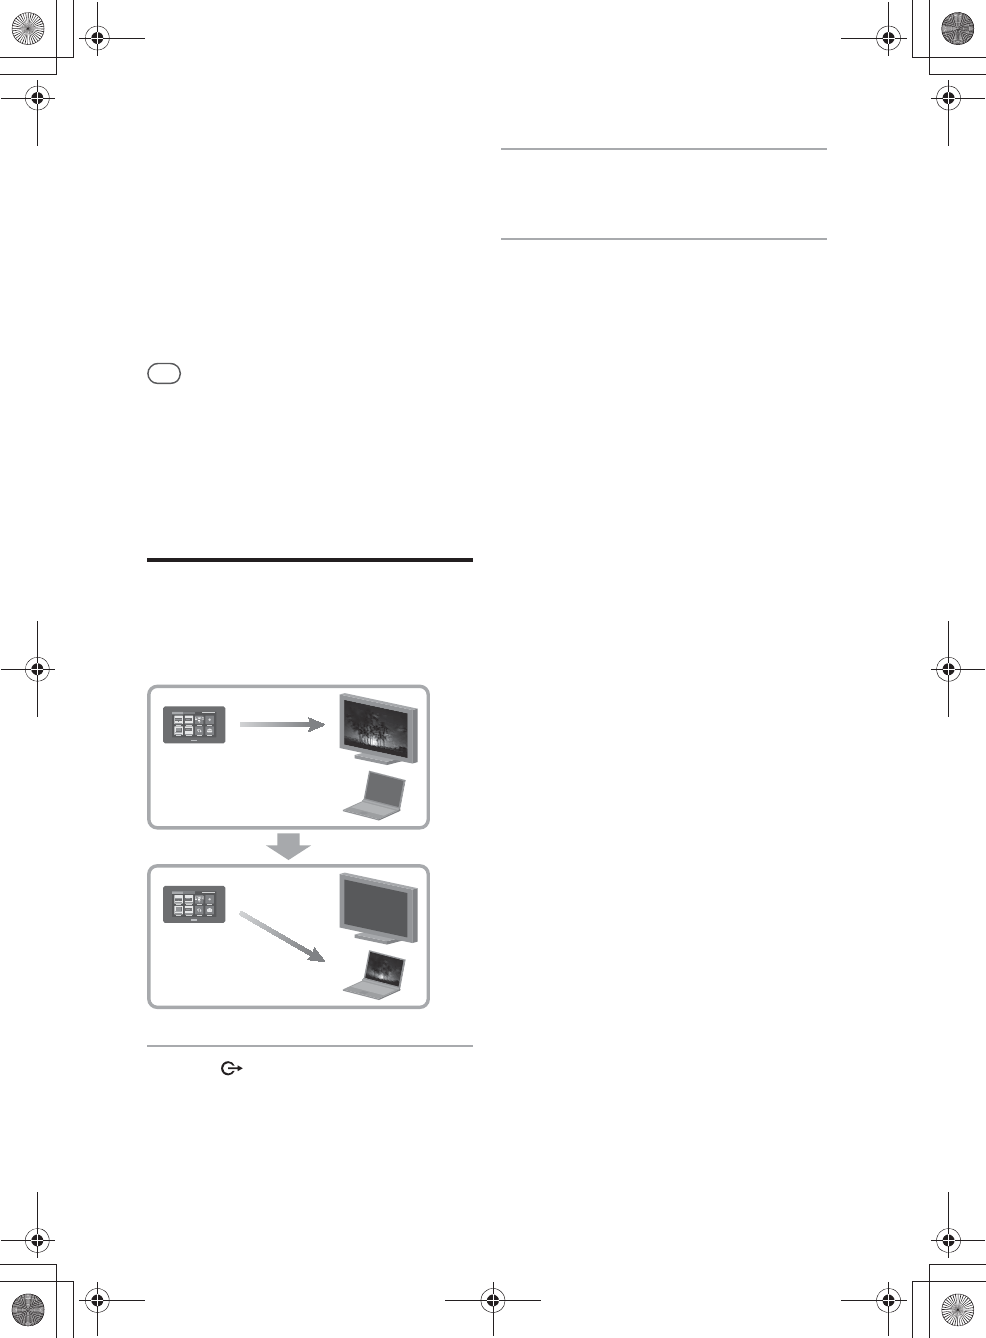
E:\AXISIM\4192581111\4192581111RMNU1U\01GB-RMNU1U\080ENJ.fm
masterpage: Left
RMN-U1
4-192-581-11(1)
46
GB
To delete server
You can delete a server you do not want to display
on the screen.
1
Tap and hold the server you want to
delete in step 5 of “Watching/viewing
content on your server” (page 44).
A menu appears.
2
Tap “Delete.”
The selected server is deleted.
Tip
The server on your home network is displayed on the
server list of this unit even if you have deleted it before.
Disconnect your server if you do not want to display it on
the server list from your home network. Refer to the
operating manual of your server for details.
Changing the renderer
(network controlled
player) currently being
used
1
Tap on the side menu while
playing back content.
The renderer (network controlled player) list
appears.
2
Tap the desired renderer (network
controlled player).
3
Tap “OK.”
The video content or photo is displayed on
the selected device.
010COV.book Page 46 Thursday, October 21, 2010 2:24 PM
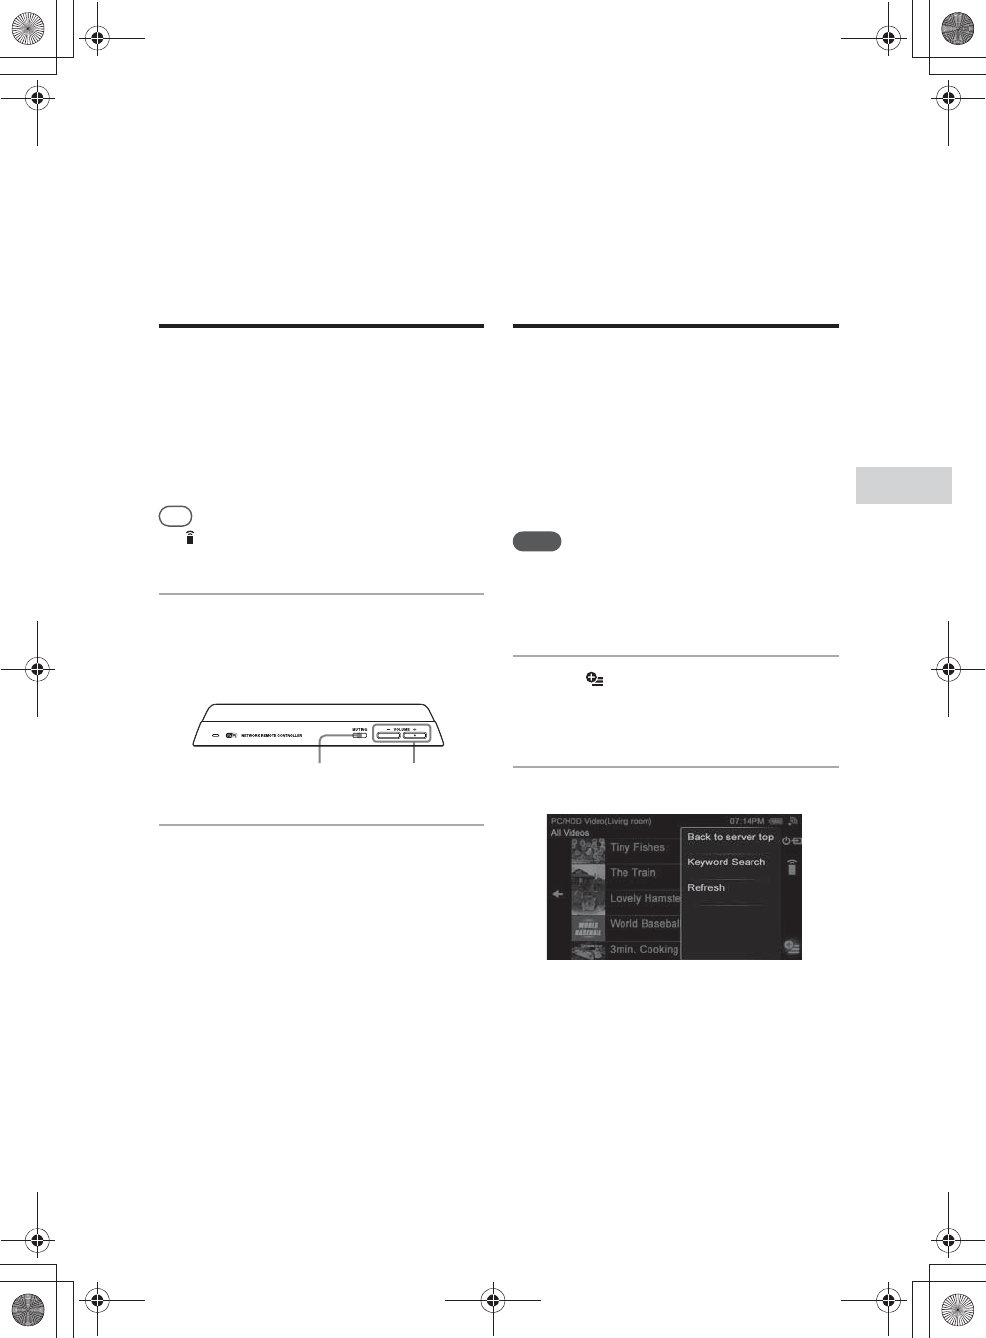
E:\AXISIM\4192581111\4192581111RMNU1U\01GB-RMNU1U\080ENJ.fm
masterpage: Right_L1
RMN-U1
4-192-581-11(1)
47
GB
Enjoying video/photos content on your home network
Useful functions
Controlling the volume of
devices currently being
controlled
You can adjust the volume level of all devices
currently being controlled at the same time. You
can also adjust the volume level of each device
separately.
Tip
Tap on the side menu if you are listening to audio
content via an infrared device.
1
Press the VOLUME +/– or
MUTING button on the unit.
The screen used for adjusting the volume
appears.
2
Tap the screen to adjust the
volume level.
You can also adjust the volume using the
VOLUME +/– button on the unit.
To turn off the sound of all
devices currently being controlled
Press the MUTING button on the unit.
Searching for content
using the Keyword
Search function (Video
only)
You can enter a keyword to search for the desired
item. This function can be used while the content
list of the “PC/HDD Video” screen is displayed.
The scope for search is all content on the server.
Notes
•You cannot use this function with a server that does not
have the content search by keyword function.
•You can search only for content within Windows Media
Player 12 when it is used as a server.
1
Tap on the side menu when the
list of an item (folder title, content
title, etc.) is displayed.
2
Tap “Keyword Search.”
A keyword text box appears.
VOLUME +/–MUTING
010COV.book Page 47 Thursday, October 21, 2010 2:24 PM

E:\AXISIM\4192581111\4192581111RMNU1U\01GB-RMNU1U\080ENJ.fm
masterpage: Left
RMN-U1
4-192-581-11(1)
48
GB
3
Enter a keyword.
For details on how to input characters, see
“Entering text” (page 19).
Tip
You can select a keyword from the input history by
tapping .
4
Tap “Execute” when you finish
entering a keyword.
“Searching...” appears. When the unit
finishes searching, items that match the
keyword appear.
5
Tap the desired item.
Tip
The content list of the folder appears when you tap
“B” while the playback screen is displayed after you
have selected content in this step.
Operating other
renderers (network
controlled player)
You can check the status of the specified device by
displaying the playback screen on the unit.
Note
You cannot use this function in the following cases:
–The renderer (network controlled player) has set access
limitations.
–The specified device is not playing back anything.
1
Press HOME on the unit.
The HOME screen appears.
2
Tap the “Device” tab.
3
Tap the device which is currently
playing back content.
The Activity list appears.
4
Tap “Now Playing.”
The video or photo image currently being
displayed on the selected device appears.
010COV.book Page 48 Thursday, October 21, 2010 2:24 PM
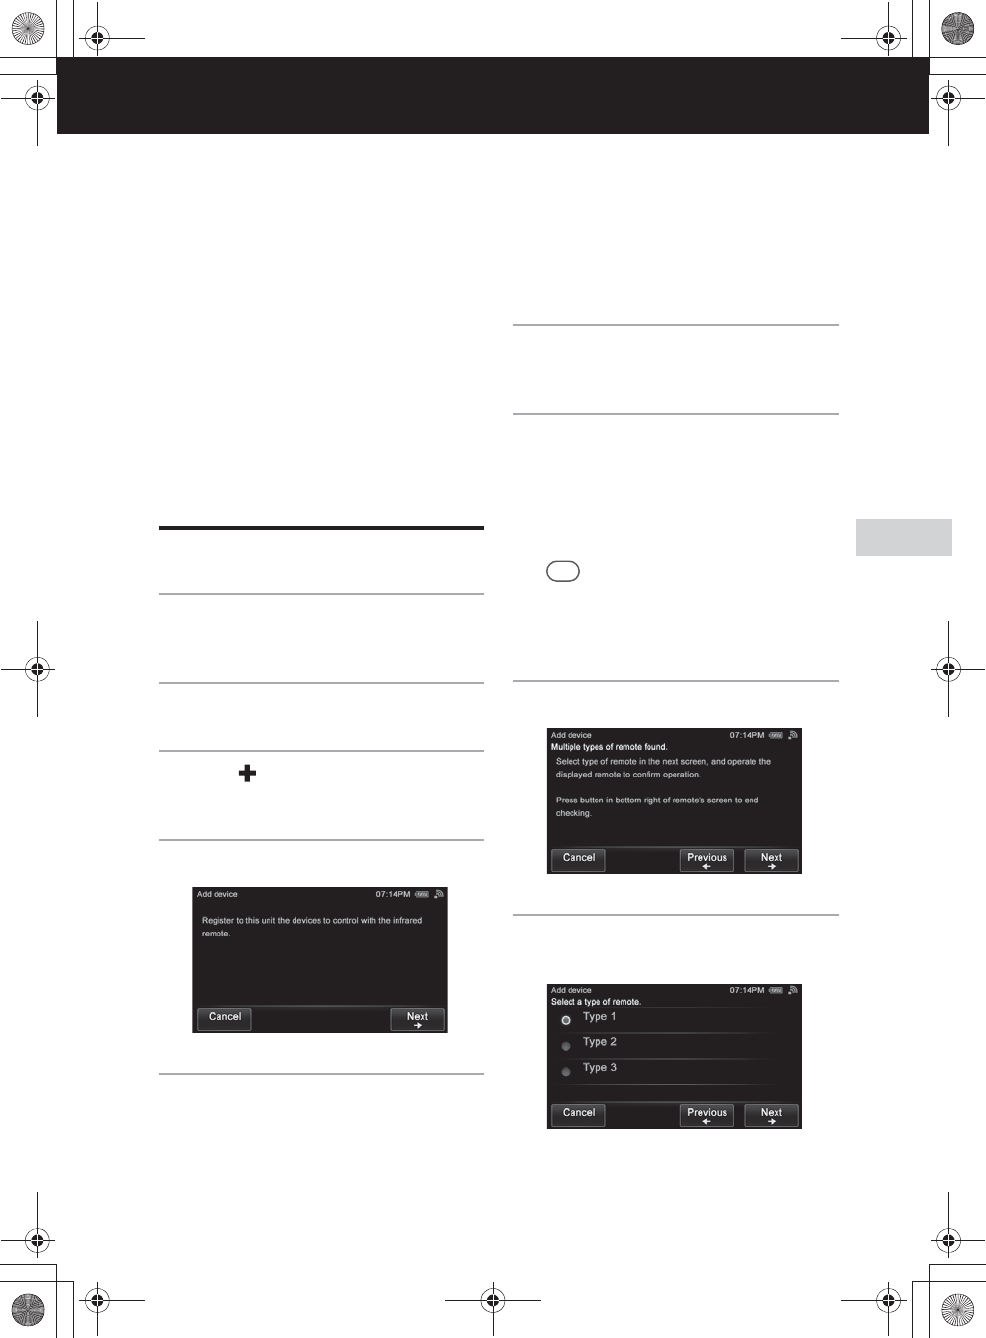
E:\AXISIM\4192581111\4192581111RMNU1U\01GB-RMNU1U\090CON.fm
masterpage: Right_L0
RMN-U1
4-192-581-11(1)
49
GB
Enjoying content via an infrared device
Enjoying content via an infrared device
Adding and using infrared devices
You can register and operate infrared devices that
are not DLNA-compliant.
After you register an Activity with the registered
device, you can use the appropriate remote control,
depending on the desired Activity, such as “Watch
TV (IR)” or “Listen to music (IR),” etc.
Adding an infrared device
1
Press HOME on the unit.
The HOME screen appears.
2
Tap the “Device” tab.
3
Tap “ Add device.”
A confirmation screen appears.
4
Tap “Next b.”
5
Tap “Select from preset data,” then
tap “Next b.”
6
Tap the correct type for your
device, then tap “Next b.”
7
Tap the vendor of your device,
then tap “Next b.”
A confirmation screen appears.
Steps 8 to 11 will be skipped if there is only
one candidate for the remote code. Go to step
12.
Tip
When you cannot find the vendor name, tap
“Previous B” repeatedly to return to the screen of
step 5. Then perform steps 5 to 10 as outlined in
“Programming the desired remote code” (page 50).
8
Tap “Next b.”
9
Tap the remote type, then tap
“Next b.”
The infrared remote control screen appears.
010COV.book Page 49 Thursday, October 21, 2010 2:24 PM
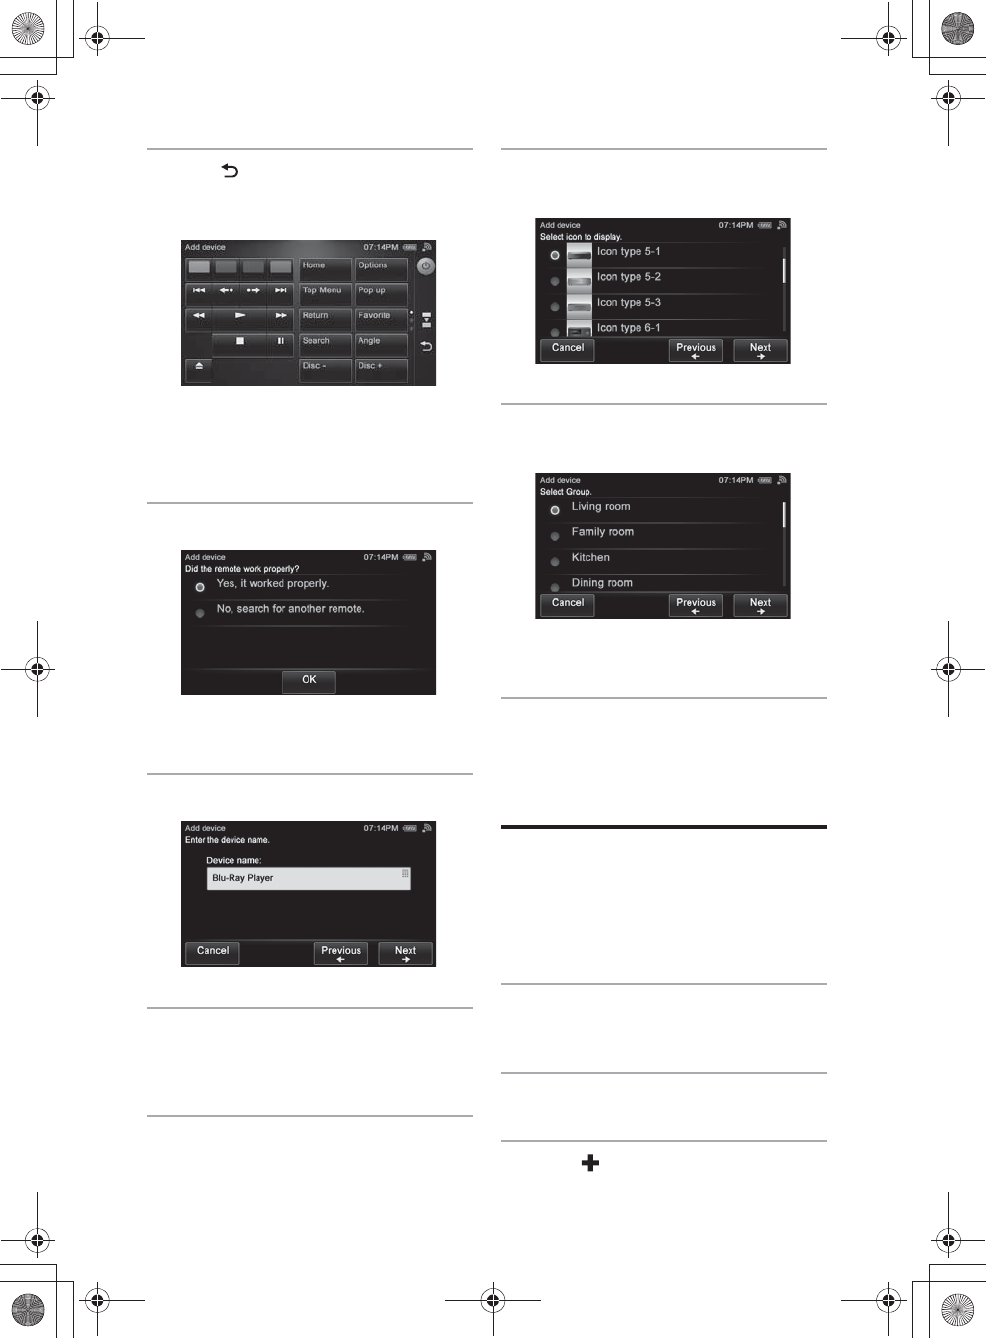
E:\AXISIM\4192581111\4192581111RMNU1U\01GB-RMNU1U\090CON.fm
masterpage: Left
RMN-U1
4-192-581-11(1)
50
GB
10
Tap on the side menu after
checking whether it is working
properly.
A confirmation screen appears.
Repeat steps 9 and 11 until you find the
correct remote code.
11
Tap “Yes, it worked properly.”
The device name input screen appears.
12
Tap the device name box.
13
Enter the device name.
For details on how to input characters, see
“Entering text” (page 19).
14
Tap “Next b.”
15
Tap the desired device icon, then
tap “Next b.”
16
Tap the desired group, then tap
“Next b.”
A confirmation screen appears.
17
Tap “OK.”
Programming the desired
remote code
You can program the remote code so that this unit
can control devices that it is normally unable to
control.
1
Press HOME on the unit.
The HOME screen appears.
2
Tap the “Device” tab.
3
Tap “ Add device.”
A confirmation screen appears.
010COV.book Page 50 Thursday, October 21, 2010 2:24 PM

E:\AXISIM\4192581111\4192581111RMNU1U\01GB-RMNU1U\090CON.fm
masterpage: Right
RMN-U1
4-192-581-11(1)
51
GB
Enjoying content via an infrared device
4
Tap “Next b.”
5
Tap “Learn,” then tap “Next b.”
6
Tap the correct type for your
device, then tap “Next b.”
A confirmation screen appears.
7
Tap “Next b.”
The key learning screen appears.
8
Program the remote code to the
key of the remote screen.
9
Tap on the side menu.
A confirmation screen appears.
10
Tap “Yes.”
010COV.book Page 51 Thursday, October 21, 2010 2:24 PM
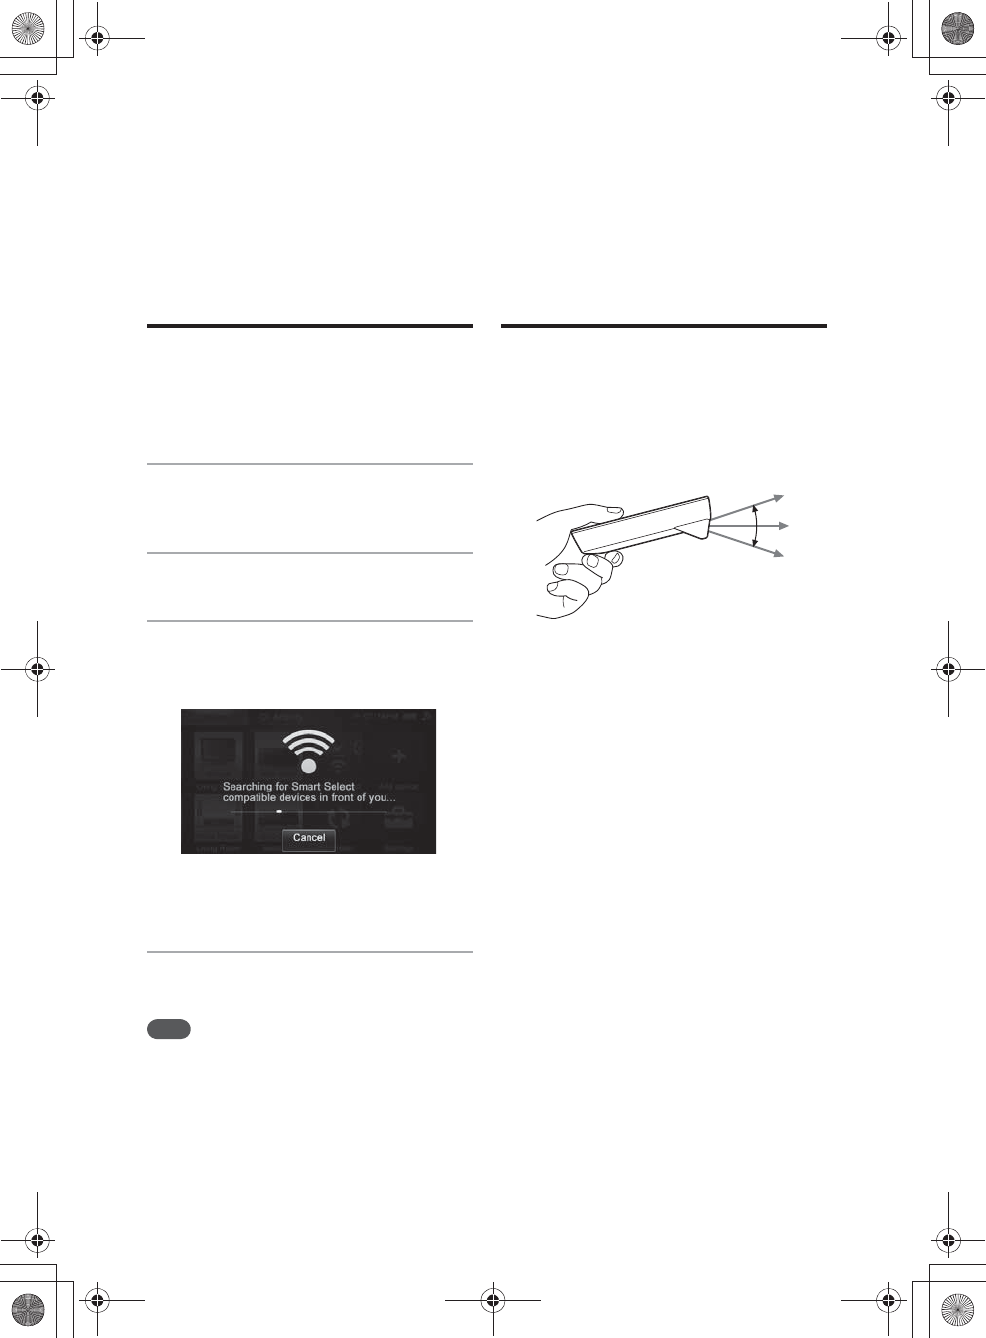
E:\AXISIM\4192581111\4192581111RMNU1U\01GB-RMNU1U\090CON.fm
masterpage: Left_L1
RMN-U1
4-192-581-11(1)
52
GB
Useful function
Using the Smart Select
function
This function allows the unit to find the target
device by using the infrared function.
1
Press HOME on the unit.
The HOME screen appears.
2
Tap the “Device” tab.
3
Tap “Smart Select.”
“Searching for Smart Select compatible
devices in front of you...” appears.
The Activity list appears when the unit has
found the device.
4
Tap the desired Activity.
Note
This function can be used when the Smart Select function
of the Sony device is activated.
Using the unit as an
infrared remote control
You can use this unit as an infrared remote control.
Be sure the unit is facing towards the remote
sensor of the device after adjusting the angle
referring to the following illustration.
010COV.book Page 52 Thursday, October 21, 2010 2:24 PM
E:\AXISIM\4192581111\4192581111RMNU1U\01GB-RMNU1U\100ACT.fm
masterpage: Right_L0
RMN-U1
4-192-581-11(1)
53
GB
Using Activity
Using Activity
Registering an Activity
This function allows you to find the desired
Activity easily after registering it in the Activity
list.
The Activity is carried out when you tap that
Activity from the Activity list.
By registering the Activity on the HOME screen of
the “ Activity” tab, you can perform several
commands (for example, selecting a device and
playing back content) by just tapping the Activity
icon.
About a DLNA Activity
You can select an Activity of the selected device
after tapping the device on the “Device” tab on the
Home screen after the unit recognizes that DLNA
device. These registrations are performed
automatically. Also you do not need turn the server
and renderer (network controlled player) on other
than the first time.
The server list is displayed after you select the
desired Activity, then select a server and the
content to be played back using the selected
renderer (network controlled player).
You can operate it using the DLNA controller
screen (page 15).
Tips
•Since a server is selected automatically, the server list
may not appear, depending on the combination of the
selected device and Activity.
•If you want to add the infrared device Activity to a
DLNA device Activity, refer to “Using an infrared
device in a DLNA Activity” (page 63).
Registering a DLNA
Activity on the HOME
screen of the “ Activity”
tab
When you register an Activity on the HOME
screen of the “ Activity” tab, you can perform
several commands (for example, selecting a device
and playing back content) by just tapping the
Activity icon.
1
Press HOME on the unit.
The HOME screen appears.
2
Tap the “ Activity” tab.
3
Tap “ Add Activity.”
Tip
A confirmation screen appears if you are
performing the Activity. Tap “OK” and go to step 4.
010COV.book Page 53 Thursday, October 21, 2010 2:24 PM
E:\AXISIM\4192581111\4192581111RMNU1U\01GB-RMNU1U\100ACT.fm
masterpage: Left
RMN-U1
4-192-581-11(1)
54
GB
4
Tap the desired DLNA Activity,
then tap “Next b.”
You can select any of the following as an
Activity.
•PC/HDD Music
•Music Services
•iPod & iPhone
•DAB/DAB+
•Audio IN
•PC/HDD Video
•PC/HDD Photo
Tip
The Activity type is displayed under the Activity
name.
5
Tap the desired renderer (network
controlled player), then tap
“Next b.”
A confirmation screen appears.
6
Tap “OK.”
The selected Activity is registered on the
HOME screen of the “ Activity” tab.
To register a DLNA Activity using
the Activity list of the “Device” tab
1
Press HOME on the unit.
The HOME screen appears.
2
Tap the “Device” tab.
3
Tap the desired device.
The Activity list appears.
4
Tap beside the desired Activity.
A confirmation screen appears.
Tip
is displayed beside any Activity that is not
registered on the HOME screen of the
“ Activity” tab.
5
Tap “OK.”
The selected Activity is registered on the
HOME screen of the “ Activity” tab.
010COV.book Page 54 Thursday, October 21, 2010 2:24 PM
E:\AXISIM\4192581111\4192581111RMNU1U\01GB-RMNU1U\100ACT.fm
masterpage: Right
RMN-U1
4-192-581-11(1)
55
GB
Using Activity
About an infrared Activity
This function allows you to turn the power supply
on and carry out input operations automatically
just by tapping the Activity icon.
While the Activity is being carried out, you can
also control each device by tapping the
corresponding remote key.
Note
The power operation of each device is registered
automatically when you register the Activity.
Registering an infrared
Activity
You can register several commands in a sequential
order on a registered device as an Activity after
registering the desired device.
This section explains how to enjoy video content
from a BD player with a TV and a receiver.
Tip
The following steps change depending on the selected
Activity and devices.
Note
You have to register all infrared devices in your home on
this unit in advance.
1
Register the BD player, TV and
receiver you want to use with this
unit (page 49).
2
Press HOME on the unit.
The HOME screen appears.
3
Tap the “ Activity” tab.
4
Tap “ Add Activity.”
5
Tap “Watch video (IR)” then tap
“Next b.”
Tip
The Activity type is displayed under the Activity
name.
6
Tap the device for playing video,
then tap “Next b.”
010COV.book Page 55 Thursday, October 21, 2010 2:24 PM
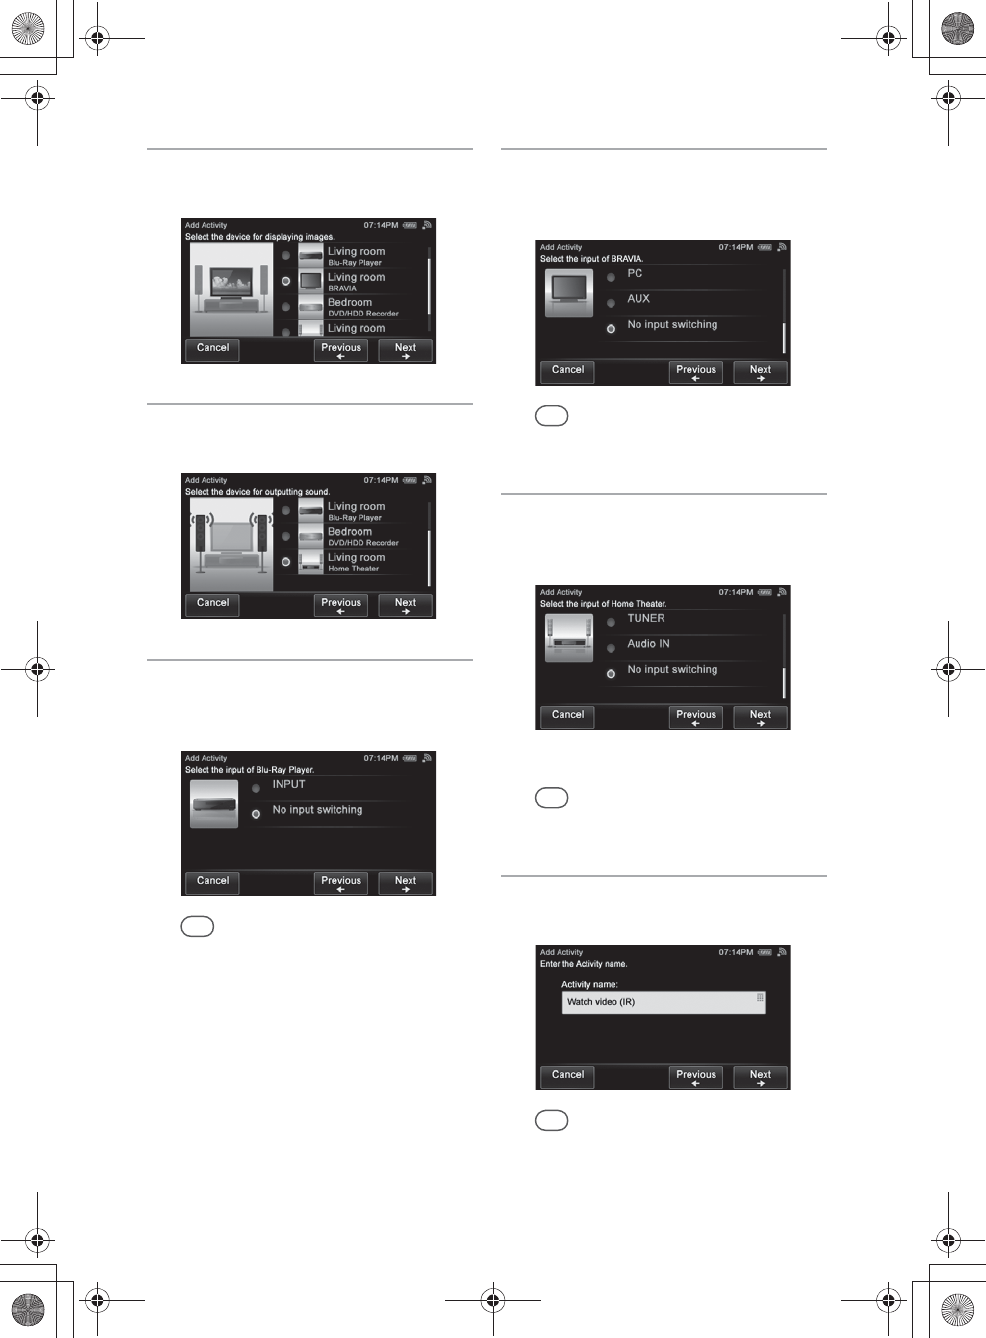
E:\AXISIM\4192581111\4192581111RMNU1U\01GB-RMNU1U\100ACT.fm
masterpage: Left
RMN-U1
4-192-581-11(1)
56
GB
7
Tap the device for displaying
images, then tap “Next b.”
8
Tap the device for outputting
sound, then tap “Next b.”
9
Tap the desired input operation of
the device for playing video, then
tap “Next b.”
Tip
If you do not want to switch the input, tap “No input
switching,” then tap “Next b.”
10
Tap the desired input operation of
the device for displaying images,
then tap “Next b.”
Tip
If you do not want to switch the input, tap “No input
switching,” then tap “Next b.”
11
Tap the desired input operation of
the device for outputting sound,
then tap “Next b.”
The Activity name screen appears.
Tip
If you do not want to switch the input, tap “No input
switching,” then tap “Next b.”
12
Check the Activity name, then tap
“Next b.”
Tip
You can change the Activity name by tapping the
Activity name box.
For details on how to input characters, see “Entering
text” (page 19).
010COV.book Page 56 Thursday, October 21, 2010 2:24 PM

E:\AXISIM\4192581111\4192581111RMNU1U\01GB-RMNU1U\100ACT.fm
masterpage: Right
RMN-U1
4-192-581-11(1)
57
GB
Using Activity
13
Tap the desired Activity icon, then
tap “Next b.”
14
Tap the group of the desired
Activity, then tap “Next b.”
A confirmation screen appears.
15
Tap “OK.”
16
Tap “Test.”
“Start Action Test” screen appears.
17
Be sure the unit is facing towards
the remote sensor of the desired
device referring to the on-screen
instructions when you tap “OK” to
check the actions registered.
The test starts.
18
Tap “It worked properly. End the
setup.” then tap “OK.”
Note
Refer to “Editing a registered Activity” (page 62) if the
power switching and input operations do not work
correctly.
To perform a retest
Tap “Perform the test again.” and tap “OK” in step
18.
To edit the actions registered
Tap “Did not work. Set advanced settings.” and tap
“OK” in step 18.
010COV.book Page 57 Thursday, October 21, 2010 2:24 PM
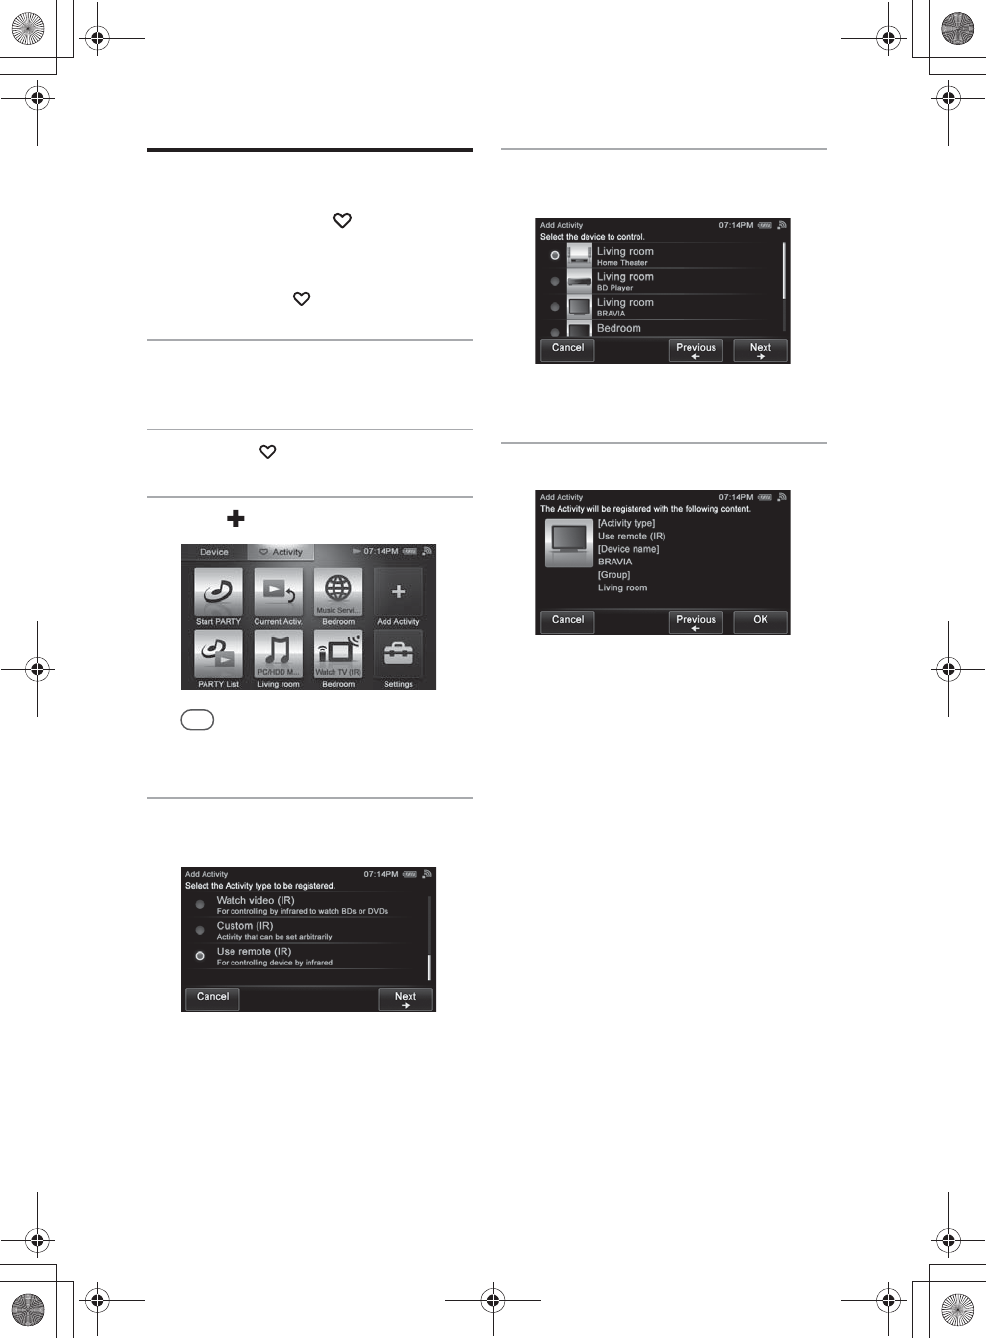
E:\AXISIM\4192581111\4192581111RMNU1U\01GB-RMNU1U\100ACT.fm
masterpage: Left
RMN-U1
4-192-581-11(1)
58
GB
Registering a device
remote on the HOME
screen of the “ Activity”
tab
You can also register the remote control on the
HOME screen of the “ Activity” tab.
1
Press HOME on the unit.
The HOME screen appears.
2
Tap the “ Activity” tab.
3
Tap “ Add Activity.”
Tip
A confirmation screen appears if you are
performing the Activity. Tap “OK” and go to step 4.
4
Tap “Use remote (IR)” then tap
“Next b.”
5
Tap the desired device, then tap
“Next b.”
A confirmation screen appears.
6
Tap “OK.”
010COV.book Page 58 Thursday, October 21, 2010 2:24 PM
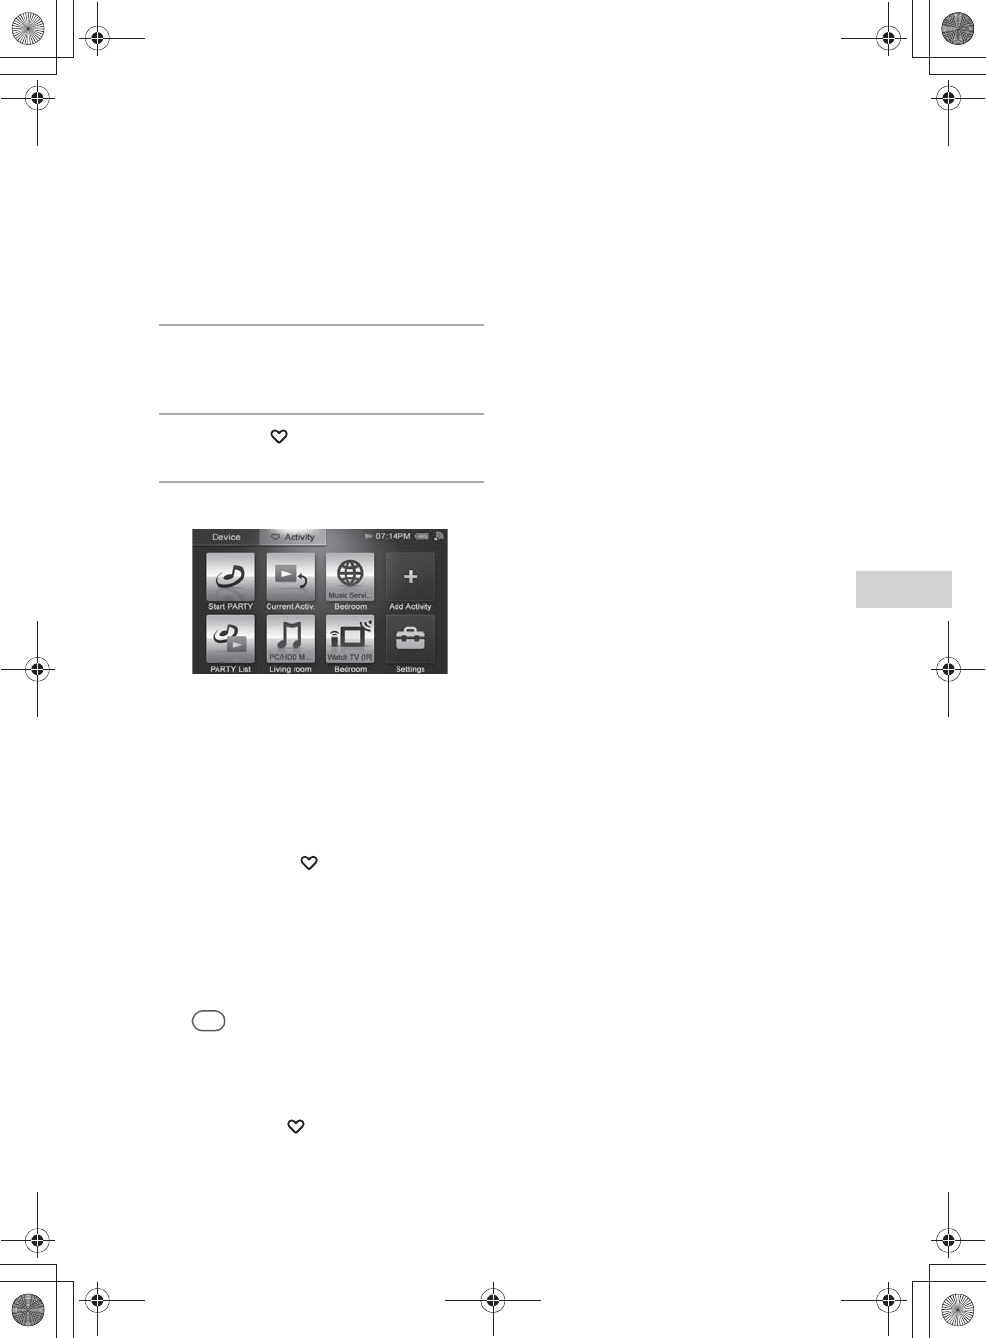
E:\AXISIM\4192581111\4192581111RMNU1U\01GB-RMNU1U\100ACT.fm
masterpage: Right_L1
RMN-U1
4-192-581-11(1)
59
GB
Using Activity
Using the Activity function
1
Press HOME on the unit.
The HOME screen appears.
2
Tap the “ Activity” tab.
3
Tap the desired item.
The selected Activity is carried out.
To edit the registered Activity
Refer to “Editing a registered Activity” (page 62).
To delete an item from the HOME
screen of the “ Activity” tab
1
Tap and hold the item you want to
delete in step 3.
A menu appears.
2
Tap “Delete Activity.”
A confirmation screen appears.
Tip
“Delete Remote” appears when you select “Use
remote (IR)” as an Activity.
3
Tap “OK.”
The selected item is deleted from the HOME
screen of the “ Activity” tab.
4
Tap “Close.”
010COV.book Page 59 Thursday, October 21, 2010 2:24 PM
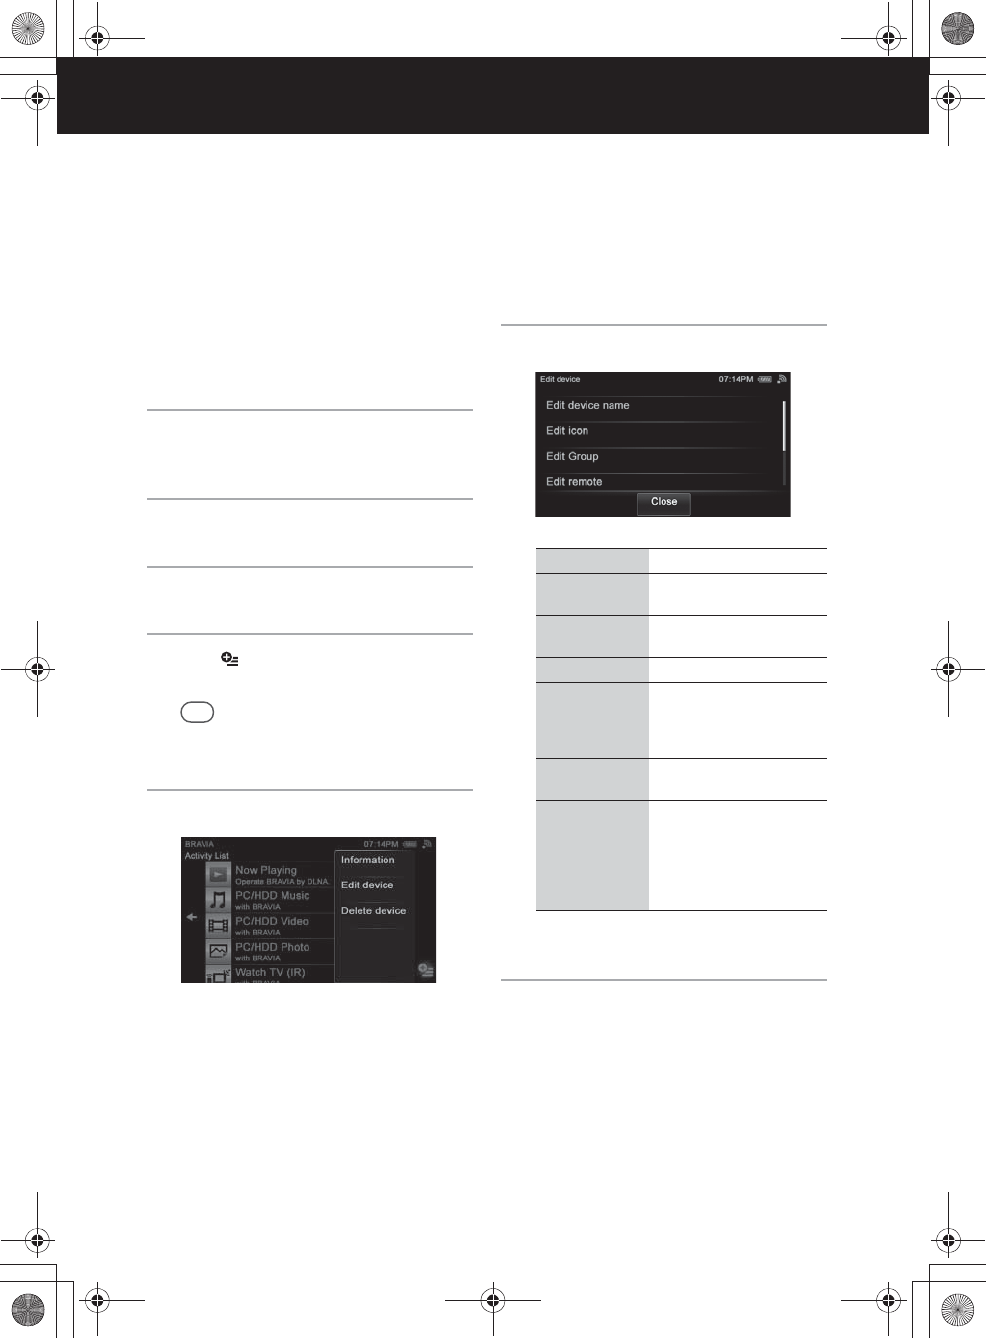
E:\AXISIM\4192581111\4192581111RMNU1U\01GB-RMNU1U\110ADD.fm
masterpage: Left_L0
RMN-U1
4-192-581-11(1)
60
GB
Additional information
Editing registered device information
You can edit registered device information. You
can change the device icon, or the group name that
was given automatically.
1
Press HOME on the unit.
The HOME screen appears.
2
Tap the “Device” tab.
3
Tap the desired device.
4
Tap .
The option menu appears.
Tip
You can also display the menu by tapping and
holding the desired device in step 3.
5
Tap “Edit device.”
6
Tap the item you want to edit.
* The menu item may not appear, depending on the
device selected.
7
Edit the desired item following the
on-screen instructions.
To check the device information
Tap “Information” in step 5.
Menu item Description
Edit device name Tap to change the device
name.
Edit icon Tap to change the device
icon.
Edit Group Tap to change the group.
Edit remote* Tap to edit the remote
control. Refer to “Editing a
device remote control”
(page 65).
Reset remote* Tap to reset the remote
control.
Merge with
renderer*
Tap to merge an infrared
device to a DLNA device.
Refer to “Merging with an
infrared device to a renderer
(network controlled
player)” (page 67).
010COV.book Page 60 Thursday, October 21, 2010 2:24 PM
E:\AXISIM\4192581111\4192581111RMNU1U\01GB-RMNU1U\110ADD.fm
masterpage: Right
RMN-U1
4-192-581-11(1)
61
GB
Additional information
To delete the device
1
Tap “Delete device” in step 5.
A confirmation screen appears.
2
Tap “OK.”
The selected device is deleted.
3
Tap “Close.”
Tip
Devices on your home network are displayed on the
device list of this unit even if you have deleted them
before. Disconnect any devices you do not want to display
on the device list from your home network. Refer to the
operating manual of your device for details.
010COV.book Page 61 Thursday, October 21, 2010 2:24 PM
E:\AXISIM\4192581111\4192581111RMNU1U\01GB-RMNU1U\110ADD.fm
masterpage: Left_L1
RMN-U1
4-192-581-11(1)
62
GB
Editing a registered Activity
You can edit registered Activities. You can also
delete an Activity from the list of registered
Activities.
1
Press HOME on the unit.
The HOME screen appears.
2
Tap the “ Activity” tab.
3
Tap and hold the Activity you want
to edit.
A menu appears.
4
Tap “Edit Activity.”
5
Tap the item you want to edit.
6
Edit the desired item.
7
Edit the desired item following the
on-screen instructions.
To check the Activity information
Tap “Information” in step 4.
To delete an Activity from an
infrared device
1
Tap and hold the Activity you want to
delete in step 4.
A menu appears.
2
Tap “Delete Activity.”
A confirmation screen appears.
3
Tap “OK.”
The selected Activity is deleted.
Menu item Description
Edit Activity
name
Tap to change the Activity
name.
Edit icon Tap to change the Activity
icon.
Edit Group Tap to edit the group setting
of a registered Activity.
Edit remote Tap to edit the remote
control. Refer to “Editing
an Activity remote control”
(page 66).
Edit device Tap to edit the device you
want to use. Refer to
“Using an infrared device in
a DLNA Activity”
(page 63).
Interval Setting Tap to adjust the interval
when you feel it too long or
short to start the IR Activity
(page 55).
Check the setting using
“Start Action Test” to find
whether the switching
between the power and the
input operation works
correctly.
Start Action Test Tap to check whether the
switching between the
power and the input
operation works correctly.
Menu item Description
010COV.book Page 62 Thursday, October 21, 2010 2:24 PM
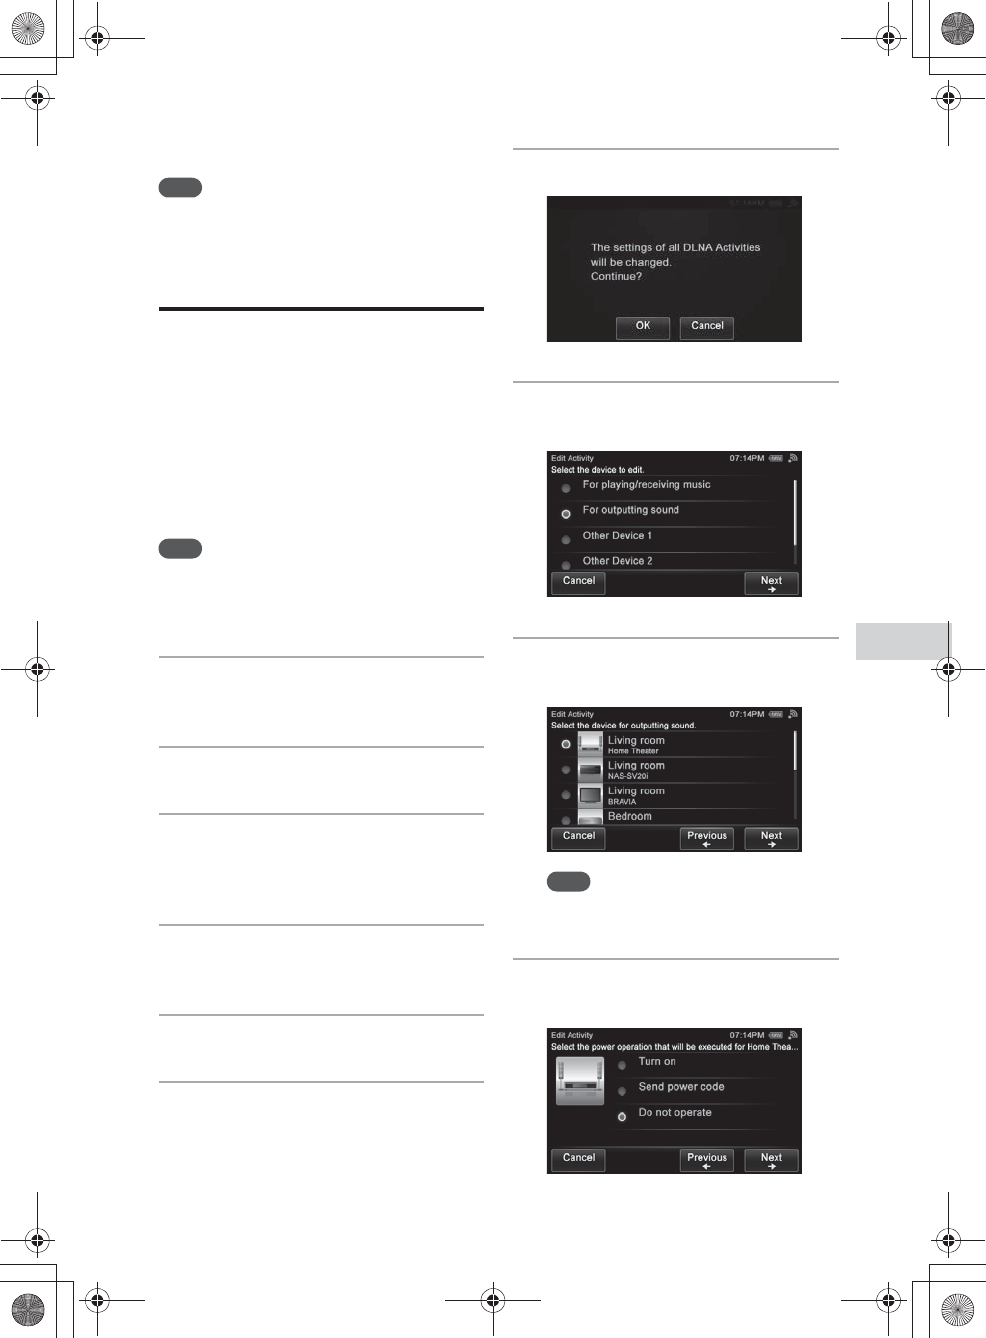
E:\AXISIM\4192581111\4192581111RMNU1U\01GB-RMNU1U\110ADD.fm
masterpage: Right
RMN-U1
4-192-581-11(1)
63
GB
Additional information
4
Tap “Close.”
Note
You can delete Activities that you have added manually.
Using an infrared device
in a DLNA Activity
When you perform a registered DLNA Activity, in
additional to using DLNA devices, you can also
use infrared devices. You can turn the infrared
device on or off, switch input operations, and
adjust the volume level.
This operation is useful when you want to output
the sound from a receiver connected to the
renderer (network controlled player) , etc,.
Note
You have to register infrared devices you want to use with
this unit in advance. Refer to “Adding and using infrared
devices” (page 49) for details on how to register infrared
devices.
1
Press HOME on the unit.
The HOME screen appears.
2
Tap the “Device” tab.
3
Tap the desired DLNA-compliant
device.
The Activity list appears.
4
Tap and hold the desired Activity.
A menu appears.
5
Tap “Edit Activity.”
6
Tap “Edit device/Start Action.”
A confirmation screen appears.
7
Tap “OK.”
8
Tap “For outputting sound,” then
tap “Next b.”
9
Tap the device for outputting
sound, then tap “Next b.”
Note
The items that can be selected are different,
depending on the device.
10
Tap the desired power operation of
the device for outputting sound.
010COV.book Page 63 Thursday, October 21, 2010 2:24 PM
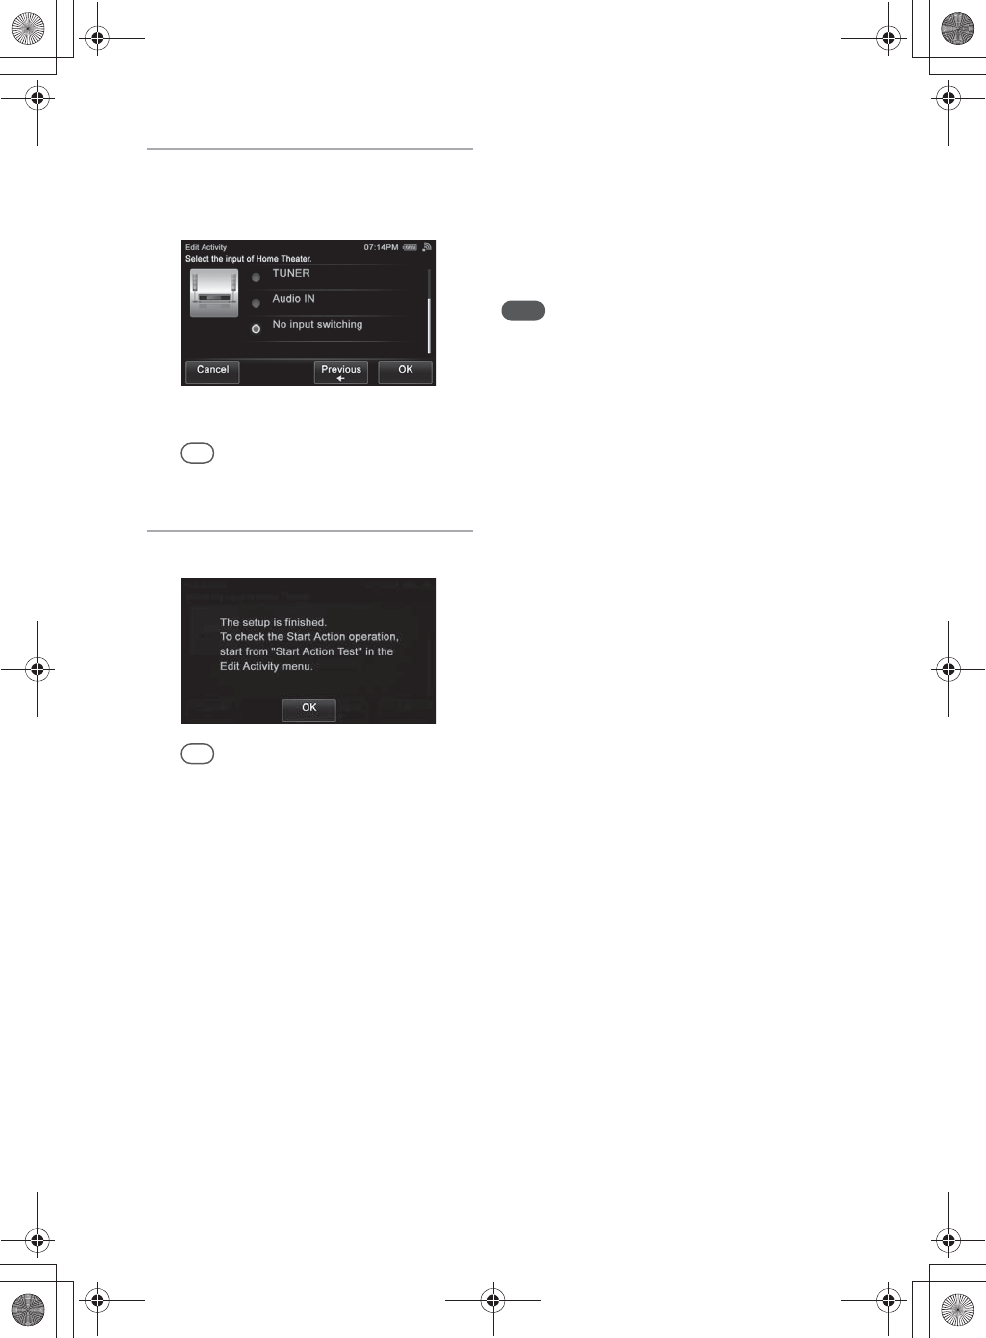
E:\AXISIM\4192581111\4192581111RMNU1U\01GB-RMNU1U\110ADD.fm
masterpage: Left
RMN-U1
4-192-581-11(1)
64
GB
11
Tap the desired input operation of
the device for outputting sound,
then tap “OK.”
A confirmation screen appears.
Tip
If you do not want to switch the input, tap “No input
switching,” then tap “Next b.”
12
Tap “OK.”
Tip
Refer to “Start Action Test” for details of “Start
Action Test” (page 62).
Adding an air-conditioner’s
functions to this unit
If you adjust the setting of an air-conditioner
according to the season, reset the parameters of the
air conditioner’s remote control (temperature, air
strength and direction, etc.), and register the new
remote signals with the unit.
When the power button on the remote control for
an air-conditioner, etc., toggles between power-on
and off with each press, the power-on/off operation
may not be registered correctly. In this case,
register the power-on/off signals to two separate
keys of the remote screen.
1
Register the power-on signal to a
key (transmit the power-on signal by
pressing the power button when the
device is turned off).
2
Register the power-off signal to
another key (transmit the power-off
signal by pressing the power button
when the device is turned on).
The two learned keys of the unit now control
the power-on/off signals of the device,
respectively.
Note
Devices such as air conditioners and heaters receiving an
infrared signal can be dangerous if misoperated.
010COV.book Page 64 Thursday, October 21, 2010 2:24 PM
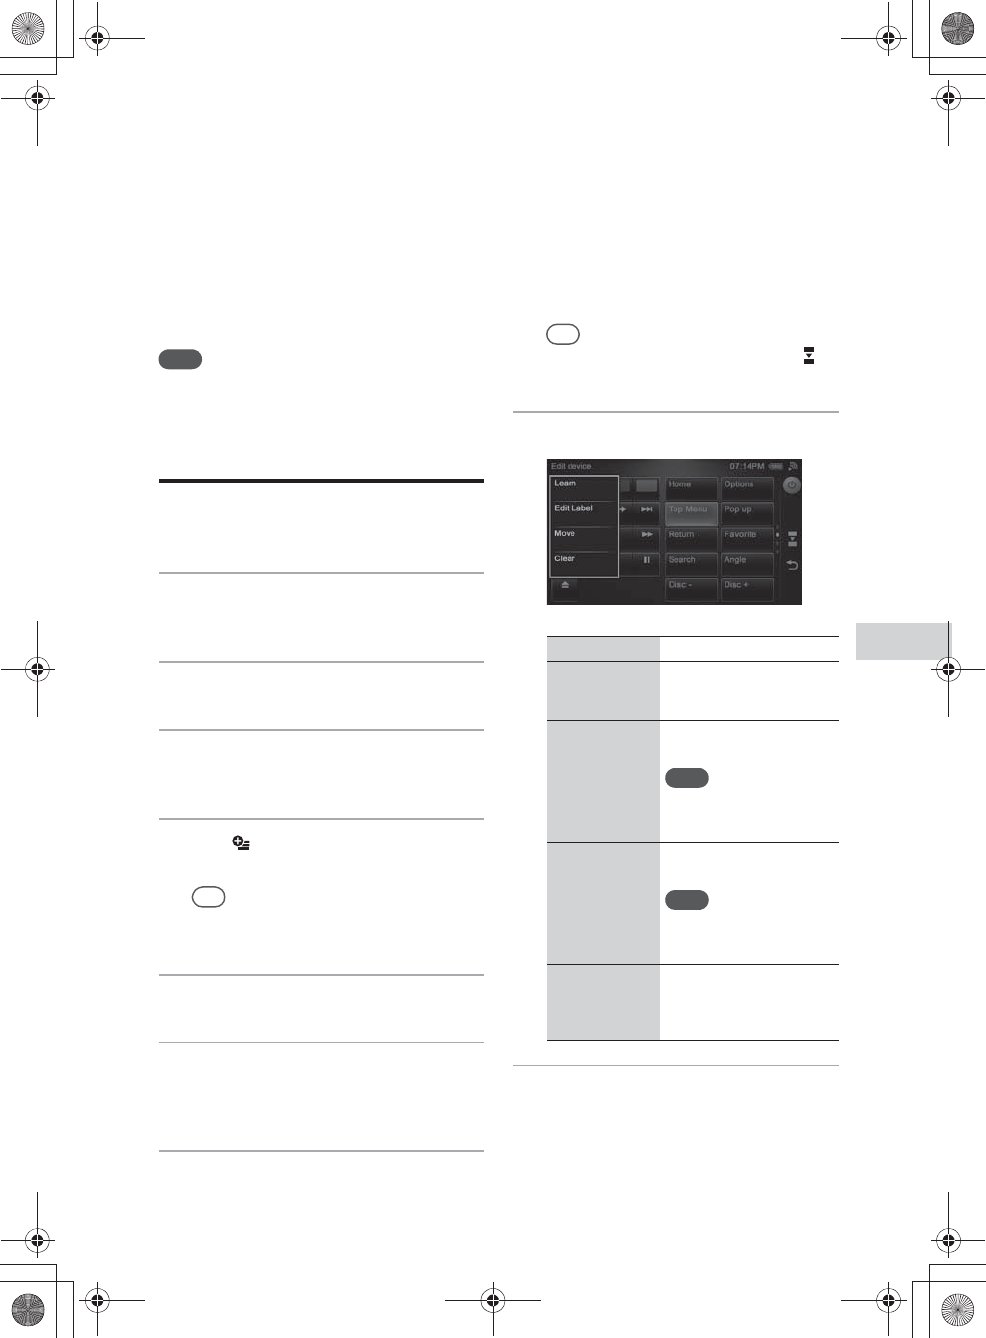
E:\AXISIM\4192581111\4192581111RMNU1U\01GB-RMNU1U\110ADD.fm
masterpage: Right_L1
RMN-U1
4-192-581-11(1)
65
GB
Additional information
Editing a registered remote control
You can edit an infrared remote control registered.
Note
You cannot edit the DLNA remote control.
Editing a device remote
control
1
Press HOME.
The HOME screen appears.
2
Tap the “Device” tab.
3
Tap the desired device.
The Activity list appears.
4
Tap .
The option menu appears.
Tip
You can also display a menu by tapping and holding
the desired device in step 3.
5
Tap “Edit device.”
6
Tap “Edit remote.”
The screen used for editing the remote
control of a device appears.
7
Tap the desired key.
The following items appear.
Tip
You can switch the remote screen by tapping on
the side menu.
8
Tap the desired item.
9
Edit the item following the
on-screen instructions.
Menu item Description
Learn You can program the
remote code to a key of the
remote screen.
Edit Label You can edit the label of a
key of the remote screen.
Note
This item appears when you
tap a key that is displayed
with a label.
Move You can move the key
position.
Note
This item appears when you
tap a key that is displayed
with a label.
Clear You can also clear the
remote code which is being
programmed to a key of the
remote screen.
010COV.book Page 65 Thursday, October 21, 2010 2:24 PM
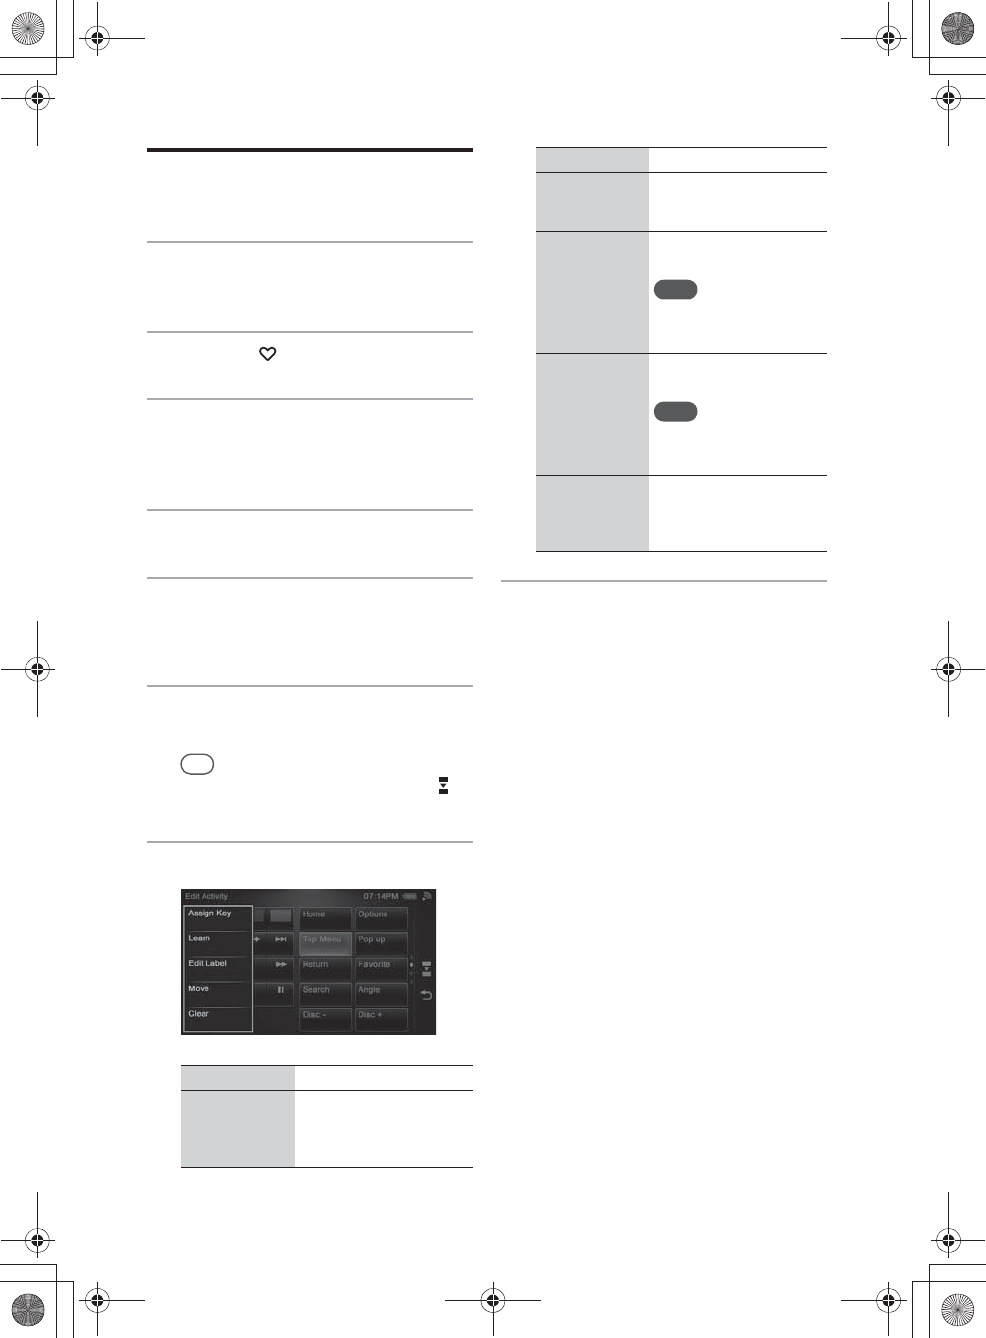
E:\AXISIM\4192581111\4192581111RMNU1U\01GB-RMNU1U\110ADD.fm
masterpage: Left
RMN-U1
4-192-581-11(1)
66
GB
Editing an Activity
remote control
1
Press HOME.
The HOME screen appears.
2
Tap the “ Activity” tab.
3
Tap and hold the Activity you want
to edit.
A menu appears.
4
Tap “Edit Activity.”
5
Tap “Edit remote.”
The screen used for editing the remote
control of a device appears.
6
Tap the desired key.
The following items appear.
Tip
You can switch the remote screen by tapping on
the side menu.
7
Tap the desired item.
8
Edit the item following the
on-screen operations.
Menu item Description
Assign Key You can assign a remote
key of the device which is
used on the Activity, to a
key of the remote screen.
Learn You can program the
remote code to a key of the
remote screen.
Edit Label You can edit the label of the
key of the remote screen.
Note
This item appears when you
tap a key that is displayed
with a label.
Move You can move the key
position.
Note
This item appears when you
tap a key that is displayed
with a label.
Clear You can clear the remote
code which is being
programmed to a key of the
remote screen.
Menu item Description
010COV.book Page 66 Thursday, October 21, 2010 2:24 PM
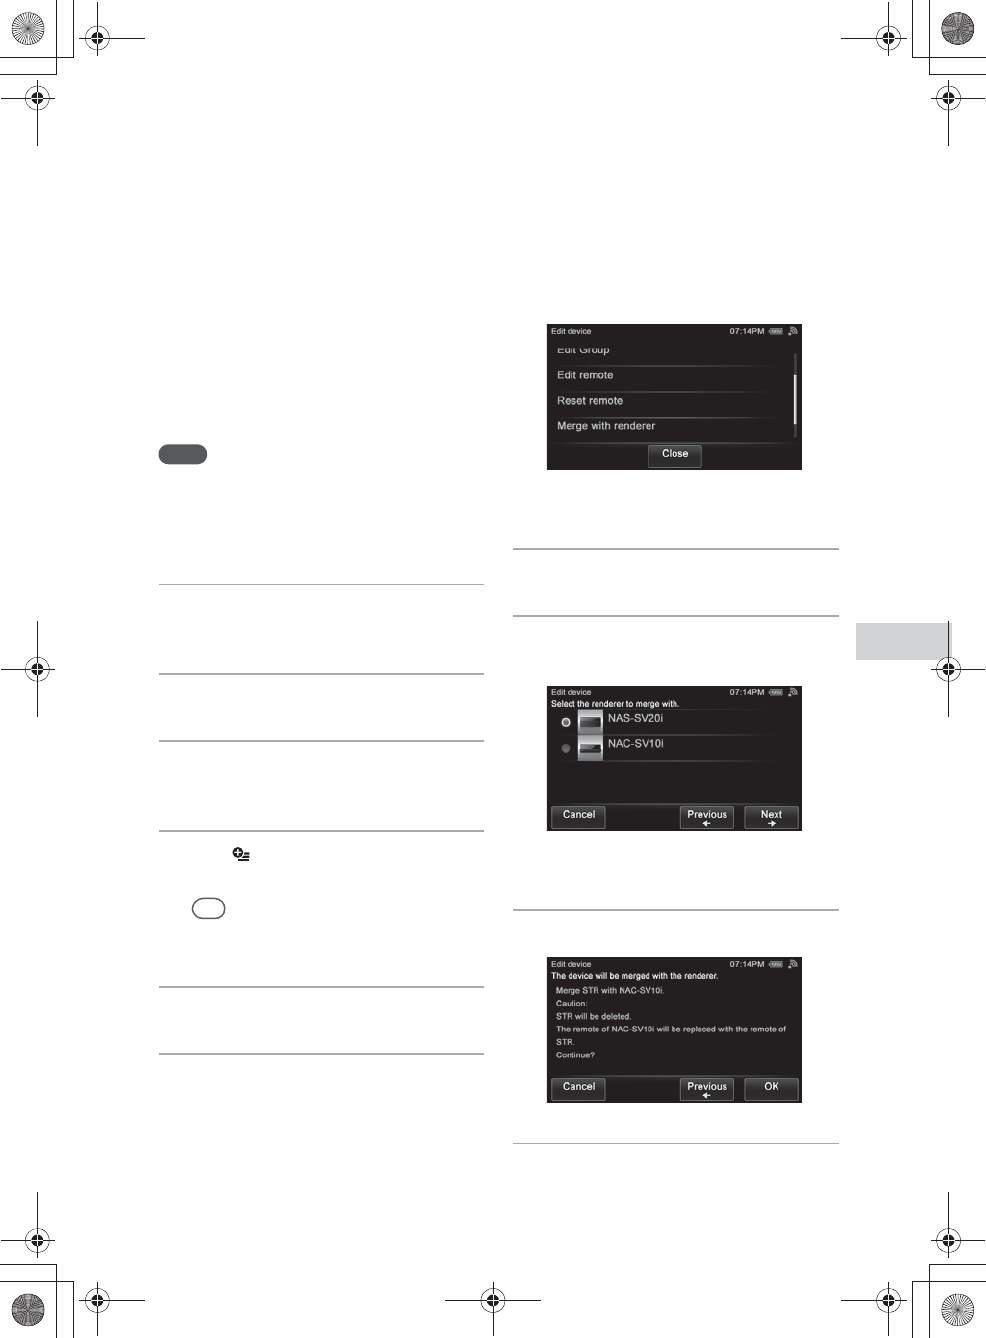
E:\AXISIM\4192581111\4192581111RMNU1U\01GB-RMNU1U\110ADD.fm
masterpage: Right_L1
RMN-U1
4-192-581-11(1)
67
GB
Additional information
Merging with an infrared device to a
renderer (network controlled player)
If, after adding an infrared device, you find the
device has been registered, the two instances of the
same device can be treated as one device.
The Activity of the infrared device also will be
merged with the Activity of the DLNA device
automatically.
Notes
•This item can be selected when you select a registered
infrared device in step 3. Refer to “Adding an infrared
device” (page 49).
•The infrared device is deleted from the HOME screen
of the “Device” tab after performing this operation.
1
Press HOME on the unit.
The HOME screen appears.
2
Tap the “Device” tab.
3
Tap the desired device.
The Activity list appears.
4
Tap .
The option menu appears.
Tip
You can also display a menu by pressing and
holding the desired device in step 3.
5
Tap “Edit device.”
6
Tap “Merge with renderer.”
A confirmation screen appears.
7
Tap “Next b.”
8
Tap the device you want to merge,
then tap “Next b.”
A confirmation screen appears.
9
Tap “OK.”
10
Tap “Close.”
The selected device is treated as one device.
010COV.book Page 67 Thursday, October 21, 2010 2:24 PM
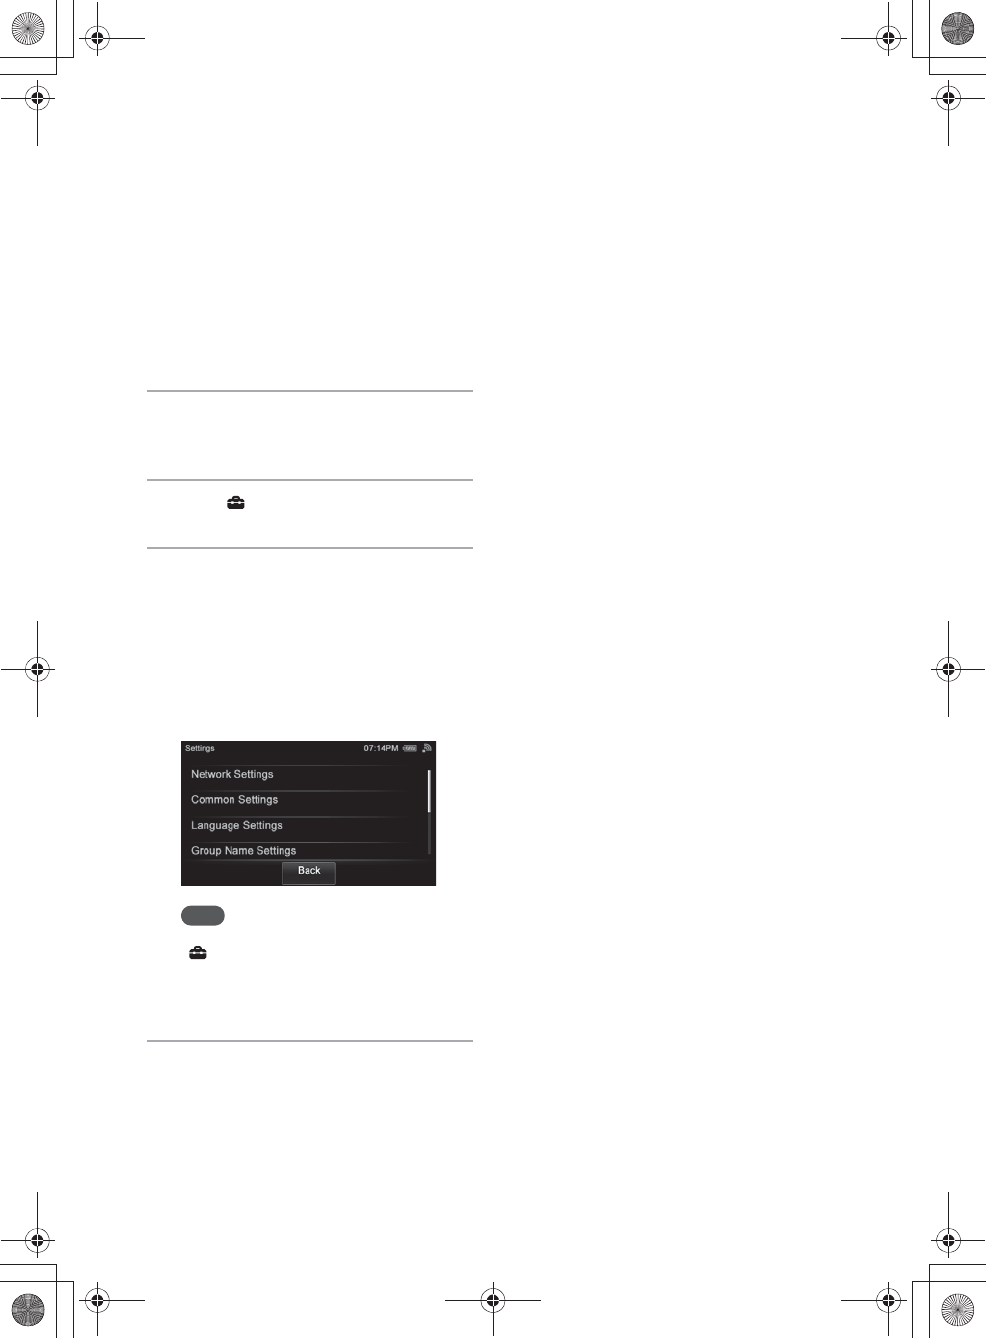
E:\AXISIM\4192581111\4192581111RMNU1U\01GB-RMNU1U\110ADD.fm
masterpage: Left_L1
RMN-U1
4-192-581-11(1)
68
GB
Changing settings
You can set or change the various settings. Do the
following to change a setting.
1
Press HOME on the unit.
The HOME screen appears.
2
Tap “ Settings.”
3
Tap the desired menu item.
The following settings can be selected.
•Network Settings
•Common Settings
•Language Settings
•Group Settings
•System Update
•Device Details
Note
A confirmation screen appears when you tap
“ Settings” on the screen while you are
performing the Activity. Tap “OK” if you want to
change the settings. The Activity currently being
performed will be cancelled in this case.
4
Tap the item repeatedly until you
complete the settings.
010COV.book Page 68 Thursday, October 21, 2010 2:24 PM
E:\AXISIM\4192581111\4192581111RMNU1U\01GB-RMNU1U\110ADD.fm
masterpage: Right_1col
RMN-U1
4-192-581-11(1)
69
GB
Additional information
Network Settings
Refer to “Connecting the unit to your home network (network settings)” (page 23).
Common Settings
Language Settings
You can select one of the following language settings.
•English (English)
•Français (French)
•Deutsch (German)
•Italiano (Italian)
•Español (Spanish)
Group Settings
You can check/edit the group information.
Menu item Parameter Description
Beep Settings ON You can set the beep sound to ON.
OFF You can set the beep sound to OFF.
Clock Settings Date&Time Settings You can select the time setting method (page 30).
Time Display Format You can select the time display format.
Daylight Saving You can select the summer time settings.
Screen Off Timer You can select the duration of time until the screen is turned off automatically. You
can select whether or not to activate the screen off timer (page 19).
Brightness From 1 to 5 You can set the brightness of the backlight of the LCD
screen to a level from 1 to 5.
Touch Panel Settings You can adjust the touch panel settings.
Reset All Settings You can reset all settings.
010COV.book Page 69 Thursday, October 21, 2010 2:24 PM
E:\AXISIM\4192581111\4192581111RMNU1U\01GB-RMNU1U\110ADD.fm
masterpage: Left_1col
RMN-U1
4-192-581-11(1)
70
GB
System Update
Refer to “Updating the Firmware” (page 71).
Device Details
You can check the firmware version and the MAC address of the unit.
010COV.book Page 70 Thursday, October 21, 2010 2:24 PM

E:\AXISIM\4192581111\4192581111RMNU1U\01GB-RMNU1U\110ADD.fm
masterpage: Right_L1
RMN-U1
4-192-581-11(1)
71
GB
Additional information
Updating the Firmware
Updating the system
application
By downloading the latest version of the system
application, you can take advantage of the newest
functions. The unit accesses the Sony server to
update the system.
When a new update is available, you will be
notified by a message that appears on the screen
while the unit is on and connected to the Internet.
Note
Make sure you do not attempt any of the following
operations while the update is in progress.
–Turn the unit off.
–Disconnect the network cable.
–Remove the unit from the charger.
1
Place the unit on the remote
control charger.
2
Press HOME on the unit.
The HOME screen appears.
3
Tap “ Settings.”
4
Tap “System Update.”
One of the following messages appears on the
screen.
Proceed to step 5 when “Found latest
software. Update?” appears on the screen.
A firmware update is not needed when “The
software is up to date. It does not need to be
updated.” appears on the screen. Tap “OK” to
exit this screen.
5
Tap “OK.”
6
Follow the on screen instructions.
The unit starts to update the system
application. It may take a while (about 20
minutes at the longest) for the unit to finish
the update. The required time will depend on
the amount of data in the updates, the line
type of the network, the network
communication environment, etc.
When the system update finishes, the unit
restarts automatically.
Notes
•Do not disconnect the network cable or remove
the unit from the charger until the update has
been completed.
•Reboot the unit once or twice after the update.
To cancel the procedure
Select “Cancel” in step 5.
010COV.book Page 71 Thursday, October 21, 2010 2:24 PM
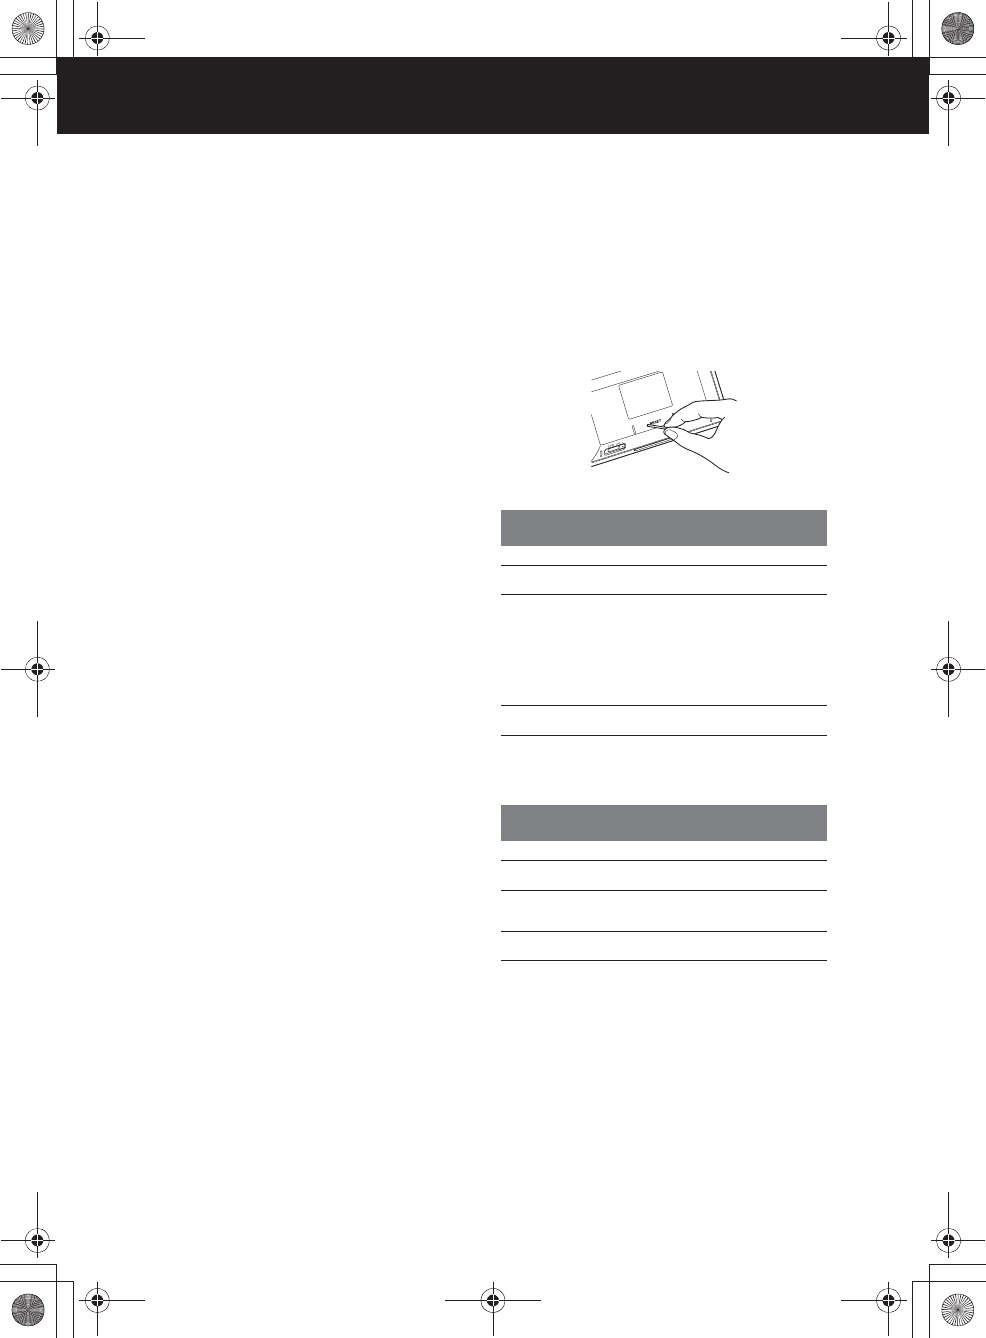
E:\AXISIM\4192581111\4192581111RMNU1U\01GB-RMNU1U\120TRB.fm
masterpage: Left_L0
RMN-U1
4-192-581-11(1)
72
GB
Troubleshooting
Troubleshooting
If a problem occurs while operating the unit,
follow the steps described below before consulting
your nearest Sony dealer. If an error message
appears, it is recommended that you make a note of
its contents for reference.
1
Check to see if the problem is listed
in this “Troubleshooting” section.
2
Check the following customer
support site.
•For customers in the USA:
http://www.esupport.sony.com/
•For customers in Canada:
English:
http://www.sony.ca/ElectronicsSupport/
French:
http://fr.sony.ca/ElectronicsSupport/
•For customers in Europe:
http://support.sony-europe.com/
You will find the latest support information
and a FAQ at this web site.
3
If, after steps 1 and 2, you still
cannot solve the problem, consult
your nearest Sony dealer.
If the problem persists after doing all of the
above, consult your nearest Sony dealer.
When bringing the unit in for repairs, be sure
to bring in the entire system (main unit,
remote control charger, and AC power
adaptor).
How to reset the unit
It is usually unnecessary to reset this unit.
However, on rare occasions, the unit enters an
abnormal state and stops responding to buttons or
on-screen operations. In this case, reset the unit by
pressing RESET on the rear panel.
To reset the unit, press RESET using a long, thin
object, such as a small pin, to reboot the system.
,Place the unit on the charger after connecting the AC
power adaptor to the charger and the power cord to a
wall outlet firmly (page 18).
,If the measure above does not solve the problem,
reset the unit (page 72).
,Reset the unit. Refer “How to reset the unit” on this
page.
,Check the nature of the error.
,Move the unit and the wireless LAN router/access
point closer to each other and perform the setup
again.
,Check the settings of the router/wireless LAN router/
access point and perform the setup again. For details
on the settings of the devices, refer to the operating
instructions of the devices.
,Make sure that you use a router/wireless router.
,Wireless networks are influenced by electromagnetic
radiation emitted by microwave ovens and other
devices. Move the unit away from these devices.
,Make sure that the router/wireless LAN router/access
point is turned on.
Power
The unit does not turn on.
The unit does not turn off.
Network connection
An error message appears.
The unit cannot connect to the network.
010COV.book Page 72 Thursday, October 21, 2010 2:24 PM
E:\AXISIM\4192581111\4192581111RMNU1U\01GB-RMNU1U\120TRB.fm
masterpage: Right
RMN-U1
4-192-581-11(1)
73
GB
Troubleshooting
,Make sure that the wireless LAN router/access point
is turned on.
,Move the unit and the wireless LAN router/access
point closer to each other.
,If you have reset the unit or have performed a system
recovery on your server, make the network settings
again (page 23).
,The server and renderer (network controlled player)
cannot accept commands from this unit temporarily
for some reason.
,Make sure that the server and renderer (network
controlled player) is turned on.
,The server and renderer (network controlled player)
may be unstable. Restart it.
,Confirm that the unit, the server and renderer
(network controlled player) are connected to the
router/wireless LAN router/access point correctly.
,Confirm that the server and renderer (network
controlled player) has been correctly set (page 32).
,Confirm that the unit has been registered with the
server and renderer (network controlled player) and
is set to allow music streaming from the server.
,If the ICF (Internet Connection Firewall) function is
active on the computer, this may prevent the unit
from connecting to the computer (only when your
computer is used as a server). You may need to
change the firewall settings to allow the unit to
connect. (For details on changing the firewall
settings, refer to the operating manual of your
computer).
,The renderer (network controlled player) may not be
able to change the playback position.
,You may have turned this unit on before you turned
the server on. Tap “Refresh” after tapping “Option”
on the side menu to refresh the server list. Display
the server list before tapping “Refresh.”
,Make sure that the router/wireless LAN router/access
point is turned on.
,Make sure that the server is turned on.
,Confirm that the server has been set correctly
(page 32).
,Confirm that the unit has been registered with the
server and is set to allow music streaming from the
server.
,Only the server which includes content of the
selected Activity is displayed on the server list. In
this case, servers other than the above server do not
appear, even if the power switch is turned on.
,The bandwidth of your wireless LAN may be too
low. Move the unit and the wireless LAN router/
access point closer to each other, without any
obstacles between them.
,When using your computer as a server, the computer
may be running many applications. If anti-virus
software is active on the computer, temporarily
disable that software as it needs large amounts of
system resources.
,Depending on the network environment or radio
interference, it may not be possible to play content
with more than one device operating at one time.
Turn off any other devices to enable the unit to play
content.
,Permit access from this unit to the server and
renderer (network controlled player) settings.
,You can turn on a server which supports the WOL
(Wake On LAN) function. Turn the server on
manually when you are using a server which does not
support the WOL function.
,Make sure the server and renderer (network
controlled player) are connected to your home
network.
,“--” is displayed when the total number of content
items exceeds 999.
,Those items do not appear when the duration of
content cannot be obtained.
Network / Playback content
on your server
The unit cannot connect to a network.
The unit fails to operate a device.
Content is played back from the beginning,
even if you change the playback mode or
playback range.
The server (such as a computer) does not
appear in the server list.
The sound or the video skips during playback.
The unit cannot access the server and
renderer (network controlled player).
You cannot turn the server on using this unit.
“The power of the playback device is not
turned on. Turn the device on.” appears on
the screen even if the server and renderer
(network controlled player) are turned on.
The total number of content items is displayed
as “--.”
The currently elapsed time, total time, and
progress bar do not appear on the playback
screen.
010COV.book Page 73 Thursday, October 21, 2010 2:24 PM
E:\AXISIM\4192581111\4192581111RMNU1U\01GB-RMNU1U\120TRB.fm
masterpage: Left
RMN-U1
4-192-581-11(1)
74
GB
,You may not be able to move the playback position,
depending on the content or the renderer (network
controlled player).
,You cannot move the playback position if the cursor
shown on the progress bar has not appeared. You
cannot move the playback position, even if there is a
cursor shown on the progress bar, if the content
currently being played back does not support the
seek function.
,“--” is displayed when the total playback time of all
content items exceeds 999 minutes and 59 seconds.
,Only the playback range or playback modes
supported by the currently active renderer (network
controlled player) are displayed.
,The server list appears when you tap , depending
on the content currently being played back.
,You can only register up to 30 devices. Delete any
unnecessary devices, then tap “ Refresh” on the
HOME screen.
,Make sure of the following.
• Does the renderer (network controlled player) have
access limitations even though you have not
registered 30 devices yet?
• Is the renderer (network controlled player)
connected to your network correctly?
• Is the renderer (network controlled player) function
of the device active?
,Only content that can be played back may be
displayed, depending on the Activity.
,Devices which have the DLNA renderer function
will be registered with this unit automatically. Set the
DLNA renderer function of the device to OFF when
you do not want to display the device on the device
list of this unit.
,Make sure that the server and renderer (network
controlled player) have not set access limitations.
,Tap “ Refresh” to refresh the HOME screen.
,Make sure the PARTY host has permitted access
from this unit.
,Make sure the unit has registered the PARTY host in
advance.
,Check the following possible causes.
• This unit is not registered with any devices having
the PARTY STREAMING function.
• Devices having the PARTY STREAMING
function are not turned on.
,Start the PARTY after selecting the device that has
the desired audio content (a device with a media disk
inserted, or a device that can receive broadcast
content, such as a Music Service, etc.) as the PARTY
host.
You cannot move the playback position when
you move the cursor shown on the progress
bar.
The total playback time of all content items is
displayed as “--.”
You cannot select the playback range or
playback mode.
You cannot return to the content list even if
you tap .
You cannot find a new renderer (network
controlled player).
Content stored on the server is not displayed
on the content list.
The same device has been registered again
after you have deleted it.
You cannot begin the selected Activity once
the power-off dialogue is displayed, even if the
server and renderer (network controlled
player) are set to ON.
PARTY
The PARTY currently being held is not
displayed on the HOME screen.
You cannot find devices having the PARTY
STREAMING function.
You cannot start a PARTY with the desired
content.
010COV.book Page 74 Thursday, October 21, 2010 2:24 PM
E:\AXISIM\4192581111\4192581111RMNU1U\01GB-RMNU1U\120TRB.fm
masterpage: Right
RMN-U1
4-192-581-11(1)
75
GB
Troubleshooting
,Move closer to the device. The maximum operating
distance is approximately 10 m. (32.8 ft).
,Check that you are aiming the unit directly at the
device, and that there are no obstructions between the
unit and the device.
,Power on the devices first, if necessary.
,Check that the device has remote infrared capability.
For example, if your device did not come with a
remote commander, it probably is not capable of
being controlled by a remote commander.
,Check whether the desired device has the Smart
Select function. Refer to “Using the Smart Select
function” (page 52) for details of Smart Select
function.
,Check whether the setting of the Smart Select
function of desired device is set to ON.
,Check whether this unit is aimed at the device.
,Check whether there are obstructions between this
unit and the device.
,Other devices may be found faster if the device with
the Smart Select function is near the device you want
to detect.
,The first item in the shuffle list is played back when
you select “Shuffle” or “Shuffle&Repeat.”
,If content has been added, edited, or deleted from
your iPod & iPhone since the last time you used it for
playback, different content may be played back.
,This error message may appear when you try to
display the content list while the unit is downloading
the jacket information. Wait for a moment until the
unit finishes downloading the jacket information.
,Display items or operations you can perform are
differents depending on the status of your iPod or
iPhone.
The remote UI mode is set to OFF on the iPod
docking device:
The content name is displayed as “iPod.”
When you play back content from an iPod or iPhone
mounted on the iPod docking device using another
renderer (network controlled player):
• You can use only the N button.
When you play back content from an iPod or iPhone
mounted on the iPod docking device using that
device:
• You can use N, X, m, M buttons.
The remote UI mode is set to ON on the iPod
docking device:
Each content item name is displayed.
When you play back content from an iPod or iPhone
mounted on the iPod docking device using another
renderer (network controlled player):
• You can use the N, m, M buttons.
• Some operation modes cannot be displayed.
When you play back content from an iPod or iPhone
mounted on the iPod docking device using that
device:
• You can use the N, X, m, M buttons.
Infrared Activity screen
You cannot operate devices.
You cannot find the desired device using the
Smart Select function.
iPod & iPhone
The audio content that is played back
automatically after selecting the iPod &
iPhone Activity is different from that played
back the previous time.
An error message appears when you try to
display the content list on the unit or iPod dock
server.
You cannot display some items when you
select “iPod & iPhone” as an Activity. / You
cannot perform some operations when you
select “iPod & iPhone” as an Activity.
120TRB.fm Page 75 Thursday, October 21, 2010 3:00 PM

E:\AXISIM\4192581111\4192581111RMNU1U\01GB-RMNU1U\130SPC.fm
masterpage: Left_L0_3col
RMN-U1
4-192-581-11(1)
76
GB
Precautions/specifications
Precautions
On safety
•Do not drop the unit or give a
shock to the unit, or it may cause a
malfunction.
•Do not leave the unit in a location
near heat sources, or in a place
subject to direct sunlight,
excessive dust or sand, moisture,
rain or mechanical shock.
•Do not put foreign objects into the
unit. Should any liquid or solid
object fall into the unit, have it
checked by qualified personnel
before operating the unit any
further.
•Do not expose the remote control
detectors of your components to
direct sunlight or other strong
illumination. Too much light there
can interfere with remote control
operations.
•Be sure to place the unit out of the
reach of small children or pets.
Components such as
air-conditioners, heaters, electric
appliances, and electric shutters or
curtains receiving an infrared
signal can be dangerous if
misused.
•Completely disconnect the power
cord (mains lead) from the wall
socket (mains) if it is not going to
be used for an extended period of
time. When unplugging the unit,
always grip the plug. Never pull
the cord itself.
•Should any solid object or liquid
get into the unit, unplug the unit,
and have it checked by qualified
personnel before operating it
again.
•The AC power adaptor can be
changed only by a qualified
service facility.
On placement
•Do not place the unit in an
inclined position or in locations
that are extremely hot, cold, dusty,
dirty, humid or lacking adequate
ventilation, or subject to vibration,
direct sunlight or a bright light.
•Be careful when placing the unit
or speakers on surfaces that have
been specially treated (for
example, with wax, oil, polish) as
staining or discoloration of the
surface may result.
About the AC power adaptor
•Use the AC power adaptor
supplied with this unit. Do not use
any other AC power adaptor since
it may cause this unit to
malfunction.
•Connect the AC power adaptor or
the power cord to an easily
accessible AC outlet. Should you
notice an abnormality in the AC
power adaptor or the power cord,
disconnect it from the AC outlet
immediately.
•The unit is not disconnected from
the AC power source (mains) as
long as it is connected to the wall
outlet, even if the unit itself has
been turned off.
•If you are not going to use this unit
for a long time, be sure to
disconnect the power supply. To
remove the AC power cord from
the wall outlet, grasp the adaptor
plug itself; never pull the cord.
On disposing of the remote
control
Before disposing of the remote
control, the built-in battery should be
removed for environmental
protection.
Notes
•Do not remove the screws at the
bottom of the remote control
except when disposing of the
remote control.
•Before removing the built-in
battery, make sure it has
completely drained.
Use the following procedure to
remove the built-in battery.
1
Remove the two screws on
the bottom of the unit.
2
Open the rear cover using
a flat object, such as a
flathead screwdriver, then
remove it.
Polarity of the plug
Rear cover
010COV.book Page 76 Thursday, October 21, 2010 2:24 PM
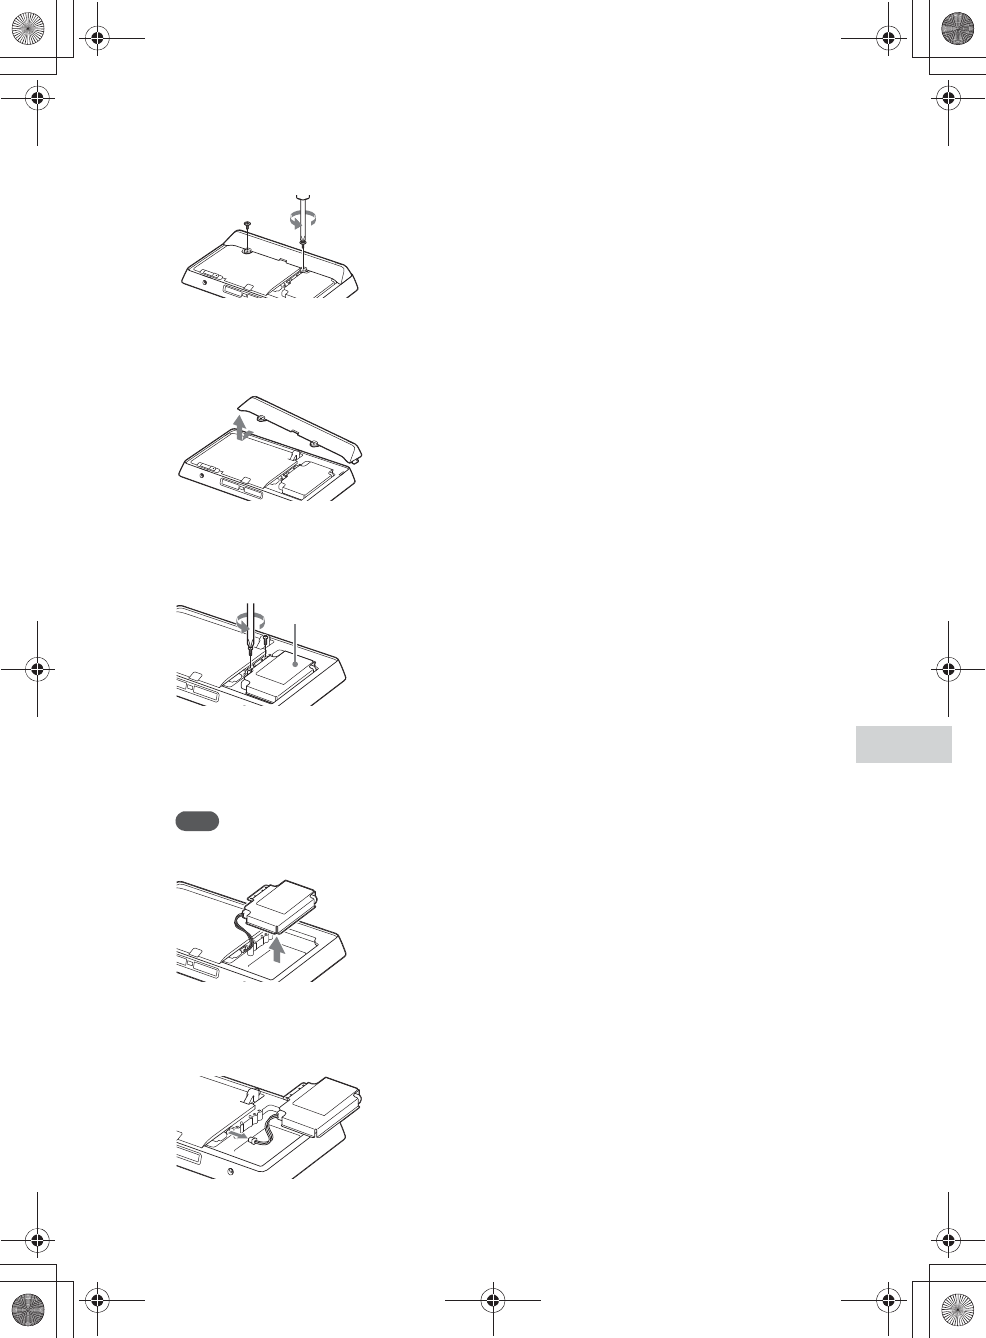
E:\AXISIM\4192581111\4192581111RMNU1U\01GB-RMNU1U\130SPC.fm
masterpage: Right_3col
RMN-U1
4-192-581-11(1)
77
GB
Precautions/specifications
3
Remove the two screws
from the bottom cover.
4
Remove the bottom cover
by lifting it up from the right
side as shown below.
5
Remove the two screws
from the metal sheet.
The battery is stored under the
metal sheet.
6
Remove the metal sheet
and the built-in battery.
The battery is attached to the
metal sheet by adhesive tape.
Note
Be careful not to injure yourself
when handling the metal sheet.
7
Disconnect the cable that
connects the battery to the
unit.
About this unit
•If you have connected to an
outside network, such as the
Internet, and have allowed access
from other devices, unauthorized
access by malicious outsiders can
occur depending on your network
configuration. It may cause
damages such as data falsification.
To avoid this problem, before
using this unit, you need to:
–Use a router and configure it
correctly.
–Register the equipment that is
to access this unit.
•It is prohibited to send or leave
copyrighted products to/on an out-
of-home network which can be
accessed from many people
without the author’s permission by
the Copyright Act.
•About DLNA support:
This unit is designed in
accordance with DLNA Guideline
v1.0. This unit is commercialized
to gain formal DLNA
accreditation. This product may be
upgraded to maintain
interconnectivity.
Do not drop this unit
•Do not subject the unit to strong
shocks. It may cause the unit to
malfunction.
•Do not exert strong pressure on
the front side of this unit where the
speakers are mounted.
Consideration for others
Keep the volume at a moderate level
out of consideration for your
neighbors, especially at night.
Notice for touch panel
operations on the unit
The touch panel of the remote
control does not work properly when
operated with:
•a gloved finger.
•two or more fingers.
•a finger nail.
•a wet finger.
•a pen, ballpoint pen, pencil, stylus,
etc.
•objects other than a finger.
About lit and unlit dots on the
LCD
You may notice some dots (red, blue,
or green) on the liquid crystal display
that do not turn off or do not turn on
(black dots). These dots do not
represent a malfunction. Because of
the high precision of the technology
used in its manufacture, the LCD
maintains an effective pixel count of
99.99% or more; however, there will
be, on rare occasions, pixels that do
not go on or that remain lit.
Cleaning the cabinet
Clean this unit with a soft cloth
slightly moistened with a mild
detergent solution. Do not use any
type of abrasive pad, scouring
powder, or solvent, such as thinner,
benzine, or alcohol.
Metal sheet
010COV.book Page 77 Thursday, October 21, 2010 2:24 PM
E:\AXISIM\4192581111\4192581111RMNU1U\01GB-RMNU1U\130SPC.fm
masterpage: Left_L1_3col
RMN-U1
4-192-581-11(1)
78
GB
Specifications
Wireless Network
Audio System
(RMN-U1)
Wireless LAN section
Compatible standards:
IEEE 802.11 b/g
(WEP 64 bit, WEP 128 bit,
WPA/WPA2-PSK (AES),
WPA/WPA2-PSK (TKIP))
General
Power requirements:
The main unit (RMN-U1):
230 V AC, 50/60 Hz
Remote control charger
(BCA-U1):
230 V AC, 50/60 Hz
Power consumption:
6 W
Operation time on a full
charge:
Approx. 4 hours
Dimensions (w/h/d) (including
projecting parts and controls):
The unit
161 mm × 95.2 mm × 19 mm
(6 3/8 in. × 3 3/4 in. × 3/4 in.)
Remote control charger
170 mm × 43 mm × 71.5 mm
(6 3/4 in. × 1 3/4 in. × 2 7/8 in.)
Mass:
The unit
Approx. 260 g (9.2 oz)
Remote control charger
Approx. 325 g (11.5 oz)
Operating temperature:
+5 ºC to +35 ºC
(+41 ºF to +95 ºF)
Operating humidity:
25 % to 80 %
Supplied accessories:
See page 11.
Design and specifications are
subject to change without
notice.
010COV.book Page 78 Thursday, October 21, 2010 2:24 PM
E:\AXISIM\4192581111\4192581111RMNU1U\01GB-RMNU1U\130SPC.fm
masterpage: Right_L1_3col
RMN-U1
4-192-581-11(1)
79
GB
Precautions/specifications
Glossary
AAC
Abbreviation for Advanced Audio
Coding. It is a standard for audio file
compression determined by the
MPEG (Motion Picture Experts
Group), an ISO (International
Organization for Standardization)/
IEC (International Electrotechnical
Commission) working group.
DHCP
Abbreviation for Dynamic Host
Configuration Protocol. A system for
automatically allocating
configuration data required for an
Internet connection.
DLNA
Abbreviation for Digital Living
Network Alliance. The DLNA is a
nonprofit organization that
establishes design guidelines for
digital content shared over networks.
For details, see http://www.dlna.org/
en/consumer/home
DNS
Abbreviation for Domain Name
System. A server that translates
domain names to IP addresses, or IP
addresses to domain names. A DNS
is identified by an IP address. Also
called a “DNS server.”
IP address
IP addresses usually comprise four
groups of up to three digits each,
separated by a period (such as
192.168.239.1). All devices on a
network must have an IP address.
LAN
Abbreviation for Local Area
Network.
LAN is a general name for networks
set up for communication among
devices including computers,
printers, and fax machines in
relatively small areas such as offices
or buildings.
MAC address
Abbreviation for Media Access
Control address. It is an
identification name assigned to all
network devices. Each device has its
own address and there are no
duplicate addresses. A MAC address
may be necessary when identifying
the unit separately from other
devices (such as a DLNA server).
Network key (security key)
An encryption key used to limit the
devices with which communication
can occur. It is used to provide
higher security for devices
communicating via a wireless LAN
router/access point.
Proxy
A program or a server that provides
Internet access to computers within a
firewall or quicker downloading of
web pages.
Router
A device that bridges networks,
converting the protocols and
addresses of each network. When
connecting multiple network devices
to the Internet, a router is necessary.
The term “router” by itself may refer
to any of these devices.
SSID
Abbreviation for Service Set
IDentifier. It is a name that identifies
a particular access point within an
IEEE 802.11 wireless LAN. To
connect with an access point, a client
device must be set with the same
SSID. SSIDs can be up to 32
characters long. For higher security,
a network key is normally also used.
In this case, connection cannot occur
unless the SSID matches the network
key.
WEP
Abbreviation for Wired Equivalent
Privacy. An encryption key used in
wireless LAN networks. As an IEEE
standard based on RC4 algorithm
cryptography, WEP is used to secure
IEEE 802.11b wireless networks.
During the transmission of a
message between a wireless LAN
access point and a client device, the
sending side encrypts the data and
the receiving side decrypts it. For
communication to occur, both
devices must use a common code
key, which is called the “WEP key.”
The encryption level is indicated by
the bit count of the key; e.g., 64 bits
or 128 bits. The higher the bit count,
the higher the security level.
WMA
Abbreviation for Windows Media
Audio. WMA is audio compression
technology developed by Microsoft
Corporation that allows audio files to
be compressed to about 1/22 of the
data size of a standard compact disc.
WPA
Abbreviation for Wi-Fi Protected
Access. An encryption standard for
wireless LAN networks created by
the Wi-Fi Alliance to remedy a
number of serious security problems
in the WEP system. In addition to the
network name (SSID) and
encryption key (WEP), this protocol
uses a user authentication framework
called “EAP” (Extensible
Authentication Protocol) and a
protocol called “TKIP” (Temporal
Key Integrity Protocol) which
automatically updates the encryption
code at regular intervals for higher
security.
010COV.book Page 79 Thursday, October 21, 2010 2:24 PM

E:\AXISIM\4192581111\4192581111RMNU1U\01GB-RMNU1U\130SPC.fm
masterpage: Left_3col
RMN-U1
4-192-581-11(1)
80
GB
WPA2
Abbreviation for Wi-Fi Protected
Access 2. An encryption standard for
wireless LAN networks. As an
upgraded version of WPA created by
the Wi-Fi Alliance, this standard
uses AES (Advanced Encryption
Standard) cryptography to provide
stronger security than WPA.
WPS
Abbreviation for Wi-Fi Protected
Setup. A wireless network standard
created by the Wi-Fi Alliance to
allow you to set up a wireless
network easily. A push button
method and a PIN code method are
available.
010COV.book Page 80 Thursday, October 21, 2010 2:24 PM

E:\AXISIM\4192581111\4192581111RMNU1U\01GB-RMNU1U\010COVIX.fm
masterpage: Right_L1_3col
RMN-U1
4-192-581-11(1)
81
GB
Index
A
AAC 79
Access point 24
Activity
DLNA device 35, 44
Infrared device 55
Add
Activity 63
Infrared device 55
Audio IN 37
C
Charging 18
Clock 30
Connecting the unit
AC power cord 18
DLNA 32, 43
Home Network 23
D
DAB/DAB+ 37
Default gateway 28
Delete
Activity 62
Device 61
Server 38, 46
DHCP 79
Display window 14
DLNA 79
Listening 35
Renderer (network controlled
player) 35, 43
Server 32, 43
Viewing 44
Watching 44
DLNA device 32, 43
DNS server 28, 79
E
Editing
Activity 62
Device 60
Remote control 65
F
Features 9
Firmware 71
Fixed IP address 28
H
HOME 14
Home Network
Connecting 23
Renderer (network controlled
player) settings 35, 43
Server settings 32, 43
I
Infrared device
Editing 60, 62, 65
Registering 49
Initial setup 21
IP address 28, 79
iPod & iPhone 36
K
Keyword search 41, 47
M
MAC address 79
Main unit 12
Manual setting
Access point 25
IP address 28
Proxy server 28
Music Services 36
Muting 41, 47
N
Network key 79
Network settings
Confirm 29
Connection method 23
P
Parts and controls 12
PARTY STREAMING
Close 40
Control 40
Start 39
PC/HDD Music 36
PC/HDD Photo 45
PC/HDD Video 45
Playback mode 37
Precautions 76
Proxy server 28, 79
R
Refresh 14
Remote control
Assign Key 66
Clear 65, 66
Edit Label 65, 66
Learn 65, 66
Move 65, 66
S
Screen remote control
DLNA device 15
Infrared device 16
Security key 24, 79
Server
Delete 38, 46
Other than Windows 7,
Windows Vista or Windows
XP 35, 43
Windows 7 32, 43
Windows Vista/XP 34, 43
Settings
Clock 30
Initial setup 21
Network connection 23
Server 32, 43
Windows 7 32, 43
Windows Vista/XP 34, 43
Settings menu
Common Settings 69
Device Details 70
Group Settings 69
Language Settings 69
Network Settings 69
System Update 70
Smart Select 52
010COV.book Page 81 Thursday, October 21, 2010 2:24 PM

E:\AXISIM\4192581111\4192581111RMNU1U\01GB-RMNU1U\010COVIX.fm
masterpage: Left_3col
RMN-U1
4-192-581-11(1)
82
GB
SSID 79
Supplied accessories 11
Support site 72
System application
Update 71
T
Text input 19
Troubleshooting 72
V
Volume level 41, 47
W
WEP 79
Windows Media Player 11 34,
43
Windows Media Player 12 32,
43
Wireless LAN signal strength
14
Wireless network
Search 24
WMA 79
WPA 79, 97
WPA2 80
WPS 80
PIN code method 27
WPS push button
configuration method 26
010COV.book Page 82 Thursday, October 21, 2010 2:24 PM

E:\AXISIM\4192581111\4192581111RMNU1U\01GB-RMNU1U\140LIC.fm
masterpage: Right
RMN-U1
4-192-581-11(1)
83
GB
END-USER LICENSE AGREEMENT FOR SONY SOFTWARE
You should carefully read the following agreement before using the SONY SOFTWARE (defined below). Using the
SONY SOFTWARE indicates your acceptance of the agreement. If you do not agree with it, you are not authorized to use
the SONY SOFTWARE.
IMPORTANT - READ CAREFULLY: This End-User License Agreement (“EULA”) is a legal agreement between
you and Sony Corporation (“SONY”), the manufacturer of your Sony hardware device (the “PRODUCT”) and the
licensor of the SONY SOFTWARE. All Sony software and third party software (other than such software subject to its
own separate license) included with your PRODUCT and any updates and upgrades thereto shall be referred to herein as
the “SONY SOFTWARE”. You may use the SONY SOFTWARE only with the PRODUCT.
By using the SONY SOFTWARE, you agree to be bound by the terms of this EULA. If you do not agree to the terms of
this EULA, SONY is unwilling to license the SONY SOFTWARE to you. In such event, you should not use the SONY
SOFTWARE.
SONY SOFTWARE LICENSE
The SONY SOFTWARE is protected by copyright laws and international copyright treaties, as well as other intellectual
property laws and treaties. The SONY SOFTWARE is licensed, not sold.
GRANT OF LICENSE
All title, copyright and other rights in and to the SONY SOFTWARE are owned by SONY or its licensors. This EULA
grants you the right to use the SONY SOFTWARE for personal use only.
DESCRIPTION OF REQUIREMENTS, RESTRICTIONS, RIGHTS AND LIMITATIONS
Limitations. You may not copy, modify, reverse engineer, decompile or disassemble the SONY SOFTWARE in whole
or in part.
Separation of Components. The SONY SOFTWARE is licensed as a single product. Its component parts may not be
separated.
Use on Single PRODUCT. The SONY SOFTWARE may only be used with a single PRODUCT.
Rental. You may not rent or lease the SONY SOFTWARE.
Software Transfer. You may permanently transfer all of your rights under this EULA only when the SONY
SOFTWARE is transferred together with and as part of the PRODUCT, provided that you retain no copies, transfer all of
the SONY SOFTWARE (including but not limited to all copies, component parts, media, instruction manuals, other
printed materials, electronic documents, recovery disks and this EULA) and the recipient agrees to the terms of this
EULA.
Termination. Without prejudice to any other rights, SONY may terminate this EULA if you fail to comply with the
terms of this EULA. In such event, when requested by SONY, you must send the PRODUCT to an address designated by
SONY, and SONY will send back the PRODUCT to you as soon as practicable after the SONY SOFTWARE has been
deleted from the PRODUCT.
Confidentiality. You agree to keep confidential information contained in SONY SOFTWARE which is not publicly
known and not to disclose such information to others without SONY’s prior written approval.
HIGH RISK ACTIVITIES
The SONY SOFTWARE is not fault-tolerant and is not designed, manufactured or intended for use or resale as on-line
control equipment in hazardous environments requiring fail-safe performance, such as in the operation of nuclear
facilities, aircraft navigation or communication systems, air traffic control, direct life support machines or weapons
systems, in which the failure of the SONY SOFTWARE could lead to death, personal injury or severe physical or
environmental damage (“High Risk Activities”). SONY and its suppliers specifically disclaim any express or implied
warranty of fitness for High Risk Activities.
EXCLUSION OF WARRANTY ON SONY SOFTWARE
You expressly acknowledge and agree that use of the SONY SOFTWARE is at your sole risk. The SONY SOFTWARE is
provided “AS IS” and without warranty of any kind, and SONY, its vendors and SONY’s licensors (for purposes of this
SECTION only, collectively, “SONY”) EXPRESSLY DISCLAIM ALL WARRANTIES, EXPRESS OR IMPLIED,
INCLUDING BUT NOT LIMITED TO THE IMPLIED WARRANTIES OF MERCHANTABILITY AND FITNESS
FOR A PARTICULAR PURPOSE. SONY DOES NOT WARRANT THAT THE FUNCTIONS CONTAINED IN THE
SONY SOFTWARE ARE FREE FROM ERRORS OR BUGS OR WILL MEET YOUR REQUIREMENT, AND SONY
DOES NOT WARRANT THAT THE OPERATION OF THE SONY SOFTWARE WILL BE CORRECTED.
FURTHERMORE, SONY DOES NOT WARRANT OR MAKE ANY REPRESENTATIONS REGARDING THE USE
OR THE RESULTS OF THE USE OF THE SONY SOFTWARE IN TERMS OF ITS CORRECTNESS, ACCURACY,
RELIABILITY OR OTHERWISE. NO ORAL OR WRITTEN INFORMATION OR ADVICE GIVEN BY SONY OR A
010COV.book Page 83 Thursday, October 21, 2010 2:24 PM

E:\AXISIM\4192581111\4192581111RMNU1U\01GB-RMNU1U\140LIC.fm
masterpage: Left
RMN-U1
4-192-581-11(1)
84
GB
SONY AUTHORIZED REPRESENTATIVE SHALL CREATE A WARRANTY OR IN ANY WAY INCREASE THE
SCOPE OF THIS WARRANTY. SOME JURISDICTIONS DO NOT ALLOW THE EXCLUSION OF IMPLIED
WARRANTIES, IN WHICH CASE THE ABOVE EXCLUSION WOULD NOT APPLY TO YOU.
Without limiting any of the foregoing, it is specifically provided that the SONY SOFTWARE is not designed or intended
for use on any product other than the PRODUCT. SONY provides no warranty that any product, software, content or data
created by you or a third party will not be damaged by the SONY SOFTWARE.
LIMITATION OF LIABILITY
SONY, ITS SUPPLIERS AND SONY’S LICENSOR’S (for purposes of this SECTION ONLY, collectively, “SONY”)
SHALL NOT BE LIABLE FOR ANY INCIDENTAL OR CONSEQUENTIAL DAMAGES RELATING TO THE
SONY SOFTWARE ARISING FROM OR BASED ON BREACH OF ANY EXPRESS OR IMPLIED WARRANTY,
BREACH OF CONTRACT, NEGLIGENCE, STRICT LIABILITY OR ANY OTHER LEGAL THEORY. SUCH
DAMAGES INCLUDE, BUT ARE NOT LIMITED TO, LOSS OF PROFITS, LOSS OF REVENUE, LOSS OF DATA,
LOSS OF USE OF THE PRODUCT OR ANY ASSOCIATED EQUIPMENT, DOWN TIME AND USER’S TIME,
REGARDLESS OF WHETHER SONY HAS BEEN ADVISED OF THE POSSIBILITY OF SUCH DAMAGES. IN
ANY CASE, SONY’S ENTIRE LIABILITY TO YOU UNDER ANY PROVISION OF THIS EULA SHALL BE
LIMITED TO THE AMOUNT ACTUALLY PAID ALLOCABLE TO THE SONY SOFTWARE.
EXPORTS
If you use or transfer the SONY SOFTWARE in or to a country other than your country of residence, you shall comply
with applicable laws and regulations relating to exports, imports and customs.
GOVERNING LAW
This EULA shall be construed, governed, interpreted and applied in accordance with the laws of Japan, without regards to
any conflict of laws provisions. Any dispute arising out of this EULA shall be subject to the exclusive venue and
jurisdiction of the courts in Tokyo, Japan, and you and SONY hereby consent to the venue and jurisdiction of such courts.
YOU AND SONY WAIVE THE RIGHT TO TRIAL BY JURY WITH RESPECT TO ANY MATTERS ARISING
UNDER OR RELATING TO THIS EULA.
SEVERABILITY
If any part of this EULA is held invalid or unenforceable, other parts will remain valid.
Should you have any questions in connection with this EULA or the limited warranty provided hereunder, you may
contact SONY by writing to SONY at the designated contact address mentioned in the warranty card included in the
product package.
010COV.book Page 84 Thursday, October 21, 2010 2:24 PM
E:\AXISIM\4192581111\4192581111RMNU1U\01GB-RMNU1U\140LIC.fm
masterpage: Right
RMN-U1
4-192-581-11(1)
85
GB
Important information on software
Included with this product are software applications for which permission for use has been obtained either directly or
indirectly by Sony Corporation (hereafter Sony) through a third party. Make sure to read this important information
regarding these software applications.
Information on GNU GPL- and GNU LGPL-compatible software
Included with this product are the following software applications (refer to the following “Package List”) that are
compatible with GNU General Public License (hereafter GPL) or GNU Lesser General Public License (hereafter LGPL).
Users have the right to obtain, modify and redistribute the source code of these software applications in accordance with
the attached GPL and LGPL.
Package list
alsa-lib
alsa-utils
busybox
directfb
dosfstools
e2fsprogs
freetype
glibc
libgcc
libusb
linux
netbase
nfs-utils
procps
pump
util-linux
wireless-tools
The source code for these applications is provided by Sony at the following web site. Please go to this web site to obtain
the source code.
http://www.sony.net/Products/Linux/
Please do not make direct enquiries regarding the source code contents.
010COV.book Page 85 Thursday, October 21, 2010 2:24 PM
E:\AXISIM\4192581111\4192581111RMNU1U\01GB-RMNU1U\140LIC.fm
masterpage: Left
RMN-U1
4-192-581-11(1)
86
GB
GNU GENERAL PUBLIC
LICENSE
Version 2, June 1991
Copyright (C) 1989, 1991 Free Software Foundation, Inc.
51 Franklin Street, Fifth Floor, Boston, MA 02110-1301,
USA
Everyone is permitted to copy and distribute verbatim
copies of this license document, but changing it is not
allowed.
Preamble
The licenses for most software are designed to take away
your freedom to share and change it. By contrast, the
GNU General Public License is intended to guarantee
your freedom to share and change free software--to make
sure the software is free for all its users. This General
Public License applies to most of the Free Software
Foundation’s software and to any other program whose
authors commit to using it. (Some other Free Software
Foundation software is covered by the GNU Lesser
General Public License instead.) You can apply it to your
programs, too.
When we speak of free software, we are referring to
freedom, not price. Our General Public Licenses are
designed to make sure that you have the freedom to
distribute copies of free software (and charge for this
service if you wish), that you receive source code or can
get it if you want it, that you can change the software or
use pieces of it in new free programs; and that you know
you can do these things.
To protect your rights, we need to make restrictions that
forbid anyone to deny you these rights or to ask you to
surrender the rights. These restrictions translate to certain
responsibilities for you if you distribute copies of the
software, or if you modify it.
For example, if you distribute copies of such a program,
whether gratis or for a fee, you must give the recipients all
the rights that you have. You must make sure that they,
too, receive or can get the source code. And you must
show them these terms so they know their rights.
We protect your rights with two steps: (1) copyright the
software, and (2) offer you this license which gives you
legal permission to copy, distribute and/or modify the
software.
Also, for each author’s protection and ours, we want to
make certain that everyone understands that there is no
warranty for this free software. If the software is modified
by someone else and passed on, we want its recipients to
know that what they have is not the original, so that any
problems introduced by others will not reflect on the
original authors’ reputations.
Finally, any free program is threatened constantly by
software patents. We wish to avoid the danger that
redistributors of a free program will individually obtain
patent licenses, in effect making the program proprietary.
To prevent this, we have made it clear that any patent
must be licensed for everyone’s free use or not licensed at
all.
The precise terms and conditions for copying, distribution
and modification follow.
TERMS AND CONDITIONS FOR
COPYING, DISTRIBUTION AND
MODIFICATION
0. This License applies to any program or other work
which contains a notice placed by the copyright holder
saying it may be distributed under the terms of this
General Public License. The “Program”, below, refers
to any such program or work, and a “work based on the
Program” means either the Program or any derivative
work under copyright law: that is to say, a work
containing the Program or a portion of it, either
verbatim or with modifications and/or translated into
another language. (Hereinafter, translation is included
without limitation in the term “modification”.) Each
licensee is addressed as “you”.
Activities other than copying, distribution and
modification are not covered by this License; they are
outside its scope. The act of running the Program is not
restricted, and the output from the Program is covered
only if its contents constitute a work based on the Program
(independent of having been made by running the
Program). Whether that is true depends on what the
Program does.
1. You may copy and distribute verbatim copies of the
Program’s source code as you receive it, in any
medium, provided that you conspicuously and
appropriately publish on each copy an appropriate
copyright notice and disclaimer of warranty; keep
intact all the notices that refer to this License and to the
absence of any warranty; and give any other recipients
of the Program a copy of this License along with the
Program.
You may charge a fee for the physical act of transferring a
copy, and you may at your option offer warranty
protection in exchange for a fee.
2. You may modify your copy or copies of the Program or
any portion of it, thus forming a work based on the
Program, and copy and distribute such modifications or
work under the terms of Section 1 above, provided that
you also meet all of these conditions:
a) You must cause the modified files to carry
prominent notices stating that you changed the files
and the date of any change.
b) You must cause any work that you distribute or
publish, that in whole or in part contains or is
derived from the Program or any part thereof, to be
licensed as a whole at no charge to all third parties
under the terms of this License.
c) If the modified program normally reads commands
interactively when run, you must cause it, when
started running for such interactive use in the most
ordinary way, to print or display an announcement
including an appropriate copyright notice and a
notice that there is no warranty (or else, saying that
010COV.book Page 86 Thursday, October 21, 2010 2:24 PM

E:\AXISIM\4192581111\4192581111RMNU1U\01GB-RMNU1U\140LIC.fm
masterpage: Right
RMN-U1
4-192-581-11(1)
87
GB
you provide a warranty) and that users may
redistribute the program under these conditions, and
telling the user how to view a copy of this License.
(Exception: if the Program itself is interactive but
does not normally print such an announcement, your
work based on the Program is not required to print
an announcement.)
These requirements apply to the modified work as a
whole. If identifiable sections of that work are not derived
from the Program, and can be reasonably considered
independent and separate works in themselves, then this
License, and its terms, do not apply to those sections when
you distribute them as separate works. But when you
distribute the same sections as part of a whole which is a
work based on the Program, the distribution of the whole
must be on the terms of this License, whose permissions
for other licensees extend to the entire whole, and thus to
each and every part regardless of who wrote it.
Thus, it is not the intent of this section to claim rights or
contest your rights to work written entirely by you; rather,
the intent is to exercise the right to control the distribution
of derivative or collective works based on the Program.
In addition, mere aggregation of another work not based
on the Program with the Program (or with a work based on
the Program) on a volume of a storage or distribution
medium does not bring the other work under the scope of
this License.
3. You may copy and distribute the Program (or a work
based on it, under Section 2) in object code or
executable form under the terms of Sections 1 and 2
above provided that you also do one of the following:
a) Accompany it with the complete corresponding
machine-readable source code, which must be
distributed under the terms of Sections 1 and 2
above on a medium customarily used for software
interchange; or,
b) Accompany it with a written offer, valid for at least
three years, to give any third party, for a charge no
more than your cost of physically performing source
distribution, a complete machine-readable copy of
the corresponding source code, to be distributed
under the terms of Sections 1 and 2 above on a
medium customarily used for software interchange;
or,
c) Accompany it with the information you received as
to the offer to distribute corresponding source code.
(This alternative is allowed only for noncommercial
distribution and only if you received the program in
object code or executable form with such an offer,
in accord with Subsection b above.)
The source code for a work means the preferred form of
the work for making modifications to it. For an executable
work, complete source code means all the source code for
all modules it contains, plus any associated interface
definition files, plus the scripts used to control
compilation and installation of the executable. However,
as a special exception, the source code distributed need
not include anything that is normally distributed (in either
source or binary form) with the major components
(compiler, kernel, and so on) of the operating system on
which the executable runs, unless that component itself
accompanies the executable.
If distribution of executable or object code is made by
offering access to copy from a designated place, then
offering equivalent access to copy the source code from
the same place counts as distribution of the source code,
even though third parties are not compelled to copy the
source along with the object code.
4. You may not copy, modify, sublicense, or distribute the
Program except as expressly provided under this
License. Any attempt otherwise to copy, modify,
sublicense or distribute the Program is void, and will
automatically terminate your rights under this License.
However, parties who have received copies, or rights,
from you under this License will not have their licenses
terminated so long as such parties remain in full
compliance.
5. You are not required to accept this License, since you
have not signed it. However, nothing else grants you
permission to modify or distribute the Program or its
derivative works. These actions are prohibited by law if
you do not accept this License. Therefore, by
modifying or distributing the Program (or any work
based on the Program), you indicate your acceptance of
this License to do so, and all its terms and conditions
for copying, distributing or modifying the Program or
works based on it.
6. Each time you redistribute the Program (or any work
based on the Program), the recipient automatically
receives a license from the original licensor to copy,
distribute or modify the Program subject to these terms
and conditions. You may not impose any further
restrictions on the recipients’ exercise of the rights
granted herein.You are not responsible for enforcing
compliance by third parties to this License.
7. If, as a consequence of a court judgment or allegation
of patent infringement or for any other reason (not
limited to patent issues), conditions are imposed on you
(whether by court order, agreement or otherwise) that
contradict the conditions of this License, they do not
excuse you from the conditions of this License. If you
cannot distribute so as to satisfy simultaneously your
obligations under this License and any other pertinent
obligations, then as a consequence you may not
distribute the Program at all. For example, if a patent
license would not permit royalty-free redistribution of
the Program by all those who receive copies directly or
indirectly through you, then the only way you could
satisfy both it and this License would be to refrain
entirely from distribution of the Program.
If any portion of this section is held invalid or
unenforceable under any particular circumstance, the
balance of the section is intended to apply and the section
as a whole is intended to apply in other circumstances.
It is not the purpose of this section to induce you to
infringe any patents or other property right claims or to
contest validity of any such claims; this section has the
sole purpose of protecting the integrity of the free
software distribution system, which is implemented by
public license practices. Many people have made generous
contributions to the wide range of software distributed
through that system in reliance on consistent application
of that system; it is up to the author/donor to decide if he
010COV.book Page 87 Thursday, October 21, 2010 2:24 PM
E:\AXISIM\4192581111\4192581111RMNU1U\01GB-RMNU1U\140LIC.fm
masterpage: Left
RMN-U1
4-192-581-11(1)
88
GB
or she is willing to distribute software through any other
system and a licensee cannot impose that choice.
This section is intended to make thoroughly clear what is
believed to be a consequence of the rest of this License.
8. If the distribution and/or use of the Program is
restricted in certain countries either by patents or by
copyrighted interfaces, the original copyright holder
who places the Program under this License may add an
explicit geographical distribution limitation excluding
those countries, so that distribution is permitted only in
or among countries not thus excluded. In such case,
this License incorporates the limitation as if written in
the body of this License.
9. The Free Software Foundation may publish revised
and/or new versions of the General Public License
from time to time. Such new versions will be similar in
spirit to the present version, but may differ in detail to
address new problems or concerns.
Each version is given a distinguishing version number. If
the Program specifies a version number of this License
which applies to it and “any later version”, you have the
option of following the terms and conditions either of that
version or of any later version published by the Free
Software Foundation. If the Program does not specify a
version number of this License, you may choose any
version ever published by the Free Software Foundation.
10.If you wish to incorporate parts of the Program into
other free programs whose distribution conditions are
different, write to the author to ask for permission. For
software which is copyrighted by the Free Software
Foundation, write to the Free Software Foundation; we
sometimes make exceptions for this. Our decision will
be guided by the two goals of preserving the free status
of all derivatives of our free software and of promoting
the sharing and reuse of software generally.
NO WARRANTY
11.BECAUSE THE PROGRAM IS LICENSED FREE
OF CHARGE, THERE IS NO WARRANTY FOR
THE PROGRAM, TO THE EXTENT PERMITTED
BY APPLICABLE LAW. EXCEPT WHEN
OTHERWISE STATED IN WRITING THE
COPYRIGHT HOLDERS AND/OR OTHER
PARTIES PROVIDE THE PROGRAM “AS IS”
WITHOUT WARRANTY OF ANY KIND, EITHER
EXPRESSED OR IMPLIED, INCLUDING, BUT
NOT LIMITED TO, THE IMPLIED WARRANTIES
OF MERCHANTABILITY AND FITNESS FOR A
PARTICULAR PURPOSE. THE ENTIRE RISK AS
TO THE QUALITY AND PERFORMANCE OF THE
PROGRAM IS WITH YOU. SHOULD THE
PROGRAM PROVE DEFECTIVE, YOU ASSUME
THE COST OF ALL NECESSARY SERVICING,
REPAIR OR CORRECTION.
12.IN NO EVENT UNLESS REQUIRED BY
APPLICABLE LAW OR AGREED TO IN WRITING
WILL ANY COPYRIGHT HOLDER, OR ANY
OTHER PARTY WHO MAY MODIFY AND/OR
REDISTRIBUTE THE PROGRAM AS PERMITTED
ABOVE, BE LIABLE TO YOU FOR DAMAGES,
INCLUDING ANY GENERAL, SPECIAL,
INCIDENTAL OR CONSEQUENTIAL DAMAGES
ARISING OUT OF THE USE OR INABILITY TO
USE THE PROGRAM (INCLUDING BUT NOT
LIMITED TO LOSS OF DATA OR DATA BEING
RENDERED INACCURATE OR LOSSES
SUSTAINED BY YOU OR THIRD PARTIES OR A
FAILURE OF THE PROGRAM TO OPERATE
WITH ANY OTHER PROGRAMS), EVEN IF SUCH
HOLDER OR OTHER PARTY HAS BEEN
ADVISED OF THE POSSIBILITY OF SUCH
DAMAGES.
END OF TERMS AND
CONDITIONS
How to Apply These Terms to Your New
Programs
If you develop a new program, and you want it to be of the
greatest possible use to the public, the best way to achieve
this is to make it free software which everyone can
redistribute and change under these terms.
To do so, attach the following notices to the program. It is
safest to attach them to the start of each source file to most
effectively convey the exclusion of warranty; and each file
should have at least the “copyright” line and a pointer to
where the full notice is found.
Copyright (C)
This program is free software; you can redistribute it
and/or modify it under the terms of the GNU General
Public License as published by the Free Software
Foundation; either version 2 of the License, or (at
your option) any later version.
This program is distributed in the hope that it will be
useful, but WITHOUT ANY WARRANTY; without
even the implied warranty of MERCHANTABILITY
or FITNESS FOR A PARTICULAR PURPOSE. See
the GNU General Public License for more details.
You should have received a copy of the GNU General
Public License along with this program; if not, write
to the Free Software Foundation, Inc., 51 Franklin
Street, Fifth Floor, Boston, MA 02110-1301, USA
Also add information on how to contact you by electronic
and paper mail.
If the program is interactive, make it output a short notice
like this when it starts in an interactive mode:
Gnomovision version 69, Copyright (C) year name of
author Gnomovision comes with ABSOLUTELY NO
WARRANTY; for details type `show w’. This is free
software, and you are welcome to redistribute it under
certain conditions; type `show c’ for details.
The hypothetical commands `show w’ and `show c’
should show the appropriate parts of the General Public
010COV.book Page 88 Thursday, October 21, 2010 2:24 PM
E:\AXISIM\4192581111\4192581111RMNU1U\01GB-RMNU1U\140LIC.fm
masterpage: Right
RMN-U1
4-192-581-11(1)
89
GB
License. Of course, the commands you use may be called
something other than `show w’ and `show c’; they could
even be mouse-clicks or menu items--whatever suits your
program.
You should also get your employer (if you work as a
programmer) or your school, if any, to sign a “copyright
disclaimer” for the program, if necessary. Here is a
sample; alter the names:
Yoyodyne, Inc., hereby disclaims all copyright
interest in the program `Gnomovision’ (which makes
passes at compilers) written by James Hacker.
<signature of TyCoon>, 1 April 1989 Ty Coon,
President of Vice
This General Public License does not permit incorporating
your program into proprietary programs. If your program
is a subroutine library, you may consider it more useful to
permit linking proprietary applications with the library. If
this is what you want to do, use the GNU Lesser General
Public License instead of this License.
GNU LESSER GENERAL
PUBLIC LICENSE
Version 2.1, February 1999
Copyright (C) 1991, 1999 Free Software Foundation, Inc.
51 Franklin Street, Fifth Floor, Boston, MA 02110-1301,
USA Everyone is permitted to copy and distribute
verbatim copies of this license document, but changing it
is not allowed.
[This is the first released version of the Lesser GPL. It
also counts as the successor of the GNU Library Public
License, version 2, hence the version number 2.1.]
Preamble
The licenses for most software are designed to take away
your freedom to share and change it. By contrast, the
GNU General Public Licenses are intended to guarantee
your freedom to share and change free software--to make
sure the software is free for all its users.
This license, the Lesser General Public License, applies to
some specially designated software packages--typically
libraries--of the Free Software Foundation and other
authors who decide to use it. You can use it too, but we
suggest you first think carefully about whether this license
or the ordinary General Public License is the better
strategy to use in any particular case, based on the
explanations below.
When we speak of free software, we are referring to
freedom of use, not price. Our General Public Licenses are
designed to make sure that you have the freedom to
distribute copies of free software (and charge for this
service if you wish); that you receive source code or can
get it if you want it; that you can change the software and
use pieces of it in new free programs; and that you are
informed that you can do these things.
To protect your rights, we need to make restrictions that
forbid distributors to deny you these rights or to ask you to
surrender these rights. These restrictions translate to
certain responsibilities for you if you distribute copies of
the library or if you modify it.
For example, if you distribute copies of the library,
whether gratis or for a fee, you must give the recipients all
the rights that we gave you. You must make sure that they,
too, receive or can get the source code. If you link other
code with the library, you must provide complete object
files to the recipients, so that they can relink them with the
library after making changes to the library and
recompiling it. And you must show them these terms so
they know their rights.
We protect your rights with a two-step method: (1) we
copyright the library, and (2) we offer you this license,
which gives you legal permission to copy, distribute and/
or modify the library.
To protect each distributor, we want to make it very clear
that there is no warranty for the free library. Also, if the
library is modified by someone else and passed on, the
010COV.book Page 89 Thursday, October 21, 2010 2:24 PM
E:\AXISIM\4192581111\4192581111RMNU1U\01GB-RMNU1U\140LIC.fm
masterpage: Left
RMN-U1
4-192-581-11(1)
90
GB
recipients should know that what they have is not the
original version, so that the original author’s reputation
will not be affected by problems that might be introduced
by others.
Finally, software patents pose a constant threat to the
existence of any free program. We wish to make sure that
a company cannot effectively restrict the users of a free
program by obtaining a restrictive license from a patent
holder. Therefore, we insist that any patent license
obtained for a version of the library must be consistent
with the full freedom of use specified in this license.
Most GNU software, including some libraries, is covered
by the ordinary GNU General Public License. This
license, the GNU Lesser General Public License, applies
to certain designated libraries, and is quite different from
the ordinary General Public License. We use this license
for certain libraries in order to permit linking those
libraries into non-free programs.
When a program is linked with a library, whether
statically or using a shared library, the combination of the
two is legally speaking a combined work, a derivative of
the original library. The ordinary General Public License
therefore permits such linking only if the entire
combination fits its criteria of freedom. The Lesser
General Public License permits more lax criteria for
linking other code with the library.
We call this license the “Lesser” General Public License
because it does Less to protect the user’s freedom than the
ordinary General Public License. It also provides other
free software developers Less of an advantage over
competing non-free programs. These disadvantages are
the reason we use the ordinary General Public License for
many libraries. However, the Lesser license provides
advantages in certain special circumstances.
For example, on rare occasions, there may be a special
need to encourage the widest possible use of a certain
library, so that it becomes a de-facto standard. To achieve
this, non-free programs must be allowed to use the library.
A more frequent case is that a free library does the same
job as widely used non-free libraries. In this case, there is
little to gain by limiting the free library to free software
only, so we use the Lesser General Public License.
In other cases, permission to use a particular library in
non-free programs enables a greater number of people to
use a large body of free software. For example, permission
to use the GNU C Library in non-free programs enables
many more people to use the whole GNU operating
system, as well as its variant, the GNU/Linux operating
system.
Although the Lesser General Public License is Less
protective of the users’ freedom, it does ensure that the
user of a program that is linked with the Library has the
freedom and the wherewithal to run that program using a
modified version of the Library.
The precise terms and conditions for copying, distribution
and modification follow. Pay close attention to the
difference between a “work based on the library” and a
“work that uses the library”. The former contains code
derived from the library, whereas the latter must be
combined with the library in order to run.
TERMS AND CONDITIONS FOR
COPYING, DISTRIBUTION AND
MODIFICATION
0. This License Agreement applies to any software library
or other program which contains a notice placed by the
copyright holder or other authorized party saying it
may be distributed under the terms of this Lesser
General Public License (also called “this License”).
Each licensee is addressed as “you”.
A “library” means a collection of software functions and/
or data prepared so as to be conveniently linked with
application programs (which use some of those functions
and data) to form executables.
The “Library”, below, refers to any such software library
or work which has been distributed under these terms. A
“work based on the Library” means either the Library or
any derivative work under copyright law: that is to say, a
work containing the Library or a portion of it, either
verbatim or with modifications and/or translated
straightforwardly into another language. (Hereinafter,
translation is included without limitation in the term
“modification”.)
”Source code” for a work means the preferred form of the
work for making modifications to it. For a library,
complete source code means all the source code for all
modules it contains, plus any associated interface
definition files, plus the scripts used to control
compilation and installation of the library.
Activities other than copying, distribution and
modification are not covered by this License; they are
outside its scope. The act of running a program using the
Library is not restricted, and output from such a program
is covered only if its contents constitute a work based on
the Library (independent of the use of the Library in a tool
for writing it). Whether that is true depends on what the
Library does and what the program that uses the Library
does.
1. You may copy and distribute verbatim copies of the
Library’s complete source code as you receive it, in
any medium, provided that you conspicuously and
appropriately publish on each copy an appropriate
copyright notice and disclaimer of warranty; keep
intact all the notices that refer to this License and to the
absence of any warranty; and distribute a copy of this
License along with the Library.
You may charge a fee for the physical act of transferring a
copy, and you may at your option offer warranty
protection in exchange for a fee.
2. You may modify your copy or copies of the Library or
any portion of it, thus forming a work based on the
Library, and copy and distribute such modifications or
work under the terms of Section 1 above, provided that
you also meet all of these conditions:
a) The modified work must itself be a software library.
b) You must cause the files modified to carry
prominent notices stating that you changed the files
and the date of any change.
010COV.book Page 90 Thursday, October 21, 2010 2:24 PM

E:\AXISIM\4192581111\4192581111RMNU1U\01GB-RMNU1U\140LIC.fm
masterpage: Right
RMN-U1
4-192-581-11(1)
91
GB
c) You must cause the whole of the work to be
licensed at no charge to all third parties under the
terms of this License.
d) If a facility in the modified Library refers to a
function or a table of data to be supplied by an
application program that uses the facility, other than
as an argument passed when the facility is invoked,
then you must make a good faith effort to ensure
that, in the event an application does not supply
such function or table, the facility still operates, and
performs whatever part of its purpose remains
meaningful.
(For example, a function in a library to compute square
roots has a purpose that is entirely well-defined
independent of the application. Therefore, Subsection
2d requires that any application-supplied function or
table used by this function must be optional: if the
application does not supply it, the square root function
must still compute square roots.)
These requirements apply to the modified work as a
whole. If identifiable sections of that work are not
derived from the Library, and can be reasonably
considered independent and separate works in
themselves, then this License, and its terms, do not
apply to those sections when you distribute them as
separate works. But when you distribute the same
sections as part of a whole which is a work based on
the Library, the distribution of the whole must be on
the terms of this License, whose permissions for other
licensees extend to the entire whole, and thus to each
and every part regardless of who wrote it.
Thus, it is not the intent of this section to claim rights or
contest your rights to work written entirely by you; rather,
the intent is to exercise the right to control the distribution
of derivative or collective works based on the Library.
In addition, mere aggregation of another work not based
on the Library with the Library (or with a work based on
the Library) on a volume of a storage or distribution
medium does not bring the other work under the scope of
this License.
3. You may opt to apply the terms of the ordinary GNU
General Public License instead of this License to a
given copy of the Library. To do this, you must alter all
the notices that refer to this License, so that they refer
to the ordinary GNU General Public License, version
2, instead of to this License. (If a newer version than
version 2 of the ordinary GNU General Public License
has appeared, then you can specify that version instead
if you wish.) Do not make any other change in these
notices.
Once this change is made in a given copy, it is irreversible
for that copy, so the ordinary GNU General Public
License applies to all subsequent copies and derivative
works made from that copy.
This option is useful when you wish to copy part of the
code of the Library into a program that is not a library.
4. You may copy and distribute the Library (or a portion
or derivative of it, under Section 2) in object code or
executable form under the terms of Sections 1 and 2
above provided that you accompany it with the
complete corresponding machine-readable source
code, which must be distributed under the terms of
Sections 1 and 2 above on a medium customarily used
for software interchange.
If distribution of object code is made by offering access to
copy from a designated place, then offering equivalent
access to copy the source code from the same place
satisfies the requirement to distribute the source code,
even though third parties are not compelled to copy the
source along with the object code.
5. A program that contains no derivative of any portion of
the Library, but is designed to work with the Library by
being compiled or linked with it, is called a “work that
uses the Library”. Such a work, in isolation, is not a
derivative work of the Library, and therefore falls
outside the scope of this License.
However, linking a “work that uses the Library” with the
Library creates an executable that is a derivative of the
Library (because it contains portions of the Library),
rather than a “work that uses the library”. The executable
is therefore covered by this License. Section 6 states terms
for distribution of such executables.
When a “work that uses the Library” uses material from a
header file that is part of the Library, the object code for
the work may be a derivative work of the Library even
though the source code is not. Whether this is true is
especially significant if the work can be linked without the
Library, or if the work is itself a library. The threshold for
this to be true is not precisely defined by law.
If such an object file uses only numerical parameters, data
structure layouts and accessors, and small macros and
small inline functions (ten lines or less in length), then the
use of the object file is unrestricted, regardless of whether
it is legally a derivative work. (Executables containing
this object code plus portions of the Library will still fall
under Section 6.)
Otherwise, if the work is a derivative of the Library, you
may distribute the object code for the work under the
terms of Section 6. Any executables containing that work
also fall under Section 6, whether or not they are linked
directly with the Library itself.
6. As an exception to the Sections above, you may also
combine or link a “work that uses the Library” with the
Library to produce a work containing portions of the
Library, and distribute that work under terms of your
choice, provided that the terms permit modification of
the work for the customer’s own use and reverse
engineering for debugging such modifications.
You must give prominent notice with each copy of the
work that the Library is used in it and that the Library and
its use are covered by this License. You must supply a
copy of this License. If the work during execution
displays copyright notices, you must include the copyright
notice for the Library among them, as well as a reference
directing the user to the copy of this License. Also, you
must do one of these things:
a) Accompany the work with the complete
corresponding machine-readable source code for the
Library including whatever changes were used in
the work (which must be distributed under Sections
010COV.book Page 91 Thursday, October 21, 2010 2:24 PM

E:\AXISIM\4192581111\4192581111RMNU1U\01GB-RMNU1U\140LIC.fm
masterpage: Left
RMN-U1
4-192-581-11(1)
92
GB
1 and 2 above); and, if the work is an executable
linked with the Library, with the complete machine-
readable “work that uses the Library”, as object
code and/or source code, so that the user can modify
the Library and then relink to produce a modified
executable containing the modified Library. (It is
understood that the user who changes the contents
of definitions files in the Library will not
necessarily be able to recompile the application to
use the modified definitions.)
b) Use a suitable shared library mechanism for linking
with the Library. A suitable mechanism is one that
(1) uses at run time a copy of the library already
present on the user’s computer system, rather than
copying library functions into the executable, and
(2) will operate properly with a modified version of
the library, if the user installs one, as long as the
modified version is interface-compatible with the
version that the work was made with.
c) Accompany the work with a written offer, valid for
at least three years, to give the same user the
materials specified in Subsection 6a, above, for a
charge no more than the cost of performing this
distribution.
d) If distribution of the work is made by offering
access to copy from a designated place, offer
equivalent access to copy the above specified
materials from the same place.
e) Verify that the user has already received a copy of
these materials or that you have already sent this
user a copy.
For an executable, the required form of the “work that
uses the Library” must include any data and utility
programs needed for reproducing the executable from it.
However, as a special exception, the materials to be
distributed need not include anything that is normally
distributed (in either source or binary form) with the major
components (compiler, kernel, and so on) of the operating
system on which the executable runs, unless that
component itself accompanies the executable.
It may happen that this requirement contradicts the license
restrictions of other proprietary libraries that do not
normally accompany the operating system. Such a
contradiction means you cannot use both them and the
Library together in an executable that you distribute.
7. You may place library facilities that are a work based
on the Library side-by-side in a single library together
with other library facilities not covered by this License,
and distribute such a combined library, provided that
the separate distribution of the work based on the
Library and of the other library facilities is otherwise
permitted, and provided that you do these two things:
a) Accompany the combined library with a copy of the
same work based on the Library, uncombined with
any other library facilities. This must be distributed
under the terms of the Sections above.
b) Give prominent notice with the combined library of
the fact that part of it is a work based on the Library,
and explaining where to find the accompanying
uncombined form of the same work.
8. You may not copy, modify, sublicense, link with, or
distribute the Library except as expressly provided
under this License. Any attempt otherwise to copy,
modify, sublicense, link with, or distribute the Library
is void, and will automatically terminate your rights
under this License. However, parties who have
received copies, or rights, from you under this License
will not have their licenses terminated so long as such
parties remain in full compliance.
9. You are not required to accept this License, since you
have not signed it. However, nothing else grants you
permission to modify or distribute the Library or its
derivative works. These actions are prohibited by law if
you do not accept this License. Therefore, by
modifying or distributing the Library (or any work
based on the Library), you indicate your acceptance of
this License to do so, and all its terms and conditions
for copying, distributing or modifying the Library or
works based on it.
10.Each time you redistribute the Library (or any work
based on the Library), the recipient automatically
receives a license from the original licensor to copy,
distribute, link with or modify the Library subject to
these terms and conditions. You may not impose any
further restrictions on the recipients’ exercise of the
rights granted herein. You are not responsible for
enforcing compliance by third parties with this
License.
11.If, as a consequence of a court judgment or allegation
of patent infringement or for any other reason (not
limited to patent issues), conditions are imposed on you
(whether by court order, agreement or otherwise) that
contradict the conditions of this License, they do not
excuse you from the conditions of this License. If you
cannot distribute so as to satisfy simultaneously your
obligations under this License and any other pertinent
obligations, then as a consequence you may not
distribute the Library at all. For example, if a patent
license would not permit royalty-free redistribution of
the Library by all those who receive copies directly or
indirectly through you, then the only way you could
satisfy both it and this License would be to refrain
entirely from distribution of the Library.
If any portion of this section is held invalid or
unenforceable under any particular circumstance, the
balance of the section is intended to apply, and the section
as a whole is intended to apply in other circumstances.
It is not the purpose of this section to induce you to
infringe any patents or other property right claims or to
contest validity of any such claims; this section has the
sole purpose of protecting the integrity of the free
software distribution system which is implemented by
public license practices. Many people have made generous
contributions to the wide range of software distributed
through that system in reliance on consistent application
of that system; it is up to the author/donor to decide if he
or she is willing to distribute software through any other
system and a licensee cannot impose that choice.
This section is intended to make thoroughly clear what is
believed to be a consequence of the rest of this License.
12.If the distribution and/or use of the Library is restricted
in certain countries either by patents or by copyrighted
interfaces, the original copyright holder who places the
Library under this License may add an explicit
010COV.book Page 92 Thursday, October 21, 2010 2:24 PM
E:\AXISIM\4192581111\4192581111RMNU1U\01GB-RMNU1U\140LIC.fm
masterpage: Right
RMN-U1
4-192-581-11(1)
93
GB
geographical distribution limitation excluding those
countries, so that distribution is permitted only in or
among countries not thus excluded. In such case, this
License incorporates the limitation as if written in the
body of this License.
13.The Free Software Foundation may publish revised
and/or new versions of the Lesser General Public
License from time to time. Such new versions will be
similar in spirit to the present version, but may differ in
detail to address new problems or concerns.
Each version is given a distinguishing version number. If
the Library specifies a version number of this License
which applies to it and “any later version”, you have the
option of following the terms and conditions either of that
version or of any later version published by the Free
Software Foundation. If the Library does not specify a
license version number, you may choose any version ever
published by the Free Software Foundation.
14.If you wish to incorporate parts of the Library into
other free programs whose distribution conditions are
incompatible with these, write to the author to ask for
permission. For software which is copyrighted by the
Free Software Foundation, write to the Free Software
Foundation; we sometimes make exceptions for this.
Our decision will be guided by the two goals of
preserving the free status of all derivatives of our free
software and of promoting the sharing and reuse of
software generally.
NO WARRANTY
15.BECAUSE THE LIBRARY IS LICENSED FREE OF
CHARGE, THERE IS NO WARRANTY FOR THE
LIBRARY, TO THE EXTENT PERMITTED BY
APPLICABLE LAW. EXCEPT WHEN OTHERWISE
STATED IN WRITING THE COPYRIGHT
HOLDERS AND/OR OTHER PARTIES PROVIDE
THE LIBRARY “AS IS” WITHOUT WARRANTY
OF ANY KIND, EITHER EXPRESSED OR
IMPLIED, INCLUDING, BUT NOT LIMITED TO,
THE IMPLIED WARRANTIES OF
MERCHANTABILITY AND FITNESS FOR A
PARTICULAR PURPOSE. THE ENTIRE RISK AS
TO THE QUALITY AND PERFORMANCE OF THE
LIBRARY IS WITH YOU. SHOULD THE LIBRARY
PROVE DEFECTIVE, YOU ASSUME THE COST
OF ALL NECESSARY SERVICING, REPAIR OR
CORRECTION.
16.IN NO EVENT UNLESS REQUIRED BY
APPLICABLE LAW OR AGREED TO IN WRITING
WILL ANY COPYRIGHT HOLDER, OR ANY
OTHER PARTY WHO MAY MODIFY AND/OR
REDISTRIBUTE THE LIBRARY AS PERMITTED
ABOVE, BE LIABLE TO YOU FOR DAMAGES,
INCLUDING ANY GENERAL, SPECIAL,
INCIDENTAL OR CONSEQUENTIAL DAMAGES
ARISING OUT OF THE USE OR INABILITY TO
USE THE LIBRARY (INCLUDING BUT NOT
LIMITED TO LOSS OF DATA OR DATA BEING
RENDERED INACCURATE OR LOSSES
SUSTAINED BY YOU OR THIRD PARTIES OR A
FAILURE OF THE LIBRARY TO OPERATE WITH
ANY OTHER SOFTWARE), EVEN IF SUCH
HOLDER OR OTHER PARTY HAS BEEN
ADVISED OF THE POSSIBILITY OF SUCH
DAMAGES.
END OF TERMS AND
CONDITIONS
How to Apply These Terms to Your New
Libraries
If you develop a new library, and you want it to be of the
greatest possible use to the public, we recommend making
it free software that everyone can redistribute and change.
You can do so by permitting redistribution under these
terms (or, alternatively, under the terms of the ordinary
General Public License).
To apply these terms, attach the following notices to the
library. It is safest to attach them to the start of each
source file to most effectively convey the exclusion of
warranty; and each file should have at least the
“copyright” line and a pointer to where the full notice is
found.
<one line to give the library’s name and an idea of
what it does.> Copyright (C) <year> <name of
author>
This library is free software; you can redistribute it
and/or modify it under the terms of the GNU Lesser
General Public License as published by the Free
Software Foundation; either version 2.1 of the
License, or (at your option) any later version.
This library is distributed in the hope that it will be
useful, but WITHOUT ANY WARRANTY; without
even the implied warranty of MERCHANTABILITY
or FITNESS FOR A PARTICULAR PURPOSE. See
the GNU Lesser General Public License for more
details.
You should have received a copy of the GNU Lesser
General Public License along with this library; if not,
write to the Free Software Foundation, Inc., 51
Franklin Street, Fifth Floor, Boston, MA 02110-1301,
USA Also add information on how to contact you by
electronic and paper mail.
You should also get your employer (if you work as a
programmer) or your school, if any, to sign a “copyright
disclaimer” for the library, if necessary. Here is a sample;
alter the names:
Yoyodyne, Inc., hereby disclaims all copyright
interest in the library `Frob’ (a library for tweaking
knobs) written by James Random Hacker.
signature of Ty Coon, 1 April 1990 Ty Coon,
President of Vice
That’s all there is to it!
010COV.book Page 93 Thursday, October 21, 2010 2:24 PM
E:\AXISIM\4192581111\4192581111RMNU1U\01GB-RMNU1U\140LIC.fm
masterpage: Left
RMN-U1
4-192-581-11(1)
94
GB
Notice regarding other
third-party software
This product contains the following software applications
for which Sony has been licensed either directly or
indirectly by third parties.
1. OpenSSL (including the library called “Original
SSLeay”)
2. libcurl
3. libjpeg
4. libpng
5. ncurses
6. ntp
7. zlib
8. Expat
9. NetBSD
10.libcap
11.OpenCV
By request of the copyright holders of these software
applications, Sony provides our customers with the
following notice.
1. OpenSSL
Copyright (c) 1998 - 2007 The OpenSSL Project.All
rights reserved.
Copyright (c) 1995-1998 Eric Young
(eay@cryptsoft.com)All rights reserved.
This product includes software developed by the
OpenSSL.
Project for use in the OpenSSL Toolkit
(http://www.openssl.org/).
OpenSSL License
Redistribution and use in source and binary forms, with or
without modification, are permitted provided that the
following conditions are met:
1. Redistributions of source code must retain the above
copyright notice, this list of conditions and the
following disclaimer.
2. Redistributions in binary form must reproduce the
above copyright notice, this list of conditions and
the following disclaimer in the documentation and/
or other materials provided with the distribution.
3. All advertising materials mentioning features or use
of this software must display the following
acknowledgment:
“This product includes software developed by the
OpenSSL Project for use in the OpenSSL Toolkit.
(http://www.openssl.org/)”
4. The names “OpenSSL Toolkit” and “OpenSSL
Project” must not be used to endorse or promote
products derived from this software without prior
written permission. For written permission, please
contact openssl-core@openssl.org.
5. Products derived from this software may not be
called “OpenSSL” nor may “OpenSSL” appear in
their names without prior written permission of the
OpenSSL Project.
6. Redistributions of any form whatsoever must retain
the following acknowledgment:
“This product includes software developed by the
OpenSSL Project for use in the OpenSSL Toolkit
(http://www.openssl.org/)”
THIS SOFTWARE IS PROVIDED BY THE OpenSSL
PROJECT “AS IS” AND ANY EXPRESSED OR
IMPLIED WARRANTIES, INCLUDING, BUT NOT
LIMITED TO, THE IMPLIED WARRANTIES OF
MERCHANTABILITY AND FITNESS FOR A
PARTICULAR PURPOSE ARE DISCLAIMED. IN NO
EVENT SHALL THE OpenSSL PROJECT OR ITS
CONTRIBUTORS BE LIABLE FOR ANY DIRECT,
INDIRECT, INCIDENTAL, SPECIAL,EXEMPLARY,
OR CONSEQUENTIAL DAMAGES (INCLUDING,
BUT NOT LIMITED TO, PROCUREMENT OF
SUBSTITUTE GOODS OR SERVICES; LOSS OF USE,
DATA, OR PROFITS; OR BUSINESS
INTERRUPTION) HOWEVER CAUSED AND ON
ANY THEORY OFLIABILITY, WHETHER IN
CONTRACT, STRICT LIABILITY, OR TORT
(INCLUDING NEGLIGENCE OR OTHERWISE)
ARISING IN ANY WAY OUT OF THE USE OF THIS
SOFTWARE, EVEN IF ADVISED OF THE
POSSIBILITY OF SUCH DAMAGE.
Original SSLeay License
Redistribution and use in source and binary forms, with or
without modification, are permitted provided that the
following conditions are met:
1. Redistributions of source code must retain the
copyright notice, this list of conditions and the
following disclaimer.
2. Redistributions in binary form must reproduce the
above copyright notice, this list of conditions and
the following disclaimer in the documentation and/
or other materials provided with the distribution.
3. All advertising materials mentioning features or use
of this software must display the following
acknowledgement:
“This product includes cryptographic software
written by Eric Young (eay@cryptsoft.com)” The
word “cryptographic” can be left out if the rouines
from the library being used are not cryptographic
related :-).
4. If you include any Windows specific code (or a
derivative thereof) from the apps directory
(application code) you must include an
acknowledgement:
“This product includes software written by Tim
Hudson (tjh@cryptsoft.com)”
THIS SOFTWARE IS PROVIDED BY ERIC YOUNG
“AS IS” AND ANY EXPRESS OR IMPLIED
WARRANTIES, INCLUDING, BUT NOT LIMITED
TO, THE IMPLIED WARRANTIES OF
MERCHANTABILITY AND FITNESS FOR A
PARTICULAR PURPOSE ARE DISCLAIMED. IN NO
EVENT SHALL THE AUTHOR OR CONTRIBUTORS
BE LIABLE FOR ANY DIRECT, INDIRECT,
INCIDENTAL, SPECIAL, EXEMPLARY, OR
CONSEQUENTIAL DAMAGES (INCLUDING, BUT
NOT LIMITED TO, PROCUREMENT OF
SUBSTITUTE GOODS OR SERVICES; LOSS OF USE,
DATA, OR PROFITS; OR BUSINESS
INTERRUPTION) HOWEVER CAUSED AND ON
ANY THEORY OF LIABILITY, WHETHER IN
CONTRACT, STRICT LIABILITY, OR TORT
(INCLUDING NEGLIGENCE OR OTHERWISE)
010COV.book Page 94 Thursday, October 21, 2010 2:24 PM

E:\AXISIM\4192581111\4192581111RMNU1U\01GB-RMNU1U\140LIC.fm
masterpage: Right
RMN-U1
4-192-581-11(1)
95
GB
ARISING IN ANY WAY OUT OF THE USE OF THIS
SOFTWARE, EVEN IF ADVISED OF THE
POSSIBILITY OF SUCH DAMAGE.
2. libcurl
COPYRIGHT AND PERMISSION NOTICE
Copyright (c) 1996 - 2008, Daniel Stenberg,
<daniel@haxx.se>.
All rights reserved.
Permission to use, copy, modify, and distribute this
software for any purpose with or without fee is hereby
granted, provided that the above copyright notice and this
permission notice appear in all copies.
THE SOFTWARE IS PROVIDED “AS IS”, WITHOUT
WARRANTY OF ANY KIND, EXPRESS OR IMPLIED,
INCLUDING BUT NOT LIMITED TO THE
WARRANTIES OF MERCHANTABILITY, FITNESS
FOR A PARTICULAR PURPOSE AND
NONINFRINGEMENT OF THIRD PARTY RIGHTS. IN
NO EVENT SHALL THE AUTHORS OR COPYRIGHT
HOLDERS BE LIABLE FOR ANY CLAIM, DAMAGES
OR OTHER LIABILITY, WHETHER IN AN ACTION
OF CONTRACT, TORT OR OTHERWISE, ARISING
FROM, OUT OF OR IN CONNECTION WITH THE
SOFTWARE OR THE USE OR OTHER DEALINGS IN
THE SOFTWARE.
Except as contained in this notice, the name of a copyright
holder shall not be used in advertising or otherwise to
promote the sale, use or other dealings in this Software
without prior written authorization of the copyright
holder.
3. libjpeg
This software is based in part on the work of the
Independent JPEG Group.
4. libpng
Copyright (c) 2004, 2006-2009 Glenn Randers-Pehrson
Copyright (c) 2000-2002 Glenn Randers-Pehrson
Copyright (c) 1998, 1999 Glenn Randers-Pehrson
Copyright (c) 1996, 1997 Andreas Dilger
Copyright (c) 1995, 1996 Guy Eric Schalnat, Group 42,
Inc.
5. ncurses
Copyright (c) 1998-2004,2006 Free Software Foundation,
Inc.
Permission is hereby granted, free of charge, to any person
obtaining a copy of this software and associated
documentation files (the “Software”), to deal in the
Software without restriction, including without limitation
the rights to use, copy, modify, merge, publish, distribute,
distribute with modifications, sublicense, and/or sell
copies of the Software, and to permit persons to whom the
Software is furnished to do so, subject to the following
conditions:
The above copyright notice and this permission notice
shall be included in all copies or substantial portions of the
Software.
THE SOFTWARE IS PROVIDED “AS IS”, WITHOUT
WARRANTY OF ANY KIND, EXPRESS OR IMPLIED,
INCLUDING BUT NOT LIMITED TO THE
WARRANTIES OF MERCHANTABILITY, FITNESS
FOR A PARTICULAR PURPOSE AND
NONINFRINGEMENT. IN NO EVENT SHALL THE
ABOVE COPYRIGHT HOLDERS BE LIABLE FOR
ANY CLAIM, DAMAGES OR OTHER LIABILITY,
WHETHER IN AN ACTION OF CONTRACT, TORT
OR OTHERWISE, ARISING FROM, OUT OF OR IN
CONNECTION WITH THE SOFTWARE OR THE USE
OR OTHER DEALINGS IN THE SOFTWARE.
Except as contained in this notice, the name(s) of the
above copyright holders shall not be used in advertising or
otherwise to promote the sale, use or other dealings in this
Software without prior written authorization.
6. ntp
Copyright (c) David L. Mills 1992-2009
Permission to use, copy, modify, and distribute this
software and its documentation for any purpose with or
without fee is hereby granted, provided that the above
copyright notice appears in all copies and that both the
copyright notice and this permission notice appear in
supporting documentation, and that the name University
of Delaware not be used in advertising or publicity
pertaining to distribution of the software without specific,
written prior permission. The University of Delaware
makes no representations about the suitability this
software for any purpose. It is provided “as is” without
express or implied warranty.
7. zlib
Copyright (C) 1995-2004 Jean-loup Gailly and Mark
Adler
8. Expat
COPYRIGHT AND PERMISSION NOTICE
Copyright (c) 1996 - 2008, Daniel Stenberg,
<daniel@haxx.se>.
All rights reserved.
Permission to use, copy, modify, and distribute this
software for any purpose with or without fee is hereby
granted, provided that the above copyright notice and this
permission notice appear in all copies.
THE SOFTWARE IS PROVIDED “AS IS”, WITHOUT
WARRANTY OF ANY KIND, EXPRESS OR IMPLIED,
INCLUDING BUT NOT LIMITED TO THE
WARRANTIES OF MERCHANTABILITY, FITNESS
FOR A PARTICULAR PURPOSE AND
NONINFRINGEMENT OF THIRD PARTY RIGHTS. IN
NO EVENT SHALL THE AUTHORS OR COPYRIGHT
HOLDERS BE LIABLE FOR ANY CLAIM, DAMAGES
OR OTHER LIABILITY, WHETHER IN AN ACTION
OF CONTRACT, TORT OR OTHERWISE, ARISING
FROM, OUT OF OR IN CONNECTION WITH THE
SOFTWARE OR THE USE OR OTHER DEALINGS IN
THE SOFTWARE.
Except as contained in this notice, the name of a copyright
holder shall not be used in advertising or otherwise to
promote the sale, use or other dealings in this Software
without prior written authorization of the copyright
holder.
9. NetBSD
Copyright (c) 1994-2004 The NetBSD Foundation, Inc.
All rights reserved.
010COV.book Page 95 Thursday, October 21, 2010 2:24 PM

E:\AXISIM\4192581111\4192581111RMNU1U\01GB-RMNU1U\140LIC.fm
masterpage: Left
RMN-U1
4-192-581-11(1)
96
GB
Redistribution and use in source and binary forms, with or
without modification, are permitted provided that the
following conditions are met:
1. Redistributions of source code must retain the above
copyright notice, this list of conditions and the
following disclaimer.
2. Redistributions in binary form must reproduce the
above copyright notice, this list of conditions and the
following disclaimer in the documentation and/or other
materials provided with the distribution.
3. All advertising materials mentioning features or use of
this software must display the following
acknowledgement:
This product includes software developed by the
NetBSD Foundation, Inc. and its contributors.
4. Neither the name of The NetBSD Foundation nor the
names of its contributors may be used to endorse or
promote products derived from this software without
specific prior written permission.
THIS SOFTWARE IS PROVIDED BY THE REGENTS
AND CONTRIBUTORS “AS IS” AND ANY EXPRESS
OR IMPLIED WARRANTIES, INCLUDING, BUT NOT
LIMITED TO, THE IMPLIED WARRANTIES OF
MERCHANTABILITY AND FITNESS FOR A
PARTICULAR PURPOSE ARE DISCLAIMED. IN NO
EVENT SHALL THE REGENTS OR CONTRIBUTORS
BE LIABLE FOR ANY DIRECT, INDIRECT,
INCIDENTAL, SPECIAL, EXEMPLARY, OR
CONSEQUENTIAL DAMAGES (INCLUDING, BUT
NOT LIMITED TO, PROCUREMENT OF
SUBSTITUTE GOODS OR SERVICES; LOSS OF USE,
DATA, OR PROFITS; OR BUSINESS
INTERRUPTION) HOWEVER CAUSED AND ON
ANY THEORY OF LIABILITY, WHETHER IN
CONTRACT, STRICT LIABILITY, OR TORT
(INCLUDING NEGLIGENCE OR OTHERWISE)
ARISING IN ANY WAY OUT OF THE USE OF THIS
SOFTWARE, EVEN IF ADVISED OF THE
POSSIBILITY OF SUCH DAMAGE.
The following notices are required to satisfy the license
terms of the software that we have mentioned in this
document:
This product includes software developed by Adam Glass.
This product includes software developed by Bill Paul.
This product includes software developed by Brini.
This product includes software developed by Causality
Limited.
This product includes software developed by Charles M.
Hannum.
This product includes software developed by Christian E.
Hopps.
This product includes software developed by Christopher
G. Demetriou.
This product includes software developed by Christopher
G. Demetriou for the
NetBSD Project.
This product includes software developed by Christos
Zoulas.
This product includes software developed by Gardner
Buchanan.
This product includes software developed by Gordon W.
Ross
This product includes software developed by Manuel
Bouyer.
This product includes software developed by Mark
Brinicombe.
This product includes software developed by Rolf
Grossmann.
This product includes software developed by TooLs
GmbH.
This product includes software developed by the NetBSD
Foundation, Inc. and its contributors.
This product includes software developed by the RiscBSD
team.
This product includes software developed by the
University of California, Berkeley and its contributors.
This product includes software developed by the
University of California, Lawrence Berkeley Laboratory
and its contributors.
This product includes software developed by the
University of California, Lawrence Berkeley Laboratory.
This product includes software developed for the NetBSD
Project by Wasabi Systems, Inc.
This product includes software developed for the NetBSD
Project by Matthias Drochner.
10.libcap
Redistribution and use in source and binary forms of
libcap, with or without modification, are permitted
provided that the following conditions are met:
1. Redistributions of source code must retain any existing
copyright notice, and this entire permission notice in its
entirety, including the disclaimer of warranties.
2. Redistributions in binary form must reproduce all prior
and current copyright notices, this list of conditions,
and the following disclaimer in the documentation and/
or other materials provided with the distribution.
3. The name of any author may not be used to endorse or
promote products derived from this software without
their specific prior written permission.
ALTERNATIVELY, this product may be distributed
under the terms of the GNU General Public License, in
which case the provisions of the GNU GPL are required
INSTEAD OF the above restrictions. (This clause is
necessary due to a potential conflict between the GNU
GPL and the restrictions contained in a BSD-style
copyright.)
THIS SOFTWARE IS PROVIDED “AS IS” AND ANY
EXPRESS OR IMPLIED WARRANTIES, INCLUDING,
BUT NOT LIMITED TO, THE IMPLIED
WARRANTIES OF MERCHANTABILITY AND
FITNESS FOR A PARTICULAR PURPOSE ARE
DISCLAIMED. IN NO EVENT SHALL THE
AUTHOR(S) BE LIABLE FOR ANY DIRECT,
INDIRECT, INCIDENTAL, SPECIAL, EXEMPLARY,
OR CONSEQUENTIAL DAMAGES (INCLUDING,
BUT NOT LIMITED TO, PROCUREMENT OF
SUBSTITUTE GOODS OR SERVICES; LOSS OF USE,
DATA, OR PROFITS; OR BUSINESS
INTERRUPTION) HOWEVER CAUSED AND ON
ANY THEORY OF LIABILITY, WHETHER IN
CONTRACT, STRICT LIABILITY, OR TORT
(INCLUDING NEGLIGENCE OR OTHERWISE)
010COV.book Page 96 Thursday, October 21, 2010 2:24 PM
E:\AXISIM\4192581111\4192581111RMNU1U\01GB-RMNU1U\140LIC.fm
masterpage: Right
RMN-U1
4-192-581-11(1)
97
GB
ARISING IN ANY WAY OUT OF THE USE OF THIS
SOFTWARE, EVEN IF ADVISED OF THE
POSSIBILITY OF SUCH DAMAGE.
11.OpenCV
Copyright (C) 2000-2008, Intel Corporation, all rights
reserved.
Copyright (C) 2008-2010, Willow Garage Inc., all rights
reserved.
Third party copyrights are property of their respective
owners.
Redistribution and use in source and binary forms, with or
without modification,
are permitted provided that the following conditions are
met:
* Redistribution's of source code must retain the above
copyright notice, this list of conditions and the
following disclaimer.
* Redistribution's in binary form must reproduce the
above copyright notice, this list of conditions and the
following disclaimer in the documentation and/or other
materials provided with the distribution.
* The name of the copyright holders may not be used to
endorse or promote products derived from this
software without specific prior written permission.
This software is provided by the copyright holders and
contributors “as is” and any express or implied warranties,
including, but not limited to, the implied warranties of
merchantability and fitness for a particular purpose are
disclaimed.
In no event shall the Intel Corporation or contributors be
liable for any direct, indirect, incidental, special,
exemplary, or consequential damages (including, but not
limited to, procurement of substitute goods or services;
loss of use, data, or profits; or business interruption)
however caused and on any theory of liability, whether in
contract, strict liability, or tort (including negligence or
otherwise) arising in any way out of the use of this
software, even if advised of the possibility of such
damage.
Trademarks, etc.
•PARTY STREAMING and the PARTY STREAMING
logo are trademarks of Sony Corporation.
•VAIO, , and VAIO Media are registered
trademarks of Sony Corporation.
•US and foreign patents licensed from Dolby
Laboratories.
•MPEG Layer-3 audio coding technology and patents
licensed from Fraunhofer IIS and Thomson.
•Microsoft, Windows, Windows Vista, Windows 7™,
Windows Media are trademarks or registered
trademarks of Microsoft Corporation in the United
States and/or other countries.
•iPhone, iPod, iPod classic, iPod nano, and iPod touch
are trademarks of Apple Inc., registered in the U.S. and
other countries.
•“ ” is a mark of the Wi-Fi Alliance.
•DLNA®, the DLNA Logo and DLNA CERTIFIED™
are trademarks, service marks, or certification marks of
the Digital Living Network Alliance.
•THIS PRODUCT IS LICENSED UNDER THE AVC
PATENT PORTFOLIO LICENSE FOR THE
PERSONAL AND NON-COMMERCIAL USE OF A
CONSUMER TO
(i)ENCODE VIDEO IN COMPLIANCE WITH THE
AVC STANDARD (“AVC VIDEO”)
AND/OR
(ii)DECODE AVC VIDEO THAT WAS ENCODED
BY A CONSUMER ENGAGED IN A PERSONAL
AND
NON-COMMERCIAL ACTIVITY AND/OR WAS
OBTAINED FROM A VIDEO PROVIDER
LICENSED TO PROVIDE AVC VIDEO. NO
LICENSE IS GRANTED OR SHALL BE IMPLIED
FOR ANY OTHER USE. ADDITIONAL
INFORMATION MAY BE OBTAINED FROM
MPEG LA, L.L.C. SEE
HTTP://WWW.MPEGLA.COM
010COV.book Page 97 Thursday, October 21, 2010 2:24 PM

E:\AXISIM\4192581111\4192581111RMNU1U\01GB-RMNU1U\140LIC.fm
masterpage: Left
RMN-U1
4-192-581-11(1)
98
GB
WPA Supplicant
Copyright (c) 2003-2006, Jouni Malinen
<jkmaline@cc.hut.fi> and contributors
All Rights Reserved.
Redistribution and use in source and binary forms, with or
without modification, are permitted provided that the
following conditions are met:
1 Redistributions of source code must retain the above
copyright notice, this list of conditions and the
following disclaimer.
2 Redistributions in binary form must reproduce the
above copyright notice, this list of conditions and the
following disclaimer in the documentation and/or
other materials provided with the distribution.
3 Neither the name(s) of the above-listed copyright
holder(s) nor the names of its contributors may be used
to endorse or promote products derived from this
software without specific prior written permission.
THIS SOFTWARE IS PROVIDED BY THE
COPYRIGHT HOLDERS AND CONTRIBUTORS "AS
IS" AND ANY EXPRESS OR IMPLIED
WARRANTIES, INCLUDING, BUT NOT LIMITED
TO, THE IMPLIED WARRANTIES OF
MERCHANTABILITY AND FITNESS FOR A
PARTICULAR PURPOSE ARE DISCLAIMED. IN NO
EVENT SHALL THE COPYRIGHT OWNER OR
CONTRIBUTORS BE LIABLE FOR ANY DIRECT,
INDIRECT, INCIDENTAL, SPECIAL, EXEMPLARY,
OR CONSEQUENTIAL DAMAGES (INCLUDING,
BUT NOT LIMITED TO, PROCUREMENT OF
SUBSTITUTE GOODS OR SERVICES; LOSS OF USE,
DATA, OR PROFITS; OR BUSINESS
INTERRUPTION) HOWEVER CAUSED AND ON
ANY THEORY OF LIABILITY, WHETHER IN
CONTRACT, STRICT LIABILITY, OR TORT
(INCLUDING NEGLIGENCE OR OTHERWISE)
ARISING IN ANY WAY OUT OF THE USE OF THIS
SOFTWARE, EVEN IF ADVISED OF THE
POSSIBILITY OF SUCH DAMAGE.
•The system names and product names indicated in this
manual are generally the trademarks or registered
trademarks of the manufacturer.
•In this manual, Microsoft Windows XP Home Edition,
Microsoft Windows XP Professional and Microsoft
Windows XP Media Center Edition are referred to as
Windows XP.
•In this manual, Microsoft Windows Vista Home Basic,
Microsoft Windows Vista Home Premium, Microsoft
Windows Vista Business and Microsoft Windows Vista
Ultimate are referred to as Windows Vista.
•In this manual, Microsoft Windows 7 Starter, Microsoft
Windows 7 Home Premium, Microsoft Windows 7
Professional, Microsoft Windows 7 Ultimate are
referred to as Windows 7.
•™ and ® marks are omitted in this manual.
010COV.book Page 98 Thursday, October 21, 2010 2:24 PM

E:\AXISIM\4192581111\4192581111RMNU1U\01GB-RMNU1U\140LIC.fm
masterpage: Right
RMN-U1
4-192-581-11(1)
99
GB
010COV.book Page 99 Thursday, October 21, 2010 2:24 PM
E:\AXISIM\4192581111\4192581111RMNU1U\01GB-RMNU1U\150BCO.fm
masterpage: Bco
RMN-U1
4-192-581-11(1)
4-192-581-11(1)
©2010 Sony Corporation Printed in China
010COV.book Page 100 Thursday, October 21, 2010 2:24 PM