Sony Group XAV68BT AV CENTER User Manual XAV 68BT
Sony Corporation AV CENTER XAV 68BT
UserManual.wiki
>
Sony Group
>
XAV68BT User Manual
(Short-Term Confidential) User Manual_XAV-68BT
Navigation menu
Upload a User Manual
Namespaces
Wiki Guide
HTML
PDF
Info
Views
User Manual
Discussion / Help
Navigation
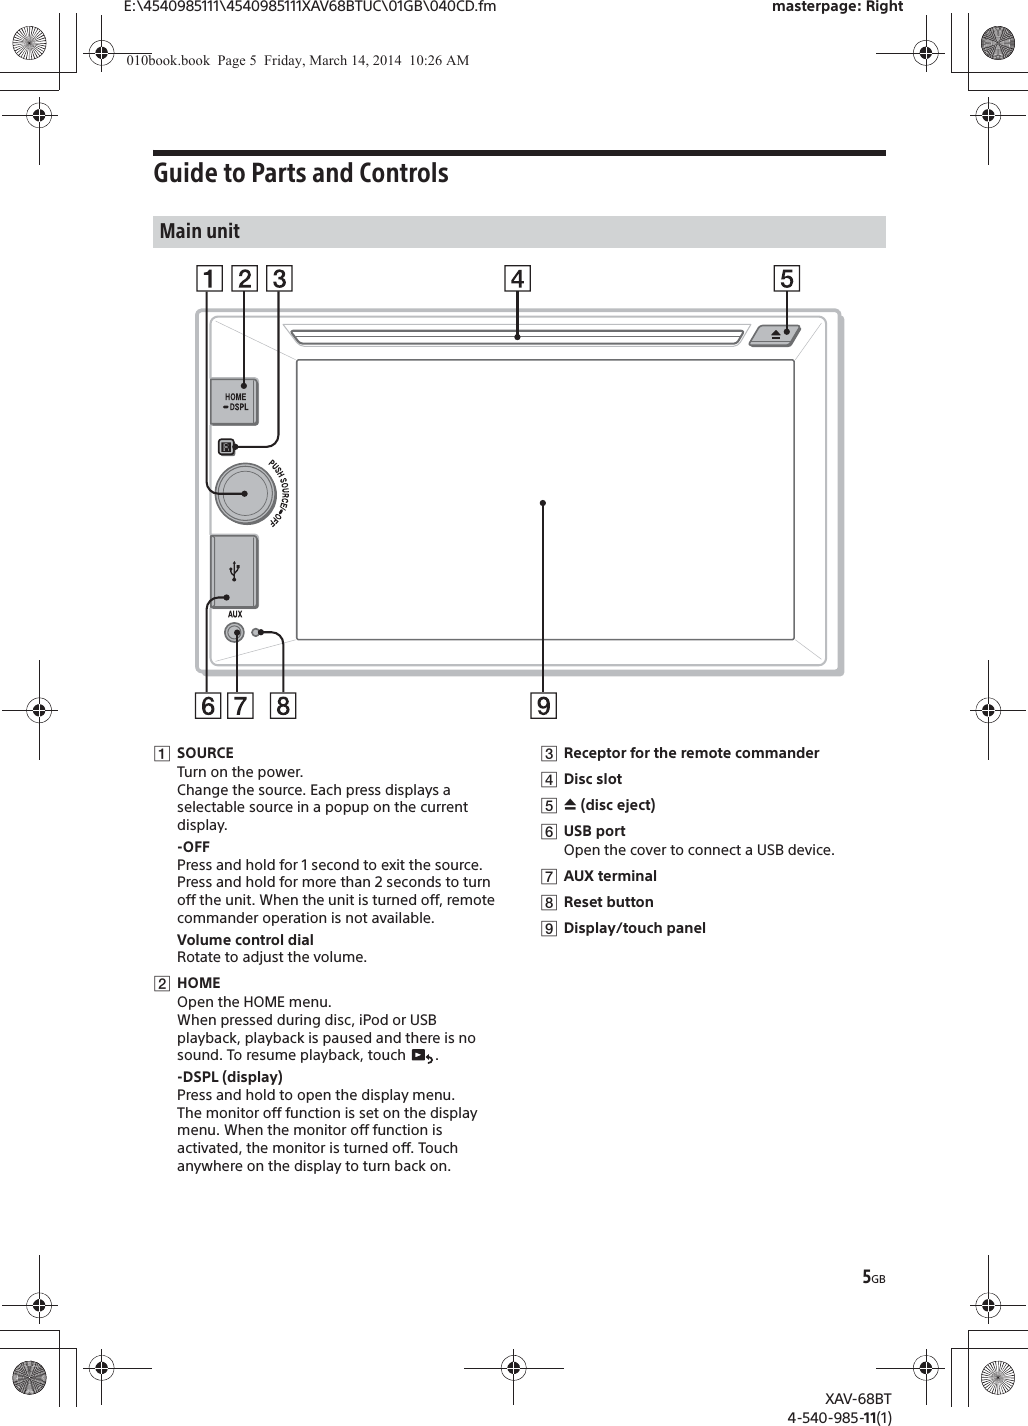
![7GBE:\4540985111\4540985111XAV68BTUC\01GB\040CD.fm masterpage: RightXAV-68BT4-540-985-11(1)ɁApplication specific areaDisplay playback controls/indications or show the unit’s status. Displayed items differ depending on the source.ɂCommon area̮Clock (page 7)When the source selects [AUX Front], [AUX Rear] or [Rear Camera], the clock is not displayed.̯Switch from the HOME screen to the playback screen.̰(option)Open the HOME option menu.Press HOME, then touch .To return to the home screen, touch .̱Source select keysChange the source.Resetting the UnitBefore operating the unit for the first time, or after replacing the car battery or changing connections, you must reset the unit.1Press the reset button on the unit.Use a pointed object, such as a ballpoint pen.NotePressing the reset button will erase the clock setting and some stored contents.Setting the Clock1Press HOME, then touch [Settings].2Touch , then touch [Clock Adjust].The setting display appears.3Touch Ă/è to set the hour and minute.4Touch [Set].The setting is complete.To activate/deactivate the CT function (page 9), touch [Clock Time].Preparing a BLUETOOTH DeviceYou can enjoy music, or perform handsfree calling, by connecting a suitable BLUETOOTH device (cellular phone, audio device, etc.). For details on connecting a BLUETOOTH device, refer to the operating instructions supplied with the device.Before connecting, turn down the volume of this unit; otherwise, loud sound may result.When connecting a BLUETOOTH device for the first time, mutual registration (called “pairing”) is required. Pairing enables this unit and other devices to recognize each other.1Press HOME, then touch [Settings].2Touch .3Touch [Bluetooth Connection], then set the signal to [ON].The BLUETOOTH signal of this unit is activated and appears on the status bar.Lights up when a cellular phone is connected to the unit for handsfree calling.Flashes when the connection is in progress.Indicates the signal strength status of the connected cellular phone.Indicates the remaining battery status of the connected cellular phone.Lights up when a connected cellular phone has unread SMS message(s).Accesses the Sound Adjust settings menu directly (page 19).(option)Open the option menu. Option menu differs depending on the source.[Icon View]Selects the icon display: [Line View] or [Grid View].Getting StartedPairing and connecting with a BLUETOOTH device010book.book Page 7 Friday, March 14, 2014 10:26 AM](https://usermanual.wiki/Sony-Group/XAV68BT/User-Guide-2281635-Page-7.png)
![8GBE:\4540985111\4540985111XAV68BTUC\01GB\040CD.fm masterpage: LeftXAV-68BT4-540-985-11(1)4Touch [Pairing >].The unit enters pairing standby mode.5Perform the pairing procedure on the BLUETOOTH device to detect this unit.6Select [Sony Car Audio] shown in the display of the BLUETOOTH device.7If passkey* input is required on the BLUETOOTH device, input [0000].* Passkey may be called “passcode,” “PIN code,” “PIN number,” “password,” etc., depending on the BLUETOOTH device. 8Select this unit on the BLUETOOTH device to establish the BLUETOOTH connection. or lights up when the connection is made.NoteWhile connecting to a BLUETOOTH device, this unit cannot be detected by another device. To enable detection, terminate the current connection.This chapter explains how to connect manually to registered BLUETOOTH devices.1Make sure that the BLUETOOTH signals both on this unit (page 18) and the BLUETOOTH device are activated. on the status bar indicates that the BLUETOOTH signal on this unit is on.2Operate the BLUETOOTH device to connect to this unit. or appears.When the ignition is turned to on with the BLUETOOTH signal activated, this unit searches for the last-connected BLUETOOTH device, and connection is made automatically if possible.NoteIf this unit cannot detect the last-connected BLUETOOTH device, touch [Reconnect] to search for the last-paired device again.If the problem is not solved, follow the pairing procedure.To install the microphoneTo capture your voice during handsfree calling, you need to install the microphone (supplied).For details on how to connect the microphone, refer to the supplied “Installation/Connections” guide.Listening to the RadioTo listen to the radio, press HOME then touch [Tuner].Reception controls (ɞ to ɤ)Reception indications (ʭ)ʭFrequencyConnecting with a paired BLUETOOTH deviceListening to the RadioReception controls/indicationsɞCurrent band iconOpens the band list.ɟ[PTY] (Program Types) (FM only)Opens the PTY list (page 10).ɠ[ZAP] (ZAPPIN™)Helps to find a desired station by listening to preset stations for a few seconds.ɡOpens the tuner option menu.ɢ/Tunes in automatically.ɣ/Tunes in manually.Touch and hold to continuously skip frequencies.ɤ[1] to [6]Selects a preset station.Touch and hold to store the currently displayed frequency in that preset.ʭɞɢɣɤɣɢɟɠ ɡ010book.book Page 8 Friday, March 14, 2014 10:26 AM](https://usermanual.wiki/Sony-Group/XAV68BT/User-Guide-2281635-Page-8.png)
![9GBE:\4540985111\4540985111XAV68BTUC\01GB\040CD.fm masterpage: RightXAV-68BT4-540-985-11(1)Storing and Receiving StationsCautionWhen tuning to stations while driving, use Best Tuning Memory (BTM) to prevent an accident.1Select the desired band ([FM1], [FM2], [FM3], [AM1], or [AM2]).2Touch .3Touch [BTM], then [Search].The unit stores the first six available stations in presets ([1] to [6]).1Touch the current band.The band list appears.2Touch the desired band ([FM1], [FM2], [FM3], [AM1], or [AM2]).3Perform tuning.To tune automaticallyTouch / .Scanning stops when the unit receives a station. Repeat this procedure until the desired station is received.To tune manuallyTouch / repeatedly until the desired frequency is received.To skip frequencies continuously, touch and hold / .1While receiving the station that you want to store, press and hold the desired preset number ([1] to [6]).1Select the band.2Touch the desired preset number ([1] to [6]).Tuner Preset ZAPPIN helps you to find a desired station by listening to preset stations for a few seconds.1While listening to radio, touch [ZAP].Tuner Preset ZAPPIN starts, and subsequent stations are received in sequence.2Touch [ZAP] again when the desired station is received.Using Radio Data System (RDS)Display itemsɸBand name, RDS*ɹFrequency, program service nameɺPreset number* During RDS reception.RDS servicesThis unit automatically provides RDS services as follows:PTY (Program Types)Displays the currently received program type.Also searches for a designated program type.CT (Clock Time)The CT data from the RDS transmission sets the clock.1During FM reception, touch [PTY].To scroll the list, touch Ă/è.2Touch the desired program type.The unit searches for a station broadcasting the selected program type.To close the PTY list, touch .Storing automatically (BTM)TuningStoring manuallyReceiving stored stationsSearching for the desired station from preset stations (Tuner Preset ZAPPIN)Selecting program types (PTY)ɺɸɹ010book.book Page 9 Friday, March 14, 2014 10:26 AM](https://usermanual.wiki/Sony-Group/XAV68BT/User-Guide-2281635-Page-9.png)
![10GBE:\4540985111\4540985111XAV68BTUC\01GB\040CD.fm masterpage: LeftXAV-68BT4-540-985-11(1)Type of programsNoteYou cannot use this function in countries/regions where no PTY data is available.For playable discs or file types, see page 22.Playing a DiscDepending on the disc, some operations may be different or restricted.Refer to the operating instructions supplied with the disc.1Insert the disc (label side up), then playback starts.If a DVD menu appearsTouch the desired item in the DVD menu.You can also use the menu control panel, which can be displayed by touching the screen anywhere except the DVD menu items. Touch V/j//p to move the cursor, then touch [ENTER] to confirm.Example of playback indications (DVD)ɸCurrent source icon, formatɹPlayback status, elapsed playback timeɺChapter/title number, audio formatTouch the display if the indications are not displayed.For audio discs, some indications are always displayed during playback.The PBC menu interactively assists with operations while a PBC-compatible VCD is played.1Start playing a PBC-compatible VCD.The PBC menu appears.2Touch .The menu control panel appears.3Touch the number keys to select the desired item, then touch [ENTER].News (News), Information (Information), Sports (Sports), Talk (Talk), Rock (Rock), Classic Rock (Classic Rock), Adult Hits (Adult Hits), Soft Rock (Soft Rock), Top 40 (Top 40), Country (Country), Oldies (Oldies), Soft (Soft), Nostalgia (Nostalgia), Jazz (Jazz), Classical (Classical), Rhythm and Blues (Rhythm and Blues), Soft R & B (Soft Rhythm and Blues), Foreign Language (Foreign Language), Religious Music (Religious Music), Religious Talk (Religious Talk), Personality (Personality), Public (Public), College (College), Weather (Weather)PlaybackUsing PBC (playback control) functionsɸɹɺ010book.book Page 10 Friday, March 14, 2014 10:26 AM](https://usermanual.wiki/Sony-Group/XAV68BT/User-Guide-2281635-Page-10.png)
![11GBE:\4540985111\4540985111XAV68BTUC\01GB\040CD.fm masterpage: RightXAV-68BT4-540-985-11(1)4Follow the instructions in the menu for interactive operations.To return to the previous display, touch á.To deactivate PBC functions, set [Video CD PBC] to [OFF] (page 20).NotesˎDuring PBC playback, the track number, playback item, etc., do not appear on the playback display.ˎResume playback is unavailable during playback with PBC.To change the audio language/formatWhen playing a DVD Video, the audio language can be changed if the disc is recorded with multilingual tracks. You can also change the audio format when playing a disc recorded in multiple audio formats (e.g., Dolby Digital).During playback, touch the screen and then .Touch repeatedly until the desired audio language/format appears.Example: Dolby Digital 5.1 chIf the same language is displayed two or more times, the disc is recorded in multiple audio formats.To change the audio channelWhen playing a VCD, you can listen to both left and right channels, right channel only or left channel only, via both right and left speakers.During playback, touch repeatedly until the desired audio channel appears.The options are indicated below.[Stereo]: Standard stereo sound (default)[Left]: Left channel sound (monaural)[Right]: Right channel sound (monaural)Playing an iPod/USB DeviceIn these Operating Instructions, “iPod” is used as a general reference for the iPod functions on the iPod and iPhone, unless otherwise specified by the text or illustrations.For details on the compatibility of your iPod, see “About iPod” (page 24) or visit the support site on the back cover.MSC (Mass Storage Class)-type USB devices (such as a USB flash drive, digital media player, Android phone) compliant with the USB standard can be used.Depending on the digital media player or Android phone, setting the USB connection mode to MSC is required.1Reduce the volume on this unit.If the device is turned off, turn it on.2Connect the iPod or the USB device to the USB port.Playback starts automatically.If an iPod/USB device is already connected, to start playback, press HOME, then touch [iPod/USB].To stop playbackPress and hold OFF for 1 second.To remove the deviceStop playback, then disconnect.Do not disconnect during playback, as data in the device may be damaged.Caution for iPhoneWhen you connect an iPhone via USB, telephone volume is controlled by the iPhone itself. In order to avoid sudden loud sound after a call, do not increase the volume on the unit during a call.About resuming modeWhen the iPod currently playing is connected to the dock connector, the mode of this unit changes to resuming mode and playback starts in the mode set by the iPod.In resuming mode, repeat/shuffle play are not available.Configuring audio settingsAudio languageAudio format/channel numbers010book.book Page 11 Friday, March 14, 2014 10:26 AM](https://usermanual.wiki/Sony-Group/XAV68BT/User-Guide-2281635-Page-11.png)
![12GBE:\4540985111\4540985111XAV68BTUC\01GB\040CD.fm masterpage: LeftXAV-68BT4-540-985-11(1)Playing a BLUETOOTH DeviceYou can play contents on a connected device that supports BLUETOOTH A2DP (Advanced Audio Distribution Profile).1Make BLUETOOTH connection with the audio device (page 8).2Reduce the volume on this unit.3Press HOME, then touch [BT Audio].4Operate the audio device to start playback.5Adjust the volume on this unit.Playback controlsIf the BLUETOOTH device supports AVRCP (Audio Video Remote Control Profile), you can control playback via this unit in the same way as disc playback.To match the volume level of the BLUETOOTH device to other sourcesYou can reduce the volume level differences between this unit and the BLUETOOTH device.During playback, touch .Select a level from –8 to +18.Searching and Playing Tracks1During playback, touch (repeat) or (shuffle) repeatedly until the desired option appears.Repeat or shuffle play starts.Available play modes differ depending on the selected sound source.NoteRepeat play and shuffle play are not available for version 2.0 VCD with PBC function.1During disc or USB playback, touch .The list screen from the currently played item appears.Furthermore, touch , or to list up by the file type (audio/video/photo).2Touch the desired item.Playback starts.Using repeat play and shuffle playSearching for a file from the list screen010book.book Page 12 Friday, March 14, 2014 10:26 AM](https://usermanual.wiki/Sony-Group/XAV68BT/User-Guide-2281635-Page-12.png)
![13GBE:\4540985111\4540985111XAV68BTUC\01GB\040CD.fm masterpage: RightXAV-68BT4-540-985-11(1)Available OptionsVarious settings are available in each source by touching . The available items differ depending on the situation.Picture EQAdjusts the picture to suit the interior brightness of the car. This setting is available only when the parking brake is set.Source: USB (Xvid/Photo), Disc (DVD/VCD/Xvid/Photo), AUX (Available only when [AUX] is set to [Rear], and [AUX Input] is set to [Video] or [Auto].)AspectThis setting is available only when the parking brake is set.Source: USB (Xvid/Photo), Disc (DVD/VCD/Xvid/Photo), AUX (Available only when [AUX] is set to [Rear], and [AUX Input] is set to [Video] or [Auto].)DVD Audio LevelSource: DiscOption PurposeDynamic (Ć),Standard, Theater, SepiaTo select the picture quality.Option PurposeNormal To display a picture with 4:3 aspect ratio (regular picture).Wide To display a picture with 4:3 aspect ratio enlarged to the left and right edges of the screen, with overflowing parts of the top and bottom cut off to fill the screen.Full (Ć)To display a picture with 16:9 aspect ratio.Zoom To display a picture with 4:3 aspect ratio enlarged to the left and right edges of the screen.Option Purpose–Adjusts the audio output level between -10 and +10 for a DVD recorded in Dolby Digital format, to balance the volume level between discs.010book.book Page 13 Friday, March 14, 2014 10:26 AM](https://usermanual.wiki/Sony-Group/XAV68BT/User-Guide-2281635-Page-13.png)
![14GBE:\4540985111\4540985111XAV68BTUC\01GB\040CD.fm masterpage: LeftXAV-68BT4-540-985-11(1)Pandora® is available to stream music through your iPhone, Android™ and BlackBerry® phones. You can control Pandora® on a USB-connected iPhone or BLUETOOTH connected Android/BlackBerry phone from this unit.The Pandora® service is not available in some countries/regions.Preparing for Pandora®1Check the usable mobile device to visit the support site on the back cover.2Download the latest version of the Pandora® application to visit: www.pandora.comStreaming Pandora®1Reduce the volume on this unit.2Connect this unit with the mobile device.In the case of an iPhone, connect via USB.In the case of Android/BlackBerry phone, connect via the BLUETOOTH function (page 7).3Press HOME, then touch [Pandora].4Launch the Pandora® application on the mobile device.5Touch , then [USB connection for iPhone] or [Bluetooth connection for Android or Blackberry].Playback starts.If the device number appearsMake sure that the same numbers are displayed (e.g., 123456) in this unit and the mobile device, then touch [OK] on this unit and confirm on the mobile device.Available Operations in Pandora®“Thumbs Up” or “Thumbs Down” feedback allows you to personalize stations.Thumbs UpDuring playback, touch .Thumbs DownDuring playback, touch .The station list allows you to easily select a desired station.1During playback, touch .The station list appears.2Touch the desired station name.Playback starts.To change the sorting order, touch or .To scroll the list, touch Ă/è.The track or artist currently being played can be bookmarked and stored in your Pandora® account.1During playback, touch , then or in [Bookmark].A new station can be created based on the track or artist being played. It will be accessible from your Pandora® account immediately.1During playback, touch , then or in [Station].Stations can be deleted from the station list in order to make room for new stations.1During playback, touch .The station list appears.2In the station list, touch .The delete mode will be activated and checkboxes will be shown next to station names.3Check the stations to be deleted and press [Delete].A confirmation box will show [OK] to confirm deletion.4Touch [OK].Listening to Pandora®“Thumbs” feedbackUsing the station listBookmarkingCreating a stationDeleting a station010book.book Page 14 Friday, March 14, 2014 10:26 AM](https://usermanual.wiki/Sony-Group/XAV68BT/User-Guide-2281635-Page-14.png)
![15GBE:\4540985111\4540985111XAV68BTUC\01GB\040CD.fm masterpage: RightXAV-68BT4-540-985-11(1)Before handsfree calling, make sure that and are in the display. If the indications do not appear, perform the BLUETOOTH connection procedure (page 7).Receiving a Call1Touch when a call is received.The phone call starts.NoteThe ringtone and talker’s voice are output only from the front speakers.To adjust the ringtone volumeThe level of ringtone volume will be stored into memory, independently from the regular volume level.Rotate the volume control dial while receiving a call.To reject/end a callTouch .Making a Call1Press HOME, then touch [Phone].2Touch one of the icons on the BLUETOOTH phone display.*1 The cellular phone needs to support PBAP (Phone Book Access Profile).*2 Do not use the voice dial function on the cellular phone while it is connected to this unit.*3 Voice dial may not work depending on the recognition specification of the cellular phone. For details, visit the support site on the back cover.3Touch .The call is made and the calling display appears until the other party answers.Available Operations During a CallTo adjust the talker’s voice volumeThe level of the talker’s voice volume will be stored into memory, independently from the regular volume level.Rotate the volume control dial during a call.To transfer the current call to the cellular phoneTouch .To transfer back to handsfree calling, touch again.Available optionsDuring a handsfree call, press .Handsfree Callingɞ (call history)*1 Select a contact from the call history list. The unit stores the last 20 calls.ɞɟ ɠɡɢɣɟ (redial)Make a call automatically to the last contact you made.ɠ (phonebook)*1Select a contact from the name list/number list in the phonebook. To search the desired contact by alphabetical order in the name list, touch . For details on how to manage the phonebook data, see “Phonebook Management” (page 16).ɡ (voice dial)*2*3Say a voice tag stored on the cellular phone.ɢ (phone number input)Enter the phone number.ɣPreset numberTouch a preset number ([1] to [6]). The unit stores up to 6 contacts in the list. For details on how to store, see “Presetting phone numbers” (page 16).010book.book Page 15 Friday, March 14, 2014 10:26 AM](https://usermanual.wiki/Sony-Group/XAV68BT/User-Guide-2281635-Page-15.png)
![16GBE:\4540985111\4540985111XAV68BTUC\01GB\040CD.fm masterpage: LeftXAV-68BT4-540-985-11(1)Phonebook ManagementNotePrior to disposal or changing ownership of your car with this unit still installed, be sure to erase all the phonebook data in this unit to prevent possible unauthorized access, by doing any of the following:ˋDelete the phonebook data by initializing (page 18).ˋPress the reset button.ˋDisconnect the power supply lead.You can access the phonebook data of a cellular phone to make a call.1Press HOME, then touch [Phone].The BLUETOOTH phone display appears.2Touch , then [Phonebook Select].3Touch the desired item.1Press HOME, then touch [Phone].The BLUETOOTH phone display appears.2Touch .The phonebook appears.3Touch .The confirmation display appears.4Touch [OK].All phonebook data on this unit is deleted.To delete an individual contact from the phonebookFollow steps 1 to 2 above, then select the contact.To search the desired contact by alphabetical order, touch then select alphabet.Touch [OK].Call Data Management1Press HOME, then touch [Phone].The BLUETOOTH phone display appears.2Touch .The call history list appears.3Touch .The confirmation display appears.4Touch [OK].All items in the call history are deleted.1Press HOME, then touch [Phone].The BLUETOOTH phone display appears.2Touch .The phonebook appears.3Select the contact to store in the preset dial.ɞIn the name list, touch the name of the contact.To search the desired contact by alphabetical order, touch , then select alphabet.ɟIn the number list, touch the phone number.The contact confirmation display appears.4Touch [Preset], then the desired preset number ([1] to [6]).The contact is stored to the selected preset number.To change the registration of the preset dialFollow the procedure above and overwrite a registered preset dial.Phone Option Menu1Press HOME, then touch [Phone].2Touch . The phone option menu appears.[Speech Quality] Reduces echo and noise during a call. For normal use, set to [Mode 1]. If the outgoing sound quality is unsatisfactory, set to [Mode 2].[MIC Gain] Adjusts the microphone volume for the other party: [Low], [Middle], [High].Selecting phonebook dataDeleting phonebook dataDeleting call historyPresetting phone numbers[Ringtone]Uses the ringtone of this unit or the connected cellular phone: [Internal], [Cellular].010book.book Page 16 Friday, March 14, 2014 10:26 AM](https://usermanual.wiki/Sony-Group/XAV68BT/User-Guide-2281635-Page-16.png)
![17GBE:\4540985111\4540985111XAV68BTUC\01GB\040CD.fm masterpage: RightXAV-68BT4-540-985-11(1)Select [Settings] in the HOME menu when you need to change the settings of the unit.“Ć” in the table below indicates the default setting.1Press HOME, then touch [Settings].2Touch one of the setup category icons.: General Settings (page 17): Sound Settings (page 19): Screen Settings (page 19): Visual Settings (page 19)3Touch Ă/è to select the desired item.To return to the previous display, touch .To switch from the HOME screen to the playback screen, touch .General SettingsLanguageUnit status: Any statusTime FormatUnit status: Any statusClock TimeUnit status: Any statusClock AdjustUnit status: Any status[Auto Answer]Answers an incoming call automatically.ˋ[OFF]: to not answer automatically.ˋ[3 sec]: to answer automatically after 3 seconds.ˋ[10 sec]: to answer automatically after 10 seconds.[Phonebook Select]Browses the phonebook data on cellular phone: [Cellular].[Receive Phonebook]Receives phonebook data from the connected cellular phone.When receiving is complete, BLUETOOTH device name appears.[Background Visualizer]Sets background visualizer: [ON], [OFF].SettingsOption PurposeEnglish (Ć), Español,РусскийTo select the display language.Option Purpose12-hour (Ć), 24-hourTo change the time format.Option PurposeOFF (Ć), ON To activate the CT function.Option Purpose–To set the clock. (Available only when [Clock Time] is set to [OFF].)010book.book Page 17 Friday, March 14, 2014 10:26 AM](https://usermanual.wiki/Sony-Group/XAV68BT/User-Guide-2281635-Page-17.png)
![18GBE:\4540985111\4540985111XAV68BTUC\01GB\040CD.fm masterpage: LeftXAV-68BT4-540-985-11(1)BeepUnit status: Any statusDimmerUnit status: Any statusDimmer LevelUnit status: Any statusTouch Panel AdjustUnit status: Any statusOutput Color SystemUnit status: No source selectedCamera InputUnit status: Any statusSteering ControlYou can operate the unit with buttons on the steering wheel.For safety, park your car before making this setting.Unit status: Any statusUser DefinedThis setting is available only when [Steering Control] is set to [User].The steering button panel appears. Press and hold a button to be assigned to the steering wheel. Then press and hold the respective button on the steering wheel.Unit status: Any statusNoteThis function may not be available on some vehicles.Bluetooth ConnectionUnit status: Any statusBluetooth ResetUnit status: Any statusOption PurposeOFF, ON (Ć)To activate the operation sound.Option PurposeOFF To deactivate the dimmer.Auto (Ć)To dim the display automatically when you turn lights on. (Available only when the illumination control lead is connected.)ON To dim the display.Option Purpose(–5 - +5)Ć: 0To select the brightness level when the dimmer is activated.Option Purpose–To adjust the touch panel calibration if the touching position does not correspond with the proper item.Option PurposeNTSC (Ć), PAL To change the color system according to the connected monitor. (SECAM is not supported.)Option PurposeOFF To deactivate the input.Normal (Ć)To display the picture from the rear view camera.Reverse To flip the picture from the rear view camera horizontally.Option PurposeUser To display the instruction and panel for steering wheel control.External (Ć)To deactivate steering wheel control.To us e rotary commander control.Option Purpose–To display the instruction and control panel.Option PurposeON, OFF (Ć)To activate the BLUETOOTH signal.Option Purpose–To initialize all BLUETOOTH-related settings such as pairing information, call history, preset dial, history of connected BLUETOOTH devices, etc.010book.book Page 18 Friday, March 14, 2014 10:26 AM](https://usermanual.wiki/Sony-Group/XAV68BT/User-Guide-2281635-Page-18.png)
![19GBE:\4540985111\4540985111XAV68BTUC\01GB\040CD.fm masterpage: RightXAV-68BT4-540-985-11(1)Sound SettingsRear/Sub OutSwitches the audio output between the rear speakers and subwoofer.Unit status: Any statusSound AdjustSelects EQ3 and adjusts subwoofer level, balance/fader level or crossover filter.Unit status: Any statusScreen SettingsDemoUnit status: Any statusVisual SettingsDVD Menu LanguageUnit status: No source selectedDVD Audio LanguageUnit status: No source selectedOption PurposeRear To output audio signals to the rear speakers (amplifier).Subwoofer (Ć)To output audio signals to the subwoofer.Option PurposeEQ3OFF (Ć), R&B, Pop, Rock, Hip-Hop, Dance, Country, CustomTo select the equalizer curve; customize the equalizer curve.When setting [Custom], selects the equalizer settings: [Low], [Mid], [High].Subwoofer:(ATT, –10 - +10)Ć: 0To adjust the volume level of the subwoofer. (Available only when [Subwoofer] is set to [ON].)Balance: (L 15 - 0 - R 15)Ć: 0To adjust the sound balance between left and right speakers.Fader:(Front 15 - 0 - Rear 15)Ć: 0To adjust the sound balance between front and rear speakers.HPF: 80 Hz, 100 Hz, 120 Hz, 140 Hz, 160 Hz, OFF (Ć)To select the cut-off frequency of the front/rear speakers.LPF: OFF (Ć), 80 Hz, 100 Hz, 120 Hz, 140 Hz, 160 HzTo select the cut-off frequency of the subwoofer. (Available only when [Subwoofer] is set to [ON].)Option PurposeOFF, ON (Ć)To activate the demonstration.Option PurposeEnglish (Ć), Chinese, German, French, Italian, Spanish, Portuguese, Dutch, Danish, Swedish, Finnish, Norwegian, Russian, OtherTo select the default language for the disc's menu.Option PurposeEnglish (Ć), Chinese, German, French, Italian, Spanish, Portuguese, Dutch, Danish, Swedish, Finnish, Norwegian, Russian, OtherTo select the default language for the soundtrack.010book.book Page 19 Friday, March 14, 2014 10:26 AM](https://usermanual.wiki/Sony-Group/XAV68BT/User-Guide-2281635-Page-19.png)
![20GBE:\4540985111\4540985111XAV68BTUC\01GB\040CD.fm masterpage: LeftXAV-68BT4-540-985-11(1)DVD Subtitle LanguageUnit status: No source selectedMonitor TypeSelects an aspect ratio suitable for the connected monitor.(The screen aspect ratio of this unit also changes.)Depending on the disc, [Letterbox] may be selected automatically instead of [Pan Scan], and vice versa.Unit status: No source selectedVideo CD PBCUnit status: No source selectedAuxiliary Audio/Video EquipmentYou can connect up to an optional device, such as a portable media player, game console, etc., to the AUX terminal on the unit.1Press HOME, then touch [AUX].The AUX playback display appears.Be sure to adjust the volume for the connected device before playback.1Reduce the volume on the unit.2Press HOME, then touch [AUX].The AUX playback display appears.3Touch to open the menu, then touch [Input Level].4Set your usual listening volume on the unit.5Touch –/+ repeatedly to adjust the level.The level is adjustable in single steps, between –10 and +15.By setting the type (video or audio) of each connected device, the background screen can be switched accordingly.1Press HOME, then touch [AUX].2Touch [Front] or [Rear].[Front] is available only for audio.3When selecting [Rear], touch to open the menu, then touch [AUX Input].4Touch [Audio], [Video] or [Auto].The default setting is [Auto].To return to the previous display, touch .Option PurposeEnglish (Ć), Chinese, German, French, Italian, Spanish, Portuguese, Dutch, Danish, Swedish, Finnish, Norwegian, Russian, OtherTo select the default subtitle language for DVD.Option Purpose16:9 (Ć)To display a wide picture.Suitable when connecting to a wide-screen monitor or a monitor with a wide mode function.Letterbox To display a wide picture with bands on the upper and lower positions of the screen.Suitable when connecting to a 4:3 screen monitor.Pan Scan To display a wide picture on the entire screen and automatically cut off the portions that do not fit.Option PurposeOFF, ON (Ć)To play a VCD with PBC functions.Additional InformationSelecting an auxiliary deviceAdjusting the volume levelSetting the type of device010book.book Page 20 Friday, March 14, 2014 10:26 AM](https://usermanual.wiki/Sony-Group/XAV68BT/User-Guide-2281635-Page-20.png)
![21GBE:\4540985111\4540985111XAV68BTUC\01GB\040CD.fm masterpage: RightXAV-68BT4-540-985-11(1)Rear View CameraBy connecting the optional rear view camera to the CAMERA IN terminal, you can display the picture from the rear view camera.The picture from the rear view camera appears when:ˋthe back lamp lights up (or the shift lever is set to the R (reverse) position).ˋyou press HOME then touch [Rear Camera].ˋyou press and hold DSPL then touch [Rear Camera].PrecautionsˎCool off the unit beforehand if your car has been parked in direct sunlight.ˎPower antenna (aerial) extends automatically.Moisture condensationShould moisture condensation occur inside the unit, remove the disc and wait for about an hour for it to dry out; otherwise the unit will not operate properly.To maintain high sound qualityDo not splash liquid onto the unit or discs.Notes on safetyˎComply with your local traffic rules, laws and regulations.ˎWhile drivingˋDo not watch or operate the unit, as it may lead to distraction and cause an accident. Park your car in a safe place to watch or operate the unit.ˋDo not use the setup feature or any other function which could divert your attention from the road.ˋWhen backing up your car, be sure to look back and watch the surroundings carefully for your safety, even if the rear view camera is connected. Do not depend on the rear view camera exclusively.ˎWhile operatingˋDo not insert your hands, fingers or foreign object into the unit, as it may cause injury or damage to the unit.ˋKeep small articles out of the reach of children.ˋBe sure to fasten seatbelts to avoid injury in the event of a sudden movement of the car.Notes on installationˎWe recommend this unit should be installed by a qualified technician or service personnel.ˋIf you try to install this unit by yourself, refer to the supplied “Installation/Connections” guide and install the unit properly.ˋImproper installation may cause battery drain or a short circuit.ˎIf the unit does not work properly, check the connections first, referring to the supplied “Installation/Connections” guide. If everything is in order, check the fuse.ˎProtect the unit surface from damage.ˋDo not expose the unit surface to chemicals, such as insecticide, hair spray, insect repellent, etc.ˋDo not leave rubber or plastic materials in contact with the unit for a long time. Otherwise, the finish of the unit may be impaired, or deformation may occur.ˎWhen installing, be sure to fix securely.ˎWhen installing, be sure to turn the ignition off. Installing the unit with the ignition on may cause battery drain or a short circuit.ˎWhen installing, be sure not to damage any car parts such as pipes, tubes, fuel tank or wiring by using a drill, as it may cause a fire or an accident.Preventing an accidentPictures appear only after you park the car and set the parking brake.If the car starts moving during video playback, the following caution is displayed and you cannot watch the video.[Video blocked for your safety.]The monitor connected to the REAR VIDEO OUT is active while the car is in motion.You cannot watch the video, but you can hear audio.Do not operate the unit or watch the monitor while driving.010book.book Page 21 Friday, March 14, 2014 10:26 AM](https://usermanual.wiki/Sony-Group/XAV68BT/User-Guide-2281635-Page-21.png)
![27GBE:\4540985111\4540985111XAV68BTUC\01GB\040CD.fm masterpage: RightXAV-68BT4-540-985-11(1)Package contents: Main unit (1)Parts for installation and connections (1 set)Remote Commander (1): RM-X170Microphone (1)Optional accessories/equipment:Mobile monitor: XVM-B62Rear View Camera: XA-R800CMounting bracket: GMD-D100Your dealer may not handle some of the above listed accessories. Please ask the dealer for detailed information.Design and specifications are subject to change without notice.Region codeThe region system is used to protect software copyrights.The region code is located on the bottom of the unit, and only DVDs labeled with an identical region code can be played on this unit.DVDs labeled can also be played.If you try to play any other DVD, the message [Playback prohibited by region code.] will appear on the monitor screen. Depending on the DVD, no region code may be labeled even though playing the DVD is prohibited by area restrictions.US and foreign patents licensed from Dolby Laboratories.MPEG Layer-3 audio coding technology and patents licensed from Fraunhofer IIS and Thomson.Manufactured under license from Dolby Laboratories. Dolby and the double-D symbol are trademarks of Dolby Laboratories.Windows Media is either a registered trademark or trademark of Microsoft Corporation in the United States and/or other countries.This product is protected by certain intellectual property rights of Microsoft Corporation. Use or distribution of such technology outside of this product is prohibited without a license from Microsoft or an authorized Microsoft subsidiary.“DVD VIDEO,” “DVD-R,” “DVD-RW,” “DVD+R,” and “DVD+RW” are trademarks.The Bluetooth® word mark and logos are registered trademarks owned by Bluetooth SIG, Inc. and any use of such marks by Sony Corporation is under license. Other trademarks and trade names are those of their respective owners.iPhone, iPod, iPod classic, iPod nano, and iPod touch are trademarks of Apple Inc., registered in the U.S. and other countries.The “AAC” logo is a trademark of Dolby Laboratories.THIS PRODUCT IS LICENSED UNDER THE MPEG-4 VISUAL PATENT PORTFOLIO LICENSE FOR THE PERSONAL AND NON-COMMERCIAL USE OF A CONSUMER FOR DECODING MPEG-4 VIDEO THAT WAS ENCODED BY A CONSUMER ENGAGED IN A PERSONAL AND NON-COMMERCIAL ACTIVITY AND/OR WAS OBTAINED FROM A VIDEO PROVIDER LICENSED BY MPEG LA TO PROVIDE MPEG-4 VIDEO. NO LICENSE IS GRANTED OR SHALL BE IMPLIED FOR ANY OTHER USE. ADDITIONAL INFORMATION INCLUDING THAT RELATING TO PROMOTIONAL, INTERNAL AND COMMERCIAL USES AND LICENSING MAY BE OBTAINED FROM MPEG LA, LLC. SEE HTTP://WWW.MPEGLA.COMTHIS PRODUCT IS LICENSED UNDER THE AVC PATENT PORTFOLIO LICENSE FOR THE PERSONAL AND NON-COMMERCIAL USE OF A CONSUMER TO(i)ENCODE VIDEO IN COMPLIANCE WITH THE AVC STANDARD (“AVC VIDEO”)AND/OR(ii)DECODE AVC VIDEO THAT WAS ENCODED BY A CONSUMER ENGAGED IN A PERSONAL ANDNON-COMMERCIAL ACTIVITY AND/OR WAS OBTAINED FROM A VIDEO PROVIDER LICENSED TO PROVIDE AVC VIDEO. NO LICENSE IS GRANTED OR SHALL BE IMPLIED FOR ANY OTHER USE. ADDITIONAL INFORMATION MAY BE OBTAINED FROM MPEG LA, L.L.C. SEE HTTP://WWW.MPEGLA.COMTHIS PRODUCT IS LICENSED UNDER THE AVC PATENT PORTFOLIO LICENSE AND VC-1 PATENT PORTFOLIO LICENSE FOR THE PERSONAL AND NON-COMMERCIAL USE OF A CONSUMER TO DECODE VIDEO IN COMPLIANCE WITH THE AVC STANDARD (“AVC VIDEO”) AND/OR THE VC-1 STANDARD (“VC-1 VIDEO”) THAT WAS ENCODED BY A CONSUMER ENGAGED IN A PERSONAL AND NONCOMMERCIAL ACTIVITY AND/OR WAS OBTAINED FROM A VIDEO PROVIDER LICENSED TO PROVIDE AVC VIDEO AND/OR VC-1 VIDEO. NO LICENSE IS GRANTED OR SHALL BE IMPLIED FOR ANY OTHER USE. ADDITIONAL INFORMATION MAY BE OBTAINED FROM MPEG LA, L.L.C. SEE HTTP://WWW.MPEGLA.COMPandora, the Pandora logo, and the Pandora trade dress are trademarks or registered trademarks of Pandora Media, Inc., used with permission.Google, Google Play and Android are trademarks of Google Inc.BlackBerry® is the property of Research In Motion Limited and is registered and/or used in the U.S. and countries around the world. Used under license from Research In Motion Limited.Copyrights010book.book Page 27 Friday, March 14, 2014 10:26 AM](https://usermanual.wiki/Sony-Group/XAV68BT/User-Guide-2281635-Page-27.png)
![28GBE:\4540985111\4540985111XAV68BTUC\01GB\040CD.fm masterpage: LeftXAV-68BT4-540-985-11(1)All other trademarks are trademarks of their respective owners.TroubleshootingIf there are any problems with your unit/mobile device, make sure your car is parked in a safe place before examining any issues.The following checklist will help you remedy problems you may encounter with your unit.Before going through the checklist below, check the connection and operating procedures.For details on using the fuse and removing the unit from the dashboard, refer to the installation/connections manual supplied with this unit.If the problem is not solved, visit the support site on the back cover.GeneralNo power is being supplied to the unit.qCheck the fuse.qThe connection is not correct.ˋConnect the yellow and red power supply leads.There is no beep sound.qAn optional power amplifier is connected and you are not using the built-in amplifier.The contents of the memory have been erased.qThe power supply lead or battery has been disconnected or it is not connected properly.Stored stations and correct time are erased.The fuse has blown.The unit makes a noise when the position of the ignition is switched.qThe leads are not matched correctly with the car’s accessory power connector.The display disappears from/does not appear on the monitor.qThe dimmer is set to [ON] (page 18).qThe display disappears if you press and hold OFF.ˋPress OFF on the unit until the display appears.qThe monitor off function is activated (page 5).ˋTouch anywhere on the display to turn the display back on.The display does not respond to your touch correctly.qTouch one part of the display at a time. If two or more parts are touched simultaneously, the display will not operate correctly.qCalibrate the touch panel of the display (page 18).qTouch the pressure sensitive panel firmly.qThe rear monitor cannot be operated. Icons displayed on the rear monitor are disabled.Menu items cannot be selected.qUnavailable menu items are displayed in gray.Radio receptionThe stations cannot be received.The sound is hampered by noises.qThe connection is not correct.ˋConnect the REM OUT lead (blue/white striped) or accessory power supply lead (red) to the power supply lead of a car’s antenna (aerial) booster (only when your car has built-in radio antenna (aerial) in the rear/side glass).ˋCheck the connection of the car antenna (aerial).ˋIf the auto antenna (aerial) will not extend, check the connection of the power antenna (aerial) control lead.Preset tuning is not possible.qThe broadcast signal is too weak.RDSPTY displays [PTY not found.].qThe current station is not an RDS station.qRDS data has not been received.qThe station does not specify the program type.PictureThere is no picture/picture noise occurs.qA connection has not been made correctly.qCheck the connection between this unit and other equipment, and set the input selector of the equipment to the source corresponding to this unit.qThe disc is defective or dirty.qInstallation is not correct.ˋInstall the unit at an angle of less than 45° in a sturdy part of the car.qThe parking cord (light green) is not connected to the parking brake switch cord, or the parking brake is not applied.The picture does not fit in the screen.qThe aspect ratio is fixed on the DVD.There is no picture/picture noise occurs in the rear monitor.qA source/mode which is not connected is selected. If there is no input, no picture appears in the rear monitor.qThe color system setting is incorrect.ˋSet the color system to [PAL] or [NTSC] according to the connected monitor (page 18).qThe picture of the rear view camera is displayed on this unit.ˋNo picture appears in the rear monitor if the picture of the rear view camera is displayed on this unit.010book.book Page 28 Friday, March 14, 2014 10:26 AM](https://usermanual.wiki/Sony-Group/XAV68BT/User-Guide-2281635-Page-28.png)
![29GBE:\4540985111\4540985111XAV68BTUC\01GB\040CD.fm masterpage: RightXAV-68BT4-540-985-11(1)SoundThere is no sound/sound skips/sound cracks.qA connection has not been made correctly.qCheck the connection between this unit and the connected equipment, and set the input selector of the equipment to the source corresponding to this unit.qThe disc is defective or dirty.qInstallation is not correct.ˋInstall the unit at an angle of less than 45° in a sturdy part of the car.qThe MP3 file sampling rate is not 32, 44.1, or 48 kHz.qThe WMA file sampling rate is not 44.1 kHz.qThe AAC file sampling rate is not 44.1 or 48 kHz.qThe MP3 file bit rate is not 48 to 192 kbps.qThe WMA file bit rate is not 48 to 192 kbps.qThe AAC file bit rate is not 40 to 320 kbps.qThe unit is in pause/reverse/fast-forward mode.qThe settings for the outputs are not made correctly.qThe DVD output level is too low (page 13).qThe volume is too low.qThe ATT function is activated.qThe format is not supported (such as DTS).ˋCheck if the format is supported by this unit (page 22).Sound is noisy.qKeep cords and cables away from each other.Disc operationThe disc does not play.qThe disc is defective or dirty.qThe disc is not playable.qThe DVD is not playable due to the region code.qThe disc is not finalized (page 23).qThe disc format and file version are incompatible with this unit (page 22, 22).qPress ì to remove the disc.MP3/WMA/AAC/Xvid/MPEG-4 files do not play.qRecording was not performed according to the ISO 9660 level 1 or level 2 format or the Joliet or Romeo expansion format (DATA CD), or the UDF Bridge format (DATA DVD) (page 22).qThe file extension is incorrect (page 23).qFiles are not stored in MP3/WMA/AAC/Xvid/MPEG-4 format.qIf the disc contains multiple file types, only the selected file type (audio/video) can be played.ˋSelect the appropriate file type using the list (page 12).MP3/WMA/AAC/Xvid/MPEG-4 files take longer to play than others.qThe following discs take a longer time to start playback.ˋa disc recorded with a complicated tree structure.ˋa disc to which data can be added.Certain functions cannot be performed.qDepending on the disc, you may not be able to perform operations such as stop, search, or repeat/shuffle play. For details, refer to the manual supplied with the disc.The soundtrack/subtitle language or angle cannot be changed.qUse the DVD menu instead of the direct selection button on the remote commander (page 10).qMultilingual tracks, multilingual subtitles, or multi-angles are not recorded on the DVD.qThe DVD prohibits changing.The operation buttons do not function.The disc will not eject.qPress the reset button (page 5).USB playbackItems cannot be played via a USB hub.qConnect iPod/USB devices to this unit without USB hub.Items cannot be played.qReconnect the USB device.The USB device takes longer to play.qThe USB device contains large-sized files or files with a complicated tree structure.The sound is intermittent.qThe sound may be intermittent at a high bit rate of more than 320 kbps.BLUETOOTH functionThe other BLUETOOTH device cannot detect this unit.qSet [Signal] to [ON] (page 18).qWhile connecting to a BLUETOOTH device, this unit cannot be detected by another device. Terminate the current connection and search for this unit from the other device. The disconnected device can be reconnected by selecting from the list of registered devices.Connection is not possible.qCheck the pairing and connection procedures in the manual of the other device, etc., and perform the operation again.The name of the detected device does not appear.qDepending on the status of the other device, it may not be possible to obtain the name.010book.book Page 29 Friday, March 14, 2014 10:26 AM](https://usermanual.wiki/Sony-Group/XAV68BT/User-Guide-2281635-Page-29.png)
![30GBE:\4540985111\4540985111XAV68BTUC\01GB\040CD.fm masterpage: LeftXAV-68BT4-540-985-11(1)There is no ringtone.qRaise the volume while receiving a call.qDepending on the connecting device, the ringtone may not be sent properly.ˋSet [Ringtone] to [Internal] (page 16).The talker’s voice volume is low.qRaise the volume during a call.The other party says that the volume is too low or high.qAdjust the [MIC Gain] level (page 15).Echo or noise occurs during call conversations.qReduce the volume.q[Speech Quality] is set to [Mode 1].ˋSet [Speech Quality] to [Mode 2] (page 15).qIf ambient noise other than the phone call sound is loud, try reducing this noise.ˋShut the window if road noise is loud.ˋLower the air conditioner if the air conditioner is loud.The phone sound quality is poor.qPhone sound quality depends on reception conditions of the cellular phone. ˋMove your car to a place where you can enhance the cellular phone’s signal if the reception is poor.The volume of the connected BLUETOOTH device is low or high.qVolume level will differ depending on the BLUETOOTH device.ˋReduce the volume level differences between this unit and the BLUETOOTH device (page 12).The sound skips during audio streaming.qReduce the distance between the unit and the BLUETOOTH device.qIf the BLUETOOTH device is stored in a case which interrupts the signal, remove the case while using the device.qSeveral BLUETOOTH devices or other devices which emit radio waves are used nearby.ˋTurn off the other devices.ˋIncrease the distance between the unit and other devices.qPlayback sound stops momentarily when this unit is connecting to a cellular phone. This is not a malfunction.You cannot control the connected BLUETOOTH device during audio streaming.qCheck that the connected BLUETOOTH device supports AVRCP.Some functions do not work.qCheck that the connecting device supports the functions in question.The name of the other party does not appear when a call is received.qThe other party is not stored in the phonebook.ˋAdd the other party to the phonebook (page 16).A call is answered unintentionally.qThe connecting phone is set to start a call automatically.q[Auto Answer] of this unit is set to [3 sec] or [10 sec] (page 16).Pairing failed due to time out.qDepending on the connecting device, the time limit for pairing may be short. Try completing the pairing within the time by setting a single digit passkey.The BLUETOOTH function cannot be operated.qExit the source by pressing and holding SOURCE for 1 second, then turn on the unit.No sound is output from the car speakers during a handsfree call.qIf the sound is output from the cellular phone, set the cellular phone to output the sound from the car speakers.Error displays/messagesBluetooth Connection ErrorqAn error has occurred between this unit and the BLUETOOTH phone.ˋCheck the BLUETOOTH signal is set to on for this unit or the BLUETOOTH phone.ˋTry pairing again.ˋReconnect the BLUETOOTH phone.Bluetooth device is not found.qThe unit cannot detect a connectable BLUETOOTH device.ˋCheck the BLUETOOTH setting of the connecting device.qNo device is in the list of registered BLUETOOTH devices.ˋPerform pairing with a BLUETOOTH device (page 7).Busy now… Please try again.qThe unit is busy.ˋWait for a moment and try again.Call Data ErrorqAn error has occurred while accessing phonebook data via PBAP or call history from the BLUETOOTH phone.ˋReconnect the BLUETOOTH phone.010book.book Page 30 Friday, March 14, 2014 10:26 AM](https://usermanual.wiki/Sony-Group/XAV68BT/User-Guide-2281635-Page-30.png)
![31GBE:\4540985111\4540985111XAV68BTUC\01GB\040CD.fm masterpage: RightXAV-68BT4-540-985-11(1)Data Listing ErrorqAn error has occurred while displaying phonebook data via PBAP or call history from the BLUETOOTH phone.ˋReconnect the BLUETOOTH phone.Disc ErrorqThe unit cannot read the data due to some problem.qThe data is damaged or corrupted.qThe disc is corrupted.qThe disc is incompatible with this unit.qThe disc is not finalized.qThe disc is dirty or inserted upside down.ˋClean or insert the disc correctly.qA blank disc has been inserted.qThe disc cannot play due to a problem.ˋInsert another disc.qThe disc is not compatible with this unit.ˋInsert a compatible disc.qPress ì to remove the disc.Error - Please select ‘Bluetooth Reset’ from the General Settings menu.qA memory error has occurred.ˋInitialize the BLUETOOTH setting (page 18).Handsfree device is not available.qA cellular phone is not connected.ˋConnect a cellular phone (page 7).Hubs not supported.qUSB hubs are not supported on this unit.No Playable DataqThe disc does not contain playable data.qThe iPod has no playable data.ˋLoad music data/files into the iPod.Overcurrent Caution on USBqThe USB device is overloaded.ˋDisconnect the USB device, then change the source by pressing the SOURCE button.ˋIndicates that the USB device is out of order, or an unsupported device is connected.Playback prohibited by region code.qThe DVD’s region code differs from the unit’s region code.The sound in DTS format is not audible.qDiscs in DTS format are not supported. Sound is not output if the DTS format is selected.ˋDTS formatted discs are not playable on this unit. Use a compatible disc format (page 22).USB device not supportedqFor details on the compatibility of your USB device, visit the support site on the back cover.qThe character cannot be displayed with the unit.For Pandora® operation:Allow connection? Check number on mobile device.qCheck the number on your mobile device. If the number is correct, touch [OK] to allow the connection.API Version ErrorqThe API versions differ.ˋSelect a source other than [Pandora], then select the Pandora® source again.Application error on mobile device. Do not check the mobile device while driving.qCheck other operations on your mobile device, then launch the Pandora® application again.qSelect a source other than [Pandora], then select the Pandora® source again.Bookmark ErrorqBookmarking a track or artist failed.ˋTry bookmarking again.Cannot connect Pandora due to poor reception.qThe mobile network signal is poor.ˋMove to an area with better reception.Cannot skip.qSkip (next) is prohibited for the current content.ˋWait until the commercial ends.ˋPandora® limits the number of skips allowed. Wait until the next track begins, or select another station on the list.Invalid LoginqThe mobile device has not logged in to Pandora®.ˋTry logging in again.No StationqThere is no station on your Pandora® account.ˋCreate a station on your mobile device.ˋSelect a source other than [Pandora], then select the Pandora® source again.Pandora ErrorqAn error occurred while using Pandora®.ˋDisconnect, then reconnect the mobile device with this unit.(For a USB device, unplug and plug the device in again. For a BLUETOOTH device, disconnect and connect the device again.)ˋLaunch the Pandora® application again from the mobile device.Pandora original licensing restricted.qUse of the service is being attempted outside the US.010book.book Page 31 Friday, March 14, 2014 10:26 AM](https://usermanual.wiki/Sony-Group/XAV68BT/User-Guide-2281635-Page-31.png)
![32GBE:\4540985111\4540985111XAV68BTUC\01GB\040CD.fm masterpage: LeftXAV-68BT4-540-985-11(1)ˋPandora® service license has been granted in the US only.Please disconnect and reconnect to sync device.qAn error has occurred between this unit and the mobile device.ˋDisconnect then reconnect the mobile device with this unit.(For a USB device, unplug and plug the device in again. For a BLUETOOTH device, disconnect and connect the device again.)Please launch Pandora application on mobile device.qThe Pandora® application has not been launched.ˋLaunch Pandora® on your mobile device, then touch [Reconnect].Server ErrorqThe Pandora® server may have a problem.ˋSelect a source other than [Pandora], then select the Pandora® source again.Station does not exist.qThe condition of the mobile device has changed between compiling the station list and selecting from the list.ˋWait until the station list refreshes.Thumbs Up/Down ErrorqThumbs Up/Down feedback failed.ˋTry Thumbs Up/Down again.If these solutions do not help improve the situation, consult your nearest Sony dealer.If you take the unit to be repaired because of disc playback trouble, bring the disc that was used at the time the problem began.010book.book Page 32 Friday, March 14, 2014 10:26 AM](https://usermanual.wiki/Sony-Group/XAV68BT/User-Guide-2281635-Page-32.png)