Sony Group XAVAX5000 AV Receiver User Manual XAV AX5000
Sony Corporation AV Receiver XAV AX5000
UserManual.wiki
>
Sony Group
>
XAVAX5000 User Manual
05 Short-Term Confidential_User Manual
Navigation menu
Upload a User Manual
Namespaces
Wiki Guide
HTML
PDF
Info
Views
User Manual
Discussion / Help
Navigation

![8GBE:\4732062111\4732062111XAVAX5000UC\01GB-XAVAX5000UC\040CD.fm masterpage: LeftXAV-AX50004-732-062-11(1)Performing Initial SettingsYou need to perform initial settings before operating the unit for the first time, after replacing the car battery, or changing connections.If the initial settings screen does not appear when you turn on the unit, perform the factory reset (page 17) to initialize the unit.1Touch [Language], then set the display language.2Touch [Demo], then touch and select [OFF] to disable the demonstration mode.3Touch [Set Date/Time], then set the date and time.4After setting the date and time, touch [OK].The startup caution appears.5Read through the startup caution, then if you accept all conditions, touch [OK].The setting is complete.This setting can be further configured in the setting menu (page 16).Preparing a BLUETOOTH DeviceYou can enjoy music or perform handsfree calling depending on the BLUETOOTH compatible device such as smartphones, cellular phones, and audio devices (hereafter “BLUETOOTH device” if not otherwise specified). For details on connecting, refer to the operating instructions supplied with the device.Before connecting the device, turn down the volume of this unit; otherwise, a loud sound may result.When connecting a BLUETOOTH device for the first time, mutual registration (called “pairing”) is required. Pairing enables this unit and other devices to recognize each other.1Place the BLUETOOTH device within 1 m (3 ft) of this unit.2Press HOME, then touch [Settings].3Touch [Bluetooth].4Touch [Bluetooth Connection], then set the signal to [ON].The BLUETOOTH signal is turned on and lights up on the status bar of the unit.5Touch [Pairing]. flashes while the unit is in pairing standby mode.6Perform pairing on the BLUETOOTH device so it detects this unit.7Select [XAV-AX5000] shown in the display of the BLUETOOTH device.If your model name does not appear, repeat from step 5.8If passkey* input is required on the BLUETOOTH device, input [0000].* Passkey may be called “passcode,” “PIN code,” “PIN number,” “password,” etc., depending on the BLUETOOTH device. When pairing is made, stays lit.9Select this unit on the BLUETOOTH device to establish the BLUETOOTH connection. or lights up when the connection is made.Notes• The unit can only be connected with one BLUETOOTH device at a time.• To disconnect the BLUETOOTH connection, turn the connection off from either the unit or the BLUETOOTH device.Getting StartedPairing and connecting with a BLUETOOTH device[0000]Input passkey010COV.book Page 8 Tuesday, August 29, 2017 11:10 AM](https://usermanual.wiki/Sony-Group/XAVAX5000/User-Guide-3636767-Page-8.png)
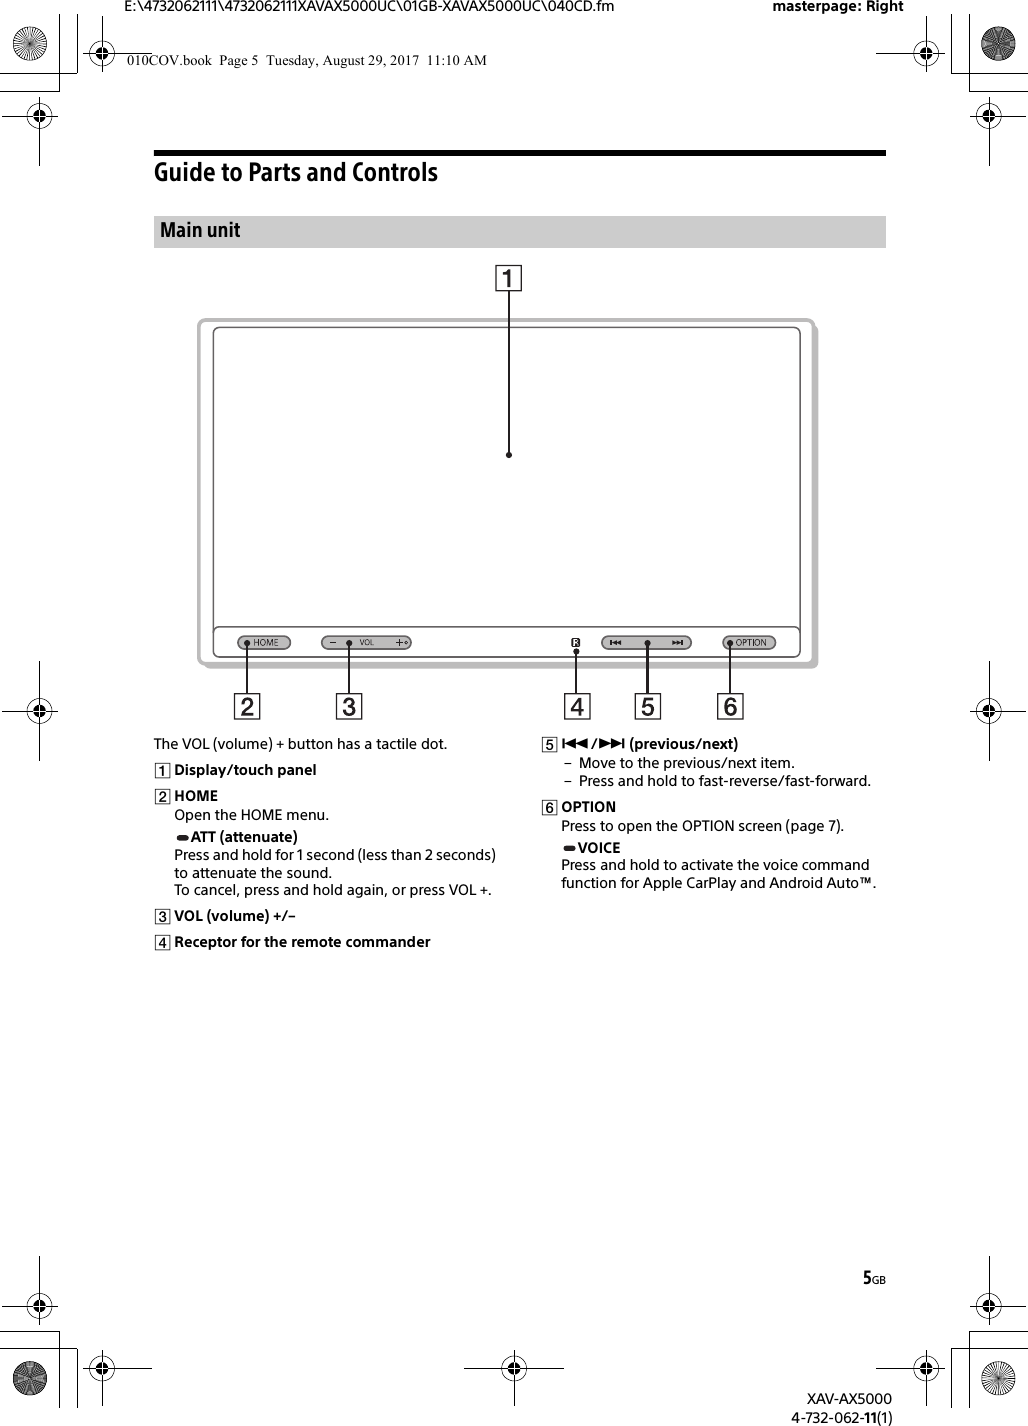
![9GBE:\4732062111\4732062111XAVAX5000UC\01GB-XAVAX5000UC\040CD.fm masterpage: RightXAV-AX50004-732-062-11(1)To use a paired device, connection with this unit is required. Some paired devices will connect automatically.1Press HOME, then touch [Settings].2Touch [Bluetooth].3Touch [Bluetooth Connection], then touch [ON].Make sure that lights up on the status bar of the unit.4Activate the BLUETOOTH function on the BLUETOOTH device.5Operate the BLUETOOTH device to connect to this unit. or lights up on the status bar.To connect the last-connected device from this unitWhen the ignition is turned to on with the BLUETOOTH signal activated, this unit searches for the last-connected BLUETOOTH device, and connection is made automatically.NoteWhile streaming BLUETOOTH audio, you cannot connect from this unit to the cellular phone. Connect from the cellular phone to this unit instead.To install the microphoneFor details, see “Installing the microphone” (page 30).Connecting Rear View CameraBy connecting the optional rear view camera to the CAMERA IN terminal, you can display the picture from the rear view camera. For details, see “Connection/Installation” (page 28).To display the picture from the rear view cameraPress HOME, touch [Camera].Listening to the RadioTo listen to the radio, press HOME then touch [Tuner].Reception controls/indicationsCurrent bandChange the band (FM or AM).Current frequency, program service name*, RDS (Radio Data System) indication** During RDS reception. (tuner option)Open the tuner option menu.SEEK-/SEEK+Tune in automatically./Tune in manually.Touch and hold to continuously skip frequencies.Preset numbersSelect a preset station. Swipe right/left to show the other preset stations.Touch and hold to store the current frequency in that preset.1Select the desired band (FM or AM).2Perform tuning.To tune automaticallyTouch SEEK-/SEEK+.Scanning stops when the unit receives a station.To tune manuallyTouch and hold / to locate the approximate frequency, then touch / repeatedly to fine adjust to the desired frequency.Connecting with a paired BLUETOOTH device Listening to the RadioTuning010COV.book Page 9 Tuesday, August 29, 2017 11:10 AM](https://usermanual.wiki/Sony-Group/XAVAX5000/User-Guide-3636767-Page-9.png)
![10GBE:\4732062111\4732062111XAVAX5000UC\01GB-XAVAX5000UC\040CD.fm masterpage: LeftXAV-AX50004-732-062-11(1)1While receiving the station that you want to store, press and hold the desired preset number.1Select the band, then touch the desired preset number.Using Tuner Option FunctionsThe following functions are available by touching .BTMStores stations in order of frequency on the preset numbers. 18 stations can be stored for FM and 12 stations for AM as preset stations.LocalSelect [ON] to tune only to stations with strong signals. To tune normally, select [OFF].PTY*Select a program type from the PTY list to search for a station broadcasting the selected program type.* Only available during FM reception.Listening to the SiriusXM Radio To listen to the SiriusXM radio, press HOME then touch [SXM].Only SiriusXM brings you more of what you love to listen to, all in one place. Get over 140 channels, including commercial-free music plus the best sports, news, talk, comedy and entertainment. Welcome to the world of satellite radio. A SiriusXM Connect Vehicle Tuner and Subscription are required. For more information, visit www.siriusxm.comAfter installing your SiriusXM Connect Vehicle Tuner and antenna (aerial), press HOME, then touch [SXM]. You should be able to hear the SiriusXM preview channel on Channel 1. After verifying that you can hear the preview channel, select Channel 0 to find the Radio ID of your tuner. In addition, the Radio ID is located on the bottom of the SiriusXM Connect Vehicle Tuner and its packaging. You will need this number to activate your subscription. Write the number down for reference.To display the SiriusXM Radio ID1Press HOME, then touch [SXM].2Touch , then select [Channel Direct Select].3Input [000], then touch [OK].In the USA, you can activate online or by calling SiriusXM Listener Care:• Online: Visit www.siriusxm.com/activatenow• Phone: Call 1-866-635-2349In Canada, you can activate online or by calling SiriusXM Listener Care:• Online: Visit www.siriusxm.ca/activatexm• Phone: Call 1-877-438-9677As part of the activation process, the SiriusXM satellites will send an activation message to your tuner. When your radio detects that the tuner has received the activation message, your radio will display: [Subscription Updated. Press Enter to Continue.]. Once subscribed, you can tune to channels in your subscription plan.Notes• The activation process usually takes 10 to 15 minutes, but may take up to an hour.• Your radio will need to be turned on and receiving the SiriusXM signal to receive the activation message.Storing manuallyReceiving stored stationsActivating your SiriusXM Subscription010COV.book Page 10 Tuesday, August 29, 2017 11:10 AM](https://usermanual.wiki/Sony-Group/XAVAX5000/User-Guide-3636767-Page-10.png)
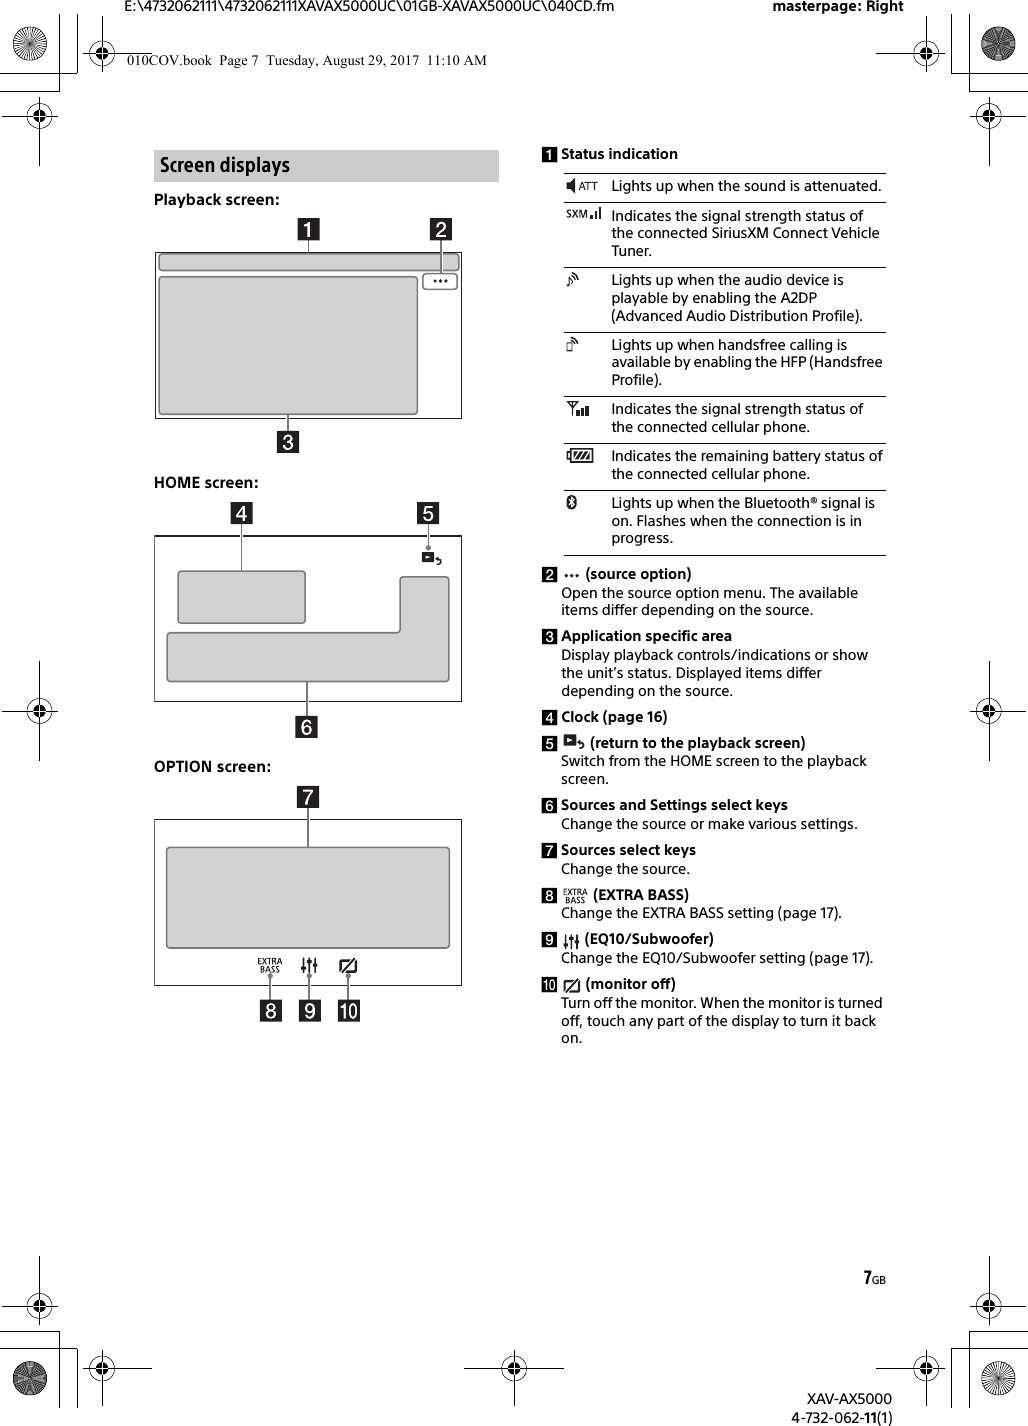
![11GBE:\4732062111\4732062111XAVAX5000UC\01GB-XAVAX5000UC\040CD.fm masterpage: RightXAV-AX50004-732-062-11(1)Reception controls/indications (list)Open the channel list or category list.CH- (previous channel) /CH+ (next channel)Select the channel.Channel number, channel name, artist name, song title (information)Switch the channel information. (SXM option)Open the SXM option menu.Preset numbersSelect a preset channel. Swipe right/left to show the other preset channels. Touch and hold to store the current channel in that preset.Channel number, channel name, category name, content informationTo tune the channel from the channel list or category list1Touch .2Touch [Channel List].Alternatively, touch [Category List], then touch the desired category item.The channel list appears.3Touch the desired channel.To store channels1While receiving the channel that you want to store, touch and hold a number key (1 to 6).To receive the stored channel, touch a number key (1 to 6).To set a parental controlThe parental control feature allows you to limit access to SiriusXM channels with mature content. When enabled, the parental control feature requires you to enter a passcode to tune to the locked channels. Information on setting up the passcode and locking channels can be found below.1Touch , then touch [Parental Control].The passcode input display appears.2Enter your 4-digit passcode by touching the number keys, then touch [OK].The passcode confirmation display appears.3Enter the 4-digit passcode again, then touch [OK].The parental control is applied, and the channels are locked.To unlock the channels/To lock the channels again1Touch , then touch [Parental Control].The passcode input display appears.2Enter your 4-digit passcode by touching the number keys, then touch [OK].To change the passcode1Touch , touch [Pass Code Change], then enter your current passcode.2Enter your new passcode.Using SXM Option FunctionsThe following functions are available by touching .Channel Direct SelectTune the desired channel by inputting its channel number directly. Use the number buttons (0 – 9) and press ENTER on the remote commander.Parental ControlSet the parental lock to on or off, and edit the passcode.Pass Code ChangeChange the passcode for the Parental Control feature.Tuning channels for SiriusXM010COV.book Page 11 Tuesday, August 29, 2017 11:10 AM](https://usermanual.wiki/Sony-Group/XAVAX5000/User-Guide-3636767-Page-11.png)
![12GBE:\4732062111\4732062111XAVAX5000UC\01GB-XAVAX5000UC\040CD.fm masterpage: LeftXAV-AX50004-732-062-11(1)Playing a USB DeviceMSC (Mass Storage Class) type USB devices*1 compliant with the USB standard can be used. Also, MTP (Media Transfer Protocol) type USB devices*1*2 can be used only when connected to the USB2 port.*1 e.g., a USB flash drive, digital media player, Android phone*2 Some digital media players or Android phones may require setting to MTP mode.Notes• For details on the compatibility of your USB device, visit the support site on the back cover.• For details on the supported file formats, see “Supported formats for USB playback” (page 19).1Turn down the volume on the unit.2Connect the USB device to the USB port.3Press HOME, then touch [USB].Playback starts.To remove the deviceTurn the unit off or turn the ignition switch to the ACC off position, then remove the USB device.When connecting the USB devices, select the USB1 port or the USB2 port according to the features to use.: Available, –: Not supportedPlaying a BLUETOOTH DeviceYou can play contents on a connected device that supports BLUETOOTH A2DP (Advanced Audio Distribution Profile).1Make a BLUETOOTH connection with the audio device (page 9).2Press HOME, then touch [BT Audio].3Operate the audio device to start playback.Notes• Depending on the audio device, information such as title, track number/time, and playback status may not be displayed on this unit.• Even if the source is changed on this unit, playback of the audio device does not stop.To match the volume level of the BLUETOOTH device to other sourcesYou can reduce the volume level differences between this unit and the BLUETOOTH device:During playback, touch , then set [Input Level] between –8 and +8.PlaybackUSB1 port and USB2 portSupported features USB1 USB2Apple CarPlay –Android Auto –File systemFAT12 FAT16 FAT32 exFAT –Playable audio formatMP3 WMA FLAC PCM –AAC –Playable video formatMPEG-4 –WMV –MKV –Xvid –USB connection mode MSC MTP – Track list display –Supported features USB1 USB2010COV.book Page 12 Tuesday, August 29, 2017 11:10 AM](https://usermanual.wiki/Sony-Group/XAVAX5000/User-Guide-3636767-Page-12.png)
![13GBE:\4732062111\4732062111XAVAX5000UC\01GB-XAVAX5000UC\040CD.fm masterpage: RightXAV-AX50004-732-062-11(1)Searching and Playing Tracks1During playback, touch (repeat) or (shuffle) repeatedly until the desired play mode appears.Playback in the selected play mode may take time to start.Available play modes differ depending on the selected sound source and connected device.The track list is not available for the device connected to the USB2 port.1During USB playback, touch .The list screen from the currently played item appears.Furthermore, touch (audio) or (video) to list up by file type.2Touch the desired item.Playback starts.Other Settings During PlaybackFurther settings are available in each source by touching . The available items differ depending on the source.Picture EQAdjusts the picture quality according to your taste: [Dynamic], [Standard], [Theater], [Custom].(Available only when the parking brake is applied and USB video is selected).AspectSelects an aspect ratio for the screen of the unit.(Available only when the parking brake is applied and USB video is selected).NormalDisplays a 4:3 picture in its original size, with side bars to fill the 16:9 screen.ZoomDisplays a 16:9 picture that has been converted into 4:3 letter box format.FullDisplays a 16:9 picture in its original size.CaptionsEnlarges the picture horizontally, while fitting captions in the screen.Repeat play and shuffle playSearching for a file from the list screen010COV.book Page 13 Tuesday, August 29, 2017 11:10 AM](https://usermanual.wiki/Sony-Group/XAVAX5000/User-Guide-3636767-Page-13.png)
![14GBE:\4732062111\4732062111XAVAX5000UC\01GB-XAVAX5000UC\040CD.fm masterpage: LeftXAV-AX50004-732-062-11(1)To use a cellular phone, connect it with this unit. For details, see “Preparing a BLUETOOTH Device” (page 8).NoteThe handsfree calling functions explained below are available only when the Apple CarPlay or Android Auto function is deactivated. When the Apple CarPlay or Android Auto function is activated, use the handsfree calling functions on its application.Receiving a Call1Touch when a call is received.The phone call starts.NoteThe ringtone and talker’s voice are output only from the front speakers.To reject/end a callTouch .Making a Call1Press HOME, then touch [Phone].2Touch one of the call icons on the BLUETOOTH phone display. (call history)*Select a contact from the call history list. The unit stores the last 20 calls. (redial)Make a call automatically to the last contact you made. (phonebook)*Select a contact from the name list/number list in the phonebook. To search for the desired contact in alphabetical order from the name list, touch . (phone number input)Enter the phone number.Preset phone number listSelect the stored contact.To store the contact, see “Presetting phone numbers” (page 14).* The cellular phone needs to support PBAP (Phone Book Access Profile).3Touch .The phone call starts.You can store up to 6 contacts in the preset list.1In the phone screen, select a phone number that you want to store in the preset dial from the phonebook.The confirmation display appears.2Touch [Add to Preset].3Select the preset phone number list where the phone number is stored.The contact is stored in the preset phone number list.Handsfree CallingPresetting phone numbers010COV.book Page 14 Tuesday, August 29, 2017 11:10 AM](https://usermanual.wiki/Sony-Group/XAVAX5000/User-Guide-3636767-Page-14.png)
![15GBE:\4732062111\4732062111XAVAX5000UC\01GB-XAVAX5000UC\040CD.fm masterpage: RightXAV-AX50004-732-062-11(1)Available Operations During a CallTo adjust the ringtone volumePress VOL +/– while receiving a call.To adjust the talker’s voice volumePress VOL +/– during a call.To adjust the volume for the other party (Mic gain adjustment)During a handsfree call, touch , then set [MIC Gain] to [High], [Middle], or [Low].To reduce echo and noise (Echo/noise canceler mode)During a call, touch , then set [Speech Quality] to [Mode 1] or [Mode 2].To switch between handsfree mode and handheld modeDuring a call, touch to switch the phone call audio between the unit and cellular phone.NoteDepending on the cellular phone, this operation may not be available.To answer an incoming call automaticallyTouch , then set [Auto Answer] to [ON].Apple CarPlayApple CarPlay lets you use your iPhone in the car in a way that allows you to stay focused on the road.(Available only when your iPhone is connected to the USB1 port.)Notes on using Apple CarPlay• iPhone with iOS 7.1 or later is required. Update to the latest iOS version before use.• Apple CarPlay can be used on iPhone 5 or later.• For details on compatible models, refer to the compatibility list on the support site on the back cover.• For details about Apple CarPlay, refer to the manual supplied with your iPhone, or visit the website of Apple CarPlay.• Since the GPS on your iPhone is used, place your iPhone where it can easily receive a GPS signal.1Connect your iPhone to the USB1 port.To connect an iPhone, use the USB connection cable for iPod (not supplied).2Press HOME, then touch the Apple CarPlay icon.Your iPhone’s display appears on the display of the unit. Touch and control the applications.Android AutoAndroid Auto extends the Android platform into the car in a way that’s purpose-built for driving.(Available only when your Android phone is connected to the USB1 port.)Notes on using Android Auto• Android phone with Android 5.0 or higher is required. Update to the latest OS version before use.• Your Android phone needs to support Android Auto. For details on compatible models, refer to the compatibility list on the support site on the back cover.• Download the Android Auto app on Google Play™.• For details about Android Auto, refer to the manual supplied with your Android phone, or visit the website of Android Auto.• Since the GPS on your Android phone is used, place your Android phone where it can easily receive a GPS signal.• Android Auto may not be available in your country or region.Useful Functions010COV.book Page 15 Tuesday, August 29, 2017 11:10 AM](https://usermanual.wiki/Sony-Group/XAVAX5000/User-Guide-3636767-Page-15.png)
![16GBE:\4732062111\4732062111XAVAX5000UC\01GB-XAVAX5000UC\040CD.fm masterpage: LeftXAV-AX50004-732-062-11(1)1Connect your Android phone to the USB1 port.To connect an Android phone, use an appropriate connection cable (not supplied).2Press HOME, then touch the Android Auto icon.The Android Auto interface will be displayed full-screen on the display of the unit. Touch and control the applications.Using Gesture CommandYou can perform frequently-used operations by swiping your finger on the reception/playback display.NoteThe gesture commands explained below are not available on the screens of Apple CarPlay and Android Auto.Basic Setting OperationYou can set items in the following setup categories:General Settings, Sound Settings, Visual Settings, Bluetooth1Press HOME, then touch [Settings].2Touch one of the setup category.The items that can be set differ depending on the source and settings.3Move the scrollbar up and down to select the desired item.To return to the previous displayTouch .To switch to the playback screenTouch .General SettingsLanguageSelects the display language: [English], [Español], [Français], [Deutsch], [Italiano], [Português], [Русский], [ ], [ ], [ ], [], [].DemoActivates the demonstration: [OFF], [ON].Date/TimeDate FormatSelects the format: [DD/MM/YY], [MM/DD/YY], [YY/MM/DD].Time FormatSelects the format: [12-hour], [24-hour].Set Date/TimeSets the date and clock time manually.BeepActivates the operation sound: [OFF], [ON].Camera InputSelects the image from the rear view camera: [OFF], [Normal], [Reverse] (mirror image).[Guide Line Adjust] adjusts the length and/or position of the marker lines on the picture from the rear view camera by touching the arrow marks.Do this ToSwipe left to rightRadio reception: seek forward stations.(The same as pressing and holding .)SiriusXM reception: tune the next channel (channel +).Video/audio playback: skip forward a file/track.(The same as .)Swipe right to leftRadio reception: seek backward stations.(The same as pressing and holding .)SiriusXM reception: tune the previous channel (channel –).Video/audio playback: skip backward a file/track.(The same as .)Swipe upwardsRadio reception: receive stored stations (go forward).SiriusXM reception: tune the next preset (preset +).Swipe downwardsRadio reception: receive stored stations (go backward).SiriusXM reception: tune the previous preset (preset –).Settings010COV.book Page 16 Tuesday, August 29, 2017 11:10 AM](https://usermanual.wiki/Sony-Group/XAVAX5000/User-Guide-3636767-Page-16.png)
![17GBE:\4732062111\4732062111XAVAX5000UC\01GB-XAVAX5000UC\040CD.fm masterpage: RightXAV-AX50004-732-062-11(1)Steering ControlSelects the input mode for the connected remote control. To prevent a malfunction, be sure to match the input mode with the connected remote control before use.CustomInput mode for the steering wheel remote control (follow the procedures of [ ] to register functions on the connected remote control).PresetInput mode for the wired remote control excluding the steering wheel remote control.The steering button panel appears.Press and hold the button you want to assign to the steering wheel.The button on the panel lights up (standby).Press and hold the button on the steering wheel you want to assign the function to.The button on the panel will change the color (highlighted or encircled by an orange line).To register other functions, repeat steps and .(Available only when [Steering Control] is set to [Custom].)Notes• While making settings, the connected remote control cannot be used even though some functions have already been registered. Use the buttons on the unit.• If an error occurs while registering, all the registered information is cleared. Restart registration from the beginning.• This function may not be available on some vehicles. For details on the compatibility of your vehicle, visit the support site on the back cover.Clock TimeSets the clock time by the RDS data: [OFF], [ON].SXM ResetInitializes the SiriusXM Connect Vehicle Tuner settings (preset channels/parental lock): [Reset], [Cancel].Factory ResetInitializes all the settings to the factory settings.Firmware VersionUpdates and confirms the firmware version.Open Source LicensesDisplays the software licenses.Sound SettingsEXTRA BASSReinforces bass sound in synchronization with the volume level: [OFF], [1], [2].EQ10/SubwooferSelects an equalizer curve and adjusts the subwoofer level.EQ10Selects the equalizer curve: [OFF], [R&B], [Rock], [Pop], [Dance], [Hip-Hop], [Electronica], [Jazz], [Soul], [Country], [Custom].[Custom] adjusts the equalizer curve: –6 to +6.SubwooferAdjusts the volume level of the subwoofer: [OFF], –6 to +6.Balance/FaderAdjusts the balance/fader level.BalanceAdjusts the sound balance between the left and right speakers: [L15] to [R15].FaderAdjusts the sound balance between the front and rear speakers: [Front 15] to [Rear 15].CrossoverAdjusts the cut-off frequency and subwoofer phase.High Pass FilterSelects the cut-off frequency of the front/rear speakers: [50Hz], [60Hz], [80Hz], [100Hz], [120Hz], [OFF].Low Pass FilterSelects the cut-off frequency of the subwoofer: [50Hz], [60Hz], [80Hz], [100Hz], [120Hz].Subwoofer PhaseSelects the subwoofer phase: [Normal], [Reverse].DSO (Dynamic Stage Organizer)Enhances audio output: [OFF], [Low], [Middle], [High].010COV.book Page 17 Tuesday, August 29, 2017 11:10 AM](https://usermanual.wiki/Sony-Group/XAVAX5000/User-Guide-3636767-Page-17.png)
![18GBE:\4732062111\4732062111XAVAX5000UC\01GB-XAVAX5000UC\040CD.fm masterpage: LeftXAV-AX50004-732-062-11(1)Visual SettingsWallpaperChanges the wallpaper: [Preset1] to [Preset5].DimmerDims the display: [OFF], [Auto], [ON].([Auto] is available only when the illumination control lead is connected and works when the head light is turned on.)[ ] adjusts the brightness level when the dimmer is activated: –5 to +5.USB video framerateSelects the video frame rate on the unit’s display: [60fps], [50fps].BluetoothBluetooth ConnectionActivates the BLUETOOTH signal: [OFF], [ON], [Pairing] (enters into pairing standby mode).Bluetooth Device InfoDisplays the information of the device connected to the unit.(Available only when [Bluetooth Connection] is set to [ON] and a BLUETOOTH device is connected to the unit.)Bluetooth ResetInitializes all BLUETOOTH-related settings such as pairing information, call history, history of connected BLUETOOTH devices, etc.Updating the FirmwareTo update the firmware, visit the support site on the back cover, then follow the online instructions.Updating the firmware takes a few minutes to complete. During the update, do not turn the ignition to the OFF position.Precautions• Cool off the unit beforehand if your car has been parked in direct sunlight.• Power antenna (aerial) extends automatically.• When you transfer ownership or dispose of your car with the unit installed, initialize all the settings to the factory settings by performing the factory reset (page 17).To maintain high sound qualityDo not splash liquid onto the unit.Notes on safety• Comply with your local traffic rules, laws, and regulations.• While driving– Do not watch or operate the unit, as it may lead to distraction and cause an accident. Park your car in a safe place to watch or operate the unit.– Do not use the setup feature or any other function which could divert your attention from the road.– When backing up your car, be sure to look back and watch the surroundings carefully for your safety even if the rear view camera is connected. Do not depend on the rear view camera exclusively.• While operating– Do not insert your hands, fingers, or foreign objects into the unit as it may cause injury or damage to the unit.– Keep small articles out of the reach of children.– Be sure to fasten seatbelts to avoid injury in the event of sudden movement of the car.Additional InformationPreventing an accidentPictures appear only after you park the car and set the parking brake.If the car starts moving during video playback, the following caution is displayed and you cannot watch the video.[Video blocked for your safety.]Do not operate the unit or watch the monitor while driving.010COV.book Page 18 Tuesday, August 29, 2017 11:10 AM](https://usermanual.wiki/Sony-Group/XAVAX5000/User-Guide-3636767-Page-18.png)
![23GBE:\4732062111\4732062111XAVAX5000UC\01GB-XAVAX5000UC\040CD.fm masterpage: RightXAV-AX50004-732-062-11(1)TroubleshootingThe following checklist will help you remedy problems you may encounter with your unit.Before going through the checklist below, check the connection and operating procedures.For details on using the fuse and removing the unit from the dashboard, see “Connection/Installation” (page 28).If the problem is not solved, visit the support site on the back cover.GeneralNo power is being supplied to the unit.Check the fuse.The connection is not correct.– Connect the yellow and red power supply leads.There is no beep sound.An optional power amplifier is connected and you are not using the built-in amplifier.The contents of the memory have been erased.The power supply lead or battery has been disconnected or it is not connected properly.The fuse has blown.The unit makes noise when the position of the ignition is switched.The leads are not matched correctly with the car’s accessory power connector.The display disappears from/does not appear on the monitor.The dimmer is set to [ON] (page 18).The monitor off function is activated (page 6, 7).– Touch anywhere on the display to turn the display back on.Menu items cannot be selected.Unavailable menu items are displayed in gray.Touch panel operationThe touch panel does not react to your touch correctly.Touch one part of the touch panel at a time. If two or more parts are touched simultaneously, the touch panel will not react correctly.Touch the pressure sensitive panel firmly.The touch panel does not react when touching with wet fingertips or when water droplets are on the touch panel.Multi touch does not be recognized.Multi touch operation is not supported on this unit.Radio receptionThe stations cannot be received.The sound is hampered by noise.The connection is not correct.– Connect the REM OUT lead (blue/white striped) or accessory power supply lead (red) to the power supply lead of a car’s antenna (aerial) booster (only when your car has built-in radio antenna (aerial) in the rear/side glass).– Check the connection of the car antenna (aerial).– If the auto antenna (aerial) will not extend, check the connection of the power antenna (aerial) control lead.Preset tuning is not possible.The broadcast signal is too weak.RDSPTY displays [PTY not found.].The current station is not a RDS station.RDS data has not been received.The station does not specify the program type.PictureThere is no picture/picture noise occurs.A connection has not been made correctly.Check the connection between this unit and other equipment and set the input selector of the equipment to the source corresponding to this unit.Installation is not correct.– Install the unit at an angle of less than 45° in a sturdy part of the car.The parking cord (light green) is not connected to the parking brake switch cord, or the parking brake is not applied.The picture does not fit in the screen.The aspect ratio is fixed on the playback source.010COV.book Page 23 Tuesday, August 29, 2017 11:10 AM](https://usermanual.wiki/Sony-Group/XAVAX5000/User-Guide-3636767-Page-23.png)
![24GBE:\4732062111\4732062111XAVAX5000UC\01GB-XAVAX5000UC\040CD.fm masterpage: LeftXAV-AX50004-732-062-11(1)SoundThere is no sound/sound skips/sound cracks.A connection has not been made correctly.Check the connection between this unit and the connected equipment and set the input selector of the equipment to the source corresponding to this unit.Installation is not correct.– Install the unit at an angle of less than 45° in a sturdy part of the car.The unit is in pause/reverse/fast-forward mode.The settings for the outputs are not made correctly.The volume is too low.The ATT function is activated.The format is not supported.– Check if the format is supported by this unit (page 19).Sound is noisy.Keep cords and cables away from each other.USB playbackItems cannot be played via a USB hub.Connect USB devices to this unit without a USB hub.Items cannot be played.Reconnect the USB device.The USB port to which the USB device is connected is not appropriate.– Connect the USB device to the appropriate USB port that supports the file formats (page 12).The USB device takes longer to play.The USB device contains large-sized files or files with a complicated tree structure.The sound is intermittent.The sound may be intermittent at a high-bit-rate.Audio files cannot be played.USB devices formatted with file systems other than FAT12, FAT16, FAT32 or exFAT*1 are unsupported.*2The USB port to which the USB device is connected is not appropriate.– Connect the USB device to the appropriate USB port that supports the file systems (page 12).*1 USB devices formatted with exFAT file system are available only when connected to the USB1 port.*2 This unit supports FAT12, FAT16, FAT32 and exFAT, but some USB device may not support all of these. For details, refer to the operating instructions of each USB device or contact the manufacturer.Operations cannot be performed.The USB mode of the device is not set to the appropriate mode.– Make sure that the USB mode of the device is set to MSC or MTP mode.The USB port to which the USB device is connected is not appropriate.– Connect the USB device to the appropriate USB port that supports the features (page 12).BLUETOOTH functionThe other BLUETOOTH device cannot detect this unit.Set [Bluetooth Connection] to [ON] (page 18).While connecting to a BLUETOOTH device, this unit cannot be detected by another device. Terminate the current connection and search for this unit from the other device.Depending on your smartphone or cellular phone, you may need to delete this unit from the history of the connected smartphone or cellular phone then pair them again (page 8).Connection is not possible.Check the pairing and connection procedures in the manual of the other device, etc., and perform the operation again.The name of the detected device does not appear.Depending on the status of the other device, it may not be possible to obtain the name.There is no ringtone.Raise the volume while receiving a call.The talker’s voice volume is low.Raise the volume during a call.The other party says that the volume is too low or high.Adjust the [MIC Gain] level (page 15).Echo or noise occurs during call conversations.Reduce the volume.Set [Speech Quality] to [Mode 1] or [Mode 2]. (page 15).If ambient noise other than the phone call sound is loud, try reducing this noise.– Shut the window if road noise is loud.– Lower the air conditioner if the air conditioner is loud.The phone sound quality is poor.Phone sound quality depends on reception conditions of the cellular phone. – Move your car to a place where you can enhance the cellular phone’s signal if the reception is poor.010COV.book Page 24 Tuesday, August 29, 2017 11:10 AM](https://usermanual.wiki/Sony-Group/XAVAX5000/User-Guide-3636767-Page-24.png)
![25GBE:\4732062111\4732062111XAVAX5000UC\01GB-XAVAX5000UC\040CD.fm masterpage: RightXAV-AX50004-732-062-11(1)The volume of the connected BLUETOOTH device is low or high.Volume level will differ depending on the BLUETOOTH device.– Reduce the volume level differences between this unit and the BLUETOOTH device (page 12).The sound skips during audio streaming or the BLUETOOTH connection fails.Reduce the distance between the unit and the BLUETOOTH device.If the BLUETOOTH device is stored in a case which interrupts the signal, remove the case while using the device.Several BLUETOOTH devices or other devices (e.g. ham radio devices) which emit radio waves are used nearby.– Turn off the other devices.– Increase the distance between the unit and other devices.Playback sound stops momentarily when this unit is connecting to a cellular phone. This is not a malfunction.The connected BLUETOOTH device cannot be controlled during audio streaming.Check that the connected BLUETOOTH device supports AVRCP.Some functions do not work.Check that the connecting device supports the functions in question.A call is answered unintentionally.The connecting phone is set to start a call automatically.[Auto Answer] of this unit is set to [ON] (page 15).Pairing failed due to time out.Depending on the connecting device, the time limit for pairing may be short. Try completing the pairing within the time.Cannot pair.The unit may not be able to pair with a previously paired BLUETOOTH device after initializing the unit if the pairing information of the unit is on the BLUETOOTH device. In this case, delete the pairing information of the unit from the BLUETOOTH device, and then pair them again.The BLUETOOTH function cannot be operated.Turn the ignition off. Wait for a while, then turn the ignition to the ACC position.No sound is output from the car speakers during a handsfree call.If the sound is output from the cellular phone, set the cellular phone to output the sound from the car speakers.SiriusXM Connect Vehicle TunerA mature channel is not blocked although parental control setting has been made.If you tune to a mature channel, the passcode display will appear. Once you have entered the passcode, you will have unblocked parental control for all channels until the unit is powered down or you turn parental control back on.– Set [Parental Control] to [Locked] in the SXM option ( ) again (page 11).Apple CarPlayThe Apple CarPlay icon does not appear on the HOME screen.Your iPhone is not compatible with Apple CarPlay.– Refer to the compatibility list on the support site on the back cover.Disconnect your iPhone from the USB1 port and reconnect it again.The USB port to which your iPhone is connected is not appropriate.– Connect your iPhone to the USB1 port.Apple CarPlay may not be available in your country or region.Make sure a certified Lightning cable is used to connect your iPhone and the unit.Android AutoThe Android Auto icon does not appear on the HOME screen.Check your Android phone and accept the disclaimers and permission requests required to use Android Auto on your Android phone.There is no Android Auto application installed on your Android phone.– Download and install the Android Auto application onto your Android phone.Your Android phone is not compatible with Android Auto.– Android phone with Android 5.0 or higher is required. Refer to the compatibility list on the support site on the back cover.Disconnect your Android phone from the USB1 port and reconnect it again.The USB port to which your Android phone is connected is not appropriate.– Connect your Android phone to the USB1 port.Android Auto may not be available in your country or region.010COV.book Page 25 Tuesday, August 29, 2017 11:10 AM](https://usermanual.wiki/Sony-Group/XAVAX5000/User-Guide-3636767-Page-25.png)
![26GBE:\4732062111\4732062111XAVAX5000UC\01GB-XAVAX5000UC\040CD.fm masterpage: LeftXAV-AX50004-732-062-11(1)MessagesGeneralCannot play this content.The currently selected content cannot be played back, or skipped to the next one.– The content is not in a supported file format. Check supported file formats (page 19).Device no responseThe unit does not recognize the connected USB device.– Reconnect the USB device.– Check that the USB device is supported by the unit.No Playable DataThe USB device has no playable data.– Load music data/files into the USB device.Overcurrent caution on USB.The USB device is overloaded.– Disconnect the USB device.– Indicates that the USB device is out of order, or an unsupported device is connected.USB device not supportedFor details on the compatibility of your USB device, visit the support site on the back cover.USB hub not supportedUSB hubs are not supported on this unit.BLUETOOTHBluetooth device is not found.The unit cannot detect a connectable BLUETOOTH device.– Check the BLUETOOTH setting of the connecting device.No device is in the list of registered BLUETOOTH devices.– Perform pairing with a BLUETOOTH device (page 8).Handsfree device is not available.A cellular phone is not connected.– Connect a cellular phone (page 9).SiriusXM Connect Vehicle TunerChannel LockedThe channel that you have requested is Locked by the radio Parental Control feature. See “To set a parental control” (page 11) for more information on the Parental Control feature and how to access locked channels.Channel Not AvailableThe channel that you have requested is not a valid SiriusXM channel or the channel that you were listening to is no longer available.You may also see this message briefly when first connecting a new SiriusXM Connect Vehicle Tuner.Visit www.siriusxm.com in the USA or www.siriusxm.ca in Canada for SiriusXM channel lineup information.Channel Not SubscribedCall SiriusXM to SubscribeThe channel that you have requested is not included in your SiriusXM subscription package or the channel that you were listening to is no longer included in your SiriusXM subscription package.If you have questions about your subscription package or would like to subscribe to this channel, please contact SiriusXM.In the USA, visit www.siriusxm.com or call 1-866-635-2349.In Canada, visit www.siriusxm.ca or call 1-877-438-9677.Check AntennaThe radio has detected a fault with the SiriusXM antenna (aerial).The antenna (aerial) cable may be either disconnected or damaged.– Verify that the antenna (aerial) cable is connected to the SiriusXM Connect Vehicle Tuner.– Inspect the antenna (aerial) cable for damage and kinks.– Replace the antenna (aerial) if the cable is damaged. SiriusXM products are available at your local car audio retailer or online atwww.shop.siriusxm.comCheck TunerThe radio is having difficulty communicating with the SiriusXM Connect Vehicle Tuner.The tuner may be disconnected or damaged.– Verify that the SiriusXM Connect Vehicle Tuner cable is securely connected to the radio.Incorrect Pass Code enteredPasscode input failed.– Check that the passcode has been entered correctly.– If you forget your passcode, perform [SXM Reset] in [General Settings] (page 17).Note that performing [SXM Reset] will initialize all the SiriusXM settings and stored contents in the SiriusXM Connect Vehicle Tuner.010COV.book Page 26 Tuesday, August 29, 2017 11:10 AM](https://usermanual.wiki/Sony-Group/XAVAX5000/User-Guide-3636767-Page-26.png)

![31GBE:\4732062111\4732062111XAVAX5000UC\01GB-XAVAX5000UC\040CD.fm masterpage: RightXAV-AX50004-732-062-11(1)Cautions• It is extremely dangerous if the cord becomes wound around the steering column or gearstick. Be sure to keep it and other parts from interfering with your driving operations.• If airbags or any other shock-absorbing equipment are in your car, contact the store where you purchased this unit or the car dealer before installation.NoteBefore attaching the double-sided tape , clean the surface of the dashboard with a dry cloth.When using the steering wheel remote controlInstallation of the connection cable RC-SR1 (not supplied) is required before use.1To enable the steering wheel remote control, select [General Settings] [Steering Control] [] to make the registration (page 17).When the registration is complete, the steering wheel remote control becomes available.Notes on installing the connection cable RC-SR1 (not supplied)• Refer to the support site on the back cover for details then connect each lead properly to the appropriate leads. Making an improper connection may damage the unit.• Consulting the dealer or an experienced technician for help is recommended.When using the wired remote control1To enable the wired remote control, set [Steering Control] in [General Settings] to [Preset] (page 17).Installation of the rear view camera (not supplied) is required before use.The picture from a rear view camera connected to the CAMERA IN terminal is displayed when:the back lamp of your car lights up (or the shift lever is set to the R (reverse) position).you press HOME, touch [Camera].InstallationMounting the unit in a Japanese carYou may not be able to install this unit in some Japanese cars. In such a case, consult your Sony dealer.When mounting this unit to the preinstalled brackets of your car, use the supplied screws in the appropriate screw holes based on your car: T for TOYOTA and N for NISSAN.NoteTo prevent a malfunction, install only with the supplied screws .When replacing the fuse, be sure to use one matching the amperage rating stated on the original fuse. If the fuse blows, check the power connection and replace the fuse. If the fuse blows again after replacement, there may be an internal malfunction. In such a case, consult your nearest Sony dealer.Using the wired remote controlUsing the rear view cameraFuse replacementTo the dashboard/center consoleParts supplied with your carBracketBracketFuse (10 A)010COV.book Page 31 Tuesday, August 29, 2017 11:10 AM](https://usermanual.wiki/Sony-Group/XAVAX5000/User-Guide-3636767-Page-31.png)