Sony 10720X GSM/WCDMA/LTE Phone+Bluetooth, DTS/UNII a/b/g/n and NFC User Manual Manual
Sony Mobile Communications Inc GSM/WCDMA/LTE Phone+Bluetooth, DTS/UNII a/b/g/n and NFC Manual
UserManual.wiki
>
Sony
>
10720X User Manual
>
Manual
Contents
1.
Manual
2.
Startup Guide
3.
HAC leaflet
4.
SAR leaflet
5.
HAC Leaflet
6.
SAR Leaflet
Manual
Navigation menu
Upload a User Manual
Namespaces
Wiki Guide
HTML
PDF
Info
Views
User Manual
Discussion / Help
Navigation

![Getting startedGUID GUID-939577FB-1BE0-4C23-9106-0910EFDEC761Title Getting startedChanges From Robyn RTL. Valid for eDream 3.0 - Home screen label changed.Version 2Author zzKomalLStatus ReleasedAbout this User guideThis is the Xperia™ L1 [Textvar-Cover-Product] User guide for the Android™ 7.1.1 [udoc_no_trans_An-droid_SW_version] software version. If you're not sure which software version your device isrunning, you can check it in the Settings menu.System and application updates can present the features in your device in another way thandescribed in this User guide. The Android™ version might not be affected in an update. Formore information about software updates, see Updating your device on page 58.GUID GUID-3FD60A71-9772-491D-A873-89B3E1008B1FTitle About this User guideChanges For Redwood - Android 7.0Version 8.2.1Author ZoltanSStatus DraftTo check the current software version of your device1From your Home screen [preference_title_home_wallpaper] , tap ID: ICN-SONY-HOME-APPTRAY-NORMAL .2Find Settings [settings_label_launcher] > About phone [about_settings<product="default">] > Android™version [firmware_version] .GUID GUID-7A18A334-C09F-4931-80FD-F9CEF6E518FETitle To check the current software version of your deviceChanges Home screen label change (Kugo)Version 1.1.1Author DoraMStatus ReleasedLimitations to services and featuresSome of the services and features described in this User guide may not be supportedin all countries or regions, or by all networks or service providers. The GSMInternational Emergency Number can always be used in all countries, regions,networks and by all service providers, provided that the device is connected to themobile network. Please contact your network operator or service provider todetermine the availability of any specific service or feature and whether additionalaccess or usage fees apply.The use of certain features and applications described in this guide may requireaccess to the internet. You may incur data connection charges when you connect tothe internet with your device. Contact your wireless service provider for moreinformation.GUID GUID-2871DC0F-1733-400C-A0A4-6AEC258F6444Title Limitations to services and featuresChanges Internet decappedVersion 6Author DoraM6This is an internet version of this publication. © Print only for private use.](https://usermanual.wiki/Sony/10720X.Manual/User-Guide-3336261-Page-6.png)
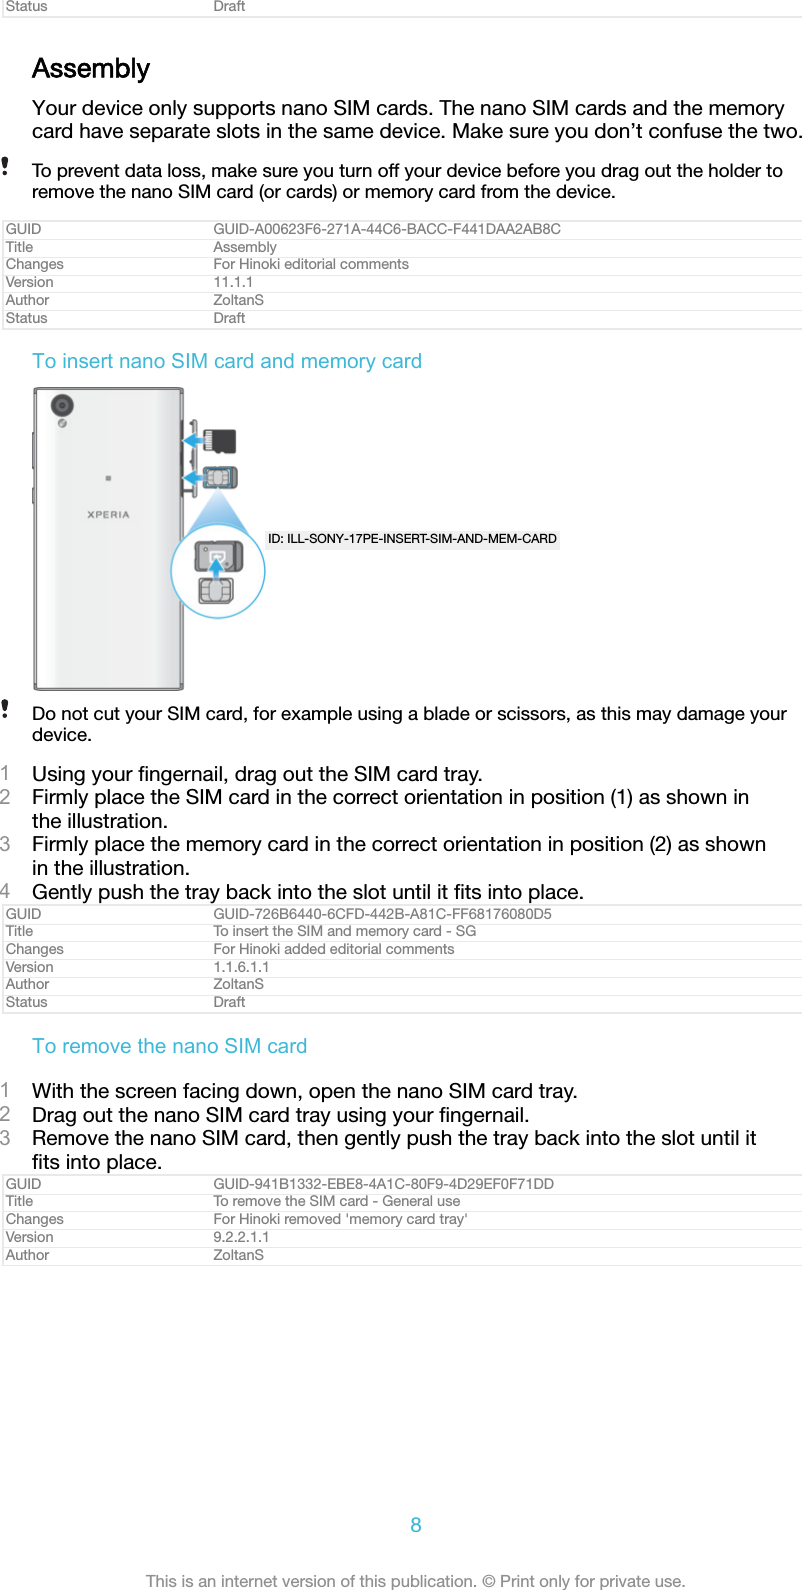
![Status ReleasedOverviewID: ILL-SONY-17PE-FRONT-OVERVIEW ID: ILL-SONY-17PE-BACK-OVERVIEW 1. Charging/Notification light2. Headset jack3. Front camera lens4. Second microphone5. Ear speaker6. Proximity/Light sensor7. Volume button8. Power key9. Main microphone10. Charger/USB Type-C™ [USB Type-C-tm]cable port11. Speaker12. Wi-Fi [udoc_no_trans_wifi_wlan_plain] /GPS/Bluetooth antenna area13. Main camera lens14. Flash15. Nano SIM/Memory card slot cover16. NFC™ detection area17. Main antenna areaGUID GUID-10B4FF0E-03C4-4B26-AFEC-84A3CD4833F8Title Overview - RDChanges Call-outs fix for PineVersion 5Author ZoltanS7This is an internet version of this publication. © Print only for private use.](https://usermanual.wiki/Sony/10720X.Manual/User-Guide-3336261-Page-7.png)
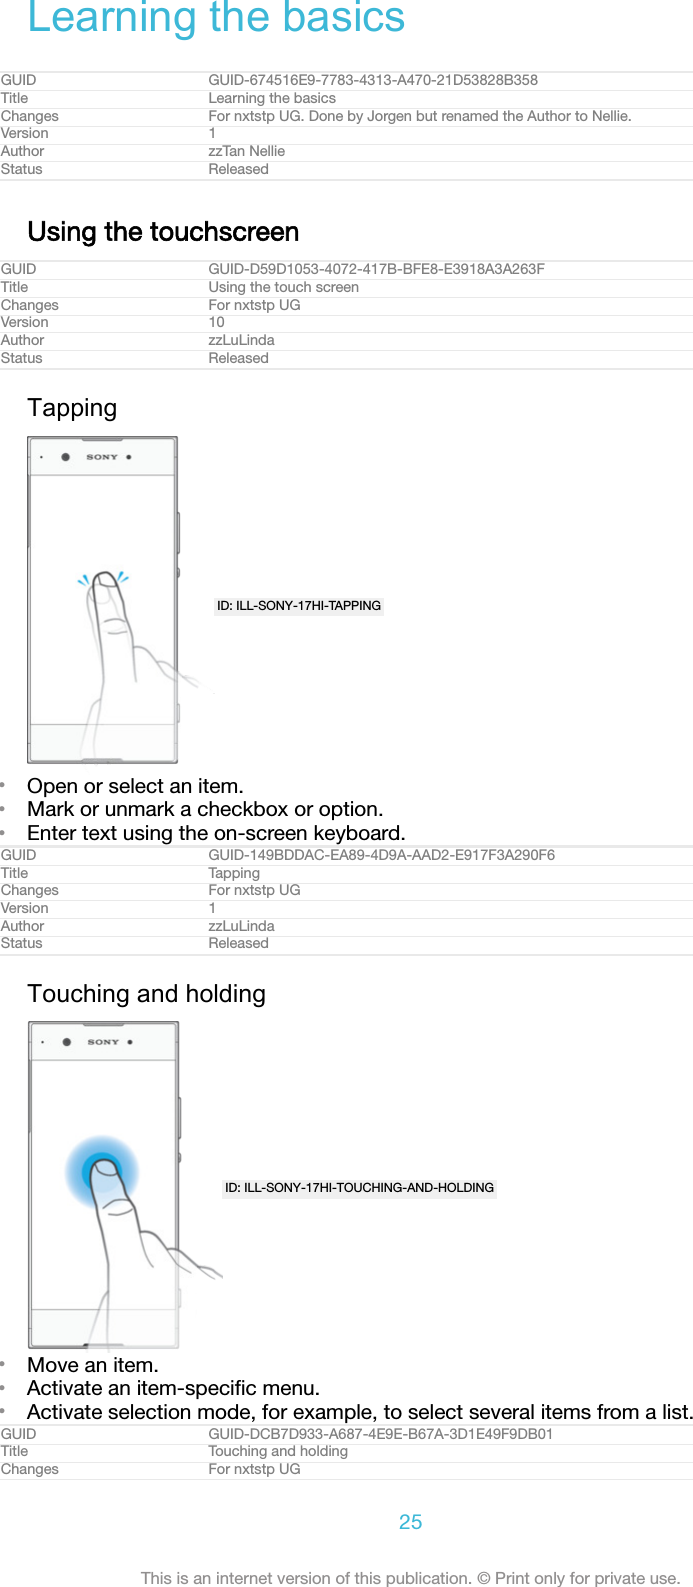
![Status DraftTo remove a memory cardID: ILL-SONY-17PE-REMOVE-MEM-CARD1Turn off your device.2With the device facing down, open the cover for the nano SIM card card tray.3Drag out the tray using your fingernail.4Remove the memory card, then reinsert the tray5Close the cover.GUID GUID-619A5E07-A310-465B-9FE6-414551E614A8Title To remove the memory card - general useChanges For Hinoki removed 'memory card tray'Version 10.2.1.1.1Author ZoltanSStatus DraftScreen protectionBefore using your device, remove the protection film by pulling up on the protruding tab.It is recommended to protect your device with a Sony branded screen cover or aprotector intended for your Xperia™ model. The use of third party screen protectionaccessories may prevent your device from working correctly by covering sensors,lenses, speakers, or microphones and can invalidate the warranty.GUID GUID-288AC71A-896C-4930-AF7D-9F76CCDD5718Title Screen protectionChanges Removed "transparent" (acc. to Hiromi's email)Version 1.1.2Author GergelyKStatus ReleasedStarting your device for the first timeIt is recommended that you charge the battery for at least 30 minutes before startingup your device for the first time. You can still use your device while it is charging, seeCharging your device on page 54.The first time you start your device, a setup guide helps you to configure basicsettings, personalise your device and sign in to your accounts, for example aGoogle™ account.GUID GUID-0860E8AA-C816-40B9-96FD-6D1C30464359Title Starting your device for the first timeChanges [ProjectX - Kagura] paragraph about charging the battery for the first time movedVersion 11Author TamasBStatus ReleasedTo turn on the deviceIt is important to use the USB Type-C™ [USB Type-C-tm] cable (provided) when charging yourdevice as other types of USB cable can damage your device. It is recommended to charge thebattery for at least 30 minutes before you turn on the device for the first time.9This is an internet version of this publication. © Print only for private use.](https://usermanual.wiki/Sony/10720X.Manual/User-Guide-3336261-Page-9.png)
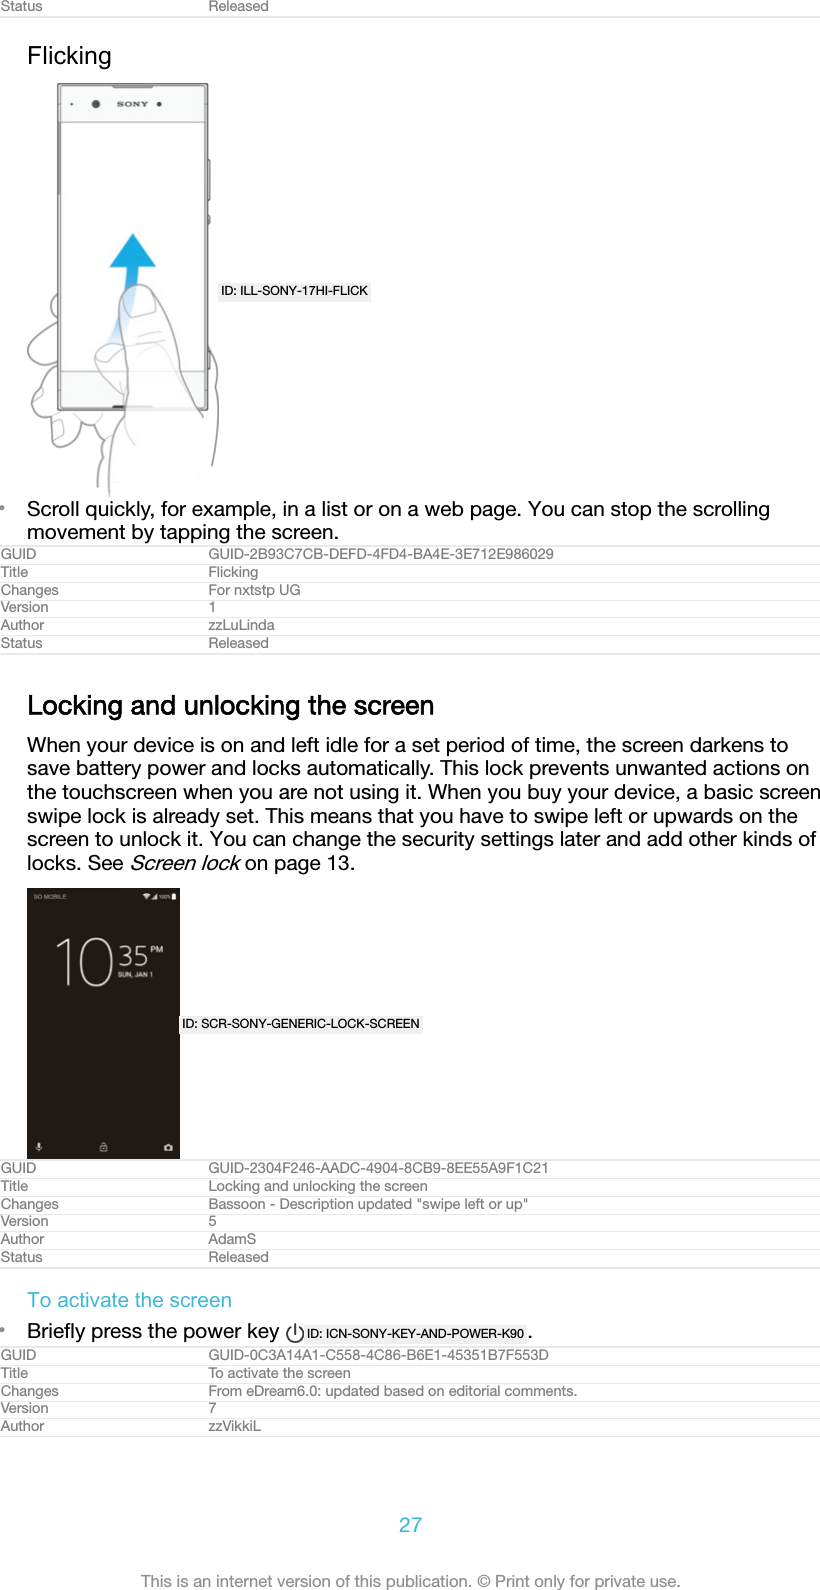
![1Press and hold down the power key ID: ICN-SONY-KEY-AND-POWER-K90 until the devicevibrates.2Enter your PIN for SIM card 1 and SIM card 2 when requested, then tap ID:ICN-SONY-TEXT-INPUT-LIGHT-ENTER .3Wait a moment for the device to start.Your SIM card PIN is initially supplied by your network operator, but you can change it laterfrom the Settings menu. To correct a mistake made while entering your SIM card PIN, tap ID: ICN-SONY-DELETE-PHONE-NUMBER-BLK .GUID GUID-69945514-1C19-44BC-A4B6-16499F44D9BBTitle To turn on the deviceChanges Kagura DS (use it only for DS devices)Version 26.1.3.1.1Author DoraMStatus ReleasedTo turn off the device1Press and hold down the power key ID: ICN-SONY-KEY-AND-POWER-K90 until the optionsmenu opens.2In the options menu, tap Power off [global_action_power_off] .It may take a while for the device to shut down.GUID GUID-18CE50BE-7FF2-40F4-B93F-8CBB76E4AF3CTitle To turn off the deviceChanges L update: delete step 3-'tap ok'.Version 8Author zzXuCindyStatus ReleasedWhy do I need a Google™ account?Your Xperia™ device from Sony runs on the Android™ platform developed byGoogle™. A range of Google™ applications and services is available on your devicewhen you purchase it, for example, Gmail™, Google Maps™, YouTube™ and thePlay Store™ application, which gives you access to the Google Play™ online storefor downloading Android™ applications. To get the most out of these services, youneed a Google™ account. For example, a Google™ account enables you to do all ofthe following:•Download and install applications from Google Play™.•Synchronise your email, contacts and calendar using Gmail™.•Chat with friends using the Duo™ application.•Synchronise your browsing history and bookmarks using the Google Chrome™ webbrowser.•Identify yourself as the authorised user after a software repair using Xperia™Companion.•Remotely find, lock or clear a lost or stolen device using the my Xperia™ orAndroid™ Device Manager services.For more information about Android™ and Google™, go tohttp://support.google.com.It is crucial that you remember your Google™ account username and password. In somesituations, you may need to identify yourself for security reasons using your Google™ account.If you fail to give your Google™ username and password in such situations, your device islocked. Also, if you have more than one Google™ account, make sure to enter the details forthe relevant account.GUID GUID-CE759E13-19AE-4AEC-8E63-215962700E87Title Why do I need a Google account?Changes Keyaki: 'Hangouts' removed 'Duo' addedVersion 10Author ZoltanS10This is an internet version of this publication. © Print only for private use.](https://usermanual.wiki/Sony/10720X.Manual/User-Guide-3336261-Page-10.png)
![Status ReleasedTo set up a Google™ account on your device1From your Home screen [preference_title_home_wallpaper] , tap ID: ICN-SONY-HOME-APPTRAY-NORMAL .2Find and tap Settings [settings_label_launcher] > Accounts & sync [settings_account_sync_title_txt] >Add account [add_account_label] > Google [SYNC-ACCOUNTS-GOOGLE-TM] .3Follow the registration wizard to create a Google™ account, or sign in if youalready have an account.You can also sign in to or create a Google™ account from the setup guide the first time youstart your device. Alternatively, you can go online and create an account atwww.google.com/accounts.GUID GUID-BF97C658-8B71-43CE-B8CF-47DD6D0FC9A6Title To set up a Google™ account on your deviceChanges Home screen label change (Kugo) and Account & sync renamed to Accounts & syncVersion 12.1.1.1.2Author DoraMStatus ReleasedTo remove a Google™ account1From your Home screen [preference_title_home_wallpaper] , tap ID: ICN-SONY-HOME-APPTRAY-NORMAL .2Tap Settings [settings_label] > Accounts & sync [settings_account_sync_title_txt] > Google [SYNC-AC-COUNTS-GOOGLE-TM] .3Select the Google™ account that you want to remove.4Tap ID: ICN-SONY-KEY-MENU > Remove account [remove_account_label] .5Tap Remove account [remove_account_label] again to confirm.If you remove your Google™ account, any security features that are linked to your Google™account will no longer be available.GUID GUID-B4F75C86-230E-481B-9A12-7ADF12525940Title To remove a Google accountChanges Home screen label change (Kugo), Account & sync renamed to Accounts & syncVersion 13Author DoraMStatus Released11This is an internet version of this publication. © Print only for private use.](https://usermanual.wiki/Sony/10720X.Manual/User-Guide-3336261-Page-11.png)

![Status ReleasedScreen lockThere are several screen lock options available. The security level of each lock type islisted below in order of weakest to strongest:•Swipe: no protection, but you have quick access to the Home screen.•Pattern: draw a simple pattern with your finger to unlock your device.•PIN: enter a numeric PIN of at least four digits to unlock your device.•Password: enter an alpha-numeric password to unlock your device.It is very important that you remember your screen lock pattern, PIN or password. Ifyou forget this information, it may not be possible to restore important data such ascontacts and messages. If you have set up a Microsoft® Exchange ActiveSync®(EAS) account on your Xperia™ device, the EAS security settings may limit the lockscreen type to only a PIN or password. This occurs when your network administratorspecifies a lock screen type for all EAS accounts for enterprise security reasons.Contact the network administrator of your company or organisation to check whatnetwork security policies are implemented for mobile devices.For more settings for each screen lock type tap ID: ICN-SONY-MENU-SETTINGS beside Screen lock[unlock_set_unlock_launch_picker_title] .GUID GUID-4547BE00-5531-4D7D-A548-729E8A0178A7Title Screen lockChanges Functional review comment implemented for KeyakiVersion 16Author RenataBStatus ReleasedTo create a screen lock pattern1From your Home screen [preference_title_home_wallpaper] , tap ID: ICN-SONY-HOME-APPTRAY-NORMAL .2Find and tap Settings [settings_label] > Lock screen & security [settings_security_and_lockscreen_ti-tle_txt] > Screen lock [unlock_set_unlock_launch_picker_title] > Pattern [unlock_set_unlock_pattern_title] .3Choose an option and follow the instructions on your device.If you enter an incorrect lock pattern five times in a row, you must wait 30 seconds beforetrying again.GUID GUID-346DE791-CADA-4BF1-A919-5CAC0817272ATitle To create a screen unlock patternChanges New step added for HinokiVersion 12Author RenataBStatus ReleasedTo change your screen lock type1From your Home screen [preference_title_home_wallpaper] , tap ID: ICN-SONY-HOME-APPTRAY-NORMAL .2Find and tap Settings [settings_label] > Lock screen & security [settings_security_and_lockscreen_ti-tle_txt] > Screen lock [unlock_set_unlock_launch_picker_title] .3Choose an option and follow the instructions on your device.GUID GUID-0774BB02-CDDD-427C-A960-B0C33C84726FTitle To change to another screen lockChanges New step included for HinokiVersion 6Author RenataB13This is an internet version of this publication. © Print only for private use.](https://usermanual.wiki/Sony/10720X.Manual/User-Guide-3336261-Page-13.png)
![Status ReleasedTo change the screen lock pattern1From your Home screen [preference_title_home_wallpaper] , tap ID: ICN-SONY-HOME-APPTRAY-NORMAL .2Find and tap Settings [settings_label] > Lock screen & security [settings_security_and_lockscreen_ti-tle_txt] > Screen lock [unlock_set_unlock_launch_picker_title] .3Draw your screen unlock pattern.4Tap Pattern [unlock_set_unlock_pattern_title] , choose an option and follow the instructionson your device.GUID GUID-4D9F9FE9-FB5F-4CE2-A6B2-FFEC5389E3C3Title To change the screen unlock patternChanges New step included for HinokiVersion 11Author RenataBStatus ReleasedTo create a screen lock PIN1From your Home screen [preference_title_home_wallpaper] , tap ID: ICN-SONY-HOME-APPTRAY-NORMAL .2Find and tap Settings [settings_label] > Lock screen & security [settings_security_and_lockscreen_ti-tle_txt] > Screen lock [unlock_set_unlock_launch_picker_title] > PIN [unlock_set_unlock_pin_title] .3Choose an option. Enter a numeric PIN, then tap CONTINUE [runtimepermis-sion_strings_somc_dialog2_continue_btn_txt] .4Re-enter and confirm your PIN, then tap OK [ok] .GUID GUID-BDD43B55-3A1E-4985-9722-9214A515C52BTitle To create a screen lock PINChanges Icon varref fix for KeyakiVersion 10Author RenataBStatus ReleasedTo create a screen lock password1From your Home screen [preference_title_home_wallpaper] , tap ID: ICN-SONY-HOME-APPTRAY-NORMAL .2Find and tap Settings [settings_label] > Lock screen & security [settings_security_and_lockscreen_ti-tle_txt] > Screen lock [unlock_set_unlock_launch_picker_title] > Password [lockscreen_glogin_password_hint] .3Choose an option and follow the instructions on your device.GUID GUID-CC50D2CE-E557-4CAE-AEF5-5372F02B7D39Title To create a screen lock passwordChanges New step included for HinokiVersion 9Author RenataBStatus ReleasedTo activate the Swipe unlock function1From your Home screen [preference_title_home_wallpaper] , tap ID: ICN-SONY-HOME-APPTRAY-NORMAL .2Find and tap Settings [settings_label] > Lock screen & security [settings_security_and_lockscreen_ti-tle_txt] > Screen lock [unlock_set_unlock_launch_picker_title] .3Draw your screen unlock pattern, or enter your PIN or password depending onwhich of these screen lock types is enabled.4Tap Swipe [unlock_set_unlock_none_title] , then tap YES, REMOVE [smart_lock_trusted_device_remove] .GUID GUID-23F9B750-20DF-4F14-8267-5CFC862C3D61Title To activate the Swipe unlock functionChanges Label in caps in step 4for N-updateVersion 5Author RenataBStatus ReleasedResetting a forgotten screen lockIf you’ve forgotten your screen lock PIN, password or pattern, you may be able toreset it using the Protection by my Xperia service. No content on your device is lostafter you have performed a screen lock reset using this service.14This is an internet version of this publication. © Print only for private use.](https://usermanual.wiki/Sony/10720X.Manual/User-Guide-3336261-Page-14.png)
![GUID GUID-EA573070-D614-430A-8CA9-010F6956281ATitle Resetting a forgotten screen lockChanges removing cross referenceVersion 3Author SzilviaMStatus ReleasedTo reset the screen lock using Protection by my Xperia1Make sure you know your Google™ account username and password and thatyou have enabled the Protection by my Xperia service on your device.2Go to myxperia.sonymobile.com using any internet-connected device.3Sign in using the same Google™ account that you have set up on your device.4Click the picture of your device under Your devices [screen_lock_your_devices] .5Select Lock [SUMMARY_DEVICE_SCREEN_LOCK_DEVICE] to replace the current screen lockwith a new PIN code.6Follow the on-screen instructions provided by Protection by my Xperia.Depending on your security settings, your device may lock after a screen lock reset. You thenneed to enter your Google™ account username and password in order to use the device.GUID GUID-96DE3A7D-AD9F-4321-A5F6-00DF57E109A9Title To reset the screen lock using Protection by my XperiaChanges Label change in step 5 for Sumirre N-updateVersion 2.2.1Author RenataBStatus ReleasedUnlocking your device automaticallyThe Smart Lock feature makes unlocking your device easier by letting you set it tounlock automatically in certain situations. You can keep your device unlocked, forexample, when it’s connected to a Bluetooth® device or when you’re carrying it withyou. With Smart Lock enabled you still need to unlock your device manually afterrestarting, and after leaving the device inactive for 4 hours.You can set Smart Lock to keep your device unlocked using the following settings:•On-body detection [udoc_trans_smart_lock_onbody_detection] : Keep your device unlocked whenyou're carrying it with you.•Trusted places [udoc_trans_smart_lock_trusted_places] : Keep your device unlocked when you're in afamiliar, secure location such as your home.•Trusted devices [usbux_strings_trusted_hosts_title_txt] : Keep your device unlocked when a trustedBluetooth® or NFC device is connected.•Trusted face [smart_lock_trusted_face] : Unlock your device by looking at it.•Trusted voice [smart_lock_trusted_voice] : Set up voice recognition to search in any screen.The Smart Lock feature is developed by Google™ and its exact functionality may change overtime due to updates from Google™. Furthermore the feature may not be available in everymarket, country or region.GUID GUID-001EB2D7-32D1-4261-AF7E-2A604856D8FFTitle Unlocking your device automaticallyChanges Notes removed and context reedited for RedwoodVersion 6Author RenataB15This is an internet version of this publication. © Print only for private use.](https://usermanual.wiki/Sony/10720X.Manual/User-Guide-3336261-Page-15.png)
![Status DraftTo enable Smart Lock1Set a pattern, PIN or password as a screen lock if you have not already doneso.2From your Home screen [preference_title_home_wallpaper] , tap ID: ICN-SONY-HOME-APPTRAY-NORMAL .3Find and tap Settings [settings_label] > Lock screen & security [settings_security_and_lockscreen_ti-tle_txt] > Trust agents [manage_trust_agents] .4Tap the Smart Lock (Google) [udoc_trans_smart_lock_title_google] slider to enable thefunction.5Tap the back arrow next to Trust agents [manage_trust_agents] .6Find and tap Smart Lock [udoc_trans_smart_lock_title] .7Enter your pattern, PIN or password. You need to enter these credentialswhenever you want to change your Smart Lock settings.8Select a Smart Lock type.GUID GUID-C6875CAA-CDFB-4FC3-9BA5-55076C9E1E8DTitle To enable Smart LockChanges Text change in step 7Version 5Author RenataBStatus ReleasedTo set up or remove trusted face1From your Home screen [preference_title_home_wallpaper] , tap ID: ICN-SONY-HOME-APPTRAY-NORMAL .2Find and tap Settings [settings_label] > Lock screen & security [settings_security_and_lockscreen_ti-tle_txt] > Smart Lock [udoc_trans_smart_lock_title] > Trusted face [smart_lock_trusted_face] .3Tap SET UP [smartLock_card_positive_label] > NEXT [button_next] . Follow the instructions onyour device, then tap FINISHED [trustedface_setup_finish_caps] .4To remove a trusted face, tap Remove trusted face [remove_trusted_face] > REMOVE[remove_trusted_face_caps] .For enhanced accuracy, tap Trusted face [smart_lock_trusted_face] > Improve face-matching [im-prove_face_matching] .GUID GUID-5BD24B2F-DEF5-4B83-9813-6A4F68B74E7ATitle To enable trusted faceChanges Info added for HinokiVersion 2Author RenataBStatus ReleasedTo set up trusted voice1From your Home screen [preference_title_home_wallpaper] , tap ID: ICN-SONY-HOME-APPTRAY-NORMAL .2Find and tap Settings [settings_label] > Lock screen & security [settings_security_and_lockscreen_ti-tle_txt] > Smart Lock [udoc_trans_smart_lock_title] > Trusted voice [smart_lock_trusted_voice] .3Follow the instructions on your device.GUID GUID-F3F9A664-81F7-4B87-8450-8DE3445C8781Title To set up trusted voiceChanges Spelling mistake fix for HinokiVersion 3Author RenataBStatus ReleasedKeeping your device unlocked while you’re carrying itUsing the On-body detection feature, you can keep your device unlocked whileyou're carrying it in your hand or in a pocket or bag. The accelerometer in your devicekeeps your device unlocked while it senses that it's being carried. The device lockswhen the accelerometer detects that the device has been put down.When you use the On-body detection feature, you need to be aware of the followingbehaviours:16This is an internet version of this publication. © Print only for private use.](https://usermanual.wiki/Sony/10720X.Manual/User-Guide-3336261-Page-16.png)
![•Any time you put your device down and it senses that it's no longer being carried, itlocks automatically.•The device can take up to one minute to lock.•After you get into a car, bus, train or other land vehicle, your device can take between5 and 10 minutes to lock.•Note that when you get on an airplane or a boat (or another non-land based vehicle),your device may not lock automatically, so make sure to lock it manually if needed.•When you pick up your device again or get out of the vehicle, just unlock it once andyour device then stays unlocked for as long as you have it on you.The On-body detection feature can't distinguish whose body is connected. If you give yourdevice to someone else while it's unlocked using On-body detection, your device may stayunlocked for the other user. Keep in mind that On-body detection as a security feature is lesssecure than a pattern, PIN, or password.GUID GUID-E6E2E97A-29CD-4FF5-A020-0DB0C13BA9FDTitle Keeping your device unlocked while you’re carrying itChanges Merge the topic with Using on-body detectionVersion 3Author RenataBStatus ReleasedTo enable or disable On-body detection1From your Home screen [preference_title_home_wallpaper] , tap ID: ICN-SONY-HOME-APPTRAY-NORMAL .2Find and tap Settings [settings_label] > Lock screen & security [settings_security_and_lockscreen_ti-tle_txt] > Smart Lock [udoc_trans_smart_lock_title] > On-body detection [udoc_trans_smart_lock_onbody_de-tection] .3Tap the slider to enable the function, then tap CONTINUE [runtimepermis-sion_strings_somc_dialog2_continue_btn_txt] . To disable the function tap the slider beside On[switch_on_text] .GUID GUID-6DFB587F-E7F9-4844-8B1D-5346D3079017Title To enable on-body detectionChanges Label in caps in step 3 for N-updateVersion 6Author RenataBStatus ReleasedConnecting to trusted devicesYou can designate a connected device as trusted and keep your Xperia™ deviceunlocked while connected. If you have a device that you connect to regularly usingBluetooth® or NFC, for example, a home entertainment system or a fitness tracker,you can add it as a trusted device and bypass the added security of the lock screento save time. This feature is suitable if you’re normally in a relatively secure placewhen you use these devices. In some cases, you may still need to manually unlockyour device before a trusted device can be connected.It is not recommended to add devices that are constantly connected to your device as trusteddevices, for example, Bluetooth® keyboards or cases.As soon as a trusted device is switched off or moves out of range, your screen locks and youneed your PIN, pattern or password to unlock it.GUID GUID-0D1C5BD4-A0CA-4306-A5BE-ED301B132009Title Connecting to trusted Bluetooth devicesChanges Title changed for N-update KitakamiVersion 3Author RenataB17This is an internet version of this publication. © Print only for private use.](https://usermanual.wiki/Sony/10720X.Manual/User-Guide-3336261-Page-17.png)
![Status ReleasedTo add or remove a trusted Bluetooth® device1Make sure your device is paired and connected to the Bluetooth® device thatyou want to add as a trusted device.2From your Home screen [preference_title_home_wallpaper] , tap ID: ICN-SONY-HOME-APPTRAY-NORMAL .3Find and tap Settings [settings_label] > Lock screen & security [settings_security_and_lockscreen_ti-tle_txt] > Smart Lock [udoc_trans_smart_lock_title] .4In the Smart lock menu tap Trusted devices [usbux_strings_trusted_hosts_title_txt] > ADDTRUSTED DEVICE [smart_lock_add_trusted_device] > Bluetooth [bluetooth_quick_toggle_title] .5Tap a device name to select it from the list of connected and paired devices,then tap YES, ADD [smart_lock_trusted_device_add] .6To remove a paired device, select it from the list and tap REMOVE TRUSTEDDEVICE [remove_trusted_device_caps] .GUID GUID-AE0E015F-05AD-4190-A72C-5B0B5AD7CA0CTitle To add or remove a trusted Bluetooth deviceChanges Label in caps for Keyaki/HinokiVersion 4Author RenataBStatus ReleasedTo add or remove a trusted NFC device1Make sure your device is paired and connected to the Bluetooth® device thatyou want to add as a trusted device.2Find and tap Settings [settings_label] > Lock screen & security [settings_security_and_lockscreen_ti-tle_txt] > Smart Lock [udoc_trans_smart_lock_title] .3Tap Trusted devices [usbux_strings_trusted_hosts_title_txt] > ADD TRUSTED DEVICE[smart_lock_add_trusted_device] > NFC [nfc_title_txt] .4Follow the on-screen instructions.5To remove a paired device, select it from the list and tap REMOVE TRUSTEDDEVICE [remove_trusted_device_caps]GUID GUID-4D57DC8A-D693-4834-8507-DF6B21EAB934Title To add or remove a trusted NFC deviceChanges Add and remove topic mergedVersion 3Author RenataBStatus ReleasedMaking sure you're secure when using trusted devicesDifferent Bluetooth® devices support different Bluetooth® standards and securitycapabilities. There's a possibility that someone could keep your Xperia™ deviceunlocked by imitating your Bluetooth® connection, even if your trusted device is nolonger nearby. Your device is not always able to determine whether your connectionis secure from someone trying to imitate it.When your device can't determine whether you're using a secure connection, you'llget a notification on your Xperia™ device and may need to manually unlock it beforethe trusted device can keep it unlocked.Bluetooth® connectivity range can vary depending on factors like the model of your device,the connected Bluetooth® device, and your environment. Depending on these factors,Bluetooth® connections can work over distances up to 100 metres.GUID GUID-A08298F5-25D4-418D-8F57-1A33F335E085Title Making sure you're secure when using trusted devicesChanges Text change due to ed commentsVersion 2Author AdelKStatus ReleasedConnecting to trusted placesWhen the Trusted places feature is set up, the lock screen security on your Xperia™device gets disabled when you are in a designated trusted location. For this feature to18This is an internet version of this publication. © Print only for private use.](https://usermanual.wiki/Sony/10720X.Manual/User-Guide-3336261-Page-18.png)
![work, you must have an internet connection (preferably over Wi-Fi [udoc_no_trans_wi-fi_wlan_plain] ) and allow your device to use your current location.To set up trusted places, first make sure that high accuracy location mode or battery-saving location mode is enabled on your device before you add home or customlocations.The exact dimensions of a trusted location are an estimate and may extend beyond thephysical walls of your home or other areas that you have added as a trusted locations. Thisfeature can keep your device unlocked within a radius of up to 80 metres. Also be aware thatlocation signals can be replicated or manipulated. Someone with access to specialisedequipment could unlock your device.GUID GUID-C3F1CBA6-F492-4015-9519-0EA032A48E20Title Connecting to trusted placesChanges Internet decapedVersion 4Author RenataBStatus ReleasedTo add your home location1From your Home screen [preference_title_home_wallpaper] , tap ID: ICN-SONY-HOME-APPTRAY-NORMAL .2Find and tap Settings [settings_label] > Lock screen & security [settings_security_and_lockscreen_ti-tle_txt] > Smart Lock [udoc_trans_smart_lock_title] > Trusted places [udoc_trans_smart_lock_trusted_places] >Home [udoc_trans_smart_lock_trusted_home] .3To enter the desired location type the address in the search bar. Your devicesearches for the entered location.GUID GUID-29D4C6EB-8DD3-483A-ABF1-C3F655969028Title To add your home locationChanges First 4 steps removed for PineVersion 9Author RenataBStatus ReleasedTo edit your home location1From your Home screen [preference_title_home_wallpaper] , tap ID: ICN-SONY-HOME-APPTRAY-NORMAL .2Find and tap Settings [settings_label] > Lock screen & security [settings_security_and_lockscreen_ti-tle_txt] > Smart Lock [udoc_trans_smart_lock_title] > Trusted places [udoc_trans_smart_lock_trusted_places] .3Select your home location.4Tap Edit [udoc_trans_smart_lock_trusted_edit] .5In the search bar, enter the location that you want to use as your homelocation.If other residences share your street address, you can add the actual location of your homewithin the building complex as a custom place.GUID GUID-EE26FAFE-864D-41E0-AF61-7633053EFCF2Title To edit your home locationChanges First 4 steps removed for PineVersion 6Author RenataBStatus ReleasedTo remove your home location1From your Home screen [preference_title_home_wallpaper] , tap ID: ICN-SONY-HOME-APPTRAY-NORMAL .2Find and tap Settings [settings_label] > Lock screen & security [settings_security_and_lockscreen_ti-tle_txt] > Smart Lock [udoc_trans_smart_lock_title] > Trusted places [udoc_trans_smart_lock_trusted_places] >Home [udoc_trans_smart_lock_trusted_home] .3Tap Edit [udoc_trans_smart_lock_trusted_edit] > ID: ICN-SONY-MENU-DELETE .GUID GUID-C4B58A0F-C460-4CD3-B953-9A9F90FB8246Title To remove your home locationChanges Less steps for Kitakami N-updateVersion 6Author RenataB19This is an internet version of this publication. © Print only for private use.](https://usermanual.wiki/Sony/10720X.Manual/User-Guide-3336261-Page-19.png)
![Status ReleasedUsing custom locationsYou can add any location as a trusted, custom place where your device can remainunlocked.GUID GUID-80A5D4A0-3A0B-4331-AB0F-A167FDB9192BTitle Using custom locationsChanges Valid from Android 5.0.Version 1Author zzVera QuStatus ReleasedTo add a custom place1From your Home screen [preference_title_home_wallpaper] , tap ID: ICN-SONY-HOME-APPTRAY-NORMAL .2Find and tap Settings [settings_label] > Lock screen & security [settings_security_and_lockscreen_ti-tle_txt] > Smart Lock [udoc_trans_smart_lock_title] > Trusted places [udoc_trans_smart_lock_trusted_places] .3Tap Add trusted place [udoc_trans_smart_lock_add_tursted_location] .4To use your current location as a custom place, tap Select this location[udoc_trans_smart_lock_select_this_location] .5Alternatively, to enter another location, tap ID: ICN-SONY-MENU-SEARCH and type theaddress. Your device searches for the entered location. Tap the suggestedaddress, to use it.6To fine-tune the location, tap the back arrow next to the address, drag thelocation pin to the desired location, then tap Select this location[udoc_trans_smart_lock_select_this_location] .GUID GUID-251D9E81-EC13-4D63-97E8-046E6B5F6FFBTitle To add a custom placeChanges Icon varref changed for KeyakiVersion 8Author RenataBStatus ReleasedTo edit a custom place1From your Home screen [preference_title_home_wallpaper] , tap ID: ICN-SONY-HOME-APPTRAY-NORMAL .2Find and tap Settings [settings_label] > Lock screen & security [settings_security_and_lockscreen_ti-tle_txt] > Smart Lock [udoc_trans_smart_lock_title] > Trusted places [udoc_trans_smart_lock_trusted_places] .3Select the place that you want to edit.4Tap Edit Address [udoc_trans_smart_lock_edit_address] .5To enter another location, tap ID: ICN-SONY-MENU-SEARCH and then type the address.Your device searches for the entered location. To use the suggested address,tap the address.6To fine-tune the location, tap the back arrow next to the address, drag thelocation pin to the desired location, then tap Select this location[udoc_trans_smart_lock_select_this_location] .GUID GUID-D7CF2365-7F1B-40DC-84DC-698D0F8EB071Title To edit a custom placeChanges Icon varref changed for KeyakiVersion 8Author RenataBStatus ReleasedTo remove a custom place1From your Home screen [preference_title_home_wallpaper] , tap ID: ICN-SONY-HOME-APPTRAY-NORMAL .2Find and tap Settings [settings_label] > Lock screen & security [settings_security_and_lockscreen_ti-tle_txt] > Smart Lock [udoc_trans_smart_lock_title] > Trusted places [udoc_trans_smart_lock_trusted_places] .3Select the place that you want to remove.4Tap Delete [udoc_trans_smart_lock_delete_address] .GUID GUID-D44D1708-DEFE-4FFC-854F-B9827D012A9FTitle To remove a custom placeChanges First 3 steps removedVersion 620This is an internet version of this publication. © Print only for private use.](https://usermanual.wiki/Sony/10720X.Manual/User-Guide-3336261-Page-20.png)
![Author RenataBStatus ReleasedSIM card protectionYou can lock and unlock each SIM card that you use in your device with a PIN(Personal Identification Number). When a SIM card is locked, the subscription linkedto the card is protected against misuse, meaning that you have to enter a PIN everytime you start your device.If you enter the PIN incorrectly too many times, your SIM card will get blocked. Youthen need to enter your PUK (Personal Unblocking Key) and a new PIN. Your PIN andPUK are supplied by your network operator.GUID GUID-ABAFC2D8-055E-4E92-87A7-DB201A033D00Title SIM card protectionChanges Implement ed commentsVersion 10.1.1Author RenataBStatus ReleasedTo set up or remove a SIM card lock1From the Home screen, tap ID: ICN-SONY-HOME-APPTRAY-NORMAL .2Find and tap Settings [settings_label] > Lock screen & security [settings_security_and_lockscreen_ti-tle_txt] > Set up SIM card lock [sim_lock_settings_category] .3Tap the Lock SIM card [sim_enable_sim_lock] slider to enable or disable the SIM cardlock.4Enter the SIM card PIN and tap OK [ok] . The SIM card lock is now active andyou will be prompted to enter the PIN every time you restart the device.GUID GUID-6EE5F448-300C-4E11-A5DF-B9BD5DA8014DTitle To set up a SIM card lockChanges Fix label error due to resource filesVersion 5.1.2Author RenataBStatus ReleasedTo change the SIM card PIN1From the Home screen [preference_title_home_wallpaper] , tap ID: ICN-SONY-HOME-APPTRAY-NORMAL .2Find and tap Settings [settings_label] > Lock screen & security [settings_security_and_lockscreen_ti-tle_txt] > Set up SIM card lock [sim_lock_settings_category] .3Tap Change SIM PIN [sim_pin_change] .4Enter the old SIM card PIN and tap OK [ok] .5Enter the new SIM card PIN and tap OK [ok] .6Re-type the new SIM card PIN and tap OK [ok] .GUID GUID-66762638-590B-495A-98A3-1FB8ED5F6955Title To change the SIM card PINChanges Fix label error due to resource filesVersion 10Author RenataBStatus ReleasedTo unlock a blocked SIM card using the PUK code1Enter the PUK code and tap ID: ICN-SONY-TEXT-INPUT-LIGHT-ENTER .2Enter a new PIN code and tap ID: ICN-SONY-TEXT-INPUT-LIGHT-ENTER .3Re-enter the new PIN code and tap ID: ICN-SONY-TEXT-INPUT-LIGHT-ENTER .If you enter an incorrect PUK code too many times, you need to contact your network operatorto get a new SIM card.GUID GUID-6654AA24-3864-4B15-A219-FC7C1CC95986Title To unlock a locked SIM cardChanges Icon varref fix for Kitakami N-updateVersion 11.3.2Author RenataB21This is an internet version of this publication. © Print only for private use.](https://usermanual.wiki/Sony/10720X.Manual/User-Guide-3336261-Page-21.png)
![Status ReleasedFinding the identification number of your deviceYour device has a unique identification number. This number is referred to as the IMEI(International Mobile Equipment Identity). You should keep a copy of this number.You may require it, for example, when you access the Xperia™ Care support serviceto register your device. Also, if your device is stolen, some network providers can usethis number to stop the device from accessing the network in your country or region.GUID GUID-D05972EA-29A9-4C5D-B5DB-9714DD83632ETitle IMEI numberChanges Implement ED commentVersion 6.1.2Author RenataBStatus ReleasedTo view your IMEI number on the label stripID: ILL-SONY-17PE-KRC1Open the cover for the nano SIM and memory card slot.2Remove the SIM Card tray.3Drag the strip outwards using your fingernail. The IMEI number is displayed onthe strip.You can also view the IMEI number by opening the phone dialer and entering *#06#.GUID GUID-0DA2A023-E45B-4D48-8205-AA78D4887688Title To view your IMEI number - OdinChanges Varref fix for PineVersion 23Author RenataBStatus DraftTo view your IMEI number via the device settings1From your Home screen [preference_title_home_wallpaper] , tap ID: ICN-SONY-HOME-APPTRAY-NORMAL .2Find and tap Settings [settings_label_launcher] > About phone [about_settings<product="default">] >Status [device_status] > IMEI information [imei_information_title] .GUID GUID-8EC38745-EBB2-49E3-BD47-B16DC4DCC17FTitle To view your IMEI number in the phoneChanges Fix label errors due to resource filesVersion 11Author RenataB22This is an internet version of this publication. © Print only for private use.](https://usermanual.wiki/Sony/10720X.Manual/User-Guide-3336261-Page-22.png)
![Status ReleasedFinding a lost deviceID: SCR-SONY-MY-XPERIAIf you have a Google™ account, the “Protection by my Xperia” web service can helpyou locate and secure your device if you ever lose it. If you have activated this serviceon your device, you can:•Locate your device on a map.•Sound an alert even if the device is in Do not disturb mode.•Remotely lock the device and make the device display your contact details to anyonewho finds it.•Remotely clear the internal and external memory of the device as a last resort.If you’ve cleared the internal memory of the device using the “Protection by my Xperia” webservice, you must sign in to a Google™ account that was previously synced on this device thenext time you turn on the device.The “Protection by my Xperia” service may not be available in all countries or regions.GUID GUID-26350A43-1644-49F4-ADC3-28A228DD7464Title Finding a lost deviceChanges Implement ed commentsVersion 5.2.1Author RenataBStatus ReleasedTo activate Protection by my Xperia1Make sure you have an active data connection, and enable location serviceson your device.2From your Home screen [preference_title_home_wallpaper] , tap ID: ICN-SONY-HOME-APPTRAY-NORMAL .3Find and tap Settings [settings_label] > Lock screen & security [settings_security_and_lockscreen_ti-tle_txt] > Protection by my Xperia [preference_title] > ACTIVATE [activate_capital] .4Mark the checkbox to agree to the terms and conditions of the service, thentap ACCEPT [dialog_button_accept_cap] .5If prompted, sign in to your Google™ account, or create a new account if youdon’t already have one.6To verify that Protection by my Xperia can locate your device, go tomyxperia.sonymobile.com and sign in to your Google™ account.If you are sharing a device with multiple users, note that the Protection by my Xperia service isonly available to the user who is logged in as the owner.GUID GUID-7ABF3EC4-77A8-4211-9E38-0A415421E783Title To activate the “my Xperia” serviceChanges Varref fix for KeyakiVersion 13Author RenataBStatus ReleasedFinding a lost device using Android™ Device ManagerGoogle™ offers a location and security web service called Android™ DeviceManager. You can use it in parallel with, or as an alternative to, the Protection by myXperia service. If you lose your device, you can use Android™ Device Manager to:23This is an internet version of this publication. © Print only for private use.](https://usermanual.wiki/Sony/10720X.Manual/User-Guide-3336261-Page-23.png)
![•Find and show where your device is located.•Ring or lock your device, erase everything on it, or add a phone number to the lockscreen.For additional information about Android™ Device Manager, go towww.support.google.com.Android™ Device Manager does not work if your device is turned off or if it does not have aconnection to the internet. The Android™ Device Manager service may not be available in allcountries or regions.GUID GUID-31DA1FDF-9CFB-4F30-BF86-E5051D937F47Title Finding a lost device using Android Device ManagerChanges Internet decapedVersion 2Author RenataBStatus ReleasedTo activate Android™ Device Manager1If you are sharing a device with multiple users, make sure that you are loggedin as the owner.2Make sure that you have an active data connection and that location servicesare enabled.3From your Home screen [preference_title_home_wallpaper] , tap ID: ICN-SONY-HOME-APPTRAY-NORMAL .4Find and tap Settings [settings_label] > Google [SYNC-ACCOUNTS-GOOGLE-TM] > Security [securi-ty_settings_title] .5Tap the sliders beside Remotely locate this device [udoc_trans_google_remote_locate] andAllow remote lock and erase [udoc_trans_google_remote_lock] to enable both functions.6If prompted, agree to the terms and conditions by tapping Activate this deviceadministrator [add_device_admin] .7To verify that Android™ Device Manager can locate your device after youactivate the service, go to www.android.com/devicemanager and sign in usingyour Google™ account.You can also activate Android™ Device Manager from Lock screen & security [settings_securi-ty_and_lockscreen_title_txt] under Device administrators.GUID GUID-6B9ADD4C-DB85-494E-AE5F-EBC78A5E64C8Title To activate Android Device ManagerChanges Steps change for N updateVersion 5Author RenataBStatus Released24This is an internet version of this publication. © Print only for private use.](https://usermanual.wiki/Sony/10720X.Manual/User-Guide-3336261-Page-24.png)

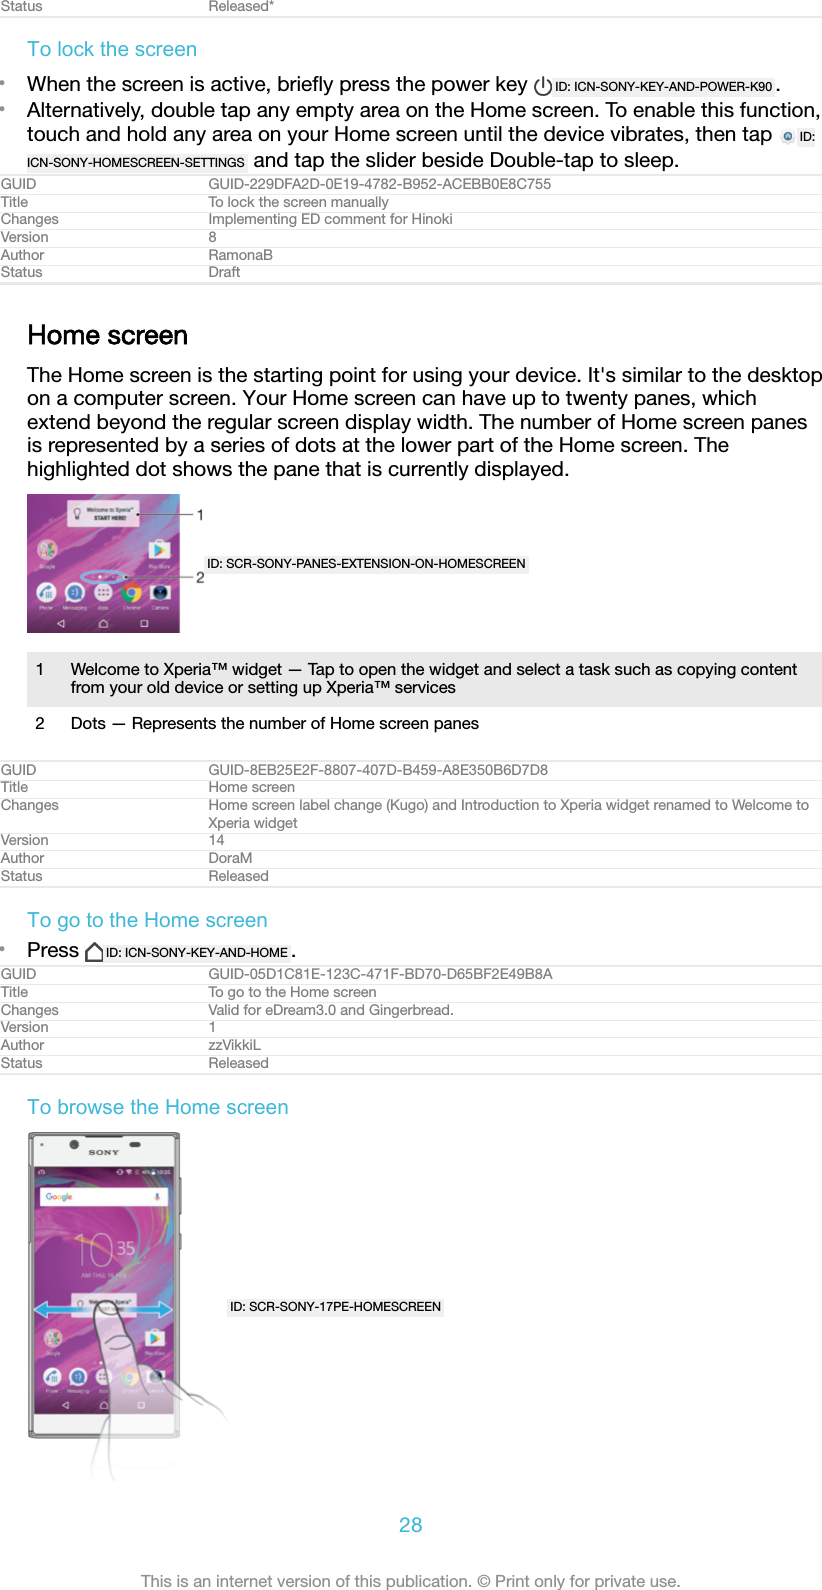
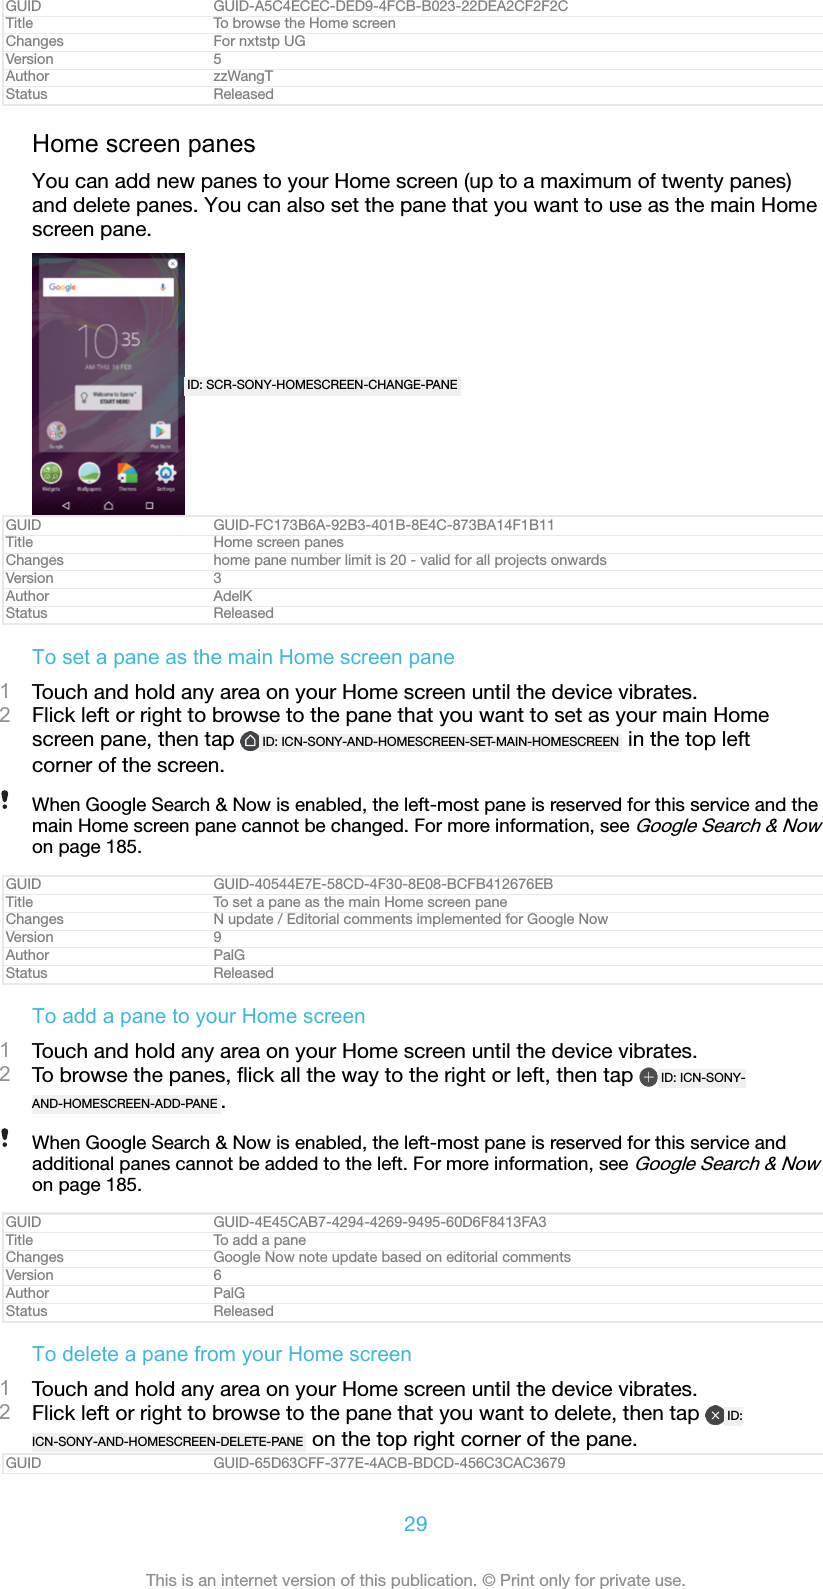
![Title To delete a pane from your Home screenChanges Update step 2; add instruction for the delete iconVersion 2Author zzLuLindaStatus ReleasedHome screen settingsGUID GUID-D945EEE8-54DB-40D8-B5D3-847458A829F8Title Home screen settingsChanges No Home screen shortcut anymore for Suzuran KK R2; description all deletedVersion 3Author zzLuLindaStatus ReleasedTo disable or uninstall an application from the Home screenDisabling a pre-installed app deletes all data, but the app can be enabled again from Settings[menu_settings] > Apps [home_cui_menu_apps_txt] . Only downloaded apps can be fully uninstalled.1Touch and hold any area on your Home screen until the device vibrates.2Flick left or right to browse the panes. All applications that can be disabled oruninstalled are indicated by ID: ICN-SONY-HOME-UNINSTALL .3Tap the relevant application, then tap DISABLE [disable_text] if the app came pre-installed on your device or OK [ok] if the app was downloaded and you wouldlike to uninstall it.GUID GUID-04B51076-E06D-4C80-A06E-444BC469AE50Title To disable or uninstall an application from the Home screenChanges N-update - UI change in step 3Version 2Author AdamSStatus ReleasedTo adjust the size of icons on your Home screen1Touch and hold any area on your Home screen until the device vibrates, thentap ID: ICN-SONY-HOMESCREEN-SETTINGS .2Tap Icon size [home_settings_icon_size_title] , then select an option.GUID GUID-200B5E99-8091-4936-A242-521893FE059FTitle To select the icon size of your Home screenChanges Change "Home Settings" label to an iconVersion 2Author zzLuLindaStatus ReleasedApplication screenThe Application screen, which you open from the Home screen, contains theapplications that come pre-installed on your device as well as applications that youdownload.ID: SCR-SONY-GENERIC-APPLICATION-SCREENGUID GUID-F02CAFC3-E592-4B0D-AA00-E5631B4A9301Title Application screenChanges Change "Home screen" from bold font to normal font; no other text changeVersion 5Author zzLuLinda30This is an internet version of this publication. © Print only for private use.](https://usermanual.wiki/Sony/10720X.Manual/User-Guide-3336261-Page-30.png)
![Status ReleasedTo view all applications on the Application screen1From your Home screen, tap ID: ICN-SONY-HOME-APPTRAY-NORMAL .2Flick left or right on the Application screen.GUID GUID-88AE7DAF-A5B8-4362-9928-02CC87DCC55ETitle To view all applicationsChanges For nxtstp UGVersion 1Author zzLuLindaStatus ReleasedTo enable or disable the recommended apps listingsThe first time you access the application screen you get the option to enable ordisable recommended apps listings. You can also enable or disable this feature laterby following the steps below:1Touch and hold any area on your Home screen until the device vibrates, thentap ID: ICN-SONY-HOMESCREEN-SETTINGS .2Tap the App recommendations slider.GUID GUID-100909D0-2187-43FC-AE65-4DF90D326830Title To enable or disable the recommended apps listingsChanges Kugo/Kagura new featureVersion 1Author DoraMStatus ReleasedTo open an application from the Application screen•When the Application screen is open, flick left or right to find the application,and then tap the application.GUID GUID-20B05253-5784-4126-AA6C-9EA9320E7E51Title To open an application from the Application screenChanges Add "when the Application screen is open" to make it be consistant with other topicsVersion 2Author zzLuLindaStatus ReleasedTo search for an application from the Application screen1When the Application screen is open, tap Search applications [app_tray_draw-er_search_hint] or simply swipe down on the Application screen or Home screen.2Enter the name of the application that you want to search for.GUID GUID-1D55A09C-CFE1-4303-803E-7E5CAB836098Title To search an application from the Application screenChanges Kugo/Kagura (The user can also access Search screen by swipe down from anywhere on theHome screen)Version 4Author DoraMStatus ReleasedTo arrange applications on the Application screen1When the Application screen is open, tap ID: ICN-SONY-KEY-MENU .2Tap Sort apps [home_app_tray_sort_mode_dialog_title_txt] , then select an option.GUID GUID-115D9148-D5DC-49BA-8428-A1AD178487AFTitle To arrange your applications on the Application screenChanges Steps are totally changed for KK R2 update; no Application screen menuVersion 10Author zzLuLindaStatus ReleasedTo add an application shortcut to the Home screen1On the Application screen, touch and hold an application icon until the devicevibrates, then drag the icon to the top of the screen. The Home screen opens.2Drag the icon to the desired location on the Home screen, then release it.GUID GUID-1CB2F7C4-2E83-4EAB-AFFB-0957648C639DTitle To add a shortcut to an application on the Home screenChanges ED comment implemented in step 2 (based on version 13)Version 14Author DoraM31This is an internet version of this publication. © Print only for private use.](https://usermanual.wiki/Sony/10720X.Manual/User-Guide-3336261-Page-31.png)
![Status ReleasedTo move an application on the Application screen1When the Application screen is open, tap ID: ICN-SONY-KEY-MENU .2Make sure that Own order [home_app_tray_sort_mode_dialog_own_order_sort_mode_txt] is selectedunder Sort apps [home_app_tray_sort_mode_dialog_title_txt] .3Touch and hold the application until the device vibrates, then drag it to the newlocation.GUID GUID-EE508701-3826-449B-BD0F-61BABEEA74C3Title To move an application on the Application screenChanges ED comment implemented (until the device vibrates instead of until it becomes selected)Version 13Author DoraMStatus ReleasedTo disable or uninstall an application from the Application screenDisabling a pre-installed app deletes all data, but the app can be enabled again from Settings[menu_settings] > Apps [home_cui_menu_apps_txt] . Only downloaded apps can be fully uninstalled.1Touch and hold any area on the Application screen until the device vibrates. Allapplications that can be disabled or uninstalled are then indicated by ID: ICN-SONY-HOME-UNINSTALL .2Tap the relevant application, then tap DISABLE [disable_text] if the app came pre-installed on your device or OK [ok] if the app was downloaded and you wouldlike to uninstall it.GUID GUID-5CA71B95-BDCD-4B80-BCB0-7AD68798B7A1Title To disable or uninstall an application from the Application screenChanges N update 7.0 comment implementedVersion 2Author DoraMStatus ReleasedNavigating applicationsYou can navigate between applications using the navigation keys and the recentlyused applications window, which lets you switch easily between all recently usedapplications. The navigation keys are the Back key, the Home key, and the Recentapps key. You can also pop open two applications on the screen at once using thesplit screen mode, if the application supports multi-window function. Someapplications get closed when you press the Home key ID: ICN-SONY-KEY-AND-HOME to exitwhile others are paused or continue to run in the background. If an application ispaused or running in the background, you can continue where you left off the nexttime you open the application.GUID GUID-3919E91F-54A0-4406-AABF-3DD87635B6FBTitle Navigating applicationsChanges For N update 1Version 5Author PeterKStatus ReleasedID: SCR-SONY-GENERIC-RECENTLY-USED-CALLOUTS32This is an internet version of this publication. © Print only for private use.](https://usermanual.wiki/Sony/10720X.Manual/User-Guide-3336261-Page-32.png)
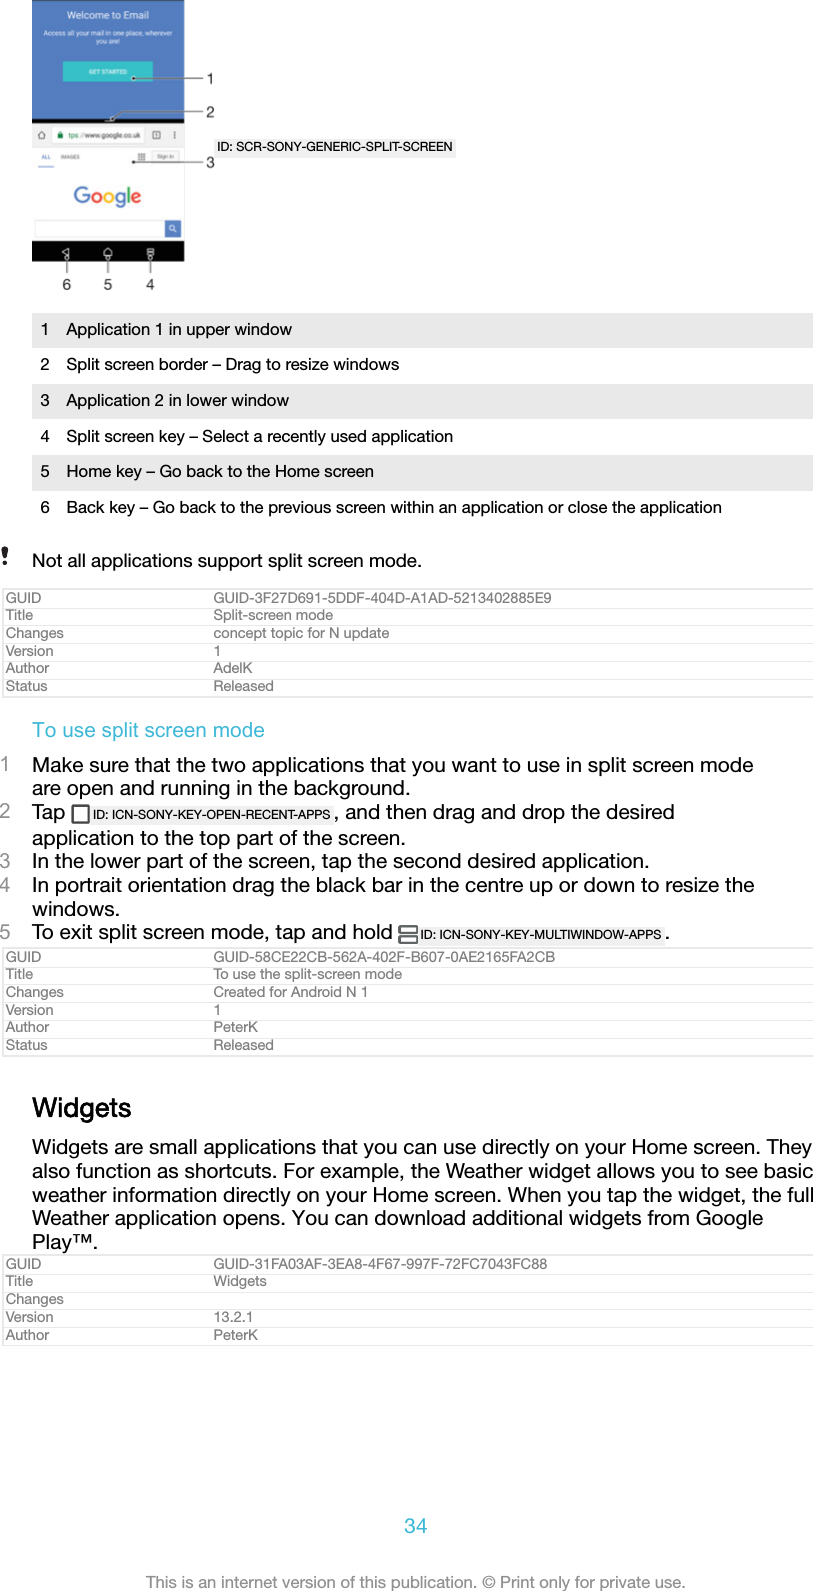
![1 Clear all – Close all the recently used applications2 Recently used applications window – Open a recently used application3 Recent apps key – Open the recently used applications window and the favourites bar4 Home key – Exit an application and go back to the Home screen5 Back key – Go back to the previous screen within an application or close the applicationGUID GUID-962D91AD-EBDC-4283-94A2-286CBA9B58CDTitle Navigating applications overviewChanges N update 7.0 CLEAR ALL button mentioned in the listVersion 6Author DoraMStatus ReleasedTo open the recently used applications window•Press ID: ICN-SONY-KEY-OPEN-RECENT-APPS .GUID GUID-A60AC121-B7D1-4A48-859B-F8CA4DC4C077Title To open the recently used applications windowChanges writing style update - delete the last sentence based on minimalismVersion 5Author zzWangTStatus Released*To quickly switch between recently used applications•Quickly press ID: ICN-SONY-KEY-OPEN-RECENT-APPS twice.GUID GUID-96B12493-0700-47CC-9810-C5746807E0B7Title To quickly switch between recent applicationsChanges For N Update 1Version 1Author PeterKStatus ReleasedTo close all the recently used applications•Tap ID: ICN-SONY-KEY-OPEN-RECENT-APPS and then tap CLEAR ALL [clear_all_notifications_text] .GUID GUID-C1E6FA9A-E606-47A6-8C92-7BC933B2B682Title To close all the recently used applicationsChanges For Android N update 1Version 6Author PeterKStatus ReleasedTo open a menu in an application•While using the application, tap ID: ICN-SONY-KEY-MENU .A menu is not available in all applications.GUID GUID-C5E4E280-0AA6-4076-B7F6-8777FD219744Title To open a menu in an applicationChanges Functional review comment implemented (Kagura)Version 1.1.1Author DoraMStatus ReleasedSplit screen modeSplit screen mode enables you to view two applications at once, for example, if youwant to view your email inbox and a web browser at the same time.33This is an internet version of this publication. © Print only for private use.](https://usermanual.wiki/Sony/10720X.Manual/User-Guide-3336261-Page-33.png)
![Status ReleasedTo add a widget to the Home screen1Touch and hold any empty area on your Home screen [preference_title_home_wallpaper] untilthe device vibrates, then tap Widgets [home_cui_menu_widgets_txt] .2Find and tap the widget that you want to add.GUID GUID-7AA3E1DD-C7DD-47D2-8DB4-4BB05D9E7686Title To add a widget to the Home screenChanges Home screen label change (Kugo)Version 16Author DoraMStatus ReleasedTo resize a widget1Touch and hold a widget until the device vibrates, then release it. If the widgetcan be resized, for example, the Calendar widget, then a highlighted frame andresizing dots appear.2Drag the dots inward or outward to shrink or expand the widget.3To confirm the new size of the widget, tap anywhere on the Home screen [prefer-ence_title_home_wallpaper] .GUID GUID-379CF5F0-A8C7-4D6F-A96C-9D06316E050BTitle To resize a widgetChanges Home screen label change (Kugo)Version 4.1.2Author DoraMStatus ReleasedTo move a widget•Touch and hold the widget until the device vibrates, then drag it to the newlocation.GUID GUID-653F4AD6-41D0-40D5-B41C-A07870088954Title To move a widget on the Home screenChanges for Bassoon - ed comments updateVersion 2.1.1Author AdelKStatus ReleasedTo remove a widget•Touch and hold the widget until the device vibrates, then drag it to Removefrom home screen [home_trashcan_dropzone_txt] .GUID GUID-E28E3921-A869-46FF-94FD-475750F619A5Title To delete a widget from the Home screenChanges for Bassoon - ed comments updateVersion 8Author AdelKStatus ReleasedShortcuts and foldersUse shortcuts and folders to manage your applications and keep your Home screentidy.GUID GUID-5B33567F-6DC3-4C3C-934D-C76C14EA069CTitle Shortcuts and foldersChanges For nxtstp UGVersion 1Author zzWangT35This is an internet version of this publication. © Print only for private use.](https://usermanual.wiki/Sony/10720X.Manual/User-Guide-3336261-Page-35.png)
![Status ReleasedID: SCR-SONY-HOMESCREEN-FOLDER-AND-SHORTCUT1 Access an application using a shortcut2 Access a folder containing applicationsGUID GUID-AB0711B3-D9D7-430C-9F04-DDEB20092B5CTitle Shortcuts and folders overviewChanges Sirius KK.Version 2Author zzXuCindyStatus ReleasedTo add an application shortcut to your Home screen1Touch and hold an empty area on your Home screen [preference_title_home_wallpaper] .2In the customisation menu, tap Widgets [home_cui_menu_widgets_txt] > Shortcuts[home_cui_menu_shortcuts_txt] .3Scroll through the list and select an application. The selected application getsadded to the Home screen [preference_title_home_wallpaper] .GUID GUID-846B78FE-AD6C-47FE-9BF8-715A3CBB7B61Title To add a shortcut from customization menu to the Home screenChanges Home screen label change (Kugo)Version 12Author DoraMStatus ReleasedTo move an item on the Home screen•Touch and hold the item until the device vibrates, then drag the item to the newlocation.GUID GUID-E0065909-6DCC-4137-BC73-976CB447E526Title To move an item on the Home screenChanges for Bassoon - ed comments updateVersion 3.1.2Author AdelKStatus ReleasedTo remove an item from the Home screen•Touch and hold the item until the device vibrates, then drag the item toRemove from home screen [home_trashcan_dropzone_txt] on the top of the screen.GUID GUID-B9D51246-2767-4FC7-B6A9-7F3A98343A35Title To delete an item on the Home screenChanges for Bassoon - ed comments updateVersion 6Author AdelKStatus ReleasedTo create a folder on the Home screen•Touch and hold an application icon or a shortcut until the device vibrates, thendrag and drop it on top of another application icon or shortcut.GUID GUID-B4485B5D-75F7-46E8-A35F-7833E55CF1DCTitle To create a folder on the Home screenChanges for Bassoon - ed comments updateVersion 9.1.2Author AdelK36This is an internet version of this publication. © Print only for private use.](https://usermanual.wiki/Sony/10720X.Manual/User-Guide-3336261-Page-36.png)
![Status ReleasedTo add items to a folder on the Home screen•Touch and hold an item until the device vibrates, then drag the item to thefolder.GUID GUID-59731CD1-AB4A-40AE-BCCC-5D64928E2B5ETitle To add items to a folderChanges for Bassoon - ed comments updateVersion 3.1.2Author AdelKStatus ReleasedTo rename a folder on the Home screen1Tap the folder to open it.2Tap the folder's title bar to show the Folder name [home_folder_dialog_folder_name_txt] field.3Enter the new folder name and tap DONE [checklist_button_done] .GUID GUID-D78DB4F3-D3D1-495D-B904-21104B8F19CATitle To rename a folderChanges Label fix for KeyakiVersion 6Author RamonaBStatus DraftBackground and themesYour device comes with a default background, but you can adapt the Home screenand Lock screen to your own style using wallpapers and themes featuring differentcolours and patterns.A wallpaper may be used without changing any of the other elements of your Homescreen and Lock screen. Live wallpapers add visual effects to your interactions withthe touch screen, letting the display change dynamically.Themes can include a wallpaper, a screensaver, title bars, and a sound scheme thatall fit together to create a unique look and feel for your device.GUID GUID-DA64CC29-770F-4901-ABCB-7A4F380547FETitle Background and themesChanges Keyaki (more detailed explanation, Live Wallpaper function)Version 4Author DoraMStatus ReleasedTo change your wallpaper1Touch and hold any empty area on your Home screen [preference_title_home_wallpaper] untilthe device vibrates.2Tap Wallpapers [home_cui_menu_wallpapers_txt] and select an option.You can also change your Lock screen wallpaper or set the same image for both your Homescreen and Lock screen. Follow the steps above, then tap Album [album_app_name_txt] . Tap thedesired image and choose an option.GUID GUID-19E276DF-4D6A-44AF-8D86-5CAAFFD4BFDDTitle To change your wallpaperChanges Keyaki - Only the title has been changedVersion 20Author DoraMStatus ReleasedTo set a theme1Touch and hold an empty area on your Home screen [preference_title_home_wallpaper] untilthe device vibrates.2Tap Themes [home_cui_menu_themes_txt] .3Choose an option:•To use an existing theme, select the theme, then tap APPLY THEME[themes_apply] .•To download a new theme, tap GET MORE THEMES [themes_get_more] .When you change a theme, the background also changes in some applications.37This is an internet version of this publication. © Print only for private use.](https://usermanual.wiki/Sony/10720X.Manual/User-Guide-3336261-Page-37.png)
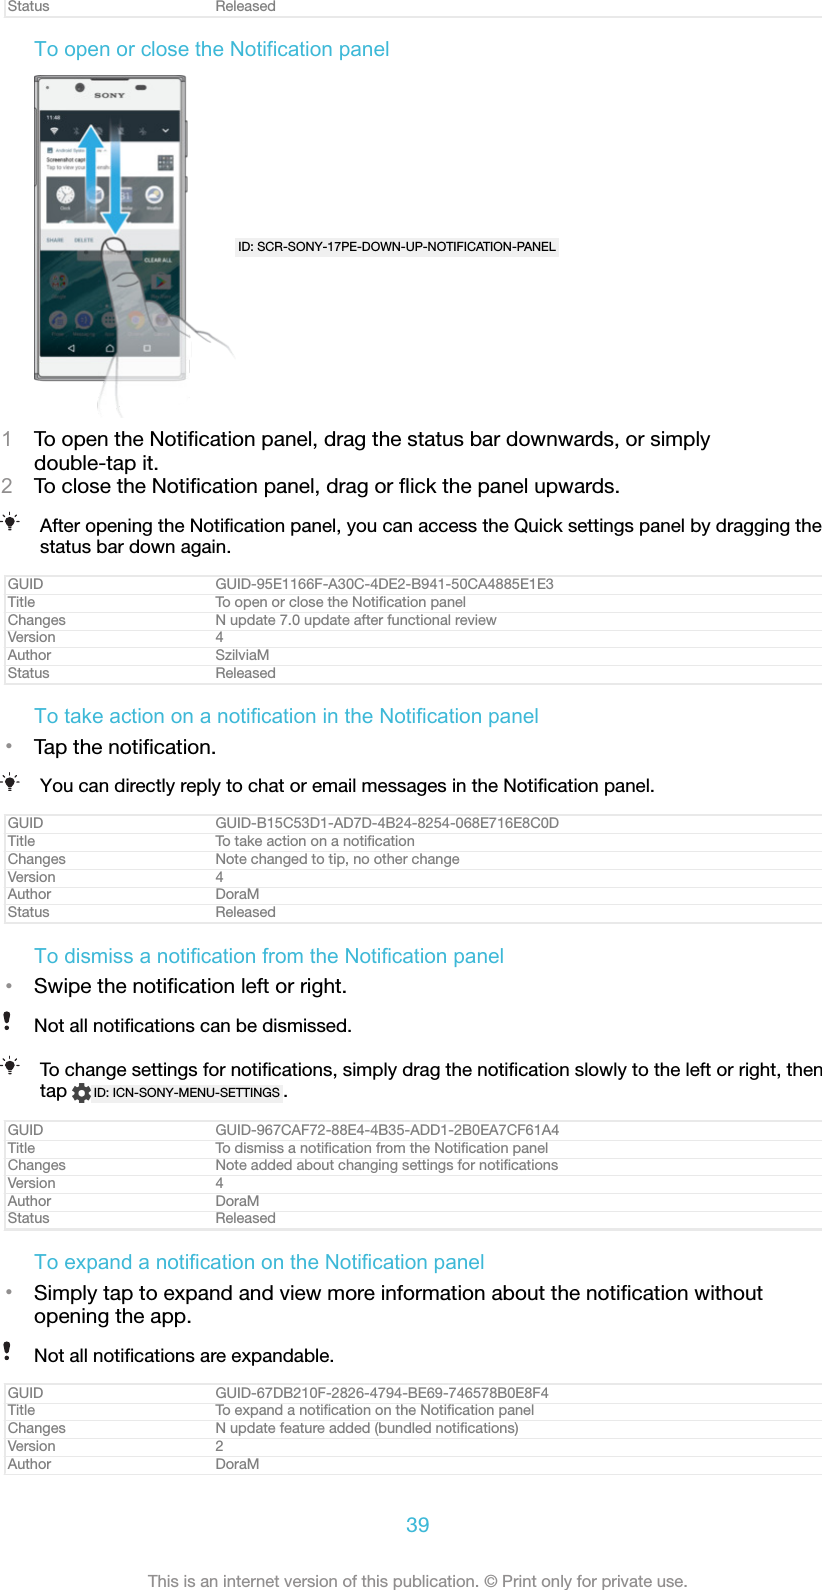
![Status ReleasedTo clear all notifications from the Notification panel•Tap CLEAR ALL [clear_all_notifications_text] .GUID GUID-DA62F1FF-BE58-4F3B-B236-8F2F85655D4FTitle To clear the Notification panelChanges For Dora N 7.0 update - correct hrefVersion 11Author SzilviaMStatus ReleasedTo take action on a notification from the lock screen•Double-tap the notification.GUID GUID-05EAA12B-826B-4E86-862B-01327B517B68Title To take action on a notification from the lock screenChangesVersion 1Author zzLuLindaStatus ReleasedTo dismiss a notification from the lock screen•Swipe the notification left or right.GUID GUID-9B2A9D17-D323-414C-8255-9D0D42E6EF22Title To dismiss a notification from the lock screenChanges Editorial comment implementedVersion 3Author DoraMStatus ReleasedTo expand a notification on the lock screen•Drag the notification downwards.Not all notifications are expandable.GUID GUID-EAA0A704-AC64-4525-B82B-DB61067E4304Title To expand a notification on the lock screenChangesVersion 1Author zzLuLindaStatus ReleasedManaging notifications on the lock screenGUID GUID-AB35235F-4199-4160-AD54-70D88BAD426ATitle Managing notifications on the lock screenChanges Content deleted, title stays (chapter reorganisation)Version 2Author DoraMStatus ReleasedShow all notification content[lock_screen_notifications_summa-ry_show]Get all notifications on the lock screen. When you have this setting turnedon, keep in mind that all content (including the content of incoming emailsand chat messages) will be visible on your lock screen unless youdesignate the relevant apps as Hide sensitive content [app_notification_sensi-tive_title] in the App notifications [app_notifications_title] settings menu.Hide sensitive notificationcontent [lock_screen_notifica-tions_summary_hide]You must have a PIN, password, or pattern set up as your screen lock inorder for this setting to be available. Contents hidden [notification_hidden_text] isdisplayed on the lock screen when sensitive notifications arrive. Forexample, you'll get a notification for an incoming email or chat, but thecontent won't be visible on your lock screen.Don't show notifications atall [lock_screen_notifications_sum-mary_disable]You won't get any notifications on the lock screen.GUID GUID-0D2FD8A6-F5C3-44BB-B59B-1EBCD00D4AC3Title Notification display options on the lock screenChanges Title conditioned (chapter reorganisation)Version 2.1.2Author DoraM40This is an internet version of this publication. © Print only for private use.](https://usermanual.wiki/Sony/10720X.Manual/User-Guide-3336261-Page-40.png)
![Status ReleasedTo select the notifications to display on the lock screen1From your Home screen [preference_title_home_wallpaper] , tap ID: ICN-SONY-HOME-APPTRAY-NORMAL .2Find and tap Settings [settings_label_launcher] > Notifications [settings_notifications_category] .3Tap ID: ICN-SONY-MENU-SETTINGS , and then tap On the lock screen [lock_screen_notifications_ti-tle] .4Select an option.You can keep notifications on the lock screen until you swipe to dismiss them. To enable thisfeature, tap the Keep notifications on lock screen [keep_lockscreen_notifications_title] slider.GUID GUID-CA5A91F1-EC1C-4AD2-BC62-F8D3AD8B6141Title To select the notifications to display on the lock screenChanges For Dora N 7.0 update - with "Notifications" label and a noteVersion 3Author SzilviaMStatus ReleasedSetting the notification level for an appGUID GUID-A5992135-5038-42FD-B279-F21A5D87ACADTitle Setting the notification level for an appChanges Content deleted, title stays (chapter reorganisation)Version 2Author DoraMStatus ReleasedBlock all [app_notification_block_title] Never receive notifications from the selected app.Sounds and vibrations off [show_silently] Receive notifications but without sound, vibration orpeeking into view.Interrupts in Priority only [app_notification_over-ride_dnd_title]Receive notifications from this app even when Do notdisturb is set to Priority only.GUID GUID-18174AD0-2800-4AFF-8511-EF5AE9052AFETitle Notification type levels and optionsChanges Title conditioned (chapter reorganisation)Version 7Author DoraMStatus ReleasedTo set the notification level for an app1From your Home screen [preference_title_home_wallpaper] , tap ID: ICN-SONY-HOME-APPTRAY-NORMAL .2Find and tap Settings [settings_label_launcher] > Notifications [settings_notifications_category] .3Select the desired app.4Tap the sliders to adjust notification settings as desired.GUID GUID-D6192DE5-6197-4E98-A891-9109F5C3DF9FTitle To set the notification level for an appChanges For Dora N 7.0 update - with "Notifications" labelVersion 3Author SzilviaMStatus ReleasedNotification lightThe notification light informs you about battery status and some other events. Forexample, a flashing white light means there is a new message or a missed call. Thenotification light is enabled by default but can be disabled manually.41This is an internet version of this publication. © Print only for private use.](https://usermanual.wiki/Sony/10720X.Manual/User-Guide-3336261-Page-41.png)
![ID: ILL-SONY-17PE-NOTIFICATION-LAMPWhen the notification light is disabled, it only lights up when there is a battery status warning,for example, when the battery level goes below 15 percent.GUID GUID-714E4307-9897-4CC8-ACA1-C7E19B4EEB6CTitle Notification lightChanges Add info about notification light being enabledVersion 4Author zzLuLindaStatus ReleasedTo enable or disable the notification light1From your Home screen, tap ID: ICN-SONY-HOME-APPTRAY-NORMAL .2Find and tap Settings [settings_label_launcher] > Notifications [settings_notifications_category] > ID:ICN-SONY-MENU-SETTINGS .3Tap the slider beside Notification light [conversations_strings_settings_led_notification_enabled_txt] toenable or disable the function.GUID GUID-032A12F8-313C-4D01-8944-3591B1AF8EF8Title To enable or disable the notification lightChanges N update UI changeVersion 5Author DoraMStatus ReleasedIcons in the status barGUID GUID-22676E23-F5D6-4AA4-96AF-C646852C53C1Title Icons in the status barChanges For nxtstp UG. Done by Jorgen but rename Author to Nellie.Version 1Author zzTan NellieStatus ReleasedStatus iconID:ICN-SONY-SYS-NO-SIM-CARDNo SIM cardID:ICN-SONY-STAT-SYS-SIGNAL-4Signal strengthID:ICN-SONY-STAT-SYS-SIGNAL-0No signalID:ICN-SONY-STAT-SYS-DATA-CONNECTED-Roaming42This is an internet version of this publication. © Print only for private use.](https://usermanual.wiki/Sony/10720X.Manual/User-Guide-3336261-Page-42.png)
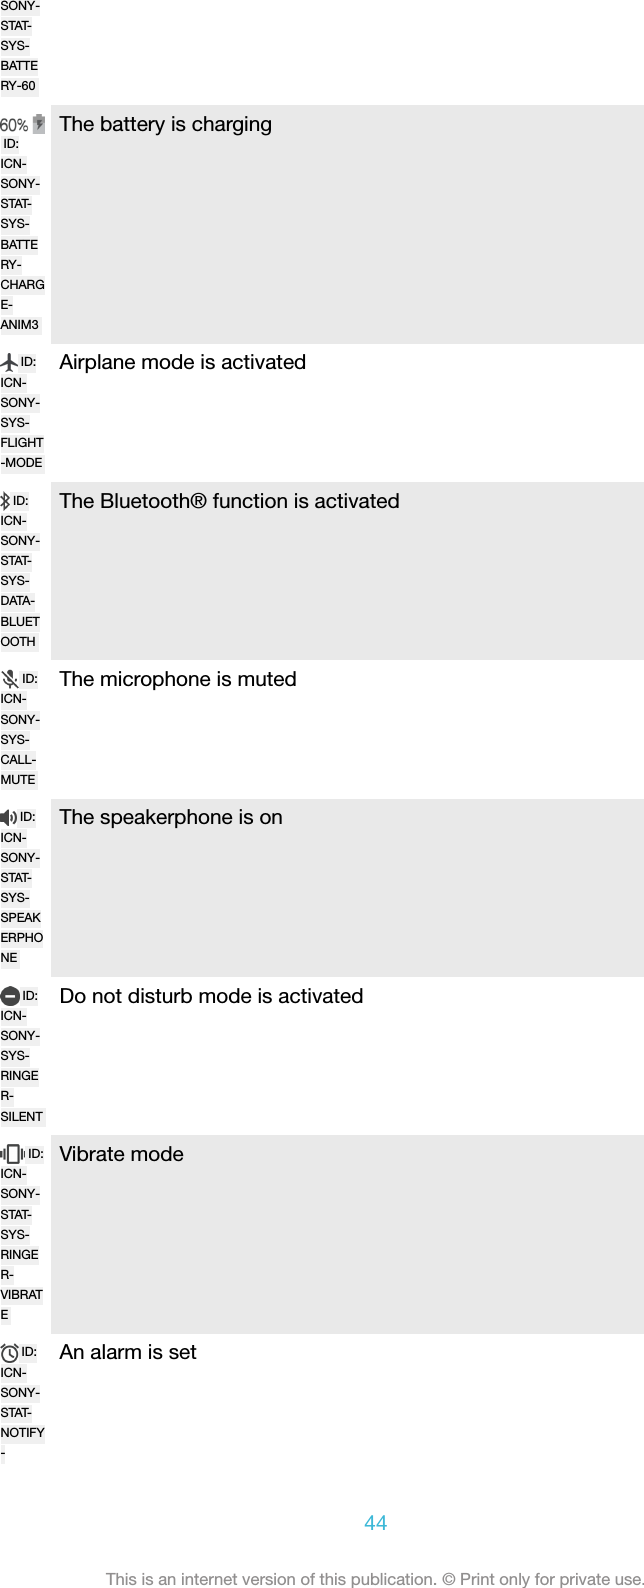
![ROAMINGID:ICN-SONY-STAT-SYS-DATA-INANDOUT-LTESending and downloading LTE dataID:ICN-SONY-STAT-SYS-DATA-INANDOUT-GSending and downloading GPRS dataID:ICN-SONY-STAT-SYS-DATA-INANDOUT-ESending and downloading EDGE dataID:ICN-SONY-STAT-SYS-DATA-INANDOUT-3GSending and downloading 3G dataID:ICN-SONY-STAT-SYS-DATA-INANDOUT-H-ATTSending and downloading HSPA+ dataID:ICN-SONY-STAT-SYS-WIFI-SIGNAL-3A Wi-Fi [udoc_no_trans_wifi_wlan_plain] connection is enabled and data is beingtransmittedID:ICN-SONY-STAT-SYS-WIFI-SIGNAL-EXCLAMATIONA Wi-Fi [udoc_no_trans_wifi_wlan_plain] connection is enabled but there is no internetconnection.This icon also appears when you are trying to connect to a secured Wi-Fi[udoc_no_trans_wifi_wlan_plain] network. After a successful login, the exclamation markdisappears.If Google™ is blocked in your area, the exclamation mark may appear evenwhen the device is connected to a Wi-Fi [udoc_no_trans_wifi_wlan_plain] network andthere is a working internet connection.ID:ICN-Battery status43This is an internet version of this publication. © Print only for private use.](https://usermanual.wiki/Sony/10720X.Manual/User-Guide-3336261-Page-43.png)
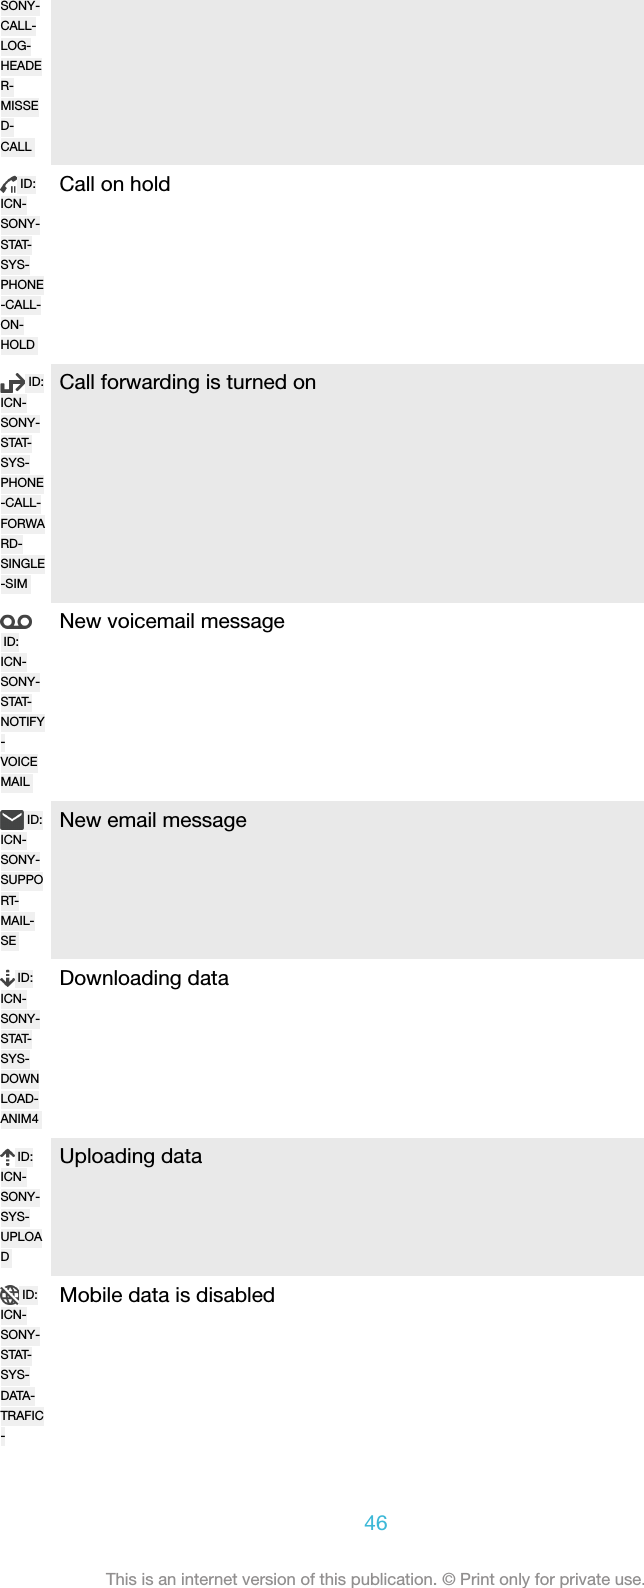
![ALARMID:ICN-SONY-STATUS-BAR-GPS-ONGPS is activatedID:ICN-SONY-STAT-NOTIFY-SYNC-ANIM0Synchronisation is ongoingID:ICN-SONY-STAT-NOTIFY-SYNC-ERRORProblem with sign-in or synchronisationDepending on your service provider, network or region, the functions or services representedby some icons in this list may not be available.GUID GUID-C1DC8CAA-170F-41B0-8AD3-E4C85176F75BTitle Status iconChanges Internet decappedVersion 9.1.1Author DoraMStatus ReleasedTo manage status bar icons1From your Home screen, tap ID: ICN-SONY-HOME-APPTRAY-NORMAL .2Find and tap Settings [settings_label] > Display [display_settings_title] > System icons [sys-tem_icon_settings_title] .3Mark the checkboxes for the system icons that you want to appear in thestatus bar.GUID GUID-BC00C184-8B18-429D-8B76-FEFC9974D621Title To manage status bar iconsChanges Path changed in step 2Version 3Author zzLuLindaStatus ReleasedNotification iconsID:ICN-SONY-SYM-ACTION-SMSNew text message or multimedia messageID:ICN-SONY-STAT-SYS-PHONE-CALL-ONGOINGOngoing callID:ICN-Missed call45This is an internet version of this publication. © Print only for private use.](https://usermanual.wiki/Sony/10720X.Manual/User-Guide-3336261-Page-45.png)
![Status DraftTo block an application from sending notifications1From your Home screen, tap ID: ICN-SONY-HOME-APPTRAY-NORMAL .2Find and tap Settings [settings_label] > Notifications [settings_notifications_category] .3Select an application.4Tap the Block all [app_notification_block_title] slider.GUID GUID-16674EFB-9632-4932-AF19-5C9695B4D326Title To manage notificationsChanges N update 7.0 UI changeVersion 2.1.4Author DoraMStatus ReleasedApplications overviewSome applications may not be included on your device or may not be supported by allnetworks or service providers in all areas.ID:ICN-SONY-APP-GALLERYUse the Album application to manage, view and edit your photos and videos.ID:ICN-SONY-APP-AMAZONBrowse, search and buy thousands of products right from your device.ID:ICN-SONY-APP-AVG-PROTECTIONProtect your device against viruses, malware, spyware, phishing attempts andonline exploitation.ID:ICN-SONY-APP-CALCULATORUse the Calculator application to perform basic calculations.ID:ICN-SONY-APP-CALENDARUse the Calendar application to keep track of events and manage yourappointments.ID:ICN-SONY-APP-CAMERAUse the Camera to take photos and record video clips.ID:ICN-SONY-APP-CHROMEUse the Chrome web browser to navigate and view web pages, managebookmarks, text and images.ID:ICN-Use the Clock application to set various kinds of alarms and timers.49This is an internet version of this publication. © Print only for private use.](https://usermanual.wiki/Sony/10720X.Manual/User-Guide-3336261-Page-49.png)

![Battery and maintenanceGUID GUID-94E51F39-6A47-459B-B4A2-4B99C9F4CD7BTitle Battery and maintenanceChanges Project XVersion 1Author SzilviSStatus ReleasedCharging your deviceAlways use an original Sony charger and USB Type-C™ [USB Type-C-tm] cable intended for yourspecific Xperia™ model. Other chargers and cables may increase charging time, not charge atall, or may even damage your device. Make sure all USB ports and connectors are completelydry, before inserting the USB Type-C™ [USB Type-C-tm] cable.A wall socket charger will charge your device faster than charging via your computer.You can still use your device while charging.If the battery is depleted, it may take up to 30 minutes for your device to respond tothe charging. During this time, the screen may remain completely dark, not showingthe charging icon. Also note that it can take up to 4 hours for a completely drainedbattery to be fully charged.Your device has an embedded, rechargeable battery that can only be replaced by anauthorised Sony repair centre. You should never try to open or take apart the device yourself.Doing so can cause damage and void your warranty.GUID GUID-B501CA3C-BFC1-4AD2-A803-96B32D053043Title Charging your deviceChanges [ProjectX - Kagura] paragraph about charging for the first time moved - version with USB TypeCVersion 8Author TamasBStatus ReleasedTo charge your deviceID: ILL-SONY-17PE-CHARGING54This is an internet version of this publication. © Print only for private use.](https://usermanual.wiki/Sony/10720X.Manual/User-Guide-3336261-Page-54.png)
![1Plug the charger into a power outlet.2Plug one end of the USB Type-C™ [USB Type-C-tm] cable into the charger (or into theUSB port of a computer).3Plug the other end of the cable into the USB Type-C™ [USB Type-C-tm] port on yourdevice. The notification light illuminates when charging begins.4When the device is fully charged, disconnect the cable from your device bypulling it straight outwards. Make sure not to bend the connector.It is important to use the USB Type-C™ [USB Type-C-tm] cable (provided) when charging yourdevice as other types of USB cables can damage your device.If the battery is completely depleted, it may take a few minutes before the notification lightilluminates and the charging icon appears.GUID GUID-AB7653A6-94E4-487D-8E13-755BAC8DC744Title To charge your deviceChanges One USB Type-C label was missing, correctedVersion 17Author DoraMStatus ReleasedBattery notification light statusGreen The battery is charging and the battery charge level is greater than 90%Orange The battery is charging and the battery charge level is less than 90%Red The battery is charging and the battery charge level is less than 15%GUID GUID-15D5D981-229B-451C-9F58-DEAE6FC82CDDTitle Battery LED statusChanges For Dora - changes according to ER commentsVersion 8Author SzilviaMStatus ReleasedBattery and power managementYour device has an embedded battery. To get the most use from it, keep track of thepower consumed by different apps and features. Background power saving featuresare activated by default to help you reduce battery consumption, and additionalpower saving modes are available to help you reduce battery consumption furtherwhen necessary.Power saving features lower the priority for certain non-essential device functions,such as higher grade image performance, network activities such as locationservices, app synchronisation and background Wi-Fi [udoc_no_trans_wifi_wlan_plain] scanning. Ifyou do not want an application to be affected, you can exempt it in the Batteryoptimisation menu. Phone calls and SMS are not affected.System updates may change the power saving features available on your device.GUID GUID-E3648D64-F53D-478B-BC8C-656BFFF90CC6Title Battery and power managementChanges Content change (corrections according to C1047 request)Version 7.2.1Author DoraMStatus ReleasedTo view battery consumption, estimated time, and power saving tips1From your Home screen [preference_title_home_wallpaper] , tap ID: ICN-SONY-HOME-APPTRAY-NORMAL .2Find and tap Settings [settings_label_launcher] > Battery [battery_settings_title] . An overviewappears showing the battery percentage and an estimated battery time.3Tap SHOW BATTERY USAGE [battery_usage_sub] to view a list of features andservices that have consumed battery power since the last charging cycle. Tapan item to get information on how to reduce its battery consumption.GUID GUID-5C39BAB5-EF4C-4302-B434-40C296257EA755This is an internet version of this publication. © Print only for private use.](https://usermanual.wiki/Sony/10720X.Manual/User-Guide-3336261-Page-55.png)
![Title To view your battery consumption and estimated battery timeChanges Tip removed due to C1047 requestVersion 3.1.4Author DoraMStatus ReleasedTo view battery consumption for applications1From your Home screen [preference_title_home_wallpaper] , tap ID: ICN-SONY-HOME-APPTRAY-NORMAL .2Find and tap Settings [settings_label_launcher] > Apps [all_apps_button_label] .3Select an application and review its battery consumption under Battery usage[battery_label] .GUID GUID-72DC8FCB-A113-4E57-88FB-5C55DCE9CFE3Title To view battery consumption for applicationsChanges [ProjectX - Kagura] title changeVersion 8Author TamasBStatus ReleasedGeneral usage tips to improve battery performanceThe following tips can help you improve battery performance:•Lower the screen brightness level, see Screen settings on page 90.•Turn off Bluetooth®, Wi-Fi [udoc_no_trans_wifi_wlan_plain] and location services when youdon't need these features.•Turn off your device or use Airplane mode if you are in an area with no or lownetwork coverage. Otherwise, your device repeatedly scans for availablenetworks, and this consumes power.•Use a Wi-Fi [udoc_no_trans_wifi_wlan_plain] network instead of roaming when abroad.Roaming is scanning for your home network and puts additional demands onyour battery as your device must transmit with a higher output power, see Wi-Fi on page 72.•Change the synchronisation settings for your email, calendar and contacts, seeSynchronising with online accounts on page 84.•Check the applications that have a high battery consumption and consider thebattery saving tips provided on your device for these applications.•Change the notification level for an application, see Notifications on page 38.•Turn off the location-sharing permission for an application, see Applicationsettings on page 93.•Uninstall applications that you are not using, see Application screen onpage 30.•Use a Sony original handsfree device to listen to music. Handsfree devicesconsume less battery than your device's loudspeakers.•Restart your device every now and then.GUID GUID-4E52E7E1-1BE9-4779-AEAF-D2F770A9A44CTitle General usage tips to improve battery performanceChanges "Sony" without TMVersion 1.1.1Author TamasB56This is an internet version of this publication. © Print only for private use.](https://usermanual.wiki/Sony/10720X.Manual/User-Guide-3336261-Page-56.png)
![Status ReleasedTo make exceptions to power saving features for apps1From your Home screen [preference_title_home_wallpaper] , tap ID: ICN-SONY-HOME-APPTRAY-NORMAL .2Find and tap Settings [settings_label_launcher] > Battery [battery_settings_title] .3Tap ID: ICN-SONY-KEY-MENU and select Battery optimisation [high_power_apps] . You will seea list of applications that are not optimised.4To add or remove applications from this list, tap APPS [apps_capital] and select orde-select an application from the list to edit its optimisation settings.5The list of applications that are not optimised will get updated according toyour settings.You cannot exempt applications from being optimised by Ultra STAMINA mode.You can also configure Battery optimisation [high_power_apps] from Settings [settings_label_launcher] >Apps [home_cui_menu_apps_txt] > ID: ICN-SONY-MENU-SETTINGS > Special access [special_access] .GUID GUID-12156D99-A51E-4F4D-BD9D-63754CF8DA70Title To make specific applications exempt from battery optimisationChanges Editorial comments implementedVersion 2.1.3.1.1Author DoraMStatus ReleasedSTAMINA modeDepending on the STAMINA level, different features will be restricted or disabled inorder to reduce battery consumption. These include rendering performance,animation and screen brightness, image enhancement, background app datasyncing, vibration (except for incoming calls), streaming and GPS (while the screen isoff). ID: ICN-SONY-STAMINA-ON appears in the status bar.If you are sharing a device with multiple users, you may need to log in as the owner, that is, theprimary user, to activate or deactivate STAMINA mode.GUID GUID-06E3ECA0-92A2-4509-BBE1-5A87420834DCTitle STAMINA modeChanges Keyaki (C1047 power saving features corrections request)Version 1Author DoraMStatus ReleasedTo activate or deactivate STAMINA mode1From your Home screen [preference_title_home_wallpaper] , tap ID: ICN-SONY-HOME-APPTRAY-NORMAL .2Find and tap Settings [settings_label_launcher] > Battery [battery_settings_title] .3Tap STAMINA mode [extended_standby_mode_label] and tap the slider to activate ordeactivate the function. When STAMINA mode is activated you can selectadditional options, for example you can adjust the Auto-start percentageaccording to your preferences.You can exempt applications from being optimised by STAMINA mode in the Batteryoptimisation menu.GUID GUID-18315E99-CD26-4905-ADE0-B8514A1912E8Title To activate or deactivate STAMINA modeChanges Keyaki (changes made according to C1047 power saving features corrections request)Version 9Author DoraMStatus ReleasedUltra STAMINA modeYour battery time is extensively prolonged, but available apps are limited and mobiledata and Wi-Fi [udoc_no_trans_wifi_wlan_plain] are disabled. Calling and SMS are still available.57This is an internet version of this publication. © Print only for private use.](https://usermanual.wiki/Sony/10720X.Manual/User-Guide-3336261-Page-57.png)
![Your Home screen is changed and ID: ICN-SONY-ULTRA-STAMINA-ON appears in the statusbar.If you are sharing a device with multiple users, you may need to log in as the owner, that is, theprimary user, to activate or deactivate Ultra STAMINA mode.GUID GUID-D302CCAF-CF3D-43C4-B00A-CBCD650ADE06Title Ultra STAMINA modeChanges Keyaki (C1047 power saving features corrections request)Version 1Author DoraMStatus ReleasedTo activate Ultra STAMINA mode1From your Home screen [preference_title_home_wallpaper] , tap ID: ICN-SONY-HOME-APPTRAY-NORMAL .2Find and tap Settings [settings_label_launcher] > Battery [battery_settings_title] .3Tap Ultra STAMINA mode [usm_item_label] and then tap ACTIVATE [activate_capital] .4Confirm to activate.You cannot exempt applications from being optimised by Ultra STAMINA mode.GUID GUID-700CBCC1-30F7-4FC3-A56B-32F4CA6ABD0ETitle To activate Ultra STAMINA modeChanges Keyaki (corrections according to C1047 power saving features request)Version 6Author DoraMStatus ReleasedTo deactivate Ultra STAMINA mode1Drag down the status bar to access the Notification panel.2Tap Deactivate Ultra STAMINA mode [ultra_stamina_notification_button_label_turn_off] .3Tap OK [alert_ok_label] .Deactivating Ultra STAMINA mode will restart your device.GUID GUID-483A774A-3D6D-43D0-AC02-0DFCAAF8B152Title To deactivate Ultra STAMINA modeChanges Project XVersion 1Author DoraMStatus ReleasedUpdating your deviceYou should update the software on your device to get the latest functionality,enhancements and bug fixes in order to ensure optimal performance. When asoftware update is available, ID: ICN-SONY-STAT-NOTIFY-SYSTEM-UPDATE appears in the statusbar. You can also check for new updates manually, or schedule an update.The easiest way to install a software update is to do it wirelessly from your device.However, some updates are not available for wireless download. You then need touse the Xperia™ Companion software on a PC or on an Apple® Mac® computer toupdate your device.Before updating your device, consider the following:•Ensure you have sufficient storage capacity before attempting to update.•If you are using a device with multiple users, you must log in as the owner, that is, theprimary user, to update the device.•System and application updates can present the features on your device in anotherway than described in this User guide. The Android™ version might not be affectedafter an update.For more information about software updates, go to www.sonymobile.com/update/.GUID GUID-FABC28A6-48B3-4457-8068-91834B8CB1F0Title Updating your phoneChanges [ProjectX] added one more note, converted to a bullet listVersion 24Author TamasB58This is an internet version of this publication. © Print only for private use.](https://usermanual.wiki/Sony/10720X.Manual/User-Guide-3336261-Page-58.png)
![Status ReleasedTo check for new software1If you are using a device with multiple users, make sure you are logged in asthe owner.2From your Home screen [preference_title_home_wallpaper] , tap ID: ICN-SONY-HOME-APPTRAY-NORMAL .3Find and tap Settings [settings_label] > About phone [about_settings<product="default">] > Softwareupdate [update_center_settings_application_menu_text] .If no new software is available, it’s possible that you may not have enough free memory onyour device. If your Xperia™ device has less than 500 MB of free internal memory available,you do not receive any information about new software. In this case you receive a warning inthe Notification panel: “Storage space running out. Some system functions may not work.” Ifyou receive this notification, you must free up internal memory to get notifications about newavailable software.GUID GUID-40461456-5CC2-4884-BB9C-06078024B88CTitle To check for new softwareChanges For Kugo - label/icon correctionsVersion 10Author SzilviaMStatus ReleasedUpdating your device wirelesslyUse the Software update application to update your device software wirelessly. Theupdates you can download over a mobile network depend on your operator. It isrecommended to use a Wi-Fi [udoc_no_trans_wifi_wlan_plain] network instead of a mobile networkto download new software so that you can avoid data traffic costs.GUID GUID-46E34C96-CD92-4DB5-BDDC-3081431482A4Title Updating your phone wirelesslyChanges N-update - wifi conditionedVersion 5.1.1Author AdamSStatus ReleasedTo install a system update1If you are sharing a device with multiple users, make sure you are logged in asthe owner.2From your Home screen [preference_title_home_wallpaper] , tap ID: ICN-SONY-HOME-APPTRAY-NORMAL .3Find and tap Settings [settings_label] > About phone [about_settings<product="default">] > Softwareupdate [update_center_settings_application_menu_text] .4If a system update is available, tap CONTINUE [continue_btn_txt] , then tap INSTALLNOW [install_now_capital] .GUID GUID-80EE363C-A662-4AC7-A280-1DD05BF77955Title To download and install a system updateChanges Hinoki (no Download button, only Continue in step 5)Version 16Author DoraMStatus ReleasedTo schedule a system update1If you are sharing a device with multiple users, make sure you are logged in asthe owner.2From your Home screen [preference_title_home_wallpaper] , tap ID: ICN-SONY-HOME-APPTRAY-NORMAL .3Find and tap Settings [settings_label] > About phone [about_settings<product="default">] > Softwareupdate [update_center_settings_application_menu_text] .4If a system update is available, tap CONTINUE [continue_btn_txt] , then tap theSchedule installation [system_installation_view_schedule_switch_txt] slider.5Tap OK [alert_ok_label] > Set time [date_time_set_time] .6Set the desired time for the software update, then tap OK [alert_ok_label] .7Your device will be updated at the set time automatically.59This is an internet version of this publication. © Print only for private use.](https://usermanual.wiki/Sony/10720X.Manual/User-Guide-3336261-Page-59.png)
![GUID GUID-87CD1345-4B6E-45CB-BF0B-BFF13CB281F4Title To schedule a system updateChanges UI update HinokiVersion 1Author DoraMStatus ReleasedTo set up automatic download of system updates1From your Home screen [preference_title_home_wallpaper] , tap ID: ICN-SONY-HOME-APPTRAY-NORMAL .2Find and tap Settings [settings_label] > About phone [about_settings<product="default">] > Softwareupdate [update_center_settings_application_menu_text] .3Tap ID: ICN-SONY-KEY-MENU , then tap Settings [settings_label] > Auto download systemupdates [automatic_update_settings_title_v2_txt] .4Select an option.GUID GUID-4B140425-EA25-4476-A5EF-489F9DC8FBECTitle To set up automatic download of system updatesChanges UI change HinokiVersion 1Author DoraMStatus ReleasedTo enable or disable automatic updates for applications1From your Home screen [preference_title_home_wallpaper] , tap ID: ICN-SONY-HOME-APPTRAY-NORMAL .2Find and tap Settings [settings_label] > About phone [about_settings<product="default">] > Softwareupdate [update_center_settings_application_menu_text] .3Tap ID: ICN-SONY-KEY-MENU , then tap Settings [settings_label] > Auto-update apps [settings_au-to_update_apps_title] .4Select the preferred option.GUID GUID-AAA06697-84A7-4050-ADC9-CE3C4B835AE1Title To enable or disable automatic updates for applicationsChanges UI changeVersion 1Author DoraMStatus ReleasedTo update your device using a computer1Using a USB Type-C™ [USB Type-C-tm] cable, connect your device to the computer.2Make sure that the screen of your device is unlocked, and that the USBconnection mode on the device is set to Transfer files [usb_use_file_transfers] .3Open Xperia™ Companion, if it is not automatically launched.4Make sure that the computer can access the internet.5Computer: If a new software update is detected, a popup window appears.Follow the on-screen instructions to run the relevant software updates.If you don’t have the Xperia™ Companion software installed on the relevant computer, connectyour device to the computer and follow the on-screen installation instructions. Make sure thatyou are using the USB Type-C [USB Type-C] cable that came with your device and that it is properlyconnected to the device and computer.GUID GUID-CB62B1AC-D041-4E4C-A8CF-C5E0B9675ED8Title To update the device using a computerChanges Internet decappedVersion 13.1.1Author DoraMStatus ReleasedMaintenance using a computerGUID GUID-F84C2081-A554-4399-93AB-451CFF7F4308Title Maintenance using a computerChanges Project XVersion 1Author AdamS60This is an internet version of this publication. © Print only for private use.](https://usermanual.wiki/Sony/10720X.Manual/User-Guide-3336261-Page-60.png)
![Status ReleasedXperia™ CompanionXperia™ Companion is a software service which provides a collection of tools andapplications you can use when you connect your device to a computer. With Xperia™Companion, you can:•Update or repair your device’s software.•Transfer your content from an old device using Xperia™ Transfer.•Back up and restore content on your computer.•Sync multimedia content – photos, videos, music and playlists – between your deviceand computer.•Browse files on your device.To use Xperia™ Companion, you need an internet-connected computer running oneof the following operating systems:•Microsoft® Windows® 7 or later•Mac OS® X 10.11 or laterLearn more and download Xperia™ Companion for Windows athttp://support.sonymobile.com/tools/xperia-companion/ or Xperia™ Companion forMac at http://support.sonymobile.com/tools/xperia-companion-mac/.GUID GUID-DBC49833-F11A-4854-B947-B9513E8A31DFTitle Xperia CompanionChanges Internet decappedVersion 19Author DoraMStatus ReleasedManaging files using a computerUse a USB Type-C™ [USB Type-C-tm] cable connection between a Windows® computerand your device to transfer and manage your files.Once the two devices are connected, you can choose whether to charge your device,transfer files or use it for MIDI input. Your computer will detect your device when youselect the Transfer files [usb_use_file_transfers] connection mode. The default connectionmode is set to Charge this device [usb_use_charging_only] .With Xperia™ Companion you can access the file system of your device. If you donot have Xperia™ Companion installed, you are requested to install it when youconnect your device to the computer.Always use the USB cable type intended for your Xperia™ model and make sure it iscompletely dry.ID: SCR-SONY-MANAGING-FILESGUID GUID-969FEDAB-08C9-40B5-91F6-69A83F45C0DBTitle Managing files using a computerChanges Type-C USB without Supply power option (HINOKI)Version 11.1.1Author DoraM61This is an internet version of this publication. © Print only for private use.](https://usermanual.wiki/Sony/10720X.Manual/User-Guide-3336261-Page-61.png)
![Status DraftUSB connection modeYou can use the Transfer files [usb_use_file_transfers] connection mode for managing files andupdating device software. This USB mode is used with Microsoft® Windows®computers. Charging is enabled by default.Using the Use device as MIDI [usb_use_MIDI] mode, your device can function as a MIDIinput for musical instrument apps.GUID GUID-3343F8C4-AF0B-4C9D-9CF1-E48518E3F3B6Title USB connection modeChanges Project X - for devices with USB connection modes [Charging only, Transfer files MTP andMIDI]Version 6Author DoraMStatus ReleasedTo change USB connection mode1Attach a USB connector to your device.2Drag down the Status bar, and then tap Charge this device [usb_use_charging_only] .3Tap either Transfer files [usb_use_file_transfers] or Use device as MIDI [usb_use_MIDI] asdesired.GUID GUID-8B946782-6C9E-4138-B712-4D9C719F1748Title To change USB connection modeChanges For Dora N 7.0 update - with new labelsVersion 8Author SzilviaMStatus ReleasedStorage and memoryYour device has several different storage and memory options.•The internal storage is about 16 [internal-storage-memory-available-GB] GB and is used to storedownloaded or transferred content along with personal settings and data. Someexamples of data saved to the internal storage are alarm, volume and languagesettings, emails, bookmarks, calendar events, photos, videos and music.•You can use a removable memory card with a storage capacity of up to 256 [memory-card-available-GB] GB to get more storage space. Media files and some apps, along with theirassociated data, can be moved to this type of memory to free up internal storage.Some apps, for example, the Camera app, can save data directly to a memory card.•The dynamic memory (RAM) is about 2 [dynamic-memory-available-GB] GB and cannot be usedfor storage. RAM is used to handle running applications and the operating system.You may have to purchase a memory card separately.Read more about the use of memory in Android devices by downloading the White paper foryour device at www.sonymobile.com/support/.GUID GUID-22B2F18B-DFF0-4F4E-9917-D71E95288CE9Title Storage and memoryChanges For Suzu V2 - replacing "memory and storage" with "storage and memory"Version 16Author SzilviaMStatus ReleasedImproving memory performanceYour device memory tends to fill up as a result of normal usage. If the device starts toslow down, or applications suddenly shut down, you should consider the following:•Always try to keep at least 500 [recommended-free-internal-storage-MB] MB of free internal storageavailable.•Close running applications that you are not using.•Clear the cache memory for all applications.•Uninstall downloaded applications that you don't use.•Move applications to the memory card if the internal storage is full.•Transfer photos, videos and music from the internal memory to the memory card.62This is an internet version of this publication. © Print only for private use.](https://usermanual.wiki/Sony/10720X.Manual/User-Guide-3336261-Page-62.png)
![•If your device can't read content on the memory card, you may need to format thecard. Note that all content on the card gets erased when you format it.If you are sharing a device with multiple users, you must log in as the owner, that is, theprimary user, to be able to perform certain actions, such as transferring data to the memorycard and formatting the memory card.GUID GUID-6D95A83D-9538-4FDB-A094-0B3FAB15D3B9Title Improving the memory performanceChanges For Lavender - implementing changes according to ED commentsVersion 4Author SzilviaMStatus ReleasedTo view the memory status1From your Home screen [preference_title_home_wallpaper] , tap ID: ICN-SONY-HOME-APPTRAY-NORMAL .2Find and tap Settings [settings_label] > Storage & memory [settings_storage_memory_title_txt] .GUID GUID-1A0904B6-9ACB-4E9D-A3FB-735F1FE2069ATitle To view the status of your memoryChanges For Kugo - label/icon correctionsVersion 7Author SzilviaMStatus ReleasedTo view the amount of free and used RAM1From your Home screen [preference_title_home_wallpaper] , tap ID: ICN-SONY-HOME-APPTRAY-NORMAL .2Find and tap Settings [settings_label] > Storage & memory [settings_storage_memory_title_txt] .3Tap ID: ICN-SONY-KEY-MENU , then tap Advanced [home_settings_advanced_category] > Memory [clean-er_memory_title] .GUID GUID-5558F4D0-78B1-4A62-9B14-DFDAEA1CBA48Title To see amount of free and used RAMChanges For Kagura N 7.0 update - accessing RAM information from Storage&memory menuVersion 6Author SzilviaMStatus ReleasedTo clear the cache memory for all applications1From your Home screen [preference_title_home_wallpaper] , tap ID: ICN-SONY-HOME-APPTRAY-NORMAL .2Find and tap Settings [settings_label] > Storage & memory [settings_storage_memory_title_txt] .3Tap ID: ICN-SONY-KEY-MENU , then tap Advanced [home_settings_advanced_category] > Storage [stor-age_settings] , then find and tap Cached data [memory_media_cache_usage] > OK [ok] . If youhave a memory card inserted, select Internal shared storage [storage_internal] aftertapping Storage [storage_settings] .When you clear the cache memory, you don't lose any important information or settings.GUID GUID-2D2023C9-84B5-4579-ABDA-C1E326DD6518Title To clear the cache memory for all applicationsChanges N-update - Kugo - updated step 3, there is an extra step if there is a memory card insertedVersion 8Author AdamSStatus ReleasedTo transfer media files to the memory card1Make sure you have a memory card inserted into your device.2From your Home screen [preference_title_home_wallpaper] , tap ID: ICN-SONY-HOME-APPTRAY-NORMAL .3Find and tap Settings [settings_label] > Storage & memory [settings_storage_memory_title_txt] >Transfer data [cleaner_transfer_data_title] .4Mark the files that you want to transfer to the memory card.5Tap Transfer [button_transfer_txt] .GUID GUID-B06D4C52-D9A8-4D45-AA61-BBBA6358637CTitle To transfer content to the memory cardChanges For Kugo - label/icon corrections63This is an internet version of this publication. © Print only for private use.](https://usermanual.wiki/Sony/10720X.Manual/User-Guide-3336261-Page-63.png)
![Version 6Author SzilviaMStatus ReleasedTo stop applications and services from running1From your Home screen [preference_title_home_wallpaper] , tap ID: ICN-SONY-HOME-APPTRAY-NORMAL .2Find and tap Settings [settings_label] > Apps [applications_settings] .3Select an application or service, then tap FORCE STOP [force_stop] > OK [ok] .GUID GUID-80043DFE-66A7-45BA-87BD-0425739F9A2BTitle To stop running applications and servicesChanges For Kugo - label/icon correctionsVersion 3Author SzilviaMStatus ReleasedTo format the memory card1From your Home screen [preference_title_home_wallpaper] , tap ID: ICN-SONY-HOME-APPTRAY-NORMAL .2Find and tap Settings [settings_label] > Storage & memory [settings_storage_memory_title_txt] .3Tap ID: ICN-SONY-KEY-MENU , then tap Advanced [home_settings_advanced_category] > Storage [stor-age_settings] > SD Card [storage_sd_card] > ID: ICN-SONY-KEY-MENU , then tap Settings [settings] >Format [extmedia_format_button_format] > Erase & format [storage_wizard_format_confirm_next] .All content on the memory card gets erased when you format it. Make sure you first makebackups of all data that you want to save. To back up your content, you can copy it to acomputer. For more information, see Managing files using a computer on page 61.GUID GUID-DEE4838C-73E0-4957-A74C-CDA9488C1842Title To format the memory cardChanges For Kugo - label/icon correctionsVersion 8Author SzilviaMStatus ReleasedSmart cleanerUsing Smart cleaner [cleaner_smart_cleaner_title] you can improve device performance byautomatically optimising storage and memory depending on frequency of app use.GUID GUID-03D56686-A904-4CD3-8A6A-564F6B2F62BDTitle Smart cleanerChanges For Kugo - new topic for a new functionVersion 1Author SzilviaMStatus ReleasedTo enable or disable Smart cleaner1From your Home screen [preference_title_home_wallpaper] , tap ID: ICN-SONY-HOME-APPTRAY-NORMAL .2Find and tap Settings [settings_label] > Storage & memory [settings_storage_memory_title_txt] .3Tap the slider beside Smart cleaner [cleaner_smart_cleaner_title] .You can also modify, copy or delete files manually if you go to Settings [settings_label] > Storage &memory [settings_storage_memory_title_txt] > ID: ICN-SONY-KEY-MENU > Advanced [home_settings_advanced_category] >Storage [storage_settings] > Explore [storage_menu_explore]GUID GUID-7E8CB9AB-CAC7-4A8B-8315-3442A42E9C8ETitle To enable or disable Smart cleanerChanges Project X - Kagura - Note addedVersion 2Author AdamSStatus ReleasedBacking up and restoring contentGenerally, you should not save photos, videos and other personal content solely onthe internal memory of your device. If your device is damaged, lost or stolen, the data64This is an internet version of this publication. © Print only for private use.](https://usermanual.wiki/Sony/10720X.Manual/User-Guide-3336261-Page-64.png)
![stored on its internal memory may be impossible to recover. It is recommended touse the Xperia™ Companion software to make backups which save your data safelyto an external device. This method is especially recommended if you are updatingyour device software to a newer Android version.The Xperia™ Backup & restore application is recommended for backing up databefore you do a factory data reset. With this application you can back up data to anonline account, an SD card or to an external USB storage device that you haveconnected to your device using a USB host adapter.With the Google Backup & restore application, you can back up data to a Googleserver.GUID GUID-D1659CD1-BB34-44E3-A1A9-E15590CE6769Title Backing up and restoring content on a deviceChanges Punctuation error correctedVersion 12Author DoraMStatus ReleasedBacking up data to a computerUse the Xperia™ Companion software to back up data from your device to a PC oran Apple® Mac® computer. You can back up the following types of data:•Call logs•Text messages•Calendar•Settings•Media files such as music and videos•Photos and imagesGUID GUID-ABBEE6D7-29AF-46DA-A3A7-2BAB7A5B3B26Title Backing up data to a computerChanges for all N update devices - fixed first bullet point due to Xperia Companion limitationsVersion 10Author AdelKStatus ReleasedTo back up your data using a computer1Unlock the screen of your device and connect it to the computer using a USBType-C™ [USB Type-C-tm] cable.2Open the Xperia™ Companion software on your computer if it is notautomatically launched. After a few moments, the computer detects yourdevice. Make sure to select Transfer files [usb_use_file_transfers] mode on your device.3Click on Backup [SECTION_TITLE_BACKUP] on the Xperia™ Companion main screen.4Follow the on-screen instructions to back up data from your device.If you do not have Xperia™ Companion installed, you are requested to install it when youconnect your device to the computer.GUID GUID-C3759A10-C018-4BDA-B9E9-DE8E8FEF5666Title To back up your data using a computerChanges Project X - Kagura - Updated description (USB Type-C)Version 7.1.1Author AdamSStatus ReleasedTo restore your data using a computer1Unlock the screen of your device and connect it to the computer using a USBType-C™ [USB Type-C-tm] cable.2Open the Xperia™ Companion software on your computer if it is notautomatically launched. After a few moments, the computer detects yourdevice. Make sure to select Transfer files [usb_use_file_transfers] mode on your device.3Click on Restore [SECTION_TITLE_RESTORE] on the Xperia™ Companion main screen.4Select a backup file from the backup records, then click on Next [next_action] andfollow the on-screen instructions to restore data to your device.If you do not have Xperia™ Companion installed, you are requested to install it when youconnect your device to the computer.65This is an internet version of this publication. © Print only for private use.](https://usermanual.wiki/Sony/10720X.Manual/User-Guide-3336261-Page-65.png)
![GUID GUID-AC949EE0-84B7-4017-98B5-E3DFCC5FCA44Title To restore data using a computerChanges Project X - Kagura - Updated descriptionVersion 8Author AdamSStatus ReleasedBacking up data with the Xperia™ Backup & restore applicationUsing the Xperia™ Backup & restore application, you can make an online or a localdata backup. You can do so manually or turn on the automatic backup function tosave data periodically.The Xperia™ Backup & restore application is recommended for backing up databefore you do a factory data reset. With this application you can back up thefollowing types of data to an online account, an SD card or to an external USBstorage device that you have connected to your device using a USB host adapter:•Contacts•Conversations•Call log•Calendar•Email accounts•Wi-Fi [udoc_no_trans_wifi_wlan_plain] accounts•Device settings•Applications•Xperia™ Home layoutGUID GUID-A9FC69CD-7D6D-4AC7-9FB1-34C8C3591764Title Backup and restore data using the Backup and restore applicationChanges A typo corrected, otherwise same as version 9Version 10Author DoraMStatus ReleasedTo set up the automatic backup function1If you are backing up content to a USB storage device, make sure the storagedevice is connected to your device using a USB host adapter. If you arebacking up to an SD card, make sure that the SD card is mounted properly intoyour device. If you are backing up content to an online account, make sure youhave signed in to your Google ™ account.2From your Home screen [preference_title_home_wallpaper] , tap ID: ICN-SONY-HOME-APPTRAY-NORMAL .3Find and tap Settings [settings_label_launcher] > Backup & reset [privacy_settings] .4Under Xperia™ Backup & Restore [somc_backup_section_title] , tap Automatic backup [auto-matic_backup_button_title] .5To enable the automatic backup function, tap the on-off switch.6Select where to save backup files.7If desired, select a backup frequency, when to back up and the specific data toback up. Otherwise the backup is completed according to the default settings.8To save your settings, tap ID: ICN-SONY-KEY-AND-BACK .GUID GUID-1A37E039-96A4-4B40-8595-1F96443F10BETitle To back up content automaticallyChanges Functional review comment implemented - Kitakami-NVersion 6.1.1Author DoraM66This is an internet version of this publication. © Print only for private use.](https://usermanual.wiki/Sony/10720X.Manual/User-Guide-3336261-Page-66.png)
![Status ReleasedTo back up content manually1If you are backing up content to a USB storage device, make sure the storagedevice is connected to your device using a USB host adapter. If you arebacking up to an SD card, make sure the SD card is properly inserted into yourdevice. If you are backing up content to an online account, make sure you havesigned in to your Google ™ account.2From your Home screen [preference_title_home_wallpaper] , tap ID: ICN-SONY-HOME-APPTRAY-NORMAL .3Find and tap Settings [settings_label_launcher] > Backup & reset [privacy_settings] .4Under Xperia™ Backup & Restore [somc_backup_section_title] , tap More [somc_backup_more_title] .5Tap Manual backup [manual_backup_start_button] , then select a backup destination andthe data that you want to back up.6Tap Back up [start_backup_button] .7After the data is backed up, tap Finish [finish_process_start_button] .GUID GUID-C93A6F81-591B-447A-AD28-3845728ED525Title To back up content manuallyChanges 'Host adapter' changed to 'host adapter'Version 5.1.1Author DoraMStatus ReleasedTo edit a backup file1From your Home screen [preference_title_home_wallpaper] , tap ID: ICN-SONY-HOME-APPTRAY-NORMAL .2Find and tap Settings [settings_label_launcher] > Backup & reset [privacy_settings] .3Under Xperia™ Backup & Restore [somc_backup_section_title] , tap More [somc_backup_more_title] .4Tap Edit backup file [edit_backup_file_button_title] , then select a backup source and thedata types that you want to delete.5Tap Delete data [setting_manage_storage_delete_button] .6Tap OK [ok] to confirm.7After the data is deleted, tap Finish [finish_process_start_button] .GUID GUID-94CD5E5D-A978-4741-A27B-917D792FCC45Title To edit backed up filesChanges For Kugo - label/icon correctionsVersion 3Author SzilviaMStatus ReleasedTo restore backed up content1If you are restoring content from a USB storage device, make sure that thestorage device is connected to your device using the USB Host adapter. If youare restoring content from an SD card, make sure that the SD card is properlyinserted into your device. If you are restoring content from Xperia Backup &Restore service, make sure you have signed in to your Google™ account.2From your Home screen [preference_title_home_wallpaper] , tap ID: ICN-SONY-HOME-APPTRAY-NORMAL .3Find and tap Settings [settings_label_launcher] > Backup & reset [privacy_settings] .4Under Xperia™ Backup & Restore [somc_backup_section_title] , tap Restore data [re-store_start_button] , then select a restore source and the data that you want to restore.5Tap Restore data [restore_start_button] .6After the content is restored, tap Finish [finish_process_start_button] .Remember that any changes that you make to your data and settings after you create abackup - such as any new apps you install - get deleted during any subsequent restoreprocedure.GUID GUID-ED5217FF-389B-4C0B-A3AE-41EE8B4736B9Title To restore contentChanges For Kagura N 7.0 update - replacing "restore data now" with "Restore data"Version 7Author SzilviaM67This is an internet version of this publication. © Print only for private use.](https://usermanual.wiki/Sony/10720X.Manual/User-Guide-3336261-Page-67.png)
![Status ReleasedBacking up data with the Google Backup & restore applicationUsing the Google Backup & restore application, you can back up data to a Googleserver. You can also turn on the automatic restore function to restore application dataand settings when you reinstall an application.With this application you can back up the following types of data:•Applications•Bookmarks•Wi-Fi [udoc_no_trans_wifi_wlan_plain] networks•Other settingsGUID GUID-8FCBF628-1551-410D-B3B4-EB327AF88DCBTitle Backing up data with the Google Backup & Restore applicationChanges N-update - wifi conditionedVersion 2Author AdamSStatus ReleasedTo back up data to a Google™ account1From your Home screen [preference_title_home_wallpaper] , tap ID: ICN-SONY-HOME-APPTRAY-NORMAL .2Find and tap Settings [settings_label_launcher] > Backup & reset [privacy_settings] .3Under Google™ Backup & Restore [somc_google_backup_section_title] , tap Back up my data[allow_backup_button_label] and then tap the slider.GUID GUID-32152A27-B342-40D2-8DEF-7FA181B88551Title To back up data to a Google accountChanges For Kugo - label/icon correctionsVersion 3Author SzilviaMStatus ReleasedTo enable or disable automatic restore when you reinstall an application1From your Home screen [preference_title_home_wallpaper] , tap ID: ICN-SONY-HOME-APPTRAY-NORMAL .2Find and tap Settings [settings_label_launcher] > Backup & reset [privacy_settings] .3Under Google™ Backup & Restore [somc_google_backup_section_title] , tap the Automaticrestore [auto_restore_title] slider.GUID GUID-818B4F0E-1213-4C7E-8434-A504F31B113DTitle To restore backed up application dataChanges For Kugo - label/icon correctionsVersion 2Author SzilviaMStatus Released68This is an internet version of this publication. © Print only for private use.](https://usermanual.wiki/Sony/10720X.Manual/User-Guide-3336261-Page-68.png)
![Downloading applicationsGUID GUID-213B33AF-5332-4FDD-A5DE-49D4D60DF54CTitle Downloading applicationsChanges For nxtstp UGVersion 1Author zzWangHermanStatus ReleasedDownloading applications from Google Play™Google Play™ is the official online Google store for downloading applications,games, music, movies and books. It includes both free and paid applications. Beforeyou start downloading from Google Play™, make sure that you have a workinginternet connection, preferably over Wi-Fi [udoc_no_trans_wifi_wlan_plain] to limit data trafficcharges.To use Google Play™, you need to have a Google™ account. Google Play™ may not beavailable in all countries or regions.GUID GUID-CCEFB15F-F00D-407C-B076-1DCEAFC9755FTitle Downloading applications from Google PlayChanges Internet decapedVersion 4Author RenataBStatus ReleasedTo download an application from Google Play™1From the Home screen [preference_title_home_wallpaper] , tap ID: ICN-SONY-HOME-APPTRAY-NORMAL .2Find and tap Play Store [android-market-market] .3Find an item you wish to download by browsing categories, or by using thesearch function.4Tap the item to view its details, and follow the instructions to complete theinstallation.Some applications may need to access data, settings and various functions on your device inorder to work properly. Only install and give permissions to applications that you trust. You canview the permissions granted to a downloaded application and also change their status bytapping the application under Settings [settings_label_launcher] > Apps [applications_settings] .GUID GUID-318E5804-E53F-43FA-8185-DB8E535C066ATitle To download an application from Google PlayChanges Fix label error due to resource filesVersion 1.2.2Author RenataBStatus ReleasedDownloading applications from other sourcesWhen your device is set to allow downloads from sources other than Google Play™,you can download applications directly from other websites by following the relevantdownload instructions.Installing applications of unknown or unreliable origin can damage your device. Downloadapplications only from reliable sources. Contact the application provider if you have anyquestions or concerns.If you are using a device with multiple users, only the owner, that is, the primary user, canallow downloads from sources other than Google Play™. Changes made by the owner affectall other users.GUID GUID-DA1F46C9-E659-45DB-8E57-51E2D50AE7A5Title Downloading applications from other sourcesChanges Note made tipVersion 3.1.3Author RenataB69This is an internet version of this publication. © Print only for private use.](https://usermanual.wiki/Sony/10720X.Manual/User-Guide-3336261-Page-69.png)
![Status ReleasedTo enable or disable the downloading of applications from other sources1From your Home screen [preference_title_home_wallpaper] , tap ID: ICN-SONY-HOME-APPTRAY-NORMAL .2Find and tap Settings [settings_label] > Lock screen & security [settings_security_and_lockscreen_ti-tle_txt] .3Tap the Unknown sources [install_applications] slider.4Tap OK [ok] .Some applications may need to access data, settings and various functions on your device inorder to work properly. Only install and give permissions to applications that you trust. You canview the permissions granted to a downloaded application and also change their status bytapping the application under Settings [settings_label_launcher] > Apps [applications_settings] .GUID GUID-9B0A4A4D-09AF-4147-81CF-E3AF4E173BE8Title To allow download of applications from other sourcesChanges Fix label error due to resource filesVersion 6Author RenataBStatus Released70This is an internet version of this publication. © Print only for private use.](https://usermanual.wiki/Sony/10720X.Manual/User-Guide-3336261-Page-70.png)
![Internet and networksGUID GUID-81B0AC57-DDA9-47E1-8D3F-DACA81C73F05Title Internet and networksChanges For nxtstp UG. Done by Jorgen but rename Author to Nellie.Version 1Author zzTan NellieStatus ReleasedBrowsing the webThe Google Chrome™ web browser for Android™ devices comes pre-installed inmost markets. Go to http://support.google.com/chrome and click the "Chrome forMobile" link to get more detailed information about how to use this web browser.GUID GUID-243B87A9-00BF-4A6F-A3A3-804B4A192B7BTitle Browsing the webChanges For nxtstp ugVersion 3Author zzLuLindaStatus ReleasedTo browse the web1From your Home screen [preference_title_home_wallpaper] , tap ID: ICN-SONY-HOME-APPTRAY-NORMAL .2Find and tap ID: ICN-SONY-APP-CHROME .3If you are using Google Chrome™ for the first time, select to either sign in to aGoogle™ account or browse with Google Chrome™ anonymously.4Enter a search term or web address in the search and address field, then tap ID: ICN-SONY-MENU-SEARCH on the keyboard.GUID GUID-507FD97F-A4A8-4989-A597-3DD9FD01990FTitle To start browsingChanges Icon varref fix for KeyakiVersion 7Author RenataBStatus ReleasedInternet and MMS settingsTo send multimedia messages, or to access the internet when there is no availableWi-Fi [udoc_no_trans_wifi_wlan_plain] network, you must have a working mobile data connectionwith the correct internet and MMS (Multimedia Messaging Service) settings. Here aresome tips:•For most mobile networks and operators, internet and MMS settings come pre-installed on your device. You can then start using the internet and send multimediamessages right away.•It is possible to download these settings via Wi-Fi [udoc_no_trans_wifi_wlan_plain] .•You can manually add, change or delete internet and MMS settings on your device atany time. If you change or delete an internet or MMS setting by mistake, downloadthe internet and MMS settings again.•If you cannot access the internet over a mobile network or if multimedia messaging isnot working, even though the internet and MMS settings have been downloadedsuccessfully to your device, refer to the troubleshooting tips for your device atwww.sonymobile.com/support/ for network coverage, mobile data, and MMS issues.•If the Battery time preferred setting of STAMINA mode is activated to save power, allmobile data traffic gets paused when the screen is off. If this causes connectionproblems, try excluding some applications and services from being paused, ordeactivate STAMINA mode temporarily.•If you are sharing a device with multiple users, only the owner, that is, the primaryuser, can download internet and messaging settings from the Settings menu, but thedownloaded settings are applicable to all users.GUID GUID-E108490D-17EF-4989-95D0-DB1F6F93AD07Title Internet and messaging settingsChanges Ed comment implemented for RedwoodVersion 23Author RenataB71This is an internet version of this publication. © Print only for private use.](https://usermanual.wiki/Sony/10720X.Manual/User-Guide-3336261-Page-71.png)
![Status DraftTo download internet and MMS settings1From your Home screen [preference_title_home_wallpaper] , tap ID: ICN-SONY-HOME-APPTRAY-NORMAL .2Find and tap Settings [settings_label_launcher] > More [radio_controls_title] > Internet settings[r2r_settings_download_title_txt] .3Tap ACCEPT [dialog_button_accept_cap] . Once the settings have been downloadedsuccessfully, ID: ICN-SONY-INTERNET-SETTINGS-DOWNLOADED appears in the status bar andmobile data traffic is turned on automatically.If the settings cannot be downloaded to your device, check the signal strength of your mobileor Wi-Fi [udoc_no_trans_wifi_wlan_plain] network connections. Move to an open location free fromobstructions or get close to a window and then try again.GUID GUID-86823E16-0E31-4A88-AD3F-6BAFB84C490ETitle To download Internet and messaging settingsChanges Wi-Fi label fixVersion 22Author RenataBStatus ReleasedTo add internet and MMS settings1From your Home screen [preference_title_home_wallpaper] , tap ID: ICN-SONY-HOME-APPTRAY-NORMAL .2Find and tap Settings [settings_label_launcher] > More [radio_controls_title] > Mobile networks [net-work_settings_title] .3Tap Access Point Names [apn_settings] > ID: ICN-SONY-MENU-ADD .4Tap Name [apn_name] and enter a name of your choice, then tap OK [ok] .5Tap APN [apn_apn] and enter the access point name, then tap OK [ok] .6Enter all other required information. If you don’t know what information isrequired, contact your network operator for more details.7When you're done, tap ID: ICN-SONY-KEY-MENU , then tap Save [save] .GUID GUID-32B23CC9-D90A-4769-AC96-E84045CC67B5Title To configure Internet settings manuallyChanges Label in lower case in step 8 for RedwoodVersion 22Author RenataBStatus DraftTo view downloaded internet and MMS settings1From your Home screen [preference_title_home_wallpaper] , tap ID: ICN-SONY-HOME-APPTRAY-NORMAL .2Find and tap Settings [settings_label_launcher] > More [radio_controls_title] > Mobile networks [net-work_settings_title] .3Tap Access Point Names [apn_settings] .4To view more details, tap any of the available items.GUID GUID-D3CA1D1D-9D77-409E-B090-A9F34E50E7C4Title To view the current Access Point Name (APN)Changes Internet decapedVersion 13Author RenataBStatus ReleasedWi-FiUse Wi-Fi [udoc_no_trans_wifi_wlan_plain] to surf the internet, download applications, or send andreceive emails. Once you have connected to a Wi-Fi [udoc_no_trans_wifi_wlan_plain] network,your device remembers the network and automatically connects to it the next timeyou come within range.Some Wi-Fi [udoc_no_trans_wifi_wlan_plain] networks require you to log in to a web page beforeyou can get access. Contact the relevant Wi-Fi [udoc_no_trans_wifi_wlan_plain] networkadministrator for more information.72This is an internet version of this publication. © Print only for private use.](https://usermanual.wiki/Sony/10720X.Manual/User-Guide-3336261-Page-72.png)
![Available Wi-Fi [udoc_no_trans_wifi_wlan_plain] networks may be open or secured:•Open networks are indicated by ID: ICN-SONY-STAT-SYS-WIFI-SIGNAL-4 next to the Wi-Fi[udoc_no_trans_wifi_wlan_plain] network name.•Secured networks are indicated by ID: ICN-SONY-STAT-SYS-WIFI-LOCK next to the Wi-Fi[udoc_no_trans_wifi_wlan_plain] network name.Some Wi-Fi [udoc_no_trans_wifi_wlan_plain] networks do not show up in the list of available networksbecause they do not broadcast their network name (SSID). If you know the network name, youcan add it manually to your list of available Wi-Fi [udoc_no_trans_wifi_wlan_plain] networks.GUID GUID-AAEAF087-8D25-4ADD-9DCB-14D7C20696D3Title Wi-FiChanges Varref fix for HinokiVersion 13Author RenataBStatus DraftTo turn Wi-Fi on or off1From your Home screen [preference_title_home_wallpaper] , tap ID: ICN-SONY-HOME-APPTRAY-NORMAL .2Find and tap Settings [settings_label_launcher] > Wi-Fi [udoc_no_trans_wifi_wlan] .3Tap the slider to enable or disable Wi-Fi [udoc_no_trans_wifi_wlan_plain] .It may take a few seconds before Wi-Fi [udoc_no_trans_wifi_wlan_plain] is enabled.GUID GUID-32D5A26E-BDE9-443A-9989-CD340E27C309Title To turn on Wi-FiChanges Topic title fix for Aries/Project XVersion 15Author RenataBStatus ReleasedTo connect to a Wi-Fi network1From your Home screen [preference_title_home_wallpaper] , tap ID: ICN-SONY-HOME-APPTRAY-NORMAL .2Find and tap Settings [settings_label_launcher] > Wi-Fi [udoc_no_trans_wifi_wlan] .3Tap the slider to turn on Wi-Fi [udoc_no_trans_wifi_wlan_plain] . All available Wi-Fi[udoc_no_trans_wifi_wlan_plain] networks are displayed.4Tap a Wi-Fi [udoc_no_trans_wifi_wlan_plain] network to connect to it. For secured networks,enter the relevant password. ID: ICN-SONY-STAT-SYS-WIFI-SIGNAL-4 is displayed in thestatus bar once you are connected.To search for new available networks, tap ID: ICN-SONY-KEY-MENU , then tap Refresh [refresh_action] . Ifyou cannot connect to a Wi-Fi [udoc_no_trans_wifi_wlan_plain] network successfully, refer to the relevanttroubleshooting tips for your device at www.sonymobile.com/support/.GUID GUID-349C27FA-BB6C-438D-A975-FBDC889BD41DTitle To connect to a Wi-Fi networkChanges Varref fix for HinokiVersion 20Author RenataB73This is an internet version of this publication. © Print only for private use.](https://usermanual.wiki/Sony/10720X.Manual/User-Guide-3336261-Page-73.png)
![Status DraftTo add a Wi-Fi network manually1From your Home screen [preference_title_home_wallpaper] , tap ID: ICN-SONY-HOME-APPTRAY-NORMAL .2Find and tap Settings [settings_label_launcher] > Wi-Fi [udoc_no_trans_wifi_wlan] .3Scroll down and tap ID: ICN-SONY-FINGERPRINT-ADD at the end of the listed items.4Enter the Network name (SSID) [wifi_ssid] information.5To select a security type, tap the Security [wifi_security] field.6If required, enter a password.7To edit advanced options such as proxy and IP settings, tap Advanced options[wifi_show_advanced] and then edit the options as desired.8Tap SAVE [menu_save] .Contact your Wi-Fi [udoc_no_trans_wifi_wlan_plain] network administrator to get the network SSID andpassword.GUID GUID-A7AE9A0F-77BC-46FA-8C4A-B90D8C3E4FACTitle To add a Wi-Fi network manuallyChanges Varref fix for HinokiVersion 20Author RenataBStatus DraftIncreasing Wi-Fi signal strengthID: ILL-SONY-17HI-WIFI-ANTENNAThere are a number of things you can do to improve Wi-Fi [udoc_no_trans_wifi_wlan_plain]reception:•Move your device closer to the Wi-Fi [udoc_no_trans_wifi_wlan_plain] access point.•Move the Wi-Fi [udoc_no_trans_wifi_wlan_plain] access point away from any potentialobstructions or interference.•Don’t cover the Wi-Fi [udoc_no_trans_wifi_wlan_plain] antenna area of your device (the highlightedarea in the illustration).GUID GUID-22C3D561-4F08-47F6-9A4B-8E8FD3D318B7Title Wi-Fi signal strengthChanges Wi-Fi label fix for N updateVersion 6Author RenataBStatus ReleasedWi-Fi settingsWhen you are connected to a Wi-Fi [udoc_no_trans_wifi_wlan_plain] network or when there are Wi-Fi [udoc_no_trans_wifi_wlan_plain] networks available in your vicinity, you can view the status ofthese networks. You can also enable your device to notify you whenever an open Wi-Fi [udoc_no_trans_wifi_wlan_plain] network is detected.GUID GUID-9C75877B-91A1-44F4-BABC-64A97D9A17E2Title Wi-Fi settingsChanges Wi_fi label fix for N updateVersion 4Author RenataB74This is an internet version of this publication. © Print only for private use.](https://usermanual.wiki/Sony/10720X.Manual/User-Guide-3336261-Page-74.png)
![Status ReleasedTo enable or disable Wi-Fi network notifications1Turn on Wi-Fi [udoc_no_trans_wifi_wlan_plain] , if it is not already on.2From your Home screen [preference_title_home_wallpaper] , tap ID: ICN-SONY-HOME-APPTRAY-NORMAL .3Find and tap Settings [settings_label_launcher] > Wi-Fi [udoc_no_trans_wifi_wlan] .4Tap ID: ICN-SONY-MENU-SETTINGS , then tap the Network notification [wifi_notify_open_networks]slider.GUID GUID-9F08F877-2C94-4551-8F02-965605144EEETitle To enable Wi-Fi network notificationChanges Label fix for N updateVersion 13Author RenataBStatus ReleasedTo view detailed information about a connected Wi-Fi network1From the Home screen [preference_title_home_wallpaper] , tap ID: ICN-SONY-HOME-APPTRAY-NORMAL .2Find and tap Settings [settings_label_launcher] > Wi-Fi [udoc_no_trans_wifi_wlan] .3Tap the Wi-Fi [udoc_no_trans_wifi_wlan_plain] network that you are currently connected to.Detailed network information is displayed.GUID GUID-51F6A64B-C4DB-47B6-91B1-ED742AACB692Title To view detailed information about a connected Wi-Fi networkChanges Wifi label fix for N updateVersion 9Author RenataBStatus ReleasedTo add a Wi-Fi sleep policy1From the Home screen [preference_title_home_wallpaper] , tap ID: ICN-SONY-HOME-APPTRAY-NORMAL .2Find and tap Settings [settings_label_launcher] > Wi-Fi [udoc_no_trans_wifi_wlan] .3Tap ID: ICN-SONY-MENU-SETTINGS , then tap Keep Wi-Fi on during sleep [wifi_setting_sleep_poli-cy_title] .4Select an option.GUID GUID-65A23535-7509-42F8-8825-7DB85FEC5A28Title To add a Wi-FI sleep policyChanges Step change for N updateVersion 8.1.5Author RenataBStatus ReleasedTo find the MAC address for your device1From the Home screen [preference_title_home_wallpaper] , tap ID: ICN-SONY-HOME-APPTRAY-NORMAL .2Find and tap Settings [settings_label_launcher] > Wi-Fi [udoc_no_trans_wifi_wlan] .3Tap ID: ICN-SONY-MENU-SETTINGS . The MAC address [wifi_advanced_mac_address_title] isdisplayed in the list.GUID GUID-BCFD0D14-2B05-41C0-AE0A-9C1C37C11CF0Title To find the MAC address for your deviceChanges Maintenance Release 2017Version 1Author DoraMStatus ReleasedWPSWPS (Wi-Fi [udoc_no_trans_wifi_wlan_plain] Protected Setup™) is a wireless networking standardthat helps you establish secure wireless network connections. WPS makes it easy foryou to set up Wi-Fi [udoc_no_trans_wifi_wlan_plain] Protected Access® (WPA) encryption tosecure your network. You can also add new devices to an existing network withoutentering long passwords.Use one of these methods to enable WPS:•Push button method – simply push a button on a WPS-supported device, forexample, a router.75This is an internet version of this publication. © Print only for private use.](https://usermanual.wiki/Sony/10720X.Manual/User-Guide-3336261-Page-75.png)
![•PIN method – your device creates a random PIN (Personal Identification Number),which you enter on the WPS-supported device.GUID GUID-8524E3B3-194C-49C4-A3B7-6C6CBD4D6536Title WPSChanges Content change for N-updateVersion 6Author RenataBStatus ReleasedTo connect to a Wi-Fi network using a WPS button1From the Home screen [preference_title_home_wallpaper] , tap ID: ICN-SONY-HOME-APPTRAY-NORMAL .2Find and tap Settings [settings_label_launcher] > Wi-Fi [udoc_no_trans_wifi_wlan] .3Turn on Wi-Fi [udoc_no_trans_wifi_wlan_plain] if it is not already on.4Tap ID: ICN-SONY-KEY-MENU , then tap Advanced [home_settings_advanced_category] > WPS PushButton [wps_tethering_menu_wps_push_btn_txt] , then press the WPS button on the WPS-supported device.GUID GUID-54815D13-F4EE-4392-BDB0-34AF1DB63D25Title To connect to a Wi-Fi using a WPS buttonChanges Label changed for HinokiVersion 7Author RenataBStatus ReleasedTo connect to a Wi-Fi network using a WPS PIN1From your Home screen [preference_title_home_wallpaper] , tap ID: ICN-SONY-HOME-APPTRAY-NORMAL .2Find and tap Settings [settings_label_launcher] > Wi-Fi [udoc_no_trans_wifi_wlan] .3Turn on Wi-Fi [udoc_no_trans_wifi_wlan_plain] if it is not already on.4Tap ID: ICN-SONY-KEY-MENU > Advanced [home_settings_advanced_category] > WPS PIN Entry [wi-fi_menu_wps_pin] .5On the WPS-supported device, enter the PIN that appears on your device.GUID GUID-9BA06C28-E285-499F-AD32-FA2234F14526Title To connect to a Wi-Fi network using a WPS PINChanges Varref fix for HinokiVersion 5Author RenataBStatus ReleasedSharing your mobile data connectionYou can share your mobile data connection with other devices in several ways, listedbelow.•USB tethering: share your mobile data connection with a single computer using aUSB cable.•Portable Wi-Fi [udoc_no_trans_wifi_wlan_plain] hotspot: share your mobile data connectionsimultaneously with up to 10 other devices, including devices that support WPStechnology.•One-touch portable hotspot: touch devices to start sharing your mobile connection over Wi-Fi [udoc_no_trans_wi-fi_wlan_plain] .•Bluetooth® tethering: share your mobile data connection with up to four otherdevices via Bluetooth®.GUID GUID-391DC4CE-B831-4F3F-8D82-9CC4E03EA622Title Sharing your mobile data connectionChanges For one-touch tethering supported devicesVersion 13Author RenataB76This is an internet version of this publication. © Print only for private use.](https://usermanual.wiki/Sony/10720X.Manual/User-Guide-3336261-Page-76.png)
![Status DraftTo share your data connection using a USB cable1Connect your device to a computer, using the USB cable that came with it.2From your Home screen [preference_title_home_wallpaper] , tap ID: ICN-SONY-HOME-APPTRAY-NORMAL .3Find and tap Settings [settings_label_launcher] > More [radio_controls_title] > Tethering & portablehotspot [usbux_strings_tethering_and_portable_hotspot] .4Tap the USB tethering [usb_tethering_button_text] slider, then tap OK [okay_action] if prompted.ID: ICN-SONY-STAT-SYS-TETHER-USB is displayed in the status bar once you areconnected.5To stop sharing your data connection, tap the USB tethering [usb_tethering_button_text]slider or disconnect the USB cable.You cannot share your device's data connection and SD card over a USB cable at the sametime.GUID GUID-60CF569F-5B4A-43C3-B7F8-759B6C76C930Title To share your data connection using a USB cableChanges Content and icon change for Kitakami N-updateVersion 10Author RenataBStatus ReleasedTo share your mobile connection by One-touch tethering1Make sure that both devices have the NFC function turned on, and that bothscreens are active.2From your Home screen [preference_title_home_wallpaper] , tap ID: ICN-SONY-HOME-APPTRAY-NORMAL .3Find and tap Settings [settings_label_launcher] > More [radio_controls_title] > Tethering & portablehotspot [usbux_strings_tethering_and_portable_hotspot] . > One-touch tethering [udoc_trans_teth-er_one_touch_tethering] .4Tap Portable hotspot [wifi_tether_checkbox_text] slider to enable the function.5Hold devices back to back so that the NFC detection areas of each devicetouch each other, then tap CONNECT [] .This function only works with devices that also support NFC Wi-Fi [udoc_no_trans_wifi_wlan_plain]tethering.GUID GUID-F5D64A17-CA8C-4431-A67A-517A6481E867Title To share your mobile connection by NFC WiFi tetheringChanges Label varref fix for devices that support one-touch tetheringVersion 5Author RenataB77This is an internet version of this publication. © Print only for private use.](https://usermanual.wiki/Sony/10720X.Manual/User-Guide-3336261-Page-77.png)
![Status DraftTo share your mobile data connection with another Bluetooth® device1Make sure that your device and the other Bluetooth® device are paired witheach other and that mobile data traffic is activated on your device.2Your device: From your Home screen [preference_title_home_wallpaper] , tap ID: ICN-SONY-HOME-APPTRAY-NORMAL .3Find and tap Settings [settings_label_launcher] > More [radio_controls_title] > Tethering & portablehotspot [usbux_strings_tethering_and_portable_hotspot] and then tap the Bluetooth tethering [blue-tooth_tether_checkbox_text] slider to enable the function.4Bluetooth® device: Set up the device so that it obtains its network connectionusing Bluetooth®. If the device is a computer, refer to the relevant instructionsto complete the setup. If the device runs on the Android™ operating system,tap the settings icon beside the name of the device that it is paired with underSettings [settings_label_launcher] > Bluetooth [bluetooth_quick_toggle_title] > Paired devices [blue-tooth_preference_paired_devices] , then mark the Internet access [bluetooth_profile_pan] checkbox.5Your device: Wait for ID: ICN-SONY-STAT-SYS-TETHER-BLUETOOTH to appear in the statusbar. Once it appears, the setup is complete.6Tap the Bluetooth tethering [bluetooth_tether_checkbox_text] slider again to disable thefunction.The Bluetooth tethering [bluetooth_tether_checkbox_text] function is turned off every time you turn off yourdevice or turn off the Bluetooth® function.GUID GUID-5FA3113B-420B-4F18-9D74-5E6488DE2C83Title To share your data connection with another Bluetooth(R) deviceChanges ED comment implemented in step 6 for N-updateVersion 7Author RenataBStatus ReleasedTo use your device as a portable Wi-Fi hotspot1From your Home screen [preference_title_home_wallpaper] , tap ID: ICN-SONY-HOME-APPTRAY-NORMAL .2Find and tap Settings [settings_label_launcher] > More [radio_controls_title] > Tethering & portablehotspot [usbux_strings_tethering_and_portable_hotspot] .3Tap Portable hotspot settings [wifi_tether_settings_text] > Configure hotspot [wifi_tether_config-ure_ap_text] .4Enter the Network name (SSID) [wifi_ssid] information.5To select a security type, tap the Security [wifi_security] field. If required, enter apassword.6Tap SAVE [menu_save] .7Tap ID: ICN-SONY-KEY-AND-BACK , then tap the Portable hotspot [wifi_tether_checkbox_text] sliderto enable the function.8If prompted, tap OK [okay_action] to confirm. ID: ICN-SONY-STAT-SYS-TETHER-WIFI-IN-MANUALappears in the status bar once the portable Wi-Fi [udoc_no_trans_wifi_wlan_plain] hotspot isactive.GUID GUID-791E5AEC-C4A2-4CFC-AAFA-F8A9D12DED39Title To use your device as a portable hotspotChanges Label and icon fix for Suzuran N-updateVersion 1.3.3Author RenataB78This is an internet version of this publication. © Print only for private use.](https://usermanual.wiki/Sony/10720X.Manual/User-Guide-3336261-Page-78.png)
![Status ReleasedTo allow a WPS-supported device to use your mobile data connection1Make sure that your device is functioning as a portable hotspot.2From your Home screen [preference_title_home_wallpaper] , tap ID: ICN-SONY-HOME-APPTRAY-NORMAL .3Find and tap Settings [settings_label_launcher] > More [radio_controls_title] > Tethering & portablehotspot [usbux_strings_tethering_and_portable_hotspot] > Portable hotspot settings [wifi_tether_set-tings_text] .4Under Configure hotspot [wifi_tether_configure_ap_text] , make sure that your portablehotspot is secured by a password.5Enable Discoverable [tether_settings_discoverable] , if it was disabled.6Tap WPS Push Button [wifi_menu_wps_pbc] , then follow the relevant instructions.Alternatively, tap ID: ICN-SONY-KEY-MENU > WPS PIN Entry [wps_tethering_menu_pin_entry_txt] ,then enter the PIN that appears on the WPS-supported device.GUID GUID-D38DF5FB-86B7-401D-88A5-72C457C92929Title To allow a WPS-supported device using your mobile data connectionChanges Implement reviewer comment in the first step for N updateVersion 4.1.2Author RenataBStatus ReleasedTo rename or secure your Mobile Hotspot1From the Home screen [preference_title_home_wallpaper] , tap ID: ICN-SONY-HOME-APPTRAY-NORMAL .2Find and tap Settings [settings_label_launcher] > More [radio_controls_title] > Tethering & portablehotspot [usbux_strings_tethering_and_portable_hotspot] .3Tap Portable hotspot settings [wifi_tether_settings_text] > Configure hotspot [wifi_tether_config-ure_ap_text] .4Enter the Network name (SSID) [wifi_ssid] information.5To select a security type, tap the Security [wifi_security] field.6If required, enter a password.7Tap SAVE [menu_save] .GUID GUID-E4366CA7-0AA0-4F7A-B25B-F8BFC3BAF97ATitle To rename or secure your portable hotspotChanges Label varref fix in step 1 and label changed to upper case for RedwoodVersion 10Author RenataBStatus DraftControlling data usageYou can keep track of the amount of data transferred to and from your device overyour mobile data or Wi-Fi [udoc_no_trans_wifi_wlan_plain] connection during a given period. Forexample, you can view the amount of data used by individual applications. For datatransferred over your mobile data connection, you can also set data usage warningsand limits to avoid additional charges.If you are using a device with multiple users, only the owner, that is, the primary user, canadjust data usage settings. Adjusting data usage settings can help you keep greater controlover data usage but cannot guarantee the prevention of additional charges.GUID GUID-C0566A1E-7656-4AA0-83CF-B16974F69C4CTitle Controlling data usageChanges Wi-Fi label fixed for N-update / Project XVersion 6.1.1Author DanielSStatus ReleasedTo help reduce data usage1From your Home screen [preference_title_home_wallpaper] , tap ID: ICN-SONY-HOME-APPTRAY-NORMAL .2Find and tap Settings [settings_label_launcher] > Data usage [account_settings_data_usage] > DataSaver [data_saver] .3Tap the slider to enable or disable the function.79This is an internet version of this publication. © Print only for private use.](https://usermanual.wiki/Sony/10720X.Manual/User-Guide-3336261-Page-79.png)
![GUID GUID-2F6F9C88-9E7F-4B75-84DE-2AE61BE4AD1BTitle To help reduce data usageChanges Step 3 removed for RedwoodVersion 3Author RenataBStatus DraftTo turn data traffic on or off1From your Home screen [preference_title_home_wallpaper] , tap ID: ICN-SONY-HOME-APPTRAY-NORMAL .2Find and tap Settings [settings_label_launcher] > Data usage [account_settings_data_usage] .3Tap the Mobile data [data_usage_enable_mobile] slider to turn data traffic on or off.When data traffic is turned off, your device can still establish Wi-Fi [udoc_no_trans_wifi_wlan_plain] andBluetooth® connections.GUID GUID-AF0FB16B-F83D-452C-B097-C0BB9FC06865Title To turn data traffic on or offChanges Version used for SS/DS N-updateVersion 10Author RenataBStatus ReleasedTo set a data usage warning1Make sure that mobile data traffic is turned on.2From your Home screen [preference_title_home_wallpaper] , tap ID: ICN-SONY-HOME-APPTRAY-NORMAL .3Find and tap Settings [settings_label_launcher] > Data usage [account_settings_data_usage] > Billingcycle [billing_cycle] .4To set the warning level, tap Data warning [data_warning] , enter the desired data limitand tap SET [data_usage_set_caps] . You receive a warning notification when theamount of data traffic reaches the level you set.GUID GUID-E984931A-1304-4ADC-93A5-1CA4FAB17CBETitle To set a level for data usage warningChanges Label in caps for Kitakamai N-update + 'Select a SIM card' step removed, according toChinese functional reviewer's requestVersion 8Author RenataBStatus ReleasedTo set a mobile data limit1Make sure that mobile data traffic is turned on.2From your Home screen [preference_title_home_wallpaper] , tap ID: ICN-SONY-HOME-APPTRAY-NORMAL .3Find and tap Settings [settings_label_launcher] > Data usage [account_settings_data_usage] .4Tap Billing cycle [billing_cycle] and tap the slider beside Set data limit [data_usage_data_limit] ,then tap OK [button_ok] .Once your mobile data usage reaches the set limit, mobile data traffic on your device getsturned off automatically.GUID GUID-387685B1-AC66-41E5-91FD-BAB3268E5AAFTitle To set data usage limitChanges One path more added for PineVersion 10Author RenataBStatus DraftTo control the data usage of individual applications1From your Home screen [preference_title_home_wallpaper] , tap ID: ICN-SONY-HOME-APPTRAY-NORMAL .2Find and tap Settings [settings_label_launcher] > Apps [applications_settings] .3Tap the application that you want to control, then tap Data usage [account_settings_da-ta_usage] .The performance of individual applications may be affected if you change the related datausage settings.80This is an internet version of this publication. © Print only for private use.](https://usermanual.wiki/Sony/10720X.Manual/User-Guide-3336261-Page-80.png)
![GUID GUID-16A3F307-2E86-443A-A431-7F192F049F2DTitle To control the data usage of individual applicationsChanges Change steps for N updateVersion 7Author RenataBStatus ReleasedTo check your data usage1From your Home screen [preference_title_home_wallpaper] , tap ID: ICN-SONY-HOME-APPTRAY-NORMAL .2Find and tap Settings [settings_label_launcher] > Data usage [account_settings_data_usage] .3To view information about the amount of data transferred via mobile dataconnection, tap Mobile data usage [mobile_data_usage] .4To view information about the amount of data transferred via Wi-Fi [udoc_no_trans_wi-fi_wlan_plain] connection, tap the Wi-Fi data usage [wifi_data_usage] .GUID GUID-BB3CD5AE-08A0-4FE8-8733-6A4152A428E4Title To check your data usageChanges Information and new label added about mobile data usage added for RedwoodVersion 6Author RenataBStatus DraftSelecting mobile networks•One WCDMA network•One GSM network•One WCDMA and one GSM network•One LTE, one WCDMA and one GSM networkYour device automatically switches between mobile networks depending on whichmobile networks are available where you are. You can also manually set your deviceto use a particular mobile network mode, for example, WCDMA or GSM.Different status icons are displayed in the status bar depending on the type or modeof network that you are connected to. Refer to Status icon on page 42 to see whatthe different status icons look like.GUID GUID-034C32F2-F90D-47E9-8612-D4F01CA13BA6Title Selecting mobile networksChanges Remove condition for Keyaki SSVersion 6.1.2Author RenataBStatus ReleasedTo select a network mode1From your Home screen [preference_title_home_wallpaper] , tap ID: ICN-SONY-HOME-APPTRAY-NORMAL .2Find and tap Settings [settings_label_launcher] > More [radio_controls_title] > Mobile networks [net-work_settings_title] .3Tap Preferred network type [preferred_network_mode_dialogtitle] , then select a networkmode.GUID GUID-D26F6D09-E741-4272-A36B-876F5D93772ATitle To select network modeChanges Step 3 removed for KeyakiVersion 9Author RenataB81This is an internet version of this publication. © Print only for private use.](https://usermanual.wiki/Sony/10720X.Manual/User-Guide-3336261-Page-81.png)
![Status ReleasedTo select another network manually1From your Home screen [preference_title_home_wallpaper] , tap ID: ICN-SONY-HOME-APPTRAY-NORMAL .2Find and tap Settings [settings_label_launcher] > More [radio_controls_title] > Mobile networks [net-work_settings_title] > Network operators [network_operators_settings] .3Tap Search mode [clh_settings_search_mode] , then select Manual [clh_settings_manual_selection] .4Select a network.If you select a network manually, your device will not search for other networks, even if youmove out of range of the manually selected network.GUID GUID-D7ED045F-09E8-437A-B0FA-7F20B36A7B9ETitle To select another network manuallyChanges Fix label error due to resource filesVersion 14Author RenataBStatus ReleasedTo activate automatic network selection1From your Home screen [preference_title_home_wallpaper] , tap ID: ICN-SONY-HOME-APPTRAY-NORMAL .2Find and tap Settings [settings_label_launcher] > More [radio_controls_title] > Mobile networks [net-work_settings_title] > Network operators [networks] .3Tap Search mode [clh_settings_search_mode] , then select Automatic [clh_preferred_lte_cdma_ev-do_gsm] .GUID GUID-9A348BA0-79C7-43D2-B4D1-CD1673E55076Title To activate automatic network selectionChanges Step 3 removed for KeyakiVersion 12Author RenataBStatus ReleasedVirtual private networks (VPNs)Use your device to connect to virtual private networks (VPNs), which allow you toaccess resources inside a secured local network from a public network. For example,VPN connections are commonly used by corporations and educational institutions forusers who need to access intranets and other internal services when they are outsideof the internal network, for example, when they are travelling.VPN connections can be set up in many ways, depending on the network. Somenetworks may require you to transfer and install a security certificate on your device.For detailed information about how to set up a connection to your virtual privatenetwork, contact the network administrator of your company or organisation.If you are using a device with multiple users, you may need to log in as the owner, that is, theprimary user, to adjust the settings for VPN.GUID GUID-2F97A59E-A7B7-44AD-8205-166EA14A3A4CTitle Virtual private networksChanges From Leo DS; only removed the word "please".Version 6Author zzTan NellieStatus ReleasedTo add a virtual private network1From your Home screen [preference_title_home_wallpaper] , tap ID: ICN-SONY-HOME-APPTRAY-NORMAL .2Find and tap Settings [settings_label_launcher] > More [radio_controls_title] > VPN [vpn_settings_title] .3Tap ID: ICN-SONY-MENU-ADD .4Select the type of VPN to add.5Enter your VPN settings.6Tap SAVE [menu_save] .GUID GUID-992DA13F-F73C-44E7-9626-6EF9060F08D282This is an internet version of this publication. © Print only for private use.](https://usermanual.wiki/Sony/10720X.Manual/User-Guide-3336261-Page-82.png)
![Title To add a virtual private networkChanges label in caps in step 7 for Karin N-updateVersion 9Author RenataBStatus ReleasedTo connect to a virtual private network1From your Home screen [preference_title_home_wallpaper] , tap ID: ICN-SONY-HOME-APPTRAY-NORMAL .2Find and tap Settings [settings_label_launcher] > More [radio_controls_title] > VPN [vpn_settings_title] .3In the list of available networks, tap the VPN that you want to connect to.4Enter the required information.5Tap Connect [vpn_connect] .GUID GUID-66363089-CE64-4AB0-A2FA-A0B688FC0289Title To connect to a virtual private networkChanges Fix label error due to resource filesVersion 5Author RenataBStatus ReleasedTo disconnect from a virtual private network1Double-tap the status bar to open the Notification panel.2Tap the notification for the VPN connection to turn it off.GUID GUID-659C005D-AC0A-411F-8CD7-622DF74D0C12Title To disconnect from a virtual private networkChanges Fix spelling mistakeVersion 3Author RenataBStatus Released83This is an internet version of this publication. © Print only for private use.](https://usermanual.wiki/Sony/10720X.Manual/User-Guide-3336261-Page-83.png)
![Synchronising data on your deviceGUID GUID-28DAA87E-EB23-4FCF-80EC-BB843C864B1ETitle Synchronising data on your deviceChanges Device term changeVersion 2Author zzGan LuStatus ReleasedSynchronising with online accountsSynchronise your device with contacts, email, calendar events and other informationfrom online accounts, for example, email accounts such as Gmail™ and ExchangeActiveSync, Facebook™ and Flickr™. You can synchronise data automatically forsuch accounts by activating the auto-sync function, or you can synchronise eachaccount manually.GUID GUID-D8D6C8EA-2D89-497B-B322-0A49D2D1AFCBTitle Synchronising with online accountsChanges For Lavender - implementing changes according to ED commentsVersion 8Author SzilviaMStatus ReleasedTo set up an online account for synchronisation1From your Home screen [preference_title_home_wallpaper] , tap ID: ICN-SONY-HOME-APPTRAY-NORMAL .2Tap Settings [settings_label] > Accounts & sync [spb_strings_settings_accounts_and_sync_main_txt] > Addaccount [add_account_label] , then select the account that you want to add.3Follow the instructions to create or sign in to an account.GUID GUID-307B6972-6E86-4640-8A06-5EA2A7AE241BTitle To set up an online account for synchronisationChanges For Kagura N 7.0 update - replacing "Account & sync" with "Accounts & sync"Version 7Author SzilviaMStatus ReleasedTo synchronise manually with an online account1From your Home screen [preference_title_home_wallpaper] , tap ID: ICN-SONY-HOME-APPTRAY-NORMAL> Settings [settings_label] > Accounts & sync [spb_strings_settings_accounts_and_sync_main_txt] .2Tap the name of the account that you want to synchronise with. A list of itemsappears showing what can be synchronised with the account.3Tap the slider next to the item that you want to synchronise.GUID GUID-F3072D92-AFE8-46DB-A07B-06CCFFFC3796Title To synchronise manually with an online accountChanges For Kagura N 7.0 update - replacing "Account & sync" with "Accounts & sync"Version 7Author SzilviaMStatus ReleasedTo remove an online account1From your Home screen [preference_title_home_wallpaper] , tap ID: ICN-SONY-HOME-APPTRAY-NORMAL> Settings [settings_label] > Accounts & sync [spb_strings_settings_accounts_and_sync_main_txt] .2Select the account type, then tap the account you want to remove.3Tap ID: ICN-SONY-KEY-MENU , then tap Remove account [remove_account_label] .4Tap REMOVE ACCOUNT [remove_account] again to confirm.GUID GUID-277BAF72-09E1-4B5F-BBFA-B39F4F028112Title To remove an online accountChanges Label in caps in step 4 for Karin N-updateVersion 7.1.1Author RenataB84This is an internet version of this publication. © Print only for private use.](https://usermanual.wiki/Sony/10720X.Manual/User-Guide-3336261-Page-84.png)
![Status ReleasedSynchronising with Microsoft® Exchange ActiveSync®If your company uses a Microsoft Exchange ActiveSync account, you can accessyour corporate email messages, calendar appointments and contacts directly on yourdevice. After setup, you can find your information in the Email [email] , Calendar [calendar]and Contacts [contactsList] applications.If you have set up a Microsoft® Exchange ActiveSync® (EAS) account on your Xperia™device, the EAS security settings may limit the lock screen type to only a PIN or password.This occurs when your network administrator specifies a lock screen type for all EAS accountsfor enterprise security reasons. Contact the network administrator of your company ororganisation to check what network security policies are implemented for mobile devices.GUID GUID-8CCDE9CD-2196-42C6-AFC4-00EC12DD4700Title Synchronising with a Microsoft Exchange ActiveSync accountChanges Fingerprint note removed for BlancVersion 7Author RenataBStatus DraftTo set up an EAS account for synchronisation1From your Home screen [preference_title_home_wallpaper] , tap ID: ICN-SONY-HOME-APPTRAY-NORMAL .2Tap Settings [settings_label] > Accounts & sync [spb_strings_settings_accounts_and_sync_main_txt] > Addaccount [add_account_label] > Exchange ActiveSync [exchange_name] .3Enter your corporate email address and password.4Tap NEXT [button_next] . If a failure occurs, enter the domain and server details foryour account manually and then tap NEXT [button_next] .5Tap OK [ok] to allow your corporate server to control your device.6Select a synchronisation method, a synchronisation interval and the data thatyou want to sync with your device.7Tap NEXT [button_next] , then select how you want to be notified when a new emailarrives.8Tap NEXT [button_next] , enter a name for the corporate account, then tap FINISHSETUP [sync_account_finish] .9If prompted, activate the device administrator to allow your corporate server toset certain security rules on your device, such as disabling voice recording andusing storage encryption.GUID GUID-3962965F-AF05-424F-A59F-BB1E3EA26F10Title To set up corporate email etcChanges Label in caps for Karin N-updateVersion 19Author RenataBStatus ReleasedTo remove an EAS account1From your Home screen [preference_title_home_wallpaper] , tap ID: ICN-SONY-HOME-APPTRAY-NORMAL> Settings [settings_label] > Accounts & sync [spb_strings_settings_accounts_and_sync_main_txt] .2Tap Exchange ActiveSync [exchange_name] , then select the EAS account that youwant to remove.3Tap ID: ICN-SONY-KEY-MENU , then tap Remove account [remove_account_label] .4Tap REMOVE ACCOUNT [remove_account] again to confirm.GUID GUID-1F78C904-3F56-4A92-B018-B964B5E9930BTitle To remove a corporate accountChanges Label in lowercase in step 3 for Sumire/Kitakami N-updateVersion 13Author RenataBStatus Released85This is an internet version of this publication. © Print only for private use.](https://usermanual.wiki/Sony/10720X.Manual/User-Guide-3336261-Page-85.png)
![Basic settingsGUID GUID-7DD92E49-DE18-4C61-ABC5-DFB40484252DTitle Basic settingsChanges For nxtstp UG from HonamiVersion 1Author zzLisaYStatus ReleasedAccessing settingsView and change settings for your device from the Settings menu. The Settings menuis accessible from both the Application screen and the Quick settings panel.GUID GUID-99D19D2C-0BF8-4893-A15F-7CD052D96170Title Phone settings menuChanges Update Notification panel to Quick settings panelVersion 4Author zzLuLindaStatus ReleasedTo open the device settings menu from the Application screen1From your Home screen [preference_title_home_wallpaper] , tap ID: ICN-SONY-HOME-APPTRAY-NORMAL .2Find and tap Settings [settings_label] .GUID GUID-5933172B-54E4-46F7-BC68-CC4B549EEE38Title To open the device settings menu from the Application screenChanges Resource file fixVersion 1.1.2Author PeterKStatus ReleasedTo view information about your device1From your Home screen [preference_title_home_wallpaper] , tap ID: ICN-SONY-HOME-APPTRAY-NORMAL .2Find and tap Settings [settings_label_launcher] > About phone [about_settings<product="default">] .GUID GUID-080851EE-CDCC-4A16-8EE9-2A34B36082D6Title To view information about your deviceChanges Resource file fixVersion 1.1.1Author PeterKStatus ReleasedTo access the Quick settings panel•Drag the status bar downwards using two fingers.GUID GUID-AE8290FA-7F10-4844-9123-8CD494EB6027Title To open or close the Quick settings panelChanges For Hinoki added editorial commentsVersion 5Author ZoltanSStatus ReleasedTo turn on the Torch1Drag the status bar downwards using two fingers.2Tap ID: ICN-SONY-SYS-TORCH .GUID GUID-6649139D-116E-4101-B0D0-0679593D5091Title To turn on the TorchChanges Maintenance Release new topic 2017Version 1Author DoraMStatus ReleasedTo select which settings to display on the Quick settings panel1Using two fingers, drag the status bar fully downwards, then tap EDIT [quick_set-tings_edit_button] .2To add a setting to the quick settings panel, drag and drop the icon into theupper part of the screen. To remove a setting, drag and drop the icon into thelower part of the screen.86This is an internet version of this publication. © Print only for private use.](https://usermanual.wiki/Sony/10720X.Manual/User-Guide-3336261-Page-86.png)
![GUID GUID-651336A8-1CA8-44B9-9C41-A6EFD5F2E187Title To select quick settings from the Notification panelChanges For Redwood - Added 'EDIT'Version 11Author ZoltanSStatus DraftTo rearrange the Quick settings panel1Drag the status bar fully downwards, then tap EDIT [quick_settings_edit_button] .2Touch and hold an icon, then move it to the desired position.GUID GUID-314B5A49-82DF-4F55-B4D7-CD94D0604854Title To rearrange the quick settings from the Notification panelChanges For Redwood - 'Edit' varref changedVersion 10Author ZoltanSStatus DraftVolume settingsYou can adjust the ringtone volume for incoming calls and notifications as well as formusic and video playback.GUID GUID-CB97D4A5-DF35-4A81-90AF-1F2624D27910Title Sound ringtone and volumeChanges M update: Do not disturbVersion 3.1.3Author HannesRStatus ReleasedTo adjust the ringtone volume with the volume key•Press the volume key up or down.GUID GUID-56F76480-7BEC-4AEA-A7A0-D5C62695A7F4Title To adjust the ringtone volumeChanges only change "ring" to "ringtone" in title as per editor's comment for Honami Nxt step UGVersion 3Author zzLisaYStatus ReleasedTo adjust the media playing volume with the volume key•When playing music or watching video, press the volume key up or down evenwhen the screen is locked.GUID GUID-B0DBCBEE-A5CE-42D1-A138-9B6E57FA84B9Title To adjust the media playing volumeChanges Add "even when the screen is locked" to the step.Version 2Author zzVera QuStatus ReleasedTo turn on vibrate mode•Press the volume key up or down until ID: ICN-SONY-STAT-SYS-RINGER-VIBRATE appears.GUID GUID-3030B405-90E5-45F2-A0F7-30F1B3C9937DTitle To set the phone to vibrate modeChanges Word order changedVersion 7Author RenataBStatus ReleasedTo adjust the volume levels1From your Home screen [preference_title_home_wallpaper] , tap ID: ICN-SONY-HOME-APPTRAY-NORMAL .2Find and tap Settings [settings_label_launcher] > Sound [device_sound] .3Drag the volume sliders to the desired positions.You can also press the volume key up or down and tap ID: ICN-SONY-MUSIC-EQUALIZER-SELECT toadjust the ringtone, media playback or alarm volume levels separately.GUID GUID-3B7471B0-45D7-418C-B640-905B6EE9D9BFTitle To adjust the volume levelsChanges for N updateVersion 8Author PeterK87This is an internet version of this publication. © Print only for private use.](https://usermanual.wiki/Sony/10720X.Manual/User-Guide-3336261-Page-87.png)
![Status ReleasedTo set your device to vibrate for incoming calls1From your Home screen [preference_title_home_wallpaper] , tap ID: ICN-SONY-HOME-APPTRAY-NORMAL .2Find and tap Settings [settings_label_launcher] > Sound [device_sound] .3Tap the Also vibrate for calls [vibrate_when_ringing_title] slider to enable the function.GUID GUID-238E06D2-6988-439A-8711-90ED73016194Title To set the phone to vibrate and ring modeChanges for N updateVersion 2.1.3Author PeterKStatus ReleasedTo set a ringtone1From your Home screen [preference_title_home_wallpaper] , tap ID: ICN-SONY-HOME-APPTRAY-NORMAL .2Find and tap Settings [settings_label_launcher] > Sound [device_sound] > Phone ringtone [ring-tone_title] .3Select an option from the list or tap ID: ICN-SONY-MENU-ADD and select a music filethat is saved on your device..4To confirm, tap DONE [checklist_button_done] .GUID GUID-2EB51A75-25CA-45E2-8D75-C0A2C484EC07Title To set a phone ringtoneChanges Label changed for uppercase in PineVersion 14Author RenataBStatus DraftTo select the notification sound1From your Home screen [preference_title_home_wallpaper] , tap ID: ICN-SONY-HOME-APPTRAY-NORMAL .2Find and tap Settings [settings_label_launcher] > Sound [device_sound] > Default notificationringtone [udoc_trans_notification_ringtone_title] .3Select an option from the list or tap Add [menu_add] and select a music file that issaved to your device.4To confirm, tap DONE [checklist_button_done] .Some applications have their own specific notification sounds, which you can select from theapplication settings.GUID GUID-2DC47BDA-6F13-480C-A3C6-10F11ADDE021Title To select a notification ringtoneChanges Label changed to uppercase in the last step for PineVersion 14Author RenataBStatus DraftTo enable touch tones1From your Home screen [preference_title_home_wallpaper] , tap ID: ICN-SONY-HOME-APPTRAY-NORMAL .2Find and tap Settings [settings_label_launcher] > Sound [device_sound] > Other sounds [oth-er_sound_settings] .3Tap the sliders to enable or disable the different touch tones as desired.GUID GUID-8D4FF0B8-3A81-46F0-AE74-031B501F394ETitle To enable touch tonesChanges for N updateVersion 9.2.2Author PeterK88This is an internet version of this publication. © Print only for private use.](https://usermanual.wiki/Sony/10720X.Manual/User-Guide-3336261-Page-88.png)
![Status ReleasedDo not disturb modeYou can set your device to Do not disturb mode and decide how long your device willbe in Do not disturb mode manually. You can also preset when your device will be inDo not disturb mode automatically.GUID GUID-3E3E99A4-D62B-4DA1-9ADA-DB929FD3AF93Title Do not disturb mode settingsChanges Updating all DND topics for better consistency.Version 2.1.3Author PeterKStatus ReleasedTo activate Do not disturb mode1Using two fingers, drag the status bar fully downwards to access the Quicksettings panel.2Find and tap ID: ICN-STAT-SYS-RINGER-DO-NOT-DISTURB .3Select an option, then tap DONE [checklist_button_done] .GUID GUID-BD394F60-A5CD-4C0C-9127-45453531921FTitle To activate silent modeChanges Label changed to uppercase in step 3 for PineVersion 8Author RenataBStatus DraftTo quickly shift between Do not disturb/Vibrate/Sound mode1Press the volume key up or down until ID: ICN-SONY-SYS-RINGER-SILENT , ID: ICN-SONY-STAT-SYS-RINGER-VIBRATE or ID: ICN-SONY-SOUND-ON appears.2Tap ID: ICN-SONY-STAT-SYS-RINGER-VIBRATE or ID: ICN-SONY-SOUND-ON to quickly shiftbetween Vibrate/Sound mode. To activate Do not disturb mode, press thevolume key down when in vibrate mode.GUID GUID-77C3C854-1355-4298-97B1-6D283BBEFDFFTitle To quickly shift between Do not disturb/Sound modeChanges Removing "do not disturb" icon from step 2.Version 5Author PeterKStatus ReleasedTo schedule Do not disturb mode time intervals1From your Home screen [preference_title_home_wallpaper] , tap ID: ICN-SONY-HOME-APPTRAY-NORMAL .2Find and tap Settings [settings_label_launcher] > Sound [device_sound] > Do not disturb[zen_mode_feature_name] > Automatic rules [zen_mode_automation_settings_title] .3Select the time or event to schedule Do not disturb mode for (Weekend,Weeknight, Event) or tap ID: ICN-SONY-MENU-ADD to add a new rule.4Enter the desired name for the rule, then tap OK [ok]5Find and tap Days [zen_mode_schedule_rule_days] and mark the checkboxes for therelevant days, then tap DONE [checklist_button_done] .6To adjust the start time, tap Start time [zen_mode_start_time] and select a value, thentap OK [ok] .7To adjust the end time, tap End time [zen_mode_end_time] and select a value, then tapOK [ok] . Your device stays in Do not disturb mode during the selected timeinterval.GUID GUID-BF98F95B-3A8F-4BCC-9085-6D4E2DD54618Title To schedule silent mode time intervalsChanges Label changed to uppercase in step 5 fro PineVersion 7Author RenataB89This is an internet version of this publication. © Print only for private use.](https://usermanual.wiki/Sony/10720X.Manual/User-Guide-3336261-Page-89.png)
![Status DraftSetting exceptions for Do not disturb modeYou can select which types of notifications are allowed to sound in Do not disturbmode and you can filter exceptions based on who the notifications come from. Themost common types of exceptions include:•Events and reminders•Calls•Messages•AlarmsGUID GUID-7C3B1F7E-6329-40AA-8E0A-8E20F5FAF28ATitle Setting exceptions in silent modeChanges Change “silent mode” to "Do not disturb mode" for Suzuran due to TID comments.Version 2Author zzVera QuStatus ReleasedTo associate exceptions with specific contact types1From the Home screen, tap ID: ICN-SONY-HOME-APPTRAY-NORMAL .2Find and tap Settings [settings_label_launcher] > Sound [device_sound] > Do not disturb[somc_zen_mode_settings_title] > Priority only allows [udoc_trans_zen_mode_option_important_interruptions] .3Tap Calls [zen_mode_calls] or Messages [zen_mode_messages] .4Select an option.GUID GUID-38670738-0F24-484E-807D-15FE37B21544Title To associate exceptions with specific notificationsChanges Label fixing 'Priority only allows'Version 4.1.1.1.1Author ZoltanSStatus DraftScreen settingsGUID GUID-EF960369-662D-46B3-9190-3ACD92FFE448Title Screen settingsChanges Valid for Robyn. Valid for eDream 3.0. Changed index markerVersion 2Author zzKomalLStatus ReleasedTo adjust the screen brightness manually regardless of lighting condition1From your Home screen, tap ID: ICN-SONY-HOME-APPTRAY-NORMAL .2Find and tap Settings [settings_label] > Display [display_settings_title] and tap the Adaptivebrightness [auto_brightness_title] slider to disable this function, if it is not alreadydisabled.3Tap Brightness level [brightness] .4Drag the slider to adjust the brightness.Lowering the brightness level helps the battery last longer.GUID GUID-6B929979-C7E3-45FB-85E0-C4A4BB05388ATitle To adjust the screen brightnessChanges Creating for consistencyVersion 14Author PeterKStatus ReleasedTo enable or disable vibrate on touch1From your Home screen, tap ID: ICN-SONY-HOME-APPTRAY-NORMAL .2Find and tap Settings [settings_label_launcher] > Sound [device_sound] > Other sounds [oth-er_sound_settings] .3Tap the Vibrate on tap [haptic_feedback_enable_title] slider to enable or disable thefunction.GUID GUID-C6A8795B-B37A-4FD6-8AE9-1CE841DFA98ETitle To set the screen to vibrateChanges for N updateVersion 9.1.290This is an internet version of this publication. © Print only for private use.](https://usermanual.wiki/Sony/10720X.Manual/User-Guide-3336261-Page-90.png)
![Author PeterKStatus ReleasedTo adjust the idle time before the screen turns off1From your Home screen [preference_title_home_wallpaper] , tap ID: ICN-SONY-HOME-APPTRAY-NORMAL .2Find and tap Settings [settings_label_launcher] > Display [display_settings_title] > Sleep [screen_timeout] .3Select an option.To turn off the screen quickly, briefly press the power key ID: ICN-SONY-KEY-AND-POWER-K90 .GUID GUID-76BAB77B-B3AF-421C-8D41-F7F3D7CEBFA6Title To adjust the idle time before the screen turns offChanges Resource file fixingVersion 6.1.1Author PeterKStatus ReleasedTo adjust the font size1From your Home screen, tap ID: ICN-SONY-HOME-APPTRAY-NORMAL .2Find and tap Settings [settings_label] > Display [display_settings_title] > Font size [title_font_size] .3Drag the slider to select the preferred option.GUID GUID-DAF8A5B6-1AFD-4BC6-82B2-6FE8D89FD2F9Title To adjust the font sizeChanges Content changed in step 3 for PineVersion 2Author RenataBStatus DraftTo adjust the display size1From your Home screen, tap ID: ICN-SONY-HOME-APPTRAY-NORMAL .2Find and tap Settings [settings_label] > Display [display_settings_title] > Display size [screen_zoom_ti-tle] .3Drag the slider to select the preferred option.GUID GUID-FAD92A68-A43B-41C6-ACC1-D0C68C67DD10Title To adjust the display sizeChanges Created for N updateVersion 1Author PeterKStatus ReleasedTo adjust the white balance of the display1From your Home screen [preference_title_home_wallpaper] , tap ID: ICN-SONY-HOME-APPTRAY-NORMAL .2Find and tap Settings [settings_label_launcher] > Display [display_settings_title] > White balance[cam_strings_advanced_setting_white_balance_txt] .3Drag the sliders to the desired positions to adjust the white balance.To revert the white balance setting back to its default values, tap ID: ICN-SONY-KEY-MENU > Defaultvalues [whitebalance_menu_title_default_values] .GUID GUID-D182377D-D6F1-4EB5-A960-DAD0438FAA75Title To adjust the white balance of the displayChangesVersion 1Author PeterKStatus ReleasedSmart backlight controlThe smart backlight control keeps the screen on as long as the device is held in yourhand. Once you put down the device, the screen turns off according to your sleepsetting.GUID GUID-A4F3421F-C1E2-43FA-8320-D7CCD7A6AB40Title Smart backlight controlChangesVersion 1Author zzLuLinda91This is an internet version of this publication. © Print only for private use.](https://usermanual.wiki/Sony/10720X.Manual/User-Guide-3336261-Page-91.png)
![Status ReleasedTo enable or disable the Smart backlight control function1From your Home screen [preference_title_home_wallpaper] , tap ID: ICN-SONY-HOME-APPTRAY-NORMAL .2Find and tap Settings [settings_label_launcher] > Display [display_settings_title] > Smart backlightcontrol [ges_backlight_strings_setting_list_title_txt] .3Tap the slider to enable or disable the function.GUID GUID-A1BAC744-44F9-420F-A186-5E75313CD830Title To turn on the Smart backlight control functionoChanges Removed "to the right".Version 3.1.1Author PeterKStatus ReleasedScreen pinningUse screen pinning to set your device to display only the screen for a specificapplication. For example, if you are playing a game and you accidentally touch theHome navigation key, the screen pinning feature prevents the active game app screenfrom being minimised. You can also use this feature when you lend your device toanother person to make it harder for them to access more than one application. Forexample, you can lend your device to somebody to take a photo and pin the screento the Camera application so that the person can't easily use other apps such asEmail.Screen pinning is not a security feature and does not fully prevent other users from unpinning ascreen and accessing your device. To protect your data, you should set up your device torequest a screen lock PIN, password or pattern before someone can unpin the screen.GUID GUID-0F36356A-A3D1-4D5A-8D63-B389A180CA63Title Screen pinningChanges Remove phone call related descriptions for Pollux gina L update.Version 2Author zzVera QuStatus ReleasedTo enable or disable screen pinning1From your Home screen [preference_title_home_wallpaper] , tap ID: ICN-SONY-HOME-APPTRAY-NORMAL .2Find and tap Settings [settings_label] > Lock screen & security [settings_security_and_lockscreen_ti-tle_txt] > Screen pinning [screen_pinning_title] .3Tap the slider to enable or disable the function.4If you have enabled Screen pinning, you can tap the Lock device whenunpinning [screen_pinning_unlock_none] slider to enable or disable this additional securityfunction, as desired.A pattern, PIN or password is not mandatory for screen pinning to work.GUID GUID-1DA4F993-1A3B-4DAC-BE9D-4A302F4CFBAATitle To activate screen pinningChanges Removed "to the right".Version 3.1.1Author PeterKStatus ReleasedTo pin a screen1Make sure that screen pinning is activated on your device.2Open an app and go to the screen that you want to pin.3Tap ID: ICN-SONY-KEY-OPEN-RECENT-APPS .4To display the screen pinning icon ID: ICN-SONY-SCREEN-PINNING , swipe upwards.5Tap ID: ICN-SONY-SCREEN-PINNING .6In the window that appears, tap Got it [screen_pinning_positive] .GUID GUID-6649F0CE-2DB3-43FA-9DC0-495D11BB0407Title To pin a screenChanges Added editorial commentsVersion 392This is an internet version of this publication. © Print only for private use.](https://usermanual.wiki/Sony/10720X.Manual/User-Guide-3336261-Page-92.png)
![Author ZoltanSStatus ReleasedTo unpin a screen•On the pinned screen, touch and hold ID: ICN-SONY-KEY-AND-BACK until the screen isunpinned.If you selected a security option when you activated the screen pinning function, you have toenter your pattern, PIN or password to unlock the device before the screen can be unpinned.GUID GUID-AE54DAE8-6224-4233-87E1-40EB93A1F9EATitle To unpin a screenChanges for N update and aboveVersion 3Author PeterKStatus ReleasedApplication settingsSome apps will ask for permissions once you start using them. You can allow or denypermissions individually for each app, either from the Settings menu or from thePermission confirm dialog. Permission requirements depend on the app’s design.GUID GUID-78871E35-6AA6-476F-8BA7-FFAC950D7BC9Title Application settingsChanges for M update 6.0 KitakamiVersion 1Author DoraMStatus ReleasedAllowing or denying permissionsYou can choose whether to allow or deny permissions when the dialog is shown. Ifyou have used another Android version previously, most apps will have already beengranted the necessary permissions.GUID GUID-836C242B-4039-4053-B0B8-4DCAE12DFF36Title Allowing or denying permissionsChanges For M update 6.0Version 1Author DoraMStatus ReleasedTo allow a permission1To allow a permission, tap Allow [grant_dialog_button_allow] .2When the confirm dialog appears for the second time, you can choose theDon't ask again [never_ask_again] option if you wish.3A dialog will also explain why the app needs the permissions and what it usesthem for specifically. To dismiss this dialog, tap OK [dialog_ok] .GUID GUID-4D1801CB-0F62-4D1F-9F7D-590D6A4964ECTitle To allow a permissionChanges for M update 6.0Version 1Author DoraMStatus ReleasedTo deny a permission•To deny a permission, tap Deny [grant_dialog_button_deny] when the dialog is shown.Some applications can still be used even if you have denied permissions.GUID GUID-B64C7DAB-B2B5-45BD-B40A-0F18D4EDC804Title To deny a permissionChanges for M update 6.0Version 1Author DoraMStatus ReleasedCritical permissionsSome permissions are mandatory for apps to work as intended. In such cases, adialog will inform you.93This is an internet version of this publication. © Print only for private use.](https://usermanual.wiki/Sony/10720X.Manual/User-Guide-3336261-Page-93.png)
![GUID GUID-0B92A5C9-70C7-420C-A75F-D4D6B6EF4D61Title Critical permissionsChanges for M Update 6.0 KitakamiVersion 1Author DoraMStatus ReleasedTo configure applications1From your Home screen [preference_title_home_wallpaper] , tap ID: ICN-SONY-HOME-APPTRAY-NORMAL .2Find and tap Settings [settings_label] > Apps [applications_settings] > ID: ICN-SONY-MENU-SETTINGS .3Select a configuration option, for example App permissions [device_apps_permissions] ,then choose an application that you want to configure.GUID GUID-589E64D8-DB51-448B-8AEC-B28678558BA9Title To configure applicationsChanges Resource file fixingVersion 2Author PeterKStatus ReleasedTo allow critical permissions1To allow a permission, tap Continue [select_continue] > APP INFO [app_info_dialog_action] >Permission [permissions_label] .2Find the critical permission you need.3Tap the relevant slider to adjust permissions.You can also manage permissions in Settings [settings_label_launcher] > Apps [all_apps_button_label] . Tap anapp and change the permissions as desired.GUID GUID-C3EEDD67-0CF5-4958-B6F9-9FD873DC42D9Title To allow critical permissionsChanges Removed "to the right".Version 1.1.1Author PeterKStatus ReleasedAllowing or denying automatic application updatesIf the automatic update feature is enabled, your applications get updated without youbeing asked, so you may not realise that large volumes of data are beingdownloaded. In order to avoid potentially high data transfer costs, you can disableautomatic updates or enable automatic updates only over Wi-Fi [udoc_no_trans_wifi_wlan_plain]connection. You have to disable the automatic update feature both in the PlayStore™ app and the What's New app (where available) to avoid the automaticupdating of apps.GUID GUID-82703B49-0938-4697-A342-DB800603C39DTitle Allowing or denying automatic application updatesChanges Maintenance Release 2017Version 1Author DoraMStatus ReleasedTo enable or disable automatic updates for all applications in the Play Store1From your Home screen [preference_title_home_wallpaper] , tap ID: ICN-SONY-HOME-APPTRAY-NORMAL , then find and tap ID: ICN-SONY-APP-MARKET-PLACE .2Tap ID: ICN-SONY-APP-CALENDAR-L , then tap Settings [conversations_strings_conversationlist_menu_set-tings_txt] > Auto-update apps [udoc_trans_auto_update_apps] .3Select the preferred option.GUID GUID-297B3CBB-C2E1-4D38-8A99-F4FFC2572FFBTitle To enable or disable automatic updates for all applications in the Play StoreChanges Maintenance Release 2017Version 1Author DoraM94This is an internet version of this publication. © Print only for private use.](https://usermanual.wiki/Sony/10720X.Manual/User-Guide-3336261-Page-94.png)
![Status ReleasedTo enable or disable automatic updates for all applications in What’s New1From your Home screen [preference_title_home_wallpaper] , tap ID: ICN-SONY-HOME-APPTRAY-NORMAL , then find and tap ID: ICN-SONY-APP-WHATS-NEW .2Tap ID: ICN-SONY-APP-CALENDAR-L , then tap Settings [conversations_strings_conversationlist_menu_set-tings_txt] > Auto-update apps [udoc_trans_auto_update_apps] .3Select the preferred option.GUID GUID-EEBE84D6-170C-43A7-92A9-72669122BB26Title To enable or disable automatic updates for all applications in What's NewChanges Maintenance Release 2017Version 1Author DoraMStatus ReleasedApplication linkingYour device can determine the default app to handle a particular web link. Thismeans that if the link is set, you don’t need to select an app each time you open alink. You can change the default app any time you want.GUID GUID-271AE5A3-60C0-4B4B-8AE5-19B096308ADBTitle Application linkingChanges for M Update 6.0 KitakamiVersion 1Author DoraMStatus ReleasedTo manage app links from the Settings menu1From your Home screen [preference_title_home_wallpaper] , tap ID: ICN-SONY-HOME-APPTRAY-NORMAL .2Find and tap Settings [settings_label_launcher] > Apps [all_apps_button_label] .3Tap ID: ICN-SONY-MENU-SETTINGS and find Opening links [domain_urls_title] .4Select an app, and adjust the settings as desired.GUID GUID-44D5827D-E0FC-4E7B-AB84-B941A128556ETitle To manage app links from the Settings menuChanges Pine: icon fixVersion 4Author RamonaBStatus DraftResetting your applicationsYou can reset an application or clear application data if your application stopsresponding or causes issues with your device.GUID GUID-FDFFB6F1-E2F1-41A6-B140-03AAE6403892Title Resetting your applicationsChanges Focalpoint request - reset applicationsVersion 1Author zzBrianBStatus ReleasedTo reset application preferences1From your Home screen [preference_title_home_wallpaper] , tap ID: ICN-SONY-HOME-APPTRAY-NORMAL .2Find and tap Settings [settings_label] > Apps [applications_settings] .3Tap ID: ICN-SONY-KEY-MENU , then tap Reset app preferences [reset_app_preferences] > Resetapps [reset_app_preferences_button] .Resetting application preferences does not delete any application data from your device.GUID GUID-CE3FE281-1563-44CD-BAB0-8EA7B20F6E38Title To reset application preferencesChanges Resource file fixingVersion 3Author PeterK95This is an internet version of this publication. © Print only for private use.](https://usermanual.wiki/Sony/10720X.Manual/User-Guide-3336261-Page-95.png)
![Status ReleasedTo clear application data1From your Home screen [preference_title_home_wallpaper] , tap ID: ICN-SONY-HOME-APPTRAY-NORMAL .2Find and tap Settings [settings_label] > Apps [applications_settings] .3Select an application or service, then tap Storage [storage_settings] > CLEAR DATA[clear_user_data_text] > OK [ok] .When you clear application data, data for the selected application is deleted from your devicepermanently. The option to clear application data is not available for every application orservice.GUID GUID-46FCC7AF-A28B-4577-BEA9-16BAD41D9610Title To clear application dataChanges Resource file fixingVersion 4Author PeterKStatus ReleasedTo clear application cache1From your Home screen [preference_title_home_wallpaper] , tap ID: ICN-SONY-HOME-APPTRAY-NORMAL .2Find and tap Settings [settings_label] > Apps [applications_settings] .3Select an application or service, then tap Storage [storage_settings] > CLEAR CACHE[clear_cache_btn_text] .The option to clear the application cache is not available for every application or service.GUID GUID-AE0C1792-AEAE-4ACE-A323-51B237AE3AF2Title To clear the application cacheChanges Resource file fixingVersion 3Author PeterKStatus ReleasedTo clear the application default setting1From your Home screen [preference_title_home_wallpaper] , tap ID: ICN-SONY-HOME-APPTRAY-NORMAL .2Find and tap Settings [settings_label] > Apps [applications_settings] .3Select an application or service, then tap Open by default [auto_launch_label] > CLEARDEFAULTS [clear_activities] .The option to clear the application default setting is not available for every application orservice.GUID GUID-93ADD1D9-D802-498C-A055-4512D5AA7CDCTitle To clear the application default settingChanges Resource file fixingVersion 3Author PeterKStatus ReleasedScreen saverSet up an interactive screen saver that automatically displays colours, photos or aslideshow while your device is docked or charging and the screen is idle.On a device with multiple users, each user can have individual Screen saver settings.GUID GUID-DE5338AF-6700-4366-8117-94C485CEC67ETitle Screen saverChanges Renamed to screen saver - N updateVersion 3Author PeterK96This is an internet version of this publication. © Print only for private use.](https://usermanual.wiki/Sony/10720X.Manual/User-Guide-3336261-Page-96.png)
![Status ReleasedTo enable or disable the screen saver1From your Home screen [preference_title_home_wallpaper] , tap ID: ICN-SONY-HOME-APPTRAY-NORMAL .2Find and tap Settings [settings_label_launcher] > Display [display_settings_title] > Screen saver[screensaver_settings_title] .3Tap the slider to enable or disable the function.GUID GUID-BA15F8F1-3801-4ADC-B6C5-E7B6E60F68A4Title To activate the Screen saverChanges renamed to Screen saver - N UpdateVersion 2.1.2Author PeterKStatus ReleasedTo select content for the Screen saver1From your Home screen [preference_title_home_wallpaper] , tap ID: ICN-SONY-HOME-APPTRAY-NORMAL .2Find and tap Settings [settings_label_launcher] > Display [display_settings_title] > Screen saver[screensaver_settings_title] .3Tap the slider to enable the function.4Select what the screen saver should display.GUID GUID-A6D6AC39-7AEF-442F-9264-87C4CC9967EDTitle To select content for the screen saverChanges Functional review comments Step 4Version 2.1.2.1.1Author EvaKStatus ReleasedTo start the Screen saver manually1From your Home screen [preference_title_home_wallpaper] , tap ID: ICN-SONY-HOME-APPTRAY-NORMAL .2Find and tap Settings [settings_label_launcher] > Display [display_settings_title] > Screen saver[screensaver_settings_title] .3Tap the slider to enable the function.4To activate the Screen saver immediately, tap ID: ICN-SONY-KEY-MENU , then tap Startnow [screensaver_settings_dream_start] .GUID GUID-4DB5C5A9-7C13-4690-B079-51CC04003941Title To set when the screen saver startsChanges Renamed to screen saver - from N updateVersion 3.1.2Author PeterKStatus ReleasedLanguage settingsYou can select a default language for your device and change it again at a later time.You can also change the writing language for text input.GUID GUID-E1D54EB1-8E02-4EA8-B64D-F1D56D4EF18BTitle Phone languageChanges For Ukulele - removing cross reference (the referred topic does not appear in the publication)Version 4Author SzilviaM97This is an internet version of this publication. © Print only for private use.](https://usermanual.wiki/Sony/10720X.Manual/User-Guide-3336261-Page-97.png)
![Status ReleasedTo change the language1From the Home screen [preference_title_home_wallpaper] , tap ID: ICN-SONY-HOME-APPTRAY-NORMAL .2Find and tap Settings [settings_label_launcher] > Languages & input [language_settings] >Languages [language_picker_title] .3To change the language, drag and drop the desired language to the top of thelist. If the desired language is not currently listed, tap ID: ICN-SONY-FINGERPRINT-ADDto add it.4Tap OK [button_ok] .If you select the wrong language and cannot read the menu texts, find and tap ID: ICN-SONY-APP-SETTINGS . Then select the text beside ID: ICN-KEYBOARD-OPTIONS and select the first entry inthe menu that opens. You can then select the language you want.GUID GUID-78FDB03D-5A9A-4DD3-B1EB-554524E573A7Title To change the languageChanges For Keyaki, resource file fixing, editorial comments addedVersion 11.1.4Author ZoltanSStatus ReleasedDate and timeYou can change the date and time on your device.GUID GUID-D9FE3D48-1528-4315-BFF7-BFB227CAB4C0Title Time and dateChangesVersion 3Author zzLisaYStatus ReleasedTo set the date manually1From the Home screen [preference_title_home_wallpaper] , tap ID: ICN-SONY-HOME-APPTRAY-NORMAL .2Find and tap Settings [settings_label_launcher] > Date & time [date_and_time_settings_title] .3Disable the Automatic date & time [date_time_auto] function by tapping the slider.4Tap Set date [date_time_set_date] .5Flick left or right, or use the arrows to set the desired date.6Tap OK [button_ok] .GUID GUID-813CD57B-7A26-4E14-BBED-243BEC6F048FTitle To set the date manuallyChanges Removed "to the right".Version 10.1.3.1.1Author PeterKStatus ReleasedTo set the time manually1From your Home screen [preference_title_home_wallpaper] , tap ID: ICN-SONY-HOME-APPTRAY-NORMAL .2Find and tap Settings [settings_label_launcher] > Date & time [date_and_time_settings_title] .3Disable the Automatic date & time [date_time_auto] function by tapping the slider.4Tap Set time [date_time_set_time] .5Select the relevant values for the hour and minute.6Tap OK [button_ok] .GUID GUID-E9572FB8-BB60-4430-84D8-3F19D899681ETitle To set the time manuallyChanges Resource file fixing + Removed "to the right".Version 14.1.3Author PeterK98This is an internet version of this publication. © Print only for private use.](https://usermanual.wiki/Sony/10720X.Manual/User-Guide-3336261-Page-98.png)
![Status ReleasedTo set the time zone1From your Home screen [preference_title_home_wallpaper] , tap ID: ICN-SONY-HOME-APPTRAY-NORMAL .2Find and tap Settings [settings_label_launcher] > Date & time [date_and_time_settings_title] .3Disable the Automatic time zone [zone_auto] function by tapping the slider.4Tap Select time zone [date_time_set_timezone] .5Select an option.GUID GUID-0C804200-55DD-4779-BB20-7445141EC74CTitle To set the time zoneChanges Removed "to the right".Version 7.1.1Author PeterKStatus ReleasedEnhancing the sound outputYou can enhance the sound of your device by manually enabling individual soundsettings such as Equaliser and Surround sound. You can enable the Dynamicnormaliser to minimise volume differences between songs or videos. You can alsoimprove the quality of compressed music files to near High-resolution Audio qualitywhen you are using a wired headphone.GUID GUID-91BE04C9-56A8-4A40-A15A-348947A469C8Title Enhancing the sound qualityChanges Add info about upgrade quality of compressed music for Suzuran.Version 6Author zzVera QuStatus ReleasedTo enhance the sound output automatically1From your Home screen [preference_title_home_wallpaper] , tap ID: ICN-SONY-HOME-APPTRAY-NORMAL .2Find and tap Settings [settings_label_launcher] > Sound [device_sound] > Audio settings [sound_en-hance_strings_audio_settings_txt] .3Enable the ClearAudio+ [sound_enhance_strings_setting_clearaudio_plus_txt] function by tappingthe slider.GUID GUID-3664463E-E3D5-4B75-B9AF-C1A14DB593D7Title To enhance the sound quality automatically using ClearAudioplusChanges for N updateVersion 6.1.2Author PeterKStatus ReleasedTo adjust the sound settings manually1From the Home screen, tap ID: ICN-SONY-HOME-APPTRAY-NORMAL .2Find and tap Settings [settings_label] > Sound [device_sound] > Audio settings [sound_en-hance_strings_audio_settings_txt] .3If the ClearAudio+ [sound_enhance_strings_setting_clearaudio_plus_txt] function is enabled, tap theslider to disable it.4Tap Sound effects [sound_effect_strings_setting_title_txt] .5Adjust the sound settings by dragging the frequency band buttons.6To adjust the sound manually, drag the frequency band buttons. To choose apreset arrangement, tap ID: ICN-SONY-MUSIC-EQUALIZER-SELECT , select anarrangement, then tap OK [okay_action] to confirm.The manual adjustment of sound output settings has no effect on voice communicationapplications. For example, there is no change in the voice call sound quality.GUID GUID-EA780EA0-0323-405F-8C35-6F974C183A18Title To adjust the sound settings manuallyChanges Functional review comment implemented for KeyakiVersion 7Author RenataB99This is an internet version of this publication. © Print only for private use.](https://usermanual.wiki/Sony/10720X.Manual/User-Guide-3336261-Page-99.png)
![Status ReleasedTo minimise volume differences using the Dynamic normaliser1From your Home screen [preference_title_home_wallpaper] , tap ID: ICN-SONY-HOME-APPTRAY-NORMAL .2Find and tap Settings [settings_label_launcher] > Sound [device_sound] > Audio settings [sound_en-hance_strings_audio_settings_txt] .3Enable the Dynamic normaliser [sound_enhance_strings_setting_dynamic_normalizer_txt] function bytapping the slider.GUID GUID-A28D091B-75EB-4F5C-9A90-4C6F965EC8BFTitle To minimise volume differences using the Dynamic normalizerChanges For Hinoki 'DSEE HX' feature removedVersion 4.1.2.1.1Author ZoltanSStatus DraftMultiple user accountsYour device supports multiple user accounts so that different users can log inseparately to the device and use it. Multiple user accounts work well in situationswhere you share the same device with other people or lend your device to someoneto use for a while. The user who sets up the device for the first time becomes theowner of the device. Only the owner can manage the accounts of other users. Apartfrom the owner account, there are two different types of accounts:•Regular User: This account type is suitable for someone who regularly uses yourdevice.•Guest User: Enable the guest account option for someone who just wants to use yourdevice temporarily.Some features are only available to the owner. For example, only the owner can allowdownloads from sources other than Google Play™.GUID GUID-6EB4144A-D4E8-4363-91EF-5323485A3AFBTitle Multiple user accountsChanges Lollipop. For device which does not have Restricted Profile. ie: Smartphones and Tablet Gina.Implemented from Ivy and any ongoing and onwards projects. - Only changed the example inthe note to implement the functional review comment in this part.. - Added a line of space toimplement ED Review Comments on Cosmos DS. To implemented 1st ED Review Commentson Pollux Gina: - Finally changed to 'Google Play™ ' which has been confirmed from Legalside.Version 3.2.2Author zzHuRuiStatus ReleasedAbout the Regular User accountBy adding Regular User accounts, you can allow different users to have differenthome screens, wallpapers and general settings. They also get separate access toapplications and memory storage for files such as music and photos. You can add upto seven regular user accounts on your device.GUID GUID-FFBE6AA4-B908-4F6B-8A04-2ADD6C1BEE4CTitle About the Regular User account_TabletChanges L Update. Castor Windy/Scorpion Gina/Scorpion Windy. It can be added with up to sevenRegular User Accounts. Implemented Ed Seperate Review Comments on MultiUser topics.Version 1Author zzHuRui100This is an internet version of this publication. © Print only for private use.](https://usermanual.wiki/Sony/10720X.Manual/User-Guide-3336261-Page-100.png)
![Status ReleasedTo add a regular user account1Make sure you are logged in as the owner, that is, the user who set up thedevice for the first time.2From your Home screen, tap ID: ICN-SONY-HOME-APPTRAY-NORMAL .3Find and tap Settings [settings_label] > Users [user_settings_title] > Add user [user_add_user_menu] .4Tap OK [button_ok] . The new account is created.5Choose from the following options:1Tap SET UP NOW [user_setup_button_setup_now] . The screen locks and an iconrepresenting the newly added user appears in the top right corner.2If you are creating the account for someone else and they are not with youright now, you can tap NOT NOW [user_setup_button_setup_later] . When the user isready, they can select Users [user_settings_title] under Settings [settings_label] and seethe new account, which appears as New user [user_new_user_name] . Just tap theaccount and follow the instructions to finish setting it up.6Unlock the screen by swiping upwards.7Follow the on-screen instructions to set up the account for the user.You can also add a regular user account from the status bar on any screen. Just drag thestatus bar downwards using two fingers and tap the user icon, then tap Add user[user_add_user_menu] .GUID GUID-98479FD1-BF7A-453F-AA42-4D616D1E4E14Title To add a new userChanges Added editorial commentsVersion 6.3.1Author ZoltanSStatus ReleasedTo delete a regular user account from your device1Make sure you are logged in as the owner.2From your Home screen [preference_title_home_wallpaper] , tap ID: ICN-SONY-HOME-APPTRAY-NORMAL .3Find and tap Settings [settings_label_launcher] > Users [user_settings_title] .4Tap ID: ICN-SONY-MENU-SETTINGS beside the name of the user that you want todelete, then tap Remove user [user_remove_user] > Delete [user_delete_button] .GUID GUID-4E331271-DAE1-430B-BE64-FE431BB77F1BTitle To delete a user or profile from your deviceChanges Fixing resource filesVersion 7Author PeterKStatus ReleasedAbout the Guest User accountIf someone just wants to use your device temporarily, you can enable a guestaccount for this user. In guest mode, your device starts up as a freshly installedsystem with only the pre-installed apps. Once your guest is finished using yourdevice, you can wipe the session clean so that the next guest can start fresh. Theguest user account is pre-installed and cannot be deleted.GUID GUID-4002D5D3-6D96-426C-9F0A-F9BAEC6D8731Title About the guest accountChanges Implemented Extra and Seperate ED Review Comments for Multiuser feature.Version 1Author zzHuRuiStatus ReleasedTo activate the guest user account1Make sure you are logged in as the owner, that is, the user who set up thedevice for the first time.2Drag the status bar downwards using two fingers and tap the user icon.3Tap Add guest [guest_new_guest] .GUID GUID-159D67E1-06D9-442A-830C-C4C7F0249164101This is an internet version of this publication. © Print only for private use.](https://usermanual.wiki/Sony/10720X.Manual/User-Guide-3336261-Page-101.png)
![Title To set up the guest accountChanges Editorial review, refurbished stepsVersion 4Author EvaKStatus ReleasedTo clear the guest session data1Make sure you are logged in to the guest account.2From your Home screen [preference_title_home_wallpaper] , tap ID: ICN-SONY-HOME-APPTRAY-NORMAL .3Find and tap Settings [settings_label_launcher] > Users [user_settings_title] .4Find and tap Remove guest [guest_exit_guest] .5Tap Remove [guest_exit_guest_dialog_remove] .You can also clear the guest session from the status bar on any screen as long as you arelogged in to the guest account. Just drag the status bar downwards and tap the user icon,then tap Remove guest [guest_exit_guest] .GUID GUID-02C625BD-23FA-479F-8870-B7EF6C246821Title To clear the guest session dataChanges Fixing resource filesVersion 3Author PeterKStatus ReleasedSwitching between multiple user accountsGUID GUID-E4E0E766-479D-4584-BFB0-FCE5D3F4830CTitle Switching between multiple user accountsChanges L Update. Applied across all L projects.Version 1Author zzHuRuiStatus ReleasedTo switch between multiple user accounts1To view the list of users, drag the status bar downwards, then tap ID: ICN-SONY-SWITCH-BETWEEN-MULTIPLE-USER .2Select the user account that you want to switch to. The lock screen for thatuser account appears.When you switch to the guest account, tap Start again [guest_wipe_session_wipe] if you want to wipethe previous session or tap Yes, continue [guest_wipe_session_dontwipe] to continue the previoussession.GUID GUID-BD7D854A-EF9F-4CE4-AEE0-4FB538010BE7Title To switch users or profilesChanges For Hinoki added editorial commentsVersion 6.1.1.1.1Author ZoltanSStatus DraftSettings for multiple user accountsThere are three different types of settings on devices with multiple users:•Settings that can be changed by any user and affect all users. Examples includelanguage, Wi-Fi [udoc_no_trans_wifi_wlan_plain] , Airplane mode, NFC and Bluetooth®.•Settings that only affect an individual user account. Examples include automatic datasyncing, screen lock, various accounts added, and wallpaper.•Settings that are only visible to the owner and affect all users, for example, VPNsettings.GUID GUID-E29C0793-72F0-4BA2-8762-4F638EA26A8ETitle Different behaviours for settingsChanges Fixing Wi-Fi labelVersion 4Author PeterKStatus Released102This is an internet version of this publication. © Print only for private use.](https://usermanual.wiki/Sony/10720X.Manual/User-Guide-3336261-Page-102.png)
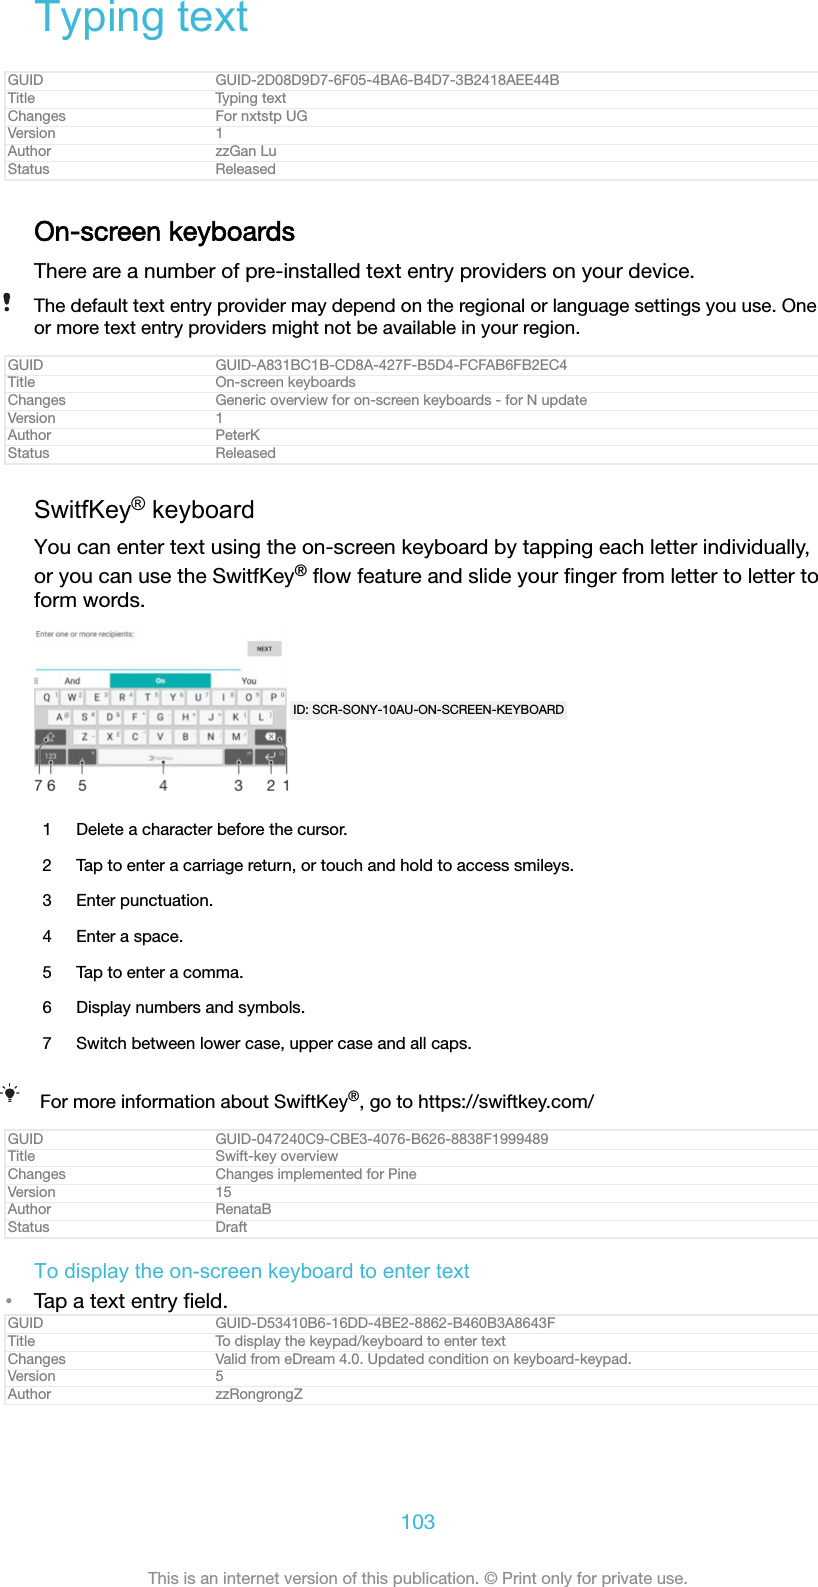
![Status ReleasedTo use the on-screen keyboard in landscape orientation•When the on-screen keyboard is displayed, turn the device sideways.You may need to adjust the settings in some applications to enable landscape orientation.GUID GUID-E3D818B3-9DFF-4DDC-B279-5CD46A966698Title To use the on-screen keyboard/keypad in landscape orientationChanges for Honami; text change madeVersion 6Author zzGan LuStatus ReleasedTo switch between different on-screen keyboard options1From the Home screen [preference_title_home_wallpaper] , tap ID: ICN-SONY-HOME-APPTRAY-NORMAL .2Find and tap Settings [settings_label] > Languages & input [language_settings] > Virtualkeyboard [virtual_keyboard] .3Tap Manage keyboards [manage_keyboards] , then tap the slider to enable or disablethe keyboard.GUID GUID-D67FA566-6621-4D4F-BC1F-F4B6A4DDDB3BTitle To switch keyboardsChangesVersion 1Author RamonaBStatus DraftTo enter text character by character1To enter a character visible on the keyboard, tap the character.2To enter a character variant, touch and hold a regular keyboard character toget a list of available options, then select from the list. For example, to enter"é", touch and hold "e" until other options appear, then, while keeping yourfinger pressed on the keyboard, drag to and select "é".GUID GUID-AD062D73-DE09-468F-8DCB-3F17D5A83CE9Title To enter text character by characterChanges for Honami; change the titleVersion 5Author zzGan LuStatus ReleasedTo enter a period•After you enter a word, double-tap the space bar.GUID GUID-6589FC1E-1265-4100-93E5-7006D5DD1E0ETitle To enter common punctuationsChanges for Togari; text change madeVersion 2Author zzGan LuStatus ReleasedTo enter text using the gesture input function1When the on-screen keyboard is displayed, slide your finger from letter to letterto trace the word that you want to write.2After you finish entering a word, lift up your finger. A word suggestion appearsbased on the letters that you have traced.3If the word that you want does not appear, tap ID: ICN-SONY-DELETE-PHONE-NUMBER-BLKto see other options and select accordingly. If the desired option does notappear, delete the entire word and trace it again, or enter the word by tappingeach letter individually.GUID GUID-70F1F614-D699-4D32-98AF-4E0CBE268385Title To enter text using the gesture inputChanges For N update - applies to Google keyboard and SwiftKeyVersion 10Author PeterK104This is an internet version of this publication. © Print only for private use.](https://usermanual.wiki/Sony/10720X.Manual/User-Guide-3336261-Page-104.png)
![Status ReleasedEditing textYou can select, cut, copy and paste text as you write. You can access the editingoptions by double-tapping the entered text. The editing options then becomeavailable via an application bar.GUID GUID-08C26779-CD77-4F3E-A3F7-B43BA97FD4CATitle Editing textChanges M-update 6.0: Icons (tools) changed to text in application barVersion 4Author TamasBStatus ReleasedApplication barThe following actions are available on the selected text:•Copy [copy]•Paste [paste]•Share [share]•Select all [selectAll]•Assist [global_action_assist]The Paste [paste] option only appears when you have text saved on the clipboard.GUID GUID-3773B154-CF41-471F-9469-DC7CD5560CCBTitle Application barChanges Cut option not supported by PineVersion 6Author RenataBStatus DraftTo select text1Double-tap a word to highlight it.2You can drag the tabs on both sides of the highlighted word to select moretext.GUID GUID-AE2DF08C-CE44-4038-A35A-347DBD2C5903Title To select textChanges "Tap and hold" to "Double-tap"Version 7Author PeterKStatus ReleasedTo edit text1Double-tap a word to make the application bar appear.2Select the text that you want to edit, then use the application bar to make yourdesired changes.GUID GUID-36E134EC-7F3C-492F-AF1B-63ECBEF26B4FTitle To edit textChanges Editorial comments implementedVersion 4Author TamasBStatus ReleasedTo use the magnifier•When you enter text, tap and hold on the text field to view the text magnifiedand to place the cursor where you want within the text field.GUID GUID-00F9663F-C8FE-4923-85D7-1712F9138082Title To use the magnifierChanges Valid for 6.0 STE ICS; new textVersion 1Author zzGan LuStatus Released105This is an internet version of this publication. © Print only for private use.](https://usermanual.wiki/Sony/10720X.Manual/User-Guide-3336261-Page-105.png)
![CallingGUID GUID-71EA3573-EAE2-4B15-A2CF-DCED46EE7587Title CallingChanges For Kugo - label/icon correctionsVersion 5Author SzilviaMStatus ReleasedMaking callsGUID GUID-73E2425E-2DE6-4B9F-BC0A-F9473A8208B4Title Making callsChanges same as version 8 head onlyVersion 9Author zzCynthiaHStatus ReleasedYou can make a call by manually dialling a phone number, by tapping a numbersaved in your contacts list, or by tapping the phone number in your call log. You canalso use the smart dial function to quickly find numbers from your contacts list andcall logs by entering part of a contact number or name and selecting from thesuggestions that appear. To make a video call, you can use the Duo™ video chatapplication on your device.ID: SCR-SONY-MAKING-CALLS1 Back to call log2 Delete number3 Dialpad4 Call buttonGUID GUID-821FBFD1-3127-496A-8FAC-D14A78507AF6Title Making calls overviewChanges Callouts chenged for PineVersion 17Author RenataBStatus DraftTo open the dialpad1From your Home screen [preference_title_home_wallpaper] , tap ID: ICN-SONY-HOME-APPTRAY-NORMAL .2Find and tap ID: ICN-SONY-APP-DIALER .3If the dialpad does not appear, tap ID: ICN-SONY-CALL-DIALPAD-PRESSED .GUID GUID-8925535C-EA93-4ABE-B677-A1ECC9488AB2Title To open the dialpadChanges For Kugo - label/icon correctionsVersion 3Author SzilviaM106This is an internet version of this publication. © Print only for private use.](https://usermanual.wiki/Sony/10720X.Manual/User-Guide-3336261-Page-106.png)
![Status ReleasedTo dial a phone number1From your Home screen [preference_title_home_wallpaper] , tap ID: ICN-SONY-HOME-APPTRAY-NORMAL .2Find and tap ID: ICN-SONY-APP-DIALER .3If the call log appears, tap ID: ICN-SONY-CALL-DIALPAD-PRESSED to display the dialpad.4Enter the phone number, and tap ID: ICN-SONY-BTN-DETAIL-CALL .To delete a number entered by mistake, tap ID: ICN-SONY-DELETE-PHONE-NUMBER-BLK .GUID GUID-4FE375CD-48B9-4D81-8DA9-730361EE3AECTitle To make a callChanges Implement reviewer comment for N updateVersion 14Author RenataBStatus ReleasedTo make a call using smart dial1From your Home screen [preference_title_home_wallpaper] , tap ID: ICN-SONY-HOME-APPTRAY-NORMAL .2Find and tap ID: ICN-SONY-APP-DIALER .3If the call log appears, tap ID: ICN-SONY-CALL-DIALPAD-PRESSED to display the dialpad.4Use the dialpad to enter letters or numbers that correspond to the contact youwant to call. As you enter each letter or number, a list of possible matchesappears.5Tap the contact that you want to call.GUID GUID-7A25E697-13EE-481C-89D0-229396708D57Title To make a call using smart dialChanges For Canopus M 6.0 update - replacing a label with an iconVersion 5Author SzilviaMStatus ReleasedTo make an international call1From your Home screen [preference_title_home_wallpaper] , tap ID: ICN-SONY-HOME-APPTRAY-NORMAL .2Find and tap ID: ICN-SONY-APP-DIALER . The call log is displayed.3Tap ID: ICN-SONY-CALL-DIALPAD-PRESSED to display the dialpad.4Touch and hold 0 until a “+” sign appears.5Enter the country code, the area code without the initial zeros, followed by thephone number. Then tap ID: ICN-SONY-BTN-DETAIL-CALL .GUID GUID-AFD0943A-BF5A-4F5D-8FF0-0A30C3B98669Title To make an international callChanges Implement reviewer comment for N updateVersion 14.1.1Author RenataBStatus ReleasedTo add a direct dial number to your Home screen1Touch and hold an empty area on your Home screen [preference_title_home_wallpaper] untilthe device vibrates and the customisation menu appears.2In the customisation menu, tap Widgets [home_cui_menu_widgets_txt] > Shortcuts[home_cui_menu_shortcuts_txt] .3Scroll through the list of applications and select Direct dial [shortcutDialContact] .4Select the contact and the number that you want to use as the direct dialnumber.GUID GUID-AD9DBDC0-D399-4583-A0F3-2476E6144B3CTitle To add a direct dial number to your Home screenChanges For Kugo - label/icon correctionsVersion 5Author SzilviaM107This is an internet version of this publication. © Print only for private use.](https://usermanual.wiki/Sony/10720X.Manual/User-Guide-3336261-Page-107.png)
![Status ReleasedShowing or hiding your phone numberYou can select to show or hide your phone number on call recipients' devices whenyou call them.GUID GUID-32174486-684C-45E8-9877-5C21C6024A57Title Showing or hiding your phone numberChanges Add a Note with condition for China MainlandVersion 3Author zzLiShuoStatus ReleasedTo show or hide your phone number during outgoing calls1From the Home screen [preference_title_home_wallpaper] , tap ID: ICN-SONY-HOME-APPTRAY-NORMAL .2Find and tap Settings [settings_label] > Call [call_settings_title] > Additional settings [addition-al_gsm_call_settings] > Caller ID [labelCallerId] , and choose an option.This option may not be provided by every operator.GUID GUID-A0B707E1-2F16-4FCC-8188-E5DEC180AF5CTitle To show or hide your phone numberChanges For Kugo - adding "and choose an option" to the last stepVersion 12Author SzilviaMStatus ReleasedReceiving callsIf you receive an incoming call when the device is in sleep mode or the screen islocked, the phone application opens in fullscreen format. If you receive an incomingcall when the screen is active, the incoming call is displayed as a floating notification,that is, in a minimised window that floats at the top of whatever screen is open. Whensuch a notification arrives, you can choose to answer the call and open the phoneapplication screen, or you can reject the call and stay on the current screen.GUID GUID-2FBB5751-AFD8-4658-B22A-12B4ACC2674FTitle Receiving callsChanges For Cosmos M 6.0 update - with a condition for DS devicesVersion 4Author SzilviaMStatus ReleasedTo answer a call when the screen is inactive•When a call comes in, drag ID: ICN-SONY-BTN-DETAIL-CALL to the right.GUID GUID-5FA70FFB-99A3-4A5A-90A4-6E57EEA66202Title To answer a call when the screen is inactiveChanges For Kugo - label/icon correctionsVersion 13Author SzilviaMStatus ReleasedTo answer an incoming call when the screen is active•When a call comes in, in the heads-up notification that appears at the top ofthe screen, tap ANSWER [description_target_answer] .Instead of answering the call, you can go to the main phone application screen by tapping theheads-up notification window. Using this method, you get more options to manage the call.For example, you can decide to reject the call with a message.GUID GUID-F3A5D35B-BCA2-43E4-AFD0-69A265C00A13Title To answer a call when the screen is activeChanges For Kagura N 7.0 update - with "by tapping the upper part of the heads-up notificationwindow"Version 7Author SzilviaMStatus ReleasedTo reject a call when the screen is inactive•When a call comes in, drag ID: ICN-SONY-CALL-SLIDER-DISMISS to the left.GUID GUID-7AF49627-A544-405D-B3FB-EC04DAC2767E108This is an internet version of this publication. © Print only for private use.](https://usermanual.wiki/Sony/10720X.Manual/User-Guide-3336261-Page-108.png)
![Title To reject a call when the screen is inactiveChanges For Canopus M 6.0 update - aligned titleVersion 8Author SzilviaMStatus ReleasedTo reject a call when the screen is active•When a call comes in, in the heads-up notification that appears at the top ofthe screen, tap DECLINE [common_plugin_btn_decline_txt] .Instead of rejecting the call, you can go to the main phone application screen by tapping theheads-up notification window. This way you get more options to manage the call. Forexample, you can decide to reject the call with a message.GUID GUID-889BCAA7-6BB5-4B85-96DA-067D174E894DTitle To reject a call when the screen is activeChanges For Kagura N 7.0 update - with "by tapping the heads-up notification window"Version 10Author SzilviaMStatus ReleasedTo mute the ringtone for an incoming call•When you receive the call, press the volume key.GUID GUID-166E8451-D0EE-4A20-8D11-A7DC0BBA7027Title To mute the ringtone for an incoming callChanges eSheep RachaelVersion 1Author zzOskarWStatus Released*Rejecting a call with a text messageYou can reject a call with a text message, sent automatically to the caller and storedin the Messaging conversation with the contact.You can select from a number of predefined messages available on your device, oryou can create a new message. You can also create your own personalisedmessages by editing the predefined ones.GUID GUID-07BBFB8F-49E0-4484-B2DC-E4BCD9CD758FTitle Rejecting a call with a messageChanges For Lavender - implementing changes according to ED commentsVersion 6Author SzilviaMStatus ReleasedTo reject a call with a text message when the screen is inactive1When an incoming call arrives, tap RESPONSE OPTIONS [phone_strings_ans_mach_re-sponse_options_] .2Select a predefined message or tap Write new message [reject_with_message_write_new] .GUID GUID-CAB1C7B1-044E-4072-BBAF-709C1E0FD0C3Title To reject a call with a text message when the screen is inactiveChanges For Kugo - label correctionVersion 5Author SzilviaMStatus ReleasedTo reject a call with a text message when the screen is active1When an incoming call arrives, tap the heads-up notification window where thephone number or the name of the contact is displayed.2Tap RESPONSE OPTIONS [phone_strings_ans_mach_response_options_] .3Select a predefined message or tap Write new message [reject_with_message_write_new] .GUID GUID-29FF2B23-C6FC-4809-ACB9-B9A9B2E01FF7Title To reject a call with a text message when the screen is activeChanges For Kagura N 7.0 update - with "by tapping the heads-up notification window"Version 4Author SzilviaM109This is an internet version of this publication. © Print only for private use.](https://usermanual.wiki/Sony/10720X.Manual/User-Guide-3336261-Page-109.png)
![Status ReleasedTo reject a second call with a text message1When you hear repeated beeps during a call, tap RESPONSE OPTIONS[phone_strings_ans_mach_response_options_] .2Select a predefined message or tap Write new message [reject_with_message_write_new] .GUID GUID-C7B2AAC2-90FE-4C43-A847-EDD862442B84Title To reject a second call with a messageChanges For Kugo - label correctionVersion 6Author SzilviaMStatus ReleasedTo edit the text message used to reject a call1From your Home screen [preference_title_home_wallpaper] , tap ID: ICN-SONY-HOME-APPTRAY-NORMAL .2Find and tap Settings [settings_label_launcher] > Call [call_settings_title] > Reject call withmessage [call_settings_reject_call_with_message] .3Tap the message that you want to edit, then make the necessary changes.4Tap OK [button_ok] .GUID GUID-BD89ACAE-CE3B-4176-9AB1-961828375848Title To edit the message used to reject a callChanges For Kagura - adding "choose a SIM card" for DS devicesVersion 13Author SzilviaMStatus ReleasedOngoing callsGUID GUID-D912EDDE-EAC1-4B36-BC45-CC568D8E32ACTitle Ongoing callsChanges For nxtstp UGVersion 3Author JorgenLStatus ReleasedID: SCR-SONY-ONGOING-CALLS1 End a call2 Make a second call3 Put the current call on hold or retrieve a call on hold4 Enter DTMF digits during a call5 Mute the microphone during a call6 Turn on the loudspeaker during a callGUID GUID-32D508A4-531B-4CD1-AF11-ACF619584DA0Title Ongoing calls overviewChanges For Canopus M 6.0 update - with "DTMF digits"Version 9Author SzilviaM110This is an internet version of this publication. © Print only for private use.](https://usermanual.wiki/Sony/10720X.Manual/User-Guide-3336261-Page-110.png)
![Status ReleasedTo change the volume during a call•Press the volume key up or down.GUID GUID-E0A64910-7B0A-4319-8169-9E7E9630ED50Title To change the ear speaker volume during a callChanges Only the title changes for castor gina.Version 2Author zzVera QuStatus ReleasedUsing the call logIn the call log, you can view missed calls ID: ICN-SONY-CALL-LOG-HEADER-MISSED-CALL-2 ,received calls ID: ICN-SONY-CALL-LOG-HEADER-INCOMING-CALL and dialled calls ID: ICN-SONY-CALL-LOG-HEADER-OUTGOING-CALL .GUID GUID-40E5841D-C7A4-4B25-AC8D-3531B9D52AFCTitle Using the call logChanges Keyaki - icon fixVersion 8Author RamonaBStatus ReleasedTo open the call log1From your Home screen [preference_title_home_wallpaper] , tap ID: ICN-SONY-HOME-APPTRAY-NORMAL .2Find and tap ID: ICN-SONY-APP-DIALER .GUID GUID-FF49DA7A-7E35-451E-8AA7-B691105E3D1FTitle To open the call logChanges For Kugo - label/icon correctionsVersion 4Author SzilviaMStatus ReleasedTo view your missed calls1When you have missed a call, ID: ICN-SONY-CALL-LOG-HEADER-MISSED-CALL appears in thestatus bar. Drag the status bar downwards.2Tap Missed call [notification_missedCallTitle] .GUID GUID-590BA208-6CD8-42C2-9D38-C05755E3917BTitle To view missed callsChanges Changed the varid for an icon onlyVersion 7Author zzCynthiaHStatus ReleasedTo call a number from your call log1From your Home screen [preference_title_home_wallpaper] , tap ID: ICN-SONY-HOME-APPTRAY-NORMAL .2Find and tap ID: ICN-SONY-APP-DIALER . The call log is displayed.3To call a number directly from the call log, tap the ID: ICN-SONY-BTN-DETAIL-CALL-MESSAGE beside the number. To edit a number before calling, touch and hold thenumber, then tap Edit number before call [recentCalls_editNumberBeforeCall] .GUID GUID-06B252C0-D4D0-476C-ABA4-5D809E1F1615Title To call a number from the call logChanges For Kagura N 7.0 update - with "tap the [phone icon] beside the number"Version 13Author SzilviaM111This is an internet version of this publication. © Print only for private use.](https://usermanual.wiki/Sony/10720X.Manual/User-Guide-3336261-Page-111.png)
![Status ReleasedTo add a number from the call log to your contacts1From your Home screen [preference_title_home_wallpaper] , tap ID: ICN-SONY-HOME-APPTRAY-NORMAL .2Find and tap ID: ICN-SONY-APP-DIALER .3Tap a number displayed in the call log, then select Create new contact [pickerNew-ContactHeader] or Add to a contact [search_shortcut_add_to_contact] .4Edit the contact details, then tap SAVE [menu_save] .GUID GUID-3511CFE2-B8CC-4CF9-93AC-53529E89BC56Title To add a number from the call log to your contactsChanges Label change for Kugo N-updateVersion 14Author RenataBStatus ReleasedTo view call log options1From your Home screen [preference_title_home_wallpaper] , tap ID: ICN-SONY-HOME-APPTRAY-NORMAL .2Find and tap ID: ICN-SONY-APP-DIALER .3Tap ID: ICN-SONY-KEY-MENU .You can also access general call settings by following the steps above.GUID GUID-CBFC0FA6-F21E-437C-A7A6-D6DEBD3435F9Title To view call log optionsChanges For Kugo - describing the full processVersion 5Author SzilviaMStatus ReleasedForwarding callsYou can direct calls to a different recipient, for example, to another phone number oranother device.GUID GUID-E1430643-8DEE-443C-8FD5-6DF310320AD0Title Forwarding callsChanges Implement reviewer comment for Kugo/KaguraVersion 2.1.2Author RenataBStatus ReleasedTo forward calls1From your Home screen [preference_title_home_wallpaper] , tap ID: ICN-SONY-HOME-APPTRAY-NORMAL .2Find and tap Settings [settings_label_launcher] > Call [call_settings_title] .3Tap Call forwarding [labelCF] > Voice [labelCFVoice] and select an option.4Enter the number you want to forward calls to, then tap Turn on [enable] .GUID GUID-24FD3201-10EA-418F-9B73-240458B3EEC2Title To forward callsChanges New label added for Dora N updateVersion 12Author RenataBStatus ReleasedTo turn off call forwarding1From your Home screen [preference_title_home_wallpaper] , tap ID: ICN-SONY-HOME-APPTRAY-NORMAL .2Find and tap Settings [settings_label_launcher] > Call [call_settings_title] > Call forwarding [labelCF] >Voice [labelCFVoice] .3Select an option, then tap Turn off [disable] .GUID GUID-89805283-2629-4D50-B89E-914E3EE2BCEATitle To turn off call forwardingChanges Keyaki MLC: changed pathVersion 12Author RamonaB112This is an internet version of this publication. © Print only for private use.](https://usermanual.wiki/Sony/10720X.Manual/User-Guide-3336261-Page-112.png)
![Status ReleasedRestricting callsYou can block all or certain categories of incoming and outgoing calls. If you havereceived a PIN2 code from your service provider, you can also use a list of FixedDialling Numbers (FDNs) to restrict outgoing calls. If your subscription includes avoicemail service, you can send all incoming calls from a specific contact directly tovoicemail.FDN is not supported by all network operators. Contact your network operator to verify if yourSIM card or network service supports this feature.GUID GUID-9ACC22D6-DCD8-4781-B9BE-BEE97E4A7477Title Restricting callsChanges 3rd üparty app deletedVersion 4.2.2Author RenataBStatus ReleasedTo block calls and messages from a specific number1From your Home screen [preference_title_home_wallpaper] , tap ID: ICN-SONY-APP-DIALER .2Find and tap ID: ICN-SONY-KEY-MENU > Settings [settings_label_launcher] > Block numbers[phone_settings_kddi_block_numbers_txt] > ADD A NUMBER [add_a_number_capitalized] .3Enter the phone number you want to block calls and texts from, then tapBLOCK [block_number_ok] .GUID GUID-7004AA90-417E-4304-85B9-6EB502561939Title To block calls and messages from a specific numberChanges Label change for KeyakiVersion 12.1.1Author RamonaBStatus ReleasedTo enable or disable fixed dialling1From your Home screen [preference_title_home_wallpaper] , tap ID: ICN-SONY-HOME-APPTRAY-NORMAL .2Find and tap Settings [settings_label_launcher] > Call [call_settings_title] > Fixed dialling numbers[fdn] .3If you want to enable fixed dialling, select Activate fixed dialling [disable_fdn_ok] . Ifyou want to disable fixed dialling, select Deactivate fixed dialling [enable_fdn_ok] .4Enter your PIN2 and tap OK [ok] .GUID GUID-FCE85A8E-BBDA-4A95-9B47-320B4293A4ABTitle To enable or disable fixed dialingChanges Label fix for Dora N updateVersion 9Author RenataBStatus ReleasedTo access the list of accepted call recipients1From your Home screen [preference_title_home_wallpaper] , tap ID: ICN-SONY-HOME-APPTRAY-NORMAL .2Find and tap Settings [settings_label_launcher] > Call [call_settings_title] .3Tap Fixed dialling numbers [fdn] > Fixed dialling numbers [fdn] .GUID GUID-9D6DE3C9-13A8-4BEE-B25F-E0B467FF8F29Title To add a number to the list of Fixed Dialing NumbersChanges Implement reviewer commentVersion 5.2.5Author RenataB113This is an internet version of this publication. © Print only for private use.](https://usermanual.wiki/Sony/10720X.Manual/User-Guide-3336261-Page-113.png)
![Status ReleasedTo change the SIM card PIN21From the Home screen [preference_title_home_wallpaper] , tap ID: ICN-SONY-HOME-APPTRAY-NORMAL .2Find and tap Settings [settings_label] > Call [call_settings_title] .3Tap Fixed dialling numbers [fdn] > Change PIN2 [change_pin2] .4Enter the old SIM card PIN2 and tap OK [ok] .5Enter the new SIM card PIN2 and tap OK [ok] .6Confirm the new PIN2 and tap OK [ok] .GUID GUID-8A252C68-D2E2-4CC7-B5F0-47D151159933Title To change the SIM card PIN2Changes Fix label error due to resource filesVersion 5.1.5Author RenataBStatus ReleasedTo send incoming calls from a specific contact directly to voicemail1From your Home screen [preference_title_home_wallpaper] , tap ID: ICN-SONY-HOME-APPTRAY-NORMAL .2Find and tap ID: ICN-SONY-APP-PHONEBOOK .3Select the desired contact.4Tap ID: ICN-SONY-EDIT-CONTACT > ID: ICN-SONY-KEY-MENU .5Mark the checkbox beside All calls to voicemail [menu_redirect_calls_to_vm] .6Tap SAVE [menu_save] .GUID GUID-B7F7BF93-7FC0-4515-A550-58B8EC66F9D8Title To send incoming calls directly to voicemailChanges Label fix for KeyakiVersion 6Author RamonaBStatus ReleasedMultiple callsIf you have activated call waiting, you can handle multiple calls at the same time.When it is activated, you will be notified by a beep if you receive another call.Mobile data is unavailable during calls. Applications like email, internet and social networkingwill work if you connect to a Wi-Fi [udoc_no_trans_wifi_wlan_plain] network.GUID GUID-BFBB9A5A-25E5-4E72-9841-247169DEEB7ATitle Multiple callsChanges Internet decappedVersion 5Author DoraMStatus ReleasedTo activate or deactivate call waiting1From your Home screen [preference_title_home_wallpaper] , tap ID: ICN-SONY-HOME-APPTRAY-NORMAL .2Find and tap Settings [settings_label_launcher] > Call [call_settings_title] > Additional settings [addi-tional_gsm_call_settings] .3To activate or deactivate call waiting, tap Call waiting [labelCW] .GUID GUID-1A9F7171-AD1D-443F-B906-7C346F87C151Title To activate or deactivate call waitingChanges Fix label error due to resource filesVersion 9Author RenataBStatus ReleasedTo answer a second call and put the ongoing call on hold1When you hear repeated beeps during a call, drag ID: ICN-SONY-BTN-DETAIL-CALL tothe right.2Tap Hold call [phone_strings_answer_second_incoming_onhold_txt] .GUID GUID-7C422C9D-1720-407E-A0C8-6D8B8EB6B19FTitle To answer a second call and put the ongoing call on holdChanges Fix icon error due to resource files114This is an internet version of this publication. © Print only for private use.](https://usermanual.wiki/Sony/10720X.Manual/User-Guide-3336261-Page-114.png)
![Version 6.1.2Author RenataBStatus ReleasedTo reject a second call•When you hear repeated beeps during a call, drag ID: ICN-SONY-CALL-SLIDER-DISMISSto the left.GUID GUID-20A61740-AB60-4D3D-BBF6-8191B6FEC058Title To reject a second callChanges Label changed to icon for N updateVersion 7Author RenataBStatus ReleasedTo make a second call1During an ongoing call, tap ID: ICN-SONY-DIAL-CONTACTS . The call log is displayed.2Tap ID: ICN-SONY-CALL-DIALPAD-PRESSED to display the dialpad.3Enter the number of the recipient and tap ID: ICN-SONY-BTN-DETAIL-CALL . The first callis put on hold.GUID GUID-0CE0A4D3-CA04-4D27-B17F-8973082C4EF3Title To make a second callChanges Fix icon error due to resource filesVersion 10.1.1.1.2Author RenataBStatus ReleasedTo switch between multiple calls•To switch to another call and put the current call on hold, tap On hold[clh_call_on_hold_txt] .GUID GUID-1309D844-C17A-4A36-8E37-26A09CD358A2Title To switch between multiple callsChanges Adding ladel "On hold"Version 5.1.1Author RenataBStatus ReleasedConference callsWith a conference or multiparty call, you can have a joint conversation with two ormore persons.For details about the number of participants that you can add to a conference call, contactyour network operator.GUID GUID-ED3A4BD7-2AAD-4A22-9486-AFBF100F1F0FTitle Conference callsChanges Created it out only changed the name no extra text changed due to comments from conceptteamVersion 4Author zzCynthiaHStatus ReleasedTo make a conference call1During an ongoing call, tap ID: ICN-SONY-DIAL-CONTACTS . The call log appears.2To display the dialpad, tap ID: ICN-SONY-CALL-DIALPAD-PRESSED .3Dial the number of the second participant and tap ID: ICN-SONY-BTN-DETAIL-CALL . Thefirst participant is put on hold temporarily.4To add the second participant to the call and start the conference call, tap ID:ICN-SONY-CALL-CONFERENCE .5To add more participants to the call, repeat the relevant steps as describedabove.GUID GUID-29B1365F-B898-4DD3-A624-19FFCDE9FC4BTitle To make a conference callChanges Implement ED commentVersion 16Author RenataB115This is an internet version of this publication. © Print only for private use.](https://usermanual.wiki/Sony/10720X.Manual/User-Guide-3336261-Page-115.png)
![Status ReleasedTo have a private conversation with a conference call participant1During an ongoing conference call, tap Manage conference [onscreenManageConference-Text] .2Tap the separate button of the participant with whom you want to have aprivate conversation.3To end the private conversation and return to the conference call, tap ID: ICN-SONY-CALL-CONFERENCE .GUID GUID-7FEE24C8-B5B3-4172-8A13-343441E63304Title To have a private conversation with a participantChanges Implement reviewer comment for N updateVersion 14Author RenataBStatus ReleasedTo release a participant from a conference call1During an ongoing conference call, tap Manage conference [onscreenManageConference-Text] .2Tap ID: ICN-SONY-CALL-SLIDER-DISMISS next to the participant you want to release.GUID GUID-317CBA11-E778-4F0B-B2F6-16BE76B17DAETitle To release a participantChanges Suzu - fixed icon in step 2Version 7Author AdamSStatus ReleasedTo end a conference call•During the conference call, tap ID: ICN-SONY-CALL-SLIDER-DISMISS .GUID GUID-B7DE81B4-2DAB-4D55-9A3B-EAACC2C86A9FTitle To end a conference callChanges Suzu - fixed icon in step 1Version 5Author AdamSStatus ReleasedVoicemailIf your subscription includes a voicemail service, callers can leave voice messages foryou when you can't answer calls. Your voicemail service number is normally saved onyour SIM card. If not, you can get the number from your service provider and enter itmanually.GUID GUID-C0B45CA8-3035-4A41-AF12-46F45200B8AATitle VoicemailChanges Valid for R800x(CDMA condition added)Version 5Author zzPengLeonStatus ReleasedTo enter your voicemail number1From the Home screen [preference_title_home_wallpaper] , tap ID: ICN-SONY-HOME-APPTRAY-NORMAL .2Find and tap Settings [settings_label_launcher] > Call [call_settings_title] .3Select a SIM card.4Tap Voicemail [callsetting_strings_network_voicemail_txt] > Voicemail settings [voicemail_settings] >Voicemail number [voicemail_settings_number_label] .5Enter your voicemail number.6Tap OK [ok] .GUID GUID-C89C34FD-27BE-4E69-A928-F67A90805CC9Title To enter your voicemail numberChanges Label fixVersion 14Author RenataB116This is an internet version of this publication. © Print only for private use.](https://usermanual.wiki/Sony/10720X.Manual/User-Guide-3336261-Page-116.png)
![Status ReleasedTo call your voicemail service1Open the dialpad.2Touch and hold 1 until your voicemail number is dialed.The first time you call your voicemail number, your network operator’s voicemail systemnormally prompts you to set up your voicemail. For example, you may be asked to record agreeting and set a password.GUID GUID-0C8C71F8-F089-4C9F-8CB4-AF024258D381Title To call your voicemail serviceChanges Implemented 2nd ED Review Comments on Lavender. Changes vs v10: - In step2 changedfrom 'Touch and hold 1 until your device dials your voicemail number.' to 'Touch and hold 1until your voicemail number is dialed.' - Better wording for the tip. - Removed the cross-reference.Version 11Author zzHuRuiStatus ReleasedEmergency callsYour device supports international emergency numbers, for example, 112 or 911.You can normally use these numbers to make emergency calls in any country, with orwithout a SIM card inserted if you are within range of a network.GUID GUID-95D14376-6C16-4B4E-9B0D-8F78EFF123E6Title Emergency callsChanges Created it out ue to comments from EdVersion 7Author zzCynthiaHStatus ReleasedTo make an emergency call1Open the dialpad.2Enter the emergency number, then tap ID: ICN-SONY-BTN-DETAIL-CALL .You can make emergency calls even when no SIM card is inserted or when all outgoing callsare blocked.GUID GUID-1C4DC7B4-8DD8-4046-82B6-4DB57A2FBB93Title To make an emergency callChanges Implement reviewer comment for N updateVersion 14Author RenataBStatus ReleasedTo make an emergency call while the SIM card is locked1Tap EMERGENCY [emergency_call] .2Enter the emergency number and tap ID: ICN-SONY-BTN-DETAIL-CALL .GUID GUID-D5A8FEA8-E9B6-4234-8D05-ADDA04F5BC2BTitle To make an emergency call while the SIM card is lockedChanges Label in caps for N-updateVersion 9Author RenataBStatus ReleasedTo make an emergency call while the screen is locked1If the active screen lock type is Swipe [unlock_set_unlock_none_title] , swipe up and tap ID:ICN-SONY-APP-DIALER , then tap ID: ICN-SONY-CALL-DIALPAD-PRESSED to display the dialpad,then enter the emergency number and tap ID: ICN-SONY-BTN-DETAIL-CALL2If your screen is locked with a pattern, PIN or password, swipe up and tapEMERGENCY [emergency_call] , then enter the emergency number and tap ID: ICN-SONY-BTN-DETAIL-CALL .GUID GUID-61C1900A-1414-49D1-859A-BDAF90953548Title To make an emergency call while the device is lockedChanges Dial varref fix for PineVersion 10Author RenataBStatus Draft117This is an internet version of this publication. © Print only for private use.](https://usermanual.wiki/Sony/10720X.Manual/User-Guide-3336261-Page-117.png)
![ContactsGUID GUID-116B5259-4FA2-46CC-A2EB-6B8073E1EDADTitle ContactsChanges removed label as per ed commentsVersion 2Author AdelKStatus ReleasedSearching and viewing contactsGUID GUID-E34360AF-B6B3-4A58-BE2C-C278E449070ETitle Searching and viewing contactsChanges For nxtstp UGVersion 1Author zzWangHermanStatus ReleasedID: SCR-SONY-EDREAM-PHONEBOOK1 Search for contacts2 Edit and view medical and emergency contact information3 View more options4 Favourites and All contacts tabs5 View contact details6 Use the slider to jump to contacts starting with the selected letter7 Add a contactGUID GUID-4ED8AE21-E166-47C1-AA2A-25979AE1B1DCTitle Contacts screen overviewChanges N updateVersion 11Author AdelKStatus ReleasedTo search for a contact1From your Home screen [preference_title_home_wallpaper] , tap ID: ICN-SONY-HOME-APPTRAY-NORMAL , then tap ID: ICN-SONY-APP-PHONEBOOK .2Tap ID: ICN-SONY-MENU-SEARCH and enter a phone number, name or otherinformation in the Find contacts [hint_findContacts] field. The result list is filtered as youenter each character.GUID GUID-EB8B497D-7462-4B6E-B63F-A5AC8DE42983Title To search for a contactChanges N update - label change in step 2Version 12Author AdelK118This is an internet version of this publication. © Print only for private use.](https://usermanual.wiki/Sony/10720X.Manual/User-Guide-3336261-Page-118.png)
![Status ReleasedTo select which contacts to display in the Contacts application1From your Home screen [preference_title_home_wallpaper] , tap ID: ICN-SONY-HOME-APPTRAY-NORMAL , then tap ID: ICN-SONY-APP-PHONEBOOK .2Press ID: ICN-SONY-KEY-MENU , then tap Contacts to display [menu_contacts_filter] .3In the list that appears, select the desired option. If you have synchronised yourcontacts with a synchronisation account, that account appears in the list.4To further expand the list of options, tap Customise [list_filter_customize] , select theappropriate drop-down list and mark or unmark the checkboxes as desired.5When you’re finished, tap OK [button_ok] .GUID GUID-7A65E1EE-85E9-4A76-8BFE-9CA005A82543Title To select which contacts to display in the Contacts applicationChanges N updateVersion 13Author AdelKStatus ReleasedAdding and editing contactsGUID GUID-D26AD4BF-CF50-4F48-A4E2-CB55941BB492Title Adding and editing contactsChanges For nxtstp UGVersion 5Author zzWangHermanStatus ReleasedTo add a contact1From your Home screen [preference_title_home_wallpaper] , tap ID: ICN-SONY-HOME-APPTRAY-NORMAL , then tap ID: ICN-SONY-APP-PHONEBOOK .2Tap ID: ICN-SONY-BTN-ADD-CONTACT .3If you have synchronised your contacts with one or more accounts and you areadding a contact for the first time, you must select the account that you wantto add the contact to. Alternatively, tap Phone contact [localaccount_strings_phone_contact_txt]if you only want to use and save this contact on your device.4Enter or select the desired information for the contact.5When you are finished, tap SAVE [menu_save] .Once you save a contact to an account, that account will show as the default account to saveto the next time you add a contact. If you want to change which account a contact is saved to,you need to create the contact again and save it to the correct account.If you add a plus sign and the country code before a contact's phone number, you do nothave to edit the number again when you make calls from abroad.GUID GUID-CE4A9D46-2505-4EAA-818C-FD7B9BDEB825Title To add a contactChanges N updateVersion 19Author AdelKStatus ReleasedTo edit a contact1From your Home screen [preference_title_home_wallpaper] , tap ID: ICN-SONY-HOME-APPTRAY-NORMAL , then tap ID: ICN-SONY-APP-PHONEBOOK .2Tap the contact that you want to edit, then tap ID: ICN-SONY-EDIT-CONTACT .3Edit the desired information.4When you are finished, tap SAVE [menu_save] .Some synchronisation services do not allow you to edit contact details.GUID GUID-04C4AA81-EF48-47E7-8F7A-4EF3A3D03F4ATitle To edit a contactChanges N updateVersion 11Author AdelK119This is an internet version of this publication. © Print only for private use.](https://usermanual.wiki/Sony/10720X.Manual/User-Guide-3336261-Page-119.png)
![Status ReleasedTo add a picture to a contact1From your Home screen [preference_title_home_wallpaper] , tap ID: ICN-SONY-HOME-APPTRAY-NORMAL , then tap ID: ICN-SONY-APP-PHONEBOOK .2Tap the contact that you want to edit, then tap ID: ICN-SONY-EDIT-CONTACT .3Tap ID: ICN-SONY-CAMERA-CAP-MODE-NORMAL , then select a method for adding thecontact picture and edit it as desired.4After you add the picture, tap SAVE [menu_save] .You can also add a picture to a contact directly from the Album [album_app_name_txt] application. Ifyou want to add a picture that is saved to an online account, you must download the picturefirst.GUID GUID-D8B5006C-48F5-4730-87AE-2730F0693F7ETitle To add a contact pictureChanges N updateVersion 12Author AdelKStatus ReleasedTo personalise the ringtone for a contact1From your Home screen [preference_title_home_wallpaper] , tap ID: ICN-SONY-HOME-APPTRAY-NORMAL , then tap ID: ICN-SONY-APP-PHONEBOOK .2Tap the contact that you want to edit, then tap ID: ICN-SONY-EDIT-CONTACT .3Tap ID: ICN-SONY-KEY-MENU > Set ringtone [menu_set_ring_tone] .4Select an option from the list or tap ID: ICN-SONYNEW-WINDOW-HOLO-DARK to select amusic file saved on your device, then tap DONE [checklist_button_done] .5Tap SAVE [menu_save] .GUID GUID-2FD5CF21-896E-4632-91AC-BB15637851E7Title To personalise the ringtone for a contactChanges 'done' label capitalizedVersion 8Author AdelKStatus ReleasedTo send all calls to voicemail for a contact1From your Home screen [preference_title_home_wallpaper] , tap ID: ICN-SONY-HOME-APPTRAY-NORMAL , then tap ID: ICN-SONY-APP-PHONEBOOK .2Tap the contact that you want to edit, then tap ID: ICN-SONY-EDIT-CONTACT .3Tap ID: ICN-SONY-KEY-MENU , then mark the All calls to voicemail [menu_redirect_calls_to_vm]checkbox.4When you are finished, tap SAVE [menu_save] .GUID GUID-8535E3AC-385F-4ED5-9CAE-F33F78B85CB0Title To send all calls to voicemail for a contactChanges N updateVersion 2Author AdelKStatus ReleasedTo block a phone number1From your Home screen [preference_title_home_wallpaper] , tap ID: ICN-SONY-HOME-APPTRAY-NORMAL , then tap ID: ICN-SONY-APP-PHONEBOOK .2Tap ID: ICN-SONY-KEY-MENU , then tap Blocked numbers [kddi_strings_unwanted_calls_prevention_list_ti-tle_txt] .3Tap ADD A NUMBER [add_a_number_capitalized] , then enter the phone number you wantto block calls and texts from.4Tap BLOCK [block_number_ok] .GUID GUID-4A664713-FCEA-40CB-AE50-AAF8ABBB31CBTitle To block a phone numberChanges Hinoki: label issue fixedVersion 3Author RamonaB120This is an internet version of this publication. © Print only for private use.](https://usermanual.wiki/Sony/10720X.Manual/User-Guide-3336261-Page-120.png)
![Status DraftTo delete contacts1From your Home screen [preference_title_home_wallpaper] , tap ID: ICN-SONY-HOME-APPTRAY-NORMAL , then tap ID: ICN-SONY-APP-PHONEBOOK .2Touch and hold the contact that you want to delete.3To delete several or all contacts, mark the checkboxes beside the contacts thatyou want to delete.4Tap ID: ICN-SONY-KEY-MENU , then tap Delete contact [menu_deleteContact] .5Tap DELETE [delete_profile] to confirm.GUID GUID-BF4AB0BA-7D03-4A81-B9B5-1F422A254EB0Title To delete contactsChanges N updateVersion 11Author AdelKStatus ReleasedTo edit contact information about yourself1From your Home screen [preference_title_home_wallpaper] , tap ID: ICN-SONY-HOME-APPTRAY-NORMAL , then tap ID: ICN-SONY-APP-PHONEBOOK .2Tap ME [me_capitalized] , then tap ID: ICN-SONY-EDIT-CONTACT .3Enter the new information or make the changes you want.4When you are finished, tap SAVE [menu_save] .GUID GUID-B75E995D-3011-4ADA-9C38-647947BFA18CTitle To edit contact information about yourselfChanges N update and aboveVersion 10Author AdelKStatus ReleasedTo create a new contact from a text message1From your Home screen [preference_title_home_wallpaper] , tap ID: ICN-SONY-HOME-APPTRAY-NORMAL , then find and tap ID: ICN-SONY-APP-MESSAGING .2Tap the icon next to the phone number, then tap SAVE [menu_save] .3Select an existing contact, or tap Create new contact [pickerNewContactHeader] .4Edit the contact information and tap SAVE [menu_save] .GUID GUID-8AD5B8FF-018E-4A1E-A547-577913797FDATitle To create a new contact from a messageChanges N update, capitalized labelVersion 20Author AdelKStatus ReleasedTransferring contactsThere are several ways to transfer contacts to your new device. You can synccontacts from an online account or import contacts directly from another device.If you sync the contacts in your old device with an online account, for example,Google Sync™ or Microsoft® Exchange ActiveSync®, you can transfer your contactsto your new device using that account.You can also copy contacts to a memory card, use Bluetooth® technology, or savecontacts to a SIM card. For more specific information about transferring the contactsfrom your old device, refer to the relevant User guide.Find out more about choosing a transfer method at www.sonymobile.com/support/.GUID GUID-F9BEA5C1-B141-4A82-B183-F98ABFE273DCTitle Transferring contactsChanges merging 'Transferring contacts using an online account' and 'Other methods for Transferringcontacts', added link for support webVersion 3Author AdelK121This is an internet version of this publication. © Print only for private use.](https://usermanual.wiki/Sony/10720X.Manual/User-Guide-3336261-Page-121.png)
![Status DraftTo synchronise contacts on your new device with a synchronisation account1From your Home screen [preference_title_home_wallpaper] , tap ID: ICN-SONY-HOME-APPTRAY-NORMAL , then tap ID: ICN-SONY-APP-PHONEBOOK .2Tap ID: ICN-SONY-KEY-MENU , then tap Manage accounts [menu_accounts] .3Select the account that you want to sync your contacts with, then tap ID: ICN-SONY-KEY-MENU > Sync now [sync_menu_sync_now] .You need to be signed in to the relevant sync account before you can sync your contacts withit.GUID GUID-6252CC57-4654-44CA-8F5C-44B27DC1C425Title To synchronise contacts to your new device using a synchronisation accountChanges N updateVersion 12Author GergelyKStatus ReleasedTo import contacts from a SIM cardWhen transferring contacts to or from a SIM card, some contacts may get duplicated at thedestination. For information on how to resolve this, see Avoiding duplicate entries in theContacts application on page 126.1From your Home screen [preference_title_home_wallpaper] , tap ID: ICN-SONY-HOME-APPTRAY-NORMAL , then tap ID: ICN-SONY-APP-PHONEBOOK .2Tap ID: ICN-SONY-KEY-MENU , then tap Import/export [menu_import_export] > Import from SIMcard [import_from_sim] .3Select where to store your contacts.4Select contacts to import. To import an individual contact, find and tap thecontact. To import all contacts, tap ID: ICN-SONY-KEY-MENU , then tap Import all[spb_strings_import_all_txt] .GUID GUID-18318225-441A-4DE5-8329-F7ED19BC1B61Title To import contacts from a SIM cardChanges N update and aboveVersion 20Author AdelKStatus ReleasedTo import contacts from a memory card1From your Home screen [preference_title_home_wallpaper] , tap ID: ICN-SONY-HOME-APPTRAY-NORMAL , then tap ID: ICN-SONY-APP-PHONEBOOK .2Press ID: ICN-SONY-KEY-MENU , then tap Import/export [menu_import_export] > Import from SDcard or internal storage (.vcf file) [import_from_vcf_file<product="default">] .3Select where to store your contacts.4Tap SD card [spb_strings_gen_sd_card_txt] .5Select the files that you want to import by tapping them.GUID GUID-CAFBA77B-691C-4AF1-9F60-B24534C33AA2Title To import contacts from a memory cardChanges N updateVersion 15Author AdelKStatus ReleasedTo import contacts using Bluetooth® technology1Make sure you have the Bluetooth® function turned on and that your device isset to visible.2When you are notified of an incoming file to your device, drag the status bardownwards and tap the notification to accept the file transfer.3Tap Accept [incoming_file_confirm_ok] to start the file transfer.4Drag the status bar downwards. When the transfer is complete, tap thenotification.5Tap the received file and select where to store your contacts.GUID GUID-DD9847E7-8319-4C3A-B863-A7BD525A52B7Title To import contacts using Bluetooth technology122This is an internet version of this publication. © Print only for private use.](https://usermanual.wiki/Sony/10720X.Manual/User-Guide-3336261-Page-122.png)
![Changes For nxtstp UGVersion 1Author zzWangHermanStatus ReleasedBacking up contactsYou can use internal storage, a memory card or a SIM card to back up contacts.GUID GUID-26F5D5F6-B693-490B-8EBE-3ED78954583BTitle Backing up contactsChanges removing cross-reference due to restructuringVersion 10Author AdelKStatus DraftTo export all contacts to internal storage1From your Home screen [preference_title_home_wallpaper] , tap ID: ICN-SONY-HOME-APPTRAY-NORMAL , then tap ID: ICN-SONY-APP-PHONEBOOK .2Press ID: ICN-SONY-KEY-MENU , then tap Import/export [menu_import_export] > Export to SDcard or internal storage (.vcf file) [export_to_vcf_file<product="default">] .3Tap ID: ICN-SONY-KEY-MENU > Show internal storage [menu_advanced_show] .4Tap ID: ICN-SONY-APP-CALENDAR-L , then tap your device’s model number beside ID:ICN-SONY-INTERNAL-STORAGE .5Select a destination folder or simply tap SAVE [menu_save] .GUID GUID-7090768B-BB34-4CD7-B384-04187A55BFD3Title To export all contacts to internal storageChangesVersion 1Author AdelKStatus ReleasedTo export all contacts to a memory card1From your Home screen [preference_title_home_wallpaper] , tap ID: ICN-SONY-HOME-APPTRAY-NORMAL , then tap ID: ICN-SONY-APP-PHONEBOOK .2Press ID: ICN-SONY-KEY-MENU , then tap Import/export [menu_import_export] > Export to SDcard or internal storage (.vcf file) [export_to_vcf_file<product="default">] .3Tap ID: ICN-SONY-APP-CALENDAR-L > SD card [spb_strings_gen_sd_card_txt] .4Tap SAVE [menu_save] .GUID GUID-A7D7643A-284D-4901-B031-AE32503C69F7Title To export all contacts to the memory cardChanges N update and aboveVersion 15Author AdelKStatus ReleasedTo export contacts to a SIM cardWhen you export contacts to a SIM card, not all information may get exported. This is due tomemory limitations on SIM cards.1From your Home screen [preference_title_home_wallpaper] , tap ID: ICN-SONY-HOME-APPTRAY-NORMAL , then tap ID: ICN-SONY-APP-PHONEBOOK .2Tap ID: ICN-SONY-KEY-MENU > Import/export [menu_import_export] .3Tap Export to SIM card [scc_strings_export_to_sim_txt] .4Tap OK [label_ok] .GUID GUID-A6A460E6-AB1C-4F0D-80C4-675CA7DC8CD9Title To export contacts to the SIM cardChanges N updateVersion 12Author AdelKStatus ReleasedAdding medical and emergency contact informationYou can add and edit emergency information in the Contacts application. You canenter medical details, such as allergies and medications that you are using, plus123This is an internet version of this publication. © Print only for private use.](https://usermanual.wiki/Sony/10720X.Manual/User-Guide-3336261-Page-123.png)
![information about relatives and friends who can be contacted in case of emergency.After setup, your emergency information can be accessed from the security lockscreen. This means that even if the screen is locked, for example, by a PIN, pattern orpassword, emergency personnel can still retrieve your emergency information.GUID GUID-2D8DBFFA-9161-488F-A2C4-7A6D2469CA87Title Adding medical and emergency contact informationChanges N updateVersion 2Author AdelKStatus ReleasedID: SCR-SONY-ICE-OVERVIEW1 Go back to the main Contacts screen2 View more options3 Medical and personal information and emergency contacts tab4 Medical and personal informationGUID GUID-0E7DBC0B-3403-48CE-BAFB-6A6023A07B96Title ICE overviewChanges N updateVersion 4Author AdelKStatus ReleasedTo enter your medical information1From your Home screen [preference_title_home_wallpaper] , tap ID: ICN-SONY-HOME-APPTRAY-NORMAL , then tap ID: ICN-SONY-APP-PHONEBOOK .2Tap ID: ICN-SONY-EMERGENCY-INFORMATION .3Edit the desired information.GUID GUID-5BDA2AF8-F090-444E-BCCB-001E2DC72A8DTitle To enter your medical informationChanges N updateVersion 4Author AdelKStatus ReleasedTo add a new emergency contact1From your Home screen [preference_title_home_wallpaper] , tap ID: ICN-SONY-HOME-APPTRAY-NORMAL , then tap ID: ICN-SONY-APP-PHONEBOOK .2Tap ID: ICN-SONY-EMERGENCY-INFORMATION , then tap CONTACTS [contacts_tab_label] > Addcontact [add_emergency_contact] .3Tap the contact that you want to use as an emergency contact.The emergency contact must have at least a phone number which emergency personnel cancall. If your device is locked by a security screen lock, emergency personnel can only see thephone number of the emergency contact, even if there is other information entered in theContacts application.GUID GUID-E1112ABC-5BE1-4480-B29E-217BF7F35A4ETitle To add a new ICE contactChanges for N update and aboveVersion 6Author AdelK124This is an internet version of this publication. © Print only for private use.](https://usermanual.wiki/Sony/10720X.Manual/User-Guide-3336261-Page-124.png)
![Status ReleasedFavouritesContacts that you mark as favourites appear under the favourites tab in the Contactsapplication along with your most frequently called contacts or "top contacts". Thisway you get quicker access to these contacts.GUID GUID-731CD283-B219-4557-A6C9-D42EE59AEEFFTitle Favourites and groupsChanges N updateVersion 5Author AdelKStatus ReleasedTo mark or unmark a contact as a favourite1From the Home screen [preference_title_home_wallpaper] , tap ID: ICN-SONY-HOME-APPTRAY-NORMAL ,then tap ID: ICN-SONY-APP-PHONEBOOK .2Tap the contact you want to add to or remove from your favourites.3Tap ID: ICN-SONY-INFINITEVIEW-FAVORITE-BTN .GUID GUID-E489EC2C-B886-4AF4-9A8E-49F9279D3DCETitle To mark or unmark a contact as a favouriteChanges label fix due to resource file updateVersion 7Author AdelKStatus ReleasedTo view your favourite contacts1From your Home screen [preference_title_home_wallpaper] , tap ID: ICN-SONY-HOME-APPTRAY-NORMAL , then tap ID: ICN-SONY-APP-PHONEBOOK .2Tap FAVOURITES [favorites_tab_label] .GUID GUID-C33D067B-1E80-4FA2-83FD-5F70E4CFC561Title To view your favourite contactsChanges for N update and aboveVersion 8Author AdelKStatus ReleasedSending contact informationGUID GUID-0A30E687-263E-4A63-A5F9-7D7583BBF0FETitle Sending contact informationChanges Created from Togari and valid for all projects onwards Title changed only based on conceptteam's requestVersion 2Author zzWangHermanStatus ReleasedTo send your business card1From your Home screen [preference_title_home_wallpaper] , tap ID: ICN-SONY-HOME-APPTRAY-NORMAL , then tap ID: ICN-SONY-APP-PHONEBOOK .2Tap ME [me_capitalized] .3Tap ID: ICN-SONY-KEY-MENU , then tap Share [menu_share] .4Select an available transfer method and follow the on-screen instructions.GUID GUID-CB7E8C2B-D712-4088-A4AE-42D483C91B78Title To send your business cardChanges N update and aboveVersion 10Author AdelKStatus ReleasedTo send a contact1From your Home screen [preference_title_home_wallpaper] , tap ID: ICN-SONY-HOME-APPTRAY-NORMAL , then tap ID: ICN-SONY-APP-PHONEBOOK .2Tap the contact whose details you want to send.3Tap ID: ICN-SONY-KEY-MENU , then tap Share [menu_share] .4Select an available transfer method and follow the on-screen instructions.125This is an internet version of this publication. © Print only for private use.](https://usermanual.wiki/Sony/10720X.Manual/User-Guide-3336261-Page-125.png)
![GUID GUID-B0257474-7B98-40F3-877B-13576B9911C7Title To send a contactChanges label fix due to resource file updateVersion 6Author AdelKStatus ReleasedTo send several contacts at once1From your Home screen [preference_title_home_wallpaper] , tap ID: ICN-SONY-HOME-APPTRAY-NORMAL , then tap ID: ICN-SONY-APP-PHONEBOOK .2Touch and hold a contact then mark or unmark the checkboxes beside thecontacts that you want to share.3Tap ID: ICN-SONY-KEY-MENU , then tap Share [menu_share] .4Select an available transfer method and follow the on-screen instructions.GUID GUID-28D36493-2518-4620-B2E6-C045B077CF22Title To select contacts to sendChanges N updateVersion 7Author AdelKStatus ReleasedTo send all contacts1From your Home screen [preference_title_home_wallpaper] , tap ID: ICN-SONY-HOME-APPTRAY-NORMAL , then tap ID: ICN-SONY-APP-PHONEBOOK .2Press ID: ICN-SONY-KEY-MENU , then tap Import/export [menu_import_export] > Share allcontacts [share_contacts] to start exporting all your contacts.3Drag the status bar downwards. When the export is complete, tap thenotification.4Select an available transfer method and follow the on-screen instructions.GUID GUID-6AE5FE79-D599-41C9-BBDF-9639D8FFC186Title To send all contactsChanges N update and aboveVersion 2Author AdelKStatus ReleasedAvoiding duplicate entries in the Contacts applicationIf you synchronise your contacts with a new account or import contact information inother ways, you could end up with duplicate entries in the Contacts application. If thishappens, you can link such duplicates to create a single entry. If you link entries bymistake, you can unlink them again later.GUID GUID-FBC8BADE-40C7-48D2-ADF4-8C47C01F47DFTitle Join contact informationChanges N update, join/seperate changed to link/unlinkVersion 4Author AdelKStatus ReleasedTo link contacts1From your Home screen [preference_title_home_wallpaper] , tap ID: ICN-SONY-HOME-APPTRAY-NORMAL , then tap ID: ICN-SONY-APP-PHONEBOOK .2Tap and hold the contact that you want to link with another contact.3Tick the checkbox beside the contact that you want to link.4Tap ID: ICN-SONY-KEY-MENU , then tap Link [batch_link_confirmation_positive_button] . The informationfrom the first contact is merged with the second contact, and the linkedcontacts are displayed as one contact in the Contacts list.5Tap LINK [link_capitalized] to confirm.GUID GUID-01136C21-4A7D-4E9B-93AA-1E74783486F3Title To link contactsChanges N update and aboveVersion 13Author AdelK126This is an internet version of this publication. © Print only for private use.](https://usermanual.wiki/Sony/10720X.Manual/User-Guide-3336261-Page-126.png)
![Status ReleasedTo separate linked contacts1From your Home screen [preference_title_home_wallpaper] , tap ID: ICN-SONY-HOME-APPTRAY-NORMAL , then tap ID: ICN-SONY-APP-PHONEBOOK .2Tap the linked contact that you want to edit, then tap ID: ICN-SONY-EDIT-CONTACT .3Tap ID: ICN-SONY-KEY-MENU , then tap Unlink [splitConfirmation_positive_button] .4Tap UNLINK [unlink_capitalized] to confirm.GUID GUID-740EA2F6-AFDC-4B00-93A9-4800C7DB325FTitle To separate linked contactsChanges N update and aboveVersion 14Author AdelKStatus Released127This is an internet version of this publication. © Print only for private use.](https://usermanual.wiki/Sony/10720X.Manual/User-Guide-3336261-Page-127.png)
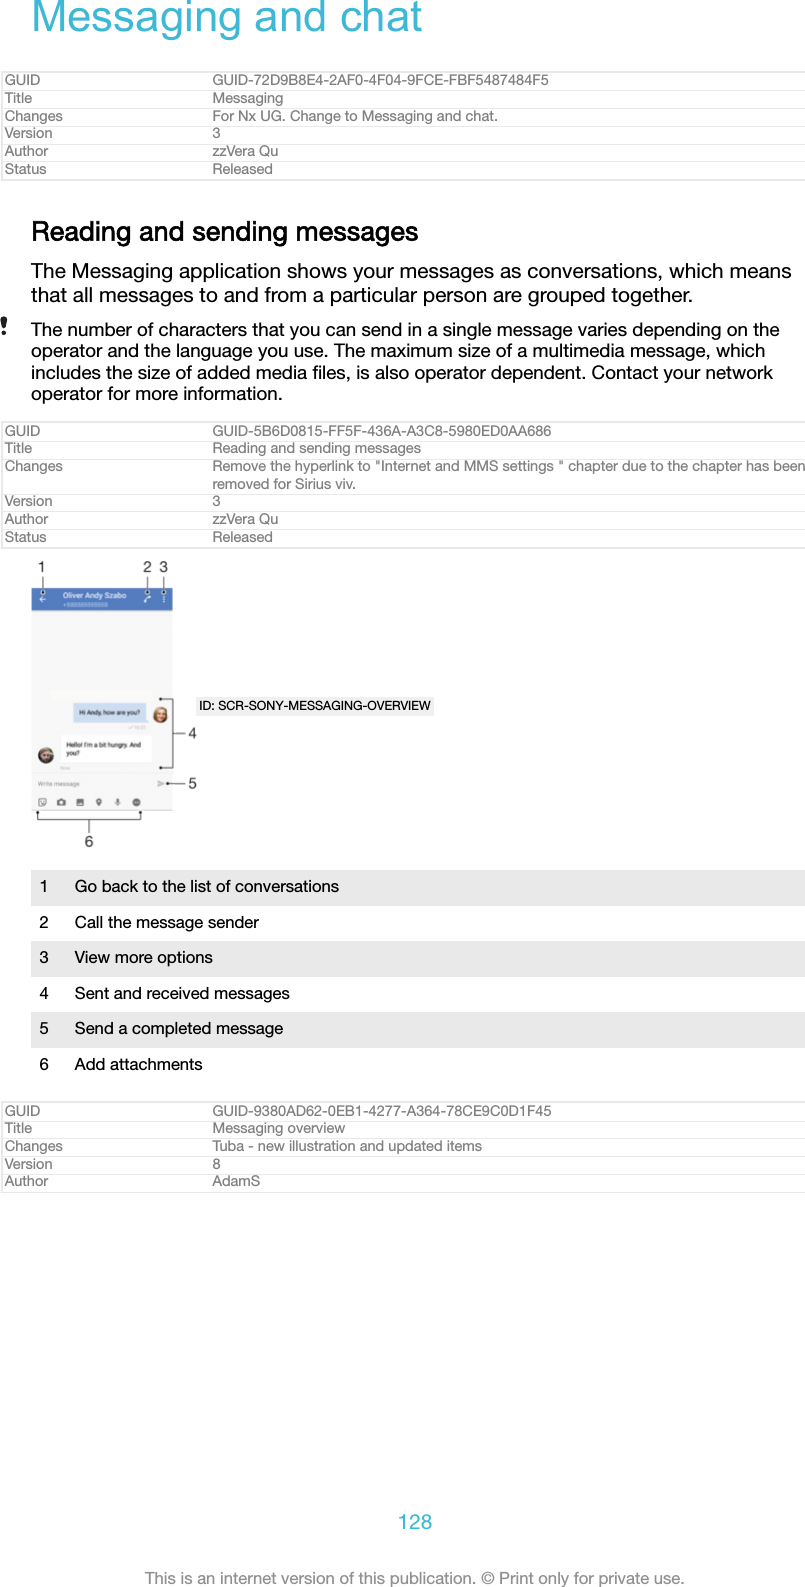
![Status ReleasedTo create and send a message1From your Home screen [preference_title_home_wallpaper] , tap ID: ICN-SONY-HOME-APPTRAY-NORMAL , then find and tap ID: ICN-SONY-APP-MESSAGING .2Tap ID: ICN-SONY-CONV-NEW-MESSAGE .3Enter the recipient’s name or phone number, then select from the suggestionsthat appear. If the recipient is not listed as a contact, enter the recipient'snumber manually.4If you want to send a group message, repeat the procedure described above toadd more recipients.5Tap Write message [conversations_strings_text_input_hint_txt] and enter your message text.6If you want to add an attachment, select the relevant attachment option.7To send the message, tap ID: ICN-SONY-MENU-SEND-HOLO-LIGHT .If you exit a message before sending, it gets saved as a draft. The conversation gets taggedwith the word Draft [conversations_strings_conversationlist_conversation_title_draft_txt] .GUID GUID-A6C2B682-0F30-475D-9682-33A737581FE9Title To create and send a messageChanges Hinoki - step 3 updatedVersion 18.1.2.3.4Author AdamSStatus DraftTo read a received message1From your Home screen [preference_title_home_wallpaper] , tap ID: ICN-SONY-HOME-APPTRAY-NORMAL , then find and tap ID: ICN-SONY-APP-MESSAGING .2Tap the desired conversation.3If the message is not yet downloaded, tap it.All received messages are saved by default to the device memory.GUID GUID-5343B3D0-3140-41FE-BF7A-424395B15F40Title To read a received messageChanges Kugo - label correctionVersion 10Author AdamSStatus ReleasedTo reply to a message1From your Home screen [preference_title_home_wallpaper] , tap ID: ICN-SONY-HOME-APPTRAY-NORMAL , then find and tap ID: ICN-SONY-APP-MESSAGING .2Tap the conversation containing the message.3Enter your reply and tap ID: ICN-SONY-MENU-SEND-HOLO-LIGHT .GUID GUID-B3F3CD74-24A7-4F3C-A344-9A3DA916D207Title To reply to a messageChanges Kugo - label correctionVersion 4.2.1.1.1Author AdamSStatus ReleasedTo forward a message1From your Home screen [preference_title_home_wallpaper] , tap ID: ICN-SONY-HOME-APPTRAY-NORMAL , then find and tap ID: ICN-SONY-APP-MESSAGING .2Tap the conversation containing the message that you want to forward.3Touch and hold the message that you want to forward, then tap Forwardmessage [conversations_strings_action_message_forward_txt] .4Enter the recipient’s name or phone number, then select from the suggestionsthat appear. If the recipient is not listed as a contact, enter the recipient'snumber manually.5Edit the message, if necessary, then tap ID: ICN-SONY-MENU-SEND-HOLO-LIGHT .GUID GUID-05F0456B-06EA-4A96-B35E-B114ADFDD14CTitle To forward a messageChanges Hinoki - step 4 updated, new label addedVersion 9.1.1.1.2129This is an internet version of this publication. © Print only for private use.](https://usermanual.wiki/Sony/10720X.Manual/User-Guide-3336261-Page-129.png)
![Author AdamSStatus DraftTo save a file contained in a received message1From your Home screen [preference_title_home_wallpaper] , tap ID: ICN-SONY-HOME-APPTRAY-NORMAL , then find and tap ID: ICN-SONY-APP-MESSAGING .2If the message has not been downloaded yet, tap it.3Touch and hold the file that you want to save, then select the desired option.GUID GUID-5F89D8FF-F03C-4F3C-9A7A-48170CF67FA1Title To save a file contained in received messageChanges Kugo - label correctionVersion 7Author AdamSStatus ReleasedOrganising your messagesGUID GUID-85E60A45-D4AA-47FD-BF9F-0DCAC9C07C87Title Organising your messagesChangesVersion 1Author zzVera QuStatus ReleasedTo delete a message1From your Home screen [preference_title_home_wallpaper] , tap ID: ICN-SONY-HOME-APPTRAY-NORMAL , then find and tap ID: ICN-SONY-APP-MESSAGING .2Tap the conversation containing the message that you want to delete.3Touch and hold the message that you want to delete, then tap Delete message[conversations_strings_action_message_delete_txt] > DELETE [delete_profile] .GUID GUID-18644181-BE89-4B64-A303-91754CC902E4Title To delete a messageChanges N-update - Kitakami - label correction in step 3. Delete - DELETEVersion 8.2.2Author AdamSStatus ReleasedTo delete conversations1From your Home screen [preference_title_home_wallpaper] , tap ID: ICN-SONY-HOME-APPTRAY-NORMAL , then find and tap ID: ICN-SONY-APP-MESSAGING .2Tap ID: ICN-SONY-KEY-MENU , then tap Delete conversations [conversations_strings_conversation-list_menu_deleteconversations_txt] .3Mark the checkboxes for the conversations that you want to delete, then tap ID: ICN-SONY-MENU-DELETE > DELETE [delete_profile] .GUID GUID-C3195918-C699-4A90-BEEE-730CA2F20750Title To delete conversationsChanges Hinoki - label corrected in step 1Version 13.2.1.2.1Author AdamSStatus DraftTo star a message1From your Home screen [preference_title_home_wallpaper] , tap ID: ICN-SONY-HOME-APPTRAY-NORMAL , then find and tap ID: ICN-SONY-APP-MESSAGING .2Tap the conversation that you want to open.3Touch and hold the message that you want to star, then tap Add star [conversa-tions_strings_action_message_star_txt] .4To unstar a message, touch and hold the starred message, then tap Delete star[conversations_strings_action_message_unstar_txt] .GUID GUID-4FC74355-8CC4-455B-ABFA-23DBA7F58E36Title To star a messageChanges Kugo - label correctionVersion 3Author AdamS130This is an internet version of this publication. © Print only for private use.](https://usermanual.wiki/Sony/10720X.Manual/User-Guide-3336261-Page-130.png)
![Status ReleasedTo view starred messages1From your Home screen [preference_title_home_wallpaper] , tap ID: ICN-SONY-HOME-APPTRAY-NORMAL , then find and tap ID: ICN-SONY-APP-MESSAGING .2Tap ID: ICN-SONY-KEY-MENU , then tap Starred messages [conversations_strings_conversation-list_menu_starredmessage_txt] .3All starred messages appear in a list.GUID GUID-950B1757-1EF2-4C8B-B38F-824EFFB7087DTitle To view starred messagesChanges Kugo - label correctionVersion 3Author AdamSStatus ReleasedTo search for messages1From your Home screen [preference_title_home_wallpaper] , tap ID: ICN-SONY-HOME-APPTRAY-NORMAL , then find and tap ID: ICN-SONY-APP-MESSAGING .2Tap ID: ICN-SONY-MENU-SEARCH .3Enter your search keywords. The search results appear in a list.GUID GUID-E70395B9-7B95-4170-B892-B843B89205C7Title To search for messagesChanges Kugo - label correctionVersion 7Author AdamSStatus ReleasedCalling from MessagingGUID GUID-D63B66D0-8BB6-4E38-B203-772A2BD271A2Title Calling from MessagingChanges Kagura - edcomment, title change: 'Calling from Messaging'Version 2Author AdamSStatus ReleasedTo call a message sender1From your Home screen [preference_title_home_wallpaper] , tap ID: ICN-SONY-HOME-APPTRAY-NORMAL , then find and tap ID: ICN-SONY-APP-MESSAGING .2Tap a conversation and tap ID: ICN-SONY-BTN-DETAIL-CALL-MESSAGE .GUID GUID-FE0F8257-CF1E-4EFA-90FA-2362196AE2C4Title To call a message senderChanges N-update - icon fix for Suzu DSVersion 8.1.1.2.3Author AdamSStatus ReleasedTo save a sender's number as a contact1From your Home screen [preference_title_home_wallpaper] , tap ID: ICN-SONY-HOME-APPTRAY-NORMAL , then find and tap ID: ICN-SONY-APP-MESSAGING .2Tap the icon next to the phone number, then tap SAVE [menu_save] .3Select an existing contact, or tap Create new contact [pickerNewContactHeader] .4Edit the contact information and tap SAVE [menu_save] .GUID GUID-8B8C17D2-FBFF-4456-A6F5-63C9BC278F25Title To save a sender's number as a contactChanges N-update - Kitakami - label corrected in step 2 and 4.Version 5Author AdamSStatus ReleasedMessaging settingsGUID GUID-E19C38B7-B58C-4BB9-B61B-1D1CB8B762A1Title Messaging settingsChangesVersion 1Author zzVera Qu131This is an internet version of this publication. © Print only for private use.](https://usermanual.wiki/Sony/10720X.Manual/User-Guide-3336261-Page-131.png)
![Status ReleasedTo change your message notification settings1From your Home screen [preference_title_home_wallpaper] , tap ID: ICN-SONY-HOME-APPTRAY-NORMAL , then find and tap ID: ICN-SONY-APP-MESSAGING .2Tap ID: ICN-SONY-KEY-MENU , then tap Settings [conversations_strings_conversationlist_menu_settings_txt] .3To set a notification sound, tap Notification sound [conversations_strings_settings_notification_ring-tone_txt] , then select an option or tap ID: ICN-SONY-BROWSER-ADD and select a music filethat is saved on your device.4To confirm, tap DONE [checklist_button_done] .5To adjust additional notification settings, tap the sliders.GUID GUID-F5A156A0-322D-4AD0-AF78-BA71783F50AETitle To change your message notification settingsChanges Keyaki - label corrected in step 4.Version 10.2.3Author AdamSStatus ReleasedTo enable or disable delivery reports for outgoing messages1From your Home screen [preference_title_home_wallpaper] , tap ID: ICN-SONY-HOME-APPTRAY-NORMAL , then find and tap ID: ICN-SONY-APP-MESSAGING .2Tap ID: ICN-SONY-KEY-MENU , then tap Settings [conversations_strings_conversationlist_menu_settings_txt] .3Tap the Delivery report [conversations_strings_settings_delivery_report_txt] slider to enable ordisable the function.After delivery reports are turned on, a check mark is displayed for messages that have beensuccessfully delivered.GUID GUID-2EAC8C35-A3F3-49C0-9A88-B52E29082E5FTitle To change the delivery report settings for outgoing messagesChanges Hinoki - note correctedVersion 9.1.1.1.1Author AdamSStatus DraftVideo chatYou can use the Google Duo™ video chat application on your device to chat withfriends who also use the application on Android™ and iOS devices.Go to https://support.google.com/duo/ to get more detailed information about how touse this application.The video call function only works on devices with a front camera.GUID GUID-B81E6A58-E436-4F16-9248-6AD837724FD9Title Instant messaging and video chatChanges Keyaki - Title and description updated. Hangouts renamed to DuoVersion 6Author AdamSStatus ReleasedTo use the Duo™ application1From your Home screen [preference_title_home_wallpaper] , tap ID: ICN-SONY-HOME-APPTRAY-NORMAL .2Find and tap Duo [google_duo] .GUID GUID-6FE3F1BB-BE3B-48CC-ACA0-3B52906AD58FTitle To start the Duo applicationChanges Keyaki - title and step 2 updated, Hangouts renamed to DuoVersion 4Author AdamSStatus Released132This is an internet version of this publication. © Print only for private use.](https://usermanual.wiki/Sony/10720X.Manual/User-Guide-3336261-Page-132.png)
![EmailGUID GUID-F40849F4-44EB-4AFE-BFB7-387364E8AE14Title EmailChangesVersion 1Author JorgenLStatus ReleasedSetting up emailUse the email application on your device to send and receive email messagesthrough your email accounts. You can have one or several email accounts at thesame time, including corporate Microsoft Exchange ActiveSync accounts.GUID GUID-143868C5-B591-49B4-AD71-446E3FA9C1CETitle Setting up emailChanges Valid for all projects - 'in your device' corrected to 'on your device'Version 2Author AdamSStatus ReleasedTo set up an email account1From your Home screen [preference_title_home_wallpaper] , tap ID: ICN-SONY-HOME-APPTRAY-NORMAL .2Find and tap Email [email] .3Follow the instructions that appear on the screen to complete the setup.For some email services, you may need to contact your email service provider for informationon detailed settings for the email account.GUID GUID-6D8E1793-757A-4533-9EEE-EB05ED33EEFATitle To set up an email account on your deviceChanges Kugo - label correctionVersion 19Author AdamSStatus ReleasedTo add an extra email account1From your Home screen [preference_title_home_wallpaper] , tap ID: ICN-SONY-HOME-APPTRAY-NORMAL .2Find and tap Email [email] .3Tap ID: ICN-SONY-APP-CALENDAR-L , then tap Settings [settings_action] > Add account [add_ac-count_action] .4Follow the on-screen instructions. If the settings for the email account cannotbe downloaded automatically, complete the setup manually.5When you are finished, tap NEXT [button_next] .GUID GUID-74CB7D9A-D8E7-415A-B56A-6FF254D6705ATitle To add an extra email account on your deviceChanges Keyaki - icon change in step 3.Version 15.1.3Author AdamS133This is an internet version of this publication. © Print only for private use.](https://usermanual.wiki/Sony/10720X.Manual/User-Guide-3336261-Page-133.png)
![Status ReleasedSending and receiving email messagesID: SCR-SONY-EMAIL-INBOX-OVERVIEW1 Access settings, view a list of all email accounts and folders2 Search for email messages3 Access other options4 List of email messages5 Write an email messageGUID GUID-40725FF2-04C4-4045-82E9-F3F025010607Title Sending and receiving email messagesChanges Keyaki - FR comment implemented, updated step 1 and 3Version 8.1.2.1.1Author AdamSStatus ReleasedTo download new email messages•When the email inbox is open, swipe downwards on the message list.Before trying to download new email messages, make sure that you have a working dataconnection. For more information about ensuring successful data connections, see Internetand MMS settings on page 71.GUID GUID-02C2D920-6923-4830-96DE-028806F248A8Title To receive email messagesChanges for Jasmine; implement the WITH changes; add a note onlyVersion 15Author zzGan LuStatus ReleasedTo read your email messages1From your Home screen [preference_title_home_wallpaper] , tap ID: ICN-SONY-HOME-APPTRAY-NORMAL .2Find and tap Email [email] .3If you are using several email accounts, tap ID: ICN-SONY-APP-CALENDAR-L , then tapID: ICN-SONY-EMAIL-SORT and select the account that you want to check. If youwant to check all your email accounts at once, tap ID: ICN-SONY-APP-CALENDAR-L ,then tap ID: ICN-SONY-EMAIL-SORT and select Combined inbox [account_folder_list_summary_in-box] .4In the email inbox, scroll up or down and tap the email message that you wantto read.GUID GUID-FD9F4939-113D-4787-883B-F276208977B9Title To read your email messagesChanges Keyaki - new icon in step 3.Version 11Author AdamS134This is an internet version of this publication. © Print only for private use.](https://usermanual.wiki/Sony/10720X.Manual/User-Guide-3336261-Page-134.png)
![Status ReleasedTo create and send an email message1From your Home screen [preference_title_home_wallpaper] , tap ID: ICN-SONY-HOME-APPTRAY-NORMAL , then find and tap Email [email] .2If you are using several email accounts, tap ID: ICN-SONY-APP-CALENDAR-L , then tapID: ICN-SONY-EMAIL-SORT and select the account from which you want to send theemail.3Tap ID: ICN-SONY-CONV-NEW-MESSAGE , then type the recipient's name or email addressand select one or more recipients from the drop-down list.4Enter the email subject and message text, then tap ID: ICN-SONY-MENU-SEND-HOLO-LIGHT .GUID GUID-F0395077-1D6B-4C89-99DB-78251B848973Title To create and send an email messageChanges Keyaki - new icon in step 2.Version 21Author AdamSStatus ReleasedTo reply to an email message1In your email inbox, find and tap the message that you want to reply to, thentap REPLY [reply_caps] or REPLY ALL [reply_all_caps] .2Enter your reply, then tap ID: ICN-SONY-MENU-SEND-HOLO-LIGHT .GUID GUID-004FD0FF-8AF0-4E74-855D-533F78929BB1Title To reply to an email messageChanges Keyaki - labels corrected in step 1.Version 14Author AdamSStatus ReleasedTo forward an email message1In your email inbox, find and tap the message that you want to forward, thentap FORWARD [forward_caps] .2Enter the recipient's name or email address, then select one or more recipientsfrom the drop-down list.3Enter your message text, then tap ID: ICN-SONY-MENU-SEND-HOLO-LIGHT .GUID GUID-887997C5-464E-4EC1-8783-06B4402A4008Title To forward an email messageChanges Kayaki - label corrected in step 1.Version 17Author AdamSStatus ReleasedTo save or view an email message attachment1Find and tap the email message containing the attachment that you want toview. Email messages with attachments are indicated by ID: ICN-SONY-MENU-ATTACHMENT .2After the email message opens, find the attachment in the email body, then tapSAVE [menu_save] or VIEW [email_view_attachment] next to it.GUID GUID-6F871E93-8365-4B52-A027-F547C8999D86Title To save or view email message attachmentsChanges N-update - Kitakami - labels corrected, save and view capitalizedVersion 13.1.4Author AdamSStatus ReleasedTo save a sender's email address to your contacts1Find and tap a message in your email inbox.2Tap the name of the sender, tap Add to Contacts [recentCalls_addToContact] then tap OK[ok] .3Select an existing contact, or tap Create new contact [pickerNewContactHeader] .4Edit the contact information if desired, then tap SAVE [menu_save] .GUID GUID-2E75631A-CAE2-4121-AF6C-6EE69F5AF6B0Title To save a sender's email address to your contactsChanges N-update - Kitakami - Label fixed in step 4.135This is an internet version of this publication. © Print only for private use.](https://usermanual.wiki/Sony/10720X.Manual/User-Guide-3336261-Page-135.png)
![Version 16Author AdamSStatus ReleasedOrganising your email messagesGUID GUID-A71E36B1-823F-4E09-B9A5-62D85E5D1EF5Title Organizing your email messagesChanges Valid from Honami.Version 1Author zzXiaxin LiStatus ReleasedTo sort your emails1From your Home screen [preference_title_home_wallpaper] , tap ID: ICN-SONY-HOME-APPTRAY-NORMAL .2Find and tap Email [email] .3If you are using several email accounts, tap ID: ICN-SONY-APP-CALENDAR-L , then tapID: ICN-SONY-EMAIL-SORT and select the account with the inbox that you want tosort. If you want to sort email in all your email accounts at once, tap ID: ICN-SONY-APP-CALENDAR-L , then tap ID: ICN-SONY-EMAIL-SORT and select Combined inbox [ac-count_folder_list_summary_inbox] .4Tap ID: ICN-SONY-KEY-MENU , then tap Sort [eas_sort_action] .5Select a sorting option.GUID GUID-FE4A2629-0ACA-463C-8C5D-3FEC06F2F9FBTitle To sort your emailsChanges Keyaki - new icon in step 3.Version 4.1.3Author AdamSStatus ReleasedTo search for emails1From your Home screen [preference_title_home_wallpaper] , tap ID: ICN-SONY-HOME-APPTRAY-NORMAL , then find and tap Email [email] .2If you are using several email accounts, tap ID: ICN-SONY-APP-CALENDAR-L , then tapID: ICN-SONY-EMAIL-SORT and select the account that you want to search. If youwant to search all your email accounts at once, tap ID: ICN-SONY-APP-CALENDAR-L ,then tap ID: ICN-SONY-EMAIL-SORT and select Combined inbox [account_folder_list_summary_in-box] .3Tap ID: ICN-SONY-MENU-SEARCH .4Enter your search text.5The search results appear in a list sorted by date. Tap the email message thatyou want to open.GUID GUID-7093B327-6BEA-47B7-BE70-236E8121C3BDTitle To search for emailsChanges Keyaki - new icon in step 2.Version 11Author AdamSStatus ReleasedTo view all folders for one email account1From your Home screen [preference_title_home_wallpaper] , tap ID: ICN-SONY-HOME-APPTRAY-NORMAL , then find and tap Email [email] .2Tap ID: ICN-SONY-APP-CALENDAR-L , then tap ID: ICN-SONY-EMAIL-SORT and select theaccount that you want to check.3Under the account that you want to check, select Show all folders [mailbox_list_ac-count_selector_show_all_folders] .GUID GUID-2C45BDBB-3267-4D66-826E-073CEBD6F135Title To view all folders for one email accountChanges Keyaki - new icon in step 2.Version 8Author AdamS136This is an internet version of this publication. © Print only for private use.](https://usermanual.wiki/Sony/10720X.Manual/User-Guide-3336261-Page-136.png)
![Status ReleasedTo delete email messages1Tap and hold the message that you want to delete until the device vibrates.2Mark the checkboxes for the messages that you want to delete.3Tap ID: ICN-SONY-MENU-DELETEYou can also flick the message to the right to delete it.GUID GUID-730E5EA9-179D-443E-9A68-6608AA6E4712Title To delete email messagesChanges Kagura - title change, updated descriptionVersion 14Author AdamSStatus ReleasedTo move an email message to another folder1In your email inbox, swipe the message that you want to move to the left.2Tap Move [email_message_swipe_ui_move] , then select a folder.For the functionality described above to work, the Swipe to delete feature must be activated.It's normally activated by default. To make sure it's activated, tap ID: ICN-SONY-APP-CALENDAR-L >Settings [settings_action] , then check the checkbox next to Swipe to organise or delete [general_prefer-ence_swipe_to_organize_or_delete_label] .GUID GUID-156E9C4E-B045-4C32-8F5F-577640B4ABC3Title To move an email message to another folderChanges Icon change in the note for PineVersion 3Author RenataBStatus DraftEmail account settingsGUID GUID-AC324477-DEDA-4684-975B-A28244F93961Title Email account settingsChanges Valid from Honami.Version 1Author zzXiaxin LiStatus ReleasedTo remove an email account from your device1From your Home screen [preference_title_home_wallpaper] , tap ID: ICN-SONY-HOME-APPTRAY-NORMAL .2Find and tap Email [email] .3Tap ID: ICN-SONY-APP-CALENDAR-L , then tap Settings [settings_action] .4Select the account you want to remove.5Tap Delete account [remove_account_action] > OK [okay_action] .GUID GUID-869BE5E7-A9F0-491E-B98C-0C9F2A2E36D3Title To remove an email account from your deviceChanges N-update - Kitakami - new icon in step 3.Version 11.1.2Author AdamSStatus ReleasedTo change the inbox check frequency1From your Home screen [preference_title_home_wallpaper] , tap ID: ICN-SONY-HOME-APPTRAY-NORMAL .2Find and tap Email [email] .3Tap ID: ICN-SONY-APP-CALENDAR-L , then tap Settings [settings_action] .4Select the desired account.5Tap Check frequency [mailbox_settings_mailbox_check_frequency_label] > Check frequency [ac-count_setup_options_mail_check_frequency_label] and select an option.GUID GUID-B32A113B-DDD8-467D-AA6A-FB03C67FDF7BTitle To change the email check frequencyChanges N-update - Kitakami - new icon in step 3.Version 9.1.2Author AdamS137This is an internet version of this publication. © Print only for private use.](https://usermanual.wiki/Sony/10720X.Manual/User-Guide-3336261-Page-137.png)
![Status ReleasedTo set an Out of Office auto-reply in an Exchange ActiveSync account1From your Home screen [preference_title_home_wallpaper] , tap ID: ICN-SONY-HOME-APPTRAY-NORMAL , then find and tap Email [email] .2Tap ID: ICN-SONY-APP-CALENDAR-L , then tap Settings [settings_action] .3Select the EAS (Exchange ActiveSync) account for which you want to set anOut of Office auto-reply.4Tap Out of office [eas_email_strings_oof_out_of_office_txt] .5Tap the slider to enable the function.6If needed, mark the Set time range [eas_email_strings_oof_set_time_range_txt] checkbox andset the time range for the auto-reply.7Enter your Out of Office message in the body text field.8Tap OK [okay_action] to confirm.GUID GUID-E47F5E3E-2813-4D8E-9286-7466F0362C32Title To set an Out of Office auto-reply in an Exchange ActiveSync accountChanges N-update - Kitakami - new icon in step 2,Version 4.1.2Author AdamSStatus ReleasedGmail™If you have a Google™ account, you can use the Gmail™ application to read andwrite email messages.ID: SCR-SONY-GMAIL-INBOX-OVERVIEW1 View a list of all Gmail accounts and folders2 Search for email messages3 List of email messages4 Write an email messageGUID GUID-98B0E4D0-1186-4FAD-A042-D43F37E36F85Title Gmail(TM)Changes For Leo L update; chane the order of itemsVersion 6Author zzGan LuStatus ReleasedTo learn more about Gmail™•When the Gmail application is open, tap ID: ICN-SONY-APP-CALENDAR-L , then find andtap Help & feedback [gmail_help_and_feedback] .GUID GUID-CF6998FF-6093-446A-B74F-AC70F5ED671ATitle To learn more about Gmail(TM)Changes Kugo - label correctionVersion 3.1.2Author AdamSStatus Released138This is an internet version of this publication. © Print only for private use.](https://usermanual.wiki/Sony/10720X.Manual/User-Guide-3336261-Page-138.png)
![Music and FM radioGUID GUID-623A32D5-8827-4BC1-BB12-BED06D37C97BTitle Music and FM radioChanges merging Music and FM radioVersion 3Author AdelKStatus ReleasedTransferring music to your deviceThere are two ways to transfer music from a computer to your device:•You can transfer music files between your device and a computer using the providedUSB Type-C™ [USB Type-C-tm] cable. After connecting, select Transfer files [usb_use_file_transfers]on your device and then simply copy and paste or drag and drop the files using thecomputer. See Managing files using a computer on page 61.•You can use the Xperia™ Companion software to transfer your media files betweenthe computer and your device. Learn more and download Xperia™ Companion forWindows at http://support.sonymobile.com/tools/xperia-companion/ or Xperia™Companion for Mac at http://support.sonymobile.com/tools/xperia-companion-mac/.The Music application may not support all music file formats. For more information aboutsupported file formats and the use of multimedia (audio, image and video) files, download theWhite paper for your device at www.sonymobile.com/support/.GUID GUID-B3D6A559-577A-49F9-A2DD-413B05741F63Title Transferring music to your deviceChanges for devices with USB type-cVersion 23Author AdelKStatus ReleasedListening to musicUse the Music application to listen to your favourite music and audio books.ID: SCR-SONY-11NI-AA-MUSIC-PLAYER-OVERVIEW1 Minimise the full screen player2 Search all songs saved to your device3 View the current play queue4 View menu options5 Album art (if available)6 Add or remove a song as a favourite7 Elapsed time of current song8 Add a song to a playlist9 Progress indicator – drag the indicator or tap along the line to fast-forward or rewind10 Total time length of current song139This is an internet version of this publication. © Print only for private use.](https://usermanual.wiki/Sony/10720X.Manual/User-Guide-3336261-Page-139.png)
![11 Repeat all songs in the current play queue12 Tap to go to the next song in the play queue, touch and hold to fast-forward within the current song13 Play or pause a song14 Tap to go to the previous song in the play queue, touch and hold to rewind within the current song15 Shuffle songs in the current play queueGUID GUID-60343300-62FE-497C-AC6D-38BF1A5FAC89Title Listening to musicChanges N update phones - new callouts for N update illustrationVersion 21Author AdelKStatus ReleasedMusic home screenID: SCR-SONY-11NI-AA-MUSIC-HOMESCREEN1Tap ID: ICN-SONY-APP-CALENDAR-L in the top left corner to open the Music menu2 Scroll up or down to view content3 Play a song using the Music application4 Play all songs in shuffle mode5 Return to the music player screenGUID GUID-4533070C-96CA-4166-9F25-AAE3DE1B1128Title Music home screenChanges label fix due to resource file updateVersion 6Author AdelKStatus ReleasedTo play a song using the Music application1From your Home screen [preference_title_home_wallpaper] , tap ID: ICN-SONY-HOME-APPTRAY-NORMAL , then find and tap ID: ICN-SONY-APP-MUSIC-PLAYER .2Tap ID: ICN-SONY-APP-CALENDAR-L .3Select a music category.4Tap a song to play it.You might not be able to play copyright-protected items. Make sure that you have thenecessary rights for the content you wish to use.GUID GUID-00E786D8-33B6-4A64-91FD-800EEC4D7017Title To play a song using the Music applicationChanges ed comments update - rephrased noteVersion 16Author AdelK140This is an internet version of this publication. © Print only for private use.](https://usermanual.wiki/Sony/10720X.Manual/User-Guide-3336261-Page-140.png)
![Status ReleasedTo find song-related information online•While a song is playing in the Music application, tap the Album art and then tapMore about this [player_options_more_about_this] .Online resources related to the song can include videos on YouTube™, song lyrics, and artistinformation on Wikipedia.GUID GUID-AF400CD3-CFD6-4043-AC4D-6286E40A1A15Title To find song-related information onlineChanges updated it due to the ed review commentsVersion 8Author zzCynthiaHStatus ReleasedTo edit music information and download album art1From the Music application, tap the Album art and then tap Edit music info[mc_strings_edit_app_title] .2Edit the information as desired.3To set or download album art, tap ID: ICN-SONY-EDIT-CONTACT , then select an option.4When you are finished, tap SAVE [menu_save] .You can also set album art to download automatically in the Music menu, under Settings.GUID GUID-7DD3B0E4-53A6-4B5A-8B33-28C69E76FB4ETitle To edit music informationChanges added step about album art for for MR 2017Version 7Author AdelKStatus ReleasedTo adjust the audio volume•Press the volume key up or down.GUID GUID-4403F052-3019-49AC-9359-660176677C22Title To adjust the volume of a trackChanges edited according to functional review commentsVersion 9Author AdelKStatus ReleasedTo minimise the Music application•When a song is playing, tap ID: ICN-SONY-KEY-AND-HOME to go to the Home screen[preference_title_home_wallpaper] . The Music application keeps running in the background.GUID GUID-B8E944E8-3D03-4080-BBAD-83FC95105859Title To minimise the music playerChanges label fix due to resource file updateVersion 11Author AdelKStatus ReleasedTo open the Music application when it is playing in the background•While a song is playing in the background, drag the status bar downwards andtap the Music application.•Alternatively, from your Home screen [preference_title_home_wallpaper] , tap ID: ICN-SONY-HOME-APPTRAY-NORMAL , then find and tap ID: ICN-SONY-APP-MUSIC-PLAYER .GUID GUID-4A52061B-5BEA-4F74-84A3-60DD425EBBAETitle To return to the music player when used in the backgroundChanges label fix due to resource file updateVersion 17Author AdelKStatus ReleasedMusic menuThe Music menu gives you an overview of all the songs on your device. From hereyou can manage your albums and playlists.141This is an internet version of this publication. © Print only for private use.](https://usermanual.wiki/Sony/10720X.Manual/User-Guide-3336261-Page-141.png)
![ID: SCR-SONY-11NI-AA-MUSIC-PORTAL1 Return to the Music home screen2 View the current play queue3 Browse all playlists4 Browse all artists5 Browse all albums6 Browse all songs7 Browse all genres8 Browse all folders9 Open the settings menu for the Music application10 Open the support menu for the Music applicationGUID GUID-D9CE57C5-B9B0-451E-A430-1C9B527FF2DATitle Your music libraryChanges Hinoki - no home networkVersion 17Author AdelKStatus DraftTo open the Music menu1From your Home screen [preference_title_home_wallpaper] , tap ID: ICN-SONY-HOME-APPTRAY-NORMAL , then find and tap ID: ICN-SONY-APP-MUSIC-PLAYER .2Tap ID: ICN-SONY-APP-CALENDAR-L .GUID GUID-A22272B3-4642-4F2E-9B58-CDC380B6D11ETitle To open the Music menuChanges label fix due to resource file updateVersion 4Author zzCynthiaHStatus ReleasedTo return to the Music home screen•When the Music menu is open, tap Home [music_home] or simply tap on the screento the right of the menu.GUID GUID-2402F482-9434-4988-ABF7-C12A3DB65FAETitle To return to the Music home screenChanges ed comments update, valid for all projects onwardsVersion 3Author AdelKStatus ReleasedTo delete a song1From the Music menu, browse to the song that you want to delete.2Touch and hold the song title, then tap Delete from storage [music_menu_delete] in thelist that appears.3Tap DELETE [delete_profile] to confirm.You cannot delete a song that is currently playing.GUID GUID-22F57582-7488-484D-B95E-28258A48B894Title To delete a trackChanges N update and above142This is an internet version of this publication. © Print only for private use.](https://usermanual.wiki/Sony/10720X.Manual/User-Guide-3336261-Page-142.png)
![Version 14Author AdelKStatus ReleasedPlaylistsOn the Music home screen, you can create your own playlists from the music that issaved on your device.GUID GUID-22626158-D739-4968-953F-803D81E125B1Title PlaylistsChanges Name change only from Walkman to MusicVersion 17Author zzCynthiaHStatus ReleasedTo create your own playlists1From the Music home screen, touch and hold the name of the album or songthat you want to add to a playlist.2In the menu that opens, tap Add to playlist [music_add_to_playlist_dialog_title] > Create newplaylist [music_playlist_new_playlist_txt] .3Enter a name for the playlist and tap OK [gui_ok_txt] .You can also open the Music home screen menu, tap Playlists [tile_playlists] , then tap ID: ICN-SONY-BROWSER-ADD to create a new playlist.GUID GUID-C3B20171-8719-4A88-B615-8CCE50EF62FBTitle To create your own playlistsChanges TID comments update for Dora - valid for all projects onwardsVersion 16Author AdelKStatus ReleasedTo play your own playlists1Open the Music menu, then tap Playlists [tile_playlists] .2Under Playlists [tile_playlists] , select the playlist that you want to open.3If you want to play all songs, tap any song or Shuffle all [music_shuffle_all_txt] .GUID GUID-DB3FBE14-71FD-4B1F-ABC1-B79E84860C1CTitle To play your own playlistsChanges Music home screen menu changed to Music menu - ed comments updateVersion 15Author AdelKStatus ReleasedTo add songs to a playlist1From the Music home screen, browse to the song or album that you want toadd to a playlist.2Touch and hold the song or the album title, then tap Add to playlist [music_add_to_play-list_dialog_title] .3Tap the name of the playlist to which you want to add the album or song. Thealbum or song is now added to the playlist.GUID GUID-39684E97-C6CE-4845-A001-9CED3D261997Title To add tracks to a playlistChanges Updated it due to the ed review commentsVersion 13Author zzCynthiaHStatus ReleasedTo remove a song from a playlist1In a playlist, touch and hold the title of the song that you want to remove.2Tap Remove from playlist [music_playlist_removefrom] .GUID GUID-EEB44D8E-B5E5-4CD5-8218-92D2EA4D722ATitle To remove a track from a playlistChanges ed comments update - delete changed to remove in step 1, removed noteVersion 7Author AdelK143This is an internet version of this publication. © Print only for private use.](https://usermanual.wiki/Sony/10720X.Manual/User-Guide-3336261-Page-143.png)
![Status ReleasedTo delete a playlist1Open the Music menu, then tap Playlists [tile_playlists] .2Touch and hold the playlist that you want to delete.3Tap Delete from storage [music_menu_delete] .4Tap DELETE [delete_profile] to confirm.You cannot delete smart playlists.GUID GUID-7D9C6392-3EF2-4E7A-878B-26A541EE5B7ETitle To delete a playlistChanges Redwood - delete from storage label changed back to deleteVersion 16Author AdelKStatus DraftSharing musicGUID GUID-7752FDE2-C2BE-42D4-B1A5-7AAD847D4141Title Sharing musicChanges Created it out from HonamiVersion 1Author zzCynthiaHStatus ReleasedTo share a song1From the Music home screen, browse to the song or album that you want toshare.2Touch and hold the song title, then tap Share [description_share_button] .3Select an application from the list, then follow the on-screen instructions.You can also share albums and playlists in the same way.GUID GUID-EDC6EF4F-65A2-4936-BD17-63E11FF9215ETitle To share a songChanges Name change only from Walkman to MusicVersion 12Author zzCynthiaHStatus ReleasedEnhancing the soundGUID GUID-DA9CFE3C-F024-4E67-A4DD-6E97D4F77A26Title Enhancing the soundChanges Created it from HonamiVersion 1Author zzCynthiaHStatus ReleasedTo improve the sound quality using the Equaliser1Open the Music menu, then tap Settings [settings_label_launcher] > Audio settings [sound_en-hance_strings_audio_settings_txt] > Sound effects [music_sound_effects] > Equaliser [sound_en-hance_strings_tab_equalizer_txt] .2Drag the frequency band buttons to adjust the sound manually. To choose apreset arrangement, tap ID: ICN-SONY-MUSIC-EQUALIZER-SELECT to select anarrangement, then tap OK [okay_action] to confirm.GUID GUID-EDE19486-44A8-4A55-81A9-99F891AC94EDTitle To improve the sound with the EqualizerChanges ed comments updateVersion 26Author AdelK144This is an internet version of this publication. © Print only for private use.](https://usermanual.wiki/Sony/10720X.Manual/User-Guide-3336261-Page-144.png)
![Status DraftTo turn on the Surround sound feature1Open the Music menu, then tap Settings [settings_label_launcher] > Audio settings [sound_en-hance_strings_audio_settings_txt] > Sound effects [music_sound_effects] > Surround sound (VPT)[sound_enhance_strings_setting_virtual_surround_txt] .2Flick left or right to select a setting, then tap OK [okay_action] to confirm.GUID GUID-904DB65B-22FA-4C19-992C-A703E77DF344Title To turn on the Surround sound featureChanges Music home screen menu changed to Music menu - ed comments updateVersion 19Author AdelKStatus ReleasedListening to the radioThe FM radio in your device works like any FM radio. For example, you can browseand listen to FM radio stations and save them as favourites. You must connect awired headset or headphones to your device before you can use the radio. This isbecause the headset or headphones act as an antenna. After one of these devices isconnected, you can then switch the audio to the speaker, if desired.ID: SCR-SONY-EDREAM-RADIO-PORTRAIT1 Favourites list2 Radio on/off button3 View menu options4 Tuned frequency5 Save or remove a channel as a favourite6 Tuning dial7 Frequency band – drag left or right to move between channels8 Move up the frequency band to search for a channel9 A saved favourite channel10 Move down the frequency band to search for a channelGUID GUID-37879EDC-C7EC-40D4-A861-001E14183BB5Title Listening to radioChanges created it out due ed review commentsVersion 14.1.1.1.1Author zzCynthiaH145This is an internet version of this publication. © Print only for private use.](https://usermanual.wiki/Sony/10720X.Manual/User-Guide-3336261-Page-145.png)
![Status ReleasedTo listen to the FM radio1Connect a headset or a set of headphones to your device.2From your Home screen [preference_title_home_wallpaper] , tap ID: ICN-SONY-HOME-APPTRAY-NORMAL .3Find and tap ID: ICN-SONY-APP-RADIO . The available channels appear as you scrollthrough the frequency band.When you start the FM radio, available channels appear automatically. If a channel has RDSinformation, it appears a few seconds after you start listening to the channel.GUID GUID-3898AB21-BAB7-40B6-8858-8BA79137E5EDTitle To open the FM radioChanges label fix due to resource file updateVersion 6Author zzCynthiaHStatus ReleasedTo move between radio channels•Drag the frequency band left or right.•Alternatively, tap the arrows on either side of the band to jump to the next clearradio signal.GUID GUID-CBBF7274-CC1C-4267-8C7F-F36E2362D7BCTitle To move between radio channelsChanges ed comments update, valid for all projects onwardsVersion 7Author AdelKStatus ReleasedTo start a new search for radio channels1When the radio is open, tap ID: ICN-SONY-KEY-MENU .2Tap Search for channels [fmradio_strings_rescan_radio_stations_txt] . The radio scans the wholefrequency band and marks all available channels.GUID GUID-68ADA9D8-FE98-42F5-85DF-5A0060B85ED6Title To start a new search for channelsChanges Both steps rephrasedVersion 3Author AdamSStatus ReleasedTo switch the radio sound to the speaker1When the radio is open, press ID: ICN-SONY-KEY-MENU .2Tap Play in speaker [fmradio_strings_play_in_loadspeaker_txt] .To switch the sound back to the wired headset or headphones, press ID: ICN-SONY-KEY-MENU andtap Play in headphones [fmradio_strings_menu_play_in_headphones_txt] .GUID GUID-B9A08CE9-BA43-4C99-85FF-9B796DA9CCFBTitle To switch between the speaker and handsfreeChanges Device Term ChangeVersion 4Author zzGan LuStatus ReleasedFavourite radio channelsGUID GUID-BBAC5D23-766F-42C3-94D1-6785FFEB7932Title Using favourite radio channelsChanges Honami html: no text added; delete description; due to nxt step comments.Version 3Author PeterC146This is an internet version of this publication. © Print only for private use.](https://usermanual.wiki/Sony/10720X.Manual/User-Guide-3336261-Page-146.png)
![Status ReleasedTo save a channel as a favourite1When the radio is open, navigate to the channel that you want to save as afavourite.2Tap ID: ICN-SONY-AND-RADIO-FAVOURITE-ON .3Enter a name and select a colour for the channel, then press SAVE [menu_save] .GUID GUID-E43E695E-5D0D-4A62-8D48-1CC6F1866CC3Title To save a channel as a favouriteChanges save label capitalizedVersion 6Author AdelKStatus DraftTo listen to a favourite radio channel1Tap ID: ICN-SONY-RADIO-FAVOURITE-LIST .2Select an option.GUID GUID-2F8211E9-133D-4AAA-930E-AE24A0344138Title To listen to a favourite radio channelChanges label fix due to resource file updateVersion 3Author AdelKStatus ReleasedTo remove a channel as a favourite1When the radio is open, navigate to the channel that you want to remove.2Tap ID: ICN-SONY-INFINITEVIEW-FAVORITE-BTN , then tap DELETE [delete_profile] .GUID GUID-57C07E91-6EAB-4D54-905F-A6BE087320A9Title To remove a channel as a favouriteChanges N update and above capitalized deleteVersion 9Author AdelKStatus ReleasedRadio sound settingsGUID GUID-FB9045F8-AC19-4401-9A4B-4838EB6B5B3CTitle Radio sound settingsChangesVersion 2Author AdelKStatus ReleasedTo switch between mono and stereo sound mode1When the radio is open, press ID: ICN-SONY-KEY-MENU .2Tap Enable stereo sound [fmradio_strings_menu_play_in_stereo_txt] .3To listen to the radio in mono sound mode again, press ID: ICN-SONY-KEY-MENU andtap Force mono sound [fmradio_strings_menu_play_in_mono_txt] .GUID GUID-3FBD4FE8-230A-4F5E-9823-984B1F29EB2DTitle To switch between the mono sound and stereo soundChanges For eD6.0Version 1Author zzXuCindyStatus ReleasedTo select the radio region1When the radio is open, press ID: ICN-SONY-KEY-MENU .2Tap Set radio region [fmradio_strings_dialog_title_set_radio_region_txt] .3Select an option.GUID GUID-C4C8BAA2-3545-46E9-BA22-591362850F6DTitle To select the radio regionChanges For Odin & YugaVersion 1Author zzXuCindyStatus Released147This is an internet version of this publication. © Print only for private use.](https://usermanual.wiki/Sony/10720X.Manual/User-Guide-3336261-Page-147.png)
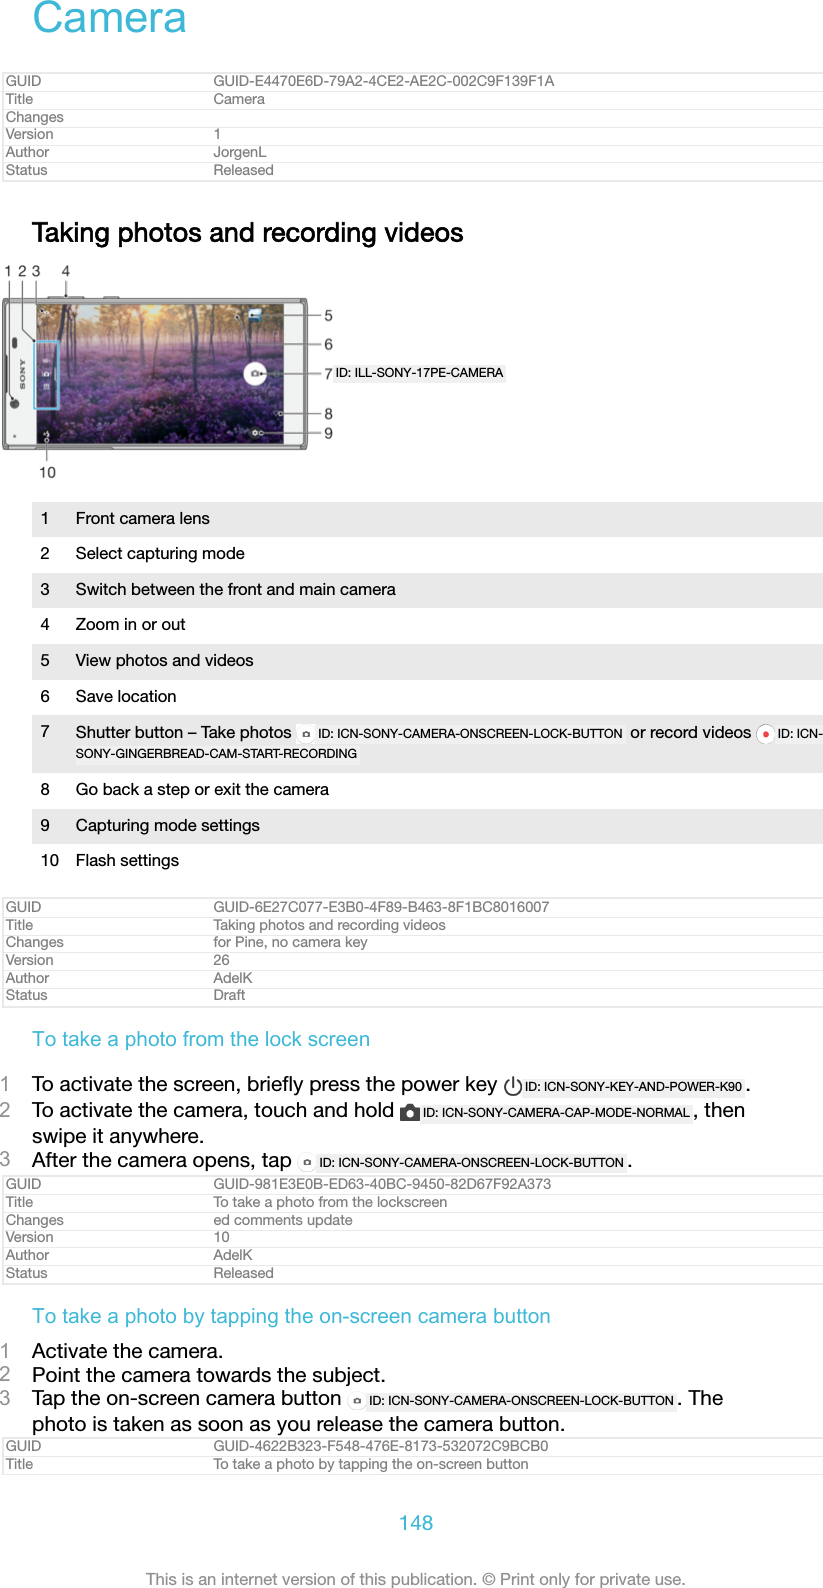
![Changes Blanc - fixed iconVersion 5Author AdelKStatus DraftTo take a selfie using the front camera1Activate the camera.2Tap ID: ICN-SONY-CAM-FRONT-MAIN .3To take the photo, tap the on-screen camera button ID: ICN-SONY-CAMERA-ONSCREEN-LOCK-BUTTON .GUID GUID-8BA01D91-C162-4CA5-8799-3DFD5099BA0CTitle To take a selfie using the front cameraChanges fixed icon errorsVersion 13Author AlexandraTStatus ReleasedTo use the still camera flash1When the camera is open, tap ID: ICN-SONY-CAMERA-QUICK-SETTINGS-FLASH-AUTO .2Select your desired flash setting.3Take the photo.GUID GUID-6075BDDE-DDAA-43BC-8CBB-12AF5C8109DBTitle To use the still camera flashChanges From KK R2 icon change onlyVersion 7Author zzZhaoJiajingStatus ReleasedTo use the zoom function•When the camera is open, pinch or spread on the camera screen.•You can also use the volume key, pressing up or down. To enable this function,tap ID: ICN-SONY-MENU-SETTINGS-L then tap More [more_item_label] > Use Volume key as[cam_strings_volumekey_txt] .GUID GUID-20291A1E-9E52-4CC2-ABDE-F3E276C59ACFTitle To use the zoomChanges Rephrased based on ed. commentsVersion 2Author AlexandraTStatus ReleasedTo record a video1Activate the camera.2If video mode is not selected, swipe the screen to select ID: ICN-SONY-CAMERA-SWITCH-VIDEO .3Point the camera towards the subject.4To start recording, tap ID: ICN-SONY-GINGERBREAD-CAM-START-RECORDING .5To pause when recording a video, tap ID: ICN-SONY-SEMC-CAMERA-PAUSE-NORMAL . Toresume recording, tap ID: ICN-SONY-GINGERBREAD-CAM-START-RECORDING .6To stop recording, tap ID: ICN-SONY-GINGERBREAD-CAM-STOP-RECORDING .GUID GUID-02644258-588E-4C5E-8826-2638BE96058BTitle To record a videoChanges Editorial review changesVersion 4.1.7Author DoraMStatus ReleasedTo take a photo when recording a video•To take a photo while recording a video, tap ID: ICN-SONY-CAMERA-ONSCREEN-LOCK-BUTTON . The photo is taken as soon as you release the camera button.GUID GUID-2EC03B28-6487-41C7-8033-1401041DFCF4Title To take a photo when recording a videoChanges Icon error fixedVersion 3Author AlexandraT149This is an internet version of this publication. © Print only for private use.](https://usermanual.wiki/Sony/10720X.Manual/User-Guide-3336261-Page-149.png)
![Status ReleasedTo view your photos and videos1Activate the camera, then tap a thumbnail to open a photo or video.2Flick left or right to view your photos and videos.GUID GUID-1CFA9AEF-6B82-4035-BE17-EFCFF649267ATitle To view your photos and videosChanges For Honami Nx UG.Version 1Author zzVera QuStatus ReleasedTo delete a photo or video1Find the photo or video that you want to delete.2Tap the screen to display the toolbar.3Tap ID: ICN-SONY-MENU-DELETE .4Tap DELETE [delete_profile] to confirm.GUID GUID-CB8AB869-69E0-4FB7-8067-497EC1ACCC9FTitle To delete a photo or recorded videoChanges N update - delete label capitalizedVersion 6Author AdelKStatus ReleasedGeneral camera settingsGUID GUID-AC0B28A4-99D7-435B-A752-AA3457A761D1Title General camera settingsChanges For Honami UG.Version 1Author zzVera QuStatus ReleasedCapturing modes overviewYou can choose from a range of capturing modes. Simply swipe left or right on thecamera screen to switch between them.ID: ICN-SONY-CAMERA-MODE-MANUALManual [cam_strings_capturing_mode_manual_txt]Manually adjust camera settings such as resolution, whitebalance and ISO.ID: ICN-SONY-CAMERA-SUPERIOR-AUTOSuperior auto [cam_strings_capturing_mode_superior_auto_cy_txt]Optimise your settings to suit any scene.ID: ICN-SONY-CAMERA-SWITCH-VIDEOVideo camera [cam_strings_shortcut_video_camera_txt]Manually adjust video settings to suit any scene.To learn more about how to take better photos, go to support.sonymobile.com.GUID GUID-64A042D0-EE80-4E33-99DD-A4E435CA3E57Title Capturing modes overviewChanges Blanc - no camera appsVersion 27Author AdelKStatus DraftAuto face detectionThe camera automatically detects faces and indicates them with frames. A colouredframe shows which face has been selected for focus. Focus is set to the face closestto the centre of the camera. You can also tap one of the frames to select which faceshould be in focus.GUID GUID-63D9E56D-F38F-4859-BBDB-87F159FC263FTitle Auto face detectionChanges wording changed based on UID comm.Version 5150This is an internet version of this publication. © Print only for private use.](https://usermanual.wiki/Sony/10720X.Manual/User-Guide-3336261-Page-150.png)
![Author AlexandraTStatus ReleasedAuto-capturingTurn on auto-capturing to take pictures automatically using one of the options below.Smile Shutter [cam_strings_smile_shutter_cy_txt]Use Smile Shutter™ technology to photograph a face just as it smiles. The camera detects up to fivefaces and selects one face for smile detection and auto focus. When the selected face smiles, thecamera automatically takes a photo.Off [cam_strings_advanced_setting_off_txt]When auto-capturing is off, you can take photos using the shutter button or the camera key.GUID GUID-4E22C76E-C604-401C-AF90-0F0F17AB64D0Title Auto-capturingChanges Deleted hand shutterVersion 2Author AlexandraTStatus ReleasedTo take a photo using Smile Shutter™1Activate the camera.2Tap ID: ICN-SONY-MENU-SETTINGS-L .3Find and tap Auto-capturing [cam_strings_shutter_trigger_txt] > Smile Shutter [cam_strings_smile_shut-ter_cy_txt] .4When the camera is open and Smile Shutter [cam_strings_smile_shutter_cy_txt] is turned on,point the camera at your subject. The camera selects which face to focus on.5The face appears inside a coloured frame and the photo is taken automaticallyas soon as a smile is detected.6If no smile is detected, you can press the shutter button to take the photomanually.GUID GUID-65983621-42FC-4F42-8CF8-06C2A05ABBE4Title To take a photo using Smile ShutterChanges ed comments update in title; no camera keyVersion 16Author AdelKStatus DraftSaving a photo's geographic locationEnable the Save location function to geotag your photos - saving the approximategeographical location as you shoot. The geographical location is determined bywireless networks and GPS technology.When ID: ICN-SONY-STATUSBAR-GPS-ON appears on the camera screen, Saving location isturned on but the geographical position has not been found. When ID: ICN-SONY-CAMERA-GEOTAG-ON appears, Saving location is turned on and the geographical location isavailable, so the geographical location can be added to your photo. When neither ofthese two symbols appears, Saving location is disabled.GUID GUID-DBEA8510-B4CD-4F62-8720-DA299E7B3EC8Title Adding geographical positions to your photosChanges Icon error fixedVersion 8Author AlexandraTStatus ReleasedTo turn on geotagging1Activate the camera.2Tap ID: ICN-SONY-MENU-SETTINGS-L .3Tap More [more_item_label] , then tap the slider beside Save location [cam_strings_geotagging_txt]to enable or disable the function.4If you are enabling geotagging, you are prompted to enable Location services ifthey are not already enabled. Tap OK [okay_action] , then tap the Location [location_set-tings_title] slider.GUID GUID-1DF05979-1001-4B28-B041-BFB6FFDFA30ATitle To turn on geotagging151This is an internet version of this publication. © Print only for private use.](https://usermanual.wiki/Sony/10720X.Manual/User-Guide-3336261-Page-151.png)
![Changes ed comments updateVersion 18Author AdelKStatus ReleasedTouch captureWith Touch capture, simply tap anywhere on the camera screen to take a photo.On [cam_strings_preview_always_txt]Front camera only [cam_strings_preview_only_front_txt]Off [cam_strings_advanced_setting_off_txt]GUID GUID-6F453966-3773-4C86-8B4D-7BA72FEDC47ETitle Touch capture - Common settingsChanges Rephrased based on ed. comm.Version 4.1.1Author AlexandraTStatus ReleasedTouch to adjustTouch the screen to choose an area to focus on while taking pictures.Focus only [cam_strings_touch_to_focus_adjust_exposure_only_focus_txt]Focus and brightness [cam_strings_touch_to_focus_adjust_exposure_focus_and_exposure_txt]This function is available in Superior auto [cam_strings_capturing_mode_superior_auto_cy_txt] mode only.GUID GUID-48389605-1D3E-4BBE-AA55-6DAC6CBEBEC1Title Touch to adjustChangesVersion 1Author AlexandraTStatus ReleasedAuto photo previewYou can choose to preview photos just after you shoot them.On [cam_strings_preview_always_txt]After you shoot a photo, a preview of it appears in the lower right corner of the screen for 3 seconds.Front camera only [cam_strings_preview_only_front_txt]After you shoot a photo with the front camera, a preview of it appears in the lower right corner of thescreen for 3 seconds.Off [cam_strings_advanced_setting_off_txt]The photo or video is saved after you shoot it, and no preview appears.GUID GUID-B371194F-AA5E-412A-BB97-412E22A9118CTitle Auto photo preview - Common settingsChanges for Tuba - on/front camera only/off options only, changed title to Auto photo previewVersion 6Author AdelKStatus ReleasedUse Volume key asYou can choose how you want to use the volume key when taking photos.Zoom [cam_strings_volumekey_zoom_txt]Use the volume key to zoom in or out.Volume [cam_strings_volumekey_volume_txt]Use the volume key to adjust the volume of notifications, ringtones and music.Shutter [cam_strings_volumekey_shutter_txt]Use the volume key to take photos.152This is an internet version of this publication. © Print only for private use.](https://usermanual.wiki/Sony/10720X.Manual/User-Guide-3336261-Page-152.png)
![GUID GUID-85676E83-211A-436F-9E23-27587379A22FTitle Use Volume key as - Common settingsChanges Added (ringtone, notifications, music) according to ed. comments.Version 2Author AlexandraTStatus ReleasedSoundWhen you take a photo or start recording a video, the Camera makes a shuttersound. If you use the self-timer, it will make a series of beeps to mark the countdown.You can choose to turn these sounds on or off.GUID GUID-067B0476-5597-4B64-B9F2-00842A77A32CTitle Sound - Common settingsChanges Wording changed due to func.rev. commentsVersion 5Author AlexandraTStatus ReleasedData storageYou can choose to save your data either to a removable SD card or to your device'sinternal storage.Internal storage [spb_strings_gen_emmc_txt]Photos or videos are saved on the device memory.SD card [spb_strings_gen_sd_card_txt]Photos or videos are saved on the SD card.GUID GUID-86D0BE1A-D724-4F2A-A75F-87BD85ADF4D6Title Data storage - Common settingsChanges Honami html: delete iconsVersion 2Author zzXuCindyStatus ReleasedGrid linesYou can use grid lines as a visual aid while shooting to help you find the rightcomposition for your photo.Grid lines are only shown on the camera screen while shooting, and do not appear in the finalphoto.GUID GUID-4F67F73F-B69B-4A15-A691-73A89F90133ATitle Grid lines - Common settingsChanges ed comments update, rewrote topicVersion 2Author AdelKStatus ReleasedQuick launchUse Quick launch settings to launch the camera when the screen is locked.Launch only [cam_strings_fast_capturing_launch_only_txt]After you drag ID: ICN-SONY-CAMERA-CAP-MODE-NORMAL inwards, the main camera is launched from sleepmode.Launch and capture [cam_strings_fast_capturing_launch_and_capture_photo_txt]After you drag ID: ICN-SONY-CAMERA-CAP-MODE-NORMAL inwards, the still camera is launched from sleepmode and a photo is captured.Launch and record video [cam_strings_fast_capturing_launch_and_capture_video_txt]After you drag ID: ICN-SONY-CAMERA-CAP-MODE-NORMAL inwards, the video camera is launched from sleepmode and starts recording.Off [cam_strings_advanced_setting_off_txt]GUID GUID-A3E21A95-B04C-455D-95F0-7A70EAA0EF9DTitle Quick launch - Common settingsChanges For L and onwards changed icon onlyVersion 9153This is an internet version of this publication. © Print only for private use.](https://usermanual.wiki/Sony/10720X.Manual/User-Guide-3336261-Page-153.png)
![Author zzZhaoJiajingStatus ReleasedTo adjust colour and brightness1Activate the camera.2Tap ID: ICN-SONY-MENU-SETTINGS-L > Colour and brightness [cam_colour_and_brightness_txt] .3Drag the sliders to the desired positions to adjust colour and brightness.This setting is only available in the Superior auto and Video camera modes.GUID GUID-92AB7802-8082-45A2-89F2-A021AB159589Title To adjust colour and brightnessChanges ed comments updateVersion 2Author AdelKStatus ReleasedWhite balance, focus, exposure and shutter speedWhite balance, which is only available in Manual [cam_strings_capturing_mode_manual_txt] capturingmode, adjusts the colour balance according to the lighting conditions. You can alsoadjust the exposure manually in the -2.0 EV to +2.0 EV range. For example, you canincrease the image brightness or decrease the overall exposure by tapping the plusor minus controls accordingly when ID: ICN-SONY-CAM-WHITE-BALANCE-MAIN is displayed.Focus and shutter speed can be set for either manual or automatic adjustment.White balance[cam_strings_advanced_set-ting_white_balance_txt]ID: ICN-SONY-CAM-WB-AUTO Auto [cam_strings_advanced_setting_white_balance_au-to_txt]Adjust the colour balanceautomatically. ID: ICN-SONY-CAMERA-ADVANCED-SETTINGS-WHITE-BALANCE-INCANDESCENTIncandescent [cam_strings_advanced_set-ting_white_balance_incandescent_txt]Adjust the colour balance for warmlighting conditions, such as underlight bulbs. ID: ICN-SONY-CAMERA-ADVANCED-SETTINGS-WHITE-BALANCE-FLUORESCENTFluorescent [cam_strings_advanced_set-ting_white_balance_fluorescent_txt]Adjust the colour balance forfluorescent lighting. ID: ICN-SONY-CAMERA-ADVANCED-SETTINGS-WHITE-BALANCE-DAYLIGHTDaylight [cam_strings_advanced_setting_white_bal-ance_day_light_txt]Adjust the colour balance for sunnyoutdoor conditions. ID: ICN-SONY-CAMERA-ADVANCED-SETTINGS-WHITE-BALANCE-CLOUDYCloudy [cam_strings_advanced_setting_white_bal-ance_cloudy_txt]Adjust the colour balance for acloudy sky.Focus AF[cam_white_balance_focu-saf_txt]ID: ICN-SONY-FOCUS-AF Adjust focus automatically.Focus MF[cam_white_balance_fo-cusmf_txt]ID: ICN-SONY-FOCUS-MF Adjust focus manually.SS auto [cam_white_bal-ance_ssauto_txt]ID: ICN-SONY-SS-AUTO Adjust shutter speed automatically.154This is an internet version of this publication. © Print only for private use.](https://usermanual.wiki/Sony/10720X.Manual/User-Guide-3336261-Page-154.png)
![SS 1/8 [cam_white_bal-ance_ss18_txt]ID: ICN-SONY-SS-18 Adjust shutter speed manually.GUID GUID-CCD95519-AFAE-4267-9515-C7C64AEF3A86Title White balance - General camera settingsChanges added shutter speed in title as per UID commentsVersion 9Author AdelKStatus ReleasedStill camera settingsGUID GUID-2D0BFF4E-8F39-4AD6-9126-43093042FC18Title Still camera settingsChanges honami htmlVersion 3Author zzXuCindyStatus ReleasedTo adjust the still camera settings1Activate the camera.2To display all settings, tap ID: ICN-SONY-MENU-SETTINGS-L .3Select the setting that you want to adjust, then edit as desired.GUID GUID-FD8232A8-DD3A-4B07-9782-F50929353DFBTitle To adjust the still camera settingsChanges For M update. Change settings iconVersion 7Author zzZsofiaPStatus ReleasedStill camera settings overviewGUID GUID-D8AFAD06-81E4-446A-B2B8-5F965BC263ABTitle Still camera settings overviewChanges Honami Nx UG: Remove the content; keep the title only.Version 5Author zzVera QuStatus Released*ResolutionChoose between several resolutions and aspect ratios before taking a photo. A photowith a higher resolution has a higher quality, but requires more memory.Main camera:13MP [cam_strings_cam_resolution_13mp]4128×3096 (4:3) [cam_strings_camera_resolution_4128_3096]13 megapixel resolution with 4:3 aspect ratio. Suitable for photos that you want toview on non-widescreen displays or print in high resolution.9MP [cam_strings_cam_resolution_9mp]4920×2204 (16:9) [cam_strings_camera_resolution_3920_2204]9 megapixel resolution with 16:9 aspect ratio. Suitable for photos that you want toview on widescreen displays.8MP [cam_strings_cam_resolution_8mp]3264×2448 (4:3) [cam_strings_camera_resolution_3264_2448]8 megapixel resolution with 4:3 aspect ratio. Suitable for photos that you want toview on non-widescreen displays or print in high resolution.155This is an internet version of this publication. © Print only for private use.](https://usermanual.wiki/Sony/10720X.Manual/User-Guide-3336261-Page-155.png)
![8MP [cam_strings_cam_resolution_8mp]3840×2160 (16:9) [cam_strings_camera_resolution_3840_2160]8 megapixel resolution with 16:9 aspect ratio. Suitable for photos that you want toview on widescreen displays.3MP [cam_strings_cam_resolution_3mp]2048×1536 (4:3) [cam_strings_camera_resolution_2048_1536]3 megapixel resolution with 4:3 aspect ratio. Suitable for photos that you want toview on non-widescreen displays or print in high resolution. This setting is onlyavailable in Manual [cam_strings_capturing_mode_manual_txt] capturing mode.2MP [cam_strings_cam_resolution_2mp]1920×1080 (16:9) [cam_strings_video_resolution_1920]2 megapixel resolution with 16:9 aspect ratio. Suitable for photos that you want toview on widescreen displays. This setting is only available in Manual [cam_strings_captur-ing_mode_manual_txt] capturing mode.VGA [cam_strings_resolution_vga_txt]640×480 (4:3) [cam_strings_video_resolution_vga]VGA format with 4:3 aspect ratio. This setting is only available in Manual [cam_strings_cap-turing_mode_manual_txt] capturing mode.Front camera:5MP [cam_strings_cam_resolution_5mp]2592×1944 (4:3) [cam_strings_camera_resolution_2592_1944]5 megapixel resolution with 4:3 aspect ratio. Suitable for photos that you want toview on non-widescreen displays or print in high resolution.3MP [cam_strings_cam_resolution_3mp]2560×1440 (16:9) [cam_strings_camera_resolution_2560_1440]3 megapixel resolution with 16:9 aspect ratio. Suitable for photos that you want toview on widescreen displays.2MP [cam_strings_cam_resolution_2mp]1600×1200 (4:3) [cam_strings_camera_resolution_1600_1200]2 megapixel resolution with 4:3 aspect ratio. Suitable for photos that you want toview on non-widescreen displays or print in high resolution. This setting is onlyavailable in Manual [cam_strings_capturing_mode_manual_txt] capturing mode.2MP [cam_strings_cam_resolution_2mp]1920×1080 (16:9) [cam_strings_video_resolution_1920]2 megapixel resolution with 16:9 aspect ratio. Suitable for photos you want to viewon widescreen displays. This setting is only available in Manual [cam_strings_captur-ing_mode_manual_txt] capturing mode.VGA [cam_strings_resolution_vga_txt]640×480 (4:3) [cam_strings_video_resolution_vga]VGA format with 4:3 aspect ratio. This setting is only available in Manual [cam_strings_cap-turing_mode_manual_txt] capturing mode.GUID GUID-AC210639-63D0-4D71-A124-4E1CA0B3FD99Title Resolution - Still cameraChanges Pine156This is an internet version of this publication. © Print only for private use.](https://usermanual.wiki/Sony/10720X.Manual/User-Guide-3336261-Page-156.png)
![Version 19Author RenataBStatus DraftSelf-timerWith the self-timer, you can take a photo without holding the device. Use this functionto take self-portraits or group photos with everyone in the photo. You can also usethe self-timer if you want to avoid shaking the camera when taking photos.10 sec. [cam_strings_self_timer_10_txt]Set a 10-second delay in taking the photo from when you tap the shutter button or press the camera key.3 sec. [cam_strings_self_timer_3_txt]Set a 3-second delay in taking the photo from when you tap the shutter button or press the camera key.Off [cam_strings_advanced_setting_off_txt]The photo is taken as soon as you tap the shutter button or press the camera key.GUID GUID-F58EF0AC-D869-4017-ACFA-0D971DC83DCETitle Self-timer - Still cameraChanges New label included for 3 sec.Version 7Author AlexandraTStatus ReleasedSoft Skin EffectYou can turn on the Soft Skin Effect [cam_strings_soft_skin_effect_cy_txt] on your device to makeskin tones slightly softened while taking selfies in Manual [cam_strings_capturing_mode_manual_txt]and Superior auto [cam_strings_capturing_mode_superior_auto_cy_txt] capturing modes.GUID GUID-9D859BB3-6294-4E07-9A27-8C58E74C0BF6Title Soft Skin EffectChanges For N updateVersion 1Author AlexandraTStatus ReleasedObject trackingWhen you select an object by touching it in the viewfinder, the camera tracks it foryou.GUID GUID-6003E2AB-F8E2-4EF9-9601-10634CCA0109Title Object tracking - Still camera and Video cameraChanges for Tuba (created from Focus mode)Version 1Author AdelKStatus ReleasedHDRUse the HDR (High Dynamic Range) setting to take a photo against strong back lightor in conditions where the contrast is sharp. HDR compensates for the loss of detailand produces a picture that is representative of both dark and bright areas.This setting is only available in Manual [cam_strings_capturing_mode_manual_txt] capturing mode.GUID GUID-BA0E0681-02F9-43FD-90AC-C6766538D74ETitle HDR - Still cameraChanges Change for Honami. delete the note.Version 3Author zzVera QuStatus ReleasedISOThe ISO sensitivity can be set to adjust automatically, or can be manually adjusted tosensitivity settings ranging from 50 to 3200.This setting is only available in Manual [cam_strings_capturing_mode_manual_txt] capturing mode.GUID GUID-EBC172A1-DE26-4D17-84F4-89DFB71D3277Title ISO - Still camera157This is an internet version of this publication. © Print only for private use.](https://usermanual.wiki/Sony/10720X.Manual/User-Guide-3336261-Page-157.png)
![Changes Changed ranging to "50 to 3200" for CanopusVersion 4.3.4Author AlexandraTStatus ReleasedMeteringThis function automatically determines a well-balanced exposure by measuring theamount of light striking the subject you want to capture.Face [cam_strings_photometry_face_txt]Measures the amount of light on your subject’s face, and adjusts the exposure so that the face is neithertoo dark nor too bright.Centre [cam_strings_advanced_setting_photometry_center_txt]Determines the centre of the image, and sets the exposure based on the brightness of the subject there.Spot [cam_strings_advanced_setting_photometry_spot_txt]Adjusts the exposure in a very small part of the subject that you want to capture.Touch [cam_metering_touch_txt]Adjusts the exposure to the desired part of the subject when you touch the screen.This setting is only available in Manual [cam_strings_capturing_mode_manual_txt] capturing mode.GUID GUID-37A6CA5A-3FEC-4530-B7BA-56B28971279DTitle Metering - Still cameraChanges Hinoki, Redwood - face/centre/spot/touchVersion 10Author AdelKStatus DraftFlashUse the flash to take photos when lighting conditions are poor or when there is abacklight. The following options are available when you tap the flash icon ID: ICN-SONY-CAMERA-QUICK-SETTINGS-FLASH-AUTO on the camera screen:ID: ICN-SONY-CAMERA-QUICK-SETTINGS-FLASH-AUTOAuto [cam_strings_advanced_setting_auto_txt]The camera automatically determines whether the lighting conditionsrequire the use of a flash.ID: ICN-SONY-CAMERA-QUICK-SETTINGS-FLASH-FILLFill flash [cam_strings_advanced_setting_flash_fill_flash_txt]Use this setting when the background is brighter than the subject. Thissetting removes unwanted dark shadows.ID: ICN-SONY-CAMERA-QUICK-SETTINGS-FLASH-RED-EYE-REDUCTIONRed-eye reduction [cam_strings_advanced_setting_flash_red_eye_reduc_txt]Reduces the red colour of eyes when taking a photo.ID: ICN-SONY-CAMERA-QUICK-SETTINGS-FLASH-OFFOff [cam_strings_advanced_setting_off_txt]The flash is turned off. Sometimes photo quality can be better withoutthe flash, even if lighting conditions are poor. Taking a good photowithout using the flash requires a steady hand. Use the self-timer toavoid blurred photos.ID: ICN-SONY-CAMERA-PHOTO-LIGHTTorch [cam_strings_flash_torch_txt]The flash shines continuously while taking pictures.GUID GUID-53732C87-D236-4E9D-A3DB-419A332ADCAATitle Flash - Still cameraChanges Torch entry wording modifiedVersion 6Author AlexandraTStatus ReleasedVideo camera settingsGUID GUID-90BE8273-E40F-403A-A176-CB6A64CFAE44Title Video camera settingsChanges Honami htmlVersion 2Author zzXuCindy158This is an internet version of this publication. © Print only for private use.](https://usermanual.wiki/Sony/10720X.Manual/User-Guide-3336261-Page-158.png)
![Status ReleasedTo adjust the video camera settings1Activate the camera.2Swipe the screen to select ID: ICN-SONY-CAMERA-SWITCH-VIDEO .3To display settings, tap ID: ICN-SONY-MENU-SETTINGS-L .4Select the setting that you want to adjust, then make your changes.GUID GUID-D55F26C3-5C2A-4588-9439-7D6642398DC5Title To adjust the video camera settingsChanges ed comments updateVersion 9Author AdelKStatus ReleasedVideo camera settings overviewGUID GUID-890099DB-D0D0-43C9-97DB-8036F9450CE1Title Video camera settings overviewChanges for Tapioca; no text change; separated from Video camera settingsVersion 1Author zzJessicaLStatus Released*Video resolutionAdjust the video resolution for different formats. HD refers to High Definition, whileFPS refers to Frames Per Second. A higher FPS rate provides a smoother video, atthe cost of a larger file size.Main camera:Full HD (30 fps) [cam_strings_video_size_full_hd_30fps_txt]1920×1080 (16:9) [cam_strings_video_resolution_1920]Full HD (Full High Definition) format with 30 FPS and 16:9 aspect ratio.HD [cam_strings_video_resolution_hd_txt]1280×720 (16:9) [cam_strings_video_resolution_1280]HD (High Definition) format with 16:9 aspect ratio.VGA [cam_strings_resolution_vga_txt]640×480 (4:3) [cam_strings_video_resolution_vga]VGA format with 4:3 aspect ratio.MMS [cam_strings_video_size_mms_txt]Record videos suitable for sending in multimedia messages. The recording time ofthis format is limited so that the video file can fit in a multimedia message.Front camera:Full HD [cam_strings_video_size_full_hd_txt]1920×1080 (16:9) [cam_strings_video_resolution_1920]Full HD (Full High Definition) format with 16:9 aspect ratio.HD [cam_strings_video_resolution_hd_txt]1280×720 (16:9) [cam_strings_video_resolution_1280]HD (High Definition) format with 16:9 aspect ratio.VGA [cam_strings_resolution_vga_txt]640×480 (4:3) [cam_strings_video_resolution_vga]VGA format with 4:3 aspect ratio.159This is an internet version of this publication. © Print only for private use.](https://usermanual.wiki/Sony/10720X.Manual/User-Guide-3336261-Page-159.png)
![MMS [cam_strings_video_size_mms_txt]Record videos suitable for sending in multimedia messages. The recording time ofthis format is limited so that the video file can fit in a multimedia message.GUID GUID-7E69C4F2-7B4D-46FF-8C9B-7026429FB366Title Video resolution - Video cameraChanges Hinoki - no Full HD (60fps)Version 13Author AdelKStatus DraftAuto-capturing (video)Turn on auto-capturing to take pictures automatically while recording a video. Usingthe Smile Shutter™ feature the camera automatically takes snapshots of smilingfaces while you continue to record your video.GUID GUID-D0C83903-4652-4B06-81E4-A149A9A23A47Title Auto-capturing (video)Changes Legal comment - Smile shutterTM -> Smile ShutterTMVersion 2.1.1Author TamasBStatus ReleasedTo turn on Smile Shutter™ (video)1Activate the camera.2Tap ID: ICN-SONY-MENU-SETTINGS-L .3Find and tap Auto-capturing (video) [cam_strings_video_shutter_trigger_txt] > Smile Shutter[cam_strings_smile_shutter_cy_txt] .GUID GUID-CBE6167B-9CC8-4F5D-A556-586F46F79FCBTitle To turn on Smile shutter (video)ChangesVersion 1Author AlexandraTStatus ReleasedSteadyShot™When recording a video, it can be difficult to hold the device steady. The stabiliserhelps you by compensating for small movements of the hand.GUID GUID-BA0386BA-84CF-43F3-8E8E-C2FB51CED9F2Title SteadyShot - Video cameraChanges Honami updated: changed title due to updated SW changed.Version 4Author zzXuCindyStatus ReleasedTorchUse the torch to provide lighting for videos when ambient lighting conditions are pooror when there is a backlight. The video flash icon ID: ICN-SONY-CAMERA-PHOTO-LIGHT isavailable on the video camera screen. Note that the video quality can sometimes bebetter without a light even if lighting conditions are poor.ID: ICN-SONY-CAMERA-PHOTO-LIGHT On [cam_strings_advanced_setting_on_txt]ID: ICN-SONY-CAMERA-QUICK-SETTINGS-PHOTO-LIGHT-OFF Off [cam_strings_advanced_setting_off_txt]GUID GUID-22275FDC-E9F8-4B46-A010-CF9A49DE8F58Title Flashlight - Video cameraChanges replaced flaslight with torch acc. to ed. commVersion 4Author AlexandraTStatus ReleasedFurther Camera support informationUse the Help menu to search for camera-related tests and other useful information.To access support, follow the steps below.160This is an internet version of this publication. © Print only for private use.](https://usermanual.wiki/Sony/10720X.Manual/User-Guide-3336261-Page-160.png)
![1Open the camera application.2Tap ID: ICN-SONY-MENU-SETTINGS-L then tap More [more_item_label] > Help [help_and_feedback]GUID GUID-5664C32B-FE5D-4EA3-961B-362C885EB2CCTitle Further Camera support informationChangesVersion 1Author AlexandraTStatus Released161This is an internet version of this publication. © Print only for private use.](https://usermanual.wiki/Sony/10720X.Manual/User-Guide-3336261-Page-161.png)
![Photos and videos in AlbumGUID GUID-C9C9DC20-84F0-433F-9E0C-58124EC6DC3FTitle Photos and videos in AlbumChanges UG Next Step XperiaVersion 2Author zzPengLeonStatus ReleasedViewing photos and videosUse the Album application to view photos and play videos that you’ve taken with yourcamera, or to view similar content that you've saved to your device. All photos andvideos are displayed in a chronologically ordered grid.ID: SCR-SONY-ALBUM-PICTURE-GRID-OVERVIEW-WVGA1Tap ID: ICN-SONY-APP-CALENDAR-L to open the Album home screen menu2 View menu options3 A slideshow of all your photos and videos, or of those added to favourites4 Drag the left edge of the screen to the right to open the Album home screen menu5 The date of items in the group6 Tap a photo or video to view it7 Scroll up or down to view contentGUID GUID-0C711360-DD0E-4CB8-ACA5-9A658EE68F7DTitle Viewing photos and videosChanges for KugoVersion 11Author AdelKStatus ReleasedTo view photos and videos1From your Home screen [preference_title_home_wallpaper] , tap ID: ICN-SONY-HOME-APPTRAY-NORMAL .2Find and tap Album [album_app_name_txt] .3Tap a photo or video that you want to view. If prompted, tap ID: ICN-SONY-SEMC-MUSIC-PLAY-NORMAL .4Flick left to view the next photo or video. Flick right to view the previous photoor video.To set the screen to rotate automatically when turned sideways, tap Rotate the contents of thescreen [display_auto_rotate_rotate] under Settings [settings_label_launcher] > Display [display_settings_title] > Whendevice is rotated [display_auto_rotate_title] .The Album application may not support all file formats. For more information about supportedfile formats and the use of multimedia (audio, image and video) files, download the Whitepaper for your device at www.sonymobile.com/support/.GUID GUID-9E9154B9-0E5F-460C-9ED7-78C88771BEC4162This is an internet version of this publication. © Print only for private use.](https://usermanual.wiki/Sony/10720X.Manual/User-Guide-3336261-Page-162.png)
![Title To view photos and videosChanges label fix due to resource file updateVersion 18Author AdelKStatus ReleasedTo change the size of the thumbnails•When viewing thumbnails of photos and videos in Album, spread two fingersapart to zoom in, or pinch two fingers together to zoom out.GUID GUID-CEAF453F-B0F8-41B0-822B-CA2B33FDC1FFTitle To change the size of the thumbnailsChanges For HTML Next Step Xperia (Honami)Version 4Author zzPengLeonStatus ReleasedTo zoom a photo•When you are viewing a photo, spread two fingers apart to zoom in, or pinch twofingers together to zoom out.GUID GUID-FA6FB193-0FB8-4C87-9768-B43CEFBA44A0Title To zoom a photoChanges For HTML Next Step Xperia (Honami)Version 7Author zzPengLeonStatus ReleasedTo watch a slideshow of your photos1When you are viewing a photo, tap the screen to display the toolbars, then tapID: ICN-SONY-KEY-MENU > Slideshow [album_option_slideshow_txt] to start playing all the photosin an album.2Tap a photo to end the slideshow.GUID GUID-ED692E31-B1E1-4A66-BA4A-3E41B1CAC491Title To watch a slideshow of your photosChanges label fix due to resource file updateVersion 7Author AdelKStatus ReleasedTo play a video1In Album, find and tap the video that you want to play.2Tap ID: ICN-SONY-SEMC-MUSIC-PLAY-NORMAL .3If the playback controls are not displayed, tap the screen to display them. Tohide the controls, tap the screen again.GUID GUID-F785DB32-33A8-44C6-AD5C-001BC1E7C4A7Title To play a videoChanges Video and Just Once steps deleted for TubaVersion 14Author zzAdriennPStatus ReleasedTo pause a video1When a video is playing, tap the screen to display the controls.2Tap ID: ICN-SONY-SEMC-MUSIC-PAUSE-NORMAL .GUID GUID-2F1D89FD-3370-4BD6-872E-6628B924E265Title To pause a videoChanges label fix due to resource file updateVersion 3Author AdelKStatus ReleasedTo fast-forward and rewind a video1When a video is playing, tap the screen to display the controls.2Drag the progress bar marker left to rewind, or right to fast-forward.GUID GUID-A785999B-662F-4020-8B3F-69AAF7D57C5ETitle To fast forward and rewind a videoChanges ed comments updateVersion 4Author AdelK163This is an internet version of this publication. © Print only for private use.](https://usermanual.wiki/Sony/10720X.Manual/User-Guide-3336261-Page-163.png)
![Status ReleasedTo adjust the sound volume of a video•Press the volume key up or down.GUID GUID-27C5332E-2A2B-47EE-AB0C-18F12067FDB8Title To adjust the volume of a videoChanges edited according to functional review commentsVersion 4Author AdelKStatus ReleasedAlbum home screen menuFrom the Album home screen menu you can browse your photo albums, includingphotos and videos taken using special effects, as well as content that you haveshared online via services such as Picasa™ and Facebook. Once you are logged in tosuch platforms, you can manage content and view online images. From the Albumapplication you can also add geotags to photos, perform basic editing tasks, and usemethods such as Bluetooth® wireless technology and email to share content.ID: SCR-SONY-ALBUM-MENU-OVERVIEW-WVGA1 Return to the Album application home screen to view all content2 View all photos and videos taken with your device's camera3 View all photos and videos saved on your device in different folders4 View all videos saved on your device5 View your photos on a map or in Globe view6 View your favourite photos and videos7 Open the settings menu for the Album application8 Open web support9 View photos from online servicesGUID GUID-273C2005-04A8-41C1-9425-B2C4ACCD8120Title Album home screen menuChanges Hinoki, no home networkVersion 10Author AdelKStatus DraftTo view photos from online services in Album1From your Home screen [preference_title_home_wallpaper] , tap ID: ICN-SONY-HOME-APPTRAY-NORMAL .2Find and tap Album [album_app_name_txt] , then tap ID: ICN-SONY-APP-CALENDAR-L .3Tap the desired online service, then follow the on-screen instructions to getstarted. All available online albums that you have uploaded to the service aredisplayed.4Tap any album to view its content, then tap a photo in the album.5Flick left to view the next photo or video. Flick right to view the previous photoor video.GUID GUID-822B8B05-A1D8-4FCB-8493-04B397CC3B83Title To view photos from online services in Album164This is an internet version of this publication. © Print only for private use.](https://usermanual.wiki/Sony/10720X.Manual/User-Guide-3336261-Page-164.png)
![Changes label fix due to resource file updateVersion 12Author AdelKStatus ReleasedSharing and managing photos and videosYou can share photos and videos that you’ve saved on your device. You can alsomanage them in different ways. For example, you can work with photos in batches,delete photos and link them to contacts. If you have lots of photos saved on yourdevice, it’s a good idea to regularly transfer them to a computer or to an externalstorage device in order to avoid any unpredictable loss of data. Doing so also freesup more space on your device. See Managing files using a computer on page 61.You might not be able to copy, send or transfer copyright-protected items. Also, some itemsmay not send if the file size is too large.GUID GUID-ADC46697-50D7-4C66-978F-F384F4DA0D8DTitle Sharing and managing photos and videosChanges Description updatedVersion 7Author AdamSStatus ReleasedTo share a photo or video1In Album, find and tap the photo or video that you want to share.2Tap the screen to display the toolbars, then tap ID: ICN-SONY-HOME-TAP-APP-SHARE .3Tap the application that you want to use to share the photo, then follow thesteps to send it.GUID GUID-8FD74D8D-4AAA-41BA-B121-428EEABE725BTitle To share a photo or videoChanges label fix due to resource file updateVersion 9Author AdelKStatus ReleasedTo use a photo as a contact picture1When you are viewing a photo, tap the screen to display the toolbars, then tapID: ICN-SONY-KEY-MENU > Use as [album_options_use_as_txt] > Contact photo [description_contact_photo] .2Select a contact, then edit the photo as desired.3Tap SAVE [menu_save] .GUID GUID-2D55DBAF-01F3-4899-B600-CFC1C77B0972Title To use a photo as a contact pictureChanges N update and aboveVersion 15Author AdelKStatus ReleasedTo use a photo as wallpaper1When you are viewing a photo, tap the screen to display the toolbars, then tapID: ICN-SONY-KEY-MENU > Use as [album_options_use_as_txt] > Wallpaper [album_set_as_wallpaper_txt] .2Follow the instructions on the screen.GUID GUID-E34C413D-B8EF-4053-B7A7-3A241D6CB8CATitle To use a photo as wallpaperChanges label fix due to resource file updateVersion 10Author zzWangHermanStatus ReleasedTo rotate a photo1When you are viewing a photo, tap the screen to display the toolbars, then tapID: ICN-SONY-KEY-MENU .2Tap Rotate [album_option_rotate_right_txt] , then select an option. The photo is saved in thenew orientation.GUID GUID-FC0207B6-9145-4A5C-87BC-01B5969CC3D1Title To rotate a photoChanges label fix due to resource file updateVersion 9Author AdelK165This is an internet version of this publication. © Print only for private use.](https://usermanual.wiki/Sony/10720X.Manual/User-Guide-3336261-Page-165.png)
![Status ReleasedTo delete a photo or video1When you are viewing a photo, tap the screen to display the toolbars, then tapID: ICN-SONY-MENU-DELETE .2Tap DELETE [delete_profile] .GUID GUID-1EECE26E-E89A-4E66-8B11-9441E0D8B89DTitle To delete a photo or videoChanges N update - delete label capitalizedVersion 8Author AdelKStatus ReleasedTo work with batches of photos or videos in Album1When viewing thumbnails of photos and videos in Album, touch and hold anitem until it is highlighted.2Tap other items that you want to work with to select them. If you want to selectall items, tap ID: ICN-SONY-KEY-MENU , then tap Select all [album_options_select_all] .3Use the tools in the toolbar to work with your selected items.GUID GUID-5199D8F4-B9B0-4E8C-89D7-56DB01A9A010Title To work with batches of photos or videos in AlbumChanges label fix due to resource file updateVersion 12Author AdelKStatus ReleasedEditing photos with the Photo editor applicationYou can edit and apply effects to original photos that you’ve taken with your camera.For example, you can change the light effects. After you save the edited photo, theoriginal unchanged version of the photo remains on your device.GUID GUID-B1DA6E8A-68DF-40B6-9BF2-391C18E01285Title Editing photos with the Photo editor applicationChangesVersion 1Author zzPengLeonStatus ReleasedTo edit a photo•When you are viewing a photo, tap the screen to display the toolbars, then tapID: ICN-SONY-ALBUM-EDIT .GUID GUID-3256B4EF-EC78-4F73-BB9F-2574825B4B99Title To edit a photoChanges Valid from Honami only label chagnedVersion 3Author zzPengLeonStatus ReleasedTo crop a photo1When you are viewing a photo, tap the screen to display the toolbars, then tapID: ICN-SONY-ALBUM-EDIT .2If prompted, select Photo editor [photoeditor_app_name_txt] .3Tap ID: ICN-SONY-ALBUM-CROP > Crop [album_option_crop_txt] .4Tap Crop [clipper_menu_crop] to select an option.5To adjust the crop frame, touch and hold the edge of the crop frame. When thecircles at the edges disappear, drag inward or outward to resize the frame.6To resize all sides of the crop frame at the same time, touch and hold one ofthe four corners. When the circles at the edges disappear, drag the corneraccordingly.7To move the crop frame to another area of the photo, touch and hold inside theframe, then drag it to the desired position.8Tap ID: ICN-SONY-TEXT-INPUT-LIGHT-ENTER .9To save a copy of the cropped photo, tap SAVE [menu_save] .GUID GUID-C8189FB3-D445-4117-B326-AEDB6E254373Title To crop a photoChanges N update - save label capitalized166This is an internet version of this publication. © Print only for private use.](https://usermanual.wiki/Sony/10720X.Manual/User-Guide-3336261-Page-166.png)
![Version 15Author AdelKStatus ReleasedTo apply special effects to a photo1When you are viewing a photo, tap the screen to display the toolbars, then tapID: ICN-SONY-ALBUM-EDIT .2If prompted, select Photo editor [photoeditor_app_name_txt] .3Tap ID: ICN-SONY-ALBUM-EDIT-COLOUR-ADJUSTMENT , ID: ICN-SONY-ALBUM-EDIT-FACE-CORRECTION or ID: ICN-SONY-ALBUM-EDIT-EXPOSURE , then select an option.4Edit the photo as desired, then tap SAVE [menu_save] .GUID GUID-1D6C2B88-4A95-4AAE-AA9E-16AECFCCD042Title To apply special effects to a photoChanges N update - save label capitalizedVersion 6Author AdelKStatus ReleasedTo add a photo frame effect to a photo1When you are viewing a photo, tap the screen to display the toolbars, then tapID: ICN-SONY-ALBUM-EDIT .2If prompted, select Photo editor [photoeditor_app_name_txt] .3Tap ID: ICN-SONY-ALBUM-ADD-FRAME , then select an option.4To save a copy of the edited photo, tap SAVE [menu_save] .GUID GUID-07A7F9DD-010A-403E-9F86-A9576C8AA734Title To improve a photo using advanced settingsChanges N update - save label capitalized, updated icon in step 3Version 5Author AdelKStatus ReleasedTo adjust the light settings for a photo1When you are viewing a photo, tap the screen to display the toolbars, then tapID: ICN-SONY-ALBUM-EDIT .2If prompted, select Photo editor [photoeditor_app_name_txt] .3Tap ID: ICN-SONY-ALBUM-EDIT-EXPOSURE , then select an option and edit as desired.4To save a copy of the edited photo, tap SAVE [menu_save] .GUID GUID-686F7515-649E-421F-B93B-97C5B2523497Title To adjust the light settings for a photoChanges N update, save label capitalizedVersion 5Author AdelKStatus ReleasedTo set the saturation level of colours in a photo1When you are viewing a photo, tap the screen to display the toolbars, then tapID: ICN-SONY-ALBUM-EDIT .2If prompted, select Photo editor [photoeditor_app_name_txt] .3Tap ID: ICN-SONY-ALBUM-EDIT-COLOUR-ADJUSTMENT , then select an option.4To save a copy of the edited photo, tap SAVE [menu_save] .GUID GUID-252B51B6-E5F7-4224-91A1-B97F7DA007B4Title To set the saturation level of colours in a photoChanges N update - label capitalizedVersion 4Author AdelKStatus ReleasedEditing videos with the Video editor applicationYou can edit videos that you’ve taken with your camera. For example, you can trim avideo to the desired length or adjust the speed of a video. After you save the editedvideo, the original unchanged version of the video remains on your device.GUID GUID-76C8384D-F079-4406-B47B-AAD555DB8D0DTitle Editing videos with the Video editor applicationChanges M 6.0 Update Movie Creator changed to Video editor in the titleVersion 2167This is an internet version of this publication. © Print only for private use.](https://usermanual.wiki/Sony/10720X.Manual/User-Guide-3336261-Page-167.png)
![Author zzAdriennPStatus ReleasedTo trim a video1In the Album, find and tap the video that you want to edit.2Tap the screen to display the toolbars, then tap ID: ICN-SONY-MOVIE-EDIT .3If prompted, select Video Editor [movie_creator_strings_new_application_name_txt] then tap Trim[movie_creator_strings_trim_txt] .4To move the trim frame to another part of the timeline, touch and hold the edgeof the trim frame and drag it to the desired position, then tap Apply [movie_crea-tor_strings_apply_txt] .5To save a copy of the trimmed video, tap SAVE [menu_save] .GUID GUID-53EB1D7A-255D-4653-AF52-3294EF6CA215Title To trim a videoChanges N update, save label capitalizedVersion 5Author AdelKStatus ReleasedTo adjust the speed of a video1In the Album, find and tap the video that you want to play.2Tap the screen to display the toolbars, then tap ID: ICN-SONY-MOVIE-EDIT .3If prompted, select Video Editor [movie_creator_strings_new_application_name_txt] then tap Speed[movie_creator_strings_speed_txt] .4Select an option, then touch and hold the edge of the timeline and drag it tothe desired position and tap Apply [movie_creator_strings_apply_txt] .5To save a copy of the edited video, tap SAVE [menu_save] .GUID GUID-3FA8828E-2299-4DEE-9905-6C5C29D0C7A1Title To adjust the speed of a videoChanges N update, save label capitalizedVersion 6Author AdelKStatus ReleasedTo capture a photo from a video1In the Album, find and tap the video that you want to play.2Tap the screen to display the toolbars, then tap ID: ICN-SONY-MOVIE-EDIT .3If prompted, select Video Editor [movie_creator_strings_new_application_name_txt] then tap PhotoCapture [movie_creator_strings_photo_capture_txt] .4With the help of the arrows, or by dragging the marker on the progress bar,select the preferred frame that you want to capture, then tap Save [movie_crea-tor_strings_save_txt] .GUID GUID-8B6DADEB-AC01-41E3-94A9-62F608833740Title To capture a photo from a videoChanges Step 2 reduced, Step 3 added "if prompted select Video Editor, then tap Photo Capture."Rewrote last step to better reflect the UI.Version 3Author SzilviaSStatus ReleasedHiding photos and videosYou can hide any photos and videos from the Album home screen. Once photos andvideos are hidden from the Album home screen, they can only be viewed from theHidden folder.GUID GUID-386C4699-7EA8-4FC9-BB4D-3918A26E20F5Title Hiding photos and videosChanges created from Jasmine and valid for all projects onwards including L updateVersion 1Author zzWangHerman168This is an internet version of this publication. © Print only for private use.](https://usermanual.wiki/Sony/10720X.Manual/User-Guide-3336261-Page-168.png)
![Status ReleasedTo hide a photo or video1In Album, find and tap the photo or video that you want to hide.2Tap the screen to display the toolbars, then tap ID: ICN-SONY-KEY-MENU .3Tap Hide [album_option_hide_txt] > OK [okay_action] .GUID GUID-7BC34C08-622A-4455-A573-73CAD13E4947Title To hide a photo or videoChanges label fix due to resource file updateVersion 2Author AdelKStatus ReleasedTo view your hidden photos and videos1In Album, tap ID: ICN-SONY-APP-CALENDAR-L , then tap Hidden [album_drawer_title_hidden] .2Tap a photo or video to view it.3Flick left to view the next photo or video. Flick right to view the previous photoor video.GUID GUID-E1BC3F27-B437-4BB5-A6FB-9DED71243CA7Title To view your hidden photos and videosChanges label fix due to resource file updateVersion 3Author AdelKStatus ReleasedTo unhide a photo or video1In Album, tap ID: ICN-SONY-APP-CALENDAR-L , then tap Hidden [album_drawer_title_hidden] .2Tap a photo or video that you want to unhide.3Tap the screen to display the toolbars, then tap ID: ICN-SONY-KEY-MENU .4Tap Don't hide [album_option_unhide_txt] .GUID GUID-A1240923-DCB1-4F9D-928E-ECD7735269EBTitle To unhide a photo or videoChanges label fix due to resource file updateVersion 3Author AdelKStatus ReleasedViewing your photos on a mapAdding location information to photos is referred to as geotagging. You can view andtag your photos on a map and show friends and family where you were when youtook a particular photo. See Saving a photo's geographic location on page 151 formore information.ID: SCR-SONY-ALBUM-MAP-OVERVIEW-WVGA-WITHMENU1 View geotagged photos in Globe view2 Search a location on the map3 View menu options4 Double tap to zoom in. Pinch to zoom out. Drag to view different parts of the map5 A group of photos or videos geotagged with the same location169This is an internet version of this publication. © Print only for private use.](https://usermanual.wiki/Sony/10720X.Manual/User-Guide-3336261-Page-169.png)
![6 Thumbnails of the selected group of photos or videos. Tap an item to view it in full screenGUID GUID-5F3D09DC-6D63-40EB-AE7D-A1D4B8B0ABE3Title Viewing your photos on a mapChanges ed comments update, moved notes to other topicsVersion 13Author AdelKStatus ReleasedTo add or edit the geotag of a photo1When you are viewing a photo, tap the screen to display the toolbars.2Tap ID: ICN-SONY-KEY-MENU , then tap Add geotag [album_options_add_geotag_txt] or Edit geotag[album_options_edit_geotag_txt] to open the map screen.3Tap on the map to set the location for the photo.4To reset the location for the photo, tap the new location on the map.5When you are finished, tap OK [gui_ok_txt] .If you have turned on location detection and activated geotagging in the camera, you can tagyour photos directly for map viewing at a later stage.GUID GUID-94B6D803-A114-4058-AF8D-CB219961DD33Title To add or edit the geotag of a photoChanges ed comments update, added noteVersion 6Author AdelKStatus ReleasedTo view geotagged photos on a map1From your Home screen [preference_title_home_wallpaper] , tap ID: ICN-SONY-HOME-APPTRAY-NORMAL .2Find and tap Album [album_app_name_txt] .3Tap ID: ICN-SONY-APP-CALENDAR-L , then tap Places [drawer_item_title_location] .4Tap the photo that you want to view on a map.If several photos were taken at the same location, only one of them appears on the map. Thetotal number of photos appears in the top right corner, for example, ID: ICN-SONY-ALBUM-PHOTO-GROUP . To view all photos in the group, tap the cover photo and then tap one of the thumbnailsat the bottom of the screen.GUID GUID-6ED5D2BE-F4C3-4957-B8EE-544F2EB007F2Title To view geotagged photos on a mapChanges added noteVersion 12Author AdelKStatus ReleasedTo view geotagged photos on a globe1From your Home screen [preference_title_home_wallpaper] , tap ID: ICN-SONY-HOME-APPTRAY-NORMAL .2Find and tap Album [album_app_name_txt] .3Tap ID: ICN-SONY-APP-CALENDAR-L , then tap Places [drawer_item_title_location] > ID: ICN-SONY-EARTH .4Tap the photo that you want to view on a globe.GUID GUID-058FF9EC-CDBF-414A-AC0B-2C89C9791CE0Title To view geotagged photos on a globeChanges label fix due to resource file updateVersion 5Author AdelKStatus ReleasedTo change the geotag of a photo1When viewing a photo on the map in Album, touch and hold the photo until itsframe turns blue, then tap the desired location on the map.2Tap OK [gui_ok_txt] .GUID GUID-C563C5E8-4E10-4BD9-A348-08F1A4A400DBTitle To change the geotag of a photoChanges For HTML Next Step Xperia (Honami)170This is an internet version of this publication. © Print only for private use.](https://usermanual.wiki/Sony/10720X.Manual/User-Guide-3336261-Page-170.png)
![Version 2Author zzPengLeonStatus ReleasedTo change the map view•When viewing the map in Album, tap ID: ICN-SONY-KEY-MENU , then switch between Classicview [album_options_map_view_classic_txt] and Satellite view [album_options_map_view_satellite_txt] .GUID GUID-000937D7-8E92-43F6-9EBD-157D5D4D21EBTitle To change the map viewChanges label fix due to resource file updateVersion 6Author AdelKStatus Released171This is an internet version of this publication. © Print only for private use.](https://usermanual.wiki/Sony/10720X.Manual/User-Guide-3336261-Page-171.png)
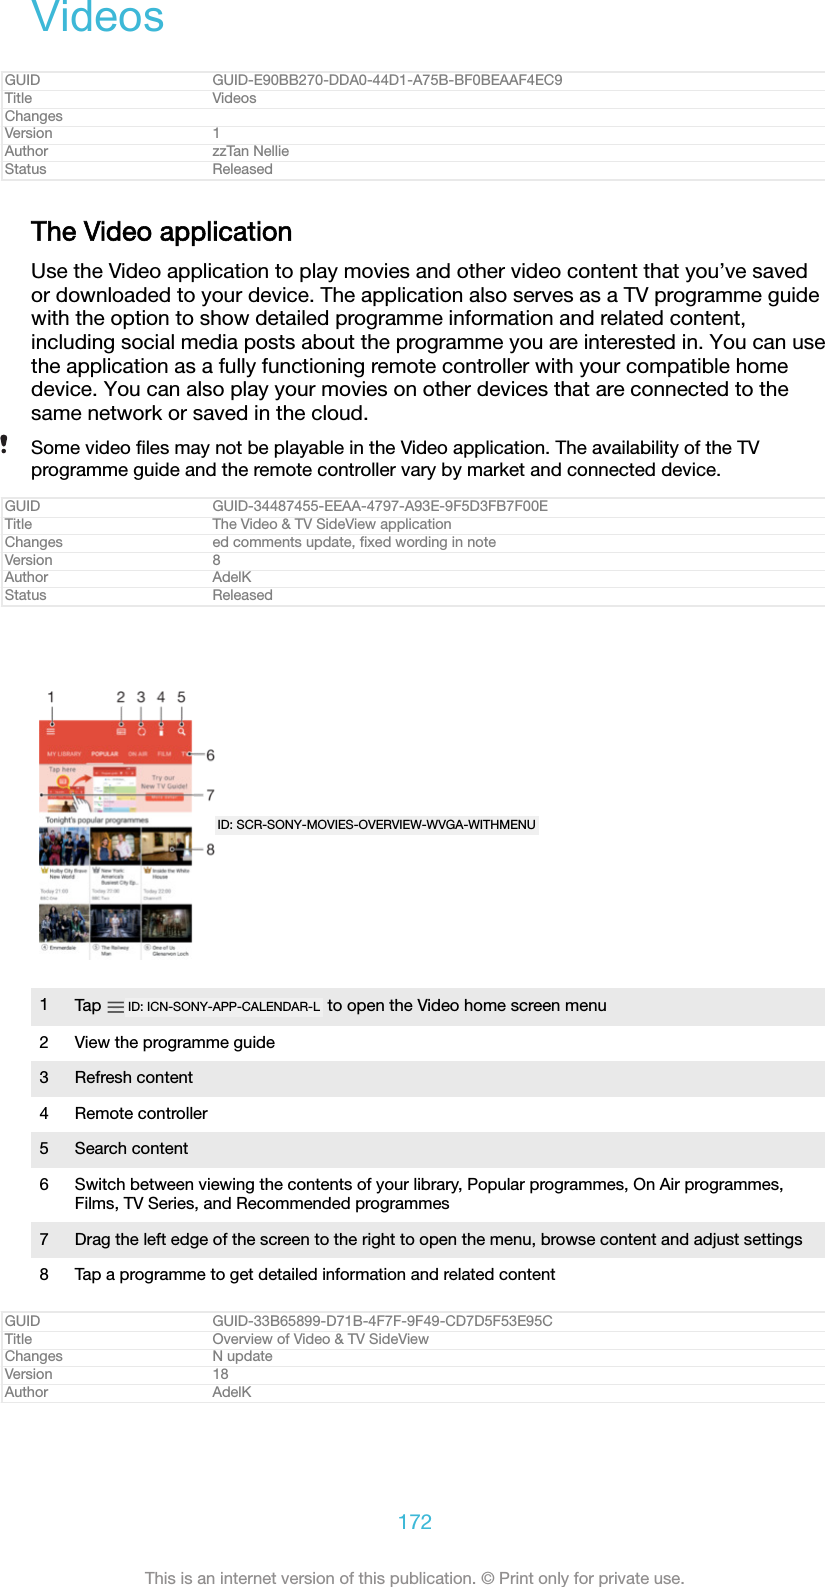
![Status ReleasedTo use your device as a remote controllerTo use your device as a remote controller with another compatible home networkdevice, you first need to pair the two devices. In order to do this, both devices needto be connected to the same network. For more information on compatible devices,visit Compatible device list.1From your Home screen [preference_title_home_wallpaper] , tap ID: ICN-SONY-HOME-APPTRAY-NORMAL , then find and tap Video [app_name_video] .2Tap ID: ICN-SONY-APP-CALENDAR-L to open the home screen menu, then tap Adddevice [irremote_add_device_view_title_txt] .3Select the home device from the list.4Enter the registration number shown on the home device and follow theinstructions to finish pairing.5After the successful pairing, the ID: ICN-SONY-TVVIDEOSIDEVIEW-REMOTE icon for theremote controller function appears. You can now use your device as a fullyfunctional remote controller for the home device.GUID GUID-AB79BCC4-7A3C-4A4E-99E0-60F732D03F92Title To use your device as a remote controllerChanges label fix due to resource file updateVersion 2Author AdelKStatus ReleasedTo change settings1From your Home screen [preference_title_home_wallpaper] , tap ID: ICN-SONY-HOME-APPTRAY-NORMAL , then find and tap Video [app_name_video] .2Tap ID: ICN-SONY-APP-CALENDAR-L to open the home screen menu, then tap Settings[settings_label] .3Change the settings as desired.GUID GUID-43457299-FEB5-4603-8FCD-2704516C40E1Title To change settingsChanges label fix due to resource file updateVersion 6Author AdelKStatus ReleasedTo play a video1From your Home screen [preference_title_home_wallpaper] , tap ID: ICN-SONY-HOME-APPTRAY-NORMAL , then find and tap Video [app_name_video] .2Find and tap the video that you want to play. If the video is not displayed onthe screen, tap ID: ICN-SONY-APP-CALENDAR-L to open the home screen menu, thenfind and tap the video that you want to play.3To display or hide the controls, tap the screen.4To pause playing, tap ID: ICN-SONY-SEMC-MUSIC-PAUSE-NORMAL . To resume playing, tapID: ICN-SONY-SEMC-MUSIC-PLAY-NORMAL .5To rewind, drag the progress bar marker to the left. To fast-forward, drag theprogress bar marker to the right.GUID GUID-BB3F685B-DC8C-4C9A-8988-347CC7F28D2BTitle To play a videoChanges label fix due to resource file updateVersion 7Author AdelKStatus ReleasedTo change the sound settings while a video is playing1While a video is playing, tap the screen to display the controls.2Tap ID: ICN-SONY-KEY-MENU > Audio settings [mvp_option_sound_effect_txt] , then change thesettings as desired.GUID GUID-2E2A3369-4370-493A-A9AD-8A797853C20ATitle To change the sound settings while a video is playingChanges N update, 3rd step removedVersion 6Author AdelK173This is an internet version of this publication. © Print only for private use.](https://usermanual.wiki/Sony/10720X.Manual/User-Guide-3336261-Page-173.png)
![Status ReleasedTo share a video1When a video is playing, tap ID: ICN-SONY-KEY-MENU , then tap Share [share] .2Tap the application that you want to use to share the selected video, thenfollow the instructions provided.GUID GUID-FA1344A1-1D81-4746-8FC6-5ECD464F44E6Title To share a videoChanges label fix due to resource file updateVersion 6Author AdelKStatus ReleasedTransferring video content to your deviceBefore you start using the Video application, it’s a good idea to transfer movies, TVshows and other video content to your device from other devices, such as acomputer. There are several ways to transfer your content:•For Windows® only: Connect your device to a computer using a USB Type-C™ [USBType-C-tm] cable and drag and drop the video files directly using the file managerapplication on the computer. See Managing files using a computer on page 61.•If you have a PC or an Apple® Mac® computer, use Xperia™ Companion to organisecontent and transfer video files to your device.GUID GUID-9080C420-CE7F-46A5-9E3D-7B1032A74172Title Transferring video content to your deviceChanges for devices with USB type-cVersion 7Author AdelKStatus ReleasedManaging video contentGUID GUID-1D0AD156-8864-431A-87A7-E5004C2ABF6CTitle Managing video contentChanges From HonamiVersion 1Author zzTan NellieStatus ReleasedTo view movie information1From your Home screen [preference_title_home_wallpaper] , tap ID: ICN-SONY-HOME-APPTRAY-NORMAL , then find and tap Video [app_name_video] .2Tap ID: ICN-SONY-APP-CALENDAR-L to open the home screen menu, then tap Mobiledevice [udoc_trans_video_mobile_device] .3Browse through the different categories and find the desired video.4Tap the video thumbnail.GUID GUID-C90DB6C6-1213-4A7F-B71E-0EFA1B841361Title To view video informationChanges label fix due to resource file updateVersion 5Author AdelKStatus ReleasedTo delete a video1From your Home screen [preference_title_home_wallpaper] , tap ID: ICN-SONY-HOME-APPTRAY-NORMAL , then find and tap Video [app_name_video] .2Tap ID: ICN-SONY-APP-CALENDAR-L to open the home screen menu, then tap Mobiledevice [udoc_trans_video_mobile_device] .3Browse through the different categories and find the desired video.4Tap the video thumbnail, then tap ID: ICN-SONY-CIRCLED-DELETE .5Tap Delete [delete] again to confirm.GUID GUID-FF4AE431-C65B-4F9C-9E9A-BD782D59D6A6Title To delete a videoChanges label fix due to resource file updateVersion 7Author AdelK174This is an internet version of this publication. © Print only for private use.](https://usermanual.wiki/Sony/10720X.Manual/User-Guide-3336261-Page-174.png)

![ConnectivityGUID GUID-2DE0CED8-8C54-45E2-BBCA-EB06A8978D22Title ConnectivityChangesVersion 1Author JorgenLStatus ReleasedMirroring the screen of your device wirelessly on a TVYou can use the Screen mirroring feature to show the screen of your device on a TVor other large display without using a cable connection. Wi-Fi Direct™ technologycreates a wireless connection between the two devices, so you can sit back andenjoy your favourite photos from the comfort of your couch. You can also use thisfeature to listen to music from your device using the TV's speakers.When using Screen mirroring, the image quality may sometimes be negatively impacted ifthere is interference from other Wi-Fi [udoc_no_trans_wifi_wlan_plain] networks.GUID GUID-EC8A4F11-748F-498C-B076-D53B371F169ATitle Mirroring the screen of your device wirelessly on a TVChanges TM instead of RVersion 11Author RenataBStatus ReleasedTo mirror the screen of your device on a TV screen1TV: Follow the instructions in the User guide of your TV to turn on the Screenmirroring function.2Your device: From your Home screen [preference_title_home_wallpaper] , tap ID: ICN-SONY-HOME-APPTRAY-NORMAL .3Find and tap Settings [settings_label_launcher] > Device connection [device_connection] > Screenmirroring [wfd_strings_xperia_settings_title_txt] .4Tap START [start_capital] .5Tap OK [ok] and select a device.Your TV must support Screen mirroring based on Wi-Fi CERTIFIED Miracast™ for the functionto work. If your TV does not support Screen mirroring, you may need to purchase a wirelessdisplay adapter separately. Also, when using Screen mirroring, do not cover the Wi-Fi[udoc_no_trans_wifi_wlan_plain] antenna area of your device.GUID GUID-43EA3640-D708-402E-A0DD-8C011F488422Title To mirror your device screen on a TVChanges Editorial comment implementedVersion 14Author DoraMStatus ReleasedTo stop screen mirroring between devices1From your Home screen [preference_title_home_wallpaper] , tap ID: ICN-SONY-HOME-APPTRAY-NORMAL .2Find and tap Settings [settings_label_launcher] > Device connection [device_connection] > Screenmirroring [wfd_strings_xperia_settings_title_txt] .3Tap Disconnect [wfd_strings_notification_disconnect_btn_txt] , then tap OK [ok] .GUID GUID-0FA1AB89-1773-45C0-9AD1-65CB6B8F80D2Title To stop screen mirroring between devicesChanges For Kugo - label/icon correctionsVersion 3Author SzilviaMStatus ReleasedConnecting your device to USB accessoriesYou can use a USB Type-C™ [USB Type-C-tm] host adapter to connect your device to USBaccessories such as USB mass storage devices, game controllers, USB keyboards176This is an internet version of this publication. © Print only for private use.](https://usermanual.wiki/Sony/10720X.Manual/User-Guide-3336261-Page-176.png)
![and USB mice. If the USB accessory has a USB Type-C [USB Type-C] connector, a USBType-C [USB Type-C] host adapter is not necessary.USB Type-C [USB Type-C] host adapters are sold separately. Sony does not guarantee thatall USB accessories are supported by your device.This device has a capless USB Type-C [USB Type-C] port. If your device gets exposed to water,ensure that the port is completely dry before connecting a USB Type-C [USB Type-C] cable.GUID GUID-4CF7C43F-F193-4D46-B0C4-4DBB202DB44ATitle Connecting your device to USB peripheralsChanges Host adapter changed to host adapter (editorial request)Version 9Author DoraMStatus ReleasedTo access content on a USB mass storage device using a USB Type-C™ [USB Type-C-tm]host adapter1Attach the USB Type-C [USB Type-C] host adapter to your device, then connect theadapter to the USB mass storage device.2To access files and folders on the USB storage device, use a file manager appsuch as File Commander.You can also open the relevant media application on your device to view content directly. Forexample, you can open the Album application to view photos stored on USB mass storagedevices.GUID GUID-02503928-B41D-4F3B-99CF-D8865CCF3F5ETitle To access content on a USB mass storage device using a USB host adapterChanges KEYAKI - step 2 and 3 deleted due to a functional review comment (USB would beautomatically detected, there's no Detect USB device option)Version 4.1.4Author DoraMStatus DraftTo disconnect a USB mass storage device1To open the Notification Panel, drag the status bar downwards.2Tap the drop-down arrow beside Android System [android_system_label] .3Tap EJECT [ext_media_unmount_action] in the drop-down list.4Detach the USB Type-C™ [USB Type-C-tm] host adapter from your device.If the notification does not appear, tap Settings [settings_label] > Storage & memory [settings_stor-age_memory_title_txt] > ID: ICN-SONY-KEY-MENU > Advanced [home_settings_advanced_category] > Storage [cleaner_stor-age_title] > ID: ICN-SONY-EJECT3 next to Portable storage [storage_external_title] .GUID GUID-FB59B043-77D6-474A-8A96-B17ED1C501B5Title To safely remove a USB mass storage device connected using a USB Host adapterChanges KEYAKI Tip added due to a functional review commentVersion 3.1.4Author DoraMStatus DraftTo connect a USB accessory using a USB Type-C™ [USB Type-C-tm] host adapter1Attach the USB Type-C [USB Type-C] host adapter to your device, then connect theadapter to the USB accessory.2From your Home screen [preference_title_home_wallpaper] , tap ID: ICN-SONY-HOME-APPTRAY-NORMAL .3Find and tap Settings [settings_label_launcher] > Device connection [device_connection] > USBConnectivity [usbux_strings_usb_connectivity_txt] > Detect USB device [quick_settings_detect_usb_device_la-bel] .Additional steps or software may be required to set up game controllers, USB audio and USBEthernet accessories. Sony does not guarantee that all USB accessories are supported byyour device.GUID GUID-AB0F8C97-F8E3-444B-9B26-B781A6CFA405Title To connect USB accessories using a USB host adapterChanges Host adapter changed to host adapter (editorial request)Version 4177This is an internet version of this publication. © Print only for private use.](https://usermanual.wiki/Sony/10720X.Manual/User-Guide-3336261-Page-177.png)
![Author DoraMStatus ReleasedTo connect a USB Type-C™ [USB Type-C-tm] accessory using a USB Type-C [USB Type-C]connector1Attach the USB Type-C [USB Type-C] connector of the USB Type-C [USB Type-C]accessory to your device.2From your Home screen [preference_title_home_wallpaper] , tap ID: ICN-SONY-HOME-APPTRAY-NORMAL .3Find and tap Settings [settings_label_launcher] > Device connection [device_connection] > USBConnectivity [usbux_strings_usb_connectivity_txt] > Detect USB device [quick_settings_detect_usb_device_la-bel] .Sony does not guarantee that all USB Type-C [USB Type-C] accessories with a USB Type-C [USBType-C] connector are supported by your device.GUID GUID-B0F68178-74A9-475A-8998-7B00D73CFFA5Title To set up your device to detect USB devicesChanges For Kugo update added Type-C labelsVersion 1.1.3Author AlexandraTStatus ReleasedNFCUse Near Field Communication (NFC) to share data with other devices, such asvideos, photos, web page addresses, music files or contacts. You can also use NFCto scan tags that give you more information about a product or service as well astags that activate certain functions on your device.NFC is a wireless technology with a maximum range of one centimetre, so thedevices sharing data must be held close to each other. Before you can use NFC, youmust first turn on the NFC function, and the screen of your device must be active.The NFC detection area is located on the back of the device. Hold your device closeto another device or an NFC reader so that the NFC detection areas touch eachother.ID: ILL-SONY-17PE-NFC-DETECTION-AREANFC may not be available in all countries or regions. Using certain apps, some NFC functionscan be enabled even when the device is switched off. Note that not all devices support thisfeature.GUID GUID-4DA4B2B5-45C2-4A5D-B1AF-53404CCAAFC1Title NFCChanges For Cosmos - NFC detection area on the back of the deviceVersion 14Author SzilviaM178This is an internet version of this publication. © Print only for private use.](https://usermanual.wiki/Sony/10720X.Manual/User-Guide-3336261-Page-178.png)
![Status ReleasedTo enable or disable the NFC function1From your Home screen [preference_title_home_wallpaper] , tap ID: ICN-SONY-HOME-APPTRAY-NORMAL .2Find and tap Settings [settings_label] > More [more_item_label] .3Tap the NFC [nfc_quick_toggle_title] slider.GUID GUID-FCB71F3A-AA5D-466D-A05D-706B9193962ATitle To enable or disable the NFC functionChanges For Kugo - label/icon correctionsVersion 6Author SzilviaMStatus ReleasedTo share a contact with another device using NFC1Make sure that both devices have the NFC function turned on, and that bothscreens are active and unlocked.2To view contacts, go to your Home screen [preference_title_home_wallpaper] , tap ID: ICN-SONY-HOME-APPTRAY-NORMAL , then tap ID: ICN-SONY-APP-PHONEBOOK .3Tap the contact that you want to share.4Hold your device and the receiving device close to each other so that the NFCdetection areas of each device touch. When the devices connect, a thumbnailof the contact appears.5Tap the thumbnail to start the transfer.6When the transfer is done, the contact information is saved on the receivingdevice and displayed on its screen.GUID GUID-A5FC1654-D575-4626-85E3-F27929134E72Title To share a contact with another NFC phoneChanges For Kugo - label/icon correctionsVersion 9Author SzilviaMStatus ReleasedTo share a music file with another device using NFC1Make sure that both your device and the receiving device have the NFCfunction turned on, and that both screens are active and unlocked.2To open the Music application, tap ID: ICN-SONY-HOME-APPTRAY-NORMAL , then find andtap ID: ICN-SONY-APP-MUSIC-PLAYER .3Select a music category and browse to the track you want to share.4Tap the track to play it. You can then tap ID: ICN-SONY-SEMC-MUSIC-PAUSE-NORMAL topause the track. The transfer works whether the track is playing or paused.5Make sure the track is displayed on full screen.6Hold your device and the receiving device close to each other so that the NFCdetection areas of each device touch. When the devices connect, a thumbnailof the track appears.7Tap the thumbnail to start the transfer.8When the transfer is done, the music file is saved on the receiving device.9To display the music file, double-tap the status bar to open the Notificationpanel, and then tap Beam complete [beam_complete] .GUID GUID-C3610A96-7DDF-4DD8-BDA2-1FF715EA0A49Title To share a music file with another NFC phoneChanges There was a (varid) in the topic instead of a (varref)Version 17Author DoraM179This is an internet version of this publication. © Print only for private use.](https://usermanual.wiki/Sony/10720X.Manual/User-Guide-3336261-Page-179.png)
![Status ReleasedTo share a photo or video with another device using NFC1Make sure that both devices have the NFC function turned on, and that bothscreens are active and unlocked.2To view photos and videos on your device, go to your Home screen [preference_ti-tle_home_wallpaper] , tap ID: ICN-SONY-HOME-APPTRAY-NORMAL , then find and tap Album [al-bum_app_name_txt] .3Tap the photo or video that you want to share.4Hold your device and the receiving device close to each other so that the NFCdetection areas of each device touch. When the devices connect, a thumbnailof the photo or video appears.5Tap the thumbnail to start the transfer.6When the transfer is done, the photo or video is saved on the receiving device.GUID GUID-497460D2-9A06-40C3-BFA1-4328DF8FE10FTitle To share a photo or video with another NFC phoneChanges For Kugo - label/icon correctionsVersion 12Author SzilviaMStatus ReleasedTo share a web address with another device using NFC1Make sure that both devices have the NFC function turned on, and that bothscreens are active and unlocked.2From your Home screen [preference_title_home_wallpaper] , tap ID: ICN-SONY-HOME-APPTRAY-NORMAL .3To open the web browser, find and tap ID: ICN-SONY-APP-CHROME .4Load the web page that you want to share.5Hold your device and the receiving device close to each other so that the NFCdetection areas of each device touch. When the devices connect, a thumbnailof the web page appears.6Tap the thumbnail to start the transfer.7When the transfer is done, the web page is displayed on the screen of thereceiving device.GUID GUID-07F451E1-A723-427E-98E5-FCDB65790FFCTitle To share a website address with another phone using NFCChanges For Kagura - Mainland China customizationVersion 10Author SzilviaMStatus ReleasedScanning NFC tagsYour device can scan various kinds of NFC tags to receive additional information,such as a web address. For example, it can scan embedded tags on a poster, on abillboard advertisement, or beside a product in a retail store.GUID GUID-ADBEF157-BCCC-408B-88D4-00FCDDD75F5DTitle Reading an NFC tagChanges For Lavender - implementing changes according to ED commentsVersion 4Author SzilviaMStatus ReleasedTo scan an NFC tag1Make sure that your device has the NFC function turned on and that the screenis active and unlocked.2Place your device over the tag so that the NFC detection area touches it. Yourdevice scans the tag and displays the content collected. Tap the content of thetag to open it.GUID GUID-2D1E1C30-8574-4E6A-9CA4-07005D115490Title To read an NFC tagChanges For Suzu V2 - adding "and unlocked" to step 1Version 5Author SzilviaM180This is an internet version of this publication. © Print only for private use.](https://usermanual.wiki/Sony/10720X.Manual/User-Guide-3336261-Page-180.png)
![Status ReleasedConnecting to an NFC compatible deviceYou can connect your device to other NFC compatible devices produced by Sony,such as a speaker or a headphone. When establishing this kind of connection, referto the User guide of the compatible device for more information.You may need to have Wi-Fi [udoc_no_trans_wifi_wlan_plain] or Bluetooth® activated on both devices forthe connection to work.GUID GUID-A923519B-5BA2-4369-9E94-23D64509E0EATitle Connecting your phone to an NFC compatible accessoryChanges MLC condition removed, Wi-Fi WLAN switchable label added (Germany also uses WLAN notonly China)Version 3.1.1Author DoraMStatus ReleasedBluetooth® wireless technologyUse the Bluetooth® function to send files to other Bluetooth® compatible devices, orto connect to handsfree accessories. Bluetooth® connections work better within 10metres (33 feet), with no solid objects in between. In some cases you have tomanually pair your device with other Bluetooth® devices.Interoperability and compatibility among Bluetooth® devices can vary.If you are using a device with multiple users, each user can change the Bluetooth® settings,and the changes affect all users.GUID GUID-36689AFD-B450-4570-B637-F31FB56656F0Title Bluetooth™ wireless technologyChanges For Lavender - implementing changes according to ED commentsVersion 14Author SzilviaMStatus ReleasedTo turn the Bluetooth® function on or off1From your Home screen [preference_title_home_wallpaper] , tap ID: ICN-SONY-HOME-APPTRAY-NORMAL .2Find and tap Settings [settings_label] > Bluetooth [bluetooth_quick_toggle_title] .3Tap the Bluetooth [bluetooth_quick_toggle_title] slider to enable or disable the function.GUID GUID-A0BC4F09-CC03-43FE-BF57-9D1239FB4499Title To enable or disable Bluetooth®Changes For Kugo - label/icon correctionsVersion 13Author SzilviaMStatus ReleasedNaming your deviceYou can give your device a name. This name is shown to other devices after youhave turned on the Bluetooth® function and your device is set to visible.GUID GUID-D1C84F4D-7E49-414F-8672-7326B1002658Title Device nameChanges Updating Bluetooth TM mark to R mark due to legal issueVersion 5Author zzLuLinda181This is an internet version of this publication. © Print only for private use.](https://usermanual.wiki/Sony/10720X.Manual/User-Guide-3336261-Page-181.png)
![Status ReleasedTo give your device a name1Make sure that the Bluetooth® function is turned on.2From your Home screen [preference_title_home_wallpaper] , tap ID: ICN-SONY-HOME-APPTRAY-NORMAL .3Find and tap Settings [settings_label_launcher] > Bluetooth [bluetooth_quick_toggle_title] .4Tap ID: ICN-SONY-KEY-MENU > Rename this device [bluetooth_rename_device] .5Enter a name for your device.6Tap RENAME [rename_capital] .GUID GUID-6063BF5D-7D27-470A-9C86-B630131B6B08Title To enter a device nameChanges Editorial comment implementedVersion 15Author DoraMStatus ReleasedPairing with another Bluetooth® deviceWhen you pair your device with another device, you can for example connect yourdevice to a Bluetooth® headset or a Bluetooth® car kit, and use these other devicesto share music.Once you pair your device with another Bluetooth® device, your device remembersthis pairing. When pairing your device with a Bluetooth® device for the first time, youmay need to enter a passcode. Your device will automatically try the genericpasscode 0000. If this does not work, refer to the user guide for your Bluetooth®device to get the device passcode. You do not need to re-enter the passcode thenext time you connect to a previously paired Bluetooth® device.Some Bluetooth® devices, for example, most Bluetooth® headsets, require you to both pairand connect with the other device.You can pair your device with several Bluetooth® devices, but you can only connect to oneBluetooth® profile at the same time.GUID GUID-C4D7D6FB-1BD3-4C5E-A7FF-5BFE54EDDF0ATitle Pairing with another Bluetooth deviceChanges For Lavender - implementing changes according to ED commentsVersion 8Author SzilviaMStatus ReleasedTo pair your device with another Bluetooth® device1Make sure that the device you want to pair with has the Bluetooth® functionactivated and is visible to other Bluetooth® devices.2From your device’s Home screen [preference_title_home_wallpaper] , tap ID: ICN-SONY-HOME-APPTRAY-NORMAL .3Find and tap Settings [settings_label_launcher] > Bluetooth [bluetooth_quick_toggle_title] .4Tap the Bluetooth [bluetooth_quick_toggle_title] slider to enable the function. A list of theavailable Bluetooth® devices appears.5Tap the Bluetooth® device that you want to pair with.6Enter a passcode, if required, or confirm the same passcode on both devices.GUID GUID-226704F7-A3B0-4FE9-A592-EB43A40DAA56Title To pair your device with another Bluetooth deviceChanges For Kugo - label/icon correctionsVersion 14Author SzilviaM182This is an internet version of this publication. © Print only for private use.](https://usermanual.wiki/Sony/10720X.Manual/User-Guide-3336261-Page-182.png)
![Status ReleasedTo connect your device to another Bluetooth® device1From your Home screen [preference_title_home_wallpaper] , tap ID: ICN-SONY-HOME-APPTRAY-NORMAL .2Find and tap Settings [settings_label_launcher] > Bluetooth [bluetooth_quick_toggle_title] .3Tap the Bluetooth® device that you want to connect to.GUID GUID-7EB7AADF-804F-460C-A176-ACA0F5C564B6Title To connect your device to another Bluetooth deviceChanges For Kugo - label/icon correctionsVersion 11Author SzilviaMStatus ReleasedTo unpair a Bluetooth® device1From your Home screen [preference_title_home_wallpaper] , tap ID: ICN-SONY-HOME-APPTRAY-NORMAL .2Find and tap Settings [settings_label_launcher] > Bluetooth [bluetooth_quick_toggle_title] .3Under Paired devices [bluetooth_preference_paired_devices] , tap ID: ICN-SONY-MENU-SETTINGSbeside the name of the device that you want to unpair.4Tap FORGET [forget_capital] .GUID GUID-A1AA3B64-C917-412E-9A50-E12A8CAC6795Title To unpair a Bluetooth deviceChanges Label error correctedVersion 10Author DoraMStatus ReleasedSending and receiving items using Bluetooth® technologyUse Bluetooth® technology to share items with other Bluetooth® compatible devicessuch as phones or computers. You can send and receive the following kinds of items:•Photos and videos•Music and other audio files•Web pagesGUID GUID-FEABAFA3-3C43-48A6-99F7-C72423ED3745Title Sending and receiving items using Bluetooth™ wireless technologyChanges Update for Pollux MR1; Bluetooth trademark changedVersion 6Author zzLuLindaStatus ReleasedTo send items using Bluetooth®1Receiving device: Make sure the Bluetooth® function is turned on and that thedevice is visible to other Bluetooth® devices.2Sending device: Open the application which contains the item that you want tosend, and scroll to the item.3Depending on the application and on the item that you want to send, you mayneed to, for example, touch and hold the item, open the item, and press ID:ICN-SONY-HOME-TAP-APP-SHARE .4Select Bluetooth [bluetooth_quick_toggle_title] .5Turn on Bluetooth® if you are prompted to do so.6Tap the name of the receiving device.7Receiving device: If prompted, accept the connection.8Sending device: If prompted, confirm the transfer to the receiving device.9Receiving device: Accept the incoming item.GUID GUID-10429839-41B9-4612-93A5-978EA3721D99Title To send items using Bluetooth™Changes For Kugo - label/icon correctionsVersion 9Author SzilviaM183This is an internet version of this publication. © Print only for private use.](https://usermanual.wiki/Sony/10720X.Manual/User-Guide-3336261-Page-183.png)
![Status ReleasedTo receive items using Bluetooth®1Make sure that the Bluetooth® function is on and is visible to other Bluetooth®devices.2The sending device now starts sending data to your device.3If prompted, enter the same passcode on both devices, or confirm thesuggested passcode.4When you are notified of an incoming file to your device, drag the status bardownwards and tap the notification to accept the file transfer.5Tap Accept [incoming_file_confirm_ok] to start the file transfer.6To view the progress of the transfer, drag the status bar downwards.7To open a received item, drag the status bar downwards and tap the relevantnotification.GUID GUID-7360A980-5A09-4B1A-8DB8-313C2CFF6DF4Title To receive items using BluetoothChanges Updating Bluetooth TM mark to R mark due to legal issueVersion 6.1.1.1.1Author zzLuLindaStatus ReleasedTo view files you have received using Bluetooth®1From your Home screen [preference_title_home_wallpaper] , tap ID: ICN-SONY-HOME-APPTRAY-NORMAL .2Find and tap Settings [settings_label] > Bluetooth [bluetooth_quick_toggle_title] .3Press ID: ICN-SONY-KEY-MENU and select Show received files [bluetooth_show_received_files] .GUID GUID-17AB4DD5-71F2-49BE-BDF0-EEE25085F3A8Title To find items received using BluetoothChanges For Kugo - label/icon correctionsVersion 5Author SzilviaMStatus Released184This is an internet version of this publication. © Print only for private use.](https://usermanual.wiki/Sony/10720X.Manual/User-Guide-3336261-Page-184.png)
![Smart apps and features that save youtimeGUID GUID-FFAC4EC6-448E-44A1-8CA1-5F86AA63526ATitle Smart lifestyleChanges Removed Smart Connect for BassoonVersion 2Author AdamSStatus ReleasedGoogle Search & NowUse the Google app to search the internet. You can also enable a feed for regularupdates ‒ for example, you can get traffic information before commuting to work, findpopular restaurants in your area, see your favourite team's current score, and more.The app can be accessed by tapping ID: ICN-SONY-APP-GOOGLE-SEARCH in the applicationlist, or you can reserve a pane on your Home screen for quick access and easyreading.GUID GUID-4FA0B913-ACAF-47E3-802C-0336CD182F4FTitle Google Search & NowChanges N update - editorial comments implemented, Now cards changed to feedVersion 2Author PalGStatus ReleasedTo enable or disable Your feed1From your Home screen [preference_title_home_wallpaper] , tap ID: ICN-SONY-HOME-APPTRAY-NORMAL .2Find and tap Settings [settings_label_launcher] > Google [SYNC-ACCOUNTS-GOOGLE-TM] > Search[search_action] > Your feed [udoc_trans_google_your_feed] .3Tap the slider to enable or disable the feed.GUID GUID-D7F2A850-D969-40E6-AFCA-2D9C735DCF6ATitle To enable or disable Your feedChanges Label change in step 2 for RedwoodVersion 3Author RenataBStatus DraftTo reserve a pane on the Home screen for Google Search & Now1Touch and hold any area on your Home screen until the device vibrates.2Tap ID: ICN-SONY-HOMESCREEN-SETTINGS , then tap the Google Now™ [home_settings_goo-gle_now_page_on_desktop_title] slider.3You can now swipe to the left-most pane on the Home screen to access theGoogle Search & Now interface.If you reserve the left-most pane for Google Search & Now, the main Home screen panecannot be changed and additional panes cannot be added to the left. Only the left-most panecan be reserved.GUID GUID-89AF527A-C53A-4B25-B836-2C5AF6010B18Title To reserve a pane on the Home screen for Google Search & NowChanges Small editorial changeVersion 2Author DoraMStatus ReleasedUsing your device as a walletYou can use your device to pay for goods without reaching for your real wallet andmanage all payment services in one place. When making a payment, remember toturn on the NFC function before you touch your device to a card reader. For moreinformation about NFC, see NFC on page 178.Mobile payment services may not be available in all regions.185This is an internet version of this publication. © Print only for private use.](https://usermanual.wiki/Sony/10720X.Manual/User-Guide-3336261-Page-185.png)
![GUID GUID-A14E4952-D35D-42DA-B188-434661B67394Title Paying with your deviceChanges For Tuba Test update link to NFCVersion 5Author MartinMStatus ReleasedTo manage payment services1From your Home screen [preference_title_home_wallpaper] , tap ID: ICN-SONY-HOME-APPTRAY-NORMAL .2Find and tap Settings [settings_label_launcher] > More [radio_controls_title] > Tap & pay [nfc_pay-ment_settings_title] . A list of payment services appears.3Manage the payment services as desired, for example, you can change yourdefault payment service.GUID GUID-118642EE-B96D-4B69-BF32-9AA1E1A93725Title To manage payment servicesChanges Fix label error due to resource filesVersion 3Author RenataBStatus Released186This is an internet version of this publication. © Print only for private use.](https://usermanual.wiki/Sony/10720X.Manual/User-Guide-3336261-Page-186.png)
![Travel and mapsGUID GUID-B1602361-6E6A-4C3D-AD90-59DA2221197BTitle Travel and mapsChanges For next step UG from AmamiVersion 3Author zzPengLeonStatus ReleasedUsing location servicesLocation services allow applications such as Maps and the camera to use informationfrom your mobile or Wi-Fi [udoc_no_trans_wifi_wlan_plain] network as well as Global PositioningSystem (GPS) information to determine your approximate location. If you're not withina clear line of sight to GPS satellites, your device can determine your location usingthe Wi-Fi [udoc_no_trans_wifi_wlan_plain] function. And if you're not within range of a network,your device can determine your location using your mobile network.In order to use your device to find out where you are, you need to enable locationservices.You may incur data connection charges when you connect to the internet from your device.GUID GUID-C916866A-B045-42A5-B58F-E26F4129F7DFTitle About location servicesChanges Internet decapedVersion 9Author RenataBStatus ReleasedTo enable or disable location services1From your Home screen [preference_title_home_wallpaper] , tap ID: ICN-SONY-HOME-APPTRAY-NORMAL .2Find and tap Settings [settings_label_launcher] > Location [location_settings_title] , then tap theslider to enable or disable location services.GUID GUID-986A4DFB-1268-43FB-8608-14A21CA08B30Title To enable location servicesChanges Fix label error due to resource filesVersion 7Author RenataBStatus ReleasedImproving GPS accuracyThe first time you use the GPS function in your device, it can take a few minutes foryour location to be found. To help the search, make sure you have a clear view of thesky. Stand still and don't cover the GPS antenna (the highlighted area in the image).GPS signals can pass through clouds and plastic, but not through most solid objectssuch as buildings and mountains. If your location isn't found after a few minutes,move to another location.ID: ILL-SONY-17HI-GPSGUID GUID-395C3448-B84F-4DFD-A2D3-EA5CF6A14E60Title Improving GPS accuracy187This is an internet version of this publication. © Print only for private use.](https://usermanual.wiki/Sony/10720X.Manual/User-Guide-3336261-Page-187.png)
![Changes Varref fix for HinokiVersion 4Author RenataBStatus DraftGoogle Maps™ and navigationUse Google Maps™ to track your current location, view real-time traffic situationsand receive detailed directions to your destination.The Google Maps™ application requires an internet connection when used online.You may incur data connection charges when you connect to the internet from yourdevice. To get more detailed information about how to use this application, go tohttp://support.google.com and click the “Maps for mobile” link.The Google Maps™ application may not be available in every market, country or region.GUID GUID-702A66F3-8639-4512-9963-87F8163E8518Title Google Maps™ overviewChanges Internet decapedVersion 5Author RenataBStatus ReleasedTo use Google Maps™1From your Home screen [preference_title_home_wallpaper] , tap ID: ICN-SONY-HOME-APPTRAY-NORMAL .2Find and tap Google [udoc_no_trans_google_home_folder_name] > Maps [google-maps-maps] .GUID GUID-42F5EBF3-FE39-4000-B2F3-D48122F0B26FTitle To use MapsChanges Fix label error due to resource filesVersion 11Author RenataBStatus ReleasedUsing data traffic when travellingWhen you travel outside of your home mobile network, you may need to access theinternet using mobile data traffic. If so, you need to activate data roaming on yourdevice. You may incur additional charges when you activate data roaming. It isrecommended to check the relevant data transmission charges in advance.If you are using a device with multiple users, you may need to log in as the owner, that is, theprimary user, to activate or deactivate data roaming.GUID GUID-73201F09-74A4-4501-8A3D-A733BDC1C923Title Data roamingChanges Internet decapedVersion 10Author RenataBStatus ReleasedTo enable or disable data roaming1From your Home screen [preference_title_home_wallpaper] , tap ID: ICN-SONY-HOME-APPTRAY-NORMAL .2Find and tap Settings [settings_label_launcher] > More [radio_controls_title] > Mobile networks [net-work_settings_title] .3Tap the Data roaming [roaming] slider to enable or disable the function.You can’t activate data roaming while mobile data traffic is turned off.GUID GUID-22182D0D-03AC-4C8D-8382-721542E916E3Title To activate or deactivate data roamingChanges Fix label error due to resource filesVersion 5Author RenataB188This is an internet version of this publication. © Print only for private use.](https://usermanual.wiki/Sony/10720X.Manual/User-Guide-3336261-Page-188.png)
![Status ReleasedAirplane modeIn Airplane mode, the network and radio transceivers are turned off to preventdisturbance to sensitive equipment. However, you can still make emergency calls,play games, listen to music, watch videos and other content, as long as all thiscontent is saved on your memory card or internal storage. You can also be notifiedby alarms, if alarms are activated.Turning on Airplane mode reduces battery consumption.GUID GUID-4592770A-6B42-477E-9A27-8326386B4FC0Title Airplane modeChanges New information added for N-updateVersion 6Author RenataBStatus ReleasedTo enable or disable Airplane mode1From your Home screen [preference_title_home_wallpaper] , tap ID: ICN-SONY-HOME-APPTRAY-NORMAL .2Find and tap Settings [settings_label_launcher] > More [radio_controls_title] .3Tap the Airplane mode [airplane_mode] slider.GUID GUID-0D75D33F-E108-41F8-B61A-F27882DA3E55Title To turn on Flight modeChanges Implement changes for N updateVersion 15.1.2Author RenataBStatus Released189This is an internet version of this publication. © Print only for private use.](https://usermanual.wiki/Sony/10720X.Manual/User-Guide-3336261-Page-189.png)
![Clock and CalendarGUID GUID-ECBFED5C-3FD9-4178-8410-BDF05AFE0032Title Clock and CalendarChanges Kagura - Title changed to 'Clock and Calendar'Version 2Author AdamSStatus ReleasedCalendarUse the Calendar application to manage your time schedule. If you have signed in toand synchronised your device with one or several online accounts that includecalendars, for example, your Google™ account, then calendar events from theseaccounts will also appear in the Calendar application. You can select whichcalendars you want to integrate into the combined Calendar view.When an appointment time approaches, your device plays a notification sound toremind you.ID: SCR-SONY-CALENDAR-OVERVIEW1 Access settings, select a view type and the calendars that you want to view2 Access an overview of the current month3 Return to the current date4 Access other options5 Scroll up or down to browse the calendar6 Add a calendar entryGUID GUID-CBBA1327-6D73-439D-87B0-2E2C4112207BTitle CalendarChanges Keyaki - updated calloutsVersion 11.1.1.1.2Author AdamSStatus ReleasedTo learn more about Calendar•When the Calendar application is open, tap ID: ICN-SONY-APP-CALENDAR-L , then findand tap Help & feedback [gmail_help_and_feedback] .GUID GUID-7F535683-883E-449F-BCE2-D413959F92C4Title To learn more about CalendarChanges Kugo - label correctionVersion 1.1.2Author AdamSStatus ReleasedClockYou can set one or several alarms and use any sound file saved on your device as thealarm signal. The alarm does not sound if your device is turned off.The alarm time format displayed is the same as the format you select for your generaltime settings, for example, 12-hour or 24-hour.190This is an internet version of this publication. © Print only for private use.](https://usermanual.wiki/Sony/10720X.Manual/User-Guide-3336261-Page-190.png)
![ID: SCR-SONY-ALARM-OVERVIEW1 Access the alarms tab2 Access the world clock tab3 Access the stopwatch tab4 Access the timer tab5 View options for the current tab6 Open date and time settings7 Turn an alarm on or off8 Add a new alarmGUID GUID-66E56B1F-52AF-43A4-B1B4-6C33096B0427Title Alarm clockChanges Kagura changes made according to ed commentsVersion 6.1.5Author AlexandraTStatus ReleasedTo set a new alarm1From your Home screen, tap ID: ICN-SONY-HOME-APPTRAY-NORMAL .2Find and tap Clock [alarm_clock] .3Tap ID: ICN-SONY-CALENDAR-ALARM-ADD .4Tap Time [time] and select the desired value.5Tap OK [ok] .6If desired, edit other alarm settings.7Tap SAVE [menu_save] .GUID GUID-BBD8A2E8-E168-4C12-B44D-78D517DCC718Title To set a new alarmChanges Keyaki - label corrected in step 7.Version 14.1.3Author AdamSStatus ReleasedTo snooze an alarm when it sounds•Tap SNOOZE [alarm_snooze_caps] .GUID GUID-2B840C9B-5748-43FC-A2F5-B00D5F685BDCTitle To turn off or snooze an alarm when it soundsChanges Keyaki - label correctedVersion 5.1.1Author AdamSStatus ReleasedTo turn off an alarm when it sounds•Drag ID: ICN-SONY-STAT-NOTIFY-ALARM to the right.To turn off a snoozed alarm, you can drag down the status bar to open the Notification paneland then tap ID: ICN-SONY-STAT-NOTIFY-ALARM .GUID GUID-E3BC96CC-903A-4362-AB16-5EC1E104562CTitle To turn off an alarm when it soundsChanges Tuba - icon changed in the noteVersion 5.1.2Author AdamS191This is an internet version of this publication. © Print only for private use.](https://usermanual.wiki/Sony/10720X.Manual/User-Guide-3336261-Page-191.png)
![Status ReleasedTo edit an existing alarm1Find and tap Clock [alarm_clock] , then tap the alarm that you want to edit.2Make the desired changes.3Tap SAVE [menu_save] .GUID GUID-78B0F168-633F-486B-B279-DB3EDD413359Title To edit an existing alarmChanges Keyaki - label corrected in the last stepVersion 13.1.3Author AdamSStatus ReleasedTo turn an alarm on or off•Find and tap Clock [alarm_clock] , then tap the slider for the alarm you want to turnon or off.GUID GUID-EFBAC44E-3523-4F2F-A87D-DD4AE68644E2Title To turn an alarm on or offChanges Holly - edcomment implementedVersion 2.1.2Author AdamSStatus ReleasedTo delete an alarm1Find and tap Clock [alarm_clock] , then touch and hold the alarm that you want todelete.2Tap Delete alarm [delete_alarm] , then tap YES [diagnostics_result_yes] .GUID GUID-80576A84-8F35-42D3-B98F-978772FBA94ETitle To delete an alarmChanges Keyaki - label corrected in the last stepVersion 16Author AdamSStatus ReleasedTo set the sound for an alarm1Find and tap Clock [alarm_clock] , then tap the alarm that you want to edit.2Tap Alarm sound [alarm_sound] and select an option, or tap ID: ICN-SONY-BROWSER-ADDand select a music file.3Tap DONE [checklist_button_done] , then tap SAVE [menu_save] .For more information about how to adjust the alarm volume levels, see Volume settings onpage 87.GUID GUID-53876E40-3354-4940-9972-990B678E56A1Title To set the alarm signalChanges Keyaki - labels corrected in the last stepVersion 18.1.1Author AdamSStatus ReleasedTo adjust the volume level for an alarm1Find and tap Clock [alarm_clock] , then tap the alarm that you want to edit.2Drag the volume slider under Alarm volume [alarm_volume] to the desired position.3Tap SAVE [menu_save] .GUID GUID-892886F6-266E-4C62-8F51-8A9E51921C33Title To adjust the alarm volume levelsChanges Keyaki - label corrected in the last stepVersion 1.1.2Author AdamSStatus ReleasedTo set a recurring alarm1Find and tap Clock [alarm_clock] , then tap the alarm that you want to edit.2Tap Repeat [alarm_repeat] .3Mark the checkboxes for the relevant days, then tap OK [ok] .4Tap SAVE [menu_save] .GUID GUID-F16ADE60-533C-483E-ADB7-104FBC199F52192This is an internet version of this publication. © Print only for private use.](https://usermanual.wiki/Sony/10720X.Manual/User-Guide-3336261-Page-192.png)
![Title To set a recurring alarmChanges Keyaki - label corrected in the last stepVersion 16Author AdamSStatus ReleasedTo activate the vibrate function for an alarm1Find and tap Clock [alarm_clock] , then tap the alarm that you want to edit.2Tap the Vibrate [alarm_vibrate] slider to enable or disable the function.3Tap SAVE [menu_save] .GUID GUID-303D610E-F5C8-41EC-A166-BD658B1C4370Title To turn on the vibration signal for an alarmChanges Keyaki - label corrected in the last stepVersion 18Author AdamSStatus ReleasedTo set the side keys behaviour1Find and tap Clock [alarm_clock] , then select the alarm that you want to edit.2Tap Side keys behaviour [volume_button_setting_title] , then select the desired behaviour ofside keys when they are pressed during the alarm.3Tap SAVE [menu_save] .GUID GUID-E68315A2-2ED1-42C3-A52F-F42361969AD0Title To set the side keys behaviorChanges Keyaki - Label corrected in the last stepVersion 3Author AdamSStatus Released193This is an internet version of this publication. © Print only for private use.](https://usermanual.wiki/Sony/10720X.Manual/User-Guide-3336261-Page-193.png)
![AccessibilityGUID GUID-BCF4ED4E-08B4-4C80-8583-67957A7E439ETitle AccessibilityChangesVersion 1Author zzBrianBStatus ReleasedMagnification gestureMagnification gesture allows you to zoom in to parts of the screen by tapping an areaof the touchscreen three times in succession.GUID GUID-CA6C8A47-52A4-4AF8-B69E-D2972865155BTitle Magnification gesturesChanges N update, gestures changed to gesture in UIVersion 2Author AdelKStatus ReleasedTo enable or disable Magnification gesture1From your Home screen [preference_title_home_wallpaper] , tap ID: ICN-SONY-HOME-APPTRAY-NORMAL .2Find and tap Settings [settings_label_launcher] > Accessibility [accessibility_settings] >Magnification gesture [accessibility_screen_magnification_title] .3Tap the slider under Magnification gesture [accessibility_screen_magnification_title] .GUID GUID-0679ECE0-893C-4EA9-B870-2E74301FA45CTitle To enable Magnification gesturesChanges N update, gestures changed to gesture in UIVersion 6Author AdelKStatus ReleasedTo magnify an area and pan across the screen1Make sure that Magnification gesture [accessibility_screen_magnification_title] is enabled.2To temporarily magnify an area, tap it three times.3Move the area by dragging it with two or more fingers.4To exit zoom mode, tap the area three times again.With certain applications, you can also zoom in or out by pinching an area.GUID GUID-3BA9B6C0-0708-4400-A123-3264516B47EATitle To magnify an area and pan across the screenChanges N update, gestures changed to gesture, updated due to ed commentsVersion 3Author AdelKStatus ReleasedFont sizeYou can enable the Font size [font_size_title] option to increase the default size of textdisplayed on your device.GUID GUID-9FFF782F-C8F6-4833-9F0B-6BC43D022668Title Font sizeChanges For Kagura N 7.0 update - replacing "Large text" with "Font size"Version 2Author SzilviaMStatus ReleasedTo set Font size1From your Home screen [preference_title_home_wallpaper] , tap ID: ICN-SONY-HOME-APPTRAY-NORMAL .2Find and tap Settings [settings_label_launcher] > Accessibility [accessibility_settings] .3Tap Font size [font_size_title] , and then set the desired font size by tapping the scale.GUID GUID-415AF824-3871-443A-AD94-890EA829547CTitle To set Font sizeChanges For Kagura N 7.0 update - replacing "Large text" with "Font size"194This is an internet version of this publication. © Print only for private use.](https://usermanual.wiki/Sony/10720X.Manual/User-Guide-3336261-Page-194.png)
![Version 5Author SzilviaMStatus ReleasedDisplay sizeYou can use the Display size [screen_zoom_title] setting to increase or decrease all elementson your screen, not just text.GUID GUID-A6662BED-A8A9-412B-9544-02CC82632860Title Display sizeChanges N update and aboveVersion 1Author AdelKStatus ReleasedTo set Display size1From your Home screen [preference_title_home_wallpaper] , tap ID: ICN-SONY-HOME-APPTRAY-NORMAL .2Find and tap Settings [settings_label_launcher] > Accessibility [accessibility_settings] .3Tap Display size [screen_zoom_title] , and then set the desired display size by tappingthe scale.GUID GUID-D504E453-253E-4409-A391-1D5A69DD2F2FTitle To set Display sizeChanges for N update and aboveVersion 1Author AdelKStatus ReleasedColour correctionThe Colour correction setting adjusts how colours are displayed on the screen forusers who are colour blind or have difficulty distinguishing between colours.GUID GUID-CA2F3195-9F63-4588-A7C5-2B71E4468073Title Colour correctionChangesVersion 1Author zzBrianBStatus ReleasedTo enable Colour correction1From your Home screen [preference_title_home_wallpaper] , tap ID: ICN-SONY-HOME-APPTRAY-NORMAL .2Find and tap Settings [settings_label_launcher] > Accessibility [accessibility_settings] > Colourcorrection [accessibility_display_daltonizer_preference_title] .3Tap the slider under Colour correction [accessibility_display_daltonizer_preference_title] .4Tap Correction mode [daltonizer_type] , then select the appropriate colour sensitivity.Colour correction is currently an experimental feature and may affect device performance.GUID GUID-65ED48F1-696B-4368-8501-8B6868454EBATitle To enable colour correctionChanges For Kugo - label/icon correctionsVersion 5Author SzilviaMStatus ReleasedTalkBackTalkBack is a screen reader service for visually impaired users. TalkBack uses spokenfeedback to describe any events or actions performed on your Android device.TalkBack describes the user interface and reads out software errors, notifications andmessages.GUID GUID-9DFD6329-3F54-4D91-9855-501103A97037Title TalkBackChangesVersion 1Author zzBrianB195This is an internet version of this publication. © Print only for private use.](https://usermanual.wiki/Sony/10720X.Manual/User-Guide-3336261-Page-195.png)
![Status ReleasedTo enable TalkBack1From your Home screen [preference_title_home_wallpaper] , tap ID: ICN-SONY-HOME-APPTRAY-NORMAL .2Find and tap Settings [settings_label_launcher] > Accessibility [accessibility_settings] > TalkBack[udoc_accessibility_talkback_title] .3Tap the slider under TalkBack [udoc_accessibility_talkback_title] and then tap OK [gui_ok_txt] .To change speech, feedback and touch preferences for TalkBack, tap Settings [accessibili-ty_menu_item_settings] , then tap the screen twice.TalkBack launches a tutorial immediately after you enable the feature. To exit the tutorial, tapID: ICN-SONY-KEY-AND-BACK , then tap the screen twice.GUID GUID-1F1E6ACB-16B9-4873-A683-41D7249D013DTitle To enable TalkBackChanges For Kagura N 7.0 update - adding double tapping the screen after tapping SettingsVersion 6Author SzilviaMStatus ReleasedTo disable TalkBack1From your Home screen [preference_title_home_wallpaper] , tap ID: ICN-SONY-HOME-APPTRAY-NORMAL , then tap anywhere on the screen twice.2Find and tap Settings [settings_label_launcher] , then tap anywhere on the screen twice.3Find and tap Accessibility [accessibility_settings] by scrolling through the list with two ormore fingers, then tap anywhere on the screen twice.4Find and tap TalkBack [udoc_accessibility_talkback_title] by scrolling through the list with twoor more fingers, then tap anywhere on the screen twice.5Tap the on-off switch, and then tap anywhere on the screen twice.6Tap OK [ok] , and then tap anywhere on the screen twice.GUID GUID-7E45EFA9-6B61-4567-A43C-A180E93FEC40Title To disable TalkBackChanges For Kagura N 7.0 update - with selecting & double tapping the screenVersion 7Author SzilviaMStatus ReleasedMono audioThe Mono audio setting makes both left and right audio channels get played backsimultaneously when playing audio. Using Mono instead of Stereo playback is mostuseful for users with certain types of hearing loss or for safety reasons, for examplewhen you need to listen to your surroundings.GUID GUID-888EF406-45E0-44FF-9A54-DA890FE57063Title Mono audioChanges N updatreVersion 1Author AdelKStatus ReleasedTo enable or disable Mono audio1From your Home screen [preference_title_home_wallpaper] , tap ID: ICN-SONY-HOME-APPTRAY-NORMAL .2Find and tap Settings [settings_label_launcher] > Accessibility [accessibility_settings] .3Tap the slider beside Mono audio [accessibility_toggle_master_mono_title] .GUID GUID-1CAD6178-624B-4B41-AFD5-ED9E8E8B6C51Title To enable Mono audioChanges Mono sound for N updateVersion 1Author AdelK196This is an internet version of this publication. © Print only for private use.](https://usermanual.wiki/Sony/10720X.Manual/User-Guide-3336261-Page-196.png)
![Status ReleasedTTY (Teletypewriter) modeThe TTY (Teletypewriter) feature on your device allows people who are deaf, hard ofhearing, or who have speech or language disabilities, to communicate using a TTYdevice or a relay service.GUID GUID-F0047CDF-F0EA-409B-9851-E1BC3AD0E8CFTitle TTYChangesVersion 1Author zzBrianBStatus ReleasedTo enable TTY mode1From your Home screen [preference_title_home_wallpaper] , tap ID: ICN-SONY-HOME-APPTRAY-NORMAL .2Find and tap Settings [settings_label_launcher] > Call [call_settings_title] .3Tap Accessibility [accessibility_settings] > TTY mode [tty_mode_option_title] .4Select the applicable TTY mode.GUID GUID-D7CB8735-C233-4495-8C77-3FEC3C2A2E42Title To enable TTYChanges For Dora N 7.0 update - varref correction for "TTY mode"Version 5Author SzilviaMStatus ReleasedSwitch AccessWith Switch Access, you can interact with your Xperia™ device using one or moreswitches. A switch is a device used to send a keystroke signal to your Androiddevice. These can be helpful for users with mobility limitations. For more informationabout Switch Access, see Settings [settings_label_launcher] > Accessibility [accessibility_settings] >Switch Access [switch_access] > SETTINGS [sagent_btn_goto_setting] > Help & feedback[gmail_help_and_feedback] .GUID GUID-972A8F3D-527C-4A6B-AF5C-9731CD869C66Title Switch AccessChanges Label fix for KeyakiVersion 2Author RenataBStatus ReleasedTo enable or disable Switch Access1From your Home screen [preference_title_home_wallpaper] , tap ID: ICN-SONY-HOME-APPTRAY-NORMAL .2Find and tap Settings [settings_label_launcher] > Accessibility [accessibility_settings] > SwitchAccess [switch_access] .3Tap the slider to enable or disable the function, then tap OK [gui_ok_txt] .GUID GUID-EB7CE0F8-68A2-4D26-A0C1-DCE2E9CB6368Title To enable or disable Switch AccessChanges Created for Android N and aboveVersion 1Author PeterKStatus Released197This is an internet version of this publication. © Print only for private use.](https://usermanual.wiki/Sony/10720X.Manual/User-Guide-3336261-Page-197.png)
![Support and legalGUID GUID-74499E7C-C777-4295-A45A-DC61658D999ATitle Support and legalChanges Project XVersion 4Author SzilviSStatus ReleasedSupport applicationUse the Support application on your device to browse User guides, troubleshootingguides, and to find information about software updates and other product-relatedinformation.GUID GUID-7A88A756-3B21-4970-9E9F-1EC73D4277B4Title Support applicationChanges Project XVersion 9Author SzilviSStatus ReleasedTo access the Support application1From your Home screen [preference_title_home_wallpaper] , tap ID: ICN-SONY-HOME-APPTRAY-NORMAL .2Find and tap ID: ICN-SONY-APP-SUPPORT , then select the required support item.Connect to the internet when using the Support application for the best available support.GUID GUID-588EA450-00B8-46C6-892D-58CF7E2CB19BTitle To access the Support applicationChanges Internet decappedVersion 16Author GergelyKStatus ReleasedXperia™ TipsUsing Xperia™ Tips you can get useful information for your device via notifications,and learn all you need to get started.GUID GUID-EEA8F2F3-9DB1-42D7-A200-2DA47C21E183Title Xperia TipsChanges New function from KugoVersion 1Author SzilviaMStatus ReleasedTo enable or disable Xperia™ Tips1From your Home screen [preference_title_home_wallpaper] , tap ID: ICN-SONY-HOME-APPTRAY-NORMAL .2Find and tap Settings [settings_label] > Assist [global_action_assist] .3Tap the Xperia™ Tips [entry_tips_title] slider.GUID GUID-2B47FEAF-D540-4E8B-9079-E62165EFA6A8Title To enable or disable Xperia TipsChanges Keyaki: 'Introduction & Tips' changed to 'Assist'Version 3Author ZoltanSStatus ReleasedHelp in menus and applicationsSome applications and settings have help available in the options menu, which isnormally indicated by ID: ICN-SONY-KEY-MENU in the individual applications.GUID GUID-4AB6E308-75A6-4AAB-A746-6DDC8EEB533FTitle Help in menus and applicationsChanges For Lavender - implementing changes according to ED commentsVersion 2Author SzilviaM198This is an internet version of this publication. © Print only for private use.](https://usermanual.wiki/Sony/10720X.Manual/User-Guide-3336261-Page-198.png)
![Status ReleasedRunning diagnostic tests on your deviceThe Xperia™ Diagnostics application can test a specific function or run a fulldiagnostic test to check if your Xperia™ device is working properly.Xperia™ Diagnostics can:•Assess potential hardware or software issues on your Xperia™ device.•Analyse how well applications perform on your device.•Log the number of dropped calls during the previous 10 days.•Identify installed software and provide useful details about your device.The Xperia™ Diagnostics application is pre-installed on most Android™ devices from Sony. Ifthe Diagnostics option is not available under Settings [settings_label_launcher] > About phone [about_set-tings<product="default">] or from the TOOLS [tools] menu in the Support application, you can downloada light version using the Play Store™ application.GUID GUID-9D6E6F57-B1C2-4910-87B6-62715245E426Title Running diagnostic tests on your deviceChanges Project X - updated the note according to the commentVersion 5Author AdamSStatus ReleasedRestarting, resetting and repairingYou can force your device to restart or shut down if it stops responding or won'trestart normally. No settings or personal data get deleted.You can also reset your device to its original factory settings. This action issometimes necessary if your device stops functioning properly, but note that if youwant to keep any important data, you should first back up this data to a memory cardor other non-internal memory. For more information, see Backing up and restoringcontent on page 64.If your device fails to turn on or you want to reset your device’s software, you can useXperia™ Companion to repair your device. For more information on using Xperia™Companion, see Xperia™ Companion on page 61.If you are sharing a device with multiple users, you may need to log in as the owner, that is,the primary user, to reset your device to its original factory settings.GUID GUID-DC1A8CCE-C51A-44BB-A9F7-5C0D0C3E15FATitle Restarting, resetting and repairingChanges Project X (title change)Version 17Author DoraMStatus ReleasedTo restart your deviceYour device may fail to restart if the battery level is low. Connect your device to a charger andtry restarting again.1Press and hold down the power key ID: ICN-SONY-KEY-AND-POWER-K90 .2In the menu that opens, tap Restart [groupsim_dialog_button_restart] . The device restartsautomatically.GUID GUID-A73AD1C5-76F2-487D-9D50-7B016DD3852ATitle To restart your deviceChanges Project X - Added note from the concep topicVersion 13Author AdamS199This is an internet version of this publication. © Print only for private use.](https://usermanual.wiki/Sony/10720X.Manual/User-Guide-3336261-Page-199.png)
![Status ReleasedTo force the device to restart or shut down1Press and hold down the power key ID: ICN-SONY-KEY-AND-POWER-K90 and the volumeup key at the same time for 6 seconds.2Your device vibrates once. Depending on whether you wish to force the deviceto restart or shut down, proceed as follows.•If you wish to force restart the device: Release the keys at this point. Thedevice restarts.•If you wish to force shut down the device: Continue pressing the keys. Aftera few more seconds, the device vibrates three times and turns off.GUID GUID-E625771C-D785-418A-8795-F63B0C1B15B0Title To force a device to shut downChanges Changed 10 to 6 seconds.Version 19Author GergelyKStatus ReleasedTo perform a factory data resetTo avoid permanent damage to your device, do not interrupt a factory data reset procedure.1Back up any important data that is saved on the internal memory of yourdevice to a memory card or other non-internal memory. If you have anyencrypted files stored on an SD card, you should also remove the encryption toensure you can still access them after the reset.2From your Home screen [preference_title_home_wallpaper] , tap ID: ICN-SONY-HOME-APPTRAY-NORMAL .3Find and tap Settings [settings_label_launcher] > Backup & reset [privacy_settings] > Factorydata reset [master_clear_title] .4Tap Reset phone [master_clear_button_text<product="default">] .5If required, draw your screen unlock pattern or enter your screen unlockpassword or PIN to continue.6To confirm, tap Erase everything [master_clear_final_button_text] .Your device does not revert to an earlier software version of Android™ when you perform afactory data reset.GUID GUID-7AEF8CEC-825F-4962-976F-522A7D71D5FETitle To perform a factory data resetChanges N-update - Kagura, Dora - Added one of the notes to step 1, edcommentVersion 22.1.1Author AdamSStatus ReleasedRepairing the device softwareIf you forget your screen unlock password, PIN or pattern, you can use the devicerepair feature in Xperia™ Companion to erase the security layer. You need to provideyour Google account login details to perform this operation. By running the repairfeature, you reinstall software for your device and you may lose some personal datain the process.If you can’t turn off your device before performing a software repair, force it to shutdown.When you receive a new Google™ account username or password, you might not be able touse them to log in to and recover your device for 72 hours.GUID GUID-C7948A36-56BF-4AE5-98BD-6E735834E329Title Repairing the device softwareChanges Project X (adding additional information)Version 2.1.1Author DoraM200This is an internet version of this publication. © Print only for private use.](https://usermanual.wiki/Sony/10720X.Manual/User-Guide-3336261-Page-200.png)
![Status ReleasedTo repair the device software using Xperia™ CompanionBefore performing a software repair, make sure you know your Google™ account usernameand password. Depending on your security settings, you may need to enter them in order torestart the device after a software repair.If your device seems to have frozen, restarts repeatedly or doesn’t start at all afteryou’ve updated the Xperia™ software or after you’ve performed a software repair or afactory data reset, try forcing the device to shut down then try turning it back on. Ifthe problem still exists, force the device to shut down then perform a software repairby following the steps below:1Make sure that Xperia™ Companion is installed on your PC or Mac®.2Open the Xperia™ Companion software on the computer and click on Softwarerepair [SECTION_TITLE_REPAIR] on the main screen.3Follow the instructions that appear on the screen to reinstall the software andcomplete the repair.GUID GUID-38F3C3A8-DE20-41AE-AB83-D66F8E116F78Title To repair your software using Xperia CompanionChanges Project X (Google credentials changed to Google account name and password)Version 15Author DoraMStatus ReleasedHelp us improve our softwareYou can allow the sending of usage info from your device so that Sony Mobile canreceive anonymous bug reports and statistics that help improve our software. Noneof the information gathered includes personal data.GUID GUID-91A13AD4-BD35-43FD-851F-6F1849CA7E43Title Help us improve our softwareChanges For Lavender - implementing changes according to ED commentsVersion 8Author SzilviaMStatus ReleasedTo allow the sending of usage info1From your Home screen [preference_title_home_wallpaper] , tap ID: ICN-SONY-HOME-APPTRAY-NORMAL .2Find and tap Settings [settings_label_launcher] > About phone [about_settings<product="default">] >Usage info settings [idd_settings_menu_title] .3Mark the Send usage info [idd_settings_menu_onoff_label] checkbox if it is not alreadymarked.4Tap Agree [idd_disclaimer_dialog_btn_agree] .GUID GUID-D380D7AC-6C99-47AB-ABB9-22B70CCF3F49Title To send usage infoChanges For Kugo - label/icon correctionsVersion 10Author SzilviaMStatus ReleasedWarranty, SAR and usage guidelinesFor information about warranty, SAR (Specific Absorption Rate) and safety guidelines,please read the Important information provided under Settings [settings_label_launcher] > Aboutphone [about_settings<product="default">] > Legal information [legal_information] on your device.GUID GUID-46E655A5-2029-410B-9845-5575F90D95F1Title Warranty SAR and usage guidelinesChanges Changing "Legal Information" labelVersion 3Author GergelyK201This is an internet version of this publication. © Print only for private use.](https://usermanual.wiki/Sony/10720X.Manual/User-Guide-3336261-Page-201.png)