Sony A1022092 GSM 900/1800/1900 Mobile Phone User Manual Z250 UG R1A EN
Sony Mobile Communications Inc GSM 900/1800/1900 Mobile Phone Z250 UG R1A EN
Sony >
08 user manual
User guide
2
Congratulations on your purchase of the
go to www.sonyericsson.com/fun. Register now
to get free online storage and special offers at
www.sonyericsson.com/myphone. For product support,
go to www.sonyericsson.com/support.
Instruction symbols
The following instruction symbols appear in this User
guide:
> Use the navigation key to scroll and select.
Press the navigation key up.
Press the navigation key down.
Press the navigation key to the left.
Press the navigation key to the right.
Tip
Note
Warning
Indicates that a service or function is network- or
subscription-dependent. All menus or functions
may not be available in your phone. Consult your
network operator for more information.
3
Prepare the phone
Always turn off your phone and detach the charger
before you insert or remove the SIM card.
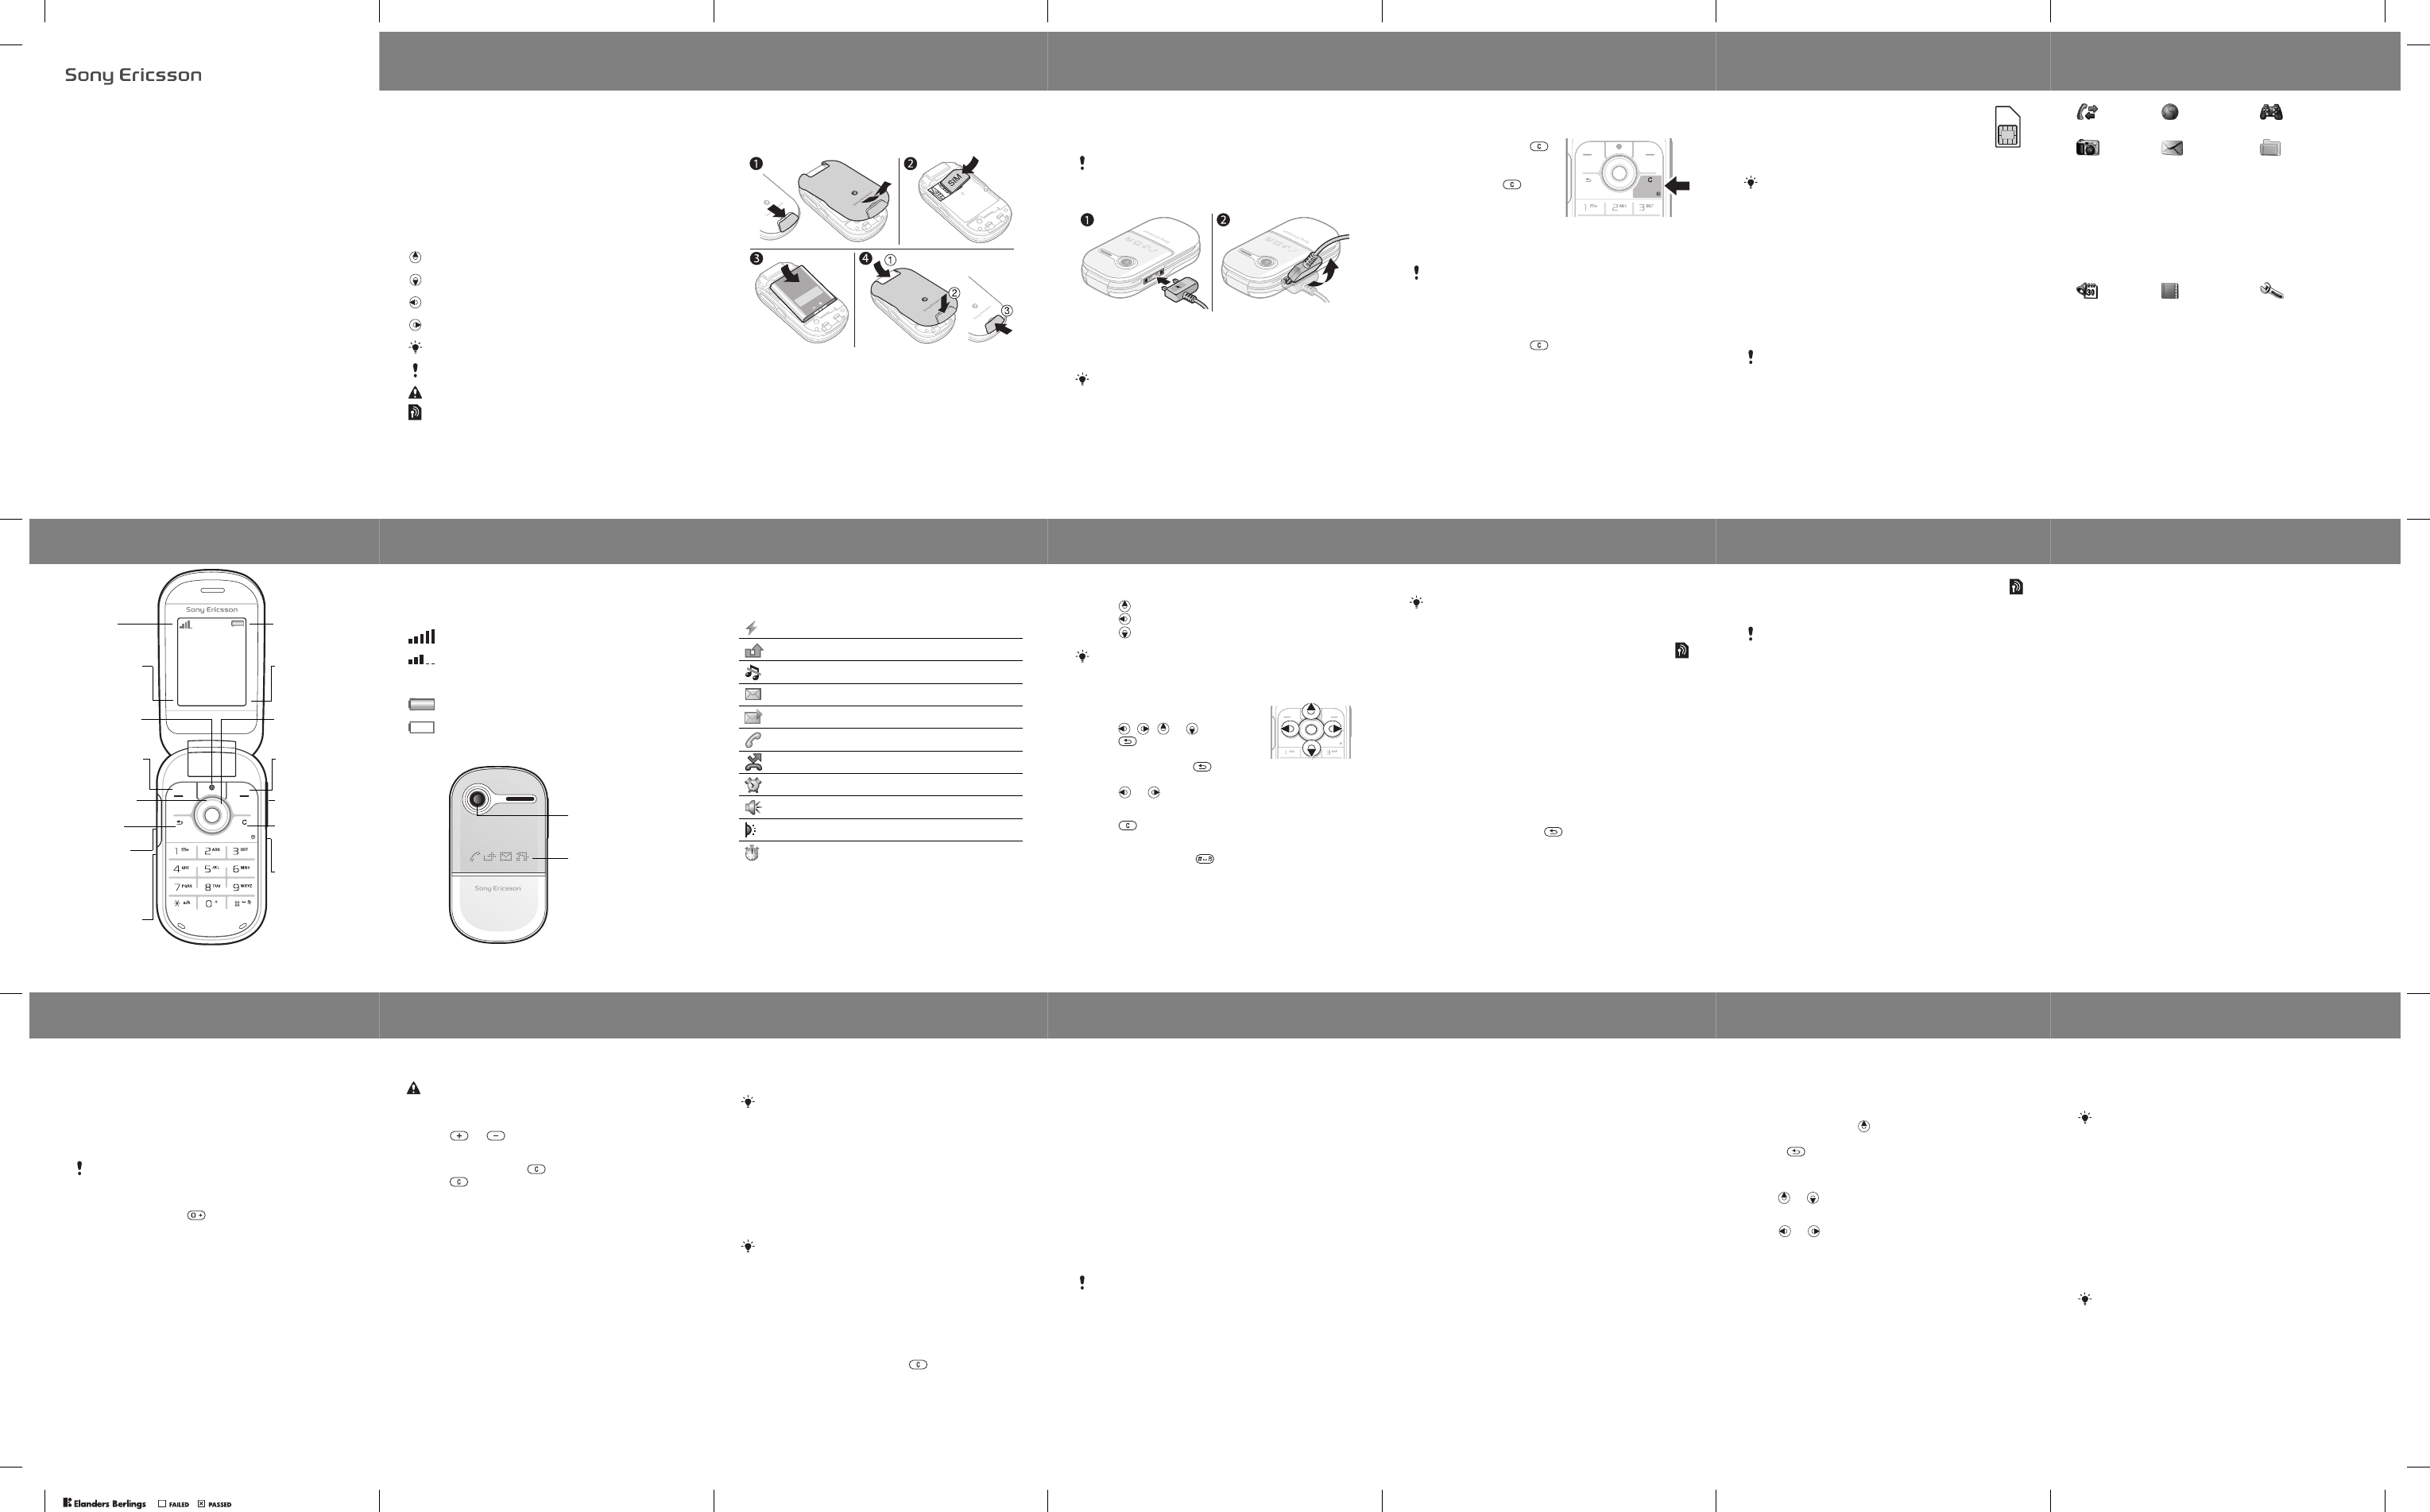
To insert the SIM card and battery
1Remove the battery cover by sliding the battery
release latch down.
2Slide the SIM card into its holder with the contacts
facing down.
3Insert the battery with the label side up and the
connectors facing each other.
4Slide the battery cover into place and close the battery
release latch.
4
Charge the battery
Your phone battery is partly charged when you buy it. It
takes approximately 3 hours to fully charge the battery.
To charge the battery
1Connect the charger to the phone. Press a key to view
the charging status on the screen.
2To remove the charger, tilt the plug upwards.
It may take 30 minutes for the battery icon to appear
on the screen.
You can use the phone during charging. You can
charge the battery for more or less than 3 hours.
Interrupted charging will not damage the battery.
5
Turn the phone on
To turn on the phone
1Press and hold down .
2Enter your PIN if
requested. To correct
mistakes, press .
3Select OK.
4Select a language.
5At first start-up, select Yes
to use the setup wizard to make a phone setup.
Select No to use the setup wizard later.
To turn off the phone
•Press and hold down .
To use the setup wizard
•From standby select Menu > Settings > General
>Setup wizard > Basic setup.
After you have turned the phone on and entered
your PIN, the name of your operator appears on the
screen. This view or screen is called standby. You
can now make and receive calls.
6
SIM card
The SIM (Subscriber Identity Module) card, which
you get from your network operator, contains
information about your subscription. Always turn
off your phone and detach the charger before you
insert or remove the SIM card.
PIN code (SIM card lock)
The PIN (Personal Identification Number) code is a SIM
card lock that protects your subscription, but not the
phone itself. If the card is locked, you have to enter the
PIN code when you turn on your phone. Each PIN digit
appears as *, unless it starts with emergency number
digits, for example, 112 or 911. You can call an
emergency number without entering a PIN.
You can save contacts on the SIM card before removing
if from your phone. Contacts may also be saved in the
phone memory. See Contacts on page 17.
If you enter the wrong PIN three times in a row,
the following message appears: PIN blocked. To
unblock, enter your PUK code provided by your
network operator. To unblock your SIM card, see
Locks on page 34.
7
Menu overview
Calls Internet Games
Camera Messaging File manager
Write new
Inbox
Drafts
Outbox
Sent messages
Saved messages
Call voicemail
Templates
Settings
Camera album
Pictures
Ringtones
Themes
Bookmarks
Games
Applications
Other
Organizer Contacts Settings
Online services
Alarms
Applications
Calendar
Tasks
Notes
Calculator
Timer
Stopwatch
Options
New contact
General
Sounds & alerts
Display
Calls
Connectivity
Some menus and icons described in this document may
vary depending on operator, network or subscription. Some
options may vary when the default settings are changed.
8
Phone overview
Camera key
Back key
Internet key Navigation key
Volume
buttons
C key (Clear)
On/off key
Infrared port
Microphone
Right
selection key
Left selection
key
Charging
(USB
connector)
Network
coverage
Battery status
Function for
right selection
key
Function for
left selection
key
Calls Menu
9
Network coverage
The network bars show the strength of the GSM network.
Move to another location if you have network problems.
No netw. coverage means you are out of range.
Battery status
The outside
= Good network coverage
= Average network coverage
= The phone battery is fully charged
= The phone battery is empty
Icon display
Camera lens
10
Icons
These icons may appear in your phone.
Icon Description
Battery charging, appears with battery icon.
You have missed a call. See Calling on page 15.
The phone is set to silent.
You have received a new text message.
You have received a new picture message.
Ongoing call.
Divert calls is activated.
An alarm is activated.
The loudspeaker is on.
The infrared port is activated.
The stopwatch is activated.
11
Shortcuts
From standby you can use the navigation keys to go
directly to a function:
•Press to start the camera.
•Press to write a message.
•Press to go to your contacts.
To navigate the menus
•From standby select Menu and
press , , or .
•Press to go back one step
in the menu.
•Press and hold down to return
to standby.
•Press or to move between tabs.
To delete items
•Press .
To set the phone to silent
•Press and hold down to set silent mode on or off.
To view tips and tricks
•From standby select Menu > Settings > General
>Setup wizard > Tips and tricks.
To change a standby shortcut, go to Menu > Settings
> General > Shortcuts. The camera shortcut cannot
be changed.
12
Messaging
Your phone supports various messaging services.
Text messages
You need a service centre number from your
network operator to be able to send text messages.
To view and set the service centre number
1From standby select Menu > Messaging > Settings
>Text message > Service centre.
2If there is no number, select New ServiceCentre, enter
the number including the international “+” prefix and
country code. Select Save.
To write and send a text message
1From standby select Menu > Messaging > Write new
> Text message.
2Write the message and select Continue. (To save the
message for later, press and select Yes to save
in Drafts.)
3Select Enter phone no., enter the number and
select OK.
4Select Send.
See Entering text on page 30 for instructions on how
to enter text and numbers.
13
Picture messages
Picture messages can contain enhanced functionality
with text, sound and pictures.
To create and send a picture message
1From standby select Menu > Messaging > Write new
> Picture msg.
2Select More and select an item to follow your
message.
3Write the message and select OK > Continue.
4Select Enter phone no., enter the number and
select OK.
5Select Send.
To save an item in a picture message
1In the message, select More > Save items.
2Select an item and where to save it.
To delete all sent messages
1From standby select Menu > Messaging > Sent
messages.
2Select More > Delete all msgs > Yes.
You need the correct Internet (MMS) settings in your
phone. Go to www.sonyericsson.com/support and
request a text message with the settings or contact
your network operator.
14
Automatic download
Select how to download your picture messages.
To select a download option
1From standby select Menu > Messaging > Settings
>Picture message > Auto download.
2Select an option:
•Always – automatic download.
•Ask in roaming – ask to download when not in home
network.
•Not in roaming – do not download when not in home
network.
•Always ask – ask to download.
•Off – new messages appear in the inbox as icons.
Select the message and select View to download.
Receiving messages
To view and save a message from the inbox
1From standby select Menu > Messaging > Inbox.
2Scroll to a message and select View. If you want to
save the message, select More > Save message
>Saved messages (SIM card) or > Templates
(phone).
To delete messages from the inbox
1From standby select Menu > Messaging > Inbox.
2Select More > Delete all msgs > All > Yes to delete
all messages. To delete one message, scroll to the
message and select More > Delete > Yes.
15
Calling
Your phone must be on and within range of a network.
To make a call
1From standby enter the area code and phone number.
2Select Call.
To make an emergency call
•From standby enter 112 (the international emergency
number) and select Call.
To make an international call
1From standby press until a + sign appears.
2Enter the country code, area code (without the first
zero), phone number and select Call.
To end a call
•Close the phone or select End call.
To answer a call
•When the phone rings, select Answer.
To reject a call
•When the phone rings, select Busy.
To view missed calls
•When Missed calls: is displayed, select Yes.
To call back, scroll to a number and select Call.
You can make emergency calls without a SIM card
and without entering a PIN.
16
To turn the loudspeaker on during a call
•Select More > Turn on speaker.
To change the ear speaker volume during a call
•Press or .
To turn off the microphone during a call
•Press and hold down . To resume, press and hold
down again.
Call list
You can view information about recent calls.
To call a number from the call list
1From standby select Calls and scroll to a tab.
2Scroll to the name or number and select Call.
To add a number to contacts
1From standby select Calls and scroll to a tab.
2Scroll to the number and select More > Save number.
3Select a contact or select New contact.
4Enter the contact information and select Save.
To delete a number from the call list
1From standby select Calls and scroll to a tab.
2Scroll to the number and select More > Delete entry
>Yes.
Do not hold the phone to your ear when using the
loudspeaker. This could damage your hearing.
17
Contacts
In Contacts you can save contact information with name,
numbers, addresses, picture, ringtone, title, personal
information and birthday.
To add a contact
1From standby select Menu > Contacts.
2Scroll to and select New contact > Add.
3Enter the name and select OK.
4Scroll to New number: and select Add.
5Enter the number and select OK.
6Scroll to and select the contact type.
7Select Save.
To call a contact
1From standby select Menu > Contacts.
2Scroll to, or enter the first few letters of the contact
and select Call.
To delete a contact
1From standby select Menu > Contacts.
2Scroll to the contact and press .
See Entering text on page 30 for instructions on how
to enter text and numbers.
Enter the + sign and country code with all phone
numbers. They can then be used abroad or at home.
18
To edit a contact
1From standby select Menu > Contacts.
2Scroll to the contact and select More > Edit contact.
3Scroll to the contact information and select Edit.
4Enter information or select a picture or ringtone.
5Confirm and select Save.
To send all contacts
•From standby select Menu > Contacts > Options
>Advanced > Send all contacts and select a transfer
method.
To copy contacts between the phone and the SIM card
1From standby select Menu > Contacts > Options
>Advanced.
2Select Copy to SIM or Copy from SIM.
3Select Copy a number or Copy all.
4To copy one contact, select the contact.
To check memory status for your contacts
•From standby select Menu > Contacts > Options
>Advanced > Memory status.
When copying all contacts to the SIM card,
all existing SIM card information is replaced.
19
Speed dialling
Speed dialling lets you select nine contacts that you
can dial quickly by pressing numbers 1-9.
To add contacts to speed dial numbers
1From standby select Menu > Contacts > Options
>Speed dial.
2Scroll to a position number and select Add.
3Select a contact.
To speed dial
•From standby enter the number (1-9) and select Call.
My number
You can view and edit your own phone number.
To view your own phone number
•From standby select Menu > Contacts > Options
>Special numbers > My numbers.
20
Camera
Your phone has a digital camera to take pictures to save
or send. Use infrared or picture messages to send a
picture to another phone or to a computer. Camera
pictures are saved in JPEG format in the Camera album.
To take pictures
1From standby press to start the camera.
2Select Capture to take the picture.
3Press to save and take another picture or select
More > Delete to delete the picture.
To use the zoom
•Use or to zoom.
To adjust the brightness
•Use or to adjust the brightness.
To use the camera options
1When the camera is activated select More.
2Select an option:
•Picture size – select between two sizes.
•Night mode – enhance picture quality in poor lighting.
•Self-timer – the picture is taken a few seconds after
you press Capture.
•Effects – select different effects for your picture.
•White balance – adjust colours to lighting conditions.
•Picture quality – select picture quality.
•Shutter sound – select different shutter sounds.
21
To view your pictures
1From standby select Menu > File manager > Camera
album.
2Scroll to a picture and select View.
To send a picture
1From standby select Menu > File manager > Camera
album.
2Scroll to a picture and select More > Send. Select
atransfer method.
To use a picture
1From standby select Menu > File manager > Camera
album and scroll to a picture.
2Select More > Use as and select how to use the picture.
You can use a USB cable to exchange pictures
between your phone and a computer. For more
information go to www.sonyericsson.com/support.
See also File manager on page 24 and Infrared
on page 31.
PPreflighted byreflighted byPreflighted by ( )( )( )
Z250i
Sony Ericsson Z250. For additional phone content,
i
22
Internet
You need the correct Internet settings in your phone.
If settings are not in your phone, you can:
•Get them in a text message from the network operator.
•On a computer, go to www.sonyericsson.com/support
and request a text message with the settings.
To select an Internet profile
•From standby select Menu > Settings > Connectivity
> Internet settings > Internet profiles. Select a profile.
To start browsing
1From standby select Menu > Internet.
2Select More for options:
•Go to – go to predefined pages or bookmarks, enter
a Web address or show previously visited pages.
•Tools – add a bookmark, save a picture, refresh page
content, send a link or make a call when browsing.
•View – select full content or text only.
•Advanced – select options such as show pictures,
allow cookies, clear cookies, clear cache and Internet
status.
To stop browsing
•When you browse, select More > Exit browser.
23
Calendar
You can set and send appointments with reminders.
To add an appointment in the calendar
1From standby select Menu > Organizer > Calendar.
2Scroll to and select a date. Select New appointm.
3Enter the details to confirm the appointment.
To set reminders options
1From standby select Menu > Organizer > Calendar
>More > Advanced > Reminders.
2Select an option. Select Always for a reminder to
sound even if the phone is off or in silent mode.
To view a calendar week
•From standby select Menu > Organizer > Calendar
>More > View week.
To send an appointment
1From standby select Menu > Organizer > Calendar
and select a date.
2Scroll to an appointment, select More > Send and
select a transfer method.
To find an appointment
1From standby select Menu > Organizer > Calendar
>More > Advanced > Find.
2Enter the search string and select OK.
24
More functions
File manager
To move a file
1From standby select Menu > File manager.
2Open a folder, scroll to a file and select More > Move.
3Select a folder or select New folder, name the new
folder and select OK.
4Select Paste.
To rename a file
1From standby select Menu > File manager.
2Scroll to a file and select More > Rename.
3Enter a new name and select OK.
To select several files
1From standby select Menu > File manager and open
afolder.
2Scroll to a file and select More > Mark.
3Select Mark several or Mark all. To select files, scroll
and select Mark or Unmark.
To view the memory status
•From standby select Menu > File manager > More
>Memory status.
Some files cannot be renamed.
If the memory is full, delete some content. Scroll
to a file or a folder and select More > Delete.
25
Alarm
The alarm rings even if the phone is off or set to silent.
To set the alarm
1From standby select Menu > Organizer > Alarms
>Alarm.
2Enter the time and select Save.
To set the recurrent alarm
1From standby select Menu > Organizer > Alarms
>Recurrent alarm.
2Enter the time and select Continue.
3Select the week days and select Done.
To turn the sounding alarm off
•Press any key. To snooze the alarm, press Snooze.
To set the alarm signal
•From standby select Menu > Organizer > Alarms
>Alarm signal and select a signal.
26
Tasks and Notes
To add a new task
1From standby select Menu > Organizer > Tasks
>New task.
2Select Task or Phone call. Enter details and confirm
each entry. Select Yes to use the reminder option.
To make a note and save it in a list
1From standby select Menu > Organizer > Notes.
2Scroll to New note and select Add.
3Enter the note and select Save.
Calculator
To use the calculator
1From standby select Menu > Organizer > Calculator.
2Press or to select ÷ x - + . % =.
Timer
To use the timer
1From standby select Menu > Organizer > Timer.
2Enter the hours, minutes and seconds.
3Select Start.
27
Stopwatch
To use the stopwatch
1From standby select Menu > Organizer > Stopwatch.
2Select Start.
3To view a new lap time, select New lap.
Language
To change the phone menu language
•From standby select Menu > Settings > General
>Language > Phone language and select a language.
Time and date
To set the time and date
1From standby select Menu > Settings > General
>Time & date.
2Select Time or Date.
3Enter the time or date and select Save.
Call time and cost
To check the call time and cost
•From standby select Menu > Settings > Calls > Time
& cost > Call timers.
28
Themes
Use themes to change the appearance of the screen.
To set a theme
1From standby select Menu > Settings > Display
>Themes.
2Scroll to a theme and select Set.
Profiles
Some phone settings are adapted to different situations,
for example, the ring volume may be adapted to suit a
meeting.
To select a profile
•From standby select Menu > Settings > General
>Profiles and select a profile to use.
To view and edit a profile
1From standby select Menu > Settings > General
>Profiles and select a profile.
2Select More > View and edit.
29
Ringtones, sounds and alerts
Your phone has melodies that can be used as ringtones.
To select a ringtone
•From standby select Menu > Settings > Sounds &
alerts > Ringtone and select a ringtone.
To set the ring volume
1From standby select Menu > Settings > Sounds &
alerts > Ring volume.
2Press or to set a volume and select Save.
To set the vibrating alert
1From standby select Menu > Settings > Sounds &
alerts > Vibrating alert.
2Select an option.
To set sounds and alerts options
1From standby select Menu > Settings > Sounds &
alerts.
2Select an option:
•Increasing ring – select an increasing ringtone.
•Message alert – select message notification.
•Key sound – select a key press sound.
30
Entering text
There are two input methods you can use to enter text;
multitap or predictive text input.
To enter text using multitap
•Press – until the letter appears.
•Press to add a space.
•Press to enter punctuation marks.
To enter text using predictive text input
•For example, to write the word “Land”, press , ,
, .
•If the word or punctuation mark is the one you want,
press to accept and add a space. To accept
without adding a space, press .
•If the word or punctuation mark is not the one you
want, press or to view alternatives.
To add a word to the dictionary
1When you write, select More > Spell word.
2Enter the word using multitap and select Insert.
By using predictive text input you only have to press
each key once. Continue writing a word even if it
appears to be wrong. The phone uses the dictionary
to recognize the word when all letters are entered.
31
How to use the keys
•Press and hold down to change the input method.
•Press to shift between upper case and lower case
letters.
•Press and hold down to change the writing
language.
•Press to delete characters. To delete a whole
word, press and hold down .
•Press and hold down – to enter numbers.
Infrared
Use the infrared port to exchange files such as pictures
and ringtones with other phones or infrared devices.
To turn on infrared
•From standby select Menu > Settings > Connectivity
> Infrared port > On.
To connect two devices using infrared
1Turn on infrared in both devices.
2Make sure the infrared ports are facing each
other with a maximum distance of 20 cm (8”).
To transfer a picture using infrared
1From standby select Menu > File manager > Camera
album.
2Scroll to a picture and select More > Send and select
Via infrared.
32
Diverting calls
Divert calls, for example, to an answering service.
To divert calls
1From standby select Menu > Settings > Calls > Divert
calls.
2Select a call type, a divert option and select Activate.
3Enter the phone number and select OK.
To cancel a call divert
1From standby select Menu > Settings > Calls > Divert
calls.
2Select a call type, a divert option and select
Deactivate.
Voicemail
Callers can leave a voicemail message when you
cannot answer. You can get your voicemail number
from your network operator.
To enter your voicemail number
1From standby select Menu > Messaging > Settings
>Voicemail number.
2Enter the voicemail number and select OK.
To call your voicemail service
•From standby press and hold down .
33
Multiple calls
When call waiting is activated, you can handle
multiple calls. A short sound indicates a second call.
To activate call waiting
•From standby select Menu > Settings > Calls
>Manage calls > Call waiting > Activate.
To answer a second call
•Select Answer. The ongoing call is put on hold.
To reject a second call
•Select Busy and continue with the ongoing call.
To make a second call
1Select More > Add call. The ongoing call is put on hold.
2Enter the number and select Call.
To switch between two calls
•Select More > Switch calls.
To join two calls
•Select More > Join calls.
To end calls
1Select End call.
2Select No to end both calls or Yes to end one call and
retrieve the call on hold.
34
Locks
SIM card lock
To unblock your SIM card
1When PIN blocked. To unblock, enter your PUK code
provided by your network operator. is displayed,
enter your PUK and select OK.
2Enter a new four-to-eight-digit PIN and select OK.
3Re-enter the new PIN to confirm and select OK.
To turn the SIM card lock on
1From standby select Menu > Settings > General
>Security > Locks > SIM protection > Protection
and select On.
2Enter your PIN and select OK.
To edit your PIN
1From standby select Menu > Settings > General
>Security > Locks > SIM protection > Change PIN.
2Enter your PIN and select OK.
3Enter a new four-to-eight-digit PIN and select OK.
4Re-enter the new PIN and select OK.
To unblock your SIM card, you need to enter your
PUK (Personal Unblocking Key) and PIN code,
supplied by your network operator.
35
Phone lock
The phone lock protects the phone against unauthorized
use. You can change the phone lock code (0000 by
default) to any four-digit code.
To set the phone lock
1From standby select Menu > Settings > General
>Security > Locks > Phone protection > Protection.
2Scroll to an option, enter your code and select OK.
To edit your phone lock code
1From standby select Menu > Settings > General
>Security > Locks > Phone protection > Change
code.
2Enter the current code and select OK.
3Enter a new code and select OK.
4Re-enter the new code and select OK.
To unlock the phone
•Enter your code and select OK.
If the phone lock is set to Automatic, you only need
to enter your phone lock code when you insert
a different SIM card.
If you forget your new code, you have to take your
phone to your local Sony Ericsson retailer.
Sony Ericsson Mobile Communications AB
SE-221 88 Lund, Sweden
www.sonyericsson.com
Printed in XXX
36
Troubleshooting
You can correct most problems yourself. For more
support go to www.sonyericsson.com/support, see
the Important information guide or contact your network
operator.
The phone turns itself off
Restart the phone or do a master reset.
To restart the phone
1Turn the phone off and remove the battery cover.
2Remove the battery and put it back in place.
3Replace the battery cover and turn the phone on.
To perform a master reset
1From standby select Menu > Settings > General
>Master reset.
2Select Reset settings to delete your changes
to settings or Reset all to delete your changes to
settings, all contacts, messages, personal data, and
content you have downloaded, received or edited.
3Select Continue.
Remove the SIM card before handing your phone
in for repair.
37
I cannot turn the phone on
•Attach the charger (make sure the power icon on the
charger is facing upwards) and charge the phone for
3hours.
Some menu options appear in grey
A service is not activated or your subscription does not
support the function.
•Contact your network operator.
The phone is working slowly
•Delete unwanted content and restart the phone.
No indication of charging
•The battery is empty or has not been used for a long
time. It may take up to 30 minutes before the battery
icon appears on the screen.
I cannot use Internet or send picture messages
You need a phone subscription that supports data
transmission, and the correct Internet settings.
•Go to www.sonyericsson.com/support or contact
your network operator.
38
What do these error messages mean?
Insert SIM
Your SIM card is not inserted correctly or may be
damaged or dirty. Try one or more of the following:
•Remove the SIM card and insert it correctly.
•Clean the connectors on the SIM card and phone
with a soft brush, a cloth or a cotton bud.
•Check if the SIM card is damaged.
Insert correct SIM card
•Check that you are using the correct operator SIM
card. If not, contact your network operator.
Wrong PIN
You have entered your PIN code incorrectly.
•See SIM card lock on page 34.
PIN blocked. To unblock, enter your PUK code
provided by your network operator.
The SIM card is blocked.
•Unblock. See SIM card lock on page 34.
PUK blocked
•Contact your network operator.
Phone locked
The phone is locked.
•Unlock. See Phone lock on page 35.
39
Phone lock code:
The phone lock code is required.
•Enter the correct code. See Phone lock on page 35.
Codes do not match
Appears when changing a security code.
•Confirm the new code by entering it twice.
Emerg. calls only
You are within range of a network but are only allowed
to use it for emergency calls.
•Contact your network operator if the problem persists.
No netw. coverage
There is no network within range.
•Contact your network operator if the problem persists.
40
We, Sony Ericsson Mobile Communications AB of
Nya Vattentornet
SE-221 88 Lund, Sweden
declare under our sole responsibility that our product
Sony Ericsson type AAB-1022092-BV
and in combination with our accessories, to which this declaration relates
is in conformity with the appropriate standards 3GPP TS 51.010-1, EN
301 489-7 and EN 60950, following the provisions of, Radio Equipment
and Telecommunication Terminal Equipment directive 99/5/EC with
requirements covering EMC directive 89/336/EEC, and Low Voltage
directive 73/23/EEC.
We fulfil the requirements of the R&TTE Directive (99/5/EC).
Lund, June 2007
Shoji Nemoto, Head of Product Business Group GSM/UMTS
Declaration of Conformity
41
Sony Ericsson Z250i
GSM 900/1800/1900
This User guide is published by Sony Ericsson Mobile Communications
AB or its local affiliated company, without any warranty. Improvements
and changes to this User guide necessitated by typographical errors,
inaccuracies of current information, or improvements to programs and/or
equipment, may be made by Sony Ericsson Mobile Communications AB
or its local affiliated company at any time and without notice. Such
changes will, however, be incorporated into new editions of this User
guide. All rights reserved.
© Sony Ericsson Mobile Communications AB, 2007
Please note: Some of the services in this User guide are not supported
by all networks. This also applies to the GSM International Emergency
Number 112. Please contact your network operator or service provider if
you are in doubt whether you can use a particular service or not. Please
read the Guidelines for safe and efficient use and the Limited warranty
chapters before you use your mobile phone. All illustrations are for
illustration only and may not accurately depict the actual phone.
The Predictive Text Technology is used under license from
Zi Corporation.
PPreflighted byreflighted byPreflighted by ( )( )( )
FCC Statement
This device complies with Part 15 of the FCC rules.
Operation is subject to the following two conditions:
(1) This device may not cause harmful interference, and
(2) This device must accept any interference received,
including interference that may cause undesired operation.
EN/LZT1089510R3A
Publication number: EN/LZT 108 9510 R3A.
1
Important information
Важная информация
MKKjA<
ĀĄĘĆ đĂĈč
2
Important information
Sony Ericsson Consumer Web site
On
www.sonyericsson.com/support
is a support section where help and tips are only a
few clicks away. Here you will find the latest computer software updates and tips on how
to use your product more efficiently.
Service and support
From now on you will have access to a portfolio of exclusive service advantages such as:
• Global and local Web sites providing support.
• A global network of Call Centers.
• An extensive network of Sony Ericsson service partners.
• A warranty period. Learn more about the warranty conditions in this guide.
On
www.sonyericsson.com
, under the support section in the language of your choice,
you will find the latest support tools and information, such as software updates,
Knowledge base, phone setup and additional help when you require it.
For operator-specific services and features, please contact your network operator for
more information. You can also contact our Call Centers. See the phone number for the
nearest Call Center in the list below. If your country/region is not represented in the list,
please contact your local dealer. (The phone numbers below were correct at the time of
going to print. On
www.sonyericsson.com
you can always find the latest updates.) In the
unlikely event that your product needs service please contact the dealer from whom it
was purchased or one of our service partners. Save your original proof of purchase, you
will need it if you need to claim warranty. For a call to one of our Call Centers you will be
charged according to national rates, including local taxes, unless the phone number is
a toll-free number.
Your mobile phone has the capability to download, store and forward additional content,
e.g. ringtones. The use of such content may be restricted or prohibited by rights of third
parties, including but not limited to restriction under applicable copyright laws. You, and
not Sony Ericsson, are entirely responsible for additional content that you download to or
forward from your mobile phone. Prior to your use of any additional content, please verify
that your intended use is properly licensed or is otherwise authorized. Sony Ericsson
does not guarantee the accuracy, integrity or quality of any additional content or any other
third party content. Under no circumstances will Sony Ericsson be liable in any way for
your improper use of additional content or other third party content.
Guidelines for Safe and Efficient Use
Please read this information before using your mobile phone.
These instructions are intended for your safety. Please follow these guidelines. If the
product has been subject to any of the conditions listed below or you have any doubt
as to its proper function make sure you have the product checked by a certified service
partner before charging or using it. Failure to do so might entail a risk of product
malfunction or even a potential hazard to your health.
Recommendations for safe use of product (mobile phone, battery, charger and
other accessories)
• Always treat your product with care and keep it in a clean and dust-free place.
• Warning! May explode if disposed of in fire.
3
• Do not expose your product to liquid or moisture or humidity.
• Do not expose your product to extreme high or low temperatures. Do not expose the
battery to temperatures above +60°C (+140°F).
• Do not expose your product to open flames or lit tobacco products.
• Do not drop, throw or try to bend your product.
• Do not paint your product.
• Do not attempt to disassemble or modify your product. Only Sony Ericsson authorised
personnel should perform service.
• Do not close your product with an object inserted between keypad and display if you
have a clamshell phone; this may damage your product.
• Do not use your product near medical equipment without requesting permission from
your treating physician or authorized medical staff.
• Do not use your product when in, or around aircraft, or areas showing the sign “turn off
two-way radio”.
• Do not use your product in an area where a potentially explosive atmosphere exists.
• Do not place your product or install wireless equipment in the area above an air bag in
your car.
• Caution: Cracked or broken displays may create sharp edges or splinters that could be
harmful upon contact.
Children
Keep out of childrens reach. Do not allow children to play with your mobile phone or its
accessories. They could hurt themselves of others, or could accidentally damage the
mobile phone or accessory. Your mobile phone or its accessory may contain small parts
that could become detached and create a choking hazard.
Power supply (Charger)
Connect the AC power adapter only to designated power sources as marked on the
product. Make sure the cord is positioned so that it will not be subjected to damage or
stress. To reduce risk of electric shock, unplug the unit from any power source before
attempting to clean it. The AC power adapter must not be used outdoors or in damp
areas. Never alter the cord or plug. If the plug does not fit into the outlet, have a proper
outlet installed by a qualified electrician. Use only Sony Ericsson branded original
chargers intended for use with your mobile phone. Other chargers may not be designed
to the same safety and performance standards.
Battery
We recommend that you fully charge the battery before you use your mobile phone for the
first time. A new battery or one that has not been used for a long time could have reduced
capacity the first few times it is used. The battery should only be charged in temperatures
between +5°C (+41°F) and +45°C (+113°F). Use only Sony Ericsson branded original
batteries intended for use with your mobile phone. Using other batteries and chargers
could be dangerous. Talk and standby times depend on several different conditions such
as signal strength, operating temperature, application usage patterns, features selected
and voice or data transmissions when the mobile phone is being used. Turn off your
mobile phone before removing the battery. Do not put the battery into your mouth.
4
Battery electrolytes may be toxic if swallowed. Do not let the metal contacts on the
battery touch another metal object. Doing this could short-circuit and damage the
battery. Use the battery for the intended purpose only.
Personal medical devices
Mobile phones may affect the operation of pacemakers and other implanted equipment.
Please avoid placing the mobile phone over the pacemaker, e.g. in your breast pocket.
When using the mobile phone, use it at the ear on the opposite side of the body to the
pacemaker. If a minimum distance of 15 cm (6 inches) is kept between the mobile phone
and the pacemaker, the risk of interference is limited. If you have any reason to suspect
that interference is taking place, immediately turn off your mobile phone. Contact your
cardiologist for more information. For other medical devices, please consult your
physician and the manufacturer of the device.
Driving
Please check if local laws and regulations restrict the use of mobile phones while driving
or require drivers to use handsfree solutions. We recommend that you use only
Sony Ericsson handsfree solutions intended for use with your product. Please note that
because of possible interference to electronic equipment, some vehicle manufacturers
forbid the use of mobile phones in their vehicles unless a handsfree kit with an external
antenna has been installed. Always pay full attention to driving and pull off the road and
park before making or answering a call if driving conditions so require.
Emergency calls
Mobile phones operate using radio signals, which cannot guarantee connection in all
conditions. You should therefore never rely solely upon any mobile phone for essential
communications (e.g. medical emergencies). Emergency calls may not be possible in all
areas, on all cellular networks, or when certain network services and/or mobile phone
features are in use. Check with your local service provider.
Antenna
This phone contains a built-in antenna. Use of antenna devices not marketed by
Sony Ericsson specifically for this model could damage your mobile phone, reduce
performance, and produce SAR levels above the established limits (see below).
Efficient use
Hold your mobile phone as you would any other phone. Do not cover the top of the phone
when it is in use, as this affects call quality and may cause the phone to operate at a higher
power level than needed, thus shortening talk and standby times.
Radio frequency (RF) exposure and Specific Absorption Rate (SAR)
Your mobile phone is a low-power radio transmitter and receiver. When it is turned on, it
emits low levels of radio frequency energy (also known as radio waves or radio frequency
fields). Governments around the world have adopted comprehensive international safety
guidelines, developed by scientific organizations, e.g. ICNIRP (International Commission
on Non-Ionizing Radiation Protection) and IEEE (The Institute of Electrical and Electronics
Engineers Inc.), through periodic and thorough evaluation of scientific studies. These
guidelines establish permitted levels of radio wave exposure for the general population.
The levels include a safety margin designed to assure the safety of all persons, regardless
of age and health, and to account for any variations in measurements. Specific
5
Absorption Rate (SAR) is the unit of measurement for the amount of radio frequency
energy absorbed by the body when using a mobile phone. The SAR value is determined
at the highest certified power level in laboratory conditions, but the actual SAR level of the
mobile phone while it is operating can be well below this value. This is because the mobile
phone is designed to use the minimum power required to reach the network. Variations
in SAR below the radio frequency exposure guidelines do not mean that there are
variations in safety. While there may be differences in SAR levels among mobile phones,
all Sony Ericsson mobile phone models are designed to meet radio frequency exposure
guidelines.
For phones sold in the US, before a phone model is available for sale to the public, it must
be tested and certified by the Federal Communications Commission (FCC) that it does
not exceed the limit established by the government-adopted requirement for safe
exposure. The tests are performed in positions and locations (that is, at the ear and worn
on the body) as required by the FCC for each model. For body-worn operation, this phone
has been tested and meets FCC RF exposure guidelines when the handset is positioned
a minimum of 15 mm from the body without any metal parts in the vicinity of the phone
or when used with the original Sony Ericsson accessory intended for this phone and worn
on the body. Use of other accessories may not ensure compliance with FCC RF exposure
guidelines. A separate leaflet with SAR information about this mobile phone model is
included with the material accompanying this mobile phone. This information can also be
found, together with more information on radio frequency exposure and SAR, on:
www.sonyericsson.com/health
.
Accessible Solutions/Special Needs
For phones sold in the US, you can use your TTY terminal with your Sony Ericsson mobile
phone (with the necessary accessory). For information on Accessible Solutions for
individuals with special needs call the Sony Ericsson Special Needs Center on 877 878
1996 (TTY) or 877 207 2056 (voice), or visit the Sony Ericsson Special Needs Center at
www.sonyericsson-snc.com
.
Disposal of old electrical and electronic equipment
This symbol indicates that all electrical and electronic equipment included shall not be
treated as household waste. Instead it shall be left at the appropriate collection point for
recycling of electrical and electronic equipment. By ensuring this product is disposed of
correctly, you will help prevent potential negative consequences for the environment and
human health, which could otherwise be caused by inappropriate waste handling of this
product. The recycling of materials will help to conserve natural resources. For more
detailed information about recycling this product, please contact your local city office,
your household waste disposal service or the shop where you purchased the product.
Disposing of the battery
Please check local regulations for disposal of batteries or call your local
Sony Ericsson Call Center for information. The battery should never be placed
in municipal waste. Use a battery disposal facility if available.
Protection of personal information
To safeguard your privacy and prevent information being accessible to a third party, you
should erase all personal data before selling or disposing of the product. To delete
personal data, perform a master reset and remove the memory card. DELETION OF
6
MATERIAL FROM THE PHONE MEMORY DOES NOT ENSURE THAT SAID
INFORMATION CANNOT BE RECOVERED BY A SUBSEQUENT USER.
SONY ERICSSON DOES NOT WARRANT AGAINST A SUBSEQUENT USER OF THE
DEVICE ACCESSING YOUR INFORMATION AND DOES NOT ASSUME ANY
RESPONSIBILITY FOR SUBSEQUENT DISCLOSURE OF SAID INFORMATION EVEN IF
A MASTER RESET HAS BEEN PERFORMED. If you are concerned about such potential
disclosure retain your device or secure its permanent destruction.
Accessories
Sony Ericsson recommends use of Sony Ericsson original accessories for safe and
efficient use of its products. Use of third-party accessories may decrease performance or
pose a risk to your health or safety. LOUDNESS WARNING: Please adjust the audio
volume cautiously when using third-party audio accessories to avoid volume levels that
may be harmful to your hearing. Sony Ericsson does not test use of third-party audio
accessories with this mobile phone. Sony Ericsson recommends using only
Sony Ericsson original audio accessories.
End User Licence Agreement
This wireless device, including without limitation any media delivered with the device,
(“Device”) contains software owned by Sony Ericsson Mobile Communications AB and
its affiliated companies (“Sony Ericsson”) and its third party suppliers and licensors
(“Software”). As user of this Device, Sony Ericsson grants you a non-exclusive, non-
transferable, non-assignable license to use the Software solely in conjunction with the
Device on which it is installed and/or delivered with. Nothing herein shall be construed as
a sale of the Software to a user of this Device. You shall not reproduce, modify, distribute,
reverse engineer, decompile, otherwise alter or use any other means to discover the
source code of the Software or any component of the Software. For avoidance of doubt,
you are at all times entitled to transfer all rights and obligations to the Software to a third
party, solely together with the Device with which you received the Software, provided
always that such third party agrees in writing to be bound by these rules. You are granted
this license for a term of the useful life of this Device. You can terminate this license by
transferring all your rights to the Device on which you have received the Software to a third
party in writing. If you fail to comply with any of the terms and conditions set out in this
license, it will terminate with immediate effect. Sony Ericsson and its third party suppliers
and licensors are the sole and exclusive owner of and retain all rights, title and interest in
and to the Software. Sony Ericsson, and, to the extent that the Software contains
material or code of a third party, such third party, shall be entitled third party beneficiaries
of these terms. The validity, construction and performance of this license shall be
governed by the laws of Sweden. The foregoing shall apply to the full extent permitted by,
when applicable, statutory consumer rights.
Limited Warranty
Sony Ericsson Mobile Communications AB, SE-221 88 Lund, Sweden, (Sony Ericsson)
or its local affiliated company, provides this Limited Warranty for your mobile phone and
original accessory delivered with your mobile phone (hereinafter referred to as “Product”).
Should your Product need warranty service, please return it to the dealer from whom it
was purchased, or contact your local Sony Ericsson Call Center (national rates may
apply) or visit
www.sonyericsson.com
to get further information.
7
Our warranty
Subject to the conditions of this Limited Warranty, Sony Ericsson warrants this Product
to be free from defects in design, material and workmanship at the time of its original
purchase by a consumer. This Limited Warranty will last for a period of one (1) year as
from the original date of purchase of the Product.
What we will do
If, during the warranty period, this Product fails to operate under normal use and service,
due to defects in design, materials or workmanship, Sony Ericsson authorized
distributors or service partners, in the country* where you purchased the Product, will, at
their option, either repair or replace the Product in accordance with the terms and
conditions stipulated herein. Sony Ericsson and its service partners reserve the right to
charge a handling fee if a returned Product is found not to be under warranty according
to the conditions below. Please note that some of your personal settings, downloads and
other information may be lost when your Sony Ericsson Product is repaired or replaced.
At present Sony Ericsson may be prevented by applicable law, other regulation or
technical restrictions from making a backup copy of certain downloads. Sony Ericsson
does not take any responsibility for any lost information of any kind and will not reimburse
you for any such loss. You should always make backup copies of all the information
stored on your Sony Ericsson Product such as downloads, calendar and contacts before
handing in your Sony Ericsson Product for repair or replacement.
Conditions
1 This Limited Warranty is valid only if the original proof of purchase for this Product
issued by a Sony Ericsson authorized dealer specifying the date of purchase and serial
number**, is presented with the Product to be repaired or replaced. Sony Ericsson
reserves the right to refuse warranty service if this information has been removed or
changed after the original purchase of the Product from the dealer.
2 If Sony Ericsson repairs or replaces the Product, the repair for the defect concerned, or
the replaced Product shall be warranted for the remaining time of the original warranty
period or for ninety (90) days from the date of repair, whichever is longer. Repair or
replacement may involve the use of functionally equivalent reconditioned units.
Replaced parts or components will become the property of Sony Ericsson.
3 This warranty does not cover any failure of the Product due to normal tear and wear, or
due to misuse, including but not limited to use in other than the normal and customary
manner, in accordance with the Sony Ericsson instructions for use and maintenance of
the Product. Nor does this warranty cover any failure of the Product due to accident,
software or hardware modification or adjustment, acts of God or damage resulting
from liquid. A rechargeable battery can be charged and discharged more than a
hundred times. However, it will eventually wear out – this is not a defect and
corresponds to normal wear and tear. When the talk-time or standby time is noticeably
shorter, it is time to replace your battery. Sony Ericsson recommends that you use only
batteries and chargers approved by Sony Ericsson. Minor variations in display
brightness and colour may occur between the phones. There may be tiny bright or dark
dots on the display. These are called defective pixels and occur when individual dots
have malfunctioned and can not be adjusted. Two defective pixels are deemed
8
acceptable. Minor variations in camera image appearance may occur between
phones. This is nothing uncommon and is not regarded as a defective camera module.
4 Since the cellular system on which the Product is to operate is provided by a carrier
independent from Sony Ericsson, Sony Ericsson will not be responsible for the
operation, availability, coverage, services or range of that system.
5 This warranty does not cover Product failures caused by installations, modifications, or
repair or opening of the Product performed by a non-Sony Ericsson authorised person.
6 The warranty does not cover Product failures which have been caused by use of
accessories or other peripheral devices which are not Sony Ericsson branded original
accessories intended for use with the Product.
7 Tampering with any of the seals on the Product will void the warranty.
8 THERE ARE NO EXPRESS WARRANTIES, WHETHER WRITTEN OR ORAL,
OTHER THAN THIS PRINTED LIMITED WARRANTY. ALL IMPLIED WARRANTIES,
INCLUDING WITHOUT LIMITATION THE IMPLIED WARRANTIES OF
MERCHANTABILITY OR FITNESS FOR A PARTICULAR PURPOSE, ARE LIMITED
TO THE DURATION OF THIS LIMITED WARRANTY. IN NO EVENT SHALL
SONY ERICSSON OR ITS LICENSORS BE LIABLE FOR INCIDENTAL OR
CONSEQUENTIAL DAMAGES OF ANY NATURE WHATSOEVER, INCLUDING BUT
NOT LIMITED TO LOST PROFITS OR COMMERCIAL LOSS; TO THE FULL EXTENT
THOSE DAMAGES CAN BE DISCLAIMED BY LAW. Some countries/states do not
allow the exclusion or limitation of incidental or consequential damages, or limitation of
the duration of implied warranties, so the preceding limitations or exclusions may not
apply to you. The warranty provided does not affect the consumer's statutory rights
under applicable legislation in force, nor the consumer’s rights against the dealer
arising from their sales / purchase contract.
*Geographical scope of the warranty
If you have purchased your Product in a country member of the European Economic Area
(EEA) or in Switzerland or the Republic of Turkey, and such Product was intended for sale
in the EEA or in Switzerland or in Turkey, you can have your Product serviced in any EEA
country or in Switzerland or in Turkey, under the warranty conditions prevailing in the
country in which you require servicing, provided that an identical Product is sold in such
country by an authorised Sony Ericsson distributor. To find out if your Product is sold in
the country you are in, please call the local Sony Ericsson Call Center. Please observe
that certain services may not be possible elsewhere than in the country of original
purchase, for example due to the fact that your Product may have an interior or exterior
which is different from equivalent models sold in other countries. Please note in addition
that it may sometimes not be possible to repair SIM-locked Products. ** In some
countries/regions additional information (such as a valid warranty card) may be
requested.
9
Важная информация
Web-узел для пользователей Sony Ericsson
На Web-узле
www.sonyericsson.com/support
размещен раздел поддержки,
который содержит полезную информацию и советы для пользователей
мобильных телефонов. Здесь находятся последние версии программного
обеспечения для компьютера и рекомендации по рациональному
использованию оборудования.
Обслуживание и поддержка
Теперь пользователи имеют доступ к пакету дополнительных услуг, в состав
которого, в частности, входят:
•глобальный и местные Web-узлы поддержки пользователей;
•глобальная сеть центров информационной поддержки;
•широкая сеть официальных сервисных центров Sony Ericsson;
•гарантийный период (условия гарантии приведены в данном руководстве).
На Web-узле
www.sonyericsson.com
в разделе поддержки на выбранном языке
предлагаются новые средства поддержки и информация, например, обновления
программного обеспечения, информационная база данных, мастер настройки
телефона и дополнительная справочная информация.
Дополнительную информацию по услугам и функциям, зависящим от оператора,
уточняйте у оператора сотовой сети. Можно также позвонить в центр
информационной поддержки. Телефонные номера некоторых центров
информационной поддержки приведены ниже. Если требуемая страна/регион
отсутствует в списке, обратитесь к местному дилеру. (Телефонные номера
являются правильными на момент опубликования. Последние изменения всегда
представлены по адресу
www.sonyericsson.com
.) В тех редких случаях, когда
изделие нуждается в обслуживании, обращайтесь к дилеру, у которого
приобретено изделие, либо в один из наших официальных сервисных центров.
Сохраните товарный чек (гарантийный талон) – он потребуется в случае
возникновения гарантийных претензий. Звонок в центр информационной
поддержки оплачивается в соответствии с местными тарифами, включая
местные налоги, если телефонный номер не является бесплатным.
Данный мобильный телефон позволяет загружать, хранить и пересылать
дополнительное содержимое, например, мелодии сигнала вызова.
Использование такого содержимого может быть ограничено или запрещено
всилу законных прав третьих сторон, включая (но не ограничиваясь этим)
ограничения, налагаемые действующим законодательством по защите
авторских прав. Ответственность за использование дополнительного
содержимого, загружаемого в телефон, а также пересылаемого из телефона,
целиком возлагается на владельца телефона (но не на компанию Sony Ericsson).
Перед использованием какого-либо дополнительного содержимого необходимо
убедиться в наличии надлежащих лицензий либо иных разрешений. Компания
Sony Ericsson не гарантирует точности, целостности или качества никакого
дополнительного содержимого и другого содержимого сторонних изготовителей.
10
Компания Sony Ericsson ни при каких обстоятельствах не несет никакой
ответственности за неправильное использование дополнительного
содержимого и другого содержимого сторонних изготовителей.
Рекомендации по эффективной и безопасной эксплуатации
Перед началом работы с мобильным телефоном обязательно прочитайте
приведенную ниже информацию.
Эти инструкции призваны обеспечить безопасность пользователя.
Неукоснительно следуйте этим инструкциям. В случае, если изделие
подверглось перечисленным ниже неблагоприятным воздействиям либо
имеются признаки ненормальной работы, перед зарядкой и эксплуатацией
изделия обязательно обратитесь в сервисный центр для проверки изделия.
Несоблюдение этого требования может привести к выходу изделия из строя
и может представлять опасность.
Рекомендации по безопасной эксплуатации изделия (мобильный
телефон, аккумулятор, зарядное устройство и другие аксессуары)
•Бережно обращайтесь с изделием и храните его в чистом и незапыленном
месте.
•Внимание! Не уничтожайте аккумуляторы путем сжигания – взрывоопасно!
•Не подвергайте изделие воздействию жидкости и влаги.
•Не подвергайте изделие воздействию чрезмерно высоких или низких
температур. Не допускайте нагрева аккумулятора свыше +60 °С (+140 °F).
•Предохраняйте изделие от воздействия открытого пламени и дыма (горящая
сигарета, зажигалка и пр.).
•Не роняйте и не пытайтесь изогнуть изделие.
•Не раскрашивайте изделие.
•Не пытайтесь разобрать или модифицировать изделие. К выполнению работ
по обслуживанию допускаются только специалисты, имеющие сертификат
компании Sony Ericsson.
•Для складных телефонов: не закрывайте изделие, когда между клавиатурой
идисплеем находятся посторонние предметы – возможно повреждение
изделия.
•Не пользуйтесь изделием около медицинского оборудования без разрешения
лечащего врача или медицинского персонала.
•Выключайте изделие, находясь в самолете или рядом с ним, а также в местах,
где вывешены плакаты с требованием “выключить приемо-передающие
устройства”.
•Не включайте изделие в районах с потенциально взрывоопасной атмосферой.
•Не кладите изделие и не устанавливайте радиооборудование над подушкой
безопасности автомобиля или в зоне ее раскрытия.
•Внимание! Треснувший или сломанный дисплей может иметь острые края или
фрагменты, которые могут стать причиной травмы.
11
Дети
Храните телефон и аксессуары в недоступном для детей месте. Не позволяйте
детям играть с телефоном и аксессуарами! Дети могут нанести травму себе
или окружающим, а также повредить телефон и аксессуары. Телефон
и аксессуары содержат мелкие детали, которые могут отсоединиться и попасть
в дыхательные пути ребенка, став причиной удушья.
Источник питания (зарядное устройство)
Подключайте блок питания только к электросети, указанной в маркировке блока
питания. Располагайте провод так, чтобы не наступить на него и не повредить.
Во избежание поражения электрическим током перед чисткой блока питания
отключите его от сети. Не используйте сетевой блок питания на улице или
всырых помещениях. Запрещается переделывать сетевой провод
исетевуювилку. Если вилка не подходит к сетевой розетке, обратитесь
к квалифицированному электрику и установите подходящую розетку.
Используйте фирменные зарядные устройства Sony Ericsson, предназначенные
специально для данной модели мобильного телефона. Другие зарядные
устройства могут не соответствовать требуемым характеристикам и стандартам
по безопасности.
Аккумулятор
Рекомендуется полностью зарядить аккумулятор прежде, чем включать
телефон первый раз. Новый или долго не использовавшийся аккумулятор может
заряжаться не полностью в течение первых нескольких циклов зарядки-
разрядки. Аккумулятор следует заряжать при температуре от +5 °С до +45 °С
(от +41 °F до +113 °F). Используйте фирменные аккумуляторы Sony Ericsson,
предназначенные специально для данной модели мобильного телефона.
Применение зарядных устройств и аккумуляторов других изготовителей создает
угрозу безопасности. Продолжительность работы аккумулятора в режиме
разговора и в режиме ожидания зависит от различных факторов, например,
уровня радиосигнала, температуры воздуха, характера эксплуатации,
использования голосовых функций и передачи данных. Перед отсоединением
аккумулятора выключите телефон. Не проверяйте зарядку аккумулятора
языком. Электролит аккумулятора токсичен. Не допускайте соприкосновения
металлических контактов аккумулятора с другими металлическими предметами.
Возможно короткое замыкание и повреждение аккумулятора. Используйте
аккумулятор только по назначению.
Персональные медицинские устройства
Мобильные телефоны могут влиять на работу имплантированных
кардиостимуляторов и других вживленных устройств. Не носите телефон рядом
с кардиостимулятором, например, в нагрудном кармане. При разговоре держите
телефон со стороны, противоположной стимулятору. Риск интерференции
снижается до минимума при расстоянии между телефоном и стимулятором более
15 сантиметров (6 дюймов). При появлении малейших признаков возникновения
помех немедленно выключите телефон. Подробные разъяснения можно получить
у кардиолога. Информацию по другим медицинским устройствам можно получить
уврача или изготовителя соответствующего оборудования.
12
Управление автомобилем
Ознакомьтесь с местными законами и правилами, которые ограничивают
использование мобильных телефонов при управлении автомобилем или
требуют использования оборудования громкой связи. Рекомендуется
использовать оборудование громкой связи, изготовленное компанией
Sony Ericsson специально для данной модели изделия. Помните, что поскольку
мобильный телефон может создавать помехи работе электронных устройств,
некоторые изготовители автомобилей запрещают пользоваться мобильными
телефонами в салоне автомобиля, если телефон не подключен к оборудованию
громкой связи с внешней антенной. Сосредоточьтесь на управлении
автомобилем; если позволяют условия движения, перед ответом на вызов или
посылкой вызова остановите автомобиль.
Вызов службы экстренной помощи
Мобильные телефоны используют радиосигналы, что не может гарантировать
связь при любых условиях. Поэтому для обеспечения абсолютной надежности
в жизненно важных ситуациях (например, при необходимости срочного вызова
врача) нельзя полагаться только на радиотелефон. Экстренные вызовы не
поддерживаются в некоторых регионах, сотовых сетях, а также при включении
некоторых услуг сети и функций мобильного телефона. Дополнительную
информацию можно получить у поставщика услуг.
Антенна
Телефон имеет встроенную антенну. Использование антенных устройств, не
имеющих маркировки Sony Ericsson как предназначенных специально для
телефона конкретной модели, может стать причиной повреждения мобильного
телефона, снижения эксплуатационных характеристик, а также превышения
установленных пределов на уровни SAR (см. ниже).
Эффективная работа с телефоном
Держите телефон обычным образом, так же, как и любой другой. Не прикасайтесь
кверхней части телефона во время разговора – это может привести к
ухудшению качества связи, повышению излучаемой мощность сверх
необходимой и к уменьшению времени работы телефона в режиме разговора
и в режиме ожидания.
Воздействие радиочастотной (РЧ) энергии и удельный коэффициент
поглощения (SAR)
Мобильный телефон является устройством, которое выполняет прием
и передачу радиосигналов малой мощности. Во включенном состоянии
он принимает и излучает радиочастотные сигналы (радиоволны).
Правительственными органами многих стран приняты исчерпывающие
рекомендации по безопасности, разработанные международными научными
организациями, такими как ICNIRP (Международная комиссия по защите от
неионизирующего излучения) и IEEE (Институт инженеров по электротехнике
и электронике), на основании систематического изучения и тщательной
проверки результатов научных исследований. Эти рекомендации определяют
допустимые уровни радиочастотного облучения для населения.
13
Эти предельные уровни облучения не превышают допустимых границ
безопасного облучения человека независимо от возраста и состояния
здоровья с учетом погрешностей измерений. Для определения уровня
облучения, поглощаемого телом человека при работе мобильного телефона,
используется единица измерения, называемая удельным коэффициентом
поглощения (SAR). Измерение коэффициента SAR выполняется в
лабораторных условиях при максимальной мощности передатчика телефона,
указанной в технических характеристиках, однако фактическое значение
уровня SAR для работающего мобильного телефона может оказаться
значительно ниже. Это обусловлено тем, что конструкция мобильного
телефона предусматривает работу при минимальной мощности, достаточной
для установления соединения с сетью. Изменение значения SAR в пределах,
указанных в рекомендациях по уровням облучения радиочастотной энергией,
не означает изменения степени безопасности. Несмотря на то, что уровни SAR
различных моделей мобильных телефонов отличаются, все модели
мобильных телефонов Sony Ericsson сконструированы в строгом соответствии
с требованиями рекомендаций по уровням облучения радиочастотной
энергией.
Для телефонов, приобретенных в США: перед тем, как конкретная модель
телефона поступает в продажу, она проходит испытания и сертификацию
Федеральной комиссии по связи (FCC), подтверждающую, что эта модель
телефона не превышает предельного уровня облучения, установленного
официальными требованиями на безопасный уровень облучения. Испытания
проводятся в различных положениях телефона (например, около уха и при
креплении на одежде) в соответствии с требованиями FCC для каждой модели.
Данная модель телефона прошла необходимые испытания и признана
соответствующей требованиям FCC на допустимые уровни радиочастотного
облучения в случае расположения телефона на расстоянии не менее 15 мм от
тела человека (при отсутствии металлических деталей вблизи телефона) либо
вслучае крепления телефона на одежде с использованием аксессуаров
Sony Ericsson, предназначенных для данной модели телефона. Использование
других аксессуаров может стать причиной превышения допустимого уровня
радиочастотного облучения, установленного требованиями FCC. В комплект
поставки мобильного телефона включена отдельная брошюра с информацией о
значении коэффициента SAR для данной модели телефона. Эту, а также другую
информацию о воздействии электромагнитного излучения и коэффициенте SAR
можно также найти в сети Интернет по адресу
www.sonyericsson.com/health
.
Варианты обслуживания/специального применения
Для телефонов, приобретенных в США: используя специальный аксессуар,
к мобильному телефону Sony Ericsson можно подключить терминал TTY
(телетайп). Информацию о предоставляемых пользователям вариантах
обслуживания/специального применения телефона можно получить в Центре
специальных применений Sony Ericsson по телефону 877 878 1996 (TTY) или
877 207 2056 (голосовая линия), а также на Web-сервере Центра специальных
применений Sony Ericsson (
www.sonyericsson-snc.com
).
14
Утилизация электрического и электронного оборудования
Данный знак указывает, что все помеченное электрическое и электронное
оборудование запрещается утилизировать вместе с прочими бытовыми
отходами. Его следует сдать в соответствующий приемный пункт переработки
электрического и электронного оборудования. Утилизация данного изделия
с нарушением требований может привести к потенциально негативному
влиянию на окружающую среду и здоровье людей, поэтому для предотвращения
подобных последствий необходимо соблюдать правила утилизации этого
изделия. Переработка данных материалов поможет сохранить природные
ресурсы. Для получения более подробной информации о переработке этого
изделия обратитесь в местные органы городского управления, службу сбора
бытовых отходов или в магазин, где было приобретено изделие.
Утилизация аккумулятора
Аккумуляторы следует уничтожать в соответствии с установленными
правилами; необходимые инструкции можно получить в местном центре
информационной поддержки Sony Ericsson (тел. линии горячей
поддержки потребителей в России +74957870986). Запрещается выкидывать
аккумулятор вместе с бытовым мусором. Если возможно, пользуйтесь услугами
специализированных организаций по утилизации аккумуляторов.
Защита персональной информации
Для обеспечения конфиденциальности и защиты информации от постороннего
доступа необходимо удалить все персональные данные перед продажей или
утилизацией изделия. Для удаления персональных данных выполните
операцию общего сброса и извлеките карту памяти. УДАЛЕНИЕ ИНФОРМАЦИИ
ИЗ ПАМЯТИ ТЕЛЕФОНА НЕ ГАРАНТИРУЕТ НЕВОЗМОЖНОСТИ ИЗВЛЕЧЕНИЯ
ЭТОЙ ИНФОРМАЦИИ ДРУГИМ ПОЛЬЗОВАТЕЛЕМ. КОРПОРАЦИЯ
SONY ERICSSON НЕ ДАЕТ НИКАКИХ ГАРАНТИЙ ОТНОСИТЕЛЬНО
НЕВОЗМОЖНОСТИ ДОСТУПА К ИНФОРМАЦИИ ДРУГИМИ
ПОЛЬЗОВАТЕЛЯМИ УСТРОЙСТВА И НЕ НЕСЕТ ОТВЕТСТВЕННОСТИ ЗА
РАСКРЫТИЕ ЭТОЙ ИНФОРМАЦИИ (В ТОМ ЧИСЛЕ И ПОСЛЕ ВЫПОЛНЕНИЯ
ОПЕРАЦИИ ОБЩЕГО СБРОСА). Для исключения возможности раскрытия
информации сохраните устройство либо обеспечьте его необратимое
уничтожение.
Аксессуары
Для обеспечения эффективной и безопасной эксплуатации изделий
Sony Ericsson рекомендуется использовать фирменные аксессуары
Sony Ericsson. Использование аксессуаров других изготовителей может
привести к ухудшению характеристик изделия и в некоторых случаях
представляет угрозу здоровью и безопасности. ПРЕДУПРЕЖДЕНИЕ ОБ
УРОВНЕ ГРОМКОСТИ. Во избежание повреждения органов слуха соблюдайте
осторожность при регулировке громкости с использованием аудиоаксессуаров
других изготовителей. Корпорация Sony Ericsson не проверяет работу
аудиоаксессуаров других изготовителей с данным мобильным телефоном.
Рекомендуется использовать только фирменные аудиоаксессуары
Sony Ericsson.
15
Лицензионное соглашение конечного пользователя
Данное мобильное устройство, включая (без каких-либо ограничений) все
носители, входящие в комплект поставки, (“Устройство”) содержит программное
обеспечение, которое является собственностью корпорации Sony Ericsson
Mobile Communications AB и филиалов компании (“Sony Ericsson”) или ее
сторонних поставщиков и держателей лицензий (“Программное обеспечение”).
Корпорация Sony Ericsson предоставляет конечному пользователю Устройства
немонопольную лицензию без права передачи и без права выдачи сублицензии
на применение этого Программного обеспечения исключительно в сочетании
с Устройством, на котором оно установлено и/или в комплекте с которым оно
поставляется. Изложенное здесь соглашение на при каких условиях не должно
истолковываться как соглашение о продаже программного обеспечения
пользователю данного Устройства. Пользователь не имеет права
воспроизводить, изменять, распространять, восстанавливать алгоритмы,
декомпилировать или иным образом изменять или использовать исходный код
Программного обеспечения или любого компонента Программного обеспечения.
Во избежание неопределенности пользователю предоставляется право в любое
время передавать все права и обязательства по Программному обеспечению
третьей стороне исключительно вместе с Устройством, с которым получено
Программное обеспечение, при обязательном условии, что эта третья сторона
дает письменное согласие с изложенными здесь условиями. Настоящая
лицензия предоставляется на весь срок службы данного Устройства. Действие
настоящей лицензии может быть прекращено путем письменной передачи
третьей стороне всех прав на Устройство, в котором получено Программное
обеспечение. Действие настоящей лицензии прекращается немедленно в
случае нарушения каких-либо положений или условий, изложенных в лицензии.
Корпорация Sony Ericsson и ее сторонние поставщики и держатели лицензий
являются единственными и исключительными владельцами с сохранением всех
прав на собственность и на прибыль по отношению к Программному
обеспечению. Корпорация Sony Ericsson и упомянутые третьи стороны (в той
степени, в которой программное обеспечение содержит материалы и код этих
третьих сторон) получают права третьих сторон, извлекающих выгоду из этих
положений. Законность, истолкование и исполнение настоящей лицензии
подпадают под действие законодательства Швеции. Вышеизложенные
положения и условия должны применяться в полной мере, допускаемой
законодательством о правах потребителя (если применимо).
Ограниченная гарантия
Корпорация Sony Ericsson Mobile Communications AB, SE-221 88 Lund, Sweden
(далее – Sony Ericsson) или местный филиал компании предоставляет данную
гарантию на мобильный телефон и фирменные аксессуары, входящие
в комплект поставки мобильного телефона (далее – “Изделие”). В случае,
если требуется гарантийное обслуживание Изделия, следует вернуть его по
месту приобретения либо обратиться в местный центр информационной
16
поддержки Sony Ericsson (тел. линии горячей поддержки потребителей в России
+74957870986); дополнительную информацию можно также получить по адресу
www.sonyericsson.com
.
Гарантийный срок
В соответствии с условиями данной ограниченной гарантии компания
Sony Ericsson гарантирует отсутствие дефектов конструкции, материалов,
комплектующих и сборки на момент первичной продажи Изделия изготовителем.
Настоящая ограниченная гарантия действует в течение одного (1) года с даты
первоначального приобретения Изделия.
Гарантийные обязательства
Если при нормальной эксплуатации Изделия в течение гарантийного срока
обнаружатся дефекты в конструкции, материалах, комплектующих или сборке,
местные дилеры или сервисные центры Sony Ericsson в стране*, где было
приобретено Изделие, по своему усмотрению отремонтируют или заменят
Изделие согласно перечисленным ниже условиям. Компания Sony Ericsson и ее
представители оставляют за собой право взимать определенную плату в случае,
если дефект Изделия не подпадает под изложенные ниже условия настоящей
гарантии. Следует иметь в виду, что персональные настройки, загруженные
файлы и другая информация может быть утрачена в случае ремонта или замены
Изделия Sony Ericsson. В настоящее время изготовление резервных копий
некоторых загруженных материалов для компании Sony Ericsson не
разрешается в силу ограничений, налагаемых применимым законодательством
и другими нормативными актами, а также технических ограничений. Компания
Sony Ericsson не несет ответственности за потерю информации любого вида
ине возмещает ущерб, связанный с потерей информации. Резервное
копирование информации, сохраненной в Изделии Sony Ericsson (загруженные
файлы, информация календаря и телефонной книги), должно выполняться
пользователем перед передачей Изделия Sony Ericsson для ремонта или
замены.
Условия гарантии
1Настоящая ограниченная гарантия предоставляется только при предъявлении
вместе с подлежащим ремонту или замене Изделием подлинного
гарантийного талона, выданного дилером компании Sony Ericsson, где указаны
дата приобретения Изделия и его серийный номер**. Компания Sony Ericsson
оставляет за собой право отказать в гарантийном обслуживании, если после
первичного приобретения Изделия у продавца данная информация была
утрачена или изменена.
2На отремонтированное или замененное компанией Sony Ericsson Изделие
предоставляется гарантия на остаток первоначального гарантийного срока
или на девяносто (90) дней с даты ремонта или замены в зависимости от того,
какой срок больше. Ремонт или замена могут выполняться с использованием
функционально эквивалентных отремонтированных деталей. Замененные
детали или компоненты становятся собственностью компании Sony Ericsson.
17
3Данная гарантия не распространяется на неисправности, возникшие в
результате нормального износа Изделия, а также неправильного обращения
сИзделием, включая (но не ограничиваясь этим) использование Изделия не
по назначению и с нарушением инструкций Sony Ericsson по эксплуатации
и обслуживанию Изделия. Данная гарантия не распространяется также на
неисправности Изделия, возникшие в результате несчастного случая,
аппаратной или программной модификации или регулировки, стихийного
бедствия и воздействия влаги. Аккумулятор можно заряжать и разряжать
более сотни раз, однако при этом он постепенно изнашивается, что не
является дефектом, а считается нормальным износом. При значительном
сокращении продолжительности работы аккумулятора (в режиме разговора
ив режиме ожидания) следует заменить аккумулятор. Используйте только
аккумуляторы и зарядные устройства, рекомендованные компанией
Sony Ericsson. В различных экземплярах Изделия возможны незначительные
отклонения яркости и цвета изображения на экране. Возможно также наличие
на экране ярких и темных точек. Эти точки (дефектные пикселы) появляются
вследствие отказа отдельных элементов экрана; устранение таких дефектов
невозможно. Считается допустимым наличие двух дефектных пикселов.
Вразличных экземплярах Изделия возможны незначительные отклонения
в изображении, полученном с камеры. Это обычное явление, которое не
является признаком неисправности модуля камеры.
4Поскольку сотовая сеть, для работы в которой предназначено Изделие,
поддерживается оператором, независимым от компании Sony Ericsson,
компания Sony Ericsson не несет ответственности за неполадки, связанные
с работой сотовой системы, ее доступностью, зоной обслуживания, услугами
ит. д.
5Данная гарантия не распространяется на неисправности, возникшие
врезультате установки дополнительных компонентов, модификации или
ремонта Изделия, а также вскрытия Изделия лицами, не уполномоченными
компанией Sony Ericsson.
6Данная гарантия не распространяется на неисправности, возникшие
врезультате использования аксессуаров или другого периферийного
оборудования, которые не являются фирменными аксессуарами,
изготовленными компанией Sony Ericsson специально для данной модели
Изделия.
7Гарантия не распространяется на Изделия с поврежденной пломбой.
8НИКАКИХ ДРУГИХ ГАРАНТИЙНЫХ ОБЯЗАТЕЛЬСТВ, ПИСЬМЕННЫХ ИЛИ
УСТНЫХ, ОТЛИЧНЫХ ОТ ПЕРЕЧИСЛЕННЫХ В ДАННОМ ПЕЧАТНОМ
ТЕКСТЕ ОГРАНИЧЕННОЙ ГАРАНТИИ, НЕ ПРЕДОСТАВЛЯЕТСЯ. ВСЕ
ПОДРАЗУМЕВАЕМЫЕ ГАРАНТИИ, ВКЛЮЧАЯ, НО НЕ ОГРАНИЧИВАЯСЬ
ЭТИМ, ПОДРАЗУМЕВАЕМЫЕ ГАРАНТИИ КОММЕРЧЕСКОЙ ВЫГОДЫ ИЛИ
ПРИГОДНОСТИ ДЛЯ ОПРЕДЕЛЕННЫХ ЦЕЛЕЙ, ОГРАНИЧИВАЮТСЯ
СРОКОМ ДАННОЙ ОГРАНИЧЕННОЙ ГАРАНТИИ. КОМПАНИЯ
SONY ERICSSON, А ТАКЖЕ ДЕРЖАТЕЛИ ЕЕ ЛИЦЕНЗИЙ НИ ПРИ КАКИХ
18
ОБСТОЯТЕЛЬСТВАХ НЕ НЕСУТ ОТВЕТСТВЕННОСТИ ЗА КОСВЕННЫЙ ИЛИ
ВОСПОСЛЕДОВАВШИЙ УЩЕРБ ЛЮБОГО ПРОИСХОЖДЕНИЯ, ВКЛЮЧАЯ,
НО НЕ ОГРАНИЧИВАЯСЬ ЭТИМ, ПОТЕРЮ ПРИБЫЛИ ИЛИ КОММЕРЧЕСКИЙ
УЩЕРБ. ПРЕТЕНЗИИ ПО ПОЛНОМУ ВОЗМЕЩЕНИЮ УЩЕРБА МОГУТ БЫТЬ
ОСПОРЕНЫ В СУДЕБНОМ ПОРЯДКЕ. Законодательства некоторых стран
не допускают исключений или ограничений на возмещение косвенного или
воспоследовавшего ущерба, а также ограничения срока действия
подразумеваемых гарантий, поэтому указанные выше ограничения или
исключения могут на вас не распространяться. Данная гарантия не
затрагивает как юридических прав потребителя согласно применимому
действующему законодательству, так и прав потребителя по отношению
кпродавцу, вытекающих из договора купли-продажи.
* Географическая область действия гарантии
Если Изделие приобретено в одной из стран Европейского экономического
сообщества (ЕЭС), либо в Швейцарии, либо в Республике Турция и это Изделие
предназначено для продажи в странах ЕЭС, либо в Швейцарии, либо в Турции,
обслуживание Изделия производится в любой стране ЕЭС, либо в Швейцарии,
либо в Турции, в соответствии с гарантийными условиями, применяемыми
в стране, в которой требуется обслуживание Изделия и где аналогичные
Изделия продаются уполномоченными дистрибьюторами компании
Sony Ericsson. Для уточнения возможности приобретения Изделия в данной
стране обратитесь в местный центр информационной поддержки Sony Ericsson.
Примите во внимание, что некоторые виды обслуживания могут быть выполнены
только в той стране, где Изделие было приобретено первоначально, например,
в силу того, что конструкция и внешний вид Изделия могут отличаться от
аналогичных моделей, продаваемых в других странах. Кроме того, в некоторых
случаях ремонту не подлежат Изделия с заблокированными SIM-картами.
** В некоторых странах/регионах требуется представить дополнительную
информацию (например, действующий гарантийный талон).
19
Support/Поддержка// /
Argentina 800-333-7427
questions.AR@support.sonyericsson.com
Australia 1-300650-600
questions.AU@support.sonyericsson.com
Belgique/België 02-7451611
questions.BE@support.sonyericsson.com
Brasil 4001-04444
questions.BR@support.sonyericsson.com
Canada 1-866-766-9374
questions.CA@support.sonyericsson.com
Central Africa +27 112589023
questions.CF@support.sonyericsson.com
Chile 123-0020-0656
questions.CL@support.sonyericsson.com
Colombia 18009122135
questions.CO@support.sonyericsson.com
Česká republika 844550 055
questions.CZ@support.sonyericsson.com
Danmark 33 31 28 28
questions.DK@support.sonyericsson.com
Deutschland 0180 534 2020
questions.DE@support.sonyericsson.com
Ελλάδα
801-11-810-810
210-89 91 919
questions.GR@support.sonyericsson.com
España 902 180 576
questions.ES@support.sonyericsson.com
France 0 825 383 383
questions.FR@support.sonyericsson.com
Hong Kong/ 8203 8863
questions.HK@support.sonyericsson.com
Hrvatska 062 000 000
questions.HR@support.sonyericsson.com
India/ 39011111
questions.IN@support.sonyericsson.com
Indonesia 021-2701388
questions.ID@support.sonyericsson.com
Ireland 1850 545 888
questions.IE@support.sonyericsson.com
Italia 06 48895206
questions.IT@support.sonyericsson.com
Lietuva 8 70055030
questions.LT@support.sonyericsson.com
gW
ﺘﺸﭘﻴﻧﺎﺒﻲ
ʤʫʩʮʺ
Hkkjr
20
Magyarország +36 1 880 4747
questions.HU@support.sonyericsson.com
Malaysia 1-800-889900
questions.MY@support.sonyericsson.com
México 01 800 000 4722
questions.MX@support.sonyericsson.com
Nederland 0900 899 8318
questions.NL@support.sonyericsson.com
New Zealand 0800-100150
questions.NZ@support.sonyericsson.com
Norge 815 00 840
questions.NO@support.sonyericsson.com
Österreich 0810 200245
questions.AT@support.sonyericsson.com
Pakistan 111 22 55 73
(92-21) 111 22 55 73
questions.PK@support.sonyericsson.com
Philippines/Pilipinas 02-6351860
questions.PH@support.sonyericsson.com
Polska 0 (prefix) 22 6916200
questions.PL@support.sonyericsson.com
Portugal 808 204 466
questions.PT@support.sonyericsson.com
România (+4021) 401 0401
questions.RO@support.sonyericsson.com
Россия
8 (495) 787 0986
questions.RU@support.sonyericsson.com
Schweiz/Suisse/Svizzera 0848 824 040
questions.CH@support.sonyericsson.com
Singapore 67440733
questions.SG@support.sonyericsson.com
Slovensko 02-5443 6443
questions.SK@support.sonyericsson.com
South Africa 0861 6322222
questions.ZA@support.sonyericsson.com
Suomi 09-299 2000
questions.FI@support.sonyericsson.com
Sverige 013-24 45 00
questions.SE@support.sonyericsson.com
Türkiye 0212 47 37 777
questions.TR@support.sonyericsson.com
Україна
(+0380) 44 590 1515
questions.UA@support.sonyericsson.com
21
United Kingdom 08705 23 7237
questions.GB@support.sonyericsson.com
United States 1-866-7669347
questions.US@support.sonyericsson.com
Venezuela 0-800-100-2250
questions.VE@support.sonyericsson.com
43 919880
questions.AE@support.sonyericsson.com
4008100000
questions.CN@support.sonyericsson.com
02-25625511
questions.TW@support.sonyericsson.com
02-2483030
questions.TH@support.sonyericsson.com
Wó&MóEY<¥Kx
Å¥
PPreflighted byreflighted byPreflighted by ( )( )( )

28
Sony Ericsson،Sony Ericsson
"א"אאא 4
.،،
،אאא
א،א،א،אא"א"אאא
5
.Sony Ericsson"א"
אאא"א"אאא
6
."א"
אאSony Ericsson
.א
"א"אאא
7
אא،א، 8
אאאאא،אאא.א
،אאאאא"א"
אSony Ericsson.אא
אא،אאאאאא
Sony Ericssonאא،אאאא
אאאא/אא
.א
،אא،אא
אאאאאאא
.אא
.א/אאאאא،אא
אאא*
א،א،EEAאאא"א"א
،אאאEEAאאאא
"א"א،א
אאאאEEAאאא
""""
""אא
Sony Ericssonא،אאא
""א
.Sony Ericsson
אא
א
א.אא
אאאאאאאא
"א"
א
،א/אא**.SIMאא
א.א
.(
)
27
"א"א
Sony Ericsson،אא
אאא.אאאא،אא،א
.אאאא(1)
،אאאאאא
"א"א
،א،א
*א،אאSony Ericsson
א،א،
.אאא،،אאא،אא
א"א"
אSony Ericsson
،אאא،אאא
א.א
.אאSony Ericsson""
אאאאא
אאאאSony Ericsson
א
Sony Ericsson
.
אאאא،א
אאא.אאא
،
،אא،אא،
אאאSony Ericssonאא
.אא
א
Sony Ericssonאאאאאא 1
**אאאאא،"א"אאאא
אאSony Ericsson.אא"א"
.א""אאא
אא
"א"אאאאא
،"א"אאSony Ericsson 2
.
،א90אאאא
אאאאאא
.Sony Ericsson אא
،
،אאאא"א"א
3
Sony Ericssonאאאאאאא،אא
،אא"א"א."א"אא
אאאאאא،אא،א
אא
..
א
אא
.אאא،
Sony Ericsson.אאא،א
א.Sony Ericssonאא
א.אאא.א
.
אא
،א
אא.
.אא
אאאאא،
26
אא
אא
،א
.אאאאאאא،אא.אא
.אאאאאאאאא
،אאאSony Ericsson،
א.אאאא
א
.
אא،א
א
.א،אSony EricssonSony Ericsson
.
אאאא
אא:אא
אSony Ericsson.
אא
.Sony EricssonSony Ericsson.אאא
אאא
Sony Ericsson Mobile،אא("א")אאא
.("א")אא
א("Sony Ericsson")אאCommunications AB
،א
،
،אאSony Ericsson
א
.
א/אאאאא،
،א،،،
.אאאא
.
אא
אא،
אאא،
אאאא
،
א
אא.א
א
אאא،א
אא
אאא
.א
،אא
אאאא
אא
.
،א
א،אא
אSony Ericsson
.
א
אאאאא،אא
אא
،
א
א
Sony Ericsson.
.אאא،א،
אאאא.א
.،
אאאא
אא
אאSony Ericsson Mobile Communications AB, SE-221 88 Lund, Sweden, (Sony Ericsson)
א)אא
אאאאאא
،א
.("א"
אאאא،אא"א"אא
www.sonyericsson.com
(אא
)אאSony Ericsson
.א
25
،אא.א
א
.אאאא،
א
אאאאא
אSARאא
،אאאאאSAR.
אא
.אאאאאSAR
.א
א
אאאSAR
א
א،אאSARא.א
.א
אא
אSony Ericsson
،אא
אאאאאא
אאאאא
FCCאאאא
אא)אאאא
.אא
אא
א.אFCC،
(א
א
אFCCאאאאא
،
א،אאא
אא15א
א
א
.אאאאSony Ericssonא
.א
אFCCאאא
א
.אאאאאאאSAR
.
www.sonyericsson.com/health
:אSARא
א
אא/אא
אTTY
א،אאאאא
אאאאא.(אא)Sony Ericsson
(TTY) 1996 878 877אאSony Ericsson Special Needs Centerא،
אSony Ericsson Special Needs Center،()2056 207 877
.
www.sonyericsson-snc.com
אא
אאאא
א
א
אאאאאא
אא
.א
אאאא.
א
אא
א
אאאא
א،אאאא
.
אאאאאאא.אאאא
،א
אאא،אא
.אאאא،אא
א
א
Sony Ericssonאאאאאאאא
.אאאאאא.אא
.אא
24
אאא
.א
אאא
.
אא.
،
אאא
،.אאאאא
אאא
אא،אאאאא
א
،אאא
،אא.א
.(6)א15אאא
.אאאאאאא،אאא
.א
אא،א
א
אאאאאאא
אאאאאא.אא
א
אאא
.אאא
אSony Ericsson
אאאאאאא،אאאא
،אאא
.א
אאאא
.אאאאאא
אא
،.אאאאאא
אא:א)אאא
אאא
אאא.(א
.אא
אא.אאא/א
אא
אSony Ericsson
אאא
.
א
א
א)אא
SARאאאא
א
.(
אא
א
،א.א
א
،אאא
.אא
SAR
אאא
א
،א.אאאאא
.(א
אאא)א
א
א
אאא
(IEEE)אאא(ICNIRP)אאא
א
אאא
.אא
23
א
א.אא
•
.(+140)+60
.א
•
.א
•
.
•
.Sony Ericssonאא.
•
؛
،אאאא
•
.א
אאאאא
•
.
אא
"אאאא،אא
•
."אאאא
.א
א
•
.אאאאאאאא
•
א
א،אאאא:
•
.
א
،א.אאא
אא.אא،א
.אא
(א)א
א.אאאאא
א،.א
א
.אאאאאאאא.א
،אא.אאאא
.אאא
אא
.
א
Sony Ericsson
.אאא
א
.אאאא
+5אאא.אא
Sony Ericssonאא.(+113)+45(+41)
א
.אא
.
א
،אאא،א
אא
א
א.
אאאאאאא،אא،א
א.
אאא
22
אא
אSony Ericsson
אאא
www.sonyericsson.com/support
א
.
א
אאא.א
אא
:،
אאאאא
.אאא
א
•
.אאאא
•
.אSony Ericssonא
•
.אאאאא.א
•
אא،א،א،
www.sonyericsson.com
א
.אאא،אאא،א،אא
.א
א،
אאאא
אאאאאא.אאאא
א،אאא/א.אא
אא.אאא).אא
אאאא،אא.(
www.sonyericsson.com
א
אא
אאא.אא
،
אאא.אא
.
א
،
אאא
אא
א
אא.،אא
אאאאא،אא
.
א،Sony Ericsson،
.
.
אא
א،א
.،،،Sony Ericsson
אאאאאאאSony Ericsson
.א
א
.אאאאא
،אאא
אא
.אא،אאא
.אאא،א،א
.
א
א
אא
אא
(،א،א،אא)
.א
אא
א
•
.אא
א!
•
.אא
•
35
תירבע
Sony Ericsson לש תוחוקלה תוריש רתא
םיפיטו הרזע ללוכה ,הכימת רודמ אוצמל לכות www.sonyericsson.com/support רתאב
בשחמ תונכותל םינורחא םינוכדע םיעיפומ ןאכ .ךממ רבכע תושקה המכ קר – די גשיהב םיליעומ
.ךתושרבש רצומב רתוי ליעי שומישל םיפיטו
הכימתו תוריש
:ןוגכ ,תוידעלב תוריש תובטה לש לסל השיגמ הנהית ךליאו התעמ
.טנרטניאב םיימוקמו םיימלוע-ללכ הכימת ירתא •
.תוריש ידקומ לש תימלוע-ללכ תשר •
.Sony Ericsson לש תורישה יפתוש לש תבחרנ תשר •
.תוירחאה יאנת לע ףסונ עדימ לבקל לכות הז ךירדמ ךשמהב .תוירחא תפוקת •
ילכ תא אוצמל לכות ,(ךתריחב יפל הפשב) הכימתה רודמב ,www.sonyericsson.com רתאב
ןכו ,ןופלט תורדגהו עדי ירגאמ ,הנכות ינוכדע ןוגכ ,רתויב םיינכדעה עדימה יטרפ תאו הכימתה
.ךרוצל םאתהב תפסונ הרזע לבקל לכות
ומכ .תורישי וילא הנפ ,תשרה ליעפמ קפסמש םיידוחיי תונוכתו םיתוריש לע ףסונ עדימ תלבקל
בורקה תורישה דקומ לש ןופלטה רפסמ תלבקל .ונלש תורישה ידקומל תונפל ךתורשפאב ,ןכ
קפסל הנפ ,המישרב םיעיפומ םניא ךרוזא וא ךתנידמ םא .ןלהלש המישרב ןייע ,ךילא רתויב
רתאב .הז ךירדמ לש ותספדה דעומל םינוכנ ויה ןלהלש ןופלטה ירפסמ) .רצומה לש ימוקמה
קקדזי רצומהש הרקמב (.םינורחאה םינוכדעה תא אוצמל דימת לכות www.sonyericsson.com
.ונלש תורישה יפתושמ דחאל וא שכרנ ונממש קפסל הנפ ,הכומנ ךכל תוריבסה םא םג ,תורישל
רובע .רצומה לע תוירחאה תרגסמב וגיצהל לכותש ידכ ,תלביקש השיכרה תחכוה ךמסמ לע רומש
םיסמ ללוכ ,םיימוקמה םיפירעתל םאתהב םוכס ךממ הבגיי ,ונלש תורישה ידקוממ דחאל החיש
.םניח גויח רפסמב רבודמ םא אלא ,םיימוקמ
שומישה .םילוצלצ ןוגכ ,םיפסונ םינכת לש הרבעהו ןוסחא ,הדרוה רשפאמ ךתושרבש ןופלטה
חוכמ הלבגה ,קר אל ךא ,תוברל ,ישילש דצ תויוכז בקע רוסא וא לבגומ תויהל יושע הלאכ םינכתב
ןופלטב םיפסונ םינכת לש הרבעה וא הדרוה לכ לע האלמה תוירחאה .םימישי םירצוי תויוכז יקוח
יכ אדו ,םהשלכ םיפסונ םינכתב שומיש ינפל .Sony Ericsson תרבח לע אלו ,ךדבל ךילע הלח
תיארחא הניא Sony Ericsson תרבח .תרחא ךרדב רשואמ וא תמלוה האשרהב ןגועמ שומישה
.ישילש דצ לש םהשלכ םירחא םינכתל וא םהשלכ םיפסונ םינכת לש תוכיאל וא תומלשל ,קוידל
םלוה-יתלב שומישל תוירחאב איהש ךרד לכב אשית אל Sony Ericsson תרבח ,הרקמ לכב
.ישילש דצ לש םהשלכ םירחא םינכתב וא םיפסונ םינכתב ךדצמ
ליעיו חוטב שומישל םיחנמ םיווק
.דיינה ןופלטב שומישה תליחת ינפל הז עדימ אורקל שי
ףושח רצומה היה םא .תויחנהה יפל לועפל דפקה .ךתוחיטב לע רומשל תודעוימ הלא תויחנה
תא אבה ,הניקתה ותלועפ יבגל והשלכ קפס ךל שי םא ןכו ,ןלהל םיטרופמה םיבצמהמ דחאל
תוענמיה .וב שמתשת וא ותוא ןעטתש ינפל ונלש השרומ תוריש ףתוש לצא הקידבל רצומה
.ךתואירב תא ןכסל ףאו רצומה לש הניקת אל הלועפל איבהל הלולע תאז תושעלמ
(םירחא םירזבאו ןעטמה ,הללוסה ,דיינה ןופלטה) רצומב חוטב שומישל תוצלמה
.קבא לוטנו יקנ םוקמב ותוא קזחהו תוריהזב רצומב לפטל דפקה •
.ץצופתהל הלולע שאל תכלשומה הללוס !הרהזא •
.תוחלו תוביטרל וא םילזונל רצומה תא ףושחת לא •
הללוסה תא ףושחת לא .םוחו רוק לש תוינוציק תורוטרפמטל רצומה תא ףושחת לא •
.+60°C לעמש תורוטרפמטל
34
)z(U>4(K+(&* J/;7;!)Nd57-,
+0(P>*b6!*>47P);9#-0F)
6#6 !*094(?Y!(6!P2 >*!9+-F=06!(E(RC5F
64*‚&()@9,>!4-4*‚7!B48>*J.F%RC0(*DC_U=6
6L!==8#-6X"/J/B48J.F%! !-P2 >*!9+0F)
6#6 !*090!4(?->4"5U 1*!+.>4o*0!40(
6)B.@0!-
k77JC#.>;*8IK==5(;M#=J(R"#.=<
K60#N\.K#.;!@(8K&6%K54#K=>4
4(v%)-
{TKn?76;M#48J6+)H0(42<?'6I;M#567(4)U(4
7<
6)-
gJN;M#48J6+)H0(E(44o!/49#" J(!7;9#
=
(;9#>4K;6]4;M#0+.-
…)%7(4*54>d#4G+)HTNn X?@>*‹-
„
S!!@+)H0(74o"#!*96,>4M(+)HM1*
!;6-K^8>4;9#U!><UJ6)H>*+)H
*8+)H0)*57!@-
##57#5"],(
*4H!><5(7!4HU"(/9>*.8X"/#N\.M1*
-6)#4(v%/*.80(D-
*$78454!@(54Z#.
754!@(!U"(/9>*.8)7<)H>*U5-+(!@0(K0(4
$)6J6+0d)*Z#!*-4 J/0/y"K;l4?/xC]4K;6P+)H
>4:Kt!4!(484/76K;6!444;l4?xC]!-
4+L=
>*$=7F(5#*M#)64G?#/CD_>%!
(PV() >=4>(48
(;4=(*M#64=>t!4
(PV(=4;6#4G4LK8;M#
4*(*$=7E>_
(PV(=4I(46+@+)H5 $=)U=4K4$
7I)6;M#X=(7<;=w
6#8!4$=5-F(7m>4X
48(6#8!4#.*5=>$=)6;M#2=48
=)5$
(4M->*X)6;M# 8(8UD/ZF(JN+0F)=6#6 9DN
*$=4(;6#8!4$;M#=N!$=2 >$=884+(/K6!9#
<6"K(;4=>(48-0)H6#6 =+0F)_U=(*;M##
$==4)U+;6!.-11+0F)*$=7_U(y>4#$
4"#U+)H=67-
33
234*M#;4)**234D8xC]*DK(;4+(5>!4"#
vG!>4M(-*8TN)67<K$+()6I7<0( I(467(4*d,
6-
!#.**2340(,5dN5>*7#n],!UD/5G0!
+yU#*2340(R4w!xC]!y]-
C)5246!
#.*4/0(w9(W>*l45UK#6*2340(>*!-7<0(>4 !<(K"#
+P$0/+@-,7/xKJ=D;l4?7+()]xC]IHy"
6X)-
L =
$% &&'"(+,--.'!+/!
()(G@K+=467N!)6J(09>4!@+)H0(J(09;4)*," 37=
V%0(s;M#s65=*4-259DNK+67+)H8)6;M#4G
>;6!4!7;M#>(!(4"(;4>(482=48
@(4M)
)(2*4G"@5$=)NFˆ44+((>4
"4#$n.-
=
464(IK!@+)H0(
4L7;M#0(5NK]4+9=!
;=l4?IN!>(483M*+8)_0=-(!@+)H0E(jXV%
7(48•(>N!;M#"#-
GA#
]4K5nJNK8!;9#>I(46+@X?@0(K+)H4G+8!
7<5G6!4Kd+
$=7<824(>>(48;M#)6=
*8z(U(4)U;M#K+)H0(;64=WI(46!CyD!8(],K(;4=
4=-K;6;4G7;M#=,K$;r'$+)H+@4(7I(46
(
*8)]2Ny]+(7<K582=4-(4)U,=6#6 9DN;M#z(U
)6K*L784+0F)#(!(4M)66u%-4H]X]
+0F)
74M(>*+(!@(4CK40/D(#$%J75"
)66;6w-
!+6*'#+7m4*X"/#N\.M1*
=)54" .8-)*()6;M#J(@7&%$
7Kz(U(4)U>48
=5"#$%J(K0"'!(CK*5>!4;6;48W3)-
N/
j(0+)H!@#/!IC(48#="#(;M#07<;6!4I
,X(4;)6!(48•(5!;6
;4)*!4G/;M#*M#4)U(!z(U(
4GPK6-K6;6;4T(!lv];6!47;M#(487V%0(,
*8‰9@8>4y]0(>8+)H8P7+.-
†4G
!N!U;)/>4;6z(U(4)U;M#Kz(U(4)U;M#
(ƒh6+)HK64f30(#.K4)U•(77!-4)U3M*(!
7X)#]z(UUD/4G;9#;6>77$-;6z(UB48>2 (UD/
yU-
|X!#!X)U=174o+;9#(!>e#JNX?@48J6+)H0(
*J)UN#!+>
*'K+;6/X?@>M!;9#>4-01)*
,!U">(K>234(>2+'>*L(4TKŠ]7648+)H0(
4G)4U(76-b6J/>4,7&"4>4+(6b6!b6
4G)B.@rC\.0(6;457+6vG56;4!>4>+-M*
32
"+"*DEFG&
K6#8!4F(4=(*09>4
J(09;4)*37N!
7" =;9#K-n.=>4,8>(7=>4>4 >*J];
^8>(72=4K
09;)6jƒƒg„…„„……09;)6()
,†h{g†h…„……&'7(!(4M)
!"+(>!4
=5(-
88-B G2*
0#8!=+.4M$+0(F!4#FN!/4J(!FK+.X2>*XT64M(0#8!
+8N7^?'l!4‚5#.(6+(75F!4#FN!/4J(!-F(7485)
I@>45N)#]9a7)6K;6#8!€@,t!X?@0(!,=+6!
4o>2(()>4M$%K( +0F)€@,-)=U"w~9]+(7=E->4
=>;7T(!>46+L58K8J@>469DNK;M#0(+(74#$P2 0(
4=>(4857X?@)K(;M4(-
#
n.=>4(P)4@4CK>40#8!4#$2=48
@(4M)-+8M8>*N7(">4-K5d,
P);9#>40#8!.7-
67/HIJ&KL
K)654M(4#7>4G !8?'6(4]7+‚9]>4!(;M#t!47J"/(
=u%8?'63)K50#8-==+.(;M#?'6lv]>4=!
L]5!4!(-
54M(I(75F3U09L]7lv]
+.-
##4#3U4=>`*!=)0)_)6
#N\.X"/56$)6U4=I>;UK=+.(7V%#]K
4G)-
N)#]56$54M1M8209K#.*8(=5(!-
"-+,&
,
(4=+0>9!0\)D;9#" 37N7IC8097E(4
=;9#-" 37N7;9#+0F)K/49#6094==&*=c!(4>
#!()6#64D8)6-$*,5DA" 37N7;9#3M*9DN,
K/49#4>G 4>7>@,]7&>6=()6,K4n>#]57R(
=-
" 37N7;9#,/49#(7090()&=-
," 37N7IC=,E(4=;9#-
G2&"C M"#
6P5;4)*=(!);4)*K;M#0(s;M#syU#+(*234>K
+46
$% &&'"(#.!>*+46!))0!
D/5G=7#5"],!Us234s+-+46
0(7;;9#5U)6
9#+ 4o>vG!J/4o!XC#J/4oK>?@4o7<(K;M#>4ICK*2347;
!`*mH0(!*K+;6P;M#;4)*(!;6n?5>!*2340(*M#
*234t!4>U;M#0(;;9#+.-!54=7K>7$Kw(7K‡,K4Zd7<)6
9#*234w">*}$>4>!4*7;9#(!4TG4*<(!4M(>*4*7;
4*(!*2340(7$'#.-340(R4U!xC]XC#y]$)*)6K"6w>4
;4)*IC>4M(*2(K+n?5>!4*234*M#-"#D45d4R!4$
64C0(+(U#-6;)6;M#0(94)57>47<0(-)6
31
:
7;9#+(!@@>*0P!0/9DN(!G3M*J(097(;d(
P)4K();9#>47*-7IC=+0(,>47*
n#=
M#;6]4)6;K=;9#-Kd!4#dN2<X#87!4X)#]JN6#6 9DN
(n?,J(097;9#CJ(!5GN784>47*(E 80#K
7<-8]3)G3M*$)*(>4/4>45d,!lDUG
*; 8J")5•%(e%(;4=+-
;#<=
!I(46)*R">4/4>4)_K((>*XM7;9#J(>*09
-Vb!!>!4H">4(")6K0(4d62%>*+(6d#J(09IC-
y)*Vb!>*)+0d)(>*d"6)*I(7,887;9#3M*(!J
5dKJ(097#,?8(!d"66"4(v%-(4M)8@8;*P0(-
>
680#>090(->*0#74o(*0#7;9#
0(;9#>4=
&*=n"(4,J(09;6]409XC0#f!(
!]7
67<"4(7nND-
(4M+*094(809-4K$;6%5>f+)./+/097;9#3M*
>b4l4?0#fn !vG4:)+944#*n"<#!4G097
6=;+N]!)Nd5756-
"?2@A:B
193+&C
+0P%/((;4G!;#4E()6J(09-7(%€DK+06!)6097
((V4>b46#862((V45(((•0(!=$#87
*-)>*57I=)N0)(w >*)*K5 44}#'>*$=
U$U$44+‚9])N05.);2(4o!!4#dN!x40.7
)UND>;!!J=(7y(4;6;)W'K-0#4G4/7<!]*)*0(
;)0U>34>4((•a4U-L)(6](J6!]0()(75)
6K*>4G;7l#80#4G4L!+52!074L4,K4)*-52Bv 7<
+J(097;9#3M*5I;6Bv ((•>b4C>4G;7]!C
<€D0(4fU/!€DK+;60U*M$(7I(46>b47J(09
6]0(740P%.+0F);9#3M*-;6]4>094(70(4#)7d"6R">4
Cb4>=;9#-4T
740P%;!@•a4U0#4G4/>*)*52
UK((;!@756•8+.)(-52+0d)4G
}#'J(>*090
J(09>*X)*K6!9#
•a4U0#4G4/>*)*yD
6]4((;-
X"5.)=!;6&(7(K4G3)t!4;09XE(F(7J"/KF(4
+.+N!I;60U0)(C7&5((•52==P-;@>4*&(70(
*J(7;9#4M("5>!(!tGE(2I=
3<K;60U09>*X>4
4G-J/]!6"5!<>26`*4G!;6&(75>!;9#>4090(j{4#)
," 37N;4)*!6#6,57
0(>4=4L5>!4;9#!09
>*#>K6;9#K;6#4G
6((•a4U0#4G4/-7;9#
>*#4;M#4==+0F),4o" 37N
•a4U0#4G4/
0)_((F-R42<;!2 E(K6PJ(090(=()*4#;4)*
!J(09X0(>4-•a4U0#4G4/;>4#$H0(
!((
+(+ -
30
>8;M#548U(54B4%K0#87-
dY;M#-
547"T!UD/54();M#-ICl477<4
3<+],
V(!4-
,*09m7)609F>6n/450#.3M*K+62>)@9,0(!&
=@9,M4/op44(09+0F)?4n-
;7 n.5!7qNUE62%(Kr?'#47d;9#d62%2<(28;M#-
>C()%*5!((28;M#7s9DN(=t88Js;9#K;6n?
d-
X)#]@8;M#7K !<9d;9#-
fCD>;M#KJ">*.dn?2<(*4/-
#]RA0#64u4+0F)()@9,56#.F6(c&(*"N<>2(*;48>(62$
)65+),=64n-
12"2
4/5==4#7!;M#*->75" J(!(!)6J(095*;7 -
65" J(!(J(0956B48n ?(K4n54M((568+0d)-
56 J/UD/J65" J(!()6J(09+0d)M984D8<(n"6
6-
34#5'./0
P)J,!;M#>!;6r'$(vTw"ICx4#%-=4M4/#UH!x4+/
6556;$=(G(nc-! (vTw"7;M#KM#4Gx44D8&*>4V[
P)5542)3/-);9#B4y(7>_("x4#%7-x4 !`*
dz(U86!(-)6>4>( 2(4%*'4*d/4(7K+.x42(4%n86!1
n?-,>*b67IC
;9#K;6]4)6J(09;9#>4=
()-6"#4==!)(>+0d)4M(>*b6-
#
)b6>4K0N!>4097;9#7J"/,(-(b6C+0F)>4
(( >4K;$;9#57fN!U6=-IC>4(0>{i
4M#kji+( !k{i4M# jj|i +(4=b6-,>*>47IC
;9#>4=)6J(09();9#K;6]4->*b6!*>47;9#
6e4D8/49#-K097;9#3M*=;!)Nd57}#'>*+UH!M#.
O(!K;9#>4=4mK=I@>KXM/J"/7(,XC#!;6B'#>*G
-t8809K>45!5!47&%->485*(vM->*+N!4#dN
6+).c+0d)56;U,>4-6>4>2f?*;7 >4M(>2
#6)6-4(7 !>45(n!4M()*>4>*nD/56J,!X)#]=0(-7
;9#;60Ul4?>4IC>4-
67/8/9*
;M#>!4J(09+0d)>*;M#4(!n/754HvM4:5;6n?-/79DN4
095n/754H;M#>!4J(*4/8>!n 5XZ>4KB# -
(vMK4/754H;M#}N'l48tG>!5J(097;9#3M*-J/]4G
,j{4#)#g(`090754H;M#!*8J/]X#84D8K6~9]-4*4G
t88J(09,K;6<(N#8(4.]JN-4#$n.>4
()$8n/r?'#-N!8E62%9DNK4M(d62%J(!P)$!;-
29
!"#$%&'(
()**()+((*,!-(+)./01)**234567!0(480!(*,
09744:;9# !-
)<)65=>?@87>9!4#(7"=A
B!( +CD!>4>#$%"-
(E F"62=478-
(;4#.GF"6E5G*87
-
(+)H;!E-()*4#04#$>;46(=;*$+)HI-
#$%+)./"(+
)64;7(#$%!20""/7J
48(0*567!>%K*234(LK;M*>!09()*4(*>577
%5#*'N=-
4>!4#$(GO8!*?#=>PK=?#9DN>M)8F"64(-
1)*082=4M)4(-7209;)6(4#F(82=40KN7+.(4K=;9#-
$=4GQ)6CD(N0@;6!49DN !+.M)84(-*09;)6>7(R44
S57()*4#06-48(T0)64!*09;>(+
=;*$-U4G)609=+V(!4,K6#67
!47(V09;6!49DNK((F82=47M)4(-48#=(8M(K
,*'F=;9#;M#+)H75K7(-,9)(FK82=47
2*(9)NH)6;U54MK6(*097F>(P);9#5M-
09(/)6J+(K+8W#@X!;4(4#$>"/7K*,J>Y7-+0F)4>
7;9#(#@0(I4(!@4M(+()ZK6#6 !+>[=(6+-N\.+
#@((5X!09I;6+(+)6;UJ=D54M;UK
-9DN
#@G4*7;9#7J"/(H7K!557<57;9#57<4>=>=*8
*3<K)=J,]5-
5NK(M[F(=9+#@(H(#@(
N^'6I()_4M)0=-
*+@46`(DN\.7+;9#+
#@(H(#@(4I;6X();U4MG4-
7&%9DN7;9#()UND0(K8J(09-
(4*J)UN#0>())66-79DN()*0(%*!4>=-,F(a4U;M#04*
(467E(7I(!+4G4/4(4554==+(#6!b67J"/)#]K5K;M#7;9#
2(F82=47P4"(-3<3(,c+0F)=0(!6;M#5(#]
4>#6#64D8)6-
!"#$%&'"(##)*+,&"-./)0
!!2)d5!8;M#R#]$)*(Me8!4G5-
$* !<95dK6#8&1-
*4/!+(U(a4U8;M#-
a4U;M#54/7>8(!(78()>8-4] a4U>42G4*
74fghi4M# jkhi+( *4/-
7&U6a4U;M#54/(06!M>8-
Sony Ericsson Mobile Communications AB
SE-221 88 Lund, Sweden
www.sonyericsson.com
Printed in Country
LZT1089495/10R1A
41
.וז תוירחא לש תיפרגואיגה התלוחת*
וא ץייוושב וא (EEA) יפוריאה ילכלכה רוזאב תורבחה תונידמהמ תחאב רצומה תא תשכר םא
וא ץייוושב וא (EEA) יפוריאה ילכלכה רוזאה תונידמב הריכמל דעוי הז רצומ םאו ,היקרוטב
וא (EEA) יפוריאה ילכלכה רוזאה תונידממ הנידמ לכב תוריש ורובע לבקל ךתורשפאב ,היקרוטב
תא לבקל שקבמ ךנה הבש הנידמב םיפקתה תוירחאה יאנתל םאתהב תאזו ,היקרוטב וא ץייוושב
.Sony Ericsson תרבח לש השרומ ןכוס ידי-לע הנידמ התואב רכמנ ההז רצומש דבלבו ,תורישה
ימוקמה תורישה דקומל רשקתה ,תעכ ההוש התא הבש הנידמב רכמנ ןכא הז רצומ םא ררבל ידכ
תשכר הבש הנידמב קר רשפאתהל םייושע םימיוסמ םיתוריש יכ ,בל םיש .Sony Ericsson לש
רצומה לש םיינוציחה וא םיימינפה םיקלחב ינוש ,המגודל – תונוש תוביסמ תאזו ,רצומה תא
רשפא דימת אל יכ בל םיש ,ןכ ומכ .תורחא תונידמב םירכמנה םימוד םימגד תמועל ךתושרבש
עדימ שרדיי םימיוסמ םירוזאב וא תונידמב יכ ןכתיי .םסחנ םהלש SIM-ה סיטרכש םירצומ ןקתל
.(ףקת תוירחא בתכ ןוגכ) ףסונ
40
םיאנתה
רצומ ןיגב קפנוה רשא ,ירוקמה השיכרה תחכוה ךמסמ תגצה םע קר הפקת וז תלבגומ תוירחא 1
רפסמהו השיכרה ךיראת וב םיניוצמש ךמסמ – Sony Ericsson לש השרומ קפס ידי-לע הז
תא המצעל תרמוש Sony Ericsson תרבח .הפלחהל וא ןוקיתל אבומה רצומה לש **ירודיסה
השיכרה רחאל הנוש וא רסוה הז עדימ םא ,תוירחאה תרגסמב תוריש קינעהל ברסל תוכזה
.קפסה ןמ רצומה לש תינושארה
ףלחומה רצומל וא ןקותש םגפל ןתנית ,רצומה תא ףילחת וא ןקתת Sony Ericsson תרבח םא 2
ךיראתמ םוי (90) םיעשת ךשמל וא תירוקמה תוירחאה תפוקתמ הרתונש הפוקתל תוירחא
תודיחיב שומיש ךות עצבתהל םייושע הפלחהה וא ןוקיתה .ןהיניבמ הכוראה הפוקתה – ןוקיתה
תרבח לש השוכר תויהל וכפהי ופלחויש םיביכר וא םיקלח .םיליבקמ םיעוציב תולעב ,תושדוחמ
.Sony Ericsson
,תוברל ,ןיקת-יתלב שומיש ,ליגר יאלבמ עבונה רצומב יהשלכ הלקת לע הלח הניא וז תוירחא 3
םעטמ רצומה לש הקוזחתהו שומישה תוארוהל םאתהב לבוקמ וניאש חרואב שומיש ,קר אל ךא
,הנואתמ תעבונה רצומב יהשלכ הלקת לע הלח וז תוירחא ןיא ,ןכ ומכ .Sony Ericsson תרבח
הללוס .םילזונ ידי-לע םרגנש קזנמ וא ןוילע חוכמ ,הרמוחב וא הנכותב תומאתה וא םייונישמ
– הלבתת איה רבד לש ופוסב ,תאז םע .םימעפ האממ רתוי הקירפו הניעט רובעל הלוכי תנעטנ
הארנ ,תרכינ הרוצב םירצקתמ הנתמההו רובידה ינמז רשאכ .ליגר יאלב אלא םגפ רדגב הז ןיאו
ךא שמתשהל הצילממ Sony Ericsson תרבח .ךתושרבש הללוסה תא ףילחתש ןמזה עיגה יכ
םייושע ,םגד ותואמ ,םיהז םירישכמ ןיב .Sony Ericsson לש םישרומ םינעטמבו תוללוסב קרו
תודוקנ גצב ועיפוי יכ ןכתיי ,ןכ ומכ .גצה לש עבצהו תוריהבה תומרב םיירעזמ םילדבה לוחל
לש תודיחי רוא תודוקנב ןרוקמו ׳םיפורש םילסקיפ׳ תונוכמ הלא תודוקנ .תוריעז תוהכ וא תוריהב
תבשחנ דחא גצב ׳םיפורש םילסקיפ׳ ינש לש המר .ןונווכל דוע תונתינ ןניאו הטילשמ ואציש גצה
.המלצמה תנומת הארמב םיירעזמ םילדבה לוחל םייושע ,םגד ותואמ ,םיהז םינופלט ןיב .הליבק
.המלצמה תדיחיב םגפכ תבשחנ הניאו הגירח הניא וז העפות
אלל ,יאמצע תוריש קפסל תכייש לועפל רצומה רומא התרגסמבש תירלולסה תשרהש רחאמ 4
,לועפתל תיארחא Sony Ericsson תרבח אהת אל יזא ,Sony Ericsson תרבחב תולת לכ
.תשר התוא לש הטילקה חווטל וא םיתורישל ,יוסיכה תמרל ,תונימזל
תחיתפמ וא ,םינוקיתמו םייונישמ ,תונקתהמ תועבונה רצומב תולקת לע הלח הניא וז תוירחא 5
.Sony Ericsson תרבח םעטמ ךכל השרומ וניאש ימ ידי-לע רצומה
םניאש םירחא םייפקיה םינקתה וא םירזבאב שומישמ תועבונה תולקת לע הלח הניא וז תוירחא 6
.רצומב שומישל םידעוימה Sony Ericsson לש םיירוקמ םינקתה וא םירזבא
.תוירחאה לוטיבל איבת רצומה יבג-לעש תומתוחל קזנ תמירג 7
רבעמ ,הפ לעב ןיבו בתכב ןיב ,תפסונ תשרופמ תוירחא לכ הנתינ אלו ןיא 8
לכ ,קר אל ךא ,תוברל ,תעמתשמ תוירחא לכ .וז תספדומ תלבגומ תוירחאל
,תמיוסמ הרטמל ותמאתהב וא רצומה תוּיתריכמב הכורכה תעמתשמ תוירחא
תרבח לע לוחת אל ,הרקמ לכב .וז תלבגומ תוירחא תפוקתב אלא לוחת אל
וא םיירקמ םיקזנל איהש תוירחא לכ המעטמ םישרומה לע וא SONY ERICSSON
,ירחסמ דספהל וא םיחוור ןדבואל ,קר אל ךא ,תוברל ,אוהש גוס לכמ םייתביסנ
תומיוסמ תונידמ .ןיד יפ-לע הלא םיקזנ ןיגב ירשפאה העיבתה ףקיהה אולמב תאזו
התוּלח תפוקת לש הלבגה וא ,םייתביסנ וא םיירקמ םיקזנ לש הלבגה וא הגרחה תוריתמ ןניא
תוירחא .ךילע תולח ןניא ליעלש תוגרחהה וא תולבגהה יכ ןכתיי ,ךכל יא .תעמתשמ תוירחא לש
תעגופ איה ןיא ןכו ,לחה ןידה יפ-לע ןכרצל תונקומה תוירוטוטטס תויוכזב עוגפל ידכ הב ןיא ,וז
.םהיניבש השיכרה וא הריכמה םכסהמ תועבונה ,קפסה לומ ויתויוכזב
39
הצק שמתשמל ןוישיר םכסה
הנכות ליכמ (׳ןקתהה׳ ןלהל) וילא הפרוצש הידמ לכ ,קר אל ךא ,תוברל ,הז דיינ יטוחלא ןקתה
הל תופנוסמה תורבחהו Sony Ericsson Mobile Communications AB תרבח תולעבב
ןלהל) הלש תונוישיר יקינעמו םיקפס םישמשמה םיישילש םידדצ ןכו (׳Sony Ericsson׳ ןלהל)
ןתינ אל ,ידעלב אל ןוישיר ךל הקינעמ Sony Ericsson תרבח ,הז ןקתהב שמתשמכ .(׳הנכותה׳
ןיא .תנקתומ איה ובש ןקתהה םע דחי קרו ךא הנכותב שמתשהל האחמהל ןתינ אלו הרבעהל
לש הלועפ לכ ךילע הרוסא .הז ןקתהב שמתשמל הנכות לש הריכמכ ןנד םירבדה ןמ רבד שרפל
לכב שומיש וא רחא ןפואב יוניש ,לע-תפשל רוזחש ,תכפוהמ הסדנה ,הצפה ,המאתה ,קותעש
,קפס רסה ןעמל .הנכותב אוהש ביכר לכ וא הנכותה לש רוקמה דוק תא תולגל ידכ רחא יעצמא
םע דחי קרו ךא ישילש דצ ידיל הנכותה יבגל תובוחהו תויוכזה לכ תא תע לכב ריבעהל יאכז התא
תויהל בתכב םיכסי הז ישילש דצ ותוא יכ דמוע יאנתב תאזו ,הנכותה תא תלביק ומעש ןקתהה
ךתורשפאב .ןקתהה לש םיליעיה תורישה ייח תפוקתל ךל קנעומ הז ןוישיר .הלא םיללכל ביוחמ
תלביק ובש ןקתהה יבגל תויוכזה לכ לש בתכב הרבעה לש ךרדב הז ןוישירב ךתקזחה תא םייסל
,הז ןוישירב םיעובקה תוינתהו םיאנתה ןמ דחאב דומעת אל םא .ישילש דצ ידיל הנכותה תא
םיקפס םישמשמה םיישילש םידדצו Sony Ericsson תרבח .רתלאל ןוישירה ףקות םייתסי
,תויוכזה לכב םיקיזחמה םהו הנכותה לש םיידעלבהו םידיחיה םילעבה םה הלש תונוישיר יקינעמו
םידדצו Sony Ericsson תרבח .הב רושקה לכבו הנכותב הטילשה תוקיזו תולעבה תויוכז
ובשחיי ,הלא ןיעמ םיישילש םידדצ לש דוק וא רמוח הליכמ הנכותהש הדימב ,םהשלכ םיישילש
יקוח חוכמ ופכאיי הז ןוישיר לש ועוציבו והנבמ ,ופקות .הלא םיאנת ןיינעל םיבטומ םיישילש םידדצ
,ןכרצל תונקומה תוירוטוטטסה תויוכזה תאז תוריתמש הדימה אולמב לוחי ליעל רמאנה .הידווש
.תומישי ןה רשאכ
תלבגומ תוירחא
ןלהל) Sony Ericsson Mobile Communications AB, SE-221 88 Lund, Sweden תרבח
וז תלבגומ תוירחא תוקינעמ הילא תפנוסמה תימוקמה הרבחה וא (׳Sony Ericsson תרבח׳
קוקז רצומה םא .(׳רצומה׳ ןלהל) ומע דחי םיקפוסמה םיירוקמה םירזבאלו ךתושרבש דיינה ןופלטל
(םיימוקמ םיפירעתב) רשקתה וא ,שכרנ ונממש קפסל ותוא רזחה ,תוירחאה תרגסמב תורישל
– הרבחה רתאב רקבל לכות ,ןיפולחל .Sony Ericsson לש ימוקמה תורישה דקומל
.ףסונ עדימ תלבקל – www.sonyericsson.com
ונלש תוירחאה
םייוקיל רצומב ויהי אלו ןיא יכ Sony Ericsson תרבח תיארחא ,וז תלבגומ תוירחא יאנתל ףופכב
לש הפוקתל תנתינ וז תלבגומ תוירחא .חוקלה ידי-לע ותשיכר דעומב רוצייה ביטב וא םירמוחב
.רצומה תשיכר דעוממ (1) תחא הנש
לעפנ דציכ
,רוצייב וא םירמוחב ,ןונכתב םייוקיל לשב יוארכ הז רצומ לעפי אל תוירחאה תפוקת ךלהמב םא
יפתוש וא Sony Ericsson תרבח לש םישרומה םיציפמה יזא ,ןוכנ שומיש וב השענש יאנתבו
,םתעד לוקיש יפ-לע ,רצומה תא ופילחי וא ונקתי רצומה תא תשכר הבש *הנידמב הלש תורישה
הלש תורישה יפתושו Sony Ericsson תרבח .וז תוירחאב םיעובקה תוינתלו םיאנתל םאתהב
הלח אל תרזחהש רצומה לע יכ אצמיי םא ,לופיט ימדב ךתוא בייחל תוכזה תא םמצעל םירמוש
תודרוהה ,תוישיאה תורדגההמ קלחש ןכתיי יכ ,בל םיש .ןלהל םייונמה םיאנתל םאתהב תוירחא
וא ןוקיתל רסמיי ךתושרבש Sony Ericsson-ה רצומ רשאכ ודבאי םירחא עדימ יטרפו תעציבש
תורחא תונקת ,םישיה קוחה יפ-לע העונמ Sony Ericsson תרבח יכ ןכתיי ,הז בלשב .הפלחהל
תלטונ הניא Sony Ericsson תרבח .תומיוסמ תודרוה לש יוביג יקתוע רוצילמ תוינכט תולבגמ וא
ןדבוא ןיגב ךתוא הצפת אל איהו ,אוהש גוס לכמ עדימ יטרפ לש ןדבוא לכל תוירחא לכ המצע לע
Sony Ericsson רצומב םירומשה עדימה יטרפ לכ לש יוביג יקתוע תריציל דימת גואדל ךילע .הזכ
.הפלחהל וא ןוקיתל רצומה תריסמ ינפל ,רשק ישנאו ןמוי ימושיר ,תודרוה ןוגכ ,ךתושרבש
38
דחא לכ יבגל FCC-ה ידי-לע שרדנכ ,(ףוגל דומצב אשינ וא ןזואל ךומסב קזחומ ,רמולכ)
תויחנהב דמוע אוה יכ אצמנו ,ףוגל דומצב אשינ אוהשכ ותלעפה ןיינעל קדבנ הז ןופלט .םימגדהמ
ףוגהמ תוחפה לכל מ״מ 15 קחרמב םקוממ אוהשכ וידר רדת תייגרנאל הפישח יבגל FCC-ה
Sony Ericsson לש ירוקמ רזבא םע דחי שומישב אוהשכ וא ותברקב םייתכתמ םיקלח לכ אלב
תויחנהב הדימע חיטבמ וניא םירחא םירזבאב שומישה יכ ןכתיי .ףוגל דומצב ותאישנל דעוימה
ןופלטה םגד רובע SAR-ה יבגל עדימ ובו דרפנ ןולע .וידר רדת תייגרנאל הפישח יבגל FCC-ה
הפישחה ןיינעב ףסונ עדימ םע דחי ,הז עדימ .ןופלטל הוולנה רמוחב לולכ ךתושרבש דיינה
.www.sonyericsson.com/health רתאב אוצמל ןתינ ,SAR-ה ןיינעבו וידר רדת תייגרנאל
םידחוימ םיכרצ / םישיגנ תונורתפ
לכ םע דחי ךתושרבש פייטלטה ןופוסמב שמתשהל ךתורשפאב ,ב״הראב םירכמנה םינופלט יבגל
םישיגנ תונורתפ לע עדימ תלבקל .(שורדה םאתמה תפסוה ךות) Sony Ericsson לש דיינ ןופלט
Sony Ericsson Special ,םידחוימ םיכרצל זכרמל הנפ ,םידחוימ םיכרצ ילעב םישנא רובע
,(רוביד וק) +877-207-2056 :ןופלטב וא ,(פייטלט) +877-878-1996 :ןופלטב ,Needs Center
.www.sonyericsson-snc.com:תבותכב הז זכרמ לש רתאב רקב וא
ןשי ינורטקלאו ילמשח דויצ קוליס
.תיתיב הפשא אוה וליאכ רבודמ ובש ינורטקלאהו ילמשחה דויצב לפטל ןיא יכ ןייצמ הז למס
דעוימה ינורטקלאו ילמשח דויצ לש המיאתמ ףוסיא תדוקנב ותוא ריאשהל שי ,תאז םוקמב
תוילילש תואצות עונמל עייסת ,הנוכנה ךרדב קלוסמ הז רצומ יכ אדוול ךדיפקהב .רוזחימל
רצומב תואנ-יתלב לופיט בקע םרגיהל תולולעש ,םדאה תואירבו הביבסה תוכיא תניחבמ תוירשפא
עדימ תלבקל .םייעבט םיבאשמ רמשל עייסמ םירמוח לש םרוזחימ .הליגר הפשא היה וליאכ הז
םוקמב תיתיבה הפשאה יוניפ תורישל ,תימוקמה תושרל הנפ ,הז רצומ רוזחימ לע רתוי טרופמ
.רצומה תא תשכר הבש תונחל וא ךירוגמ
שומישמ האציש הללוס קוליס
תורישה דקומל רשקתה וא תוללוס קוליסל רשאב ימוקמה קוחה תוארוה תא קודב
לכמל הללוסה תא ךילשת לא םלועל .ףסונ עדימ תלבקל Sony Ericsson לש ימוקמה
.ונשי םא ,תוללוס קוליסל דחוימ ןקתמב שמתשה .ליגר ינוריע הפשא
םיישיא םיטרפ לע הנגה
ךינותנ לש תללוכ הקיחמ עצבל ךילע ,ישילש דצ ידי-לע עדימל השיג עונמלו ךתויטרפ לע ןגהל ידכ
סופיא עצב ,ןופלטבש םיישיאה םינותנה תא קוחמל ידכ .ותריכמ וא רצומה קוליס ינפל םיישיאה
עדימה יכ החיטבמ הניא ןופלטה ןורכיזמ רמוח תקיחמ .ןורכיזה סיטרכ תא רסהו אלמ
תרבח .רישכמב אבה שמתשמה ידי-לע רוזחשל ןתינ היהי אל רומאה
תשגל לכוי אל ןופלטב אבה שמתשמה יכ ךכל הברע הניא SONY ERICSSON
םג ,רומאה עדימה הפישח ןיינעל תוירחא לכ המצע לע תחקול הניאו ךלש עדימל
ןופלטב קיזחהל ךשמה ,וז ןיעמ תירשפא הפישח ינפמ ששוח התא םא .אלמ סופיא עצוב םא
.ןיטולחל סרהיי יכ חטבה וא ךתושרבש
םירזבא
חיטבהל ידכ Sony Ericsson לש םיירוקמ םירזבאב שמתשהל הצילממ Sony Ericsson תרבח
רצומה יעוציבב עוגפל לולע םיינוציח םינרצי לש םירזבאב שומיש .הירצומב ליעיו חוטב שומיש
עמש ירזבאב שומיש תעב :ההובג לוק תמצוע יבגל הרהזא .ךתוחיטב וא ךתואירב תא ןכסל וא
עוגפל תולולעה המצוע תומר עונמל ידכ תוריהזב לוקה תמצוע תא ןנווכ ,םיינוציח םינרצי לש
שומישב םירחא םינרצי לש עמשה ירזבא תא תקדוב הניא Sony Ericsson תרבח .ךתעימשב
לש םיירוקמ עמש ירזבאב קרו ךא שמתשהל הצילממ Sony Ericsson תרבח .הז דיינ ןופלט םע
.Sony Ericsson
37
הגיהנ
וא הגיהנ תעב םידיינ םינופלטב שומישה לע ןהשלכ תולבגמ הליטמ תימוקמה הקיחתה םא קודב
תוירוקמ תוירובידב קרו ךא שמתשהל ץלמומ .תירוביד תונורתפב שמתשהל גהנה תא תבייחמ
םרגיתש תורשפאה בקע יכ ,בל םיש .ךתושרבש ןופלטב שומישל תודעוימה ,Sony Ericsson לש
שומיש לע םירסואה בכר ינרצי םנשי ,בכרב ינורטקלאה דויצה לש הניקתה ותלועפל הערפה
שידקהל דימת דפקה .תינוציח הנטנא ללוכה תירוביד ןורתפ תועצמאב אלא ,םהיבכרב דיינ ןופלטב
הנחו ךרדה ילושל דר ,תאז םישרוד הגיהנה יאנת םאו ,המצע הגיהנל ךבל תמושת אולמ תא
.החישל הנעת וא החיש עצבת םרטב
םוריח תוחיש
רשק םייקל תורשפאה יבגל הבורע לכ ןיא ןכלו ,וידר תותוא רודיש ידי-לע םילעופ םידיינ םינופלט
– (םייאופר םוריח יבצמב ומכ) תינויח תורשקתהב רבודמ רשאכש ,ןאכמ .תוביסנהו םיאנתה לכב
םירוזאב םוריח תוחיש עצבל לכות אל יכ ןכתיי .ךתושרבש דיינה ןופלטה לע קר ךומסת לא םלועל
ןופלטה לש תומיוסמ תונוכת וא/ו םימיוסמ תשר יתוריש רשאכ וא ,תומיוסמ תותשרב ,םימיוסמ
.תאז ררבל ידכ ימוקמה תורישה קפסל הנפ .שומישב םיאצמנ דיינה
הנטנא
ידי-לע םיקוושמ םניאש הנטנא ינקתהב שומישה .תינבומ הנטנא ללוכ ךתושרבש דיינה ןופלטה
תא דירוהל ,ול קיזהל לולע ךתושרבש םגדהמ דיינה ןופלטה רובע דחוימב Sony Ericsson
.(ןלהל האר) םיצלמומה תולובגל רבעמש SAR תומרל םורגלו ויעוציב
ליעי שומיש
וקלח תא הסכת לא ,ןופלטב שומיש תעב .ןופלט לש רחא גוס לכ ומכ דיינה ןופלטה תא קזחה
ןמ ההובג המצוע תמרב לועפל ןופלטל םורגל ףאו החישה תוכיאב עוגפל לולע רבדה ןכש ,ןוילעה
.ולש הנתמההו רובידה ינמז רוציק ךות – שורדה
(SAR) ׳תילוגסה הגיפסה תמר׳ תועמשמו (RF) וידר רדת תייגרנאל הפישח
,קלוד אוה רשאכ .םיכומנ םיקפסהב לעופה וידר (רדשמ-טלקמ) ש״מקמ ונה דיינה ןופלטה
.(׳וידר רדת תודש׳ וא ׳וידר ילג׳ םג הנוכמה) וידר רדת תייגרנא לש תוכומנ תומר טלופ אוה
םינוגרא ידי-לע וחתופש ,םיפיקמ םיימואלניב םיחנמ םיווק תרוש וצמיא םלועה יבחרב תולשממ
ICNIRP-ה ,תנניימ-יתלב הנירק ינפמ הנגהל תימואלניבה הדעווה ןוגכ – םייולת-יתלב םייעדמ
למשחה יסדנהמ ןוגראו ,(International Commission on Non-Ionizing Radiation)
תאזו – (The Institute of Electrical and Electronics Engineers Inc) IEEE-ה ,הקינורטקלאהו
תומר תא םיעבוק הלא םיחנמ םיווק .םייעדמ םירקחמ לש הצממו תיתפוקת הכרעה לש ךרדב
ילוש תוללוכ רבודמ ןהבש תומרה .תיללכה הייסולכואה רובע וידר ילגל תורתומה הפישחה
,תואירבה בצמלו ליגל רשק אלב ,םישמתשמה לכ לש םתוחיטב לע ןגהל הרטמב ,םיבחר תוחיטב
תדיחי הנה (SAR) ׳תילוגסה הגיפסה תמר׳ .תודידמב תוירשפאה תויטסה לכב תובשחתה ךות
ךרע .דיינ ןופלטב םישמתשמ רשאכ ףוגה תומקרב תעלבנה וידר רדת תייגרנא לש תומכל הדימ
תמר םלוא ,תרתומה רתויב ההובגה רודישה תמצוע תמר יפל הדבעמ יאנתב עבקנ SAR-ה
רבדה .הברהב ךומנ ךרע לע דומעל היושע דיינה ןופלטה תלועפ תעב לעופב תמייקה SAR-ה
ידי-לע הטילקל השורדה תירעזמה רודישה תמצועב שומישל ןנכותמ דיינה ןופלטהש ךכמ עבונ
ןשוריפ ןיא ,וידר רדת תייגרנאל הפישח יבגל םיחנמה םיווקל רבעמ SAR-ה תמרב תויטס .תשרה
לש םימגד ןיב SAR-ה תומרב םילדבה תויהל םייושעש םגה .תוחיטבה תמרב תויטס תומייקש
םיחנמה םיווקב דומעל םיננכותמ Sony Ericsson לש םידיינה םינופלטה ימגד לכ ,םידיינ םינופלט
.וידר רדת תייגרנאל הפישח יבגל םימיאתמה
,רוביצה ברקב הריכמל עצומ והשלכ םגדמ דיינ ןופלטש ינפל ,ב״הראב םירכמנה םינופלט יבגל
Federal) FCC-ה ,תרושקתל תילרדפה תינקירמאה הדעווה רושיאב תוכזלו קדביהל וילע
תושירדב עבקנש ילובגה ךרעהמ גרוח וניאש ךכ לע ,(Communications Commission
תונוש תודוקנב םקוממ ןופלטה רשאכ תועצובמ תוקידבה .החוטב הפישח ןיינעל תויתלשממה
36
.םימוד םירצומו תורעוב תוירגיסל וא תויולג תובהלל רצומה תא ףושחת לא •
.ותוא ףפוכל הסנת לאו ותוא קורזת לא ,רצומה תא ליפת לא •
.רצומה תא עבצת לא •
תרבח לש םיכמסומ תוריש ישנא קר .יוניש וב תושעל וא רצומה תא קרפל הסנת לא •
.תוריש תרגסמב וב לפטל םישרומ Sony Ericsson
חול ןיב ןותנ והשלכ ץפחשכ ותוא רוגסת לא ,הפדצ בוציעב ןופלט אוה ךתושרבש רצומה םא •
.ול קיזהל לולע רבדה – גצהו םישקמה
תווצ שיאמ וא ךלש לפטמה אפורהמ תושר תשקב אלל יאופר דויצ תברקב רצומב שמתשת לא •
.ךמסומ יאופר
וידר הבכ׳ חסונב טוליש םהב גצומש םירתאב ןכו םכותב וא םיסוטמ תברקב רצומב שמתשת לא •
.׳ינוויכ-וד
.ץוציפ תנכס וא הציפנ הריווא םהב תמייקש םירתאב רצומב שמתשת לא •
.יטוחלא דויצ םש ןיקתת לאו תינוכמב ריוואה תירכ לעמש רוזאב ןופלטה תא חינת לא •
הלאו ,םיסיסר זיתהל וא םידח תווצק ילעב תויהל םילולע םירובש וא םיקודס םיגצ :תוריהז •
.םהב עגונל קזנ םורגל םילולע
םידלי
.וירזבאב וא ןופלטב קחשל םידליל השרת לא .םידלי לש םדי גשיהמ דיינה ןופלטה תא קחרה
.וירזבא וא ןופלטה תא גגושב לקלקל םילולע םה ןכו ,תלוזב וא םמצעב עוגפל םילולע םידלי
.םידלי לצא קנח תנכס רוצילו ונממ קתנתהל םילולעה ,םינטק םיקלח םיללוכ וירזבא וא ןופלטה
(ןעטמ) חוכה קפס
יכ אדו .רצומה יבג-לע ןמוסמכ ,ךכל םידעוימה חוכ תורוקמל קרו ךא (ח״ז) חוכה קפס תא רבח
,תולמשחתהה תנכס תא תיחפהל ידכ .והשלכ רחא קזנל וא החיתמל ףשחיי אלש ךכ םקוממ לבכה
.םיחל תומוקמב וא הנבמל ץוחמ קפסב שמתשהל ןיא .יוקינ ינפל חוכה רוקממ םאתמה תא קתנ
השרומ יאלמשחש ךכל גאד ,עקשל םיאתמ וניא עקתה םא .עקתב וא לבכב יוניש השעת לא םלועל
ןופלטל םידעוימה Sony Ericsson לש םיירוקמ םינעטמב קרו ךא שמתשה .םיאתמ עקש ביכרי
.םיעוציבו תוחיטב ינקת םתואב דומעל םיננכותמ םניא םירחא םינעטמ יכ ןכתיי .ךתושרבש
הללוסה
.דיינה ןופלטב ןושארה שומישה ינפל תועש עברא ךשמל הללוסה לש הניעט עצבל ץלמומ
םימעפב הכומנ תויהל הלולע בר ןמז שומישב התייה אלש הללוס וא השדח הללוס לש התלוביק
.+45°C ןיבל +5°C ןיבש הרוטרפמט תמרב קר הללוסה תא ןועטל שי .הב שמתשתש תונושארה
שומישה .ךתושרבש ןופלטל תודעוימה Sony Ericsson לש תוירוקמ תוללוסב קרו ךא שמתשה
םייולת דיינה ןופלטה לש הנתמההו רובידה ינמז .ןכוסמ תויהל לולע םירחא םינעטמבו תוללוסב
תונוכתה ,םימושייב שומישה יסופד ,הלעפהה תרוטרפמט ,הטילקה תמצוע ןוגכ ,םיאנת המכב
ינפל ןופלטה תא הבכ .ןופלטב שומישה תעב םינותנ וא רוביד תוחיש לש עוציבה תדימו ורחבנש
םיליער תויהל םילולע הללוסבש םיטילורטקלאה .הפל הללוסה תא סינכת לא .הללוסה תרסה
לולע רבדה .רחא יתכתמ ץפחב תעגל הללוסה יבג-לעש םייתכתמה םיעגמל רשפאת לא .העילבב
.ןהל תדעוימ איהש תורטמל קרו ךא הללוסב שמתשה .קזנ הל םורגלו הללוסב רצק רוציל
םיישיא םייאופר םינקתה
.םיפסונ םילתשומ דויצ יטירפו בל יבצוק לש הניקתה םתלועפב עוגפל םילולע םידיינ םינופלט
,ןופלטב שומישה תעב .הצלוחה לש ןוילעה סיכב רמולכ ,בצוקה לעמ ןופלטה תא חינהלמ ענמיה
בצוקל ןופלטה ןיב מ״ס 15 לש ירעזמ חוור רמשנ םא .בצוקל ידגנה דצבש ךנזוא לא ותוא אבה
תא דימ הבכ ,בצוקה תלועפל הערפהל והשלכ ששח םייק םא .תלבגומ הערפהה תנכס ,בלה
םינקתהב שמתשמ התא םא .ךב לפטמה גולוידרקה אפורל הנפ ,ףסונ עדימ תלבקל .ןופלטה
.םהמ דחא לכ לש ןרציבו ךב לפטמה אפורב ץעוויה ,םירחא םייאופר
PPreflighted byreflighted byPreflighted by ( )( )( )