Sony A3624021 Licensed transmitter User Manual
Sony Mobile Communications Inc Licensed transmitter
UserManual.wiki
>
Sony
>
A3624021 User Manual
>
08 user guide part 1
Contents
1.
08 user guide part 1
2.
08 user guide part 2
08 user guide part 1
Navigation menu
Upload a User Manual
Namespaces
Wiki Guide
HTML
PDF
Info
Views
User Manual
Discussion / Help
Navigation
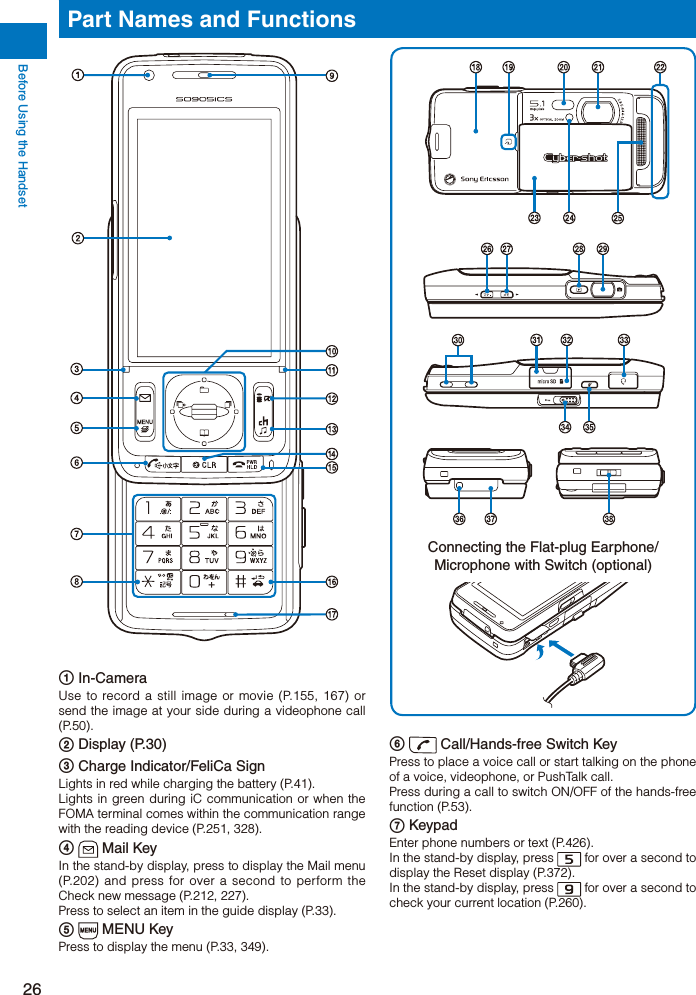
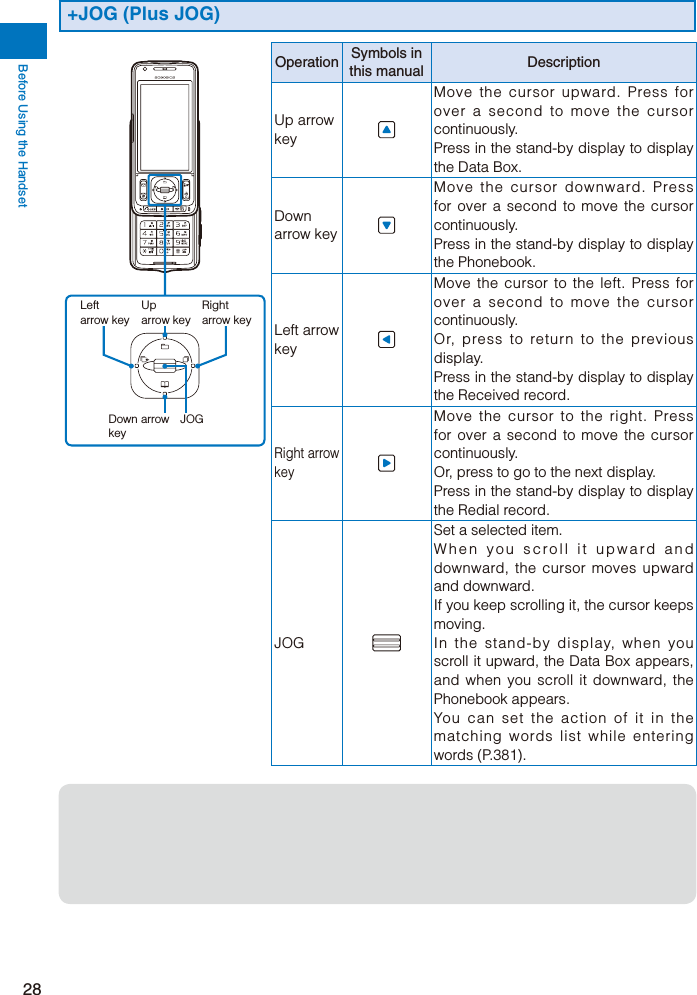
![Easy Search/Contents/Precautions9Plus JOGYou can select the items quickly by scrolling the JOG upward and downward. The JOG gives you more convenient operations with the 4-way keys (P.28).Stand-by booksThere are eight unique preinstalled Flash contents which display various information such as bits of knowledge, general knowledge, and picture books wave after wave every time when the stand-by display appears.You can set your favorite content selecting from the [Preinstalled] folder in My picture of the Data Box and enjoy it (P.118).Quick deco. Mail FunctionFun Deco-mail is available with simple steps (P.206).“POBox Pro 2.0” and Convenient Text InputThe FOMA terminal is provided with the prediction conversion function “POBox Pro 2.0” (Predictive Operation Based On eXample Pro 2.0). Pressing allows you to move vertically and horizontally in the “POBox Pro 2.0”, enabling to select the target word. Also, switching tabs allows you to enable the speedy selection of the matching words list (P.379).MultiaccessYou can use voice call and packet communication simultaneously. You can receive i-mode mail even when you are in a call and you can also make a call while you are using i-mode (P.348).High-Definition Wide VGA Liquid-Crystal Screen DisplayA 2.7-inch high-resolution full wide liquid-crystal screen display is employed. Not only you can enjoy viewing websites, but also perform mail and i-mode operations in the large screen comfortably.Lifetime CalendarThe Lifetime Calendar allows you to display an image, mail, Schedule, and Phonebook (birthday) data directly from the Calendar and provides you with more pleasant way of retrieving your memories saved in the FOMA terminal (P.351).Infrared Communication/Infrared Remote ControlYou can exchange data with other FOMA terminals using the infrared communication function. You can also use the FOMA terminal to operate equipment such as a TV that is provided with infrared remote control. Moreover, the FOMA terminal supports the high-speed infrared communication standard IrSimple, allowing you to transfer high-quality images to compatible devices at a high speed (P.323, 327).Security Settings (P.129)Omakase LockIf you misplace the FOMA terminal, it can be locked by your request. You can cancel the lock as well. See the contact address at the backcover of this manual for inquiries (P.136). Please note that Omakase Lock is a paid service](https://usermanual.wiki/Sony/A3624021.08-user-guide-part-1/User-Guide-889387-Page-11.png)

![Before Using the Handset35Selecting a Function from the Function MenuThe Function menu is a menu that plays an auxiliary role for each function.Whenever the Function menu is available, [Func] appears in the guide display. Press to display a list of available Function menus.ˎ The contents of the Function menu vary depending on the functions and displays. For details, see the description of operation for the individual option.ˎ When the numbers and symbols are displayed in the Function menu, press a key on the keypad to activate a function.](https://usermanual.wiki/Sony/A3624021.08-user-guide-part-1/User-Guide-889387-Page-37.png)

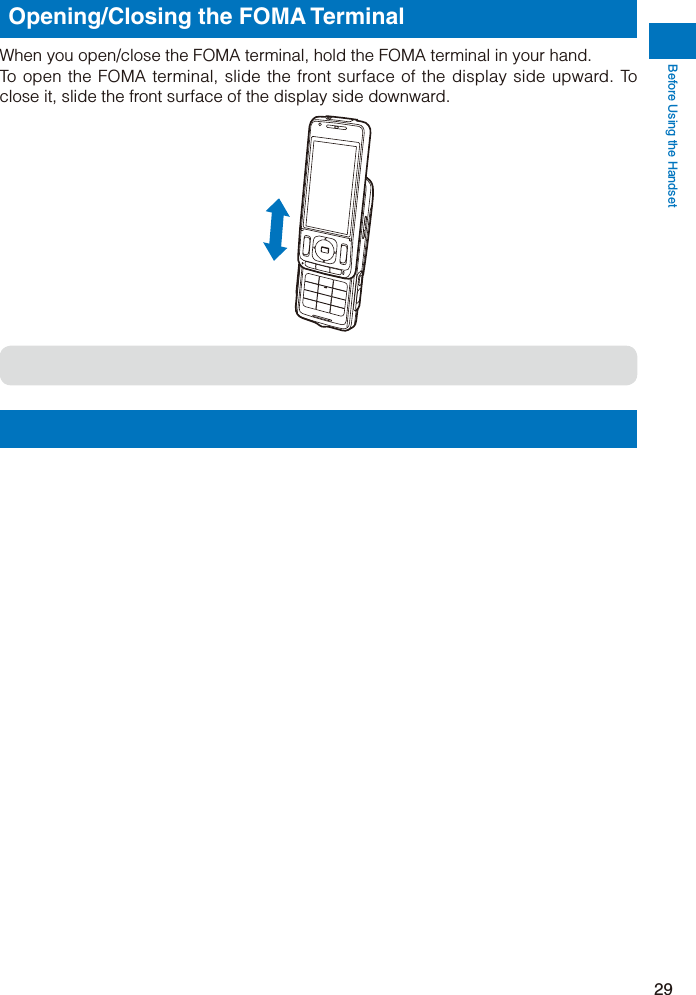
![Before Using the Handset43Powering On/Off <Power on/off>ˎ When you power on the FOMA terminal, the screen informing to execute the software update automatically may appear (P.452). 1 Press (PWR) for over two seconds.The FOMA terminal is powered on, the display and the keypad lights are turned on, and an animation is displayed. After a while, the stand-by display appears.ˎ If you have set the PIN1 code setting to [ON], the PIN1 code input screen appears. Enter the PIN1 code and press (OK) (P.131).To power offPress (PWR) for over two seconds.](https://usermanual.wiki/Sony/A3624021.08-user-guide-part-1/User-Guide-889387-Page-45.png)
![Before Using the Handset44Setting the Date and Time <Date/time>You can set the date and time either by automatically correcting the time based on the time information obtained from the DoCoMo network or by manually setting the time.Example: Correcting the time automatically 1 From the Menu, select [Settings]](https://usermanual.wiki/Sony/A3624021.08-user-guide-part-1/User-Guide-889387-Page-46.png)
![Before Using the Handset45Notifying the Recipient of Your Phone Number <Notify caller ID>When placing a call, your phone number can be shown in the display of the recipient’s phone you are calling.ˎ The caller ID is important personal information. Carefully decide whether you notify a recipient of your caller ID. 1 From the Menu, select [Settings]](https://usermanual.wiki/Sony/A3624021.08-user-guide-part-1/User-Guide-889387-Page-47.png)
![Voice/Videophone Calls51Operations during a Videophone CallOperation Key operationSwitch between camera image/substitute imagePress (MySide/Sub). Every time you press the key, the display is switched between camera image/substitute image.Switch cameras Press (In/Out). Every time you press the key, the camera is switched between the In-/Out-camera.You can also switch between the In-/Out-camera by opening/closing the lens cover.Switch ON/OFF of the hands-free operationPress ( ). Every time you press the key, the ON/OFF setting is switched.Zoom-in/-out image Press (Zoom in) / (Zoom out) when recording with the Out-camera.Put a call on hold From the Function menu, select [Holding]. To cancel this function, press .Switch the display From the Function menu, select [Display setting].Switch the quality of the outgoing imageFrom the Function menu, select [Visual preference]. When you finish a call, the image quality set for the Visual preference of the Videophone setting is restored.Select a substitute image From the Function menu, select [Select sub image].Switch ON/OFF of the photo lightFrom the Function menu, select [Photo light] (when using the Out-camera only).Display your phone number From the Function menu, select [Own number].Switch to a voice call From the Function menu, select [Chg. to voice call] (when placing a videophone call only).](https://usermanual.wiki/Sony/A3624021.08-user-guide-part-1/User-Guide-889387-Page-53.png)
![Voice/Videophone Calls54Entering a timer “T”To dial an inside line number following an outside line number, enter “T (timer)” between the outside and inside line numbers. After a preset interval in seconds, the inside line number is dialed following the outside line number. An interval of about one second is added for every timer (T) entry. You can enter “T” consecutively to make the interval longer. 1 Press for over a second in the phone number input display.“T” is entered.Entering a “+”If you enter “+” at the beginning of a phone number when the Auto conversion of the Int’l dial assist setting is set to [ON], a call is dialed by automatically adding the set international access number (set to “009130010” at the time of purchase). 1 Press for over a second in the stand-by display.“+” is entered.](https://usermanual.wiki/Sony/A3624021.08-user-guide-part-1/User-Guide-889387-Page-56.png)

![Voice/Videophone Calls56Example: Displaying the Redial record 1 Press ( ) in the stand-by display.The Redial record display appears.To display the Received recordPress ( ) in the stand-by display.To display the Dial frequency recordPress in the Redial record display.To display phone numbersWhen saved in the Phonebook, the name and phone type of a recipient are displayed instead of the phone number. Press to switch the display temporarily between names and phone numbers. The display is not switched when a group name for a PushTalk call is displayed.To place a voice callMove the cursor to a call record and press .To place a videophone callMove the cursor to a call record and press (V.phone).To originate a PushTalk callMove the cursor to a call record and press .To send mailYou can send mail to a person whose phone number and mail address are saved in the Phonebook. Move the cursor to a call record and from the Function menu, select [Reply by mail]](https://usermanual.wiki/Sony/A3624021.08-user-guide-part-1/User-Guide-889387-Page-58.png)
![Voice/Videophone Calls59 2 Select the Chaku-moji display style and press .The display style for Chaku-moji is set.Placing a Call with a Chaku-moji MessageYou can place a voice or videophone call together with a Chaku-moji message. 1 Enter a phone number in the stand-by display and press (Option).The Call menu appears. 2 Select [Chaku-moji] and press .](https://usermanual.wiki/Sony/A3624021.08-user-guide-part-1/User-Guide-889387-Page-61.png)
![Voice/Videophone Calls60Changing the Caller ID Setting ON/OFF for an Individual Call<186/184>You can choose whether to notify a recipient of your phone number (caller ID) every time you place a call.ˎ The caller ID is important personal information. Carefully decide whether you want to notify a recipient of your caller ID.You can use the following methods to notify or not notify your caller ID.Presetting for all calls Use the Set Notification to set [Notify]/[Not notify] (P.45).Setting in the Phonebook Add “186/184” to the recipient’s phone number when you save it in the Phonebook (P.95).Setting when you place a callSet [Call with ID]/[Call without ID] at the Caller ID of the Option call display after dialing a recipient’s phone number (P.60).Enter “186/184” before dialing a recipient’s phone number (P.51).To notify the caller IDPress 186 + Phone number + .Not to notify the caller IDPress 184 + Phone number + .](https://usermanual.wiki/Sony/A3624021.08-user-guide-part-1/User-Guide-889387-Page-62.png)
![Voice/Videophone Calls63 2 Select [ON]/[OFF] at [Auto conversion].[ON] : Automatically add the additional number you set for the Int’l prefix.[OFF] : Do not automatically add the additional number. 3 Select [Int’l prefix] and press .The Int’l prefix setting display appears. 4 Select an input field and press .](https://usermanual.wiki/Sony/A3624021.08-user-guide-part-1/User-Guide-889387-Page-65.png)
![Voice/Videophone Calls64 2 Select [ON]/[OFF] and press .The Sub-address is set.To place a call by specifying a sub-addressIn the stand-by display, enter a phone number + + sub-address and press either or (V.phone).](https://usermanual.wiki/Sony/A3624021.08-user-guide-part-1/User-Guide-889387-Page-66.png)

![Voice/Videophone Calls67Pressing a Key on the Keypad to Receive a Call<Any key answer>You can set to answer a call by pressing a key on the keypad instead of pressing when you receive a voice or PushTalk call. 1 From the Menu, select [Settings]](https://usermanual.wiki/Sony/A3624021.08-user-guide-part-1/User-Guide-889387-Page-69.png)
![Voice/Videophone Calls73Setting the Operation of the Record Message 1 Press in the stand-by display, select [Set rec msg], and press .](https://usermanual.wiki/Sony/A3624021.08-user-guide-part-1/User-Guide-889387-Page-75.png)
![Voice/Videophone Calls74Recording a Caller’s Message When Unable to Answer a Call Just Receiving<Quick record message>You can start the Record message for temporary use when you receive a voice or videophone call even if the Record message is [OFF].ˎ If three record messages are recorded when the FOMA terminal receives a voice call, the Quick record message function cannot be operated. Similarly, if three videophone messages are recorded when it receives a videophone call, the Quick record message function cannot be operated. 1 Press while receiving a call.](https://usermanual.wiki/Sony/A3624021.08-user-guide-part-1/User-Guide-889387-Page-76.png)
![Voice/Videophone Calls75Deleting a Record Message/Videophone Message/Voice MemoYou can record up to three record messages, three videophone messages, and three voice memos. Delete unnecessary record/videophone messages or voice memos.Example: Deleting a record message 1 Press in the stand-by display, select [Play rec msg], and press .To delete a videophone messagePress in the stand-by display and select [Play Vphone msg].To delete a voice memoPress in the stand-by display and select [Play voice memo].To delete all record messagesFrom the Function menu, select [Delete all], enter the Security code, and select [Yes]. 2 Select a record message and press (Func).The Function menu appears. 3 Select [Delete one]](https://usermanual.wiki/Sony/A3624021.08-user-guide-part-1/User-Guide-889387-Page-77.png)
![Voice/Videophone Calls76Setting the Videophone Operation <Videophone setting>Setting the Display to Be Used in a Videophone CallYou can set the image to be displayed on the videophone images (Large) and (Small) during a videophone call. 1 From the Menu, select [Settings]](https://usermanual.wiki/Sony/A3624021.08-user-guide-part-1/User-Guide-889387-Page-78.png)
![Voice/Videophone Calls77Setting the Videophone Image Quality You can set the quality of an image to be sent to the recipient. 1 From the Menu, select [Settings]](https://usermanual.wiki/Sony/A3624021.08-user-guide-part-1/User-Guide-889387-Page-79.png)
![Voice/Videophone Calls78Setting How to Answer a Videophone Call during i-modeYou can set how to answer a videophone call received during i-mode or packet communication, for example, sending or receiving mail. 1 From the Menu, select [Settings]](https://usermanual.wiki/Sony/A3624021.08-user-guide-part-1/User-Guide-889387-Page-80.png)

![PushTalk85Saving Data in the PushTalk PhonebookYou can save up to 1,000 members in the PushTalk phonebook.Members you want to save in the PushTalk phonebook must be also saved in the FOMA terminal phonebook. You can save only one phone number in the PushTalk phonebook for each FOMA terminal phonebook entry. The name of a member displayed in the PushTalk phonebook is diverted from that saved in the FOMA terminal phonebook.ˎ When 2in1 is set to the B mode, you cannot save data in the PushTalk phonebook.ˎ When 2in1 is set to the Dual mode, you cannot save the phonebook data for which the Phonebook 2in1 setting is set to [B] in the PushTalk phonebook.ˎ When 2in1 is set to the A mode, the member for which the Phonebook 2in1 setting is set to [B] is not displayed. 1 Press in the stand-by display and press (Func).The Function menu appears. 2 Select [Create] and press .The screen for selecting the saving method appears.[View phonebook] : Select from the FOMA terminal phonebook.[Direct input] : Save new data in the FOMA terminal phonebook and then save it in the PushTalk phonebook.ˎ Follow the same steps as in “Add to FOMA terminal phonebook” (P.95, step 3 to 6). 3 Select [View phonebook] and press .The FOMA terminal phonebook appears. 4 Select an entry](https://usermanual.wiki/Sony/A3624021.08-user-guide-part-1/User-Guide-889387-Page-87.png)
![PushTalk86Saving a Group 1 Press in the stand-by display and press (Func).The Function menu appears. 2 Select [Group setting] and press .The Group setting display appears.To display group numbersWhen saved, group icons are displayed instead of group numbers. Press to switch the display temporarily between group icons and group numbers. 3 Select a group and press .](https://usermanual.wiki/Sony/A3624021.08-user-guide-part-1/User-Guide-889387-Page-88.png)
![PushTalk87Originating a PushTalk Call Using the PushTalk PhonebookIf you save persons as members in the PushTalk phonebook, you can originate a PushTalk call to several persons.ˎ When 2in1 is set to the B mode, you cannot use the PushTalk phonebook.ˎ When 2in1 is set to the Dual mode, you cannot use members for which the Phonebook 2in1 setting is set to [B]. 1 Press in the stand-by display, select a member, and press .](https://usermanual.wiki/Sony/A3624021.08-user-guide-part-1/User-Guide-889387-Page-89.png)
![PushTalk89Using the PushTalk Phonebook <PushTalkPlus>You can connect to the network and use the PushTalkPlus service (P.80).ˎ To use the PushTalkPlus service, you must subscribe to this service. 1 Press in the stand-by display and press (Func).The Function menu appears. 2 Select [NW connection]](https://usermanual.wiki/Sony/A3624021.08-user-guide-part-1/User-Guide-889387-Page-91.png)
![PushTalk90Setting How to Answer a Voice Call during PushTalk CommunicationYou can set how to answer a voice call when you receive it during PushTalk communication. 1 From the Menu, select [Settings]](https://usermanual.wiki/Sony/A3624021.08-user-guide-part-1/User-Guide-889387-Page-92.png)
![PushTalk91Setting the Operation for the FOMA Terminal Being Closed during PushTalk CommunicationYou can end a call or switch a call to the hands-free operation by closing the FOMA terminal during PushTalk communication. You can also continue the communication. 1 From the Menu, select [Settings]](https://usermanual.wiki/Sony/A3624021.08-user-guide-part-1/User-Guide-889387-Page-93.png)
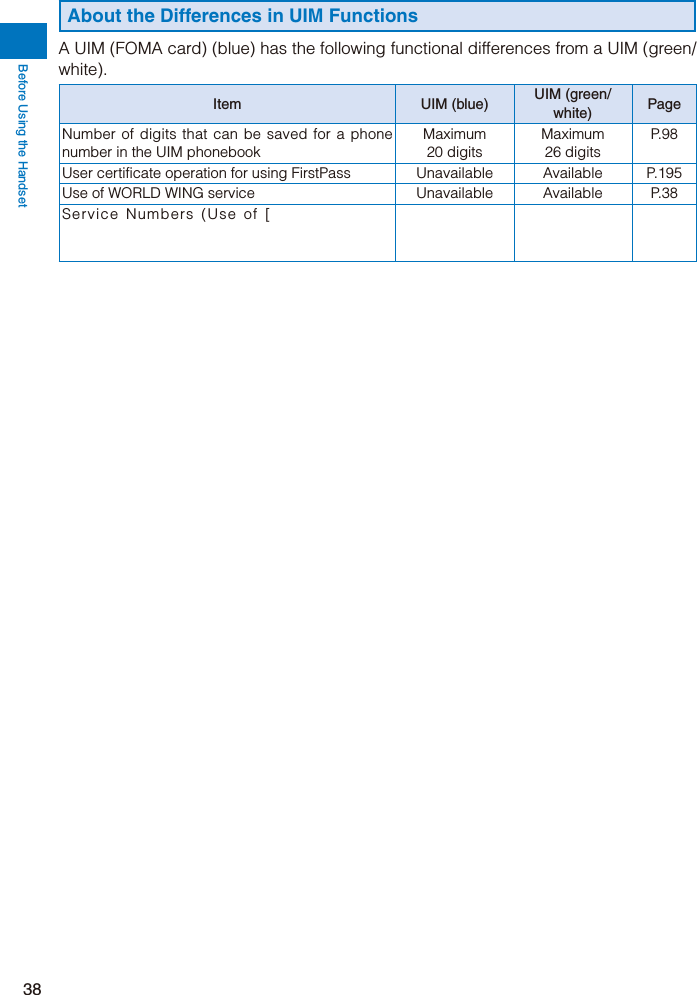
![Phonebook94Phonebooks the FOMA Terminal Can UseThe FOMA terminal is equipped with two types of phonebooks, the FOMA terminal phonebook, which you can set up with various functions, and the UIM (FOMA card) phonebook, which can be used with other FOMA terminals. Use either phonebook to your convenience.ˎ You can also use the PushTalk phonebook dedicated for PushTalk that can be created using data saved in the FOMA terminal phonebook (P.85).The table below shows the data you can save in each phonebook.Data to be savedFOMA terminal phonebook UIM phonebookNumber of data entriesYou can save up to 1,000 entries. You can save up to 50 entries.Group You can sort entries in groups from Group 0 to 19.You can sort entries in groups from Group 0 to 10.Phone number to be savedYou can save up to three numbers for each phonebook entry and a total of up to 3,000 numbers in the Phonebook.You can save one number for each phonebook entry in the PushTalk phonebook.You can save one number for each phonebook entry.You can select from nine types of icons, such as [ Public] and [ Mobile1].You cannot select icons. “ ” is saved automatically.Mail address to be savedYou can save up to three addresses for each phonebook entry and a total of up to 3,000 addresses in the Phonebook. You can also save one Secret code for each address.You can save one address for each phonebook entry.You can select from five types of icons, such as [ Mobile1] and [ Home].You cannot select icons. “ ” is saved automatically.Image to be savedYou can save one Des call display and one Des substitute image for each phonebook entry. You can save up to 1,000 each of still image and Chara-den files in the Phonebook.You cannot save images.Other data to be savedYou can save one name, reading, memory number, location information, postal code, postal address, and birthday for each phonebook entry.You can also set one type of Des phone tone, Des mail tone, Select phone Illum., Select mail Illum., and Secret for each phonebook entry.You can save one name and reading for each phonebook entry.Group to be savedYou can save one group name and group icon for each group.You can save one group name for each group. You cannot change a group name with [](https://usermanual.wiki/Sony/A3624021.08-user-guide-part-1/User-Guide-889387-Page-96.png)

![Phonebook98Saving an Entry in the UIM Phonebook <Add to UIM phonebook>Up to 50 entries can be saved in the UIM (FOMA card) phonebook. 1 Press ( ) in the stand-by display and press (Create). 2 Select [UIM] and press .](https://usermanual.wiki/Sony/A3624021.08-user-guide-part-1/User-Guide-889387-Page-100.png)
![Phonebook99Saving the Redial/Received Record in the PhonebookA phone number saved in the record can be directly added to the Phonebook.Example: Saving a received record in the FOMA terminal phonebook as a new entry 1 Press ( ) in the stand-by display.To save a number from the redial recordPress ( ) in the stand-by display. 2 Select a received record and press (Save).The screen for selecting where to save appears. 3 Select [Ordinary PB] and press .The screen for selecting how to save to the Phonebook appears.To save data in the PushTalk phonebookSelect [PushTalk PB]](https://usermanual.wiki/Sony/A3624021.08-user-guide-part-1/User-Guide-889387-Page-101.png)
![Phonebook103Editing a Phonebook Entry <Edit phonebook> 1 From the Phonebook, select an entry and press . 2 Press (Edit).The Edit phonebook display appears. 3 Edit each item.ˎ Follow the same steps as in “Add to FOMA terminal phonebook” (P.95, step 3 to 5) or in “Add to UIM phonebook” (P.98, step 3). 4 Press (Complete).The edited data is saved in the Phonebook.Deleting a Phonebook Entry <Delete phonebook>You can delete Phonebook entries using three methods.ˎ When the Phonebook is ordered by the phone number, [Delete one] and [Select&delete] cannot be selected.Example: Deleting an entry 1 Press ( ) in the stand-by display.](https://usermanual.wiki/Sony/A3624021.08-user-guide-part-1/User-Guide-889387-Page-105.png)
![Phonebook104Checking the Number of Entries Saved <Memory status>You can check the number of entries saved in the FOMA terminal phonebook and UIM (FOMA card) phonebook and entries saved as Secret. 1 Press (Func) in the Phonebook.The Function menu appears. 2 Select [Memory status] and press .](https://usermanual.wiki/Sony/A3624021.08-user-guide-part-1/User-Guide-889387-Page-106.png)
![Sound/Display/Light Settings108Setting the Ring Tone/Image/Indicator Color for Incoming Call and Mail<Incoming set>You can set a ring tone, ring volume, incoming image, vibration pattern, and incoming indicator color for each type of incoming transmission (voice, videophone, or PushTalk call, or mail, etc.).Example: Performing incoming mail settings 1 From the Menu, select [Settings]](https://usermanual.wiki/Sony/A3624021.08-user-guide-part-1/User-Guide-889387-Page-110.png)
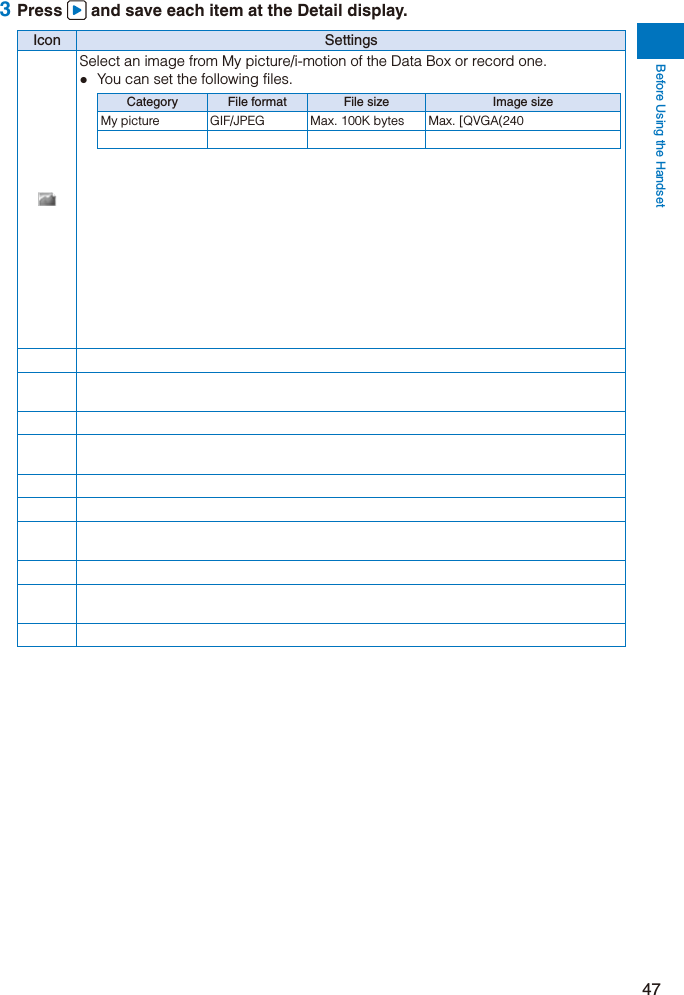
![Sound/Display/Light Settings109Continued 4 Select an image from the Data Box at [Received image].ˎ You can set the following files.Category File format File size Image sizeMy picture GIF/JPEG Max. 250K bytes Max. [Stand-by(480](https://usermanual.wiki/Sony/A3624021.08-user-guide-part-1/User-Guide-889387-Page-111.png)
![Sound/Display/Light Settings110 7 Set a vibration pattern at [Vibrator].](https://usermanual.wiki/Sony/A3624021.08-user-guide-part-1/User-Guide-889387-Page-112.png)
![Sound/Display/Light Settings112Adjusting the Volume of Caller’s Voice <Volume>The volume of caller’s voice during a voice, videophone, or PushTalk call can be adjusted in six levels from level 1 (smallest) to level 6 (largest). 1 From the Menu, select [Settings]](https://usermanual.wiki/Sony/A3624021.08-user-guide-part-1/User-Guide-889387-Page-114.png)
![Sound/Display/Light Settings114 5 Select [ON]/[OFF] of the incoming indicator at [Color].ˎ You can set the incoming indicator to the Position location and Location notice functions. 6 Press (Complete).The sound volume level and incoming indicator ON/OFF settings to be applied when you use the GPS function are set.Setting the Poor Signal Quality Alert <Quality alarm>You can set to inform you with alarm of the possibility of the call being disconnected during a voice call due to the radio wave condition. 1 From the Menu, select [Settings]](https://usermanual.wiki/Sony/A3624021.08-user-guide-part-1/User-Guide-889387-Page-116.png)
![Sound/Display/Light Settings117Changing the Original MannerThe operations of the Original manner can be customized. For the items you can set, see “Functions of each mode” (P.116).Example: Setting the battery alarm 1 Press in the stand-by display, select [Original manner], and press .](https://usermanual.wiki/Sony/A3624021.08-user-guide-part-1/User-Guide-889387-Page-119.png)

![Sound/Display/Light Settings11911 Press and select [ON]/[OFF] at [Soft key].The Soft key is set.](https://usermanual.wiki/Sony/A3624021.08-user-guide-part-1/User-Guide-889387-Page-121.png)
![Sound/Display/Light Settings120 4 Select [Select folder] and press .The screen for selecting a folder appears.To restore the specified folder to the default settingMove the cursor to the folder specified field, press (Reset), and select [Yes]. 5 Select a folder from My picture of the Data Box at the folder specified field and press .ˎ Up to five folders can be specified. 6 Select [Yes]/[No] at [Update image].The Stand-by pictures are set.](https://usermanual.wiki/Sony/A3624021.08-user-guide-part-1/User-Guide-889387-Page-122.png)
![Sound/Display/Light Settings121Setting the Display for Incoming and Outgoing Calls<Call display> You can set whether the Des call display or the name saved in the Phonebook is displayed. 1 From the Menu, select [Settings]](https://usermanual.wiki/Sony/A3624021.08-user-guide-part-1/User-Guide-889387-Page-123.png)
![Sound/Display/Light Settings122 3 Set the display light brightness at [Adjust light].Select from [1 to 5].To reset to the default brightnessPress (Reset). 4 Select [ON]/[OFF] of the Keypad light at [Keypad light]. 5 Select [Backlight always on] and press .](https://usermanual.wiki/Sony/A3624021.08-user-guide-part-1/User-Guide-889387-Page-124.png)
![Sound/Display/Light Settings123Example: Setting an image as the icon for i-mode 1 From the Menu, select [Settings]](https://usermanual.wiki/Sony/A3624021.08-user-guide-part-1/User-Guide-889387-Page-125.png)
![Sound/Display/Light Settings124Example: Setting a Kisekae tool 1 From the Menu, select [Settings]](https://usermanual.wiki/Sony/A3624021.08-user-guide-part-1/User-Guide-889387-Page-126.png)
![Sound/Display/Light Settings125Resetting the Settings of the Display and SoundYou can reset the settings of the display and sound set by the Kisekae Tool to the default settings. 1 From the Menu, select [Settings]](https://usermanual.wiki/Sony/A3624021.08-user-guide-part-1/User-Guide-889387-Page-127.png)
![Sound/Display/Light Settings126Resetting the Operation History of the Kisekae MenuSome Kisekae menus save the frequencies in use of menu items as an operation history and change the menu items automatically. The Operation history can be deleted. 1 From the Menu, select [Settings]](https://usermanual.wiki/Sony/A3624021.08-user-guide-part-1/User-Guide-889387-Page-128.png)
![Sound/Display/Light Settings127Setting the Font Size <Font size>Setting the Font Size At OnceYou can set the size of fonts to be used for displaying the Kisekae menu, Phonebook, Call record, mail/SMS, and sites or for entering a word at once. 1 From the Menu, select [Settings]](https://usermanual.wiki/Sony/A3624021.08-user-guide-part-1/User-Guide-889387-Page-129.png)

![Security Settings131i-mode PasswordThe 4-digit “i-mode password” is required when saving/deleting My Menu or subscribing/canceling message service or i-mode charged service, etc.(There may be other passwords for the i-mode used by IP (information service providers).)The i-mode password is set to “0000” at the time of subscription. It can be changed by yourself.You can change the i-mode password using i-mode, by selecting [i Menu]](https://usermanual.wiki/Sony/A3624021.08-user-guide-part-1/User-Guide-889387-Page-133.png)
![Security Settings132Changing the Security Code <Change code> 1 From the Menu, select [Settings]](https://usermanual.wiki/Sony/A3624021.08-user-guide-part-1/User-Guide-889387-Page-134.png)
![Security Settings133Changing the PIN1 Code/PIN2 Codeˎ To change the PIN1 code, set the PIN1 code setting to [ON].Example: Changing the PIN1 code 1 From the Menu, select [Settings]](https://usermanual.wiki/Sony/A3624021.08-user-guide-part-1/User-Guide-889387-Page-135.png)
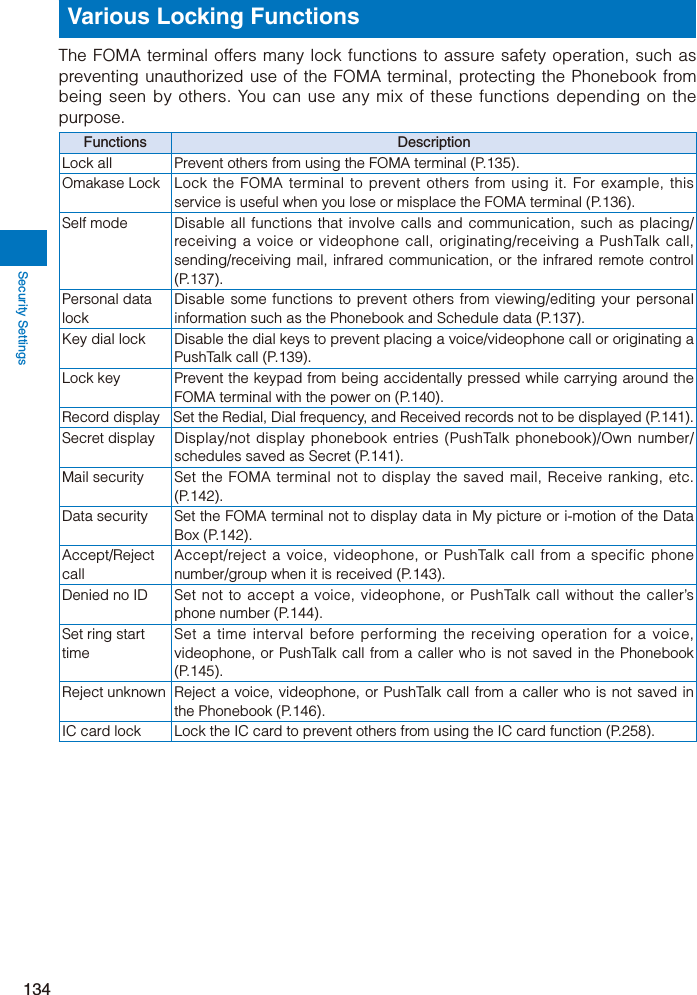
![Security Settings135Locking the Keypad to Prevent Unauthorized Use <Lock all>You can set the Lock all to prevent others from using the FOMA terminal. When the Lock all is set, you cannot perform any operation other than powering on/off the FOMA terminal and answering a voice or videophone call. 1 From the Menu, select [Settings]](https://usermanual.wiki/Sony/A3624021.08-user-guide-part-1/User-Guide-889387-Page-137.png)
![Security Settings137Restricting Placing/Receiving Calls <Self mode>You can disable all functions that involve calls or communication, such as placing/receiving a voice or videophone call, originating/receiving a PushTalk call, and sending/receiving mail. You cannot use infrared communication, infrared remote control, and iC communication, either. 1 From the Menu, select [Settings]](https://usermanual.wiki/Sony/A3624021.08-user-guide-part-1/User-Guide-889387-Page-139.png)
![Security Settings138 2 Enter the Security code and press (OK). 3 Select [ON] and press .The Personal data lock is set and “ ” appears.To cancel the Personal data lockSelect [OFF]. The Personal data lock is canceled and “ ” disappears.](https://usermanual.wiki/Sony/A3624021.08-user-guide-part-1/User-Guide-889387-Page-140.png)
![Security Settings139Restricting Dialing from the Keypad <Key dial lock>The keypad is locked to restrict placing a voice or videophone call or originating a PushTalk call. To cancel the Key dial lock temporarily, enter the Security code.ˎ When you set the Key dial lock, you cannot perform the following functions.- Place a call using the keys on the keypad (excluding calls made by the 2-touch dial or using the Flat-plug Earphone/Microphone with Switch) or [Call back] from i-mode mail- Add a member during PushTalk communication using the keys on the keypad- Place a call to a recipient who is not saved in the Phonebook using the Redial/Dial frequency/Received record- Send i-mode mail or SMS to a recipient who is not saved in the Phonebook- Phone To (AV Phone To) or Mail To- Save new data or edit/delete data in the Phonebook- Operate the Phonebook stored in the microSD memory card- Select the Phonebook attached to i-mode mail- Save/edit/delete the Location notice or information of a party- Send the Phonebook data using the infrared communication 1 From the Menu, select [Settings]](https://usermanual.wiki/Sony/A3624021.08-user-guide-part-1/User-Guide-889387-Page-141.png)
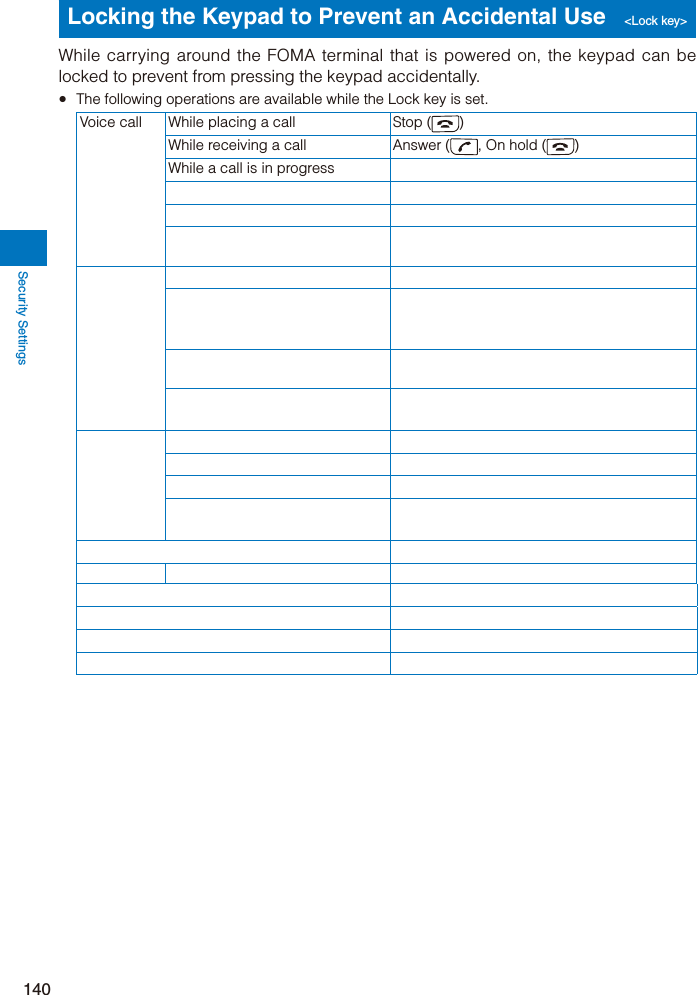
![Security Settings141Setting the Lock Key by Opening/Closing the FOMA Terminal<Slide lock>You can set to lock the keypad by closing the FOMA terminal and cancel the lock by opening it. 1 From the Menu, select [Settings]](https://usermanual.wiki/Sony/A3624021.08-user-guide-part-1/User-Guide-889387-Page-143.png)
![Security Settings142Protecting Mail from Unauthorized Access <Mail security>You can set the FOMA terminal not to display the received/sent/saved mail by folder. You can also use this function not to display the Receive/Send ranking and Sort inbox/outbox. To cancel this function temporarily, enter the Security code. 1 From the Mail menu, select [Inbox]/[Outbox]/[Draft] and press . 2 Press (Func).The Function menu appears. 3 Select [Mail security] and press .The Security code screen appears. 4 Enter the Security code and press (OK).The Mail security set display appears. 5 Select a folder to be locked and press .“” appears.To lock all foldersPress (Sel. all).To unlock the selected folderPress (Rel.). 6 Press (Complete).The Mail security is set and “ ” (yellow)/“ ” (blue)/“ ” appears (P.215).Protecting Data from Unauthorized Access <Data security>You can set the FOMA terminal not to display data in My picture or i-motion of the Data Box. You can select data not to display by folder. To cancel this function temporarily, enter the Security code.The Data security can be set for the following folders.Category FolderMy picture i-mode, Camera, Data exchange, and User-created folderi-motion i-mode, Camera, Data exchange, and User-created folder 1 From the Data Box, select a category and press .The folder list appears. 2 Press (Func).The Function menu appears. 3 Select [Data security] and press .The Security code screen appears. 4 Enter the Security code and press (OK).The screen for selecting a security folder appears.](https://usermanual.wiki/Sony/A3624021.08-user-guide-part-1/User-Guide-889387-Page-144.png)
![Security Settings143 5 Select a folder to be locked and press .To lock all foldersPress (Sel. all).To unlock the selected folderPress (Rel.). 6 Press (Complete).The screen for confirming the change of the security setting appears. 7 Select [Yes] and press .The Data security is set.Specifying Phone Numbers to Accept/Reject Calls<Accept/Reject call>You can set to accept/reject voice, videophone, or PushTalk calls only from specific phone numbers. For the Accept/Reject calls, up to 20 phone numbers can be saved (Phone No.).You can also set to accept/reject calls only from specific groups in the FOMA terminal phonebook. For the Accept/Reject calls, up to three groups can be saved (Group list).This function is valid only when a caller sends the phone number. It is recommended to set the Caller ID Display Request Service and the Denied no ID together with this function.ˎ SMS and i-mode mail can be received regardless of this function.ˎ For an incoming PushTalk call, it is only to the caller’s phone number that the Accept/Reject call setting is valid. The Accept/Reject setting does not work even if you set it to a member other than the caller. When you make the Accept/Reject setting through the Group list, a call is accepted/rejected if the caller of it belongs to the specified group in the FOMA terminal phonebook.ˎ When the Personal data lock is set, you cannot set the Accept/Reject calls.Example: Setting [Accept]/[Reject] for calls from specified phone numbers 1 From the Menu, select [Settings]](https://usermanual.wiki/Sony/A3624021.08-user-guide-part-1/User-Guide-889387-Page-145.png)
![Security Settings144 4 Select [Phone No.] and press .](https://usermanual.wiki/Sony/A3624021.08-user-guide-part-1/User-Guide-889387-Page-146.png)
![Security Settings145Muting the Ring Tone for Calls with No Phonebook Entry<Set ring start time>You can set a time interval before starting operation of the ring tone, incoming indicator, and vibrator when you receive a voice, videophone, or PushTalk call from a person/group who is not saved in the Phonebook. This function is also useful for blocking a nuisance call such as from a malicious caller.ˎ When the Reject unknown is set, you cannot set the Set ring start time. 1 From the Menu, select [Settings]](https://usermanual.wiki/Sony/A3624021.08-user-guide-part-1/User-Guide-889387-Page-147.png)
![Security Settings146Rejecting Calls from Callers with No Phonebook Entry<Reject unknown>You can set to reject voice, videophone, or PushTalk calls from callers not saved in the Phonebook. It is recommended that you set the Caller ID Display Request Service together with this function.ˎ SMS and i-mode mail can be received regardless of this function.ˎ If you receive a call from a caller who is not saved in the Phonebook when the Reject unknown is [ON], the call is not connected. The missed call notification icon appears and the call is saved in the Received record.ˎ When the Set ring start time or Personal data lock is set, you cannot set the Reject unknown. 1 From the Menu, select [Settings]](https://usermanual.wiki/Sony/A3624021.08-user-guide-part-1/User-Guide-889387-Page-148.png)
![Camera151ContinuedAbout Still Image/MovieItem Still image MovieFile format JPEG (Exif format) MP4 (MobileMP4)File name When saved to [Data Box]YYYYMMDDhhmmssˎThe recorded year, month, date, hour, minute, second is displayed. For example, when a still image is recorded at February 1, 2008, 18:02:10, it appears as “20080201180210”.ˎWhen using the Continuous mode, 00 to 03 is added after the year, month, date, hour, minute, second, resulting in a format like “20080201180210_00”.When saved to [microSD]DSC0nnnnWhen saved to [Data Box]YYYYMMDDhhmmssˎThe recorded year, month, date, hour, minute, second is displayed. For example, when a movie is recorded at February 1, 2008, 18:02:10, it appears as “20080201180210”.When saved to [microSD]MOLnnnFile number NNN-nnnnˎThe file number is displayed when saved to [microSD]. You can reset the file number (P.177).](https://usermanual.wiki/Sony/A3624021.08-user-guide-part-1/User-Guide-889387-Page-153.png)

![Camera155Recording Still Images <Shoot by photo>When recording with the Out-camera, you can use the Auto Focus function to focus on an object at the center of the display and record still images. When the Auto orientation is set to [ON], the orientation of the FOMA terminal is automatically recognized and record an image while recording.ˎ The allowable distance for the Auto focus between the camera and an object is about 30 cm or over using [Macro OFF], about 10 cm or over using [Macro mode], and about 3 cm to 18 cm using [Super Macro mode].ˎ You cannot use the Auto Focus when you set the Select scene to [Night scene]/[Low Light] for recording still images.ˎ If an image recoded when the Auto orientation is set to [ON] is attached to mail or posted on a blog, depending on the recipient’s terminal or site where it is posted, the image may not be displayed correctly facing the vertical/horizontal direction. 1 Slide the lens cover to open in the stand-by display.The Camera mode is activated.ˎ You can also activate the Camera mode by sliding the lens cover to open in the menu display. 2 Point the camera at the object and press halfway down to focus on it.](https://usermanual.wiki/Sony/A3624021.08-user-guide-part-1/User-Guide-889387-Page-157.png)
![Camera156 4 Press (Save).The still image is saved.To attach to mailPress (Func) for over a second. The still image is saved and the Edit mail display appears. You can also attach an image to mail by selecting [ ] (Attach to mail) from the Function menu.To cancel a recorded imagePress and select [Yes].To display a saved imagePress in the Camera mode display.To add location informationFrom the Function menu, select [ ] (Location info)](https://usermanual.wiki/Sony/A3624021.08-user-guide-part-1/User-Guide-889387-Page-158.png)

![Camera158 2 Press until the time you want to show or [OFF].The Auto timer is set.](https://usermanual.wiki/Sony/A3624021.08-user-guide-part-1/User-Guide-889387-Page-160.png)
![Camera159Switching the Camera Used for RecordingYou can switch between the Out- and In-cameras for recording.ˎ When the Shoot mode of the still image is set to [Best Pic™], [Continuous mode], [High sensitivity], or [Panorama], you cannot switch the camera.ˎ When the Shoot mode of the still image is set to [Shoot with frame] while the image size is set to [Stby(480](https://usermanual.wiki/Sony/A3624021.08-user-guide-part-1/User-Guide-889387-Page-161.png)
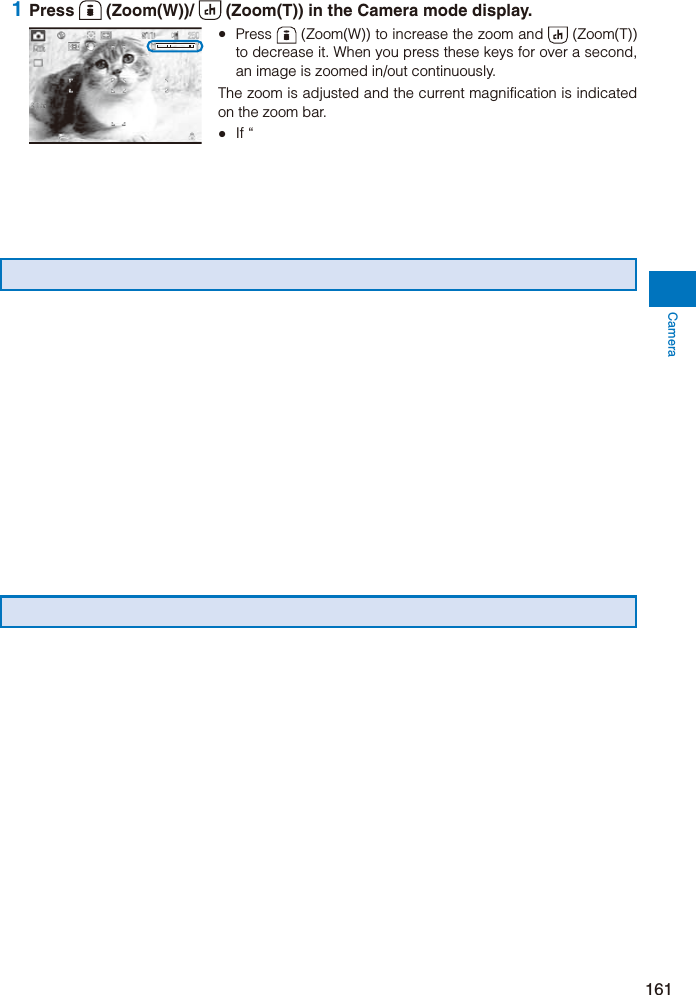
![Camera160Adjusting ZoomYou can adjust the zoom of an image while recording with the Out-camera. Up to about 3x optical zoom can be used. When the zoom magnification is exceeded, you can record an image using the digital zoom. Moreover, the Smart zoom function does not degrade the quality of the image while recording even if the maximum magnification of the optical zoom is exceeded. The maximum magnification of Smart zoom changes depending on the settings of the image size or when the Shoot mode is set to [High sensitivity]. The zoom magnifications which can be adjusted at each image size are follows.ˎ The maximum magnification is included 3x magnifications (9 levels) of the optical zoom.When recording a still image](https://usermanual.wiki/Sony/A3624021.08-user-guide-part-1/User-Guide-889387-Page-162.png)
![Camera164 2 Select a frame size and press .The Frame display appears. 3 Select a frame and press .To check a frameMove the cursor to a frame and press (Play). 4 Press (Close).The Shoot mode is set to [Shoot with frame] and “ ” and the selected frame appear. 5 Point the camera at the object and press halfway.The white-framed focusing window is used to adjust the focus. When the image comes into focus, the confirmation sound is heard, and the focusing window turns green. 6 Press .An image is recorded with the shutter sound and the screen for confirming whether to save the image appears. 7 Press (Save).The image is saved.Recording an Image Using the High Sensitivity ModeYou can record an image beautifully by reducing the blurring of an object under low-light condition or in a dark room without using the flash.ˎ When the image is [2M(1632](https://usermanual.wiki/Sony/A3624021.08-user-guide-part-1/User-Guide-889387-Page-166.png)
![Camera165Recording a Panoramic ImageAfter you press the shutter, keep the camera in a horizontal position and move it to record images serially, and connect to each other and save as a single image. You can also record a panoramic image with a 360-degree field of view. ˎ The Auto timer cannot be set.ˎ When the Shoot mode is set to [Panorama], the Picture effect is changed to [OFF]. Also, temporarily, the Flash is set to [OFF], and the Auto Focus and Face detection are set to [OFF]. 1 Press (Func) in the Camera mode display, select [ ] (Shoot mode)](https://usermanual.wiki/Sony/A3624021.08-user-guide-part-1/User-Guide-889387-Page-167.png)
![Camera167To paste an image stampSelect [ ]](https://usermanual.wiki/Sony/A3624021.08-user-guide-part-1/User-Guide-889387-Page-169.png)

![Camera169 3 Select [Multi AF]/[Spot AF] and press .The Multi focus is set and the icon for the current Multi focus type appears.Multi AF Spot AFSetting the Effective Distance of the Auto FocusYou can set the effective distance of the Auto Focus function when you record still images with the Out-camera. 1 Press (Func) in the Camera mode display, select [ ], and press . 2 Select [Shoot]](https://usermanual.wiki/Sony/A3624021.08-user-guide-part-1/User-Guide-889387-Page-171.png)
![Camera170Turning on the Photo LightThe FOMA terminal’s built-in photo light can be used when recording with the Out-camera in a dark place, etc. 1 Press in the Camera mode display.Every time you press , the photo light is switched to [ON]/[OFF].When switched to [ON], the photo light is turned on and “ ” appears.](https://usermanual.wiki/Sony/A3624021.08-user-guide-part-1/User-Guide-889387-Page-172.png)
![Camera171Setting Movies to Play Back on Another FOMA TerminalYou can set recorded movies to play back on another FOMA terminal.ˎ When the Common replay mode is set to either [High quality] or [Long play], the settings of the camera are changed, as follows.Item High quality Long playImage size [QCIF(176](https://usermanual.wiki/Sony/A3624021.08-user-guide-part-1/User-Guide-889387-Page-173.png)
![Camera172 3 Select a white balance type and press .The White balance is set and the icon for the current white balance type appears.ˎ No icon appears for [AUTO].Fine Cloudy Fluorescent BulbSetting a Position for Automatic Adjustment of the ExposureYou can set what position on the screen to use as a reference for the image brightness (EV) adjustment. 1 Press (Func) in the Camera mode display, select [ ], and press . 2 Select [Adjust]](https://usermanual.wiki/Sony/A3624021.08-user-guide-part-1/User-Guide-889387-Page-174.png)
![Camera174Setting Whether Recorded Images Are Automatically SavedYou can set the save method of an image recorded. 1 Press (Func) in the Camera mode display, select [ ], and press . 2 Select [Set]](https://usermanual.wiki/Sony/A3624021.08-user-guide-part-1/User-Guide-889387-Page-176.png)
![Camera175Movie[Super fine] : Higher image quality mode. The file size is larger and the recording time is shortest.[Fine] : Image quality mode for smoother movement in movies.[Standard] : Standard image quality mode.[Economy] : Lowest image quality mode. The file size is smaller and the recording time is longest. 3 Select the image quality and press .The image quality is set and the icon for the current image quality appears.Super fine (Movie only) StandardFine EconomySetting Whether to Use the Digital ZoomYou can set whether to use the digital zoom when the maximum magnification of the optical zoom exceeds while recording an image with the Out-camera. 1 Press (Func) in the Camera mode display, select [ ], and press . 2 Select [Set]](https://usermanual.wiki/Sony/A3624021.08-user-guide-part-1/User-Guide-889387-Page-177.png)
![Camera176Changing the Shutter SoundThe shutter sound can be selected from three types when the Shoot mode for still images is [Regular], [Best Pic™], [Shoot with frame], [High sensitivity] or, [Panorama].ˎ The shutter sound volume is fixed and cannot be adjusted or muted. The shutter sound is heard even if the Manner mode is set.ˎ When the Shoot mode is set to [Deco-Snap], the current shutter sound is heard when recording. You cannot set the shutter sound. 1 Press (Func) in the Camera mode display, select [ ], and press . 2 Select [Set]](https://usermanual.wiki/Sony/A3624021.08-user-guide-part-1/User-Guide-889387-Page-178.png)
![Camera177Setting Whether to Add Location Information to an Image When SavingYou can add location information automatically to a recorded still image using the GPS function. 1 Press (Func) in the Camera mode display, select [ ], and press . 2 Select [Set]](https://usermanual.wiki/Sony/A3624021.08-user-guide-part-1/User-Guide-889387-Page-179.png)
![Camera178 1 Press (Func) in the Camera mode display, select [ ], and press . 2 Select [Set]](https://usermanual.wiki/Sony/A3624021.08-user-guide-part-1/User-Guide-889387-Page-180.png)
![183i-mode/i-motion/i-ChannelDisplaying SitesVarious sites offered by IP (information service providers) can be displayed (the subscription is necessary for some sites). 1 From the i-mode menu, select [i Menu]](https://usermanual.wiki/Sony/A3624021.08-user-guide-part-1/User-Guide-889387-Page-185.png)
![185i-mode/i-motion/i-ChannelDisplaying a Site URLThe URL of the currently displayed site can be displayed. 1 While displaying a site, press (Func).The Function menu appears. 2 Select [URL] and press .The URL of the site is displayed.To copy the URLPress (Copy).Sending a URL by MailThe URL of the currently displayed site can be sent by mail. 1 While displaying a site, press (Func).The Function menu appears. 2 Select [Compose message] and press .The Edit mail display appears.The site URL is already entered in the main body. 3 Compose mail and send it.ˎ Follow the same steps as in “Compose and send mail” (P.203, step 2 to 5).Displaying a Site CorrectlyIf the display of the text is incorrect on a site, you can reload the page after changing the character code. 1 While displaying a site, press (Func).The Function menu appears. 2 Select [Word translate]](https://usermanual.wiki/Sony/A3624021.08-user-guide-part-1/User-Guide-889387-Page-187.png)
![187i-mode/i-motion/i-ChannelDisplaying Internet Sites <Internet connection>i-mode compatible Internet site can be displayed from the i-mode terminal.ˎ Sites that are not compatible with i-mode may not be displayed correctly. 1 From the i-mode menu, select [Go to location]](https://usermanual.wiki/Sony/A3624021.08-user-guide-part-1/User-Guide-889387-Page-189.png)
![188i-mode/i-motion/i-ChannelDisplaying a SiteA site can be displayed using a bookmark. 1 From the i-mode menu, select [Bookmark] and press .A list of bookmark folders appears.ˎ The following icons show the type of folder. (Yellow) Preset folder (Blue) User-created folder 2 Select a folder and press .A list of bookmarks appears. 3 Select a bookmark and press (Cnct).The FOMA terminal is connected to the site of the selected bookmark.To check the URLMove the cursor to the bookmark and press (Check).To copy a bookmark URLMove the cursor to the bookmark and press (Check) and (Copy).To change the titleMove the cursor to the bookmark and from the Function menu, select [Edit title]. Enter the title within 12 full-width or 24 half-width characters.To display other site while displaying a siteFrom the Function menu, select [Bookmark]](https://usermanual.wiki/Sony/A3624021.08-user-guide-part-1/User-Guide-889387-Page-190.png)
![189i-mode/i-motion/i-Channel 3 Select [Move]](https://usermanual.wiki/Sony/A3624021.08-user-guide-part-1/User-Guide-889387-Page-191.png)
![190i-mode/i-motion/i-ChannelProtecting a Screen MemoYou can protect screen memos from being overwritten. You can protect up to 50 screen memos. 1 Select a screen memo from the screen memo list and press (Func).The Function menu appears.To cancel the protectionMove the cursor to the protected screen memo and press (Func). 2 Select [Protect ON/OFF]](https://usermanual.wiki/Sony/A3624021.08-user-guide-part-1/User-Guide-889387-Page-192.png)
![193i-mode/i-motion/i-ChannelSetting i-mode <i-mode setting>Setting the Connection TimeoutThe duration before disconnecting the FOMA terminal automatically can be set when you cannot send or receive data due to heavy traffic at the i-mode center. 1 From the i-mode menu, select [i-mode setting]](https://usermanual.wiki/Sony/A3624021.08-user-guide-part-1/User-Guide-889387-Page-195.png)
![194i-mode/i-motion/i-ChannelSetting Whether to Use the Saved Data for Flash MoviesYou can set whether to use the saved data (P.185) when you play back a Flash movie displayed on a site or saved in the Screen Memo. 1 From the i-mode menu, select [i-mode setting]](https://usermanual.wiki/Sony/A3624021.08-user-guide-part-1/User-Guide-889387-Page-196.png)
![195i-mode/i-motion/i-ChannelSetting the FirstPass <User certificate>You can issue and download the user certificate from the FirstPass Center.The user certificate certifies that you are a FOMA subscriber. The downloaded user certificate is saved on the green/white UIM (FOMA card) and enables you to use FirstPass-compatible sites.ˎ You cannot use the user certificate using the blue UIM.ˎ To connect to the FirstPass Center, set the date and time (P.44).ˎ The screens and operation methods displayed by the FirstPass Center may change.ˎ While the FOMA terminal is connected to the FirstPass Center, you cannot send/receive mail or receive Message R/F.ˎ The User certificate is not available overseas. 1 From the i-mode menu, select [i-mode setting]](https://usermanual.wiki/Sony/A3624021.08-user-guide-part-1/User-Guide-889387-Page-197.png)