Sony A3624021 Licensed transmitter User Manual
Sony Mobile Communications Inc Licensed transmitter
Sony >
Contents
- 1. 08 user guide part 1
- 2. 08 user guide part 2
08 user guide part 2
199
i-mode/i-motion/i-Channel
When You Receive i-Channel
”

201
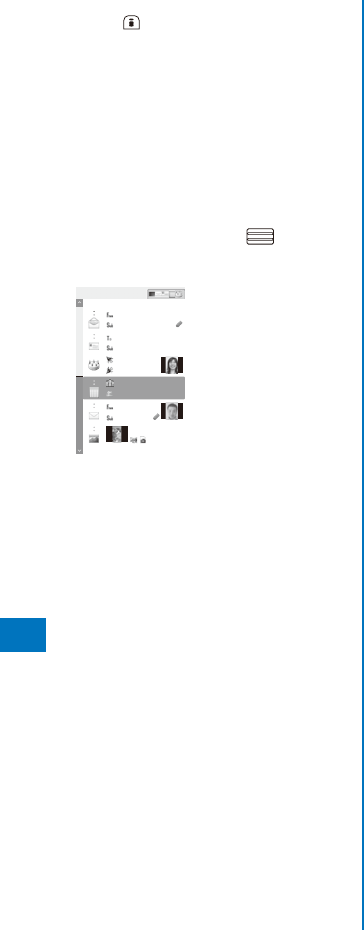
Mail
What is i-mode Mail? ............................................................................................... 202
Displaying the Mail Menu ....................................................................... <Mail menu> 202

202
Mail
What is i-mode Mail?
When subscribing to the i-mode service, mail
can be exchanged with i-mode terminals as
well as e-mail over the Internet.
In addition to the main body of text, you can
attach up to 10 files (JPEG, ToruCa, PDF data,
etc.) of up to 2M bytes in total. The i-mode
mail function also provides Deco-mail support,
and you can change the font color/size and
background color of the mail main body text.
Since there are many preinstalled Deco-mail
pictographs that can be inserted in an i-mode
mail message in the same manner as other
pictographs, you can easily compose and
send expressive mail.
ˎ For details on the i-mode mail, see the “Mobile
Phone User’s Guide
203
Mail
Continued
Composing and Sending
i-mode Mail <Compose and send mail>
Sent mail is saved in [Outbox].
ˎ Mail may not be displayed correctly on the
recipient’s phone depending on the radio wave
condition.
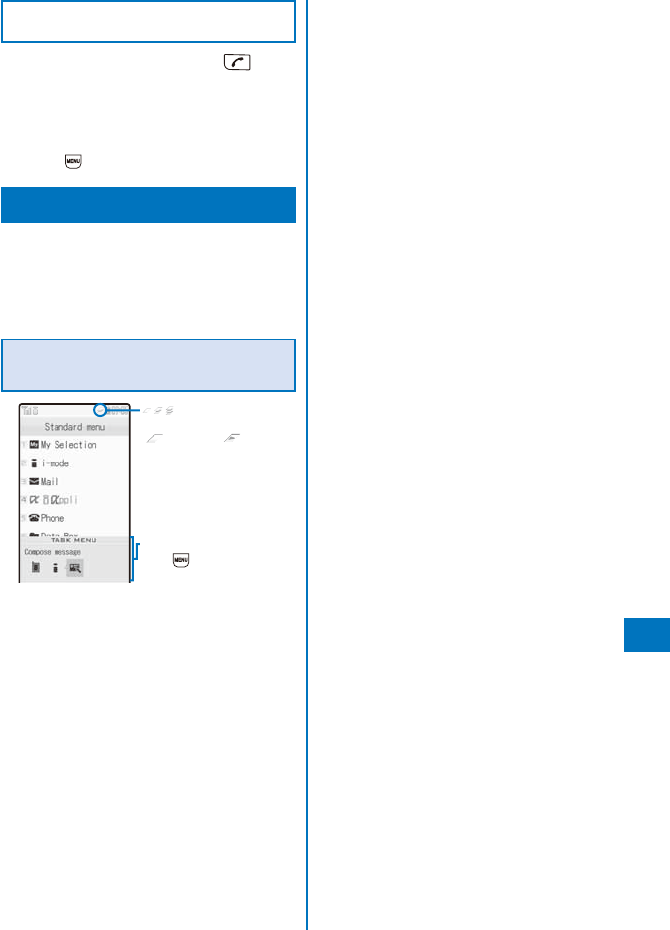
1 From the Mail menu, select [Compose
message] and press .
ˎ You can also display the mail compose display
by pressing (Cmps msg) in the Mail menu.

204
Mail
2 Select [Add receiver]
205
Mail
3 Enter/decorate the main body at [ ].
Enter the main body within 5,000 full-width or
10,000 half-width characters.
ˎ Number of characters permitted in the main
body may be reduced depending on the type
and volume of decoration you use.
Press in the Main body input display to display
the decoration menu.

206
Mail
207
Mail
Entering the Main Body After
Specifying Decoration
1 Press in the main body input display.
The decoration menu appears.
2 Select the decoration and press .
The Cross Deco-palette appears.
When you select “ ”

208
Mail
2 Select a template and press (Mail).
The Edit mail display appears.
3 Compose mail and send it.
ˎ Follow the same steps as in “Compose and send
Deco-mail” (P.204, step 2 to 4).

209
Mail
3 Select a file type and press .
To check the contents of a file
Move the cursor to a file and press (Play).
4 Select a folder

210
Mail
Receiving i-mode Mail
<Auto receive>
When mail is sent to the i-mode center, the
FOMA terminal automatically receives them.
211
Mail
Selecting to Receive
i-mode Mail <Receive option>
You can check through mail held at the i-mode
center, where you can select mail to receive
and delete mail without receiving it based on
the information such as mail subject. To use
this function, set the Recv option setting to
[ON]. When the Recv option setting is set to
[ON], i-mode mail is not received automatically.
ˎ When the Recv option setting is set to [ON], the Mail
tone does not sound and when the Manner mode or
Vibrator is set, the vibrator does not operate.
212
Mail
Checking New i-mode Mail
<Check new message>
New mail held at the i-mode center while the
FOMA terminal is powered off or outside of the
i-mode service area can be checked.
ˎ Depending on the radio wave condition, you may
not be able to check new mail.
1 Press (Mail) for over a second in the
stand-by display.
The FOMA terminal is connected to the i-mode
center, and an inquiry result is displayed.
To check mail
Select [Mail].
Replying to i-mode Mail
<Reply to mail>
You can compose and send replies to the
received mail.
ˎ You may not be able to reply to some received mail.
1 From the received mail list, select mail
and press (Quote).
The Edit mail display appears.
The mail address as address, “Re: title of the
received mail” as subject, and “>main body of
the received mail” as main body are entered
beforehand.
ˎ When the subject including “Re:” exceeds 100
full-width or 200 half-width characters, the extra
characters are automatically deleted.
ˎ When the subject of the received mail includes
more than one “Re:”, some “Re:” are brought
together in one automatically.
To reply to mail without the sender’s message
Move the cursor to mail and press (Reply).
To reply to broadcast mail
Select mail, press (Quote) or (Reply), and
select [Reply to sender]/[Reply all].
2 Compose mail and send it.
ˎ Follow the same steps as in “Compose and send
mail” (P.203, step 3 to 5).
The reply mail is sent and “ ” appears.
213
Mail
Saving the Mail Address/Phone
Number in the Phonebook
Saving the Sender’s/Recipient’s
Mail Address in the Phonebook
You can save the mail address of a received
mail sender and recipient or sent/saved mail
recipient in the Phonebook.
Example: Saving the mail address of a received mail
sender to the FOMA terminal phonebook as
a new entry
1 From the received mail list, select mail,
press , and press (Func).
The Function menu appears.
2 Select [Save address] and press .
The screen for selecting how to save to the
Phonebook appears.
3 Select [New] and press .
The screen for selecting where to save appears.
When you select [Add]
Select an entry to which you want to add the mail
address from the Phonebook.
When there are multiple mail addresses
Select mail addresses

214
Mail
Playing Back/Saving a File
Attachment Received in i-mode Mail
You can display/play back/save/delete a file
that is attached or pasted in i-mode mail or a
message including an image, movie/i-motion,
melody, ToruCa card, PDF data, Phonebook,
Schedule, Bookmark, and My data.
215
Mail
Receiving a File Attachment Selectively
You can obtain a file attachment exceeding
100K bytes and one for which the Attached file
pref. is set to [Invalid].
ˎ You cannot obtain a file attachment whose retention
period is expired.
1 From the received mail list, select mail
and press .
2 Select “ ” and press .
The obtaining operation starts and the file
attachment is obtained.
216
Mail
2 Select a folder and press .
The received/sent/saved mail list appears.
Received mail
217
Mail
To place a call
When a mail address and phone number is
saved in the Phonebook, you can place a call
to this number. Move the cursor to the mail and
from the Function menu, select [Call back].
3 Select mail and press .
Received mail
218
Mail
4 Select mail and press .
ˎ To store several mails, repeat step 4.
5 Press (Complete).
The screen for confirming whether to store the mail
appears.
6 Select [Yes] and press .
The call is connected to the Data Security Service
Center and mail is stored. When the storing is
completed, the storing result display appears.
219
Mail
Example: Moving received mail
1 From the Mail menu, select [Inbox]
220
Mail
2 Select a folder and press .
The received mail list appears.
To delete all read mail in the folder
From the Function menu, select [Delete]
221
Mail
Example: Sorting received mail
1 Press (Func) in the received mail list.
The Function menu appears.
2 Select [Sort]

222
Mail
Assigning Separate Folders for
Mail
You can save requirements to sort received
or sent mail so that they can be automatically
assigned to folders. Up to 30 sorting
requirements can be saved.
Example: Setting a sorting requirement for received
mail
1 From the Mail menu, select [Mail setting]
223
Mail
Adding a Signature to Mail
When saved beforehand, your signature can
be attached at the end of the main body of
mail.
Saving a Signature
The signature attached to mail can be created
and saved.
1 From the Mail menu, select [Mail setting]

224
Mail
Setting a Mail List
By saving mail addresses in a mail list, you can
send mail to all members in the list at the same
time.
Up to 10 mail lists can be saved. Up to five
mail addresses can be saved in each mail list.
1 From the Mail menu, select [Mail setting]

225
Mail
Setting the Receiving Operation
during Multitasking
You can set whether the incoming mail or
received mail display should appear when you
receive mail, SMS, or Message R/F while you
are using the FOMA terminal for other tasks.
1 From the Mail menu, select [Mail setting]

226
Mail
Receiving a Message
<Receive message>
When a message is received while in the
stand-by display, the contents of the message
are automatically displayed. Up to 20 Message
R and Message F each can be saved in the
FOMA terminal.
227
Mail
Checking a New Message
<Check new message>
New messages held at the i-mode center while
the FOMA terminal is powered off or outside of
the i-mode service area can be checked.
ˎ Depending on the radio wave condition, you may
not be able to check new messages.
1 Press (Mail) for over a second in the
stand-by display.
The FOMA terminal is connected to the i-mode
center, and an inquiry result is displayed.
To check messages
Select [MessageR] or [MessageF].

228
Mail
Protecting a Message
Message R or Message F can be protected
from being overwritten.
ˎ An unread message cannot be protected.
Example: Protecting Message R
1 From the Mail menu, select [Inbox]

229
Mail
What is Early Warning
“Area Mail”? (to be offered)
Area Mail is a service that allows you to receive
mail such as the urgent earthquake news flash
delivered by the Japan Meteorological Agency.
ˎ You can receive Area Mail without subscribing to the
i-mode service.
<Usage precautions>
ˎ To receive Area Mail, you need to set the Receive
setting.

230
Mail
Setting to Save Receiving Entry
of Area Mail
You need to save a name and Message ID of
Area Mail including information you want to
receive rather than Area Mail of the emergency
information. To receive emergency information,
you do not need to save receiving entry.
1 From the Mail menu, select [Mail setting]
231
Mail
1 From the Mail menu, select [Compose
SMS] and press .

232
Mail

233
i-

234
i-

235
i-

236
i-

237
i-

238
i-

239
i-

240
i-

241
i-

242
i-

243
i-

244
i-

245
i-

246
i-

247
i-

249
Osaifu-Keitai/ToruCa
What is Osaifu-Keitai? ............................................................................................. 250
What is the iC transfer service? ................................................................................ 250
Starting an Osaifu-Keitai-compatible i-

250
Osaifu-Keitai/ToruCa
What is Osaifu-Keitai?
“Osaifu-Keitai” provides convenient i-mode
functions (i-mode FeliCa) that can be
performed using the IC card inserted in an
i-mode terminal.
FeliCa adopts a contactless IC card technology
that enables data to be read/written just by
scanning.
You can simply hold up your Osaifu-Keitai to a
reading device in stores that provide the FeliCa
service to pay using e-money, or use it as an
airplane ticket or point card. With features like
Osaifu-Keitai, your mobile phone becomes an
increasingly handy tool.
This latest FeliCa is even more convenient to
use compared with previous versions of the
FeliCa-compatible contactless IC card. For
example, you can deposit e-money in Osaifu-
Keitai on the IC card, and check the balance
and purchase history using communications.

251
Osaifu-Keitai/ToruCa
Starting an Osaifu-Keitai-
compatible i-

252
Osaifu-Keitai/ToruCa
What is ToruCa?
ToruCa is an e-card that can be obtained using
Osaifu-Keitai. This convenient e-card can be
used for applications such as flier, restaurant
card, or coupon.
You can obtain ToruCa cards from a reading
device or site. These e-cards can be easily
exchanged by way of e-mail, infrared
communication, or the microSD memory card.
The ToruCa card you obtained is saved in
[ToruCa] of the [Osaifu-Keitai] menu.
You need a ToruCa-compatible terminal to use
ToruCa. For details, see the “Mobile Phone
User’s Guide
253
Osaifu-Keitai/ToruCa
254
Osaifu-Keitai/ToruCa
Managing ToruCa Cards
ˎ You cannot move, sort, or search a ToruCa card in
the [Used] folder.
Adding/Deleting Folders
You can create and delete a folder for saving a
ToruCa card. You can manage up to 22 folders.
You can also change the name of a folder or
sort folders in the list.
ˎ You cannot delete or change the names of the
preset folders.
Example: Adding a folder
1 Press (Func) in the ToruCa folder list.
The Function menu appears.
2 Select [Edit folder]
255
Osaifu-Keitai/ToruCa
3 Select a ToruCa card and press (Func).
The Function menu appears.
4 Select [Delete]

256
Osaifu-Keitai/ToruCa
Assigning Separate Folders for
ToruCa Cards
You can save requirements to sort ToruCa
cards obtained from a reading device so that
they can be automatically assigned to folders.
Up to 20 sorting requirements can be saved.
1 From the Menu, select [Osaifu-Keitai]

257
Osaifu-Keitai/ToruCa
1 From the Menu, select [Osaifu-Keitai]
258
Osaifu-Keitai/ToruCa
Locking the IC Card
Function <IC card lock>
You can lock the IC card function to prevent
others from using it.
1 Press ( ) for over a second in the
stand-by display.
The IC card function is locked and “ ” appears.
To cancel the IC card lock
Press ( ) for over a second in the stand-by
display, enter the Security code, and press
(OK).
Locking the IC Card Function When
the FOMA Terminal Is Powered Off
You can set to automatically lock the IC card
function when the FOMA terminal is powered
off.
1 From the Menu, select [Osaifu-Keitai]

259
GPS Function
Precautions on the Use of GPS Functions .............................................................. 260
Checking Your Location .................................................................<Position location> 260
Using the GPS-compatible i-

260
GPS Function
Precautions on the Use of
GPS Functions
ˎ You may need i-mode subscription for the use of the
GPS function.
ˎ GPS is operated by the U.S. Department of
Defense. Therefore, GPS radio wave condition may
be controlled (degradation of accuracy, suspension
of radio wave transmission, etc.) at the discretion of
the U.S. Department of Defense.
ˎ Note that radio waves may not be received or it may
be difficult to receive radio waves in the following
conditions, since GPS uses radio waves from a
satellite.

261
GPS Function
Continued
Example: Displaying a map of your current location
1 From the Menu, select [LifeKit]

262
GPS Function
Basic Service and Additional Service
There are the basic services and additional
services for this software.
Basic service : Services provided by
DoCoMo for free of
charge.
Additional service : Services provided by
ZENRIN DataCom that
require an additional
charge.
You can use the additional services except
the traffic information up to 90 days after you
activate the software for the first time.
After 90 days, if you wish to keep using the
additional services, you need to apply for a
membership (paid) to “
263
GPS Function
264
GPS Function
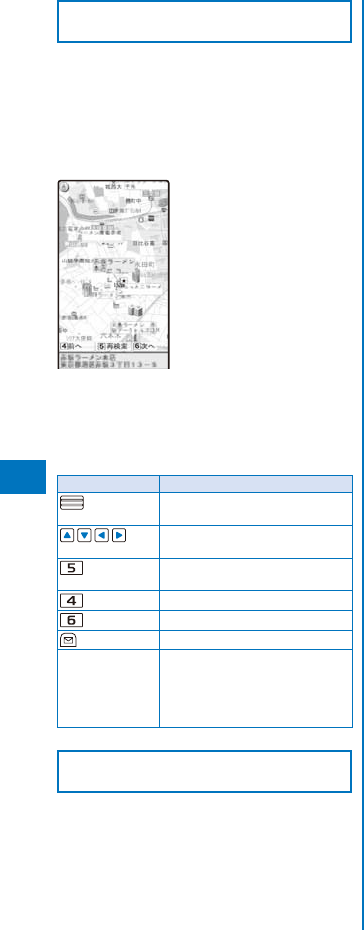
Display and Operations of the Search
Result of Neighboring Information
ˎ It explains only for the display and operations of the
search result displayed on the map, and it does not
apply for the display and operations selected from
the list.
ˎ The display shown is an image for explanatory
purpose and may be different from the actual
display.
Search result display of neighboring information
©ZENRIN DataCom CO.,LTD. 2007
Key operations while displaying the search result
display of neighboring information
ˎ When the cursor does not point at searched
information such as a store, the quick menu is
displayed.
Key operation Action
Check the detailed information on
the search result.
Move the map horizontally or
vertically.
Search again based on the
displayed map to be center.
Show the previous search result.
Show the next search result.

265
GPS Function
5 Select [

266
GPS Function
Key operations while displaying the quick access menu
Key operation Action

267
GPS Function
When the settings for using each service is set to “

268
GPS Function
Operations When the Period to Permit for
Providing Location Information is Set
Example: When the current date and time is “2008/2/23
14:00”
Starting time: 15:00 Ending time: 22:00
Settings Period for providing location
information
Repeat
type Valid period
None
specified
269
GPS Function
Starting time: 15:00 Ending time: 10:00
Settings Period for providing location
information
Repeat
type Valid period
None
specified
270
GPS Function
Setting the User-defined Host
271
GPS Function
2 Select [Loc. service client]

272
GPS Function
5 Select [Phone number]
273
GPS Function
Using the Location Information
from Each Function
You can display a map based on the location
information added to the Phonebook, sites,
screen memos, ToruCa cards, Message R/F,
or images. You can also paste the location
information URL to mail.
Adding the Location Information
You can add the location information to an
image or the FOMA terminal phonebook or
paste the location information URL in the main
body of mail.
Example: Adding the location information to the mail
main body by obtaining it by the Position
location
1 Press (Func) in the mail main body
input display, select [Rcv loc. info], and
press .

274
GPS Function
To save the location information in the Phonebook
Select [Add to phonebook]

275
Full Browser
Displaying a Website Designed for PC ..................................................................... 276
Key Operations While Viewing a Website .................................................................. 276
Managing a Bookmark.............................................................................................. 281
Setting the Full Browser Functions ........................................................................... 282

276
Full Browser
Displaying a Website
Designed for PC
You can view websites designed for PC on the
FOMA terminal using Full Browser.
ˎ Some websites may not be displayed at all or
displayed incorrectly.
ˎ Note that the communication charge could be
expensive if you exchange large volumes of data
such as viewing websites that contain a lot of
images or downloading files. For details on the
packet communication charge, see the “Mobile
Phone User’s Guide
277
Full Browser
Continued
Operating method
Operation Key operation
Move the pointer
278
Full Browser
Item Operation
Connect to
another site
Select [Bookmark]
279
Full Browser
Displaying Using the URL
History
Up to 50 websites that have been displayed
by entering their URLs are saved in the URL
history. The sites can be directly accessed
from the URL history.
ˎ If a total of 50 URLs is saved in the URL history, the
URL is overwritten from the oldest.
1 From the Full Browser menu, select [Go
to location]
280
Full Browser
Changing the Display
You can set whether to display the guide
display in the display.
1 Press (Func) in the Full Browser
display.
The Function menu appears.
2 Select [Full scrn/normal] and press .
The Full scrn/normal is set.
Displaying a SSL-/TLS-
Compatible Page
You can display a SSL-/TLS-compatible page
whose URL begins with “https://” using Full
Browser.
ˎ SSL/TLS is a method to perform data communication
safely using the authentication/cryptograph
technology.
281
Full Browser
Searching a Character String in
a Page
1 Press (Func) in the Full Browser
display, select [Search], and press .
2 Enter a keyword to be searched at [Search
text].
Enter a keyword within 25 full-width or 50 half-width
characters.
3 Select [ON]/[OFF] at [Match full].
4 Select [ON]/[OFF] at [Case sensitivity].
5 Press (OK).
The searched word is displayed in reverse video.
To display the previous/next search result
Press (Back)/ (Next).
Uploading an Image
You can upload an image saved in the Data
Box or microSD memory card to a website
which allows you to upload an image.
ˎ The way of uploading an image varies depending
on a website.
1 Select the “select” key in the Full Browser
display and press .
2 Select an image in My picture of the Data
Box or microSD memory card.
ˎ The following image can be uploaded.
Category File format File size Image
size
My picture GIF/JPEG
Max. 80K bytes
282
Full Browser
Editing a Bookmark
You can change the title of a bookmark or URL.
1 From the Full Browser menu, select
[Bookmark]

283
Full Browser
Setting JavaScript to Be Valid/
Invalid
JavaScript is a programming language
used on a website to create a website with
movement.
When JavaScript is used at the website, you
can set whether to execute the program.
ˎ Some websites may not be displayed correctly
when you set JavaScript to be invalid.
1 From the Full Browser menu, select [Full
Browser setting]

284
Full Browser
Setting Whether to Open a New
Window Automatically
You can set whether to open a website in a
new window automatically when JavaScript of
a website requests to open a new window.
1 From the Full Browser menu, select [Full
Browser setting]

285
Data Display/Edit/
Management
286
Data Display/Edit/Management
Displaying the Saved
Image <My picture>
You can display images saved in My picture of
the Data Box or microSD memory card.
1 Press ( ) in the stand-by display,
select [My picture], and press .
My picture folder list appears.
2 Select a folder and press .
287
Data Display/Edit/Management
Continued
To display the previous/next image
Use to display the previous image and to
display the next image.
To change the display size of a JPEG or GIF image
Press (True img/Std./Enlarge/Shrink). Press
(True img) to display the image in the true
size. However, when the image size is set
to [sQCIF(128
288
Data Display/Edit/Management
To change the Effect
While pausing, from the Function menu, select
[](Effect)
289
Data Display/Edit/Management
6 Press (Save), select [Overwrite], and
press .
The image with the stamp is saved by overwriting
the original image.
To save as a new image
Select [Save new]
290
Data Display/Edit/Management
5 Press (Save), select [Overwrite], and
press .
The trimmed image is saved by overwriting the
original image.
To save as a new image
Select [Save new]
291
Data Display/Edit/Management
ˎ You cannot store a file that contains an image larger
than 100K bytes and an image that is prohibited
from being retrieved out of the FOMA terminal.
1 Press (Func) in the file list of My
picture.
The Function menu appears.
2 Select [Store in Center] and press .
The Security code screen appears.
3 Enter the Security code and press .
The Select&save display appears.
4 Select an image and press .
ˎ To store several images, repeat step 4.
5 Press (Complete).
The screen for confirming whether to store the
image appears.
6 Select [Yes] and press .
The call is connected to the Data Security Service
Center and the image is stored. When the storing is
completed, the storing result display appears.
Playing Back Movie/
i-motion <i-motion>
You can play back movie/i-motion that is saved
in i-motion of the Data Box or microSD memory
card.
1 Press ( ) in the stand-by display,
select [i-motion], and press .
The i-motion folder list appears.
To play back data from the last stopped position
Select [Resume play].
To play back a playlist
Select the [Playlist] folder, move the cursor to
a playlist, and press (Play). When you play
back a movie/i-motion in the playlist, select the
[Playlist] folder
292
Data Display/Edit/Management
To play back movie in a folder repeatedly
From the Function menu, select [Continuous
play]. The files displayed in the list are played
back sequentially. To stop the playback, press
(Stop).
To display the saved date/time
Press to switch the display temporarily
between the management title and saved date/
time.
3 Select a movie/i-motion and press .
The selected movie/i-motion appears.
When the screen informing to make enough space
appears
Select [Yes].
To change the display quality
Press . By pressing , you can switch the
display quality between Normal/Sharp/Dynamic.
ˎ The following icons show the display quality.
Normal
Sharp
Dynamic
To hide the icons and guide display
Press (Display). When you press (Display),
you can switch the display between standard/
simple or turn it off.
To display the previous/next movie/i-motion
Use to display the previous movie/i-motion
and to display the next movie/i-motion.
To change the display size
Press (True img/Std./Enlarge). When the
image size is set to [QVGA(320
293
Data Display/Edit/Management
294
Data Display/Edit/Management
3 Select a playlist to be saved and press
.
The screen for selecting the saving method
appears.
[Add]:
Newly add selected movie/i-motion to the movie/
i-motion saved in a playlist.
[Overwrite]:
The screen for confirming whether to overwrite all
movies/i-motion saved in a playlist with selected
movies/i-motion appears. Note that all data
existing in the playlist is deleted when you select
[Yes].
4 Select [Add] and press .
The selected movie/i-motion is saved in the playlist.
Deleting/Reordering Movies/
i-motion of the Playlist
You can delete movies/i-motion from a playlist
or reorder them within a playlist. Even if you
delete movies/i-motion from a playlist, the files
of the movies/i-motion are not deleted.
Example: Deleting one movie/i-motion
1 From the i-motion folder list, select
[Playlist]

295
Data Display/Edit/Management
2 Select [Edit movie]

296
Data Display/Edit/Management
2 Select [Edit movie]

297
Data Display/Edit/Management
To set an image for stand-by or other displays
From the Function menu, select [ ] (Display
set)

298
Data Display/Edit/Management
To display the detailed information of a movie
From the Function menu, select [ ] (File)
299
Data Display/Edit/Management
300
Data Display/Edit/Management
ˎ The following icons show the type of music data
and playback restrictions.
Ty p e
Icon Type
/Original playlist, WMA playlist, and
imported playlist
Chaku-Uta Full®
Chaku-Uta Full® downloaded partway
3GPP
WMA
ˎ File restriction is set for Chaku-Uta Full® and
“” appears on the upper right of the icon.
Playback restrictions
Icon Playback restrictions
Music data with playback restrictions
Music data whose time limit on
playback has expired
Uta-hodai
Uta-hodai whose time limit on playback
has expired
To play back music data in a folder
Select a folder and press .
To switch between the jacket display and list display
From the Function menu, select [Change
jackets].
To switch to the MUSIC Player
From the Function menu, select [Player mode].
To set a Chaku-Uta Full® for the ring tone
Move the cursor to a Chaku-Uta Full® from the
Function menu, select [Sound setting]
301
Data Display/Edit/Management
ˎ The following icons show the type of the melody.
Icon Type
Melody
3D sound-compatible melody
ˎ “ ” appears on the upper right of the icon for
melodies prohibited from being retrieved out
of the FOMA terminal.
To play a melody that has specified playback range
Move the cursor to the melody and from the
Function menu, select [Play portion].
To attach to i-mode mail
Move the cursor to the melody and from the
Function menu, select [Attach to mail] (P.208).
To set a melody for the phone tone or other settings
Move the cursor to a melody and from the
Function menu, select [Sound setting]

302
Data Display/Edit/Management
3 Select a Kisekae tool and press .
303
Data Display/Edit/Management
ˎ Do not remove the microSD memory card during
data access (reading of data, saving data, etc.).
Doing so may cause malfunction, etc.
ˎ During preparation for access after insertion of the
microSD memory card (the time before the first
reading/writing operation is ready), “ ” flashes. If
“” keeps flashing, remove the microSD memory
card and then insert it again. If the icon still keeps
flashing, please check conditions of the microSD
memory card.
ˎ Do not stick a label, etc. on the microSD memory
card. It may be removed when inserting/removing
the microSD memory card, resulting in malfunction,
etc. of the FOMA terminal.
ˎ When you save data in a microSD memory card, it is
recommended to make a backup copy of the saved
data and keep it separately in a safe place. Under
no condition will DoCoMo be held liable for any loss
or modification of the data.
The microSD memory card formatted on a PC or other
devices cannot be used on the FOMA terminal. Be
sure to use the microSD memory card after formatting
it using the FOMA terminal (P.309).
Inserting and Removing the
microSD memory card

304
Data Display/Edit/Management
Displaying Data on the
microSD memory card
Data saved in the microSD memory card can
be displayed and checked.
1 From the Menu, select [LifeKit]
Data Display/Edit/Management
305
Folder Setup of the microSD memory card
When Displaying the Folders on the FOMA Terminal
Data Display/Edit/Management
306
When Displaying the Folders on a PC
When you save data of the FOMA terminal to the microSD memory card, a corresponding folder is
created automatically.
ˎ The maximum number of files that can be saved is an estimated number, assuming the blank memory is used.
Category FOMA terminal folder File format FOMA terminal filename
Estimated max.
number of files to
be saved (64MB)
DCIM
307
Data Display/Edit/Management
Data That Can Be Written/Read to
and from the microSD memory card
ˎ It may take time to save data depending on the data
size.
ˎ Data saved from the microSD memory card may not
be displayed/played back properly.
ˎ You cannot copy/move a file prohibited from being
retrieved out of the FOMA terminal.
Category
Data you can/cannot
save from the FOMA
terminal
Data you cannot save from
the FOMA terminal and
other information
One
file
Selected
files
All
files
My
picture

308
Data Display/Edit/Management
Saving Data from the FOMA Terminal
to the microSD memory card
You can copy data from the FOMA terminal to
the microSD memory card.
ˎ While you save the Phonebook, Text memo,
Schedule, mail, Bookmark, and ToruCa card data,
the status of the FOMA terminal is the same as the
outside of the service area status. Therefore, you
cannot use call or communication functions, such as
placing/receiving a call and using i-mode and data
communication.
Example: Saving data
1 Select data and press (Func).
The Function menu appears.
2 Select [Save to microSD]
309
Data Display/Edit/Management
5 Select [Add] and press .
The selected data is saved.
Saving a Melody and Image
You can save My picture, i-motion, Melody,
My document, and MM File data to the FOMA
terminal.
Example: Saving data
1 From the microSD category list, select a
category and press .
2 Select data and press (Func).
The Function menu appears.
3 Select [Save to main]
310
Data Display/Edit/Management
2 Select [microSD info] and press .

311
Data Display/Edit/Management
[microSD mode]:
Read and write data from/to the microSD memory
card.
[MTP mode]:
Transfer music data (WMA file) from a PC to the
microSD memory card.
2 Select [microSD mode] and press .
The microSD mode is set and “ ” changes to “ ”.
On the PC, “

312
Data Display/Edit/Management
2 Move the pointer to [USB

313
Data Display/Edit/Management
Copying Data from the
UIM to the FOMA Terminal
You can copy UIM (FOMA card) phonebook
data and SMS from the UIM to the FOMA
terminal.
ˎ The reading of the UIM phonebook is converted
from full-width katakana characters to half-width
katakana characters.
ˎ If a group with the same name exists in the FOMA
terminal phonebook, data is saved in it and if not,
data is saved in
314
Data Display/Edit/Management
Category Folder name Contents of data
i-motion i-mode Movie obtained from
a site, i-mode mail, or
i-
315
Data Display/Edit/Management
3 Select [Preinstall] and press .

316
Data Display/Edit/Management
To delete a folder
Move the cursor to the folder and from the
Function menu, select [Edit folder]
317
Data Display/Edit/Management
318
Data Display/Edit/Management
Setting How to Display a List of
Images
You can select the display style of My picture,
i-motion, Music&Video Channel, and Kisekae
Tool file lists using the following three methods.
The set display style is applied to all folders.
6 images 20 images List only
319
Data Display/Edit/Management
Continued
2 Press (Edit).

Data Display/Edit/Management
320
Data Display/Edit/Management
321
Display item
My picture
Chaku-
Uta
Full®
Music&Video Channel
Movie/
i-motion
Melody
My
document
Chara-
den
Kisekae
Tool
Description
JPEG
GIF SWF
Program
Chapter
(Chaku-
Uta Full®)
Chapter
(Movie/
i-motion)
Move to
microSD

322
Data Display/Edit/Management
Checking the Memory of the
FOMA Terminal
<Storage information>
You can display the memory use status of the
FOMA terminal. You can also check the volume
used up by the category-specific Data Box
and i-
323
Data Display/Edit/Management
4 Press (Delete), select [Yes], and press
.
The selected software is deleted and then
downloading starts.
Data Display/Edit/Management
324
Data That Can Be Sent/Received via Infrared Communication
You can send and receive your Own number, Phonebook, Schedule, Text memo, Bookmark, mail,
image, movie, melody, PDF data, and ToruCa card between mobile phones and other devices
equipped with the infrared communication function.
ˎ It may take time to exchange or save data depending on the data size.
ˎ Data received using the infrared communication may not be displayed/played back properly.
Type of data
Reception
Transmission
Storage for received
data Items that cannot be sent/received, etc.
One
item
All
items
One
item
All
items
Own number
325
Data Display/Edit/Management
Receiving Data Using the Infrared
Communication
<Receive Ir data>
Receiving Data
1 From the Menu, select [LifeKit]
326
Data Display/Edit/Management
Sending All Data
ˎ It is necessary that you and the receiver determine
the 4-digit authentication password beforehand.
1 Press (Func) in the folder list of data
to be sent.
The Function menu appears.
2 Select [Send all Ir data] and press .
“” changes to “ ” and the Security code
screen appears.
To send all entries in the Phonebook/Text Memo
From the Function menu in the list of data, select
[Send Ir data]

327
Data Display/Edit/Management
Using the Infrared Remote
Control
Once infrared remote control software is
downloaded from a site and saved in the
FOMA terminal, the FOMA terminal can be
used as the TV or DVD player remote control.
ˎ To use the infrared remote control, it is necessary to
download the software corresponding to the target
equipment. Even if the corresponding software is
used, some equipment may not be operated.
ˎ The infrared remote control key operations vary
depending on the software.
328
Data Display/Edit/Management
Receiving Data Using iC
Communication
Receiving Data
1 Place the FeliCa mark “ ” of the FOMA
terminal over that of the other terminal in
the stand-by display on both terminals.
The vibrator vibrates and the FeliCa Sign lights.
“” changes to “ ” and data exchange is
started.
The screen for confirming whether to save data
appears.
2 Select [Yes] and press .
The received data is saved.
When you receive Phonebook data
The screen for confirming whether to save data
in the PushTalk phonebook appears. If you select
[Yes], the data is saved in both the PushTalk
and FOMA terminal phonebooks. If you select
[No], the data is saved in the FOMA terminal
phonebook only. When there are several phone
numbers, select the phone number to be saved
in the PushTalk phonebook.
Receiving All Data
ˎ It is necessary that you and the sender determine
the 4-digit authentication password beforehand.
Example: Adding received data
1 Place the FeliCa mark “ ” of the FOMA
terminal over that of the other terminal in
the stand-by display on both terminals.
The vibrator vibrates and the FeliCa Sign lights.
“” changes to “ ”.
329
Data Display/Edit/Management
Sending All Data
ˎ It is necessary that you and the receiver determine
the 4-digit authentication password beforehand.
1 Press (Func) in the folder list of data
to be sent.
The Function menu appears.
2 Select [iC trans.(all)] and press .
“” changes to “ ” and the Security code
screen appears.
To send all entries in the Phonebook/Text Memo
From the Function menu in the list of data, select
[iC transmission]
330
Data Display/Edit/Management
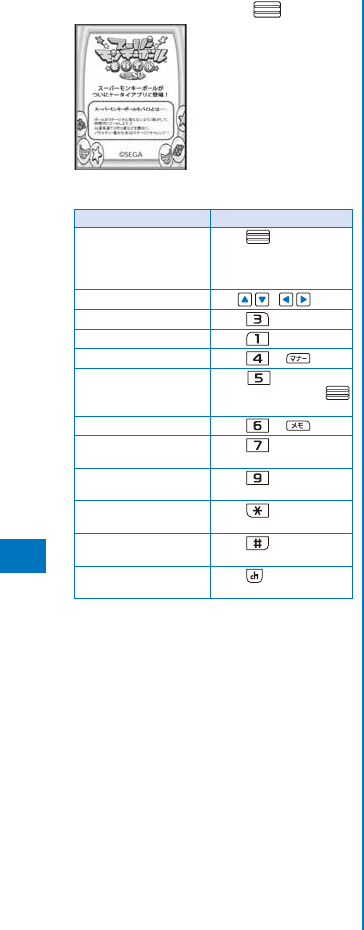
3 Select PDF data and press .
©SEGA
Operating method
Operation Key operation
Display the data in
original size or by
adjusting the page
width to the display size
Press (Fit/Tr img).
Scroll Use / .
Zoom in Press .
Zoom out Press .
Move to previous page Press or .
Move to the specified
page
Press , enter a page
number, and press
(OK).
Move to next page Press or .
Rotate counterclockwise
by 90 degrees
Press .
Rotate clockwise by 90
degrees
Press .
Turn on/off the Ratio/
Page No.
Press .
Turn on/off the scrollbar
display
Press .
Display the list of key
operations
Press (Help).
To change the page layout
From the Function menu, select [Page layout]
331
Data Display/Edit/Management
Searching a Character String of
PDF Data
1 Press (Search) in the PDF data display.
332
Data Display/Edit/Management
Displaying the i Bookmark/Mark List
Example: Displaying the i bookmark list
1 Press (Func) in the PDF data display.
The Function menu appears.
2 Select [Bookmark]

333
What is Music&Video Channel? ............................................................................... 334
Setting a Program ..................................................................................................... 334
Playing Back a Program ........................................................................................... 336
Playing Back a Program from the Data Box ............................................................. 338

334
Music&Video Channel/Music Playback
What is Music&Video
Channel?
Music&Video Channel is a service that a music
program of up to one hour is automatically
distributed during the night only by setting
your favorite channel in advance. You can also
enjoy high-quality movie programs up to 30
minutes. Programs are updated regularly and
you can enjoy the distributed program anytime
such as during commuting time to work or
school.
335
Music&Video Channel/Music Playback
Checking/Canceling a Set
Program
1 From the Music&Video Channel menu,
select [Set program] and press .
2 Operate as instructed on the display.
You can check or cancel a set program. For more
details, see the “Mobile Phone User’s Guide

336
Music&Video Channel/Music Playback
Playing Back a Program
1 From the Menu, select [MUSIC]

337
Music&Video Channel/Music Playback
338
Music&Video Channel/Music Playback
3 Select a folder and press (Complete).
339
Music&Video Channel/Music Playback

340
Music&Video Channel/Music Playback
Directly Copying Music Data to
the FOMA Terminal on a PC
The microSD memory card can be used as an
external drive of a PC by connecting the FOMA
terminal to the PC, allowing you to read/write
data from/to the microSD memory card.
With an AAC file (.3gp), you can play it back
on the MUSIC Player also by saving it directly
in the microSD memory card without using
Windows Media Player.
ˎ Music data that is saved in the microSD memory
card without using Windows Media Player may not
be played back properly on SO905iCS.
ˎ Do not delete music data that is saved in the
microSD memory card using Windows Media Player
by performing the direct operation of the microSD
memory card.
ˎ For details on the folder setup of the microSD
memory card, see P.305.
1 Change the USB mode setting of the
FOMA terminal to [microSD mode].
ˎ To change the USB mode setting, see “Using the
FOMA Terminal with a PC” (P.310, step 1 to 3).
2 Connect the FOMA terminal and PC
using the FOMA USB Cable with Charge
Function 01 (optional).
3 Double-click [

341
Music&Video Channel/Music Playback
Playing Back Music Data
You can use the MUSIC Player to play back
music data saved in MUSIC of the Data Box
and microSD memory card.
You can also search a song you want to listen
to easily by specifying an artist, album, genre,
etc. in the Music menu.
ˎ While music data in the MUSIC Player is updated,
“” appears. If another function is activated,
updating the data may take time. The MUSIC Player
operation may be slower while the data is being
updated. While the data is updated, all tracks may
not be displayed. After the update is completed, re-
display the Music menu.
ˎ It may take time to start playback of some music
data.
ˎ Jacket images may not be displayed depending on
music data.
ˎ Sound skip or noise may occur depending on the
format and bit rate of music data.
ˎ When the battery level is low, you may not be
able to operate the MUSIC Player. If the battery
level becomes low during playback, the player is
stopped. Fully charge the battery before using this
function.
ˎ Do not insert/remove the microSD memory card into/
from the FOMA terminal while you are playing back
music data on the MUSIC Player. The playback is
interrupted.
ˎ If you receive a voice, videophone, or PushTalk call
or mail, or the Alarm/Schedule alarm is activated
while you are playing back music data on the
MUSIC Player, the playback is interrupted and
one of the above operations is performed. After
the operation is completed, when you return to the
MUSIC Player, the playback resumes automatically,
however, with some exceptions.
ˎ If you save a Chaku-Uta Full® or display the music
folder while you are playing back music data on the
MUSIC Player, the MUSIC Player is terminated.
ˎ It may take time to display a music data list
depending on music data.
Example: Playing back music data by selecting the
artist
1 From the Menu, select [MUSIC]

342
Music&Video Channel/Music Playback
[Top50]:
Display up to 50 tracks in the order of the
number of the playback times, from the highest
to the lowest. Select the music data.
[Recent 50]:
Display up to 50 tracks in the order of the
playback date/time, from the most recent to the
oldest. Select the music data.
[Saved areas]:
Select a place to save to and select the music
data.
[Music settings]:
Display the menu of the Music settings.
2 Select [Artists] and press .
The artist list appears.
3 Select an artist

343
Music&Video Channel/Music Playback
Playback Restrictions of Music
Data
Some music data is set the playback
restrictions. When you play back music
data with playback restrictions, the different
confirmation screen may appear depending on
a type of music data.

344
Music&Video Channel/Music Playback
Managing the Playlist
There are three types of playlists that can be
played back using the FOMA terminal.
Original playlist
The playlist is created on the FOMA terminal. You can
create or edit up to 20 playlists and save up to 50
tracks of music data per file.
WMA playlist/Imported playlist
The playlist is created on an external device such as a
PC. You can display up to 100 playlists. A WMA playlist
or imported playlist can display up to 500 tracks or 200
tracks of music data per file, respectively. You cannot
create/edit these playlists on the FOMA terminal.
You can create a WMA playlist using Windows
Media Player 10/11. You use an imported playlist by
transferring a playlist file in the M3U format created by
a PC, etc. to the microSD memory card.
Creating a Playlist
You can save your favorite music data in an
original playlist.
Example: Adding and saving one track of music data
in an original playlist
1 From the music data list, select music
data and press (Func).
The Function menu appears.
2 Select [Add to playlist]

345
Music&Video Channel/Music Playback
To delete several music data
From the Function menu, select [Delete from
list]

346
Music&Video Channel/Music Playback
3 Select the repeat type at [Repeat].
[All tracks]:
Repeat playback of all tracks in the selected
music data list.
[1 track]:
Repeat playback of the selected track.
[OFF]:
Play back only once.
4 Select whether to restrict the playback
volume at [AVLS].
[ON]:
Restrict the playback volume. You cannot turn up
the volume to level 16 or higher.
[OFF]:
Do not restrict the playback volume.
To reset the music settings to the default status
From the Music settings display, select [Reset
settings]

347
Other Convenient
Functions
Multiaccess Feature ............................................................................ <Multiaccess> 348
Multitask Feature ..................................................................................... <Multitask> 349
Displaying the Edit Display by Sliding the FOMA Terminal .............<Edit slide setting> 350
Using the Lifetime Calendar ........................................................ <Lifetime Calendar> 351
Posting on a Blog...................................................................................................... 354
Starting the Alarm at a Specified Time ........................................................ <Alarm> 356
Saving Schedules ................................................................................... <Schedule> 359
Performing Frequently Used Functions Quickly ..................................<My Selection> 364
Recording Recipient’s or Your Own Voice ........................................... <Voice memo> 365
Checking the Call Duration and Charge ...................................... <Call duration/cost> 365
Setting the Limit for Alert on the Total Call Charge ........................ <Cost limit notice> 367
Using the Calculator .............................................................................. <Calculator> 368
Using a Memo ...................................................................................... <Text Memo> 368
Displaying the Settings of Various Functions ........................................ <Application> 369
Using the Earphone/Microphone with Switch ....... <Earphone/microphone with switch> 370
Receiving a Call Automatically with Earphone ......................... <Auto answer setting> 371
Setting Which Mic to Use......................................................... <Headset microphone> 372
Setting the JOG ..................................................................................... <Jog setting> 372
Resetting to the Default Settings ......................................................<Reset settings> 372
Deleting All Saved Data ..............................................................<Reset all data&set> 373
List of Reset Items ................................................................................................... 374
348
Other Convenient Functions
Multiaccess Feature
<Multiaccess>
Multiaccess is a function that enables you to
use a voice call, packet communication, and
SMS functions at the same time.
ˎ For multiaccess combinations, see P.431.
Voice call 1 line
i-mode, i-
349
Other Convenient Functions
Continued
Receiving a Voice Call during i-mode/
Packet Communication
1 When you receive a call, press .
When you receive a voice call, the receive call
display appears.
You can answer a voice call while you continue to
use i-mode or packet communication.
To switch the display during a call
Press (MENU) and select a task icon.
Multitask Feature <Multitask>
Multitask is a function that enables you to
perform several functions at the same time,
each of which you can access by switching the
displays.
ˎ For multitask combinations, see P.433.
Using the Display during the
Multitask Operation
/ / : One/two/three or more
tasks are being executed.
( changes to while
playback is in progress on the
MUSIC Player)
TASK MENU
Press (MENU) to display
the TASK MENU.
350
Other Convenient Functions
Activating a New Function
1 Press (MENU) during the activation of
a function.
2 Press (New TASK).
3 From the Menu, select a new function and
press .
Switching Functions
While running multiple functions, you can
switch to the display that provides access to
the function you want to use.
1 Press (MENU).
Function name
The cursor moves to a task
icon on the TASK MENU.
2 Use to select a task icon and press
.
The selected function display appears.
Stopping All Functions
Currently Activated
1 Press (MENU).
2 Press (Quit all).
3 Select [Yes] and press .
All functions currently activated are stopped.

351
Other Convenient Functions
2 Select [Quote replay]/[Replay] at [Inbox].
[Quote replay]:
Quote the main body.
[Replay]:
Do not quote the main body.
[OFF]:
Do not display the Edit mail display.
ˎ Even if you select [Quote replay], the Replay
is applied when the Quote replay cannot be
performed. Also, even if you select [Replay],
the Quote replay is applied when the Replay
cannot be performed.
To edit a send mail
Select [ON]/[OFF] at [Outbox].
To edit a saved mail
Select [ON]/[OFF] at [Draft].
To edit a schedule
Select [ON]/[OFF] at [Schedule].
To edit a text memo
Select [ON]/[OFF] at [Text Memo].
Using the Lifetime Calendar
<Lifetime Calendar>
The Lifetime Calendar displays an image, mail,
Schedule, and birthday data stored in the
FOMA terminal in the Calendar format. This
function helps you more effectively to keep
track of items to remember.
You can also automatically display the items
to remember, and display mail, Schedule, etc.
from the Lifetime Calendar.
1 From the Menu, select [LifeKit]
352
Other Convenient Functions
To display the index
Press (Index). When you select a year and
month, the Lifetime Calendar for the selected
year and month appears.
To create a new schedule
From the Function menu, select [Create new]
and save the schedule.
To display the Lifetime Calendar by specifying a
date
From the Function menu, select [Select date] and
enter the date. Enter the date within the range
from 2000/01/01 to 2050/12/31.
To update the displayed data
From the Function menu, select [Data update].
2 Select the date and press .
The Lifetime Calendar appears displaying one year
including the selected day (Detail view).

353
Other Convenient Functions
Data Displayed in the Lifetime Calendar
The following data is displayed in the Lifetime
Calendar.
- JPEG and GIF images saved in My picture of the
Data Box
- Received and sent mail saved in the FOMA terminal,
or images attached to SMS and received/sent mail
354
Other Convenient Functions
[Memory auto display]:
Set the time before the item to remember is
automatically displayed when a key is not
operated for a specific period.
[Security data display]:
Set whether to display a folder which is set the
Mail security or Data security. If you set [Display],
you need to enter the Security code when you
display the Lifetime Calendar.
To display the Help of the LTC setting
Press (Help).
3 Select [Display setting] and press .
The Display setting display appears.
[Photo]:
Set the display of the still image to [All]/
[Selected]/[Selected off]/[OFF]. To or not to
display still images saved in a specific folder
only, select [Selected]/[Selected off]

355
Other Convenient Functions
2 Press (Func), select [Added], and
press .
The service setting display appears.
To edit a blog service
Move the cursor to a blog service and from the
Function menu, select [Edit].
ˎ When you set an easy BlogUp service
information file, you can edit the service name
and service details.
To delete a blog service
Move the cursor to a blog service and from the
Function menu, select [Delete one]

356
Other Convenient Functions
4 From the Data Box, select a category

357
Other Convenient Functions
3 Select an alarm to be set and press .
358
Other Convenient Functions
[OFF]:
Do not set the vibrator.
To check the vibration
Move the cursor to the pattern and press
(Confirm).
11
Select an indicator color at [Color].
Select from 12 indicator colors or [C13:ALL]
(indicator flashes in 12 colors in sequence).
When you move the cursor, the indicator flashes
accordingly.
12
Select [ON]/[OFF] at [Snooze].
[ON]:
The alarm operates for about one minute and
repeats operation up to six times every five
minutes.
[OFF]:
Do not repeat the alarm operation.
13
Press (Complete).
The Alarm is set and “ ” appears in the stand-by
display.

359
Other Convenient Functions
Saving Schedules <Schedule>
Up to 300 schedules, such as date and events/
appointments can be saved for management.
When a Schedule alarm is set, the FOMA
terminal activates the alarm at the scheduled
time.
ˎ An entry is required at [ ] (Event).
1 From the Menu, select [LifeKit]
360
Other Convenient Functions
13
Press (Complete).
The schedule is saved. When the Alarm is set to
[ON], “ ” appears in the stand-by display.
The schedule dates are highlighted on the calendar.

361
Other Convenient Functions
2 Select [Schedule setting]
362
Other Convenient Functions
Displaying the Schedule
The saved schedule can be checked using the
calendar.
1 From the Menu, select [LifeKit]
363
Other Convenient Functions
Example: Deleting a schedule
1 From the Menu, select [LifeKit]
364
Other Convenient Functions
Checking the Number of
Schedules Saved
The number of schedules saved can be
checked as well as the number of schedules
still available to be saved or saved as Secret.
1 Press (Func) in the calendar.
The Function menu appears.
2 Select [Memory status] and press .
365
Other Convenient Functions
Recording Recipient’s or
Your Own Voice <Voice memo>
Your own voice during stand-by and the
recipient’s voice during a voice call can be
recorded.
Up to three voice memos of up to about 15
seconds each can be recorded.
ˎ When you record a voice memo during a call in
addition to the already recorded three voice memos,
the oldest memo is automatically overwritten by the
new one. When you record a voice memo during
stand-by, the screen for confirming whether to
overwrite the oldest voice memo appears.
ˎ For information on playing back and deleting the
voice memo, see P.74.
Recording Your Own Voice
during Stand-by
1 Press in the stand-by display, select
[Rec voice memo]
366
Other Convenient Functions
2 Select the item and press .

367
Other Convenient Functions
Setting the Limit for Alert on the
Total Call Charge
<Cost limit notice>
You can set an upper limit amount of call
charges to alert yourself with an icon or alarm
tone when the total call charge exceeds this
limit value.
1 From the Menu, select [Settings]

368
Other Convenient Functions
Using the Calculator
<Calculator>
You can use the FOMA terminal to perform the
four basic operations of arithmetic (

369
Other Convenient Functions
Displaying a Memo
The contents of a saved memo can be
checked.
1 From the Menu, select [LifeKit]

370
Other Convenient Functions
1 From the Menu, select [Settings]
371
Other Convenient Functions

372
Other Convenient Functions
Setting Which Mic to Use
<Headset microphone>
You can set to use a microphone during a call
when the Flat-plug Earphone/Microphone with
Switch (optional), etc. is connected.
1 From the Menu, select [Settings]

373
Other Convenient Functions
Deleting All Saved Data
<Reset all data&set>
You can delete saved data and reset the
settings of each function to the default settings.
For the functions to be reset by the Reset all
data&set, see the list of reset items (P.374) and
the list of menus (P.416).
ˎ The following data is not deleted.
- Preinstalled data in My picture, MUSIC, i-motion,
Melody, My document, some Kisekae tools, and
Chara-den of the Data Box
(The [

Other Convenient Functions
374
List of Reset Items
The items in which settings, that are made through the associated Function menus, etc., are reset
by executing the Reset settings or Reset all data&set are as follows. For functions that can be
accessed through the menu display, see the list of menus (P.416).

Other Convenient Functions
375
Menu Default setting Reset
settings
Reset all
data&set Page
Camera Auto orientation ON
377
Character Entry
About Entering Text ................................................................................................. 378
Entering Text ............................................................................................................ 379
Entering Common Phrases ..................................................................................... 381
Entering Pictographs/Symbols ................................................................................ 382
Editing/Saving Common Phrases .......................................... <Edit common phrases> 382
Quoting Data from the Phonebook, etc. .................................................................. 383
Cutting/Copying/Pasting Text ................................................................................... 383
Entering Text Using Kuten Codes .........................................................<Input kuten> 384
Saving the Frequently Used Kanji Words ................................ <Save prediction/user> 384
Restoring the Default Settings .............................................................. <Reset data> 385
Using the Downloaded Dictionary ........................................... <Download dictionary> 385
For kuten codes, see the “Kuten Code List” (PDF format) included in the supplied CD-ROM.
You need Adobe® Reader® (Version 6.0 or later is recommended) to read the “Kuten Code
List” (PDF format). If Adobe® Reader® is not installed on your PC, install it from the same CD-
ROM, which also contains the Adobe® Reader® software.
For details on using Adobe® Reader®, see the Help that is installed with the software.

378
Character Entry
About Entering Text
The overview of the text entry is described
here.
ˎ Characters including JIS level 1 and level 2, 6,355
kanji are available.
ˎ Some complicated kanji characters are abridged or
simplified in part.

379
Character Entry
Continued

380
Character Entry
Entering Text in the User
Conversion Mode
Example: Entering “

381
Character Entry
Setting the Movement Method for the
Cursor in the Matching Words List
You can select a movement method for the
cursor in the matching words list.
1 From the Menu, select [Settings]
382
Character Entry
Entering Pictographs/
Symbols
Pictographs and symbols, which displayed in
the order of number of entering in the Pict/Sym
ranking, you entered can be selected when
you enter characters.
For pictographs and symbols, see P.427, 428.
1 Press (Pict/Sym) in the text input
display.
Every time you press (Pict/Sym), the pictograph/
symbol mode changes in the order of [Ranking]
383
Character Entry
Quoting Data from the
Phonebook, etc.
You can quote data saved in the Phonebook or
Own number (My data) or characters scanned
by the bar code reader to enter in the main
body of mail or in the text input display while
displaying a site.
Example: Quoting from the Phonebook
1 Press (Func) in the text input display.
The Function menu appears.
2 Select [Quote phonebook] and press .
The Phonebook appears.
To quote the Own number
Select [Quote my data].
To quote texts using the bar code reader
Select [Bar code reader].
3 Select a name
384
Character Entry
Copying/Cutting Text
1 Press (Func) in the text input display.
The Function menu appears.
2 Select [Copy] and press .
To cut
Select [Cut].
3 Select the Start point and press .
The first character to be copied is set.
To select all characters
Press (Sel. all).
4 Select the End point and press .
The range of characters to be copied is set and
saved in the clipboard.
Pasting Text
1 Select the position to paste in the text
input display and press (Func).
The Function menu appears.
2 Select [Paste] and press .
The copied/cut text is pasted.
Entering Text Using Kuten
Codes <Input kuten>
You can enter characters, numbers and
symbols using corresponding 4-digit kuten
codes as listed in the Kuten code list.
ˎ For kuten codes, see the “Kuten Code List” (PDF
format) included in the supplied CD-ROM.
1 Press (Func) in the text input display.
The Function menu appears.
2 Select [Input kuten] and press .

385
Character Entry
3 Enter the reading in the reading field.
Enter a reading within 16 hiragana characters.
4 Enter the word in the word field.
Enter a word within 16 full-width or 32 half-width
characters.
5 Press (Complete).
The entered word is saved in the Prediction
dictionary.
Restoring the Default
Settings <Reset data>
The FOMA terminal’s dictionary has a data
learning feature. The data leaning feature
memorizes the frequency in which individual
words are used and give priority to the
frequently used words when displaying them
in the matching words list/conversion target
words.
If you reset the learning data, the order of
priority is reset to the default setting.
1 From the Menu, select [Settings]
386
Character Entry
Sorting the Downloaded
Dictionaries
When you download several dictionaries, you
can change the order of the dictionaries in
the list to display words of a frequently used
dictionary by priority.
1 Press (Func) in the Dictionary folder
display.
The Function menu appears.
2 Select [Reorder] and press .
3 Select a dictionary and press .
The Reorder display appears.
4 Select a position to move to and press
(Move).
5 Press (Complete).
The searching priority is set.
387
Network Services
Using the Voice Mail Service ................................................................................... 388
Using the Call Waiting Service ................................................................................ 389
Using the Call Forwarding Service .......................................................................... 389
Using the Nuisance Call Blocking Service ............................................................... 390
Using the Caller ID Display Request Service .......................................................... 391
Using the Dual Network Service .............................................................................. 391
Using the English Guidance Service ....................................................................... 391
Using the Service Numbers ..................................................................................... 392
Selecting an Operation for an Incoming Call during a Call ..............<Arrival Call Act> 392
Setting Remote Control ................................................................. <Remote Control> 393
Using the Multi Number Service .............................................................................. 393
Using 2in1 ................................................................................................................. 394
Using OFFICEED .................................................................................<OFFICEED> 398
Saving a New Service to Use It .......................<Additional service (USSD) registration> 398
Available Network Services
You can use the following DoCoMo network services on the FOMA terminal.
For details on the outline and how to use each service, see the relevant pages indicated in
the table below.
Service name
Application
Monthly
charge
Page Service name
Application
Monthly
charge
Page
The Voice Mail Service Required Paid
P. 3 8 8
The English Guidance Service
Not required
Free
P. 3 9 1
The Call Waiting Service Required Paid
P. 3 8 9
The Multi Number Service Required Paid
P. 3 9 3
The Call Forwarding Service
Required Free
P. 3 8 9
2in1 Required Paid
P. 3 9 4
The Nuisance Call Blocking Service Not required
Free
P. 3 9 0
OFFICEED Required Paid
P. 3 9 8
Notify Caller ID
Not required
Free P.45 Public mode (Drive mode)
Not required
Free P.69
The Caller ID Display Request Service
Not required
Free
P. 3 9 1
Public mode (Power off)
Not required
Free P.70
The Dual Network Service Required Paid
P. 3 9 1
Melody Call Required Paid
P. 1 1 5
ˎ You cannot use the network services when you are outside of the service area or in a location without the
radio wave.
ˎ For details, see the “Mobile Phone User’s Guide

388
Network Services
Using the Voice Mail Service
The Voice Mail Service takes messages for
you, as long as it answers a call with the
answering message, if there is an incoming
voice or videophone call when you are in a
location without the radio wave, while the
FOMA terminal is powered off, or when you are
in a situation where you cannot answer a call.
ˎ When the Voice Mail Service and Record Message
(P.72) are set simultaneously, and if you want to give
priority to the Voice Mail Service, set the ring time for
the Voice Mail Service shorter than the time before
starting the answering message for the Record
Message.
ˎ When the Voice Mail Service is set to “Activate”
and if you do not answer an incoming voice or
videophone call, the call is saved in the Received
record as a “Missed call” and the notification icon
“” (Missed call) appears in the stand-by display.
ˎ When the Call Forwarding Service is set to “Activate”,
the Voice Mail Service is automatically deactivated.

389
Network Services
Continued
Notes on the service for the videophone

390
Network Services
2 Set each item.
Menu item Operation
Activate

391
Network Services
Using the Caller ID Display
Request Service
When you receive a voice or videophone
call without a caller ID, the Caller ID Display
Request Service answers the call with a
guidance requesting the caller to send the
caller ID and then automatically disconnects
the call.
ˎ When there is an incoming call from the caller
who does not notify the phone number, the ring
tone does not sound. The call is not saved in the
Received record either.
ˎ When you receive a videophone call without a caller
ID, it is disconnected after playing back the caller
ID display request video guidance on the caller’s
phone.
ˎ When you receive a PushTalk call without a caller
ID, the caller ID display request guidance is not
played back on the caller’s phone and the call is
disconnected.
1 From the Menu, select [Settings]

392
Network Services
4 Select a language for the guidance played
during incoming calls and press .
[Japanese]:
Set the guidance to Japanese.
[Japanese+English]:
Set the guidance in the order of Japanese

393
Network Services
Setting Remote Control
<Remote Control>
You can set to be able to operate the Voice
Mail or Call Forwarding Service, etc. from a
general push-button telephone, public phone,
DoCoMo mobile phones, etc.
ˎ To use the Voice Mail or Call Forwarding Service
overseas, the Remote Control function must be set
in advance.
1 From the Menu, select [Settings]
394
Network Services
Item Description
Select an incoming image from My picture/
i-motion of the Data Box.
ˎ You can set the following files.
Category
File format
File size Image size
My
picture
GIF/
JPEG
Max. 250K
bytes
Max. [Stby
(480

395
Network Services
ˎ When you replace the UIM (From 2in1 subscriber
to 2in1 subscriber) while 2in1 is used, to obtain a
correct Number B, you need to perform the 2in1
function OFF (P.396) first, and then set the 2in1 to
ON again.
When you replace the UIM (From 2in1 subscriber to
2in1 non-subscriber), perform the 2in1 function OFF.
ˎ When placing a voice/videophone call or originating
64K data communication from an external device,
if 2in1 is set to either the A mode or Dual mode, it
is done by Number A. When the B mode is set, it is
done by Number B.
Setting 2in1
You can set the operations such as the Stand-by
display and Receive avoid. setting by setting
the ON for 2in1.
1 From the Menu, select [Settings]

396
Network Services
Menu
item Operation
Set call/
receive
No.
To identify the call placed or received using
Number B, set the font color and ring tone of
the incoming/receiving call display.
Network Services
397
Functions Available for Each Mode
The funcions which only differ from each mode are listed (the functions which are common with
the A mode are excluded).
Service A mode B mode Dual mode
Voice/
videophone
call
Call Number A Number B Selectable when placing a call

398
Network Services
399
PC Connection
About Data Communication ..................................................................................... 400
Before Using Data Communication .......................................................................... 401
Preparations and Flow of Data Communication ...................................................... 403
AT Commands ......................................................................................................... 403
About the Supplied CD-ROM .................................................................................. 403
Introduction of DoCoMo keitai datalink .................................................................... 404
For detailed information on Data Communication, see the “Manual for PC connection setting”
(PDF format) included in the supplied CD-ROM. You need Adobe® Reader® (Version 6.0
or later is recommended) to read the “Manual for PC connection setting” (PDF format). If
Adobe® Reader® is not installed on your PC, install it from the same CD-ROM, which also
contains the Adobe® Reader® software.
For details on using Adobe® Reader®, see the Help that is installed with the software.

400
PC Connection
About Data Communication
You can use the FOMA terminal for three types
of data communication, packet communication,
64K data communication, and data transfer.
ˎ The FOMA terminal does not support Remote
Wakeup.
ˎ The FOMA terminal does not support FAX
communication.
ˎ If you are going to connect the FOMA terminal to
DoCoMo’s “sigmarion
401
PC Connection
Continued
Setting a Host (Such as an Internet
Service Provider)
The host for packet communication is different
from the host for 64K data communication.
To use packet communication, use a packet
communication-compliant host; to use 64K
data communication, use a FOMA 64K data
communication-compliant host or ISDN
synchronous 64K-compliant host.
ˎ You cannot connect to a DoPa access point.
ˎ You cannot connect to a PHS 64K/32K data
communication access point such as PIAFS.
User Authentication for Network Access
User authentication (ID and password) may
be required when connecting to some hosts.
If user authentication is required, enter your ID
and password on the communication software
(dial-up network) for connecting to the host.
The Internet service provider or network
administrator of the host assigns an ID and
password. For details, contact your Internet
service provider or network administrator of the
host.
Access Authentication for the Use of a
Browser
When a FirstPass-compatible site that you
access through the Internet browser on your
PC requires the FirstPass (user certificate) as
an access authentication, install the FirstPass
PC software from the supplied CD-ROM
and perform necessary settings. For details,
see “FirstPassManual” (PDF format) in the
[FirstPassPCSoft] folder on the CD-ROM. You
need Adobe® Reader® (Version 6.0 or later is
recommended) to read “FirstPassManual” (PDF
format). If Adobe® Reader® is not installed
on your PC, install it from the same CD-ROM,
which also contains the Adobe® Reader®
software.
For details on using Adobe® Reader®, see the
Help that is installed with the software.
Conditions of Packet and 64K Data
Communication
The following conditions are necessary to
perform communication using the FOMA
terminal.
- The FOMA USB Cable with Charge Function 01
(optional) can be used on your PC.
- Your PDA must have FOMA packet and 64K data
communication support.
- You must be inside of the FOMA’s service area.
- The host for packet communication must have
FOMA packet communication support.
- The host for 64K data communication must
have FOMA 64K or ISDN synchronous 64K data
communication support.
Note, however, that even if you comply with
the above conditions, you may not be able to
perform communication if the base station is
congested or radio wave condition is poor.
Before Using Data
Communication
About the Operating Environment
Operating environment of a PC to be used for
data communication is as follows.
Item Required environment
PC main unit ˎ PC/AT compatible machine with a
built-in or removable CD-ROM drive
ˎ USB port (Universal Serial Bus
Specification 1.1 compliant)
OS

402
PC Connection
Other Necessary Items
Other than the FOMA terminal and a PC, the
following hardware and software are necessary.
ˎ FOMA USB Cable with Charge Function 01 (optional)
or FOMA USB Cable (optional)
ˎ Supplied CD-ROM “FOMA SO905iCS CD-ROM”
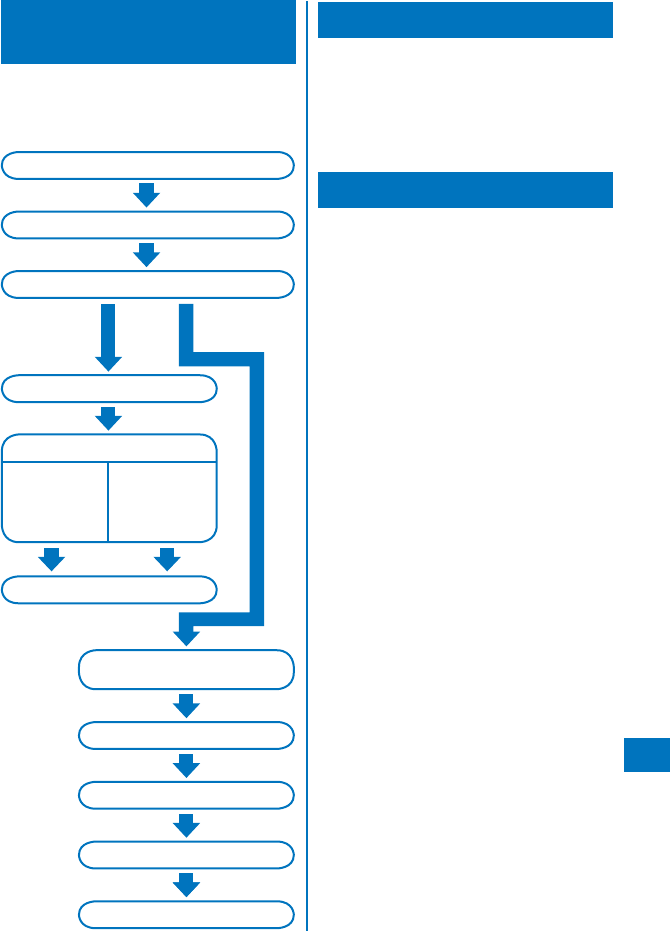
403
PC Connection
Preparations and Flow of
Data Communication
The preparations required for performing
packet and 64K data communication by
connecting the FOMA terminal to a PC are
given below.
When you use the
FOMA PC setup
software
Install the FOMA communication configuration files (USB drivers).
Connect the FOMA terminal to a PC.
Check the installed FOMA communication configuration files.
Set a host.
Packet
communication
ˎ “mopera U” or
“mopera”
ˎ Other provider
Perform communication.
Start up communication software that is
compatible with AT commands.
Set a host.
Set ON/OFF for the Notify caller ID.
Set up the dial-up network.
Perform dial-up connection.
When you do not
use the FOMA PC
setup software
Install the FOMA PC setup software.
64K data
communication
ˎ “mopera U” or
“mopera”
ˎ Other provider
AT Commands
AT commands are the commands (instructions)
that are executed on a PC for setting and
changing the functions of the FOMA terminal.
For more information on the AT commands, see
the “Manual for PC connection setting” (PDF
format) included in the supplied CD-ROM.
About the Supplied CD-ROM
The supplied CD-ROM contains the software
required for data communication using
the FOMA terminal and the “Manual for
PC connection setting”/“Kuten Code List”
operation instructions (PDF format). For details,
see the supplied CD-ROM.
<Software/PDF>

404
PC Connection

405
Overseas Use
Overview of International Roaming (WORLD WING) .............................................. 406
Services Available Overseas ................................................................................... 406
Before Using the FOMA Terminal Overseas ............................................................ 407
Placing a Call from Your Overseas Location ............................................................ 410
Receiving a Call ....................................................................................................... 410
Setting the Network to be Used ...................................................... <3G/GSM setting> 411
Setting the Carrier Search Method ........................................<Network search mode> 411
Setting the Higher-priority Carrier for Connection .............................<PLMN setting> 412
Setting the Display for International Roaming ......................<Operator name display> 412
Checking the Communication Status .........................................<Check service area> 413
Starting the Roaming Guidance Service ...................................<Roaming Guidance> 413
Rejecting an Incoming Call during Roaming ............................... <Bar Incoming call> 413
Using the Network Services during Roaming ................................<Oversea service> 414

406
Overseas Use
Overview of International
Roaming (WORLD WING)
The international roaming (WORLD WING) is
a service that enables you to use the same
phone number and mail address as used
in Japan to have phone conversations or
communicate using the networks of overseas
carriers even if you are abroad.
For more information on available
communication services while the international
roaming service is used, see the “Mobile
Phone User’s Guide
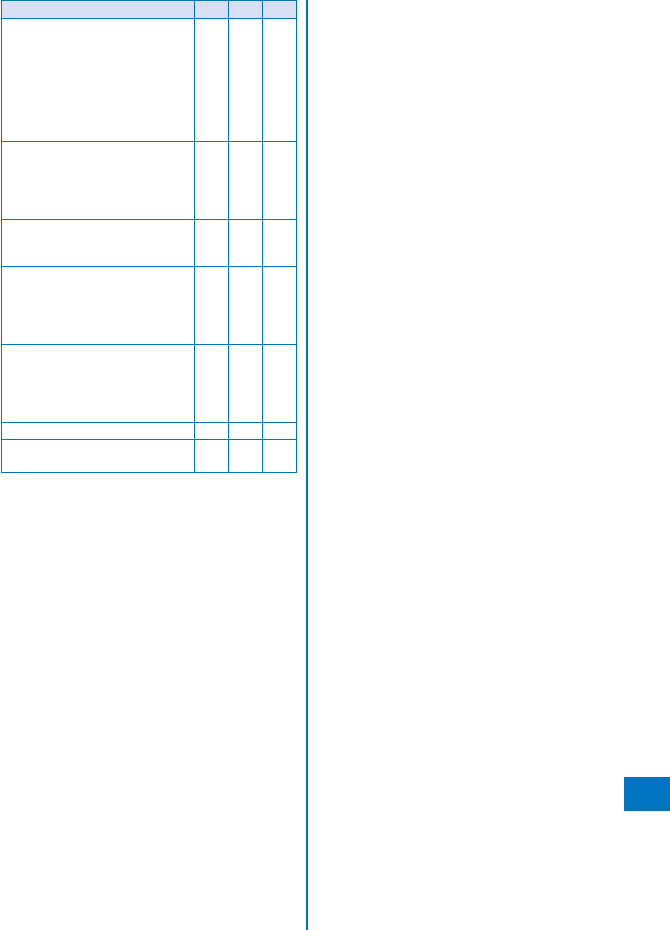
407
Overseas Use
Continued
Communication service 3G GSM
GPRS
Voice call

408
Overseas Use

409
Overseas Use

410
Overseas Use
Placing a Call from Your
Overseas Location
You can use the international roaming service
and place a call from an overseas location.
Placing a Call to Another Country (Including
Japan) from Your Overseas Location
You can place a call to Japan or another
country from your country of stay.
ˎ You can easily place an international call if you save
the country codes of frequently dialed countries
using the Country code of the Int’l dial assist setting
(P.62).
1 Press “+” (press for over a second)
in the stand-by display. Enter a country
code, area code, and a recipient’s phone
number, in that order.
ˎ If an area code begins with “0”, omit the “0”
when dialing (excepting when calling ordinary
phones, etc. in Italy).
ˎ To place an international call to Japan, enter the
country code “81”.
To place a call to a country saved using the Country
code
Enter a phone number in the stand-by display,
press (Option), select [Call method]
411
Overseas Use

412
Overseas Use
3 Select a carrier and press .
The carrier to be connected is changed.
413
Overseas Use
Checking the Communication
Status
<Check service area>
You can check the available network services
in your overseas location.
1 From the Menu, select [Settings]
414
Overseas Use
Using the Network Services
during Roaming
<Oversea service>
You can use network services such as the
Voice Mail and Call Forwarding Services from
an overseas location.
ˎ To use the network services overseas, set the
Remote Control to “Activate” (P.393).
ˎ An international call charge applies in the country
where you use the service when you operate the
FOMA terminal overseas.
Operating the Voice Mail Service
from Your Overseas Location
1 From the Menu, select [Settings]

415
Appendix/External
Devices/Troubleshooting
List of Menus ........................................................................................................... 416
Characters Assigned to Keys .................................................................................. 426
Special Symbols ...................................................................................................... 427
Pictographs .............................................................................................................. 428
Emoticons ................................................................................................................ 429
Common Phrases .................................................................................................... 430
Multiaccess Combinations ....................................................................................... 431
Multitask Combinations ........................................................................................... 433
Services Available on the FOMA Terminal .............................................................. 434
Optional and Related Devices ................................................................................. 435

Appendix/External Devices/Troubleshooting
416
List of Menus
ˎ You can press a key on the keypad of the number or symbol next to some menu names listed
below in the menu display to execute the associated function.
Appendix/External Devices/Troubleshooting
417
Continued
Menu Default Setting
Reset
settings
Reset all
data&set
Page
i-mode
[3]
Full
Browser
[30]
Home
Appendix/External Devices/Troubleshooting
418
Menu Default Setting
Reset
settings
Reset all
data&set
Page
Mail
[4]
Mail
setting
[4 ]
Area Mail
setting
Receive setting OFF
Appendix/External Devices/Troubleshooting
419
Menu Default Setting
Reset
settings
Reset all
data&set
Page
MUSIC
[8]
MUSIC Player [81]
Appendix/External Devices/Troubleshooting
420
Menu Default Setting
Reset
settings
Reset all
data&set
Page
LifeKit
[ ]
GPS [ #] GPS
settings
Sound/Color setting Position location:
Volume: OFF, Vibrator:
OFF, Color: ON
Location notice:
Volume: 4, Vibrator: OFF,
Color: ON
Loc. provide/accept/Loc.
provide/check:
Volume: 4, Vibrator: OFF
Appendix/External Devices/Troubleshooting
421
Menu Default Setting
Reset
settings
Reset all
data&set
Page
Settings
[#]
Display Animation Calling Kisekae tool
Appendix/External Devices/Troubleshooting
422
Menu Default Setting
Reset
settings
Reset all
data&set
Page
Settings
[#]
Call Call assist Sub-address ON
Appendix/External Devices/Troubleshooting
423
Menu Default Setting
Reset
settings
Reset all
data&set
Page
Settings
[#]
Application Schedule Schedule alarm Alarm tone: Alarm(std),
Alarm volume: 4, Alarm
image:
Appendix/External Devices/Troubleshooting
424
Menu Default Setting
Reset
settings
Reset all
data&set
Page
Settings
[#]
Management
NW
Services
In-call arrival act
Appendix/External Devices/Troubleshooting
425
Menu Default Setting
Reset
settings
Reset all
data&set
Page
Settings
[#]
Management
Set basic
tone
Keypad sound 1

Appendix/External Devices/Troubleshooting
426
Characters Assigned to Keys
Move cursor left

Appendix/External Devices/Troubleshooting
427
Special Symbols
ˎ Symbols marked with

Appendix/External Devices/Troubleshooting
428
Pictographs
ˎ Pictographs may not be displayed correctly when sending to i-mode non-compatible mobile
phones or PCs.
ˎ Some pictographs may not be displayed correctly depending on the type of recipient’s i-mode
compatible mobile phone.
ˎ For SMS, pictographs other than “ ”, “ ”, or “ ” are replaced with a half-width space (blank).

Appendix/External Devices/Troubleshooting
429
Emoticons
When you enter the following words in the kanji/hiragana mode, emoticons are
entered.
ˎ Some of the following emoticons may be different from those actually displayed.
ˎ Emoticons may be displayed in the ImgSym tab rather than in the Pre. tab.
Appendix/External Devices/Troubleshooting
430
Common Phrases

Appendix/External Devices/Troubleshooting
431
Multiaccess Combinations
The table below indicates whether another event or task is available for each task in
progress.
ˎ The FOMA terminal may not operate as indicated in the table below depending on its condition.

Appendix/External Devices/Troubleshooting
432

Appendix/External Devices/Troubleshooting
433
Multitask Combinations
The table below indicates whether another function is available for each function in
the menu.
ˎ The FOMA terminal may not operate as indicated in the table below depending on the status of
each function.
ˎ Some functions may pause temporarily when they are not displayed in the display even if
already activated.
Appendix/External Devices/Troubleshooting
434
Services Available on the FOMA Terminal
Service Phone number
Number guide service (paid: service charge + call charge)

435
Appendix/External Devices/Troubleshooting
Optional and Related Devices
A variety of commercially available optional devices allows you to expand the FOMA
terminal’s capabilities by supporting a wide range of applications, including personal
and business uses. Some accessories are only available in some areas. For details,
please contact our service counter (DoCoMo shop, etc.). For details on optional
devices, see the user’s manual of each device.

436
Appendix/External Devices/Troubleshooting
Introduction of Movie Player Software
To play back a movie (MP4 format file) on a PC, you need QuickTime Player (free) ver.
6.4 or later (or ver. 6.3+3GPP) from Apple Computer, Inc.
You can download QuickTime from the following website.
http://www.apple.com/jp/quicktime/download/
ˎ To download this software, you need a PC connected to the Internet. A separate communication
charge is also required for downloading.
ˎ Check the above website for details about the operating environment, downloading method,
operation method, and other information.
Enjoying with Picture Motion Browser
Picture Motion Browser is the software that allows you to use various functions such
as managing a saved image on the calendar, and selecting and editing an image.
ˎ To install Picture Motion Browser, set the attached CD-ROM “FOMA SO905iCS CD-ROM” to
a PC and from the start-up menu, click [ENTERTAINMENT TOOL]
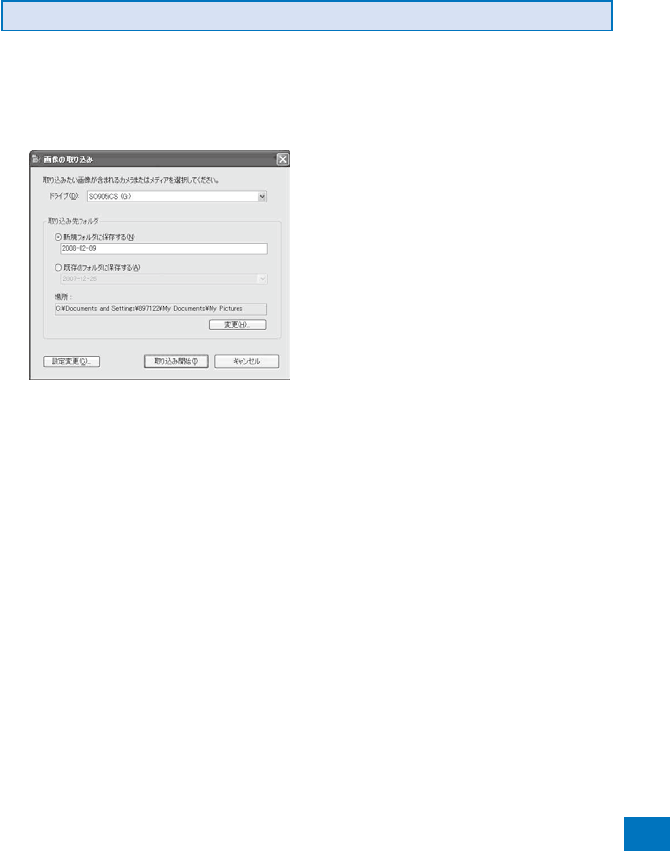
437
Appendix/External Devices/Troubleshooting
Continued
Importing an Image Recorded by the Camera to a PC
ˎ If an image to be imported to a PC is saved in the Data Box, save the image in the microSD
memory card beforehand (P.308).
Example: For Windows XP
1
Insert the microSD memory card in which an image is saved into the SD card
slot.
ˎ If you use the microSD memory card, use
the adapter to convert it to the size of the SD
memory card.
To use the microSD mode of the FOMA terminal
From the Menu, select [Settings]

438
Appendix/External Devices/Troubleshooting
Saving an Image Folder
To display images imported to a PC on Picture Motion Browser, you need to save an
image folder.
1
In the Main display of Picture Motion Browser, from the Menu bar, click [
439
Appendix/External Devices/Troubleshooting
3
Click the recorded year
440
Appendix/External Devices/Troubleshooting
Troubleshooting
First, check if the software update is necessary for the FOMA terminal. If necessary,
perform the software update (P.452).
Trouble Cause and Remedy
Cannot power on the FOMA terminal.
(The FOMA terminal cannot be used.)
ˎ Check if the battery pack is attached properly (P.39).
ˎ Check if the battery pack is not run out (P.42).
The FOMA terminal cannot be
used
ˎ Check if the Lock key is set (P.140).
The warning tone sounds and
does not stop even when you
press the Power key, and the
FOMA terminal is powered off.
ˎ The battery is running out. Charge the battery (P.41).
The busy tone sounds and the
call is not connected, even if
you dial up.
ˎ Check if “ ” appears (P.30).
ˎ Check if you enter the area code (P.51).
ˎ Check if you dial up in a hurry without hearing the ringing tone
(P.51).
“” is displayed and the
busy tone sounds.
ˎ Check if you are outside of the service area or in a location
with weak radio wave condition (P.30).
Cannot place a call even if you
press the keypad.
ˎ Check if the Self mode is set (P.137).
ˎ Check if the Key dial lock is set (P.139).
ˎ Check if the Lock key is set (P.140).
The dark display appears and
cannot operate anything.
ˎ Check if the FOMA terminal is powered on (P.43).
ˎ Check if the Lock key is set (P.140).
is displayed and cannot
operate anything.
ˎ Check if the Lock key is set (P.140).
The set stand-by display
does not appear and the dark
display appears.
ˎ Check if the Power saver mode is set (P.122).
Text is displayed in Japanese. ˎ Check if the Select language is set to [Japanese] (P.128).
Cannot receive a call or the
ring tone does not sound.
ˎ Check if the Public mode (Drive mode) is set (P.69).
ˎ Check if the Ring volume is set to [OFF] (P.109).
ˎ Check if the Manner mode is set (P.116).
ˎ Check if the Self mode is set (P.137).
ˎ Check if the Accept/Reject call is set (P.143).
ˎ Check if the Denied no ID is set (P.144).
ˎ Check if the Set ring start time is set (P.145).
ˎ Check if the Reject unknown is set (P.146).
ˎ Check if the ring time of the Voice Mail/Call Forwarding Service
is set to 0 seconds (P.388, 389).
ˎ Check if the Caller ID Request is set (P.391).
ˎ Check if the Mova terminal is enabled for the Dual Network
Service (P.391).
The mail and alarm tones
sound but the ring tone for an
incoming call does not sound.
ˎ Check if the Ring volume is set to [OFF] (P.115).
ˎ Check if a longer interval (such as 99 sec) is set at [Start time]
of the Set ring start time. Set it to a shorter interval (P.145).
The mail tone sounds but there
is no incoming mail.
ˎ Check if the Tone/Vibrate notice of the Voice Mail Service is
set to [ON]. If it is ON, you are notified of the increase in the
number of record messages by the mail tone (P.388).
441
Appendix/External Devices/Troubleshooting
Trouble Cause and Remedy
An image other than that
you set is displayed for an
incoming call.
ˎ If multiple images are set for the incoming image for voice/
videophone call, the image is displayed in the following order
of priority (P.97, 100, 109).
1. Des call display set in the Phonebook
2. Des call display set in the Group setting
3. Incoming image set in the Incoming set
When an i-motion or Chaku-Uta Full® is set for the ring tone or
an i-motion is set for the incoming image, however, the order
of priority may vary.
A ring tone other than that you
set sounds for an incoming
call.
ˎ If multiple ring tones are set for voice/videophone call, the ring
tone sounds in the following order of priority (P.97, 100, 109,
393, 396).
1. Ring tone set in the Number Setting (when a call is placed
to an Additional No. for the Multi Number)
2. Des phone tone set in the Phonebook
3. Des phone tone set in the Group setting
4. Ring tone of the Ringtone for Number B of 2in1
5. Ring tone set in the Incoming set
When an i-motion or Chaku-Uta Full® is set for the ring tone or
an i-motion is set for the incoming image, however, the order
of priority may vary.
A ring tone other than that you
set sounds for an incoming
mail.
ˎ If multiple ring tones are set for mail, the ring tone sounds in
the following order of priority (P.97, 100, 109).
1. Des mail tone set in the Phonebook
2. Des mail tone set in the Group setting
3. Ring tone set in the Incoming set
When an i-motion or Chaku-Uta Full® is set for the ring tone,
however, the order of priority may vary.
The incoming indicator in the
color other than that you set
lights for an incoming call or
mail.
ˎ If multiple incoming indicators are set for voice call/
videophone call/mail, the incoming indicator flashes in the
following order of priority (P.97, 100, 110).
1. Select phone/mail Illum. set in the Phonebook
2. Select phone/mail Illum. set in the Group setting
3. Indicator color set in the Incoming set
The incoming indicator flashes
in certain cycle.
ˎ Check if the Missed call is set to [ON] (P.126).
The charge indicator stays lit. ˎ
Check if [Charging] of the Backlight always on is set to [ON] (P.122).
In this setting, it may take time to complete charging, but this
is not a malfunction.
ˎ Check if you use a function such as the videophone, data
communication, and i-
442
Appendix/External Devices/Troubleshooting
Error Messages
ˎ In some cases, a 3-digit number may be displayed together with a message. This is a DoCoMo
own code that DoCoMo displays on the FOMA terminal.
A
Accessing IC card. Cannot
delete
ˎ Failed to delete the software
because data in the Osaifu-
Keitai-compatible i-
443
Appendix/External Devices/Troubleshooting
Continued
ˎ Failed to connect to a line
due to a network problem.
Retry to connect after a
while.
ˎ Failed to connect to a line for
some reason when placing a
videophone call.
Connection failed (403)
ˎ Failed to connect to i-mode
for some reason. Retry to
connect (P.182).
Connection failed (503)
ˎ Failed to connect to a line
due to a network problem.
Retry to connect after a
while.
Connection failed (562)
ˎ Failed to connect to the
i-mode center. Move to a
location with better radio
wave condition and then
retry the operation.
Connection interrupted
ˎ The communication is
interrupted because of an
error occurrence during data
communication.
Content length exceeds
maximum size for i-motion
ˎ Failed to retrieve the data
because its volume has
exceeded the maximum
size.
Content length exceeds
replayable size for i-motion
ˎ Failed to retrieve the data
because its volume has
exceeded the maximum
size.
Continue using ppli and
transmit data?
ˎ
This message appears
when the number of times of
communication performed
while an i-

444
Appendix/External Devices/Troubleshooting
Error in the dictionary
ˎ There are some words or
phrases that have failed to
be saved because of an
error in part of the dictionary
data (words or phrases
that have been saved
successfully can be used as
dictionary data).
Exceeds max number of
simultaneous call
ˎ
This message appears when
you originate a PushTalk call
to more than four members.
Reduce the number of members
you select to four or less and
originate the call again.
F
Final number exists. Cannot shoot
ˎ The microSD memory
card contains a file with
the maximum number
(999-9999), so no more files
can be saved in it. Delete
the images from the largest
file numbers (P.317).
I
ppli stand-by display
terminated due to security
error
ˎ The i-
445
Appendix/External Devices/Troubleshooting
Continued
Invalid UIM. Start failed
ˎ
Unable to start software
because the information
on a UIM inserted in the
FOMA terminal and its
corresponding information on
the IC card are different. Use
the UIM that was inserted in
the FOMA terminal when you
downloaded and activated
the Osaifu-Keitai-compatible
i-

446
Appendix/External Devices/Troubleshooting
No more file number. Please
reset
ˎ The file number which is
attached to an image saved
in the microSD memory card
and incremented with the
number of saved images
has reached the maximum
number (999-9999). Perform
the Reset file No. or delete
the images from the largest
file numbers (P.177, 317).
No requested software
ˎ The i-
447
Appendix/External Devices/Troubleshooting
Continued
PUK blocked
ˎ The PUK code is locked.
Contact the nearest DoCoMo
shop (P.131).
R
Receiving data exceeds
maximum size for i-motion
ˎ
Failed to retrieve the data
because its volume has
exceeded the maximum size.
ˎ Failed to retrieve the data
because its file size has
exceeded 10M bytes while
playing back a streaming
type i-motion.
Receiving data exceeds
replayable size for i-motion
ˎ
Failed to retrieve the data
because its volume has
exceeded the maximum size.
ˎ Failed to retrieve the data
because its file size has
exceeded 500K bytes while
playing back a standard
type i-motion.
Registration is in progress
(554)
ˎ User registration of i-mode
is in progress. Retry the
operation after a while.
Remotely Controllable
services denied
ˎ You currently do not yet
subscribe to services
such as the Voice Mail or
Call Forwarding Service
that can be operated by
remote control. To use the
remote control, subscribe to
services.
Replay period has expired
ˎ This file is provided with
an expiry date or time limit
on playback. It cannot be
played back because the
term permitted for playback
has expired. Check the
expiry date in the Detail info
display (P.318).
Replay period has not yet
started
ˎ This file is provided with
a time limit on playback.
It cannot be played back
because the term permitted
for playback has not yet
started. Check the starting
date of the term in the Detail
info display (P.318).
Requested software
unavailable
ˎ Failed to start the i-

448
Appendix/External Devices/Troubleshooting
Services are full. MUSIC of
overwritten service is unable
to play. Overwrite?
ˎ The maximum number of
music services (members
only) which can be saved
has been exceeded. If you
select [Yes], the new service
overwrites the service
which has the oldest time
limit on playback. Also, you
cannot play back music
downloaded from the service
which is overwritten.
Setting keyguard
ˎ The Lock key is set. Cancel
the Lock key and then retry
the operation (P.140).
Setting self mode
ˎ The Self mode is set. Cancel
the Self mode and then retry
the operation (P.137).
Setting unknown reject
ˎ The Reject unknown is set.
Cancel the Reject unknown
and then retry the operation
(P.146).
Software already updated
ˎ No update is available
for the i-
449
Appendix/External Devices/Troubleshooting
Too many active functions.
Cannot activate
ˎ You cannot execute the
selected function because
of too many functions being
executed by multitasking.
Quit a currently executed
function and then retry the
operation (P.349).
Too many active functions.
Cannot execute. Quit other
function and retry
ˎ You cannot execute a
selected function because
of insufficient memory. Quit a
currently executed function
and then retry the operation
(P.349).
Too much data was entered
ˎ Failed to send because
of too many characters.
Reduce the number of
characters and try to send
again.
Transmission failed
ˎ An error occured while
sending mail. Make sure that
“” is not displayed and
send it again. If the message
appears again, retry to send
after a while (P.209).
ˎ The address of SMS is
incorrect. Enter the correct
address (phone number)
and send again (P.230).
Transmission failed (552)
ˎ Failed to connect to a line
due to a problem at the
i-mode or SMS center. Retry
to connect after a while.
U
UIM is full
ˎ The number of SMS saved
in the UIM has reached the
maximum number. Delete
unnecessary SMS (P.219).
UIM is not inserted. Content is
unavailable
ˎ Failed to operate because
the UIM is not inserted.
Insert the UIM that was used
when you retrieved the data
or file and then retry the
operation (P.36).
Unable to obtain data due to
replay restriction data error
ˎ Failed to obtain the file
because of an error in the
playback restriction data.
Unable to retrieve the
requested URL (504)
ˎ Failed to connect to the site
or website for some reason.
Retry to connect.
Unable to run this software
ˎ When 2in1 is set to the
B mode, you cannot run
i-

450
Appendix/External Devices/Troubleshooting
Warranty and After Sales Services
Warranty

451
Appendix/External Devices/Troubleshooting

452
Appendix/External Devices/Troubleshooting
453
Appendix/External Devices/Troubleshooting

454
Appendix/External Devices/Troubleshooting
Updating the Software Automatically (Auto-update)
Download new software automatically and rewrite old one with it at the previously set
time.
When the status is changed to be ready to rewrite, “ ” appears. After you check the
time of rewriting, you can change the time or select whether to rewrite right away.
1
From the Menu, select [Settings]

455
Appendix/External Devices/Troubleshooting
Continued
456
Appendix/External Devices/Troubleshooting
Updating the Software Immediately (Now update)
1
From the screen for selecting the update type, select [Now update] and press .

457
Appendix/External Devices/Troubleshooting
2
Select the date/time to be reserved
458
Appendix/External Devices/Troubleshooting
Protecting Your Mobile Phone from Harmful Data
<Scan function>
At first, update the pattern definitions to get the latest definitions.
You can detect information related to the data and programs obtained into the FOMA
terminal from an external source, such as data downloaded from a site or i-mode
mail, and delete data or end the start-up of application that can cause a trouble.
ˎ Use the pattern definitions for checking. Since the pattern definitions are upgraded every time
a new problem is discovered, be sure to update the definitions (P.459).
ˎ The scanning function provides explicit protection against intrusive data that causes mobile
phone trouble while you are viewing a website or receiving mail. Note that if the pattern
definitions corresponding to each trouble are not downloaded to the mobile phone, or if there
are no pattern definitions corresponding to each trouble, this function cannot prevent the
trouble occurrences.
ˎ The contents of the pattern definitions vary depending on the model of your mobile phone.
Note that the distribution of pattern definitions for models released more than three years ago
may be discontinued at our company’s discretion.
Setting the Scanning Function
You can set whether to automatically check data and programs when they are
executed.
1
From the Menu, select [Settings]

459
Appendix/External Devices/Troubleshooting
Continued
Updating the Pattern Definitions
1
From the Menu, select [Settings]
460
Appendix/External Devices/Troubleshooting

461
Appendix/External Devices/Troubleshooting
Continued
Specifications

462
Appendix/External Devices/Troubleshooting
463
Appendix/External Devices/Troubleshooting
Continued
About the Specific Absorption Rate (SAR) of Mobile Phones, etc.

464
Appendix/External Devices/Troubleshooting
The radio wave exposure guidelines employ a unit of measurement known as the Specific
Absorption Rate (SAR). Tests for SAR are conducted using standardized methods with the phone
transmitting at its highest certified power level in all used frequency bands. While there may be
differences between the SAR levels of various phone models, they are all designed to meet the
relevant guidelines for exposure to radio waves. For more information on SAR, please refer to the
safe and efficient use chapter in the User Guide.
The highest SAR value as reported to the authorities for this phone model when tested for use by
the ear is 0.62 W/kg*, and when worn on the body is 0.26 W/kg* for speech and 0.35 W/kg* for
data calls. Body worn measurements are made while the phone is in use and worn on the body
with a Sony Ericsson accessory supplied with or designated for use with this phone. It is therefore
recommended that only Ericsson and Sony Ericsson original accessories be used in conjunction
with Sony Ericsson phones.
**Before a phone model is available for sale to the public in the US, it must be tested and certified
by the Federal Communications Commission (FCC) that it does not exceed the limit established
by the government-adopted requirement for safe exposure*. The tests are performed in positions
and locations (i.e., by the ear and worn on the body) as required by the FCC for each model. The
FCC has granted an Equipment Authorization for this phone model with all reported SAR levels
evaluated as in compliance with the FCC RF exposure guidelines. While there may be differences
between the SAR levels of various phones, all mobile phones granted an FCC equipment
authorization meet the government requirement for safe exposure. SAR information on this phone
model is on file at the FCC and can be found under the Display Grant section of http://www.fcc.
gov/oet/fccid after searching on FCC ID PY7A3624021 Additional information on SAR can be
found on the Cellular Telecommunications & Internet Association (CTIA) website at
http://www.phonefacts.net.
* In the United States and Canada, the SAR limit for mobile phones used by the public is 1.6
watts/kilogram (W/kg) averaged over one gram of tissue. The standard incorporates a margin
of safety to give additional protection for the public and to account for any variations in
measurements.
** This paragraph is only applicable to authorities and customers in the United States.
Europe
This mobile phone model SO905iCS has been designed to comply with applicable safety
requirements for exposure to radio waves. These requirements are based on scientific guidelines
that include safety margins designed to assure the safety of all persons, regardless of age and
health.
The radio wave exposure guidelines employ a unit of measurement known as the Specific
Absorption Rate, or SAR. Tests for SAR are conducted using standardized methods with the
phone transmitting at its highest certified power level in all used frequency bands.
While there may be differences between the SAR levels of various phone models, they are all
designed to meet the relevant guidelines for exposure to radio waves.
465
Appendix/External Devices/Troubleshooting
Continued
For more information on SAR, please refer to the safety chapter in the User’s Guide.
SAR data information for residents in countries that have adopted the SAR limit recommended
by the International Commission of Non-lonizing Radiation Protection (ICNIRP), which is 2 W/kg
averaged over ten (10) gram of tissue (for example European Union, Japan, Brazil and New
Zealand):
The highest SAR value for this model phone tested by Sony Ericsson for use at the ear is 1.01 W/kg
(10g).
Radio Frequency (RF) Exposure and SAR
Your mobile phone is a low-power radio transmitter and receiver.
When it is turned on, it emits low levels of radio frequency energy (also known as radio waves or
radio frequency fields).
Governments around the world have adopted comprehensive international safety guidelines,
developed by scientific organizations, e.g. ICNIRP (International Commission on Non-Ionizing
Radiation Protection) and IEEE (The Institute of Electrical and Electronics Engineers Inc.), through
periodic and thorough evaluation of scientific studies. These guidelines establish permitted levels
of radio wave exposure for the general population. The levels include a safety margin designed to
assure the safety of all persons, regardless of age and health, and to account for any variations in
measurements.
Specific Absorption Rate (SAR) is the unit of measurement for the amount of radio frequency
energy absorbed by the body when using a mobile phone. The SAR value is determined at the
highest certified power level in laboratory conditions, but the actual SAR level of the mobile phone
while operating can be well below this value. This is because the mobile phone is designed to use
the minimum power required to reach the network.
Variations in SAR below the radio frequency exposure guidelines do not mean that there are
variations in safety. While there may be differences in SAR levels among mobile phones, all Sony
Ericsson mobile phone models are designed to meet radio frequency exposure guidelines.
Before a phone model is available for sale to the public, it must be tested and certified to the
FCC that it does not exceed the limit established by the government-adopted requirement for
safe exposure. The tests are performed in positions and locations (that is, at the ear and worn
on the body) as required by the FCC for each model. For body worn operation, this phone has
been tested and meets FCC RF exposure guidelines when the handset is positioned a minimum
of 15 mm from the body without any metal parts in the vicinity of the phone or when used with the
original Sony Ericsson body worn accessory intended for this phone. Use of other accessories
may not ensure compliance with FCC RF exposure guidelines.
SAR information for this mobile phone model is included with the material that comes with this
mobile phone. This information can also be found, together with more information on radio
frequency exposure and SAR, on:
www.sonyericsson.com

466
Appendix/External Devices/Troubleshooting
Guidelines for Safe and Efficient Use
Please read this information before using your mobile phone.
These instructions are intended for your safety. Please follow these guidelines. If the product has
been subject to any of the conditions listed below or you have any doubt as to its proper function
make sure you have the product checked by a certified service partner before charging or using
it. Failure to do so might entail a risk of product malfunction or even a potential hazard to your
health.
Recommendations for safe use of product (mobile phone, battery, charger and other accessories)

467
Appendix/External Devices/Troubleshooting
Continued
Power supply (Charger)
Connect the AC power adapter only to designated power sources as marked on the product.
Make sure the cord is positioned so that it will not be subjected to damage or stress. To reduce
risk of electric shock, unplug the unit from any power source before attempting to clean it. The AC
power adapter must not be used outdoors or in damp areas. Never alter the cord or plug.
Battery
We recommend that you fully charge the battery before you use your mobile phone for the first
time. A new battery or one that has not been used for a long time could have reduced capacity
the first few times it is used. The battery should only be charged in temperatures between +5°C
(+41°F) and +35°C (+95°F).
Use only original batteries intended for use with your mobile phone. Using other batteries and
chargers could be dangerous.
Talk and standby times depend on several different conditions such as signal strength, operating
temperature, application usage patterns, features selected and voice or data transmissions when
the mobile phone is being used.
Turn off your mobile phone before removing the battery. Do not put the battery into your mouth.
Battery electrolytes may be toxic if swallowed. Do not let the metal contacts on the battery touch
another metal object. Doing this could short-circuit and damage the battery. Use the battery for
the intended purpose only.
Personal medical devices
Mobile phones may affect the operation of pacemakers and other implanted equipment. Please
avoid placing the mobile phone over the pacemaker, e.g. in your breast pocket. When using the
mobile phone, use it at the ear on the opposite side of the body to the pacemaker. If a minimum
distance of 15 cm (6 inches) is kept between the mobile phone and the pacemaker, the risk
of interference is limited. If you have any reason to suspect that interference is taking place,
immediately turn off your mobile phone. Contact your medical doctor for more information.
For other medical devices, please consult your physician and the manufacturer of the device.
Driving
Please check if local laws and regulations restrict the use of mobile phones while driving or
require drivers to use handsfree solutions.
For the use of mobile phones in the vehicle, please follow instructions from vehicle manufacturers.
Always pay full attention to driving and pull off the road and park before making or answering a
call if driving conditions so require.
468
Appendix/External Devices/Troubleshooting
Emergency calls
Mobile phones operate using radio signals, which cannot guarantee connection in all conditions.
You should therefore never rely solely upon any mobile phone for essential communications (e.g.
medical emergencies).
Emergency calls may not be possible in all areas, on all cellular networks, or when certain network
services and/or mobile phone features are in use. Check with your local service provider.
Efficient use
Hold your mobile phone as you would any other phone. Do not cover the hinge area when the
phone is in use, as this affects call quality and may cause the phone to operate at a higher power
level than needed, thus shortening talk and standby times.
Disposal of old electrical and electronic equipment
This symbol indicates that all electrical and electronic equipment included shall not be treated
as household waste. Instead it shall be left at the appropriate collection point for recycling of
electrical and electronic equipment. By ensuring this product is disposed of correctly, you will
help prevent potential negative consequences for the environment and human health, which
could otherwise be caused by inappropriate waste handling of this product. The recycling of
materials will help to conserve natural resources. For more detailed information about recycling
this product, please contact your local city office, your household waste disposal service or the
shop where you purchased the product.
Disposing of the battery
Please check local regulations for disposal of batteries or call your local Sony Ericsson Call
Center for information.
The battery should never be placed in municipal waste. Use a battery disposal facility if available.
Memory Card
If your product comes complete with a removable memory card, it is generally compatible with
the handset purchased but may not be compatible with other devices or the capabilities of their
memory cards. Check other devices for compatibility before purchase or use. If your product is
equipped with a memory card reader, check memory card compatibility before purchase or use.
Memory cards are generally formatted prior to shipping. To reformat the memory card, use a
compatible device. Do not use the standard operating system format when formatting the memory
card on a PC. For details, refer to the operating instructions of the device or contact customer
support.

469
Appendix/External Devices/Troubleshooting
WARNING:
If your device requires an adapter for insertion into the handset or another device, do not insert
the card directly without the required adapter.
Precautions on Memory Card Use
470
Appendix/External Devices/Troubleshooting
FCC Statement
This device complies with Part 15 of the FCC rules. Operation is subject to the
following two conditions :
(1) This device may not cause harmful interference, and
(2) This device must accept any interference received, including interference
that may cause undesired operation.
Declaration of Conformity for SO905iCS
We, Sony Ericsson Mobile Communications AB of Nya Vattentornet SE-221 88 Lund, Sweden
declare under our sole responsibility that our product
Sony Ericsson type AAD-3624021-BV
and in combination with FOMA global AC charger 01(MODEL:MAS-BH0008-A 002), to which this
declaration relates is in conformity with the appropriate standards EN 301 511:V9.0.2, EN 301
908-1:V2.2.1, EN 301 908-2:V2.2.1, EN 301 489-24:V1.3.1, EN 301 489-7:V1.3.1, EN 301 489-3:
V1.4.1, EN 302 291-2:V1.1.1, and EN 60950-1:2006, following the provisions of, Radio Equipment
and Telecommunication Terminal Equipment Directive 1999/5/EC
Lund, December 2007
0682
Signature
Yukio Kubota, Head of Product Business Unit JAPAN

471
Appendix/External Devices/Troubleshooting
Export Controls and Regulations
This product and its accessories are covered and controlled by Japan’s export
control regulations (“Foreign Exchange and Foreign Trade Law” and related laws
and regulations). If you wish to export this product and/or its accessories, you must
complete the necessary procedures at your own responsibility and cost. Detailed
information on the procedure, contact the Ministry of Economy, Trade and Industry.

473
Index/Quick Manual
Index ........................................................................................................................ 474
Quick Manual ........................................................................................................... 490

474
Index/Quick Manual
A
AC adapter ......................... 41
Accept/Reject call ............. 143
Acquire image ................... 190
Additional service ............. 398
Adjust light ........................ 121
Adjust volume
GPS .............................. 113
i-motion ........................ 292
i-

475
Index/Quick Manual
Call method ........................ 60
Call Rejection ..................... 65
Call Waiting Service .......... 389
Call with ID/Call without ID
....................................... 60
Caller ID Display Request
Service ......................... 391
Camera ............................. 150
Adjust EV ...................... 161
Adjust zoom ................. 160
Attach to mail ....... 155, 167
Auto Focus ................... 169
Auto orientation ............ 175
Auto save ..................... 174
Auto timer ..................... 169
Backlight always on ..... 121
Bar code reader ........... 179
BestPic™...................... 162
Common replay mode
... 171
Continuous mode ......... 163
Deco-Snap ................... 166
Digital Zooming ............ 175
easy BlogUp ................ 355
Estimated number of
recordable images ... 151
Estimated recording time
of movie ........... 152, 153
Face detection ............. 161
File size ........................ 178
Flash............................. 170
Graphical menu ........... 157
Grid Line ...................... 170
High sensitivity ............. 164
Icons ............................ 154
Image quality ............... 175
Image stabilize ............. 176
Mini-Photo creator ........ 174
Movie shoot .................. 167
Multi focus .................... 168
Panorama ..................... 165
Photo light .................... 170
Photometry ................... 172
Picture effect ................ 172
Picture Motion Browser
... 436
Reset all ....................... 173
Reset file No. ................ 178
Select save to ............... 173
Select scene ................ 159
Select size .................... 158
Set attach loc. info ....... 177
Shoot by photo ............. 155
Shoot mode .......... 162, 178
Shoot with frame .......... 163
Shutter sound ............... 176
Switch camera ............. 159
Viewer .......................... 349
White balance .............. 171
Direct button ................ 157
Certificates
............. 183, 194, 236, 280
Chaku-moji ......................... 58
Create message ............. 58
Place a call ..................... 59
Set Message display ...... 58
Chaku-Uta Full R .............. 340
Change code .................... 132
Characters Assigned to Keys
..................................... 426
Chara-den ......................... 298
Action input mode .......... 75
Action list ................ 75, 298
Call Chara-den ....... 75, 299
Change action ........ 75, 299
Delete ........................... 317
Detail ............................ 318
DTMF send mode .......... 75
Set Chara-den .............. 299
Set sub image .............. 299
Sort ............................... 317
Charge ................................ 40
Backlight always on ..... 121
Charge sound .............. 111
Charging time ................ 40
Check new message
............................. 212, 227
Animation ..................... 120
i-mode inquiry set ........ 223
Check new SMS ............... 232
Animation ..................... 120
Check service area ........... 413
Chg. to videophone ............. 54
Chg. to voice call ................ 54
Chg.MENU ......................... 35
Color theme setting .......... 124
Common phrases ............. 381
Edit ............................... 382
List of common phrases
... 430
Communication mode ....... 310
Compose message ........... 203
Cost limit notice ................ 367
Country code ...................... 60
Cursor ................................. 28
D
Data Box ........................... 313
Chara-den .................... 298
i-motion ........................ 291
Kisekae Tool ................. 301
Melody ......................... 300
MUSIC .......................... 299
Music&Video Channel
... 338
My document ............... 329
My picture .................... 286
Property ........................ 318
Data communication ......... 400
Data security..................... 142
Data Security Service
............................. 105, 147
Connect to Center ........ 105
Exchanging history ...... 105
Save mail ...................... 217
Save phonebook .......... 105
Save photo ................... 290
Service setting ............. 105
Date/time ............................ 44
DC adapter ......................... 41
Deco mail pict. .................. 382
Deco-mail ......................... 204
Compose and send
message .................. 204
Deco. slcted txt ............ 206
Continued

476
Index/Quick Manual
Decorate mail ............... 207
Quick deco. Mail .......... 206
Templates ..................... 207
Delete max cost icon ........ 367
Denied no ID ..................... 144
Desktop holder ................... 41
Dial frequency record ......... 55
Dictionary
Delete ........................... 385
Dictionary folder ........... 385
Download ..................... 191
Edit name ..................... 385
Information ................... 385
Reorder ........................ 386
Save ............................. 384
Differences in UIM functions
....................................... 38
Disp. call/rcv. No. ............... 121
Display ................................ 30
Backlight ...................... 121
Guide display ......... 33, 117
Icon ........................ 30, 154
Display sites ..................... 183
DoCoMo keitai datalink ..... 404
Download
Chaku-Uta Full® ........... 340
Chara-den .................... 191
Dictionary ..................... 191
easy BlogUp service
inforamtion file ......... 191
Graphics ...................... 190
i-motion ........................ 197
i-

477
Index/Quick Manual
Location history ............ 272
Location notice ............. 270
Location provision ........ 266
Location request .......... 267
Position location ........... 260
Positioning mode ......... 274
Rcv loc. info ................. 273
Reg. service client ....... 271
Service settings ............ 270
Sound/Color setting ..... 113
Use loc. info ................. 273
GPS settings
..... 113, 267, 270, 271, 274
Guide display .............. 33, 117
H
Handling precautions .......... 19
Hands-free .................... 53, 64
Headset microphone ........ 372
Headset setting ......... 114, 371
Headset sw. to call ............ 371
Headset usage setting ...... 114
Hold
Holding........................... 68
Multiple connections .... 389
On hold .......................... 68
Holding ............................... 68
I
i Menu ............................... 183
i

478
Index/Quick Manual
i-mode menu ..................... 182
i-mode password .............. 131
Change ........................ 186
i-mode setting ........... 112, 193
i-mode Trouble Diagnosis Site
..................................... 452
i-motion ..................... 196, 291
Attach to mail ............... 208
Backlight always on ..... 121
Change display ............ 318
Chapter list ................... 293
Continuous play ........... 292
Data security ................ 142
Delete ........................... 317
Detail ............................ 318
Display quality .............. 292
Display setting ............. 292
Download ..................... 197
Edit folder ..................... 315
Edit movie .................... 294
Folder info .................... 318
iC transmission ............. 328
i-motion auto replay ..... 197
Move ............................ 316
Play .............................. 291
Play mode change ....... 292
Playlists ........................ 293
Save ............................. 308
Send Ir data ................. 325
Sort ............................... 317
i-motion auto replay .......... 197
In-call arrival act ............... 392
Incoming set ..................... 108
Individual font size ............ 127
Information on using the manual and
how to look up in the manual
... 1
Infrared communication .... 323
Infrared remote control
... 327
Receive ........................ 325
Send ............................. 325
Send IrSS ..................... 326
Initial setting ........................ 43
Input method
..... 380, 381, 382, 384, 385
Insufficient memory .......... 322
Intellectual Property Right
....................................... 22
International call ................. 61
International roaming ........ 406
Int’l dial assist ..................... 62
Int’l prefix ............................ 60
Int’l roaming
............. 411, 412, 413, 414
i-

479
Index/Quick Manual
Original manner ........... 117
Silent ............................ 115
Melody .............................. 300
Attach to mail ............... 208
Delete ........................... 317
Detail ............................ 318
Edit folder ..................... 315
Folder info .................... 318
iC transmission ............. 328
Move ............................ 316
Play .............................. 300
Play portion .................. 301
Save ............................. 308
Send Ir data ................. 325
Sort ............................... 317
Melody Call setting ........... 115
Menu ................................... 33
Menu setting ..................... 122
Message
Auto-display ................. 226
Check new message ... 227
Delete ........................... 228
Display ......................... 227
Dur multi task disp ....... 225
i-mode inquiry set ........ 223
Incoming set ................ 108
Melody auto play .......... 224
Protect ON/OFF ............ 228
Receive ........................ 226
Save attached .............. 214
Message F ........................ 227
Message R ....................... 227
microSD memory card ...... 302
Delete ........................... 317
Display ......................... 304
Folder setup ................. 305
Format .......................... 309
Insert/Remove .............. 303
microSD info ................. 310
Reset file No. ................ 178
Save ............................. 308
Update mng. info ......... 310
microSD mode .................. 311
Missed call ........................ 126
Movie player software ....... 436
MTP mode ........................ 311
Multi Number Service ....... 393
Multiaccess ....................... 348
Combinations ............... 431
Multitask ........................... 349
Combinations ............... 433
MUSIC ...................... 299, 338
Delete ........................... 317
Detail ............................ 318
Edit folder ..................... 315
Folder info .................... 318
Move ............................ 316
Play .............................. 299
MUSIC Player ................... 338
Change jackets ............ 343
Music settings .............. 345
Play .............................. 341
Playable music data ..... 338
Playback restriction ...... 300
Playlist .......................... 344
Reset settings .............. 346
Transfer ........................ 339
Music slide show .............. 287
Music&Video Channel ...... 334
Change display ............ 318
Chapter list ................... 337
Delete ................... 317, 337
Detail ............................ 318
Downloading a program
... 335
Edit folder ..................... 315
Folder info .................... 318
Move program .............. 337
Play ...................... 336, 338
Set program ................. 335
Sort ............................... 317
My data ............................... 45
My document .................... 329
Attach to mail ............... 208
Bookmark ..................... 332
Capture screen ............ 332
Delete ........................... 317
Detail ............................ 318
Detail info disp ............. 330
Display ......................... 329
Edit folder ..................... 315
Folder info .................... 318
iC transmission ............. 328
i-mode bookmark ......... 332
Mark ............................. 331
Move ............................ 316
Save ..................... 308, 330
Search .......................... 331
Send Ir data ................. 325
Sort ............................... 317
My Menu ........................... 186
My picture ......................... 286
Attach to mail ............... 208
Change display ............ 318
Data security ................ 142
Delete ........................... 317
Detail ............................ 318
Display quality .............. 286
Edit folder ..................... 315
Edit photo ..................... 288
Folder info .................... 318
iC transmission ............. 329
Move ............................ 316
Save ............................. 308
Send Ir data ................. 325
Send IrSS ..................... 326
Sort ............................... 317
Store in Center ............. 290
My Selection ..................... 364
N
Name ................................ 121
Network search mode ....... 411
Network security code ...... 130
Network service ................ 387
Notification display .............. 32
Notify caller ID .................... 45
Nuisance Call Blocking
Service ......................... 390
Number of protected data
items............................. 462
Continued

480
Index/Quick Manual
Number of saved data items
..................................... 462
NW Services ..................... 388
O
OFFICEED ....................... 398
Omakase Lock .................. 136
On hold ............................... 68
Operator name display ..... 412
Optional and related devices
..................................... 435
Osaifu-Keitai ..................... 250
IC card lock .................. 258
Use ............................... 251
Osaifu-Keitai-compatible
i-

481
Index/Quick Manual
Delete ............................. 75
Play ................................ 74
Quick record message... 74
Redial record ...................... 55
Add to phonebook ......... 99
Delete ............................. 57
Detail info ....................... 57
Font size ....................... 127
Reduce noise ...................... 64
Reject unknown ................ 146
Remote Control ................ 393
Reset all data&set ............ 373
List of reset items
... 374, 416
Reset data ........................ 385
Reset display/sound ......... 125
Reset menu log ................ 126
Reset menu screen .......... 124
Reset settings ................... 372
List of reset items
... 374, 416
Reset total ........................ 366
Ring time .......................... 110
S
Safety precautions .............. 12
SAR .................................. 463
Saved mail ........................ 215
Scan code ......................... 179
Scan function .................... 458
Set auto-update ........... 459
Set scan ....................... 458
Update ......................... 459
Version ......................... 460
Schedule
Attach to mail ............... 208
Delete ........................... 362
Display ......................... 362
iC transmission ............. 328
Memory status.............. 364
Save ..................... 308, 359
Schedule alarm ............ 361
Secret display .............. 141
Select date ................... 362
Send Ir data ................. 325
Set holidays .................. 363
Schedule setting ....... 361, 363
Screen memo
Delete ........................... 190
Display ......................... 189
Protect ON/OFF ............ 190
Save ............................. 189
URL .............................. 189
Secret
Own number .................. 46
Phonebook ..................... 96
Schedule ...................... 359
Secret code ........................ 96
Secret display ................... 141
Security code .................... 130
Change ........................ 132
Security scanning function
(Scan function) ............. 458
Select host ........................ 196
Select language ................ 128
Self mode ......................... 137
Send IrSS ......................... 326
Sent mail ........................... 215
Service numbers .............. 392
Set basic tone ................... 111
Set call record ................... 141
Set rec msg ........................ 73
Set ring start time ............. 145
Setting when folded ............ 67
Slide lock .......................... 141
Slide open setting ............... 67
Slide setting
................. 67, 91, 141, 350
SMS .................................. 202
Animation ..................... 120
Compose and send ..... 230
Copy to Main ................ 313
Copy to UIM ................. 312
Receive ........................ 231
Save ............................. 231
SMS setting ...................... 232
Soft key ............................. 117
Software update ............... 452
Now update .................. 456
Reserve ........................ 456
Set auto-update ........... 454
Update ......................... 455
Sound effect ..................... 112
Specifications ................... 461
SSL list ............................. 194
SSL site ............................ 183
Standard menu ................. 416
Stand-by books ................. 118
Stand-by display ............... 117
Stand-by pictures .............. 119
Start menu setting ............ 123
Stereo&3D ........................ 111
Storage info ...................... 322
Sub-address ....................... 63
Supplied and optional
accessories .................... 24
Symbols ............................ 382
List of special symbols
... 427
T
Template ........................... 207
Delete ........................... 207
Text input .......................... 378
Bar code reader ........... 383
Character mode ........... 378
Characters assigned to
keys ......................... 426
Common phrases
... 381, 430
Copy............................. 384
Cut................................ 383
Delete ........................... 378
Dictionaries .................. 385
Edit common phrases
... 382
Edit prediction .............. 384
Edit user dict ................ 384
Full/Half size ................. 378
Insert ............................ 378
Kuten codes ................. 384
Operation in item .......... 381
Paste ............................ 383
Pictograph/symbol mode
... 378
Pictographs .......... 382, 428
Continued

482
Index/Quick Manual
Prediction ..................... 379
Quote my data ............. 383
Quote phonebook ........ 383
Reset data .................... 385
Select conversion ......... 380
Symbols ............... 382, 427
Undo ............................ 379
User conversion ........... 380
Text Memo ........................ 368
Copy Text Memo .......... 369
Delete ........................... 369
Display ......................... 369
iC transmission ............. 328
Save ..................... 308, 368
Send Ir data ................. 325
Ticker ................................ 199
Timer (T) ............................. 54
ToruCa .............................. 252
Attach to mail ............... 208
Auto recognition ........... 257
Delete ........................... 254
Display ......................... 253
Duplication check ........ 257
Edit folder ..................... 254
IC act. notice ................ 257
IC card lock .................. 258
iC transmission ............. 328
Move ............................ 254
Obtain .......................... 252
Save ............................. 308
Search .......................... 255
Send Ir data ................. 325
Sort ............................... 255
Sort folder..................... 256
ToruCa receive ............. 255
ToruCa setting .................. 255
Total calls cost .................. 365
Total calls duration ............ 365
Touch-tones ........................ 53
Troubleshooting ................ 440
U
UIM ..................................... 36
Copy to Main ................ 313
Copy to UIM ................. 312
Insert/Remove ................ 36
PIN1/PIN2 code ........... 133
UIM phonebook .................. 94
Save ............................... 98
UIM setting ....................... 132
URL
Display ......................... 185
History .................. 187, 279
Last accessed URL ...... 183
USB mode setting ............. 310
User certificate ................. 195
V
V.ph switch notice ............... 78
Vibrator ............................. 110
Videophone ........................ 50
Animation ..................... 120
Auto redial(voice) ........... 77
Backlight always on ..... 121
Call Rejection ................. 65
Chara-den ...................... 75
Chg. to voice call ........... 54
Display setting ............... 76
Hands-free ............... 53, 77
Holding........................... 68
Incoming set ................ 108
Missed call ..................... 71
On hold .......................... 68
Quick record message... 74
Select sub image ........... 51
Set call display ............. 121
Set outgoing image ........ 76
Setting when folded ....... 67
Slide open setting .......... 67
V.ph while packet ........... 78
Visual preference ........... 77
Videophone setting ............. 76
Voice call
Animation ..................... 120
Any key ans .................... 67
Call Rejection ................. 65
Chg. to videophone ....... 54
Hands-free ..................... 53
Holding........................... 68
Incoming set ................ 108
Missed call ..................... 71
On hold .......................... 68
Quick record message... 74
Set call display ............. 121
Setting when folded ....... 67
Slide open setting .......... 67
Whisper mode ................ 68
Voice Mail Service ............ 388
Bar Incoming call ......... 413
Roaming Guidance ...... 413
Voice memo ................ 74, 365
Volume .............................. 112
Volume setting .................. 112
W
Warranty and after sales
services ........................ 450
Web To function ................ 192
Whisper mode .................... 68
WORLD CALL .................... 61
WORLD WING .................... 38
Symbols and Numbers

MEMO

MEMO

MEMO

MEMO

MEMO

MEMO

MEMO

Index/Quick Manual
490
Quick Manual
Using the Quick Manual
To bring the Quick Manual provided with this manual, separate it at the tear-off line
and fold as shown below.
You can conveniently bring the Quick Manual “Overseas Use” with you when you are
overseas and using the international roaming service (WORLD WING).

Tear-off line
123
7654
Quick Manual

Tear-off line
91011
15141312
8
Camera (P.155, 167)

Tear-off line
17 18 19
23222120
16
List of Menus (P.33, 416)

Tear-off line
25 26 27
31302928
24
The Call Waiting Service (P.389)

Tear-off line
123
7654
Quick Manual for “Overseas Use”

Tear-off line
91011
15141312
8
Placing a Call from Your Overseas Location (P.410)

“
Printed with soybean oil ink.
Li-ion
Return all spent battery packs
to NTT DoCoMo or a dealer,
or a recycling shop
to protect the environment.
General Contact Contact for Repair (in Japanese only)