Sony A3880003 Licensed transmitter User Manual 08 user guide part 1
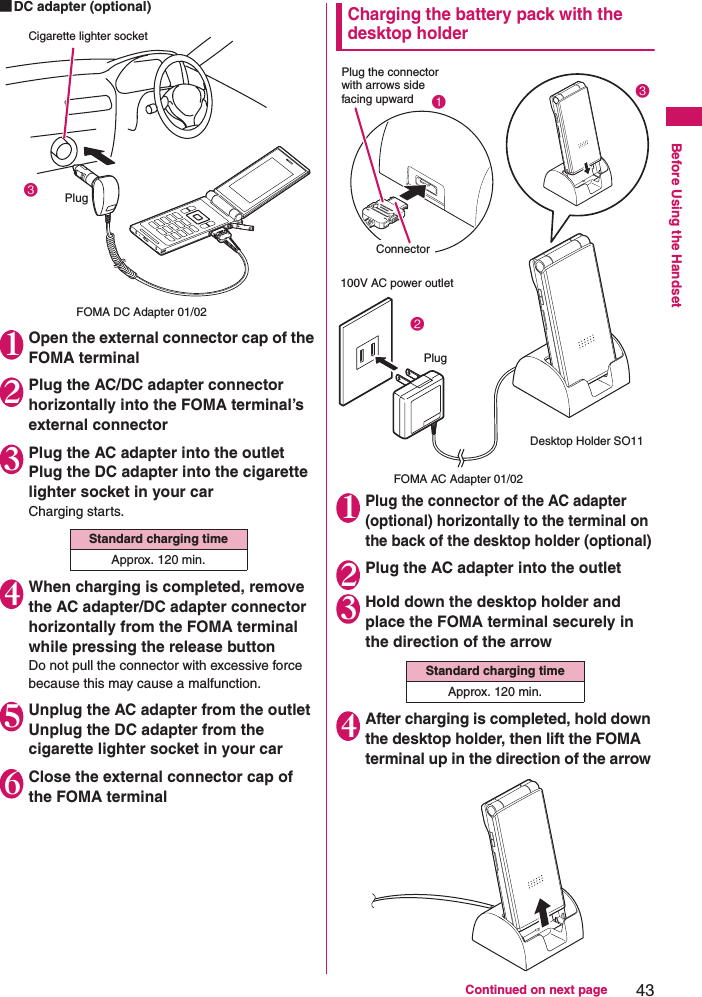
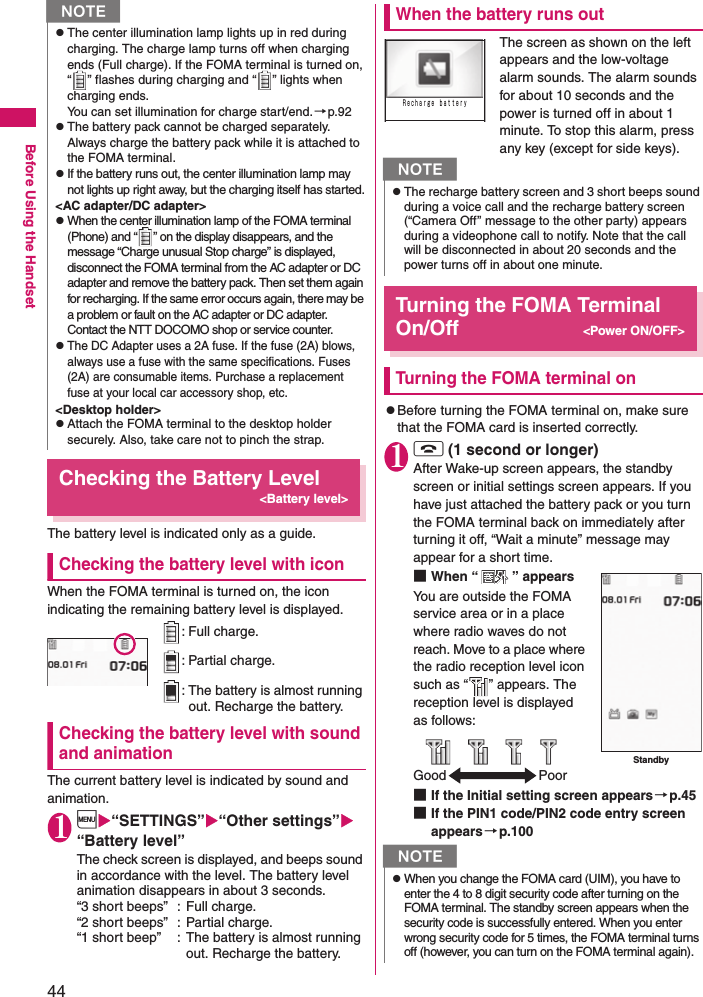
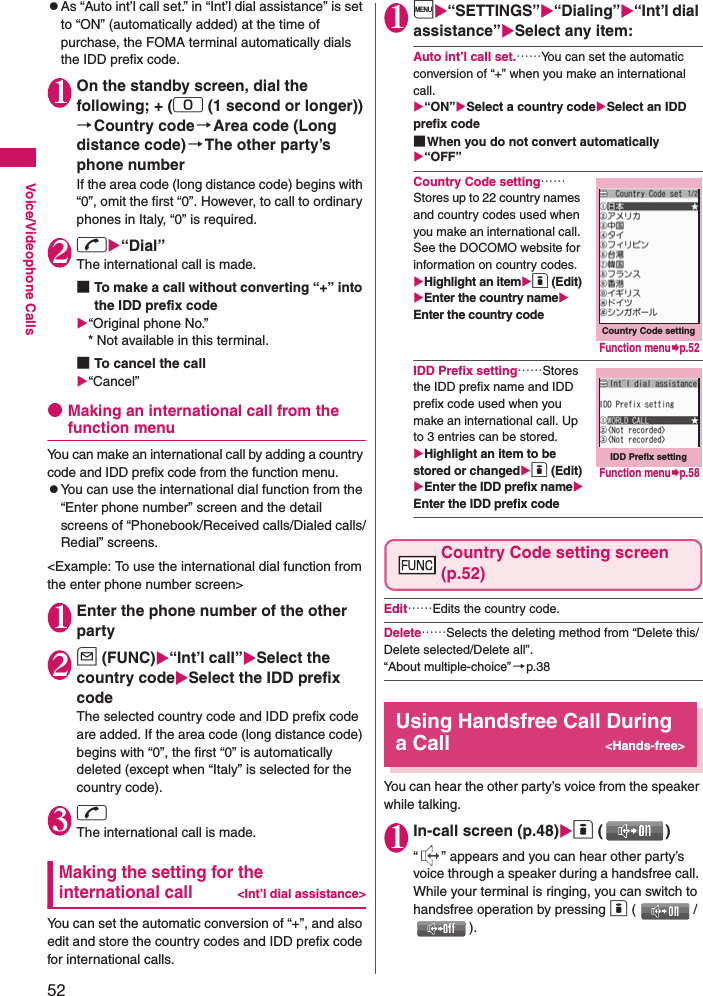
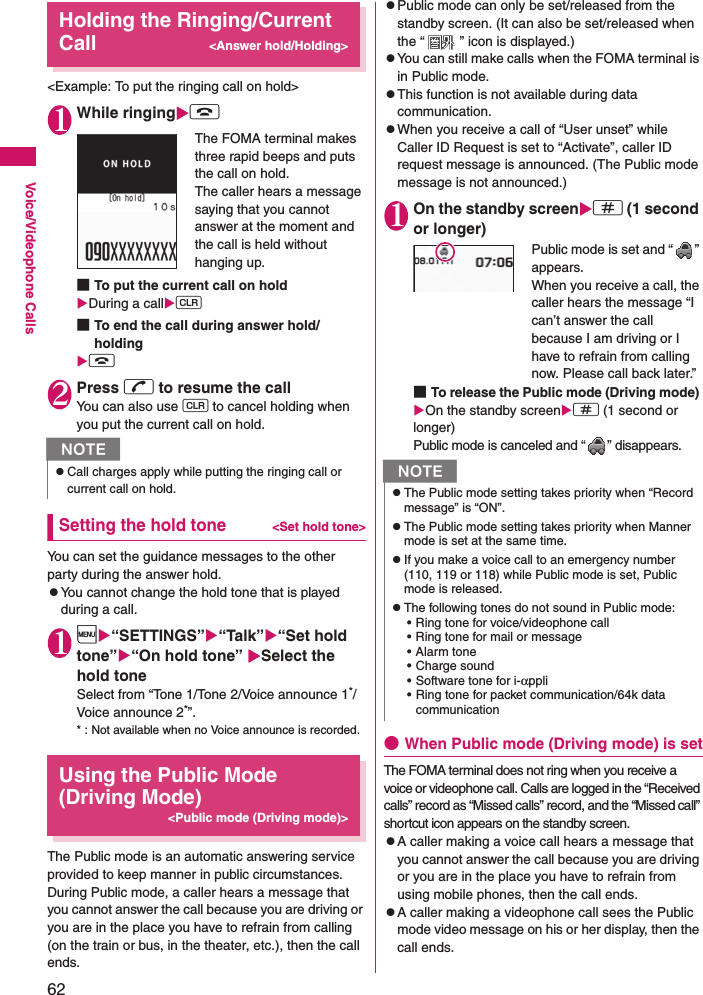
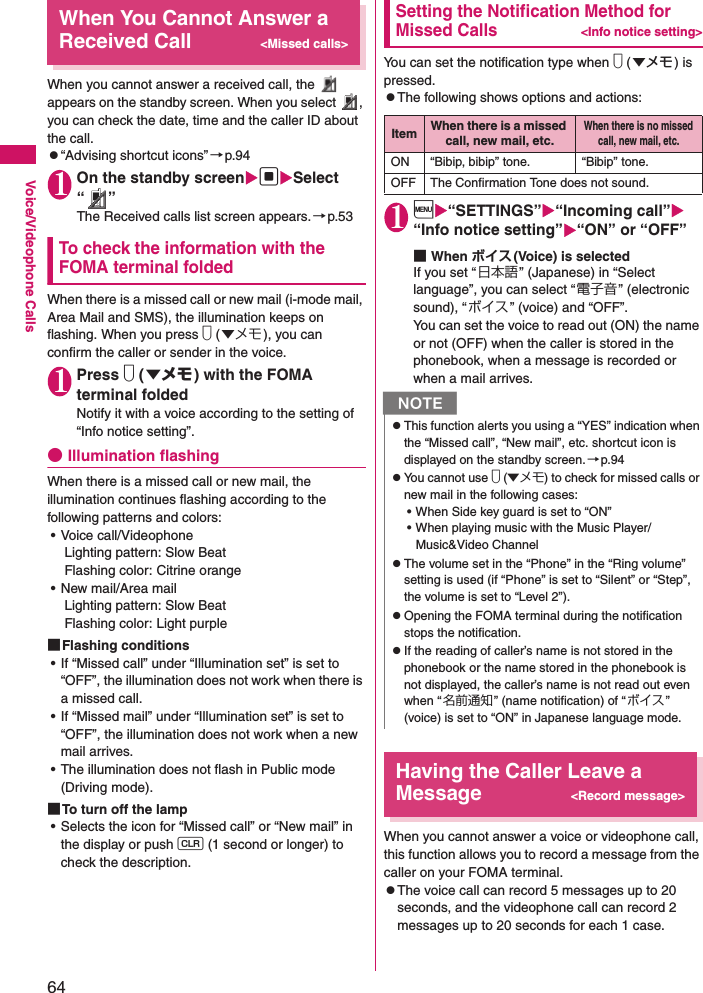
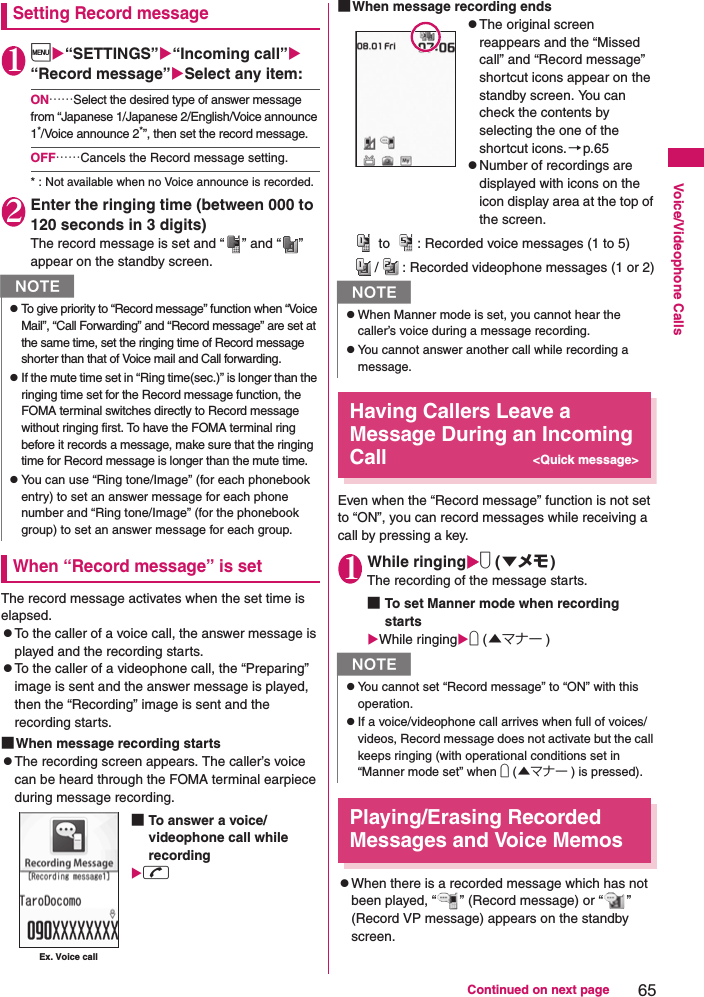
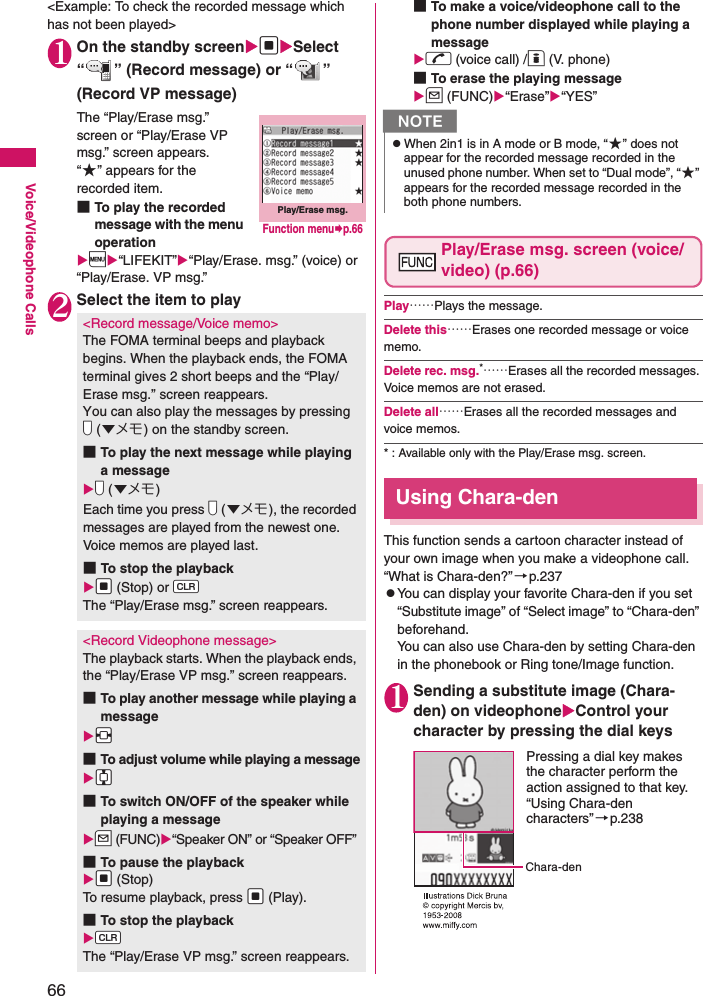
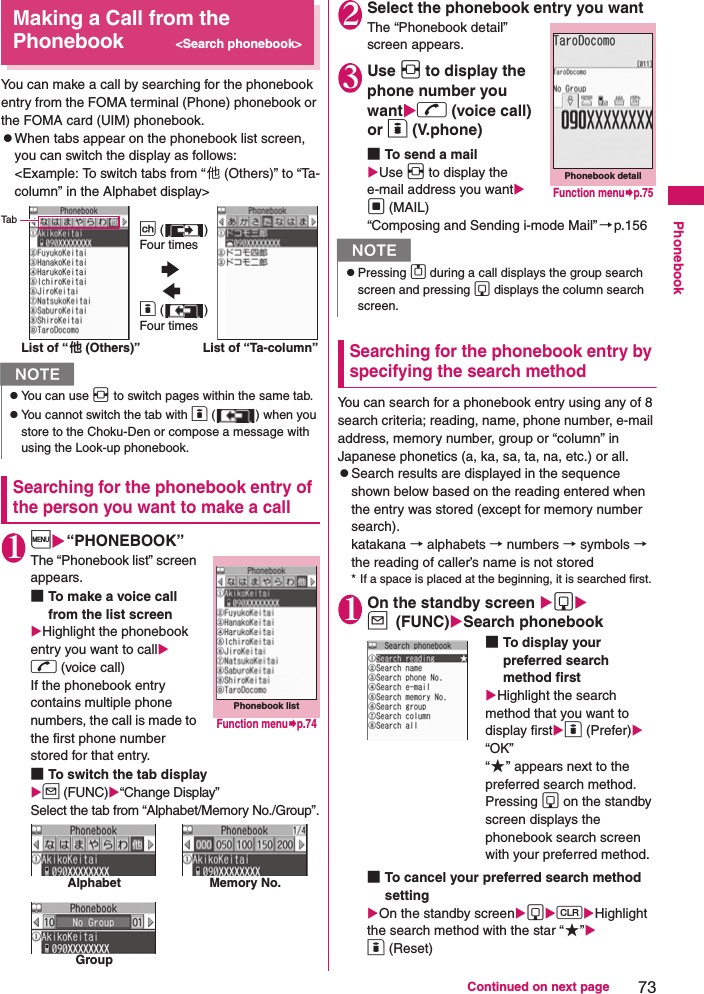
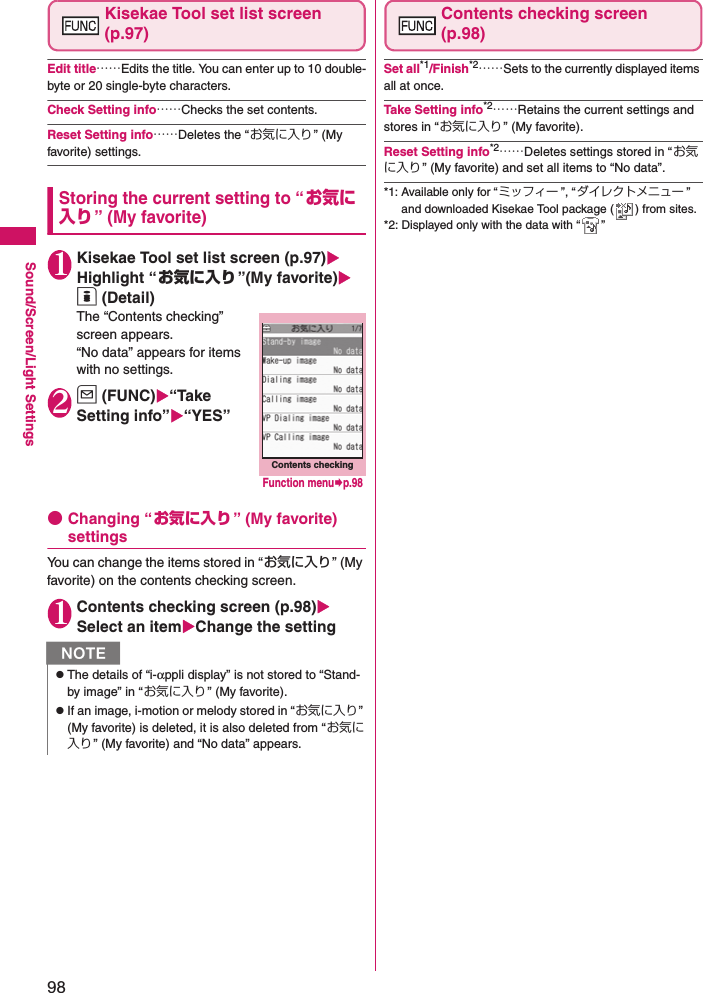
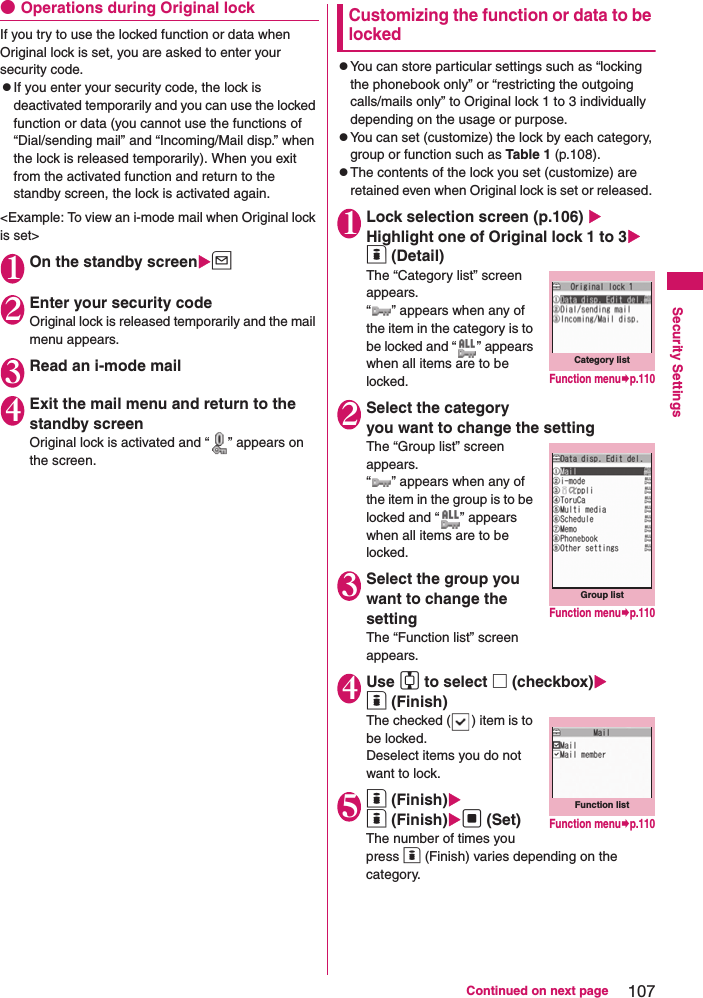
Sony Mobile Communications Inc Licensed transmitter 08 user guide part 1
UserManual.wiki
>
Sony
>
A3880003 User Manual
>
08 user guide part 1
Contents
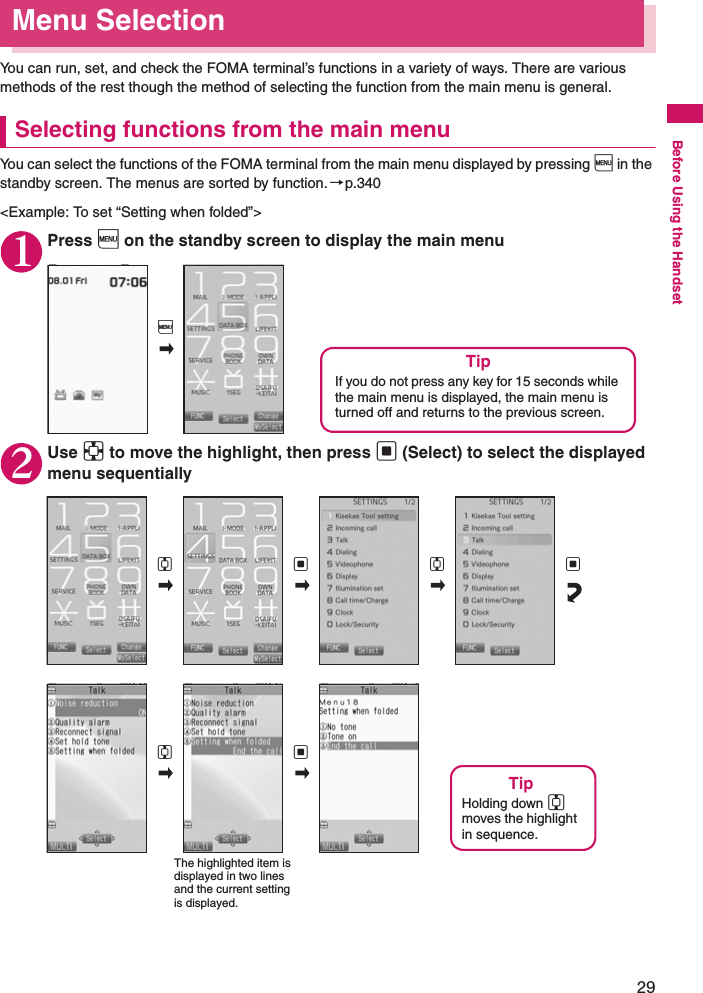
1.
08 user guide part 1
2.
08 user guide part 2
08 user guide part 1
Navigation menu
Upload a User Manual
Namespaces
Wiki Guide
HTML
PDF
Info
Views
User Manual
Discussion / Help
Navigation

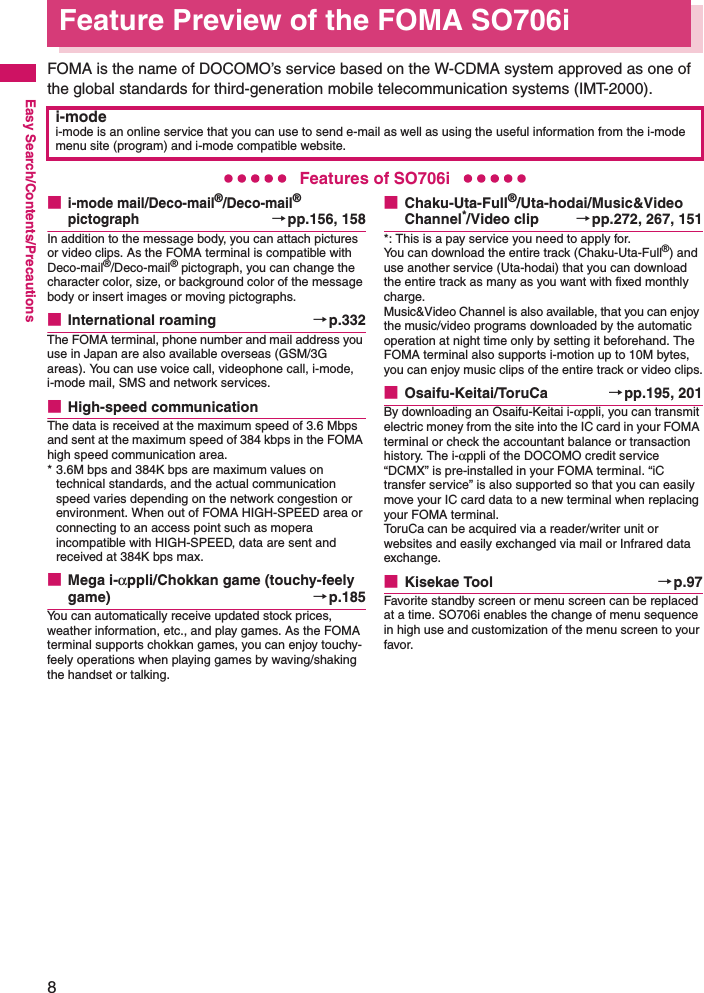
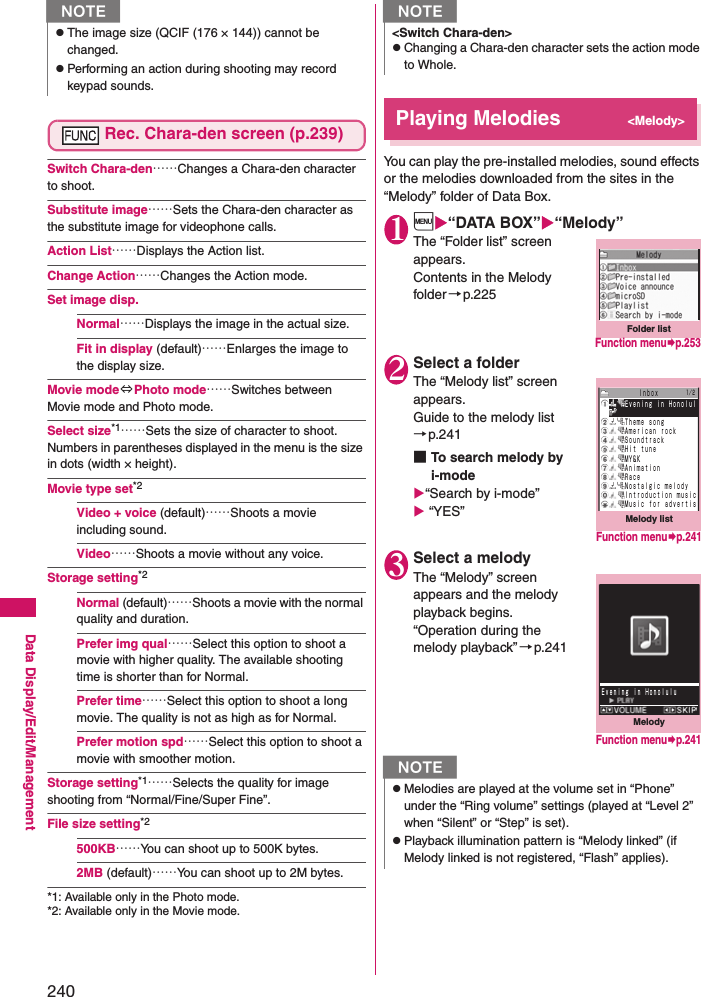
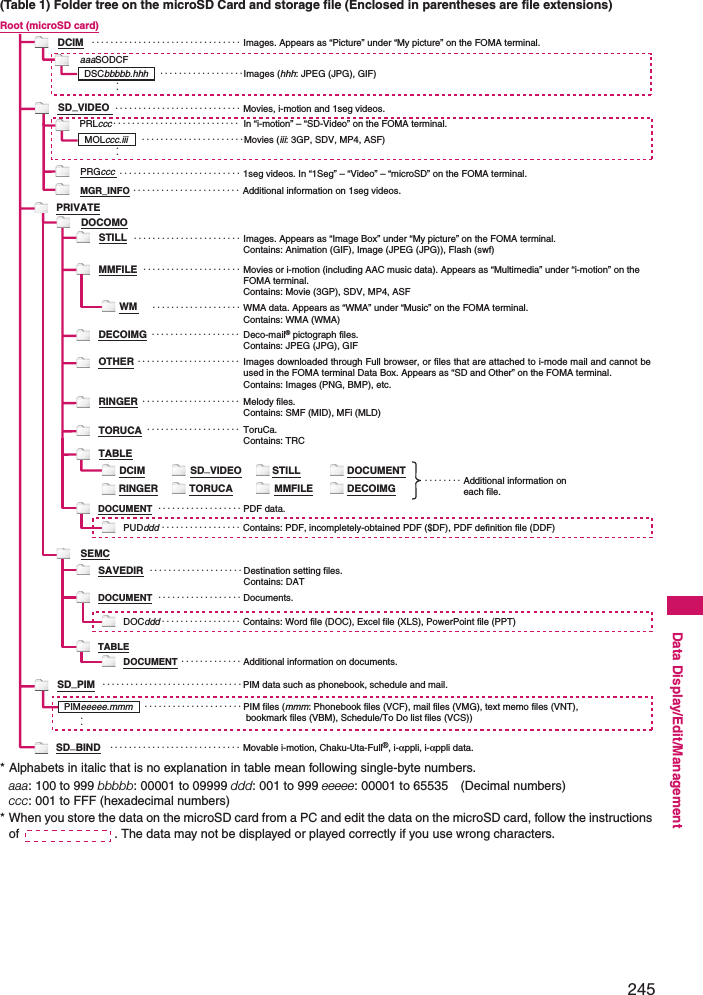
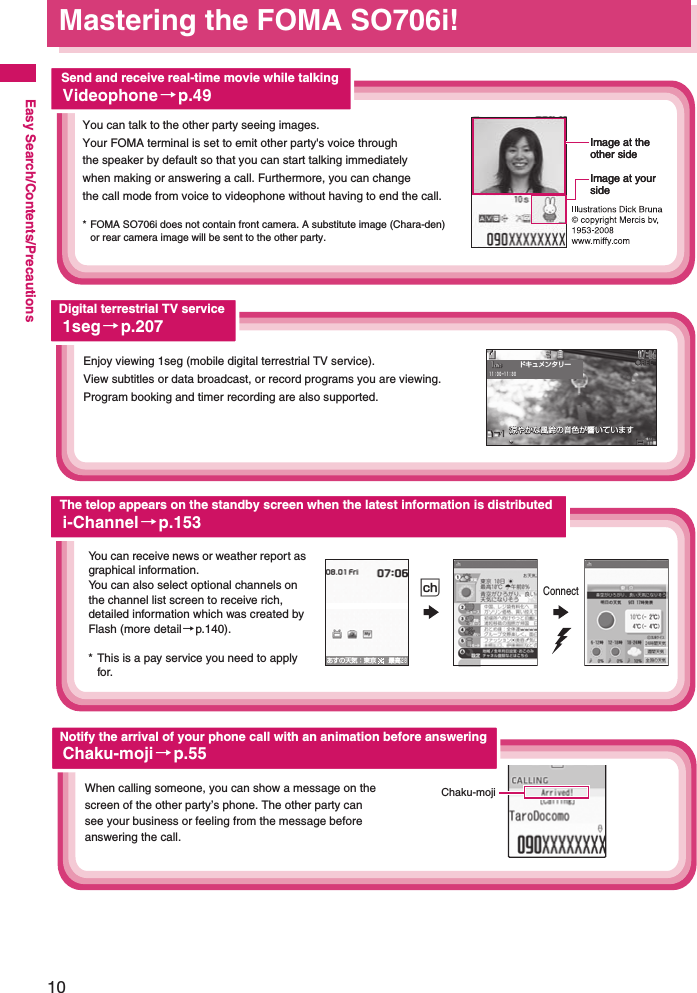
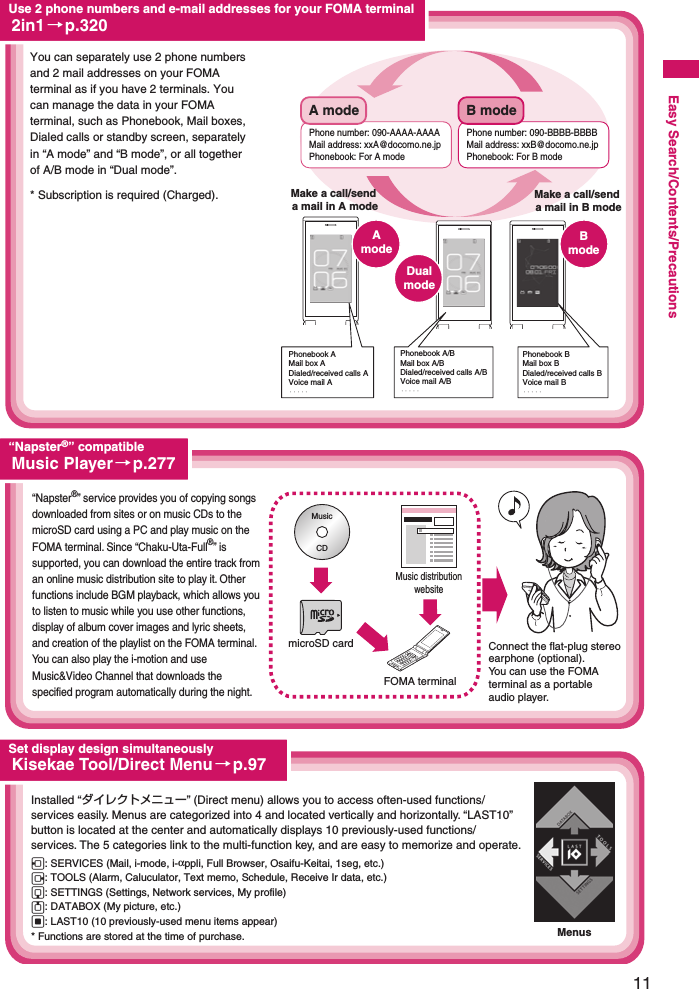
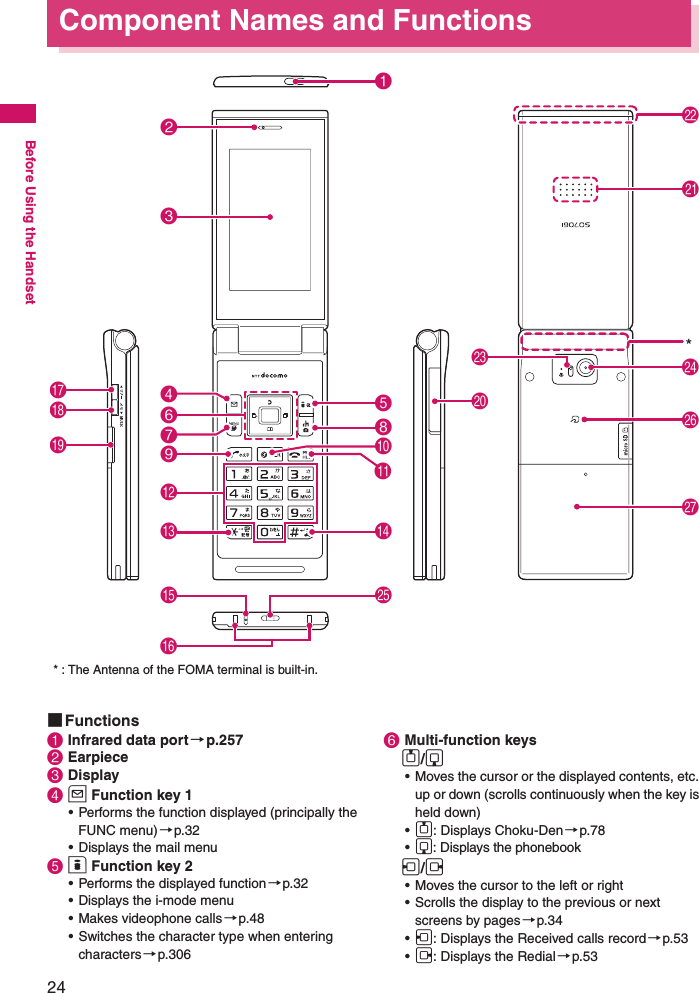
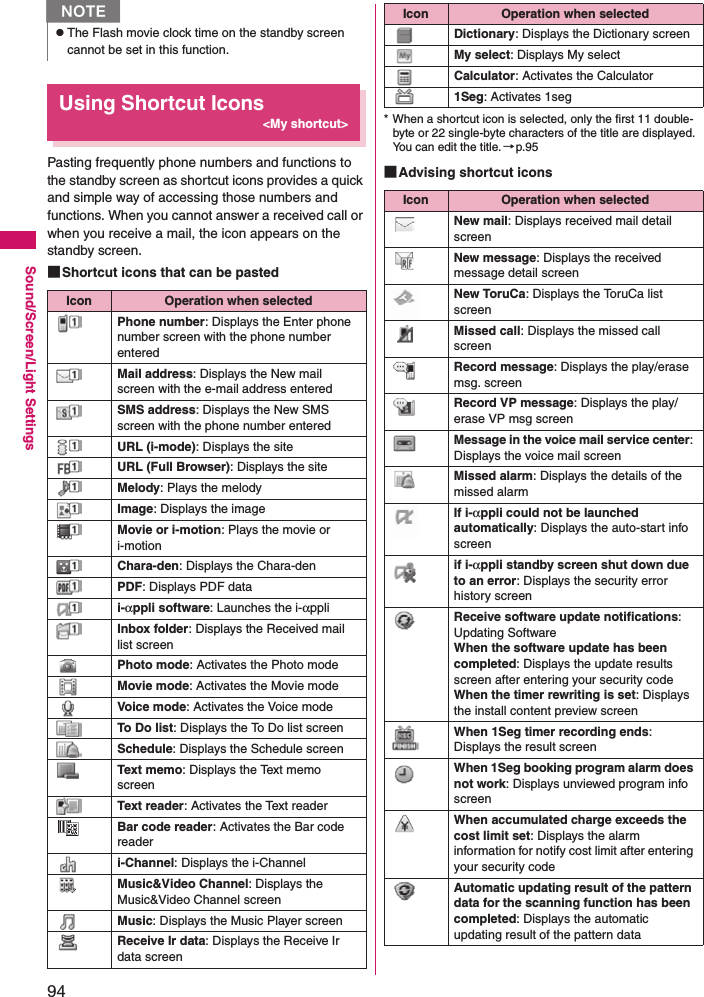
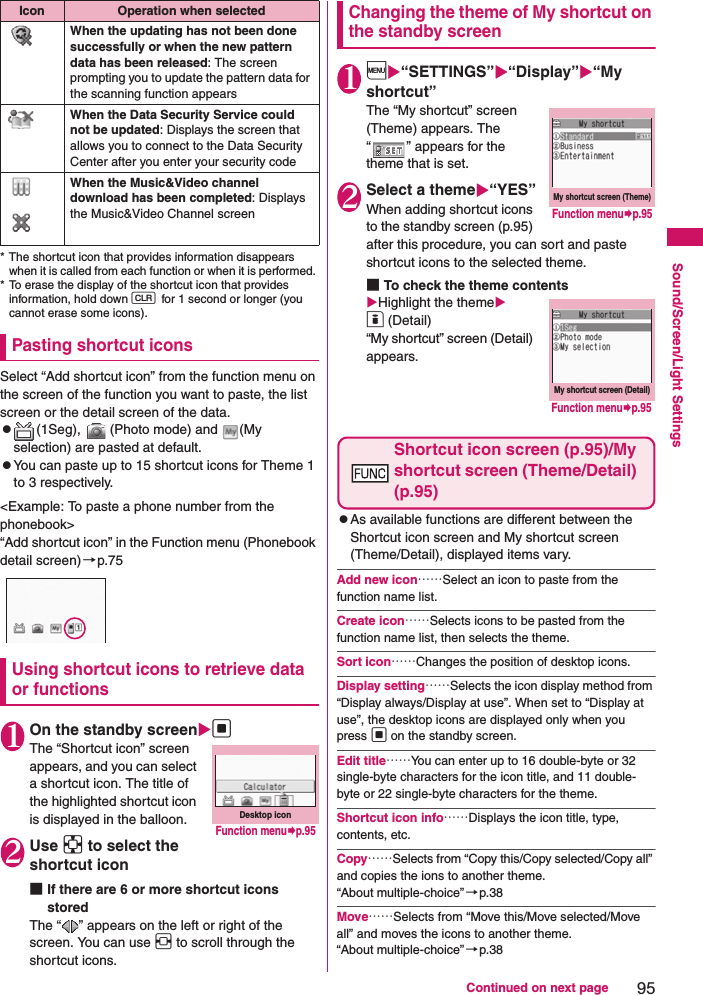
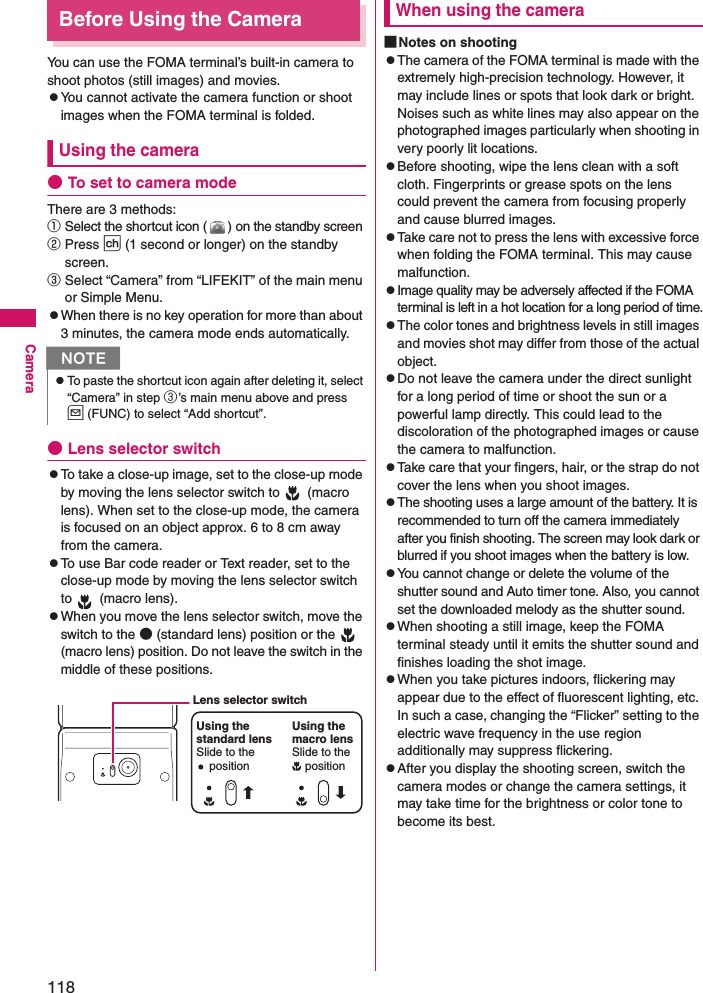
![9Easy Search/Contents/PrecautionsWide variety of functions■Colorful illuminations →p.923 lamps, 11 patterns and 20 color combinations offer favorites illuminations.Time signal can be received using illumination.■Style-Up® panelStyle-Up® panel is adopted. You can enjoy changing the optional panel to your moods.Also, it is available to download panel-fit Kisekae Tool from “PlayNow” by SO.■“POBox Pro” and handy text entry →p.301The prediction conversion function “POBox Pro” (Predictive Operation Based On eXample Pro) is installed. Pressing g for 1 second or longer moves the candidates in “POBOx” on a line basis and selects a target word. Press and hold the dial keys and you can switch the character assigned to the dial keys consecutively such as “a→b→c→A→B→C→2→…”.■Stand-by books →p.89Flash contents with a difference are preinstalled. Every time you open the standby screen, various information such as bits of knowledge, general knowledge and picture books appear. Select your favorite contents from DATA BOXMy picturePre-installed and set it to the standby screen for your enjoyment.■Contents useful when traveling overseas→pp.89, 298Contains Flash content “TalkMan” useful for foreign language conversation. The content can be downloaded from “PlayNow” by SO. Also contains “地球の歩き方” (Chikyu-no Arukikata) and “世界遺産” (World Heritage) as stand-by books, supporting overseas travel.■Dictionary →p.296Japanese, English-Japanese and Japanese-English dictionaries are available.■Wide scale displayThe approximately 2.8-inch high-resolution display is adopted. This recreates the still images or videos in bright and vivid colors.■Camera →p.117Use the camera with the effective pixels 2 million (maximum recorded pixels 1.9 million) to take 2M (1,200 × 1,600) pictures.■microSD card →pp.243, 252Your FOMA terminal supports the microSD card where you can copy data such as phonebook entries, mail messages and images from the FOMA terminal storage and view them on the display.Connecting the FOMA terminal with PC enables you to use it as a reader/writer for the microSD card.■Full Browser →p.217You can access websites for PC to view more information.■PDF viewer/Document viewer→pp.261, 263• With the PDF viewer, you can easily view useful information such as map, catalogue or time table on your i-mode terminal.• The document viewer allows you to view Microsoft® Word, Microsoft® Excel and Microsoft® PowerPoint files.■Infrared data exchange or Infrared remote control →pp.257, 261You can exchange data with other FOMA terminals using infrared communication. You can also operate the devices such as a TV which supports the infrared remote control.■Multi access/Multitask →pp.282, 283You can use voice phone, packet communication and SMS simultaneously (Multi access). You can activate multiple functions and use them simultaneously by switching them (Multitask).Security■Omakase Lock →p.102You can lock your FOMA terminal if you lost it, and cancel lock on your request. For inquiries, see the back cover of this manual.* Omakase Lock service is charged. However, it shall be free of charge when you subscribe to this service at the same time or during the period that you suspend the subscription of the FOMA terminal.* Omakase Lock is a service to lock the FOMA terminal at the subscriber’s request. If the subscriber and user are different, the FOMA terminal may be locked on the subscriber’s request.■Data Security Service →p.115Back up the Phonebook and other data on your FOMA terminal at Data Center on the i-mode network to be able to smoothly restore data if you lose your FOMA terminal, etc. You can edit or manage data stored at Data Center using a PC and restore edited data on the FOMA terminal.* For precautions and usage instructions on “Data Security Service”, see “Mobile Phone User’s Guide [i-mode] FOMA version”. For inquiries, see the back of this manual.* This is a pay service you need to subscribe to. Wide variety of network services (→p.311)• Voice Mail (charged)*• Call Waiting (charged)*• Call Forwarding (free)**: You need to apply for. • Nuisance Call Blocking (free)• Caller ID Request (free)• Dual Network (charged)*• English Guidance (free)• Multi Number (charged)*• 2in1(charged)*](https://usermanual.wiki/Sony/A3880003.08-user-guide-part-1/User-Guide-951150-Page-11.png)
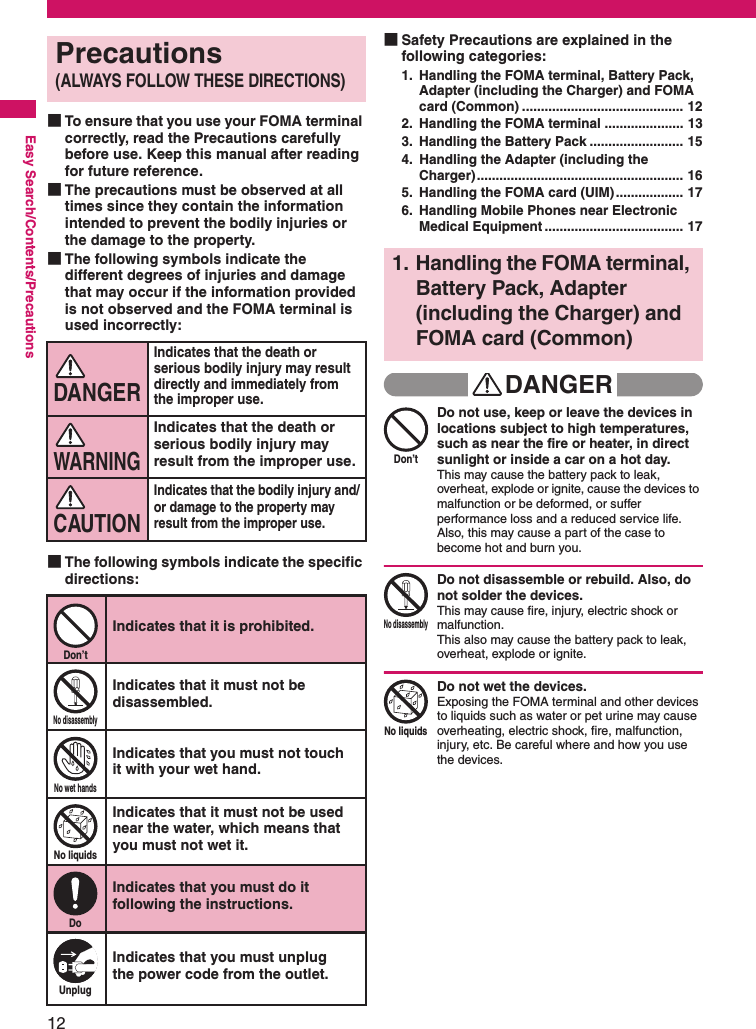


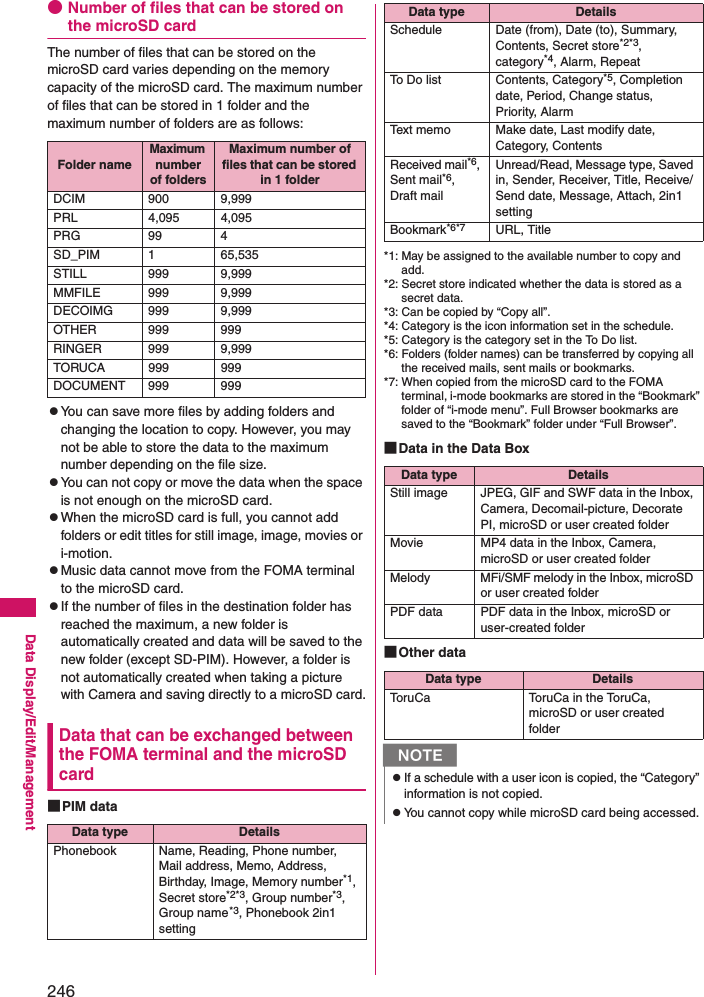
![32Before Using the HandsetAccessing functions by selecting menu numbersWhen the main menu is set to “Standard Menu” (p.33), you can access functions quickly by pressing the keys pre-assigned to the menu numbers (p.340). <Example: To access “Select ring tone”>1Press i on the standby screen, then press 13 in sequencei 13How to use the function keysThe operation icons (Function display) corresponding to u, d, o, i, p and the direction icons corresponding to b are displayed on the screen. Only when the corresponding keys can be used, those icons are displayed. ■Performing the functions assigned to the function keyPress the key for 1 to 5, the function is activated. 1includes (FUNC), (Exit), etc. When the FUNC key is displayed, press u to show the function menu.→p.37The center of 2 includes (Select), (Set), (Play), (Dial) etc. 3includes (Edit), (Finish), (Chrct) etc. 4includes (MENU) and (MULTI). 5includes (ch), (Change), (Ir data), (Pict/Sym) etc.■Moving or scrolling the screenPress b in the direction you want to scroll. [Notation]■Description of the function displayIn this manual, operations related to the keys for the function display are generally described with the function display in the parenthesis, such as Xd (Select) and Zu (FUNC). 2415324153](https://usermanual.wiki/Sony/A3880003.08-user-guide-part-1/User-Guide-951150-Page-34.png)
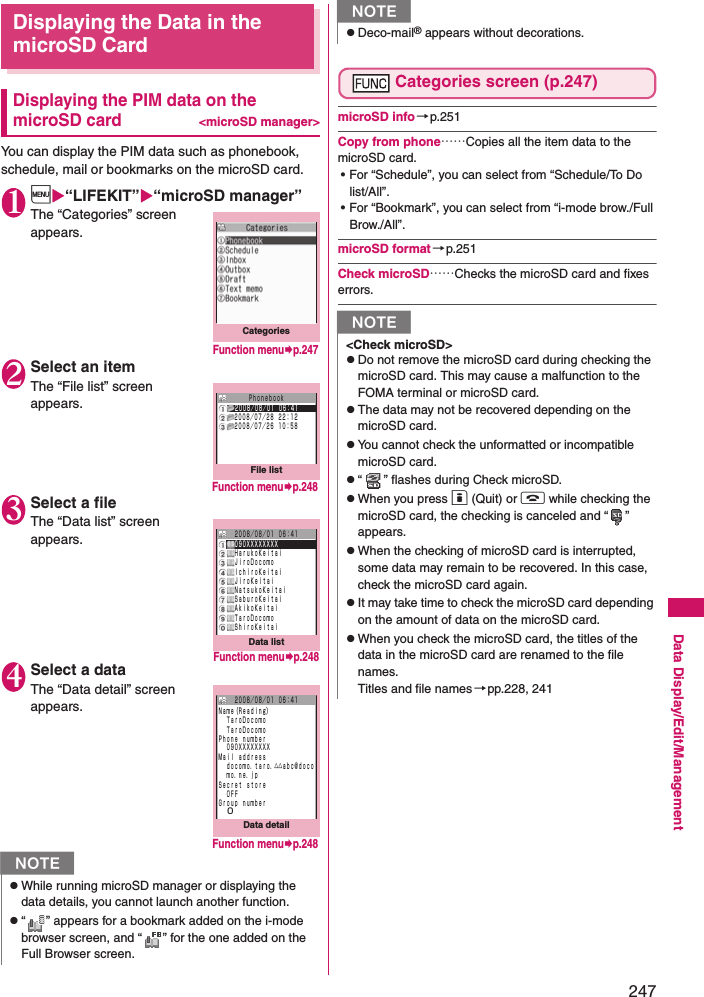
![33Before Using the HandsetChanging the Main MenuYou can change the design of the main menu (style for background or icon, etc.) as you want. zWhen you change the design of the menu display using Kisekae Tool, the menu structure may change in accordance with frequency of using functions. Also, you cannot access some functions entering the menu number assigned to the functions. In this case, change the main menu to “Standard Menu” (p.33) or perform “Reset menu op. log” (p.91) so as to operate as described in this manual.1Press i on the standby screen, then press o (Change) in sequence2Select an item“Lacy Pink” to “Standard Menu”Switches the display design in each menu. When set to “Standard Menu”, you can access functions by entering the menu numbers.→p.32“Large Menu”Large-font menu appears.“Simple Menu”Simple Menu consists of frequently used menus, and its character size is large and operation procedure is simple.→p.349Sets the character size of the screens to “X-large” all at once. →p.93“Original theme”→p.91You can change the icons and background image used on the main menu. You can also set the picture you shot as the background. “Kisekae Tool”→p.97You can change various design of the FOMA terminal such as the main menu all at once with the Kisekae Tool package.■Changing the Main Menu temporarilyHighlight an item on the theme screen and press o (Change) to change the main menu temporarily.When the main menu is displayed again, the main menu before it sets is displayed. NzWhen you set the menu that supports the user customizing, you can sort the menu items by selecting “Manual-sort” by pressing u (FUNC) in the main menu.→p.284[Notation]■Description of the main menuThe menu name may be different depending on the selected theme of Menu display set. Steps are described using default settings when the phone color is platinum white.①MAIL ②I-MODE ③I-APPLI ④SETTINGS⑤DATA BOX ⑥LIFEKIT ⑦SERVICE ⑧PHONE BOOK⑨OWN DATA ⑩MUSIC ⑪1SEG ⑫OSAIFU-KEITAIi ThemeMain Menuo Switching pages→p.34Simple Menu](https://usermanual.wiki/Sony/A3880003.08-user-guide-part-1/User-Guide-951150-Page-35.png)
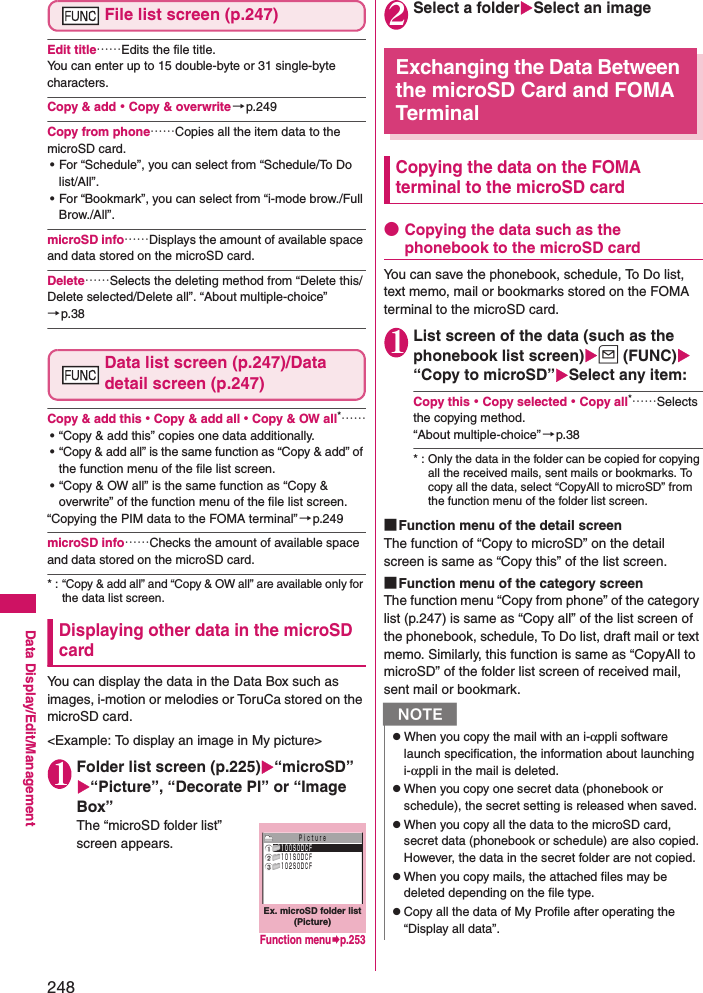
![36Before Using the HandsetDescription of the OperationsIn this manual, instructions for menu operations are briefly described in almost all cases as follows: The example of description of operations and the actual operations1i“LIFEKIT”“Alarm”Highlight the item to set u (FUNC)①: Press i on the standby screen. ②: Press b to move the highlight to the menu in the double quotation mark, then press d (Select). ③: Press b to move the highlight to the item in the double quotation mark, and then press d (Select). Or, press 1 to 9 0 w q for the menu number in the double quotation mark. ④: Press b to move the highlight. ⑤: Press the key for the function displayed in parentheses. [Notation]■Omission of Xd in the “Select” and “Set” operations• When a target function is selected from the main menu or list, such as example ② and ③, Xd (Select) is omitted. • In the cases such as “Select an item” or “Enter your security code”, Xd (Select) and Xd (Set) are omitted in the same way. • When you are supposed to move to the next step without pressing Xd (Select), “Highlight xxx” is used, such as example ④. ■Easy operations are preferred• Though the operation of the main menu has been described, this manual gives priority to the operations by short cut keys operations (p.30). • If you select the menu from the Simple Menu, refer to “Simple Menu function list” (p.349). ■Omission of the descriptions after completing the operations• The descriptions for the operations after completing the function are omitted. • “To cancel operations, and to return to the standby screen”→p.35■Brief description of keys and menus • In this manual, instructions for key illustrations/menu displays/holding down keys are simply described as follows:① ② ③ ④ ⑤Key Menu display Holding down keysActual display/operation Menu Press and hold down q for 1 second or longerDescription in this manual 1iMenu q (1 second or longer)](https://usermanual.wiki/Sony/A3880003.08-user-guide-part-1/User-Guide-951150-Page-38.png)

![38Before Using the Handset●About multiple-choiceWhen you delete unnecessary data, protect important data or move the data you do not want to be viewed by others to the secret folder, etc., you can select not only one data or all data but also multiple data. In this case, perform the following operation. <Example: To delete multiple mail on the received mail list screen>●Menus which switch alternatelyDepending on the menu, menu items switches alternately as follows: When the Phonebook detail screen is displayed in “Set normal font” mode, “Set large font” appears as in <Example 1>. If “Set large font” is selected, the font mode changes to large font mode, and “Set normal font” appears next time the function menu appears.[Notation]■Description of the menus which switch alternatelySuch menus are described as “Set large font⇔Set normal font”. NzWhen the displayed menu contains sub menus, “ ” appears on the right.zThe displayed contents of the function menu may vary or you may not be able to select the item of function menu depending on the operating function and settings. The function menu items you cannot select are displayed in gray. “Delete selected” Check mails to delete o (Finish) “YES”Marking a checkboxWhen you use b to move the frame to the item to select and press d (Select), the checkbox changes from to . This means that the item is selected. Pressing d (Select) switches between and . In the images display, appears when the item is selected. Nothing appears when unselected. • When “ ” appears on the function display area, pressing u (FUNC) allows you to use “Select all” or “Release all”. d d Camera1/22008/08/01 06:35Camera1/22008/08/01 06:35dd“When normal font is set” “When large font is set”<Example 1> <Example 2>](https://usermanual.wiki/Sony/A3880003.08-user-guide-part-1/User-Guide-951150-Page-40.png)
![42Before Using the Handset■Battery pack charging• For details, refer to the manuals for the FOMA AC Adapter 01/02 (optional), FOMA AC Adapter for Global Use 01 (optional) and FOMA DC Adapter 01/02 (optional). • FOMA AC Adapter 01 supports voltage of 100V AC only. • FOMA AC Adapter 02 and FOMA AC Adapter 01 for Global Use support voltage from 100V AC to 240V AC, but the plug shape of the AC adapter is for 100V AC (domestic). For overseas use, the compatible conversion plug adapter is required. Do not charge the battery using the transformer for travel. • When charging the battery pack, the battery pack must be attached to the FOMA terminal. • You can receive calls during charging if the FOMA terminal is turned on. However, the battery level will fall during the call and the time required for charging will increase. Charging time also increases when “Charging” of “Backlight” setting is set to “All time ON”. • When plugging in or out the connector, do it slowly and securely not to apply an excessive force. • When you make a call or perform packet communication during charging in a high-temperature environment, the FOMA terminal’s temperature may rise and the charging may be stopped. If this occurs, stop a running function and wait for the temperature or the FOMA terminal to fall before you retry charging. ■Do not charge the battery pack for a long period of time (several days) with the FOMA terminal turned on• If you charge the battery pack for a long period of time with the FOMA terminal turned on, power to the FOMA terminal will be supplied from the battery pack once charging ends. As a result, you will only be able to use the FOMA terminal for a short time and the low-voltage alarm may sound immediately. In this case, recharge the battery pack correctly. Disconnect the FOMA terminal from the AC adapter (or desktop holder) or DC adapter, then set it again for recharging. ■Battery usage rough time (The duration varies depending on the charging time and the deterioration of the battery pack)* : To switch networks, use “3G/GSM setting” (p.336).• The continuous standby time in stationary is the average usage time when the FOMA terminal is folded and standing still while radio waves can be normally received. • The continuous standby time in moving is the average usage time when the FOMA terminal is folded under condition of “stationary”, “moving”, and “out of service area” within the area where radio waves can be normally received. • Note that the actual continuous talk/standby time and 1seg viewing time may decrease by as much as half depending on the following conditions: the battery pack charging level, the function settings, ambient environment such as temperature, the status of radio waves (out of service area or weak radio waves). It may shorten the talk (communication)/standby time to make i-mode communication, compose i-mode mail, transfer data, execute multi access, activate i-αppli or i-αppli standby screen, use camera, play movie/i-motion/music and view 1seg.• Depending on the network condition of the country, talk (communications) and standby time may decrease.• When using in Japan, talk (communications) and standby times will be longer if “3G/GSM setting” (p.336) is set to “3G”.Charging the battery pack with the AC/DC adapter■AC adapter (optional)Continuous Standby Time[FOMA/3G] Stationary (“Auto”*): Approx. 580 hrs.In transit (“3G”*): Approx. 430 hrs.In transit (“Auto”*): Approx. 360 hrs.[GSM] Stationary (“Auto”*): Approx. 290 hrs.Continuous Talk Time[FOMA/3G] Voice communications: Approx. 220 min.Videophone: Approx. 100 min.[GSM] Voice communications: Approx. 190 min.1seg Viewing TimeNormal: Approx. 280 min.ECO mode: Approx. 350 min.100V AC power outletPlugFOMA AC Adapter 01/02ReleasebuttonPlug the connector with arrows side facing upwardConnector capConnector123](https://usermanual.wiki/Sony/A3880003.08-user-guide-part-1/User-Guide-951150-Page-44.png)

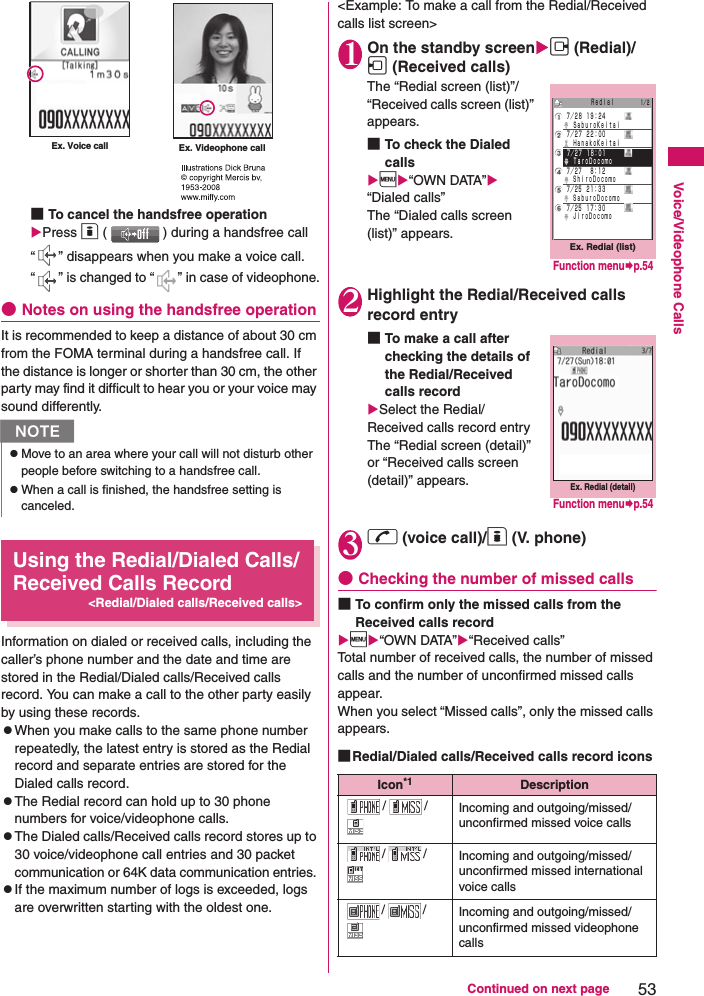
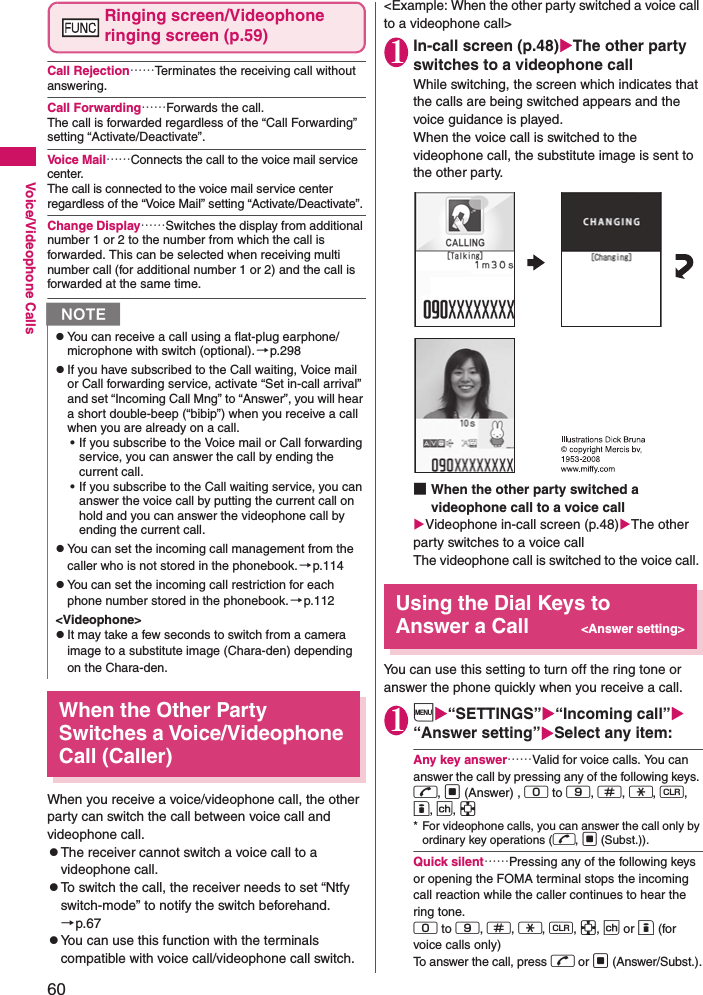
![55Continued on next pageVoice/Videophone CallsUsing Chaku-moji<Chaku-moji>When making a voice call or videophone call, you can send a message (Chaku-moji) to the other party to show the summary of the call, etc. beforehand. z5 Chaku-moji messages are stored at the time of purchase. You can change the pre-installed Chaku-moji messages. zYou can include pictographs or face marks in Chaku-moji, and you can send a message of up to 10 characters including pictograph/symbol/double-byte character/single-byte character. zFor details on Chaku-moji and the compatible models, refer to the DOCOMO website or “Mobile Phone User’s Guide [Network services]”. Making a call with a messageYou can add Chaku-moji when making a voice or videophone call from the “Enter phone number” screen and the detail screen of the “Phonebook” or “Redial/Dialed calls/Received calls”. <Example: To make a call with Chaku-moji from the enter phone number screen>1Enter phone number screen (p.48)u (FUNC)“Chaku-moji”Select any item: Create message……Enters Chaku-moji. You can enter up to 10 characters.Select message……Selects from the stored Chaku-moji. You can edit Chaku-moji by pressing o (Edit) on the message selection screen.Sent messages……Selects from the previously sent Chaku-moji. You can edit Chaku-moji by pressing o (Edit) on the sent message screen.■To delete the entered Chaku-moji (to make a call without Chaku-moji)u (FUNC)“Chaku-moji”“Create message” Clear all the entered Chaku-moji2r (voice call) /o (V. phone)●When you receive a voice or videophone call with a messageThe Chaku-moji appears on the ringing screen. The Chaku-moji disappears when you answer the call.NzSelecting “Delete all” from the Redial/Dialed calls record deletes all the Redial and Dialed calls records. Note that selecting “Delete this” or “Delete selected” for the Redial record does not delete the entries of Dialed calls record, and selecting “Delete this” or “Delete selected” for the Dialed calls record does not delete the entries of the Redial record. <Compose message>zWhen the phonebook stores the phone number and the mail address, an address listed first is used as destination to create a message.NzSending Chaku-moji is charged. Receiving Chaku-moji is not charged. zYou can store up to 30 Chaku-moji in the sent messages record (if you use 2in1, up to 30 sent messages records when set to each mode, and up to 30 sent messages records for each and total of the 60 records are stored when set to Dual mode). When you send same Chaku-moji repeatedly, only the latest one is recorded. When the entries exceed the maximum number, entries are overwritten from the oldest entry. zIf the receiver’s terminal is under the following conditions, Chaku-moji cannot be sent. In this case, no sending charges apply. • The terminal is not compatible with Chaku-moji (“Transmission failed” appears)• Chaku-moji does not appear on the screen of the receiver terminal because of the “MSG display settings” on the receiver terminal (“Transmission failed” appears)• Public mode (Driving mode) is set• The ringing time for recording message is set to 0 second.•“” or the FOMA terminal is turned off. zDepending on the signal status, sending result does not appear on the sender terminal even when the receiver terminal receives Chaku-moji. In this case, sending charges apply. zYou cannot send or receive Chaku-moji when using the FOMA terminal overseas. When the other party’s terminal receives Chaku-moji, the result “Transmission completed” appears. Ex. Voice callChaku-moji](https://usermanual.wiki/Sony/A3880003.08-user-guide-part-1/User-Guide-951150-Page-57.png)

![63Voice/Videophone CallszIf the FOMA terminal is set to Public mode (Driving mode) while network services are activated, voice calls and videophone calls are handled as shown in the Table 1 (p.63).zWhen you receive a mail, the ring tone does not sound and the “New mail” shortcut icon appears on the standby screen.Using the Public Mode (Power OFF)<Public mode (Power OFF)>The Public mode (Power OFF) is an automatic answering service provided to keep manner in public circumstances. During Public mode (Power OFF), a caller who made a call while the FOMA terminal is turned off hears a message that you cannot answer the call because you are in the place you have to turn off the mobile phone (in the hospital, on the airplane, around the priority seat on the train, etc.), then the call ends.1On the standby screenw25251rPublic mode (Power OFF) is set. (Nothing changes on the standby screen.)When you receive a call after setting Public mode (Power OFF) and turning off the FOMA terminal, the caller hears the message “The person you are calling is in an area where cell phone should not be used. Please call back later.” ■To cancel the Public mode (Power OFF)On the standby screenw25250r■To check Public mode (Power OFF) settingOn the standby screenw25259r●When Public mode (Power OFF) is setThe setting is valid until “*25250” is dialed to release the Public mode (Power OFF). The setting is not canceled only by turning on the FOMA terminal. The Public mode (Power OFF) message is announced even when you are in an out-of-service area or where the reception is very poor. zA caller making a voice call hears a message that you cannot answer the call because you are in the place you have to turn off the mobile phone, then the call ends. zA caller making a videophone call sees the Public mode (Power OFF) video message on his or her display, then the call ends. zIf the FOMA terminal is set to Public mode (Power OFF) while network services are activated, voice calls and videophone calls are handled as shown in the Table 1 (p.63).NzIf the power is off or “ ” is displayed, the message for “ ” is announced instead of the Public mode message even when Public mode is set. [Table 1] Handling of received calls when network services and Public mode (Driving mode/Power OFF) are set* : If the ring time is set to 0 second, the Public mode message is not announced and the “Voice Mail Service” or “Call Forwarding Service” is applied. In addition, they are not recorded in the “Received calls” record and “Missed call” shortcut icon does not appear.Service When a voice call is received When a videophone call is receivedVoice Mail Service• Connects to the Voice mail service center after announcing the Public mode message.*• Connects to the Voice mail service center without showing the Public mode video message. Call Forwarding Service• Transfers the call to the forwarding number after announcing the Public mode message.*• The Public mode message is announced or not depending on the setting of the call forwarding service. • Transfers the videophone call to the forwarding number without showing the Public mode video message. • The connection is not established when the videophone for the forwarding number is not compatible with 3G-324M. Nuisance Call Blocking• Ends the call after showing the message that the connection could not be established for the barred callers. • Ends the call after announcing the Public mode message for other callers. • Ends the call after showing the video message that the connection could not be established for the barred callers. • Ends the call after showing the Public mode video message for other callers. Caller ID Request• Ends the call after announcing the caller ID request message for the callers who do not provide the caller ID. • Ends the call after announcing the Public mode message for the callers who provide the caller ID. • Ends the call after showing the caller ID request video message for the callers who do not provide the caller ID. • Ends the call after showing the Public mode video message for the callers who provide the caller ID.](https://usermanual.wiki/Sony/A3880003.08-user-guide-part-1/User-Guide-951150-Page-65.png)

![71Phonebook3Select any item: (group)……Selects a group number among “Group 01-19” for “Phone” or among “Group 01-10” for “UIM”. If no group is selected, the entry is automatically assigned to “No Group”. (phone number)……Enters the phone number. • Also select an icon for “Phone”. You can enter up to 26 digits for the phone number. Once you have stored the first phone number, the “ <Not stored>” option appears on the Phonebook edit screen. Select this option to store an additional phone number. • You can enter 20 digits for a blue FOMA card (UIM), and 26 digits for a green/white FOMA card (UIM). (mail address)……Enters the e-mail address. You can enter up to 50 single-byte alphabets, numbers and symbols. Also select an icon for “Phone”. Once you have stored the first e-mail address, the “ <Not stored>” option appears on the Phonebook edit screen. Select this option to store an additional e-mail address. (address)……Enters the ZIP code and street address. Enter the 7 single-byte numbers for ZIP codes. You can enter up to 50 double-byte or 100 single-byte kanji characters, hiragana, katakana, alphabets, numbers and pictographs. (birthday)……Enters the contact’s birthday (year, month and day). Any year from 1800 to 2099 can be set. (memorandums)……Enters a memo (short note). You can enter up to 100 double-byte or 200 single-byte characters which include kanji characters, hiragana, katakana, alphabets, numbers and pictographs. (image)……Shoots or selects the image displayed when you receive a call from the contact. (Chara-den)……Selects the “Chara-den” character displayed as the substitute image for videophone calls. (memory No.)……Memory numbers are automatically* assigned when an entry is stored in the phonebook, but can be changed to any number between 000 and 999. * : Assigned to the available number between 010 to 999 from the smallest number. If no number is available from 010 to 999, it is assigned to the available number between 000 to 009. 4o (Finish)When phonebook editing is interruptedYou can resume editing the phonebook entry which is stopped being edited because of the emit of the low-voltage alarm or activation of a task of Tool groups using Multitask, etc. 1i“PHONEBOOK”u (FUNC)“Add to phonebook”Select the destination“Recall”When you are re-editing the entry, if you cancel editing without storing the changes, the data being edited is erased. ■To add a new phonebook entry“New”NzPhonebook entries stored using symbols or pictographs may not be displayed correctly when data are transferred by the infrared communication, etc. zEnter the correct domain when storing e-mail addresses. The domain is the part of the address that follows the “@” symbol. However, if the contact’s e-mail address is in the “[phone number]@docomo.ne.jp” format, store just the phone number as the e-mail address. z“2in1 setting” in Phonebook is specified according to the 2in1 mode at registration. The setting of “Phonebook 2in1 setting” ( / / ) is displayed on the Phonebook list screen or Phonebook detail screen when 2in1 mode is in Dual mode. However, when attaching the phonebook to a mail or copying it to the UIM phonebook, Phonebook 2in1 setting is not to be sent. <Chara-den settings priority sequence>zThe priority order for Chara-den settings is as follows: ①Chara-den setting of Ring tone/Image (for individual)②Chara-den setting of Ring tone/Image (for group)③Chara-den stored in the phonebook entry④Substitute image in Select imageMode Phonebook 2in1 settingDual mode AA mode AB mode BOFF AYou can change the Phonebook 2in1 setting in “2in1 setting”.→p.322](https://usermanual.wiki/Sony/A3880003.08-user-guide-part-1/User-Guide-951150-Page-73.png)
![75PhonebookPhonebook detail screen (p.73)Edit phonebook→p.76Notify Caller ID→p.56Chaku-moji→p.55Dial settingPrefix numbers→p.58Int’l call→p.522in1/Multi Num.……When 2in1 is set to ON and Dual mode, selects from “Number A/Number B/Cancel number” (p.323) (not available when A mode or B mode is set). Selects from “Basic number/Additional number 1/Additional number 2/Cancel number” (p.319) at the Multi Number when 2in1 set to OFF. Select image……Selects the image used during a videophone call from “My side/Chara-den”. Select “Release settings” to cancel the setting. Ring tone/Image*1→p.77Restrictions*1 →p.112Move to top*1……Moves the displayed phone number/mail address to the top when multiple phone numbers/mail addresses are stored in one phonebook entry. Add to Choku-Den*1 →p.78Add shortcut →p.94Compose message*2 →p.156Attach to mail*1*2……Displays a new mail screen with the phonebook data attached. Compose SMS*2 →p.182iC transmission*1→p.259iC trans. all*1 →p.260Send Ir data*1 →p.258Send all Ir data*1→p.258Copy to microSD*1 →p.248CopyName……Copies the name. The copied name can be pasted into input and other screens.→p.308Phone number*3……Copies the phone number. The copied phone number can be pasted into input and other screens.→p.308Secret code*1→p.75Set code……Sets the secret code (4 digits). Check code……Confirms the set secret code. Release settings……Cancels the set secret code. Set secret*1*4 →p.103Copy to UIM*5→p.255Set large font⇔Set normal font……Switches the displayed font size between “Big font/Standard font”.→p.93Delete data→p.76*1: Not operate for the UIM phonebook. *2: Not available when 2in1 is in B mode. *3: Depending on the selected item, one of “Mail address/Address/Birthday/Memorandums” appears. *4: “Release secret” when referring to the phonebook of the secret data. *5: “Copy from UIM” when referring to the UIM phonebook. ●Secret codeWhen the mail address of the other party is “[phone number]@docomo.ne.jp” and he/she sets a secret code, you have to specify “[phone number + secret code]@docomo.ne.jp” as the e-mail address. There are 2 ways to send an e-mail to such a destination. zSet a secret code for the phonebook entry from the phonebook detail screen function menu (when referring to the mail address, the secret code is automatically added to the mail address in the phonebook). zStore the mail address with a secret code in the phonebook. N<Add to Choku-Den>zWhen stored to Choku-Den, “★” appears on the function menu. NzSecret code settings are valid only to mail addresses in “[phone number]@docomo.ne.jp” or “phone number” format. zYou cannot set secret codes for the UIM phonebook.](https://usermanual.wiki/Sony/A3880003.08-user-guide-part-1/User-Guide-951150-Page-77.png)
![77PhonebookSetting Different FOMA Terminal Actions for Each Phone Number and Mail Address<Ring tone/Image>You can set different ring tones or answer messages for the Record message depending on groups, phone numbers or e-mail address in the phonebook. This function is useful when you want to distinguish the caller only by the ring tone. zYou cannot set this setting for “No Group” on the FOMA terminal (Phone) or the phonebook or groups on the FOMA card (UIM). zThe Ring tone/Image functions are disabled when the caller does not notify the caller ID. It is recommended to set the “Caller ID Request” service.1Phonebook detail screen (p.73)u (FUNC)“Ring tone/Image”The “Ring tone/Image” screen appears. “★” appears next to the selected function. The available functions vary depending on the item selected in the phonebook detail screen.■To set this function for each groupGroup setting screen (p.72)u (FUNC)“Ring tone/Image”2Select the item to distinguishSelect the item from “Voice call (recv.)/V.phone (dial/recv.)/Mail (recv.)”. • When “Mail (recv.)” is selected, this function is applied not only i-mode mail but SMS. 3Select any item: “★” appears next to the selected function. ■To release a selected functionHighlight the function with “★”o (Reset)The function is released and the “★” disappears. Ring tone*1……Sets ring tones to distinguish the caller of the phone or sender of mail. “Changing the Ring Tone” →p.82Image*1*2……Sets images to distinguish the caller of the phone. “Changing the Display”→p.88Chara-den setup*3……Selects Chara-den to be displayed as the substitute image for videophone calls.Set illumination*1……Sets the illumination pattern and color to distinguish the caller of the phone or sender of mail. “Setting the Flashing Mode of the Illumination”→p.92Vibrator*1……Sets vibration patterns to distinguish the caller of the phone or sender of mail. “Setting the Vibration to Notify You of Incoming Calls”→p.84Answer message*2……Changes the answer message used when record message*4 or quick message starts up depending on the caller. “Having the Caller Leave a Message” →p.64*1: You can also distinguish the incoming 64K data communication. *2: Available only when “Voice call (recv.)” or “V.phone (dial/recv.)” is selected. *3: Available only when “V.phone (dial/recv.)” is selected. *4: You need to set “Record message” to “ON” beforehand. ■When you set Ring tone/ImageAn icon appears in the phonebook detail screen indicating that each item is set. : Ring tone (voice/videophone call): Ring tone (mail): Illumination (voice/videophone call): Illumination (mail): Vibration (voice/videophone call): Vibration (mail): Image (voice/videophone call): Answer message (voice/videophone call): Chara-den (videophone call)Ring tone/ImageNzYou cannot set this setting for the phonebook stored as the secret data. Even if the setting is made for the group, it is disabled for the phonebook entry stored as the secret data.zThe “Mail (recv.)” setting set for a phone number is activated when you receive an SMS or the sender’s e-mail address is “[phone-number]@ docomo.ne.jp”. zRefer to the following pages for the priority when the Ring tone/Image settings and other settings for incoming calls, etc. are duplicated. • Ring tone priority→p.83• Vibrator priority→p.84• Image priority→p.83• Illumination priority →p.93• Chara-den priority→p.71](https://usermanual.wiki/Sony/A3880003.08-user-guide-part-1/User-Guide-951150-Page-79.png)
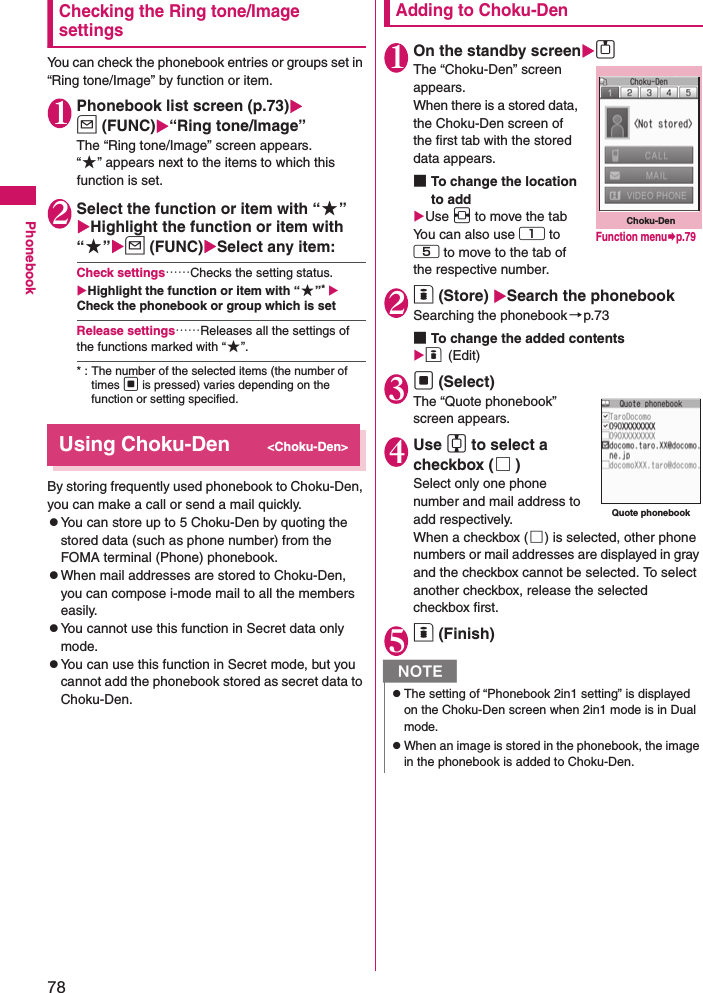
![79PhonebookMaking a call/composing a mail from Choku-Den<Example: To make a call>1Choku-Den screen (p.78)Use v to display Choku-Den screen to make a callYou can also use 1 to 5 to move to the tab of the respective number. 2Use c to select “CALL”■To compose a mailUse c to select “MAIL”→p.156■To make a videophone callUse c to select “VIDEO PHONE”Choku-Den screen (p.78)Store/Edit……Adds a phonebook to Choku-Den which is not stored or edits the stored Choku-Den.→p.78Image……Changes the image displayed in Choku-Den by selecting an image from “My picture”. Broadcast mail……Displays the new mail screen with all mail addresses stored to Choku-Den are entered to the address.→p.156Release this・Release all……Releases one or all Choku-Den.Using Dialing Shortcuts<Two-touch dialing>By assigning memory numbers “000” to “009” to phone numbers in the phonebook, you can call those phone numbers only by pressing one of 0 to 9 (last digit of the memory number) and r. 10 to 9r (voice call)/o (V.phone)Storing the Phonebook at the Data Security Center<Data security serv.>You can store the FOMA terminal (Phone) phonebook at the DOCOMO Data Security Center. The stored phonebook can be restored to the FOMA terminal or updated by connecting to the Data Security Center. zData Security Service is a pay service you need to apply for. If you have not subscribed to the service and try to connect to the Data Security Center, the notification screen appears. zThe service is not available when out of i-mode service area or the power is off.zFollow the procedure below to restore the phonebook or set the auto update (Japanese):o“iMenu”“マイメニュー” (My Menu)“電話帳お預かり” (Data Security)zFor details on how to use the Data Security Service, refer to “Mobile Phone User’s Guide [i-mode] FOMA version”. 1i“LIFEKIT”“Data security serv.” “Connect to Center”■To set about sending images in the phonebook“Sndg img in Phonebook”“ON” (default: “OFF”)The images stored in the phonebook are also stored at the Data Security Center.2Enter your security code“YES”The FOMA terminal connects to the Data Security Center to start saving the phonebook. 3o (Finish)N<Image>zYou can add an image whose file size is 100K bytes or smaller and whose width or height is 854 dots or smaller.zYou cannot add images other than JPEG or GIF. NzIf the phonebook entry contains multiple phone numbers, the call is made to the first phone number stored for that entry. NzYou cannot store the phonebook stored in the FOMA card (UIM) at the Data Security Center. zA phonebook entry with an image larger than 100K bytes cannot be stored or updated.](https://usermanual.wiki/Sony/A3880003.08-user-guide-part-1/User-Guide-951150-Page-81.png)
![80Phonebook●Restoring/updating the phonebookThe phonebook data stored at the Data Security Center can be stored on the FOMA terminal from the site of the Data Security Center. You can also edit the phonebook data stored at the Data Security Center from a PC, etc. For details on how to use, refer to “Mobile Phone User’s Guide [i-mode] FOMA version”. ●Checking the communication log with the Data Security CenterzYou can check up to 30 communication logs. If the maximum number of logs is exceeded, logs are overwritten starting with the oldest one. zOn the communication log detail screen, the transmission results, dates, transmission details, data sizes, sending results to the Data Security Center, reception results of the mobile phone and number of data files left in the Data Security Center appear. 1i“LIFEKIT”“Data security serv.” “Exchanging history”The “Exchanging history” screen appears. 2Select the communication log itemExchanging history screen (p.80)Delete this・Delete selected・Delete all……Select the deleting method. “About multiple-choice”→p.38NzAutomatic update is not performed when another function is activated while updating the phonebook. zWhen the phonebook is not updated, it is notified with “ ” shortcut icon. zWhen you restore the phonebook data stored at the Data Security Center to the FOMA terminal, icons stored with phone number or mail address may be replaced with “ ” or “ ”. zDeleting the FOMA terminal’s phonebook also deletes the phonebook in the Data Security Center when updated. To download the phonebook in the Data Security Center to the FOMA terminal, follow the procedure below (Japanese):o“iMenu”“マイメニュー ” (My Menu)“電話帳お預かり” (Data Security)“お預かりセンター ” (Data Security Center)Enter your i-mode password“決定” (Select)“ケータイへダウンロード” (Download to Phone)“OK”Download starts in about 15 seconds. Redisplay the standby screen.Exchanging historyExchanging history 2008/ 7/28 11:40:00 2008/ 7/25 12:40:10 2008/ 7/24 12:40:20 2008/ 7/21 13:40:30 2008/ 7/18 15:40:40 2008/ 7/16 12:40:50 2008/ 7/10 19:40:00 2008/ 7/ 7 12:40:10 2008/ 6/27 18:40:20Function menup.80](https://usermanual.wiki/Sony/A3880003.08-user-guide-part-1/User-Guide-951150-Page-82.png)
![87Sound/Screen/Light Settings[Table 1] When you set Manner mode* : If all the following are set to “OFF” or “Silent”, the beep tone does not sound:“Phone vol.” “Mail vol.” “Alarm vol.” “i-αppli vol.” “Keypad sound” “Record msg.” “LVA tone” “VM tone”[Table 2] When earphones are connectedItem MannerModeSupersilentOriginal(displays the Original manner mode settings)Record message activation Record message (p.65) setting“Record message” settingVibrator ON “Vibrator” settingRing volume for voice/videophone call and 64K data communicationSilent “Phone vol.” settingRing volume for mail, packet communication, MessageR/F and Area MailSilent “Mail vol.” settingArea Mail beep tone Silent “Level 6”*Alarm volume (including snooze function) Silent “Alarm vol.” settingi-αppli volume Silent “i-αppli vol.” settingSchedule/To Do List/Cost limit alarm volumeSilent “Phone vol.” settingActivation and completion tones for recorded messages, voice memos, etc. ON OFF “VM tone” settingKeypad sound OFF “Keypad sound” settingMicrophone sensitivity during calls Up “Mic sensitiv.” settingHolding tone Silent “Phone vol.” settingPlayed at “Level 1” when set to other than “Silent”On hold tone Silent “Phone vol.” settingPlayed at “Level 2” when set to “Step”Low-voltage alarm OFF “LVA tone” settingEven when “Phone vol.” is set to “Silent”, the low-voltage alarm sounds at “Level 1” when “LVA tone” is set to “ON”. Reading out received mails “Phone” setting of “Ring volume”Played at “Level 2” when set to “Silent” or “Step”Valid only when “Read out message” in the function menu of the received mail detail screen is selectedVoice clock (Standby, Snoozing) Missed call/new mail confirmation tones when the FOMA terminal is foldedSilent “Phone vol.” settingPlayed at “Level 2” when set to “Step”ToruCa acquisition tone Silent “Phone vol.” settingPlayed at “Level 4” when set to “Step”Item MannerModeSupersilentOriginal(displays the Original manner mode settings)Reading out received mails “Phone” setting of “Ring volume”Played at “Level 2” when set to “Silent” or “Step”Voice clock (during standby or snooze) and missed call/new mail confirmation tones when the FOMA terminal is folded“Phone” setting of “Ring volume”Played at “Level 2” when set to “Silent” or “Step”“Phone vol.” settingPlayed at “Level 2” when set to “Step”Music Player volume Volume setting of the Music Player (p.278)1seg viewing/recording playback volume Volume setting for 1seg viewing/recording playback (p.210)](https://usermanual.wiki/Sony/A3880003.08-user-guide-part-1/User-Guide-951150-Page-89.png)
![102Security SettingszWhen Dial lock or Omakase Lock is set, the “Alarm”, “Schedule”, “To Do list”, “1Seg booking program” and “1Seg timer recording” are not given. Once Dial lock or Omakase Lock is released, the “ (Missed alarm)” or “ (Missed program)” shortcut icon appears on the standby screen.zThe shortcut icon is not displayed when Dial lock or Omakase Lock is set. Once Dial lock or Omakase Lock is released, these icons reappear. zEven when you receive calls from the callers stored in the phonebook, only the phone numbers are displayed when Dial lock or Omakase Lock is set. Setting the Dial lock1i“SETTINGS”“Lock/Security” “Lock”Enter your security code “Dial lock”●Operations during Dial lockz“Dial lock” and “ ” appear on the screen. IC card lock is also set to “ON” and IC card functions become unavailable (Dial lock can be released using the IC card authentication function). zYou can still receive MessageR/F, i-mode mail or SMS automatically when Dial lock is set, but the receiving screen or reception results screen does not appear. Once Dial lock is released, the icon for the received message/mail appears on the standby screen. • You can still receive the Area Mail automatically and view the contents. Releasing Dial lockzIf you fail to release Dial lock 5 times in a row, the FOMA terminal turns off. However, you can turn it on again. 1Enter your security code on the screen when Dial lock is setdDial lock is released and “ ” disappears. ■To release the lock using the IC card authentication→p.111Using Omakase LockThis service enables you to remotely lock the FOMA terminal with the FOMA card (UIM) you subscribed to inserted by contacting DOCOMO or from My docomo when you lost your FOMA terminal. You can release the lock by calling DOCOMO, etc. * Omakase Lock is a pay service. If you subscribe to the service at the same time with the subscription of suspending the service or while the service is suspended, no charge applies. * For details on Omakase Lock, refer to “Mobile Phone User’s Guide [i-mode] FOMA version”.●Operations during Omakase Lockz“おまかせロック中です ” (Omakase Lock set) appears on the display. zWhen Omakase Lock is set, all the key operations except answering voice/videophone calls and powering on/off are locked, and the functions (including IC card) become unusable.zAlthough you can receive voice/videophone calls, only the phone number appears on the display while the name, image, etc. stored in the phonebook do not.zMails received when Omakase Lock is set are kept at i-mode center.zYou can turn the FOMA terminal on/off, but Omakase Lock is not released even when the power is turned off.zThe FOMA card (UIM) and microSD card remain unlocked. NzEven if an incorrect security code is input while releasing Dial lock, no error message appears. Press y and input a correct security code again. NzWhen other function is activated, the function is terminated and the FOMA terminal is locked (the editing data may be canceled before terminating). zYou can set Omakase Lock even when other lock function is set. In this case, releasing Omakase Lock returns to the lock setting before Omakase Lock is set (however, Secret or Secret data only mode are released). zLock is not set when “ ”, Self mode is set or the FOMA terminal is turned off.zThe lock is not set if you subscribed to the “Dual Network” service and are using the mova service. 0120-524-360 (Operating time: 24 hours a day) (only in Japanese)Call Center (for setting/releasing Omakase Lock)* My docomo is also available to set/release Omakase Lock via a PC, etc.](https://usermanual.wiki/Sony/A3880003.08-user-guide-part-1/User-Guide-951150-Page-104.png)
![108Security Settings[Table 1] Functions and data for the Original lockGroup Function Operations when locked/NotesData disp. Edit del.Mail MailMail memberLocks the activation of each function. • You can view the Area Mail contents.i-mode i-mode Locks the i-mode function (i-mode, Full Browser and i-Channel).Bookmark Locks the i-mode and Full Browser bookmark list displays. i-αppli i-αppli Locks the i-αppli function or IC card list display. • IC card function is not locked. • When the i-αppli standby screen is set, the i-αppli standby screen is deactivated when the lock is set. ToruCa ToruCa Locks the display of ToruCa folder list screen. • The ToruCa acquisition is available with a reader/writer unit even when the lock is set, but the “New ToruCa” shortcut icon does not appear (once the lock is released, the “New ToruCa” shortcut icon appears). Multi media My pictureMusici-motionMelody1SegKisekae ToolMy documentChara-denDocument viewerVoice announceLocks the activation of each function. • The data cannot be accessed from other functions. • If the data to be locked is set as the ring tone, receiving screen, standby screen, etc., the default settings are used when the lock is set. • When “My picture” or “Chara-den” is to be locked and an substitute image is sent for a videophone call when the lock is set, the “Pre-installed” substitute image is sent. Music&Video ChannelCameraBar code readerText readerLocks the activation of each function. • Music&Video Channel programs can be downloaded even when the lock is set. Schedule ScheduleAlarmTo Do listLocks the activation of each function. • The alarm notification is not given when the lock is set and “Missed alarm” shortcut icon appears. Memo Play/Erase msg.Play/Erase VP msg.Locks the activation of each function (you can set the Record message). • During any lock function is set, and when you press s (▼メモ) with the FOMA terminal folded, you cannot check “Record message”. Voice memoVoice memo (in-call)Locks the activation of each function. • The play/erase a voice memo is not locked (Set the lock for “Play/Erase msg.” screen)Phonebook Phonebook/Choku-DenLocks the activation of the phonebook and Choku-Den (this affects many other functions which use the phonebook). • The stored name is not displayed when the lock is set in the Dialed and Received call or Mail list screen. A phone number or mail address is displayed. • When “MSG display settings” of “Chaku-moji” is set to “Only number in PH-book”, a Chaku-moji message is not displayed. • You cannot set “Reject unknown” at the same time. • “Call rejection”, “Call acceptation”, “Call Forwarding” and “Voice Mail” settings are deactivated. • Even if you press s (▼メモ) with the FOMA terminal folded while lock is set, the FOMA terminal does not read out the caller or sender’s name of a missed call or new mail. My profile Locks the activation of My Profile. Dialed calls Locks the activation of “Dialed calls”, “Redial” and “Sent address”. Received calls Locks the activation of “Received calls” and “Received address”. • Even if you press s (▼メモ) with the FOMA terminal folded while lock is set, the FOMA terminal does not check a missed call.](https://usermanual.wiki/Sony/A3880003.08-user-guide-part-1/User-Guide-951150-Page-110.png)
![115Continued on next pageSecurity SettingszYou cannot set “Reject unknown” when “Set mute seconds” of “Ring time(sec.)” is set to “ON”. 1i“SETTINGS”“Lock/Security” “Reject unknown”Enter your security code“Reject” or “Accept”Disabling Making/Receiving Calls, etc.<Self mode>You can set the FOMA terminal not to make or receive voice or videophone calls, use i-mode, or send or receive mails. This is useful when you want to use the FOMA terminal without worrying about interruptions such as incoming voice or videophone calls. zYou can make voice calls to emergency numbers (110, 119 and 118) even when Self mode is set. Note that making a voice call at an emergency number cancels Self mode.1i“SETTINGS”“Lock/Security” “Self mode”“YES”Self mode is set and “ ” appears. ■To cancel Self modeRepeat step 1Self mode is canceled and “ ” disappears. ●When Self mode is setzReceived voice or videophone calls are not recorded in the “Received calls” record and the “Missed call” shortcut icon also does not appear on the standby screen. zMessageR/F or i-mode mails sent to you are kept at the i-mode center and SMS are kept at the SMS center. zThe caller of the voice or videophone call is notified with a guidance or message that the FOMA terminal is in out of signal range or is turned off. When you use the “Voice Mail” or “Call Forwarding” service, you can use the same service provided when the FOMA terminal is turned off. zData exchange via Infrared data exchange/iC communication, packet communication or 64K data communication with a PC connected, user authentication by IC card authentication are also unavailable. However, you can read and write data on the IC card using data transfer via USB connection (OBEX™ connection) or Osaifu-Keitai i-αppli. Data Security Service<Data Security Service>The automatic update function allows you to back up the Phonebook and other data on your FOMA terminal at Data Center to be able to smoothly restore data if you lose your FOMA terminal or when changing models. Broadcast report is available to let others know that you changed your mail address. Packet communications charges do not apply to send mail. The service gives you even more convenience if you have a PC (My docomo).* For details on how to use the Data Security Service, refer to “Mobile Phone User’s Guide [i-mode] FOMA version”. zData Security Service is a pay service you need subscription (you need to subscribe to i-mode service in advance). NzWhen you receive a call from someone who is stored in the phonebook as a secret data, the call is not rejected regardless of this setting. zWhen this function is set to “Reject”, the caller hears the busy tone even if you have activated “Voice Mail” or “Call Forwarding”. If the FOMA terminal is turned off or “ ” is displayed or if the ringing time set for “Voice Mail” or “Call Forwarding” is 0 (zero) second, the caller does not hear the busy tone and is connected to the Voice Mail service center or the forwarding number. zThe FOMA terminal receives i-mode mail and SMS regardless of this function. How the service worksInternetData Security CenterPC, etc.FOMAterminalSaving/Downloading phonebook entries, mails or imagesRestoring data easily when lost, exposed to water or changing modelDownloading data edited on a PCViewing or editing data kept at the Center](https://usermanual.wiki/Sony/A3880003.08-user-guide-part-1/User-Guide-951150-Page-117.png)
![116Security SettingszRefer to the following pages for storing operations of Data Security Service: • “Storing the Phonebook at the Data Security Center”→p.79• “Storing mails at the Data Security Center”→p.176• “Storing images at the Data Security Center”→p.229Other Security SettingsApart from those explained in this chapter, there are functions/services relating to security settings as shown below. * : Refer to “Mobile Phone User’s Guide [i-mode] FOMA version”.Purpose Function/Service nameTo prevent others from using the IC card functionsIC card lock setting→p.206To avoid “nuisance phone calls” such as prank phone calls or unsolicited sales phone callsNuisance Call Blocking →p.315To reject calls that has no caller ID Caller ID Request→p.316To send data securely by using the user certificate service* Only available on sites that support FirstPassFirstPass→p.150To update the FOMA terminal software when necessarySoftware Update→p.377Protecting the FOMA Terminal from Harmful DataScanning function→p.383To accept only necessary mails when receiving i-mode mailsReceive option→p.164To leave/hear the information about the safety using i-mode at the time of disaster“i-mode Disaster Message Board” service*To change your mail addressChange Mail Address*To reject mails with URLs Spam Mail Prevention (Reject Mail with URL)*To accept/reject mail from specified domainSpam Mail Prevention (Reject/Receive Mail Settings)*To accept/reject i-mode mail onlyTo accept/reject mail from specified addressTo set the recommended settings of Spam Mail Prevention easilySpam Mail Prevention (かんたんメール設定 (Simple mail setting))*To reject i-mode mail from senders who have already sent 500 or more messages from the same i-mode mobile phone in the same daySpam Mail Prevention (Reject Mass i-mode Mail Senders)*To reject SMS Spam Mail Prevention (SMS Rejection Settings)*To reject advertisements Spam Mail Prevention (Reject Unsolicited Ad Mail)*To restrict the size of received mail Limit Mail Size*To check the status of the mail function settingsConfirm Settings*To temporarily stop the mail functionSuspend Mail*To search for the rough location of your lost mobile phoneKeitai-Osagashi Service*NzBe careful when calling back to the numbers you do not know. In particular, sending your caller ID to the unknown party may cause unnecessary problems. <Nuisance Call Blocking priority sequence>zPriority is assigned when nuisance call barring function is set at the same time: ①Nuisance Call Blocking service②Reject unknown or Ring time(sec.)/Call setting w/o ID/Call rejectionPurpose Function/Service name](https://usermanual.wiki/Sony/A3880003.08-user-guide-part-1/User-Guide-951150-Page-118.png)
![119Continued on next pageCamera■Flashing of illumination when shootingzThe center illumination lamp lights up or flashes as follows:• Shooting screen activated: Flashes in red• Shooting still images, M-continuous mode: Lights in red (about 3 seconds)• A-continuous mode: Lights in red (when shooting)• Shooting movies, recording in Voice mode: Flashes in red• Auto timer activated: Flashes in blue→p.128■Saving the still images, movies, etc. you shotzThe images, movies, etc. are saved in the folder specified in “Select to save”. zYou can save the still images, movies, etc. you shot automatically when “Auto save set” is set to “ON”. zIf the battery is low, you may not be able to save the still images, movies, etc. you shot. zIf the FOMA terminal is turned off or the battery pack is removed while saving the files, incomplete files may be saved. ■When the shooting is interruptedzThe shooting is interrupted when you receive a voice/videophone or 64K data communication, or alarm notification (1Seg booking program, 1Seg timer recording, Alarm, Schedule or To Do list), or operate other functions. • When shooting images continuously or shooting movies, the shooting is interrupted and respective screens appear. When you exit from these screens, the camera screen reappears so that you can save the data you shot before receiving calls or alarm notification. • When adjusting the zoom or brightness of the camera, the adjusting setting is set and the screen returns to the camera menu. • The Auto timer is canceled. zThe shooting is not interrupted in the following cases:• When you receive mails or MessageR/F when using the camera (including the case that the shooting screen appears), the reception result screen does not appear and the shooting mode continues regardless of the “Receiving setting”. • When “Alarm setting” is set to “Operation preferred”, you can continue the shooting, make settings or operate the Auto timer without interruption even when the alarm specified time is reached.■ When using the microSD cardzWhen saving the data on the microSD card, “ ” flashes. Do not remove the microSD card during this period. This may cause a malfunction to the FOMA terminal or microSD card. zWhen “microSD” is selected in “Select to save” and there is no folder in the microSD card, a folder is created automatically. zIf the number of files in the microSD folder selected in “Select to save” has reached the maximum, you cannot set to the folder. Image size and maximum number of images/shooting timeThe following Table 1 to 3 (pp.119, 120) shows the image sizes, number of still images and movie shooting time supported by FOMA SO706i. [Table 1] The image sizes and shooting mode[Table 2] The approximate number of still images that can be saved by destination to save• The number of images that can be saved varies depending on the shooting environment, etc. Image size Photo modeContinuous modeMovie mode2M (1,200 × 1,600) ○××1M (960 × 1,280) ○××VGA (640 × 480) ○××CIF (352 × 288) ○○×Screen (240 × 427) ○○×QVGA V. (240 × 320) ○○×QVGA (320 × 240) ××○QCIF (176 × 144) ○○○SubQCIF (128 × 96) ○○○Quality2M 1MVGA CIF ScreenQVGA V.QCIF SubQCIFDestination: FOMA SO706i (Phone)Super Fine 116 140 341 700 1,000Fine 140 700 1,000Normal 229 1,000Destination: microSD (64M bytes)Super Fine 99 118 291 542 948 1,897Fine 118 542 948 1,897Normal 189 948 1,265 3,795](https://usermanual.wiki/Sony/A3880003.08-user-guide-part-1/User-Guide-951150-Page-121.png)
![120Camera[Table 3] The approximate shooting time that can be saved by destination to save• Available recording times if deletable pre-installed data are deleted.• The time is the approximate time that can be shot with the file size. • The available shooting time varies depending on the shooting environment, etc. ImageSizeFilesizeMovie type setAvailable shooting time for a single movie Available total shooting timeQuality setting Quality settingLong dur. mode Normal Fine modeSuper Fine modeLong dur. mode NormalFine modeSuper Fine modeDestination: FOMA SO706i (Phone)QVGA 2MB Normal 82s 34s 16s 8s 47min. 19min. 9min. 280sVideo 88s 35s 17s 8s 50min. 20min. 10min. 280sVoice 21min. 735min.QCIF 500KB Normal 104s 53s 20s 16s 247min. 125min. 47min. 38min.Video 128s 64s 22s 16s 303min. 151min. 52min. 38min.Voice 316s 750min.2MB Normal 428s 219s 82s 63s 249min. 127min. 47min. 37min.Video 524s 262s 88s 66s 305min. 152min. 51min. 39min.Voice 21min. 735min.SubQCIF500KB Normal 176s 67s 29s 20s 418min. 159min. 68min. 47min.Video 256s 86s 32s 22s 608min. 204min. 75min. 52min.Voice 316s 750min.2MB Normal 12min. 276s 119s 82s 420min. 161min. 69min. 47min.Video 17min. 350s 131s 88s 595min. 204min. 76min. 51min.Voice 21min. 735min.Destination: microSD (64M bytes)QVGA 2MB Normal 82s 34s 16s 8s 43min. 18min. 512s 256sVideo 88s 35s 17s 8s 46min. 18min. 544s 256sVoice 21min. 672min.Long timeNormal 27min. 11min. 327s 164s 27min. 11min. 327s 164sVideo 28min. 11min. 331s 165s 28min. 11min. 331s 165sVoice 120min. 672min.QCIF 500KB Normal 104s 53s 20s 16s 227min. 115min. 43min. 34min.Video 128s 64s 22s 16s 279min. 139min. 48min. 34min.Voice 316s 689min.2MB Normal 428s 219s 82s 63s 228min. 116min. 43min. 33min.Video 524s 262s 88s 66s 279min. 139min. 46min. 35min.Voice 21min. 672min.Long timeNormal 120min. 71min. 27min. 20min. 228min. 71min. 27min. 20min.Video 120min. 86min. 28min. 21min. 279min. 86min. 28min. 21min.Voice 120min. 672min.SubQCIF500KB Normal 176s 67s 29s 20s 384min. 146min. 63min. 43min.Video 256s 86s 32s 22s 558min. 187min. 69min. 48min.Voice 316s 689min.2MB Normal 12min. 276s 119s 82s 384min. 147min. 63min. 43min.Video 17min. 350s 131s 88s 544min. 186min. 69min. 46min.Voice 21min. 672min.Long timeNormal 120min. 90min. 39min. 27min. 384min. 90min. 39min. 27min.Video 120min. 115min. 43min. 28min. 544min. 115min. 43min. 28min.Voice 120min. 672min.](https://usermanual.wiki/Sony/A3880003.08-user-guide-part-1/User-Guide-951150-Page-122.png)

![136i-mode/i-motion/i-ChannelWhat is i-mode?The i-mode service enables you to use an i-mode-compatible FOMA terminal (i-mode terminal) display to access online services such as i-mode mail, connecting to the Internet and sites (programs), etc. ■Notes on using i-mode• Contents on sites (programs) or Internet websites are normally protected by copyright laws. The loaded documents, pictures, and other data from these sites (programs) or websites to your i-mode terminal is permitted only when intended for your personal use only. No data may be copied in part or in whole, whether modified or not, for resale or redistribution without the consent of the copyright holder. • Note also that when the FOMA card (UIM) is replaced or the mobile phone is turned on with no FOMA card (UIM) inserted, some types of mobile phone may be incapable of viewing or playing melodies, images and movies downloaded from sites, files attached to sent or received mail (images, movies or melodies), screen memos and MessageR/F. • If a file with restrictions on viewing and playback imposed by the FOMA card (UIM) is set as the standby screen or as a ring tone, the FOMA terminal operates under the default settings if the FOMA card (UIM) is replaced or the FOMA terminal is turned on without the FOMA card (UIM) inserted. Viewing a Site<i-mode menu/site>You can access the services provided by IPs (information service provider). (You may need a subscription.)1o“iMenu”“i-mode menu” screen appears first, then “iMenu” screen appears.Select “iMenu” in the i-mode menu screen, then i-mode communication starts. “ ” icon flashes while the communication with the i-mode Center is in progress, and “ ” icon flashes when you are receiving i-mode service (during i-mode). 2Select links and other options to display the site screen you want to view“Viewing and Using Sites”→p.139■To cancel the download of pagest3To quit i-mode, press y“YES”After “ ” blinks, “ ” disappears. zi-mode is a pay service you need to apply for. zFor details on i-mode, refer to “Mobile Phone User’s Guide [i-mode] FOMA version”. NzThe i-mode service area is the same as the FOMA service area (the area in which calls can be made and received). zSome sites may require you to pay additional information fee. zThe number of colors displayed on certain sites exceeds the maximum number of colors that the FOMA terminal can display. For this reason, the site may not appear as intended. i-mode menu iMenuSitesFunction menup.137](https://usermanual.wiki/Sony/A3880003.08-user-guide-part-1/User-Guide-951150-Page-138.png)


![153Continued on next pagei-mode/i-motion/i-Channel1i-mode settings screen (p.148) “i-motion auto-replay”Select any item: ON (default)……Automatically plays the i-motion after downloading. Some i-motion is played while downloading. OFF……Displays the data acquisition screen without playing the i-motion automatically after downloading.What is i-Channel?i-channel is a news and information service distributed for i-mode subscribers with i-channel compatible handsets. A variety of information including news and weather forecasts is automatically delivered to the phone’s standby screen as subtitles, and subscribers can check a channel list of the information received by simply pressing the i-channel button (p). (Displaying the channel list →p.153)i-Channel is a pay service you need to subscribe to (you need to subscribe to i-mode service).There are two types of channels that you can enjoy with i-channel service: “Basic Channel” distributed by DOCOMO and “Optional Channel” by information service providers (IP). “Basic Channel” does not incur packet communications charges when information is updated. “Optional Channel” that users can choose and register at their own will incurs packet communications charges when information is updated. Detailed content will incur packet communications charges. During international roaming, both auto update and detailed content view incur packet communications charges.For details on i-Channel, refer to “Mobile Phone User’s Guide [i-mode] FOMA version”. ●Ticker on the standby screenIf you have subscribed to i-Channel, the information is displayed on the standby screen as a ticker when the information is received. z“ ” flashes while i-Channel information is being delivered. zYou can set the ticker display with “i-Channel setting”.→p.154Viewing Sites from the Channel ListYou can display channel list screen to access information sites of i-Channel. You can display up to 15 channels including both “Basic channel” and “Optional channel” on the channel list. 1On the standby screenpThe “Channel list” screen appears. ■From the main menuo“i-Channel”“i-Channel list”2Select channel itemThis service provides only Japanese channels.NzTicker is displayed even when i-motion or i-αppli standby screen is set on the standby screen. Ticker is also displayed when the Self mode is set. zThe ticker does not appear when the FOMA card (UIM) is not inserted, when Public mode (Driving mode) is set or in Power saver mode. NzInformation may be received when the channel list screen is displayed in some cases.Tickerあすの天気:東京 最高28Channel listFunction menup.154](https://usermanual.wiki/Sony/A3880003.08-user-guide-part-1/User-Guide-951150-Page-155.png)
![156MailWhat is i-mode Mail?Subscribing to i-mode enables you to send and receive e-mail messages via the Internet not only between i-mode terminals. In addition to the message body, you can attach up to 10 files (pictures, videos, etc.) within the total of 2M bytes. As the FOMA terminal is compatible with Deco-mail®, you can send expressive mail by changing font color, size, or background color of the message body or using Deco-mail® pictographs.zFor details on i-mode mail, refer to “Mobile Phone User’s Guide [i-mode] FOMA version”. Composing and Sending i-mode Mail<Compose message/Send>Use this procedure to compose and send a new i-mode mail message. zYou can change the size and color of the text used in the message body, assign actions to the text and insert images, lines and other decorative features.Deco-mail®→p.158zYou can store up to 500 sent mails (i-mode mail and SMS) (the number of mails you can actually store may be reduced depending on the file size).1u“Compose message”The “New mail” screen appears.2“ <No address>”Enter an addressEnter an address to select the mail address input method. ■Searching in the phonebook“Phonebook”Search the phonebook (p.73) Select a mail address in the phonebook detail screen■Searching in the address list“Sent address” or “Received address”Select a mail address■Using Mail member“Mail member”Select a mail memberFor information on mail member→p.162■Entering a mail address directly“Enter address”Enter a mail addressYou can enter up to 50 single-byte alphabets, numbers or symbols for a mail address. When you enter a mail address, the new mail address field is displayed below the filled field. You can enter other mail addresses and send a same mail message to multiple recipients. You can enter up to 5 mail addresses. 3“”Enter a subjectThe “Subject” screen appears. You can enter up to 100 double-byte or 200 single-byte characters. 4“ <No message>”Enter the message bodyYou can enter up to 5,000 double-byte characters.You can also insert a line feed (hard return) while editing the message. You can also insert a line feed by pressing g at the end of a sentence. “ ” is also counted as 1 double-byte character. Spaces are also counted in the same way as characters. You can also compose Deco-mail®.→p.158You can use Template to compose and send the Deco-mail®.→p.1595o (Send)When you enter the message, number of bytes of the message appears on the upper right corner of the message. An animation appears while sending a mail. After sending a mail, select “OK” to return to the mail menu screen. After sending a mail, select “OK” to return to the mail menu screen. ■To cancel the transmissionp (Quit) or t (1 second or longer)Depending on the timing, the i-mode mail may be sent. ■When you are requested to send the mail again“YES”New mailMail menuFunction menup.157MessageFunction menupp.158, 306](https://usermanual.wiki/Sony/A3880003.08-user-guide-part-1/User-Guide-951150-Page-158.png)
![157Continued on next pageMail●Entering Deco-mail® pictographsDeco-mail® pictograph is an image which fulfills certain conditions including moving pictograph. On the SO706i, you can enter Deco-mail® pictograph in the mail message easily because Deco-mail® pictograph entry is arranged by the categories. zYou can download Deco-mail® pictograph from websites, in addition to the pre-installed Deco-mail® pictograph.→p.144zMails with Deco-mail® pictographs are handled as Deco-mail®. ■Entering Deco-mail® pictographPress and hold p (Pict/Sym) (“ Pictograph D” in the operation guidance area) for 1 second or longer on the Message screen to display the Pictograph D (Deco-mail® pictograph) entry screen which is arranged by the categories. Use b to move the frame and press d (Select) to enter Deco-mail® pictograph.[Other key operations]u (←Switch): Displays the previous categoryo (Switch→): Displays the next categoryp (JUMP): Displays the category listt: Quits entering Deco-mail® pictograph●Composing i-mode mail from the phonebook screenLocate and display an e-mail address stored in the phonebook and then press d (MAIL), then the new mail screen with the mail address entered to the address appears. Searching the phonebook→p.73●WEB mailSelecting “WEB mail” on the Mail menu (p.156), you can access the WEB mail site and compose and send mail from Address B of 2in1*.* : For details on 2in1, refer to “Mobile Phone User’s Guide [2in1]”. New mail screen (p.156)Send……Sends i-mode mail. Save→p.161Delete receiver……If there are 2 or more addresses entered, you can delete the address you select. Change rcv. type……Changes the address type with an address highlighted. To……The recipient’s address. The mail address entered in the “To” field is displayed in other recipient’s terminals.Cc……Broadcasts address. The mail address entered in the Cc field are also displayed to the other recipients. Select this option to send copies of the message sent to the address in the To field to other addresses.Bcc……Broadcasts address. The mail address entered in the Bcc field are not displayed to the other recipients. Template →p.159Attach file……Attaches a file such as melody, image or i-motion to an i-mode mail.→p.160Activate camera……Activates the camera function to shoot still images or movies.Photo mode→p.123Movie mode →p.126Delete att. file・Del all att. files……Deletes one or all attached file(s).Add header……Pastes a header into the i-mode mail message.NzIf the storage capacity for sent mails is full when you send a mail, mails are deleted from the oldest one (protected mails and mails in the Secret folder are not deleted).[Category]顔文字・i絵文字 (Face mark/i-pictograph)装飾 (Decoration)天気・季節 (Weather/Seasons)生活 (Life)食べ物 (Food)キャラクター (Character)文字・せりふ (Text/Phrase)いろいろ (Miscellaneous)zSome phones may be unable to receive a part of a subject.zWhen you use pictographs in the subject or message body and send the mail to the devices of other mobile phone companies (au/SoftBank), the pictographs are automatically converted to similar ones on the other party’s device. However, pictographs may not be displayed properly depending on the model or functions of the other party’s mobile Phone. When the receiver does not have the corresponding pictographs, the pictographs are converted to characters or “〓”.zWhen the recipient address is a phone number and the number is preceded by the “184” or “186” prefix, a message appears asking whether to delete the prefix before sending the mail when you try to send i-mode mail. zDepending on the signal quality, the recipient may not be able to display the text correctly. Also, the “Transmission failed” message may appear even after the message has been sent. zWhen 2in1 is in B mode, you cannot compose and send i-mode mail. N](https://usermanual.wiki/Sony/A3880003.08-user-guide-part-1/User-Guide-951150-Page-159.png)
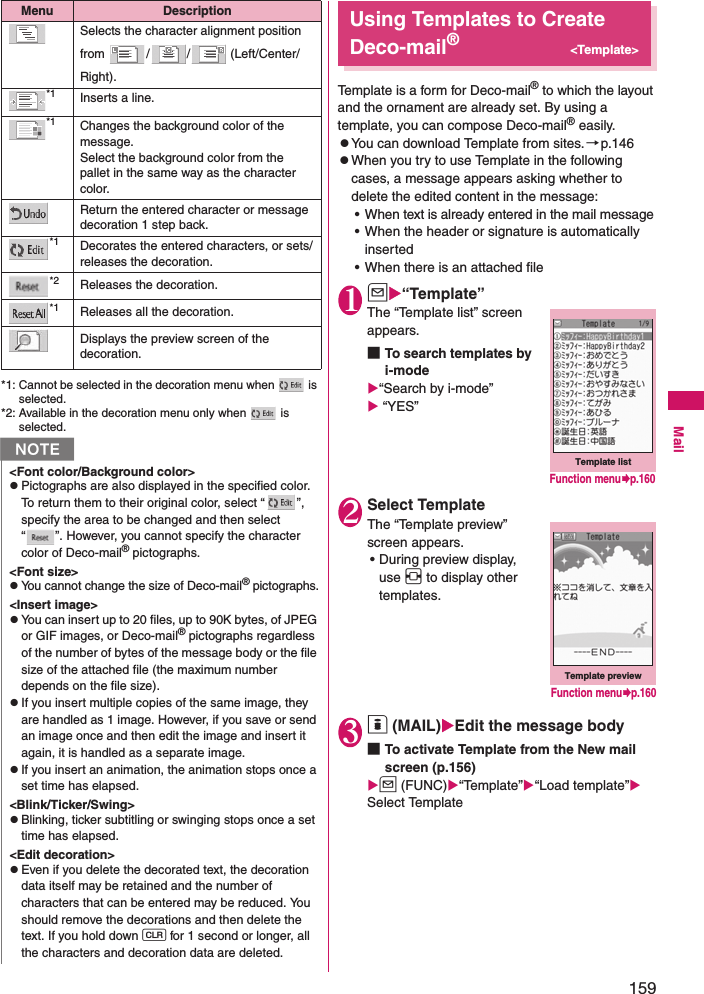
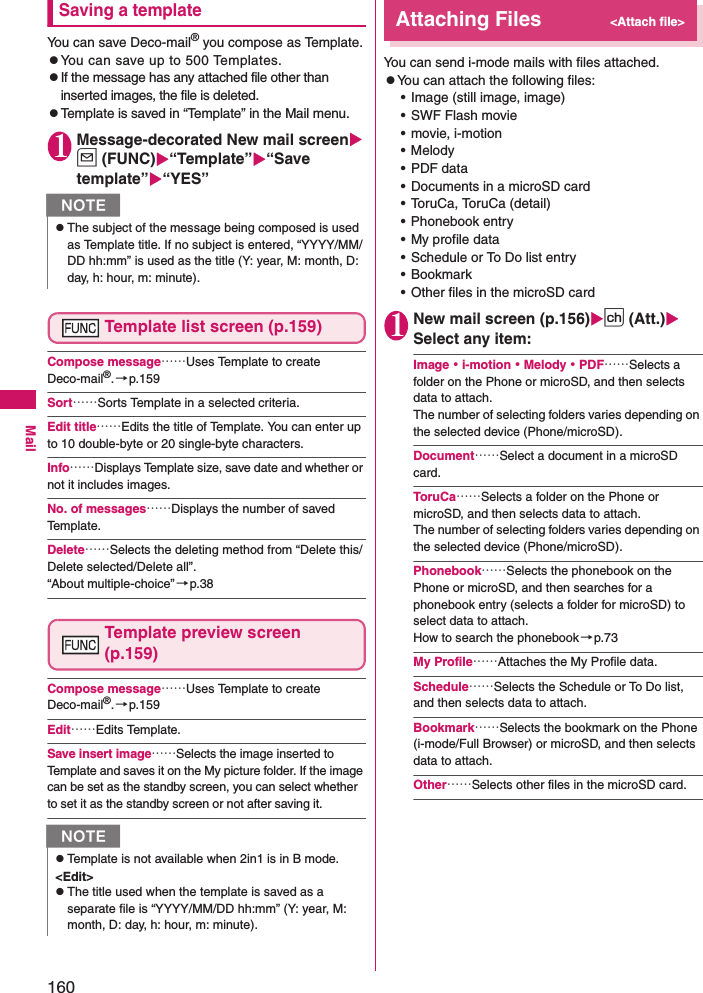
![162MailDraft mail list screen (p.161)List setting……Selects a mail-list format from “Subject/Name/Address”. iC transmission→p.259Send Ir data→p.258iC trans. all→p.260Send all Ir data→p.258Copy to microSD→p.248No. of messages……Displays the number of mails in the Draft mailbox. Store in Center→p.176Delete……Selects the deleting method from “Delete this/Delete selected/Delete all”. “About multiple-choice” →p.38Storing Addresses in Mailing ListsBy storing addresses in the Mail member, you can easily enter multiple addresses only by selecting the Mail member. zYou can store up to 20 mail members with up to 5 e-mail addresses in each list. 1i“OWN DATA”“Mail member”The “Mail member list” screen appears. 2Select a mail memberThe “Mail member detail” screen appears. 3Highlight “<Not stored>”o (Edit) Enter the mail addressTo store more e-mail addresses, repeat step 3.Mail member list screen (p.162)Compose message……Composes an i-mode mail message with the members of the mail member pasted into the recipients field. Edit member name……Edits the name of the mail member. You can enter up to 10 double-byte or 20 single-byte characters. Reset member name……Resets the mail member name to the default name. Mail member detail screen (p.162)Edit address……Edits the e-mail address. Look-up address……Enters the e-mail address by browsing the phonebook, sent address list or received address list. Delete this・Delete all……Deletes one or all mail member(s).When You Receive i-mode MailWhen the FOMA terminal is in a service area, i-mode mail or MessageR/F is automatically sent to the FOMA terminal from the i-mode Center. zYou can store up to 1,000 received mails (i-mode mail and SMS) (the number of mails you can actually store may be reduced depending on the file size).zYou can have the FOMA terminal read out the received mail message.→p.168Displaying new messages automatically<Auto receive mail/Message>[1]The “Receiving” screen appears when the reception of i-mode mail or Message starts and the “Received result” screen appears when the reception is finished.NzWhen 2in1 is in B mode, you cannot display the Draft mail list screen.Mail member listFunction menup.162Mail member detailFunction menup.162](https://usermanual.wiki/Sony/A3880003.08-user-guide-part-1/User-Guide-951150-Page-164.png)
![163Mailz“ ” flashes while receiving a mail and “ ” stops flashing and lights up when the reception is finished. z“ ” or “ ” flashes while receiving a Message. [2]The number of received mail or MessageR/F appears on the received result screen. zThe number of mails includes the number of SMS.zWhen you select mail or Message on the received result screen, the Received mail list screen (pp.170, 171) or Message list screen (p.180) appears. zIf no operation is performed for about 15 seconds while the received result screen is displayed, the previous screen appears for mails and Detail screen appears for Message. The display duration may vary depending on the “Mail/Msg. ring time” setting. zPress o (Read) on the received result screen to have the FOMA terminal read out the mail message.→p.168zThe detail screen of MessageR/F is displayed automatically when the message is received on the standby screen. zIf no operation is performed for about 15 seconds while the Message detail screen is displayed, the standby screen reappears. However, if you use operations such as scrolling, the detail screen continues to be displayed.zYou can set the FOMA terminal to display the detail screen of MessageR/F automatically with “Auto-display setting”. ■When you receive a mail exceeds 100K bytesIf the total amount of mail message, inserted image(s) and attached file(s) exceeds 100K bytes, the attached file(s) cannot be automatically received when receiving mail. In this case, receive manually later on.You can download the attached file which exceeds 100K bytes manually from the i-mode Center.→p.166Viewing a new mail1On the standby screendSelect “”■To display the unread mail listOn the standby screendUse b to select “”The “Unread mail list” screen appears.NzIf the storage capacity for received mails is full when you receive a mail, mails are deleted from oldest read mails (unread or protected mails and mails in the Secret folder are not deleted). zWhen the FOMA terminal cannot receive any more mails (because it is full with unread and protected mails), (red)/ (red) appear. Read the unread mails or unprotect the unnecessary mails. zWhen 2in1 is in A mode or B mode and a mail arrives only at address in unspecified mode, the “Mail Receiving...” screen appears, but the receiving results screen and “ ” do not appear. In addition, the mail ring tone does not sound. zIf you receive i-mode mail from a terminal capable of specifying “To”, “Cc” and “Bcc” recipients, refer to the mail detail screen to see whether your own address is in the “To”, “Cc” or “Bcc” field.→pp.170, 172zIf you receive i-mode mail when the standby screen is not displayed and “Operation preferred” is set in “Receiving setting”, the FOMA terminal does not ring. When “Alarm preferred” is selected, the FOMA terminal plays the ring tone and displays the reception results screen. zIf you receive an i-shot service mail sent from a mova terminal, images arrive as attached files. NzCharacters that cannot be displayed appear as spaces.zIf the number of characters in the i-mode mail message body exceeds the maximum number of characters that can be received, either “/” or “//” is inserted at the end of the message and the remaining portion is automatically deleted. zIf the size of received i-mode mail exceeds the size set in “Limit Mail Size”, the pasted data is deleted at the i-mode Center and you cannot download it. zIf you receive decorated mail (HTML mail) from a PC, the decorations may not be displayed correctly. NShortcut iconUnread mail list 7/29 ShiroDocomo 7/27 ShiroDocomo 7:06 HanakoKeitai Unread mail 6:45 ShiroDocomo 7/30 HanakoKeitai 7/26 HanakoKeitaiThank you for last night. −−−−END−−−−1/2Unread mail iconFunction menup.175](https://usermanual.wiki/Sony/A3880003.08-user-guide-part-1/User-Guide-951150-Page-165.png)


![174Mail●Setting Auto-sortYou can sort mail messages into the specified folders by the set criteria such as mail address or subject. 1Mail folder list screen (pp.170, 171) Highlight the destination folderu (FUNC)“Auto-sort”Set any item from the followingWhen the sorting is already set, the setting is displayed. Press u (FUNC) again.■When Original lock is set to the Phonebook or mail membersWhen checking auto-sort-set folder conditions, the group name appears as “Group” even after changed, and the mail member name appears as “Mail member” even after changed. Address sort……Sets the e-mail address. Look-up address……Sets the e-mail address by browsing the phonebook or address list. Look-up group……Sets the group of the phonebook. Look-up member……Sets the mail member. Enter address……Sets a mail addresses by entering it. Subject sort……Sets the subject. Reply impossible (Send impossible)……Sets an e-mail address to which you cannot reply or you could not send a mail as an Auto-sort criteria. Sort all……This can only be set for mail-linked i-αppli folders. Sorts all mails into a mail-linked i-αppli folder. Edit addr/subj……Edits a previously specified e-mail address or mail subject. List setting……Selects a mail-list format from “Name/Address”. Release……Releases the Auto-sort criteria by selecting “Release this/Release selected/Release all”. “About multiple-choice” →p.38<Delete folder>zYou cannot delete an i-αppli mail folder if there is a corresponding mail-linked i-αppli. You can delete an i-αppli mail folder if there is no corresponding software, but the folder created in the Inbox folder screen or Outbox folder screen is also deleted. zIf you delete a folder that is specified in the “Auto-sort” settings, the automatic sorting setting for that folder is also canceled. <Delete read> <Delete all>zThe following i-mode mail or SMS messages will not be deleted. • Protected messages• Messages in the Secret folderzFor Delete all, hidden mail messages are also deleted by 2in1 setting.zThe MessageR/F are not deleted. NNzIf received or sent mail meets multiple sort criteria, the priority of the Auto-sort settings is assigned as follows. ①Sort all ②Subject sort③Reply/Send impossible④Mail address/Phone number⑤Mail member ⑥Phonebook groupzMail received or sent before the Auto-sort settings are not sorted. zThe mails sent as broadcast message are searched for the sorting criteria in the order of address entered. zWhen using 2in1 and setting Auto-sort, select the criteria from “Look-up address (Phonebook,/Sent address/Received address list)”, “Look-up member”, “Direct input”, “Subject sort”, “Reply impossible”, “Sort all”, or “Edit addr/subj”. zThe Area Mail is not included for “Address sort”, “Subject sort” and “Reply impossible”. <Address sort>zYou can set a total of 700 addresses for automatic sorting (more than one setting is available for 1 folder). <Address sort (Look-up group)>zWhen you set address sort to the mail address stored as secret data and receive mail from the address, the mail is stored in the “Inbox” folder when the FOMA terminal is not in Secret or Secret data only mode and stored in the sorting destination folder when the FOMA terminal is in Secret or Secret data only mode. <Address sort (Enter address)>zEnsure that the e-mail address domain (the part that follows the @ symbol) is entered correctly. However, if the address format is “[phone number]@docomo.ne. jp”, simply enter the phone number. <Subject sort>zIf the subject meets the sort criteria for multiple folders, the mail is sorted into the folder closest to the Inbox or Outbox folder. zYou cannot use this function to sort i-mode mail that has no subject entered and is displayed as “No title” even if you set “No title” as a sort criteria. zYou cannot use this option to sort SMS. <Reply impossible>zYou cannot use this option to sort SMS reports. z“Reply impossible” can only be set for 1 folder of Inbox. <Send impossible>z“Send impossible” can only be set for 1 folder of Inbox.](https://usermanual.wiki/Sony/A3880003.08-user-guide-part-1/User-Guide-951150-Page-176.png)
![176Mail●Storing mails at the Data Security CenterYou can store i-mode mails and SMS stored in the FOMA terminal at the Data Security Center. zData Security Service is a pay service you need to apply for. If you have not subscribed to the service and try to connect to the Data Security Center, the notification screen appears. 1Mail list screen (pp.161, 170)u (FUNC)“Store in Center”Use c to select □ (checkbox)o (Finish)You can select up to 10 mails. 2Enter your security code“YES”The FOMA terminal connects to the Data Security Center to start saving the mails.3o (Finish)■To restore the mailThe mail data stored at the Data Security Center can be stored on the FOMA terminal from the site of the Data Security Center. For details on how to use, refer to “Mobile Phone User’s Guide [i-mode] FOMA version”.Mail detail screen (pp.170, 172)Reply*1*2 →p.165Reply with quote*1*2 →p.165Forward*1*2→p.165Edit*3……Edits the recipient, subject or message body of the sent mail. Press o (Send) to send the mail. Resend*3……Resends the message. Protect ON/OFF……Protects or unprotects mail. Move……Selects the destination folder to move a mail message to the folder. Copy……Copies the message body, subject or e-mail address. The copied text can be pasted into the Character entry screens, etc.→p.308Save address・Add to phonebook→p.166Save data……“Checking and Saving the File Attached to i-mode Mail”→p.166Save insert image……Selects the image inserted to the Deco-mail® and saves it on the My picture folder. After saving the image, you can specify whether to set it as the standby screen. Add shortcut →p.94Save template……Saves an i-mode mail as a template.→p.160Refer dictionary……Starts the dictionary.→p.296Property……Selects an image to display the file name and size of an image inserted into the message in Deco-mail®. Read out message*1→p.168Disp. SMS report*3……Displays the SMS report for an SMS. iC transmission→p.259Send Ir data→p.258Copy to microSD→p.248UIM operation……“Moving or copying SMS from the mail screen”→p.255Message scroll (default: 1 line)……Selects the number of scrolling lines in a screen from “1 line/3 lines/5 lines”. Font size (default: Standard)……Selects the font size from “Small/Standard/Large/X-large”.→p.93Delete att. file・Del all att. files……Deletes one or all attached file(s). Delete……Deletes a mail. Keep in secret⇔Put out*4……“Preventing Others from Viewing Data”→p.104*1: Available only with the received mail detail screen. *2: Not available when 2in1 is in B mode. *3: Available only with the sent mail detail screen. *4: Available only in Secret or Secret data only mode. <Protect ON/OFF>zA mail that is not displayed by the setting of 2in1 is not targeted for setting of “Protect all” nor “Unprotect all” even if either of them is selected. <Keep in secret> <Put out>zA mail that is not displayed by the setting of 2in1 is not targeted for setting of “Keep all” nor “Put out all” even if either of them is selected. NzYou cannot store SMS stored in the FOMA card at the Data Security Center. zWhen saving mails with attached files, the attached files are deleted. zWhen saving received mails in which images prohibited to be output from the FOMA terminal are pasted into, these images are deleted. zThe setting of “Color coding” is not saved. NN<Delete att. file> <Del all att. files>zYou cannot delete the data pasted into the message body or undownloadable file ( ).](https://usermanual.wiki/Sony/A3880003.08-user-guide-part-1/User-Guide-951150-Page-178.png)
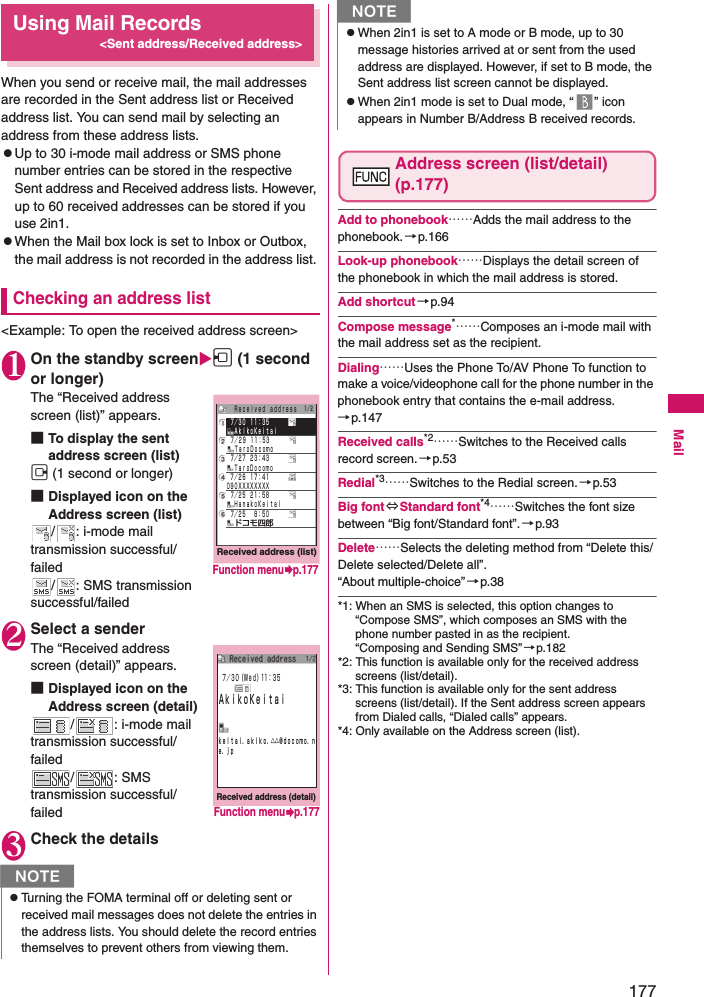
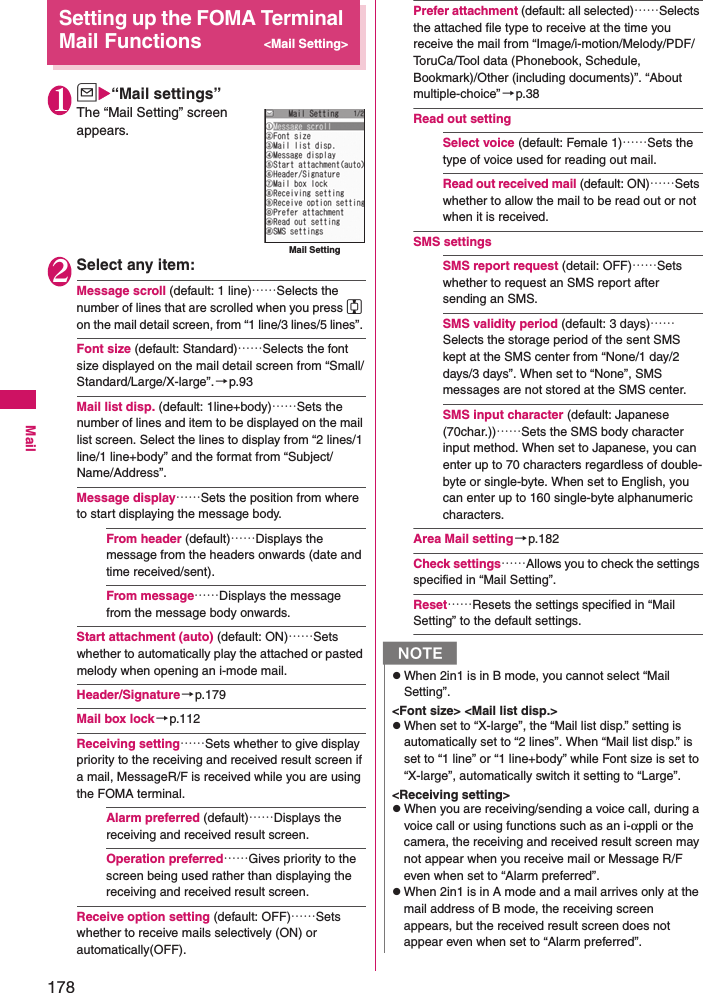
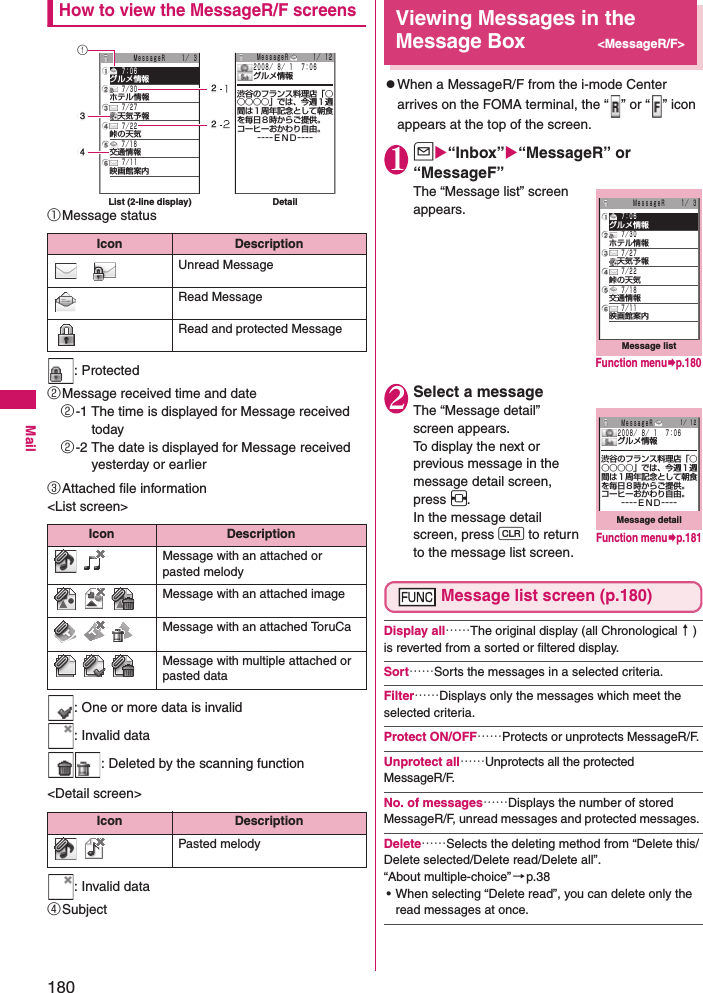
![186i-αppliWhat is an i-αppli?Downloading an i-αppli from a site enables you to use i-mode terminal in more convenient. Some i-αppli allow you to store data from the i-αppli directly into the phonebook or your schedule, and Some i-αppli linked to Data box allow you to save or download images.As the FOMA terminal supports mega i-αppli with large capacity, you can enjoy high-resolution 3D games or long roll-playing games.zFor details on i-αppli, refer to “Mobile Phone User’s Guide [i-mode] FOMA version”. Downloading i-αppli from SitesYou can download software from an i-mode site and run the software on your FOMA terminal. zUp to 1M-byte i-αppli can be downloaded. Up to 200 i-αppli can be stored. The maximum number of software applications that can be saved varies depending on the data size. The number includes partly downloaded i-αppli. 1Select softwarePress d (Select) when the “Completed” message appears. For the software that is immediately launched from the site, the software starts up without displaying a completion message. ■To cancel data downloading in progressDuring downloadingd (Cancel) or t■When the software setting screen appearsSet the software“YES”Software settings→p.1882“YES”The downloaded software is launched.■Not to launch the software“NO”●Downloading Mail-linked i-αpplizWhen you download a mail-linked i-αppli, an i-αppli mail folder is automatically created in the inbox or Outbox folder. The folder names are assigned by the downloaded mail-linked i-αppli and cannot be changed. The FOMA terminal can store up to 5 mail-linked i-αppli.zMail sent and received using a mail-linked i-αppli is automatically sorted into the dedicated folders created when that mail-linked i-αppli was downloaded. You can also manually sort received mails.zYou cannot download mail-linked i-αppli in the following cases: • If there are already 5 dedicated folders for mail-linked i-αppli• If there is already saved a mail-linked i-αppli that uses the same folder• Mail box lock is set for Inbox/OutboxViewing i-αppli information during downloading<Disp. Software info>You can specify whether the software information is displayed for checking when downloading software. 1i“SETTINGS”“i-αppli settings” “Disp. Software info”“Display”■Not to check information“Not display”NzTo restore deleted software that had been pre-installed, download from “PlayNow” by SO.“iMenu”“メニューリスト”“ケータイ電話メーカー ”“PlayNow by SO”QR code on the right is also availableto select the displayed URL and access the site.zSome i-αppli software automatically opens communication after being downloaded. You can set your terminal not to automatically communicate by using “Network set” in “Software setting”. zIf you download an i-αppli that uses the terminal data (the stored information or mobile phone/FOMA card (UIM) manufacture numbers) or an i-αppli DX, a message appears notifying that the i-αppli uses the terminal data. When you select “YES”, your terminal information is sent to the IP (information service provider) via the internet and may be disclosed to the third party as a result. zDepending on the data storage capacity of the IC card, you may not be able to download Osaifu-Keitai i-αppli even when there is capacity available in the software storage area. Follow the confirmation screen, delete the displayed software and download again. You may not be able to delete the software depending on the software type you are going to download. Depending on the software, the software itself is deleted after the software is launched and data in the IC card is deleted. zWhen 2in1 is set to B mode, the activation confirmation screen may not appear after download, depending on the i-αppli.](https://usermanual.wiki/Sony/A3880003.08-user-guide-part-1/User-Guide-951150-Page-188.png)

![194i-αppli3Voice is recognized and a confirmation screen appears■When recognition is incorrect“音声再入力” (Retry)●Using 設定/ヘルプ (Setting/Help)1TOP menu screen (p.191)“設定/ヘルプ” (Setting/Help)Select any item:各種設定 (Settings)……Make the basic settings/route guide settings/home settings/station settings, delete history and reset the settings.ヘルプ・規約 (Help/Terms)……Shows usage, FAQ and terms of service.会員情報確認 (Membership information)……Checks your subscription state to “ゼンリン 地図+ナビ” (ZENRIN Map+Navi).PC確認方法 (PC check method)……View URL, login ID or password to view a PC-designed map i-αppli site.Gガイド番組表リモコン (G-GUIDE EPG Remote Control)This is a useful monthly-charge-free i-αppli containing the program guide and AV remote control function. You can obtain digital, analog or BS digital TV program information easily anywhere at any time. You can check the program title, contents of program and start/end time, etc. 1seg can be activated from the program guide. The program guide can be activated from 1seg.If you are interested in some program, you can set timer recording via the Internet to record the program on the DVD recorder (a DVD recorder compatible with the online timer recording function is required. To use this function, you need initial settings on this application). You can also search for program information by keyword such as TV program genre, your favorite personality or pickup keyword on the top of the main screen. Moreover, the remote control is possible for TV/Video/DVD player (some models do not support this function). zWhen you use this application for the first time, agree to the license agreement and set the default settings.zPacket communication charges will apply. zWhen using this software overseas, set “Set main time” to the Japanese time. zFor details on Gガイド番組表リモコン (G-GUIDE EPG Remote Control), refer to “Mobile Phone User’s Guide [i-mode] FOMA version”. ■Booking program functionYou can book a 1seg view by selecting a program from the program guide of this application.zTimer activationActivate this application to select a program you want to watch. Select “予約実行” (Book) from “視聴予約” (Book program) in メニュー (Menu) to activate the booking scheduler. Follow the on-screen instructions.■Timer recording functionYou can reserve 1seg recording by selecting a program from the program guide of this application.zTimer recordingActivate this application to select a program you want to record. Select “予約実行” (Book) from “#ワンセグ録画予約 ” (#1Seg timer recording) in メニュー (Menu) to activate the booking scheduler. Follow on-screen instructions.(* Alternatively, activate this application, select a program, and press q.)■Online timer recordingIf you have a DVD recorder compatible with the online timer recording, you can set timer recording from the program guide of this application via the Internet while you are away from your house. To use online timer recording, you need initial settings on this application. zInitial settings①Perform the Internet connection setting on the DVD recorder (refer to the manual supplied with the DVD recorder). ②Launch this application. When you select “リモート録画予約 ” (Online timer recording) on メニュー (Menu), instructions appear. Follow the instructions to perform initial settings. * The above is a screen image. The actual screen may look different. The displayed TV guide corresponds to the area where you live.](https://usermanual.wiki/Sony/A3880003.08-user-guide-part-1/User-Guide-951150-Page-196.png)
![196i-αppliiアプリバンキング (i-αppli banking)This i-αppli enables you to conveniently use mobile banking. Mobile banking is a service that you can check your bank balance or account activity, or you can transfer money whenever or wherever, by using a mobile phone. You can use Mobile banking for up to 2 banking facilities, only by entering the password you have set when launching the i-αppli. zTo use the mobile banking service, a bank account of the banking facility and application to the mobile banking service is required. zYou are charged for the packet communication. zFor details on i-αppli banking, refer to “Mobile Phone User’s Guide [i-mode] FOMA version”. zFor information on i-αppli banking, see the i-mode site. • i-mode site (Japanese) : oiMenu“メニューリスト” (Menu List)モバイルバンキングiアプリバンキング楽オク出品アプリ2 (Rakuten Auction application 2)楽オク出品アプリ2 (Rakuten Auction application 2) is a useful application that you can easily sell goods at Rakuten Auction site. It provides a guidance display for new users who use the i-αppli for the first time. There are helpful functions such as shooting/editing a photo or saving the history, and you can bring goods to the auction in a shorter time than from a site. zYou need to agree to “利用規約” (Terms and conditions) before you use i-αppli for the first time. zPacket communication is charged. zFor more information, refer to “Mobile Phone User’s Guide [i-mode] FOMA version”.zMember subscription and auctioneer registration to Rakuten are required to sellgoods on Rakuten Auction. zFor details, see i-mode site (Japanese). • i-mode site: oiMenuオークション (Auction)FOMA通信環境確認アプリ (FOMA communication environment check application)FOMA communication environment check application is the application that checks whether the FOMA terminal can use the FOMA High-speed area. zTo use the FOMA communication environment check application, agree with “ご利用上の注意 ” (Notes on using the application). NzWhen you launch this application for the first time, agree with “ ご利用上の注意” (Notes on using the application). zPacket communication charges are applied for settings or operations. ■Notes on Osaifu-Keitai i-αpplizNTT DOCOMO accepts no liability whatsoever regarding the information set on the IC card. * The above is a screen image. The actual screen may look different. NzThe displayed items may be different or the description that the FOMA terminal is out of service area is displayed depending on the conditions (weather, the signal quality, or network traffic) even if it is the same place and time. zWhen you use other functions during this application is activated, the checking may fail. * The above is a screen image. The actual screen may look different.* The above is a screen image. The actual screen may look different.](https://usermanual.wiki/Sony/A3880003.08-user-guide-part-1/User-Guide-951150-Page-198.png)
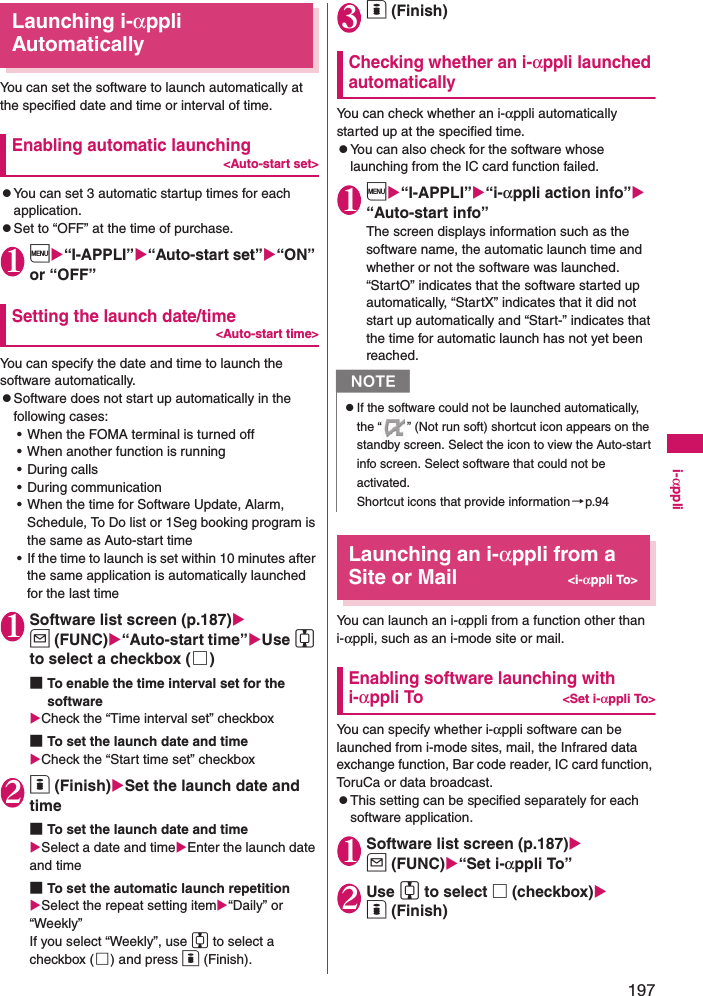
![202Osaifu-Keitai/ToruCaWhat is Osaifu-Keitai?Hold the “Osaifu-Keitai” up to a reader/writer at a member store and pay for your shopping, or utilize as membership card, coupons, and more.You can also use the i-mode network to add e-money credit, check balances and usage history. Enough security is provided so the Osaifu-Keitai can be used without worries.zFor details, refer to “Mobile Phone User’s Guide [i-mode] FOMA version”.* In order to use Osaifu-Keitai services, please download the i-αppli for Osaifu-Keitai from the Osaifu-Keitai site* and then make the necessary settings.*: i-mode site (Japanese): oiMenuメニューリスト (Menu List)おサイフケータイ (Osaifu-Keitai)• If a malfunction occurs with the FOMA terminal, the data (including e-money, points, etc.) on the IC card may be erased or altered (If you need to send your cell phone to NTT DOCOMO for repairs, please delete the data yourself as we cannot accept your cell phone for repair if there is data on it). For support such as having data reissued or restored or to have it temporarily kept or transferred (except for transferring data using iC transfer service), please contact your Osaifu-Keitai service provider. Make sure to use the service which provides backup service for important data.• NTT DOCOMO shall not be liable for any loss of or damage to data stored on the IC card, or any other loss related to Osaifu-Keitai service under any circumstances whatsoever, including but not limited to malfunctions, model changes, etc. • If the FOMA terminal is lost or stolen, contact your Osaifu-Keitai service provider immediately about what to do. Please note, you can use Omakase Lock and IC Card lock with this FOMA terminal.→pp.101, 206What is iC Transfer Service?The iC Transfer Service*1 is a service that allows you to move all the data on your Osaifu-Keitai’s IC card*2 to a replacement Osaifu-Keitai*3 when your Osaifu-Keitai is replaced due to a model change, repairs, etc.Once you move the IC card data, it is a snap to start using the Osaifu-Keitai services by simply downloading*4 the Osaifu-Keitai i-αppli. The iC transfer service is available at a NTT DOCOMO shop or service counter near you.zFor details, refer to “Mobile Phone User’s Guide [i-mode] FOMA version”.*1 : To use the iC Transfer Service, both the new and the old phones must be Osaifu-Keitai compatible. To use the service, please visit your nearest DOCOMO shop.*2 : Some iC transfer services may not be supported by all Osaifu-Keitai services; only the data inside the IC card of an iC transfer service compatible Osaifu-Keitai service can be moved.*3 : This service does not copy the data; it moves it, so no data inside the IC card is left on the source FOMA terminal. There may be instances when the iC transfer service may not be utilized. Use back-up services of your Osaifu-Keitai service. *4 : Packet communication charges do apply for downloading i-αppli and the different kinds of settings. Launching Osaifu-Keitai i-αppliYou can launch the Osaifu-Keitai i-αppli from the software list screen. You can use the Osaifu-Keitai i-αppli to read and write the data in the IC card to use useful functions such as charging electronic money or ticket, or browsing the balance and transaction history on the FOMA terminal.zTake great care not to disclose your security code and passwords of each service to others.zThe reading/writing of the data from the software to the IC card is interrupted in the following cases. In this case, the read/written data is discarded. The operation after the call varies depending on the service.• If you receive a call while launching i-αppli• If the battery failszWhen Osaifu-Keitai i-αppli is activated or downloaded for the first time, FOMA card (UIM) information is linked to an IC card. After this, you cannot use the IC card function unless the linked FOMA card (UIM) is inserted. If you use another FOMA card (UIM), you cannot use the IC card functions unless you delete (Reset IC owner) Osaifu-Keitai i-αppli first.11i“OSAIFU-KEITAI”“IC card content”The “IC card content” screen appears. 22Select the Osaifu-Keitai i-αppliYou can also launch the Osaifu-Keitai i-αppli from the “Software list” screen (p.187).IC card contentFunction menup.188](https://usermanual.wiki/Sony/A3880003.08-user-guide-part-1/User-Guide-951150-Page-204.png)
![203Continued on next pageOsaifu-Keitai/ToruCaUsing the Osaifu-KeitaiBy holding the FeliCa mark “e” on the FOMA terminal over the reader/writer unit, you can pay with the electronic cash or use the FOMA terminal as a ticket. These functions can be used without launching the software. zThough you cannot launch the Osaifu-Keitai i-αppli during a call, you can use the Osaifu-Keitai by holding the FeliCa mark over the reader/writer unit. 1Hold the FeliCa mark “e” over the reader/writer unit to use the service you wantThe center illumination flashes following the “IC card Illumination” setting when you use Osaifu-Keitai. Checking the IC Card Owner Information<Check IC owner>Check if the IC card in Osaifu-Keitai links to the inserted FOMA card (UIM).To use another FOMA card (UIM), delete (reset) the Osaifu-Keitai i-αppli then use the IC card functions.1i“OSAIFU-KEITAI”“Check IC owner”If another FOMA card (UIM) is inserted, select “Reset IC owner” to change the IC owner (reset Osaifu-Keitai i-αppli).■To change the IC owner (reset Osaifu-Keitai i-αppli)“Change IC owner”“Reset IC owner”“YES”Enter your security code“YES”What is ToruCa?<ToruCa>ToruCa is the electronic card that can be acquired via Osaifu-Keitai, which can be used as an flyer, restaurant card, coupon, etc. ToruCa can be acquired via a reader/writer unit or websites, and can be easily exchanged via mail, Infrared data exchange or microSD card. zThe acquired ToruCa is stored in “ToruCa” of “OSAIFU-KEITAI” menu. zThis function is available with ToruCa-compatible models. For details, refer to “Mobile Phone User’s Guide [i-mode] FOMA version”. ToruCa usage flowNzWhen 2in1 is set to B mode, you cannot launch an i-αppli which uses the mail function.NzYou can use the IC card function by holding the FeliCa mark over the reader/writer unit even when the FOMA terminal is turned off or the battery is low. (You cannot launch the Osaifu-Keitai i-αppli.) However, you may not be able to use this function when the battery pack is not attached, the battery pack is attached but not used for a long period of time, or when the FOMA terminal is left uncharged after the battery alarm sounds, so be sure to charge the battery pack. zDo not shock the FOMA terminal when holding the FeliCa mark over a reader/writer unit. zIf the FeliCa mark is not recognized, hold the FOMA terminal close to the reader/writer section of the unit, move the FOMA terminal back and forth and around to be parallel to the reader/writer unit. zThe Osaifu-Keitai i-αppli may be launched when you hold the FeliCa mark over the reader/writer unit. Hold the FeliCa mark (e) over the reader unitHold Osaifu-Keitai over the reader unit to acquire ToruCaToruCa (detail)ToruCaSelect ToruCa from the list. Pressing the “詳細” (Detail) button displays the detailed information. Restaurant](https://usermanual.wiki/Sony/A3880003.08-user-guide-part-1/User-Guide-951150-Page-205.png)

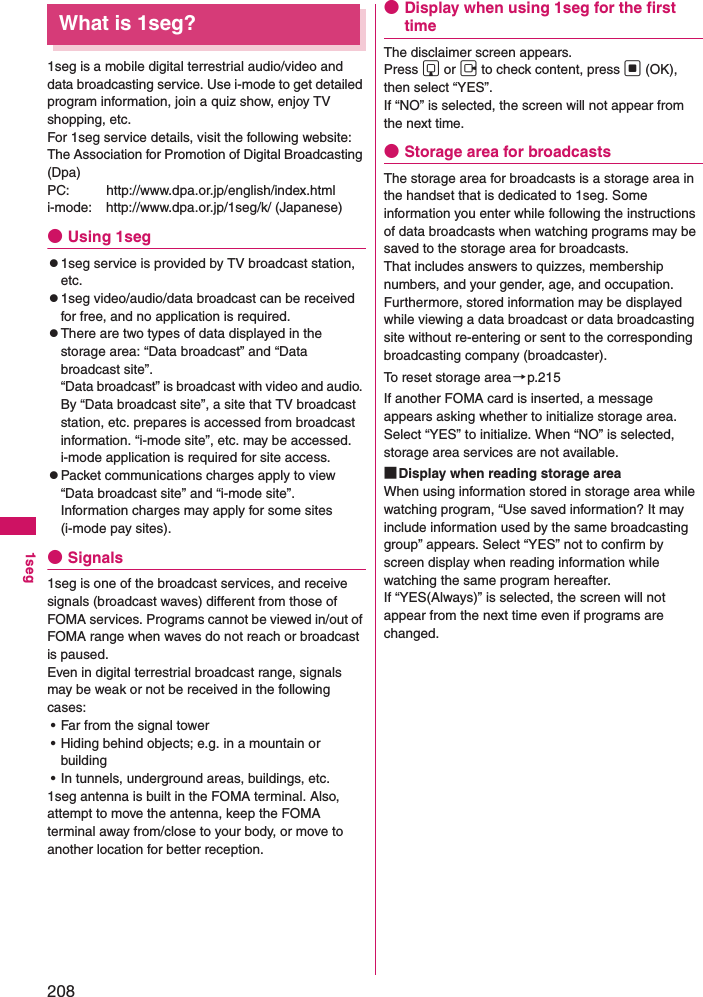

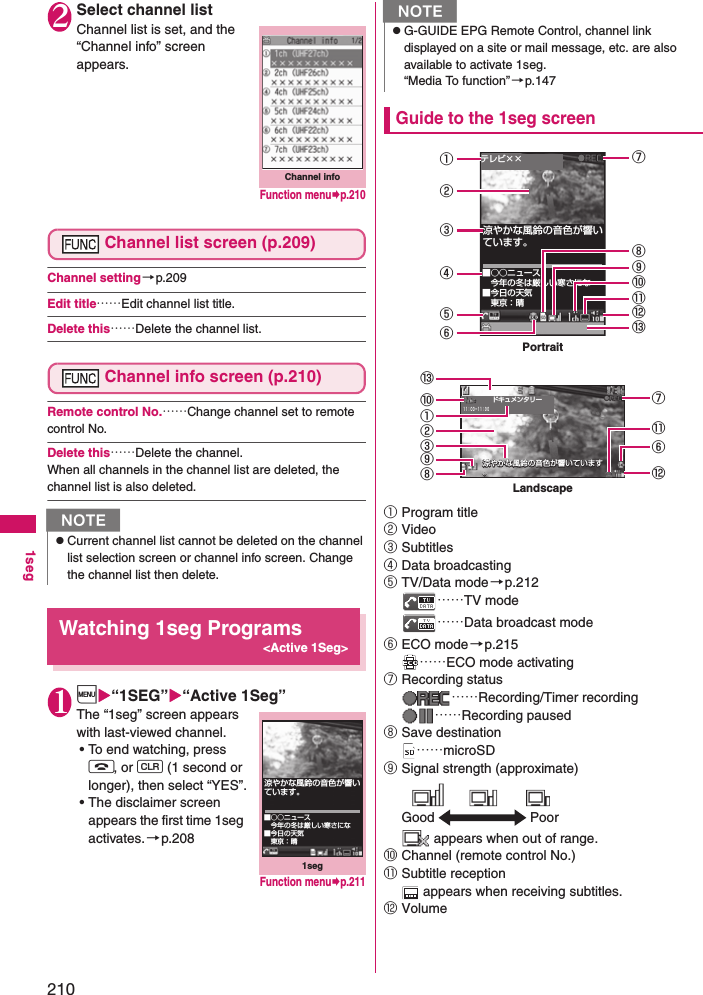

![218Full BrowserDisplaying Website Designed for PC<Full Browser>You can enjoy viewing websites designed for PC with the Full Browser function. Some websites incompatible with i-mode can be displayed correctly. zSome websites may not be displayed or be displayed incorrectly. zNote that the communication charge can become expensive if large volumes of data is acquired by viewing websites containing many image data or downloading files. For details on packet communication fee, refer to “Mobile Phone User’s Guide [i-mode] FOMA version”. zYou can view a website composed of frames*1. You can also select a frame to display it.→p.220zYou can view SSL/TLS*2-compliant websites in Full Browser. *1: The “frame” used in this chapter refers to each of separated sections that constitute a website page and differs from that used for framed photography. *2: SSL and TLS are authentication/encryption technology to protect your privacy in data transmissions. Data sent to or received from a SSL/TLS page is encrypted to prevent hackers from eavesdropping data, site spoofing or altering, thus making credit card transactions and the sending of personal information (e.g. address) safer. Displaying a website1o“Full Browser”2Select any item: Home……Displays a website with the URL registered as home URL.Bookmark……Displays the website registered as bookmark. URL history→p.138Enter URL……Enters a URL to display the website. Full Browser settings→p.221■When the confirmation message asking whether to use Full Browser appearsThe default setting of “Access setting” (setting whether to use Full Browser) is “OFF”. When “OFF” is set for “Access setting”, the confirmation message asking whether to use Full Browser appears. Read the given notes carefully and perform the setting. When you select “Yes” on the confirmation message, “ON” is set for “Access setting” (p.221) and the setting will be retained. ●Guide to the Full Browser screen①Tab• As many tabs and titles as the number of websites displayed simultaneously (if there is no title, the URL is displayed)• “ ” indicating that the selected frame (p.220) appears• “ ” is also displayed when another frame is in communication while the selected frame is displayed (p.220). ②Scroll barCurrent position in the displayed website (Not displayed for Mobile layout)NzYou cannot save a page displayed in Full Browser as a screen memo. zWebsites displayed in Full Browser cannot be viewed in i-mode. zThe Full Browser does not support Flash movies or PDF.zBe sure to insert the FOMA card (UIM) before setting “Access setting”. zWhen “Access setting” is set to “ON” and the FOMA card (UIM) is replaced, the “Access setting” changes to “OFF”. XXXXXX●XXXXXXXXXXXXXXXXXXXXXXXXXXXXXXXXXXXXXXXXXXXXXXXXXXXXXXXXXX●XXXXXXXXXXXXXXXXXXXXXXXXXXXXXX XXXX XX●XXXX②①③Full Browser④Function menup.220](https://usermanual.wiki/Sony/A3880003.08-user-guide-part-1/User-Guide-951150-Page-220.png)
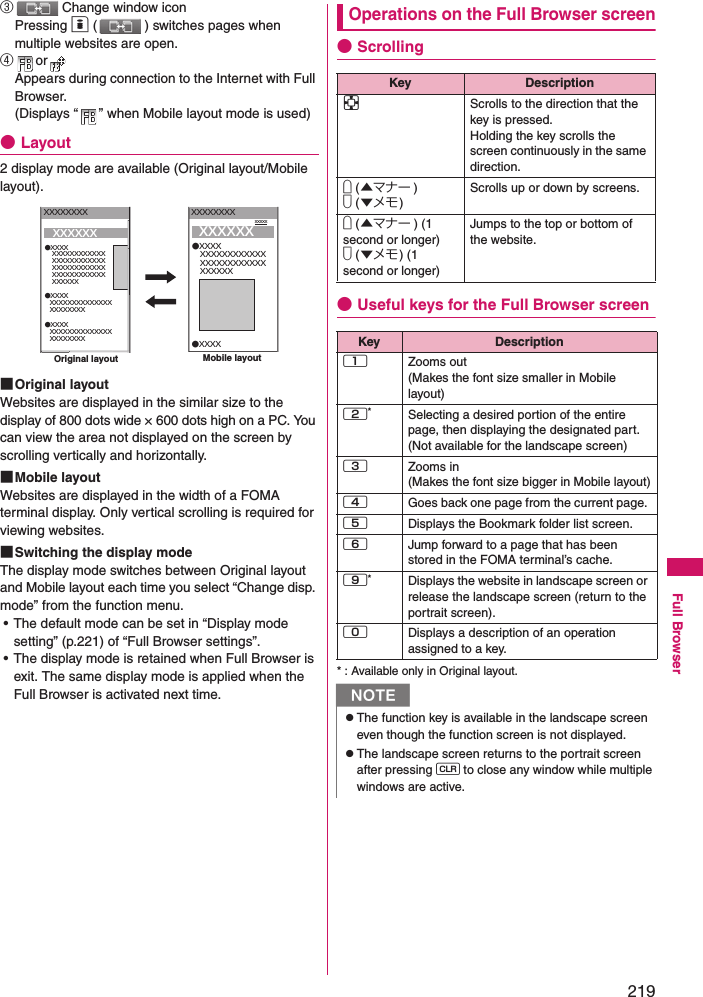
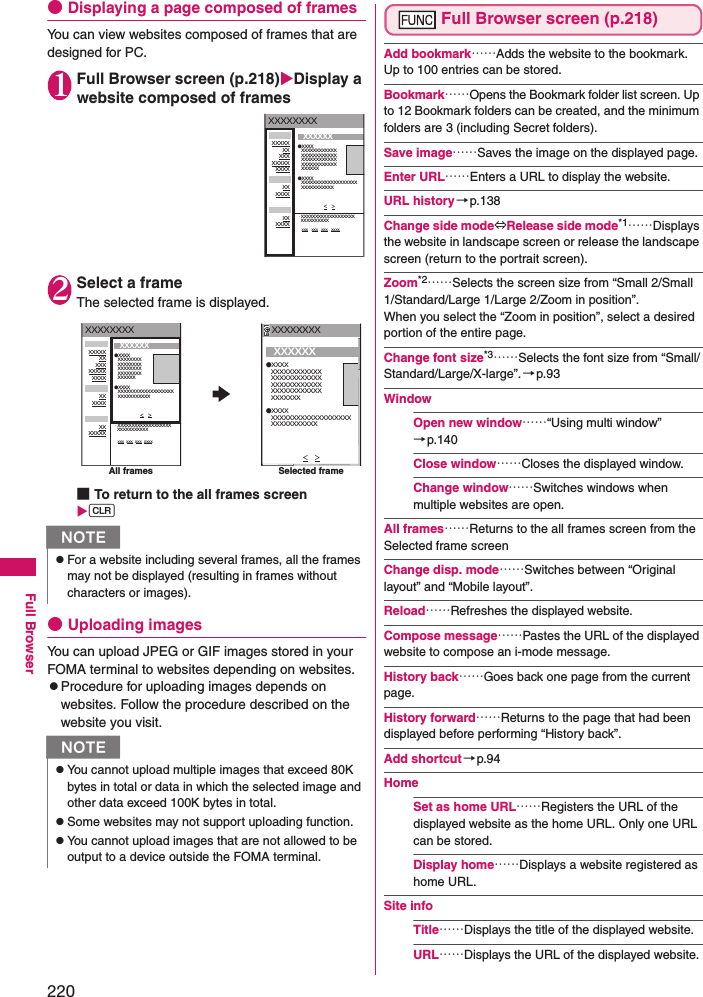
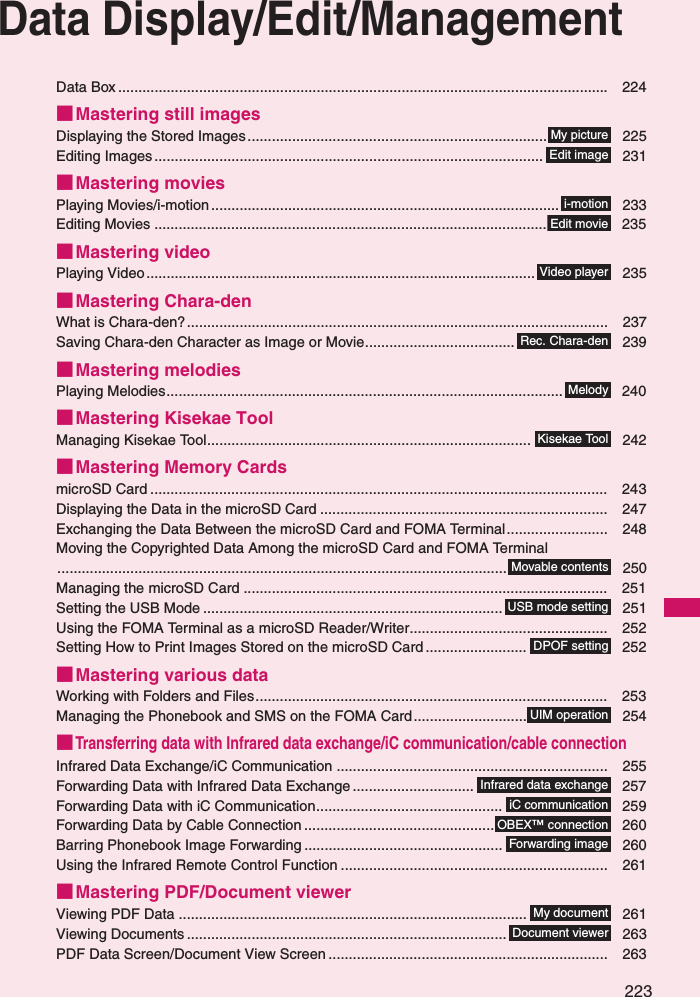
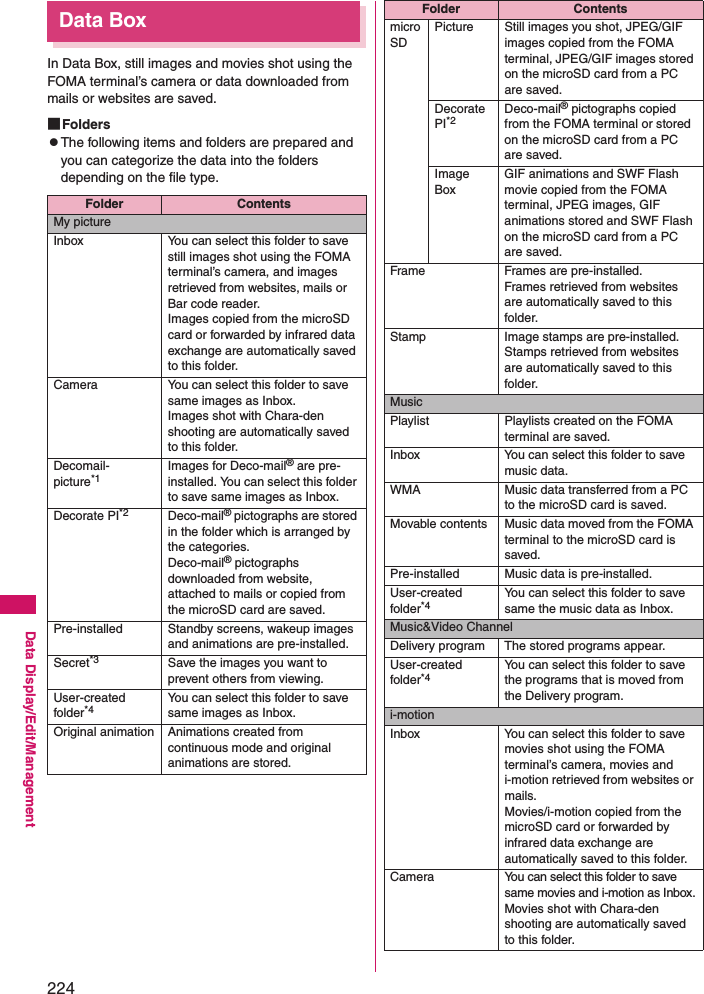
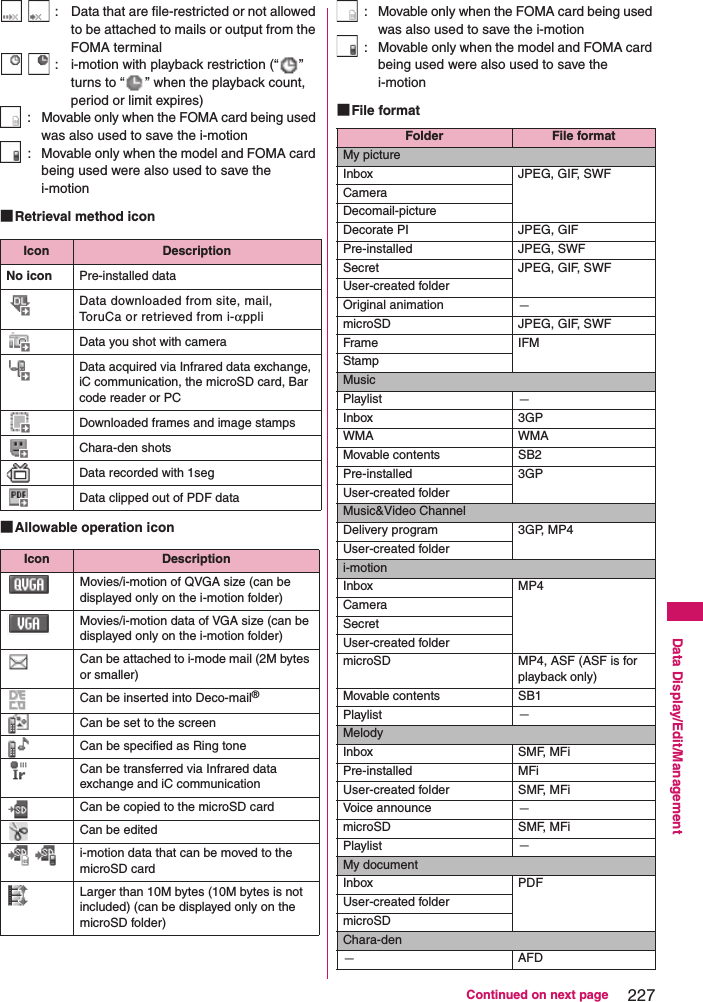
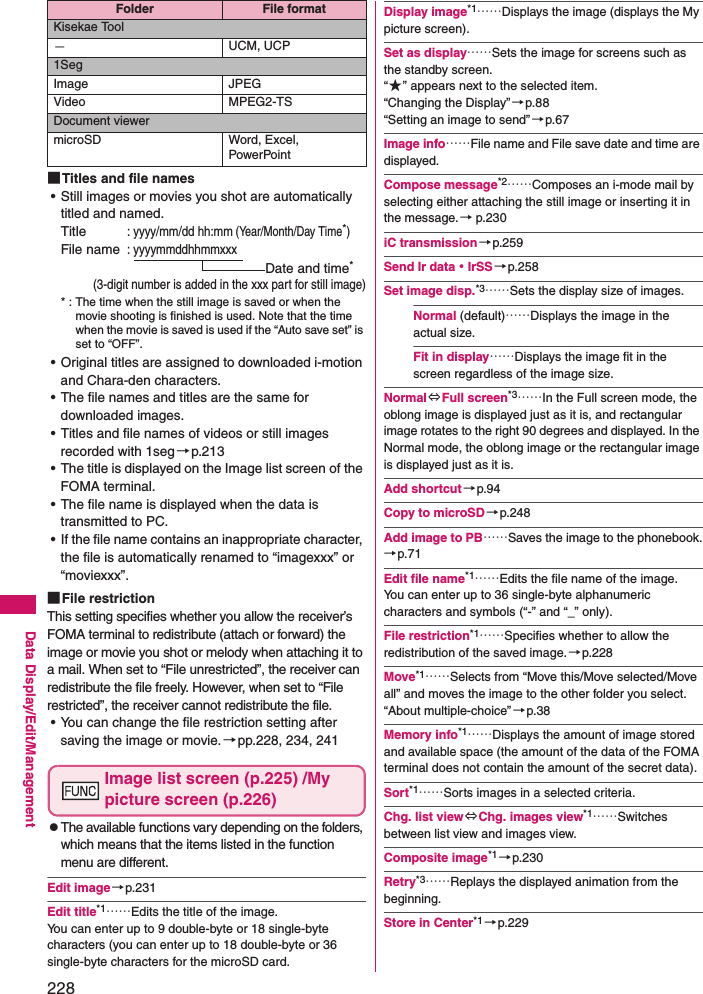
![229Data Display/Edit/ManagementDelete*1……Selects the deleting method from “Delete this/Delete selected/Delete all”. “About multiple-choice”→p.38Delete this*3……Deletes one image. Keep in secret⇔Put out*1*4……“Preventing Others from Viewing Data”→p.104Copy to Phone*5→p.249DPOF setting*5 →p.252Copy*1*5……“Copying the data to the different folder in the microSD card”→p.250*1: Available only with the Image list screen. *2: Not available when 2in1 is in B mode. *3: Available only with the My picture screen. *4: Available only in Secret or Secret data only mode. *5: Available only for images stored on the microSD card. ●Storing images at the Data Security CenterYou can store images, etc. stored in the FOMA terminal at the Data Security Center. zData Security Service is a pay service you need to apply for. If you have not subscribed to the service and try to connect to the Data Security Center, the notification screen appears. 1Image list screen (p.225)u (FUNC) “Store in Center”Use b to select an imageo (Finish)You can select up to 10 images. 2Enter your security code“YES”The FOMA terminal connects to the Data Security Center to start saving the images. 3o (Finish)■To restore imagesThe image data stored at the Data Security Center can be stored on the FOMA terminal from the site of the Data Security Center. For details on how to use, refer to “Mobile Phone User’s Guide [i-mode] FOMA version”. N<Edit title>zYou may not be able to edit the title when the space is not enough on the microSD card. zYou cannot edit the titles of the pre-installed images. <Set as display>zYou can set the images in Inbox, Camera or User-created folder to the following screens: • Standby screen, wake-up display• Dialing/calling screens of voice or videophone calls• Mail sending/receiving/checking/receiving result• Answer hold/on hold/substitute image/record message/preparing message/voice memo for videophone callszYou cannot specify the following images to the screens:• An image whose width or height is larger than 854 dots• An image whose file size exceeds 100K bytes (except for standby and wake-up display)<Normal/Full screen>zIn case of GIF animations and SWF Flash movies, the display does not change even if you switch the Normal mode and Full screen.<Add image to PB>zYou can add an image whose size is 100K bytes or smaller and whose width or height is 854 dots or smaller.zYou cannot add images other than JPEG or GIF. <Edit file name>zYou cannot edit the names of the following images: • Pre-installed images• A still image of Chara-den character with “Rec. File Restriction”• Images that is prohibited to be output from your FOMA terminalzYou cannot use single-byte spaces for file names. <File restriction>zYou cannot change restrictions if it is: • Neither JPEG nor GIF• A still image of Chara-den character with “Rec. File Restriction”<Sort>z“By source” sorts the images in the following order.①Downloaded images or images acquired from i-αppli or ToruCa②Still images shot by the camera③Images retrieved using Infrared data exchange, iC communication or from microSD card, etc. ④Chara-den shots⑤Images clipped out of PDF data⑥Pre-installed imagesNzYou cannot save images when the file size for a image exceeds 100K bytes, when it is prohibited to be output from the FOMA terminal, pre-installed Deco-mail® pictures or pictographs. N](https://usermanual.wiki/Sony/A3880003.08-user-guide-part-1/User-Guide-951150-Page-231.png)
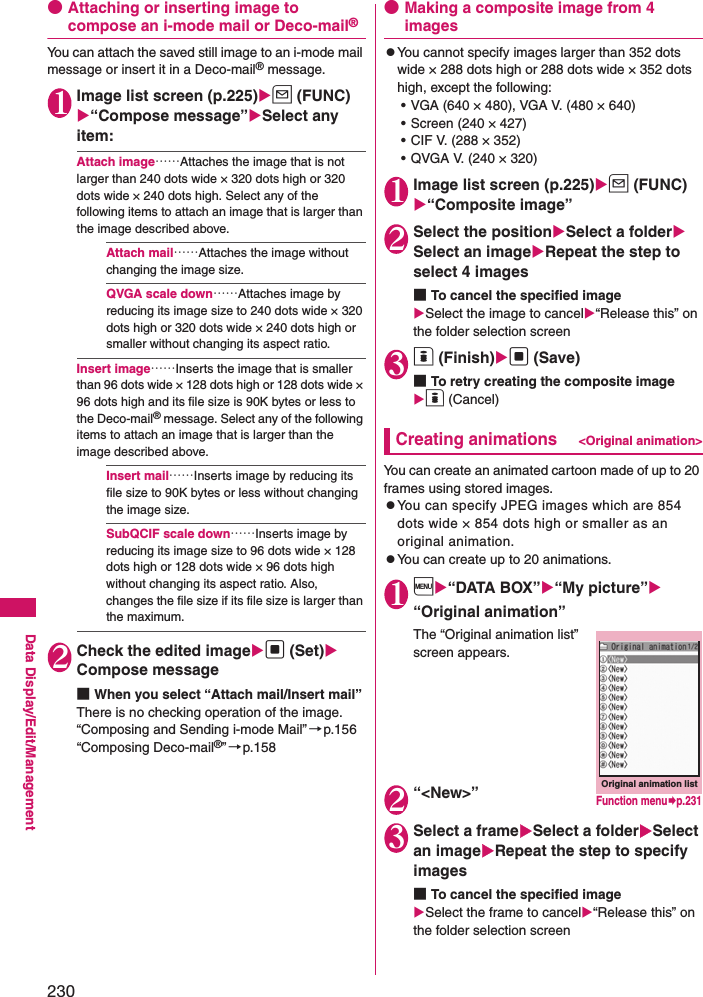
![231Continued on next pageData Display/Edit/Management4o (Finish)Original animation list screen (p.230)Edit title……Edits the title of the original animation. You can enter up to 9 double-byte or 18 single-byte characters. Org. animation……Newly creates Original animation when “<New>” is highlighted. Edits the original animation when the existing one is highlighted. Display image……Plays the original animation (Displays the original animation playback screen). Set as display……Selects the item to which the original animation is set. Image info……Checks the destination to save the original animation set in “Set as display”. If there is no setting, “No set” is displayed. Release animation……Cancels the original animation. Playing the original animation1Original animation list screen (p.230) Select an original animationThe “Original animation playback” screen appears. If there are two original animations or more, use v to play the previous or next animation. Original animation playback screen (p.231)Set as display……Selects the item to which the image is set. Set image disp.……Specifies the display mode of an image smaller than the image display area. Normal (default)……Displays the image in the actual size. Fit in display……Enlarges the movie to the display size. Retry……Plays the animation from the beginning. Editing Images<Edit image>You can edit the still images you shot, etc. zThe following are the contents and size you can edit:[Frame]• 854 × 480, 480 × 854 dots• 640 × 480, 480 × 640 dots• 352 × 288, 288 × 352 dots• 320 × 240, 240 × 320 dots• 427 × 240, 240 × 427 dots• 176 × 144, 144 × 176 dots• 128 × 96, 96 × 128 dots[Image effect/Correct backlight/Refresh skin tone]• Up to 854 × 480, 480 × 854 dots[Image stamp/Character stamp/Trim away/Brightness/Rotate/Change size]• 2,592 × 1,944, 1,944 × 2,592 dots• 2,304 × 1,728, 1,728 × 2,304 dots• 2,048 × 1,536, 1,536 × 2,048 dots• 1,616 × 1,212, 1,212 × 1,616 dots• 1,600 × 1,200, 1,200 × 1,600 dots• 1,280 × 960, 960 × 1,280 dots• Up to 854 × 480, 480 × 854 dotsHowever, an image larger than 854 × 480 or 480 × 854 dots is scaled dowen to 640 × 480 or 480 × 640 dots before editing.* Even if the image size is able to edit in the descriptions above, some image may not support editing function. You can edit only the image with “ ”. You cannot select the menu that cannot be edited. zWhen “Edit image” is selected in the photo mode checking screen function menu, only the “Frame”, “Image effect”, “Refresh skin tone” and “Correct backlight” are available. 1My picture screen (p.226)u (FUNC) “Edit image”Select any item: Frame→p.232Image effect……Applies effects to the image. Sharp……Sharpens the outline of the image. Blur……Softens the outline of the image. Sepia……Makes the sepia-tone image. Emboss……Brings out the image in relief. Negative……Makes the negative image. Horizontal flip……Reverses the left and right in the image (mirroring). Image stamp→p.232Character stamp→p.232Original animation playbackFunction menup.231](https://usermanual.wiki/Sony/A3880003.08-user-guide-part-1/User-Guide-951150-Page-233.png)