Sony A3880072 GSM 850/900/1800/1900 GPRS/EDGE /UMTS FDD18 / HSPA mobile phone with Bluetooth, WLAN 802.11bg, GPS, FM receiver User Manual Sony Ericsson Mobile Communications AB

Sony Mobile Communications Inc GSM 850/900/1800/1900 GPRS/EDGE /UMTS FDD18 / HSPA mobile phone with Bluetooth, WLAN 802.11bg, GPS, FM receiver Sony Ericsson Mobile Communications AB

08 user guide part 1

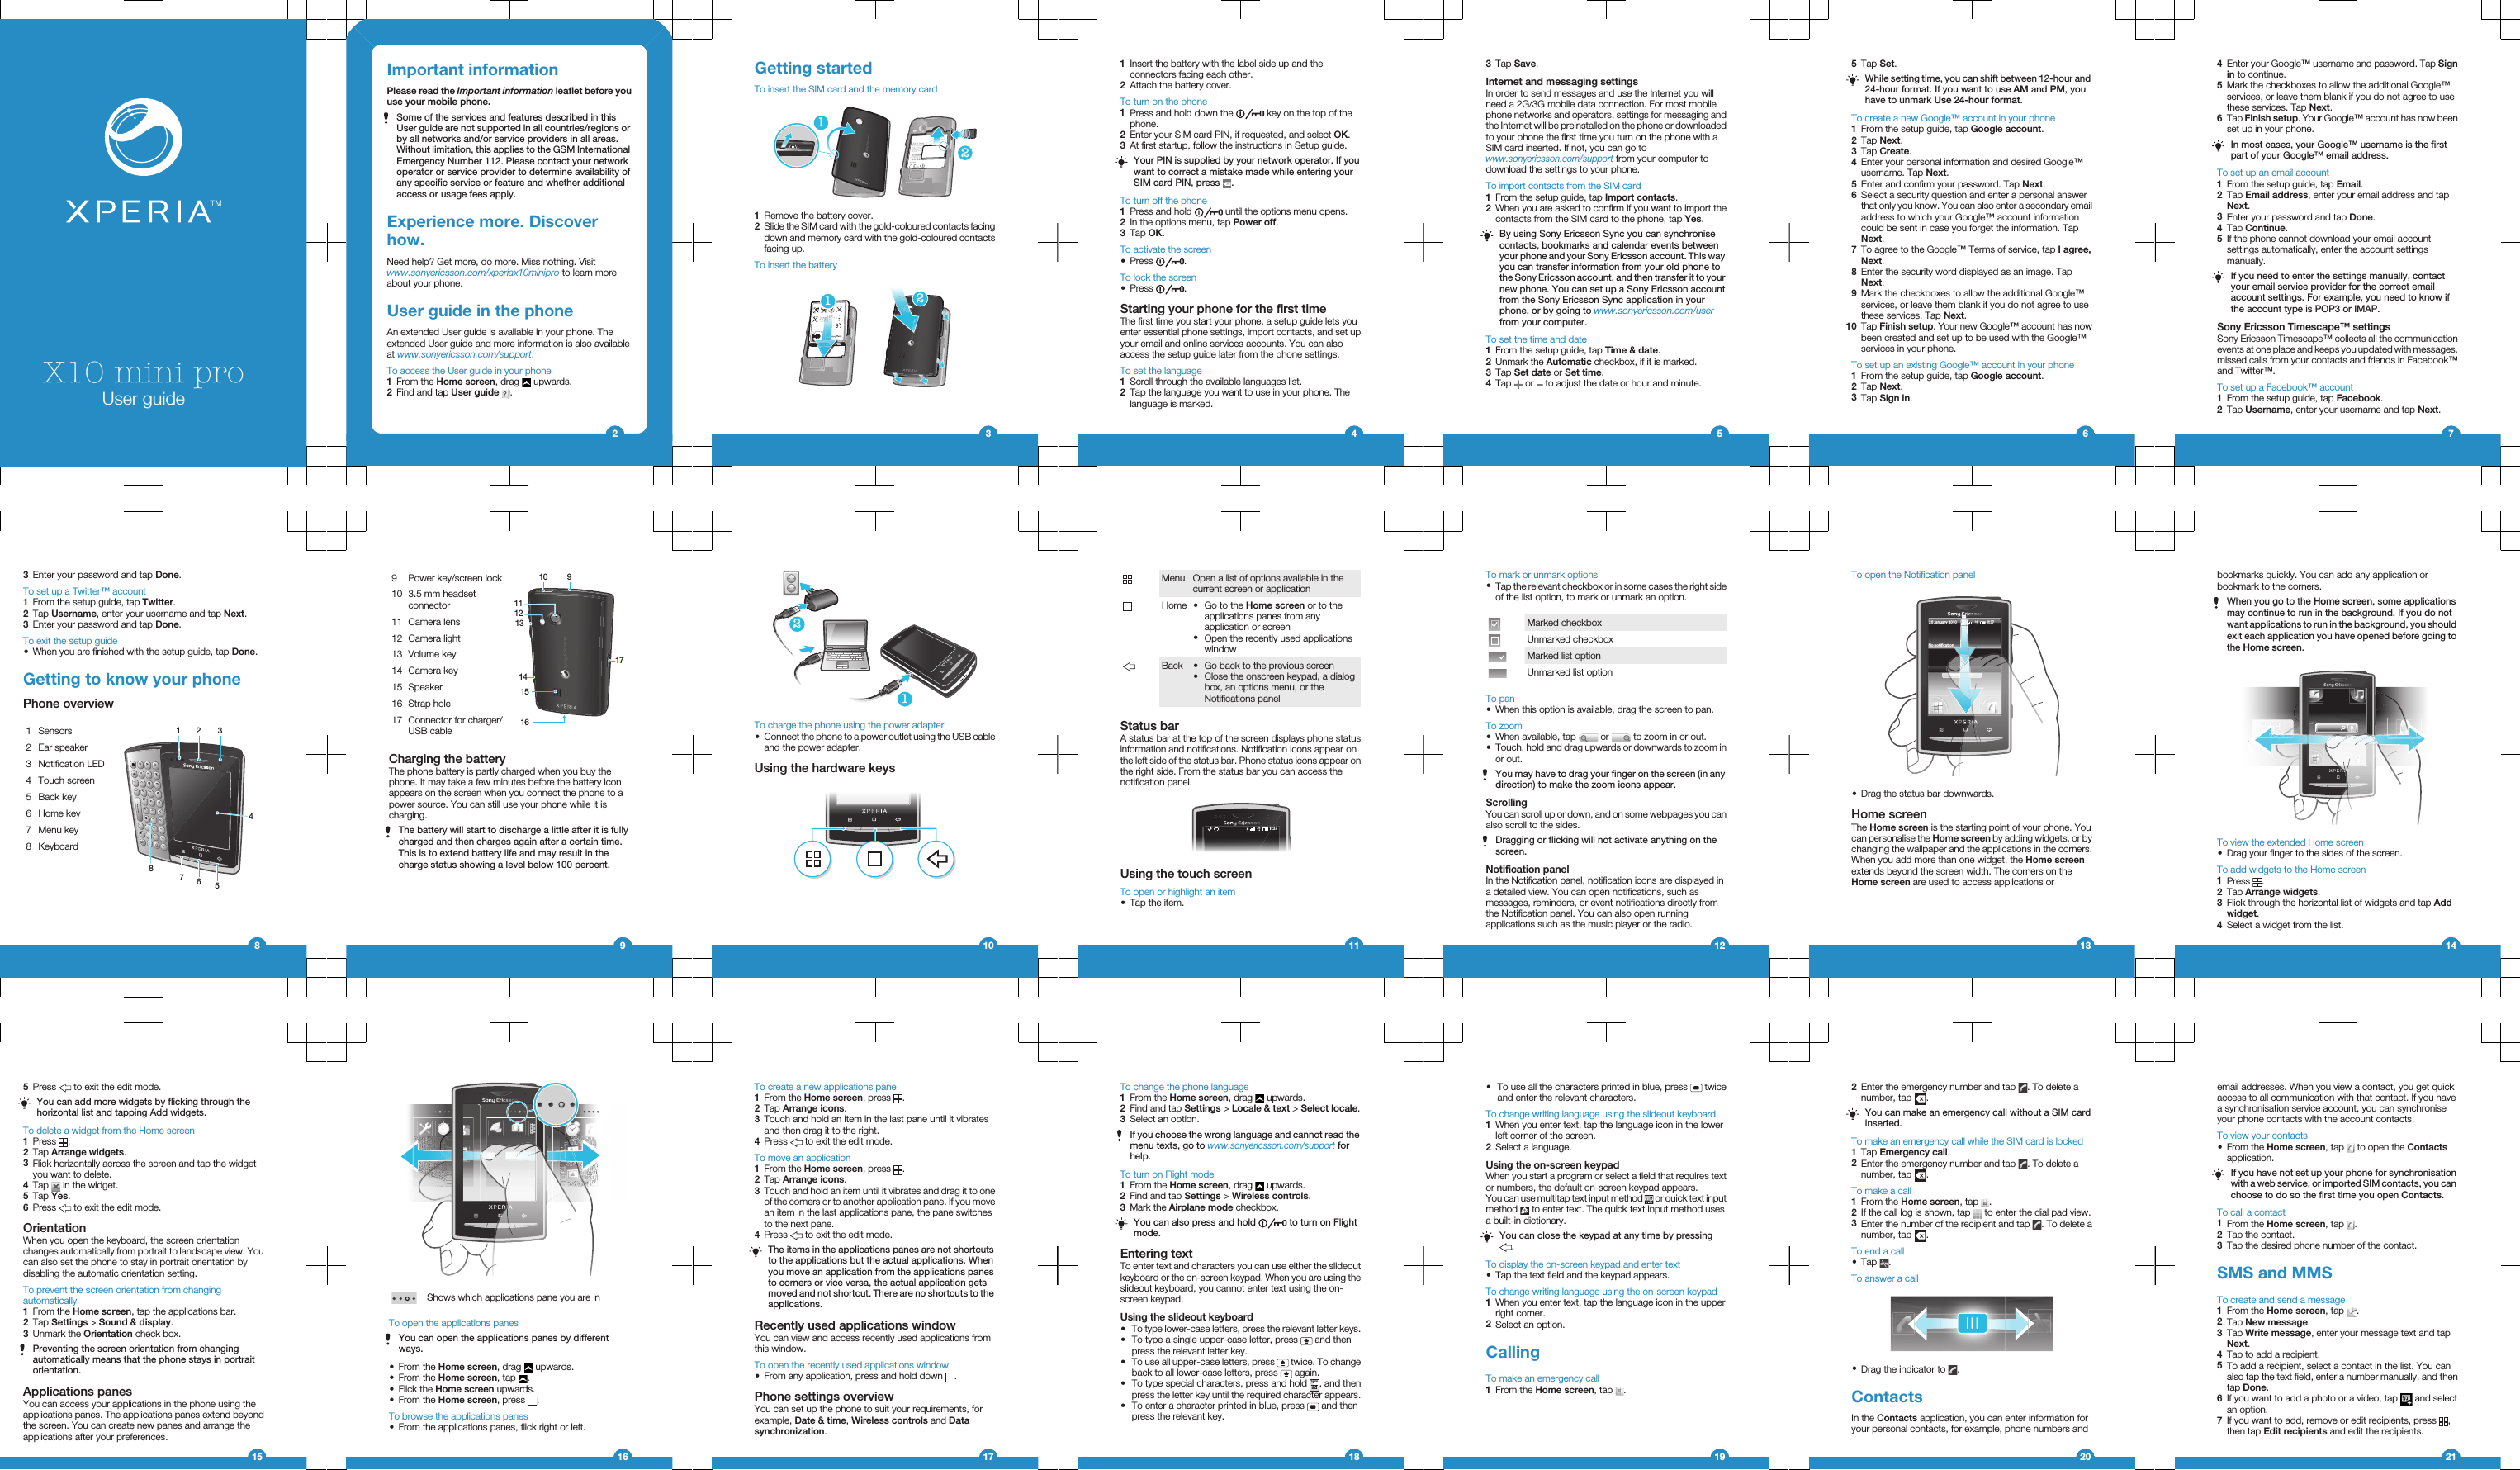
X10 mini proUser guideImportant informationPlease read the Important information leaflet before youuse your mobile phone.Some of the services and features described in thisUser guide are not supported in all countries/regions orby all networks and/or service providers in all areas.Without limitation, this applies to the GSM InternationalEmergency Number 112. Please contact your networkoperator or service provider to determine availability ofany specific service or feature and whether additionalaccess or usage fees apply.Experience more. Discoverhow.Need help? Get more, do more. Miss nothing. Visitwww.sonyericsson.com/xperiax10minipro to learn moreabout your phone.User guide in the phoneAn extended User guide is available in your phone. Theextended User guide and more information is also availableat www.sonyericsson.com/support.To access the User guide in your phone1From the Home screen, drag   upwards.2Find and tap User guide  .2Getting startedTo insert the SIM card and the memory card211Remove the battery cover.2Slide the SIM card with the gold-coloured contacts facingdown and memory card with the gold-coloured contactsfacing up.To insert the battery1231Insert the battery with the label side up and theconnectors facing each other.2Attach the battery cover.To turn on the phone1Press and hold down the   key on the top of thephone.2Enter your SIM card PIN, if requested, and select OK.3At first startup, follow the instructions in Setup guide.Your PIN is supplied by your network operator. If youwant to correct a mistake made while entering yourSIM card PIN, press  .To turn off the phone1Press and hold   until the options menu opens.2In the options menu, tap Power off.3Tap OK.To activate the screen•Press  .To lock the screen•Press  .Starting your phone for the first timeThe first time you start your phone, a setup guide lets youenter essential phone settings, import contacts, and set upyour email and online services accounts. You can alsoaccess the setup guide later from the phone settings.To set the language1Scroll through the available languages list.2Tap the language you want to use in your phone. Thelanguage is marked.43Tap Save.Internet and messaging settingsIn order to send messages and use the Internet you willneed a 2G/3G mobile data connection. For most mobilephone networks and operators, settings for messaging andthe Internet will be preinstalled on the phone or downloadedto your phone the first time you turn on the phone with aSIM card inserted. If not, you can go towww.sonyericsson.com/support from your computer todownload the settings to your phone.To import contacts from the SIM card1From the setup guide, tap Import contacts.2When you are asked to confirm if you want to import thecontacts from the SIM card to the phone, tap Yes.By using Sony Ericsson Sync you can synchronisecontacts, bookmarks and calendar events betweenyour phone and your Sony Ericsson account. This wayyou can transfer information from your old phone tothe Sony Ericsson account, and then transfer it to yournew phone. You can set up a Sony Ericsson accountfrom the Sony Ericsson Sync application in yourphone, or by going to www.sonyericsson.com/userfrom your computer.To set the time and date1From the setup guide, tap Time & date.2Unmark the Automatic checkbox, if it is marked.3Tap Set date or Set time.4Tap   or   to adjust the date or hour and minute.55Tap Set.While setting time, you can shift between 12-hour and24-hour format. If you want to use AM and PM, youhave to unmark Use 24-hour format.To create a new Google™ account in your phone1From the setup guide, tap Google account.2Tap Next.3Tap Create.4Enter your personal information and desired Google™username. Tap Next.5Enter and confirm your password. Tap Next.6Select a security question and enter a personal answerthat only you know. You can also enter a secondary emailaddress to which your Google™ account informationcould be sent in case you forget the information. TapNext.7To agree to the Google™ Terms of service, tap I agree,Next.8Enter the security word displayed as an image. TapNext.9Mark the checkboxes to allow the additional Google™services, or leave them blank if you do not agree to usethese services. Tap Next.10 Tap Finish setup. Your new Google™ account has nowbeen created and set up to be used with the Google™services in your phone.To set up an existing Google™ account in your phone1From the setup guide, tap Google account.2Tap Next.3Tap Sign in.64Enter your Google™ username and password. Tap Signin to continue.5Mark the checkboxes to allow the additional Google™services, or leave them blank if you do not agree to usethese services. Tap Next.6Tap Finish setup. Your Google™ account has now beenset up in your phone.In most cases, your Google™ username is the firstpart of your Google™ email address.To set up an email account1From the setup guide, tap Email.2Tap Email address, enter your email address and tapNext.3Enter your password and tap Done.4Tap Continue.5If the phone cannot download your email accountsettings automatically, enter the account settingsmanually.If you need to enter the settings manually, contactyour email service provider for the correct emailaccount settings. For example, you need to know ifthe account type is POP3 or IMAP.Sony Ericsson Timescape™ settingsSony Ericsson Timescape™ collects all the communicationevents at one place and keeps you updated with messages,missed calls from your contacts and friends in Facebook™and Twitter™.To set up a Facebook™ account1From the setup guide, tap Facebook.2Tap Username, enter your username and tap Next.73Enter your password and tap Done.To set up a Twitter™ account1From the setup guide, tap Twitter.2Tap Username, enter your username and tap Next.3Enter your password and tap Done.To exit the setup guide•When you are finished with the setup guide, tap Done.Getting to know your phonePhone overview1 Sensors123567482 Ear speaker3 Notification LED4 Touch screen5 Back key6 Home key7 Menu key8 Keyboard89 Power key/screen lock10 91112131415171610 3.5 mm headsetconnector11 Camera lens12 Camera light13 Volume key14 Camera key15 Speaker16 Strap hole17 Connector for charger/USB cableCharging the batteryThe phone battery is partly charged when you buy thephone. It may take a few minutes before the battery iconappears on the screen when you connect the phone to apower source. You can still use your phone while it ischarging.The battery will start to discharge a little after it is fullycharged and then charges again after a certain time.This is to extend battery life and may result in thecharge status showing a level below 100 percent.912To charge the phone using the power adapter•Connect the phone to a power outlet using the USB cableand the power adapter.Using the hardware keys10Menu Open a list of options available in thecurrent screen or applicationHome •Go to the Home screen or to theapplications panes from anyapplication or screen•Open the recently used applicationswindowBack •Go back to the previous screen•Close the onscreen keypad, a dialogbox, an options menu, or theNotifications panelStatus barA status bar at the top of the screen displays phone statusinformation and notifications. Notification icons appear onthe left side of the status bar. Phone status icons appear onthe right side. From the status bar you can access thenotification panel.11:37Using the touch screenTo open or highlight an item•Tap the item.11To mark or unmark options•Tap the relevant checkbox or in some cases the right sideof the list option, to mark or unmark an option.Marked checkboxUnmarked checkboxMarked list optionUnmarked list optionTo pan•When this option is available, drag the screen to pan.To zoom•When available, tap   or   to zoom in or out.•Touch, hold and drag upwards or downwards to zoom inor out.You may have to drag your finger on the screen (in anydirection) to make the zoom icons appear.ScrollingYou can scroll up or down, and on some webpages you canalso scroll to the sides.Dragging or flicking will not activate anything on thescreen.Notification panelIn the Notification panel, notification icons are displayed ina detailed view. You can open notifications, such asmessages, reminders, or event notifications directly fromthe Notification panel. You can also open runningapplications such as the music player or the radio.12To open the Notification panelJanuary 7, 201011: 3 7No notication20 January 2010nn0Januar0ryyy772, 2777001110yJa•Drag the status bar downwards.Home screenThe Home screen is the starting point of your phone. Youcan personalise the Home screen by adding widgets, or bychanging the wallpaper and the applications in the corners.When you add more than one widget, the Home screenextends beyond the screen width. The corners on theHome screen are used to access applications or13bookmarks quickly. You can add any application orbookmark to the corners.When you go to the Home screen, some applicationsmay continue to run in the background. If you do notwant applications to run in the background, you shouldexit each application you have opened before going tothe Home screen.727010JanJ727010anuary7, 2770100y727010To view the extended Home screen•Drag your finger to the sides of the screen.To add widgets to the Home screen1Press  .2Tap Arrange widgets.3Flick through the horizontal list of widgets and tap Addwidget.4Select a widget from the list.145Press   to exit the edit mode.You can add more widgets by flicking through thehorizontal list and tapping Add widgets.To delete a widget from the Home screen1Press  .2Tap Arrange widgets.3Flick horizontally across the screen and tap the widgetyou want to delete.4Tap   in the widget.5Tap Yes.6Press   to exit the edit mode.OrientationWhen you open the keyboard, the screen orientationchanges automatically from portrait to landscape view. Youcan also set the phone to stay in portrait orientation bydisabling the automatic orientation setting.To prevent the screen orientation from changingautomatically1From the Home screen, tap the applications bar.2Tap Settings > Sound & display.3Unmark the Orientation check box.Preventing the screen orientation from changingautomatically means that the phone stays in portraitorientation.Applications panesYou can access your applications in the phone using theapplications panes. The applications panes extend beyondthe screen. You can create new panes and arrange theapplications after your preferences.15Shows which applications pane you are inTo open the applications panesYou can open the applications panes by differentways.•From the Home screen, drag   upwards.•From the Home screen, tap  .•Flick the Home screen upwards.•From the Home screen, press  .To browse the applications panes•From the applications panes, flick right or left.16To create a new applications pane1From the Home screen, press  .2Tap Arrange icons.3Touch and hold an item in the last pane until it vibratesand then drag it to the right.4Press   to exit the edit mode.To move an application1From the Home screen, press  .2Tap Arrange icons.3Touch and hold an item until it vibrates and drag it to oneof the corners or to another application pane. If you movean item in the last applications pane, the pane switchesto the next pane.4Press   to exit the edit mode.The items in the applications panes are not shortcutsto the applications but the actual applications. Whenyou move an application from the applications panesto corners or vice versa, the actual application getsmoved and not shortcut. There are no shortcuts to theapplications.Recently used applications windowYou can view and access recently used applications fromthis window.To open the recently used applications window•From any application, press and hold down  .Phone settings overviewYou can set up the phone to suit your requirements, forexample, Date & time, Wireless controls and Datasynchronization.17To change the phone language1From the Home screen, drag   upwards.2Find and tap Settings > Locale & text > Select locale.3Select an option.If you choose the wrong language and cannot read themenu texts, go to www.sonyericsson.com/support forhelp.To turn on Flight mode1From the Home screen, drag   upwards.2Find and tap Settings > Wireless controls.3Mark the Airplane mode checkbox.You can also press and hold   to turn on Flightmode.Entering textTo enter text and characters you can use either the slideoutkeyboard or the on-screen keypad. When you are using theslideout keyboard, you cannot enter text using the on-screen keypad.Using the slideout keyboard•To type lower-case letters, press the relevant letter keys.•To type a single upper-case letter, press   and thenpress the relevant letter key.•To use all upper-case letters, press   twice. To changeback to all lower-case letters, press   again.•To type special characters, press and hold Symau, and thenpress the letter key until the required character appears.•To enter a character printed in blue, press   and thenpress the relevant key.18•To use all the characters printed in blue, press   twiceand enter the relevant characters.To change writing language using the slideout keyboard1When you enter text, tap the language icon in the lowerleft corner of the screen.2Select a language.Using the on-screen keypadWhen you start a program or select a field that requires textor numbers, the default on-screen keypad appears.You can use multitap text input method   or quick text inputmethod   to enter text. The quick text input method usesa built-in dictionary.You can close the keypad at any time by pressing.To display the on-screen keypad and enter text•Tap the text field and the keypad appears.To change writing language using the on-screen keypad1When you enter text, tap the language icon in the upperright corner.2Select an option.CallingTo make an emergency call1From the Home screen, tap  .192Enter the emergency number and tap  . To delete anumber, tap  .You can make an emergency call without a SIM cardinserted.To make an emergency call while the SIM card is locked1Tap Emergency call.2Enter the emergency number and tap  . To delete anumber, tap  .To make a call1From the Home screen, tap  .2If the call log is shown, tap   to enter the dial pad view.3Enter the number of the recipient and tap  . To delete anumber, tap  .To end a call•Tap  .To answer a call•Drag the indicator to  .ContactsIn the Contacts application, you can enter information foryour personal contacts, for example, phone numbers and20email addresses. When you view a contact, you get quickaccess to all communication with that contact. If you havea synchronisation service account, you can synchroniseyour phone contacts with the account contacts.To view your contacts•From the Home screen, tap   to open the Contactsapplication.If you have not set up your phone for synchronisationwith a web service, or imported SIM contacts, you canchoose to do so the first time you open Contacts.To call a contact1From the Home screen, tap  .2Tap the contact.3Tap the desired phone number of the contact.SMS and MMSTo create and send a message1From the Home screen, tap  .2Tap New message.3Tap Write message, enter your message text and tapNext.4Tap to add a recipient.5To add a recipient, select a contact in the list. You canalso tap the text field, enter a number manually, and thentap Done.6If you want to add a photo or a video, tap   and selectan option.7If you want to add, remove or edit recipients, press  ,then tap Edit recipients and edit the recipients.21
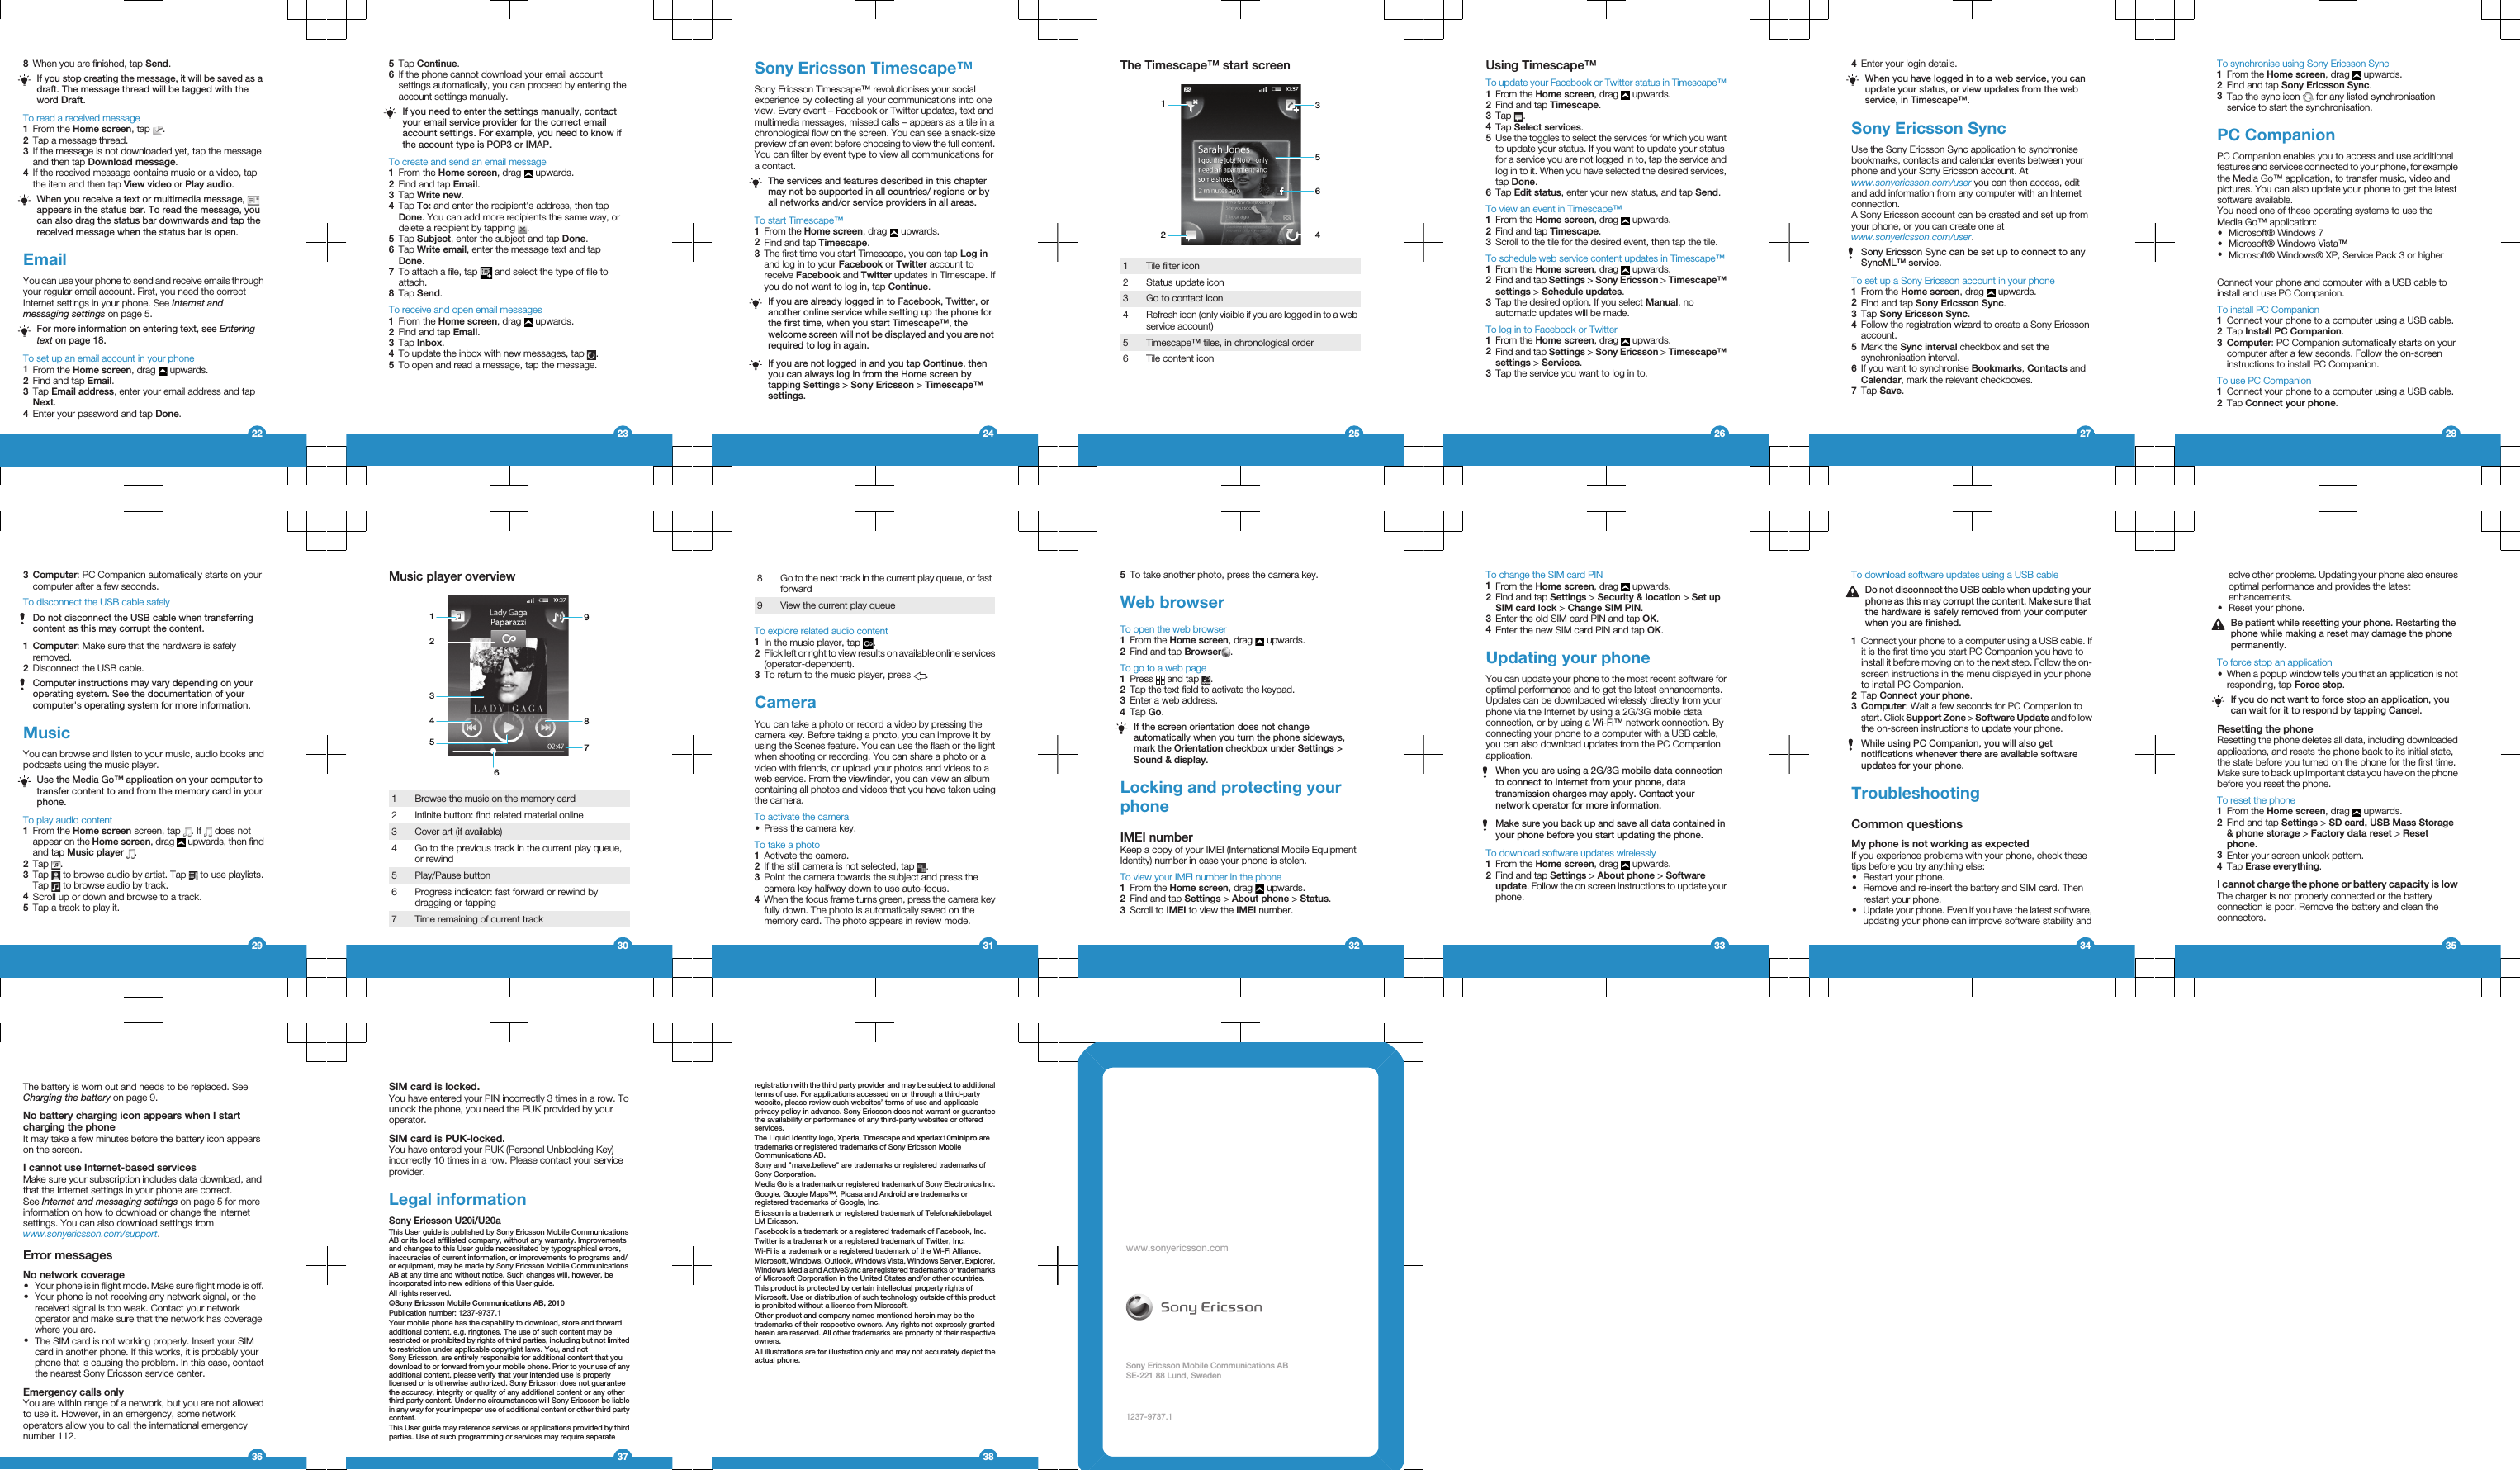
8When you are finished, tap Send.If you stop creating the message, it will be saved as adraft. The message thread will be tagged with theword Draft.To read a received message1From the Home screen, tap  .2Tap a message thread.3If the message is not downloaded yet, tap the messageand then tap Download message.4If the received message contains music or a video, tapthe item and then tap View video or Play audio.When you receive a text or multimedia message, appears in the status bar. To read the message, youcan also drag the status bar downwards and tap thereceived message when the status bar is open.EmailYou can use your phone to send and receive emails throughyour regular email account. First, you need the correctInternet settings in your phone. See Internet andmessaging settings on page 5.For more information on entering text, see Enteringtext on page 18.To set up an email account in your phone1From the Home screen, drag   upwards.2Find and tap Email.3Tap Email address, enter your email address and tapNext.4Enter your password and tap Done.225Tap Continue.6If the phone cannot download your email accountsettings automatically, you can proceed by entering theaccount settings manually.If you need to enter the settings manually, contactyour email service provider for the correct emailaccount settings. For example, you need to know ifthe account type is POP3 or IMAP.To create and send an email message1From the Home screen, drag   upwards.2Find and tap Email.3Tap Write new.4Tap To: and enter the recipient's address, then tapDone. You can add more recipients the same way, ordelete a recipient by tapping  .5Tap Subject, enter the subject and tap Done.6Tap Write email, enter the message text and tapDone.7To attach a file, tap   and select the type of file toattach.8Tap Send.To receive and open email messages1From the Home screen, drag   upwards.2Find and tap Email.3Tap Inbox.4To update the inbox with new messages, tap  .5To open and read a message, tap the message.23Sony Ericsson Timescape™Sony Ericsson Timescape™ revolutionises your socialexperience by collecting all your communications into oneview. Every event – Facebook or Twitter updates, text andmultimedia messages, missed calls – appears as a tile in achronological flow on the screen. You can see a snack-sizepreview of an event before choosing to view the full content.You can filter by event type to view all communications fora contact.The services and features described in this chaptermay not be supported in all countries/ regions or byall networks and/or service providers in all areas.To start Timescape™1From the Home screen, drag   upwards.2Find and tap Timescape.3The first time you start Timescape, you can tap Log inand log in to your Facebook or Twitter account toreceive Facebook and Twitter updates in Timescape. Ifyou do not want to log in, tap Continue.If you are already logged in to Facebook, Twitter, oranother online service while setting up the phone forthe first time, when you start Timescape™, thewelcome screen will not be displayed and you are notrequired to log in again.If you are not logged in and you tap Continue, thenyou can always log in from the Home screen bytapping Settings > Sony Ericsson > Timescape™settings.24The Timescape™ start screen2315641 Tile filter icon2 Status update icon3 Go to contact icon4Refresh icon (only visible if you are logged in to a webservice account)5 Timescape™ tiles, in chronological order6 Tile content icon25Using Timescape™To update your Facebook or Twitter status in Timescape™1From the Home screen, drag   upwards.2Find and tap Timescape.3Tap  .4Tap Select services.5Use the toggles to select the services for which you wantto update your status. If you want to update your statusfor a service you are not logged in to, tap the service andlog in to it. When you have selected the desired services,tap Done.6Tap Edit status, enter your new status, and tap Send.To view an event in Timescape™1From the Home screen, drag   upwards.2Find and tap Timescape.3Scroll to the tile for the desired event, then tap the tile.To schedule web service content updates in Timescape™1From the Home screen, drag   upwards.2Find and tap Settings > Sony Ericsson > Timescape™settings > Schedule updates.3Tap the desired option. If you select Manual, noautomatic updates will be made.To log in to Facebook or Twitter1From the Home screen, drag   upwards.2Find and tap Settings > Sony Ericsson > Timescape™settings > Services.3Tap the service you want to log in to.264Enter your login details.When you have logged in to a web service, you canupdate your status, or view updates from the webservice, in Timescape™.Sony Ericsson SyncUse the Sony Ericsson Sync application to synchronisebookmarks, contacts and calendar events between yourphone and your Sony Ericsson account. Atwww.sonyericsson.com/user you can then access, editand add information from any computer with an Internetconnection.A Sony Ericsson account can be created and set up fromyour phone, or you can create one atwww.sonyericsson.com/user.Sony Ericsson Sync can be set up to connect to anySyncML™ service.To set up a Sony Ericsson account in your phone1From the Home screen, drag   upwards.2Find and tap Sony Ericsson Sync.3Tap Sony Ericsson Sync.4Follow the registration wizard to create a Sony Ericssonaccount.5Mark the Sync interval checkbox and set thesynchronisation interval.6If you want to synchronise Bookmarks, Contacts andCalendar, mark the relevant checkboxes.7Tap Save.27To synchronise using Sony Ericsson Sync1From the Home screen, drag   upwards.2Find and tap Sony Ericsson Sync.3Tap the sync icon   for any listed synchronisationservice to start the synchronisation.PC CompanionPC Companion enables you to access and use additionalfeatures and services connected to your phone, for examplethe Media Go™ application, to transfer music, video andpictures. You can also update your phone to get the latestsoftware available.You need one of these operating systems to use theMedia Go™ application:•Microsoft® Windows 7•Microsoft® Windows Vista™•Microsoft® Windows® XP, Service Pack 3 or higherConnect your phone and computer with a USB cable toinstall and use PC Companion.To install PC Companion1Connect your phone to a computer using a USB cable.2Tap Install PC Companion.3Computer: PC Companion automatically starts on yourcomputer after a few seconds. Follow the on-screeninstructions to install PC Companion.To use PC Companion1Connect your phone to a computer using a USB cable.2Tap Connect your phone.283Computer: PC Companion automatically starts on yourcomputer after a few seconds.To disconnect the USB cable safelyDo not disconnect the USB cable when transferringcontent as this may corrupt the content.1Computer: Make sure that the hardware is safelyremoved.2Disconnect the USB cable.Computer instructions may vary depending on youroperating system. See the documentation of yourcomputer's operating system for more information.MusicYou can browse and listen to your music, audio books andpodcasts using the music player.Use the Media Go™ application on your computer totransfer content to and from the memory card in yourphone.To play audio content1From the Home screen screen, tap  . If   does notappear on the Home screen, drag   upwards, then findand tap Music player .2Tap  .3Tap   to browse audio by artist. Tap   to use playlists.Tap   to browse audio by track.4Scroll up or down and browse to a track.5Tap a track to play it.29Music player overview2934561871 Browse the music on the memory card2 Infinite button: find related material online3 Cover art (if available)4 Go to the previous track in the current play queue,or rewind5 Play/Pause button6 Progress indicator: fast forward or rewind bydragging or tapping7 Time remaining of current track308Go to the next track in the current play queue, or fastforward9 View the current play queueTo explore related audio content1In the music player, tap  .2Flick left or right to view results on available online services(operator-dependent).3To return to the music player, press  .CameraYou can take a photo or record a video by pressing thecamera key. Before taking a photo, you can improve it byusing the Scenes feature. You can use the flash or the lightwhen shooting or recording. You can share a photo or avideo with friends, or upload your photos and videos to aweb service. From the viewfinder, you can view an albumcontaining all photos and videos that you have taken usingthe camera.To activate the camera•Press the camera key.To take a photo1Activate the camera.2If the still camera is not selected, tap  .3Point the camera towards the subject and press thecamera key halfway down to use auto-focus.4When the focus frame turns green, press the camera keyfully down. The photo is automatically saved on thememory card. The photo appears in review mode.315To take another photo, press the camera key.Web browserTo open the web browser1From the Home screen, drag   upwards.2Find and tap Browser .To go to a web page1Press   and tap  .2Tap the text field to activate the keypad.3Enter a web address.4Tap Go.If the screen orientation does not changeautomatically when you turn the phone sideways,mark the Orientation checkbox under Settings >Sound & display.Locking and protecting yourphoneIMEI numberKeep a copy of your IMEI (International Mobile EquipmentIdentity) number in case your phone is stolen.To view your IMEI number in the phone1From the Home screen, drag   upwards.2Find and tap Settings > About phone > Status.3Scroll to IMEI to view the IMEI number.32To change the SIM card PIN1From the Home screen, drag   upwards.2Find and tap Settings > Security & location > Set upSIM card lock > Change SIM PIN.3Enter the old SIM card PIN and tap OK.4Enter the new SIM card PIN and tap OK.Updating your phoneYou can update your phone to the most recent software foroptimal performance and to get the latest enhancements.Updates can be downloaded wirelessly directly from yourphone via the Internet by using a 2G/3G mobile dataconnection, or by using a Wi-Fi™ network connection. Byconnecting your phone to a computer with a USB cable,you can also download updates from the PC Companionapplication.When you are using a 2G/3G mobile data connectionto connect to Internet from your phone, datatransmission charges may apply. Contact yournetwork operator for more information.Make sure you back up and save all data contained inyour phone before you start updating the phone.To download software updates wirelessly1From the Home screen, drag   upwards.2Find and tap Settings > About phone > Softwareupdate. Follow the on screen instructions to update yourphone.33To download software updates using a USB cableDo not disconnect the USB cable when updating yourphone as this may corrupt the content. Make sure thatthe hardware is safely removed from your computerwhen you are finished.1Connect your phone to a computer using a USB cable. Ifit is the first time you start PC Companion you have toinstall it before moving on to the next step. Follow the on-screen instructions in the menu displayed in your phoneto install PC Companion.2Tap Connect your phone.3Computer: Wait a few seconds for PC Companion tostart. Click Support Zone > Software Update and followthe on-screen instructions to update your phone.While using PC Companion, you will also getnotifications whenever there are available softwareupdates for your phone.TroubleshootingCommon questionsMy phone is not working as expectedIf you experience problems with your phone, check thesetips before you try anything else:•Restart your phone.•Remove and re-insert the battery and SIM card. Thenrestart your phone.•Update your phone. Even if you have the latest software,updating your phone can improve software stability and34solve other problems. Updating your phone also ensuresoptimal performance and provides the latestenhancements.•Reset your phone.Be patient while resetting your phone. Restarting thephone while making a reset may damage the phonepermanently.To force stop an application•When a popup window tells you that an application is notresponding, tap Force stop.If you do not want to force stop an application, youcan wait for it to respond by tapping Cancel.Resetting the phoneResetting the phone deletes all data, including downloadedapplications, and resets the phone back to its initial state,the state before you turned on the phone for the first time.Make sure to back up important data you have on the phonebefore you reset the phone.To reset the phone1From the Home screen, drag   upwards.2Find and tap Settings > SD card, USB Mass Storage& phone storage > Factory data reset > Resetphone.3Enter your screen unlock pattern.4Tap Erase everything.I cannot charge the phone or battery capacity is lowThe charger is not properly connected or the batteryconnection is poor. Remove the battery and clean theconnectors.35The battery is worn out and needs to be replaced. SeeCharging the battery on page 9.No battery charging icon appears when I startcharging the phoneIt may take a few minutes before the battery icon appearson the screen.I cannot use Internet-based servicesMake sure your subscription includes data download, andthat the Internet settings in your phone are correct.See Internet and messaging settings on page 5 for moreinformation on how to download or change the Internetsettings. You can also download settings fromwww.sonyericsson.com/support.Error messagesNo network coverage•Your phone is in flight mode. Make sure flight mode is off.•Your phone is not receiving any network signal, or thereceived signal is too weak. Contact your networkoperator and make sure that the network has coveragewhere you are.•The SIM card is not working properly. Insert your SIMcard in another phone. If this works, it is probably yourphone that is causing the problem. In this case, contactthe nearest Sony Ericsson service center.Emergency calls onlyYou are within range of a network, but you are not allowedto use it. However, in an emergency, some networkoperators allow you to call the international emergencynumber 112.36SIM card is locked.You have entered your PIN incorrectly 3 times in a row. Tounlock the phone, you need the PUK provided by youroperator.SIM card is PUK-locked.You have entered your PUK (Personal Unblocking Key)incorrectly 10 times in a row. Please contact your serviceprovider.Legal informationSony Ericsson U20i/U20aThis User guide is published by Sony Ericsson Mobile CommunicationsAB or its local affiliated company, without any warranty. Improvementsand changes to this User guide necessitated by typographical errors,inaccuracies of current information, or improvements to programs and/or equipment, may be made by Sony Ericsson Mobile CommunicationsAB at any time and without notice. Such changes will, however, beincorporated into new editions of this User guide.All rights reserved.©Sony Ericsson Mobile Communications AB, 2010Publication number: 1237-9737.1Your mobile phone has the capability to download, store and forwardadditional content, e.g. ringtones. The use of such content may berestricted or prohibited by rights of third parties, including but not limitedto restriction under applicable copyright laws. You, and notSony Ericsson, are entirely responsible for additional content that youdownload to or forward from your mobile phone. Prior to your use of anyadditional content, please verify that your intended use is properlylicensed or is otherwise authorized. Sony Ericsson does not guaranteethe accuracy, integrity or quality of any additional content or any otherthird party content. Under no circumstances will Sony Ericsson be liablein any way for your improper use of additional content or other third partycontent.This User guide may reference services or applications provided by thirdparties. Use of such programming or services may require separate37registration with the third party provider and may be subject to additionalterms of use. For applications accessed on or through a third-partywebsite, please review such websites’ terms of use and applicableprivacy policy in advance. Sony Ericsson does not warrant or guaranteethe availability or performance of any third-party websites or offeredservices.The Liquid Identity logo, Xperia, Timescape and xperiax10minipro aretrademarks or registered trademarks of Sony Ericsson MobileCommunications AB.Sony and "make.believe" are trademarks or registered trademarks ofSony Corporation.Media Go is a trademark or registered trademark of Sony Electronics Inc.Google, Google Maps™, Picasa and Android are trademarks orregistered trademarks of Google, Inc.Ericsson is a trademark or registered trademark of TelefonaktiebolagetLM Ericsson.Facebook is a trademark or a registered trademark of Facebook, Inc.Twitter is a trademark or a registered trademark of Twitter, Inc.Wi-Fi is a trademark or a registered trademark of the Wi-Fi Alliance.Microsoft, Windows, Outlook, Windows Vista, Windows Server, Explorer,Windows Media and ActiveSync are registered trademarks or trademarksof Microsoft Corporation in the United States and/or other countries.This product is protected by certain intellectual property rights ofMicrosoft. Use or distribution of such technology outside of this productis prohibited without a license from Microsoft.Other product and company names mentioned herein may be thetrademarks of their respective owners. Any rights not expressly grantedherein are reserved. All other trademarks are property of their respectiveowners.All illustrations are for illustration only and may not accurately depict theactual phone.38www.sonyericsson.comSony Ericsson Mobile Communications ABSE-221 88 Lund, Sweden1237-9737.1

Navigation menu