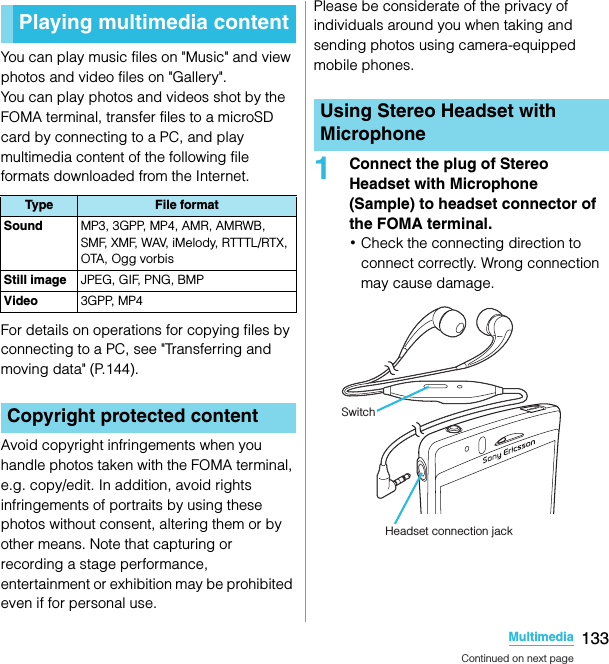
Sony A3880112 GSM 850/900/1800/1900 GPRS / EDGE / UMTS FDD156 / HSUPA/HSDPA mobile phone with Bluetooth, WLAN 802.11bgn, GPS/A-GPS, FM Rx, ANT+ and RFID User Manual
Sony Mobile Communications Inc GSM 850/900/1800/1900 GPRS / EDGE / UMTS FDD156 / HSUPA/HSDPA mobile phone with Bluetooth, WLAN 802.11bgn, GPS/A-GPS, FM Rx, ANT+ and RFID
Sony >
Contents
- 1. 08 user guide part 1
- 2. 08 user guide part 2
- 3. 08 user manual part 1
- 4. 08 user manual part 2
08 user manual part 2
![71Calling/Network ServicesSO-02C Web_TACopying contacts registered in Google account to docomo account1On the "docomoアカウントへコピー (Copy to account)" tab screen, tap a Google account you want to copy.2Tap [ 上書き (Overwrite)]/[追加 (Add)].・You can also copy the Contacts data saved in "Phone contact" to docomo account as well as Google account.You can back up contacts to the Phonebook back up center automatically on a regular basis and restore the contacts in case of losing the FOMA terminal or erasing the contacts accidentally.For details on Phonebook backup, refer to "ご利用ガイドブック (spモード <スマートフォン>編) Mobile Phone User's Guide [sp-mode <Smartphone>] (in Japanese only)".You can use the following DOCOMO network services on the FOMA terminal. For details on the outline and how to use each service, see the relevant pages indicated in the following table.・You cannot use the network services when you are outside of the service area or in a location without the radio wave.・For details, see the "Mobile Phone User's Guide [Network Services]".・For subscription and inquiry, contact "General Inquiries" on the last page of this manual.Using Phonebook backupNetwork ServicesAvailable Network ServicesService name Monthly charge Application PageVoi ce Mail ServicePaid Required P.72Call Waiting ServicePaid Required P.74Call Forwarding ServiceFree Required P.76Caller ID Notification ServiceFree Not required P.77Continued on next pageSO-02C_E_TA.book 71 ページ 2011年5月24日 火曜日 午後2時33分](https://usermanual.wiki/Sony/A3880112.08-user-manual-part-2/User-Guide-1472593-Page-1.png)
![72Calling/Network ServicesSO-02C Web_TA❖Information・In this manual, the outlines of each network service are described with menu operations.The Voice Mail Service takes messages for you, as long as it answers a call with the answering message, if there is an incoming call when you are in a location without the radio wave, while the FOMA terminal is powered off, or when you cannot answer a call within the preset ring time.・When the Voice Mail Service is set to "Activate" and if you do not answer an incoming call, the call is saved in "Call log" as a "Missed call" and (Missed call) appears in the status bar.・The FOMA terminal does not support Voice Mail service of videophone call. Call "1412" to set "Not support".❖Information・This FOMA terminal does not have Record message function which records voice messages on internal memory. Use the Voice Mail Service.・The message can be recorded up to 3 minutes for 1 message, up to 20 messages, and stored up to 72 hours.・The number of Voice Mail messages appears until you have played all messages.Basic flow of the Voice Mail ServiceVoice Mail ServiceYour FOMA terminal receives a call.If you do not answer the call, it is connected to the Voice Mail service center.The caller leaves a message.The receiver is notified that the Voice Mail service center has taken the voice message.Play the voice message.If you are in a hurry and wish to leave a message without listening to the Voice Mail answering message, you can interrupt the answering message and switch to message recording mode immediately by tapping [Dialpad] → [#].▼Activate the Voice Mail Service.▼▼▼▼SO-02C_E_TA.book 72 ページ 2011年5月24日 火曜日 午後2時33分](https://usermanual.wiki/Sony/A3880112.08-user-manual-part-2/User-Guide-1472593-Page-2.png)
![73Calling/Network ServicesSO-02C Web_TASetting Voice Mail Service1From the Home screen, press t and tap [Settings].2Tap [Call settings] X [Network service setting].3Tap [Voicemail].・Select items you want to use from the following.* After operation is finished, you receive the "NTT DoCoMo VM:XX" SMS.❖Information・If you have the recorded messages stored at the Voice Mail service center, (New SMS message) and (Voice Mail message) appear on the status bar. (Voice Mail message) disappears when you delete all messages.・The notification setting and notifications (message (SMS) reception) are not charged.Activate Voi cemai lTap [OK] to activate the Voice Mail Service.Set ring time Enter the ring time (0 to 120 seconds).It changes only the ring time.Deactivate Voi cemai lTap [OK] to deactivate the Voice Mail Service.Check Voicemail settingCheck the current service settings.Play messages* Tap [OK] to call the Voice Mail service center. After this step, follow the voice prompts to play the message.Voicemail setting*Tap [OK] to change the Voice Mail setting with the voice prompts. The call is connected to the Voice Mail service center. After this step, follow the voice prompts to operate.Check messages* Check if a new message is stored. After checking, the completion message appears.Notification settingsSet whether to alert you of a new message with the tone or vibration.Activate Missed Call NotificationWhen it is received while the FOMA terminal is powered off or outside of the service area, an SMS is sent to notify you of the information about the call (date, time and the caller ID) once you turn the FOMA terminal back on or move back in to the service area.Select [All calls] to notify you of all received calls.Select [Calls with Caller ID] to notify you of only the calls with the caller ID.Deactivate Missed Call NotificationWhile starting the notification, tap this item to deactivate the notification.Check setting Check the notification settings.SO-02C_E_TA.book 73 ページ 2011年5月24日 火曜日 午後2時33分](https://usermanual.wiki/Sony/A3880112.08-user-manual-part-2/User-Guide-1472593-Page-3.png)
![74Calling/Network ServicesSO-02C Web_TAPlaying the voice message1When the SMS notification "NTT DoCoMo VM:XX" appears, tap [New message] from the notification panel (P.34).・A recorded message plays.2Follow the voice prompts to operate.When there is another incoming call while you are on a call, the in-call ring tone notifies you of the second call. You can answer the second call by putting the first call on hold. You can also put your current call on hold and place a call to another party.❖Information・Even when the call is on hold, the caller is charged for a call fee.Setting Call Waiting1From the Home screen, press t and tap [Settings].2Tap [Call settings] X [Network service setting].3Tap [Call Waiting].You can select the following operations.Putting the current call on hold and answering an incoming call1When you hear the beep during a call, tap [Answer].The first call is put automatically on hold and the incoming call is received.・The FOMA terminal does not support Conference call. When you tap to the upper right of the screen, "Unable to conference calls" appears.・Tap [Busy] to connect the incoming call to the Voice Mail service center. Activating Voice Mail service is required beforehand.Call WaitingActivate Call WaitingTap [OK] to activate the Call Waiting Service.Deactivate Call WaitingTap [OK] to deactivate the Call Waiting Service.Check settings You can check the current service settings.Continued on next pageSO-02C_E_TA.book 74 ページ 2011年5月24日 火曜日 午後2時33分](https://usermanual.wiki/Sony/A3880112.08-user-manual-part-2/User-Guide-1472593-Page-4.png)
![75Calling/Network ServicesSO-02C Web_TA2Switch to the first call.・To end the later call, tap [End call].The later call is terminated and switched to the first call.・To put the later call on hold, tap [Switch to this call].The later call is put on hold and switched to the first call. Tapping [Switch to this call] switches to the other party.Ending the current call and answering an incoming call1When you hear the beep during a call, tap [End current call and answer].・The first call is terminated and the incoming call is received.Putting the current call on hold and making a call to another party1During a call, tap [Contacts]/[Dialpad].2Enter the other party's phone number, then tap .・The first call is automatically on hold and switched to the new call you made. You can also search for a contact by tapping [Contacts] and [Call log].3Switch to the first call.・To terminate the new call, tap [End call].The new call is terminated and switched to the first call.・To put the new call on hold, tap [Switch to this call].The new call is put on hold and switched to the first call. Tapping [Switch to this call] switches to the other party.SO-02C_E_TA.book 75 ページ 2011年5月24日 火曜日 午後2時33分](https://usermanual.wiki/Sony/A3880112.08-user-manual-part-2/User-Guide-1472593-Page-5.png)
![76Calling/Network ServicesSO-02C Web_TAThe Call Forwarding Service forwards a voice call to a preset forwarding number when you are in a location without the radio wave, the FOMA terminal is powered off, or you do not answer the call within the preset ring time.・When the Call Forwarding Service is set to "Activate Call Forwarding" and if you do not answer an incoming voice call, the call is saved in "Call log" as a "Missed call" and (Missed call) appears in the status bar.Basic flow of the Call Forwarding ServiceCall charge for the Call Forwarding Service❖Information・Even when the Call Forwarding Service is set to "Activate Call Forwarding", you can answer the call during a ringtone sounds.Setting Call Forwarding Service1From the Home screen, press t and tap [Settings].2Tap [Call settings] X [Network service setting].Call Forwarding ServiceActivate the Call Forwarding Service.Save the forwarding number.Your FOMA terminal receives a call.If you do not answer the call, it is automatically forwarded to the specified forwarding number.▼▼▼Call Forwarding Service subscriberCallerForwarding partyThe caller is charged for a call fee.The Call Forwarding Service subscriber is charged for a call fee.Continued on next pageSO-02C_E_TA.book 76 ページ 2011年5月24日 火曜日 午後2時33分](https://usermanual.wiki/Sony/A3880112.08-user-manual-part-2/User-Guide-1472593-Page-6.png)
![77Calling/Network ServicesSO-02C Web_TA3Tap [Call Forwarding].・Select items you want to use.* A subscription of Voice Mail service is required.Setting on/off of the Call Forwarding guidance1From the Home screen, tap [Phone].2[1] [4] [2] [9] X Tap [Call].・Follow the voice prompts to operate. For details, see the "Mobile Phone User's Guide [Network Services]".When making a call, your phone number can be shown in the display of the recipient's phone you are calling. The caller ID is important personal information. Carefully decide whether you notify a recipient of your caller ID.・You cannot set the Caller ID notification where the FOMA terminal indicates the outside of service area ( ).・The setting is available only the other party's phone can display the caller ID.・If an announcement requesting caller ID is heard when making a call, set Caller ID notification or add prefix "186" to the phone number to call again.1From the Home screen, press t and tap [Settings].Activate Call ForwardingEnter the forwarding number and ring time, then tap [OK] to activate the Call Forwarding Service.Change forwarding numberMark the checkbox and enter the forwarding number.Register ring timeMark the checkbox and enter the ring time (0 to 120 seconds).If the ring time is set to 0 seconds, an incoming call is not saved in "Call log".Deactivate Call ForwardingWhile the Call Forwarding Service is activated, tap this item and [OK] to deactivate the Call Forwarding Service.Register The Forwarding NumberChange the forwarding number. Enter the forwarding number and tap [OK].Activate Call ForwardingMark the checkbox to change the forwarding number and to activate the Call Forwarding Service simultaneously.Setting if forwarding number is busy*When the forwarding number is busy, an incoming call is connected to the Voice Mail service center. Tap [Connect] to turn on the setting; tap [Do not connect] to turn off the setting.Check setting You can check the current service settings.Caller ID NotificationContinued on next pageSO-02C_E_TA.book 77 ページ 2011年5月24日 火曜日 午後2時33分](https://usermanual.wiki/Sony/A3880112.08-user-manual-part-2/User-Guide-1472593-Page-7.png)
![78Calling/Network ServicesSO-02C Web_TA2Tap [Call settings] X [Network service setting].3Tap [Caller ID Notification].・Select items you want to use.Activate Caller ID NotificationEnter the Network security code, then tap [OK].Your phone number is notified to the other party.Deactivate Caller ID NotificationEnter the Network security code, then tap [OK].The caller ID notification is deactivated.Check settingsCheck the current settings.SO-02C_E_TA.book 78 ページ 2011年5月24日 火曜日 午後2時33分](https://usermanual.wiki/Sony/A3880112.08-user-manual-part-2/User-Guide-1472593-Page-8.png)
![79SettingsSO-02C Web_TA1From the Home screen, press t.2Tap [Settings].■ Setting menu❖Information・Alternatively, from the Home screen, tap , then tap [Settings].The FOMA terminal automatically switches between 2G and 3G networks depending on availability.An access point for connecting to the Internet (sp-mode, mopera U) is already registered. You can add or change it if necessary.By default, sp-mode (P.80) is set for the usual access point.Checking the access point you use1From the Settings screen (P.79), tap [Wireless & networks] X [Mobile networks] X [Access Point Names].・Available access points (APN) appear.Viewing the setting menuSony Ericsson Connect the FOMA terminal to another device or PC via USB connection or Wi-Fi. (P.144)Wireless & networks P. 7 9Call settings P. 8 6Sound P. 8 7Display P. 8 9Location & security P. 9 0Applications P. 9 5Accounts & sync P. 9 7Privacy P. 1 0 0Storage P. 1 0 1Language & keyboard P. 1 0 2Voice input & output P. 1 0 2Accessibility P. 1 0 3Date & time P. 1 0 3About phone P. 1 0 4SettingsWireless & networksAirplane mode P. 8 1Wi-Fi/Wi-Fi settings P. 8 2Bluetooth/Bluetooth settings P. 1 4 9VPN settings P. 8 5Mobile networks P.79, P.177Setting an access pointContinued on next pageSO-02C_E_TA.book 79 ページ 2011年5月24日 火曜日 午後2時33分](https://usermanual.wiki/Sony/A3880112.08-user-manual-part-2/User-Guide-1472593-Page-9.png)
![80SettingsSO-02C Web_TA❖Information・If you have several available connections, a marked radio button to the right indicates the active network connection.Setting an access point additionally1From the Settings screen (P.79), tap [Wireless & networks] X [Mobile networks] X [Access Point Names].2Press t.3Tap [New APN].4Tap [Name], enter a name and tap [OK].5Tap [APN] and enter the access point name and tap [OK].6Tap and enter all other information required by your network operator.7Press t, then tap [Save].❖Information・Do not change the MCC/MNC. If you change MCC/MNC to other than the default value (440/10), the settings do not appear on the APNs screen. When the MCC/MNC settings do not appear on the APNs screen, make APN settings with [Reset to default] or [New APN] again.・Note that, when using the prediction conversion by one-byte alphabet entry mode (English mode) with mark in [Auto space] checkbox on Japanese keyboard settings screen (P.55), spaces may be entered automatically. In this case, delete spaces.By initializing an access point, the default state is restored.1From the Settings screen (P.79), tap [Wireless & networks] X [Mobile networks] X [Access Point Names].2Press t, then tap [Reset to default].sp-mode is ISP for NTT DOCOMO smartphone. In addition to accessing Internet, you can use the mail service using the same address as i-mode mail (@docomo.ne.jp), etc. sp-mode is a service requiring subscription. For details on sp-mode, refer to NTT DOCOMO website.Initializing an access pointsp-modeSO-02C_E_TA.book 80 ページ 2011年5月24日 火曜日 午後2時33分](https://usermanual.wiki/Sony/A3880112.08-user-manual-part-2/User-Guide-1472593-Page-10.png)
![81SettingsSO-02C Web_TAmopera U is ISP of NTT DOCOMO's Internet connection. If you have subscribed to mopera U, you can use Internet after making the simple settings. mopera U is a service requiring subscription.Setting mopera U1From the Settings screen (P.79), tap [Wireless & networks] X [Mobile networks] X [Access Point Names].2Mark [mopera U (スマートフォン定額)]/[mopera U設定 ] radio button.・Return to the Home screen and open the Browser. You can enjoy the nice Internet access.❖Information・"mopera U 設定 " is an access point for setting mopera U. When you use the access point for setting mopera U, packet communication charges for setting do not apply. Note that you can set only the initial setting screen or the change setting screen. For details on mopera U settings, refer to mopera U website.・Subscription to packet flat-rate service is required for using "mopera U (スマートフォン定額)". For details on mopera U (スマートフォン定額), refer to NTT DOCOMO website.In this mode, the functions of using radio wave transmissions such as calling, accessing to the Internet (including sending/receiving mails), etc. are disabled. It can be useful when you want to operate the FOMA terminal with no interruption of incoming calls or mails.Turning on Airplane mode1From the Settings screen (P.79), tap [Wireless & networks].2Mark [Airplane mode] checkbox.・When you unmark [Airplane mode] checkbox, the Airplane mode turns off.❖Information・You can also switch ON/OFF of the Airplane mode by pressing and holding p for over a second to switch to the Phone options menu, then tapping [Airplane mode].・Even if Airplane mode is ON, Wi-Fi can be turned ON. Be careful not to use Wi-Fi in a place where the use is prohibited such as in airplane or hospital.mopera U Airplane modeSO-02C_E_TA.book 81 ページ 2011年5月24日 火曜日 午後2時33分](https://usermanual.wiki/Sony/A3880112.08-user-manual-part-2/User-Guide-1472593-Page-11.png)
![82SettingsSO-02C Web_TAUsing Wi-Fi, you can access the Internet via Wi-Fi network with your FOMA terminal.・Even when Wi-Fi is ON, packet communication is available. However, while you connect Wi-Fi network, Wi-Fi comes first.・When a Wi-Fi network is disconnected, connection is automatically switched to a 3G/GPRS network. Note that packet communication fee applies for using 3G/GPRS network.Before using Wi-FiTo use Wi-Fi, turn on Wi-Fi and search available Wi-Fi network, then connect it.・To access the Internet using Wi-Fi, connect to Wi-Fi network in advance.❖Information・Make sure to receive enough signal strength for using Wi-Fi. The signal strength of the Wi-Fi network varies by the location of the FOMA terminal. Moving closer to the Wi-Fi router might enhance the signal strength.1From the Settings screen (P.79), tap [Wireless & networks].2Mark [Wi-Fi] checkbox.・The FOMA terminal scans for available Wi-Fi networks.❖Information・It may take a few seconds before the Wi-Fi connection is ON.1From the Settings screen (P.79), tap [Wireless & networks] X [Wi-Fi settings].・Available Wi-Fi networks are displayed under [Wi-Fi networks]. The available networks may be open or secured. This is indicated by or next to the Wi-Fi network name.2Select Wi-Fi network you want to connect, tap [Connect]・If you are trying to connect to a protected Wi-Fi network, you are asked to enter the security key for that Wi-Fi network before you can connect to it.About Wi-Fi Turning on Wi-FiConnecting to a Wi-Fi networkContinued on next pageContinued on next pageSO-02C_E_TA.book 82 ページ 2011年5月24日 火曜日 午後2時33分](https://usermanual.wiki/Sony/A3880112.08-user-manual-part-2/User-Guide-1472593-Page-12.png)
![83SettingsSO-02C Web_TA❖Information・The next time you connect to a Wi-Fi network, the security key is saved in the FOMA terminal.■ Wi-Fi network status icons on status barThe following icons appear according to the Wi-Fi network connection status.* Without connected to Wi-Fi network, you need to set Wi-Fi Network notification to ON beforehand. (P.83)When you are connected to a Wi-Fi network or when there are Wi-Fi networks available in your vicinity, you can see the status of these Wi-Fi networks. You can also enable the FOMA terminal to notify you wherever a Wi-Fi network is detected.Setting the Wi-Fi network notification to ON1Confirm that Wi-Fi is turned on, and then on the Settings screen (P.79), tap [Wireless & networks] X [Wi-Fi settings].2Mark [Network notification] checkbox.Scanning for Wi-Fi networks manually1From the Settings screen (P.79), tap [Wireless & networks] X [Wi-Fi settings].2Press t.3Tap [Scan].・Scanning for Wi-Fi networks is started, and they are displayed under "Wi-Fi networks".4Tap a Wi-Fi network in the list to connect to it.Appears when connected to Wi-Fi network.Appears when connected to Wi-Fi network using AutoIP function.Appears when any open network within the service area is detected*.Wi-Fi network statusSO-02C_E_TA.book 83 ページ 2011年5月24日 火曜日 午後2時33分](https://usermanual.wiki/Sony/A3880112.08-user-manual-part-2/User-Guide-1472593-Page-13.png)
![84SettingsSO-02C Web_TABefore you add a Wi-Fi network manually, you need to turn on the Wi-Fi setting. (P.82)Adding a Wi-Fi network manually1From the Settings screen (P.79), tap [Wireless & networks] X [Wi-Fi settings].2Tap [Add Wi-Fi network].3Enter [Network SSID] name of the Wi-Fi network you want to add.4Tap [Security] field, then mark a radio button of security type for the Wi-Fi network you want to add.5If required, enter security information for the Wi-Fi network you want to add.6Tap [Save].Viewing detailed information on a connected Wi-Fi network1From the Settings screen (P.79), tap [Wireless & networks] X [Wi-Fi settings].2Tap the Wi-Fi network that you are currently connected to.・The detailed network information is displayed.By changing a Wi-Fi sleep policy, you can choose to disable the Wi-Fi function in the FOMA terminal when the screen turns off. You can also set the FOMA terminal to always turn on the Wi-Fi function or to turn it on when the FOMA terminal is charged.❖Information・When a Wi-Fi network is disconnected, connection is automatically switched to a 3G/GPRS network.Adding a Wi-Fi sleep policy1From the Settings screen (P.79), tap [Wireless & networks] X [Wi-Fi settings].2Press t.3Tap [Advanced].Advanced Wi-Fi settingsWi-Fi sleep policyContinued on next pageSO-02C_E_TA.book 84 ページ 2011年5月24日 火曜日 午後2時33分](https://usermanual.wiki/Sony/A3880112.08-user-manual-part-2/User-Guide-1472593-Page-14.png)
![85SettingsSO-02C Web_TA4Tap [Wi-Fi sleep policy].5Tap any of [When screen turns off]/[Never when plugged in]/[Never].You can set up the FOMA terminal to connect to a Wi-Fi network using a static IP address.Setting up a static IP address1From the Settings screen (P.79), tap [Wireless & networks] X [Wi-Fi settings].2Press t.3Tap [Advanced].4Mark [Use static IP] checkbox.・Item of IP settings can be selected.5Tap an item to enter necessary information.・Enter "IP address", "Gateway", "Netmask", "DNS1" to use a static IP address.6Press t.7Tap [Save].Virtual Private Network (VPN) is a technology to connect to the information in a protected local network from another network. Generally, VPNs are provided to companies, schools and other facilities. A user can access to the information in the local network from outside of the premises.To set up a VPN access from the FOMA terminal, you need to retrieve the information related to security from your network administrator. For details, refer to http://www.sonyericsson.co.jp/support/・This FOMA terminal supports the following VPNs:- PPTP VPN- L2TP VPN- L2TP/IPSec PSK VPN- L2TP/IPSec CRT VPNAdding a VPN1From the Settings screen (P.79), tap [Wireless & networks] X [VPN settings].2Tap [Add VPN].3Tap a VPN type to add.Using a static IP addressConnecting to a VPN (Virtual Private Network)Continued on next pageSO-02C_E_TA.book 85 ページ 2011年5月24日 火曜日 午後2時33分](https://usermanual.wiki/Sony/A3880112.08-user-manual-part-2/User-Guide-1472593-Page-15.png)
![86SettingsSO-02C Web_TA4If a setting screen appears, follow the instruction of the network administrator to set required items of VPN settings.5Press t, then tap [Save].・A new VPN is added in the list on VPN settings screen.❖Information・Added VPNs can be edited or deleted.To edit VPNs, touch and hold a desired VPN, then tap [Edit network]. Change the VPN settings, as required, press t and tap [Save]. To delete, touch and hold a VPN to be removed, then tap [Delete network] X [OK].Connecting to a VPN1From the Settings screen (P.79), tap [Wireless & networks] X [VPN settings].・Added VPNs are displayed in the list on the VPN setting screen.2Tap a VPN to connect to.3If the dialog box appears, enter the desired authentication information and tap [Connect].・When you are connected to a VPN, the connecting notification appears in the status bar. When you are disconnected, the notification indicating to return to the VPN setting screen appears, so that you can reconnect to. For details, see "Status bar" (P.32).Disconnecting a VPN1Open the Notification panel, tap the VPN connecting notification.・Tap a connecting VPN to disconnect.You can use the network services and search for available networks.Call settingsNetwork service settingP. 7 1Network operators When you start using overseas or move out of your operator's network, the FOMA terminal searches another available network and reconnects to it.Continued on next pageSO-02C_E_TA.book 86 ページ 2011年5月24日 火曜日 午後2時33分](https://usermanual.wiki/Sony/A3880112.08-user-manual-part-2/User-Guide-1472593-Page-16.png)
![87SettingsSO-02C Web_TASet ringtones, operation sound, vibrator, etc.1Press p for over a second.・Phone options menu appears.2Tap [Silent mode].❖Information・Alternatively, from the Settings screen (P.79), tap [Sound] X [Silent mode].・Setting the phone to silent mode does not mute sounds (playback of video or music, alarm, etc.) other than the ringtone, operation sound, and notification sounds.1From the Settings screen (P.79), tap [Sound] X [Vibrate].2Tap any of [Always]/[Never]/[Only in Silent mode]/[Only when not in Silent mode].Noise suppression Makes the other party's voice clear to hear during a call.Accounts Set Internet phone (SIP) account.Use Internet calling Set Internet phone (SIP) call method.SoundSilent mode P. 8 7Vibrate P. 8 7Vol ume P. 8 8Phone ringtone P. 8 8Notification ringtone P. 8 9Audible touch tones P. 8 9Audible selection P. 8 9Screen lock sounds Set sound ON/OFF while the screen is locked.Haptic feedback Set whether to vibrate for some operations such as specified software key operation.Setting the FOMA terminal to silent modeSetting the vibratorSO-02C_E_TA.book 87 ページ 2011年5月24日 火曜日 午後2時33分](https://usermanual.wiki/Sony/A3880112.08-user-manual-part-2/User-Guide-1472593-Page-17.png)
![88SettingsSO-02C Web_TA1From the Settings screen (P.79), tap [Sound] X [Volume].・Adjust the volume of following items.-Ringtone- Media (sounds of the music player, Gallery and FM radio)-Alarm- Notification2Drag the slider left or right to adjust the level.・Drag the slider to the left for volume down, or to the right for volume up.3Tap [OK].❖Information・By default, Notification volume is adjusted to the same as Ringtone volume. To adjust Ringtone and Notification separately, unmark [Use incoming call volume for notifications] in Step 1. Ringtone and Notification volume adjustment sliders appear, then drag each slider to the right or left to adjust volume.1From the Home screen, press up or down of m.・The volume adjustment bar appears, you can adjust the volume up or down.❖Information・You can also press m or p to mute the ringtone for an incoming call.1From the Settings screen (P.79), tap [Sound] X [Phone ringtone].2Select a ringtone and tap [Done].・You can set voice file in ".wav", ".m4a" or in other format which is transferred from Media Go (P.148) or downloaded from the Internet as a ringtone. (P.142)❖Information・To set a ringtone other than the ones stored by default, you can also set from [Music library].Adjusting the volume Adjusting the ringer volume with the volume keySetting a ringtoneSO-02C_E_TA.book 88 ページ 2011年5月24日 火曜日 午後2時33分](https://usermanual.wiki/Sony/A3880112.08-user-manual-part-2/User-Guide-1472593-Page-18.png)
![89SettingsSO-02C Web_TA1From the Settings screen (P.79), tap [Sound] X [Notification ringtone].2Select a ringtone and tap [Done].❖Information・To set a notification sound other than the ones stored by default, you can also set from [Music library].1From the Settings screen (P.79), tap [Sound].2Mark [Audible touch tones] or [Audible selection].・If you unmarked them, any operation tone does not sound when you touch or tap.❖Information・"Audible touch tones" is a tone for numeric key operations. "Audible selection" is a tone when selecting menu item.・To set the key sound of software keyboard, from the Settings screen (P.79), tap [Language & keyboard], and select a type of software keyboard.Set brightness, orientation of the screen, etc.1From the Settings screen (P.79), tap [Display] X [Brightness].2Drag the slider to the right or left.・Drag the slider to the left for dimmer screen, or to the right for brighter screen.3Tap [OK].Selecting a notification ringtoneSetting touch tones to ONDisplayMobile BRAVIA EngineTo view photos or movies colorfully and beautifully, set image quality improving procedure (Mobile BRAVIA Engine). It adjusts contrast, color shade, etc.Brightness P. 8 9Auto-rotate screen P. 9 0Animation P. 9 0Screen timeout P. 9 0Adjusting the screen brightnessSO-02C_E_TA.book 89 ページ 2011年5月24日 火曜日 午後2時33分](https://usermanual.wiki/Sony/A3880112.08-user-manual-part-2/User-Guide-1472593-Page-19.png)
![90SettingsSO-02C Web_TAYou can set the screen orientation to change automatically between landscape and portrait view when you turn the FOMA terminal sideways/paleways.❖Information・Even when you change the orientation of the FOMA terminal, the screen may not change to landscape view depending on the screen such as Home screen, etc.Setting to change to landscape view1From the Settings screen (P.79), tap [Display].2Mark [Auto-rotate screen] checkbox.Set animation effect which shows transition of screen smoothly.1From the Settings screen (P.79), tap [Display] X [Animation].2Select an animation option.1From the Settings screen (P.79), tap [Display] X [Screen timeout].2Select a time option before the screen turns off.❖Information・To turn the screen off immediately, press p.Set options related to location information and security.Changing orientation of the screenSetting animation effect to transitionAdjusting the idle time before the screen turns offLocation & securityUse wireless networks P. 1 6 1Use GPS satellites P. 1 6 1Set up screen lock P. 9 3Set up SIM card lock P. 9 2Visible passwords Set whether to show the input character before "・" appears on the password entry screen.Select device administratorsAdd or remove available device administrators.Use secure credentials Allow applications to access secure certificates and other credentials.*1Continued on next pageSO-02C_E_TA.book 90 ページ 2011年5月24日 火曜日 午後2時33分](https://usermanual.wiki/Sony/A3880112.08-user-manual-part-2/User-Guide-1472593-Page-20.png)
![92SettingsSO-02C Web_TANetwork security codeThe network security code is a 4-digit number necessary for identification or using the docomo Network Services at reception of your request in docomo Shop or at docomo Information Center. It can be set any number at the subscription and also changed later by yourself.You can change your network security code to the new one using the PC if you have the "docomoID"/"Password" for the "My docomo"* General support site for PC.* For information on "My docomo", see the previons page of the last page of this manual.You can set a security code called PIN code to the UIM. The code is set to "0000" at the time of subscription. It can be changed by yourself.PIN code is a 4- to 8-digit number (code) that must be entered for user confirmation to prevent unauthorized use by a third party every time you insert the UIM into the FOMA terminal or when the FOMA terminal is powered on. Entering the PIN code enables making/receiving calls and terminal operation.・When you purchase a new FOMA terminal and use the UIM that you have used on the current FOMA terminal by inserting to the new one, use the set PIN code on the former terminal. If you did not change the setting, the code is "0000".・If you enter a wrong PIN code 3 times consecutively, the PIN code is locked and cannot be used anymore. In this case, unlock with "PUK". (P.92)PUK codeThe PUK code is an 8-digit number for canceling the locked PIN1/PIN2 code. The PUK code cannot be changed by yourself.・If you enter a wrong PUK code 10 times consecutively, the UIM is locked. Please contact a docomo Shop.By setting PIN (security code) and enter PIN1 code when powered on, you can protect the UIM from improper use.1From the Settings screen (P.79), tap [Location & security] X [Set up SIM card lock] X [Lock SIM card].2Enter the PIN code of the UIM and tap [OK].PIN codeEnabling the UIM PINSO-02C_E_TA.book 92 ページ 2011年5月24日 火曜日 午後2時33分](https://usermanual.wiki/Sony/A3880112.08-user-manual-part-2/User-Guide-1472593-Page-22.png)
![93SettingsSO-02C Web_TAEntering the PIN code when powered on1On the PIN code entry screen, enter the PIN code of the UIM.2Tap [OK].Changing the PIN code・You can change the PIN code when the UIM PIN is enabled.1From the Settings screen (P.79), tap [Location & security] X [Set up SIM card lock] X [Change SIM PIN].2Enter the current PIN code of the UIM and tap [OK].3Enter the new PIN code of the UIM and tap [OK].4Enter the new PIN code and tap [OK].Unblocking the locked UIM1On the PUK code entry screen, enter the PUK code and tap [OK].2Enter the new PIN code of the UIM and tap [OK].3Enter the new PIN code and tap [OK].You can secure your data by requiring a screen unlock pattern every time the FOMA terminal is turned on or every time it is activated from sleep mode.There are 3 types of screen lock settings: "Pattern", "PIN" and "Password". (P.93)❖Information・You can use Key lock (P.30) to prevent unintended operation or save the power consumption of the FOMA terminal without setting screen lock.Setting screen unlock pattern1From the Settings screen (P.79), tap [Location & security] X [Set up screen lock].2Tap [Pattern]/[PIN]/[Password].・When you tap [Pattern], follow the onscreen instructions to enter screen unlock pattern.Set security question and answer in case you forget the pattern.・When you tap [PIN], follow the onscreen instructions to enter 4 or more numbers.・When you tap [Password], follow the onscreen instructions to enter 4 or more characters including alphabets.Screen lockSO-02C_E_TA.book 93 ページ 2011年5月24日 火曜日 午後2時33分](https://usermanual.wiki/Sony/A3880112.08-user-manual-part-2/User-Guide-1472593-Page-23.png)
![94SettingsSO-02C Web_TAChanging the screen unlock method1From the Settings screen (P.79), tap [Location & security] X [Change screen lock].・Enter current screen unlock pattern, PIN or password.・If you should fail 5 times when you enter the unlock pattern, wait 30 seconds and then try again.2Tap [Pattern]/[PIN]/[Password].・Select items you want to change into.For setting procedure, see Step 2 (P.93) of "Setting screen unlock pattern".Locking the screenOnce screen unlock pattern (P.93) is set, keys and screen are locked when the terminal enters in the sleep mode or when p is pressed.Unlocking the screen1Press y or p to activate the FOMA terminal.2Unlock the key lock, then enter the screen unlock pattern.・Enter preset screen unlock pattern, PIN or password.❖Information・Even if you do not unlock the screen lock, you can make an emergency call from the screen unlocking screen after unlocking the key lock. (P.58)If you forget how to unlock■ If you set "Pattern""Incorrect pattern" appears when you enter incorrect unlock pattern 5 times consecutively.・Tap [ Ne x t] X [Answer question] and then answer the question that you set the unlock pattern to unlock.・If you registered Google account, on the "Incorrect pattern" screen, tap [Next] X [Enter Google account details], and then enter Google account and password to unlock.❖Information・Tap [Try again] to retry entering pattern in 30 seconds.・Alternatively, when you tap [Try again] X [Forgot pattern?], the question screen that you set unlock pattern appears.・You can set multiple Google accounts. To unlock the screen with Google account and password, enter one of those accounts.■ If you set "PIN"/"Password"Please contact a docomo Shop.SO-02C_E_TA.book 94 ページ 2011年5月24日 火曜日 午後2時33分](https://usermanual.wiki/Sony/A3880112.08-user-manual-part-2/User-Guide-1472593-Page-24.png)
![95SettingsSO-02C Web_TACanceling screen lockYou can cancel screen lock pattern after you set.1From the Settings screen (P.79), tap [Location & security] X [Change screen lock].・Enter preset screen unlock pattern, PIN or password.2Tap [None].You can set options related to application display and management.Before you can download unknown source's applications, set the FOMA terminal to enable downloading.Applications you download may be of unknown origin. To protect your FOMA terminal and personal data, only download applications from trusted sources such as the Android Market etc.1From the Settings screen (P.79), tap [Applications].2Mark [Unknown sources] checkbox.3Read the cautions appeared, tap [OK].Checking downloaded applications1From the Home screen, tap [Browser].2Press t, tap [More] X [Downloads].❖Information・Applications downloaded from Android Market do not appear.ApplicationsUnknown sources P. 9 5Manage applicationsP. 9 6Running services Display/Manage the currently running services.Storage use Display size of all applications, usage condition, etc.Battery use Display operations which has been using the battery.Development Set options for application development.Permitting downloading unknown source's applicationSO-02C_E_TA.book 95 ページ 2011年5月24日 火曜日 午後2時33分](https://usermanual.wiki/Sony/A3880112.08-user-manual-part-2/User-Guide-1472593-Page-25.png)
![96SettingsSO-02C Web_TAYou can view installed applications' names, memory usage condition, etc. or change the settings.Viewing permitted operation of the applications in the FOMA terminal1From the Settings screen (P.79), tap [Applications] X [Manage applications].2Tap an application to view.3Scroll down the screen to view permitted operations.・If all permitted operations do not appear, tap [All].Shutting down an application1A pop-up window that indicates the application does not reply appears, tap [Force stop].❖Information・If you do not want to shut down the application, tap [Cancel] and wait for a reply of the application.❖Note・If you cancel the status bar forcibly, operations may not be performed correctly.Deleting all data of the application・Before deleting all installed application data, back up contents related to the application that you want to save including data saved in the application.1From the Settings screen (P.79), tap [Applications] X [Manage applications].2Tap an application to delete the data.3Tap [Clear data].4Tap [OK].Deleting an installed application・Before deleting installed application, back up contents related to the application that you want to save including data saved in the application.・Some applications cannot be deleted.1From the Settings screen (P.79), tap [Applications] X [Manage applications].2Tap an application to be deleted.3Tap [Uninstall].4Tap [OK].Managing your applicationsContinued on next pageSO-02C_E_TA.book 96 ページ 2011年5月24日 火曜日 午後2時33分](https://usermanual.wiki/Sony/A3880112.08-user-manual-part-2/User-Guide-1472593-Page-26.png)
![97SettingsSO-02C Web_TA❖Information・You may not uninstall the applications pre-installed in the FOMA terminal.Deleting cache of the application1From the Settings screen (P.79), tap [Applications] X [Manage applications].2Tap an application to delete cache.3Tap [Clear cache].1From the Settings screen (P.79), tap [Applications] X [Development].2Mark [Stay awake] checkbox.You can manage (add or delete) online service accounts or synchronize contacts, messages, etc. saved in online services with the FOMA terminal.You can add or delete an online service account.Setting Google accountYou can create a Google account on your FOMA terminal and use Google services such as Gmail, Google Talk, Google Calendar, Android Market, etc.You can set multiple Google accounts on the FOMA terminal.Keeping the screen on while chargingAccounts & syncBackground data All the applications installed to the FOMA terminal perform automatic data communications.Auto-sync Synchronize online information such as your Gmail, calendar, contacts, etc. automatically. (P.99)Manage accounts P. 9 7Managing accountsContinued on next pageSO-02C_E_TA.book 97 ページ 2011年5月24日 火曜日 午後2時33分](https://usermanual.wiki/Sony/A3880112.08-user-manual-part-2/User-Guide-1472593-Page-27.png)
![98SettingsSO-02C Web_TA1From the Settings screen (P.79), tap [Accounts & sync] X [Add account] X [Google].2Follow the registration wizard, set a Google account.・If you have no Google account, create an account.・If you have already the Google account, sign in.❖Information・You can use the FOMA terminal without creating your Google account, however the services such as Google Talk, Gmail, Android Market, etc. are not available.・To sign in, you need a Google account and a password.・Make sure to check if the data connection is available (3G/GPRS) before sign-in to the Google account. For checking the data connection status, see "Status icons" (P.32).Setting Facebook accountWhen you register or sign in Facebook, you can synchronize (register/update) profile information published online to Contacts.❖Information・If you do not have a Facebook account, you can also create a new account at http://www.facebook.com.1From the Settings screen (P.79), tap [Accounts & sync] X [Add account] X [Facebook].2Enter your login information.・If you have no Facebook account, register an account.・If you have Facebook account, login.❖Information・To display updates of Facebook on the Contacts screen, from the Settings screen (P.79), tap [Accounts & sync] X [Add account] and register or sign in an account to "Facebook" application.・To display updates of Facebook on Timescape, registering or signing in from Timescape is required. (P.156)SO-02C_E_TA.book 98 ページ 2011年5月24日 火曜日 午後2時33分](https://usermanual.wiki/Sony/A3880112.08-user-manual-part-2/User-Guide-1472593-Page-28.png)
![99SettingsSO-02C Web_TASetting other account■ Exchange Active Sync account・If you have Exchange Active Sync account, on the settings screen (P.79), tap [Accounts & sync] X [Add account] X [Exchange Active Sync], and then set the settings according to the onscreen instructions.■ docomo accountdocomo account is set by default.Deleting a service account1From the Settings screen (P.79), tap [Accounts & sync] and select a service account you want to delete.2Tap [Remove account] X [Remove account].❖Information・The first set Google account cannot be removed from "Remove account". To remove the first set Google account, reset the FOMA terminal. For details on how to reset, see "Resetting the FOMA terminal" (P.100).Synchronize online information such as your Gmail, calendar, contacts, etc. to the FOMA terminal. You can display and edit information on the FOMA terminal or a PC.❖Information・You need to set your online service account such as Google account, etc. on the FOMA terminal to synchronize. You can set to synchronize manually or automatically through use of background data.Setting automatic synchronization1From the Settings screen (P.79), tap [Accounts & sync].2Mark [Background data] checkbox.3Mark [Auto-sync] checkbox.4Tap an online service whose account is set.5Tap an item for automatic synchronization.Data synchronizationContinued on next pageSO-02C_E_TA.book 99 ページ 2011年5月24日 火曜日 午後2時33分](https://usermanual.wiki/Sony/A3880112.08-user-manual-part-2/User-Guide-1472593-Page-29.png)
![100SettingsSO-02C Web_TA❖Note・If you mark [Background data], all the applications installed to the FOMA terminal are permitted automatic data communications to online services whose accounts are set. And, if you mark [Auto-sync], your Gmail, calendar, contacts, and profile information published by "Friend" are permitted automatic data communications by Google account. These communications may cause you to pay packet communications charges.Canceling synchronization1During synchronization ( appears in the status bar), press t.2Tap [Cancel sync].You can set application backup and reset the FOMA terminal.Resetting the FOMA terminal deletes all data, including downloaded applications and Google accounts, and resets the FOMA terminal back to the initial (default) state. Make sure to back up important data you have on the FOMA terminal before you reset the FOMA terminal.For the initial settings, see "Initial settings (Setup guide)" (P.31).1From the Settings screen (P.79), tap [Privacy] X [Factory data reset] X [Reset phone].・Mark [Erase SD card] checkbox to delete all contents on the microSD card.・Enter your screen unlock method as required.2Tap [Erase everything].・By tapping [Erase everything], the FOMA terminal restarts automatically.❖Note・While restarting or resetting the FOMA terminal, wait for a while. Note that, if you remove the battery pack while restarting or resetting, it may cause malfunction of the FOMA terminal.PrivacyBack up my dataBack up application settings and data to Google servers.Automatic restoreRestore backed up settings and data when reinstalling an application.Factory data resetP. 1 0 0Resetting the FOMA terminalSO-02C_E_TA.book 100 ページ 2011年5月24日 火曜日 午後2時33分](https://usermanual.wiki/Sony/A3880112.08-user-manual-part-2/User-Guide-1472593-Page-30.png)
![101SettingsSO-02C Web_TAYou can check memory space of microSD card and FOMA terminal, and initialize microSD card.* Display changes depending on condition of microSD card recognition.Formatting a microSD card1From the Settings screen (P.79), tap [Storage] X [Unmount SD card].2Tap [OK].3Tap [Erase SD card].4Tap [Erase SD card] again, and tap [Erase everything].❖Information・Formatting a microSD card deletes all the data in it.Confirming how much space left is on a microSD card and the FOMA terminal1From the Settings screen (P.79), tap [Storage].・The total volume and free space of the microSD card appear at the top of the screen, and the free space of the FOMA terminal appears at the bottom of the screen.Increasing the free volume of the FOMA terminal and a microSD cardIf the FOMA terminal has a small memory, you can do the following to increase the available memory:・In the browser, you can clear all temporary Internet files and browser history information. For details, see "Clearing history" (P.119).・Uninstall programs that you no longer use. For details, see "Deleting an installed application" (P.96).StorageTotal space Check memory of microSD card.Available spaceCheck memory space of microSD card.Unmount SD card*Cancel recognition of microSD card to remove it safely.Mount SD card*Recognize microSD card.Erase SD card P. 1 0 1Available spaceCheck memory space of the FOMA terminal.Managing memorySO-02C_E_TA.book 101 ページ 2011年5月24日 火曜日 午後2時33分](https://usermanual.wiki/Sony/A3880112.08-user-manual-part-2/User-Guide-1472593-Page-31.png)
![102SettingsSO-02C Web_TAYou can select language and keyboard input.Changing the phone language1From the Settings screen (P.79), tap [Language & keyboard] X [Select language].2Select a language.❖Information・If you choose the wrong language and cannot read the menu texts, go to http://www.sonyericsson.co.jp/so-02c/faq.html for help.You can set Google voice recognizer and Text-to-speech settings.■ Voice recognizer settings■ Text-to-speech settingsLanguage & keyboardSelect language P. 1 0 2User dictionary Register words.Default input P. 5 3Japanese keyboardChinese keyboardVoice input & outputLanguage Select language used for Google voice search.SafeSearch Set filter explicit.Block offensive wordsSet whether to display recognized offensive voice results.Show hints Set whether to display hints on search box.Listen to an examplePlayback sample of audio synthesis.Always use my settingsOverwrite application settings with content of "Default Engine", "Install voice data", "Speech rate", "Language" and "Pico TTS".Default EngineSet audio synthesis engine to read out text. By default, "Pico TTS" is set.Install voice dataInstall voice data required to voice synthesis. If voice data is not installed, connect to Android Market to search voice data.Speech rate Set speed at reading out text.Language Set language for reading out text.Pico TTS Make settings for installed voice synthesis engine.SO-02C_E_TA.book 102 ページ 2011年5月24日 火曜日 午後2時33分](https://usermanual.wiki/Sony/A3880112.08-user-manual-part-2/User-Guide-1472593-Page-32.png)
![103SettingsSO-02C Web_TAYou can set call end operation and user support service which sounds or vibrates according to user's operation.❖Information・A user support application is not installed by default. For the first time of use, install a screen reader for FOMA terminal from the Android Market according the onscreen instructions.・To use Android Market, you need to set Google account (P.97).You can change the date and time in the FOMA terminal.To set date, time zone and time manually, unmark "Automatic" (Use network-provided values) under Date & time settings.1From the Settings screen (P.79), tap [Date & time] X [Set date].2Tap or to adjust the date.・Touch and hold down each key to switch number continuously until you release the finger from the key.3Tap [Set].❖Information・Correction of the time differences may not be performed correctly depending on the overseas telecommunication carrier. In that case, set time zone manually (P.104).AccessibilityAccessibility Set user support service ON/OFF.Power button ends callSet to end a call by pressing p.Date & timeAutomatic Adjust date, time zone, and time automatically by using network-provided information.Set date P. 1 0 3Select time zone P. 1 0 4Set time P. 1 0 4Use 24-hour format P. 1 0 4Select date format P. 1 0 4Setting the dateSO-02C_E_TA.book 103 ページ 2011年5月24日 火曜日 午後2時33分](https://usermanual.wiki/Sony/A3880112.08-user-manual-part-2/User-Guide-1472593-Page-33.png)
![104SettingsSO-02C Web_TA1From the Settings screen (P.79), tap [Date & time] X [Select time zone].2Tap an item to set.1From the Settings screen (P.79), tap [Date & time] X [Set time].2Tap or to adjust the hour and minute.・When you unmark [Use 24-hour format], you can change AM/PM. When you tap [AM], it changes to [PM] (or vice versa).3Tap [Set].1From the Settings screen (P.79), tap [Date & time] X [Use 24-hour format].2Mark/Unmark [Use 24-hour format] checkbox.・Mark the checkbox to shift to 24-hour format, and unmark to shift to 12-hour format.1From the Settings screen (P.79), tap [Date & time] X [Select date format].2Tap an item to set.You can check your own phone number, signal level, legal information, etc.Setting the time zoneSetting the timeSetting the time formatSetting the date formatAbout phoneSoftware update P. 1 8 8Status Check your own phone number, signal level, etc.Battery use Display operations which have been using the battery.Legal information Check license agreement, terms of use, etc.Model number Check version and number.Android versionBaseband versionKernel versionBuild numberSO-02C_E_TA.book 104 ページ 2011年5月24日 火曜日 午後2時33分](https://usermanual.wiki/Sony/A3880112.08-user-manual-part-2/User-Guide-1472593-Page-34.png)
![105Mail/InternetSO-02C Web_TAYou can create email accounts provided by mopera U mail, a POP3 or IMAP compatible email account provided by general service provider, or an Exchange Active Sync account to send or receive email.Email setup wizard appears. Set according the onscreen instructions. Multiple email accounts can be set.1From the Home screen, tap , then tap [Email].2Enter your email address and password.3Tap [Next].4On the mail account registration screen, enter Account name and a name you want to display on outgoing mails.・If the FOMA terminal cannot complete the email account settings automatically, tap [Manual setup] and enter the account settings manually.5Tap [Done].❖Information・If you need to make the settings manually, contact your email service provider or system administrator for the correct email account settings.・If you set an Exchange Active Sync account as email account, and if server manager sets Remote wipe, the data saved in the FOMA terminal may be deleted.・Emails are not displayed in Timescape.1From the Home screen, tap , then tap [Email].2Tap [New mail].3Enter the email address of recipient.・To add a Cc or Bcc, press t and tap [Add Cc/Bcc].・If you enter an alphabet or a name, email address options appear from the contacts beginning with the entered character.・If you send an email to multiple recipients, separate with a comma (,) and then enter the next email address.・The sender name of a received email is the name set on sender's terminal.4Enter a subject.EmailSetting up an email account for the first timeMail/InternetCreating and sending an email messageContinued on next pageSO-02C_E_TA.book 105 ページ 2011年5月24日 火曜日 午後2時33分](https://usermanual.wiki/Sony/A3880112.08-user-manual-part-2/User-Guide-1472593-Page-35.png)
![106Mail/InternetSO-02C Web_TA5Enter a message text.6To attach a file, tap [Add attachment] and attach a file in the following steps.・In this operation, only image/video/music file (up to 5 MB) can be attached.7Tap [Send].❖Information・You can save the message as a draft by tapping [Save draft]. Also, when you move to the other screen while creating a mail, the mail is automatically saved as draft.・In sent/received emails, a communication data is also included other than text and image displayed on the screen and charges will apply to the data.・Email is handled as an email from a PC. You cannot send or receive email if "Reject emails from PCs" is set on a recipient terminal.1From the Home screen, tap , then tap [Email].・When an account list appears, tap and select an email account to receive.2To update the inbox with new messages, press t, then tap [Refresh].・Tap [Load more messages] to update the inbox.3Tap the email.❖Information・If you set "Email notifications", appears in the status bar when you receive a new message. You can drag the status bar downwards to read the message. If you set "Inbox check frequency" to other than "Never", and if you are using the pay-as-you-go data communication, you may be charged every time you check your email.・If you tap the address of a received email, you can register it in a contact. If it has been already registered, you can display the details.・When phone memory becomes low, a message indicating low memory space appears and receiving emails is not available. Delete saved messages etc. to make available memory space.Add picture Select a file from the saved image file list.Take photo Start the camera to take a photo and attach it.Add video Select a file from the saved video file list.Record video Start the camera to record a video and attach it.Add sound Select music: Select a saved music file.Sound Recorder: Record a voice message and attach it.Receiving and reading the emailSO-02C_E_TA.book 106 ページ 2011年5月24日 火曜日 午後2時33分](https://usermanual.wiki/Sony/A3880112.08-user-manual-part-2/User-Guide-1472593-Page-36.png)
![107Mail/InternetSO-02C Web_TA1From the Home screen, tap , then tap [Email].・When an account list appears, tap and select an email account whose attachment you want to save.2Tap an email.・The attachment list appears underneath the message field.3Tap [Save] of a file you want to save.・The attached file (up to 5MB) is saved on the microSD card.・You can display attachment files by tapping [Open].1From the Home screen, tap , then tap [Email].・When an account list appears, tap and select an email account whose email you want reply or forward.■ReplyingTap an email X [Reply] or [Reply all] X Enter text, then tap [Send].■ForwardingTap an email X [Forward] X Enter recipient email address X Enter text, then tap [Send].❖Information・When you reply or forward an email, the original message contents for replying or forwarding is quoted. To delete the quoted message text, tap .・When you forward an email, the attachment file of the original message is quoted. To cancel quoting attached file, tap .・You can also touch and hold the email to reply or forward an email.1From the Home screen, tap , then tap [Email].・When an account list appears, tap and select an email account whose email you want to delete.2Touch and hold an email, then tap [Delete].❖Information・To delete multiple emails at the same time, tap checkboxes at the left of the mails you want to delete and then tap [Delete] at the bottom of the screen.・To delete email while sending, press t and tap [Folder] X [Outbox], touch and hold a mail you want to delete and then tap [Discard].Saving email message attachmentReplying to or forwarding emailsDeleting an email messageSO-02C_E_TA.book 107 ページ 2011年5月24日 火曜日 午後2時33分](https://usermanual.wiki/Sony/A3880112.08-user-manual-part-2/User-Guide-1472593-Page-37.png)
![108Mail/InternetSO-02C Web_TA1From the Home screen, tap , then tap [Email].・When an account list appears, touch and hold an account that you want to change the settings and tap [Account settings], then go to Step 3.2Press t, then tap [Account settings].3Select items you want to change.・You can set "Account name", "Your name", and "Signature".・To set whether to check new messages automatically and intervals of automatic check, tap [Inbox check frequency].・Mark [Default account] checkbox if you want to use this account for all outgoing emails.・Mark [Email notifications] checkbox if you want notifications for new email messages to appear in the status bar.・You can change the receiving setting by tapping "Select ringtone" or "Vibrate". Also, tap "Incoming settings" and "Outgoing settings" to change the server settings.・You can also set "Inbox check frequency", "Sync contacts", and "Sync calendar" for an Exchange Active Sync account.❖Information・If you set "Inbox check frequency" to other than "Never", and if you are using the pay-as-you-go data communication, you may be charged every time you check your email.1From the Home screen, tap , then tap [Email].・When a screen other than account list, press t and tap [Account].2Press t, tap [Add account].3Enter your email address and password.・If required, mark [Send email from this account by default.] checkbox.・If the FOMA terminal cannot complete the email account settings automatically, tap [Manual setup] and enter the account settings manually.Changing the settings for an email accountAdding an extra email accountContinued on next pageSO-02C_E_TA.book 108 ページ 2011年5月24日 火曜日 午後2時33分](https://usermanual.wiki/Sony/A3880112.08-user-manual-part-2/User-Guide-1472593-Page-38.png)
![109Mail/InternetSO-02C Web_TA4Tap [Next].5On the mail account registration screen, enter an account name and name you want to display on outgoing messages, then tap [Done].❖Information・If you need to make the settings manually, contact your email service provider or system administrator for the correct email account settings.・If you set an Exchange Active Sync account as email account, and if server manager sets Remote wipe, the data saved in the FOMA terminal may be deleted.・Emails are not displayed in Timescape.1From the Home screen, tap , then tap [Email].・When a screen other than account list, press t and tap [Account].2Touch and hold the account to be removed, then tap [Delete account] X [OK].mopera U users (for the setting, see "Setting mopera U" (P.81)) can use mopera U Mail.In mopera U Mail, POP mail and IMAP mail are available. The mail box supports 50 MB. Also, the Web mail system is available.■ POP mail1From the Home screen, tap , then tap [Email].・If you have already set an email account, operate the following operations.- When an account list appears, press t and tap [Add account].- When a screen other than account list appears, press t and tap [Account], and then press t and tap [Add account].2Enter mopera U mail address and mopera U password, then tap [Manual setup]/[Next].・If you tap [Next], it changes automatically to POP3 account. Go to Step 4.3Tap [POP3] from the type of the mail account.Removing an email account from the FOMA terminalUsing mopera U mailContinued on next pageSO-02C_E_TA.book 109 ページ 2011年5月24日 火曜日 午後2時33分](https://usermanual.wiki/Sony/A3880112.08-user-manual-part-2/User-Guide-1472593-Page-39.png)
![110Mail/InternetSO-02C Web_TA4Check that you have entered [User name] and [Password] for mopera U correctly, and [mail.mopera.net] for the POP3 server.・If you tap [Next] in Step 2, "mail.mopera.net" is entered in the POP3 server field.5Select the security type.・If you do not select it, go to Step 8.6On the security selection screen, mark the security radio button to be used.7Confirm the entry, then tap [Next].8Enter [mail.mopera.net] for the SMTP server and confirm the entry of [User name] and [Password] for mopera U.・If you tap [Next] in Step 2, "mail.mopera.net" is entered in the SMTP server field. Set "587" in the Port field.9Tap [Next].10On the option setting screen, set frequency of checking Emails etc. and tap [More].11On the mail account registration screen, enter a name you want to display on outgoing messages, then tap [Done].・The mailer is displayed and the set mail account is available.You can send/receive mails using i-mode mail address (@docomo.ne.jp).You can use pictogram and Deco-mail. Mails can be received automatically. For details on sp-mode mail, refer to "ご利用ガイドブック (spモード<スマートフォン>編) Mobile Phone User's Guide [sp-mode <Smartphone>] (in Japanese only)".1From the Home screen, tap , and then tap [sp モードメール (sp-mode mail)].・After this step, follow the onscreen instructions.sp-mode mailSO-02C_E_TA.book 110 ページ 2011年5月24日 火曜日 午後2時33分](https://usermanual.wiki/Sony/A3880112.08-user-manual-part-2/User-Guide-1472593-Page-40.png)
![111Mail/InternetSO-02C Web_TAIf you have a Google account, you can send/receive emails by using Gmail on your FOMA terminal. If you have no Google account, see "Setting Google account" (P.97).❖Information・Gmail messages are not displayed in Timescape.1From the Home screen, tap , then tap [Gmail].2On the inbox, press t and tap [Refresh].・Synchronizing Gmail application in the FOMA terminal with your Gmail account starts, and the Inbox is refreshed.❖Information・For details of Gmail, press t on the Gmail screen, then tap [More] X [Help] to view the mobile help.You can use Google Talk instant messaging to chat with friends. To use Google Talk, you need to make settings of your Google account. For details, see "Setting Google account" (P.97).Signing in Google TalkSigning in is unnecessary if you have already set a Google account.1From the Home screen, tap , then tap [Talk].2Tap [Next] X [Sign in], enter your user name and password.3Tap [Sign in].❖Information・For details of Google Talk, on the Google Talk screen, press t, then tap [Settings] X [Terms & privacy] X [Help Center] (Talk Help is displayed in English).Using GmailRefreshing GmailGoogle Talk (Chat)Sign in and online chatSO-02C_E_TA.book 111 ページ 2011年5月24日 火曜日 午後2時33分](https://usermanual.wiki/Sony/A3880112.08-user-manual-part-2/User-Guide-1472593-Page-41.png)
![112Mail/InternetSO-02C Web_TAYou can send and receive text messages up to 70 two-byte characters (160 one-byte characters) to/from other terminal.1From the Home screen, tap , then tap [Messaging].2Tap [New message].3Tap [Add recipient], then tap the recipient you want to send a message from the contact list.・If a name or phone number is entered, a list of contacts beginning with the entered numbers or letters appears.4Tap [Write message] field and enter a message.・When the number of entered characters comes close to a limit, a counter appears on the upper left of the text box and you can check the remaining entry space.5Tap [Send].❖Information・For the character entry, see "Character entry" (P.46).・When "Delivery report" is set, each time a recipient receives a message, the message you sent is marked. To set "Delivery report", on the thread list, press t, tap [Settings] and mark [Delivery report] checkbox.・You can also send/receive text messages to/from customers of overseas telecommunications carriers other than DOCOMO. See "Mobile Phone User's Guide [International Services]" or the DOCOMO International Services website.・To send SMS to users of overseas telecommunications carriers other than DOCOMO, enter "+", "Country code" and then "the recipient mobile phone number". Enter the phone number without a leading "0", if any. You can also enter "010", "Country code" and "the recipient mobile phone number" to send messages (To reply to the received SMS overseas, enter "010").1From the Home screen, tap , then tap [Messaging].2Tap someone whose messages you want to read from the recipient list.・A received message appears.Message (SMS)Sending message (SMS)Receiving and reading messages (SMS)Continued on next pageSO-02C_E_TA.book 112 ページ 2011年5月24日 火曜日 午後2時33分](https://usermanual.wiki/Sony/A3880112.08-user-manual-part-2/User-Guide-1472593-Page-42.png)
![113Mail/InternetSO-02C Web_TA❖Information・When you receive a message (SMS), appears on the status bar. To read the message, drag the status bar downwards.1From the Home screen, tap , then tap [Messaging].2Select a thread whose phone number you want to save.3Press t, then tap [Edit recipients].4Tap the phone number you want to add to a contact.5On the Sending screen, tap , then tap [Create new contact].6Tap [docomo]/[Phone contact].・When you set Google account etc., it appears as a saving location.1From the Home screen, tap , then tap [Messaging].2Press t, then tap [Settings].・You can set the following options.Saving a number in a received message to a contactAdjusting messages (SMS) settingsDelivery report Mark to receive a report every time you send messages.Notifications Mark if you want to receive a notification in the status bar when a new message arrives.Notification toneSet if you want to receive a notification in selected ringtone when a new message arrives.Notification vibrationSet if you want to receive a notification by vibration when a new message arrives.SIM messages Manage messages saved to UIM.Push settings Reports of message settings can be received from the provider.SO-02C_E_TA.book 113 ページ 2011年5月24日 火曜日 午後2時33分](https://usermanual.wiki/Sony/A3880112.08-user-manual-part-2/User-Guide-1472593-Page-43.png)
![114Mail/InternetSO-02C Web_TA1From the Home screen, tap , then tap [Messaging].2Tap a thread to select.3Touch and hold a message you want to delete.4Tap [Delete message].1From the Home screen, tap , then tap [Messaging].2Touch and hold a thread to delete.3Tap [Delete conversation].1From the Home screen, tap , then tap [Messaging].2Press t, then tap [Delete several].3Tap [Mark all] X [Delete].・After tapping [Mark all], you can tap individual thread to unmark. Tap [Unmrk all] to unmark all of the threads.1From the Home screen, tap [Browser].❖Information・You can view the browser screen turning the FOMA terminal sideways. If the screen orientation does not change automatically when you turn the FOMA terminal sideways, from the Home screen, press t and tap [Settings] X [Display], then mark [Auto-rotate screen] checkbox.1Tap the search box on the top of the browser screen.2Using the keyboard, enter the web page address or keyword to be searched for.・As you enter the address, matching web page addresses appear on the screen. Tap the address to go directly to that web page or continue entering the web page address.Going back to the previous page1Press x.Deleting a messageDeleting threadDeleting all threadsUsing BrowserOpening BrowserMoving to a web pageSO-02C_E_TA.book 114 ページ 2011年5月24日 火曜日 午後2時33分](https://usermanual.wiki/Sony/A3880112.08-user-manual-part-2/User-Guide-1472593-Page-44.png)
![115Mail/InternetSO-02C Web_TA1To close all open windows and exit Browser, press y.Browser offers advanced features that let you view web pages like on a PC.Opening a new browser windowYou can open up to 8 browser windows.1While browsing, press t, and tap [New window].・A new browser window opens in the default home page.Switching between browser windowsYou can easily switch from one website to another by opening several windows.1From the Browser screen, press t, then tap [Windows].2Tap a browser window you want to view.Closing a browser window1From the Browser screen, press t, then tap [Windows].2Tap on the browser window you want to close.Zooming in/out a web pageTo zoom in/out a webpage, perform any of the following operations.・Double-tap at the point you want to zoom in/out.・Pinch-out at the point you want to zoom in or pinch-in at the point you want to zoom out.・Tap the zoom control icon (the zoom control icon may appear when you drag in any direction on the screen).❖Information・Web pages created to fit to the screen cannot be zoomed in/out.Exiting BrowserDisplaying web pagesZoom outZoom inSO-02C_E_TA.book 115 ページ 2011年5月24日 火曜日 午後2時33分](https://usermanual.wiki/Sony/A3880112.08-user-manual-part-2/User-Guide-1472593-Page-45.png)
![116Mail/InternetSO-02C Web_TASearching for text within a web page1While viewing a web page, press t, then tap [More] X [Find on page].・The search bar appears in the upper part of the screen.2Enter the search item.・As you enter, matching characters are highlighted in green.3Tap to close the search bar.Copying text from a web page1While viewing a web page, press t, then tap [More] X [Select text].2Place your finger at the start of the text you want to copy and then drag to the end of the text you want to copy.・Copied text is highlighted in orange.3Take your finger away from the screen and tap the selected text.・After copying text is completed, a message "Text copied to clipboard." appears.4To paste text in an email, text message or multimedia message, touch and hold the text box on a message or email and tap [Paste] in the options menu.❖Information・On some web pages, selecting characters may not available.Auto-fitting a web pageAdjust display size of web pages automatically to fit the screen.1From the Browser screen, press t, tap [More] X [Settings] X mark [Auto-fit pages].❖Information・Some web pages cannot be adjusted automatically.Adjusting Browser settings1From the Browser screen, press t, tap [More] X [Settings] to set Browser settings and options.Back to the previous matched itemGo to next matched itemSO-02C_E_TA.book 116 ページ 2011年5月24日 火曜日 午後2時33分](https://usermanual.wiki/Sony/A3880112.08-user-manual-part-2/User-Guide-1472593-Page-46.png)
![117Mail/InternetSO-02C Web_TASetting the home page1From the Browser screen, press t, tap [More] X [Settings].2Tap [Set home page], enter URL you want to set as the home page, tap [OK].❖Information・The URL set as the home page appears when opening a new browser window.Operating links in web pages1Open the web page you want to operate the links.2To open the web page, tap the link.・The links get enclosed in an orange box when selected.・If you touch and hold the link, the option menus "Open", "Open in new window", "Bookmark link", "Save link", "Share link" and "Copy link URL" appear. When you touch and hold an image or a link contained image, [Save image], [View image] and [Set as wallpaper] also appear. To share the link via email, Bluetooth function or Gmail, tap "Share the link".・Browser recognizes some phone numbers that allow you to call the phone number. Tap the phone number to call.・When you download a file by "Save link" from websites which require Basic authentication or SSL session, the downloading may be failed.You can check history and store many bookmarks on the FOMA terminal.Bookmarking a web page1From the Browser screen, go to the web page you want to bookmark.2Press t, then tap [Bookmarks].・A list of bookmarks appears.・You can also access the list screen by tapping on the right side of the URL.・You can switch thumbnail view and List view by pressing t on the bookmark list screen.Operating linksManaging bookmarks and historyContinued on next pageSO-02C_E_TA.book 117 ページ 2011年5月24日 火曜日 午後2時33分](https://usermanual.wiki/Sony/A3880112.08-user-manual-part-2/User-Guide-1472593-Page-47.png)
![118Mail/InternetSO-02C Web_TA■Thumbnail viewTap [ ★Add] on the upper left of the screen X Edit the name of bookmark, if required, and tap [OK].■List viewTap [Add bookmark...] on the top of the screen X Edit the name of bookmark, if required and tap [OK].❖Information・You can also bookmark the page by pressing t and tapping [Bookmark last-viewed page] in the bookmark list screen.・Tap [Most visited]/[History] tab in the bookmark list screen and tap on the right side of the record. turns into and the web page is added to the bookmark list.Opening a bookmark1From the Browser screen, press t, then tap [Bookmarks].2Tap the bookmark you want to open.・If you do not tap a bookmark but touch and hold it, the option menus "Open", "Open in new window", "Edit bookmark", "Add shortcut to Home", "Share link", "Copy link URL", "Delete bookmark" and "Set as homepage" appear. Tap "Add shortcut to Home" to create a shortcut on the Home screen. To share the link via email, Bluetooth function or Gmail, tap "Share link".Checking browsing history1From the Browser screen, press t, then tap [Bookmarks] X [History] tab.2Tap the time you browsed the web page, such as [Today], [Yesterday], etc.・To open the web page, tap an item.・To check your most visited web pages, tap [Most visited] tab.SO-02C_E_TA.book 118 ページ 2011年5月24日 火曜日 午後2時33分](https://usermanual.wiki/Sony/A3880112.08-user-manual-part-2/User-Guide-1472593-Page-48.png)
![119Mail/InternetSO-02C Web_TAClearing history1From the Browser screen, press t, then tap [Bookmarks] X [History] tab.2Press t, then tap [Clear history].・When you delete the history, all bookmarks in "Most visited" tab are also deleted.❖Information・To delete temporary internet file such as cache, from the Browser screen, press t and tap [More] X [Settings] and then set each item from "Privacy settings" menu on the appeared screen.SO-02C_E_TA.book 119 ページ 2011年5月24日 火曜日 午後2時33分](https://usermanual.wiki/Sony/A3880112.08-user-manual-part-2/User-Guide-1472593-Page-49.png)

![129MultimediaSO-02C Web_TA6Press x to turn off the camera.Using the camera key (k) to record a video1Press and hold k for over a second.・If the movie recording screen does not appear, tap .2Press k to start recording.3Press k to stop recording.・The recording data is automatically saved in the microSD card.4Press x to turn off the camera.Adjusting exposure level1On the shooting screen, press t, then tap (Exposure value).2Tap or slide the bar to adjust the level.Tap the recently recorded history displayed at the right or bottom of the shooting screen to display movie, and then tap to crop the movie partially.1On the recording screen, tap the shooting history to display movie.2Tap .・ (Progress bar) appears at the bottom of the screen.3Drag at the left of the progress bar to the right for starting point of cropping.4Drag at the right of progress bar to the left for ending point of cropping.・Tap the screen to play the cropped part for check.5Tap [Save].・Tap [Cancel] to return to the recording screen.Cropping movieSO-02C_E_TA.book 129 ページ 2011年5月24日 火曜日 午後2時33分](https://usermanual.wiki/Sony/A3880112.08-user-manual-part-2/User-Guide-1472593-Page-59.png)
![134MultimediaSO-02C Web_TA❖Information・When you listen to Music player/FM radio with Stereo Headset with Microphone connecting to the FOMA terminal, you can switch ON/OFF by pressing the switch of Stereo Headset with Microphone. However, operation may differ depending on the conditions of use.・If receiving a call when using Stereo Headset with Microphone, music stops, and resumes when the call ends.・If you are using regular headphones without a microphone, you have to remove the headphones from the headset connection jack to be able to talk.Use Gallery to view/play pictures, photos and videos you take. Also, use Media Go to transfer content to the FOMA terminal's microSD card and to take content from an external device. For details, see "Using microUSB cable" (P.144).Photos and videos that you took or saved in the microSD from a PC are displayed in an album.1From the Home screen, tap X [Gallery].・The following album list screen appears by default.・If you signed in an online service available to be synchronized such as Picasa, online album appears after synchronization.aCamera albumbpicture albumcvideo albumdCamera button: Tap to activate the camera.eAlbum listViewing photos/videos with GalleryViewing photo/video albumCamera Photos and videos taken with the FOMA terminal・It does not appear when no photo nor video is taken.picture Album of sample picturesvideo Album of sample videosadbceContinued on next pageSO-02C_E_TA.book 134 ページ 2011年5月24日 火曜日 午後2時33分](https://usermanual.wiki/Sony/A3880112.08-user-manual-part-2/User-Guide-1472593-Page-64.png)
![135MultimediaSO-02C Web_TA2Tap an album you want to view.・Photo/Video files in album appear in the list.・On the photo/video file list screen, tap a file to view.・On the photo/video file list screen, touch and hold a file. The checkbox is marked to indicate the file is selected. The checkboxes appear on all files. By marking or unmarking the checkbox, you can perform the following operations appeared at the bottom of the screen.❖Information・On the album list screen or photo viewing screen in the camera album, tap to activate the camera.・When you tap an album, then tap in to the upper right of the screen, the albums sorted by date appear.When you tap the date album, the list of all files appears. However, the files of selected date appear with the thicker frame than the other files.・To display only videos in the list, tap of "Media shortcuts", the widget on the Home screen.Videos recorded by the FOMA terminal and sample videos appear on the list screen.・Depending on the number of photos saved, it may take some times to load all photos on the screen.■ Photo viewing screen of GalleryaAlbum informationb[Slideshow] key: Start a slideshow.cZoom outdZoom Ine[Menu] key: Operate the viewing file by tapping "Share", "Delete", "More" at the bottom of the screen.Starting a slideshow1While viewing photo, tap [Slideshow].Share Select a transfer method and send photos/videos.Delete Delete selected photos/videos.More Details: Display title, type, date, album name, location, etc.Set as: Set the photo as either wallpaper or contact photo.Crop: A cropping frame appears. Crop a photo and save as a separated file.Rotate Left: Rotate a picture 90 degrees counterclockwise.Rotate Right: Rotate a picture 90 degrees clockwise.・The items vary depending on the selected file.abdecSO-02C_E_TA.book 135 ページ 2011年5月24日 火曜日 午後2時33分](https://usermanual.wiki/Sony/A3880112.08-user-manual-part-2/User-Guide-1472593-Page-65.png)
![136MultimediaSO-02C Web_TASharing a photoYou can upload a file to an online service and send an email with a file.1While viewing photo, press t.2Tap [Share].3Select sending method and send.・The following operations vary depending on the application you select.❖Information・You can upload photos to an online web album of Facebook or Picasa. If you have not set an online service account, select an online service in Step 3 and follow the setup wizard to set.・If you upload on Picasa, use the Google account set to the FOMA terminal. You cannot upload on a Picasa account you set in "Setting Facebook account" (P.98).Deleting a photo1While viewing photo, press t.2Tap [Delete] X [Confirm Delete].❖Information・Alternatively, tap an album, then touch and hold a file you want to delete in the file list. You can also delete multiple files by marking other files displayed on the list screen.Cropping a photo1While viewing photo, press t.2Tap [More] X [Crop].3Adjust the crop frame.・To adjust the crop frame, touch and hold the edge of the crop frame. When crop arrows appear, drag inward to or outward from the center of the crop frame to resize it.・To move the crop frame to another area of the photo, drag the inside of the frame to the desired position.4Tap [Save].Using a photo as wallpaper1While viewing photo, press t.2Tap [More] X [Set as] X [Wallpaper].3Crop the photo if necessary, and tap [Save].SO-02C_E_TA.book 136 ページ 2011年5月24日 火曜日 午後2時33分](https://usermanual.wiki/Sony/A3880112.08-user-manual-part-2/User-Guide-1472593-Page-66.png)
![137MultimediaSO-02C Web_TAUsing a photo as a contact photo1While viewing photo, press t.2Tap [More] X [Set as] X [Contact picture].3Select a contact or a new contact to set.4Crop the photo if necessary, and tap [Save].1From the Home screen, tap X [Gallery].2Tap [Camera]/[video].・The file list screen in the album appears. Video file is displayed with the icon .3Tap a video to play it.❖Information・If the screen orientation does not change automatically when you turn the phone sideways, press t, then tap [Display settings] and mark [Auto-rotate screen] checkbox.■ Video viewing screen of Gallerya[Rewind] key: Move the frame to be played backward.bProgress bar: Display the playback position in the playback duration.cMarker: Playback position. Drag to change the playback position.d[Play/Pause] keye[Fast forward] key: Fast-forward the playing position.Sharing a videoYou can upload a video to YouTube and send a video by Bluetooth and email.1From the Home screen, tap X [Gallery].2Tap [Camera]/[video].・A list of files appears.Playing a videoedabcContinued on next pageSO-02C_E_TA.book 137 ページ 2011年5月24日 火曜日 午後2時33分](https://usermanual.wiki/Sony/A3880112.08-user-manual-part-2/User-Guide-1472593-Page-67.png)
![138MultimediaSO-02C Web_TA3Touch and hold the video file to mark.・The checkboxes appear on all files. To change selected files, tap a file to unmark or tap another file to mark.4Tap [Share].5Select sending method and send.❖Information・For shared files, file size and the file type are not particularly limited, but may be limited by the application to transfer. DRM content cannot be shared.Adjusting the volume of a video1On the video playback screen, press m up or down.Deleting a video1On the file list screen, touch and hold a file you want to delete.・To delete multiple files, mark the checkboxes of other files.2Tap [Delete] X [Confirm Delete].Fast forwarding and rewinding a video1Drag the progress bar marker right or left.・Tap / to rewind/forward.YouTube is a free online video streaming service. You can play, search for and upload videos.・A packet communication charge may be applied when downloading or uploading video content.1From the Home screen, tap , then tap [YouTube].・YouTube playback screen and list screen of videos appear.・To select a video from each category, press t and tap [Browse].Playing video with YouTubePlaying YouTube videoContinued on next pageSO-02C_E_TA.book 138 ページ 2011年5月24日 火曜日 午後2時33分](https://usermanual.wiki/Sony/A3880112.08-user-manual-part-2/User-Guide-1472593-Page-68.png)
![139MultimediaSO-02C Web_TA2Tap a video to play it.・While playing a video, tap the screen to display the play control keys which you can switch Play/Pause. Double-tap to switch landscape/portrait. In landscape, drag the progress bar at the bottom of the play screen left or right to change playing point.・Press x to stop the playback, and return to list screen of videos.・To exit YouTube, press y.1While playing a video, double-tap the screen to switch to the landscape screen.2Tap the screen to display the play control keys, then tap .❖Information・A movie plays in high quality when Wi-Fi is connected.・To play movie in high quality on 3G network, on YouTube screen, press t, then tap [Settings] and mark [High quality on mobile].1On YouTube screen, press t and tap [Search].2Enter the search keyword.3Scroll the result and tap a video to play it.1On YouTube screen, press t and tap [Settings].2Tap [Clear search history] X [OK].You can watch photos and videos on television by connecting the FOMA terminal using an HDMI cable (type D).Playing YouTube movies in high qualitySearching for a video with keywordsDeleting search historyConnecting the FOMA terminal to TV to watch photos and videosSO-02C_E_TA.book 139 ページ 2011年5月24日 火曜日 午後2時33分](https://usermanual.wiki/Sony/A3880112.08-user-manual-part-2/User-Guide-1472593-Page-69.png)
![140MultimediaSO-02C Web_TA1Connect the FOMA terminal with Home screen or application screen displayed to a TV using an HDMI cable.・Gallery starts on the FOMA terminal in landscape view, and album list screen appears also on TV screen.・ appears in the status bar.2Play data of Gallery on the FOMA terminal.・For playing data of Gallery, see "Viewing photos/videos with Gallery" (P.134).3To end playing, remove the HDMI cable.❖Information・Drag down the status bar and tap [HDMI connected] to confirm the operations enabled to control the FOMA terminal with the remote control of TV. Operations may not be available depending on the TV remote control.・Removing an HDMI cable exits connection, however, TV may remain to HDMI input mode. Follow the instructions on the TV to switch to digital terrestrial television mode, etc.You can browse and listen to your music, playlists and podcasts using Music.Tap on the Music screen, you can browse and play audio content saved in microSD by detailed category.❖Note・Do not perform "Unmount SD card" while a track is playing.1From the Home screen, tap X [Music].・The Music playback screen appears.2Tap .3Browse to a track by tapping Artists/Albums/Tracks/Playlists by category.4Tap a track to play it.Connecting the FOMA terminal to TV Music playerSearching for music data and playingSO-02C_E_TA.book 140 ページ 2011年5月24日 火曜日 午後2時33分](https://usermanual.wiki/Sony/A3880112.08-user-manual-part-2/User-Guide-1472593-Page-70.png)
![141MultimediaSO-02C Web_TA■ Music screenaArtist name, song titlebAlbum artc[Previous] key: Go to the previous track, or to the beginning of the track in the current playlist.dProgress bar: Resume playback from the specified point by dragging or tapping.eTrack play timef[Next] key: Go to the next track in the current playlist.gPlay/Pause keyhDisplay the track list of artist/album/track/playlistiInfinite button: Connect to YouTube to display related information of the current track.jDisplay playing track and the list contains the track・You can switch to play/pause the playing track, and change the track by tapping other track in the list.m: Adjust the volume.t: On the playback screen, select "Equalizer"/"Set as ringtone" from the menu. On the track list of each category, select "Send several"/"Delete several" from the menu.❖Information・You can return to the Home screen to perform another operation while listening to the music player in the background. To return to the playback screen of the Music player, from the Home screen, tap X [Music], or drag down the status bar and tap the current track name in the ongoing item.・If the Music player widget is displayed on the Home screen, tap Play/Pause/ / . Tap the album art to display the playback screen of the Music player.Adjusting the volume1While playing a track, press m up or down.Sharing a trackYou can share (send) files by Bluetooth and email attachment.1On the Music player screen, tap .2Touch and hold an item in Artists, Albums, Tracks or Playlists.・Alternatively, on the list screen, press t, tap [Send several], mark items to share (send) and go to Step 3.3Tap [Send].4Select sending method and send.abcdefgh i jContinued on next pageSO-02C_E_TA.book 141 ページ 2011年5月24日 火曜日 午後2時33分](https://usermanual.wiki/Sony/A3880112.08-user-manual-part-2/User-Guide-1472593-Page-71.png)
![142MultimediaSO-02C Web_TA❖Information・For shared (to be sent) files, file size and the file type are not particularly limited, but may be limited by the application to transfer. DRM content cannot be shared.Deleting a trackOn the Music player screen, tap , touch and hold an item on track list screen of each category and tap [Delete] to delete the selected item. On the track list of each category, press t, tap [Delete several] and select items to delete.Using a track as a ringtone1When playing/pausing the track in the Music player, press t.2Tap [Set as ringtone].Playing PlaylistsMusic player creates track lists automatically in "Most played" and "Never played" playlists. You can also create new playlists.You can use Media Go to maintain your music library and create your own playlists. Playlists that you create yourself are in the m3u format and are stored on microSD in the FOMA terminal. When you connect the FOMA terminal to a PC using the supplied microUSB cable, you need to use a microSD card as a removal disk. For details, refer to "Using microUSB cable" (P.144).1On the Music player screen, tap .2Tap [Playlists].・You can set the following operations.Create new playlistMark tracks to register to a playlist in track list, tap [Create] and enter the playlist name.Newly added Touch and hold a track to add to playlist in track list, tap [Add to playlist] → [(Playlist)]/[Create new playlist] to add the selected track to a playlist.Most played Display the list of frequently played tracks.Never played Display the list of available tracks which have not played wholly.Continued on next pageSO-02C_E_TA.book 142 ページ 2011年5月24日 火曜日 午後2時33分](https://usermanual.wiki/Sony/A3880112.08-user-manual-part-2/User-Guide-1472593-Page-72.png)
![143MultimediaSO-02C Web_TA3Tap a playlist you want to play X Tap a track.・The playlist plays from the track you tap.TrackID is a music recognition service. You can search for title, artist and album name for a track you hear playing through a loudspeaker. For best results, use TrackID in a quiet area. You can recommend tracks to others. You can also search for and view related content on YouTube. If you cannot use TrackID, see "Wireless & networks" (P.79) to check the Internet connection.1From the Home screen, tap , then tap [TrackID].1Start TrackID, then hold the FOMA terminal towards the music source.2Tap [Record].・The track information appears in the result screen.・To return to the TrackID start screen, press x.When a track has been recognized by TrackID, you can recommend it, search for related content for the track on YouTube, or do some others. The track information appears when a track is recognized after a search, but also in a history list.To use TrackID results・When a recorded track is recognized, the track information appears. Tap one of the keys in the track information screen to recommend to others, or view the track on YouTube.・To view the track information, tap the desired track in the history list, or tap [Charts] and view the optional chart.TrackIDStarting TrackIDSearching for the track informationUsing TrackID resultsSO-02C_E_TA.book 143 ページ 2011年5月24日 火曜日 午後2時33分](https://usermanual.wiki/Sony/A3880112.08-user-manual-part-2/User-Guide-1472593-Page-73.png)
![145File managementSO-02C Web_TA2Tap [Skip].・The FOMA terminal is connected to a PC in "Media transfer mode (MTP)", USB connection mode set by default. "Portable Device" window appears on the PC. Select "デバイスを開いてファイルを表示する エクスプローラ使用 (Open device to display files Use Explorer)" and click "OK" to access "Memory Card" in the FOMA terminal.❖Information・Drag the status bar when connecting and tap [Connected in Media transfer mode] X [Connectivity settings] to check connectivity or change the following connection settings.・If you switch the USB connection mode to "Mass storage mode (MSC)", you can access the microSD card in the FOMA terminal as a removable disc. However accessing microSD card on the FOMA terminal is not available and you may not use functions or applications on the FOMA terminal such as Camera, Gallery and music player.・If you install PC Companion, you can use the following applications on a PC for managing media files, creating backup files, etc. when connecting the FOMA terminal and the PC. For details, check on the PC Companion screen after installation.・When the FOMA terminal is connected to a PC, charging starts automatically.Disconnecting the microUSB cable safely・Do not disconnect the microUSB cable during data transferring. Otherwise, data may be damaged.■ Media transfer mode (MTP)1Drag the status bar downwards.2Tap [Connected in Media transfer mode].PC Companion installationDisplay PC Companion installation wizard when connected to a PC.USB connection modeSelect USB connection mode from "Media transfer mode (MTP)"/"Mass storage mode (MSC)" when connected to a PC.Trusted devices for wireless media transferConnect the FOMA terminal and a host device in a pair via Wi-Fi network. P.147Media Go P. 1 4 8Support Zone Update software of the FOMA terminal connecting to a PC. P. 1 8 9Sync Zone Synchronize calendar and contacts between Outlook and the FOMA terminal.File Manager Check file type, update time, location, etc. of microSD card.Continued on next pageSO-02C_E_TA.book 145 ページ 2011年5月24日 火曜日 午後2時33分](https://usermanual.wiki/Sony/A3880112.08-user-manual-part-2/User-Guide-1472593-Page-75.png)
![146File managementSO-02C Web_TA3Tap [Change to Mass storage mode].・"Connect your phone" appears on the status bar.4Drag the status bar downward and tap [Connect your phone].5Tap [Connect phone memory card].・[Phone memory card connected] appears in the status bar.6Drag the status bar downward and tap [Phone memory card connected].7Tap [Disconnect].・"Connect your phone" appears on the status bar.8Disconnect the microUSB cable.■ Mass storage mode (MSC)1Drag the status bar downwards.・When "Connect your phone" is displayed, go to Step 2. When "Phone memory card connected" is displayed, go to Step 5.2Tap [Connect your phone].3Tap [Connect phone memory card].・[Phone memory card connected] appears in the status bar.4Drag the status bar downwards.5Tap [Phone memory card connected].6Tap [Disconnect].・"Connect your phone" appears in the status bar.7Disconnect the microUSB cable.Dragging and dropping data on the FOMA terminal and a PC■ Media transfer mode (MTP)1Connect the FOMA terminal to a PC using a microUSB cable.2Drag and drop data that you have selected between the FOMA terminal and a PC.■ Mass storage mode (MSC)1Connect the FOMA terminal to a PC using a microUSB cable.・If the microSD card is not mounted on a PC, go to Step 2. In other cases, go to Step 4.2Drag the status bar downward and tap [Connect your phone].Continued on next pageSO-02C_E_TA.book 146 ページ 2011年5月24日 火曜日 午後2時33分](https://usermanual.wiki/Sony/A3880112.08-user-manual-part-2/User-Guide-1472593-Page-76.png)
![147File managementSO-02C Web_TA3Tap [Connect phone memory card].・[Phone memory card connected] appears in the status bar.4Drag and drop data that you have selected between the FOMA terminal and a PC.❖Information・You can transfer files using a microUSB cable on most devices and the following operating systems (OSs) that supports the USB mass-storage memory interface.- Microsoft Windows 7- Microsoft Windows Vista- Microsoft Windows XPIf the FOMA terminal and a PC*1 are connected in a pair on a Wi-Fi network, automatic connection/disconnection of microSD card and a PC is enabled when FOMA terminal user comes in and out of the Wi-Fi area, You can easily access to a microSD card inserted in the FOMA terminal from a connected PC. *1 Use Microsoft Windows 7 to make a pair setting. Pair setting cannot be made under Microsoft Windows XP, Microsoft Windows Vista or other OS.1Connect a PC you want to set in a pair to a Wi-Fi network.2Set USB connection mode of the FOMA terminal to "Media transfer mode (MTP)".3Connect the FOMA terminal to a Wi-Fi network.4Connect the FOMA terminal to a PC using a microUSB cable. ・When a confirmation screen for installation of PC Companion software appears on the FOMA terminal, tap [Skip].5Make sure that "SO-02C" is displayed as a portable device on the explorer of the PC.6Right click the portable device icon, then click "ネットワーク構成 (network composition)".7Click [次へ (Next)].8On the FOMA terminal, tap [Pair].9On the network composition of the portable device screen of the PC, click " 完了 (Done)".Connecting the FOMA terminal to a PC on a Wi-Fi networkContinued on next pageSO-02C_E_TA.book 147 ページ 2011年5月24日 火曜日 午後2時33分](https://usermanual.wiki/Sony/A3880112.08-user-manual-part-2/User-Guide-1472593-Page-77.png)
![148File managementSO-02C Web_TA10Disconnect the microUSB cable.・The FOMA terminal and a PC are connected in "Media transfer mode (MTP)" on a Wi-Fi network, and you can exchange data files.❖Information・From the Home screen of the FOMA terminal, press t and tap [Settings], X [Sony Ericsson] X [Connectivity] to display "Host name" (PC name) in the "Trusted devices for wireless media transfer" field. Tap the host name and tap [Forget] to cancel connection setting. Until "Forget" is tapped, the connection setting retains even if you connect/disconnect repeatedly by coming in and out of a Wi-Fi area.The Media Go computer application helps you transfer and manage media content in the FOMA terminal and computer.With Media Go, you can load music from a CD to a PC and transfer to the FOMA terminal.You need one of these operating systems to use the Media Go application:・Microsoft Windows 7・Microsoft Windows Vista・Microsoft Windows XP, Service Pack 3 or higher❖Information・To transfer files, set USB connection mode to "Media transfer mode (MTP)" in advance when connecting the FOMA terminal and a PC using microUSB cable.・To learn more about how to use the Media Go application, see the help section in the main menu of the Media Go application.Installing Media Go1Connect the FOMA terminal to a PC using a microUSB cable.・"PC Companion software" screen appears.2Tap [Install].・An Installer screen appears on the PC screen.3On the Installer screen of PC, select "English (U.K.)" or "English (U.S.)" X click "Install".・After this step, follow the instructions on the screen.4After the installation, on the "Sony Ericsson PC Companion" screen of the PC, install "Media Go".❖Information・You can also download Media Go from http://www.sonyericsson.co.jp/mediago/.Using Media GoSO-02C_E_TA.book 148 ページ 2011年5月24日 火曜日 午後2時33分](https://usermanual.wiki/Sony/A3880112.08-user-manual-part-2/User-Guide-1472593-Page-78.png)
![149File managementSO-02C Web_TATransferring data using Media Go1Connect the FOMA terminal to a PC using a microUSB cable.2Drag the status bar down to check the connection mode.・When "Connected in Media transfer mode" is displayed, go to Step 5. When "Connect your phone" is displayed, go to Step 3.3Tap [Connect your phone] X [Connectivity settings].4Tap [USB connection mode] X [Media transfer mode (MTP)] X [OK].5Select Media Go from the PC's start menu and activate Media Go.・Using Media Go, you can move files between the FOMA terminal and the PC.The Bluetooth function creates a wireless connection to other Bluetooth devices, for example, handsfree devices. A range within 10 meters, with no solid objects in between, is recommended. You must turn ON the Bluetooth function to communicate with Bluetooth devices. You may also have to make pair setting for your phone and Bluetooth devices.❖Information・By default, Bluetooth function is OFF. If you turn Bluetooth on and then turn off the FOMA terminal, Bluetooth function turns off. When you turn on the FOMA terminal again, Bluetooth function turns ON automatically.・If you do not use Bluetooth function, turn it OFF to save the battery. Keep the Bluetooth function OFF in a place, such as in an airplane and hospital, where the use of wireless devices is prohibited.■ Reception interference caused by wireless LAN devicesThe FOMA terminal's Bluetooth function and wireless LAN devices use the same frequency band (2.4GHz). If you use the terminal near a wireless LAN device, reception interference may occur or the communications speed may lower. Also, you may hear noise or have a connection problem. In these cases, do the following:Using Bluetooth functionContinued on next pageSO-02C_E_TA.book 149 ページ 2011年5月24日 火曜日 午後2時33分](https://usermanual.wiki/Sony/A3880112.08-user-manual-part-2/User-Guide-1472593-Page-79.png)
![150File managementSO-02C Web_TA・Keep the Bluetooth device over 10 meters away from a wireless LAN device.・Within 10 meters, turn off either the Bluetooth device or the wireless LAN device.* The FOMA terminal does not communicate wirelessly with all types of Bluetooth devices. Bluetooth DUN is not supported. The FOMA terminal does not create a dial-up connection as a modem via a PC.1From the Home screen, press t.2Tap [Settings] X [Wireless & networks].3Mark [Bluetooth] checkbox.・ appears on the status bar and Bluetooth function turns ON.4Tap [Bluetooth settings].5Mark [Discoverable] checkbox.・Bluetooth devices can detect the FOMA terminal for 120 seconds.You can name the FOMA terminal. The name appears on Bluetooth devices when you use the Bluetooth function.1Confirm that the Bluetooth function is ON.2From the Home screen, press t.3Tap [Settings] X [Wireless & networks] X [Bluetooth settings] X [Device name].4Enter a name.5Tap [OK].By making pair setting for the FOMA terminal and another Bluetooth device, you can use the device such as Bluetooth handsfree headset etc. connecting to the FOMA terminal to make and receive calls.Making the FOMA terminal detectable with the Bluetooth function ONEntering the FOMA terminal's nameMaking pair setting for the FOMA terminal and Bluetooth deviceContinued on next pageSO-02C_E_TA.book 150 ページ 2011年5月24日 火曜日 午後2時33分](https://usermanual.wiki/Sony/A3880112.08-user-manual-part-2/User-Guide-1472593-Page-80.png)
![151File managementSO-02C Web_TAOnce you have made pair setting for your phone and a Bluetooth device, the setting is saved. When making pair setting for the FOMA terminal and a Bluetooth device, you may need to enter a pass code (PIN). Your phone will automatically try the generic pass code 0000. If this does not work, see the documentation of your Bluetooth device for the pass code used by your Bluetooth device. You do not need to re-enter the pass code the next time you connect to a paired Bluetooth device already set.You cannot make pair setting for the FOMA terminal and two Bluetooth headsets. However, you can set it with two or more Bluetooth devices if the same profile is not in use. The FOMA terminal supports the following Bluetooth profiles: A2DP, AVRCP, H F P, H S P, O P P, P B A P a n d S P P.1From the Home screen, press t.2Tap [Settings] X [Wireless & networks] X [Bluetooth settings].3Tap [Scan for devices].・A list of Bluetooth devices detected appears.4Select a Bluetooth device to pair with the FOMA terminal.5If necessary, enter the pass code (PIN).・You can use a Bluetooth device that has been paired. The pairing and connection status appear below the Bluetooth device name in the Bluetooth device list.・Some Bluetooth devices make connections continuously after making pair setting.❖Information・Make sure that the Bluetooth function of the device for making pair setting is ON, and that the Bluetooth detection function is on.・When you make pair setting with the Bluetooth device supporting Secure Simple Pairing (SSP) function, a passkey appears on the screen. After checking the appeared passkey is correct, the pair setting is mode.1From the Home screen, press t.2Tap [Settings] X [Wireless & networks] X [Bluetooth settings].Connecting the FOMA terminal with another Bluetooth deviceContinued on next pageSO-02C_E_TA.book 151 ページ 2011年5月24日 火曜日 午後2時33分](https://usermanual.wiki/Sony/A3880112.08-user-manual-part-2/User-Guide-1472593-Page-81.png)
![152File managementSO-02C Web_TA3Touch and hold a device in the Bluetooth device list that you are going to connect.・Touch and hold a device with "Pair with this device" displayed under the device name.4Tap [Pair].・Depending on the device type, "Paired but not connected"/"Connected to phone audio"/"Connected to media audio"/"Connected to phone and media audio" is displayed under the device name when pair setting is completed. While connecting to a device, appears in the status bar.1From the Home screen, press t.2Tap [Settings] X [Wireless & networks] X [Bluetooth settings].3Touch and hold the currently connected Bluetooth device name in the Bluetooth device list.・The device with "Connected to phone audio"/"Connected to media audio"/"Connected to phone and media audio" displayed under the device name is paired with the FOMA terminal and connected.4Tap [Disconnect].・Tap the device name and tap [OK] on the confirmation screen for disconnecting to disconnect. The display under the device name changes to "Paired but not connected" while the pair setting remains set. To reconnect, tap the device name.1From the Home screen, press t.2Tap [Settings] X [Wireless & networks] X [Bluetooth settings].3Touch and hold the currently connected Bluetooth device name in the Bluetooth device list.Deactivating the connection of a Bluetooth device Deactivating the pair setting of a Bluetooth deviceContinued on next pageSO-02C_E_TA.book 152 ページ 2011年5月24日 火曜日 午後2時33分](https://usermanual.wiki/Sony/A3880112.08-user-manual-part-2/User-Guide-1472593-Page-82.png)
![153File managementSO-02C Web_TA4Tap [Disconnect & unpair].・Connection disconnects and the pair setting is canceled.❖Information・When the FOMA terminal is only set to pair with Bluetooth device (not connected), [Unpair] appears.With Media server, you can share media files with other client (DLNA: Digital Living Network Alliance) devices using Wi-Fi function.Set Wi-Fi connection (P.82) with another client device.1From the Home screen, tap , then tap [Media server].Sharing files with DLNA devices via Media serverSetting Media server2Media server Set to connect from a client device to the FOMA terminal via Wi-Fi.Change server nameRename the FOMA terminal (server) on a client device.Client device listManage client device registered to the FOMA terminal.Wi-Fi settings P. 8 2About Explains basic information such as checking connection status of media server or client device by icons on the status bar.SO-02C_E_TA.book 153 ページ 2011年5月24日 火曜日 午後2時33分](https://usermanual.wiki/Sony/A3880112.08-user-manual-part-2/User-Guide-1472593-Page-83.png)
![154ApplicationsSO-02C Web_TAWith Android Market, you can access to useful applications or fun games directly which you can download and install on the FOMA terminal. And you can send feedback and comments about an application, or report objectionable application or incompatible application with the FOMA terminal as an inappropriate content.・To use Android Market, you need to set Google account (P.97).・Some applications and games are free of charge, and the others are paid. In the applications list of Market, distinction between free and paid is clearly specified. For details on purchasing, returning and refunding of paid applications, see "Help" (P.154).1From the Home screen, tap , then tap [Market].2When you open Android Market for the first time, the Terms of Service for Android Market window appears. Tap [Accept].❖Information・Be sure to check the security of application, then install it at your own risk. The FOMA terminal may be infected with a virus and the data may be damaged.・NTT DOCOMO is not liable for malfunctions, if any, caused by the application you installed. In such case, the repair is charged even during the warranty period.・NTT DOCOMO is not liable for any disadvantage brought to you or any third party due to an application you installed.・Some applications automatically perform packet communications. Packet communication is kept active unless you disconnect it or the time-out is occurred. To disconnect packet communication manually, from the Home screen, press t and tap [Settings] X [Wireless & networks] X [Mobile networks], then unmark [Data enabled] checkbox by tapping.・Some applications may be updated automatically.When you need help or have any questions about Android Market, press t then tap [Help]. From the Browser, the Android Market Help web page is opened.In the DOCOMO Market, you can quickly access DOCOMO recommended sites and useful applications.Using Android MarketOpening Android MarketApplication sHelpUsing DOCOMO MarketSO-02C_E_TA.book 154 ページ 2011年5月24日 火曜日 午後2時33分](https://usermanual.wiki/Sony/A3880112.08-user-manual-part-2/User-Guide-1472593-Page-84.png)
![155ApplicationsSO-02C Web_TA1From the Home screen, tap , then tap [docomo market].・The browser is activated and DOCOMO Market is displayed.❖Information・To use DOCOMO Market, Internet connection by packet communication (3G/GPRS) or Wi-Fi is required.・For accessing DOCOMO Market or downloading applications introduced in DOCOMO Market, a packet communication charge is applied separately. Some downloaded applications automatically perform packet communications.・The introduced applications on DOCOMO Market include charged ones.・NTT DOCOMO is not liable for any disadvantage caused by introduced websites on DOCOMO Market or the acquired information from the website.・And NTT DOCOMO is not liable for contents, adequateness to purpose of use, reliability, etc. of applications introduced on the DOCOMO Market.・Some applications that you perform installation may give the FOMA terminal instability of the operation, or may send your location information or personal information registered to the FOMA terminal to outside via the Internet and the information may be used improperly. Please thoroughly check a provider and operation status of the application etc. which you want to use beforehand and then use it.・The copyrights of materials (documents, photographs, illustrations, animations, sounds, software, etc.) on this Site are the possession of DOCOMO or other third parties and are protected by the Copyright Act as well as other laws and agreements. Excluding the extent of quotation and reproduction for private use that is approved in the Copyright Act, without the consent of the party owing the copyright, the reproduction, adapting or public transmission of copyrighted material is prohibited.Sony Ericsson TimescapeTM (hereinafter referred to as Timescape) allows you to realize wide communication by displaying all your communications chronologically. All events - Calls, messages (SMS), Facebook, Twitter, mixi updates, etc. are displayed on the screen chronologically. You can see a tile preview of events before choosing to view the full content. With the infinite button ( ), you can view all communication information related to the registered contacts. (P.158)❖Information・To make best use of Timescape, you can set up your social networking service (SNS) account.・Note that, you cannot view emails of Gmail or other Email application accounts in Timescape.・If you do not have a Facebook account, you can create a new account at http://www.facebook.com.Opening the DOCOMO MarketTimescapeTMContinued on next pageSO-02C_E_TA.book 155 ページ 2011年5月24日 火曜日 午後2時33分](https://usermanual.wiki/Sony/A3880112.08-user-manual-part-2/User-Guide-1472593-Page-85.png)
![156ApplicationsSO-02C Web_TA・If you do not have a Twitter account, you can create a new account at http://www.twitter.com.・If you do not have a mixi account, refer to mixi (http://mixi.jp) on a PC.・You can check the update of set Facebook, Twitter or mixi by Timescape.・The first time you start Timescape, a setup wizard will guide you through the necessary steps.1From the Home screen, tap , then tap [TimescapeTM].・The Timescape screen appears.2Tap a tile.3If you want, enter your Facebook/Twitter/mixi account information.4Tap [Done].❖Information・Timescape also can be started by tapping the start button on the upper right of the Timescape widget.・After completion of setup wizard, you can change the settings. On the Timescape screen, press t and tap [Settings].・If the automatic update of Facebook/Twitter/mixi is set, you can check information update sooner; however, the battery runs out quickly. To save the battery, set to manual update.aLatest comment of Facebook/Twitter. To filter the services, use tile filter.bTimescape tiles (various information such as missed calls, received SMS, Facebook, Twitter or mixi friend's updates are displayed in chronological order)cTimescape tile filter (tap a filter item to narrow the information down to a certain type)・Display order of tile filters may differ.Scrolling through tiles in Timescape1Drag a tile up and down.Previewing tiles in TimescapeSelect a tile to view the content on the tile.1Tap a tile.Setting up TimescapeTimescape screenabcSO-02C_E_TA.book 156 ページ 2011年5月24日 火曜日 午後2時33分](https://usermanual.wiki/Sony/A3880112.08-user-manual-part-2/User-Guide-1472593-Page-86.png)
![157ApplicationsSO-02C Web_TAFiltering the displayed tile1Tap the filter icons on the Timescape screen.Refreshing the start screen in TimescapeWhen you refresh the start screen, the FOMA terminal connects to the Internet to update information from your Twitter, Facebook and mixi account set in Timescape.1In the Timescape screen, press t and tap [Refresh].Posting to Facebook or Twitter from Timescape1In the Timescape screen, press t and tap [Update status].2Mark the service you want to update the status for and tap [Continue].3Enter the text and tap [Post].The following icons on a tile indicate a type of event.Content filter iconsFilter Icon Displayed tileAll tilesReceived SMSMissed callsUpdates from your Twitter contactsUpdates from your Facebook contactsUpdates from your mixi contactsTile iconIcon EventA missed call. Tap the tile to call the caller.An SMS message. Tap the tile to display the message.A Twitter update from a friend. Tap the tile to display the update.A Facebook update from a friend. Tap the tile to display the update.A mixi update from a friend. Tap the tile to display the update of mixi diary or album.SO-02C_E_TA.book 157 ページ 2011年5月24日 火曜日 午後2時33分](https://usermanual.wiki/Sony/A3880112.08-user-manual-part-2/User-Guide-1472593-Page-87.png)
![158ApplicationsSO-02C Web_TAViewing a tile information1On the Timescape screen, tap a tile.Calling back from Timescape when you have a missed call1Double-tap .2Tap [Return call XXXXXXXX].Replying to an SMS message in Timescape1Double-tap .2Enter a message text.3Tap [Send].When you tap a tile, the infinite button appears in the upper right corner. By tapping , you can view the communication log by registered information in the contacts or tile filter event.Viewing the registered information of contacts in Timescape1On the Timescape screen, tap a tile.2Tap .・A communication log related to the selected tile by event appears.3Flick the filter items at the bottom of the screen, and tap an information filter item.・Contact information appears.・For communication history or message (SMS) tiles, you can check logs.The infinite button in TimescapeSO-02C_E_TA.book 158 ページ 2011年5月24日 火曜日 午後2時33分](https://usermanual.wiki/Sony/A3880112.08-user-manual-part-2/User-Guide-1472593-Page-88.png)
![159ApplicationsSO-02C Web_TADisplaying the Timescape setting screen1On the Timescape screen, press t, then tap [Settings].・You can set the following operations.There are two ways to find your location, using Mobile networks with Wi-Fi (Wireless network) or GPS. Wireless network technology determines your position fast but accuracy may vary. If you use GPS technology it may take a little longer, but it will find your exact position. You can enable both Wireless network and GPS to benefit from both technologies when trying to find your position.The FOMA terminal has a GPS receiver that uses satellite signals to calculate your location. Some GPS features use the Internet. Data rates and charges may apply.When you use functions that require the GPS receiver to find your location, make sure you have a clear view of the sky. If the GPS receiver does not find your location after a few minutes, you should move to another location. To help the search, stand still and do not cover the GPS antenna. The first time you use the GPS it may take up to 10 minutes before your location is found.・Use the GPS system with great care. DOCOMO is not liable for any damage caused by abnormality of the system.・Note that DOCOMO shall have no liabilities for any purely economic loss including those due to missing a chance to check the measurement (communication) results because of external factors (including the running out of the battery), such as a failure, malfunction, or any other problems of the FOMA terminal or the power failure.Setting TimescapeSchedule updatesSet your Twitter/Facebook/mixi account information to be updated automatically/manually when Timescape is activated.TimescapeTM contentChange a content type displayed in Timescape.Set up servicesSet Facebook/Twitter/mixi accountAbout location servicesGPS FunctionContinued on next pageSO-02C_E_TA.book 159 ページ 2011年5月24日 火曜日 午後2時33分](https://usermanual.wiki/Sony/A3880112.08-user-manual-part-2/User-Guide-1472593-Page-89.png)
![161ApplicationsSO-02C Web_TAEnabling GPS function1From the Home screen, press t and tap [Settings].2Tap [Location & security].3Mark [Use GPS satellites] checkbox.4Read the note and tap [Agree].Enabling Wireless network to find your position・Enable to search a current location using mobile network and Wi-Fi.1From the Home screen, press t and tap [Settings].2Tap [Location & security].3Mark [Use wireless networks] checkbox.4Read the note and tap [Agree].5Read the note on location information and tap [Agree].・Wireless network users' location information is stored without specifying who they are. Some location information is stored even when the application is not running.The Google Maps application lets you view your current location, find other locations and calculate routes. When you start the Google Maps application, your approximate location is shown using information from nearby mobile towers. Your location is updated with a more precise position when the GPS receiver finds your location.❖Information・Make sure you enable the location settings before trying to get your position.・If the screen orientation does not change automatically when you turn the FOMA terminal sideways, from the Home screen, press t and tap [Settings] X [Display], then mark [Auto-rotate screen] checkbox.・To use Google Map, enable data connection (3G/GPRS) or connect to Wi-Fi.・Google Map does not cover the whole world.・Only using 3G/Wi-Fi connection may not detect some locations.・Google may provide updated service or function.1From the Home screen, tap .2Tap [Maps].Using Google MapSO-02C_E_TA.book 161 ページ 2011年5月24日 火曜日 午後2時33分](https://usermanual.wiki/Sony/A3880112.08-user-manual-part-2/User-Guide-1472593-Page-91.png)
![162ApplicationsSO-02C Web_TADetecting the current location on a map1On the map screen, tap .・The blinking blue arrow shows the current location.Using Street view・Street view does not cover some areas.1Touch and hold a spot on the map that you are going to look at in Street view.2Tap the displayed balloon.3Tap (Street View).・When Street View is operating, press t and tap [Compass mode], and then the compass in Street View shows the same direction as the FOMA terminal's geomagnetic compass.・Street view does not cover some areas. Uncovered area appears in gray.Searching for a location you want to look at1On the map screen, press t and tap [Search].2Fill out the search box.・You can enter addresses, city names, business types and institution names (for example, London and art museum).・If you have entered information, the screen shows the list of all places entered and was referred to previously. If you tap an address on the menu, you can check the location on the map.3Tap [ 実行 (Execute)].・Instead, you may tap the icon on the screen.4Tap at the lower left on the map to display the list, and tap your location.・If your location has a balloon on the map, tap the balloon to display the options.・List does not appear if only one location has been found.5Tap an option.・You can use [Show on map], [Get directions], [Call XXXXXXXX], [More options], etc. You can also tap [Reviews] and [Details] tabs. The options you can use vary depending on the location.Continued on next pageSO-02C_E_TA.book 162 ページ 2011年5月24日 火曜日 午後2時33分](https://usermanual.wiki/Sony/A3880112.08-user-manual-part-2/User-Guide-1472593-Page-92.png)
![163ApplicationsSO-02C Web_TA❖Information・With "Places" application, select "Restaurants", "Coffee", "Bars", "Hotels", "Attractions", "ATMs", "Gas stations" categories to search and show it on the map. You can add the search categories.Zooming in or out on a map1Tap to zoom in or out on a map.❖Information・Alternatively, double-tap or pinch on the screen to zoom in/out.Changing the layerYou can select information to overlay on the map.1On the map screen, tap .2Tap [Traffic]/[Satellite]/[Terrain]/[Buzz]/[Latitude]/[More Layers].・Tap [More Layers] to select [My Maps]/[Wikipedia]/[Transit Lines]/[Favorite places].・Traffic information and routes are not available in all locations.Receiving guidesGoogle Map helps you receive detailed guides for your destination.1On the map screen, press t, then tap [Directions].2Enter a departure point in the upper text box, and a destination in the lower text box.・Alternatively, tap at the right of the text box to select a departure point and a destination from [My current location]/[Contacts]/[Point on map].3Select a transportation device from (Driving)/ (Transit)/ (Walking).4Tap [Go].・A list of guides for your destination appears.Traffic Show traffic condition.Satellite Display satellite photo.Terrain Display geological formation.Buzz Show buzz from the point.Latitude Join Latitude.My Maps View My Maps that you create on a PC. Only viewing: You cannot create My Maps on the FOMA terminal.Wikipedia appears.Tap to display a Wikipedia article related to the location.Transit Lines Show route information.Continued on next pageSO-02C_E_TA.book 163 ページ 2011年5月24日 火曜日 午後2時33分](https://usermanual.wiki/Sony/A3880112.08-user-manual-part-2/User-Guide-1472593-Page-93.png)
![164ApplicationsSO-02C Web_TA5If your search type is Transit, tap a route in the list.・A route is displayed if you search in car or walk option. Tap to display a route on the map.❖Information・With "Navigation" application, you can use easy route search with current location as a departure point.Clearing the MapsClear deleted layers, route search results and some others.1On the map screen, press t, then tap [Clear Map].・If there is nothing to clear, you cannot tap [Clear Map].Google Latitude enables you to check where a friend is on the map, and to share status messages. Latitude also enables you to send messages (SMS) and emails, to make phone calls, and to find the route to where a friend is.Location information cannot be automatically shared. You need to join Latitude and invite a friend who gives his or her location information, or to receive an invitation from him or her.Joining Latitude1While a map is displayed, press t, and tap [Join Latitude].・For the first time to join Latitude, a message confirming whether to agree to Google's privacy policy appears.・Once you join Latitude, your menu item changes into [Latitude].Confirming Your Friend's Current Location with Google LatitudeSO-02C_E_TA.book 164 ページ 2011年5月24日 火曜日 午後2時33分](https://usermanual.wiki/Sony/A3880112.08-user-manual-part-2/User-Guide-1472593-Page-94.png)
![165ApplicationsSO-02C Web_TAOpening LatitudeIf you join Latitude, you can confirm where a friend is, and check update with opening the screen.1When a map is displayed, press t, and tap [Latitude].You can listen to FM broadcast with the FOMA terminal. Tuning can be made automatically or manually, and you can register your favorite channels to Favorites. To use FM radio, use a handsfree device, such as Stereo Headset with Microphone (Sample), etc. or a headphone. They work as antenna.1Connect Stereo Headset with Microphone to the FOMA terminal.・For connection of Stereo Headset with Microphone, see "Using Stereo Headset with Microphone" (P.133).2From the Home screen, tap , then tap [FM radio].・FM radio screen appears and selecting channel starts automatically. You can select channel by dragging the screen. To select channel automatically furthermore, go to Step 3.3Press t, then tap [Search for channels].・The search ends when radio waves are received.4Tap .・The frequency bands of searched channels are registered to Favorites and the star changes from gray to white.5To stop the FM radio, tap .❖Information・You can return to the Home screen to perform another operation while listening to FM radio in the background. To return to the FM radio screen, from the Home screen, X Tap [FM radio], or drag the status bar downward and tap in the running menu item.FM radioSearching and registering channelsSO-02C_E_TA.book 165 ページ 2011年5月24日 火曜日 午後2時33分](https://usermanual.wiki/Sony/A3880112.08-user-manual-part-2/User-Guide-1472593-Page-95.png)
![166ApplicationsSO-02C Web_TA■ FM radio screenaMove upward to select next favoritebTuning button ( for Favorites)cMove downward to select next favoritedChannel assigned to favoriteeON/OFF of FM radiofChannel point displayed in a good radio wave conditiongSearch music information with TrackID (P.143)1From the FM radio screen, press t.2Tap [Play in speaker].・The sound output is switched to the speaker. While the speaker emits sound, perform the same operation, then tap [Play in hands free] to switch to the handsfree device.The FOMA terminal has a built-in calendar for the schedule. If you have a Google account, you can synchronize the FOMA terminal's calendar and web calendar. See "Accounts & sync" (P.97).・You need to create a Google account (P.97) before activating the calendar.After Google account registration, tap the Google account displayed in "Accounts & sync" and a sync item "Sync Calendar". You can create schedule etc.FM radio screenbacde gfSwitching the speaker and handsfree deviceCalendarSO-02C_E_TA.book 166 ページ 2011年5月24日 火曜日 午後2時33分](https://usermanual.wiki/Sony/A3880112.08-user-manual-part-2/User-Guide-1472593-Page-96.png)
![167ApplicationsSO-02C Web_TA1From the Home screen, tap , then tap [Calendar].2Press t, tap [Day]/[Week] to select.・In "Day" view, [Week] and [Month] can be selected, and in "Week" view, [Day] and [Month] can be selected.To create a schedule in Calendar, register Google account and synchronize Google.1From the Home screen, tap , then tap [Calendar].2Press t, tap [More] X [New event].3Enter a schedule name, date, place, and some others.4If you have two or more calendar accounts, select one.5If necessary, select the repetition intervals of the calendar.6Select the notification intervals of the schedule.・Tap to add a new notification into the schedule.7Tap [Done].Displaying a calendar schedule1From the Home screen, tap , then tap [Calendar].2Tap a schedule you want to display.・In Month view, flick up and down to display the next/previous month. In Day, Week view, flick right and left to display next/previous day or week.1If a reminder icon ( ) appears in the status bar, drag the bar downward.・The notification panel opens.・The reminder icon appears at set notification time.2Tap a schedule.Setting the calendar viewCreating a calendar scheduleReleasing the reminder of a schedule or setting the snoozeContinued on next pageSO-02C_E_TA.book 167 ページ 2011年5月24日 火曜日 午後2時33分](https://usermanual.wiki/Sony/A3880112.08-user-manual-part-2/User-Guide-1472593-Page-97.png)
![168ApplicationsSO-02C Web_TA3Tap [Snooze all]/[Dismiss all].・If you have any schedules on hold, they appear on the same screen.・If you touch [Snooze all], all the calendars can be put on snooze five minutes later.(Snooze is a function that sounds the alarm some time later even though you stop it.)Set Calendar view, reminder notifications, ringtone, vibration, reminder time.1From the Home screen, tap , then tap [Calendar].2Press t, tap [More] X [Settings].3Select an item to change.With "Clock" application, you can set an alarm; additionally, you can set to show the clock or photo slideshow on the display or to play with the music player when you place the FOMA terminal out.1From the Home screen, tap .2Tap [Clock].The Alarm screen appears.aAlarm display: Appear when there is a set alarm.b: Turn off the backlight. Tap the screen to light up.cClock display: When 5 minutes are passed without touching the display, the day and time view appears.dTap to activate "News & Weather".* To view the weather of current location, set to position the current location (P.161).e: Set alarm.f: Set to slideshow display.g: Display the music player screen.h: Go to the Home screen.Changing the calendar settingsClock/Alarmbace f g hdSO-02C_E_TA.book 168 ページ 2011年5月24日 火曜日 午後2時33分](https://usermanual.wiki/Sony/A3880112.08-user-manual-part-2/User-Guide-1472593-Page-98.png)
![169ApplicationsSO-02C Web_TA1From the Home screen, tap , then tap [Alarms].・The alarm list screen appears.・Alternatively, tap on the clock screen to display the alarm clock list.2Tap [Add alarm].・A new alarm time setting screen appears.3Tap or to adjust the time and then tap [Set].・A new alarm edit screen appears.4Set the following items.5Tap [Done].・Return to the alarm list screen, green line lights on under of set ON and appears on the status bar.Turning off the alarm1On the alarm list screen, tap the alarm icon to set OFF.・Return to the alarm list screen, green line turns off under of set OFF.Setting the alarm settingsMake common settings such as alarm volume etc.1From the Alarms screen, press t.2Tap [Settings].・The alarm settings screen appears.3Set the following items.Deleting the alarm1On the alarms list screen, tap an alarm to delete.2Tap [Delete].Setting the alarmTime When changing the time, tap to return to Step 3.Repeat Set a day of the week for the alarm.・No repetition without settingRingtone Select ringtone.Vibrate Mark to vibrate at the alarm time.Label Name the alarm.Alarm in silent modeYou can set not to sound the ringtone in Silent mode.Alarm volume Set alarm volume.Snooze duration Set time interval to sound the ringtone again after stopping the ringtone.Side button behaviorSet operation when side button (m, k) is pressed while alarm is sounding.Continued on next pageSO-02C_E_TA.book 169 ページ 2011年5月24日 火曜日 午後2時33分](https://usermanual.wiki/Sony/A3880112.08-user-manual-part-2/User-Guide-1472593-Page-99.png)
![170ApplicationsSO-02C Web_TA3Tap [OK].Stopping an alarm while the alarm is sounding1On the dialog box for the alarm sounding, tap [Dismiss] or [Snooze].・[Dismiss] stops the alarm. [Snooze] stops the alarm in a given time and sounds again.Evernote is a service that allows you to save various information such as website contents, shot images, idea memos to the server to search/view at any time you want it.Saving or viewing information can be available not only from the FOMA terminal but also PC or other devices.❖Information・To use this application, create an Evernote account.With OfficeSuite, you can view files of Word, Excel, etc. from the FOMA terminal or the microSD card.1From the Home screen, tap .2Tap [OfficeSuite].OfficeSuite is activated.❖Information・For details, refer to http://www.sonyericsson.co.jp/so-02c/index.html.The following applications are preinstalled in the FOMA terminal to use the various services on the Web.EvernoteOfficeSuiteActivating OfficeSuiteOther applicationsSO-02C_E_TA.book 170 ページ 2011年5月24日 火曜日 午後2時33分](https://usermanual.wiki/Sony/A3880112.08-user-manual-part-2/User-Guide-1472593-Page-100.png)
![171ApplicationsSO-02C Web_TAToruCa is an electronic card that can be obtained to mobile terminals. It can be obtained from sites as store information, coupon ticket, etc. Obtained ToruCa is saved to the "ToruCa" application. Use the "ToruCa" application to display, search or update.For details on ToruCa, refer to "Mobile Phone User's Guide [sp-mode <Smartphone>]" or DOCOMO Market.❖Information・For obtaining, displaying or updating ToruCa, a packet communication charge may be applied.・Some ToruCa provided to i-mode terminal may not be obtained/displayed/updated.・Depending on the settings of IP (Information Provider), the following functions may not be available.Obtaining/Updating from the IC card reader, sending attaching email, moving to microSD card, copying/displaying map・Some ToruCa which can be displayed in a map from ToruCa (details) may not be displayed in a map from the ToruCa list depending on the IP settings.・If you set 重複チェック (Duplication check) to "ON", obtaining the same ToruCa redundantly is not available. To obtain the same ToruCa redundantly, set it to "OFF".・When you send ToruCa attaching to email, it is sent in the condition before obtaining ToruCa (details).・Depending on email application, ToruCa received via the emails may not be saved.・Depending on browser, ToruCa cannot be obtained.・When ToruCa is moved/copied to the microSD card, it is moved/copied in the condition before obtaining ToruCa (details).・The "ToruCa" application cannot be deleted.BeeTV is a dedicated broadcasting station for moble phones. Register paid-membership to watch all programs on BeeTV.E★エブリスタ is an application for viewing high-profile electronic books and electronic comics ranged from original works by professional authors/famous people to general user posted popular works.Viewing works of professional authors/famous people is a charged service.BOOKストア2Dfacto is an electronic book store where you can view and buy e-books in many categories such as serious novels, popular comics, hot business books, etc.ToruCaBeeTVE★エブリスタ (E★eburista)BOOKストア2Dfacto (Book store 2Dfacto)SO-02C_E_TA.book 171 ページ 2011年5月24日 火曜日 午後2時33分](https://usermanual.wiki/Sony/A3880112.08-user-manual-part-2/User-Guide-1472593-Page-101.png)
![172ApplicationsSO-02C Web_TAThis application supports operation methods or initial settings for the first use owners.There are basic operation practice, basic settings or terminological dictionary.・Due to downloading large amount of contents for the first time of activation, high packet communication charges may be applied. Subscription of packet flat-rate service is highly recommended.PlayNow is a web application which allows you to use news flash, dictionary service, etc.To use the application, from the Home screen, tap and then tap [PlayNow] to connect the dedicated site. For membership registration etc., operate following the onscreen instructions.mora touch is an application which allows you to access music downloading service for Android terminal.To use the application, from the Home screen, tap and then tap [mora touch] to connect the dedicated site. You can operate after creating a new account or using your existing account.life.episode application is a new entertainment which allows you to discover the latest information for wide ranged categories such as news, music, animation, photos, gourmet, shopping, etc. corresponding specified age and gender. Use "Pocket" function, you can clip favorite information easily and take it out any time.To use life.episode, from the Home screen, tap and then tap [life.episode] to download the application. Set age and gender to complete installation.You can use news and weather.You can check the weather forecast of current location and news of each category.Startup guidePlayNowmora touchlife.episodeNews & WeatherSO-02C_E_TA.book 172 ページ 2011年5月24日 火曜日 午後2時33分](https://usermanual.wiki/Sony/A3880112.08-user-manual-part-2/User-Guide-1472593-Page-102.png)
![173Overseas useSO-02C Web_TAWith the international roaming (WORLD WING), you can use the FOMA terminal without changing phone number or mail address in the service area of the overseas network operator affiliated with DOCOMO. You do not need to change the settings of voice call and SMS.■ Service areaThe FOMA terminal works in a 3G roaming area and GSM/GPRS service area. Services are also available in countries and areas supporting 3G850MHz/GSM850MHz. Check available area.■ Before using the FOMA terminal overseas, refer to the followings.・"Mobile Phone User's Guide [International Services]"・DOCOMO International Services website❖Information・For Country code, International call access code, Universal number international prefix, supported countries/area and network operator, refer to "Mobile Phone User's Guide [International Services]" or DOCOMO International Services Website.*1 A sp-mode user can use this without changing the access point. To use data communication during roaming, mark "Data roaming" checkbox in Mobile network settings. P.177 A mopera U flat-rate service subscriber needs to change settings of the access point. P.177*2 For GPS positioning (Positioning location), a packet communication charge is applied.・Some services are not available depending on the overseas telecommunications carrier or network.Overview of International roaming (WORLD WING)Overseas useAvailable ServicesMain communication service 3G GSM/GPRS GSMVoice call ○○○Message (SMS) ○○○Email*1○○×Browser*1○○×Position location of GPS*2○○×SO-02C_E_TA.book 173 ページ 2011年5月24日 火曜日 午後2時33分](https://usermanual.wiki/Sony/A3880112.08-user-manual-part-2/User-Guide-1472593-Page-103.png)
![175Overseas useSO-02C Web_TAWhen you arrive overseas and turn on the FOMA terminal, an available network is automatically set.ConnectivityWhen you have set search mode of "Available networks" to "Select automatically" in "Network operators" settings, optimized network is automatically selected.When you connect to the network operator conducted in flat-rate service manually, you can use the service with flat-rate packet communication charges overseas. To use this service, subscription of packet flat-rate service is required. For details, refer to "Mobile Phone User's Guide [International Services]" or DOCOMO International Services Website.・mopera U users can use data communication during roaming by setting the access point to the pay-as-you-go one. If you subscribed to a packet flat-rate service and select the network operator conducted in flat-rate service, you can use the service in flat-rate even when connecting to a pay-as-you-go access point.・When you connected to a pay-as-you-go access point, switch the access point to "mopera U (スマートフォン定額) (mopera U (Smartphone flat-rate))" before returning to Japan (P.81). Using the FOMA terminal in Japan without switching, your packet communication charges may be higher.DisplayIn the status bar, the type of your operator's network are displayed.: During International roaming/ : Connecting/Using GPRS/ : Connecting/Using 3G (packet)・You can confirm the name of the connected network operator on the notification panel.Date & time settingsWhen "Date & time" is set to "Automatic", the date, time and time differences of the FOMA terminal clock are corrected by receiving the information related to time and time differences from the network of overseas telecommunications carrier you connect to.・Correction of the time differences may not be performed correctly depending on the network of overseas telecommunication carrier. In that case, set time zone manually.・Timing of correction varies by the overseas telecommunications carrier.After arriving overseasContinued on next pageSO-02C_E_TA.book 175 ページ 2011年5月24日 火曜日 午後2時33分](https://usermanual.wiki/Sony/A3880112.08-user-manual-part-2/User-Guide-1472593-Page-105.png)
![176Overseas useSO-02C Web_TA・In the country Daylight saving time is adopted, check if the displayed time in Standby is different from the current time. Time correction cannot be used depending on the overseas telecommunications carrier.・Date & time (P.103)About inquiries・For loss or theft of the FOMA terminal or UIM, immediately contact DOCOMO from the spot to take the necessary steps for suspending the use. For inquiries, see the last page of this manual. Note that you are still liable for the call and communication charge incurred after the loss or theft occurred.・For using from land-line phone, entering "International call access code" or "Universal number international prefix" for the country is needed.After returning to JapanWhen you return to Japan, the FOMA terminal is connected to FOMA network automatically. If connection is failed, perform the following operations.・Set "Preferred network mode" of "Network Mode" to "GSM/WCDMA preferred". P.177・Set "Search mode" to "Select automatically" in "Network operators" settings. P.176Confirming and switching the network search modeBy default, network search mode is set to "Select automatically". When you connect manually to an overseas network operator conducted in flat-rate service, confirm the search mode with the following operations and switch to "Select manually".1From the Home screen, press t and tap [Settings].2Tap [Call settings] X [Network operators].3Tap [Search mode] X [Select manually].4From "Available networks", tap a network to use.・To display available networks, tap [Search networks].❖Information・If you set a network manually, the FOMA terminal is not reconnected to another network automatically even if you move out of the network area.・To return to "Select automatically", tap [Select automatically] in Step 3.SO-02C_E_TA.book 176 ページ 2011年5月24日 火曜日 午後2時33分](https://usermanual.wiki/Sony/A3880112.08-user-manual-part-2/User-Guide-1472593-Page-106.png)
![177Overseas useSO-02C Web_TAChanging network modeYou can change network mode settings according to the network mode (communication method) adopted by the overseas network operator.1From the Home screen, press t and tap [Settings].2Tap [Wireless & networks] X [Mobile networks] X [Network Mode].3Select your preferred network mode.・You can select from [WCDMA only], [GSM only] or [GSM/WCDMA preferred]. If you select [GSM/WCDMA preferred], you can use both GSM and WCDMA.Activating data roaming1From the Home screen, press t and tap [Settings].2Tap [Wireless & networks] X [Mobile networks].3Mark [Data roaming] checkbox.4Tap [OK].Changing an access pointWhen you connect to network overseas, switch the access point if you set the access point to "mopera U ( スマートフォン定額) (mopera U (Smartphone flat-rate))".1From the Home screen, press t and tap [Settings].2Tap [Wireless & networks] X [Mobile networks] X [Access Point Names].3Press t and tap [New APN].4Fill out the "Name" field, and enter "mopera.net" in "APN", then tap [OK].5Press t, then tap [Save].6Check the radio button of the access point you created.❖Information・Some applications automatically perform packet communications. To disconnect packet communication manually, from the Home screen, press t and tap [Settings] X [Wireless & networks] X [Mobile networks] X [Data enabled] to unmark.SO-02C_E_TA.book 177 ページ 2011年5月24日 火曜日 午後2時33分](https://usermanual.wiki/Sony/A3880112.08-user-manual-part-2/User-Guide-1472593-Page-107.png)
![178Overseas useSO-02C Web_TAWhen you arrive overseas and turn on the FOMA terminal, an available network is automatically set.・Check that the battery and signal levels are high enough.・Depending on the network operator, even if the Caller ID notification is active, the caller ID may not be notified or appear properly.In this case, calls cannot be made from the call log screen.You can make a call from overseas using the international roaming service.・You can easily make international calls from the country you stay to Japan or to other countries by entering prefix "+" and then the country code and phone number.1From the Home screen, tap [Phone].2Dial + (press and hold [0]) X Country code X Area code (City code) X Enter a phone number.・If the area code begins with "0", omit "0". However, "0" may be required to dial to some country or area such as Italy.・To call an overseas "WORLD WING" user, enter "81" (Japan) for the country code.3Tap [Call].You can make a call by entering the phone number of the other party's land-line phone or mobile phone in the same way you do in Japan.1From the Home screen, tap [Phone].2Enter the other party's phone number.・To make a call to land-line phone, enter the area code (city code) + other party's phone number.3Tap [Call].Making/Receiving calls in the country you stayMaking a call to outside country you stay (including Japan)Making a call within the country you staySO-02C_E_TA.book 178 ページ 2011年5月24日 火曜日 午後2時33分](https://usermanual.wiki/Sony/A3880112.08-user-manual-part-2/User-Guide-1472593-Page-108.png)
![179Overseas useSO-02C Web_TAWhen the other party uses international roaming service, make a call as an international call to Japan even when you stay in the same country as the other party.You can receive a call using the international roaming service.1When there is an incoming call, tap [Answer].2When the conversation is finished, tap [End call].❖Information・When you received a call during the international roaming, regardless of which country the call is from, it is forwarded internationally from Japan. A caller is charged for a call fee to Japan, and the receiver is charged for a reception fee.■ Having the other party call you・To have the other party in Japan call you overseasTo have the other party make a call from a land-line phone or mobile phone in Japan to the FOMA terminal in the country you stay, the other party only needs to dial the phone number as in Japan.・To have the other party make a call from the outside Japan to the FOMA terminal in the country you stayYou have to receive a call through Japan no matter where you are; therefore, the other party needs to enter the international call access code and "81" (Country code of Japan).International access code - 81 - 90 (or 80) - XXXX - XXXXMaking a call to WORLD WING user overseasReceiving a call in the country you staySO-02C_E_TA.book 179 ページ 2011年5月24日 火曜日 午後2時33分](https://usermanual.wiki/Sony/A3880112.08-user-manual-part-2/User-Guide-1472593-Page-109.png)
![183Appendix/IndexSO-02C Web_TA■ Overseas use■ Data management・Check if clouds or dirt attach to the lens of camera.-・To shoot a portrait image, use the face detection function.P. 1 2 2・Shoot using shake reducing function. P.128P. 1 3 2Cannot use the FOMA terminal overseas.■When antenna mark is displayed・Do you subscribe WIRLD WING?Check if you subscribe WORLD WING.-■Out of service area indicator appears・Check if you are out of the international roaming service area or in an area with poor signal strength.Check if the service area and network operator are available, referring to "Mobile Phone User's Guide [International Services]" or DOCOMO International Services website.・Try to change the network settings or overseas network operator settings.Set "Search mode" of "Network operators" to "Select automatically."Set "Network Mode" to "GSM/WCDMA preferred".・Turning off the FOMA terminal and then turning on again may work for the restoration.P. 1 7 5Cannot perform data communication overseas.Mark the data roaming checkbox. P.177Cannot use the FOMA terminal suddenly while using overseas.・Check if usage amount exceeds the limit of maximum charges for use.For use of "International roaming (WORLD WING)", the limit of maximum charges for use is set in advance. If exceeding the limit of maximum charges for use, pay the charges.-Cannot receive calls overseas.・Check if you set "Network Mode" to other than "GSM/WCDMA preferred".P. 1 7 7Data transfer is not performed.・Check if USB hub is used. If you use USB hub, operations may not be performed correctly.-Data saved in microSD card is not displayed.・Remove the microSD card and insert it again.P. 2 5When trying to display an image, " ×" appears instead of it. Or "×" appears for the demo play or the preview function.・"×" may appear instead of destroyed image data.-SO-02C_E_TA.book 183 ページ 2011年5月24日 火曜日 午後2時33分](https://usermanual.wiki/Sony/A3880112.08-user-manual-part-2/User-Guide-1472593-Page-113.png)


![189Appendix/IndexSO-02C Web_TA1From the Home screen, press t and tap [Settings].2Tap [About phone] X [Software update].3Tap [Update now].4Tap [OK].5Tap [OK].・The FOMA terminal searches for software updates.❖Note・To download software updates by using Wi-Fi only, from the Home screen, press t and tap [Settings] X [About phone] X [Software update] X [Network] X [Wi-Fi only]. Note that if you select [Wi-Fi & mobile networks], a Wi-Fi connection automatically switches to 3G connection when the Wi-Fi connection is unstable and packet communication fee may apply.・For software update via mobile network, a high packet communication charge will be applied because of a large amount data communication. For this reason, subscription of packet flat-rate service is highly recommended.・While you are using roaming service overseas, you cannot search for or download update software through the mobile network (2G/3G network connection).Searching software update automaticallyYou can search the latest software update automatically on regular basis. If software update is searched, appears on the status bar.1From the Home screen, press t and tap [Settings].2Tap [About phone] X [Software update].3Mark [Auto search] checkbox.4Tap [OK].❖Note・Note that packet communication fee may apply for searching automatically.You can update software by using PC Companion that can be installed into a PC from the FOMA terminal.❖Information・To install PC Companion on a PC, an Internet connection is required.Connecting to a PC and updatingSO-02C_E_TA.book 189 ページ 2011年5月24日 火曜日 午後2時33分](https://usermanual.wiki/Sony/A3880112.08-user-manual-part-2/User-Guide-1472593-Page-119.png)
![190Appendix/IndexSO-02C Web_TAWhen PC Companion is not installed on your PC1Use the supplied microUSB cable to connect the FOMA terminal to a PC.2On the FOMA terminal, tap [Install].・Installer of PC Companion starts on the PC.3Follow the onscreen instructions on the PC to install.・After installation, PC Companion starts on the PC. If further software update is searched, it is automatically notified. Follow the onscreen instructions on the PC.When PC Companion is installed on your PC1Check if PC Companion is activated on the PC. If not, activate PC Companion from the Start menu.2Connect the FOMA terminal to a PC using a microUSB cable.3Follow the onscreen instructions on the PC.・If software update is searched, it is automatically notified.■ FOMA terminalMain specificationsProduct name SO-02CSize Approx. 125 mm (H) ×approx. 63 mm (W)×approx. 10.9 mm (T) (maximum thickness: approx. 11.4 mm)Weight Approx. 118 g (with battery pack attached)Storage ROM 1GB (Flash memory)RAM 512MB (SRAM)External memory microSD card: Up to 2GB microSDHC: Up to 32GB (as of March, 2011)Continuous stand-by timeFOMA/3G Stationary (Auto): Approx. 400 hoursMoving (Auto): Approx. 290 hoursMoving (3G static): Approx. 360 hoursGSM Approx. 270 hours (stationary)Continuous call timeFOMA/3G Approx. 340 min.GSM Approx. 390 min.Charging time with AC adapter cableApprox. 170 min.Continued on next pageSO-02C_E_TA.book 190 ページ 2011年5月24日 火曜日 午後2時33分](https://usermanual.wiki/Sony/A3880112.08-user-manual-part-2/User-Guide-1472593-Page-120.png)

![SO-02C Web_TADon't forget your mobile phone ... or your manners!Remember to be courteous to others when you use your FOMA terminal.Turn the power off when you are:■In places where use is prohibitedUse is prohibited in some places. Be sure to switch the power off in:・Airplanes ・Hospitals* Turn off your FOMA terminal even in hospital lobbies and waiting rooms as well as hospital wards if electronic medical devices may be in use near you.■DrivingUsing a handheld mobile phone while driving will result in a penalty.* When you need to receive a call, tell the caller that you will call back later using hands-free functions, then pull off the road before using the phone.■In crowded places such as peak-hour trains if implanted electronic medical devices may be in use near youRadio waves emitted by the FOMA terminal may adversely affect implanted pacemakers and ICDs when used in close proximity.■In places such as theaters, cinemas, and art galleriesUsing the FOMA terminal in a public place, where you need to be quiet, annoys people around you.Keep your voice and ring tone down■Keep your voice down in quiet places like restaurants and hotel lobbies.■If you are in an outdoor public place, make sure you do not disturb others.Respect privacyPlease be considerate of the privacy of individuals around you when taking and sending photos using camera-equipped mobile phones.Have good mannersThe FOMA terminal is equipped with useful functions not to answer an incoming call or to mute the sound.Make various applications or charge your billing plan, check your charges and points, and more online.My docomo (http://www.mydocomo.com/) ⇒ 各種お申込・お手続き (Various applications/procedures)* "docomo ID and password" are required for use.* Please contact "General Inquiries" described on the last page of this manual if you forget or do not have "docomo ID and password".* May not be available in some cases depending on the conditions of your subscription.* There are cases where the site may not be available due to system maintenance, etc.[Silent mode] (P.87)Silent mode mutes the sounds of the FOMA terminal such as the keypad sounds and the ring tone.You can also use optional services such as the Voice Mail Service (P.72) and Call Forwarding Service (P.76).SO-02C_E_TA.book 1 ページ 2011年5月24日 火曜日 午後2時33分](https://usermanual.wiki/Sony/A3880112.08-user-manual-part-2/User-Guide-1472593-Page-147.png)
