Sony A3880112 with Bluetooth, WLAN 802.11bgn, GPS/A-GPS, FM Rx, ANT+ and RFID User Manual
Sony Mobile Communications Inc with Bluetooth, WLAN 802.11bgn, GPS/A-GPS, FM Rx, ANT+ and RFID
Sony >
Contents
- 1. 08 user guide part 1
- 2. 08 user guide part 2
- 3. 08 user manual part 1
- 4. 08 user manual part 2
08 user guide part 1
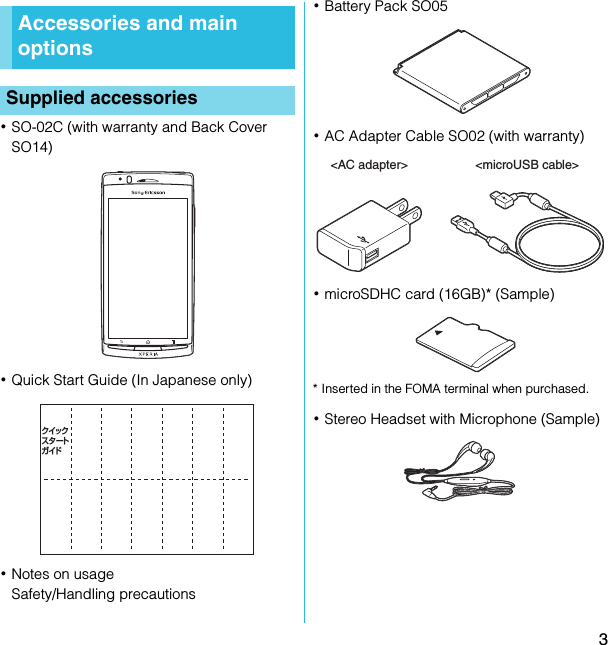
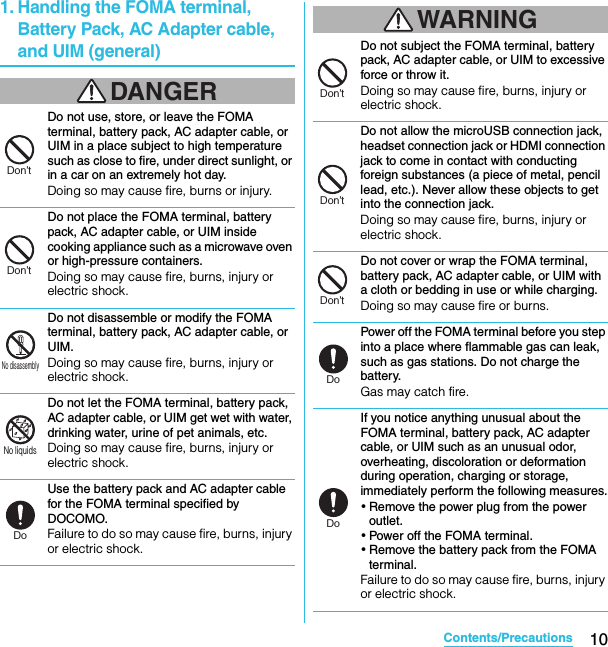
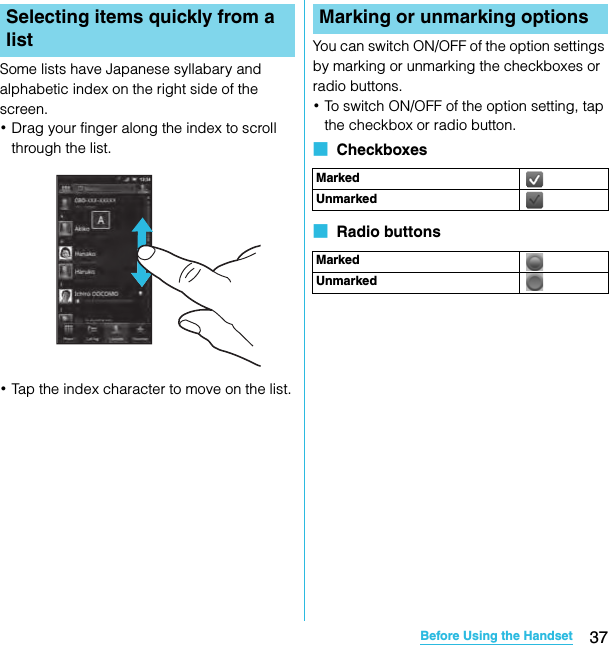
![1SO-02C Web_TAIn addition to this manual, the operations of SO-02C are described in "Quick Start Guide" (in Japanese only) and "SO-02C eトリセツ(取扱説明書) (SO-02C e Instruction manual)" application of the FOMA terminal.The initial operations and settings after purchasing the FOMA terminal, screen view contents and operations of main function are explained. (In Japanese only)Similarly to this manual, operations and settings of each function are explained.To use "SO-02C eトリセツ(取扱説明書) (SO-02C e Instruction manual)" application, from the Home screen, tap X [Instruction Manual]. For the first time using, download and install it according to the onscreen instructions. You can use the application as an electronic book. You can also shift to actual operations by tapping the description in the contents or view reference contents.❖Cautions・For downloading or updating the application, a high packet communication charge will be applied because of a large amount data communication. For this reason, subscription of packet flat-rate service is highly recommended.* If you use Wi-Fi function to download, packet communication charges are not applied.Operations and settings of each function are explained.It can be downloaded from NTT DOCOMO website.http://www.nttdocomo.co.jp/support/trouble/manual/download/index.html* The URL and contents are subject to change without prior notice.❖Cautions・Reproduction or reprint of all or part of this manual without prior permission is prohibited.・Important information for SO-02C is posted in the following website. Be sure to check before using.http://www.sonyericsson.co.jp/support/use_support/product/so-02c/About manuals of SO-02C"Quick Start Guide" (Supplied accessories)"Instruction Manual" (Application of the FOMA terminal)"Instruction Manual" (PDF file)SO-02C_E_TA.book 1 ページ 2011年5月24日 火曜日 午後2時33分](https://usermanual.wiki/Sony/A3880112.08-user-guide-part-1/User-Guide-1472573-Page-3.png)
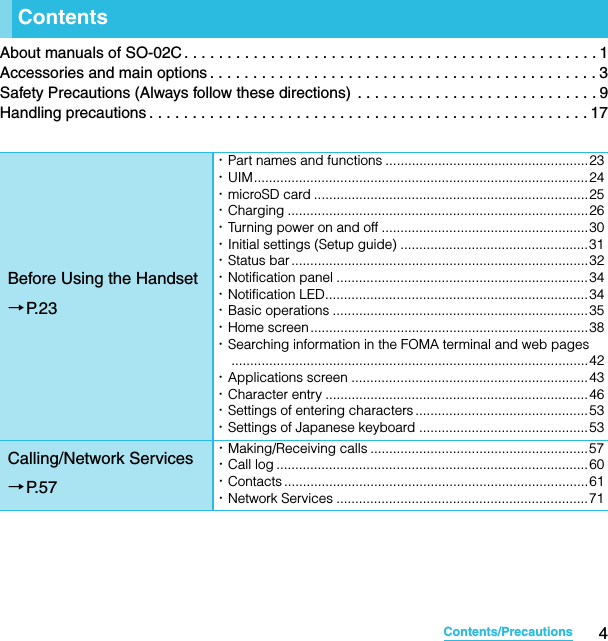
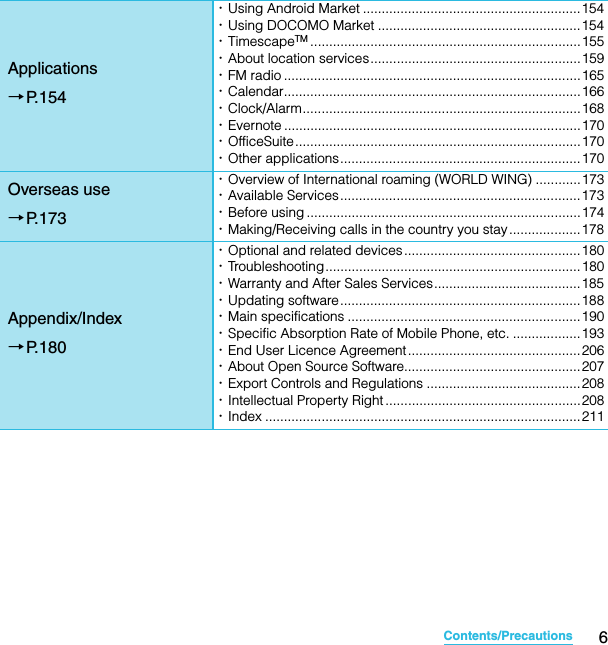
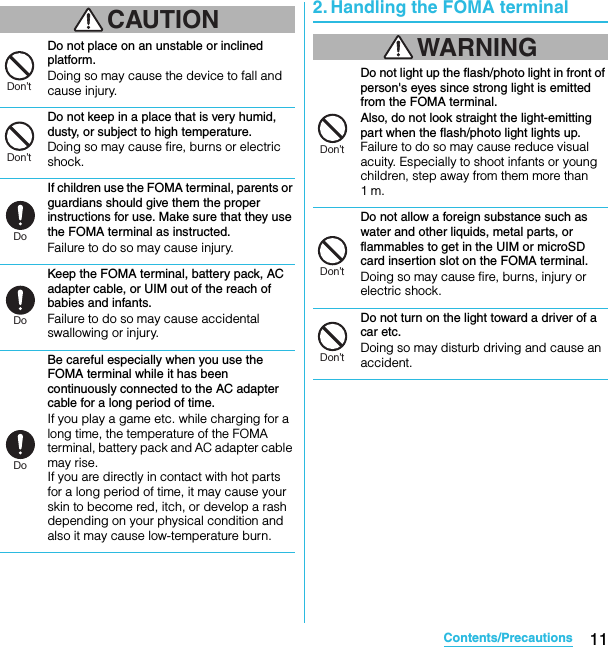
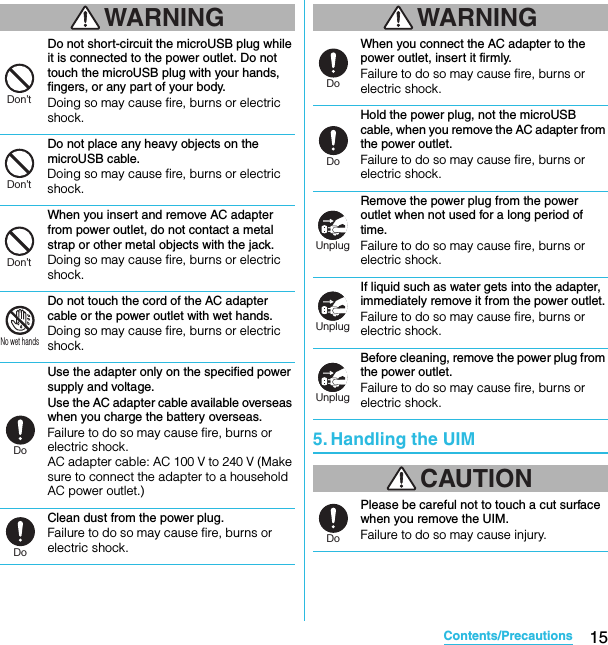
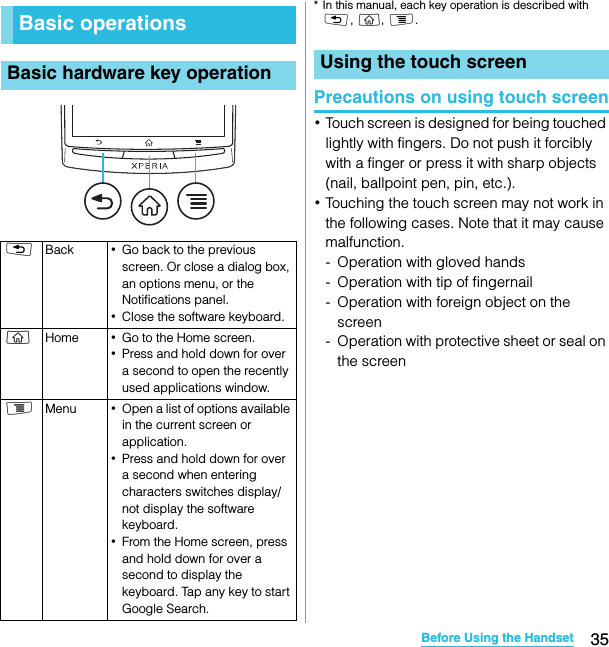
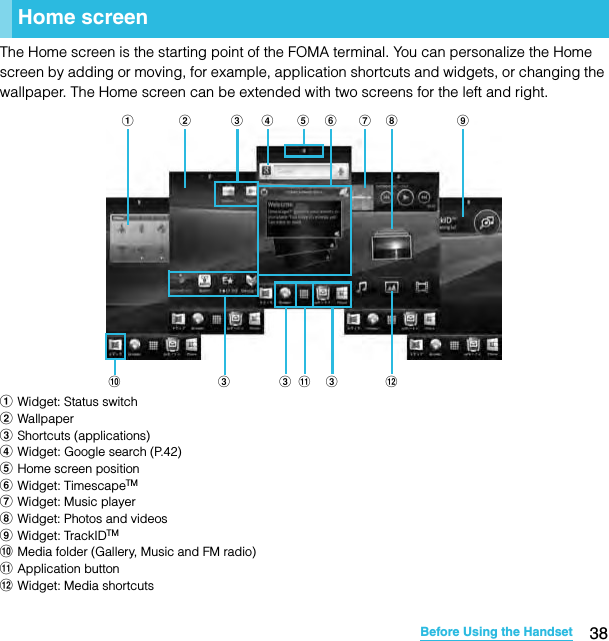
![2SO-02C Web_TAIn this manual, each key operations are described with p, x, y, t, m, k. And selection operations of the icons or function items on the touch panel are described as follows.❖Information・In this manual, the instructions are described with the default Home screen. If you set the other application to the home screen, the operations may differ from the descriptions.・Display examples and illustrations used in this manual are just images for explanations and may be different from actual ones.・In this manual, the easier procedure is described for the functions and settings which have multiple operating procedures.・Please note that "SO-02C" is called the "FOMA terminal" in this "Instruction Manual".Operation descriptionsDescription OperationFrom the Home screen, press t and tap [Settings].From the Home screen, press t (Menu) key and tap "Settings" on the screen.Tap [Settings] X [Date & time] X [Set date].Tap "Settings" displayed on the screen, and then tap "Date & time" on the next screen and "Set date" on the following screen in order.Tap or to adjust the date.Tap or displayed on the screen and adjust the date.Touch and hold the title bar of the folder.Keep touching the title bar of the folder longer (1-2 seconds).SO-02C_E_TA.book 2 ページ 2011年5月24日 火曜日 午後2時33分](https://usermanual.wiki/Sony/A3880112.08-user-guide-part-1/User-Guide-1472573-Page-4.png)
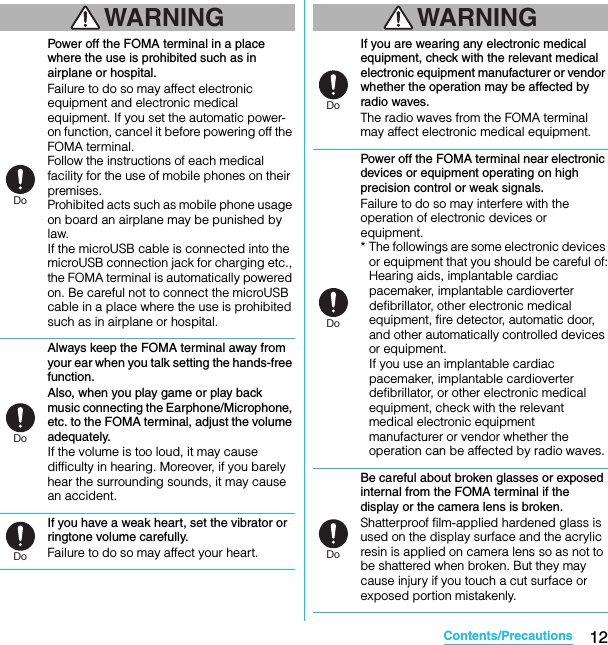
![7Contents/PrecautionsSO-02C Web_TANotes on usage・The FOMA terminal does not support i-mode sites (programs) or i-αppli.・The FOMA terminal automatically performs communication for synchronizing data, checking the latest software version, maintain connection with the server, etc. If you transmit a large amount of data such as downloading applications or watching movie, a packet communication charge becomes high. Subscription of packet flat-rate service is highly recommended.・This FOMA terminal cannot be used as a modem.・Public mode (Driving mode) is not supported.・Setting the phone to silent mode does not mute sounds (playback of video or music, alarm, etc.) other than the ring tone, operation sound, and notification sounds.・The names of the operators are displayed when the screen is locked.・Your phone number (own number) can be checked as follows:From the Home screen, press t and tap [Settings] X [About phone] X [Status].・The software version of your FOMA terminal can be checked as follows:From the Home screen, press t and tap [Settings] X [About phone].・You can perform software update by downloading an update file with a PC via Internet and connecting the PC to the FOMA terminal. For details, see "Connecting to a PC and updating" (P.189).・By some software updates, the operating system (OS) may be version-upgraded for improving the FOMA terminal quality. For this reason, you always need to use the latest OS version. And some applications that used in the previous OS version may not be available or some unintended bugs may occur.・When using the FOMA terminal inserting some UIM other than UIM (FOMA card) (white), voice calls and packet communication may not be available in some overseas networks. For using overseas, please visit a docomo Shop near you. DOCOMO exchanges UIM (FOMA card) (green) for UIM (FOMA card) (white) free of charge.・Set the screen lock to ensure the security of your FOMA terminal for its loss. For details, see "Screen lock" (P.93).Continued on next pageSO-02C_E_TA.book 7 ページ 2011年5月24日 火曜日 午後2時33分](https://usermanual.wiki/Sony/A3880112.08-user-guide-part-1/User-Guide-1472573-Page-9.png)
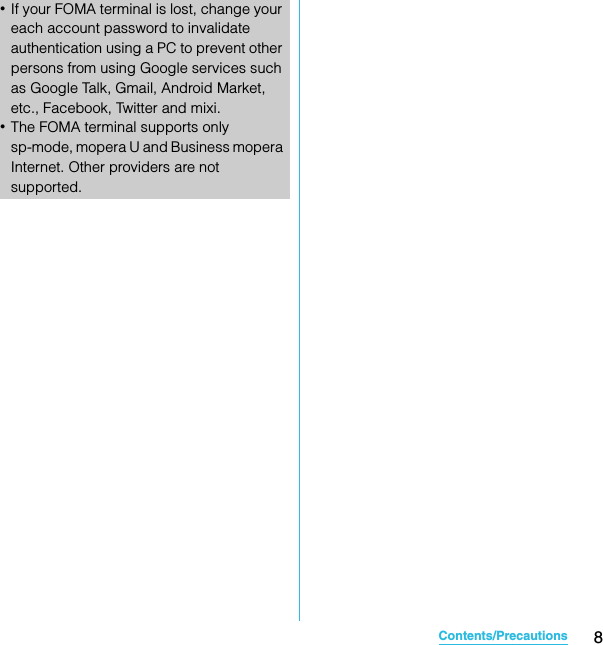
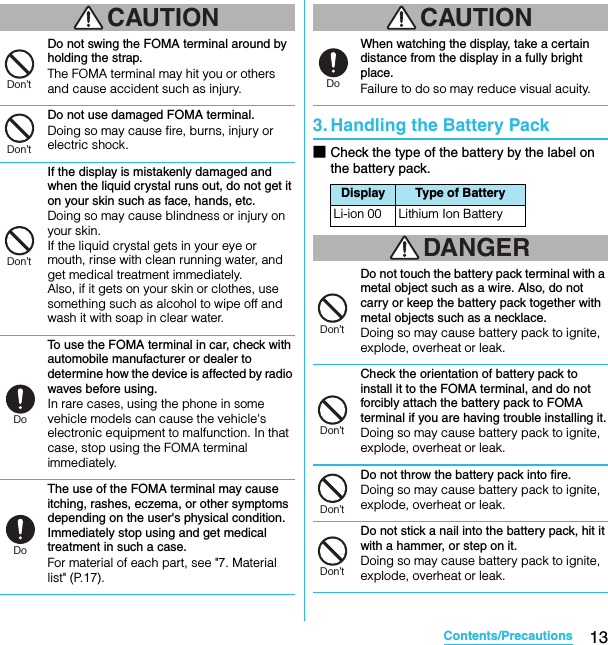
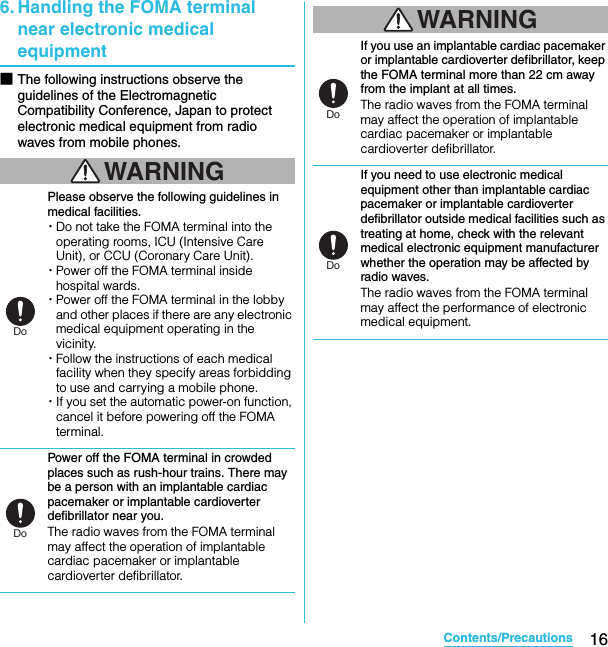

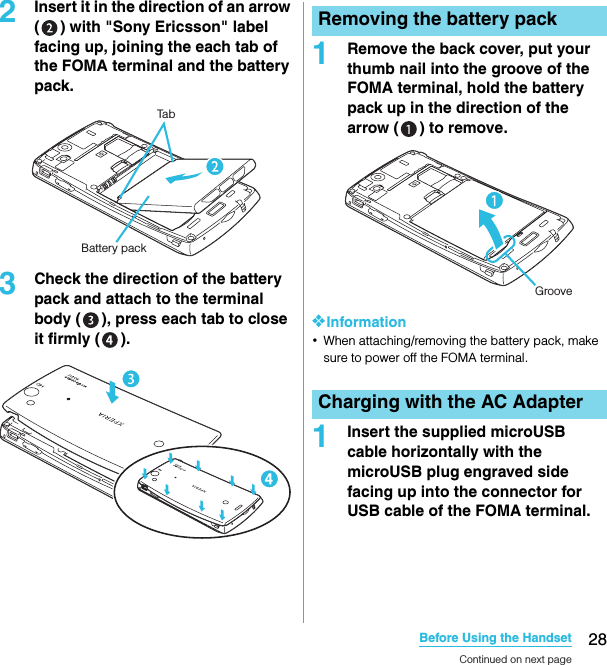
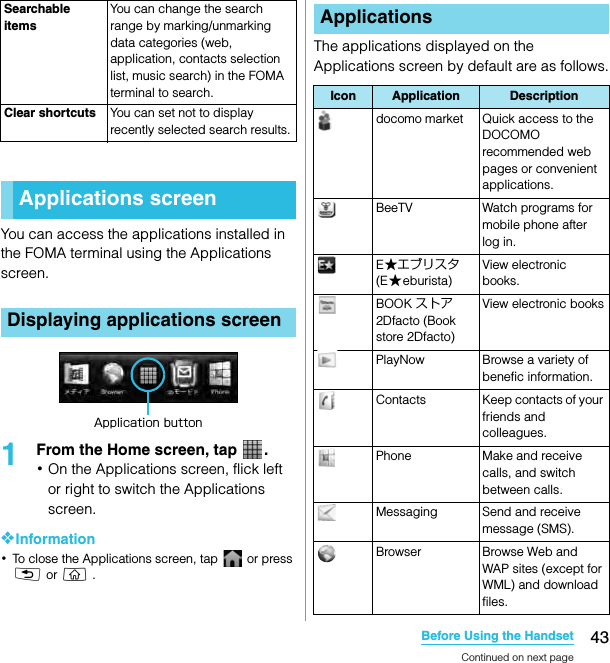
![27Before Using the HandsetSO-02C Web_TA・Return all spent battery packs to NTT DOCOMO or a dealer, or a recycling shop to protect the environment. ・The included AC adapter's power plug is compatible with AC100V to 240V. For using the FOMA terminal overseas, a plug adapter that fits the electrical outlets in the country you stay is needed. Do not use an electrical transformer for overseas use to charge the FOMA terminal.・Use the included AC Adapter cable for charging.・When charging starts, the notification LED turns on in red/orange/green. Green means the remaining battery level reaches more than 90%. To check the battery level, press t from the Home screen, then tap [Settings] X [About phone] X [Status] and check "Battery level". When charging is completed, "100%" is displayed in the battery level.・When you start charging the battery with the FOMA terminal powered off, the power turns on. However, you cannot operate the FOMA terminal. Do not charge the battery in a place where the use is prohibited such as in airplane or hospital.Do not charge the battery pack for a long time (several days)・If you remain charging the FOMA terminal for a long time, the power supply starts from the battery pack after completion of charging. The usage time duration may be short. In that case, please charge it again correctly. For recharging, remove the FOMA terminal from the AC Adapter cable and reconnect it again.1Put your thumb nail into the groove, hold it up in the direction of the arrow ( ) to remove the back cover.ChargingLi-ion 00Attaching the battery packGrooveContinued on next pageSO-02C_E_TA.book 27 ページ 2011年5月24日 火曜日 午後2時33分](https://usermanual.wiki/Sony/A3880112.08-user-guide-part-1/User-Guide-1472573-Page-29.png)
![29Before Using the HandsetSO-02C Web_TA2Insert the microUSB cable horizontally with the USB plug engraved side facing up into the connector for USB of the AC Adapter, and insert the AC Adapter plug to the power outlet.3When the charging is completed, remove the microUSB plug of the microUSB cable from the FOMA terminal.4Remove the AC Adapter from the power outlet.❖Note・If the microUSB cable is connected into the connector for external devices for charging etc, the FOMA terminal is automatically powered on. Be careful not to connect the microUSB cable in a place where the use is prohibited such as in airplane or hospital.1Insert the microUSB cable horizontally with the microUSB plug engraved side facing up into the connector for USB cable of the FOMA terminal.2Insert the USB plug of the microUSB cable into the USB port of a PC.・When "PC Companion software" screen appears on the FOMA terminal, tap [Skip].・When a screen for new hardware detection etc. appears on the PC, select [Cancel].3When the charging is completed, remove the microUSB plug of the microUSB cable from the FOMA terminal.4Remove the USB plug of the microUSB cable from the USB port of the PC.❖Note・If the microUSB cable is connected into the USB connection jack for charging etc, the FOMA terminal is automatically powered on although the operations are not available. Be careful not to connect the microUSB cable in a place where the use is prohibited such as in airplane or hospital.・Check the connecting direction to connect correctly. Wrong connection may cause damage.Charging with a PCContinued on next pageSO-02C_E_TA.book 29 ページ 2011年5月24日 火曜日 午後2時33分](https://usermanual.wiki/Sony/A3880112.08-user-guide-part-1/User-Guide-1472573-Page-31.png)
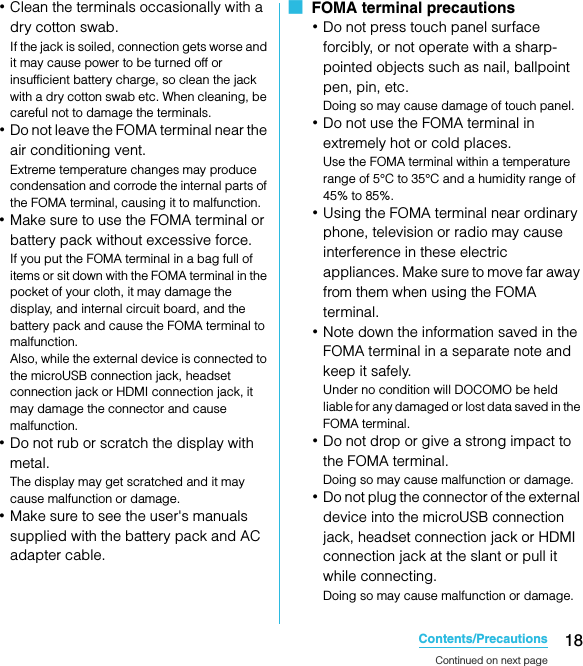
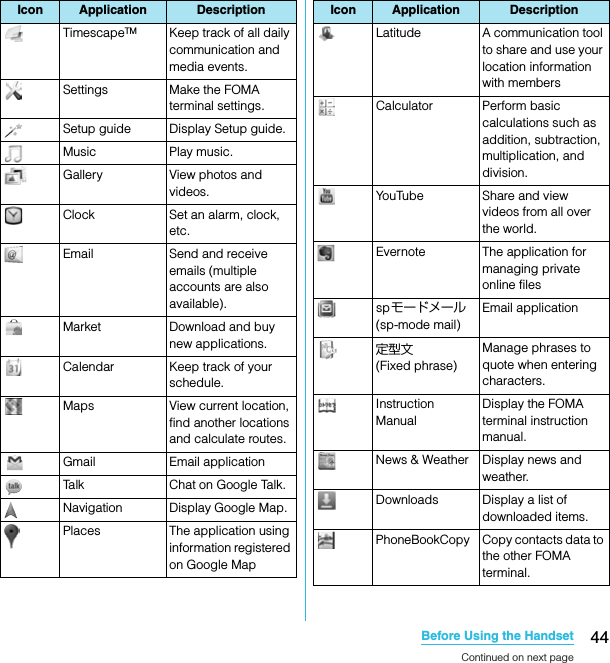
![30Before Using the HandsetSO-02C Web_TA1Press p for over a second.・The key lock screen appears.2Deactivate the key lock.・For deactivating the key lock, see "Unlocking the keys" (P.31).❖Information・The first time you turn ON, "Setup guide" (P.31) appears.・If you activate the screen lock or SIM card lock, a PIN code entry screen appears when turning power on. Enter the PIN code and tap [OK]. To correct the wrong PIN entry, tap / .1Press p for over a second.・Phone options menu appears.2Tap [Power off].3Tap [OK].When the key lock is set, the screen light turns off. You can avoid the touch screen or button from false operations.・The FOMA terminal keys are locked with turning the screen light off after the specified time duration.1Press p.Turning power on and offTurning power onmicroUSB plugNotification LEDAC adapterUSB plugmicroUSB cableTurning power offSetting Key lockContinued on next pageSO-02C_E_TA.book 30 ページ 2011年5月24日 火曜日 午後2時33分](https://usermanual.wiki/Sony/A3880112.08-user-guide-part-1/User-Guide-1472573-Page-32.png)
![31Before Using the HandsetSO-02C Web_TA❖Information・For details on settings for turning the backlight off and the duration of time before the key lock activation, see "Adjusting the idle time before the screen turns off" (P.90).・There is no function to deactivate the key lock.・If you set the screen lock, entering the pattern, PIN or password is needed before the screen unlock. For details on the screen lock settings, see "Screen lock" (P.93).A key unlocking screen appears when turning the power on or the backlight on by pressing p/y.1Touch and drag to until it laps over.❖Information・ appears on the right until you touch . You can switch the ringtone ON/OFF without unlocking the keys and screen by touching and dragging to the left.When you turn on the FOMA terminal for the first time, Setup guide appears to import contacts saved in the UIM and the microSD card and make settings of language, date and time, etc.❖Information・Even if you skip Setup guide, you can set or change the items later as required. To change the settings later, from the Home screen, press , then tap [Settings] or [Setup guide] to set up from the menu.1Press p for over a second.・A screen for selecting language appears.2Tap [English (United States)] X [次へ (Next)].・"Welcome Learn how to use the phone with this easy guide" appears. You can check the operations of main functions and initial settings.3Tap [Next].・Tap [Change] to change Date & time (P.103).4Tap [Next].・Tap [View] to check how to use the keyboard.Unlocking the keysKey lockInitial settings (Setup guide)Continued on next pageSO-02C_E_TA.book 31 ページ 2011年5月24日 火曜日 午後2時33分](https://usermanual.wiki/Sony/A3880112.08-user-guide-part-1/User-Guide-1472573-Page-33.png)
![32Before Using the HandsetSO-02C Web_TA5Tap [Next].・Tap [View] to check how to use the application Timescape.6Tap [Next].・Tap [Import] X [Yes] to import contacts in SIM.・Tap [Set up] to make settings of Wireless network (P.82), Google account (P.97), Email (P.105) and Timescape (P.155).7Tap [Next] X [Finish].The Home screen appears.❖Information・To set the online service settings, enabling data connection (3G/GPRS) is required. For checking the data connection status, see "Status icons" (P.32).A status bar appears at the top of the screen. In the status bar, the FOMA terminal status and notification are displayed. Notification icons appear on the left side, and the FOMA terminal status icons appear on the right side of the status bar.❖Note・If you cancel the status bar forcibly (P.96), operations may not be performed correctly.The status icons displayed on the screen are as follows.Status barStatus barStatus iconsSignal strength Connecting to Bluetooth deviceDuring International roamingGPS function is activatedNo signal During Data synchronizationFOMA HIGH-SPEED availableAirplane mode is activatedSending and downloading via FOMA HIGH-SPEEDSilent mode (vibration) ONGPRS available Sound OFF (Ringtone volume 0) Sending and downloading GPRS dataSpeakerphone on3G available Microphone is set to muteSending and downloading 3G dataAn alarm is setConnecting to Wi-Fi Battery statusContinued on next pageSO-02C_E_TA.book 32 ページ 2011年5月24日 火曜日 午後2時33分](https://usermanual.wiki/Sony/A3880112.08-user-guide-part-1/User-Guide-1472573-Page-34.png)
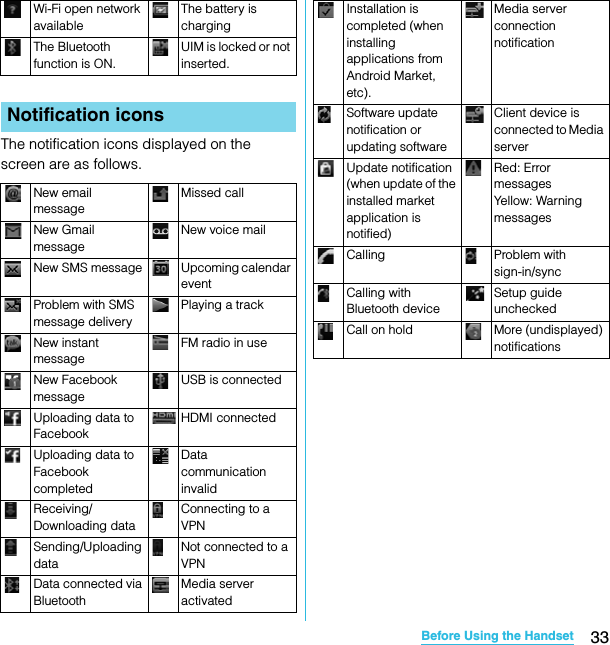
![34Before Using the HandsetSO-02C Web_TANotification icons are displayed in the Notification panel. You can open notifications, such as messages, remainders, or event notifications directly from the Notification panel.1Drag the status bar downwards.・Press x to close the Notification panel.1From the Notification panel, tap [Clear].❖Information・Some notifications cannot be cleared.Notification LED provides information on the FOMA terminal status, incoming/receiving, etc.Notification panelOpening/Closing the Notification panelNotification panelClearing the Notification panelNotification LEDLED statusStatus IndicationRed The battery is charging when the remaining battery level is less than 10 %.Flashing red The battery level is not enough for activating the FOMA terminal for turning ON.Green The battery is charging when the remaining battery level is more than 90 %.Flashing green Missed calls, incoming messages (SMS) or emails exist.Orange The battery is charging when the remaining battery level is 10 % - 90 %.SO-02C_E_TA.book 34 ページ 2011年5月24日 火曜日 午後2時33分](https://usermanual.wiki/Sony/A3880112.08-user-guide-part-1/User-Guide-1472573-Page-36.png)
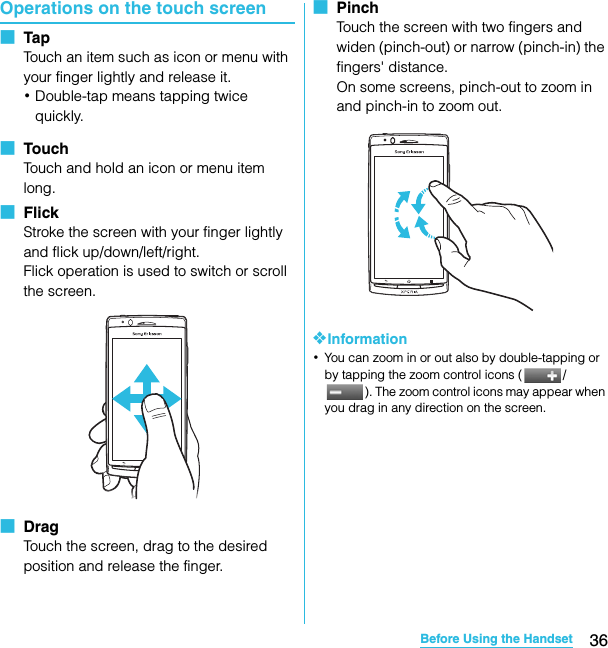
![39Before Using the HandsetSO-02C Web_TA1Flick the Home screen to left or right.・The Home screen switches.❖Information・You can check the current position of the Home screen with at the top of the screen.1From the Home screen, press t.2Tap [Add].・"Add to home screen" menu appears to change the Home screen.■ Add to home screen❖Information・"Add to home screen" appears also by touching and holding anywhere on the Home screen without icons.Adding a shortcut on the Home screen1In "Add to home screen" menu, tap [Shortcuts].2Select a shortcut you want to add.・The shortcut appears on the Home screen.❖Information・You can add shortcuts of applications on the Home screen also by the following operation.- From the Home screen, tap , touch and hold down an icon until the Home screen appears and release the finger where you want to place the shortcut.Adding widgets1In "Add to home screen" menu, tap [Widgets].・A list of widgets appears.Switching the Home screenChanging the Home screenShortcuts Add shortcuts of applications or setting screens. (P.39)Widgets Add widgets. (P.39)Folder Add folders to collect shortcuts, etc. (P.40)Wallpapers Change the wallpaper. (P.41)Analogue clockDisplay the analog clock.Calendar Display the calendar.Data traffic Switch ON/OFF of data communication.Digital clock Display the digital clock.Facebook View comments of members.Google Search Display the Quick search box.Home screen tipsDisplay tips of the Home screen operation.Continued on next pageSO-02C_E_TA.book 39 ページ 2011年5月24日 火曜日 午後2時33分](https://usermanual.wiki/Sony/A3880112.08-user-guide-part-1/User-Guide-1472573-Page-41.png)
![40Before Using the HandsetSO-02C Web_TA2Select an item.❖Information・If you install an application with widget from Android Market, the installed widget is added to the widget list.Displaying widget on the Home screen by a list1From the Home screen, pinch-in.・A list of the widgets on the Home screen appears.❖Information・To return to the Home screen, pinch-out or tap [Exit overview].Adding a folder to the Home screen1In "Add to home screen" menu, tap [Folder].2Select the folder icon you want to add.・To change the folder name, tap [Create new folder] entry box.3Tap [Done].・The folder appears on the Home screen.Latitude View locations of members.Market Display recommended applications of Android Market.Media shortcutsDisplay Music player and Gallery (photos, videos).Music player Display Music player.News & WeatherDisplay news and weather.Photos and videosDisplay shot photos and videos.Picture frame Crop the shot photo to display on the Home screen.Power Control Display the setting buttons for turning on Wi-Fi function, Bluetooth function, the GPS function, synchronization and brightness (switch).Rate Places Display information of nearby stores or post word of mouth.Status switch Display the setting buttons for turning on Airplane mode, Bluetooth function, the GPS function, Wi-Fi, and for switching speakerphone ON, vibrate, and Mobile network settings.TimescapeTM widgetDisplay the latest Timescape tile.TrackIDTM Display TrackIDTM.YouTube Display the list of frequently played movies and recommended.SO-02C_E_TA.book 40 ページ 2011年5月24日 火曜日 午後2時33分](https://usermanual.wiki/Sony/A3880112.08-user-guide-part-1/User-Guide-1472573-Page-42.png)
![41Before Using the HandsetSO-02C Web_TAAdding items to a folder1From the Home screen, touch and hold a shortcut icon until the FOMA terminal vibrates.2Drag the shortcut icon over to the folder.3Release your finger from the icon.・The shortcut is added in a folder.Renaming a folder1Tap the folder to open it.2Touch and hold the title bar of the folder.・A dialog box for changing folder settings appears.3Tap entry box of [Folder name] and enter a folder name, and tap [Done].・To change the folder icon, tap a folder from [Select folder icon].Changing wallpaper1In "Add to home screen" menu, tap [Wallpapers].2Tap[Gallery]/[Live wallpapers]/ [Sony Ericsson wallpapers].・When you tap [Gallery], select an image to set to the wallpaper, pinch the cropping frame or drag it to area you want to use as wallpaper, and tap [Save].・When you tap [Live wallpapers], select a content, tap [Set wallpaper]. You can also download and add Live wallpaper content from a web page.・When you tap [Sony Ericsson wallpapers], select an image to set to the wallpaper, tap [Select wallpaper].❖Information・From the Home screen, you can also press t and tap [Wallpaper].1From the Home screen, touch and hold an icon until the FOMA terminal vibrates.2Keep touching the icon and drag it.・To move to another Home screen, keep touching the icon and drag to left or right.3Release your finger from the icon.Moving an icon on the Home screenSO-02C_E_TA.book 41 ページ 2011年5月24日 火曜日 午後2時33分](https://usermanual.wiki/Sony/A3880112.08-user-guide-part-1/User-Guide-1472573-Page-43.png)
![42Before Using the HandsetSO-02C Web_TA1From the Home screen, touch and hold an icon until appears at the bottom of the screen.2Drag the icon to .・The icon lights up in red.3Release your finger from the icon.Enter a word in the search box to browse the information in the FOMA terminal or on the Internet.1Tap the search box (P.38) on the top of the browser screen.・The software keyboard appears.2Enter a search word.・Search suggestions appear as you enter a character.・For character entry, see "Character entry" (P.46).3Tap a search item or .・To enter a search word again, press x.❖Information・Tap to set the search range from "All", "Web" and "Apps".・Tap to enter a search word by voice to browse the Internet.You can set search engines to use for Quick search box or set search objectives in the FOMA terminal.1From the Home screen, tap , then tap [Google Search].2Press t, then tap [Search settings].・A search settings screen appears. You can set the following items.Deleting an icon from the Home screenSearching information in the FOMA terminal and web pagesSearch settingsGoogle search You can set whether to display search options when a search word is entered, or whether to reflect the previous search result in the search options. You can also open the web search log settings page by Browser.・You need to create your Google account.Continued on next pageSO-02C_E_TA.book 42 ページ 2011年5月24日 火曜日 午後2時33分](https://usermanual.wiki/Sony/A3880112.08-user-guide-part-1/User-Guide-1472573-Page-44.png)
![46Before Using the HandsetSO-02C Web_TASelecting an application to move1On the Applications screen, tap , then drag an application icon you want to move.・If does not appear on the Applications screen, select "Custom sorting" from the "Sorting" menu (P.45).2Release your finger from the application icon.・The application icon moves.3Tap .❖Information・To move icons to another Applications screen, drag the icon to the side edge of the screen.・To add the Applications screen, drag the icon to the rightmost screen.You can view and access recently used applications from this window.1Press y for over a second.・A recently used applications appear on a list.To enter characters, use the software keyboard which appears when you tap the character input box in a message, contacts, etc.❖Information・Press x to return to the previous screen from the character entry screen.In this FOMA terminal, you can select Input method (keyboard type) from "Chinese keyboard", "Japanese keyboard" and "Default input".1On a character entry screen, touch and hold the text box.2Tap [Input method] X [Chinese keyboard]/[Default input]/[Japanese keyboard].Opening the recently used applications windowCharacter entrySelecting input methodChinese keyboardSelect to enter Chinese.Default input Select a language for text entry.Select to enter language otherthan Japanese.Japanese keyboardSelect to enter Japanese.Continued on next pageSO-02C_E_TA.book 46 ページ 2011年5月24日 火曜日 午後2時33分](https://usermanual.wiki/Sony/A3880112.08-user-guide-part-1/User-Guide-1472573-Page-48.png)

![49Before Using the HandsetSO-02C Web_TA*1 When any characters are entered, just touch the desired position on the entered character string to move the cursor.*2 On some screens such as the search box or mail account registration screen, "Next", "Done", "Go", etc. appear.Changing display keys・For Japanese input, you can set not to display less-frequent-used keys (Q, X, C, etc.) on the QWERTY software keyboard.1When entering characters with QWERTY software keyboard, tap .2Tap [Change settings] X [Select display keys].3Unmark the checkbox of the key you want to hide.4Tap [OK].Changing symbols・You can change symbols (12) displayed in (Symbol assistant area) to the ones you use frequently.1When entering characters with QWERTY software keyboard, tap .2Tap [Change settings] X [Change symbols].・A list of 12 symbols to be displayed on QWERTY software keyboard appears.3Tap a symbol you want to change and delete character previously set, then enter a character to display.4Tap [OK].SO-02C_E_TA.book 49 ページ 2011年5月24日 火曜日 午後2時33分](https://usermanual.wiki/Sony/A3880112.08-user-guide-part-1/User-Guide-1472573-Page-51.png)
![50Before Using the HandsetSO-02C Web_TASelecting an assistant keyboardWhen you enter in Hiragana/Kanji input mode using the QWERTY software keyboard, you can change the assistant keyboard to make the frequent using keys to be displayed widely for easy tapping.1When entering characters with QWERTY software keyboard, tap .2Tap [Change settings] X [Choose key type].3Tap any of [Static key resizing]/[Key highlight while typing]/[Dynamic key resizing with highlight]/[Off].■ Static key resizingWiden frequent using key for easy tapping.■ Key highlight while typingWiden frequent using key and highlight the key that is predicted for the next entry.■ Dynamic key resizing with highlightWiden the key that is predicted for the next entry much further and highlight it.■ OffDisplay equally the width of each key.SO-02C_E_TA.book 50 ページ 2011年5月24日 火曜日 午後2時33分](https://usermanual.wiki/Sony/A3880112.08-user-guide-part-1/User-Guide-1472573-Page-52.png)
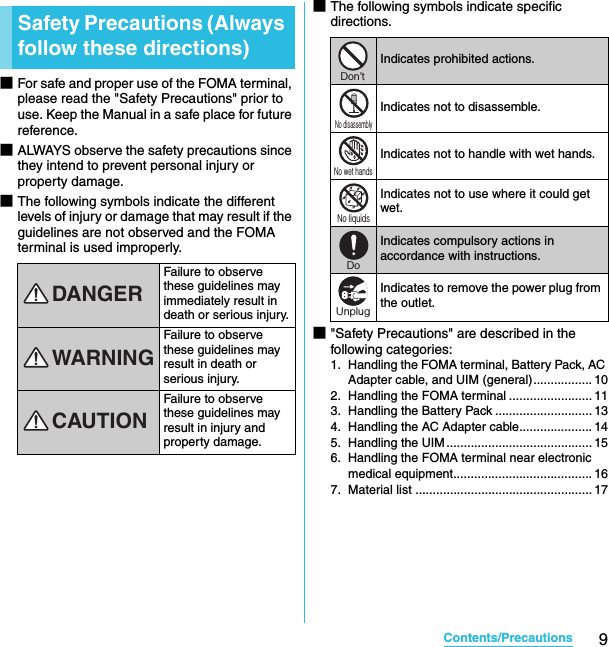
![52Before Using the HandsetSO-02C Web_TASettings of key entry■ Flick inputFlick up/down/left/right to enter characters in each column of kana syllabary.・Ex: Entering characters in "な" columnYou can enter "な" only by touching. Flick left for "に", up for "ぬ", right for "ね" and down for " の".・To switch upper/lower case or change to voiced sound, tap .・Flick input is available by default. You can cancel by the following operation beforehand.aFrom the Home screen, press t and tap [Settings].bTap [Language & keyboard] → [Japanese keyboard].cUnmark the checkbox of "Flick input".■ Toggle entryTap the same key continuously to enter the assigned character.To enter characters assigned to the same key continuously, operate the followings.・Ex: To enter " あお"aTap " あ" once.bTap , and tap "あ" 5 times.・Ex: To enter "ca"aTap "ABC" 3 times.bTap , and tap "ABC" once.❖Information・When a certain time is passed after the key tapped, the tapped key's highlighter goes off and you can enter a character assigned to the same key consecutively without tapping .・To switch upper/lower case or change to voiced sound, tap .・Operate the following to enter characters in the toggle entry while Flick input is set.aFrom the Home screen, press t and tap [Settings].bTap [Language & keyboard] → [Japanese keyboard].cMark [Multitap text input] checkbox.ぬねにのなFlick up Tou c hFlick rightFlick leftFlick downSO-02C_E_TA.book 52 ページ 2011年5月24日 火曜日 午後2時33分](https://usermanual.wiki/Sony/A3880112.08-user-guide-part-1/User-Guide-1472573-Page-54.png)
![53Before Using the HandsetSO-02C Web_TAWhile entering characters, touch and hold the text box to display the "Edit text" menu and edit entered text.For each type of keyboard, you can make settings related to character entry.1From the Home screen, press t, then tap [Settings] X [Language & keyboard].2Tap [Default input]/[Japanese keyboard]/[Chinese keyboard].・The settings screen for each keyboard appears. Tap an item displayed on the screen to set.❖Information・The items vary depending on the keyboard type.・The setting screen for "Chinese keyboard" is displayed in English. When Select language (P.102) set to Chinese (中文), it appears in Chinese.You can make keyboard settings such as Key sound, Vibrate, etc.1From the Home screen, press t and tap [Settings] X [Language & keyboard] X [Japanese keyboard].・The setting screen for Japanese keyboard appears. Tap [12 key keyboard settings] to set the items.Editing textSelect word Drag the slider to select a part of entered text.Select all Select all entered text.Input method P. 4 6Add "xx" to dictionaryAdd the entered text to the dictionary.Cut Display when "Select word"/"Select all" is selected. Cut the text selected by "Select word"/"Select all".Copy Display when "Select word"/"Select all" is selected. Copy the text selected by "Select word"/"Select all".Paste Display when "Cut"/"Copy" is selected. Paste the cut/copied text by "Cut"/"Copy".Settings of entering charactersSettings of Japanese keyboard12 key keyboard settingsKey sound Set whether to sound at the time of key tapping.Vibrate Set whether to vibrate at the time of key tapping.Continued on next pageSO-02C_E_TA.book 53 ページ 2011年5月24日 火曜日 午後2時33分](https://usermanual.wiki/Sony/A3880112.08-user-guide-part-1/User-Guide-1472573-Page-55.png)
![54Before Using the HandsetSO-02C Web_TAYou can change keyboard skin.1From the Home screen, press t, then tap [Settings] X [Language & keyboard].2Tap [Japanese keyboard] X [Select keyboard skin].3Select a keyboard and tap [Set skin].❖Information・You can also download and add keyboard skins from a website.The Word suggestion function shows predicted conversion candidates when you enter Japanese/English characters. Mark the checkbox of Word suggestion checkbox to set options "Error correction" and "Auto space" These options help you entering characters with ease.Setting Word suggestion1From the Home screen, press t, then tap [Settings] X [Language & keyboard].2Tap [Japanese keyboard].3Mark [Word suggestion] checkbox.Setting Error correction・Error correction corrects mistyped characters and shows conversion candidates before conversion in one-byte alphabet input mode when entering characters with QWERTY software keyboard.1From the Home screen, press t, then tap [Settings] X [Language & keyboard].2Tap [Japanese keyboard].Popup on key pressSet to popup the key you have tapped at the time of key tapping.Auto capitalizationSet to capitalize automatically the top letter you enter in English input mode.Keep keyboard typeSet to stabilize the last status of keyboard by screen orientation and kana/alphabet/number input mode.Keyboard skinWord suggestionContinued on next pageSO-02C_E_TA.book 54 ページ 2011年5月24日 火曜日 午後2時33分](https://usermanual.wiki/Sony/A3880112.08-user-guide-part-1/User-Guide-1472573-Page-56.png)
![55Before Using the HandsetSO-02C Web_TA3Mark [Error correction] checkbox.Setting Auto space・When selecting English word suggestion, Auto space enters a space next to the entered character. However, space is not entered automatically in the mail address or URL input fields.1From the Home screen, press t, then tap [Settings] X [Language & keyboard].2Tap [Japanese keyboard].3Mark [Auto space] checkbox.To display the word as the preferred candidate when entering characters, set the user dictionary beforehand.Registering words in user dictionariesThere are two types of user dictionaries: "My words Japanese" (Kana/Kanji) and "My words English" (one-byte alphabet).1From the Home screen, press t, then tap [Settings] X [Language & keyboard].2Tap [Japanese keyboard].3Tap [My words Japanese]/[My words English].4Press t, then tap [Add].5Tap the character input box for "Reading" and fill it out, then tap [次へ (Next)].6Enter a word in the input box for "Word" and tap [完了 (Done)].7Tap [Save].Setting Words by learning1From the Home screen, press t, then tap [Settings] X [Language & keyboard].2Tap [Japanese keyboard] X [Words by learning].3Mark [Save word while typing].・To reset all learning, tap "Delete saved words" X [OK].User dictionarySO-02C_E_TA.book 55 ページ 2011年5月24日 火曜日 午後2時33分](https://usermanual.wiki/Sony/A3880112.08-user-guide-part-1/User-Guide-1472573-Page-57.png)
![56Before Using the HandsetSO-02C Web_TAYou can quote phrases with the plug-in application "定型文 ". To call up "定型文", touch and hold down / when entering characters. Phrases are saved in 5 categories of "インターネット (Internet)", "あいさつ (Greeting)", "ビジネス (Business)", "返事 (Reply)", "プライベート (Private)" in advance. You can add, delete and edit categories and phrases.Adding a category of phrasesAdd a new category and register a phrase.1From the Home screen, tap , then tap [ 定型文 (Fixed phrase)].A list of categories appears.2Press t, then tap [カテゴリー追加 (Add category)].3Enter the category name and tap [OK].4Tap [ 新規追加 (Add phrase)] and enter a phrase.5Tap [OK].❖Information・When you tap each category, a list of registered phrases appears. Tap a phrase to edit/delete.・To restore the default phrases, in the category list, press t, then tap [ 初期化 (Reset)].You can install and add plug-in applications to use when entering characters.1From the Home screen, press t, then tap [Settings] X [Language & keyboard].2Tap [Japanese keyboard] X [Manage applications].3On the Info screen, tap [OK].The plug-in setting screen appears.4Tap [Download new applications].5Tap an application and follow the onscreen instructions.❖Information・Marked plug-in applications in the plug-in setting screen can be activated in the character entry screen.Using plug-in application "定型文 (Fixed phrase)"Adding a plug-in applicationSO-02C_E_TA.book 56 ページ 2011年5月24日 火曜日 午後2時33分](https://usermanual.wiki/Sony/A3880112.08-user-guide-part-1/User-Guide-1472573-Page-58.png)
![57Calling/Network ServicesSO-02C Web_TA1From the Home screen, tap [Phone].2Enter the number of the recipient and tap [Call].・If a wrong number is entered, tap on the right of the phone number field to delete the number.Entering pause (,)This function allows you to operate voice mail at home, to reserve tickets or to check the balance of a bank account, etc.1From the Home screen, tap [Phone].2Enter the number of the recipient and touch and hold the asterisk (*) key until a comma (,) appears.When the FOMA terminal is within range of the service area, you can make an emergency call of 110 (Police), 119 (Fire and ambulance) or 118 (Japan Coast Guard).1From the Home screen, tap [Phone].2Enter the emergency number and tap [Call].・If a wrong number is entered, tap on the right of the phone number field to delete the number.❖Note・In Japan, when UIM is not inserted to the FOMA terminal, the emergency numbers of 110/119/118 are not available.・This FOMA terminal supports "Emergency call location information". If you use the FOMA terminal to place a call to emergency numbers such as 110, 118, or 119, the information of a location where you are calling from (location information) is automatically notified to the Emergency call acceptance organization such as the Police Station.The Emergency call acceptance organization may not be able to figure out your exact location depending on the location where you place a call or radio wave condition.If you make a call without the caller ID, such as by entering a phone number with "184" for each call, the location information and phone number are not notified. However, the Emergency call acceptance organization may decide to obtain the location information and phone number regardless of your settings when they consider it is necessary for lifesaving, etc. Note that the areas/time for which the "Emergency call location information" is ready to be used vary depending on the preparatory state of each Emergency call acceptance organization.Making/Receiving callsMaking a callMaking an emergency callCalling/Network Ser vicesContinued on next pageSO-02C_E_TA.book 57 ページ 2011年5月24日 火曜日 午後2時33分](https://usermanual.wiki/Sony/A3880112.08-user-guide-part-1/User-Guide-1472573-Page-59.png)
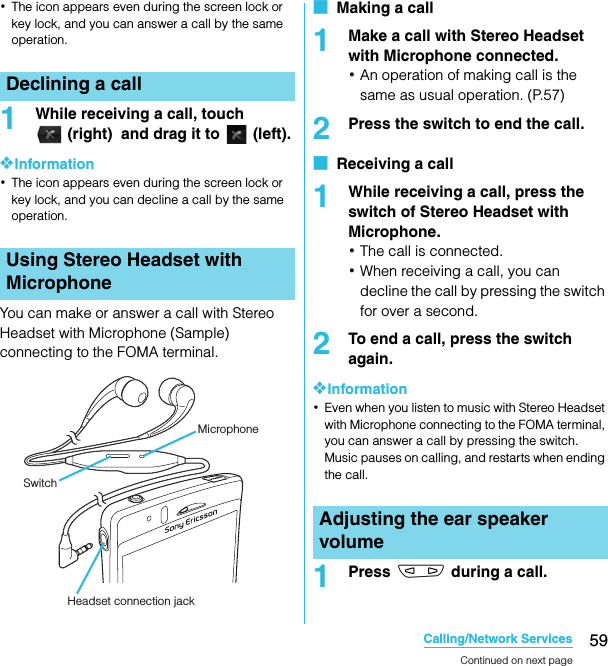
![58Calling/Network ServicesSO-02C Web_TA・When you call the Police (110), Fire/Ambulance (119), or Maritime rescue (118) from the FOMA terminal, clearly indicate that you are calling from a mobile phone, then give your present location and mobile phone number. Also, make a point to call in a stationary position to prevent the call from being dropped. Do not power off the FOMA terminal for at least 10 minutes after the emergency call just in case the Police or Fire/Ambulance may have to get in contact with you.・Note that you may not connect to the local Fire Department or Police Station depending on where you are calling from. In this case, try to call from a public phone or an ordinary phone in the neighborhood.Making an emergency call while UIM is locked1Tap [Emergency call].2Enter the emergency number and tap [Call].・If a wrong number is entered, tap on the right of the phone number field to delete the number.❖Note・In Japan, while entering PIN code on the screen (P.93) or during PUK lock (P.93), the emergency numbers of 110/119/118 are not available.1Tap [End call].For details on WORLD CALL, refer to DOCOMO International Services website.1From the Home screen, tap [Phone].2Touch and hold [0] key until "+" sign appears.・When making an international call, "+" is replaced by an international access code.3Enter the country code X Area code X A phone number of recipient and tap [Call].・If the area code begins with "0", omit "0". However, "0" may be required to dial to some countries or areas such as Italy.1While receiving a call, touch (left) and drag it to (right).❖Information・If you are using regular headphones without a microphone, you need to speak to the microphone of the FOMA terminal.Ending a callMaking an international call (WORLD CALL)Receiving a callContinued on next pageSO-02C_E_TA.book 58 ページ 2011年5月24日 火曜日 午後2時33分](https://usermanual.wiki/Sony/A3880112.08-user-guide-part-1/User-Guide-1472573-Page-60.png)
![60Calling/Network ServicesSO-02C Web_TA❖Information・You can adjust the ear speaker volume only during a call.1Press m when a call is received.❖Information・You can also press p to mute the ringtone for an incoming call.・To change ringtone volume other than when receiving, press up or down of m on the Home screen to adjust the ringtone volume.By using the call option during a call, you can make a call on hold or mute the microphone.❖Note・Do not bring the FOMA terminal close to your ear with the speakerphone ON to avoid hearing damage.In the call log, missed ( ), received ( ), and dialed ( ) calls are displayed with the icons.When you have missed calls, appears in the status bar.1Drag the status bar downwards.2Tap [Missed call].Muting the ringtone for an incoming callCall OptionsHold During a call, press t, tap [Hold]. To cancel hold, while a call is on hold, tap [Retrive call].・To set a call on hold, "Call waiting" subscription is required. (P.74)Contacts Display the contacts list during a call.Speaker Set speakerphone ON/OFF.・When the speakerphone is ON, a speakerphone icon appears in the status bar.Mute Set muting ON/OFF of the microphone during a call.・When the microphone is muted, a mute icon appears in the status bar.Dialpad Enter the phone number to add to make a call.・The ongoing call is automatically on hold.・To add a call, "Call waiting" subscription is required. (P.74)End call End a call.Call logDisplaying missed callsSO-02C_E_TA.book 60 ページ 2011年5月24日 火曜日 午後2時33分](https://usermanual.wiki/Sony/A3880112.08-user-guide-part-1/User-Guide-1472573-Page-62.png)
![61Calling/Network ServicesSO-02C Web_TA1From the Home screen, tap [Phone] X [Call log].2Tap next to the desired number.1From the Home screen, tap [Phone] X [Call log].2Tap and hold the number, then tap [Add to Contacts].・You can select [Add to Contacts] from the menu displayed when you tap the number.3Tap desired contact, or tap [Create new contact].・Tap [Create new contact] to display a screen for selection of the saving locations appears. You can select Phone contact or docomo account as the saving location.4Edit the contact details and tap [Done].1From the Home screen, tap [Phone] X [Call log].2Press t, and tap [Clear call log].❖Information・You can delete only one contact by touching and holding a contact to delete on the call log list, then tapping [Delete from call log].In Contacts, you can enter all your information for your personal contacts, for example, phone numbers, email addresses and web service accounts. When you view a contact, you get quick access to all communication with that contact.1From the Home screen, tap , then tap [Contacts].・You can also open Contacts from the Home screen, tap [Phone] X [Contacts].Calling a number from the call logAdding a number from the call log to your contactsDeleting the call logContactsOpening ContactsContinued on next pageSO-02C_E_TA.book 61 ページ 2011年5月24日 火曜日 午後2時33分](https://usermanual.wiki/Sony/A3880112.08-user-guide-part-1/User-Guide-1472573-Page-63.png)
![62Calling/Network ServicesSO-02C Web_TA❖Information・The first time you open Contacts, a setup wizard starts. In the setup wizard, you can load contacts from UIM or microSD card, or synchronize contacts with the account that you specified in advance. To use Contacts, tap [Open Phonebook].On the Contacts screen, you can view details of your contacts. You can add a contact picture, and display updated information of online services.aSet conditions of contacts to displaybContact search fieldcKey for adding a new contactdYour own phone numbereA contact saved in ContactsfJapanese syllabary or alphabetical index for browsing contactsgOnline status* of Google Talk (Chat) (P.111)hUpdates from your Facebook contactsiScreen tabs (Phone/Call log/Contacts/Favorites)* Depending on the usage, it may be different from online display of Google Talk.Adding a contact1From the Home screen, tap , then tap [Contacts].2Press t, then tap [New contact].3Tap [docomo]/[Phone contact].・When you set Google account etc., it appears as a saving location.4Enter a name.5Enter or select the desired additional information for the contact.・You can add items other than phone number, email address and ringtone by tapping [Add field].6Tap [Done].❖Information・You can also add a contact by tapping c () on the Contacts screen (P.62).・For using "Send calls directly to voicem.", a subscription of Voice Mail service is required. For details, see "Voice Mail Service" (P.72).・When you save "ふりがな(姓/名) (Reading (Last name/First name))", contacts list is displayed according to Japanese syllabary order or alphabets (only when Select language is set to 日本語 (Japanese)).Contacts screencdefgabihManaging contactsSO-02C_E_TA.book 62 ページ 2011年5月24日 火曜日 午後2時33分](https://usermanual.wiki/Sony/A3880112.08-user-guide-part-1/User-Guide-1472573-Page-64.png)
![63Calling/Network ServicesSO-02C Web_TAUsing shortcuts of ContactsWhen you tap the photo (image) part on contacts list screen, shortcuts for phone number, mail, etc. appear. Tap the shortcut to make a call, or create and send a mail.* You can also use the registered Google Talk account, addresses, etc.❖Information・When you tap a part other than photo (image) on the contacts list screen, "Info" filter screen (P.68) of the contact appears instead of shortcuts.・Email shortcut appears when email address is saved in the selected contact and you have set your email account.Searching for a contact1From the Home screen, tap , then tap [Contacts].2Enter searching name or reading in the search field.・All contacts beginning with those letters appear.❖Information・You can switch the view contacts between "Contacts w. ph. number" and "Online contacts" by tapping a ( ) on the Contacts screen (P.62). Also, you can set to show/hide contacts by account or group.Editing a contact1From the Home screen, tap , then tap [Contacts].2Tap the name part of contact you want to edit.・"Info" filter screen (P.68) of the contact appears.・When you tap the image (photo) part of the contact, contact shortcuts appear. Tap to display "Info" filter screen (P.68).3Tap [Edit].・By tapping (Add field) on the editing screen, you can add information to enter.4Edit the desired information and tap [Done].Linking contactsYou can bind multiple contacts together into one.1From the Home screen, tap , then tap [Contacts].Make a call to saved phone number."Info" filter screen (P.68) of the contact appears.Create and send message (SMS).Select an email application to create and send an email.Continued on next pageSO-02C_E_TA.book 63 ページ 2011年5月24日 火曜日 午後2時33分](https://usermanual.wiki/Sony/A3880112.08-user-guide-part-1/User-Guide-1472573-Page-65.png)
![64Calling/Network ServicesSO-02C Web_TA2Touch and hold the desired contact, then tap [Join contacts].・The link candidates appear.3Tap the contact to link.4Tap [OK].❖Information・To cancel link of contacts, on Contact edit screen, press t, then tap [Separate].Auto linking functionContacts of the same name registered in different saving locations separately are automatically linked and collected as one.■ Conditions automatically linkedIf different saving locations (Phone contact/docomo account/Google account) are registered, they are automatically linked.Examples:* When you set two or more Google accounts etc., they are recognized as different saving locations and the contacts are automatically linked.Alternatively, contacts whose saving locations (account types) are different and registered in any of the following conditions, the contacts are automatically linked.Examples:Contacts are registered turning over the last name and first name.Saving location: Phone contactLast name: DocomoFirst name: IchiroSaving location: docomo accountLast name: DocomoFirst name: IchiroSaving location: Google account (□□□@gmail.com)*Last name: DocomoFirst name: IchiroSaving location: Google account (△△△@gmail.com)*Last name: DocomoFirst name: IchiroContacts are registered turning over the last name and first name.Last name: DocomoFirst name: IchiroLast name: IchiroFirst name: DocomoThe last name and first name are registered in the same field, or only the last names or first names are registered in contacts.Last name: DocomoFirst name: IchiroLast name: Docomo IchiroFirst name: Different last names/first names are registered under the same reading (only when Select language is set to 日本語 (Japanese)). Last name: ドコモ (Docomo)First name: 一郎 (Ichiro)Last name (reading): どこもFirst name (reading): いちろうLast name: 土戸茂 (Docomo)First name: 伊知朗 (Ichiro)Last name (reading): どこもFirst name (reading): いちろうContinued on next pageSO-02C_E_TA.book 64 ページ 2011年5月24日 火曜日 午後2時33分](https://usermanual.wiki/Sony/A3880112.08-user-guide-part-1/User-Guide-1472573-Page-66.png)
![65Calling/Network ServicesSO-02C Web_TA❖Information・If last names/first names are registered in the following conditions, the contacts are also automatically linked.- Two-byte hiragana/two-byte katakana/one-byte katakana- Upper case/Lower case of alphabets- The same characters with or without accent marks or phonetic symbols■ Conditions not automatically linkedContacts with the same last name/first name but registered in the same saving location are not automatically linked.Examples:Deleting contacts1From the Home screen, tap , then tap [Contacts].2Press t, then tap [Delete contacts].3Mark the contacts you want to delete.・If you want to delete all contacts, tap [Mark all].4Tap [Delete] X [OK].❖Information・You can also delete the contacts by touching and holding a contact on the Contacts screen, then tapping [Delete contact].The last names/first names are the same as the reading of last names/first names (only when Select language is set to 日本語 (Japanese)).Last name: ドコモ (Docomo)First name: 一郎 (Ichiro)Last name (reading): どこもFirst name (reading): いちろうLast name: どこもFirst name: いちろうLast names/first names are not registered but the identical phone numbers or mail addresses are registered (similar last names/first names may be linked)Last name: ドコモ (Docomo)First name: 一郎 (Ichiro)Phone number: 090△△△△△△△△Last name: First name: Phone number: 090△△△△△△△△Saving location: Phone contactLast name: DocomoFirst name: IchiroSaving location: Phone contact Last name: DocomoFirst name: IchiroSO-02C_E_TA.book 65 ページ 2011年5月24日 火曜日 午後2時33分](https://usermanual.wiki/Sony/A3880112.08-user-guide-part-1/User-Guide-1472573-Page-67.png)
![66Calling/Network ServicesSO-02C Web_TACalling a contact1From the Home screen, tap , then tap [Contacts].2Tap a name of contact to call to.3Tap a desired phone number.Checking Myself and editing contact information1From the Home screen, tap , then tap [Contacts].2Tap [XXX-XXXX-XXXX] (My number) at the top of the contact list.3Tap [Edit].・The "Myself" edit screen appears.4Enter the new information or make the changes you want.・By tapping (Add field) on the editing screen, you can add information to enter.5When you are done, tap [Done].❖Information・In "Myself", you can add multiple phone numbers, emails, etc. The history of dialed/received calls from the registered phone numbers is displayed in "Call log" of "Info" filter screen (P.68).Sending your contact via Bluetooth/Email/GmailYou can send the saved contacts or "Myself" information by using Bluetooth function (P.149), email attachment, etc.1From the Home screen, tap , then tap [Contacts].2Tap [XXX-XXXX-XXXX] (My number) or the contact.3Press t, then tap [Send contact].4On the send confirmation screen, tap [OK].■Using Bluetooth functionTap [Bluetooth] X [Turn on] X Select a destination device from the list.・Bluetooth function is ON and searches destination devices.・When Bluetooth function is already ON, Bluetooth terminal scan screen appears.Continued on next pageSO-02C_E_TA.book 66 ページ 2011年5月24日 火曜日 午後2時33分](https://usermanual.wiki/Sony/A3880112.08-user-guide-part-1/User-Guide-1472573-Page-68.png)
![67Calling/Network ServicesSO-02C Web_TA■Attaching contacts to Email/GmailTap [Email]/[Gmail].・Create an email on each compose screen, and send it.・"Email" appears when you have set an email account. If you select "Gmail" when you have not set an account, setup wizard appears. You can create and send email after settings are done.❖Information・You can send multiple registered contacts all at once.- From the Home screen, tap X [Contacts], press t and tap [Send contacts]. Mark the checkboxes for the contacts you want to send and tap [Send]. If you want to mark all contacts, tap [Mark all]. On the send confirmation screen, tap [OK].Marking a contact as a favoriteYou can mark a contact as a favorite. The favorite list provides quick access to the contacts you have marked.1From the Home screen, tap , then tap [Contacts].2Touch and hold the contact you want to mark.3Tap [Add to Favorites].❖Information・You can also add the contacts to favorites by tapping [Favorites] on "Info" filter screen (P.68).・On the Contacts screen, tap [Favorites] to display contacts registered to Favorites.Setting a photo to a contact1From the Home screen, tap , then tap [Contacts].2Tap the contact.3Tap [Edit].4Tap .5Tap [Gallery]/[Take new photo].・Select [Gallery] to select a saved photo and add it.・Select [Take new photo] to shoot a photo and save it.6Tap [Done].❖Information・You can also set photo to a contact by the following operation.- From the Home screen, X Tap [Gallery] and select an image to set. Tap [Menu] at the lower right of the screen X [More] X [Set as] X [Contact picture] and select a contact you want to register to, and then tap [Save].SO-02C_E_TA.book 67 ページ 2011年5月24日 火曜日 午後2時33分](https://usermanual.wiki/Sony/A3880112.08-user-guide-part-1/User-Guide-1472573-Page-69.png)
![68Calling/Network ServicesSO-02C Web_TAWhen you are viewing a contact details screen, you can flick the filter at the bottom of the screen right or left to show the following information.Setting to display Facebook updates on contactsYou can view the Facebook update information if the contacts are linked to online services such as Facebook.1From the Home screen, tap , then tap [Contacts].2Press t, tap [Settings] X [Accounts & sync] X [Add account].3Tap [Facebook].・For the first time to login to Facebook, a message confirming if you agree or not agree with the End user license agreement appears.4Enter account information and tap [Login].・After log in, the confirmation screen for synchronizing contacts with members appears. Tap Select any of [Sync all]/[Sync with existing contacts]/[Don't sync].5Tap [Next] X [Finish].❖Information・To display Facebook filter in "Info" filter screen (P.68), login to Facebook from Timescape to refresh in Timescape.You can export/import contacts from/to microSD card or UIM. This is useful, for example, when you want to transfer the contact information to another phone.❖Information・You can also use a synchronization service for synchronizing your contacts. For details, see "Data synchronization" (P.99).The contact information filterFilter InformationInfo Contact phone numbers, mail addresses, addresses, Facebook information, etc.Facebook Facebook status updates for the contact・Appears if you have set Facebook account in Timescape.Messaging Message (SMS) conversations with the contactCalls Call history for the contactExporting/Importing contactsContinued on next pageSO-02C_E_TA.book 68 ページ 2011年5月24日 火曜日 午後2時33分](https://usermanual.wiki/Sony/A3880112.08-user-guide-part-1/User-Guide-1472573-Page-70.png)
![69Calling/Network ServicesSO-02C Web_TA・When contacts are imported to other mobile phone, phone number type "Mobile:/M", "Work:/W" or "Home:/H" may appear at the next to the name of the contacts backed up from the FOMA terminal to UIM. If there is no corresponding item, "/O" may appear.Exporting all contacts on microSD card1From the Home screen, tap , then tap [Contacts].2Press t, then tap [Back up contacts]. X [Memory card] (microSD card).3Tap [OK].Importing contacts from microSD card1From the Home screen, tap , then tap [Contacts].2Press t, then tap [Import contacts]. X [Memory card] (microSD card).3Tap [docomo]/[Phone contact].・When you set Google account etc., it appears as an import destination.4Select the vCard file to import.・If there is only one file, vCard file selection screen does not appear. The file is imported immediately.・If a file has multiple contacts, they are imported all at once.・If there are two or more vCard files, tap any of [Import vCard file]/[Import vCard files]/[Import all vCard files] to select.5Tap [OK].❖Information・Some part of data may not be imported or exported depending on the contacts.Exporting names and numbers on UIM1From the Home screen, tap , then tap [Contacts].2Press t, then tap [Back up contacts]. X [SIM card].3Mark the contacts you want to copy.・If you want to mark all contacts, tap [Mark all].4Tap [Back up].Continued on next pageSO-02C_E_TA.book 69 ページ 2011年5月24日 火曜日 午後2時33分](https://usermanual.wiki/Sony/A3880112.08-user-guide-part-1/User-Guide-1472573-Page-71.png)
![70Calling/Network ServicesSO-02C Web_TA5Tap [Add contacts]/[Replace all contacts].・If you select [Replace all contacts], all existing UIM information is replaced.❖Information・When you copy a contact to the UIM, only the contact name and the first number is saved. This is due to limited memory on a UIM.・Contacts without phone number cannot be saved to the UIM.Importing contacts from UIM1From the Home screen, tap , then tap [Contacts].2Press t, then tap [Import contacts]. X [SIM card].3Tap [docomo]/[Phone contact].・When you set Google account etc., it appears as an import destination.4To import one contact, tap the contact you want to import.・To import all contacts, press t, then tap [Import all].・If there is a contact whose name is matched with the imported contact, the contact is imported as a separated one.❖Information・Only a name and the first phone number can be imported to a contact.You can copy the Contacts data to or from another FOMA terminal by using microSD card. You can also copy the Contacts data registered in Google account to docomo account.1From the Home screen, tap , then tap [PhoneBookCopy].・For the first time of use, agree to "使用許諾契約書 (License Agreement)".Exporting contacts saved in docomo account to microSD card1On the "エクスポート (Export)" tab screen, tap [ 開始 (Start)].Importing contacts on microSD card to docomo account1On the "インポート (Import)" tab screen, tap a file you want to import.2Tap [ 上書き (Overwrite)]/[追加 (Add)].Using PhoneBookCopySO-02C_E_TA.book 70 ページ 2011年5月24日 火曜日 午後2時33分](https://usermanual.wiki/Sony/A3880112.08-user-guide-part-1/User-Guide-1472573-Page-72.png)