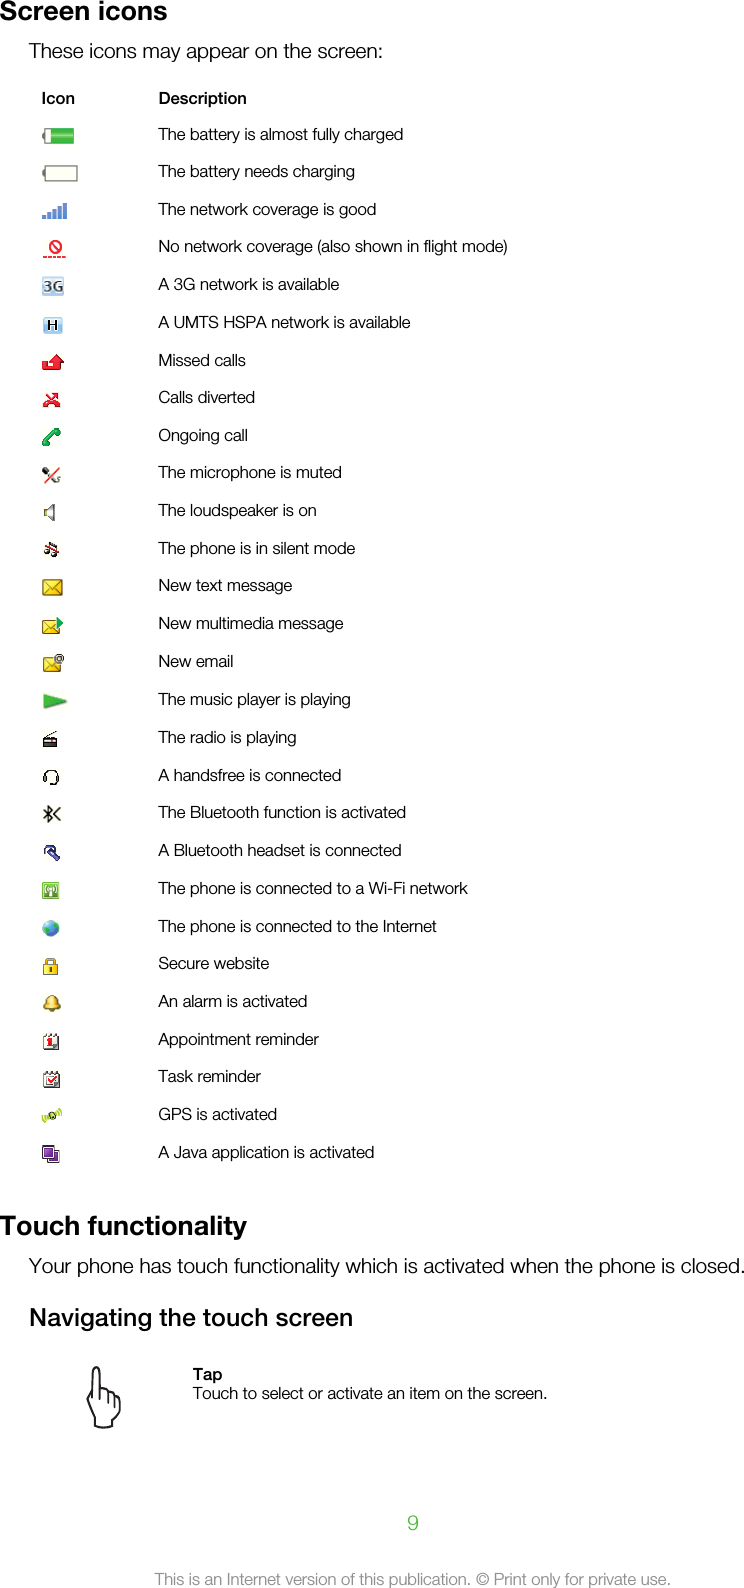
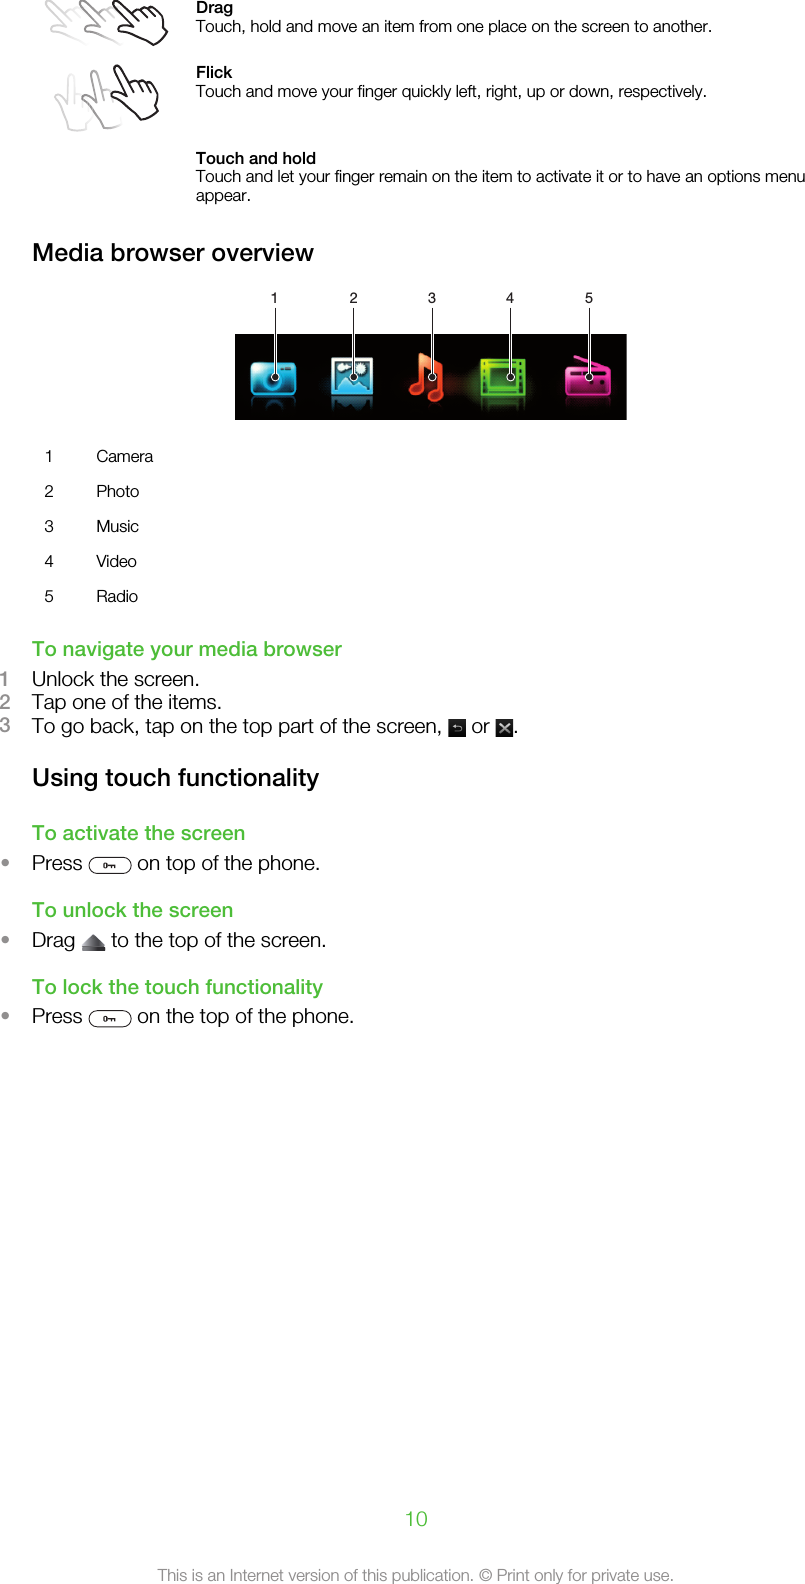
Sony DDA-2025 Stereo Streaming Bluetooth Headset User Manual Sony Ericsson Mobile Communications AB

Sony Mobile Communications Inc Stereo Streaming Bluetooth Headset Sony Ericsson Mobile Communications AB

Contents

08 user manual long

ContentsGetting started..............................................................................4Touch instructions...............................................................................4Phone overview...................................................................................5Turning on the phone..........................................................................6Help....................................................................................................7Charging the battery...........................................................................7Maximising battery performance.........................................................7Screen icons.......................................................................................9Touch functionality..............................................................................9Menu overview..................................................................................11Navigation.........................................................................................12Memory............................................................................................13Phone language................................................................................14Entering text......................................................................................14Calling..........................................................................................16Answering calls.................................................................................16Making and answering calls..............................................................17Contacts ..........................................................................................18Speed dial.........................................................................................21More calling features.........................................................................21Imaging........................................................................................25Using the still camera........................................................................25Using the video camera.....................................................................28Working with photos.........................................................................29Viewing and tagging photos..............................................................30Using photos.....................................................................................31Printing photos..................................................................................31Sharing photos and videos................................................................31Accessing videos in your phone........................................................32Music ..........................................................................................34Stereo portable handsfree.................................................................34Accessing music in your phone.........................................................34Clear stereo and clear bass...............................................................36Playlists.............................................................................................36SensMe™.........................................................................................37Audio books......................................................................................38Buy Now...........................................................................................38PlayNow™........................................................................................38TrackID™ .........................................................................................381This is an Internet version of this publication. © Print only for private use.
Online music and video clips.............................................................39Radio ...............................................................................................39Recording sound ..............................................................................40Transferring and handling content...........................................41Handling content in the phone..........................................................41Sending content to another phone....................................................41Using a USB cable............................................................................41Transferring content to and from a computer....................................42Phone name.....................................................................................43Using Bluetooth™ wireless technology..............................................43Backing up and restoring..................................................................44Updating your phone.................................................................46Updating your phone using Sony Ericsson PC Suite..........................46Updating your phone wirelessly.........................................................46Messaging...................................................................................47Text and picture messages...............................................................47Conversations...................................................................................48Voice messages................................................................................48Email.................................................................................................48Internet .......................................................................................51Web browser toolbar.........................................................................51Web browser shortcuts.....................................................................51Bookmarks.......................................................................................51History pages....................................................................................52More browser features......................................................................52Internet security and certificates........................................................52File transfers......................................................................................52Web feeds........................................................................................53Facebook™......................................................................................54Connected home........................................................................55Wi-Fi™..............................................................................................55DLNA™............................................................................................55Remote Play with PLAYSTATION®3.................................................56GPS..............................................................................................57Using GPS........................................................................................57Google Maps™ for mobile................................................................58Driving directions...............................................................................58Tracker.............................................................................................58Synchronising.............................................................................60Synchronising using a computer.......................................................60Synchronising using an Internet service.............................................602This is an Internet version of this publication. © Print only for private use.
More features.............................................................................61Flight mode.......................................................................................61Alarms..............................................................................................61Calendar...........................................................................................62Notes................................................................................................62Tasks................................................................................................63Profiles..............................................................................................63Time and date...................................................................................63Themes.............................................................................................64Main menu layout..............................................................................64Screen orientation.............................................................................64Ringtones..........................................................................................64Games..............................................................................................65Applications......................................................................................65Antivirus............................................................................................65PIN codes.........................................................................................66IMEI number.....................................................................................67Stereo Streaming Bluetooth™ Headset MH100......................68Introduction.......................................................................................68Charging...........................................................................................68Turning on and off.............................................................................69Pairing the headset...........................................................................69Adjusting the volume.........................................................................69Calling...............................................................................................70Listening to music.............................................................................70Resetting headset.............................................................................71Battery..............................................................................................71Troubleshooting................................................................................71Troubleshooting.........................................................................73Common questions...........................................................................73Error messages.................................................................................75Legal information.......................................................................76Index............................................................................................773This is an Internet version of this publication. © Print only for private use.
Getting startedImportant informationPlease read the Important information before you use your mobile phone.Touch instructionsInstructions highlighted by a grey line refer to touch screen functions only.4This is an Internet version of this publication. © Print only for private use.
Phone overview1 Ear speaker123456789102 Screen3 Selection keys4 Call key5 Activity menu key6 Navigation key7 C key (Clear)8 Volume key9 End key, On/off key10 Camera key/shutter key      11 Screen lock key1112131415161712 Flash light13 Camera lens14 Memory card slot (under the cover)15 Connector for charger, handsfree and USB cable16 Phone antenna17 LoudspeakerTo insert the SIM card5This is an Internet version of this publication. © Print only for private use.
1Remove the battery cover.2Slide the SIM card into its holder with the gold-coloured contacts facing down.To insert the battery1Insert the battery with the label side up and the connectors facing each other.2Attach the battery cover.Turning on the phoneTo turn on the phone1Press and hold down  .2Enter your SIM card PIN (Personal Identification Number), if requested, and selectOK.3Select a language.4Follow the instructions that appear.If you want to correct a mistake when you enter your PIN, press  .SIM cardThe SIM (Subscriber Identity Module) card, which you get from your network operator,contains information about your subscription. Always turn off your phone and detach thecharger before you insert or remove the SIM card.You can save contacts on the SIM card before you remove it from your phone.PINYou may need a PIN (Personal Identification Number) to activate the services and functionsin your phone. Your PIN is supplied by your network operator. Each PIN digit appears as*, unless it starts with emergency number digits, for example, 112 or 911. You can see andcall an emergency number without entering a PIN.If you enter the wrong PIN three times in a row, the SIM card is blocked. See SIM protection onpage 66.StandbyAfter you have turned on your phone and entered your PIN, the name of the networkoperator appears. This view is called standby. Your phone is now ready for use.6This is an Internet version of this publication. © Print only for private use.
Using other networksMaking and receiving calls, using messaging and data transfer, for example, Internet-basedservices, outside your home network (roaming) may incur additional costs. Contact youroperator for more information.HelpIn addition to this User guide, Feature guides and more information are available atwww.sonyericsson.com/support.There are also help functions and a User guide in your phone. See the following instructionson how to access them.To access the User guide in your phone•Select Menu > Settings > User help > User guide.To view tips and tricks•Select Menu > Settings > User help > Tips and tricks.To view information about functions•Scroll to a function and select Info, if available. In some cases, Info appears underOptions.To view the phone demonstration•Select Menu > Entertainment > Demo tour.To view the phone status•Press the volume key. Phone, memory and battery information is shown.Supported services and featuresSome of the services and features described in this User guide are not supported by all networksand/or service providers in all areas. Without limitation, this applies to the GSM InternationalEmergency Number 112. Please contact your network operator or service provider to determineavailability of any specific service or feature and whether additional access or usage fees apply.Charging the batteryThe phone battery is partly charged when you buy it.To charge the battery1Connect the charger to the phone.2Remove the charger by tilting the plug upwards.Maximising battery performance•Charge your phone often. The battery lasts longer if you charge it frequently.7This is an Internet version of this publication. © Print only for private use.
•If you are in an area with no coverage, your phone repeatedly scans for available networks.This consumes power. If you cannot move to an area with better coverage, turn off yourphone temporarily.•Turn off 3G, Bluetooth™ wireless technology and Wi-Fi™ when you do not need thesefunctions.•Do not cover the phone antenna when you are engaged in a call.Go to www.sonyericsson.com/support to learn more about how to maximise your battery'sperformance.8This is an Internet version of this publication. © Print only for private use.
Screen iconsThese icons may appear on the screen:Icon DescriptionThe battery is almost fully chargedThe battery needs chargingThe network coverage is goodNo network coverage (also shown in flight mode)A 3G network is availableA UMTS HSPA network is availableMissed callsCalls divertedOngoing callThe microphone is mutedThe loudspeaker is onThe phone is in silent modeNew text messageNew multimedia messageNew emailThe music player is playingThe radio is playingA handsfree is connectedThe Bluetooth function is activatedA Bluetooth headset is connectedThe phone is connected to a Wi-Fi networkThe phone is connected to the InternetSecure websiteAn alarm is activatedAppointment reminderTask reminderGPS is activatedA Java application is activatedTouch functionalityYour phone has touch functionality which is activated when the phone is closed.Navigating the touch screenTapTouch to select or activate an item on the screen.9This is an Internet version of this publication. © Print only for private use.
DragTouch, hold and move an item from one place on the screen to another.FlickTouch and move your finger quickly left, right, up or down, respectively. Touch and holdTouch and let your finger remain on the item to activate it or to have an options menuappear.Media browser overview1 2 3 4 51 Camera2 Photo3 Music4 Video5 RadioTo navigate your media browser1Unlock the screen.2Tap one of the items.3To go back, tap on the top part of the screen,   or  .Using touch functionalityTo activate the screen•Press   on top of the phone.To unlock the screen•Drag   to the top of the screen.To lock the touch functionality•Press   on the top of the phone.10This is an Internet version of this publication. © Print only for private use.
Menu overview*PlayNow™CameraLocation servicesGoogle MapsNavigationTrackerMy favouritesSettingsCalls**AllAnsweredDialledMissedInternetMessagingWrite newInbox/ConversationsMessagesEmailCall voicemailContactsMyselfNew contactOrganiserAlarmsApplicationsMedia HomeFile manager **File transferCalendarTasksNotesVideo callSynchronisationTimerStopwatchTorchCalculatorEntertainmentOnline servicesRadioTrackID™Remote PlayGamesPhoto MateRecord soundDemo tourMediaPhotoMusicVideoGamesWeb feedsSettingsMusic playerSettingsGeneralProfilesTime & dateLanguageUpdate softwareVoice controlShortcutsFlight modePIN codesSecurityAccessibilityPhone statusMaster resetSounds & alertsRing volumeRingtoneSilent modeIncreasing ringVibrating alertMessage alertKey soundDisplayWallpaperMain menu layoutThemeStartup screenScreen saverClock sizeBrightnessEdit line namesCallsSpeed dialSmart searchDivert callsSwitch to line 2Manage callsTimeShow/hide my no.HandsfreeOpen to answerClose to end callConnectivityWi-FiBluetoothUSBPhone nameContent sharingSynchronisationDevice managementMobile networksData communicationInternet settingsStreaming settingsMessage settingsSIP settingsAccessoriesUser helpUser guideSettings downloadBasic setupTips and tricks* Some menus are operator-,network- and subscription-dependent.** You can use the navigationkey to scroll between tabs insubmenus.11This is an Internet version of this publication. © Print only for private use.
NavigationTo access the main menu•When Menu appears on the screen, press the centre selection key to selectMenu.•If Menu does not appear on the screen, press  , and then press the centreselection key to select Menu.To navigate the phone menus•Press the navigation key upwards, downwards, left or right to move through themenus.To select actions on the screen•Press the left, centre or right selection key.To view options for an item•Select Options to, for example, edit.To end a function•Press  .To return to standby•Press  .To navigate your media1Select Menu > Media.2Scroll to a menu item and press the navigation key right.3To go back, press the navigation key left.To delete items•Press   to delete items such as numbers, letters, pictures and sounds.TabsTabs may be available. For example, Calls have tabs.To scroll between tabs•Press the navigation key left or right.ShortcutsYou can use the navigation key shortcuts to go directly to functions from standby.To use navigation key shortcuts•Press the navigation key upwards, downwards, left or right, to go directly to afunction.12This is an Internet version of this publication. © Print only for private use.
To edit a navigation key shortcut1Select Menu > Settings > General > Shortcuts.2Scroll to an option and select Edit.3Scroll to a menu option and select Shortc..Main menu shortcutsMenu numbering starts from the top left icon and moves across and then down row byrow.To go directly to a main menu item•Select Menu and press   –  ,  ,   or  .The Main menu layout must be set to Grid. See To change the main menu layout on page 64.Activity menuThe activity menu gives you quick access to:•New events – missed calls and new messages.•Running apps – applications that are running in the background.•My shortcuts – add your favourite functions to access them quickly.•Internet – connect conveniently to the Internet.To open the activity menu•Press  .Alerts and notificationsYou can handle alarm alerts and get notifications of, for example, incoming messages andcalendar events. When you dismiss a notification, you can view it later in the Activity menu.To turn off or snooze an alarmWhen the alarm is ringing:•To turn off the alarm, drag the alarm icon to the right.•To snooze the alarm, tap Snooze.To dismiss a notification•When you get a notification of an incoming email message or a calendar event, tap.MemoryYou can save content on a memory card, in the phone memory and on the SIM card. Photosand music are saved on the memory card, if a memory card is inserted. If not, or if thememory card is full, photos and music are saved in the phone memory. Messages andcontacts are saved in the phone memory, but you can choose to save them on the SIMcard.Memory cardYou may have to purchase a memory card separately.Your phone supports a microSD™ memory card, adding more storage space to yourphone. This type of card can also be used as a portable memory card with other compatibledevices.You can move content between a memory card and the phone memory.13This is an Internet version of this publication. © Print only for private use.
To insert a memory card•Remove the battery cover and insert the memory card with the gold-colouredcontacts facing down.Phone languageYou can select a language to use in your phone.To change the phone language1Select Menu > Settings > General > Language > Phone language.2Select an option.Entering textYou can use multitap text input or Quick text input   to enter text. The Quick text inputmethod uses a dictionary application in your phone.To change the writing language•When you enter text, press and hold down  .To change the text input method•When you enter text, press and hold down  .To shift between upper- and lower-case letters or numbers•When you enter text, press  .To enter numbers1When you enter text, press   until   appears at the top of the screen.2To enter a number, press   –  .To enter a number from text input mode, you can press and hold down   –  .To enter punctuation marks and symbols1When you enter text, press   briefly.2Scroll to a symbol and select Insert.To select from the most commonly used punctuation marks, you can also press  .14This is an Internet version of this publication. © Print only for private use.
To enter text using Quick text input1Select, for example, Menu > Messaging > Write new > Message.2If   is not displayed, press and hold down   to change to Quick text input.3Press each key only once, even if the letter you want is not the first letter on the key.For example, to write the word “Jane”, press  ,  ,  ,  . Write the wholeword before looking at the suggestions.4To view word suggestions, press   or press the navigation key downwards.5Press   to accept a suggestion and add a space.To enter text using the multitap method1Select, for example, Menu > Messaging > Write new > Message.2If   is displayed, press and hold down   to change to multitap text input.3Press   –   repeatedly until the desired letter appears.4Press   to add a space.To add words to the phone dictionary1When you enter text using Quick text input, select Options > Spell word.2Write the word using multitap input and select Save.15This is an Internet version of this publication. © Print only for private use.
CallingYou need to turn on your phone and be within range of a network.Answering callsYou can answer calls without opening the phone.To answer a call when screen lock is on•Drag   from left to right.To answer a call when screen lock is off•Tap  .To reject a call when screen lock is on•Drag   to the right and then to the left.To reject a call when screen lock is off•Tap  .To mute the microphone during a call•Tap  .To turn on a loudspeaker during a call•Tap  .Do not hold your phone to your ear when using the loudspeaker. This could damage your hearing.To turn off the ringtone before answering a call when screen lock is on•Drag   to the right.To turn off the ringtone before answering a call when screen lock is off•Tap  .16This is an Internet version of this publication. © Print only for private use.
To end a call•Tap  .Making and answering callsTo make a call1Enter a phone number (with international country code and area code, if applicable).2Press  .You can call numbers from your contacts and call list.To end a call•Press  .To make international calls1Press and hold down   until a “+” sign appears.2Enter the country code, area code (without the first zero) and phone number.3Press  .To re-dial a number•When Retry? appears, select Yes.Do not hold your phone to your ear when waiting. When the call connects, your phone gives aloud signal.To answer a call•Press  .To reject a call•Press  .To change the ear speaker volume during a call•Press the volume key up or down.To mute the microphone during a call1Press and hold down  .   appears.2Press and hold down   again to resume.To turn on the loudspeaker during a call•Select Spkr on.   appears.Do not hold the phone to your ear when using the loudspeaker. This could damage your hearing.To view missed calls from standby• appears. Press   to open the call list.Video callDuring a video call, you can share video from the main camera.17This is an Internet version of this publication. © Print only for private use.
Before making video calls3G (UMTS) service is available when   or   appears. To make a video call, both partieson the call must have a 3G (UMTS) phone subscription that supports 3G (UMTS) serviceand 3G (UMTS) coverage.To make a video call1Enter a phone number (with international country code and area code, if applicable).2Select Options > Make video call.To use the zoom with an outgoing video call•Press the navigation key upwards or downwards.To share photos and videos during a video call1During a video call, press the navigation key left to switch to the video share modetab.2Scroll to a video clip or photo and select Share.To view video call options•During the call, select Options.Emergency callsYour phone supports international emergency numbers, for example, 112 or 911. You cannormally use these numbers to make emergency calls in any country, with or without theSIM card inserted, if you are within range of a network.In some countries, other emergency numbers may also be promoted. Your network operator maytherefore have saved additional local emergency numbers on the SIM card.To make an emergency call•Enter 112 (the international emergency number) and press  .To view your local emergency numbers1Select Menu > Contacts.2Scroll to New contact and select Options > Special numbers > Emergencynumbers.NetworksYour phone switches automatically between GSM and   (UMTS) or   networksdepending on availability. Some network operators allow you to switch networks manually.To switch networks manually1Select Menu > Settings > Connectivity > Mobile networks > GSM/3Gnetworks.2Select an option.Call listYou can view information about answered   , dialled   and missed or rejected   calls.To call a number from the call list1Press   and scroll to a tab.2Scroll to a name or a number and press  .ContactsYou can save names, phone numbers and personal information in Contacts. Informationcan be saved in the phone memory or on the SIM card.You can synchronise your contacts using the Sony Ericsson PC Suite.18This is an Internet version of this publication. © Print only for private use.
Default contactsYou can choose which contact information is shown as default. If Phone contacts isselected as default, your contacts show all the information saved in Contacts. If you selectSIM contacts as default, your contacts show names and numbers saved on the SIM card.To select default contacts1Select Menu > Contacts.2Scroll to New contact and select Options > Advanced > Default contacts.3Select an option.Phone contactsPhone contacts can contain names, phone numbers and personal information. They aresaved in the phone memory.To add a phone contact1Select Menu > Contacts.2Scroll to New contact and select Add.3Enter the name and select OK.4Scroll to New number: and select Add.5Enter the number and select OK.6Select a number option.7Scroll between the tabs and add information to the fields.8Select Save.Calling contactsTo call a contact1Select Menu > Contacts.2Scroll to a contact and press  .To go directly to the contacts list•Press and hold down   –  .To call with Smart search1Press   –   to enter a sequence of (at least two) digits. All entries which matchthe sequence of digits or corresponding letters are shown in a list.2Scroll to a contact or a phone number and press  .To turn on or off Smart search1Select Menu > Settings > Calls > Smart search.2Select an option.Editing contactsTo add information to a phone contact1Select Menu > Contacts.2Scroll to a contact and select Options > Edit contact.3Scroll between the tabs and select Add or Edit.4Select an option and an item to add or edit.5Select Save.If your subscription supports Calling Line Identification (CLI) service, you can assign personalringtones and pictures to contacts.To copy names and numbers to phone contacts1Select Menu > Contacts.2Scroll to New contact and select Options > Advanced > Copy from SIM.3Select an option.19This is an Internet version of this publication. © Print only for private use.
To copy names and numbers to the SIM card1Select Menu > Contacts.2Scroll to New contact and select Options > Advanced > Copy to SIM.3Select an option.When you copy all contacts from your phone to the SIM card, all existing SIM card informationis replaced.To automatically save names and phone numbers on the SIM card1Select Menu > Contacts.2Scroll to New contact and select Options > Advanced > Auto save on SIM.3Select an option.To save contacts on a memory card1Select Menu > Contacts.2Scroll to New contact and select Options > Advanced > Back up to m. card.SIM contactsSIM contacts can contain names and numbers only. They are saved on the SIM card.To add a SIM contact1Select Menu > Contacts.2Scroll to New contact and select Add.3Enter the name and select OK.4Enter the number and select OK.5Select a number option and add more information, if available.6Select Save.Deleting contactsTo delete all contacts1Select Menu > Contacts.2Scroll to New contact and select Options > Advanced > Delete all contacts.3Select an option.Contact memory statusThe number of contacts you can save in your phone or on the SIM card depends onavailable memory.To view contact memory status1Select Menu > Contacts.2Scroll to New contact and select Options > Advanced > Memory status.MyselfYou can enter information about yourself and, for example, send your business card.To enter Myself information1Select Menu > Contacts.2Scroll to Myself and select Open.3Scroll to an option and edit the information.4Select Save.To add your own business card1Select Menu > Contacts.2Scroll to Myself and select Open.3Scroll to My contact info and select Add > Create new.4Scroll between the tabs and add information to the fields.5Enter the information and select Save.20This is an Internet version of this publication. © Print only for private use.
GroupsYou can create a group of phone numbers and email addresses from Phone contacts tosend messages to. You can also use groups (with phone numbers) when you createaccepted callers lists.To create a group of numbers and email addresses1Select Menu > Contacts.2Scroll to New contact and select Options > Groups.3Scroll to New group and select Add.4Enter a name for the group and select Continue.5Scroll to New and select Add.6For each contact phone number or email address you want to mark, scroll to it andselect Mark.7Select Continue > Done.Speed dialSpeed dialling lets you select nine contacts that you can dial quickly from standby. Thecontacts can be saved in positions 1-9.To add contacts to speed dial numbers1Select Menu > Contacts.2Scroll to New contact and select Options > Speed dial.3Scroll to a position number and select Add.4Select a contact.To speed dial•Enter the position number and press  .More calling featuresVoicemailIf your subscription includes an answering service, callers can leave a voicemail messagewhen you cannot answer a call.To enter your voicemail number1Select Menu > Messaging > Messages > Settings > the Message settings tab> Voicemail number.2Enter the number and select OK.To call your voicemail service•Press and hold down  .Voice controlBy creating voice commands you can:•Voice dial – call someone by saying their name•Answer and reject calls when you use a handsfreeTo record a voice command using voice dialling1Select Menu > Settings > General > Voice control > Voice dialling > Activate.2Select Yes > New voice command and select a contact. If the contact has morethan one number, select the number to add the voice command to.3Record a voice command such as “John mobile.”4Follow the instructions that appear. Wait for the tone and say the command torecord. The voice command is played back to you.5If the recording sounds OK, select Yes. If not, select No and repeat steps 3 and 4.Voice commands are saved in the phone memory only. They cannot be used in another phone.21This is an Internet version of this publication. © Print only for private use.
To voice dial1Press and hold down a volume key.2Wait for the tone and say a recorded name, for example “John mobile.” The phoneplays the name back to you and connects the call.To activate voice answering and record voice answer commands1Select Menu > Settings > General > Voice control > Voice answer > Activate.2Follow the instructions that appear and select Continue. Wait for the tone and say“Answer”, or say any other word.3Select Yes to accept or No for a new recording.4Wait for the tone and say “Busy”, or say any other word.5Select Yes to accept or No for a new recording.6Follow the instructions that appear and select Continue.7Select the environments in which you want to activate voice answering.To answer a call using voice commands•Say “Answer.”To re-record a voice command1Select Menu > Settings > General > Voice control > Voice dialling > Editnames.2Scroll to a command and select Options > Replace voice.3Wait for the tone and say the command.Diverting callsYou can divert calls, for example, to an answering service.When Restrict calls is used, some divert call options are not available.To divert calls1Select Menu > Settings > Calls > Divert calls.2Select a call type and a divert option.3Select Activate.   appears.4Enter the number to divert calls to and select OK.Call waitingYou will hear a beep if you receive a second call while call waiting is active.To activate call waiting•Select Menu > Settings > Calls > Manage calls > Call waiting > Activate.More than one callYou can handle more than one call at a time. For example, you can put an ongoing call onhold, while you make or answer a second call. You can also switch between the two calls.You cannot answer a third call without ending one of the first two calls.To switch between two calls•During the call, press  .To join two calls•During the call, select Options > Join calls.To end an ongoing call and return to the call on hold•First press   and then  .22This is an Internet version of this publication. © Print only for private use.
To make a second call1During the call, press  . This puts the ongoing call on hold.2Select Options > Add call.3Enter the number to call and press  .To answer a second call•During the call, press  . This puts the ongoing call on hold.To reject a second call•During the call, press   and continue with the ongoing call.To end an ongoing call and answer a second call•During the call, select Replace active call.Conference callsWith a conference call, you can have a joint conversation with up to five people.To add a new participant1During the call, press  . This puts the joined calls on hold.2Select Options > Add call.3Enter the number to call and press  .4Select Options > Join calls to add the new participant.5Repeat this task to add more participants.To release a participant1Select Options > Release party.2Select the participant to release.To have a private conversation1During the call, select Options > Talk to and select the participant to talk to.2To resume the conference call, select Options > Join calls.My numbersYou can view, add and edit your own phone numbers.To check your phone numbers1Select Menu > Contacts.2Scroll to New contact and select Options > Special numbers > My numbers.3Select an option.Accept callsYou can choose to receive calls from certain phone numbers only.To add numbers to the accepted callers list1Select Menu > Settings > Calls > Manage calls > Accept calls > Only from list.2Scroll to New and select Add.3Select a contact or Groups.To accept all calls•Select Menu > Settings > Calls > Manage calls > Accept calls > All callers.Restricted diallingYou can restrict outgoing and incoming calls. A password from your service provider isrequired.If you divert incoming calls, you cannot use some restrict calls options.23This is an Internet version of this publication. © Print only for private use.
Restrict calls optionsStandard options are:•All outgoing – all outgoing calls•Outgoing intl – all outgoing international calls•Outgoing intl roam. – all outgoing international calls except to your home country•All incoming – all incoming calls•Inc. when roaming – all incoming calls when you are abroadTo restrict calls1Select Menu > Settings > Calls > Manage calls > Restrict calls.2Select an option.3Select Activate.4Enter your password and select OK.Call time and costDuring a call, the phone shows how long you have been talking. You can also check onthe duration of your last call, your outgoing calls and the total time of all your calls.To check the call time•Select Menu > Settings > Calls > Time > Call timers.Showing or hiding your phone numberYou can decide to show or hide your phone number when you make a call.To hide your phone number1Select Menu > Settings > Calls > Show/hide my no..2Select Hide number.24This is an Internet version of this publication. © Print only for private use.
ImagingThe phone must be closed before you can use the camera. You can take photos and recordvideos to view, save or send. When the phone is closed, you can find saved photos andvideos in   or  . When the phone is open, you can find saved photos and videos inMedia and in File manager. Use Media Go™ to transfer content to and from your phone.For more information, see Transferring content to and from a computer on page 42.To activate the camera•Tap  .Using the still cameraTo take a photo by tapping the screen1Activate the camera.2If the still camera is not selected, tap  .3Tap  .4Tap a spot in the viewfinder where you want the focus to be. The photo is taken assoon as focus is set. The photo is automatically saved.5To return to the viewfinder and to take another photo, press  .To take a photo using the shutter key1Activate the camera.2If the still camera is not selected, tap  .3Tap  .4Press   halfway down to use auto focus. When the dot and focus frame are green,press   fully down to take a photo. The photo is saved automatically.5To return to the viewfinder and to take another photo, press  .To use zoom•Press the volume key.To select still camera settings1Activate the camera.2If the still camera is not selected, tap  .3Tap  .4Tap   to display the settings bar.Face detectionYou can use face detection to bring an off-centre face into focus. The camera automaticallydetects up to three faces, indicated by white frames. A green frame shows which face hasbeen selected for focus. Focus is set to the face closest to the camera.To use Face detection1Activate the camera.2If the still camera is not selected, tap  .3Tap  .4Tap   to display the settings bar.5Tap   and then  .6Tap the screen to take the photo. The photo is taken as soon as focus is set. Thephoto is saved automatically.7To return to the viewfinder and to take another photo, press  .Photo fixYou can use Photo fix to improve a photo you have taken. In a one-tap operation,brightness, light and contrast are adjusted to give you the best possible photo. Theimprovements are saved as a copy of the photo. The original photo is not affected.25This is an Internet version of this publication. © Print only for private use.
To improve a photo with Photo fix1Take a photo.2During review, tap the screen to display the toolbar.3Tap  .4Tap  .5Review the improvement and tap   to save.6If you do not want to save the improvement select  .You can apply Photo fix on a photo several times.Still camera settingsSetting Icon   DescriptionScenes     Use Scenes to quickly set up the camera for commonsituations using pre-programmed scenes. The camera hasdetermined a number of settings for you to fit the selectedscene, ensuring the best possible photo. Auto The camera automatically adjusts settings for a photo. Portrait Use for portrait photos. Face detection is turned on. Settingsare optimised to give slightly softer skin tones. Twilight portrait Use for portrait photos at night or in poorly lit environments(with or without the flash). Due to long exposure time, thecamera must be held still or placed on a stable surface. Sports Use for photos of fast-moving objects. Short exposure timeminimises motion blurring. Snow & beach Use in bright environments to avoid underexposed photos. Landscape Use for landscape photos. The camera focuses on distantobjects. The flash is turned off. Twilight landscape Use when taking landscape photos at night or in poorly litenvironments (without the flash). Due to long exposure time,the camera must be held still or placed on a stable surface. Document Use for photos of text or drawings. It gives the photoincreased and sharper contrast.Focus     Focus controls which part of a photo should be sharp. Auto The camera automatically focuses on the selected subject.The white focus frame turns green when focus is set. Face detection The camera automatically detects up to three human faces,indicated by white frames. A green frame shows which facehas been selected when auto focus is used. Focus is set onthe face closest to the camera. Face detection cannot beused for all scene types. Macro Auto focus for extreme close-up photos. Infinite Use when taking photos at a distance. Focus is set onsubjects far away. Subjects close to the camera may beblurred.Flash     Use the flash to take photos when lighting conditions arepoor. Auto The flash will automatically fire when lighting conditions arepoor. Off The flash never goes off, regardless of lighting conditions.Sometimes photo quality can be better without a flash, evenif lighting conditions are poor. Taking a good photo withoutusing the flash requires a steady hand. You can use the self-timer to avoid a blurred photo.Self-timer     With the self-timer you can take a photo without holding thephone. Use it to take self-portraits, or group photos whereeveryone can be in the photo. You can also use the self-timerto avoid shaking the camera when taking photos.26This is an Internet version of this publication. © Print only for private use.
 On, 10s Sets a 10-second delay from when the shutter key is presseduntil the photo is taken. On, 2s It can be hard to hold the phone perfectly still when pressingthe shutter key, which may result in a blurred photo. Use the2-second delay to solve this problem. Off The photo is taken as soon as you press the shutter key.Picture size     You can select between several picture sizes and aspectratios before taking a photo. Note that a photo with a higherresolution requires more memory. 8MP 8 megapixel picture size with 4:3 aspect ratio. Suitable forphotos you want to view on non-widescreen displays or printin high resolution. 7MP 7 megapixel picture size with 3:2 aspect ratio. This is the ratioused for traditional photos. Printed photos will fit most framesand photo albums. 6MP 6 megapixel picture size with 16:9 aspect ratio. A highresolution widescreen format. Has a higher resolution thanfull HD. Suitable for photos you want to view on widescreendisplays. 3MP 3 megapixel picture size with 4:3 aspect ratio. Suitable forphotos you want to view on non-widescreen displays. Full HD Full high-definition format with 1920×1080 pixels. Suitable forphotos you want to view on a widescreen HD TV.Add geotags     You can tag photos with details of where you took them.Show friends and family where you were on a map, or usegeotags to find your way back to the location another time. Off When turned off, you are not able to view the location ofwhere you took a photo on a map. On When turned on, the approximate geographical location isadded to photos when you take them. This information canlater be used to identify the location where the photo wastaken. You can view your photos on a map in Media >Photo.Tips on using the cameraRule of thirdsDon’t place your subject in the middle of the frame. By placing it a third of the way in, youachieve a better result.Hold it steadyAvoid blurry photos by holding the camera steady. Try to steady your hand by leaning itagainst a solid object. You can also use the self-timer to make sure that the phone is steadywhen the photo is taken.Get closerBy getting as close as possible to your subject, you can avoid relying on the zoom. Try tofill the viewfinder with your subject.Stay within the flash rangePhotos taken beyond the maximum flash range will be too dark. The maximum flash rangeis about four steps from the subject.Consider varietyThink about different angles, and move towards the object. Take some vertical photos. Trydifferent positions.Use a plain backgroundA plain background helps highlight your subject.27This is an Internet version of this publication. © Print only for private use.
Keep your lens cleanMobile phones are used in all kinds of weather and places, and carried in pockets and bags.This results in the camera lens becoming dirty and covered with fingerprints. Use a softcloth to clean the lens.Using the video cameraTo record a video by tapping the screen1Activate the camera.2If the video camera is not selected, tap  .3Tap  .4To start recording, tap the screen.5To pause the recording, tap  . To continue recording, tap  .6To stop recording, tap  . The video is saved automatically.7To return to the viewfinder and to record another video, tap  .To record a video using the shutter key1Activate the camera.2If the video camera is not selected, tap  .3Tap  .4Press   to start recording.5To stop recording, press  . The video is saved automatically.6To return to the viewfinder and to record another video, press  .To select video camera settings1Activate the camera.2If the video camera is not selected, tap  .3Tap  .4Tap   to display the settings bar.Video camera settingsSetting Icon   DescriptionVideo format     Select the size and aspect ratio of a video before you record it. nHD 640x352 pixels video size with 16:9 aspect ratio. A widescreenformat suitable for videos you want to view on widescreen displays. VGA 640x480 pixels video size. Standard video format for video camerasand computer screens. Message Record videos suitable for sending in multimedia messages. Therecording time of this video format is limited to fit in a multimediamessage.Night mode     Use when lighting conditions are poor. On When turned on, light sensitivity is increased. Use in poorly litenvironments. Videos of fast-moving objects may get blurred. Holdyour hand steady, or use a support. Off Turn off night mode when lighting conditions are good, to improvethe video quality.Light     Select whether you want to use the light when you record a video. On Turn on the light to improve close-up videos in poorly litenvironments. Off The light is always turned off regardless of lighting conditions. Note:Sometimes a video gets better without the light, even if lightingconditions are poor. To record a good-quality video without usingthe light requires a steady hand. You can also use a support and theself-timer to avoid a blurred video.Microphone     Select whether to pick up the surrounding sound when recordingvideos.28This is an Internet version of this publication. © Print only for private use.
 Off When turned off, no sound is recorded with the video. On When turned on, sound is recorded with the video.Self-timer     With the self-timer you can record a video without holding the phone.Use it to record a video where everyone can be in it. You can alsouse the self-timer to make sure that the phone is steady when thevideo is recorded. On, 10s Sets a 10-second delay from when the shutter key is pressed untilthe video recording starts. On, 2s It can be hard to hold the phone perfectly still when pressing theshutter key, which may result in a blurred video. Use the 2-seconddelay to solve this problem. Off When the self-timer is off, the video recording starts as soon as youpress the shutter key.Image stabiliser     When recording a video, it can be difficult to hold the phone steady.The stabiliser helps you by compensating for small movements ofthe hand. On It is recommended to have the stabiliser turned on. Off When the stabiliser is turned off, the video you record might lookjumpy.Working with photosYou can view, enhance and organise photos and videos on your computer by installing theAdobe™ Photoshop™ Album Starter Edition. It is available for download atwww.sonyericsson.com/support.Use Media Go™ to transfer content to and from your phone.Editing photosTo delete a photo1Tap  .2Flick through the photos and videos.3Select a photo.4Tap the photo to view the tool bar.5Tap   to delete a photo.To edit a photo1Tap  .2Flick through the photos and videos.3Select a photo.4Tap the photo to view the tool bar.5Tap 6Tap   to apply black and white.7Tap   to apply Photo fix.To zoom a photo1Tap 2Flick through the photos and videos.3Select a photo.4Tap the photo to view the tool bar.5Tap  .6Drag   to zoom the photo.29This is an Internet version of this publication. © Print only for private use.
Viewing and tagging photosTo view photos and videos using the camera1Activate the camera.2Tap  .3Tap  .4Flick through your photos and videos. Tap the screen to display controls.5Videos are indicated by  . Tap   to play a video.To view photos and videos in the media browser1Tap  .2Flick through the photos and videos.3Tap a photo or a video.To view photos in a slide show1Select Menu > Media > Photo > Camera album.2Select a month.3Scroll to a photo and select View.4Select Options > Slide show.5Select a mood.Viewing photos on a mapWhen you take a photo, you can attach your geographical position to it. This is called geotagging. Geo-tagged photos are tagged with   in Media. If you cannot view photos on amap, see I cannot use Internet-based services on page 73.Information provided by use of Geo Tagging is approximate and will require use of a compatibleapplication. Sony Ericsson makes no warranty of any kind with respect to the accuracy of suchlocation data.To view photos on a map1Select Menu > Media > Photo > Geotags.2Select a month.3Scroll to a photo and select View.4Select Options > View on map.To turn on or off geo tagging1Activate the camera.2If the still camera is not selected, tap  .3Tap  .4Tap   to display the settings bar.5Tap   or 6Tap an option.Photo tagsYou can organise your photos using photo tags. You can create new tags, assign one orseveral tags to a photo, or remove a tag from a photo. Photos with the same tag are savedtogether under Photo tags. For example, you can add the tag ’Vacation’ to all your vacationphotos and view them all in Photo tags under the tag ’Vacation’.To create a new photo tag1Select Menu > Media > Photo > Camera album.2Select a month.3Scroll to a photo and select View.4Press the navigation key downwards and select Options > Tag this photo.30This is an Internet version of this publication. © Print only for private use.
To tag photos1Select Menu > Media > Photo > Camera album.2Select a month.3Scroll to a photo and select View.4Press the navigation key downwards and scroll to a tag.5Select Options > Tag this photo.6For each photo you want to tag, scroll to the photo and select Options > Tag thisphoto.To delete a tag from a photo1When viewing a photo, press the navigation key downwards2Scroll to a tag and select Options > Delete tag.Using photosYou can add a photo to a contact, use the photo during phone startup, as a wallpaper instandby, or as a screen saver.To use photos1Select Menu > Media > Photo > Camera album.2Select a month.3Scroll to a photo and select View.4Select Options > Use as.5Select an option.Printing photosYou can print photos using a USB cable connected to a PictBridge™ compatible printer.You can also print using a Bluetooth compatible printer that supports the Object Push Profile.To print photos using a USB cable1Select Menu > Organiser > File manager > Camera album > Open.2Select Options > Mark > Mark several or Mark all.3Select Options > Print and follow the instructions.4Connect the USB cable to the phone.5Connect the USB cable to the printer.6Wait for feedback in the phone.7Set printer settings if required and select Print.Disconnect and re-connect the USB cable if there is a printer error.Sharing photos and videosYou can take a picture or video, or view a picture or a video, and send it to another phoneor to the web.To send a photo or a video saved in the phone1Tap  .2Select a photo or a video.3Tap the screen.4Tap  .5Select To web albums, As message, As email or Via Bluetooth.6Open the phone.7Enter a recipient and select Send.31This is an Internet version of this publication. © Print only for private use.
To send a photo or a video you have just captured1When you have captured a photo or a video, tap  .2Select To web albums, As message, As email or Via Bluetooth.3Open the phone.4Enter a recipient and select Send.Using web albumsIf your subscription supports this service, you can send photos or videos to a web album.If you cannot send content to a web album, see I cannot use Internet-based services onpage 73.Web services may require a separate license agreement between you and the service provider.Additional regulations and charges may apply. Contact your service provider for moreinformation.To send photos saved in your phone to a web album1Select Menu > Media > Photo > Camera album.2Select a month and year.3Scroll to the photo and select Options > Send > To web albums.4Select a web album service. If requested, enter your login information.5Select an album, or add a new album.6Enter text and select Send.To send videos saved in your phone to a web album1Select Menu > Media > Video > Videos.2Scroll to a video and select Options > Send > To web albums.3Select a web album service. If requested, enter your login information.4Select a web album, or add a new web album.5Enter some text and select Send.To view web albums1Select Menu > Media > Photo > Web albums.2Select a web album.To go to a Web address from contacts1Select Menu > Contacts.2Scroll to a contact and select Open.3Scroll to a Web address and select Go to.Accessing videos in your phoneWhen the phone is closed, you can browse and play videos using the video player in themedia browser. You can find videos you recorded using the camera under Cameraalbum. You can access other videos from Videos. When the phone is open, you canaccess your videos from Media and File manager.To play videos1Tap  .2Tap a category.3Flick left or right to browse through your videos.4Tap the video you want to play.To pause videos1Tap the screen to display the controls.2Tap  .To fast forward and rewind videos1Tap the screen to display the controls.2Touch and hold   or  .32This is an Internet version of this publication. © Print only for private use.
To move between videos•Flick left to move to the next video, or flick right to move to the previous video.To view a video zoomed in1Tap the screen to display the controls.2Tap  .To show subtitles1Tap the screen to display the controls.2If a video has subtitles,   is displayed. Tap  .3Select a language.To hide subtitles1Tap the screen to display the controls.2If a video has subtitles,   is displayed. Tap  .3Tap Off.To play videos1Select Menu > Media > Video > Videos or Camera album.2Scroll to a title and select Play.To stop playing videos•Press the centre selection key.To fast forward and rewind•Press and hold down the navigation key right or left.To move between videos•Press the navigation key right or left.To change the volume•Press the volume key up or down.To change the video screen size•Press the navigation key downwards.33This is an Internet version of this publication. © Print only for private use.
MusicYou can listen to music, audio books and podcasts. Use Media Go™ to transfer contentto and from your phone. For more information, see Transferring content to and from acomputer on page 42.Stereo portable handsfreeTo use a handsfree•Connect a portable handsfree. Music stops when you receive a call and resumeswhen the call has ended.If headphones are not included with the phone, you may purchase them separately.Accessing music in your phoneWhen the phone is closed, you can browse and play music using the music player in themedia browser. More music features are available in Media and File manager, which youcan access when the phone is open.To browse music1Tap  .2Tap a category.3Flick left or right to browse through your music.4Tap an album or a playlist to view its content.5To go back, tap outside the list and then tap the top part of the screen.To browse music using the slider1When browsing music, for example, albums, tap the lower part of the screen todisplay  .2To browse your music, drag   left or right.To play music1Tap  .2Tap a category.3Flick left or right to browse through your music.4Tap an album or a playlist.5To play a track, tap the title.To pause the music•Tap  .To fast forward and rewind music•Touch and hold   or  .You can also drag   right or left to fast forward or rewind.34This is an Internet version of this publication. © Print only for private use.
To move between tracks•Tap   or  .To view the current play queue•Tap the album art.To minimise the music player•Tap  .To return to the music player•Tap   in the lower part of the screen.To play music1Select Menu > Media > Music.2Browse by category using the navigation key.3Scroll to a title and select Play.To stop playing music•Press the centre selection key.To fast forward and rewind•Press and hold down the navigation key right or left.To move between tracks•Press the navigation key right or left.To change the volume•Press the volume key up or down.To minimise the player•Select Options > Minimise.To return to the player•Select Menu > Media.Playing music in random orderYou can play tracks in playlists in random order. A playlist can be, for example, a playlistyou have created yourself or an album.To play tracks in random order1In the music player, tap  .2Tap  .35This is an Internet version of this publication. © Print only for private use.
Shake controlTo shuffle tracks•When music is playing, press and hold down   and shake your phone.You can also shuffle tracks when the phone is open by shaking the phone.Using the music mini playerYou can use the music mini player for quick access to music controls when the screen lockis on.To activate the music mini player1To view the screen, press   on top of the phone.2Tap the status bar at the bottom of the screen.Clear stereo and clear bassClear stereo and clear bass are turned on when you set the equaliser manually.To set the equaliser manually1Select Menu > Media > Music.2Browse by category using the navigation key.3Scroll to a title and select Play.4Select Options > Settings > Equaliser.5Make sure you are in Manual view. If you are not, select Manual.6To scroll between the frequency bands, press the navigation key right or left.7To change the value for a selected frequency band, press the navigation keyupwards or downwards.8To go back to the player view, select Done.To turn on clear stereo and clear bass using equaliser presets1Select Menu > Media > Music.2Browse by category using the navigation key.3Scroll to a title and select Play.4Select Options > Settings > Equaliser.5Make sure you are in Preset view. If you are not, select Preset.6To scroll between the presets, press the navigation key right or left.7Select any of the presets, except Normal.PlaylistsYou can create playlists to organise your music. You can add tracks and folders to a playlist.It may take a few minutes for the phone to create a playlist.36This is an Internet version of this publication. © Print only for private use.
To create a playlist1Select Menu > Media > Music > Playlists.2Scroll to New playlist and select Add.3Enter a name and select OK.4For each track you want to add, scroll to the track and select Mark.5Select Add to add the marked tracks to the playlist.To add tracks to a playlist1Select Menu > Media > Music > Playlists.2Select a playlist.3Scroll to Add music and select Add.4For each track you want to add, scroll to the track and select Mark.5Select Add to add the marked tracks to the playlist.SensMe™With SensMe™ you can create playlists in two ways, by mood or from all the tracks in yourphone. By mood, you first use Media Go™ to transfer tracks to your phone. Informationsuch as mood, tempo and chords is then added. The tracks are displayed as dots on amap with two axes. In the All view, all the tracks in your phone are placed randomly on themap.To create a playlist by mood1Select Menu > Media > Music.2Scroll to SensMe™ and select Open.3Press the navigation key upwards, downwards, right or left.4Make sure you are in Mood view. If you are not, select Mood.5To preview different tracks, press the navigation key upwards, downwards, right orleft.6To choose an area of tracks, select Add and press the navigation key upwards ordownwards.7To create the playlist and play it in the music player, select Create.8Select Options > Save playlist.9Enter a name and select OK.To create a playlist from All view1Select Menu > Media > Music.2Scroll to SensMe™ and select Open.3Press the navigation key upwards, downwards, right or left.4Make sure you are in All view. If you are not, select All.5To preview different tracks, press the navigation key upwards, downwards, right orleft.6To choose an area of tracks, select Add and press the navigation key upwards ordownwards.7To create the playlist for playing in the music player, select Create.8Select Options > Save playlist.9Enter a name and select OK.37This is an Internet version of this publication. © Print only for private use.
Audio booksIf you use Media Go™ to transfer audio books to your phone from a computer, you canlisten to the audio books in your phone. It may take a few minutes before a transferredaudio book appears in the list of available audio books.To access audio books•Select Menu > Media > Music > Audio books.You can find audio books in formats other than M4B and those that do not have ID3v2 chaptertags in the Tracks folder.Buy NowIf you subscribe to a music service allowing limited, non-permanent use with your phone,you can mark a track you are interested in buying later. The next time you synchronise yourmusic with Windows Media® Player on a computer with enabled Internet access, youshould be asked if you want to buy the track you marked earlier. If you accept, the track isdownloaded to your computer and your selected music service account is charged. Thisservice requires a subscription and account with a downloadable music service, acomputer with Microsoft® Windows Media® Player 11 or subsequent compatible versionof Windows Media® Player, and a USB computer connection.You cannot see that a track is marked. You cannot unmark tracks you have already marked.To mark a track•When the track you want to mark is playing, press and hold down  .PlayNow™When you select PlayNow™ you enter PlayNow™ arena, where you can download music,games, ringtones, themes and wallpapers. You can preview or listen to content before youpurchase and download it to your phone. If you cannot use PlayNow™ and PlayNow™arena, see I cannot use Internet-based services on page 73.This service is not available in all countries.For extended functionality, you can also access the PlayNow™ arena Web shop on acomputer from www.playnow-arena.com. For more information, go towww.sonyericsson.com/support to read the PlayNow™ arena Feature guide.To use PlayNow™1Select Menu > PlayNow™.2Scroll through PlayNow™ arena and follow the instructions to preview and purchasecontent.TrackID™TrackID™ is a music recognition service. You can search for title, artist and album namefor a track you hear playing through a loudspeaker or on the radio in your phone. If youcannot use TrackID™, see I cannot use Internet-based services on page 73.To search for track information•When you hear a track through a loudspeaker, select Menu > Entertainment >TrackID™ > Start.•When the radio in your phone is playing select Options > TrackID™.For best results, use TrackID™ in a quiet area.38This is an Internet version of this publication. © Print only for private use.
Online music and video clipsYou can view video clips and listen to music by streaming them to your phone from theInternet. If you cannot use the Internet, see I cannot use Internet-based services onpage 73.To select a data account for streaming1Select Menu > Settings > Connectivity > Streaming settings > Connect using:.2Select the data account to use.3Select Save.To stream music and video clips1Select Menu > Internet.2Select   and then  .3Select a link to stream from.RadioDo not use your phone as a radio in places where this is prohibited.To turn on the radio1Connect a handsfree to the phone.2When the phone is closed, unlock the screen.3Tap  .To search for channels automatically•Tap   or  .To search for channels using the slider•Drag   through the frequency band.To fine tune the frequency•Tap   or  .To select saved channels1Tap  .2Tap a channel.If   is unavailable, there are no channels saved. To save channels, use the radio when the phoneis open.To minimise the radio•Tap  .To return to the radio•Tap  .To turn off the radio•Tap  .To turn on the radio1Connect a handsfree to the phone.2Select Menu > Entertainment > Radio.To search for channels automatically•Select Search.39This is an Internet version of this publication. © Print only for private use.
To fine tune the frequency•Press the navigation key right or left.To change the volume•Press the volume key up or down.To minimise the radio•Select Options > Minimise.To return to the radio•Select Menu > Entertainment > Radio.Saving channelsYou can save up to 20 preset channels.To save channels automatically•Select Options > Channels > Auto save.To save channels manually1When you find a radio channel, select Options > Channels > Save.2Scroll to a position and select Insert.3If you want, you can rename the channel. Select Save.You can also save a channel in a position by pressing and holding down   -  .To switch between saved channels•Press the navigation key upwards or downwards.You can also select a saved channel by pressing   -  .Recording soundYou can record a voice memo or a call. Recorded sounds can also be set as ringtones.In some countries or states, it is required by law that you inform the other person before recordinga call.To record a sound1Select Menu > Entertainment > Record sound > Record.2To stop recording and save, select Save.To record a call1During an ongoing call, select Options > Record.2To save the recording, select Save.To listen to a recording1Select Menu > Organiser > File manager.2Scroll to Music and select Open.3Scroll to a recording and select Play.40This is an Internet version of this publication. © Print only for private use.
Transferring and handling contentYou can transfer and handle content such as pictures and music.You are not allowed to exchange some copyright-protected material.   identifies a protecteditem.Handling content in the phoneYou can use File manager in your phone, to handle content saved in the phone memoryor on a memory card. Tabs and icons in File manager show where the content is saved.If the memory is full, delete some content to create space.To view memory status1Select Menu > Organiser > File manager.2Select Options > Memory status.3Select Memory card or Phone.To select more than one item in a folder1Select Menu > Organiser > File manager.2Scroll to a folder and select Open.3Select Options > Mark > Mark several.4For each item you want to mark, scroll to the item and select Mark.To move items between the phone memory and the memory card1Select Menu > Organiser > File manager.2Find an item and select Options > Manage file > Move.3Select Memory card or Phone.4Scroll to a folder and select Open.5Select Paste.To view information about content1Select Menu > Organiser > File manager.2Find an item and select Options > Information.Sending content to another phoneYou can send content, for example, in messages or using Bluetooth wireless technology.To send content1Scroll to an item and select Options > Send.2Select a transfer method.Make sure the receiving device supports the transfer method you select.Using a USB cableYou can connect your phone to a computer with a USB cable. If you are using a PC, youare asked to install PC Companion the first time you connect.You may have to purchase a USB cable separately. Only use a USB cable supported by yourphone.To disconnect the USB cable safelyDo not disconnect the USB cable when transferring content as this may corrupt the content.41This is an Internet version of this publication. © Print only for private use.
1Computer: Right-click the Safely Remove Hardware icon in Microsoft® Windows®Explorer.2Select the drives you want to disconnect. Select Stop.3Wait until you are notified that it is safe to remove the drive. Disconnect the USBcable.PC CompanionPC Companion lets you:•Explore content in your phone.•Use your phone as a modem.•Install PC Software used to synchronise, transfer and back up phone content.For more information, go to www.sonyericsson.com/support to read Feature guides.To download Mac® compatible software, go to www.sonyericsson.com/support.To install PC Companion1Connect your phone to a PC using a USB cable supported by your phone.2Computer: Follow the instructions.Dragging and dropping contentYou can drag and drop content between your phone, a memory card and a computer inMicrosoft Windows Explorer.To drag and drop content1Connect your phone to a computer using a USB cable.2Computer: Wait until the phone memory and memory card appear as external disksin Microsoft® Windows® Explorer.3Drag and drop selected files between the phone and the computer.Required operating systemsYou need one of these operating systems to use Sony Ericsson PC software:•Microsoft® Windows Vista™•Microsoft® Windows® XP, Service Pack 2 or higherTransferring content to and from a computerYou can use Media Go™ to transfer media content between your phone and a computer.Media Go™ is available for download through PC Companion or fromwww.sonyericsson.com/support.To download Mac® compatible software, go to www.sonyericsson.com/support.To transfer content using Media Go™1Connect the phone to a computer with a USB cable supported by your phone.2Computer:  Select Start/Programs/Sony/Media Go™.3Select Transfer to or from Device using Media Go™ and click OK.4Wait until the phone appears in Media Go™.5Move files between your phone and the computer in Media Go™.Media HomeYou can use Media Home to transfer content automatically from Media Go™ to yourphone. You can also use Media Home to download content from a DLNA server.Before using Media Home, you must install Media Go™ on your computer and enableMedia sharing. Media Go™ is available for download through PC Companion or fromwww.sonyericsson.com/support.42This is an Internet version of this publication. © Print only for private use.
To set up Media Home1Computer:  Turn on Media Go™ and enable Media sharing.2Phone:  Start and complete the Setup wizard.To automatically transfer content to your phone from Media Go™•Connect the phone to the charger. Media Home will start an automatic downloadwhen a charger is connected.To manually transfer content to your phone from Media Go™1Select Organiser > Media Home.2Press Start.To browse and download content from a DLNA server1Select Organiser > Media Home > Options > Browse.2Select a server and mark the content you want to download.3Press Download.Phone nameYou can enter a name for your phone that is shown to other devices when using, forexample, Bluetooth™ wireless technology.To enter a phone name1Select Menu > Settings > Connectivity > Phone name.2Enter the phone name and select OK.Using Bluetooth™ wireless technologyThe Bluetooth™ function is free of charge and makes wireless connection to otherBluetooth devices possible. You can, for example:•Connect to handsfree devices.•Connect to several devices at the same time.•Connect to computers and access the Internet.•Exchange items.•Play multiplayer games.A range within 10 metres (33 feet), with no solid objects in between, is recommended forBluetooth communication.Before using Bluetooth wireless technologyYou must turn on the Bluetooth function to communicate with other devices. You may alsohave to pair your phone with other Bluetooth devices.To turn on the Bluetooth function•Select Menu > Settings > Connectivity > Bluetooth > Turn on.Make sure that the device you want to pair your phone with has the Bluetooth function activatedand Bluetooth visibility turned on.To pair the phone with another device1Select Menu > Settings > Connectivity > Bluetooth > Add new device.2Select a device.3Enter a passcode, if required.43This is an Internet version of this publication. © Print only for private use.
To allow connection to the phone1Select Menu > Settings > Connectivity > Bluetooth.2Select a device from the list.3Select Options > Allow connection.4Select Always ask or Always allow.This is only possible with devices that require access to a secure service.Power savingYou can save battery power with the Power save function. In Power save mode you canonly connect with a single Bluetooth device. If you want to connect with more than oneBluetooth device at the same time, you must turn off this function.To turn on Power save•Select Menu > Settings > Connectivity > Bluetooth > Options > Power save >On.Transferring sound to and from a Bluetooth handsfreeYou can transfer sound to and from a Bluetooth handsfree using a phone key or theappropriate key on the handsfree.To transfer sound1Select Menu > Settings > Connectivity > Bluetooth > Options > Incoming call.2Select an option. In phone transfers sound to the phone. In handsfree transferssound to the handsfree.You need to answer the call with the phone key for this setting to apply.To transfer sound during a call1During a call, select Sound.2Select from the list of options available.Backing up and restoringYou can back up and restore contacts, the calendar, tasks, notes and bookmarks usingthe Sony Ericsson PC Suite.Before backing up and restoring, you need to install the Sony Ericsson PC Suite, which isavailable through PC Companion or from www.sonyericsson.com/support.You can back up and restore contacts in your phone using a memory card. You can movecontent between the memory card and the phone memory. See Handling content in thephone on page 41.Back up your phone content regularly to make sure you do not lose it.To make a backup using the Sony Ericsson PC Suite1Computer: Start the Sony Ericsson PC Suite from Start/Programs/Sony Ericsson/Sony Ericsson PC Suite.2Follow the instructions in the Sony Ericsson PC Suite on how to connect.3Go to the backup and restore section in the Sony Ericsson PC Suite and make abackup of your phone content.To restore phone content using the Sony Ericsson PC SuiteThe Sony Ericsson PC Suite overwrites all phone content during the restore process. You maydamage your phone if you interrupt the process.44This is an Internet version of this publication. © Print only for private use.
1Computer: Start the Sony Ericsson PC Suite from Start/Programs/Sony Ericsson/Sony Ericsson PC Suite.2Follow the instructions in the Sony Ericsson PC Suite on how to connect.3Go to the backup and restore section in the Sony Ericsson PC Suite and restoreyour phone content.45This is an Internet version of this publication. © Print only for private use.
Updating your phoneYou can update your phone to the most recent software for optimal performance and toget the latest enhancements. You need a USB cable and an Internet-connected PC.To learn how, go towww.sonyericsson.com/update.Remember to back up your phone content before updating. See Backing up and restoring onpage 44.Updating your phone using Sony Ericsson PC SuiteYou can update your phone using a USB cable and Sony Ericsson PC Suite. When thephone is connected, it will automatically check for and notify you of new updates.Updating your phone wirelesslyYou can update your phone over the air using the Update Service application in the phone.You do not lose personal or phone information.Update Service requires data access such as GPRS, 3G or HSDPA.To select settings for Update Service•Select Menu > Settings > General > Update software > Settings > Internetsettings.To use Update Service1Select Menu > Settings > General > Update software.2Select Search for update and follow the instructions that appear.46This is an Internet version of this publication. © Print only for private use.
MessagingText and picture messagesMessages can contain text, pictures, sound effects, animations, and melodies.When sending messages, the phone automatically selects the most suitable method (as atext or picture message) for sending the message.If you cannot use picture messages, see I cannot use Internet-based services onpage 73.Sending messagesYou can send messages from your phone. The maximum size of a standard text messageis 160 characters (including spaces) if no other items are added to the message. If youenter more than 160 characters, a second message is created. Your messages are sentas one concatenated message.To create and send a message1Select Menu > Messaging > Write new > Message.2Enter text. To add items to the message, press the navigation key downwards, scrollby pressing the navigation key left or right, and select an item.3If you selected to use the camera: open the phone, take a picture or a video, andclose the phone again to continue writing.4Select Continue > Contacts look-up.5Select a recipient and select Send.If you send a message to a group, you may be charged for each member. Contact your serviceprovider for details.To copy and paste text in a message1When you write the message, select Options > Copy & paste.2Select Copy all or Mark & copy. Scroll to and mark text in the message.3Select Options > Copy & paste > Paste.Receiving and saving messagesYou are notified when you receive a message.   or   appears. Messages areautomatically saved in the phone memory. When the phone memory is full, you can deletemessages or save them on a memory card or on the SIM card.To save an incoming message on a memory card•Select Menu > Messaging > Messages > Settings > Save to > Memory card.To save a message on the SIM card1Select Menu > Messaging > Messages and select a folder.2Scroll to a message and select Options > Save message.To view a message in the inbox1Select Menu > Messaging > Messages > Inbox.2Scroll to the message and select View.To call a number contained in a message•When you view the message, scroll to the phone number and press  .Message optionsYou can set some options, such as the Message alert and default storage location, to applyto all messages. You can set other options, such as the Delivery priority and Delivery time,for each message you send.47This is an Internet version of this publication. © Print only for private use.
To set options for all messages1Select Menu > Messaging > Messages > Settings.2Select an option.To set options for a specific message1When the message is ready and a recipient is selected, select Options >Advanced.2Scroll to an option and select Edit.ConversationsYou can choose whether to view your messages in Conversations or the Inbox. Amessaging conversation shows all messaging communication between you and one ofyour contacts.To view messages in Conversations•Select Menu > Messaging > Inbox > the Conversations tab.•Select Menu > Messaging > Conversations and select a conversation.To send a message from Conversations1Select Menu > Messaging.2Select Conversations, or select Inbox > the Conversations tab.3Select a conversation.4Write a message and select Send.Voice messagesYou can send and receive a sound recording as a voice message.The sender and recipient must have a subscription supporting multimedia messaging.To record and send a voice message1Select Menu > Messaging > Write new > Voice message.2Record the message and select Stop > Send > Contacts look-up.3Select a recipient and select Send.EmailYou can use standard email functions and your computer email address in your phone.You can synchronise your email using Microsoft® Exchange ActiveSync® application.Before using emailYou can use the Basic setup to check if settings are available for your email account or youcan enter them manually. You can also receive settings atwww.sonyericsson.com/support.To create an email account for the first time1To start the email setup wizard, select Menu > Messaging > Email.2Follow the instructions to create the account.If you need to enter settings manually, you can contact your email provider for more information.An email provider could be the company that supplied your email address.48This is an Internet version of this publication. © Print only for private use.
To write and send an email message1Select Menu > Messaging > Email.2If you have several email accounts, select the account you want to send the messagefrom.3Select Write new.4To add a recipient, scroll to To: and select Add > Enter email address. Enter theemail address and select OK.5To add more recipients, scroll to To: and select Edit. Scroll to an option and selectAdd. When you are ready, select Done.6To enter a subject, scroll to Subject:, select Edit, enter the subject, and select OK.7To enter the message text, scroll to Text:, select Edit, enter the text, and selectOK.8Select Add to attach a file.9Select Continue > Send.To receive and read an email message1Select Menu > Messaging > Email.2If you have several email accounts, select an account.3Select Inbox > Options > Check new email.4Scroll to the message and select View.To save an email message1Select Menu > Messaging > Email.2If you have several email accounts, select an account.3Select Inbox.4Scroll to the message and select View > Options > Save message.To reply to an email message1Select Menu > Messaging > Email.2If you have several email accounts, select an account.3Select Inbox.4Scroll to the message and select Options > Reply.5Write the reply and select OK.6Select Continue > Send.To view an attachment in an email message•When you view the message, select Options > Attachments > Use > View.Active email accountIf you have several email accounts, you can change which one is active.To create additional email accounts1Select Menu > Messaging > Email.2If you have several email accounts, select an account.3Select Accounts.4Scroll to New account and select Add.To change the active email account1Select Menu > Messaging > Email.2If you have several email accounts, select an account.3Select Accounts.4Select the account you want to activate.Automatically checking for new email messagesYou can set your phone to automatically check for new email messages. You can use atime interval for the check, or you can let the phone stay connected to the email server(push email). The phone will only check for email messages for the active email account.W hen you receive a new email message, you will be notified by   .49This is an Internet version of this publication. © Print only for private use.
To set the interval for checking for new email messages1Select Menu > Messaging > Email.2If you have several email accounts, select an account.3Select Settings > the Download tab > Check interval.4Select an option.50This is an Internet version of this publication. © Print only for private use.
InternetIf you cannot use the Internet, see I cannot use Internet-based services on page 73.To start browsing1Select Search.2Enter a web address, a search phrase or the name of a bookmark.3Scroll to an item in the list and select Go to or Search.To exit the browser1When you are browsing the web, select   and then select  .2Select Exit browser.Web browser toolbarWhen you are viewing a web page, select  . The following options appear:Icon FunctionAdd the web page to your web feedsPan and zoom the web pageManage your favourite web pagesManage the files you have downloaded from the InternetWeb browser shortcutsYou can use the keypad to go directly to a web browser function.Key ShortcutBookmarks -  Enter text to Enter address, Search Internet or search in BookmarksZoomOverview (when Smart-Fit is off)BookmarksYou can create and edit bookmarks as quick links to your favourite web pages.To create a bookmark1When you are viewing a web page you want to add to your bookmarks, select and then select  .2Select Add as bookmark.To select a bookmark1Select Menu > Internet.2When you are browsing the Internet, select   and then select  .3Scroll to a bookmark and select Go to.To send a bookmark1Select Menu > Internet.2When you are browsing the Internet, select   and then select  .3Select   and scroll to a bookmark.4Select Options > Send and select a transfer method.51This is an Internet version of this publication. © Print only for private use.
History pagesYou can view and go to web pages you have previously visited.To view history pages1Select Menu > Internet.2Select   and then select  .3Select History.More browser featuresTo turn on or off Smart-Fit Rendering™1Select Menu > Internet.2Select   and then select  .3Select Settings > Smart-Fit.4Select an option.With Smart-Fit on, the web site is adjusted to your display to avoid horizontal scrolling. WithSmart-fit off, you can pan and zoom while viewing a web site.To use pan and zoom on a web page1When you are viewing a web page, select  , then select  .2Use the navigation key to move the frame.3Press the centre selection key to zoom in on a part of the web page.To use pan and zoom, Smart-Fit must be turned off.To make a call when you are browsing the web•Press  .To save a picture from a web page1When you are viewing a web page, select   and then select  .2Select Save picture.3Select a picture.To find text on a web page1When you are viewing a web page, select   and then select  .2Select Find on page.3Enter text and press Find.To send a link1When you are viewing a web page, select   and then select  .2Select Send link and select a transfer method.Make sure the receiving device supports the transfer method you select.Internet security and certificatesYour phone supports secure browsing. Certain Internet services, such as banking, requirecertificates in your phone. Your phone may already contain certificates when you buy it oryou can download new certificates.To view certificates in the phone•Select Menu > Settings > General > Security > Certificates.File transfersThe File transfer manager keeps track of the files you download from the Internet, forexample media files, podcasts and games, and helps you access them. It also tracks your52This is an Internet version of this publication. © Print only for private use.
photo uploads to web sites, such as web albums and blogs. In the File transfer manageryou can also install downloaded Java applications, and to pause, resume or canceldownloads.To access a file using File transfer1Select Menu > Organiser > File transfer.2Scroll to the file.3Press the centre selection key to access the file, or select Options for other actions.Web feedsUsing web feeds, you can subscribe to and download frequently updated content, suchas news, podcasts or photos.To add new feeds from a web page1When you browse a page on the Internet that provides web feeds, indicated by  ,select   and then  .2For each feed you want to add, scroll to the feed and select Add > Yes.3Select an update frequency.To search for web feeds1Select Menu > Media > Web feeds.2Select New feed and enter a web address.To download content via web feeds1Select Menu > Media > Web feeds.2Select an updated web feed.3Scroll to an updated feed and select View.4Scroll to a heading by pressing the navigation key left or right.5Scroll to the item you want to download by pressing the navigation key downwards,then select Options > Download file.You can access downloaded files from the File transfer manager. See File transfers onpage 52.You can also subscribe to and download web feed content to a computer using Media Go™.See To transfer content using Media Go™ on page 42.Updating web feedsYou can manually update your feeds, or schedule updates. When updates arrive, appears on the screen.To schedule web feed updates1Select Menu > Media > Web feeds.2Scroll to a feed and select Options > Schedule update.3Select an option.Frequent updates may be costly.Web feeds in standbyYou can show news updates on the standby screen.To show web feeds in standby1Select Menu > Media > Web feeds.2Scroll to a feed and select Options > Settings > Standby ticker > Show instandby.53This is an Internet version of this publication. © Print only for private use.
To access web feeds from standby1From standby, select Ticker.2To read more about a feed, press the navigation key upwards or downwards to scrollto a headline, then select View.PodcastsPodcasts are files, for example, radio programmes or video content, that you can downloadand play. You subscribe to and download podcasts using web feeds.To access audio podcasts•Select Menu > Media > Music > Music feeds.To access video podcasts•Select Menu > Media > Video > Video feeds.Photo feedsYou can subscribe to photo feeds and download photos.To access photo feeds•Select Menu > Media > Photo > Photo feeds.Facebook™Facebook is a social utility that helps you communicate with your friends, family andcoworkers.To access Facebook•Select Menu > Organiser > Applications > Facebook.54This is an Internet version of this publication. © Print only for private use.
Connected homeConnected home makes the phone a part of everyday living in terms of music and mediahandling in home environment. It connects Hifi, TV, movies, gaming etc. on the homenetwork.Wi-Fi™Using Wi-Fi™ you can access the Internet wirelessly with your phone. You can browse theInternet at home (personal networks) or in public access zones (hot spots):•Personal networks – usually protected. A pass phrase or a key is required from the owner.•Hot spots – usually non-protected but often requires you to log on to the operator’s servicebefore you get Internet access.Using Wi-FiTo be able to browse the Internet using Wi-Fi you need to search for and connect to anavailable network and then open the Internet browser.To turn on Wi-Fi•Select Menu > Settings > Connectivity > Wi-Fi > Turn on.To connect to a network1Select Menu > Settings > Connectivity > Wi-Fi.2Scroll to a network and select Connect.To start browsing using Wi-Fi1Make sure   is showing in the status bar.2Select Menu > Internet.Often used networks can be saved as favourites. If you turn on Auto connect for one of thesenetworks, your phone will connect automatically to that network when it is within range.DLNA™Your phone has a built-in DLNA™ (Digital Living Network Alliance) functionality thatconnects to your home network through Wi-Fi. Other DLNA devices connected to the samehome network can access, view and play images and music saved in your phone. Acompatible DLNA device can be, for example, a computer, camera, TV, PLAYSTATION®3or another phone with DLNA functionallity.Wi-Fi must be turned on and the phone must be connected to a favourite networkTo set the phone as a DLNA server1Select Menu > Settings > Connectivity > Content sharing.2Select a favourite network from the list.3Select On > Save.A DLNA server exposes music, images and videos on the network. Other DLNA units play mediafrom the media servers on the network.To view photos saved in your phone on another DLNA device1Select Menu > Media > Photo > Camera album.2Select a month.3Scroll to a photo and select Options > View on.4Select a DLNA device from the list.55This is an Internet version of this publication. © Print only for private use.
To play music stored in your phone on another DLNA device1Select Menu > Media > Music.2Browse by category using the navigation key.3Scroll to and select a title.4Select Options > Play on.5Select a DLNA device from the list.To play music stored on another DLNA device in your phone1Select Menu > Media > Music > Media servers.2Select a Media server from the list.3Browse by category using the navigation key.4Scroll to a title and select Play.Remote Play with PLAYSTATION®3Remote Play with PLAYSTATION 3 allows your phone to connect wirelessly to aPLAYSTATION 3 system. With Remote Play, you can access your PLAYSTATION 3 mediacontent on your phone. You can control and view the PLAYSTATION 3 screen, includingthe menu, on your mobile phone. PLAYSTATION 3 will stream media to your phone. Youcan browse video, photos and music and download and watch game and movie trailersand images from PlayStation® Store. PlayTV* enables you to watch, record and search TVprograms.* Some functions are market dependentDRM protected media can not be streamed and played on your phone. For further information,please check the PLAYSTATION 3 website.To start Remote Play with PLAYSTATION 31Select Menu > Entertainment > Remote Play > Start.2Select Yes > OK to confirm creation of a eight digit registration code onPLAYSTATION 3.3Enter the eight digit registration code created in PLAYSTATION 3 and select OK.4Select Via Wi-Fi.5Select PLAYSTATION 3 from the list and select OK.To stop Remote Play with PLAYSTATION 31Select Options > End Remote Play.2Select Yes to turn off the PLAYSTATION 3 too.56This is an Internet version of this publication. © Print only for private use.
GPSYour phone has a GPS receiver that uses satellite signals to calculate your location. SomeGPS features use the Internet. Data rates and charges may apply.If you cannot use some GPS features, see I cannot use Internet-based services on page 73.Using GPSYour location can be found when you have a clear view of the sky. If your location is notfound after a few minutes, move to another location. To help the search, stand still and donot cover the GPS antenna.The first time you use the GPS it may take up to 10 minutes before your location is found.Assisted startAssisted start helps calculate your location more quickly. If not turned off, Assistedstart will automatically be used to find your location when Assisted GPS (A-GPS)technology is available.To set when to use Assisted start1Select Menu > Location services > Settings > Assisted start.2Select an option.Saving locationsYou can find all saved locations in My favourites.To save your current location1Select Menu > Location services > My favourites > Add new place.2Select Edit and enter the title. Select OK.3Scroll to Description: and select Add.4Enter the description and select OK.5Scroll to Position: and select Add > Current position.6When the position is found, select Save.To view a saved location on a map1Select Menu > Location services > My favourites.2Scroll to a location and select Go to.Location requestsExternal services may ask for your location. You can allow external services to useinformation about your location, as well as restrict them from doing so.To change access for external services1Select Menu > Location services > Settings > Privacy.2Select an option.57This is an Internet version of this publication. © Print only for private use.
Turning off GPSThe GPS receiver turns off automatically when it is not in use. You can also turn the GPSreceiver off manually. This saves battery power when you use features that do not requirethe GPS receiver to find your location.To turn on or off GPS manually1Select Menu > Location services > Settings.2Select Enable GPS or Disable GPS.Google Maps™ for mobileGoogle Maps™ lets you view your current location, find other locations and calculateroutes.When you start Google Maps, your approximate location is shown using information fromnearby mobile towers. Your location is updated with a more precise position when the GPSreceiver finds your location.To use Google Maps™•Select Menu > Location services > Google Maps.To access favourites from Google Maps•Press  .To learn more about Google Maps•When you use Google Maps, select Options > Help.Driving directionsThe Wisepilot™ application guides you to your destination using voice instructions. A trialversion of the Wisepilot application may be included in the phone.Sony Ericsson does not warrant the accuracy of any directional services including but not limitedto turn-by-turn navigational services.To start Wisepilot•Select Menu > Location services > Navigation.TrackerTracker is a GPS-based sports application which allows you to keep track of your speed,distance, route and energy consumption during training. You can base the training on howlong time you want to train or on what distance you want to cover. You can also base it ona previous training route which has GPS data.Information provided by use of the Tracker application is approximate. Sony Ericsson makes nowarranty of any kind with respect to the accuracy of the Tracker application. Any serious healthand fitness concerns should be referred to a health care professional.To start a training session1Select Menu > Location services > Tracker > Start training.2Select a training type.3Scroll to an item, select Edit and enter the data.4To save, select Done.5To start training, select Start.To switch between training views•During a training session, press the navigation key left or right to view information ontraining duration, progress and live comparison with a previous session.58This is an Internet version of this publication. © Print only for private use.
To compare results during training1Select Menu > Location services > Tracker > Start training.2Select Route based.3Scroll to Route:, select Edit and select a route.4Scroll to Live compare and select Edit.5Scroll to the result you want to compare and select Compare.6Select Done and then Start.A GPS location is required before results can be compared.To end a training session manually•During a training session, select Pause > End.ResultsThe training result is shown after a session is ended. You can view past results anytime,and compare them if they have GPS data.To view a training result1Select Menu > Location services > Tracker > Results.2Scroll to a month and select View.3Scroll to a date and select View.4Select a training result. If you have used laps, press the navigation key left or rightto view result per lap.To compare results1Select Menu > Location services > Tracker > Results.2Scroll to a result and select Options > Compare.3Select a result to compare with.A GPS location is required before results can be compared.Energy consumptionTo calculate and view the energy consumption for a session you must first set your personalprofile in Settings in Tracker. You view the energy consumption in the result view.To set the personal profile1Select Menu > Location services > Tracker > Settings > Personal profile.2Select an item, enter data and select OK.3When finished, select Options > Save profile.To turn on energy consumption•Select Menu > Location services > Tracker > Settings > Energy consumption> On.59This is an Internet version of this publication. © Print only for private use.
SynchronisingYou can synchronise your phone in two different ways: using a computer program, or usingan Internet service.Use only one of the synchronisation methods at a time with your phone.For more information, go to www.sonyericsson.com/support to read the SynchronisationFeature guide.Synchronising using a computerYou can use a USB cable or Bluetooth wireless technology to synchronise phone contacts,appointments, bookmarks, tasks and notes with Online Service or a computer programsuch as Microsoft® Outlook®.Before synchronising, you need to install the Sony Ericsson PC Suite. Sony Ericsson PCSuite software is available for download through PC Companion or fromwww.sonyericsson.com/support.To download Mac® compatible software, go to www.sonyericsson.com/support.To synchronise using the Sony Ericsson PC Suite1Computer: Start Sony Ericsson PC Suite from Start/Programs/Sony Ericsson/Sony Ericsson PC Suite.2Follow the instructions in the Sony Ericsson PC Suite for how to connect.3When you are notified that the Sony Ericsson PC Suite has found your phone, youcan start synchronising.For usage details, see the Sony Ericsson PC Suite Help section once the software has beeninstalled on your computer.Synchronising using an Internet serviceYou can synchronise with an Internet service using SyncML™ or a Microsoft® ExchangeServer using Microsoft Exchange ActiveSync. For more information, go towww.sonyericsson.com/support to read the Synchronisation Feature guide.60This is an Internet version of this publication. © Print only for private use.
More featuresFlight modeIn Flight mode the network and radio transceivers are turned off to prevent disturbance tosensitive equipment.When the flight mode menu is activated you are asked to select a mode the next time youturn on your phone:•Normal mode – full functionality•Flight mode – limited functionalityTo activate the flight mode menu•Select Menu > Settings > General > Flight mode > Continue > Show atstartup.To select flight mode1When the flight mode menu is activated, turn off your phone.2Turn on your phone and select Flight mode.   appears.AlarmsYou can set a sound or the radio as an alarm signal. The alarm sounds even if the phoneis turned off. When the alarm sounds, you can silence it or turn it off.To set the alarm1Select Menu > Organiser > Alarms.2Scroll to an alarm and select Edit.3Scroll to Time: and select Edit.4Enter a time and select OK > Save.To set the recurrent alarm1Select Menu > Organiser > Alarms.2Scroll to an alarm and select Edit.3Scroll to Recurrent: and select Edit.4Scroll to a day and select Mark.5To select another day, scroll to the day and select Mark.6Select Done > Save.To set the alarm signal1Select Menu > Organiser > Alarms.2Scroll to an alarm and select Edit.3Scroll to the   tab.4Scroll to Alarm signal: and select Edit.5Find and select an alarm signal. Select Save.To silence the alarm•When the alarm sounds, press any key.•To repeat the alarm, select Snooze.To turn off the alarm•When the alarm sounds, press any key, then select Turn off.To cancel the alarm1Select Menu > Organiser > Alarms.2Scroll to an alarm and select Turn off.61This is an Internet version of this publication. © Print only for private use.
To set the snooze duration1Select Menu > Organiser > Alarms.2Scroll to an alarm and select Edit.3Scroll to Snooze duration: and select Edit.4Select an option.The alarm in silent modeYou can set the alarm not to sound when the phone is in silent mode.To set an alarm to sound or not in silent mode1Select Menu > Organiser > Alarms.2Scroll to an alarm and select Edit.3Scroll to the   tab.4Scroll to Silent mode: and select Edit.5Select an option.CalendarYou can synchronise your calendar with a computer calendar, with a calendar on the web orwith a Microsoft® Windows Server® (Outlook®) application.AppointmentsYou can add new appointments or reuse existing appointments.To add an appointment1Select Menu > Organiser > Calendar.2Select a date.3Scroll to New entry and select Add.4Enter the information and confirm each entry.5Select Save.To view an appointment1Select Menu > Organiser > Calendar.2Select a date.3Scroll to an appointment and select View.To edit an appointment1Select Menu > Organiser > Calendar.2Select a date.3Scroll to an appointment and select View.4Select Options > Edit.5Edit the appointment and confirm each entry.6Select Save.To set when reminders should sound1Select Menu > Organiser > Calendar.2Select a date.3Select Options > Advanced > Reminders.4Select an option.A reminders option set in calendar affects a reminders option set in tasks.NotesYou can make notes and save them. You can also show a note in standby.62This is an Internet version of this publication. © Print only for private use.
To add a note1Select Menu > Organiser > Notes.2Scroll to New note and select Add.3Write a note and select Save.To show a note in standby1Select Menu > Organiser > Notes.2Scroll to a note and select Options > Show in standby.To hide a note from standby1Select Menu > Organiser > Notes.2Scroll to the note shown in standby. This is marked with an icon. Select Options >Hide in standby.TasksYou can add new tasks or reuse existing tasks.To add a task1Select Menu > Organiser > Tasks.2Select New task and select Add.3Select an option.4Enter details and confirm each entry.To set when reminders should sound1Select Menu > Organiser > Tasks.2Scroll to a task and select Options > Reminders.3Select an option.A reminders option set in tasks affects a reminders option set in calendar.ProfilesYou can change settings such as the ring volume and vibrating alert to suit differentlocations. You can reset all profiles to the phone’s original settings.To select a profile1Select Menu > Settings > General > Profiles.2Select a profile.To view and edit a profile1Select Menu > Settings > General > Profiles.2Scroll to a profile and select Options > View and edit.You cannot rename the Normal profile.Time and dateTo set the time1Select Menu > Settings > General > Time & date > Time.2Enter the time and select Save.To set the date1Select Menu > Settings > General > Time & date > Date.2Enter the date and select Save.63This is an Internet version of this publication. © Print only for private use.
To set the time zone1Select Menu > Settings > General > Time & date > My time zone.2Select the time zone you are in.If you select a city, My time zone also updates the time when daylight saving time changes.To change the clock size of the standby screen1Select Menu > Settings > Display > Clock size.2Select an option.ThemesYou can change the appearance of the screen through items such as colours andwallpaper. You can also create new themes and download them. For more information, goto www.sonyericsson.com/fun.To set a theme1Select Menu > Settings > Display > Theme.2Scroll to a theme and select Set.Main menu layoutYou can change the layout of the icons in the main menu.To change the main menu layout1Select Menu > Options > Main menu layout.2Select an option.Screen orientationYou can change between landscape and portrait orientation, or select Auto rotate to havethe orientation change when you rotate the phone.To change screen orientation in the browser1Select Menu > Internet.2Select   and then select  .3Select Settings > Orientation.4Select an option.To change screen orientation in Media1Select Menu > Media > Settings > Orientation.2Select an option.RingtonesTo set a ringtone1Select Menu > Settings > Sounds & alerts > Ringtone.2Find and select a ringtone.To set the ringtone volume1Select Menu > Settings > Sounds & alerts > Ring volume.2Press the navigation key left or right to adjust the volume.3Select Save.To turn off the ringtone•Press and hold down  .   appears.The alarm signal is not affected.64This is an Internet version of this publication. © Print only for private use.
To set the vibrating alert1Select Menu > Settings > Sounds & alerts > Vibrating alert.2Select an option.GamesYour phone contains preloaded games. You can also download games. For moreinformation, go to www.sonyericsson.com/fun. Help texts are available for most games.To start a game1Select Menu > Media > Games.2Select a game.To end a game•Press  .ApplicationsYou can download and run Java applications. You can also view information or set differentpermissions. If you cannot use Java applications, see I cannot use Internet-basedservices on page 73.To select a Java application1Select Menu > Organiser > Applications.2Select an application.To set permissions for a Java application1Select Menu > Organiser > Applications.2Scroll to an application and select Options > Permissions.3Set permissions.Java application screen sizeSome Java applications are designed for a specific screen size. For more information,contact the application vendor.To set the screen size for a Java application1Select Menu > Organiser > Applications.2Scroll to an application and select Options > Screen size.3Select an option.To set a Java™ application as a wallpaper1Select Menu > Settings > Display.2Select Wallpaper > Application.3Select a Java application.You can only see the Java applications that have support for wallpaper.AntivirusAntivirus identifies and removes applications you install on your phone that become infectedby viruses. It automatically scans applications during installation. When an infectedapplication is detected, you can delete or release the infected application. You can selecta 30-day free evaluation or enter a subscription number. We recommend that you updatethe antivirus application with the latest virus protection frequently. You need the correctInternet settings in your phone to use this function.Our inclusion or your use of antivirus software does not ensure that your use of this product willbe free from exposure to viruses, malware or other harmful software.65This is an Internet version of this publication. © Print only for private use.
To turn on Antivirus1Select Menu > Settings > General > Security > Antivirus.2Follow the instructions to use the setup wizard.To turn off Antivirus1Select Menu > Settings > General > Security > Antivirus > Virus scan.2Select Off.PIN codesSIM protectionThis lock only protects your subscription. Your phone will work with a new SIM card. If thelock is on, you have to enter a PIN (Personal Identity Number).If you enter your PIN incorrectly three times in a row, the SIM card is blocked and you needto enter your PUK (Personal Unblocking Key). Your PIN and PUK are supplied by yournetwork operator.To unblock the SIM card1When PIN blocked appears, enter your PUK and select OK.2Enter a new four-to-eight-digit PIN and select OK.3Re-enter the new PIN and select OK.To edit the PIN1Select Menu > Settings > General > PIN codes > SIM protection > ChangePIN.2Enter your PIN and select OK.3Enter a new four-to-eight-digit PIN and select OK.4Re-enter the new PIN and select OK.If Codes do not match appears, you entered the new PIN incorrectly. If Incorrect PIN appears,you entered the old PIN incorrectly.To use the SIM card lock1Select Menu > Settings > General > PIN codes > SIM protection > Protection.2Select an option.3Enter your PIN and select OK.Phone protectionYou can stop unauthorised use of your phone. Change the phone lock code (0000) to anyfour-to-eight-digit personal code.It is important that you remember your new code. If you forget it, you need to take your phoneto your local Sony Ericsson retailer.To use the phone lock1Select Menu > Settings > General > PIN codes > Phone protection >Protection.2Select an option.3Enter the phone lock code and select OK.When Automatic phone protection is activated the phone protection code must be entered whenanother SIM card is inserted.To unlock the phone•When Phone locked appears, enter your phone lock code and select OK.66This is an Internet version of this publication. © Print only for private use.
To change the phone lock code1Select Menu > Settings > General > PIN codes > Phone protection > Changecode.2Enter the old code and select OK.3Enter the new code and select OK.4Repeat the code and select OK.IMEI numberKeep a copy of your IMEI (International Mobile Equipment Identity) number in case yourphone is stolen.To view your IMEI number•Press  ,  ,  ,  ,  .67This is an Internet version of this publication. © Print only for private use.
Stereo Streaming Bluetooth™Headset MH1001 Microphone245638712 Call key3 Earpiece connector4 Volume touch area5 On/off key6 Charger connector7 Next/Play-Pause/Previous keys8 Music/battery/status light indicatorsIf you are using a headset other than the MH100, go to www.sonyericsson.com/support for moreinformation.IntroductionThe Stereo Streaming Bluetooth Headset MH100 lets you stay in control of your incomingand outgoing phone calls. You can enjoy stereo audio from a phone or other Bluetoothdevice, such as a computer or a portable music player. During calls, the music automaticallypauses and starts playing again when the call ends.ChargingBefore using the headset for the first time, charge it with the supplied charger for 8 hours.The normal charging time is 2.5 hours.68This is an Internet version of this publication. © Print only for private use.
Turning on and offTo turn on the headset•Press and hold down   until a light appears.To turn off the headset•Press and hold down   until the lights have disappeared.Pairing the headsetThe MH100 is already pre-paired with the phone it is shipped with. The MH100 and thephone connect automatically the first time you turn on this headset.Pairing the headset with a different phoneIf you want to use the headset with a different phone you need to pair the headset with thatphone. After successful pairing, the headset connects automatically to the phone as soonas the headset is turned on and within range.To pair the headset with a phone1Make sure the headset is turned off.2Turn on the Bluetooth function in the phone. For instructions, see To turn on theBluetooth function on page To turn on the Bluetooth function.3Turn on Bluetooth visibility in the phone. This makes the phone visible to otherBluetooth devices.4Place the phone within 20 cm (8 inches) of the headset.5Press and hold down the on/off key on the headset for about 5 seconds until theindicator light flashes blue and green alternately.6In your phone: Search for and add a new device.7The passcode is 0000.8The indicator light flashes blue for 2 seconds when successfully paired.The headset turns off if you do not pair it with the phone within 10 minutes.Adjusting the volumeTo adjust speaker or music volume•During a call, or when listening to music or the FM radio, swipe your finger along thevolume touch area.69This is an Internet version of this publication. © Print only for private use.
CallingTo make a call•Dial the number using the phone keys. The call is automatically activated in theheadset.To end a call•Press   briefly.To make a call using voice commands•Press   briefly, wait for a beep and then say the command.To answer a call•A beep indicates an incoming call. Press   briefly.To reject a call•Press and hold down   until you hear a beep.To re-dial a number•Double-click  .To answer a second call•Press  . The ongoing call is put on hold.To switch between two calls•Press and hold down   until you hear a beep.Calling using voice commandsVoice commands can be useful when you are using the headset. For more information onvoice commands, and if your phone supports it, see Voice control on page 21.Transferring soundTo transfer the sound from the headset to the phone•See Transferring sound to and from a Bluetooth handsfree on page 44.To transfer the sound from the phone to the headset•During a call on the phone, press the call key.Listening to musicTo listen to music1Press   to start the media player in your phone.2To start and pause the music, press   on the headset.To move between tracks•When you listen to music, press   or  .To move within a track•Press and hold   or   until you reach the desired position.Listening to the Radio1Make sure your headset has a connection to the phone.2Start the radio in your phone.To search for channels manually•Press and hold   or   until you reach the desired position.70This is an Internet version of this publication. © Print only for private use.
To select a preset radio station•Press   or  .Resetting headsetReset the headset if it behaves unexpectedly.Resetting the headset removes all information about paired devices other than the phoneit was shipped with.To reset the headset1Make sure the headset is turned off.2Press and hold down the on/off key until the indicator light flashes blue and greenalternately.3Simultaneously press and hold down the on/off key and the call key until the headsetturns off.BatteryA battery that has been infrequently used, or a new one, could have reduced capacity. Youmay need to recharge it a number of times.When the battery level is low, you hear a low beep. If you do not charge the headset, itautomatically turns off after 10 minutes.Battery statusBattery colour DescriptionOne red light The battery needs charging soonThree green flashes The battery is half fullFour green flashes The battery is fully chargedTo check the battery status•Press the power key briefly. The number of green light indicators shows how full thebattery is.TroubleshootingRedial does not work•Make sure the call list in the phone is not empty.•Make sure your phone or other device supports the Bluetooth handsfree profile.I cannot answer a second call•Make sure your phone supports the Bluetooth handsfree profile.Voice commands do not work•Make sure the voice commands are enabled and recorded in your phone before you startusing them.•Make sure your phone supports the Bluetooth headset profile.The music is not played in the headset•Make sure your phone or other device is paired with the headset. You may have to restartthe media player and select to use the headset.The radio does not play in the headset•Make sure the MH100 is connected to the phone.71This is an Internet version of this publication. © Print only for private use.
•If you have paired the MH100 with another phone, this phone might not support the FMreception in the MH100.The headset is automatically turned off•The battery level is too low. You hear a beep approximately 10 minutes before the headsetturns off. Charge the battery.•The headset turns off if you do not pair it with the phone within 10 minutes.Unexpected behaviour•Reset the headset.No connection to the phoneMake sure the headset is charged and within range of the phone. We recommend amaximum distance of 10 metres (33 feet) with no solid objects in between. Check or resetthe Bluetooth settings in the phone. Try to pair the headset again.It is not possible to use the headset during charging.72This is an Internet version of this publication. © Print only for private use.
TroubleshootingSome problems can be fixed using Update Service. Using Update Service on a regularbasis will optimise the phone’s performance. See Updating your phone on page 46.Some problems will require you to call your network operator.For more support go to www.sonyericsson.com/support.Common questionsWhere can I find the regulatory information such as my IMEI number ifI cannot turn on my phone?XXXXXXXX - XXXXXX - XI have problems with memory capacity or the phone is working slowlyRestart your phone every day to free memory or do a Master reset.Master resetIf you select Reset settings, the changes that you have made to settings will be deleted.If you select Reset all, your settings and content, such as contacts, messages, pictures,sounds and downloaded games, will be deleted. You may also lose content that was in thephone at purchase.To reset the phone1Select Menu > Settings > General > Master reset.2Select an option.3Follow the instructions that appear.I cannot charge the phone or battery capacity is lowThe charger is not properly connected or the battery connection is poor. Remove thebattery and clean the connectors.The battery is worn out and needs to be replaced. See Charging the battery on page 7.No battery icon appears when I start charging the phoneIt may take a few minutes before the battery icon appears on the screen.The screen turns black. What do I do?If the screen turns black, touch somewhere on the screen to activate the screen.Some menu options appear in greyA service is not activated. Contact your network operator.I cannot use Internet-based servicesYour subscription does not include data capability. Settings are missing or incorrect.73This is an Internet version of this publication. © Print only for private use.
You can download settings using the Settings download or fromwww.sonyericsson.com/support.To download settings1Select Menu > Settings > User help > Settings download.2Follow the instructions that appear.Contact your network operator or service provider for more information.I cannot send messages from my phoneTo send messages, you need to set a service centre number. The number is supplied byyour service provider and is usually saved on the SIM card. If the number of your servicecentre is not saved on your SIM card, you must enter the number yourself.To send most picture messages, you must set an MMS (Multimedia Messaging Service)profile and the address of your message server. If no MMS profile or message server exists,you can receive all the settings automatically from your network operator, downloadsettings using the Settings download, or go towww.sonyericsson.com/support.To enter a service centre number1Select Menu > Settings > Connectivity > Message settings > Text message andscroll to Service centre. The number is shown if it is saved on the SIM card.2If there is no number shown, select Edit.3Scroll to New service centre and select Add.4Enter the number, including the international “+” sign and country code.5Select Save.To select an MMS profile1Select Menu > Settings > Connectivity > Message settings > Multim.message.2Select an existing profile or create a new one.To set the message server address1Select Menu > Settings > Connectivity > Message settings > Multim.message.2Scroll to a profile and select Options > Edit.3Scroll to Message server and select Edit.4Enter the address and select OK > Save.The phone does not ring or rings too softlyMake sure that Silent mode has not been set to On. See To turn off the ringtone onpage 64.Check the ringtone volume. See To set the ringtone volume on page 64.Check the profile. See To select a profile on page 63.Check the divert call options. See To divert calls on page 22.The phone cannot be detected by other devices using Bluetoothwireless technologyYou have not turned the Bluetooth function on. Make sure that the visibility is set to Showphone. See To turn on the Bluetooth function on page 43.I cannot synchronise or transfer content between my phone and thecomputer, when using a USB cable.The software or the USB drivers have not been properly installed. Go towww.sonyericsson.com/support to read Feature guides which contain detailed installationinstructions and troubleshooting sections.74This is an Internet version of this publication. © Print only for private use.
Error messagesInsert SIMThere is no SIM card in your phone or you may have inserted it incorrectly.See To insert the SIM card on page 5.The SIM card connectors need cleaning. If the card is damaged, contact your networkoperator.Insert correct SIM cardYour phone is set to work only with certain SIM cards. Check if you are using the correctoperator SIM card.Incorrect PIN/Incorrect PIN2You have entered your PIN or PIN2 incorrectly.Enter the correct PIN or PIN2 and select OK.PIN blocked/PIN2 blockedYou have entered your PIN or PIN2 code incorrectly three times in a row.To unblock, see SIM protection on page 66.Codes do not matchCodes that you have entered do not match. When you want to change a security code, forexample your PIN, you have to confirm the new code. See SIM protection on page 66.No netw. coverage•Your phone is in flight mode. See Flight mode on page 61.•Your phone is not receiving any network signal, or the received signal is too weak. Contactyour network operator and make sure that the network has coverage where you are.•The SIM card is not working properly. Insert your SIM card in another phone. If this works,it is probably your phone that is causing the problem. Please contact the nearestSony Ericsson service location.Emergency calls onlyYou are within range of a network, but you are not allowed to use it. However, in anemergency, some network operators allow you to call the international emergency number112. See Emergency calls on page 18.PUK blocked. Contact operator.You have entered your personal unblocking key code (PUK) incorrectly 10 times in a row.75This is an Internet version of this publication. © Print only for private use.
Legal informationSony Ericsson U10i/U10a/U10 - MH100This User guide is published by Sony Ericsson Mobile Communications AB or its local affiliated company, without anywarranty. Improvements and changes to this User guide necessitated by typographical errors, inaccuracies of currentinformation, or improvements to programs and/or equipment, may be made by Sony Ericsson Mobile CommunicationsAB at any time and without notice. Such changes will, however, be incorporated into new editions of this User guide.All rights reserved.©Sony Ericsson Mobile Communications AB, 2009Publication number: 1230-5084.1Your mobile phone has the capability to download, store and forward additional content, e.g. ringtones. The use ofsuch content may be restricted or prohibited by rights of third parties, including but not limited to restriction underapplicable copyright laws. You, and not Sony Ericsson, are entirely responsible for additional content that youdownload to or forward from your mobile phone. Prior to your use of any additional content, please verify that yourintended use is properly licensed or is otherwise authorized. Sony Ericsson does not guarantee the accuracy, integrityor quality of any additional content or any other third party content. Under no circumstances will Sony Ericsson beliable in any way for your improper use of additional content or other third party content.Smart-Fit Rendering is a trademark or a registered trademark of ACCESS Co., Ltd.Bluetooth is a trademark or a registered trademark of Bluetooth SIG Inc. and any use of such mark bySony Ericsson is under license.The Liquid Identity logo, PlayNow, Aino, SensMe and TrackID are trademarks or registered trademarks ofSony Ericsson Mobile Communications AB.TrackID™ is powered by Gracenote Mobile MusicID™. Gracenote and Gracenote Mobile MusicID are trademarks orregistered trademarks of Gracenote, Inc.Sony is a trademark or registered trademark of Sony Corporation.Media Go is a trademark or registered trademark of Sony Media Software and Services.microSD is a trademark or a registered trademark of SanDisk Corporation.PictBridge is a trademark or registered trademark of Canon Kabushiki Kaisha Corporation.Wi-Fi is a trademark or a registered trademark of the Wi-Fi Alliance.DLNA is a trademark or registered trademark of the Digital Living Network Alliance.Google Maps™ is a trademark or registered trademark of Google, Inc.PLAYSTATION is a trademark or registered trademark of Sony Computer Entertainment, Inc.Wisepilot is a trademark of Appello Systems AB and its products are the property of Appello Systems AB and areprotected against unauthorized use by trademark laws.SyncML is a trademark or registered trademark of Open Mobile Alliance LTD.Facebook is a trademark or registered trademark of Facebook, Inc.Ericsson is a trademark or registered trademark of Telefonaktiebolaget LM Ericsson.Mac is a trademark of Apple Inc., registered in the U.S. and other countries.Adobe Photoshop Album Starter Edition is a trademark or registered trademark of Adobe Systems Incorporated inthe United States and/or other countries.Microsoft, Windows, Outlook, Windows Vista, Windows Server and ActiveSync are registered trademarks ortrademarks of Microsoft Corporation in the United States and/or other countries.This product is protected by certain intellectual property rights of Microsoft. Use or distribution of such technologyoutside of this product is prohibited without a license from Microsoft.Content owners use Windows Media digital rights management technology (WMDRM) to protect their intellectualproperty, including copyrights. This device uses WMDRM software to access WMDRM-protected content. If theWMDRM software fails to protect the content, content owners may ask Microsoft to revoke the software's ability touse WMDRM to play or copy protected content. Revocation does not affect unprotected content. When you downloadlicenses for protected content, you agree that Microsoft may include a revocation list with the licenses. Content ownersmay require you to upgrade WMDRM to access their content. If you decline an upgrade, you will not be able to accesscontent that requires the upgrade.This product is licensed under the MPEG-4 visual and AVC patent portfolio licenses for the personal and non-commercial use of a consumer for (i) encoding video in compliance with the MPEG-4 visual standard ("MPEG-4 video")or the AVC standard ("AVC video") and/or (ii) decoding MPEG- 4 or AVC video that was encoded by a consumerengaged in a personal and non-commercial activity and/or was obtained from a video provider licensed by MPEG LAto provide MPEG-4 and/or AVC video. No license is granted or shall be implied for any other use. Additional informationincluding that relating to promotional, internal and commercial uses and licensing may be obtained from MPEG LA,L.L.C. See http://www.mpegla.com. MPEG Layer-3 audio decoding technology licensed from Fraunhofer IIS andThomson.Java, JavaScript and Java-based trademarks and logos are trademarks or registered trademarks of SunMicrosystems, Inc. in the U.S. and other countries.End-user license agreement for Sun Java Platform, Micro Edition.1. Restrictions: Software is confidential copyrighted information of Sun and title to all copies is retained by Sun and/or its licensors. Customer shall not modify, decompile, disassemble, decrypt, extract, or otherwise reverse engineerSoftware. Software may not be leased, assigned, or sublicensed, in whole or in part.2. Export Regulations: This product, including any software or technical data contained in or accompanying theproduct, may be subject to import and export regulations of the European Union, the United States and other countries.The user and any possessor of the product agrees to comply strictly with all such regulations and acknowledges thatit is their responsibility to obtain any required licenses to export, re-export, or import this product. Without limiting theforegoing, and as an example, the user and any possessor of the product: (1) must not knowingly export or re-exportProducts to destinations identified pursuant to Articles in Chapter II of European Council Regulation (EC) 1334/2000;(2), must comply with U.S. government Export Administration Regulations ("EAR", 15 C.F.R. §§ 730-774, http://www.bis.doc.gov/ ) administered by Department of Commerce, Bureau of Industry and Security; and (3) must complywith economic sanctions regulations (30 C.F.R. §§ 500 et. seq.,., http://www.treas.gov/offices/enforcement/ofac/)administered by the U.S. Department of Treasury, Office of Foreign Assets Control. The user and any possessor ofthe product may not transport or deliver the product, its accessories or separate software to any country, region,entity or person prohibited by these regulations.Restricted Rights: Use, duplication or disclosure by the United States government is subject to the restrictions as setforth in the Rights in Technical Data and Computer Software Clauses in DFARS 252.227-7013(c) (1) (ii) and FAR52.227-19(c) (2) as applicable.Other product and company names mentioned herein may be the trademarks of their respective owners.Any rights not expressly granted herein are reserved.All illustrations are for illustration only and may not accurately depict the actual phone.76This is an Internet version of this publication. © Print only for private use.
IndexAactivity menu ...........................................................13alarms ......................................................................61answering service ....................................................21antivirus ...................................................................65applications .............................................................65appointments ..........................................................62audio book ..............................................................38auto rotate ...............................................................64automatically checking for email .............................49Bbacking up and restoring ........................................44batterycapacity .............................................................7charging ............................................................7inserting .............................................................6blog ...................................................................31, 32Bluetooth™ wireless technology .............................43bookmarks ...............................................................51business card ..........................................................20Ccalendar ...................................................................62call divert .................................................................22call list ......................................................................18call numbers in message .........................................47call time ...................................................................24caller-specific ringtones ..........................................19callsaccepting .........................................................23answering and rejecting ..................................17emergency .......................................................18international .....................................................17making and receiving ......................................17putting on hold ................................................22recording .........................................................40video ................................................................17camera .....................................................................25printing ............................................................31clear bass ................................................................36clear stereo ..............................................................36clip ...........................................................................32conference calls ......................................................23Connected home .....................................................55contactsadding phone contacts ...................................19default contacts ...............................................19groups .............................................................21Smart search ...................................................19conversations ..........................................................48costs ..........................................................................7Ddate .........................................................................63DLNA™ ....................................................................55downloadfiles ..................................................................52downloadmusic ...............................................................38settings ............................................................74Eediting photos .........................................................29email ........................................................................48emergency numbers ................................................18equaliser ..................................................................36Fface detection ..........................................................25file manager .............................................................41file transfers .............................................................52flight mode ..............................................................61Ggames ......................................................................65geo tagging .............................................................30Google Maps™ .......................................................58GPS .........................................................................57groups .....................................................................21Hhandsfree ...........................................................21, 34help ............................................................................7hiding number .........................................................24Iimaging ....................................................................25IMEI number ............................................................67Internet ....................................................................52bookmarks ......................................................51screen orientation ............................................64security and certificates ..................................52settings ............................................................73Kkeys .....................................................................5, 68Llanguage ..................................................................14location services ......................................................57lockSIM card ..........................................................66Mmaster reset ............................................................73media browser .........................................................10Media Go™ .............................................................42media transfer .........................................................42memory ...................................................................13memory card ...........................................................13memory status .........................................................20menu overview ........................................................11messagesemail ................................................................48picture .............................................................47text ..................................................................47voice ................................................................48microphone .............................................................17MMS see picture messagesMMS See picture messagesmodel name ...............................................................7music feed .........................................................52, 54music mini player ....................................................36music player ............................................................34my numbers .............................................................23my phone number .....................................................7Nnavigating menus ....................................................12notes ........................................................................62Oonlinemusic ...............................................................39video clips .......................................................3977This is an Internet version of this publication. © Print only for private use.
Ppan and zoomweb pages .......................................................52PC Companion ........................................................42PC Suite ..................................................................60phoneturning on ..........................................................6phone memory ....................................................7, 13phone name ............................................................43photo .......................................................................32photo feed ...............................................................52photos ...............................................................30, 31editing ..............................................................29feeds ................................................................54geo tagging .....................................................30printing ............................................................31tags ..................................................................30picture messages ..............................................31, 47pictures ..............................................................30, 32PIN .......................................................................6, 66playlists ....................................................................36PlayNow™ ...............................................................38podcasts ............................................................52, 54power saving ...........................................................44profiles .....................................................................63protectionphone ..............................................................66PUK .........................................................................66push email ...............................................................49QQuick text input .................................................14, 15Rradio ........................................................................39recordinglistening to .......................................................40Remote Play ............................................................56restricted dialling .....................................................23ringtones ..................................................................64setting ..............................................................64roaming .....................................................................7RSS feeds - see web feedsSscreen icons ..............................................................9screen orientation ....................................................64searchon web pages ..................................................52selection keys ..........................................................12send .........................................................................32as email ...........................................................31as message .....................................................31to web album ...................................................31via Bluetooth ...................................................31SensMe™ ................................................................37settingringtones .........................................................64settingsdownload .........................................................74Internet ............................................................73shake control ...........................................................36shortcuts .................................................................12web browser ....................................................51SIM cardcopying to/from .........................................19, 20inserting .............................................................5lock and unblocking ........................................66SMS See text messagesSOS See emergency numberssound recorder ........................................................40speed dialling ..........................................................21standby ......................................................................6notes ................................................................63still camera ..............................................................25streaming .................................................................39synchronising ..........................................................60Ttagging photos ........................................................30tasks ........................................................................63text messages .........................................................47theme ......................................................................64time ....................................................................63, 64time zone .................................................................64touch ...............................................................4, 9, 10Tracker ....................................................................58TrackID™ .................................................................38training .....................................................................58transfer methodBluetooth™ wireless technology .....................43USB cable .......................................................41transferringmusic ...............................................................42photos .............................................................42sound ..............................................................44Transferring content ................................................41turning on/offBluetooth™ function .......................................43phone lock .......................................................66SIM lock protection .........................................66UUpdating phone software ........................................46USB cable ...............................................................41Vvideo ........................................................................32video camera .....................................................25, 28video clip .................................................................31video feed ................................................................52video player .............................................................33video ringtones ........................................................64voice control ............................................................21voice messages .......................................................48voicemail .................................................................21volumeear speaker ......................................................17ringtone ...........................................................64Wweb ..........................................................................52web album .........................................................31, 32web feeds ................................................................53web pages history ...................................................52web site ...................................................................32Wi-Fi™ .....................................................................5578This is an Internet version of this publication. © Print only for private use.

Navigation menu