Sony HDR SR10 User Manual DIGITAL CAMCORDER Manuals And Guides L0803366
SONY Digital Camcorder Manual L0803366 SONY Digital Camcorder Owner's Manual, SONY Digital Camcorder installation guides
User Manual: Sony HDR-SR10 HDR-SR10 SONY DIGITAL CAMCORDER - Manuals and Guides View the owners manual for your SONY DIGITAL CAMCORDER #HDRSR10. Home:Electronics Parts:Sony Parts:Sony DIGITAL CAMCORDER Manual
Open the PDF directly: View PDF ![]() .
.
Page Count: 69
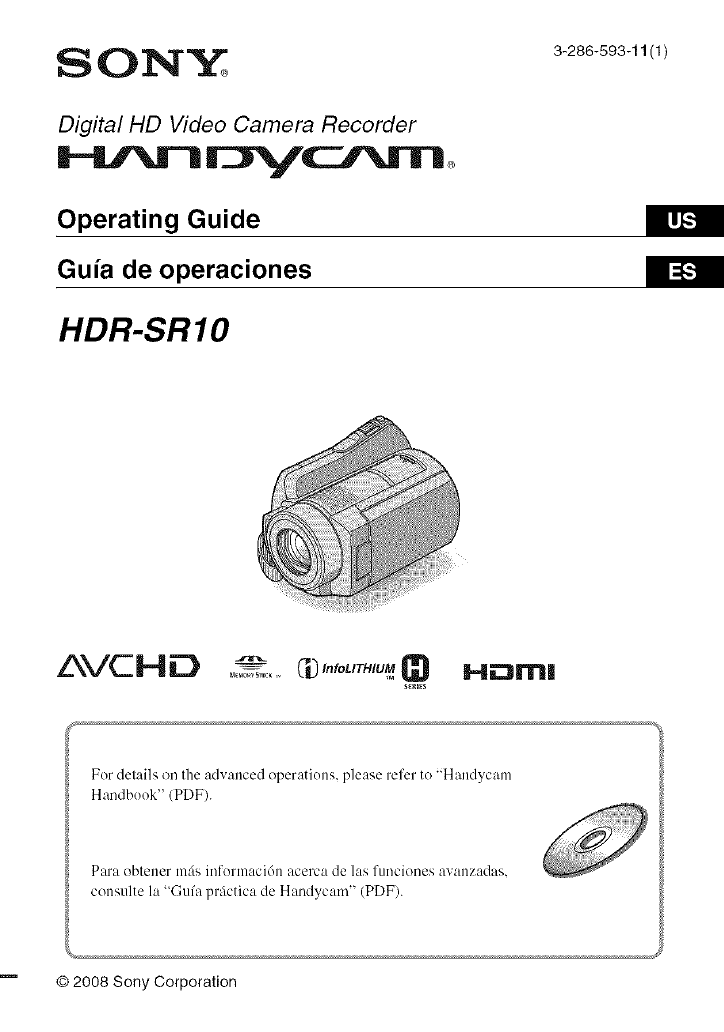
S 01NY+
Digital lid Video Camera Recorder
Operating Guide
Guia de operaciones
HDR-SRIO
3-286-593-11 (1)
_.1[,,.!
_ =[,.!
AVCHD +'- Q
........_--,,-'-_C#"'°UT'U_ H,-_m|
s_m_s
For details on the advanced operations, please refer to "Handycanl
Handbook" (PDF).
Para oblener re:is infonnaci6n acerca de las funciones avanzadas,
consulte la '+Gufa prfictica de Handycam" (PDF).
© 2008 Sony Corporation
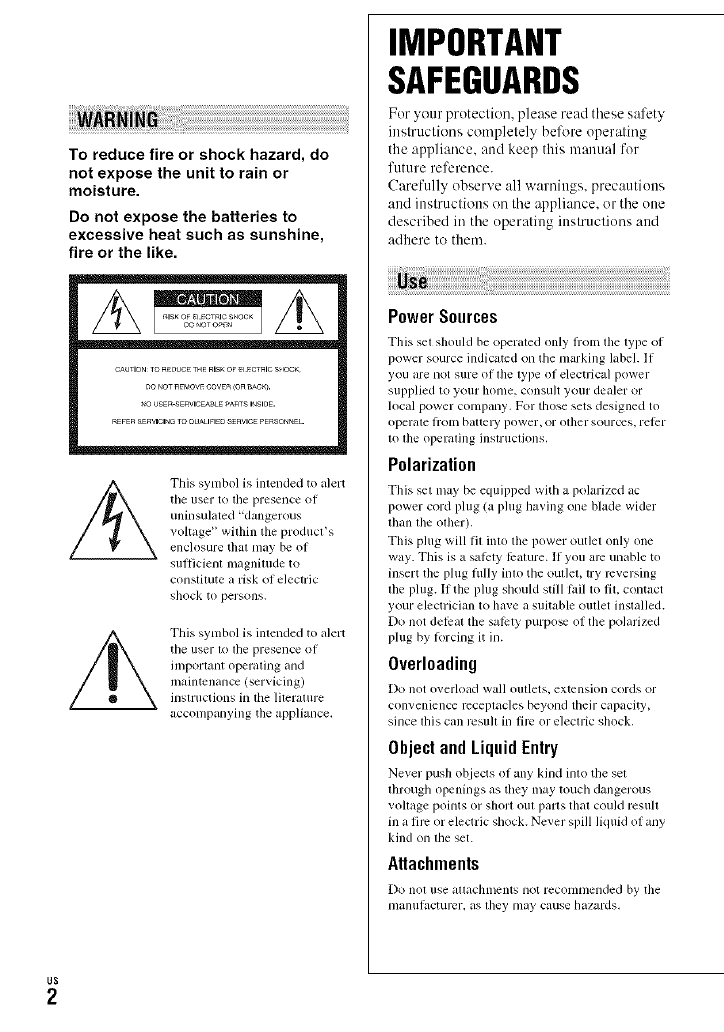
To reduce fire or shock hazard, do
not expose the unit to rain or
moisture.
Do not expose the batteries to
excessive heat such as sunshine,
fire or the like.
CAUTIONTO_C_ T_IERISKOF_ _CTalC S_'OCK
nO _omREMOWCOVE_(On_AC_).
_O USER-SErVICEaBLEPA_TSI_SlOE.
REWRSERWClNam OUA_IFIEUSEnVlCEPERSOnNEl-
This synlbol is intended to alert
tile iiser to the presence of
unh3sulated "dangerous
voltage" within the product's
enclosure thal lllay be of
sufficient n_agnimde to
constitute a risk of electric
shock to persons.
This synlbol is intended to alert
tile riser to the presence of
important operating and
maintenance (servicing)
instructions in tile literature
acconlpanying the appliance.
IMPORTANT
SAFEGUARDS
For your protection, please read these safety
instructitms completely bel\_re operating
the appliance, attd keep this manual for
future reference.
Carefully observe all warnings, precautions
and instructions on the appliance, or the uue
described in the operating iuslructions attd
adhere to them.
PowerSources
Tiffs sel sllould be operaled only fi'om tile lype of
power source indicated on tile marking label. It
you are IIOI sure ol file type ol eleclrical power
supplied to your honle, consult your dealer or
local power company. For those sets designed to
operate lroln bat tell' power, or ot]ler sourcvs, reler
tO file operaling instructions.
Polarization
This set may be equipped with a polarized ac
power cord plug (a plug having one blade wider
than tile ()tiler).
This plug will fit into the power outlet only one
way. This is a salcty lcature, lfyou arc unable to
insert tile plug flflly into the outlet, try reversing
the phlg. If the plug should still lail to fit, contact
your electrician to have a suitable outlet installed.
Do not delirat the salcty purpo_ of tile polarized
plug by lorcing it in.
Overloading
Do not overload wall outlets, extension cords or
convenience receptacles beyond their capacity,
since lifts can rCSllll ill l]rc or eleclric sllock.
ObjectandLiquidEntry
Ne_er push objects ol any kind into the set
through openings as they may touch dangerous
vollage points or short oul paris thal could resull
in a fire or electric shock. Never spill Ik]uid of any
kind on lhe set.
Attachments
Do no1 use aU,,iC]llnt:nts llOl reconlnlended by the
nlanu|_lcturer, as riley may Cause hazards,
Cleaning
Unplug tile set fi'onl the wall outlet befine
clemling or polishing it. Do not use liqukl clemlers
or aerosol cleaners. U_ a cloth lightly dampened
with water for cleaning tile exterior of tile set.
long periods of time, unplug it from tile wall
oullel and disconnect file antenna or cable system.
This will prevent damage 1o lhe set due to
ligbming and power-line surges.
WaterandMoisture
Do nol use power-]hie operaled _ls llear waler
lor example, near a bathtub, washbowl, kitchen
sink. or laundry tub, in a wet basement, or nero a
swimndng pool. etc.
Power-CordProtection
Route tile power cord so that it is not likely to be
walked on or pinched by ilems placed upon or
against tbenl, paying particular attention to tile
plugs, receplacles, and the poinl where the cord
exils lrom tile appliance.
Accessories
Do llot place tile set Oil all /instable cart, stand,
tripod, bracket, or table. Tile set may lhll, causing
serious injury to a child or an adult, and serious
danlage to tile set. Use only a carl stand, tripod,
bracket, or table recommended by the
ii/anu filcl urcr.
Ventilation
Tile slots and openings in tile cabinet arc pro', ided
lor necessary ventilation. To ensure reliable
operation of tile set, and to protecl it Ii'oln
overhealing, lbese slots and openings musl never
be blocked or covered.
Never cover file slots and openings with a cloth
or ()tiler lnalerials,
Never block lhe slots and openings by placing
tile set on a bed, sola, rug, or other similar
surtace.
Never place the set in a confined space, such as
a bookcase, or buill-in cabinet, unless proper
ventilatkm is provided.
Do nol place tile set near or over a radialor or
Ileal register, or where it is exposed to direct
sunlighl,
Lightning
For added protection Ior this set during a lightning
slorm, or when il is left unattended and unused fi)r
DamageRequiringService
Unplug tile set fi'oln tile wall outlet and rel_r
servicing to qualified service personnel under tile
lollowing conditions:
When tile power cord or phlg is damaged or
h'ayed.
If liquid has been spilled or objects hz_velallen
into lhe set.
If lfie set has been exposed to rain or water.
If the _t has been subject to excessive shock by
being dropped, or the cabinet has been
damaged.
If tile set does not operate normally when
lollowing tile operating instructions. Adjust
only lhose controls that are specified in lhe
operating instruclions, hnproper adjusmlent of
other controls may result in damage and will
often require exlensive work by a qualified
teclmician to restore the set lo norlnal operalion.
When lbe sel exhibits a distinct change in
perlormance this indicg_tes a need lot service.
Servicing
Do not attelllpl to service tile set yourselI as
opening or rcnloving covers may expose you IO
dangerous voltage or other hazards.
Relcr all selwicing to qualified service personnel.
Replacementparts
_¢Vhellreph,cenlent parts are Ivquh'cd, be sure tile
service technician has used mplacelnent parts
specified by the manufi_cmrcr lhat have file same
characteristics as the original paris.
Unauthorized substimfions may r_2gu][in fire,
electric shock, or other hazards.
Safety Check
Upon colnplelion oI any sel"_ice or repairs to tile
set, ask tile selwice technician to perfi)rm ro/llille
salcty checks (as specified by tile manuli_cturcr)
to detcrnline that file set is ill salP operating
ColldJlion.

Readthis first
Belk_re operating the unit, please read this
manual thoroughly, and retain it for future
reference.
Replace the battery with the
specified type only. Otherwise, fire
or injury may result.
RECYCLINGLITHIUM-IONBATTERIES
Lifllimn-lon batteries are rccyclable.
You can help pre_rve our
en'_'irolllnent by returning your
used rechargeable batteries to tile
collection and recycling Iocatkm
nearesl you.
For lnore ink_rmatkm regarding
recycling of rechargeable baueries+ call loll fiee 1-
800-822- 8837, or visit http://www,rbrc,org/
Caution: Do not handle damaged or leaking
Lidfium-lon batteries.
Owner'sRecord
Tile model and serial numbers are located on tile
bottom. Record tile serial nulnber ill tile space
provMed below. RelPr to these nun;bers whene; er
you call your Sony dealer regarding this product.
Model No. HI)R-
Serial No.
Model No. AC-
Serial No.
If you have any questions about this
product, you may call:
Sony Customer hfformation Center 1-800-
222-SONY (7669).
The number below is for the FCC related
matters only.
RegulatoryInformation
Declaration of Conformity
Trade Name: SONY
Model No.: HDR-SR10
Responsible Party: Sony Electronics lnc.
Address: 16530 Via Esprilk). San Diego. CA
92127 U.S.A.
Telephone nunlber: 858-942-2230
This device complies with Part 15 of the FCC
Rules. Operation is subject to tile Iollowing two
conditions: (1) This device may not cause
hanntul intertPmnce, and (2) this device must
accept any intertercncc received, including
iluer|crcnce that may cituse undesired operalkm,
Notes
HDR-SRI0 is to be used "_ith the
Haudycam Station Model DCRA-C220 and
AC Adaptor Model AC-L200/L200B.
CAUTION
You al+e cmuioned that any chmlges or
modifications not expressly appro; ed in this
manual could xoid your authority to operate this
equipment.
Note
This equipment has been tested and round to
comply with tile limits lor aClass B digital
device, pursuant to Part 15 of file FCC Rules.
These limits are designed to provide reasonable
protection against haz'zntul intertlrz-ezlce ill a
residential installation. This equipment genel'atcs.
uses. and can radiate radio li+cquency energy +rod,
it nIU installed and used in accoz'danc_ widl the
instructions, ill_ly C_l/ise harllllll] inlerlcrellce 1o
radio colnlnunicalions.
However, there is no guaraluee thai interlkrence
will not occur in a particular installation. If this
equipment does cause harmful interference to
radk> or tcleviskm receptkm, which can be
determined by turning tile equipment oil and on.
the user is encouraged to try to correct the
interlPrence by one or more of tile Iollowing
nleasuB:s:
Reorient or relocate tile receiving antenna.
Increase the _paration between tile equipment
and receiver.
Connecttileequipmentinto an outlet <in a
circuit different li+om that to which the receiver
is connecled.
Consult the dealer or an experienced radio/TV
technician lor help.
Tile supplied interli_ce cable must be used with the
equipment in order to comply with the limits k)r a
digital device pursuant to Subpart B of Part 15 of
FCC Rules.
Forthe State of California, USA only
Pcrchlorate Material -special handling may
apply, See
www.dtsc.ca, gov/h azardouswast e/per chlorate
Perchlorate Material: Lithium battery contains
perchlorate.
Supplieditems
The tmmbers in ( ) are the supplied
quantity.
• AC Adaptor (1)
• Power cord (Mains lead) (l)
• Handycam Station (1)
• Component A/V cable (1)
• A/V connecting cable (1)
• USB cable 11)
• Wireless Remote Commander (1)
A button-type lithium battery is already installed.
• Rcchargeable battery pack NP-FH60 (1)
• CD-ROM "Handycam Application Soltware '+
(1) (p, 24)
Picture Motion Browser (Soltware)
PMB Guide
Handycam Handbook (PDF)
• "Operating Guide '+ (This manual) (1)
[] [] [] []
Usingthe camcorder
• Tile cumcorder is not dustprooled, dripprool_d
or waterprootPd, See +Prccmltions" (p. 30),
• Do not do ally' o1 tile lollowing when tile
(Movie)/_ (Still) mode lamps or the
ACCESS lamps (I7. 12, 16) arc lit or flashing,
Otherwise, tile media may be damaged,
recorded images may be lost or other
malltlnclions could occur,
Eject the "Memo UStick PRO Duo"
Remove tile battel T pack or AC Adaptor lrom
tile calncorder
Apply mechanical shock or vibration to file
canlcorder
• When connecting your cmncorder to another
device wilh conmmnication cables, be sure to
insert the connector plug in the correct way,
Pushing the plug Iorcibly into the terminal will
damage the terminal and may result in a
inalfilnction of your canlcorder,
• Connect cables to the connectors of the
Handycam Station when using your camcorder
attached to tile Handycum Station. Do not
connect lhe cables to bodl file Handycam
Station and your camcorder.
• Do not apply shock or vibration to your
camcorder. The imernal hard disk of tile
camcorder may not be lvcogni/cd or recording/
playback may not be possible.
• Do not use your camcorder in vel 3' h)ud areas.
Tile hard disk of your camcorder may not be
recogni/cd, or recording may not be possible.
• To protect the internal hard disk tiom shock by
dropping, tile camcorder has drop sensor
Iunction +. When a drop occurs, or under a non-
gravity conddion, the block noise made when
this llmction is activated by the camcorder may
also be recorded. If the drop sensor catches a
drop repeatedly, recording/playback may be
slopped.
• When tile temperature of tile camcorder
becomes exlremely high or extremely low, you
may not be able to record or play back on the
calncorder, due to the protcclion Ieatures of lhe
camcorder being activated in such situations. In
this case+ a message appears on the LCD screen
(p, 28).
• Do not turn on the camcorder ilk a low-pressure
area, where the altitude is more than 3,000
meters (9,800 llret). Doing so may damage the
hard disk drive of your cumcorder,
• If you repeat recoMin_deleting images R_r a long
tilIlt', fi+agl nentation of data occurs on tile media,
hnuge8 cannot be saved or recorded. In such a case+
save your images on SOlilt_type of external nlcdia
fir% and then pellbrm [MED1A FORMAT]*.
• Fasten the grip belt and hold your camcorder
corlvctly while recording,
x
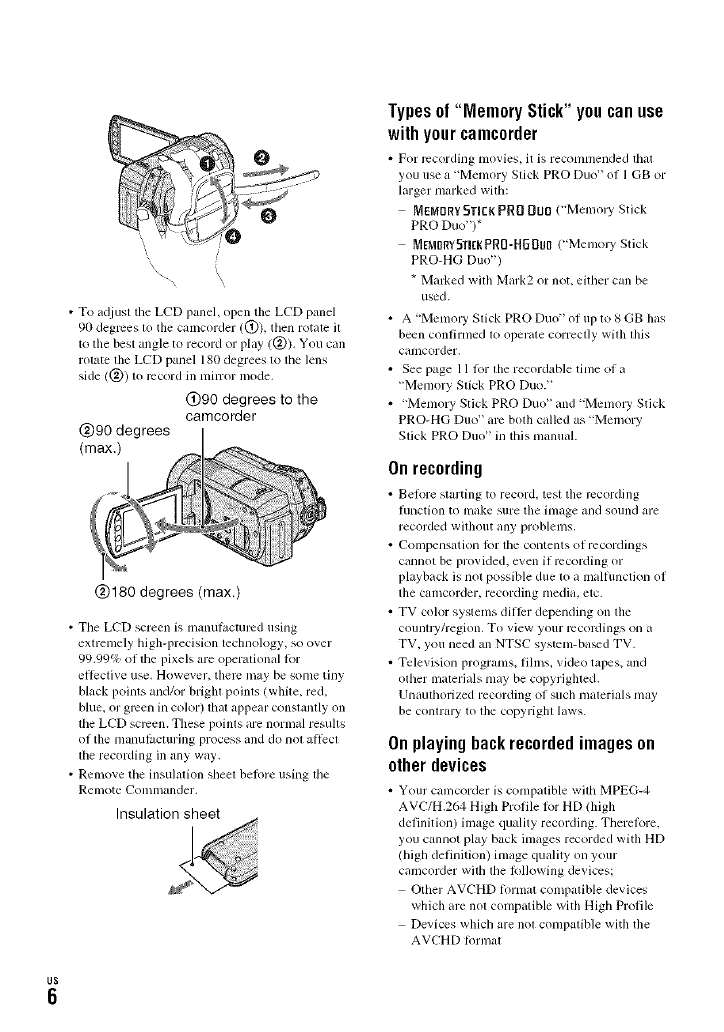
• To a_ljust tile LCD panel, open tile LCD panel
90 degrees to the camcorder ((!)), then rotate il
to the best angle to record or play (@). You call
rotate the LCD panel 180 degrees to the lens
side (@) to record ill reinor mode.
@90 degrees to the
camcorder
@90 degrees
(max.) 21 ...<__
@180 degrees (max.)
• The LCD screen is manulacturcd using
extremely higb-preciskm teclmology, so over
99.99% of lhe pixels are operational Ior
eltective use. However, them may be some tiny
black points and/or brighl poinls (while, red,
blue, or green in color) thai appear conslanlly on
lhe LCD screen. These poinls are normzd results
of tile nlanul_lcluring process and do not allecl
tile recording ill ally way.
• Remove tile insulation sheel be%re using lhe
Remote Comlnander.
Insulation sheet
Typesof "Memory Stick" you canuse
withyour camcorder
• For recording movies, it is reconnnended that
you use a "Memory Stick PRO Duo' ol I GB or
larger marked with:
MEMORY€;TEK PRO DUD ("Menloly Stick
PRO Duo")*
MEMIIRYSTI[RPR[I-HI][ItlII("Memory Stick
PRO-HG Duo")
* Marked with Mark2 or not, either call be
used.
• A _Memory Stick PRO Duo" of up to 8 GB has
been confimled Iv)opel'ale correctly wilb Ibis
camcorder.
• Seepage 11 lorlllerecordabletimeofa
'_Memory Stick PRO Duo."
• '_Menlory Stick PRO Duo" and "Memo W Stick
PRO-HG Duo" am bolh called as "Memory
Stick PRO Duo" in tilts manual.
Onrecording
• Belore slarting to record, test tile recording
function to make sure tile image and sound are
recorded without any problems.
• Compensatkm for tile contents of recordings
cannot be provided, even if rccoMing or
playback is not possible due to a malflmction of
tile camcorder, recording media, etc.
• TV color systems dillcr depending on lbe
counlly/region. To view your lvcoMings on a
TV. you need an NTSC system-ba_d TV.
• Television programs, films, vkleo tapes, and
other malerials may be copyrighled.
Unaulhorized recording of such malerkds nlay
be conlraly to lhe copyrigbl laws.
Onplaying backrecordedimageson
otherdevices
• Your camcorder is compatible with MPEG-4
AVC/H.264 High Profile Ior HD (lligb
definition) image quality recording. There%re.
you cannot play back images recorded with HD
(high definitkm) image quality on your
camcorder with the lblk)wing devices:
Other AVCHD lornlaI compatible devices
which are not compatible with High Profile
Devices which are not compatible with tile
AVCHD lormat
Tableof Contents
Save all yourrecordedimage data
• To pie:vent your image data fi'om being lost,
sa_e all your recorded images on external media
periodically. It is recomnmnded that you save
the image data on a disc such as DVD-R using
your colnputer*. Also, you can silve yollr illlilge
data using a VCR, or a DVD/HDD recorder*.
Whenthecamcorderis connectedtoa
computer
• Do not try to lol'mat the hard disk of the
calncorder using a conlplltcr. It you do so, your
C_llncorder ingly llOt operate correctly.
Noteondisposal/transfer
• Even if you perlorm [MEDIA FORMAT]* or
lormalling the hard disk of the camcorder, you
may not delete data lrom the hard disk
colnpletcly. When you transli:r the camcorder, il
is reconnnended that you perlorm [@
EMPTY]* to prcvenl the recovel T of your data.
Also, when you dispose of lhe camcorder, it is
reconlnlended thai you destroy lhe actual body
of tile canlcorder.
Aboutlanguagesetting
• The on-screen displays in each local language _II'C
used lor illustrating lhe operating procedures.
Change lhe screen language belore using your
canlcorder if necessary (p. l(t).
Aboutthis manual
• The images of tile LCD screen used ill this
manual k_r illusm_tion purposes are captured
using a digital still camera, and there%rc may
appear different hom tile actual images of the
LCD screen.
• In this Operaling Guide, the hard disk of your
canlcorder and "Men_ol T Stick PRO Duo" are
called "media."
• The screenshots am hom Windows Visla. The
scenes may va W depending on die operating
syslem of lhe computer.
*Rotor also to "Handycam Handbook" (PDF) and
"PMB Gukle."
IMPORTANT SAFEGUARDS ......... 2
Read this first .................................. 4
Step 1:Charging the battery pack
...................................................... 8
Step 2: Turning the power on, and
setting the date and time ............. 10
Changing the language setting
................................................... 10
Step 3: Selecting the media .......... 11
Recording ..................................... 13
Playback ....................................... 14
Playing the image on a TV ........... 15
Name and functions of each part
.................................................... 16
Indicators displayed during recording/
playback ...................................... 18
Performing various functions - "_
HOME" and .o__- OPTION" .......... 20
Saving images .............................. 22
Deleting images ............................ 23
Performing with a computer .......... 24
Installing and viewing "Handycam
Handbook" (PDF) ...................... 24
Installing "Picture Motion Browser"
................................................... 24
Troubleshooting ............................ 27
Precautions ................................... 30
Specifications ................................ 32
Ge_#_gS_aded
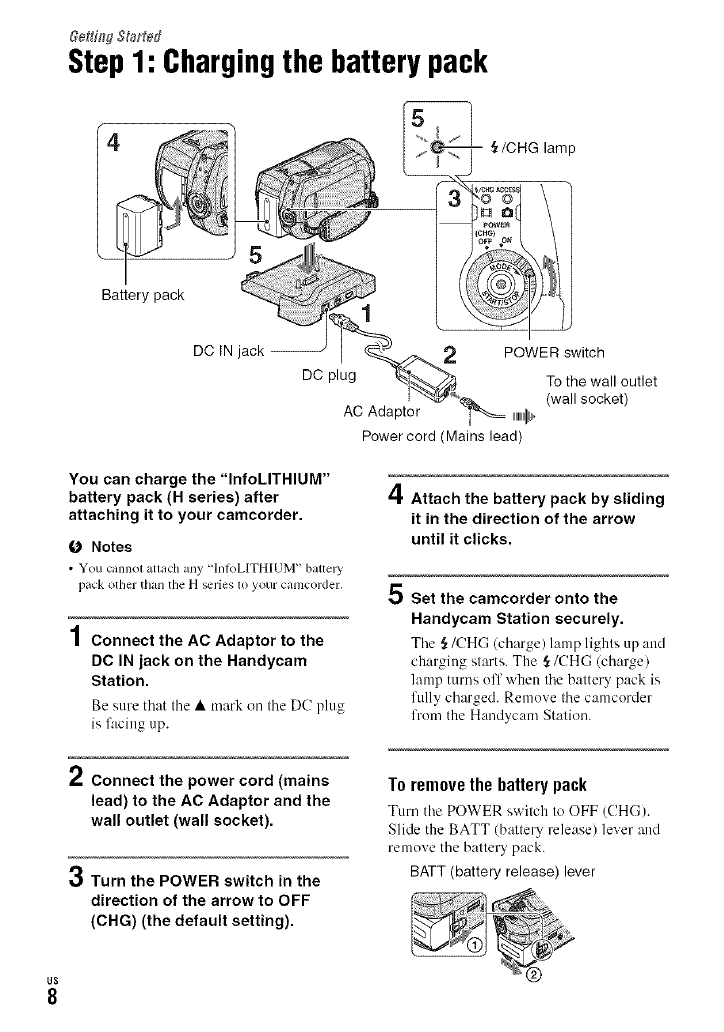
Step1: Chargingthe battery pack
Battery pack
DC IN jack 2 POWER switch
DC plug To the wall outlet
(wall socket)
AC Adaptor """11_
Power cord (Mains lead)
You can charge the "InfoLITHIUM"
battery pack (H series) after
attaching it to your camcorder.
O Notes
• You cannot attach any "]ntoL]TH[UM _ battmy
pack othcl" th;ll] the H_I'iCS 10 your C_[I]ICOI'deI:,
4
| Connect the AC Adaptor to the
DC IN jack on the Handycam
Station.
Be s/ire tbat tbe •mark on tbe DC plug
is facing up.
4
5
Attach the battery pack by sliding
it in the direction of the arrow
until it clicks.
Set the camcorder onto the
Handycam Station securely.
Tile {_/CHG (cbarge) hunp lights up :rod
charging starts. The _/CHG (cbarge)
lamp turns off when tbe battery pack is
fully cbarged. Remove tbe camcorder
from the Handycam Station.
2Connect the power cord (mains
lead) to the AC Adaptor and the
wall outlet (wall socket).
OTurn the POWER switch in the
direction of the arrow to OFF
(CHG) (the default setting).
To remove the battery pack
Turn tbe POWER switch to OFF (CH(-;).
Slide the BATT (battery release) lever and
remove tbe battery pack.
BATT (battery release) lever

To chargethe batterypack using only
the ACAdaptor
Turn tile POWER switch to OFF (CHG),
then connect the AC Adaptor directly to the
DC IN jack (m tile camcorder.
POWER switch
DC IN jack
DC plug Open Ihe jack
Cover,
Charging time:
Approximate time (rain.) required when
you fully charge a completely exhausted
battery pack.
Recording/Playback time:
Approximate time (rain.) available when
you use a fully charged battery pack.
"HD" stands for high definition image
quality, and "SD" stands for standard image
quality.
(Unit:rain.)
HD SD HD SD
Charging time 135
Recording time *_.2
Continuous 90 I I 0 90 I I 0
recording time
Typical
recording 40 50 40 50
tinle *a
Playback time .2 130 130 13(1 130
*_ [REC MODE]: SP
*2 When tile LCD backligla is on
*a Typical recording finle shows the time when
you repeat recording start/stop, turning tile
power on/oI] and zoonlhlg.
On the battery pack
• Wbell you relnove file battely pack or
disconnect tile AC Adaptor, turn tile POWER
switch m OFF (CHG) and make sure thal tile
(Movie) lamp/_ (Still) lamp (p. 10)1
ACCESS lanlps (p. 12, 16) are turned off. ,_=
• Tile power will not be supplied h'om tile battely
as long as the AC Adaptor is connected to tile
DC IN jack of your camcorder or tile Handycam _.
Station, even when tile power cord (mains lead)
is disconnected fl'Olll tile wall outlet (wall
socket).
On the charging/recording/playback time
• Tinles nleasured when using tile camcorder at
25°C (77°F) (10°C to 30%" (50°F to 86°F) is
reconlmended).
• Tile available recording and playback tinlc will
be sllorter wbell yoll use yollr canlcorder ill low
tenlperamres.
• Tile available recording and playback time will
be sllorter depending on the conditions under
which yoll use yollr canlcorder.
On the AC Adaptor
• Use tile nearby wall outlet (wall socket) when
using the AC Adaptor. Disconnect the AC
Adaptor honl the wall outlet (wall socket)
inlmediatcly if any malhmction occurs while
using your camcorder,
• Do not usv the AC Adaptor placed in a narrow
space, such as between a wall and lhrnimre.
• Do not sbort-circud the DC plug of tile AC
Adaptor or battery terminal with any metallic
ot_iects. This may cause a nlalhmction.
• Even if yollr camcorder is turned oil. AC power
source (mains) is still supplied to it while
connected to the wall oullet (wall socket) via the
AC Adaptor,
Step2: Turningthe poweron, andsettingthe
date andtime
/HOME) lp. 20)
Touch the bullon on Ihe
LCD screen.
POWER switch
\
k
When using the
camcorder for Ihe
first time, the
[CLOCK SET]
screen appears on
the LCD screen.
US
10
1While pressing the green button,
turn the POWER switch
repeatedly in the direction of the
arrow until the respective lamp
lights up.
(Movie): To recoM movies
I1_ (Still): To record still images
Go to step 3when you turn on your
camcorder for the first time.
• When you turn on O (Still) lamp, tile
screen aspecl ratio is changed to 4:3
automalically.
2Touch _ (HOME) -_
(SETTINGS) -_ [CLOCK/
[] LANG] -_ [CLOCK SET].
3Select the desired geographical
area with D/D, then touch
[NEXT].
4Set [DST SET] or [SUMMERTIME],
[Y] (year), [M] (month), [D] (day),
hour and minute, then touch I_1.
The clock starts.
"_" Tips
•Tim date mid time does not appear during
recording, but riley are automatically recorded
on the media, mid can be displayed during
playback.
• You can turn off the operation beeps by
touching _ !HOME) _ _1_ (SETTINGS)
[SOUND/DISP SET] -+ [BEEP] -+ [OFF].
You can change the on-screen displays to
show messages in a specified language.
Touch _ (HOME) ---+ _ (SETTINGS)
-* [CLOCK/[_] LANG] --*
[[] LANGUAGE SET], then select the
desired language.
Step3: Selectingthe media
You can select tile hard disk or "Memory
Stick PRO Duo" as the recording/playback/
editing media oil your camcorder. Select the
media for movies and still images
separately.
The default setting is hard disk fur movies
and still images.
Hard disk
H
Movie
lJUagL +
O Notes
• You can do recording/playback/editing
operations tor the selected media. When you
want to change media, reselect file media.
•The recordable time with [HD SP] recording
mode/the delault selling) is as follows:
On the internal hard disk: approx. 1 I h 50 Ill
On a "Memory Slick PRO Duo" 14 GB) made
by Sony Corporation: approx. 1 h 5 m
"_° Tips
• Check lhe munber of recoMable still images on
tile LCDscreen o1your camcorder (p, 18).
1Touch _l_ (HOME)--+
(MANAGE MEDIA).
/Touch [MOVIE MEDIA SET] to
select the media for movies.
Tile media setting screen appears.
3Touch the desired media and
image quality.
indicates HD (high defiuitiun/
image quality, and _ indicates SD
(standard definitiuu) image quality.
4Touch [YES] -+ I_.
The media is changed.
To select the media for still images
Tuuch [PHOTO MEDIA SET] in step 2,
then touch the desired media.
To check the media setting
(!) Turn Ihe POWER switch repeatedly to light
up the _ (Movie)/{_ (Still) lamp,
depending on which media setting you
want to check.
(_) Check the media icon on the screen.
STBY _
Media icon
@: Hard disk
:"Memury Stick PRO Duo"
Insert a "Memory Stick PRO Duo" if
"Memury Stick PRO Duo" has been
selected as the media.
For types of "Memory Stick" you can use in
your camcorder, see page 6. US
11
m
g
g.
1Insert the "Memory Stick PRO
Duo."
@ Open the Memory Stick Duo cover in
the direction of the arrow.
(_) Insert the ' Memory Stick PRO Duo"
into the Memory Stick Duo slot in the
right direction until it clicks.
@ Close the Memor,_ Stick Duo cover.
ACCESS lamp ("Memory
Stick PRO Duo")
/If you have selected "Memory
Stick PRO Duo" as the movie
media, turn the POWER switch
until the _! (Movie) lamp lights
up.
If the POWER switch is set Io OFF
(CHG), turn it on while pressing tile
green billion.
3Touch [YES].
To recoM only still images on a
"Memory Stick PRO Duo," touch [NO].
Toeject the "Memory Stick PRO Duo"
()[)ell the Memory Stick Duo cover :rod
lighlly push the "Memory Stick PRO Duo"
ill once.
0 Notes
• Do not open the Memory Stick Duo coxer
during recoMing.
• If you force the "Memoly Slick PRO Duo" inlo
the slot in the wrong direction, the 'Memory
Stick PRO Duo," the Memory Slick Duo slot, or
image dam may be damaged,
• If [Failed 1o crcale a new Image Dalabase File.
It may be possible lhat lherc is nol enough tree
space,] is displayed in slep 3, formal the
"Memory Slick PRO Duo," Note that formatting
will delete all data recorded on the "Memory
Slick PRO Duo."
• When inserting or ejecting the "Menlory Stick
PRO Duo," be care/hl so that tile +'Memory
Slick PRO Duo" does not pop out and drop,
The [Create a new Image Database
File.] screen appears on the LCD screen
when you insert a new "MemoryStick
PRO Duo."
US
12
Recording/Playback
Recording
The images are recorded on Ihe media selected in tile media setting (p. 1] ). In the default
setting, both movies and still images are recorded on Ihe haM disk.
1 2
POWER switch []
_i_ : To record movies
: To record still images
(
1_ (HOME) []
(p. 20)
START/STOP []
)
i?_-i
[STBYI _ [RECI
Flashing _ Lights up
START/STOP []
1Turn the POWER switch [] until the respective lamp lights up.
Press Ihe green button only when Ihe POWER switch [] is in tile OFF (CHC/position.
2Start recording.
Press START/STOP [] (or [_).
To stop recording, press START/STOP []
/or [_) again.
Press PHOTO [] lightly to adjust the
focus _ (a beep sounds), then press
it fully O (a shutter click sounds).
JJJJJJJJappears beside @or _. When JJJJJJJJ
disappears, the image has been recorded.
"10
g
"_° Tips
• You can check the rccoMable time and tile
remaining capacfly by pressing _- (HOME)
_;3 (MANAGE MEDlA) _ [MEDIA
INFO].
• You can capture still images by pressing
PHOTO _ during movie recording.
•The lllaXimllln continuolls lvcordable lime of
movies is approximately 13hours.
• When a movie file exceeds 2 GB, the nexl
movie file is created automatically.
US
13
US
14
Playback
You can play back the image recorded in the media thai has been sel on the media set/ing
(p. I 1). ht tile defaull selting, tile images on the hard disk are played back.
[] (VIEW IMAGES) []
2
[] (VIEW IMAGES) []
(_) Goes 1o the _ (Fihn Roll Index) screen
(_) Goes to tile I_ (Face hldex) screen
@ Goes to "_" (HOME)
@ Previous 6 images
@ Next 6 inlages
(_) Returns to the recording screen
1
POWER switch []
@ Displays movies with HD (high definition)
image quality*
@ Displays still images
(_)Searches lbr images by date
(_ _ (OPTION)
* _ appears when you select the movie with SD
(standard definition) image qualily in [MOVIE
MEDIA SETI (p. 11).
1Turn the POWER switch [] to turn on your camcorder.
2Press [] (VIEW IMAGES) [] (or [_).
The VISUAL INDEX screen appears on the LCD screen (It may take some seconds).
3Start playback.
Touch the _ or _ tab, then select
the desired movie to play back.
Beginning oI the Toggles Play
lllO',,ie/previous or Pause as
movie yoll tOllch Nexl l/lOVie
Slops (goes to tile "_ n
INDEX screen) O=_(OPTION)
Touch the _tab, then select the
desired still image to play back.
Slide show
10*i=00/4 1
Goes to tile V[SUAL Previous/Next
INDEX screen @=_ (OPTION)
To adjustthe soundvolumeof movies
When playing back a movie, touch O_
(OPTION) -..+ [_ tab -..+ [VOLUME],
1hen ac!jusl 1he volume with _/[_7.
"_" Tips
• On tile VISUAL INDEX screen, IIm,-I/_-appears
with tile inlage on tile tab that was most recently
played back/recorded. When you loucb an
image marked with II_-I/,. you can play it back
lrom tile point it was previously stopped.
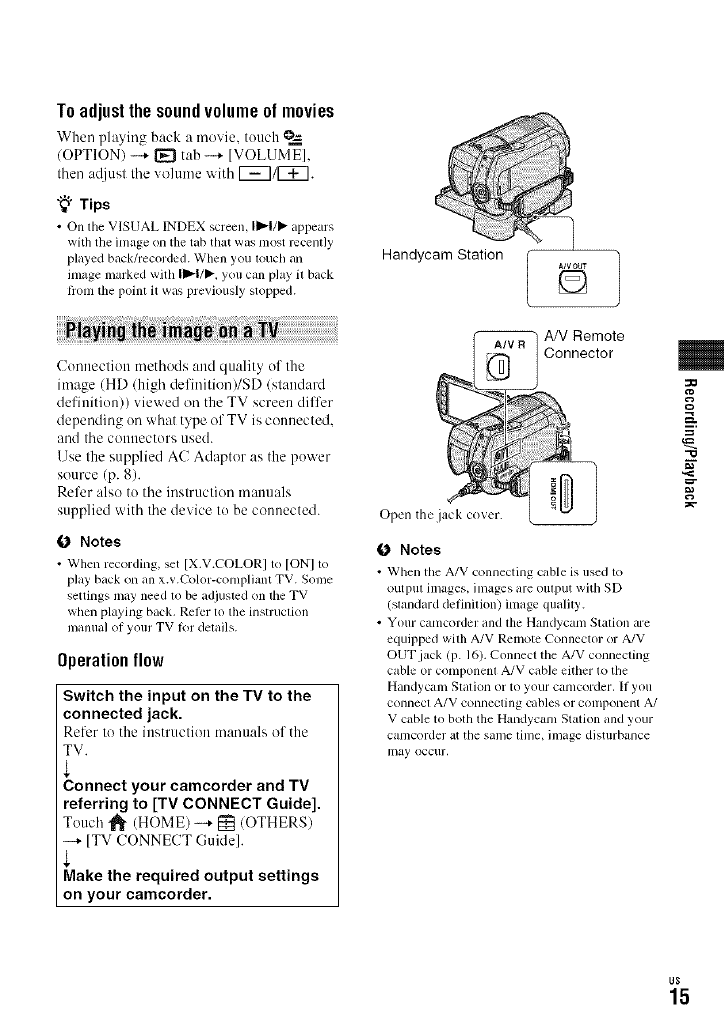
Connection methods and quality uf the
image (HD (high definition)/SD (standard
definition)) viewed on the TV screen differ
depending un what type of TV is connected.
and tile couuectors used.
Use the supplied AC Adaptor as the power
source (p. 8).
Refer also tu the instruction manuals
supplied with the device to be connected.
ONotes
• When recording, set [X.V.COLOR] to [ON] 1o
play back on an x.v.Color-compliant TV. Some
settings may need to be adjusted on the TV
when playing back. Rel_:r to the instruction
manual of your TV lot delails.
Operation flow
Switch the input on the TV to the
connected jack.
Refer to tile iu£truction mauu:ds of tile
TV.
_Connect your camcorder and TV
referring to [TV CONNECT Guide].
Touch _ (HOME) --+ I_ (OTHERS)
--+ [TV CONNECT Guide].
Make the required output settings
on your camcorder.
Handycam Station
A/VOUT ]
Q
A/V Remote
Connector
Open the jack cover.
0Notes
•When tile A/V connecting cable is used to
outpuI images, images are oulput with SD
(standard definition) image quality.
• Your camcorder and lhe Handycam Station me
equipped wilh A/V Remote Connector or A/V
OUT jack (p. 16). Connect tile A/V connecting
cable or componenl A/V cable either to the
Handycam Slalion or to your canlcorder. If you
connecl A/V connecting cables or conlponent A/
V cable to both the Handycam Station and your
camcorder at the same lime_ image disturbance
may occur,
o
"10
g
ix-
US
15
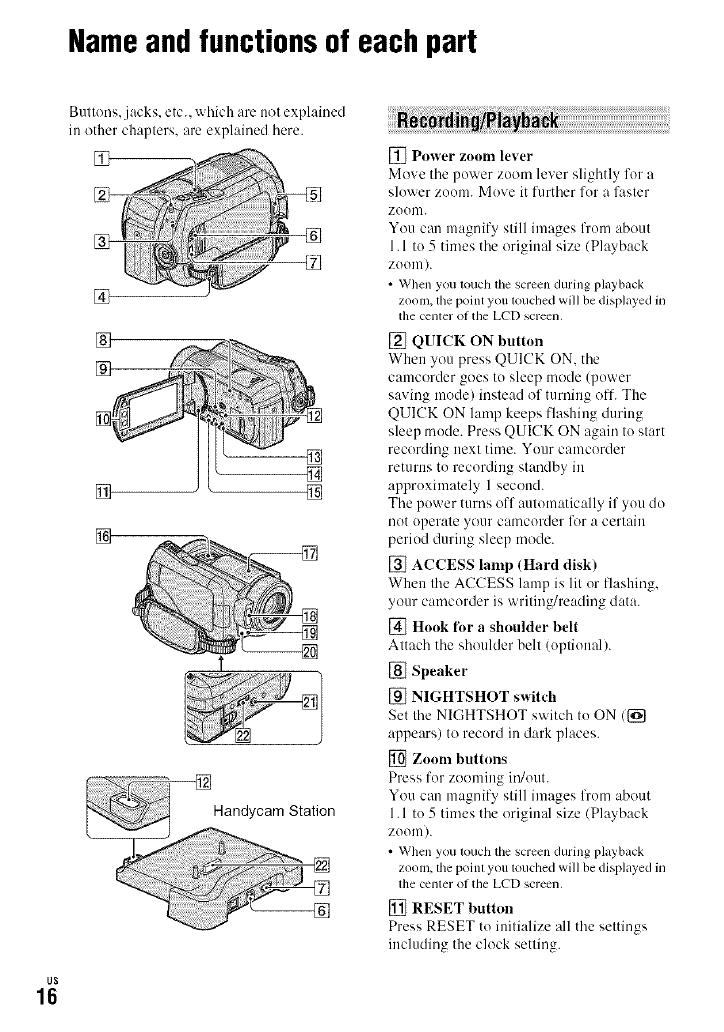
Nameandfunctionsof each part
US
16
Buttons, jacks, etc.. which are not explained
in other chapters, are explained here.
%,
%
[]
[]
®
[]
[]
Handycam Station
[]
--®
[_ Power zoonl lever
Move tile power zoom lever slightly for a
slower zoom. Move it further for a faster
ZOOUl.
You can magnify still images fl'om about
1.1 to 5 times tile originN size/Playback
Z00Ul).
• When you louch lhe screen during playback
zoom, thepointyou touclledwill be displayed in
thecemer of the LCD screen.
[] QUICK ON button
When you press QUICK ON. the
camcorder goes to sleep mode (power
saving mode) instead of turning olT. The
QUICK ON lamp keeps flashing during
sleep mode. Press QUICK ON again to start
recording uext time. Your canlcorder
returns to recording standby in
approximately 1 second.
Tile power turns off automatically if you do
not operate your camcorder lklr a certain
period during sleep mode.
[] ACCESS lamp (Hard disk)
When tile ACCESS lamp is lit or llashing,
your camcorder is writing/reading data.
[] Hook for ashoulder belt
Attach tile shoulder belt (optional).
[] Speaker
[] NIGHTSHOT switch
Set tile NIGHTSHOT switch to ON/{_
appears) to record in dark places.
[] Zoonl buttons
Press for zooming in/out.
You can magnify still images from about
1.1 to 5 times tile original size/Playback
Z00Ul).
• When you louch the screen during playback
zoom, the pointyou touchedwill be displayed in
thecenter of the LCD screen.
[] RESET button
Press RESET to initialize all tile settings
including the clock setting.
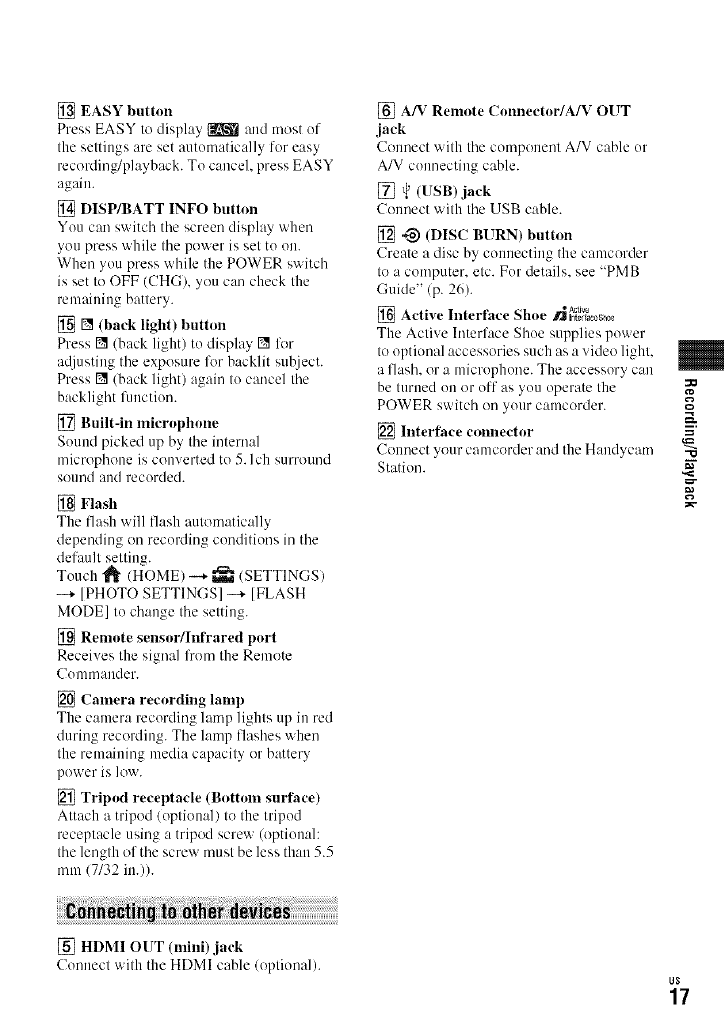
[] EASY button
Press EASY to display _ and most of
the settings are set automatically for easy
recording/playback. To cancel, press EASY
again.
[] DISP/BATT INFO button
You can switch tile screen display when
you press while tile power is set tu on.
When you press while the POWER switch
is set to OFF (CHG/, you can check the
remaining battery.
[] [] (back light) button
Press [] (back light) to display [] for
at!justiug tile exposure liw backlit sut!ject.
Press [] (back light) again tu cancel tile
backlight function.
[] Built-in microphone
Sound picked up by tile internal
microphone is converted tu 5.Ich surround
Souud aud recorded.
[] Flash
The flash will flash automatically
depending on recurding cunditions in tile
default setting.
Touch _ /HOME/-...+ _ (SETTINGS/
-+ ]PHOTO SETTINGS] -+ [FLASH
MODE] tu change tile setting.
[] Remote sensor/IntYared port
Receives the signal from the Remote
C()mm:mder.
[] Camera recording lamp
The camera recording lamp lights up in red
during recording. Tile lamp flashes when
the remaining media capacity or battery
power is low.
[] Tripod receptacle (Bottom surface)
Attach a tripod/uptioual) to the tripod
receptacle using a tripod screw (optiuual:
the length of tile screw must be less than 5.5
mm (7132 in.)).
[] A/V Remote Connector/A/V OUT
jack
Connect with tile component A/V cable ur
A/V cunnectiug cable.
[] ¢ (USB)jack
Connect with tile USB cable.
[] ._ (DISC BURN) button
Create a disc by connecting the camcorder
to a computer, etc. Fur details, see "PMB
Guide" (p. 26).
Ac/_ve
[] Active Interf_ce Shoe /JIrlt_ Iaee_ll_0
The Active Interface Shoe supplies power
to optiunal accessories such as a video light,
a flash, or a microphone. The accessory can
be turned un or off as yuu operate the
POWER switch on yuur camcorder.
[] Interface connector
Connect your camcorder :rod the Haudycam
Station.
o
g
[] HDMI OUT (mini) jack
Connect with the HDMI cable/optional).
US
17
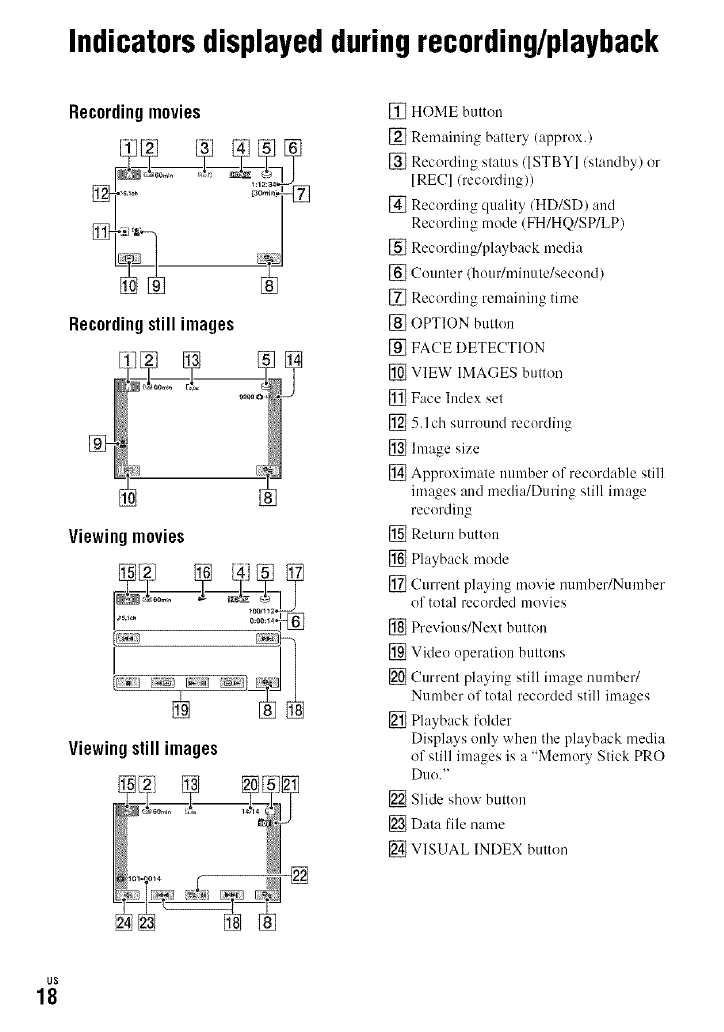
Indicatorsdisplayedduringrecording/playback
Recordingmovies
Recording still images
?
N-
8
Viewingmovies
Viewing still images
[] HOME button
[] Remaiuing battery (approx.)
[] Recording status/[STBY]/standby) or
[RE(?]/recordiug))
[] Recording quality/HD/SD) aud
Recording mode (FH/HQ/SP/LP)
[] Recording/playback media
[] Counter/houUminute/second)
[] Recording remaining time
[] OPTION button
[] FACE DETECTION
[] VIEW IMAGES button
[] Face Index set
[] 5.1ch surround recording
[] hnage size
[] Approximate number of recordable still
images and media/During still image
recording
[] Return button
[] Playback mode
[] Current playing movie number/Number
of total recorded movies
[] Previous/Next button
[] Video operation buttons
[] Current playing still image number/
Number of total recorded still images
[] Playback folder
Displays only when the playback media
of still images is a "Memory Stick PRO
DUo."
[] Slide show button
[] Data file name
[] VISUAL INDEX button
US
18
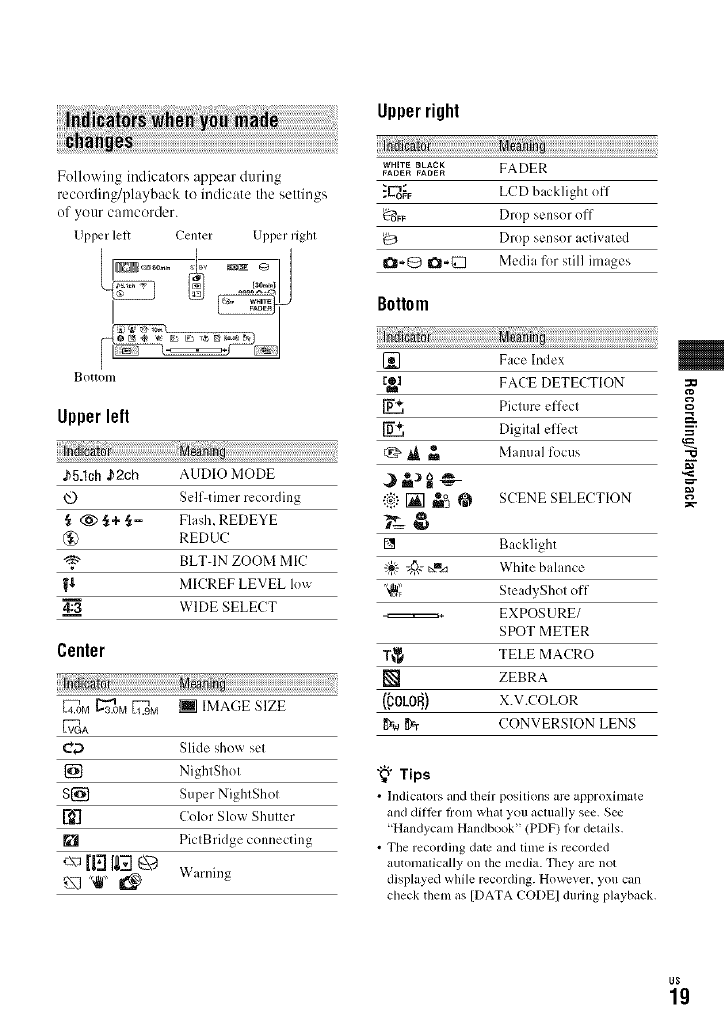
Following indicators appear during
recording/playback to indicate tile settings
of your camcorder.
Upper lelt Center Upper righl
Bottol/l
Upperleft
.b5.1ch J_2ch AUDIO MODE
Self-timer recording
,_ @ ,_+ ,_= Flash, REDEYE
(_) REDUC
_," BLT-IN ZOOM MIC
W_, MICREF LEVEL low
4:3 WIDE SELECT
Center
4[T..OM_3.0M 1E_,gM [] IMAGE SIZE
_A
C,.'} Slide show set
[] NightShot
S[] Super NightShot
_"] Color Slow Shutter
PictBridge connecting
c\_[FI1_.-1Q
"_tr' I_ Warning
Upperright
WHITE BLACK FADER
FADER FADER
_E-_F LCD backlight off
{'_w Drop sensor off
Drop sensor activated
I_'0 I_'_ Media for still images
Bottom
[] Face Index
_1 FACE DETECTION
Picture effect
Digital ell_ct
_ _ Manual focus
"i_) [] _% @ SCENE SELECTION
_=@
[] Backlight
_= _@ txI._ White balance
'_,,_ SteadyShot off
_+ EXPOSURE/
SPOT METER
T_ TELE MACRO
[] ZEBRA
( oLo } x.v.cOLOR
_rw I_r CONVERSION LENS
"_° Tips
•lndicmors and tl/eil"positions arc approximate
and dittPr ti'om what you aclually see. See
"HmMycam Handbook' (PDF) tL}rdetails,
• The recording date and time is recorded
automalically on the media. They am not
displayed while recording. However, you can
check them as [DATA CODEI during playback.
:O
"10
g
US
19
Performingvariousfunctions- HOME"and
OPTION"
You can display tile menu screen by
pressing _ (HOME) [] (or [_)/
(OPTION). For details of the menu
items, see "Handycam Handbook" (PDF)
(p. 24).
(HOME)
1_ (HOME) []
Tosee the explanationof the HONE
MENU(HELP)
@ Press _- (HOME) [] (or [_]).
@ Touch [] (HELP).
The bottom of [] (HELP) turns orange.
@ Touch the item you want to learn about.
When you touch an item, its explanation
appears on the screen.
To apply the selected item, touch [YES].
You can cl'mege II'le operating settings for
your convenience. Press "_ (HOME) []
(or [_) to display the menu screen.
Menu items
The _ (OPTION) MENU appears just like
the pop-up window that appears when you
right-click the mouse on a computer.
Press _ (OPTION) to display the menu
items you can change in the current
situation.
US
2O
Category
1 Touch the desired category then
item to change the setting.
2Follow the instructions on the
screen.
"_° Tips
•If the item is not on tile screen, touch _/_ 1o
change the page,
• To hide lhe HOME MENU screen, touch IX],
• You cannot simultaneously select or activate the
grayed items in the currenl rccording/playback
sittlation,
Menuitems
i
Tab
1Touch the desired tab then item
to change the setting.
2After completing the setting,
touch I_gl.
0Notes
• When the item you want is not on the screen.
touch iulother tab. If yo/I CilllllO[ |]nd file item
anywhere, file limction is nol available under file
current siluadon.
• The O=_(OPTION) MENU cannol be used
during Easy Handycam operation.
MOVIE*
PHOTO*
SMTH SLW
REC
VISUAL
INDEX*
_ INDEX*
[] INDEX*
PLAYLIST
m0s
DELETE* I_ DELETE],
[_-I DELETE]
PHOTO
CAPTURE
MOVIEDUB INI_ O -* _ DUBI,
[_ _ -_- _ DUB]
PHOTO ]COPY by selecll, ]COPY by
COPY date]
EDIT [_ DELETE].
[_ DELETE]. [DIVIDE]
PLAYLIST [_q_ ADD], [_ ADD],
EDIT [_ ADD by dalel,
[_1] ADD by datel,
[_--_1 ERASE].[ ,_=soERASE],
[_a¢_ ERASE ALL].
[._=SDERASE ALL],
[_=1_ MOVE], [.'_=sDMOVE]
PRINT
USB [{_ USB CONNECT],
CONNECT [_ USB CONNECT], ]DISC
BURN]
TV
CONNECT
Guide*
MOVIE
MEDIA
SET*
PHOTO
MEDIA
SET*
MEDIA
INFO
MEDIA [HDDI, [MEMORY STICKI
FORMAT*
REPAIR [HDDI, [MEMORY STICKI
IMG.DB F.
MOVIE [REC MODE], [AUDIO
SETTINGS MODE], [NIGHTSHOT
LIGHT], [WIDE SELECTI,
[DIt31TAL ZOOM]_
[STEADYSHOT], ]AUTO
SEW SHUTTRI,
[X.V.COLOR],
[GUIDEFRAME], [ZEBRA],
1_ REMAINING SET],
[SUB-T DATE], ]FLASH
MODE]*, [FLASH LEVEL],
[REDEYE REDUC], ]FACE
DETECTION], [[] lNDEX
SET]*, [CONVERSION
LENS]
PHOTO I_ IMAGE SIZE]*, ]FILE
SETTINGS NO.I. [NIGHTSHOT LIGHTI.
[STEADYSHOTI,
[GUIDEFRAME], [ZEBRA],
]FLASH MODE]*, ]FLASH
LEVEL], [REDEYE REDUC],
]FACE DETECTIONI,
]CONVERSION LENSI
VIEW ]DATA CODEI,
IMAGES 1[_ DISPLAY]
SET
SOUND/ [VOLUME]*, [BEEP]*, [LCD
DISP SET** BRIGHT], [LCD BL LEVEL],
[LCD COLOR]
OUTPUT [TV TYPE], [DISP OUTPUT],
SETTINGS ]COMPONENT]
o
g
US
21
Savingimages
CLOCK/[_] [CLOCK SET]*, [AREA SET],
LANG [DST SET], [SUMMERTIME],
[_ LANGUAGE SET]*
GENERAL [DEMO MODE], [REC
SET LAMP], [CALIBRATION],
[A.SHUT OFF], [QUICK ON
STBY], [REMOTE CTRL],
[DROP SENSOR], [CTRL
FOR HDMI]
* You can set these items also during Easy
Handyc_m_ operalion.
**The menu name is changed m [SOUND
SETTINGS] during Easy Handycam opcration,
Items you can set only un the OPTION
MENU will be described below.
[FOCUS], [SPOTFOCUS], [TELL MACRO],
[EXPOSUREI. [SPOTMETER]. [SCENE
SELECTION], [WHITE BAL.I, [COLOR
SLOW SHTR], [SUPER NIGHTSHOT]
[FADER], [D.EFPECT], [PICT.EFFECT]
[BLT-lN ZOOM MIC], [MICREF LEVELI,
[SELF-TIMER], [TIMING], [RECORD
SOUNDI
(Th ab:a o ati Ia
[SLIDE SHOW], [SLIDESHOW SET],
[COPIES], [DATE/TIME], [SIZE]
Due to tile limited capacity of the media.
make sure that you save the image data to
some type of external media such as a
DVD-R or a computer.
You can save the images recurded on the
camcorder as described below.
By using "Picture Motiun Browser" uu the
supplied CD-ROM, yuu can save the
images recorded on yuur camcorder with
HD (high definition) image quality or SD
(standard defiuitiun) image quality.
You can rewrite muvies with HD (high
definition) image quality from the computer
tu your camcurdur, if necessary. For details.
see "PMB Guide" (p. 26).
Creatinga discwith OneTouch
(OneTouchDisc Burn)
You can save images recoMed unthe hard
disk of your camcorder directly to a disc
with ease by pressing the *_ ]DISC
BURN) button.
Saving images on a computer
(Easy PCBack-up)
You can save images recorded un the
camcorder on the hard disk of a computer.
Creating a disc with selected images
You can save images copied to >ore"
cumputer on a disc. You can also edit those
images.
For details, see "Handycam Haudbouk"
(PDF).
US
22
Deletingimages
Connecting with the A/V connecting
cable
You can dub to VCRs. DVD/HDD
recorders with SD (standard definition)
image quality.
Connecting with the USB cable
You can dub to movie dubbing compatible
DVD writers, etc.. with HD (high
definitionl image quality.
"_" Tips
• You can dub movies or copy slitl images fi'om
the hard disk to a "Menlory Stick PRO Duo."
Touch _" (HOME) -_" {_ (OTHERS) -_"
[MOVIE DUB]/[PHOTO COPY],
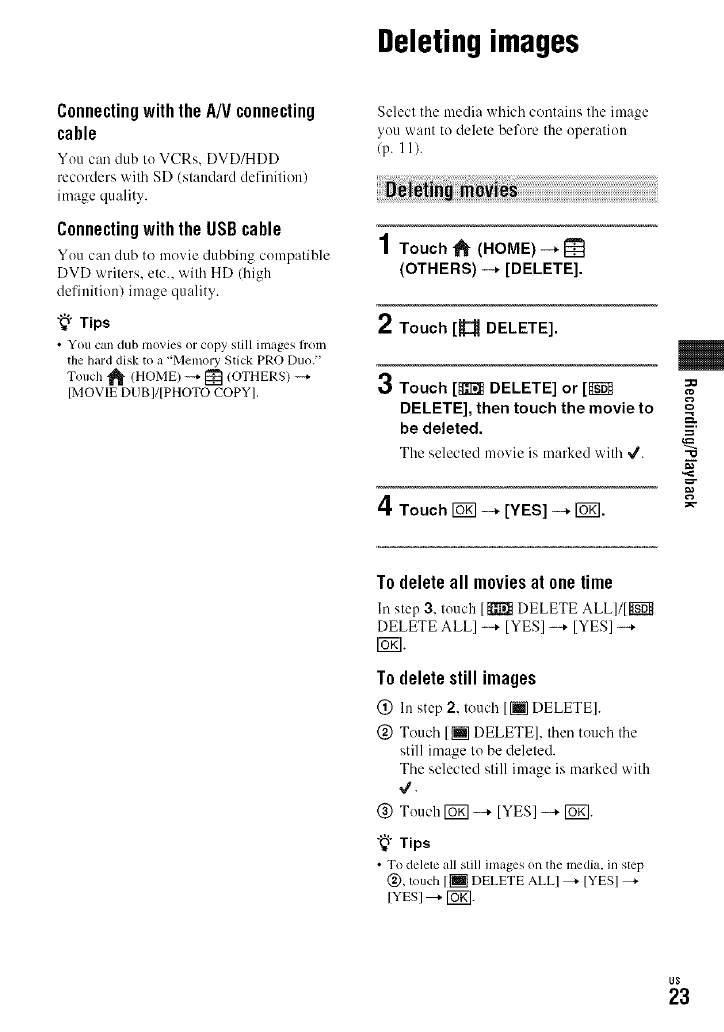
Selecl the media which contains the image
you want to delete before the operation
(p. 11).
1Touch "_ (HOME) --+ [_
(OTHERS) --+ [DELETE].
2Touch [_::_ DELETE].
3Touch [_T_ DELETE] or [1_'_5_
DELETE], then touch the movie to
be deleted.
The selected movie is marked with _/.
4Touch _--+ [YES] --+ [B_].
=13
"10
g
To delete all movies at one time
In step 3, touch 1_ DELETE ALL]/[[t_!_
DELETE ALL] --.,- [YES] --.,- [YES] --.,-
15_1.
To delete still images
(_) In step 2, touch 1_ DELETE].
(_) Touch [1_1 DELETE], then touch the
still image to be deleted.
The selected still image is marked with
4.
@ Touch 15K]--+ [YES] --+ 15_].
"_" Tips
• To delete all still images on the mcdia, in step
@, touch [th_ DELETE ALLI _ [YESI
[YES] _ [Og].
US
23
Performingwith a computer
US
24
i "Handycam Handbook"(PDF)
"Haudycanl Handbook" (PDF) explains in
detail about your camcorder and its
practical use.
N "Picture Motion Browser" (only for
Windows users)
"Picture Motion Bro'_ ser" is tile supplied
software. You can el_joy the following
operations.
Crealing a disc with one touch operatkm
hnporling images to a conlputer
Ediling imported images
Cleating a disc
0 Notes
•The suppUed software "Picture Motion
Browser" is not supported I0 Macintosh
comlmters. To use aMacintosh comlmter
('Olllle('ted to 3oIIr c;lnl('order_ see the
foOowing website for details,
http://guide.d-imaging.son_.co.jp/nmc/mslusl
To view "Handycam Handbook" (PDF),
you need to install Adobe Reader on your
computer.
Continue with the installation, even if a
coufimlation screen of an unknown
publisher appears.
(!) Turn on the computer.
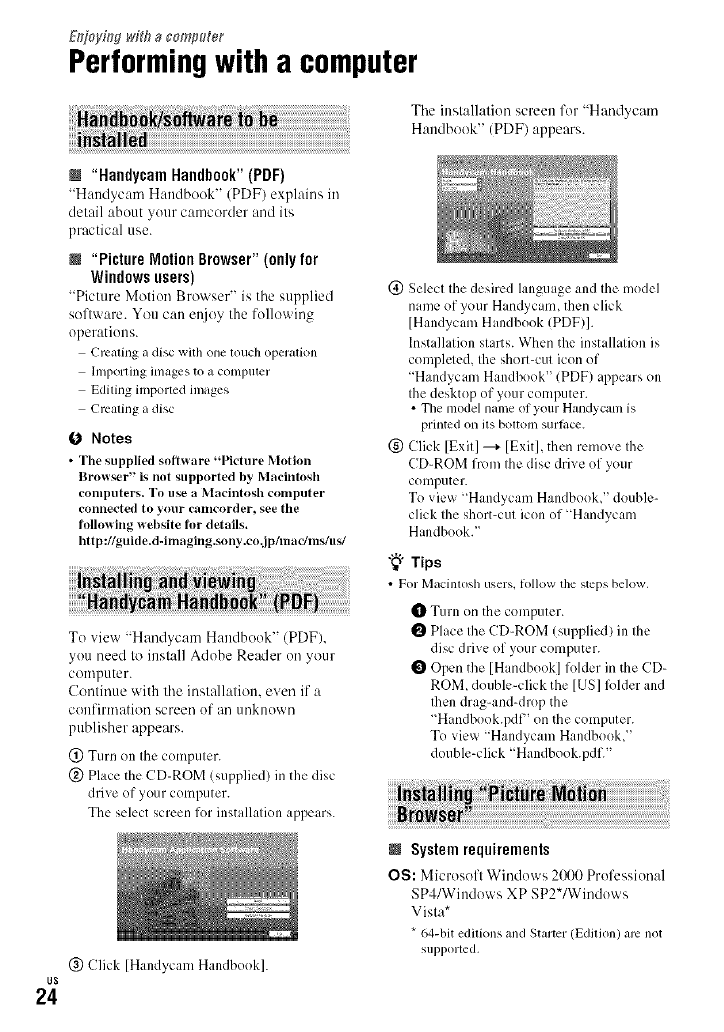
@ Place the CD-ROM (supplied) in the disc
drive of your computer.
The select screen fur installation appears.
@ Click [Handycam Handbook].
Tile installation screen for "Handycam
Handbook" (PDF) appears.
(_) Select the desired language and the model
name of your H mdycam, then click
[Handycam Handbook (PDF)].
Installation starts. When the installation is
completed, the short-cut icon of
Han@cam Handbook (PDF) appears on
the desktop of your computer.
• Tile model name (if your Handycam is
printed on its bollom surlace.
(_) Click [Exit] --+ [Exit], then remove the
CD-ROM lrun] the disc drive of your
conlputer.
To view "Han@cam Handbookd' double-
click the short-cut icon of "Handycam
Handbook."
"_° Tips
•For Macintosh users, tollow the steps below,
Turn on the computer.
Place the CD-ROM (supplied) ill the
disc drive of your computer.
Open the [H mdbook] fulder in the CD-
ROM, double-click the [US] R)lder and
Ihen drag-and-drop the
"Handbook.pdf' on the computer.
To view "Handycam Handbook,"
double-click "Handbook.pdf."
NSystem requirements
OS: Microsoft Windows 2(R)0Professional
SP4/Windows XP SP2*/Windows
Vista*
* 64-bit editions and Starter (Edition) arc not
supported,
Standardinstallationisrequired.
OperationisnotassurediftileaboveOS
hasbeenupgradedorinamulti-boot
environment.
CPO:lutelPeutium42.8GHzorfaster
(IntelPeutium43.6GHzorfaster,lntel
PentiumD2.8GHzorfaster.IutelCore
Duo1.66GHzorfaster,orIntel(!ore2
Duo1.66GHzorfasteris
recom mended.)
httel Pentium II1 1 GHz or faster
enables the following operations:
Importing lhe conlenls to the con/purer
One Touch Disc Burn
Creating an AVCHD lormal disc/DVD-
video
Copying a disc
Processing only lhe contents in SD
(slandard definuion) image qualdy
Memory: For Windows 2000/Windows
XP: 512 MB or more 11GB or more is
recommended.)
For processing SD (standard definition)
ima,qe quality content only, 256 MB of
uleulory or more is necessary.
For Windows Vista: I GB or more
Nard disk: Disk volume required liar
instdlation: Approximately 500 MB
(10 GB or more may be necessary when
creating AVCHD format discs.)
Display: Mininmm 1.024 x 768 dots
Others: ¢USB port (this must be
provided as standard. Hi-Speed USB
(USB 2.0 compatible) is recommended),
DVD burner (CD-ROM drive is
necessa Ulk_rinstallation)
Attention
This camcorder captures high definition
footage in the AVCHD lk_rmat. Using the
enclosed PC software, high definition
footage can be copied onto DVD media.
However. DVD media containing AVCHD
footage should not be used with DVD based
players or recorders, as the DVD player/
recorder may fail to eject the media and
may erase its contents without warning.
DVD media containing AVCHD footage
may be played on a compatible Blu-ray
Disc j\l player/recorder or other compatible
device.
NInstallation procedure
You need to install tile soft'_xare to your
Windows computer before connecting
your camcorder to the computer. The
installation is required onl_ for tile first
time.
Contents to be installed and procedures
may differ depending on your OS.
(!) Confirm that your camcorder is not
connected to the computer.
@ Turn on the computer.
O Notes
• Log on as an Administrator tot installation.
•Close _dlapplications rumdng on the
computerbelbreinslalling thesol_wm'c.
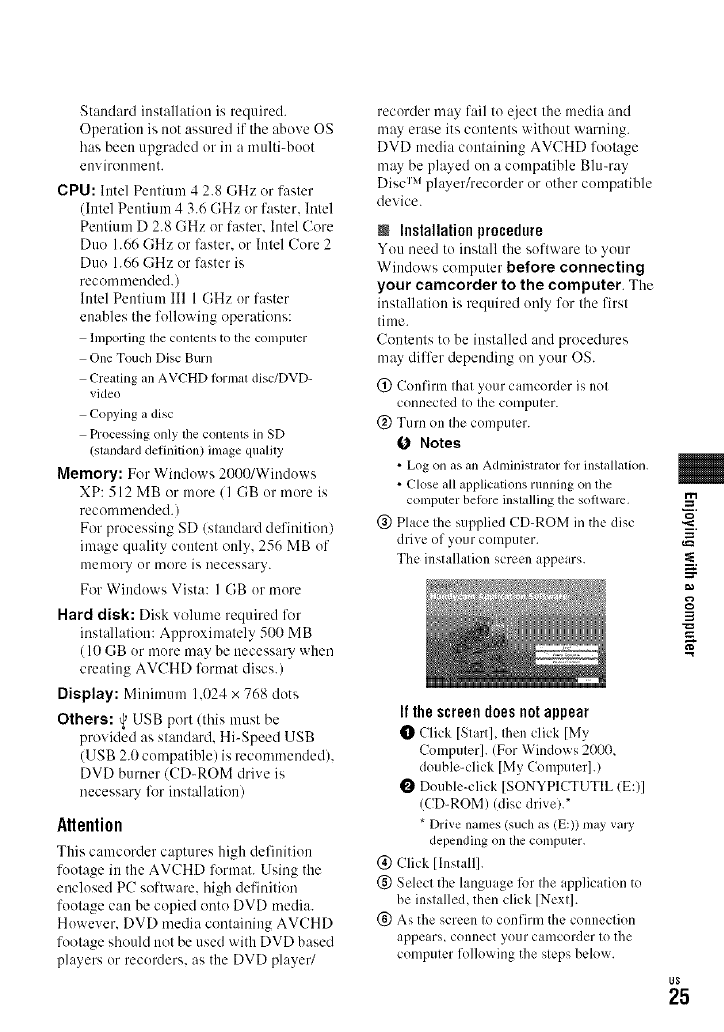
@ Place tile supplied CD-ROM in the disc
drive of your computer.
The installation screen appears.
It the screen does not appear
t_ Click [Start],allenclick [My
Computer]. (For Windo_ s2000,
double-click [My Computer].)
!_ Double-click [SONYPICTUTIL IE:)]
(CD-ROM) (disc drive)."
* Drive names (such as (E:))may vary
depending on the compuler.
(_) Click [Install].
(g) Select the hmguage lbr the application to
be installed, then click [Next].
(_) As the screen to confirm the connection
appears_ connect your camcorder to the
computer following the steps below.
=
g
3
US
25
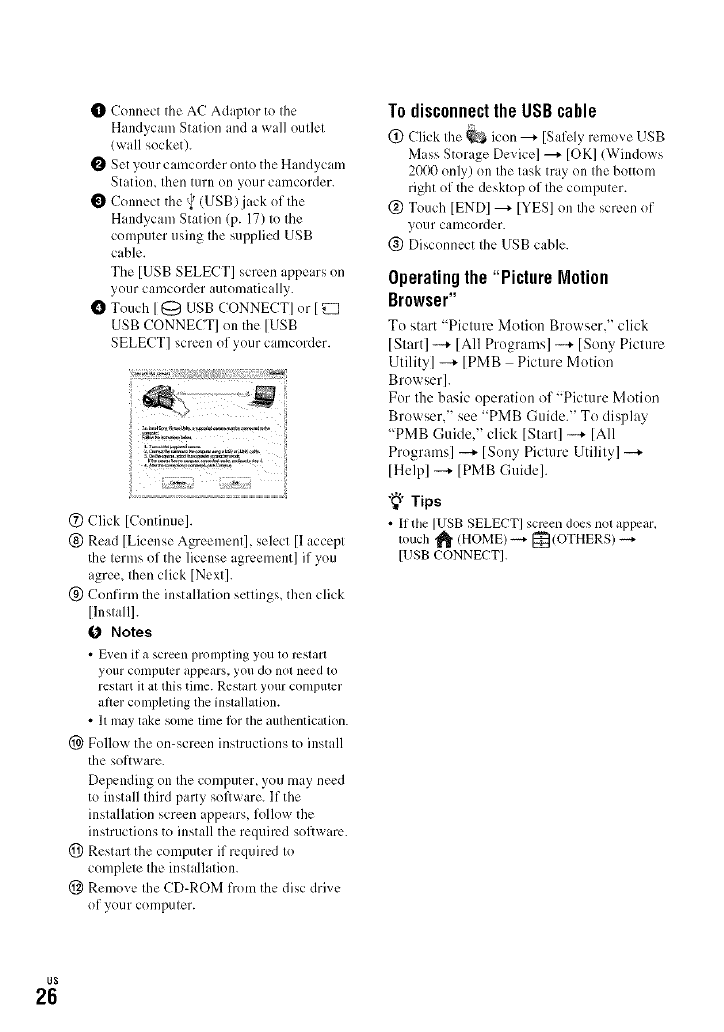
{[_ Connect the AC Adaptor to the
Handycam Station and a waU outh:t
(wall socket).
O Set your camcorder onto the Handycam
Station, then turn on your camcorder.
Connect the _' (USB)jack of the
Handycam Station (p. 17) to the
computer using the supplied USB
cable.
Tile [USB SELECT] screen appears on
your camcorder automatically.
Touch [ @ USB CONNECT] or [
USB CONNECT] on the [USB
SELECT] screen of your camcorder.
(_) Click [Continue].
(_) Read [License Agreement], select [1accept
the terms of the license agreement] if you
agree, then click [Next].
(_ Confirm tile installation settings, then click
[Install].
0 Notes
•E_en ifa screen prompting you 1o restart
your COlllputer appeal'S_ you do not need 1o
restart it at this tinle. Restarl your computer
ariel"completing the inslallation.
• It may take sortie time lk)rthe aulhenticatkln.
Follow the on-screen instructions to install
the software.
Depending on lhe computer, you may need
to install third party software. If the
installatkm screen appears, follow the
instructions to install the required software.
(_ Restart the computer if required to
complete the installation.
(_ Remove the CD-ROM from the disc drive
of your computer.
To disconnect the USB cable
(_) Click Ihe _ icon --+ [Safely remove USB
Mass Storage Device] --+ [OK] (Windows
2000 only) on the task tray on the bottom
right of tile desktop of the computer.
(_) Touch [ENDI --+ [YESI on the screen of
your camcorder.
@ Disconnect the USB cable.
Operating the "Picture Motion
Browser"
To start "Picture Motion Browser." click
]Start] --+ [All Programs] --+ [Sony Picture
Utility] --+ [PMB Picture Motion
Browser].
For the basic operation of "Picture Motion
Browser." see "PMB Guide?' To display
"PMB Guide," click ]Start] --+ [All
Programs] --+ [Sony Picture Utility] --+
]Help] -+ [PMB Guide].
"_° Tips
• If the [USB SELECT]scrcen does nol appear.
louch _ (HOME) -'4 [_(OTHERS) -'4
[USB CONNECT],
US
26
Tro@fesflooh_g
Troubleshooting
If you run into any problems using your
camcorder, use tile following table to
troubleshoot the problem. If the problenl
persists, disconnect the power source attd
contact your Sony dealer.
Notes beforesendingyour camcorder
forrepair
•Your c;mlcorder may be required to initialize or
cbnge the current hard disk ot the camcorder,
depending on the problen_. In the event ot this,
the dak_ stored on the hard di_k will be deleted.
Be snl_: to sa_ethe data on tile internal ham di_k
(see ' Hm_dycmn HmMbook"/PDF)) omo oilier
mcdia (backup) belore sending your camcorder
lot repair, We will not compensate you lot any
loss of hard disk data,
• During repair, we may check a minimum
amount of data storcd on the hard disk in order
to investigz_te the problem. However, your Sony
dealer will neither copy nor retain your okla.
• For lhe sytllplonls of your calncorder, see
"Handycam Handbook" (PDF) and R)r
connecting 1o the compuler, see "PMB Guide."
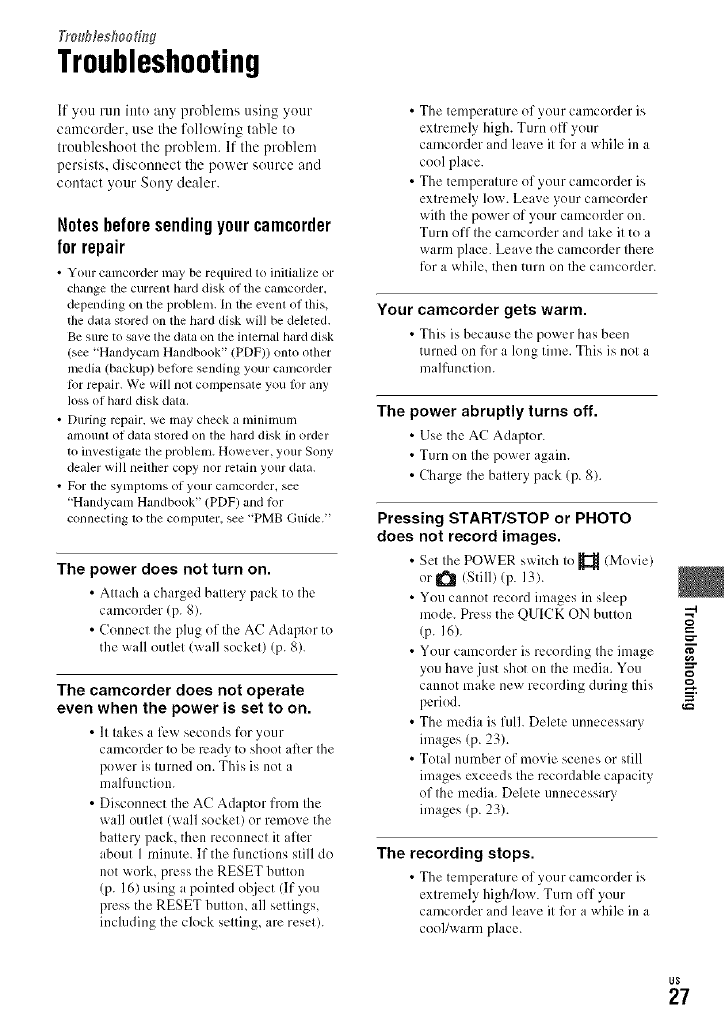
The power does not turn on.
• Attach a charged battery _:_ackto the
camcorder (p. 8).
• Connect the plug of the AC Adaplor to
the wall outlet (wall socket) (p. g).
The camcorder does not operate
even when the power is set to on.
• It takes a 1_.'_ seconds for your
camcorder to be ready to shoot after the
power is turned on. This is not a
malfunction.
• Disconnect Ihe AC Adaptor from the
wall outlet (wall socket) or remove the
battely pack, then reconnect it d'ler
about 1 minute. If the functions still do
not x_()rk, press the RESET button
(p. 16) using a pointed object (lf you
press the RESET button, all settings,
including the clock setting, are reset).
• The tenlperature of your camcorder is
extremely high. Turn off your
camcorder md leave it lbr a while ill a
cool place.
• The temperature of your camcorder is
extremely h)w. Leave your camcorder
with the power of your camcorder on.
Turn off the camcorder and take it to a
warm place. Leave the camcorder there
for a while, then turn on the camcorder.
Your camcorder gets warm.
• This is because tile power has been
turned on for a long time. This is not a
malfimction.
The power abruptly turns off.
• Use tile AC Adaptor.
• Turn on the power again.
• Charge the battery pack (p. 8).
Pressing START/STOP or PHOTO
does not record images.
• Set Ihe POWER switch Io _ (Movie)
or I_ll (Still)(p. 13).
• You cannot record images in sleep
mode. Press the QUICK ON button
(p. 16).
• Your camcorder is recording the image
you have just shot on the media. You
cannot make new recording during this
period.
• The media is fulh Delete tmnecessary
images (p. 23).
• Total number of movie scenes or still
images exceeds the recordable capacity
of the media. Delete unnecessary
images (p. 23).
The recording stops.
• The temperature of your camcorder is
extremely high/low. Turn off your
camcorder md leave it lbr a while ill a
coolA_amt place.
-4
m
US
27
US
28
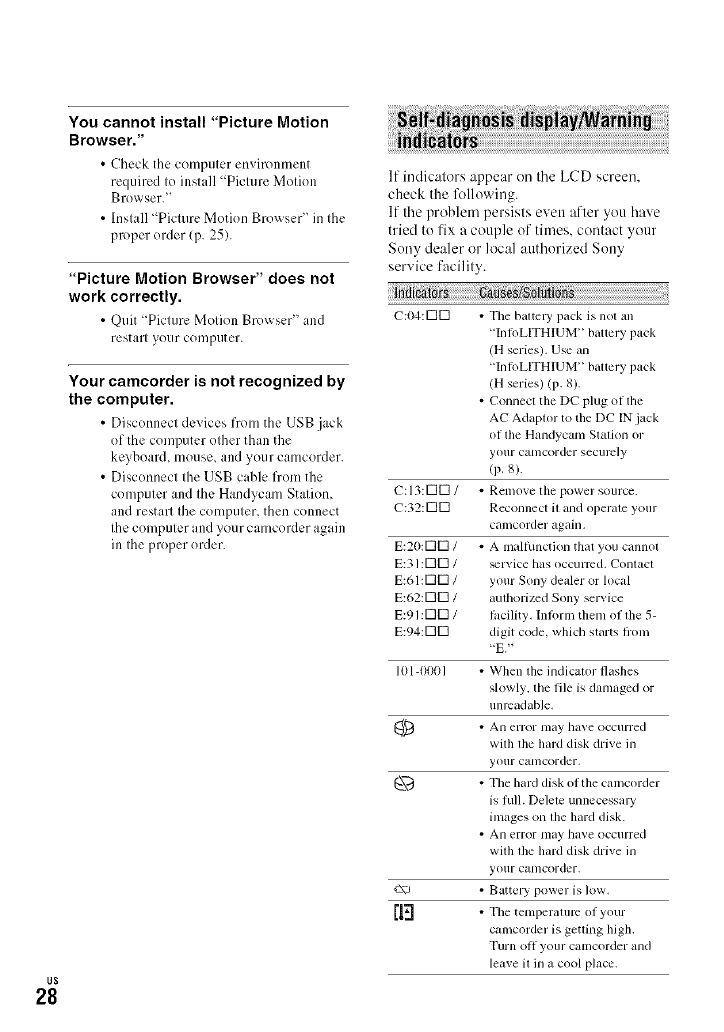
You cannot install "Picture Motion
Browser."
• Check the computer emironment
required to install "Picture Motion
Browser."
•Install ' Picture Motion Brox_ ser" in the
proper order (p. 25).
"Picture Motion Browser" does not
work correctly.
• Quit +Picture Motion Brm_scr" and
restart your computer.
Your camcorder is not recognized by
the computer.
• Discotmcct devices from the USB jack
of the computer other than the
keyboard, mouse, and your camcorder.
• Disconnect the USB cable from the
computer and the Handycam Station,
and restart the computer, then connect
the computer and your camcorder again
in the proper order.
If indicators appear on the LCD screen.
check the lk_llowing.
If the problem persists evett after you have
tried to fix a couple of times, contact your
Sony dealer or local authorized Sony
service facility.
c:04:u]u] • Tile baltcly pack is not an
"InloLITHIUM" battery pack
/H series), Use an
"InlbLITHIUM" bauery pack
/H series) (p. 8).
• Connect Hm DC plug of the
AC Adaptor to flm DC IN iack
of the Handycam Station or
your camcorder securc]y
(p. 8).
C:I3:U]U] /• Remove the power source.
C:32:NN Reconnect il and opelale your
can/corder again.
E:20:U]N /• A malhmction that you cannot
E:31:NN /_rvice has occurred. Conlact
E:61:U]U] /your Sony degller or local
E:62:NN /aulhorized Sony service
E:91 :U]U] /lacility. Inlbrm them of lhe 5-
E:94:NN digit code, which starts flom
-E? +
101-0001 • When lhe indicator flashes
slowly, the file is damaged or
unreadable.
{_ • All have occllrred
error lllay
with the hard disk drive in
your cat/lcorder,
___ • The hard disk of the camcorder
is full. Delete unnecessa W
images on the hard disk.
• An error may have occurred
with the hard disk drive in
your camcordcr,
c\? • Battery power is ]ow,
[_ • The temperature of your
camcorder is geuing high.
T/Irn Oil your camcorder and
leglve il in a cool phJce.
•The telnperaturc O| yo/ir
camcorder is low. Make tile
canlcorder warnl,
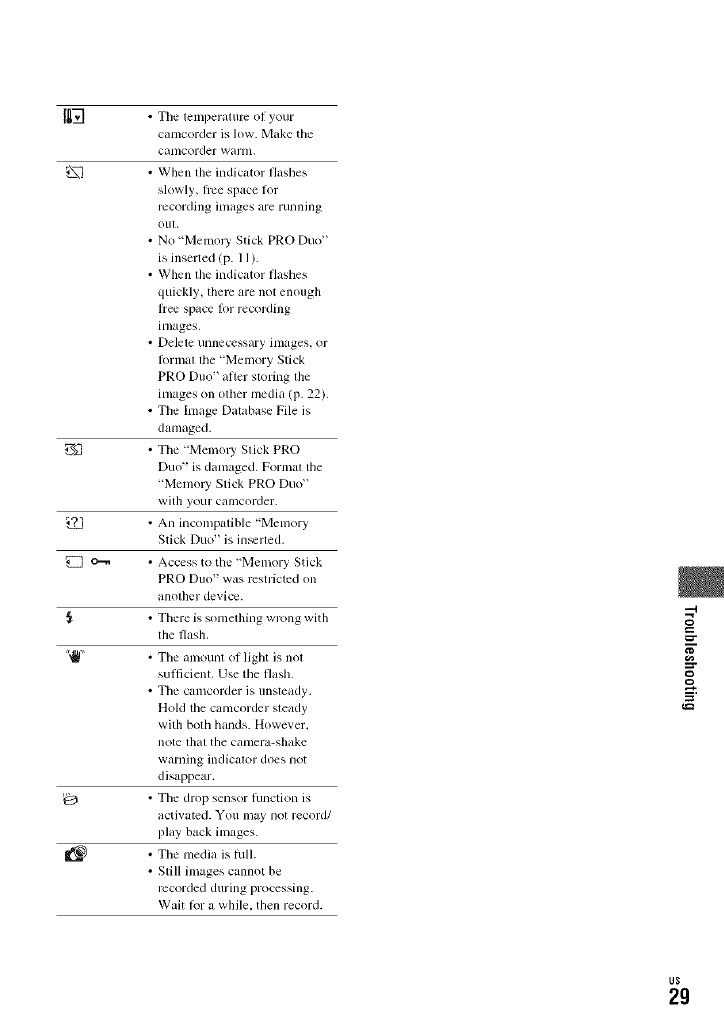
• When the indictm>r flashes
slowly, five space lot
recording images are running
Oil[.
• No "MemoJ T Stick PRO Duo"
is inserted (p. 1 I).
• When the indicator flashes
quickly, them are not enough
ltee sp_ce lot recording
images.
• Delele unnecessary images, or
Ibrmal lhe "Memory Stick
PRO Duo" alter sloring lhe
images on oilier media (p. 22).
• The Image Database File is
damaged.
• The "Memo W Stick PRO
Duo" is damaged. Formal tile
"Memo W Stick PRO Duo"
with your camcorder.
• An incompmible "Memory
Stick Duo" is in_rted.
• Access to the _'Memory Stick
PRO Duo" was restricted on
anolher device.
• There is somelhing wrong with
tile flash.
• The amount of light is not
sufficient. Use the flash.
• The camcorder is unstcady.
Hold tile camcorder steady
with both hands. However.
note lhal the canlera-shake
warning indicator does not
disappear.
• The drop sensor Iunction is
activated. You may not record/
play back inl_ges.
• Tile media is Iulh
• Still inlages cgmnot be
recorded during processing.
Wait k)r a while, then record.
m
tJ$
2g
Addf_do#a, I #No;ma_i_n
Precautions
us
3O
On useand care
• Do llOl uqe or store the C_llllCOrder _llld
accessories in the lonowing locations:
Anywhere extremely hot, cold or humid.
Ne_er le_l\e them exposed to leulpel'alures
abme 6t)°C (140°F), such as under direct
sunlighb near heaters or ill a car parked in tile
sun. riley nlay nla]l/lllCtion or become
de%rmed.
Near strong magnelic fields or mechanical
vibration. Tile camcorder may malhmction.
Near strong radio waves or radiation. Tile
calncorder may not be able to record properly.
Near AM receivers and video equipment,
Noise lnay occ/ir.
On a sandy beach or anywhere dusty. If sand
or dusI gets ill your calncorder, it may
malflmction. Solnefimes this nlalhmction
cannot be repaired.
Near windows or outdoors, where file LCD
screen or tile lens may be exposed to direct
sunlight. This danlages the inside of file LCD
screen.
•Operate your camcorder on DC 6.8 V/7.2 V
(bauely pack) or DC 8.4 V/AC Adaptor).
• For DC or AC operation, use the accessories
ix:conmlended in these operating instructions.
• Do not let your camcorder get wet, k)r example,
[ionl rain or sea waler. If your camcorder gets
wet, it may malflmction. Sonletimes this
nlalfunction cannot be repaired.
• If any solid (q_iect or lktukl gets inside the
casing, unplug your camcorder and have it
checked by a Sony dealer belore operating it
any flmher.
• Avoid rough handling, disas_mbling,
nlodilying, physical shock, or impact such as
hamlnering, dropping or stepping on the
producl. Be particuhu'ly careful of tile lens.
• Keep the POWER swilch setting to OFF (CHG)
when you are not using your camcorder.
• Do not wrap your canlcorder with a towel, lor
example, and operate it. Doing so might cause
heat to build up inside.
• When disconnecting the power cord (mains
leg_d), pun it by the plug and not the cord (lead).
• Do not damage the power cord (mains lead)
such as by placing anything heavy on it.
• Kee I) nletal conlacts clean.
• Keep tile Remote Conmlander and buuon-type
battery (1111of children's reach. It the barrel T is
accidentally swanowed, consult a doctor
inmlediately.
• If the battery electrolytic liqukl has leaked:
Consult your local authorized Sony selxice
lacilily.
Wash oil any liquid thai nlay have conlacled
your skin.
If any liqukl gets in your eyes, wash with
plenly of walcr and consull a doclor.
NWhennotusingyourcamcorderfora
longtime
• Periodically turn it on and lel il lun such as by
playing back or recording itmtges lor about 3
nlinules,
• Use up the baltery pack completely bek)re
storing it,
LCDscreen
• Do not exert excessive pressure on the LCD
screen, as it may cause danlage.
• If your camcorder is used in a cold place, a
residual inlage nlay appear on the LCD semen.
This is nol a u/alfimclion,
• While using your calncorder, the back of the
LCD semen nlay heal 1117.This is not a
nlallhnction.
NTo clean the LCD screen
If fingerprints or dust make the LCD screen
dirty, it is recommended yuu use a soft
cloth to clean it. When you use the LCD
Cleaning Kit (optional), do not apply the
cleaning liquid directly to the LCD screen.
Use cleaning paper moistened with the
liquid.
Onhandlingthecasing
• If file casing is soiled, clean tile canlcorder hody
with a soft cloth lightly nloistened with water,
and then wipe tile casing with a dry soil cloth,
• A_oid tile tonowing lo avoid damage to lhe
linish:
Using chenliclds such as thinner, benzine,
alcohol, chenlical cloths, repellenl, inseclicide
and sunscreen
Handling the camcorder with above
subslances on your hands

Leavingthecasingincontactwithrubberor
vinylobjectsloralongperiodoftime
About care and storage of the lens
• Wipe the SUl'l_ce ol file lens clean with a sol_
c]ofll ill tile lollowing illsb'lllces:
When flmre are tingerprinls on lhe lens
surl,/ce.
In hot or hunlid locations
When tile lens is exposed to salty air such as
attile seaside.
• Store in a well-venlilatedIocalion sut_iect 1o
little dirl or dllsI.
• To prcvenl mold, periodically clean the lens as
described above. II is rccomnmndedthat you
operale your calncorder aboul once a nlont]l Io
keep it ill optinlum sine k)r a long lilne.
Onchargingthe pre-installed
rechargeablebattery
Your cmncoMer has a preqnstalled
rechargeable battery to retaitt the date, time,
and other settittgs even whett the POWER
switch is set to OFF (CHG). The pre-
installed rechargeable battery is always
charged while your catncorder is connected
to the wall outlet (wall socket) via the AC
Adaptor or while the battery pack is
attached. The rechargeable battery will be
fully discharged in about 3 months if
you do trot use your camcorder at all. Use
your camcorder al-ler charging the pre-
ittstalled rechargeable battery.
However. even if the pre-ittstalled
rechargeable battery is not charged, the
camcorder operatiott will not be affected as
long as you are not recording the date.
NProcedures
Conuect _o/Ir camcorder to a "_xall outlet
(wall socket) using the supplied AC
Adaptor. attd leave it with the POWER
switch set to OFF (CHG) for more than 24
hours.
Powersupply
You cun use yotlr CalllCOrder ill ;Ill)' countries/
regions using tile AC Adaptor supplied with your
camcorder within tile AC 100 V to 240 V, 50/60 Hz
range.
Use a commercially availableACplug adaptor [a],
if necessary,depending on the design of tile wall
outlet [b],
[
AC-L2OO/I_2OOB [a] [b]
To change the battery of the Remote
Commander
(!) While pressing ott the tab. inset _our
fittgernail ittto the slit to pull out the
battery case.
(_) Place a new battery with the + side
facing up.
@ lusert the battery case back into the
Remote Commander until it clicks.
WARNING
Battery may explode ff mistreated. Do not
recharge, disassemble or dispose of in
fire.
•When tilelithium battclT becomes weak, lhe
operating distance of tile Remole Commander
inay shorten, or the tenlole Commander may
nol Iunclion properly. In this case, replace lhe _"
battery with a Sony CR2025 lithiuin battery. _'
Use of another baltely may present a risk ol fire
or explosion. g
US
31
Specifications
us
32
System
Vkleo compression lommt: AVCHD (HD)/
MPEG2 (SD)/JPEG (Still images)
Audio coml?rcssion lommt: Dolby Digflal 2/5.1ch
Dolby Digilal 5.1 Crealor
Video signal: NTSC color, EIA standards
1080/60i specificalion
Hard disk: 411GB
When measuring media capacity, 1 GB equals
I billion bytes, a portion of which is used lor
(hlla ll]anagelllen[,
Recording lonnat: Movie (HD): AVCHD 108(1/
60i
Movie (SD): MPEG2-PS
Slill image: Exif Vet.2.2*
hnage device: 3.6 mm (1/5 type) CMOS sensor
Recording pixels (still image, 4:3):
Max. 4.0 mega (2 304 × 1 728) pixels**
Gross: Approx. 2 36(1 01,_1 pixels
Effective (nlovie, 16:9):
Approx. 1 49t) 000 pixels
Effective (slill image, 16:9):
Approx. 1 49t) 000 pixels
Effective (slill image, 4:3):
Approx. 1 99t) 000 pixels
Lens: Carl Zeiss Vario-Sonnar Tak
15 × (Oplical), 30 ×, 180 × (Digital)
Focal length: FI.g - 2.6
Filter diameter: 3t) nml (1 3/16 in.)
1=3.1 - 46.5 Into (1/8 - 17/8 in.)
When converted to a 35 mm still camera
For movies: 4t) - 6(tt) mm ( 1 5/8 - 23 5/8 in.)
(16:9)
For still images: 37 - 555 mm (1 1/2 - 21 7/8
in.) (4:3)
Cok)r temperature: [AUTOL [ONE PUSH],
[INDOOR] (3 200 K),
[OUTDOOR] (5 800 K)
Minimum illumination: 5 Ix (lu×) ([AUTO SLW
SHUTTR] [ON], Shutter speed 1/3t) sec)
0 Ix (lux) (during NighlShot function)
* "ExiF' is a file lormat for still images,
established by tl_e JEITA (Japan
Electronics and Inlormation Technology
Industries Association). Files in this
Iormal can have addilional inlkwmalion
such as your camcorder's setting
inlormalion al file lime of recording.
** The unique I?ixel array of Sony's ClearVid
CMOS sensor and image processing
system (BIONZ) allows lot still inmge
resohltion equivalenl to tile si/cs
described.
Input/0utputconnectors
A/V Remote Connector: ComponentA ideo mid
audio outpul jack
HDM[ OUT jack: HDM[ Type C mini cozmectoz
USB jack: ndni-B
LCDscreen
Image: 6.7 cnl (2.7 lype, aspect ratio 16:9)
Total dot number: 211 21X) (960 × 22(I)
General
Power requircnmnls: DC 6.g V/7.2 V (batlel'y
pack)
DC 8.4 V (AC Adaptor)
Average power consu[npIion: During camera
recording with normal brighmess:
Hard disk:
HD: 4.5 W SD: 3.7 W
"Memoly Stick PRO Duo":
HD: 4.5 W SD: 3.7 W
Operaling lelnperaturc: 0 °C 1o + 40 °C (32 °F to
104 °F)
Storage tenlperalurc: -20 °C to + 60 °C (-4 °F 1o +
14(1 °F)
Dinlenskms (approx.): gl × 76 × 129 mm
(3 1/4 x 3 x 5 118 in.) (w/hid)
including the proiecling paris
81 × 76 x 134 mm
(3 1/4 x 3 x 5 3/8 in.) (wkl/d)
including the projecting parts, and the supplied
rcchargeable battel T pack atlached
Mass (approx.): 480 g (1 lb) lnain unil only
56(1 g (1 lb 3 oz) including the supplied
rcchargeable battel T pack
nandycamStation DCRA-C220
Input/Outputconnectors
A/V OUT jack: Componenl/_ ideo and audio
oulpuI jack
USB jack: mini-B
AC Adaptor AC-L200/L200B
Power rcquirelnents: AC 100 V - 240 V. 50/60 Hz
Currenl consull/plion: 0.35 - O. lg A
Powerconsllnlplioll:1_W
Outputvoltage:DC8.4V*
Operatingtemperature:0°Cto+40°C(32°Fto
11)4°F)
Storagetenlperamrc:-20°Cto+60°C(-4°Fto+
141)°F)
Dimensions(approx.):48×29x81mm
1115/16×13/16x31/4in.)(w/h/d)
excludingtheprojectingparts
Mass(approx.):170g(6.0oz)excludingthe
powercord(nminslead)
*SeetilelabelontileACAdaptorR_rother
specifications.
RechargeablebatterypackNP-FH60
Maxinmnl output voltage: DC 8.4 V
Output _ oltage: DC %2 V
Capacity: 7.2 Wh (1 (X)0 mAh)
Type: Li-ion
Design and specifications of your camcorder and
accessories are subject to change withollI notice.
• Your camcorder is produced under the license of
Dolby Laboratories.
On trademarks
• "Handycanl' and I_lLg'_l-'! _"_-------...f_
a,v registered trademarks of Sony Corporation.
• "AVCHD" and "AVCHD" logotype are
tradenlarks of Malsushita Eleclric lndustrkd
Co., Ltd. and Sony Corporation.
• "Memoly Stick," "_ .,+' "Memory Stick
Duo," "MEIVtORY SIIEK DUO," "Memory Slick
PRO Duo." "MEMllRY 5TIEK PR[I [lUll ,"
"Menlory Stick PRO-HG Duo,"
"rvl[m0RY 5Ivt PRD-H[_ nu0 .- "MagicGatc,"
+'[VIZ_,GICCIZ_TE ," "MagicGate Memory
Stick" and "MagicGate Memory Stick Duo" are
trademarks or registered trademarks of Sony
Corporation.
• "InlbLITHIUM" is a trademark of Sony
Corporation.
• "x.v.Color" is a tradenlark of Sony Corporation.
• "BIONZ" is a trademark of Sony Corporatkm.
• "BRAVIA" is a trademark of Sony Corporatkm.
• Dolby and the double-D symbol are trademarks
of Dolby Laboratories.
•Dolby Digital 5.1 Creator is a n'ademark of
Dolby Laboratories.
• HDML the HDMI logo and High-Definilion
Mullimedia Interl, tce am trademarks or
regislered trademarks of HDMI Licensing LLC.
• Microsoft. Windows, Windows Media,
Windows Vista, and DireclX are either
regislered tradem*wks or trademarks of
Microsoft Corporation in the Uniled Stales and/
or oilier countries.
• Macintosh and Mac OS are registered
trademaNs of Apple Inc. ill the U.S. and other
countries.
• lntel. Intel Core, and Pentium are trademarks or
registered tradenlarks of Intel Corporatkm or its
subsidiaries ill the United States and other
countries.
• Adobe, the Adobe logo, and Adobe Acrobat are
either registered trademarks or trademarks of
Adobe Systems Incorporated in tile United
States alld/or other co/intries.
All other product names mentioned heroin may be
the trademarks or registered trademarks of their
respective companies. Purlberlliore, IM and +'('g3++
are not nlentioned ill each case ill this ii]anua].
g
us
33
Leaesto primero
Antes de poner en funcionamiento la
unidad, lea detenidamente este manual y
consdrve]o para futuras consllltas.
PORFAVORLEA DETALLADAMENTEESTE MANUAL
DE INSTRUCCIONESANTES DE CONECTARY OPERAR
ESTE EQUIPO.
RECUERDEQUE UNMALUSO DE SU APARATO
PODRiAANULAR LA GARANTiA.
N0mbredelpr0duct0:Vide0c_mara
IVl0del0:HDR-SRIO
Para reducir el riesgo de incendios o
electrocuci6n, no exponga la unidad
a la Iluvia ni a la humedad.
No exponga las pilas a fuentes de
calor excesivo, como la luz solar
directa, el fuego o similares.
Sustituya la bateria anicamente por
otra del tipo especificado. De Io
contrario, es posible que se
produzcan incendios o lesiones.
Element0ssuministrad0s
Los nfimeros entre ( ) corresponden It la
cantidad suministrada.
Adaptador de alimentaci6n de ca ( 1)
Cable de alinlentaci6n ( 1)
Handycam Station ( 1)
Cable de A/V de componentc ( 1)
Cable de conexi6n de A/V (1)
Cable USB (1)
Conllx)l reillOlO inalrimbrico (1)
La pila de litio lip(} bol6n ya viene inslalada,
• Baleria rccargable NP-FH60 (1)
• CD-ROM "Handycam Application Soltware'
(1) (prig. 26)
Picture Motion Browser (software)
Gufa de PMB
Guia prriclica de Handycam (PDF)
• "Gufa de operaciones" (esle manual) ( 1)
[] [] [] []
Us0de lavide0c_mara
• La _ ideocrinlara no estri protegida contra el
polio, las salpicuduras o el agua, Consulle
"Precauciones" (prig. 33),
• No imente realizar ninguna de las siguientes
operaciolles cuando los indicadores de lnodo
(Pelfcula)/_ ([mrigenes/ijas) o los
indicadoms ACCESS (prig. 12, 17) est_n
encendidos o parpadeen, Si 1ohace, los sop{)rles
podrian dafiarse, podrian perderse las imrigenes
grabadas, o bien, producirse onas tallas ell el
fullcionalnienlo.
Expulsar el "Memo W Stick PRO Duo"
Extraer la bateria o el adaptador de
alinlentaci6n de ca de la videocrinlara.
Someler la videocrimara a golpes o a
vibraciones,
• AI conectar la videocrimara a olro dispositivo
mediante cables de comunicaciones, asegOrese
de insertar la clavija del coneclor de la lorma
correcta. Si cjercc presi6n al insertar el coneclor
ell el lerminal, esle filtimo podria dafiarse y
ocasionar el real tuncion_mfienlo de la
videocrimara.
• Conectc los cables a los coneclor_$s de la
Handycam Slation cuando utility la
videocrimara coneclada a la Handycam Station,
No conecte los cables a ninguna de las
Handycam Slation ni a la videocrimara.
• No someta la videocrimara a golpes ni
vibraciones. Es posible que el disco duro de la
videocritllara no se reconozca oque la operacidn
de grabaci6n o rcproducci6n no sea posible.
• No utilice la videocrimara en lugarcs con mucbo
ruido. Es posible que el disco duro de la
videocritllara no se reconozca o que la operacidn
de grabacidn no sea posible.
•Paraprotegereldisc()durointerno de los golpes
prox ocados por una cMda, la _,ideocdnlara
dispone de un sensor de caida*. Si la cfimara
suite una caMa, o ell condiciones de ausencia de
gravedad, puede que se grabe el sonido de
bloqueo que emite la videocfimara cuando se
activa dicha lunci6n. Si el _nsor de cafda
detecta golpes repelidos, la grabaci6n o la
mproducci6n podrian deteneme.
• Cuando la temperamra de la videocfimara es
extrcmadamenle alta o b_ja, es posible que no se
pueda grabar ni rcproducir, ya que podrfan
activarse las funciones de prolecci6n de la
videoci_mara, Ell este caso, aparcce un mensi_je
en la pantalla LCD (prig. 31).
• NO encienda la videocfimara en zonas de baja
presi6n con una altilud superior a 3 000 metro.
Si 1o hace, podria dafiarse el disco dill'() de ]a
vid¢ocfi/llara,
•Si grtlbtl y elhnina ilnfigenes repelidalnenl_ duranle
nmcho tiempo, los dalos dcl sot×_llequedan
li'agmenlados. Las imfigenes no _ pueden guardar
ni gmbar. En dicho caso, guarde las imfigenes el/
alvin tipo de sopolle exlerno primero y, a
conlinuaci6n, ejecule [FORMAT.SOPORTE]*.
• Aprietc la correa de sujeci6n y sujete la
videocfimara corrcctanlenle duranle ]a
grabaci6n.
O
\ i:
\\
\
• Para ajustar el panel de cristal lktuido, fibralo 9(1
grados respecto de la videocfimara ((!)) y, a
conlinuaci6n, gfrelo en el fingulo que le resulle
mils adecuado para grabar o reproducir (@).
Puede girar el panel de cristal lktuido 180
grados hacia el lado del objetivo (@) para
grabar en nlodo de espcjo.
@90 grados respecto
de la videocamara
@180 grados (max.)
• La pantalla de cristal liquido se labric6 con
tecnologfa de alia pmcisidn, 1o que hace que
mils del 99,99% de los pixeles sean luncionales.
Sin embargo, es posible que ap*,rezcan
conslanlenlenle algunos pequefios puntos negros
o brillantes (blancos, rojos, azules o verdes) en
la pantalla LCD. Estos puntos son el resultado
normal del proceso de labricacidn y no alcctan
en modo alguno a la grabacidn.
•Retire la Ithnina de aislamiento del control
renloto antes de ulilizar]o,
Lamina de aislamiento
Tipos de "Memory Stick" que pueden
utilizarse conla videoc;imara
• Para la grabaci6n de pel_culas, se rccon/ienda
que utilicc un "Memo W Stick PRO Duo" de
I GB o mayor con la marca:
NEMORYSTIEKPRODUO('Memory Slick
PRo Duo")*
MEMORYSTIEKPRO-HGBUO("Memory Slick
PRO-HG Duo")
* Con o sin la marca Mark2, se pueden
utilizar ambos.
• Se comprob6 que los "Memory Slick PRO
Duo" de hasta 8 GB de capz_cidad flmcionan
correctanlentc con esta videoc_nlara.
• Consulle la pfigina 11 para obtener in%rmacidn
acerca del liempo de grabaci6n de un "Memoly
Stick PRO Duo".
• Tanto el "Memory Stick PRO Duo" como el
"Memory Stick PRO-HG Duo" se denominan
"Memory Stick PRO Duo" en esle nlanual.

Grabaci6n
• Antes de colnenzar a grabar, pmebe las
Ihnciones de grabaci6n para asegurarse de que
la imagen y el sonido se graben sin problemas.
• No es posible compensar el contenido de las
grabaciones, aun si la grabaci6n o la
reproducci6n no son posibles debido a una lalla
en el flmcionamienlo de la videocfimara, de los
sopoltes de grabaci6n, etc.
• Los sislemas de tclevisidn en color varfan en
Ihnci6n del pals o la regi6n. Si desea ver su
grabaci6n en un televisor, necesila un televisor
con sistcma NTSC.
• Los programas de televisi6n, pelfculas, cintas de
video y denlfis matcriales pueden estar sl_ielos a
derechos de autor. La grabaci6n no amorizada
de tales materiales puede ir en contra de las
leyes sobre los derechos de autor.
Reproducci6nde im;igenesgrabadas
en otrosdispositivos
• La _ideocfimara es compatible con MPEG-4
AVC/H.264 High Profile para la grabacidn con
calidad de ilnagen HD (alia detilfici(m). Pot 1o
lanto, no se pueden mproducir imfigenes
grabadas con calidad de imagen HD (alta
definici6n) en la videocfimara con los siguiemes
dispositivos;
Otros dispositivos compatibles con el kwmalo
AVCHD que no son compatibles con High
Profile
Disposifivos que no son coml)afibles con el
lormato AVCHD
Guardetodos los datosde imagen
grabados
• Para e_itar que se pierdan sus dams de ilnagen,
guaMe todas las imfigenes gr_badas en soportcs
¢xternos. S¢ recolllienda gu_ll'dar los datos de
hnagen ell t/11 disco COlllO_ por ¢jelnp]o, Ull
DVD-R mediante la computadora*. Tambi6n
pueden guardar los dalos de hnagen con una
videograbadora o una gz'abadora de DVD/
HDD*.
Cuandola videoc;imaraest;i
conectada
a unacomputadora
• No intente lbl'matear el disco duro de la
videoc_tllal'a con Ull_l colnputadora. Si ]o hace+
la vMeocfilnara podrfa flmcionar
incorl?eCt_lt/lentc,
Notasobreeliminaci6ny
transferencia
• Incluso si e.jecma [FORMAT.SOPORTE]* o
Ionnatca el disco duro de la videocfimara, es
posible que no pueda elinlinar totallnenle los
dalos del disco duro. Si transfiem la
videoci]mara, se reconlienda cjecular
[{_ VACIAR]* para evilar la recuperaci6n de
los datos,
Ademfis. cuando deseche la videocfimara, se
reconliellda destruir e] cllerpo de la i/list/la.
Acercadelajustedeidioma
• Para ihlstrar los plocedimientos operafivos se
utili/im indicaciones en pantalla en cada idioma
local. Si es necesario, calnbie el klion_a de la
i?antalla antes de milizar la videocdmara
(pdg. 10).
Acercade este manual
• Las iron,genes de la pantalla de cristal lktuido
Iltili/_tdas ell est¢ lllilnllal Se CilplUl'al'Oll con /llltt
cfimara digital de imfigenes Iijas; pot 1o tanto.
pueden set disfimas de ]as inlfigenes qu¢
aparczcan en realklad.
• En esta guia de operaciones, tanto el disco duro
de la videocfimara como el 'Memory Stick PRO
Duo' se denolllinan 'soporte '.
• Las capturas de pamalla corrcsponden a
Windows Vista. Las esccnas pueden variar en
funci6n del sislema operalivo de la
COlllputadora.
* Consulle tambidn la "Gufa prfictica de
Handycam" (PDF) y la "Gufa de PMB".
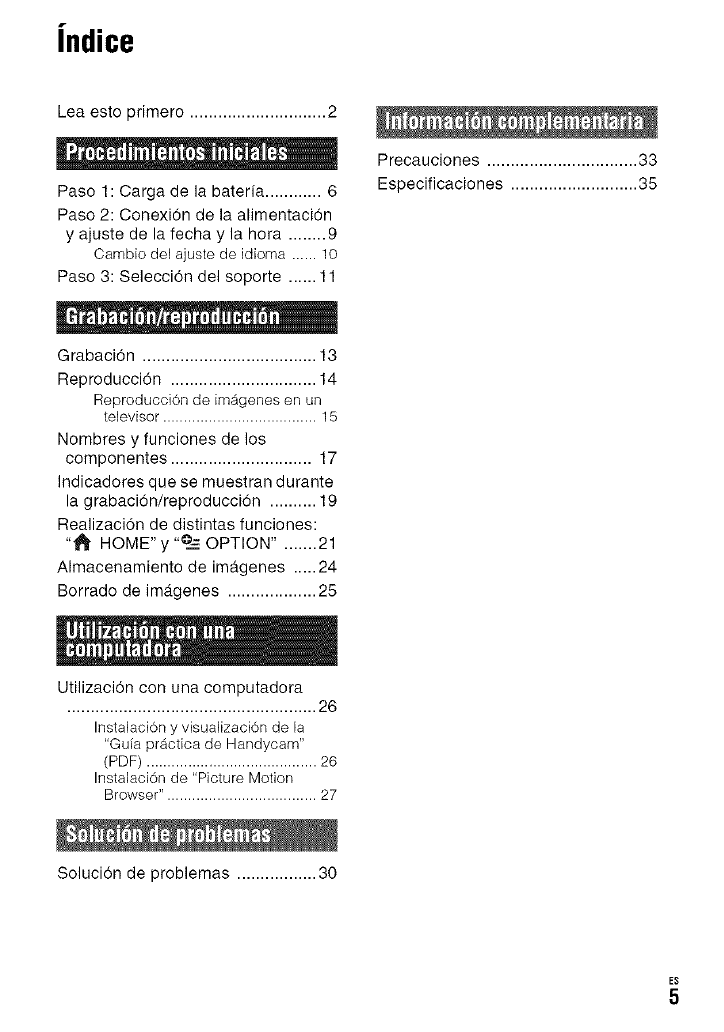
|ndice
Lea esto primero ............................. 2
Paso 1 : Carga de la baterfa ............ 6
Paso 2: Conexion de la alimentacion
y ajuste de la fecha y la hora ........ 9
Cambio del ajuste de idioma ...... 10
Paso 3: Selecci6n del soporte ...... 11
Grabacbn ..................................... 13
Neproduccion ............................... 14
Reproducci0n de im_genes en un
televisor ..................................... 15
Nombres y funciones de los
componentes .............................. 17
Indicadores que se muestran durante
lag rabaciOn/reproduccion .......... 19
RealizaciOn de distintas funciones:
"t1_ HOME'y ,,0___-OPTION" . ...... 21
Almacenamiento de ima.genes ..... 24
Borrado de imagenes ................... 25
Precauciones ................................ 33
Especificaciones ........................... 35
Utilizacidn con una computadora
..................................................... 26
InstalaciOn y visualizaciOn de la
"Gu[a pr_ctica de Handycam"
(PDF) ......................................... 26
InstalaciOn de "Picture Motion
Browser". ................................... 27
Soluci6n de problemas ................. 30
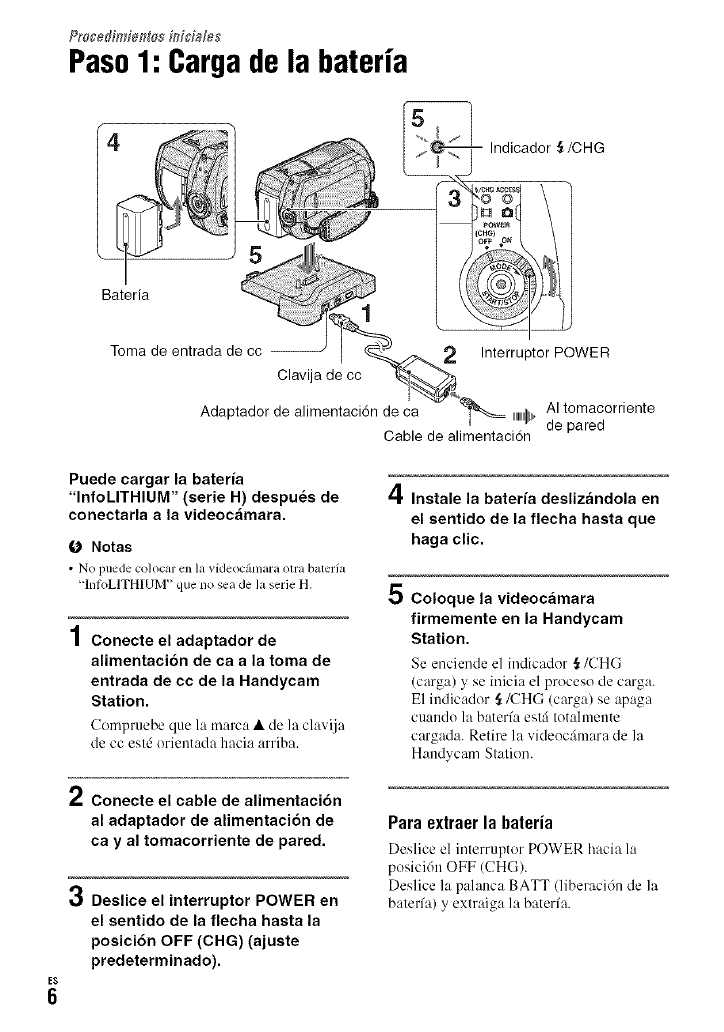
Proced#_?ie_[asi_iciafes
Paso1: Cargade la bateria
Bateria
Toma de entrada de cc -- 2 Interrupter POWER
Clavija de cc
Adaptador de alimentaci6n de ca ,,,,,lllbAI tomacorriente
de pared
Cable de alimentaci6n
Puede cargar la bateria
"InfoLITHIUM" (serie H) despu6s de
conectarla a la videocbmara.
tO Notas
• No pllede co]ocar ell l_l videoc_lllal-a ()Ira balel_a
'InfoLITHIUM" que nosea de la serie H.
,4
/ Conecte el adaptador de
alimentaci6n de ca a la toma de
entrada de cc de la Handycam
Station.
Compruebe que la marca • de la clavij:l
de cc estd orientada hacia arriba.
4Instale la bateria deslizandola en
el sentido de la flecha hasta que
haga clic.
5Coloque la videocamara
firmemente en la Handycam
Station.
Se enciende el indicador _ ICHG
(carga) y se inicia el proceso de carga.
E1 indicador ,{/('HG (carga) se apaga
cuando la baterfa est:i totahnente
cargada. Retire la videoc:imara de la
Handycam Station.
2Conecte el cable de alimentaci6n
al adaptador de alimentaci6n de
ca y al tomacorriente de pared.
•._ Deslice el interruptor POWER en
el sentido de la flecha hasta la
posici6n OFF (CHG) (ajuste
predeterminado).
Paraextraerla bateria
Deslice el interrupter POWER bacia la
pesici6n OFF (CHG).
Deslice la palanca BATT (liberaci6n de la
baterfa) y extraiga la baterfa.
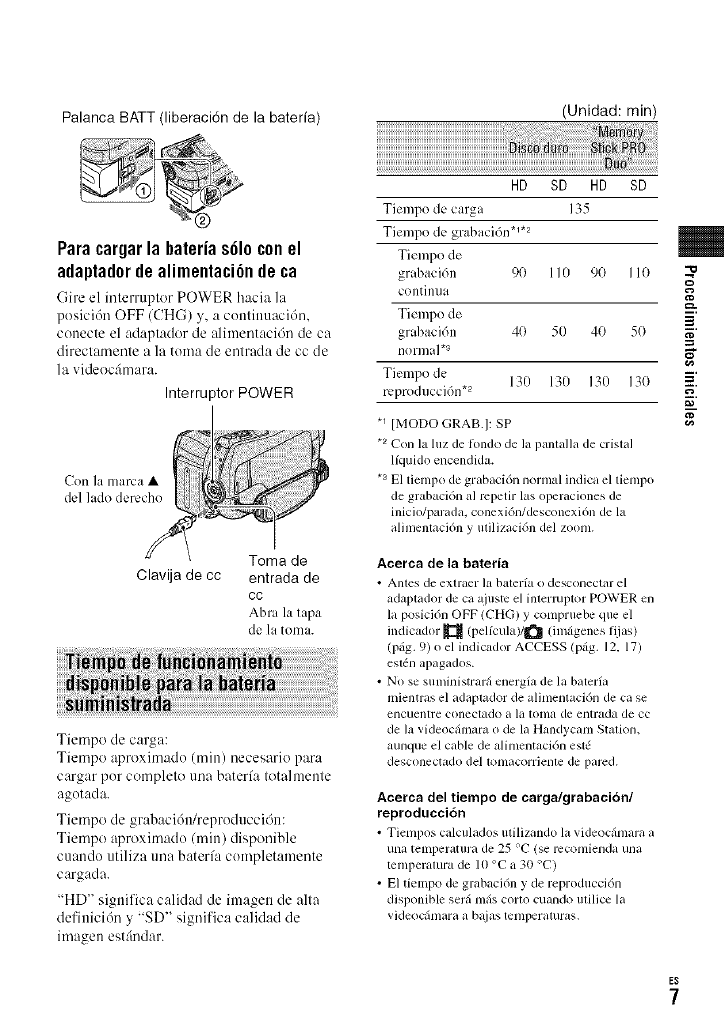
Palanca BATT (liberaci6n de la baterfa' (Unidad: min)
HD SD HD SD
Tiempo de carga 135
Tiempo de grabaci6n *_.2
Tiempo de
grabaci6n 90 110 90 110
continua
Tiempo de -_i
grabaci6n 40 50 40 50
n°lm{d "3
Tiempo de 130 130 130 130 _'
rcproducci6n .2 _.
*_ [MODO GRAB.l: SP
*2 Con la h/z de londo de la panlalla de crislal
lkluido encendida.
*a El tiempo de grabacidn nornlal indica el tienlpo
de grabacidn al mpetir las operaciones de
inicio/parada, conexidn/desconexi6n de la
alimenlacidn y ulilizacidn del zoom.
Para cargar la bateria s61o con el
adaptador de alimentaci6n de ca
(-;ireel interruptor POWER hacia la
posici6n OFF (CHG) y, a continuacidn.
conecte el adaptador de alimentaci6n de ca
directamente a la toma de entrada de cc de
la videoc:hnara.
Interruptor POWER
Toma de
Clavija de cc entrada de
cc
Abrl la tapa
de la toma.
Tiempo de carga:
Tiempo aproximado (rain) necesario para
cargar por completo una baterfa totalmente
agotada.
Tiempo de grabaci6n/reproduccidn:
Tiempo aproximado (rain) disponible
cuando utiliza una baterfa completamente
cargada.
"HD" significa calidad de imagen de alta
definicidn y "SD" significa calidad de
imagen estgindar.
Acerca de la bateria
• Allies de extraer ]_l batel'ia o desconectar el
adaptador de ca ajuslc el inlermptor POWER en
la posici6n OFF (CHG) y compruebe que el
indicador _ (pelfcula)/l_ (imrigenes lijas)
(prig. 9) o el indicador ACCESS (prig. 12, 17)
esl_n apagados.
• NO se suministrarri energia de la bateria
mientras el adaptador de Mimentacidn de ca se
encuenlre conectado a la ionia de entrada de cc
de la videocrimara o de la Handycam Stalion.
aunque el cable de alimentacidn estd
desconectado del lomacorrienle de parcd.
Acerca del tiempo de carga/grabaci6n/
reproduccidn
• Tiempos calculados utili/imdo la _ideocrimara a
una temperatura de 25 %" (se rcconlienda una
temperamra de 10 °C a 30 %')
• El tiempo de grabaci6n y de reproducci6n
disponible serri mris corto cuando ulilice la
xideocrimara a b@_stemperamras.
•Enhmci6ndelascondicionesenlasqueufilice
lavideocfimara,esposiblequeeltiempode
grabaci6nyrcproduccidndisponibleseveg_
reducido,
Acerca del adaptador de alimentacion de
ca
• Si utiliza el adaplador de alimentaci6n de ca
con_ct_lo _1 un lonlacOlTientc de ptlrcd Celctlno.
Si se produce alguna lalla de hlncionamiento al
ufilizar ]a _ideocilmm'a, desconecte e] adaptador
de alimentaci6n de ca del tomacorrienle de
hmmdiato.
•No utilice el adaptador de alilnentaci6n de ca
colocado en Ull ¢sptlcio angoslo, lit] colno entre
una pared y los muebles.
• No provoque un cortocircuilo en la clavija de cc
del *_daptador de ca ni en el terminal de la
baterfa con ningtin ob.ielo methlico, Eslo puede
provocar l_dlas ell el funcionamiento.
• Aunque la videoc&nara est,5 apagada, seguirfi
rccibiendo adaptador de alimcnlaci6n de ca
(corriente domEslica) mientras est,5 conectada a
la toma de pared medianle el adaplador de
alimenlaci6n de ca
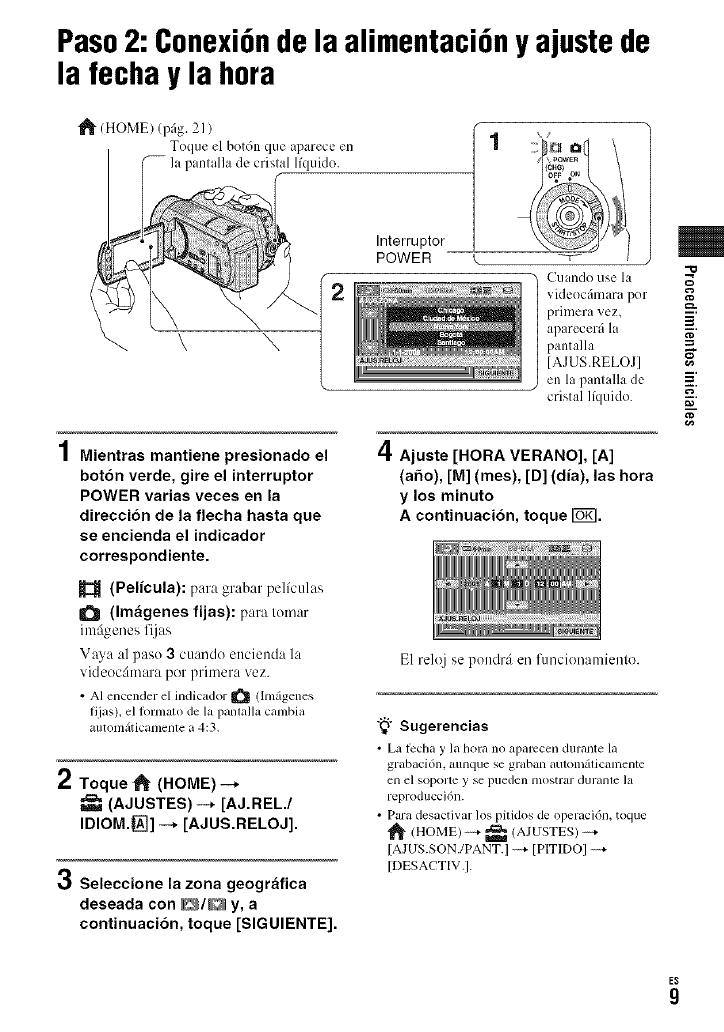
Paso2: Conexi6nde la alimentaci6nyajustede
la fecha y la hora
"_ (HOME (prig. 21 )
Toque el bot6n que q)arece en
Interruptor
POWER \
Cuando use la
v ideoct_mara por
primera vez,
aparecerfi la
pantalla
[AJUS.RELOJ]
en la pantalla de
cristal lfquido.
1Mientras mantiene presionado el
bot6n verde, gire el interruptor
POWER varias veces en la
direcci6n de la flecha hasta que
se encienda el indicador
correspondiente.
(Pelicula): para grabar pelfculas
(Imfigenes fijas): para tomar
imfigenes fijas
Vaya al paso 3 cuando encienda la
videoc:imara por primera vez.
• AIencender el indicador _ (hnfigenes
fijas), el lbrmmo de la pamalla cambia
autonlfiticamellle a 4:3,
2Toque _(HOME) -_
(AJUSTES) --+ [AJ.REL./
IOlOM.l'_] --* [AJUS.RELOJ].
3Seleccione la zona geogrfifica
deseada con _/D y, a
continuaci6n, toque [SIGUIENTE].
4Ajuste [HORA VERANO], [A]
(a6o), [M] (rues), [D] (dia), las hora
y los minuto
A continuaci6n, toque I_KI.
E1 reloj se pondrfi en funcionamienlo.
"_° Sugerencias
• La/_cha y la hora no aparccen durante la
grabaci6n, mmque se graban automfiticanlentc
ell el soporte y Se pueden mostrar dul+alae ]a
reproducci6n.
• Paradesactivarlospitklos de operaci6n, toque
fi _mOME)-4 _ (AJUSTES)-4
IAJUS.SON./PANT.I ++ IPIT]DOI ++
[DESACTIV.].
"10
g
g

Puede modificar las indicaciones en
pantalla para que muestren los mens_jes en
un idioma determinado.
Toque i_" (HOME)-.+ _ (AJUSTES)
-+ [AJ.REL./IDIOM{_]]-+ [_] AJUSTE
IDIOMA] y, a continuaci6n, seleccione el
idioma deseado.
E$
10
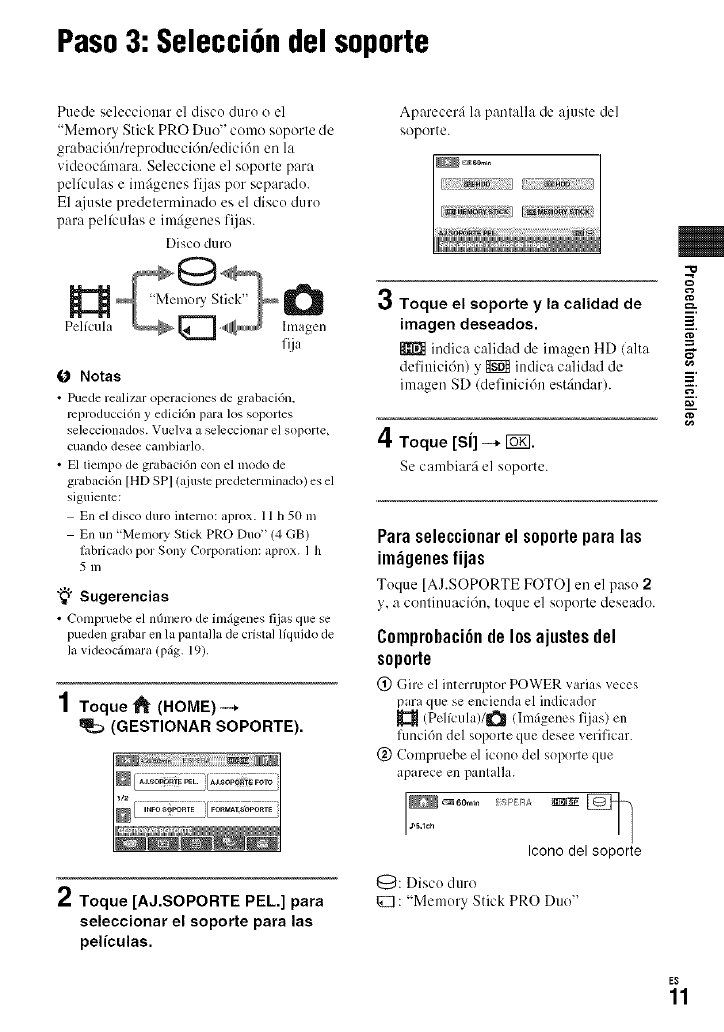
Paso3: Selecci6ndel soporte
Puede seleccionar el disco duro o el
"Memory Stick PRO Duo" como soporte de
grabaci6n/reproducci6n/edici6n en la
videocfimara. Seleccione el soporte para
pelfculas e imfigenes fijas pot separado.
E1 :tiuste predeterminado es el disc() duro
para pelfculas e im:igenes fijas.
Disc() duro
H
Pelfcula nj.
0Notas
• Puede realizar operaciones de grabaci6n.
mproducci6n y edici6n para los soportes
selecckmados. Vuelvaa se]ecck)narel soporte,
cuando desee cambiarlo.
• El liempo de grabaci6n con el modo de
grabaci6n [HDSPI (ajustepredeterminado) es el
siguientc:
En el disco duro intern():aprox. 11h 50 nl
En un "Memory Stick PRO Duo" (4 GB)
IiJbricadopor Sony Corporation: aprox. 1 h
5 m
"_° Sugerencias
•Compruebe el nfinlerode imfigenesfijas que se
pueden grabar en la pantallade cristal liquido de
la videocfimara (p_g. 19).
1Toque _(HOME)--*
(GESTIONAR SOPORTE).
2Toque [AJ.SOPORTE PEL.] para
seleccionar el soporte para las
peliculas.
Aparecer:i la pantalla de u.juste del
s;oporte.
3Toque el soporte y la calidad de
imagen deseados.
indicu c:,lidad tie imagen HD (:,lta
definicidn) y _ indica calidad de
imagen SD (definici6n est:indar).
4Toque [SJ] --* r_].
Se cambiarfi el soporte.
Paraseleccionarel soportepara las
im_genesfijas
Toque [AJ.SOPORTE FOTO] en el paso 2
y, a continuacidn, toque el soporte deseado.
C0mpr0haci6nde10sajustesdel
s0p0rte
(!) (-;ireel interrul)tor POWER v:,rias vcccs
para que se encienda el indicador
(Pelfcula)/_ (Imfigenes fijas) en
funci6n del soporte que desee verificar.
@ Compruebe el icono del soporte que
aparece en pantalla.
_60mtn E*;PE RA _'g_ ii
_5. ch
Icono del soporte
@: Disc() duro
: "Memory Stick PRO Duo"
g
g
E$
11
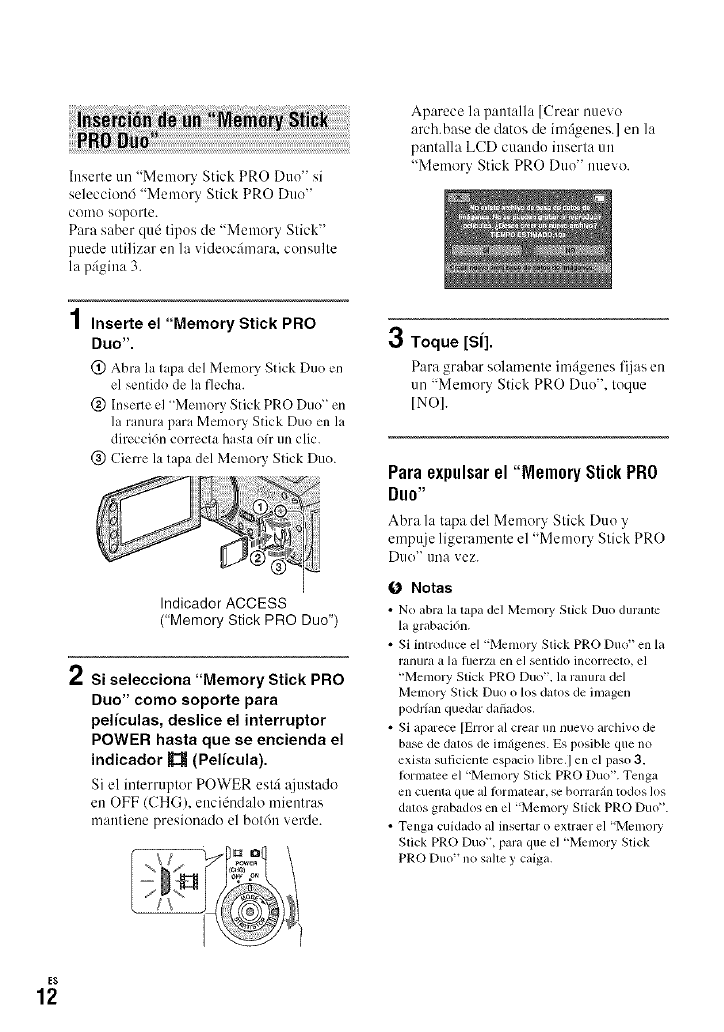
Inserte un "Memory Stick PRO Duo" si
selecciond "Memory Stick PRO Duo"
como soporte.
Para saber qm5tipos de "Memory Stick"
puede utilizar en la videoc:imara, consulte
la p:igina 3.
4
| Inserte el "Memory Stick PRO
Duo".
(_) Abra la tWJ dcl Memory Stick Duo cn
el sentido de la flccha.
(_ lnserte el "Memory Stick PRO Duo" en
la ranura para Memory Stick Duo en la
direcci6n correcta hasta oft un clic.
(_) Cierre la tapa del Memory Stick Duo.
Indicador ACCESS
("Memory Stick PRO Duo")
2si selecciona "Memory Stick PRO
Duo" como soporte para
peliculas, deslice el interruptor
POWER hasta que se encienda el
indicador _(Pelicula).
Si el interruptor POWER est:i :\iustado
en OFF (CHG), enci_Sndalo mientras
mantiene presionado el bot6n verde.
Aparece la pantalla [Crear nuevo
arch.base de datos de imfigenes.] en ]a
pantalla LCD cuando inserta un
"Memory Stick PRO Duo" nuevo.
3Toque [S[].
Para grabar solamente im:igenes fi.jas en
un "Memory Stick PRO Duo". toque
[NO].
Para expulsar el "Memory Stick PRO
Duo"
Abra la tapa del Memor_ Stick Duo y
empuje ligeramente el "Memory Stick PRO
Dtlo" una vez.
fO Notas
• No abra la tapa de] Memoly Stick Duo durantc
la grabacidn.
• Si inlroduce el "Memol T Stick PRO Duo" en la
ranura a la fllerza en el sentido incorreclo, el
"Menlory Slick PRO Duo", la ranura del
Menlol T Stick Duo o los datos de imagen
podrian quedar dafiados.
• Si aparece [Error al crear un nuevo archivo de
base de dalos de imzigenes. Es posible que no
exisla suficienle espacio libm.I en el paso 3,
R)rnlz_tce el "Memory Stick PRO Duo". Tenga
en cuenta que al lbrnlalear, se bomwfin todos los
dalos grabados en el "Memory Slick PRO Duo".
• Tcnga cuidado al insertar o extract el "Memol T
Stick PRO Duo", para que el "Menlory Stick
PRO Duo" no salle y caiga.
E$
12
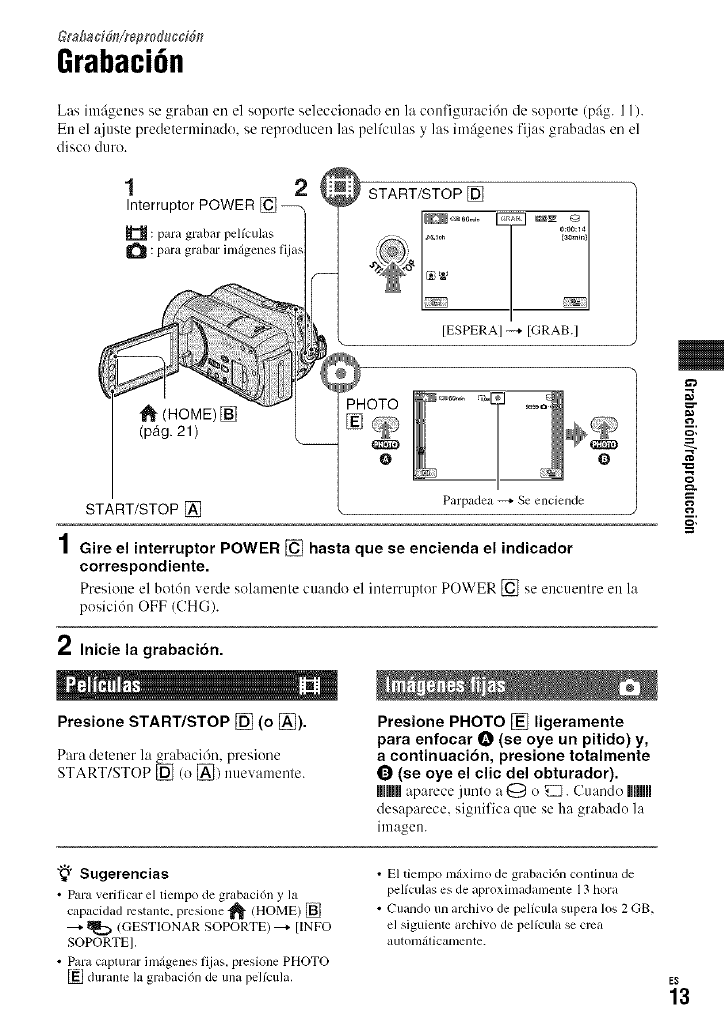
&a_mcici_A_epro__cd6n
Grabacian
Las imrigenes se graban en el soporle seleccionado en la configuraci6n de s;oporle (prig. 11 ).
En el ajuste predeterminado, s;e reproducen las pel(culas y las imrigenes fijas grabadas en el
disco duro.
12
Interruptor POWER []
: p_wa gn_bar pelfculas
Q : para grabar imfigenes ti.ias
{
1_ (HOME) []
(pag. 21)
START/STOP []
START/STOP []
[ESPERAI -_ [GRAB.I
Parpadea _ Se enciende
1Gire el interruptor POWER [] hasta que se encienda el indicador
correspondiente.
Presione el bol6n verde solamente cuando el interruptor POWER [] se encuentre en la
posici6n OFF (CHG).
2Inicie la grabacion.
Presione START/STOP [] (o [_).
Para detener la rabaclon, preslone
START/STOP U_ (o [_)nuevamenle.
Presione PHOTO [] ligeramente
para enfocar O (se oye un pitido) y,
a continuaci6n, presione totalmente
(se oye el clic del obturador).
HU aparece junto a @ o _. ('uando UlM
desaparece, significa que se ha grabado la
imagen.
g,
"_° Sugerencias
•Para veriticar el tiempo de grabaci6n y la
capacidad restante, presione _" (HOME)
I_ (GESTIONAR SOPORTE) _ [INFO
SOPORTEI.
•Para capturar imfigenes lijas, presione PHOTO
duranle I_Jgrabacidn de una pelfcula.
• El tiempo mfiximo de grabaci6n continua de
pelfculas es de aproximadamenle 13 hora
• Cuando tin archivo de pelicula supera los 2 GB,
el siguiente archivo de pelfcula se crca
autonlfilicamente.
E$
13
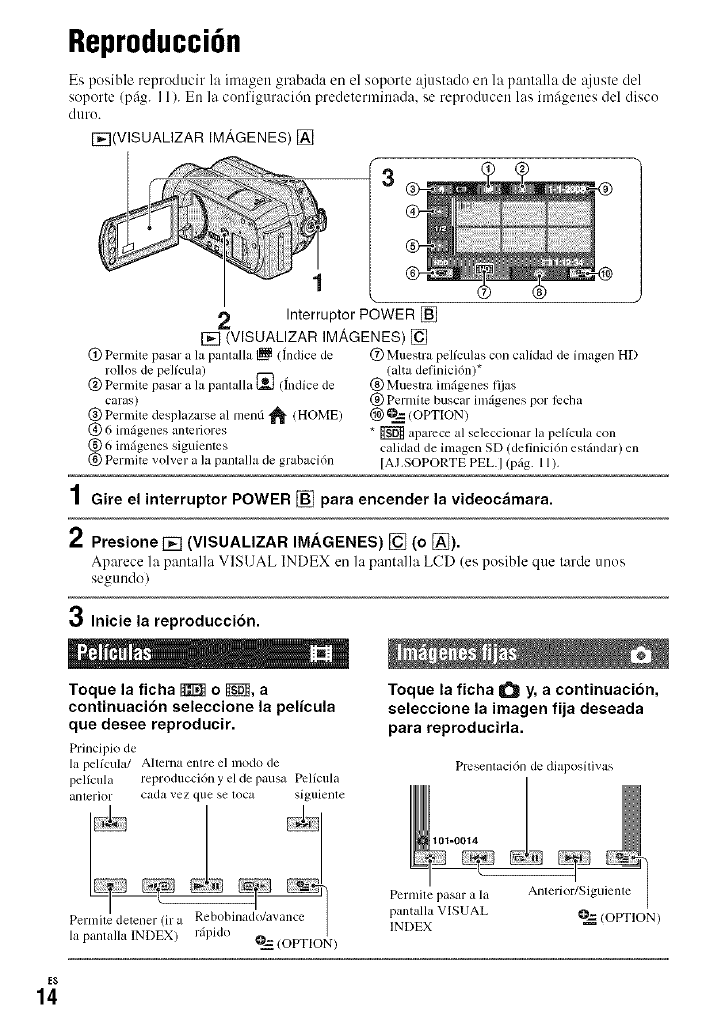
E$
14
Reproducci6n
Es posible reproducir la imagen grabada en el soporte ajustado en la pamalla de _{iusledel
soporte (pkg. I 1). En la configuraci6n predeterminada, se reproducen las imfigenes del disco
duro.
r_(VlSUALIZAR IMAGENES) []
1
Interruptor POWER []
[] (VISUALIZAR IMAGENES) []
@ Permite pasar a la panlalla _ (fildice de
rollos de pelfcula)
@ Permite pasar a la panlalla _ (fildice de
caras)
@ Permite desplazarse al menfi _ (HOME)
@ 6 imrigenes antcfiores
@ 6 imrigenes siguientcs
@ Permitc volver a la pamalla de grabaci6n
@ Muestra pelfculas con calidad de imagen HD
(alta definici6n)*
@ Muestra imrigenes fijas
(g) Pemfite buscar imfigenes por lk:cha
_) _ (OPTION)
* _ apamce al seleccionar la pelfcula con
calidad de imagen SD (definici6n estrindar) en
[AJ.SOPORTE PEL.I (prig. 11).
3Inicie la reproducci6n.
Toque la ficha _ o_, a
continuaci6n seleccione la pelicula
que desee reproducir.
Principio de
la pelfcula/ Allerna enlre el modo de
pelicula reproducci6n y el de pausa Pclicula
anlerior cada vez que se loca siguienle
Permile detener (ir a h,,,_,,,,,,'_
la pantalla lNDEX) (OPT[ON)
Toque la ficha _ y, a continuaci6n,
seleccione la imagen fija deseada
para reproducirla.
Permile pasar a la Anterior/Siguienle
pantalla VISUAL @=_ (OPTION)
INDEX
Presentaci6n de diapositivas
101=0014 _
1 Gire el interruptor POWER [] para encender la videoc_mara.
2Presione [] (VISUALIZAR IMAGENES) [] (o [_).
Aparece la panlalla VISUAL INDEX en la pantalla LCD (es po_.ible que larde unos
segundo)
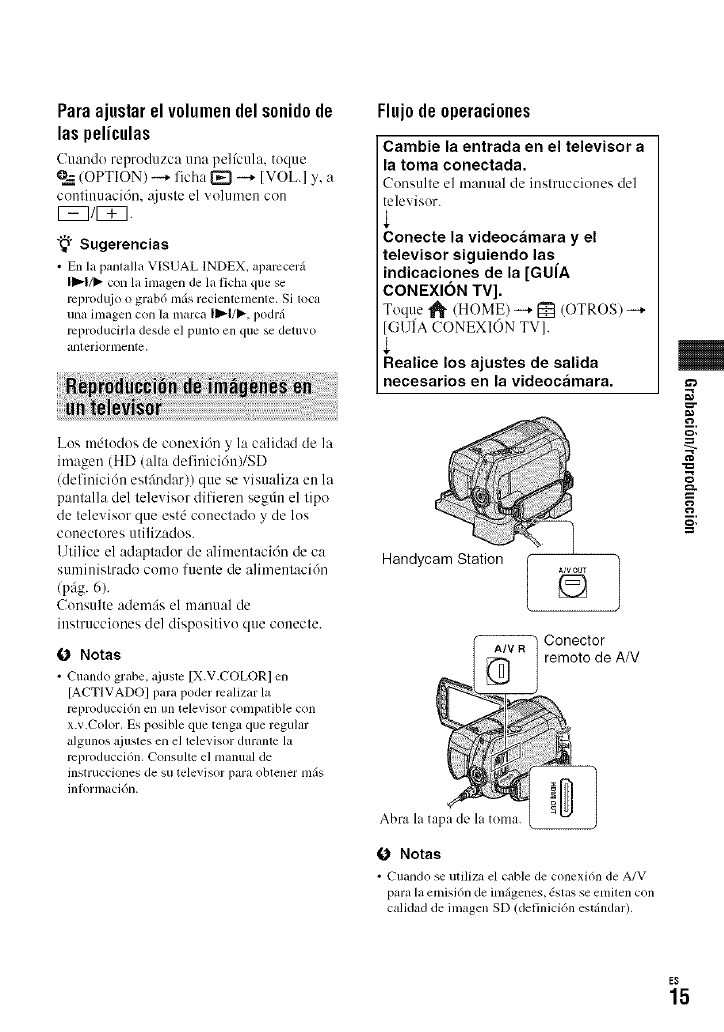
Paraajustarel v01umendels0nid0de
las peliculas
Cuando reproduzca una pelfcula, toque
@_.(OPTION) -+ ficha _ -+ [VOL.] y, a
continuaci6n. :tjuste el volumen con
[5E2/EE3.
-_i- Sugerencias
• En la pank,lla VISUAL INDEX. alx,rccerfi
I1_1/1_con la imagen de laficha que se
rel)rod/[jo o grab6 t/li_s recientemenle. Si loca
una imagen con la marca I_'t/,, podrti
rcproducirla desde el punt<) en que se detuvo
anteriormentc.
Los m4todos de conexi6n y la calidad de la
imagen (HD (alta definici6nl/SD
(definici6n estfindar)) que se visualiza en la
pantalla del televisor difieren segtht el tipo
de televisor que est,5 conectado y de los
conectores utilizados.
Utilice el adaptador de alimentaci6n de ca
suministrado como fuente de alimentaci6n
/pfig. 6).
Consulte adem:is el manual de
instrucciones del dispositivo que conecte.
O Notas
•Cuando grabe, ajuste [X.V.COLOR]ell
[ACTIVADOIpara poder rcalizar la
mproducci6n en un televisor compatible con
x.v.Color. Es posible que tenga que regular
algunos ajustes en el televisordurame la
mproducci6n. Consulte el manual de
inslrucciones de su televisor para obteneri/lils
inlbrmacidn.
Fluj0de0peraci0nes
Cambie la entrada en el televisor a
la toma conectada.
Consulte el manual tie instrucciones del
televisor.
Conecte la videoc_mara y el
televisor siguiendo las.
indicaciones de la [GUIA
CONEXION TV].
Toque "1_ /HOIvlE) -+ [_ (OTROS/-+
(;UIA CONEXION WV].
Realice los ajustes de salida
necesarios en la videocamara.
Handycam Station
Conector
remoto de A/V
Abra la tapa de la toma.
ONotas
•Cuando se utiliza el cable de conexi6n de A/V
para la emisi6n de imfigenes, 6stas se emiten con
calidad de imagen SD (delinici6n estfindar).
m.
g,
E$
15

• La videocfimara y la Handycam Station eslfin
eq/lip;idas con I111Collector relnoto de A/V o
una loma A/V OUT (prig. 17). Conectc el cable
de conexi6n de A/V o el cable de A/V de
componenle a la Handycam Station o a la
videocrimara. Si conecta los cables de conexi6n
A/V o el cable A/V del componenle a
Handycam Station y a la videoclhnara al mismo
liempo, pueden producirse perturbaciones en la
imagen.
E$
16

Nombresy funcionesde loscomponentes
Los botones, tomas y otros elementos que
no se explican en otros capftulos se
describen en este apartado.
[]
[]
%
[]
[]
[]
[]
[]
Handycam Station
[] Palanca del ZOOlnmotorizado
Mueva la palanca del zoom motorizado
levemente para obtener un zoom re:is lento.
Mudvala mils para obtener un zoom re:is
rfipido.
Es posible ampliar imfigenes fijas desde
aproximadamente 1.1 hasta 5 veces su
tamafio original/zoom de reproducci6n).
• Si loca la panlalla mientras uliliza el zoom de
reproduccidn, el punlo que loque aparecerfi en el
centro de la panlalla de crislal lktuido.
[] Botdn QUICK ON
A1 presionar QUICK ON, la videoc:imara
pasa a modo suspendido (modo de ahorro
de energia) en lugar de apagarse. E1
indicador QUICK ON parpadea en modo
suspendido. Vuelva a presionar QUICK ON
para iniciar la grabaci6n la pr6xima vez. La
videocfimara regresa al modo de espera de
grabaci6n ell aproximadamente I segundo.
La cgimara se apaga automgiticamente si no
la utiliza durante un tiempo determinado
mientras se encuentra ell nlodo suspendido.
[] Indicador ACCESS (disco duro)
Si el indicador ACCESS estfi encendido o
parpadea, significa que la videocfimara est5
escribiendo o leyendo datos.
[] Gancho para la bandolera
Coloque la bandolera/opcional).
[] Altavoz
[] Interruptor NIGHTSHOT
A.juste el imerruptor NIGHTSHOT en ON
/aparece [_) para grabar ell lugares
OSCllFOS.
[] Botones de zoom
Presidnelos para amplim" o ale.jar la imagen.
Es posible ampliar imfigenes fijas desde
aproximadamente I.I hasta 5 veces su
tamafio original/zoom de reproducci6n).
• Si loca la panlalla mientras uliliza el zoom de
reproduccidn, el punlo que loque aparecerfi en el
centro de la panlalla de crislal lfquido.
g,
E$
17
[] Bot6n RESET
Presione RESET para inicializar todos los
_justes, incluido el del tel@
[] Botdn EASY
Presione EASY para mostrar I-'._; la
mayorfa de los ajustes se establecerfin
automfiticamente para facilitar las
operaciones de grabacidn o reproduccidn.
Para cancelar esta flmci6n, vuelva a
presionar EASY.
[] Bot6n DISP/BATT INFO
Podrfi cambiar la visualizaci6n ell pantalla
si lo presiona con la videoctimara
encendida.
Si Il! presiona con el interruptor POWER
_0ustado ell OFF/CHG), podrfi comprobar
la energfa restante de la baterfa.
[] Bot6n [] (contraluz)
Presione [] (contraluz) para que @arezca
[], que le permitirfi ajustar la exposicidn de
motivos a contraluz. Presione [] (contraluz)
de nuevo para cancelar la fimcidn de
contra]uz.
[] Micr6fimo integrado
E1 sonido que capta el micr6fono interno se
convierte ell SoIlido envolvente de 5. I
canales y se graba ei/este nlodo.
[] Flash
E1 flash se dispara alltomfiticamente ell
funci6n de las condiciones de grabaci6n
con el :tiuste predeterminado.
Toque _, (HOME)-...+ _ (AJUSTES)-...+
[AJUST.FOTO CAM.] --+ [MODO
FLASH] para cambiar el :_iuste.
[] Sensor relnoto/puerto de inlYarrojos
Permite recibir la serial del control remoto.
[] Indicador de grabacidn de la c_imara
E1 indicador de grabaci6n de la cSmara se
ilumina ell rqio durante la grabaci6n. E1
indicador parpadea cuando la capacidad
restante del soporte o la energfa de la
baterfa se estfi agotando.
[] Receptficulo del trlpode (superlicie
inferior)
Coloque un trfpode/opcional) ell el
receptficulo correspondiente mediante un
tomillo para trfpode (opcional: la longitud
del tomillo debe ser inferior a 5,5 ram)
[] Tonm HDMI OUT (mini)
Conecte el cable HDMI (opcional).
[] Conector relnoto de A/V/Toma
MV OUT
Conecte el cable de A/V de componente o
el cable de conexi6n de A/V.
[] Tolna _ (USB)
Conecte el cable USB a esta tonm
[] Botdn ,@ (DISC BURN)
Para crear un disco, conecte la videocfimara
a una computadora, etc. Para obtener mils
informacidn, consulte la "Gu/a de PMB"
(pSg. 29).
[] Active Inter|hce S" ,r,cti,,_hoe _'_ Int_rVac0Stm_
La Active Interface Shoe suministra
alimentaci0n a accesorios opcionales como.
pot eiemplo, una luz de video, un flash o un
micr6fono. E1 accesorio se puede encender
o apagar al utilizar el illterruptor POWER
de la videoc:hnara.
[] Conector de interfaz
Conecte la videocSmara y la Handycam
Station a esta toma.
E$
18
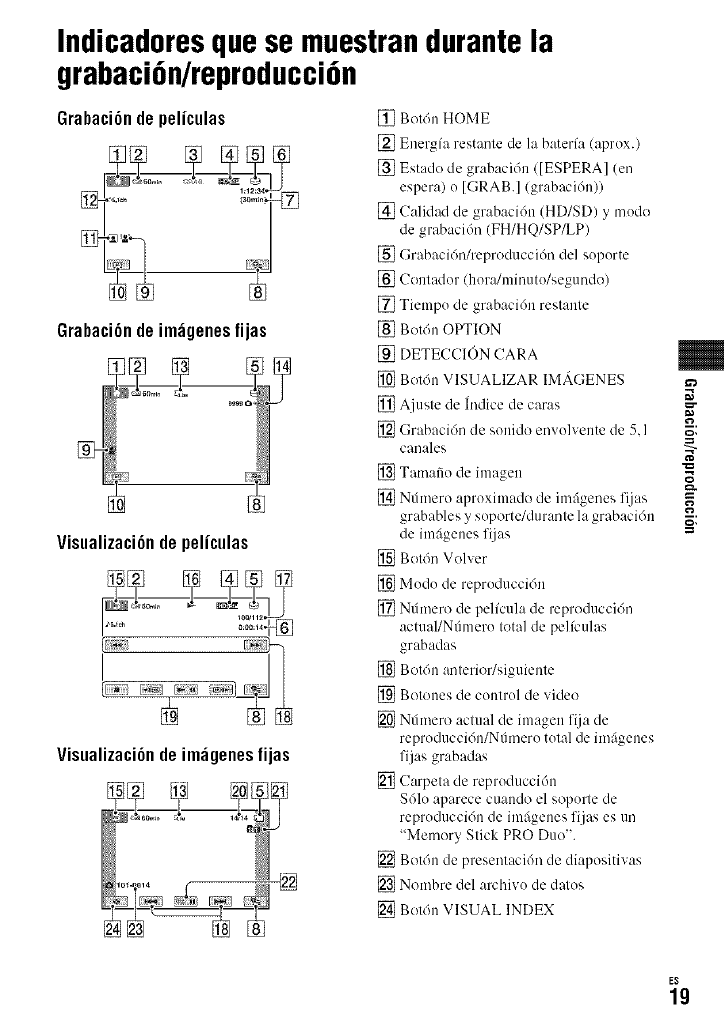
Indicadoresquese muestrandurantela
grabaci6n/reproducci6n
Grabaci6n de peliculas
Grabaci6n de im_genes fijas
Visualizaci6n de peliculas
Visualizaci6ndeim_genesfijas
[] Butdn HOME
[] Energfa restame de la bateria (aprox.)
[] Estado de grabaci6n ([ESPERAI (en
espera) o [GRAB.] (grabacidn))
[] Calidad de grabaci6n (HD/SD) y modu
de grabaci6n (FH/HQ/SP/LP)
[] Grabaci6n/repruducci6n del soporte
[] Cuntador (hor,q/minuto/segundo)
[] Tiempo de grabaci6n restante
[] Botdn OPTION
[] DETECCION CARA
[] Butdn VISUALIZAR IMAGENES
[] Ajuste de Iudice de caras
[] Grabaci6n de sonidu envolvente de 5. I
canales
[] Tamafio de imagen
[] Ntimero aproximadu de imfigenes fijas
grabables y soporte/durante la grabaci6n
de imfigenes fijas
[] Butdn Volver
[] Modo de reproducci6n
[] Nfimeru de pelicula de repruduccidn
actual/Nfimero total de pelfculas
grabadas
[] Botdn anteriur/siguiente
[] Butones de control de video
[] Nt_meru actual de imagen fija de
reproducci6n/Nfimero total de imfigenes
fijas grabadas
[] Carpeta de reproducci6n
$61o aparece cuando el soporte de
reproducci6n de imfigenes fijas es un
"Memory Stick PRO Duo".
[] Botdn de presentaci6n de diapositivas
[] Nombre del archivo de datos
[] Butdn VISUAL INDEX
m.
g,
E$
19
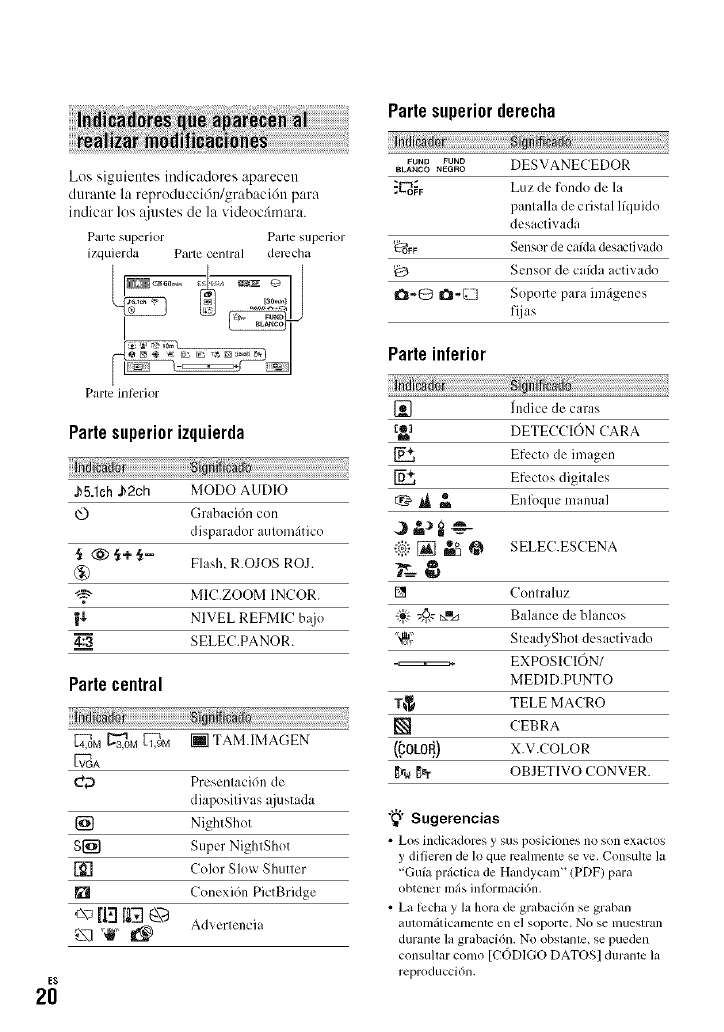
Los siguientes indicadores aparecen
durame la reproducci6n/grabaci6n para
indicar los @lstes de la videocfimara.
Parle superior Parle superior
izquierda Parle cemral derccha
Parte superiorderecha
_u.D _UND DESVANECEDOR
BLANCO NEGRO
"E_o_F Luz de rondo de l_
p mlall i de cristal lfquido
desactivada
'_F Sensor de cafda desactivado
'_3 Sensor de cafda activado
O'@ II_-Q Sopol_e para im;igenes
fijas
Parleinferior
E$
2O
Parle interior
Parlesuperiorizquierda
J_5.1ch _2ch MODO AUDIO
_O Grabaci6n con
disparador aulom_itico
@ Flash, R.OJOS ROJ.
_-._." MIC.ZOOM INCOR.
_$ NIVEL REFMIC b@)
4:3 SELEC.PANOR.
Parlecentral
4L_,oM_"3,3,0M1_,9M [] TAM.IMAGEN
_'g) Presentaci6n de
diapositivas _iustada
[] NightShot
S[_ Super NightShot
['_J Color Slow Shutter
Conexi6n PictBridge
_.-_7]"_t[_"_ Advertencia
[] in(lice de caras
[ol DETECCION CARA
Efccto de imagen
['ff+, Efcctos digitales
t:_ t_ _ Enl_)que manual
@_ [] &-_ @SELEC.ESCENA
[] Contrahlz
_ @,_ _=_ Balance de blancos
'_" SteadyShot desactivado
EXPOSICION7
MEDID.PUNTO
T_ TELE MACRO
CEBRA
(,COLOR,') X.V.COLOR
_rw _T OBJETIVO CONVER.
"_i° Sugerencias
• Los hldicadorcs y sus posiciones no son exaclos
y difieren de lo que rcalnlcnte sere. Consulte la
"Guia prfictica de Handycmn" (PDF) para
obtener infis inl_)rmaci6n.
•La lccha y la hora de grabaci6nsegraban
aulom_tiCalllelltC ell ¢] Soporte. No se nlueslran
duranle la grabaci6n. No obslanle_ se pueden
consultar como [CODIGO DATOS] durame h_
reproducci6n.

Realizaci6nde distintasfunciones: HOME"
y OPTION"
Para visualizar la pantalla de menfi.
presione _ (HOME) [] (o [_)/
(OPTION). Para obtener mils
informaci6n acerca de los elementos del
metal consulte la "Gufa prfictica de
Handycam" (PDF) (prig. 26).
• La simaci6n actual de grabacidn oreproducci6n
no le perlllite seleccionar ni aclivar
shi/u]lfineal/lellle los e]elllelltOS alelluados.
Paraver la explicaci6ndelHONE
MENU (HELP)
(!) Prcsionc _1_ (HOME) [] (o [_).
@ Toque [] (HELP).
La parte inferior de [] (HELP) se ihunina
el/ naranja.
_(HOME) []
obtener informaci6n.
Es posible modificar los :tiustes de A1tocar un elemento, su explicacidn
operacidn como [nI_s]e convenga. Presione aparece en la pantalla.
_" (HOME) [] (o [_) para visualizar llt Para aplicar cl elemento seleccionado,
pantalla de menfi, toque [Si]. m.
g,
Elementos del
menO
Categoria
1Toque la categoria deseada y, a
continuacibn, el elemento cuyo
ajuste desee modificar.
2Siga las instrucciones de la
pantalla.
E1 _ (OPTION) MENU se muestra como
la velltalla elnergente que aparece al hacer
clic con el botdn derecho del mt6n de una
computadora.
Presione @=_(OPTION) para visualizar los
elementos del menfi que puede modificar en
llt situacidn actual.
Elementos del
menO
Ficha
"_° Sugerencias
• Si el elemento no se nmestra en pantalla_ toque
/_para cambiar de pfigina.
• Para ocullar la pantalla HOME MENU, toque
IX]
1Toque la ficha deseada y, a
continuacibn, el elemento cuyo
ajuste desee modificar.
E$
21
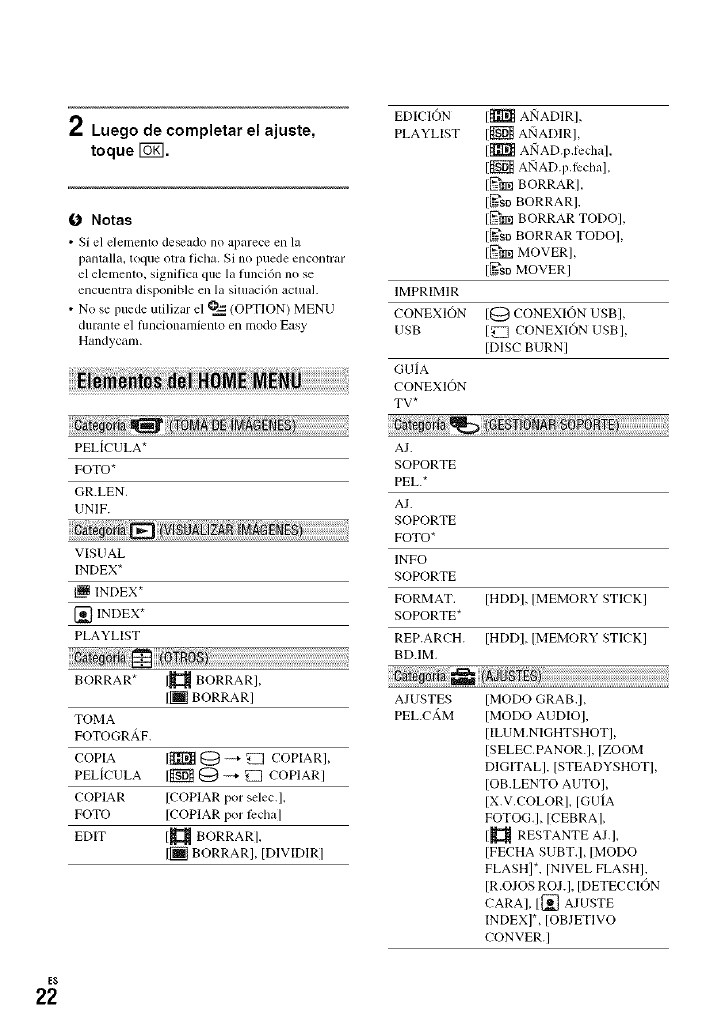
EDICION
2Luego de completar el ajuste, PLAYLIST
toque [UKI.
ONotas
• Si el elemenlo de.ado no aparece en la
pantalla, toque otra Iicha. Si no puede encontrar
el elelnento, signilic_ que la tunci6n no se
encuentra disponible en la situaci6n actual.
•No se puede milizar el _ (OPTION) MENU
durame el hmciolmnliento en lnodo Easy
Handycam.
PEL[CULA*
FOTO*
GR.LEN.
UNIF.
VISUAL
INDEX*
INDEX*
[] INDEX*
PLAYLIST
BORRAR* I_ BORRARI,
Ilml BORRARI
TOMA
FOTOGRAF.
COPIA 1_ _ ----+_ COPIAR],
PELtCULA INNQ -_"_ COPIARI
COPIAR [COPIAR por selec.I,
FOTO [COPIAR pot li:cha]
EDIT 1_ BORRAR],
[li-) BORRAR], [DIVIDIR]
[[]I]_ AiqADIRI,
I_ AiqADIR],
[_] AIqAD.p,lccha],
[[_I_ AiqAD.pAi:cha],
[__-rrmBORRAR],
[.._--sr_BORRAR],
[__-rrmBORRAR TODO],
[_su BORRAR TODOI,
[g_I)_ MOVER],
[.._--soMOVER[
IMPRIMIR
CONEXION 1@ CONEXION USB],
USB [_ CONEXION USB],
[DISC BURN]
GUiA
CONEXION
TV*
N
AJ.
SOPORTE
PEL.*
AJ.
SOPORTE
FOTO*
INFO
SOPORTE
FORMAT. [HDD], [MEMORY STICK]
SOPORTE*
REP.ARCH [HDD], ]MEMORY STICK]
BD.IM.
AJUSTES [MODO GRAB.[,
PEL.C_.M [MODO AUDIOf
[ILUM.NIGHTSHOTI,
[SELEC.PANOR.I, [ZOOM
DIGITAL], [STEADYSHOTI,
lOB.LENTO AUTO[,
[X.V.COLORI, [GUtA
FOTOG.], [CEBRA],
1_ RESTANTE ALl,
[FECHA SUBT.], [MODO
FLASH]*, [NIVEL FLASHI,
[R.OJOS ROLl, [DETECCION
CARA], [[] AJUSTE
INDEX]*, [OBJETIVO
CONVER.I
E$
22
AJUST. [[_ TAM.IMAGEN]*,
FOTO CAM. [NUM.ARCHIVO].
[ILUMNIGHTSHOT],
[STEADYSHOT], [GUiA
FOTOG,]. [CEBRA]. [MODO
FLASH]*. [NIVEL FLASH].
[R.OJOS ROE], [DETECCION
CARAI, [OBJETIVO
CONVER,I
VIS. [CODIGO DATOS],
AJUSTES [PANTALLA _]
IMAG
AJUS.SON# [VOL 1", [PITIDO]*, [BRILLO
PANT,** LCD], [NIV LUZ LCD],
[COLOR LCDI
AJUSTES [TIPO TVI, [SALIDA PANT, l,
SALIDA [COMPONENTE]
AJ,REL./ [AJ US.RELOJ]*,
IDIOM.{_] [AJ US.ZONAl, [DST SET],
[HORA VERANOI, [AJUSTE
1DIOMA[]]*
AJUST. [MODO DEMO],
GENERALES lIND.GRAB,l,
[CALIBRACION],
[APAGADO AUTO[,
[ESPERA ENC,R,_F.],
[CTRL REMOTO], [SENSOR
CA[DA], [CTRL.PARA
HDMI]
* Puede ajustar eslos e]emenlos duranle el modo
Easy Handycam.
** El hombre del menfi canlbia a [AJUSTES
SONIDO] durante el hmcionalniento en modo
Easy Handycam.
ii_!:_i_U__iiiiiiiiiiiiiiiiiiiiiiiiiiiiiiiiiiiiiiiiiiiiiiiiiiiiiiiiiiiiiiiiiiiiiiiiiiiiiiiiiiiiiiiiiiiiiiiiiiiiiiiiiiiiiiiiiiiiiiiiiiiii:!
[DESVANECEDOR], [EFECTO DIG.I,
[EFECTO IMAG.]
[MIC.ZOOM INCOR,I, [NIVEL REFMICI,
[AUTODISPAR,], [TEMFORIZ.], [GRABAR
SONIDOI
[PRES.DIAP.I, [AJUS,PASE DIAPO.I,
[COPIAS], [FECHA/HORA], [TAMAIqO]
g,
A continuaci6n se describen los elementos
que solamente se pueden ajustar en el
OPTION MENU.
[ENFOQUE], [ENFOQ,PUNTO],
[TELE MACROI, [EXPOSICIONI,
[MEDID.PUNTO], [SELEC.ESCENA],
[BAL.BLANCOSI, [COLOR SLOW SHTRI,
[SUPER NIGHTSHOT]
E$
23
Almacenamientode im genes
Debido a la capacidad limitada del soporte,
asegtirese de guardar los datos de imagen
en algfin tipo de soporte externo, como uu
DVD-R o una computadora.
Las imfigenes grabadas en la videoc:hnara
se pueden guardar en el modo que se indica
a continuaci6n.
Puede utilizar "Picture Motion Browser"
del CD-ROM suministrado, pard guardar
las imfigenes grabadas en la videocfimara
con calidad de imagen HD (alta definici6n)
o calidad de imageu SD (definici6n
est:indar).
Puede reescribir pelfculas con calidad de
imagen HD (alta definici6u) desde la
computadora a la videoc:imara, si es
necesario. Pard obtener m_is inli_rmaci6n.
consulte la "Gufa de PMB" (prig. 29).
Creaci6n de un disco con un solo
toque(OneTouch Disc Burn)
Pard guardar fhcilmeute las iul_'lgenes
grabadas en el disco duro de la videoc:imara
directamente en un disco, presione el bot6n
*_ (DISC BURN).
Almacenamientode im;igenesen una
computadora(EasyPC Back-up)
Se pueden gu:,Marl:,s imfigeuesgrabad:,s
de la videocfimaraen el disco duro de una
con/putadora.
Creaci6ndeundiscoconim;igenes
seleccionadas
Puede guardar las imfigenes copiadas en un
disco a la computadora. Tambidn puede
modificar dichas imfigenes.
Pard obtener regisinformacidn, consulte la
"Gu/a prficticade Handycam" (PDF).
Conexi6nconel cabledeconexi6n
A/V
Puede realizar copias eu videogr:,badoras y
grabadoras de DVD/HDD con calidad de
imagen SD (definicidn est:indar).
Conexi6nconel cableUSB
Puede realizar copias en grabadoras de
DVD. etc. compatibles con la grabaci6n de
pelfculas con calidad de imagen HD (alta
defiuicidn).
"_° Sugerencias
• Puede copiar pelfcuh,s o imfigenes tijas del
disco duro en un "Memory Stick PRO Du(fL
Toque _ (HOME)_ _ (OTROS)
ICOPIA PELICULAI/ICOPIAR FOTO].
E$
24
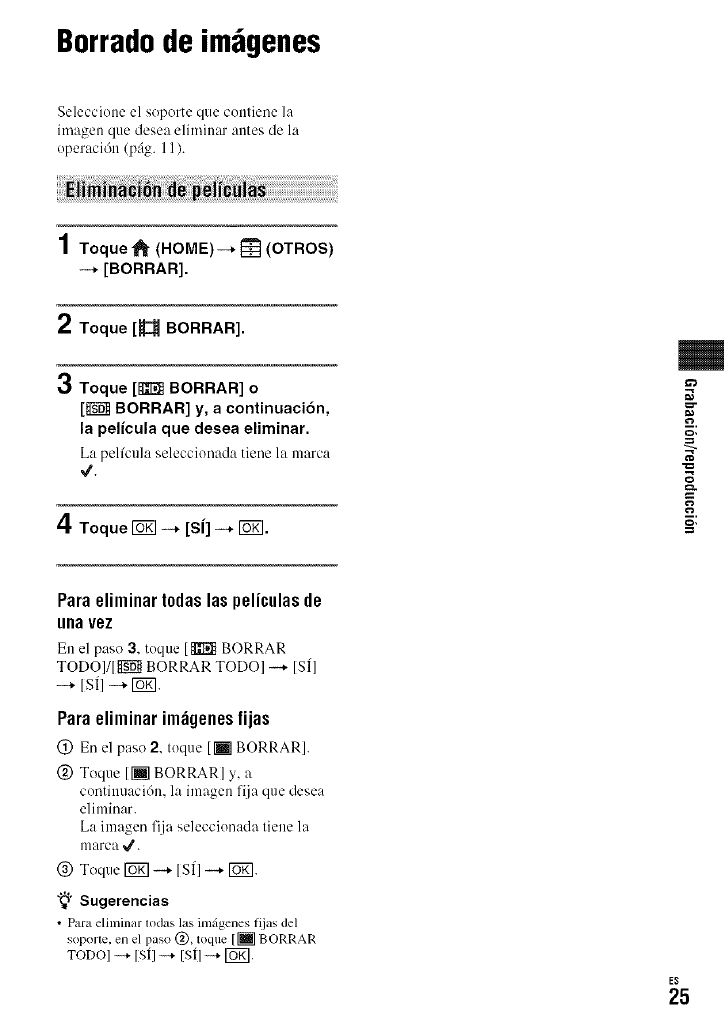
Borradode im genes
Seleccione el soporte que conliene la
imagen que desea eliminar antes de la
operaci6n (prig. 11 ).
1Toque_ (HOME)--*[_] (OTROS)
--* [BORRAR].
2 Toque [_ BORRAR].
O
0Toque [1_ BORRAR] o
[_ BORRAR] y, a continuaci6n,
la pelicula que desea eliminar.
L:_pelfcuhJ seleccionathJ tiene la marc_J
4Toque _ -_ [si] --* Io_1. =_,
Paraeliminart0daslaspeliculasde
ugavez
En el paso 3, toque [_ BORRAR
TODO]/[{]_ BORRAR TODO] -_ [S]]
--* [S_l --* f_.
Paraeliminarim;igenesfijas
@ En el paso 2, toque [lil BORRAR].
@ Toque [_ BORRAR] y, a
continuacidn, la imagen fija que desea
eliminar.
La imagen fija seleccionada tiene la
marca _.
@ Toque [_] _ ISil --* C0_.
"_° Sugerencias
•Parz_ elinlinar tod_Js las imfigenes lijas del
sopolle, en el paso @, toque [Iml BORRAR
TODO] -_- [S(] -_- [S(] -_- [_,
E$
25
Ut71izaci6_co_ _ma_ompu_dom
Utilizacidncon unacomputadora
E$
26
I "Guia prfictica de Handycam" (PDF)
En la "Gufa prfictica de Handycanf' (PDF)
se brindan explicaciones detalladas sobre la
videoc_mara y su uso prfictico.
"Picture Motion Browser" (s61o para
usuarios de Windows)
"Picture Motion Bro'_ set" es el software
suministrado. Puede realizar las siguientes
operaciones.
Creaci6n de un disc(> con un solo toque
hnporlaci6n de im_igenes en una computadora
Edici6n de las imfigenes importadas
Crcaci6n de un disco
0 Notas
•H software "Picture Motion Browser"
suministrado no es comlmtible con
computadoras Macintosh. Para utilizar una
computadora Macintosh conectada a la
videochmara_ consulte el sitio web siguiente
para obtener mallS informaci6n.
ht tp://guid e.d-imaging.sony.co.jp/mac/ms/e_
Para poder ver la "Gufa prfictica de
Handycam" (PDF), deber:i tener Adobe
Reader instalado en la computadora.
Continfie con la instalaci6n aunque
aparezca una pantalla de confirmacidn de
un editor desconocido.
(_) Encienda la computadora.
(_) Coloque el CD-ROM (suministrado) en la
unidad de disco dc la computadora.
Aparccerfi la pantalla de selecci6n de la
instalaci6n.
(_) Haga clic en [Handycam Handbook].
Aparecerfi la pantalla de instalaci6n de
la "Gufa prfictica de Handycam" (PDF).
(_) Seleccione el idioma deseado y el hombre
del modelo de la Handycam y, a
continuaci6n, haga clic en [Handycam
Handbook IPDF)].
Se iniciarfi la instalaci6n. Cuando 6sta
finalice, aparecer_ el icono de acceso
dirccto de la "Gufa pnictica de Handycam"
(PDF) en el escritorio de la computadora.
• Elnombm del modelo de la Handycanlestfi
imprcso en la parle interior de launidad.
(_) Haga clic en [Exit] ---+ [Exit] y, a
continuaci6n, extraiga el CD-ROM de la
unidad de disco de la computadora.
Para vet la "Gufa pr:ictica de Handycam',
haga doble clic en el icono de acceso
directo correspondiente.
"_° Sugerencias
• Los usuarios de Macinlosh deben rcalizm los
pasos siguientcs,
0Endenda ]a computadora.
Coloquc c] CD-ROM (suministrado)en
la unidad dc disco de la computadora.
Abra la carpeta [Handbook] de] CD-
ROM, haga doble clic en la carl)eta
[ESUS] y, a continuaci6n, arrastre y
suelte el archivo "Handbook.pdF en la
conlputadora.
Para vet la "Guia pr_icticade
Handycam', haga doble clic en
"Handbook.pdF.
NRequisitosdel sistema
Sistema operativo: Microsoft Windo_ s
2000 Professional SP4/Windows XP
SP2*/Windows Vista*
* Lasedickmes de 64-bil y Starter (Edition)
110 son compatibles,
Se requiere la instalacidn estfindar.
No se garantizan las operaciones ell un
entomo basado en uua acmalizacidn de
los sistemas operativos descritos
auteriomleute ui eI/ Eli] eutorno de inicio
mfiltiple.
CPO: Intel Peutium 4 a 2.8 GHz o superior
(se recomienda Intel Pentium 4 a
3,6 GHz o superior, lntel Pentium D a
2.8 GHz o superior, lntel Core Duo a
1.66 GHz o superior o lntel Core 2 Duo
a 1.66 GHz o superior).
E1 uso de un procesador lntel Pentium
1II a 1 GHz o superior permite las
operaciones siguieutes:
hnportaci6n del conlenido en la
conlputadora
One Touch Disc Burn
Creacidn de t111disc(} de tormato AVCHD/
DVDvideo
Copia de un disco
Procesamientos61odel contenido con
calidad de imagen SD (definicidn estfindar)
Memor[a: Para Windows 2000/Windows
XP: 512 MB o mils (se recomienda
1GB o mils).
Para el procesamiento sdlo de conteuido
de calidad de imageu SD (definici6u
estfindar), se requiere una memoria de
256 MB o re:is.
Para Windows Vista: 1GB o mils
Disco duro: Volumen de disco necesario
para la instalacidn: aproximadamente
500 MB (es posible que se requieran
10 GB o mils cuando se creen discos de
formato AVCHD).
Pantalla: mflfimo de 1 024 x 768 puntos
Otros: puerto _;USB (debe proporcionarse
como est:indar, se recomienda USB de
alta velocidad (compatible con USB
2.0)), grabadora de DVD (se requiere
una unidad de CD-ROM para la
instalaci6n).
Atenci6n
Esta videocfimara captura imfigenes de alta
definici6n en el flwmato AVCHD.
Mediante el software para PC suministrado.
se podrfin copiar im:igenes de alta
definicidn en un soporte DVD. No obstante.
el soporte DVD que contiene imfigenes
AVCHD no debe utilizarse con grabadoras
o reproductores basados en DVD, ya que es
posible que este tipo de dispositivo DVD no
expulse el soporte y que borre su contenido
sin advertencia. Los soportes DVD que
contienen imfigenes AVCHD se pueden
reproducir en un reproductor o uua
grabadora compatible con Blu-ray Disc m u
otto dispositivo compatible.
N Procedimiento de instala¢i6n
Debe instalar el software en la comput:<lora
Windows antes de conectar la
videocamara a 4sta La instalaci6n se
debe rea]izar sd]o ]a primera vez.
E1 contenido y los procedimieutos de la
instalaci6n pueden variar en fimcidn del
sistema operativo.
(_) Compmebe que la videoc_hnara no estfi
conectad ia la coulputadora.
@ EncieMa la computadora.
0Notas
•Inicie sesi6n COil perllfisos de adlninistrador
para realizar la inslalaci6n.
• Cierre todas las aplicaciones que se esl&l
cjeculando en la computadora ames de
instalar el sol}ware.
@ Coloque el CD-ROM suministrado en la
unidad de disc() de la computadora.
Aparecerfi la pantalla de instalaci6n.
E$
27
Si la pantalla no aparece
OHaga clic en [Starl] y+a continuaci6n+
en [My Computer]. (En Windows
2000, haga doble clic ell [My
Computer].)
t_ Haga doble clic en [SONYPICTUTIL
(E:)] (CD-ROM) (unidad de disco)/
* Los nombres de las unidades (pot
c.iemplo, (E:)) pueden variar segfin la
computadora.
(_) Haga clic en [Install].
(g) Seleccione el idioma de la aplicaci6n que
desea instalar y, a cominuaci6n+ haga clic
en [Next].
(_) Cuando ap trczca la pantalla tie
confirmaci6n tie la conexi6m realice los
pasos siguientes para conectar la
videocfimara a la computadora.
OConecte el adaptador de alimentaci6n
de ca a la Handycam Station y al
tomacorriente de pared.
t_ Coloque la videocrimara en la
Handycam Station y+a continuacidn,
encienda la videocfimara.
O Conecte la toma _' (USB) de la
Handycam Station (prig. Ig) a la
computadora mediante el cable USB
suministrado.
Aparecerfi automfiticamente la pantalla
[SELEC.USB] en la videocrimara.
O Toque [ O CONEXION USB] o
[ _ CONEXI()N USB] en la pantalla
[SELEC.USB] de la videocrimara.
(_) Haga clic en [Continue].
(g) Lea el [License Agreement], seleccione [I
accept the terms of the license agreement]
si estri de acuerdo y+a continuaci6n+ haga
clic en [Next].
(_) Compruebe los _[iustes tie la instalaci6n y+ a
continuaci6n+ haga clic ell [Install].
0 Notas
• Aunque apm'czc+, urn, p+mmlla que le solicite
qu¢ l'¢illiCie ltl colnputadora, 11o es lleCesario
hacerlo en este momento. Reinicie la
compmadora cuando finalice 1+1instalacidn.
• Es posib]e que la mltenticacidn demote
cierto liempo.
Siga las instruccioncs quc aparcccn cn
pantalla para la instalaci6n dcl solid, arc.
Segfin la computadora, cs posiblc que deba
instalar software de otros fabricantes. Si
aparece la pantalla de instalaci6n, siga las
instrucciones para instalar el solkware
necesario.
_) Reinicie la computadora si se requiere para
complelar la instalaci6n.
(_ Extraiga el CD-ROM tie la unidad de disco
de la computadora.
Paradesc0nectarel cableUSB
(!) Htga clic en el icono _ ---+ [Sal_:ly
remove USB Mass Storage Device] ---+
[OK] (s61o en Windox_s 2000) de la
bandqia de tare ts situada en la parte
inli:rior derecha del escritorio de la
comptltadora.
@ Toque [FIN] --+ [gil en la pantalla tie la
videocSmara.
(_) Desconecte el cable USB.
E$
28

Utilizaci6nde"Picture Motion
Browser"
Para iniciar "Picture Motion Browser".
haga clic en [Start] -_+ [All Programs] --+
/Sony Picture UtilityJ --+ [PMB Pictnre
Motion Browser].
Para conocer las operacicmes bfisicas de
"Picture Motion Browser". consulte la
;;Gufa de PMB'. Para visualizar la "Gufade
PMB'. haga clic en [Start] -...+[All
Programs] -+ [Sony Picture Utility] -+
[Ayuda] -...+[Gufa de PMB].
"_° Sugerencias
•Si no aparece lapantalla [SELEC.USB], loque
[CONEXION USBI,
m
E$
2g
$o1_#@ d_ pmblemas
Soluci6nde problemas
Si surge algfin problema al utilizar la
videocfimara, consulte la siguiente tabla
para solucionarlo. Si el problema persiste,
desconecte la fllente de alimentaci6n y
p6ngase en comacto con sit distribuidor de
Sony.
Notas antes de enviar a reparar la
videoc_imara
• En lhnci6n del problema, puede que _a
necesario iniciar la videocrimara o bien, cambiar
el disc<>duro de la t/list/la. En ese caso, se
borrarrin los datos ahllaccnados ell e] disco duro,
AsegOrcse de guardar los dalos del disco duro
interno (consulte la 'Gufa prficlica de
Handycam" (PDF)) en otro soporte (copia de
svguridad) antes de enviar la videocfimara a
reparar. No asumimos ninguna rcsponsabilidad
por la pdrdida de dalos del disco duro.
• Durante la reparacidn, es posible que tengamos
que revisar una minima canlidad de los dalos
ahnacenados en el disco duro para investigar el
problema. NO obstanle, el distribuidor Sony no
copiarfi ni conservarfi los dalos.
• Para consultar los problemas de la videocrimara,
consulte la "Gufa prfictica de Handycam" (PDF)
y, para obtener inlbrmaci6n acerca de la
conexidn de la videocrimara a la compuladora,
consulle ]a "GuhI de PMB'.
La videocamara no se enciende.
•Instale una bateria cargada cu ]a
vidcocrinl ml (prig. 6).
• Conecte la clavija del adaptador de
aliment icidn de ca al tomacolTiente de
pared (prig. 6).
La videocamara no funciona, aun
cuando la alimentacion est_i
encendida.
• Despuds de encender la videocSmara,
tarda/inos cuantos segundo en esttr
lista para tomar imSgenes. No se trata
de una falla de funcionamiento.
• Desconecte el idaptador de
alimentaci6n de ca del tomacorriente de
pared o extraiga la bateria y vuelva a
conectarlos trauscurrido
aproximadamente 1 minuto.
Si las funciones no funcionan, prcsione
el botdn RESET (p_g. 18) utilizando un
objeto puntiagudo (si presiona el bot6n
RESET. se restablecerrin todas
fimciones, incluido el reloj).
• Li temperatura de la videocrimara es
extremadamente elevada. Apague la
videocrinlam y d_jela un tiempo ell un
lugar fresco.
•La temperatura de la videocrimara es
extremadamente b_ja. Dcje la
videocrimam con la alimentaci6n
encendida. Apague la videocrimara y
Ildvela a un hlgar mris cfilido. Ddjela
alli durante un rato y a continuacidn
encidndala.
La videoc;imara se calienta.
• Esto se dcbe a que ha cstado cncendida
durante nmcho tiempo. No se trata de
una falla de l?mcionanfiento.
La alimentaci6n se desconecta
bruscamente.
• Utilice el adaptador de alimcntacidn dc
ca
• Vuelva a encender la alimentacidn.
• Cargue la bateria (prig. 6).
AI presionar START/STOP o PHOTO
no se graban im_igenes.
• Ajuste cl interruptor POWER en
(Pelicuh0 o I_ (]mrigenes fijas)
(prig. 13).
• No se pueden grabar imrigenes en modo
suspendido. Presione el botdn QUICK
ON (prig. 17).
E$
3O
• La videoc_hnara graba en el soporte la
imagen que acaba de tomar. No se
pueden realizar nuevas grabaciones
durante este periodo.
• El soporte esUl lleno. Elimine las
im_igenes innecesarias (prig. 25).
• El nfimero total de escenas de pelicula
o de imfigenes fijas supera la capacidad
de grabaci6n del soporte. Elimine las
im¢igenes innecesarias (prig. 25).
La grabaci6n se detiene.
• La tempcratura dc la vidcoc_hnara es
extremadamente dta o baja. Apague la
videoc_hnara y ddjela un tiempo en un
lugar fresco o cfilido.
No es posible instalar "Picture
Motion Browser".
• Compruebe el entorno inl2wmfitico
necesario para instalar "Picture Motion
Browser.
• lnstale "Picture Motion Browser" en el
orden adecuado (prig. 27).
"Picture Motion Browser" no
funciona correctamente.
• Cierre Picture Motion Bro_ser y
reinicie la computadora.
La computadora no reconoce la
videocfimara.
• Desconccte cualquicr dispositivo de la
toma USB de la computadora que no
sea el teclado, el ratdn o la
videocfimara.
• Desconecte el cable USB de la
computadora y de la Handycam
Station, reinicie la computadora y, a
continuaci6n, vuelva a conectar la
computadora y la videocfimara en el
orden adecuado.
Si en la pantalla LCD aparecen indicadores.
compruebe lo siguiente.
Si el problema persiste aun despuds de
intentar solucionarlo varias veces, pdngase
en contacto con su distribuidor de Sony o
con un centro de servicio tdcnico local
autorizado de Sony.
C:o4:v3N * La baleria no es una bater_a
"InIoLITHIUM" (serie H).
Utilice una balerfa
"InIoLITHIUM" (serie H)
(prig. 6).
• Conecle firmemcnle la clavija
de cc del adaplador de
alimentacidn de ca a la toma
de entrada de cc de la
Handycam Slation o de la
videocfimara (prig. 6),
C:I 3:V3N /* Desconecte la fllente de
C:32:V3N alimentacidn. ConEctela de
nuevo y vuelva a poner en
hlnciona/lliento la
videoc_//lara.
E:20:V3N /* Se hzl producido una lrilla de
E:31 :V3V3/tuncionamiento que no puede
E:61 :V3N /solucionar sin la ayuda del
E:62:V3N /servicio t@nico. P6ngase en
E:91 :V3N /contacto con su distribuidor de
E:94:V3N Sony o con un cenlro de
servicio t@nico local
autorizado de Sony. lndfquele
el cddigo de 5 dfgitos que
comienza por la letra "E".
101-0001 * Si el indicador parpadetl
lentamentc, significa que el
archivo estfi dafiado o es
ilegible.
{_ • Es posible que _ haya
producido un error en la
unidad de disco duro de la
videoc_imara.
E$
31
E$
32
Q
[;3
tq
_33
_o-_
• El disco duro de |a
videocfimara estfi lien().
Elimine las ilnfigenes
innecesarias del disco duro,
• Es posible que se haya
producido un error en la
unidad de disc() duro de la
ideocgLtnar a,
• La baterfa dispone de poca
energht,
•La temperatura de la
videocfimara aumellla. Apague
la videocrimara y ddjela en un
lugar h-¢sco.
• La temperamra de la
videocfimara es baja. Deje que
la videocfimara se caliente.
• Si el indicador parpadea
lentamente, el espacio libre
para grabar inlfigelles _ eslri
agotando.
• No se ha inserlado ningdn
"Memol7 Stick PRO Duo"
(prig. 12).
• Si el indicador parpadea
rfipidamente, no existe espacJo
libre suficiente para grabar
imfigenes.
• Elinfine las imfigenes
innecesarias o [orinatee e]
"Memol T Stick PRO Duo"
despuEs de almacenar las
ilnfigenes en otro soporte
(prig. 24).
• El archivo de base de datos de
imfigenes estfi daiiado.
• El 'Memory Stick PRO Duo"
eslfi dahado. Formatee el
"Memol T Stick PRO Duo" con
la videocfinlara.
•El "Memory Stick Duo"
insertado es incompatible.
• Se ha restringido el acceso al
"Mcmoly Stick PRO Duo" ell
otro disposilivo.
• Existe algdn tipo de problema
con el flash,
• La cantidad de luz es
insuficiente. Us el flash,
•La videocfinlara se encuentra
en posicidn inestable.
Soslenga |a videocfimara
I]rtnelnente con alnbas manos.
No obstantc, lenga ell cuenta
que el indicador de advertencia
de sacudidas de la cfimara no
desapamcerfi,
• La funci6n del sensor de cafda
eslfi activada. Es posible que
no pueda grabar o reproducir
imzlgenes.
• El soporte est5 lleno.
•Las imfigenes/ijas no se
pueden grabar durante el
procesamiento. Esperc ttnos
instantes y, a conlinuacidn,
grribelas,
_n;om_aci6ncomHementa_ia
Precauciones
Usoy cuidados
• NO milice ni almacene la _ideoclhnara y los
uccesorios ell los siguiellles lugares:
En lugarcs extremadamente cfilidos, IHos o
hl]llledos. Nunca los deje expuestos a
lemperaluras que supercn los 60 °C coillO_ por
cjemplo, bajo la luz directa del sol, cerca de
calentadorcs o ell Ull autolnd'dl estacionado
bajo el sol. Podrfan deR_rmarse o sutrir IMlas
de Nncionamiento.
Gerca de campos magn`5ticos intcnsos o
vibraciones mccfinicas. La videocfimara
podria suliir l, dlas de tuncionamiento.
Cerca de ondas radioldnicas filertes o
radiaciones. Es posible que la videocfimara no
pueda grabar correctamcnte.
Cerca de receptorcs de AM y de equipos de
vide(). Es posible que se produzcan ruidos.
Ell una playa o ell cualquier lugar con mucho
polvo. Si elllr_l arena o polvo en la
videocfilnara, pueden causar una talla de
funcionamiento. En ocasiones, esta lidla de
funcionamiento puede resultar irreparable.
Cerca de ventanas o en el exterior, donde la
pantalla de cristal lfquido o el objefivo pueden
quedar expuestos a la luz solar directa. Esto
dafiarfa el interior de la panmlla de crisml
lkluido.
• Alimente la videocfimara con cc de 6,8 V/7+2 V
(bateria) o cc de 8,4 V (adaptador de
alimentacidn de ca)
• Para ulinlent+lr la videocfilnara con cc o c_l
utilice los accesorios reCOlllend_ldos en este
II][lllll[/l de instrucciones.
• No permita que la videocfimara se moje; por
eiemplo, bajo la lluvia o por el agua del mar. Si
la videocfimara se moja. podrfa suliir lallas de
flmcionamiento. En ocasiones, esta l_dla de
flmcionamiento puede resultar incparable.
• Si entra algfin objeto o lfquido la videocfimara.
desconEctela y haga que la revise un distribuidor
de Sony antes de volver a utilizarla.
• Evite inanipular, desamlar o nlodificur la
videoc+imara bruscamenle y exponerla a golpes
oimpactos conlo marlillazos, caidas o
pisotones. Sea especiahnente cuidadoso con el
objetivo.
•Cuando no vaya a milizar la videocfimara,
mamenga el imermptor POWER en la posici6n
OFF (CHG).
• NO utilice la videocfimara envuelta en una
toalla, pot ejemplo. Si 1o hace, puede
recalenmrse intcrnamenle.
• Cuando desconecte el cable de alimentacidn,
tim del enchulc y nunca del cable.
• Procure no dafiar el cable de alimentaci6n al
colocar un o[_ielo pesado sobre ,51.
• Mantenga limpios los contactos lnetfilicos.
• Mantengz_ el control mlnolo y la pila tip() bol6n
fllera del alcance de los nifios. En caso de
ingestidn de la pila, consulte a un m,sdico de
inlnedialo.
• Si se producen hlgas del liquido electrolflico de
la pila:
P6nga_ en conlacto con un centro de selwicio
t,scnico local autorizado de Sony.
Limpie con agua cualquier liquido que haya
estado en conlacto con Sil piel.
Si le cam Ifquido en los ojos. lfiveselos con
agua abundante y acuda a un m,sdico.
NCuandonoutilice la videocamara
duranteuntiempoprolongado
• Enci,sndala peri6dicamente y d,sjela operar, pot
ejemplo reproduciendo o grabando imfigenes
dill'[lille IIIIOS 3 Illinll[O.
• Agole la baterfa completamente allies de
guardal]a,
Pantalla de cristal liquido
• NO ejerza excesiva prcsi6n sobl_2 la palllalla de
cristal liquido porque puede dafiarse.
• Cuando utilice la videocfimara en un lugar hfo,
es posible que en la panlalla de clistal liquido
aparezca Ulla illlagell lesidlla]. No se trata de illla
falla de l/lllcionalllienlo.
•Mientras utiliza la videocfimara, la parle _"
posterior de la pantalla de crislal lkluido se 3
puede calenlar. No se trata de una falla de
ftlnciollamienlo, _
N Paralimpiarla pantallade ¢ristal g
I[quido 3
Si la pantalla de cristal lfquido se eusucia de
huellas daclilares u pulvo, se recolnienda el ,_3
uso de un patio suave para limpiarla. Si
utiliza el kit de limpieza para la pantalla de r,'
cristal lfquido (opcional), no aplique el
liquido de limpieza directameute sobre la
pantalla. Utilice papel de limpieza
humedecido con el liquido. E$
33
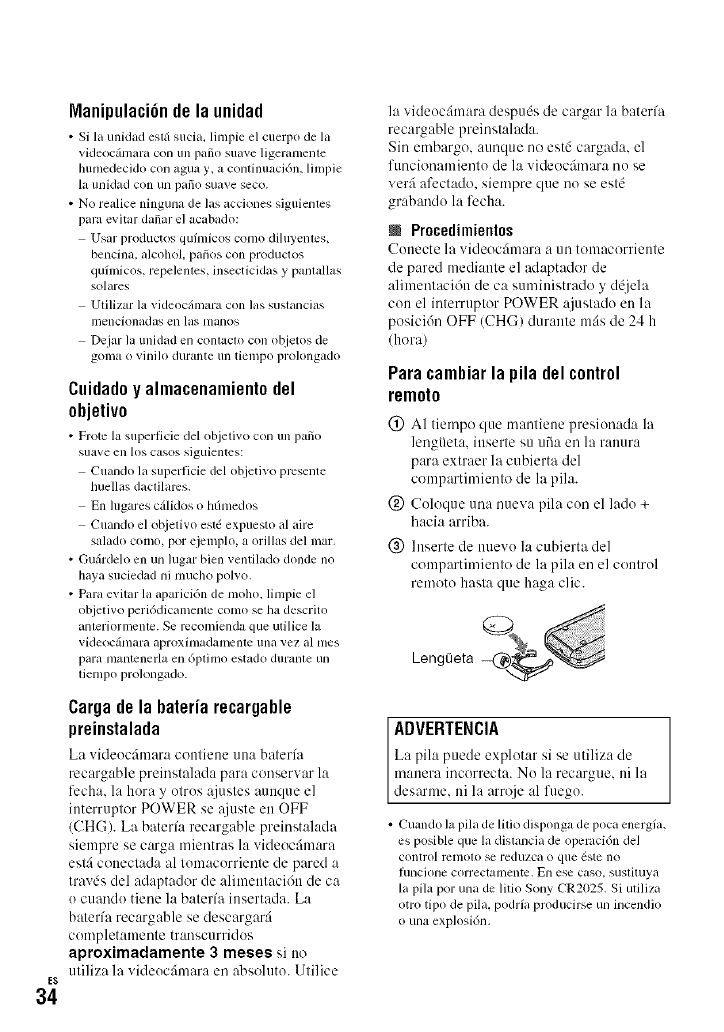
E$
34
IVlanipulaci6n de la unidad
• Si la unidad eslfisucia, limpie el cuerpo de la
videoc_lnilril coil tin piLfio StlilVe ]igeriullenle
hunmdecklo conaguay. aconlilmacidn, limpie
la tlllklad con Ull ])_LflO 5U_I_ e SeCO.
• No re_lliceninguna de las acciones siguienles
paraevitar d_dmrel ac_R_ado:
Us_u" productos quhnicos como diluyelaes,
bencinm alcohol, pa/ios con productos
quhnicos, repelemes, hlsecticklasypantaHas
so]_lles
Utilizarla _ideoclhnm'acon las sustanCklS
Inencioneldets ell lets tll[lllOS
De jar la unidad en conlaclo con objetos de
goma o vinilo durante illl tiempo prolongado
Cuidado y almacenamiento del
objetivo
• Frote la superficie del objetivo con un patio
SII_IVe ely los C_ISOS siguientcs:
Cuando la superficie del objetivo prcsente
huellas dactilarcs.
En lugares cfilidos o hfimedos
Cuando el objetivo est6 expuesto al aire
salad() como, por ejemplo, a orillas del lnar.
• Gufirdelo en un lugar bien ventilado donde no
haya suciedad ni mucho polvo.
• Para evitar la aparicidn de nloho, limpie el
objetivo periddicamente como se ha descrito
anleriormcnte. Se rccomienda que utilice la
videocfinlara aproximadamcnte una vez al tiles
para nlantenerla en 6plimo estado duranle un
liempo prolongado.
Carga de la bateria recargable
preinstalada
La videocfimara contiene una baterfa
recargable preinstalada pare conservar la
fccha, la hora y otros ajustes aunque el
interruptor POWER se :_juste en OFF
(CHG). La baterfa recargable preinstalada
siempre se carga mientras la videocfimara
est4 conectada al tomacorriente de pared a
travds del adaptador de alimentacidn de ca
o cuando tiene la baterfa insertada. La
baterfa recargable se descargarti
completanlente transcnrridos
aproximadamente 3 meses si no
utiliza la videocfimara en absoluto. Utilice
la videocgimara despuds de cargar la baterfa
recargable preinstalada.
Sin embargo, aunque no estd cargada, el
funcionamiento de la videocfimara no se
verfi afcctado, siempre que no se estd
grabando la fccha.
NProcedimientos
Conecte la videocfinlara a/ill tonlacorriente
de pared mediante el adaptador de
alimentacidn de ca suministrado y ddjela
con el interruptor POWER ajustado en la
posici6n OFF (CHG) durante mils de 24 h
(hora)
Paracambiarla pila delcontrol
remoto
(_) A1 tiempo que m:mliene presionada la
]engtieta. inserte su ufia en la ranura
para extmer la cubierta del
compartimiento de la pila.
(_) Coloque una nueva pila con el lad() +
hacia arriba.
@ lnserte de nuevo la cubierta del
compartimiento de la pila en el control
remoto hasta que haga clic.
LengOeta
ADVERTENCIA
La pila puede explotar si se utiliza de
manera incorrecta. No la recargue, ni la
desarme, ni la arroje al fuego.
• Cuando la pila de lilio disponga de poca energia,
es posible que la distancia de operaci6n del
control rclnolo se reduzca o que _ste no
funcione correctamentc. En ese caso, susliluya
la pila por una de litio Sony CR2025. Si ulilizn
otro tipo de pila, podria producirse un incendio
o una explosidn.
Especificaciones
Sistema
Fornmlo de COlnplesi(m de _ideo: AVCHD (HD)/
MPEG2 (SD)/JPEG ([mfigenes tijas)
Fornmto de compresidn de audio: Dolby Digilal 2/
5.1 canales
Dolby Digital 5.1 Creator
SefiM de video: Color NTSC, estlindares EIA
Especificaci6n I(18016(1i
Disco duro: 4(1 GB
En el cfilculo de la capacidad del soporte,
I GB equivale a rail nfillones de bytes, parle
de los cuales se utiliza para la administracidn
de datos.
Formato de grabaci6n: Pelfcula (HD): AVCHD
10811/60i
Pclfcula (SD): MPEG2-PS
hnagen fija: Exif versidn 2,2*
Dispositivo de imagen: sensor CMOS de 3,6 mm
(lipo 1/5)
Pfxeles de grab*_ci6n (imagen tija, 4:3):
mfiximo de 4.0 megapfxeles (2 304 x I 728)**
Blutos: aprox. 2 360 1tlt0 pfxeles
Etcctivos (pelfcula, 16:91:
aprox. 1 49(1 0/10 pfxeles
Elcctivos (inmgen lija, 16:91:
aprox. 1 490 0/10 pfxeles
Elcctivos (inmgen lija, 4:3):
aprox. 1 99(11t/10pfxeles
Objetivo: Carl Zeiss Vario-Sonnar T:g
15 × (6ptico). 30 ×, 180 × (digilal)
Dislancia h)cal: F1,8 - 2,6
Difimetro del fillro: 30 mm
1=3,1 - 46,5 Into
{_'/l[llldO Se convierle ell Iln_l Calllgll'_l
k_logrfifica de 35 mm
Para pelfculas: 40 - 600 mm (16:9)
Para imfigenes tiias: 37 _ 555 mm (4:3)
Tempelamra del color: [AUTOM.], [UNA
PULS.], [INTERIOR] (3 21111K),
[EXTERIORI (5 8(10 K)
llunlinaci6n nlinima: 5 Ix (lux) ([OB.LENTO
AUTO] [ACTIVADO]_ velocidad del
obturador de 1/30 s)
0 Ix (lux) (duranle la hmci6n NightShot)
* "Exi?' es un lormalo de archivo para
ilnfigenes tijas eslablecido pot la JEITA
(Japan Electronics and Intormation
Technology Industries Associalion). Los
archivos en esle lornlato pueden contener
inlormaci6n adicionM como, por eiemplo,
]a inRwlnacidn de _tiustes de la
videocfinlara ell el monlento de la
grabaci6n.
**La exclusiva matriz de pixeles del sensor
ClearVid CMOS y el sistelna de
procesamiento de imfigenes de Sony
(BIONZ) permiten que la resoluci6n de
imfigenes lijas sea equivalenle a los
tanlaflos descritos.
Conecloresde entrada/salida
Conector relnoto de A/V: toma de salida de audio
y _ ideo/componenle
Tonla HDMI OUT: lniniconector HDMI tipo C
Toma USB: nfini-B
Pantallade cristalliquido
hnagen: 6,7 cm (tip() 2,7, tormato 16:9)
Nfimero total de puntos: 211 21tlt (960 x 221t)
Generales
Requisitos de alimenlacidn: cc de 6,8 V/7.2 V
(baterfa)
cc de 8.4 V (adaptador de alimentacidn de ca)
Consumo medio de energia: Durantc la gr_bacidn
con la c&nara con bri]lo nornla]:
Disco duro:
HD: 4.5 W SD: 3,7 W
"Melnory Stick PRO Duo":
HD: 4.5 W SD: 3,7 W
Tcmperatura de funcionamienlo:
De 0 °C a + 40 °C
Ycnlpel-al/ll-_l de _llnl_lccn_lnlielllO_
De -20 °C a + 60 °C
Dimensiones (aprox.): 81 x 76 × 129 mm
(an/al/prf)
incluidas las piezas salienles
81 × 76 x 134 mm (an/al/prl)
incluidas las piezas salienles con la balerfa
lvcargable suministrada conectada
Peso (aprox.): 480 g s61o la unidad principal
5611g incluida la baleria rccargable
suministrada
=Z
3
g
g
3
R'{¢
E$
35
HandycamStationDCRA-C220
Conectoresdeentrada/salida
Toma A/V OUT: toma de salida de audio y video/
colllpOllenle
Toma USB: nfini-B
Adaptadordealimenta¢i6ndeca AC-
L2OO/L2OOB
Requisilos de alimenlaci6n: ca de 100 V a 240 V
50160 Hz
Consumo de corrientc: De 0,35 a 0,18 A
Consmno de energia: 18 W
Tensidn de salida: cc de 8,4 V
1.5 A d 1,7 A (refiErase a
la etiqueta del adaptador
suminislrado)
relnperatura de I/lllCJollall/iellto:
De 0 °C a + 40 °C
Weln])eratura de ah/lacenanlienlo:
De -20 °C a + 60 °C
Dimensiones (aprox.): 48 x 29 x 81 nltll
(an/al/prl) excluidas las piezas salientes
Peso (aprox.): 170 g excluido el cable de
alimentacidn
BateriarecargableNP-FH60
Tensidn mfixinla de salida: cc de 8,4 V
Tensi6n de salMa: cc de 7,2 V
Cg_pacidad: 7,2 Wh (1 000 mAh)
Tipo: iones de litio
El diseflo y las especificaciones de los accesorios
y de la videocfimara estfin stLjetos a cambios sill
previo aviso,
• La videocfimara se li_brica ba)o licencia de
Dolby Laboratories.
Marcascomer¢iales
•"Handycam" y _ I-J_.,t_KI3rl son
nlarcas colnercia]es registradas de Sony
Corporalkm.
• Los Iogotipos "AVCHD" y "AVCH[)" son
marcas registradas de Matsushita Electric
Industrial Co., Ltd, y Sony Corporation.
• '%lemory Slick", "M_I_ +", "Memoly Slick
Duo", "MEMORY _lmEK _U[I", "Memow Slick
PRO Duo", "MEMDRY STIEK PR0 DUO",
"Memory Slick PRO-HG Duo".
"MEMORYSII[I{PRn-Hfi Duo","MagicGate",
"+_Z_.GlCtGZ_.TE", "MagicGate Memory
Stick" y "MagicGatc Memory Slick Duo" son
tllarcas conlerciales o marcas COll/erciales
registradas de Sony Corporatkm,
• "Ink>LITHIUM" es una nmrca comercial de
Sony Corporation.
• '+x.v._'olor" es ilna nlarca conlerckil de Sony
Corporation.
• "BIONZ" es una m_,rca comerckd de Sony
Corporation.
• "BRAVIA" es una marca comercial de Sony
Corporation.
• Dolby y el simbolo de la doble D son marcas
comerciales de Dolby Laboratories.
• Dolby Digital 5.1 Creator es una marca
comercial de Dolby Laboratories.
• HDMI, el logotipo de HDMI y High-Definitkm
multinledia Inlerl_ce son tllarcas comercia]es o
nlarcas conlerciales rcgislradas de HDMI
Licensing LLC.
• Microsoft, Windows, Windows Media,
Windows Vista, y DirectX son marcas
conlerciales registradas o tnarcas COll/erciales de
Microsoft Corporation ell los Estados Unidos y/
o ell otros parses.
• Macintosh y Mac OS son marcas comerciales
registradas de Apple Inc. en los Estados Unidos
y en otros parses.
• Intel. lntel Core y Penfium son marcas
conlercia]es o nlarcas comerciales registradas de
Intcl Corporation o de sus Iiliales en Estados
Unidos y en otros pMses.
• Adobe, el Iogofipo de Adobe y Adobe Acrobat
son tnarcas comerciales rcgislradas o marcas
comerciales de Adobe Systems Incorporated en
Estados Unidos y/u otros paises,
Todos los derails nombrcs de productos
nlencionados en este nlanllal ptleden ser marcas
conlerciales o nl_ll-cas comerciales lvgistradas de
sus respectivas colnpafifas. Adelnfis, ell este
i M (_ > >
lllantlal, _ y " _'11( se illC]llyen de k rll/a expresa
ell lodos ]os casos.
E$
36
Additional informalion on this producl and
answers to frequenlly asked questions can
be found ;it ()Ill" Cuslomer Supporl Website.
P/lede enconlr,_.tl" ii]_Js iI]f()fll]aciOI] sobre este
producto y respueslas alas pregtmbtts mas
frecuentes en nueslro sitio Web de alenci6n
[al clienle.
http://www.sony.neti
Prinled on 70% or morc recycled i?aper
using VOC (Volatile Organic Compound)-
fice vegetable oil based ink.
Impreso en papel reciclado en un 70% o
mils utilizando tinta hecha con accitc
vegetal exenlo de cot/lpllesto orgfinico
volfilil (COV),
Printed in Japan 3286593110
