Sony KDL 40V2500 40V2500/KDL 46V2500 User Manual Installing The Wall Mount Bracket KDL40V2500 IM
User Manual: Sony KDL-40V2500 Installing the Wall-Mount Bracket
Open the PDF directly: View PDF ![]() .
.
Page Count: 2
– 4 –
© 2006 Sony Corporation Printed in U.S.A. 2-697-123-11(1)
KDL-40V2500
KDL-46V2500
Installing the Wall-Mount Bracket English
Installation du support de fixation murale Français
To Customers
For product protection and safety reasons, Sony strongly recommends that
wall-mounting of your TV be performed by Sony dealers or licensed
contractors. Do not attempt to install it yourself.
Your KDL-40V2500/KDL-46V2500 can be wall-mounted using SU-WL51
Wall-Mount Bracket (sold separately). Please provide your licensed contractor
with this installation supplement as well as the Instructions (supplied with
the SU-WL51 Wall-Mount Bracket). Read these documents carefully for safety
and proper installation.
To Sony Dealers and Contractors
Provide full attention to safety during the installation, periodic maintenance
and examination of this product.
À l’attention des clients
Par souci de protection du produit et pour des raisons de sécurité, Sony
recommande vivement que l’installation du support de fixation mural du
téléviseur soit confiée à un revendeur Sony ou à un installateur agréé. Ne pas
tenter d’effectuer l’installation soi-même.
Le KDL-40V2500/KDL-46V2500 peut être fixé au mur à l’aide du support de
fixation mural SU-WL51 (vendu séparément). Veuillez fournir à l’installateur
agréé ce supplément ainsi que le mode d’emploi (accompagnant le support de
fixation mural SU-WL51). Lire attentivement ces documents qui concernent la
sécurité et l’installation correcte du support.
À l’intention des revendeurs Sony et des installateurs
Accorder une attention particulière à la sécurité lors de l’installation, de
l’entretien périodique et de la vérification de ce produit.
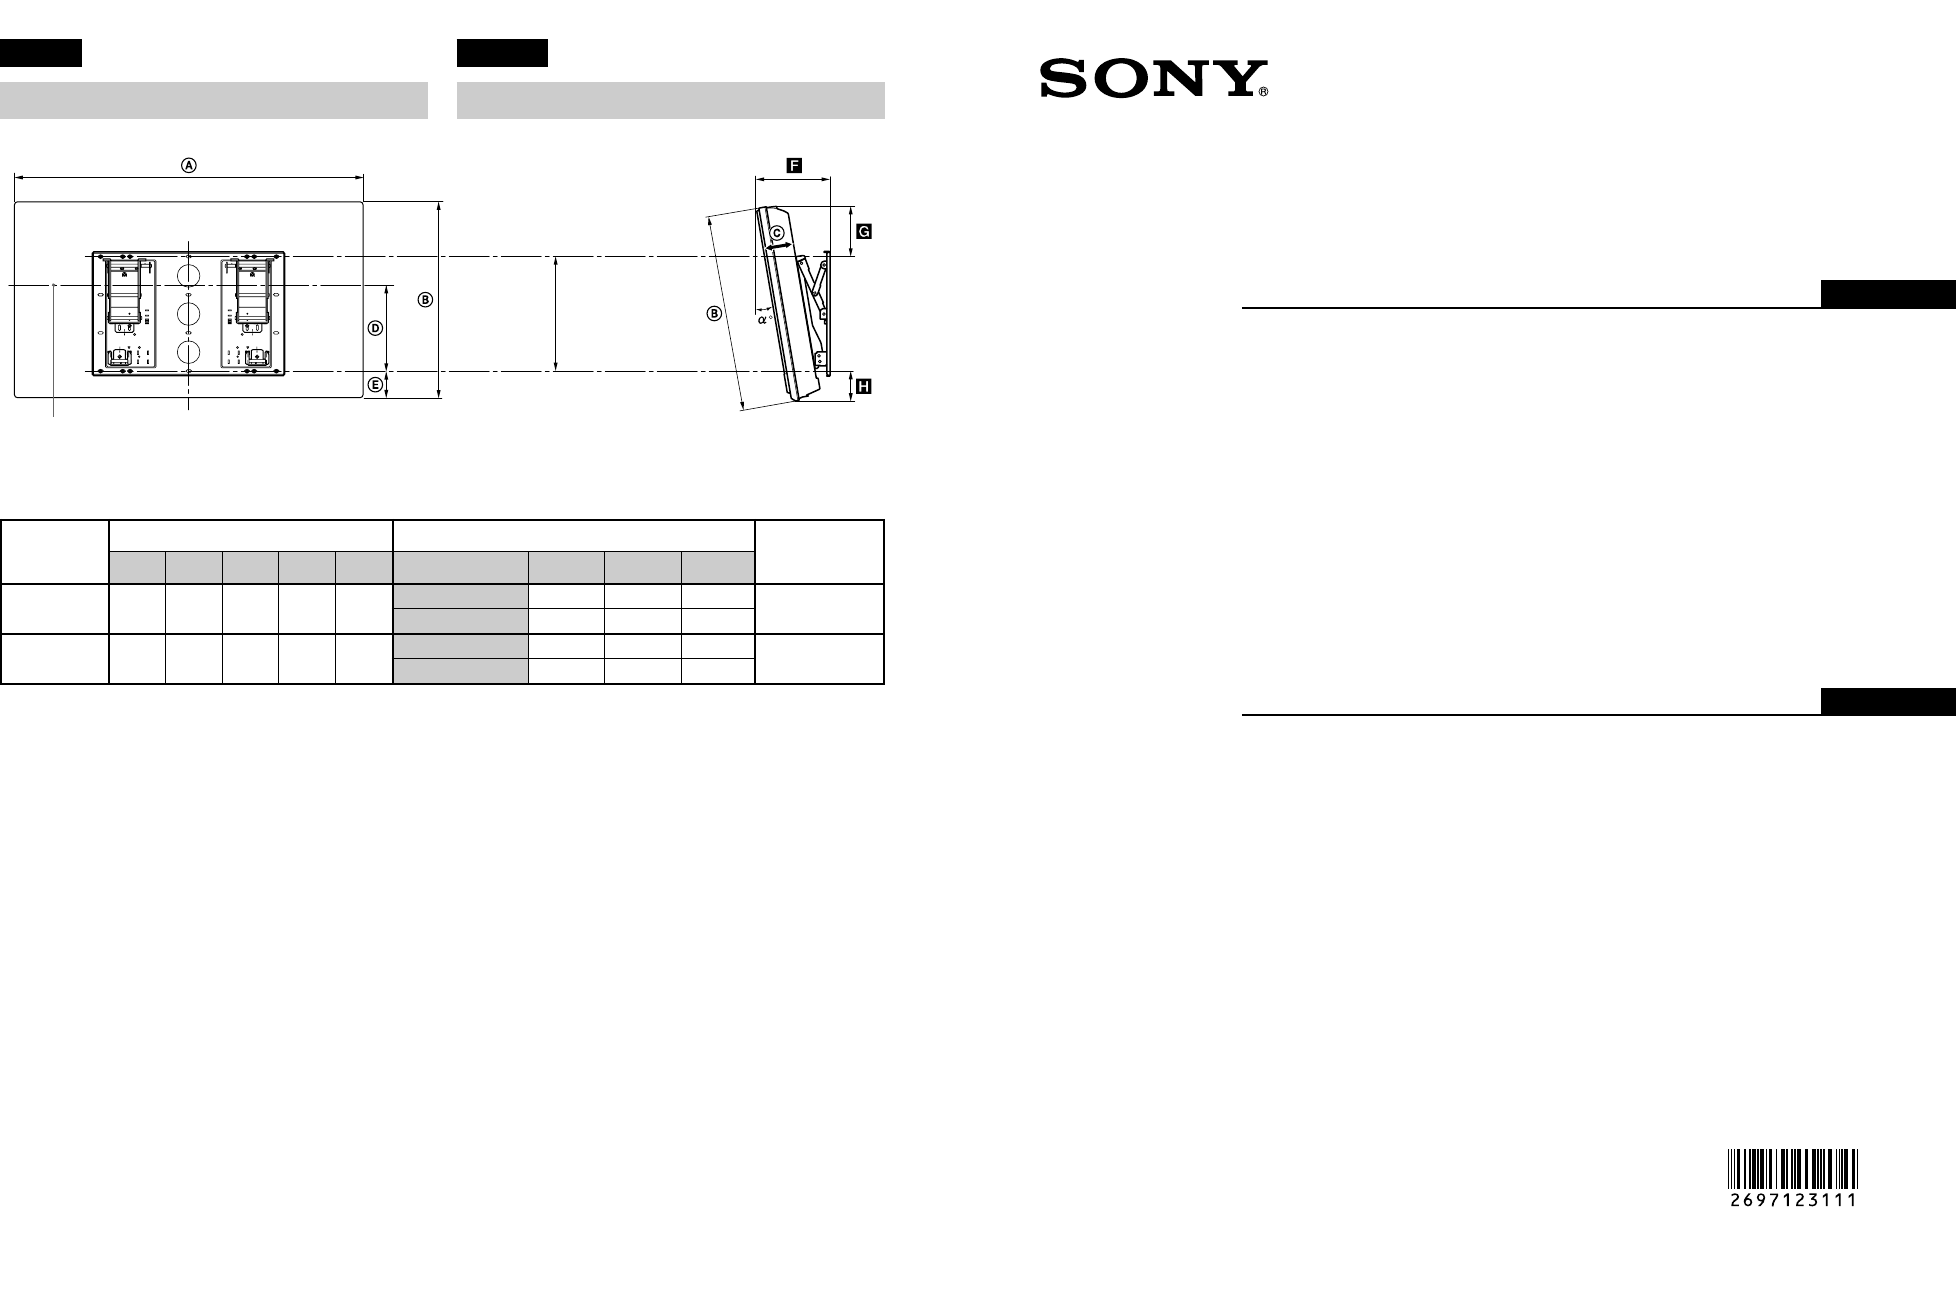
Installation dimensions table*1Tableau des dimensions pour l’installation*1
Display Dimensions/ Unit: mm (inches)/
Length for each mounting angle/ Unit: mm
(inches)
/Weight/
Display Model/ Dimensions de l’écran Unité : mm (pouces)
Longueur de chaque angle de montage Unité : mm (pouces) Poids
Modèle d’écran ABCDE
Mounting angle (α°)/ FGH (× 4)*2
Angle de montage (a°)
KDL-40V2500 988 665 105 288 83 0° 163 (6 1/2)189 (7 1/2)83 (3 3/8)
(39) (26 1/4) (4 1/4) (11 3/8) (3 3/8)20° 338 (13 3/8)132 (5 1/4)111 (4 3/8)
KDL-46V2500 1120 755 118 323 100 0° 176 (7) 262 (10 3/8)100 (4)
(44 1/8) (29 3/4) (4 3/4) (12 3/4)(4) 20° 375 (14 7/8)198 (7 7/8)130 (5 1/8)
*1Installation dimensions may differ according to how the display is installed./
*1Les dimensions lors de l’installation peuvent être différentes selon la façon dont l’écran est posé.
*2The wall must be strong enough to support at least four times the weight of the display that you are installing./
*2Le mur doit être suffisamment solide pour supporter au moins quatre fois le poids de l’écran que vous installez.
English Français
Center line of the screen when installed on the wall/
Axe central de l’écran lorsqu’il est installé au mur
23.0 kg
(50 lb 12 oz)
(92.0 kg (202 lb 14 oz))
30.0 kg
(66 lb 3 oz)
(120.0 kg (264 lb 9 oz))
393 ± 0.5
(15
1
/
2
±
1
/
32
)
– 2 – – 3 –
English
Installing the TV on a wall
The TV can be installed on a wall by attaching a Wall-
Mount Bracket (sold separately).
Verify your TV’s model number and be sure to use
the bracket specified for your model only. Refer to the
Steps on this leaflet along with the Instructions
supplied with the SU-WL51 Wall-Mount Bracket, to
properly carry out the installation.
Sufficient expertise is required in installing this
product, especially to determine the strength of
the wall for withstanding the TV’s weight. Be
sure to entrust the attachment of this product to
the wall to Sony dealers or licensed contractors
and pay adequate attention to safety during the
installation. Sony is not liable for any damage or
injury caused by mishandling or improper
installation.
Step 1: Checking the parts required for
the installation
Open the Wall-Mount Bracket package and check the
contents for all required parts along with the
Instructions.
Step 2: Deciding on the installation
location
Decide where you want to install your TV. See the
back cover of this manual for the display installation
dimensions and determine the location.
Refer to the Instructions for SU-WL51.
Step 3: Installing the Plate Unit on the
wall
Refer to the Instructions for SU-WL51.
Changing the position of the Mounting Hook
Unit support shafts is necessary.
Français
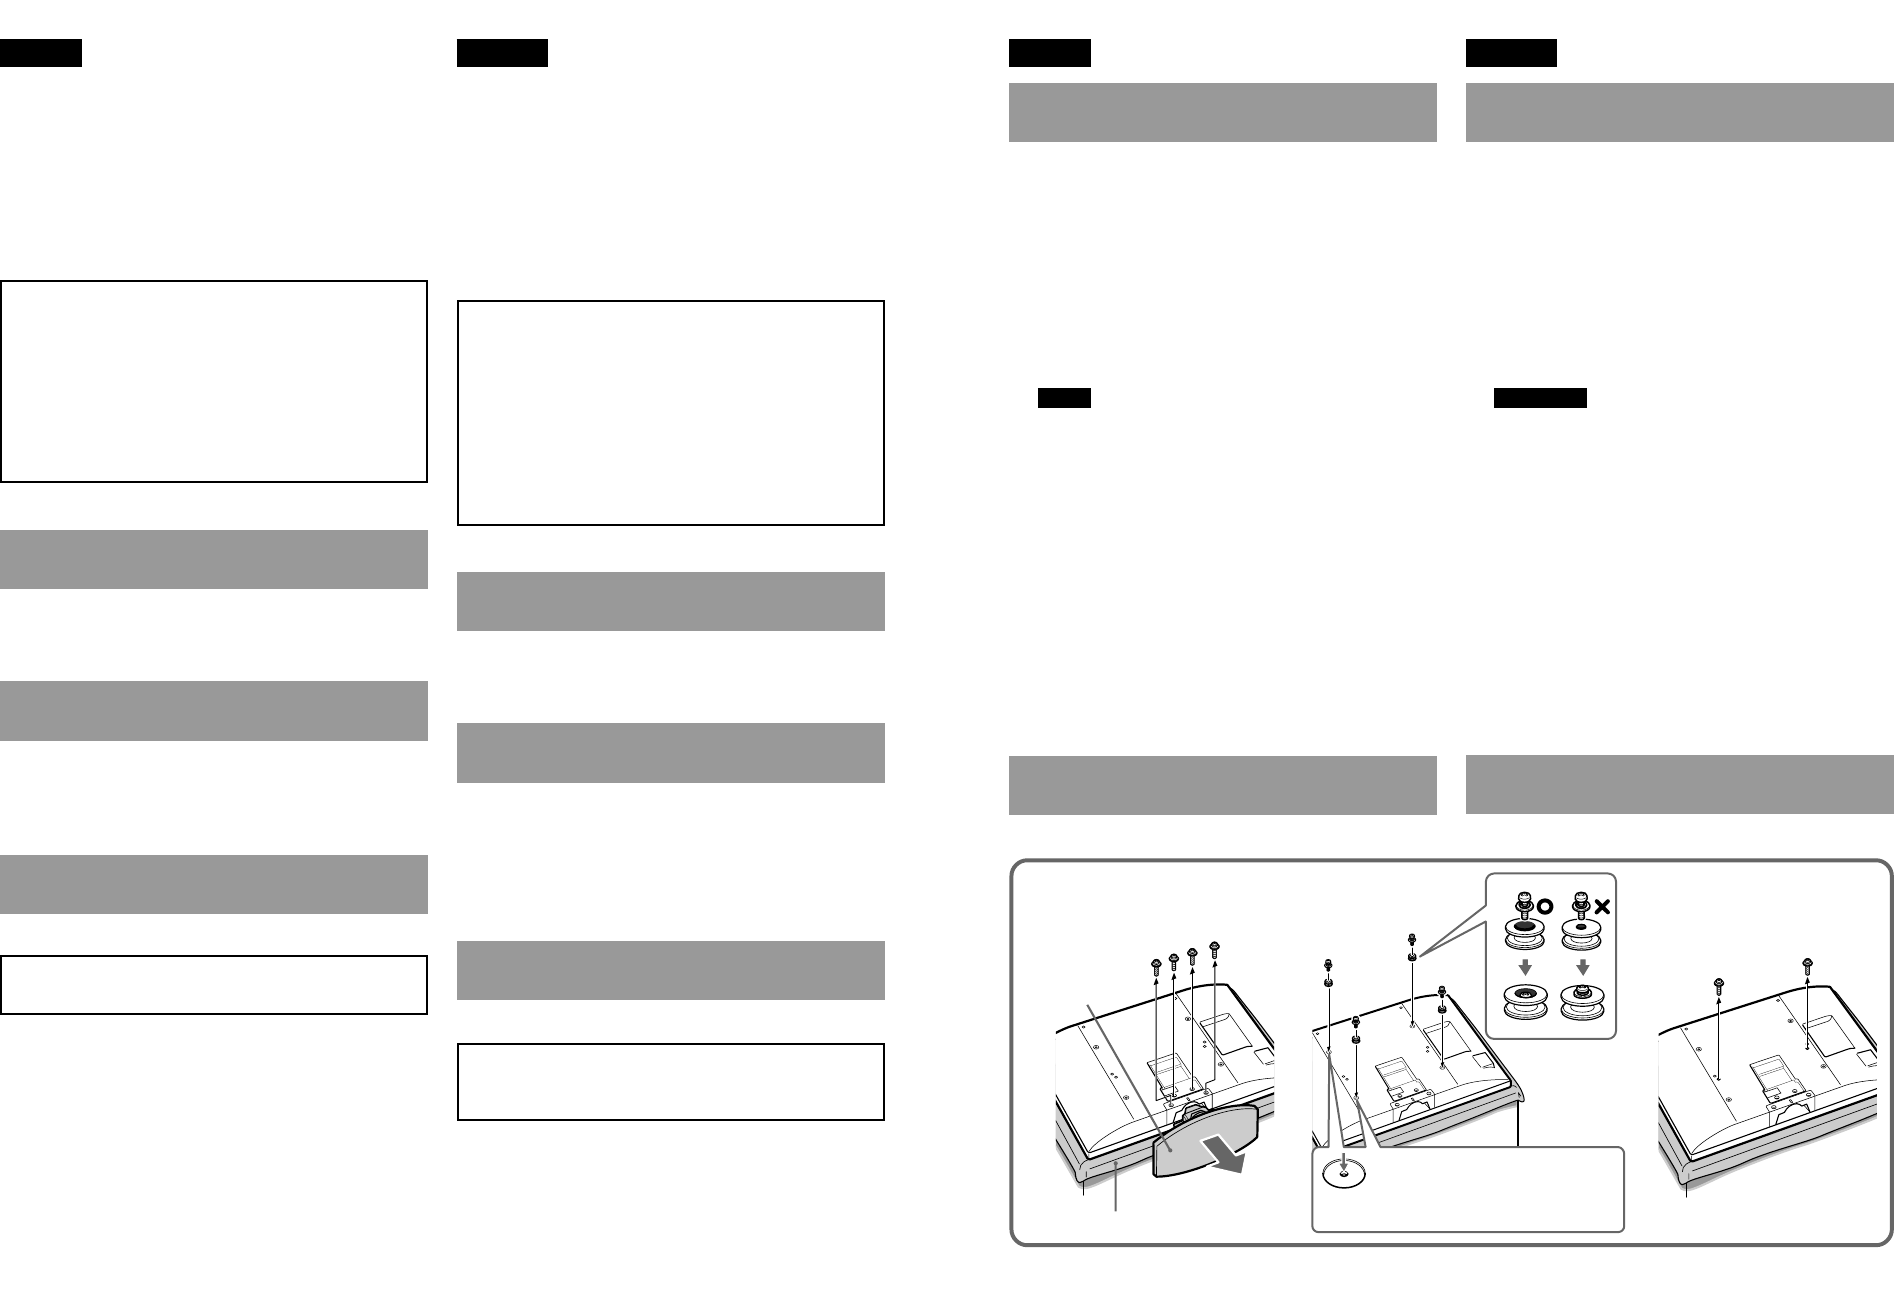
Step 4: Preparing for the installation of
the TV
Before removing the Table-Top Stand, disconnect all
the cables from the TV.
1Place the TV, with its screen facing down, on a
stable, soft cloth-covered work surface.
2Rotate the cable holder by 90 degrees, and pull it
out.
3Remove the four screws and the Table-Top Stand
from the TV (A).
4Attach the four supplied hooks with the four
supplied screws (+PSW5 × L16) (B).
Note
When using an electric screwdriver, set the torque
setting to approximately 2 N·m {20 Kgf·cm}.
5Remove the two screws on the rear side of the TV
(C).
For bracket installation, refer to the instruction guide
provided by the Wall-Mount Bracket model for your
TV. Sufficient expertise is required in installing this
TV, especially to determine the strength of the wall
for withstanding the TV’s weight.
For product protection and safety reasons, Sony
strongly recommends that you use the Wall-
Mount Bracket model designed for your TV and
the wall-mounting of your TV should be
performed by Sony dealers or licensed
contractors.
Step 5: Installing the TV on the Plate
Unit
Refer to the Instructions for SU-WL51.
English Français
Fixation du téléviseur au mur
Le téléviseur peut être fixé au mur à l’aide du
support de fixation mural (vendu séparément).
Vérifier la référence du modèle du téléviseur et
s’assurer à utiliser uniquement le support spécifié
pour ce modèle. Consulter les étapes de ce dépliant
ainsi que le mode d’emploi accompagnant le support
de fixation mural SU-WL51 pour effectuer
correctement l’installation.
Une certaine expertise est requise pour installer
ce produit, notamment pour déterminer la
résistance du mur par rapport au poids du
téléviseur. S’assurer de confier la fixation de ce
produit au mur à des revendeurs Sony ou à des
installateurs agréés et d’être particulièrement
vigilant en matière de sécurité au cours de
l’installation. Sony ne peut être tenu responsable
de tout dommage ou blessure résultant d’une
manipulation ou d’une installation incorrecte.
Étape 1 : Vérification des pièces
requises pour l’installation
Ouvrez l’emballage du support de fixation mural et
vérifiez que toutes les pièces nécessaires sont
présentes ainsi que les Instructions.
Étape 2 : Choix de l’emplacement
d’installation
Décidez de l’emplacement où vous voulez installer
votre téléviseur. Consulter la couverture arrière du
présent manuel pour obtenir les dimensions
d’installation du téléviseur et en déterminer
l’emplacement.
Reportez-vous aux Instructions du SU-WL51.
Étape 3 : Installation de la plaque sur le
mur
Reportez-vous aux Instructions du SU-WL51.
Il est nécessaire de modifier la position des axes
de support de la barre de crochets de fixation
murale.
Étape 4 : Préparation de l’installation
du téléviseur
Avant de retirer le support de table, débranchez tous
les câbles du téléviseur.
1Placez le téléviseur, écran face vers le bas, sur une
surface de travail stable, recouverte de tissu doux.
2Faites pivoter l’attache de câbles de 90 degrés et
retirez-la.
3Enlevez les quatre vis et le support de table du
téléviseur (A).
4Fixez les quatre crochets fournis à l’aide des
quatre vis fournies (+PSW5 × L16) (B).
Remarque
Si vous utilisez un tournevis électrique, réglez son
couple sur 2 N·m {20 Kgf·cm} environ.
5Enlevez les deux vis situées à l’arrière du
téléviseur (C).
Pour la procédure d’installation de le support de fixation
murale, voir au guide d’installation du support de
fixation murale conçue pour votre appareil. Une certaine
expertise est nécessaire pour l’installation des supports
de fixations murales, en particulier en ce qui concerne la
solidité du mur en relation avec le poids de l’appareil.
Pour des raisons de sécurité et de protection du
téléviseur, Sony recommande fortement que vous
utilisiez le modèle de support de fixation murale conçu
pour votre appareil, et que l’installation soit effectuée
par un revendeur Sony ou un installateur agréé.
Étape 5 : Installation du téléviseur sur
la plaque
Reportez-vous aux Instructions du SU-WL51.
Soft cloth/Tissu doux
AB C
Align the hook with the circle on the
rear side of the TV.
Alignez le crochet sur le cercle
indiqué à l’arrière du téléviseur.
Table-Top Stand/
Support de table
