Sony PCM D100 User Manual Using Sound Forge Audio Studio LE QSG 4475417121
User Manual: Sony PCM-D100 Using Sound Forge Audio Studio LE
Open the PDF directly: View PDF ![]() .
.
Page Count: 2
4-475-417-12(1)
© 2017 Sony Corporation Printed in China
PCM-D100
Application Software
Using Sound Forge Audio Studio LE
What you can do with Sound Forge Audio Studio LE
Sound Forge Audio Studio LE allows you to play and edit audio files recorded with your linear PCM
recorder, imported from an audio CD, downloaded from a website, or copied from your computer.
You can also burn an audio CD and enjoy a variety of features available in Sound Forge Audio Studio LE.
Note
Sound Forge Audio Studio LE does not support nor handle a DSD (.dsf/.dff/.wsd) file.
You can divide a file, combine files, and delete files using the linear PCM recorder. For detailed procedures,
refer to the operating instructions.
Install Sound Forge Audio Studio LE on your computer
System requirements for Sound Forge Audio Studio LE
Operating systems
Windows® 7 32 bit or 64 bit
Windows® 8.1 32 bit or 64 bit
Windows® 10 32 bit or 64 bit
Note
One of the above operating systems should be by default pre-installed. Any operating system
other than those indicated above, upgraded operating systems or multi-boot environment are
not supported.
Hardware environment
CPU: processor of 1 GHz or faster
Free hard disk space: At least 350 MB (For software installation)
Memory: At least 1 GB
Sound board: Sound boards compatible with any of the supported operating systems
Port: USB port
Disk drive: CD-ROM drive compatible with any of the supported operating systems
(To create a music CD, you need a CD-R/RW drive.)
Microsoft DirectX® 9.0c or higher
Microsoft .NET Framework 2.0*
Internet connection
* On Windows 8.1 or one of its later versions, Microsoft .NET Framework 3.5 must be enabled
before you install Sound Forge Audio Studio LE.
To enable it, click [Control Panel] - [Programs and Features] - [Turn Windows features on or off],
select the check box for [.NET Framework 3.5 (includes .NET 2.0 and 3.0)], and then restart your
computer.
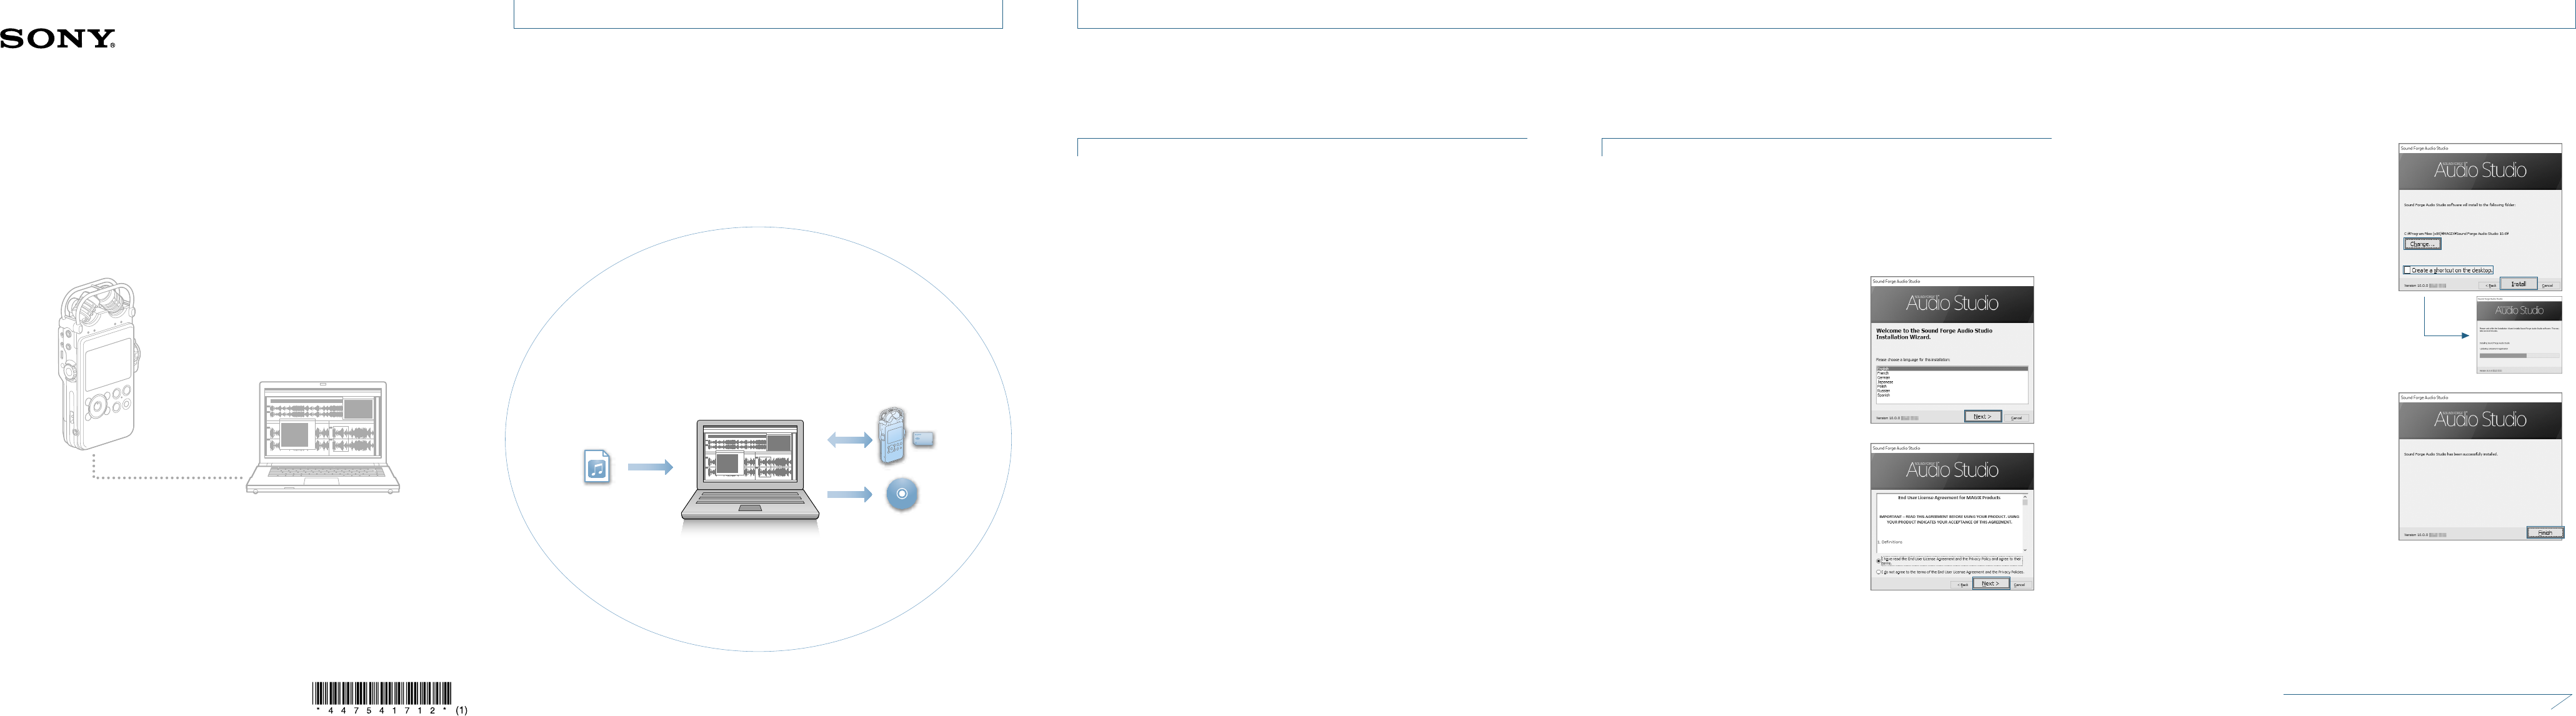
Sound Forge Audio Studio LE
Easy audio edition
Audio files
Transfer files
Create a disc
Installing Sound Forge Audio Studio LE
1 Insert the supplied Application Disc (“Sound Forge Audio Studio LE”) into the CD-
ROM drive of your running computer.
The setup window starts up automatically.
If the startup window does not appear automatically, open Windows Explorer, right-click
the CD-ROM drive, double-click [Sound_Forge_Audio_Studio_LE_10.0.313.exe], and then
follow the instructions on the screen.
2 When the ”Welcome to the Sound Forge
Audio Studio Installation Wizard” window
appears, click [Next].
If you want to change the language for menus
and messages, select the desired language.
3 Read the statements in the END USER
LICENSE AGREEMENT, check “I have read the
End User License Agreement and the Privacy
Policy and agree to their terms.,” and then
click [Next].
To the reverse side
4 When the window to select the destination
folder for installation appears, click [Install].
If you want to change the destination folder,
click [Change] and select the desired folder.
To start Sound Forge Audio Studio quickly from
the desktop, check “Create a shortcut on the
desktop.”
The installation starts.
5 When the “Sound Forge Audio Studio has been
successfully installed.” window appears, click
[Finish].
1
Step
Sound Forge is a trademark or registered trademark of MAGIX Software GmbH in the United States and
other countries.
Start Sound Forge Audio Studio LE Copy and save files onto your computer
You can exchange files between your linear PCM recorder and your computer without using
Sound Forge Audio Studio LE.
Create an audio CD
You can create an audio CD from tracks registered in Sound Forge Audio Studio LE.
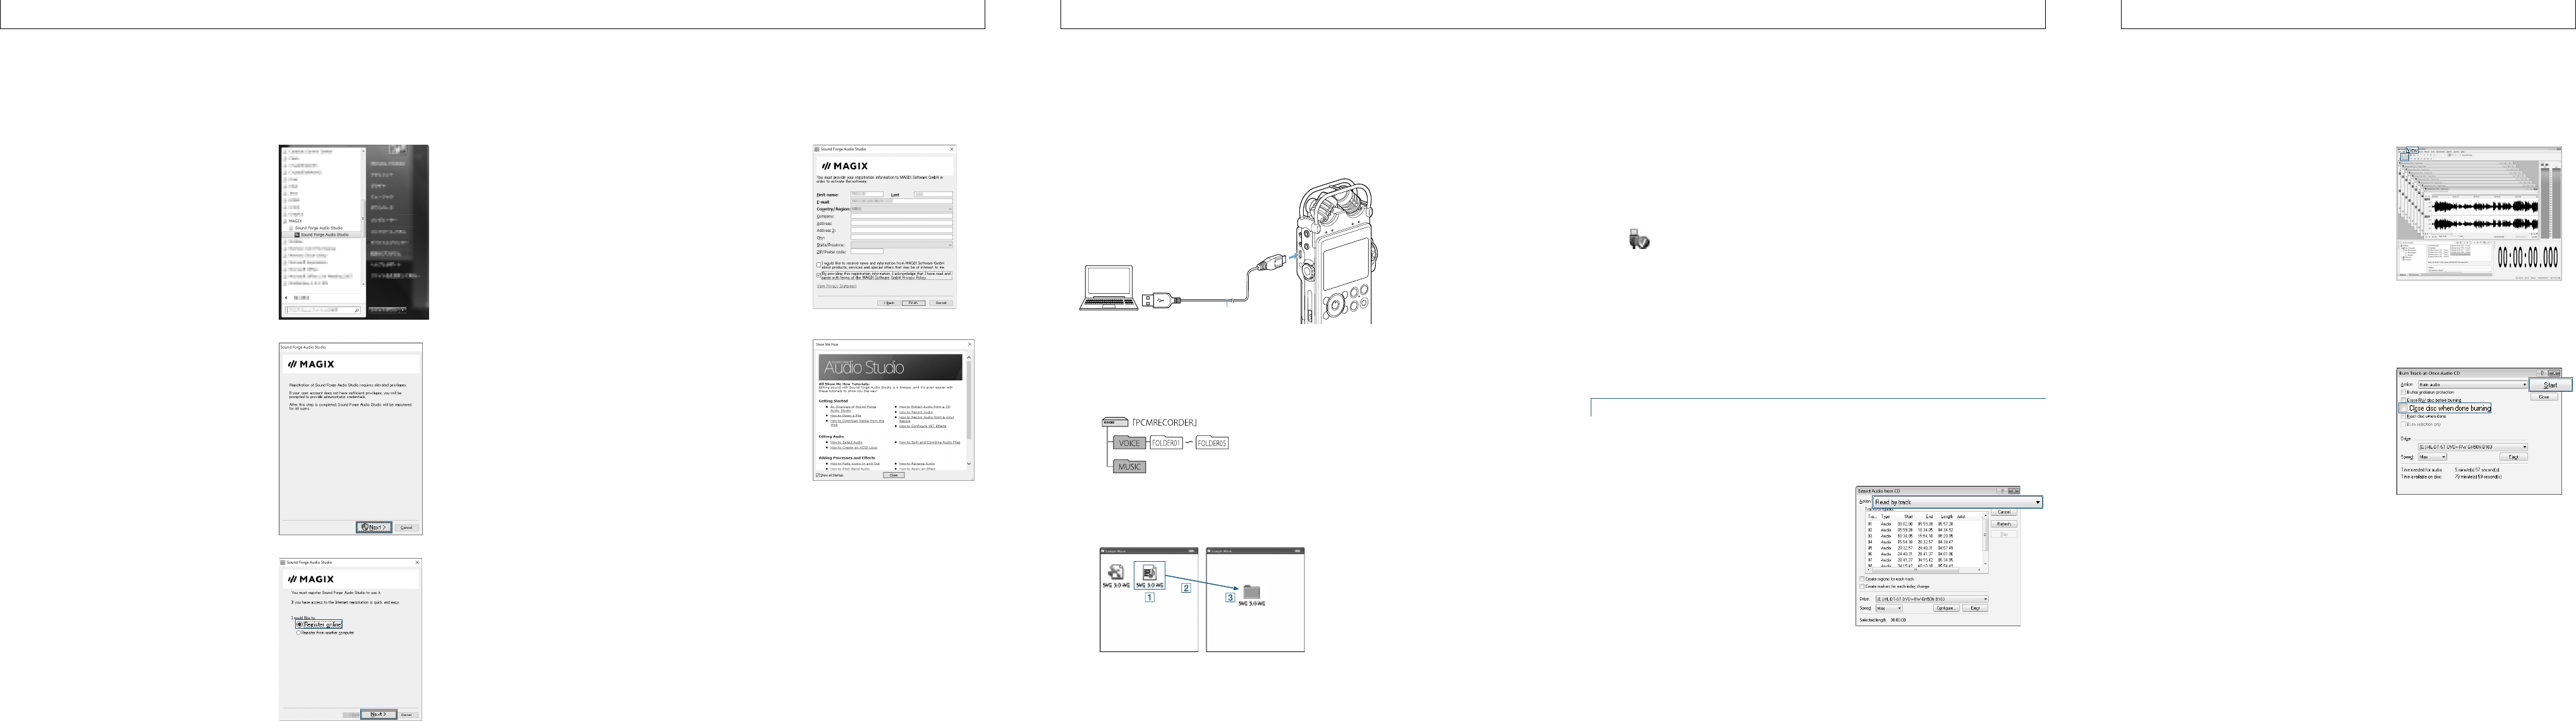
1 Click [Start], and then click [All Programs] –
[Sound Forge Audio Studio].
Sound Forge Audio Studio LE starts.
When you start the software for the first time,
the product registration window is displayed.
2 Click [Next].
3 When the product registration window is
displayed, check “Register online”, and then
click [Next].
1 Connect your linear PCM recorder to a running computer using the USB cable
(supplied).
Computer
USB cable (supplied)
Linear PCM recorder
Connect to a USB port on
a running computer
2 Make sure that your linear PCM recorder is recognized correctly by your computer.
In Windows: Open [Computer] or [PC], and check that [PCMRECORDER] is recognized
properly.
In Mac: Check that the [PCMRECORDER] drive is displayed in the Finder.
3 Copy files you want to transfer to your computer.
Drag and drop the files you want to copy from “PCMRECORDER” or “MEMORY CARD” to the local disk
on your computer.
PCMRECORDER or
MEMORY CARD
Your computer
Click and hold,
drag,
and then drop.
Importing audio files from a CD
1 Insert an audio CD into the CD-R/RW drive of your computer.
2 From the [File] menu, select [Extract Audio from CD].
3 When the “Extract Audio from CD” window
appears, select [Read by track] from the
“Action” drop-down list. Select the tracks you
want to import in the “Tracks to extract” list
box, and click [OK].
To import all of the tracks on a CD, select
[Read entire disc].
The selected audio tracks are extracted to
Sound Forge Audio Studio LE. To use the
extracted tracks, select [Save] from the [File]
menu.
1 Open the files you want to burn to an audio
CD.
Select the [Open] button on the toolbar or
[Explorer] from the [View] menu, and open the
desired files in the workspace of Sound Forge
Audio Studio.
2 Insert a new CD-R/CD-RW disc into the CD-R/RW drive of your computer.
3 From the [Tool] menu, click [Burn Track-at-Once Audio CD].
4 When the “Burn Track-at-Once Audio CD”
window is displayed, check “Close disc when
done burning,” and click [Start].
Burning of the audio CD starts. When it
is completed, a confirmation message is
displayed. Click [OK].
Tip
Closing the disc allows you to play files on an
audio CD player.
Note
When you burn multiple files to an audio CD,
check the “Close disc when done burning” only
for the last file you burn. For the rest of files,
make sure not to check the check box.
4 When the online registration window
is displayed, enter your information for
registration, and check “By providing this
registration information, I acknowledge that I
have read and agree with terms of the MAGIX
Software GmbH Privacy Policy.,” then click
[Finish].
The online registration starts. When it is
completed, a confirmation message appears.
Click [OK].
Sound Forge Audio Studio LE starts.
The tutorial window will start. You can select the
desired operation and click to start the tutorial of
the operation.
For details on the operations of Sound Forge
Audio Studio LE, refer to the Help Guide of
Sound Forge Audio Studio LE.
4 Disconnect the PCM recorder from your computer.
Make sure that the ACCESS indicator on the linear PCM recorder is not lit and perform the
following operation on your computer.
On Windows:
On the taskbar at the bottom right of the desktop, click the following icon:
Then click “Eject PCMRECORDER.”
The icon and menu displayed may be different depending on the operating system. The
icon may not always be displayed on the taskbar depending on your computer settings.
On Mac:
Click the “PCMRECORDER” removal icon that appears on the sidebar of the Finder.
For details on the procedures to remove your linear PCM recorder from your computer,
refer to the manual supplied with your computer.
2
Step
3
Step
4
Step
