Sony PM-0070 GSM/GPRS/EDGE/UMTS/HSPA/LTE mobile phone with Bluetooth, Bluetooth LE, WLAN 802.11abgn, GPS/A-GPS, RFID and FM Rx User Manual 08 user guide part 1
Sony Mobile Communications Inc GSM/GPRS/EDGE/UMTS/HSPA/LTE mobile phone with Bluetooth, Bluetooth LE, WLAN 802.11abgn, GPS/A-GPS, RFID and FM Rx 08 user guide part 1
Sony >
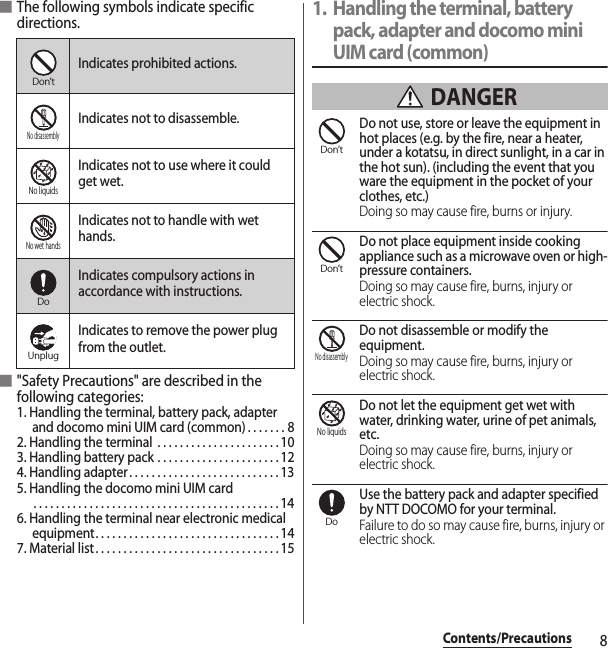
Contents
- 1. 08 user guide part 1
- 2. 08 user guide part 2
08 user guide part 1
![IntroductionThank you for your purchase of "SO-01E".For proper use of the SO-01E, read this manual carefully before and while you use the SO-01E.About manuals of SO-01EIn addition to this manual, the operations of SO-01E are described in "クイックスタートガイド (Quick Start Guide)" (in Japanese only) and "Instruction Manual" application of the terminal.●"クイックスタートガイド (Quick Start Guide)" (Supplied accessories)The initial operations and settings after purchasing the terminal, screen view contents and operations of main function are explained. (In Japanese only)●"Instruction Manual" (Application of the terminal)Similarly to this manual, operations and settings of each function are explained. To use "Instruction Manual" application, from the Home screen, tap and [Instruction Manual]. When using for the first time or reinstalling, download and install the application according to the onscreen instructions. You can use the application as an electronic book. You can also shift to actual operations by tapping the description in the contents or view reference contents.❖Note・For downloading or updating the application, a high packet communication charge will be applied because of a large amount data communication. For this reason, subscription of packet flat-rate service is highly recommended.* If you use Wi-Fi function to download, packet communication charges are not applied.●"Instruction Manual" (PDF file)Operations and settings of each function are explained. It can be downloaded from NTT DOCOMO website.http://www.nttdocomo.co.jp/english/support/trouble/manual/download/index.html* You can download the latest information of "クイックスタートガイド (Quick Start Guide)" (in Japanese only). The URL and contents are subject to change without prior notice.❖Note・Reproduction or reprint of all or part of this manual without prior permission is prohibited.・Important information for SO-01E is posted in the following website. Be sure to check before using.http://www.sonymobile.co.jp/support/use_support/product/so-01e/ (in Japanese only)](https://usermanual.wiki/Sony/PM-0070.08-user-guide-part-1/User-Guide-1802255-Page-1.png)
![1Operation descriptionsIn this manual, each key operation is described with p, x, y, r, m, k. And selection operations of the icons or function items on the touch panel are described as follows.❖Information・In this manual, the instructions are described with the default Home screen. If you set the other application to the home screen, the operations may differ from the descriptions.・Display examples and illustrations used in this manual are just images for explanations and may be different from actual ones.・In this manual, the easier procedure is described for the functions and settings which have multiple operating procedures.・Please note that "SO-01E" is called "the terminal" in this manual.・In this manual, explanations for "docomo" as Home application are provided. To switch the Home applications, see "Learning Home screen" (P.60).Description OperationFrom the Home screen, tap and tap [Settings]u[About phone].From the Home screen, tap (Applications button), and then tap "Settings" on the next screen and "About phone" on the following screen in order.Touch and hold icon.Keep touching the icon longer (1-2 seconds).](https://usermanual.wiki/Sony/PM-0070.08-user-guide-part-1/User-Guide-1802255-Page-2.png)

![6Contents/Precautions・The terminal automatically performs communication for synchronizing data, checking the latest software version, maintain connection with the server, etc. If you transmit a large amount of data such as downloading applications or watching movie, a packet communication charge becomes high. Subscription of packet flat-rate service is highly recommended.・Public mode (Driving mode) is not supported.・Setting the phone to silent mode does not mute sounds for shutter, playback of video or music, alarm, etc.・The names of the operators are displayed on unlocking screen (P.31).・Your phone number (own number) can be checked as follows:From the Home screen, tap and tap [Settings]u[About phone]u[Status].・The software version of your terminal can be checked as follows:From the Home screen, tap and tap [Settings]u[About phone].・You can perform software update by downloading an update file with a PC via Internet and connecting the PC to the terminal. For details, see "Connecting to a PC and updating" (P.236).・By some software updates, the operating system (OS) may be version-upgraded for improving the terminal quality. For this reason, you always need to use the latest OS version. And some applications that used in the previous OS version may not be available or some unintended bugs may occur.・You can use the terminal only with docomo mini UIM card. If you have a UIM or FOMA card, bring it to a docomo Shop to replace.・Set the screen lock to ensure the security of your terminal for its loss. For details, see "Screen lock" (P.142).・If your terminal is lost, change your each account password to invalidate authentication using a PC to prevent other persons from using Google services such as Google Talk, Gmail, Google Play, etc., Facebook, Twitter and mixi.・Google application and service contents are subject to change without prior notice.・The terminal supports only sp-mode, mopera U and Business mopera Internet. Other providers are not supported.・To use tethering, subscription of sp-mode is required.・Packet communication charge when using tethering varies depending on the charging plan you use. Subscription of packet flat-rate service is highly recommended.](https://usermanual.wiki/Sony/PM-0070.08-user-guide-part-1/User-Guide-1802255-Page-7.png)

![28Before Using the Terminal・When you start charging, notification LED on the terminal turns red/orange/green, and green light indicates that the battery level has reached 90 % or more. From the Home screen, tap and [Settings]u[About phone]u[Status] to check "Battery level" for the status of charging. When charging is complete, battery level is displayed as "100%".・When you start charging the battery with the terminal powered off, the power turns on. However, you cannot operate the terminal. Do not charge the battery in a place where the use is prohibited such as in airplane or hospital.Do not charge the battery pack for a long time (several days)・If you remain charging the terminal for a long time, the power supply starts from the battery pack after completion of charging. The usage time duration may be short. In that case, please charge it again correctly. For recharging, remove the terminal from the AC Adapter and reconnect it again.Use the compatible AC adapter for charging. If you use a charger that is not compatible, the terminal may not be charged or may not operate properly. (P.225)When using AC adapter 03 (optional) for charging, do the following procedures.1Insert the microUSB cable horizontally with the microUSB plug engraved side facing up into the microUSB connecting jack of the terminal.2Insert a USB plug of microUSB cable into the USB connecting jack of the AC Adapter horizontally and insert the plug of the AC Adapter into the power outlet.3When the charging is complete, remove the microUSB plug of the microUSB cable from the terminal.4Remove the AC Adapter from the power outlet.❖Note・If the microUSB cable is connected into the USB connecting jack for charging etc., the terminal is automatically powered on although the operations are not available. Be careful not to connect the microUSB cable in a place where the use is prohibited such as in a airplane or hospital.Charging with AC adapter](https://usermanual.wiki/Sony/PM-0070.08-user-guide-part-1/User-Guide-1802255-Page-29.png)
![29Before Using the TerminalDC adapter 03 (optional) supplies power from a car cigarette lighter socket (12 V/24 V). For details, refer to the DC adapter 03 (optional) manual.1Insert the microUSB cable horizontally with the microUSB plug engraved side facing up into the microUSB connecting jack of the terminal.2Insert the USB plug of the microUSB cable horizontally into the USB port of a PC.・When "PC Companion software" screen appears on the terminal, tap [Skip].・When a screen for new hardware detection etc. appears on the PC, select [キャンセル (Cancel)].3When the charging is complete, remove the microUSB plug of the microUSB cable from the terminal.4Remove the USB plug of the microUSB cable from the USB port of the PC.❖Note・Installation of MTP driver to a PC is required to charge the battery with a Microsoft Windows XP PC, since "USB connection mode" is set to "Media transfer mode (MTP)" by default. Install Windows Media Player 10 or later to install MTP driver.・If the microUSB cable is connected into the USB connecting jack for charging etc., the terminal is automatically powered on although the operations are not available. Be careful not to connect the microUSB cable in a place where the use is prohibited such as in a airplane or hospital.・Check the connecting direction to connect correctly. Wrong connection may cause damage.Charging with DC adapterCharging with a PC](https://usermanual.wiki/Sony/PM-0070.08-user-guide-part-1/User-Guide-1802255-Page-30.png)
![30Before Using the Terminal1Press and hold p for over a second.・The unlock screen appears.2Unlock the screen.・For unlocking the screen by default, see "Unlocking the screen" (P.31).❖Information・The first time you turn on, "Initial settings (Setup guide)" (P.31) appears.・If you have activated the screen lock (P.142) or SIM card lock (P.141), unlock screen/PIN code entry screen appears when turning power on. For unlocking the screen lock, see "Unlocking the screen lock" (P.143), and for unlocking SIM card lock, see "Entering the PIN code when powered on" (P.141).1Press and hold p for over a second.・A pop-up screen appears.2Tap [Power off ].3Tap [OK].When the screen lock is set, the screen backlight turns off. You can avoid the touch screen or button from false operations.・The screen is locked with turning the screen backlight off after the specified time duration.1Press p.❖Information・Screen lock is set to "Slide" by default. For changing the screen lock, see "Screen lock" (P.142).・For details on settings for turning the backlight off and the duration of time before the screen lock activation, see "Adjusting the idle time before the screen turns off" (P.127).・When you set screen lock to "Slide", you can check the notifications or activate application even if you do not unlock the screen. For details, refer to "Setting information displayed on the unlock screen" (P.128).Turning power on/offTurning power onTurning power offSetting screen lock](https://usermanual.wiki/Sony/PM-0070.08-user-guide-part-1/User-Guide-1802255-Page-31.png)
![31Before Using the TerminalAn unlock screen appears when turning the power on or the backlight on by pressing p.■ Screen lock set to "Slide"1Touch and drag to until it laps over.❖Information・ appears on the right until you touch . Touch and drag it left to activate camera without unlocking the screen lock.・The screen lock can be disabled. For details, refer to "Screen lock" (P.142).When you turn on the terminal for the first time, make initial settings such as a display language, wireless network, online services, docomo service, etc.❖Information・You can set or change the items later as required.To change the settings later, from the Home screen, tap , then tap [Settings] or [Setup guide] to set up from the menu.1Press and hold p for over a second.・A screen for selecting language appears.2Tap [English (United States)]u[Done].・"Welcome!" screen appears and you can learn how to use the function and make initial settings.3Tap .・The Internet connection screen appears. Tap [Mobile network and Wi-Fi] or [Wi-Fi only] to select.4Tap .・The wireless network screen appears. Tap [Search for networks] to add Wi-Fi network.5Tap .・A service screen appears. Make settings of "Google (P.135)", "Facebook (P.136)", "Exchange ActiveSync (P.98)".6Tap .・Automatic renewal screen appears. Tap [Synchronize automatically] or [No thank you] to select.Unlocking the screenInitial settings (Setup guide)](https://usermanual.wiki/Sony/PM-0070.08-user-guide-part-1/User-Guide-1802255-Page-32.png)
![32Before Using the Terminal7Tap .・The import contacts screen appears. For information on import contacts, see "Exporting/Importing phonebook entries" (P.92).8Tap .・Preferred applications screen appears. Tap either [docomo applications] or [Xperia™ applications] to select.9Tap u[Finish].・Initial settings (Setup guide) end and an initial setting screen for docomo service appears.10Tap .・Application batch installation screen appears. Tap [Install] or [Not install] to select.11Tap .・Osaifu-Keitai screen appears. Tap [Set] or [Not set] to select. If you select [Set], the initial setting screen for Osaifu-Keitai appears. Follow the onscreen instructions.12Tap .・A setting screen for docomo apps password appears. Tap [Set] and enter a password.13Tap .・A setting screen for location provision appears. Tap any of [Location providing ON]/[Location providing OFF]/[Unknown blocking] to select.14Tap .・Screen for Send preinstalled apps usage status appears. Tap [Send] or [Not send] to select.15Tap u[OK].・A home screen appears.❖Information・Make sure to check if the data connection is available (LTE/3G/GPRS) before setup online services. For checking the data connection status, see "Status icon" (P.33).](https://usermanual.wiki/Sony/PM-0070.08-user-guide-part-1/User-Guide-1802255-Page-33.png)
![35Before Using the TerminalNotification icons are displayed in the Notification panel. You can open notifications, such as mails, reminders, or event notifications directly from the Notification panel.1Flick or drag the status bar downwards.・Tap x to close the notification panel.❖Information・When the screen lock is set to "Slide", flick or drag the status bar downwards to check the Notification panel without unlocking the screen.・Flick or drag the status bar downwards to enable/disable silent mode or data communications.1On the Notification panel, tap [Clear].❖Information・Keep the touch and flick left or right on the display on the panel to delete from the list.・Some notifications cannot be cleared.Notification panelOpening/Closing the Notification panelNotication panel / / Enable/disable silent mode (Vibrate/Mute). / Enable/disable Bluetooth function. / Enable/disable Wi-Fi function. / Enable/disable data communication.Display Settings menu (P.112).Clearing contents on the Notification panel](https://usermanual.wiki/Sony/PM-0070.08-user-guide-part-1/User-Guide-1802255-Page-36.png)
![38Before Using the TerminalYou can set the screen orientation to change automatically between landscape and portrait view when you turn the terminal horizontal/vertical.1From the Home screen, tap , then tap [Settings]u[Display].2Mark [Auto-rotate screen] checkbox.❖Information・Even when you change the orientation of the terminal, the screen may not change to landscape view depending on the screen such as Home screen, etc.・From the Home screen, tap , then tap [Settings]u[Accessibility] and mark [Auto-rotate screen] to switch the screen automatically between landscape and portrait view.You can save the current displayed screen as an image (screen shot).You can check captured screen shots on the album (P.188).1On the screen you want to capture, press and hold p and lower of m for over a second at the same time.・Screenshot is captured and appears in the status bar.❖Information・Drag the status bar downwards and tap a screen shot displayed in the notification panel to display "Complete action using" screen, then tap [Beam with Twonky]/[Album] to share or send the shot image.On the phonebook list screen, tap [Index] at the bottom of the screen to display index characters with which you can search by Japanese syllabary and alphabetic order.・Tap the index character to move on the list.Changing orientation of the screenCapturing the screenshotSelecting items quickly from a list](https://usermanual.wiki/Sony/PM-0070.08-user-guide-part-1/User-Guide-1802255-Page-39.png)
![39Before Using the TerminalYou can switch on/off of the option settings by marking or unmarking the checkboxes or radio buttons.・To switch on/off of the option setting, tap the checkbox or radio button.■ Checkbox■ Radio buttonEnter a word in the search box to browse the information in the terminal or on the Internet.1From the Home screen, tap , then tap [Search].・When you use for the first time, the Terms of Service window for Google Search appears. Read the terms of use and tap [OK].・The software keyboard appears.2Enter a search word.・Search suggestions appear as you enter a character.・For character entry, see "Character entry" (P.40).・To enter a new search word, tap .3Tap a search item or .❖Information・Tap on the software keyboard to input a search word by voice.Marking or unmarking option checkboxMarkUnmarkMarkUnmarkSearching information in the terminal and web pages](https://usermanual.wiki/Sony/PM-0070.08-user-guide-part-1/User-Guide-1802255-Page-40.png)
![40Before Using the TerminalYou can set search engines to use for Quick search box or set search objectives in the terminal.1From the Home screen, tap , then tap [Search].2Tap , then tap [Settings].・Google search setting screen appears. You can set the following items.To enter characters, use the software keyboard which appears when you tap the character input box in a mail, phonebook, etc.❖Information・When the software keyboard is displayed, appears on the status bar.・To return to the previous screen from the character entry screen, tap x.・Touch and hold a text in the character entry screen to display the enlarged text to check with dragging on the text.In the terminal, you can select Input method (keyboard type) from "Shabette-Key-Nyuryoku", "Xperia™ Chinese keyboard", "Xperia™ Japanese keyboard" or "Xperia™ keyboard".Search settingsSearchable itemsChange the search range by marking/unmarking data categories (Google, Apps, Browser, Email, Google Play Movies, Messaging, OfficeSuite, Phonebook, Play Store, WALKMAN) in the terminal.Google SearchSet whether to display search options from Web history when a search word is entered, or whether to activate/delete Web history.・You need to create your Google account.Character entrySelecting input methodShabette-Key-NyuryokuSelect to enter characters by voice.Xperia™ Chinese keyboardSelect to enter Chinese.Xperia™ Japanese keyboardSelect to enter Japanese.Xperia™ keyboardSelect a language for text entry. Select to enter language other than Japanese.](https://usermanual.wiki/Sony/PM-0070.08-user-guide-part-1/User-Guide-1802255-Page-41.png)
![41Before Using the Terminal1From the Home screen, tap , then tap [Settings].2Tap [Language & input]u[Default]u[Shabette-Key-Nyuryoku]/[Xperia™ Chinese keyboard]/[Xperia™ Japanese keyboard]/[Xperia™ keyboard].❖Information・On a character entry screen, drag the status bar downwards and tap [Select input method] to select from Google voice typing/Shabette-Key-Nyuryoku/Xperia™ Chinese keyboard/Xperia™ Japanese keyboard/Xperia™ keyboard.For Japanese keyboard, there are 4 types of software keyboards: phonepad, QWERTY, Japanese syllabary and Kana handwriting input.❖Information・The key display of software keyboard varies depending on the entry screen, character mode or settings.■ Phonepad keyboardJapanese characters can be entered in "Kana input" mode.■ QWERTY keyboardJapanese characters can be entered in "Romaji input" mode.Software keyboardPortraitLandscapeLandscapePortrait](https://usermanual.wiki/Sony/PM-0070.08-user-guide-part-1/User-Guide-1802255-Page-42.png)

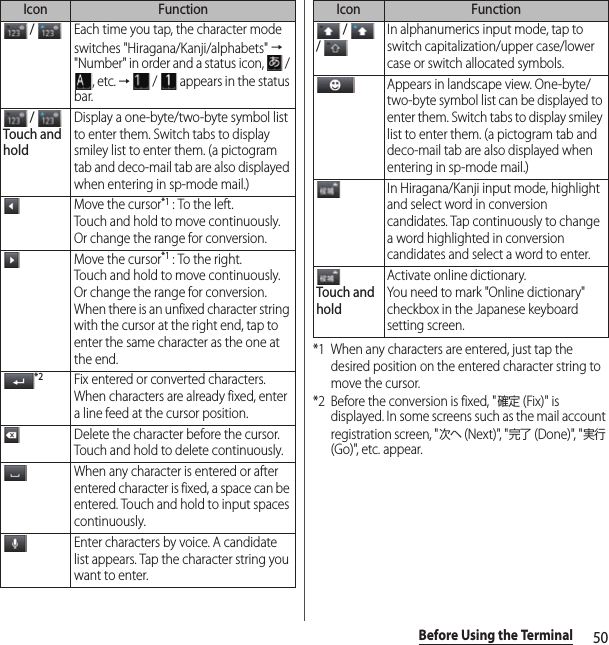
![44Before Using the Terminal*1 When any characters are entered, just tap the desired position on the entered character string to move the cursor.*2 Before the conversion is fixed, "確定 (Fix)" is displayed. In some screens such as the mail account registration screen, "次へ (Next)", "完了 (Done)", "実行 (Go)", etc. appear.Settings of key entry■ Flick inputFlick up/down/left/right to enter characters in each column of kana syllabary.・Ex: Entering characters in "な" columnYou can enter "な" only by tapping. Flick left for "に", up for "ぬ", right for "ね" and down for "の".・To switch upper/lower case or change to voiced sound, flick or tap .・Flick input is available by default. You can cancel by the following operation beforehand.aFrom the Home screen, tap , then tap [Settings].bTap [Language & input] and on "Xperia™ Japanese keyboard".Display the previous character (opposite order).In Hiragana/Kanji input mode, highlight and select word in conversion candidates. Tap continuously to change a word highlighted in conversion candidates and select a word to enter.Touch and holdActivate online dictionary.You need to mark "Online dictionary" checkbox in the Japanese keyboard setting screen. / Appears when entering numbers, tap to switch one-byte/two-byte character.Icon FunctionぬねにのなFlick leftFlick up TapFlick rightFlick down](https://usermanual.wiki/Sony/PM-0070.08-user-guide-part-1/User-Guide-1802255-Page-45.png)
![45Before Using the Terminalc[On-screen keyboard settings]uUnmark [Flick input] checkbox.・To change sensitivity of the flick input, on the Xperia™ Japanese keyboard setting screen, tap [On-screen keyboard settings]u[Sensitivity of flick input], then select "High"/"Medium (default)"/"Low".■ Toggle entryTap the same key continuously to enter the assigned character.To enter characters assigned to the same key continuously, operate the followings.・Ex: To enter "あお"aTap "あ" once.bTap , and tap "あ" 5 times.・Ex: To enter "ca"aTap "abc" 3 times.bTap *.cTap "abc" once.* In some applications, tap in Step b.❖Information・When a certain time is passed after the key tapped, the tapped key's highlighter goes off and you can enter a character assigned to the same key consecutively without tapping .・To switch upper/lower case or change to voiced/semi-voiced sound, tap .・Multitap text input is available by default. You can cancel by the following operation beforehand.aFrom the Home screen, tap , then tap [Settings].bTap [Language & input], then tap on "Xperia™ Japanese keyboard".c[On-screen keyboard settings]uUnmark [Multitap text input] checkbox.](https://usermanual.wiki/Sony/PM-0070.08-user-guide-part-1/User-Guide-1802255-Page-46.png)
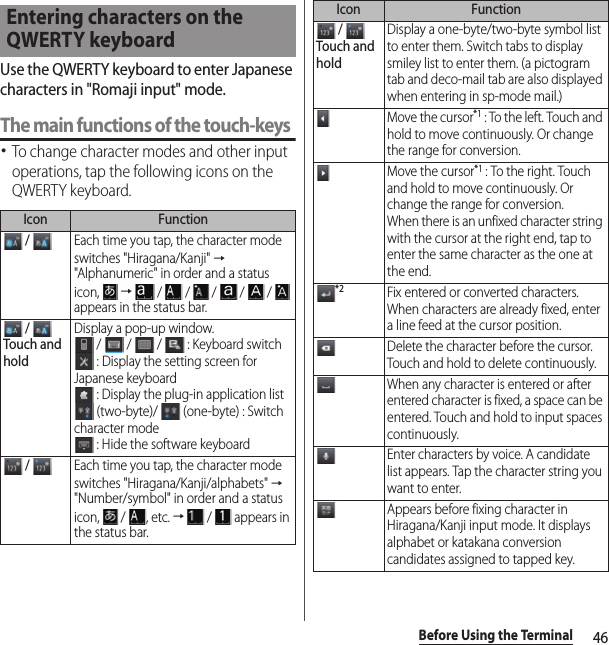
![47Before Using the Terminal*1 When any characters are entered, just tap the desired position on the entered character string to move the cursor.*2 Before the conversion is fixed, "確定 (Fix)" is displayed. In some screens such as the mail account registration screen, "次へ (Next)", "完了 (Done)", "実行 (Go)", etc. appear.Selecting an assistant keyboardWhen you enter in Hiragana/Kanji input mode using the QWERTY keyboard, you can change the assistant keyboard to make the frequent using keys to be displayed widely for easy tapping.1On a character entry screen, touch and hold .2Tap .3Tap [On-screen keyboard settings]u[Choose key type].4Tap any of [Static key resizing]/[Key highlight while typing]/[Dynamic key resizing with highlight]/[Off].■ Static key resizingWiden frequent using key for easy tapping. / / In alphanumerics input mode, tap to switch capitalization/upper case/lower case.In Hiragana/Kanji input mode, highlight and select word in conversion candidates. Tap continuously to change a word highlighted in conversion candidates and select a word to enter.Touch and holdActivate online dictionary.You need to mark "Online dictionary" checkbox in the Japanese keyboard setting screen. / Appears in number input mode, tap to switch alphanumerics to one-byte/two-byte character.Icon Function](https://usermanual.wiki/Sony/PM-0070.08-user-guide-part-1/User-Guide-1802255-Page-48.png)
![48Before Using the Terminal■ Key highlight while typingWiden frequent using key and highlight the key that is predicted for the next entry.■ Dynamic key resizing with highlightWiden the key that is predicted for the next entry much further and highlight it.■ OffDisplay equally the width of each key.Changing display keys・For Japanese input, you can set not to display less-frequent-used keys (Q, X, C, etc.) on the QWERTY keyboard.1On a character entry screen, touch and hold .2Tap .3Tap [On-screen keyboard settings]u[Hide keys].・When the Choose key type (P.47) is set to "Off", [Hide keys] cannot be selected.4Unmark the checkbox of the key you want to hide.5Tap [OK].](https://usermanual.wiki/Sony/PM-0070.08-user-guide-part-1/User-Guide-1802255-Page-49.png)
![49Before Using the TerminalCustomizing keyboard・You can change symbols which are displayed in QWERTY keyboard when entering number to desired characters/symbols.1On a character entry screen, touch and hold .2Tap .3Tap [On-screen keyboard settings]u[Keyboard customization].4Tap a symbol you want to change and delete character previously set, then enter a character to display and tap [OK].・Only one character (two-byte or one-byte character) can be entered.5Tap [OK].❖Information・To return to the default status, in Step 3, tap , then tap [Reset]u[OK].You can use the software keys arranged according to the Japanese syllabary to enter Japanese characters in "Kana input" mode.The main functions of the touch-keys・To change character modes and other input operations, tap the following icons on the Japanese syllabary keyboard.Entering characters on the Japanese syllabary keyboardIcon Function / Each time you tap, the character mode switches "Hiragana/Kanji" → "Alphanumeric" in order and a status icon, → / / / / / appears in the status bar. / Touch and holdDisplay a pop-up window. / / / : Keyboard switch : Display the setting screen for Japanese keyboard : Display the plug-in application list (two-byte)/ (one-byte) : Switch character mode : Hide the software keyboardAppears in Hiragana/Kanji input mode. Switch upper/lower case or add voiced sound/semi-voiced sound.](https://usermanual.wiki/Sony/PM-0070.08-user-guide-part-1/User-Guide-1802255-Page-50.png)
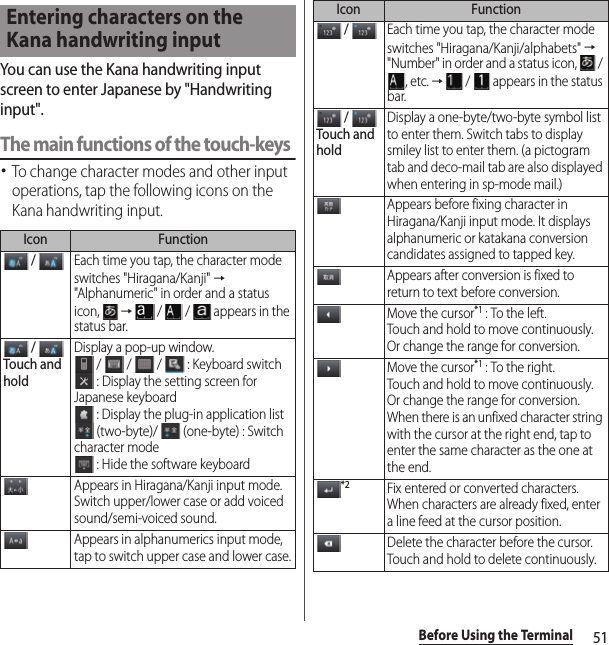
![52Before Using the Terminal*1 When any characters are entered, just tap the desired position on the entered character string to move the cursor.*2 Before the conversion is fixed, "確定 (Fix)" is displayed. In some screens such as the mail account registration screen, "次へ (Next)", "完了 (Done)", "実行 (Go)", etc. appear.❖Information・When you enter character by Kana handwriting for the first time, read a guidance and tap [OK].・In Kana handwriting input, hiragana, alphabet, number, some symbols can be entered.・You can enter a character continuously without deleting entered character.・For voiced sound and semi voiced sound mark, enter in the right upper part of the Kana handwriting input screen.・For punctuation mark and lower case, enter in the lower part from the center of the Kana handwriting input.・For entering alphabet, enter it with reference to lower horizontal line of the Kana handwriting input screen.In the character entry screen such as mail, phonebook, etc., double-tap text you want to edit so that text edit menu appears at the top of the screen. Drag or to change the character string to select.When any character is entered or after entered character is fixed, a space can be entered. Touch and hold to input spaces continuously.Enter characters by voice. A candidate list appears. Tap the character string you want to enter.In Hiragana/Kanji input mode, highlight and select word in conversion candidates. Tap continuously to change a word highlighted in conversion candidates and select a word to enter.Touch and holdActivate online dictionary.You need to mark "Online dictionary" checkbox in the Japanese keyboard setting screen.Appears when entering number. One-byte/two-byte symbol list can be displayed to enter them. Switch tabs to display smiley list to enter them. (a pictogram tab and deco-mail tab are also displayed when entering in sp-mode mail.)Icon FunctionEditing text (Select all)Select all entered text. (Cut)Cut a selected character string. (Copy)Copy a selected character string. (Paste)Paste a copied/cut character string.Close the edit menu.](https://usermanual.wiki/Sony/PM-0070.08-user-guide-part-1/User-Guide-1802255-Page-53.png)
![53Before Using the Terminal❖Information・To paste a copied or cut character string, touch and hold a position where you want to insert, then tap [PASTE]. Alternatively, when texts are entered, tap a position where you want to insert, then tap and [PASTE].・Edit menu icons vary by applications.For each input method, you can make settings related to character entry.1From the Home screen, tap , then tap [Settings]u[Language & input].2Tap on "Google voice typing"/"Shabette-Key-Nyuryoku"/"Xperia™ Chinese keyboard"/"Xperia™ Japanese keyboard"/"Xperia™ keyboard".・Settings screen for respective input method appears. Tap an item displayed on the screen to set.❖Information・The items vary depending on the input method.Common settings of software keyboardMake keyboard settings such as Key sound, Vibrate, etc.1From the Home screen, tap , then tap [Settings]u[Language & input].2Tap on "Xperia™ Japanese keyboard".・The setting screen for Japanese keyboard appears.3Tap [On-screen keyboard settings].・Set items for "COMMON ON-SCREEN KEYBOARD SETTINGS".Setting character entrySetting Japanese keyboardSound on keypressSet whether to sound at the time of key tapping.Vibration on keypressSet whether to vibrate at the time of key tapping.Pop-up on keypressSet to popup the key you have tapped at the time of key tapping.No. of lines (portrait)Set number of lines for conversion candidates displayed in portrait mode.No. of lines (landscape)Set number of lines for conversion candidates displayed in landscape mode.](https://usermanual.wiki/Sony/PM-0070.08-user-guide-part-1/User-Guide-1802255-Page-54.png)
![54Before Using the Terminal❖Information・By default, conversion candidates are displayed in 2 lines in portrait/landscape screen.Auto capitalizationSet to capitalize automatically the top letter you enter in one-byte alphabet entry mode.1From the Home screen, tap , then tap [Settings]u[Language & input].2Tap on "Xperia™ Japanese keyboard".3Mark [Auto capitalization].❖Information・The top letter may not always be capitalized automatically in one-byte alphabet entry mode when [Auto capitalization] is marked.Keeping keyboard typeSet to stabilize the last status of keyboard (phonepad/QWERTY/Japanese syllabary keyboard/Kana handwriting input) in the each portrait/landscape screen in kana/alphabet/number input mode.1From the Home screen, tap , then tap [Settings]u[Language & input].2Tap on "Xperia™ Japanese keyboard".3[On-screen keyboard settings]uMark [Keep keyboard type].❖Information・You can set to stabilize the last status of keyboard in the each portrait/landscape screen without marking [Keep keyboard type].You can change keyboard skin.1From the Home screen, tap , then tap [Settings]u[Language & input].2Tap on "Xperia™ Japanese keyboard".3Tap [Keyboard skin].4Select from displayed keyboards and tap [Set skin].❖Information・To download and add keyboard skins from a website, tap [Search for skin] in Step 4. Some keyboard skins downloaded from website may not support the terminal.・To delete the downloaded keyboard skin, from the Home screen, tap , and tap [Settings]u[Apps], and tap the keyboard skin you want to delete in the "Downloaded" tab, and then tap [Uninstall]u[OK]u[OK]. Also, tap [Uninstall] in Step 4 so that you can delete the keyboard skin that is not compatible with the terminal.Keyboard skin settings](https://usermanual.wiki/Sony/PM-0070.08-user-guide-part-1/User-Guide-1802255-Page-55.png)
![55Before Using the TerminalThe Word suggestion function shows predicted conversion candidates when you enter Japanese/English characters. Mark the checkbox of Word suggestion checkbox to set options "Spell check" and "Auto space". These options help you entering characters with ease.Setting Word suggestion1From the Home screen, tap , then tap [Settings]u[Language & input].2Tap on "Xperia™ Japanese keyboard".3Mark [Word suggestions] checkbox.❖Information・Flick or drag downward in the word suggestion field to enlarge suggestion field in which you can see more word suggestions and to hide the keyboard. Tap [前候補 (previous suggestion)]/[次候補 (next suggestion)]/[確定 (fix)] shown at the bottom of the word suggestions screen to select/fix characters to be entered. To show the software keyboard, tap [戻る (Back)] or x.Setting Spell check・Spell check corrects mistyped characters and shows conversion candidates before conversion in one-byte alphabet input mode when entering characters with QWERTY keyboard.1From the Home screen, tap , then tap [Settings]u[Language & input].2Tap on "Xperia™ Japanese keyboard".3Mark [Spell check] checkbox.Setting Auto space・When selecting English word suggestion, Auto space enters next to the entered character. However, space is not entered automatically in the mail address or URL input fields.1From the Home screen, tap , then tap [Settings]u[Language & input].2Tap on "Xperia™ Japanese keyboard".3Mark [Auto space] checkbox.Word suggestion settings](https://usermanual.wiki/Sony/PM-0070.08-user-guide-part-1/User-Guide-1802255-Page-56.png)
![56Before Using the TerminalTo display the word as the preferred candidate when entering characters, set the user dictionary beforehand.Registering words in user dictionariesThere are 2 types of user dictionaries: "My words Japanese" and "My words English".1From the Home screen, tap , then tap [Settings]u[Language & input].2Tap on "Xperia™ Japanese keyboard".3Tap [My words Japanese]/[My words English].4Tap and [Add].5Tap the character input box for "Reading" and fill it out.6Enter a word in the input box for "Word" and tap [完了 (Done)].7Tap [Save].❖Information・Up to 50 characters (regardless of one-byte or two-byte characters) can be stored for a "Reading" and "Word", and up to 500 items can be stored in the user dictionary.・When entering characters, tapping [直変 (Direct conversion)] in the word suggestion field may give priority to some registered words.Editing user dictionary1On the user dictionary screen, select a word you want to edit.2Tap and [Edit].3Edit the content and tap [Save].Deleting words from user dictionary1On the user dictionary screen, select a word you want to delete.2Tap and tap [Delete]u[OK].・To delete all words in the list, tap [Delete all]u[OK].Setting Words by learning1From the Home screen, tap , then tap [Settings]u[Language & input].2Tap on "Xperia™ Japanese keyboard".3Tap [Learn words].4Mark [Save word while typing].・To reset already learned words, tap [Delete saved words]u[OK].User dictionary settings](https://usermanual.wiki/Sony/PM-0070.08-user-guide-part-1/User-Guide-1802255-Page-57.png)
![57Before Using the Terminal❖Information・To delete history for learned words individually, touch and hold a word you want to delete and tap [Delete].Setting online dictionaryIn Hiragana/Kanji input mode, touch and hold to activate online dictionary.1From the Home screen, tap , then tap [Settings]u[Language & input].2Tap on "Xperia™ Japanese keyboard".3Tap [Online dictionary].4Tap [Online dictionary], then read the note and tap [Agree].・[Online dictionary] is marked.Backing up and restoring dictionaryUser dictionary and Words by learning can be backed up onto an internal storage and restored when needed.1From the Home screen, tap , then tap [Settings]u[Language & input].2Tap on "Xperia™ Japanese keyboard".3Tap [Backup & restore].4Tap [Backup]/[Restore].5Mark a dictionary you want to back up or restore from among [My words Japanese], [My words English], or [Learn words].6Tap [Go].・When backing up, a screen asking whether to overwrite the user dictionary on the internal storage appears. When restoring, a screen asking whether to overwrite the user dictionary in the terminal appears.7Tap [OK]u[OK].・The data is backed up or restored.❖Information・If restoring data is failed, user dictionary in the terminal restores to the default.](https://usermanual.wiki/Sony/PM-0070.08-user-guide-part-1/User-Guide-1802255-Page-58.png)
![58Before Using the Terminal・User dictionary and Words by learning are not backed up onto microSD card.When entering characters, touch and hold and tap to display the plug-in application list.Using Contact Picker 2.3If contacts are registered to the Contacts, you can use "Contact Picker 2.3" to enter contact information when entering characters. "Contact Picker 2.3" is a preinstalled plug-in application.1On a character entry screen, touch and hold .2Tap .3Tap [Contact Picker 2.3].4On the contacts list screen, tap the contact to pick up.5Mark items you want to enter and tap [OK].・If you want to select/deselect all items, tap [Mark all]/[Unmark all].Adding a plug-in applicationYou can install and add plug-in applications to use when entering characters.1From the Home screen, tap , then tap [Settings]u[Language & input].2Tap on "Xperia™ Japanese keyboard".3Tap [Manage extensions].4On the Info screen, tap [OK].・Plug-in setting screen appears.5Tap [Download new extensions].6Tap an application and follow the onscreen instructions.❖Information・Marked plug-in applications in the plug-in setting screen can be activated in the character entry screen. Checkboxes for preinstalled plug-in applications, "Contact Picker 2.3" is marked by default.Using a plug-in application](https://usermanual.wiki/Sony/PM-0070.08-user-guide-part-1/User-Guide-1802255-Page-59.png)
![59Before Using the TerminalYou can view the detailed explanations on the high performance Japanese keyboard from the basic to application. The latest information can be obtained from the websites for plug-in applications or keyboard skins.1From the Home screen, tap , then tap [Settings]u[Language & input].2Tap on "Xperia™ Japanese keyboard".3Tap [POBox Touch User Guide].Connect USB keyboard or Bluetooth keyboard that supports HID (Human Interface Device) profile with the terminal to enter characters.❖Information・Some Bluetooth keyboards compatible with HID profiles cannot be used or may not operate.・Use USB keyboard or Bluetooth keyboard with key order that is compatible with 106 keyboard/109 keyboard.・Tap the character input box to display or on the status bar of the terminal, then enter characters with USB keyboard or Bluetooth keyboard.・Press "半角/全角 (one-byte/two-byte)" key on USB keyboard or Bluetooth keyboard to switch Kana input/Alphabet input on the terminal.・While displaying word suggestions, press "Tab" key/"↓" key on the USB keyboard or the Bluetooth keyboard to select a word in word suggestions.・While not selecting a word in word suggestions, press "Space" key on the USB keyboard or the Bluetooth keyboard to switch to direct conversion.・You can edit texts with connected USB keyboard or the Bluetooth keyboard. For instructions on editing texts on the terminal, see "Editing text" (P.52).- Press "Ctrl" key and "A" key to select all entered text.- Press "Ctrl" key and "X" key to cut a selected character string.- Press "Ctrl" key and "C" key to copy a selected character string.- Press "Ctrl" key and "V" key to paste a copied or cut character string.POBox Touch User GuideUSB keyboard/Bluetooth keyboard](https://usermanual.wiki/Sony/PM-0070.08-user-guide-part-1/User-Guide-1802255-Page-60.png)
![60docomo Palette UIdocomo Palette UIHome screen is a start screen for using applications. You can personalize the Home screen by adding or moving, for example, application shortcuts and widgets, or changing the wallpaper.Tapping y displays Home screen which consists of up to 12 screens you can use flicking left and right.aCurrent home screen positionbWidget : Google SearchcWidget : i-ChanneldWidget : Machi-charaeShortcuts (applications)fApplications buttongWallpapers❖Information・You can switch the home application between "docomo" and "Xperia™" in the terminal."docomo" is set to the home application by default. To switch the home application, from the Home screen, tap and [Setup guide] and on the Preferred applications screen, [Change now]u[Home screen], or from the Home screen, tap , [Settings]u[Xperia™]u[Preferred apps settings]u[Home screen]. To switch applications (Home, phonebook (contacts), video or music player) to be used in the terminal all at once, from the Home screen, tap [Preferred apps settings]u[OK], or from the Home screen, tap , [Settings]u[Xperia™]u[Preferred apps settings]u[Set all to].・When the home application is switched, widgets or shortcuts on the screen may not be displayed correctly depending on home screen layout etc.Switching the Home screen1Flick the Home screen to left or right.・The Home screen switches.❖Information・You can check the current position of the Home screen with at the top of the screen.・Alternatively, display a list of home screens and then tap a home screen to switch. For details on the home screen list, see "Displaying a list of home screens" (P.61).Home screenLearning Home screenabefegcd"ひつじのしつじくん®(Butler Sheep)"©NTT DOCOMO](https://usermanual.wiki/Sony/PM-0070.08-user-guide-part-1/User-Guide-1802255-Page-61.png)
![61docomo Palette UIDisplaying a list of home screens1From the Home screen, pinch-in.・A home screen list appears.❖Information・Touch and hold an area of the Home screen where no icons are displayed and tap [Home screens] to display list of home screens.・To return to the home screen, pinch-out, or tap y or x.1Touch and hold an area of the Home screen where no icons are displayed.・"select an action" menu appears to change the Home screen.■ Select an actionAdding a shortcut to the Home screen1On "select an action" menu screen (P.61), tap [Shortcut].2Select a shortcut you want to add.・The shortcut appears on the Home screen.❖Information・Alternatively, you can add from the Home screen, and touch and hold an icon you want to add, tap [Add].Adding to the Home screenShortcutAdd shortcuts of applications or setting screens. (P.61)WidgetAdd widgets. (P.62)FolderCreate new folder etc. (P.63)KisekaeChange the background of the home screen or application screen, or download from website to add. (P.63)WallpaperChange the wallpaper or download from website to add. (P.63)GroupAdd group shortcut of application screen. (P.64)Home screensShow home screens. (P.61)Wallpaper loop settingsSet whether to loop wallpaper on the Home screen.](https://usermanual.wiki/Sony/PM-0070.08-user-guide-part-1/User-Guide-1802255-Page-62.png)
![62docomo Palette UIAdding a widget to the Home screen1On "select an action" menu screen (P.61), tap [Widget].・A list of widgets appears.2Select an item.❖Information・If you install an application with widget from Google Play, the installed widget is added to the widget list.BookmarksView bookmarks.CalendarDisplay the calendar.ContactView contacts using Contacts application of Xperia™.Contents HeadlineDisplay latest information of contents such as music, videos, e-books, etc.docomo location informationActivate docomo location information application.docomo Wi-Fiかんたん接続 (docomo Wi-Fi easy connection)View docomo Wi-Fi.FacebookView Friends' comments.Friends' musicView list of songs shared in Facebook.GmailView Inbox of Gmail etc.Google SearchDisplay the Quick search box.Google+ photosView pictures in Google+.Google+ postsView posted contents in Google+.IC Tag/Barcode ReaderEnable or disable IC Tag read mode.iチャネルウィジェット (i-Channel widget)Display latest information such as news or weather.LatitudeView locations of members.Machi-charaDisplay reception of mails or calls information with Machi-chara.Music UnlimitedView Music Unlimited.Personal areaDisplay personal area.PhonebookView phonebook using phonebook application provided by DOCOMO.Phonebook Select membersDisplay history of calls or message (SMS) of 3 contacts selected from the Phonebook fixed/at random.Play StoreShow applications recommended by Google Play.Schedule & MemoDisplay memos or photo memos on the calendar.TrackID™View TrackID.TrafficEnter a widget name and destination to activate the widget showing travel time to the destination. Tap to check supplied traffic information.YouTubeDisplay the list of frequently played movies and recommended.プリインアプリ利用状況 (Usage of preinstalled applications)View use of preinstalled applications.診断ツール (Diagnosis tool)Activate diagnosis tool.](https://usermanual.wiki/Sony/PM-0070.08-user-guide-part-1/User-Guide-1802255-Page-63.png)
![63docomo Palette UIAdding a folder to the Home screen1On "select an action" menu screen (P.61), tap [Folder].2Select a folder you want to add.・The folder appears on the Home screen.・You can rename or add items to a folder by selecting [New folder] on the folder selection screen.■RenamingTouch and hold a folder you want to renameu[Edit name]uEnter a folder name and tap [OK].■Adding an itemFrom the Home screen, touch and hold a shortcut you want to add to the folderuDrag it onto a folder and lift up your finger.・A shortcut is moved into a folder.❖Information・Alternatively, open a folder by tapping and then touch and hold the title bar to display the [Folder name] entry box to change.Changing Kisekae1On "select an action" menu screen (P.61), tap [Kisekae].2Flick left or right and tap a Kisekae you want to change to.❖Information・Alternatively, select Kisekae you want to change to and tap [Set] to change Kisekae.・Alternatively, from the Home screen, tap and then tap [Kisekae] to change.・You can add Kisekae contents by tapping [Search] to download from website. To delete added Kisekae contents, select the image and tap [Delete]u[Delete].Changing wallpaper1On "select an action" menu screen (P.61), tap [Wallpaper].2Tap [Album]/[Live Wallpapers]/[Wallpaper gallery]/[Xperia™ wallpapers].・When you tap [Xperia™ wallpapers], select an image to set to the wallpaper, tap [Set wallpaper].・When you tap [Album], select an image to set to the wallpaper, drag and set trimming frame for range in the image you want to use as wallpaper, and then tap [Crop] to set wallpaper.](https://usermanual.wiki/Sony/PM-0070.08-user-guide-part-1/User-Guide-1802255-Page-64.png)
![64docomo Palette UI・When you tap [Live Wallpapers], select a content, tap [Set wallpaper]. You can also download and add Live wallpaper content from a web page. For some contents, you can change type or contents displayed on the wallpaper by tapping [Settings].・When you tap [Wallpaper gallery], select an image you want to use as wallpaper, then tap [Set wallpaper].Adding a group to the Home screen1On "select an action" menu screen (P.61), tap [Group].2Select a group of applications you want to add.❖Information・Alternatively, on the Application screen (P.66), touch and hold the group name and then tap [Add].You can add, delete, sort home screens while the home screen list is displayed.・For details on the home screen list, see "Displaying a list of home screens" (P.61).Adding a home screen1From the Home screen, pinch-in.2Tap .❖Information・There are 5 home screens by default. You can add 7 home screens moreover.Deleting a home screen1From the Home screen, pinch-in.2Tap of thumbnail you want to delete on the Home screen.❖Information・Alternatively, on the home screen list, touch and hold a thumbnail of home screen you want to delete and tap [Delete].Changing the Home screen](https://usermanual.wiki/Sony/PM-0070.08-user-guide-part-1/User-Guide-1802255-Page-65.png)
![65docomo Palette UISorting home screens1From the Home screen, pinch-in.2Touch and hold a home screen you want to sort.3Drag it to the place you want to move and lift up your finger.Moving an icon on the Home screen1From the Home screen, touch an icon you want to move.2Drag it anywhere.・To move to another Home screen, keep touching the icon and drag to left or right.3Release your finger from the icon.Deleting an icon from the Home screen1From the Home screen, touch an icon you want to delete.2Tap [Delete].❖Information・Alternatively, touch and hold an icon you want to delete from the Home screen and drag to displayed at the bottom of the screen.Uninstalling a shortcut or widget on the Home screen・Before uninstalling shortcut or widget on the Home screen, back up contents related to the application or widget that you want to save including data saved in the application or widget.・Some applications or widgets may not be uninstalled.1From the Home screen, touch and hold a shortcut or widget you want to uninstall.2Tap [Uninstall].・Uninstall screen appears.3Tap [OK]u[OK].❖Information・You can also uninstall them from the Settings menu. For details, see "Deleting installed application" (P.132).](https://usermanual.wiki/Sony/PM-0070.08-user-guide-part-1/User-Guide-1802255-Page-66.png)

![72docomo Palette UI❖Information・From the Home screen, tap and tap "Recommends" tab to display applications recommended by DOCOMO. For details, see "Installing "Recommends" applications" (P.76).・Some application names may not be displayed fully.・Some applications require downloading and installation. If you cannot download application by tapping, from the Home screen, tap and tap [Settings]u[Security]u[Unknown sources]u[OK], mark the checkbox and then tap the application.・Activating two or more applications may increase battery consumption and the operation time may become short. For this reason, it is recommended to end applications when not used. To end the application, on the application screen you are using, tap x to display the Home screen (P.60).・If you selected Japanese as a language in Initial settings (P.31), some group names are displayed in Japanese even after the language setting is changed. These group names can be changed to English (P.74).](https://usermanual.wiki/Sony/PM-0070.08-user-guide-part-1/User-Guide-1802255-Page-73.png)
![73docomo Palette UIFrom the Application screen, you can add icons, sort icons, uninstall applications. Also you can change group setting.Adding an application icon to the Home screen1From the Application screen, touch and hold an icon you want to add to the Home screen.2Tap [Add].・The application icon is added onto the Home screen.❖Information・Touch and hold an area of the Home screen where no icons are displayed and tap [Shortcut] u[Application] and select an application to add an icon.Sorting application icons1From the Application screen, touch and hold an application icon you want to sort.2Drag it to the place you want to move and lift up your finger.・The application icon moves.❖Information・To move an application icon to another application group, touch and hold the icon on the Application screen, tap [Move], then select a group you want to move to. Alternatively, to move an icon, you can touch and hold an icon on the Application screen, then drag it to the group you want to move to.Uninstalling an applicationSome application icons can be deleted from the Application screen.・Before uninstalling application, back up contents related to the application that you want to save including data saved in the application.・Some applications or widgets may not be uninstalled.1From the Application screen, touch and hold an icon of application you want to uninstall.2Tap [Uninstall].・Uninstall screen appears.3Tap [OK]u[OK].❖Information・You can also uninstall them from the Settings menu. For details, see "Deleting installed application" (P.132).Changing the Application screen](https://usermanual.wiki/Sony/PM-0070.08-user-guide-part-1/User-Guide-1802255-Page-74.png)
![74docomo Palette UIAdding a shortcut of group to the Home screen1From the Application screen, touch and hold a group you want to add to the Home screen.2Tap [Add].・Shortcuts to the group is added to the Home screen.❖Information・Touch and hold an area of the Home screen where no icons are displayed and tap [Group] and select a group to add a shortcut.Changing a label color of the group name1From the Application screen, touch and hold a group you want to change the color.2Tap [Edit label] and select label color to change.・The color for group name is changed.Deleting a group1From the Application screen, touch and hold a name of a group you want to delete.2Tap [Delete]u[OK].・Application icons belonged to the deleted group move to the "Download Application" group.❖Information・"Recently", "DOCOMO Services", and "Download Application" groups cannot be deleted.Changing a group name1From the Application screen, touch and hold a group name you want to rename.2Tap [Edit name].3Enter a group name in the [Group name] entry box and tap [OK].・The group is renamed.❖Information・"Recently", "DOCOMO Services", and "Download Application" groups cannot be renamed.Adding a group1From the Application screen, tap and tap [Add group].2Enter a group name in the [Group name] entry box and tap [OK].・A new group is added.](https://usermanual.wiki/Sony/PM-0070.08-user-guide-part-1/User-Guide-1802255-Page-75.png)
![75docomo Palette UISorting groups1From the Application screen, touch and hold an group name you want to sort.2Drag it to the place you want to move and lift up your finger.・The group is moved.You can view and access recently used applications from this window.1Tap r.・Recently used applications appear on a list. Tap an application to activate. Flick left or right to delete from the list.❖Information・On the recently used applications list screen, touch and hold an application to select [Remove from list]/[App info].Search application installed into the terminal to activate.1From the Application screen, tap and then tap [Search].・When you use for the first time, the Terms of Service window for Google Search appears. Read the terms of use and tap [OK].・The software keyboard appears.2Enter application name you want to search in the search box.・Search suggestions appear as you enter a character.3Tap a search item.・The application activates.❖Information・Alternatively, from the Home screen, tap , then tap [Search] to search application. For details, refer to "Searching information in the terminal and web pages" (P.39).Opening the recently used applications windowSearching applications](https://usermanual.wiki/Sony/PM-0070.08-user-guide-part-1/User-Guide-1802255-Page-76.png)
![76docomo Palette UIIcons on the Application screen can be displayed in a list or tiles.1From the Application screen, tap and then tap [List format]/[Tile format].The "Recommends" tab in the Application screen shows applications recommended by DOCOMO. (P.66)1From the Application screen, tap [Recommends] tab.2Tap an application.・Download screen opens. Follow the onscreen instructions.❖Information・Downloaded applications are displayed in "Download Application" group on "Application" tab in the Application screen.・Tap [もっとアプリを見る (More apps)] on the "Recommends" tab to display dmenu.1From the Application screen, tap and then tap [Application info].・The home application information appears.Switching application screensInstalling "Recommends" applicationsChecking Home application information](https://usermanual.wiki/Sony/PM-0070.08-user-guide-part-1/User-Guide-1802255-Page-77.png)
![77PhonePhone1From the Home screen, tap , then tap [Dial] tab.2Enter the number of the recipient and tap .・If a wrong number is entered, tap to delete the number.❖Information・To activate Xperia™ phone application, from the Home screen, tap , then tap [Dial].Entering pause (,)This function allows you to operate voice mail at home, to reserve tickets, or to check the balance of a bank account, etc.1From the Home screen, tap , then tap [Dial] tab.2Enter the phone number, then tap and tap [Add 2–sec pause].When the terminal is within range of the service area, you can make an emergency call of 110 (Police), 119 (Fire and ambulance), or 118 (Japan Coast Guard).1From the Home screen, tap , then tap [Dial].2Enter the number of the emergency call and tap .・If a wrong number is entered, tap to delete the number.❖Note・If docomo mini UIM card is not inserted to the terminal, emergency calls (110, 119, 118) cannot be made in Japan.・You can make an emergency call by tapping [Emergency call] on the screen unlocking screen. In Japan, however, when the power ON, on the PIN code entry screen (P.141), or on the PUK entry screen (P.142), emergency calls (110, 119, 118) cannot be made even if you tap [Emergency call].・If SIM card lock is set in Airplane mode, emergency call cannot be made.・This terminal supports "Emergency call location information". If you use the terminal to place a call to emergency numbers such as 110, 119, or 118, the information of a location where you are calling from (location information) is automatically notified to the Emergency call acceptance organization such as the Police Station.Making/Receiving a callMaking a callEmergency call](https://usermanual.wiki/Sony/PM-0070.08-user-guide-part-1/User-Guide-1802255-Page-78.png)
![78PhoneThe Emergency call acceptance organization may not be able to figure out your exact location depending on the location where you place a call or radio wave condition.If you make a call hiding your caller ID, such as by entering a phone number with "184" for each call, the location information and phone number are not notified. However, the Emergency call acceptance organization may decide to obtain the location information and phone number regardless of your settings when they consider it is necessary for lifesaving, etc. Note that the areas/time for which the "Emergency call location information" is ready to be used vary depending on the preparatory state of each Emergency call acceptance organization.・When calling 110, 119 or 118 for emergency from the terminal, tell that you are calling from a mobile phone, and give your phone number and your current location precisely for checking callback from the police/fire department. Also, make a point to call in a stationary position to prevent the call from being dropped. Do not power off the terminal for at least 10 minutes after the emergency call just in case the Police or Fire/Ambulance may have to get in contact with you.・Note that you may not connect to the local Fire Department or Police Station depending on where you are calling from. In this case, try to call from a public phone or an ordinary phone in the neighborhood.1Tap [End call].For details on WORLD CALL, refer to DOCOMO International Services website.1From the Home screen, tap , then tap [Dial] tab.2Touch and hold [0] key until "+" sign appears.・When making an international call, "+" is replaced by an international access code.3Enter Country codeuArea code (City code)uThe number of the recipient and tap .・If the area code begins with "0", omit "0". However, "0" may be required to dial to some countries or areas such as Italy.Ending a callMaking an international call (WORLD CALL)](https://usermanual.wiki/Sony/PM-0070.08-user-guide-part-1/User-Guide-1802255-Page-79.png)
![80Phone・To create a new message to send, when receiving a call, drag up and tap to create a message and send. To edit a message, from the Home screen, tap and , then tap [Call settings]u[Reject call with message] to select and edit an existing message, then tap [OK].You can make or answer a call with Stereo Headset with Microphone (Sample) connecting to the terminal.■ Making a call1Make a call with Stereo Headset with Microphone (Sample) connected.・An operation of making a call is the same as usual operation. (P.77)2Press the switch to end the call.■ Receiving a call1While receiving a call, press the switch of Stereo Headset with Microphone (Sample).・The call is connected.・When receiving a call, you can decline the call by pressing the switch for a second or more.2To end a call, press the switch again.❖Information・Even when you listen to music with Stereo Headset with Microphone (Sample) connecting to the terminal, you can answer a call by pressing the switch. Music pauses on calling. Music restarts when ending the call automatically depending on the player application.・Connecting and removing Stereo Headset with Microphone (Sample) repeatedly during a call may disconnect a call.Using Stereo Headset with Microphone](https://usermanual.wiki/Sony/PM-0070.08-user-guide-part-1/User-Guide-1802255-Page-81.png)
![81Phone1During a call, press m to adjust.❖Information・You can adjust the ear speaker volume only during a call.■ Calling screenaName of the other partybA photo saved in PhonebookcCall duration timedSpeaker : Set speakerphone on/off.・Other party's voice can be heard from the speaker and handsfree call can be made.・When the speakerphone is on, a speakerphone icon appears in the status bar.ePhonebook : View phonebook entry list screen.fOption menu : Set Hold during a call.・To cancel Hold, tap [Retrieve call] during Hold.・To set a call on hold, "Call waiting" subscription is required. (P.84)gNumber of the other partyhMute : Set muting on/off of the microphone during a call.・When the microphone is muted, a mute icon appears in the status bar.iDial key : Enter the phone number you want to add to make a call.・The ongoing call is automatically on hold.・To add a call, "Call waiting" subscription is required. (P.84)jEnd call❖Note・Do not bring the terminal close to your ear with the speakerphone on to avoid from hearing damage.Adjusting the ear speaker volumeOperations during a callegajibchfd](https://usermanual.wiki/Sony/PM-0070.08-user-guide-part-1/User-Guide-1802255-Page-82.png)
![82Phone1From the Home screen, tap , then tap [Recent calls] tab.・The Recent calls screen appears.On the Recent calls screen, incoming call history and outgoing call history are displayed in chronological order.aIncoming historybCall status icons : Caller ID notified : Caller ID hidden・Notified if calls are made with "186" (Notify)/"184" (Hide) prefixed to the number.・If you enter a phone number and tap , then select [Caller ID notification]u[Notify]/[Not notify] to make a call, / does not appear in the call log list. : Koe-no-Takuhaibin・For details on Koe-no-Takuhaibin, refer to "Koe-no-Takuhaibin" (P.84) or NTT DOCOMO website. : Outgoing international call : Incoming international callcPhone number/namedConsecutive calls with the same party・Tap a history or to display combined history, tap again to display individually.・Number in bracket indicates number of combined history.eOutgoing historyfOutgoinggHistory icons : Missed call : Incoming call : Outgoing callhDateiPhonebook❖Information・On the Recent calls screen, tap and tap [Search location] to check the current location of the party using imadocokantan search. To set/edit "Network service" or "Reject call with message", tap and tap [Call settings]. (P.84)Call historyShowing call historyRecent calls screenabceghidf](https://usermanual.wiki/Sony/PM-0070.08-user-guide-part-1/User-Guide-1802255-Page-83.png)
![83PhoneWhen you have missed calls, appears in the status bar.1Drag the status bar downwards.2Tap [Missed call].❖Information・When you set the screen lock to "Slide", a missed call icon appears on the screen unlock screen for missed calls. For the setting to show or hide icons, see "Setting information displayed on the unlock screen" (P.128).1On the Recent calls screen (P.82), tap .1On the Recent calls screen (P.82), touch and hold a phone number, tap [Edit number before call]u[Add Phonebook].・You can also save by tapping the number and then [Add Phonebook] at the bottom of the screen.2Tap desired phonebook entry, or tap [Register new].・When you set Google account etc., tap [Register new] to select an account to register.3On the profile editing screen, enter information and tap [Save].1On the Recent calls screen (P.82), tap .2Tap [Delete all]u[OK].❖Information・To delete only an item of call log, on the Recent calls list screen (P.82), touch and hold a call log you want to delete and tap [Delete from call log]u[OK].・To delete all any of "Incoming history" or "Outgoing history", on the Recent calls list screen (P.82), tap [Incoming history]/[Outgoing history] and tap , then [Delete all]u[OK].Displaying missed callsMaking a call from call historyAdding a number from the call history to PhonebookDeleting a call history](https://usermanual.wiki/Sony/PM-0070.08-user-guide-part-1/User-Guide-1802255-Page-84.png)
![84PhoneYou can use the network services and search for available networks.1From the Home screen, tap , then tap .2Tap [Call settings].・You can set the following options.Call settingsNetwork serviceKoe-no-TakuhaibinKoe-no-Takuhaibin is a service of taking voice messages for you.Voice mail serviceIt is a service of taking caller's message when you cannot answer an incoming call.Call forwarding serviceIt is a service of transferring call when you cannot answer an incoming call.Call WaitingIt is a service of putting the current call on hold and answering an incoming call or making a call to another party.Caller ID notificationNotify the display of the recipient phone of your phone number.Nuisance call blocking serviceRegister phone numbers of nuisance call to reject.Network ServiceCaller ID display request serviceRequest number notification for calls without phone number with guidance.Second call settingsSet action for additional incoming call during a call.Call notificationNotify incoming calls by SMS while the power off or out of service area.English guidanceSet voice guidance to English.Remote operation settingsSet to operate Voice Mail Service or Call forwarding Service using land-line phone, public phone or DOCOMO mobile phone, etc.Roaming settingsP. 2 2 2Advanced call settingsSet whether to reject an incoming call with phone number that is unregistered in the Phonebook automatically.Reject call with messageEdit/Set a message (SMS) to be sent when rejecting an incoming call.Service providersWhen you start using overseas or move out of your operator's network, the terminal searches another available network and reconnects to it.Noise suppressionMake the voice clear to understand for the other party during a call.AccountsSet Internet phone (SIP) account.](https://usermanual.wiki/Sony/PM-0070.08-user-guide-part-1/User-Guide-1802255-Page-85.png)
![85PhoneIn the Phonebook, you can enter various information for contacts, for example, phone numbers, mail addresses and web service accounts. You can display phonebook entry to get quick access to that contact.1From the Home screen, tap , then tap [Phonebook].・The phonebook list screen appears.・Alternatively, from the Home screen, tap and tap [Phonebook] to display phonebook list screen.❖Information・To activate Xperia™ phone application, from the Home screen, tap , then tap [Contacts].On the phonebook list screen, you can view details of your contacts. You can add a picture to a phonebook entry, and display phonebook entries by group.aContacts tabbName registered in the phonebook entrycEntry items・Icons indicate entry items.dPhoto set in the phonebook entryeRegisterfGroup・Select a group to be displayed.gCommunication tab・Display communication history (call, sp-mode mail, message (SMS)). Tap a history to check communication, or reply call, mail, etc.hOption menuiMy profile tab・Check your own phone number.jIndex character area・Tap index character to display phonebook entries allocated to the index character.Use Internet callingSet Internet phone (SIP) call method.PhonebookOpening PhonebookPhonebook list screenkagcdbfeihjl](https://usermanual.wiki/Sony/PM-0070.08-user-guide-part-1/User-Guide-1802255-Page-86.png)
![86PhonekIndex・Display the index character to search entries in the order of Japanese syllabary, alphabet, etc.lSearchAdding a new phonebook entry1On the phonebook list screen (P.85), tap [Register].・When you set Google account etc., you can select an account to be registered.2Entering name on the profile editing screen.3Select a desired item to enter.・You can set phone number, mail address, group, etc. Tap in "Others", then tap [Add] to add information.4Tap [Save].❖Information・When you save "Phonetic name (family/given)", phonebook list is displayed according to Japanese syllabary order or alphabets order of "Phonetic name". If you enter "family/given" in Kanji without entering "Phonetic name" to add phonebook entry, the name appear in "ABC" field on the phonebook list screen.・To check registered numbers in the Phonebook, from the phonebook list screen (P.85), tap , and [Others]u[About].・On "Set all to" in Preferred apps settings (P.60), [Xperia™] can be set, and then you can select "Phone contact" account as a saving location and set ringtone when saving a phonebook entry in the "Contacts" application. When "docomo" is set in Preferred apps settings (P.60), ringtone set on "Phone contact" account cannot be changed.Using shortcuts of PhonebookWhen you tap the photo (image) part on the phonebook list screen, shortcuts for phone, mail, etc. appear. Tap the shortcut to make a call, or create and send a mail.* You can also use the registered addresses, etc.Managing phonebookMake a call to saved phone number.Create and send message (SMS).Select Email application to create and send an email.・If [Use by default for this action.] checkbox is marked, application selection screen will not appear for the next time.](https://usermanual.wiki/Sony/PM-0070.08-user-guide-part-1/User-Guide-1802255-Page-87.png)
![87Phone❖Information・When you tap a part other than photo (image) on the phonebook list screen, profile screen of the phonebook appears instead of shortcuts.・Email shortcut appears when email address is saved in the selected phonebook entry and you have set your email account. If you have not set your email account, shortcut for Gmail ( ) appears.・For a phonebook entry with only name, tapping photo (image) does not display the shortcut.Making a call using the phonebook1On the phonebook list screen (P.85), tap a phonebook entry to call.2On the Profile screen, tap a phone number.3Tap [Call].Searching for a phonebook entry1On the phonebook list screen (P.85), tap [Search].2Enter name or reading you want to search in the search field.・All phonebook entries beginning with those letters appear.Changing contacts display order1On the phonebook list screen (P.85), tap , then tap [Others]u[Contacts display order].2Tap [Japanese order]/[Alphabetical order]/[Number order].Changing accounts to displayYou can set registered phonebook entries to be displayed in the phonebook list.1On the phonebook list screen (P.85), tap , then tap [Others]u[Accounts to display].2Tap [Display all accounts]/[docomo]/[Phone contacts].・When you set Google account etc., select an account to be displayed.・Tap [Customize...], select a checkbox for each account, and then customize display of the phonebook list screen.](https://usermanual.wiki/Sony/PM-0070.08-user-guide-part-1/User-Guide-1802255-Page-88.png)
![88PhoneDisplaying phonebook entries by group1On the phonebook list screen (P.85), tap [Groups].2Tap a group.・Phonebook entries are displayed by the group set when the entry is registered.・To hide the group, tap [Close].Setting group for phonebook entryYou can set phonebook entries registered to docomo account to a group from the phonebook list screen.1On the phonebook list screen (P.85), tap [Groups] and touch and hold a phonebook entry to set a group, and then drag it to any group.❖Information・To cancel group setting, on the phonebook list screen (P.85), tap [Groups] and touch and hold a phonebook entry you want to cancel the group setting, and then drag it to set group.・When you set Google account etc., display groups by account. You can set/cancel group in the same account.Creating a new group in Phonebook1On the phonebook list screen (P.85), tap [Groups]u[Add].・When "Add" is not displayed, flick on groups to display.2Tap [docomo].・When you set Google account etc., you can select it as an account to add.3On the group addition screen, enter color, icon, group name, and tap [OK].・The items vary depending on the account type.❖Information・You can edit/delete newly created groups and "Family"/"Friends"/"Company", which are saved by default. To edit a group, touch and hold a created group and touch [Edit group], then enter group name etc. and tap [OK]. To delete a group, touch and hold a created group and touch [Delete group], then tap [OK]. Phonebook entry belonged to the deleted group move to the "No group" tab.・You cannot add a group that has the same name as existing groups.](https://usermanual.wiki/Sony/PM-0070.08-user-guide-part-1/User-Guide-1802255-Page-89.png)
![89PhoneEditing a phonebook entry1On the phonebook list screen (P.85), tap a phonebook entry to edit.2On the profile screen, tap [Edit].3Select a required item and edit.・Tap [Add] to set phone number or mail address, and tap on "Others" and [Add] to add information.4Tap [Save].Registering a phonebook entry to FavoritesYou can mark a phonebook entry as a favorite. The favorite list provides quick access to the phonebook entry you have marked.1On the phonebook list screen (P.85), tap a phonebook entry you want to mark.2On the profile screen, tap .❖Information・Only phonebook entries saved to the docomo account can be added to Favorites.・To save a phonebook entry to Favorites, tap [Groups] on the phonebook list screen (P.85) and touch and hold a phonebook entry you want to save to Favorites, then drag it onto "Favorites".・To display phonebook entries added to Favorites, on the phonebook list screen, tap [Groups]u[Favorites], or from the Home screen, tap and then tap [Favorites] tab.Setting photo in a phonebook entry1On the phonebook list screen (P.85), tap a phonebook entry you want to add a picture.2On the profile screen, tap [Edit].3Tap [Setting] for image.4Tap [Take photo]/[Select picture].・After shooting a photo or selecting an image, drag or pinch adjusting a trimming frame to set range for displaying image, and then tap [Crop].5Tap [Save].❖Information・You can also set photo to a phonebook entry by the following operation.From the Home screen, tap , then tap [Album]. Select an image you want to set and tap the screen and , then tap [Use as]u[Photo of phonebook]. Select a phonebook entry you want to register, set image range to be displayed, and then tap [Crop].](https://usermanual.wiki/Sony/PM-0070.08-user-guide-part-1/User-Guide-1802255-Page-90.png)
![90PhoneSetting ringtone1On the phonebook list screen (P.85), tap a phonebook entry to set ringtone.2On the profile screen, tap and [Set ringtone].3Select a ringtone and tap [Done].❖Information・To set a ringtone other than the ones stored by default, tap .・Ringtone can be set when saving a phonebook entry depending on the saving account.Combining phonebook entriesYou can bind multiple phonebook entries together into one.1On the phonebook list screen (P.85), tap a phonebook entry to combine.2On the profile screen, tap and [Join/Separate].・Phonebook entries to be combined are displayed.3Tap the phonebook entry to combine.❖Information・To cancel binding, on the profile screen of the phonebook, tap , then tap [Join/Separate]u[Separate].Deleting a phonebook entry1On the phonebook list screen (P.85), tap , then tap [Delete].2Mark the phonebook entry you want to delete.・If you want to delete all phonebook entries, tap [Select all].3Tap [Delete]u[OK].❖Information・To delete only an item of phonebook entry, on the phonebook list screen (P.85), tap a phonebook entry you want to delete and tap , then tap [Delete]u[OK].Checking My profile and editing information1On the phonebook list screen (P.85), tap [My profile].2Tap [Edit].3On the My profile screen, enter necessary information.・Tap [Add] to set phone number or mail address, and tap on "Others" and [Add] to add information.](https://usermanual.wiki/Sony/PM-0070.08-user-guide-part-1/User-Guide-1802255-Page-91.png)
![91Phone4Tap [Save].❖Information・You can register multiple phone numbers, mail addresses, etc. in My profile.・Name card data created with name card creator application can be saved to My profile and the name card data can be exchanged via network. When you use for the first time, on the phonebook list screen (P.85), tap the [My profile] tab and [Create new] and follow the onscreen instructions.Sending phonebook via Bluetooth/Email/GmailRegistered phonebook and My profile information can be sent using Bluetooth function (P.154), or email attachment function.■ Sending phonebook1Tap a phonebook entry you want to send on the phonebook list screen (P.85).2On the profile screen, tap and [Share].3Select sending method and follow the onscreen instructions.■ Sending My profile1Tap [My profile] on the phonebook list screen (P.85).2Tap and [Share].3Select sending method and follow the onscreen instructions.❖Information・To use Bluetooth function, turn on Bluetooth function (P.154) in advance or select [Bluetooth] in Step 3 then tap [Turn on].・If you want to send data as files attached to email/Gmail, send from the compose screen for the mail service in which you have set an account. When you have not set a Gmail account, setup wizard appears. You can create and send email after settings are done.・Messaging (SMS) is not available.・You cannot send some information such as name card data set in phonebook.・For sending all phonebook entries, see "Sharing phonebook entry currently displayed" (P.91).Sharing phonebook entry currently displayed1On the phonebook list screen (P.85), tap , then tap [Others]u[Import/Export].2Tap [Share phonebook data].3Select sending method and follow the onscreen instructions.・If [Use by default for this action.] checkbox is marked, application selection screen will not appear for the next time.](https://usermanual.wiki/Sony/PM-0070.08-user-guide-part-1/User-Guide-1802255-Page-92.png)
![92Phone❖Information・If display conditions for phonebook (P.87) are set, only phonebook entries to be displayed are exported.・To use Bluetooth function, turn on Bluetooth function (P.154) in advance or select [Bluetooth] in Step 3 then tap [Turn on].・If you want to send data as files attached to email/Gmail, send from the compose screen for the mail service in which you have set an account. When you have not set a Gmail account, setup wizard appears. You can create and send email after settings are done.・Messaging (SMS) is not available.・You cannot send some information such as name card data set in phonebook.You can export/import phonebook entries from/to microSD card or docomo mini UIM card. This is useful, for example, when you want to transfer the contact information to another phone.❖Information・You can also use a synchronization service for synchronizing your phonebook. For details, refer to "Setting Auto-sync" (P.138).Exporting phonebook to microSD card1On the phonebook list screen (P.85), tap , then tap [Others]u[Import/Export].2Tap [Export to SD card].3Select a phonebook you want to export.・Tap to select any of [Export one contact data]/[Export some contact data]/[Export all contact data], then tap [OK].・When [Export one contact data]/[Export some contact data] is selected and tap [OK], select a contact you want to export and tap [OK].4Select [Yes]/[No] to attach name card.5Tap [OK].Exporting/Importing phonebook entries](https://usermanual.wiki/Sony/PM-0070.08-user-guide-part-1/User-Guide-1802255-Page-93.png)
![93PhoneImporting phonebook from microSD card1On the phonebook list screen (P.85), tap , then tap [Others]u[Import/Export].2Tap [Import from SD card].・When you set Google account etc., select an account.3Select vCard file you want to import.・If there is only one file, vCard file selection screen does not appear. The file is imported immediately.・If a file has multiple phonebook entries, they are imported all at once.・If there are two or more vCard files, tap any of [Import one phonebook data]/[Import multiple phonebook data]/[Import all phonebook data] to select.4Tap [OK].・If you select [Import one phonebook data]/[Import multiple phonebook data] and tap [OK], select vCard files to import then tap [OK].❖Information・For some phonebook entries, a part of data may not be imported or exported.Importing phonebook entries from docomo mini UIM card1On the phonebook list screen (P.85), tap , then tap [Others]u[Import/Export].2Tap [Import from SIM card].・When you set Google account etc., select an account.3To import one contact, tap the contact you want to import.・To import all contacts, tap and [Import all phonebook data].・If there is a phonebook entry whose name is matched with the imported entry, the entry is imported as a separated one.❖Information・Names and phone numbers can be imported.・Alternatively, on the phonebook list screen, tap [My profile] tab, then tap and [General settings]u[Data management]u[Import]u[Import from SIM card] to import contacts from the docomo mini UIM card.・To export phonebook entries to docomo mini UIM card, use Xperia™ phonebook application. Note that only name and the first phone number can be saved because of memory space of docomo mini UIM card. For some phonebook entries, a part of data may not be exported.](https://usermanual.wiki/Sony/PM-0070.08-user-guide-part-1/User-Guide-1802255-Page-94.png)
![95Mail/Web browserMail/Web browse rSend/receive mails using DOCOMO mail address (@docomo.ne.jp).You can use pictogram and Deco-mail. Mails can be received automatically. For details on sp-mode mail, refer to "ご利用ガイドブック (spモード編) (Mobile Phone User's Guide [sp-mode]) (in Japanese only)".1From the Home screen, tap .2Flick the screen, then tap [ダウンロード (Download)].・After this step, follow the instructions on the screen.❖Information・When the screen lock (P.142) is set to "Slide", a notification icon for sp-mode mail reception can be displayed on the unlock screen. For the setting to show or hide icons, see "Setting information displayed on the unlock screen" (P.128).・sp-mode mail data can be backed up in a microSD card using "SD card backup". For information on backing up, see "SD card backup" (P.213).You can send and receive text messages up to 70 two-byte characters (up to 160 one-byte characters) with a mobile phone number as the destination.1From the Home screen, tap , then tap [Messaging].2Tap (New mail).3Tap , then mark a checkbox for the other party to send to from the contacts list.・When you enter a name or phone number in the box at the top of the screen, a list of contacts beginning with the entered numbers or letters appears.・You can input phone number directly by tapping [To:].4Tap [Done].5Tap [Write message] and enter a message.・Tap and [Select message template] to enter by selecting texts from templates registered in "Message template settings" (P.97).sp-mode mail Message (SMS)Sending message (SMS)](https://usermanual.wiki/Sony/PM-0070.08-user-guide-part-1/User-Guide-1802255-Page-96.png)
![96Mail/Web browser・When the number of entered characters comes close to a limit, a counter appears on the upper left of the text box and you can check the remaining entry space.6Tap [Send].❖Information・For the character entry, see "Character entry" (P.40).・You can also send/receive text messages to/from customers of overseas network operators. See "Mobile Phone User's Guide [International Services]" or the DOCOMO International Services website.・To send SMS to users of overseas network operators, enter "+", "Country code" and then "the recipient mobile phone number". Enter the phone number without a leading "0", if any. You can also enter "010", "Country code" and "the recipient mobile phone number" to send messages (To reply to the received SMS overseas, enter "010").1From the Home screen, tap , then tap [Messaging].2Tap someone whose messages you want to read from the recipient list.・A message (SMS) appears.❖Information・When you receive a message (SMS), appears on the status bar. To read the message (SMS), drag the status bar downward, tap an item of notified message (SMS).・When the screen lock (P.142) is set to "Slide", a notification icon for message (SMS) reception can be displayed on the unlock screen. For the setting to show or hide icons, see "Setting information displayed on the unlock screen" (P.128).・Tap / in the message (SMS) to turn to (yellow). From the Home screen, tap , then tap [Messaging]uTap and [Starred messages] to quickly access to the mail you have marked.Receiving and reading message (SMS)](https://usermanual.wiki/Sony/PM-0070.08-user-guide-part-1/User-Guide-1802255-Page-97.png)
![97Mail/Web browser1From the Home screen, tap , then tap [Messaging].2Select a thread whose phone number you want to save.3Tap and then [Add to Contacts].4Tap [Register new].・When you set Google account etc., you can select an account to add.5Enter required items and tap [Save].1From the Home screen, tap , then tap [Messaging].2Tap and then [Settings].・You can set the following options.Saving phone number of message (SMS) to ContactsSetting message (SMS)Delivery reportIf you mark, a message (SMS) you sent is marked each time a recipient receives the message (SMS).NotificationsMark if you want to be notified by the status bar when a new message (SMS) arrives.Notification toneSet if you want to be notified by selected notification tone when a new message arrives.Notification vibrationSet if you want to receive a notification by vibration when a new message arrives.Notification lightMark to set to notify of reception by notification LED when notification setting is made.SIM messagesManage messages (SMS) saved to docomo mini UIM card.Message template settingsRegister phrase that can be inserted when writing a text.Push settingsSet a message (SMS) sent from the provider.](https://usermanual.wiki/Sony/PM-0070.08-user-guide-part-1/User-Guide-1802255-Page-98.png)
![98Mail/Web browser1From the Home screen, tap , then tap [Messaging].2Tap a thread.3Touch and hold a message (SMS) you want to delete.4Tap [Delete message]u[Yes].1From the Home screen, tap , then tap [Messaging].2Touch and hold a thread to delete.3Tap [Delete conversation]u[Yes].1From the Home screen, tap , then tap [Messaging].2Tap and tap [Delete several].3Tap [Mark all]u[Delete].・After tapping [Mark all], you can tap individual thread to unmark. Tap [Unmark all] to unmark all of the threads.You can create an email account provided by mopera U mail, a POP3 or IMAP compatible email account provided by general ISP (provider), or an Exchange ActiveSync account to send or receive email.Email setup wizard appears. Set according the onscreen instructions. Multiple email accounts can be set.1From the Home screen, tap , and then tap [Email].2Enter your email address and password.3Tap [Next].・To make the email account settings manually, tap [Manual setup] and follow the onscreen instructions.4Select required items for account setting and tap [Next].Deleting a message (SMS)Deleting a threadDeleting all threadsEmailMaking initial setting for Email](https://usermanual.wiki/Sony/PM-0070.08-user-guide-part-1/User-Guide-1802255-Page-99.png)
![99Mail/Web browser5Enter account name and displayed name for email, and tap [Next].・Inbox for set email account appears.・If a screen for selecting type of account appears, tap an email account type and follow the onscreen instructions to set.・If you set an Exchange ActiveSync account, a name displayed for email cannot be set. Set up from "Your name" (P.102) on email account settings after email initial settings is complete.❖Information・If you need to make the settings manually, contact your email service provider or system administrator for the correct email account settings.・If you set an Exchange ActiveSync account as email account, and if server manager sets Remote wipe, the data saved in the terminal may be deleted. Data stored in microSD card is not deleted.・Emails are not displayed in Timescape.1From the Home screen, tap , and then tap [Email].2Tap (Compose).3Enter the email address of recipient.・Tap to display the contacts list screen to select from registered contacts. When you enter a name or email address in the box at the top of the screen, a list of contacts beginning with the entered numbers or letters appears.・To Cc or Bcc, tap and tap [Show Cc/Bcc].・To enter multiple email addresses directly, separate with a comma (,) and then enter the next email address.4Enter a subject.5Enter a message.Creating and sending email](https://usermanual.wiki/Sony/PM-0070.08-user-guide-part-1/User-Guide-1802255-Page-100.png)
![100Mail/Web browser6To attach a file, tap .・Attach a file in the following operations.・Image/video/music file up to 5MB can be attached in Email.7Tap (Send).❖Information・When you want to save a mail as draft while creating a mail, enter any of recipient, subject or message or attach a file. If you do not enter or attach anything, a mail is not saved as draft. (When only automatic signature is attached, a mail is not saved as draft either.)・While creating a mail, tap and tap [Save draft] to save a mail as draft. Also, when you move to the other screen while creating a email, the email is automatically saved as draft.・In sent/received emails, a communication data is also included other than text and image displayed on the screen and charges will apply to the data.・Email is handled as an email from a PC. You cannot send or receive email if "Reject emails from PCs" is set on a recipient terminal.1From the Home screen, tap , and then tap [Email].・If you have already set an email account, tap [Inbox] to select an email account to receive.2On the Inbox, tap and tap [Refresh].3Tap an email.❖Information・The sender name of a received email is the name set on sender's terminal.・If you set "Email notifications" in Account settings (P.102) and set "Inbox check frequency" to an item other than "Manual", appears in the status bar when you receive a new email. Drag the status bar downwards to read the received email.・If you set "Inbox check frequency" in Account settings (P.102) to an item other than "Manual", and if you are using the pay-as-you-go data communication, you may be charged every time you check your email.・If you tap the address of a received email, you can register it in Contacts. If it has been already registered, you can display the details of the contact.Add pictureSelect a file from the saved image file list.Take photoStart the camera to take a photo and attach it.Add videoSelect a file from the saved video file list.Record videoStart the camera to record a video and attach it.Add sound WALKMAN : Select a saved music file.Sound Recorder : Record a voice message and attach it.Receiving and reading email](https://usermanual.wiki/Sony/PM-0070.08-user-guide-part-1/User-Guide-1802255-Page-101.png)
![101Mail/Web browser・Tap (gray) to turn (yellow) on the email list screen or email message screen to add the marked email to "Starred" folder on the email screen. "Starred" folder is displayed when you tap [Inbox] and [Show all folders]. From "Starred" folder, you can quickly access to the mail you have marked.If is not displayed on the email message screen, tap to display.・When phone memory becomes low, a message indicating low memory space appears and receiving emails is not available. Delete saved emails etc. to make available memory space.Changing Inbox view1From the Home screen, tap , and then tap [Email].2Tap and [Settings]u[General]u[Preview pane].・If you mark [Landscape], email message preview can be displayed in landscape view.❖Information・If you have two or more accounts, change made in any of the accounts applies to all accounts.1From the Home screen, tap , and then tap [Email].2Tap email and .・The attached file list is displayed.3Tap [Save] of file you want to save.・When attached file is not loaded, tap [Load].・Tap [View] and select an application to view the attached file.❖Information・The attached file is saved on the internal storage.1From the Home screen, tap , and then tap [Email].2Tap email and .3Tap any of [Reply]/[Reply all]/[Forward].4Enter a message and tap .・When you select [Forward], enter an email address to forward.❖Information・Alternatively, touch and hold an email you want to reply/forward and tap [Reply]/[Reply all]/[Forward].Saving attachment file of emailReplying/forwarding email](https://usermanual.wiki/Sony/PM-0070.08-user-guide-part-1/User-Guide-1802255-Page-102.png)
![102Mail/Web browser・When you reply or forward an email, the original message contents for replying or forwarding is quoted. To delete the quoted message text, unmark "Include original text".・When you forward an email, the attachment file of the original message is quoted. To cancel quoting attached file, tap .1From the Home screen, tap , and then tap [Email].2Tap an email delete.3Tap u[Yes].❖Information・Touch and hold an email you want to delete and tap [Delete]u[Yes] to delete.・To delete several emails at the same time, operate as follows.In Inbox, tap and [Delete]uMark checkboxes on the emails you want to deleteuTap [Delete]u[Yes].1From the Home screen, tap , and then tap [Email].2Tap and [Settings].3Tap an Email account you want to change the settings.・You can set the following options.Deleting emailChanging Email account settingsAccount nameChange account name.Your nameChange your name (sender name).SignatureChange your signature.Quick replyRegister phrase that can be inserted when creating an email.Default accountSet to the default account to send email, if you set two or more email accounts.Inbox check frequencySet whether to check new messages automatically and intervals of automatic check.Auto download attachmentsSet whether to download attached file automatically when connecting via Wi-Fi.Email notificationsSet whether to show email arrival notification in the status bar.Select ringtoneSet ringtone when receiving an email.VibrateSet whether to vibrate when receiving an email.Notification lightSet whether to notify email reception by notification LED.](https://usermanual.wiki/Sony/PM-0070.08-user-guide-part-1/User-Guide-1802255-Page-103.png)
![103Mail/Web browser・The items vary depending on the account type.❖Information・You can also set "Out of office", "Days to sync", "Sync contacts", and "Sync calendar" for an Exchange ActiveSync account. "Outgoing settings" cannot be set.・If you set "Inbox check frequency" to other than "Manual", and if you are using the pay-as-you-go data communication, you may be charged every time you check your email.・If you tap [General] in Step 2, you can change whole "Email" application settings.1From the Home screen, tap , and then tap [Email].2Tap and [Settings]u[ADD ACCOUNT].3Enter your email address and password.・If required, mark [Send email from this account by default.] checkbox.4Tap [Next].・To make the email account settings manually, tap [Manual setup] and follow the onscreen instructions.5Enter required items for account settings and tap [Next].6Enter account name and displayed name for email, and tap [Next].・Inbox for set email account appears.・If a screen for selecting type of account appears, tap an email account type and follow the onscreen instructions to set.・If you set an Exchange ActiveSync account, a name displayed for email cannot be set. Set up from "Your name" (P.102) on email account settings after email initial settings is complete.Incoming settingsSet mail server for receiving.Outgoing settingsSet mail server for sending.Delete accountDelete Email account.Setting another Email account](https://usermanual.wiki/Sony/PM-0070.08-user-guide-part-1/User-Guide-1802255-Page-104.png)
![104Mail/Web browser❖Information・If you need to make the settings manually, contact your email service provider or system administrator for the correct email account settings.・If you set an Exchange ActiveSync account as email account, and if server manager sets Remote wipe, the data saved in the terminal may be deleted. Data stored in microSD card is not deleted.・Tap [Inbox] to display a list of set accounts. Tap [Combined view] to display combined Inbox for all accounts.・Emails are not displayed in Timescape.1From the Home screen, tap , and then tap [Email].2Tap and [Settings]uTap an account to delete.3Tap [Delete account]u[OK].mopera U users (for the setting, see "Setting mopera U" (P.124)) can use mopera U Mail.In mopera U Mail, POP mail and IMAP mail are available. The mail box supports 50MB. Also, the Web mail system is available.■ POP mail1From the Home screen, tap , and then tap [Email].・If you already set an Email account, tap and [Settings]u[ADD ACCOUNT].2Enter mopera U mail address and mopera U password, then tap [Manual setup]/[Next].・If you tap [Next], it changes automatically to POP3 account. Go to Step 4.3Tap [POP3] from the type of the mail account.4Check that you have entered [User name] and [Password] for mopera U correctly, and [mail.mopera.net] for the POP3 server.・If you tap [Next] in Step 2, "mail.mopera.net" is entered in the SMTP server field.Deleting Email accountUsing mopera U Mail](https://usermanual.wiki/Sony/PM-0070.08-user-guide-part-1/User-Guide-1802255-Page-105.png)
![105Mail/Web browser5Select the security type.・When you do not set security, select [None].6Confirm the entry, then tap [Next].7Enter [mail.mopera.net] for the SMTP server and confirm the entry of [User name] and [Password] for mopera U.・If you tap [Next] in Step 2, you need to mark [Require sign–in] to check entered [User name], [Password] for mopera U.・If you tap [Next] in Step 2, "mail.mopera.net" is entered in the SMTP server field. Set "587" in the Port field.8Tap [Next].9On the account setting screen, set frequency of checking Emails etc. and tap [Next].10On the account setting screen, enter a display name for sending mail and tap [Next].・The mailer is displayed and the set mail account is available.❖Information・When [Require sign-in.] is unmarked on the SMTP server setting screen, sending mails is not available. Mark [Require sign-in.].If you have a Google account, you can send/receive emails by using Gmail on your terminal. If you have no Google account, see "Setting Google account" (P.135).❖Information・Gmail messages are not displayed in Timescape.1From the Home screen, tap , then tap [Gmail].2On the Inbox tray, tap .・Synchronizing "Gmail" application in the terminal with your Gmail account starts, and the Inbox is refreshed.❖Information・For details of Gmail, from the Gmail screen, tap and then [Help] to refer to the Help with the Browser.GmailRefreshing Gmail](https://usermanual.wiki/Sony/PM-0070.08-user-guide-part-1/User-Guide-1802255-Page-106.png)
![106Mail/Web browserYou can use Google Talk instant messaging to chat with friends. To use Google Talk, you need to make settings of your Google account. For details, refer to "Setting Google account" (P.135).Signing in Google TalkSigning in is unnecessary if you have already set a Google account.1From the Home screen, tap , then tap [Talk].2Tap [Existing] and enter user name and password.3Tap [Sign in].・After this step, follow the onscreen instructions.❖Information・For details of Google Talk, from the Google Talk screen, tap and then [Help] to refer to the Help with the Browser.It is a service with which you can receive earthquake early warning, etc. delivered by the Meteorological Agency.・Area Mail is a free service for which subscription is not required.・Area Mail cannot be received in the following case.-During a voice call- Out of service area- While power is off- During International roaming-During Airplane mode- While updating software - When a SIM other than by DOCOMO is inserted - While sending/receiving a message (SMS)・Area Mail may not be received when tethering is set or during packet communications.・Area Mail that could not be received cannot be received later.Google TalkSign in and online chatEarly Warning "Area Mail"](https://usermanual.wiki/Sony/PM-0070.08-user-guide-part-1/User-Guide-1802255-Page-107.png)
![107Mail/Web browserA notification content screen appears and you are notified by buzzer sound/dedicated ringtone and vibration.1Receive Area Mails automatically.2A dedicated ring tone sounds and notification LED flashes when an Area Mail is received.・Ringtone and ringtone volume cannot be changed.・The notification LED blinks only when backlight is off.3A message body of Area Mail appears automatically.View received Area Mail later1From the Home screen, tap , then tap [Area Mail].2Select an Area Mail from the Area Mail list.・You can view message of Area Mail.1From the Home screen, tap , then tap [Area Mail].2Tap and then [Settings].❖Information・Area Mail cannot be set when docomo mini UIM card is not inserted.Receiving Early Warning "Area Mail"Setting Early Warning "Area Mail"Receive settingSet whether to receive Area Mails.Beep toneSet sounding time for Area Mail reception and whether to sound a dedicated ringtone even in silent mode.Check screen image and beep toneCheck the ringtone and screen for reception of earthquake early warning, tsunami warning or disaster/evacuation information.Other settingsSet receiving/deleting Area Mail.](https://usermanual.wiki/Sony/PM-0070.08-user-guide-part-1/User-Guide-1802255-Page-108.png)
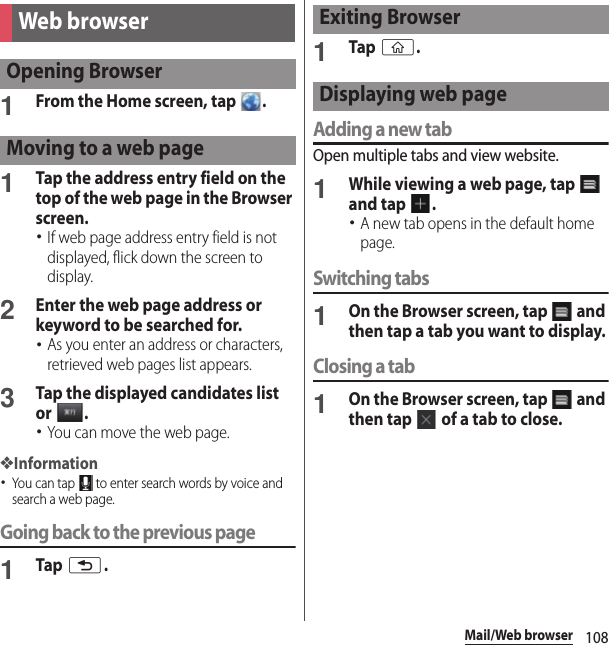
![109Mail/Web browserZooming in/out a web pageTo zoom in/out a webpage, perform any of the following operations.・Double-tap at the point you want to zoom in/out.・Pinch-out at the point you want to zoom in or pinch-in at the point you want to zoom out.❖Information・Web pages created to fit to the screen cannot be zoomed in/out.Searching text in a web page1While viewing a web page, tap and tap [Find on page].・The search bar appears in the upper part of the screen.2Enter the search item.・When you enter characters, matching characters are emphasized.3Tap to close the search bar.Copying text in a web page1While viewing a web page, touch and hold text you want to copy.・For link set text, touch and hold it long and then [Select text].2Drag or to select a range of text to copy.・Selected text is highlighted in blue.3Tap .・After copying text is completed, a message "Text copied to clipboard." appears.4Touch and hold the entry field on the pasting location, and tap [PASTE].❖Information・On some web pages, selecting characters may not be available.Adjusting Browser settings1On the Browser screen, tap and [Settings] to select an item for the Browser.Back to the previous matched itemGo to next matched item](https://usermanual.wiki/Sony/PM-0070.08-user-guide-part-1/User-Guide-1802255-Page-110.png)
![110Mail/Web browserSetting a home pageSet home page for opening new tab.1On the Browser screen, tap and then [Settings]u[General]u[Set homepage] and select a home page setting option.Operating links in web pages1Open the web page you want to operate the links.2Tap a link.・The links get enclosed in a blue box when selected.・If you touch and hold link, the menus, "Open", "Open in new tab", "Save link", "Copy link URL" and "Select text" appear. When you touch and hold an image or a link contained image, "Save image", "View image" and "Set as wallpaper" also appear.・Browser recognizes some phone numbers that allow you to call the phone number. Tap the phone number to call.・When you download a file by "Save link" from websites which require Basic authentication or SSL session, the downloading may be failed.Operating links](https://usermanual.wiki/Sony/PM-0070.08-user-guide-part-1/User-Guide-1802255-Page-111.png)
![111Mail/Web browserYou can check history and store many bookmarks on the terminal.Bookmarking a web page1On the Browser screen, display the web page you want to bookmark.2Tap and [Save to bookmarks].3Set label etc. and tap [OK].・You can set the following options.Opening a bookmark1On the Browser screen, tap and [Bookmarks].2Tap the bookmark you want to open.・Touch and hold a bookmark to edit or delete.Checking browsing history1On the Browser screen, tap and tap [Bookmarks]u[History] tab.2Tap the time you browsed the web page, such as [Today], [Yesterday], etc.・To open the web page, tap an item.・To check your most visited web pages, tap [Most visited].❖Information・On the Browser screen, touch and hold x to check the history.Clearing history1On the Browser screen, tap and tap [Bookmarks]u[History] tab.2Touch and hold a history you want to delete and tap [Remove from history].❖Information・To clear temporary internet files such as cache, on the Browser screen, tap and [Settings], then from the "Privacy & security", set each item.Managing bookmarks and historyLabelSet a name displayed to the bookmark.AddressSet URL saved to the bookmark.AccountWhen you set Google account etc., you can select the account as a bookmark saving location.Add toAdd a shortcut of the bookmark on the Home screen or create a folder.](https://usermanual.wiki/Sony/PM-0070.08-user-guide-part-1/User-Guide-1802255-Page-112.png)
![112SettingsSettings1From the Home screen, tap , then tap [Settings].■ Setting menu❖Information・Alternatively, from the Home screen, tap and u[Settings], or open the notification panel and tap to display the Settings screen.You can make settings related to networks such as Wi-Fi, Bluetooth function.Using the Wi-Fi function, you can connect to an access point for your home, company network or public wireless LAN services to use mail and Internet.・Even when Wi-Fi is on, packet communication is available. However, while you connect Wi-Fi network, Wi-Fi comes first.・When a Wi-Fi network is disconnected, connection is automatically switched to a "LTE (preferred)/WCDMA/GSM" network. Note that packet communication fee applies for using LTE/3G/GPRS net work .・Turn the Wi-Fi function to off when you do not use Wi-Fi to cut battery power consumption.Before using Wi-FiTo use Wi-Fi, turn on Wi-Fi and search available Wi-Fi network, then connect it.・To access the Internet using Wi-Fi, connect to Wi-Fi network in advance.❖Information・Make sure to receive enough signal strength for using Wi-Fi. The signal strength of the Wi-Fi network varies by the location of the terminal. Moving closer to the Wi-Fi router might enhance the signal strength.Viewing the setting menuWIRELESS & NETWORKSP. 1 1 2DEVICEP. 1 2 5PERSONALP. 1 3 4SYSTEMP. 1 4 7Wireless & networksWi-FiP. 1 1 2BluetoothP.117, P.154Data usageP. 1 1 7More... Airplane modeP. 1 1 8VPNP. 1 1 9Tethering & por table hotspotP. 1 2 0Wi-Fi DirectP. 1 2 2Location-based Wi-FiP. 1 2 2Mobile networksP.122, P.220Wi-Fi](https://usermanual.wiki/Sony/PM-0070.08-user-guide-part-1/User-Guide-1802255-Page-113.png)
![114SettingsTurning on Wi-Fi1From the Settings screen (P.112), tap of Wi-Fi or drag it to the right.❖Information・It may take a few seconds before the Wi-Fi connection is on.Connecting to a Wi-Fi network1From the Settings screen (P.112), tap [Wi-Fi].・Available Wi-Fi networks are displayed. The available networks may be open or secured. This is indicated by or next to the Wi-Fi network name.2Select Wi-Fi network you want to connect, tap [Connect].・If you are trying to connect to a protected Wi-Fi network, you are asked to enter the security key for that Wi-Fi network before you can connect to it.❖Information・The next time you connect to a Wi-Fi network, the security key is saved in the terminal.・If you enter a wrong password (security key) when selecting an access point to connect, any of the following appears.-Saved, Secured with WEP- Avoided poor Internet connection*- Authentication problem- Limited connectivity* It may take 5 minutes or more to display the message after [Connect] is tapped.Check a password (security key).When any above message appears even if you enter a correct password (security key), the correct IP address may not have been acquired. Check the signal status and reconnect.・To connect Wi-Fi network with WPS compatible device, on the Settings menu screen (P.112), tap [Wi-Fi] and select a Wi-Fi network to connect and mark [Show advanced options]. Set appeared WPS item to "Push button", tap [Connect] and then push WPS button on the WPS compatible device.](https://usermanual.wiki/Sony/PM-0070.08-user-guide-part-1/User-Guide-1802255-Page-115.png)
![115Settings■ Wi-Fi network status icons on status barThe following icons appear according to the Wi-Fi network connection status.* Without connected to Wi-Fi network, you need to set Wi-Fi Network notification to on beforehand. (P.115)Disconnecting a Wi-Fi network1From the Settings screen (P.112), tap [Wi-Fi].2Tap the Wi-Fi network that you are currently connected to.3Tap [Forget network].Wi-Fi network statusWhen you are connected to a Wi-Fi network or when there are Wi-Fi networks available in your vicinity, you can see the status of these Wi-Fi networks. You can also set the terminal to notify you when an unsecured Wi-Fi network is detected.Setting the Wi-Fi network notification to ON1Confirm Wi-Fi is ON and from the Settings screen (P.112), tap [Wi-Fi].2Tap and [Advanced].3Mark [Network notification] checkbox.Scanning for Wi-Fi networks manually1From the Settings screen (P.112), tap [Wi-Fi].2Tap [Scan].・Scanning Wi-Fi networks starts.3Tap a Wi-Fi network in the list to connect to it.Adding a Wi-Fi network manuallyYou need to turn on the Wi-Fi setting beforehand. (P.114)1From the Settings screen (P.112), tap [Wi-Fi].2Tap [Add network].3Enter a network SSID of the Wi-Fi network you want to add.Appears when connected to Wi-Fi network.Appears when communicating via Wi-Fi network.Appears when connected to Wi-Fi network using Auto IP function.Appears when any open network within the service area is detected.*](https://usermanual.wiki/Sony/PM-0070.08-user-guide-part-1/User-Guide-1802255-Page-116.png)
![116Settings4Tap [Security] field and tap a security type of the Wi-Fi network you want to add.・4 options, "None", "WEP", "WPA/WPA2 PSK", or "802.1x EAP", appear.5If required, enter security information for the Wi-Fi network you want to add.6Tap [Save].Viewing detailed information on a connected Wi-Fi network1From the Settings screen (P.112), tap [Wi-Fi].2Tap the Wi-Fi network that you are currently connected to.・The detailed network information is displayed.❖Information・From the Settings screen (P.112), tap [Wi-Fi] and , then tap [Advanced] to enable/disable Auto IP support or check "MAC address" and "IP address".Wi-Fi sleep policyBy changing Wi-Fi sleep policy, you can choose to disable the Wi-Fi function in the terminal when the screen backlight turns off. You can also set the terminal to always turn on the Wi-Fi function or to turn it on when the terminal is charged.❖Information・When a Wi-Fi network is disconnected, connection is automatically switched to a LTE/3G/GPRS network.Adding a Wi-Fi sleep policy1From the Settings screen (P.112), tap [Wi-Fi].2Tap .3Tap [Advanced].4Tap [Keep Wi-Fi on during sleep].5Tap any of [Always]/[Only when plugged in]/[Never (increases data usage)].](https://usermanual.wiki/Sony/PM-0070.08-user-guide-part-1/User-Guide-1802255-Page-117.png)
![117SettingsConnect Bluetooth device wirelessly using Bluetooth function. For Bluetooth communication, see "Using Bluetooth function" (P.154).Enable/Disable data communication or set data usage limit.❖Information・You can check communication volume for each application. For some applications, the settings can be displayed.Turning on data communication1From the Settings screen (P.112), tap [Data usage].2Tap of Mobile data or drag it to the right.3Read the note and tap [Yes].Setting data usage limit1From the Settings screen (P.112), tap [Data usage].2Tap [Set mobile data limit] and read the notes, and then tap [OK].・[Set mobile data limit] is marked.❖Information・Note that data communication will be disabled when data usage volume reaches to the limit.・Change the setting value for data usage limit and the value for alert by dragging the right end of each bar in the graph.Setting Data usage cycle1From the Settings screen (P.112), tap [Data usage].2Tap a period set in "Data usage cycle"/[Change cycle...].・When [Change cycle...] is tapped, select reset data and tap [Set].BluetoothData usage](https://usermanual.wiki/Sony/PM-0070.08-user-guide-part-1/User-Guide-1802255-Page-118.png)
![118SettingsPermitting data roaming1From the Settings screen (P.112), tap [Data usage].2Tap and then [Data roaming], read the notes and then tap [OK].・[Data roaming] checkbox is marked.Restricting background dataYou need to set restricting mobile data beforehand. (P.117)1From the Settings screen (P.112), tap [Data usage].2Tap and [Restrict background data], then read the notes and then tap [OK].・[Restrict background data] checkbox is marked.Displaying Wi-Fi usage status1From the Settings screen (P.112), tap [Data usage].2Tap and mark [Show Wi-Fi usage].・"Wi-Fi" tab is displayed and tap it to check Wi-Fi usage condition.In this mode, the functions of using radio wave transmissions such as calling, accessing to the Internet (including sending/receiving mails), etc. are disabled. It is useful when you want to operate the terminal with no interruption of incoming calls or mails.Turning on Airplane mode1From the Settings screen (P.112), tap [More...].2Mark [Airplane mode] checkbox.・When you unmark [Airplane mode] checkbox, the Airplane mode turns off.❖Information・You can also switch on/off by pressing and holding p for over a second and then [Airplane mode] in the pop-up screen.・Even if Airplane mode is on, Wi-Fi and Bluetooth function can be turned on.Airplane mode](https://usermanual.wiki/Sony/PM-0070.08-user-guide-part-1/User-Guide-1802255-Page-119.png)
![119SettingsVirtual Private Network (VPN) is a technology to connect to the information in a protected local network from another network. Generally, VPNs are provided to companies, schools and other facilities. A user can access to the information in the local network from outside of the premises.To set up a VPN access from the terminal, you need to retrieve the information related to security from your network administrator. For details, refer to http://www.sonymobile.co.jp/support/ (in Japanese only).❖Information・If you set sp-mode as an ISP, you cannot use PPTP.Adding a VPNSet the unlock method for the screen lock in advance. For details, refer to "Setting screen unlock method" (P.143).1From the Settings screen (P.112), tap [More...]u[VPN].2Tap [Add VPN network].3When an editing screen is displayed, follow the instruction of the network administrator to set required items of VPN settings.4Tap [Save].❖Information・Added VPNs can be edited or deleted.To edit VPNs, touch and hold a desired VPN, then tap [Edit network]. Change the VPN settings as required and tap [Save].To delete, touch and hold a VPN to be removed, then tap [Delete network].Connecting to a VPN1From the Settings screen (P.112), tap [More...]u[VPN].2Tap a VPN to connect to.3If the dialog box appears, enter the desired authentication information and tap [Connect].・When you are connected to a VPN, appears in the status bar. When you are disconnected, the notification indicating to return to the VPN setting screen appears, so that you can reconnect to.Disconnecting a VPN1Open the Notification panel, and tap the VPN connecting notification.2Tap [Disconnect].Connecting to a VPN (Virtual Private Network)](https://usermanual.wiki/Sony/PM-0070.08-user-guide-part-1/User-Guide-1802255-Page-120.png)
![120SettingsTethering stands for using mobile devices such as smartphone as modem to allow USB compatible devices or wireless LAN devices to access the Internet.❖Information・Packet communication charge when using tethering varies depending on the charging plan you use. Subscription of packet flat-rate service is highly recommended.・For details on usage charge, etc., refer to http://www.nttdocomo.co.jp/english/ .・For details on tethering, from the Settings screen (P.112), tap [More...]u[Tethering & portable hotspot]u[Help] to refer.Setting USB tetheringConnecting the terminal to a USB compatible PC with microUSB cable, and using the terminal as a modem, you can connect the PC to the Internet.1From the Settings screen (P.112), tap [More...]uTap [Tethering & portable hotspot].2Connect the terminal to a PC using a microUSB cable (P.29).・When you connect microUSB cable for the first time, the driver software for the terminal is installed to a PC. Wait for a while until installation is completed. After completion, if a confirmation screen for installation of PC Companion software appears, tap [Skip].3Tap [USB tethering].4Confirm details of the cautions displayed, tap [OK].・[USB tethering] is marked.❖Information・System requirements (OS) for USB tethering are as follows.- Microsoft Windows 7- Microsoft Windows Vista- Microsoft Windows XP*-Linux* For Microsoft Windows XP, installation of PC Companion is required.Using tethering function](https://usermanual.wiki/Sony/PM-0070.08-user-guide-part-1/User-Guide-1802255-Page-121.png)
![121SettingsSetting up a portable Wi-Fi hotspotYou can use the terminal as a Wi-Fi access point to connect up to 10 wireless LAN devices to the Internet simultaneously.1From the Settings screen (P.112), tap [More...]u[Tethering & portable hotspot].2Tap [Configure Wi-Fi hotspot].3Enter a network SSID of the Wi-Fi access point to set.・By default, "Xperia AX SO-01E_XXXX" is set.4Tap [Security] field and tap a security type of Wi-Fi access point to set.・"None", "WPA PSK" and "WPA2 PSK" appear.5Enter security information of the Wi-Fi access point to set as required.6Tap [Save].❖Information・By default, the password is set at random. You can change the password as desired.Setting Wi-Fi tethering1From the Settings screen (P.112), tap [More...]u[Tethering & portable hotspot].2Tap [Portable Wi-Fi hotspot].3Confirm details of the cautions displayed, tap [OK].・[Portable Wi-Fi hotspot] is marked.❖Information・If USB tethering starts while connecting to Wi-Fi network, Wi-Fi network is disconnected and automatically connected when Wi-Fi tethering ends. Alternatively, when the terminal and DLNA device are connected via Wi-Fi network, starting/ending Wi-Fi tethering affects Wi-Fi connection.・USB tethering and Wi-Fi tethering can be used at the same time.](https://usermanual.wiki/Sony/PM-0070.08-user-guide-part-1/User-Guide-1802255-Page-122.png)
![122SettingsYou can connect among the devices compatible with Wi-Fi Direct via Wi-Fi even without configuring access point.1From the Settings screen (P.112), tap [More...]u[Wi-Fi Direct].・When the Wi-Fi setting is on, the note appears. Read the note and tap [OK].・[Wi-Fi Direct] is marked.❖Information・To use the Wi-Fi Direct function, you need an application that is compatible with Wi-Fi Direction function. The function is available when you install a compatible application.Connect to Wi-Fi within only neighboring place you registered to reduce the battery power consumption.1From the Settings screen (P.112), tap [More...]u[Location-based Wi-Fi].2Tap of Location-based Wi-Fi or drag it to the right.・When Wi-Fi network is not registered, tap [Set up Wi-Fi] to connect to Wi-Fi. (P.114)An access point for connecting to the Internet (sp-mode, mopera U) is already registered. You can add or change it if necessary.By default, sp-mode (P.124) is set for the usual access point.Checking the access point you use1From the Settings screen (P.112), tap [More...]u[Mobile networks]u[Access Point Names].・Available access points (APN) appear.・It is recommended that you use the displayed access point without editing.❖Information・If you have several available connections, a marked radio button to the right indicates the active network connection.Using Wi-Fi Direct functionUsing Location-based Wi-FiSetting an access point](https://usermanual.wiki/Sony/PM-0070.08-user-guide-part-1/User-Guide-1802255-Page-123.png)
![123SettingsSetting an access point additionally1From the Settings screen (P.112), tap [More...]u[Mobile networks]u[Access Point Names].2Tap .3Tap [New APN].4Tap [Name], enter a name and tap [OK].5Tap [APN] and enter the access point name and tap [OK].6Tap and enter all other information required by your network operator.7Tap and [Save].❖Information・Do not change the MCC/MNC. If you change MCC/MNC to other than the default value (440/10), the settings do not appear on the APNs screen. When the MCC/MNC settings do not appear on the APNs screen, tap to make APN settings with [Reset to default] or [New APN] again.・Note that, when using the prediction conversion by one-byte alphabet entry mode (English mode) with mark in [Auto space] (P.55) on Japanese keyboard settings screen, spaces may be entered automatically when the prediction option is confirmed. In this case, delete spaces.Using block access point change functionSet to prevent changing access point automatically.1From the Settings screen (P.112), tap [More...]u[Mobile networks].2Mark [Block access point change] checkbox.❖Information・This function is enabled by default. If disabled, access point is changed automatically and charges may apply unexpectedly.・If you install an application, some applications may not be operated correctly when this function is enabled.](https://usermanual.wiki/Sony/PM-0070.08-user-guide-part-1/User-Guide-1802255-Page-124.png)
![124SettingsBy initializing an access point, the default state is restored.1From the Settings screen (P.112), tap [More...]u[Mobile networks]u[Access Point Names].2Tap and tap [Reset to default].sp-mode is ISP for NTT DOCOMO smartphone. In addition to accessing Internet, you can use the mail service using the same address as imode mail (@docomo.ne.jp), etc. sp-mode is a service requiring subscription. For details on sp-mode, refer to NTT DOCOMO website.mopera U is ISP of NTT DOCOMO's Internet connection. If you have subscribed to mopera U, you can use Internet after making the simple settings. mopera U is a service requiring subscription.Setting mopera U1From the Settings screen (P.112), tap [More...]u[Mobile networks]u[Access Point Names].2Mark [mopera U]/[mopera U設定 (mopera U settings)] radio button.・Return to the Home screen and open the Browser. You can enjoy the nice Internet access.❖Information・"mopera U設定 (mopera U settings)" is an access point for setting mopera U. When you use the access point for setting mopera U, packet communication charges for setting do not apply. Note that you can set only the initial setting screen or the change setting screen. For details on mopera U settings, refer to mopera U website.Initializing an access pointsp-modemopera U](https://usermanual.wiki/Sony/PM-0070.08-user-guide-part-1/User-Guide-1802255-Page-125.png)
![125SettingsYou can use the network services and search for available networks. For Call settings, see "Call settings" (P.84).Set ringtones, operation sound, vibrator, etc.Adjusting each sound volume1From the Settings screen (P.112), tap [Sound]u[Volumes].・Adjust the volume of following items.- Music, video, games, & other media- Ringtone & notifications-Alarms2Drag the slider left or right to adjust the level.・Drag the slider to the left for volume down, or to the right for volume up.3Tap [OK].❖Information・Even if alarm volume is set in Volumes, alarm volume is enabled by "Alarm volume" set in "Alarm & clock" (P.210).Adjusting the ringtone volume with the volume key1From the Home screen, press up or down of m.・The volume adjustment bar appears, you can adjust the volume up or down.❖Information・You can also press m or p to mute the ringtone for an incoming call.DeviceCall settingsSoundxLOUD™Set audio playback level enhancement technology ("xLOUD") to enjoy powerful sounds with the built-in speaker when playing WALKMAN, YouTube, Album, etc.VolumesP. 1 2 5Silent modeP. 1 2 6Phone ringtoneP. 1 2 6Default notificationP. 1 2 6Vibrate on ringP. 1 2 6Dial pad touch tonesP. 1 2 6Touch soundsP. 1 2 6Screen lock soundSet whether to emit sound for unlocking the screen lock.Vibrate on touchSet whether to vibrate the terminal for some operations such as specified software key operation.](https://usermanual.wiki/Sony/PM-0070.08-user-guide-part-1/User-Guide-1802255-Page-126.png)
![126SettingsSetting Silent mode1From the Settings screen (P.112), tap [Sound]u[Silent mode].2Tap any of [Off]/[Vibrate]/[Mute].❖Information・You can also set the Silent mode by pressing and holding p for over a second and then tap / in the pop-up screen. Set Mute (ringtone volume 0) by tapping or set Vibration by tapping .・Setting the phone to Silent mode does not mute sounds for shutter, playback of video or music, alarm, etc. Note that volume up for "Ringtone & notifications" in Volumes (P.125) cancels Silent mode.Setting a ringtone1From the Settings screen (P.112), tap [Sound]u[Phone ringtone].2Select a ringtone and tap [Done].❖Information・You can set voice file in ".wav", ".m4a" or in other format which is transferred from Media Go (P.154) or downloaded from the Internet as a ringtone.・To set a ringtone other than the ones stored by default, tap .Selecting a notification ringtone1From the Settings screen (P.112), tap [Sound]u[Default notification].2Select a ringtone and tap [Done].❖Information・To set a notification other than the ones stored by default, tap .Setting vibration when receiving a call1From the Settings screen (P.112), tap [Sound]uMark [Vibrate on ring].・Ringtone sounds and the terminal vibrates when there is an incoming call.Setting touch tones to ON1From the Settings screen (P.112), tap [Sound].2Mark [Dial pad touch tones] and [Touch sounds].・If you unmarked them, any operation tone does not sound when you touch or tap.](https://usermanual.wiki/Sony/PM-0070.08-user-guide-part-1/User-Guide-1802255-Page-127.png)
![127Settings❖Information・"Dial pad touch tones" is a sound for operations on the dial pad. "Touch sounds" is a sound for selecting menu.・To set the key sound of software keyboard, select a type of software keyboard (P.53) to set.Set brightness, orientation of the screen, etc.* Setting Mobile BRAVIA Engine improves image quality when using Xperia™ application.Adjusting the screen brightness1From the Settings screen (P.112), tap [Display]u[Brightness].2Drag the slider to the right or left.・Drag the slider to the left for dimmer screen, or to the right for brighter screen.3Tap [OK].❖Information・Mark [Adapt to lighting conditions] to adjust brightness automatically according to the ambient brightness with reference to the manually set brightness.Adjusting the idle time before the screen turns off1From the Settings screen (P.112), tap [Display]u[Sleep].2Select a time option before the screen back light turns off.❖Information・To turn the screen back light off immediately, press p.DisplayMobile BRAVIA EngineTo view photos or movies colorfully and beautifully, set image quality improving procedure (Mobile BRAVIA Engine). It adjusts contrast, color shade, etc.*BrightnessP. 1 2 7WallpaperP. 6 3Auto-rotate screenP. 3 8SleepP. 1 2 7Font sizeSet font size.ThemeSet a background for the Home screen, Settings screen, etc.Lock screen settingsP. 1 2 8](https://usermanual.wiki/Sony/PM-0070.08-user-guide-part-1/User-Guide-1802255-Page-128.png)
![128SettingsSetting information displayed on the unlock screenYon can set information displayed on the unlock screen (P.31). To display information, set unlocking method of the screen lock to "Slide".1From the Settings screen (P.112), tap [Display]u[Lock screen settings].■Displaying notificationMark [Missed calls]/[New sp-mode mails]/[New messages]/[New emails]/[Calendar events].・By default, "Missed calls", "New sp-mode mails" and "New messages" are marked.・When you log in to Facebook and set "Facebook inside Xperia™" (P.137), "Facebook notifications" checkbox appears. Mark the checkbox to display a notification information for new message of Facebook on the unlock screen. (Notifications such as "Friend Requests", "Event Invitation", etc. are not displayed.)■Hiding detailed information on notificationMark [Privacy] checkbox.・Notification and a number of messages, calls, etc. are displayed while information on the other party or message contents are not displayed.■Changing shortcuts of applicationsTap [Application shortcuts]u[Add new shortcut]/[Contacts]/[Messaging]/[Search] and select the application you want to change.・By default, "Contacts", "Messaging" and "Search" are set, which can be customized.・Flick right around date and time displayed on the unlock screen to display a shortcut for the preset application, or flick left to display WALKMAN widget. You can activate the application or play music without unlocking screen lock. You cannot replace the WALKMAN widget.■Changing wallpaperTap [Wallpaper]u[Xperia™ wallpapers]/[Album].・For setting procedure, see Step 2 (P.63) in "Changing wallpaper".](https://usermanual.wiki/Sony/PM-0070.08-user-guide-part-1/User-Guide-1802255-Page-129.png)
![129Settings■Displaying Machi-charaMark [Machi-chara] and tap [OK].・Set "Machi-chara" widget on the Home screen in advance. For setting procedure, see "Adding a widget to the Home screen" (P.62).・If [Machi-chara] is marked, three checkboxes or less can be marked for Notification (P.128).Check memory volume of the phone memory, internal storage, microSD card, and USB storage. And you can delete data in the internal storage, microSD card and USB storage and format.USB storage is an external memory such as a microSD card connected to the terminal using commercially available reader/writer cable.StoragePHONE MEMORYTotal spaceCheck the phone memory for apps, available space, etc.INTERNAL STORAGETotal spaceCheck memory space for Apps, Pictures, videos, Audio (music, ringtones, podcasts, etc.) and available space.Clear internal storageP. 1 3 0SD CARDTotal spaceCheck available memory space etc. of microSD card.Unmount SD card*Cancel connection of microSD card to remove it safely.Mount SD card*Have microSD card recognized.Erase SD cardP. 1 3 0USB STORAGETotal spaceCheck available memory space of USB storage.](https://usermanual.wiki/Sony/PM-0070.08-user-guide-part-1/User-Guide-1802255-Page-130.png)