Sony PM-0070 GSM/GPRS/EDGE/UMTS/HSPA/LTE mobile phone with Bluetooth, Bluetooth LE, WLAN 802.11abgn, GPS/A-GPS, RFID and FM Rx User Manual 08 user guide part 2
Sony Mobile Communications Inc GSM/GPRS/EDGE/UMTS/HSPA/LTE mobile phone with Bluetooth, Bluetooth LE, WLAN 802.11abgn, GPS/A-GPS, RFID and FM Rx 08 user guide part 2
Sony >
Contents
- 1. 08 user guide part 1
- 2. 08 user guide part 2
08 user guide part 2
![130Settings* Display changes depending on condition of USB storage or microSD card recognition.❖Information・Note that when available memory of internal storage becomes 32KB or less, microSD card cannot be mounted.Formatting the internal storage of the terminal1From the Settings screen (P.112), tap [Storage].2Tap [Clear internal storage]u[Clear internal storage].・Enter your screen unlock method as required.3Tap [Erase everything].❖Information・Formatting the terminal deletes all the data in it.Formatting microSD card1From the Settings screen (P.112), tap [Storage].2Tap [Erase SD card]u[Erase SD card].・Enter your screen unlock method as required.3Tap [Erase everything].❖Information・Formatting microSD card deletes all the data in it.Formatting USB storageInsert external memory such as a microSD card into commercially available reader/writer cable and connect the cable to the terminal in advance.1From the Settings screen (P.112), tap [Storage].2Tap [Clear USB storage]u[Erase].・Enter your screen unlock method as required.3Tap [Erase everything].❖Information・Formatting USB storage (external memory such as microSD card) deletes all the data in it.Unmount USB storage*Cancel connection of USB storage to remove it safely.Mount USB storage*Have USB storage recognized.Clear USB storageP. 1 3 0](https://usermanual.wiki/Sony/PM-0070.08-user-guide-part-2/User-Guide-1802256-Page-1.png)
![131SettingsIncreasing the available memory of the terminalIf the terminal has a small memory, you can perform the following operations to increase available memory.・In the browser, you can clear all temporary Internet files and browser history information. For details, refer to "Clearing history" (P.111).・Uninstall programs that you no longer use. For details, refer to "Deleting installed application" (P.132).Display battery usage data, remaining battery level, available usage time against the remaining battery level, etc.Tap to update the information.Manage and delete installed applications, display memory usage condition, etc. or change the settings.Viewing permitted operation of the applications in the terminalYou can check functions which are permitted to access to each application in the progress of performing, such as network communication function or location information function of the terminal.1From the Settings screen (P.112), tap [Apps].2Tap an application to view.3Flick the screen up to view permitted operations.・If all permitted operations do not appear, tap [Show all].BatteryApps](https://usermanual.wiki/Sony/PM-0070.08-user-guide-part-2/User-Guide-1802256-Page-2.png)
![132SettingsShutting down an applicationIf a pop-up window that indicates the application does not reply appears, you can force quit the application.1From the Settings screen (P.112), tap [Apps].2Tap an application to force-quite.3Tap [Force stop].4Read the cautions displayed, tap [OK].❖Information・When you do not want to force stop the application, tap [Cancel] and wait for a reply of the application.❖Note・If you cancel the "status bar" of applications forcibly, operations may not be performed correctly.Deleting all data of the application・Before deleting all installed application data, back up contents related to the application that you want to save including data saved in the application.1From the Settings screen (P.112), tap [Apps].2Tap an application to delete the data.3Tap [Clear data].4Read the cautions displayed, tap [OK].Deleting installed application・Before deleting installed application, back up contents related to the application that you want to save including data saved in the application.・Some applications cannot be deleted.1From the Settings screen (P.112), tap [Apps].2Tap an application to be deleted.3Tap [Uninstall].4Tap [OK].5When uninstallation is completed, tap [OK].](https://usermanual.wiki/Sony/PM-0070.08-user-guide-part-2/User-Guide-1802256-Page-3.png)
![133Settings❖Information・Some applications pre-installed in the terminal cannot be uninstalled. For applications which cannot be uninstalled, disabling is possible (P.133).・Applications can be deleted from the Application screen. For details, refer to "Uninstalling an application" (P.73).Disabling applicationYou can disable some applications which cannot be uninstalled or services. Disabled applications are not displayed on the Application screen and you cannot execute them, but they are not uninstalled.1From the Settings screen (P.112), tap [Apps].2Tap [All].3Tap an application to be disabled.4Tap [Disable].5Read the cautions displayed, tap [OK].・To enable again, tap [Enable].❖Information・When you disabled an application, some other applications linked to the disabled application may not be operated correctly. Enable the disabled application again to operate them correctly.Deleting cache of the application1From the Settings screen (P.112), tap [Apps].2Tap an application to delete cache.3Tap [Clear cache].Deleting settings for activating the applicationYou can delete settings for activating the application and restore to the default.1From the Settings screen (P.112), tap [Apps].2Tap an application to delete its settings.3Tap [Clear defaults].](https://usermanual.wiki/Sony/PM-0070.08-user-guide-part-2/User-Guide-1802256-Page-4.png)
![135SettingsYou can manage (add or delete) online service accounts or synchronize contacts, messages, etc. saved in online services with the terminal.Setting Google accountYou can create a Google account on your terminal and use Google services such as Gmail, Google Talk, Google Calendar, Google Play, etc.You can set multiple Google accounts on the terminal.1From the Settings screen (P.112), tap [Accounts & sync]u[Add account]u[Google].2Follow the registration wizard, set a Google account.・If you have no Google account, create an account.・If you have already the Google account, sign in.❖Information・You can use the terminal without creating your Google account, however the services such as Google Talk, Gmail, Google Play, etc. are not available.・To log in, you need a Google account and a password.・When you sign in, "Backup and restore" screen may appear. Backup is not available using a Google account.・Tap Google account displayed on the "Accounts & sync" screen and synchronize each data from the following items manually.* If a lot of photos are included to Picasa web album used in Google account or web album uploaded by Google+, it may consume a lot of battery power or increase data communication volume during the synchronization.Accounts & syncSync BrowserSynchronize browser settings saved in Google account such as bookmarks with web function of the terminal.Sync CalendarSynchronize calendar information such as schedule, etc., stored in Google account with Calendar in the terminal.Sync ContactsSynchronize contacts stored in Gmail with the phonebook stored in the terminal.Sync GmailSynchronize email logs used in Gmail account with Gmail on the terminal.Sync Google PhotosSynchronize web album Google Photos with album in the terminal*.Sync Picasa extensionSynchronize web album of Picasa used in Gmail account with Album in the terminal.](https://usermanual.wiki/Sony/PM-0070.08-user-guide-part-2/User-Guide-1802256-Page-6.png)
![136Settings・If you set a Google account and use Google+ in it, "Sync Google+" appears. Tap it to synchronize and display instant upload photos in the Album in the terminal. To upload photos automatically, select settings to enable the instant upload on the confirmation screen when you log in Google+.・Make sure to check if the data connection is available before sign in to the Google account. For checking the data connection status, see "Status icon" (P.33).Setting Facebook accountWhen you register or sign in Facebook, you can display profile information published by online "Friend" to Phonebook. And you can display Facebook updates of "Friends" in Timescape.❖Information・If you do not have a Facebook account, you can also create a new account at http://www.facebook.com.・If you download and install client applications for Twitter, you can setup accounts and synchronize contacts information in the same manner as Facebook.1From the Settings screen (P.112), tap [Accounts & sync]u[Add account]u[Facebook].・If you already have a Facebook account and set account from Phonebook or Timescape of the terminal, you need not add a new account.2Enter your sign in information.・If you have no Facebook account, register an account.・If you have Facebook account, sign in.](https://usermanual.wiki/Sony/PM-0070.08-user-guide-part-2/User-Guide-1802256-Page-7.png)
![137Settings❖Information・Set Facebook account to display in the status bar. Drag the status bar downwards, tap [Facebook inside Xperia™], mark the [Facebook integration] checkbox, read the displayed note, and then tap [Accept]. Tap (Facebook inside Xperia™) added to the "Accounts & sync" screen, and tap the following items to synchronize and display corresponding data.Setting other accountYou can use Corporate (Exchange ActiveSync), docomo account, Email, Facebook inside Xperia™ other than Google account (P.135) or Facebook account (P.136).■ Corporate (Exchange ActiveSync) account・If you have Corporate (Exchange ActiveSync) account, from the Settings menu screen (P.112), tap [Accounts & sync]u[Add account]u[Corporate] and set according to the onscreen instruction.■ docomo account・docomo account helps you to use "ドコモバックアップ (docomo backup)" service (P.67) provided by NTT DOCOMO. docomo account is set by default.Removing account1From the Settings screen (P.112), tap [Accounts & sync] and select a service account you want to delete.2Tap , then tap [Remove account]u[Remove account].Sync CalendarSynchronize events such as Friends' birthdays, etc., stored in Facebook with Calendar in the terminal.Sync ContactsSynchronize profile of Friends stored in Facebook with the phonebook stored in the terminal.Sync Facebook photo extensionSynchronize photos registered to Facebook with the Album in the terminal.Sync Friends' musicSynchronize music that Friends specified "Like" in Facebook with WALKMAN in the terminal.](https://usermanual.wiki/Sony/PM-0070.08-user-guide-part-2/User-Guide-1802256-Page-8.png)
![138Settings❖Information・The first set Google account is registered as backup account. When a backup account is removed, caution appears on the status bar.・docomo account cannot be deleted.Setting Auto-syncSynchronize information of online service with the terminal. You can display and edit information on the terminal or a PC.You need to set your online service account (Google account, Facebook account, etc.) in the terminal to synchronize in advance.1From the Settings screen (P.112), tap [Accounts & sync].2Tap or drag it to the right.3Read the cautions displayed, tap [OK].4Tap an online service whose account is set.5Tap to mark an item for automatic synchronization.・If the items to be synchronized are marked and checkboxes are led by , synchronization starts. When is not displayed, tap and tap [Sync now] to start synchronization.❖Note・Tap or drag it to the right to permit to synchronize with your Gmail, calendar, contacts, and profile information published by "Friends", etc. in Google account automatically. These communications may cause you to pay packet communications charges.・If (auto-sync is disabled) is set, you can synchronize manually. On the settings screen (P.112), tap [Accounts & sync], tap the service where your account is set to display the synchronizing items, then tap items you want to synchronize.Canceling synchronization1Tap during a synchronization.2Tap [Cancel sync].](https://usermanual.wiki/Sony/PM-0070.08-user-guide-part-2/User-Guide-1802256-Page-9.png)

![140SettingsProtecting docomo mini UIM cardSome functions provided for convenient use of the terminal require the security code to use them. Besides the security code for locking the terminal, the network security code necessary for the network services etc. are available. Make use of the terminal using an appropriate security code according to the purpose.■ Notes on the security codes・Avoid using a number that is easy to guess, such as "birth date", "part of your phone number", "street address number or room number", "1111", and "1234". Make sure to make a note of the security code you set lest you should forget it.・Be very careful not to let others know your security code. If your security code is known by anyone else, DOCOMO shall have no liability for any loss due to any unauthorized use of it.・If you forget your security codes, you must bring your official identification (such as drivers license), the terminal, and docomo mini UIM card with you to the nearest docomo Shop. For details, contact the "General Inquiries" on the last page of this manual.・The PUK code is written on the subscription form (copy for customer) handed at the subscription in the docomo Shop. If you subscribed other than docomo Shop, you must bring your official identification (such as drivers license), the docomo mini UIM card with you to the nearest docomo Shop or contact the "General Inquiries" on the last page of this manual.Network security codeThe network security code is a 4-digit number necessary for identification or using the docomo Network Services at reception of your request in docomo Shop or at docomo Information Center. It can be set any number at the subscription and also changed later by yourself.You can change your network security code to the new one using the PC if you have the "docomo ID"/"Password" for the "My docomo"* General support site for PC.Alternatively, from the Home screen, tap [dmenu] and [お客様サポートへ (To Customer Support)]u[各種お申込・お手続き (Subscription/Procedure)]. (In Japanese only.)* For information on "My docomo" and "お客様サポート (Customer Support)", see the previous page of the last page of this manual.](https://usermanual.wiki/Sony/PM-0070.08-user-guide-part-2/User-Guide-1802256-Page-11.png)
![141SettingsPIN codeYou can set security code which named PIN code to docomo mini UIM card. It is set "0000" at the subscription. They can be changed by yourself.PIN code is a 4- to 8-digit number (code) that must be entered for user confirmation to prevent unauthorized use by a third party every time you insert the docomo mini UIM card into the terminal or when the terminal is powered on. Entering the PIN code enables making/receiving calls and terminal operation.・If you use a newly purchased terminal with docomo mini UIM card you have been using inserted, use the PIN code set on the former terminal. If you did not change the setting, the code is "0000".・If you enter a wrong PIN code 3 times consecutively, the PIN code is locked and cannot be used anymore. In this case, unlock with "PUK". (P.141)Personal Unblocking Key (PUK code)The PUK code is an 8-digit number for canceling the locked PIN code. The PUK code cannot be changed by yourself.・If you failed to enter PUK code 10 times consecutively, the docomo mini UIM card is locked. Please contact a docomo Shop.Enabling the docomo mini UIM card PINBy setting PIN (security code) and entering PIN code when powered on, you can protect the docomo mini UIM card from improper use.1From the Settings screen (P.112), tap [Security]u[Set up SIM card lock]u[Lock SIM card].2Enter the PIN code of the docomo mini UIM card and tap [OK].・[Lock SIM card] is marked.Entering the PIN code when powered on1On the PIN code entry screen, enter the PIN code of the docomo mini UIM card.2Tap [OK].](https://usermanual.wiki/Sony/PM-0070.08-user-guide-part-2/User-Guide-1802256-Page-12.png)
![142SettingsChanging the PIN code・You can change the PIN code only when the PIN of docomo mini UIM card is enabled.1From the Settings screen (P.112), tap [Security]u[Set up SIM card lock]u[Change SIM PIN].2Enter the current PIN code of the docomo mini UIM card and tap [OK].3Enter the new PIN code of the docomo mini UIM card and tap [OK].4Enter the new PIN code of the docomo mini UIM card again and tap [OK].Unblocking the locked docomo mini UIM card1On the PUK code entry screen, enter the PUK code of the docomo mini UIM card.2Tap [New SIM PIN] field to enter new PIN code of docomo mini UIM card.3Tap [OK].Screen lockYou can secure your data by requiring a screen unlock pattern every time the terminal is turned on or every time it is activated from sleep mode.There are 5 types of screen lock settings: "Slide", "Face Unlock", "Pattern", "PIN" and "Password". (P.143)](https://usermanual.wiki/Sony/PM-0070.08-user-guide-part-2/User-Guide-1802256-Page-13.png)
![143SettingsSetting screen unlock method1From the Settings screen (P.112), tap [Security]u[Screen lock].2Tap [Slide]/[Face Unlock]/[Pattern]/[PIN]/[Password].・When you select [Face Unlock] follow the onscreen instructions to set face authentication. For Screen lock when the Face Unlock cannot be unlocked, select pattern or PIN to enter.・When you select [Pattern], follow the onscreen instructions to enter unlock pattern.Set security question and answer in case you forget the pattern.・When you select [PIN], follow the onscreen instructions to enter 4 or more numbers. This "PIN" code is different from a PIN code to be set to docomo mini UIM card (P.141).・When you select [Password], follow the onscreen instructions to enter 4 or more characters including alphabets.Changing screen unlock method1From the Settings screen (P.112), tap [Security]u[Screen lock].・Enter the set unlock pattern/PIN/password.・If you should fail 5 times when you enter the unlock pattern, wait 30 seconds and then try again.2Tap [Slide]/[Face Unlock]/[Pattern]/[PIN]/[Password].・Select items you want to change into. For setting procedure, see Step 2 (P.143) of "Setting screen unlock method".Locking the screenOnce screen unlock method (P.143) is set, the screen is locked when the sleep mode is set or p is pressed.Unlocking the screen lock1Press p to turn the backlight on.2Enter unlock screen method.・Enter the set Slide/Face unlock/unlock pattern/PIN/password.](https://usermanual.wiki/Sony/PM-0070.08-user-guide-part-2/User-Guide-1802256-Page-14.png)
![144SettingsIf you forget how to unlock■ If you set "Pattern""Incorrect pattern" appears when you enter incorrect unlock pattern 5 times consecutively.・Tap [Next], and answer the security question that you set for the unlock pattern setting, then tap [Unlock] to unlock the screen lock.・If you set Google account, on the "Incorrect pattern" screen, tap [Next] to display "Answer question" and "Enter Google account details".- Mark [Answer question] and tap [Next], and answer the question that you set for the unlock pattern, then tap [Unlock] to unlock the screen lock.- Mark [Enter Google account details], tap [Next], and enter Google account and password, then tap [Sign in] to unlock the screen lock.・When setting new unlock pattern after unlocking screen lock, "Screen unlocked" appears. Tap [Yes] to reset unlock pattern.❖Information・Tap [Try again] to retry entering pattern in 30 seconds.・Alternatively, tap [Try again] and [Forgot pattern?] to display answering question screen that you set the unlock pattern.・You can set multiple Google accounts. To unlock the screen with Google account and password, enter one of those accounts.■ If you set "PIN"/"Password"Please contact a docomo Shop.Canceling screen lockYou can cancel screen lock pattern after you set.1From the Settings screen (P.112), tap [Security]u[Screen lock].・Enter the set unlock pattern/PIN/password.2Tap [None].](https://usermanual.wiki/Sony/PM-0070.08-user-guide-part-2/User-Guide-1802256-Page-15.png)
![145SettingsPermitting downloading unknown source's applicationBefore you can download unknown source's applications, set the terminal to enable downloading.Applications you download may be of unknown origin. To protect your terminal and personal data, only download applications from trusted sources such as the Google Play etc.1From the Settings screen (P.112), tap [Security].2Tap [Unknown sources].3Read the cautions displayed, tap [OK].・[Unknown sources] checkbox is marked.You can select language and input method.Changing phone language1From the Settings screen (P.112), tap [Language & input]u[Language].2Select a language and tap [Done].・When you select Japanese, "完了 (Done)" is displayed, but its display varies by the language you selected.Language & inputLanguageP. 1 4 5Spelling correctionSet spelling correction.Personal dictionaryRegister words.DefaultSet input method.Google voice typingP. 5 3Shabette-Key-NyuryokuXperia™ Chinese keyboardXperia™ Japanese keyboardXperia™ keyboardVoice SearchP. 1 4 6Text-to-speech outputP. 1 4 6Pointer speedSet pointer speed of mouse etc.](https://usermanual.wiki/Sony/PM-0070.08-user-guide-part-2/User-Guide-1802256-Page-16.png)
![146Settings❖Information・If you choose the wrong language and cannot read the menu texts, go to http://www.sonymobile.co.jp/so-01e/faq.html for help (in Japanese only).Setting Voice SearchText-to-speech settings* Japanese is not supported.Restore the terminal to default.Resetting the terminalResetting the terminal deletes all data, including downloaded applications and accounts, and resets the terminal back to the initial (default) state. Make sure to back up important data you have on the terminal before you reset the terminal.For the initial settings, see "Initial settings (Setup guide)" (P.31).1From the Settings screen (P.112), tap [Backup & reset]u[Factory data reset]u[Reset phone].・Mark [Erase internal storage] checkbox to delete all contents (music, photos, videos, etc.) on the internal storage.・Enter your screen unlock method as required.2Tap [Erase everything].・The terminal restarts automatically.❖Information・If you reset the terminal, license information for the DRM protected content may be erased making the content unable to be played.・While restarting or resetting the terminal, just wait. If you remove the battery pack while restarting or resetting the terminal, it may cause malfunction.LanguageSelect language used for Google voice search.SafeSearchSet filter explicit.Block offensive wordsSet whether to display recognized offensive voice results.Google Text-to-speech Engine*Set language for text-to speech and audio synthesis engine to read out text.Pico TTS*Make settings for installed voice synthesis engine.Speech rateSet speed at reading out text.Listen to an examplePlayback sample of audio synthesis.Backup & reset](https://usermanual.wiki/Sony/PM-0070.08-user-guide-part-2/User-Guide-1802256-Page-17.png)
![147SettingsYou can change the date and time in the terminal.To set date/time or time zone manually, unmark [Automatic date & time] or [Automatic time zone] to disable network-provided time/time zone in advance.❖Information・Correction of the time differences may not be performed correctly depending on the overseas telecommunication carrier. In that case, set time zone manually (P.147).Setting the date1From the Settings screen (P.112), tap [Date & time]u[Set date].2Drag number to adjust date.3Tap [Set].Setting the time1From the Settings screen (P.112), tap [Date & time]u[Set time].2Drag number to adjust hour and minute.・When you unmark [Use 24-hour format], you can change [AM]/[PM].3Tap [Set].Setting the time zone1From the Settings screen (P.112), tap [Date & time]u[Select time zone].2Select time zone you want to set.SystemDate & timeAutomatic date & timeAdjust date and time automatically by using network-provided information.Automatic time zoneAdjust time zone automatically by using network-provided information.Set dateP. 1 4 7Set timeP. 1 4 7Select time zoneP. 1 4 7Use 24-hour formatP. 1 4 8Select date formatP. 1 4 8](https://usermanual.wiki/Sony/PM-0070.08-user-guide-part-2/User-Guide-1802256-Page-18.png)
![148SettingsSetting the time format1From the Settings screen (P.112), tap [Date & time] and mark/unmark [Use 24-hour format] checkbox.・Mark the checkbox to shift to 24-hour format, and unmark to shift to 12-hour format.Setting the date format1From the Settings screen (P.112), tap [Date & time]u[Select date format].2Select date format you want to set.You can set user support service which sounds or vibrates according to users operation and call end operation.AccessibilityTalkBackSet user support service (TalkBack).Large textEnlarge text size.Power button ends callSet to end a call by pressing p.Auto-rotate screenP. 3 8Speak passwordsOutput password by voice sound.Touch & hold delaySet response speed for operation of touching and holding the screen.Install web scriptsSet whether to install script from Google.](https://usermanual.wiki/Sony/PM-0070.08-user-guide-part-2/User-Guide-1802256-Page-19.png)
![149SettingsPut the terminal into debug mode when connecting USB or set the screen backlight to ON while charging.Keeping the screen backlight ON while charging1From the Settings screen (P.112), tap [Developer options].2Mark [Stay awake] checkbox.You can check your own phone number, signal level, legal information, etc.Developer optionsAbout phoneSoftware updateP. 2 3 4StatusCheck your own phone number, signal level, battery level, etc.Legal informationCheck license agreement, terms of use, etc.Model numberCheck version and number.Android versionBaseband versionKernel versionBuild number](https://usermanual.wiki/Sony/PM-0070.08-user-guide-part-2/User-Guide-1802256-Page-20.png)
![151File management2Tap [Skip].❖Information・Window that appears when connecting to a PC may vary depending on the operating system (OS) of a PC.・From the Home screen, tap and tap [Settings]u[Xperia™]u [Connectivity] to check connection mode and change the settings as follows.・Connecting with "Mass storage mode (MSC)" also accesses microSD card as a removal disk. microSD card cannot be accessed from the terminal and functions using microSD card may become unavailable in Camera, Album, etc. while connecting to a PC.・If you install PC Companion by tapping [Install] in Step 2, you can use the following applications on a PC for managing media files, creating backup files, etc. when connecting the terminal and the PC. For details, check on the PC Companion screen after installation.・When the terminal is connected to a PC, charging starts automatically. For details, see "Charging with a PC" (P.29).Install PC CompanionDisplay PC Companion installation wizard when connected to a PC.USB connection modeUSB connection mode when connecting to a PC can be selected between "Media transfer mode (MTP)" and "Mass storage mode (MSC)".TRUSTED DEVICESConnect the terminal and a host device in a pair via Wi-Fi network. (P.153)Support ZoneUpdate software of the terminal connecting to a PC. (P.236)Contacts SetupCopy the contacts data of the mobile phone previously used to the terminal.Media GoP.154Sync ZoneSynchronize calendar and contacts between the terminal and Outlook etc.Back up and restoreBack up the terminal data or move the data to another terminal.File ManagerCheck file type, update time, location, etc. on the terminal.](https://usermanual.wiki/Sony/PM-0070.08-user-guide-part-2/User-Guide-1802256-Page-22.png)
![152File managementDisconnecting the microUSB cable safely・Do not disconnect the microUSB cable during data transferring. Data may be damaged.・If you connect the terminal in the Media transfer mode (MTP), make sure that data transfer is not in progress and just disconnect the microUSB cable.■ Mass storage mode (MSC)1Drag the status bar downwards.・When "Internal storage & SD card" is displayed, go to Step 3.When "SD card connected" is displayed, go to Step 2.2Tap [SD card connected].・"SD card disconnected" appears in the status bar.3Disconnect the microUSB cable.Dragging and dropping data on the terminal and a PC■ Media transfer mode (MTP)1Connect the terminal to a PC using a microUSB cable.・"Int.storage/SD card connected" appears in the status bar.2Drag and drop selected data between the terminal and a PC.■ Mass storage mode (MSC)1Connect the terminal to a PC using a microUSB cable.・"SD card connected" appears in the status bar.2Drag and drop selected data between the terminal and a PC.❖Information・You can transfer files using a microUSB cable on most devices and the following operating systems (OSs) that supports the USB mass-storage memory interface.- Microsoft Windows 7- Microsoft Windows Vista- Microsoft Windows XP](https://usermanual.wiki/Sony/PM-0070.08-user-guide-part-2/User-Guide-1802256-Page-23.png)
![153File managementIf the terminal and a PC* are connected in a pair on a Wi-Fi network, automatic connection/disconnection of internal storage of the terminal with a PC is enabled when the terminal user comes in and out of the Wi-Fi area. You can easily access to files in the internal storage of the terminal from a connected PC.* Use Microsoft Windows 7 to make a pair setting. Pair setting cannot be made under Microsoft Windows XP, Microsoft Windows Vista or other OS.1Connect a PC you want to set in a pair to a Wi-Fi network.2Connect the terminal to a Wi-Fi network (P.114).3Connect the terminal to a PC using a microUSB cable.・When a confirmation screen for installation of PC Companion software appears on the terminal, tap [Skip].4Make sure that "Xperia AX SO-01E " is displayed as a portable device on the explorer of the PC.5Right click the portable device icon, then click "ネットワーク構成 (network composition)".6Click "次へ (Next)".7On the pop-up screen of the terminal, tap [Pair].8On the network composition of the portable device screen of the PC, click " 完了 (Done)".9Disconnect the microUSB cable.10From the Home screen, tap and tap [Settings]u[Xperia™]u[Connectivity]u"Host name" (PC name) in the "TRUSTED DEVICES" field.11Tap [Connect].・The terminal and the PC are connected in "Media transfer mode (MTP)" on a Wi-Fi network, and you can exchange data files.Connecting the terminal to a PC on a Wi-Fi network](https://usermanual.wiki/Sony/PM-0070.08-user-guide-part-2/User-Guide-1802256-Page-24.png)
![154File management❖Information・From the Home screen, tap and tap [Settings]u[Xperia™]u[Connectivity] to display "Host name" (PC name) in the "TRUSTED DEVICES" field. To cancel connection setting, tap the host name and [Forget]. Until "Forget" is tapped, the connection setting retains even if you connect/disconnect repeatedly by coming in and out of a Wi-Fi area.・If the privacy separator function for Wi-Fi network (access point) is enabled, pair setting cannot be made.The Media Go computer application helps you transfer and manage media content in the terminal and PC.With Media Go, you can load music from a CD to a PC and transfer to the terminal.・You can install Media Go from PC Companion. Activate PC Companion installed in a PC and install Media Go with "Sony PC Companion" screen. For information on how to install PC Companion, see "When PC Companion is not installed on your PC" (P.236).❖Information・You can also download Media Go from http://mediago.sony.com/enu/features.・To learn more about how to use the Media Go application, see the help section of the Media Go application.The Bluetooth function creates a wireless connection to other Bluetooth devices, for example, handsfree devices. A range within 10 meters, with no solid objects in between, is recommended. You must turn on the Bluetooth function to communicate with Bluetooth devices. You may also have to make pair setting for the terminal and Bluetooth device.❖Information・By default, Bluetooth function is off. If you turn Bluetooth on and then turn off the terminal, Bluetooth function turns off. When you turn on the terminal again, Bluetooth function turns on automatically.・When you do not use Bluetooth function, turn it off to save the battery.Using Media GoUsing Bluetooth function](https://usermanual.wiki/Sony/PM-0070.08-user-guide-part-2/User-Guide-1802256-Page-25.png)
![155File management■ Reception interference caused by wireless LAN devicesThe terminal's Bluetooth function and wireless LAN devices use the same frequency band (2.4GHz). If you use the terminal near a wireless LAN device, reception interference may occur or the communications speed may lower. Also, you may hear noise or have a connection problem. In these cases, do the following:・Keep the Bluetooth device 10 meters or more away from a wireless LAN device.・Within 10 meters, turn off either the Bluetooth device or the wireless LAN device.* The terminal does not communicate wirelessly with all types of Bluetooth devices. Bluetooth DUN is not supported.1From the Home screen, tap , then tap [Settings].2Tap in Bluetooth or drag it right.・ appears on the status bar and Bluetooth function turns on.3Tap [Bluetooth].4Tap [SO-01E].・The terminal becomes detectable by other Bluetooth devices for 2 minutes.You can name the terminal. The name appears on Bluetooth devices when you use the Bluetooth function.1Make sure that the Bluetooth function is on.2From the Home screen, tap Tap [Settings]u[Bluetooth].3Tap and tap [Rename phone].4Enter a name.5Tap [Rename].Making the terminal detectable with the Bluetooth function onEntering the terminal's name](https://usermanual.wiki/Sony/PM-0070.08-user-guide-part-2/User-Guide-1802256-Page-26.png)
![156File managementBy making pair setting for the terminal and another Bluetooth device, you can use the device such as Bluetooth handsfree headset etc. connecting to the terminal to make and receive calls.Once you have made pair setting for the terminal and a Bluetooth device, the setting is saved. When making pair setting for the terminal and a Bluetooth device, you may need to enter a passkey (PIN). The terminal automatically tries the generic passkey "0000". If this passkey does not work, see the documentation of your Bluetooth device. You do not need to re-enter the passkey the next time you connect to a paired Bluetooth device already set.You cannot pair the terminal with two Bluetooth headsets. However, you can pair the terminal with two or more Bluetooth devices of different profiles. The terminal supports the following Bluetooth profiles: A2DP, AVRCP, HFP, HID, HSP, OPP, PAN, PBAP, and SPP.1Make sure that the Bluetooth function is on.2From the Home screen, tap and tap [Settings]u[Bluetooth].3Tap [Search for devices].・A list of detected Bluetooth devices appears.4Tap a Bluetooth device name to pair with the terminal.5Check a passkey on the "Bluetooth pairing request" screen, then tap [Pair].・You can use the Bluetooth device that has been paired.・Some Bluetooth devices make connections continuously after making pair setting.・Authentication passcode may be required on the "Bluetooth pairing request" screen.❖Information・Make sure that the Bluetooth function and Bluetooth detection function of the target device are on.・When you make pair setting with the Bluetooth device supporting Secure Simple Pairing (SSP) function, a passkey appears on the screen. Check the passkey and make the pair setting.Making pair setting for the terminal and Bluetooth device](https://usermanual.wiki/Sony/PM-0070.08-user-guide-part-2/User-Guide-1802256-Page-27.png)
![157File management1Make sure that the Bluetooth function is on.2From the Home screen, tap and tap [Settings]u[Bluetooth].3Tap [Search for devices].・A list of detected Bluetooth devices appears.・Set Bluetooth device pairing as required.4Tap the name of Bluetooth device you want to connect.・While connecting to a device, appears in the status bar and the connection status appears under the device name.❖Information・Tap on the connected Bluetooth device name to check the status of that Bluetooth device or change the settings.1From the Home screen, tap and tap [Settings]u[Bluetooth].2Tap the connected Bluetooth device name.3Tap [OK].・To reconnect, tap the device name.1From the Home screen, tap and tap [Settings]u[Bluetooth].2Tap in a Bluetooth device name to unpair and tap [Unpair].・Connection disconnects and the pair setting is canceled.Connecting the terminal with Bluetooth deviceDeactivating the connection of a Bluetooth deviceCanceling the pair setting of a Bluetooth device](https://usermanual.wiki/Sony/PM-0070.08-user-guide-part-2/User-Guide-1802256-Page-28.png)
![158File managementWith Media server, you can share media files with other client (DLNA: Digital Living Network Alliance) devices using Wi-Fi function.Set Wi-Fi connection (P.112) with another client device.1From the Home screen, tap , then tap [Connected devices].・When you activate for the first time, "Welcome!" screen appears. Tap or x.2Tap , then tap [Media server].・Media server settings screen appears. You can set the following items.❖Information・On the Media server screen, tap to set Wi-Fi connection.Set Wi-Fi connection with a DLNA device to allow access from the terminal in advance.1From the Home screen, tap , then tap [Connected devices].・If the device name appears in the server list, go to Step 4.2Tap [Wireless & networks] and tap in Wi-Fi or drag it right.3Tap x.・Go back to "Connected devices" screen.4Tap the device name displayed in the server list and tap the desired category folder.5Tap a media file to play it.Sharing files with DLNA devices via Connected devices (Media server)Setting Connected devices (Media server)SO-01E (server name)Rename the terminal (server) displayed on a client device.Share contentSet to connect from a client device to the terminal via Wi-Fi.PENDING DEVICESManage client devices waiting access permissions.REGISTERED DEVICESManage client device registered to the terminal.Playing media files in the DLNA device with the terminal](https://usermanual.wiki/Sony/PM-0070.08-user-guide-part-2/User-Guide-1802256-Page-29.png)
![159File managementSet Wi-Fi connection on a DLNA device in advance.1From the Home screen, tap , then tap [Connected devices].2Tap , then tap [Media server] and tap in Share content or drag it right.3Tap [OK] and tap in Wi-Fi or drag it right.・"Media server turned on" appears in the status bar.4Tap y, tap , and tap [Album].・Album list screen appears.5Tap a tile you want to play.6Tap , then tap [See all...]u[Play on device].・A "Play on device" screen appears.7Tap a device displayed on the "Play on device" screen.・The file is played by a DLNA device.Playing a media file in the terminal with a DLNA device](https://usermanual.wiki/Sony/PM-0070.08-user-guide-part-2/User-Guide-1802256-Page-30.png)
![160ApplicationsApplicationsIn dmenu, you can easily access sites recommended by DOCOMO or convenient applications.1From the Home screen, tap [dmenu].・Browser activates to display "dmenu".❖Information・To use dmenu, Internet connection by packet communication (LTE/3G/GPRS) or Wi-Fi is required.・For connecting dmenu and downloading applications introduced in dmenu, packet communication charge is applied separately. Some applications automatically perform packet communications.・Applications introduced by dmenu may include charged ones.You can obtain useful and interesting contents which meet your needs at dmarket.1From the Home screen, tap [dmarket].・When you activate for the first time, "dマーケットソフトウェア使用許諾契約書 (License Agreement)" appears. Mark [Agree] checkbox and tap [Start use].❖Information・For details on dmarket, refer to NTT DOCOMO website.dmenuOpening dmenudmarketOpening dmarket](https://usermanual.wiki/Sony/PM-0070.08-user-guide-part-2/User-Guide-1802256-Page-31.png)
![161ApplicationsWith Google Play, you can directly access useful applications or fun games which you can download and install on the terminal. And you can send feedback and comments about an application, or report objectionable application or incompatible application with the terminal as an inappropriate content.・To use Google Play, you need to set Google account (P.135).・Some applications and games are free of charge, and the others are paid. In the applications list of Market, distinction between free and paid is clearly specified. For details on purchasing, returning and refunding of paid applications, see "Help" (P.162).1From the Home screen, tap [Play Store].・When you activate for the first time, Terms of use window appears. Tap [Accept].2Search application and tap application you want to install.・Check the displayed contents carefully and follow the onscreen instructions.・Be careful especially about applications which have many functions or access large amount of data. If you perform download operation, you are responsible for the consequences of using this application on the terminal.❖Information・Be sure to check the security of application, then install it at your own risk. The terminal may be infected with a virus and the data may be damaged.・NTT DOCOMO is not liable for malfunctions, if any, caused by the application you installed. In such case, the repair is charged even during the warranty period.・NTT DOCOMO is not liable for any disadvantage brought to you or any third party due to an application you installed.・Some applications automatically perform packet communications. Packet communication is kept active unless you disconnect it or the time-out is occurred. To disconnect packet communication manually, from the Home screen, tap and tap [Settings]u[More...]u[Mobile networks] and unmark [Data enabled].・Some applications may be updated automatically.Play StoreInstalling applications](https://usermanual.wiki/Sony/PM-0070.08-user-guide-part-2/User-Guide-1802256-Page-32.png)
![162Applications1From the Home screen, tap [Play Store].2Tap and [My Apps].3Tap the applications you want to delete, then tap [Uninstall]u [OK].・When you uninstall charged applications, a screen for refund may appear. For details, refer to "Help" (P.162).When you need help or have any questions about Google Play, display the Google Play screen, then tap and tap [Help]. The Browser opens the Google Play Help web page.Osaifu-Keitai equipped with IC card is a function which allows you to pay money or to use coupon, stamp-rally, etc. only by holding the terminal over an IC card reader in stores etc.You can access a site or website, obtain the latest coupon, check credit or payment of electronic money, etc. by holding the terminal over the IC card reader. In addition, you can lock your Osaifu-Keitai to provide against loss or theft, and you can use Osaifu-Keitai with safe.For details on Osaifu-Keitai, refer to "ご利用ガイドブック (spモード編) (Mobile Phone User's Guide [sp-mode]) (in Japanese only)".* A setting from the dedicated website or application is required to use Osaifu-Keitai compatible services.Deleting applicationHelpOsaifu-Keitai](https://usermanual.wiki/Sony/PM-0070.08-user-guide-part-2/User-Guide-1802256-Page-33.png)
![163ApplicationsPrecautions on using Osaifu-Keitai・The data (including electronic money, points, etc.) in the IC card may be lost or modified because of the malfunction of the terminal (When we take your Osaifu-Keitai for repair etc., as we cannot take it with data remained, you are required to erase the data by yourself). For support such as reissuance, restoration, temporary preservation or transfer of data, contact Osaifu-Keitai compatible service providers. For important data, be sure to use a service with backup service.・If the data in the IC card is lost, modified or damaged by any means related to Osaifu-Keitai compatible service such as malfunction or model change, DOCOMO assumes no responsibility for the loss of data.・If the terminal is stolen or misplaced, immediately contact Osaifu-Keitai compatible service provider for an advice.・The terminal does not support iC transfer service.1From the Home screen, tap then tap [Osaifu-Keitai].2Select a service you want to use from a service list.・At the first time you activate Osaifu-Keitai, an initial setting screen appears. Follow the onscreen instructions.You can exchange data with an IC card reader only by holding mark over the card reader.・When holding mark over an IC card reader, make sure not to hit the terminal strongly.・Hold mark horizontally over the center of the IC card reader.・Slowly move the terminal to hold mark over the IC card reader.・If mark is not recognized even when holding over the IC card reader, try slightly picking the terminal up off the reader, or moving the terminal back, forth and around.・If there are metal objects between mark and an IC card reader, scanning may be failed. Using Osaifu-KeitaiHolding Osaifu-Keitai over IC card reader](https://usermanual.wiki/Sony/PM-0070.08-user-guide-part-2/User-Guide-1802256-Page-34.png)
![164ApplicationsAnd note that a sticker put on nearby the mark may affect communication performance.❖Information・You can scan and write data to or from an IC card reader without activating Osaifu-Keitai compatible application.・The function is available even if the terminal is off, but it is not available when the battery pack is not attached. Even if the battery pack is attached, the function may not be available when you leave the terminal off for a long time or the battery level is low, etc.Use "Osaifu-Keitai Lock Setting" to restrict the use of Osaifu-Keitai function and related services.・Osaifu-Keitai lock is different from screen lock for the terminal, SIM card lock.1From the Home screen, tap then tap [Osaifu-Keitai].2Tap [Lock Settings] at the bottom right of the "Osaifu-Keitai" screen.3Follow the onscreen instructions to enter unlock pattern.❖Information・ is displayed in the status bar when you set "Osaifu-Keitai Lock Setting".・Note that you cannot cancel "Osaifu-Keitai Lock Setting", if the battery runs out while using "Osaifu-Keitai Lock Setting". Be careful about remaining battery level. If the battery runs out, charge the terminal before canceling "Osaifu-Keitai Lock Setting".・You need to enter unlock pattern to use Osaifu-Keitai menu while using "Osaifu-Keitai Lock Setting".・IC card unlock pattern will not be deleted even if you reset the terminal.・Note that you cannot cancel "Osaifu-Keitai Lock Setting" if you forget both the lock pattern and answer for security question."iD" is a convenient electronic money by credit clearance scheme. You can enjoy shopping simply and conveniently only by holding Osaifu-Keitai with credit information set or the iD-compatible card over the IC card reader in stores. Because up to 2 types of credit information can be registered in Osaifu-Keitai, you can use them according to the benefits, etc. It also supports cashing, depending on the card issuer.・To use iD with Osaifu-Keitai, subscribing to a card issuer that supports iD, settings for iD setting application are required.Locking Osaifu-Keitai functioniD設定アプリ (iD setting application)](https://usermanual.wiki/Sony/PM-0070.08-user-guide-part-2/User-Guide-1802256-Page-35.png)
![165Applications・The charges required for iD service (including the annual charge) vary by card issuer.・For using the application, a packet communication charge is applied.・A packet communication fee for oversea use differs from the one in Japan.・For details on iD, refer to iD website (http://id-credit.com/ (In Japanese only)).ToruCa is an electronic card that can be obtained to mobile terminals. It can be obtained from the IC card reader or site as store information, coupon ticket, etc. Obtained ToruCa is saved to the "ToruCa" application. Use the "ToruCa" application to display, search or update.For details on ToruCa, refer to "ご利用ガイドブック (spモード編) (Mobile Phone User's Guide [sp-mode]) (in Japanese only)".❖Information・For obtaining, displaying or updating ToruCa, a packet communication charge may be applied.・Some ToruCa provided to i-mode terminal may not be obtained/displayed/updated.・Depending on the settings of IP (Information Provider), the following functions may not be available.- Obtaining/Updating from the IC card reader, sharing ToruCa, moving to microSD card, copying/displaying map・Some ToruCa which can be displayed in a map from ToruCa (details) may not be displayed in a map from the ToruCa list depending on the IP settings.・While using Osaifu-Keitai Lock Setting, you cannot obtain ToruCa with an IC card reader.・If you mark 重複チェック (Duplication check), obtaining the same ToruCa redundantly is not available. To obtain the same ToruCa redundantly, unmark 重複チェック (Duplication check).・When you send ToruCa attaching to email, it is sent in the condition before obtaining ToruCa (details).・Depending on email application, ToruCa received via the emails may not be saved.・Depending on browser, ToruCa cannot be obtained.・When ToruCa is moved/copied to the microSD card, it is moved/copied in the condition before obtaining ToruCa (details).・You may not be able to obtain ToruCa with an IC card reader, if you do not make initial setting for Osaifu-Keitai.ToruCa](https://usermanual.wiki/Sony/PM-0070.08-user-guide-part-2/User-Guide-1802256-Page-36.png)
![166ApplicationsYou can listen to the FM radio with the terminal. Tuning can be made automatically or manually, and you can register your favorite channels to Favorites. To use FM radio, use a handsfree device such as Stereo Headset with Microphone (Sample), etc. or a headphone. They work as antenna.1Connect Stereo Headset with Microphone (Sample) to the terminal.・For connection of Stereo Headset with Microphone (Sample), see "Using Stereo Headset with Microphone" (P.188).2From the Home screen, tap , then tap [FM radio].・FM radio screen appears and selecting channel starts automatically. You can select channel by flicking the screen left and right. To select channel automatically furthermore, go to Step 3.3Tap , then tap [Search for channels].・Alternatively, tap / to search for channels.・The search ends when radio waves are received.4Tap , then tap [+ Add XX.X to favorites].5Tap entry box, enter a name and tap [Save].・The frequency bands of searched channels are registered to Favorites.6To stop the FM radio, tap .❖Information・You can return to the Home screen to perform another operation while listening to FM radio in the background. To return to the FM radio screen, from the Home screen, tap then tap [FM radio], or drag the status bar downward and tap [FM radio] on the Notification panel.・When the docomo mini UIM card is not inserted, the frequency band range is 87.5MHz - 108.0MHz. You cannot listen to the FM radio programs in Japan.FM radioSearching and registering channels](https://usermanual.wiki/Sony/PM-0070.08-user-guide-part-2/User-Guide-1802256-Page-37.png)
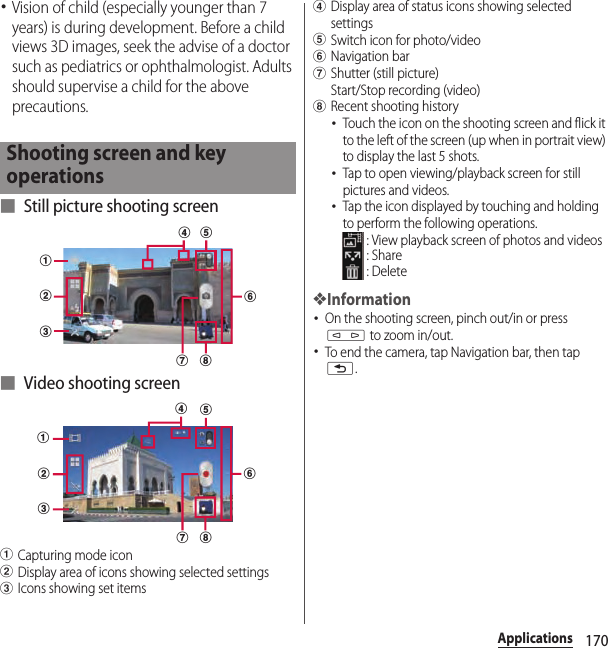
![167Applications■ FM radio screenaMonaural/stereo effect bPlay in speaker/Play in handsfreecChannel point displayed in a good radio wave conditiondOn/Off of FM radioePosting "Like" in Facebook・"Like" appears if you log in to Facebook.fView optional menugBroadcasting station now listeninghChannel assigned to favoriteiSearch channels automaticallyjMove left to select next favoritekFavorites saving/editing/tuninglMove right to select next favorite1On the FM radio screen, tap .2Tap [Play in speaker]/[Play in headphones].・The sound output is switched to the speaker/handsfree device.You can shoot still picture and video by tapping the shutter icon or screen or using the camera key (k). You can hold the camera horizontally or vertically to shoot still pictures (when shooting with 3D Sweep Panorama/Sweep Multi Angle/Sweep Panorama, hold the camera horizontally). For recording videos, screen display supports landscape only. Still pictures and videos are saved automatically in the internal storage or a microSD card.cfglkjhiabd eSwitching the speaker and handsfree deviceCamera](https://usermanual.wiki/Sony/PM-0070.08-user-guide-part-2/User-Guide-1802256-Page-38.png)
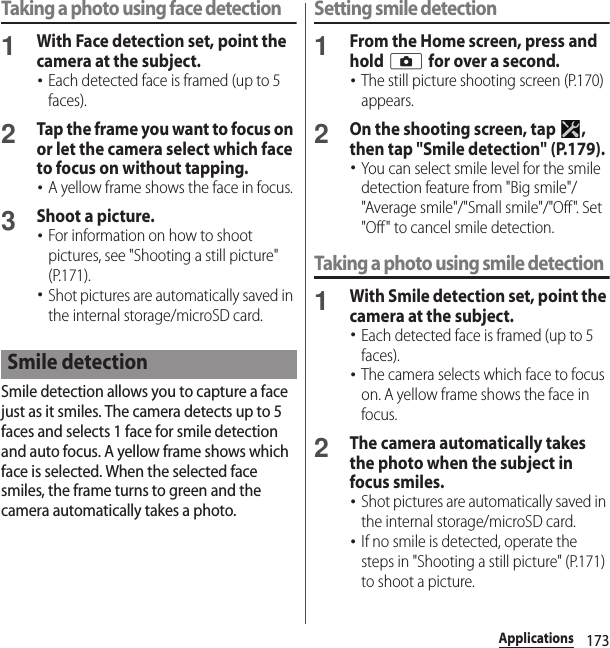
![171ApplicationsShooting a still pictureTap the shutter icon ( ) or screen, or use camera key (k) to shoot a still picture. Shot still pictures are automatically saved in the internal storage/microSD card.1From the Home screen, press and hold k for over a second.・The still picture shooting screen (P.170) appears.■Tapping the shutter icon ( )Tap the shutter icon ( ) on the shooting screen.・To take a photo using auto-focus function, touch and hold the shutter icon ( ) and release your finger when the focus frame turns green and sound beeps. The photo is taken as soon as you release the finger. If the focus frame turns red, auto-focus does not operate correctly.■Tapping the screenOn the shooting screen, tap u[Capturing method]u[Touch capture]uTap the screen.・To take a photo using auto-focus function, touch and hold the screen and release your finger when the focus frame turns green and sound beeps. The photo is taken as soon as you release the finger. If the focus frame turns red, auto-focus does not operate correctly.■Using the camera key (k)On the shooting screen, press k.・Even if "Capturing method" (P.181) is set to "On-screen button" or "Touch capture", you can press k to shoot.・To take a photo using auto-focus function, press k half way and when the focus frame turns green, press k the rest of the way down until it stops. If the focus frame turns red, auto-focus does not operate correctly. Press k halfway again.❖Information・When you connect Stereo Headset with Microphone (Sample), commercially available earphone set or other Bluetooth device, shutter sound may be softer. Shooting using Quick launch1On the SIM/screen unlock screen, press and hold k for over a second.・The camera is activated to shoot a photo immediately. Shot pictures are automatically saved in the internal storage/microSD card.Shooting still pictures](https://usermanual.wiki/Sony/PM-0070.08-user-guide-part-2/User-Guide-1802256-Page-42.png)
![172Applications❖Information・"Quick launch" (P.181) is set to "Launch and capture" by default. The operation of Quick launch can be selected from "Launch and capture", "Launch only", and "Off". When "Quick launch" is set to "Off", pressing and holding k for over a second on the SIM/screen unlock screen does not activate the camera.Using zoom1On the shooting screen, press m.❖Information・On the shooting screen, pinch in/out the screen to zoom out/in.・Zoom is not available while using Front camera/3D Sweep Panorama/Sweep Multi Angle/Sweep Panorama.Adjusting Exposure value1On the shooting screen, tap the shooting mode icon (P.170), then tap [Normal].2On the shooting screen, tap , then [Exposure value].3Tap or drag the bar to adjust the exposure value.You can use face detection to bring an off-center face into focus. The camera automatically detects up to 5 faces at a time. A yellow frame indicates a face to focus on, and white frames indicate the rest. An appropriate face is determined by distance from the camera and off-center balance, and is focused automatically. You can also tap one of the frames to select which face should be in focus.Setting face detection1From the Home screen, press and hold k for over a second.・The still picture shooting screen (P.170) appears.2On the shooting screen, tap the shooting mode icon (P.170), then tap [Normal].3On the shooting screen, tap , then tap "Focus mode" (P.179).4Tap (Face detection).❖Information・"Scenes" (P.177) is set to "Landscape"/"Night scene"/"Document", Face detection cannot be used.Face detection](https://usermanual.wiki/Sony/PM-0070.08-user-guide-part-2/User-Guide-1802256-Page-43.png)
![174Applications1From the Home screen, press and hold k for over a second.・The still picture shooting screen (P.170) appears.2On the shooting screen, tap the capturing mode icon (P.170), then select capturing mode.Capturing mode1From the Home screen, press and hold k for over a second.・The still picture shooting screen (P.170) appears.2On the shooting screen, tap the shooting mode icon (P.170), then tap [Front camera].3Shoot a picture.・For information on how to shoot pictures, see "Shooting a still picture" (P.171).❖Information・For using Front camera, "Resolution", "Self-timer", "Smile detection", "Geotagging", "Capturing method", "Data storage" can be set. Other "Still camera setting" (P.177) are not supported by Front camera.- "Resolution" can be selected from "1MP 16:9", "1M P 4:3" for Front camera.- The settings other than "Resolution" take over the camera settings set at the time when switching.Changing capturing modeItem Icon DescriptionCapturing modeSelect the shooting method. Scene recognitionThe camera determines most suitable scene effect. A corresponding scene icon appears when the scene is recognized. Normal A standard shooting mode. Front cameraP. 1 7 4 3D Sweep PanoramaP. 1 7 5 Sweep Multi Angle Sweep PanoramaUsing Front camera to shoot pictures](https://usermanual.wiki/Sony/PM-0070.08-user-guide-part-2/User-Guide-1802256-Page-45.png)
![175ApplicationsUse Sweep Panorama to shoot panoramic image with wide angle.Aligning the white frame on the screen with the black frame, move the camera slowly toward the set shooting direction to shoot.Using 3D Sweep Panorama allows you to shoot 3D pictures.・Photos shot with 3D Sweep Panorama cannot be displayed in 3D on the terminal. View them with a 3D compatible monitor using a microSD card etc.・Photos shot with Sweep Multi Angle can be viewed three-dimensionally by tilting the terminal left and right.Setting 3D Sweep Panorama/Sweep Multi Angle/Sweep Panorama1From the Home screen, press and hold k for over a second.・The still picture shooting screen (P.170) appears.2On the shooting screen, tap the shooting mode icon (P.170), then tap [3D Sweep Panorama]/[Sweep Multi Angle]/[Sweep Panorama].・Tap to select "On" or "Off" for "Photo light" (P.181).・For 3D Sweep Panorama, tap to select "Panorama image size" (P.178).・For Sweep Panorama, tap to select "Shooting direction" (P.181).Using Sweep Panorama](https://usermanual.wiki/Sony/PM-0070.08-user-guide-part-2/User-Guide-1802256-Page-46.png)
![182Applications❖Note・Some settings cannot be used in combination with one another.RecordingTap the start recording ( )/stop recording ( ) icon or recording screen, or use camera key (k) to record video. For video recording screen, only landscape screen is supported. Recorded data is automatically saved in the internal storage/microSD card.1From the Home screen, press and hold k for over a second.・Tap on switch icon for photo/video (P.170) to display the video recording screen.■Tapping the start recording ( )/stop recording ( ) iconOn the recording screen, tap to start recordinguTap to stop recording.■Tapping the screenOn the recording screen, tap u"Capturing method"u"Touch capture"uTap the screen to start recordinguTap the screen to stop recording.■Using camera key (k)On the recording screen, press k to start recordinguPress k to stop recording.・Even if "Capturing method" (P.186) is set to "On-screen button" or "Touch capture", you can press k to start/stop recording.❖Information・Do not cover the microphone with fingers etc. when recording videos.・When you connect Stereo Headset with Microphone (Sample), commercially available earphone set or other Bluetooth device, shutter sound may be softer. Using Front video camera to record1On the recording screen, tap the recording mode icon (P.170), then tap [Front video].2Start/Stop recording.・For information on how to start/stop recording, see "Recording" (P.182).Data storageSet the saving location for shot images.Internal storageSave shot images in the internal storage.SD card Save shot images in a microSD card.Recording videosItem Icon Description](https://usermanual.wiki/Sony/PM-0070.08-user-guide-part-2/User-Guide-1802256-Page-53.png)
![183Applications❖Information・For using Front video camera, "Video resolution", "Self-timer", "Geotagging", "Microphone", "Capturing method", "Data storage" can be set. Other "Video camera setting" (P.184) are not supported by Front video camera.- The settings take over the video settings set at the time when switching (if "Video resolution" is set to "Full HD", the video size is changed to "HD 720p").Adjusting Exposure value1On the recording screen, tap , then [Exposure value].2Tap or drag the bar to adjust the exposure value.1From the Home screen, press and hold k for over a second.・Tap on switch icon for photo/video (P.170) to display the video recording screen.2On the shooting screen, tap , then tap item to set.・Several setting icons are displayed on the shooting screen in advance. The displayed setting icons change depending on the setting conditions.・For setting items and icons, see "Video camera setting" (P.184).3Tap an option in the selected setting.・If you change setting options, icons displayed on the shooting screen change to the set items.❖Information・On the recording screen, tap to display setting items. If you touch and hold an item and then drag it to the area where setting item icons are displayed, you can replace displayed icons on the recording screen.・To delete a setting item icon displayed on the recording screen, touch and hold a setting item icon and drag to displayed in the center of the screen.・Capturing mode icons and setting icons (P.170) cannot be replaced or deleted.Changing the recording settings](https://usermanual.wiki/Sony/PM-0070.08-user-guide-part-2/User-Guide-1802256-Page-54.png)

![188Applications1Connect the plug of Stereo Headset with Microphone (Sample) to headset connector of the terminal.・Check the connecting direction to connect correctly. Wrong connection may cause damage.❖Information・When you listen to Media Player/WALKMAN/FM radio with Stereo Headset with Microphone (Sample) connecting to the terminal, you can switch on/off by pressing the switch of Stereo Headset with Microphone (Sample). However, operation may differ depending on the conditions of use.・If receiving a call when using Stereo Headset with Microphone (Sample), music stops, and the ringtone sounds.- If receiving a call when using Media player, playing music resumes by tapping the play key on the Media player screen after the call ends.- If receiving a call when using WALKMAN, playing music resumes when the call ends.Images, photos and videos you took can be viewed and played. Also, use Media Go to transfer content to the terminal and to take content from an external device. For details, refer to "Using microUSB cable" (P.150).1From the Home screen, tap , then tap [Album].・A list of pictures appears.❖Information・Depending on the number of saved images, it may take some times to load images.Using Stereo Headset with MicrophoneAlbumViewing photo/video](https://usermanual.wiki/Sony/PM-0070.08-user-guide-part-2/User-Guide-1802256-Page-59.png)
![189Applications■ Album screenaPictures tab・Pictures are displayed in a list separated by months.bMaps tab・Geotagging images appear on a map.cShow album listdView optional menueOnline tab・Images in albums in synchronized online services.1From the Home screen, tap , then tap [Album].・A list of pictures appears.2Tap a photo.・The photo is played.・Tap the screen to display information such as shooting date, option menu icons, etc.■ Still picture viewing screenaMy location info(location information)・For geotagged images, tap to view map.bShooting date and timecBack to the image listdView share menueDelete imagefView optional menu❖Information・ appears on an image shot with 3D Sweep Panorama/Sweep Multi Angle. Tap it and select an application to play, pause or transfer the image.・Photos shot with 3D Sweep Panorama cannot be displayed in 3D on the terminal. View them with a 3D compatible monitor using a microSD card etc.・Photos shot with Sweep Multi Angle can be viewed three-dimensionally by tilting the terminal left and right.・Pinch out/in on the photo viewing screen to zoom in/out image.・The items vary depending on the selected file.Viewing photosabec dbac d e f](https://usermanual.wiki/Sony/PM-0070.08-user-guide-part-2/User-Guide-1802256-Page-60.png)
![190Applications1From the Home screen, tap , then tap [Album].・A list of pictures appears. icon is displayed on the video files.2Tap a video and tap .・Video is played.Sharing image filesYou can share image files by attaching to Gmail or Email, uploading to Picasa or Google+, or sending to Bluetooth devices.1Tap an image file to share in the Album screen.2Tap the screen and .・Menu for sharing image file appears.・Tap [See all...] to display all share menus.3Select sharing method for image file.・After this step, follow the onscreen instructions.・The items vary depending on the selected file.・Some items cannot be operated in some image files.❖Information・On the image file list screen, tap , tap [Select items], then select image file to operate. You can operate several files as a group. ・Tap [Play on device] to display the connection device selection screen (if you do not connect Wi-Fi network in advance, tap [Settings] to display the setting screen for Wireless & networks). Select a device detected on the connection device selection screen, and tap the device name to play on to share a file between a DLNA device and the terminal.・For shared files, file size and the file type are not particularly limited, but may be limited by the application to transfer. DRM content cannot be shared.Deleting image files1On the photo viewing screen/video playing screen, tap the screen and tap u[OK].・Image file is deleted.❖Information・On the image file list screen, tap , tap [Select items], then select image file to delete. You can delete several files as a group. Playing videoOperating image files](https://usermanual.wiki/Sony/PM-0070.08-user-guide-part-2/User-Guide-1802256-Page-61.png)
![191ApplicationsUsing optional menuView slideshow, edit image, set image to phonebook entry or as wallpaper, check shooting date and time, etc.1On the photo viewing screen/video playing screen, tap the screen and tap .2From the displayed menu, select item you want to use.・The items vary depending on the selected file.・Some items cannot be operated in some image files.YouTube is a free online video streaming service. You can play, search for and upload videos.・A packet communication charge is applied when downloading or uploading video content using mobile networks.1From the Home screen, tap , then tap [YouTube].・YouTube video list screen appears.・You can tap [BROWSE] to select video from each category.2Tap a video to play it.・Tap the screen to display the play control keys which you can switch Play/Pause.・Double-tap the screen to switch landscape/portrait.・In landscape, drag the marker on the progress bar at the bottom of the play screen left or right to change playing point.・Tap x to stop playing and return to the video list screen.・To quit YouTube, tap y.YouTub ePlaying YouTube video](https://usermanual.wiki/Sony/PM-0070.08-user-guide-part-2/User-Guide-1802256-Page-62.png)
![192Applications❖Information・For movies with caption function which can display subtitles, "CC" appears on the playback screen in the landscape mode. Tap [CC] to set the caption function.1While playing a video, double-tap the screen to switch to the landscape screen.2Tap the screen to display the play control keys, then tap [HD]/[HQ].❖Information・A video plays in high quality when Wi-Fi is connected.・On the YouTube screen, tap , then tap [Settings]u[General] then mark [High quality on mobile] checkbox to always play video in high quality even when mobile network is connected.1Tap .2Enter the search keyword.3Tap the displayed candidates list or .4Flick the result up and down and tap a video you want to play.1Tap and tap [Settings]u[Search].2[Clear search history]uTap [OK].Playing YouTube videos in high qualitySearching for a video with keywordsDeleting search history](https://usermanual.wiki/Sony/PM-0070.08-user-guide-part-2/User-Guide-1802256-Page-63.png)
![194Applications4When charging is complete, remove the terminal from the TV Dock, and then remove the AC adapter from the power outlet.❖Note・The battery cannot be charged by connecting the TV Dock with a PC.1Connect the TV Dock to the AC adapter with the microUSB cable, and insert the AC Adapter plug into the power outlet.・Perform Step 1 and 2 of "Charging with TV Dock" (P.193).2Insert an HDMI cable connector (type A) into the HDMI connecting jack on the back side of the TV Dock ( ), and connect the other side of the connector to a TV ( ).3Align the microUSB connection jack position of the terminal with the charging jack of the TV Dock then insert the terminal ( ).・If you do not insert the terminal in parallel to the charging jack, it may cause damage.・, appear in the status bar then the terminal is connected to TV.❖Information・While MHL is connected, drag the status bar downward and tap [MHL connected] to make output settings or check how to use remote controller.Connecting to TV with TV Dock](https://usermanual.wiki/Sony/PM-0070.08-user-guide-part-2/User-Guide-1802256-Page-65.png)
![195Applications1Connect the terminal to a TV.・TV launcher screen is activated, then if you switch the TV to the HDMI input mode, the screen is displayed on the TV.・Also, drag the status bar downwards and tap [TV launcher] to activate TV launcher.2Select application using the TV remote controller.・You can also operate by flicking left and right or tap on the terminal's screen.❖Information・Some devices are not compatible with TV remote controller.For compatible devices, refer to http://www.sonymobile.co.jp/support/use_support/product/so-01e/ (in Japanese only).・On the TV launcher screen, select an album art in WALKMAN at the upper left to display WALKMAN screen.・On the TV launcher screen, select [Add] or tap u[Add] and select the desired shortcut to add to the TV launcher screen.・On the TV launcher screen, select [Home] to display the Home screen of the terminal.・Tap u[Rearrange] to rearrange shortcuts on the TV launcher screen.・Tap u[Delete] to delete shortcuts on the TV launcher screen.・Removing the terminal severs connection, however, TV may remain to HDMI input mode. Follow the instructions on the TV to switch to digital terrestrial television mode, etc.Play back videos and music stored on a microSD card using Media player.・For information on how to copy music and video data from a PC, see "Using microUSB cable" (P.150).・For information on file formats of playable data, see "Playing multimedia content" (P.187).1From the Home screen, tap , then tap [Media player].・A song list in Media player appears.Activating an application by TV launcherMedia PlayerActivating Media player](https://usermanual.wiki/Sony/PM-0070.08-user-guide-part-2/User-Guide-1802256-Page-66.png)
![196Applications■ Media player screen.aSongs/Artists/Albums tab・Switch display setting for song list.bView optional menucMovie tab・Show a video list.dStore tab・Activate dmarket.❖Information・Display order of "Songs", "Artists", "Albums" tabs. To change the display order, tap and tap [Settings]u[Arrange icons], and then touch and hold an icon you want to change order to drag to any of [Songs]/[Artists]/[Albums] then tap [Apply].1From the Home screen, tap , then tap [Media player].・A song list appears.・Tap [Songs]/[Artists]/[Albums] to change order of the song list.・Tap [Movie] to display video list.2Tap a song or video.・The playback screen appears to start playback.❖Information・If you reset the terminal (P.146), contents protected by Digital Rights Management (DRM) cannot be played.abcdPlaying music/video](https://usermanual.wiki/Sony/PM-0070.08-user-guide-part-2/User-Guide-1802256-Page-67.png)
![198ApplicationsYou can play back songs in the order you decided using playlist.Creating a playlist1From the Home screen, tap , then tap [Media player].・A song list appears.2Tap [Play list].・If playlists are not displayed, tap and tap [Settings]u[Arrange icons], and then touch and hold [Play list] to drag to any of [Songs]/[Artists]/[Albums] then tap [Apply].3Tap [Create new] and enter the access point name and tap [OK].4Tap [Add songs to playlist] and select songs you want to add.・You can also select songs from "Artists" and "Albums".・ on the selected song turns red and the song is added to Play list by each tap.5Tap [Apply]u[Save]u[OK].Editing songs in playlist1Tap [Play list] on the songs screen, then select a playlist to edit and tap [Edit].・Playlist editing screen appears.■ Changing order of the songs1Drag up and down in song to change order.2Tap [Save]u[OK].■ Deleting songs from playlist1Tap a song you want to delete.2Tap [Save]u[OK].Deleting playlist1Tap [Play list] and tap [Edit].2Tap a playlist you want to delete.3Tap [Save]u[OK].・"Recently added songs", "Recently played songs", and "Most played songs" playlists cannot be deleted.Play list](https://usermanual.wiki/Sony/PM-0070.08-user-guide-part-2/User-Guide-1802256-Page-69.png)
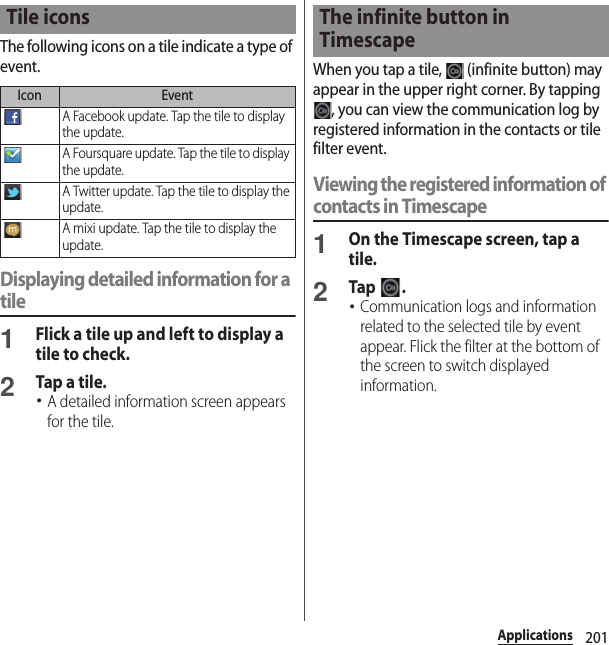
![199ApplicationsTimescape™ (hereinafter referred to as Timescape) displays various information such as Facebook, Foursquare, Twitter or mixi updates, etc. in chronological order. You can see a tile preview of events before choosing to view the full content. With (infinite button), you can view all communication information related to the registered contacts.(P. 2 0 1)❖Information・To make best use of Timescape, you can set up your social networking service (SNS) account.・Note that, you cannot view emails of Gmail or other Email application accounts in Timescape.・If you do not have a Facebook account, you can create a new account at http://www.facebook.com.・If you do not have a Foursquare account, you can create a new account at https://ja.foursquare.com.・If you do not have a Twitter account, you can create a new account at http://www.twitter.com.・If you do not have a mixi account, you can create a new account at http://mixi.jp (in Japanese only).・You can check the update of set Facebook, Foursquare, Twitter or mixi by Timescape.・The first time you start Timescape, a setup wizard will guide you the necessary steps to set up account.1From the Home screen, tap , then tap [Timescape™].2Tap a tile.3If you want, enter your Facebook/Foursquare/Twitter/mixi account information.4Tap [Done].❖Information・In the setup wizard, tap [Extension search] on the account registration screen to connect to Google Play and search new services for Timescape.・After completion of setup wizard, you can change the settings. On the Timescape screen, tap and tap [Settings]u[Set up services].・If the automatic update of Facebook/Foursquare/Twitter/mixi is set, you can check information update sooner; however, the battery runs out quickly. To save the battery, set to manual update.Timescape™Setting up Timescape](https://usermanual.wiki/Sony/PM-0070.08-user-guide-part-2/User-Guide-1802256-Page-70.png)
![200ApplicationsaView optional menubLatest comment・Display the latest comments posted to Facebook/Foursquare/Twitter/mixi.cTile・Display various information such as Facebook, Foursquare, Twitter or mixi friends updates in chronological order.dFilter・Tap a filter icon to narrow the information down to a certain type.・Display order of filters may differ.Previewing tiles in TimescapeSelect a tile to view the content on the tile.1Flick a tile up and left to display a tile to check.Displaying tiles by serviceApply filters to narrow tiles to display by service.1Tap the filter icons on the Timescape screen.Refreshing the Timescape screenWhen you refresh the Timescape screen, the terminal connects to the Internet to update information from your Facebook, Foursquare, Twitter and mixi whose accounts are set in Timescape.1On the Timescape screen, tap and tap [Refresh].Posting to Facebook, Foursquare, Twitter, mixi from Timescape1On the Timescape screen, tap and tap [Update status].2Mark the service you want to post and tap [Continue].3Enter the text and tap [Post].Timescape screenbdcaFilter Icon Displayed tileAll tilesUpdates from your Facebook contactsUpdates from your Foursquare contactsUpdates from your Twitter contactsUpdates from your mixi contacts](https://usermanual.wiki/Sony/PM-0070.08-user-guide-part-2/User-Guide-1802256-Page-71.png)
![202ApplicationsDisplaying the Timescape setting screen1On the Timescape screen, tap and tap [Settings].・You can set the following operations.There are two ways to find your location, using Mobile networks with Wi-Fi (Wireless network) or GPS. Wireless network technology determines your position fast but accuracy may vary. If you use GPS technology it may take a little longer, but it will find your exact position. You can enable both Wireless network and GPS to benefit from both technologies when trying to find your position.The terminal has a GPS receiver that uses satellite signals to calculate your location. Some GPS features use the Internet. Data rates and charges may apply.When you use functions that require the GPS receiver to find your location, make sure you have a clear view of the sky. If the GPS receiver does not find your location after a few minutes, you should move to another location. To help the search, stand still and do not cover the GPS antenna (P.22). The first time you use the GPS it may take up to 10 minutes before your location is found.Timescape settingsUpdate modeSet your Facebook/Foursquare/Twitter/mixi account information to be updated manually/automatically when Timescape is activated.Timescape™ contentChange a content type displayed in Timescape.Set up servicesSet Facebook/Foursquare/Twitter/mixi account or search new service of Timescape.Location servicesGPS function](https://usermanual.wiki/Sony/PM-0070.08-user-guide-part-2/User-Guide-1802256-Page-73.png)
![204Applications❖Note・If some of the GPS functions are not available, or if none of them are, check that your contract includes the use of the Internet, and see "Wireless & networks" (P.112).・NTT DOCOMO is not liable for navigation services or for the accuracy of location services.Enabling GPS function1From the Home screen, tap , then tap [Settings].2Tap [Location services].3Tap [GPS satellites].4Read the note and tap [Agree].・[GPS satellites] checkbox is marked.Enabling Wireless networks to find position・Enable to search a current location using mobile network and Wi-Fi.1From the Home screen, tap , then tap [Settings].2Tap [Location services].3Tap [Google's location service].4Read the note and tap [Agree].5Read the note on location information and tap [Agree].・[Google's location service] checkbox is marked.・Wireless network users' location information is stored without specifying who they are. Some location information is stored even when the application is not running.The Google Maps application lets you view your current location, find other locations and calculate routes. When you start the Google Maps application, your approximate location is shown using information from nearby mobile towers. Your location is updated with a more precise position when the GPS receiver finds your location.❖Information・Make sure to enable the location information service setting before trying to get your position.・To use Google Maps, enable data connection (LTE/3G/GPRS) or connect to Wi-Fi.・Google Maps does not cover the whole world.・Only using LTE/3G/Wi-Fi connection may not detect some locations.・Google may provide updated service or function.1From the Home screen, tap .Using Google Maps](https://usermanual.wiki/Sony/PM-0070.08-user-guide-part-2/User-Guide-1802256-Page-75.png)
![205Applications2Tap [Maps].・If a message appears, tap [OK].・A map screen appears.Finding the current location on the map1On the map screen, tap .・The blinking blue arrow shows the current location.・If you tap , the terminal's geomagnetic compass links the direction displayed on the map.Viewing Street View・Street View does not cover some areas.1Touch and hold a spot on the map that you are going to look at in Street View.2Tap the displayed call-out.3Tap (Street View)u[OK].・On the Street View display, tap and tap [Compass mode]. The compass in Street View shows the same direction as the terminal's geomagnetic compass.・Uncovered area for Street View appears in light gray.Searching for a location you want to look at1On the map screen, tap .2Fill out the search box.・You can enter addresses, city names, business types and institution names (for example, London and art museum).・If a list of places searched or referred previously appears on the screen, tap an address, etc. on the list to check the location on the map.3Tap .・Search result appears on the map.・If "RESULTS LIST" appears, tap [RESULTS LIST] to select the place to view.・When "Did you mean:" appears on the map, you can tap [Did you mean:] to select the place to view.4Tap a destination.・A detailed information screen appears.❖Information・On the detailed information screen, you can check the route or phone number for the searched location. The items displayed vary depending on the location.・On the map screen, tap to select a category such as "Restaurants", "Cafes" and show it on the map.](https://usermanual.wiki/Sony/PM-0070.08-user-guide-part-2/User-Guide-1802256-Page-76.png)
![206ApplicationsZooming in or out on a map1Pinch out or in.❖Information・Alternatively, double-tap the screen to zoom in.Changing the layersYou can select information to overlay on the map.1On the map screen, tap .2Tap the information you want to view.・Traffic information and routes are not available in all locations.Receiving guidesGoogle Maps helps you receive detailed guides for your destination.1On the map screen, tap .2Enter a start point in the upper entry field, and an end point in the lower entry field.・Alternatively, tap at the right of the text box to select a Start point and End point from [My current location]/[Contacts]/[Point on map]/[My Places].3Select a transportation from (Driving)/ (Transit)/ (Walking).4Tap [GET DIRECTIONS].■Going by car/on footDirection is shown on a map.■Going by public transportTrip list appears. Tap a trip to view details.❖Information・The "Navigation" application is displayed if you tap in car or walk option. With "Navigation" application, you can use easy route search with My Location as Start point.TrafficShow traffic condition.SatelliteDisplay satellite photo.TerrainDisplay geological formation.Transit LinesShow route information.LatitudeJoin Latitude.My MapsView My Maps that you create on a PC. Only viewing : You cannot create My Maps on the terminal.WikipediaDisplay .Tap to display a Wikipedia article related to the location.](https://usermanual.wiki/Sony/PM-0070.08-user-guide-part-2/User-Guide-1802256-Page-77.png)
![207ApplicationsClearing the MapsClear displayed layers, route search results and some others.1On the map screen, tap and tap [Clear Map].・If there is nothing to clear, "Clear Map" is displayed in light gray.Google Latitude enables you to share location information with your friends on the map.You need to set up a Google account (P.135) and join Latitude and invite a friend who gives his or her location information, or to receive an invitation from him or her.Joining Latitude1From the Home screen, tap , then tap [Latitude].・If My Location function is disabled, a message appears. Tap [Settings], then enable the function of "Enabling Wireless networks to find position" (P.204) or "Enabling GPS function" (P.204).2Tap [MAP VIEW].❖Information・To set Latitude or log out, tap a call-out displayed on My Location in the map screen, then tap [Location settings] to display a screen for the operation.・For details of Latitude, tap on the map screen, then tap [Help] to view the mobile help.Checking where a friend is by Google Latitude](https://usermanual.wiki/Sony/PM-0070.08-user-guide-part-2/User-Guide-1802256-Page-78.png)
![208ApplicationsThe terminal has a built-in calendar for the schedule. If you have a Google account, you can synchronize the terminal's calendar and web calendar. See "Accounts & sync" (P.135).・When you register Google account, tap the Google account displayed in "Accounts & sync" and a sync item "Sync Calendar". You can create schedule etc.1From the Home screen, tap , then tap [Calendar].2Tap [Month]/[Week]/[Day] to select.1From the Home screen, tap , then tap [Calendar].2Tap at the upper right.3Enter a schedule name, date, and time.4If you have two or more calendar accounts, select one.5If necessary, select the repetition intervals of the calendar.6Select the notification intervals of the schedule.・Tap to add a new notification into the schedule.7Enter a place and some others of schedule.8Tap [Save].❖Information・Tap in "More" and flick the screen to set "Time zone", "Guests (Email addresses)", "Show me as:", and "Privacy".Viewing schedule in Calendar1From the Home screen, tap , then tap [Calendar].・Flick the calendar left or right to display the next or previous month/week/day according to the view mode.・Tap to display date and time set on the terminal.・Pinch out/in on the weekly or daily schedule screen to zoom in/out calendar.2Tap a schedule you want to display.CalendarSetting the calendar viewCreating a schedule in Calendar](https://usermanual.wiki/Sony/PM-0070.08-user-guide-part-2/User-Guide-1802256-Page-79.png)
![209Applications❖Information・While the Calendar is displayed, tap and [My calendars] to synchronize with the docomo account. You can view the events created in "Schedule" application in the Calendar.・If you log in to Facebook, tap [Sync Calendar] in the "Facebook inside Xperia™" (P.137) to display events in Facebook in the Calendar.1If a reminder icon ( ) appears in the status bar, drag the bar downward.・The notification panel opens.・The reminder icon appears at set Notification time.2Tap a schedule.3Tap [Snooze all] or [Dismiss all].・If you have any schedules on hold, they appear on the same screen.・If you tap [Snooze all], all the alarms sound again 5 minutes later.(Snooze is a function that sounds the alarm some time later even though you stop it.)1From the Home screen, tap , then tap [Calendar].2Tap and [Search].3Enter a keyword in the search box and tap .・Search results appear. Tap an event to view details.Set Calendar view, reminder notifications, ringtone, vibration, reminder time.1From the Home screen, tap , then tap [Calendar].2Tap and tap [Settings].3Select an item to change.Releasing the reminder of a schedule or setting the snoozeSearching events in CalendarChanging calendar settings](https://usermanual.wiki/Sony/PM-0070.08-user-guide-part-2/User-Guide-1802256-Page-80.png)
![210ApplicationsWith "Alarm & Clock" application, you can set an alarm and use world clock, stopwatch and timer.1From the Home screen, tap .2Tap [Alarm & Clock].aClock display・Tap to view date and time (P.147) setting screen.bAdd alarmcAlarms setdDisplay clock in full screeneView alarm screenfView world clockgView stop watchhView timeriDelete set alarm1From the Home screen, tap , then [Alarm & Clock].・The alarm list screen appears.2Tap [Add alarm].・An alarm setting screen appears. You can set the following items.・Tap [Advanced alarm settings] to view all setting items.Alarm & Clockadbceif g hSetting alarmTimeSet time.RepeatSet a day of the week for the alarm.Alarm soundSet alarm sound.Snooze durationSet time interval to sound the ringtone again after stopping the ringtone.Alarm textEnter texts that appear while alarm is sounding.Style settingsMark the checkbox to display an image while alarm is sounding.VibrateMark to vibrate at the alarm time.Alarm volumeDrag the slider left or right to adjust the level.Alarm in silent modeMark to sound alarm even in silent mode.Side keys behaviorSelect an effect when pressing m / k while alarm is sounding.Auto silent timeSet time interval until alarm automatically stops.](https://usermanual.wiki/Sony/PM-0070.08-user-guide-part-2/User-Guide-1802256-Page-81.png)
![211Applications3Tap [Done].・Return to the alarms list screen.❖Information・To switch on/off alarm, from the alarm list screen, tap or touch and hold an alarm that is set, then tap [Turn alarm on]/[Turn alarm off ].・When an alarm is turned on, the line under lights blue.Deleting the alarm1On the alarm list screen, tap and mark alarm to delete.2Tap [Delete]u[Yes].・The number of marked alarms appears on the "Delete" button.❖Information・Alternatively, on the alarm list screen, touch and hold an alarm you want to delete, then tap [Delete alarm]u[Yes] to delete the alarm.Stopping an alarm while the alarm is sounding1While alarm is sounding, touch and drag it to the right.❖Information・If you tap [Snooze], the alarm sounds again when the time set in "Snooze duration" (P.210) has passed.Display the date and time in cities around the world.1From the Home screen, tap , then [Alarm & Clock].2Tap [World clock].・The list screen of the world clock appears.3Tap [Add city].4Select a city.❖Information・Tap to display date and time set on the terminal in full screen.・Add a city and tap , then flick the list of added cities left and right to check date and time corresponding to the terminal's settings.Using World clock](https://usermanual.wiki/Sony/PM-0070.08-user-guide-part-2/User-Guide-1802256-Page-82.png)
![212ApplicationsChanging World clockYou can switch, sort or delete Celsius/Fahrenheit displayed on World clock.1On the world clock list screen, tap .■Setting home cityTap [Set home city] and select a city.■Switching Celsius/FahrenheitTap [Celsius]/[Fahrenheit].・Switch Celsius/Fahrenheit.■SortingTap [Rearrange]uDrag of the date in the world clock up and downuTap [Done].■DeletingTap [Delete]uMark world clock checkbox you want to deleteuTap [Delete]u[Yes].・The number of marked cities appears on the "Delete" button.・Alternatively, on the world clock list screen, touch and hold a city you want to delete, then tap [Delete city]u[Yes].1From the Home screen, tap , then [Alarm & Clock].2Tap [Stopwatch].3Tap [Start].・Measurement starts and appears in the status bar.・Tap [Lap] to measure elapsed time.4Tap [Stop].・Tap [Start] to resume measuring.・Tap [Reset] to delete measured time and lap time.❖Information・Tap to display date and time set on the terminal in full screen.Using Stopwatch](https://usermanual.wiki/Sony/PM-0070.08-user-guide-part-2/User-Guide-1802256-Page-83.png)
![213Applications1From the Home screen, tap , then [Alarm & Clock].2Tap [Timer].・Time screen appears.3Tap [Set time].4Flick number up and down to adjust the time and then tap [Set].5Tap [Start].・Timer starts, and appears in the status bar.6Tap [Stop].・Stop sounding alarm after a set time has elapsed.・Tap [Stop] within a set time duration to pause timer. Tap [Start] to resume timer.❖Information・Tap to display date and time set on the terminal in full screen.・Tap to set time from Timer history.・Tap uSelect an alarm sounduTap [Done] to change the alarm sound.Move or back up data such as phonebook entries, sp-mode mails, bookmarks, etc. using external memory such as microSD card.・Do not remove the battery pack or microUSB card during backup or restoring. Doing so may damage the terminal data.・If the battery is low, backup or restore may not be done. In that case, charge the terminal and retry to back up or restore.・docomo apps password is required to back up or restore. For details on docomo apps password, see "docomo apps password" (P.134).❖Information・For details of SD card backup, tap , then tap [Help] to view the help.Using TimerSD card backup](https://usermanual.wiki/Sony/PM-0070.08-user-guide-part-2/User-Guide-1802256-Page-84.png)
![214ApplicationsIf microSD card is not installed, data such as images and movies are saved to the internal storage. You can back up only data such as images and movies stored in the internal storage. Data stored in microSD card cannot be backed up.1From the Home screen, tap , then tap [SD card backup].・When you use for the first time, agree to "License agreement".2Tap [Back up].3Mark checkboxes for data to back up.・Tap [Select all] to mark all checkboxes.4Tap [Start backup]u[OK].5Enter docomo apps password and tap [OK].・Data is backed up in a microSD card.1From the Home screen, tap , then tap [SD card backup].2Tap [Restore].3Tap [Select] on data type, mark checkboxes for data to restore, and tap [Select].・Tap [Select latest data] to select the latest data for each data type.4Tap [Add]/[Overwrite] to select restore method and tap [Start restore]u[OK].5Enter docomo apps password and tap [OK].・Backed up data is restored.Backing up Restoring](https://usermanual.wiki/Sony/PM-0070.08-user-guide-part-2/User-Guide-1802256-Page-85.png)
![215ApplicationsYou can copy contacts data registered in Google account and in the terminal to docomo account.1From the Home screen, tap , then tap [SD card backup].・When you use for the first time, agree to "License agreement".2Tap [Phonebook account copy], tap [Select] on phonebook contacts you want to copy.3Tap [Overwrite]/[Add].・Phonebook data is copied to docomo account.❖Information・If phonebook item names (e.g. Phone number, etc.) of the other terminal are different from ones of your terminal, the item names may be changed or deleted. Also, some text may be deleted in copied destination, because savable characters in a phonebook entry vary by terminal.・When backing up phonebook entries to microSD card, data without Name cannot be copied.・If microSD card is low on memory, backup may not be done. In that case, delete unnecessary files to make available space.With OfficeSuite, you can view files of Word, Excel, etc. from the terminal or a microSD card.❖Information・Some files may not be viewed properly due to corrupted layouts.1From the Home screen, tap .2Tap [OfficeSuite].・OfficeSuite starts.❖Information・When you use for the first time, a screen appears for registering a name etc. Select either [Register later] or [Register now].Copying phonebook entries registered in Google account to docomo accountOfficeSuiteStarting OfficeSuite](https://usermanual.wiki/Sony/PM-0070.08-user-guide-part-2/User-Guide-1802256-Page-86.png)
![216International roamingInternational roamingWith the international roaming (WORLD WING), you can use the terminal without changing phone number or mail address in the service area of the overseas network operator affiliated with DOCOMO. You do not need to change the settings of call and SMS.■ Supporting networksThe terminal is Class 4. The terminal works in a 3G roaming area and GSM/GPRS service area. Services are also available in countries and areas supporting 3G 850MHz/GSM 850MHz. Check available areas. Use 3G network or GSM/GPRS network overseas because Xi is not available overseas.■ Before using the terminal overseas, refer to the followings.・"Mobile Phone User's Guide [International Services]"・DOCOMO International Services website❖Information・For Country codes, International call access codes, Universal number international prefix, supported countries/areas and network operators, refer to "Mobile Phone User's Guide [International Services]" or DOCOMO International Services Website.* To use data communication during roaming, mark [Data roaming] checkbox in Mobile network settings. (P.220)❖Information・Some services are not available depending on the overseas network operator or network.Overview of International roaming (WORLD WING)Available ServicesMain communication services 3G 3G850 GSM (GPRS)Phone○○○Message (SMS)○○○Email*○○○Browser*○○○](https://usermanual.wiki/Sony/PM-0070.08-user-guide-part-2/User-Guide-1802256-Page-87.png)
![218International roamingWhen you arrive overseas and turn on the terminal, an available network is automatically set.ConnectivityWhen you have set search mode of "Available networks" to "Automatic" in "Service providers" settings, optimized network is automatically selected.When you connect to the network operator conducted in flat-rate service, you can use the service with flat-rate packet communication charges overseas up to the specified upper limit per day. To use this service, subscription of packet flat-rate service in Japan is required. For details, refer to "Mobile Phone User's Guide [International Services]" or DOCOMO International Services Website.DisplayDuring international roaming, appears on the status bar.・You can confirm the name of the connected network operator on the Notification panel.❖Note・While appears on the status bar, packet communication is available. Note that packet communication fee may become high.Date & time settingsWhen "Automatic date & time" is marked in "Date & time", the date, time and time differences of the terminal clock are corrected by receiving the information related to time and time differences from the network of overseas network operator you connect to. ・Correction of the time/time differences may not be performed correctly depending on the network of overseas network operator. In that case, set time zone manually.・Timing of correction varies by the overseas network operator.・Date & time (P.147)About inquiries・For loss or theft of the terminal or UIM/docomo mini UIM card, immediately contact DOCOMO from the spot to take the necessary steps for suspending the use. For inquiries, see the last page of this manual. Note that you are still liable for the call and communication charge incurred after the loss or theft occurred.・For using from land-line phone, entering "International call access code" or "Universal number international prefix" for the country is needed.After arriving overseas](https://usermanual.wiki/Sony/PM-0070.08-user-guide-part-2/User-Guide-1802256-Page-89.png)
![219International roamingAfter returning to JapanWhen you return to Japan, the terminal is connected to DOCOMO network automatically. If connection is failed, perform the following operations.・Set "Network Mode" to "LTE (preferred)/WCDMA/GSM". (P.220)・Set "Search mode" to "Automatic" in "Service providers" settings. (P.219)When you start the international roaming or move out of your operator's network, you need to reconnect the terminal to another available network.❖Information・Some applications automatically perform packet communications. To disconnect packet communication manually, from the Home screen, tap and Tap [Settings]u[More...]u[Mobile networks]u[Data enabled] to unmark.Confirming and switching the network search modeBy default, network search mode is set to "Automatic". When you connect manually to an overseas network operator conducted in flat-rate service, confirm the search mode with the following operations and switch to "Manual".1From the Home screen, tap , then tap .2Tap [Call settings]u[Service providers].3Tap [Search mode]u[Manual].4From "AVAILABLE NETWORKS", tap a network to mark.・To display available networks, tap [Search networks].❖Information・If you set a network manually, the terminal is not reconnected to another network automatically even if you move out of the network area.・To return to "Automatic", tap [Automatic] in Step 3.Making setting for international use](https://usermanual.wiki/Sony/PM-0070.08-user-guide-part-2/User-Guide-1802256-Page-90.png)
![220International roamingChanging network mode settingsYou can change network mode settings according to the network mode (communication method) adopted by the overseas network operator.1From the Home screen, tap , then tap [Settings].2Tap [More...]u[Mobile networks]u[Network Mode].3Select a network mode you use.・You can select from [LTE/WCDMA], [GSM only] and [LTE (preferred)/WCDMA/GSM]. If you select [LTE (preferred)/WCDMA/GSM] to switch available network automatically.Activating data roaming1From the Home screen, tap , then tap [Settings].2Tap [More...]u[Mobile networks].3Tap [Data roaming].4Read the cautions displayed, tap [Yes].・[Data roaming] checkbox is marked.When you arrive overseas and turn on the terminal, an available network is automatically set.・Check that the battery and signal levels are high enough.・Depending on the network operator, even if the Caller ID notification is active, the caller ID may not be notified or appear properly.In this case, calls cannot be made from the call log.You can make a call from overseas using the international roaming service.・You can easily make international calls from the country you stay to Japan or to other countries by entering prefix "+" and then the country code and phone number.1From the Home screen, tap , then tap [Dial].Making/Receiving calls in the country you stayMaking a call to outside country you stay (including Japan)](https://usermanual.wiki/Sony/PM-0070.08-user-guide-part-2/User-Guide-1802256-Page-91.png)
![221International roaming2Dial + (touch and hold [0])uCountry codeuArea code (City code)uEnter a phone number.・If the area code begins with "0", omit "0". However, "0" may be required to dial to some country or area such as Italy.・To call an overseas "WORLD WING" user, enter "81" (Japan) for the country code.3Tap .❖Information・During international roaming, if you make an international call to Japan using DOCOMO's phonebook application, the "International dialing assist" screen appears. You can make a call without entering country code from that screen.You can make a call by entering the phone number of the other party's land-line phone or mobile phone in the same way you do in Japan.1From the Home screen, tap , then tap [Dial].2Enter the other party's phone number.・To make a call to land-line phone, enter the area code (city code) + other party's phone number.3Tap .When the other party uses international roaming service, make a call as an international call to Japan even when you stay in the same country as the other party.You can receive a call using the international roaming service.Making a call within the country you stayMaking a call to WORLD WING user overseasReceiving a call in the country you stay](https://usermanual.wiki/Sony/PM-0070.08-user-guide-part-2/User-Guide-1802256-Page-92.png)
![222International roaming1While receiving a call, touch (left) and drag it to (right).2When the conversation is finished, tap [End call].❖Information・When you received a call during the international roaming, regardless of which country the call is from, it is forwarded internationally from Japan. A caller is charged for a call fee to Japan, and the receiver is charged for a reception fee.■ Having the other party call you・Calling from Japan to the country you stayTo have the other party make a call from a land-line phone or mobile phone in Japan to the terminal in the country you stay, the other party only needs to dial the phone number as in Japan.・Calling from the country except Japan to the country you stayYou have to receive a call through Japan no matter where you are; therefore, the other party needs to enter the international call access code and "81" (Country code of Japan). International access code - 81 - 90 (or 80) - XXXX - XXXXMake settings for using international roaming or international calls.Set restricting incoming calls overseas or using roaming guidance.・For some overseas network operators, settings may not be made.Restricting incoming calls for roaming1From the Home screen, tap , then tap .2Tap [Call settings]u[Roaming settings].3Tap [Restricting incoming calls].・Select items you want to use.International roaming settingsSettings for making/receiving calls overseasActivate restrictingTap any of [Restricting all incomings]/[Restricting incoming of video call/64K data], enter the network security code, and tap [OK].Deactivate restrictingEnter the network security code and tap [OK].](https://usermanual.wiki/Sony/PM-0070.08-user-guide-part-2/User-Guide-1802256-Page-93.png)
![223International roamingSetting incoming notification on roaming1From the Home screen, tap , then tap .2Tap [Call settings]u[Roaming settings].3Tap [Incoming notification on roaming].・Select items you want to use.Setting roaming guidance1From the Home screen, tap , then tap .2Tap [Call settings]u[Roaming settings].3Tap [Roaming guidance].・Select items you want to use.Setting international dial assistance1From the Home screen, tap , then tap .2Tap [Call settings]u[Roaming settings].3Tap [International dial assist].・Select items you want to use.Settings Network service (overseas)Set network service such as voice mail from overseas.・If you make the settings overseas, you are charged a call fee to Japan from the country you stay.・For some overseas network operators, settings may not be made.Check settingsCheck the current service settings.Activate incoming call notificationTap [OK] to activate roaming incoming call notification.Deactiv. incoming call notificationTap [OK] to deactivate roaming incoming call notification.Check settingsCheck the current service settings.Activate roaming guidanceTap [OK] to activate roaming guidance.Deactivate roaming guidanceTap [OK] to deactivate roaming guidance.Check settingsCheck the current service settings.Auto conversionMark the checkbox to add international prefix or country code automatically.Country codeTap [OK ] to select a countr y code which will be used for auto conversion.International prefixTap [OK] to select an international prefix which will be used for auto conversion.](https://usermanual.wiki/Sony/PM-0070.08-user-guide-part-2/User-Guide-1802256-Page-94.png)
![224International roaming1From the Home screen, tap , then tap .2Tap [Call settings]u[Roaming settings].3Tap [Network service].・Select items you want to use. You need to set "Remote access" to activate.* Follow the voice prompts to operate.Voicemail(charged)Activate Voicemail (roaming)Tap [OK].*Deactivate Voicemail (roaming)Tap [OK].*Play voicemail message (roaming)Tap [OK]. After this step, follow the voice prompts to play the message.Voicemail settings (roaming)Tap [OK].*Voicemail ring time (roaming)Tap [OK].*Incoming call notific. (charged)Tap [OK].*Caller ID request (charged)Tap [OK].*Roaming guidance (charged)Tap [OK].*Remote operation (charged)Tap [OK].*Call forwarding (charged)Activate call forwardingTap [OK].*Deactivate call forwardingTap [OK].*Check settingsTap [OK].*](https://usermanual.wiki/Sony/PM-0070.08-user-guide-part-2/User-Guide-1802256-Page-95.png)
![229Appendix/Index■ Data management■Out of service area indicator appears・Check if you are out of the international roaming service area or in an area with poor signal strength. Check if the service area and network operator are available, referring to "Mobile Phone User's Guide [International Services]" or DOCOMO International Services website.・Change the network settings or overseas network operator settings.Set "Search mode" to "Automatic" in "Service providers" settings.Set "Network Mode" to "LTE (preferred)/WCDMA/GSM".・Turning off the terminal and then turning on again may work for the restoration.P. 2 1 8P. 2 2 0P. 3 0Cannot perform data communication overseas.・Mark the data roaming checkbox. P.220The terminal suddenly became unavailable while using overseas.・Check if usage amount exceeds the limit of maximum charges for use.For use of "International roaming (WORLD WING)", the limit of maximum charges for use is set in advance. If exceeding the limit of maximum charges for use, pay the charges.−Cannot receive calls overseas.・Is "Restricting incoming calls" set to "Activate restricting"?P. 2 2 2No caller ID is notified/A notified caller ID is different from that of the caller/Functions for using contents saved in phonebook or those using Caller ID notification do not operate.・Even if a caller notifies its caller ID, it is not displayed on the terminal unless the network or network operator notifies it. And a different caller ID may be notified depending on the network or network operator you use.−Data transfer is not performed.・Check if USB hub is used. If you use USB hub, operations may not be performed correctly.−Data saved in microSD card is not displayed.・Remove the microSD card and insert it again.P. 2 4When trying to display an image, "×" appears instead of it.Or "×" appears for the demo play or the preview function.・"×" may appear instead of destroyed image data.−](https://usermanual.wiki/Sony/PM-0070.08-user-guide-part-2/User-Guide-1802256-Page-100.png)
![231Appendix/IndexBy sharing screens of your terminal with NTT DOCOMO, you can receive technical support to make settings (in Japanese only).・This service is not available when your docomo mini UIM card is not inserted, during international roaming, or in Airplane mode.・Smartphone Anshin Remote Support is a service requiring subscription.・Some operations and settings are not supported.・For details on Smartphone Anshin Remote Support, refer to NTT DOCOMO website.1Call スマートフォン遠隔サポートセンター (Remote support center for smartphone) ( 0120-783-360, Business hours: 9:00 a.m. to 8:00 p.m., open all year round).2Tap [遠隔サポート (Remote support)].・When you use for the first time, agree to "ソフトウェア使用許諾書 (License Agreement)".3Enter connection number notified by DOCOMO.4Remote support starts when you are connected.・Make sure that the warranty is received with the terminal upon purchase. Check to be sure that "販売店名・お買い上げ日 (the name of the retailer, date of purchase)", and other items have been filled out on the warranty before storing it in a safe place. If any necessary information is not provided, immediately contact the retailer and request to complete the warranty. The terminal comes with a year's free warranty starting from the date of purchase.・Specifications of this product and its accessories are subject to change for improvement without prior notice.・Data saved in the Contacts etc. may be changed/lost due to the trouble/repairs or handling of the terminal. DOCOMO recommends making a copy of the Phonebook data etc., in case.* You can save Phonebook data in a microSD card inserted to the terminal.* Data such as phonebook entries can be backed up to Data center using Data Security Service (subscription is required).Smartphone Anshin Remote Support Warranty and After Sales ServicesWarranty](https://usermanual.wiki/Sony/PM-0070.08-user-guide-part-2/User-Guide-1802256-Page-102.png)
![235Appendix/IndexSetting notification of Software updateYou can set to be notified of updating software.1From the Home screen, tap , then tap [Update Center].2Tap and [Settings].3Mark [Notifications] checkbox.・To change the notification tone, tap [Notification tone], then tap notification tone you want to change, and then tap [Done].❖Information・If you mark [Notification vibration] checkbox in Step 3, Software update is notified by vibration.Downloading software to updateSoftware can be downloaded wirelessly directly from your terminal via the Internet by using mobile network connection or by using a Wi-Fi network connection.1From the Home screen, tap , then tap [Update Center].2Tap [System] tab and then .・The terminal searches for software updates.❖Information・You can also search the software update in the following operation.From the Home screen, tap and , then tap [Settings]u[About phone]u[Software update]u[System] and then tap .・"New apps"/"Updates" tabs in the Update Center screen are not available because the services are not provided in Japan.❖Note・For software update via mobile network, a high packet communication charge will be applied because of a large amount data communication. For this reason, subscription of packet flat-rate service is highly recommended.・While you are using roaming service overseas, you cannot search for or download update software through the mobile network.Downloading software updates wirelessly](https://usermanual.wiki/Sony/PM-0070.08-user-guide-part-2/User-Guide-1802256-Page-106.png)
![236Appendix/IndexUpdating the latest software automaticallyYou can update the latest software update automatically on regular basis. If software update is searched, appears on the status bar.1From the Home screen, tap , then tap [Update Center].2Tap and [Settings].3Tap [Allow automatic updates], read the notes and tap [OK].❖Note・Note that if you tap from the Home screen, then tap [Update Center] and then tap [Settings]u[Preffered data traffic] and then select [Via mobile network/Wi-Fi] in the Preffered data traffic screen, a Wi-Fi connection automatically switches to mobile network communications when the Wi-Fi connection is unstable and packet communication fee may apply.・Note that packet communication fee may apply for searching automatically.You can update software by using PC Companion that can be installed into a PC from the terminal.❖Information・To install PC Companion on a PC, an Internet connection is required.When PC Companion is not installed on your PC1Connect the terminal to a PC using a microUSB cable.2When "PC Companion software" screen appears on the terminal, tap [Install].・Installer of PC Companion starts on the PC.3Follow the onscreen instructions on the PC to install.・After installation, PC Companion starts on the PC. If further software update is searched, it is automatically notified. Follow the onscreen instructions on the PC.Connecting to a PC and updating](https://usermanual.wiki/Sony/PM-0070.08-user-guide-part-2/User-Guide-1802256-Page-107.png)