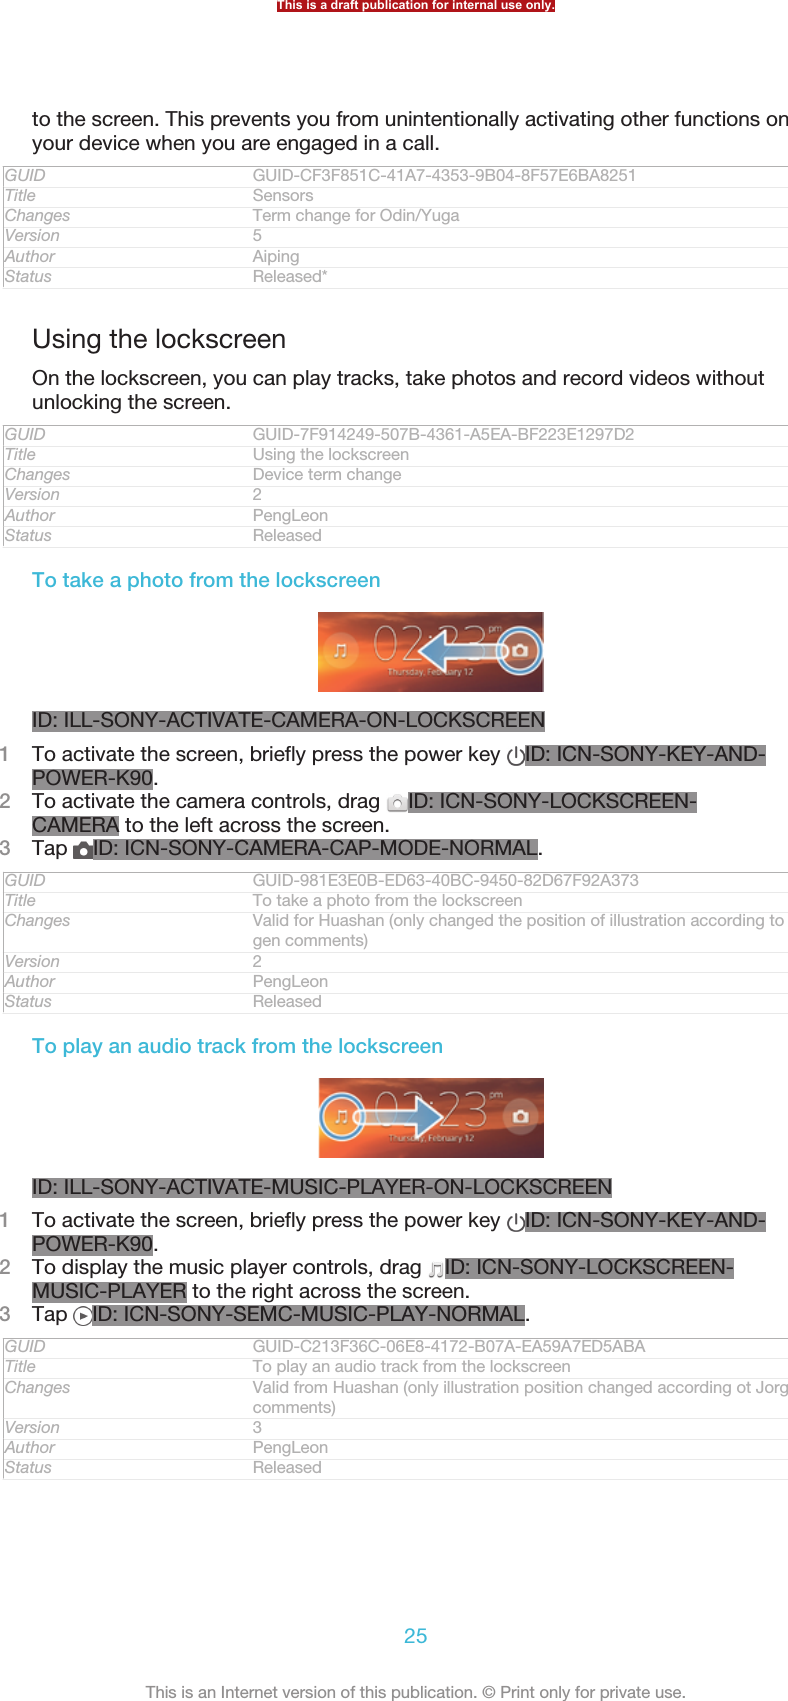
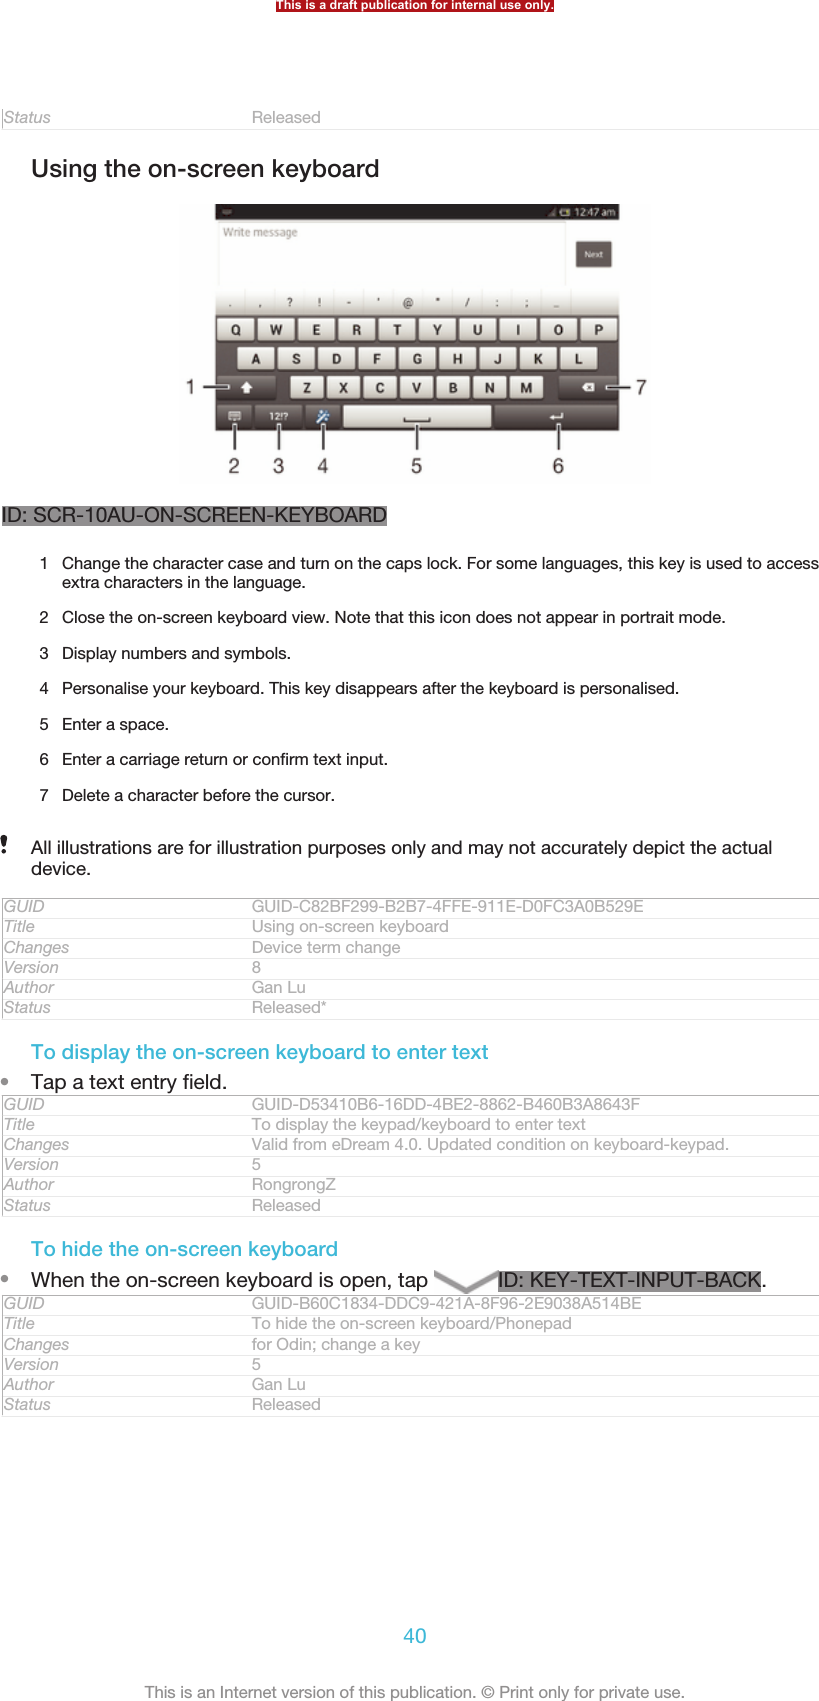
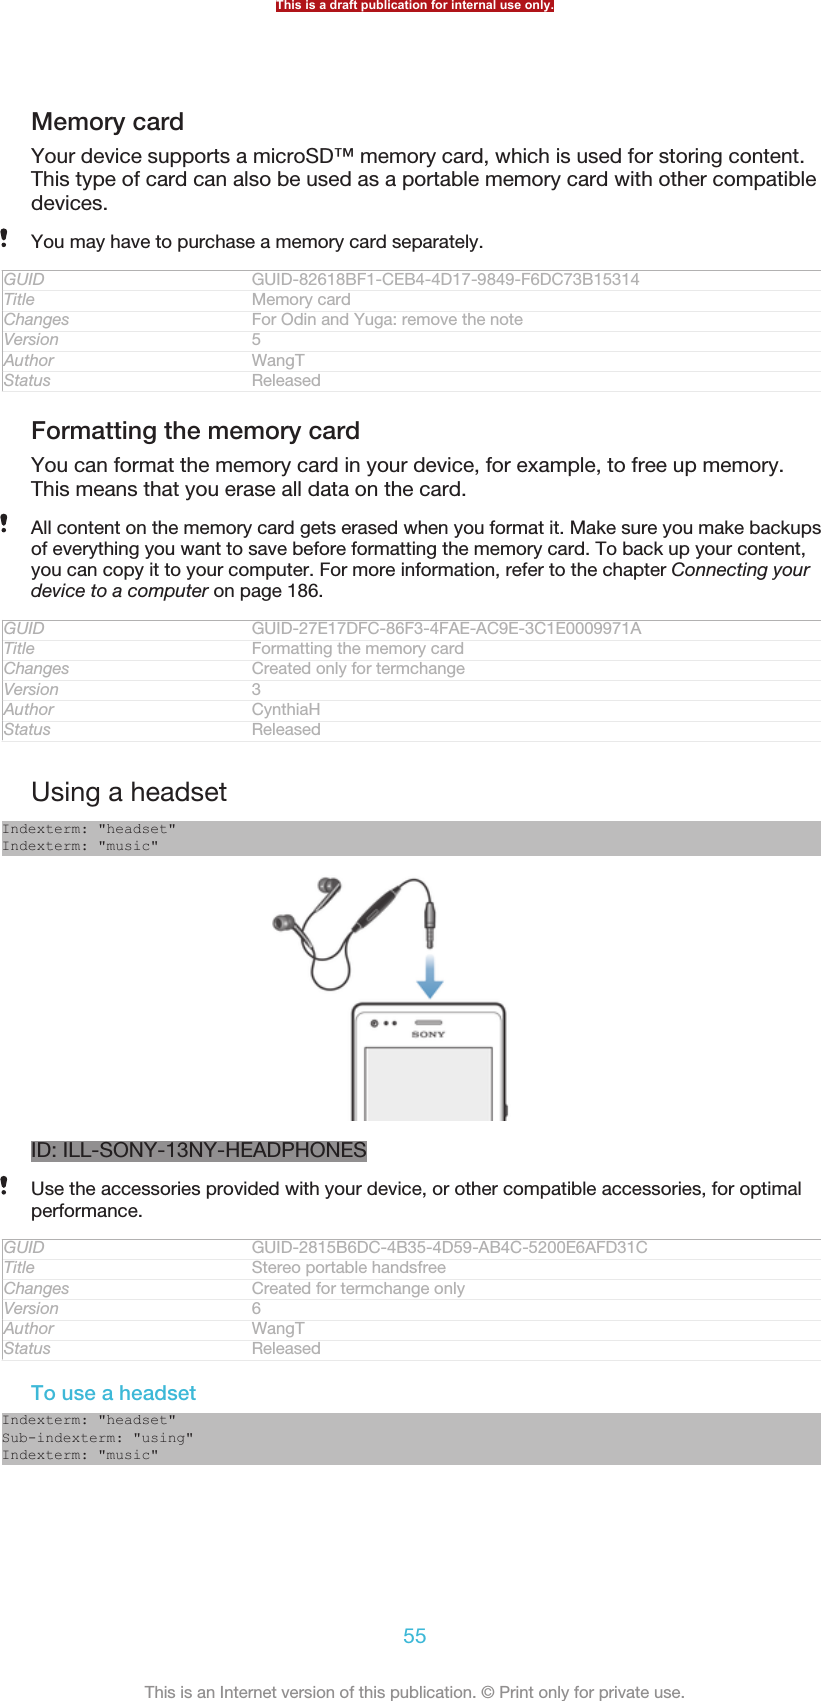
Sony PM-0480 PDA Phone User Manual Sony Ericsson Mobile Communications AB
Sony Mobile Communications Inc PDA Phone Sony Ericsson Mobile Communications AB
Sony >
Contents
- 1. [Short-term confidential]userguide_EN_[PRODUCT NAME]_[PART NUMBER]_Android4.0
- 2. HAC leaflet.pdf
- 3. Nicki-SS-a1245_SAR-FCC-DoC-leaflet---America (draft)_20130611
- 4. HAC leaflet
[Short-term confidential]userguide_EN_[PRODUCT NAME]_[PART NUMBER]_Android4.0
![DraftUser guideProduct name variable ismissing in the XML[COVERPRODUCT VARIABLE MISSING IN XML]](https://usermanual.wiki/Sony/PM-0480.Short-term-confidential-userguide-EN-PRODUCT-NAME-PART-NUMBER-Android4-0/User-Guide-1988542-Page-1.png)
![Xperia™ V [] User guideThis is a draft publication for internal use only.6This is an Internet version of this publication. © Print only for private use.](https://usermanual.wiki/Sony/PM-0480.Short-term-confidential-userguide-EN-PRODUCT-NAME-PART-NUMBER-Android4-0/User-Guide-1988542-Page-6.png)
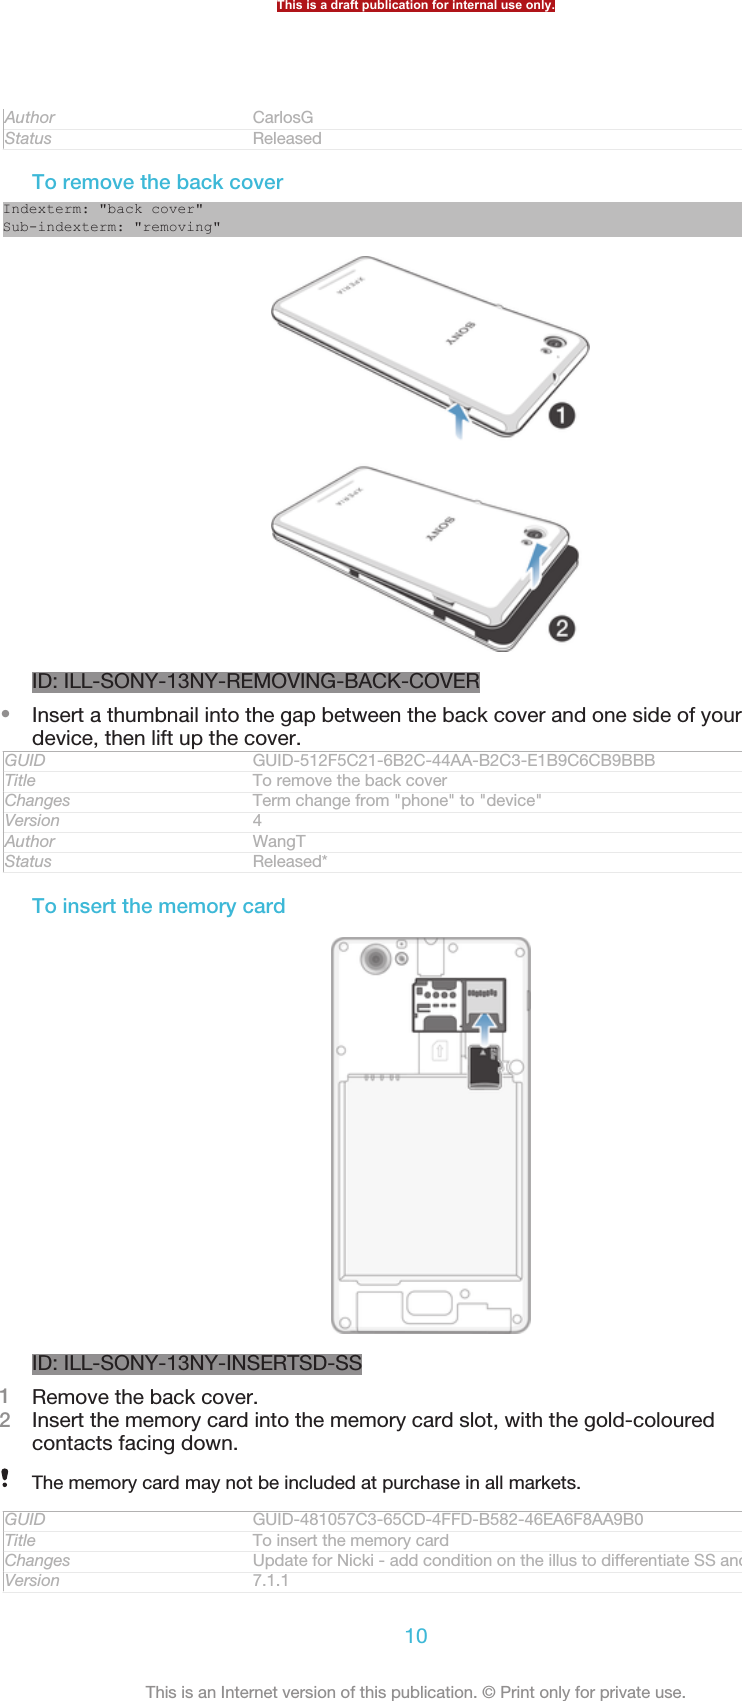

![ID: ILL-SONY-13NY-ATTACHING-BACK-COVER1Place the back cover over the back of the device from the bottom side.2Moving from bottom to top, press down the sides of the cover until you hearclicking noises as they lock into place.GUID GUID-F642FE56-9AA2-4E63-8B4F-8172A84F30F2Title To attach the back coverChanges The direction to attach the back cover changed - first attach at the bottomand then press dowm from bottom to top - like NickiVersion 5Author WangTStatus DraftTurning the device on and offIndexterm: "powering on"Indexterm: "powering off"Indexterm: "turning on"Indexterm: "turning off"GUID GUID-F3910263-29C3-4AC1-974D-7A25AA32A88FTitle Turning on or off the device - heading onlyChanges device term changeVersion 7Author QianWangStatus ReleasedTo turn on the deviceID: ILL-SONY-13NY-ON1Press and hold down the power key ID: ICN-SONY-KEY-AND-POWER-K90until the device vibrates.2If your screen goes dark, briefly press the power key ID: ICN-SONY-KEY-AND-POWER-K90 to activate the screen.3To unlock the screen, swipe up or down on the screen.4Enter your SIM card PIN when requested, then select OK [sim_enter_ok] .5Wait a while for the device to start.Your SIM card PIN is initially supplied by your network operator, but you can change it laterfrom the Settings [settings_label] menu. To correct a mistake made while entering your SIM cardPIN, tap ID: ICN-SONY-DELETE-PHONE-NUMBER-BLK.GUID GUID-69945514-1C19-44BC-A4B6-16499F44D9BBTitle To turn on the deviceChanges For Togari; text changed; only change "drag" to "swipe" in step3.Version 18Author Tan NellieStatus DraftTo turn off the device1Press and hold down the power key ID: ICN-SONY-KEY-AND-POWER-K90until the options menu opens.2In the options menu, tap Power off [global_action_power_off] .3Tap OK [button_ok] .It may take a while for the device to shut down.GUID GUID-18CE50BE-7FF2-40F4-B93F-8CBB76E4AF3CThis is a draft publication for internal use only.12This is an Internet version of this publication. © Print only for private use.](https://usermanual.wiki/Sony/PM-0480.Short-term-confidential-userguide-EN-PRODUCT-NAME-PART-NUMBER-Android4-0/User-Guide-1988542-Page-12.png)
![Version 12Author QianWangStatus ReleasedTo access the setup guide manually1From the Home screen [homescreen_strings_application_name_txt] , tap ID: ICN-SONY-HOME-APPTRAY-NORMAL.2Tap Settings [settings_label] > Setup guide [setupguide_settings_title] .GUID GUID-45BAC9AF-99A4-4D6C-979B-E6E88255911ETitle To access the setup guide manuallyChanges For Jelly Bean projects. Steps changed.Version 7Author QianWangStatus ReleasedAccounts and servicesIndexterm: "accounts"Indexterm: "services"Sign in to your online service accounts from your device to get easy access whenyou're on the move. For example, you can integrate contacts from your Google™account into your Contacts, so you have everything in one place. You can sign up tonew online services from your device as well as from a computer.GUID GUID-59021D9A-ABD0-412C-A582-5DA4E43841EETitle ServicesChanges change phonebook to ContactsVersion 4Author LuLindaStatus ReleasedGoogle™ accountIndexterm: "accounts"Sub-indexterm: "Google™"Having a Google™ account is key to using a range of applications and services withyour Android device. You need a Google™ account, for example, to use the Gmail™[GOOGLE-GMAIL-PLAIN] application in your device, to chat with friends using Google Talk™,and to synchronise the calendar application on your device with your GoogleCalendar™. You also need a Google™ account to download applications and games,music, movies and books from Google Play™.GUID GUID-887CAF1C-9BBE-477E-B164-01220815B2ACTitle Google accountChanges Update for Term change from phone to deviceVersion 5Author PanLStatus ReleasedMicrosoft® Exchange ActiveSync® accountIndexterm: "accounts"Sub-indexterm: "Exchange Active Sync®"Synchronise your device with your corporate Microsoft® Exchange ActiveSync®account. This way, you keep your work email, contacts and calendar events with youat all times.GUID GUID-80919EF6-5273-4790-AEF0-EE09B4D8CD50Title Exchange Active Sync accountChanges Update for Term change from phone to deviceVersion 5Author PanLStatus ReleasedFacebook™ accountIndexterm: "accounts"Sub-indexterm: "Facebook™"This is a draft publication for internal use only.14This is an Internet version of this publication. © Print only for private use.](https://usermanual.wiki/Sony/PM-0480.Short-term-confidential-userguide-EN-PRODUCT-NAME-PART-NUMBER-Android4-0/User-Guide-1988542-Page-14.png)

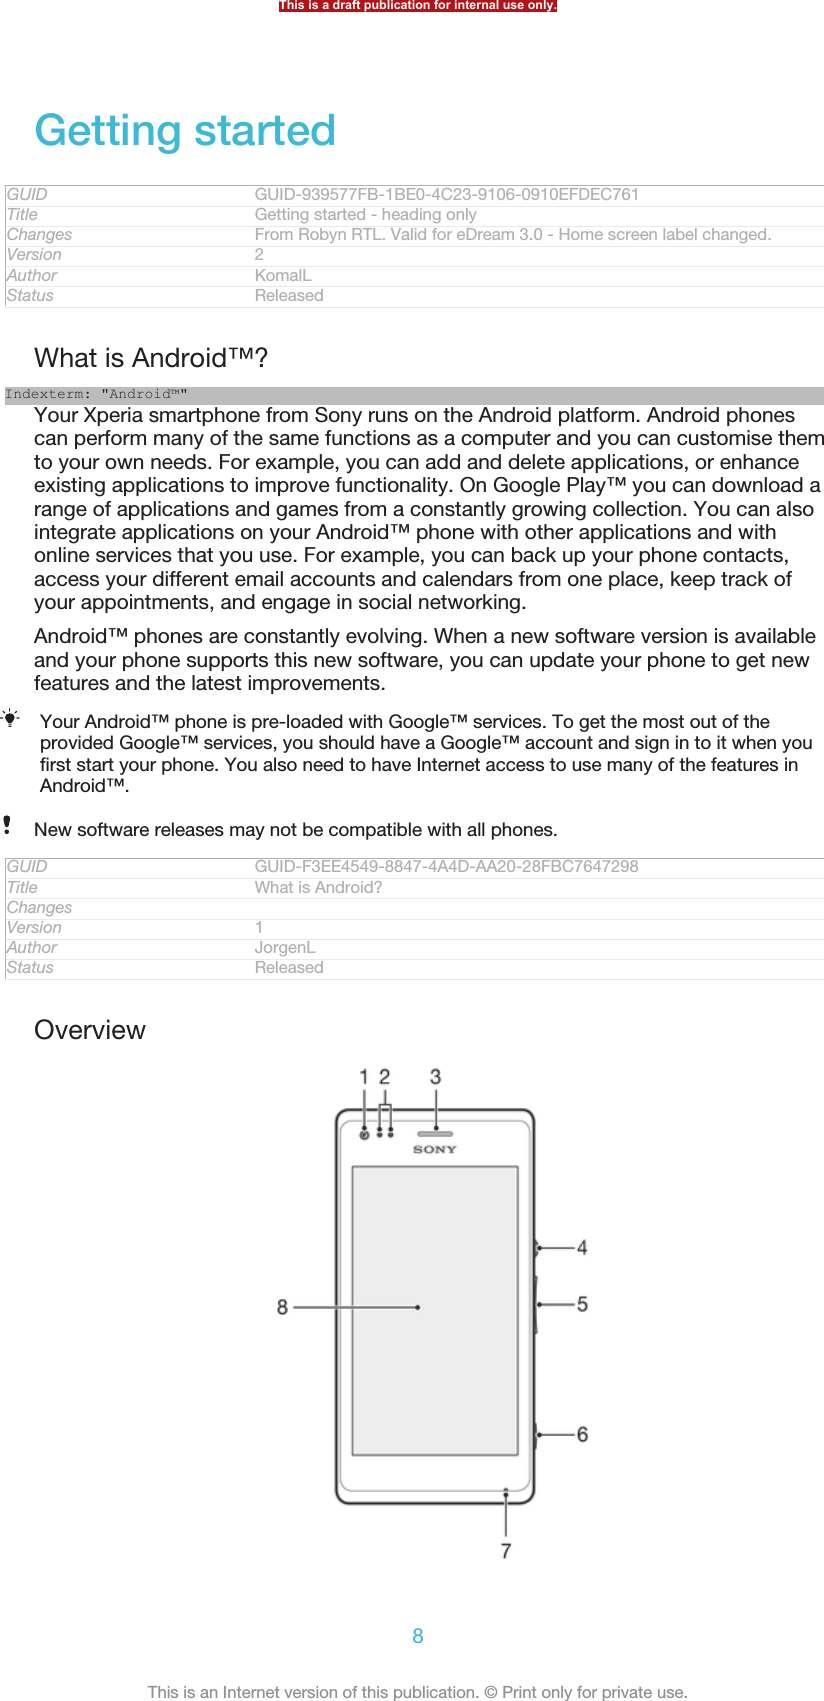
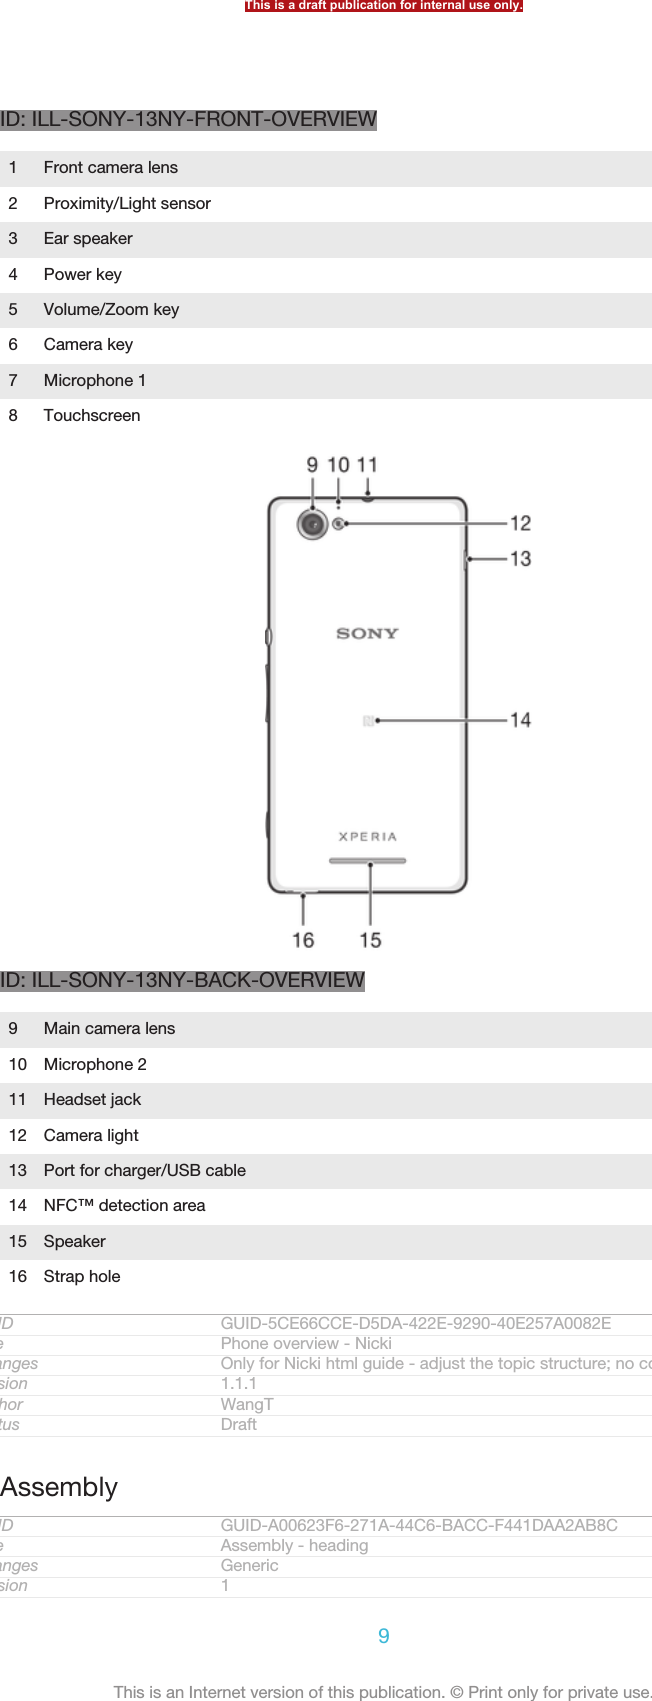
![Getting to know your phoneGUID GUID-AA4FF55E-CC16-4F0C-8A77-A735D267BF46Title Getting to know your phone - heading onlyChanges GenericVersion 1Author JorgenLStatus Released*Using the keysIndexterm: "keys"ID: ILL-SONY-13NY-HARDWARE-KEYSID:ICN-SONY-KEY-AND-BACKBack•Go back to the previous screen•Close the on-screen keypad, a dialog box, an options menu, or the Notification panelID:ICN-SONY-KEY-AND-HOMEHome•Go to the Home screen [homescreen_strings_application_name_txt]ID:ICN-SONY-KEY-OPEN-RECENT-APPSTask•Tap to open a window showing your most recently used applications and a small apps barGUID GUID-CA3D8D48-DDF0-40EB-8E9F-26C4BFB4D6DDTitle Using the hardware keys - Three keysChanges Key update for Mint/HayabusaVersion 5Author AipingStatus Released*BatteryGUID GUID-08267A67-94DC-4C15-8A25-EAD0CE6D540ATitle BatteryChanges Device Term ChangeVersion 2Author Gan LuStatus ReleasedThis is a draft publication for internal use only.16This is an Internet version of this publication. © Print only for private use.](https://usermanual.wiki/Sony/PM-0480.Short-term-confidential-userguide-EN-PRODUCT-NAME-PART-NUMBER-Android4-0/User-Guide-1988542-Page-16.png)
![Author Gan LuStatus ReleasedTo check the battery level1From your Home screen [homescreen_strings_application_name_txt] , tap ID: ICN-SONY-HOME-APPTRAY-NORMAL .2Find and tap Settings [settings_label_launcher] > About phone [about_settings<product="default">] >Status [device_status] > Battery level [battery_level_title] .GUID GUID-1769B484-1C7F-4F81-B850-45A7984995ABTitle To check the battery levelChanges For ICS update: changed the label for "About phone"Version 4Author VikkiLStatus Released*Improving battery performanceIndexterm: "device"Sub-indexterm: "battery"Sub-indexterm: "performance"The following tips can help you improve battery performance:•Charge your device often. This will not affect the lifetime of the battery.•Downloading data from the Internet is power consuming. When you're not using theInternet, you can save power by disabling all mobile data connections from theexpanded status bar. This setting does not prevent your device from transmittingdata over other wireless networks.•Turn off Bluetooth™ and Wi-Fi® when you don't need these features. You can turnthem on and off more easily from the expanded status bar.•Use the STAMINA mode [extended_standby_mode_label] and Low battery mode [power_save_mode_label]features to reduce battery consumption. You can select the power saving mode thatbest suits the way you use your device. You can also customise the settings of eachpower saving mode.•Set your synchronisation applications (used to synchronise your email, calendar andcontacts) to synchronise manually. You can also synchronise automatically, butincrease the synchronisation intervals.•Check the battery usage menu in your device to see which applications use the mostpower. Your battery consumes more power when you use video and music streamingapplications, such as YouTube™. Some applications downloaded from GooglePlay™ may also consume more power.•Close and exit applications that you are not using.•Lower the screen display brightness level.•Turn off your device or activate the Airplane mode [airplane_mode] setting if you are in anarea with no network coverage. Otherwise, your device repeatedly scans for availablenetworks, and this consumes power.•Use a Sony original handsfree device to listen to music. Handsfree devices demandless battery power than your device's own loudspeakers.•Keep your device in standby mode whenever possible. Standby time refers to thetime during which your device is connected to the network and is not being used.•Disable any live wallpaper.GUID GUID-F9A76820-0B4C-41EA-A31F-152FE937C886Title Improving battery performanceChanges From Togari; text changed; change the way of controlling Bluetooth™ andWi-Fi®.Version 22.1.1.1.2Author Tan NellieStatus DraftTo access the battery usage menu1From your Home screen [homescreen_strings_application_name_txt] , tap ID: ICN-SONY-HOME-APPTRAY-NORMAL .2Find and tap Settings [settings_label_launcher] > Power management [power_settings_title] >Battery usage [battery_label] .GUID GUID-72DC8FCB-A113-4E57-88FB-5C55DCE9CFE3Title To access the battery usage menu with eco modeThis is a draft publication for internal use only.18This is an Internet version of this publication. © Print only for private use.](https://usermanual.wiki/Sony/PM-0480.Short-term-confidential-userguide-EN-PRODUCT-NAME-PART-NUMBER-Android4-0/User-Guide-1988542-Page-18.png)
![Changes for Odin & Yuga; update a label onlyVersion 2Author Gan LuStatus ReleasedUsing STAMINA modeActivate the STAMINA mode [extended_standby_mode_label] feature to pause your Wi-Fi®[udoc_no_trans_wifi_wlan_plain] connection, data traffic and several power consumingapplications when your screen is inactive. When STAMINA mode is active, you canstill receive phone calls, and text and multimedia messages. You can also set up anapplications list to allow some applications to keep running when your screen isinactive. Once the screen becomes active again, all paused functions are resumed.GUID GUID-BAD9774F-09BB-4637-AE5C-C88606ADFD46Title Using the STAMINA mode featureChanges for Odin & Yuga; new featureVersion 1Author Gan LuStatus Released*To activate STAMINA mode1From your Home screen [homescreen_strings_application_name_txt] , tap ID: ICN-SONY-HOME-APPTRAY-NORMAL .2Find and tap Settings [settings_label_launcher] > Power management [power_settings_title] .3Tap ID: ICN-SONY-LAGAN-SWITCH-OFF next to STAMINA mode [extended_stand-by_mode_label] , then tap Activate [activate_txt] .GUID GUID-18315E99-CD26-4905-ADE0-B8514A1912E8Title To activate STAMINA modeChanges for Odin & YugaVersion 1Author Gan LuStatus ReleasedTo deactivate STAMINA mode1From your Home screen [homescreen_strings_application_name_txt] , tap ID: ICN-SONY-HOME-APPTRAY-NORMAL .2Find and tap Settings [settings_label_launcher] > Power management [power_settings_title] .3Tap ID: ICN-SONY-LAGAN-SWITCH-ON next to STAMINA mode [extended_stand-by_mode_label] .GUID GUID-4A739D0C-9062-4D68-ADD9-75E89178E876Title To deactive the STAMINA modeChanges for Odin & YugaVersion 1Author Gan LuStatus ReleasedTo change the settings for STAMINA modeIndexterm: "STAMINA mode"Sub-indexterm: "changing settings"1From your Home screen [homescreen_strings_application_name_txt] , tap ID: ICN-SONY-HOME-APPTRAY-NORMAL.2Find and tap Settings [settings_label_launcher] > Power management [power_settings_title] .3To open the settings menu, tap STAMINA mode [extended_standby_mode_label] .4Add or remove applications, as desired.5When you're finished, tap Done [button_done] .GUID GUID-04D506B4-63EE-426D-8D1B-BD8C18C3DBB0Title To change the settings for STAMINA modeChanges for Odin & YugaVersion 1Author Gan LuStatus ReleasedThis is a draft publication for internal use only.19This is an Internet version of this publication. © Print only for private use.](https://usermanual.wiki/Sony/PM-0480.Short-term-confidential-userguide-EN-PRODUCT-NAME-PART-NUMBER-Android4-0/User-Guide-1988542-Page-19.png)
![Estimating the standby time of your deviceIndexterm: "standby time"Sub-indexterm: "estimating"Standby time refers to the amount of time the battery can last when your device isconnected to the network but is not in active use, for example, to receive or makephone calls. STAMINA mode, when activated, continuously evaluates the remainingstandby time, which can vary depending on how you use your device. STAMINAmode is more effective in lengthening the standby time if you keep the screen of yourdevice locked. If you rarely lock the screen, you may not see much improvement inbattery performance.When you use your device for the first time, the estimated standby time may not be accuratesince there is no previous usage history to estimate from.GUID GUID-F75634BA-0777-4510-B021-E7A5AF6EAB76Title Viewing the estimated standby timeChanges From Lotus & Nypon JB update; add this info due to CS request.Version 1Author Tan NellieStatus Released*To view the estimated standby time1From your Home screen [homescreen_strings_application_name_txt] , tap ID: ICN-SONY-HOME-APPTRAY-NORMAL.2Find and tap Settings [settings_label_launcher] > Power management [power_settings_title] .GUID GUID-AEFF9658-539B-41D1-83FF-9BA660166F47Title To view the standby timeChanges From Lotus & Nypon JB updateVersion 1Author Tan NellieStatus ReleasedUsing Low battery modeYou can activate the Low battery mode [power_save_mode_label] feature to save power whenthe battery level is low. This feature helps you to adjust the settings for screenbrightness, data traffic and the vibrate function so that you can reduce batteryconsumption.GUID GUID-9276E04F-3CB5-4764-BA73-5B99161CBEBDTitle Using Low battery modeChanges From Togari; text changed; only change the description in the 1st sentence.Version 2Author Tan NellieStatus DraftTo activate Low battery mode1From your Home screen [homescreen_strings_application_name_txt] , tap ID: ICN-SONY-HOME-APPTRAY-NORMAL .2Find and tap Settings [settings_label_launcher] > Power management [power_settings_title] .3Tap ID: ICN-SONY-LAGAN-SWITCH-OFF next to Low battery mode [pow-er_save_mode_label] , then tap Activate [activate_txt] .GUID GUID-E2DBA1A1-C68E-471F-982B-14BCBB074753Title To activate Low battery modeChanges for Odin & YugaVersion 1Author Gan LuStatus ReleasedThis is a draft publication for internal use only.20This is an Internet version of this publication. © Print only for private use.](https://usermanual.wiki/Sony/PM-0480.Short-term-confidential-userguide-EN-PRODUCT-NAME-PART-NUMBER-Android4-0/User-Guide-1988542-Page-20.png)
![To deactivate Low battery mode1From your Home screen [homescreen_strings_application_name_txt] , tap ID: ICN-SONY-HOME-APPTRAY-NORMAL .2Find and tap Settings [settings_label_launcher] > Power management [power_settings_title] .3Tap ID: ICN-SONY-LAGAN-SWITCH-ON next to Low battery mode [pow-er_save_mode_label] .GUID GUID-E22485F8-EBCA-44F5-93F5-F9C449CC7A23Title To deactivate the Low battery modeChanges for Odin & YugaVersion 1Author Gan LuStatus ReleasedTo change the settings for Low battery mode1From your Home screen [homescreen_strings_application_name_txt] , tap ID: ICN-SONY-HOME-APPTRAY-NORMAL.2Find and tap Settings [settings_label_launcher] > Power management [power_settings_title] .3To open the settings menu, tap Low battery mode [power_save_mode_label] .4Adjust the settings as desired.5When you're finished, tap ID: ICN-SONY-KEY-AND-BACK.GUID GUID-DC6395BB-6010-4667-9E56-6E99F8E0DACCTitle To change the settings for Low battery modeChanges for Odin & YugaVersion 1Author Gan LuStatus ReleasedUsing the touchscreenIndexterm: "screen"Sub-indexterm: "glass"Sub-indexterm: "cracked"Sub-indexterm: "warranty"Indexterm: "protective plastic sheet"A protective plastic sheet is attached to the screen of your phone when you buy it.You should peel off this sheet before using the touchscreen. Otherwise, thetouchscreen might not function properly.When your phone is on and left idle for a set period of time, the screen darkens tosave battery power, and locks automatically. This lock prevents unwanted actions onthe touchscreen when you are not using it. You can also set personal locks to protectyour subscription and make sure only you can access your phone content.Your phone screen is made from glass. Do not touch the screen if the glass is cracked orshattered. Avoid trying to repair a damaged screen yourself. Glass screens are sensitive todrops and mechanical shocks. Cases of negligent care are not covered by the Sony warrantyservice.GUID GUID-D59D1053-4072-417B-BFE8-E3918A3A263FTitle Using the touch screenChanges From Nozomi and Aoba: added Sony brand conditionVersion 8Author VikkiLStatus Released*To open or highlight an item•Tap the item.GUID GUID-4B6D2343-E130-4C7B-8ED3-DC492017558BTitle To open or highlight an itemChanges esheep - Rachael. Valid for eDream 3.0.Version 1Author CarlosGStatus ReleasedMarking optionsIndexterm: "marking options"This is a draft publication for internal use only.21This is an Internet version of this publication. © Print only for private use.](https://usermanual.wiki/Sony/PM-0480.Short-term-confidential-userguide-EN-PRODUCT-NAME-PART-NUMBER-Android4-0/User-Guide-1988542-Page-21.png)

![To pause an audio track from the lockscreen1To activate the screen, briefly press the power key ID: ICN-SONY-KEY-AND-POWER-K90.2When the music player controls appear, tap ID: ICN-SONY-SEMC-MUSIC-PAUSE-NORMAL.GUID GUID-3B168A06-AFA8-4D87-8CBE-55C4F4C6B867Title To pause a playing track from the lockscreenChanges From ICS update: added another way of activating the screenVersion 2Author VikkiLStatus ReleasedTo change the currently playing audio track from the lockscreen1To activate the screen, briefly press the power key ID: ICN-SONY-KEY-AND-POWER-K90.2When the music player controls appear, tap ID: ICN-SONY-SEMC-MUSIC-PREVIOUS-NORMAL or ID: ICN-SONY-SEMC-MUSIC-NEXT-NORMAL.GUID GUID-278C3FC9-2E03-46AC-9E1F-8F2671CBBC73Title To change audio tracks from the lockscreenChanges For ICS update: added one more way of activating the screenVersion 2Author VikkiLStatus ReleasedHome screenIndexterm: "Home screen"Indexterm: "extensions"Your phone Home screen [homescreen_strings_application_name_txt] is the equivalent of the desktopon a computer. It's your gateway to the main features in your phone. You cancustomise your Home screen [homescreen_strings_application_name_txt] with widgets, shortcuts,folders, themes, wallpaper and other items.The Home screen [homescreen_strings_application_name_txt] extends beyond the regular screendisplay width, so you need to flick left or right to view content in one of the screen'sfour extensions. ID: ICN-SONY-HOME-PAGINATION shows which part of theHome screen [homescreen_strings_application_name_txt] you are in.ID: SCR-SONY-13NY-HOMESCREENThe items in the bar at the bottom of the screen are always available for quickaccess.GUID GUID-8EB25E2F-8807-407D-B459-A8E350B6D7D8Title Home screenThis is a draft publication for internal use only.26This is an Internet version of this publication. © Print only for private use.](https://usermanual.wiki/Sony/PM-0480.Short-term-confidential-userguide-EN-PRODUCT-NAME-PART-NUMBER-Android4-0/User-Guide-1988542-Page-26.png)
![Changes From eDream 4.0 all products: added text about 4-corner UI with condition"UI size"Version 7Author VikkiLStatus Released*To go to the Home screen•Press ID: ICN-SONY-KEY-AND-HOME.GUID GUID-05D1C81E-123C-471F-BD70-D65BF2E49B8ATitle To go to the Home screenChanges Valid for eDream3.0 and Gingerbread.Version 1Author VikkiLStatus ReleasedTo browse the Home screen•Flick right or left.GUID GUID-A5C4ECEC-DED9-4FCB-B023-22DEA2CF2F2CTitle To browse the Home screenChanges Valid for eDream3.0 and Gingerbread. Changed heading from "To view theextended Home screen" to "To browse the Home screen"Version 4Author VikkiLStatus ReleasedTo share an item from your Home screen1Press ID: ICN-SONY-KEY-AND-HOME to open your Home screen [home-screen_strings_application_name_txt] .2Touch and hold an item until it magnifies and the phone vibrates, then drag theitem to ID: ICN-SONY-DETAIL-SHARE-NORMAL.3Select an option and confirm, if necessary. You can now share the applicationsand widgets you like with your friends so they can download and use them.GUID GUID-55FD963B-6AF2-4FC0-BA37-51D2AD4727A8Title To share an item from your Home screenChangesVersion 1Author VikkiLStatus Released*WidgetsIndexterm: "widgets"Widgets are small applications that you can use directly on your Home screen [home-screen_strings_application_name_txt] . For example, the “WALKMAN” widget allows you to startplaying music directly.Some widgets are resizable, so you can expand them to view more content or shrinkthem to save space on your Home screen [homescreen_strings_application_name_txt] .GUID GUID-31FA03AF-3EA8-4F67-997F-72FC7043FC88Title WidgetsChanges For Taoshan: change music player widget to walkman widgetVersion 10Author WangTStatus ReleasedTo add a widget to the Home screen1From your Home screen [homescreen_strings_application_name_txt] , press ID: ICN-SONY-KEY-MENU.2Tap Add [home_menu_add_txt] > Widgets [home_option_add_widget_txt] .3Tap a widget.GUID GUID-7AA3E1DD-C7DD-47D2-8DB4-4BB05D9E7686Title To add a widget to the Home screenChanges From 4.0.1 Urushi: Updated labels in the topicVersion 7Author VikkiLStatus Released*This is a draft publication for internal use only.27This is an Internet version of this publication. © Print only for private use.](https://usermanual.wiki/Sony/PM-0480.Short-term-confidential-userguide-EN-PRODUCT-NAME-PART-NUMBER-Android4-0/User-Guide-1988542-Page-27.png)
![To resize a widgetIndexterm: "widgets"Sub-indexterm: "resizing"1Touch and hold a widget until it magnifies and the phone vibrates, then releasethe widget. If the widget can be resized, for example, the Calendar widget,then a highlighted frame and resizing dots appear.2Drag the dots inward or outward to shrink or expand the widget.3To confirm the new size of the widget, tap anywhere on the Home screen [home-screen_strings_application_name_txt] .GUID GUID-379CF5F0-A8C7-4D6F-A96C-9D06316E050BTitle To resize a widgetChanges For Mint Amy. Added an example of resizable widget in step 1 as commen-ted by ATT.Version 3Author Xiaxin LiStatus Released*To get an overview of all widgets on your Home screen•Pinch on any area of your Home screen [homescreen_strings_application_name_txt] . All widgetsfrom different parts of your Home screen [homescreen_strings_application_name_txt] are nowdisplayed in one view.When all Home screen [homescreen_strings_application_name_txt] widgets are combined in one view, tapon any widget to go to the part of the Home screen [homescreen_strings_application_name_txt] containingthat widget.GUID GUID-172CC58A-1942-4B8C-BD9E-816B85EA3BAATitle To get an overview of the widgets on all Home screensChanges From eDream 4.0: as per X-team commentsVersion 2Author VikkiLStatus ReleasedRearranging your Home screenIndexterm: "Home screen"Sub-indexterm: "customising"Customise the appearance of your Home screen and change the features that youcan access from it. Change the screen background, move items around, createfolders, and add shortcuts to contacts.GUID GUID-F0E2EDDE-9A6D-4354-BCE5-D2FFE325FC77Title Rearranging your Home screenChanges From eDream4.0: added UI size conditionVersion 2Author VikkiLStatus Released*To open the options menu of your Home screenYou can open the Home screen [homescreen_strings_application_name_txt] options menu in twoways:•From your Home screen [homescreen_strings_application_name_txt] , press ID: ICN-SONY-KEY-MENU.•Touch and hold on any part of your Home screen [homescreen_strings_application_name_txt] .GUID GUID-006FEB36-CD2E-4B2A-B429-E6FF72753075Title To open the options menu of your Home screenChangesVersion 1Author VikkiLStatus Released*This is a draft publication for internal use only.28This is an Internet version of this publication. © Print only for private use.](https://usermanual.wiki/Sony/PM-0480.Short-term-confidential-userguide-EN-PRODUCT-NAME-PART-NUMBER-Android4-0/User-Guide-1988542-Page-28.png)
![To add a shortcut to the Home screen1From your Home screen [homescreen_strings_application_name_txt] , press ID: ICN-SONY-KEY-MENU.2Tap Add [home_menu_add_txt] > Shortcuts [home_option_add_shortcut_txt] .3Find and select a shortcut.Add an application shortcut directly from the Application screen by touching and holding theapplication.GUID GUID-846B78FE-AD6C-47FE-9BF8-715A3CBB7B61Title To add a shortcut to the Home screenChanges From 4.0.1 Urushi: updated labelsVersion 2Author VikkiLStatus Released*To move an item on the Home screen1Press ID: ICN-SONY-KEY-AND-HOME to open your Home screen [home-screen_strings_application_name_txt] .2Touch and hold an item until it magnifies and the phone vibrates, then drag theitem to the new location.GUID GUID-E0065909-6DCC-4137-BC73-976CB447E526Title To move an item on the Home screenChanges from edream4.0: moved the tip to "To add a folder to your home screen"Version 2Author VikkiLStatus Released*To delete an item from the Home screen•Touch and hold an item until it magnifies and the phone vibrates, then drag theitem to ID: ICN-SONY-MENU-DELETE.GUID GUID-B9D51246-2767-4FC7-B6A9-7F3A98343A35Title To delete an item on the Home screenChanges Created for eDream3.0Version 1Author VikkiLStatus Released*To add a folder to the Home screen1From your Home screen [homescreen_strings_application_name_txt] , press ID: ICN-SONY-KEY-MENU.2Tap Add [home_menu_add_txt] > Folder [home_option_add_folder_txt] .3Enter a name for the folder and tap Done [gui_done_txt] .Drag and drop an item on top of another item on your Home screen to create a folderautomatically.GUID GUID-B4485B5D-75F7-46E8-A35F-7833E55CF1DCTitle To create a folder on the Home screenChanges From 4.0.1 SZ and UG for coming products: functional change on folder cre-ation on HSVersion 6Author VikkiLStatus Released*To add items to a folder•Touch and hold an item until it magnifies and the phone vibrates, then drag theitem to the folder.GUID GUID-59731CD1-AB4A-40AE-BCCC-5D64928E2B5ETitle To add items to a folderChanges Valid for eDream3.0 and Gingerbread. Updated instruction text so it says"item" instead of "application icon" to make more generic and align with theheading.Version 2Author VikkiLStatus Released*This is a draft publication for internal use only.29This is an Internet version of this publication. © Print only for private use.](https://usermanual.wiki/Sony/PM-0480.Short-term-confidential-userguide-EN-PRODUCT-NAME-PART-NUMBER-Android4-0/User-Guide-1988542-Page-29.png)
![To rename a folder1Tap the folder to open it.2Touch the folder's title bar to show the Folder name [home_folder_dialog_folder_name_txt]field.3Enter the new folder name and tap Done [gui_done_txt] .GUID GUID-D78DB4F3-D3D1-495D-B904-21104B8F19CATitle To rename a folderChanges From 4.0.1 Urushi: updated labelsVersion 4Author VikkiLStatus Released*Changing the background of your Home screenIndexterm: "animated wallpaper"Indexterm: "live wallpaper"Indexterm: "wallpaper"Indexterm: "themes"Adapt the Home screen [homescreen_strings_application_name_txt] to your own style usingwallpapers and different themes.GUID GUID-ABAA5C9B-0C1F-41EE-8456-EDAF70D2BB98Title Changing the background of your Home screenChanges From eDr4.0.1.1: changed index term from "theme" to "themes"Version 5Author VikkiLStatus ReleasedTo change your Home screen wallpaper1From your Home screen [homescreen_strings_application_name_txt] , press ID: ICN-SONY-KEY-MENU.2Tap Wallpaper [home_menu_wallpaper_txt] , then select a wallpaper.You can use a photo you have taken, or an animation. Go to Google Play™ and other sourcesto download, for example, live wallpapers that change with the changing hours of the day.GUID GUID-19E276DF-4D6A-44AF-8D86-5CAAFFD4BFDDTitle To change your Home screen wallpaperChanges change Android Market™ to Google Play™ based on legal requirementVersion 7.1.1Author WangTStatus ReleasedTo set a theme1From your Home screen [homescreen_strings_application_name_txt] , press ID: ICN-SONY-KEY-MENU.2Tap Theme [home_menu_theme_txt] , then select a theme.When you change a theme, the background also changes in some applications.GUID GUID-506DA76F-B990-4363-A85D-2F100F4C36A7Title To set a themeChanges From eDream4.0.1 Urushi: Changing theme is applicable and affects morethan just Home screen - so update the topic accordinglyVersion 3Author VikkiLStatus Released*Accessing and using applicationsOpen applications from shortcuts on your Home screen [homescreen_strings_application_name_txt] orfrom the Application screen.GUID GUID-935DE265-ADC5-4C4D-8BD5-D097758DA59CTitle Accessing and using applicationsChanges Created for eDream3.0Version 1Author VikkiLStatus ReleasedThis is a draft publication for internal use only.30This is an Internet version of this publication. © Print only for private use.](https://usermanual.wiki/Sony/PM-0480.Short-term-confidential-userguide-EN-PRODUCT-NAME-PART-NUMBER-Android4-0/User-Guide-1988542-Page-30.png)
![Application screenIndexterm: "applications"Sub-indexterm: "screen"The Application screen, which you open from your Home screen [homescreen_strings_applica-tion_name_txt] , contains the applications that come pre-installed on your device as well asthe applications you download.The Application screen extends beyond the regular screen width, so you need to flickleft and right to view all content.GUID GUID-F02CAFC3-E592-4B0D-AA00-E5631B4A9301Title Application screenChanges Device Term ChangeVersion 3Author XuCindyStatus ReleasedTo open the Application screenID: SCR-SONY-13NY-APPLICATIONS-SCREEN•From your Home screen [homescreen_strings_application_name_txt] , tap ID: ICN-SONY-HOME-APPTRAY-NORMAL.GUID GUID-A798DDA3-C3C7-49D5-975F-0D42DA2CB916Title To open the Application screenChanges Valid from eDream3.0. Index term removed.Version 3Author WangTStatus ReleasedTo browse the Application screen•From the Application screen, flick right or left.GUID GUID-76BB630C-11CA-44CF-A042-92465E3899FATitle To browse the application screensChanges The content is same as version 3. Just changed "application" to "Applica-tion".Version 4Author WangHermanStatus ReleasedTo create a shortcut to an application on the Home screen1From your Home screen [homescreen_strings_application_name_txt] , tap ID: ICN-SONY-HOME-APPTRAY-NORMAL .2Touch and hold an application icon until the screen vibrates, then drag the iconto the top of the screen. The Home screen [homescreen_strings_application_name_txt] opens.3Drag the icon to the desired location on the Home screen [homescreen_strings_applica-tion_name_txt] , then release your finger.GUID GUID-1CB2F7C4-2E83-4EAB-AFFB-0957648C639DTitle To create a shortcut to an application on the Home screenChanges Updated from version 3. Step 2 description changes because of Odin andYuga's UI changes.Version 4Author Vera QuStatus Released*This is a draft publication for internal use only.31This is an Internet version of this publication. © Print only for private use.](https://usermanual.wiki/Sony/PM-0480.Short-term-confidential-userguide-EN-PRODUCT-NAME-PART-NUMBER-Android4-0/User-Guide-1988542-Page-31.png)
![To share an application from your Application screen1From your Home screen [homescreen_strings_application_name_txt] , tap ID: ICN-SONY-HOME-APPTRAY-NORMAL.2Tap ID: ICN-SONY-KEY-MENU , then tap Share [share] . All applications whichcan be shared are indicated by ID: ICN-SONY-HOME-APP-SHARE .3Tap the application that you want to share, then select an option and confirm,if necessary. A link to a download of the application is sent to the people youhave selected.GUID GUID-3626E628-C31A-4C0E-BCEC-07EB17CF2C3FTitle To share an application from your Application screenChanges Updated from version1. Step 2 changes due to UI's change for Odin and Yu-ga.Version 2Author Vera QuStatus Released*Opening and closing applicationsGUID GUID-C41A794C-3079-4816-A08C-45D4DBEC5234Title Opening and closing applicationsChanges Valid for eDream3.0 and Gingerbread.Version 1Author VikkiLStatus ReleasedTo open an application•From your Home screen [homescreen_strings_application_name_txt] or the Application screen,tap the application.GUID GUID-A38931CB-ACFB-42B2-B95E-852ABB09E511Title To open an applicationChanges Created for eDream3.0Version 1Author VikkiLStatus ReleasedTo close an application•Press ID: ICN-SONY-KEY-AND-BACK.Some applications are paused when you press ID: ICN-SONY-KEY-AND-HOME to exit,while other applications may continue to run in the background. In the first case, the next timeyou open the application, you can continue where you left off. Remember that someapplications may cause data connection charges when they are running in the background,for example, social networking services.GUID GUID-370B9F32-5544-4DA2-8DF2-414E9A7F69BATitle To close an applicationChanges From eDream6.0: added text about data usage for paused applicationsVersion 2Author VikkiLStatus ReleasedRecently used applications windowIndexterm: "recently used applications window"You can switch between recently used applications from this window. You can alsoopen small apps.GUID GUID-4E475135-9A16-4587-AB71-F73F430BE6A9Title Recently used applications windowChanges From Blue 1.0: text changes made - added description about small appsVersion 2Author VikkiLStatus ReleasedTo open the recently used applications window•Press ID: ICN-SONY-KEY-OPEN-RECENT-APPS .GUID GUID-A60AC121-B7D1-4A48-859B-F8CA4DC4C077Title To open the recently used applications windowChanges writing style update - delete the last sentence based on minimalismThis is a draft publication for internal use only.32This is an Internet version of this publication. © Print only for private use.](https://usermanual.wiki/Sony/PM-0480.Short-term-confidential-userguide-EN-PRODUCT-NAME-PART-NUMBER-Android4-0/User-Guide-1988542-Page-32.png)
![Author Vera QuStatus ReleasedTo rearrange your small apps1To make the small apps bar appear, press ID: ICN-SONY-KEY-OPEN-RECENT-APPS.2Touch and hold a small app and drag it to the desired position in the smallapps bar.GUID GUID-3830D3E3-63FD-4C72-A393-E6F5E8D58EA5Title To arrange your small appsChangesVersion 1Author VikkiLStatus Released*To remove a small app from the small apps bar1To make the small apps bar appear, press ID: ICN-SONY-KEY-OPEN-RECENT-APPS.2Touch and hold a small app icon and drag it away from the small apps bar.GUID GUID-BF1EE6E5-D398-49CC-89A9-CCE7426CFF47Title To remove a small app from the recently used applications windowChangesVersion 1Author VikkiLStatus Released*To restore a previously removed small app1To make the small apps bar appear, press ID: ICN-SONY-KEY-OPEN-RECENT-APPS.2Tap ID: ICN-SONY-BROWSER-ADD > Installed small apps [dialog_add_app_installed_ti-tle] .3Select the small app that you want to restore.GUID GUID-1B077C5F-3405-4E30-BC25-453CECB522D9Title To restore a previously removed small appChangesVersion 1Author VikkiLStatus Released*To download a small app1To make the small apps bar appear, press ID: ICN-SONY-KEY-OPEN-RECENT-APPS.2Tap ID: ICN-SONY-BROWSER-ADD > ID: ICN-SONY-APP-MARKET-PLACE.3Find a small app that you want to download, then follow the instructions tocomplete the installation.GUID GUID-AE4A69D2-7CB5-44EF-BF20-90B0B35793CBTitle To download a small app from Play StoreChangesVersion 1Author VikkiLStatus Released*Application menuYou can open a menu at any time when you are using an application. The menu willlook different depending on which application you are using.GUID GUID-7ECF296C-1511-432D-A846-7C99F6F65764Title Application menuChanges From Blue: for phones without the menu key - no text change and removedthe illustration onlyVersion 2Author VikkiLStatus ReleasedThis is a draft publication for internal use only.34This is an Internet version of this publication. © Print only for private use.](https://usermanual.wiki/Sony/PM-0480.Short-term-confidential-userguide-EN-PRODUCT-NAME-PART-NUMBER-Android4-0/User-Guide-1988542-Page-34.png)
![To open a menu in an application•While using the application, press ID: ICN-SONY-KEY-MENU.A menu is not available in all applications.GUID GUID-C5E4E280-0AA6-4076-B7F6-8777FD219744Title To open a menu in an applicationChanges From ShakiraVersion 1Author AnnEStatus Released*Rearranging your Application screenMove the applications around on the Application screen according to yourpreferences.GUID GUID-3809890F-C0C3-438A-BA16-A3C7F978256ATitle Rearranging your Application screenChanges Valid for eDream3.0Version 1Author VikkiLStatus ReleasedTo arrange applications on the Application screenIndexterm: "applications"Sub-indexterm: "arranging"Indexterm: "applications"Sub-indexterm: "sorting"1From your Home screen [homescreen_strings_application_name_txt] , tap ID: ICN-SONY-HOME-APPTRAY-NORMAL to go to the Application screen.2Tap the drop-down list on the top left of the screen and select an option.GUID GUID-115D9148-D5DC-49BA-8428-A1AD178487AFTitle To arrange your applications on the Application screenChanges Updated from version 6. Step 2 changes for Odin & Yuga because the icon isnot be used.Version 7Author Vera QuStatus ReleasedTo move an application on the Application screen1Open the Application screen.2Touch and hold an item until it magnifies and the device vibrates, then drag theitem to the new location.You can only move your applications when Own order [home_action_bar_option_free_sort_txt] is selected.GUID GUID-EE508701-3826-449B-BD0F-61BABEEA74C3Title To move an application on the Application screenChanges Updated from version 5. Description changes due to UI changes. For Odin &Yuga.Version 6Author Vera QuStatus ReleasedTo uninstall an application from the Application screen1From your Home screen [homescreen_strings_application_name_txt] , tap ID: ICN-SONY-HOME-APPTRAY-NORMAL .2Tap ID: ICN-SONY-KEY-MENU , then tap Uninstall [uninstall_text] . All uninstallableapplications are indicated by ID: ICN-SONY-HOME-UNINSTALL .3Tap the application that you want to uninstall, then tap Uninstall [uninstall_text] .GUID GUID-553D1225-BF53-4ED7-A71D-7D887D7F3D2BTitle To uninstall an application from the Application screenChanges Updated from version 2. Step 2 and step 3 description changes due to Odin& Yuga's UI changes.Version 3Author Vera QuStatus Released*This is a draft publication for internal use only.35This is an Internet version of this publication. © Print only for private use.](https://usermanual.wiki/Sony/PM-0480.Short-term-confidential-userguide-EN-PRODUCT-NAME-PART-NUMBER-Android4-0/User-Guide-1988542-Page-35.png)
![To dismiss a notification from the Notification panel•Place your finger on a notification and flick left or right.GUID GUID-967CAF72-88E4-4B35-ADD1-2B0EA7CF61A4Title To dismiss a notification from the Notification panelChangesVersion 1Author VikkiLStatus ReleasedTo clear the Notification panel•From the Notification panel, tap Clear [status_bar_clear_all_button] .GUID GUID-DA62F1FF-BE58-4F3B-B236-8F2F85655D4FTitle To clear the Notification panelChanges Valid for Rrobyn/Mimmi (change in label)Version 2Author KomalLStatus Released*Setting your phone from the Notification panelIndexterm: "notification"Sub-indexterm: "panel"Sub-indexterm: "setting"You can open the settings menu from the Notification panel to adjust basic phonesettings. For example, you can turn on Wi-Fi®.GUID GUID-001BB4C3-E0FB-4953-8605-57D48285C63CTitle Setting your device from the Notification panelChangesVersion 1Author PengLeonStatus Released*To open the phone settings menu from the Notification panel1Drag the status bar downwards.2Tap ID: ICN-SONY-MENU-SETTINGS .GUID GUID-DEDF9332-F8E7-4B61-BF9C-C58055553DBATitle To open settings menu from the notification panelChanges Valid from Mint (only Step 1 added)Version 3Author PengLeonStatus Released*To adjust sound settings from the Notification panel1Drag the status bar downwards.2Tap ID: ICN-SONY-STAT-SYS-SPEAKERPHONE.GUID GUID-379AC15A-BC4F-4496-A74F-090064D224AATitle To adjust your sound settings from the Notification panelChangesVersion 1Author PengLeonStatus ReleasedTo control the Bluetooth™ function from the Notification panel1Drag the status bar downwards.2Tap ID: ICN-SONY-STAT-SYS-DATA-BLUETOOTH.GUID GUID-76B8B30E-0F68-45DE-A79C-2F11B0F0604ATitle To turn on or off the Bluetooth™ function from the Notification panelChangesVersion 1Author PengLeonStatus ReleasedThis is a draft publication for internal use only.38This is an Internet version of this publication. © Print only for private use.](https://usermanual.wiki/Sony/PM-0480.Short-term-confidential-userguide-EN-PRODUCT-NAME-PART-NUMBER-Android4-0/User-Guide-1988542-Page-38.png)
![To control the Wi-Fi® function from the Notification panel1Drag the status bar downwards.2Tap ID: ICN-SONY-STAT-SYS-WIFI-SIGNAL-4.GUID GUID-0E0F12AA-C120-4B5F-9977-A81FC38FC4D7Title To turn on or off Wi-Fi® from the Notification panelChangesVersion 1Author PengLeonStatus Released*To enable or disable data traffic from the Notification panel1Drag the status bar downwards.2Tap ID: ICN-SONY-STAT-SYS-DATA-TRAFFIC.GUID GUID-2E74E4DD-6C24-4177-9238-032630E89AAFTitle To enable or disable data traffic from the Notification panelChangesVersion 1Author PengLeonStatus Released*Phone settings menuView and change your phone settings from the Settings menu.GUID GUID-99D19D2C-0BF8-4893-A15F-7CD052D96170Title Phone settings menuChanges Valid for eDream 3.0Version 1Author JessicaLStatus Released*To access the phone settings1From the Home screen [homescreen_strings_application_name_txt] , tap ID: ICN-SONY-HOME-APPTRAY-NORMAL.2Tap Settings [settings_label] .GUID GUID-A9F73FEB-FB36-4722-BF69-5ABA7B7B020BTitle To access the phone settingsChanges Valid for Rachael/Robyn/Mimmi eDream 2.0. Valid for eDream 3.0.Version 4Author KomalLStatus Released*Typing textIndexterm: "keyboard"Indexterm: "Phonepad"Indexterm: "text input method"Indexterm: "symbols"Indexterm: "caps lock"GUID GUID-5EF956D7-B1A6-46E3-BE7A-206DBA9DAF00Title Typing text - keyboard and keypadChanges Valid from eDream 4.0.Version 5Author RongrongZStatus Released*On-screen keyboardIndexterm: "on-screen keyboard"Tap the keys of the on-screen QWERTY keyboard to enter text conveniently. Someapplications open the on-screen keyboard automatically. You can also open thiskeyboard by touching a text field.GUID GUID-047240C9-CBE3-4076-B626-8838F1999489Title On-screen keyboardChanges Valid from eDream 4.0.Version 1Author RongrongZThis is a draft publication for internal use only.39This is an Internet version of this publication. © Print only for private use.](https://usermanual.wiki/Sony/PM-0480.Short-term-confidential-userguide-EN-PRODUCT-NAME-PART-NUMBER-Android4-0/User-Guide-1988542-Page-39.png)
![To personalise the on-screen keyboard1Open the on-screen keyboard, then tap ID: ICN-SONY-TEXT-INPUT-SETUPGUIDE-WAND-FEEDBACK .2Follow the instructions to personalise your on-screen keyboard, for example,mark the Smiley key [textinput_strings_settings_show_smiley] and Gesture input [textinput_strings_set-tings_trace_input] checkboxes.If you don't mark the Smiley key [textinput_strings_settings_show_smiley] checkbox when you personalisethe on-screen keyboard, the smiley icon will not appear.GUID GUID-1833FEDD-7B56-4FD2-B800-187FF06AB7D9Title To personalise the keyboardChanges for pollux; add "gesture input" to step 2Version 3Author Gan LuStatus DraftTo use the on-screen keyboard in landscape orientation•When you enter text, turn the device sideways.For the keyboard to support this feature, landscape mode must be supported by theapplication you are using, and your screen orientation settings must be set to automatic.GUID GUID-E3D818B3-9DFF-4DDC-B279-5CD46A966698Title To use the on-screen keyboard/keypad in landscape orientationChanges Device Term ChangeVersion 5Author Gan LuStatus ReleasedTo enter text using the on-screen keyboard1To enter a character visible on the keyboard, tap the character.2To enter a character variant, touch and hold a regular keyboard character toget a list of available options, then select from the list. For example, to enter"é", touch and hold "e" until other options appear, then, while keeping yourfinger pressed on the keyboard, drag to and select "é".GUID GUID-AD062D73-DE09-468F-8DCB-3F17D5A83CE9Title To enter text using the on-screen keyboardChanges Valid from eDream 4.0. Specified for on-screen keyboard.Version 3Author RongrongZStatus ReleasedTo shift between upper-case and lower-case letters•Before you enter a letter, tap ID: ICN-SONY-TEXT-INPUT-SHIFT-FEEDBACKto switch to upper-case ID: ICN-SONY-TEXT-INPUT-SHIFT-CAPS-FEEDBACK, or vice versa.GUID GUID-E5ADF539-526B-4CA6-BFB2-F17AECB73C5ATitle To shift between upper-case and lower-case lettersChanges Updated as per FG comment. Valid for all eDream 2.1 productsVersion 3Author JuliaZStatus ReleasedTo turn on the caps lock•Before you type a word, tap ID: ICN-SONY-TEXT-INPUT-SHIFT-FEEDBACKor ID: ICN-SONY-TEXT-INPUT-SHIFT-CAPS-FEEDBACK until ID: ICN-SONY-TEXT-INPUT-SHIFT-CAPS-LOCK-FEEDBACK appears.GUID GUID-CA02935F-2636-481C-8064-DC00F523D22DTitle To turn on the Caps lockChanges Updated as per FG review comments. Valid for all eDream 2.1 productsVersion 3Author JuliaZStatus Released*This is a draft publication for internal use only.41This is an Internet version of this publication. © Print only for private use.](https://usermanual.wiki/Sony/PM-0480.Short-term-confidential-userguide-EN-PRODUCT-NAME-PART-NUMBER-Android4-0/User-Guide-1988542-Page-41.png)
![To enter numbers or symbols•When you enter text, tap ID: ICN-SONY-TEXTINPUT-NUMBERS-SYMBOLS.A keyboard with numbers and symbols appears. Tap ID: ICN-SONY-TEXTINPUT-SYMBOL-PAGES to view more options.GUID GUID-829C61AB-3536-4122-80EF-E4D3C174FE52Title To enter numbers or symbols using the keyboard/keypadChanges Valid from eDream4.0. Added the page icon info.Version 2Author RongrongZStatus ReleasedTo enter common punctuation marks1When you finish entering a word, tap the space bar.2Select a punctuation mark from the candidate bar. The selected mark isinserted before the space.To quickly enter a full stop, tap the space bar twice when you finish entering a word.GUID GUID-6589FC1E-1265-4100-93E5-7006D5DD1E0ETitle To enter common punctuationsChanges Valid from eDream 6.0.Version 1Author RongrongZStatus ReleasedTo delete characters•Tap to place the cursor after the character you want to delete, then tap ID:ICN-SONY-DELETE-PHONE-NUMBER-BLK.GUID GUID-A3C39984-81D4-419A-9F01-63DC364540FBTitle To delete charactersChangesVersion 1Author JuliaZStatus ReleasedTo enter a carriage return•When you enter text, tap ID: ICN-SONY-TEXT-INPUT-LIGHT-ENTER toenter a carriage return.GUID GUID-83E45AEE-6F56-4817-8260-CE9E7E139097Title To turn to the next line in textChanges Valid for eDream 3.0Version 1Author RongrongZStatus ReleasedTo select text1Enter some text, then tap and hold the text. The word you tap gets highlightedby tabs on both sides.2Drag the tabs left or right to select more text.GUID GUID-AE2DF08C-CE44-4038-A35A-347DBD2C5903Title To select textChanges for Nanhu; change "double-tap" to "tap and hold"Version 5Author Gan LuStatus ReleasedTo edit text in landscape orientation1Enter some text, then double-tap the entered text.2Select the text you want to work with, then tap Edit... [extract_edit_menu_button] andselect an option.GUID GUID-E5B2A668-8E68-4FC8-948B-CB0BCFA0F634Title To edit text in landscape orientationChanges For Aoba Amy. Removed the note per editorial comment.Version 3.1.1Author QianWangStatus ReleasedThis is a draft publication for internal use only.42This is an Internet version of this publication. © Print only for private use.](https://usermanual.wiki/Sony/PM-0480.Short-term-confidential-userguide-EN-PRODUCT-NAME-PART-NUMBER-Android4-0/User-Guide-1988542-Page-42.png)
![To edit text in portrait orientation1Enter some text, then double-tap the entered text to make the application barappear.2Select the text you want to edit, then use the application bar to make yourdesired changes.GUID GUID-570FACF3-512A-4631-82C7-DE1CC414CE8CTitle To edit text in portrait orientationChanges For Aoba Amy ICS. Removed the note per editor's commentVersion 3.1.1Author QianWangStatus ReleasedApplication barID: SCR-11ICS-TOOLBAR-EDITTEXT1Close the application bar2 Select all text3 Cut text4 Copy text5 Paste textID: ICN-SONY-MAGNIFIER-PASTE only appears when you have text stored on theclipboard.GUID GUID-3773B154-CF41-471F-9469-DC7CD5560CCBTitle Application barChangesVersion 1Author Vera QuStatus Released*Using the Gesture input [textinput_strings_settings_trace_input] function to write wordsIndexterm: "gesture input"You can input text by sliding your finger from letter to letter on the on-screenkeyboard.Gesture input [textinput_strings_settings_trace_input] is only available when you use the on-screenkeyboard.GUID GUID-0D50805D-88A7-417D-BF39-293347812DD9Title Gesture inputChanges Device Term ChangeVersion 4Author Gan LuStatus Released*This is a draft publication for internal use only.43This is an Internet version of this publication. © Print only for private use.](https://usermanual.wiki/Sony/PM-0480.Short-term-confidential-userguide-EN-PRODUCT-NAME-PART-NUMBER-Android4-0/User-Guide-1988542-Page-43.png)
![To enter text using the Gesture input [textinput_strings_settings_trace_input] function1When you enter text using the on-screen keyboard, slide your finger from letterto letter to trace the word you want to write.2Lift up your finger when you’ve finished entering a word. A word is suggestedbased on the letters you have traced. If necessary, select the correct word inthe candidate bar.3To view more options, scroll right or left in the word candidate bar. If youcannot find the desired word, tap ID: ICN-SONY-DELETE-PHONE-NUMBER-BLK once to delete the entire word. Then try again to trace the wordusing the Gesture input function, or tap each letter to enter the word.4If the Space between gestures [textinput_strings_settings_trace_auto_accept] setting is activated,trace the next word that you want to enter. If not, tap the space bar and thentrace the next word you want to enter.To enter joined compound words when the Space between gestures [textinput_strings_settings_trace_au-to_accept] setting is activated, you may need to slide to enter the first part of the word, then tapeach letter to enter the rest of the word.GUID GUID-70F1F614-D699-4D32-98AF-4E0CBE268385Title To enter text using the Gesture input functionChanges Device Term ChangeVersion 5Author Gan LuStatus ReleasedTo change the Gesture input [textinput_strings_settings_trace_input] settings1When you enter text using the on-screen keyboard, tap ID: ICN-SONY-TEXTINPUT-NUMBERS-SYMBOLS.2Tap ID: ICN-SONY-MENU-SETTINGS, then tap Keyboard settings [textin-put_strings_input_options_menu_item_personalize] .3Tap Text input settings [textinput_strings_settings_quick_text] .4Mark or unmark the Gesture input [textinput_strings_settings_trace_input] checkbox.5If you want to automatically add a space between gestures without having totap the space bar each time, mark the Space between gestures [textinput_strings_set-tings_trace_auto_accept] checkbox.GUID GUID-3C41CA62-030A-483B-8C09-E1CB01CAF541Title To change the Gesture input settingsChanges Valid for Nozomi ICS; text changes made; operation steps changedVersion 4Author WangTStatus Released*PhonepadIndexterm: "Phonepad"The Phonepad is similar to a standard 12-key telephone keypad. It gives youpredictive text and multi-tap input options. You can activate the Phonepad text inputmethod via the keyboard settings. The Phonepad is only available in portraitorientation.GUID GUID-9D94BF81-E127-4971-B769-92AF75781DAETitle PhonepadChanges Valid from eDream 4.0.Version 1Author RongrongZStatus ReleasedThis is a draft publication for internal use only.44This is an Internet version of this publication. © Print only for private use.](https://usermanual.wiki/Sony/PM-0480.Short-term-confidential-userguide-EN-PRODUCT-NAME-PART-NUMBER-Android4-0/User-Guide-1988542-Page-44.png)
![Using the PhonepadID: SCR-11-PHONEPAD-OVERVIEW1Choose a text input option2 Change the character case and turn on the caps lock3 Display numbers4 Display symbols and smileys5 Enter a space6 Enter a carriage return or confirm text input7 Delete a character before the cursorAll illustrations are for illustration purposes only and may not accurately depict the actualdevice.GUID GUID-CF8AE6C3-3225-46D4-8632-18F2F4FD71EFTitle Using the PhonepadChanges Device Term ChangeVersion 5Author Gan LuStatus ReleasedTo open the Phonepad for the first time1Tap a text entry field, then tap ID: ICN-SONY-TEXTINPUT-NUMBERS-SYMBOLS.2Tap ID: ICN-SONY-MENU-SETTINGS, then tap Keyboard settings [textin-put_strings_input_options_menu_item_personalize] .3Tap Keyboard appearance [textinput_strings_settings_keyboard_appearance] > Keyboard layout[textinput_strings_settings_keyboard_layout_title] .4Select the Phonepad.The Phonepad can only be used in portrait mode.GUID GUID-63194001-9DA2-43FD-98FC-B549C9D81580Title To open the Phonepad for the first timeChanges Valid for Hikari: change an icon on step 1Version 4Author Gan LuStatus Released*This is a draft publication for internal use only.45This is an Internet version of this publication. © Print only for private use.](https://usermanual.wiki/Sony/PM-0480.Short-term-confidential-userguide-EN-PRODUCT-NAME-PART-NUMBER-Android4-0/User-Guide-1988542-Page-45.png)
![To enter text using the Phonepad•When ID: ICN-SONY-TEXT-INPUT-PHONEPAD-SINGLETAP-ON appears inthe Phonepad, tap each character key only once, even if the letter you want isnot the first letter on the key. Tap the word that appears or tap ID: ICN-SONY-TEXT-INPUT-PREDICTION-ARROW-RIGHT to view more word suggestionsand select a word from the list.•When ID: ICN-SONY-TEXT-INPUT-PHONEPAD-SINGLETAP-OFF appears inthe Phonepad, tap the on-screen key for the character you want to enter. Keeppressing this key until the desired character is selected. Then do the same forthe next character you want to enter, and so on.GUID GUID-25EC71FC-8474-4FEB-99F5-ED0485C15922Title To enter text using the on-screen keypadChanges Remove incorrect usage of the context tagVersion 2Author RongrongZStatus ReleasedTo enter numbers using the Phonepad•When the Phonepad is open, tap ID: ICN-SONY-TEXTINPUT-NUMBERS-HORIZONTAL. A Phonepad with numbers appears.GUID GUID-99C92908-9500-4C3A-B3C1-FDC17779AE84Title To enter numbers using the virtual keypad/keyboardChanges Valid from eDream4.0 Smultron. On-screen keypad.Version 4Author RongrongZStatus ReleasedTo insert symbols and smileys using the Phonepad1When the Phonepad is open, tap ID: ICN-SONY-TEXT-INPUT-PHONEPAD-SYM-SMILEY. A grid with symbols and smileys appears.2Scroll up or down to view more options. Tap a symbol or smiley to select it.GUID GUID-A9123BFE-979A-40FB-9E68-904BDE6FF860Title To insert symbols and smileys using the keypadChanges Valid from eDream4.0 Smultron - On-screen keypad.Version 2Author RongrongZStatus Released*Keyboard and Phonepad settingsIndexterm: "keyboard"Sub-indexterm: "settings"Indexterm: "language"Sub-indexterm: "writing"You can select settings for the on-screen keyboard and the Phonepad, such aswriting language and automatic correction.GUID GUID-3F81FB45-0DDC-4DE9-A7C4-8028057256A6Title Keyboard/keypad settingsChanges Valid from eDream 4.0.Version 2Author RongrongZStatus Released*To access the on-screen keyboard and Phonepad settings1When you enter text using the on-screen keyboard or Phonepad, tap ID:ICN-SONY-TEXTINPUT-NUMBERS-SYMBOLS or ID: ICN-SONY-TEXTINPUT-NUMBERS-HORIZONTAL.2Tap ID: ICN-SONY-MENU-SETTINGS, then tap Keyboard settings [textin-put_strings_input_options_menu_item_personalize] .GUID GUID-5AA8DA1C-44F4-4634-AF38-A2945CA7C238Title To access the on-screen keyboard and Phonepad settingsChanges Valid for Nozomi ICS; operation steps changes; text changes madeVersion 4Author WangTStatus Released*This is a draft publication for internal use only.46This is an Internet version of this publication. © Print only for private use.](https://usermanual.wiki/Sony/PM-0480.Short-term-confidential-userguide-EN-PRODUCT-NAME-PART-NUMBER-Android4-0/User-Guide-1988542-Page-46.png)
![To add a writing language for text input1When you enter text using the on-screen keyboard or Phonepad, tap ID:ICN-SONY-TEXTINPUT-NUMBERS-SYMBOLS or ID: ICN-SONY-TEXTINPUT-NUMBERS-HORIZONTAL .2Tap ID: ICN-SONY-MENU-SETTINGS , then tap Keyboard settings [textin-put_strings_input_options_menu_item_personalize] .3Tap Languages [textinput_strings_settings_language_options] > Writing languages [textinput_strings_set-tings_language] and mark the relevant checkboxes. Tap OK [button_ok] to confirm.GUID GUID-5EBAE597-1B8B-43E5-95D0-C1C8ABC27F9CTitle To add a writing language to the on-screen keyboard or the PhonepadChanges for Nicki SS; change a label only; no text changeVersion 13.1.1Author Gan LuStatus DraftText input settingsWhen entering text using the on-screen keyboard or the Phonepad, you can access atext input settings menu that helps you set options for text prediction, automaticspacing and quick fixes. For example, you can decide how word options arepresented and how words get corrected as you type. You can also set the text inputapplication to remember new words that you write.GUID GUID-2FCD6D60-C03C-4055-90C7-97DC630B64B0Title Text input settingsChanges Device term changeVersion 5Author Gan LuStatus ReleasedTo change the text input settings1When you enter text using the on-screen keyboard or the Phonepad, tap ID:ICN-SONY-TEXTINPUT-NUMBERS-SYMBOLS or ID: ICN-SONY-TEXTINPUT-NUMBERS-HORIZONTAL.2Tap ID: ICN-SONY-MENU-SETTINGS, then tap Keyboard settings [textin-put_strings_input_options_menu_item_personalize] > Text input settings [textinput_strings_settings_quick_text]and select the relevant settings.GUID GUID-B505E8A0-AD82-4568-90AD-EC857B2CCDB0Title To change text input settingsChanges for Hayabusa; add an icon on step 2Version 5Author Gan LuStatus Released*Entering text using voice inputIndexterm: "voice input"Indexterm: "voice recognition"When you enter text, you can use the voice input function instead of typing thewords. Just speak the words that you want to enter. Voice input is an experimentaltechnology from Google™, and is available for a number of languages and regions.GUID GUID-3948A877-17B6-4759-9BFC-0EFCA283BC8BTitle Entering text using voice inputChanges for Taoshan; remove the noteVersion 2Author Gan LuStatus ReleasedThis is a draft publication for internal use only.47This is an Internet version of this publication. © Print only for private use.](https://usermanual.wiki/Sony/PM-0480.Short-term-confidential-userguide-EN-PRODUCT-NAME-PART-NUMBER-Android4-0/User-Guide-1988542-Page-47.png)
![To enable voice input1When you enter text using the on-screen keyboard or the Phonepad, tap ID:ICN-SONY-TEXTINPUT-NUMBERS-SYMBOLS or ID: ICN-SONY-TEXTINPUT-NUMBERS-HORIZONTAL .2Tap ID: ICN-SONY-MENU-SETTINGS , then tap Keyboard settings [textin-put_strings_input_options_menu_item_personalize] .3Mark the Google voice typing key [textinput_strings_settings_voice_input_start_from_keyboard]checkbox.4Press ID: ICN-SONY-KEY-AND-BACK to save your settings. A microphoneicon ID: ICN-SONY-VOICE-INPUT-MIC-ONLY appears on your on-screenkeyboard or Phonepad.GUID GUID-60824615-DA86-4535-89BA-E47AAEC235A1Title To enable voice inputChanges update for FAQs: add a conditon for icon; no other changes;Version 3.1.1Author Vera QuStatus ReleasedTo enter text using voice input1Open the on-screen keyboard or the Phonepad.2If ID: ICN-SONY-VOICE-INPUT-MIC-ONLY is available, tap it. If not, touchand hold the input language key, for example, ID: ICN-SONY-VOICE-INPUT-LANG-MIC.3When ID: ICN-SONY-VOICE-INPUT-MIC-CIRCLE appears, speak to entertext. When you're finished, tap ID: ICN-SONY-VOICE-INPUT-MIC-CIRCLEagain. The suggested text appears.4Edit the text manually if necessary.GUID GUID-4D762661-CFA9-4D74-9134-B58D18FEECFCTitle To enter text using voice inputChanges for Taoshan; remove step 1Version 5Author Gan LuStatus Released*Customising your deviceYou can adjust several device settings to suit your own needs. For example, you canchange the language, add a personal ringtone, or change the screen brightness.GUID GUID-D9CF5557-AC85-4B4C-BEF7-A7B1BF31128FTitle Customising your phoneChanges Device Term ChangeVersion 2Author LisaYStatus Released*Adjusting the volumeIndexterm: "volume"Sub-indexterm: "key"Indexterm: "silent mode"You can adjust the ringtone volume for incoming calls and notifications as well as formusic and video playback.GUID GUID-96B4FB24-5A76-42F9-9F7C-3804DF486237Title Adjusting the volumeChanges Device Term Change from OdinVersion 2Author LisaYStatus Released*To adjust the ring volume with the volume key•Press the volume key up or down.GUID GUID-56F76480-7BEC-4AEA-A7A0-D5C62695A7F4Title To adjust the ring volume with the volume keyChanges Valid for Robyn & Mimmi. Valid for eDream 3.0.Version 2This is a draft publication for internal use only.48This is an Internet version of this publication. © Print only for private use.](https://usermanual.wiki/Sony/PM-0480.Short-term-confidential-userguide-EN-PRODUCT-NAME-PART-NUMBER-Android4-0/User-Guide-1988542-Page-48.png)
![Author KomalLStatus ReleasedTo adjust the media playing volume with the volume key•When playing music or watching video, press the volume key up or down.GUID GUID-B0DBCBEE-A5CE-42D1-A138-9B6E57FA84B9Title To adjust the media playing volume with the volume keysChanges Valid for Android Rachael. Valid for eDream 3.0.Version 1Author SophieJStatus ReleasedAdjusting the sound settingsYou can adjust several sound settings. For example, you can set your device to silentmode so that it doesn't ring when you're in a meeting.GUID GUID-F97936DD-6D15-45A6-B517-7635755366D5Title Adjusting the sound settingsChanges Device Term ChangeVersion 2Author LisaYStatus Released*To set your device to vibrate mode•Press the volume key down until ID: ICN-SONY-STATUSBAR-VIBRATE-ONappears in the status bar.You can also press and hold down the power key ID: ICN-SONY-KEY-AND-POWER-K90and then tap ID: ICN-SONY-STATUSBAR-VIBRATE-ON in the menu that opens to set yourdevice to vibrate mode.GUID GUID-3030B405-90E5-45F2-A0F7-30F1B3C9937DTitle To set the phone to vibrate modeChanges Device Term Change and steps change for OdinVersion 3Author LisaYStatus ReleasedTo set your device to silent mode1Press the volume key down until the device vibrates and ID: ICN-SONY-STATUSBAR-VIBRATE-ON appears in the status bar.2Press the volume key down again. ID: ICN-SONY-ICS-SOUND-SILENCTappears in the status bar.You can also press and hold down the power key ID: ICN-SONY-KEY-AND-POWER-K90and then tap ID: ICN-SONY-ICS-SOUND-SILENCT in the menu that opens to set yourdevice to silent mode.GUID GUID-DFB6F5BB-15B2-49A2-B023-828A4852DD0ATitle To set the phone to silent and vibrating modeChanges steps change for huashanVersion 11Author LisaYStatus Released*To set your device to vibrate and ring mode1From your Home screen [homescreen_strings_application_name_txt] , tap ID: ICN-SONY-HOME-APPTRAY-NORMAL.2Find and tap Settings [settings_label_launcher] > Sound [sound_settings] .3Mark the Vibrate when ringing [vibrate_when_ringing_title] checkbox.GUID GUID-238E06D2-6988-439A-8711-90ED73016194Title To set the phone to vibrate and ring modeChanges Device Term Change and one label name changeVersion 2Author LisaYStatus ReleasedThis is a draft publication for internal use only.49This is an Internet version of this publication. © Print only for private use.](https://usermanual.wiki/Sony/PM-0480.Short-term-confidential-userguide-EN-PRODUCT-NAME-PART-NUMBER-Android4-0/User-Guide-1988542-Page-49.png)
![Time and dateIndexterm: "time"Indexterm: "date"Sub-indexterm: "format"You can change the time and date on your device.GUID GUID-D9FE3D48-1528-4315-BFF7-BFB227CAB4C0Title Time and dateChanges Device Term ChangeVersion 2Author LisaYStatus ReleasedTo set the date manually1From the Home screen [homescreen_strings_application_name_txt] , tap ID: ICN-SONY-HOME-APPTRAY-NORMAL .2Find and tap Settings [settings_label_launcher] > Date & time [date_and_time_settings_title] .3Unmark the Automatic date & time [date_time_auto] checkbox, if it is marked.4Tap Set date [date_time_set_date] .5Adjust the date by scrolling up and down.6Tap Done [date_time_done] .GUID GUID-813CD57B-7A26-4E14-BBED-243BEC6F048FTitle To set the date manuallyChanges only one label changed for OdinVersion 9Author LisaYStatus Released*To set the time manually1From your Home screen [homescreen_strings_application_name_txt] , tap ID: ICN-SONY-HOME-APPTRAY-NORMAL .2Find and tap Settings [settings_label_launcher] > Date & time [date_and_time_settings_title] .3Unmark the Automatic date & time [date_time_auto] checkbox if it is marked.4Tap Set time [date_time_set_time] .5Scroll up or down to adjust the hour and minute.6If applicable, scroll up to change am [udoc_trans_set_time_am ] to pm [udoc_trans_set_time_pm ] ,or vice versa.7Tap Done [date_time_done] .GUID GUID-E9572FB8-BB60-4430-84D8-3F19D899681ETitle To set the time manuallyChanges only one label changed for OdinVersion 13Author LisaYStatus Released*To set the time zone1From your Home screen [homescreen_strings_application_name_txt] , tap ID: ICN-SONY-HOME-APPTRAY-NORMAL.2Find and tap Settings [settings_label_launcher] > Date & time [date_and_time_settings_title] .3Unmark the Automatic time zone [zone_auto] checkbox, if it is marked.4Tap Select time zone [date_time_set_timezone] .5Select an option.GUID GUID-0C804200-55DD-4779-BB20-7445141EC74CTitle To set the time zoneChanges ICS updateVersion 5Author Xiaxin LiStatus Released*Ringtone settingsIndexterm: "notification"Sub-indexterm: "ringtone"Indexterm: "vibration"GUID GUID-36AE80F9-AAA9-408B-A8AE-5E58014B7377This is a draft publication for internal use only.50This is an Internet version of this publication. © Print only for private use.](https://usermanual.wiki/Sony/PM-0480.Short-term-confidential-userguide-EN-PRODUCT-NAME-PART-NUMBER-Android4-0/User-Guide-1988542-Page-50.png)
![Title Ringtone settings - headingChanges Valid for Robyn & Mimmi. Valid for eDream 3.0Version 2Author KomalLStatus ReleasedTo set a ringtone1From your Home screen [homescreen_strings_application_name_txt] , tap ID: ICN-SONY-HOME-APPTRAY-NORMAL.2Find and tap Settings [settings_label_launcher] > Sound [sound_settings] > Phone ringtone [ring-tone_title] .3Select a ringtone.4Tap Done [gui_done_txt] .GUID GUID-2EB51A75-25CA-45E2-8D75-C0A2C484EC07Title To set a phone ringtoneChanges Device Term ChangeVersion 9Author LisaYStatus ReleasedTo enable touch tones1From your Home screen [homescreen_strings_application_name_txt] , tap ID: ICN-SONY-HOME-APPTRAY-NORMAL.2Find and tap Settings [settings_label_launcher] > Sound [sound_settings] .3Mark the Dial pad touch tones [dtmf_tone_enable_title] and Touch sounds [sound_effects_ena-ble_title] checkboxes.GUID GUID-8D4FF0B8-3A81-46F0-AE74-031B501F394ETitle To enable touch tonesChanges update the label SoundVersion 7Author Xiaxin LiStatus Released*To select the notification sound1From your Home screen [homescreen_strings_application_name_txt] , tap ID: ICN-SONY-HOME-APPTRAY-NORMAL.2Find and tap Settings [settings_label_launcher] > Sound [sound_settings] > Default notification[notification_sound_title] .3Select the sound to be played when notifications arrive.4Tap Done [gui_done_txt] .GUID GUID-2DC47BDA-6F13-480C-A3C6-10F11ADDE021Title To select a notification ringtoneChanges for Odin Yuga titile updated according to label changed to "Notificationsound"Version 10Author LisaYStatus Released*Screen settingsIndexterm: "brightness"Indexterm: "screen"GUID GUID-EF960369-662D-46B3-9190-3ACD92FFE448Title Screen settings - headingChanges Valid for Robyn. Valid for eDream 3.0. Changed index markerVersion 2Author KomalLStatus ReleasedTo adjust the screen brightnessIndexterm: "LCD backlight control"This is a draft publication for internal use only.51This is an Internet version of this publication. © Print only for private use.](https://usermanual.wiki/Sony/PM-0480.Short-term-confidential-userguide-EN-PRODUCT-NAME-PART-NUMBER-Android4-0/User-Guide-1988542-Page-51.png)
![Indexterm: "brightness"1From your Home screen [homescreen_strings_application_name_txt] , tap ID: ICN-SONY-HOME-APPTRAY-NORMAL.2Find and tap Settings [settings_label_launcher] > Display [display_settings_title] > Brightness [bright-ness] .3Drag the slider to adjust the brightness.4Tap OK [ok] .The brightness level affects your battery performance. For tips on how to improve batteryperformance, see Improving battery performance.GUID GUID-6B929979-C7E3-45FB-85E0-C4A4BB05388ATitle To adjust the screen brightnessChanges for Odin Yuga Xperia Care removing the cross reference only no other textchangeVersion 8.1.1Author LisaYStatus ReleasedTo set the screen to vibrate1From your Home screen [homescreen_strings_application_name_txt] , tap ID: ICN-SONY-HOME-APPTRAY-NORMAL.2Find and tap Settings [settings_label_launcher] > Sound [sound_settings] .3Mark the Vibrate on touch [haptic_feedback_enable_title] checkbox. The screen nowvibrates when you tap soft keys and certain applications.GUID GUID-C6A8795B-B37A-4FD6-8AE9-1CE841DFA98ETitle To set the screen to vibrateChanges update the label SoundVersion 5Author Xiaxin LiStatus ReleasedTo adjust the idle time before the screen turns off1From your Home screen [homescreen_strings_application_name_txt] , tap ID: ICN-SONY-HOME-APPTRAY-NORMAL.2Find and tap Settings [settings_label_launcher] > Display [display_settings_title] > Sleep [screen_time-out] .3Select an option.To turn off the screen quickly, briefly press the power key ID: ICN-SONY-KEY-AND-POWER-K90.GUID GUID-76BAB77B-B3AF-421C-8D41-F7F3D7CEBFA6Title To adjust the idle time before the screen turns offChanges ICS updateVersion 6Author Xiaxin LiStatus ReleasedLanguage settingsIndexterm: "language"You can select a default language for your device and change it again at a later time.GUID GUID-E1D54EB1-8E02-4EA8-B64D-F1D56D4EF18BTitle Phone languageChanges Device Term ChangeVersion 2Author LisaYStatus ReleasedThis is a draft publication for internal use only.52This is an Internet version of this publication. © Print only for private use.](https://usermanual.wiki/Sony/PM-0480.Short-term-confidential-userguide-EN-PRODUCT-NAME-PART-NUMBER-Android4-0/User-Guide-1988542-Page-52.png)
![To change the language1From the Home screen [homescreen_strings_application_name_txt] , tap ID: ICN-SONY-HOME-APPTRAY-NORMAL.2Find and tap Settings [settings_label_launcher] > Language & input [language_settings] >Language [language_picker_title] .3Select an option.4Tap OK [button_ok] .If you select the wrong language and cannot read the menu texts, find and tap ID: ICN-SONY-APP-SETTINGS. Then select the text beside ID: ICN-SONY-SETTINGS-LANGUAGEand select the first entry in the menu that opens. You can then select the language you want.GUID GUID-78FDB03D-5A9A-4DD3-B1EB-554524E573A7Title To change the phone languageChanges Device Term ChangeVersion 11Author LisaYStatus ReleasedAirplane modeIndexterm: "Airplane mode"Indexterm: "Flight mode - See Airplane mode"In Airplane mode, the network and radio transceivers are turned off to preventdisturbance to sensitive equipment. However, you can still play games, listen tomusic, watch videos and other content, as long as all this content is saved on yourmemory card or internal storage. You can also be notified by alarms, if alarms areactivated.Turning on Airplane mode reduces battery consumption.GUID GUID-4592770A-6B42-477E-9A27-8326386B4FC0Title Airplane modeChanges Device Term ChangeVersion 5Author LisaYStatus ReleasedTo turn on Airplane mode1From your Home screen [homescreen_strings_application_name_txt] , tap ID: ICN-SONY-HOME-APPTRAY-NORMAL .2Find and tap Settings [settings_label_launcher] > More… [radio_controls_title] .3Mark the Airplane mode [airplane_mode] checkbox.You can also press and hold down the power key ID: ICN-SONY-KEY-AND-POWER-K90and then select Airplane mode [airplane_mode] in the menu that opens.GUID GUID-0D75D33F-E108-41F8-B61A-F27882DA3E55Title To turn on Flight modeChanges Device Term Change and rewrite the tip to avoid using the "phone options"labelVersion 10Author LisaYStatus ReleasedEnhancing the sound outputYou can enhance the sound output that comes from the speakers in your deviceusing features such as Clear Phase™ and xLOUD™ technology.GUID GUID-91BE04C9-56A8-4A40-A15A-348947A469C8Title Enhancing the sound qualityChangesVersion 1Author LisaYStatus ReleasedThis is a draft publication for internal use only.53This is an Internet version of this publication. © Print only for private use.](https://usermanual.wiki/Sony/PM-0480.Short-term-confidential-userguide-EN-PRODUCT-NAME-PART-NUMBER-Android4-0/User-Guide-1988542-Page-53.png)
![Using Clear Phase™ technologyUse Clear Phase™ technology from Sony to automatically adjust the sound qualitycoming from your device's internal speakers and get a cleaner, more natural sound.GUID GUID-48A17031-9A20-4C8C-9A02-0ACA60316D37Title Using Clear Phase™ technologyChangesVersion 1Author LisaYStatus ReleasedTo enhance the speaker sound quality using Clear Phase™1From your Home screen [homescreen_strings_application_name_txt] , tap ID: ICN-SONY-HOME-APPTRAY-NORMAL.2Find and tap Settings [settings_label_launcher] > Sound [sound_settings] .3Mark the Clear Phase™ [udoc_no_trans_clear_phase] checkbox.The activation of the Clear Phase™ feature has no effect on voice communicationapplications.GUID GUID-DA49322A-6A65-4A9F-BCD3-C4E5F450AEDFTitle To enhance the sound quality of the speaker using Clear Phase™Changes remove "For example... voice call" in the tip for pollux windyVersion 3Author LisaYStatus ReleasedUsing xLOUD™ technologyUse xLOUD™ audio filter technology from Sony to enhance the speaker volumewithout sacrificing quality. Get a more dynamic sound as you listen to your favouritesongs.GUID GUID-9BE06EDA-D4B0-41CC-9562-D89EBDDA4B01Title Using xLOUD™ technologyChangesVersion 1Author LisaYStatus ReleasedTo enhance the speaker volume using xLOUD™1From your Home screen [homescreen_strings_application_name_txt] , tap ID: ICN-SONY-HOME-APPTRAY-NORMAL.2Find and tap Settings [settings_label_launcher] > Sound [sound_settings] .3Mark the xLOUD™ [XLOUD] checkbox.The activation of the xLOUD™ feature has no effect on voice communication applications.GUID GUID-DADE3E84-AFBD-453C-A218-747C2077F534Title To enhance the speaker loudness using xLOUD™Changes remove "For example... voice call" in the tip for pollux windyVersion 5Author LisaYStatus ReleasedMemoryYou can save content to your device's internal storage and to a memory card.GUID GUID-22B2F18B-DFF0-4F4E-9917-D71E95288CE9Title MemoryChanges From Odin and Yuga: remove application memory; only keep internal memo-ry and memory cardVersion 6Author WangTStatus ReleasedThis is a draft publication for internal use only.54This is an Internet version of this publication. © Print only for private use.](https://usermanual.wiki/Sony/PM-0480.Short-term-confidential-userguide-EN-PRODUCT-NAME-PART-NUMBER-Android4-0/User-Guide-1988542-Page-54.png)
![Sub-indexterm: "using a headset"1Connect the headset to your device.2To answer a call, press the call handling key.3To end the call, press the call handling key.If a headset is not included with the device, you may purchase one separately.If you are listening to music, the music stops when you answer a call and resumes after youend the call.GUID GUID-804D9F4A-FDEA-40BE-BC7D-C6C3CE8DF02BTitle To use a handsfreeChanges Created for termchange onlyVersion 6Author CynthiaHStatus ReleasedInternet and messaging settingsIndexterm: "Internet"Sub-indexterm: "settings"Indexterm: "settings"Sub-indexterm: "Internet"Indexterm: "settings"Sub-indexterm: "messaging"Sub-indexterm: "MMS"Indexterm: "messages"Sub-indexterm: "settings"Indexterm: "Multimedia Messaging Service (MMS)"Sub-indexterm: "settings"Indexterm: "download"Sub-indexterm: "Internet settings"To send text and multimedia messages and to access the Internet, you must have amobile data connection and the correct settings. There are different ways to getthese settings:•For most mobile networks and operators, Internet and messaging settings comepreinstalled on your device. You can then start using the Internet and send messagesright away.•In some cases you will get the option to download Internet and messaging settingsthe first time you turn on your device. It is also possible to download these settingslater from the Settings [settings_label_launcher] menu.•You can manually add and change Internet and network settings on your device atany time. Contact your network operator for detailed information about Internet andmessaging settings.GUID GUID-E108490D-17EF-4989-95D0-DB1F6F93AD07Title Internet and messaging settingsChanges Update for Term change from phone to deviceVersion 7Author PanLStatus ReleasedTo download Internet and messaging settings1From your Home screen [homescreen_strings_application_name_txt] , tap ID: ICN-SONY-HOME-APPTRAY-NORMAL.2Find and tap Settings [settings_label_launcher] > Xperia™ [sonyericsson_settings_title] > Internetsettings [r2r_settings_download_title_txt] .3Tap Accept [r2r_strings_cost_button_accept_txt] .GUID GUID-86823E16-0E31-4A88-AD3F-6BAFB84C490ETitle To download Internet and messaging settingsChanges added the last step based on v5 for Odin and YugaVersion 8Author MikeCaoStatus ReleasedThis is a draft publication for internal use only.56This is an Internet version of this publication. © Print only for private use.](https://usermanual.wiki/Sony/PM-0480.Short-term-confidential-userguide-EN-PRODUCT-NAME-PART-NUMBER-Android4-0/User-Guide-1988542-Page-56.png)
![To reset the default Internet settings1From the Home screen [homescreen_strings_application_name_txt] , tap ID: ICN-SONY-HOME-APPTRAY-NORMAL.2Tap Settings [settings_label_launcher] > More… [radio_controls_title] > Mobile networks [network_set-tings_title] > Access Point Names [ph_apn_settings] .3Tap ID: ICN-SONY-KEY-MENU.4Tap Reset to default [menu_restore] .GUID GUID-C806ACFF-830E-4A1B-8232-CA132C88AE40Title To reset to the default Internet settingsChanges only changed the word press to tap for OdinYugaVersion 7Author MikeCaoStatus ReleasedAccess Point Names (APNs)An APN is used to establish data connections between your device and the Internet.The APN defines which type of IP address to use, which security methods to invoke,and which fixed-end connections to use. Checking the APN is useful when youcannot access the Internet, have no data connection, or cannot send or receivemultimedia messages.GUID GUID-31CA14E0-F62F-48B1-AC9C-5E907E30A153Title Access Point Names (APNs)Changes Update for Term Change phone to deviceVersion 2Author PanLStatus ReleasedTo view the current APN1From your Home screen [homescreen_strings_application_name_txt] , tap ID: ICN-SONY-HOME-APPTRAY-NORMAL.2Find and tap Settings [settings_label_launcher] > More… [radio_controls_title] > Mobile networks[network_settings_title] .3Tap Access Point Names [apn_settings] .If you have several available connections, the active network connection is indicated by amarked button.GUID GUID-D3CA1D1D-9D77-409E-B090-A9F34E50E7C4Title To view the current Access Point Name (APN)Changes From Mesona; only update the heading to use the acronym because a con-cept topic about APN is added.Version 6Author Tan NellieStatus ReleasedTo add Internet settings manually1From the Home screen [homescreen_strings_application_name_txt] , tap ID: ICN-SONY-HOME-APPTRAY-NORMAL .2Find and tap Settings [settings_label_launcher] > More… [radio_controls_title] > Mobile networks[network_settings_title] > Access Point Names [apn_settings] .3Tap ID: ICN-SONY-KEY-MENU .4Tap New APN [menu_new] .5Tap Name [apn_name] and enter the name of the network profile that you want tocreate.6Tap APN [apn_apn] and enter the access point name.7Enter all other information required by your network operator.8Tap ID: ICN-SONY-KEY-MENU , then tap Save [menu_save] .GUID GUID-32B23CC9-D90A-4769-AC96-E84045CC67B5Title To configure Internet settings manuallyChanges removed an icon based on v9 for Odin and YugaVersion 12Author MikeCaoStatus ReleasedThis is a draft publication for internal use only.57This is an Internet version of this publication. © Print only for private use.](https://usermanual.wiki/Sony/PM-0480.Short-term-confidential-userguide-EN-PRODUCT-NAME-PART-NUMBER-Android4-0/User-Guide-1988542-Page-57.png)
![Controlling data usageIndexterm: "settings"Sub-indexterm: "data usage"Indexterm: "data traffic"Keep track of and control the amount of data transferred to and from your deviceduring a given period. For example, you can set data usage warnings and limits foryour device to avoid additional charges. You can also limit the amount of data usedby individual applications.Adjusting data usage settings can help you keep greater control over data usage but cannotguarantee the prevention of additional charges.GUID GUID-C0566A1E-7656-4AA0-83CF-B16974F69C4CTitle Optimising data usageChanges Update for Term change from phone to deviceVersion 3Author PanLStatus ReleasedTo access data usage settings1From your Home screen [homescreen_strings_application_name_txt] , tap ID: ICN-SONY-HOME-APPTRAY-NORMAL.2Find and tap Settings [settings_label_launcher] > Data usage [account_settings_data_usage] .GUID GUID-4AA02A5A-A8F4-4BD6-B3B2-4065096178D2Title To access data usage settingsChanges For Tapioca; For newly added data usage featureVersion 1Author Tan NellieStatus ReleasedTo turn data traffic on or off1From your Home screen [homescreen_strings_application_name_txt] , tap ID: ICN-SONY-HOME-APPTRAY-NORMAL.2Find and tap Settings [settings_label_launcher] > Data usage [account_settings_data_usage] .3To turn data traffic on or off, tap the on-off switch beside Mobile data [data_us-age_enable_mobile] accordingly.You can also turn data traffic on or off by marking or unmarking the Mobile data traffic [data_en-abled] checkbox under Settings [settings_label_launcher] > More… [radio_controls_title] > Mobile networks [net-work_settings_title] .GUID GUID-AF0FB16B-F83D-452C-B097-C0BB9FC06865Title To enable mobile dataChanges Nypon JB TRS update from version 2 (note added with a condition for UGuse only)Version 3Author AipingStatus ReleasedTo set a data usage warning1Make sure that you have turned on data traffic.2From your Home screen [homescreen_strings_application_name_txt] , tap ID: ICN-SONY-HOME-APPTRAY-NORMAL.3Find and tap Settings [settings_label_launcher] > Data usage [account_settings_data_usage] .4To set the warning level, drag the lines to the desired values. You receive awarning notification when the amount of data traffic approaches the level youset.GUID GUID-E984931A-1304-4ADC-93A5-1CA4FAB17CBETitle To set a level for data usage warningChanges For Tapioca; for the newly added data usage feature.Version 1Author Tan NellieStatus ReleasedThis is a draft publication for internal use only.58This is an Internet version of this publication. © Print only for private use.](https://usermanual.wiki/Sony/PM-0480.Short-term-confidential-userguide-EN-PRODUCT-NAME-PART-NUMBER-Android4-0/User-Guide-1988542-Page-58.png)
![To set a data usage limit1Make sure that you have turned on data traffic.2From your Home screen [homescreen_strings_application_name_txt] , tap ID: ICN-SONY-HOME-APPTRAY-NORMAL.3Find and tap Settings [settings_label_launcher] > Data usage [account_settings_data_usage] .4Mark the Set mobile data limit [data_usage_disable_mobile_limit] checkbox if it is notmarked, then tap OK [button_ok] .5To set the data usage limit, drag the lines to the desired values.Once your data usage reaches the set limit, data traffic on your device will be turned offautomatically.GUID GUID-387685B1-AC66-41E5-91FD-BAB3268E5AAFTitle To set data usage limitChanges Update for Term change from phone to deviceVersion 2Author PanLStatus ReleasedTo control the data usage of individual applications1From your Home screen [homescreen_strings_application_name_txt] , tap ID: ICN-SONY-HOME-APPTRAY-NORMAL.2Find and tap Settings [settings_label_launcher] > Data usage [account_settings_data_usage] .3Find and tap the desired application.4Mark the Restrict background data [data_usage_app_restrict_background] checkbox.5To access more specific settings for the application, tap View app settings [da-ta_usage_app_settings] and make the desired changes.Specific settings for an application may not always be accessible.The performance of individual applications may be affected if you change the related datausage settings.GUID GUID-16A3F307-2E86-443A-A431-7F192F049F2DTitle To change data usage settings by applicationChanges removed description about changing the "data usage limit" or "restrict all da-ta traffic" from TaoshanVersion 2Author MikeCaoStatus ReleasedMobile network settingsYour device automatically switches between mobile networks depending on whatmobile networks are available in different areas. You can also manually set yourdevice to use a particular mobile network mode, for example, WCDMA or GSM.GUID GUID-03604570-8FDB-4743-A698-1DD36415FCEDTitle Network settingsChanges Update for Term change from phone to deviceVersion 6Author PanLStatus Released*To select a network type1From your Home screen [homescreen_strings_application_name_txt] , tap ID: ICN-SONY-HOME-APPTRAY-NORMAL.2Find and tap Settings [settings_label_launcher] > More… [radio_controls_title] > Mobile networks[network_settings_title] .3Tap Network Mode [preferred_network_mode_title] .4Select a network type.GUID GUID-D26F6D09-E741-4272-A36B-876F5D93772ATitle To select network modeChanges For Tapioca DSDS; text changed; change the function-related description inthe noteVersion 3.1.1This is a draft publication for internal use only.59This is an Internet version of this publication. © Print only for private use.](https://usermanual.wiki/Sony/PM-0480.Short-term-confidential-userguide-EN-PRODUCT-NAME-PART-NUMBER-Android4-0/User-Guide-1988542-Page-59.png)
![Author Tan NellieStatus ReleasedTo select another network manually1From the Home screen [homescreen_strings_application_name_txt] , tap ID: ICN-SONY-HOME-APPTRAY-NORMAL.2Find and tap Settings [settings_label_launcher] > More… [radio_controls_title] > Mobile networks[network_settings_title] > Service providers [networks] .3Tap Search mode [clh_settings_search_mode] > Manual [clh_settings_manual_selection] .4Select a network.If you select a network manually, your device will not search for other networks, even if youmove out of range of the manually selected network.GUID GUID-D7ED045F-09E8-437A-B0FA-7F20B36A7B9ETitle To select another network manuallyChanges Update for Term change from phone to deviceVersion 10Author PanLStatus ReleasedTo activate automatic network selection1From the Home screen [homescreen_strings_application_name_txt] , tap ID: ICN-SONY-HOME-APPTRAY-NORMAL.2Find and tap Settings [settings_label_launcher] > More… [radio_controls_title] > Mobile networks[network_settings_title] > Service providers [networks] .3Tap Search mode [clh_settings_search_mode] > Automatic [select_automatically] .GUID GUID-9A348BA0-79C7-43D2-B4D1-CD1673E55076Title To activate automatic network selectionChanges From Togari; no text changed; only merge the last two step into one step.Version 7Author Tan NellieStatus DraftTurning off data trafficYou can disable all data connections over mobile networks to avoid any unwanteddata downloads and synchronisations. Contact your network operator if you needdetailed information about your subscription plan and data traffic charges.When data traffic is turned off, you can still use Wi-Fi® and Bluetooth™ connections. You canalso send and receive multimedia messages.GUID GUID-742544F3-883A-46CC-AEB8-A348267E78B6Title Turning off data trafficChanges Update for Term change from phone to deviceVersion 6Author PanLStatus ReleasedTo turn off all data traffic1From your Home screen [homescreen_strings_application_name_txt] , tap ID: ICN-SONY-HOME-APPTRAY-NORMAL.2Find and tap Settings [settings_label_launcher] > More… [radio_controls_title] > Mobile networks[network_settings_title] .3Unmark the Mobile data traffic [data_enabled] checkbox.GUID GUID-CC611F89-1392-4026-8612-ED7FF9CE6536Title To turn off all data trafficChanges Label changedVersion 5Author PengLeonStatus ReleasedThis is a draft publication for internal use only.60This is an Internet version of this publication. © Print only for private use.](https://usermanual.wiki/Sony/PM-0480.Short-term-confidential-userguide-EN-PRODUCT-NAME-PART-NUMBER-Android4-0/User-Guide-1988542-Page-60.png)
![Data roamingSome network operators allow mobile data connections via mobile networks whenyou are outside of your home network (roaming). Note that data transmission chargesmay apply. Contact your network operator for more information.Applications may sometimes use the Internet connection in your home network without anynotification, for example, when sending search and synchronisation requests. Additionalcharges may apply when such Internet connections are established while you are roaming.Consult your network operator for more information.GUID GUID-73201F09-74A4-4501-8A3D-A733BDC1C923Title Data roamingChanges Update from Tsubasa Gina LTE network description is rewrittenVersion 5Author PanLStatus ReleasedTo activate data roaming1From the Home screen [homescreen_strings_application_name_txt] , tap ID: ICN-SONY-HOME-APPTRAY-NORMAL .2Find and tap Settings [settings_label_launcher] > More… [radio_controls_title] > Mobile networks[network_settings_title] .3Mark the Data roaming [roaming] checkbox.You can’t activate data roaming when data connections have been deactivated.GUID GUID-C60097AE-0FB1-41C4-B18F-1FA5C7A7B8CCTitle To activate data roamingChanges Add conditions for FAQVersion 7Author Vera QuStatus ReleasedThis is a draft publication for internal use only.61This is an Internet version of this publication. © Print only for private use.](https://usermanual.wiki/Sony/PM-0480.Short-term-confidential-userguide-EN-PRODUCT-NAME-PART-NUMBER-Android4-0/User-Guide-1988542-Page-61.png)
![Google Play™GUID GUID-C30DF276-0F47-43A3-98AB-5696A071AD32Title Google Play - heading onlyChangesVersion 1Author JorgenLStatus ReleasedGetting started with Google Play™Open Google Play™ and enter a world of applications and games. You can browsethese applications and games through different categories. You can also rate anapplication or game and send feedback on it.To use Google Play™, you need to have a Google™ account. See To set up aGoogle™ account in your phone on page 96.Google Play™ may not be available in all countries or regionsGUID GUID-948C2660-2BA8-4007-BE93-4192F4B8B60ATitle Getting started with Google Play™Changes Valid for Tapioca Phoenix eDream 6.0 Aoba ROW Nozomi ICS and onwardsLabel updated and plain text Android Market changed to Google Play onlyNo text change and no need reviewVersion 9Author WangHermanStatus ReleasedTo open Google Play™Indexterm: "Android Market™ - See Google Play™"Indexterm: "Google Play™"1From the Home screen [homescreen_strings_application_name_txt] , tap ID: ICN-SONY-HOME-APPTRAY-NORMAL.2Find and tap Play Store [android-market-market] .GUID GUID-A6466E9C-56BD-433F-BFEC-33CBCD2B6725Title To open Google PlayChanges Valid for Tapioca Phoenix eDream 6.0 Aoba ROW 6 Nozomi ICS and on-wards Index updated only No need reviewVersion 7Author WangHermanStatus ReleasedDownloading from Google Play™You can download all kinds of applications from Google Play™, including freeapplications.GUID GUID-49F15983-B569-4F3D-925B-068E32B35056Title Downloading from Android™ MarketChanges Valid for Tapioca Phoenix eDream 6.0 Aoba ROW 6.0 STE Nypon KumquatPepper Nozomi ICS and onwards Plain text Android Market changed to PlayShop only No text change and no need reviewVersion 5Author WangHermanStatus ReleasedBefore you download applicationsBefore you start downloading from Google Play™, make sure that you have aworking Internet connection.Also, remember that you might incur data traffic charges when you download contentto your phone. Contact your operator for more information.GUID GUID-03BC5C4C-F4A2-43E2-841B-112DBE3EE81BTitle Before you download applicationsThis is a draft publication for internal use only.62This is an Internet version of this publication. © Print only for private use.](https://usermanual.wiki/Sony/PM-0480.Short-term-confidential-userguide-EN-PRODUCT-NAME-PART-NUMBER-Android4-0/User-Guide-1988542-Page-62.png)
![Changes Valid for Tapioca Phoenix eDream 6.0 Aoba ROW Nozomi ICS and onwardsPlain text Android Market changed to Google Play only No text change andno need reviewVersion 2Author WangHermanStatus Released*To download a free application1In Google Play™, find an item you wish to download by browsing categories,or by using the search function.2Tap the item to view its details, and follow the instructions to complete theinstallation.3If the application you want to download requires access to your data or controlof any functions on your phone, an additional screen appears with details.Read this screen carefully because the functionality of your phone may beseriously affected if you proceed. Tap OK [ph_ok] if you agree, or Cancel [cancel] ifyou wish to cancel the download.GUID GUID-7F1229FC-3D9E-4AD7-B551-601E0A4FA6D0Title To download a free applicationChanges Valid for Tapioca Phoenix eDream 6.0 Aoba ROW Nozomi ICS and onwardsPlain text Android Market changed to Google Play only No text change andno need reviewVersion 5Author WangHermanStatus Released*To download a paid application1In Google Play™, find an item you wish to download by browsing categories,or by using the search function.2Tap the item to view its details, and follow the instructions in your phone tocomplete your purchase.3If the application you want to download requires access to your data or controlof any functions on your phone, an additional screen appears with details.Read this screen carefully because the functionality of your phone may beseriously affected if you proceed. Tap OK [ph_ok] if you agree, or Cancel [cancel] ifyou wish to cancel the download.GUID GUID-177043C5-8E5C-422D-9FFA-F6589DA0B947Title To download a paid applicationChanges Valid for Tapioca Phoenix eDream 6.0 Aoba ROW Nozomi ICS and onwardsPlain text Android Market changed to Google Play only No text change andno need reviewVersion 6Author WangHermanStatus Released*To open a downloaded application1In Google Play™, press ID: ICN-SONY-KEY-MENU, then tap My Apps [android-mar-ket-my-apps] .2Tap the downloaded application.You can also access downloaded applications from the Application screen.GUID GUID-EBFE0735-60B3-4E17-BE7F-C03345392F0FTitle To open a downloaded applicationChanges Valid for Tapioca Phoenix eDream 6.0 Aoba ROW Nozomi ICS and onwardsPlain text Android Market changed to Google Play only No text change andno need reviewVersion 5Author WangHermanStatus ReleasedClearing your application dataYou may sometimes need to clear data for an application. This might happen if, forexample, the application memory becomes full, or you want to clear high scores for aThis is a draft publication for internal use only.63This is an Internet version of this publication. © Print only for private use.](https://usermanual.wiki/Sony/PM-0480.Short-term-confidential-userguide-EN-PRODUCT-NAME-PART-NUMBER-Android4-0/User-Guide-1988542-Page-63.png)
![game. You might also want to erase incoming email, text and multimedia messagesin some applications.GUID GUID-EAF62666-1ACE-41A8-B75E-0BA17DE3F88DTitle Clearing your application dataChanges For Shakira and onwardsVersion 1Author AnnEStatus ReleasedTo clear all cache for an application1From your Home screen [homescreen_strings_application_name_txt] , tap ID: ICN-SONY-HOME-APPTRAY-NORMAL.2Find and tap Settings [settings_label_launcher] .3Tap Apps [applications_settings] .4Tap the application for which you want to clear all cache.5Tap Clear cache [clear_cache_btn_text] .It is not possible to clear the cache for some applications.GUID GUID-223FC104-FDE6-4850-B2BD-9B392F63ABABTitle To clear all data for an applicationChanges Valid for eDream 4.1 ICS update Urushi Ayame Haida. Step 3 "Applications"changed to "Apps" and removed "Manage applications"Version 7Author WangHermanStatus Released*To delete an installed application1From your Home screen [homescreen_strings_application_name_txt] , tap ID: ICN-SONY-HOME-APPTRAY-NORMAL.2Find and tap Settings [settings_label] .3Tap Apps [applications_settings] .4Select the application that you want to delete.5Tap Uninstall [uninstall_text] .It is not possible to delete some preinstalled applications.GUID GUID-9CD7AFD4-1CA6-4816-9333-D43825F06633Title To delete an installed applicationChanges Valid for eDream 4.1 ICS update Urushi Ayame Haida. Step 3 "Applications"changed to "Apps" and removed "Manage applications"Version 5Author WangHermanStatus Released*PermissionsSome applications may need to access data, settings and various functions on yourdevice in order to work properly. If so, then they need the relevant permissions fromyou. For example, a navigation application needs permissions to send and receivedata traffic, and access your location.Some applications might misuse their permissions by stealing or deleting data, or byreporting your location. Make sure you only install and give permissions toapplications you trust.GUID GUID-66ABAE3F-553A-4CC4-8ACA-88C9B976FF77Title PermissionsChanges Updated from Togari and valid for all projects onwards Breaked the wholeparagraph into two paragraphs according to concept team's request No textchange NO NEED REVIEWVersion 3Author WangHermanStatus DraftThis is a draft publication for internal use only.64This is an Internet version of this publication. © Print only for private use.](https://usermanual.wiki/Sony/PM-0480.Short-term-confidential-userguide-EN-PRODUCT-NAME-PART-NUMBER-Android4-0/User-Guide-1988542-Page-64.png)
![To view permissions of an application1From your Home screen [homescreen_strings_application_name_txt] , tap ID: ICN-SONY-HOME-APPTRAY-NORMAL.2Find and tap Settings [settings_label] .3Tap Apps [applications_settings] .4Tap the desired application.5Scroll down to view the relevant details under Permissions [permissions_label] .GUID GUID-5CA82138-A0F8-465B-B505-E2EDD4879535Title To view permissions of an applicationChanges Valid for eDream 4.1 ICS update Urushi Ayame Haida. Step 3 "Applications"changed to "Apps" and removed "Manage applications"Version 5Author WangHermanStatus ReleasedInstalling applications not from Google Play™Installing applications of unknown or unreliable origin can damage your phone. Bydefault, your phone is set to block such installations. However, you can change thissetting and allow installations from unknown sources.Sony does not warrant or guarantee the performance of any third-party applications or contenttransferred via download or other interface to your phone. Similarly, Sony is not responsible forany damage or reduced performance of your phone attributable to the transfer of third-partycontent. Only use content from reliable sources. Contact the content provider if you have anyquestions or concerns.GUID GUID-4658ED14-9236-4B4B-80D8-EFB84089B731Title Allowing applications from sources other than Google Play™Changes Valid for Tapioca Phoenix eDream 6.0 Aoba ROW Nozomi ICS and onwardsPlain text Android Market changed to Google Play only No text change andno need reviewVersion 9Author WangHermanStatus Released*To allow the installation of applications not from Google Play™1From your Home screen [homescreen_strings_application_name_txt] , tap ID: ICN-SONY-HOME-APPTRAY-NORMAL.2Find and tap Settings [settings_label] > Security [security_settings_title] .3Mark the Unknown sources [install_applications] checkbox.GUID GUID-1931F6D3-8F6E-4208-9D9E-C78CA2753904Title To allow the installation of applications from sources other than GooglePlay™Changes Valid for Tapioca Phoenix Nozomi ICS and onwards Plain text Android Mar-ket changed to Play Store only No text change and no need reviewVersion 8Author WangHermanStatus Released*This is a draft publication for internal use only.65This is an Internet version of this publication. © Print only for private use.](https://usermanual.wiki/Sony/PM-0480.Short-term-confidential-userguide-EN-PRODUCT-NAME-PART-NUMBER-Android4-0/User-Guide-1988542-Page-65.png)
![CallingIndexterm: "telephony - See calls"Indexterm: "calls"GUID GUID-71EA3573-EAE2-4B15-A2CF-DCED46EE7587Title Calling - heading onlyChanges Valid from Nypon ICS (justed remove the italics form of index terms)Version 4Author PengLeonStatus ReleasedEmergency callsIndexterm: "calls"Sub-indexterm: "emergency"Indexterm: "SOS - See emergency numbers"Indexterm: "emergency numbers"Your device supports international emergency numbers, for example, 112 or 911.You can normally use these numbers to make emergency calls in any country, with orwithout the SIM card inserted if you are within range of a network.GUID GUID-95D14376-6C16-4B4E-9B0D-8F78EFF123E6Title Emergency callsChanges Device term changeVersion 6Author PengLeonStatus ReleasedTo make an emergency call1From your Home screen [homescreen_strings_application_name_txt] , tap ID: ICN-SONY-HOME-APPTRAY-NORMAL.2Find and Tap Phone [launcherDialer] .3Enter the emergency number and tap Call [spb_strings_dialer_call_txt] . To delete anumber, tap ID: ICN-SONY-INPUT-DELETE.You can make emergency calls when no SIM card is inserted or when outgoing calls arebarred.GUID GUID-1C4DC7B4-8DD8-4046-82B6-4DB57A2FBB93Title To make an emergency callChanges Changed "You can make emergency calls when no SIM card is inserted or alloutgoing calls are barred"Version 7Author PengLeonStatus ReleasedTo make an emergency call while the SIM card is locked1Tap Emergency call [clh_emergency_enable_radio_dialog_title_txt] .2Enter the emergency number and tap Call [spb_strings_dialer_call_txt] . To delete anumber, tap ID: ICN-SONY-INPUT-DELETE.GUID GUID-D5A8FEA8-E9B6-4234-8D05-ADDA04F5BC2BTitle To make an emergency call while the SIM card is lockedChanges Modify lableVersion 3Author MaLijiaStatus ReleasedMaking and receiving callsYou can make a call by manually dialling a phone number, by tapping a numbersaved in your contact list, or by tapping the phone number in your call log view. Youcan also use the smart dial feature to quickly find numbers from your contact list andcall logs.This is a draft publication for internal use only.66This is an Internet version of this publication. © Print only for private use.](https://usermanual.wiki/Sony/PM-0480.Short-term-confidential-userguide-EN-PRODUCT-NAME-PART-NUMBER-Android4-0/User-Guide-1988542-Page-66.png)
![When you make a call, your device's main microphone works together with thesecond microphone to suppress noise and background sound.Do not cover the second microphone while you make a call.GUID GUID-73E2425E-2DE6-4B9F-BC0A-F9473A8208B4Title Call handling - headingChanges Changed the healing only no extra text changed due to comments from con-cept teamVersion 7Author CynthiaHStatus DraftContacts [contactsList] Ongoing call handling overviewID: SCR-SONY-13TI-CALL HANDLING11Answer a call2 Decline a callGUID GUID-5E4AF474-9E9F-4344-8156-2C7B64C59E0FTitle Ongoing call handling overviewChangesVersion 1Author CynthiaHStatus DraftContacts [contactsList] Incoming call handling overviewID: SCR-SONY-13TI-CALL HANDLING21Mute the microphone during a call2 Enter numbers during a call3 End a call4 Turn on the loudspeaker during a callGUID GUID-D912EDDE-EAC1-4B36-BC45-CC568D8E32ACTitle Incoming call handling overviewChangesVersion 1Author CynthiaHStatus DraftThis is a draft publication for internal use only.67This is an Internet version of this publication. © Print only for private use.](https://usermanual.wiki/Sony/PM-0480.Short-term-confidential-userguide-EN-PRODUCT-NAME-PART-NUMBER-Android4-0/User-Guide-1988542-Page-67.png)
![To make a call by dialling1From your Home screen [homescreen_strings_application_name_txt] , tap ID: ICN-SONY-HOME-APPTRAY-NORMAL.2Find and tap Phone [launcherDialer] .3Enter the number of the recipient and tap Call [spb_strings_dialer_call_txt] . To delete anumber, tap ID: ICN-SONY-INPUT-DELETE.GUID GUID-4FE375CD-48B9-4D81-8DA9-730361EE3AECTitle To make a callChanges For eDream 4.0Version 6Author PengLeonStatus Released*To make a call using smart dial1From your Home screen [homescreen_strings_application_name_txt] , tap ID: ICN-SONY-HOME-APPTRAY-NORMAL.2Find and tap Phone [launcherDialer] .3Use the dialpad to enter letters or numbers that correspond to the contact youwant to call. As you enter each letter or number, a list of possible matchesappears.4Tap the contact you want to call.GUID GUID-7A25E697-13EE-481C-89D0-229396708D57Title To make a call using smart dialChangesVersion 1Author PengLeonStatus ReleasedTo make an international call1From your Home screen [homescreen_strings_application_name_txt] , tap ID: ICN-SONY-HOME-APPTRAY-NORMAL.2Find and tap Phone [launcherDialer] .3Touch and hold 0 until a “+” sign appears.4Enter the country code, area code (without the first 0) and phone number, thentap Call [spb_strings_dialer_call_txt] .GUID GUID-AFD0943A-BF5A-4F5D-8FF0-0A30C3B98669Title To make an international callChanges for eDream 4.0.1 (The number" 0" is changed after discussionVersion 6Author PengLeonStatus ReleasedTo reject a second call•When you hear repeated beeps during a call, tap ID: ICN-SONY-CALL-SLIDER-DISMISS.GUID GUID-20A61740-AB60-4D3D-BBF6-8191B6FEC058Title To reject a second callChanges Comments from TID. From Huashan,changed drag into tap also changed theicon.Version 4Author CynthiaHStatus ReleasedTo change the ear speaker volume during a call•Press the volume key up or down.GUID GUID-E0A64910-7B0A-4319-8169-9E7E9630ED50Title To change the ear speaker volume during a callChanges eSheep RachaelVersion 1Author OskarWStatus ReleasedThis is a draft publication for internal use only.68This is an Internet version of this publication. © Print only for private use.](https://usermanual.wiki/Sony/PM-0480.Short-term-confidential-userguide-EN-PRODUCT-NAME-PART-NUMBER-Android4-0/User-Guide-1988542-Page-68.png)
![To activate the screen during a call•Briefly press ID: ICN-SONY-KEY-AND-POWER-K90.GUID GUID-9CB25B9D-B1B8-4A2C-B6B7-76163D97AB11Title To activate the screen during a callChanges Changed due to Ed comments just be more accurateVersion 4Author CynthiaHStatus ReleasedTo mute the ringtone for an incoming call•When you receive the call, press the volume key.GUID GUID-166E8451-D0EE-4A20-8D11-A7DC0BBA7027Title To mute the ringtone for an incoming callChanges eSheep RachaelVersion 1Author OskarWStatus Released*Rejecting callsGUID GUID-9CC9879B-B661-4EA1-A066-DA2827D97592Title Rejecting callsChanges Created it out due to comments from concept teamVersion 1Author CynthiaHStatus DraftRejecting a call with a messageIndexterm: "calls"Sub-indexterm: "reject"You can reject a call with a predefined message. When you reject a call with such amessage, the message is automatically sent to the caller and saved on your device.Six messages are predefined on your device. You can select from these predefinedmessages, which can also be edited if necessary.GUID GUID-07BBFB8F-49E0-4484-B2DC-E4BCD9CD758FTitle Rejecting a call with a messageChanges Device term changeVersion 2Author PengLeonStatus ReleasedTo reject a call with a predefined message•Drag Reject with message [call_reject_call_with_message] upward, then select a message.GUID GUID-CAB1C7B1-044E-4072-BBAF-709C1E0FD0C3Title To reject a call with a messageChangesVersion 1Author PengLeonStatus ReleasedTo reject a second call with a predefined message•When you hear repeated beeps during a call, drag Reject with message [call_re-ject_call_with_message] upward, then select a message.GUID GUID-C7B2AAC2-90FE-4C43-A847-EDD862442B84Title To reject a second call with a messageChangesVersion 2Author PengLeonStatus ReleasedThis is a draft publication for internal use only.69This is an Internet version of this publication. © Print only for private use.](https://usermanual.wiki/Sony/PM-0480.Short-term-confidential-userguide-EN-PRODUCT-NAME-PART-NUMBER-Android4-0/User-Guide-1988542-Page-69.png)
![To edit the message used to reject a call1From your Home screen [homescreen_strings_application_name_txt] , tap ID: ICN-SONY-HOME-APPTRAY-NORMAL .2Find and tap Settings [settings_label_launcher] > Call settings [call_settings_title] > Reject callwith message [call_settings_reject_call_with_message] .3Tap the message you want to edit, then make the necessary changes.4When you're done, tap OK [button_ok] .GUID GUID-BD89ACAE-CE3B-4176-9AB1-961828375848Title To edit the message used to reject a callChanges changed a label id no need ed reviewVersion 3Author MikeCaoStatus ReleasedBarring callsIndexterm: "calls"Sub-indexterm: "diverting"Sub-indexterm: "barring"You can bar all or certain categories of incoming and outgoing calls. When you usecall barring for the first time, you need to enter your PUK (Personal Unblocking Key)and then a new password to activate the call barring function.GUID GUID-B96C42F8-041D-4CA5-9C24-FAB3231F9BF6Title Barring callsChangesVersion 1Author PengLeonStatus ReleasedTo bar incoming or outgoing calls1From your Home screen [homescreen_strings_application_name_txt] , tap ID: ICN-SONY-HOME-APPTRAY-NORMAL.2Find and tap Settings [settings_label_launcher] > Call settings [call_settings_title] > Call blocking[labelCallBarring] .3Select an option.4Enter the password and tap Enable [enable] .GUID GUID-7004AA90-417E-4304-85B9-6EB502561939Title To bar incoming or outgoing callsChangesVersion 1Author PengLeonStatus Released*Recent callsIndexterm: "calls"Sub-indexterm: "log"Sub-indexterm: "missed"In the call log, you can view missed ID: ICN-SONY-CALL-LOG-HEADER-MISSED-CALL, received ID: ICN-SONY-CALL-LOG-HEADER-INCOMING-CALL and dialledID: ICN-SONY-CALL-LOG-HEADER-OUTGOING-CALL calls.GUID GUID-40E5841D-C7A4-4B25-AC8D-3531B9D52AFCTitle Recent callsChanges Comments from TID changed an icon only for huashanVersion 3Author CynthiaHStatus ReleasedTo view your missed calls1When you have missed a call, ID: ICN-SONY-CALL-LOG-HEADER-MISSED-CALL appears in the status bar. Drag the status bar downwards.2Tap Missed call [notification_missedCallTitle] .GUID GUID-590BA208-6CD8-42C2-9D38-C05755E3917BTitle To view missed callsThis is a draft publication for internal use only.70This is an Internet version of this publication. © Print only for private use.](https://usermanual.wiki/Sony/PM-0480.Short-term-confidential-userguide-EN-PRODUCT-NAME-PART-NUMBER-Android4-0/User-Guide-1988542-Page-70.png)
![Changes Changed the varid for an icon onlyVersion 7Author CynthiaHStatus ReleasedTo show the call log1From your Home screen [homescreen_strings_application_name_txt] , tap ID: ICN-SONY-HOME-APPTRAY-NORMAL.2Find and tap ID: ICN-SONY-APP-DIALER > ID: ICN-SONY-KEY-MENU.3Tap Show call log [spb_strings_show_call_log_txt] .GUID GUID-ADDBBB5C-9B83-4C04-98D8-48FE46F95C39Title To show the call logChangesVersion 1Author PengLeonStatus ReleasedTo call a number from your call log1From your Home screen [homescreen_strings_application_name_txt] , tap ID: ICN-SONY-HOME-APPTRAY-NORMAL.2Find and tap Phone [launcherDialer] .The call log view appears on the upper part ofthe screen.3To call a number directly, tap the number. To edit a number before calling,touch and hold the number, then tap Edit number before call [recentCalls_editNumberBe-foreCall] .You can also call a number by tapping ID: ICN-SONY-SMARTSEARCH-CALLLOG-DETAIL-BTN-NORMAL > Call back [callBack] .GUID GUID-06B252C0-D4D0-476C-ABA4-5D809E1F1615Title To call a number from the call logChanges for ICS Wave2 update (Changed the way to call the number)Version 8Author PengLeonStatus ReleasedTo add a number from the call log to your contacts1From your Home screen [homescreen_strings_application_name_txt] , tap ID: ICN-SONY-HOME-APPTRAY-NORMAL.2Find and tap Phone [launcherDialer] .The call log view appears on the upper part ofthe screen.3Touch and hold the number, then tap Add to Contacts [recentCalls_addToContact] .4Tap the desired contact, or tap Create new contact [pickerNewContactHeader] .5Edit the contact details and tap Done [menu_done] .GUID GUID-3511CFE2-B8CC-4CF9-93AC-53529E89BC56Title To add a number from the call log to your contactsChanges for ICS Wave 2 update (changed the way to view call log)Version 7Author PengLeonStatus ReleasedVoicemailIndexterm: "voicemail"Indexterm: "answering service"If your subscription includes a voicemail service, callers can leave voice messages foryou when you can't answer calls. Your voicemail service number is normally saved onyour SIM card. If not, you can get the number from your service provider and enter itmanually.GUID GUID-C0B45CA8-3035-4A41-AF12-46F45200B8AATitle VoicemailChanges Valid for R800x(CDMA condition added)Version 5Author PengLeonThis is a draft publication for internal use only.71This is an Internet version of this publication. © Print only for private use.](https://usermanual.wiki/Sony/PM-0480.Short-term-confidential-userguide-EN-PRODUCT-NAME-PART-NUMBER-Android4-0/User-Guide-1988542-Page-71.png)
![Status ReleasedTo enter your voicemail number1From the Home screen [homescreen_strings_application_name_txt] , tap ID: ICN-SONY-HOME-APPTRAY-NORMAL.2Find and tap Settings [settings_label_launcher] > Call settings [call_settings_title] > Voicemail [gen-eral_dialpad_voicemail_txt] >Voicemail settings [voicemail_settings] > Voicemail number [voicemail_set-tings_number_label] .3Enter your voicemail number.4Tap OK [ok] .GUID GUID-C89C34FD-27BE-4E69-A928-F67A90805CC9Title To enter your voicemail numberChanges comments from TID added only one step in 2 no text changedVersion 5.1.1Author CynthiaHStatus ReleasedTo call your voicemail service1From your Home screen [homescreen_strings_application_name_txt] , tap ID: ICN-SONY-HOME-APPTRAY-NORMAL.2Find and tap Phone [launcherDialer] .3Touch and hold 1.GUID GUID-0C8C71F8-F089-4C9F-8CB4-AF024258D381Title To call your voicemail serviceChanges Remove incorrect usage of tag <b>Version 7Author PengLeonStatus ReleasedMultiple callsIndexterm: "calls"Sub-indexterm: "multiple"If you have activated call waiting, you can handle multiple calls at the same time.When it is activated, you will be notified by a beep if you receive another call.GUID GUID-BFBB9A5A-25E5-4E72-9841-247169DEEB7ATitle Multiple callsChanges Changed title from More than one call to Multiple calls - From RobynVersion 2Author OisinFStatus ReleasedTo activate or deactivate call waitingIndexterm: "calls"Sub-indexterm: "waiting"1From the Home screen [homescreen_strings_application_name_txt] , tap ID: ICN-SONY-HOME-APPTRAY-NORMAL.2Find and tap Settings [settings_label] > Call settings [call_settings_title] > Additional settings[additional_gsm_call_settings] .3To activate or deactivate call waiting, tap Call waiting [labelCW] .GUID GUID-1A9F7171-AD1D-443F-B906-7C346F87C151Title To activate or deactivate call waitingChanges eDream 2.0 Robyn/Mimmi & RachaelVersion 3Author UlrikaKStatus Released*To answer a second call and put the ongoing call on hold•When you hear repeated beeps during a call, tap ID: ICN-SONY-CALL-SLIDER-ANSWER.GUID GUID-7C422C9D-1720-407E-A0C8-6D8B8EB6B19FTitle To answer a second call and put the ongoing call on holdChanges Comments from TID. From Huashan,changed drag into tap also changed theicon.This is a draft publication for internal use only.72This is an Internet version of this publication. © Print only for private use.](https://usermanual.wiki/Sony/PM-0480.Short-term-confidential-userguide-EN-PRODUCT-NAME-PART-NUMBER-Android4-0/User-Guide-1988542-Page-72.png)
![Version 4Author CynthiaHStatus ReleasedTo make a second call1During an ongoing call, tap Dialpad [clh_large_icbp_dialpad_txt] .2Enter the number of the recipient and tap Call [spb_strings_dialer_call_txt] .3The first call is put on hold.The same procedure applies to subsequent calls.GUID GUID-0CE0A4D3-CA04-4D27-B17F-8973082C4EF3Title To make a second callChanges label changedVersion 6Author PengLeonStatus ReleasedTo switch between multiple calls•To switch to another call and put the current call on hold, tap ID: ICN-SONY-CALL-SLIDER-ANSWER.GUID GUID-1309D844-C17A-4A36-8E37-26A09CD358A2Title To switch between multiple callsChanges comments from TID for Huashan changed an icon only no extra text changedVersion 4Author CynthiaHStatus ReleasedSetting up a conference callIndexterm: "conference calls"With a conference or multiparty call, you can have a joint conversation with two ormore persons.For details on the number of participants you can add to a conference call, contact yournetwork operator.GUID GUID-ED3A4BD7-2AAD-4A22-9486-AFBF100F1F0FTitle Setting up a conference callChanges Created it out only changed the name no extra text changed due to com-ments from concept teamVersion 4Author CynthiaHStatus DraftTo make a conference call1During an ongoing call, tap Dialpad [clh_large_icbp_dialpad_txt] .2Dial the number of the second participant and tap Call [spb_strings_dialer_call_txt] . Afterthe second participant answers, the first participant is put on hold.3Tap ID: ICN-SONY-CALL-CONFERENCE to add the second participant tothe conference call.4Repeat steps 1 to 3 to add more call participants.GUID GUID-29B1365F-B898-4DD3-A624-19FFCDE9FC4BTitle To make a conference callChanges label changedVersion 7Author PengLeonStatus ReleasedThis is a draft publication for internal use only.73This is an Internet version of this publication. © Print only for private use.](https://usermanual.wiki/Sony/PM-0480.Short-term-confidential-userguide-EN-PRODUCT-NAME-PART-NUMBER-Android4-0/User-Guide-1988542-Page-73.png)
![To have a private conversation with a conference call participant1During an ongoing conference call, tap {0} participants [clh_large_conference_call_partici-pants] .2Tap the telephone number of the participant with whom you want to talkprivately.3To end the private conversation and return to the conference call, tap ID:ICN-SONY-CALL-CONFERENCE.GUID GUID-7FEE24C8-B5B3-4172-8A13-343441E63304Title To have a private conversation with a participantChanges Changed due to Ed comments only.so that things are as clear as possible.Version 8Author CynthiaHStatus ReleasedTo release a participant from a conference call1During an ongoing conference call, tap the button showing the number ofparticipants. For example, tap 3 participants [3_participants] if there are threeparticipants.2Tap ID: ICN-SONY-CALL-ONGOING-HANGUP next to the participant youwant to release.GUID GUID-317CBA11-E778-4F0B-B2F6-16BE76B17DAETitle To release a participantChanges For eDream 4.0 (End call icon changed)Version 4Author PengLeonStatus ReleasedTo end a conference call•During the call, tap ID: ICN-SONY-CALL-ONGOING-HANGUP.GUID GUID-B7DE81B4-2DAB-4D55-9A3B-EAACC2C86A9FTitle To end a conference callChanges From RobynVersion 2Author OisinFStatus Released*Call settingsIndexterm: "calls"Sub-indexterm: "settings"Indexterm: "settings"Sub-indexterm: "call"GUID GUID-25809A0F-E933-4AFD-ACC1-43091E006C84Title Call settings - headingChanges GenericVersion 1Author OskarWStatus ReleasedForwarding callsIndexterm: "calls"Sub-indexterm: "diverting"Sub-indexterm: "forwarding"You can forward calls, for example, to another phone number, or to an answeringservice.GUID GUID-E1430643-8DEE-443C-8FD5-6DF310320AD0Title Forwarding callsChanges eSheep RachaelVersion 1Author OskarWStatus ReleasedThis is a draft publication for internal use only.74This is an Internet version of this publication. © Print only for private use.](https://usermanual.wiki/Sony/PM-0480.Short-term-confidential-userguide-EN-PRODUCT-NAME-PART-NUMBER-Android4-0/User-Guide-1988542-Page-74.png)
![To forward calls1From your Home screen [homescreen_strings_application_name_txt] , tap ID: ICN-SONY-HOME-APPTRAY-NORMAL.2Find and tap Settings [settings_label_launcher] > Call settings [call_settings_title] > Callforwarding [labelCF] .3Select an option.4Enter the number you want to forward the calls to, then tap Enable [enable] .GUID GUID-24FD3201-10EA-418F-9B73-240458B3EEC2Title To forward callsChanges label changedVersion 4Author PengLeonStatus Released*To turn off call forwarding1From your Home screen [homescreen_strings_application_name_txt] , tap ID: ICN-SONY-HOME-APPTRAY-NORMAL.2Find and tap Settings [settings_label_launcher] > Call settings [call_settings_title] > Callforwarding [labelCF] .3Select an option, then tap Disable [disable] .GUID GUID-89805283-2629-4D50-B89E-914E3EE2BCEATitle To turn off call forwardingChanges label changedVersion 4Author PengLeonStatus Released*Showing or hiding your phone numberYou can select to show or hide your phone number on call recipients' devices whenyou call them.GUID GUID-32174486-684C-45E8-9877-5C21C6024A57Title Showing or hiding your phone numberChanges From RobynVersion 2Author OisinFStatus Released*To show or hide your phone number1From your Home screen [homescreen_strings_application_name_txt] , tap ID: ICN-SONY-HOME-APPTRAY-NORMAL.2Find and tap Settings [settings_label_launcher] > Call settings [call_settings_title] > Additionalsettings [additional_gsm_call_settings] > Caller ID [labelCallerId] .GUID GUID-A0B707E1-2F16-4FCC-8188-E5DEC180AF5CTitle To show or hide your phone numberChanges Valid for 4.0.1.1 ("Select an option" removed for it is not allowed to modify)Version 6Author PengLeonStatus Released*Restricting outgoing callsIndexterm: "calls"Indexterm: "fixed dialling"If you have received a PIN2 code from your service provider, you can use a list ofFixed Dialling Numbers (FDN) to restrict outgoing calls.GUID GUID-F19CDD47-158A-4E2A-B3A7-F9857F389BABTitle Restricting outgoing callsChanges Created it out only named changed no extra text changed due to commentsfrom concept teamVersion 6Author CynthiaHStatus DraftThis is a draft publication for internal use only.75This is an Internet version of this publication. © Print only for private use.](https://usermanual.wiki/Sony/PM-0480.Short-term-confidential-userguide-EN-PRODUCT-NAME-PART-NUMBER-Android4-0/User-Guide-1988542-Page-75.png)
![To enable or disable fixed dialling1From your Home screen [homescreen_strings_application_name_txt] , tap ID: ICN-SONY-HOME-APPTRAY-NORMAL.2Find and tap Settings [settings_label_launcher] > Call settings [call_settings_title] > Fixed dialingnumbers [fdn] .3Tap Activate fixed dialing [disable_fdn_ok] or Deactivate fixed dialing [enable_fdn_ok] .4Enter your PIN2 and tap OK [ok] .GUID GUID-FCE85A8E-BBDA-4A95-9B47-320B4293A4ABTitle To enable or disable fixed dialingChanges label changedVersion 4Author PengLeonStatus Released*To access the list of accepted call recipients1From your Home screen [homescreen_strings_application_name_txt] , tap ID: ICN-SONY-HOME-APPTRAY-NORMAL.2Find and tap Settings [settings_label_launcher] > Call settings [call_settings_title] > Fixed dialingnumbers [fdn] > Fixed dialing numbers [fdn] .GUID GUID-9D6DE3C9-13A8-4BEE-B25F-E0B467FF8F29Title To access the list of accepted call recipientsChanges label changedVersion 5Author PengLeonStatus Released*This is a draft publication for internal use only.76This is an Internet version of this publication. © Print only for private use.](https://usermanual.wiki/Sony/PM-0480.Short-term-confidential-userguide-EN-PRODUCT-NAME-PART-NUMBER-Android4-0/User-Guide-1988542-Page-76.png)
![Contacts [contactsList]GUID GUID-116B5259-4FA2-46CC-A2EB-6B8073E1EDADTitle Contacts - heading onlyChangesVersion 1Author JorgenLStatus ReleasedGetting contacts into your deviceIndexterm: "contacts"Indexterm: "personal information"Use the Contacts application to store and manage all your numbers, emailaddresses, and other contact data in one place.You can add new contacts in your device and synchronise them with contacts savedin your Google™ account, Microsoft® Exchange ActiveSync® account, or otheraccounts that support synchronisation. The Contacts application automaticallycreates new entries and also helps you match data such as email addresses withexisting entries.GUID GUID-3BC3BC83-899E-4120-A755-E0E716E36061Title Getting contacts into your deviceChanges Updated from Togari based on concept team's request Title changedVersion 4Author WangHermanStatus DraftTransferring contacts using a PCIf you are transferring contacts using a PC, use the PC Companion program. It's free,and the installation files are already saved on your new device. PC Companion alsooffers a range of other features, including help to update your device software. Youcan use a PC to transfer contacts from several device brands, including iPhone,Samsung, HTC and Nokia.You need:•An Internet-connected PC running Windows®•A USB cable for your old device•A USB cable for your new Android™ device•Your old device•Your new Android™ deviceGUID GUID-591E6477-5FDD-482B-BF11-A419FBCAE182Title Transferring contacts using a PCChanges Updated from Togari and valid for all project onwards Combined "using thepc companion program to transfer contacts" into this topicVersion 5Author WangHermanStatus DraftTo transfer contacts to your new device using PC Companion1Make sure that PC Companion is installed on your PC.2Open the PC Companion program on the PC, then click Contacts Setup andfollow the instructions to transfer your contacts.GUID GUID-27563B9B-6733-47AF-92B4-72F4B3A72B19Title To transfer contacts to your new Sony Ericsson Android™ phoneChanges Device Term ChangeVersion 2Author WangHermanStatus ReleasedTransferring contacts using an Apple® Mac® computerIndexterm: "contacts"This is a draft publication for internal use only.77This is an Internet version of this publication. © Print only for private use.](https://usermanual.wiki/Sony/PM-0480.Short-term-confidential-userguide-EN-PRODUCT-NAME-PART-NUMBER-Android4-0/User-Guide-1988542-Page-77.png)
![Sub-indexterm: "transferring"Indexterm: "transferring"Sub-indexterm: "contacts"If you are transferring contacts using an Apple® Mac® computer, use the Sony™Bridge for Mac program. It's free and downloadable from Bridge for Mac. For detailedinstructions on how to use an Apple Mac computer to transfer contacts from your olddevice, go to Transfer your contacts.GUID GUID-FA1412DB-AA24-4B07-9646-FEF4F5BF258ETitle Transferring contacts using an Apple® Mac® computerChanges Updated from Togari and valid for all projects onwards Added info aboutbridge for macVersion 5Author WangHermanStatus DraftTo transfer contacts to your new device using Sony™ Bridge for Mac1Make sure the Sony™ Bridge for Mac application is installed on your Apple®Mac® computer.2Open the Sony™ Bridge for Mac application on your Apple® Mac® computer.3Double-click the Sony™ Bridge for Mac icon in the Applications folder, thenfollow the instructions to transfer your contacts.GUID GUID-19A42BE7-8125-4DBB-98D0-883E3F8AEE3FTitle To transfer contacts to your new device using Sony™ Bridge for MacChanges Created from Togari and valid for all project onwardsVersion 1Author WangHermanStatus ReleasedTransferring contacts using synchronisation accountsIndexterm: "contacts"Sub-indexterm: "transferring"Indexterm: "transferring"Sub-indexterm: "contacts"Your device works with popular online synchronisation accounts such as GoogleSync™, Microsoft® Exchange ActiveSync®or Facebook™. If you have synced thecontacts in your old device or your computer with an online account, you can transferyour contacts to your new device using that account. For more detailed informationabout synchronisation, see Synchronising your corporate email, calendar andcontacts on page 197.GUID GUID-CF308157-311E-475A-8477-81F42609A3C2Title Transferring contacts using synchronization accountsChanges Updated from Odin Yuga HTML UG and valid for all projects onwards Deviceterm updated only No need reviewVersion 2.1.1.1.2Author WangHermanStatus ReleasedTo synchronise contacts on your device with a synchronisation account1From your Home screen [homescreen_strings_application_name_txt] , tap ID: ICN-SONY-HOME-APPTRAY-NORMAL , then tap ID: ICN-SONY-APP-PHONEBOOK .2Tap ID: ICN-SONY-KEY-MENU , then tap Settings [spb_strings_gen_settings_txt] >Accounts & sync [spb_strings_settings_accounts_and_sync_main_txt] .3If you have already set up a synchronisation account and you want to syncwith that account, tap the account, then tap ID: ICN-SONY-KEY-MENU , andtap Sync now [sync_menu_sync_now] .GUID GUID-6252CC57-4654-44CA-8F5C-44B27DC1C425Title To synchronise your phone contacts with an accountChanges Device Term Change Also removed the first sentence in step3 Valid for Odinand Yuga onwardsVersion 8Author WangHermanStatus ReleasedThis is a draft publication for internal use only.78This is an Internet version of this publication. © Print only for private use.](https://usermanual.wiki/Sony/PM-0480.Short-term-confidential-userguide-EN-PRODUCT-NAME-PART-NUMBER-Android4-0/User-Guide-1988542-Page-78.png)
![Transferring contacts from a SIM cardIndexterm: "contacts"Sub-indexterm: "transferring"Indexterm: "transferring"Sub-indexterm: "contacts"GUID GUID-0B73987A-CFD6-4F26-805F-BCE6C92BCB9ATitle Transferring contacts from the SIM card - heading onlyChanges Heading only Updated from Mint Hayabsa and valid for all ongoing projectsVersion 1Author WangHermanStatus ReleasedTo import contacts from a SIM cardIndexterm: "SIM card"Sub-indexterm: "importing contacts from"Indexterm: "importing SIM contacts"Indexterm: "contacts"Sub-indexterm: "importing from SIM card"1From your Home screen [homescreen_strings_application_name_txt] , tap ID: ICN-SONY-HOME-APPTRAY-NORMAL , then tap ID: ICN-SONY-APP-PHONEBOOK .2Press ID: ICN-SONY-KEY-MENU , then tap Import contacts [spb_strings_contacts_im-port_txt] > SIM card [spb_strings_gen_sim_txt] .3If you have set up a synchronisation account, you can choose to add the SIMcard contacts under that account. Or you can choose to only use thesecontacts on your device. Select your desired option.4To import an individual contact, find and tap the contact. To import allcontacts, tap Import all [spb_strings_import_all_txt] .GUID GUID-18318225-441A-4DE5-8329-F7ED19BC1B61Title To import contacts from the SIM cardChanges Device Term ChangeVersion 12Author WangHermanStatus Released*Transferring contacts from a memory cardIndexterm: "contacts"Sub-indexterm: "transferring"Indexterm: "transferring"Sub-indexterm: "contacts"GUID GUID-CEF617F7-395C-42BC-A841-1D43A977B424Title Transferring contacts from the memory card - heading onlyChangesVersion 1Author WangHermanStatus ReleasedTo import contacts from a memory card1From your Home screen [homescreen_strings_application_name_txt] , tap ID: ICN-SONY-HOME-APPTRAY-NORMAL, then tap ID: ICN-SONY-APP-PHONEBOOK.2Press ID: ICN-SONY-KEY-MENU, then tap Import contacts [spb_strings_contacts_im-port_txt] > SD card [spb_strings_gen_sd_card_txt] .3If you have set up a synchronisation account, you can add the importedmemory card contacts under that account. Or you can choose to only use theimported contacts on your device. Select your desired option.4If you have more than one vCard file on the SD card, a list appears showingdifferent batches of contacts saved on your device, with the correspondingdates for when they were created. Select the batch that you want to import.GUID GUID-CAFBA77B-691C-4AF1-9F60-B24534C33AA2Title To import contacts from the memory cardChanges Device Term ChangeVersion 8.1.1Author WangHermanStatus ReleasedThis is a draft publication for internal use only.79This is an Internet version of this publication. © Print only for private use.](https://usermanual.wiki/Sony/PM-0480.Short-term-confidential-userguide-EN-PRODUCT-NAME-PART-NUMBER-Android4-0/User-Guide-1988542-Page-79.png)
![Receiving contacts from other devicesIndexterm: "contacts"Sub-indexterm: "transferring"Indexterm: "transferring"Sub-indexterm: "contacts"GUID GUID-4012D9CB-D077-4966-A56D-B14DF8B3976FTitle Receiving contacts from other devices - heading onlyChanges Heading only Updated from Mint Hayabusa and valid for all ongoing projectsVersion 1Author WangHermanStatus ReleasedTo receive contact data sent using Bluetooth™ technology1Make sure you have the Bluetooth™ function turned on and your phone set tovisible. If not, then you cannot receive data from other devices.2When you are asked to confirm whether you want to receive the file, tapAccept [incoming_file_confirm_ok] .3Drag down the Notification panel and tap the file you received to import thecontact data.GUID GUID-23A7741C-808A-4745-84AB-82CEB7F6CD75Title To receive contacts from another Bluetooth deviceChanges Valid for eDream 3.0 and Zeus Verizon.Version 3Author RongrongZStatus Released*To receive contacts sent using a messaging service1When you receive a new text message, multimedia message, or emailmessage, open the message.2The received contact data appears as a vCard attachment. Tap, or touch andhold the vCard file to open a menu so you can save the contact data.GUID GUID-4F2EE42C-BEA9-4F05-BA58-D1AACB381FBBTitle To receive contacts sent using a messaging serviceChanges Valid for eDream 2.1 Robyn Mimmi Shakira and Rachael. Moved note to mainconcept.Version 2Author AnnaBStatus ReleasedAdding and editing contactsYou can create, edit and synchronise your contacts in a few simple steps. You canselect contacts saved in different accounts and manage how you display them onyour device.If you synchronise your contacts with more than one account, you can join contactson your device to avoid duplicates.Some synchronisation services, for example, some social networking services, do not allowyou to edit contact details.GUID GUID-D26AD4BF-CF50-4F48-A4E2-CB55941BB492Title Adding and editing contactsChanges Updated from Togari and valid for all projects onwards Title changed onlybased on concept team's request No other text changeVersion 4Author WangHermanStatus DraftThis is a draft publication for internal use only.80This is an Internet version of this publication. © Print only for private use.](https://usermanual.wiki/Sony/PM-0480.Short-term-confidential-userguide-EN-PRODUCT-NAME-PART-NUMBER-Android4-0/User-Guide-1988542-Page-80.png)
![To add a contact1From your Home screen [homescreen_strings_application_name_txt] , tap ID: ICN-SONY-HOME-APPTRAY-NORMAL, then tap ID: ICN-SONY-APP-PHONEBOOK.2Tap ID: ICN-SONY-BTN-ADD-CONTACT.3If you have synchronised your contacts with one or more accounts, select theaccount to which you want to add the contact, or tap Local contact [account_phone]if you want to keep the contact's information only on your device.4Enter or select the desired information for the contact.5When you are finished, tap Done [menu_done] .GUID GUID-CE4A9D46-2505-4EAA-818C-FD7B9BDEB825Title To add a contactChanges Valid for Pollux Label updated only No need reviewVersion 11.1.1Author WangHermanStatus ReleasedTo edit a contact1From the Home screen [homescreen_strings_application_name_txt] , tap ID: ICN-SONY-HOME-APPTRAY-NORMAL, then tap ID: ICN-SONY-APP-PHONEBOOK.2Tap the contact you want to edit, then tap ID: ICN-SONY-INFINITEVIEW-OPTIONMENU-EDIT-CONTACT.3Edit the desired information. When you are finished, tap Done [menu_done] .GUID GUID-04C4AA81-EF48-47E7-8F7A-4EF3A3D03F4ATitle To edit a contactChanges Valid for Tusbasa Gina Step2 updated due to SW changeVersion 7Author WangHermanStatus ReleasedTo associate a picture with a contactIndexterm: "contacts"Sub-indexterm: "picture"Indexterm: "photos"Sub-indexterm: "associating with a contact"1From your Home screen [homescreen_strings_application_name_txt] , tap ID: ICN-SONY-HOME-APPTRAY-NORMAL, then tap ID: ICN-SONY-APP-PHONEBOOK.2Tap the contact you want to edit, then tap ID: ICN-SONY-INFINITEVIEW-OPTIONMENU-EDIT-CONTACT.3Tap ID: ICN-SONY-CONTACT-EDIT-ADD-PHOTO and select the desiredmethod for adding the contact picture.4When you have added the picture, tap Done [menu_done] .You can also add a picture to a contact directly from the Album [album_app_name_txt] application.GUID GUID-D8B5006C-48F5-4730-87AE-2730F0693F7ETitle To add a contact pictureChanges Valid for Tusbasa Gina Step2 updated due to SW changeVersion 9Author WangHermanStatus ReleasedTo delete contacts1From your Home screen [homescreen_strings_application_name_txt] , tap ID: ICN-SONY-HOME-APPTRAY-NORMAL, then tap ID: ICN-SONY-APP-PHONEBOOK.2Touch and hold the contact that you want to delete.3To delete all contacts, tap the downwards arrow to open the drop down menu,then select Mark all [spb_strings_gen_mark_all_txt] .4Tap ID: ICN-SONY-MENU-DELETE, then tap OK [spb_strings_gen_ok_txt] .GUID GUID-BF4AB0BA-7D03-4A81-B9B5-1F422A254EB0Title To delete contactsChanges Updated for Pollux Gina Rewrote step3 only No other text changeVersion 7Author WangHermanStatus ReleasedThis is a draft publication for internal use only.81This is an Internet version of this publication. © Print only for private use.](https://usermanual.wiki/Sony/PM-0480.Short-term-confidential-userguide-EN-PRODUCT-NAME-PART-NUMBER-Android4-0/User-Guide-1988542-Page-81.png)
![To edit contact information about yourself1From your Home screen [homescreen_strings_application_name_txt] , tap ID: ICN-SONY-HOME-APPTRAY-NORMAL, then tap ID: ICN-SONY-APP-PHONEBOOK.2Tap Myself [spb_strings_contacts_long_press_option_title_myself_txt] , then tap ID: ICN-SONY-INFINITEVIEW-OPTIONMENU-EDIT-CONTACT.3Enter the new information or make the changes you want.4When you are done, tap Done [menu_done] .GUID GUID-B75E995D-3011-4ADA-9C38-647947BFA18CTitle To edit contact information about yourselfChanges Valid for Tusbasa Gina Step2 updated due to SW changeVersion 6Author WangHermanStatus ReleasedTo create a new contact from a message1From your Home screen [homescreen_strings_application_name_txt] , tap ID: ICN-SONY-HOME-APPTRAY-NORMAL, then find and tap ID: ICN-SONY-APP-MESSAGING.2Tap ID: ICN-SONY-CONTACT-EDIT-ADD-PHOTO > Save [gui_save_txt] .3Select an existing contact, or tap Create new contact [pickerNewContactHeader] .4Edit the contact information and tap Done [menu_done] .GUID GUID-8AD5B8FF-018E-4A1E-A547-577913797FDATitle To create a new contact from a messageChanges Updated from Togari and valid for all project onwards Title changed onlybased on concept team's request No other text changeVersion 14Author WangHermanStatus DraftSearching and viewing contactsGUID GUID-01145D46-615D-4A67-943F-2197103D4F57Title Searching and viewing contactsChangesVersion 1Author WangHermanStatus DraftContacts [contactsList] screen overviewID: SCR-SONY-EDREAM-PHONEBOOK1Shortcut tabs2 Tap a contact to view its detailsThis is a draft publication for internal use only.82This is an Internet version of this publication. © Print only for private use.](https://usermanual.wiki/Sony/PM-0480.Short-term-confidential-userguide-EN-PRODUCT-NAME-PART-NUMBER-Android4-0/User-Guide-1988542-Page-82.png)
![3 Alphabetical index for browsing contacts4 Tap a contact thumbnail to access the quick contact menu5 Search for contacts6 Create a contact7 Open more optionsGUID GUID-32585317-AD2B-4698-BAC3-DE5353ECF92DTitle Contacts screen overviewChanges Valid for Mint Hayabusa Added bullet 7 onlyVersion 8Author WangHermanStatus Released*To search for a contact1From your Home screen [homescreen_strings_application_name_txt] , tap ID: ICN-SONY-HOME-APPTRAY-NORMAL, then tap ID: ICN-SONY-APP-PHONEBOOK.2Tap ID: ICN-SONY-MENU-SEARCH and enter the first few letters of thecontact name in the Search contacts [searchHint] field. All contacts beginning withthose letters appear.GUID GUID-EB8B497D-7462-4B6E-B63F-A5AC8DE42983Title To search for a contactChanges Valid for Tusbasa Gina Label updated only No text change No need reviewVersion 8Author WangHermanStatus ReleasedTo select which contacts to display in the Contacts application1From your Home screen [homescreen_strings_application_name_txt] , tap ID: ICN-SONY-HOME-APPTRAY-NORMAL, then tap ID: ICN-SONY-APP-PHONEBOOK.2Press ID: ICN-SONY-KEY-MENU, then tap Filter [spb_strings_contacts_list_filter_txt] .3In the list that appears, mark and unmark the desired options. If you havesynchronised your contacts with a synchronisation account, that accountappears in the list. To further expand the list of options, tap the account.4When you are finished, tap OK [spb_strings_gen_ok_txt] .GUID GUID-7A65E1EE-85E9-4A76-8BFE-9CA005A82543Title To select which contacts to displayChanges Valid for eDream 6.0 Aoba Nozomi. Only removed one step no need reviewVersion 9Author WangHermanStatus ReleasedThe quick contact menuTap a contact's thumbnail to view quick communication options for a particularcontact. Options include calling the contact, sending a text or multimedia message,and starting a chat using the Google Talk™ application.For an application to appear as an option in the quick contact menu, you may need to set upthe application in your device and be logged in to the application. For example, you need tostart the Gmail™ [GOOGLE-GMAIL-PLAIN] application and enter your login details before you can useGmail™ [GOOGLE-GMAIL-PLAIN] from the quick contact menu.GUID GUID-A234170B-D4D1-4781-A7D3-C237647047BFTitle The quick contact menuChanges Updated from Taoshan and valid for all HTML UG Device term change onlyNO NEED REVIEWVersion 7.1.2Author WangHermanStatus ReleasedAvoiding duplicate entries in the Contacts applicationIndexterm: "contacts"Sub-indexterm: "joining contact information"This is a draft publication for internal use only.83This is an Internet version of this publication. © Print only for private use.](https://usermanual.wiki/Sony/PM-0480.Short-term-confidential-userguide-EN-PRODUCT-NAME-PART-NUMBER-Android4-0/User-Guide-1988542-Page-83.png)
![If you synchronise your contacts with a new account or import contact information inother ways, you could end up with duplicate entries in the Contacts application. If thishappens, you can join such duplicates to create a single entry. And if you join entriesby mistake, you can separate them again later.GUID GUID-FBC8BADE-40C7-48D2-ADF4-8C47C01F47DFTitle Join contact informationChanges Valid for eDream 4.0.1.1. Ayame Coconut Satsuma.Version 3Author WangHermanStatus ReleasedTo link contacts1From your Home screen [homescreen_strings_application_name_txt] , tap ID: ICN-SONY-HOME-APPTRAY-NORMAL, then tap ID: ICN-SONY-APP-PHONEBOOK.2Tap the contact you want to link with another contact.3Press ID: ICN-SONY-KEY-MENU, then tap Link contact [spb_strings_edit_link_to_other_txt] .4Tap the contact whose information you want to join with the first contact, thentap OK [ok] to confirm. The information from the first contact is merged with thesecond contact, and the first contact is no longer displayed in the Contacts list.GUID GUID-01136C21-4A7D-4E9B-93AA-1E74783486F3Title To link contactsChanges Valid for Tusbasa Gina Step2 updated due to SW changeVersion 9Author WangHermanStatus ReleasedTo separate linked contacts1From your Home screen [homescreen_strings_application_name_txt] , tap ID: ICN-SONY-HOME-APPTRAY-NORMAL, then tap ID: ICN-SONY-APP-PHONEBOOK.2Tap the linked contact you want to edit, then tap ID: ICN-SONY-INFINITEVIEW-OPTIONMENU-EDIT-CONTACT.3Tap Unlink contact [spb_strings_edit_unlink_field_txt] .4Tap OK [ok] .GUID GUID-740EA2F6-AFDC-4B00-93A9-4800C7DB325FTitle To separate linked contactsChanges Valid for Tusbasa Gina Step2 updated due to SW changeVersion 9Author WangHermanStatus ReleasedFavourites and groupsGUID GUID-731CD283-B219-4557-A6C9-D42EE59AEEFFTitle Favourites and groups - heading onlyChangesVersion 1Author WangHermanStatus DraftFavouritesIndexterm: "contacts"Sub-indexterm: "favourite"You can mark contacts as favourites so that you can get quick access to them fromthe Contacts application.GUID GUID-2F920924-BA47-4976-B2B6-66B670B3C210Title FavouritesChanges Valid for ICS update. Only removed "tab" no need reviewVersion 6Author WangHermanStatus ReleasedThis is a draft publication for internal use only.84This is an Internet version of this publication. © Print only for private use.](https://usermanual.wiki/Sony/PM-0480.Short-term-confidential-userguide-EN-PRODUCT-NAME-PART-NUMBER-Android4-0/User-Guide-1988542-Page-84.png)
![To mark or unmark a contact as a favourite1From the Home screen [homescreen_strings_application_name_txt] , tap ID: ICN-SONY-HOME-APPTRAY-NORMAL, then tap ID: ICN-SONY-APP-PHONEBOOK.2Tap the contact you want to add to or remove from your favourites.3Tap ID: ICN-SONY-INFINITEVIEW-FAVORITE-BTN.GUID GUID-E489EC2C-B886-4AF4-9A8E-49F9279D3DCETitle To mark or unmark a contact as a favouriteChanges Valid for eDream 3.0 Anzu Hallon Zeus and eDream 4.0 Iyokan Mango Smul-tron. Changing the Contacts label to the Contacts icon.Version 5Author WangHermanStatus ReleasedTo view your favourite contacts1From your Home screen [homescreen_strings_application_name_txt] , tap ID: ICN-SONY-HOME-APPTRAY-NORMAL, then tap ID: ICN-SONY-APP-PHONEBOOK.2Tap ID: ICN-SONY-INFINITEVIEW-FAVORITE-BTN.GUID GUID-C33D067B-1E80-4FA2-83FD-5F70E4CFC561Title To view your favourite contactsChanges Update from Aoba Rita and valid for all ongoing project Remove one labelonly in step 2 No other text changes No need reviewVersion 2Author WangHermanStatus ReleasedGroupsIndexterm: "contacts"Sub-indexterm: "groups"You can assign contacts to groups to get quicker access to them from within theContacts application.GUID GUID-49883222-009C-43A5-86FB-3E645982B0ECTitle GroupsChanges Valid for ICS wave 1 and 2 Also for Phoenix and Tapioca onwardsVersion 1Author WangHermanStatus ReleasedTo assign a contact to a group1In the Contacts application, tap the contact that you want to assign to a group.2Tap ID: ICN-SONY-INFINITEVIEW-OPTIONMENU-EDIT-CONTACT, then tapthe bar directly under Assign to group [spb_strings_assign_group] .3Mark the checkboxes for the groups to which you want to add the contact,then tap Done [done] .4Tap Done [done] .GUID GUID-D97D0B85-FDA0-4486-AE31-1273993A1514Title To assign a contact to a groupChanges Valid for Tusbasa Gina Step1&2 updated due to SW changeVersion 3Author WangHermanStatus ReleasedSending contact informationIndexterm: "contacts"Sub-indexterm: "sending"Sub-indexterm: "sharing"Indexterm: "sending"Sub-indexterm: "contacts"GUID GUID-0A30E687-263E-4A63-A5F9-7D7583BBF0FETitle Sending contact information - heading onlyChanges Created from Togari and valid for all projects onwards Title changed onlybased on concept team's requestVersion 2Author WangHermanStatus DraftThis is a draft publication for internal use only.85This is an Internet version of this publication. © Print only for private use.](https://usermanual.wiki/Sony/PM-0480.Short-term-confidential-userguide-EN-PRODUCT-NAME-PART-NUMBER-Android4-0/User-Guide-1988542-Page-85.png)
![To send your business cardIndexterm: "sending"Sub-indexterm: "business cards"Indexterm: "business cards"Sub-indexterm: "sending"1From your Home screen [homescreen_strings_application_name_txt] , tap ID: ICN-SONY-HOME-APPTRAY-NORMAL, then tap ID: ICN-SONY-APP-PHONEBOOK.2Tap Myself [spb_strings_contacts_long_press_option_title_myself_txt] .3Press ID: ICN-SONY-KEY-MENU, then tap Send contact [infiniteview_menu_send_con-tact_txt] > OK [spb_strings_gen_ok_txt] .4Select an available transfer method and follow the on-screen instructions.GUID GUID-CB7E8C2B-D712-4088-A4AE-42D483C91B78Title To send your business cardChanges Valid for eDream 6.0 Nozomi Aoba. Changed "myself" to "my info" in step 2for Aoba.Version 6Author WangHermanStatus ReleasedTo send a contact1From your Home screen [homescreen_strings_application_name_txt] , tap ID: ICN-SONY-HOME-APPTRAY-NORMAL, then tap ID: ICN-SONY-APP-PHONEBOOK.2Tap the contact whose details you want to send.3Press ID: ICN-SONY-KEY-MENU, then tap Send contact [infiniteview_menu_send_con-tact_txt] > OK [spb_strings_gen_ok_txt] .4Select an available transfer method and follow the on-screen instructions.GUID GUID-B0257474-7B98-40F3-877B-13576B9911C7Title To send a contactChanges Valid for eDream 4.0.1 Urushi. Label updated only.Version 5Author WangHermanStatus ReleasedTo send several contacts at once1From your Home screen [homescreen_strings_application_name_txt] , tap ID: ICN-SONY-HOME-APPTRAY-NORMAL, then tap ID: ICN-SONY-APP-PHONEBOOK.2Press ID: ICN-SONY-KEY-MENU, then tap Mark several [spb_strings_con-tacts_list_menu_mark_mode_txt] .3Mark the contacts you want to send, or select all if you want to send allcontacts.4Tap ID: ICN-SONY-GALLERY-SHARE, then select an available transfermethod and follow the on-screen instructions.GUID GUID-28D36493-2518-4620-B2E6-C045B077CF22Title To select contacts to sendChanges Valid for Tusbasa Gina Label updated only No need reviewVersion 5Author WangHermanStatus ReleasedBacking up contactsIndexterm: "contacts"Sub-indexterm: "backing up"Sub-indexterm: "copying"Indexterm: "backing up"Sub-indexterm: "contacts"You can use a memory card, a SIM card or an online synchronisation tool such asMicrosoft® Exchange ActiveSync® to back up contacts.GUID GUID-26F5D5F6-B693-490B-8EBE-3ED78954583BTitle Backing up contactsChanges Changed from Tapioca Phoenix and valid for all projects onwards Index termupdated onty No need reviewVersion 5Author WangHermanStatus ReleasedThis is a draft publication for internal use only.86This is an Internet version of this publication. © Print only for private use.](https://usermanual.wiki/Sony/PM-0480.Short-term-confidential-userguide-EN-PRODUCT-NAME-PART-NUMBER-Android4-0/User-Guide-1988542-Page-86.png)
![To export all contacts to a memory card1From your Home screen [homescreen_strings_application_name_txt] , tap ID: ICN-SONY-HOME-APPTRAY-NORMAL, then tap ID: ICN-SONY-APP-PHONEBOOK.2Press ID: ICN-SONY-KEY-MENU, then tap Back up contacts [spb_strings_con-tacts_list_menu_export_contacts_txt] > Memory Card [memory-card] .3Tap OK [spb_strings_gen_ok_txt] .GUID GUID-A7D7643A-284D-4901-B031-AE32503C69F7Title To export all contacts to the memory cardChanges Valid for Tapioca DS Changed SIM card to Memory cardVersion 11Author WangHermanStatus ReleasedTo export contacts to a SIM cardIndexterm: "SIM card"Sub-indexterm: "exporting contacts to"1From your Home screen [homescreen_strings_application_name_txt] , tap ID: ICN-SONY-HOME-APPTRAY-NORMAL, then tap ID: ICN-SONY-APP-PHONEBOOK.2Press ID: ICN-SONY-KEY-MENU, then tap Back up contacts [spb_strings_con-tacts_list_menu_export_contacts_txt] > SIM card [spb_strings_gen_sim_txt] .3Mark the contacts you want to export, or tap Mark all [spb_strings_gen_mark_all_txt] if youwant to export all your contacts.4Tap Back up [spb_strings_gen_export_txt] .5Select Add contacts [spb_strings_gen_add_contacts_txt] if you want to add the contacts toexisting contacts on your SIM card, or select Replace all contacts[spb_strings_gen_replace_contacts_txt] if you want to replace the existing contacts on yourSIM card.When you export contacts to a SIM card, not all information may get exported. This is due tomemory limitations on SIM cards.GUID GUID-A6A460E6-AB1C-4F0D-80C4-675CA7DC8CD9Title To export contacts to the SIM cardChanges Valid for eDream 3.0 Anzu Hallon Zeus and eDream 4.0 Iyokan Mango Smul-tron. Changing the Contacts label to the Contacts icon.Version 7Author WangHermanStatus ReleasedThis is a draft publication for internal use only.87This is an Internet version of this publication. © Print only for private use.](https://usermanual.wiki/Sony/PM-0480.Short-term-confidential-userguide-EN-PRODUCT-NAME-PART-NUMBER-Android4-0/User-Guide-1988542-Page-87.png)
![MessagingGUID GUID-72D9B8E4-2AF0-4F04-9FCE-FBF5487484F5Title Messaging - heading onlyChanges GenericVersion 1Author OskarWStatus Released*Using text and multimedia messagingYou can send and receive text messages from your device using SMS (ShortMessage Service). If your subscription includes MMS (Multimedia MessagingService), you can also send and receive messages that contain media files, forexample, pictures and videos. The number of characters you can send in a single textmessage varies depending on the operator and the language you use. If you exceedthe character limit, then all your single messages are linked together and sent as onemessage. You are charged for each single text message you send. When you viewyour messages, they appear as conversations, which means that all messages to andfrom a particular person are grouped together.To send multimedia messages, you need the correct MMS settings on your device. SeeInternet and messaging settings.GUID GUID-74DA81D5-2211-43F7-B8C7-31CADCECBE9CTitle Using text and multimedia messagingChanges Device Term ChangeVersion 7Author MikeCaoStatus ReleasedTo create and send a message1From your Home screen [homescreen_strings_application_name_txt] , tap ID: ICN-SONY-HOME-APPTRAY-NORMAL, then find and tap ID: ICN-SONY-APP-MESSAGING.2Tap ID: ICN-SONY-CONV-NEW-MESSAGE.3Tap ID: ICN-SONY-BTN-ADD-CONTACT, then select the desired recipientsfrom the Contacts list. If the recipient is not listed as a contact, enter thecontact's number manually and tap ID: ICN-SONY-BROWSER-ADD.4When you are finished adding recipients, tap Done [spb_strings_select_done_txt] .5Tap Write message [conversations_strings_text_input_hint_txt] and enter your message text.6If you want to add a media file, tap ID: ICN-SONY-MENU-ATTACHMENT andselect an option.7To send the message, tap Send [gui_send_txt] .If you exit a message before sending, it gets saved as a draft. The conversation gets taggedwith the word Draft: [conversations_strings_conversationlist_conversation_snippet_draftprefix_txt] .GUID GUID-A6C2B682-0F30-475D-9682-33A737581FE9Title To create and send a messageChanges update step 3 to immplement concept team's comment for MintVersion 16Author MikeCaoStatus ReleasedThis is a draft publication for internal use only.88This is an Internet version of this publication. © Print only for private use.](https://usermanual.wiki/Sony/PM-0480.Short-term-confidential-userguide-EN-PRODUCT-NAME-PART-NUMBER-Android4-0/User-Guide-1988542-Page-88.png)
![To read a received message1From your Home screen [homescreen_strings_application_name_txt] , tap ID: ICN-SONY-HOME-APPTRAY-NORMAL, then find and tap ID: ICN-SONY-APP-MESSAGING.2Tap the desired conversation.3If the message is not yet downloaded, tap and hold the message, then tapDownload message [conversations_strings_action_message_download_txt] .You can also open messages from the status bar when ID: ICN-SONY-SYM-ACTION-SMSappears there. Just drag down the bar and tap the message.GUID GUID-5343B3D0-3140-41FE-BF7A-424395B15F40Title To read a received messageChanges Valid from eDream 6.0. Changed the label to icon. Changed the wording ofthe tip.Version 7Author RongrongZStatus ReleasedTo reply to a message1From your Home screen [homescreen_strings_application_name_txt] , tap ID: ICN-SONY-HOME-APPTRAY-NORMAL, then find and tap ID: ICN-SONY-APP-MESSAGING.2Tap the conversation containing the message.3Enter your reply and tap Send [gui_send_txt] .GUID GUID-B3F3CD74-24A7-4F3C-A344-9A3DA916D207Title To reply to a messageChanges Valid from eDream 6.0. Only replaced a label with an icon.Version 4Author RongrongZStatus ReleasedTo forward a message1From your Home screen [homescreen_strings_application_name_txt] , tap ID: ICN-SONY-HOME-APPTRAY-NORMAL, then find and tap ID: ICN-SONY-APP-MESSAGING.2Tap the conversation containing the message you want to forward.3Touch and hold the message you want to forward, then tap Forward message[conversations_strings_action_message_forward_txt] .4Tap ID: ICN-SONY-BTN-ADD-CONTACT, then select a recipient from theContacts list. If the recipient is not listed as a contact, enter the contact'snumber manually and tap ID: ICN-SONY-BROWSER-ADD.5When you are finished adding recipients, tap Done [spb_strings_select_done_txt] .6Edit the message, if necessary, and tap Send [gui_send_txt] .In step 4, you can also tap To [message_compose_to_hint] and enter the recipient's phone numbermanually.GUID GUID-05F0456B-06EA-4A96-B35E-B114ADFDD14CTitle To forward a messageChanges valid for Nozomi 2 updated step 4Version 7Author MikeCaoStatus ReleasedTo delete a message1From your Home screen [homescreen_strings_application_name_txt] , tap ID: ICN-SONY-HOME-APPTRAY-NORMAL, then find and tap ID: ICN-SONY-APP-MESSAGING.2Tap the conversation containing the message you want to delete.3Touch and hold the message you want to delete, then tap Delete message [con-versations_strings_action_message_delete_txt] > Delete [gui_delete_txt] .GUID GUID-18644181-BE89-4B64-A303-91754CC902E4Title To delete a messageThis is a draft publication for internal use only.89This is an Internet version of this publication. © Print only for private use.](https://usermanual.wiki/Sony/PM-0480.Short-term-confidential-userguide-EN-PRODUCT-NAME-PART-NUMBER-Android4-0/User-Guide-1988542-Page-89.png)
![Changes only changed a label for Mint/HayabusaVersion 7Author MikeCaoStatus Released*To delete conversations1From your Home screen [homescreen_strings_application_name_txt] , tap ID: ICN-SONY-HOME-APPTRAY-NORMAL , then find and tap ID: ICN-SONY-APP-MESSAGING .2Press ID: ICN-SONY-KEY-MENU , then tap Delete conversations [conversa-tions_strings_conversationlist_menu_deleteconversations_txt] .3Mark the checkboxes for the conversations that you want to delete, then tap ID: ICN-SONY-MENU-DELETE > Delete [gui_delete_txt] .GUID GUID-C3195918-C699-4A90-BEEE-730CA2F20750Title To delete conversationsChanges update step3 based on v9 for Tubasa GinaVersion 11Author MikeCaoStatus Released*To call a message sender1From your Home screen [homescreen_strings_application_name_txt] , tap ID: ICN-SONY-HOME-APPTRAY-NORMAL, then find and tap ID: ICN-SONY-APP-MESSAGING.2Tap a conversation.3Tap the recipient name or number at the top of the screen, then select therecipient name or number from the list that appears.4If the recipient is saved in your contacts, tap the phone number that you wantto call. If you have not saved the recipient in your contacts, tap ID: ICN-SONY-BTN-DETAIL-CALL.GUID GUID-FE0F8257-CF1E-4EFA-90FA-2362196AE2C4Title To call a message senderChanges Valid from eDream 6.0. One step added.Version 5Author RongrongZStatus ReleasedTo save a file contained in a message you receive1From your Home screen [homescreen_strings_application_name_txt] , tap ID: ICN-SONY-HOME-APPTRAY-NORMAL, then find and tap ID: ICN-SONY-APP-MESSAGING.2Tap the conversation you want to open.3If the message has not been downloaded yet, tap and hold the message, thentap Download message [conversations_strings_action_message_download_txt] .4Touch and hold the file you want to save, then select the desired option.GUID GUID-5F89D8FF-F03C-4F3C-9A7A-48170CF67FA1Title To save a file contained in a message you receiveChanges Valid from eDream 6.0. Only replaced one label with an icon.Version 4Author RongrongZStatus ReleasedTo star a message1From your Home screen [homescreen_strings_application_name_txt] , tap ID: ICN-SONY-HOME-APPTRAY-NORMAL, then find and tap ID: ICN-SONY-APP-MESSAGING.2Tap the conversation you want to open.3In the message you want to star, tap ID: ICN-SONY-INFINITEVIEW-FAVORITE-BTN.4To unstar a message, tap ID: ICN-SONY-INFINITEVIEW-FAVORITE-BTN-SELECTED.GUID GUID-4FC74355-8CC4-455B-ABFA-23DBA7F58E36Title To star a messageThis is a draft publication for internal use only.90This is an Internet version of this publication. © Print only for private use.](https://usermanual.wiki/Sony/PM-0480.Short-term-confidential-userguide-EN-PRODUCT-NAME-PART-NUMBER-Android4-0/User-Guide-1988542-Page-90.png)
![Changes Valid from eDream 6.0.Version 1Author RongrongZStatus ReleasedTo view starred messages1From your Home screen [homescreen_strings_application_name_txt] , tap ID: ICN-SONY-HOME-APPTRAY-NORMAL, then find and tap ID: ICN-SONY-APP-MESSAGING.2Press ID: ICN-SONY-KEY-MENU, then tap Starred messages [conversa-tions_strings_conversationlist_menu_starredmessage_txt] .3All starred messages appear in a list.GUID GUID-950B1757-1EF2-4C8B-B38F-824EFFB7087DTitle To view starred messagesChanges Valid from eDream 6.0.Version 1Author RongrongZStatus Released*To search for messages1From your Home screen [homescreen_strings_application_name_txt] , tap ID: ICN-SONY-HOME-APPTRAY-NORMAL, then find and tap ID: ICN-SONY-APP-MESSAGING.2Press ID: ICN-SONY-KEY-MENU, then tap Search [conversations_strings_conversation-list_menu_search_txt] .3Enter your search keywords, then tap the confirm key.GUID GUID-E70395B9-7B95-4170-B892-B843B89205C7Title To search for messagesChanges delete a stepVersion 3Author MikeCaoStatus Released*Text and multimedia message optionsGUID GUID-DE7D5E9D-9544-491A-9E63-86DFAA4136D1Title Text and multimedia message options - HeadingChanges eDream 2.1 Robyn/Mimmi/Shakira & Rachael. Valid for eDream 3.0.(Changed topic name to be in line with heading.)Version 3Author UlrikaKStatus ReleasedTo change your message notification settings1From your Home screen [homescreen_strings_application_name_txt] , tap ID: ICN-SONY-HOME-APPTRAY-NORMAL, then find and tap ID: ICN-SONY-APP-MESSAGING.2Press ID: ICN-SONY-KEY-MENU, then tap Settings [conversations_strings_conversation-list_menu_settings_txt] .3To set a notification sound, tap Notification tone [conversations_strings_settings_notification_ring-tone_txt] and select an option.4For other notification settings, check or uncheck the relevant checkboxes.GUID GUID-F5A156A0-322D-4AD0-AF78-BA71783F50AETitle To change your message notification settingsChanges Valid from eDream 6.0. Only replaced one label with an icon.Version 5Author RongrongZStatus Released*This is a draft publication for internal use only.91This is an Internet version of this publication. © Print only for private use.](https://usermanual.wiki/Sony/PM-0480.Short-term-confidential-userguide-EN-PRODUCT-NAME-PART-NUMBER-Android4-0/User-Guide-1988542-Page-91.png)
![To change the delivery report settings for outgoing messages1From your Home screen [homescreen_strings_application_name_txt] , tap ID: ICN-SONY-HOME-APPTRAY-NORMAL, then find and tap ID: ICN-SONY-APP-MESSAGING.2Press ID: ICN-SONY-KEY-MENU, then tap Settings [conversations_strings_conversation-list_menu_settings_txt] .3Tap Delivery report [conversations_strings_settings_delivery_report_txt] to activate or deactivatedelivery reports.GUID GUID-2EAC8C35-A3F3-49C0-9A88-B52E29082E5FTitle To change the delivery report settings for outgoing messagesChanges delete a note for LotusVersion 5Author MikeCaoStatus Released*To view messages saved on the SIM card1From your Home screen [homescreen_strings_application_name_txt] , tap ID: ICN-SONY-HOME-APPTRAY-NORMAL, then find and tap ID: ICN-SONY-APP-MESSAGING.2Press ID: ICN-SONY-KEY-MENU, then tap Settings [conversations_strings_conversation-list_menu_settings_txt] > SIM messages [conversations_strings_settings_sim_messages_txt] .GUID GUID-C5D5AE02-B914-4668-97D7-478A77D77AB2Title To view messages saved on the SIM cardChanges Valid from eDream 6.0. Only replaced a label with an icon.Version 4Author RongrongZStatus Released*Google Talk™Indexterm: "chat"Indexterm: "instant messaging"Indexterm: "Google Talk™"You can use the Google Talk™ instant messaging application on your device to chatwith friends who also use this application.GUID GUID-1E9CFE8C-50B8-49B1-94FC-29AD426BC9E6Title Google TalkChanges Device Term Change.Version 4Author Xiaxin LiStatus Released*To start Google Talk™1From your Home screen [homescreen_strings_application_name_txt] , tap ID: ICN-SONY-HOME-APPTRAY-NORMAL.2Find and tap Talk [GOOGLE-TALK-CLIENT] .GUID GUID-39156C72-B0A6-4488-9F61-198A160ED9F1Title To start Google TalkChanges Valid for eDream 3.0Version 4Author RongrongZStatus Released*To reply to an instant message with Google Talk™1When someone contacts you on Google Talk™, ID: ICN-SONY-NOTIFY-CHAT appears in the status bar.2Drag the status bar downwards, then tap the message and begin to chat.GUID GUID-52935D59-02B4-4CD1-8B46-9EB6ACF6D202Title To reply to an instant message with Google TalkChanges Add condition only for FAQ. Change Talk to Google Talk™ for editor's com-ments.Version 3Author Vera QuThis is a draft publication for internal use only.92This is an Internet version of this publication. © Print only for private use.](https://usermanual.wiki/Sony/PM-0480.Short-term-confidential-userguide-EN-PRODUCT-NAME-PART-NUMBER-Android4-0/User-Guide-1988542-Page-92.png)
![EmailIndexterm: "email"GUID GUID-F40849F4-44EB-4AFE-BFB7-387364E8AE14Title Email - heading onlyChangesVersion 1Author JorgenLStatus ReleasedGetting started with EmailIndexterm: "email"Use the Email application in your phone to send and receive emails through yourregular email account or through your corporate account. Or you can do both. Yourphone can handle several email accounts at the same time. You can set up theseaccounts to run through one combined inbox, or through separate inboxes. Note thatemails you receive to your Gmail™ [GOOGLE-GMAIL-PLAIN] account can be accessed in thephone from both the Email and the Gmail™ [GOOGLE-GMAIL-PLAIN] applications.Your corporate Microsoft® Outlook® email messages have to be stored on aMicrosoft® Exchange server for the functionality described above to work. See Synchronisingyour corporate email, calendar and contacts on page 197 for more information.GUID GUID-08D874D0-85C7-406B-95B1-EEB0903FCB6FTitle Getting started with EmailChangesVersion 1Author JorgenLStatus Released*Using email accountsIndexterm: "email"Sub-indexterm: "more than one account"GUID GUID-83C8D331-63FE-4FD8-8DD8-BA39AEF13F88Title Using email accounts - headingChanges eDream 2.1 Robyn/Mimmi/Shakira & RachaelVersion 2Author UlrikaKStatus ReleasedTo set up an email account in your phone1From your Home screen [homescreen_strings_application_name_txt] , tap ID: ICN-SONY-HOME-APPTRAY-NORMAL.2Find and tap ID: ICN-SONY-APP-EMAIL.3Enter your email address and password, then tap Next [next_action] .4If the settings for the email account cannot be downloaded automatically,complete the setup manually. If necessary, contact your email service providerfor detailed settings. For corporate email setup on your phone, selectExchange Active Sync [account_setup_account_type_exchange_action] as the account type.5When you are prompted, enter a name for your email account, so that it iseasily identifiable. The same name shows in the emails you send from thisaccount. When you are finished, tap Next [next_action] .You can set up more than one email account.GUID GUID-6D8E1793-757A-4533-9EEE-EB05ED33EEFATitle To set up an email account on your deviceChanges For Tsubasas html User guide. Removed lnik.Version 12.1.1Author JorgenLStatus ReleasedThis is a draft publication for internal use only.94This is an Internet version of this publication. © Print only for private use.](https://usermanual.wiki/Sony/PM-0480.Short-term-confidential-userguide-EN-PRODUCT-NAME-PART-NUMBER-Android4-0/User-Guide-1988542-Page-94.png)
![To set an email account as your default account1From your Home screen [homescreen_strings_application_name_txt] , tap ID: ICN-SONY-HOME-APPTRAY-NORMAL.2Find and tap ID: ICN-SONY-APP-EMAIL.3Press ID: ICN-SONY-KEY-MENU, then tap Settings [settings_action] .4Tap the account you want to use as the default account for composing andsending emails.5Mark the Default account [account_settings_default_label] checkbox. The inbox of thedefault account appears every time you open the Email application.If you only have one email account, this account is automatically the default account.GUID GUID-B96CB0AB-5A56-4EC7-84C7-E0760681D683Title To set an email account as your default accountChanges For eD4.1 ICS update.Version 6Author RongrongZStatus Released*To add an extra email account in your phone1From your Home screen [homescreen_strings_application_name_txt] , tap ID: ICN-SONY-HOME-APPTRAY-NORMAL.2Find and tap ID: ICN-SONY-APP-EMAIL.3Press ID: ICN-SONY-KEY-MENU, then tap Settings [settings_action] .4Tap Add account [add_account_action] .5Enter the email address and password, then tap Next [next_action] .6If the settings for the email account cannot be downloaded automatically,complete the setup manually. If necessary, contact your email service providerfor detailed settings.7When prompted, enter a name for your email account so that it is easilyidentifiable. The same name shows in the emails that you send from thisaccount.8When you are finished, tap Next [next_action] .GUID GUID-74CB7D9A-D8E7-415A-B56A-6FF254D6705ATitle To add an extra email account on your deviceChanges For eD4.1 ICS update.Version 10Author RongrongZStatus Released*To remove an email account from your phone1From your Home screen [homescreen_strings_application_name_txt] , tap ID: ICN-SONY-HOME-APPTRAY-NORMAL.2Find and tap ID: ICN-SONY-APP-EMAIL.3Press ID: ICN-SONY-KEY-MENU, then tap Settings [settings_action] .4Tap the account you want to remove.5Find and tap Remove account [account_settings_delete_account_label] > OK [okay_action] .GUID GUID-869BE5E7-A9F0-491E-B98C-0C9F2A2E36D3Title To remove an email account from your deviceChanges For eD4.1 ICS update.Version 9Author RongrongZStatus Released*Gmail™ [GOOGLE-GMAIL] and other Google™ servicesIndexterm: "Gmail™"If you have a Google™ account, you can use the Gmail™ [GOOGLE-GMAIL-PLAIN] applicationin your phone to read, write and organise email messages. After you set up yourGoogle™ account to work in the phone, you can also chat to friends using theThis is a draft publication for internal use only.95This is an Internet version of this publication. © Print only for private use.](https://usermanual.wiki/Sony/PM-0480.Short-term-confidential-userguide-EN-PRODUCT-NAME-PART-NUMBER-Android4-0/User-Guide-1988542-Page-95.png)
![Google Talk™ application, synchronise your phone calendar application with yourGoogle Calendar™, and download applications and games from Google Play™.The services and features described in this chapter may not be supported in all countries orregions, or by all networks and/or service providers in all areas.GUID GUID-7F044258-0B66-4E0E-95C6-A0946A3F377CTitle Google Mail/Gmail and other Google servicesChanges Change from Phoenix Android Market changedVersion 10Author CynthiaHStatus Released*To set up a Google™ account in your phoneIndexterm: "Google™ account setup"1From your Home screen [homescreen_strings_application_name_txt] , tap ID: ICN-SONY-HOME-APPTRAY-NORMAL.2Find and tap Settings [settings_label_launcher] > Accounts & sync [sync_settings] > Addaccount [add_account_label] > Google [SYNC-ACCOUNTS-GOOGLE-TM] .3Follow the registration wizard to create a Google™ account, or sign in if youalready have an account. Your phone is now ready to use with Gmail™ [GOOGLE-GMAIL-PLAIN] , Google Talk™ and Google Calendar™.You can also sign in or create a Google™ account from the setup guide the first time you startyour phone. Or you can go online and create an account at www.google.com/accounts.GUID GUID-BF97C658-8B71-43CE-B8CF-47DD6D0FC9A6Title To set up a Google™ account on your deviceChanges Only replaced "Gmail" with a new label.Version 8Author RongrongZStatus Released*To open the Gmail™ [GOOGLE-GMAIL] application1From the Home screen [homescreen_strings_application_name_txt] , tap ID: ICN-SONY-HOME-APPTRAY-NORMAL.2Find and tap Gmail [GOOGLE-GMAIL-NO-TM] .GUID GUID-3E791330-5603-4425-BBC9-4EDDF20DE362Title To open Gmail/Google MailChanges label with varid GOOGLE-MAIL is replaced with label with varid GOOGLE-GMAIL-NO-TMVersion 4Author Xiaxin LiStatus Released*Using emailGUID GUID-9B3A7116-6682-4D17-97B1-952D5D094A4BTitle Using email - heading onlyChanges GenericVersion 1Author OskarWStatus ReleasedThis is a draft publication for internal use only.96This is an Internet version of this publication. © Print only for private use.](https://usermanual.wiki/Sony/PM-0480.Short-term-confidential-userguide-EN-PRODUCT-NAME-PART-NUMBER-Android4-0/User-Guide-1988542-Page-96.png)
![To create and send an email message1Make sure that you have set up an email account.2From your Home screen [homescreen_strings_application_name_txt] , tap ID: ICN-SONY-HOME-APPTRAY-NORMAL, then find and tap Email [em_app_name] .3If you are using several email accounts, tap ID: ICN-SONY-EMAIL-SELECT-ACCOUNT at the top of the screen and select the account that you want touse.4Tap ID: ICN-SONY-CONV-NEW-MESSAGE, then tap To [message_compose_to_hint]and start typing the recipient's name or email address, or tap ID: ICN-SONY-BTN-ADD-CONTACT and select one or more recipients from your Contactslist.5Enter the email subject and message text, then tap ID: ICN-SONY-MENU-SEND-HOLO-LIGHT.GUID GUID-F0395077-1D6B-4C89-99DB-78251B848973Title To create and send an email messageChanges As per the request from Henrik. Changed from verion 12 into a shorter ver-sion resembling version 14.Version 15Author Xiaxin LiStatus ReleasedTo receive email messages1From your Home screen [homescreen_strings_application_name_txt] , tap ID: ICN-SONY-HOME-APPTRAY-NORMAL.2Find and tap ID: ICN-SONY-APP-EMAIL. The inbox of your default emailaccount appears.3If you want to check another email account that you have set up on yourphone, tap the bar containing ID: ICN-SONY-SPINNER-AB-DEFAULT-HOLO-LIGHT, then select the account you want to check. If you want to checkall your email accounts at once, tap the bar containing ID: ICN-SONY-SPINNER-AB-DEFAULT-HOLO-LIGHT, then tap Combined view [mailbox_list_ac-count_selector_combined_view] .4To download new messages, tap ID: ICN-SONY-IC-MENU-REFRESH-HOLO-LIGHT.If you have set up a corporate email account, you can set the check frequency to Automatic(Push) [account_setup_options_mail_check_frequency_push] .GUID GUID-02C2D920-6923-4830-96DE-028806F248A8Title To receive email messagesChanges For eD4.1 ICS update.Version 8Author RongrongZStatus Released*To read your email messages1From your Home screen [homescreen_strings_application_name_txt] , tap ID: ICN-SONY-HOME-APPTRAY-NORMAL.2Find and tap ID: ICN-SONY-APP-EMAIL. The inbox of your default emailaccount appears. If you want to check another email account that you have setup on your phone, tap the bar containing ID: ICN-SONY-SPINNER-AB-DEFAULT-HOLO-LIGHT, and select the account you want to check.3In the email inbox, scroll up or down and tap the email you want to read.4In the body text field, spread two fingers apart, or pinch them together, tozoom in or out.5Use the forward and backward arrows to read your next or previous message.GUID GUID-FD9F4939-113D-4787-883B-F276208977B9Title To read your email messagesChanges For eD4.1 ICS update.Version 4Author RongrongZStatus Released*This is a draft publication for internal use only.97This is an Internet version of this publication. © Print only for private use.](https://usermanual.wiki/Sony/PM-0480.Short-term-confidential-userguide-EN-PRODUCT-NAME-PART-NUMBER-Android4-0/User-Guide-1988542-Page-97.png)
![To view an email message attachment1From your Home screen [homescreen_strings_application_name_txt] , tap ID: ICN-SONY-HOME-APPTRAY-NORMAL.2Find and tap ID: ICN-SONY-APP-EMAIL. The inbox of your default emailaccount appears. If you want to check another email account that you have setup on your phone, tap the bar containing ID: ICN-SONY-SPINNER-AB-DEFAULT-HOLO-LIGHT, then select the account you want to check.3Find and tap the desired message in your email inbox. Emails with attachmentsare identified by ID: ICN-SONY-MENU-ATTACHMENT.4Tap the attachment tab in the email body. All attachments appear in a list.5Tap Load [message_view_attachment_load_action] below an attachment item.6When the attachment is downloaded, tap View [message_view_attachment_view_action] orSave [message_view_attachment_save_action] .GUID GUID-6F871E93-8365-4B52-A027-F547C8999D86Title To view an email message attachmentChanges For eD4.1 ICS update.Version 6Author RongrongZStatus Released*To save a sender's email address to your contacts1From your Home screen [homescreen_strings_application_name_txt] , tap ID: ICN-SONY-HOME-APPTRAY-NORMAL.2Find and tap ID: ICN-SONY-APP-EMAIL. The inbox of your default emailaccount appears. If you want to check another email account that you have setup on your phone, tap the bar containing ID: ICN-SONY-SPINNER-AB-DEFAULT-HOLO-LIGHT, then select the account you want to check.3Find and tap the desired message in your email inbox.4Tap the name of the sender.5Tap OK [ok] when you are prompted to add the name to your contacts.6Select an existing contact, or tap Create new contact [pickerNewContactHeader] if youwant to create a new contact.7Edit the contact information and tap Done [menu_done] .GUID GUID-2E75631A-CAE2-4121-AF6C-6EE69F5AF6B0Title To save a sender's email address to your contactsChanges For eD4.1 ICS update.Version 8Author RongrongZStatus Released*To reply to an email message1From your Home screen [homescreen_strings_application_name_txt] , tap ID: ICN-SONY-HOME-APPTRAY-NORMAL.2Find and tap ID: ICN-SONY-APP-EMAIL. The inbox of your default emailaccount appears. If you want to check another email account that you have setup on your phone, tap the bar containing ID: ICN-SONY-SPINNER-AB-DEFAULT-HOLO-LIGHT, then select the account you want to check.3Find and tap the message you want to reply to, then tap ID: ICN-SONY-IC-REPLY.4To reply to all, tap ID: ICN-SONY-MORE-ACTIONS-EMAIL, then tap Replyall [reply_all_action] .5Enter your reply, then tap ID: ICN-SONY-MENU-SEND-HOLO-LIGHT.GUID GUID-004FD0FF-8AF0-4E74-855D-533F78929BB1Title To reply to an email messageChanges For eD4.1 ICS update.Version 8Author RongrongZStatus Released*This is a draft publication for internal use only.98This is an Internet version of this publication. © Print only for private use.](https://usermanual.wiki/Sony/PM-0480.Short-term-confidential-userguide-EN-PRODUCT-NAME-PART-NUMBER-Android4-0/User-Guide-1988542-Page-98.png)
![To forward an email message1From your Home screen [homescreen_strings_application_name_txt] , tap ID: ICN-SONY-HOME-APPTRAY-NORMAL.2Find and tap ID: ICN-SONY-APP-EMAIL. The inbox of your default emailaccount appears. If you want to check another email account that you have setup on your phone, tap the bar containing ID: ICN-SONY-SPINNER-AB-DEFAULT-HOLO-LIGHT, then select the account you want to check.3Find and tap the message you want to forward.4Tap ID: ICN-SONY-MORE-ACTIONS-EMAIL, then tap Forward [forward_action] .5Tap To [message_compose_to_hint] and enter the recipient's address.6Enter your message text, then tap ID: ICN-SONY-MENU-SEND-HOLO-LIGHT.GUID GUID-887997C5-464E-4EC1-8783-06B4402A4008Title To forward an email messageChanges For eD4.1 ICS update.Version 9Author RongrongZStatus Released*To delete an email message1From your Home screen [homescreen_strings_application_name_txt] , tap ID: ICN-SONY-HOME-APPTRAY-NORMAL.2Tap ID: ICN-SONY-APP-EMAIL. The inbox of your default email accountappears. If you want to check another email account that you have set up onyour phone, tap the bar containing ID: ICN-SONY-SPINNER-AB-DEFAULT-HOLO-LIGHT, then select the account you want to check.3In your email inbox, mark the checkbox for the email you want to delete, thentap ID: ICN-SONY-MENU-DELETE.GUID GUID-730E5EA9-179D-443E-9A68-6608AA6E4712Title To delete an email messageChanges For eD4.1 ICS update.Version 7Author RongrongZStatus Released*To mark a read email as unread1From your Home screen [homescreen_strings_application_name_txt] , tap ID: ICN-SONY-HOME-APPTRAY-NORMAL.2Find and tap ID: ICN-SONY-APP-EMAIL. The inbox of your default emailaccount appears. If you want to check another email account that you have setup on your phone, tap the bar containing ID: ICN-SONY-SPINNER-AB-DEFAULT-HOLO-LIGHT, then select the account you want to check.3Mark the checkbox for the desired email, then tap ID: ICN-SONY-SUPPORT-MAIL-SE.To mark an unread email as read, mark its checkbox, then tap ID: ICN-SONY-IC-MENU-MARK-READ-HOLO-LIGHT.GUID GUID-401CA411-0A1F-4A0E-9B2B-453A37EF0DDATitle To mark a read email as unreadChanges From eD4.1 ICS update.Version 1Author RongrongZStatus ReleasedThis is a draft publication for internal use only.99This is an Internet version of this publication. © Print only for private use.](https://usermanual.wiki/Sony/PM-0480.Short-term-confidential-userguide-EN-PRODUCT-NAME-PART-NUMBER-Android4-0/User-Guide-1988542-Page-99.png)
![To star an email1From your Home screen [homescreen_strings_application_name_txt] , tap ID: ICN-SONY-HOME-APPTRAY-NORMAL.2Find and tap ID: ICN-SONY-APP-EMAIL. The inbox of your default emailaccount appears. If you want to check another email account that you have setup on your phone, tap the bar containing ID: ICN-SONY-SPINNER-AB-DEFAULT-HOLO-LIGHT, then select the account you want to check.3Mark the checkbox for the email that you want to star, then tap ID: ICN-SONY-INFINITEVIEW-FAVORITE-BTN.To unstar an email, mark it, then tap ID: ICN-SONY-INFINITEVIEW-FAVORITE-BTN-SELECTED.GUID GUID-7B44517D-C6F1-4D09-AB34-6F9B97705CCETitle To star an emailChanges For eD4.1 ICS update.Version 1Author RongrongZStatus ReleasedTo view all starred emails1From your Home screen [homescreen_strings_application_name_txt] , tap ID: ICN-SONY-HOME-APPTRAY-NORMAL, then find and tap ID: ICN-SONY-APP-EMAIL.2Tap ID: ICN-SONY-IC-LIST-FOLDER, then tap Starred [account_folder_list_summary_star-red] . Starred emails from all your accounts appear in a list.GUID GUID-70E72EE5-C600-4C03-8DEC-E8144982DB37Title To view all starred emailsChanges For eD4.1 ICS update.Version 1Author RongrongZStatus ReleasedTo manage your email in batches1From your Home screen [homescreen_strings_application_name_txt] , tap ID: ICN-SONY-HOME-APPTRAY-NORMAL, then find and tap ID: ICN-SONY-APP-EMAIL.The inbox of your default email account appears. If you want to check anotheremail account that you have set up on your phone, tap the bar containing ID:ICN-SONY-SPINNER-AB-DEFAULT-HOLO-LIGHT, then select the account youwant to check.2Mark the checkboxes for the emails you want to select.3When you are finished, tap one of the icons in the tool bar to, for example,move the selected emails to another folder.GUID GUID-5AC2F609-65C5-4B19-A063-ED590A5935FFTitle To manage your email in batchesChanges For eD4.1 ICS update.Version 2Author RongrongZStatus Released*To view all folders for one email account1From your Home screen [homescreen_strings_application_name_txt] , tap ID: ICN-SONY-HOME-APPTRAY-NORMAL, then find and tap ID: ICN-SONY-APP-EMAIL.The inbox of your default email account appears. If you want to check anotheremail account that you have set up on your phone, tap the bar containing ID:ICN-SONY-SPINNER-AB-DEFAULT-HOLO-LIGHT, then select the account youwant to check.2Tap ID: ICN-SONY-IC-LIST-FOLDER to view all the folders in the account.GUID GUID-2C45BDBB-3267-4D66-826E-073CEBD6F135Title To view all folders for one email accountChanges For eD4.1 ICS update.Version 2Author RongrongZStatus Released*This is a draft publication for internal use only.100This is an Internet version of this publication. © Print only for private use.](https://usermanual.wiki/Sony/PM-0480.Short-term-confidential-userguide-EN-PRODUCT-NAME-PART-NUMBER-Android4-0/User-Guide-1988542-Page-100.png)
![To change the inbox check frequency1From your Home screen [homescreen_strings_application_name_txt] , tap ID: ICN-SONY-HOME-APPTRAY-NORMAL.2Find and tap ID: ICN-SONY-APP-EMAIL.3Press ID: ICN-SONY-KEY-MENU, then tap Settings [settings_action] .4If you are using several email accounts, tap the account you want to adjust.5Tap Inbox check frequency [account_settings_mail_check_frequency_label] and select an option.GUID GUID-B32A113B-DDD8-467D-AA6A-FB03C67FDF7BTitle To change the email check frequencyChanges For eD4.1 ICS update.Version 5Author RongrongZStatus Released*This is a draft publication for internal use only.101This is an Internet version of this publication. © Print only for private use.](https://usermanual.wiki/Sony/PM-0480.Short-term-confidential-userguide-EN-PRODUCT-NAME-PART-NUMBER-Android4-0/User-Guide-1988542-Page-101.png)
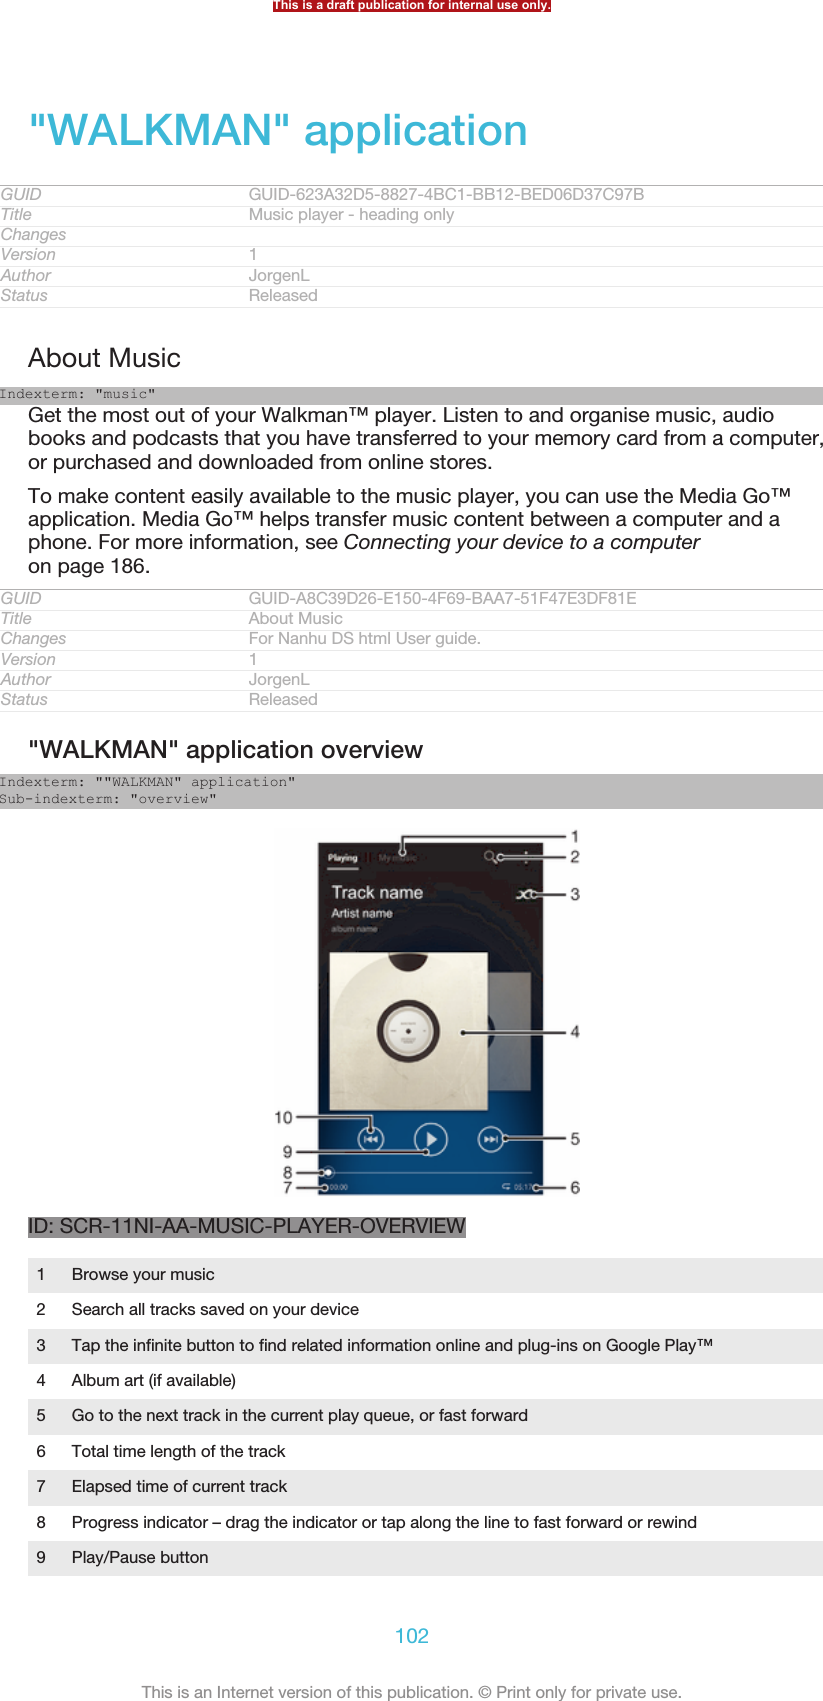
![10 Go to the previous track in the current play queue, or rewindGUID GUID-F3DF136D-A738-4BA8-817C-D323DE096CD4Title Music player overviewChanges Created it out only for leaving more space. no extra text changedVersion 15Author CynthiaHStatus ReleasedTransferring media files to your deviceIndexterm: "music"Sub-indexterm: "transferring to your device"Indexterm: "music"Sub-indexterm: "transferring to/from a computer"Indexterm: "photos"Sub-indexterm: "transferring to/from a computer"Indexterm: "videos"Sub-indexterm: "transferring to/from a computer"Before using the "WALKMAN" application, it's a good idea to transfer all yourfavourite media content from a computer to your device and then play or view thiscontent on your device. Media content can include music, photos and videos. Theeasiest way to transfer files is with a USB cable. After you connect your device andthe computer using the USB cable, you can use the file manager application on thecomputer or the Media Go™ application to transfer the files.GUID GUID-B3D6A559-577A-49F9-A2DD-413B05741F63Title Copying media files to your memory cardChanges Created it only for Xperia Care removed the cross referenceVersion 10.1.1Author CynthiaHStatus ReleasedUsing the "WALKMAN" applicationIndexterm: ""WALKMAN" application"Sub-indexterm: "using"GUID GUID-CED067CC-9C0E-4FFE-92A0-D1A9A7D11999Title Using the music player - headingChanges Changed due to index only added two indexVersion 6Author CynthiaHStatus ReleasedTo play audio contentIndexterm: "music"Sub-indexterm: "playing"Indexterm: "playing"Sub-indexterm: "music"Indexterm: "audio"Sub-indexterm: "playing"1From your Home screen [homescreen_strings_application_name_txt] , tap ID: ICN-SONY-HOME-APPTRAY-NORMAL, then find and tap ID: ICN-SONY-APP-MUSIC-PLAYER.2In My music [music_tab_mymusic_ics] , select a music category and browse to the trackthat you want to open.3Tap a track to play it.You might not be able to play copyright-protected items. Please verify that you havenecessary rights in material that you intend to share.GUID GUID-00E786D8-33B6-4A64-91FD-800EEC4D7017Title To play audio contentChanges Changed for Tablet due to the access changed also added a tipVersion 12Author CynthiaHStatus ReleasedTo change tracksIndexterm: "music"This is a draft publication for internal use only.103This is an Internet version of this publication. © Print only for private use.](https://usermanual.wiki/Sony/PM-0480.Short-term-confidential-userguide-EN-PRODUCT-NAME-PART-NUMBER-Android4-0/User-Guide-1988542-Page-103.png)
![Sub-indexterm: "changing tracks"•When a track is playing, tap ID: ICN-SONY-SEMC-MUSIC-NEXT-NORMALor ID: ICN-SONY-SEMC-MUSIC-PREVIOUS-NORMAL.•When a track is playing, swipe the album art left or right.GUID GUID-7A4E3960-E486-40B9-A360-A3C3CA0E7006Title To change tracksChanges No content changed only fixed an index this change will start from Hikaricomments from EdVersion 4Author CynthiaHStatus ReleasedTo pause a trackIndexterm: "music"Sub-indexterm: "pausing a track"Indexterm: "pausing a track"•Tap ID: ICN-SONY-SEMC-MUSIC-PAUSE-NORMAL.GUID GUID-AC80B728-6644-4705-A066-F133C752F665Title To pause a trackChanges Changed from Tablet using "WALKMAN" applicationVersion 5Author CynthiaHStatus ReleasedTo fast forward and rewind music•Touch and hold ID: ICN-SONY-SEMC-MUSIC-NEXT-NORMAL or ID: ICN-SONY-SEMC-MUSIC-PREVIOUS-NORMAL.You can also drag the progress indicator marker right or left.GUID GUID-8D2FC9AE-1F1E-4426-AF2A-041D10DEE2F1Title To fast forward and rewind tracksChanges Changed from Tablet using "WALKMAN" applicationVersion 9Author CynthiaHStatus ReleasedTo adjust the audio volumeIndexterm: "music"Sub-indexterm: "adjusting volume"Indexterm: "adjusting volume"Indexterm: "audio"Sub-indexterm: "adjusting volume"•Press the volume key.GUID GUID-4403F052-3019-49AC-9359-660176677C22Title To adjust the volume of a trackChanges Changed only for Tablet using "WALKMAN" application. Due to the com-ments from sony removed the first half sentenceVersion 8Author CynthiaHStatus ReleasedTo improve the sound quality using the equaliserIndexterm: ""WALKMAN" application"Sub-indexterm: "using the equaliser"Indexterm: "equaliser"Indexterm: "equaliser"Indexterm: "using the equaliser"1When the "WALKMAN" application is open, tap ID: ICN-SONY-KEY-MENU.2Tap Settings [settings_label_launcher] > Sound enhancements [menu_equalizer_ics] .3To adjust the sound manually, drag the frequency band buttons up or down.To adjust the sound automatically, tap ID: ICN-SONY-MUSIC-EQUALIZER-SELECT and select a style.GUID GUID-EDE19486-44A8-4A55-81A9-99F891AC94EDTitle To improve the sound with the equalizerChanges Created it out due to functional review for odin and yuga. added a stepVersion 10Author CynthiaHStatus ReleasedThis is a draft publication for internal use only.104This is an Internet version of this publication. © Print only for private use.](https://usermanual.wiki/Sony/PM-0480.Short-term-confidential-userguide-EN-PRODUCT-NAME-PART-NUMBER-Android4-0/User-Guide-1988542-Page-104.png)
![To turn on the surround sound featureIndexterm: ""WALKMAN" application"Sub-indexterm: "using the equaliser"Indexterm: "surround sound feature"Indexterm: "equaliser"1When the "WALKMAN" application is open, tap ID: ICN-SONY-KEY-MENU.2Tap Settings [settings_label_launcher] > Sound enhancements [menu_equalizer_ics] > Surroundsound (VPT) [sound_enhance_strings_setting_virtual_surround_txt] .3Select a setting, then tap OK [okay_action] to confirm.GUID GUID-904DB65B-22FA-4C19-992C-A703E77DF344Title To surround soundChanges Created it due to OMV test for Pollux. only changed one step.removed a la-bel no text changedVersion 8Author CynthiaHStatus Released*To view the current play queue•While a track is playing in the "WALKMAN" application, tap ID: ICN-SONY-MUSIC-PLAY-QUEUE.GUID GUID-8E79652E-4E0C-4EB4-8C95-0DAA260BD4AETitle To view the current play queueChanges Created it due to comments from OMV removed a label used an icon insteadVersion 7Author CynthiaHStatus ReleasedTo minimise the "WALKMAN" applicationIndexterm: ""WALKMAN" application"Sub-indexterm: "minimising"•When the "WALKMAN" application is playing, tap ID: ICN-SONY-KEY-AND-BACK to go to the previous screen, or tap ID: ICN-SONY-KEY-AND-HOMEto go to the Home screen [homescreen_strings_application_name_txt] . The "WALKMAN"application stays playing in the background.GUID GUID-B8E944E8-3D03-4080-BBAD-83FC95105859Title To minimise the music playerChanges Changed from Tablet using "WALKMAN" applicationVersion 6Author CynthiaHStatus ReleasedTo open the "WALKMAN" application when it is playing in the background1While a track is playing in the background, tap the ID: ICN-SONY-KEY-OPEN-RECENT-APPS to open the Notification panel.2Tap the track title to open the "WALKMAN" application.GUID GUID-4A52061B-5BEA-4F74-84A3-60DD425EBBAETitle To return to the music player when used in the backgroundChanges Created it due to OMV test remove step 1 no status bar hereVersion 10Author CynthiaHStatus Released*To delete a trackIndexterm: "deleting"Sub-indexterm: "tracks"Indexterm: ""WALKMAN" application"Sub-indexterm: "deleting tracks"Indexterm: "deleting"1In My music [music_tab_mymusic_ics] , browse to the track that you want to delete.2Touch and hold the track title, then tap Delete [gui_delete_txt] .You can also delete albums this way.GUID GUID-22F57582-7488-484D-B95E-28258A48B894Title To delete a trackChanges Changed from Tablet using "WALKMAN" applicationVersion 9Author CynthiaHThis is a draft publication for internal use only.105This is an Internet version of this publication. © Print only for private use.](https://usermanual.wiki/Sony/PM-0480.Short-term-confidential-userguide-EN-PRODUCT-NAME-PART-NUMBER-Android4-0/User-Guide-1988542-Page-105.png)
![Status ReleasedTo send a trackIndexterm: "music"Sub-indexterm: "sending"Indexterm: "sending"Sub-indexterm: "music"1In My music [music_tab_mymusic_ics] , when browsing your tracks , touch and hold atrack title.2Tap Send [gui_send_txt] .3Select an application from the list, and follow the on-screen instructions.You can also send albums and playlists in the same way.GUID GUID-EDC6EF4F-65A2-4936-BD17-63E11FF9215ETitle To share a trackChanges Changed only forTablet using "WALKMAN" application also due to the com-ments from sony. Changed"share"into "send"and also changed the text instep 3 to avoid the expresion which looks like Sony's recommending piracy.Version 7Author CynthiaHStatus ReleasedTo "Like" a track on Facebook™Indexterm: "recommending music"Indexterm: ""Like" a track on Facebook™"Indexterm: "Facebook™"Sub-indexterm: ""Like" a track on Facebook™"1While the track is playing in the "WALKMAN" application, tap the album art.2Tap ID: ICN-SONY-ACTIONLAYER-LIKE-OFF to show that you "Like" thetrack on Facebook™. If desired, add a comment in the comments field.3Tap Share [music_like_share_button] to send the track to Facebook™. If the track isreceived successfully, you will get a confirmation message from Facebook™.GUID GUID-20AC8CF4-0C6B-4930-AB1B-BFBAD84F84A9Title To recommend a track on Facebook™Changes Changed due to Ed comments just removed a labelVersion 10Author CynthiaHStatus ReleasedGetting more information about a track or artistIndexterm: "infinite button"Indexterm: "audio content"Sub-indexterm: "related content"In the "WALKMAN" application, you can get more information about the artist thatyou are listening to by tapping the infinite button ID: ICN-SONY-INFINITE-BUTTON.The infinite button ID: ICN-SONY-INFINITE-BUTTON also gives you access torelated content such as:•Music videos on YouTube™•Artist info on Wikipedia•Lyrics on Google•Karaoke videos on YouTube™•Extension searches on the web•Content from the PlayNow™ serviceThe accuracy of search results may vary.GUID GUID-60343300-62FE-497C-AC6D-38BF1A5FAC89Title Searching for related content with the infinite buttonChanges Changed due to Ed commentsVersion 8Author CynthiaHStatus ReleasedThis is a draft publication for internal use only.106This is an Internet version of this publication. © Print only for private use.](https://usermanual.wiki/Sony/PM-0480.Short-term-confidential-userguide-EN-PRODUCT-NAME-PART-NUMBER-Android4-0/User-Guide-1988542-Page-106.png)
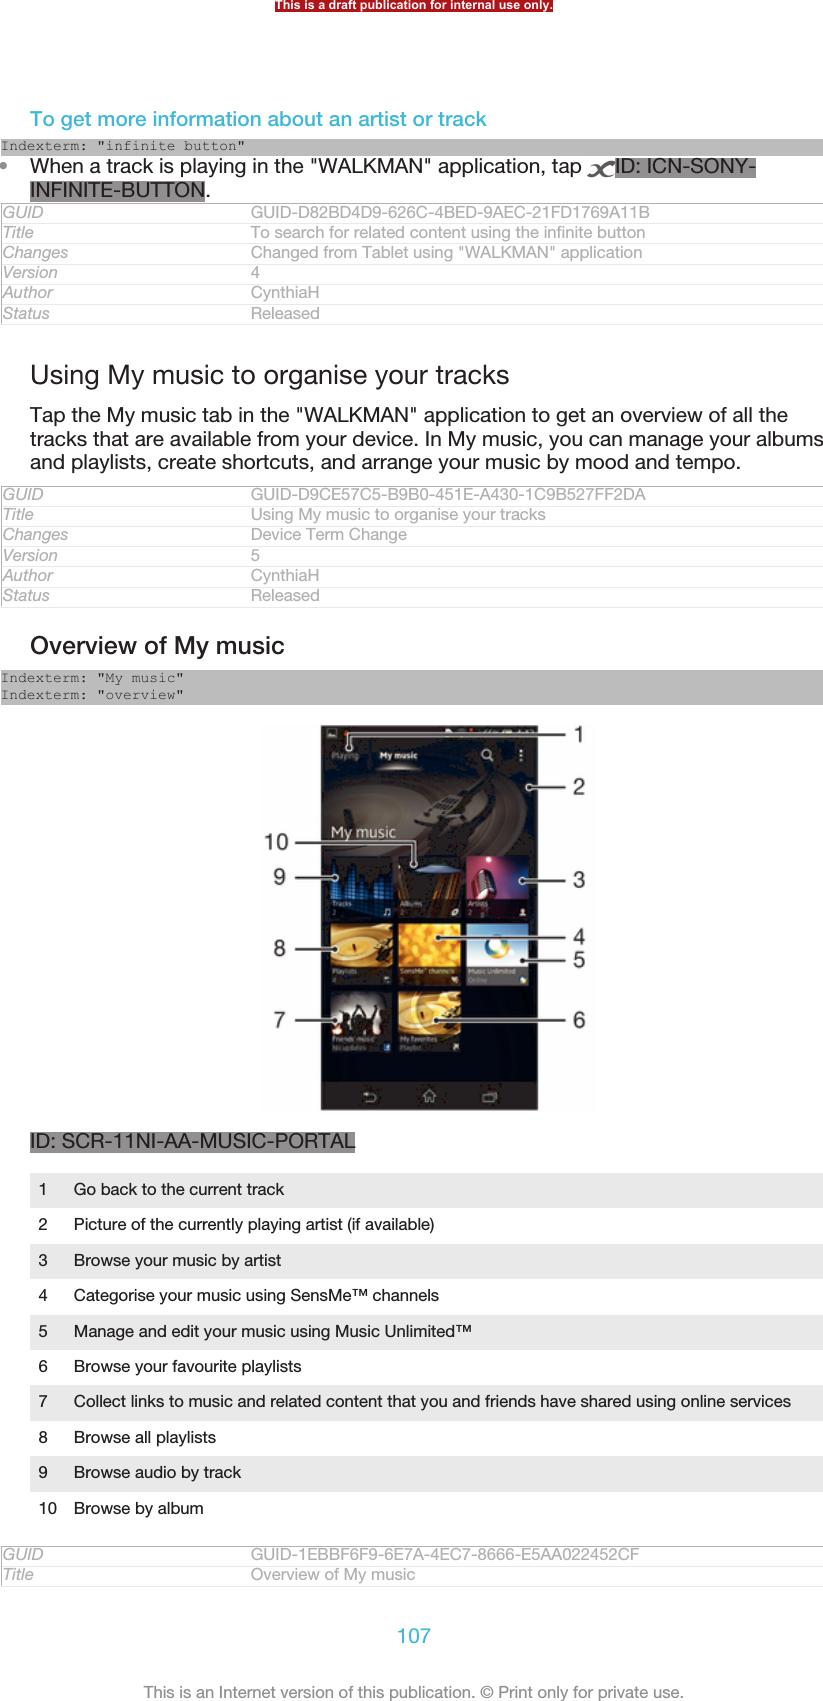
![Changes Created it out only for leaving more space. no extra text changedVersion 7Author CynthiaHStatus ReleasedTo add a shortcut to a trackIndexterm: "music"Sub-indexterm: "shortcuts"1In My music [music_tab_mymusic_ics] , tap ID: ICN-SONY-MUSIC-SEARCH-ALBUM, ID: ICN-SONY-MUSIC-LIBRARY-PLAYLISTS, ID: ICN-SONY-MUSIC-LIBRARY-TRACKS-BG or ID: ICN-SONY-MUSIC-SEARCH-ARTIST, thenbrowse to the track for which you want to create a shortcut.2Touch and hold the track title.3Tap Add as shortcut [music_library_add_portal_shortcut_txt] . The shortcut now appears in theMy music main view.GUID GUID-5681CA4D-407C-4B04-A817-64096B1B2216Title To add a music track as a shortcutChanges Changed from Tablet using "WALKMAN" application also changed the ac-cess due to dual diaplayVersion 5Author CynthiaHStatus ReleasedTo rearrange shortcuts•In My music [music_tab_mymusic_ics] , touch and hold a shortcut until it magnifies andyour device vibrates, then drag the item to a new location.GUID GUID-6EC5B302-1B42-4486-8972-7FA79B29BE46Title To rearrange shortcutsChanges Device Term ChangeVersion 5Author CynthiaHStatus ReleasedTo delete a shortcutIndexterm: "music"Sub-indexterm: "shortcuts"•In My music [music_tab_mymusic_ics] , touch and hold a shortcut until it magnifies andyour device vibrates, then drag the item to ID: ICN-SONY-MENU-DELETE.You can only delete shortcuts that you create yourself.GUID GUID-C2DD45A8-3E12-4254-B1F0-CA022001D51ETitle To delete a shortcutChanges Created it out due to Ed review comments keeping minimalismVersion 10Author CynthiaHStatus Released*To update your music with the latest informationIndexterm: "music"Sub-indexterm: "downloading music information"1In My music [music_tab_mymusic_ics] , tap ID: ICN-SONY-KEY-MENU.2Tap Download music info [mc_download_music_info_ics] > Start [mc_strings_start] . Your devicesearches online and downloads the latest available album art and trackinformation for your music.The SensMe™ channels application is activated when you download music information.GUID GUID-3195FACE-36F1-409A-A913-BD7B086D97EFTitle To update your music with the latest informationChanges Device Term ChangeVersion 6Author CynthiaHStatus ReleasedCategorising your music using SensMe™ channelsIndexterm: "SensMe™ channels"This is a draft publication for internal use only.108This is an Internet version of this publication. © Print only for private use.](https://usermanual.wiki/Sony/PM-0480.Short-term-confidential-userguide-EN-PRODUCT-NAME-PART-NUMBER-Android4-0/User-Guide-1988542-Page-108.png)
![The SensMe™ channels application helps you arrange your music by mood andtempo. SensMe™ groups all your tracks into several categories, or channels, so youcan select music that matches your mood or suits the time of day.GUID GUID-67E8AAFA-80A6-46FC-8109-B7903972EF94Title SensMe™ channelsChanges Changed only due to index no extra text changedVersion 5Author CynthiaHStatus ReleasedTo enable the SensMe™ channels applicationIndexterm: "audio"Indexterm: "SensMe™ channels"•In My music [music_tab_mymusic_ics] , tap ID: ICN-SONY-KEY-MENU, then tapDownload music info [mc_download_music_info_ics] .This application requires a mobile or Wi-Fi® network connection.GUID GUID-C266C1CA-6744-4DD0-BFAF-84B326099827Title To enable the SensMe™ channelsChanges Changed due to index only no extra text changedVersion 6Author CynthiaHStatus ReleasedPlaying music in random orderYou can play tracks in playlists in random order. A playlist can be, for example, aplaylist you have created yourself or an album.GUID GUID-C3CD30B3-5405-46BF-BD8C-358C628CDFE1Title Playing music in random orderChanges ver 1. Created for RachaelVersion 1Author PeterCStatus ReleasedTo play tracks in random orderIndexterm: ""WALKMAN" application"Sub-indexterm: "playing tracks in random order"Indexterm: "audio"Sub-indexterm: "playing tracks in random order"Indexterm: "shuffle music"1In My music [music_tab_mymusic_ics] , tap ID: ICN-SONY-MUSIC-SEARCH-ALBUMand navigate to an album, or tap ID: ICN-SONY-MUSIC-LIBRARY-PLAYLISTS and browse to a playlist.2Tap the album art, then tap ID: ICN-SONY-ACTIONLAYER-SHUFFLE-PRESSED to turn on Shuffle mode [music_shuffle_menu_option_ics] .GUID GUID-37CE98F9-7B76-4219-890D-5469799D15E9Title To play tracks in random orderChanges Changed a label only no extra text changedVersion 11Author CynthiaHStatus ReleasedManaging playlistsIndexterm: ""WALKMAN" application"Sub-indexterm: "playlists"Indexterm: "playlists"In My music [music_tab_mymusic_ics] , you can create your own playlists from the music that issaved on your device. In addition, you can install the Media Go™ application on acomputer and use it to copy playlists from the computer to your device.For more information, see Connecting your device to a computer on page 186.GUID GUID-22626158-D739-4968-953F-803D81E125B1Title PlaylistsChanges Changed due to comments from concept team deleted a space All text inone paragraph insteadThis is a draft publication for internal use only.109This is an Internet version of this publication. © Print only for private use.](https://usermanual.wiki/Sony/PM-0480.Short-term-confidential-userguide-EN-PRODUCT-NAME-PART-NUMBER-Android4-0/User-Guide-1988542-Page-109.png)
![Version 13Author CynthiaHStatus ReleasedTo create your own playlistsIndexterm: ""WALKMAN" application"Sub-indexterm: "creating playlists"Sub-indexterm: "creating playlists"Indexterm: "playlists"Sub-indexterm: "creating"1In My music [music_tab_mymusic_ics] , to add an artist, album or a track to a playlist,touch and hold the name of the artist or the title of the album or track.2In the menu that opens, tap Add to playlist [music_playlist_addto] > Create new playlist[music_playlist_new_playlist_txt] .3Enter a name for the playlist and tap OK [gui_ok_txt] .GUID GUID-C3B20171-8719-4A88-B615-8CCE50EF62FBTitle To create your own playlistsChanges Changed from Tablet using "WALKMAN" application also changed the ac-cess due to dual displayVersion 11Author CynthiaHStatus Released*To add tracks to a playlistIndexterm: "playlists"Sub-indexterm: "adding a track"Indexterm: ""WALKMAN" application"Sub-indexterm: "adding tracks to playlists"1In My music [music_tab_mymusic_ics] , when browsing your tracks, touch and hold thename of the artist or the title of the album or track that you want to add.2Tap Add to playlist [music_playlist_addto] .3Tap the name of the playlist to which you want to add the artist, album ortrack. The artist, album or track is added to the playlist.GUID GUID-39684E97-C6CE-4845-A001-9CED3D261997Title To add tracks to a playlistChanges Changed from Tablet using "WALKMAN" applicationVersion 5Author CynthiaHStatus ReleasedTo play your own playlistsIndexterm: "playlists"Sub-indexterm: "playing your own"Indexterm: "music"Sub-indexterm: "My playlists"1In My music [music_tab_mymusic_ics] , tap ID: ICN-SONY-MUSIC-LIBRARY-PLAYLISTS.2Under Playlists [tile_playlists] , tap a playlist.3Tap a track to play it.GUID GUID-DB3FBE14-71FD-4B1F-ABC1-B79E84860C1CTitle To play your own playlistsChanges Changed from Tablet using "WALKMAN" application also changed accessdue to dual displayVersion 8Author CynthiaHStatus ReleasedTo remove a track from a playlistIndexterm: "playlists"Sub-indexterm: "removing tracks"1In a playlist, touch and hold the title of the track you want to delete.2Tap Delete from playlist [music_playlist_removefrom] from the list that appears.GUID GUID-EEB44D8E-B5E5-4CD5-8218-92D2EA4D722ATitle To remove a track from a playlistChanges Changed from tablet. add a few text into step 2 to be more clearlyVersion 4Author CynthiaHThis is a draft publication for internal use only.110This is an Internet version of this publication. © Print only for private use.](https://usermanual.wiki/Sony/PM-0480.Short-term-confidential-userguide-EN-PRODUCT-NAME-PART-NUMBER-Android4-0/User-Guide-1988542-Page-110.png)
![Status ReleasedTo delete a playlistIndexterm: "playlists"Sub-indexterm: "deleting"1In My music [music_tab_mymusic_ics] , then select Playlists [tile_playlists] .2Touch and hold the playlist you want to delete.3Tap Delete [gui_delete_txt] .4Tap Delete [gui_delete_txt] again to confirm.You cannot delete default playlists.GUID GUID-7D9C6392-3EF2-4E7A-878B-26A541EE5B7ETitle To delete a playlistChanges Changed from Tablet using "WALKMAN" application also changed the ac-cess due to dual displayVersion 11Author CynthiaHStatus Released"WALKMAN" application widgetIndexterm: ""WALKMAN" application widget"The "WALKMAN" application widget is a miniature application that gives you directaccess to the "WALKMAN" application from your Home screen [homescreen_strings_applica-tion_name_txt] . You need to add this widget to your Home screen [homescreen_strings_applica-tion_name_txt] before you can use it.GUID GUID-DCDC7539-3C70-43E4-A6DB-1717EB2FE4DATitle Music player widgetChanges Changed from Tablet using "WALKMAN" applicationVersion 5Author CynthiaHStatus ReleasedTo add the "WALKMAN" application widget to your Home screen1Tap an empty area on your Home screen [homescreen_strings_application_name_txt] , then tapWidgets [home_cui_menu_widgets_txt] .2Find and tap WALKMAN [udoc_no_trans_app_walkman] .GUID GUID-BD0DBCF8-67B3-4E14-BF99-5253E114FF48Title To add the music player widget to your Home screenChanges Created it out due to functional review comments for odin and yuga.changed a step onlyVersion 8Author CynthiaHStatus ReleasedProtecting your hearingIndexterm: "music"Listening to the "WALKMAN" application or other media players at excessive volumeor for a prolonged period of time can damage your hearing, even when the volume isat a moderate level. To alert you to such risks, a volume level warning appears whenthe volume is too high, and after the "WALKMAN" application is used for over 20hours.GUID GUID-0134A3D9-E3C4-41B3-807C-BD82B9697B2ETitle Protecting your hearingChanges Changed from Tablet using "WALKMAN" applicationVersion 4Author CynthiaHStatus ReleasedTo turn off the volume level warningIndexterm: "music"This is a draft publication for internal use only.111This is an Internet version of this publication. © Print only for private use.](https://usermanual.wiki/Sony/PM-0480.Short-term-confidential-userguide-EN-PRODUCT-NAME-PART-NUMBER-Android4-0/User-Guide-1988542-Page-111.png)
![Sub-indexterm: "hearing protection"•When ID: ICN-SONY-LOUD-MUSIC-HVGA appears, tap OK [music_rri_ok_button_txt]to dismiss the warning.Every time you restart your device, the media volume is automatically set to a moderate level.GUID GUID-E246B5D4-C66C-4CF2-9D96-CD41E2FBE40ATitle To turn off the volume level warningChanges Device Term ChangeVersion 3Author CynthiaHStatus ReleasedTrackID technologyIndexterm: "TrackID™ technology"Indexterm: "searching"Sub-indexterm: "track information"GUID GUID-35468A67-04FE-4B42-A1D9-2A88481C8CD5Title TrackID technology - heading onlyChangesVersion 1Author JorgenLStatus Released*Identifying music using TrackID™ technologyIndexterm: "TrackID™ technology"Indexterm: "searching"Sub-indexterm: "track information"Use the TrackID™ music recognition service to identify a music track you hearplaying in your surroundings. Just record a short sample of the song and you’ll getartist, title and album info within seconds. You can purchase tracks identified byTrackID™ and you can view TrackID™ charts to see what TrackID™ users aroundthe globe are searching for. For best results, use TrackID™ technology in a quietarea.The TrackID™ application and the TrackID™ service are not supported in all countries/regions,or by all networks and/or service providers in all areas.GUID GUID-D1B43D3C-7EEF-4158-8400-C2F30C3ECDE6Title TrackID™ technologyChanges add trade mark "TM" for TrackID only no other text change for DogoVersion 6.1.2Author LisaYStatus ReleasedTo open the TrackID™ applicationIndexterm: "TrackID™ technology"Sub-indexterm: "opening"1From your Home screen [homescreen_strings_application_name_txt] , tap ID: ICN-SONY-HOME-APPTRAY-NORMAL .2Find and tap TrackID™ [ti_application_name_txt] .You can also use the TrackID™ widget to open the TrackID™ [ti_application_name_txt] application.GUID GUID-C81DD308-62BE-4BBD-A682-CB41B327C1E0Title To open the TrackID™ applicationChanges Remove the trackID icon in step 2.Version 7Author JessyDStatus ReleasedTo search for track information using TrackID™Indexterm: "TrackID™ technology"Sub-indexterm: "searching for track information"Indexterm: "searching"Sub-indexterm: "music using TrackID™"Indexterm: "music"This is a draft publication for internal use only.112This is an Internet version of this publication. © Print only for private use.](https://usermanual.wiki/Sony/PM-0480.Short-term-confidential-userguide-EN-PRODUCT-NAME-PART-NUMBER-Android4-0/User-Guide-1988542-Page-112.png)
![Sub-indexterm: "searching using TrackID™"1Open the TrackID™ [ti_application_name_txt] application, then hold your device towardsthe music source.2Tap ID: ICN-SONY-APP-TRACK-ID. If the track is recognised by theTrackID™ service, the results appear on the screen.To return to the TrackID™ [ti_application_name_txt] start screen, press ID: ICN-SONY-KEY-AND-BACK.GUID GUID-E0CB0974-D670-45CF-A0B5-3A8D4B7CD1C8Title To search for track informationChanges update based on editorial review comment for HuashanVersion 10Author LisaYStatus ReleasedTo view TrackID™ chartsIndexterm: "TrackID™ technology"Sub-indexterm: "viewing charts"1Open the TrackID™ [ti_application_name_txt] application, then tap Charts [ti_tab_charts_txt] .The first time you view a chart, it is set to your own region.2To see charts of the most popular searches in other regions, tap ID: ICN-SONY-KEY-MENU > Regions [ti_options_menu_region_txt] .3Select a country or region.GUID GUID-DE4BBE03-E523-459E-A100-616D351C1CC7Title To view charts in TrackIDChanges update based on editorial review comment for HuashanVersion 5Author LisaYStatus ReleasedUsing TrackID™ technology resultsIndexterm: "TrackID™ technology"Sub-indexterm: "using results"Track information appears when the TrackID™ application recognises a track. Youcan select to purchase the track or share it using email, SMS or a social networkingservice. You can also get more information about the track's artist.GUID GUID-430D27D9-86A8-40F1-AF6F-B98085921378Title Using TrackID™ technology resultsChanges add "a social network service" based on TID comments for HuashanVersion 10Author LisaYStatus Released*To buy a track recognised by the TrackID™ applicationIndexterm: "TrackID™ technology"Sub-indexterm: "buying a track"Indexterm: "purchasing"Sub-indexterm: "music"Indexterm: "music"Sub-indexterm: "purchasing"1After a track has been recognised by the TrackID™ [ti_application_name_txt] application,tap Download [ti_list_download_txt] .2Follow the instructions on your device to complete your purchase.You can also select a track to buy by opening the History [ti_tab_history_txt] or Charts [ti_tab_charts_txt]tabs from the TrackID™ [ti_application_name_txt] start screen.The track purchase feature may not be supported in all countries/regions, or by all networksand/or service providers in all areas.GUID GUID-142FF661-9B11-4566-BD41-37638DD70719Title To buy a track using TrackID™ technologyChanges update step one from HuashanVersion 9Author LisaYStatus ReleasedThis is a draft publication for internal use only.113This is an Internet version of this publication. © Print only for private use.](https://usermanual.wiki/Sony/PM-0480.Short-term-confidential-userguide-EN-PRODUCT-NAME-PART-NUMBER-Android4-0/User-Guide-1988542-Page-113.png)
![To share a trackIndexterm: "TrackID™ technology"Sub-indexterm: "sharing a track"Indexterm: "sharing"Sub-indexterm: "music"Indexterm: "music"Sub-indexterm: "sharing"1After a track has been recognised by the TrackID™ [ti_application_name_txt] application,tap Share [ti_share_button_txt] , then select a sharing method.2Follow the instructions on your device to complete the procedure.You can also select a track to share by opening the History [ti_tab_history_txt] or Charts [ti_tab_charts_txt]tabs from the TrackID™ [ti_application_name_txt] start screen.GUID GUID-C7FE7DFE-9EF2-483D-A7B2-8A7AFEB7AF60Title To share a trackChanges text change on step1 from huashanVersion 5Author LisaYStatus ReleasedTo view the artist information for a trackIndexterm: "TrackID™ technology"Sub-indexterm: "viewing artist info"Indexterm: "music"Sub-indexterm: "viewing artist info"•After a track has been recognised by the TrackID™ [ti_application_name_txt] application,tap Artist info [ti_button_artist_txt] .You can also view the artist information for a track by opening the History [ti_tab_history_txt] orCharts [ti_tab_charts_txt] tabs from the TrackID™ [ti_application_name_txt] start screen.GUID GUID-6A2E01ED-08A0-4A9D-BAEB-F20954FD50B1Title To view the artist information of a trackChanges text change on step 1 for HuashanVersion 4Author LisaYStatus ReleasedTo recommend a track on Facebook™Indexterm: "TrackID™ technology"Sub-indexterm: "recommending a track"Indexterm: "recommending music"Indexterm: "music"Sub-indexterm: "recommending"1When the TrackID™ [ti_application_name_txt] application is open, tap a track title.2In the track information screen, wait for the ID: ICN-SONY-ACTIONLAYER-LIKE-OFF tab to appear, then tap this tab.3Log in to Facebook™ [Facebook™] and recommend the track.The feature may not be supported in all countries/regions, or by all networks and/or serviceproviders in all areas.GUID GUID-98DF18AC-6871-48D1-A9AE-9EA38E711FE0Title To recommend a track on FacebookChanges update Facebook label name only from Odin YugaVersion 2Author LisaYStatus Released*To delete a track from the track historyIndexterm: "TrackID™ technology"Sub-indexterm: "deleting a track"Indexterm: "deleting"Sub-indexterm: "music"Indexterm: "music"Sub-indexterm: "deleting"1Open the TrackID™ [ti_application_name_txt] application, then tap History [ti_tab_history_txt] .2Tap a track title, then tap Delete [ti_button_delete_txt] .3Tap Yes [gui_yes_txt] to confirm.GUID GUID-20DBCF02-36FD-4981-932B-2A7F0F707A00This is a draft publication for internal use only.114This is an Internet version of this publication. © Print only for private use.](https://usermanual.wiki/Sony/PM-0480.Short-term-confidential-userguide-EN-PRODUCT-NAME-PART-NUMBER-Android4-0/User-Guide-1988542-Page-114.png)
![FM radioIndexterm: "radio"GUID GUID-50B65AF5-0E4E-4C2E-95F9-1EEBF8FE2B3BTitle FM radio - heading onlyChangesVersion 1Author JorgenLStatus ReleasedAbout the FM radioIndexterm: "radio"The FM radio in your device works like any FM radio. For example, you can browseand listen to FM radio stations and save them as favourites. You must connect awired headset or headphones to your device before you can use the radio. This isbecause the headset or headphones act as an antenna. After one of these devices isconnected, you can then switch the radio sound to the speaker, if desired.When you open the FM radio, available channels appear automatically. If a channel has RDSinformation, it appears a few seconds after you start listening to the channel.GUID GUID-BBBAD591-4F98-4597-B54A-EBB6D1DA402DTitle About the FM radioChanges Device term changeVersion 2Author XuCindyStatus ReleasedTo start the FM radioIndexterm: "radio"Sub-indexterm: "opening"1Connect a headset or a set of headphones to your device.2From your Home screen [homescreen_strings_application_name_txt] , tap ID: ICN-SONY-HOME-APPTRAY-NORMAL .3Find and tap FM radio [fmradio_strings_application_name_txt] ID: ICN-SONY-APP-RADIO .The available channels appear as you scroll through the frequency band.When you start the FM radio, available channels appear automatically. If a channel has RDSinformation, it appears a few seconds after you start listening to the channel.GUID GUID-3898AB21-BAB7-40B6-8858-8BA79137E5EDTitle To open the FM radioChanges Device Term ChangeVersion 4Author XuCindyStatus ReleasedTo move between radio channelsIndexterm: "radio"Sub-indexterm: "selecting a channel"Indexterm: "FM radio"Sub-indexterm: "selecting a channel"Indexterm: "radio"Sub-indexterm: "moving between channels"•Flick your finger left or right along the frequency band.•Drag the tuning dial right or left.GUID GUID-CBBF7274-CC1C-4267-8C7F-F36E2362D7BCTitle To move between radio channelsChanges For Nozomi ICS: add 'a' in indexVersion 3Author XuCindyStatus Released*To select the radio regionIndexterm: "radio"This is a draft publication for internal use only.116This is an Internet version of this publication. © Print only for private use.](https://usermanual.wiki/Sony/PM-0480.Short-term-confidential-userguide-EN-PRODUCT-NAME-PART-NUMBER-Android4-0/User-Guide-1988542-Page-116.png)
![Sub-indexterm: "radio region"1When the radio is open, press ID: ICN-SONY-KEY-MENU.2Tap Set radio region [fmradio_strings_dialog_title_set_radio_region_txt] .3Select an option.GUID GUID-C4C8BAA2-3545-46E9-BA22-591362850F6DTitle To select the radio regionChanges For Odin & YugaVersion 1Author XuCindyStatus ReleasedTo adjust the visualiserIndexterm: "radio"Sub-indexterm: "visualiser"1When the radio is open, tap ID: ICN-SONY-KEY-MENU.2Tap Visualizer [fmradio_strings_menu_visualizer_txt] .3Select an option.GUID GUID-3DB80072-63E2-4F94-AF7A-7638362DB9AFTitle To adjust the visualizerChanges For Togari HTML: changed from 'visualizer' to 'visualiser'.Version 2Author XuCindyStatus DraftFM radio overviewIndexterm: "radio"Sub-indexterm: ""ID: SCR-SONY-EDREAM-RADIO-PORTRAIT1Radio on/off button2 View menu options3 Move up the frequency band to search for a channel4 A saved favourite channel5 Move down the frequency band to search for a channel6 Tuning dial7 Save or remove a channel as a favourite8 Tuned frequencyGUID GUID-37879EDC-C7EC-40D4-A861-001E14183BB5Title FM radio overviewChanges For taoshan: delete one settingVersion 9Author XuCindyStatus Released*This is a draft publication for internal use only.117This is an Internet version of this publication. © Print only for private use.](https://usermanual.wiki/Sony/PM-0480.Short-term-confidential-userguide-EN-PRODUCT-NAME-PART-NUMBER-Android4-0/User-Guide-1988542-Page-117.png)
![Using your favourite radio channelsYou can save the radio channels you most frequently listen to as favourites. By usingfavourites you can quickly return to a radio channel.GUID GUID-BBAC5D23-766F-42C3-94D1-6785FFEB7932Title Using favourite radio channelsChanges Valid for eDream 2.1 Robyn/Mimmi/Sharkira and onwards. Changed the titleaccording to editor's comment.Version 2Author PeterCStatus ReleasedTo save a channel as a favouriteIndexterm: "radio"Sub-indexterm: "favourites"Indexterm: "favourites"Sub-indexterm: "saving radio channels as"Indexterm: "presets"Sub-indexterm: "saving radio channels as"1When the radio is open, navigate to the channel that you want to save as afavourite.2Tap ID: ICN-SONY-AND-RADIO-FAVOURITE-ON.3Enter a name and select a colour for the channel, then press Save [save_label] .GUID GUID-E43E695E-5D0D-4A62-8D48-1CC6F1866CC3Title To save a channel as a favouriteChanges For Taoshan: no text change; changed an iconVersion 4Author XuCindyStatus ReleasedTo remove a channel as a favouriteIndexterm: "radio"Sub-indexterm: "favourites"Indexterm: "FM radio"Sub-indexterm: "favourites"Indexterm: "favourites"Sub-indexterm: "removing radio channels as"Indexterm: "presets"Sub-indexterm: "removing radio channels as"1When the radio is open, navigate to the channel that you want to remove.2Tap ID: ICN-SONY-INFINITEVIEW-FAVORITE-ACTION-BTN, then tap Delete[gui_delete_txt] .GUID GUID-57C07E91-6EAB-4D54-905F-A6BE087320A9Title To remove a channel as a favouriteChanges For Taoshan: no text change; changed an iconVersion 7Author XuCindyStatus ReleasedMaking a new search for radio channelsIf you have moved to a new location or the reception has improved in your currentlocation, you can start a new scan for radio channels.Any favourites you have saved are not affected by a new scan.GUID GUID-7F9E2B72-3E39-4E37-86C0-28B03075A5E6Title Making a new search for radio channelsChanges ver.1 Created for Robyn/Mimmi RTLVersion 1Author PeterCStatus ReleasedTo start a new search for radio channelsIndexterm: "radio"This is a draft publication for internal use only.118This is an Internet version of this publication. © Print only for private use.](https://usermanual.wiki/Sony/PM-0480.Short-term-confidential-userguide-EN-PRODUCT-NAME-PART-NUMBER-Android4-0/User-Guide-1988542-Page-118.png)
![Sub-indexterm: "searching for channels"1When the radio is open, press ID: ICN-SONY-KEY-MENU.2Tap Search for channels [fmradio_strings_rescan_radio_stations_txt] . The radio scans the wholefrequency band, and all available channels are displayed.GUID GUID-68ADA9D8-FE98-42F5-85DF-5A0060B85ED6Title To starta new search for channelsChanges ver. 2 Valid from eDream 3.0 Used in Anzu Hallon + Zeus GlobalVersion 2Author WangTStatus ReleasedSound settingsIndexterm: "radio sound"GUID GUID-FB9045F8-AC19-4401-9A4B-4838EB6B5B3CTitle Sound settings - heading onlyChangesVersion 1Author JorgenLStatus ReleasedSwitching the radio sound between devicesYou can listen to the radio through a wired headset or through wired headphones.Once either device is connected, you can switch the sound to the speaker, if desired.GUID GUID-A7C4F5DA-CB55-4560-B2CE-FDA843730C49Title Switching between the speaker and the handsfreeChanges Device Term ChangeVersion 3Author XuCindyStatus ReleasedTo switch the radio sound to the speakerIndexterm: "radio"Sub-indexterm: "listening to with the speaker"1When the radio is open, press ID: ICN-SONY-KEY-MENU.2Tap Play in speaker [fmradio_strings_play_in_loadspeaker_txt] .To switch the sound back to the wired headset or headphones, press ID: ICN-SONY-KEY-MENU and tap Play in headphones [fmradio_strings_menu_play_in_headphones_txt] .GUID GUID-B9A08CE9-BA43-4C99-85FF-9B796DA9CCFBTitle To switch between the speaker and handsfreeChanges Device Term ChangeVersion 4Author Gan LuStatus ReleasedSwitching between mono and stereo sound modeYou can listen to your FM radio in either mono or stereo mode. In some situations,switching to mono mode can reduce noise and improve sound quality.GUID GUID-F811B111-325A-4DE0-A5CB-A2212EF4DE3BTitle Switching between the stereo sound and the mono soundChanges Correct the misspelling of stereoVersion 2Author JessyDStatus ReleasedTo switch between mono and stereo sound modeIndexterm: "radio"Sub-indexterm: "mono sound"Indexterm: "radio"This is a draft publication for internal use only.119This is an Internet version of this publication. © Print only for private use.](https://usermanual.wiki/Sony/PM-0480.Short-term-confidential-userguide-EN-PRODUCT-NAME-PART-NUMBER-Android4-0/User-Guide-1988542-Page-119.png)
![Sub-indexterm: "stereo sound"1When the radio is open, press ID: ICN-SONY-KEY-MENU.2Tap Enable stereo sound [fmradio_strings_menu_play_in_stereo_txt] .3To listen to the radio in mono sound mode again, press ID: ICN-SONY-KEY-MENU and tap Force mono sound [fmradio_strings_menu_play_in_mono_txt] .GUID GUID-3FBD4FE8-230A-4F5E-9823-984B1F29EB2DTitle To switch between the mono sound and stereo soundChanges For eD6.0Version 1Author XuCindyStatus ReleasedIdentifying radio tracks using TrackID™Use TrackID™ [ti_application_name_txt] technology to identify music tracks as they play onyour device's FM radio.GUID GUID-819ED68C-5940-440C-AA23-CD4827FD3F34Title Identifying your music in TrackIDChanges Device Term ChangeVersion 2Author Gan LuStatus ReleasedTo identify a song on the FM radio using TrackID™Indexterm: "TrackID™ technology"Sub-indexterm: "using with the FM Radio"1While the song is playing on your device's FM radio, press ID: ICN-SONY-KEY-MENU, then select TrackID™ [ti_application_name_txt] .2A progress indicator appears while the TrackID™ application samples thesong. If successful, you are presented with a track result, or a list of possibletracks.3Press ID: ICN-SONY-KEY-AND-BACK to return the FM Radio.The TrackID™ application and the TrackID™ service are not supported in all countries/regions,or by all networks and/or service providers in all areas.GUID GUID-1931C6CE-DD54-4358-89BE-377610C41914Title To identify the music your are listening using TrackIDChanges For Togari HTML: TrackID text loop. No text changes.Version 7Author XuCindyStatus DraftThis is a draft publication for internal use only.120This is an Internet version of this publication. © Print only for private use.](https://usermanual.wiki/Sony/PM-0480.Short-term-confidential-userguide-EN-PRODUCT-NAME-PART-NUMBER-Android4-0/User-Guide-1988542-Page-120.png)
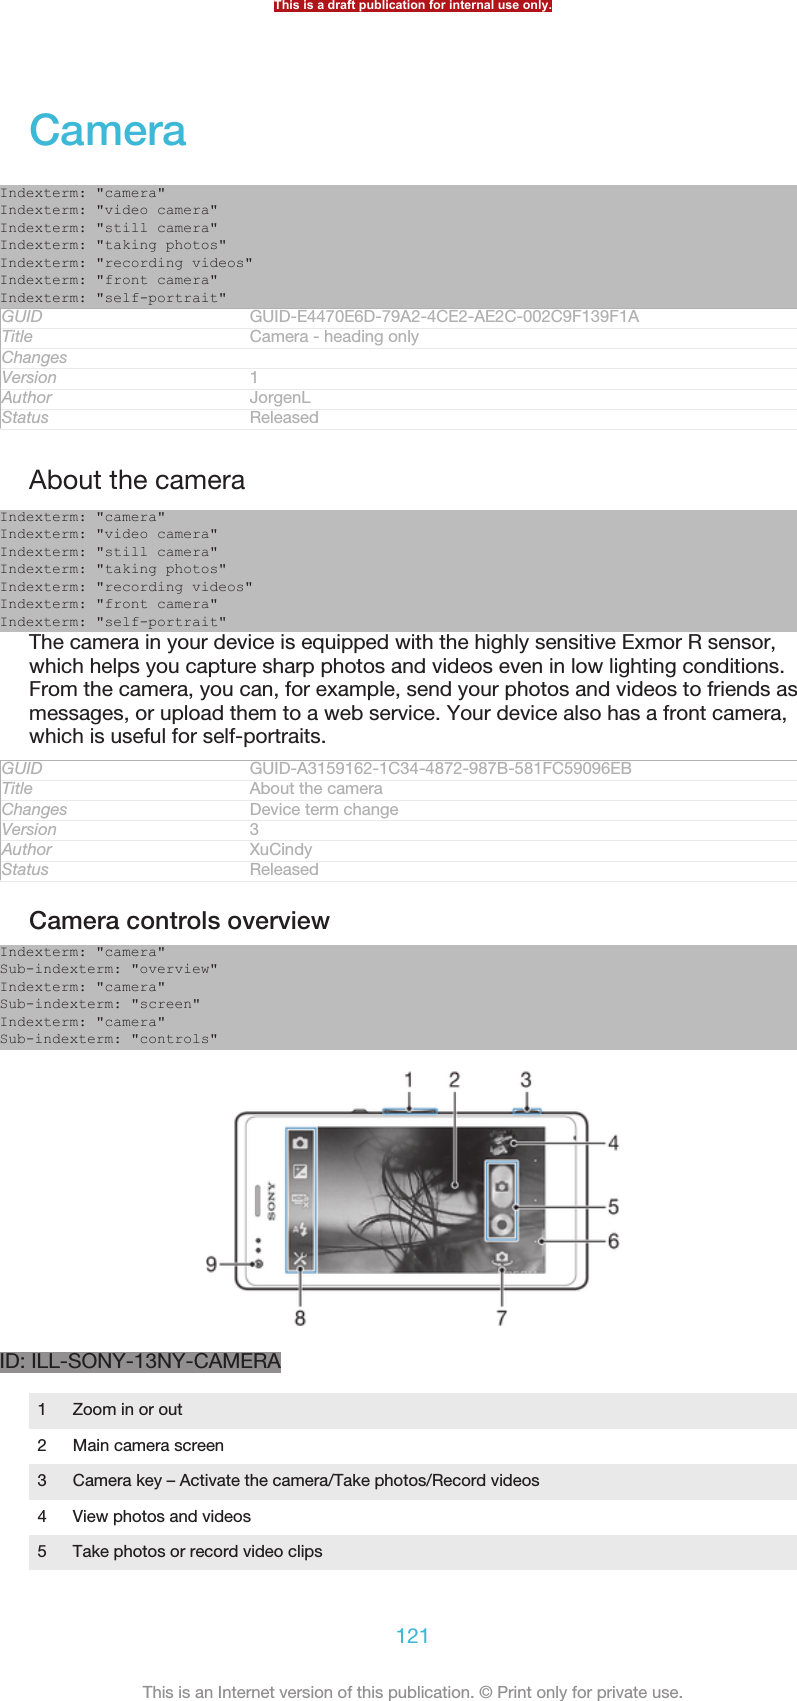
![Sub-indexterm: "taking"1Activate the camera.2Point the camera towards the subject.3Tap the on-screen camera button ID: ICN-SONY-CAMERA-ONSCREEN-BUTTON. The photo is taken as soon as you release your finger.GUID GUID-4622B323-F548-476E-8173-532072C9BCB0Title To take a photo by tapping the on-screen buttonChanges For Odin&Yuga:Delete step 2,3,4.Version 3Author XuCindyStatus ReleasedTo take a self-portrait using the front cameraIndexterm: "taking photos"Sub-indexterm: "self-portraits"Indexterm: "camera"Sub-indexterm: "self-portraits"Indexterm: "photos"Sub-indexterm: "taking"1Activate the camera.2Tap the icon on the top left of the screen, then find and select Front camera[cam_strings_capturing_mode_front_camera_txt] .3To take the photo, press the camera key. The photo is taken as soon as yourelease your finger.GUID GUID-8BA01D91-C162-4CA5-8799-3DFD5099BA0CTitle To take a self-portraitChanges For Odin & Yuga: Delete step 2-4.Version 9Author XuCindyStatus ReleasedTo use the zoom functionIndexterm: "zoom"Indexterm: "camera"Sub-indexterm: "zoom"•When the camera is open, press the volume key up or down to zoom in or out.GUID GUID-8EB812FD-8599-4290-ACF7-7AB15082F0DCTitle To use zoomChanges Changed for eDream 4.0Version 3Author XuCindyStatus ReleasedTo use the still camera flashIndexterm: "camera"Sub-indexterm: "using the flash"Indexterm: "flash"Sub-indexterm: "using when taking photos"1When the camera is open, tap ID: ICN-SONY-MENU-SETTINGS.2Tap Flash [cam_strings_advanced_setting_flash_txt] , and select your desired flash setting.3Take the photo.GUID GUID-6075BDDE-DDAA-43BC-8CBB-12AF5C8109DBTitle To use the still camera flashChanges for Mint; text changes made; changed press to tap and changed tags of aniconVersion 5Author JessicaLStatus ReleasedTo view your photos and videosIndexterm: "camera"Sub-indexterm: "viewing photos"Indexterm: "viewing"Sub-indexterm: "photos"Indexterm: "photos"This is a draft publication for internal use only.123This is an Internet version of this publication. © Print only for private use.](https://usermanual.wiki/Sony/PM-0480.Short-term-confidential-userguide-EN-PRODUCT-NAME-PART-NUMBER-Android4-0/User-Guide-1988542-Page-123.png)
![Sub-indexterm: "viewing"1Open the camera, then tap a thumbnail at the top right of the screen to open aphoto or video.2Flick left or right to view your photos and videos. Videos are identified by ID:ICN-SONY-SEMC-MUSIC-PLAY-NORMAL.GUID GUID-239B38C4-A380-4C4D-99D0-920BADC8FC12Title To view your photosChanges For Odin and Yuga: delete a noteVersion 8Author XuCindyStatus ReleasedTo delete a photo1Open the photo that you want to delete.2Tap an empty area of the screen to make ID: ICN-SONY-CAMERA-REVIEW-DELETE appear.3Tap ID: ICN-SONY-CAMERA-REVIEW-DELETE.4Tap Delete [video_strings_delete_txt] to confirm.GUID GUID-D9349D8E-79C5-4E25-96EC-96911F82C141Title To delete a photoChanges For Taoshan: change from 'ok' to 'delete'.Version 8Author XuCindyStatus ReleasedFace detectionIndexterm: "face detection"Indexterm: "camera"Sub-indexterm: "face detection"You can use face detection to bring an off-centre face into focus. The cameraautomatically detects up to five faces, indicated by white frames. A yellow frameshows which face has been selected for focus. Focus is set to the face closest to thecamera. You can also tap one of the frames to select which face should be in focus.GUID GUID-63D9E56D-F38F-4859-BBDB-87F159FC263FTitle Face detectionChanges valid for Anzu/Hallon - changed green to yellowVersion 2Author JessicaLStatus ReleasedTo turn on face detection1Activate the camera.2Tap the icon on the top left of the screen, then select Normal [cam_strings_captur-ing_mode_normal_txt] .3To display all settings, tap ID: ICN-SONY-MENU-SETTINGS.4Tap Focus mode [cam_strings_focus_mode_txt] > Face detection [cam_strings_focus_mode_face_detec-tion_txt] .GUID GUID-5A0ADE83-3ACE-4509-8387-91471C221D56Title To set face detectionChanges For Pollux: no text changes; changed label string of 'Normal'.Version 8Author XuCindyStatus Released*To take a photo using face detectionIndexterm: "taking photos"Sub-indexterm: "using face detection"Indexterm: "camera"Sub-indexterm: "taking photos"Indexterm: "photos"Sub-indexterm: "taking"Indexterm: "face detection"Indexterm: "camera"This is a draft publication for internal use only.124This is an Internet version of this publication. © Print only for private use.](https://usermanual.wiki/Sony/PM-0480.Short-term-confidential-userguide-EN-PRODUCT-NAME-PART-NUMBER-Android4-0/User-Guide-1988542-Page-124.png)
![Sub-indexterm: "face detection"1When the camera is open and Face detection [cam_strings_focus_mode_face_detection_txt]turned on, point the camera at your subject. Up to five faces can be detected,and each detected face is framed.2Press the camera key halfway down. A yellow frame shows which face is infocus.3To take the photo, press the camera key fully down.GUID GUID-EFCD189A-01A1-4B22-A685-F15358A3C14ATitle To take a photo using face detectionChanges for Tsubasa; text changes made; changed the frame colour from green toyellow according to camera software designVersion 6Author JessicaLStatus ReleasedUsing Smile Shutter™ to capture smiling facesUse Smile Shutter™ technology to photograph a face just as it smiles. The cameradetects up to five faces and selects one face for smile detection and auto focus.When the selected face smiles, the camera automatically takes a photo.GUID GUID-77C6CF85-B277-4D09-995B-C19F88AC0FBETitle Smile detectionChanges old 6.0 versionVersion 3Author XuCindyStatus ReleasedTo turn on Smile Shutter™1Activate the camera.2To display all settings, tap ID: ICN-SONY-MENU-SETTINGS.3Tap Smile Shutter [cam_strings_smile_shutter_cy_txt] and select a smile level.GUID GUID-65983621-42FC-4F42-8CF8-06C2A05ABBE4Title To set smile detectionChanges For Odin&Yuga: Delete step 2.Version 9Author XuCindyStatus Released*To take a photo using Smile Shutter™Indexterm: "taking photos"Sub-indexterm: "using smile detection"Sub-indexterm: "using Smile Shutter™"Indexterm: "camera"Sub-indexterm: "taking photos"Indexterm: "photos"Sub-indexterm: "taking"Indexterm: "camera"Sub-indexterm: "smile detection"Sub-indexterm: "Smile Shutter™"Indexterm: "smile detection"Indexterm: "Smile Shutter™"1When the camera is open and Smile Shutter is turned on, point the camera atyour subject. The camera selects which face to focus on.2The face selected appears inside a green frame and the photo is takenautomatically.3If no smile is detected, press the camera key to take the photo manually.GUID GUID-4AFCD885-96FC-408B-BE91-7BAA76C90ADDTitle To take a photo using smile detectionChanges For Pollux: change index nameVersion 9Author XuCindyStatus ReleasedAdding the geographical position to your photosIndexterm: "geotagging"Sub-indexterm: "of photos"This is a draft publication for internal use only.125This is an Internet version of this publication. © Print only for private use.](https://usermanual.wiki/Sony/PM-0480.Short-term-confidential-userguide-EN-PRODUCT-NAME-PART-NUMBER-Android4-0/User-Guide-1988542-Page-125.png)
![Indexterm: "photos"Sub-indexterm: "adding the geographical position"Indexterm: "camera"Indexterm: "camera"Sub-indexterm: "geotagging"Turn on geotagging to add the approximate geographical location (a geotag) tophotos when you take them. The geographical location is determined either bywireless networks (mobile or Wi-Fi® networks) or GPS technology.When ID: ICN-SONY-STATUSBAR-GPS-ON appears on the camera screen,geotagging is turned on but the geographical position has not been found. When ID:ICN-SONY-CAMERA-GEOTAG-ON appears, geotagging is turned on and thegeographical location is available, so your photo can get geotagged. When neither ofthese two symbols appears, geotagging is turned off.GUID GUID-DBEA8510-B4CD-4F62-8720-DA299E7B3EC8Title Adding the geographical position to your photosChanges Changed for eDream 4.0Version 5Author XuCindyStatus ReleasedTo turn on geotaggingIndexterm: "photos"Sub-indexterm: "viewing same location"Indexterm: "location"1Activate the camera.2Tap ID: ICN-SONY-MENU-SETTINGS, then tap Geotagging [cam_strings_advanced_set-ting_geo_tag_txt] > On [cam_strings_advanced_setting_on_txt] .3Tap OK [gui_ok_txt] to agree to enable GPS and/or wireless networks.4Check the options that you want to select under Location services [location_set-tings_title] .5After you confirm your settings, press ID: ICN-SONY-KEY-AND-BACK toreturn to the camera screen.6If ID: ICN-SONY-CAMERA-GEOTAG-ON appears on the camera screen, yourlocation is available and your photo can get geotagged. If not, check your GPSand/or wireless network connection.GUID GUID-1DF05979-1001-4B28-B041-BFB6FFDFA30ATitle To turn on geotaggingChanges For Odin&Yuga: Delete Step 2.Version 9Author XuCindyStatus Released*Using still camera settingsIndexterm: "settings"Sub-indexterm: "still camera "Indexterm: "camera"Sub-indexterm: "settings"GUID GUID-2D0BFF4E-8F39-4AD6-9126-43093042FC18Title Using still camera settings - headingChanges Valid from e-dream 3.0.Version 2Author JessicaLStatus ReleasedTo adjust the still camera settingsIndexterm: "camera"Indexterm: "settings"Sub-indexterm: "camera"Indexterm: "still camera"Sub-indexterm: "settings"1Activate the camera.2To display all settings, tap ID: ICN-SONY-MENU-SETTINGS.3Select the setting that you want to adjust, then edit as desired.GUID GUID-FD8232A8-DD3A-4B07-9782-F50929353DFBTitle To select still camera settingsChanges For Odin&Yuga: Delete step 2; changed in step 3This is a draft publication for internal use only.126This is an Internet version of this publication. © Print only for private use.](https://usermanual.wiki/Sony/PM-0480.Short-term-confidential-userguide-EN-PRODUCT-NAME-PART-NUMBER-Android4-0/User-Guide-1988542-Page-126.png)
![Version 4Author XuCindyStatus ReleasedTo customise the still camera settings panel1When the camera is open, tap ID: ICN-SONY-MENU-SETTINGS to display allsettings.2Touch and hold the setting you want to move and drag it to the desiredposition.If you drag the setting outside of the settings panel, the change is cancelled.GUID GUID-55ABBAD7-0AEB-4CCD-ABB0-75A1EE05973CTitle To customise the still camera settings panelChanges for Mint; text changes made; changed press to tap and changed tags of aniconVersion 2Author JessicaLStatus Released*Still camera settings overviewIndexterm: "camera"Sub-indexterm: "settings"Indexterm: "still camera"ID: ICN-SONY-CAMERA-SUPERIOR-AUTOSuperior auto [cam_strings_capturing_mode_superior_auto_cy_txt]Optimise your settings to suit any scene.ID: ICN-SONY-CAMERA-CAP-MODE-NORMALNormal [cam_strings_capturing_mode_normal_txt]ID: ICN-SONY-CAMERA-FRONT-CAMERAFront camera [cam_strings_capturing_mode_front_camera_txt]Select the front camera if you want to take self-portrait photos.ID: ICN-SONY-CAMERA-PICTURE-EFFECTPicture effect [cam_strings_capturing_mode_pic_effect_cy_txt]Apply effects to photos.ID: ICN-SONY-CAMERA-CAP-MODE-SCENE-RECOGNITIONScene selection [cam_strings_capturing_mode_scene_selection_cy_txt]ID: ICN-SONY-SWEEP-PANORAMASweep Panorama [cam_3d_strings_sweep_panorama_short_txt]Use this setting to take wide-angle, panoramic photos. Just pressthe camera key and move the camera steadily from one side to theother.GUID GUID-D8AFAD06-81E4-446A-B2B8-5F965BC263ABTitle Still camera settings overview - separated from Still camera settingsChanges for Tsubasa; added new settings such as Superior Auto and Picture effectVersion 3.1.1.1.1Author JessicaLStatus Released*ResolutionChoose between several picture sizes and aspect ratios before taking a photo. Aphoto with a higher resolution requires more memory.ID: ICN-SONY-CAMERA-RESOLUTION-SETTING-5MP5MP 4:3 [cam_strings_resolution_5mp_txt]5 megapixel picture size with 4:3 aspect ratio. Suitable for photos you wantto view on non-widescreen displays or print in high resolution.ID: 3MP 16:9 [cam_strings_resolution_3mp_txt]3 megapixel picture size with 16:9 aspect ratio. A high resolution widescreenformat. Has a higher resolution than full HD. Suitable for photos you want toview on widescreen displays.ID: 2MP 4:3 [cam_strings_resolution_2mp_txt]2 megapixel picture size with 4:3 aspect ratio. Suitable for photos you wantto view on non-widescreen displays.This is a draft publication for internal use only.127This is an Internet version of this publication. © Print only for private use.](https://usermanual.wiki/Sony/PM-0480.Short-term-confidential-userguide-EN-PRODUCT-NAME-PART-NUMBER-Android4-0/User-Guide-1988542-Page-127.png)
![ID: ICN-SONY-CAMERA-RESOLUTION-SETTING-2MP2MP 16:9 [cam_strings_resolution_full_hd_txt]2 megapixel picture size with 16:9 aspect ratio. Suitable for photos you wantto view on widescreen displays.GUID GUID-50E3A0A3-30F1-419A-95F5-8E31E958B605Title Resolution - separated from Still camera settingsChanges no text change; separated Resolution from Still camera settingsVersion 1Author JessicaLStatus Released*FlashUse the flash to take photos when lighting conditions are poor or when there is abacklight.ID: ICN-SONY-CAMERA-QUICK-SETTINGS-FLASH-AUTOAuto [cam_strings_advanced_setting_auto_txt]The camera automatically determines if the lighting conditions requirethe use of a flash.ID: ICN-SONY-CAMERA-QUICK-SETTINGS-FLASH-FILLFill flash [cam_strings_advanced_setting_flash_fill_flash_txt]Use this setting when the background is brighter than the subject. Thisremoves unwanted dark shadows.ID: ICN-SONY-CAMERA-QUICK-SETTINGS-FLASH-OFFOff [cam_strings_advanced_setting_off_txt]The flash is turned off. Sometimes photo quality can be better withoutthe flash, even if lighting conditions are poor. Taking a good photowithout using the flash requires a steady hand. Use the self-timer toavoid blurred photos.ID: ICN-SONY-CAMERA-QUICK-SETTINGS-FLASH-RED-EYE-REDUCTIONRed-eye reduction [cam_strings_advanced_setting_flash_red_eye_reduc_txt]Reduces the red colour of eyes when taking a photo.GUID GUID-53732C87-D236-4E9D-A3DB-419A332ADCAATitle Flash - separated from Still camera settingsChanges no text change; separated the Flash part from Still camera settingsVersion 1Author JessicaLStatus ReleasedSelf-timerWith the self-timer you can take a photo without holding the device. Use this functionto take self-portraits, or group photos where everyone can be in the photo. You canalso use the self-timer to avoid shaking the camera when taking photos.ID: ICN-SONY-CAMERA-ADVANCED-SETTINGS-SELF-TIMER-ONOn (10 sec.) [cam_strings_advanced_setting_selftimer_duration_txt]Set a 10-second delay from when you tap the camera screen untilthe photo is taken.ID: ICN-SONY-CAMERA-ADVANCED-SETTINGS-SELF-TIMER-ON-TWO-SECOn (2 sec.) [cam_strings_advanced_setting_self_timer_two_sec_txt]Set a 2-second delay from when you tap the camera screen untilthe photo is taken.ID: ICN-SONY-CAMERA-ADVANCED-SETTINGS-SELF-TIMER-OFFOff [cam_strings_advanced_setting_off_txt]The photo is taken as soon as you tap the camera screen.GUID GUID-F58EF0AC-D869-4017-ACFA-0D971DC83DCETitle Self-timer - separated from Still camera overviewChanges For Pollux HTML: change two labels.Version 3Author XuCindyStatus ReleasedSmile Shutter™Use the smile shutter function to determine what kind of smile the camera reacts tobefore taking a photo.GUID GUID-D65717B3-5AB0-4C82-A1BE-8F0996B7FB5BThis is a draft publication for internal use only.128This is an Internet version of this publication. © Print only for private use.](https://usermanual.wiki/Sony/PM-0480.Short-term-confidential-userguide-EN-PRODUCT-NAME-PART-NUMBER-Android4-0/User-Guide-1988542-Page-128.png)
![Title Smile detection - separated from Still camera settingsChanges for Tsubasa; text changes made; changed Smile detection to Smile Shutterto align with Sony camera productsVersion 2Author JessicaLStatus ReleasedQuick launchUse Quick launch settings to launch the camera from the lock screen. If the device isin sleep mode of camera, press the camera key.ID: ICN-SONY-SEMC-SLIDING-TAB-FASTCAPTURE-PRESSEDLaunch and capture [cam_strings_fast_capturing_launch_and_capture_photo_txt]By pressing and holding down the camera key, the first photo iscaptured immediately after the camera is launched from sleepmode.ID: ICN-SONY-SEMC-SLIDING-TAB-FASTCAM-NORMALLaunch only (still camera) [cam_strings_fast_capturing_launch_only_photo_txt]By pressing and holding down the camera key, the still camera islaunched from sleep mode.ID: ICN-SONY-SEMC-SLIDING-TAB-FASTCAM-VIDEOREC-NORMALLaunch and record video [cam_strings_fast_capturing_launch_and_capture_vid-eo_txt]By pressing and holding down the camera key, the first video is shotimmediately after the camera video camera is launched from sleepmode.ID: ICN-SONY-SEMC-SLIDING-TAB-FASTCAM-VIDEO-PRESSEDLaunch only (video camera) [cam_strings_fast_capturing_launch_only_video_txt]By pressing and holding down the camera key, the video camera islaunched from sleep mode.ID: ICN-SONY-CAM-LAUNCH-CAPTURE-OFFOff [cam_strings_advanced_setting_off_txt]GUID GUID-A3E21A95-B04C-455D-95F0-7A70EAA0EF9DTitle Quick launchChanges For Odin and Yuga: modify the description of quick launchVersion 4Author XuCindyStatus Released*Focus modeThe focus function controls which part of a photo should be sharp. When continuousautofocus is on, the camera keeps adjusting focus so that the area within the yellowfocus frame stays sharp.ID: ICN-SONY-CAMERA-FOCUS-MODE-SINGLE-AFSingle autofocus [cam_strings_focus_mode_single_af_txt]The camera automatically focuses on the selected subject. Continuousautofocus is on. Touch and hold the camera screen until the yellow focus frameturns blue, indicating that the focus is set. The photo is taken when you releaseyour finger.ID: ICN-SONY-CAMERA-FOCUS-MODE-MULTI-AFMulti autofocus [cam_strings_focus_mode_multi_af_txt]The focus is automatically set on several areas of the image. Touch and hold thecamera screen until the yellow focus frame turns blue, indicating that the focusis set. The photo is taken when you release your finger. Continuous autofocus isoff.ID: ICN-SONY-CAMERA-FOCUS-MODE-FACE-DETECTIONFace detection [cam_strings_focus_mode_face_detection_txt]The camera automatically detects up to five human faces, indicated by frameson the screen. The camera automatically focuses on the nearest face. You canalso select which face to focus on by tapping it on the screen. When you tap thecamera screen, a blue frame shows which face is selected and in focus. Facedetection cannot be used for all scene types. Continuous autofocus is on.ID: ICN-SONY-CAMERA-CAP-MODE-TOUCH-CAPTURINGTouch focus [cam_strings_focus_mode_touch_focus_txt]Touch a specific area on the camera screen to set the area of focus. Continuousautofocus is off. Touch and hold the camera screen until the yellow focus frameturns blue, indicating that the focus is set. The photo is taken when you releaseyour finger.This is a draft publication for internal use only.129This is an Internet version of this publication. © Print only for private use.](https://usermanual.wiki/Sony/PM-0480.Short-term-confidential-userguide-EN-PRODUCT-NAME-PART-NUMBER-Android4-0/User-Guide-1988542-Page-129.png)
![ID: ICN-SONY-CAM-OBJECT-TRACKINGObject tracking [cam_strings_focus_mode_object_tracking_txt]When you select an object by touching it in the viewfinder, the camera tracks itfor you.This setting is only available in Normal [cam_strings_capturing_mode_normal_txt] capturing mode.GUID GUID-9554F8D4-BDAB-4479-8A03-C5041ECA6385Title Focus mode - separated from Still camera settingsChanges For Pollux: no text changes; changed label string of 'Normal'.Version 5.3.1Author XuCindyStatus Released*Exposure valueID: ICN-SONY-CAMERA-QUICK-EXPOSURE-LEVEL-TCHDetermine the amount of light in the photo you want to take. Ahigher value indicates an increased amount of light.This setting is only available in Normal [cam_strings_capturing_mode_normal_txt] capturing mode.GUID GUID-91AEAD7C-18FA-4B92-AAB0-7C10B6678961Title Exposure value - separated from Still camera settingsChanges For Tsubasa html User guide. Removed lines tag.Version 2.1.1Author JorgenLStatus ReleasedHDRUse the HDR (High Dynamic Range) setting to take a photo against strong back lightor in conditions where the contrast is sharp. HDR compensates for the loss of detailand produces a picture that is representative of both dark and bright areas.This setting is only available in Normal [cam_strings_capturing_mode_normal_txt] capturing mode.GUID GUID-BA0E0681-02F9-43FD-90AC-C6766538D74ETitle HDR - cameraChanges For Odin and Yuga: add a noteVersion 2Author XuCindyStatus ReleasedWhite balanceThe white balance setting adjusts the colour balance according to the lightingconditions.ID: ICN-SONY-CAMERA-ADVANCED-SETTINGS-WHITE-BALANCE-AUTOAuto [cam_strings_advanced_setting_white_balance_auto_txt]Adjusts the colour balance automatically to suit the lightingconditions.ID: ICN-SONY-CAMERA-ADVANCED-SETTINGS-WHITE-BALANCE-INCANDESCENTIncandescent [cam_strings_advanced_setting_white_balance_incandes-cent_txt]Adjusts the colour balance for warm lighting conditions,such as under light bulbs.ID: ICN-SONY-CAMERA-ADVANCED-SETTINGS-WHITE-BALANCE-FLUORESCENTFluorescent [cam_strings_advanced_setting_white_balance_fluores-cent_txt]Adjusts the colour balance for fluorescent lighting.ID: ICN-SONY-CAMERA-ADVANCED-SETTINGS-WHITE-BALANCE-DAYLIGHTDaylight [cam_strings_advanced_setting_white_balance_day_light_txt]Adjusts the colour balance for sunny outdoor conditions.ID: ICN-SONY-CAMERA-ADVANCED-SETTINGS-WHITE-BALANCE-CLOUDYCloudy [cam_strings_advanced_setting_white_balance_cloudy_txt]Adjusts the colour balance for a cloudy sky.This setting is only available in Normal [cam_strings_capturing_mode_normal_txt] capturing mode.GUID GUID-CCD95519-AFAE-4267-9515-C7C64AEF3A86Title White balance - separated from Still camera settingsThis is a draft publication for internal use only.130This is an Internet version of this publication. © Print only for private use.](https://usermanual.wiki/Sony/PM-0480.Short-term-confidential-userguide-EN-PRODUCT-NAME-PART-NUMBER-Android4-0/User-Guide-1988542-Page-130.png)
![Changes for Tsubasa; no text changes made; changed a labelVersion 3Author JessicaLStatus ReleasedISOYou can reduce image blurring caused by dark conditions or moving subjects byincreasing the ISO sensitivity.ID: ICN-SONY-CAMERA-ISO-AUTO Auto [cam_strings_settings_auto_txt]Sets the ISO sensitivity automatically.ID: ICN-SONY-CAMERA-ISO-100 100 [cam_strings_iso_100_txt]Sets the ISO sensitivity to 100.ID: ICN-SONY-CAMERA-ISO-200 200 [cam_strings_iso_200_txt]Sets the ISO sensitivity to 200.ID: ICN-SONY-CAMERA-ISO-400 400 [cam_strings_iso_400_txt]Sets the ISO sensitivity to 400.ID: ICN-SONY-CAMERA-ISO-800 800 [cam_strings_iso_800_txt]Sets the ISO sensitivity to 800.This setting is only available in Normal [cam_strings_capturing_mode_normal_txt] capturing mode.GUID GUID-EBC172A1-DE26-4D17-84F4-89DFB71D3277Title ISO - separated from Still camera settingsChanges For Taoshan: delete one setting iso1600Version 3Author XuCindyStatus ReleasedMeteringThis function automatically determines a well-balanced exposure by measuring theamount of light striking the image you want to capture.ID: ICN-SONY-CAMERA-ADVANCED-SETTINGS-METERING-CENTERCenter [cam_strings_advanced_setting_photometry_center_txt]Adjusts the exposure to the centre of the image.ID: ICN-SONY-CAMERA-ADVANCED-SETTINGS-METERING-AVERAGEAverage [cam_strings_advanced_setting_photometry_average_txt]Calculates the exposure based on the amount of light striking thewhole image.ID: ICN-SONY-CAMERA-ADVANCED-SETTINGS-METERING-SPOTSpot [cam_strings_advanced_setting_photometry_spot_txt]Adjusts the exposure in a very small part of the image that you wantto capture.This setting is only available in Normal [cam_strings_capturing_mode_normal_txt] capturing mode.GUID GUID-37A6CA5A-3FEC-4530-B7BA-56B28971279DTitle Metering - separated from Still camera settingsChanges For Dogo: changed on the words accoridng to ed. review.Version 4Author XuCindyStatus ReleasedImage stabiliserWhen taking a photo, it can be difficult to hold the device steady. The stabiliser helpsyou by compensating for small movements of the hand.GUID GUID-5C247A77-68D8-43C5-B54C-F7AC962C69E7Title Image stabiliser - separated from Still camera settingsChanges for Pollux; term change madeVersion 2Author JessicaLStatus ReleasedThis is a draft publication for internal use only.131This is an Internet version of this publication. © Print only for private use.](https://usermanual.wiki/Sony/PM-0480.Short-term-confidential-userguide-EN-PRODUCT-NAME-PART-NUMBER-Android4-0/User-Guide-1988542-Page-131.png)
![GeotaggingTag photos with details of where you took them.ID: ICN-SONY-CAMERA-GEOTAG-ONOn [cam_strings_advanced_setting_on_txt]When geotagging is turned on, the approximate geographical location is added tophotos when you take them. To use geotagging, you must enable location featuresfrom the Settings [settings_label] menu. For geotags to be added to a photo, thelocation must be determined before you take the photo. Your location is determinedwhen ID: ICN-SONY-CAMERA-GEOTAG-ON appears on the camera screen. Whenyour device is searching for your position, ID: ICN-SONY-STATUSBAR-GPS-ONappears.ID: ICN-SONY-CAMERA-GEOTAG-OFFOff [cam_strings_advanced_setting_off_txt]When geotagging is turned off, you cannot view the location where you took aphoto.GUID GUID-7CA8028F-3C9B-47C4-82E6-EBECC45818EFTitle Geotagging - separated from Still camera settingsChanges For Odin HTML: remove cross referenceVersion 4Author XuCindyStatus ReleasedPreviewYou can choose to preview the photo just after you have taken or the video you haverecorded.ID: ICN-SONY-CAM-PREVIEW-DURATION-SETTING-NOLIMITUnlimited [cam_strings_preview_duration_unlimited_txt]The preview of the photo or video appears after you have taken.ID: ICN-SONY-CAM-PREVIEW-DURATION-SETTING-5SEC5 seconds [cam_strings_preview_duration_5sec_txt]The preview of the photo or video apears for 5 seconds after youhave taken.ID: ICN-SONY-CAM-PREVIEW-DURATION-SETTING-3SEC3 seconds [cam_strings_preview_duration_3sec_txt]The preview of the photo or video appears for 3 seconds after youhave taken.ID: ICN-SONY-CAM-PREVIEW-DURATION-SETTING-OFFOff [cam_strings_advanced_setting_off_txt]The photo or video has been saved after you have taken, nopreview appears.This setting is only available in Normal [cam_strings_capturing_mode_normal_txt] capturing mode.GUID GUID-B371194F-AA5E-412A-BB97-412E22A9118CTitle Preview - separated from still camera settingsChanges changed 'normal' label strings: valid for all.Version 2Author XuCindyStatus ReleasedAuto uploadAutomatically upload updates to photos to a pre-selected social networking service(SNS).GUID GUID-50B64185-716A-4532-AEC5-335636BAB190Title Auto upload - separated from Still camera settingsChangesVersion 1Author XuCindyStatus ReleasedTouch captureIdentify a particular focus area by touching the camera screen with your finger. Thephoto is taken as soon as you release your finger. This setting is only available whenfocus mode is set to touch focus.This is a draft publication for internal use only.132This is an Internet version of this publication. © Print only for private use.](https://usermanual.wiki/Sony/PM-0480.Short-term-confidential-userguide-EN-PRODUCT-NAME-PART-NUMBER-Android4-0/User-Guide-1988542-Page-132.png)
![ID: ICN-SONY-CAMERA-ADVANCED-SETTINGS-TOUCH-CAPTURE-ONOn [cam_strings_advanced_setting_on_txt]ID: ICN-SONY-EDREAM-CAM-ADV-SETTINGS-TOUCH-CAP-OFF Off [cam_strings_advanced_setting_off_txt]GUID GUID-6F453966-3773-4C86-8B4D-7BA72FEDC47ETitle Touch capture - for both Still and video camera settingsChangesVersion 1Author XuCindyStatus ReleasedShutter soundChoose to turn on or turn off the shutter sound when you record a video.GUID GUID-41F4BDE1-4227-4DD9-ADA6-CB37D174758CTitle Shutter sound - separated from Video camera settingsChanges For Tapioca; no text change; separated from Video camera settingsVersion 1Author JessicaLStatus ReleasedData storageYou can choose to save your data either to a removable SD card or to your device'sinternal storage.ID: ICN-SONY-CAM-DATA-INTERNAL-STORAGE Internal storage [spb_strings_gen_emmc_txt]Photos or videos are saved on the device memory.ID: ICN-SONY-CAM-DATA-SD-CARD SD card [spb_strings_gen_sd_card_txt]Photos or videos are saved on the SD card.GUID GUID-86D0BE1A-D724-4F2A-A75F-87BD85ADF4D6Title Data storage - separated from both Still and Video camera settingsChangesVersion 1Author XuCindyStatus ReleasedUsing the video cameraIndexterm: "video camera"Indexterm: "camera"Sub-indexterm: "video"GUID GUID-90BE8273-E40F-403A-A176-CB6A64CFAE44Title Using the video camera - headingChanges GenericVersion 1Author PeterCStatus ReleasedTo record a video using the camera keyIndexterm: "recording videos"Sub-indexterm: "using the camera key"Indexterm: "camera"Sub-indexterm: "recording videos"Indexterm: "videos"Sub-indexterm: "recording"1Activate the camera.2To start recording a video, press the camera key.3To stop recording, press the camera key again.Shoot your videos in landscape orientation to get the best results.GUID GUID-77DC2CA9-B6A6-447C-8FFB-42EA365E6169Title To record a video using the shutter keyChanges For Odin and Yuga: delete step 2.Version 5Author XuCindyThis is a draft publication for internal use only.133This is an Internet version of this publication. © Print only for private use.](https://usermanual.wiki/Sony/PM-0480.Short-term-confidential-userguide-EN-PRODUCT-NAME-PART-NUMBER-Android4-0/User-Guide-1988542-Page-133.png)
![Status ReleasedTo adjust the video camera settingsIndexterm: "camera"Indexterm: "settings"Sub-indexterm: "camera"Indexterm: "video camera"Sub-indexterm: "settings"1Activate the camera.2Tap one of the settings icons on the screen.3To display all settings, tap ID: ICN-SONY-MENU-SETTINGS.4Select the setting that you want to adjust, then make your changes.GUID GUID-D55F26C3-5C2A-4588-9439-7D6642398DC5Title To select video camera settingsChanges For Pollux: changed grammarVersion 5Author XuCindyStatus Released*To customise the video camera settings panel1When the video camera is open, tap ID: ICN-SONY-MENU-SETTINGS todisplay all settings.2Touch and hold the setting that you want to move, then drag it to the desiredposition.If you drag the setting outside of the settings panel, the change is cancelled.GUID GUID-F4D69895-0C2F-451C-9467-0D140C207B11Title To customize the video camera settings panelChanges for Mint; text changes made; changed press to tap and changed tags of aniconVersion 3Author JessicaLStatus ReleasedVideo camera settings overviewIndexterm: "camera"Sub-indexterm: "icons"Indexterm: "camera"Sub-indexterm: "settings"Indexterm: "video camera"Sub-indexterm: "settings"Indexterm: "icons"Sub-indexterm: "in the camera"Indexterm: "camera"Indexterm: ""ID: ICN-SONY-CAM-VIDEO-CAMERAVideo camera [cam_strings_capturing_mode_video_camera_short_txt]Select the video camera if you want to record videos.ID: ICN-SONY-CAM-FRONT-VIDEO-CAMERAFront video [cam_strings_capturing_mode_front_video_short_txt]Select the front video if you want to record self-portrait videos.GUID GUID-890099DB-D0D0-43C9-97DB-8036F9450CE1Title Video camera settings overviewChanges For Togari HTML: no text change; changed icon strings.Version 3Author XuCindyStatus DraftScenesThe Scenes feature helps you to quickly set up the camera for common situationsusing pre-programmed scenes. The camera determines a number of settings for youto fit the selected scene, ensuring the best possible video.ID: ICN-SONY-CAMERA-SCENE-NORMALOff [cam_strings_advanced_setting_off_txt]The Scenes feature is off and you can shoot videos manually.This is a draft publication for internal use only.135This is an Internet version of this publication. © Print only for private use.](https://usermanual.wiki/Sony/PM-0480.Short-term-confidential-userguide-EN-PRODUCT-NAME-PART-NUMBER-Android4-0/User-Guide-1988542-Page-135.png)
![ID: ICN-SONY-CAMERA-SCENE-SOFTSNAPSoft snap [cam_strings_scenes_soft_snap_cy_txt]Use for shooting videos against soft backgrounds.ID: ICN-SONY-CAMERA-SCENE-LANDSCAPELandscape [cam_strings_scenes_landscape_txt]Use for videos of landscapes. The camera focuses on distant objects.ID: ICN-SONY-CAMERA-SCENE-NIGHT-SCENENight [cam_strings_scenes_nightmode_txt]When turned on, light sensitivity is increased. Use in poorly lit environments.Videos of fast-moving objects may get blurred. Hold your hand steady, oruse a support. Turn off night mode when lighting conditions are good, toimprove the video quality.ID: ICN-SONY-CAMERA-SCENE-BEACH-SNOWBeach and snow [cam_strings_scenes_beachsnow_txt]Use in bright environments to avoid underexposed videos.ID: ICN-SONY-CAMERA-SCENE-SPORTSports [cam_strings_scenes_sports_txt]Use for videos of fast-moving objects. Short exposure time minimisesmotion blurring.ID: ICN-SONY-CAMERA-SCENE-PARTYParty [cam_strings_scenes_party_txt]Use for indoor videos in poorly lit environments. This scene picks up indoorbackground lighting or candlelight. Videos of fast-moving objects may getblurred. Hold your hand steady, or use a support.GUID GUID-5EDE7E57-7ED0-4F23-B63E-07FFE0EDB131Title Scenes - separated from Video camera settingsChanges for Tusbasa; text changes made; added the Soft Snap settingVersion 5Author JessicaLStatus Released*Video resolutionAdjust the video resolution for different formats.ID: ICN-SONY-CAMERA-RESOLUTION-SETTING-HD1280×720(16:9) [cam_strings_video_resolution_1280]HD (High Definition) format with 16:9 aspect ratio. 1280×720 pixels.ID: ICN-SONY-CAMERA-RESOLUTION-SETTING-VGA640×480(4:3) [cam_strings_video_resolution_vga]VGA format with 4:3 aspect ratio. 640x480 pixels.ID: 320×240(4:3) [cam_strings_video_resolution_320_240]Quarter VGA format with 4:3 aspect ratio. 320x240 pixels.ID: ICN-SONY-CAMERA-RESOLUTION-SETTING-MMS176×144(11:9) [cam_strings_video_resolution_mms]Record videos suitable for sending in multimedia messages. Therecording time of this video format is limited to fit in a multimediamessage.GUID GUID-7E69C4F2-7B4D-46FF-8C9B-7026429FB366Title Video size - separated from Video camera settingsChanges For JB update 3: Lotus.not in use.Version 1.1.2Author XuCindyStatus DraftSelf-timerWith the self-timer you can record a video without holding the device. Use it to recordgroup videos where everyone can be in the video. You can also use the self-timer toavoid shaking the camera when recording videos.ID: ICN-SONY-CAMERA-ADVANCED-SETTINGS-SELF-TIMER-ONOn (10 sec.) [cam_strings_advanced_setting_selftimer_duration_txt]Set a 10-second delay from when you tap the camera screen untilthe video begins to record.ID: ICN-SONY-CAMERA-ADVANCED-SETTINGS-SELF-TIMER-ON-TWO-SECOn (2 sec.) [cam_strings_advanced_setting_self_timer_two_sec_txt]Set a 2-second delay from when you tap the camera screen untilthe video begins to record.This is a draft publication for internal use only.136This is an Internet version of this publication. © Print only for private use.](https://usermanual.wiki/Sony/PM-0480.Short-term-confidential-userguide-EN-PRODUCT-NAME-PART-NUMBER-Android4-0/User-Guide-1988542-Page-136.png)
![ID: ICN-SONY-CAMERA-ADVANCED-SETTINGS-SELF-TIMER-OFFOff [cam_strings_advanced_setting_off_txt]The video begins to record as soon as you tap the camera screen.GUID GUID-D819F98C-8A85-44F0-90E5-2478C221D341Title Self-timer - separated from Video camera settingsChanges for Pollux; term change madeVersion 2Author XuCindyStatus ReleasedQuick launchUse Quick launch settings to launch the camera from the lock screen. If the device isin sleep mode of camera, press the camera key.ID: ICN-SONY-SEMC-SLIDING-TAB-FASTCAPTURE-PRESSEDLaunch and capture [cam_strings_fast_capturing_launch_and_capture_photo_txt]By pressing and holding down the camera key, the first photo iscaptured immediately after the camera is launched from sleepmode.ID: ICN-SONY-SEMC-SLIDING-TAB-FASTCAM-NORMALLaunch only (still camera) [cam_strings_fast_capturing_launch_only_photo_txt]By pressing and holding down the camera key, the still camera islaunched from sleep mode.ID: ICN-SONY-SEMC-SLIDING-TAB-FASTCAM-VIDEOREC-NORMALLaunch and record video [cam_strings_fast_capturing_launch_and_capture_vid-eo_txt]By pressing and holding down the camera key, the first video is shotimmediately after the camera video camera is launched from sleepmode.ID: ICN-SONY-SEMC-SLIDING-TAB-FASTCAM-VIDEO-PRESSEDLaunch only (video camera) [cam_strings_fast_capturing_launch_only_video_txt]By pressing and holding down the camera key, the video camera islaunched from sleep mode.ID: ICN-SONY-CAM-LAUNCH-CAPTURE-OFFOff [cam_strings_advanced_setting_off_txt]GUID GUID-A3E21A95-B04C-455D-95F0-7A70EAA0EF9DTitle Quick launchChanges For Odin and Yuga: modify the description of quick launchVersion 4Author XuCindyStatus Released*Focus modeThe focus setting controls which part of a video should be sharp. When continuousautofocus is on, the camera keeps adjusting focus so that the area within the whitefocus frame stays sharp.ID: ICN-SONY-CAMERA-FOCUS-MODE-SINGLE-AFSingle autofocus [cam_strings_focus_mode_single_af_txt]The camera automatically focuses on the selected subject. Continuousautofocus is on.ID: ICN-SONY-CAMERA-FOCUS-MODE-FACE-DETECTIONFace detection [cam_strings_focus_mode_face_detection_txt]The camera automatically detects up to five human faces, indicated by frameson the screen. The camera automatically focuses on the nearest face. You canalso select which face to focus on by tapping it on the screen. When you tapthe camera screen, a green frame shows which face is selected and in focus.Face detection cannot be used for all scene types. Continuous autofocus is on.GUID GUID-A90913F5-D710-413B-8710-073469C04CB2Title Focus mode - separated from Video camera settingsChanges for Mint; no text changes made; removed the infinity settingVersion 3Author JessicaLStatus Released*This is a draft publication for internal use only.137This is an Internet version of this publication. © Print only for private use.](https://usermanual.wiki/Sony/PM-0480.Short-term-confidential-userguide-EN-PRODUCT-NAME-PART-NUMBER-Android4-0/User-Guide-1988542-Page-137.png)
![Exposure valueID: ICN-SONY-CAMERA-QUICK-EXPOSURE-LEVEL-TCHThis setting allows you to determine the amount of light in the imageyou capture. A higher value indicates an increased amount of light.GUID GUID-069267FB-9F1C-485A-BE7D-67237399139DTitle Exposure value - separated from Video camera settingsChanges For Tsubasa html User guide. Removed not working lines tag.Version 1.1.1Author JorgenLStatus ReleasedVideo HDRUse the video HDR (High-Dynamic Range) setting to record a video against strongback light or in conditions where the contrast is sharp. Video HDR compensates forthe loss of detail and produces a picture that is representative of both dark and brightareas.GUID GUID-65A1A984-7995-4588-A86F-07C76DD284C8Title Video HDR - videoChangesVersion 1Author XuCindyStatus ReleasedWhite balanceThe white balance setting adjusts the colour balance according to the lightingconditions.ID: ICN-SONY-CAMERA-ADVANCED-SETTINGS-WHITE-BALANCE-AUTOAuto [cam_strings_advanced_setting_white_balance_auto_txt]Adjust the colour balance automatically to the lightingconditions.ID: ICN-SONY-CAMERA-ADVANCED-SETTINGS-WHITE-BALANCE-INCANDESCENTIncandescent [cam_strings_advanced_setting_white_balance_incandes-cent_txt]Adjusts the colour balance for warm lighting conditions,such as under light bulbs.ID: ICN-SONY-CAMERA-ADVANCED-SETTINGS-WHITE-BALANCE-FLUORESCENTFluorescent [cam_strings_advanced_setting_white_balance_fluores-cent_txt]Adjust the colour balance for fluorescent lighting.ID: ICN-SONY-CAMERA-ADVANCED-SETTINGS-WHITE-BALANCE-DAYLIGHTDaylight [cam_strings_advanced_setting_white_balance_day_light_txt]Adjust the colour balance for sunny outdoor conditions.ID: ICN-SONY-CAMERA-ADVANCED-SETTINGS-WHITE-BALANCE-CLOUDYCloudy [cam_strings_advanced_setting_white_balance_cloudy_txt]Adjust the colour balance for a cloudy sky.GUID GUID-893AE629-E040-473B-A646-DDD824381DCCTitle White balance - separated from Video camera settingsChanges for Tapioca; no text change; separated from Video camera settingsVersion 1Author JessicaLStatus ReleasedMeteringThis function automatically determines a well-balanced exposure by measuring theamount of light striking the image that you want to capture.ID: ICN-SONY-CAMERA-ADVANCED-SETTINGS-METERING-CENTERCenter [cam_strings_advanced_setting_photometry_center_txt]Adjust the exposure to the centre of the image.ID: ICN-SONY-CAMERA-ADVANCED-SETTINGS-METERING-AVERAGEAverage [cam_strings_advanced_setting_photometry_average_txt]Calculate the exposure based on the amount of light striking thewhole image.This is a draft publication for internal use only.138This is an Internet version of this publication. © Print only for private use.](https://usermanual.wiki/Sony/PM-0480.Short-term-confidential-userguide-EN-PRODUCT-NAME-PART-NUMBER-Android4-0/User-Guide-1988542-Page-138.png)
![ID: ICN-SONY-CAMERA-ADVANCED-SETTINGS-METERING-SPOTSpot [cam_strings_advanced_setting_photometry_spot_txt]Adjust the exposure in a very small part of the image that you wantto capture.GUID GUID-16EA22DD-0E21-451B-9654-5C1DE476B434Title Metering - separated from Video camera settingsChanges For Pollux: delete a noteVersion 2Author XuCindyStatus ReleasedImage stabiliserWhen recording a video, it can be difficult to hold the device steady. The stabiliserhelps you by compensating for small movements of the hand.GUID GUID-BA0386BA-84CF-43F3-8E8E-C2FB51CED9F2Title Image stabiliser - separated from Video camera settingsChanges for Pollux; term change madeVersion 2Author XuCindyStatus ReleasedGeotaggingTag videoss with details of where you took them.ID: ICN-SONY-CAMERA-GEOTAG-ONOn [cam_strings_advanced_setting_on_txt]When geotagging is turned on, the approximate geographical location is added tovideos when you take them. To use geotagging, you must enable location featuresfrom the Settings [settings_label] menu. For geotags to be added to a video, the locationmust be determined before you take the video. Your location is determined when ID: ICN-SONY-CAMERA-GEOTAG-ON appears on the camera screen. When yourdevice is searching for your position, ID: ICN-SONY-STATUSBAR-GPS-ONappears.ID: ICN-SONY-CAMERA-GEOTAG-OFFOff [cam_strings_advanced_setting_off_txt]When geotagging is turned off, you cannot view the location where you took a video.GUID GUID-B4018131-CF65-4509-819D-BC177282DA8ETitle Geotagging - separated from video camera settingsChanges JB update 3Version 1Author XuCindyStatus ReleasedMicrophoneSelect whether to pick up the surrounding sound when recording videos.GUID GUID-D1755DC3-3516-47EA-8FCB-919814BC27EBTitle Microphone - separated from Video camera settingsChanges for Tapioca; no text change; separated from Video camera settingsVersion 1Author JessicaLStatus ReleasedTouch captureIdentify a particular focus area by touching the camera screen with your finger. Thephoto is taken as soon as you release your finger. This setting is only available whenfocus mode is set to touch focus.ID: ICN-SONY-CAMERA-ADVANCED-SETTINGS-TOUCH-CAPTURE-ONOn [cam_strings_advanced_setting_on_txt]ID: ICN-SONY-EDREAM-CAM-ADV-SETTINGS-TOUCH-CAP-OFF Off [cam_strings_advanced_setting_off_txt]GUID GUID-6F453966-3773-4C86-8B4D-7BA72FEDC47ETitle Touch capture - for both Still and video camera settingsThis is a draft publication for internal use only.139This is an Internet version of this publication. © Print only for private use.](https://usermanual.wiki/Sony/PM-0480.Short-term-confidential-userguide-EN-PRODUCT-NAME-PART-NUMBER-Android4-0/User-Guide-1988542-Page-139.png)
![ChangesVersion 1Author XuCindyStatus ReleasedShutter soundChoose to turn on or turn off the shutter sound when you record a video.GUID GUID-41F4BDE1-4227-4DD9-ADA6-CB37D174758CTitle Shutter sound - separated from Video camera settingsChanges For Tapioca; no text change; separated from Video camera settingsVersion 1Author JessicaLStatus ReleasedData storageYou can choose to save your data either to a removable SD card or to your device'sinternal storage.ID: ICN-SONY-CAM-DATA-INTERNAL-STORAGE Internal storage [spb_strings_gen_emmc_txt]Photos or videos are saved on the device memory.ID: ICN-SONY-CAM-DATA-SD-CARD SD card [spb_strings_gen_sd_card_txt]Photos or videos are saved on the SD card.GUID GUID-86D0BE1A-D724-4F2A-A75F-87BD85ADF4D6Title Data storage - separated from both Still and Video camera settingsChangesVersion 1Author XuCindyStatus ReleasedThis is a draft publication for internal use only.140This is an Internet version of this publication. © Print only for private use.](https://usermanual.wiki/Sony/PM-0480.Short-term-confidential-userguide-EN-PRODUCT-NAME-PART-NUMBER-Android4-0/User-Guide-1988542-Page-140.png)
![AlbumIndexterm: "Album"Indexterm: "photos"Sub-indexterm: "viewing"Indexterm: "videos"Sub-indexterm: "viewing"GUID GUID-C9C9DC20-84F0-433F-9E0C-58124EC6DC3FTitle Album - heading onlyChangesVersion 1Author JorgenLStatus ReleasedAbout AlbumIndexterm: "Album"Indexterm: "photos"Sub-indexterm: "viewing"Indexterm: "videos"Sub-indexterm: "viewing"Use Album to view photos and play videos that you’ve taken with your camera, or toview similar content that you've saved to your device. You can add geotags to yourphotos and videos, and then view them on a world map. In Album, you can also viewphotos and videos that you've uploaded to an online service, for example, to aPicasa™ web album.From Album, you can share your favourite photos and videos with friends viaBluetooth™ wireless technology, email, messaging and various online services. Youcan also perform basic editing tasks on photos and set them as wallpaper or contactpictures. For more information, see Connecting your device to a computeron page 186.GUID GUID-0C711360-DD0E-4CB8-ACA5-9A658EE68F7DTitle About AlbumChangesVersion 1Author PengLeonStatus Released*Album tab overviewThe following tabs are available in Album:•Pictures [album_tab_pictures_txt] – view all photos and videos saved to the memory card.•Maps [album_tab_places_txt] – view your geotagged photos and video clips on a world map.•Online [album_tab_online_txt] – view your online albums.GUID GUID-CB4D15AC-CB5D-4CD6-8A9F-615E6C43ACB9Title Album tab overviewChanges For Nozoimi ICS. only changed a label from Camera to Pictures.Version 1.1.1Author RongrongZStatus ReleasedTo open AlbumIndexterm: "photo albums"Sub-indexterm: "viewing"Indexterm: "video albums"Sub-indexterm: "viewing"Indexterm: "Album"Sub-indexterm: "opening"1From your Home screen [homescreen_strings_application_name_txt] , tap ID: ICN-SONY-HOME-APPTRAY-NORMAL.2Find and tap Album [album_app_name_txt] .If the screen orientation does not change automatically when you turn your device sideways,mark the Auto-rotate screen [accelerometer_title] checkbox under Settings [settings_label_launcher] >Display [display_settings_title] .GUID GUID-70F2F687-424C-4551-884F-DE2FADD2DCF3This is a draft publication for internal use only.141This is an Internet version of this publication. © Print only for private use.](https://usermanual.wiki/Sony/PM-0480.Short-term-confidential-userguide-EN-PRODUCT-NAME-PART-NUMBER-Android4-0/User-Guide-1988542-Page-141.png)
![Title To open AlbumChanges Valid from Pollux only Device condition addedVersion 4Author PengLeonStatus ReleasedViewing photos and videos in the Pictures [album_tab_pictures_txt] tabIndexterm: "Album"Indexterm: "Album"Sub-indexterm: "viewing local content"In the Pictures [album_tab_pictures_txt] tab in Album, you can view your photos and videos inthumbnails in a grid view.GUID GUID-7CFC5610-3AFB-4143-A0DD-256EAF1AA6FFTitle Viewing your photos and videos in Pictures tabChanges Device Term Change Valid from Odin and Yuga (List view related contentsremoved)Version 5Author PengLeonStatus ReleasedOverview of Pictures [album_tab_pictures_txt] tabIndexterm: "Album"Sub-indexterm: "pictures"Sub-indexterm: "viewing"Sub-sub indexterm: "photos and videos"ID: SCR-SONY-ALBUM-PICTURE-GRID-OVERVIEW-WVGA1Grid view of photos and videos.2 View menu options.3 Scroll up or down to view content.4 Tap a photo or video to view it.5 The date and number of items in the group below.GUID GUID-E6EC185C-6CDA-42FF-B58C-7FA96CDD8695Title Overview of Picture tabChanges Device Term Change.Version 7Author RongrongZStatus Released*To view photos and videos in grid viewIndexterm: "photos"This is a draft publication for internal use only.142This is an Internet version of this publication. © Print only for private use.](https://usermanual.wiki/Sony/PM-0480.Short-term-confidential-userguide-EN-PRODUCT-NAME-PART-NUMBER-Android4-0/User-Guide-1988542-Page-142.png)
![Sub-indexterm: "viewing"Sub-indexterm: "photo viewer"Indexterm: "videos"Sub-indexterm: "viewing"1From your Home screen [homescreen_strings_application_name_txt] , tap ID: ICN-SONY-HOME-APPTRAY-NORMAL.2Find and tap Album [album_app_name_txt] . All photos and videos are displayed in achronologically ordered grid. Videos are indicated by ID: ICN-SONY-SEMC-MUSIC-PLAY-NORMAL.3Tap a photo or video to view it.4Flick left to view the next photo or video. Flick right to view the previous photoor video.If the screen orientation does not change automatically when you turn your device sideways,mark the Auto-rotate screen [accelerometer_title] checkbox under Settings [settings_label_launcher] >Display [display_settings_title] .GUID GUID-9E9154B9-0E5F-460C-9ED7-78C88771BEC4Title To view photos and videos in grid viewChanges Valid from Pollux only Device condition addedVersion 11Author PengLeonStatus ReleasedTo change the size of the thumbnails in AlbumIndexterm: "Album"Sub-indexterm: "thumbnail size"•When viewing thumbnails of photos and videos in Album, spread two fingersapart to zoom in, or pinch two fingers together to zoom out.GUID GUID-CEAF453F-B0F8-41B0-822B-CA2B33FDC1FFTitle To change the size of the photo and video thumbnails in AlbumChanges From Nozomi ICS (edream 6.0). Text changed.Version 3Author RongrongZStatus ReleasedTo work with batches of photos or videos in AlbumIndexterm: "photos"Sub-indexterm: "viewing"Sub-indexterm: "selecting"Indexterm: "videos"Sub-indexterm: "viewing"Sub-indexterm: "selecting"1When viewing thumbnails of photos and videos in Album, tap ID: ICN-SONY-KEY-MENU, then tap Select items [album_options_mark_mode_txt] .2Tap the items you want to work with. Selected items are indicated by a blueframe.3Use the tools in the toolbar at the top of the screen to work with your selecteditems.To activate selection mode, you can also touch and hold an item until its frame turns blue.Then you can tap other items to select them.GUID GUID-5199D8F4-B9B0-4E8C-89D7-56DB01A9A010Title To work with batches of photos or videosChanges From Nozomi ICS (edream 6.1). Text changed.Version 6Author RongrongZStatus ReleasedViewing photos and videos in the My albums [album_tab_my_albums_txt] tabIndexterm: "Album"Indexterm: "Album"The following tiles are available in My albums:•Camera albums [album_divider_camera_albums_txt] – view all photos and videos taken with yourdevice’s camera.This is a draft publication for internal use only.143This is an Internet version of this publication. © Print only for private use.](https://usermanual.wiki/Sony/PM-0480.Short-term-confidential-userguide-EN-PRODUCT-NAME-PART-NUMBER-Android4-0/User-Guide-1988542-Page-143.png)
![•Internal memory [album_divider_internalmemory_albums_txt] – view all photos and videos saved toyour device's internal storage.•My SD card [album_divider_memorycard_albums_txt] – view all photos and videos saved to aremovable memory card in your device.GUID GUID-E2F2FDE5-56BD-41EF-8054-92E5AEB1ABDATitle Viewing photos and videos in My albums tabChanges Valid from Huashan (only changed Tab to Tile according to TID comments)Version 2Author PengLeonStatus Released*Overview of My albums [album_tab_my_albums_txt] tabIndexterm: "Album"Sub-indexterm: "My albums"Sub-indexterm: "viewing"Sub-sub indexterm: "photos and videos"ID: SCR-SONY-ALBUM-MY ALBUM-LIST-OVERVIEW-WVGA1View photos and videos using the PlayMemories online service.2 View photos and videos on Facebook™.3 View photos and videos in Picasa™.4 View all photos and videos saved to the removable memory card.5 View all photos and videos saved to your device's internal storage.6 View all photos with faces.7 View your photos in globe mode.8 View your photos on a map.9 View all photos and videos taken with your device’s camera.GUID GUID-6D2E2C78-45CA-4F7E-9EE9-3E0A8E7A2B3DTitle Overview of My albums tabChanges valid from Togari only the Face feature description addedVersion 5Author PengLeonStatus ReleasedThis is a draft publication for internal use only.144This is an Internet version of this publication. © Print only for private use.](https://usermanual.wiki/Sony/PM-0480.Short-term-confidential-userguide-EN-PRODUCT-NAME-PART-NUMBER-Android4-0/User-Guide-1988542-Page-144.png)
![To view content in list view in the Camera albums tile1From your Home screen [homescreen_strings_application_name_txt] , tap ID: ICN-SONY-HOME-APPTRAY-NORMAL.2Find and tap Album [album_app_name_txt] > My albums [album_tab_my_albums_txt] > Cameraalbums [album_divider_camera_albums_txt] .3Tap a folder that you want to open. The folder's content appears in achronologically ordered grid. Videos are indicated by ID: ICN-SONY-SEMC-MUSIC-PLAY-NORMAL.4Tap a photo or video to view it.5Flick left to view the next photo or video. Flick right to view the previous photoor video.If the screen orientation does not change automatically when you turn your device sideways,mark the Auto-rotate screen [accelerometer_title] checkbox under Settings [settings_label_launcher] >Display [display_settings_title] .GUID GUID-ED17CFDD-41FA-443C-9995-B8DCAA048F5FTitle To view content in list view in the Camera albums tileChanges Valid from Pollux only Device condition addedVersion 3Author PengLeonStatus ReleasedTo view content in list view in the Internal memory tile1From your Home screen [homescreen_strings_application_name_txt] , tap ID: ICN-SONY-HOME-APPTRAY-NORMAL.2Find and tap Album [album_app_name_txt] > My albums [album_tab_my_albums_txt] > Internalmemory [album_divider_internalmemory_albums_txt] .3Tap a folder that you want to open. The folder's content appears in achronologically ordered grid. Videos are indicated by ID: ICN-SONY-SEMC-MUSIC-PLAY-NORMAL.4Tap a photo or video to view it.5Flick left to view the next photo or video. Flick right to view the previous photoor video.If the screen orientation does not change automatically when you turn your device sideways,mark the Auto-rotate screen [accelerometer_title] checkbox under Settings [settings_label_launcher] >Display [display_settings_title] .GUID GUID-CEB86E94-D783-4941-BDE0-DCF7022825D3Title To view content in list view in the Internal memory tileChanges Valid from Pollux only Device condition addedVersion 3Author PengLeonStatus ReleasedTo view content in list view in the My SD card tile1From your Home screen [homescreen_strings_application_name_txt] , tap ID: ICN-SONY-HOME-APPTRAY-NORMAL.2Find and tap Album [album_app_name_txt] > My albums [album_tab_my_albums_txt] > My SD card[album_divider_memorycard_albums_txt] .3Tap a folder that you want to open. The folder's content appears in achronologically ordered grid. Videos are indicated by ID: ICN-SONY-SEMC-MUSIC-PLAY-NORMAL.4Tap a photo or video to view it.5Flick left to view the next photo or video. Flick right to view the previous photoor video.If the screen orientation does not change automatically when you turn your device sideways,mark the Auto-rotate screen [accelerometer_title] checkbox under Settings [settings_label_launcher] >Display [display_settings_title] .GUID GUID-39256779-538C-4305-9C60-D8A86F2E8398Title To view content in list view in the My SD card tileChanges Valid from Pollux only Device condition addedVersion 3This is a draft publication for internal use only.145This is an Internet version of this publication. © Print only for private use.](https://usermanual.wiki/Sony/PM-0480.Short-term-confidential-userguide-EN-PRODUCT-NAME-PART-NUMBER-Android4-0/User-Guide-1988542-Page-145.png)
![Author PengLeonStatus ReleasedTo view photos with faces in list view in the Faces tile1From your Home screen [homescreen_strings_application_name_txt] , tap ID: ICN-SONY-HOME-APPTRAY-NORMAL.2Find and tap Album [album_app_name_txt] > My albums [album_tab_my_albums_txt] > Faces [al-bum_dashboard_tile_faces_txt] .3Tap a folder that you want to open. The folder's content appears in achronologically ordered grid.4Tap a photo to view it.5Flick left to view the next photo. Flick right to view the previous photo.If the screen orientation does not change automatically when you turn your device sideways,mark the Auto-rotate screen [accelerometer_title] checkbox under Settings [settings_label_launcher] >Display [display_settings_title] .GUID GUID-3D1914BE-78F3-43BB-9C54-1668AFC9D076Title To view photos with faces in list view in the Face tileChanges Valid from Pollux only Device condition addedVersion 2Author PengLeonStatus ReleasedWorking with photos in AlbumYou can edit photos in Album. For example, you can crop photos, associate themwith contacts, or use them as wallpaper.GUID GUID-ADC46697-50D7-4C66-978F-F384F4DA0D8DTitle Working with photos in AlbumChanges From Nozomi ICS (eDream 6.1). No text change. Only changed app's namefrom Gallery to Album.Version 4Author RongrongZStatus ReleasedTo zoom a photoIndexterm: "photos"Sub-indexterm: "zooming"Indexterm: "zooming"Sub-indexterm: "photos"•When you are viewing a photo, double-tap the screen to zoom in. Double-tap againto zoom out.•When you are viewing a photo, spread two fingers apart to zoom in, or pinch twofingers together to zoom out.GUID GUID-FA6FB193-0FB8-4C87-9768-B43CEFBA44A0Title To zoom a photoChanges Changed from edream 6.0Version 6Author CynthiaHStatus ReleasedTo watch a slideshow of your photosIndexterm: "slideshow"Indexterm: "photos"Sub-indexterm: "slideshow"1When you are viewing a photo, tap ID: ICN-SONY-KEY-MENU, then tapSlideshow [album_option_slideshow_txt] to start playing all the photos in an album.2Tap a photo to end the slideshow.GUID GUID-ED692E31-B1E1-4A66-BA4A-3E41B1CAC491Title To watch a slideshow of your photosChanges From Nozomi ICS (eDream 6.1). Text changed in step 1.Version 5Author RongrongZStatus Released*This is a draft publication for internal use only.146This is an Internet version of this publication. © Print only for private use.](https://usermanual.wiki/Sony/PM-0480.Short-term-confidential-userguide-EN-PRODUCT-NAME-PART-NUMBER-Android4-0/User-Guide-1988542-Page-146.png)
![To watch a slideshow of your photos with musicIndexterm: "Album"Sub-indexterm: "SensMe™ slideshow"Indexterm: "photos"Sub-indexterm: "SensMe™ slideshow"1When you are viewing a photo, tap the screen to display the toolbars, then tapID: ICN-SONY-KEY-MENU > SensMe™ slideshow [album_options_sensme_pictures_txt] .2Select the music and theme that you want to use for the slideshow, then tap ID: ICN-SONY-SEMC-MUSIC-PLAY-NORMAL. The Album applicationanalyses your photos and uses SensMe™ music data to play a slideshow.3To pause playing, tap the screen to display the controls, then tap ID: ICN-SONY-SEMC-MUSIC-PAUSE-NORMAL.GUID GUID-909BEA45-DC15-4EC4-AB19-328F878A9060Title To watch a slideshow of your photos with musicChanges Valid for Xperia CareVersion 1.1.1Author PengLeonStatus ReleasedTo rotate a photoIndexterm: "rotating"Sub-indexterm: "photos"Indexterm: "photos"Sub-indexterm: "rotating"1When you are viewing a photo, tap ID: ICN-SONY-KEY-MENU.2Select Rotate left [album_option_rotate_left_txt] or Rotate right [album_option_rotate_right_txt] . Thephoto is saved in the new orientation.GUID GUID-FC0207B6-9145-4A5C-87BC-01B5969CC3D1Title To rotate a photoChanges From Nozomi ICS (edream 6.1). Tex reused from released topics.Version 5Author RongrongZStatus Released*To crop a photoIndexterm: "photos"Sub-indexterm: "cropping"Indexterm: "cropping"Sub-indexterm: "photos"Indexterm: "resizing"Sub-indexterm: "photos"1When you are viewing a photo, tap the screen to display the toolbars, then tapID: ICN-SONY-KEY-MENU > Edit photo [album_options_edit_photo_txt] > ID: ICN-SONY-ALBUM-CROP > Crop [album_option_crop_txt] .2To adjust the crop frame, touch and hold the edge of the crop frame. When thesquares at the edges disappear, drag inward or outward to resize the frame.3To resize all sides of the crop frame at the same time, touch and hold one ofthe four corners to make the squares at the edges disappear, then drag thecorner accordingly.4To move the crop frame to another area of the photo, touch and hold inside theframe, then drag it to the desired position.5To save a copy of the photo as you cropped it, tap Save [album_options_save_txt] . Theoriginal uncropped version remains on your device.GUID GUID-C8189FB3-D445-4117-B326-AEDB6E254373Title To crop a photoChanges Valid from Pollux only changed the way to open CropVersion 12Author PengLeonStatus ReleasedTo use a photoIndexterm: "photos"This is a draft publication for internal use only.147This is an Internet version of this publication. © Print only for private use.](https://usermanual.wiki/Sony/PM-0480.Short-term-confidential-userguide-EN-PRODUCT-NAME-PART-NUMBER-Android4-0/User-Guide-1988542-Page-147.png)
![Sub-indexterm: "using as"1When you are viewing a photo, tap the screen to display the toolbars, then tapID: ICN-SONY-KEY-MENU > Use as [album_options_use_as_txt] .2Select an option from the list that appears.3Follow the relevant steps to use the photo.GUID GUID-1EF627DD-3E4B-49E7-8AF0-E8133D8D4248Title To use a photo - for Sony Tablet and WalkmanChanges For Tablet and Walkman only. Because in Tablet and Walkman devices it's"Contact photo" instead of "Contact picture.Version 1Author RongrongZStatus ReleasedTo edit a photoIndexterm: "photos"Sub-indexterm: "editing"Indexterm: "editing"Sub-indexterm: "photos"•When you are viewing a photo, tap ID: ICN-SONY-KEY-MENU, then tap Editphoto [album_options_edit_photo_txt] .GUID GUID-3256B4EF-EC78-4F73-BB9F-2574825B4B99Title To edit a photoChanges From Nozomi ICS (edream 6.1).Version 1Author RongrongZStatus Released*To apply a picture effect to a photoIndexterm: "photos"Sub-indexterm: "cropping"Indexterm: "cropping"Sub-indexterm: "photos"Indexterm: "resizing"Sub-indexterm: "photos"1When you are viewing a photo, tap the screen to display the toolbars, then tapEdit photo [album_options_edit_photo_txt] > ID: ICN-SONY-ALBUM-EDIT-FILTER.2Select an option.3To save a copy of the photo that you applied the effect to, tap Save [album_op-tions_save_txt] . The original unchaged version remains on your device.GUID GUID-1D6C2B88-4A95-4AAE-AA9E-16AECFCCD042Title To apply a picture effect to a photoChangesVersion 1Author PengLeonStatus DraftTo make a photo more beautiful with advanced settingsIndexterm: "photos"Sub-indexterm: "editing"Indexterm: "editing"Sub-indexterm: "photos"1When you are viewing a photo, tap the screen to display the toolbars, then tapEdit photo [album_options_edit_photo_txt] > ID: ICN-SONY-ALBUM-EDIT-FACE-CORRECTION.2Select an option.3To save a copy of the photo that you applied the setting to, tap Save [album_op-tions_save_txt] . The original unchanged version remains on your device.GUID GUID-07A7F9DD-010A-403E-9F86-A9576C8AA734Title To make a photo more beautifulChangesVersion 1Author PengLeonStatus DraftTo set the light amount of colours in a photoIndexterm: "photos"Sub-indexterm: "editing"Indexterm: "setting"This is a draft publication for internal use only.148This is an Internet version of this publication. © Print only for private use.](https://usermanual.wiki/Sony/PM-0480.Short-term-confidential-userguide-EN-PRODUCT-NAME-PART-NUMBER-Android4-0/User-Guide-1988542-Page-148.png)
![Sub-indexterm: "light amount"1When you are viewing a photo, tap the screen to display the toolbars, then tapEdit photo [album_options_edit_photo_txt] > ID: ICN-SONY-ALBUM-EDIT-EXPOSURE.2Select an option.3To save a copy of the photo that you applied the light setting to, tap Save [al-bum_options_save_txt] . The original unchaged version remains on your device.GUID GUID-686F7515-649E-421F-B93B-97C5B2523497Title To set the light amout of colors in a photoChangesVersion 1Author PengLeonStatus DraftTo set the saturation level of colours in a photoIndexterm: "photos"Sub-indexterm: "saturation level"Indexterm: "setting"Sub-indexterm: "photos"1When you are viewing a photo, tap the screen to display the toolbars, then tapID: ICN-SONY-KEY-MENU > Edit photo [album_options_edit_photo_txt] > ID: ICN-SONY-ALBUM-EDIT-COLOUR-ADJUSTMENT.2Select an option.3To save a copy of the photo in which you set the saturation level of colours,tap Save [album_options_save_txt] . The original uncropped version remains on yourdevice.GUID GUID-252B51B6-E5F7-4224-91A1-B97F7DA007B4Title To set the saturation level of colors in a photoChangesVersion 1Author PengLeonStatus DraftTo share a photoIndexterm: "photos"Sub-indexterm: "sharing"Indexterm: "photos"Indexterm: "sharing"Sub-indexterm: "photos"1When you are viewing a photo, tap the screen to display the toolbars, then tapID: ICN-SONY-GALLERY-SHARE.2In the menu that opens, tap the application that you want to use to share thephoto, then follow the steps to send it.GUID GUID-8FD74D8D-4AAA-41BA-B121-428EEABE725BTitle To share a photoChanges From Nozomi ICS (edream 6.1). Text changed .Version 7Author RongrongZStatus ReleasedTo add a geotag to a photoIndexterm: "photos"Sub-indexterm: "adding a geotag"1When you are viewing a photo, tap the screen to display the toolbars, then tapID: ICN-SONY-ACTION-LAYER-GEOTAG-PREVIEW-BG to open the mapscreen.2Find and tap the desired location to put the photo on the map.3To adjust the location of the photo, tap the location on the map to where youwant to move the photo.4When you are finished, tap OK [gui_ok_txt] to save the geotag and return to thephoto viewer.When a photo is geotagged, ID: ICN-SONY-ACTION-LAYER-GEOTAG-BG appears alongwith location information. You can tap this icon to view the photo on a map.GUID GUID-94B6D803-A114-4058-AF8D-CB219961DD33Title To add a geotag when viewing a photoChanges From Nozomi ICS (edream 6.1).This is a draft publication for internal use only.149This is an Internet version of this publication. © Print only for private use.](https://usermanual.wiki/Sony/PM-0480.Short-term-confidential-userguide-EN-PRODUCT-NAME-PART-NUMBER-Android4-0/User-Guide-1988542-Page-149.png)
![Version 1Author RongrongZStatus ReleasedTo delete a photoIndexterm: "photos"Sub-indexterm: "deleting"Indexterm: "deleting"Sub-indexterm: "photos"1When you are viewing a photo, tap the screen to display the toolbars, then tapID: ICN-SONY-KEY-MENU > Delete [album_options_delete_txt] .2Tap OK [gui_ok_txt] .GUID GUID-1EECE26E-E89A-4E66-8B11-9441E0D8B89DTitle To delete a photoChanges Valid from Taoshan changed the way to delete photoVersion 5Author PengLeonStatus ReleasedAnalysing photos with faces in AlbumYou can analyse photos with faces saved to your devices. For example, you can addand edit names for faces.GUID GUID-CAF912E8-705E-4454-9B93-1DA407255083Title Analysing photos with facesChangesVersion 1Author PengLeonStatus ReleasedTo analyse photos with facesIndexterm: "photos"Sub-indexterm: "analysing"Indexterm: "analysing"Sub-indexterm: "photos"1In the Faces tile, tap ID: ICN-SONY-KEY-MENU > Photo analysis [mslide-show_strings_show_op_photo_analysis_setting_txt] .2Tap Activate [gui_activate_txt] .GUID GUID-7AC9032C-AD11-470E-9D87-D3C3FF9458EFTitle To analyse photos with facesChanges Valid from Togari only label changed no text updatedVersion 2Author PengLeonStatus DraftTo name a faceIndexterm: "faces"Sub-indexterm: "editing"Indexterm: "editing"Sub-indexterm: "faces"1In the Faces tile, find and tap the face you want to name in the Unnamed facesfolder.2Tap Add name [face_strings_faceitem_btn_write_name_txt] .3Type a name, then tap OK [okay_action] .GUID GUID-09F1ED28-4A6C-48CC-875F-EBA88F566193Title To name a faceChangesVersion 1Author PengLeonStatus ReleasedTo edit a face nameIndexterm: "faces"Sub-indexterm: "editing"Indexterm: "editing"This is a draft publication for internal use only.150This is an Internet version of this publication. © Print only for private use.](https://usermanual.wiki/Sony/PM-0480.Short-term-confidential-userguide-EN-PRODUCT-NAME-PART-NUMBER-Android4-0/User-Guide-1988542-Page-150.png)
![Sub-indexterm: "faces"1When you are viewing a face in the full screen view, tap the screen to displaythe toolbars, then tap ID: ICN-SONY-KEY-MENU > Edit name tags [face_strings_al-bum_op_edit_tag_txt] .2Tap the face name to edit the name.3Type a name, then tap OK [okay_action] .GUID GUID-5F513671-8DE9-4A62-982F-8CAF8EB3D9ABTitle To edit a face nameChangesVersion 1Author PengLeonStatus ReleasedWorking with videos in AlbumIndexterm: "videos"Use Album to watch videos that you’ve taken with the camera, downloaded, orcopied to your device. You can also share your videos with friends, for example, byuploading them to online services.GUID GUID-51F5D9E3-4BEA-4803-9717-36F071DC30A0Title Working with videosChanges Device Term Change.Version 6Author RongrongZStatus ReleasedTo play a videoIndexterm: "videos"Sub-indexterm: "playing"1Open the Pictures [album_tab_pictures_txt] tab or the My albums [album_tab_my_albums_txt] tab inAlbum.2Using grid view or list view, locate the video that you want to open.3Tap the video to play it.4If the playback controls are not displayed, tap the screen to display them. Tohide the controls, tap the screen again.GUID GUID-F785DB32-33A8-44C6-AD5C-001BC1E7C4A7Title To play a videoChanges Valid for Odin and Yuga (Changed Step 1 "Open the picture and My albums"tabVersion 9Author PengLeonStatus Released*To pause a videoIndexterm: "videos"Sub-indexterm: "pausing"Indexterm: "video player"Sub-indexterm: "pausing a video"1When a video is playing, tap the screen to display the controls.2Tap ID: ICN-SONY-SEMC-MUSIC-PAUSE-NORMAL.GUID GUID-2F1D89FD-3370-4BD6-872E-6628B924E265Title To pause a videoChanges ver. 1 Created for Robyn/Mimmi RTLVersion 1Author PeterCStatus Released*To fast forward and rewind a videoIndexterm: "videos"Sub-indexterm: "fast forwarding and rewinding"1When a video is playing, tap the screen to display the controls.2Drag the progress bar marker left to rewind, or right to fast forward.GUID GUID-A785999B-662F-4020-8B3F-69AAF7D57C5ETitle To fast forward and rewind a videoChanges From Nozomi ICS (edream 6.1). No text change. Only removed the tip.Version 3Author RongrongZThis is a draft publication for internal use only.151This is an Internet version of this publication. © Print only for private use.](https://usermanual.wiki/Sony/PM-0480.Short-term-confidential-userguide-EN-PRODUCT-NAME-PART-NUMBER-Android4-0/User-Guide-1988542-Page-151.png)
![Status ReleasedTo adjust the volume of a videoIndexterm: "videos"Sub-indexterm: "adjusting volume"Indexterm: "volume"Sub-indexterm: "adjusting video"•Press the volume key.GUID GUID-27C5332E-2A2B-47EE-AB0C-18F12067FDB8Title To adjust the volume of a videoChanges ver. 2 Created for Robyn/Mimmi RTLVersion 2Author PeterCStatus Released*To share a videoIndexterm: "videos"Sub-indexterm: "sharing"Indexterm: "videos"Sub-indexterm: "sending"1When a video is playing, tap ID: ICN-SONY-KEY-MENU, then tap Share [al-bum_options_share_txt] .2In the menu that opens, tap the application that you want to use to share theselected video, then follow the relevant steps to send it.You might not be able to copy, send or transfer copyright-protected items. Also, some itemsmay not send if the file size is too large.GUID GUID-5930D392-F898-40B7-9FF0-39EF4F7F23FDTitle To share a videoChanges From Nozomi ICS (edream 6.1). Text changed in step 1.Version 7Author RongrongZStatus Released*To delete a videoIndexterm: "videos"Sub-indexterm: "deleting"Indexterm: "deleting"Sub-indexterm: "videos"1In Album, find the video you want to delete.2Touch and hold the video to activate selection mode. The frame of the videothumbnail turns blue when it is selected.3Tap ID: ICN-SONY-KEY-MENU > Delete [album_options_delete_txt] , then tap OK[gui_ok_txt] .GUID GUID-CF190C14-1CF7-499E-84C3-A49C86003422Title To delete a videoChanges Valid from Taoshan changed the way to delete videoVersion 8Author PengLeonStatus ReleasedViewing your photos on a mapIndexterm: "photos"Sub-indexterm: "viewing on a map"If you enable location detection when taking photos, you can use the informationgathered at a later stage. For example, you can view your photos on a map and showfriends and family where you were when you took the photo. Adding locationinformation is also referred to as geotagging. When you enable location detection,you can select to use either GPS satellites or wireless networks, or both, to find yourposition.GUID GUID-5F3D09DC-6D63-40EB-AE7D-A1D4B8B0ABE3Title Viewing your photos on a mapChanges Valid from JB Update HTML User Guide only X-ef removedVersion 8.1.2Author PengLeonStatus ReleasedThis is a draft publication for internal use only.152This is an Internet version of this publication. © Print only for private use.](https://usermanual.wiki/Sony/PM-0480.Short-term-confidential-userguide-EN-PRODUCT-NAME-PART-NUMBER-Android4-0/User-Guide-1988542-Page-152.png)
![Overview of Maps [album_tab_places_txt] tileIndexterm: "Album"Sub-indexterm: "map"Sub-indexterm: "viewing"Sub-sub indexterm: "photos and videos"ID: SCR-SONY-ALBUM-MAP-OVERVIEW-WVGA-WITHMENU1Search a location on the map.2 View menu options.3 A group of photos and/or videos geotagged with the same location.4 Double tap to zoom in. Pinch to zoom out. Drag to view different parts of the map.5 Thumbnails of the selected group of photos and/or videos. Tap an item to view it in full screen.GUID GUID-D8B29D35-3D56-45A2-8132-19F5EAB3D57CTitle Overview of Map tileChanges Valid from Huashan (only changed Tab to Tile according to TID comments)Version 6Author PengLeonStatus Released*To enable location detection1From your Home screen [homescreen_strings_application_name_txt] , tap ID: ICN-SONY-HOME-APPTRAY-NORMAL.2Find and tap Settings [settings_label_launcher] > Location services [location_settings_title] .3Mark the GPS satellites [location_gps] and/or Google's location service [location_net-work_based] checkboxes.GUID GUID-97BCD6C5-2465-4164-953E-72EE4716155DTitle To enable location detectioncChanges From Nozomi ICS (eDream 6.1). Text changed in step 1 and 2.Version 4Author RongrongZStatus ReleasedThis is a draft publication for internal use only.153This is an Internet version of this publication. © Print only for private use.](https://usermanual.wiki/Sony/PM-0480.Short-term-confidential-userguide-EN-PRODUCT-NAME-PART-NUMBER-Android4-0/User-Guide-1988542-Page-153.png)
![To view geotagged photos on a map in Album1From your Home screen [homescreen_strings_application_name_txt] , tap ID: ICN-SONY-HOME-APPTRAY-NORMAL.2Find and tap Album [album_app_name_txt] > My albums [album_tab_my_albums_txt] > Maps [al-bum_tab_places_txt] .3Tap a photo to view it in full screen.4If several photos were taken at the same location, only one of them appears onthe map. The total number of photos appears in the top right corner, forexample, ID: ICN-SONY-ALBUM-PHOTO-GROUP. To view these photos,tap the cover photo and then tap one of the thumbnails at the bottom of thescreen.When viewing a geotagged photo in the photo viewer, you can touch the screen to display thetoolbars, then tap ID: ICN-SONY-ACTION-LAYER-GEOTAG-BG to view the photo on themap.GUID GUID-6ED5D2BE-F4C3-4957-B8EE-544F2EB007F2Title To view geotagged photos on a map in AlbumChanges Valid from Odin and Yuga (The path to open Maps changed)Version 7Author PengLeonStatus ReleasedTo view geotagged photos on a globe in Album1From your Home screen [homescreen_strings_application_name_txt] , tap ID: ICN-SONY-HOME-APPTRAY-NORMAL.2Find and tap Album [album_app_name_txt] > My albums [album_tab_my_albums_txt] > Globe [al-bum_dashboard_tile_globe_txt] .3Tap a photo to view it in full screen.4If several photos were taken at the same location, only one of them appears onthe map. The total number of photos appears in the top right corner, forexample, ID: ICN-SONY-ALBUM-PHOTO-GROUP. To view these photos,tap the cover photo and then tap one of the thumbnails at the bottom of thescreen.When viewing a geotagged photo from the camera application, you can touch the screen todisplay the toolbars, then tap ID: ICN-SONY-ACTION-LAYER-GEOTAG-BG to view thephoto on the map.GUID GUID-058FF9EC-CDBF-414A-AC0B-2C89C9791CE0Title To view geotagged photos in globe viewChangesVersion 1Author PengLeonStatus ReleasedTo add a geotag when viewing the map in Album1When viewing the map in Album, tap ID: ICN-SONY-KEY-MENU, then tap Addgeotag [album_options_add_geotag_txt] .2Find and tap the photo to which you want to add the geotag.3Tap the desired location on the map to set the geotag, then tap OK [gui_ok_txt] .GUID GUID-FFCB4D26-20C3-4693-90EF-C62E7FBE98F7Title To add a geotag when viewing the map in AlbumChanges From Nozomi ICS (edream6.1).Version 1Author RongrongZStatus ReleasedTo edit the geotag of a photo in Album1When viewing a photo on the map in Album, touch and hold the photo until itsframe turns blue.2Drag the photo to the new location.You can also tap the desired location on the map instead of dragging.GUID GUID-C563C5E8-4E10-4BD9-A348-08F1A4A400DBThis is a draft publication for internal use only.154This is an Internet version of this publication. © Print only for private use.](https://usermanual.wiki/Sony/PM-0480.Short-term-confidential-userguide-EN-PRODUCT-NAME-PART-NUMBER-Android4-0/User-Guide-1988542-Page-154.png)
![Title To edit the geotag of a photo in AlbumChanges From Nozomi ICS (edream 6.1).Version 1Author RongrongZStatus ReleasedTo change the map view in Album•When viewing the map in Album, tap ID: ICN-SONY-KEY-MENU, then select Classicview [album_options_map_view_classic_txt] or Satellite view [album_options_map_view_satellite_txt] .GUID GUID-000937D7-8E92-43F6-9EBD-157D5D4D21EBTitle To change the map view in AlbumChanges Valid from Sony United only Globe view removedVersion 3Author PengLeonStatus ReleasedViewing online albumsIn Album, view the photos and videos that you and your friends have uploaded toonline services, such as Picasa™ and Facebook™. You can view comments fromyour friends and add your own comments as well.GUID GUID-B00667D1-883A-41A7-A178-D8B55B1E6021Title Viewing your online albumsChanges Valid from Odin and Yuga (Updated according to functional review com-ments)Version 2Author PengLeonStatus Released*Overview of online servicesIndexterm: "Album"Sub-indexterm: "online albums"Sub-indexterm: "viewing"Sub-sub indexterm: "photos and videos"ID: SCR-SONY-ALBUM-ONLINE-OVERVIEW-WVGA-WITHMENU1Active online service.2 Name of online album.3 Number of items in the online album.4 Refresh.5 View menu options.GUID GUID-9DBECC44-0C94-4D50-B44F-B155BBF20D59Title Overview of online tabChanges Valid from Odin and Yuga (Only Title changed)This is a draft publication for internal use only.155This is an Internet version of this publication. © Print only for private use.](https://usermanual.wiki/Sony/PM-0480.Short-term-confidential-userguide-EN-PRODUCT-NAME-PART-NUMBER-Android4-0/User-Guide-1988542-Page-155.png)
![Version 4Author PengLeonStatus Released*To view and add comments to online album content1When viewing a photo from an online album, tap the screen to display thetoolbars, then tap ID: ICN-SONY-ALBUM-ONLINE-COMMENT to view thecomments.2To view more comments, scroll down the screen.3To add your own comments, enter your comments at the bottom of the screen,then tap Post [album_online_add_comment_hint_txt] .GUID GUID-EB349C86-E7AC-4B9E-A8C4-E8276B331929Title To view and add comments to online album contentChanges From Nozomi ICS (edream 6.1).Version 1Author RongrongZStatus ReleasedTo recommend a photo or video on Facebook™Indexterm: ""Like" a photo on Facebook™"Indexterm: ""Like" a video on Facebook™"Indexterm: "recommending photos and videos"•While viewing a photo or video from one of your Facebook™ albums, tap thescreen to display the toolbars, then tap ID: ICN-SONY-ACTIONLAYER-LIKE-OFF to show that you "Like" the item on Facebook™ [Facebook™] .GUID GUID-34B7D433-85CD-4664-A3AE-951412CE0161Title To recommend a photo on Facebook™Changes From Nozomi2. Updated index by removing Xperia with Facebook. Replaced"it" with "the item" according to editor's comments.Version 4Author RongrongZStatus Released*This is a draft publication for internal use only.156This is an Internet version of this publication. © Print only for private use.](https://usermanual.wiki/Sony/PM-0480.Short-term-confidential-userguide-EN-PRODUCT-NAME-PART-NUMBER-Android4-0/User-Guide-1988542-Page-156.png)
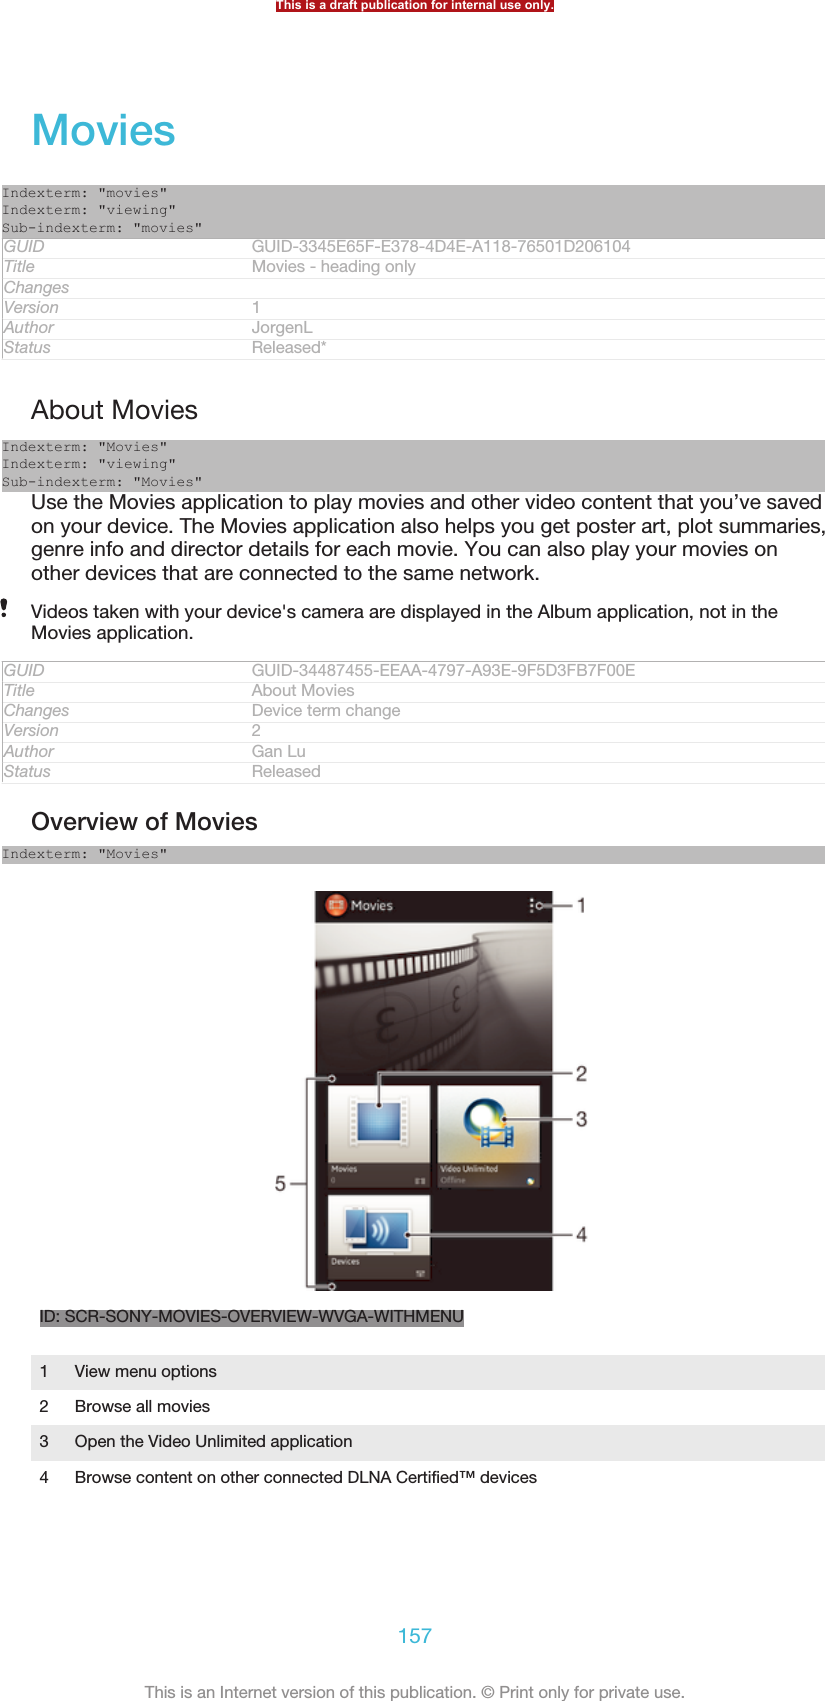
![5 All video categories available on your deviceVideo Unlimited may not be available in all countries or regions.GUID GUID-33B65899-D71B-4F7F-9F49-CD7D5F53E95CTitle Overview of MoviesChanges For Nicki SS; remove bullets 1&6 for Movies 3.3 (based on V5)Version 7Author Tan NellieStatus DraftUsing MoviesIndexterm: "using Movies"GUID GUID-C5D88595-AEA0-4E12-873D-48921AC9D35FTitle Using Movies - heading onlyChanges for Huashan; update index termVersion 2Author Gan LuStatus ReleasedTo play a video in Movies1From your Home screen [homescreen_strings_application_name_txt] , tap ID: ICN-SONY-HOME-APPTRAY-NORMAL, then find and tap Movies [udoc_trans_app_name_movies] .2Select a video category and browse to the video that you want to play.3Tap the video you want to select, then tap ID: ICN-SONY-SEMC-MUSIC-PLAY-NORMAL to play it.4To display or hide the controls, tap the screen.5To pause playing, tap ID: ICN-SONY-SEMC-MUSIC-PAUSE-NORMAL.6To rewind, drag the progress bar marker left. To fast forward, drag theprogress bar marker right.GUID GUID-BB3F685B-DC8C-4C9A-8988-347CC7F28D2BTitle To play a video in MoviesChanges From Tablet 2012 fall. Updated due to functional change.Version 2Author RongrongZStatus ReleasedTo play a video in full screen1When a video is playing, tap the screen to display the controls.2Tap ID: ICN-SONY-MOVIES-FULL-SCREEN.To play the video in its original size, tap ID: ICN-SONY-MOVIES-ORIGINAL-SIZE.GUID GUID-51B9F0A2-1F73-4BA0-AF3D-204D8040AA98Title To play a video in full screenChanges For Tablet 2012 fall. Updated due to editor's comments.Version 2Author RongrongZStatus ReleasedTo share a video1When a video is playing, tap ID: ICN-SONY-KEY-MENU, then tap Share [share] .2In the menu that opens, tap the application that you want to use to share theselected video, then follow the relevant steps to send it.GUID GUID-FA1344A1-1D81-4746-8FC6-5ECD464F44E6Title To share a videoChanges For Tablet 2012 fall. Updated according to editor's comments.Version 2Author RongrongZStatus Released*This is a draft publication for internal use only.158This is an Internet version of this publication. © Print only for private use.](https://usermanual.wiki/Sony/PM-0480.Short-term-confidential-userguide-EN-PRODUCT-NAME-PART-NUMBER-Android4-0/User-Guide-1988542-Page-158.png)
![To get movie information manually1Make sure your phone has an active data connection.2From your Home screen [homescreen_strings_application_name_txt] , tap ID: ICN-SONY-HOME-APPTRAY-NORMAL, then find and tap Movies [udoc_trans_app_name_movies] .3Tap ID: ICN-SONY-KEY-MENU, then make sure that the Get video details [on-line_mode_option_info] checkbox is marked.4Select a video category and browse to the video for which you want to getinformation.5Touch and hold the movie for which you want to get information, then tapSearch for info [gracenote_option_lookup_info] in the list that appears.6In the search field, enter keywords for the video, then tap the confirm key onthe keyboard. All matches are displayed in a list.7Select a search result, then tap Done [gui_done_txt] . The download of theinformation begins.You also get information about newly added videos automatically when the Movies applicationis opened and the Get video details [online_mode_option_info] checkbox is marked. Data transmissioncharges may apply.If the downloaded information is not correct, tap ID: ICN-SONY-VIDEO-DETAILS andsearch again using different keywords.GUID GUID-C90DB6C6-1213-4A7F-B71E-0EFA1B841361Title To get movie information manuallyChanges Customized for Tablet. Added condition to change "phone" to "device". Edi-torially approved except step 6/note/tip.Version 2Author RongrongZStatus Released*To clear information about a videoIndexterm: "movies"Sub-indexterm: "clearing video information"1From your Home screen [homescreen_strings_application_name_txt] , tap ID: ICN-SONY-HOME-APPTRAY-NORMAL, then find and tap Movies [udoc_trans_app_name_movies] .2Select a video category and browse to the video that you want to edit.3Touch and hold the video thumbnail, then tap Clear info [gracenote_option_clear_info] .GUID GUID-7DC6C771-703A-4944-8C0F-DEE68A90FBD2Title To clear information about a videoChanges for Odin; change step 3Version 3Author Gan LuStatus Released*To play a video on an external device1Make sure the devices that you want to share files with are connected to thesame Wi-Fi® [udoc_no_trans_wifi_wlan_plain] network as your device.2From your Home screen [homescreen_strings_application_name_txt] , tap ID: ICN-SONY-HOME-APPTRAY-NORMAL, then find and tap Movies [udoc_trans_app_name_movies] > ID: ICN-SONY-KEY-MENU.3Tap Throw [play_on_device] , then select a device from the list.4Select the video that you want to play.GUID GUID-C5049CCE-C12E-4772-9E8F-1481619786BFTitle To play a video on an external deviceChanges for Odin & YugaVersion 1Author Gan LuStatus ReleasedThis is a draft publication for internal use only.159This is an Internet version of this publication. © Print only for private use.](https://usermanual.wiki/Sony/PM-0480.Short-term-confidential-userguide-EN-PRODUCT-NAME-PART-NUMBER-Android4-0/User-Guide-1988542-Page-159.png)
![To change the sound settings while a video is playing1While a video is playing, tap the screen to display the controls.2Tap ID: ICN-SONY-KEY-MENU, then tap Sound settings [udoc_trans_movies_sound_set-tings] .3Mark the checkboxes for the sound settings that you want to activate.4When you're finished, tap OK [gui_ok_txt] .GUID GUID-2E2A3369-4370-493A-A9AD-8A797853C20ATitle To change the sound settings when playing a videoChanges From Tablet 2012 fall models. Movies 2.1. New topic.Version 1Author RongrongZStatus ReleasedTo delete a video1From your Home screen, tap ID: ICN-SONY-HOME-APPTRAY-NORMAL,then find and tap Movies [udoc_trans_app_name_movies] .2Select a video category and browse to the video that you want to delete.3Touch and hold the video thumbnail, then tap Delete [video_strings_delete_txt] from thelist that appears.4Tap Delete [video_strings_delete_txt] again to confirm.GUID GUID-FF4AE431-C65B-4F9C-9E9A-BD782D59D6A6Title To delete a videoChanges From Tablet. Movies 2.1.Version 1Author RongrongZStatus ReleasedThis is a draft publication for internal use only.160This is an Internet version of this publication. © Print only for private use.](https://usermanual.wiki/Sony/PM-0480.Short-term-confidential-userguide-EN-PRODUCT-NAME-PART-NUMBER-Android4-0/User-Guide-1988542-Page-160.png)
![Video UnlimitedIndexterm: "Video Unlimited"GUID GUID-D97D2EE7-6F18-4CCD-89E5-F603425C0B59Title Video Unlimited - heading onlyChanges From Togari; text changed; only remove the trademark (TM).Version 2Author Tan NellieStatus DraftAbout Video UnlimitedIndexterm: "Video Unlimited"Use the Video Unlimited service to rent and purchase videos that you can view notonly on your Android device, but also on a PC, PlayStation® Portable (PSP®),PlayStation® 3 or PlayStation® Vita. Select your pick from the latest Hollywoodreleases, action movies, comedies, classics, and a range of other categories.Video Unlimited might not be available in all countries or regions.GUID GUID-ECD7AFE6-638C-403E-B141-21012DD658A3Title About Video UnlimitedChanges From Togari; text changed; remove the trademark (TM) and add PlaySta-tion® Vita.Version 3Author Tan NellieStatus DraftTo open Video Unlimited1From your Home screen [homescreen_strings_application_name_txt] , tap ID: ICN-SONY-HOME-APPTRAY-NORMAL.2Find and tap ID: ICN-SONY-APP-QRIOCITY.GUID GUID-A757408D-63DB-4C20-8594-32428F18B21ATitle To open Qriocity™ VideoChanges From Togari; text changed; only remove the trademark (TM) as TID requires.Version 4Author Tan NellieStatus DraftVideo Unlimited menu overviewIndexterm: "Video Unlimited"Sub-indexterm: "menu overview"ID:ICN-SONY-MENU-ACCOUNT-LISTView your account informationID:ICN-SONY-MENU-SEARCHSearch for a videoID:ICN-SONY-QRIOCITY-View the download status for all your itemsThis is a draft publication for internal use only.161This is an Internet version of this publication. © Print only for private use.](https://usermanual.wiki/Sony/PM-0480.Short-term-confidential-userguide-EN-PRODUCT-NAME-PART-NUMBER-Android4-0/User-Guide-1988542-Page-161.png)
![Changes From Togari; text changed; remove the trademark (TM) and all the icons asTID requires.Version 6Author Tan NellieStatus DraftTo open the Video Unlimited menu•Open Video Unlimited [IA_APP_VIDEO_UNLIMITED] , then tap ID: ICN-SONY-KEY-MENU.GUID GUID-CA8B4FC3-5116-45D0-B3F4-EE8853C45850Title To open the Qriocity menuChanges From Togari; text changed; only remove the trademark (TM) as TID requires.Version 5Author Tan NellieStatus DraftCreating a Video Unlimited accountIndexterm: "Video Unlimited"Sub-indexterm: "creating an account"You need to create a Video Unlimited account if you want to buy or rent moviesthrough the Video Unlimited service. If you already have a PlayStation® networkaccount or a Sony Entertainment Network account, then you can use that accountinstead.GUID GUID-4F2540B1-5415-4BCE-B849-D61FFDA326B8Title Creating an accountChanges From Togari; text changed; remove the trademark (TM) and add Sony Enter-tainment Network account as TID requires.Version 6Author Tan NellieStatus DraftExploring the Video Unlimited selectionBrowse videos by category, or enter text to search for a particular item. You can alsochoose to preview videos you're interested in.GUID GUID-B42162CD-C272-454E-8512-EA332CE6C769Title Exploring the Qriocity video selectionChanges From Togari; text changed; only remove the trademark (TM) as TID requires.Version 5Author Tan NellieStatus DraftRenting or buying a videoIndexterm: "Video Unlimited"Sub-indexterm: "buying videos"Sub-indexterm: "renting videos"When you rent a video, you have a fixed amount of time in which to view it. This timeperiod varies from market to market. You can also choose to download a purchasedvideo to most Sony™ devices that are connected to your Video Unlimited account.GUID GUID-4E75E2C5-7F58-494C-94B1-72FF82C56D64Title Renting or buying a videoChanges From Togari; text changed; only remove the trademark (TM) as TID requires.Version 5Author Tan NellieStatus DraftVideo Unlimited notifications overviewIndexterm: "Video Unlimited"Sub-indexterm: "notifications"When you buy or rent videos, the following notifications may appear:ID:ICN-SONY-Downloading of video is completedThis is a draft publication for internal use only.163This is an Internet version of this publication. © Print only for private use.](https://usermanual.wiki/Sony/PM-0480.Short-term-confidential-userguide-EN-PRODUCT-NAME-PART-NUMBER-Android4-0/User-Guide-1988542-Page-163.png)
![Web browserIndexterm: "web browser"Indexterm: "Internet"Sub-indexterm: "web browser"GUID GUID-C6458DD6-EE02-482B-8272-9E1E99BEF6E7Title Web browser - heading onlyChangesVersion 1Author JorgenLStatus ReleasedAbout the web browserIndexterm: "web browser"Indexterm: "Internet"Sub-indexterm: "web browser"The Google Chrome™ web browser for Android™ devices comes pre-installed inmost markets. Go to http://support.google.com/chrome and click the "Chrome forMobile" link to get more detailed information about how to use this web browser.Google Chrome™ is not available in all markets.GUID GUID-4C8FA0B0-E32C-4AFF-98E4-F6EB2DD99BC4Title About the web browserChanges updated for devices which don't have web broswer but Chrome onlyVersion 4Author LuLindaStatus ReleasedTo open the web browser1From your Home screen [homescreen_strings_application_name_txt] , tap ID: ICN-SONY-HOME-APPTRAY-NORMAL.2Find and tap ID: ICN-SONY-APP-CHROME.GUID GUID-9F6D5FF1-0FE2-436C-A909-4616287CCC89Title To open the web browserChanges Changed for Odin/Yuga: Update the Chrome icon.Version 7Author GuoZhaoyunStatus ReleasedThis is a draft publication for internal use only.167This is an Internet version of this publication. © Print only for private use.](https://usermanual.wiki/Sony/PM-0480.Short-term-confidential-userguide-EN-PRODUCT-NAME-PART-NUMBER-Android4-0/User-Guide-1988542-Page-167.png)
![ConnectivityIndexterm: "connectivity"GUID GUID-2DE0CED8-8C54-45E2-BBCA-EB06A8978D22Title Connectivity - heading onlyChangesVersion 1Author JorgenLStatus ReleasedConnecting to wireless networksYou can access the Internet wirelessly from your device using Wi-Fi® [udoc_no_trans_wi-fi_wlan_plain] technology. This way you can browse the web and share media files over thesame Wi-Fi® [udoc_no_trans_wifi_wlan_plain] network with other DLNA Certified™ devices, forexample, TVs and computers.If your company or organisation has a virtual private network (VPN), you can connectto this network using your device. You can use a VPN to access intranets and otherinternal services at your company.GUID GUID-DC584BA4-E5B9-4791-AF52-B42F72507E7FTitle Connecting to wireless networksChanges Remove snippet image for Xperia CareVersion 8Author LiShuoStatus ReleasedBefore using Wi-Fi®To browse the Internet using a Wi-Fi® [udoc_no_trans_wifi_wlan_plain] connection, you need tosearch for and connect to an available Wi-Fi® [udoc_no_trans_wifi_wlan_plain] network and thenopen the Internet browser. The signal strength of the Wi-Fi® [udoc_no_trans_wifi_wlan_plain]network may differ depending on your device's location. Move closer to the Wi-Fi®[udoc_no_trans_wifi_wlan_plain] access point to increase the signal strength.GUID GUID-8A163681-5881-423C-B364-FBF0EF3186C4Title Before using Wi-FiChanges Device Term ChangeVersion 6Author LiShuoStatus ReleasedTo turn on Wi-Fi®1From your Home screen [homescreen_strings_application_name_txt] , tap ID: ICN-SONY-HOME-APPTRAY-NORMAL.2Find and tap Settings [settings_label_launcher] .3Drag the slider beside Wi-Fi® [udoc_no_trans_wifi_wlan_plain] to the right to turn on the Wi-Fi® [udoc_no_trans_wifi_wlan_plain] function.It may take a few seconds before Wi-Fi® [udoc_no_trans_wifi_wlan_plain] is enabled.GUID GUID-32D5A26E-BDE9-443A-9989-CD340E27C309Title To turn on Wi-FiChanges Device term ChangeVersion 10Author LiShuoStatus Released*This is a draft publication for internal use only.168This is an Internet version of this publication. © Print only for private use.](https://usermanual.wiki/Sony/PM-0480.Short-term-confidential-userguide-EN-PRODUCT-NAME-PART-NUMBER-Android4-0/User-Guide-1988542-Page-168.png)
![To connect to a Wi-Fi® network1From the Home screen [homescreen_strings_application_name_txt] , tap ID: ICN-SONY-HOME-APPTRAY-NORMAL .2Find and tap Settings [settings_label_launcher] .3Make sure that the Wi-Fi® [udoc_no_trans_wifi_wlan_plain] function is on. Tap Wi-Fi[udoc_no_trans_wifi_wlan] .4Available Wi-Fi® [udoc_no_trans_wifi_wlan_plain] networks are displayed. The availablenetworks may be open or secured. Open networks are indicated by ID: ICN-SONY-STAT-SYS-WIFI-SIGNAL-4 and secured networks are indicated by ID: ICN-SONY-STAT-SYS-WIFI-LOCK next to the Wi-Fi® [udoc_no_trans_wifi_wlan_plain]network name.5Tap a Wi-Fi® [udoc_no_trans_wifi_wlan_plain] network to connect to it. If you are trying toconnect to a secure network, you are asked to enter a password. ID: ICN-SONY-STAT-SYS-WIFI-SIGNAL-4 is displayed in the status bar once you areconnected.Your device remembers Wi-Fi® [udoc_no_trans_wifi_wlan_plain] networks you connect to. The next timeyou come within reach of a previously connected Wi-Fi® [udoc_no_trans_wifi_wlan_plain] network, yourdevice automatically connects to it.In some locations, open Wi-Fi® [udoc_no_trans_wifi_wlan_plain] networks require you to log in to a webpage before you can get access to the network. Contact the relevant Wi-Fi® [udoc_no_trans_wi-fi_wlan_plain] network administrator for more information.GUID GUID-349C27FA-BB6C-438D-A975-FBDC889BD41DTitle To connect to a Wi-Fi networkChanges Device Term ChangeVersion 10Author LiShuoStatus ReleasedTo connect to another Wi-Fi® network1From your Home screen [homescreen_strings_application_name_txt] , tap ID: ICN-SONY-HOME-APPTRAY-NORMAL .2Find and tap Settings [settings_label_launcher] > Wi-Fi [wifi] . Detected Wi-Fi® networksare displayed.3Tap another Wi-Fi® network to connect to it.GUID GUID-ACB344A8-EF66-450F-A3D2-77293F9DDC56Title To connect to another Wi-Fi networkChanges updated for ICSVersion 7Author JessicaLStatus ReleasedTo scan for Wi-Fi® [udoc_no_trans_wifi_wlan_plain] networks manually1From your Home screen [homescreen_strings_application_name_txt] , tap ID: ICN-SONY-HOME-APPTRAY-NORMAL .2Find and tap Settings [settings_label_launcher] > Wi-Fi [wifi] .3Press ID: ICN-SONY-KEY-MENU, then tap Scan [wifi_menu_scan] .4To connect to a Wi-Fi® [udoc_no_trans_wifi_wlan_plain] network, tap the network name.GUID GUID-A26E7C05-6ECB-40EC-95AA-1868D0A57BCETitle To scan for Wi-Fi networks manuallyChanges Device Term ChangeVersion 10Author LiShuoStatus Released*This is a draft publication for internal use only.169This is an Internet version of this publication. © Print only for private use.](https://usermanual.wiki/Sony/PM-0480.Short-term-confidential-userguide-EN-PRODUCT-NAME-PART-NUMBER-Android4-0/User-Guide-1988542-Page-169.png)
![To add a Wi-Fi® network manually1Make sure that Wi-Fi® [udoc_no_trans_wifi_wlan_plain] is turned on.2From the Home screen [homescreen_strings_application_name_txt] , tap ID: ICN-SONY-HOME-APPTRAY-NORMAL .3Find and tap Settings [settings_label_launcher] > Wi-Fi [udoc_no_trans_wifi_wlan] .4Tap ID: ICN-SONY-BROWSER-ADD.5Enter the Network SSID [wifi_ssid] for the network.6Tap the Security [wifi_security] field to select a security type.7If required, enter a password.8Tap Save [wifi_save] .Wi-Fi® [udoc_no_trans_wifi_wlan_plain] network name is indicated as SSID, ESSID, Access Point, etc.Contact your Wi-Fi® [udoc_no_trans_wifi_wlan_plain] network administrator to get the Network SSIDname and password.GUID GUID-A7AE9A0F-77BC-46FA-8C4A-B90D8C3E4FACTitle To add a Wi-Fi network manuallyChanges Add one step according to edtior's comments. From odin and onwards.Version 10Author LiShuoStatus Released*Advanced Wi-Fi® settingsGUID GUID-41AE41FC-BE40-45A1-9859-AC3D9604CA13Title Advanced Wi-Fi settingsChanges Move content to another topic according to editor's commentsVersion 4Author LiShuoStatus ReleasedWi-Fi® network statusWhen you are connected to a Wi-Fi® [udoc_no_trans_wifi_wlan_plain] network or when there areWi-Fi® [udoc_no_trans_wifi_wlan_plain] networks available in your vicinity, it is possible to see thestatus of these Wi-Fi® [udoc_no_trans_wifi_wlan_plain] networks. You can also enable yourdevice to notify you whenever an open Wi-Fi® [udoc_no_trans_wifi_wlan_plain] network isdetected.GUID GUID-2A94796D-5D9C-4582-A884-D1E458807BAFTitle Wi-Fi network statusChanges Device Term ChangeVersion 5Author LiShuoStatus ReleasedTo enable Wi-Fi® network notifications1Turn on Wi-Fi®, if it is not already on.2From your Home screen [homescreen_strings_application_name_txt] , tap ID: ICN-SONY-HOME-APPTRAY-NORMAL .3Find and tap Settings [settings_label_launcher] > Wi-Fi [wifi] .4Press ID: ICN-SONY-KEY-MENU.5Tap Advanced [pref_extras_title] .6Mark the Network notification [wifi_notify_open_networks] checkbox.GUID GUID-9F08F877-2C94-4551-8F02-965605144EEETitle To enable Wi-Fi network notificationChanges updated for ICSVersion 8Author JessicaLStatus ReleasedThis is a draft publication for internal use only.170This is an Internet version of this publication. © Print only for private use.](https://usermanual.wiki/Sony/PM-0480.Short-term-confidential-userguide-EN-PRODUCT-NAME-PART-NUMBER-Android4-0/User-Guide-1988542-Page-170.png)
![To view detailed information about a connected Wi-Fi® network1From the Home screen [homescreen_strings_application_name_txt] , tap ID: ICN-SONY-HOME-APPTRAY-NORMAL .2Find and tap Settings [settings_label_launcher] > Wi-Fi [wifi] .3Tap the Wi-Fi® network that you are currently connected to. Detailed networkinformation is displayed.GUID GUID-51F6A64B-C4DB-47B6-91B1-ED742AACB692Title To view detailed information about a connected Wi-Fi networkChanges updated for ICSVersion 7Author JessicaLStatus ReleasedWi-Fi® sleep policyBy adding a Wi-Fi® [udoc_no_trans_wifi_wlan_plain] sleep policy, you can specify when to switchfrom Wi-Fi® [udoc_no_trans_wifi_wlan_plain] to mobile data.If you are not connected to a Wi-Fi® [udoc_no_trans_wifi_wlan_plain] network, your device uses a mobiledata connection to access the Internet (if you have set up and enabled a mobile dataconnection on your device).GUID GUID-CD643BF1-D575-4F69-A82A-5A1D1773478CTitle Wi-Fi sleep policyChanges Device Term ChangeVersion 6Author LiShuoStatus ReleasedTo add a Wi-Fi® sleep policy1From the Home screen [homescreen_strings_application_name_txt] , tap ID: ICN-SONY-HOME-APPTRAY-NORMAL .2Find and tap Settings [settings_label_launcher] > Wi-Fi [wifi] .3Press ID: ICN-SONY-KEY-MENU.4Tap Advanced [wifi_menu_advanced] .5Tap Keep Wi-Fi on during sleep [wifi_setting_sleep_policy_title] .6Select an option.GUID GUID-65A23535-7509-42F8-8825-7DB85FEC5A28Title To add a Wi-Fi sleep policyChanges updated for ICSVersion 7Author JessicaLStatus ReleasedWi-Fi Direct™Indexterm: "Wi-Fi®"Use Wi-Fi Direct™ to connect to other devices directly, without joining a traditionalhome, office or hotspot network. For example, you can enable your device to beconnected directly to a computer so that you can access content from your deviceon the computer. The devices that you share content with must have Wi-Fi Direct™certification.GUID GUID-6ADC65CD-B4F8-46F5-83B6-1A54F06FD754Title Wi-Fi directChanges Device Term ChangeVersion 2Author LiShuoStatus ReleasedThis is a draft publication for internal use only.171This is an Internet version of this publication. © Print only for private use.](https://usermanual.wiki/Sony/PM-0480.Short-term-confidential-userguide-EN-PRODUCT-NAME-PART-NUMBER-Android4-0/User-Guide-1988542-Page-171.png)
![To turn on Wi-Fi Direct™1Make sure your device has the Wi-Fi® [udoc_no_trans_wifi_wlan_plain] function turned on.2From your Home screen [homescreen_strings_application_name_txt] , tap ID: ICN-SONY-HOME-APPTRAY-NORMAL.3Find and tap Settings [settings_label_launcher] > Wi-Fi [wifi] .4Tap ID: ICN-SONY-KEY-MENU > Wi-Fi Direct [wifidir_strings_settings_direct_title_txt] .GUID GUID-61D62CD1-0A49-4146-ABEF-644FAFBE04B7Title To turn on Wi-Fi DirectChanges From Odin. change the path of Wi-Fi direct according to the new UI.Version 2Author LiShuoStatus ReleasedSharing your mobile data connectionIndexterm: "tethering"Sub-indexterm: "USB tethering"Indexterm: "tethering"Sub-indexterm: "with Xperia Link™"You can share your device's mobile data connection with a single computer using aUSB cable. This process is called USB tethering. You can also share your device'sdata connection with up to eight other devices at once, by turning your device into aportable Wi-Fi® [udoc_no_trans_wifi_wlan_plain] hotspot.When your device is sharing its data connection, the following icons may appear inthe status bar or in the Notification panel:ID: ICN-SONY-STAT-SYS-TETHER-USB USB tethering is activeID: ICN-SONY-STAT-SYS-WIFI-SIGNAL-4 Portable Wi-Fi® [udoc_no_trans_wifi_wlan_plain]hotspot is activeGUID GUID-391DC4CE-B831-4F3F-8D82-9CC4E03EA622Title Sharing the mobile data connection of your phoneChanges Device Term ChangeVersion 7Author LiShuoStatus ReleasedTo share your data connection using a USB cable1Deactivate all USB cable connections to your device.2Using the USB cable that came with your device, connect your device to acomputer.3From your Home screen [homescreen_strings_application_name_txt] , tap ID: ICN-SONY-HOME-APPTRAY-NORMAL .4Find and tap Settings [settings_label] > More… [radio_controls_title] > Tethering & portablehotspot [tether_settings_title_all] .5Mark the USB tethering [usb_tethering_button_text] checkbox.6To stop sharing your data connection, unmark the USB tethering [usb_tethering_but-ton_text] checkbox or disconnect the USB cable.You cannot share your device's data connection and SD card over a USB cable at the sametime.You may need to prepare your computer to establish a network connection via USB cable. Goto www.android.com/tether to get the most current information.GUID GUID-60CF569F-5B4A-43C3-B7F8-759B6C76C930Title To share data connection of your phone via USBChanges Device Term ChangeVersion 4Author LiShuoStatus ReleasedThis is a draft publication for internal use only.172This is an Internet version of this publication. © Print only for private use.](https://usermanual.wiki/Sony/PM-0480.Short-term-confidential-userguide-EN-PRODUCT-NAME-PART-NUMBER-Android4-0/User-Guide-1988542-Page-172.png)
![To use your device as a portable Wi-Fi® hotspot1From the Home screen [homescreen_strings_application_name_txt] , tap ID: ICN-SONY-HOME-APPTRAY-NORMAL .2Find and tap Settings [settings_label] > More… [radio_controls_title] > Tethering & portablehotspot [tether_settings_title_all] .3Tap Portable Wi-Fi hotspot settings [wifi_tether_settings_text] > Set up Wi-Fi hotspot [wi-fi_tether_configure_ap_text] .4Enter the Network SSID [wifi_ssid] for the network. Tap the Security [wifi_security] field toselect a security type.5If required, enter a password.6Tap Save [wifi_save] .7Mark the Portable Wi-Fi hotspot [wifi_tether_checkbox_text] checkbox. Your device startsbroadcasting its Wi-Fi network name (SSID). Up to eight computers or otherdevices can now connect to this network.8Unmark the Portable Wi-Fi hotspot [wifi_tether_checkbox_text] checkbox when you wantto stop sharing your data connection via Wi-Fi®.GUID GUID-7B256C79-790C-43DE-9EEB-9BC8B6C70165Title To share data connection of your phone as a portable Wi-Fi hotspotChanges Device Term ChangeVersion 5.1.2Author LiShuoStatus Released*To rename or secure your portable hotspot1From the Home screen [homescreen_strings_application_name_txt] , tap ID: ICN-SONY-HOME-APPTRAY-NORMAL .2Find and tap Settings [settings_label] > More… [radio_controls_title] > Tethering & portablehotspot [tether_settings_title_all] .3Tap Portable Wi-Fi hotspot settings [wifi_tether_settings_text] > Set up Wi-Fi hotspot [wi-fi_tether_configure_ap_text] .4Enter the Network SSID [wifi_ssid] for the network.5To select a security type, tap the Security [wifi_security] field.6If required, enter a password.7Tap Save [wifi_save] .GUID GUID-E4366CA7-0AA0-4F7A-B25B-F8BFC3BAF97ATitle To rename or secure your portable hotspotChanges Add one step from Odin.Version 5Author LiShuoStatus ReleasedVirtual private networks (VPNs)Use your device to connect to virtual private networks (VPNs), which allow you toaccess resources inside a secured local network from outside the actual network. Forexample, VPN connections are commonly used by corporations and educationalinstitutions for users who need to access intranets and other internal services whenthey are outside of the internal network, for example, when they are travelling.VPN connections can be set up in many ways, depending on the network. Somenetworks may require you to transfer and install a security certificate in your device.For detailed information on how to set up a connection to your virtual privatenetwork, please contact the network administrator of your company or organisation.GUID GUID-2F97A59E-A7B7-44AD-8205-166EA14A3A4CTitle Virtual private networksChanges Device Term ChangeVersion 3Author LiShuoStatus ReleasedThis is a draft publication for internal use only.173This is an Internet version of this publication. © Print only for private use.](https://usermanual.wiki/Sony/PM-0480.Short-term-confidential-userguide-EN-PRODUCT-NAME-PART-NUMBER-Android4-0/User-Guide-1988542-Page-173.png)
![To add a virtual private network1From your Home screen [homescreen_strings_application_name_txt] , tap ID: ICN-SONY-HOME-APPTRAY-NORMAL.2Find and tap Settings [settings_label_launcher] > More… [radio_controls_title] > VPN [vpn_settings_title] .3Tap Add VPN profile [vpn_create_profile] .4Select the type of VPN to add.5Enter your VPN settings.6Tap Save [vpn_save] .GUID GUID-992DA13F-F73C-44E7-9626-6EF9060F08D2Title To add a virtual private networkChanges Change the Icon to label for Pollux and Nicky ss in step 3 only.Version 6Author Vera QuStatus ReleasedTo connect to a virtual private network1From your Home screen [homescreen_strings_application_name_txt] , tap ID: ICN-SONY-HOME-APPTRAY-NORMAL.2Find and tap Settings [settings_label_launcher] > More… [radio_controls_title] > VPN [vpn_settings_title] .3In the list of available networks, tap the VPN that you want to connect to.4Enter the required information.5Tap Connect [vpn_connect] .GUID GUID-66363089-CE64-4AB0-A2FA-A0B688FC0289Title To connect to a virtual private networkChanges updated for ICSVersion 4Author JessicaLStatus ReleasedTo disconnect from a virtual private network1Drag the status bar downwards.2Tap the notification for the VPN connection to turn it off.GUID GUID-659C005D-AC0A-411F-8CD7-622DF74D0C12Title To disconnect from a virtual private networkChanges From Shakira RTL - first documentation of the featureVersion 1Author TobiasNStatus Released*Sharing content with DLNA Certified™ devicesYou can view or play media content saved to your device on other devices such as,for example, a TV, or a computer. Such devices must be DLNA Certified™ by theDigital Living Network Alliance and all devices must be connected to the same Wi-Fi® [udoc_no_trans_wifi_wlan_plain] network in order for content to be shared. You can also viewor play content from other DLNA Certified™ devices on your device.After you set up the sharing of content between devices, you can, for example, listento music files stored on your home computer from your device, or view photos takenwith your device's camera on a large-screen TV.GUID GUID-A89920CC-EDB6-4CFF-A765-A27DE555911BTitle Using the Connected devices feature to share filesChanges Device Term ChangeVersion 8Author LiShuoStatus ReleasedPlaying files from DLNA Certified™ devices on your deviceWhen you play files from another DLNA Certified™ device on your device, this otherdevice acts as a server. In other words, it shares content over a network. The serverdevice must have its content sharing function enabled and give access permission toThis is a draft publication for internal use only.174This is an Internet version of this publication. © Print only for private use.](https://usermanual.wiki/Sony/PM-0480.Short-term-confidential-userguide-EN-PRODUCT-NAME-PART-NUMBER-Android4-0/User-Guide-1988542-Page-174.png)
![your device. It also must be connected to the same Wi-Fi® [udoc_no_trans_wifi_wlan_plain]network as your device.GUID GUID-00FB7F2C-AC5B-40CB-8B7A-4B9F1DAAD699Title Playing files from other devices on your phoneChanges Device Term ChangeVersion 5Author LiShuoStatus ReleasedTo play a shared track on your device1Make sure the devices that you want to share files with are connected to thesame Wi-Fi® [udoc_no_trans_wifi_wlan_plain] network as your device.2From your Home screen [homescreen_strings_application_name_txt] , tap ID: ICN-SONY-HOME-APPTRAY-NORMAL, then find and tap WALKMAN [udoc_no_trans_app_walkman] .3Tap My music [music_tab_mymusic_ics] to open the music library.4Select a device from the list of connected devices.5Browse the folders of the connected device and select the track that you wantto play. The track starts playing automatically.GUID GUID-793BA59D-C09E-4393-9935-1993AA924122Title To play a shared track on your phoneChanges Device Term ChangeVersion 2Author LiShuoStatus ReleasedTo play a shared video on your device1Make sure the devices that you want to share files with are connected to thesame Wi-Fi® [udoc_no_trans_wifi_wlan_plain] network as your device.2From your Home screen [homescreen_strings_application_name_txt] , tap ID: ICN-SONY-HOME-APPTRAY-NORMAL, then find and tap Movies [udoc_trans_app_name_movies] >Devices [dlna_strings_new_app_name_txt] .3Select a device from the list of connected devices.4Browse the folders of the connected device and select the video that you wantto play.GUID GUID-86BF0ECD-897F-4839-A3A2-6EA8BA98F236Title To play a shared video on your phoneChanges Device Term ChangeVersion 2Author LiShuoStatus ReleasedTo view a shared photo on your device1Make sure the devices that you want to share files with are connected to thesame Wi-Fi® [udoc_no_trans_wifi_wlan_plain] network as your device.2From your Home screen [homescreen_strings_application_name_txt] , tap ID: ICN-SONY-HOME-APPTRAY-NORMAL.3Find and tap Album [album_app_name_txt] > My albums [album_tab_my_albums_txt] . All youravailable online albums and connected devices are displayed.4Select a device from the list of connected devices.5Browse the folders of the connected device and select a photo to view it.GUID GUID-FC9F47BE-94A5-4AC3-B206-AB1BA8BA60D9Title To view a shared photo on your phoneChanges Device Term ChangeVersion 2Author LiShuoStatus ReleasedPreparing to play content from your device on DLNA Certified™devicesBefore you can view or play media files from your device on other DLNA Certified™devices, you must set up file sharing on your device. The devices that you sharecontent with are called client devices. For example, a TV, computer or tablet can actThis is a draft publication for internal use only.175This is an Internet version of this publication. © Print only for private use.](https://usermanual.wiki/Sony/PM-0480.Short-term-confidential-userguide-EN-PRODUCT-NAME-PART-NUMBER-Android4-0/User-Guide-1988542-Page-175.png)
![as client devices. Your device works as a media server when it makes contentavailable to client devices. When you set up file sharing on your device, you mustalso give access permission to client devices. After you do so, such devices appearas registered devices. Devices that are waiting for access permission are listed aspending devices.GUID GUID-F12966C1-E49E-47DE-9021-2F453A5A6C1ATitle Setting up the Media serverChanges Device term ChangeVersion 2Author LiShuoStatus ReleasedTo set up file sharing with other DLNA Certified™ devices1Connect your device to a Wi-Fi® [udoc_no_trans_wifi_wlan_plain] network.2From your Home screen [homescreen_strings_application_name_txt] , tap ID: ICN-SONY-HOME-APPTRAY-NORMAL, then find and tap ID: ICN-SONY-APP-MUSIC-PLAYER.3Tap My music [music_tab_mymusic_ics] to open the music library.4Press ID: ICN-SONY-KEY-MENU, then tap Media server [dlna_strings_home_op-tion_menu_media_server_txt] .5To turn on the Share content [mdms_strings_main_dms_menu_status_title_txt] function, drag theslider. ID: ICN-SONY-MEDIA-SERVER-STAT appears in the status bar. Yourdevice can now work as a media server.6Connect your computer or other devices to the same Wi-Fi® [udoc_no_trans_wi-fi_wlan_plain] network as your device.7A notification appears in the status bar of your device. Open the notificationand set the relevant access permissions for other devices.The instructions described above may differ depending on the client devices used. Refer toyour client device User guide for more information. If the device cannot connect, check thatyour Wi-Fi® [udoc_no_trans_wifi_wlan_plain] network is working.You can also access the Media server [dlna_strings_home_option_menu_media_server_txt] menu underSettings [settings_label_launcher] > More… [radio_controls_title] > Media server settings[dlna_strings_home_my_phone_list_media_server_row1_txt] . If you close the Media server [dlna_strings_home_op-tion_menu_media_server_txt] view, file sharing function function stays running in the background.GUID GUID-B95EA6EC-DFEE-4D0C-808A-7EDFCA85B9DATitle To set up file sharing using the Connected devices featureChanges Update the note according to TID's commentsVersion 9Author LiShuoStatus ReleasedTo stop sharing files with other DLNA Certified™ devices1From your Home screen [homescreen_strings_application_name_txt] , tap ID: ICN-SONY-HOME-APPTRAY-NORMAL, then find and tap ID: ICN-SONY-APP-MUSIC-PLAYER.2Tap My music [music_tab_mymusic_ics] to open the music library.3Press ID: ICN-SONY-KEY-MENU, then tap Media server [dlna_strings_home_op-tion_menu_media_server_txt] .4Drag the slider to turn off the Share content [mdms_strings_main_dms_menu_status_title_txt]function.GUID GUID-2C90F93C-C384-458A-8304-A16052A200EATitle To turn off the media serverChanges For Blue 3.0. Add one step since "Media server" menu change its position.Version 3Author LiShuoStatus ReleasedThis is a draft publication for internal use only.176This is an Internet version of this publication. © Print only for private use.](https://usermanual.wiki/Sony/PM-0480.Short-term-confidential-userguide-EN-PRODUCT-NAME-PART-NUMBER-Android4-0/User-Guide-1988542-Page-176.png)
![To set access permissions for a pending device1From your Home screen [homescreen_strings_application_name_txt] , tap ID: ICN-SONY-HOME-APPTRAY-NORMAL, then find and tap ID: ICN-SONY-APP-MUSIC-PLAYER.2Tap My music [music_tab_mymusic_ics] to open the music library.3Press ID: ICN-SONY-KEY-MENU, then tap Media server [dlna_strings_home_op-tion_menu_media_server_txt] .4Select a device from the Pending devices [mdms_strings_main_divider_pending_list_txt] list.5Select an access permission level.GUID GUID-066FC9A7-DBA3-4BBA-A1E5-53443EA60BC4Title To set the access level of a pending client deviceChanges For Blue 3.0. Add one step since "Media server" change its position.Version 3Author LiShuoStatus ReleasedTo change the name of a registered device1From your Home screen [homescreen_strings_application_name_txt] , tap ID: ICN-SONY-HOME-APPTRAY-NORMAL, then find and tap ID: ICN-SONY-APP-MUSIC-PLAYER.2Tap My music [music_tab_mymusic_ics] to open the music library.3Press ID: ICN-SONY-KEY-MENU, then tap Media server [dlna_strings_home_op-tion_menu_media_server_txt] .4Select a device from the Registered devices [mdms_strings_main_divider_registered_list_txt] list,then select Change name [mdms_strings_dialog_context_menu_change_client_name_txt] .5Enter a new name for the device.GUID GUID-DF01091D-D2BB-40F9-93BB-E0C50438DEBATitle To change the name of a registered deviceChanges For Blue 3.0Version 4Author LiShuoStatus ReleasedTo change the access level of a registered device1From your Home screen [homescreen_strings_application_name_txt] , tap ID: ICN-SONY-HOME-APPTRAY-NORMAL, then find and tap ID: ICN-SONY-APP-MUSIC-PLAYER.2Tap My music [music_tab_mymusic_ics] to open the music library.3Press ID: ICN-SONY-KEY-MENU, then tap Media server [dlna_strings_home_op-tion_menu_media_server_txt] .4Select a device from the Registered devices [mdms_strings_main_divider_registered_list_txt] list.5Tap Change access level [mdms_strings_dialog_context_menu_change_permission_txt] and select anoption.GUID GUID-8007B32F-DA74-47C8-91BB-80BED0C11249Title To change the access level of a client deviceChanges For Blue 3.0Version 4Author LiShuoStatus ReleasedTo get help about sharing content with other DLNA Certified™ devices1From your Home screen [homescreen_strings_application_name_txt] , tap ID: ICN-SONY-HOME-APPTRAY-NORMAL, then find and tap ID: ICN-SONY-APP-MUSIC-PLAYER.2Tap My music [music_tab_mymusic_ics] to open the music library.3Press ID: ICN-SONY-KEY-MENU, then tap Media server [dlna_strings_home_op-tion_menu_media_server_txt] .4Tap ID: ICN-SONY-MENU-HELP.GUID GUID-A9A9ECB2-D77C-443F-B3BD-E56C08BF3C14Title To view help information about Media serverChanges Update according to editoral review commentsThis is a draft publication for internal use only.177This is an Internet version of this publication. © Print only for private use.](https://usermanual.wiki/Sony/PM-0480.Short-term-confidential-userguide-EN-PRODUCT-NAME-PART-NUMBER-Android4-0/User-Guide-1988542-Page-177.png)
![Version 7Author LiShuoStatus ReleasedPlaying files on a Digital Media Renderer deviceUsing DLNA™ technology, you can push media content saved on your device toanother device connected to the same Wi-Fi® [udoc_no_trans_wifi_wlan_plain] network. The otherdevice must be able to function as a Digital Media Renderer (DMR) device, whichmeans that it can render, or play, content received from your device. A DMR devicecan be, for example, a TV with DLNA function, or a PC running Windows® 7 orhigher.The settings for enabling the Digital Media Renderer may vary depending on the device used.Refer to the user guide for the respective device for more detailed information.Content with Digital Rights Management (DRM) cannot be played on a Digital Media Rendererdevice using DLNA™ technology.GUID GUID-0707E2B4-E1A5-4333-AEAE-04ED332BF637Title Playing your videos on other devices using DLNAChanges added a note for Sony UnitedVersion 5Author MikeCaoStatus ReleasedTo view photos or videos from your device on a DMR device1Make sure that you have correctly set up the DMR device and that it isconnected to the same Wi-Fi® [udoc_no_trans_wifi_wlan_plain] network as your device.2From your Home screen [homescreen_strings_application_name_txt] , tap ID: ICN-SONY-HOME-APPTRAY-NORMAL.3Find and tap Album [album_app_name_txt] .4Browse to and open the file that you want to view.5Tap the screen to display the toolbars, then tap ID: ICN-SONY-ACTIONMENU-PLAYON-CONNECTED and select a DMR device to share yourcontent with. The selected files start playing in chronological order on thedevice that you select.6To disconnect from the DMR device, tap ID: ICN-SONY-ACTIONMENU-PLAYON-INSTALLED and select your device. The file stops playing on theDMR device but continues playing on your device.You can also share a video from the Movies application on your device by tapping the videoand then tapping ID: ICN-SONY-ACTIONMENU-PLAYON-CONNECTED.GUID GUID-3E1387B9-5D26-4A2A-A6BF-B3A245D3848BTitle To open media files from your phone on another deviceChanges Updaet one label. no text change.Version 7Author LiShuoStatus ReleasedTo play a music track from your device on a DMR device1Make sure that you have correctly set up the DMR device and that it isconnected to the same Wi-Fi® [udoc_no_trans_wifi_wlan_plain] network as your device.2From your Home screen [homescreen_strings_application_name_txt] , tap ID: ICN-SONY-HOME-APPTRAY-NORMAL, then find and tap WALKMAN [udoc_no_trans_app_walkman] .3Tap My music [music_tab_mymusic_ics] to open the music library.4Select a music category and browse to the track that you want to share, thentap the track.5Tap ID: ICN-SONY-ACTIONMENU-PLAYON-CONNECTED and select a DMRdevice to share your content with. The track plays automatically on the devicethat you select.6To disconnect from the DMR device, tap ID: ICN-SONY-ACTIONMENU-PLAYON-INSTALLED and select your device. The track stops playing on theDMR device but continues playing on your device.GUID GUID-F791072F-54AE-411C-AFE2-33FFECE143DBThis is a draft publication for internal use only.178This is an Internet version of this publication. © Print only for private use.](https://usermanual.wiki/Sony/PM-0480.Short-term-confidential-userguide-EN-PRODUCT-NAME-PART-NUMBER-Android4-0/User-Guide-1988542-Page-178.png)
![Title To play a track from your phone on another deviceChanges Update a label. No text change.Version 10Author LiShuoStatus ReleasedNFCUse Near Field Communications (NFC) to share data with other devices, such as avideo, photo, web page address, music file or contact. You can also use NFC to scantags that give you more information about a product or service as well as tags thatactivate certain functions on your device.NFC is a wireless technology with a maximum range of one centimetre, so thedevices sharing data must be held close to each other. Before you can use NFC, youmust first turn on the NFC function, and the device's screen must be active.NFC may not be available in all countries and/or regions.GUID GUID-4DA4B2B5-45C2-4A5D-B1AF-53404CCAAFC1Title NFCChanges For Huashan: device term changeVersion 8Author XuCindyStatus ReleasedTo turn on the NFC function1From your Home screen [homescreen_strings_application_name_txt] , tap ID: ICN-SONY-HOME-APPTRAY-NORMAL.2Find and tap Settings [settings_label] > More… [radio_controls_title] .3Mark the NFC [nfc_quick_toggle_title] checkbox.GUID GUID-FCB71F3A-AA5D-466D-A05D-706B9193962ATitle To turn on the NFC functionChangesVersion 1Author JessicaLStatus Released*NFC detection areaID: ILL-SONY-13NY-NFCThe location of the NFC detection area is not the same on all devices. When sharing data withanother device using NFC, refer to the User guide of the other device for more information.GUID GUID-F1D7581D-5E4B-4A2F-B69D-8BD4BD974852Title Detection areaChanges Device Term ChangeVersion 2This is a draft publication for internal use only.179This is an Internet version of this publication. © Print only for private use.](https://usermanual.wiki/Sony/PM-0480.Short-term-confidential-userguide-EN-PRODUCT-NAME-PART-NUMBER-Android4-0/User-Guide-1988542-Page-179.png)
![Author XuCindyStatus ReleasedTo share a contact with another device using NFC1Make sure that both devices have the NFC function turned on, and that bothscreens are active.2To view contacts, go to your Home screen [homescreen_strings_application_name_txt] , tap ID: ICN-SONY-HOME-APPTRAY-NORMAL , then tap ID: ICN-SONY-APP-PHONEBOOK .3Tap the contact that you want to share.4Hold your device and the receiving device back to back so that the NFCdetection areas of each device touch each other. When the devices connect,they vibrate and play a short sound. A thumbnail of the contact appears.5Tap the thumbnail to start the transfer.6When the transfer is done, the contact information is displayed on the screenof the receiving device and is also saved on the receiving device.GUID GUID-A5FC1654-D575-4626-85E3-F27929134E72Title To share a contact with another NFC phoneChanges Device Term ChangeVersion 4Author XuCindyStatus ReleasedTo share a music file with another device using NFC1Make sure that both your device and the receiving device have the NFCfunction turned on, and that both screens are active.2To open the "WALKMAN" application, tap ID: ICN-SONY-HOME-APPTRAY-NORMAL, then find and tap ID: ICN-SONY-APP-MUSIC-PLAYER.3Tap the My music [music_tab_mymusic_ics] tab to open the music library.4Select a music category and browse to the track you want to share.5Tap the track to play it. You can then tap ID: ICN-SONY-SEMC-MUSIC-PAUSE-NORMAL to pause the track. The transfer works whether the track isplaying or paused.6Hold your device and the receiving device back to back so that the NFCdetection areas of each device touch each other. When the devices connect,they vibrate and play a short sound. A thumbnail of the track appears.7Tap the thumbnail to start the transfer.8When the transfer is done, the music file plays immediately on the receivingdevice. At the same time, the file is saved on the receiving device.You might not be able to copy, send or transfer copyright-protected items.GUID GUID-C3610A96-7DDF-4DD8-BDA2-1FF715EA0A49Title To share a music file with another NFC phoneChanges For Pollux: change from 'walkman player' to 'walkman applications'.Version 6Author XuCindyStatus ReleasedThis is a draft publication for internal use only.180This is an Internet version of this publication. © Print only for private use.](https://usermanual.wiki/Sony/PM-0480.Short-term-confidential-userguide-EN-PRODUCT-NAME-PART-NUMBER-Android4-0/User-Guide-1988542-Page-180.png)
![To share a photo or video with another device using NFC1Make sure that both devices have the NFC function turned on, and that bothscreens are active.2To view photos and videos in your device, go to your Home screen [home-screen_strings_application_name_txt] , tap ID: ICN-SONY-HOME-APPTRAY-NORMAL , thenfind and tap Album [album_app_name_txt] .3Tap the photo or video that you want to share.4Hold your device and the receiving device back to back so that the NFCdetection areas touch each other. When the devices connect, they vibrate andplay a short sound. A thumbnail of the photo or video appears.5Tap the thumbnail to start the transfer.6When the transfer is done, the photo or video is displayed on the screen of thereceiving device. At the same time, the item is saved on the receiving device.You can also use NFC to share a video from the Movies application.GUID GUID-497460D2-9A06-40C3-BFA1-4328DF8FE10FTitle To share a photo or video with another NFC phoneChanges Term change:'phone' to 'device'; words change.Version 6Author XuCindyStatus ReleasedTo share a web address with another device using NFC1Make sure that both devices have the NFC function turned on, and that bothscreens are active.2From your Home screen [homescreen_strings_application_name_txt] , tap ID: ICN-SONY-HOME-APPTRAY-NORMAL .3To open the web browser, find and tap ID: ICN-SONY-APP-CHROME .4Load the web page that you want to share.5Hold your device and the receiving device back to back so that the NFCdetection areas touch each other. When the devices connect, they vibrate andplay a short sound. A thumbnail of the web page appears.6Tap the thumbnail to start the transfer.7When the transfer is done, the web page is displayed on the screen of thereceiving device.GUID GUID-07F451E1-A723-427E-98E5-FCDB65790FFCTitle To share a website address with another phone using NFCChanges Device Term ChangeVersion 3Author XuCindyStatus ReleasedScanning NFC tagsYour device can scan various kinds of NFC tags. For example, it can scan embeddedtags on a poster, on a billboard advertisement, or beside a product in a retail store.You can receive additional information, such as a web address.GUID GUID-ADBEF157-BCCC-408B-88D4-00FCDDD75F5DTitle Reading an NFC tagChanges For Pollux: delete 'phone number'Version 3Author XuCindyStatus ReleasedTo scan an NFC tag1Make sure that your device has the NFC function turned on and that the screenis active.2Place your device over the tag so that the NFC detection area touches it. Yourdevice scans the tag and displays the content collected. Tap the content of thetag to open it.3To open the tag, tap it.GUID GUID-2D1E1C30-8574-4E6A-9CA4-07005D115490Title To read an NFC tagThis is a draft publication for internal use only.181This is an Internet version of this publication. © Print only for private use.](https://usermanual.wiki/Sony/PM-0480.Short-term-confidential-userguide-EN-PRODUCT-NAME-PART-NUMBER-Android4-0/User-Guide-1988542-Page-181.png)
![Changes Device Term ChangeVersion 3Author XuCindyStatus ReleasedPaying for items with your deviceYou can use the Google Wallet™ application or the Operator wallet application onyour device to pay for items in stores that support NFC payment methods. Just tapyour device on specially enabled electronic payment pads to pay for your purchases.Payments are backed by a credit or debit card, or by prepaid cards or vouchers. Yourpayment information is stored in the payment application, so you don’t need to enterit every time.To use Operator wallet, your SIM card must have a secure element embedded. Contact yournetwork operator for more details.GUID GUID-6AB537FB-9ADE-4D7C-8929-F15F345985A2Title Paying with your phoneChanges Device Term changeVersion 4Author XuCindyStatus ReleasedGoogle Wallet™Use the Google Wallet™ application to pay for goods at checkouts. If there is asupported NFC terminal at the checkout, you can just tap your device on the terminalto pay. Google Wallet™ stores details of your credit and debit cards as well as detailsof coupons and other special offers. Most major credit card types are supported.Security features include a PIN, encrypted storage and the ability to remotely disablea lost wallet.GUID GUID-F0F227BF-55A5-4CFD-AC86-008E19A5455ETitle Google WalletChanges Device Term ChangeVersion 2Author XuCindyStatus ReleasedOperator walletThe Operator wallet application lets you access a variety of services provided by yournetwork operator, such as the option to pay for items in underground trains andstores. Contact your network operator for more information about such services.GUID GUID-793427E4-4D2A-4F41-87C2-96064B45016BTitle Operator walletChanges for Tsubasa; created from scratchVersion 1Author JessicaLStatus ReleasedTo select a wallet for use on your device1Make sure that the NFC function is on.2From your Home screen [homescreen_strings_application_name_txt] , tap ID: ICN-SONY-HOME-APPTRAY-NORMAL .3Find and tap Settings [settings_label] > More… [radio_controls_title] .4Tap Wallet [secure_elements_settings_title] and select an option.GUID GUID-3819BC1D-56D2-4B04-A3C1-62671C259BE7Title To select a secure element for use in your phoneChanges Device Term ChangeVersion 2Author XuCindyStatus ReleasedThis is a draft publication for internal use only.182This is an Internet version of this publication. © Print only for private use.](https://usermanual.wiki/Sony/PM-0480.Short-term-confidential-userguide-EN-PRODUCT-NAME-PART-NUMBER-Android4-0/User-Guide-1988542-Page-182.png)
![Connecting to an NFC compatible deviceYou can connect your device to other NFC compatible devices produced by Sony,such as a speaker or a headphone. When establishing this kind of connection, referto the User guide of the compatible device for more information.You may need to have Wi-Fi® or Bluetooth™ activated on both devices for the connection towork.GUID GUID-A923519B-5BA2-4369-9E94-23D64509E0EATitle Connecting your phone to an NFC compatible accessoryChanges Device Term ChangeVersion 2Author XuCindyStatus ReleasedBluetooth™ wireless technologyIndexterm: "Bluetooth™ wireless technology"Use the Bluetooth™ function to send files to other Bluetooth™ compatible devices,or to connect to handsfree accessories. Turn on the Bluetooth™ function in yourdevice and create wireless connections to other Bluetooth™ compatible devicessuch as computers, handsfree accessories, and phones. Bluetooth™ connectionswork better within 10 metres (33 feet), with no solid objects in between. In somecases you have to manually pair your device with other Bluetooth™ devices.Interoperability and compatibility among Bluetooth™ devices can vary.GUID GUID-36689AFD-B450-4570-B637-F31FB56656F0Title Bluetooth™ wireless technologyChanges meters changed to metresVersion 7.1.1.1.1Author LuLindaStatus ReleasedTo turn on the Bluetooth™ function and make your device visible1From your Home screen [homescreen_strings_application_name_txt] , tap ID: ICN-SONY-HOME-APPTRAY-NORMAL.2Find and tap Settings [settings_label] .3Tap the on-off switch beside Bluetooth [bluetooth_quick_toggle_title] to turn on theBluetooth™ function.4Tap Bluetooth [bluetooth_quick_toggle_title] . Your device and a list of availableBluetooth™ devices appear.5Tap your device name to make your device visible to other Bluetooth™devices.GUID GUID-A0BC4F09-CC03-43FE-BF57-9D1239FB4499Title To turn on the Bluetooth function and make your device visibleChanges Term change for Odin/YugaVersion 8Author AipingStatus ReleasedTo adjust your device's visibility time to other Bluetooth™ devices1From your Home screen [homescreen_strings_application_name_txt] , tap ID: ICN-SONY-HOME-APPTRAY-NORMAL.2Find and tap Settings [settings_label] > Bluetooth [bluetooth_quick_toggle_title] .3Press ID: ICN-SONY-KEY-MENU and select Visibility timeout [bluetooth_visibility_time-out] .4Select an option.GUID GUID-E14A820F-8572-461D-BC89-2CCB9966818BTitle To adjust the visibility time before your device becomes invisible to otherBluetooth devicesChanges Term change for Odin/YugaVersion 2Author AipingStatus Released*This is a draft publication for internal use only.183This is an Internet version of this publication. © Print only for private use.](https://usermanual.wiki/Sony/PM-0480.Short-term-confidential-userguide-EN-PRODUCT-NAME-PART-NUMBER-Android4-0/User-Guide-1988542-Page-183.png)
![Naming your deviceYou can give your device a name. This name is shown to other devices after youhave turned on the Bluetooth™ function and your device is set to visible.GUID GUID-D1C84F4D-7E49-414F-8672-7326B1002658Title Device nameChanges Term change for Odin/YugaVersion 4Author AipingStatus ReleasedTo give your device a name1Make sure that the Bluetooth™ function is turned on.2From your Home screen [homescreen_strings_application_name_txt] , tap ID: ICN-SONY-HOME-APPTRAY-NORMAL.3Find and tap Settings [settings_label] > Bluetooth [bluetooth_quick_toggle_title] .4Press ID: ICN-SONY-KEY-MENU and select Rename phone [bluetooth_rename_de-vice<product="default">] .5Enter a name for your device.6Tap Rename [bluetooth_rename_button] .GUID GUID-6063BF5D-7D27-470A-9C86-B630131B6B08Title To enter a device nameChanges Term change for Odin/YugaVersion 8Author AipingStatus Released*Pairing with another Bluetooth™ deviceWhen you pair your device with another device, you can, for example, connect yourdevice to a Bluetooth™ headset or a Bluetooth™ car kit and use these other devicesto make and receive calls.Once you have paired your device with a Bluetooth™ device, your device willremember this pairing. When pairing your device with a Bluetooth™ device, you mayneed to enter a passcode. Your device will automatically try the generic passcode0000. If this does not work, refer to the user guide for your Bluetooth™ device to getthe device passcode. You do not need to re-enter the passcode the next time youconnect to a paired Bluetooth™ device.Some Bluetooth™ devices, for example, most Bluetooth™ headsets, require you toboth pair and connect with the other device.You can pair your device with several Bluetooth™ devices, but you can only connectto one Bluetooth™ profile at the same time.GUID GUID-C4D7D6FB-1BD3-4C5E-A7FF-5BFE54EDDF0ATitle Pairing with another Bluetooth deviceChanges Term change for Odin/YugaVersion 5Author AipingStatus Released*To pair your device with another Bluetooth™ device1Make sure that the device you want to pair your device with has theBluetooth™ function activated and is visible to other Bluetooth™ devices.2From the Home screen [homescreen_strings_application_name_txt] , tap ID: ICN-SONY-HOME-APPTRAY-NORMAL.3Find and tap Settings [settings_label] > Bluetooth [bluetooth_quick_toggle_title] . All availableBluetooth™ devices appear in a list.4Tap the Bluetooth™ device that you want to pair with your device.5Enter a passcode, if required, or confirm the same passcode on both devices.Your device and the Bluetooth™ device are now paired.GUID GUID-226704F7-A3B0-4FE9-A592-EB43A40DAA56Title To pair your device with another Bluetooth deviceChanges Term change for Odin/YugaThis is a draft publication for internal use only.184This is an Internet version of this publication. © Print only for private use.](https://usermanual.wiki/Sony/PM-0480.Short-term-confidential-userguide-EN-PRODUCT-NAME-PART-NUMBER-Android4-0/User-Guide-1988542-Page-184.png)
![Version 8Author AipingStatus ReleasedTo connect your device to another Bluetooth™ device1If you are connecting to a Bluetooth device that requires you to first pair yourdevice before connecting, follow the relevant steps to pair your device withthat device.2From your Home screen [homescreen_strings_application_name_txt] , tap ID: ICN-SONY-HOME-APPTRAY-NORMAL.3Find and tap Settings [settings_label] > Bluetooth [bluetooth_quick_toggle_title] .4Tap the Bluetooth™ device to which you want to connect your device.GUID GUID-7EB7AADF-804F-460C-A176-ACA0F5C564B6Title To connect your device to another Bluetooth deviceChanges Term change for Odin/YugaVersion 7Author AipingStatus ReleasedTo unpair a Bluetooth™ device1From the Home screen [homescreen_strings_application_name_txt] , tap ID: ICN-SONY-HOME-APPTRAY-NORMAL.2Find and tap Settings [settings_label] > Bluetooth [bluetooth_quick_toggle_title] .3Under Paired devices [bluetooth_preference_paired_devices] , tap ID: ICN-SONY-PAIRED-DEVICE beside the name of the device that you want to unpair.4Tap Unpair [bluetooth_device_context_unpair] .GUID GUID-A1AA3B64-C917-412E-9A50-E12A8CAC6795Title To unpair a Bluetooth deviceChanges updated for ICSVersion 5Author JessicaLStatus ReleasedSending and receiving items using Bluetooth™ technologyIndexterm: "sending"Sub-indexterm: "sending items using Bluetooth™"Indexterm: "receiving items using Bluetooth™"Share items with other Bluetooth™ compatible devices such as phones orcomputers. You can send and receive several kinds of items using the Bluetooth™function, such as:•Photos and videos•Music and other audio files•Contacts•Web pagesGUID GUID-FEABAFA3-3C43-48A6-99F7-C72423ED3745Title Sending and receiving items using Bluetooth™ wireless technologyChanges added index term "sending"Version 3Author JessicaLStatus Released*This is a draft publication for internal use only.185This is an Internet version of this publication. © Print only for private use.](https://usermanual.wiki/Sony/PM-0480.Short-term-confidential-userguide-EN-PRODUCT-NAME-PART-NUMBER-Android4-0/User-Guide-1988542-Page-185.png)
![To send items using Bluetooth™1Receiving device: Make sure the Bluetooth™ function is turned on and thatthe device is visible to other Bluetooth™ devices.2Sending device: Open the application which contains the item that you want tosend, and scroll to the item.3Depending on the application and the item you want to send, you may need to,for example, touch and hold the item, open the item or press ID: ICN-SONY-KEY-MENU. Other ways to send an item may exist.4Select Share [menu_share] or Send [gui_send_txt] .5Select Bluetooth [bluetooth_quick_toggle_title] .6Turn on Bluetooth™, if you are asked to do so.7Tap the name of the receiving device.8Receiving device: If asked, accept the connection.9Sending device: If asked, confirm the transfer to the receiving device.10 Receiving device: Accept the incoming item.GUID GUID-10429839-41B9-4612-93A5-978EA3721D99Title To send items using Bluetooth™Changes Updated for Aoba RitaVersion 4.1.1Author AipingStatus Released*To receive items using Bluetooth™1Make sure that the Bluetooth™ function is on and is visible to otherBluetooth™ devices.2The sending device now starts sending data to your device.3If prompted, enter the same passcode on both devices, or confirm thesuggested passcode.4When you are notified of an incoming file to your device, drag the status bardownwards and tap the notification to accept the file transfer.5Tap Accept [incoming_file_confirm_ok] to start the file transfer.6To view the progress of the transfer, drag the status bar downwards.7To open a received item, drag the status bar downwards and tap the relevantnotification.GUID GUID-7360A980-5A09-4B1A-8DB8-313C2CFF6DF4Title To receive items using BluetoothChanges Term change for Odin/YugaVersion 6.1.1Author AipingStatus Released*To view files you have received using Bluetooth™1From your Home screen [homescreen_strings_application_name_txt] , tap ID: ICN-SONY-HOME-APPTRAY-NORMAL.2Find and tap Settings [settings_label] > Bluetooth [bluetooth_quick_toggle_title] .3Press ID: ICN-SONY-KEY-MENU and select Show received files [bluetooth_show_re-ceived_files] .GUID GUID-17AB4DD5-71F2-49BE-BDF0-EEE25085F3A8Title To find items received using BluetoothChanges updated for ICSVersion 2Author JessicaLStatus Released*Connecting your device to a computerConnect your device to a computer and start transferring pictures, music and otherfile types. The easiest ways to connect are using a USB cable or Bluetooth wirelesstechnology.When you connect your device to the computer using a USB cable, you areprompted to install the PC Companion application on your computer. PC CompanionThis is a draft publication for internal use only.186This is an Internet version of this publication. © Print only for private use.](https://usermanual.wiki/Sony/PM-0480.Short-term-confidential-userguide-EN-PRODUCT-NAME-PART-NUMBER-Android4-0/User-Guide-1988542-Page-186.png)
![helps you access additional computer applications to transfer and organise mediafiles, update your device, synchronise device content, and more.You might not be able to transfer some copyright-protected material between your device anda computer.GUID GUID-3D56A712-284B-4E62-84E6-B774A4E321F8Title Connecting your phone to a computerChanges Device term changeVersion 7Author Hu PanStatus ReleasedTransferring and handling content using a USB cableIndexterm: "USB connection"Use a USB cable connection between a computer and your device for easy transferand management of your files. Once the two devices are connected, you can dragand drop content between your device and the computer, or between your device'sinternal storage and SD card, using the computer's file explorer.If you're transferring music, video, pictures or other media files to your device, it'sbest to use the Media Go™ application on your computer. Media Go™ convertsmedia files so that you can use them on your device.GUID GUID-57E9CFC0-9C19-41CD-BEA6-D940CC06B54ETitle Transferring and handling content using a USB cableChanges Device term changeVersion 8Author PengLeonStatus Released*To transfer content between your device and computer using a USB cable1Using a USB cable, connect your device to a computer. Internal storage & SDcard connected [usbux_ics_both_emmc_and_sd_connected_status_bar_txt] appears in the status baron the screen of your device.2Computer: Open Microsoft® Windows® Explorer from the desktop and waituntil your device's internal storage and your SD card appear as external disksin Microsoft® Windows® Explorer.3Computer: Drag and drop the desired files between your device and thecomputer.GUID GUID-0E4C094F-CDCA-412C-8E76-45ABDCEEF413Title To transfer content between your device and computer using a USB cableChanges Device term changeVersion 15Author PengLeonStatus Released*To transfer content between internal storage and an SD card via USB1Using a USB cable, connect your device to a computer. Internal storage & SDcard connected [usbux_ics_both_emmc_and_sd_connected_status_bar_txt] appears in the status baron the screen of your device.2Computer: Open Microsoft® Windows® Explorer from the desktop and waituntil your device's internal storage and your SD card appear as external disksin Microsoft® Windows® Explorer.3Computer: Drag and drop the desired files between the device's internalstorage and the SD card.GUID GUID-51531B4B-77BC-442B-87AB-FC49BBB85D6FTitle To transfer content between internal storage and an SD card via USBChanges Device term changeVersion 2Author PengLeonStatus ReleasedThis is a draft publication for internal use only.187This is an Internet version of this publication. © Print only for private use.](https://usermanual.wiki/Sony/PM-0480.Short-term-confidential-userguide-EN-PRODUCT-NAME-PART-NUMBER-Android4-0/User-Guide-1988542-Page-187.png)
![To transfer files directly from internal storage to an SD card in the device1From your Home screen [homescreen_strings_application_name_txt] , tap ID: ICN-SONY-HOME-APPTRAY-NORMAL.2Find and tap Settings [settings_label_launcher] > Storage [storage_settings] > Transfer data toSD card [transfer_data_desc_txt] .3Mark the file types you want to transfer to the SD card.4Tap Transfer [button_transfer_txt] .The direct transfer method means that a USB cable connection to a computer is notnecessary.GUID GUID-5619F3BA-2821-4D9D-B998-190802F29514Title To transfer files from the internal storage to SD cardChangesVersion 1Author PengLeonStatus ReleasedTransferring files using Media transfer mode via Wi-Fi®You can transfer files between your device and other MTP compatible devices, suchas a computer, using a Wi-Fi® connection. Before connecting, you first need to pairthe two devices. If you're transferring music, video, pictures or other media filesbetween your device and a computer, it's best to use the Media Go™ application onthe computer. Media Go™ converts media files so that you can use them on yourdevice.In order to use this feature, you need a Wi-Fi® enabled device that supports Media transfer,for example, a computer running Microsoft® Windows Vista® or Windows® 7.GUID GUID-4F7E8833-019A-4D0A-8556-9433F6C04D19Title Transferring and handling content using Media transfer mode over Wi-FiChanges Device term changeVersion 3Author PengLeonStatus ReleasedTo pair your device wirelessly with a computer using Media transfer mode1Make sure Media transfer mode is enabled on your device. It is normallyenabled by default.2Connect your device to the computer using a USB cable.3Computer: Once the name of your device appears on the screen, clickNetwork configuration and follow the instructions to pair the computer.4When you are finished pairing, disconnect the USB cable from both devices.The above instructions only work if Windows® 7 is installed on your computer and thecomputer is connected to a Wi-Fi® Access Point via a network cable.GUID GUID-D08D64DB-D0EC-4B8B-8502-25924770E375Title To pair your device with a computer for using Media transfer mode over Wi-FiChanges Device term changeVersion 3Author PengLeonStatus ReleasedThis is a draft publication for internal use only.188This is an Internet version of this publication. © Print only for private use.](https://usermanual.wiki/Sony/PM-0480.Short-term-confidential-userguide-EN-PRODUCT-NAME-PART-NUMBER-Android4-0/User-Guide-1988542-Page-188.png)
![To connect paired devices wirelessly in Media transfer mode1Make sure Media transfer mode is enabled on your device. It is normallyenabled by default.2From your Home screen [homescreen_strings_application_name_txt] , tap ID: ICN-SONY-HOME-APPTRAY-NORMAL.3Find and tap Settings [settings_label_launcher] > Xperia™ [sonyericsson_settings_title] > USBConnectivity [usbux_strings_usb_connectivity_txt] .4Tap the paired device that you want to connect to under Trusted devices [us-bux_strings_trusted_hosts_title_txt] .5Tap Connect [usbux_strings_connect_txt] .Make sure the Wi-Fi® function is turned on.GUID GUID-CD8EA3D6-AA60-42E9-A72E-06ACE3160E0BTitle To connect paired devices wirelessly in Media transfer modeChanges Valid from Odin and Yuga (only a label changed no text updated)Version 4Author PengLeonStatus ReleasedTo disconnect a wirelessly paired device in Media transfer mode1From your Home screen [homescreen_strings_application_name_txt] , tap ID: ICN-SONY-HOME-APPTRAY-NORMAL.2Find and tap Settings [settings_label_launcher] > Xperia™ [sonyericsson_settings_title] > USBConnectivity [usbux_strings_usb_connectivity_txt] .3Tap the paired device that you want to disconnect from under Trusted devices[usbux_strings_trusted_hosts_title_txt] .4Tap Disconnect [usbux_strings_disconnect_txt] .GUID GUID-E3943642-BCA2-4EE0-ACB6-11714C1A3BBDTitle To disconnect from connected deviceChanges Valid from Odin and Yuga (only a label changed no text updated)Version 3Author PengLeonStatus ReleasedTo remove a pairing with another device1From your Home screen [homescreen_strings_application_name_txt] , tap ID: ICN-SONY-HOME-APPTRAY-NORMAL.2Find and tap Settings [settings_label_launcher] > Xperia™ [sonyericsson_settings_title] > USBConnectivity [usbux_strings_usb_connectivity_txt] .3Tap the paired device that you want to remove.4Tap Forget [usbux_strings_trusted_hosts_button_forget_txt] .GUID GUID-257C445A-E565-4C26-932D-EE78996A0B2ETitle To remove from the paired hostChanges Valid from Odin and Yuga (Only label changed no text updated)Version 3Author PengLeonStatus ReleasedPC CompanionPC Companion is a computer application that gives you access to additional featuresand services which help you transfer music, video and pictures to and from yourdevice. You can also use PC Companion to update your device and get the latestsoftware version available. The installation files for PC Companion are saved on yourdevice and the installation is launched from the device when you connect it to acomputer via USB cable.You need an internet connected computer running one of the following operatingsystems to use the PC Companion application:•Microsoft® Windows® 7•Microsoft® Windows Vista®This is a draft publication for internal use only.189This is an Internet version of this publication. © Print only for private use.](https://usermanual.wiki/Sony/PM-0480.Short-term-confidential-userguide-EN-PRODUCT-NAME-PART-NUMBER-Android4-0/User-Guide-1988542-Page-189.png)
![•Microsoft® Windows® XP (Service Pack 3 or higher)GUID GUID-DBC49833-F11A-4854-B947-B9513E8A31DFTitle PC CompanionChanges Device term changeVersion 7Author PengLeonStatus ReleasedTo install PC Companion on a computer1Connect your device to a computer using a USB cable.2Device: Tap Install [usbux_strings_install_txt] in the PC Companion installation window.3Computer: PC Companion automatically starts after a few seconds. Follow theon-screen instructions to install PC Companion.The PC companion installer is enabled by default on your device. You can disable this optionin your device settings.GUID GUID-E39641B8-6636-488E-B6BF-75B389585C30Title To install PC CompanionChanges Device term changeVersion 5Author PengLeonStatus DraftTo start PC Companion1Make sure that PC Companion is installed on your PC.2Open the PC Companion application on the PC, then click Start to open one ofthe features that you want to use.GUID GUID-AF8F73C0-0423-4C7B-B4BD-0DC0507C9694Title To use PC CompanionChanges Changed for ICS UpdateVersion 10Author peng kikiStatus ReleasedMedia Go™Indexterm: "Media Go™"The Media Go™ computer application helps you transfer and manage media contentin your device and computer. You can install and access Media Go™ from within thePC Companion application.You need one of these operating systems to use the Media Go™ application:•Microsoft® Windows® 7•Microsoft® Windows Vista®•Microsoft® Windows® XP, Service Pack 3 or higherGUID GUID-107B9C4F-BD96-4635-B7F5-EA775969ED11Title Media Go™Changes Term ChangVersion 8Author LeonPStatus ReleasedTo transfer content using the Media Go™ application1Connect your device to a computer using a supported USB cable.2Device: In the status bar, Internal storage connected [usbux_strings_internal_storage_connec-ted_homestatus_txt] appears.3Computer: Open the PC Companion application on the PC first. InPC Companion, click Media Go to start the Media Go™ application. In somecases, you may have to wait for Media Go™ to install.4Using Media Go™, drag and drop files between your computer and device.GUID GUID-D0BCECF1-74E8-41F9-96B0-ECA7157D85A0Title To transfer content using Media Go™Changes Term changeVersion 8.1.1.1.1Author LeonPStatus ReleasedThis is a draft publication for internal use only.190This is an Internet version of this publication. © Print only for private use.](https://usermanual.wiki/Sony/PM-0480.Short-term-confidential-userguide-EN-PRODUCT-NAME-PART-NUMBER-Android4-0/User-Guide-1988542-Page-190.png)
![Version 1Author JorgenLStatus ReleasedAbout scanning with the NeoReader™ applicationUse your device as a barcode scanner to find out more about items you scan. Forexample, you see a coat in a magazine ad and want to find the nearest retail outlet tobuy it. If the ad contains a readable barcode, the NeoReader™ application uses thiscode to access mobile web content, such as a web page with more productinformation or a map of nearby outlets. NeoReader™ supports most standardbarcode types.GUID GUID-71CB1582-5806-4159-8420-F8470C3F0645Title About scanning with the NeoReader™ applicationChanges device term changeVersion 2Author QianWangStatus ReleasedTo start the NeoReader™ application1From the Home screen [homescreen_strings_application_name_txt] , tap ID: ICN-SONY-HOME-APPTRAY-NORMAL.2Find and tap ID: ICN-SONY-NEOREADER NeoReader™ [IA_APP_NeoReader] .GUID GUID-E880B67F-34D1-4D0E-A239-83DE212029BATitle To start the NeoReader™ applicationChanges Valid for Robyn & MimmiVersion 1Author AnnEStatus ReleasedTo scan a barcode1When the NeoReader™ application is open, hold your device over the barcodeuntil the complete barcode is visible in the viewfinder.2Your device automatically scans the barcode, and vibrates when the barcodeis recognised.Some bar codes might be too small to scan.GUID GUID-DA4F156D-4FD8-468B-ABCE-E82B147832B2Title To scan a bar codeChanges device term change. Add a condition for tablet.Version 4Author QianWangStatus ReleasedTo enter a barcode manually1When the NeoReader™ application is open, tap ID: ICN-SONY-NEOREADER-MENU-OPEN.2Enter the numbers of the barcode in the text field, then tap GO! [udoc_no_trans_neoread-er_go] .GUID GUID-111F2AD2-F333-4A3B-B3A3-80601DE7BBA3Title To enter bar code numbers manuallyChanges Updated from Aoba Rita and valid for all ongoing projects Icon updated andupdated step2 a little bitVersion 3Author WangHermanStatus ReleasedNeoReader™ application menu overviewThe following menu options are available in the NeoReader™ application:ID:ICN-SONTap to open more optionsThis is a draft publication for internal use only.192This is an Internet version of this publication. © Print only for private use.](https://usermanual.wiki/Sony/PM-0480.Short-term-confidential-userguide-EN-PRODUCT-NAME-PART-NUMBER-Android4-0/User-Guide-1988542-Page-192.png)
![Smart ConnectIndexterm: "Smart Connect"GUID GUID-68FE7B74-814F-4E9E-8C87-1B9327458760Title Smart Connect - Heading onlyChanges fix a typoVersion 2Author Gan LuStatus ReleasedAbout Smart ConnectIndexterm: "Smart Connect"Use the Smart Connect application to set what happens in your device when youconnect or disconnect an accessory. You can also use it to set a specific action or agroup of actions to launch on your device at certain times of the day.For example, when you connect your headset or headphones, you can set an eventso that the following actions are launched on your device:•Between 7am and 9am, when you commute to work, the "WALKMAN" applicationstarts, and the web browser opens the morning paper.•On the way back from work, the FM radio starts, and a notes app with your shoppinglist opens.GUID GUID-A6EEBEB7-3017-4A9F-B814-589329C68676Title About Smart ConnectChanges for Pollux; change "WALKMAN player" to "WALKMAN application"Version 2.1.1Author Gan LuStatus ReleasedTo start the Smart Connect application1From your Home screen [homescreen_strings_application_name_txt] , tap ID: ICN-SONY-HOME-APPTRAY-NORMAL.2Find and tap Smart Connect [app_name_smart_connect] .GUID GUID-C873A6A9-8D7B-46E0-A142-5F750C07A596Title To start the Smart Connect applicationChanges Created for Smart Connect v5.0.5Version 1Author Gan LuStatus ReleasedTo create a Smart Connect event1Start the Smart Connection application. If you are opening Smart Connect forthe first time, tap OK [ok] to close the introduction screen.2On the Events [event_tab] tab, tap ID: ICN-SONYNEW-WINDOW-HOLO-DARK.3Give the event a name, then tap Create [dlg_add_event_button_create] .4Under When [edit_event_triggers] , add either an accessory or a time interval, or both.5Under Do this [edit_event_start_actions] , add what you want to happen in your device.6Under At the end [edit_event_stop_actions] , add what you want to happen when youdisconnect the accessory or when the time interval comes to an end. If boththese conditions are set, the actions start either when you disconnect theaccessory, or when the time interval comes to an end.7To save the event, press ID: ICN-SONY-KEY-AND-BACK.To add a Bluetooth™ accessory, you have to first pair it with your device.GUID GUID-6FAC4C54-43FB-49B7-9629-446C10B5F912Title To create a Smart Connect eventChanges Created for Smart Connect v5.0.5Version 1Author Gan LuStatus ReleasedThis is a draft publication for internal use only.194This is an Internet version of this publication. © Print only for private use.](https://usermanual.wiki/Sony/PM-0480.Short-term-confidential-userguide-EN-PRODUCT-NAME-PART-NUMBER-Android4-0/User-Guide-1988542-Page-194.png)
![To edit a Smart Connect event1Start the Smart Connection application.2On the Events [event_tab] tab, tap an event.3If the event is switched off, tap ID: ICN-SONY-LAGAN-SWITCH-OFF.4Adjust the settings as desired.5To save the event, press ID: ICN-SONY-KEY-AND-BACK.To delete an incorrect entry, touch and hold the entry and then tap Delete [delete] .GUID GUID-DD5DB4FE-7107-4CBC-8C57-28384CA3EEA7Title To edit a Smart Connect eventChanges Created for Smart Connect v5.0.5Version 1Author Gan LuStatus ReleasedThis is a draft publication for internal use only.195This is an Internet version of this publication. © Print only for private use.](https://usermanual.wiki/Sony/PM-0480.Short-term-confidential-userguide-EN-PRODUCT-NAME-PART-NUMBER-Android4-0/User-Guide-1988542-Page-195.png)
![Synchronising data on your phoneIndexterm: "synchronising"GUID GUID-28DAA87E-EB23-4FCF-80EC-BB843C864B1ETitle Synchronising data on your device - heading onlyChangesVersion 1Author JorgenLStatus Released*About synchronising data on your deviceIndexterm: "synchronising"You can sync contacts, email, calendar events, and other information with yourdevice from multiple email accounts, synchronisation services and other kinds ofaccounts, depending on the applications installed on your device. Synchronising yourdevice with other information sources is an easy and practical way to stay up to date.GUID GUID-D8D6C8EA-2D89-497B-B322-0A49D2D1AFCBTitle About synchronising data on your phoneChanges for Dogo; remove the list of informationVersion 3Author Gan LuStatus ReleasedSynchronising with Google™Indexterm: "Google™ synchronisation"Indexterm: "synchronising"Sub-indexterm: "Google™ contacts, calendar, email"Synchronise your phone with different Google™ services to keep your information upto date, regardless of which phone you're using your Google™ account from. Forexample, you can synchronise your contacts, Gmail™ and calendar data.GUID GUID-8FD641F7-C099-408F-9D1E-A01712736415Title Google Sync synchronisation serviceChanges for Nanhu SS; remove Google BrowserVersion 12Author Gan LuStatus ReleasedTo set up a Google™ account for synchronisation1From your Home screen [homescreen_strings_application_name_txt] , tap ID: ICN-SONY-HOME-APPTRAY-NORMAL.2Tap Settings [settings_label] > Add account [add_account_label] > Google [SYNC-ACCOUNTS-GOOGLE-TM] .3Follow the registration wizard to create a Google™ account, or sign in if youalready have an account.4Tap your newly created Google™ account, then tap the items that you want tosynchronise.GUID GUID-7E6DA8CF-6E32-42A9-8626-EF851EE27181Title To set up a Google account for synchronisationChanges for Pollux; remove step 4Version 12Author Gan LuStatus ReleasedTo synchronise manually with your Google™ account1From the Home screen [homescreen_strings_application_name_txt] , tap ID: ICN-SONY-HOME-APPTRAY-NORMAL .2Tap Settings [settings_label] > Google [SYNC-ACCOUNTS-GOOGLE-TM] .3Tap the Google™ account that you want to synchronise.4Press ID: ICN-SONY-KEY-MENU , then tap Sync now [sync_menu_sync_now] .GUID GUID-1B403B1F-500B-41F5-8077-9E8F4B4C8257Title To synchronise manually with your Google accountThis is a draft publication for internal use only.196This is an Internet version of this publication. © Print only for private use.](https://usermanual.wiki/Sony/PM-0480.Short-term-confidential-userguide-EN-PRODUCT-NAME-PART-NUMBER-Android4-0/User-Guide-1988542-Page-196.png)
![Changes for JB Platform; change a label in step 2Version 5Author Gan LuStatus ReleasedTo remove a Google™ account1From your Home screen [homescreen_strings_application_name_txt] , tap ID: ICN-SONY-HOME-APPTRAY-NORMAL.2Tap Settings [settings_label] > Google [SYNC-ACCOUNTS-GOOGLE-TM] .3Tap the Google™ account that you want to remove from the accounts list.4Press ID: ICN-SONY-KEY-MENU, then tap Remove account [remove_account_label] .5Tap Remove account [remove_account_label] again to confirm.GUID GUID-B4F75C86-230E-481B-9A12-7ADF12525940Title To remove a Google accountChanges for JB platform; change a label in step 2Version 9Author Gan LuStatus ReleasedSynchronising your corporate email, calendar and contactsIndexterm: "Microsoft® Exchange synchronisation"Indexterm: "corporate email, calendar and contacts"Indexterm: "synchronising"Sub-indexterm: "with Microsoft® Exchange"Access your corporate email messages, calendar appointments and contacts directlyfrom your device. View and manage them just as easily as you would from acomputer. After setup, you can find your information in the Email [em_app_name] ,Calendar [cal_app_label] and Contacts [contactsList] applications.For you to access the functionality described above, your corporate information must bestored on a Microsoft® Exchange server.GUID GUID-16B85AE6-57DF-421F-9596-611EA3A85879Title Corporate email etcChanges Device Term ChangeVersion 4Author Gan LuStatus ReleasedTo set up corporate email, calendar and contacts1From your Home screen [homescreen_strings_application_name_txt] , tap ID: ICN-SONY-HOME-APPTRAY-NORMAL.2Tap Settings [settings_label] > Add account [add_account_label] > Exchange ActiveSync [ex-change_name] .3Enter your corporate email address and password.4Tap Next [next_action] . Your device begins to retrieve your account information. If afailure occurs, contact your corporate network administrator for moreinformation.5Tap OK [ph_ok] to allow your corporate server to control your device.6Select what data you want to sync with your device, such as contacts andcalendar entries.7If desired, activate the device administrator to allow your corporate server tocontrol certain security features on your device. For example, you can allowyour corporate server to set password rules and set storage encryption.8When the setup is done, enter a name for the corporate account.GUID GUID-3962965F-AF05-424F-A59F-BB1E3EA26F10Title To set up corporate email etcChanges for JB platform; remove step 3&4; change step 2Version 7Author Gan LuStatus Released*This is a draft publication for internal use only.197This is an Internet version of this publication. © Print only for private use.](https://usermanual.wiki/Sony/PM-0480.Short-term-confidential-userguide-EN-PRODUCT-NAME-PART-NUMBER-Android4-0/User-Guide-1988542-Page-197.png)
![To edit the setup of corporate email, calendar and contacts1From your Home screen [homescreen_strings_application_name_txt] , tap ID: ICN-SONY-HOME-APPTRAY-NORMAL.2Tap Email [em_app_name] , then tap ID: ICN-SONY-KEY-MENU.3Tap Settings [settings_label_launcher] and select a corporate account.4Change the desired settings.GUID GUID-F2995E0C-54E9-43FA-A02B-4DED8389F312Title To edit your Exchange ActiveSync accountChanges for Odin & Yuga; change steps 2 & 3Version 4Author Gan LuStatus ReleasedTo set a synchronisation interval for a corporate account1From your Home screen [homescreen_strings_application_name_txt] , tap ID: ICN-SONY-HOME-APPTRAY-NORMAL.2Tap Settings [settings_label] > Accounts & sync [sync_settings] and select your corporateaccount.3Tap Account settings [account_settings_action] , then tap the corporate account forwhich you want to set a synchronisation level.4Tap Inbox check frequency [account_settings_mail_check_frequency_label] and select an intervaloption.GUID GUID-2A828419-E14E-4123-A8A3-128F519783E6Title To set a synchronisation interval - EASChanges For ICS Update - change the description at step 3Version 3Author Tan NellieStatus Released*To remove a corporate account1From your Home screen [homescreen_strings_application_name_txt] , tap ID: ICN-SONY-HOME-APPTRAY-NORMAL.2Tap Settings [settings_label] > Exchange ActiveSync [exchange_name] , then select thecorporate account.3Tap ID: ICN-SONY-KEY-MENU, then tap Remove account [remove_account_label] .4Tap Remove account [remove_account_label] again to confirm.GUID GUID-1F78C904-3F56-4A92-B018-B964B5E9930BTitle To remove a corporate accountChanges for Odin & Yuga; add a label in step 2Version 4Author Gan LuStatus ReleasedSynchronising with Facebook™Indexterm: "Facebook™"Sub-indexterm: "synchronisation"Indexterm: "Facebook™"Sub-indexterm: "Xperia™ with Facebook"Indexterm: "synchronising"Sub-indexterm: "Facebook™ contacts, calendar, photos"There are two ways to use Facebook™ on your device. You can use the standardFacebook application to access your online Facebook account, or you cansynchronise your Facebook account with your device and share content betweenFacebook™ and a range of other applications. For example, you can share music inthe "WALKMAN" application on your device via Facebook. To synchronise yourdevice with Facebook, you must first set up an "Xperia™ with Facebook" account —a solution developed by Sony to enable easy integration.GUID GUID-DFC5FFBA-4663-4D32-B4F1-BD49FBE4399FTitle Sync with Facebook inside XperiaChanges for Odin; change Timescape to WALKMAN; change "Facebook integration to"Xperia with Facebook"; Device Term ChangeVersion 6Author Gan LuThis is a draft publication for internal use only.198This is an Internet version of this publication. © Print only for private use.](https://usermanual.wiki/Sony/PM-0480.Short-term-confidential-userguide-EN-PRODUCT-NAME-PART-NUMBER-Android4-0/User-Guide-1988542-Page-198.png)
![Status ReleasedTo set up an "Xperia™ with Facebook" account on your device1From your Home screen [homescreen_strings_application_name_txt] , tap ID: ICN-SONY-HOME-APPTRAY-NORMAL.2Tap Settings [settings_label] > Add account [add_account_label] > Xperia™ with Facebook[auth_label] .3Follow the on-screen instructions to sign in to your Facebook™ account, orcreate a new account.GUID GUID-FEBC2F19-4E4A-4D41-BB94-2502341DB1C7Title To set up a Facebook inside Xperia account on your deviceChanges for Odin; change "Facebook integration" to "Xperia with Facebook"; DeviceTerm ChangeVersion 5Author Gan LuStatus Released*To synchronise manually with an "Xperia™ with Facebook" account1From your Home screen [homescreen_strings_application_name_txt] , tap ID: ICN-SONY-HOME-APPTRAY-NORMAL.2Tap Settings [settings_label] > Xperia™ with Facebook [auth_label] .3Select the account that you want to synchronise.4Press ID: ICN-SONY-KEY-MENU, then tap Sync now [sync_menu_sync_now] .GUID GUID-6D6FECAA-F74F-467B-91EC-B51C15FF88DETitle To sync manually with Xperia™ with FacebookChanges for Odin; change "facebook integration" to "Xperia with Facebook"Version 5Author Gan LuStatus ReleasedTo remove a Facebook™ integration accountWhen you remove a Facebook™ integration account from your phone, the associated onlineFacebook account is not deleted and you can still access it from a computer.1From your Home screen [homescreen_strings_application_name_txt] , tap ID: ICN-SONY-HOME-APPTRAY-NORMAL.2Tap Settings [settings_label] > Xperia™ with Facebook [auth_label] .3Select the account that you want to remove.4Press ID: ICN-SONY-KEY-MENU, then tap Remove account [remove_account_label] .5Tap Remove account [remove_account_label] again to confirm.GUID GUID-113D4663-C554-4489-951B-ACCBAC8D07B7Title To remove a Facebook inside Xperia accountChanges for Nanhu SS; change a label in step 2Version 5Author Gan LuStatus ReleasedThis is a draft publication for internal use only.199This is an Internet version of this publication. © Print only for private use.](https://usermanual.wiki/Sony/PM-0480.Short-term-confidential-userguide-EN-PRODUCT-NAME-PART-NUMBER-Android4-0/User-Guide-1988542-Page-199.png)
![Maps and locationsIndexterm: "GPS"Indexterm: "wireless networks"Indexterm: "locations"Indexterm: "maps"GUID GUID-B1602361-6E6A-4C3D-AD90-59DA2221197BTitle Maps and locations - heading onlyChangesVersion 1Author JorgenLStatus Released*About location servicesIndexterm: "GPS"Indexterm: "wireless networks"Indexterm: "location"Use your device to find out where you are. There are two methods: GPS and wirelessnetworks. Enable the wireless networks option if you only need your approximatelocation, and want it fast. If you want a more exact position, and have a clear view ofthe sky, enable the GPS option. In situations where the wireless network connectionis weak, you should enable both options to ensure that your location is found.Sony does not warrant the accuracy of any location services including but not limited tonavigational services.GUID GUID-C916866A-B045-42A5-B58F-E26F4129F7DFTitle About location servicesChanges device term changeVersion 2Author QianWangStatus ReleasedUsing GPSYour device has a global positioning system (GPS) receiver that uses satellite signalsto calculate your location.When you use features that require the GPS receiver to find your location, make sure you havea clear view of the sky.GUID GUID-D115BE02-E89E-4E2A-838A-984E33539A9FTitle Using GPSChanges device term changeVersion 6Author QianWangStatus ReleasedTo enable GPS1From your Home screen, tap ID: ICN-SONY-HOME-APPTRAY-NORMAL.2Tap Settings [la_menu_settings] > Location services [location_settings_title] .3Mark the GPS satellites [location_gps] checkbox.GUID GUID-B38FAFAB-9F56-4C79-8392-AB4E9EE30936Title To enable GPSChanges Update labels for ICS productsVersion 6Author WangTStatus Released*Getting the best performanceThe first time you use the GPS it can take 5 to 10 minutes for your location to befound. To help the search, make sure you have a clear view of the sky. Stand still anddon't cover the GPS antenna (the highlighted area in the image). The GPS signals canpass through clouds and plastic, but not through most solid objects such asThis is a draft publication for internal use only.200This is an Internet version of this publication. © Print only for private use.](https://usermanual.wiki/Sony/PM-0480.Short-term-confidential-userguide-EN-PRODUCT-NAME-PART-NUMBER-Android4-0/User-Guide-1988542-Page-200.png)
![buildings and mountains. If your location isn't found after a few minutes, move toanother location.ID:GUID GUID-395C3448-B84F-4DFD-A2D3-EA5CF6A14E60Title Getting the best performanceChanges Valid for eDream3.0 and Gingerbread.Version 1Author WangTStatus ReleasedGoogle Maps™Indexterm: "Google Maps™"Indexterm: "Maps"Track your current location, view real-time traffic situations and receive detaileddirections to your destination. Before taking trips, you can download and save mapsto your memory card to avoid high roaming costs.The Google Maps™ application requires the use of an Internet connection. You may incur dataconnection charges when you connect to the Internet from your device. Contact your networkoperator for more information. The Google Maps™ application may not be available in everymarket, country or region.GUID GUID-3D2F9342-00BF-45BC-94EE-B8D95FCCE84FTitle Google MapsChanges index term updatedVersion 10Author QianWangStatus ReleasedTo use Google Maps™1From your Home screen [homescreen_strings_application_name_txt] , tap ID: ICN-SONY-HOME-APPTRAY-NORMAL.2Find and tap Maps [google-maps-maps] .If you want to use Google Maps™, you have to enable one of the location methods availableunder Settings [la_menu_settings] > Location services [location_settings_title] .GUID GUID-42F5EBF3-FE39-4000-B2F3-D48122F0B26FTitle To use MapsChanges For eDream 4.1 - ICS updateVersion 7Author WangTStatus Released*To learn more about Google Maps™•When you use Google Maps™, tap ID: ICN-SONY-KEY-MENU , then tap Help[google_maps_help] .GUID GUID-323FA75F-5130-4EC6-8FE4-9A05D8119BD9Title To learn more about MapsChanges From Odin/Yuga. Updated icon and change press to tap.Version 3Author QianWangStatus ReleasedViewing your friends’ locations with Google Latitude™Indexterm: "Latitude"Indexterm: "Google Latitude™"Join Google Latitude™ to view your friends’ locations on maps and share yourlocation and other information with them.GUID GUID-8F5922E5-665A-4A37-AE1C-815FAE8557BATitle Viewing your friends’ locations with Google LatitudeChanges 4.0 legal review comments implementedThis is a draft publication for internal use only.201This is an Internet version of this publication. © Print only for private use.](https://usermanual.wiki/Sony/PM-0480.Short-term-confidential-userguide-EN-PRODUCT-NAME-PART-NUMBER-Android4-0/User-Guide-1988542-Page-201.png)
![Version 2Author WangTStatus ReleasedUsing Google Maps™ to get directionsIndexterm: "Navigation application"Indexterm: "driving directions"Use the Google Maps™ application to get directions when you travel by foot, publictransportation, or car. You can add a shortcut to a destination on your Home screento get quick directions from wherever you are.When you view a map, you make an Internet connection, and data is transferred toyour device. So it's a good idea to download and save maps to your device beforeyou take a trip. This way, you can avoid high roaming costs.Sony does not warrant the accuracy of any directional services.GUID GUID-481D23C6-DA60-43D8-8BE5-143CEEF414A9Title Getting driving directionsChanges device term changeVersion 9Author QianWangStatus Released*Using the Navigation applicationUse the Navigation application in your device to get turn-by-turn instructions on howto get places. The directions are both spoken and displayed on the screen.The Navigation application may not be available in every market.GUID GUID-5CEA149E-FFED-4D6D-B53B-B656B1BC5C75Title Using the Navigation applicationChanges device term changeVersion 4Author QianWangStatus ReleasedTo start Navigation1From your Home screen, tap ID: ICN-SONY-HOME-APPTRAY-NORMAL.2Find and tap Navigation [navigation_app_name] .GUID GUID-7E50DF30-726E-4555-A88F-CA6EBE00EFF9Title To start NavigationChanges Valid for eDream3.0 and Gingerbread.Version 1Author WangTStatus ReleasedThis is a draft publication for internal use only.202This is an Internet version of this publication. © Print only for private use.](https://usermanual.wiki/Sony/PM-0480.Short-term-confidential-userguide-EN-PRODUCT-NAME-PART-NUMBER-Android4-0/User-Guide-1988542-Page-202.png)
![Calendar and alarm clockGUID GUID-ECBFED5C-3FD9-4178-8410-BDF05AFE0032Title Calendar and alarm clock - heading onlyChangesVersion 1Author JorgenLStatus ReleasedCalendarIndexterm: "calendar"Indexterm: "time management"Indexterm: "events"Sub-indexterm: "calendar"GUID GUID-CBBA1327-6D73-439D-87B0-2E2C4112207BTitle Calendar - heading onlyChangesVersion 1Author JorgenLStatus ReleasedAbout the calendarYour device has a calendar for managing your time schedule. If you have a Google™account, you can also synchronise your device calendar with your web calendar. SeeSynchronising your corporate email, calendar and contacts on page 197.GUID GUID-AC492FE1-C780-4683-B1A7-1A156D38C51ETitle About the calendarChanges Updated from Togari and valid for all project onwards Device term changeonly No other text change NO NEED REVIEWVersion 2Author WangHermanStatus DraftTo set the calendar view1From your Home screen [homescreen_strings_application_name_txt] , tap ID: ICN-SONY-HOME-APPTRAY-NORMAL, then find and tap Calendar [cal_app_label] .2Tap Month [month_view] , Week [week_view] or Day [day_view] to select an option.GUID GUID-B4247FA7-E926-4F30-9A63-594965D23245Title To set the calendar viewChanges Valid for eDream 6.0 Nozomi AobaVersion 5Author WangHermanStatus ReleasedTo view multiple calendars1From your Home screen [homescreen_strings_application_name_txt] , tap ID: ICN-SONY-HOME-APPTRAY-NORMAL, then find and tap Calendar [cal_app_label] .2Press ID: ICN-SONY-KEY-MENU, then tap My calendars [menu_select_calendars] .3Select the calendars you want to view.GUID GUID-38ECA636-32DF-42B1-89D7-FCC59C1E6703Title To view multiple calendarsChanges Valid for eDream 4.0.1 Urushi. Label updated only.Version 7Author WangHermanStatus Released*To create a calendar eventIndexterm: "calendar"This is a draft publication for internal use only.203This is an Internet version of this publication. © Print only for private use.](https://usermanual.wiki/Sony/PM-0480.Short-term-confidential-userguide-EN-PRODUCT-NAME-PART-NUMBER-Android4-0/User-Guide-1988542-Page-203.png)
![Sub-indexterm: "create an event"1From your Home screen [homescreen_strings_application_name_txt] , tap ID: ICN-SONY-HOME-APPTRAY-NORMAL, then tap Calendar [cal_app_label] .2Tap ID: ICN-SONY-KEY-MENU, then tap New event [event_create] .3Enter the name, time, location and description for the event.4Select a reminder for the event. To add a new reminder for the event, tap ID:ICN-SONYNEW-WINDOW-HOLO-DARK.5Tap Done [done_action] .When the appointment time approaches, your phone plays a short sound to remind you. Also,ID: ICN-SONY-STAT-NOTIFY-CALENDAR appears in the status bar.GUID GUID-87AB0FCE-7DAF-4D8C-BF7C-B2DB57AE2AFATitle To create a calendar eventChanges Valid for Nicki Label updated only in step5 No text change NO NEED RE-VIEWVersion 9.1.1Author WangHermanStatus DraftTo view a calendar event1From your Home screen [homescreen_strings_application_name_txt] , tap ID: ICN-SONY-HOME-APPTRAY-NORMAL, then tap Calendar [cal_app_label] .2Tap the event you want to view.GUID GUID-9E9515CA-9293-43C4-B772-71B2358A39FBTitle To view a calendar eventChanges Valid for eDream 4.0.1 Urushi. Label updated only.Version 6Author WangHermanStatus ReleasedTo change the calendar settings1From your Home screen [homescreen_strings_application_name_txt] , tap ID: ICN-SONY-HOME-APPTRAY-NORMAL, then tap Calendar [cal_app_label] .2Press ID: ICN-SONY-KEY-MENU, then tap Settings [menu_preferences] .3Tap the setting you want to change, then edit as desired.GUID GUID-ACA68FC1-0F37-4C04-8E1C-3F8D25930FC3Title To change the calendar settingsChanges Updated from Aoba Amy and valid for all ongoing projects Condition upda-ted only No text changes No need reviewVersion 8Author WangHermanStatus ReleasedAlarm clockIndexterm: "ringtone"Indexterm: "vibration"Indexterm: "alarm"Indexterm: "deleting"Sub-indexterm: "an alarm"GUID GUID-3FBC57C7-1556-440E-B522-08403A64455BTitle Alarm clock - heading onlyChangesVersion 1Author JorgenLStatus ReleasedAbout the alarm clockUse your device as an alarm clock and select any sound in your device as your alarmsignal. The alarm does not sound if your device is turned off. But it does sound whenyour device is set to silent mode.GUID GUID-F5FC671B-D26F-4394-B67B-81F3420E1693Title About the alarm clockChanges Updated from Togari and valid for all projects onwards Device term changeonly No other text change NO NEED REVIEWThis is a draft publication for internal use only.204This is an Internet version of this publication. © Print only for private use.](https://usermanual.wiki/Sony/PM-0480.Short-term-confidential-userguide-EN-PRODUCT-NAME-PART-NUMBER-Android4-0/User-Guide-1988542-Page-204.png)
![Version 2Author WangHermanStatus DraftTo open the alarm clock1From your Home screen [homescreen_strings_application_name_txt] , tap ID: ICN-SONY-HOME-APPTRAY-NORMAL.2Find and tap Alarm & clock [alarm_clock] .GUID GUID-BF64BBBC-7137-4E46-80C0-6B213644B50DTitle To open the alarm clockChanges Updated from Aoba Amy and valid for all ongoing projects Condition upda-ted only No text changes No need reviewVersion 11Author WangHermanStatus ReleasedTo set a new alarm1From your Home screen, tap ID: ICN-SONY-HOME-APPTRAY-NORMAL.2Find and tap Alarm & clock [alarm_clock] .3Tap Add alarm [add_alarm] .4Tap Time [time] and adjust the time by scrolling up and down.5Tap Done [done] .6If desired, edit other alarm settings.7Tap Done [done] .GUID GUID-BBD8A2E8-E168-4C12-B44D-78D517DCC718Title To set a new alarmChanges Valid for Odin Yuga onwards Label updated only No need reviewVersion 13Author WangHermanStatus ReleasedTo edit an existing alarm1From your Home screen [homescreen_strings_application_name_txt] , tap ID: ICN-SONY-HOME-APPTRAY-NORMAL.2Find and tap Alarm & clock [alarm_clock] .3Tap the alarm you want to edit.4Tap Time [time] and adjust the time by scrolling up and down.5Tap Done [done] .6If desired, edit other alarm settings.7Tap Done [done] .The alarm time format displayed is the same as the format you select for your general timesettings, for example, 12-hour or 24-hour.GUID GUID-78B0F168-633F-486B-B279-DB3EDD413359Title To edit an existing alarmChanges Valid for Odin Yuga onwards Label updated only No need reviewVersion 11Author WangHermanStatus ReleasedTo deactivate an alarm1From your Home screen [homescreen_strings_application_name_txt] , tap ID: ICN-SONY-HOME-APPTRAY-NORMAL.2Find and tap Alarm & clock [alarm_clock] .3Tap ID: ICN-SONY-STAT-NOTIFY-ALARM next to the alarm you want todeactivate.GUID GUID-74DB17F6-DC5D-46D9-AC0D-91D3CEB046D4Title To deactivate an alarmChanges Updated from Aoba Amy and valid for all ongoing projects Condition upda-ted only No text changes No need reviewVersion 11Author WangHermanStatus ReleasedThis is a draft publication for internal use only.205This is an Internet version of this publication. © Print only for private use.](https://usermanual.wiki/Sony/PM-0480.Short-term-confidential-userguide-EN-PRODUCT-NAME-PART-NUMBER-Android4-0/User-Guide-1988542-Page-205.png)
![To activate an existing alarm1From your Home screen [homescreen_strings_application_name_txt] , tap ID: ICN-SONY-HOME-APPTRAY-NORMAL.2Find and tap Alarm & clock [alarm_clock] .3Tap ID: ICN-SONY-STAT-NOTIFY-ALARM next to the alarm you want toactivate.GUID GUID-C8A84DE5-4042-4B27-BC9A-CBE7C9F79E25Title To activate an existing alarmChanges Updated from Aoba Amy and valid for all ongoing projects Condition upda-ted only No text changes No need reviewVersion 11Author WangHermanStatus ReleasedTo delete an alarm1From your Home screen [homescreen_strings_application_name_txt] , tap ID: ICN-SONY-HOME-APPTRAY-NORMAL.2Find and tap Alarm & clock [alarm_clock] .3Touch and hold the alarm you want to delete.4Tap Delete alarm [delete_alarm] , then tap Yes [gui_yes_txt] .GUID GUID-80576A84-8F35-42D3-B98F-978772FBA94ETitle To delete an alarmChanges Updated from Aoba Amy and valid for all ongoing projects Condition upda-ted only No text changes No need reviewVersion 13Author WangHermanStatus ReleasedTo set the ringtone for an alarm1From your Home screen [homescreen_strings_application_name_txt] , tap ID: ICN-SONY-HOME-APPTRAY-NORMAL.2Find and tap Alarm & clock [alarm_clock] .3Tap the alarm you want to edit.4Tap Advanced alarm settings [advanced_alarm] and unmark the Style settings [alarm_di-vider_styling] checkbox.5Tap Alarm sound [alarm_sound] and select an option.6Tap Done [done] , then tap Done [done] .GUID GUID-53876E40-3354-4940-9972-990B678E56A1Title To set the alarm signalChanges Updated from Aoba Amy and valid for all ongoing projects Condition upda-ted only No text changes No need reviewVersion 12Author WangHermanStatus ReleasedTo set a recurring alarm1From your Home screen [homescreen_strings_application_name_txt] , tap ID: ICN-SONY-HOME-APPTRAY-NORMAL.2Find and tap Alarm & clock [alarm_clock] .3Tap the alarm you want to edit.4Tap Repeat [alarm_repeat] .5Mark the checkboxes for the desired days, then tap OK [ok] .6Tap Done [done] .GUID GUID-F16ADE60-533C-483E-ADB7-104FBC199F52Title To set a recurring alarmChanges Updated from Aoba Amy and valid for all ongoing projects Condition upda-ted only No text changes No need reviewVersion 12Author WangHermanStatus ReleasedThis is a draft publication for internal use only.206This is an Internet version of this publication. © Print only for private use.](https://usermanual.wiki/Sony/PM-0480.Short-term-confidential-userguide-EN-PRODUCT-NAME-PART-NUMBER-Android4-0/User-Guide-1988542-Page-206.png)
![To set the title for an alarm1From your Home screen [homescreen_strings_application_name_txt] , tap ID: ICN-SONY-HOME-APPTRAY-NORMAL.2Find and tap Alarm & clock [alarm_clock] .3Tap the alarm you want to edit.4Tap Advanced alarm settings [advanced_alarm] , then tap the Alarm text[alarm_strings_alarm_text_title_txt] field and enter a name for the alarm.5Tap Done [done] .GUID GUID-539AE06C-CB28-436A-88B1-818209CA7788Title To set a title for an alarmChanges Updated from Aoba Amy and valid for all ongoing projects Condition upda-ted only No text changes No need reviewVersion 11Author WangHermanStatus ReleasedTo activate the vibrate function for an alarm1From your Home screen [homescreen_strings_application_name_txt] , tap ID: ICN-SONY-HOME-APPTRAY-NORMAL.2Find and tap Alarm & clock [alarm_clock] .3Tap the alarm you want to edit.4Tap Advanced alarm settings [advanced_alarm] , then mark the Vibrate [alarm_vibrate]checkbox.5Tap Done [done] .GUID GUID-303D610E-F5C8-41EC-A166-BD658B1C4370Title To turn on the vibration signal for an alarmChanges Updated from Aoba Amy and valid for all ongoing projects Condition upda-ted only No text changes No need reviewVersion 12Author WangHermanStatus ReleasedTo set alarms to sound when the device is in silent mode1From your Home screen [homescreen_strings_application_name_txt] , tap ID: ICN-SONY-HOME-APPTRAY-NORMAL .2Find and tap Alarm & clock [alarm_clock] , then tap to select an alarm.3Tap Advanced alarm settings [advanced_alarm] , then mark the Alarm in silent mode[alarm_in_silent_mode_title] checkbox.4Tap Done [done] .GUID GUID-62CDB24C-9410-4CFB-8695-8DA96C9F6CD3Title To set the alarm in silent modeChanges Updated from Huashan and valid for all HTML UG Device term change onlyNo need reviewVersion 8.1.4Author WangHermanStatus ReleasedTo snooze an alarm when it sounds•Tap Snooze - min [alarm_alert_snooze_min] .GUID GUID-2B840C9B-5748-43FC-A2F5-B00D5F685BDCTitle To turn off or snooze an alarm when it soundsChanges Updated from Aoba Amy and valid for all ongoing projects Condition upda-ted only No text changes No need reviewVersion 7Author WangHermanStatus ReleasedTo turn off an alarm when it sounds•Slide ID: ICN-SONY-STAT-NOTIFY-ALARM to the right.GUID GUID-E3BC96CC-903A-4362-AB16-5EC1E104562CTitle To turn off an alarm when it soundsChanges Updated from Aoba Amy and valid for all ongoing projects Condition upda-ted only No text changes No need reviewVersion 4This is a draft publication for internal use only.207This is an Internet version of this publication. © Print only for private use.](https://usermanual.wiki/Sony/PM-0480.Short-term-confidential-userguide-EN-PRODUCT-NAME-PART-NUMBER-Android4-0/User-Guide-1988542-Page-207.png)
![Support and maintenanceIndexterm: "phone maintenance"Indexterm: "maintenance"Indexterm: "support"GUID GUID-74499E7C-C777-4295-A45A-DC61658D999ATitle Support and maintenance - heading onlyChangesVersion 1Author JorgenLStatus Released*Updating your deviceIndexterm: "updating your device"Indexterm: "device"Sub-indexterm: "update"Update your device to the most recent software version to get optimal performanceand the latest enhancements.You can use the Update center application on your device to run a wireless update oryou can use the PC Companion application on a computer to run an update using aUSB cable connection. If you update wirelessly, then you can use either a mobilenetwork or a Wi-Fi® network connection. Just make sure you back up and save alldata stored on your device before you update.When you run an update using the Update center application, a data connection is establishedand related charges may be incurred. Also, the availability of updates over a mobile networkdepends on your operator. Contact your network operator for more information.GUID GUID-FABC28A6-48B3-4457-8068-91834B8CB1F0Title Updating your phone - new versionChanges Update from Odin Yuga and valid for all projects onwards Index term upda-ted only based on ED review No need reviewVersion 13Author WangHermanStatus ReleasedUpdating your device wirelesslyUse the Update center application to update your device wirelessly. You candownload software updates manually, or you can allow Update service to updateyour device automatically whenever downloads become available. When theautomatic update feature is activated, a notification appears in the status bar everytime an update becomes available.GUID GUID-46E34C96-CD92-4DB5-BDDC-3081431482A4Title Updating your phone wirelesslyChanges Device Term ChangeVersion 3Author WangHermanStatus ReleasedTo download software updates manually from Update center1From your Home screen, tap ID: ICN-SONY-HOME-APPTRAY-NORMAL .2Find and tap Update Center [update_center_app_name_txt] .3Select the desired application or system update and tap ID: ICN-SONY-UC-DOWNLOAD, or tap ID: ICN-SONY-UC-DOWNLOAD-SEVERAL to downloadall application updates.Application updates launch automatically after download. With system updates, install theupdate manually after download, then your device will restart when the installation is finished.You may incur data connection charges when downloading updates over mobile networks.GUID GUID-8CCE0AB2-B9D4-415B-BB96-99406E3E97D1Title To download software updates manuallyChanges Updated from Togari and valid for all projects onwards Label updated andrephrased the system updates part in noteThis is a draft publication for internal use only.209This is an Internet version of this publication. © Print only for private use.](https://usermanual.wiki/Sony/PM-0480.Short-term-confidential-userguide-EN-PRODUCT-NAME-PART-NUMBER-Android4-0/User-Guide-1988542-Page-209.png)
![Version 8Author WangHermanStatus DraftTo activate automatic software updates using the Update Center application1From your Home screen, tap ID: ICN-SONY-HOME-APPTRAY-NORMAL .2Find and tap Update Center [update_center_app_name_txt] .3Press ID: ICN-SONY-KEY-MENU , then tap Settings [update_center_options_menu_set-tings_txt] .4Mark the Allow automatic downloads [automatic_update_settings_title_txt] checkbox, thentap Agree [agree_label] . Updates are now downloaded automatically as soon asthey become available.You may incur data connection charges when downloading updates over mobile networks.GUID GUID-30B859DA-2FAD-4C39-AF5E-8E857AAA68DBTitle To download software updates automaticallyChanges Update from Odin Yuga and valid for all oning projects Removed 3G in noteonlyVersion 9Author WangHermanStatus ReleasedTo install system updates1From your Home screen, tap ID: ICN-SONY-HOME-APPTRAY-NORMAL .2Find and tap Update Center [update_center_app_name_txt] .3Select a system update you want to install, then tap ID: ICN-SONY-UC-DOWNLOAD-READY-TO-INSTALL.GUID GUID-80EE363C-A662-4AC7-A280-1DD05BF77955Title To install system updatesChanges Updated from Togari and valid for all projects onwards Label updated onlyNo text change NO NEED REVIEWVersion 3Author WangHermanStatus DraftUpdating your device using a USB cable connectionSome updates are not available for wireless download. Notifications appear in thestatus bar to inform you of such updates. To download and run the updates, youneed a USB cable and a computer running the PC Companion application. You caninstall PC Companion on the computer using installation files saved on your device,or you can download the application directly from PC Companion.GUID GUID-14D62035-6D62-4C0B-895B-0CCD4B30FAFDTitle Updating your phone using a USB cableChanges Updated from Huashan and valid for all ongoing HTML UG Updated link onlyNo need reviewVersion 8Author WangHermanStatus ReleasedTo download the PC Companion application from your device1Connect your device to a computer using a USB cable.2When prompted, follow the instructions in your device to launch the installationof PC Companion on the computer.PC Companion can also be downloaded from PC Companion.GUID GUID-7ED22A2A-2675-458C-9304-FB54397D0F6BTitle To download PC Companion application from your phoneChanges Updated from Huashan and valid for all ongoing HTML UG Updated link onlyNo need reviewVersion 4Author WangHermanStatus ReleasedThis is a draft publication for internal use only.210This is an Internet version of this publication. © Print only for private use.](https://usermanual.wiki/Sony/PM-0480.Short-term-confidential-userguide-EN-PRODUCT-NAME-PART-NUMBER-Android4-0/User-Guide-1988542-Page-210.png)
![•Text messagesYou do not need to back up music files and photos or videos taken with the camera. They arebacked up automatically to the device's memory card.You may incur additional data transmission charges when you restore applications fromGoogle Play™.GUID GUID-9D77D8EF-C130-46A7-BD2E-E39C78715514Title Types of content you can back upChanges Device Term ChangeVersion 9Author MikeCaoStatus ReleasedResetting your deviceGUID GUID-DC1A8CCE-C51A-44BB-A9F7-5C0D0C3E15FATitle Resetting your deviceChanges New heading for HTML user guide to be used from Hushan onwardsVersion 1Author LisaYStatus ReleasedAbout resetting your deviceIndexterm: "resetting"You can reset your device to its original settings, with or without deleting all of yourpersonal data. It is possible to reset your device to the state it was in before you firstturned it on. But before you perform a reset, make sure to back up any importantdata saved on your device.GUID GUID-B575DCE7-245D-4510-A1C6-20E50282D7F5Title About resetting your deviceChanges change "Resetting your device" to "About resetting your device" for htmlUserguideVersion 7.1.1Author LisaYStatus ReleasedTo perform a factory data resetTo avoid permanent damage to your device, do not restart your device while a resetprocedure is underway.1From your Home screen [homescreen_strings_application_name_txt] , tap ID: ICN-SONY-HOME-APPTRAY-NORMAL.2Find and tap Settings [settings_label] > Backup & reset [privacy_settings] .3Tap Factory data reset [master_clear_title] .4If you also want to erase data such as pictures and music, which is saved toyour device's internal storage, mark the Erase internal storage [erase_external_stor-age<product="nosdcard">] checkbox.5Tap Reset phone [master_clear_button_text<product="default">] .6To confirm, tap Erase everything [master_clear_final_button_text] .GUID GUID-7AEF8CEC-825F-4962-976F-522A7D71D5FETitle To reset the factory dataChanges device term change only for Huashan html userguideVersion 3Author LisaYStatus ReleasedLocking and protecting your deviceIndexterm: "screen"Sub-indexterm: "screen unlock pattern"Indexterm: "PIN"Indexterm: "PUK"Indexterm: "SIM card"GUID GUID-2639F9EC-B210-437E-BCCC-DC2A951FFD2DThis is a draft publication for internal use only.212This is an Internet version of this publication. © Print only for private use.](https://usermanual.wiki/Sony/PM-0480.Short-term-confidential-userguide-EN-PRODUCT-NAME-PART-NUMBER-Android4-0/User-Guide-1988542-Page-212.png)
![Title Locking and protecting your device - headingChanges Device term changeVersion 5Author PengLeonStatus Released*IMEI numberEvery device has a unique IMEI (International Mobile Equipment Identity) number.You should keep a copy of this number. If your device is stolen, your networkprovider can use your IMEI number to stop the device from accessing the network inyour country.GUID GUID-D05972EA-29A9-4C5D-B5DB-9714DD83632ETitle IMEI numberChanges Device term changeVersion 5Author PengLeonStatus ReleasedTo view your IMEI numberID: ILL-SONY-13NY-KRC-SS•Turn off your device, then remove the battery cover and battery to view your IMEInumber.•Open the phone dialer on your device and enter *#06#*.GUID GUID-0DA2A023-E45B-4D48-8205-AA78D4887688Title To view your IMEI number - OdinChanges Device term changeVersion 6Author PengLeonStatus DraftTo view your IMEI number in the device1From your Home screen [homescreen_strings_application_name_txt] , tap ID: ICN-SONY-HOME-APPTRAY-NORMAL .2Find and tap Settings [settings_label] > About phone [about_settings<product="default">] > Status[device_status] .3Scroll to IMEI [status_imei] to view the IMEI [status_imei] number.GUID GUID-8EC38745-EBB2-49E3-BD47-B16DC4DCC17FTitle To view your IMEI number in the phoneChanges Device term changeVersion 7Author PengLeonStatus ReleasedThis is a draft publication for internal use only.213This is an Internet version of this publication. © Print only for private use.](https://usermanual.wiki/Sony/PM-0480.Short-term-confidential-userguide-EN-PRODUCT-NAME-PART-NUMBER-Android4-0/User-Guide-1988542-Page-213.png)
![SIM card protectionIndexterm: "SIM card"Indexterm: "PIN"Indexterm: "PUK"The SIM card lock only protects your subscription. Your device will still work with anew SIM card. If the SIM card lock is on, you have to enter a PIN (Personal IdentityNumber). If you enter your PIN incorrectly more times than the maximum number ofattempts allowed, your SIM card will become blocked. You need to enter your PUK(Personal Unblocking Key) and then a new PIN. Your PIN, PIN2 and PUK are suppliedby your network operator.GUID GUID-ABAFC2D8-055E-4E92-87A7-DB201A033D00Title SIM card protectionChanges Device term changeVersion 5Author PengLeonStatus Released*To enable the SIM card PIN lock1From the Home screen [homescreen_strings_application_name_txt] , tap ID: ICN-SONY-HOME-APPTRAY-NORMAL .2Find and tap Settings [settings_label] > Security [security_settings_title] > Set up SIM/RUIMcard lock [sim_lock_settings_category] .3Tap Lock SIM card [sim_enable_sim_lock] .4Enter the SIM card PIN and tap OK [ph_ok] .GUID GUID-5356FA5C-1394-42B5-925F-6D2EF991D4D7Title To enable the SIM card PIN lockChanges Update for Tapioca DS. Add new steps and condtions for DS and icons.Version 5Author Hu PanStatus ReleasedTo change the SIM card PIN1From the Home screen [homescreen_strings_application_name_txt] , tap ID: ICN-SONY-HOME-APPTRAY-NORMAL .2Find and tap Settings [settings_label] > Security [security_settings_title] > Set up SIM/RUIMcard lock [sim_lock_settings_category] .3Tap Change SIM PIN [sim_pin_change] .4Enter the old SIM card PIN and tap OK [ph_ok] .5Enter the new SIM card PIN and tap OK [ph_ok] .6Re-type the new SIM card PIN and tap OK [ph_ok] .GUID GUID-66762638-590B-495A-98A3-1FB8ED5F6955Title To change the SIM card PINChanges Update for Tapioca DS. Add steps and condition for Tapioca DS.Version 5Author Hu PanStatus ReleasedTo change the SIM card PIN21From the Home screen [homescreen_strings_application_name_txt] , tap ID: ICN-SONY-HOME-APPTRAY-NORMAL.2Find and tap Settings [settings_label] > Call settings [call_settings_title]3Tap Fixed dialing numbers [fdn] > Change PIN2 [change_pin2] .4Enter the old SIM card PIN2 and tap OK [ph_ok] .5Enter the new SIM card PIN2 and tap OK [ph_ok] .6Confirm the new PIN2 and tap OK [ph_ok] .GUID GUID-8A252C68-D2E2-4CC7-B5F0-47D151159933Title To change the SIM card PIN2Changes Update for Tapioca DS. Add steps and conditions.Version 5Author Hu PanStatus ReleasedThis is a draft publication for internal use only.214This is an Internet version of this publication. © Print only for private use.](https://usermanual.wiki/Sony/PM-0480.Short-term-confidential-userguide-EN-PRODUCT-NAME-PART-NUMBER-Android4-0/User-Guide-1988542-Page-214.png)
![To unlock a locked SIM card1When Enter PUK and new PIN code. [keyguard_password_enter_puk_code] appears, enterthe PUK code.2Enter a new PIN code and tap OK [ph_ok] .3Re-enter the new PIN code and tap OK [ph_ok] .If you enter an incorrect PUK code too many times, the SIM card becomes locked. If thishappens, contact your service provider to get a new SIM card.GUID GUID-6654AA24-3864-4B15-A219-FC7C1CC95986Title To unblock a locked SIM cardChanges Add one step from Tsubasa Gina TID reviewingVersion 8Author PanLStatus ReleasedSetting a screen lockThere are several ways to lock your device screen. For example, you can use theFace Unlock feature, which uses a picture of your face to unlock the screen. You canalso set a screen unlock pattern, a number-based PIN lock, or a text-basedpassword.GUID GUID-08EC7630-FD8C-447A-BD76-199317B4BB3FTitle Set up screen lockChanges Device term changeVersion 3Author PengLeonStatus ReleasedTo set a screen lock1From your Home screen [homescreen_strings_application_name_txt] , tap ID: ICN-SONY-HOME-APPTRAY-NORMAL > Settings [settings_label] > Security [security_settings_title] >Screen lock [unlock_set_unlock_launch_picker_title] .2Select an option.GUID GUID-89E19A3B-4420-48D4-A449-6DEF928CE0C0Title To set a screen lockChanges Valid from Dogo only Tip removed according to Jorgen commentsVersion 5Author PengLeonStatus ReleasedTo set up the Face Unlock feature1From your Home screen [homescreen_strings_application_name_txt] , tap ID: ICN-SONY-HOME-APPTRAY-NORMAL > Settings [settings_label] > Security [security_settings_title] >Screen lock [unlock_set_unlock_launch_picker_title] .2Tap Face Unlock [udoc_trans_unlock_set_ face_unlock] , then follow the instructions in yourdevice to capture your face.3After your face is successfully captured, tap Continue [lockpassword_continue_label] .4Select a backup lock method and follow the instructions in the device tocomplete the setup.The Face Unlock feature is less secure than a screen lock pattern, PIN, or password. Someonewho looks similar to you could unlock your device.For best results, capture your face in an indoor area that is well lit but not too bright, and holdthe device at eye level.GUID GUID-94EBF99A-4C98-44AD-81B1-620DBDD534C5Title To set up the Face Unlock protectionChanges Device term changeVersion 4Author PengLeonStatus ReleasedThis is a draft publication for internal use only.215This is an Internet version of this publication. © Print only for private use.](https://usermanual.wiki/Sony/PM-0480.Short-term-confidential-userguide-EN-PRODUCT-NAME-PART-NUMBER-Android4-0/User-Guide-1988542-Page-215.png)
![To unlock the screen using the Face Unlock feature1Activate the screen.2Look at your device from the same angle you used to capture your FaceUnlock photo.If the Face Unlock feature fails to recognise your face, you need to draw the backup patternor enter the PIN to unlock the screen.GUID GUID-9D3616A6-A462-45ED-BFDC-26D20002A3CBTitle To unlock the screen using the Face Unlock featureChanges Device term changeVersion 2Author PengLeonStatus ReleasedTo disable the Face Unlock feature1From your Home screen [homescreen_strings_application_name_txt] , tap ID: ICN-SONY-HOME-APPTRAY-NORMAL > Settings [settings_label] > Security [security_settings_title] >Screen lock [unlock_set_unlock_launch_picker_title] .2Draw your backup screen unlock pattern or enter your PIN.3Tap Swipe [unlock_set_unlock_none_title] .GUID GUID-64709CE2-6987-4E3B-B2F2-934689181A69Title To disable the Face Unlock featureChanges Valid from Pollux (Updated according to editorial comments)Version 4Author PengLeonStatus ReleasedTo create a screen unlock pattern1From the Home screen [homescreen_strings_application_name_txt] , tap ID: ICN-SONY-HOME-APPTRAY-NORMAL.2Find and tap Settings [settings_label] > Security [security_settings_title] > Screen lock [un-lock_set_unlock_launch_picker_title] > Pattern [unlock_set_unlock_pattern_title] .3Follow the instructions in your device. You are asked to select a securityquestion that will be used to unlock the device if you forget your screen unlockpattern.GUID GUID-346DE791-CADA-4BF1-A919-5CAC0817272ATitle To create a screen unlock patternChanges Device term changeVersion 6Author PengLeonStatus ReleasedTo unlock the screen using a screen unlock pattern1Activate the screen.2Draw your screen unlock pattern.If the unlock pattern you draw on the screen is rejected five times in a row, you can select toeither wait 30 seconds and then try again, or to answer the security question you haveselected.GUID GUID-01E17F5F-AD94-4FC1-ABFD-A22C37526813Title To unlock the screen using a screen unlock patternChanges Remove one step from Tsubasa Gina TID reviewingVersion 6Author PanLStatus ReleasedThis is a draft publication for internal use only.216This is an Internet version of this publication. © Print only for private use.](https://usermanual.wiki/Sony/PM-0480.Short-term-confidential-userguide-EN-PRODUCT-NAME-PART-NUMBER-Android4-0/User-Guide-1988542-Page-216.png)
![To change the screen unlock pattern1From your Home screen [homescreen_strings_application_name_txt] , tap ID: ICN-SONY-HOME-APPTRAY-NORMAL.2Find and tap Settings [settings_label] > Security [security_settings_title] > Screen lock [un-lock_set_unlock_launch_picker_title] .3Draw your screen unlock pattern.4Tap Pattern [unlock_set_unlock_pattern_title] .5Follow the instructions in your device.GUID GUID-4D9F9FE9-FB5F-4CE2-A6B2-FFEC5389E3C3Title To change the screen unlock patternChanges Device term changeVersion 7Author PengLeonStatus ReleasedTo disable the screen unlock pattern1From your Home screen, tap ID: ICN-SONY-HOME-APPTRAY-NORMAL >Settings [settings_label] > Security [security_settings_title] > Screen lock [unlock_set_unlock_launch_pick-er_title] .2Draw the screen unlock pattern.3Tap Swipe [unlock_set_unlock_none_title] .GUID GUID-953E76D2-861C-43EA-968C-96E2C0D6FCE7Title To disable the screen unlock patternChanges Update for ICS function. Update the task steps.Version 4Author Hu PanStatus Released*To create a screen unlock PIN1From your Home screen, tap ID: ICN-SONY-HOME-APPTRAY-NORMAL >Settings [settings_label] > Security [security_settings_title] > Screen lock [unlock_set_unlock_launch_pick-er_title] > PIN [unlock_set_unlock_pin_title] .2Enter a numeric PIN.3If necessary, tap ID: KEY-TEXT-INPUT-BACK to minimise the keyboard.4Tap Continue [lockpassword_continue_label] .5Re-enter and confirm your PIN.6If necessary, tap ID: KEY-TEXT-INPUT-BACK to minimise the keyboard.7Tap OK [ok] .GUID GUID-BDD43B55-3A1E-4985-9722-9214A515C52BTitle To create a screen unlock PINChanges Valid from Odin and Yuga (Only icon changed no text updated)Version 3Author PengLeonStatus ReleasedTo disable the screen unlock PIN1From your Home screen [homescreen_strings_application_name_txt] , tap ID: ICN-SONY-HOME-APPTRAY-NORMAL > Settings [settings_label] > Security [security_settings_title] >Screen lock [unlock_set_unlock_launch_picker_title] .2Enter your PIN, then tap Next [next_button_label] .3Tap Swipe [unlock_set_unlock_none_title] .GUID GUID-83C4262A-3A90-400B-B579-FCA8166DA93CTitle To disable the screen unlock PINChanges Update for ICS function.Version 2Author Hu PanStatus Released*This is a draft publication for internal use only.217This is an Internet version of this publication. © Print only for private use.](https://usermanual.wiki/Sony/PM-0480.Short-term-confidential-userguide-EN-PRODUCT-NAME-PART-NUMBER-Android4-0/User-Guide-1988542-Page-217.png)
![To create a screen lock password1From your Home screen [homescreen_strings_application_name_txt] , tap ID: ICN-SONY-HOME-APPTRAY-NORMAL > Settings [settings_label] > Security [security_settings_title] >Screen lock [unlock_set_unlock_launch_picker_title] > Password [lockscreen_glogin_password_hint] .2Enter a password.3If necessary, tap ID: KEY-TEXT-INPUT-BACK to minimise the keyboard.4Tap Continue [lockpassword_continue_label] .5Re-enter and confirm your password.6If necessary, tap ID: KEY-TEXT-INPUT-BACK to minimise the keyboard.7Tap OK [ok] .GUID GUID-CC50D2CE-E557-4CAE-AEF5-5372F02B7D39Title To create the screen unlock passwordChanges Valid from Odin and Yuga (only icon changed no text updated)Version 3Author PengLeonStatus ReleasedTo disable the screen unlock password1From your Home screen [homescreen_strings_application_name_txt] , tap ID: ICN-SONY-HOME-APPTRAY-NORMAL > Settings [settings_label] > Security [security_settings_title] >Screen lock [unlock_set_unlock_launch_picker_title] .2Enter your password and tap Continue [lockpassword_continue_label] .3Tap Swipe [unlock_set_unlock_none_title] .GUID GUID-E2143224-2786-4FA5-9574-701F849BB063Title To disable the screen unlock passwordChanges Update one label comment from Tsubasa Gina TID reviewingVersion 4Author PanLStatus Released*Support applicationIndexterm: "Support application"GUID GUID-7A88A756-3B21-4970-9E9F-1EC73D4277B4Title Help application - heading onlyChanges Software chagnes "Help" to "Support" App for TaoshanVersion 3Author LisaYStatus ReleasedTo access the Support application1From your Application screen, find and tap ID: ICN-SONY-APP-SUPPORT.2Find and tap the required support item.GUID GUID-588EA450-00B8-46C6-892D-58CF7E2CB19BTitle To access the Support applicationChanges Same text as version5 only capitalized S for support applicationVersion 7Author CynthiaHStatus ReleasedRecycling your phoneIndexterm: "recycling your phone"Got an old phone lying around the house? Why not recycle it? By doing so, you willhelp us reuse its materials and components, and you’ll protect the environment, too!Find out more about the recycling options in your region at blogs.sonymobile.com/about-us/sustainability/commitment/overview/.GUID GUID-D08F930B-B234-4D13-B1A2-FD4F5B866A9BTitle Recycling your phoneChanges For Tsubasa html User guide. Updated cross referenceVersion 1.1.1Author JorgenLStatus ReleasedThis is a draft publication for internal use only.218This is an Internet version of this publication. © Print only for private use.](https://usermanual.wiki/Sony/PM-0480.Short-term-confidential-userguide-EN-PRODUCT-NAME-PART-NUMBER-Android4-0/User-Guide-1988542-Page-218.png)
![ReferenceGUID GUID-0CE60553-0706-4B38-B614-3AFED70B2C2FTitle Reference - heading onlyChangesVersion 1Author JorgenLStatus ReleasedSettings overviewGet to know the settings in your device so that you can personalise them to your ownrequirements.Wi-Fi [wifi] Turn Wi-Fi® on or off, scan for available Wi-Fi®networks, or add a Wi-Fi® network.Bluetooth [bluetooth_quick_tog-gle_title]Turn Bluetooth™ on or off, search for availableBluetooth™ devices, and make your device visible orinvisible to other Bluetooth™ devices.Data usage [account_settings_da-ta_usage]Turn the mobile data traffic on or off, and keep track ofyour data usage details over a specified period of time.More… [radio_controls_title] Turn Airplane mode on or off, configure settings for VPNand mobile networks, and enable your device to share itsmobile data connection as a portable Wi-Fi® hotspot, orvia USB tethering or Bluetooth™ tethering. You can alsoenable or disable the NFC function.Call settings [call_settings_title] Manage and configure settings for fixed dialing numbers,voicemail and Internet calls.Sound [sound_settings] Configure how your device rings, vibrates, or alerts youwhen you receive communications. You can also usethese settings to set the volume level for music, video,games or other media with audio, and to make relatedadjustments.Display [display_settings_title] Enable the screen to switch orientation when you rotateyour device. You can also set the brightness, font size,wallpaper and screen timeout.Storage [storage_settings] Check out the available space on the internal storageand on the SD card. You can also erase the SD card, orunmount it for safe removal.Power management [pow-er_settings_title]Turn the power saving modes on or off. You can alsoview your battery status and see how differentapplications consume battery power.Apps [applications_settings] Manage running applications, downloaded applicationsand applications on the SD card.Xperia™ [sonyericsson_settings_ti-tle]Access a range of settings tailored to your Xperia device,for example, USB connection mode and Internet.Location services [loca-tion_settings_title]Enable or disable access to your location information.Security [security_settings_title] Protect your device by setting up different locks andpasswords. You can also allow the installation ofapplications not from Google Play™.This is a draft publication for internal use only.219This is an Internet version of this publication. © Print only for private use.](https://usermanual.wiki/Sony/PM-0480.Short-term-confidential-userguide-EN-PRODUCT-NAME-PART-NUMBER-Android4-0/User-Guide-1988542-Page-219.png)
![Language & input [lan-guage_settings]Select the device language, adjust text input options andconfigure speech settings.Backup & reset [privacy_set-tings]Back up your data and reset your device.Setup guide [setupguide_set-tings_title]Get help setting up your device.Add account [add_account_la-bel]Add an account on your device, for example, an emailaccount or a Google™ account.Date & time [date_and_time_set-tings_title]Set the time and date, or choose the network-providedvalues. Select your preferred date and hour format.Accessibility [accessibility_set-tings]Enable your installed accessibility services and adjustrelated settings.Developer options [develop-ment_settings_title]Set options for application development. For example,you can display CPU usage on the Home screen or setyour device to enter debug mode when USB connectionsare active.About phone [about_set-tings<product="default">]View information about your device, such as the modelnumber and signal strength. You can also update yoursoftware to the latest version.GUID GUID-41CE9920-8E92-421A-873A-20C132CA49F2Title Phone settings overviewChanges Update from v14. For Aoba JB. Remove "screen mirroring security andThrow settings" in Xperia. Remove "add words to the personal dictionary" inLanguage input.Version 14.2.1Author Vera QuStatus ReleasedStatus and notification icons overviewGUID GUID-8CCE681D-6FAB-4172-9224-6CFCEF0A966ATitle Icons overviewChanges Valid for eDream 6.0 (changed the title to be more specific)Version 4Author PengLeonStatus ReleasedStatus iconsIndexterm: "status"Indexterm: "icons"The following status icons may appear on your screen:ID:ICN-SONY-STAT-SYS-SIGNAL-4Signal strengthID:ICN-SONY-STAT-SYS-SIGNAL-0No signalThis is a draft publication for internal use only.220This is an Internet version of this publication. © Print only for private use.](https://usermanual.wiki/Sony/PM-0480.Short-term-confidential-userguide-EN-PRODUCT-NAME-PART-NUMBER-Android4-0/User-Guide-1988542-Page-220.png)

![Important informationGUID GUID-649D6144-4BB8-4D37-8311-A6303D21E672Title Important information - heading onlyChangesVersion 1Author JorgenLStatus ReleasedImportant information leafletBefore you use your device, please read the Important information leaflet providedin the Setup guide in your device or in the box.GUID GUID-4EB461AA-46A2-4B40-A84B-BFF5E93028AFTitle Important information leafletChangesVersion 1Author JorgenLStatus Released*To access the setup guide manually1From the Home screen [homescreen_strings_application_name_txt] , tap ID: ICN-SONY-HOME-APPTRAY-NORMAL.2Tap Settings [settings_label] > Setup guide [setupguide_settings_title] .GUID GUID-45BAC9AF-99A4-4D6C-979B-E6E88255911ETitle To access the setup guide manuallyChanges For Jelly Bean projects. Steps changed.Version 7Author QianWangStatus ReleasedLimitations to services and featuresSome of the services and features described in this User guide are not supported in allcountries/regions or by all networks and/or service providers in all areas. Without limitation,this applies to the GSM International Emergency Number, 112. Please contact your networkoperator or service provider to determine availability of any specific service or feature andwhether additional access or usage fees apply.Use of certain features and applications described in this guide may require accessto the Internet. You may incur data connection charges when you connect to theInternet from your phone. Contact your wireless service provider for moreinformation.GUID GUID-2871DC0F-1733-400C-A0A4-6AEC258F6444Title Limitations to services and featuresChangesVersion 1Author JorgenLStatus Released*Legal informationGUID GUID-1A9D3F04-6F50-46B0-98ED-788E34A611F3Title Legal information - headingChanges GenericVersion 1Author JorgenLStatus ReleasedThis is a draft publication for internal use only.231This is an Internet version of this publication. © Print only for private use.](https://usermanual.wiki/Sony/PM-0480.Short-term-confidential-userguide-EN-PRODUCT-NAME-PART-NUMBER-Android4-0/User-Guide-1988542-Page-231.png)
![Sony [Emptylabel][]/[Emptylabel][] [Empty label] []This User guide is published by Sony Mobile Communications AB or its local affiliated company, without anywarranty. Improvements and changes to this User guide necessitated by typographical errors, inaccuracies ofcurrent information, or improvements to programs and/or equipment, may be made by Sony MobileCommunications AB at any time and without notice. Such changes will, however, be incorporated into neweditions of this User guide.©Sony Mobile Communications AB, 2012.All rights reserved.Your mobile phone has the capability to download, store and forward additional content, for example,ringtones. The use of such content may be restricted or prohibited by rights of third parties, including but notlimited to restriction under applicable copyright laws. You, and not Sony, are entirely responsible for additionalcontent that you download to or forward from your mobile phone. Prior to your use of any additional content,please verify that your intended use is properly licensed or is otherwise authorized. Sony does not guaranteethe accuracy, integrity or quality of any additional content or any other third party content. Under nocircumstances will Sony be liable in any way for your improper use of additional content or other third partycontent.This User guide may reference services or applications provided by third parties. Use of such programming orservices may require separate registration with the third party provider and may be subject to additional termsof use. For applications accessed on or through a third-party website, please review such websites’ terms ofuse and applicable privacy policy in advance. Sony does not warrant or guarantee the availability orperformance of any third-party websites or offered services.Remove the battery to see regulatory information such as the CE mark.All product and company names mentioned herein are the trademarks or registered trademarks of theirrespective owners. Any rights not expressly granted herein are reserved. All other trademarks are property oftheir respective owners.Visit www.sonymobile.com for more information.All illustrations are for illustration purposes only and may not accurately depict the actual phone.This product is protected by certain intellectual property rights of Microsoft. Use or distribution of suchtechnology outside of this product is prohibited without a license from Microsoft.Content owners use Windows Media digital rights management technology (WMDRM) to protect theirintellectual property, including copyrights. This device uses WMDRM software to access WMDRM-protectedcontent. If the WMDRM software fails to protect the content, content owners may ask Microsoft to revoke thesoftware's ability to use WMDRM to play or copy protected content. Revocation does not affect unprotectedcontent. When you download licenses for protected content, you agree that Microsoft may include arevocation list with the licenses. Content owners may require you to upgrade WMDRM to access their content.If you decline an upgrade, you will not be able to access content that requires the upgrade.This product is licensed under the MPEG-4 visual and AVC patent portfolio licenses for the personal and non-commercial use of a consumer for (i) encoding video in compliance with the MPEG-4 visual standard("MPEG-4 video") or the AVC standard ("AVC video") and/or (ii) decoding MPEG- 4 or AVC video that wasencoded by a consumer engaged in a personal and non-commercial activity and/or was obtained from a videoprovider licensed by MPEG LA to provide MPEG-4 and/or AVC video. No license is granted or shall be impliedfor any other use. Additional information including that relating to promotional, internal and commercial usesand licensing may be obtained from MPEG LA, L.L.C. See http://www.mpegla.com. MPEG Layer-3 audiodecoding technology licensed from Fraunhofer IIS and Thomson.GUID GUID-BA620967-57C4-482B-9882-A32947F9CFB9Title Legal text - html User guide - TsubasaChanges Part number is removedVersion 1Author JorgenLStatus Released*This is a draft publication for internal use only.232This is an Internet version of this publication. © Print only for private use.](https://usermanual.wiki/Sony/PM-0480.Short-term-confidential-userguide-EN-PRODUCT-NAME-PART-NUMBER-Android4-0/User-Guide-1988542-Page-232.png)