Sony PM-0801 Quad GSM/ WCDMA/ LTE cellular mobile telephone with BT, WLAN, Ant+ and RF ID User Manual Sony Mobile Communications AB
Sony Mobile Communications Inc Quad GSM/ WCDMA/ LTE cellular mobile telephone with BT, WLAN, Ant+ and RF ID Sony Mobile Communications AB
Sony >
Contents
- 1. User Manual 1
- 2. User Manual 2
- 3. SAR Leaflet
- 4. HAC Leaflet
User Manual 1
Important Information
Before you use your device, please read the
Important
Information
provided in your device regarding warranty,
safety and handling information.
Protecting your device from water
and dust
Your device has IP (Ingress Protection) ratings of IP65 and
IP68. These ratings mean that your device is dust tight and
is protected against low pressure water stream as well as
against the effects of submersion for 30 minutes in fresh
(non-saline) water up to 1.5 metres deep.
Always firmly attach all covers to ensure the water and dust
resistance of the device. If liquid is detected inside the
device, for example, underneath one of the covers, your
warranty will be void.
Before using your device in water and in dusty conditions,
refer to the relevant section of the User guide for your
device for more detailed information. An online User guide
as well as a downloadable version is available at
www.sonymobile.com/support
.
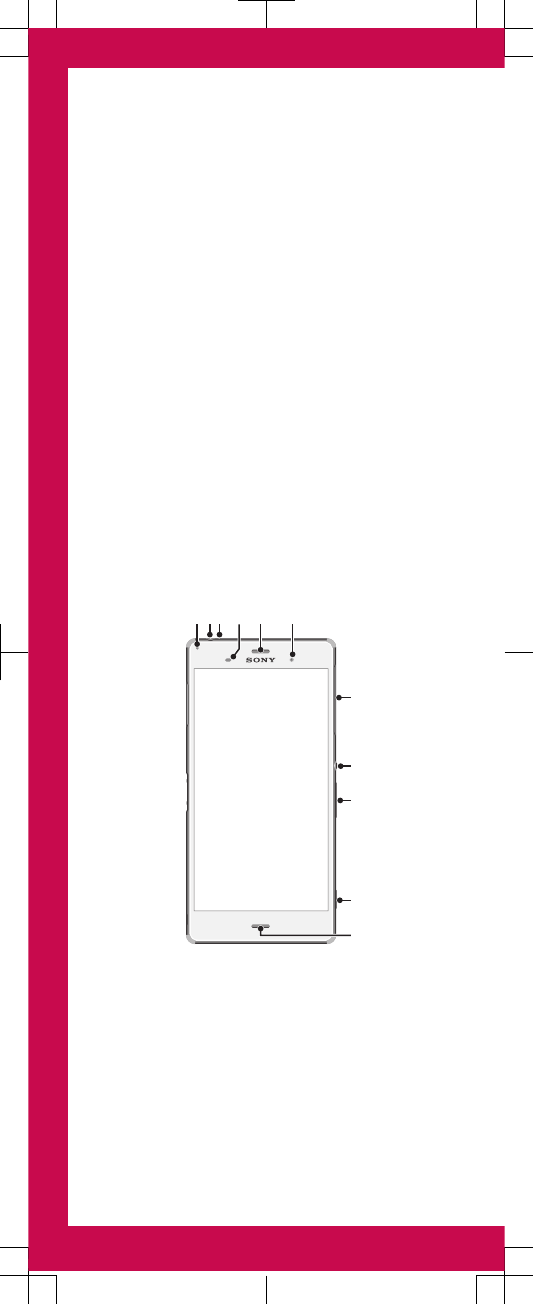
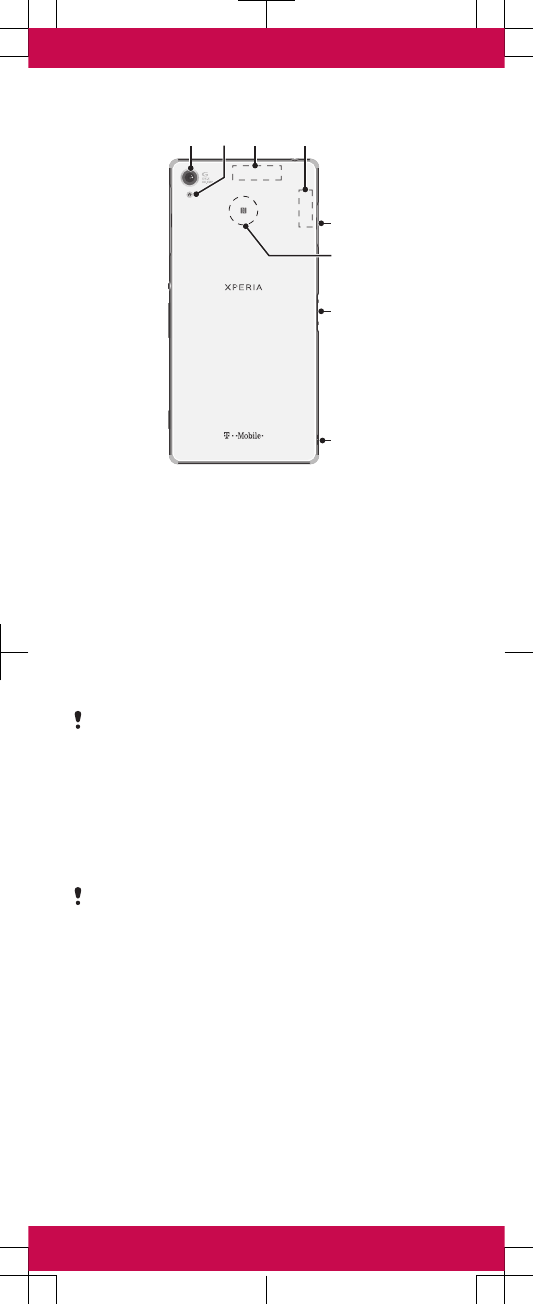
Overview
21 43 5 6
7
8
9
10
11
12 1413
16
18
19
17
15
1. Charging/Notification
light
2. Headset jack
3. Second microphone
4. Proximity/Light sensor
5. Ear speaker/Second
speaker
6. Front camera lens
7. Cover for nano SIM
and memory card slot
8. Power key
9. Volume/Zoom key
10. Camera key
11.Main microphone/Speaker
12. Main camera lens
13. Camera light
14. GPS antenna area
15. Wi-Fi/Bluetooth antenna
area
16. Cover for charger/USB
cable port
17. NFC™ detection area
18. Charging dock connector
19. Strap hole
Use the accessories, such as the charger and the charging
cable, provided with your device for optimal performance.
Assembly
Please use the nano SIM card included in the box. This new
card allows you to use the Wi-Fi Calling feature and other
enhanced device features. For help transferring contacts
from your previous SIM card, please ask a retail store
representative to help you.
Your device only supports nano SIM cards.
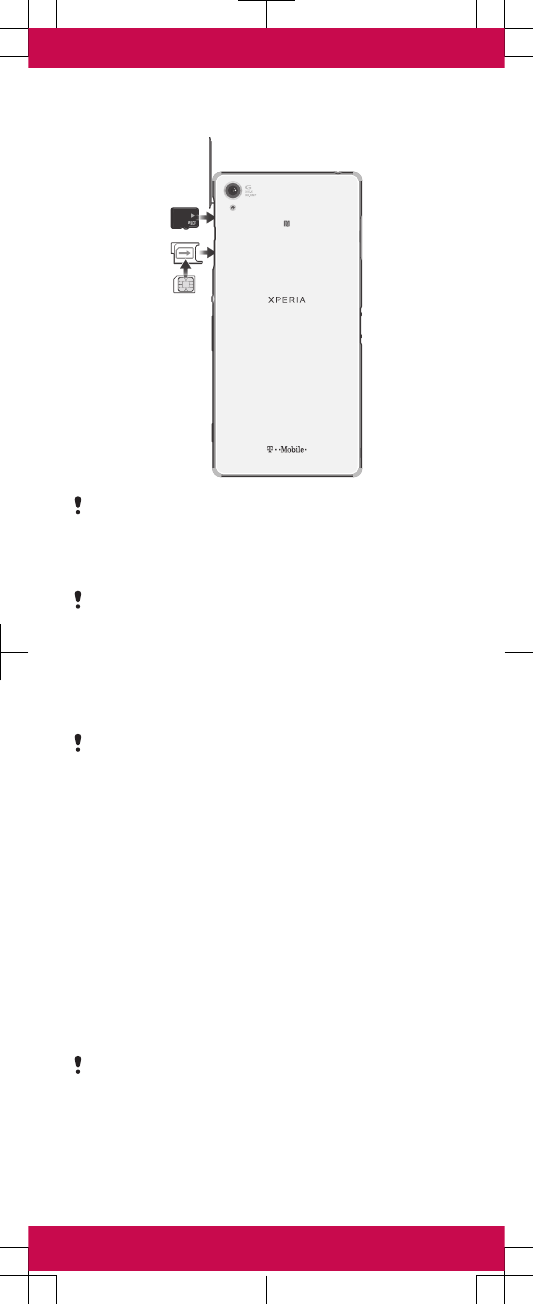
Make sure you insert the nano SIM card into the nano SIM
card holder before inserting it into the device. Also, don’t
confuse the nano SIM card slot with the memory card slot.
To insert the nano SIM card
If you insert the nano SIM card while the device is
powered on, the device restarts automatically.
1Detach the cover for the nano SIM card holder.
2Using a fingernail or other similar object, drag out the nano
SIM card holder.
3Place the nano SIM card in the nano SIM card holder, then
reinsert the holder.
4Re-attach the cover.
Make sure you reinsert the nano SIM card holder in the
correct orientation. When you drag the holder out to insert
the nano SIM card, do not turn the holder around.
To insert the memory card
1Remove the memory card slot cover.
2With the gold coloured contacts facing down, insert the
memory card into the memory card slot, then re-attach the
memory card slot cover.
Basics
Turning on the device
Make sure that the battery is charged for at least 30 minutes
before you turn on the device for the first time.
To turn on the device
Make sure that the battery is charged for at least 30
minutes before you turn on the device for the first time.
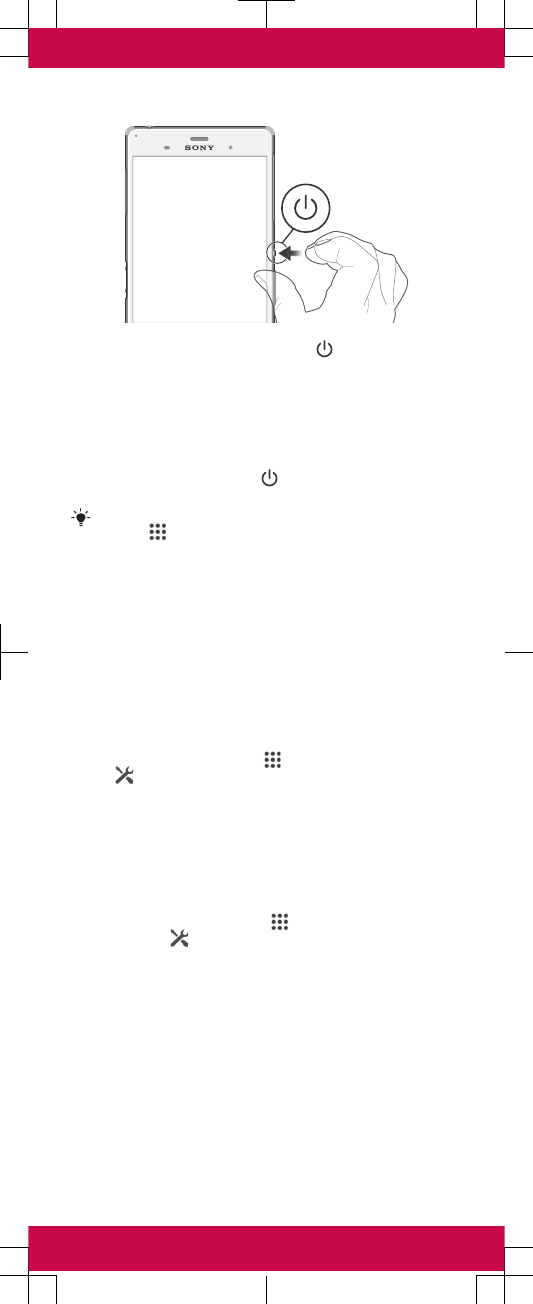
1Press and hold down the power key until the device
vibrates.
2Wait a while for the device to start.
Waking up the screen
To activate the screen
•Briefly press the power key .
•If Tap to wake up mode is enabled, double-tap the screen.
To enable Tap to wake up mode, go to the Home screen,
then tap > Settings > Display > Tap to wake up.
Setting up your device
Setup guide
The first time you start your device, a setup guide opens to
help you configure basic settings, sign in to some accounts
(for example, your Google™ account), and personalise your
device. You can also manually access the setup guide at a
later stage.
To access the setup guide manually
1From the Home screen, tap .
2Tap > Setup guide.
Accessing settings
View and change settings for your device from the Settings
menu. The Settings menu is accessible from both the
Application screen and the Quick settings panel.
To access your device settings
1From your Home screen, tap .
2Find and tap .
Transferring your contacts
Xperia™ Transfer is an application within the PC Companion
and the Sony Bridge for Mac computer programs that helps
you to collect contacts from your old device and transfer
them to your new device. Xperia™ Transfer supports several
device brands, including iPhone, Samsung, HTC, BlackBerry,
LG, and Nokia.
You need:
•An Internet-connected computer.
•A USB cable for your old device.
•A USB cable for your new Android™ device.
•Your old device.
•Your new Android™ device.
To transfer contacts to your new device
1Search and download PC Companion (on a PC) or Bridge
for Mac (on a Mac computer) from
www.sonymobile.com
if
the application is not already installed.
2After successful installation, open the PC Companion
application or the Sony Bridge for Mac application, then
click
Xperia™ Transfer
and follow the relevant instructions
to transfer your contacts.
Backing up content of your device
Use the Back up & restore application to make backups of
content to Google servers. Such backups can be used to
restore your content and some settings in cases where your
data gets lost or deleted.
See the relevant section of the User guide for more detailed
information. An online User guide as well as a downloadable
version is available at
www.sonymobile.com/support
.
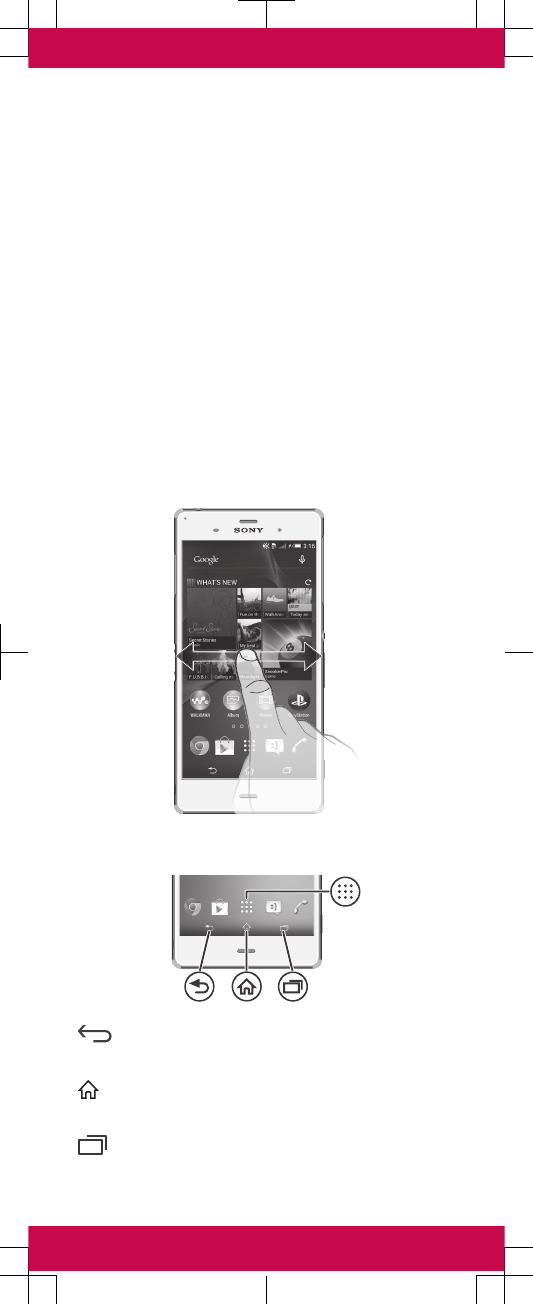
Finding your way
Using the keys
Back navigation key
•Go back to the previous screen within an
application or close the application.
Home navigation key
•Exit an application and go back to the Home
screen.
Task navigation key
•Open the recently used applications window and
the small apps bar.
Application screen
•Open the Application screen.
Basic applications and settings
Make phone calls by dialling the number manually or by
using the smart dial function.
Use the Messaging application to send and receive text
and multimedia messages.
Go to Google Play™ to download free and paid
applications for your device.
Optimise the device settings to suit your own
requirements.
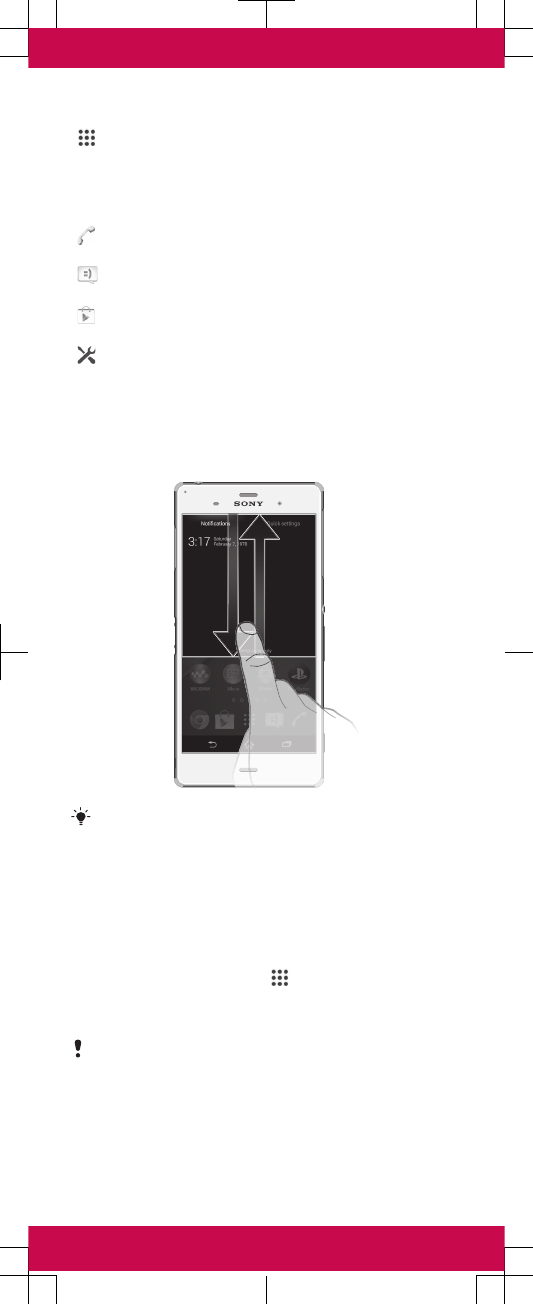
Status and notifications
To open or close the Notification panel
Drag down two fingers instead of one to open the Quick
settings panel instead.
Visual Voicemail
Visual Voicemail allows users to view, listen and save all
voicemails in any order directly from the phone, without the
need of calling the voicemail system.
To listen to a voicemail message
1From your Home screen, tap .
2Find and tap Visual Voicemail.
3In your voicemail inbox, tap the message that you want to
listen to.
If this is the first time accessing Visual Voicemail, you may
be prompted to enter a new PIN code and tap Next to
activate Visual Voicemail.
T-Mobile Name ID
T-Mobile Name ID identifies callers, displaying Name, City
and State even if the caller is not in your contacts list. It is an
optional add-on feature that can be purchased directly from
your phone for an additional monthly charge. A one time 10
days trial is included with the phone.
To access the T-Mobile Name ID
application
1From your Home screen, tap .
2Find and tap T-Mobile Name ID.
3Select an option.
Wi-Fi Calling
To use Wi-Fi Calling you should use the SIM card shipped
with your device. A different SIM card may not work with
the Wi-Fi Calling feature. Also, you must have a 911
emergency address registered with your account. Log into
your account at
www.t-mobile.com
. Go to your profile,
add 911 Address in the General section.
About Wi-Fi Calling
Wi-Fi Calling can improve your coverage and allows you to
make phone calls and send messages over a Wi-Fi network
(when a Wi-Fi network is available). Unless your rate plan
provides otherwise, Wi-Fi Calling minutes count the same as
T-Mobile cellular calling minutes on your phone bill.
Smartphone Mobile Hotspot
This feature allows you to turn your device into a Wi-Fi
hotspot. The feature works best when used in conjunction
with 4G and 4G LTE data services (although 3G service can
also be used).
The Smartphone Mobile Hotspot service cannot be active
when device is connected to Wi-Fi. Disconnect your Wi-Fi
connection before activating this service.
You must have qualifying service on your account in order
to use the Mobile Hotspot.
To active the Mobile Hotspot for the
first time
1From your Home screen, tap .
2Find and tap Mobile Hotspot.
3Tap Mobile Hotspot settings > Set up Mobile Hotspot.
4Enter the Network name (SSID) information.
5Verify the Security field is set to WPA2 PSK.
6Enter a new password then write it down.
7Mark the Broadcast network name (SSID) checkbox if you
want to broadcast your SSID name to nearby devices.
Then tap Save.
8Tap Channel and select an option. Then tap .
9Mark the Mobile Hotspot checkbox, then tap OK. is
displayed in the status bar once the service is active.
By default, during the initial setup process, the connection
is not secure. It is recommended that you maintain a
secure connection by using a password for
communication.
Using your 4G service and Smartphone Mobile Hotspot
drains our phone’s battery at a much faster rate than when
using any other feature combination. The best way to keep
using the phone as a Hotspot is to have it connected to a
power supply.
To change the Mobile Hotspot
password
1From your Home screen, tap .
2Find and tap Mobile Hotspot.
3Tap Mobile Hotspot settings > Set up Mobile Hotspot.
4Tap the Security field and select WPA2 PSK.
5Delete the previous password and enter a new one into the
Password field.
6Tap Save.
Wireless Emergency Alert
Wireless Emergency Alert (WEA), also known as Commercial
Mobile Alert System (CMAS), is a personalized emergency
alert system designed to alert you of nearby threats or
emergencies. Your device is capable of receiving three kinds
of alert messages:
•Presidential alerts
•Extreme alerts and Severe alerts
•AMBER alerts
Your device notifies you in the following ways:
•Transmit a unique tone
•Vibrate with a unique cadence
•Display the alert message
To turn off WEA alerts
1From your Home screen, tap , then find and tap .
2Tap , then tap Settings > Emergency alerts .
3Unmark the relevant checkboxes.
You cannot turn off the Presidential alert, but you can turn
off the Extreme alerts, Severe alerts and AMBER alerts.
Additional Information
There is no additional charge to receive WEA alerts. Alerts
may not be available: (1) while on active calls; (2) if a
subscriber is outside the TMobile coverage area; or (3) due to
interference concerns. You cannot forward or reply to WEA
alerts. Currently, WEA alerts will only be in English (no other
languages available). Occasionally, a duplicate of previously
received alert may display again. For more information and
FAQs see
www.t-mobile.com/CMAS
.
Storage and memory
Storage
Your device has different types of storage possibilities for
photos, apps and other files:
•The internal storage is used to store downloaded or
transferred content along with personal settings and data.
Examples are alarm, volume and language settings,
emails, bookmarks, call logs, contacts, messages,
calendar events, photos, videos and music.
•You can use a removable SD card to get more storage
space. Most applications can read data from an SD card
but only certain apps can save files to this type of storage.
You can, for example, set the camera application to save
photos directly to the SD card.
You may have to purchase an SD card separately.
RAM
The dynamic memory (RAM) cannot be used for storage.
RAM is used to handle running applications and the
operating system. And you can stop running applications and
services manually.
To stop applications and services from
running
1From your Home screen, tap .
2Find and tap Settings > Apps > Running.
3Select an application or service, then tap Stop.
Additional support
For more information and additional support, please visit
www.t-mobile.com/support
where you can:
•Register for
my.t-mobile.com
to check your minutes, pay
your bill, upgrade your device, and change your rate plan.
Review your device’s User Manual and troubleshooting
FAQs.
•View the latest troubleshooting solutions in the Support
Forums or ask a question of your own.
If you are a new T-Mobile customer and your service has not
yet been activated, call Customer Care at 1-800-937-8997
and a T-Mobile Activation representative will assist you.
You can also access account and device information from
your device.
1From your Home screen, tap
2Find and tap T-Mobile My Account
Information about safeguarding
handsets
T-Mobile encourages customers to take appropriate
measures to secure their handsets and invites them to take
advantage of the features available on this handset to help
secure it from theft and/or other unauthorized access and
use. This handset has a locking function (e.g., user-defined
codes or patterns) that can serve as a first line of defense
against unauthorized use or access to stored information.
Preloaded security applications that allow customers to track
or locate misplaced devices can be found on several T-
Mobile devices. Lost or stolen devices should be immediately
reported to T-Mobile so that proper measures can be taken
to protect accounts. For additional information, visit:
www.t-mobile.com/devicesecurity
and
http://www.t-
mobile.com/Company/PrivacyResources.aspx
.
Approved firmware versions
This device will only operate with firmware versions that have
been approved for use by T-Mobile and the device
manufacturer. If unauthorized firmware is placed on the
device it will not function.
Learn more about your device
You can visit the following sites to learn more about your
device:
•Help for Setting Up Your New Android Device:
http://
support.t-mobile.com/docs/DOC-2501
.
•Help for Your Device:
http://support.t-mobile.com/
community/phones_data_devices/android
.
Accessories
Whether you want a fashionable carrying case, a Bluetooth®
headset, or you just want to browse for fun extras, T-Mobile
is the place to shop for all your phone accessories.
To purchase accessories for your phone, visit T-Mobile.com,
call 1.800.204.2449, or visit your nearest T-Mobile store.
Accessory selection subject to change and may vary by
location.
Support on the web
Visit
www.sonymobile.com/support
to access a range of
support options for your device, including downloads,
troubleshooting tips and a User guide.
Legal information
Sony D6616
Publication number: xxxx-xxxx.1
This Startup guide is published by Sony Mobile
Communications Inc. or its local affiliated company, without
any warranty. Improvements and changes to this Startup
guide necessitated by typographical errors, inaccuracies of
current information, or improvements to programs and/or
equipment, may be made by Sony Mobile Communications
Inc. at any time and without notice. Such changes will,
however, be incorporated into new editions of this Startup
guide. All illustrations are for illustration only and may not
accurately depict the actual device.
See regulatory information such as the CE mark in the
relevant label tray in the device.
All product and company names mentioned herein are the
trademarks or registered trademarks of their respective
owners. Any rights not expressly granted herein are reserved.
Visit
www.sonymobile.com/us/legal/
for more information.
Product compliance: This product has been manufactured by
or on behalf of Sony Mobile Communications Inc., 1-8-15
Konan, Minato-ku, Tokyo 108-0075, Japan. Inquiries related
to product compliance based on national legislation shall be
addressed to Sony Mobile Quality Officer, Sony Mobile
Communications Inc., 1-8-15 Konan, Minato-ku, Tokyo
108-0075, Japan. For any service or guarantee matters,
please refer to the contact details provided in the separate
service or guarantee documents.
© 2014 Sony Mobile Communications Inc. All rights reserved.
Use of some content or features may incur separate,
additional charges and/or require qualifying service or access
to Wi-Fi connection.
Wi-Fi: Device will not transition between Wi-Fi and the
cellular network. Devices using wireless connections may be
vulnerable to unauthorized attempts to access data and
software stored on the device. Plan data allotment applies to
use by connected devices sharing Wi-Fi. Use of connected
devices subject to T-Mobile Terms and Conditions.
Wi-Fi Calling: Wi-Fi connection required; may decrement plan
minutes. See your selected service for details.
Messaging/Data: You will be charged for all messages and
data sent by or to you through the network, regardless of
whether or not data is received. Character length/file size of
messages/attachments may be limited. T-Mobile is not liable
for content of messages/attachments or for any failures,
delays or errors in any T-Mobile generated alerts or
notifications. Your data session, plan, or service may be
slowed, suspended, terminated, or restricted if you use your
service in a way that interferes with or impacts our network or
ability to provide quality service to other users, if you roam
for a significant portion of your usage, or if you use a
disproportionate amount of bandwidth during a billing cycle.
You may not use your plan or device for prohibited uses.
Downloads/Applications: T-Mobile is not responsible for any
third party content or Web site you may be able to access
using your phone. Additional charges may apply; not all
downloads available on all phones. You obtain no rights in
downloads; duration of use may be limited and downloads
may be stored solely for use with your phone. T-Mobile is not
responsible for any download lost due to your error. T-Mobile
is not responsible for Apps, including download, installation,
use, transmission failure, interruption or delay, third party
advertisements you may encounter while using an App,
alterations any App may make to the functionality of your
device, including any changes that may affect your T-Mobile
plan, service, or billing, or any content or website you may be
able to access through an App.
Hearing Aid Compatibility: This phone has been tested and
rated for use with hearing aids for some of the wireless
technologies that it uses. However, there may be some
newer wireless technologies used in this phone that have not
been tested yet for use with hearing aids. It is important to try
the different features of this phone thoroughly and in different
locations, using your hearing aid or cochlear implant, to
determine if you hear any interfering noise. Consult your
service provider or the manufacturer of this phone for
information on hearing aid compatibility. If you have
questions about return or exchange policies, consult your
service provider or phone retailer.
FCC Caution: Please notice Sony Mobile did NOT perform
the testing of Hearing Aid Compatibility of VoLTE and VoIP
over Wi-Fi for CMRS air interfaces because the test
instrumentation for it was not readily available at the time
testing.
Devices, accessories, and screen images are simulated. See
brochures and Terms and Conditions (including arbitration
provision) at T-Mobile.com, for rate plan information, charges
for features and services, and restrictions and details,
including important limitations on availability and reliability of
9-1-1 emergency service when using Wi-Fi Calling.
FCC Caution: Operation in the 5.15 GHz to 5.25 GHz
frequency band is only permitted for indoor use. For indoor
and outdoor operation, connect your device to an FCC
approved 5 GHz WLAN access point.
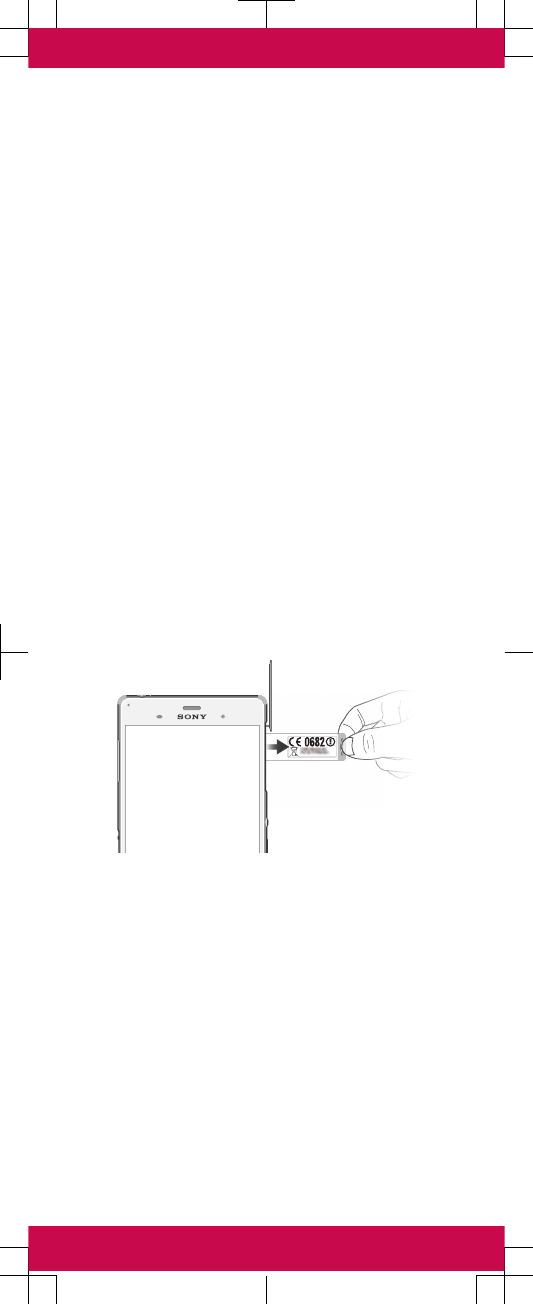
To view the CE mark and the FCC ID
1Detach the cover of the SD card slot.
2Using a fine-tipped pen or other similar tool, press the
memory card inwards and then release it quickly.
3Draw the memory card outwards and remove it fully.
4Insert a fingernail, or a sharp object such as a pen, into the
hole in the label tray, then drag the tray outwards. The
information is displayed on the tray.
Start guide
Xperia® X
D6616