Soundcast VGBT05A Bluetooth Speaker System, VG5 User Manual
Soundcast LLC Bluetooth Speaker System, VG5
User manual

VG5
9771-E Clairemont Mesa Blvd., San Diego, CA 92124 USA
Gesworenhoekseweg 4
5047TM Tilburg, the Netherlands
VG5 USER MANUAL
ENGLISH....................4
ESPAÑOL...................7
FRANCAIS................10
PORTUGUÊS...........13
DEUTSCHE..............16
NEDERLANDS.......19
中文........................... 22
DC IN
AUX IN 15V 1.5 A USB/
SERVICE RESET
4
ENGLISH | How to use VG5
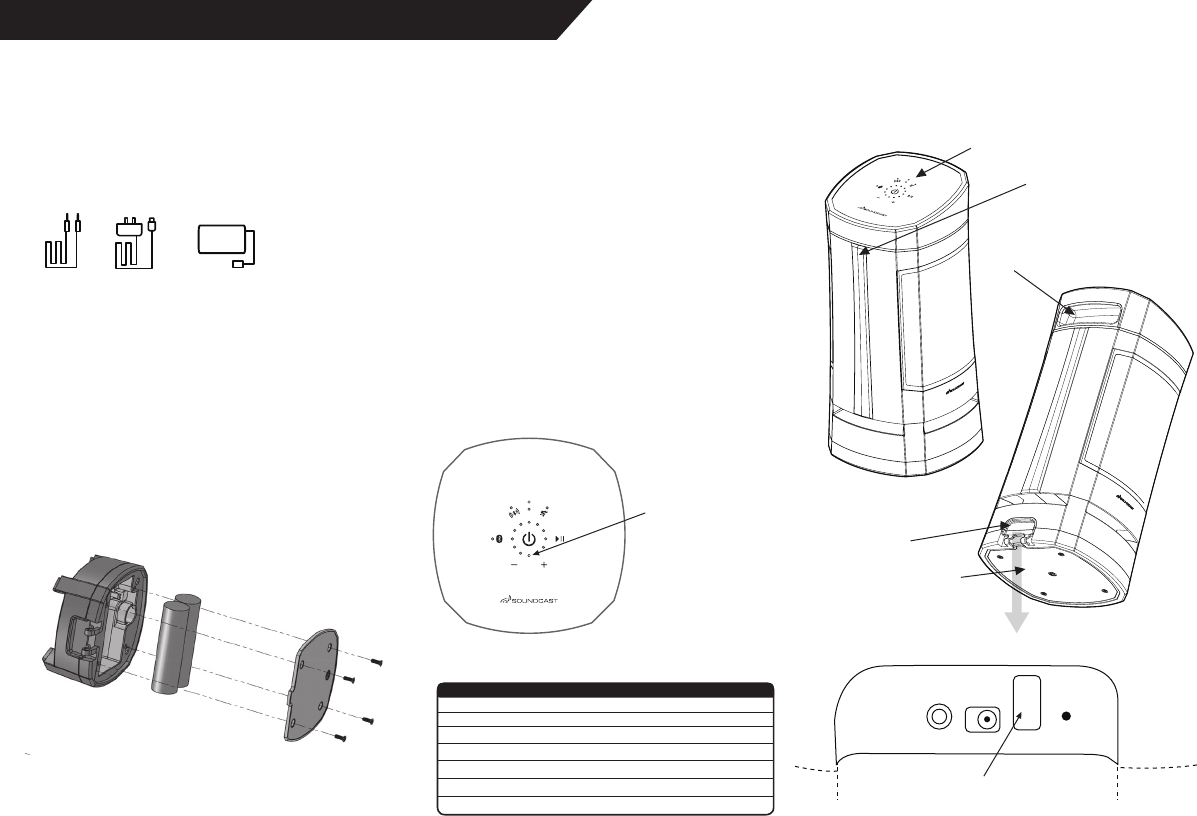
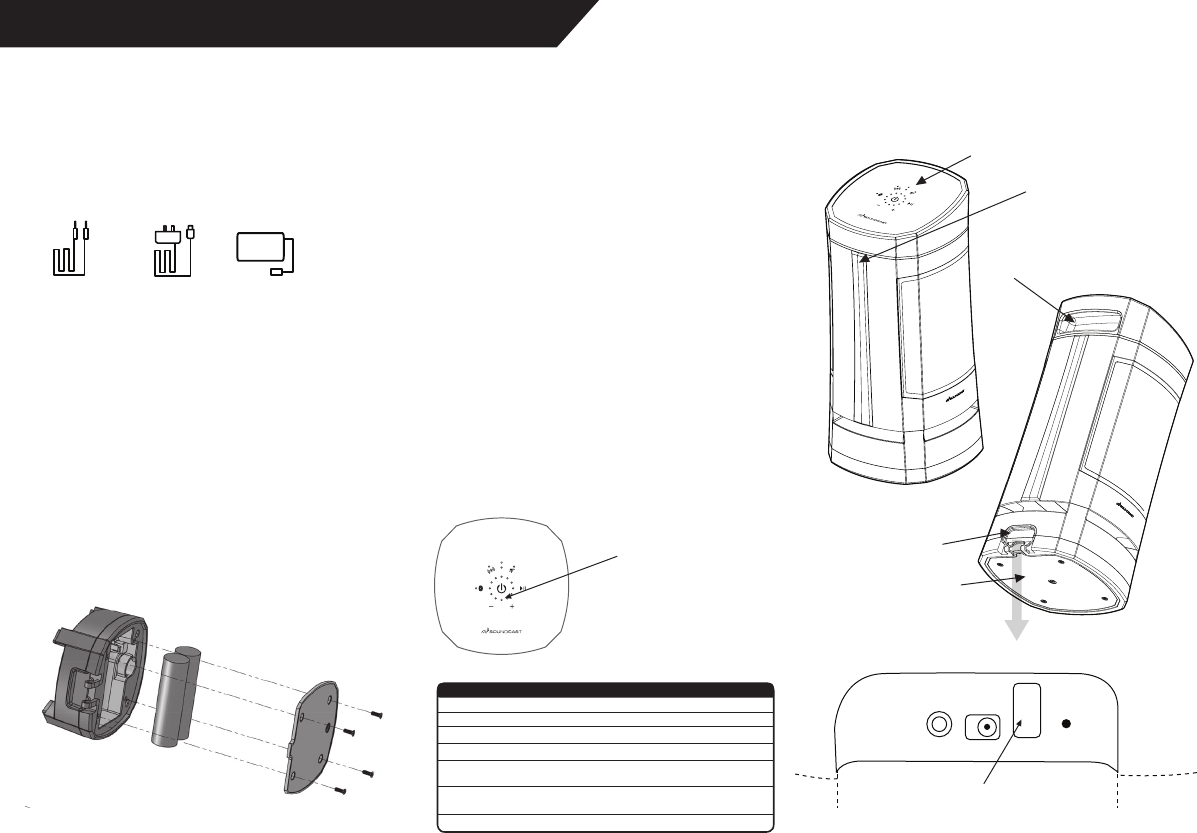
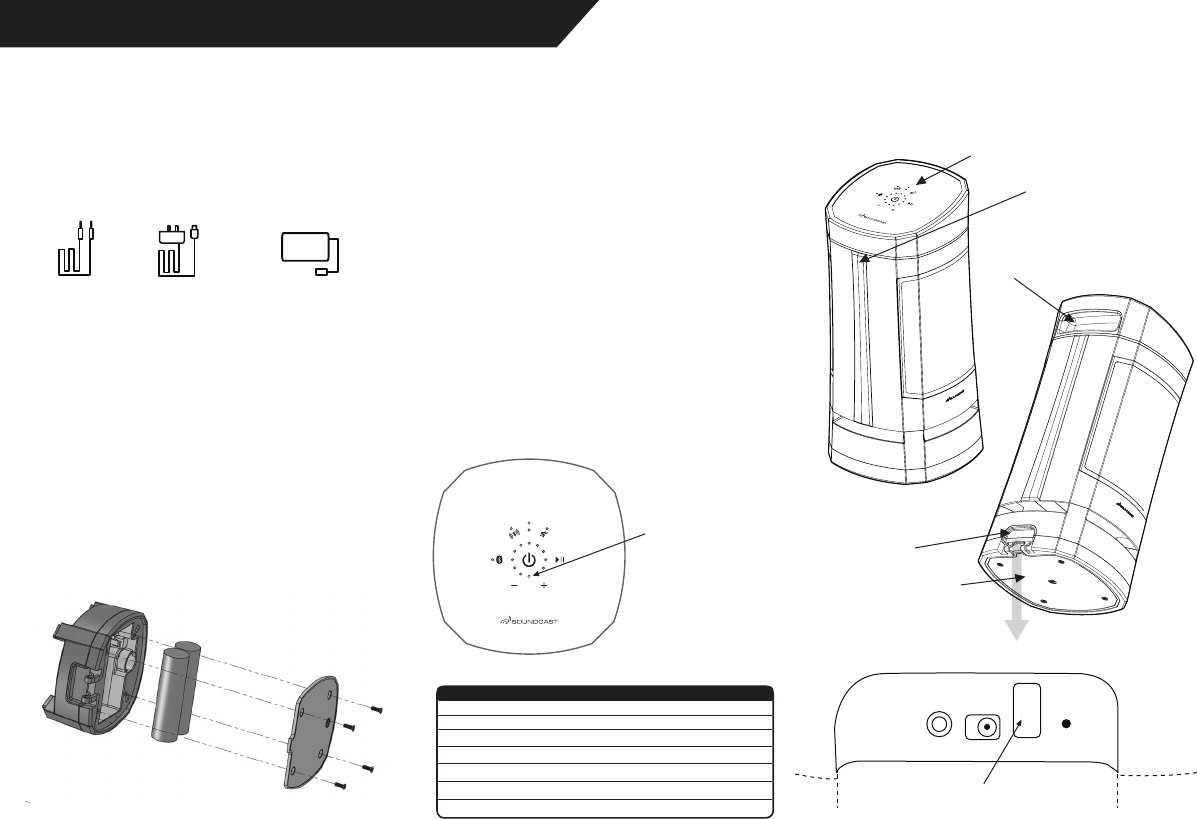
Installing Battery
1. Using a Phillips #3 screwdriver, unscrew and
remove battery cover located on bottom of VG5
2. Connect the battery to the VG5 connector which
will only fit in the proper direction
3. Route the battery wires
4. Re-install battery cover
Charging Battery
Before initial use, charge battery for at least 5 hours to
full capacity. To ensure battery longevity and maximum
performance of the system, the battery should always
be charged prior to mobile operation.
1. Plug-In the included AC Wall Charger to AC power
and connect the other end to the VG5 DC In port
located behind the port protection cover of the VG5.
2. The VG5 can be operated from AC Wall Current
even when battery is fully discharged
3. Charge time is approximately 4-5 hours from fully
discharged battery
4. Playtime varies from depending upon volume level
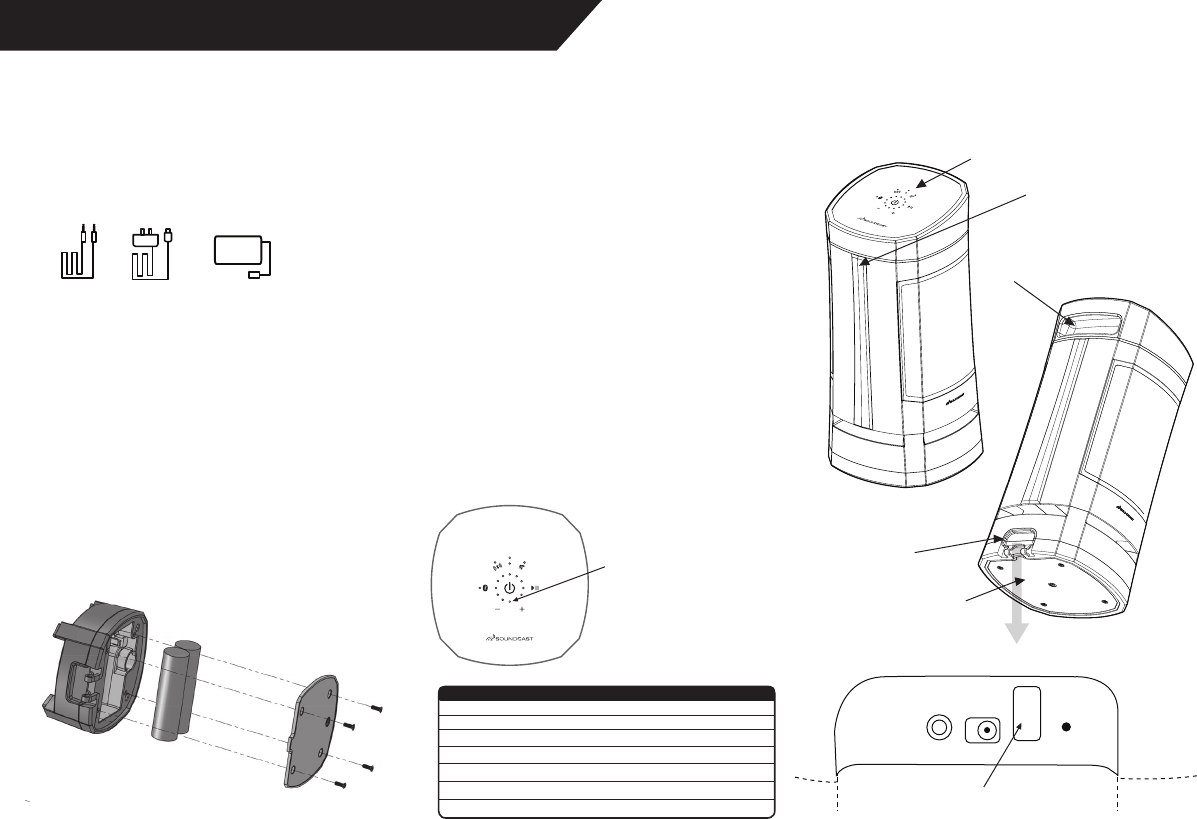
Box Includes:
Quick Start Guide
Congratulations and thank you for your purchase of the Soundcast VG5.
Please read the operation instructions carefully before use.
3.5mm
analog
audio
cable
AC Wall
Charger
with
Adaptor
clips
Battery
Pack
Orange Power/
Charging
Indicator LED
USB Power Bank
Charging Output
Capacitive Touch Control Keypad
Weather Resistant
Charging & Access
Ports Location
Battery access panel
NFC (Near Field
Communication)
Location
Comfort-Grip
Carry Handle
Power ON
Power OFF
Battery Low
Charging
Fully Charged
Fully Charged
Error- Cannot Charge
Solid Orange
Off
Slow Blinking Red
Solid Red
Off (if power off)
Solid Orange (if power on)
Fast Blinking Red
Status Power LED
Ports, Connections and Inputs
Charging & Access Ports
5
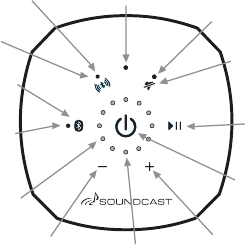
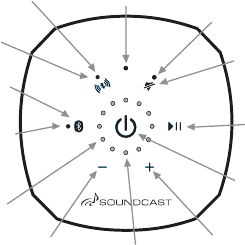
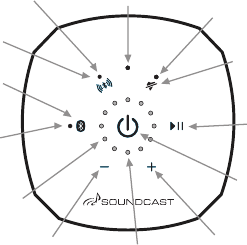
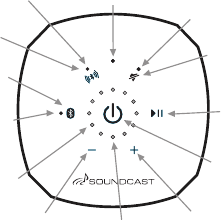
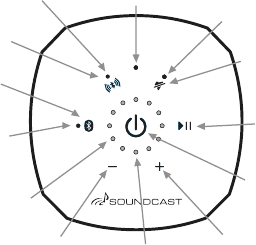
Mute indicator
Mute button
Yellow AUX
indicator
LED
Bluetooth
indicator LED
Bluetooth
button
TWS button
Blue and orange LEDs
indicate current
TWS state
Eleven
LEDs for
volume and
fuel guage
display
Power
button
Volume
up
button
Orange
power
LED
Volume
down
button
Play/
Pause
button
Control Panel Keypad
Capacitive Touch Keypad
The VG5 features an advanced capacitive touch keypad
and backlighting technology. User functions are
accessed by a single press or press and hold over the
appropriate button area of the keypad
surface as indicated.
Powering On/Off: The VG5 is turned on and off using
the large button located in the center of the keypad
Turn On: Press and hold the power button for (2)
seconds until the backlights illuminate and then release
within (2) seconds, a confirmation beep will confirm unit
is turned on
Turn Off: Press and hold the power button for (2)
seconds then release within (2) seconds, a confirmation
beep will confirm unit is turning off
Connecting and Pairing
*The VG5 power must be turned on before trying to
pair (as well as aux input disconnected)
Press and hold the TWS (TWS icon) for (2) seconds until
a confirmation beep is heard. The TWS LED will start to
blink slowly. Repeat with the second VG5 unit.
3. When paired, the TWS LED on both units will show
both blue and orange (purple)
➤ When in TWS mode and you turn off one unit, the
other unit will turn off automatically
4. Reconnecting: The TWS-paired units will re-connect
to each other automatically after turning both units on.
A short press of the TWS button on either unit allows
cycling through the TWS modes (stereo, left/right, off)
as indicated below;
• LED blue and orange: left/right
from each speaker
• LED orange only: left from primary speaker,
right from secondary speaker
• LED off: TWS off
➤ To clear all devices from TWS memory and return to
single device operation, press and hold the TWS button
for (10) seconds until third beep is heard and the TWS
LED double blinks, then turn the unit off. When unit is
turned on again, the TWS LED will not be on, indicating
that TWS is disabled.
➤ If you experience any difficulty with either standard
Bluetooth pairing or TWS operation, the VG5 Bluetooth
system can be reset by clearing pairing memory of both
Bluetooth and TWS by using the (10) second press and
hold function (third beep) of each button and then power
cycling the unit.
➤ No music or intermittent dropouts? VG5 primary and
secondary units may be too far away
from each other.
Bluetooth pairing with NFC
1. Enable Bluetooth and NFC functions on
your mobile device
2. Hold phone near the NFC logo (logo) on VG5 unit
until mobile device connects and Bluetooth
LED blinks slowly
3. Press OK/Connect on your mobile device
to complete pairing
4. Play audio
Standard Bluetooth Pairing
1. Enable Bluetooth on your mobile device
2. Pair a new device: press the VG5 Bluetooth button
(Bluetooth LED will blink slowly)
3. From Bluetooth menu on mobile device settings,
select “VG5 by Soundcast_xxxxxx”
4. Once paired, the Bluetooth LED becomes solid blue
➤ Press & Hold Bluetooth button for (2) seconds and
beep is heard to re-enter pairing mode to pair a new or
additional device.
➤ To clear all devices from memory, press and hold the
Bluetooth button for (10) seconds until the Bluetooth
LED double blinks and second confirmation beep is
heard.
Aux Input Mode
Plug external audio source into 3.5mm jack to
automatically switch to Aux Input mode as indicated by
Aux LED turns yellow. Remove 3.5mm plug to switch
back to Bluetooth operation.
TrueWireless Stereo (TWS) Pairing
With TWS, two VG5 units may be paired for synchro-
nous Bluetooth playback. Power off, volume and TWS
mode will by synchronized and may be controlled from
either unit.
1. Both speakers must be powered on in Bluetooth
mode (no Aux input connected)
2. At least one of the speakers must be paired to audio
source (as described above)
6
Other Controls and Features
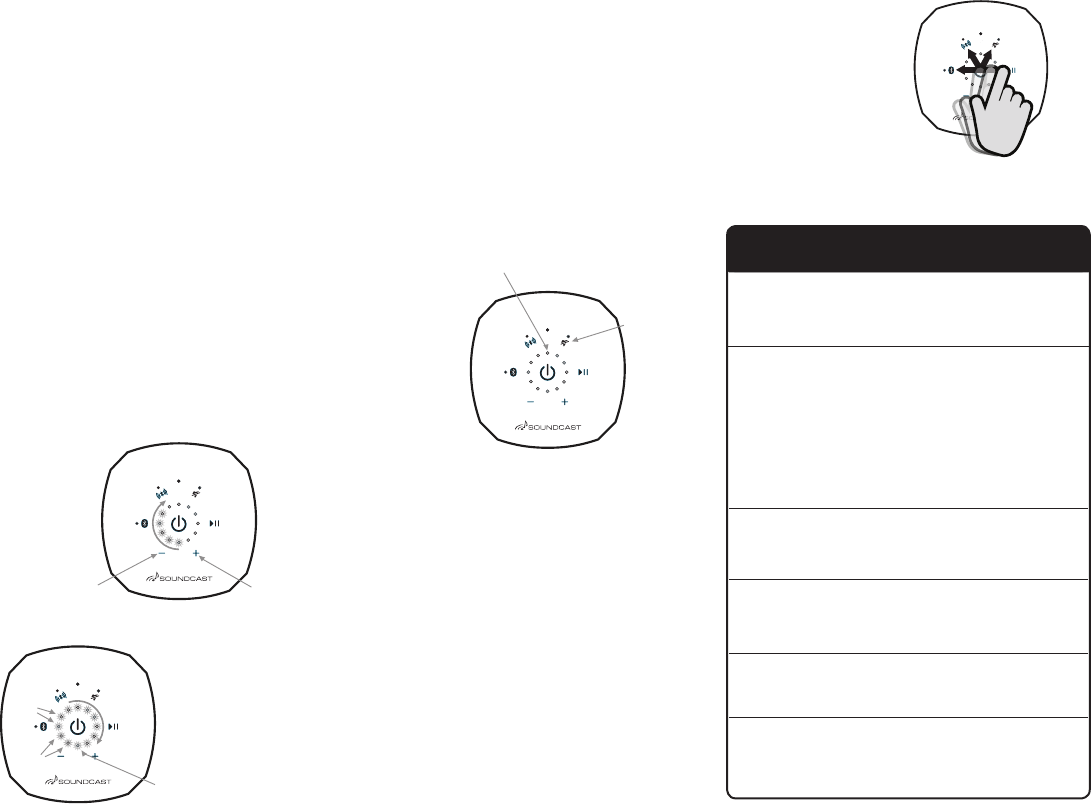
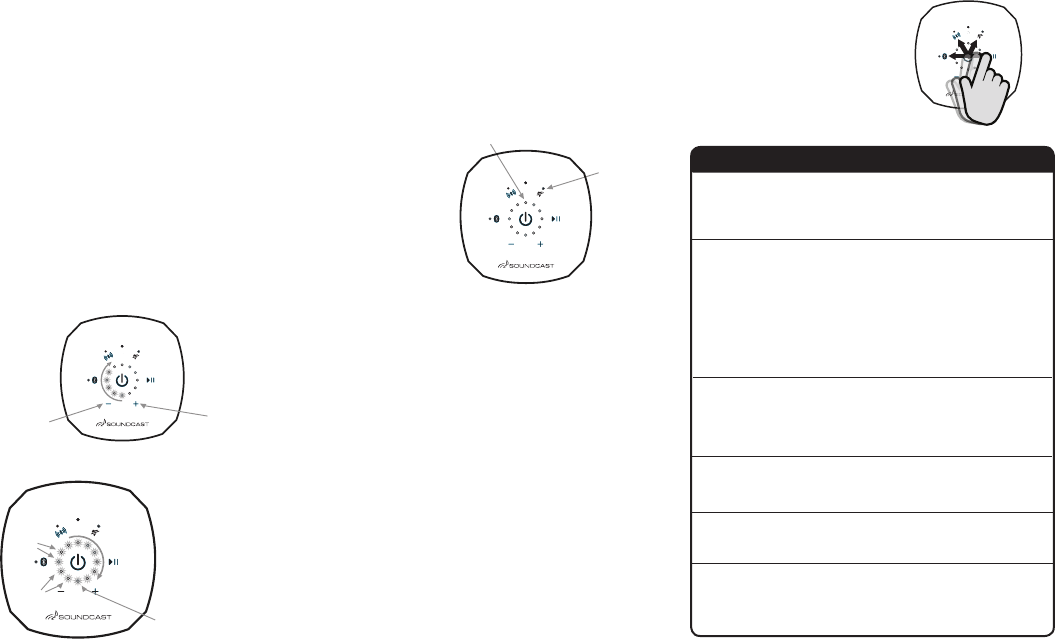
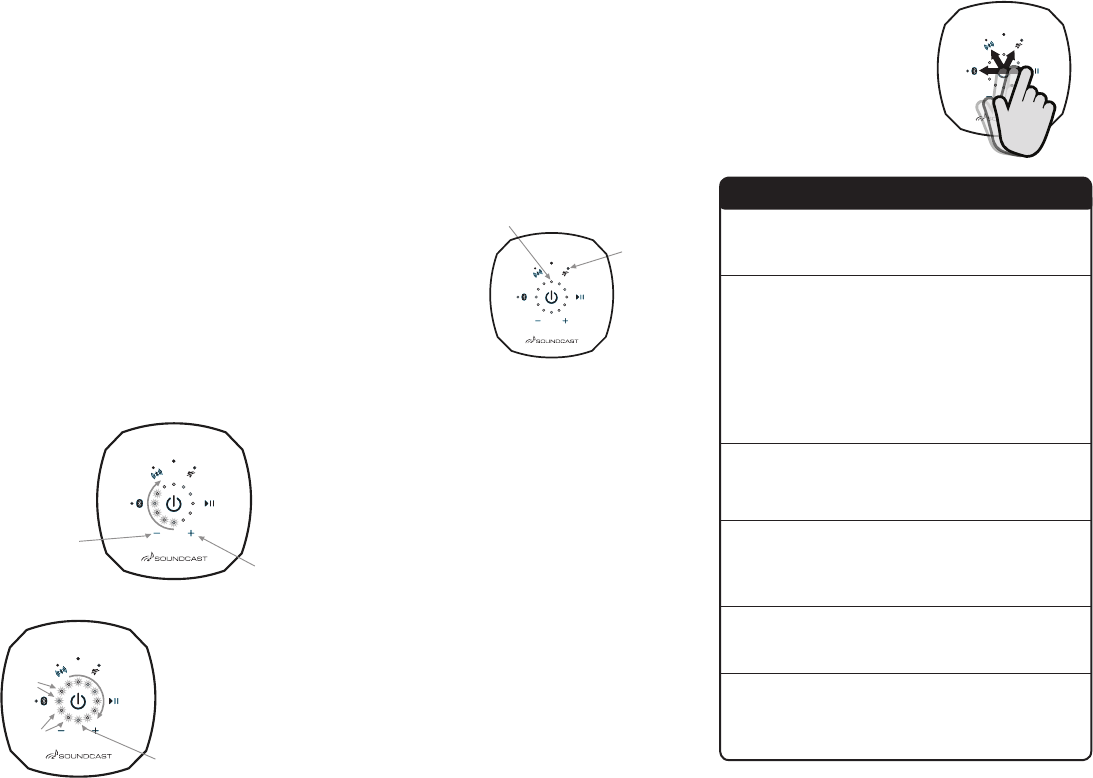
Volume Control:
The VG5 volume can be adjusted when playing music
or during speakerphone operation by pressing or press
and holding the + (up) or – (down) volume adjustment
buttons on the keypad. The current volume level will be
displayed with blue LED’s on the volume bar graph.
➤ Mobile devices that support the AVRCP protocol
can adjust the volume from the mobile devices
volume slider control.
Fuel Gauge:
Press the Power button for (1) second and beep is
heard to display the current battery level bar graph us-
ing a combination of RED=Low, YELLOW=OK, GREEN=-
Full LEDs. The bar graph will move counter-clockwise as
the battery discharges.
➤ The fuel-gauge and amber low battery LED indicators
will NOT be accurate until at least two full charging/
discharging cycles have been completed.
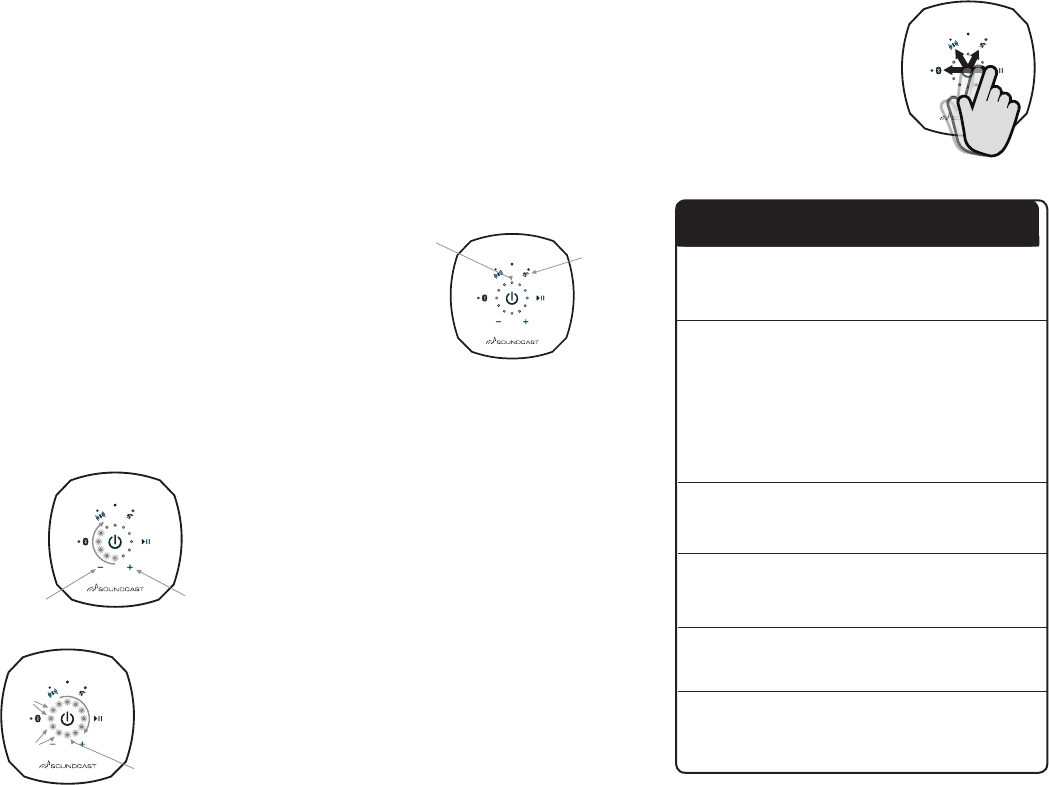
Blue LEDs
illuminate in
clockwise direction
to indicate
volume level.
Volume Level Indication
Battery Status Indication
Volume
up
button
Orange
Power
LED
Volume
down
button
Red
(Low
Battery)
Yellow
(Ok
Battery) Green
(Charged
Battery)
Keyboard Lock
The VG5 has two different keypad lockout mechanisms
to prevent un-intended or accidental operation. Both are
disabled by default. When enabled, all keypad functions
except for power on/off will be ignored.
Child Lock:
To Enable or Disable, press and hold the mute button
for (5) seconds and release. The top most BLUE LED
will flash indicating the keypad is locked and child lock
is active. Power cycling the unit will disable the keypad
child lock.
Auto Lock:
Keypad Lock Indicator:
Flashing Blue:
Child Lock Active
Flashing Green:
Auto Lock Active
Slide finger from power
button to any function
button, and release.
Mute
button
Troubleshooting
Temporary Unlock
Swipe Action
To Enable or Disable Auto-Lock, press and hold the
mute button for (10) seconds and release. The volume
bar graph will blink twice when enabled and once when
disabled. When enabled, the keypad will “Auto-Lock”
after (3) minutes of no keypad interaction. The top
GREEN LED will blink indicating the keypad is locked The
Auto-Lock will remain enabled or disabled when power
cycling the unit.
Temporarily unlock the keypad for use while Auto-Lock is
activeby conducting an “Unlock Swipe”. This can be done
by sliding your finger quickly between the power button
and any other function button, being sure to release your
finger while it is still over the “other function” button.
The volume bar graph will blink indicating that the keypad
is unlocked. Keypad will auto-lock again after (3) minutes
of no interaction.
VG5 does not
turn on
Difficulty with
Bluetooth or
TWS pairing
process
Keypad has
un-intended
operation due
to moisture
Keypad
backlights
are changing
brightness or
turn off
Keypad is not
responding
to button
presses
Unit is
misbehaving or
not responsive
• Be sure unit is fully charged
• Be sure keypad is clear of any dirt,
dust or moisture
• Disconnect / Re-connect battery
• Power cycle VG5 unit(s) and retry
• Clear both Bluetooth and TWS pairing
history by holding the Bluetooth button
for 10 seconds (third beep), repeat
by pressing the TWS buttons for a full
10 seconds (third beep) and try your
pairing again
• Disable/Enable Bluetooth function
on your music source device (phone or
computer) and retry
• Wipe down keypad to remove any
excess moisture or dirt
• Utilize Child Lock or Auto Lock features
described above
• The VG5 utilizes an ambient light
sensor to adjust the LED backlights
and status LED indicators based on the
ambient light. This is normal operation
Power cycle the unit and be certain
that Child Lock and Auto-Lock functions
are Disabled
* Perform factory reset by
Disconnecting & Reconnecting battery
* Clear both Bluetooth and TWS
memory (refer to instructions above)
* Power cycle unit
Problem Solution
7
DC IN
AUX IN 15V 1.5 A USB/
SERVICE RESET
ESPAÑOL | Cómo usar el VG5
Instalación de las Baterías
1. Con un destornillador Phillips #3, destornille y
retire la cubierta de la batería ubicada en la parte
inferior del VG5
2. Conecte la batería al conector del VG5, e cual
ingresará solamente en la dirección correcta
3. Enrute los cables de la batería
4. Reinstale la cubierta de la batería
Carga de la Batería
Antes del uso inicial, cargue la batería al menos por
5 horas a su máxima capacidad. Para garantizar la
larga vida útil de la batería y el máximo rendimiento del
sistema, la batería siempre debe cargarse antes de la
operación móvil.
1. Enchufe el cargador de pared de CA incluido a
la alimentación de CA y conecte el otro extremo
al puerto de entrada VG5 de CC ubicado
2. El VG5 puede operarse desde la corriente CA
de la pared incluso cuando la batería está
totalmente descargada
3. El tiempo de carga es de aproximadamente
4-5 horas si se tiene una batería
completamente descargada
4. El tiempo de reproducción varía dependiendo
del nivel de volumen
La caja incluye
Guía de Inicio Rápido
Felicitaciones y gracias por su compra del Soundcast VG5. Lea las
instrucciones de operación cuidadosamente antes de usar.
Cable
de audio
análogo
de 3.5
mm
Cargador de
pared de CA con
sujetadores para
el adaptador
Bloque de
baterías
LED indicador
naranja de
carga / encendido
Salida de carga del
cargador de baterías USB
Teclado por control táctil capacitivo
Ubicación de los
puertos de carga y
acceso resistentes
a las condiciones
climáticas
Battery access panel
Ubicación de la
comunicación de
campo cercano (NFC)
Asa de transporte de
agarre cómodo
Encendido
Apagado Apagado
Batería baja
Cargando
Totalmente cargado
Totalmente cargado
Error- No Puede Cargar
Naranja sólido
Rojo parpadeando lento
Rojo sólido
Apagado
(si la corriente está apagada)
Naranja sólido
(si la corriente está encendida)
Rápido parpadeando rojo
Estado LED de encendido
Puertos, Conexiones y Entradas
Puertos de Carga y Acceso
8
Indicador de
silencio
Botón de
silencio
LED indicador
del AUX
amarillo
LED indicador
del Bluetooth
Botón del
Bluetooth
Botón TWS
Los LED de color azul
y naranja indican el
estado actual del TWS
Once
LED para
volumen y
medidor de
carga de la
batería
Botón de
encendido/
apagado
Botón para
subir el
volumen
LED de
encendido
naranja
Botón para
bajar el
volumen
Botón de
reproducción
/ pausa
Teclado del Panel de Control
Teclado Táctil Capacitivo
El VG5 presenta un teclado táctil capacitivo avanzado y
tecnología de luz de fondo. Se accede a las funciones de
usuario mediante una sola presión o presione y manten-
ga presionada
el área del botón apropiado de la superficie del teclado
como se indica;
Encendido/Apagado: El VG5 se enciende y se apaga
usando el botón grande ubicado en el centro del teclado
Encendido: Presione y mantenga presionado el botón de
encendido/apagado por (2) segundos hasta que la luz
de fondo se ilumine y luego suelte dentro de (2) segun-
dos; un sonido de confirmación indicará que la unidad
está encendida
Apagado: Presione y mantenga presionado el botón de
encendido/apagado por (2) segundos y luego suelte
dentro de (2) segundos; un sonido de confirmación
indicará que la unidad está apagada
Conexión y Emparejamiento
➤ La corriente del VG5 debe estar encendida antes de
tratar de emparejar (y la entrada Aux, desconectada)
1. Ambos altavoces deben encenderse en modo
Bluetooth (sin conexión de entrada Aux)
2. Al menos uno de los altavoces debe emparejarse
a la fuente de audio (como se describe anteriormente)
Presione y mantenga presionado el TWS (ícono de
TWS) por (2) segundos hasta que se escuche un
sonido de confirmación. El LED del TWS empezará a
parpadear lentamente. Repita con la segunda
unidad del VG5.
3. Cuando se empareje, el LED del TWS en ambas
unidades se mostrará azul y naranja (morado)
➤ Cuando esté en modo TWS y apague una unidad, la
otra unidad se apagará automáticamente
4. Reconexión: Las unidades emparejadas del TWS
se reconectarán entre sí automáticamente después
de encender ambas unidades. Una corta presión del
botón del TWS en cada unidad permite desplazarse
por los modos del TWS (estéreo, izquierda/derecha,
apagado) como se indica a continuación;
• LED azul y naranja: izquierda/derecha
de cada altavoz
• LED naranja solamente: izquierda del altavoz
primario, derecha del altavoz secundario
• LED apagado: TWS apagado
➤ Para eliminar todos los dispositivos de la memoria del
TWS y regresar a la operación de un único dispositivo,
presione y mantenga presionado el botón TWS por
(10) segundos hasta que se escuche un tercer sonido
y el LED del TWS parpadee dos veces, luego apague la
unidad. Cuando la unidad se vuelve a encender, el LED
del TWS no estará encendido, indicando que el TWS
está deshabilitado.
➤ Si experimenta alguna dificultad con el emparejamien-
to estándar del Bluetooth o la operación del TWS, el
sistema Bluetooth del VG5 puede reiniciarse eliminando
la memoria de emparejamiento, tanto del Bluetooth
como del TWS, usando la función de presionar y man-
tener presionado por (10) segundos (tercer sonido) de
cada botón y luego reiniciando la unidad.
➤ ¿No hay música o hay cortes intermitentes? Las
unidades primaria y secundaria del VG5 podrían estar
demasiado lejos una de la otra.
Emparejamiento del Bluetooth con el NFC
1. Habilita las funciones de Bluetooth y NFC en
su dispositivo móvil
2. Sostenga el teléfono cerca del logo del NFC (logo)
en la unidad del VG5 hasta que el dispositivo móvil se
conecte y el LED del Bluetooth parpadee lentamente
3. Presione OK/Conectar en su dispositivo móvil para
completar el emparejamiento
4. Reproduzca el audio
Emparejamiento Estándar del Bluetooth
1. Habilita el Bluetooth en su dispositivo móvil
2. Empareje un nuevo dispositivo: presione el botón
de Bluetooth del VG5 (el LED del Bluetooth
parpadeará lentamente)
3. Del menú del Bluetooth en las configuraciones
del dispositivo móvil, seleccione
“VG5 por Soundcast_xxxxxx”
4. Una vez emparejado, el LED del Bluetooth
se vuelve azul sólido
➤ Presione y mantenga presionado el botón por (2)
segundos hasta oír un sonido para reingresar al modo
de emparejamiento para emparejar un dispositivo nuevo
o adicional
➤ Para eliminar todos los dispositivos de la memoria,
presione y mantenga presionado el botón Bluetooth por
(10) segundos hasta que el LED del Bluetooth parpadee
dos veces y se escuche un segundo sonido
de confirmación.
Modo de Entrada Aux
Enchufe la fuente de audio externa en la clavija de 3.5
mm para pasar automáticamente al modo de entra-
da Aux, como se indica cuando el LED Aux se torna
amarillo. Retire el enchufe de 3.5 mm para regresar a la
operación del Bluetooth.
Emparejamiento del Estéreo TrueWireless (TWS)
Con TWS, dos unidades de VG5 pueden emparejarse
para reproducción sincrónica del Bluetooth. El apagado,
el volumen y el modo TWS serán sincronizados y pueden
ser controlados desde cualquier unidad.
9
Otros Controles y Características
Control de Volumen:
El volumen del VG5 puede ajustarse cuando se repro-
duce música o durante la operación del teléfono altavoz
presionando o presionando y manteniendo presionados
los botones de ajuste de volumen + (alto) o – (bajo) en el
teclado. El nivel de volumen actual se mostrará con LED
azules en el gráfico de barras de volumen.
➤ Los dispositivos móviles que tienen soporte para el
protocolo AVRCP pueden ajustar el volumen desde el
control deslizador de volumen de los
dispositivos móviles.
Medidor de Carga de la Batería:
Presione el botón de encendido/apagado por (1) segun-
do hasta oír un sonido para mostrar el gráfico de barras
del nivel de batería actual usando una combinación de
ROJO=Bajo, AMARILLO=Bien, VERDE= LED completos.
El gráfico de barras se moverá en sentido antihorario a
medida que la batería se descarga.
➤ Los indicadores de carga de la batería y LED ámbar
de batería baja NO serán precisos hasta que se hayan
completado por lo menos dos ciclos completos
de carga / descarga.
Los LED azules se
iluminan en sentido
horario para indicar
el nivel de volumen.
Indicación del Nivel de Volumen
Indicación del Estado de la Batería
Botón para
subir el
volumen
LED de
encendido
naranja
Botón para bajar
el volumen
Rojo
(Batería
baja)
Amarillo
(Batería}
Verde
(Batería
cargada)
Bloqueo del Teclado
El VG5 tiene dos mecanismos de bloqueo del teclado
para evitar una operación no intencionada o accidental.
Ambos vienen deshabilitados de fábrica. Cuando se
habiliten, se ignorarán todas las funciones del teclado,
excepto encendido/apagado.
Bloqueo de Niños:
Para habilitar o deshabilitar, presione y mantenga presio-
nado el botón de silencio por (5) segundos y suelte. El
LED azul que está más arriba parpadeará indicando que
el teclado está bloqueado y que el bloqueo de niños está
activo. Reiniciar la unidad deshabilitará el bloqueo de
niños del teclado.
Azul parpadeante:
Bloqueo para
niños activo
Verde parpadeante:
Bloqueo automático activo
Deslice el dedo desde el botón
de encendido/apagado hacia
cualquier botón de función
y suelte.
Botón de
silencio
Indicador del bloqueo del teclado:
El VG5 no se
enciende
Dificultad con
el proceso
de empare-
jamiento del
Bluetooth o
TWS
El teclado tiene
una operación
no intencionada
por humedad
Las luces de
fondo del teclado
cambiande brillo
o se apagan
El teclado no
responde a cuan-
do se presiona
un botón
La unidad se
está com-
portando mal o
no responde
• Asegúrese de que la unidad esté
completamente cargada
• Asegúrese que el teclado no
presente suciedad, polvo o humedad
• Desconecte / Reconecte la batería
• Reinicie la(s) unidad(es) del
VG5 y reintente
• Elimine el historial de emparejamiento
del Bluetooth y del TWS presionando
el botón del Bluetooth por 10 segun-
dos (tercer sonido) y repita presion
ando los botones del TWS por 10
segundos completos (tercer sonido) e
intente emparejar otra vez.
• Deshabilite/Habilite la función del
Bluetooth en su dispositivo de fuente
de música (teléfono o computadora)
y vuelva a intentar
• Limpie el teclado para eliminar
cualquier exceso de humedad osuciedad
• Utilice las funciones del bloqueo de niños
o bloqueo automático descritas
anteriormente
• El VG5 utiliza un sensor de luces de
fondo de ambiente para ajustar las
luces de fondo del LED y los indicadores
LED de estado en base a la luz
ambiente. Así es la operación normal
Reinicie la unidad y asegúrese que las
funciones del bloqueo de niños y del blo-
queo automático estén deshabilitadas
• Realice un reinicio de fábrica
desconectando y reconectando la batería
• Elimine la memoria del Bluetooth y del
TWS (consulte las instrucciones anteriores)
• Reinicie la unidad
Problema Solución
Detección y Solución de Problemas
Acción de Pase Para Desbloqueo Temporal
Bloqueo Automático:
Para habilitar o deshabilitar el bloqueo automático,
presione y mantenga presionado el botón de silencio por
(10) segundos y suelte. El gráfico de barras de volumen
parpadeará tres veces cuando esté habilitado y una
vez cuando esté deshabilitado. Cuando esté habilitado,
el teclado se bloqueará automáticamente luego de (3)
minutos de no interacción del teclado. El LED VERDE
de arriba parpadeará indicando que el teclado está blo-
queado. El bloqueo automático permanecerá habilitado
o deshabilitado cuando se reinicie la unidad.
Desbloquee el teclado para usar mientras el blo-
queo automático está activo realizando un “Pase de
desbloqueo”. Esto puede hacerse deslizando su dedo
rápidamente entre el botón de encendido/apagado y
otro botón de función, asegurándose de soltar el dedo
mientras todavía se encuentre sobre el botón de “otra
función”. El gráfico de barras de volumen parpadeará y
se escuchará un sonido de confirmación de que el tecla-
do está desbloqueado. El teclado se volverá a bloquear
automáticamente luego de (3) minutos
de no interacción.
10
DC IN
AUX IN 15V 1.5 A USB/
SERVICE RESET
FRANÇAIS | Comment utiliser VG5
Installation de la batterie
1. À l’aide d’un tournevis cruciforme #3, dévisser et
retirer le couvercle de la batterie situé au
bas du VG5
2. Raccordez la batterie au connecteur VG5 qui ne
sera compatible que dans le bon sens.
3. Acheminez les fils de la batterie
4. Réinstallez le couvercle de la batterie
Chargement de la batterie
Avant la première utilisation, charger la batterie
pendant au moins 5 heures à pleine capacité. Pour
assurer la longévité de la batterie et les performances
maximales du système, la batterie doit toujours être
rechargée avant le fonctionnement mobile.
1. Branchez le chargeur mural CA fourni au secteur
et connectez l’autre extrémité à la prise d’entrée CC
du VG5 située derrière le capot de protection des
ports du VG5
2. Le VG5 peut fonctionner à partir d’un courant
mural alternatif, même lorsque la batterie est
complètement déchargée
3. Le temps de charge est environ 4-5 heures
pour une batterie entièrement déchargée
4. La durée de lecture varie en fonction
du volume sonore
La boîte inclut:
Guide de démarrage rapide
Félicitations et merci pour votre achat du haut-parleur Soundcast VG5.
Lire attentivement toutes les instructions avant utilisation.
Câble
audio 3,5
mm
Chargeur
mural CA
avec pinces
d’adaptation
Bloc
batterie
Voyant lumineux
orange d’alimentation/
chargement
Sortie de chargement de
chargeur portable USB
lavier de commande par
touches capacitives
Emplacement des
ports de chargement
et d’accès résistant
aux intempéries
Panneau d’accès batterie
Communication
en champ proche
(CCP)
Poignée de
transport confortable
Ports, connexions et entrées
Ports de chargement et d’accès
Marche
Arrêt
Battery Low
En chargement
Pleinement chargé
Pleinement chargé
Erreur- Impossible de charger
Orange fixe
Éteint
Batterie faible
Rouge fixe
Éteint (si éteint)
Orange fixe (s’il est allumé)
Rouge clignotant rapidement
Statut Voyant d’alimentation
11
Indicateur sourdine
Bouton
sourdine
Voyant
lumineux
AUX jaune
Voyant
Bluetooth
Bluetooth
button
TWS button
Voyants lumineux bleu
et orange indique l’état
TWS actuel
Onze voyants
lumineux pour
le volume et
la jauge de
carburant
écran
Bouton
d’alimentation
Bouton
volume
haut
Voyant
d’alimentation
orange
Bouton
volume
bas
Bouton
lecture/
pause
Clavier du panneau de contrôle
Clavier à touches capacitives
Le VG5 est équipé d’un clavier à touche capacitive
et d’une technologie avancée de rétroéclairage. Les
fonctions utilisateur sont accessibles en appuyant sur
une seule touche ou en maintenant la touche enfoncée
surla zone appropriée de la surface du clavier telle
qu’indiquée.
Mise en marche/arrêt : Le VG5 est activé et désactivé
à l’aide du gros bouton situé dans le centre du clavier.
Allumer: maintenez enfoncée la touche d’alimentation
(2) secondes jusqu’à ce que le rétro-éclairage s’allume
et puis relâchez (2) secondes, un bip de confirmation
confirmera que l’appareil est sous tension.
Éteindre: Appuyez sur le bouton d’alimentation et main-
tenez-le enfoncé pendant 2 secondes, puis relâchez-le
dans les 2 secondes, un bip de confirmation confirmera
que l’appareil est éteint.
Connexion et appairage
➤ Le VGx doit être mis sous tension avant d’essayer
d’appairer (et l’entrée aux doit être débranchée)
1. Les deux haut-parleurs doivent être sous tension
en mode Bluetooth(pas d’entrée auxiliaire connectée)
2. Au moins un des haut-parleurs doit être appairé
à une source audio (comme décrit ci-dessus)
Appuyez sur la touche TWS (icône TWS) et
maintenez-la enfoncée pendant 2 secondes jusqu’à
ce que un bip de confirmation est émis. Le voyant
lumineux TWS commencera à clignoter lentement.
Répéter avec la deuxième unité VG5.
3. Lorsqu’il est jumelé, le voyant TWS des deux
unités affichera à la fois le bleu et l’orange (violet)
➤ Lorsque vous êtes en mode TWS et que vous
éteignez une unité, l’autre unité
s’éteindra automatiquement.
4. Reconnexion: Les deux TWS se reconnectent
automatiquement après avoir mis les deux appareils
sous tension. Une courte pression sur le bouton TWS
de l’un ou l’autre des appareils permet de parcourir
les modes TWS (stéréo, gauche/droite, arrêt)
comme indiqué ci-dessous;
• Voyant bleu et orange: gauche/droite
de chaque enceinte
• Voyant orange uniquement: à gauche
du haut-parleur principal, à droite du
haut-parleur secondaire
• Voyant éteint: TWS éteint
➤ Pour effacer tous les appareils de la mémoire TWS
et revenir au fonctionnement avec un seul appareil,
appuyez sur le bouton TWS et maintenez-le enfoncé
pendant 10 secondes jusqu’ à ce que le troisième bip
sonore retentisse et que le TWS Le voyant clignote deux
fois, puis éteint l’unité. Quand l’unité est allumée de
nouveau, le voyant TWS ne s’allume pas, indiquant que le
TWS est désactivé.
➤ Si vous éprouvez des difficultés avec l’appairage
Bluetooth standard ou TWS, le système Bluetooth VG5
peut être réinitialisé en effaçant la mémoire d’appairage
Bluetooth et TWS en utilisant la fonction en appuyant et
tenant enfoncé (10) secondes (troisième bip) de chaque
bouton et puis en redémarrant l’unité.
➤ Pas de musique ou perte de signal intermittente? Les
unités primaires et secondaires VG5 peuvent être trop
éloignées les unes des autres.
Appairage Bluetooth® simple avec CCP
1. Activez les fonctions Bluetooth et CCP
sur votre appareil mobilee
2. Tenez le téléphone près du logo CCP (logo) sur
l’unité VG5 jusqu’ à ce que l’appareil mobile
se connecte et que le voyant lumineux
Bluetooth clignote lentement
3. Appuyez sur OK/Connect sur votre appareil
mobile pour terminer l’appairage
4. Lecture audio
Appairage Bluetooth standard
1. Activez Bluetooth sur votre appareil mobile
2. Appairer un nouvel appareil: appuyez sur le
bouton Bluetooth VG5 (le voyant lumineux
Bluetooth clignote lentement)
3. Dans le menu Bluetooth des réglages de l’appareil
mobile, sélectionnez “VG5 by Soundcast_xxxxxxxx”
4. Une fois l’appairage complété, le voyant
lumineux Bluetooth devient bleu
➤ Appuyez et maintenez le bouton Bluetooth enfoncé
pendant 2 secondes et un bip se fait entendre pour
ré-entrer en mode appairage pour appairer un nouveau
ou un dispositif supplémentaire.
➤ Pour effacer tous les périphériques de la mémoire,
appuyez sur le bouton Bluetooth et maintenez-le enfoncé
pendant 10 secondes jusqu’ à ce que l’indicateur
Bluetooth double clignote et que le deuxième bip de
confirmation soit émis.
Mode entrée Aux
Branchez la source audio externe dans une prise jack
de 3,5 mm pour basculer automatiquement en mode
d’entrée auxiliaire, comme indiqué par le voyant Aux
devenant jaune. Retirez la prise de 3,5 mm pour revenir
au mode Bluetooth.
Appairage TrueWireless Stereo (TWS)
Avec le TWS, deux VG5 peuvent être appairés pour la
synchronisation Bluetooth. La mise hors tension, le vol-
ume et le mode TWS sont synchronisés et peuvent être
commandés à partir de n’importe quel appareil.
12
Autres contrôles et
caractéristiques
Contrôler le volume :
Le volume du VG5 peut être réglé pendant la lecture
de la musique ou pendant le fonctionnement du haut-
parleur en appuyant sur les boutons de réglage de vol-
ume + (haut) ou - (bas) du clavier ou en les maintenant
enfoncés. Le niveau de volume actuel sera affiché avec
des voyants bleus sur le graphique à barres de volume.
➤ Les appareils mobiles prenant en charge le protocole
AVRCP peuvent régler le volume à partir du curseur de
volume des appareils mobiles.
Jauge de carburant :
Appuyer sur le bouton d’alimentation pendant (1) sec-
onde et un bip sonore retentit pour afficher le graphique
à barres actuel du niveau de charge de la batterie - une
combinaison de ROUGE=Faible, JAUNE=OK, VERT=
LEDs complètes. Le graphique à barres se déplace dans
le sens antihoraire comme suit
la batterie se décharge.
➤ Les indicateurs DEL de jauge de carburant et de
pile faible jaune ambré ne seront PAS précis tant qu’au
moins deux cycles complets de chargement/décharge-
ment n’auront pas été complétés.
Les voyants bleus
s’allument dans le
sens des aiguilles
d’une montre pour
indiquer le niveau
du volume.
Indication du
volume sonore
Indication du
statut de
la batterie
Bouton
volume
haut
Orange
Voyant
d’alimentation
Bouton
volume
bas
Rouge
(batterie
faible)
Jaune
(batterie
Ok) Vert
(batterie
chargée)
Verrouillage du clavier
Le VG5 dispose de deux mécanismes de verrouillage
du clavier pour éviter tout fonctionnement involontaire
ou accidentel. Les deux sont désactivés par défaut. Lor-
squ’ils sont activés, toutes les fonctions du clavier, à l’ex-
ception de la mise sous et hors tension, sont ignorées.
Verrouillage parental:
Pour activer ou désactiver, appuyez et maintenez la
touche sourdine enfoncée
pendant 5 secondes et relâcher. Le voyant bleu le plus
haut clignotera, indiquant que le clavier est verrouillé est
que le verrouillage enfant est activé. Le fait de mettre
l’appareil sous tension désactive le verrouillage enfant
du clavier.
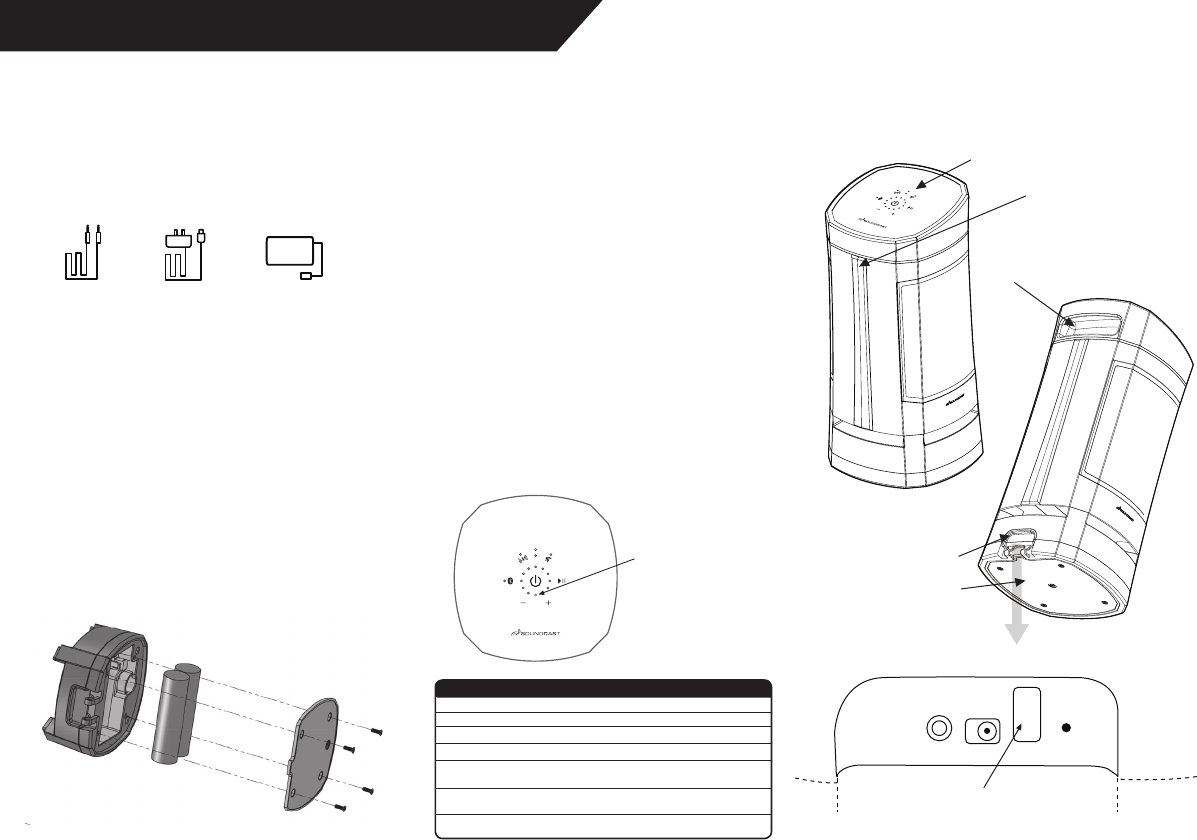
Bleu clignotant :
Verrouillage
enfant actif
Vert clignotant :
Verrouillage
automatique actif
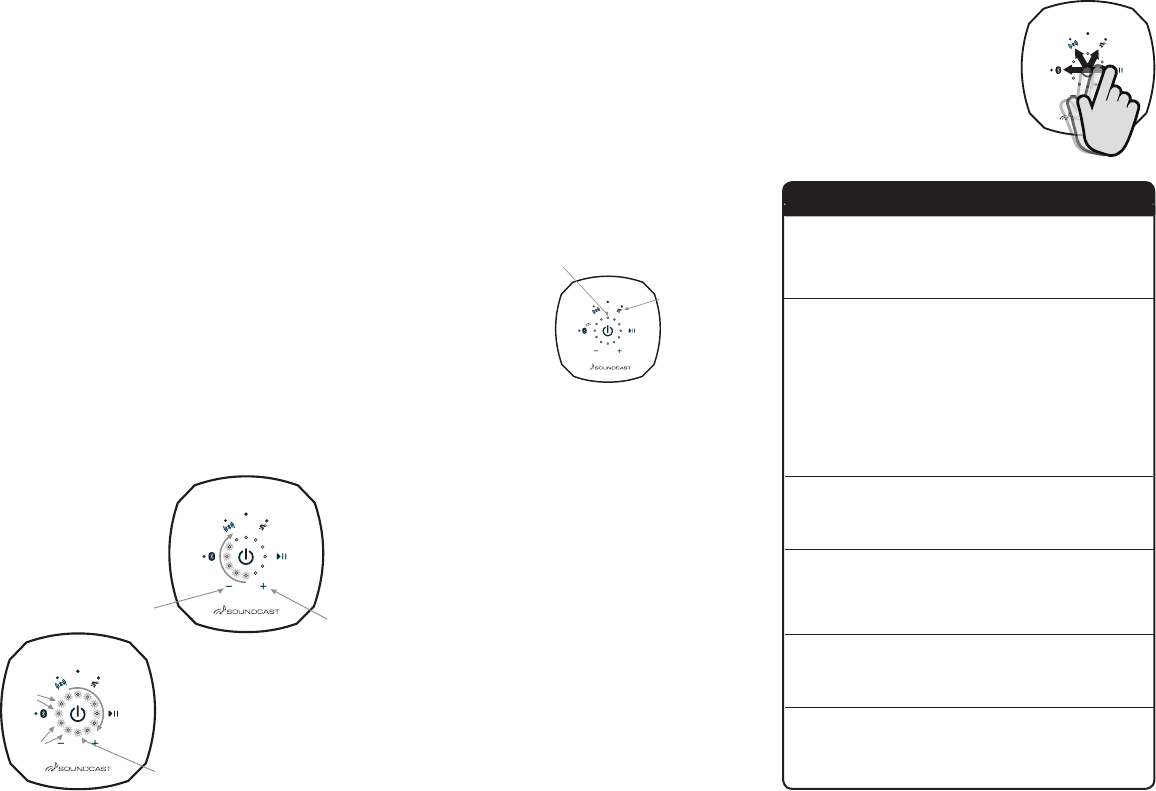
Faites glisser votre doigt de
la touche marche/arrêt à
toute touche fonction,
puis relâchez.
Bouton
sourdine
Le VG5 ne
s’allume pas
Difficulté avec
le processus
d’appairage
Bluetooth ou
TWS
Le clavier a
opération non
intentionnelle
en raison de
l’humidité
Clavier changent
luminosité ou
éteindre
Le clavier ne
répond pas aux
pressions des
boutons
L’unité se com-
porte mal ou ne
réagit pas bien
• Assurez-vous que l’appareil est
complètement chargé.
• Assurez-vous que le clavier est
exempt de toute saleté, poussière
ou humidité.
• Débranchez/rebranchez la batterie
• Redémarrez l’unité VG5 et
essayez à nouveau
• Effacez l’historique des appairages
Bluetooth et TWS en maintenant
le bouton Bluetooth enfoncé pendant
10 secondes (troisième bip), répétez
en appuyant sur les boutons TWS pour
un 10 secondes complètes (troisième
bip) et essayez votre appairage
à nouveau.
• Désactivez/Activez la fonction
Bluetooth sur votre appareil source de
musique (téléphone ou ordinateur)
et réessayez
• Essuyez le clavier pour retirer toute
humidité ou saleté excédentaire
• Utiliser les fonctionnalités
de verrouillage enfant ou verrouillage
automatique décrite ci-haut
• Le VG5 utilise un capteur de lumière
ambiante afin d’ajuster le
rétroéclairage DEL et les indicateurs
de statut basés sur la lumière
ambiante. Ceci est un
fonctionnement normal
Redémarrez l’unité et assurez-vous
queLes fonctions de verrouillage enfant
et de verrouillage automatique
sont désactivées
• Effectuez la réinitialisation d’usine en
débranchant et reconnectant la batterie.
• Effacez la mémoire Bluetooth et TWS
(voir instructions ci-dessus)
• Redémarrer l’unité
Problème Solution
Dépannage
Déverrouillage temporaire par
action de glissement
Verrouillage automatique :
Pour activer ou désactiver le verrouillage automatique,
appuyez sur la touche de sourdine et maintenez-la enfon-
cée pendant 10 secondes, puis relâchez-la. Le graphique
à barres de volume clignotera deux fois lorsqu’il est
activé et une fois lorsqu’il est désactivé. Lorsqu’il est
activé, le clavier se verrouille automatiquement après
trois (3) minutes sans interaction avec le clavier. Le
voyant vert du haut clignote pour indiquer que le clavier
est verrouillé. Le verrouillage automatique reste activé
ou désactivé lorsque l’appareil est sous tension.
Déverrouiller temporairement le clavier pendant que
le verrouillage automatique est actif en effectuant un
« Déverrouillage par glissement ». Pour ce faire, glissez
votre doigt rapidement entre le bouton d’alimentation
et tout autre bouton de fonction, en vous assurant de
relouer votre doigt pendant qu’il est encore au-dessus
du bouton « autre fonction ». Le graphique à barres du
volume clignotera et un bip de confirmation sera émis
pour indiquer que le clavier est en position de marche.
Le clavier se verrouille automatiquement après (3)
minutes sans interaction.
Voyant de verrouillage du clavier :
13
DC IN
AUX IN 15V 1.5 A USB/
SERVICE RESET
PORTUGUÊS | Como utilizar o VG5
Instalação da bateria
1. Com uma chave de fendas Phillips n.º 3,
desaparafuse e retire a tampa do compartimento
das pilhas na parte inferior do VG5
2. Ligue a bateria ao conector do VG5, que só
encaixa na direção correta
3. Encaminhe os fios da bateria
4. Volte a colocar a tampa do compartimento
das pilhas
Carregamento da bateria
Antes da primeira utilização, carregue a bateria
durante pelo menos cinco horas até à capacidade total.
Para garantir a longevidade da bateria e o desempenho
máximo do sistema, a bateria deve ser sempre
carregada antes da operação móvel.
1. Ligue o carregador de parede de CA incluído à
alimentação de CA, e ligue a outra extremidade
da porta de entrada de CC do VG5, que se encontra
atrás da tampa de proteção da porta do VG5
2. O VG5 pode ser operado com corrente de CA
mesmo quando a bateria está totalmente carregada
3. O tempo de carregamento é aproximadamente
entre quatro a cinco horas com uma bateria
totalmente descarregada
4. O tempo de reprodução varia consoante
o nível do volume
Conteúdo da caixa:
Guia de início rápido
Parabéns e obrigado por ter adquirido o Soundcast VG5. Leia
atentamente as instruções de utilização antes da utilização.
Cabo de
áudio
analógico
de 3,5 mm
Carregador de
parede de CA
com grampos
para adaptador
Bateria
de pilhas
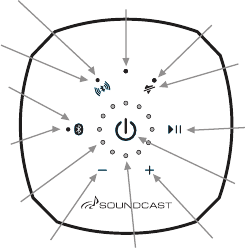
LED indicador
laranja de
alimentação/
carregamento
Saída de carregamento
do power bank USB
Teclado tátil de controlo
Localização das portas de
acesso e carregamento
resistente a intempéries
Painel de acesso
à bateria
Zona NFC (Near
Field Communi-
cation)
Pega para
transporte confortável
Alimentação ligada
Alimentação desligada
Bateria fraca
A carregar
Totalmente carregado
Totalmente carregado
Erro. Não é possível carregar
Laranja constante
Desligado
Vermelho intermitente lento
Vermelho constante
Desligado
(se a alimentação estiver desligada)
Laranja-escuro
(se a alimentação estiver ligada)
Vermelho intermitente rápido
Estado LED de força
Portas, ligações e entradas
Portas de acesso e carregamento
14
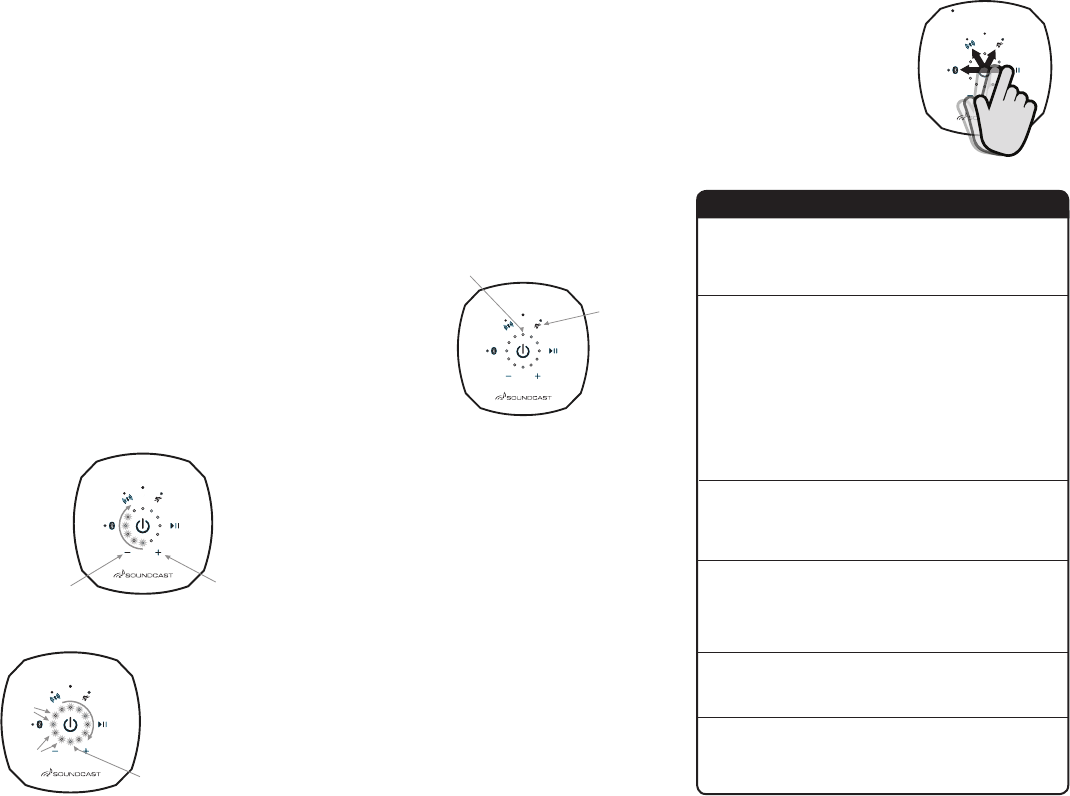
Indicador de
Sem Som
Botão Sem
Som
LED indicador
AUX amarelo
LED indicador
do Bluetooth
Botão do
Bluetooth
Botão TWS
Os LED azul e laranja
indicam o estado atual
do TWS
Onze LED
para volume
e medidor
de energia
Botão de
alimentação
Botão de
aumento do
volume
LED de
alimentação
laranja
Volume de
diminuição
do volume
Botão
Reproduzir/
Pausa
Teclado do painel de controlo
TECLADO TÁTIL
O VG5 possui um teclado tátil e tecnologia de retroilumi-
nação. O acesso às funções do utilizador é feito através
de um premir breve ou um premir longo da área do
botão apropriada do teclado da superfície do teclado
como indicado.
Ligação/desligamento: o VG5 é ligado e desligado
utilizando o botão de grandes dimensões no centro do
teclado.
Ligar: mantenha o botão de alimentação premido du-
rante dois (2) segundos até a retroiluminação acender
e solte em dois (2) segundos. É emitido um sinal sonoro
de confirmação quando a unidade estiver ligada.
Desligar: mantenha o botão de alimentação premido
durante dois (2) segundos e solte em dois (2) segundos.
É emitido um sinal sonoro de confirmação quando a
unidade estiver desligada.
Ligação e emparelhamento
➤ A alimentação do VG5 tem de ser ligada antes de
tentar realizar o emparelhamento (e a entrada aux tem
de ser desligada)
2. Pelo menos um dos altifalantes tem de
ser emparelhado com a fonte de áudio
(conforme descrito acima)
➤ Mantenha premido TWS (ícone TWS) durante dois
segundos (2) até é emitido um sinal sonoro de confir-
mação. O LED do TWS começa a piscar lentamente.
Repita com a segunda unidade VG5.
3. Após o emparelhamento, o LED do TWS em
ambas as unidades apresenta azul e laranja (roxo)
➤ No modo TWS, se desligar uma unidade, a outra
unidade desliga automaticamente.
4. Voltar a ligar: as unidades emparelhadas por TWS
voltam a ligar-se uma à outra automaticamente
depois de ligar ambas as unidades. Um breve premir
do botão TWS em cada unidade permite mudar os
modos de TWS (estéreo, esquerda/direita, desligado)
como indicado abaixo.
• LED azul e laranja: esquerda/direta
de cada altifalante
• LED apenas laranja: esquerda do altifalante
principal, direita do altifalante secundário
• LED desligado: TWS desligado
➤ Para apagar todos os dispositivos da memória do
TWS e voltar à operação de dispositivo único, mantenha
premido o botão TWS durante dez (10) segundos até
ser emitido um terceiro sinal sonoro e o LED TWS
piscar duas vezes. A unidade desliga. Quando a unidade
é ligada novamente, o LED do TWS não está ligado,
indicando que o TWS está desativado.
➤ Se tiver dificuldades com o emparelhamento por
Bluetooth padrão ou a operação de TWS, o sistema
de Bluetooth do VG5 pode ser reposto ao apagar a
memória de emparelhamento do Bluetooth e TWS uti-
lizando a função de premir longo de dez (10) segundos
(terceiro sinal sonoro) de cada botão e desligando e
ligando a unidade.
➤ Sem música ou perdas intermitentes? As unidades
VG5 principal e secundárias podem estar
demasiado afastadas.
Emparelhamento por Bluetooth com NFC
1. Ative o Bluetooth e as funções de NFC no
seu dispositivo móvel
2. Aproxime o telefone do logótipo NFC (logótipo)
na unidade VG5 até o dispositivo móvel se ligar
e o LED do Bluetooth piscar lentamente
3. Prima OK/Ligar no seu dispositivo móvel para
concluir o emparelhamento
4. Reproduza áudio
Emparelhamento por Bluetooth padrão
1. Ative o Bluetooth no seu dispositivo móvel
2. Para emparelhar um novo dispositivo:
prima o botão Bluetooth do VG5 (o LED do
Bluetooth pisca lentamente)
3. No menu Bluetooth nas definições do dispositivo
móvel, selecione “VG5 by Soundcast_xxxxxx
4.Após o emparelhamento, o LED do Bluetooth
fica azul constante
➤ Mantenha premido o botão do Bluetooth durante
dois (2) segundos. É ouvido um sinal sonoro para voltar
a entrar no modo de emparelhamento e emparelhar um
dispositivo novo ou adicional.
➤ Para apagar todos os dispositivos da memória, man-
tenha premido o botão do Bluetooth durante dez (10)
segundos até o LED do Bluetooth piscar duas vezes e
ser emitido um segundo sinal sonoro de confirmação.
Modo de entrada auxiliar
Ligue a fonte de áudio externo à tomada de 3,5 mm
para mudar automaticamente para o modo de entrada
auxiliar como indicado pelo LED AUX amarelo. Retire a
ficha de 3,5 mm para voltar à operação Bluetooth.
Emparelhamento TrueWireless Stereo (TWS)
Com TWS, é possível emparelhar duas unidades VG5
para reprodução síncrona por Bluetooth. O desligamen-
to, volume e modo TWS serão sincronizados e podem
ser controlados a partir de qualquer unidade.
1.Ambos os altifalantes têm de ser ligados no modo
Bluetooth (sem a entrada Aux ligada)
15
Outros controlos e funcionalidades
Controlo de volume:
O volume do VG5 pode ser ajustado ao reproduzir
música e durante a operação da alta voz ao premir ou
manter premido os botões de ajuste do volume + (cima)
ou – (baixo) no teclado. O nível atual do volume é apre-
sentado com o LED azul no gráfico de barras do volume.
➤ Os dispositivos móveis que suportam o protocolo
AVRCP podem ajustar o volume com o controlo desli-
zante do volume dos dispositivos móveis.
Medidor de energia:
Prima o botão de alimentação durante um (1) segundo
e é emitido um sinal sonoro para apresentar o gráfico
de barras do nível atual da bateria utilizando uma com-
binação de VERMELHO=fraca, AMARELO=OK, VERDE=
CHEIA. O gráfico de barras move-se para a esquerda à
medida quea bateria descarrega
➤ Os LED indicadores de bateria fraca e medidor de en-
ergia NÃO serão exatos até à conclusão de pelo menos
dois ciclos completos de carregamento/descarga.
Os LED azuis iluminam
para a direita para
indicar o
nível de volume.
Indicação do nível de volume
Indicação de estado da bateria
Botão de
aumento do
volume
LED de alimentação laranja
Volume de
diminuição
do volume
Vermelho
(bateria
fraca)
Amarelo
(bateria
OK) Verde
(bateria
carregada)
Bloqueio do teclado
O VG5 tem dois mecanismos de bloqueio do teclado
diferentes para evitar uma operação não intencional ou
acidental. Ambos estão desativados por predefinição.
Quando ativados, todas as funções do teclado, exceto
ligar/desligar, serão ignoradas.
Bloqueio para crianças:
Para ativar ou desativar, mantenha premido o botão
Sem Som durante cinco (5) segundos e solte. O LED
AZUL mais acima pisca indicando que o teclado está
bloqueado, e que o bloqueio para crianças está ativo. De-
sligar e ligar a unidade desativa o bloqueio para crianças
do teclado.
Azul intermitente:
bloqueio para
crianças ativo
Verde intermitente:
bloqueio automático
ativo
Passe o dedo do botão
de alimentação para
qualquer botão de
função e solte
Botão
Sem Som
O VG5 não liga
Dificuldade
com o
processo de
emparelhamen-
to por Bluetooth
ou TWS
Operação
qualquer não
intencional do
teclado devido
a humidade
Mudança
de brilho ou
desligamento
da retroilu-
minação do
teclado
O teclado não
responde ao
premir de
botões
Unidade
anómala ou não
responsiva
• Certifique-se de que a unidade
está completamente carregada
• Certifique-se de que o teclado
não está sujo, empoeirado ou húmido
• Desligue/volte a ligar a bateria
• Desligue e ligue a(s) unidade(s)
VG5 e tente novamente
• Apague o histórico de emparelhamento
por Bluetooth e TWS mantendo o botão
do Bluetooth premido durante 10
segundos (terceiro sinal sonoro).
Repita premindo os botões TWS durante
10 segundos (terceiro sinal sonoro)
e tente o emparelhamento novamente
• Desative/ative a função Bluetooth
no dispositivo de fonte de música
(telefone ou computador) e
tente novamente
• Limpe o teclado para remover
excesso de humidade ou sujidade
• Utilize as funcionalidades Bloqueio
para Crianças e Bloqueio Automático
descritas acima
• O VG5 utiliza um sensor de luz ambiente
para ajustar a retroiluminação LED
e os indicadores LED de estado com
base na luz ambiente. É a
operação normal
Desligue e ligue a unidade e certifique-se
de que o bloqueio para crianças e o
bloqueio automático estão desativados
• Faça a reposição ao desligar e
ligar a bateria
• Apague a memória do Bluetooth
e TWS (consulte as instruções acima)
• Desligue e ligue a unidade
Problem Solution
Resolução de problemas
Ação de passagem para
desbloqueio temporário
Bloqueio automático:
Para ativar ou desativar o bloqueio automático, man-
tenha premido o botão durante dez (10) segundos e
solte. O gráfico de barras do volume pisca duas vezes
quando está ativado e uma vez quando está desativado.
Quando ativado, o teclado bloqueia automaticamente
depois de três (3) minutos sem interação no teclado. O
LED VERDE superior pisca indicando que o teclado está
bloqueado. O bloqueio automático permanece ativado ou
desativado após o desligamento e ligação da unidade.
Desbloqueie automaticamente o teclado para utilização
quando o bloqueio automático está ativo ao efetuar uma
“passagem para desbloqueio”. Isto pode ser feito ao
passar o dedo rapidamente entre o botão de alimen-
tação e qualquer outro botão de função, certificando-se
de que solta o dedo enquanto ainda está sobre o botão
da outra função. O gráfico de barras do volume pisca e é
emitido um sinal sonoro de confirmação indicando que o
teclado está desbloqueado. O teclado bloqueia automati-
camente depois de três (3) minutos de interação.
Indicador de bloqueio do teclado:
16
DC IN
AUX IN 15V 1.5 A USB/
SERVICE RESET
DEUTSCH | Wie man den VG5 verwendet
Einlegen des Akkus
1. Mithilfe eines Nr. 3 Kreuzschraubendrehers
lösen Sie die Schrauben an der Abdeckung
des Akkufachs (siehe Unterseite des VG5) und
entfernen Sie die Abdeckung
2. Verbinden Sie den Akku mit dem VG5-Stecker,
der nur in eine (die richtige) Richtung passt
3. Führen Sie die Akkukabel durch
4. Setzen Sie die Akkuabdeckung wieder ein
Aufladen des Akkus
Laden Sie den Akku vor der ersten Anwendung mind-
estens 5 Stunden, bis er vollständig aufgeladen ist. Um
die Langlebigkeit des Akkus und die maximale Leistung
des Systems sicherzustellen, sollte der Akku vor dem
mobilen Betrieb immer aufgeladen werden.
1. Stecken Sie das mitgelieferte AC-Ladegerät
in die Steckdose, um die AC-Netzversorgung
sicherzustellen, und verbinden Sie das andere
Ende mit dem DC-Eingangsanschluss des VG5,
der sich hinter der Anschlussschutzabdeckung
des VG5 befindet
2. Der VG5 kann mit AC-Strom aus der
Wandsteckdose betrieben werden, selbst wenn
der Akku vollständig entladen ist
3. Die Ladezeit beträgt ca. 4-5 Stunden, wenn
der Akku vollständig entladen ist
4. . Die Laufzeit variiert, abhängig von der Lautstärke
Lieferumfang:
Kurzanleitung
Glückwunsch und vielen Dank für Ihren Kauf des Soundcast VG5. Bitte lesen
Sie die Betriebsanweisungen vor der Anwendung sorgfältig durch.
3,5 mm
analoges
Audiokabel
AC-Lade-
gerät mit
Adapterklem-
men
Akku
Orange Power-/
Ladeanzeige-LED
USB-Ladegerät
Ladeausgang
Capacitive Touc Kapazitives
Touch-Bedienungs-Tastenfeld
Lage der wetter-
beständigen Lade- &
Zugangsanschlüsse
Akkufachdeckel
NFC (Near Field
Communication)
Location
Komfort-
Tragegriff
Strom EIN
Strom AUS
Akkustand niedrig
Lädt
Voll aufgeladen
Voll aufgeladen
Fehler - kann nicht laden
Durchgehend orange
Aus
Blinkt langsam rot
Durchgehend rot
Aus
(wenn Strom aus)
Durchgehend orange
(wenn Strom an)
Blinkt schnell rot
Status Power LED
Ports, Anschlüsse und Eingänge
Lade- & Zugangsanschlüsse
17
Stumm-Indikator
Stumm-Taste
Gelb AUX
anzeige LED
Bluetooth-
Anzeige-LED
Bluetooth-Taste
TWS-Taste
Blaue und orange LEDs
zeigen den aktuellen
TWS-Status an
Elf LEDs für die
Lautstärke-und
Akkuanzeige
Power-Taste
Lauter-Taste
Orange
power-
LED
Leiser-Taste
Play-/
Pause-
Taste
Bedienungs-Tastenfeld
Kapazitives Touch-Bedienungs-Tas-
tenfeld
Der VG5 verfügt über ein fortschrittliches, kapazitives
Touch-Bedienfeld und eine Backlight-Technologie. Die
Nutzerfunktionen werden über einfaches Drücken oder
Drücken und Halten der entsprechenden Taste auf der
Tastenfläche, wie angegeben, ausgeführt.
Ein-/Ausschalten: Der VG5 wird mittels der großen
Taste in der Mitte des Tastenfelds ein-
und ausgeschaltet.
Einschalten: Drücken und halten Sie die Power-Taste
zwei (2) Sekunden lang, bis die Hintergrundbeleuchtung
leuchtet, und lassen Sie die Taste innerhalb von zwei
(2) Sekunden los. Ein Piepton bestätigt, dass die Einheit
eingeschaltet ist.
Abschalten: Drücken und halten Sie die Power-Taste
zwei (2) Sekunden lang, und lassen Sie die Taste inner-
halb von zwei (2) Sekunden los. Ein Piepton bestätigt,
dass sich die Einheit abschaltet.
Anschließen und Koppeln
➤ Der VG5-Strom muss eingeschaltet sein, bevor Sie
versuchen, die Geräte zu koppeln (außerdem muss der
Hilfseingang getrennt sein)
2. Mindestens einer der Lautsprecher muss mit einer
Audioquelle gekoppelt sein (wie oben beschrieben)
Drücken und halten Sie TWS (das TWS-Symbol)
zwei (2) Sekunden lang, bis ein Piepton zur
Bestätigung ertönt. Die TWS-LED beginnt
langsam zu blinken. Wiederholen Sie den Vorgang
für die zweite VG5-Einheit.
3. Nach der Kopplung, leuchtet die TWS-LED an
beiden Einheiten blau und orange (violett)
➤Wenn Sie sich im TWS-Modus befinden und eine
Einheit abschalten, schaltet sich die andere Einheit
automatisch ab.
4. Wiederverbinden: Die TWS-gekoppelten Einheiten
werden sich automatisch wieder miteinander verbin
den, nachdem Sie beide Einheiten eingeschaltet
haben. Ein kurzes Drücken der TWS-Taste an
einer der Einheiten ermöglicht ein Schalten durch die
TWS-Modi (Stereo, links/rechts, aus),
wie unten angegeben;
• LED leuchtet blau und orange: links/
rechts vom Lautsprecher
• LED leuchtet nur orange: links vom
Hauptlautsprecher, rechts vom
Sekundärlautsprecher
• LED aus: TWS aus
➤ Um alle Geräte aus dem TWS-Speicher zu löschen
und zu einem Einzelgerätebetrieb zurückzukehren, drück-
en und halten Sie die TWS-Taste zehn (10) Sekunden
lang, bis der Piepton ertönt und die TWS-LED doppelt
blinkt, dann schalten Sie die Einheit ein. Wenn die Einheit
wieder eingeschaltet ist, leuchtet die TWS-LED nicht,
was anzeigt, dass TWS deaktiviert ist.
➤ Sollten Sie Schwierigkeiten mit der Standard-Blue-
tooth-Kopplung oder mit dem TWS-Betrieb haben, kann
das Bluetooth-System des VG5 zurückgesetzt werden,
indem der Kopplungsspeicher von Bluetooth und TWS
mittels zehnsekündigem (10) Drücken und Halten
(dritter Piepton) jeder der Tasten gelöscht wird und die
Einheit dann aus- und wieder eingeschaltet wird.
➤ Sie hören keine Musik oder hören intermittierende
Aussetzer? Dann könnte es sein, dass die Primär- und
Sekundäreinheiten des VG5 zu weit voneinander ent-
Bluetooth-Kopplung mit NFC
1. Aktivieren Sie die Bluetooth- und NFC-Funktionen
auf Ihrem Mobilgerät
2. Halten Sie das Telefon in die Nähe des NFC-Logos
(Logo) an der VG5-Einheit, bis sich das Mobilgerät
verbindet und die Bluetooth-LED langsam blinkt
3. Drücken Sie OK/Verbinden auf Ihrem
Mobilgerät, um die Kopplung abzuschließeng
4. Spielen Sie den Audioinhalt ab
Standard Bluetooth-Kopplung
1. Aktivieren Sie Bluetooth auf Ihrem Mobilgerät
2. Koppeln eines neuen Geräts: Drücken Sie die VG5-
Bluetooth-Taste (die Bluetooth-LED blinkt langsam)
3. Wählen Sie in Ihrem Bluetooth-Menü in den Einstel
lungen des Mobilgeräts “VG5 by Soundcast_xxxxxx”
4. Sobald das Gerät gekoppelt ist, leuchtet die
LED durchgehend blau
➤ Drücken & halten Sie die Bluetooth-Taste zwei (2)
Sekunden lang bis der Piepton ertönt, um wieder in den
Kopplungsmodus zu schalten und ein neues oder zusät-
zliches Gerät zu koppeln.
➤ Um alle Geräte aus dem Speicher zu löschen,
drücken und halten Sie die Bluetooth-Taste zehn (10)
Sekunden lang, bis die Bluetooth-LED doppelt blinkt und
der Piepton zur Bestätigung ertönt.
Hilfseingangsmodus
Stecken Sie die externe Audioquelle in die 3,5 mm
Buchse, um automatisch in den Hilfseingangsmodus zu
schalten, was dadurch angezeigt wird, dass die AUX-LED
gelb leuchtet. Entfernen Sie den 3,5 mm Stecker, um
wieder in den Bluetooth-Betrieb zu schalten.
TrueWireless Stereo (TWS)-Kopplung
Mit TWS können zwei VG5-Einheiten für die synchrone
Bluetooth-Wiedergabe gekoppelt werden. Strom aus,
Lautstärke und TWS-Modus können von jeder der Ein-
heiten synchronisiert und gesteuert werden.
1. Beide Lautsprecher müssen im Bluetooth-Modus
eingeschaltet sein (kein Hilfseingang verbunden)
18
Andere Steuerungen und Merkmale
Lautstärkeregelung:
Die Lautstärke des VG5 kann während des Abspielens
von Musik oder während des Freisprechbetriebs durch
Drücken oder Drücken und Halten der Einstelltasten +
(lauter) oder – (leiser) auf dem Tastenfeld eingestellt
werden. Die aktuelle Lautstärke wird mittels blauer
LEDs auf der Lautstärkeleiste angezeigt.
➤ Mobilgeräte, die das AVRCP-Protokoll unterstützen,
können die Lautstärke über den Lautstärkeregler am
Mobilgerät regeln.
Akkufüllstandanzeige:
Drücken Sie die Power-Taste eine (1) Sekunde lang, bis
ein Piepton ertönt und die aktuelle Akkufüllstandleiste
mit einer Kombination aus ROTEN=Niedriger Füllstand,
GELBEN=OK, GRÜNEN= Voll LEDs angezeigt wird. Die
Leiste bewegt sich entgegen dem Uhrzeigersinn, wenn
sich der Akku entleert.
➤ Die Füllstandanzeige und die orange LED-Anzeigen
für einen niedrigen Akkufüllstand sind NICHT akkurat,
wenn nicht mindestens zwei volle Lade-/Entladezyklen
abgeschlossen wurden.
Blaue LEDs
leuchten im
Uhrzeigersinn
und zeigen die
Lautstärke an.
Lautstärkeanzeige
Statusanzeige für den Akku
Lauter-Taste
Orange
Power-
LED
Leiser-Taste
Rot
(Niedriger
Akkustand)
Gelb
(Akku
Ok) Grün (Akku
lädt)
Tastenfeldsperre
Der VG5 hat zwei verschiedene Sperrmechanismen
für das Tastenfeld, um eine unbeabsichtigte oder
versehentliche Betätigung zu verhindern. Beide sind
gemäß der Voreinstellung deaktiviert. Wenn sie aktiviert
sind, werden alle Tastenfeldfunktionen, außer „Ein/Aus“
ignoriert.
Kindersicherung:
Zum Aktivieren oder Deaktivieren halten und drücken
Sie die Stumm-Taste
fünf (5) Sekunden lang und lassen Sie sie dann los.
Die oberste BLAUE LED blinkt und zeigt an, dass das
Tastenfeld gesperrt und die Kindersicherung aktiv ist.
Ein Aus- und Einschalten der Einheit deaktiviert die
Kindersicherung des Tastenfelds.
Blinkt blau:
Kindersicherung aktiv
Blinkt grün:
Automatische Sperre
aktiv
Anzeige für die Tastenfeldsperre:
Gleiten Sie mit dem Fin-
ger von der Power-Taste
zu einer beliebigen
Funktionstaste und
lassen Sie dann los.
Stumm-
Taste VG5 geht nicht an
Schwierigkeiten
mit dem Bluetooth-
oder TWS-Kop-
plungsverfahren
Das Tastenfeld
führt aufgrund von
Feuchtigkeit eine
unbeabsichtigte
Betätigung aus
Tastenfeld-Back-
lights ändern die
Helligkeit oder
schalten ab
Tastenfeld
reagiert nicht auf
Tastendruck
Die Einheit zeigt
Fehlverhalten oder
reagiert nicht
• Vergewissern Sie sich, dass das
Gerät vollständig geladen ist
• Stellen Sie sicher, dass das Tastenfeld
frei von Schmutz, Staub oder Feuchtigkeit ist
• Nehmen Sie den Akku heraus/legen Sie
den Akku wieder ein
• Schalten Sie die VG5-Einheit(en) aus
und wieder ein und versuchen Sie es erneut
• Löschen Sie den Bluetooth- und den TWS-
Kopplungsverlauf, indem Sie die Blue
tooth-Taste zehn Sekunden lang (dritter
Piepton) halten, wiederholen Sie dies, indem
Sie die TWS-Tasten volle zehn Sekunden lang
(dritter Piepton) gedrückt halten, und ver
suchen Sie Ihre Kopplung erneut
• Deaktivieren/Aktivieren Sie die Blue
tooth-Funktion auf dem Gerät, das Ihre
Musikquelle abspielt (Telefon oder Computer)
und versuchen Sie es erneut
• Wischen Sie das Tastenfeld ab, um
übermäßige Feuchtigkeit oder Schmutz
zu beseitigen
• Verwenden Sie die Kindersicherung oder
die automatische Sperrfunktion, wie oben
beschrieben eine unbeabsichtigte
Betätigung aus
Der VG5 verwendet einen Umgebungslichtsen-
sor, um die LED-Backlights und Status-LED-An-
zeigen basierend auf dem Umgebungslicht
einzustellen. Dies ist der normale Betrieb.
Schalten Sie die Einheit aus und wieder ein und
stellen Sie sicher, dass die Kindersicherungs-
und die automatischen Tastensperrfunktionen
deaktiviert sind
• Setzen Sie das Gerät zurück, indem Sie den
Akku herausnehmen und wieder einsetzen
• Löschen Sie den Bluetooth- und TWS-
Speicher (beziehen Sie sich auf die
obenstehenden Anweisungen)
• Schalten Sie die Einheit aus und wieder ein
Problem Lösung
Fehlerbehebung
Vorrübergehendes Entsperren durch Wischen
Automatische Sperre:
Um die automatische Sperre zu aktivieren oder zu
deaktivieren, halten Sie die Stumm-Taste zehn (10)
Sekunden lang und lassen Sie sie dann los. Die Laut-
stärkeleiste blinkt zweimal, wenn die automatische
Sperre aktiviert ist und einmal, wenn sie deaktiviert ist.
Wenn sie aktiviert ist, geht das Tastenfeld automatisch
nach drei (3) Minuten ohne Betätigung einer Taste in
die „Auto-Lock”-Funktion (automatische Tastensperre)
über. Die obere GRÜNE LED blinkt und zeigt an, dass
das Tastenfeld gesperrt ist. Die automatische Sperre
bleibt aktiviert oder deaktiviert, wenn die Einheit aus- und
wieder eingeschaltet wird.
Sie können das Tastenfeld vorübergehend für die An-
wendung entsperren, während die automatische Sperre
aktiv ist, indem Sie ein „Entsperren durch Wischen“
durchführen. Dies erfolgt, indem Sie mit dem Finger
schnell von der Power-Taste zu einer beliebigen anderen
Funktionstaste wischen und sicherstellen, dass Sie
loslassen, wenn sich Ihr Finger noch auf der „anderen
Funktion“ befindet. Die Lautstärkeleiste blinkt und es
ist ein Bestätigungston zu hören, der angibt, dass das
Tastenfeld entsperrt ist. Das Tastenfeld wird automa-
tisch nach drei (3) Minuten ohne Betätigung einer Taste
wieder gesperrt.
19
DC IN
AUX IN 15V 1.5 A USB/
SERVICE RESET
NEDERLANDS | Uw VG5 gebruiken
Accu installeren
1. Gebruik een #3 kruiskop en verwijder de
accubedekking aan de onderkant van de VG5
2. Verbindt de accu met de VG5-connector, die
alleen past in de juiste richting
3. Verbind de accudraden
4. Plaats het batterijklepje terug
Accu
Laad voor het eerste gebruik de accu ten minste 5 uur
op tot volle capaciteit. Om de levensduur van de accu
en maximale prestaties van het systeem te waarbor-
gen moet de accu altijd voor mobiele operatie worden
opgeladen.
1. Plug de bijgesloten netstroomadapter in het
stopcontact en verbindt het andere eind aan de
VG5 gelijkstroompoort achter de poortbescherming
van de VG5
2. De VG5 kan worden gebruikt op netstroom,
zelfs wanneer de accu helemaal leeg is
3. De oplaadtijd is ongeveer 4-5 uur vanaf een
volledig lege accu
4. De speeltijd hangt af van het volume
Box Includes:
Snel starten
Gefeliciteerd en bedankt voor uw aankoop van de Soundcast VG5.
Lees a.u.b. de handleiding aandachtig door voor gebruik.
3,5mm
analoge
audiokabel
Netstroom-
adapter met
adapterclips
Accu
Oranje stroom-/
laadindicator-LED
Laadoutput
USB-powerbank
Capacitief aanrakingstoetsenbord
Weerbestendige
locatie laad- en
toegangspoorten
Toegangspaneel accu
NFC (Near Field
Communication)-
locatie
Comfortabel
draaghandvat
Stroom AAN
Stroom UIT
Accu bijna leeg
Opladen
Volledig opgeladen
Volledig opgeladen
Fout - opladen niet mogelijk
Vast orangje
Uit
Langzaam rood knipperen
Vast rood
Uit (als stroom uit is)
Vast oranje (als stroom aan is)
Snel rood knipperen
Status Stroom-LED
Poorten, verbindingen en inputs
Laad- en toegangspoorten
20
Indicator dempen
Dempknop
Gele AUX
LED-indicator
Bluetooth-
LED-indicator
Bluetooth
-knop
TWS-knop
blauwe en oranje
LED’sde huidige
TWS-status
aangeven
Elf LED’s voor
weergave van
de volume- en
brandstofmeter
Aan-
knop
Knop
volume
omlaag
Oranje
stroom-
LED
Knop
volume
omlaag
Afspelen-/
Pauze-knop
Toetsenbord bedieningspaneel
Capacitief aanrakingstoetsenbord
De VG5 heeft een geavanceerd capacitief aanrakings-
toetsenbord en achtergrondverlichting. Gebruikersfunc-
ties kunnen worden gebruikt met een enkele aanraking
of het ingedrukt houden van het correcte gebied van het
toetsenbordoppervlak, zoals aangegeven.
Aan-/uitzetten: De VG5 wordt aan- en uitgezet met
een grote knop in het midden van het toetsenbord
Aanzetten: Hou de aan-knop (2) seconden ingedrukt
tot de achtergrondverlichting oplicht en laat deze dan
binnen (2) seconden los; er wordt een bevestigingstoon
afgespeeld om aan te geven dat de eenheid aan staat.
Uitzetten: Hou de aan-knop (2) seconden ingedrukt en
laat deze dan binnen (2) seconden los; er wordt een
bevestigingstoon afgespeeld om aan te geven dat de
eenheid uit gaat.
Verbinden en koppelen
➤ De VGx-stroom moet aanstaan voordat u probeert te
koppelen (en de aux-input moet ontkoppeld zijn)
2. Hou de TWS (TWS-icoon) (2) seconden ingedrukt
totdat of tot er een bevestigingstoon klinkt.
De TWS LED begint langzaam te knipperen.
Herhaal dit met de tweede VG5-eenheid..
3. Na het paren toont de TWS LED op beide
eenheden zowel blauw als oranje (paars)
➤ Als u in TWS-modus een eenheid uitzet gaat de
andere ook automatisch uit.
4. Opnieuw verbinden: De TWS-gekoppelde eenheden
verbinden automatisch opnieuw met elkaar wanneer
beide eenheden aanstaan. Het kort indrukken van de
TWS-knop op beide eenheden laat u roteren door de
TWS-modi (stereo, links/rechts, uit) zoals
hieronder aangegeven;
• LED blauw en oranje: links/rechts uit
elke speaker
• LED alleen oranje: links uit primaire
speaker, rechts uit secundaire speaker
• LED uit: TWS uit:
➤ Om alle apparaten uit het TWS-geheugen te wissen
en terug te gaan naar een enkel apparaat, houdt u de
TWS-knop (10) seconden ingedrukt totdat er een derde
toon klinkt en de TWS LED dubbel knippert en zet de
eenheid daarna uit. Wanneer de eenheid weer wordt
aangezet staat de TWS LED niet aan, wat aangeeft dat
TWS is uitgeschakeld.
➤ Als u moeilijkheden ervaart met de standaard
Bluetooth-koppeling of TWS-gebruik kan het VG5 Blue-
tooth-systeem worden gereset door het koppelgeheugen
van zowel Bluetooth als TWS te wissen door elke knop
(10) seconden ingedrukt te houden en daarna een
stroomcyclus uit te voeren op het apparaat.
➤ Geen muziek of periodieke onderbrekingen? De
primaire en secundaire VG5-eenheden zijn mogelijk te
ver weg van elkaar.
Bluetooth koppelen met NFC
1. Schakel de Bluetooth- en NFC-functies in op
uw mobiele apparaat
2. Hou de telefoon bij het NFC-logo (logo) op de
VG5-eenheid totdat het mobiele apparaat verbindt
en de Bluetooth-LED langzaam knippert
3. Druk op OK/Verbinden op uw mobiele apparaat
om de koppeling te voltooien
4. Speel de audio af
Standaard Bluetooth-koppeling
1. Schakel Bluetooth in op uw mobiele apparaat
2. Koppel een nieuw apparaat: druk op Bluetooth-knop
op de VG5 (Bluetooth-LED knippert langzaam)
3. Vanuit het Bluetooth-menu in de instellingen
van het mobiele apparaat selecteert u
“VG5 by Soundcast_xxxxxx”
4. Zodra het gekoppeld is wordt de
Bluetooth-LED blauw
➤ Hou de Bluetooth-knop (2) seconden ingedrukt totdat
u een piepje hoort dat aangeeft dat de koppelingsmo-
dus is geactiveerd en u nieuwe of extra apparaten kunt
koppelen.
➤ Om alle apparaten kuit het geheugen te wissen houdt
u de Bluetooth-knop (10) seconden ingedrukt totdat de
Bluetooth-LED dubbel knippert en er een tweede beves-
tigingstoon klinkt.
Aux-inputmodus
Plug de externe audiobron in de 3,5mm jack om autom-
atisch naar de Aux-inputmodus te schakelen, waarbij de
Aux-LED geel wordt. Verwijder de 3,5mm plug om terug
te schakelen naar Bluetooth.
TrueWireless Stereo (TWS)-koppelen
Met TWS kunnen er twee VG5-eenheden worden
gekoppeld voor synchrone Bluetooth-playback. Stroom
uit, volume en TWS-modus worden gesynchroniseerd en
kunnen van beide eenheden worden bestuurd.
1. Beide speakers moeten aanstaan in
Bluetooth-modus (geen verbonden Aux-input)
21
Andere besturingen en functies
Volumeregeling:
Het volume van de VG5 kan worden aangepast bij het
spelen van muziek of wanneer de speakertelefoon wordt
gebruikt door de + (omhoog) en - (omlaag) volumeknop-
pen in te drukken of ingedrukt te houden op het toetsen-
bord. Het huidige volumeniveau wordt weergegeven met
blauwe LED’s op de volumebalk.
➤ Mobiele apparaat die het AVRCP-protocol onders-
teunen kunnen het volume aanpassen via de volumebalk
van mobiele apparaten.
Brandstofmeter:
Druk de aan-knop (1) seconde in waarna er een toon
klinkt en het huidige accuniveau wordt weergegeven in
een combinatie van ROOD=laag, GEEL=OK en GROEN=
Volle LED’s. De balk beweegt tegen de klok in terwijl
de accu ontlaadt.
➤ De brandstofmeter en amberkleurige LED-indicators
voor lage accuspanning zijn NIET nauwkeurig totdat er
ten minste twee volledige laad- en ontladingscycli
zijn voltooid.
Blauwe LED’s lichten
met de klok mee op
om het volumeniveau
aan te geven.
Indicatie volumeniveau
Indicatie accustatus
Knop
volume
omhoog
Oranje
stroom-
LED
Knop
volume
omlaag
Rood
(accu
laag)
Geel
(accu
OK)
Groen (accu
opgeladen)
Toetsenbordvergrendeling
De VG5 heeft twee verschillende vergrendelingsmech-
anismen om onbedoelde operatie te vermijden. Beiden
zijn standaard uitgeschakeld. Als ze ingeschakeld zijn
worden alle toetsenbordfuncties behalve
aan/uit genegeerd.
Kinderslot:
Hou de dempknop (5) seconden ingedrukt om in- of uit
te schakelen en laat deze dan los. De bovenste BLAUWE
LED knippert om aan te geven dat het toetsenbord is
vergrendeld en het kinderslot actief is. Het kinderslot kan
worden gedeactiveerd door de eenheid
aan- en uit te zetten.
Blauw knipperen:
Kinderslot actief
Knippert groen:
Automatische
vergrendeling actief
Veeg een vinger van de
aan-knop naar enige
functieknop en laat deze
dan los.
Demp-
knop
VG5 gaat niet
aan
Problemen met
Bluetooth- of
TWS-
koppelingsproces
Toetsenbord
heeft onbedoelde
werking door
vocht
Toetsenbord
verandert
helderheid of
uitzetten
Toetsenbord
reageer niet
op toets
aanrakingen
Eenheid
reageert
verkeerd of
reageert niet
• Zorg dat de eenheid volledig
is opgeladen
• Zorg dat het toetsenbord vrij
is van viezigheid, stof of vocht
• Accu ontkoppelen/opnieuw koppelen
• Zet de VG5-unit(s) aan en uit
en probeer het opnieuw
• Wis de koppelgeschiedenis van
Bluetooth en TWS door de Blue
tooth-knop 10 seconden ingedrukt
te houden (derde piepje) en herhaal
door de TWS-knop een volle 10 sec
onden in te drukken (derde piepje) en
probeer de koppeling opnieuw.
• Schakel de Bluetooth-functie in/
uit op het bronapparaat van uw
muziek (telefoon of computer) en
probeer het opnieuw
• Veeg het toetsenbord af om overmatig
vocht of viezigheid te verwijderen
• Gebruik de kinderslot of
automatische vergrendeling die
hierboven zijn omschreven
• De VG5 gebruikt een omgeving
slichtachtergrondverlichting sensor
om de LED-achtergrondverlichting en
LED-statusindicators aan te passen op
basis van achtergrondverlichting.
Dit is normaal
• Zet de eenheid aan en uit en zorg er
voor dathet kinderslot en de automa
tische vergrendeling zijn uitgeschakeld
• Herstel de fabrieksinstellingen door de
accu te ontkoppelen en weer
aan te koppelen
• Wis de Bluetooth- en TWS-geheugens
(zie de instructies hierboven)
• Zet de eenheid aan en uit
Probleem Oplossing
Probleemoplossing
Swipen tijdelijk ontgrendelen
Automatische vergrendeling:
Om de automatische vergrendeling aan of uit te zetten
houdt u de dempknop (10) seconden ingedrukt en laat
deze dan los. De volumebalk knippert twee keer bij het
aanzetten en een keer bij het uitzetten. Bij het aanzetten
vergrendelt het toetsenbord automatisch na (3) minuten
zonder interactie met het toetsenbord. De bovenste
GROENE LED knippert om aan te geven dat het toetsen-
bord is vergrendeld via de automatische vergrendeling
en blijft aan of uit als de eenheid wordt aan-/uitgezet.
Het tijdelijk ontgrendelen van het toetsenbord tijdens de
automatische vergrendeling kan worden gedaan met
een ‘ontgrendelende swipe’. Dit kan worden gedaan
door uw vinger snel tussen de aan-knop en een andere
functieknop te bewegen, waarna u de vinger loslaat
terwijl deze zich nog steeds boven de andere functieknop
bevindt. De volumebalk knippert en er wordt een toon
afgespeeld om aan te geven dat het toetsenbord
is ontgrendeld. Het toetsenbord vergrendelt automa-
tisch weer na (3) minuten zonder interactie.
Indicator toetsenbordvergrendeling:
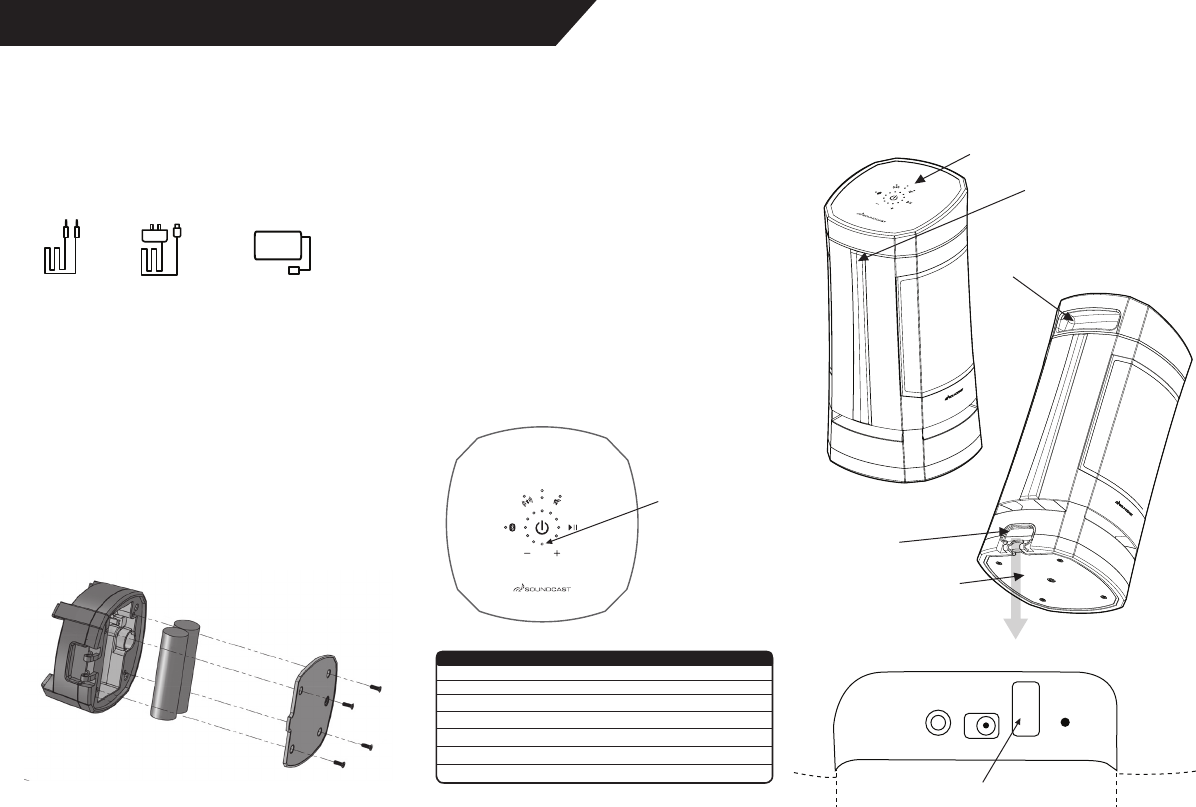
22
DC IN
AUX IN 15V 1.5 A USB/
SERVICE RESET
中文 | 如何使用 VG5
安装电池
1. 使用3号十字螺丝刀,松开螺丝并取下位于
VG5 底部的电池盖
2. 连接电池到 VG5 的连接器中,注意正确的正负
极连接方向
3. 接好连接电池的电线
4. 重新安装电池盖
盒内包括:
迅速上手指南
祝贺并感谢您购买 Soundcast VG5。使用前请仔细阅读操作指导
3.5mm 模
拟音频线 带适配夹的
壁式电源适
配器
电池组
橙色灯/ 充电指
示灯
USB 电源充电输出
电容式触控键盘
全天候充电及接入
孔位置
电池安放盖
NFC(近场通讯)位置
便于抓握手柄
电源打开
电源关闭
电池电量低
充电中
电量全部充满
电量全部充满
故障-不能充电
橙色长亮
关闭
慢速红色闪烁
红色长亮
关闭(如果电源关闭)
橙色长亮(如果电源打开)
快速红色闪烁
Status Power LED
端口、连接与输入
充电及接入孔
充电电池
第一次使用前,请至少将电池充电5小时以充满。为
了确保电池的使用寿命和系统的最佳性能,在移动操
作前请始终为电池充电。
1. 将随附的壁式电源适配器插入交流电源并将另
一端连接到位于 VG5 端口保护盖后面的VG5 直
流输入口中。
2. VG5 即使在没有电池时仍然可以通过壁式
电源适配器的电流运行。
3. 电量全部用完的电池充电充满时间大约为
4-5小时。
4. 播放时间根据播放的音量大小而不同。
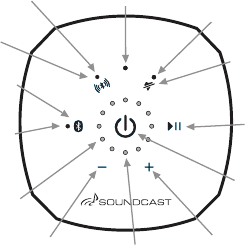
23
静音指示灯
静音按钮
黄色 音频
输入
指示灯
蓝牙指示灯
蓝牙按钮
TWS 按钮
蓝橙色指示灯
显示当前的 TWS
状态
用于显示音
量和电量的
十一个指示
灯 显示
电源键
音量升
高按钮
橙色电
源指示
灯
音量降
低按钮
播放/暂
停按钮
控制面板键盘
电容式触控键盘
VG5 有着先进的电容式触控键盘和背光科技。用户
功能通过单次按压或按下并按住如图所示的键盘表面
适当的按钮区域来实现;
电源开/关VG5 使用位于键盘中心大的按钮来开关
打开: 按下并按住电源按钮(2)秒,直到背光亮起再在
(2)秒内放开,确认的哔哔声将确认设备已开机
关闭:按下并按住电源按钮(2)秒,再在(2)秒内放
开,确认的哔哔声将确认设备已关闭
连接和配对
➤ 配对前 VG5 电源必须打开(并且音频输入断
开)。
3. 配对时, 两个单元上的 TWS 灯将会都显示为
蓝橙色(紫色)
➤ 在 TWS 模式时 如果你关闭了一个单元,另一个
单元将会自动关闭
4. 重新连接:TWS 配对的单元再将两个单元都
打开时将会自动相互连接。短按任何一个单元上
的 TWS 按钮将会允许按照下述在 TWS 模式(立
体声、左/右、关机)中循环;
•指示灯蓝色和橙色:具备左右声道
•指示灯仅橙色:主机为左声道,
副机为右声道
•指示灯灭:TWS关闭
➤ 为了将所有设备从 TWS 中清除并转变为单设备操
作,按下并按住 TWS 按钮(10)秒直到听到第三
声哔哔声并且TWS 指示灯双闪,然后将单元关机。
当单元再次打开时, TWS 指示灯不会亮起,说明
TWS 禁用。
➤无论是标准的蓝牙配对还是 TWS 连接,VG5 的
蓝牙系统可以通过清除配对记忆来重置蓝牙系统,通
过用(10)秒钟按下并按住每个功能按钮然后关机
再开机 。
➤ 无音乐或断断续续的无声?VG5 的主单元和次单
元可能相互之间离得太远。
通过 NFC 的蓝牙配对
1. 在你的移动设备上打开蓝牙和 NFC 功能
2. 将移动设备放到靠近 VG5 设备上的NFC
标志,直到移动设备连接上并且蓝
牙灯缓慢闪烁
3. 按下你的移动设备上的 OK/连接键以完
成配对
4. 播放音频
标准的蓝牙配对
1. 在你的移动设备上打开蓝牙功能
2. 配对一个新设备:按下 VG5 蓝牙按钮(蓝牙指
示灯将会缓慢闪烁)
3. 从移动设备设置的蓝牙菜单中选择“ VG5 by
Soundcast_xxxxxx”
4. 一旦配对,蓝牙灯变为蓝色长亮
➤ 按下并按住蓝牙按钮(2)秒并听到哔哔声以重新进
入配对模式来匹配一个新的或其它的设备。
➤ 要从内存中清除所有设备,按下并按住蓝牙按钮
(10)秒钟直到蓝牙指示灯双闪并且听到第二声哔
哔声。
辅助输入模式
插入外部音源到3.5毫米插孔以自动切换到音频输入
模式,这时音频指示灯变黄。移除3.5mm插入线以切
换回蓝牙操作。
真无线立体声(TWS)配对
通过 TWS,两个 VG5 单元可以配对以同步使用 同
步蓝牙回放。关机、音量和 TWS 模式将会同步并可
以从任一单元上控制。
1. 两个音响都必须打开蓝牙
模式(没有音频输入连接)
2. 至少一个音响必须与音源配对(如上所述)
按下并按住 TWS (TWS 图标)(2)秒直到 听
到表示确认的哔哔声。TWS 等将会开始缓慢闪
烁。在第二个 VG5 单元上重复操作
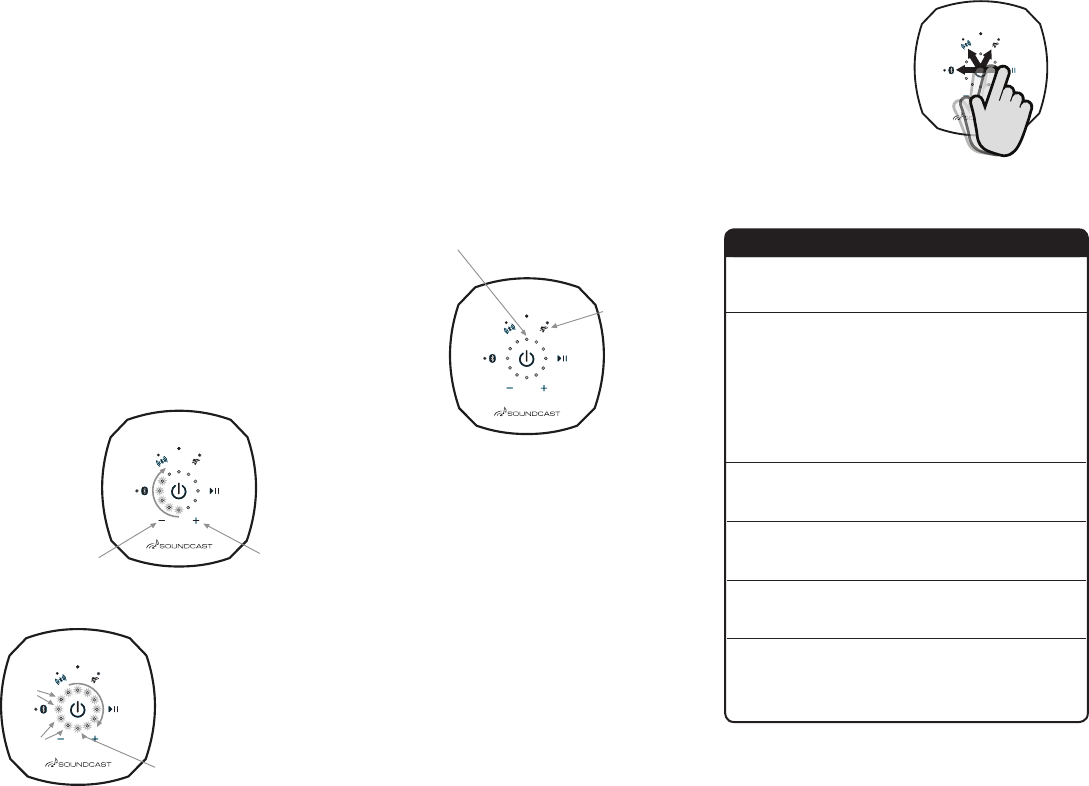
24
其它的控制和功能
音量控制
VG5 的音量可以在播放音乐或者使用扬声器时进行
调节,通过长按或按下并按住键盘上的+(加)或-(
减)音量调节按钮。当前音量水平将通过蓝色指示灯
显示在音量表上。
➤ 支持 AVRCP 协议的移动设备可以从移动设备的
滑动音量控制键来调节音量。
电量表
按下电源键(1)秒并且听到哔哔声后会用下述指示
灯组合来显示当前电池的电量:红色=电量低、黄色
=有电,绿色=电量满。在电池放电时电池指示将会逆
时针递减 。
➤ 电量表和琥珀色的电池电量低指示灯将不会准确显
示,直到至少两个完整的充电/放电循环进行完毕。
蓝色指示灯以逆时
针方向 递减以显示
音量水平
音量指示器
电池状态指示器
音量升
高按钮
橙色电
源指
示灯
音量降
低按钮
红色
(电池电
量低)
黄色
(电池
够用)
绿色(充
满电的电
池)
键盘锁
VG5 有两种键盘锁定机制以防止不希望的或意外的
键盘操作。两者默认都是禁用的。当启用后,除了
开/关机以外的键盘功能都会被忽略。
儿童锁:
要启用或禁用,按下并按住禁音键 (5)秒并放开。最
上面的蓝色指示灯将会闪烁以显示键盘被锁定并且儿
童锁被激活。反复按下电源键将会禁用键盘儿童锁。
键盘锁指示灯:
蓝色闪烁:
儿童锁激活
绿色闪烁:
自动锁激活
将手指从电源键滑动到
任意功能键并放开。
静音按
钮
VG5 不能开机
蓝牙或 TWS 配
对过程有困难
键盘由于水汽
发生不想要的
操作
键盘背光亮度改
变或关闭
键盘对按钮按
下没有
反应
单元表现不正常
或不能回应
• 确认单元是充满电了的
• 确认键盘上无任何污物或水汽
• 断开/再连接电池
• 反复按 VG5 单元的电源键并再
次尝试
• 通过按下蓝牙按钮 10秒钟
(第三声哔哔声)清除蓝牙和 TWS
配对的历史,重复按下 TWS 按钮
整整10秒(第三声哔哔声)并再次
尝试配对。
• 在你的音源设备(电话或电脑)上
禁用/启用蓝牙功能
• 擦屏幕以去除任何多余的水汽和
污物
• 使用上面描写的键盘锁功能
• VG5 使用环境光感应器来调节指示
灯背光,状态指示灯也是基于环境
光的。这是属于正常的操作。
反复按单元的电源键并确保
键盘锁和自动锁处于禁用
• 通过断开和重新连接电池进行出
厂重置
• 清除蓝牙和 TWS 记忆(参考上
述指导)
• 反复按开关机单元
问题 解决方案
故障排除
暂时解锁轻扫动作
自动锁
要启用或禁用自动锁,按下并按住禁音键(10)秒并
放开。音量指示表将在启用时闪烁两次,在禁用时闪
烁一次。当启用时,键盘会在(3)分钟无键盘交互
后“自动锁定”。顶上的绿色指示灯将会闪烁以显示
键盘由“自动锁”锁住。当反复开关机时,自动锁定
将保持启用或禁用。
在自动锁激活时通过进行“解锁轻扫”临时解锁键
盘。这可以通过快速地在电源键和任意一个功能键间
滑动手指来完成,确认你的手指在“其它的功能”的
按钮上时放开手指。音量条将会闪烁并且将会听到确
认的哔哔声以显示键盘已经被锁定。键盘在(3)分
钟无交互作用后会再次自动锁定。

25
ENGLISH
LITHIUM-ION BATTERIES SAFETY INSTRUCTIONS
The VGX uses a 12 volt Lithium-Ion rechargeable battery for DC operation.
Please review the following safety instructions before use. Failure to read
and follow the instructions below may result in fire, personal injury, and
damage to property if charged or used improperly. Please note that the
battery must be fully charged prior to its initial use.
Please observe the following precautions when using or
handling the battery:
• Do not dispose in fire or expose to high temperature.
• Do not under any circumstances insert the battery with the positive and
negative poles reversed.
• Do not directly connect the battery to power outlets or
12 volt automotive ports.
• Do not connect the positive terminal with the negative terminal
with metals such as wire, etc. Also, do not store or carry the battery
with metal necklaces, etc.
• Do not disassemble or modify the battery. The battery contains safety
and protective devices which, if damaged, may cause the battery
to generate heat, explode or ignite.
• Do not directly solder the battery.
• The battery contains a chemical liquid. If this liquid comes in contact
with the eyes, this may lead to loss of sight. Without rubbing the eyes,
immediately ush them with clean water for at least 15 minutes and then
consult a doctor.
• Do not use the battery if it shows signs of any leakage, a change of color
or shape, or any other changes in appearance, an unusual smell,
or feels hot.
• Do not wet the battery or place it in water or sea water.
This may lead to the battery generating heat or rusting.
• Do not remove or damage the coating tube. This makes it easy for
the battery to short-circuit and may cause leakage or heat generation.
• At all times, store the battery out of reach of small children.
• If the battery is rusted, generating heat, or shows any other
abnormal signs at the time of purchase, take it to the point of
purchase without using it.
• When not using the battery, or not using the unit for a prolonged period,
remove the battery from the unit and store it in a dry place between
the temperatures of -20 degrees C (-4 degrees F) and +35 degrees C
(95 degrees F). This prevents leakage, rust, and decreased battery
performance and service life.
• Do not place the battery in direct sunlight, in hot cars, in front of stoves
or other hot places. This may lead to leakage or explosion, and may
deteriorate the performance and life expectancy.
• Only the battery provided with the device, or a compatible replacement
battery purchased from Soundcast, LLC should be used in this device.
Do not use this battery in any other device.
• When charging the battery, use only the built-in charger provided in this
device. Do not attempt to charge the battery by any other means, or
using any other device. Failure to do so may cause the battery to become
hot, rupture, or ignite and cause serious injury.
• The temperature range over which the battery can be charged is
0°C (+32°F) to +45°C (+113°F). The built-in charger in this device
will not charge the battery outside of this range. Charging the battery at
temperatures outside of this range may cause the battery to become hot
or to break, and may also harm the performance of the battery or reduce
its life expectancy.
• The temperature range over which the battery can be used is -20°C
(-4°F) to +50°C (+122°F). Use of the battery outside of this temperature
range may damage the performance of the battery or may
reduce its life expectancy.
FOR CUSTOMERS IN THE U.S.A. AND CANADA
RECYCLING LITHIUM-ION BATTERIES: Lithium-Ion batteries are recyclable.
You can help preserve our environment by returning your used rechargeable
batteries to the collection and recycling location nearest you. For more
information regarding recycling of rechargeable batteries, call
toll free: 1-800-822-8837, or visit www.call2recycle.org Caution: Do not
handle damaged or leaking Lithium-Ion batteries.
Caution: Danger of explosion if battery is incorrectly replaced.
Replace only with the same or equivalant type.
Batteries and battery packs shall not be exposed to excessive
heat, such as prolonged sunlight or fire.
LITHIUM-ION BATTERIES SAFETY INSTRUCTIONS
ESPAÑOL
INTRUCCIONES DE SEGURIDAD PARA LAS
BATERÍAS LITHIUM-ION
VGX utiliza una batería recargable de 12 voltios
de ion de litio para su operación CC. Lea las
siguientes instrucciones de seguridad antes
de uso. Si no lee y sigue las instrucciones de
abajo, podrían producirse incendios, daños
personales y daños a la propiedad si se carga
o se usa de manera inadecuada.
Tenga
en cuenta que las baterías deben estar
cargadas antes de usarlo por primera vez.
Por favor cumpla con las siguientes
precauciones cuando use o maneje la batería:
• No se deshaga de ellas en una hoguera o
exponga a altas temperaturas.
• Bajo ninguna circunstancia, inserte la batería
con los polos positivo y negativo invertidos.
• No conecte directamente la batería a
enchufes de pared o a puertos automotor de
12 V.
• No conecte la terminal positiva, la terminal
negativa con metales como cables, etc.
Tampoco almacene o lleve la batería con
collares de metal, etc.
•
batería contiene dispositivos de seguridad y
protección que, si, se dañan podrían hacer
que la batería genere calor, explote o se
incendie.
• No suelde directamente la batería.
•La batería tiene un líquido químico. Si este
líquido entra en contacto con los ojos, podría
perder la vista. Sin tocarse los ojos, límpielos
de inmediato con agua limpia durante 15
minutos y luego consulte con un médico.
• No use la batería si detecta fugas, cambio de
color o forma o cualquier cambio de aspecto,
olor inusual o se recalienta.
• No moje la batería o no la ponga en agua
o agua de mar. Eso podría tener como
consecuencia que la batería se recaliente u
oxide.
• No quite o dañe el tubo revestido. Quitarlo
facilita que la batería tenga cortocircuitos,
tenga fugas o genere calor.
•
Guarde la batería fuera del alcance de los
niños en todo momento.
• Si la batería está oxidada, genera calor o
se comporta de forma anormal cuando la
compre, llévela al punto de venta sin usarla.
• Cuando no use la batería, o no use la unidad
durante un periodo de tiempo prolongado,
quite la batería de la unidad y guárdela en un
lugar seco con temperaturas entre -20º C (-4º
Fahrenheit) y +35º C (95º Fahrenheit). Con
ello evitará fugas, oxidación y la disminución
del rendimiento y vida de la batería.
• No ponga la batería directamente en el sol,
en coches calientes, en frente de fogones o
lugares calientes. La consecuencia podría ser
fugas, explosión o deterioro de la batería.
• Solo debería usar la batería provista con
el dispositivo, o una batería compatible de
sustitución que compre a Soundcast, LLC. No
use esta batería en ningún otro dispositivo.
• Cuando cargue la batería, use el cargador
integrado provisto. No intente cargar la
batería con otros medios o usarla en otro
dispositivo.
• Si lo hace, podría tener como consecuencia
que la batería se recalentase, su ruptura, su
incendio o que cause daños serios.
• El rango de temperaturas con los que se
puede cargar la batería es entre 0°C (+32°F)
a +45°C (+113°F). El cargador integrado en
este dispositivo no cargará la batería fuera
de este rango. Cargar la batería fuera de este
rango podría tener como consecuencia el
recalentamiento o la ruptura de la batería,
además, también podría dañar el rendimiento
de la batería o reducir su expectativa de vida.
• El rango de temperaturas con los que se
puede usar la batería es entre -20º C (-4°F)
a +50°C (+122°F). El uso de la batería fuera
de este rango de temperaturas podría dañar
el rendimiento de la batería o reducir su
expectativa de vida.
PARA CLIENTES EN EE.UU. O CANADÁ
RECICLADO DE BATERÍAS DE IÓN DE LITIO:
Las baterías de ion de litio se pueden reciclar.
Puede ayudar a conservar el medio ambiente
devolviendo las baterías recargables al punto
que tenga más cercano para su recogida y
reciclado. Para tener más información acerca
del reciclado de baterías recargables, llame a
este número gratuito: 1-800-822-8837 o visite
www.call2recycle.org
Atención: No maneje
baterías de ion de litio dañadas o con fugas.
FRANCAIS
CONSIGNES DE SÉCURITÉ POUR LES
BATTERIES LITHIUM-ION
Le VGX utilise une batterie rechargeable 12
volts au lithium-ion pour un fonctionnement en
courant continu. Veuillez lire les consignes de
sécurité suivantes avant toute utilisation. Ne
pas lire et respecter les instructions ci-dessous
peut entraîner un incendie, des blessures
corporelles et des dommages matériels si la
batterie est rechargée ou utilisée de manière
incorrecte.
Veuillez noter que la batterie doit
être complètement chargée avant d’être
utilisée pour la première fois.
Veuillez respecter les précautions suivantes
lors de l’utilisation ou de la manipulation de
la batterie.
• Ne la jetez pas dans le feu et ne l’exposez
pas à une température élevée.
• N’insérez en aucun cas la batterie avec les
pôles positif et négatif inversés.
• Ne connectez pas directement la batterie
à une prise secteur à une prise 12 volts de
voiture.
• Ne raccordez pas la borne positive à la
borne négative par le biais de métal, tels
et ne rangez pas la batterie avec un collier
métallique, etc.
•
batterie. La batterie contient des dispositifs
de sécurité et de protection qui, s’ils sont
endommagés, peuvent faire que la batterie
chauffe de manière anormale, explose ou
• Ne soudez pas directement la batterie.
•La batterie contient un liquide chimique. Si ce
liquide entre en contact avec les yeux, cela
peut entraîner la perte de la vision. Sans vous
frotter les yeux, rincez-les immédiatement
avec de l’eau propre pendant au moins 15
minutes, puis consultez un médecin.
• N’utilisez pas la batterie si elle présente des
signes de fuite, un changement de couleur
d’apparence, une odeur inhabituelle, ou si elle
est chaude.
• Ne mouillez pas la batterie ou ne la placez
pas dans de l’eau ou de l’eau de mer. Cela
pourrait faire que la batterie surchauffe ou
rouille.
• Ne retirez pas et n’endommagez pas le tube
de revêtement. Cela rendrait un court-circuit
de la batterie plus facile et pourrait entraîner
une fuite ou une surchauffe.
• Rangez toujours la batterie hors de portée des
jeunes enfants.
• Si la batterie est rouillée, si elle surchauffe ou
si elle présente tout autre signe anormal au
moment de l’achat, rapportez-la au revendeur
sans l’utiliser.
•
Lorsque vous n’utilisez pas la batterie ou
que vous n’utilisez pas l’appareil pendant
une période prolongée, retirez la batterie
de l’appareil et rangez-la dans un endroit
sec, à une température comprise entre -20
°C (-4 °F) et +35 °C (+95 °F). Cela permet
d’éviter les fuites, la rouille et une baisse des
performances de la batterie et de sa durée de
vie.
• Ne placez pas la batterie en plein soleil,
dans une voiture chaude, en face d’un four,
d’un radiateur ou de tout autre source de
chaleur. Cela pourrait entraîner une fuite
ou une explosion, ou pourrait détériorer sa
performance et sa durée de vie.
• Utilisez uniquement la batterie fournie avec
l’appareil ou une batterie de remplacement
compatible achetée auprès de Soundcast,
LLC. N’utilisez pas cette batterie dans un
autre appareil quelconque.
•
Lorsque vous rechargez la batterie, utilisez
uniquement le chargeur intégré dans cet
appareil. N’essayez pas de recharger la
batterie par un autre moyen, ni d’utiliser
un autre appareil. Cela pourrait faire que la
batterie surchauffe, se fendre ou prenne feu
et causer des blessures graves.
•
La plage de température dans laquelle la
batterie peut être rechargée est entre 0 °C
(+32 °F) et +45 °C (+113 °F). Le chargeur
intégré dans cet appareil ne rechargerait
pas la batterie en dehors de cette plage de
température. Recharger la batterie à des
températures en dehors de cette plage
pourrait faire que la batterie surchauffe ou
se casse, ou pourrait également réduire sa
performance et sa durée de vie.
•
La plage de température dans laquelle la
batterie peut être utilisé est entre -20°C
(-4°F) et +50°C (+122°F). L’utilisation de
la batterie en dehors de cette plage de
température pourrait réduire la performance
de la batterie et sa durée de vie.
POUR LES CLIENTS DES ÉTATS-UNIS ET DU
CANADA
RECYCLAGE DES BATTERIES LITHIUM-ION :
Les batteries lithium-ion sont recyclables. Vous
pouvez contribuer à préserver l’environnement
en rapportant les batteries usagées au point
de collecte et de recyclage le plus proche.
Pour plus d’informations sur le recyclage des
batteries rechargeables, téléphonez au numéro
gratuit : 1-800-822-8837, ou consultez www.
call2recycle.org Attention : Ne manipulez pas
des batteries Lithium-Ion endommagées ou
qui fuient.
26
PORTUGUESE
INSTRUÇÕES DE SEGURANÇA DE BATERIAS
DE IÕES DE LÍTIO
A VGX utiliza uma bateria recarregável de
iões de lítio de 12 volts. Leia atentamente as
instruções de segurança antes de utilizar o
produto. O não cumprimento das instruções
pode provocar incêndios, danos corporais
e materiais, caso a bateria seja utilizada ou
carregada indevidamente. De referir que a
bateria tem de estar totalmente carregada
antes de ser utilizada pela primeira vez.
Queira respeitar as seguintes precauções
quando utiliza ou manipula a bateria:
• Não queime a bateria nem a exponha a
temperaturas elevadas.
• Nunca coloque a bateria com os polos
positivo e negativo ao contrário.
• Não ligue diretamente a bateria a tomadas
de energia ou a carregadores de 12 volts em
automóveis.
• Não ligue o terminal positivo ao terminal
disso, não guarde nem transporte a bateria
junto de colares de metal, etc.
• bateria contém dispositivos de segurança
a bateria pode gerar calor, explodir ou
incendiar-se.
• Não solde diretamente a bateria.
• A bateria contém um líquido químico. Se o
líquido entrar em contacto com os olhos,
pode provocar perda de visão. Sem esfregar
os olhos, lave-os imediatamente com água
limpa durante, pelo menos, 15 minutos e, em
seguida, consulte um médico.
• Não utilize a bateria, se esta apresentar
sinais de fugas, mudança de cor ou forma, ou
qualquer outra alteração no aspeto, um odor
incaracterístico ou esteja quente.
• Não molhe a bateria nem a coloque na água
(doce ou salgada). Tal pode fazer com que a
bateria gere calor ou corrosão.
• revestimento. Caso contrário, poderá ser mais
fácil a bateria fazer curto-circuito e poderá
causar fugas ou produzir calor.
• Guarde sempre a bateria longe do alcance
das crianças.
• Se, aquando da compra, a bateria estiver
oxidada, gerar calor ou apresentar outros
sinais anormais, não a utilize e leve-a ao
ponto de venda.
• Se não utilizar a bateria ou a unidade durante
um período de tempo prolongado, retire a
bateria da unidade e guarde-a num local seco
a uma temperatura entre os -20º C e +35ºC.
Tal evita as fugas e a oxidação e preserva o
desempenho da bateria e a sua vida útil.
• Não coloque a bateria à luz direta do sol, em
carros quentes, em frente de fornos ou outras
fontes de calor. Tal pode provocar fugas ou
explosões e pode prejudicar o desempenho e
a vida útil da bateria.
• Neste dispositivo apenas deve ser utilizada
a bateria fornecida com o mesmo ou uma
bateria de substituição compatível adquirida
junto da Soundcast, LLC. Não utilize esta
bateria em nenhum outro dispositivo.
• Utilize apenas o carregador incorporado neste
dispositivo para carregar a bateria. Não tente
carregar a bateria utilizando outros meios ou
dispositivos. Caso contrário, a bateria pode
aquecer, rebentar, incendiar-se e causar
lesões graves.
• A bateria pode ser carregada num intervalo
de temperaturas entre os 0 °C e os +45 °C. O
carregador incorporado neste dispositivo não
irá carregar a bateria fora deste intervalo. O
carregamento da bateria numa temperatura
fora deste intervalo pode fazer com que a
pode prejudicar o desempenho da bateria ou
reduzir a sua vida útil.
• A bateria pode ser utilizada num intervalo de
temperaturas entre os -20 °C e os +50 °C.
A utilização da bateria numa temperatura
fora deste intervalo pode prejudicar o
desempenho da bateria ou reduzir a sua vida
útil.
PARA CLIENTES NOS EUA E NO CANADÁ
RECICLAGEM DE BATERIAS DE IÕES DE LÍTIO:
as baterias de iões de lítio são recicláveis.
Proteja o ambiente ao colocar as baterias
recarregáveis usadas no ponto de recolha e
reciclagem mais perto de si. Para obter mais
informações sobre a reciclagem das baterias
recarregáveis, ligue gratuitamente para o
número 1-800-822-8837 ou visite www.
call2recycle.org
Atenção: não manipule
fugas.
DEUTSCH
SICHERHEITSANWEISUNGEN FÜR LITHIUM-
IONEN BATTERIEN
Volt Lithium Ionen Batterie für Nutzung
unter Gleichstrom. Bitte sehen Sie sich die
folgende Sicherheitsanweisung an bevor
das Gerät verwendet wird. Wenn Sie diese
Anweisung nicht lesen und nicht befolgen,
kann das Resultat Feuer, Verletzungen und
zu Sachschäden führen, wenn die Batterie
unsachgemäss verwendet oder aufgeladen
wird. Bitte laden Sie die Batterie vor dem
ersten Gebrauch vollständig.
Bitte merken Sie die folgenden Vorkehrungen
bei der Handhabung der Batterie oder wenn Sie
sie anwenden.
• Nicht ins Feuer werfen oder hohen
Temperaturen aussetzen.
• In keiner Weise setzen Sie die Batterie
umgekehrt mit dem negativen und positiven
verkehrt ein.
• Stecken Sie niemals die Batterie direkt in die
Steckdose oder an die 12V Kfz-Ports.
• Vermeiden Sie den Kontakt der positiven und
den negativen Anschlüsse mit Metallen wie
z. B. Drähte, usw. Auch tragen Sie nicht die
Batterien zusammen mit Halsbändern usw.
• Nehmen Sie nicht die Batterie auseinander
Die Batterie enthält Sicherheits- und
Schutzeinrichtungen, die wenn beschädigt,
wärme erzeugen, explodieren oder sich
entzünden können.
•
Löten oder Schweißen Sie nicht direkt an der
Batterie
• Die Batterie enthält chemische Flüssigkeiten.
Wenn dies Flüssigkeiten mit den Augen
in Kontakt kommen kann man die Sicht
verlieren. Ohne an den Augen zu reiben,
waschen Sie sofort 15 Minuten lang mit
sauberem Wasser. Suchen Sie sofort einen
Arzt auf.
• Verwenden Sie nicht die Batterie wenn diese
Zeichen von undichte, Änderung in der Farbe
oder Form oder jede andere Änderung zeigt.
Auch wenn heiß, oder sie komisch riecht.
•
Lassen Sie die Batterie nicht nass werden
oder legen Sie sie nicht in Meereswasser
oder Wasser. Dies kann dazuführen dass die
Batterie heiß wird oder rostet.
• Entfernen oder machen Sie keinen
Schaden an der Beschichtung. Das führt zu
Kurzschlüssen und kann zu Undichte oder
Hitzegeneration führen.
• Halten Sie immer die Batterien von kleinen
Kindern entfernt.
• Wenn die Batterie verrostet ist, Hitze erzeugt,
oder jede Art von abnormalen Zeichen im
Moment des Kaufes hat, bringen Sie sie zum
Händler ohne dies zu verwenden.
• Wenn die Batterie nicht angewendet
wird, oder diese für ein Längere Zeit nicht
angewendet werden soll, nehmen Sie die
Batterie heraus und lagern Sie sie an einem
trockenen Ort bei einer Temperatur von
zwischen -20° C (-4°F) und 35°C (95° F).
Dies hindert das rosten, auslaufen, und
schlechte Batterieleistung und ein kurzes
Leben.
•
Lassen Sie die Batterie niemals im direkten
Sonnenlicht, in heissen Autos, vor Herden,
oder andere heisse Stellen. Dies könnte
zu einer Explosion oder Leck führen,
und kann die Lebensdauer und Leistung
beeinträchtigen.
• Nur die Batterie die mit dem Gerät geliefert
wird, oder eine kompatible Ersatzbatterie die
bei Soundcast, LLC gekauft wurde sollte im
Gerät angewendet werde. Verwenden Sie
diese Batterie in keinem anderen Gerät.
• Wenn die Batterie geladen wird, verwenden
Sie nur das mitgelieferte Ladegerät.
Versuchen Sie nicht die Batterie in einer
anderen Weise zu laden. Das nicht Befolgen
kann zum erhitzen, platzen und schweren
Verletzungen führen.
• Die Temperaturränge in denen die Batterie
geladen werden kann sind 0°C (+32°F) bis
+45°C (+113°F). Der eingebaute Lader in
diesem Gerät wird die Batterie außerhalb
außerhalb von diesem Rang zu laden wird
dazu führen dass die Batterie heiß wird und
kaputt geht. Dies kann auch die Leistung und
Lebensdauer der Batterie beinträchtigen.
• Der Temperaturrang in dem die Batterie
verwendet werden kann ist -20°C (-4°F) bis
+50°C (+122°F).Die Batterie außerhalb von
diesem Rang anzuwenden wird dazu führen
dass die Leistung und Lebensdauer der
Batterie beeinträchtigt wird.
FÜR KUNDEN IN DEN USA UND KANADA
RECYCLING VON LITHIUM-IONEN BATTERIEN:
Lithium Ionen Batterien kann man recyclen.
Sie können helfen unsere Umwelt zu schonen
Batterien zur Sammlung und Verwertung
abgeben. Zu mehr Informationen über das
Recycling von Batterien rufen sie kostenlos
an:1-800-822-8837, oder besuchen sie http://
www.rbrc.org/ Achtung: Verwenden Sie keine
beschädigten oder leckenden Lithium-Ionen-
Batterien.
NEDERLANDS
LI-ION ACCU VEILIGHEIDSINSTRUCTIES
De VGX gebruikt een 12 volt Lithium-ion
oplaadbare accu voor gelijkspanningsgebruik.
Lees voor gebruik de volgende
veiligheidsinstructies door. Wanneer u de
onderstaande instructies niet leest en niet
opvolgt, kan dit bij onjuist opladen of gebruik
tot brand, lichamelijk letsel en schade aan
eigendommen leiden. Let op dat de accu
voor het eerste gebruik volledig moet zijn
opgeladen.
Neem de volgende voorzorgsmaatregelen in
acht wanneer u de accu gebruikt of hanteert.
• Gooi de accu niet in het vuur en stel deze niet
aan een hoge temperatuur bloot.
• Plaats de accu onder geen enkele
omstandigheid met de positieve en negatieve
polen omgedraaid.
• Sluit de accu niet rechtstreeks op
stopcontacten of 12 volt-autocontacten aan.
• Verbind de positieve klem niet met de
negatieve klem door middel van metalen
zoals draad. Draag of sla de accu ook niet op
met metalen kettingen enz.
• Haal de accu niet uit elkaar en wijzig niets
aan de accu. De accu bevat onderdelen
ter beveiliging en bescherming die, bij
beschadiging, ervoor kunnen zorgen dat de
accu warmte gaat genereren, ontploft of in
brand vliegt.
• Soldeer niet rechtstreeks op de accu.
• De accu bevat een chemische vloeistof.
Indien deze vloeistof in contact komt met
ogen, kan dit tot blindheid leiden. Wrijf niet in
de ogen, spoel de ogen meteen met schoon
water uit gedurende minstens 15 minuten en
raadpleeg een arts.
• Gebruik de accu niet indien er tekenen van
lekkage, een verandering van kleur of vorm of
elke andere verandering in het uiterlijk te zien
zijn, deze een ongebruikelijke geur afgeeft of
als deze warm aanvoelt.
• Maak de accu niet nat, of plaats deze niet
in water of zeewater. Hierdoor kan de accu
warm worden of roesten.
• Verwijder of beschadig het omhulsel niet.
Daardoor kan de accu gemakkelijk kortsluiten
en dit leidt mogelijk tot lekkage en het
genereren van warmte.
• Sla de accu altijd buiten het bereik van kleine
kinderen op.
• Indien de accu ten tijde van de aankoop
roestvorming vertoont, warmte genereert
of enig ander afwijkende tekenen vertoont,
breng deze dan terug naar de winkel en
gebruik deze niet.
• Wanneer u de accu niet gebruikt, of het
apparaat voor langere tijd niet gebruikt,
verwijder dan de accu uit het apparaat en sla
deze op een droge plek op met temperaturen
tussen -20 °C (-4 °F) en +35 °C (95 °F). Dit
voorkomt lekkage, roest en verminderde
prestaties en levensduur van de accu.
• Plaats de accu niet in direct zonlicht, in
warme auto’s, voor ovens of andere warme
leiden en kan de prestaties en levensduur
verminderen.
• Gebruik in dit apparaat alleen de bij het
apparaat geleverde accu of een compatibele
vervangende accu gekocht bij Soundcast,
LLC. Gebruik deze accu niet in een ander
apparaat.
• Gebruik voor het opladen van de accu alleen
de ingebouwde lader van het apparaat.
Probeer niet om de accu op enige andere
wijze of met gebruik van enig ander apparaat
op te laden. Het niet op de voorgeschreven
wijze laden kan ertoe leiden dat de accu
warm wordt, kapot gaat, of in brand vliegt en
kan lichamelijk letsel veroorzaken.
• Het temperatuurbereik waarbinnen deze
accu kan worden opgeladen is 0 °C (+32
°F) tot +45 °C (+113 °F). De in het apparaat
ingebouwde lader kan de accu buiten dit
bereik niet opladen. Het laden van de accu
op temperaturen buiten dit bereik kan ertoe
leiden dat de accu warm wordt of kapot gaat,
en kan ook leiden tot vermindering van de
prestaties en levensduur van de accu.
• Het temperatuurbereik waarin deze accu
gebruikt kan worden is -20 °C (-4 °F) tot +50
°C (+122 °F). Gebruik van de accu buiten dit
temperatuurbereik kan de accu beschadigen
of de levensduur verminderen.
VOOR KLANTEN IN DE V.S. EN CANADA
RECYCLEN VAN LITHIUM-ION ACCU’S: Lithium-
ion accu’s kunnen worden gerecycled. U kunt
helpen het milieu te beschermen door uw
gebruikte accu’s weg te brengen naar een
inzamel- en recyclepunt bij u in de buurt.
Voor meer informatie over het recyclen van
accu’s kunt u gratis bellen: 1-800-822-8837
of kunt u naar http:// www.rbrc.org/ gaan.
Waarschuwing: gebruik geen beschadigde of
lekkende Lithium-ion accu’s. 小心:如果电池更换不当,会有爆炸的危险。只能替换为相同或等同类型。
电池和电池组不应暴露于过热的环境中,如长时间的阳光照射或火灾。
27
SAFETY INSTRUCTIONS
ENGLISH
DISPOSAL OF OLD ELECTRICAL & ELECTRONIC EQUIPMENT
(Applicable in the European Union and other European
countries with separate collection systems)This symbol
on the product or on its packaging indicates that this
product shall not be treated as household waste. Instead
it shall be handed over to the applicable collection
point for the recycling of electrical and electronic equipment. By
ensuring this product is disposed of correctly, you will help prevent
potential negative consequences for the environment and human
health, which could otherwise be caused by inappropriate waste
handling of this product. The recycling of materials will help to
conserve natural resources. For more detailed information about
your household waste disposal service or the shop where you
purchased the product.
This symbol on the battery or on the packaging indicates
that the battery provided with this product shall not be
treated as household waste. By ensuring these batteries
are disposed of correctly, you will help prevent potentially
negative consequences for the environment and human health
which could otherwise be caused by inappropriate waste handling
of the battery. The recycling of the materials will help to conserve
natural resources.In case of products that for safety, performance
or data integrity reasons require a permanent connection with an
service staff only.To ensure that the battery will be treated properly,
hand over the product at end-of-life to the applicable collection
point for the recycling of electrical and electronic equipment. For
all other batteries, please view the section on how to remove
the battery from the product safely. Hand the battery over to the
applicable collection point for the recycling of waste batteries.
For more detailed information about recycling of this product or
disposal service or the shop where you purchased the product.
SAFETY INFORMATION
CAUTION: PLEASE READ THE INSTRUCTIONS GIVEN IN THIS
MANUAL AND THOSE MARKED ON THE UNIT. KEEP THESE
INSTRUCTIONS FOR FUTURE REFERENCE. PLEASE HEED ALL
WARNINGS AND FOLLOW ALL INSTRUCTIONS.
This unit has been designed and manufactured to assure personal
safeguards incorporated in this unit will protect you if you observe
the following procedures for installation, use, and servicing. This
unit does not contain any parts that can be repaired by the user.
AC/DC ADAPTER POWER SUPPLY
Use only the AC adapter that was supplied by Soundcast Systems.
Do not use a substitute AC adapter. Using an incorrect AC adapter
may cause damage to the unit and will void its warranty.
IMPORTANT SAFETY INSTRUCTIONS
• Read the instructions.
• Heed all warnings.
• Follow all instructions.
• Do not use this unit in water. The unit is weather resistant, not
water proof. It is recommended to have the unit outdoors only
while in use. It should be stored indoors when not in use.
• When using the unit outdoors it is recommended to operate
on battery power only. The AC adapter is designed for indoor
applications only.
• Clean only with a dry cloth.
• Do not block any ventilation openings. Install in accordance with
the manufacturers instructions.
• Do not install near any heat sources such as radiators, heat
produce heat.
• Do not defeat the safety purpose of the polarized plug. A
polarized plug has two blades with one wider than the other. The
wide blade is provided for your safety. If the provided plug does
obsolete outlet. - This applies to 110 volt markets only.
• Protect the power cord from being walked on or pinched
particularly at the plugs, convenience receptacles, and the point
where it exits the unit.
•
•
required when the unit has been damaged in any way, such
as the power supply cord or plug is damaged, liquid has been
spilled or objects have fallen into the unit, the power supply has
been exposed to rain or moisture, does not operate, or has been
dropped.
SAFETY PRECAUTIONS
an equilateral triangle, alerts the user to the
presence of un-insulated “dangerous voltage”
within the product’s enclosure that may be of
The exclamation point within an equilateral triangle
alerts the user to the presence of important
operating and maintenance (servicing) instructions
in the literature accompanying the appliance.
WARNING: TO REDUCE THE RISK OF FIRE OR ELECTRIC SHOCK, DO
NOT EXPOSE THIS APPLIANCE TO RAIN OR MOISTURE. VOLTAGES
ARE PRESENT INSIDE THE ENCLOSURE. DO NOT OPEN THE
ENCLOSURE. REFER SERVICING TO QUALIFIED PERSONNEL ONLY.
CAUTION: TO PREVENT ELECTRIC SHOCK, MATCH THE
WIDE BLADE
OF THE PLUG TO THE WIDE SLOT, AND FULLY INSERT. - 110 volt
markets only.
ESPAÑOL
RECLICLADO DE ANTIGUOS EQUIPOS ELÉCTRICOS Y
ELECTRÓNICOS
(Aplicable en la Unión Europea y otros países europeos
con sistemas de reciclado diferentes) Este símbolo en
el producto o en el embalaje indica que este producto
no es basura del hogar. En su lugar se debe llevar
al punto de recogida designado para el reciclado de
equipos eléctricos y electrónicos.Al asegurarse que este producto
se recicla de la manera adecuada, ayudará a evitar consecuencias
potenciales, negativas para el entorno y la salud humana, que
podrían ser consecuencia de un tratamiento inadecuado de este
producto. El reciclado de materiales ayudará a conservar recursos
naturales. Para obtener más información acerca del reciclado de
este producto, póngase en contacto con el funcionario local, el
servicio de reciclado local o la tienda donde compró el producto.
Este símbolo en la batería o en el embalaje indica que
la batería de este producto no es basura del hogar. Al
asegurarse que las baterías se reciclan de la manera
adecuada, ayudará a evitar consecuencias potenciales,
negativas para el entorno y la salud humana, que podrían ser
consecuencia de un tratamiento inadecuado de las baterías. El
reciclado de materiales ayudará a conservar recursos naturales.
En el caso de productos que necesiten tener la batería incorporada
continuadamente por razones de seguridad, rendimiento o
integridad de los datos, esta batería la debería cambiar solo
su vida al punto de recogida designado para el reciclaje de equipo
eléctrico o electrónico. Para el resto de baterías, consulte la sección
Cómo quitar la batería del producto con seguridad. Lleve la batería
al punto de recogida designado de reciclaje de baterías. Para más
información sobre el reciclado de este producto o batería, póngase
en contacto con su funcionario local, servicio de reciclado local o la
tienda donde compró el producto.
INFORMACIÓN DE SEGURIDAD
ATENCIÓN: LEA ATENTAMENTE LAS INSTRUCCIONES DEL
MANUAL Y LAS MARCADAS EN LA UNIDAD. GUARDE LAS
INSTRUCCIONES PARA CONSULTARLAS EN EL FUTURO. RESPETE
LAS ADVERTENCIAS E INSTRUCCIONES.
Esta unidad se ha diseñado y fabricado para asegurar su seguridad
personal. Un uso inadecuado puede tener como resultado choque
eléctrico o incendio. Los salvaguardas incorporados en la unidad
le protegen si cumple con los siguientes procedimientos de
instalación, uso y servicio. Esta unidad no puede ser reparada
por el usuario.
ADAPTADOR ALIMENTADOR CA/CC
Use solo el adaptador CA provisto por Soundcast Systems. No use
un adaptador CA sustituto. Usar un adaptador CA incorrecto podría
dañar la unidad y anulará esta garantía.
INTRUCCIONES IMPORTANTES DE SEGURIDAD
• Lea las instrucciones.
• Respete las advertencias.
• Siga las instrucciones.
• No use esta unidad en agua. Unidad es resistente al agua, no
impermeable. Se recomienda solo tener la unidad fuera mientras
se usa. Se debería guardar en el interior cuando no se usa.
• Cuando use la unidad en el exterior, se recomienda que use solo
la batería. El adaptador CA se ha diseñado para su uso en el
interior.
• Límpielo con un trapo seco.
• No bloquee las aperturas de ventilación. Instale siguiendo las
instrucciones del fabricante.
• No lo instale cerca de fuentes de calor como radiadores,
calefactores, estufas u otros dispositivos (incluyendo
•
polarizada.Una clavija polarizada tiene dos clavijas, una más
ancha que la otra. La clavija ancha está para su seguridad. Si
el conector no cabe en el enchufe, consulte con un electricista
para sustituir el enchufe obsoleto. - Esto solo se aplica a los
mercados de 110 voltios.
• Proteja el cable alimentador para que nadie lo pise o se pince,
en particular en los enchufes, ladrones y puntos donde salen del
aparato.
•
fabricante.
•
necesario reparar cuando la unidad se ha dañado, como por
ejemplo se ha dañado el cable o el enchufe, ha caído líquido
o han caído objetos en la unidad, el alimentador se ha visto
expuesto a humedad de lluvia, no funciona o se ha caído.
PRECAUCIONES DE SEGURIDAD
triángulo equilátero indica al usuario que la caja
del sistema puede contener una tensión sin aislar
de descarga eléctrica.
El signo de exclamación dentro de un triángulo
equiláteroalerta al usuario de que existen
instrucciones de operación y mantenimiento
importantes en esta guía.
ADVERTENCIA: PARA REDUCIR EL RIESGO DE INCENDIO O CHOQUE
ELÉCTRICO, NO EXPONGA ESTE APARATO A LLUVIA O HUMEDAD.
HAY VOLTAJE EN LA CAJA. NO ABRA LA CAJA.TODA REPARACIÓN
DEBE SER REALIZADA POR PERSONAL CUALIFICADO.
ATENCIÓN: PARA EVITAR CHOQUES ELÉCTRICOS, COINCIDA LA
CLAVIJA ANCHA DEL ENCHUFE CON LA RANURA ANCHA E INSERTE.
– Solo mercados de 110 voltios
FRANCAIS
ÉLIMINATION DU MATÉRIEL ÉLECTRIQUE ET ÉLECTRONIQUE
USAGÉS
(Applicables dans l’Union Européenne et d’autres pays
européens disposant de systèmes de collecte sélective) v
Ce symbole sur le produit ou sur son emballage indique
que ce produit ne doit pas être traité comme un déchet
ménager. Il doit plutôt être jeté au point de collecte
approprié pour le recyclage du matériel électrique et électronique.
En s’assurant que ce produit est éliminé correctement, vous aidez
la prévention des conséquences négatives pour l’environnement
et la santé humaine qui pourraient autrement résulter d’une
manipulation inappropriée des déchets de ce produit. Le recyclage
des matériaux aide à préserver les ressources naturelles. Pour
des informations plus détaillées sur le recyclage de ce produit,
veuillez contacter votre municipalité, votre service municipal
d’élimination des déchets ménagers ou le magasin où vous avez
acheté le produit.
Ce symbole, sur la batterie ou sur l’emballage, indique
que la batterie fournie avec ce produit ne doit pas être
traitée comme un déchet ménager. En s’assurant que
ces f batteries sont éliminées correctement, vous aidez
la prévention des conséquences négatives pour l’environnement
et la santé humaine qui pourraient autrement résulter d’une
manipulation inappropriée des déchets de ces batteries. Le
recyclage des matériaux aide à préserver les ressources naturelles.
Dans le cas de produits qui, pour des raisons de sécurité, de
performance ou de protection des données, nécessitent une
connexion permanente à une batterie incorporée, cette batterie
que la batterie sera traitée correctement, remettez-le produit en
matériel électrique et électronique. Pour toutes les autres piles,
veuillez consulter la section sur la façon de retirer les piles de
l’appareil en toute sécurité. Éliminez les piles dans un point de
collecte approprié pour le recyclage des piles usagées. Pour des
informations plus détaillées sur le recyclage de ce produit ou de
piles, veuillez contacter votre municipalité, votre service municipal
d’élimination des déchets ménagers ou le magasin où vous avez
acheté le produit.
CONSIGNES DE SÉCURITÉ
ATTENTION : VEUILLEZ LIRE LES INSTRUCTIONS DONNÉES DANS
CE MANUEL ET CELLES INDIQUÉES SUR L’APPAREIL. CONSERVEZ
CES INSTRUCTIONS POUR RÉFÉRENCE ULTÉRIEURE. VEUILLEZ
PRENDRE EN COMPTE TOUS LES AVERTISSEMENTS ET SUIVRE
TOUTES LES INSTRUCTIONS.
Cet appareil a été conçu et fabriqué pour assurer votre sécurité
personnelle. Une utilisation incorrecte peut provoquer une décharge
électrique ou un risque d’incendie. Les dispositifs de sécurité
incorporés dans cet appareil vous protégeront si vous respectez les
procédures d’installation, d’utilisation et d’entretien. Cet appareil ne
contient aucune pièce qui puisse être réparée par l’utilisateur
ALIMENTATION DE L’ADAPTATEUR C.A. / C.C.
Utilisez uniquement l’adaptateur secteur fourni par Soundcast
Systems. N’utilisez pas un autre adaptateur c.a. L’utilisation d’un
adaptateur c.a. incorrect peut endommager l’appareil et annuler
la garantie.
CONSIGNES DE SÉCURITÉ IMPORTANTES
• Lisez les instructions.
• Prenez les avertissements en compte.
• Suivez toutes les instructions.
• N’utilisez pas cet appareil dans l’eau. Le appareil est résistant
aux intempéries, il n’est pas étanche. Il est conseillé de laisser
l’appareil à l’extérieur seulement pendant son utilisation. Il doit
être rangé à l’intérieur lorsqu’il n’est pas utilisé.
• Lorsque vous utilisez l’appareil à l’extérieur, il est conseillé de le
faire fonctionner sur batterie uniquement. L’adaptateur secteur
est conçu pour l’utilisation à l’intérieur seulement.
• Nettoyez-le uniquement avec un chiffon sec.
• N’obstruez aucune ouverture de ventilation. Installez
conformément aux instructions du fabricant.
• N’installez pas à proximité de sources de chaleur telles que
radiateurs, bouches de chaleur, fours ou autres appareils (y
•
que l’autre. La broche la plus large joue un rôle de sécurité.
électricien pour remplacer la prise obsolète. - Ces consignes
s’appliquent aux réseaux 110 volts seulement.
•
de raccordement et au point où il sort de l’appareil.
• Utilisez uniquement des produits et accessoires agréés par le
fabricant.
•
est nécessaire lorsque l’appareil a été endommagé d’une façon
est tombé à l’intérieur de l’appareil, l’alimentation électrique a
été exposée à la pluie ou à l’humidité, l’appareil ne fonctionne
pas normalement ou il est tombé par terre.
MESURES DE SÉCURITÉ
Le symbole représentant un éclair terminé par
l’utilisateur de la présence d’une « tension
dangereuse» non isolée à l’intérieur du boîtier de
de décharges électriques.
Le symbole représentant un point d’exclamation
dans un triangle équilatéral avertit l’utilisateur de
la présence d’instructions importantes relatives au
fonctionnement et à l’entretien (et la maintenance)
dans la documentation accompagnant l’appareil.
PRUDENCE : POUR RÉDUIRE LE RISQUE D’INCENDIE OU DE
DÉCHARGES ÉLECTRIQUES, N’EXPOSEZ PAS CET APPAREIL À LA
PLUIE OU À L’HUMIDITÉ. CERTAINES PARTIES À L’INTÉRIEUR DU
BOÎTIER SONT SOUS TENSION N’OUVREZ PAS LE BOÎTIER. POUR
TOUTE RÉPARATION, FAITES APPEL À UN PERSONNEL QUALIFIÉ
UNIQUEMENT
ATTENTION : POUR ÉVITER LES DÉCHARGES ÉLECTRIQUES, LA
BROCHE LA PLUS LARGE DE LA FICHE DOIT ÊTRE COMPLÈTEMENT
ENFONCÉE DANS LE TROU LE PLUS LARGE DE LA PRISE. -
S’applique aux réseaux 110 volts seulement.
1.This product is suitable for non-tropical weather condi-
tions, for use below 2000 meters above sea level
2. NOTE: If your VG5 Bluetooth Source has not played
back audio for 10 minutes, it will automatically go to Net-
work Standby mode, to minimizing power consumption.
Power consumption in Network Standby mode is below
2W, this is according to EU regulations. Without any
Source input,VG5 will automatically go to full standby
mode after 15 minutes (according to European CE
regulations).Power consumption in full standby mode is
below 0.5W. When connected to DC insert, and Without
any Source input,VG5 will automatically go to full standby
mode after 1 week
1. Este producto es adecuado para condiciones climáti-
cas no tropicales, para usar a menos de 2000 metros
sobre el nivel del mar
2. NOTA: Si su fuente de Bluetooth VG5 no ha reproduci-
do audio durante 10 minutos, pasará automáticamente
al modo de espera de red, para minimizar el consumo
de energía. El consumo de energía en modo de espera
de red está por debajo de 2W, esto es de acuerdo
con las regulaciones de la UE. Sin ninguna entrada de
fuente, VG5 pasará automáticamente al modo de espera
completo después de 15 minutos (de acuerdo con las
regulaciones europeas CE). El consumo de energía en
modo de espera completo está por debajo de 0.5W.
Cuando se conecta a la inserción de CC, y sin ninguna
entrada de fuente, VG5 pasará automáticamente al
modo de espera completo después de 1 semana.
1. Ce produit convient aux conditions atmosphériques
non tropicales, pour l’utilisation au-dessous de 2000
mètres au-dessus du niveau de la mer
2. REMARQUE: Si votre source Bluetooth VG5 n’a
pas lu d’audio pendant 10 minutes, elle passera au-
tomatiquement en mode veille réseau pour réduire la
consommation d’énergie. La consommation d’énergie
en mode veille réseau est inférieure à 2W, conformé-
ment aux réglementations de l’UE. Sans aucune
entrée Source, VG5 passera automatiquement en
mode de veille complète après 15 minutes (selon les
normes CE européennes). La consommation d’énergie
en mode veille est inférieure à 0,5W. Lorsqu’il est
connecté à DC insert, et sans aucune entrée Source,
VG5 passera automatiquement en mode veille après
1 semaine
28
PORTUGUESE
TRATAMENTO DE EQUIPAMENTO ELÉTRICO ANTIGO E
EQUIPAMENTO ELETRÓNICO
(Aplicável na União Europeia e outros paises Europeus
com sistemas de recolha separada) Este símbolo no
produto ou na sua embalagem indica que este produto
não será tratado como resíduo doméstico. Em vez
disso será tratado no respetivo ponto de recolha para
reciclagem de equipamento elétrico e eletrónico.
Ao assegurar-se que este produto é depositado corretamente,
ajudará a prevenir potenciais consequências negativas para o
ambiente e para a saúde , que poderia, de outra forma, ocorrer
pelo depósito inapropriado no manuseamento deste produto. A
reciclagem de materiais ajudará a conservar os recursos naturais.
Para informação mais detalhada sobre a reciclagem deste produto.
ou loja onde adquiriu este produto.
Este símbolo na bateria ou na embalagem indica
que a bateria fornecida não será tratada como um
resíduo doméstico. Ao assegurar que estas baterias
são depositadas corretamente, ajudará a prevenir
consequências potencialmente negativas para o
ambiente e para a saúde que poderiam, de outro modo, ser
causadas pelo depósito inapropriado do manuseamento da bateria.
A reciclagem dos materiais ajudará a conservar os recursos
naturais . No caso de produtos que, para segurança, desempenho
ou motivos de integração de dados, requerem uma ligação
permanente com a bateria incorporada, esta bateria deve ser
Para assegurar que a bateria será tratada de forma apropriada,
para a reciclagem de equipamento elétrico e eletrónico. Para
todas as outras baterias, veja por favor a secção sobre como
remover a bateria do produto com segurança. Para todas as outras
baterias, veja por favor a secção sobre como remover a bateria do
produto com segurança. Entregue a bateria no ponto de recolha
para a reciclagem de resíduos de baterias. Para informação mais
detalhada sobre a reciclagem deste produto ou bateria, contacte
reciclagem deste produto ou bateria ou a loja onde adquiriu este
produto.
INFORMAÇÃO DE SEGURANÇA
CUIDADO: LEIA POR FAVOR AS INSTRUÇÕES DADAS NESTE
MANUAL E AQUELAS INSTRUÇÕES PARA REFERÊNCIA FUTURA
.POR FAVOR LEIA OS AVISOS E SIGA TODAS AS INSTRUÇÕES.
Este aparelho foi desenhado e manufaturado para assegurar a
segurança pessoal. O uso inapropriado poderá resultar em choque
elétrico ou incêndio. As proteções incorporadas nesta unidade
protegê-lo-ão se seguir os seguintes procedimentos para instalação
e funcionamento. Esta undade não contém quaisquer partes que
possam ser reparadas pelo Utilizador.
INSTRUÇÕES IMPORTANTES DE SEGURANÇA
• Leia as instruções.
• Tenha atenção a todos os avisos.
• Siga as instruções.
• Não utilize esta unidade em água. A unidade é resistente às
intempéries, não à prova de água. Recomenda-se que a unidade
esteja ao ar livre somente enquanto estiver em uso. Ele deve ser
armazenado em ambientes fechados quando não estiver em uso.
• Ao usar as saídas do aparelho é recomendável utilizar apenas
para a corrente da bateria.
• O adaptador AC é concebido apenas para usos domésticos.
Limpe apenas com um pano seco.
• Não bloqueie quaisquer saídas de ventilação. Instale de acordo
com as instruções do fabricante.
• Não instale perto de fontes de calor, tais como radiadores,
termostatos, fogões, e outros aparelhos (incluindo
• Não anule o objetivo de segurança da tomada polarizada. A
tomada polarizada tem duas lâminas, sendo uma mais larga
do que a outra. A lâmina mais larga é providenciada para sua
segurança. Se a tomada fornecida não encaixar na tomada
elétrica, consulte um eletricista para substituir a tomada
obsoleta. - Isto aplica-se apenas até 110 volts.
• Proteja a extensão elétrica de ser pisada ou trilhada,
particularmente nas tomadas, tomadas de uso geral, e no ponto
de saída do aparelho.
•
• Todo o serviço de reparação deverá ser efetuado por pessoal
terem caído objetos dentro do aparelho, a alimentação elétrica
ter sido exposta à chuva ou humidade, não funcionar, ou ter
caído.
PRECAUÇÕES DE SEGURANÇA
O raio com o símbolo de uma seta dentro de um
triângulo equilátero, alerta o utilizador para a
presença de uma “perigosa voltagem”
não isolada
dentro da área fechada do produto,
que poderá ser
de choque elétrico.
O ponto de exclamação dentro de um triângulo
equilátero alerta o utilizador para presença de
instruções importantes de funcionamento e
manutenção na literatura que acompanha o
aparelho.
PERIGO: para reduzir o risco de incêndio ou choque elétrico, não
exponha este aparelho à chuva ou humidade. As voltagens estão
visíveis dentro da embalagem. Não abra a embalagem. A
reparação
CUIDADO: para prevenir o choque elétrico, ligue a lâmina larga da
tomada à ranhura larga e insira totalmente. - Apenas 110 volts.
DEUTSCH
ENTSORGUNG VON ALTEN ELEKTRO- UND ELEKTRONISCHEN
GERÄTEN
(Gültig in der Europäischen Union und anderen
europäischen Ländern mit einem separaten
Sammelsystem) Das Symbol auf dem Produkt oder
Verpackung zeigt das dieses Produkt nicht als
herkömmlicher Haushaltsmüll behandelt werden soll.
Stattdessen soll es an einem Sammelpunkt für das Recycling
von elektrischen und Elektronischen Geräten abgegeben werden.
Wenn die Batterien richtig entsorgt werden, tragen Sie dazu bei
negative Folgen für die Umwelt und menschliche Gesundheit zu
erzeugen die durch die unsachgemäße Entsorgung dieses Produkts
verursacht werden können. Geben Sie die Batterie an einer
Annahmestelle für das Recycling von Altbatterien ab. Für weitere
detaillierte Informationen über das Recycling dieses Produkts oder
der Batterie erhalten Sie von Ihrer Gemeinde, den kommunalen
Entsorgungsbetrieben oder dem Geschäft, in dem Sie das Produkt
gekauft haben.
Das Symbol auf der Batterie oder auf der Verpackung
zeigt an, dass die Batterie in diesem Gerät nicht als
normaler Haushaltsmüll behandelt werden soll. Durch
die Sicherstellung das diese Batterien richtig entsorgt
werden, helfen Sie die Möglichen negativen Folgen in unserer
Umwelt und für die menschliche Gesundheit, die ansonsten durch
die unsachgemässe entsorgung der Batterie verursacht werden
können. Das Recycling der Materielien hilft, die natürlichen
Ressourcen zu bewahren. In Fällen von Produkten die aus Gründen
von Sicherheit der Datenintegrität eine ständige Verbindung mit
einer integrierten Batterie brauchen, sollte diese Batterie nur
vergewissern das die Batterie richtig behandelt wird, sollte das
Produkt am Ende seiner Lebensdaur an einen Sammelpunkt für
das Recycling abgegeban werden. Für den Rest der Batterien
sehen Sie die Sektion wie man die Batterie Sicher aus dem Gerät
entfernt. Für weitere Informationen über das Recycling dieses
Produktes oder der Batterie kontaktieren Sie Ihre Gemeinde, oder
Ihr Abfall- Entsorgungsbetrieb oder den Händler wo Sie das Produkt
gekauft haben.
INFORMATIONEN ZUR SICHERHEIT
ACHTUNG: BITTE LESEN SIE DIE ANWEISUNGEN IN DIESEM
HANDBUCH UND DIE DIE AUF DEM GERÄT ANGEGEBEN SIND.
BEHALTEN SIE DIESE ANLEITUNG ZUM SPÄTEREN NACHSCHLAGEN.
BITTE BEACHTEN SIE ALLE WARNUNGEN UND BEFOLGEN SIE ALLE
ANWEISUNGEN.
Dieses Gerät wurde so konzipiert und hergestellt, um Ihre
persönliche Sicherheit zu gewährleisten. Ein unsachgemäßer
Gebrauch kann zu Stromschlägen oder Bränden führen. Die in
diesem Grät integrierten Schutzmassnahmen werden Sie schützen
wenn Sie die folgenden Verfahren während der Installation,
Verwendung und Wartung beachten. Dieses Gerät enthält keine
Teile die vom Benutzer repariert werden können.
AC / DC ADAPTER NETZTEIL
Verwenden Sie nur das Netzteil das von Souncast Systems geliefert
wurde. Ersetzen Sie nie den AC-Adapter. Die Verwendung eines
falschen Netzteils kann zu schäden am Gerät und zur Erlöschung
der Garantie führen.
WICHTIGE SICHERHEITSHINWEISE
• Lesen Sie die Gebrauchsanweisung
• Beachten Sie alle Warnungen.
• Folgen Sie alle Anweisungen.
• Verwenden Sie dieses Gerät nicht im Wasser. Gerät ist
witterungsbeständig aber nicht wasserdicht. Es wird empfohlen
das das Gerät nur während seinem Gebrauch im Freien ist.
Es sollte in einem innenraum gelagert werden wenn es nicht
gebraucht wird.
• Wenn das Gerät im Freien verwendet wird, empfehlen wir
Batteriestrom zu verwenden. Das Netzteil ist nur für den
Gebrauch im Haus ausgelegt.
• Nur mit einem trokenen Lappen reinigen
• Blockieren Sie keine Belüftungsöffnungen. Installieren Sie in
Übereinstimmung mit den Anweisungen des Herstellers.
• Stellen Sie das Gerät nicht in die Nähe von Heizkörper,
Wärmespeicher, Ofen oder andere Geräte, (einschließlich
Verstärker), die Wärme erzeugen.
• Umgehen Sie nicht die Sicherheitsfunktion eines polarisierten
Steckers. Ein Polarisierter Stecker hat zwei Klingen wo einer
breiter ist als der andere. Die breite Klinge ist für Ihre Sicherheit
vorgesehen. Wenn der mitgelieferte Stecker nicht in die
Steckdose passt, wenden Sie sich an einen Techniker um die
veraltete Steckdose umzutauschen. - Dies gilt nur für 110 Volt
Märkte.
• Schützen Sie das Netzkabel vor dem Abknicken, insbesondere
am Stecker, Steckdosen und am Punkt wo das Kabel aus dem
Gerät kommt.
• Verwenden Sie nur Zusatzgeräte / Zubehörteile, die vom
Hersteller erlaubt sind.
•
Techniker. Eine Wartung ist erforderlich, wenn das Gerät in
irgendeiner Weise beschädigt wurde, wie z. B. wenn das Kabel
oder Stecker beschädigt wurde, Flüssigkeit darüber geschüttet
wurde, oder Gegenstände auf das Gerät gefallen sind, oder
die Stromversorgung dem Regen oder Feuchtigkeit ausgesetzt
wurde, oder fallen gelassen wurde.
SICHERHEITSVORKEHRUNGEN
Der Blitz mit Pfeilspitze in einem gleichseitigen
Dreieck soll den Benutzer auf das Vorhandensein
nicht isolierter “gefährlicher Spannung” im Gehäuse
des Produkts warnen, die stark genug sein kann,
um die Gefahr eines elektrischen Schlags für
Personen darzustellen.
Das Ausrufezeichen in einem gleichseitigen Dreieck
weisst den Benutzer auf das Vorhandensein
wichtiger Betriebs- und Wartungen (Service) in der
im Gerät beiliegenden Literatur hin.
WARNUNG: UM DIE GEFAHR VON FEUER ODER STROMSCHLAG ZU
VERMEIDEN DARF DIESES GERÄT NICHT DEM FEUER ODER REGEN
AUSGESETZT WERDEN. ES GIBT SPANNUNGEN IM INNEREN DES
GEHÄUSES. DIESES GEHÄUSE DARF NICHT GEÖFFNET WERDEN.
REPARATUREN DÜRFEN NUR DURCH QUALIFIZIERTES PERSONAL
GEMACHT WERDEN.
ACHTUNG: UM STROMSCHLÄGE ZU VERMEIDEN,
STECKEN SIE DEN
BREITEN KONTAKT DES STECKERS IN DEN BREITEN SCHLITZ, UND
SCHIEBEN SIE IHN VOLLKMMEN EIN. Nur für 110Volt Märkte.
NEDERLANDS
OUDE ELEKTRISCHE OF ELEKTRONISCHE APPARATUUR
AFVOEREN
(Van toepassing in de Europese Unie en andere Europese
landen met gescheiden afvoer). Dit symbool op het
product of op de verpakking geeft aan dat dit product
niet als huishoudelijk afval mag worden afgevoerd . In
plaats daarvan moet het bij een geschikt inzamelpunt
voor het recyclen van elektrische en elektronische apparatuur
worden ingeleverd. Door dit product op de juiste manier af te
voeren, helpt u om mogelijk schadelijke gevolgen voor het milieu
en de gezondheid te voorkomen, die anders zouden kunnen worden
veroorzaakt door dit product incorrect als afval te verwerken .
Het recyclen van materialen helpt bij het behoud van natuurlijke
grondstoffen. Voor gedetailleerde informatie over het recyclen
van dit product, kunt u contact opnemen met uw gemeente,
huishoudelijke afvalverwerkingsbedrijf of de winkel waar u dit
product heeft aangeschaft.
Dit symbool op de accu of op de verpakking geeft aan
dat de accu geleverd bij dit product niet als huishoudelijk
afval mag worden afgevoerd. Door de accu op de juiste
manier af te voeren, helpt u om mogelijk schadelijke
gevolgen voor het milieu en de gezondheid te voorkomen, die
anders zouden kunnen worden veroorzaakt door de accu incorrect
als afval te af te voeren. Het recyclen van materialen helpt bij het
behoud van natuurlijke grondstoffen. In het geval van producten
waarbij om redenen van veiligheid, prestaties of integriteit van
gegevens een permanente verbinding met de hierin verwerkte accu
worden vervangen. Om ervoor te zorgen dat de accu correct wordt
afgevoerd, moet u het product aan het eind van de levensduur
inleveren bij een geschikt inzamelpunt voor het recyclen van
elektrische en elektronische apparatuur. Voor alle andere accu’s
moet u het gedeelte over het veilig verwijderen van de accu lezen.
Lever de accu in bij een geschikt inzamelpunt voor het recyclen van
oude batterijen. Voor gedetailleerde informatie over het recyclen
van dit product, kunt u contact opnemen met uw gemeente,
huishoudelijke afvalverwerkingsbedrijf of de winkel waar u dit
product heeft aangeschaft.
VEILIGHEIDSINFORMATIE
WAARSCHUWING: LEES DE INSTRUCTIES IN DEZE HANDLEIDING EN
OP HET APPARAAT GOED DOOR. BEWAAR DEZE INSTRUCTIES VOOR
TOEKOMSTIG GEBRUIK. NEEM ALLE WAARSCHUWINGEN IN ACHT
EN VOLG ALLE INSTRUCTIES OP.
Dit apparaat is ontworpen en gefabriceerd met uw persoonlijke
veiligheid centraal. Onjuist gebruik kan tot elektrische schokken of
brandgevaar leiden. De veiligheidsmaatregelen die in dit apparaat
zijn verwerkt, beschermen u indien u de volgende procedures voor
installatie, gebruik en onderhoud opvolgt. Dit apparaat bevat geen
onderdelen die door de gebruiker gerepareerd kunnen worden.
NETVOEDINGSADAPTER
Gebruik alleen de door Soundcast Systems meegeleverde
netvoedingsadapter. Gebruik geen vervangende
netvoedingsadapter. Het gebruik van een onjuiste
netvoedingsadapter kan tot schade aan het apparaat leiden wat
niet door de garantie wordt gedekt.
BELANGRIJKE VEILIGHEIDSINSTRUCTIES
• Lees alle instructies.
• Neem alle waarschuwingen in acht.
• Volg alle instructies op.
• Gebruik dit apparaat niet onder water. De Melody is
weerbestendig, niet waterdicht. Aangeraden wordt het
apparaat alleen buiten te laten als het in gebruik is. Bewaar het
binnenshuis als het niet in gebruik is.
• Als het apparaat buiten wordt gebruikt, wordt aangeraden het
alleen met accuvoeding te gebruiken. De netvoedingsadapter is
alleen ontworpen voor gebruik binnenshuis.
•
Maak het apparaat alleen met een droge doek schoon.
• Blokkeer geen ventilatieopeningen. Installeer het apparaat in
overeenstemming met de instructies van de fabrikant.
• Installeer het apparaat niet in de buurt van warmtebronnen,
zoals radiators, verwarmingsroosters, ovens of andere apparaten
(inclusief versterkers) die warmte produceren.
• Maak de veiligheidsfunctie van de gepolariseerde stekker niet
onklaar. Een gepolariseerde stekker heeft twee pinnen, waarvan
de ene breder is dan de andere. De brede pin is voor uw
veiligheid. Indien de stekker niet in uw contactdoos past, vraag
dan een elektricien het oude stopcontact te vervangen. – Dit is
alleen van toepassing in landen met een netspanning van 110
volt.
• Zorg dat niet over de voedingskabel kan worden gelopen en
dat deze niet beklemd kan raken, met name in de buurt van de
stekkers, stopcontacten en de plek waar deze uit het apparaat
komt.
•
fabrikant.
•
Onderhoud is nodig als het apparaat op een of andere wijze
beschadigd is, bijvoorbeeld wanneer de voedingskabel of stekker
beschadigd is, er vloeistof over geknoeid is of objecten in het
apparaat terecht zijn gekomen, of de netvoeding aan regen of
vocht is blootgesteld, het apparaat niet meer werkt of gevallen is.
VEILIGHEIDSWAARSCHUWINGEN
Het symbool met een bliksemschicht met pijlpunt
binnen een gelijkzijdige driehoek is bedoeld om de
gebruiker te waarschuwen voor de aanwezigheid
van niet-geïsoleerde “gevaarlijke spanningen”
binnen de behuizing van het product die mogelijk zo
groot kunnen zijn dat de kans bestaat dat personen een elektrische
schok krijgen.
Het uitroepteken met punt binnen een
gelijkzijdige driehoek is bedoeld om de gebruiker
te waarschuwen voor de aanwezigheid van
belangrijke gebruiks- en onderhoudsinstructies in
de documentatie die met dit product wordt meegeleverd.
WAARSCHUWING: OM HET RISICO OP BRAND OF ELEKTRISCHE
SCHOKKEN TE VOORKOMEN, MAG DIT APPARAAT NIET
AAN REGEN
OF VOCHT WORDEN BLOOTGESTELD. BINNEN DE BEHUIZING
KOMEN HOGE SPANNINGEN VOOR. OPEN DE BEHUIZING NIET.
LAAT ONDERHOUD ALLEEN DOOR GEKWALIFICEERDE TECHNICI
UITVOEREN.
WAARSCHUWING: OM ELEKTRISCHE SCHOKKEN TE VOORKOMEN
,
MOET DE BREDE PIN VOLLEDIG IN DE BREDE OPENING WORDEN
GESTOKEN. – alleen in landen met een netspanning van 110 volt.
1.Dieses Produkt ist geeignet für nicht-tropischen
Wetterbedingungen, für den Einsatz unter 2000 Meter
über dem Meeresspiegel
2. HINWEIS: Wenn Ihre VG5 Bluetooth-Quelle 10
Minuten lang keine Audiodaten abgespielt hat, wechselt
sie automatisch in den Netzwerk-Standby-Modus, um den
Stromverbrauch zu minimieren. Der Stromverbrauch im
Netzwerk-Standby-Modus liegt unter 2W, dies entspricht
den EU-Vorschriften. Ohne Quelleneingang schaltet der
VG5 automatisch nach 15 Minuten in den Voll-Stand-
by-Modus (gemäß den europäischen CE-Vorschriften).
Der Stromverbrauch im Voll-Standby-Modus liegt unter
0,5 W. Bei Anschluss an den DC-Eingang und ohne Quel-
leneingang schaltet VG5 nach einer Woche automatisch
in den vollen Standby-Modus
1. Dit product is geschikt voor niet-tropische weersomstan-
digheden, voor gebruik onder 2000 meter boven zeeniveau
2. OPMERKING: Als uw VG5 Bluetooth-bron gedurende 10
minuten geen audio heeft afgespeeld, gaat deze automatisch
naar de netwerkstand-bymodus om het stroomverbruik tot
een minimum te beperken. Het stroomverbruik in de netwerk-
stand-bymodus is minder dan 2 W, dit is in overeenstemming
met de EU-regelgeving. Zonder enige broninvoer zal de VG5
na 15 minuten automatisch automatisch overschakelen naar
volledige stand-bymodus (volgens de Europese CE-richtlijnen).
Het stroomverbruik in de volledig standby-modus is minder dan
0,5 W. Wanneer verbonden met DC-tussenvoegsel, en Zonder
enige broninvoer, zal VG5 na 1 week automatisch naar de
volledige standby-modus gaan
1. Este produto é adequado para condições climáticas
não-tropicais, para uso abaixo de 2000 metros acima
do nível do mar
2. NOTA: Se a fonte Bluetooth VG5 não reproduz o áudio
por 10 minutos, irá automaticamente para o modo de
espera de rede, para minimizar o consumo de energia.
O consumo de energia no modo de espera de rede é
inferior a 2W, isto é de acordo com os regulamentos
da UE. Sem qualquer entrada de fonte, o VG5 irá
automaticamente para o modo de espera completo
após 15 minutos (de acordo com os regulamentos CE
europeus). O consumo de energia no modo de espera
completo está abaixo de 0,5 W. Quando conectado à
inserção CC, e sem qualquer entrada de fonte, o VG5
irá automaticamente para o modo de espera completo
após 1 semana
1.本产品适用于非热带气候条件,海拔2000米
以下使用
2.注意:如果您的VG5蓝牙信号源在10分钟内没有播
放音频,它将自动进入网络待机模式,以最大限度地
降低功耗。网络待机模式下的功耗低于2W,这是根
据欧盟法规。在没有任何信号源输入的情况下,15分
钟后(根据欧洲CE标准),VG5将自动进入完全待
机模式。全待机模式下的功耗低于0.5W。当连接到
DC插入,并且没有任何源输入,VG5将在1周后自动
进入完全待机模式
29
WARRANTY INFORMATION
Soundcast, LLC warrants to the end user (“Customer”) that the
hardware product will be free from defects in workmanship and
materials, under normal use and service, for the following length
of time from the date of purchase from Soundcast or an authorized
retailer: One (1) Year.
Soundcast’s sole obligation under this express warranty shall be,
at its option and expense, to repair the defective product or part,
deliver to Customer an equivalent product or part to replace the
defective item. All products that are replaced will become the
property of Soundcast. Replacement products may be new or
refurbished. Soundcast warrants any replaced or repaired product
or part for a period of ninety (90) days from shipment, or the
remainder of the initial warranty period, whichever is longer. In no
case shall Soundcast be responsible for damage to any connected
audio equipment, resulting from misuse, abuse, neglect, improper
alteration of or tampering with Soundcast products.
For warranty service please contact:
Soundcast
San Diego, California
US only 1-800-722-1293 or 1-619-591-0126
customersupport@gosoundcast.com
*to a maximum warrany period of 2-years
WARRANTY
ENGLISH
Double your warranty!
* Register your
product at www.goSoundcast.com/
Double your warranty!
* Register your
product at www.goSoundcast.com/
hardware estará libre de defectos en fabricación y materiales, con
un uso y servicio normales, durante el siguiente periodo de tiempo
desde la fecha de compra a Soundcast o un vendedor autorizado:
un (1) año.
La única responsabilidad de Soundcast según esta garantía expresa
será, si así lo decide y a su costa, reparar el producto o parte
defectuoso, entregar al Cliente un producto o parte equivalente para
sustituir el artículo defectuoso. Todos los productos sustituidos serán
propiedad de Soundcast. Los productos de sustitución pueden ser
nuevos o reparaciones. Soundcast garantiza cualquier producto
sustituido o reparado durante un periodo de noventa (90) días desde
su envío o el resto del periodo inicial de garantía, el más largo. En
ninguna circunstancia, Soundcast será responsable de daños a
equipos audio conectados, resultado de mal uso, abuso, negligencia,
Para contactar con el servicio de garantía:
Soundcast
San Diego, California
Solo EE.UU. 1-800-722-1293 o 1-619-591-0126
customersupport@gosoundcast.com
*hasta un período máximo de garantía de 2 años
GARANTÍA
ESPAÑOL
ÁDuplique su garant’a!* Registre su
producto en www.goSoundcast.com/
ÁDuplique su garant’a!* Registre su
producto en www.goSoundcast.com/
produit matériel est exempt de vices de matériaux et de fabrication,
sous conditions d’utilisation et d’entretien normaux, pendant toute
la durée suivante à compter de la date d’achat auprès de Soundcast
ou d’un revendeur agréé : Un (1) an.
La seule obligation de Soundcast au titre de cette garantie explicite
est, à sa discrétion et à ses frais, de réparer le produit ou la pièce
défectueuse, de fournir au client un produit ou une pièce équivalente
pour remplacer le produit ou la pièce défectueuse. Tous les produits
remplacés deviendront la propriété de Soundcast. Les produits
de remplacement peuvent être neufs ou remis à neuf. Soundcast
garantit tout produit ou pièce remplacé ou réparé, pour une période
de quatre-vingt-dix (90) jours à compter de la date d’expédition
ou le reste de la période de garantie initiale, si elle est plus longue.
En aucun cas, Soundcast ne saurait être tenu responsable des
dommages survenus à tout équipement audio connecté, résultant
d’une mauvaise utilisation, d’abus, de négligence, de mauvaise
Pour le service de garantie, veuillez contacter :
Soundcast
San Diego, California
États-Unis : 1-800-722-1293 ou 1-619-591-0126
customersupport@gosoundcast.com
*pour une période de garantie maximale de 2 ans
GARANTIE
FRANCAIS
Doublez votre garantie !* Enregistrez votre
produit sur le site www.goSoundcast.com/

30
Soundcast, LLC garantiert dem Endbenutzer (“Kunde”), dass das
Hardware-Produkt frei von Mängel in der Verarbeitung und Material
unter normalem Gebrauch und Service ist, und für den folgenden
Zeitraum ab dem Datum des Kaufs bei SoundCast oder einem
autorisierten Fachhändler garantiert ist: Ein (1) Jahr.
Gewährleistung besteht darin, dass nach eigenem Ermessen und
auf eigene Kosten, das mangelhafte Produkt oder Teile davon zu
reparieren, dem Kunden ein gleichwertiges Produkt oder Teil auf die
mangelhafte Sache zu ersetzen. Alle Produkte die ersetzt werden,
werden Eigentum von Soundcast . Ersatzprodukte können neu
oder renoviert sein. Soundcast gewährt auf ersetzte oder reparierte
Produkte oder Teile für einen Zeitraum von neunzig (90) Tagen ab
dem Versand oder den Rest der ursprünglichen Garantiezeit, je nach
dem welcher Zeitraum länger ist.
Für Garantieleistungen kontaktieren Sie bitte:
Soundcast
San Diego, California
US only 1-800-722-1293 o 1-619-591-0126
customersupport@gosoundcast.com
*auf eine maximale Garantiezeit von 2 Jahren
GARANTIE
DEUTSCHE
Verdoppeln Sie Ihre Garantie!* Registrieren
Sie Ihr Produkt unter www.goSoundcast.com/
Verdoppeln Sie Ihre Garantie!* Registrieren
Sie Ihr Produkt unter www.goSoundcast.com/
Soundcast, LLC garandeert aan de eindgebruiker (“Klant”) dat de
apparatuur vrij is van gebreken in vakmanschap en materialen, bij
normaal gebruik en onderhoud, gedurende de volgende tijdsperiode
vanaf de datum van aankoop bij Soundcast of een geautoriseerde
verkoper: Eén (1) jaar.
De enige verplichting van Soundcast onder deze expliciete
garantie is om, naar eigen keuze en kosten, het defecte apparaat
of onderdeel te repareren, de Klant een gelijkwaardig apparaat of
onderdeel te leveren of om het defecte onderdeel te vervangen.
Alle producten die worden vervangen worden het eigendom van
Soundcast. Vervangende producten kunnen nieuw of gereviseerd
zijn. Soundcast garandeert elk vervangen of gerepareerd product
of onderdeel voor een periode van negentig (90) dagen vanaf
verzending, of het restant van de originele garantietermijn, welke
van deze het langste is. In geen geval is Soundcast verantwoordelijk
voor schade aan enig aangesloten audioapparaat, als gevolg van
onjuist gebruik, misbruik, nalatigheid, onjuiste installatie of testen,
aan Soundcast-producten.
Voor garantie service kunt u contact opnemen met:
Soundcast
San Diego, California
Alleen voor de 1-800-722-1293 ou 1-619-591-0126
customersupport@gosoundcast.com
*tot een maximale garantieperiode van 2 jaar
GARANTIE
NEDERLANDS
Verdubbel uw garantie! !* Registreer uw
product op www.goSoundcast.com/
Verdubbel uw garantie! !* Registreer uw
product op www.goSoundcast.com/
produto de hardware não terá defeitos de fabrico nem de materiais,
em condições normais de utilização e manutenção, por o período de
um (1) ano a partir da data de compra junto da Soundcast ou de um
revendedor autorizado.
Ao abrigo da presente garantia, a Soundcast só está obrigada,
ao seu exclusivo critério e expensas, a reparar o produto ou peça
defeituosa, ou a entregar ao Cliente um produto ou uma peça
equivalente para substituir o artigo defeituoso. Todos os produtos
substituídos tornam-se propriedade da Soundcast. Os produtos de
substituição podem ser novos ou recondicionados. A Soundcast
oferece uma garantia a todos os produtos ou peças substituídas ou
reparadas por um período de noventa (90) dias a partir da data de
envio ou pelo tempo restante do período da garantia inicial, o que
for mais extenso. A Soundcast jamais será responsável por danos
causados a um equipamento de áudio ligado que resultem de uma
utilização, teste ou instalação indevida, abusiva, negligente ou
dos produtos da Soundcast.
Para assistência ao abrigo da garantia, contacte:
Soundcast
San Diego, California
Apenas nos EUA 1-800-722-1293 or 1-619-591-0126
customersupport@gosoundcast.com
*até um período máximo de dois (2) anos
GARANTIA
PORTUGUESE
Prolongue a sua garantia!* Registe o seu
produto em www.goSoundcast.com/
Prolongue a sua garantia!* Registe o seu
produto em www.goSoundcast.com/
31
Caution
This device complies with Part 15 of the FCC Rules /
Industry Canada licence-exempt RSS standard(s).
Operation is subject to the following two conditions: (1)
this device may not cause harmful interference, and (2)
this device must accept any interference received,
including interference that may cause undesired
operation.
Le présent appareil est conforme aux CNR d'Industrie
Canada applicables aux appareils radio exempts de
licence. L'exploitation est autorisée aux deux conditions
suivantes : (1) l'appareil ne doit pas produire de
brouillage, et (2) l'utilisateur de l'appareil doit accepter
tout brouillage radioélectrique subi, même si le
brouillage est
susceptible d'en compromettre le fonctionnement.
Warning: Any changes or modifications to this unit not
expressly approved by the party responsible for
compliance could void the user's authority to operate
the equipment.
NOTE: This equipment has been tested and found to
comply with the limits for a Class B digital device,
pursuant to part 15 of the FCC Rules. These limits are
designed to provide reasonable protection against
harmful interference in a residential installation. This
equipment generates, uses and can radiate radio
frequency energy and, if not installed and used in
accordance with the instructions, may cause harmful
interference to radio communications. However, there
is no guarantee that interference will not occur in a
particular installation. If this equipment does cause
harmful interference to radio or television reception,
which can be determined by turning the equipment off
and on, the user is encouraged to try to correct the
interference by one or more of the following measures:
—Reorient or relocate the receiving antenna.
—Increase the separation between the equipment and
receiver.
—Connect the equipment into an outlet on a circuit
different from that to which the receiver is connected.
—Consult the dealer or an experienced radio/TV
technician for help.
To satisfy FCC / IC RF exposure requirements, a
separation distance of 20 cm or
more should be maintained between the antenna of
this device and persons during
device operation.
To ensure compliance, operations at closer than this
distance is not recommended.
Les antennes installées doivent être situées de facon à
ce que la population ne puisse
y être exposée à une distance de moin de 20 cm.
Installer les antennes de facon à ce
que le personnel ne puisse approcher à 20 cm ou
moins de la position centrale de l’
antenne.
La FCC des éltats-unis stipule que cet appareil doit être
en tout temps éloigné d’au
moins 20 cm des personnes pendant son
functionnement.

VG5