Sounding Audio P1 Polk Marine Audio User Manual P1 R1
Sounding Audio Industrial Ltd. Polk Marine Audio P1 R1
User manual

P1
Installation and Operation Manual

CONTEN
T
Warnings and C
o
Introduction .......
.
Safety Informati
o
Installation .........
.
Wiring ................
.
Basic Operation
.
Tuner Operation
.
Weather Band O
SiriusXM Operat
i
USB MP3 Opera
Bluetooth Opera
t
APP Operation ..
.
Specifications ....
.
Troubleshooting
.
T
S
o
mpliance ..............
.
..............................
.
o
n ...........................
.
..............................
.
..............................
.
..............................
.
..............................
.
peration ................
.
i
on .........................
.
tion .......................
.
t
ion ........................
.
..............................
.
..............................
.
..............................
.
www.a
s
8
7
.
..............................
.
..............................
.
..............................
.
..............................
.
..............................
.
..............................
.
..............................
.
..............................
.
..............................
.
..............................
.
..............................
.
..............................
.
..............................
.
..............................
s
aelectronics.com
7
7.305.0445
.
..............................
.
..............................
.
..............................
.
..............................
.
..............................
.
..............................
.
..............................
.
..............................
.
..............................
.
..............................
.
..............................
.
..............................
.
..............................
.
..............................
ii
.......... 1
.......... 3
.......... 4
.......... 5
.......... 7
.......... 8
........ 10
........ 12
........ 12
........ 19
........ 21
........ 22
........ 23
........ 23
Copy
r
Sirius,
and it
s
progr
a
other
m
reser
v
r
ights and Tradem
XM and all related
s
subsidiaries. Visit
w
a
mming/channel lin
e
m
arks and logos ar
e
ed.
arks
marks and logos a
r
w
ww.siriusxm.com
/
e
up/ XM service su
b
e
the property of th
e
r
e trademarks of Si
r
/
xmlineup for updat
e
b
ject to change or
p
e
ir respective owne
r
P1
r
ius XM Radio Inc.
e
s. All
p
reemption. All
r
s. All rights

W
ARNIN
G
Important Sa
1.
Read these
i
2.
Keep these
i
3.
Heed all wa
r
4.
Follow all in
s
5.
Do not use t
h
6.
Clean only
w
7.
Do not blo
c
manufactur
e
8.
Do not insta
l
or other app
a
9.
Do not defe
a
polarized pl
u
plug has tw
o
prong is pro
v
When the p
r
replacemen
t
10.
Protect the
p
convenienc
e
11.
Only use att
a
12.
Use only
w
manufactur
e
when movin
g
13.
Unplug this
periods of ti
m
14.
Refer all se
r
the apparat
u
plug is da
m
G
S AND C
O
fety Instructio
n
instructions.
i
nstructions.
r
nings.
s
tructions.
his apparatus near
w
ith a dry cloth.
c
k any ventilation
e
r's instructions.
l
l near any heat so
u
a
ratus (including a
m
a
t the safety purpo
u
g has two blades
w
o
blades and a thir
d
v
ided for your safet
y
r
ovided plug does n
t
of the obsolete ou
t
p
ower cord from be
i
e
receptacles, and t
h
a
chments/accesso
r
w
ith a cart, stand,
e
r, or sold with the
g
the cart/apparatu
s
Porta
b
apparatus during
m
e.
r
vicing to qualified
s
u
s has been damag
m
aged, liquid has
b
O
MPLIAN
C
n
s
water.
openings. Install
u
rces such as radia
t
m
plifiers) that produ
se of the polarized
w
ith one wider than
t
d
grounding prong.
T
y
.
ot fit into your outl
e
t
let.
i
ng walked on or pi
n
h
e point where the
y
r
ies specified by th
e
tripod, bracket,
o
apparatus. When
a
s
combination to av
b
le Cart Warning
lightning storms
o
s
ervice personnel.
S
ed in any way, suc
h
b
een spilled or ob
j
C
E
in accordance
w
t
ors, heat registers,
ce heat.
or grounding-type
t
he other. A ground
i
T
he wide blade or t
e
t, consult an electri
n
ched particularly
a
y
exit from the appa
e
manufacturer.
o
r table specified
a
cart is used, use
oid injury from tip-
o
o
r when unused
f
S
ervicing is requir
e
h
as power -supply
j
ects have fallen i
1
w
ith the
stoves,
plug. A
i
ng type
he third
cian for
a
t plugs,
ratus.
by the
caution
o
ver.
f
or long
e
d when
cord or
nto the
a
p
o
p
WAR
N
appa
r
WAR
N
that n
appa
r
p
paratus, the appa
p
erate normally, or
h
N
ING! To reduce t
h
ra
tus to rain or mo
i
N
ING! The apparat
u
o objects filled wi
t
ra
tus.
ratus has been ex
h
as been dropped.
h
e risk of fire of el
e
i
sture.
u
s shall not be ex
p
t
h liquids, such a
s
posed to rain or
m
e
ctric shock, do n
o
p
osed to dripping
s
vases, shal
l
be p
l
P1
m
oisture, does not
o
t expose this
or splashing and
l
aced on

FCC Notes
WARNING! An
y
party responsi
b
the equipment.
This device co
m
the following t
w
interference, an
including interf
e
FCC Radiation
E
This equipment
uncontrolled env
minimum distan
c
This transmitter
m
antenna or trans
m
Note: This equip
Class B digital d
provide reason
a
installation. This
energy and, if n
o
cause harmful
i
guarantee that
equipment does
can be determin
e
try to correct the
• Reorient or
r
• Increase th
e
• Connect the
the receiver
• Consult the
d
y
Changes or modi
f
b
le for compliance
m
plies with part 1
5
w
o conditions: (1)
T
d (2) this device
m
e
rence that may c
a
E
xposure Stateme
complies with FC
C
ironment. This equ
c
e 20cm between th
m
ust not be co-loc
a
m
itter.
ment has been te
s
evice, pursuant to
a
ble protection ag
equipment gener
a
o
t installed and u
s
i
nterference to ra
d
interference will n
cause harmful inte
r
e
d by turning the e
q
interference by on
e
r
elocate the receivi
n
e
separation betwe
e
equipment into an
is connected.
d
ealer or an experi
e
f
ications not expr
e
could void the us
e
5
of the FCC Rules
.
T
his device may n
o
m
ust accept any in
a
use undesired o
p
nt:
C
radiation expos
u
ipment should be i
n
e radiator& your b
o
a
ted or operating in
s
ted and found to
c
the FCC Rules. T
h
ainst harmful int
e
a
tes uses and ca
n
s
ed in accordance
d
io communication
ot occur in a pa
r
r
ference to radio or
q
uipment off and on
e
or more of the foll
o
n
g antenna.
e
n the equipment a
n
outlet on a circuit d
i
e
nced radio/TV tec
h
e
ssly approved b
y
e
r’s authority to o
p
.
Operation is sub
j
o
t cause harmful
terference receiv
e
p
eration.
u
re limits set forth
n
stalled and opera
t
o
dy.
conjunction with a
n
c
omply with the lim
i
h
ese limits are desi
g
e
rference in a re
s
n
radiate radio fr
e
with the instructio
n
s. However, ther
e
r
ticular installation.
television receptio
n
, the user is encou
r
o
wing measures:
n
d receiver.
ifferent from that to
h
nician for help.
2
y
the
p
erate
j
ect to
e
d,
for an
t
ed with
n
y other
i
ts for a
g
ned to
s
idential
e
quency
n
s, may
e
is no
If this
n
, which
r
aged to
which
P1
INTROD
U
System Feat
u
Features of the
P
• 4.3” color T
F
• AM/FM US/
E
• SiriusXM-R
e
• USB Playba
c
• Bluetooth (S
• APP Ready
• Weatherban
• Mute
• Pre-set Equ
a
• Electronic B
a
• Output Pow
e
• Protective C
• Wired Rem
o
• 4-Channel
P
• Auxiliary Au
d
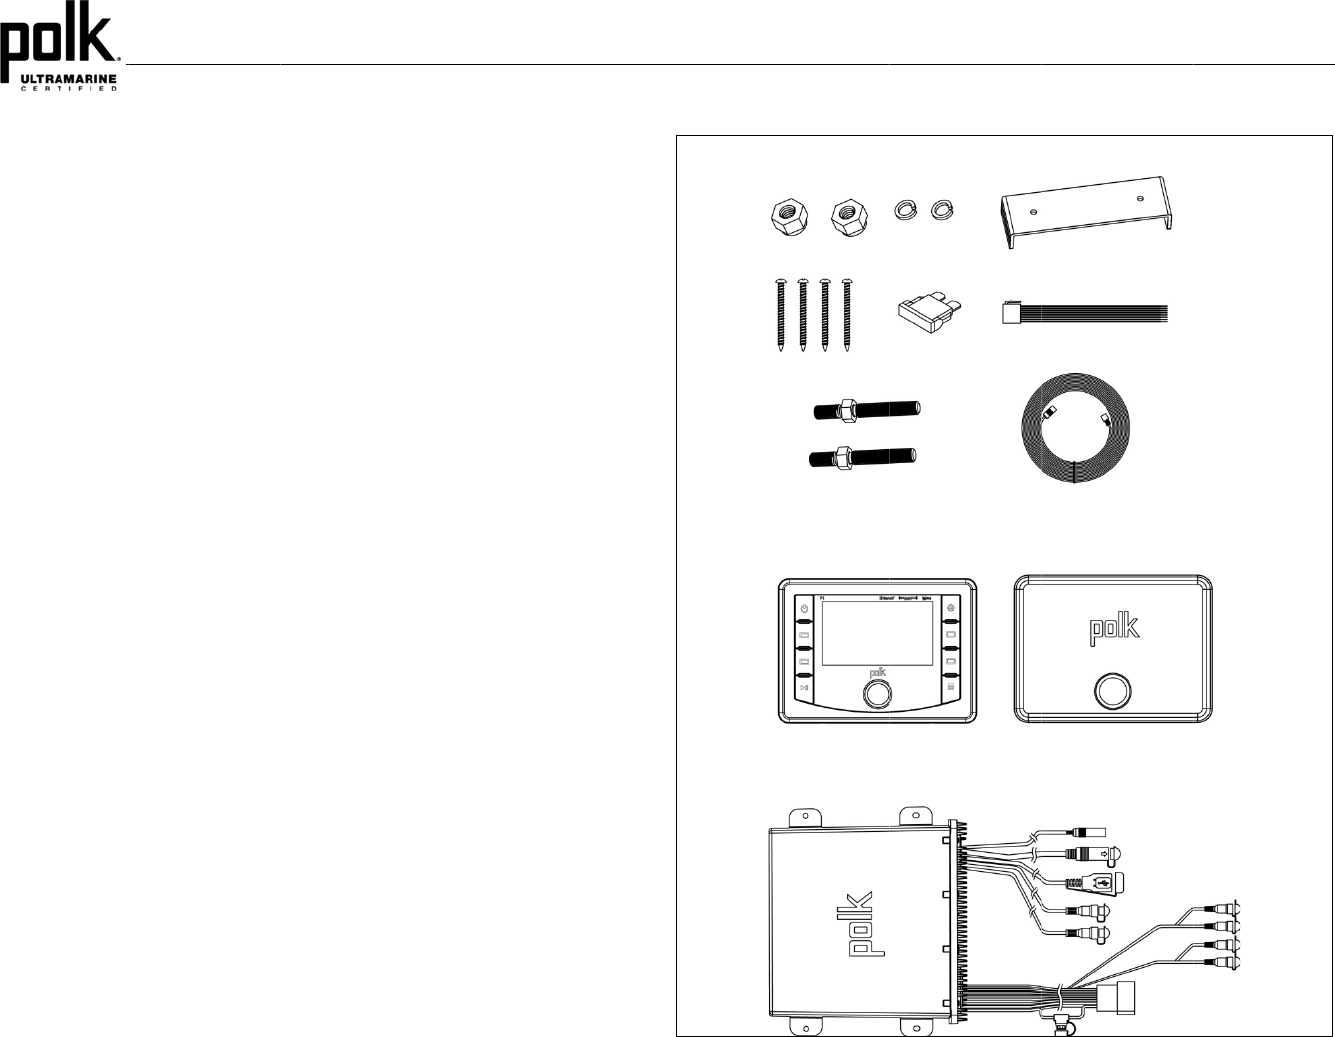
Content List
• Polk P1 Tun
• Polk P1 Wir
e
• 10’ Extensio
• Commande
r
• Wire Harne
s
• Quick Refer
e
• Cutout Mou
n
• Hardware Ki
- Rear Mou
n
- (4x) #8 M
o
- (2x) Moun
- (2x) Lock
W
- (2x) Lock
- 15A Blad
e
U
CTION
u
res
P
olk P1 marine audi
F
T display
E
URO Tuner with 3
0
e
ady™
c
k of MP3 and WM
A
S
upports A2DP & A
V
d Tuner with Alerts
a
lizer – 5 settings (
U
a
ss, Treble, Balanc
e
r 50W x 4
ommander Cove
r
o
te Control Read
y
(
o
P
re-amp Line Level
O
d
io Input (RCA)
e
r
/Amp Module
e
d Commande
r
n Cable
r
Cove
r
s
s
e
nce Guide
n
ting Template
t
nting Bracket
o
unting Screws
ting Bolt
W
asher
Nut
e
Fuse
o system include:
0
Presents (12 AM,
A
files
V
RCP)
U
ser, Flat, Rock, Cl
e and Fader Contr
o
o
ptional PRC100B
C
O
utputs (Front & R
e
18 FM)
assical, Pop)
o
ls
C
, PRC200BC)
e
ar RCA)
3
HAR
D
D
WARE KIT C
O
O
NTENTS
P1

SAFETY
When Boating
Keep the volum
e
Protect from W
a
Do not submerg
e
other damage.
Protect from th
e
Use the included
water while not i
n
Protect from Hi
g
Do not mount ra
d
Use the Proper
P
This product is d
e
system.
CAUTION:
DO NOT OPEN
C
REFER SERVIC
INFORMA
T
e
level low enough t
o
a
ter
e
the product in wat
e
e
Elements
cover to protect th
e
n
use.
g
h Temperatures
d
io within close pro
x
P
ower Suppl
y
e
signed to operate
C
OVERS AND DO
ING TO A QUALIFI
T
ION
o
be aware of your
e
r, as this can cau
s
e
wired commande
r
x
imity of engine co
m
with a 12 volt DC n
e
NOT REPAIR BY
Y
ED TECHNICIAN.
surroundings.
s
e electric shorts, fi
r
r
from sunlight, dus
t
m
partment.
e
gative ground bat
t
Y
OURSELF. PLEA
S
4
r
e or
t
, and
t
ery
S
E
WAR
N
TO R
E
USE
O
N
ING:
E
DUCE THE RISK
O
O
NLY THE RECO
M
O
F FIRE OR ELEC
T
M
MENDED ACCES
S
T
RIC SHOCK AND
S
ORIES.
P1
INTERFERENCE,
INSTALL
A
Before You
B
Always disconne
Important N
o
• Before final
i
connected p
• Consult with
other modifi
c
• Install the u
n
cannot injur
e
• Use the incl
u
Commander
• During stora
protecting th
other eleme
n
Wired Comm
• Choose a m
o
allowing the
• Secure the
w
methods de
t
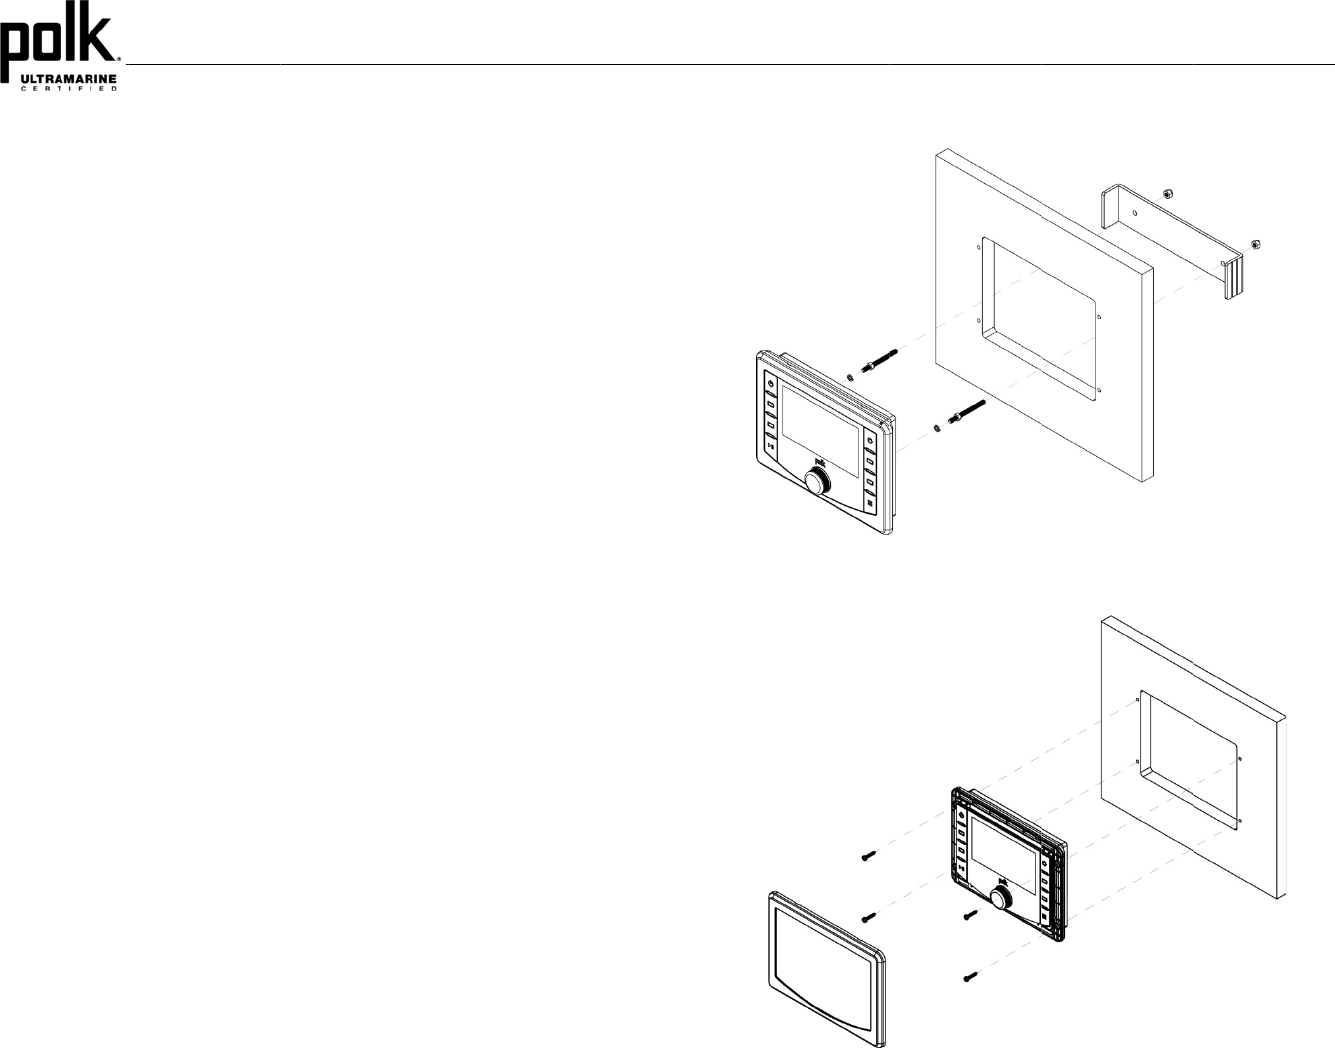
Bracket Mou
n
• Insert wired
included ha
r
Screw Moun
t
• Secure the
w
pan head sc
A
TION
B
egin
ct the negative batt
o
tes
i
nstallation, test the
roperly and the sys
your nearest deal
e
c
ations to your ves
s
n
it where it does no
t
e
passengers.
u
ded template to c
u
Cove
r
ge, use the include
d
e wired command
e
n
ts.
ander Mountin
o
unting area for th
e
rear gasket to fully
w
ired commander u
t
ailed below.
n
t
commander throug
h
r
dware as detailed i
n
t
w
ired commander t
o
rews (not included)
ery terminal
wiring connection
s
tem works.
e
r if installation requ
s
el.
t
interfere with oper
u
t the installation op
d
cover to prolong
t
e
r from direct sunlig
h
g
e
wired commander
seal to the mounti
n
sing either of the r
e
h
cut-out and secu
r
n
the diagram.
o
the mounting surf
a
as detailed in the
d
s
to make sure the
u
ires the drilling of h
r
ating the vessel an
d
ening.
t
he life of your devi
c
h
t, moisture, dust,
a
that is clean and fl
a
n
g surface.
e
commended moun
t
r
e with bracket usin
g
a
ce using #6 stainle
d
iagram.
5
u
nit is
oles or
d
c
e by
a
nd
a
t,
t
ing
g
ss steel
Brac
k
S
c
k
et Mount
c
rew Mount
P1
Removing th
e
To remove the c
o
mounting screws
Tuner / Ampl
i
1. Choose a m
o
of ventilatio
n
module can
when mount
facing straig
h
2. Using the s
h
the tuner/ a
m
3. Route the tu
required. Ke
this can cau
s
4. Follow the
w
secure with
i
5. After compl
e
the battery
a
must be on)
.
wiring and r
e
manual.
e
Unit
o
mmande
r
, remove
s
, then slide wired c
o
i
fie
r
Module M
o
o
unting area for th
e
n
to prevent the am
p
be mounted in the
h
ing in vertical positi
ht up, as water can
h
ortest length of the
m
plifier as detailed i
ner/amplifier harne
s
ep some slack in t
h
s
e damage to the
w
w
iring diagram caref
u
i
nsulated crimp con
e
ting the wiring con
n
a
nd turn the unit on
.
If the unit does no
t
e
fer to the trouble-s
bracket mount or r
e
o
mmander out of t
h
o
unting
e
tuner/amplifier mo
d
p
lifier from overhea
t
h
orizontal or vertic
a
on, do not mount
w
collect around the
c
recommended siz
e
n the diagram on t
h
s
s and cable throu
g
h
e harness/cables s
w
ires.
u
lly and make cert
a
nectors to ensure
p
n
ections, reconnect
to confirm operatio
n
t
operate, disconne
c
hooting guide locat
e
e
move trim ring an
d
h
e mounting hole.
d
ule that will provid
e
t
ing. The tuner/am
p
a
l position. Please n
w
ith the harness exit
c
hassis in these ar
e
e
screws possible,
m
h
e below.
g
hout the vessel as
o it won't be too tig
h
a
in all connections
a
p
roper operation.
the negative termi
n
n
(vessel accessor
y
c
t battery, recheck
a
e
d in the back of th
e
6
d
e
plenty
p
lifier
ote that
points
e
as.
m
ount
h
t, as
a
re
n
al on
y
switch
a
ll
e
STAINLE
1/8” PIL
O
.180 PIL
O
SS STEEL #8 SCREWS
O
T HOLES FOR SUPPLI
E
O
T HOLES WHEN USIN
G
P1
(INCLUDED)
E
D SELF-STARTING S
C
G
THREADED MACHIN
E
C
RWS
E
SCREWS
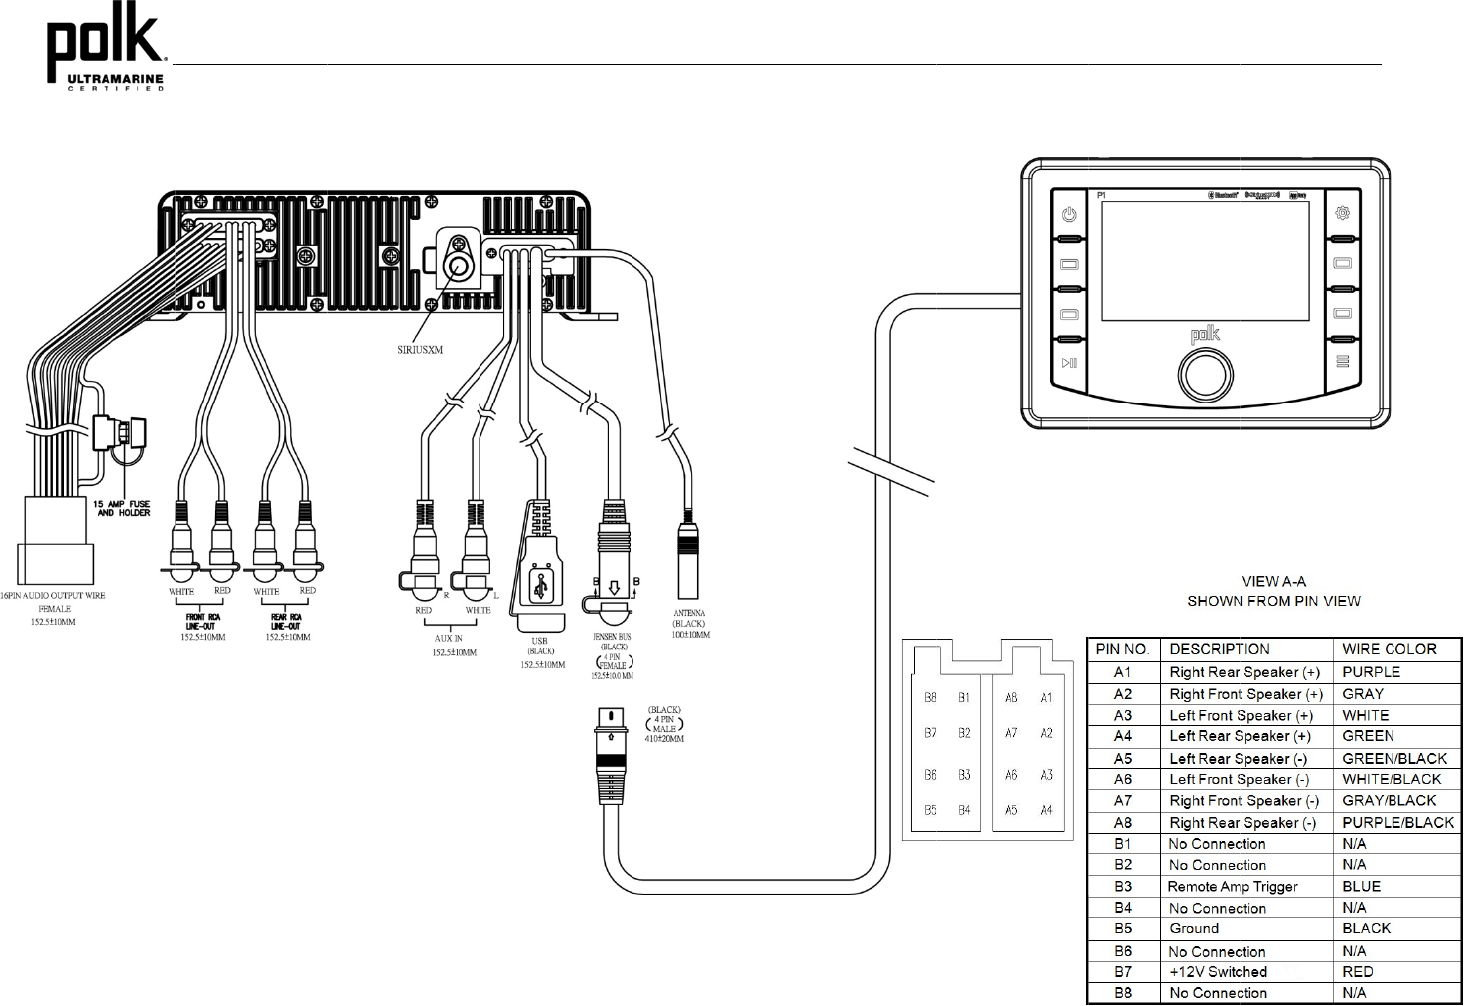
WIRING
TUNER/
A
A
MP MODULE
7
COMMAND
E
P1
ER
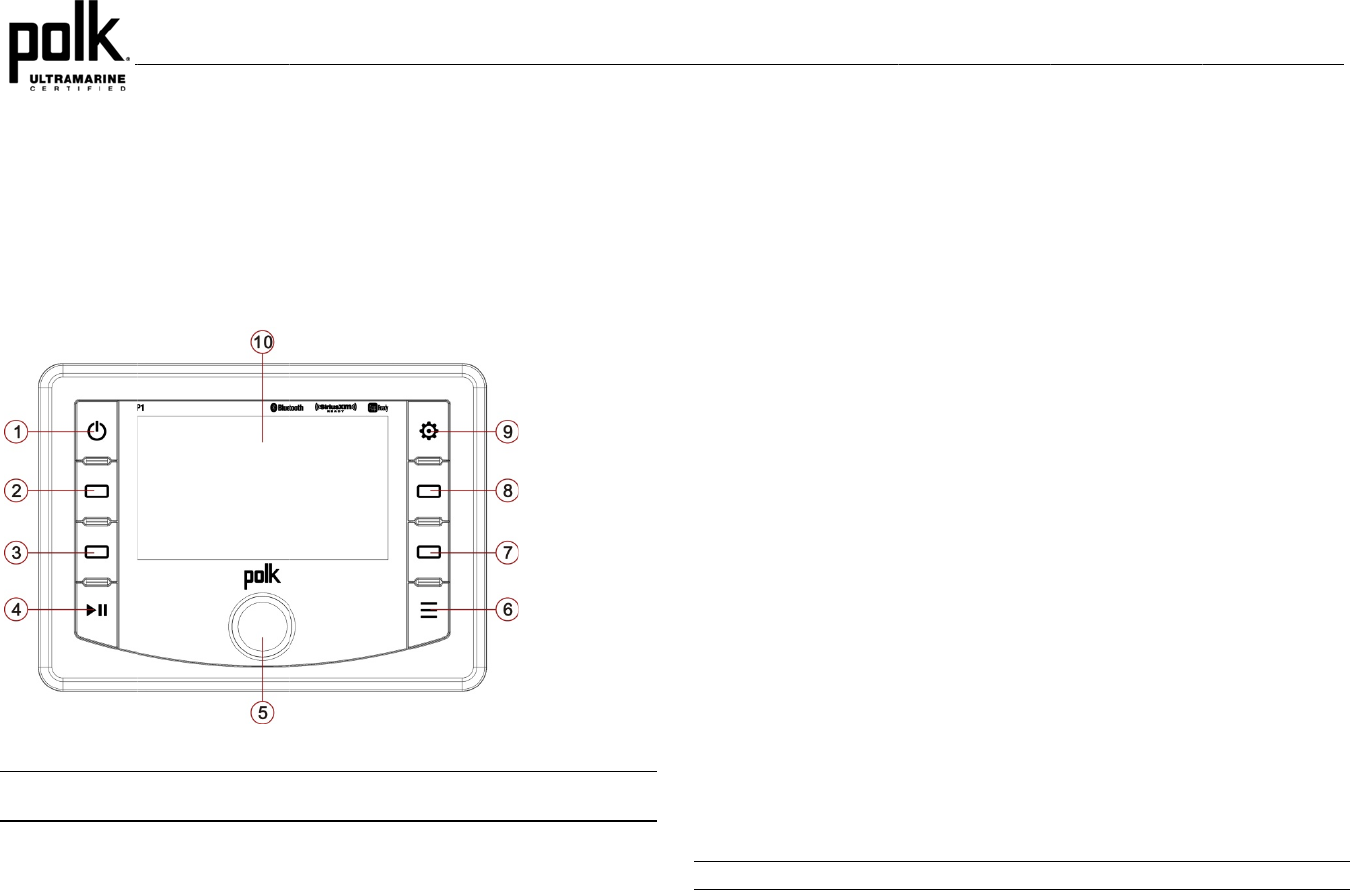
BASIC O
P
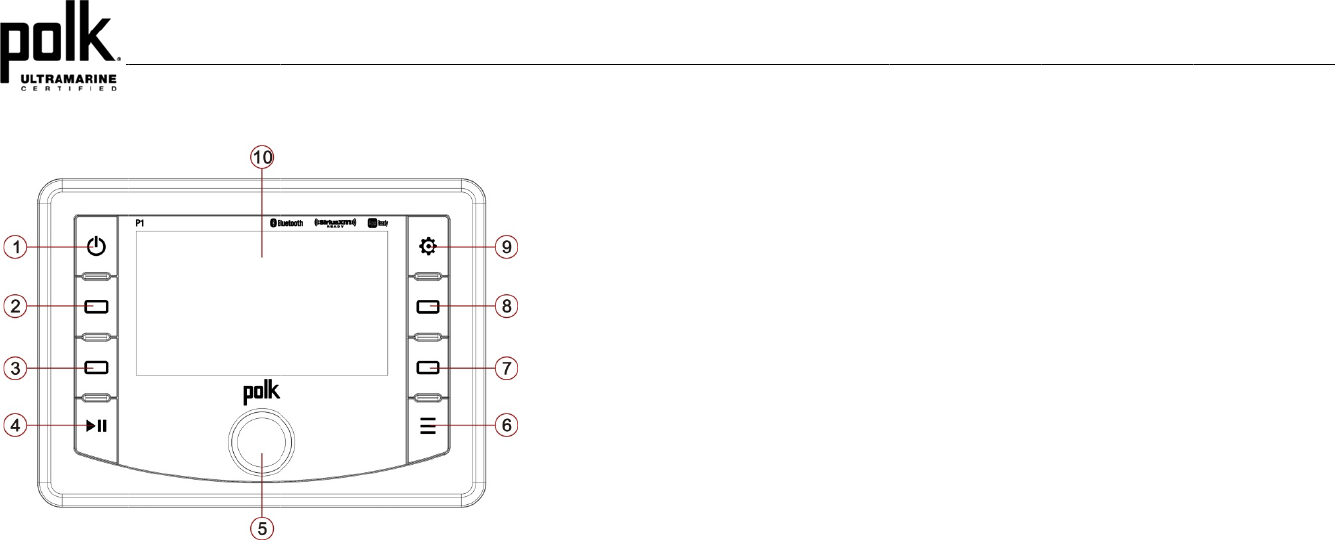
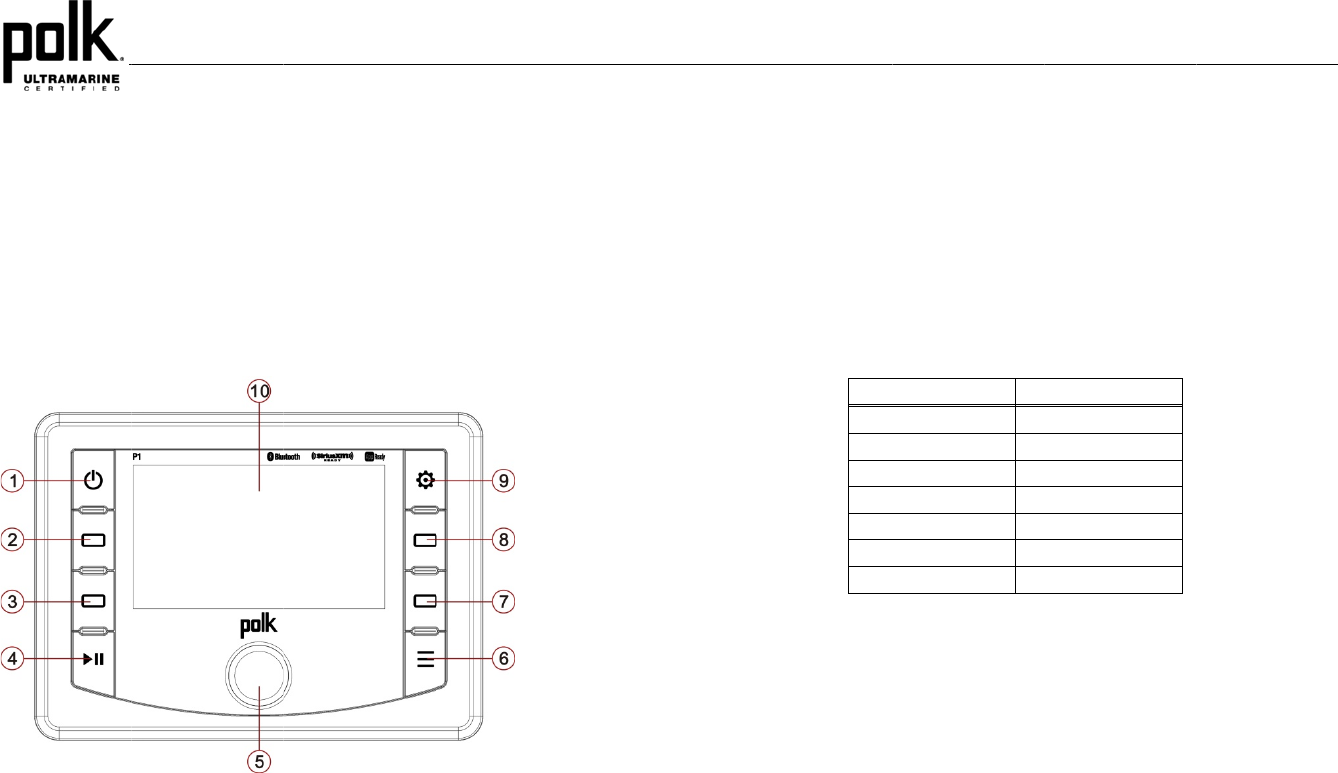
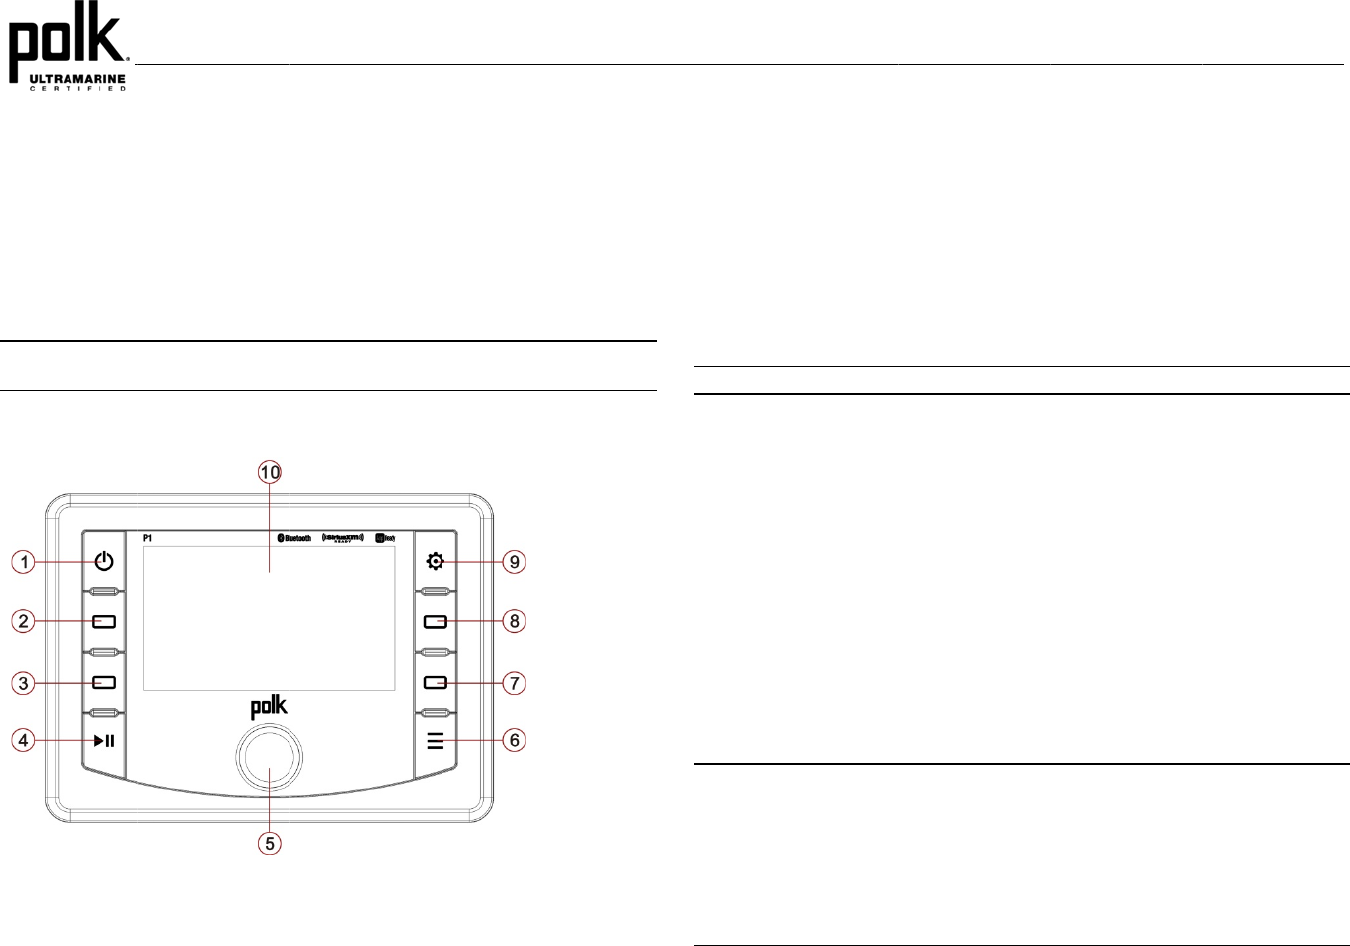
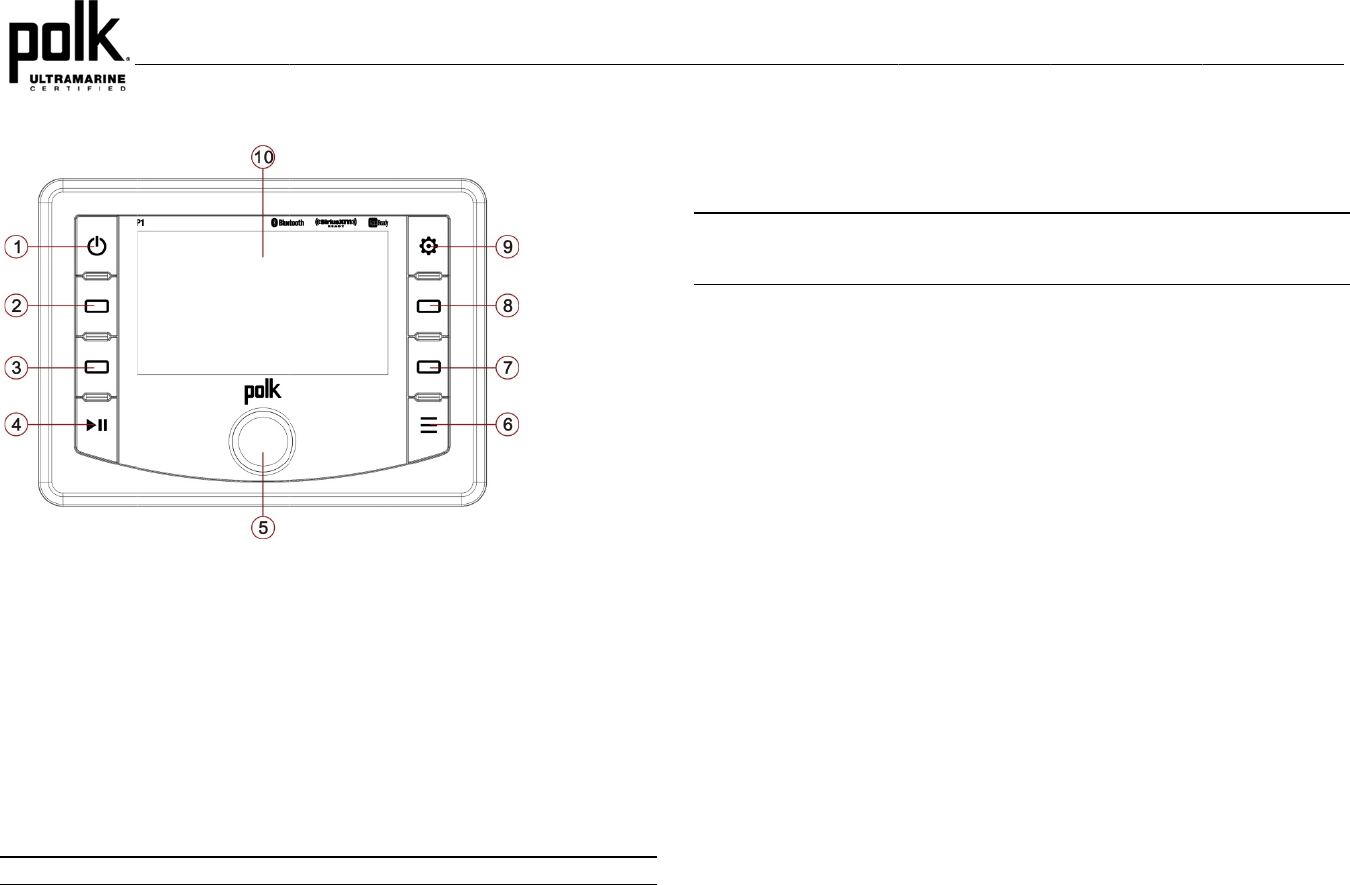
Power On/Of
f
Press the Powe
r
Volume
To increase the
v
volume, rotate th
Play/Pause/
M
Press the ►|| bu
t
Press ►|| button
Mode
Press the Mode
b
Continue to pres
s
Press the associ
a
P
ERATIO
N
f
r
button (1) to turn t
h
v
olume, rotate the
E
e Encoder Knob c
M
ute
tton (4) on the cont
r
again to unmute o
r
button (6) on the c
o
s
the Mode button t
a
ted soft button for
N
h
e unit on/off.
E
ncoder Knob (5)
c
ounte
r
-clockwise.
r
ol panel to pause
o
r
restore the audio
o
o
ntrol panel to ente
r
o page through the
the desired playba
c
c
lockwise. To decre
a
o
r mute the audio o
u
o
utput to the previo
u
r
mode selection di
s
available playback
c
k mode as display
e
8
a
se the
u
tput.
u
s level.
s
play.
modes.
e
d.
A
udi
Press
navig
a
pressi
n
clock
w
autom
menu
Bass
L
Use t
h
Trebl
e
Use t
h
Balan
Use t
h
from “
L
Fade
r
Use t
h
from “
R
Equa
l
Press
five pr
Loud
n
Press
low v
o
o
Menu
the Menu button (9
a
te through the audi
n
g the Encoder K
n
w
ise to increase an
d
atically exit the aud
items can be adjus
t
L
eve
l
h
e Encoder Knob t
o
e
Leve
l
h
e Encoder Knob t
o
c
e
h
e Encoder Knob t
o
L
12” (full left) to “R
1
r
h
e Encoder Knob t
o
R
12” (full rear) to “
F
i
zer
the EQ soft button
t
e
-defined bass and
n
ess
the Loud soft butt
o
o
lumes, this feature
) on the control pan
o menu items by r
o
n
ob to make selecti
o
d
counte
r
-clockwise
io menu after 10 s
e
t
ed.
o
adjust the Bass l
e
o
adjust the Treble
l
o
adjust the Balanc
e
1
2” (full right).
o
adjust the Fader
b
F
12” (full front).
t
o turn on the equa
l
treble curves: Use
r
o
n to toggle loudne
s
will boost the bass
el to access the au
d
o
tation the Encode
r
o
n. Rotate the Enc
o
to decrease. The
u
e
conds of inactivity.
e
vel range from “-6”
l
evel range from “-
6
e
between the left
a
b
etween the rear a
n
l
ization function an
d
r
> Flat > Rock > Cl
s
s on/off. When list
e
and treble ranges.
P1
d
io menu. You can
r
Knob and
o
der Knob
nit will
The following
to “+6”.
6
” to “+6”.
a
nd right speakers
n
d front speakers
d
select between
assical > Pop.
e
ning to music at

System Men
u
1. Press and h
o
system men
u
first menu it
e
2. Rotate the
E
desired item
3. Press the E
n
adjust the s
e
4. Press the E
n
menu list.
5. Press the S
w
6. The followin
g
• Key Be
e
• LCD B
a
• LCD C
o
• Button
B
• Power
B
• Tuning
R
• SXM S
a
- Set L
o
- Lock
e
- SXi S
• Bluetoo
t
- BT O
n
- BT D
e
and d
- BT P
a
pairin
-
• Battery
A
• Battery
A
• Reset t
o
factory
d
• About:
P
NOTE: BT Pair
a
u
o
ld the Menu butto
n
u. “System Setting
s
e
m, “Key Beep.”
E
ncoder Knob (5) t
o
.
n
coder Knob to se
l
e
lected menu item.
n
coder Knob agai
n
w
oop Arrow soft b
u
g
items can be adj
u
e
p (On/ Off)
a
cklight (1 – 10)
o
ntrast (1 – 10)
B
acklight (1 – 10)
B
utton Backlight (1
–
R
egion (USA/ Euro
p
a
tellite Radio (Sub
M
o
ck Code
e
d Channels
oftware Version
t
h Setup (Sub Men
u
n
/Off: Turn on and
o
e
vice List (Lock/Unl
elete from a list of
p
a
ir: Press Encoder
g mode.
A
larm (On/Off)
A
uto Off (On/Off)
o
Defaults: Press E
n
d
efault settings)
P
ress Encoder Kn
o
a
nd BT Device me
n
n
(9) for more than
3
s
” will appear on th
e
o
navigate the syst
e
l
ect the item and ro
t
n
to enter your sele
c
u
tton to return to th
e
u
sted:
–
10)
p
e)
M
enu, only accessi
b
u
, only accessible i
n
o
ff BT module.
ock, Disconnect/C
o
p
reviously paired m
Knob to confirm s
e
n
coder Knob once
o
b to view software
n
u options are on
l
3
seconds to enter
e
display, followed
b
e
m menu and highli
t
ate the Encoder
K
c
tion and return to t
h
e
previous operatio
n
b
le in SiriusXM mo
d
n
Bluetooth mode)
o
nnect, Delete): Vie
w
obile devices.
e
lection and put the
to confirm. (Reset
s
version informatio
n
l
y available while
i
9
the
b
y the
ght the
K
nob to
h
e
n
.
d
e)
w
, lock
P1 into
s
unit to
n
.
i
n the
BT m
o
Batt
e
If Batt
e
the vo
flashi
n
NOT
E
the v
o
A
uxi
l
To ac
c
1. C
o
f
2. P
r
3. P
r
Liqu
i
The c
u
NOT
E
temp
e
numb
norm
a
Bac
k
In vari
lower
r
the sy
s
o
de.
e
ry Alarm Oper
a
e
ry Alarm is set to “
O
l
tage drops to 10.8
V
n
g on the LCD displ
a
E
: “OFF” is the def
a
o
lume is set to 0, t
h
l
iary Input
c
ess an auxiliary de
v
o
nnect the portable
f
the radio.
r
ess the Mode butt
o
r
ess the Auxiliary
s
i
d Crystal Disp
l
u
rrent frequency an
d
E
: LCD panels may
e
ratures for an ext
e
e
rs on the LCD m
a
a
l when the tempe
r
k
Key (Swoop
A
o
us modes and co
n
r
ight soft button. Pr
e
s
tem default time o
u
a
tion
O
N”, an alarm will
s
V
(+/- 0.3V). A visu
a
a
y.
a
ult setting for Ba
t
h
e audible beep
w
v
ice:
audio player to th
e
o
n (6) twice to view
s
oft button to select
l
ay (LCD)
d
activated functio
n
take longer to re
s
e
nded period of ti
m
a
y decrease sligh
t
r
ature increases t
o
A
rrow)
n
ditions, the swoop
e
ss button to exit th
e
u
t and returning to
t
s
ound (3 beeps eve
a
l warning (Battery
L
t
tery Alarm. If the
a
w
ill not be heard.
e
AUX IN cables ro
u
the Auxiliary optio
n
auxiliary audio inp
u
n
s are shown on th
e
s
pond when subje
c
m
e. In addition, th
e
t
ly. The LC
D
displ
a
o
a normal range.
arrow option will b
e
e
current operation
t
he previous menu
d
P1
ry 30 sec) when
L
ow) will appear
a
udio is muted or
u
ted from the rear
n
.
u
t mode.
e
LCD panel (10).
c
ted to cold
e
visibility of the
a
y will return to
e
available in the
without waiting for
d
isplay.

TUNER
O
Tuner mode opti
o
BAND
Select a Band
Press the Band
s
TUNE
Manual Tuning
Press the Tune
s
increment statio
n
Seek Tuning
Press and hold t
h
previous stronge
s
PRESET
Preset mode opt
i
Autosave
Press the Autos
a
store them in the
O
PERATIO
N
o
ns available are T
u
s
oft button to chan
g
s
oft button. Press t
h
n
s down/up step by
h
e |<< or >>| soft b
u
s
t broadcast statio
n
i
ons available are
A
a
ve soft button to a
preset list for the s
N
u
ne, Band, Preset
a
g
e between FM or
A
h
e |<< or >>| soft bu
step.
u
ttons to automatic
a
n
.
A
utosave, Scan and
utomatically select
s
elected Band. The
n
a
nd PT
Y
.
A
M bands.
ttons to decrement
/
a
lly seek the next o
r
List.
s
trongest stations
a
n
e
w
stations repla
c
10
/
r
a
nd
c
e any
statio
n
Scan
Press
will pa
scann
i
List
Press
prese
t
Store
While
navig
a
and h
o
the st
a
memo
Recal
l
Rotat
e
prese
t
corres
n
s already stored in
the Scan soft butto
use for ten second
s
i
ng when the desir
e
the List soft button
locations to store
y
a Station
tuned to the desire
d
a
te the preset list a
n
o
ld the Encoder K
n
a
tion. The station fr
e
ry location number.
l
a Station
e
the Encoder Kno
b
memory location.
P
ponding stored sta
t
that band.
n to scan stations s
s
at each preset st
a
e
d station is reache
d
to display the pres
e
y
our favorite broad
c
d
broadcast station
,
n
d highlight the desi
n
ob for 3 seconds o
e
quency will appea
r
b
to navigate the p
r
P
ress the Encoder
t
ion.
tored in the current
a
tion. Press Scan a
g
d
.
e
t list. There are 1
8
c
ast stations.
,
rotate the Encod
e
red preset memory
r press the Save s
o
r
in the display adja
c
r
eset list and highli
g
Knob to select an
d
P1
band list. The unit
g
ain to stop
8
FM and 12 AM
r Knob (5) to
location. Press
o
ft button to store
c
ent to the preset
g
ht the desired
tune to the

PTY
Press the PTY s
o
RBDS informatio
NOTE: Radio st
a
listening area.
In FM radio mod
e
(PTY) options: A
N
Adult Hits / Soft
R
/ R&B / Soft R&
B
Personality / Pu
b
To search for sta
t
1. Rotate the
E
categories a
2. Highlight sel
search the
b
during the s
e
automaticall
y
previously t
u
NOTE: Perform
i
station broadca
Stereo (ST)
The unit will aut
o
stereo mode, th
e
available, the uni
displayed.
o
ft button access s
e
n.
a
tions broadcasti
n
e
, press the PTY s
o
N
Y / News / Inform
a
R
ock / Top 40 / Cou
n
B
/
Foreign Languag
b
lic / College / Weat
t
ions in a PTY cate
g
E
ncoder Knob cont
nd select the progr
a
ecting the desired
P
b
and or broadcasts
o
e
arch. If a matchin
g
y
tune to that statio
n
u
ned broadcast stat
i
ng a PTY search
o
sting RBDS, rega
r
o
matically pick up a
n
e
“ST” icon appears
t will automatically
r
e
arch for stations in
n
g RBDS may not
o
ft button to list the
f
a
tion / Sports / Talk
n
try / Oldies / Soft /
e / Religious Music
her / Emergency T
e
g
ory:
rol to navigate thro
u
a
m type you wish t
o
P
TY, press the Enc
o
o
f this type. PTY S
e
g
broadcast station i
n
. If none is found,
t
ion.
o
n “ANY” will See
k
r
dless of the prog
r
n
FM stereo signal,
in the display. Whe
r
evert to mono ope
r
your area broadca
s
be available in yo
u
f
ollowing Program
T
/ Rock / Classic R
o
Nostalgia / Jazz /
C
/ Religious Talk /
e
st / Emergency
u
gh the list of avail
a
o
search.
o
der Knob control
t
e
arch…” will be dis
p
s found, it will
t
he unit will return t
o
k
Tune and stop o
n
r
am type.
when available. W
h
n no stereo signal i
r
ation, and no icon
w
11
s
ting
u
r
T
ype
o
ck /
C
lassical
a
ble
t
o start
p
layed
o
the
n
any
h
en in
s
w
ill be
P1
W
EATHE
What is the
N
NOAA (National
O
that broadcasts l
o
National Weathe
r
stations covering
the U.S. Virgin Is
transmitting stati
o
A similar system
administered by
E
Tuning to W
e
Press the Weath
frequency broad
c
with the current
n
"WB-5", "WB-6"
o
tune to the stron
g
Manual Tuni
n
Press the Tune
s
tuning step-by-st
e
R BAND O
N
OAA Weather
O
ceanic and Atmo
s
o
cal weather emer
g
r
Service (NWS) n
e
the 50 states as w
e
lands and the U.S.
o
n and there are a
t
is available in Can
a
E
nvironment Cana
d
e
atherband
e
r
soft button to ac
c
c
ast). The indicatio
n
n
umber and chann
e
o
r "WB-7". Under n
o
g
est station in the a
n
g
s
oft button and use
t
e
p.
PERATIO
N
Radio/Weathe
r
s
pheric Administrati
o
g
ency information 2
4
e
twork. The U.S. ne
t
e
ll as the adjacent
c
Pacific Territories.
E
t
otal of seven broa
d
a
da under the Wea
t
d
a.
c
ess the weather b
a
n
"WB" will appear
o
e
l indication: "WB-1
"
o
rmal conditions th
e
rea within 10 seco
n
t
he |<< or >>| soft
b
N
r
adio Canada?
o
n) is a nationwide
4
hours a day via t
h
t
work has more tha
c
oastal waters, Pue
r
E
ach local area has
d
casting frequencie
s
t
heradio Canada se
a
nd (NOAA seven
o
n the display pane
"
, “WB-2", "WB-3",
"
e
unit will automati
c
n
ds.
b
uttons to adjust st
a
12
system
h
e
n 530
r
to Rico,
its own
s
used.
rvice
l, along
"
WB-4",
c
ally
a
tion
LIST
Press
Recal
l
Rotat
e
prese
t
corres
chang
.
the Presets soft b
u
l
a Station
e
the Encoder Kno
b
memory location.
P
ponding stored sta
t
e
d by the use
r
Fre
q
u
tton to display the
p
b
(5) to navigate th
e
P
ress the Encoder
t
ion. Note that the p
Weatherband Fr
e
q
uency (MHz)
162.400
162.425
162.450
162.475
162.500
162.525
162.550
p
reset list.
e
preset list and hig
Knob to select an
d
resets are assigne
d
e
quencies
Preset
2
4
5
3
6
7
1
P1
hlight the desired
tune to the
d
and cannot be
SIRIUS
X
About Sirius
X
Sirius, XM and a
l
and its subsidiari
programming/ch
a
other marks and
reserved.
NOTE: The Siri
u
when an option
a
Switching to
Press the Mode
b
soft button (8) to
Accessing y
o
To subscribe to t
h
identify the Radi
o
X
M OPERA
T
X
M
l
l related marks an
d
es. Visit www.siriu
s
a
nnel lineup/ XM s
e
logos are the prop
e
u
sXM Satellite Ra
d
a
l SiriusXM Conn
e
SiriusXM Mod
e
button (6) to enter
m
change to SiriusX
M
o
ur SiriusXM R
h
e SiriusXM Satelli
t
o
ID of your SiriusX
M
T
ION
d
logos are tradema
s
xm.com/xmlineup
f
e
rvice subject to ch
a
e
rty of their respecti
v
d
io controls on thi
s
e
ct Vehicle Tuner
i
e
m
ode selection dis
p
M
mode.
adio ID
t
e Radio service, it i
M
Tuner. With the r
a
rks of Sirius XM R
a
f
or updates. All
a
nge or preemption
.
v
e owners. All right
s
unit are availabl
e
i
s connected.
p
lay. Press the Siri
u
s necessary to loc
a
a
dio turned on, tun
e
13
a
dio Inc.
.
All
s
e
only
u
sXM
a
te and
e
to the
Sirius
X
Sirius
X
1. I
n
D
2. R
3. P
r
4. U
y
o
5.
W
NOT
E
A
cti
v
1.
W
C
y
o
c
h
in
2. F
o
w
w
1
-
F
o
h
t
1
-
NOT
E
activ
a
Siriu
s
recei
v
Upda
t
plan.
N
take
u
Siriu
s
X
M previe
w
chann
e
X
M preview chann
e
SiriusXM mode,
pr
i
rect Channel Entr
y
o
tate the Encoder
r
ess the Encoder
K
p
on entering the la
s
o
u
r
tuner.
W
rite down the 8 dig
i
E
: The SiriusXM R
a
v
ating Your Ser
v
W
ith the radio still tu
r
h
annel 1. You shou
o
ur service is not a
c
h
eck the installation
stalled.
o
r subscriptions in t
w
w.siriusxm.com/a
c
-
866-635-2349.
o
r subscriptions in
C
t
tp://www.siriusxm.
c
-
877-438-9677
E
: As part of the ac
a
tion message to
y
X
M Vehicl
e
Tuner
”
v
ed the activation
m
t
ed”. Once subscr
i
N
ote, the activatio
u
p to an hour. You
r
X
M signal to rece
i
e
l on Channel 1. Yo
u
e
l even if you
r
servi
c
r
ess and hold the E
n
mode.
Knob to select eac
h
K
nob button for ea
c
s
t digit, the unit will
t
i
t ID number for ref
e
a
dio ID does not in
v
ice
r
ned on, tune to the
ld be able to hear t
h
c
tivated. If you can
n
instructions to ma
k
he United States,
p
c
tivatenow or call S
C
anada, please visi
t
c
a/help/activation-h
e
tivation process,
t
y
our tuner (see “A
d
”
). When your rad
i
m
essage, your ra
d
i
bed, you can tun
e
n process usuall
y
r
radio will need t
o
i
ve the activation
m
u
should be able to
c
e is not activated.
n
coder Knob butt
o
h
digit.
c
h digit to enter “00
0
t
une to the SiriusX
M
e
rence.
clude the letters I,
SiriusXM preview
c
h
e SiriusXM previe
w
n
ot hear the previe
w
k
e sure your tuner i
s
p
lease visit
iriusXM Listener C
a
t
e
lp or call XM Liste
n
t
he SiriusXM satel
l
d
visory Messages
i
o detects that the
d
io will display: “
S
e
to channels in y
o
y
takes 10 to 15 mi
n
o
be powered on a
n
m
essage.
P1
hear the
o
n (5) to select
0
”.
M
ID number for
O, S or F.
c
hannel on
w
channel even if
w
channel, please
s
properly
a
re at
n
er Care at
l
ites will send an
Reported by the
tuner has
S
ubscription
o
ur subscription
n
utes, but may
n
d receiving the

TUNE
Tune mode opti
o
Manual Tuning
Press the Tune
s
increment chann
e
Rapid Tuning
Press and hold |
<
sequence.
PRESETS
Preset mode opt
i
SCAN
Press the Scan
s
pause for ten se
c
or the Scan soft
reached.
LIST
Press the List s
o
to store and allo
w
Store a Station
While tuned to th
navigate the pre
s
and hold the En
c
the channel. The
preset memory l
o
Recall a Station
Rotate the Enco
d
desired preset m
tune to the corre
s
o
ns available are |<
<
s
oft button. Press t
h
e
ls down/ up step
b
<
< or >>| soft butto
n
i
ons available are
P
s
oft button to scan
s
c
onds at each pres
e
button again to sto
p
o
ft button to display
w
convenient acces
s
e desired broadca
s
s
et list and highligh
t
c
oder Knob for 3 s
e
channel informatio
o
cation number.
d
er Knob button to
emory location. Pr
e
s
ponding stored ch
a
<
, >>| and Info.
h
e |<< (3) or >>| (2)
b
y step.
n
s to quickly tune n
e
P
reset, Tune and L
i
s
tations stored in th
e
e
t channel. Press th
p
scanning when th
e
the preset list. The
r
s
to you
r
favorite c
h
s
t channel, rotate th
e
t
the desired preset
e
conds or press th
e
n will appear in the
navigate the pres
e
e
ss the Encoder K
n
a
nnel.
soft buttons to dec
r
e
xt or previous cha
n
i
st.
e
preset list. The u
n
e Encoder Knob b
e
desired channel i
s
r
e are 18 preset lo
c
h
annels.
e
Encoder Knob t
o
memory location.
P
e
Save soft button t
o
display adjacent to
e
t list and highlight t
h
n
ob button to selec
t
14
r
ement/
n
nels in
n
it will
utton (5)
s
c
ations
o
P
ress
o
store
the
h
e
t
and
CAT
E
Categ
o
Cate
g
1. P
r
b
e
2. R
c
a
3. P
r
Chan
n
1. P
r
C
2. R
3. P
r
di
4. U
Siriu
s
The P
a
includ
i
requir
e
settin
g
locke
d
E
GORY
o
r
y
mode options a
r
ory Tuning
r
ess the Cat - /+ so
f
e
displayed along
w
o
tate the Encoder
a
tegory.
r
ess Encoder Kno
b
n
el Direct Access
T
r
ess and hold the E
h
annel Number: 0
_
o
tate the Encoder
r
ess the Encoder
K
git.
p
on entering the la
s
X
M Channel Lock
a
rental Control feat
u
ng those with matu
e
s you to enter a p
a
g
up the user passc
o
d
channels is descri
b
r
e Cat+, Cat- and I
n
f
t buttons to chang
e
w
ith the channel list
w
Knob to navigate t
h
b
button to confirm
t
T
uning
ncode
r
Knob butt
o
_
_
” will appear on t
Knob to select a di
g
K
nob button to con
f
s
t digit, the unit will
t
Feature
u
re allows you to li
m
re content. When e
a
sscode to tune to t
h
o
de, locking chann
e
b
ed on the next pa
g
n
fo.
e
the category. Eac
h
w
ithin the selected
h
e channel list withi
t
he channel selecti
o
o
n to access Direct
T
he display.
g
it (0 – 9) for each
n
f
irm each digit and
m
t
une to the desired
m
it access to any S
i
nabled, the Parent
a
h
e locked channels
e
ls, and the metho
d
g
e.
P1
h
category title will
category.
n the selected
o
n.
T
une mode. “Enter
n
umber position.
m
ove to the next
channel number.
i
riusXM channels,
a
l Control feature
. Information on
d
to access the

Setting the Use
r
1. Press and
system m
e
2. Rotate the
MENU" op
t
3. Press the
E
4. Press the
E
0 _ _ _” pr
o
5. Rotate the
The defaul
t
each digit
a
6. Upon ente
r
7. Repeat th
e
Locking a Chan
1. Press and
system me
2. Rotate the
Radio" opti
3. Rotate the
4. Press the
E
prompt me
s
5. Enter the
L
6. Rotate the
7. Press the
E
indicate th
e
Accessing a Lo
c
1. Tune to th
e
direct acce
2. An “Enter
L
3. Enter the
L
4. The devic
e
cycle.
r
Passcode
hold the Menu butt
o
e
nu.
Encoder Knob (5)
t
ion.
E
ncoder Knob but
t
E
ncoder Knob but
t
o
mpt message will
a
Encoder Knob to
s
t
code is "0000".
P
a
nd move to the ne
x
r
ing the last digit, th
e
same steps to ent
e
ne
l
hold the Menu butt
o
nu.
Encoder Knob to
n
on.
Encoder Knob to
"
E
ncoder Knob but
t
s
sage will appear.
L
ock Code, a list of
c
Encoder Knob to
s
E
ncoder Knob but
t
e
channel has been
c
ked Channe
l
e
desired channel u
s
ss tuning method.
L
ock Code: 0 _ _ _”
L
ock Code within 1
0
e
will remain in “unr
e
o
n (9) for more tha
n
to navigate the me
t
on to view "Set Lo
c
t
on to select Set Lo
c
a
ppear.
s
elect a digit (0 – 9
)
P
ress the Encoder
x
t digit.
e unit will prompt f
o
e
r the code again.
o
n (9) for more tha
n
n
avigate the menu
l
"
Locked Channels
…
t
on to select. “Enter
c
hannels with open
s
elect a channel yo
t
on to lock the chan
successfully locke
d
s
ing the |<< or >>|
s
prompt message
w
0
seconds to unlock
e
stricted” (unlocked
)
n
3 seconds to ent
e
nu list to the "SXM
c
k Code".
c
k Code. “Enter Lo
c
)
for each number
p
Knob button to co
n
o
r confirmation of th
n
3 seconds to ente
l
ist to the "SXM Sa
t
…
".
Lock Code: 0
_
_
_
lock icons will app
e
u wish to lock
nel. The locked ico
n
d
.
s
oft buttons or use
t
w
ill appear.
and tune the chan
n
)
mode until the ne
x
15
e
r the
SETUP
c
k Code:
p
osition.
n
firm
e code.
r the
t
ellite
_
”
e
ar.
n
will
t
he
n
el.
x
t power
Rese
t
If you
f
the co
chann
1.
2.
R
s
3.
P
4.
R
5.
P
6.
P
7.
P
8.
P
9.
P
n
INF
O
Alter
n
Info o
p
button
Name
Name
Satell
i
The di
SiriusXM Channe
f
orget your Parenta
d
e to the default “0
0
e
ls list.
I
n SiriusXM mode,
t
R
otate the Encode
r
s
etting to 0.
P
res
s
and hold the
R
otate the Encode
r
P
ress the Encoder
P
ress the Encoder
P
ress the Encoder
P
ress the Return b
P
ress the Power b
u
n
ow been reset to “
O
n
ate Display Infor
m
p
tion is available in
to change the disp
(Artist) > Song (Tit
(Artist).
i
te Signal Strengt
h
splay will indicate
s
Signal S
No Si
We
a
Go
o
Exce
l
l Lock Cod
e
l Control lock code,
0
00”. Resetting the
t
une to Channel 0 (
R
r
Knob counter-clo
c
Setting button to e
r
Knob to view the
Knob to view soft
w
Knob once to con
f
Knob button to tur
n
utton to exit the sy
s
u
tton (1) to turn off
a
0000”.
m
ation
Tune, Category a
n
lay information in t
h
le) > Info (Content,
h
s
atellite reception st
r
trength
gnal
a
k
o
d
l
lent
use the following
d
lock code will not a
R
adio ID).
c
kwise to decrease
nter the System Se
“About”.
w
are version inform
a
f
irm.
n
the LCD display
o
s
tem menu..
a
nd on the unit. Th
e
n
d Preset List mod
e
h
e following order:
if available) > Cate
r
ength as shown b
e
Strength Displ
a
P1
d
irections to reset
ffect the locked
the volume
tting Menu.
a
tion.
o
ff.
e
lock code has
e
s. Press Info soft
gory (Category) >
e
low.
a
y

O
C
h
C
h
N
o
S
u
P
r
C
o
C
h
C
h
O
n-Screen Display
h
eck Antenna
h
eck Tune
r
o
Signal
u
bscription update
r
ess Any Key to
o
ntinue
h
an Unavailable
h
UnSubscribed
A
dvisory Mes
s
Check Antenna
Check Tuner
No Signal
Subscription Up
d
Channel Not Ava
Channel Not
Subscribed
A
d
s
age
The radio h
a
antenna ca
b
• The ra
d
Tuner.
• The tu
n
The Sirius
X
the SiriusX
M
d
ated The radio h
a
status.
ilable The chann
e
channel or
t
available.
Yo
connecting
The chann
e
SiriusXM s
u
listening to
i
visory Messages
R
C
a
a
s detected a fault
w
b
le is either disconn
e
d
io is having difficult
y
n
er may be disconne
c
X
M Connect Vehicle
T
M
satellite signal
a
s detected a chang
e
l that you have requ
t
he channel that you
Yo
u may also see thi
s
a new SiriusXM Co
n
e
l that you have requ
u
bscription package
o
i
s no longer include
d
16
R
eported by the S
a
use
w
ith the SiriusXM ant
e
e
cted or damaged.
y
communicating wit
h
c
ted or damaged.
T
uner is having diffic
u
e in your SiriusXM s
u
ested is not a valid
S
were listening to is
n
s
message briefly wh
n
nect Vehicle tuner.
ested is not include
d
o
r the channel that y
d
in your SiriusXM c
h
iriusXM Vehicle T
u
e
nna. The •
•
h
the SiriusXM •
•
u
lty receiving •
•
•
•
•
u
bscription •
•
•
•
S
iriusXM
n
o longer
e
n first
Vi
s
th
e
d
in your
o
u were
annel lineup.
•
•
u
ne
r
E
Verify that the ant
e
Tuner.
Inspect the antenn
antenna if the cabl
e
Verify that the Siri
u
the radio SiriusXM
If the problem pers
then contact your
d
Verify that your an
t
southern sky.
Verify that the Siriu
area on the outsid
e
Move the SiriusX
M
Inspect that anten
n
antenna if the cabl
e
If the problem pers
then contact your
d
Press any key to c
l
No further action i
s
Questions about y
o
visit www.siriusxm.
Care at 1-866-635
-
Questions about y
o
http://www.siriusx
m
Care at 1-877-438
-
s
it www.siriusxm.co
m
e
SiriusXM channel li
Questions about y
o
visit www.siriusxm.
Care at 1-866-635
-
Questions about y
o
http://www.siriusx
m
Care at 1-877-438
-
E
xplanation/Soluti
o
e
nna cable is connec
t
a cable for damage
a
e
is damaged.
u
sXM Tuner cable is
mating connector/c
a
ists, disconnect and
d
ealer.
t
enna is outdoors wi
t
sXM antenna is mo
u
e
of the vessel.
M
antenna away from
n
a cable for damage
e
is damaged.
ists, disconnect and
d
ealer.
l
ear the message.
s
required.
o
ur subscription in t
h
com/activatenow or
-
2349.
o
ur subscription in
C
m
.ca/help/activation-
h
-
9677
m
/channellineup for
m
neup.
o
ur subscription in t
h
com/activatenow or
-
2349.
o
ur subscription in C
m
.ca/help/activation-
h
-
9677
P1
o
n
t
ed to the SiriusXM
a
nd kinks. Replace t
h
s
ecurely connected
t
a
ble.
reconnect the tune
r
a
t
h a clear view of the
u
nted in an unobstru
c
any obstructions.
and kinks. Replace
t
reconnect the tuner
a
h
e United States ple
a
call SiriusXM Listen
e
C
anada, please visit
h
elp/ or call XM List
e
m
ore information abo
h
e United States ple
a
call SiriusXM Listen
e
anada, please visit
h
elp/ or call XM Liste
h
e
t
o
a
nd
c
ted
t
he
a
nd
a
se
e
r
e
ner
ut
a
se
e
r
ner

O
C
h
E
n
W
O
n-Screen Display
h
an Locked
n
ter Code:_ _ _ _
W
rong Code
A
dvisory Mes
s
Channel Locked
Enter Lock Code
Invalid Lock Cod
e
A
dvisor
y
s
age
The chann
e
Parental C
o
User prom
p
e
The unlock
y
Messages Repor
t
C
a
e
l that you have requ
o
ntrol feature.
p
ted to enter the lock
/
code entered by the
17
t
ed by the SiriusX
M
a
use
ested is Locked by t
h
/
unlock code.
user is incorrect.
M
Vehicle Tuner (
C
h
e radio S
e
on
ch
a
En
•
•
C
ontinued)
E
e
e the section on Pa
r
the Parental Contro
a
nnels.
ter the four digit cod
e
Input the correct f
o
Reset lock code to
E
xplanation/Soluti
o
r
ental Control, page
1
l feature and how to
e
to unlock the chan
o
ur digit code to unlo
c
default instructions
o
P1
o
n
1
5 for more informati
access locked
nel.
c
k the channel.
o
n page 15.
on
USB MP
3
MP3 Specifi
c
• A directory t
h
• Maximum nu
• Maximum nu
• Maximum nu
• Maximum nu
• Sampling fre
q
• Bit rates: ma
x
• Maximum nu
• ID3 Tag vers
i
• ID3 Tag vers
i
NOTE: USB fla
s
Inserting an
d
Inserting a USB
Insert the USB d
e
USB mode, the
d
the files on the U
3
OPERATI
c
ations
h
at does not includ
e
mber of folders: 51
2
mber of folder leve
l
mber of MP3 files:
9
mber of characters
q
uency: 16KHz, 22
x
imum 384 Kbps.
mber of Character
s
i
on 1.0: 32
i
on 2.x: 32
s
h drives with a ca
p
d
Removing a
U
Device
e
vice into the USB
j
d
isplay will then sho
w
SB device automat
ON
e
an MP3 file is skip
2
(including skippe
d
l
s: 12
9
99
for MP3 file name
a
.05KHz, 24KHz, 32
s
of ID3 Tag:
p
acity of up to 64
U
SB Device
j
ack and press the
M
w
the “Loading…”
m
ically.
ped.
d
directories)
a
nd folder name: 3
2
KHz, 44.1KHz, 48
K
GB are supporte
d
M
ode button (6) to
m
essage. The unit
w
19
2
K
Hz.
d
.
enter
w
ill read
Rem
o
Press
from t
h
NOT
E
order
may
n
A
cc
e
Switc
h
Press
(2) to
c
USB
m
Selec
t
Press
file. T
h
soft b
u
begin
s
LIST
Brow
s
Rotat
e
Press
BAC
K
direct
o
Play/
P
Press
resum
RRI (
R
Previ
e
Press
ving a USB Devic
e
the Mode button to
h
e USB connector.
E
: After loading a
U
in which they we
re
n
ot be the same a
s
e
ssing USB Mo
d
h
ing to USB Mod
e
the Mode button to
c
hange to USB mo
d
m
ode options availa
t
ing Tracks
the |<< (3), >>| (2)
h
e selected file na
m
u
ttons to fast forwar
s
when the button i
s
s
e Files/Folders
e
the Encoder Kno
b
the Encoder Kno
b
K
soft button to reve
r
o
ry.
P
ause
the || button (4) t
o
e playback.
R
epeat, Random, I
n
e
wing Tracks
the Intro soft butto
n
e
select anothe
r
mo
d
U
SB device, files a
n
re
written to the d
e
s
the order in whic
h
d
e
enter mode selecti
o
d
e.
ble are |<<, >>|, LI
S
soft buttons to incr
e
m
e will appear on th
e
d or fast reverse th
r
s
released.
b
(5) to navigate a
n
b
button to select th
e
r
se navigate the fol
d
o
suspend playbac
k
n
tro)
n
(8) to play the firs
t
d
e and then remov
e
n
d folders are acc
e
e
vice. Therefore, t
h
h
they are expect
e
o
n display. Press t
h
S
T and RRI.
e
ment or decremen
t
e
display. Press an
d
r
ough the current fil
n
d view the list of all
e
highlighted file/fol
d
d
ers and return to t
h
k
. Press the || but
t
t
10 seconds of eac
h
P1
e
the USB device
e
ssed in the
h
e playing order
e
d to be played.
h
e USB soft button
t
to the next song
d
hold the |<<, >>|
e. Playback
files/folders.
d
er. Press the
h
e root level
t
on again to
h
file in the current

folder sequential
l
resume normal
p
Repeat Play
Press the Repe
a
the Repeat soft
b
Random Play
Press the Rand
o
shuffled order. P
r
l
y. Press the Intro
s
p
layback of the curr
e
a
t soft button (2) du
r
b
utton again to sto
p
o
m soft button (3) t
o
r
ess the Random s
s
oft button again to
s
e
nt file.
r
ing song play to re
p
p
repeat play.
o
play all files in the
oft button again to
s
stop Intro Scan an
d
p
eat the current file
current folder in ra
n
s
top random play.
20
d
. Press
n
dom,
P1
BLUETO
O
The P1 includes
b
Bluetooth device
s
About Bluet
o
Bluetooth is a sh
o
it transmits voice
meters.
Bluetooth M
e
NOTE: Please n
while the unit i
s
Press and hold t
h
Encoder Knob (
Encoder Knob t
o
• BT On/Off:
R
then press t
h
• BT Device
L
Rotate the
E
Press the E
n
O
TH OPE
R
b
uilt-in Bluetooth te
s
to this head unit f
o
o
oth Technolo
g
o
rt-range wireless r
a
and data at speed
s
e
nu Options
ote that some Blu
e
s
in Bluetooth Aud
i
h
e MENU button (9
)
5) to navigate the
m
o
access the follow
i
R
otate the Encode
r
h
e Encoder Knob
b
L
ist: Press the Enc
o
E
ncoder Knob to vi
e
n
coder Knob butto
n
R
ATION
chnology that allow
o
r streaming audio
g
y
a
dio protocol. Oper
a
s
up to 2.1 Mbit/s o
v
e
tooth menu opti
o
i
o mod
e
.
)
to enter menu adj
u
m
enu list to “Blueto
o
i
ng Bluetooth Men
u
r
Knob to choose “
B
b
utton to enter the
s
o
der Knob button t
o
e
w a list of previou
s
n
to select the devi
c
s you to wirelessly
c
playback.
a
ting in the 2.4 GH
z
v
er a range of up t
o
o
ns are only avail
a
u
stment mode. Rot
a
o
th Setup” and pres
u
options:
B
T On” or “BT Off”,
s
election.
o
view devices fro
m
s
ly paired mobile d
e
c
e. Rotate the Enc
o
21
c
onnect
z
range,
o
10
a
ble
a
te the
s the
and
m
the list
e
vices. .
o
der
K
c
a
• B
K
• L
o
d
e
b
e
lo
di
• D
b
u
r
e
• D
Pairi
n
Befor
e
pair w
i
Bluet
o
1. O
s
u
2. E
n
B
l
3. P
r
a
v
4. O
c
o
E
n
Note:
Recei
v
When
hangi
n
neces
s
nob to choose Loc
k
a
nnot delete a devi
c
T Pair: Press the E
nob again to start
p
o
c
k
/Unlock: The P
e
vices are stored in
e
ing bumped from t
h
ck the device. To L
o
splay/change the L
o
i
sconnect: To disc
o
u
tton to temporarily
e
-established throu
g
e
let
e
: To delete a
d
n
g a Bluetooth
e
you begin, consult
i
th the P1.
o
oth Quick Pair:
n your personal Bl
u
u
re your device has
n
ter Bluetooth mod
e
l
uetooth.
r
ess and hold the E
v
ailable on your Blu
n your Bluetooth d
e
o
nnect your device.
n
ter the pairing pa
s
You can alternati
v
v
ing a Call While
L
answering a call u
s
n
g up from the call,
s
ary to press the pl
a
k
/Unlock, Disconne
c
c
e that is actively c
o
ncoder Knob to di
s
p
airing mode.
1 can store up to 5
FIFO (First in First
h
e list when more t
h
o
ck/Unlock a devic
e
o
cked or Unlocked
o
nnect a connecte
d
remove the Blueto
o
g
h your phone men
u
d
evice from the list,
Device
the owner’s manu
a
u
etooth device, ent
e
Bluetooth turned o
e
on the P1 by pre
s
ncoder Knob for t
h
etooth device.
e
vice, select P1 on
c
sword (0000), if re
q
v
ely pair from the
B
L
istening to Music
s
ing a connected ph
Bluetooth audio wil
l
a
y button to resum
e
c
t or Delete for this
o
nnected.
s
play “Pair?” and p
r
devices for BT con
n
Out) order. To pre
v
h
an 5 devices are
u
e
, press the Encod
e
icon.
d
device, press the
E
o
th link. The link ca
n
u
by selecting the P
press the Encoder
a
l for the Bluetooth
d
e
r the Bluetooth set
t
n and is searching
f
s
sing the Mode butt
h
ree seconds to m
a
c
e it becomes avail
a
q
uested.
B
luetooth Menu.
one, Bluetooth aud
i
l
continue on some
e
Bluetooth audio.
P1
device. You
r
ess the Encoder
n
ection. The
v
ent a device from
u
sed, you must
e
r Knob button to
E
ncoder Knob
n
be
1 for connection.
Knob button.
d
evice you want to
t
ings list. Make
f
or new devices.
on and selecting
a
ke the P1
a
ble to pair and
i
o will pause. After
phones. It may be

Bluetooth
Au
When connected
access Bluetoot
h
button (9). While
LCD.
Selecting Track
s
During playback,
track.
Pausing Playba
During playback,
will appear on th
e
If you change to
a
Mode button (6)
playback.
INFO
Press Info butto
n
NOTE: If a Blue
t
off or if the dev
i
search for the
m
u
dio (A2DP)
, a Bluetooth enabl
e
h
mode and play so
n
in Bluetooth mode,
s
press the |<< (3) /
>
c
k
press the || butt
o
e
LCD. Press || a
g
a
nother mode, the
m
to return to Blueto
o
n
(7) to view the na
m
t
ooth device is di
s
i
ce is disconnecte
d
m
atching Bluetoot
h
e
d device is able to
n
gs stored on your
the Bluetooth audi
o
>
>| (2) soft buttons
t
o
n (4) to pause the
B
g
ain to resume pla
y
m
obile phone audi
o
o
th mode and resu
m
m
e of the connecte
d
s
connected due to
d
inadvertently, t
h
h
device when the
stream audio to th
e
phone, press the
M
o
icon illuminates o
t
o play the previou
s
B
luetooth audio pla
y
y
back.
o
will pause. Press
t
m
e mobile phone au
d
device.
the power being
t
h
e unit will automa
power is restore
d
22
e
P1. To
M
ode
n the
s
o
r
next
y
er. “||”
t
he
dio
t
urned
tically
d
.
AP
P
POLK
®
stereo
prima
r
transf
o
Feat
u
This a
•
P
•
V
•
A
•
S
•
N
•
B
•
F
U
•
A
•
A
s
•
V
s
Con
n
After
d
devic
e
you c
a
When
Bluet
o
P
OPERAT
I
®
Specialty Controll
system. Store awa
r
y functions of your
o
rming your mobile
u
res
pp controls all of th
e
P
ower on/off
V
olume and mute
A
M/FM radio tuner:
S
iriusXM radio: ac
c
N
OAA weather ban
d
B
luetooth® streami
n
F
ile structure visibil
i
U
SB
A
uxiliary audio inpu
A
udio menu control
s
peaker selection s
e
V
isual display feed
b
s
creen
n
ecting and us
i
d
ownloading and in
s
e
to the P1 as state
d
a
n open the app an
d
Ultramarine is inst
a
o
oth pairing, otherwi
I
ON
er is the ultimate w
i
y your old remotes
POLK stereo right
f
device into a functi
o
e
primary functions
access station, re
c
c
ess station, recall,
s
d
and alert
n
g audio
i
ty, track selection,
t
t control –auxiliary
a
s- bass, treble, bal
a
e
ttings
b
ack so you can se
e
i
ng Ultramarin
e
s
talling Ultramarine
d
above for Bluetoo
t
d
use with your P1
r
a
lled on Android op
e
se there may be er
r
i
reless remote cont
r
and enjoy the con
v
f
rom your phone or
o
nal stereo remote
of your stereo feat
u
c
all, store presets, s
s
tore presets, switc
t
rack audible scan
u
a
nalog 1
a
nce, fader, equaliz
e
e
artist title and alb
u
e
app
app on your apple
t
h pairng. Once yo
u
r
adio.
e
rating system, clo
s
r
ors on Bluetooth c
o
P1
r
ol for your POLK
v
enience of all the
tablet by
control!
u
res including:
witch songs
h songs
u
p and down via
e
r, volume and
u
m on your mobile
device, pair your
u
r device is paired
s
e the app before
o
nnection.

SPECIFI
C
FM Radio
Frequency Cove
r
Frequency Cove
r
Sensitivity (S/N
=
Image Rejection
Stereo Separatio
AM/MW
Frequency Cove
r
Frequency Cove
r
Sensitivity (S/N
=
General
Frequency band
(
Operating Voltag
Grounding Syste
Speaker Impeda
n
Tone Controls:
Bass (at 100
H
Treble (at 10
k
Power Output . .
Current Drain . .
.
Tuner/Amp Box
D
Front Panel Dim
e
C
ATIONS
r
age (USA) . . . . . .
.
r
age (Europe) . . . .
=
30dB) . . . . . . . . . .
. . . . . . . . . . . . . . . .
n . . . . . . . . . . . . .
r
age (USA) . . . . . .
.
r
age (Europe) . . . .
=
20dB) . . . . . . . . . .
(
s) (for Bluetooth). .
e . . . . . . . . . . . . . .
.
m . . . . . . . . . . . .
n
ce . . . . . . . . . . . . .
H
z) . . . . . . . . . . . . .
k
Hz) . . . . . . . . . . . .
. . . . . . . . . . . . . . . .
.
. . . . . . . . . . . . . . .
D
imension . . . . . . .
e
nsions . . . . . . . . . .
.
. . . . . . . . . . . . . . .
. . . . . . . . . . . . . . . .
. . . . . . . . . . . . . . .
.
. . . . . . . . . . . . . . . .
. . . . . . . . . . . . . . . .
.
. . . . . . . . . . . . . . .
. . . . . . . . . . . . . . . .
. . . . . . . . . . . . . . . .
. . . . . . . . . . . . . . .
.
.
. . . . . . . . . . . . . . .
.
. . . . . . . . . . . . . . .
.
. . . . . . . . . . . . . . .
. . . . . . . . . . . . . . .
.
. . . . . . . . . . . . . . . .
. . . . . . . . . . . . . . .
. . . . . . . . . . . . . . . .
. . . . . . . . . . . . .7.4(
L
. . . . . . . . . . . . 6.8(
L
. . . . . . . 87.5 to 10
7
. . . . . . . . .87.5 to 1
0
.
. . . . . . . . . . . . . . .
. . . . . . . . . . . . . . .
.
. . . . . . . . . . . . . . . .
. . . . . . . . . . .530-1
7
. . . . . . ...526.5-160
. . . . . . . . . . . . . . . .
.
. . . . . . . . 2402~2
4
.
. . . . . . . . . . . .DC
1
.
. . . . . . . Negative
. . . . 4-8 ohms per
c
.
. . . . . . . . . . . . . . .
. . . . . . . . . . . . . . . .
. . . . . . . . . . . . . . .
5
. . . . . . . 15 Amper
e
L
) x 7.4(W) x 2.2(H
)
L
) x 5.0(W) x 2.8(H
)
23
7
.9 MHz
0
8 MHz
. . . 4uV
.
>45 dB
>25 dB
7
10 kHz
6.5 kHz
. .36dB
4
80MHz
1
2 Volts
Ground
c
hannel
..±10dB
.±10dB
5
0W x 4
e
(max.)
)
Inches
)
Inches
TR
O
No Po
w
No So
u
The O
p
work
O
UBLESH
O
Symptom
w
e
r
u
nd
p
eration keys do not
O
OTING
Cause
The vessel’s acc
e
switch is not on
Fuse is blown
Volume is too lo
w
Wiring is not pro
p
connected
Wired command
e
properly installed
Built-in microcont
not operating pro
p
e
ssory If the p
o
properl
y
vessel’
s
termina
l
ignition
Replac
e
w
Adjust
v
level
p
erly Check
w
e
r is not Check
w
installat
roller is
p
erly
Press t
h
located
Tuner/
A
P1
Solution
o
wer supply is
y
connected to the
s
accessory
l
, switch the
key to “ACC”
e
the fuse
v
olume to audible
w
iring connections
w
ired commander
ion and connection
h
e RESET button
on the back of the
A
mp Module

Sounding Audio Industrial Ltd
www.asaelectronics.com
v.150517