Sounding Audio SA102 Car Audio User Manual EAGLEPLASTIC
Sounding Audio Industrial Ltd. Car Audio EAGLEPLASTIC
User manual
Page 1 of 33
Operation Instruction Manual SA102
Operation Instruction Manual
SA102

Page 2 of 33
Operation Instruction Manual SA102
Content
1. Appearance -----------------------------------------------------------------3
2. Wiring Connection --------------------------------------------------------4
3. Front panel description --------------------------------------------------5
4. Main Menu -----------------------------------------------------------------6
5. Settings ----------------------------------------------------------------------7
6. Apple CarPlay -------------------------------------------------------------13
7. Andriod Auto --------------------------------------------------------------14
8. Radio mode----------------------------------------------------------------15
9. SiriusXM® Operation ------------------------------------------------------16
10. USB --------------------------------------------------------------------------22
11. BT Audio --------------------------------------------------------------------24
12. Phone -----------------------------------------------------------------------26
13. Aux IN -----------------------------------------------------------------------29
14. Rear Camera ---------------------------------------------------------------30
15. Remote Control -----------------------------------------------------------31
16. Specification ---------------------------------------------------------------32
Page 3 of 33
Operation Instruction Manual SA102
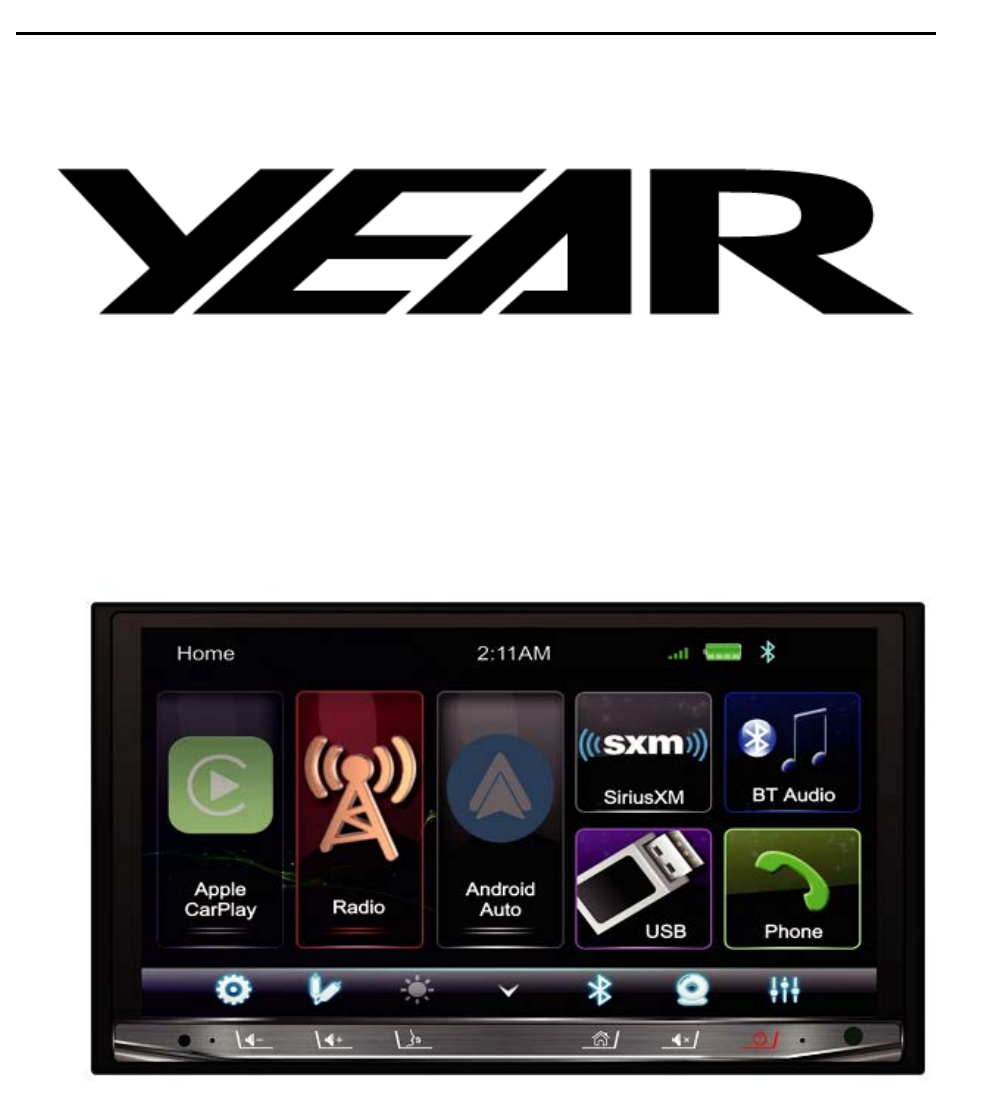
1. Appearance
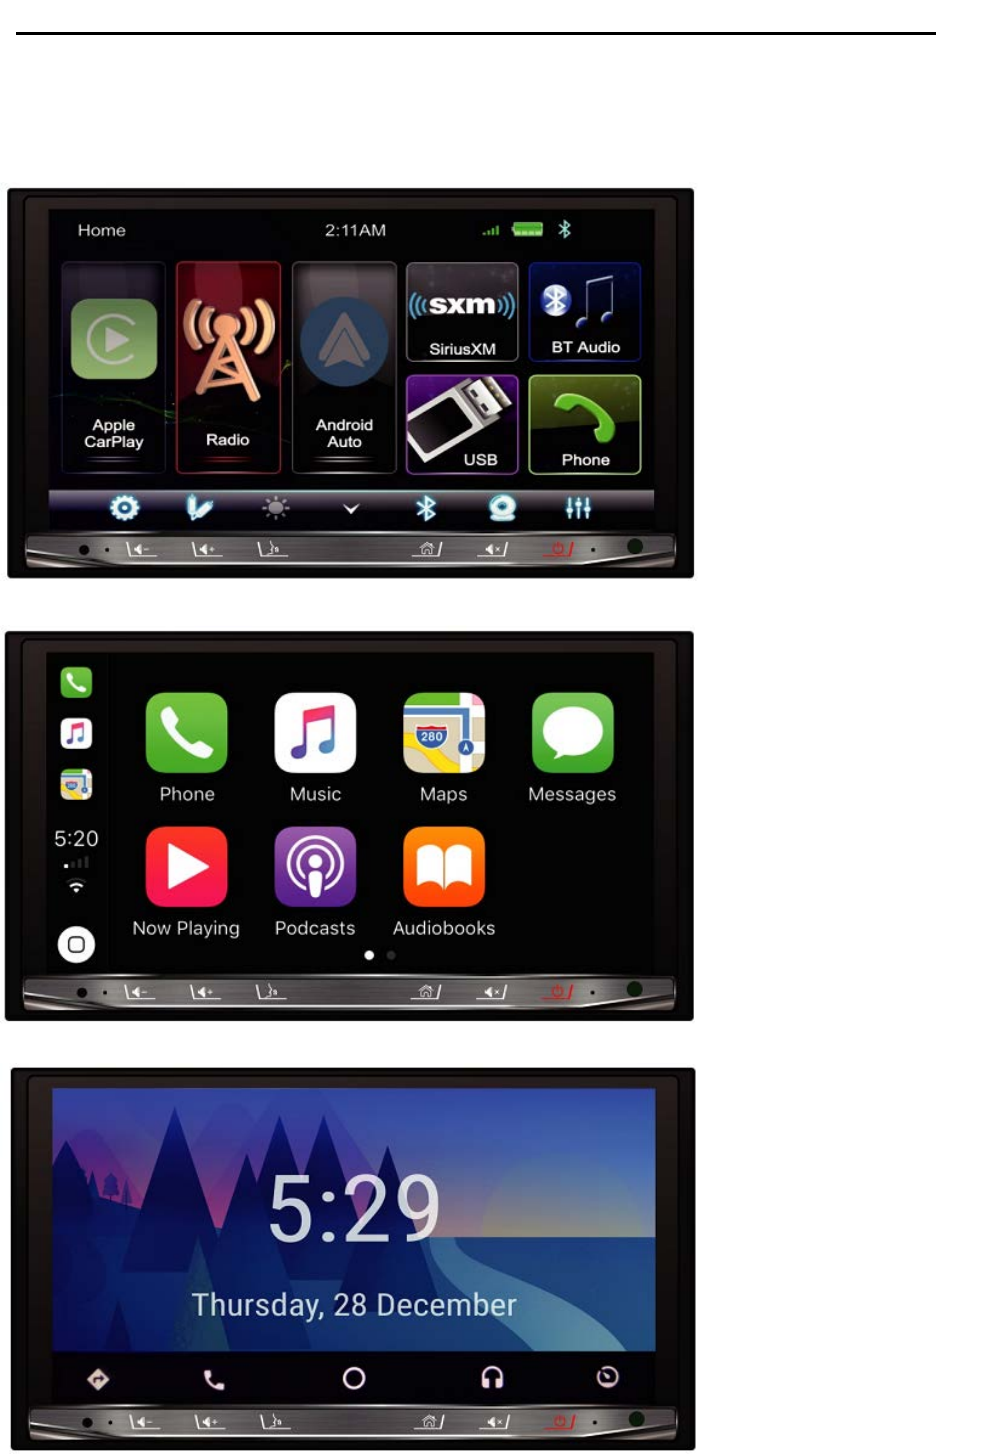
Main Menu
CarPlay Menu
Andriod auto Menu
Page 4 of 33
Operation Instruction Manual SA102
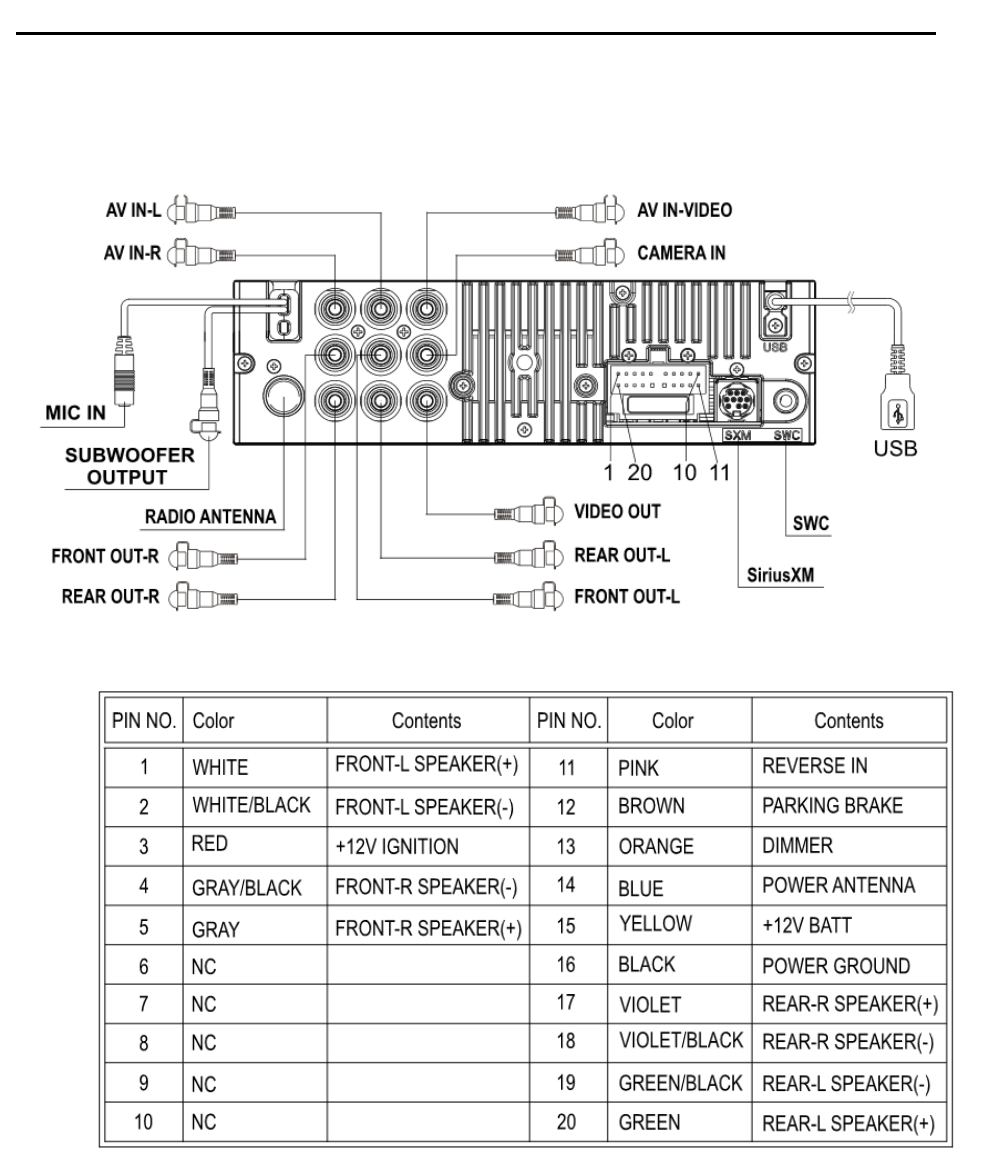
2. WIRING CONNECTION
Page 5 of 33
Operation Instruction Manual SA102
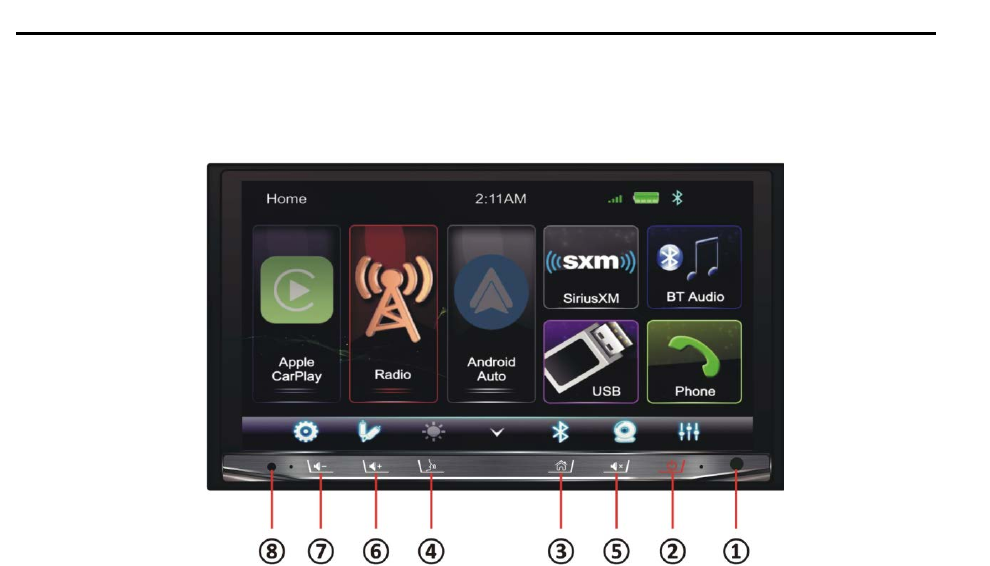
3. FRONT PANEL Description
① IR SENSOR
IR Remote control signal receiving windows. Max distance is 6-8 meters while facing directly
② POWER
Turn Power on or off. During power OFF, press Power button to turn ON the Head unit.
During the unit is ON, long press power button to turn OFF the Head unit
③ Home
In any mode, touch the Home button to enter to the Main Menu.
④ VOICE
In CarPlay or Android mode, touch the VOICE button to activate voice function.
⑤ MUTE
To toggle Mute and unmute
⑥ VOL+
Increment the Volume level (0~50).
⑦ VOL-
Decrement the Volume level (50~0).
⑧RESET
To reset the Head unit for any reason, use a ball pen or pin to press the RESET button. After
reset the head unit, the head unit will be restart, all parameter and setting will be kept as
pervious status.

Page 6 of 33
Operation Instruction Manual SA102
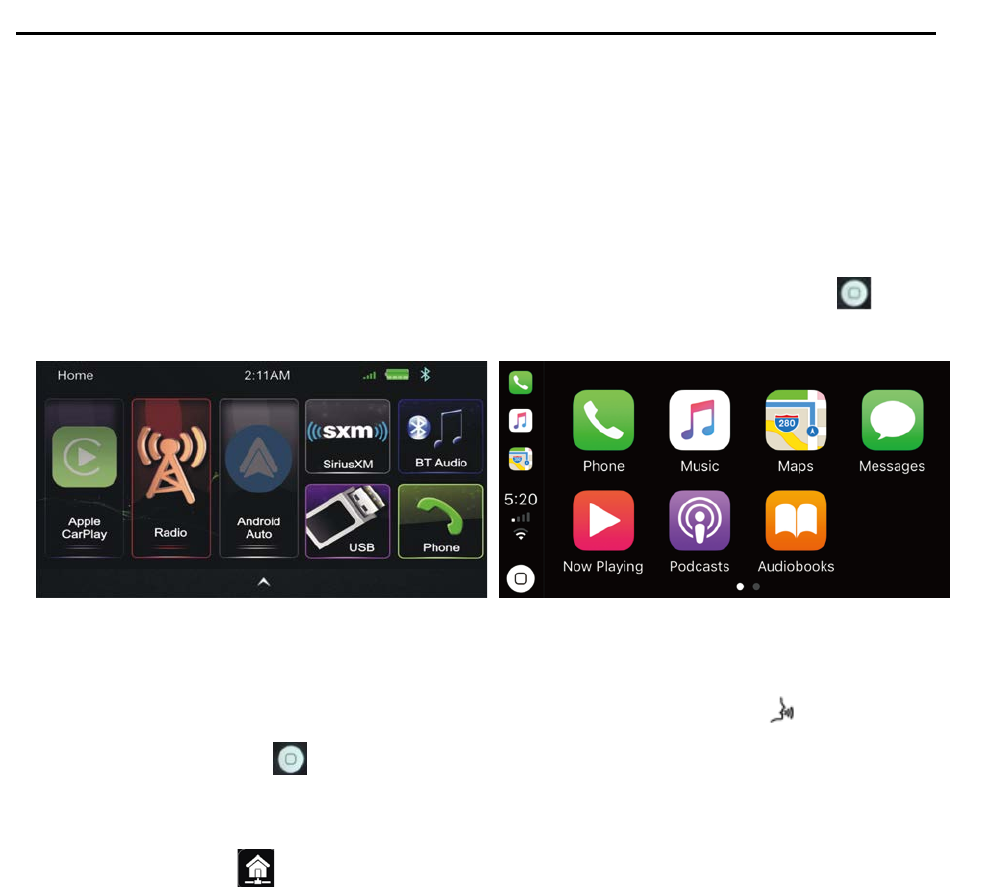
4. MAIN MENU
This is a Two Din Car Audio with the following functions:
Apple CarPlay, Android auto, Radio, SiriusXM®, Bluetooth Audio, USB and Phone.
The MODE icon in grey mean the corresponding function is not ready or proper device have not been
connected.
Touch the corresponding MODE icon to enter playing mode.
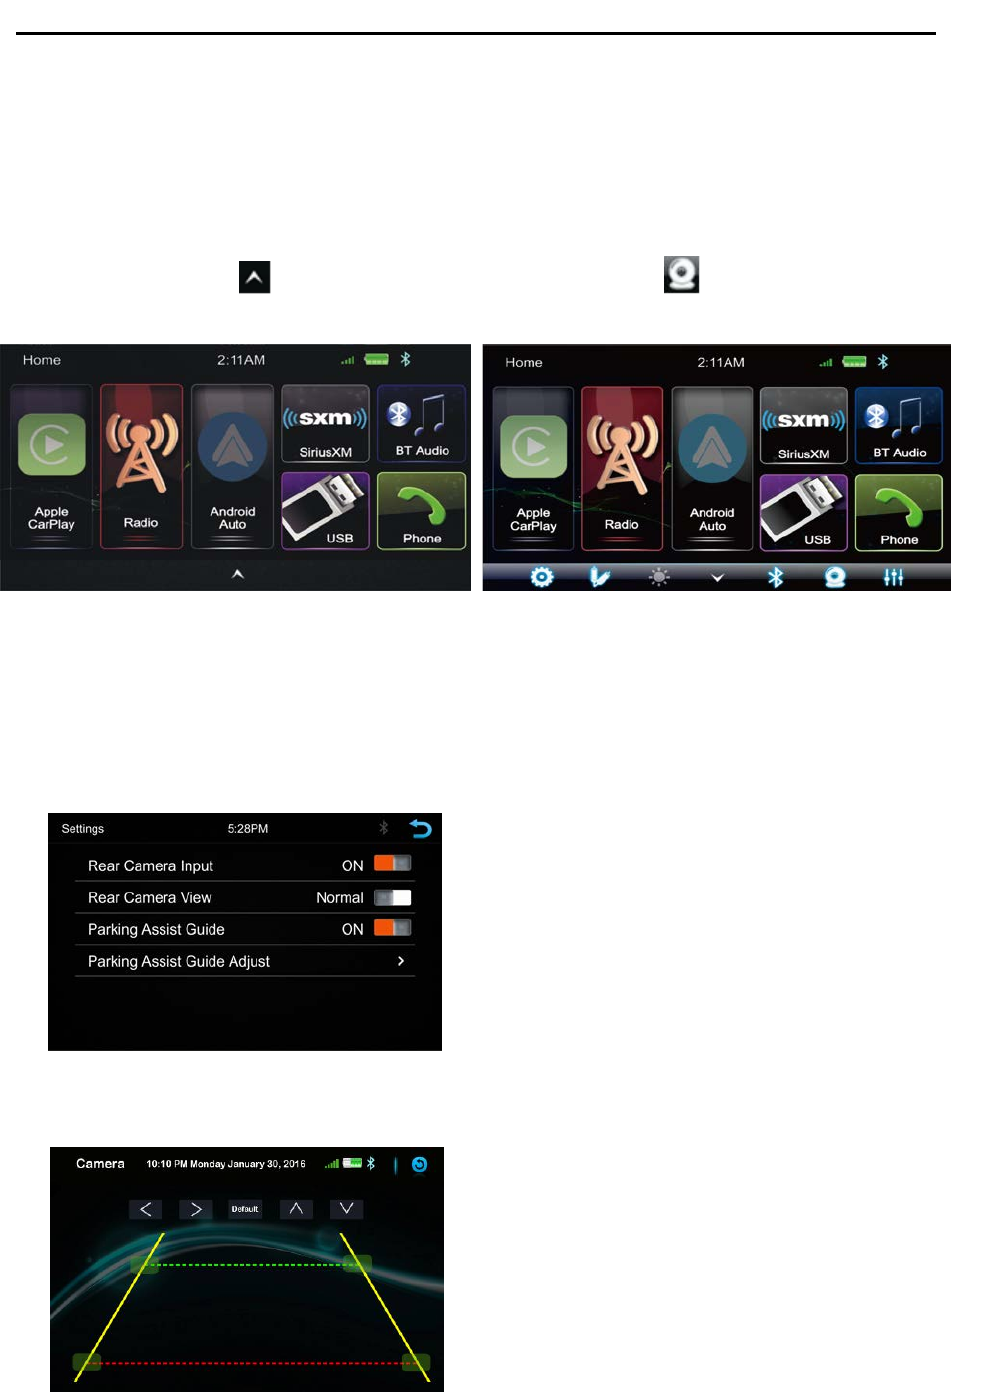
Hidden soft button bar
A hidden pop up soft button bar is located at the bottom. Touch the icon to shown the soft
button bar. Touch the to hidden.
Pop up the soft button bar
Hidden the pop up soft button bar
Setup, to enter the Settings Menu
AUX IN, to enter the AUX and A/V IN interface
Dimming, to change Daylight or Night (If lighting detect is OFF in Display Setting)
Rear Camera, to enter the camera setting mode
EQ Setting, to enter the Audio EQ setting menu
Bluetooth pairing
Page 7 of 33
Operation Instruction Manual SA102
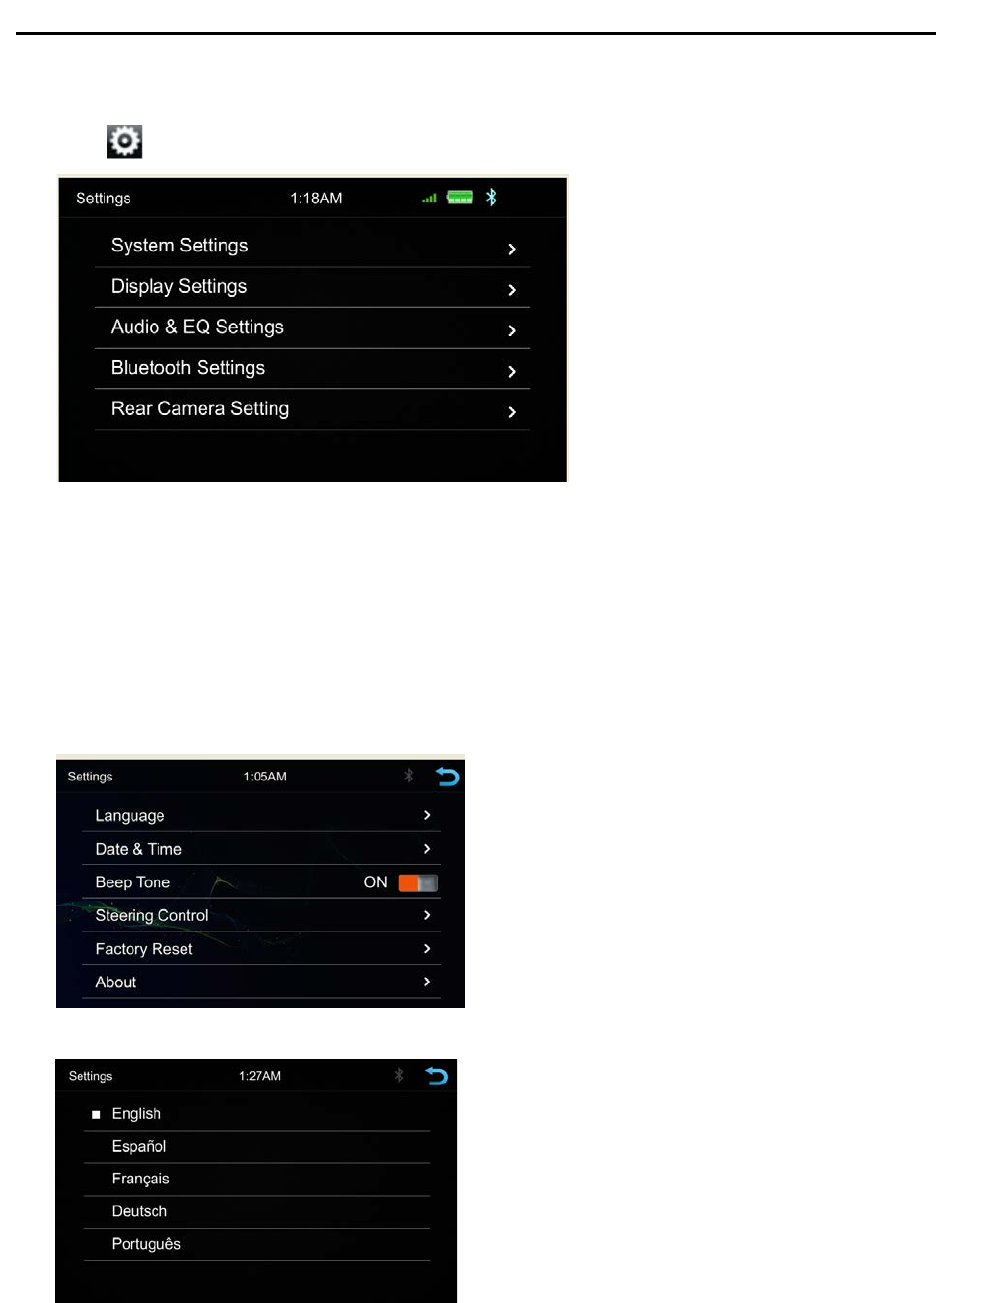
5. Settings
Touch the icon to enter the Setup menu.
The Setup menu is included System Settings, Display Settings, Audio & EQ Settings, Bluetooth Settings
and Rear Camera Settings.
System Settings
The System Settings allow the user to set up the Language, Display Time, Date & Time, Beep Tone,
Factory Reset and About.
Language
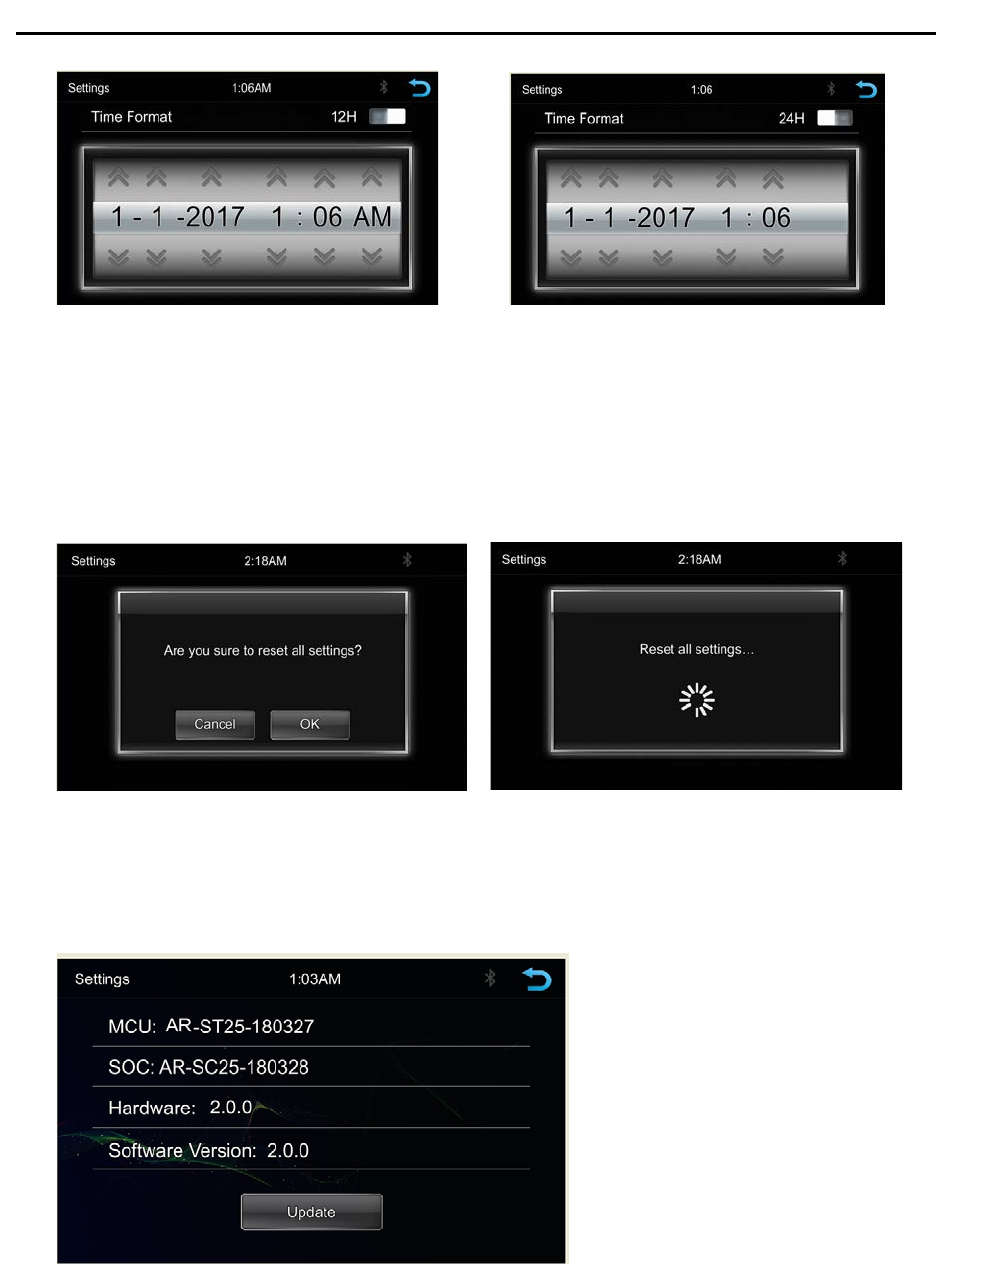
Date & Time:
- To setting Time display format (12H or 24H), setting the date and time
Page 8 of 33
Operation Instruction Manual SA102
Beep Tone: On/Off
- To set the touch button beep tune On or Off
Factory Reset
- To reset the default factory setting.
About
- To display the Unit Hardware and Firmware version
Page 9 of 33
Operation Instruction Manual SA102
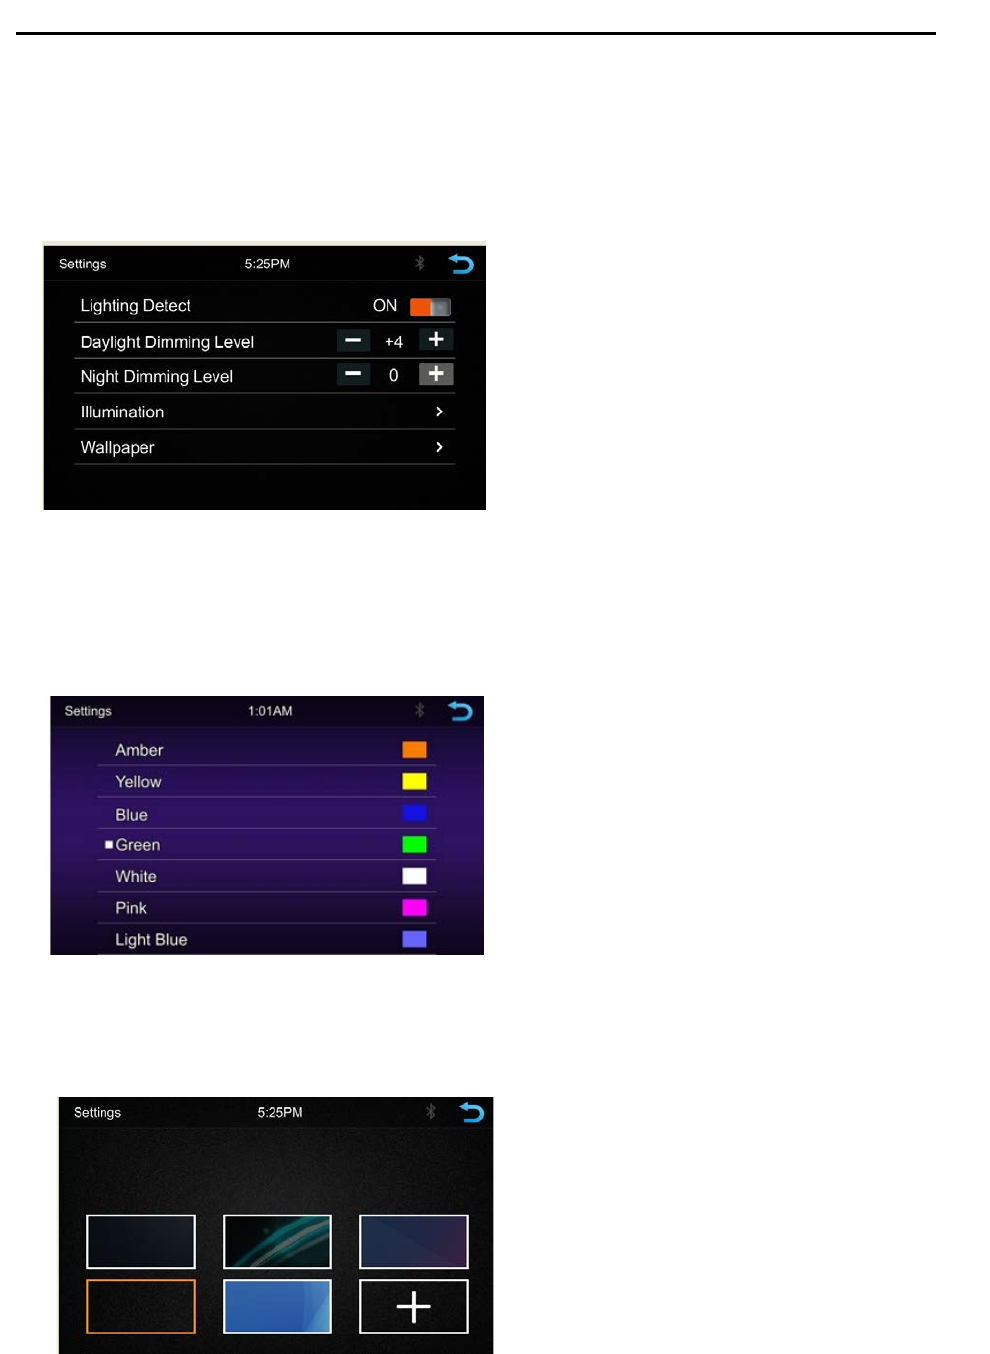
Display Settings
Below is the Display setting menu, user can select Lighting Detect, Daylight Dimming Level, Night
Dimming Level, Illumination and Wallpaper.
Lighting Detect: On/Off
Daylight Dimming Level: 0 – 8
Night Dimming Level: -8 – 0
Illumination: Amber/Yellow/Blue/Green/White/Pink/Light Blue
Wallpaper
User can select the preset wallpaper or select the picture in USB driver as the wallpaper.
Touch the corresponding picture to select the prefer background.
Touch “ + “, the head unit will search the USB photo file for wallpaper.
Select a picture and touch OK to add the wallpaper
Page 10 of 33
Operation Instruction Manual SA102
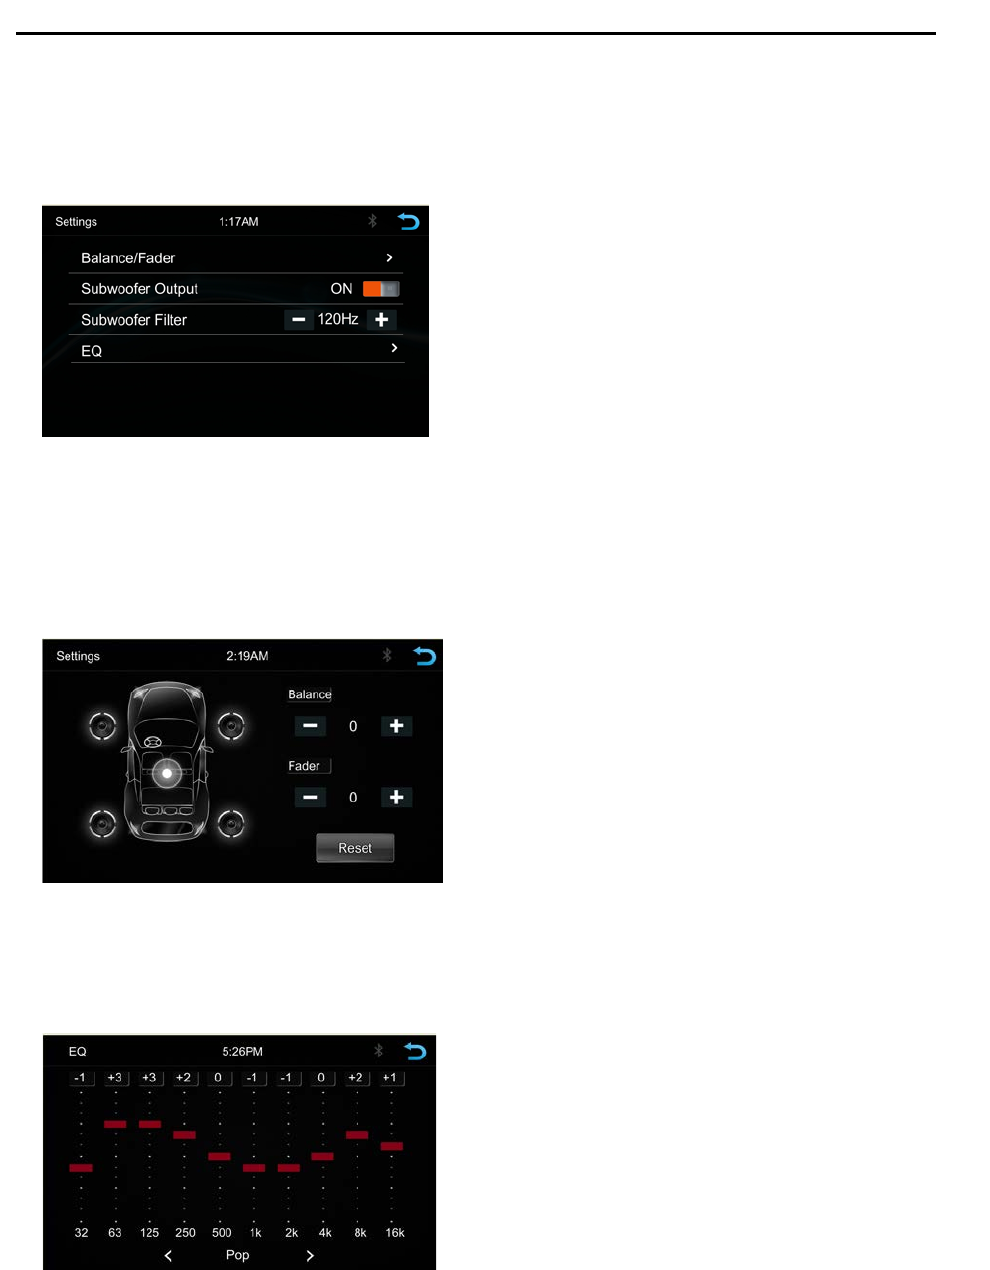
Audio & EQ Settings
Below shown is the Audio Setting Menu
Balance/Fader:
Touch the + or – of Balance/Fade to tune for the driver and passenger preference.
The value of Balance (Left 15 – Right 15) and Fade (Front 15 – Rear 15)
Touch Reset to set both Balance and Fade to zero
Subwoofer Output On/Off
Subwoofer Filter OFF/ 50Hz/ 80Hz/ 120Hz/ 160Hz
10-Band Equalizer 10 band of EQ tuning, slide the EQ bar to tune each band frequency
level according to user preference. Touch Reset to set all Band to 0.
Or user can touch < or > at the bottom to select the following preset EQ:
Custom/ Jazz/ Hip_Hop /Pop/Rock/R&B/FLAT
Page 11 of 33
Operation Instruction Manual SA102
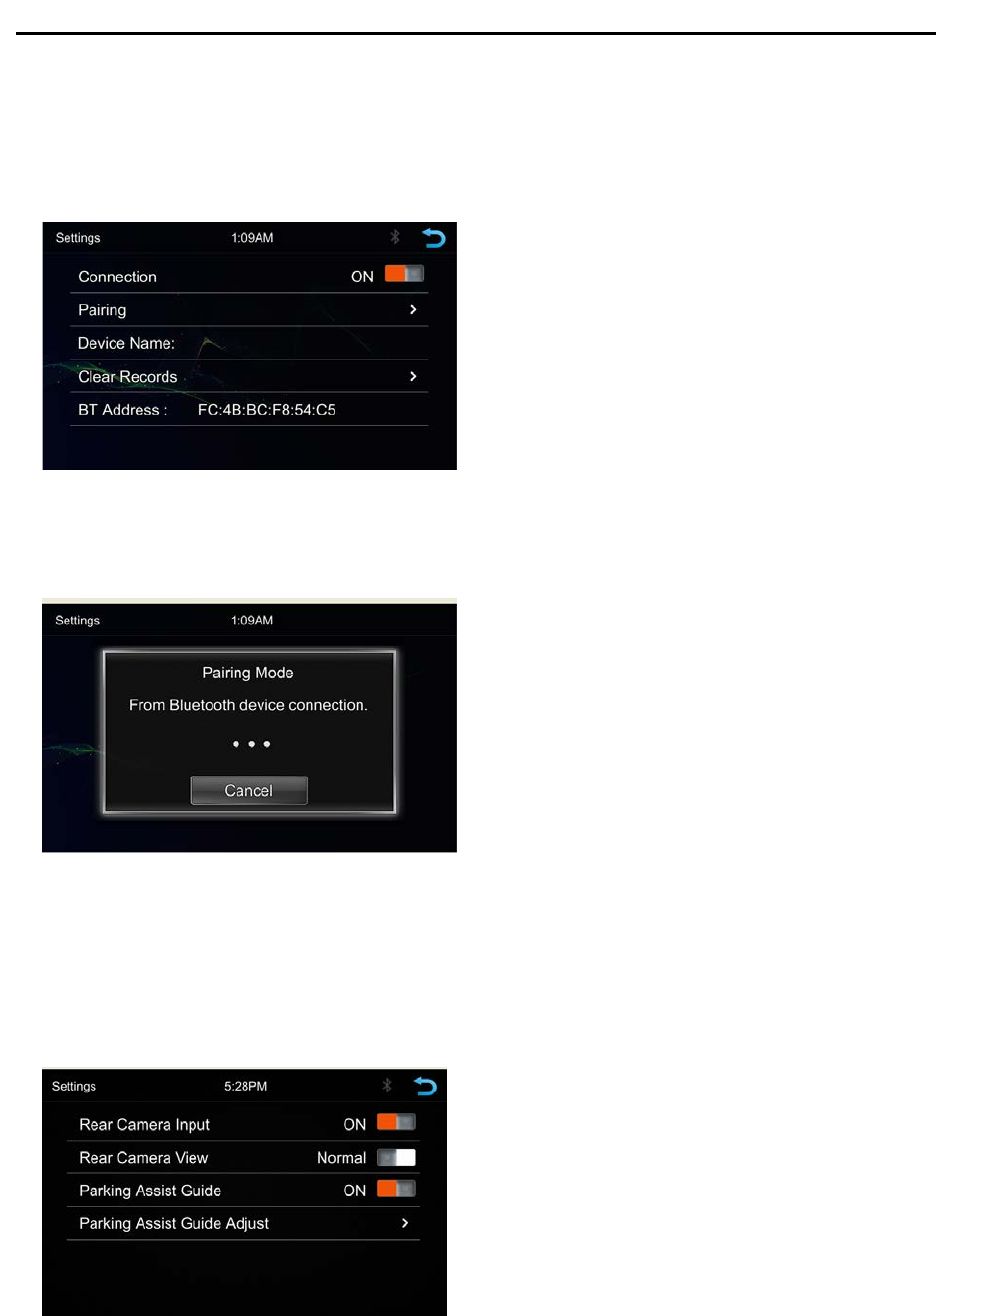
Bluetooth Settings
Touch the Bluetooth Settings from the setting menu will be shown below
Connection: On/Off (Select Bluetooth connection on or off)
Pairing > (To start the pairing)
Device Name: shown the connected phone or device
Clear Records (To clear the device list records)
Rear Camera Setting
Touch Rear View Camera in the Setting Menu to enter rear camera setting interface as follow:
Rear Camera Input: On/Off
Rear Camera View: Normal/Reverse
Parking Assist Guide: On/Off
Parking Assist Guide Adjustment
Page 12 of 33
Operation Instruction Manual SA102
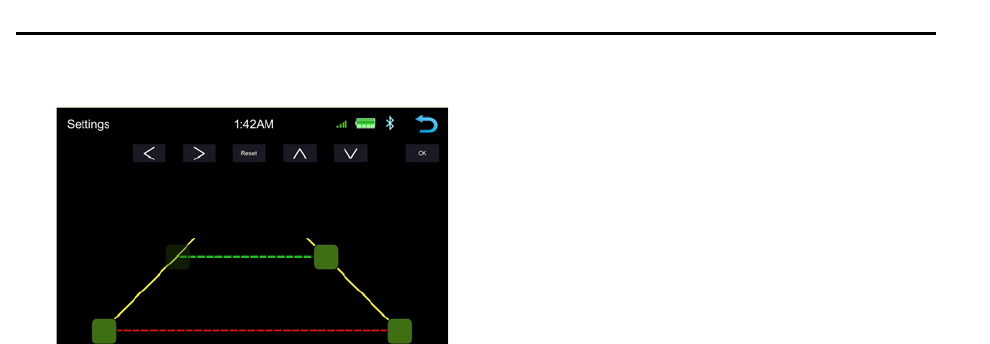
Touch > to enter Parking Assist Guide Adjustment interface to show the below screen
Select the adjust position and Touch ˂/˃/˄/˅ to adjust.
Touch Reset to resume the default Parking Assist Line
Page 13 of 33
Operation Instruction Manual SA102
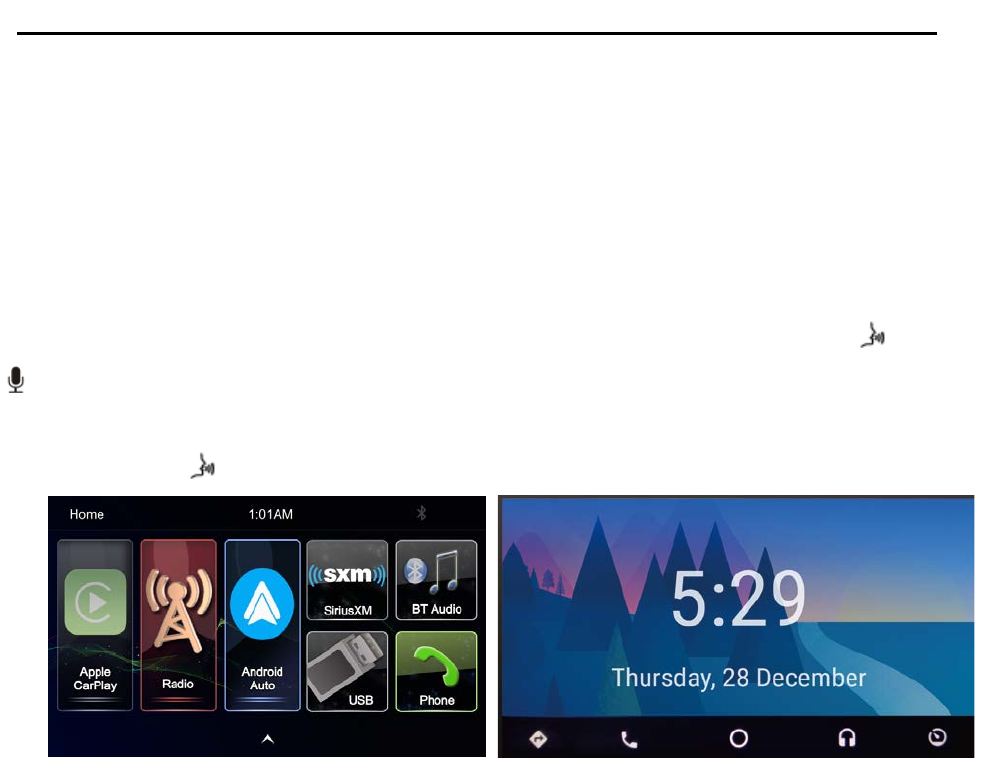
6. Apple CarPlay
Plug the iPhone (iPhone 5 or latter models, and iOS 7.1 or above) through the lightening cable to the
USB port of the Head unit. The iPhone will be shown the “CarPlay”. The Head unit will enter the
CarPlay interface, the APP that support the CarPlay feature will be displayed on the Head Unit as
shown below. Touch the corresponding APP can operation the operation, touch the button to
go back to the CarPlay interface.
SIRI
In CarPlay mode, user can talk to SIRI to control the CarPlay function. Press button to start the
SIRI function, or touch the button for 2 second or the HOME button of iPhone in the CarPlay.
Home screen to talk to SIRI for playing music, GPS ……
Notice: For the SIRI function in the Head unit, the Microphone has to been connected.
In CarPlay model, touch button or Main menu icon to enter the Head unit main menu
Page 14 of 33
Operation Instruction Manual SA102
7. Android Auto
Install an Android Auto APP to Android mobile with Andorid 5.0 or higher, plug the phone via USB
port of the Head unit. The phone will be shown the “Android Auto”. The head unit will enter the
Android Auto interface.
Voice
In Android Auto mode, user can use the voice to control Android Auto. Press the button or
icon to start the voice for playing music, GPS …..
Notice: For the Voice function in the head unit, the microphone has to been connected. In Android
Auto mode, touch button back to head unit home.
Page 15 of 33
Operation Instruction Manual SA102
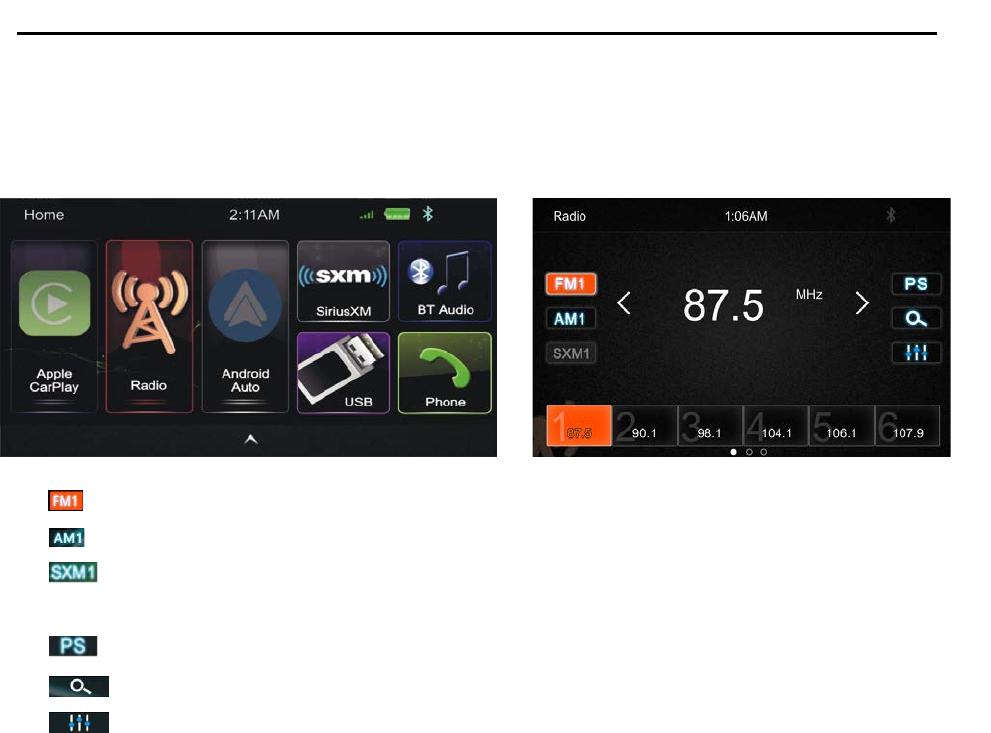
8. Radio Mode
Touch the Radio mode icon to enter Radio mode
Touch FM can change between FM1=>FM2=>FM3
Touch AM can change between AM1=>AM2
Touch SiriusXM to enter SiriusXM Mode, if a SiriusXM tuner is connected with the unit.
*Note - A SiriusXM Connect Vehicle Tuner and Subscription are required and sold separatly.
Touch for Prescan search, each scanned station will be play for 3 sec, touch again to stop.
Touch it for the Auto Scan searching.
Touch it to enter EQ setting
< Short touch for Tune-, long touch for Seek-.
> Short touch for Tune+, long touch for Seek+.
Preset channel, Six preset buttons store and recall stations for each band. Touch and slide the preset
channel can switch to next band FM1 / FM2 / FM3 or AM1 / AM2
Slide the frequency to Seek +/- to next station
Store a Station
1. Tune radio to desired station.
2. Touch and hold the one of the preset channel button for more than 3 seconds, then the
preset buttons will be highlighted on the screen, and the preset station will be store.
Page 16 of 33
Operation Instruction Manual SA102
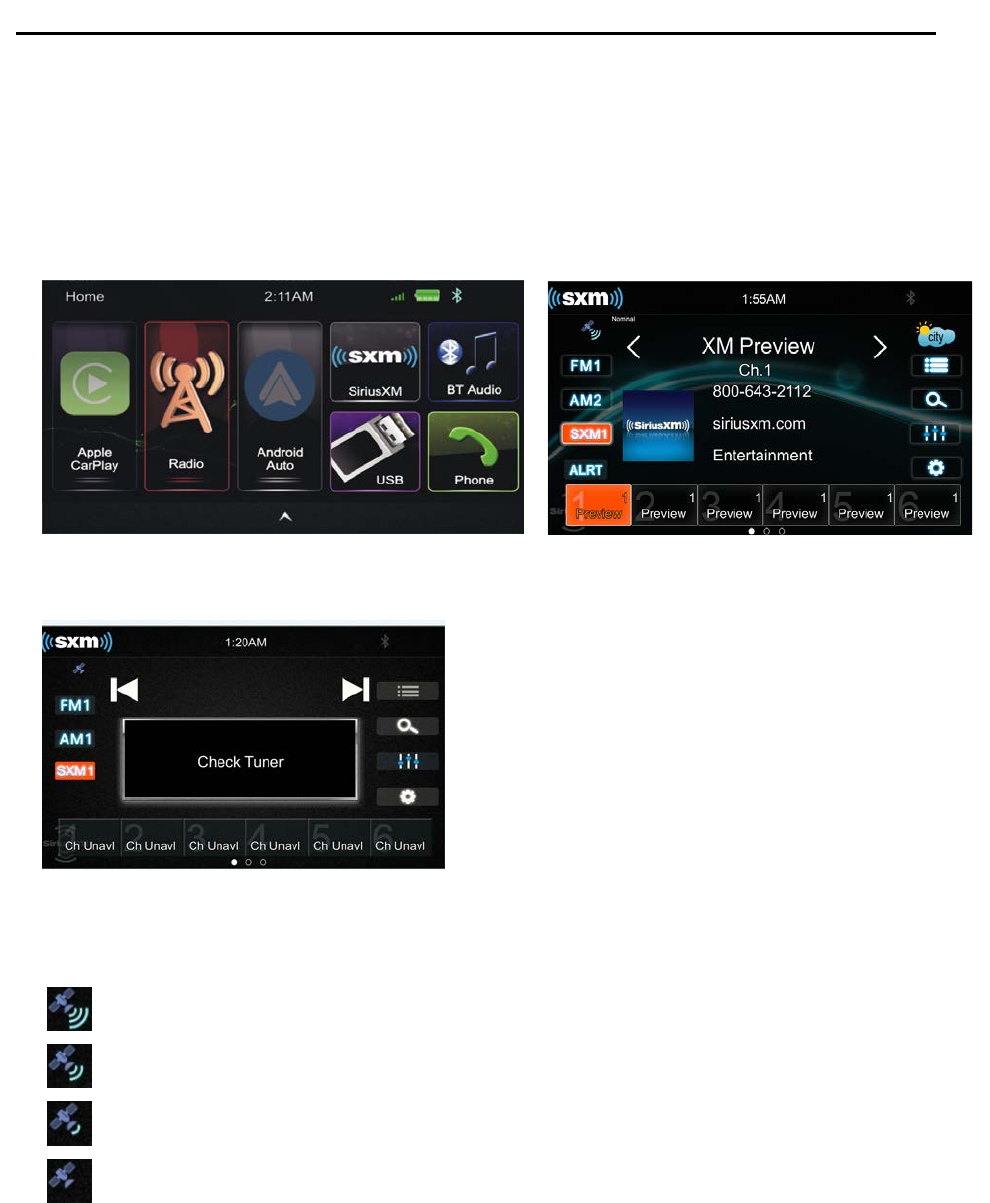
9. Sirius XM Operation
SA102 is SiriusXM Satellite Radio Ready, to operation this function, connect an optional SiriusXM
Connect Vehicle Tu ner.
To enter SiriusXM Mode, touch the SXM icon on the Main Menu.
If the screen is shown “Check Tuner” as below, check the SiriusXM tuner connection.
Signal Strength
The Top Left corner of the screen is showing the Signal Strength of the SiriusXM satellite
SiriusXM Signal is Excellent
SiriusXM Signal is Good
SiriusXM Signal is Weak
No SiriusXM Signal
In SiriusXM mode, SiriusXM icon is highlighted.
Touch FM1 to go to FM radio
Touch AM1 to go to AM radio
Press < to go to the previous channel
Press > to go to the next channel
Preset Stations is shown at the bottom, six preset buttons store and recall stations for each band.
Page 17 of 33
Operation Instruction Manual SA102
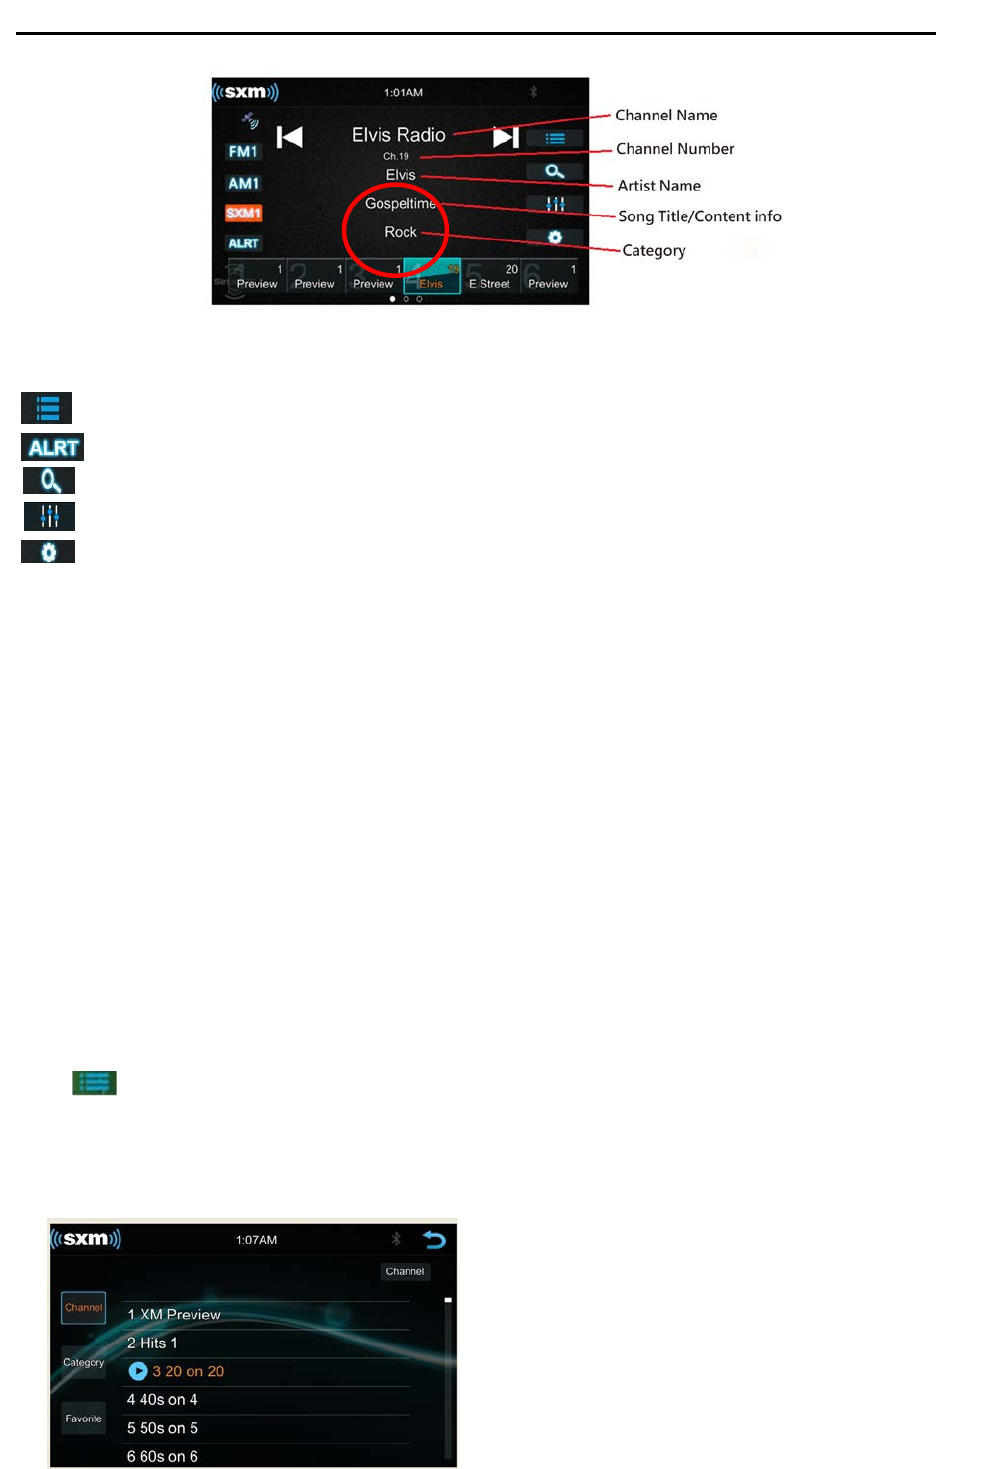
The following functions are also supported
Browse function
Favorite Alerts, Touch to list the favorite channel to direct select the channel
Direct Tune function
EQ Setting function
SiriusXM Setting Menu
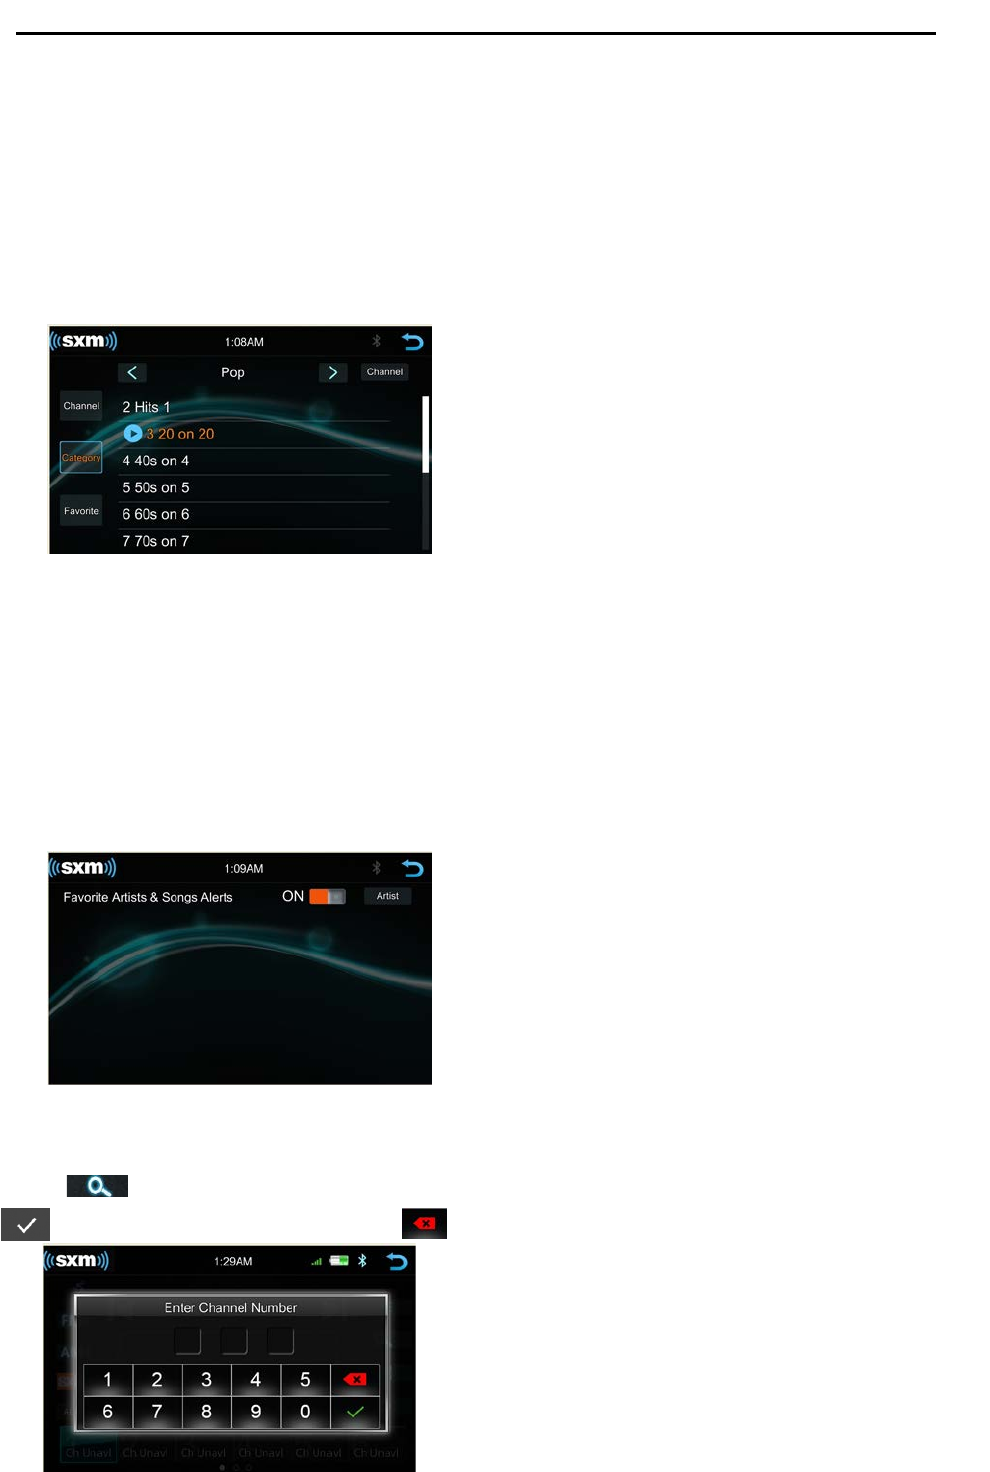
Artist and Song Altert
While listening to SiriusXM Satellite Radio, user can mark Artists and/or Songs for which you wish to
be alerted. The radio will display an Alert message when a matching artist or song is found on
another channel. Then user can choose if you want to tune to that favorite or user can ignore the
alert and stay on your current channel.
To store an artist or song title, touch on the "artist" or "Song" metadata on the display. User will then
be prompted to set the alert for the Artist or the Song Title.
User will be alerted when one of your stored artists or songs is playing on another channel. If multile
alerts happen at the same time, or the alert gets dismissed, user can touch the ALRT button to list the
channels that are currently playing your artist or song.
Browser Function
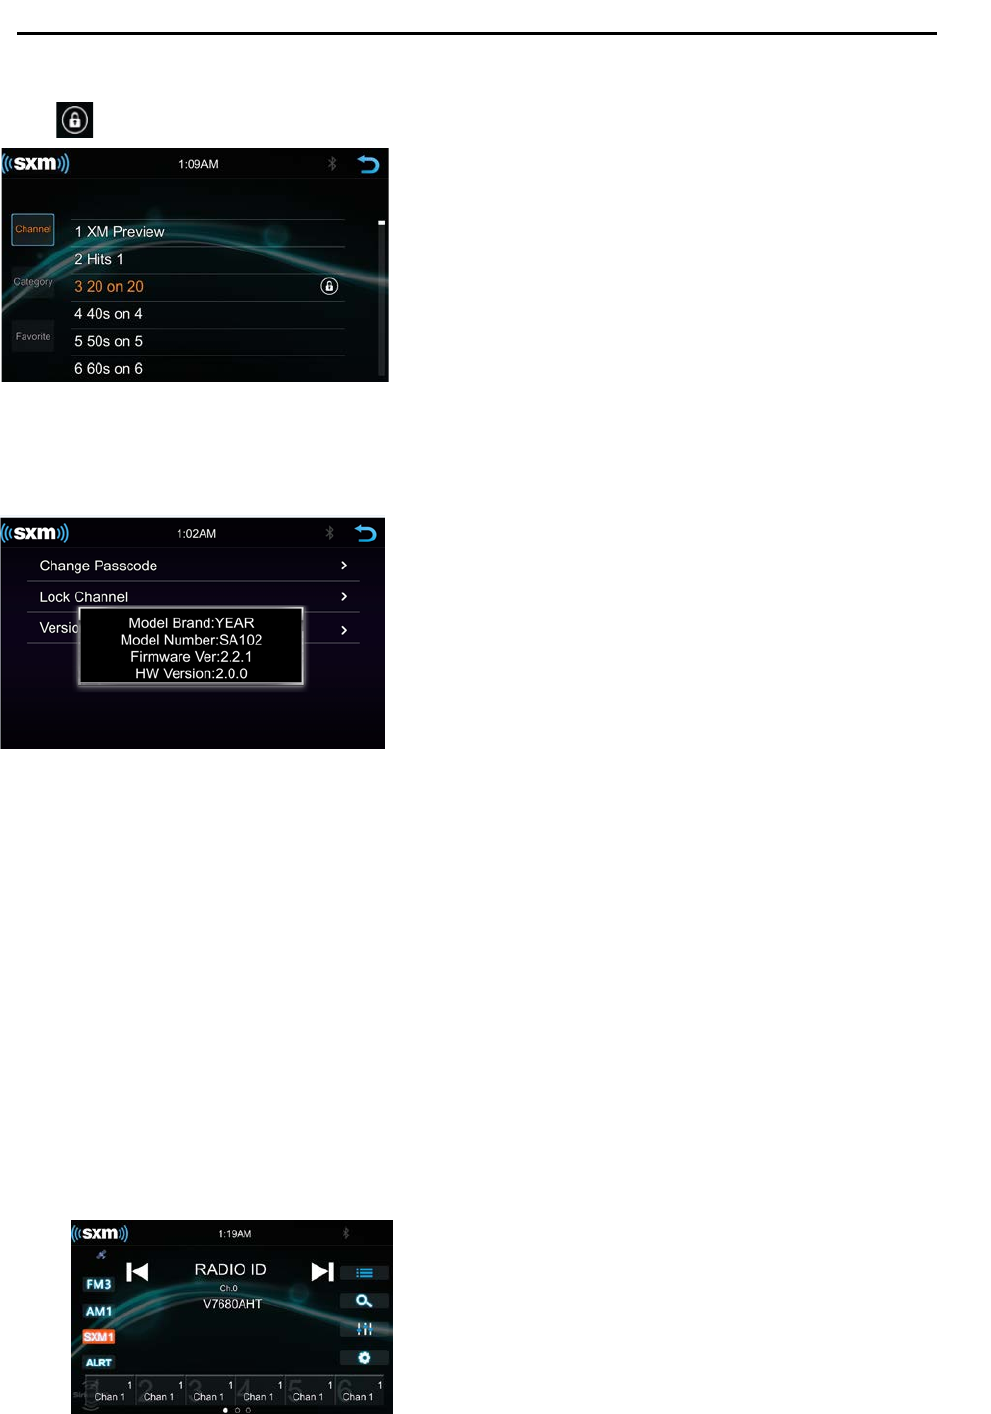
Touch to browse the channel. User can browse by select the Channel List and Category List.
Channel List
Touch “Channel” button at Left side to show the channel listing
Page 18 of 33
Operation Instruction Manual SA102
Slide the bar at right to browse the channel
Touch “Channel” button at top right corner to change the display different Metadata as Channel
Name, Song Title, Artist/Category Name, Content Info and Category Name
Category List
Touch the “Category” for the Category list
The channel will be shown according to different Category. Touch < or > to select different Category.
Touch “Channel” button at top right corner to change the display different Metadata as Channel
Name, Song Title, Artist/Category Name and Content Info.
Favorite List
Touch the “Favorite” for the Favorite List.
Direct Tune
Press to shown the direct tune interface, user can direct enter the channel number and touch
to go to the desire channel. Press backspace to clear the pervious digit
Page 19 of 33
Operation Instruction Manual SA102
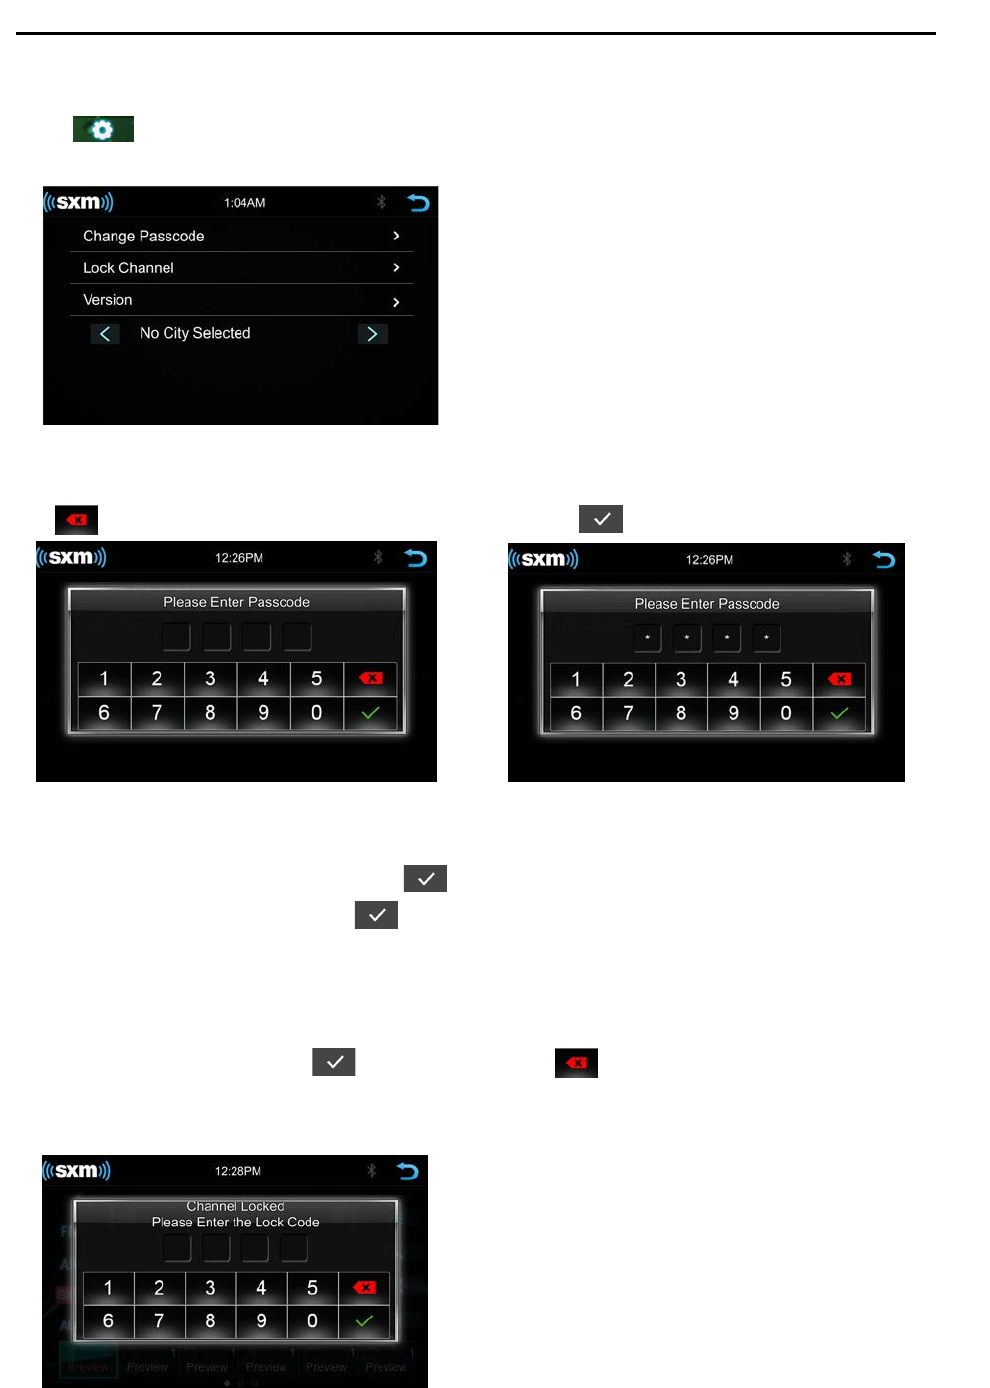
SiriusXM Setting Menu
Touch to enter the SiriusXM setting menu. It allows user to Change Passcode, Lock Channel,
check the Version and select the city.
Change Passcode
Touch > of the Change Passcode to show the below screen. Input the passcode by using the keypad.
Press to clear the pervious digit if input wrong. Touch to confirm input.
If the passcode is correct, the below screen will be shown to allow user to Enter NEW Passcode.
Input a new 4 digits passcode and select to confirm the new passcode
Input the passcode again and press to confirm, then the passcode can be successfully changed.
Lock Channel
Press > of the Lock Channel in SiriusXM setting menu to enter the Lock channel interface as below.
Input the passcode and touch to confirm, press to backspace to remove the pervious
digit if input wrongly
If the passcode is correct, the unit will enter the lock channel list, select the channel for any channel
Page 20 of 33
Operation Instruction Manual SA102
that has been locked. Tap the locked channel again to remove from the locked channel list. The lock
icon will be shown that that you would like to lock.
Version
Press Version in the menu, the below screen will be shown the SA102 Software version information
Reset SiriusXM passcode
The default SiriusXM passcode is 0000, If you forget the passcode, follow the steps below to restore
the unit to the default.
1. Enter Settings;
2. Set the time format is 24H and the date/time to 2001-1-1 01:01;
3. Enter SiriusXM mode and select direct tune;
4. Input the channel number 9992(the display only can show 999);
5. Press confirm to reset the SiriusXM passcode to default
Radio ID
Tune to channel 0 to display the Radio ID. You can use channel up/down or direct tune.

Page 21 of 33
Operation Instruction Manual SA102
Advisory Message
On-Screen Display
Advisory Message
Cause
Explanation/Solution
Check Antenna Check Antenna
The radio has detected a fault with the
SiriusXM antenna. The antenna cable may
be either disconnected or damaged.
• Verify that the antenna cable is connected to
the SiriusXM Connect Vehicle Tuner.
• Inspect the antenna cable for damage and
kinks. Replace the antenna if the cable is
damaged.
Check Tuner Check Tuner
• The radio has difficulty communicating
with the SiriusXM Connect Vehicle Tuner.
• The tuner may be disconnected or
damaged
• Verify that the SiriusXM Connect Vehicle Tuner
cable is securely connected to the radio SiriusXM
connector/ cable.
• If the problem persists, disconnect and
reconnect the tuner and then contact your
dealer.
No Signal No Signal
The SiriusXM Connect Vehicle Tuner has
difficulty receiving the SiriusXM satellite
signal.
• Verify that your vehicle is outdoors with a clear
view of the southern sky.
• Verify that the SiriusXM magnetic mount
antenna is mounted on a metal surface on the
outside the vehicle.
• Move the SiriusXM antenna away from any
obstructions.
• Inspect the antenna cable for damage and
kinks. Replace the antenna if the cable is
damaged.
• If the problem persists, disconnect and
reconnect the tuner and then contact your
dealer.
Channel Not
Available
Channel Not
Available
The channel that you have requested is not
a valid SiriusXM channel or the channel
that you were listening to is no longer
available. You may also see this message
briefly when first connecting a new
SiriusXM Connect Vehicle tuner. Visit
www.siriusxm.com for more information
about the SiriusXM channel lineup.
Visit www.siriusxm.com/channellineup for more
information about the SiriusXM channel lineup.
Channel Not
Subscribed
Channel Not
Subscribed
The channel that you have requested is not
included in your SiriusXM subscription
package or the channel that you were
listening to is no longer included in your
SiriusXM subscription package
• Questions about your subscription in the
United States please visit
http://www.siriusxm.com/activatenow or call
SiriusXM Listener Care at 1-866-635-2349.
• Questions about your subscription in Canada
please visit
http://www.siriusxm.ca/help/activation-help/ or
call XM Listener Care at 1-877-438-9677
Channel Locked Channel Locked The channel that you have requested is
Locked by the radio
See the section on Lock Channel, page 18 for
more information on the Lock Channel feature
and how to access locked channels
Please Enter the
Lock Code
Please Enter the
Lock Code
User prompted to enter the lock/unlock
code.
Enter the four digit code to unlock the channel
Incorrect Passcode
Entered
Incorrect Passcode
Entered
The unlock code entered by the user is
incorrect
• Input the correct four digit code to unlock the
channel.
• Reset lock code to default following
instructions on page 19
Page 22 of 33
Operation Instruction Manual SA102
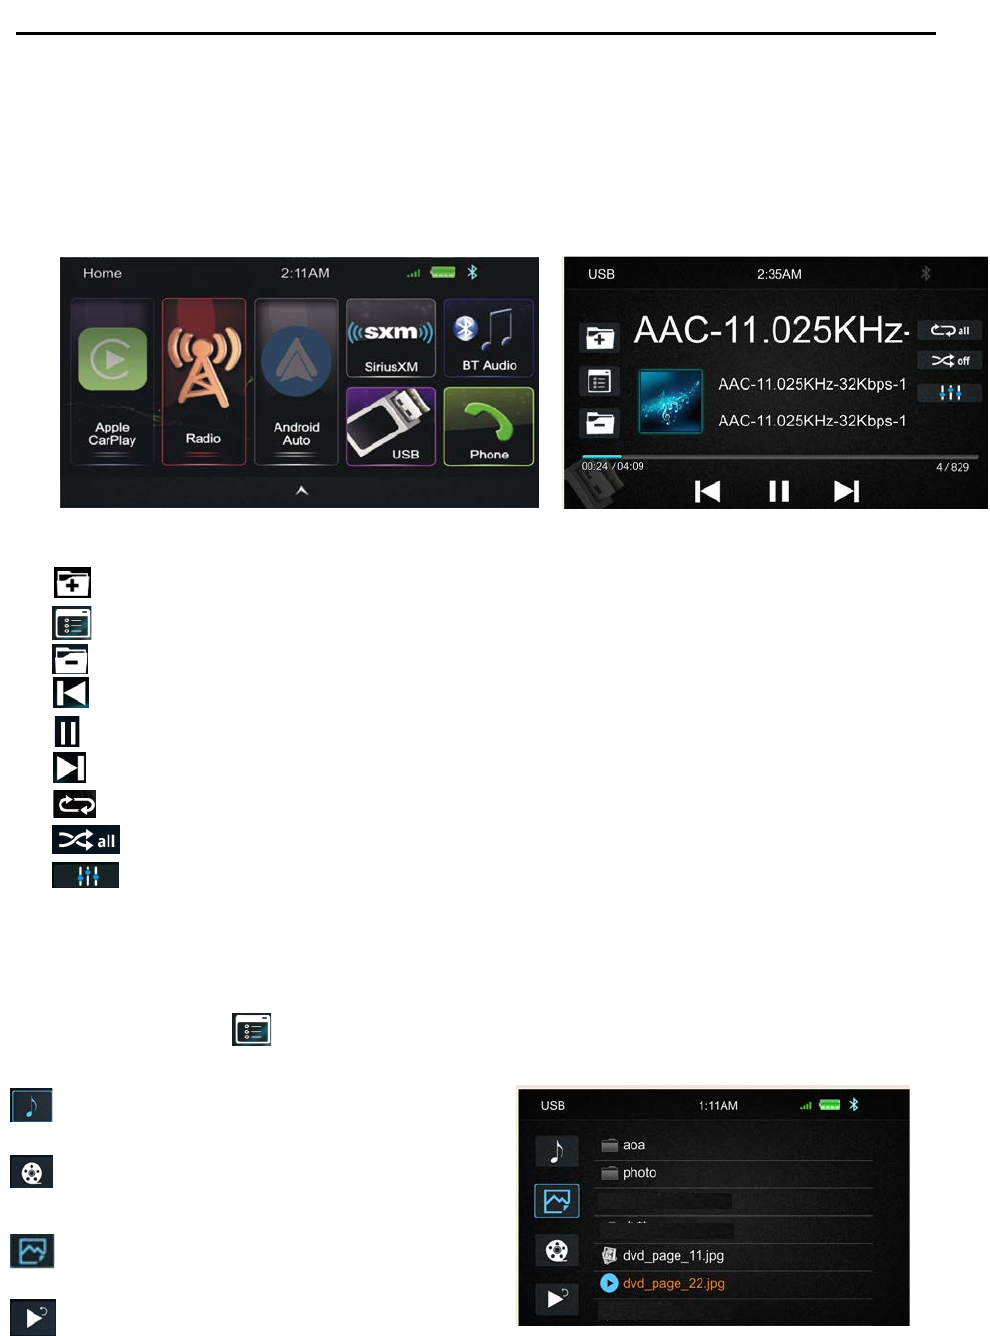
10. USB
Plug the USB to the connector, the USB icon will have color. Touch the USB icon to enter the
USB playback mode. The Head unit default to play the Audio in the USB driver.
Press to go to the next fold e r.
Press to search Audio, Video or Picture files.
Press to go to the previous folder.
Short press it to skip to the previous track, long press it to fast reverse.
Pause/Play button.
Short press it to skip to the next track, long press it to fast forward.
Repeat Play Press it to select Repeat All, Repeat One or Repeat Directory.
Press it to turn on/off random play.
Press it to select the Audio setting or set the prefer EQ of each band in Custom mode
Audio, Video, Picture play back
SA102 is default audio play back, it also support to play picture and video. If there is other multimedia
files in the USB, touch to browse the folder and file list of the USB driver. Select the
multimedia type
Select Audio or Music files
Select Movie or Video files.
Select Picture files
Return to playing pervious file
Touch the corresponding icon to select different type of multimedia file list will be shown.
Select the file to play.
Page 23 of 33
Operation Instruction Manual SA102
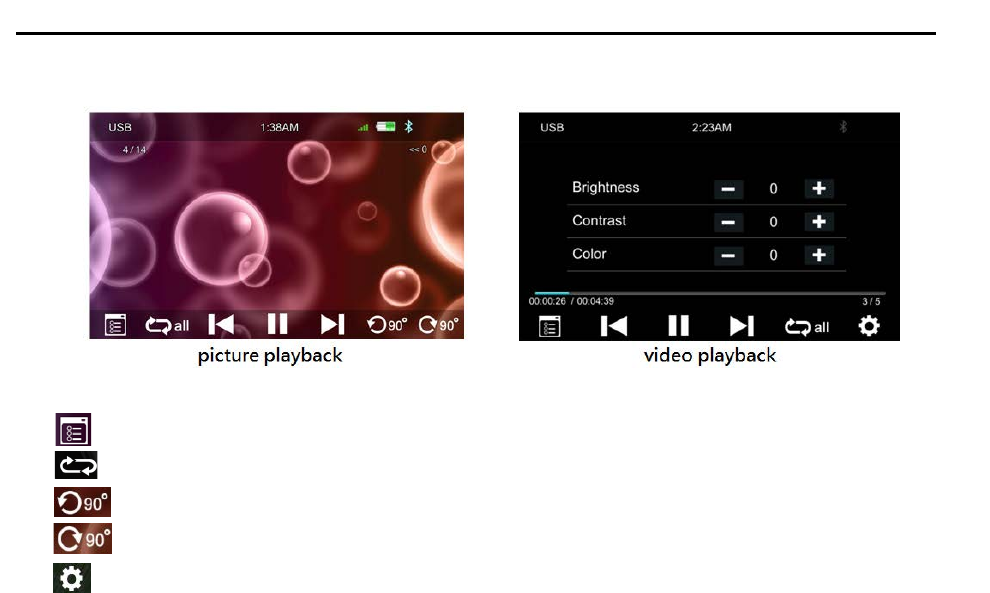
Picture and Video Playback
Touch it to return to the file list
Repeat Play, touch to select repeat play once, directory or all
Touch to rotate the picture anti-clockwise for 90 degree (for picture playback)
Touch to rotate the picture clockwise for 90 degree (for picture playback)
Touch to set the video Brightness, Contrast and Color (for video playback)
Page 24 of 33
Operation Instruction Manual SA102
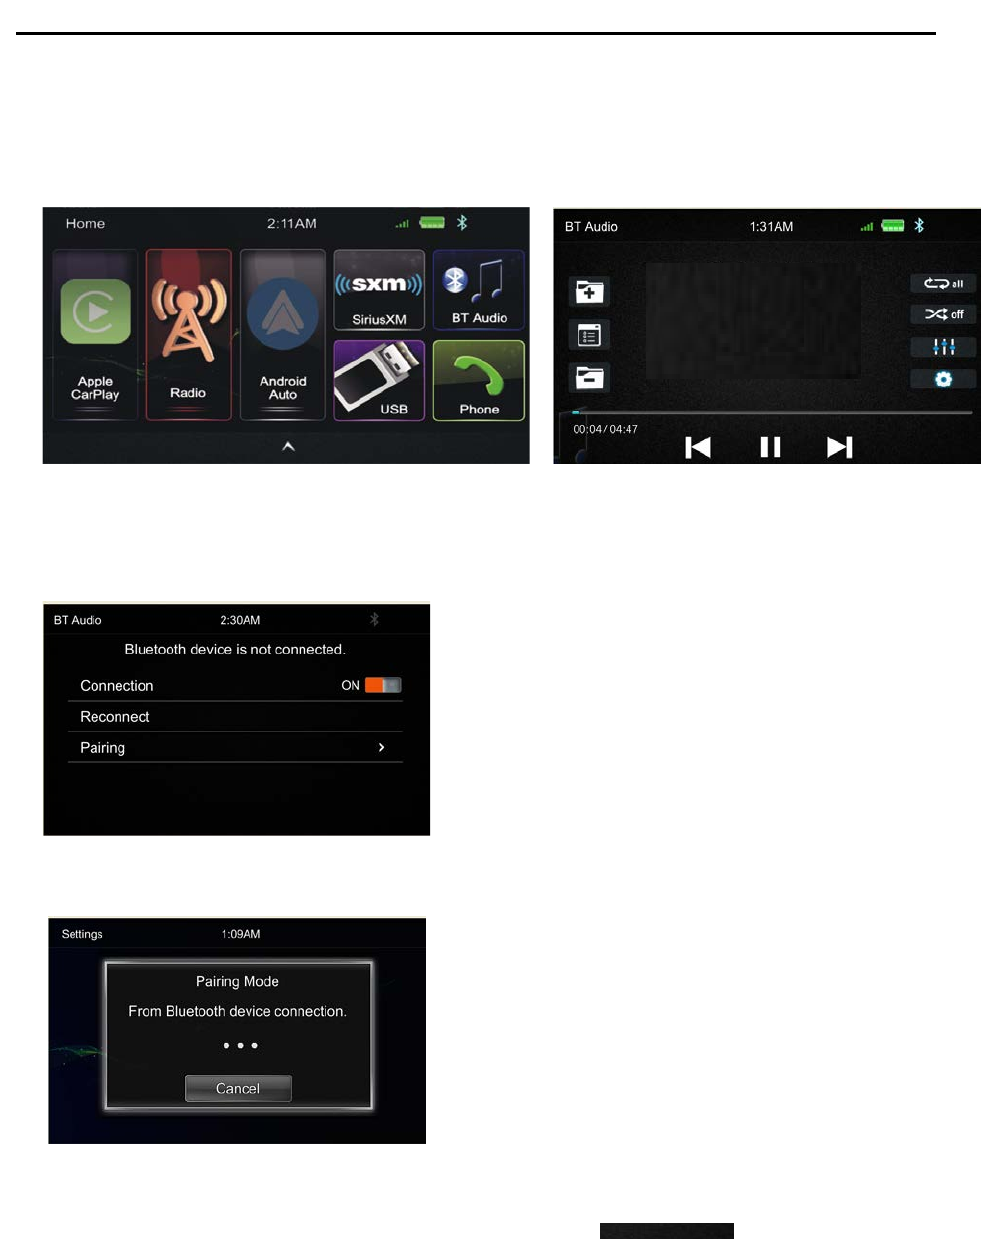
11. Bluetooth Audio
Touch the BT Audio icon to enter Bluetooth Audio playing mode. If the Bluetooth is connected, the
music will be playing as following shown.
If the Bluetooth is not connected, press Reconnect to connect the paired phone or Pairing to pair the
new device.
Bluetooth Pairing
Press Pairing the Pairing Mode screen will be shown as below
Turn on the Bluetooth of the Mobile phone/Bluetooth device, you can see the SA102.
Select the SA102 for pairing and connection
Page 25 of 33
Operation Instruction Manual SA102
Bluetooth Audio Playback
Press it to skip to the next folder.
Press it to open the music file list or folder (support iPhone).
Press it to skip to the previous folder.
Short press it to skip to the previous track.
Pause/Play button.
Short press it to skip to the next track.
Repeat, press for select between Repeat All, Repeat One or Repeat Directory
Press it to turn on/off random play.
Press it to turn on/off the Audio Settings menu to adjust the EQ.
Setting the Bluetooth input level
Page 26 of 33
Operation Instruction Manual SA102
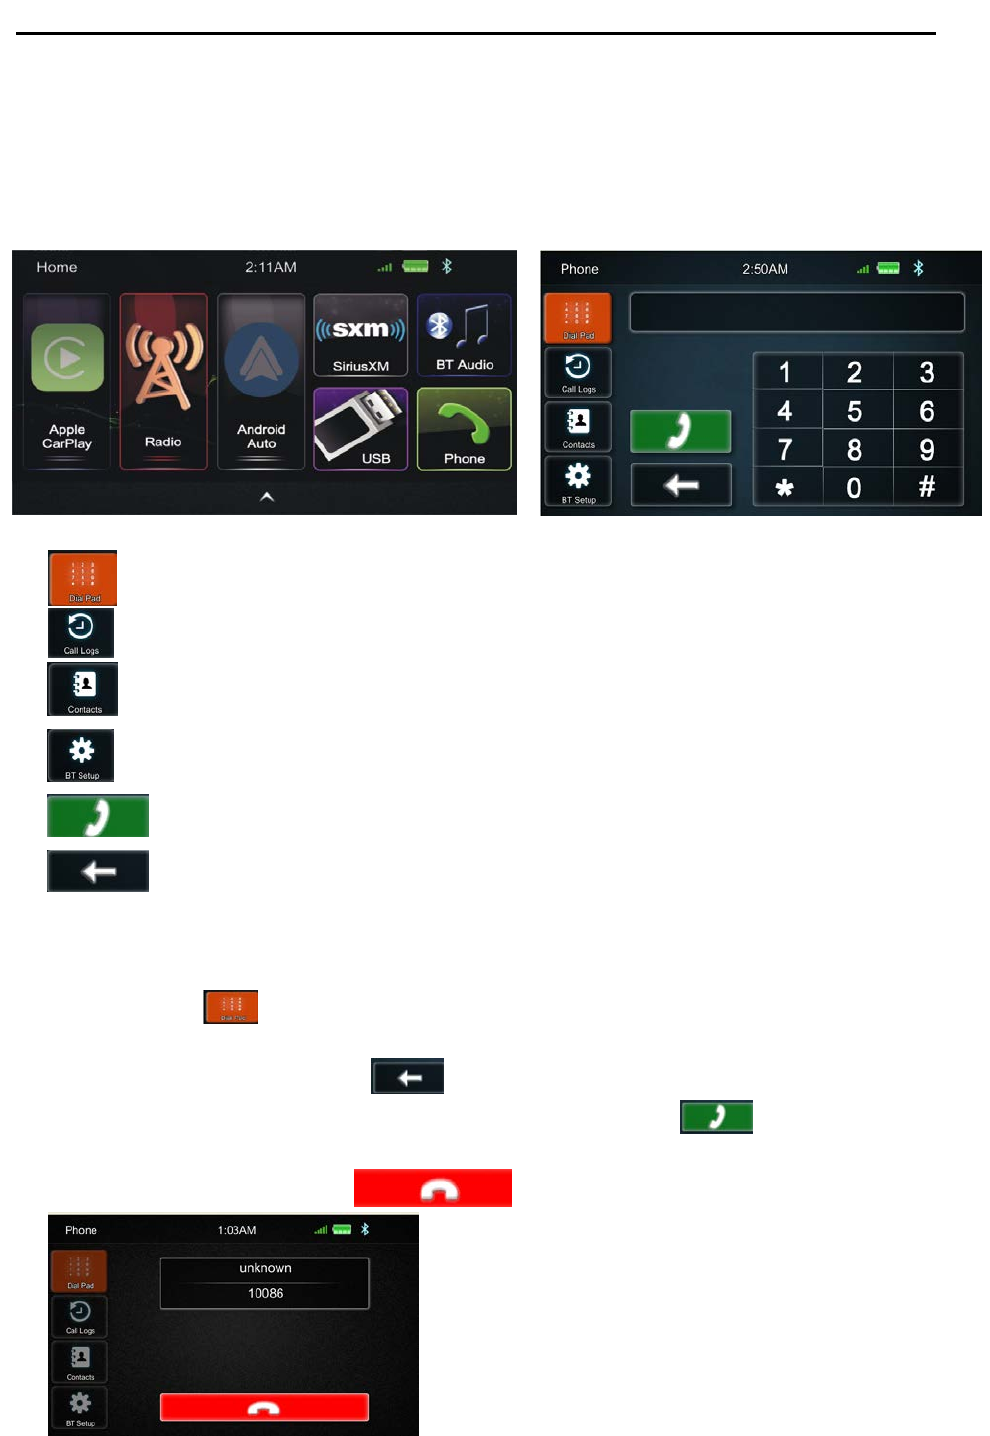
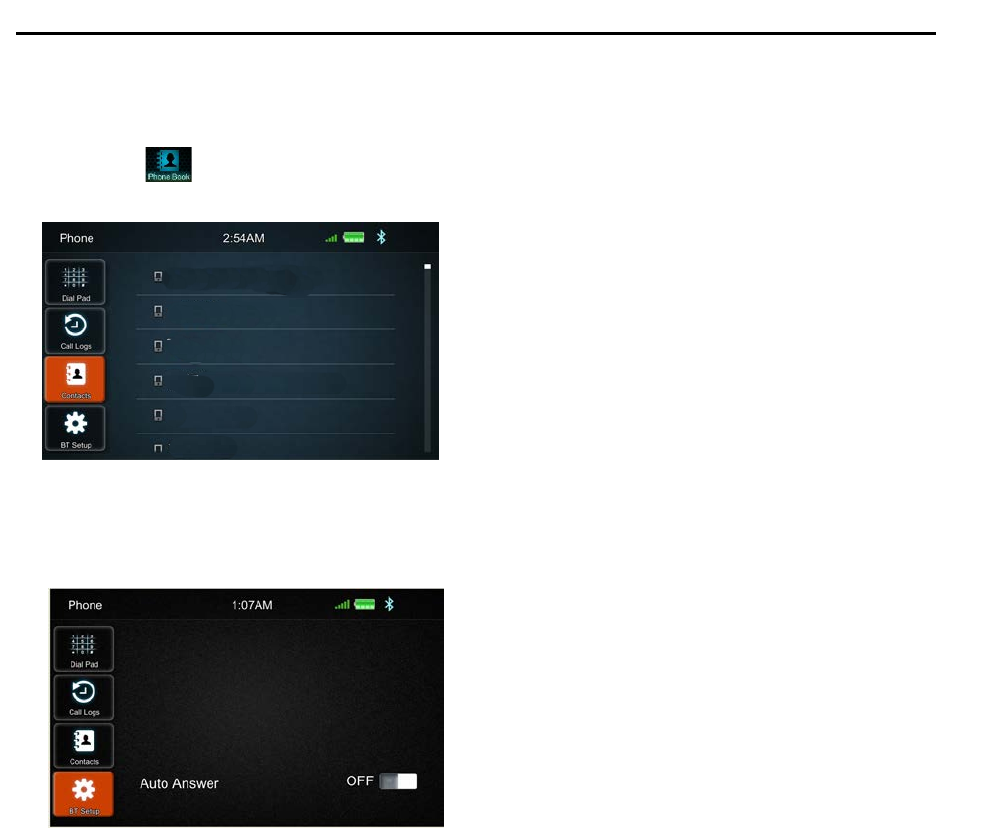
12. Phone
Touch the Phone icon in main menu to go to Phone mode. After the phone connected with the Head
Unit via Bluetooth (HFP), user can through the Head unit to make a phone call. Please note it needs to
connect the microphone for phone call.
Dial Pad, tap Dial pad button to enter call mode
Call logs, to show the call record, missed, received and dialed calls
Contacts, to show the phonebook connected phone
BT Setup, to set auto answer
Make a Call or Accept the Incoming Call
Backspace, to clear the pervious dial digit
Dial a Call
1. Touch the icon to the above screen will appear.
2. Using the keypad, touch 0-9,*, #, to enter the phone number you wish to dial. If you enter
an incorrect number, touch the icon on the keypad to delete the incorrect number.
3. Once the correct number appears on the screen, touch the icon. To go back dialing
interface, touch the return icon at the upper right corner of the screen.
4. To end the call, touch the on the screen
Page 27 of 33
Operation Instruction Manual SA102
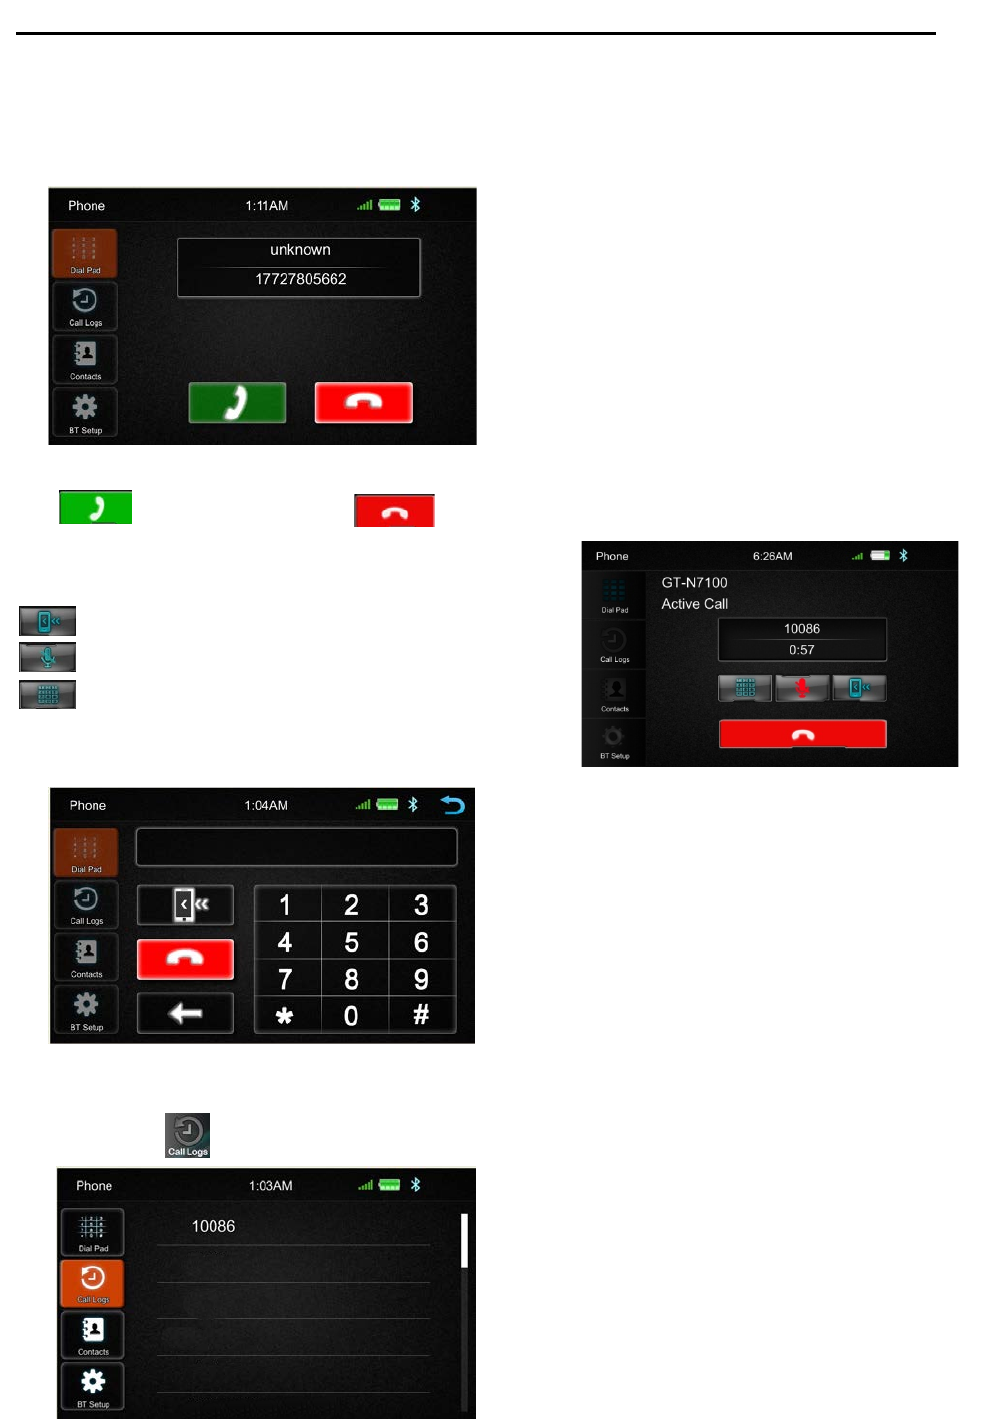
Receive an incoming Call
If the Phone is connect with the unit via Bluetooth, when an incoming call, the below screen will be
shown
Press to receive the Call or to hang the call
Interchange between phone and head unit
ON/OFF the Microphone function
Display the Dial Pad
Call Logs
Touch the icon to display the Call Combined list.
Slide the bar at right side up and down to display a Call logs up to 20 records.
Page 28 of 33
Operation Instruction Manual SA102
Contacts
Touch the icon to access the phone book of the connected phone.
To make a call from the phone book, simply touch the contact name.
BT Setup
Auto Answer On/Off

Page 29 of 33
Operation Instruction Manual SA102
13. AUX IN
The Audio/Video source with RCA cable can through the Head unit to play the Audio/Video. Plug the
RCA to the corresponding A/V socket.
Touch the to pop up the function bars and touch to view the playing Audio/Video.
The Audio and Video will via the RCA cable to the Head unit
If there is no Video signal the below screen will be shown
Page 30 of 33
Operation Instruction Manual SA102
14. Rear Camera
There is a RCA socket for the Rear camera video signal to display on the Head unit.
The Reverse wire in High level (+12V) is reverse; low level (ground or NC) is normal
User also can touch the to pop up the function bars and touch to view the Rear camera.
Rear Camera Settings menu
Rear Camera Input: On/Off
Rear Camera view: Normal/ Reverse
Parking Assist Guide: On/Off
Parking Assist Guide Adjust
Touch the ˂/˃/˄/˅ buton to adjust the assist line to guide the car position

Page 31 of 33
Operation Instruction Manual SA102
15. Remote Control
1. Power/Mute
Long press it to power off/short press to active the
mute.
2. Call
Entry to phone call screen.
3. Answer
BT phone is connected, press it to accept call.
4. Hang up
BT phone is connected, press it to end call.
5. PLAY/PAUSE
Play/Pause button
6. SEEK+/-/ /
In Radio mode, short press for previous /next preset
channel, long press for SEEK-/+.
In SiriusXM mode, short press for previous /next
preset channel, long press to browse the channel
up/down.
In USB/BT mode, short press for previous/ next
track, long press for fast reserve/ forward.
7. Home
Short press to Return back to head unit home from
any mode.
8. Up/down/Left/right
In the radio mode, press Up/down to select a preset
station up/down.
Press left /right to seek - / seek +, Long press left /
right for tune- / tune +.
In the USB mode, press Up/down to select folder
up/down.
9. ENTER/MENU
In disc mode, press it to confirm selection or enter
setting for DVD menu.
10. USB
Press it to select the USB mode if there is a USB
device in the unit.
11. VOL-
Press for decrement the volume step, long press for
volume rapid down.
12. Radio
Press it to select the Radio mode.
13. Phone
Press it to select the BT Phone mode.
14. SiriusXM
Press it to select the SiriusXM mode if the unit is
connected with a SiriusXM tuner.
15. USB
Press it to select the USB mode if there is a USB
device in the unit.
16. VOL-
Press for decrement the volume step, long press for
volume rapid down.
17. Radio
Press it to select the Radio mode.
18. Phone
Press it to select the BT Phone mode.
19. SiriusXM
Press it to select the SiriusXM mode if the unit is
connected with a SiriusXM tuner.
20. Disc
Invalidation operation.
21. EJECT
Press it to eject the disc, Press it to again to insert
the disc.
22. Numeric Key
In Radio and SiriusXM mode, 1 to 6 can use to select
the preset channel.
In BT Phone mode, the numeric key can act for
number dialing.

Page 32 of 33
Operation Instruction Manual SA102
16. Specification
General
Power Supply ………………………….………………………………….……..…………. DC10~16Volts
Grounding System …………………………………..……..……….………..…….. Negative Ground
Current Drain ………………………………….…………………………...……..….…………. 15A(Max.)
Power Output ………………………………………….………………..……. 4×40W/channel(Max.)
Speaker Impedance ……………………………………....…..……………. 4~8ohms per channel
Frequency Response……………………………………..……….………………………. 20Hz~20KHz
Operating Temperature …………………………………..……………….................. -20~+60℃
Dimensions …………………………………….……..…… 175mm(W)×155mm(D)×100mm(H)
TFT Display
TFT Screen size…………………………………………..……………………….…………………..6.75inch
Resolution………………………………………………………………..…..……………..800×480 pixels
FM Radio
Frequency Range (USA) ………………………………………………...……..……87.5~107.9MHz
Frequency Range (Europe/South America) …………………...…..…..……87.5~108MHz
Usable Sensitivity (S/N=30dB)………..…………………………….…..…….…….…….…≦15dB
S/N Ratio……………………………………………………………………..….....…………………≧55dB
Stereo Separation………………………………………...…..…………………..………………≧30dB
AM/MW
Frequency Range (USA) ………………………………………….…………..…….…530~1710KHz
Frequency Range (Europe) ………………………..………………..…..………….531~1602KHz
Usable Sensitivity(S/N=20dB)……………….……………………………..……….…….…≦40dB
S/N Ratio………………………………………………………………………….…..………………≧45dB
USB
S/N Ratio……………………………………………………….………………………..……………≧60dB
Channel Separation ……………………………….…………………………..……..……>50dB
Line-Out/Subwoofer Output
Maximum Output Level (10K ohms load)……………….……………..……..….…≧4Vrms
Subwoofer Time Align……………………………………………………………….…………0~18ms

Page 33 of 33
Operation Instruction Manual SA102
FCC Warning
Any Changes or modifications not expressly approved by the party responsible for
compliance could void the user’s authority to operate the equipment.
This device complies with part 15 of the FCC Rules. Operation is subject to the
following two conditions: (1) This device may not cause harmful interference, and (2)
this device must accept any interference received, including interference that may
cause undesired operation.
FCC Radiation Exposure Statement:
This equipment complies with FCC radiation exposure limits set forth for an
uncontrolled environment. This equipment should be installed and operated with
minimum distance 20cm between the radiator& your body.
This transmitter must not be co-located or operating in conjunction with any other
antenna or transmitter.
Note: This equipment has been tested and found to comply with the limits for a Class B
digital device, pursuant to part 15 of the FCC Rules. These limits are designed to
provide reasonable protection against harmful interference in a residential installation.
This equipment generates uses and can radiate radio frequency energy and, if not
installed and used in accordance with the instructions, may cause harmful interference
to radio communications. However, there is no guarantee that interference will not
occur in a particular installation. If this equipment does cause harmful interference to
radio or television reception, which can be determined by turning the equipment off
and on, the user is encouraged to try to correct the interference by one or more of the
following measures:
Reorient or relocate the receiving antenna.
Increase the separation between the equipment and receiver.
Connect the equipment into an outlet on a circuit different from that to which
the receiver is connected.
Consult the dealer or an experienced radio/TV technician for help.