Spectrum 450412ZWV 914C Zwave Electronic Door Lock User Manual 13 Users Manual
Spectrum Brands, Inc. 914C Zwave Electronic Door Lock 13 Users Manual
Spectrum >
Users Manual

Regulatory Compliance
This product complies with standards established by the following
regulatory bodies:
• Federal Communications Commission (FCC)
• Industry Canada
FCC
This device complies with Part 15 of the FCC Rules. Operation
is subject to the following two conditions: ( 1 ) this device may
not cause harmful interference, and ( 2 ) this device must accept
any interference received, including interference that may cause
undesired operation.
This equipment has been tested and found to comply with the limits
for a Class B digital device, pursuant to Part 15 of the FCC Rules.
These limits are designed to provide reasonable protection against
harmful interference in a residential installation. This equipment
generates, uses, and can radiate radio frequency energy and, if
not installed and used in accordance with the instructions, may
cause harmful interference to radio communications. However,
there is no guarantee that interference will not occur in a particular
installation. If this equipment does cause harmful interference to
radio or television reception, which can be determined by turning
the equipment o and on, the user is encouraged to try to correct
the interference by one or more of the following measures:
• Reorient or relocate the receiving antenna.
• Increase the separation between the equipment and receiver.
• Connect the equipment into an outlet on a circuit dierent
from that to which the receiver is connected.
• Consult the dealer or an experienced radio/TV technician for
help.
IMPORTANT! Changes or modiications not expressly approved by
the manufacturer could void the user’s authority to operate the
equipment.
Industry Canada
This device complies with Industry Canada licence-exempt RSS
standard(s). Operation is subject to the following two conditions:
( 1 ) this device may not cause interference, and ( 2 ) this device
must accept any interference, including interference that may
cause undesired operation of the device.
Cumplimiento Normativo
Este producto cumple con las normas establecidas por los
siguientes organismos reguladores:
• Comisión Federal de Comunicaciones (FCC)
• Industry Canada
FCC
Este dispositivo cumple con la 15ª parte del reglamento de la FCC.
Su funcionamiento está sujeto a las siguientes dos condiciones:
( 1 ) este dispositivo no deberá causar ninguna interferencia dañina,
y ( 2 ) este dispositivo deberá aceptar cualquier interferencia
recibida, incluyendo aquélla que podría causar un funcionamiento
no deseado.
Se realizaron pruebas a este equipo cuyos resultados revelaron que
cumple con los límites establecidos para un dispositivo digital de
la Clase B, conforme a la 15ª parte del reglamento de la FCC. Estos
límites han sido impuestos para proporcionar protección razonable
contra interferencias dañinas en una instalación residencial. Este
equipo genera, utiliza y puede irradiar energía de radiofrecuencia
y, si no se instala y utiliza según lo que indican las instrucciones,
podría causar interferencia dañina en radiocomunicaciones. Sin
embargo, no hay garantía de que la interferencia no ocurrirá en
determinadas instalaciones. Si este equipo efectivamente causa
interferencia en la recepción de radio o televisión, la cual puede
determinarse encendiendo y apagando el equipo, sugerimos al
usuario que intente corregir dicha interferencia tomando una o más
de las siguientes medidas:
• Volver a orientar o ubicar la antena receptora.
• Incrementar la distancia entre el equipo y el recibidor.
• Conectar el equipo a una toma de corriente en un circuito
distinto del circuito en el cual esté conectado el recibidor.
• Consultar con el distribuidor o un técnico de radio y TV con
experiencia para obtener su ayuda.
¡IMPORTANTE! Todo cambio o modiicación no aprobado
expresamente por el fabricante podría desautorizar al usuario para
operar el equipo.
Industria de Canada
Este dispositivo cumple con las normas de la Industria de Canada
licencia-exenta RSS. Su funcionamiento está sujeto a las siguientes
dos condiciones: ( 1 ) este dispositivo no deberá causar ninguna
interferencia dañina, y ( 2 ) este dispositivo deberá aceptar
cualquier interferencia, incluyendo aquélla que podría causar el
funcionamiento no deseado del dispositivo.
Conformité règlementaire
Ce produit est conforme aux normes établies par les organismes de
règlementation suivants :
• Federal Communications Commission (FCC)
• Industrie Canada
FCC
Cet appareil est conforme aux limites prescrites dans la partie 15
des règlements de la Federal Communication Commission (FCC)
des États-Unis. Son utilisation est subordonnée aux conditions
suivantes : ( 1 ) l’appareil ne doit pas causer d’interférence nuisibles,
et ( 2 ) il doit accepter toute interférence, y compris celles qui
peuvent causer son mauvais fonctionnement.
Lors des tests eectués, cet appareil s’est révélé conforme aux
limites prescrites dans la partie 15 des règlements de la Federal
Communications Commission (FCC) des États-Unis pour un
appareil numérique de Classe B. Ces limites ont été ixées pour
protéger raisonnablement les installations résidentielles contre les
interférences nuisibles. L’appareil produit, utilise et peut émettre
des radiofréquences. S’il n’est pas installé et utilisé de la façon
prescrite, il peut brouiller les communications radio. Il n’est pas
garanti qu’aucune interférence ne se produira. Si l’appareil brouille
la réception d’une radio ou d’un téléviseur (pour savoir s’il est
à l’origine du brouillage, il suit de l’éteindre et de le rallumer),
l’utilisateur est invité à tenter de corriger la situation en prenant une
ou plusieurs des mesures suivantes :
• réorienter ou déplacer l’antenne réceptrice;
• éloigner davantage l’appareil émetteur du récepteur;
• brancher l’appareil dans une prise reliée à un circuit diérent
de celui auquel le récepteur est relié;
• consulter le détaillant ou un technicien de radiotélévision
expérimenté pour obtenir de l’aide.
IMPORTANT! Les modiications qui n’ont pas été expressément
approuvées par le fabricant de l’appareil peuvent annuler
l’autorisation d’utiliser l’appareil.
Industrie Canada
Cet appareil est conforme aux normes d’Industrie Canada exemptes
de licence RSS. L’opération est sujette aux deux conditions: ( 1 ) ce
dispositif peut ne pas causer l’interférence et ( 2 ) ce dispositif doit
accepter n’importe quelle interférence, y compris l’interférence qui
peut causer le fonctionnement non souhaité du dispositif.
61890 / 01
1 / 4
66452001
Rev 01
ZWave® Plus
Installation and User Guide
ENGLISH
Kwikset
1-800-327-5625
www.kwikset.com
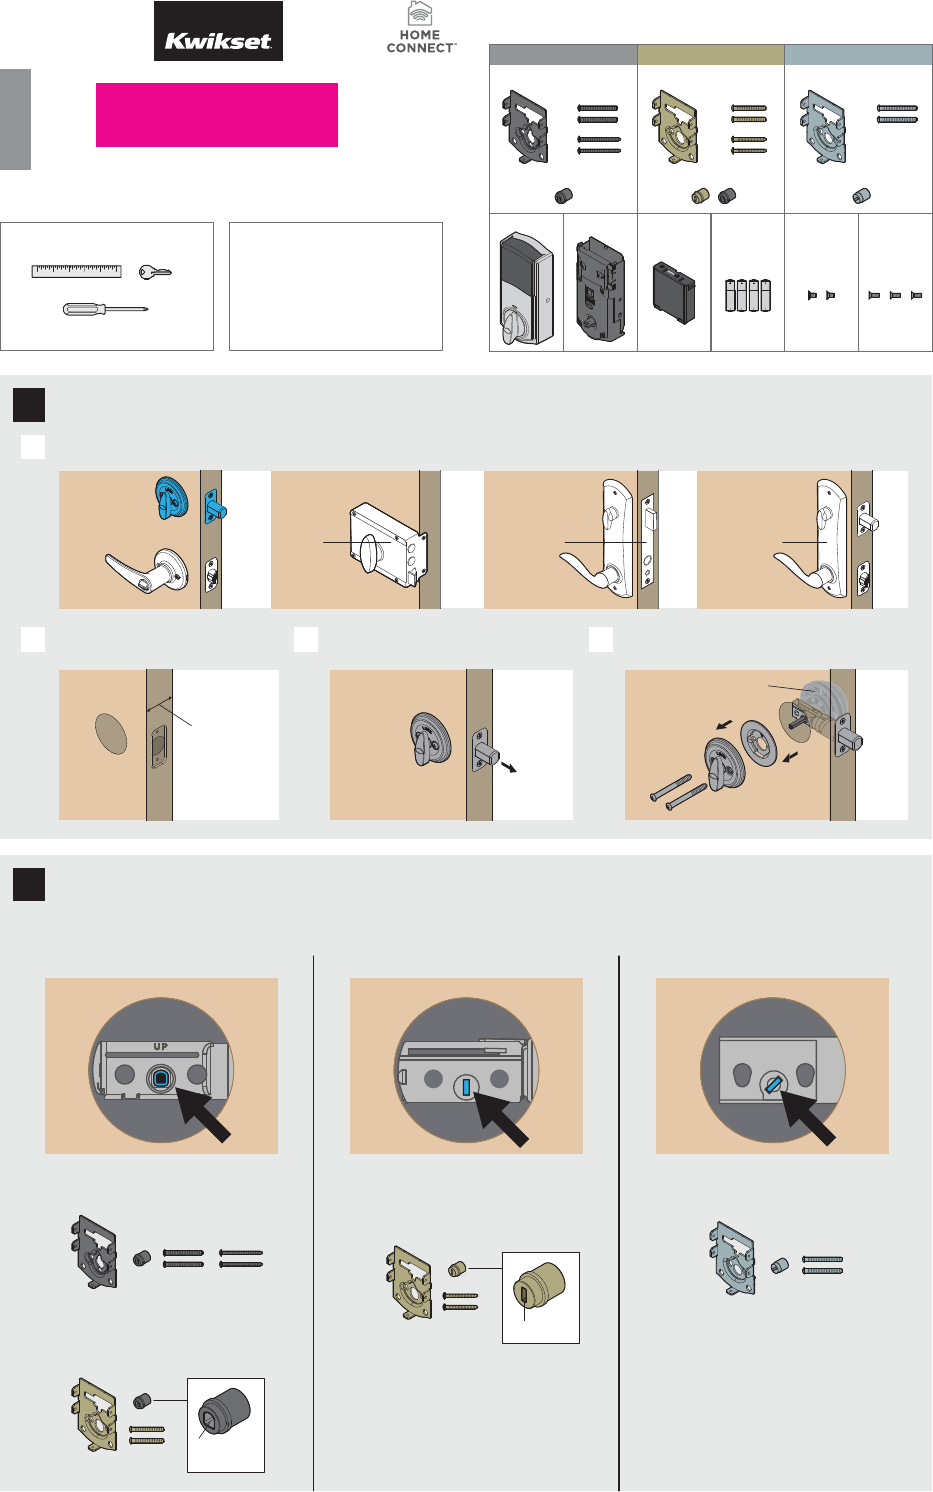
Required tools
Ruler
Phillips head screwdriver
Existing key
1Prepare your door
2Determine the parts needed for your door
Parts in the box
6410949191
Black components Gold components Silver components
Mounting plate
screws
Mounting plate
screws
Mounting plate
screws
Mounting plate
Interior cover Interior assembly Battery pack AA batteries Interior assembly
screws
Interior cover
screws
Mounting plateMounting plate
Adapter AdapterAdapters
Make sure your existing deadbolt is compatible. If you have a standard deadbolt
mounted separately from the handle below it, it is compatible with Kwikset Convert.
Measure to conirm that your door is either
13/8" or 13/4" (35 mm or 44 mm) thick.
13/8"or 13/4"
35 or 44 mm
Make sure your door is open and
extend your latch bolt.
extended
Remove all existing deadbolt hardware from the interior
side of your door. Keep your deadbolt exterior in place.
deadbolt
exterior
C
A
B D
Look into the hole in your door.
What shape is your torque blade (the part sticking out through the latch)?
For a list of compatible deadbolt
models, please see the Kwikset
Convert page at www.kwikset.com
Kwikset and Weiser deadbolts:
Use the black component kit for your door.
Use the gold component kit for your door.
You will need the gold adapter with the vertical slot
and the thinner gold screws.
thicker
screws
thinner
screws
D-shaped
hole
vertical slot
Use the silver component kit for your door.
Baldwin deadbolts:
Use the gold component kit for your door.
You will need the black adapter with the
D-shaped hole and the thicker gold screws.
D-shape Vertical rectangle Slanted rectangle
Not Compatible
Rim
Lock
Mortise
Lock
Integrated
Interior
Not Compatible Not CompatibleCompatible
LOGO FPO
2 / 4
3
4
Install the mounting plate and test your latch
Prepare the interior assembly
torque blade
Note: A D-shaped torque blade is shown, but installation is the same for all models.
A
C D
Place the mounting plate on the door so that the torque
blade inserts through the center hole.
Black Components Only: To
determine which mounting
screws to use, test one of
the thicker screws irst.
If the thicker screw its, continue
installing the thicker screws.
If the thicker screw doesn't it,
install the thinner screws.
Insert your key and test the latch for smooth operation. Remove your key and make sure the bolt is fully extended.
fully
extended
If the latch does not
extend or retract
smoothly, adjust the
mounting screws.
B
Keep parallel to the
edge of the door.
Tighten
screws evenly.
Secure the mounting plate with the mounting screws.
ab c d
Temporarily install the interior cover to correctly orient the turnpiece shaft.
A
Lay the interior assembly on a lat
surface, and install the interior cover.
Rotate the turnpiece so that its
narrow tip faces the Status LED.
Remove the interior
cover from the
interior assembly.
If the interior cover does not lay
lush, rotate the turnpiece. When the
Status LED pops into place, the cover
is lush and correctly aligned.
Remove the battery pack.
Do not
install
batteries
yet.
Status LED
align tabs
Gold adapter:
Keep slot vertical.
Press adapter irmly onto
the interior assembly.
Install the adapter on the interior assembly.
Look at your mounting plate.
Is your latch bolt to the left or right of your mounting plate?
SILVER COMPONENTS ONLY:
B!
Silver adapter:
Tab is on bottom.
Black adapter:
Curve is on top.
RightLeft
No adjustment is required.
Proceed to next step.
Unlocked
Make the following adjustments:
1. Unlock your deadbolt.
Switch #2
2. On your interior assembly, lip
switch #2 to the top position.
3 / 4
Pair the lock with your smart home system
If the window is unlocked, it can
slide up for quick access to the
buttons while the cover is installed.
The interior cover will be
installed over the back panel
with three screws.
The window on the interior cover is
locked by default to prevent someone
from tampering with the back panel.
Important Information about the interior cover
Remove
security
screw.
Install
cover.
Install
screws.
a
b c
If you want to unlock the window (for quick access to back panel):
Install
cover.
Install
screws.
a
b
If you want to keep the window locked:
K
Install the interior cover
A
A B
B C D
This step will teach the lock the orientation of your door and is crucial for lock operation.
Install 4 AA batteries in
the battery pack.
Align the adapter with the torque blade. Secure with two (2) interior assembly screws.
Ensure correct polarity. For best
results, use new, non-rechargeable
Alkaline batteries only.
Make sure the door is open. Insert the battery
pack while PRESSING AND HOLDING the
Program button. Release the button when the
battery pack is all the way inside the lock interior.
The Status LED will lash red and green, and
the lock will beep. Press and release the
Program button again. The latch bolt will
retract and extend on its own.
If the latch bolt did
not move, remove the
battery pack, wait 15
seconds, then attempt
the process again.
status LED
Perform the door handing process
Install the interior assembly
5
6
7
8
Initiate the pairing process at
your smart home controller.
Refer to your smart home system
instructions for more information.
When prompted by your smart home system
to initiate pairing at the lock, press button “A”
on the lock interior one time. The red LED will
illuminate when pairing mode has been entered.
If the pairing process is successful, re-name
the lock in your system (if applicable).
If pairing is unsuccessful, follow your system's
instructions to remove the lock from the
controller and any other network, then
press button “A” on the lock one time.
Perform steps 7A7C again.
If pairing is still unsuccessful, see
"Troubleshooting: Lock won't pair with
smart home system" on page 4.
A B C
D
button “A”
Please allow time for the controller to pair with the lock.
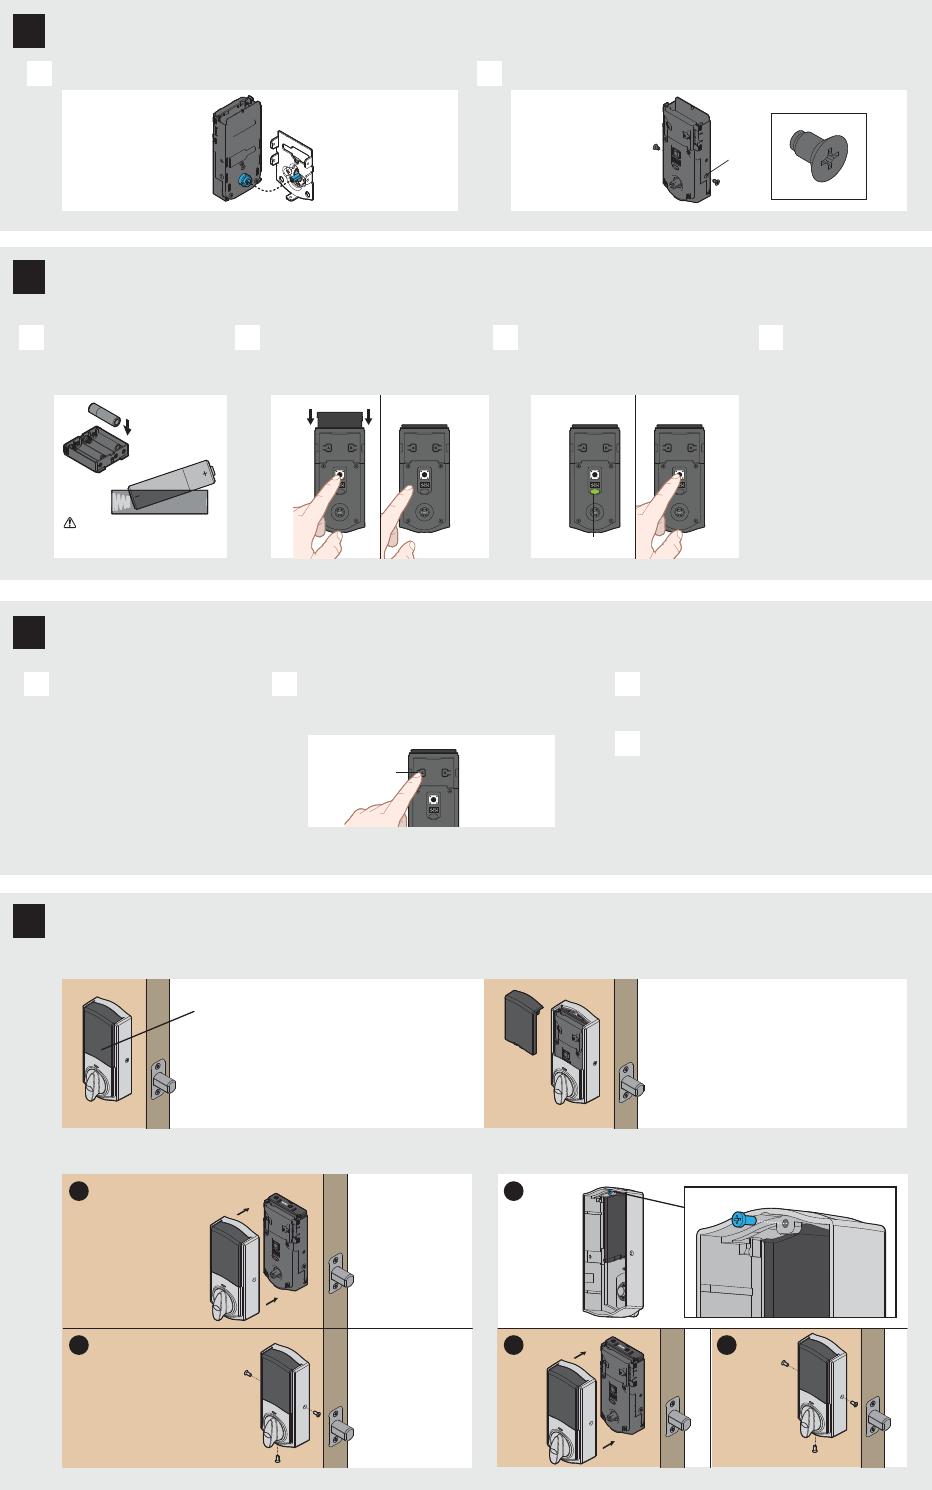
bottom
hole

4 / 4 © 2016 Spectrum Brands, Inc.
Reference Guide
Factory Reset
A factory reset will delete all codes associated with the lock.
Some Z-wave systems require that the lock be within 12" of the controller during the pairing
process. If this is the case, follow the steps below to remove the lock interior from the door
to perform the pairing process closer to the controller:
1. Remove the small screws that secure the
interior assembly to the mounting plate.
2. Remove the interior assembly from the door. 3. Hold the interior assembly a maximum of 12" (305 mm) from
your smart home controller for the rest of this process.
Status
LED
1 Remove
battery pack.
2 Press and HOLD the
Program button while
reinserting the battery pack.
Keep holding the button
for 30 seconds until
the lock beeps and the
status LED lashes red.
3 Press the Program
button once more. When
the LED lashes green
and you hear one beep,
the lock has been reset.
4 Perform the door handing process
again to teach the lock the
orientation of the door and pair the
lock to your smarthome system.
1. Read all instructions in their entirety.
2. Familiarize yourself with all warning and caution statements.
3. Remind all family members of safety precautions.
4. Always have access to your lock’s standard key.
5. If using the Auto-Lock feature, make sure to have your smartphone
or standard key with you to prevent locking yourself out.
6. Replace low batteries immediately.
CAUTION: Prevent unauthorized entry. Restrict access to your lock’s back panel and
routinely check your settings to ensure they have not been altered without your
knowledge.
WARNING: This Manufacturer advises that no lock can provide complete security
by itself. This lock may be defeated by forcible or technical means, or evaded by
entry elsewhere on the property. No lock can substitute for caution, awareness of
your environment, and common sense. Builder’s hardware is available in multiple
performance grades to suit the application. In order to enhance security and reduce
risk, you should consult a qualiied locksmith or other security professional.
Important Safeguards
Kwikset Convert at a Glance
AB
Button “A”
Back panel
Program button
Turnpiece shaft
Switches
Button “B”
Status LED
Switches
1. Status LED
Door lock status LED blinks
every 6 seconds. ON position
is factory default.
2. Invert
Only used for right-handed
doors that have installed
silver components.
on o
3. Audio
Beeping sound is heard during
programming and normal operation.
ON position is factory default.
4. Auto-Lock
Automatically re-locks door 30
seconds after unlocking. OFF
position is factory default.
CAUTION: With this feature
enabled, it is possible to lock yourself
outside if you don’t have an enrolled
smartphone or standard key with you.
1234
Status LED Notiications
Troubleshooting: Lock won't pair with smart home system
Amber lash
Door is locked
Green lash
Door is unlocked.
Red lash
The 4 AA batteries in
the Kevo interior are
low and need to be
replaced.
Network Information
ZWave System Notes
This product is a security enabled Z-wave Plus product and must be used with a Security
Enabled ZWave controller to be fully utilized. ZWave is a “Wireless mesh network,” and
results may vary based on building construction and communication path, with 35 feet+
being typical installed distance from smart home controller. It may be necessary to install
additional ZWave beaming capable devices that can serve as repeaters to enhance the
communication path between the lock and controller for a more robust ZWave network.
To assure interoperability, each ZWave product must pass a stringent conformance test to
assure that it meets the ZWave standard for complete compliance with all other devices and
controls. The ZWave identity mark assures consumers, integrators, dealers and manufacturers
that their products will reliably perform with any other ZWave device. And, regardless of the
vendor, always powered nodes may act as a repeater for Kwikset/Weiser/Baldwin products.
ZWave Coniguration and Association Parameters are available on
the Kwikset Convert page at www.kwikset.com.
Removing the lock from the network
Follow your smart home system’s instructions
to remove the lock from the network. When
prompted by the system, press button A” on the
lock interior once.
The lock and controller must remain stationary for
at least 60 seconds during the pairing process.
ZWave
Controller
12"
305 mm
4. Initiate the pairing process at your smart home
controller. Refer to your smart home system
instructions for more information.
5. When prompted by your smart home system to
initiate pairing at the lock, press button “A” on the
lock interior one time. The red LED will illuminate
when pairing mode has been entered.
6. When pairing is complete, re-name the lock in
your system (if applicable). Then, reinstall the
lock interior on the interior assembly.
ZWave
Controller
12"
305 mm