Spin Master Toys Far East 20418TX2G4 ARH XSM HyprRacrsProAst User Manual Layout 1
Spin Master Toys Far East Ltd. ARH XSM HyprRacrsProAst Layout 1
Users Manual
®
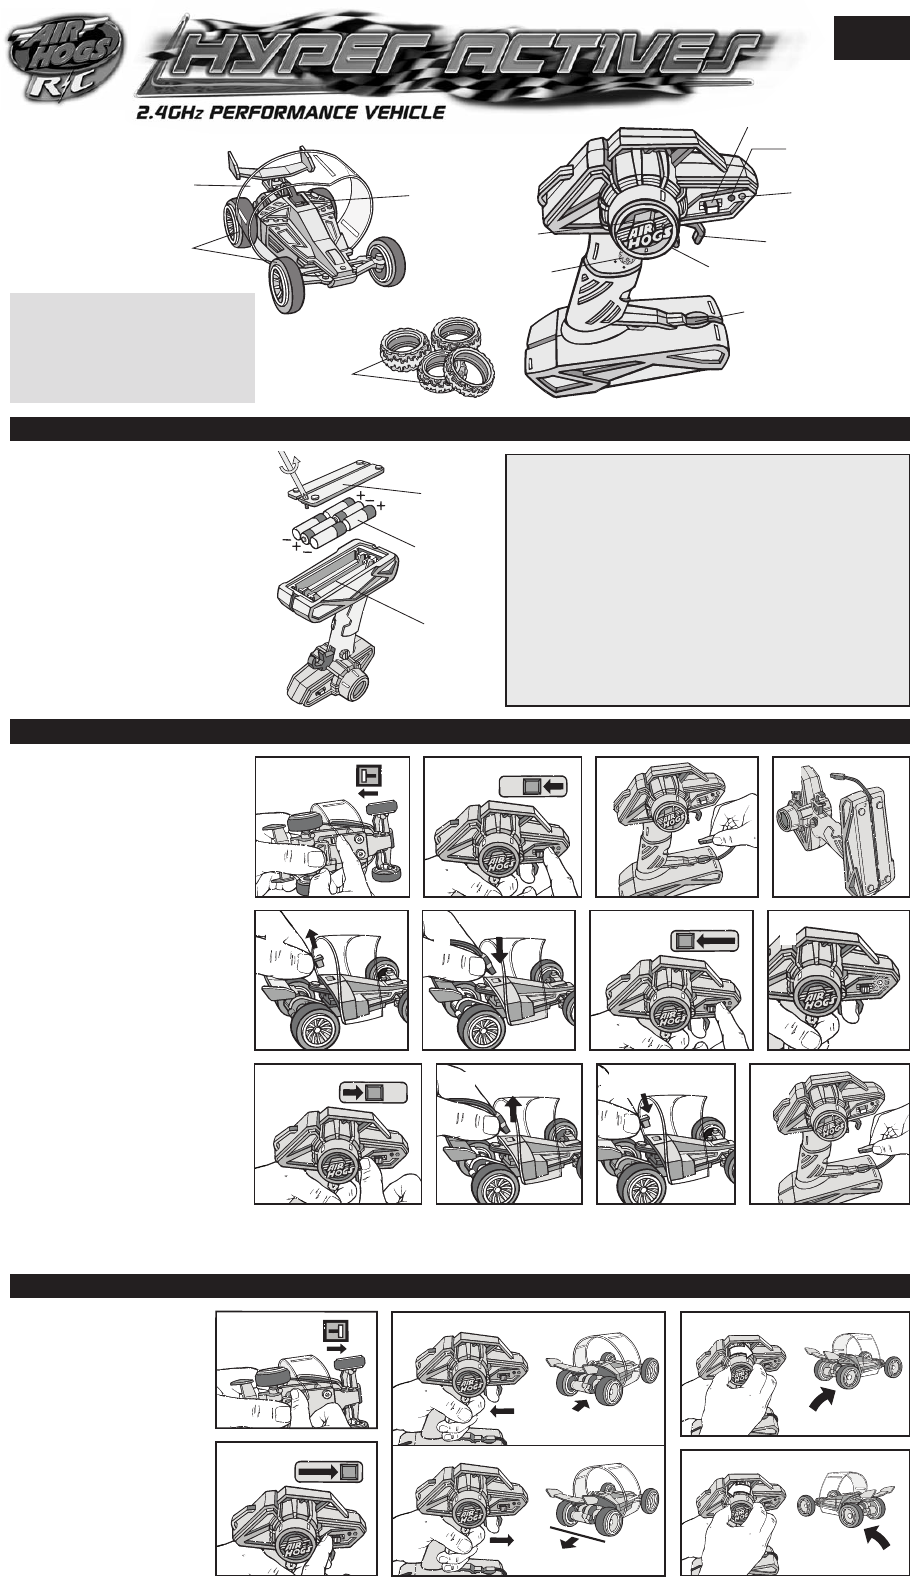
1. Open the battery door with a
screwdriver (not included).
2. If used batteries are present,
remove these batteries from the
unit by pulling up on one end of
each battery.
3. Install new batteries as shown in
the polarity diagram (+/-) inside
the battery compartment.
4. Replace battery door securely.
5. Check your local laws and
regulations for correct recycling
and/or battery disposal.
INSTALLING/REPLACING THE BATTERIES
HOW TO CHARGE YOUR HYPER ACTIVES™
USING THE REMOTE/CHARGER
Battery
Compartment
Cover
Battery
Compartment
6 x
1.5V AA
Alkaline
Batteries
• Remote/charger requires 6 x 1.5V
AA alkaline batteries (not included).
• Batteries are small objects.
• Replacement of batteries must be
done by adults.
• Follow the polarity (+/-) diagram in
the battery compartment.
• Promptly remove dead batteries
from the toy.
• Dispose of used batteries properly.
• Remove batteries for prolonged
storage.
• Only batteries of the same or
equivalent type as recommended
are to be used.
• DO NOT incinerate used batteries.
• DO NOT dispose of batteries in fire,
as batteries may explode or leak.
• DO NOT mix old and new batteries.
• DO NOT mix different types
of batteries, i.e.: alkaline/standard
(carbon-zinc) or rechargeable
batteries.
•
DO NOT use rechargeable batteries.
• DO NOT recharge non-
rechargeable batteries.
• DO NOT short-circuit the supply
terminals.
• DO NOT store your car or controller
near heat or in direct sunlight.
BATTERY SAFETY INFORMATION
12 +YRS
EXPERT
O I
CHG OFF ON
CHG OFF ON
1. Turn vehicle OFF.
2. Turn remote/charger OFF.
3. Remove charge plug from
storage base.
4. Remove charge cable from
bottom storage groove.
5. Remove vehicle charge
port cover.
6. Carefully insert the charge plug
all the way into the vehicle’s
charge port.
7. Set the remote/charger switch
to CHG.
8. The red charging light will turn
on and charging will begin when
it starts to flash. After 30 to 50
minutes the charging will be
complete and the red charge
light and green power light will
both start to flash.
9. When charging is complete, set
the charge switch to OFF.
10. Remove charge plug from the
vehicle charge port.
11. Replace vehicle charge port
cover.
12. Store charge plug cable
and charge plug in remote/
charger base.
CHG OFF ON
1
5
910 11 12
6 7 8
2 3 4
Remote/Charger
Forward/Reverse,
Left/Right.
1. Turn vehicle ON.
2. Turn remote/charger ON.
3. Pulling the throttle trigger
back moves the vehicle
forward. Pushing the
throttle trigger forward,
brakes then reverses
the vehicle.
4. To move the vehicle to the
right turn the directional
control to the right.
5. To move the vehicle to the
left turn the directional
control to the left.
OI
O I
4
5
1
CHG OFF ON
2
NOTE: 1. If the charge light and power light are flashing alternatively while
charging, there may be a bad cable connection. Check that cable and plug
are connected correctly and repeat charging steps 1 to 6.
2. The remote control will automatically shut off after idling for about
5 minutes. To reactivate turn off and on.
3. When the remote control is in either ON status or CHARGE status and
the green power light is flashing, it means that the battery level is low
and the batteries need to be replaced.
Hyper Actives™
Contents:
• 1 x Hyper Actives™
• 4 x Rubber All Terrain Tires
• 4 x Rubber Foam Indoor Tires
• 1 x Pistol Grip Remote/Charger
• 1 x Instruction Guide
Rollbar
Interchangeable
Rubber and Foam Tires
for Various Terrains
Rubber
All Terrain Tires
TM
Charge
Port
Charge
Plug
Directional Control
Left/Right
CHG/OFF/ON
Switch
Red
Charge Light
Green
Power Light
Trim Dial
SLOW
FAST
Variable
Speed Dial
Throttle Trigger
Pull – Proportional Speed
Push – Brake and Reverse
INSTRUCTIONS
3
Forward
Reverse
Right
Left
Spin Master Ltd., 450 Front Street West, Toronto, ON M5V 1B6 Canada
Spin Master Inc., PMB #10053, 300 International Drive, Suite 100,
Williamsville, NY 14221, USA
Spin Master Toys Far East Limited, Rm #1113, 11/F, Chinachem Golden Plaza,
77 Mody Rd., Tsimshatsui E., Kowloon, HK
North American Consumer Information
Phone: 1-800-622-8339
Email: customercare@spinmaster.com
www.spinmaster.com
Air Hogs®, related trademarks & © 2011 Spin Master Ltd. All rights reserved.
This product conforms to safety requirements of ASTM F-963 & CHPA. • Please retain
this information for future reference. • Please remove all packaging materials before
giving to children. • An adult should periodically check this toy to ensure no damage
or hazards exist, if so, remove from use. • Children should be supervised during play.
• Keep addresses and phone numbers for future reference. • The item inside this
package may vary from the photographs and/or illustrations. MADE IN CHINA.
20043334, 20043335, 20049415, 20049426 REV 0
T20418_0001_20043334_NEN_IS_R1
TROUBLESHOOTING GUIDE
Vehicle is slow or will not move.
Vehicle does not drive in a
straight line.
My vehicle and/or remote is dirty.
Vehicle is not responding or driving
on it’s own.
1. Batteries in the controller need to be
replaced if green power light is flashing.
2. Vehicle is out of range of controller.
3. There is hair or debris stuck in the wheels
or wheel axles.
4. Batteries are installed incorrectly.
5. Improper surface for vehicle.
6. Remote not aimed at vehicle or objects
interfering with signal.
7. Remote was inactive for 30 seconds
or more and turned itself off to preserve
your batteries.
Vehicle requires wheel alignment.
1. Inappropriate driving surface.
2. Dirty hands.
1. Using another vehicle remote/
charger of the same frequency.
2. Infrared interference from another source.
1. Replace batteries in the remote with new, fresh batteries.
2. Move closer to the vehicle.
3. With the vehicle and remote turned off, have an adult carefully remove the hair
or debris from the wheels or wheel axles. Remove debris by blowing gently on
the wheel assembly area located on the bottom of the vehicle.
4. With the vehicle and remote turned off, have an adult check that the batteries
are installed correctly in the remote.
5. Examples of poor play surfaces are thick grass, sand or pebbly areas. Examples
of good play surfaces are tiles, concrete or asphalt.
6. Point remote IR at the vehicle. Ensure there are no objects blocking the
controller “line of sight” to the vehicle.
7. Press the ON/OFF button.
Refer to Trim Adjustment guide above.
Ensure the remote and vehicle are off. Have an adult remove the batteries first
and replace the battery cover. Slightly dampen a clean cloth in water and wipe toy
clean. DO NOT IMMERSE IN WATER and DO NOT USE ANY CHEMICALS.
Let the toy completely dry before putting batteries back into clean, dry battery
compartment.
1. Only use the remote/charger supplied with this vehicle.
2. Do not operate vehicle around devices that emit other infrared signals.
PROBLEM CAUSE SOLUTION
NOTE: If normal function of the product is disturbed or interrupted, strong
electro-magnetic interference may be causing the issue. To reset product, turn it
completely off, then turn it back on. If normal operation does not resume, move the
product to another location and try again. To ensure normal performance, change
the batteries, as low batteries may not allow full function.
Your Hyper Actives™ is equipped with a Lithium Polymer battery.
SPECIAL LIPO BATTERY INSTRUCTIONS:
- Never charge battery unattended.
- Charge battery in isolated area. Keep away from flammable materials.
- Do not expose to direct sunlight.
- There is a risk of the batteries exploding, overheating, or igniting. Do not disassemble, modify heat,
or short-circuit the batteries. Do not place them in fires or leave them in hot places.
- Do not drop or subject to strong impacts.
- Do not allow the batteries to get wet.
- Only charge the batteries with the specified Spin Master™ battery charger.
- Only use the batteries in the device specified by Spin Master™.
- Carefully read the instruction guide, and use the batteries correctly.
- In the unlikely event of leakage or explosion use sand or a chemical fire extinguisher for the battery.
- Batteries must be recycled or disposed of properly.
PRODUCT BATTERY REMOVAL INSTRUCTIONS: Internal battery is factory installed,
product disassembly and battery removal must be performed by an adult. Do not puncture,
cut, tear, compress or deform product during disassembly. Ensure product is turned off,
then use a screw driver to remove all screws. Separate product body halves to expose
internal electronics. When battery is visible in its entirety use scissors to cut a single battery
wire, immediately wrap the cut wire end with tape to isolate it, repeat until all battery wires
are cut and isolated, and the battery is free from the rest of the product. Dispose of battery
in accordance with your local battery recycling or disposal laws. NOTE: Opening of
product and/or removal of battery will render product inoperative and voids manufacturer
warranties, dispose of remaining product components in accordance with local laws.
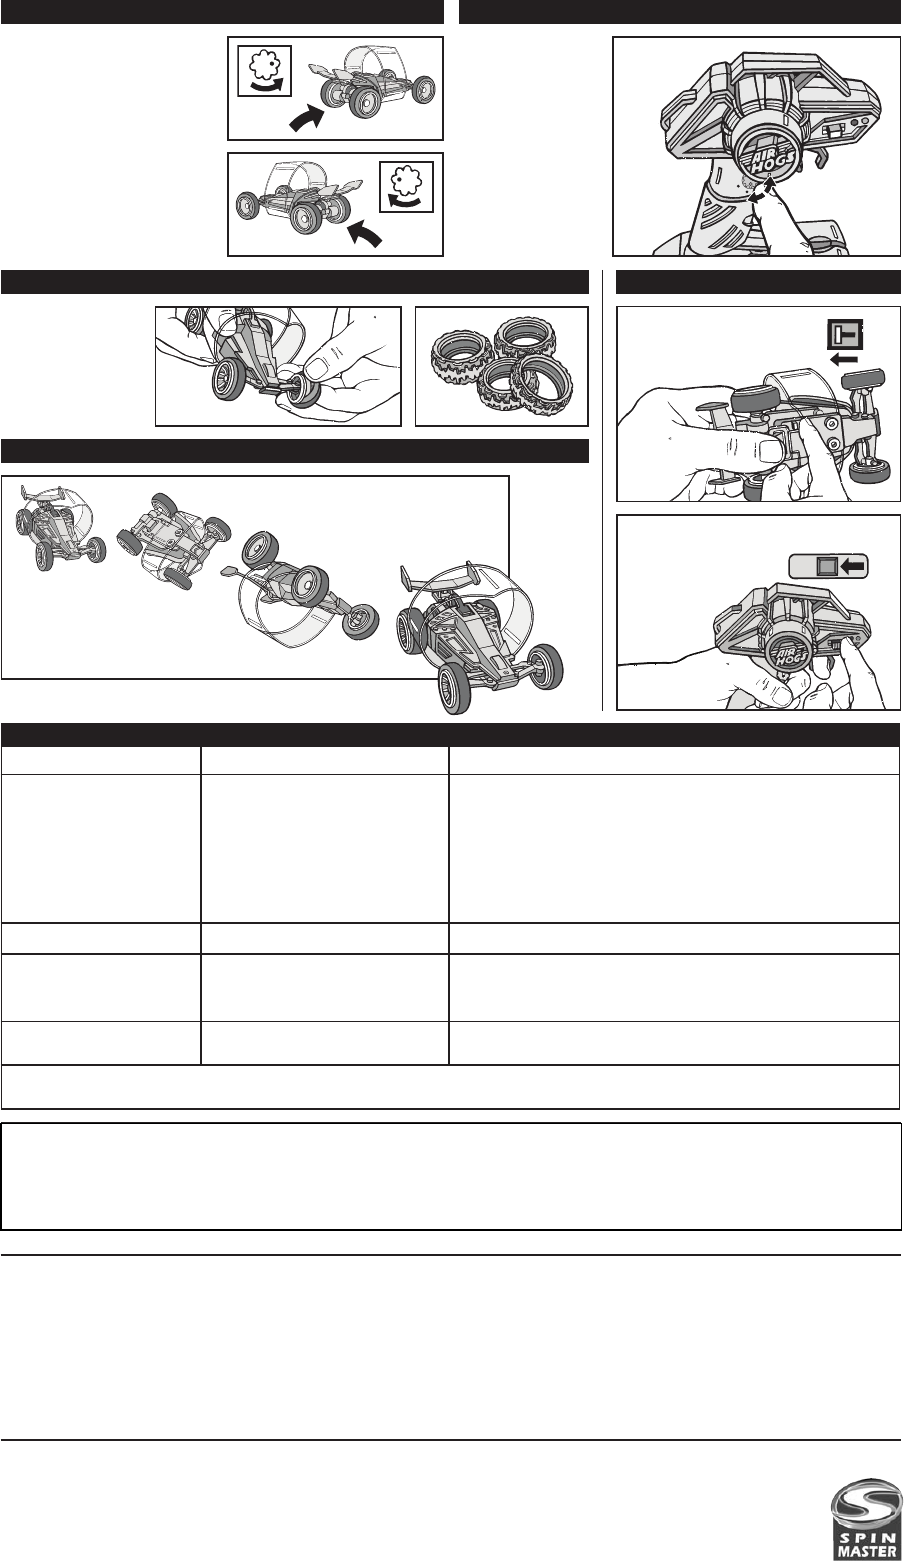
VEHICLE TRIM ADJUSTMENT
CHANGING TIRES WHEN FINISHED PLAYING
SELF-RIGHTING ROLLBAR
If the vehicle is not driving
straight when you have the
directional control wheel in the
forward position, use the trim
dial to correct the problem.
1. If the vehicle turns to the
right, slowly turn the trim dial
to the left until the vehicle
drives straight.
2. If the vehicle turns to the left,
slowly turn the trim knob to
the right until the vehicle
drives straight.
Before using your
Hyper Actives™
outdoors, carefully
remove the rubber
foam indoor tires and
replace them with
the rubber all terrain
outdoor tires!
O I
CHG OFF ON
VARIABLE SPEED DIAL
Moving the variable
speed dial to
the right will limit
the throttle travel
decreasing the
amount of speed
available. Moving
the dial to the left will
activate full throttle
and maximum
speed.
SLOW
FAST
1
2
Turn vehicle OFF.
Turn remote/charger OFF.
TM
A fast, quick turn will cause
the vehicle to roll over and the
self-righting roll bar will return
the vehicle onto its wheels!
This product complies with Part 15 of the FCC rules. Operation is subject to the following two conditions: (1) This device may not cause harmful interference, and (2) This device must
accept any interference received, including interference that may cause undesirable operation. This equipment has been tested and found to comply with the limits for Class B digital
devices pursuant to Part 15 of the FCC rules. These limits are designed to provide reasonable protection against harmful interference to radio communications. This equipment generates,
uses and can radiate radio frequency energy and, if not installed and used in accordance with the instruction, may cause harmful interference to radio communication. If this toy does cause
interference to radio or television reception (you can check this by turning the toy off and on while listening for the interference), one or more of the following measures may be useful:
• Reorient or relocate the receiving antenna • Increase the separation between the toy and the radio or the TV • Consult the dealer or an experienced TV-radio technician for help.
NOTE: Changes, adjustments or modifications to this unit, including but not limited to, replacement of any transmitter component (crystal, semiconductor, etc) could result in a violation of
FCC rules under part 15 and/or 95 and must be expressly approved by Spin Master Ltd. or they could void the user’s authority to operate the equipment.
CANADIAN Class B statement: This Class B digital apparatus meets all of the requirements of the Canadian Interference-Causing Equipment Regulations.
T
his device complies with Part 15 of the FCC rules. Operation is subject to the following two conditions: (1) This device may not cause harmful interference, and (2) This device must accept any interference received,
including interference that may cause undesirable operation. This equipment has been tested and found to comply with the limits for Class B digital devices pursuant to Part 15 of the FCC rules. These limits are
designed to provide reasonable protection against harmful interference to radio communications. Because this toy generates, uses, and can radiate radio frequency energy, there can be no guarantee that
interference will not occur. if not installed and used in accordance with the instructions, may cause harmful interference to radio communications. If this toy does cause interference to radio or television reception
(you can check this by turning the toy off and on while listening for the interference), one or more of the following measures may be useful: • Reorient or relocate the receiving antenna • Increase the separation
between the toy and the radio or the TV • Consult the dealer or an experienced TV-radio technician for help. NOTE:Changes, adjustments or modifications to this unit, including but not limited to, replacement of any
transmitter component (crystal, semiconductor, etc.) could result in a violation of FCC rules under part 15 and/or 95 and must be expressly approved by Spin Master Ltd. or they could void the user’s authority to
operate the equipment.