Spin Master Toys Far East 44354TX27145 F14 Tomcat User Manual T44354 0001 20017492 GTL IS R1 Layout 5 2
Spin Master Toys Far East Ltd. F14 Tomcat T44354 0001 20017492 GTL IS R1 Layout 5 2
Users Manual
®
INSTRUCTION GUIDE
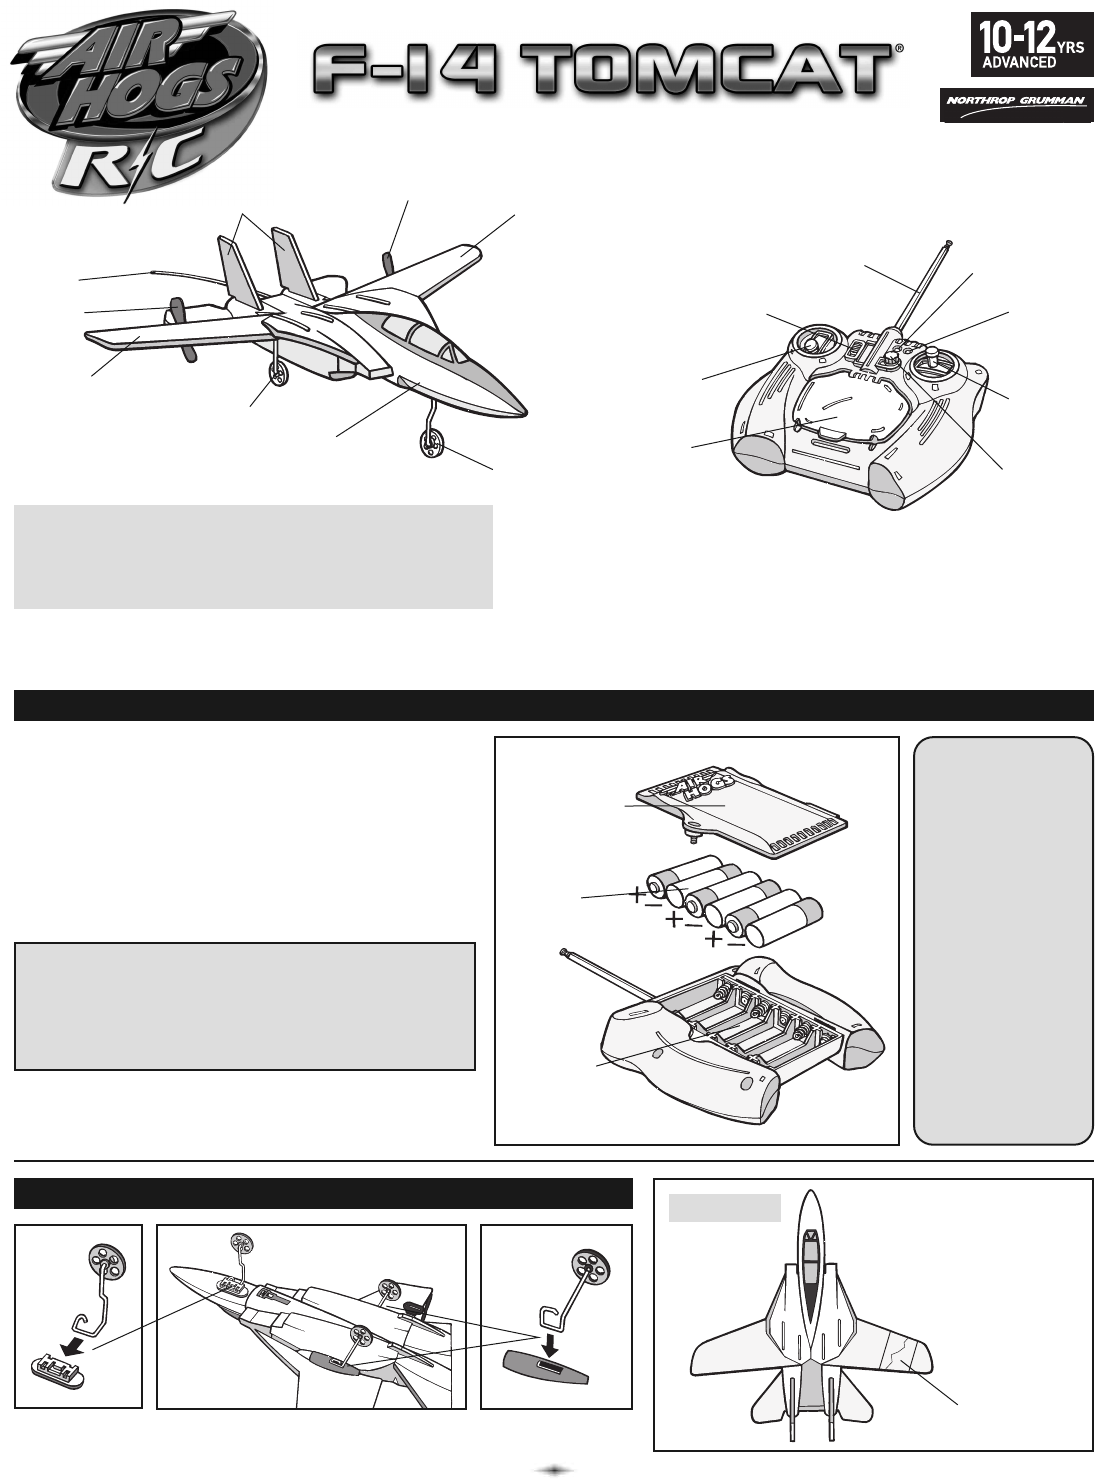
The Air Hogs®F-14 Tomcat®is a revolutionary radio controlled jet that is a true backyard flyer. You can hand toss or take
off from the ground using the landing gear. The F-14 Tomcat®uses digital proportional control which provides hobby like
flight performance.
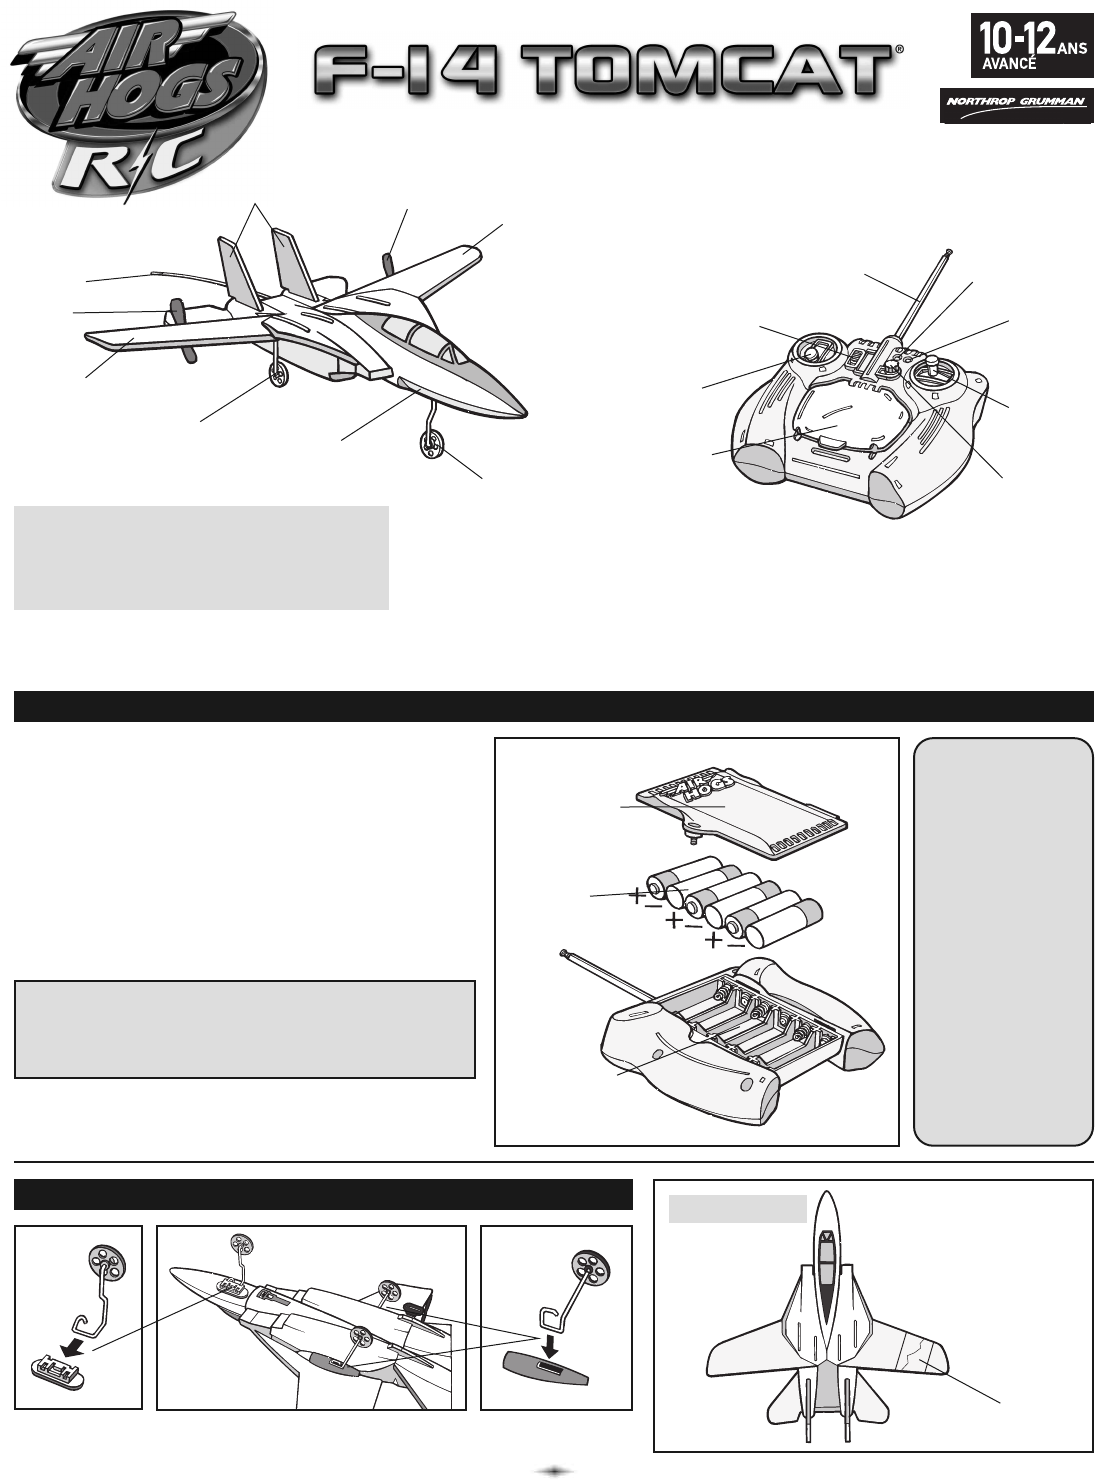
Controller/Charger
Antenna
ON/OFF/CHARGE
Switch
Throttle
Charge Door
(to access
Charge Nozzle)
Charge
LED
Power
LED
Left/Right
Toggle
Steering
Trim Knob
Main Wing
Propeller
F-14 Tomcat®
Vertical
Tail Wings
Propeller
Fuselage Wheels
Main Wing
Nose Wheel
Fuselage
1
1. Open the battery door with a screwdriver.
2. If used batteries are present, remove these
batteries from the unit by pulling up on one
end of each battery.
3. Install new batteries as shown in the polarity
diagram (+/-) inside the battery compartment.
4. Replace battery door securely.
5. Check your local laws and regulations for correct
recycling and/or battery disposal.
Controller/Charger
Battery
Compartment
Door
6 x AA
1.5-V
Alkaline
Batteries
IMPORTANT TIP: TURN YOUR CONTROLLER
ON TO ENSURE THAT THE BATTERIES ARE
INSTALLED PROPERLY. THE RED LED LIGHT
ON THE FRONT OF THE CONTROLLER
SHOULD TURN RED.
After each flight, store the jet in the package to
prevent damage.
REPAIRS
CONTROLLER/CHARGER BATTERY INSTALLATION
If the wings on your jet
get damaged they can
be easily repaired with
clear tape as shown.
ADDING WHEELS TO THE F-14 TOMCAT®
Repair
Attach the front and rear wheels to the jet as shown. The wires on the wheels
slide into the slots on the jet and clip into place.
Battery
Compartment
Your
F-14 Tomcat®
jet has a
preinstalled
rechargeable
battery in the
jet’s fuselage.
Because
the Controller’s
AA batteries
are used for
2 functions –
charging and
controlling,
they will need to
be replaced
every so often.
Antenna
rePLICA SERIES
Contents:
1 x Air Hogs®F-14 Tomcat®
1 x Remote Control/Charger, 1 x User Instruction Guide
1 x Landing Gear, 1 X Spare Props
PRE-FLIGHT ENVIRONMENT CHECK
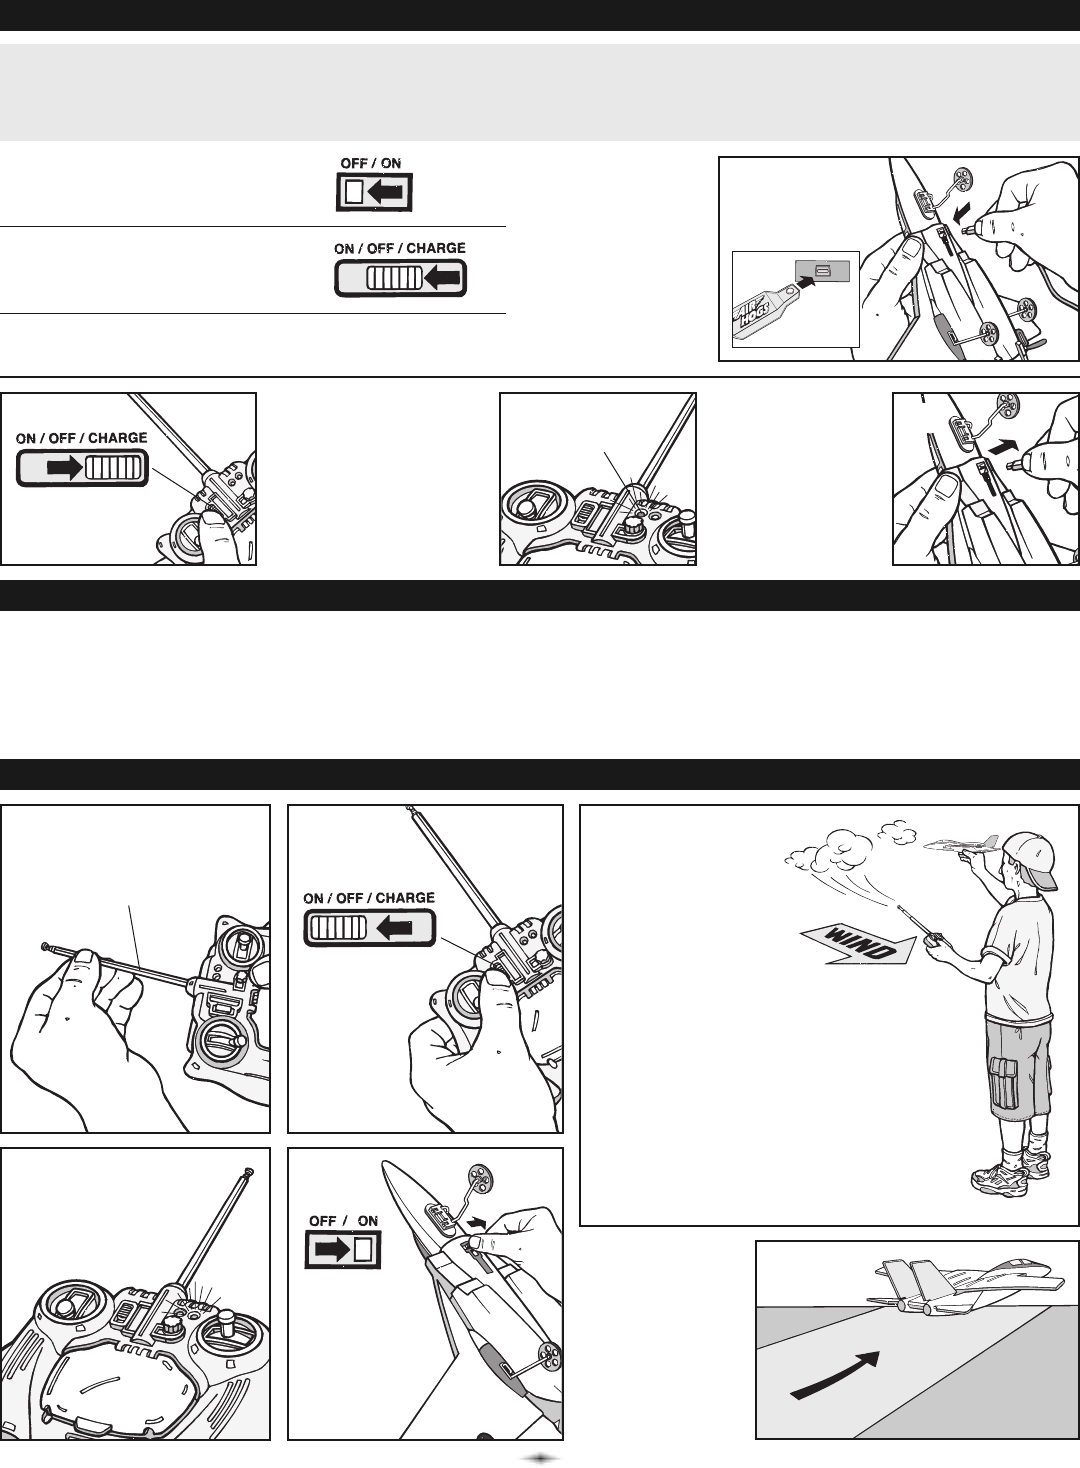
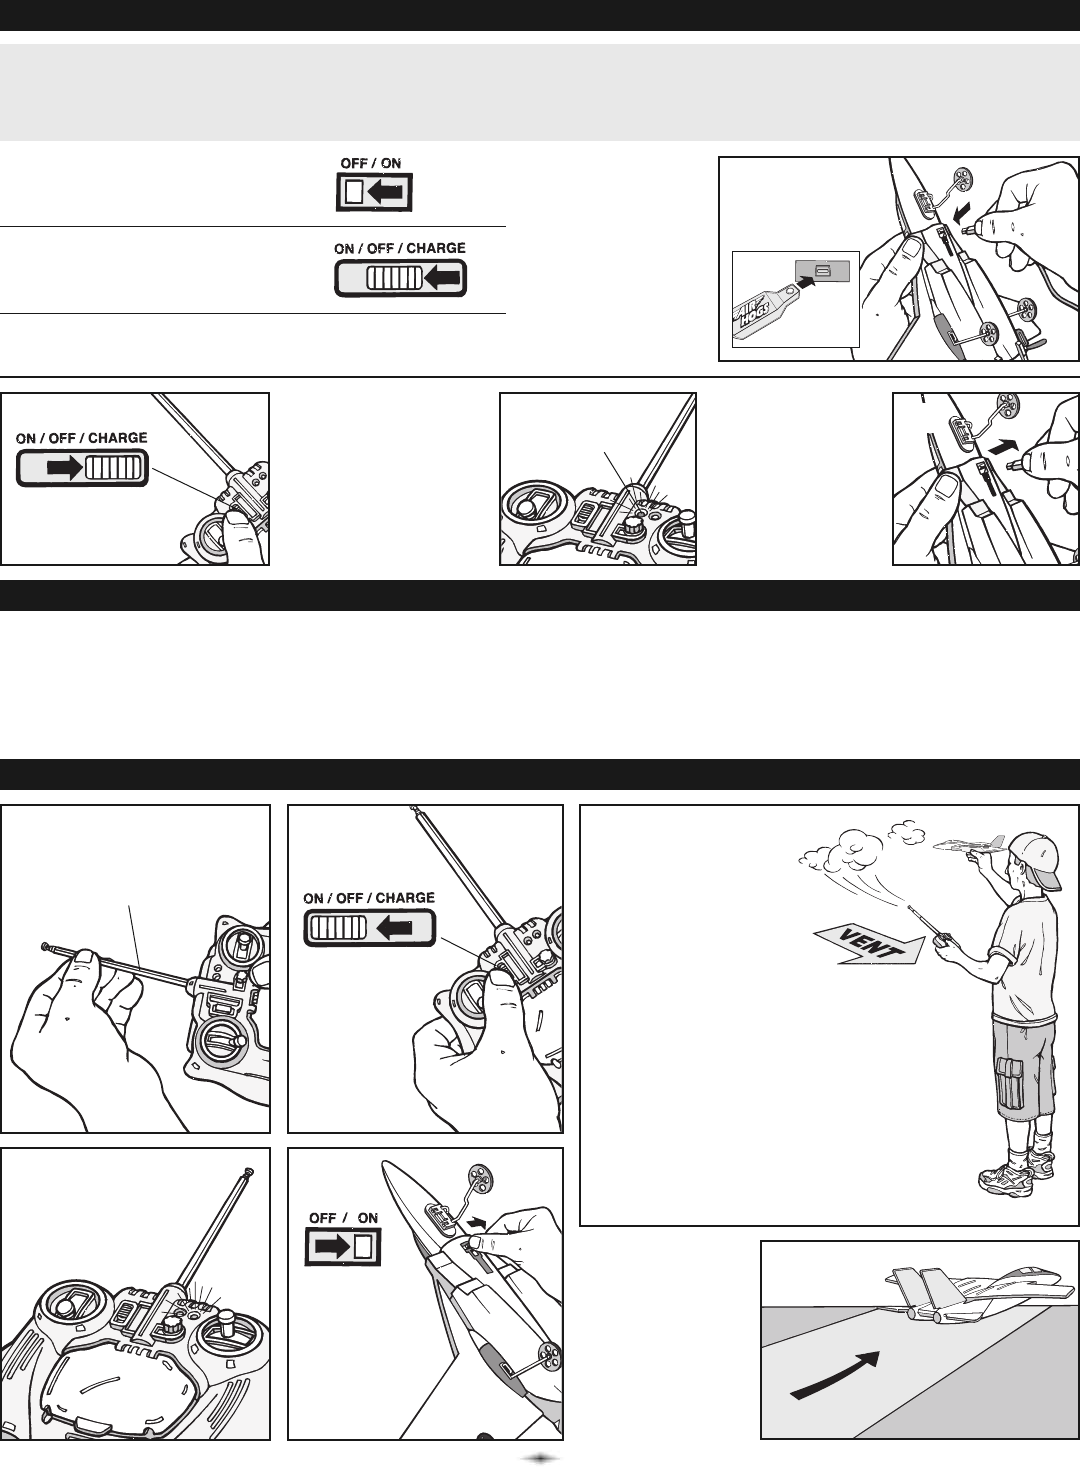
CHARGING YOUR F-14 TOMCAT®
Set the controller/
charger switch
to CHARGE.
4. Carefully
push the charge
nozzle all the
way into the jet’s
charge port
located on the
bottom of the jet.
FLYING INSTRUCTIONS
Fully extend
controller/charger
antenna.
Push the
controller/
charger
switch to
ON.
Power light will
turn RED.
12
3
5
5. During the charging
process, the green
charge light will turn
ON. When the jet is
completely charged,
the green charging
light will turn OFF.
6. Remove charge
nozzle gently
from the jet’s
charge port.
Store charge
nozzle and
close the
charge door.
5
Important Charging Information:
• Before taking your initial flight, charge the jet for a complete charge cycle on your charger.
• Depending upon the length of future play, you will not need to complete a full charge before each flight.
NOTE: A shortened charge results in a shorter playtime (may take up to 30-40 minutes to fully charge).
Green
Charge Light
1. Location – Fly in a large wide open, grassy location that is free of buildings, trees, overhead wires, and other
obstructions. Do not fly near people or animals.
2. Weather – Fly on mild, sunny days. Do not fly in electrical storms, rain, sleet, snow or other adverse weather
conditions. Do not fly if the temperature is below 7°C/45°F. In very cold temperatures, the jet will become fragile and the
engine performance will decrease.
3. Wind Conditions – Do not fly in strong winds. Strong winds may overpower the aircraft and make it difficult to control.
5
NOTE:
We recommend that
you start flying by
hand launching to
get used to the controls.
When preparing for take-off,
check the direction of the wind.
Always launch the jet
against the wind for best
take-off and flight results.
Use your left hand to apply at least
half throttle on the controller/charger.
Gently toss the jet forward into the
wind and parallel to the ground.
Refrain from using the directional
toggle while launching the jet.
1. Push the ON/OFF switch on the
bottom of the jet to the LEFT to
turn the jet OFF.
2. Set the controller/charger
switch to OFF.
3. Flip the charge door open to
reveal the charge nozzle.
6
If you are taking
off from the
ground, make
sure you are on a
smooth paved
surface, and put
the throttle all the
way forward for
fast acceleration.
4
Push the
jet’s ON/OFF
switch to the
right to turn
the jet to ON.
2
4
CONTROLLING JET FLIGHT
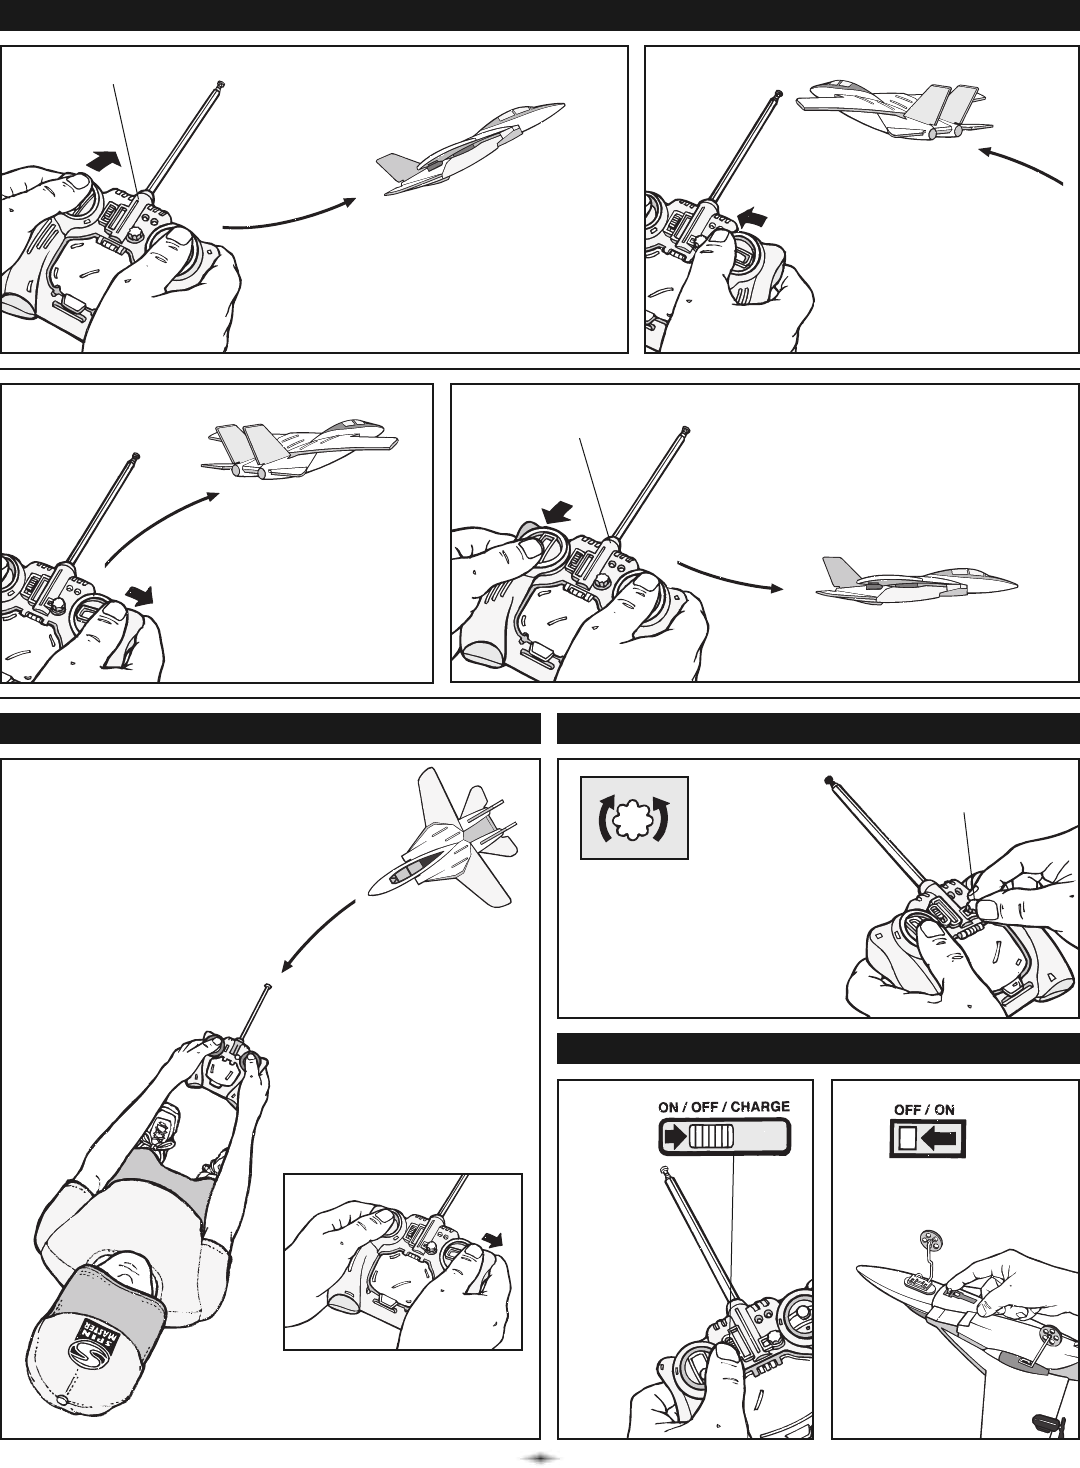
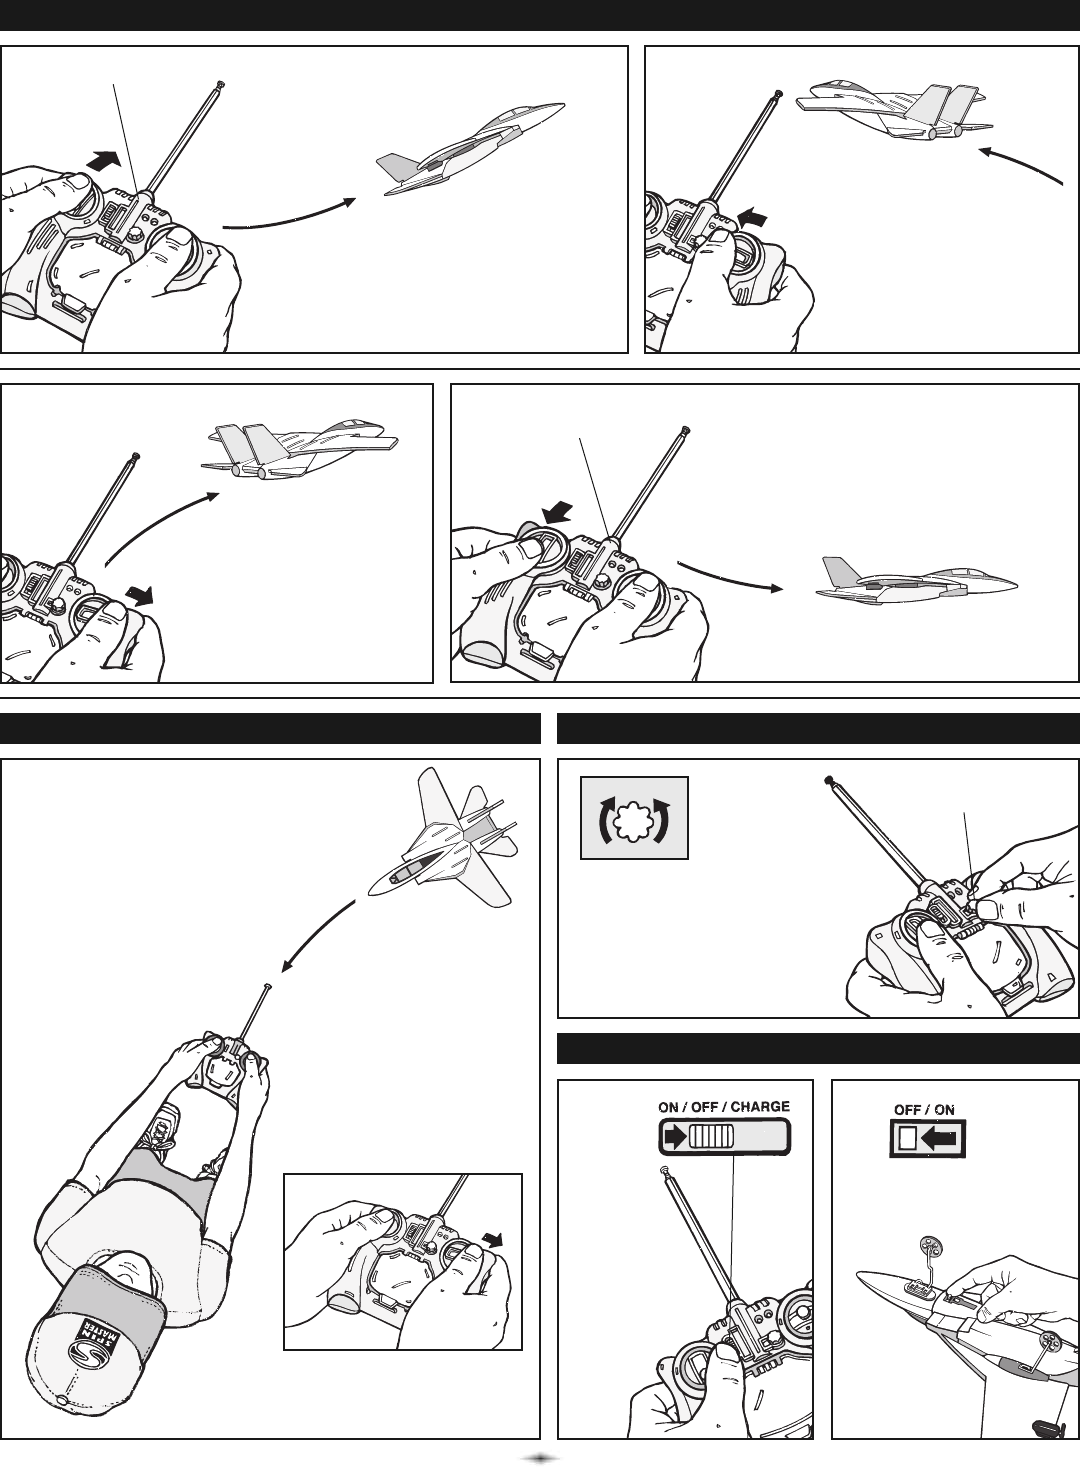
Turn the
controller/
charger
OFF by
pulling
the switch
down.
LEFT TURN
Move the direction toggle
to the left.
If you want to straighten out
your flight path, turn the
Steering Trim Knob to the
left or right during flight.
FLIGHT ADJUSTMENTS
ONCE THE JET HAS LANDED
Steering
Trim Knob
Controller/Charger
2
1
To ACCELERATE or climb
Push the throttle (left toggle) forward.
RIGHT TURN
Move the direction toggle
to the right.
Controller/Charger TO LAND
Select a soft grassy area and pull
the throttle (left toggle) back slowly
and then release.
For example: To make the jet
move to the LEFT, move the
toggle to the RIGHT.
CONTROL REVERSAL
IMPORTANT:
When the jet is flying towards
you, the controls are reversed.
Turn jet OFF by
pushing switch to
the left.
3
IMPORTANT BATTERY INFORMATION
• Requires 6 x 1.5-V AA alkaline batteries (not included).
• Batteries are small objects.
• Replacement of batteries must be done by adults.
• Follow the polarity (+/-) diagram in the battery compartment.
• Promptly remove dead batteries from the toy.
• Dispose of used batteries properly.
• Remove batteries for prolonged storage.
• DO NOT incinerate used batteries.
• DO NOT dispose of batteries in fire, as batteries may explode or leak.
• DO NOT mix old and new batteries or types of batteries
(i.e. alkaline/standard).
• DO NOT use rechargeable batteries.
• DO NOT recharge non-rechargeable batteries.
• DO NOT short-circuit the supply terminals.
Your F-14 Tomcat®is equipped with a Lithium Polymer battery.
SPECIAL LiPO BATTERY INSTRUCTIONS:
• Never charge battery unattended.
• Charge battery in isolated area. Keep away from flammable materials.
• Do not expose to direct sunlight.
• There is a risk of the batteries exploding, overheating, or igniting.
Do not disassemble, modify heat, or short circuit the batteries.
Do not place them in fires or leave them in hot places.
• Do not drop or subject to strong impacts.
• Do not allow the batteries to get wet.
• Only charge the batteries with the specified Spin Master™ battery charger.
• Only use the batteries in the device specified by Spin Master™.
• Carefully read the instruction guide, and use the batteries correctly.
• In the unlikely event of leakage or explosion use sand or a chemical fire
extinguisher for the battery.
• Batteries must be recycled or disposed of properly.
This product complies with Part 15 of the FCC rules. Operation is subject to the following two conditions: (1) This device may not cause harmful interference, and (2) This device must accept any interference received, in-
cluding interference that may cause undesirable operation. This equipment has been tested and found to comply with the limits for Class B digital devices pursuant to Part 15 of the FCC rules. These limits are designed
to provide reasonable protection against harmful interference to radio communications. Because this toy generates, uses, and can radiate radio frequency energy, there can be no guarantee that interference will not
occur. if not installed and used in accordance with the instructions, may cause harmful interference to radio communications. If this toy does cause interference to radio or television reception (you can check this by turn-
ing the toy off and on while listening for the interference), one or more of the following measures may be useful: • Reorient or relocate the receiving antenna • Increase the separation between the toy and the radio or the
TV • Consult the dealer or an experienced TV-radio technician for help. NOTE: Changes, adjustments or modifications to this unit, including but not limited to, replacement of any transmitter component (crystal, semicon-
ductor, etc.) could result in a violation of FCC rules under part 15 and/or 95 and must be expressly approved by Spin Master Ltd. or they could void the user’s authority to operate the equipment.
4
CANADIAN Class B statement: This class B digital apparatus meets all the requirements of the Canadian Interference-Causing Equipment Regulations.
RSS-310 Statement: This Category II radio communication device complies with Industry Canada Standard RSS-310.
Carrier frequency: 27.145MHz Field strength: 78.0dBuV/m at 3m.
Contains LiPo battery pack. • Battery pack must be recycled or disposed of properly.
• If at any time in the future you should need to dispose of this product please note
that Waste Electrical Products should NOT be disposed of with household waste.
Please recycle where facilities exist. Check with your Local Authority or retailer for
recycling advice. (Waste Electrical and Electronic Equipment Directive).
Hereby, Spin Master Ltd., declares that this
F-14 Tomcat® is in compliance with the
essential requirements and other relevant
provisions of Directive 1999/5/EC.
<http://www.airhogs.com>
Warning!
Choking Hazard –
Small Parts.
TM
Spin Master Ltd., 450 Front Street West, Toronto, ON M5V 1B6 Canada
Customer Care: 1-800-622-8339 Fax: 416-364-8005 Web: www.spinmaster.com
Email: customercare@spinmaster.com
Spin Master Inc., PMB #10053, 300 International Drive, Suite 100, Williamsville,
NY 14221, USA
Spin Master Toys Far East Limited, Rm #1113, 11/F, Chinachem Golden Plaza,
77 Mody Rd., Tsimshatsui E., Kowloon, HK
Spin Master Toys UK Ltd., Riverhead House, Boston Drive, Bourne End,
Buckinghamshire, SL8 5YS, United Kingdom Customer Service: 01628 535 000
Email: ukservice@spinmaster.com
Spin Master France – 59-60 Quai Le Gallo – 92100 Boulogne Billancourt – France
Service Après-Vente – Numéro vert : 0800 803 355 ou
E-mail : Jouets@spinmaster.com – Site internet : www.spinmaster.fr
Air Hogs®, related trademarks & © 2011 Spin Master Ltd. All rights reserved.
F-14 Tomcat®is a registered trademark of Northrop Grumman Corporation and is
used under license to Spin Master Ltd. Manufactured for and distributed by Spin
Master Ltd. This product conforms to safety requirements of ASTM F963, EN71
& CHPA. • Please retain this information for future reference. • Please remove all
packaging materials before giving to children. • An adult should periodically check
this toy to ensure no damage or hazards exist, if so, remove from use. • Children
should be supervised during play. • Keep addresses and phone numbers for future
reference. • The item inside this package may vary from the photographs and/or
illustrations. MADE IN CHINA.
20017492 GTL English REV 0
T44354_0001_20017492_GTL_IS_R1
TROUBLESHOOTING GUIDE
Green charge light is not on.
Engines will not start.
No Control.
Jet turns in the wrong
direction.
1. Charge Nozzle is not installed all the way.
1. Jet is not fully charged.
2. Electric motor safety protection.
3. Electric battery safety protection.
1. No batteries in controller/charger or low battery power.
2. Jet antenna is not fully extended all the way.
3. Flight controller antenna not fully extended.
4. It is a windy day.
1. Jet is flying toward you and you have not
reversed the way you use the throttle.
1. Insert the Charge Nozzle all the way into the Charge port.
1. Charge the jet following “CHARGING YOUR JET” instructions.
2. Turn jet OFF and back ON to reset.
3. If jet was left on for more than 15 minutes and not used, it
automatically shuts off. To reset, turn jet OFF then ON again.
1. Replace the batteries in the controller/charger following the “BATTERY
INSTALLATION” instructions.
2. Gently uncoil the jet’s antenna all the way.
3. Extend the silver flight controller antenna all the way.
4. Do not fly on windy days. Wind may overpower your plane’s engines
and you will be unable to control the plane.
1. See the control reversal instruction section page 3.
PROBLEM CAUSE SOLUTION
NOTE: If normal function of the product is disturbed or interrupted, strong electro-
magnetic interference may be causing the issue. To reset product, turn it com-
pletely off, then turn it back on. If normal operation does not resume, move the
product to another location and try again.
To ensure normal performance, change the batteries, as low batteries may not
allow full function.
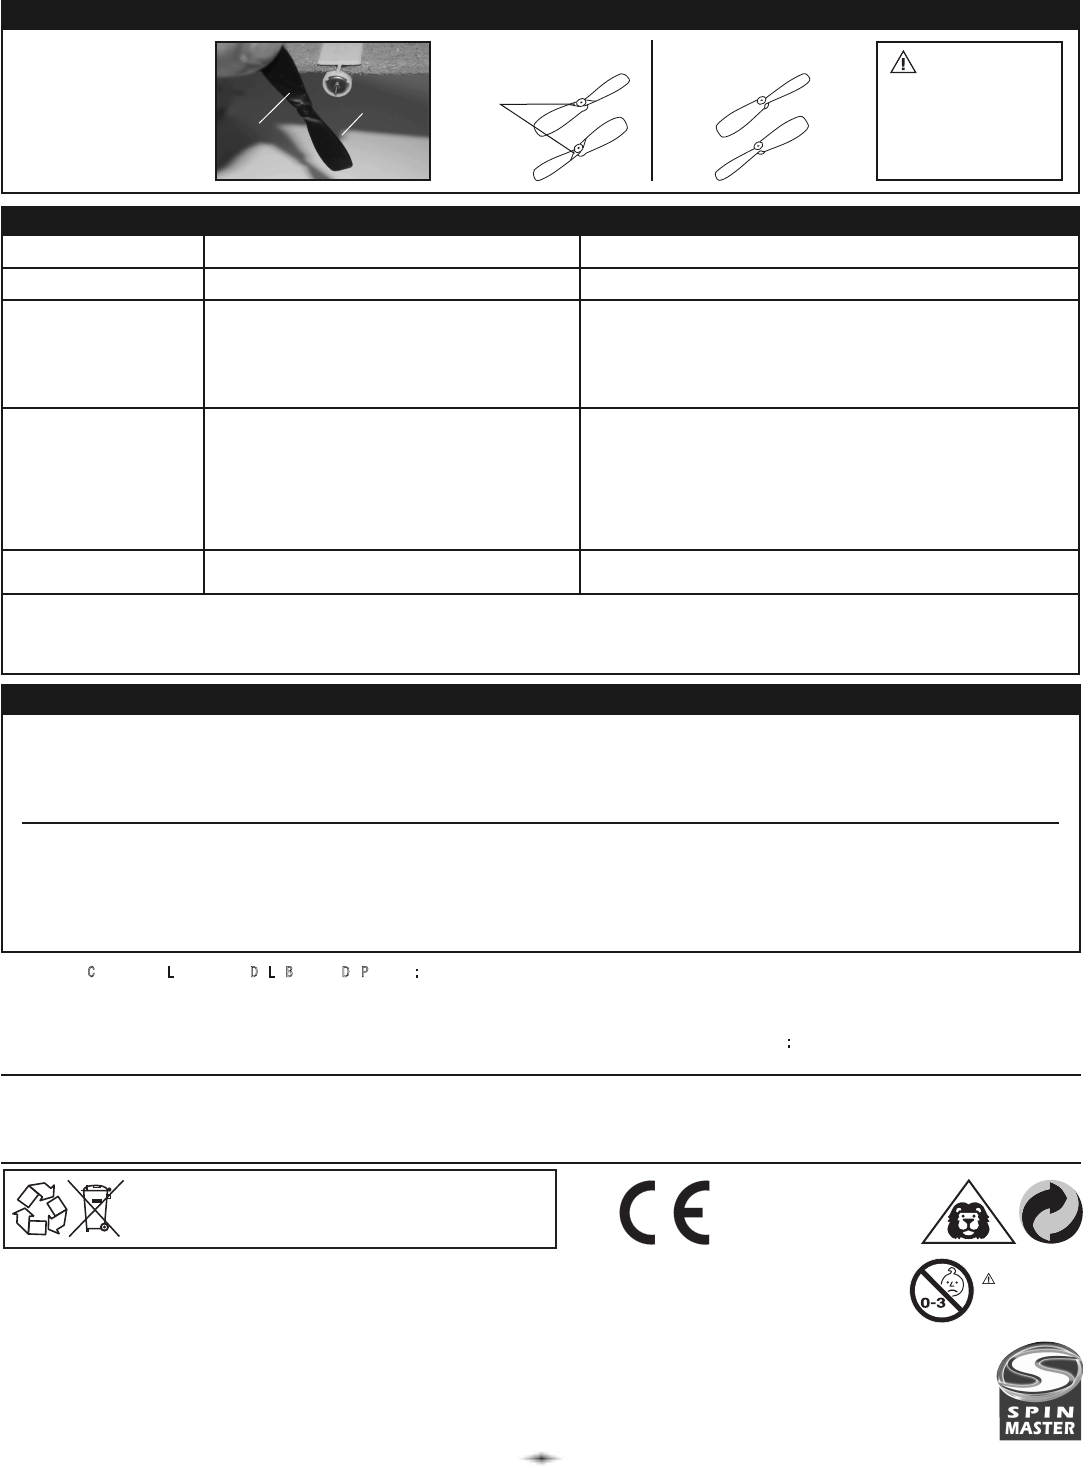
REPLACING THE PROPELLERS
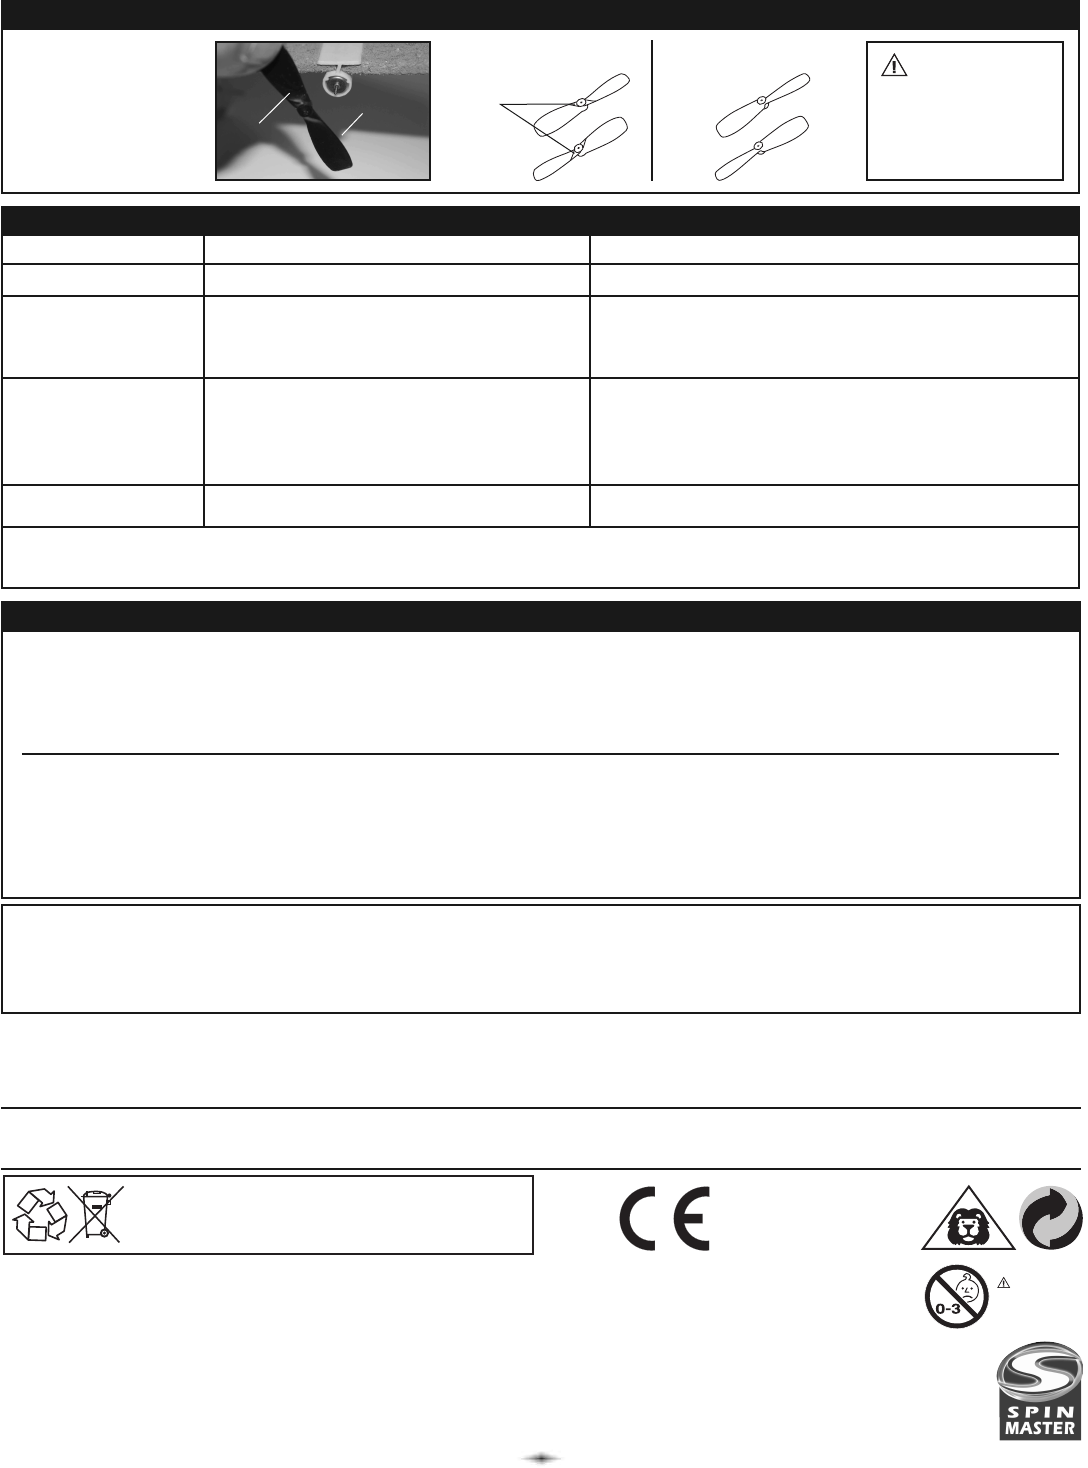
1. Remove the broken
propeller as shown
in photo.
2. Check the direction
of the propeller
before attaching a
new one.
Side with groove facing
outward.
Side with groove facing
the motor.
CAUTION:
Sharp point on the
motor shaft. The
propeller must be
replaced by an adult!
Side with
groove
Side
without
groove
right
left
groove
right
left
PRODUCT BATTERY REMOVAL INSTRUCTIONS: Internal battery is factory installed, product disassembly and battery removal must be performed by an adult. Do not use any tools for disassembly. Pulling, tearing, and deform-
ing of the product during disassembly, while necessary, should be as limited as possible. Do not compress the product at any time. Ensure product is turned off. Find a point where the two body halves meet; the nose of the aircraft or
where the wing meets the body. Start to peel the halves apart, separating them where they are glued together; remove any tape as necessary. Separate product body halves to expose internal electronics. To separate battery from
product use scissors to cut a single battery wire, immediately wrap the cut wire end with tape to isolate it, repeat until all battery wires are cut and isolated. Dispose of battery in accordance with your local battery recycling or disposal
laws. NOTE: Opening of product and/or removal of battery will render product inoperative and voids manufacturer warranties, dispose of remaining product components in accordance with local laws.
This device complies with Part 15 of the FCC rules. Operation is subject to the following two conditions: (1) This device may not cause harmful interference, and (2) This device must accept any interference received, including
interference that may cause undesirable operation. This equipment has been tested and found to comply with the limits for Class B digital devices pursuant to Part 15 of the FCC rules. These limits are designed to provide reasonable
protection against harmful interference to radio communications. Because this toy generates, uses, and can radiate radio frequency energy, there can be no guarantee that interference will not occur. if not installed and used in
accordance with the instructions, may cause harmful interference to radio communications. If this toy does cause interference to radio or television reception (you can check this by turning the toy off and on while listening for the
interference), one or more of the following measures may be useful: • Reorient or relocate the receiving antenna • Increase the separation between the toy and the radio or the TV • Consult the dealer or an experienced TV-radio
technician for help. NOTE:Changes, adjustments or modifications to this unit, including but not limited to, replacement of any transmitter component (crystal, semiconductor, etc.) could result in a violation of FCC rules under part 15
and/or 95 and must be expressly approved by Spin Master Ltd. or they could void the user’s authority to operate the equipment.
Le F-14 Tomcat®d’Air Hogs®est un jet radiocommandé révolutionnaire et un avion conçu pour le jardin. Vous pouvez le lancer à
la main ou le faire décoller depuis le sol en utilisant le train d’atterrissage. Le F-14 Tomcat®utilise une commande digitale
proportionnelle qui fournit des performances de vol comparables à celles d’un vol amateur.
1
1. Dévissez le couvercle du compartiment des piles à l’aide
d’un tournevis.
2. S’il y a des piles usagées ou épuisées, enlevez ces piles
de l’unité soulevant un côté de chaque pile.
3. Installez des piles neuves comme indiqué sur le schéma
de polarité (+/-) affiché à l’intérieur du compartiment
des piles.
4. Remettez bien en place le couvercle du compartiment
des piles.
5. Veuillez vérifier les règlements locaux pour assurer
l’élimination correcte des piles.
Radiocommande/chargeur
Clapet du
compartiment
des piles
6 piles
alcaline AA
1.5-V
CONSEIL IMPORTANT : ALLUMEZ LA RADIOCOMMANDE
POUR VOUS ASSURER QUE LES PILES SONT BIEN
INSTALLÉES. LA DEL ROUGE À L’AVANT DE LA
COMMANDE DOIT S’ALLUMER EN ROUGE.
Après chaque vol, rangez le jet dans son emballage afin
de prévenir tout dégât.
RÉPARATIONS
INSTALLATION DES BATTERIES DE LA RADIOCOMMANDE/CHARGEUR
Si les ailes de votre jet
s’abîment, elles peuvent
être facilement réparées
avec du scotch transparent,
comme indiqué.
Réparation
Compartiment
des piles
AJOUTER DES ROUES AU F-14 TOMCAT®
Votre jet
F-14 Tomcat®
contient une
batterie
rechargeable
pré-installée
dans le fuselage
du jet.
Les piles AA de
la télécommande
sont utilisées
pour 2 fonctions –
le chargement
et le contrôle
il sera donc
nécessaire de les
remplacer de
temps en temps.
Attacher les roues avant et arrière de l’avion comme sur le dessin. Les attaches situées
sur les roues glissent dans les ouvertures de l’avion et s’emboîtent.
Radiocommande/chargeur
Antenne
Commutateur
ON/OFF/charge
Accélérateur
Clapet de charge
(pour accéder au
cordon de charge)
DEL de
charge
DEL de
courant
Joystick
gauche/droit
Bouton
de réglage de
la direction
®
Aile principale
Hélice
F-14 Tomcat®
Ailes de
queue verticales
Hélice
Roues pour le fuselage
Aile principale
Roue avant
Fuselage
Antenne
MODE D’EMPLOI
GAMME DE RÉPLIQUEs
Contenu :
1 Air Hogs®F-14 Tomcat®
1 Contrôleur-Chargeur , 1 Mode D’emplo
1 Train D’atterrissage , 1 Hélices De Rechange
CONTRÔLE DU MILIEU AVANT LE VOL
RECHARGER VOTRE F-14 TOMCAT®
Placez le commutateur
de la radiocommande/
chargeur sur CHARGE.
4. Poussez avec
précaution le
cordon de charge le
long de tout le port
de charge du jet,
situé sous celui-ci.
INSTRUCTIONS DE VOL
Déployez
complètement l’antenne
de la radiocommande/
chargeur.
Placez le
commutateur
de la radio-
commande/
chargeur
sur ON.
La lumière de charge
devient ROUGE.
12
3
5
5. Pendant le processus
de charge, la lumière
verte de charge
s’ALLUME. Lorsque le
jet est complètement
chargé, la lumière
verte de charge
s’ETEINT.
6. Retirez
délicatement le
cordon de charge
du port de charge
du jet. Rangez le
cordon de charge
et fermez le clapet
de charge.
5
Informations importantes concernant la charge :
• Avant votre premier vol, effectuez un cycle de charge complet lorsque vous rechargez le jet sur votre chargeur.
• Selon la longueur de vos futurs vols, vous ne devrez pas forcément effectuer une charge complète avant chaque vol.
REMARQUE : Le vol sera moins long si le temps de charge est court (une charge complète peut prendre 30 à 40 minutes).
Lumière verte
de charge
1. Emplacement – Faire voler dans un endroit à ciel ouvert, étendu et recouvert d’herbe, qui soit dépourvu de bâtiments, d’arbres, de
câbles aériens, ou de tout autre obstacle. Ne pas faire voler à proximité de personnes ou d’animaux.
2. Temps – Faire voler par temps doux et ensoleillé. Ne pas faire voler durant des orages électriques, par temps de pluie, neige fondue, neige
ou lorsque les conditions climatiques sont mauvaises. Ne pas faire voler en cas de température inférieure à 7°C/45°F. Si les températures
sont vraiment basses, l’avion devient alors fragile et les performances du moteur s’en voient amoindries.
3. Vent – Ne pas faire voler lorsqu’il y a du vent. Les vents peuvent donner plus de puissance à l’avion et le rendre ainsi difficile à contrôler.
5
REMARQUE :
Lorsque vous commencez
à voler, nous vous recommandons
de faire décoller l’avion à
la main pour vous habituer
aux commandes.
Lorsque vous vous préparez au décollage,
vérifiez la direction du vent.
Toujours faire décoller le jet face au vent
pour un meilleur décollage et de meilleurs
résultats au vol.
Utilisez votre main gauche pour pousser
l’accélérateur à moitié sur la radiocommande/
chargeur. Lancez délicatement le jet face
au vent et parallèlement au sol. Lorsque vous
faites décoller le jet, n’utilisez pas le joystick
de contrôle.
1. Poussez le commutateur ON/OFF
sous le jet vers la GAUCHE pour
ÉTEINDRE le jet.
2. Placez le commutateur de la
radiocommande/chargeur sur OFF.
3. Ouvrez le clapet de charge pour
laisser le cordon de charge sortir.
6
Si vous décollez
depuis le sol,
assurez-vous d’être
sur une surface lisse
et pavée et poussez
complètement
l’accélérateur vers
l’avant pour une
accélération rapide.
2
4
Poussez le
commutateur
ON/OFF du jet
vers la droite
pour ALLUMER
le jet.
4
CONTRÔLER LE VOL DU JET
ÉTEIGNEZ
la radiocom-
mande/
chargeur en
plaçant le
commutateur
vers le bas.
TOURNER À GAUCHE
Bougez le joystick
directionnel vers la gauche.
Si vous voulez ajuster ta
route de vol, tournez
le Bouton de réglage de
la direction vers la droite ou
la gauche pendant le vol.
AJUSTEMENTS DE VOL
UNE FOIS QUE LE JET A ATTERRI
Bouton de réglage
de la direction
Radiocommande/chargeur
2
1
Pour ACCÉLÉRER ou monter
Poussez l’accélérateur (joystick de gauche)
vers l’avant.
TOURNER À DROITE
Bougez le joystick
directionnel vers la droite.
Radiocommande/chargeur POUR ATTERRIR
Choisissez un espace herbeux et doux
et tirez doucement sur l’accélérateur
(joystick de gauche) avant de relâcher.
Par exemple : Pour faire
tourner le jet à GAUCHE, bougez
le joystick vers la DROITE.
CONTRÔLE INVERSÉ
IMPORTANT :
Lorsque le jet vole vers vous,
les commandes sont inverses.
ÉTEIGNEZ le jet en
poussant le commutateur
vers la gauche.
3
4
GUIDE DE DÉPANNAGE
Le voyant vert n’est pas allumé.
Les moteurs ne
démarrent pas.
Pas de contrôle.
Le jet tourne dans la
mauvaise direction.
1
.Le cordon de charge n’est pas complètement installé.
1. Le jet n’est pas complètement chargé.
2. Système de protection du moteur électrique.
3. Système de protection de la batterie électrique.
1. Il n’y a pas de piles dans la radiocommande/
chargeur ou peu d’alimentation.
2. L’antenne du jet n’est pas complètement
déployée.
3. L’antenne de la commande de vol n’est pas complètement
déployée.
4. Il y a du vent.
1. Le jet vole dans votre direction et vous n’avez pas inversé
le sens du joystick.
1. Insérez complètement le cordon de charge dans le port de charge.
1. Chargez le jet en suivant les instructions de la partie “CHARGER VOTRE
JET”.
2. Éteignez puis rallumez votre jet pour le redémarrer.
3. Si le jet a été laissé pendant plus de 15 minutes sans être
utilisé, il s’éteint automatiquement. Afin de le redémarrer, ÉTEIGNEZ puis
ALLUMEZ de nouveau le jet.
1. Remplacez les batteries de la radiocommande/chargeur en
suivant les instructions de la partie “INSTALLATION DES PILES”.
2. Déployez complètement l’antenne du jet.
3. Déployez complètement l’antenne argentée de la commande
de vol.
4. Ne pas faire voler en cas de vent. Les vents peuvent donner
plus de puissance aux moteur de l’avion et vous aurez alors
du mal a le contrôler.
1. Voir la section des instructions concernant le contrôle inversé, page 3.
PROBLÈME CAUSE SOLUTION
LES PILES ET VOTRE SÉCURITÉ
• Nécessite six piles alcalines de AA 1,5 V (non incluses).
• Les piles sont des objets de petite taille.
• Le remplacement des piles doit être effectué par un adulte.
• Respectez le schéma de polarité (+/-) reproduit dans le compartiment des piles.
• Enlevez rapidement les piles usagées du jouet.
• Suivez les procédures adéquates pour vous débarrasser des piles usagées.
• Retirez les piles en cas de non-usage prolongé.
• NE PAS incinérer les piles usagées.
• NE PAS jeter les piles au feu, car elles peuvent exploser ou fuir.
• NE PAS mélanger piles usagées et piles neuves, ni différents types de piles
(c’est-à-dire alcalines/standard).
• NE PAS utiliser de piles rechargeables.
• NE PAS recharger des piles non rechargeables.
• NE PAS court-circuiter les terminaux d’alimentation.
Votre F-14 Tomcat®est muni d’une pile lithium polymère.
INSTRUCTIONS POUR LES BATTERIES LITHIUM POLYMÈRE :
• Surveillez la batterie lors du chargement.
• Charger la batterie dans un endroit isolé, tenir à l’écart de toute matière
inflammable.
• Protéger des rayons du soleil.
• Les batteries peuvent exploser, surchauffer, ou prendre feu. Ne pas démonter, modifier, chauffer
ou court-circuiter les batteries. Ne pas les mettre au feu ou les laisser dans un endroit chaud.
• Ne pas laisser tomber ou soumettre à des chocs.
• Ne pas laisser les batteries prendre l’eau.
• N’utiliser que le chargeur de batteries de Spin MasterMC pour recharger
les batteries.
• N’utilisez la batterie que dans l’appareil spécifié par Spin MasterMC.
• Lisez soigneusement le mode d’emploi. utilisez les piles de façon appropriée.
• En cas de fuite ou d’explosion, utiliser du sable ou un extincteur chimique pour les piles.
• Les piles doivent être recyclées ou jetées dans un réceptacle prévu à cet effet.
NOTE : Si la fonction normale de ce produit est perturbée
ou interrompue, ceci pourrait être à cause d’une interférence
électromagnétique forte. Pour réinitialiser, éteint le produit
complètement et ensuite rallumer-le. Si le fonctionnement normal
ne reprend pas, essaye encore une fois dans un autre endroit.
Pour garantir une fonction normale, change les piles, puisque les piles faibles
peuvent limiter le fonctionnement complet du produit.
Déclaration CANADIENNE Classe B : Cet appareil numérique de la classe B respecte toutes les exigences du Règlement sur le matériel brouilleur du Canada.
Déclaration RSS-310 : Ce dispositif de radiocommunication de catégorie II respecte la norme CNR-310 d’Industrie Canada.
Fréquence porteuse : 27.145 MHz Force de champ : 78.0 dBuV/m à 3m.
Contient une batterie LiPo. • La batterie doit être recyclée ou jetée dans un réceptacle
prévu à cet effet. • Si vous deviez jeter ce produit un jour, veuillez noter que les appareils
électriques N’ONT PAS leur place dans les sacs à déchets. Veuillez le recycler dans un
endroit bénéficiant des installations nécessaires. Renseignez-vous auprès des autorités
locales ou de votre détaillant pour obtenir des conseils sur le recyclage de cet appareil.
(Directive sur le déchet d’équipement électrique et électronique).
Par la présente Spin Master Ltd. déclare
que l’appareil F-14 Tomcat® est conforme
aux exigences essentielles et aux autres
dispositions pertinentes de la directive
1999/5/CE. <http://www.airhogs.com>
Avertissement !
Risque d’etouffement.
Petites pièces.
TM
Spin Master Ltd., 450 Front Street West, Toronto, ON M5V 1B6 Canada
Service consommateurs : 1-800-622-8339 Fax : 416-364-8005
Web : www.spinmaster.com E-mail : customercare@spinmaster.com
Spin Master Inc., PMB #10053, 300 International Drive, Suite 100, Williamsville,
NY 14221, USA
Spin Master Toys Far East Limited, Rm #1113, 11/F, Chinachem Golden Plaza,
77 Mody Rd., Tsimshatsui E., Kowloon, HK
Spin Master Toys UK Ltd., Riverhead House, Boston Drive, Bourne End,
Buckinghamshire, SL8 5YS, United Kingdom
Service à la clientele : 01628 535 000 E-mail : ukservice@spinmaster.com
Spin Master France – 59-60 Quai Le Gallo – 92100 Boulogne Billancourt – France
Service Après-Vente – Numéro vert : 0800 803 355 ou
E-mail : Jouets@spinmaster.com – Site internet : www.spinmaster.fr
Air Hogs®, les marques de commerce qui y sont associées et © 2011 Spin Master Ltd.
Tous droits réservés. Le F-14 Tomcat®est une marque registrée de Northrop Grumman
Corporation et est sous licence par Spin Master Ltd. Fabriqué pour et distribué par Spin Master
Ltd. Ce produit est conforme aux normes de sécurité ASTM F963, EN71 et CHPA.
• Veuillez conserver ces renseignements pour consultation ultérieure. Enlever tout l’emballage
avant de donner le produit à des enfants. • Un adulte devrait contrôler ce jouet de temps en temps
pour assurer qu’il n y a pas de dommages ni de risques. En cas de problème, ne l’utilisez plus.
• Les enfants doivent être supervisés pendant qu’ils jouent. • Veuillez conserver les adresses et
les numéros de téléphone pour consultation ultérieure. • L’objet dans cet emballage peut varier
des photographies et/ou les illustrations. FABRIQUÉ EN CHINE.
20017492 GTL French REV 0
T44354_0001_20017492_GTL_IS_R1
CHANGER LES HÉLICES
1. Retirez l’hélice cassée
comme indiqué sur la
photo.
2. Vérifiez le sens de
l’hélice avant d’en
placer une nouvelle.
Côté dont la fente est vers
l’extérieur. Côté dont la fente est vers
l’intérieur. ATTENTION :
Endroit tranchant
sur l’arbre du moteur.
L’hélice doit être
remplacée par un
adulte !
Côté avec
une fente
Côté sans
fente
droite
gauche
fente
droite
gauche
INSTRUCTIONS CONCERNANT L’EXTRACTION DE LA BATTERIE DU PRODUIT : la batterie interne est installée en usine. Le démontage du produit et l’extraction de sa batterie doivent être effectués par un
adulte. Ne pas utiliser d’outils pour le démontage. Bien que cela puisse s’avérer nécessaire, il convient de tirer, de déchirer et de déformer le produit le moins possible. Ne jamais comprimer le produit. S’as-
surer que le produit est éteint. Trouver un endroit où les deux parties de la carcasse se touchent (le nez de l’avion ou l’endroit où se rencontrent les ailes et la carcasse par exemple). Commencer par détacher
les deux parties et les séparer là où se trouve la colle. Enlever également toute la bande adhésive nécessaire. Séparer les deux parties de la carcasse pour accéder aux composants électroniques internes.
Pour dégager la batterie du produit, utiliser des ciseaux et couper l’un des fils. En emballer immédiatement l’extrémité avec de la bande adhésive afin de l’isoler. Répéter l’opération jusqu’à ce que tous les fils
soient coupés et isolés. Se débarrasser de la batterie conformément aux lois locales relatives au recyclage et à l’élimination des batteries. REMARQUE : l’ouverture du produit ou l’extraction de la batterie em-
pêcheront le produit de fonctionner et rendront la garantie du fabricant nulle et non avenue. Jeter les composants restants du produit conformément aux lois locales.