Starnex SG-20 Play-Guard User Manual CamBall Manual July 8th 2008
Starnex Co., Ltd. Play-Guard CamBall Manual July 8th 2008
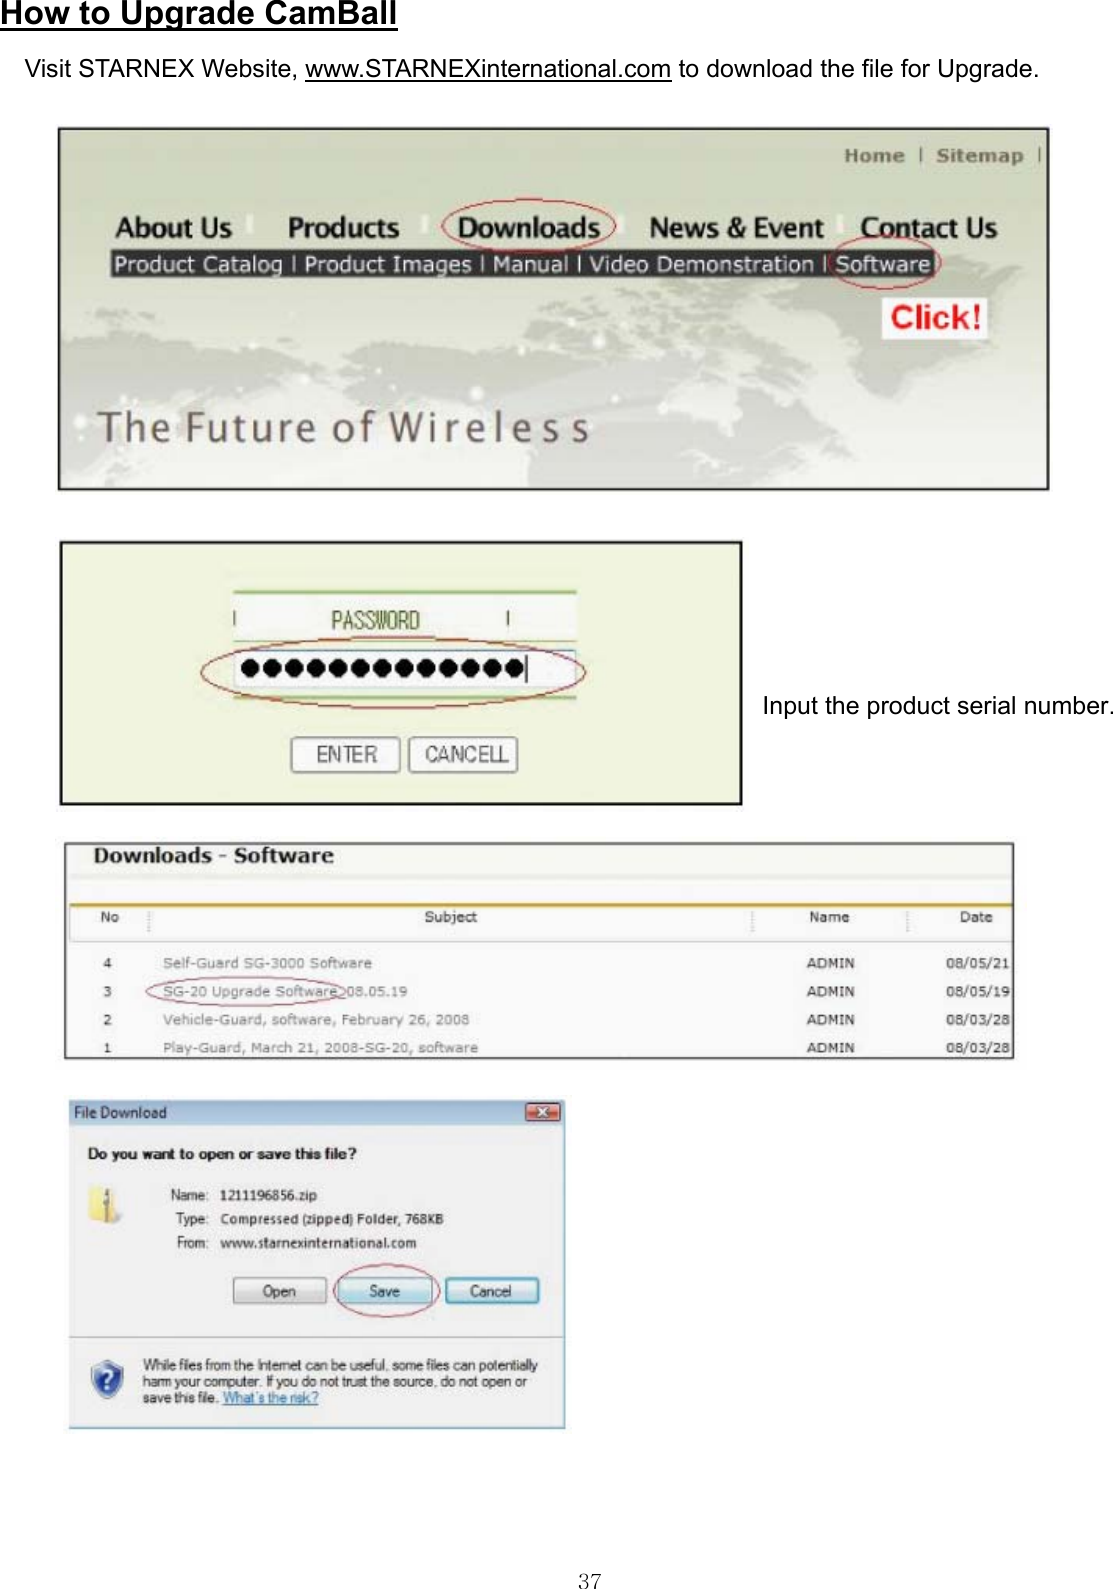
UserManual.wiki
>
Starnex
>
SG 20 User Manual
User manual
Navigation menu
Upload a User Manual
Namespaces
Wiki Guide
HTML
PDF
Info
Views
User Manual
Discussion / Help
Navigation
![13 Let’s get to know CamBall’s Functions, Modes, and Recording Types!! ● Power ON / OFF Press the center button for more than 2 seconds to turn ON / OFF the system. Press for 2 sec. ● Reset Button When the system does not operate properly, press this button with a thin object. ● Use Button Hold To prevent unintentional button operation, you can turn ON or OFF [Button Hold] function by pressing the Center & [▽] button together and holding for 2 seconds. Press for 2 sec. ● Power Saving (Motion Detection) To minimize waste of battery and memory, use Power Saving mode. Press [▷] button for 2 seconds to turn ON/OFF this function. When if this function is ON and CamBall starts recording, it only records when any motion detected. The color of the Power Saving Lamp is Red when it is ON. Lamp Status when Power Saving is ON](https://usermanual.wiki/Starnex/SG-20/User-Guide-971997-Page-13.png)
![14***You may encounter discontinuance of audio sound when you playback files. This does not indicate a product defect. When you set CamBall to Power Saving Mode to achieve a longer battery life, CamBall goes into sleep mode and does not record when there is no motion detected after the very last motion detection. CamBall comes out of the sleep mode every 2 seconds to check if there is motion, and if it does not detect motion, then it repeats the process of going into sleep mode and checking for any motion every two seconds. However, it does not record audio when there is audio if there is no motion. This will result in discontinuance audio sound during playback. ● Status of CamBall Press [▽] button to check On and Off status for each function with indication of 5 different types of Green, Red, Red & Green, Red Blink and Green Blink. Lamp Colors for each Function [Overwrite] - [ON]: When Memory is full, the oldest files get deleted in order. [Overwrite] - [OFF]: When Memory is full, CamBall stops recording. From the [Menu Mode], if [Memory Full Status] is ON, then Memory status lamp blinks for 5 minutes.](https://usermanual.wiki/Starnex/SG-20/User-Guide-971997-Page-14.png)
![15● 2 Modes of CamBall (Operating & Menu Modes) 1. Operating Mode When the power is on, CamBall enters into [Operating Mode] and gives you 6 functions of options as shown below: 1. Snapshot: Take pictures by pressing the Center Button. 2. Status: To check status of each function, press [ ]▽ button. 3. Record: Start /Stop recording by pressing [ ]△ button for 2 seconds. 4. Recording Type: Select among General/Vehicle/Security by pressing [ ]◁ for 2 seconds in sequence. 5. Power Saving: Turn on or off by pressing [▷] for 2 seconds. 6. Menu Mode: Turn on this mode to playback, edit and set up various functions.](https://usermanual.wiki/Starnex/SG-20/User-Guide-971997-Page-15.png)
![16 2. Menu Mode [Menu Mode] can be used only when CamBall is connected to a TV Monitor. In [Menu Mode], you can search or edit Video/Audio/Photo files and change/set up functions. Using the provided cable, connect the unit to a TV Monitor and press [▽] button for 2 seconds to enter into the [Menu Mode]. To go back to [Operating Mode], press [▽] button for 2 seconds again. Press for 2 sec. Functions of each button in the [Menu Mode] Lamp Status when [Menu Mode] is ON](https://usermanual.wiki/Starnex/SG-20/User-Guide-971997-Page-16.png)
![17● Three Recording Types of CamBall Recording Type can be changed by pressing [◁] button for 2 seconds in sequence. [General Recording] ☞ [Vehicle Recording] ☞ [Security Recording] ☞ [General Recording] 1. General Recording In the [General Recording], the recording type lamp is Red. This type of recording is for using CamBall the same as you would with a Camcorder. *Recording: When you press [ ]△ button for 2 seconds, CamBall starts to record and it will end recording until the built-in battery is exhausted. *Charging: Regardless of how much battery is left, it will start to charge whenever the power adaptor is connected to the unit. When CamBall is in [General Recording], the recording type lamp is Red. Lamp Status in [General Recording] 2. Vehicle Recording This type of recording is for using CamBall in vehicles. *Recording: When the “Car adaptor with A/V Cable” is connected and the ignition is turned on, CamBall starts to record immediately. When you turn off the ignition, it will record for 1 minute using the built-in battery of the CamBall and then stop recording. You can change the battery recording time from 1 minute to 120 minutes, turn OFF (stop recording when the vehicle ignition is off) or ON(recording until the battery is exhausted) from the option menu, [Vehicle Battery Time]. When the car adaptor is not connected, press [ ]△ for 2 seconds to make the unit start recording and stop recording until the battery is exhausted. *Charging: To save the Battery life, it starts charging only when the battery is left less than 30% to prevent frequent charging/discharging from frequent turning on or off of car ignition. When CamBall is in [Vehicle Recording], recording type lamp is Green.](https://usermanual.wiki/Starnex/SG-20/User-Guide-971997-Page-17.png)
![18Lamp Status in [Vehicle Recording] 3. Security Recording This type of recording is for using CamBall for security purpose. CamBall has an “automatic recovery function”, and it automatically turns on its power when it is provided with external power sources. If there is an electricity (a power) failure, CamBall automatically starts to use the power from its battery. As soon as the electricity is available to the CamBall, it automatically starts to charge the battery with electricity, and starts recording again. This function is very useful when you have installed the CamBall in remote places far away from you. In the case that you have installed the CamBall in a remote place, and there happens to be an electricity failure for some time and the electricity becomes available to the CamBall again, then you have to go to where the CamBall is placed to turn it on, and to set it to the “RECORD” mode. But CamBalls have an “automatic recovery function”, and free the users from the burden. When the power adaptor is not connected, press [ ]△ for 2 seconds to make the unit start recording. *Recording: When the power adaptor is connected or the CamBall is turned on, it begins recording immediately. *Charging: Regardless of how much battery is left, it will start to charge whenever the power adaptor is connected to the unit. When CamBall is in [Security Recording] mode, the recording type lamp is Red & Green. Lamp Status in [Security Recording]](https://usermanual.wiki/Starnex/SG-20/User-Guide-971997-Page-18.png)
![21*HOW TO USE CAMBALL Recording <Before Recording> Before you start recording, please check and select the [Recording Type] and turn ON or OFF [Power Saving]. Power Saving function can be turned on or off by pressing the [▷] button for 2 seconds. Recording Type can be selected by pressing the [◁] button for 2 seconds. <Power Saving> <Recording Type> (Motion Detection) Press for 2 sec. Press for 2 sec. [ON] ☞ [OFF] [General] ☞ [Vehicle] ☞ [Security] <Start/Stop Recording> Power ON Start Recording Stop Recording Press for 2 sec. Press for 2 sec. Press for 2 sec. Before you start recording, please check Memory, Battery and Overwrite Status.](https://usermanual.wiki/Starnex/SG-20/User-Guide-971997-Page-21.png)
![22 Lamp Status when Recording *** If you turn off the overwrite function and the memory is full when recording, the unit will stop from recording. If you try to record video on this occasion, then the memory status lamp will blink for 5 times to indicate that the memory is full. *** If you are recording onto the built-in flash memory, then a file gets created for every hour or 20MB of file size while recording images. In the Power Saving Mode, a file gets created for every 20MB. If the unit is recording onto the micro SD card, then a file gets created by every hour or 300MB of file size. Creating a file by 20MB, 300MB or by the hour will prevent you from deleting large sized files when you turn on the [OVERWRITE] feature. *** Please make sure that your PC has MPEG4 codec to playback the video files. You may also playback the video files with Divx. Video/Audio File name is created by [Year/Month/Day/Time-Number]. Example) B07122514-001: File is recorded on December 25, 2007 at 2:00 P.M. M07122515-002: File is recorded on December 25, 2007 at 3:00 P.M. ’B’ stands for ‘Built-in Memory’ and ‘M’ stands for Micro SD Card’ File extension names are as below: Video/Audio File: xxx.AVI / Audio File: xxx.WMA / Photo File: xxx.JPG It’s also possible to start recording in [Menu Mode] but in this case, the [Power Saving] feature is turned off automatically.](https://usermanual.wiki/Starnex/SG-20/User-Guide-971997-Page-22.png)
![23Searching / Editing Video Files To search or edit Video/Audio files, please connect an External Monitor to the unit. Move the cursor to To exit from [Search/Edit] Playback Press center button Press for 2 sec. Select [Built-in] or [Micro SD] Press the center button Go back to Previous Screen Move to [Video] Press the center button Button Inputs when playback on Menu Mode Move to the file to search Press the center button Editing Go to [Edit] Select go back to Edit Function [Search]](https://usermanual.wiki/Starnex/SG-20/User-Guide-971997-Page-23.png)
![24Taking Photos (Snapshot) After turning on CamBall, you can take pictures by pressing the middle button. Each lamp blinks fast in order to make it go round to show that the unit’s just taken a snapshot. Power ON Take Snapshots Press for 2 sec. Searching / Editing Photo Files Before searching or editing photo files, please connect a TV Monitor to the unit. Move the cursor to [Search/Edit] Press center button Move the Cursor to a file Select [Built-in] or [Micro SD] for Playback Press the center button and Press center button Search Photo Files Move to [Photo] Press the center button Go back to Previous Screen Press for 2 sec.](https://usermanual.wiki/Starnex/SG-20/User-Guide-971997-Page-24.png)
![25 Editing Go to [Edit] Select go back to Edit Function [Search] ** If you turn off the overwrite function and the memory is full when taking pictures, the unit will not take pictures. If you try to take pictures on this occasion, then the memory status lamp will blink 5 times to indicate that the memory is full. *OPTIONS Camera Set You can adjust the values of [Brightness] and [Contrast], and turn on or off [Night Mode] and [Flip Vertical] when recording video or taking photos. <Brightness> The range of adjustment is from 1 to 20. Move to [Option] Using the buttons Press the center button Change the value Move to [Camera Set] Go back to Press the center button Previous Screen Move to [Brightness] Press the center button](https://usermanual.wiki/Starnex/SG-20/User-Guide-971997-Page-25.png)
![26<Contrast> The range of adjustment is from 1 to 20. Move to [Option] Using the buttons Press the center button Change the value Move to [Camera Set] Go back to Press the center button Previous Screen Move to [Contrast] Press the center button <Night Mode> Turn [Night Mode] to ON when recording at night or in a dark place to realize a brighter image. In [Night Mode], the recording speed will decrease by 25%. Move to [Option] Using the buttons Press the center button Change to [ON] or [OFF] Move to [Camera Set] Go back to Press the center button Previous Screen Move to [Night Mode] Press the center button](https://usermanual.wiki/Starnex/SG-20/User-Guide-971997-Page-26.png)
![27<Flip Vertical> The [Flip Vertical] function flips the video upside-down (vertically-top over bottom). Turn it off to return back to the original. Move to [Option] Using the buttons Press the center button Change to [ON] or [OFF] Move to [Camera Set] Go back to Press the center button Previous Screen Move to [Flip Vertical] Press the center button Record Set You can set up [Video], [Audio], [Overwrite], [Recording Speed], [Recording Quality], [Size (Resolution)], [Zoom In] and [Timestamp]. <Video Set> You can turn off the video. If you would like to save only audio data, turn off this function. (SG-20, 30 only) Move to [Option] Move to [Video] Press the center button Change to [ON] or [OFF] Move to [Record Set] Go back to Press the center button Previous Screen](https://usermanual.wiki/Starnex/SG-20/User-Guide-971997-Page-27.png)
![28<Audio Set> You can turn off the audio. If you would like to record video without the audio, turn off this function. (SG-20, 30 only) Move to [Option] Move to [Audio] Press the center button Change to [ON] or [OFF] Move to [Record Set] Go back to Press the center button Previous Screen <Overwrite ON / OFF> If you set this Overwrite function to on, then the oldest file in dates gets replaced by the new file being recorded, enabling the CamBall to continue to record when the memory is full. If this function is off, and the memory is full with the existing files, then the CamBall stops from recording video. If Overwrite function is ON and both the built-in memory and Micro SD card are full, then it will overwrite on the Micro SD card only. Move to [Option] Move to [Overwrite] Press the center button Change to [ON] or [OFF] Move to [Record Set] Go back to Press the center button Previous Screen](https://usermanual.wiki/Starnex/SG-20/User-Guide-971997-Page-28.png)
![29<Recording Speed (FPS: frames per second)> This function is to set [Recording Speed] in frames per second. Available Recording Speeds (fps) are 1, 3, 7, 15, and 30. Move to [Option] Move to [Speed] Press the center button Change the value Move to [Record Set] Go back to Press the center button Previous Screen <Recording Quality> There are 4 image quality levels (Low, Medium, High and Ultra High). If you set this level to “Ultra High”, then you get more clear images than in other levels, but a larger file size will result. On the other hand, if you set the level to “Low”, then it requires smaller file sizes, but you get less clear images compared to the images in “Ultra High”. If you set it to “Medium”, then the file size gets 40% smaller than “High”. If you set it to “Low”, then the file size gets 45% smaller than “High”. Move to [Option] Move to [Quality] Press the center button Change the value Move to [Record Set] Go back to Press the center button Previous Screen](https://usermanual.wiki/Starnex/SG-20/User-Guide-971997-Page-29.png)
![30<Size (Image Resolution for Recording)> This is to set Image Resolution (recording size). This function is available for the next version, and it now fixed at 320x240 pixels. Move to [Option] Move to [Size] Press the center button Change the value Move to [Record Set] Go back to Press the center button Previous Screen <Zoom In> This is to magnify the images up to 4 times while recording video. This function applies for recording video only as photos are taken with 640x480 pixels. Move to [Option] Move to [Zoom In] Press the center button Change to [ON] or [OFF] Move to [Record Set] Go back to Press the center button Previous Screen](https://usermanual.wiki/Starnex/SG-20/User-Guide-971997-Page-30.png)
![31<Timestamp Set> Set [Timestamp] to display date and time when you playback video. You can choose to place this information either on Top or Bottom of the playback screen. If you don’t want to use this function, set it [OFF]. Move to [Option] Move to [Timestamp] Press the center button Change the position or Turn [OFF] Move to [Record Set] Go back to Press the center button Previous Screen Playback Set Set functions for Playback. <Video Playback Set> You can select different video playback types: [Normal] is to playback the current file to the last file of the list. [Repeat] is to playback the current file continuously. [Repeat All] is to playback all the files in the list and repeat playing the list continuously. Move to [Option] Using the center button Press the center button Change the value Move to [Playback Set] Go back to Press the center button Previous Screen](https://usermanual.wiki/Starnex/SG-20/User-Guide-971997-Page-31.png)
![32Date/Time Set Before using CamBall, you must set [Date/Time Set] to display the correct date and time on the Playback screen. Move to [Option] Using the buttons Press the center button Change [Date / Time] and Choose[Date Type] Move to [Date/Time Set] Apply this change Press the center button and Confirm Memory Set <Capacity> Check memory capacity for both built-in and external memory (Micro SD card), how much memory you have used and how much memory is left. Move to [Option] Move to [Capacity] Press the center button Press the center button Move to [Memory Set] Go back to Press the center button Previous Screen](https://usermanual.wiki/Starnex/SG-20/User-Guide-971997-Page-32.png)
![33<Built-in Memory ON / OFF> CamBall has Built-in flash memory of 128MB and you can also use Micro SD Card for up to 2 GB for memory extension. When you want to record onto the Micro SD card only, then turn the Built-in memory OFF. Move to [Option] Move to [Built-in] Press the center button Press the center button Move to [Memory Set] Go back to Press the center button Previous Screen <Memory Full Status Indicator> When the memory is full, CamBall can no longer record (when Overwrite is OFF). Then, you can use this function to recognize when the memory is full. Move to [Option] Move to [Full Status] Press the center button Change to [ON] or [OFF] Move to [Memory Set] Go back to Press the center button Previous Screen](https://usermanual.wiki/Starnex/SG-20/User-Guide-971997-Page-33.png)
![34 <Format> This is to format and erase all data in the Built-in memory or the Micro SD card. Double check if all files are downloaded to your PC or you don’t need those files before you format. ***Important: It is strongly recommended that you format both Internal and External Memory regularly once in 2-3 months as a way of properly managing the memory. Move to [Option] Choose the memory Press the center button and Confirm Move to [Memory Set] Go back to Press the center button Previous Screen Move to [Format] Press the center button](https://usermanual.wiki/Starnex/SG-20/User-Guide-971997-Page-34.png)
![35Others Configuring other settings such as [External Monitor Type], [Auto Power OFF Time], [Vehicle Battery Time], and [Default] <External Monitor Type> There are two types of Monitor: NTSC and PAL. Choose the correct monitor type before connecting it to the CamBall unit. For example, in the USA and Korea, the external monitor type is NTSC and for most countries in Europe, they use PAL type monitors. Move to [Option] Move to [Monitor Type] Press the center button Change to [NTSC] or [PAL] Move to [Others] Go back to Press the center button Previous Screen <Auto Power OFF Time> The CamBall automatically turns off the power if you don’t press any button for a certain amount of time you set between 1-9 minutes. This power off does not indicate malfunction of the system. If you don’t want to use this function, set this to [OFF]. You can’t activate this function in [Record] mode or playback. Even if you set this to on, it will not turn off the power in while recording or playback. Move to [Option] Move to [Auto Power Off] Press the center button Change the value Move to [Others] Go back to Press the center button Previous Screen](https://usermanual.wiki/Starnex/SG-20/User-Guide-971997-Page-35.png)
![36<Vehicle Battery Time> When you set Recording Type to Vehicle Recording, you can change the battery recording time from 1 minute to 120 minutes. Turn it OFF to stop recording when the vehicle ignition is off. Or turn ON to record until the battery is exhausted. The default set value is 1 minute. Move to [Option] Move to [Vehicle Battery Time] Press the center button Change the value Move to [Others] Go back to Press the center button Previous Screen <Default> This function is to change the values set in all the menus back to its default state. Note that all the values changed by the user will be deleted once you apply this function. Move to [Option] Move to [Default Set] Press the center button and Confirm Move to [Others] Go back to Press the center button Previous Screen](https://usermanual.wiki/Starnex/SG-20/User-Guide-971997-Page-36.png)
![381. When CamBall is connected to PC, regardless of existence of Micro SD Card, 2 disks will be created. The disk name for the Built-in memory is [PG] and the name for the micro SD card is [PG SD]. In the [PG] drive, there are 3 folders of CONFIG, PHOTO, and VIDEO. You must delete the CONFIG folder from the Drive. Please note that you have to format the Micro SD card at least once in the menu mode to see the disk name to read [PG SD], otherwise it will display a different disk name. 2. Copy the upgrade file into this Drive and disconnect CamBall from PC. In about 5 seconds, the unit turns off the power for you to turn on again for upgrade. 3. You can find the new version number from the [Menu Mode] to check for the successful upgrading.](https://usermanual.wiki/Starnex/SG-20/User-Guide-971997-Page-38.png)