Starnex SG-20 Play-Guard User Manual CamBall Manual July 8th 2008
Starnex Co., Ltd. Play-Guard CamBall Manual July 8th 2008
Starnex >
User manual
CamBall
The Ball DVR
MANUAL
*EXCEPT FOR SECURITY PURPOSES, DO NOT USE THIS PRODUCT FOR ANY
OTHER PURPOSES WHICH MAY DISTURB THE PRIVATE LIVES OF OTHERS.
THIS PRODUCT IS REGISTERED WITH ELECTROMAGNETIC WAVE STANDARDS
AND CAN BE USED FOR ANY PLACE INCLUDING RESIDENTIAL AREAS. BEFORE USING
THIS PRODUCT, BE SURE TO READ THE PRECAUTIONS CONTAINED IN THE MANUAL.

2
CONTEXT
*BEFORE USING CAMBALL
4 Package Contents
5-9 Let’s get to know CamBall!!
10-12 Safety Rules
13-18 Let’s get to know CamBall’s Functions, Modes, and Recording Types!!
*CONNECTING WITH OTHER DEVICES
19 Charging the Battery
19 Inserting Micro SD Card into CamBall
19 Connecting with TV Monitor
20 Connecting with Accessories
*HOW TO USE CAMBALL
21-22 Recording - <Before Recording>
<Start / Stop Recording>
23 Searching / Editing Video Files
24 Taking Photos (Snapshot)
24-25 Searching / Editing Photo Files
*OPTIONS
25-27 Camera Set - <Brightness>
<Contrast>
<Night Mode>
<Flip Vertical>
27-31 Record Set - <Video Set>
<Audio Set>
<Overwrite ON/OFF>
<Speed (Frames per Second)>
<Quality>
<Size (Image Resolution for Recording)>
<Zoom In>
<Timestamp>
3
31 Playback Set - <Video Playback>
32 Date/Time Set
32-34 Memory Set - <Capacity>
<Built-in Memory ON/OFF>
<Memory Full Status Indicator>
<Format>
35-36 Others - <External Monitor Type>
<Auto Power OFF>
<Vehicle Battery Time>
<Default>
37-38 How to Upgrade CamBall
39 Warranty
4
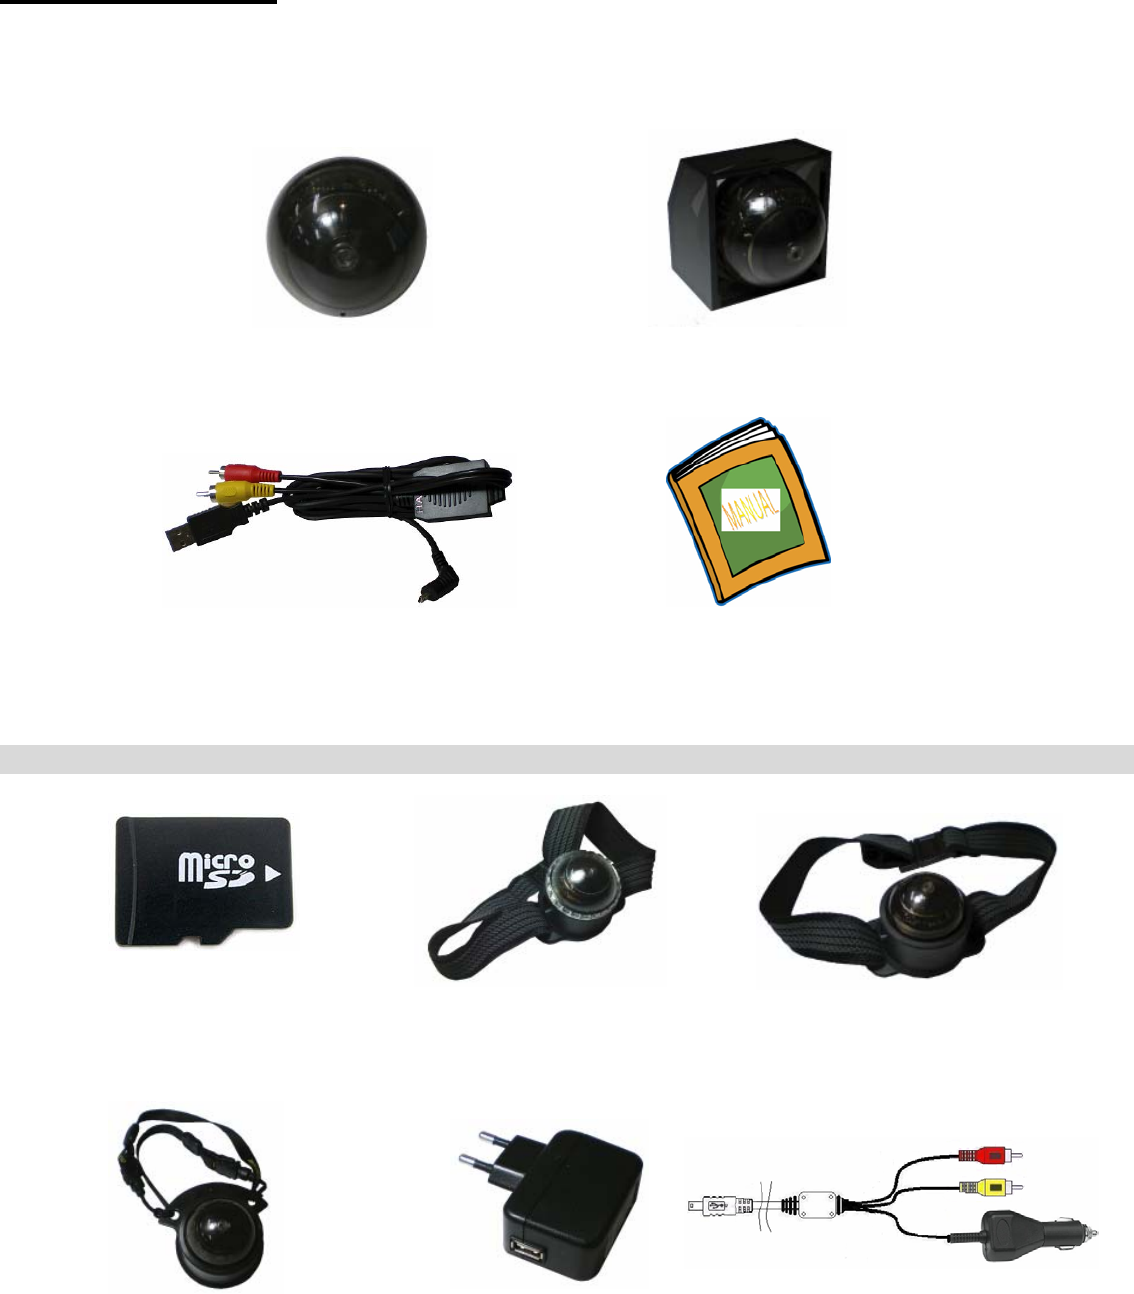
Package Contents
Check to make sure that all of the items shown below are included in your CamBall package.
CamBall Unit Attachable Case
Connection Cable Manual
OPTIONAL
Micro SD Card Water-proof Band Extreme Sports Band
(1GB, 2GB, 4GB, 8GB)
Neck Strap Type Holder USB type Adaptor Car adaptor with A/V Out Cable
* Above images may be different from actual products.

5
Let’s get to know CamBall!!
<SPECIFICATIONS>
Section Description Remark
Camera CMOS, 640 x 480 Pixels Under 1 Lux,
55 Degrees
Built-In 128 MB Flash Memory
Memory
External Micro SD card Up to 8 GB
Recording Resolution Up to 320 x 240 pixels
Recording Methods Continuous/Power Save(motion detection)
Video Compression Method MPEG 4 + Starnex’s Algorithm
Recording Speed Up to 30fps @320x240 pixels
Microphone Built-in Microphone
Video/Audio Output 1 TV Output Port NTSC / PAL
Continuous Recording: 24 hours
Storage Capacity
Recording on Motion Detection: 32 – 288 hours
8GB @320x240, 30fps
Continuous Recording: 2.5 hours
Battery Duration
Recording on Motion Detection: 4 – 48 hours
Source of Power Rechargeable Li-Polymer Battery (3.7VDC, 380mA)
USB Connector /Adaptor (5V DC, 2A)
Size: 37 mm / 1.5 Inch (Diameter) Weight (Including Battery): 20g (0.04 lbs.)
Humidity: Under 80% Operating Temperature: -15 °C to + 70 °C (5°F to 158 °F)
6
<FEATURE COMPARISON TABLE FOR EACH MODEL>
Model
Feature SG-10 SG-20 SG-30
Video Recording √ √ √
Audio Recording √ √
Bluetooth
√
TV Output √ √ √
Snap Shot √ √ √
Power Save √ √ √
USB √ √ √
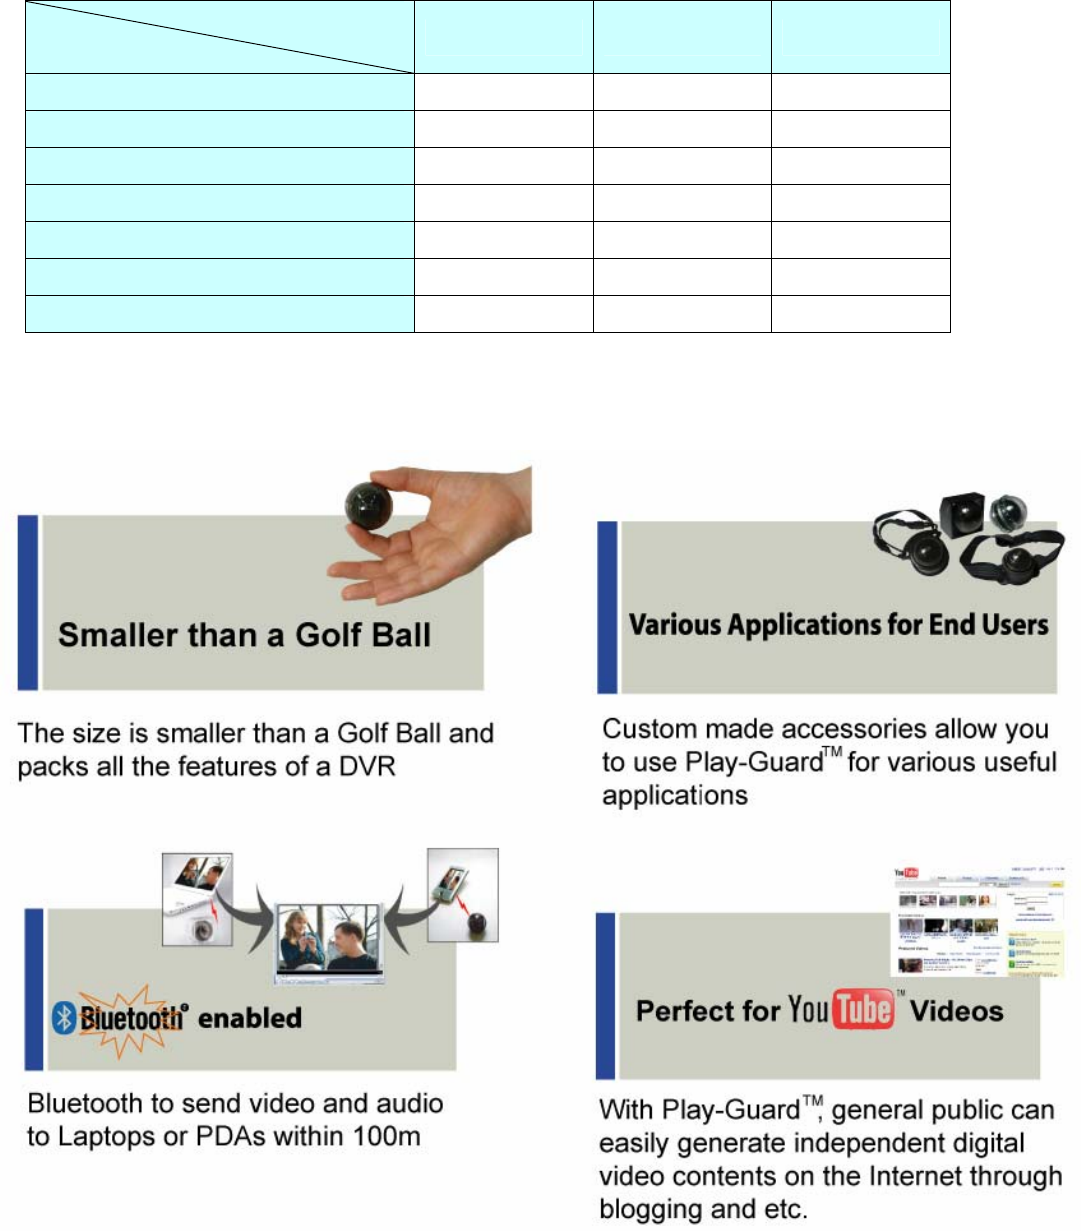
<What’s Special about CamBall?>
7
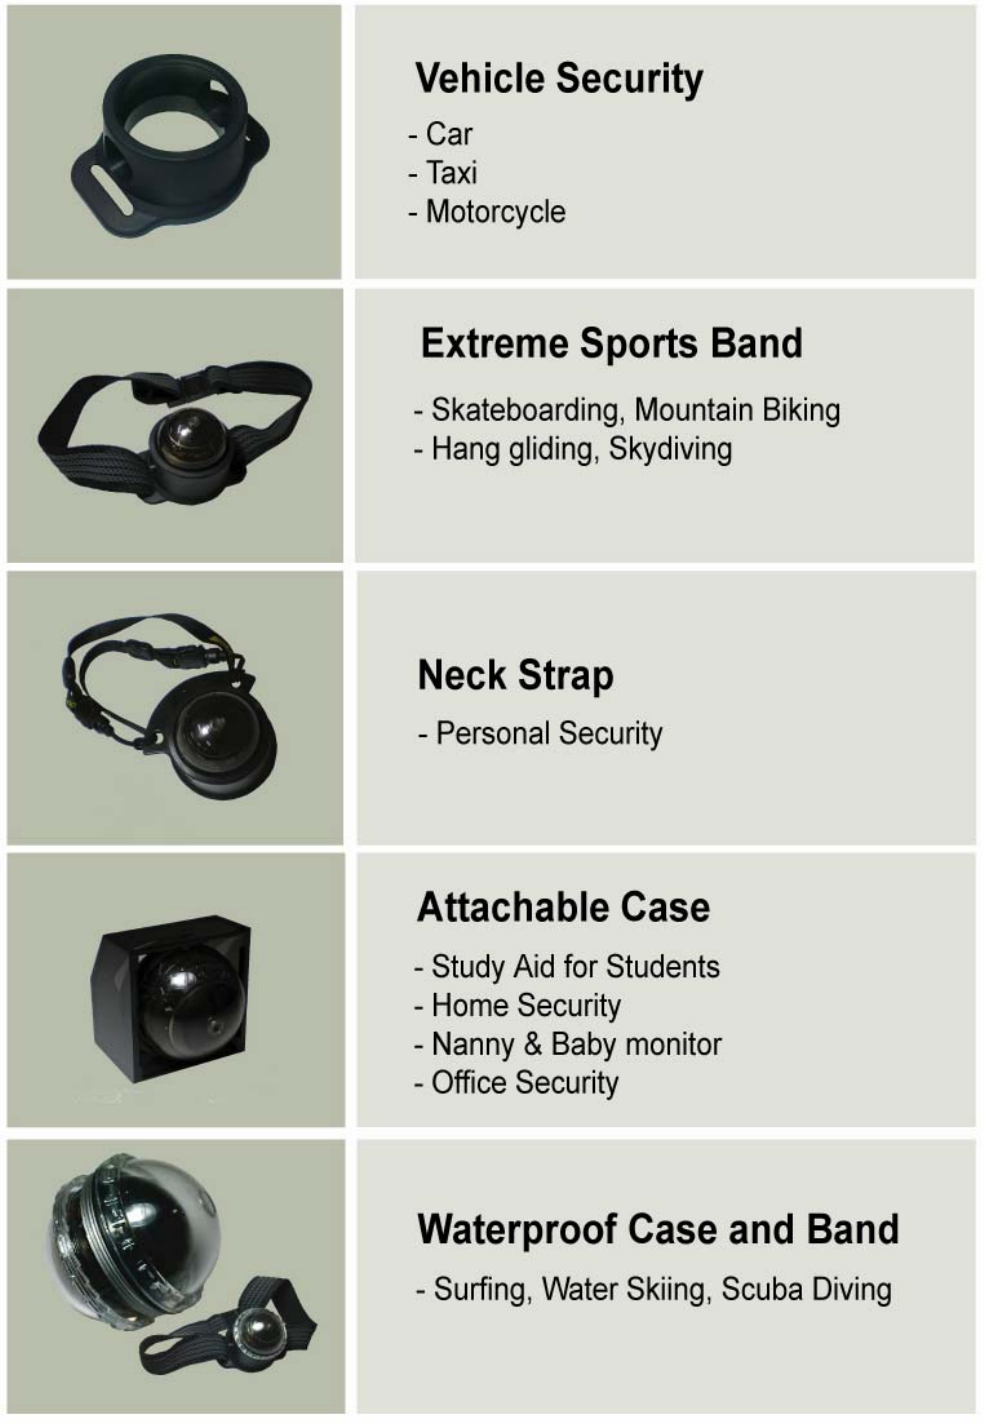
<ACCESSORIES FOR EACH APPLICATION>
8
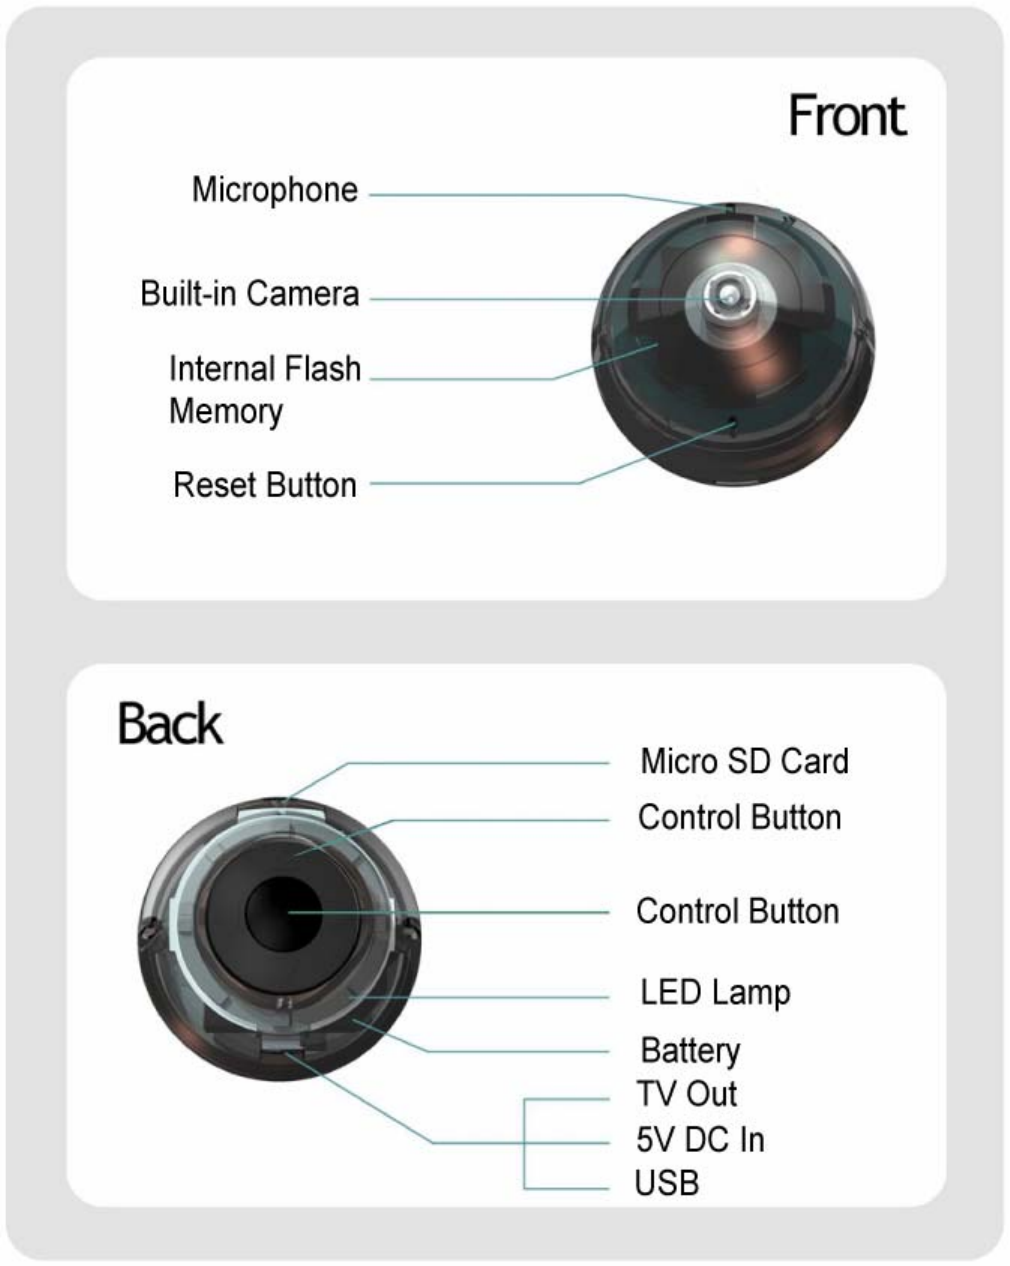
<NAMES AND FUNCTIONS OF EACH PART>

9
<Protect and enjoy your life!!!>

10
Safety Rules
*HANDLE WITH CARE
CamBall is a delicate device. If there is any impact on the unit, it may cause a breakdown or
improper operation. When you use CamBall, please use caution and “Handle with Care” as
directed below.
Please note that even if the unit is under warranty period and a breakdown is proved
that it is user’s fault, the repair will proceed with payment.
Never apply too much force when cleaning the surface of the lens.
Doing so can scratch the lens surface. Dust or any other soiling of the
lens can interfere with proper image recording. You can remove dust particles
from the lens surface by using a lens blower to blow them off. Next, wipe the
surface of the lens with a soft lens cloth.
Please be careful not to give an impact on CamBall such as dropping.
Do not keep the unit in your pocket to prevent the unit accidentally falling
out of the pocket when bending over.
Please make sure CamBall is away from excess force or impact when
in a bag.
Please keep the small parts and accessories of this CamBall out of the
reach of small children. If swallowed accidentally, contact your physician
immediately.
Please keep CamBall away from intense sunlight or heat. It may cause
a breakdown.
Never try to open the case of the CamBall or attempt your own repairs.
High-voltage internal components may cause electric shock when exposed.
Always leave maintenance and repair work up to a STARNEX authorized
service center.
Please keep CamBall away from water and other liquids, and never let it
get wet. Moisture may increase risk of fire or electric shock. When you
use CamBall outdoors in the rain or snow and at the seashore or beach,
use it with a Water-proof Band or proper CamBall accessories.
11
<COPYRIGHT RESTRICTION>
Except for the security purpose, unauthorized copy, reproduction and circulation of
snapshot or movie files violate copyright and international contract laws. Distribution
to third parties of such files over the Internet without permission of the copyright holder,
whether or not for profit violates international contract law and is strictly prohibited.
<GENERAL NOTICE>
9 The contents of this manual are subject to change without notice.
9 STARNEX Co., LTD. has the responsibilities as the manufacturer of CamBall to
tell each distributor that using the CamBall unit in the public domain may be in
violation of federal privacy statues.
9 STARNEX Co., LTD. assumes no responsibility for any damage or loss resulting
from the use of this manual.
9 STARNEX Co., LTD. assumes no responsibility for any loss or claims by third parties
which may arise through the use of the CamBall.
9 STARNEX Co., LTD. assumes no responsibility for any damage or loss caused by
deletion of data as a result of malfunction, repairs, or battery replacement. Be sure
to back up all important data on other media to protect against its loss.
9 Note that the example screens and product illustrations shown in this manual
may differ somewhat to the screens and configuration of the actual product.
9 The buttons and functions, which are not explained in this manual, are aimed to
improve the functions in the future.
9 The features of this product can be changed at any time without notice for the
purpose of improvement of the product.
12
**As with other USB devices, your PC recognizes the unit as a Removable Disk, so you can only
copy or playback the files with your PC. You are unable to view or change the OPTION MENU.
In order to see the OPTION MENU and to change the settings, you must connect the unit to an
External Monitor like a TV or a small LCD monitor.
**Please make sure that your PC has MPEG 4 codec to playback the video files. You may also
playback the video files with DivX.
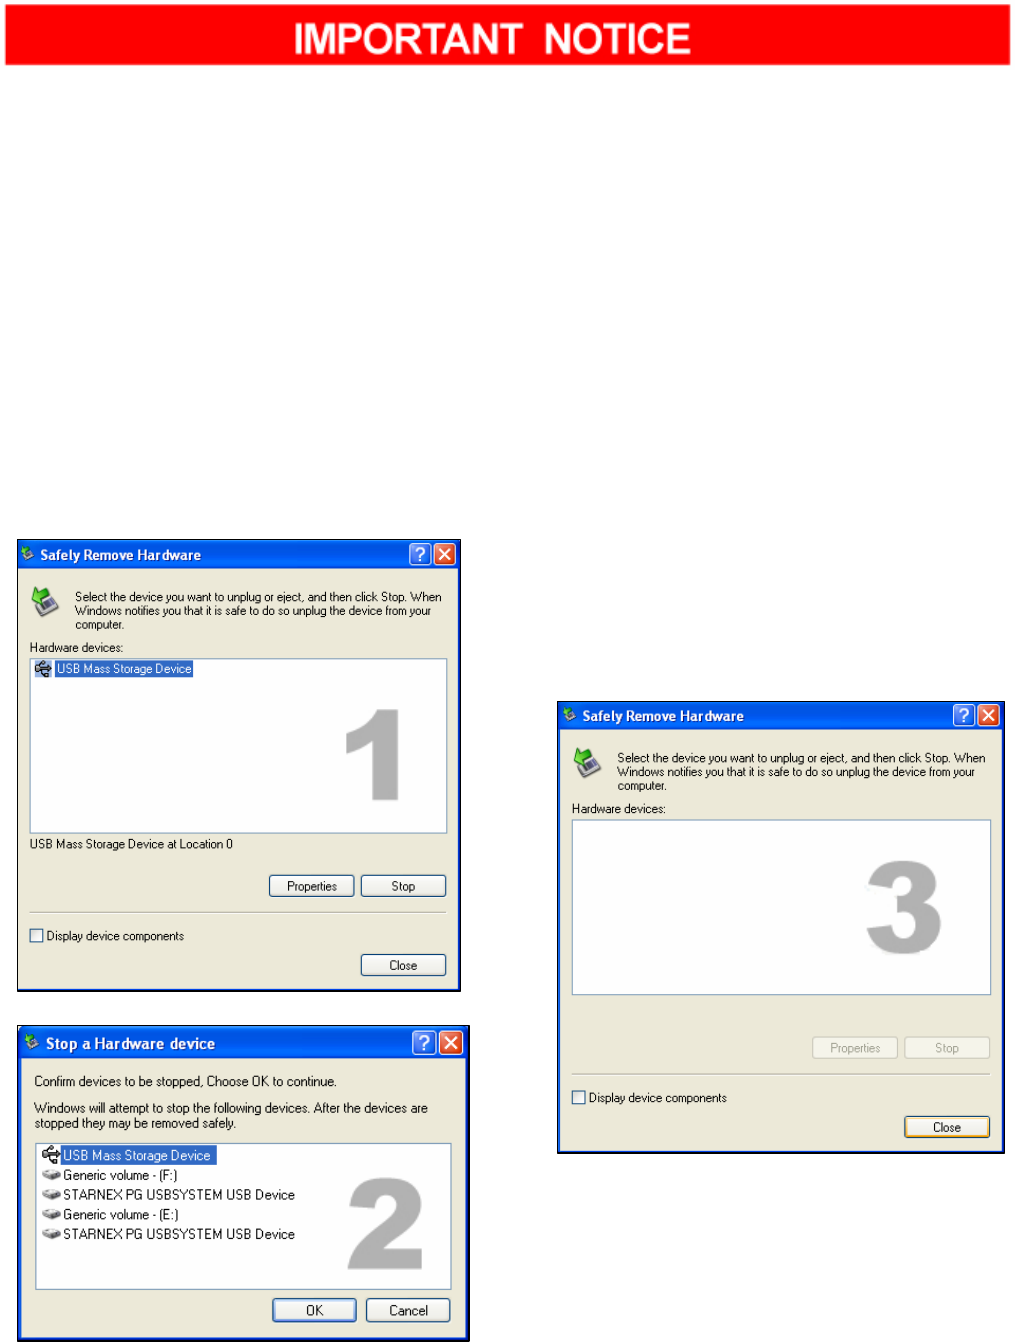
**Before you disconnect the CamBall unit (USB cable) from your PC, you MUST “Safely
Remove Hardware” in your PC first before disconnection. Otherwise, it may cause a fatal problem
to the PC and/or CamBall unit.
13
Let’s get to know CamBall’s Functions, Modes, and Recording Types!!
● Power ON / OFF
Press the center button for more than 2 seconds to turn ON / OFF the system.
Press for 2 sec.
● Reset Button
When the system does not operate properly, press this button with
a thin object.
● Use Button Hold
To prevent unintentional button operation, you can turn ON or OFF [Button Hold]
function by pressing the Center & [▽] button together and holding for 2 seconds.
Press for 2 sec.
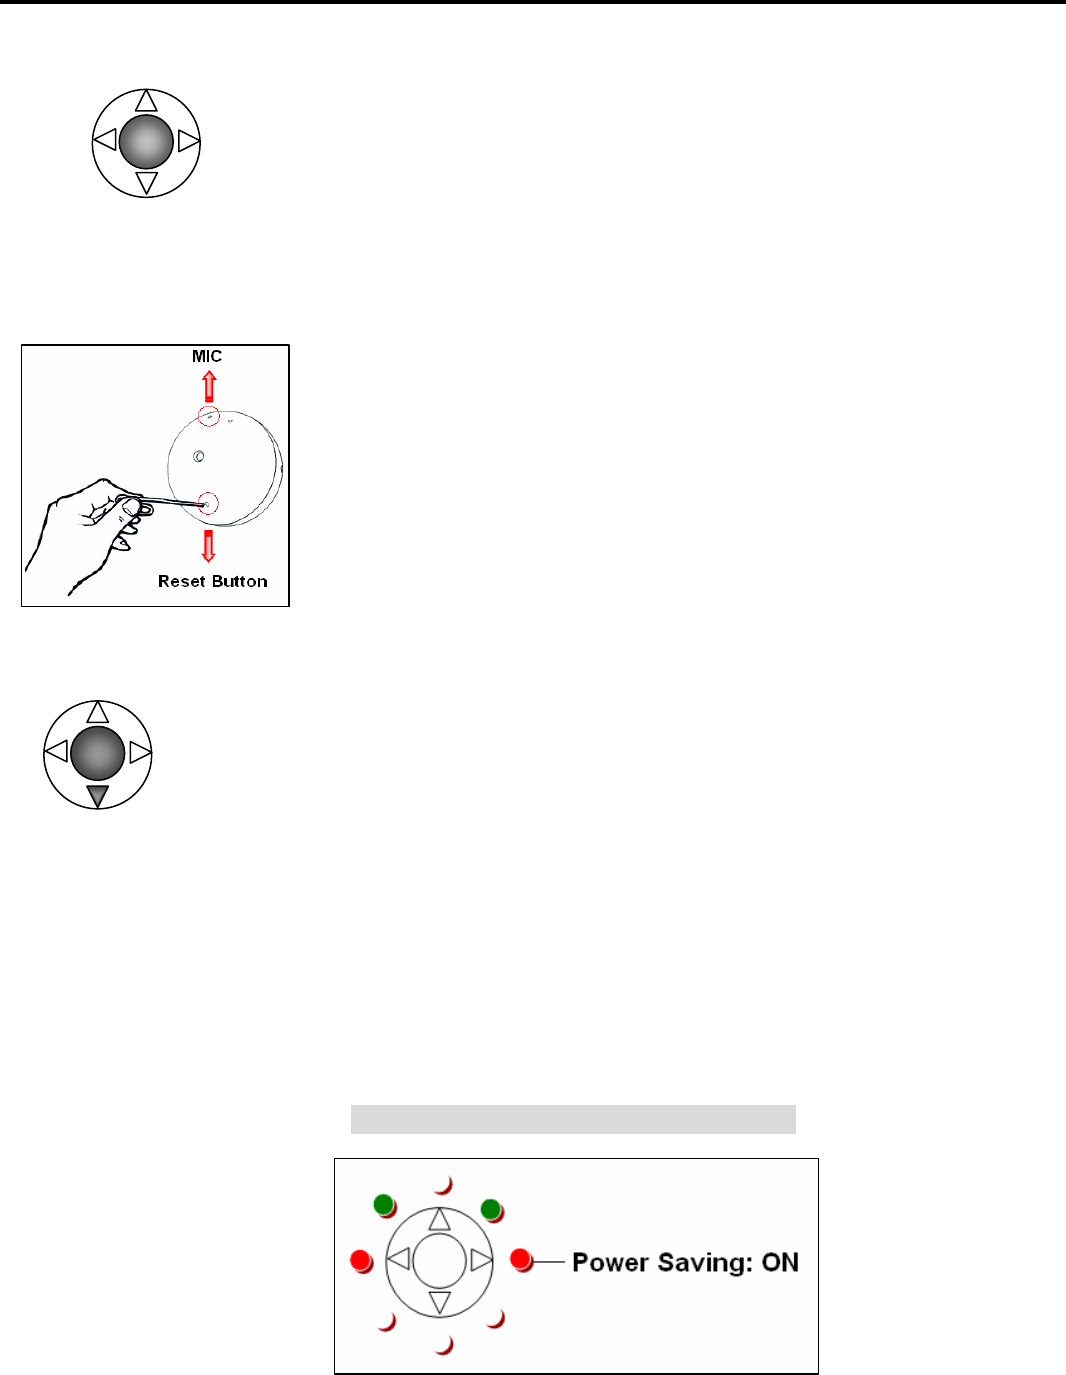
● Power Saving (Motion Detection)
To minimize waste of battery and memory, use Power Saving mode. Press [▷] button for 2 seconds
to turn ON/OFF this function. When if this function is ON and CamBall starts recording, it only
records when any motion detected. The color of the Power Saving Lamp is Red when it is ON.
Lamp Status when Power Saving is ON
14
***You may encounter discontinuance of audio sound when you playback files. This does not indicate a product
defect. When you set CamBall to Power Saving Mode to achieve a longer battery life, CamBall goes into sleep mode
and does not record when there is no motion detected after the very last motion detection. CamBall comes out of the
sleep mode every 2 seconds to check if there is motion, and if it does not detect motion, then it repeats the process
of going into sleep mode and checking for any motion every two seconds. However, it does not record audio when
there is audio if there is no motion. This will result in discontinuance audio sound during playback.
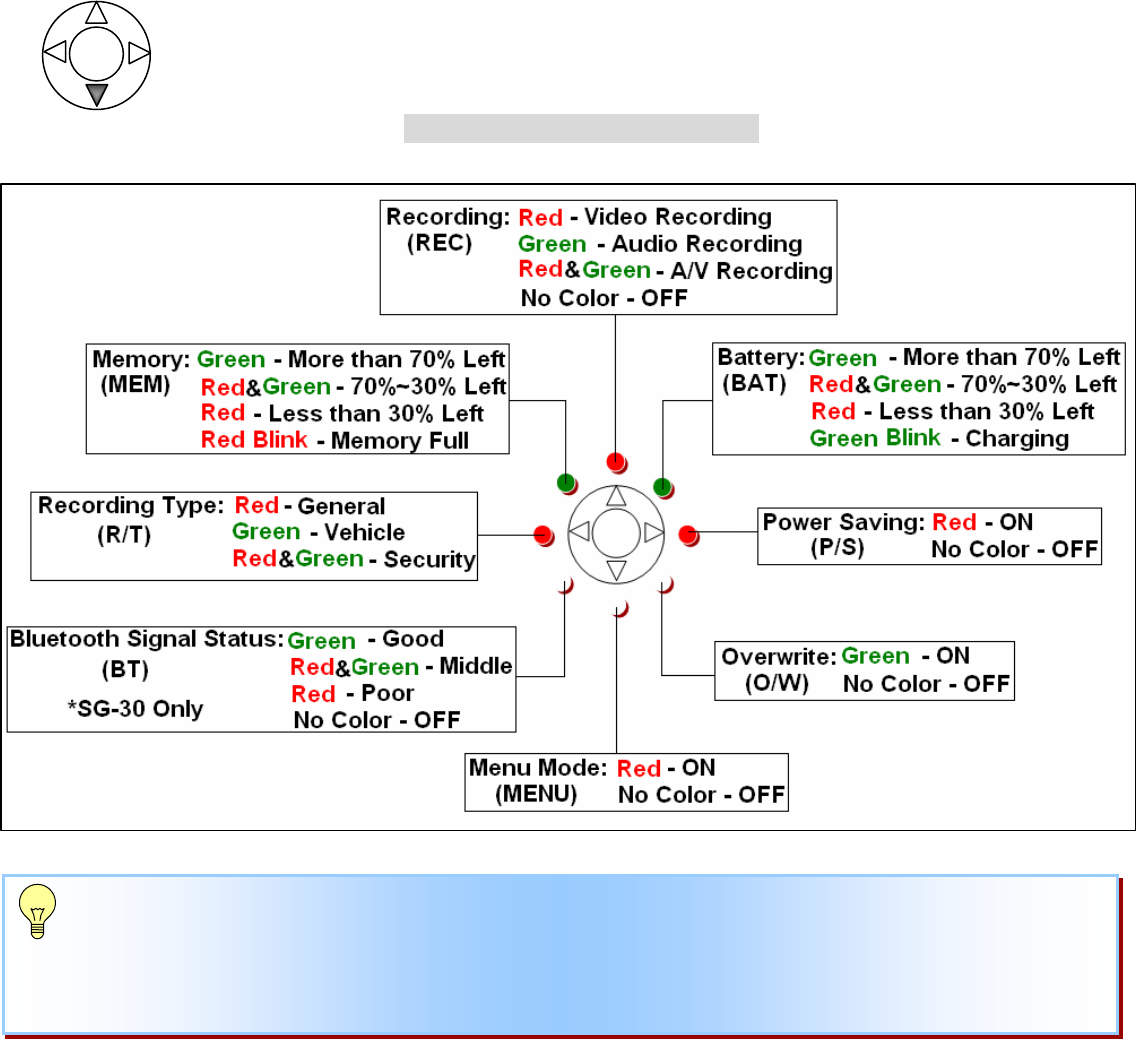
● Status of CamBall
Press [▽] button to check On and Off status for each function with indication of 5
different types of Green, Red, Red & Green, Red Blink and Green Blink.
Lamp Colors for each Function
[Overwrite] - [ON]: When Memory is full, the oldest files get deleted in order.
[Overwrite] - [OFF]: When Memory is full, CamBall stops recording. From the [Menu Mode], if
[Memory Full Status] is ON, then Memory status lamp blinks for 5 minutes.

15
● 2 Modes of CamBall (Operating & Menu Modes)
1. Operating Mode
When the power is on, CamBall enters into [Operating Mode] and gives you 6 functions of options
as shown below:
1. Snapshot: Take pictures by pressing the Center Button.
2. Status: To check status of each function, press [ ]▽ button.
3. Record: Start /Stop recording by pressing [ ]△ button for 2 seconds.
4. Recording Type: Select among General/Vehicle/Security by pressing [ ]◁ for 2 seconds in sequence.
5. Power Saving: Turn on or off by pressing [▷] for 2 seconds.
6. Menu Mode: Turn on this mode to playback, edit and set up various functions.
16
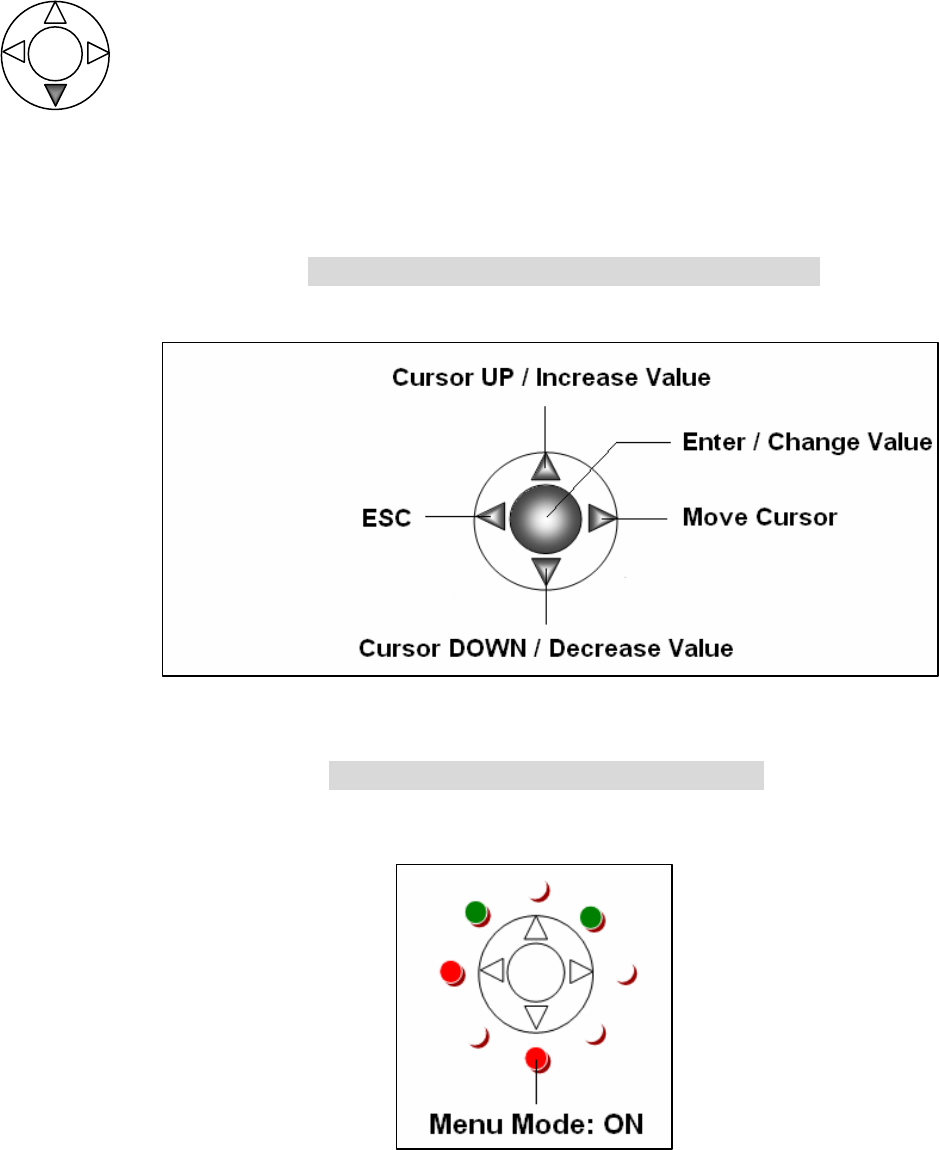
2. Menu Mode
[Menu Mode] can be used only when CamBall is connected to a TV Monitor.
In [Menu Mode], you can search or edit Video/Audio/Photo files and change/set
up functions. Using the provided cable, connect the unit to a TV Monitor and
press [▽] button for 2 seconds to enter into the [Menu Mode]. To go back to
[Operating Mode], press [▽] button for 2 seconds again.
Press for 2 sec.
Functions of each button in the [Menu Mode]
Lamp Status when [Menu Mode] is ON
17
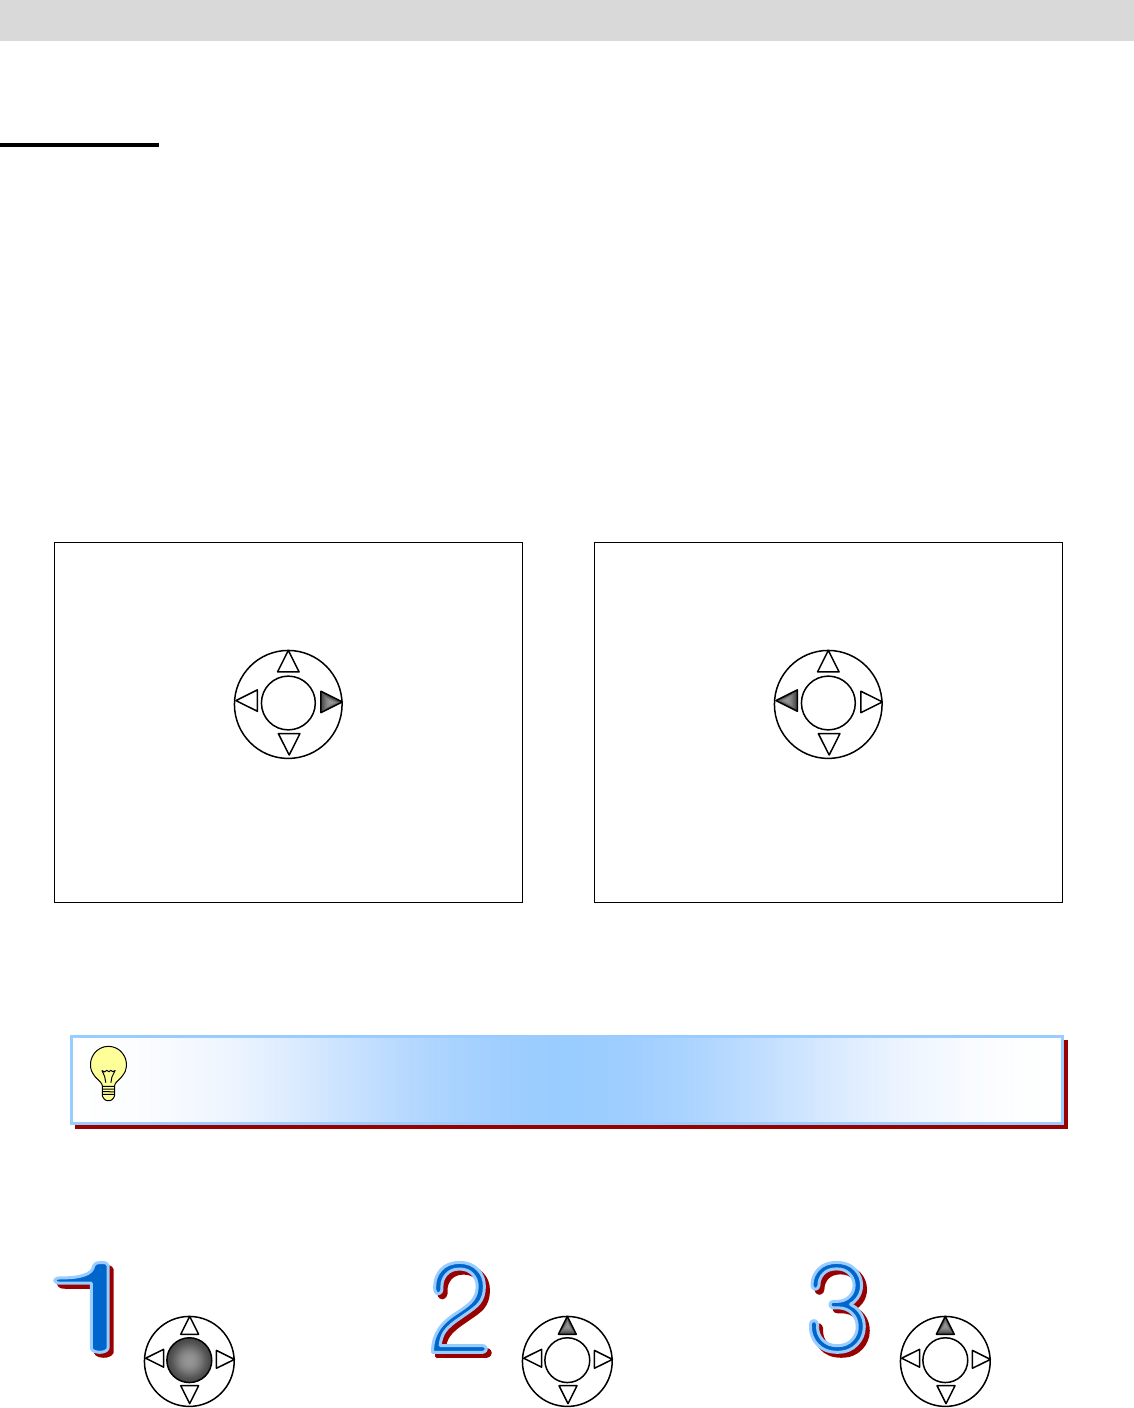
● Three Recording Types of CamBall
Recording Type can be changed by pressing [◁] button for 2 seconds in sequence.
[General Recording] ☞ [Vehicle Recording] ☞ [Security Recording] ☞ [General Recording]
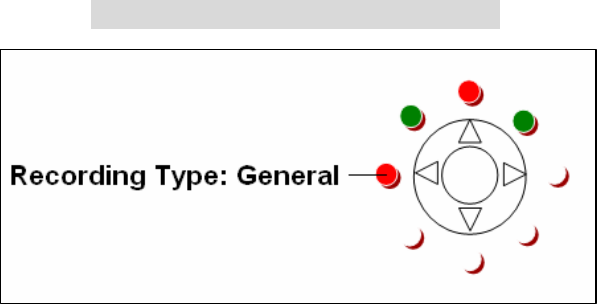
1. General Recording
In the [General Recording], the recording type lamp is Red.
This type of recording is for using CamBall the same as you would with a Camcorder.
*Recording: When you press [ ]△ button for 2 seconds, CamBall starts to record and it will
end recording until the built-in battery is exhausted.
*Charging: Regardless of how much battery is left, it will start to charge whenever the power adaptor
is connected to the unit.
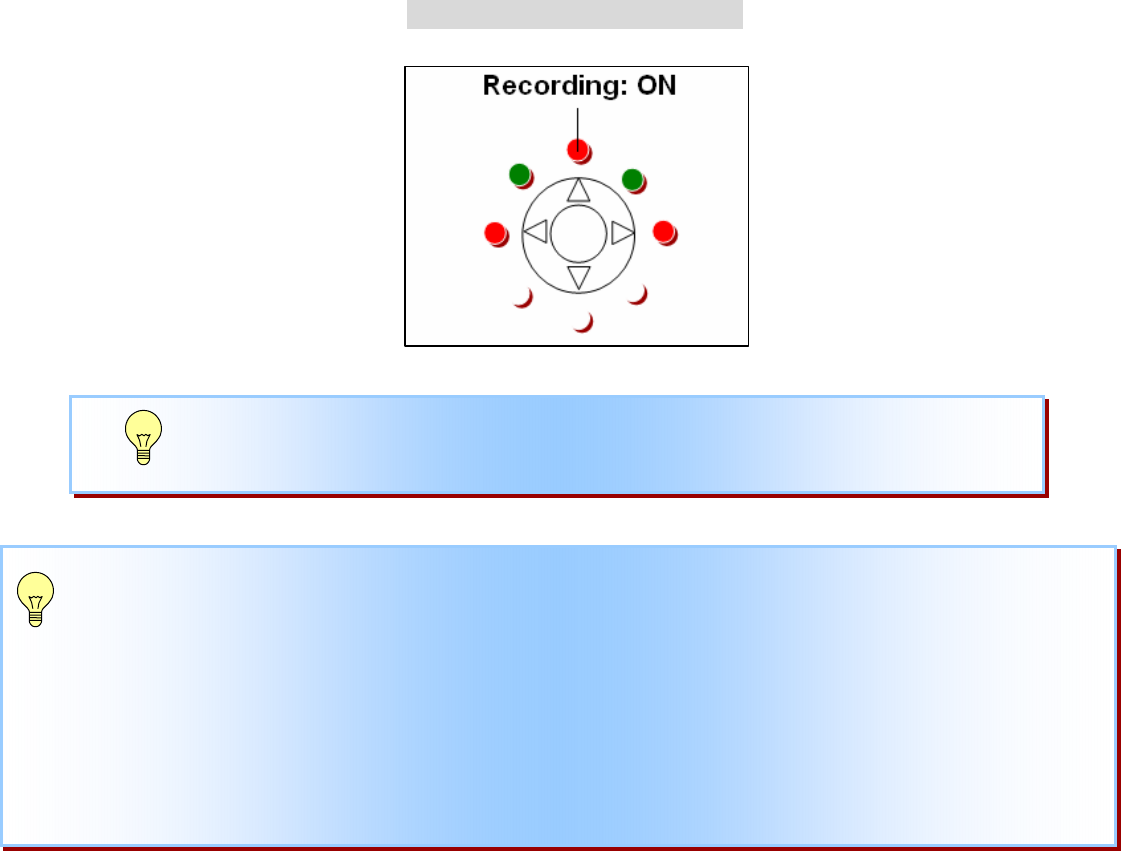
When CamBall is in [General Recording], the recording type lamp is Red.
Lamp Status in [General Recording]
2. Vehicle Recording
This type of recording is for using CamBall in vehicles.
*Recording: When the “Car adaptor with A/V Cable” is connected and the ignition is turned on,
CamBall starts to record immediately. When you turn off the ignition, it will record
for 1 minute using the built-in battery of the CamBall and then stop recording. You
can change the battery recording time from 1 minute to 120 minutes, turn OFF
(stop recording when the vehicle ignition is off) or ON(recording until the battery
is exhausted) from the option menu, [Vehicle Battery Time]. When the car adaptor is
not connected, press [ ]△ for 2 seconds to make the unit start recording and stop
recording until the battery is exhausted.
*Charging: To save the Battery life, it starts charging only when the battery is left less than 30%
to prevent frequent charging/discharging from frequent turning on or off of car ignition.
When CamBall is in [Vehicle Recording], recording type lamp is Green.
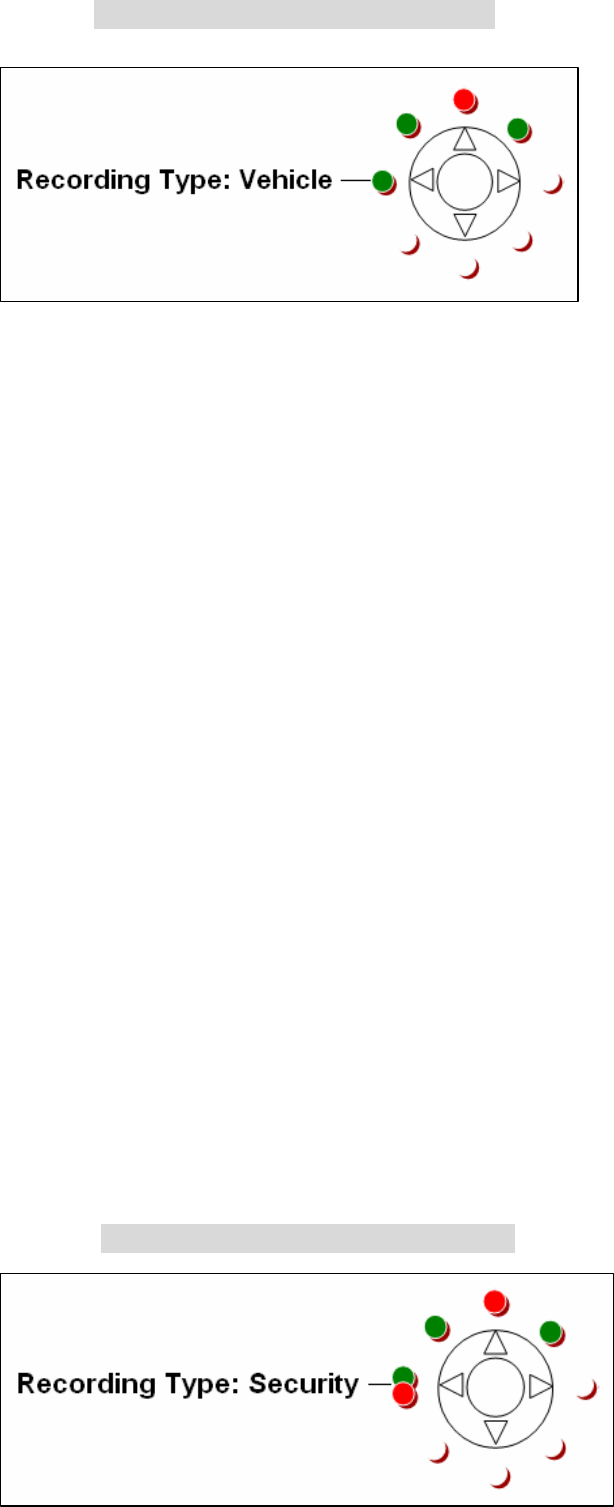
18
Lamp Status in [Vehicle Recording]
3. Security Recording
This type of recording is for using CamBall for security purpose.
CamBall has an “automatic recovery function”, and it automatically turns on its power when it
is provided with external power sources. If there is an electricity (a power) failure,
CamBall automatically starts to use the power from its battery. As soon as the electricity is
available to the CamBall, it automatically starts to charge the battery with electricity, and
starts recording again.
This function is very useful when you have installed the CamBall in remote places far away
from you. In the case that you have installed the CamBall in a remote place, and there happens
to be an electricity failure for some time and the electricity becomes available to the CamBall
again, then you have to go to where the CamBall is placed to turn it on, and to set it to
the “RECORD” mode. But CamBalls have an “automatic recovery function”, and free the users
from the burden. When the power adaptor is not connected, press [ ]△ for 2 seconds to make the
unit start recording.
*Recording: When the power adaptor is connected or the CamBall is turned on, it begins recording
immediately.
*Charging: Regardless of how much battery is left, it will start to charge whenever the power adaptor is
connected to the unit.
When CamBall is in [Security Recording] mode, the recording type lamp is Red & Green.
Lamp Status in [Security Recording]
19
*CONNECTING WITH OTHER DEVICES
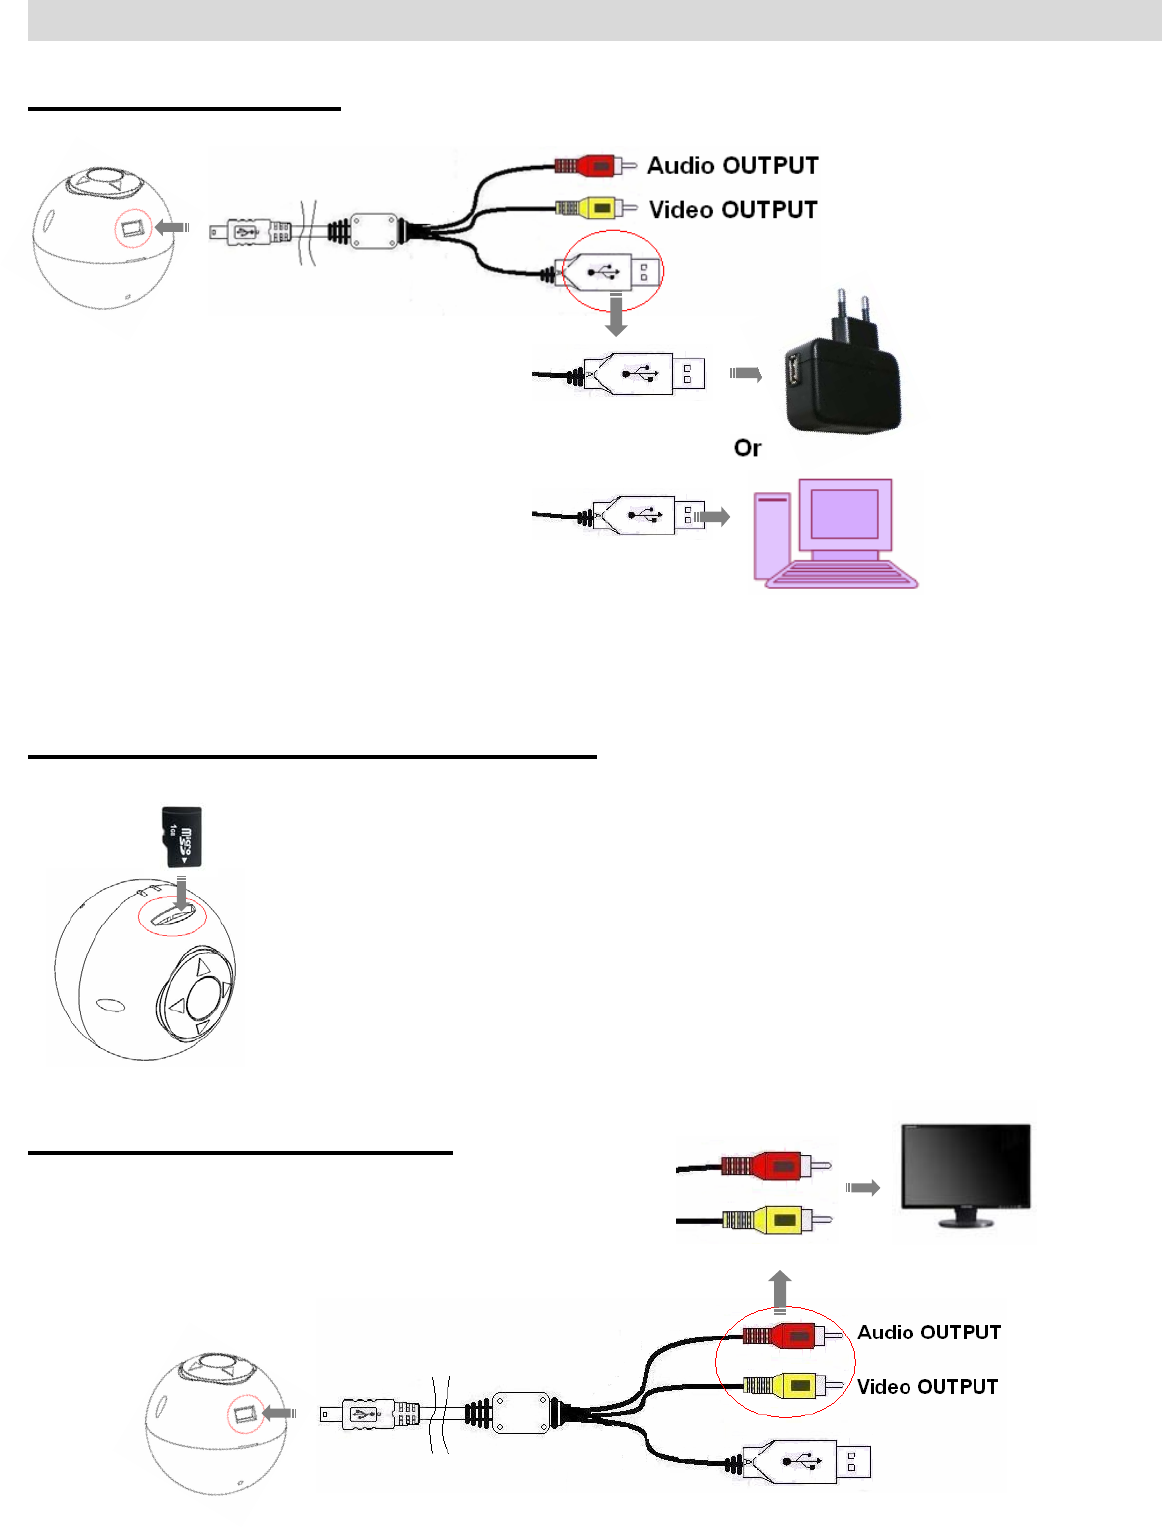
Charging the battery
To charge the battery, connect the unit to the USB adaptor or USB port in the PC using the provided cable.
The USB adaptor is available for both 110V and 220V. Total battery recharging time is 1 hour.
Inserting Micro SD Card into CamBall
※ Before inserting the Micro SD Card, please format it with your PC. If you do not
format the Micro SD card before using, it may cause an error in the unit.
※ When inserting or removing the Micro SD Card, please make sure CamBall
is not Recording.
Connecting with TV Monitor
※ In order to see the OPTION MENU and change
settings, you must connect the unit to an External TV Monitor
Monitor like a TV or small LCD Monitor.
20
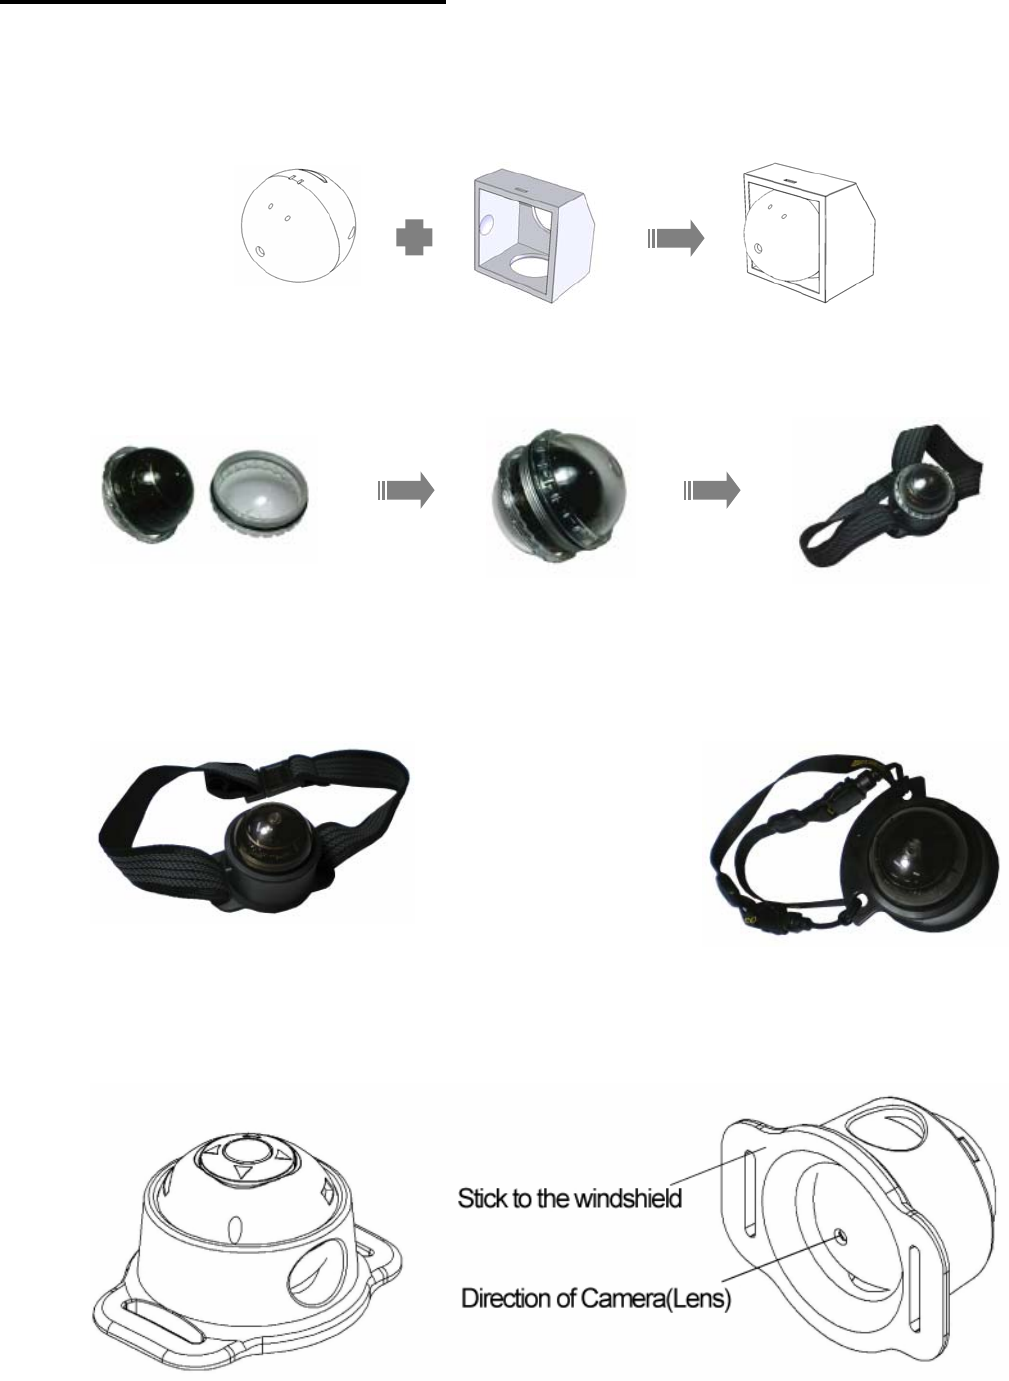
Connecting with Accessories
<Attachable Case>
<Water-proof Band>
<Extreme Sports Band> <Neck Strap Type Holder>
<Sports Pack for Vehicle>
21
*HOW TO USE CAMBALL
Recording
<Before Recording>
Before you start recording, please check and select the [Recording Type] and turn ON or OFF [Power
Saving].
Power Saving function can be turned on or off by pressing the [▷] button for 2 seconds.
Recording Type can be selected by pressing the [◁] button for 2 seconds.
<Power Saving> <Recording Type>
(Motion Detection)
Press for 2 sec. Press for 2 sec.
[ON] ☞ [OFF] [General] ☞ [Vehicle] ☞ [Security]
<Start/Stop Recording>
Power ON Start Recording Stop Recording
Press for 2 sec. Press for 2 sec. Press for 2 sec.
Before you start recording, please check Memory, Battery and Overwrite Status.
22
Lamp Status when Recording
*** If you turn off the overwrite function and the memory is full when recording, the unit will stop from recording.
If you try to record video on this occasion, then the memory status lamp will blink for 5 times to indicate that
the memory is full.
*** If you are recording onto the built-in flash memory, then a file gets created for every hour or 20MB of file size
while recording images. In the Power Saving Mode, a file gets created for every 20MB. If the unit is recording
onto the micro SD card, then a file gets created by every hour or 300MB of file size.
Creating a file by 20MB, 300MB or by the hour will prevent you from deleting large sized files when you turn
on the [OVERWRITE] feature.
*** Please make sure that your PC has MPEG4 codec to playback the video files. You may also playback the
video files with Divx.
Video/Audio File name is created by [Year/Month/Day/Time-Number].
Example) B07122514-001: File is recorded on December 25, 2007 at 2:00 P.M.
M07122515-002: File is recorded on December 25, 2007 at 3:00 P.M.
’B’ stands for ‘Built-in Memory’ and ‘M’ stands for Micro SD Card’
File extension names are as below:
Video/Audio File: xxx.AVI / Audio File: xxx.WMA / Photo File: xxx.JPG
It’s also possible to start recording in [Menu Mode] but in this case, the
[Power Saving] feature is turned off automatically.
23
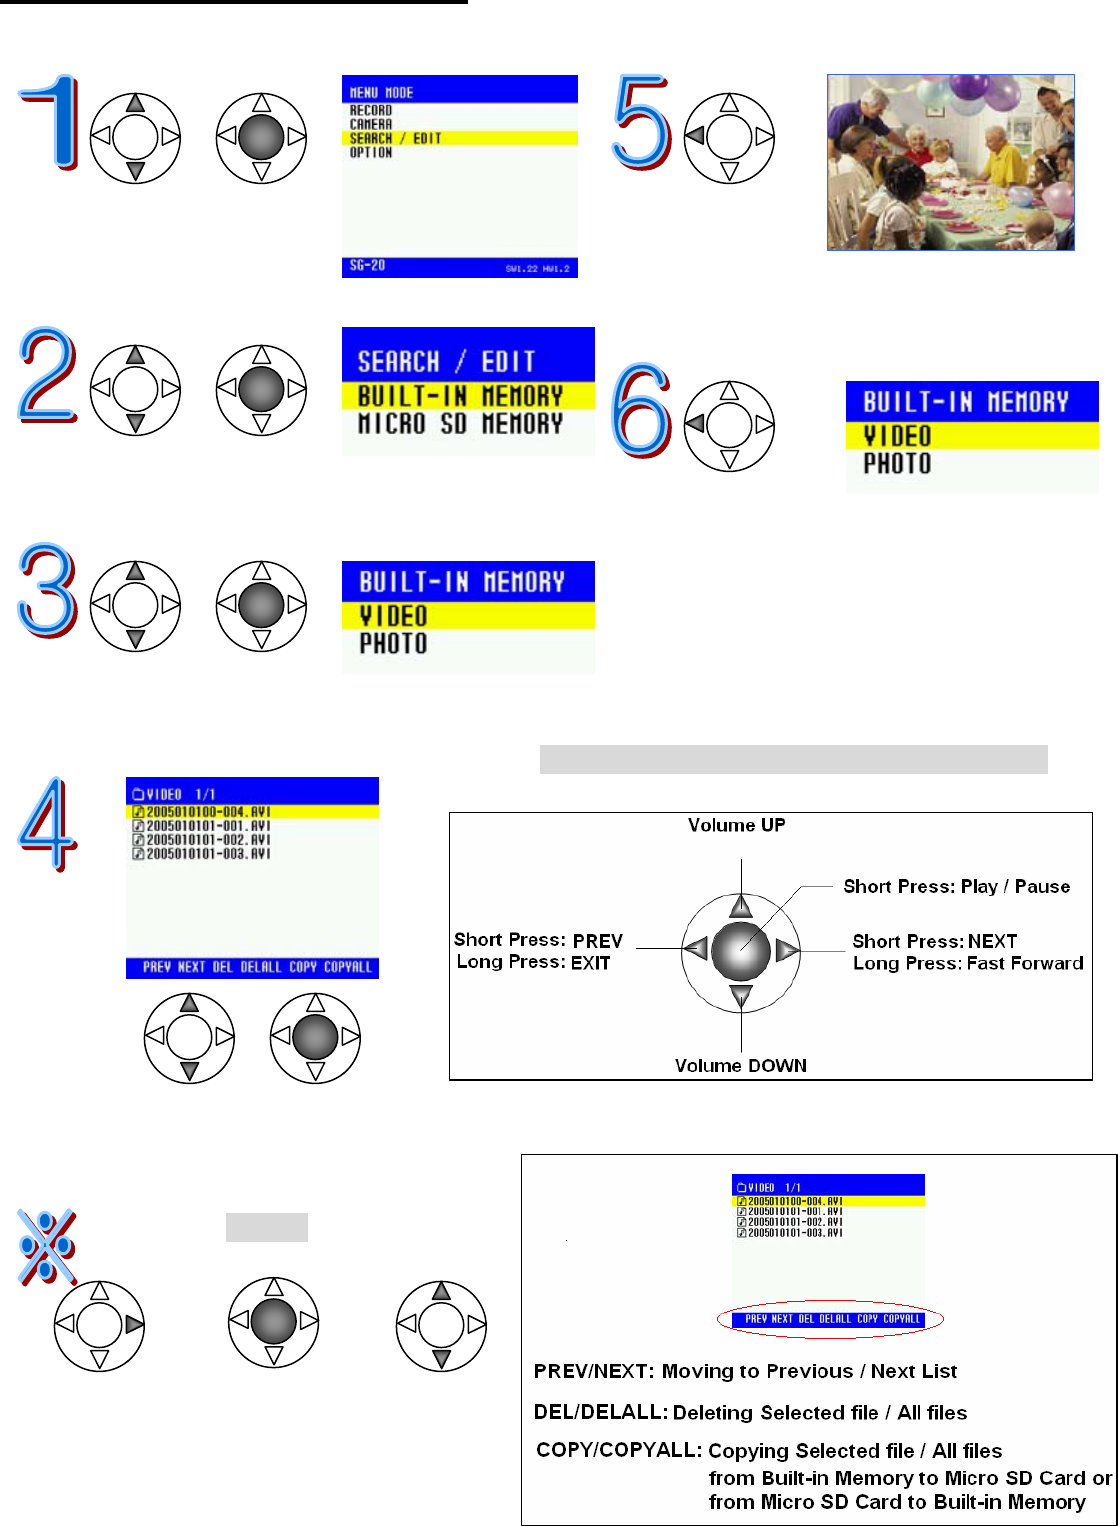
Searching / Editing Video Files
To search or edit Video/Audio files, please connect an External Monitor to the unit.
Move the cursor to To exit from
[Search/Edit] Playback
Press center button Press for 2 sec.
Select [Built-in] or [Micro SD]
Press the center button Go back to
Previous Screen
Move to [Video]
Press the center button
Button Inputs when playback on Menu Mode
Move to the file to search
Press the center button
Editing
Go to [Edit] Select go back to
Edit Function [Search]
24
Taking Photos (Snapshot)
After turning on CamBall, you can take pictures by pressing the middle button.
Each lamp blinks fast in order to make it go round to show that the unit’s just taken a snapshot.
Power ON Take Snapshots
Press for 2 sec.
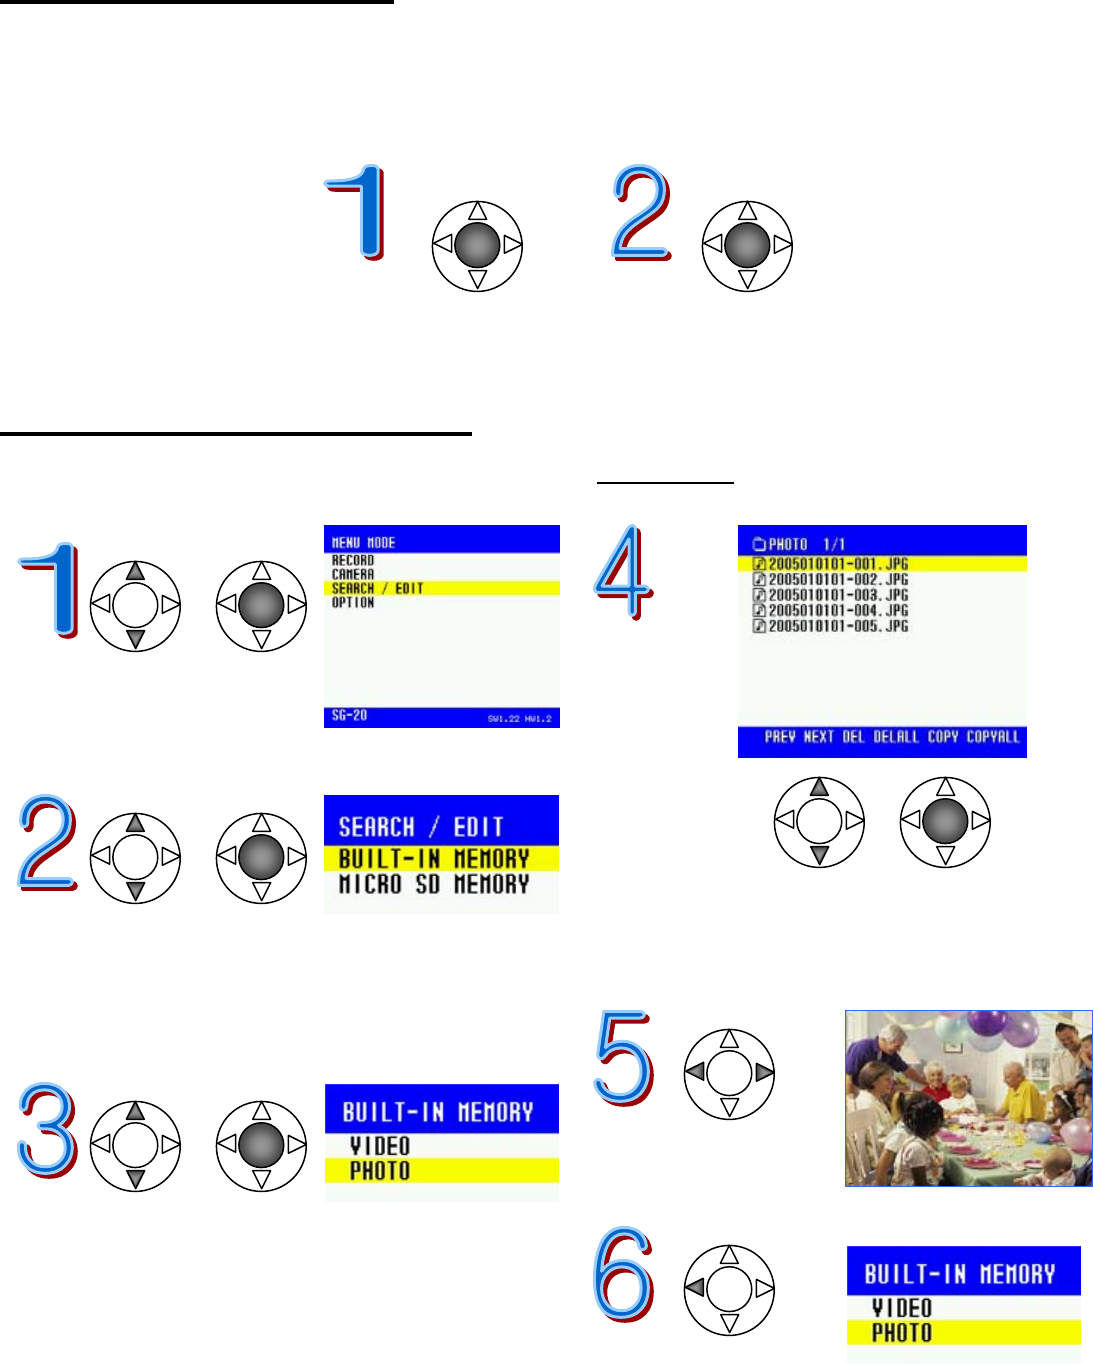
Searching / Editing Photo Files
Before searching or editing photo files, please connect a TV Monitor to the unit.
Move the cursor to
[Search/Edit]
Press center button
Move the Cursor to a file
Select [Built-in] or [Micro SD] for Playback
Press the center button and Press center button
Search
Photo Files
Move to [Photo]
Press the center button
Go back to
Previous Screen
Press for 2 sec.
25
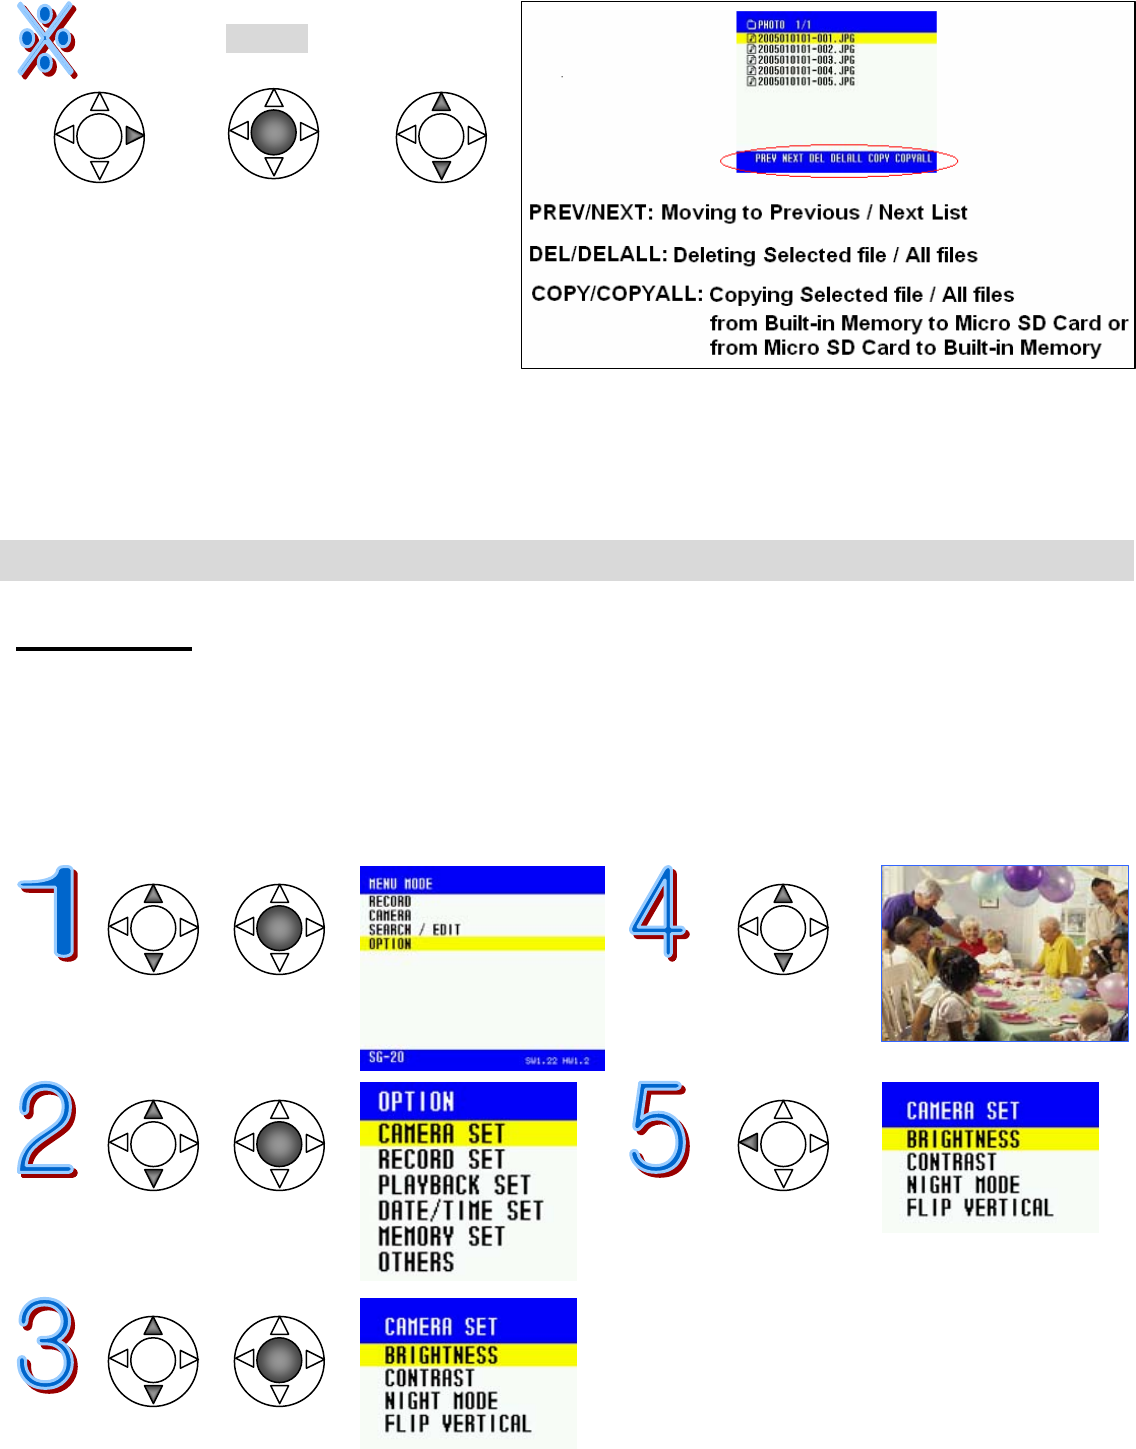
Editing
Go to [Edit] Select go back to
Edit Function [Search]
** If you turn off the overwrite function and the memory is full when taking pictures, the unit will not take pictures.
If you try to take pictures on this occasion, then the memory status lamp will blink 5 times to indicate that the memory is full.
*OPTIONS
Camera Set
You can adjust the values of [Brightness] and [Contrast], and turn on or off [Night Mode] and [Flip Vertical]
when recording video or taking photos.
<Brightness>
The range of adjustment is from 1 to 20.
Move to [Option] Using the buttons
Press the center button Change the value
Move to [Camera Set] Go back to
Press the center button Previous Screen
Move to [Brightness]
Press the center button
26
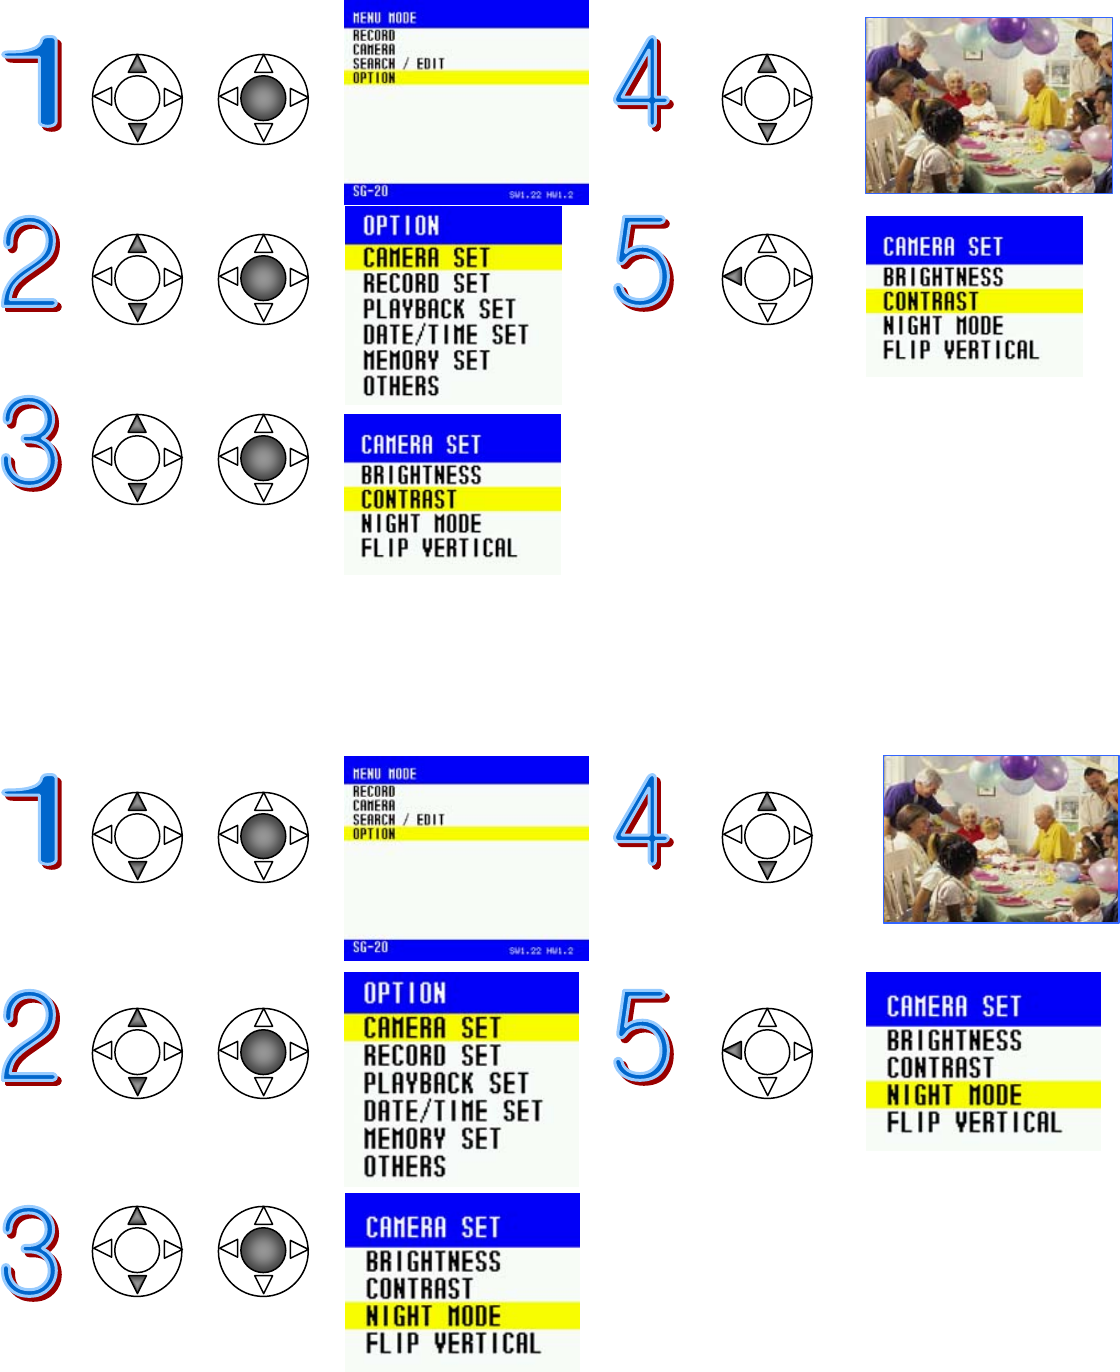
<Contrast>
The range of adjustment is from 1 to 20.
Move to [Option] Using the buttons
Press the center button Change the value
Move to [Camera Set] Go back to
Press the center button Previous Screen
Move to [Contrast]
Press the center button
<Night Mode>
Turn [Night Mode] to ON when recording at night or in a dark place to realize a brighter image. In [Night
Mode], the recording speed will decrease by 25%.
Move to [Option] Using the buttons
Press the center button Change to [ON] or [OFF]
Move to [Camera Set] Go back to
Press the center button Previous Screen
Move to [Night Mode]
Press the center button
27
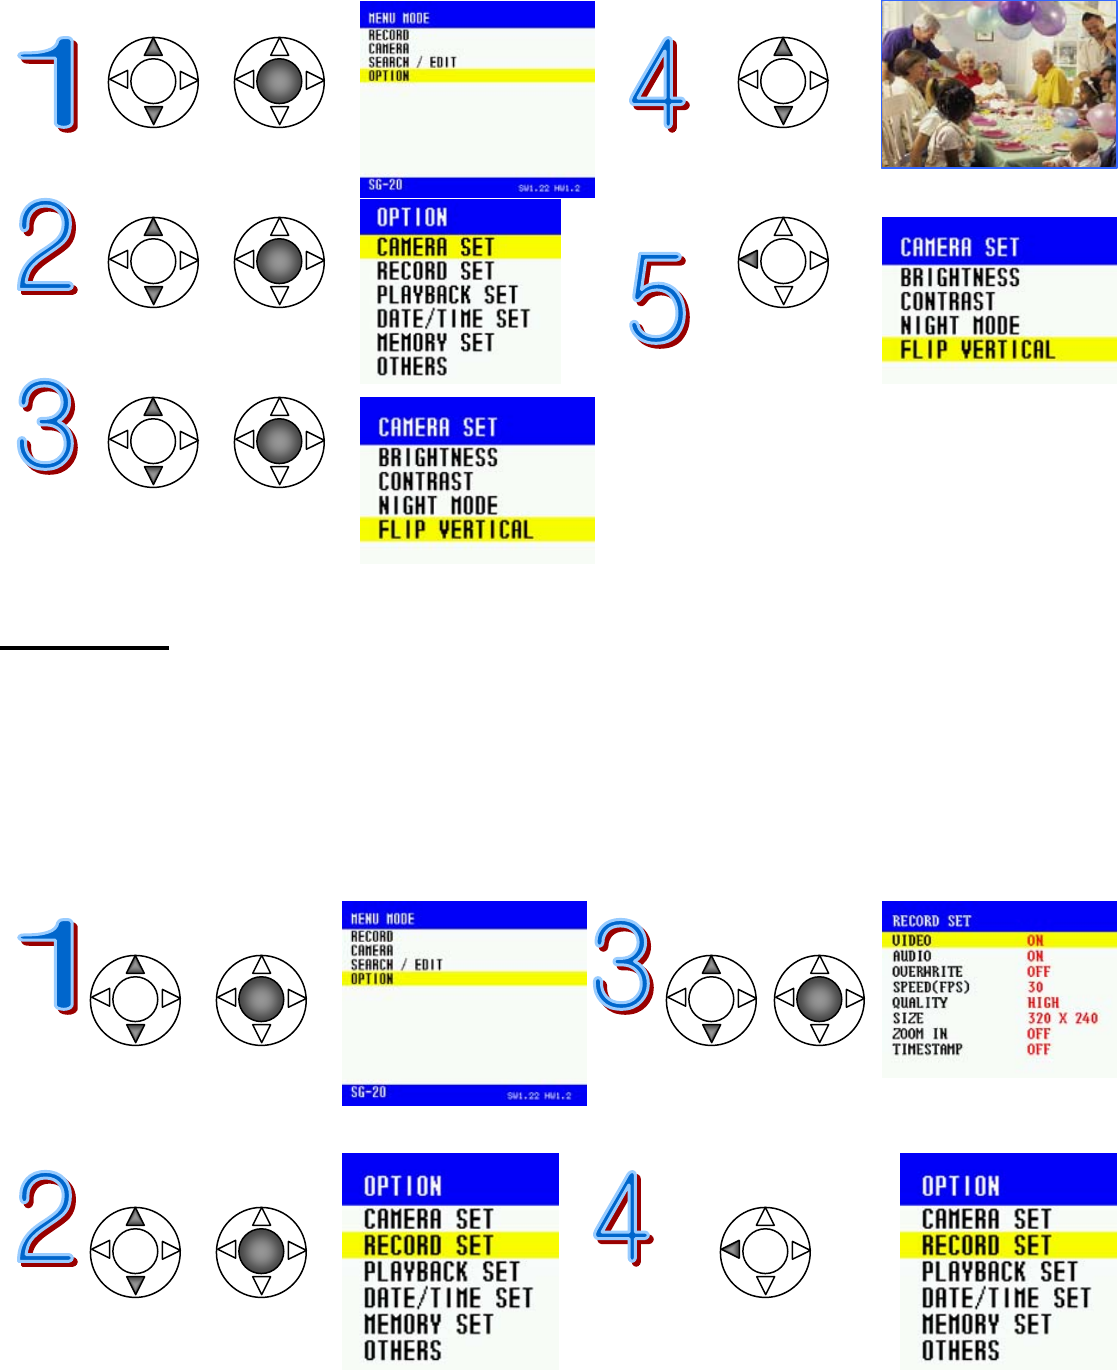
<Flip Vertical>
The [Flip Vertical] function flips the video upside-down (vertically-top over bottom). Turn it off to return back
to the original.
Move to [Option] Using the buttons
Press the center button Change to [ON] or [OFF]
Move to [Camera Set] Go back to
Press the center button Previous Screen
Move to [Flip Vertical]
Press the center button
Record Set
You can set up [Video], [Audio], [Overwrite], [Recording Speed], [Recording Quality], [Size (Resolution)],
[Zoom In] and [Timestamp].
<Video Set>
You can turn off the video. If you would like to save only audio data, turn off this function.
(SG-20, 30 only)
Move to [Option] Move to [Video]
Press the center button Change to [ON] or [OFF]
Move to [Record Set] Go back to
Press the center button Previous Screen

28
<Audio Set>
You can turn off the audio. If you would like to record video without the audio, turn off this function.
(SG-20, 30 only)
Move to [Option] Move to [Audio]
Press the center button Change to [ON] or [OFF]
Move to [Record Set] Go back to
Press the center button Previous Screen
<Overwrite ON / OFF>
If you set this Overwrite function to on, then the oldest file in dates gets replaced by the new file being recorded,
enabling the CamBall to continue to record when the memory is full. If this function is off, and the memory is full with
the existing files, then the CamBall stops from recording video. If Overwrite function is ON and both the built-in
memory and Micro SD card are full, then it will overwrite on the Micro SD card only.
Move to [Option] Move to [Overwrite]
Press the center button Change to [ON] or [OFF]
Move to [Record Set] Go back to
Press the center button Previous Screen
29
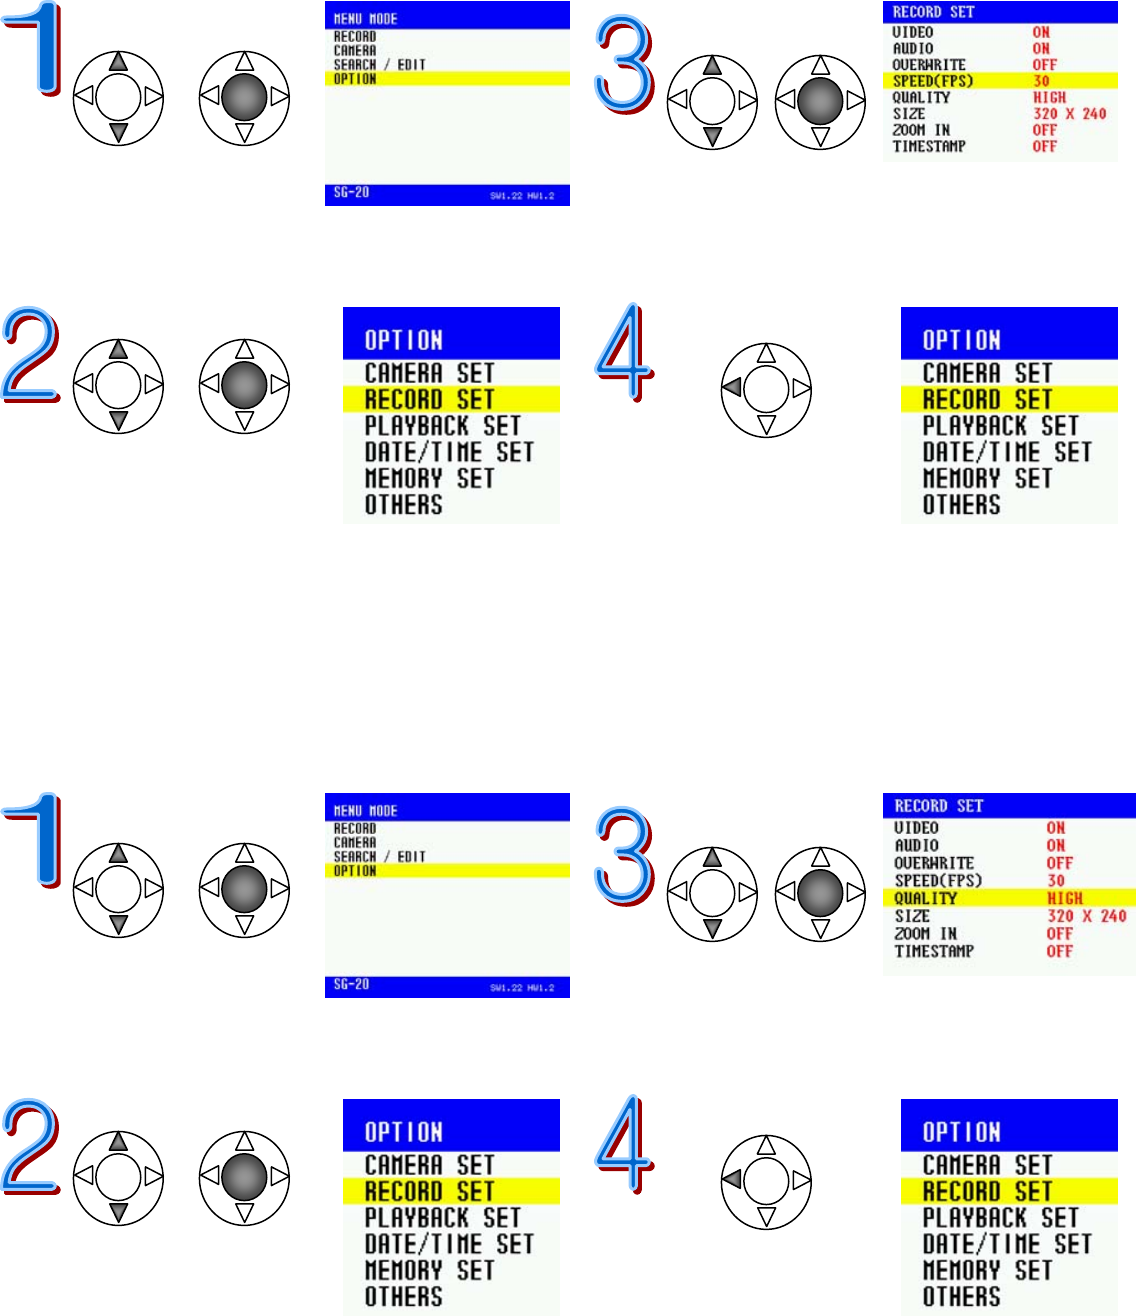
<Recording Speed (FPS: frames per second)>
This function is to set [Recording Speed] in frames per second. Available Recording Speeds (fps) are 1, 3,
7, 15, and 30.
Move to [Option] Move to [Speed]
Press the center button Change the value
Move to [Record Set] Go back to
Press the center button Previous Screen
<Recording Quality>
There are 4 image quality levels (Low, Medium, High and Ultra High). If you set this level to “Ultra High”,
then you get more clear images than in other levels, but a larger file size will result. On the other hand, if
you set the level to “Low”, then it requires smaller file sizes, but you get less clear images compared to the
images in “Ultra High”. If you set it to “Medium”, then the file size gets 40% smaller than “High”. If you set
it to “Low”, then the file size gets 45% smaller than “High”.
Move to [Option] Move to [Quality]
Press the center button Change the value
Move to [Record Set] Go back to
Press the center button Previous Screen
30
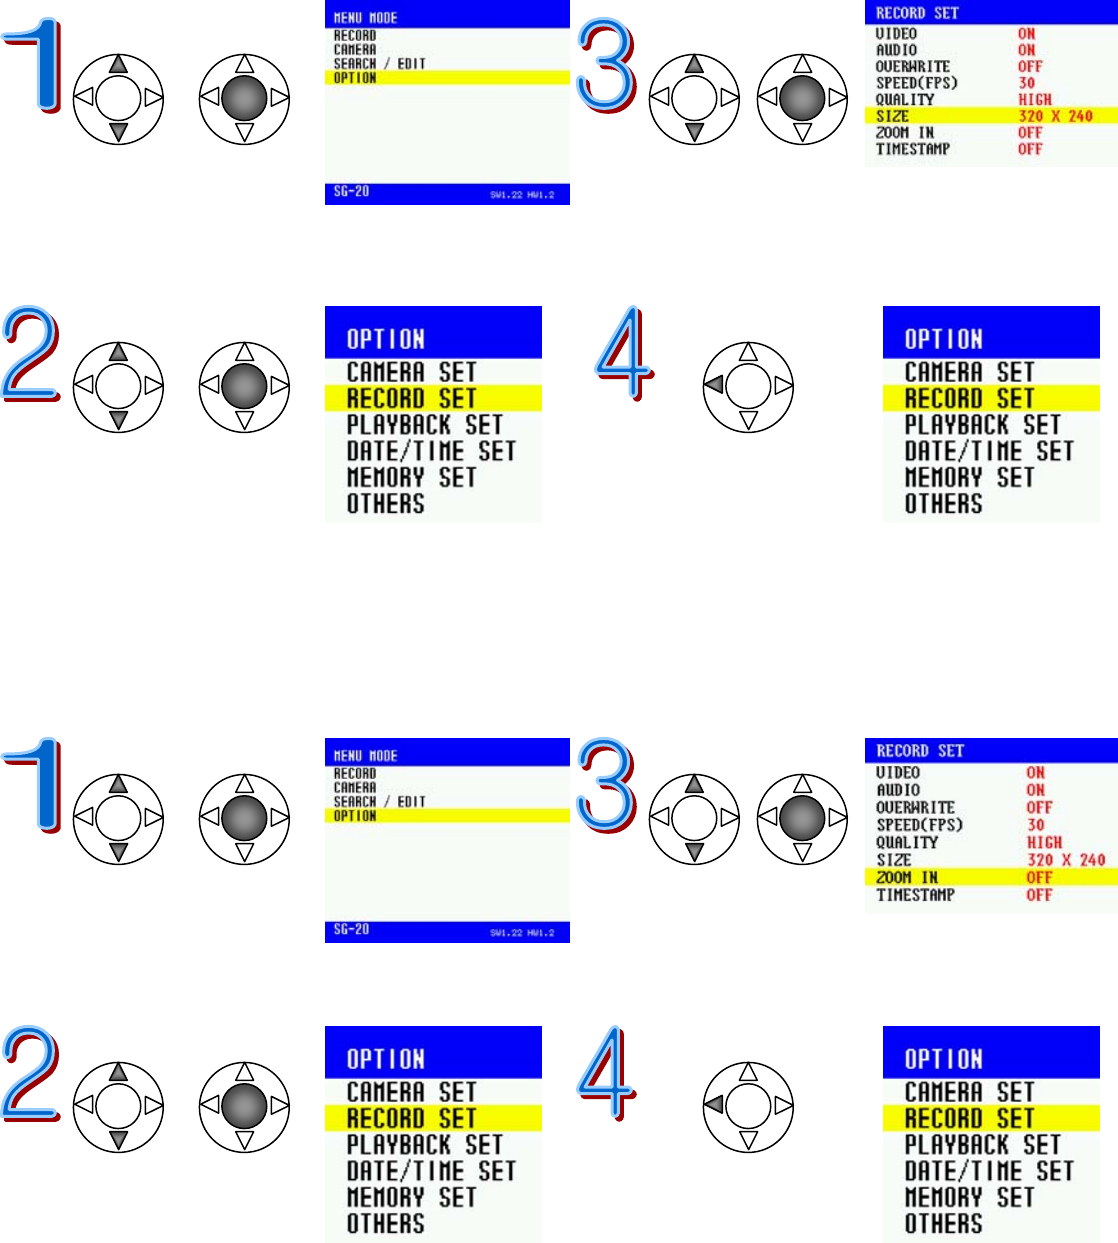
<Size (Image Resolution for Recording)>
This is to set Image Resolution (recording size). This function is available for the next version, and it now
fixed at 320x240 pixels.
Move to [Option] Move to [Size]
Press the center button Change the value
Move to [Record Set] Go back to
Press the center button Previous Screen
<Zoom In>
This is to magnify the images up to 4 times while recording video. This function applies for recording
video only as photos are taken with 640x480 pixels.
Move to [Option] Move to [Zoom In]
Press the center button Change to [ON] or [OFF]
Move to [Record Set] Go back to
Press the center button Previous Screen
31
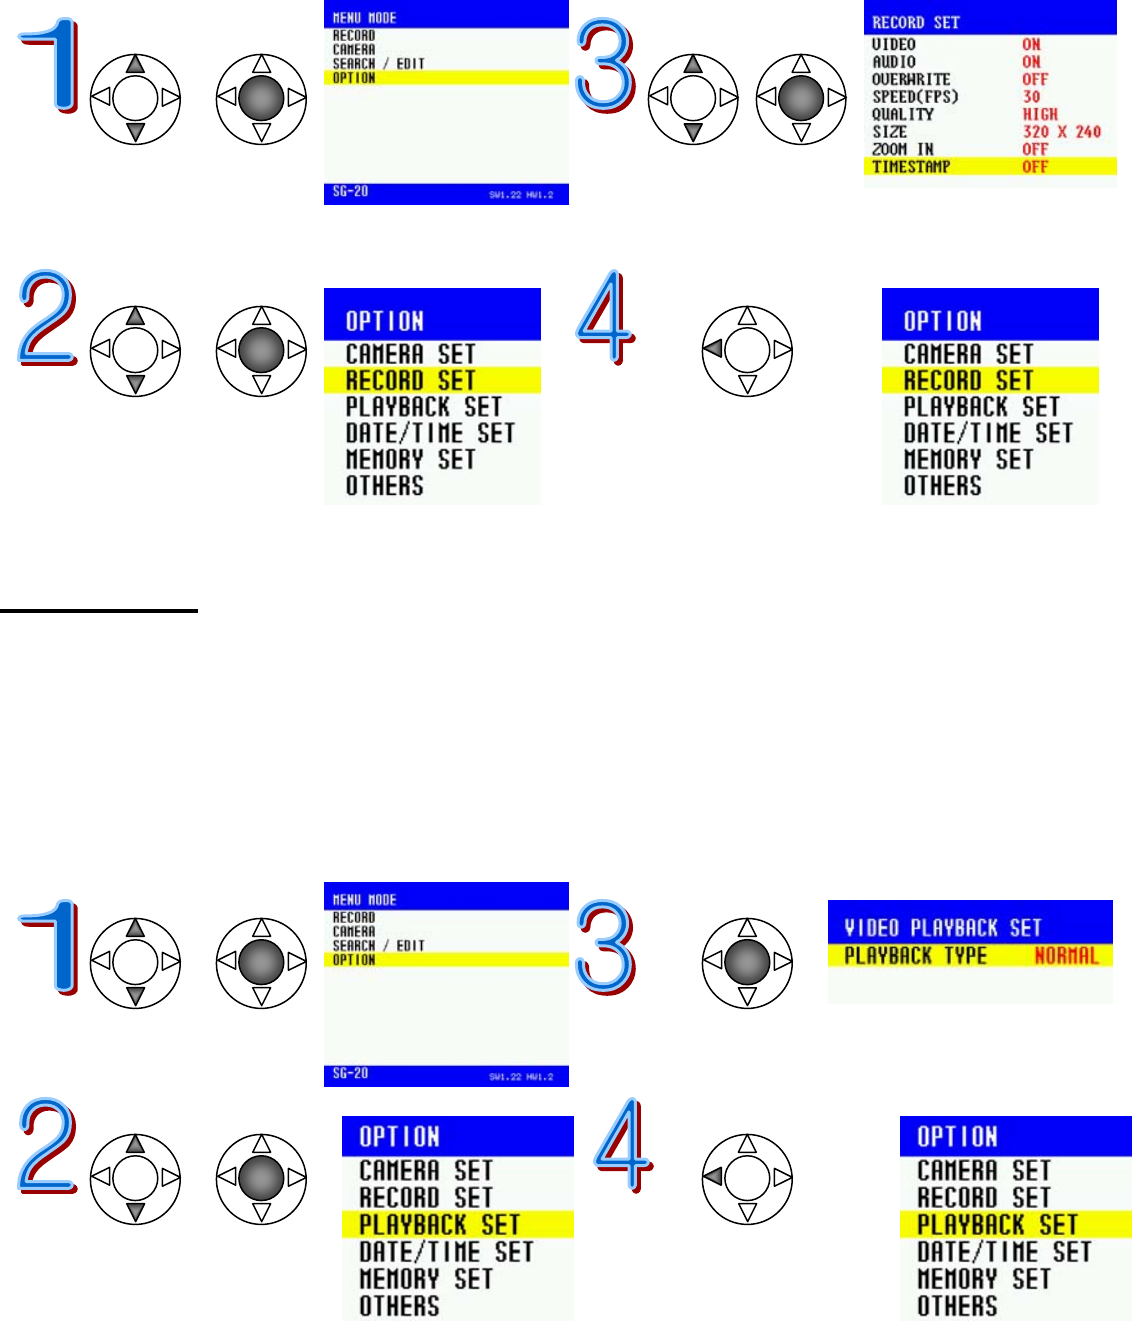
<Timestamp Set>
Set [Timestamp] to display date and time when you playback video. You can choose to place this
information either on Top or Bottom of the playback screen. If you don’t want to use this function, set it
[OFF].
Move to [Option] Move to [Timestamp]
Press the center button Change the position or
Turn [OFF]
Move to [Record Set] Go back to
Press the center button Previous Screen
Playback Set
Set functions for Playback.
<Video Playback Set>
You can select different video playback types: [Normal] is to playback the current file to the last file of the
list. [Repeat] is to playback the current file continuously. [Repeat All] is to playback all the files in the list
and repeat playing the list continuously.
Move to [Option] Using the center button
Press the center button Change the value
Move to [Playback Set] Go back to
Press the center button Previous Screen
32
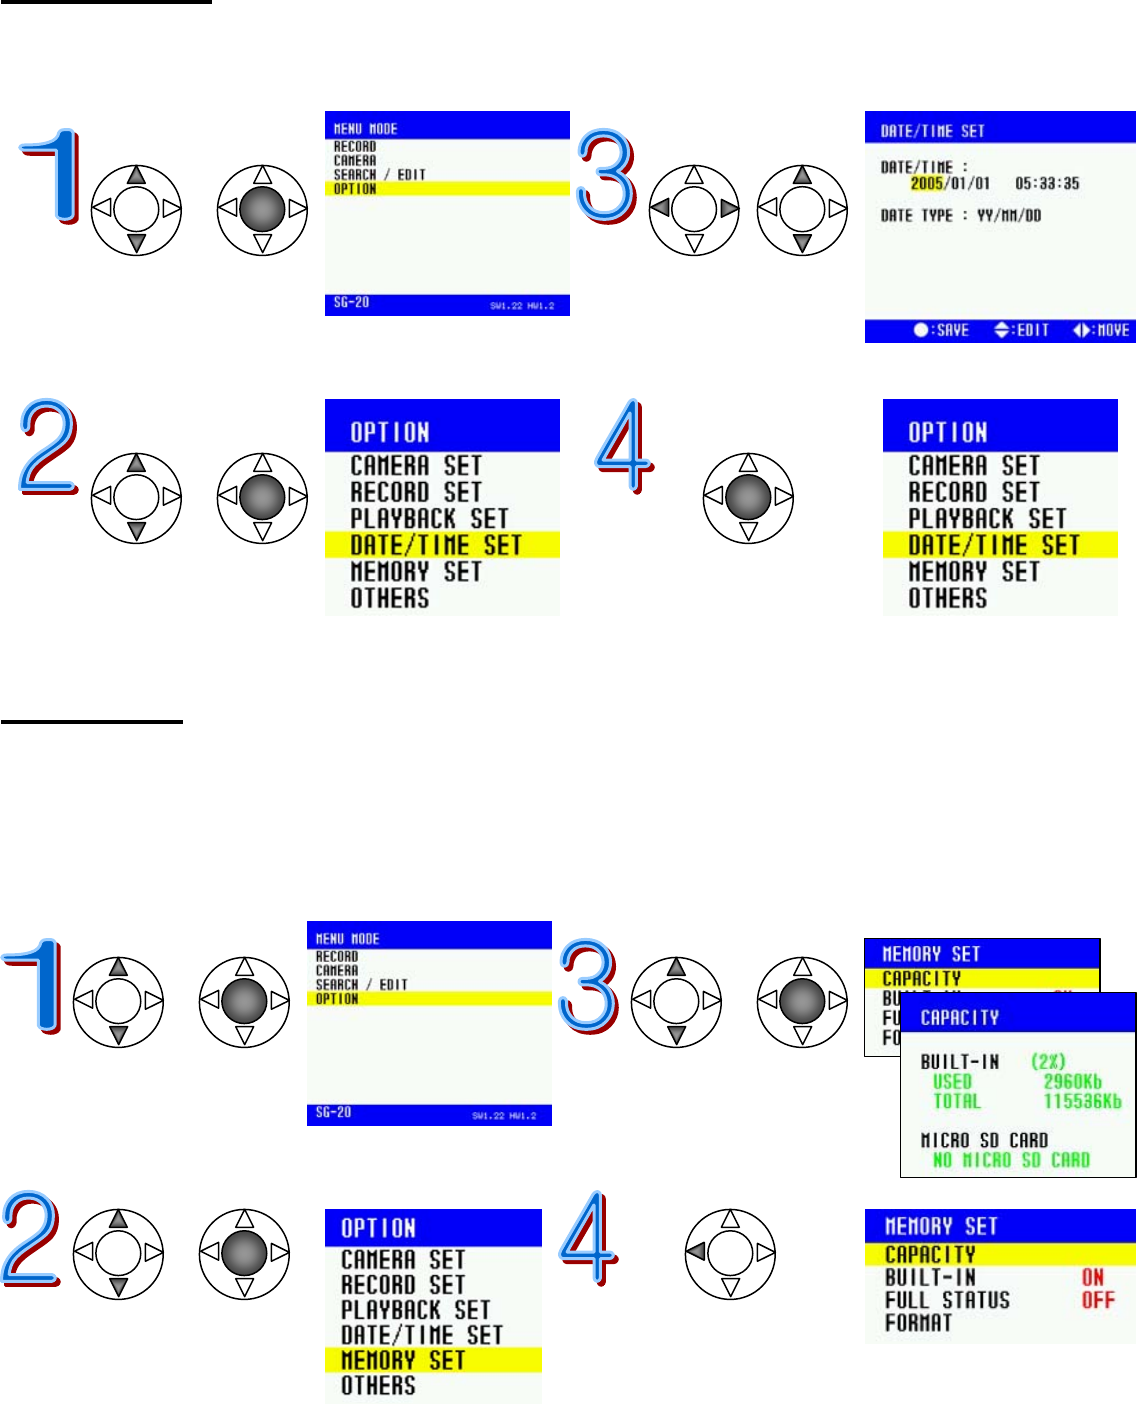
Date/Time Set
Before using CamBall, you must set [Date/Time Set] to display the correct date and time on the Playback
screen.
Move to [Option] Using the buttons
Press the center button Change [Date / Time]
and Choose[Date Type]
Move to [Date/Time Set] Apply this change
Press the center button and Confirm
Memory Set
<Capacity>
Check memory capacity for both built-in and external memory (Micro SD card), how much memory you
have used and how much memory is left.
Move to [Option] Move to [Capacity]
Press the center button Press the center button
Move to [Memory Set] Go back to
Press the center button Previous Screen
33
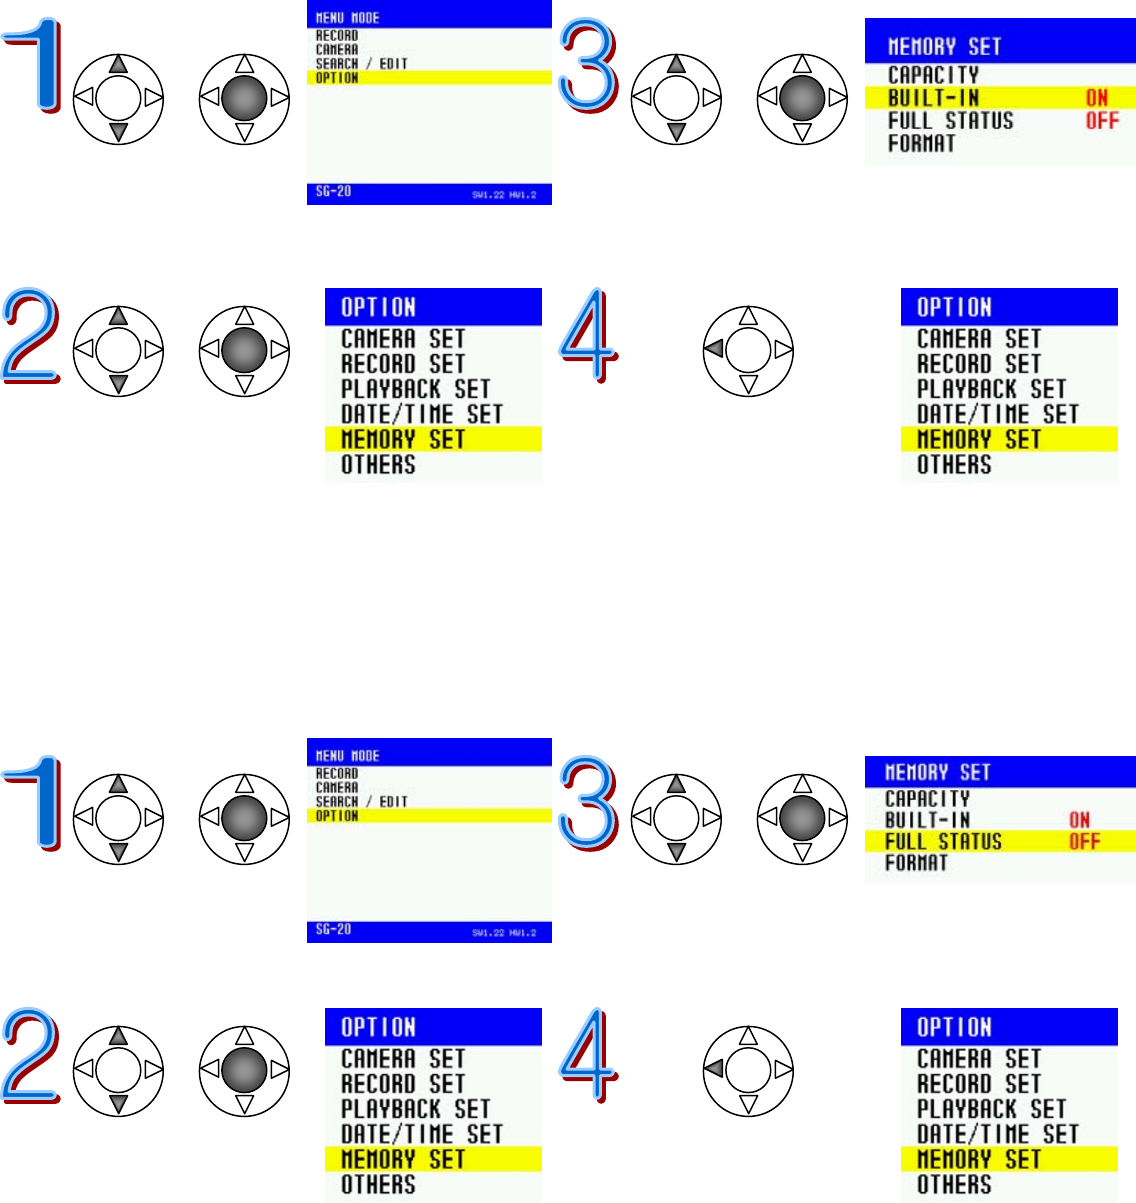
<Built-in Memory ON / OFF>
CamBall has Built-in flash memory of 128MB and you can also use Micro SD Card for up to 2 GB
for memory extension. When you want to record onto the Micro SD card only, then turn the
Built-in memory OFF.
Move to [Option] Move to [Built-in]
Press the center button Press the center button
Move to [Memory Set] Go back to
Press the center button Previous Screen
<Memory Full Status Indicator>
When the memory is full, CamBall can no longer record (when Overwrite is OFF). Then, you can
use this function to recognize when the memory is full.
Move to [Option] Move to [Full Status]
Press the center button Change to [ON] or [OFF]
Move to [Memory Set] Go back to
Press the center button Previous Screen

34
<Format>
This is to format and erase all data in the Built-in memory or the Micro SD card. Double check if all files are
downloaded to your PC or you don’t need those files before you format.
***Important: It is strongly recommended that you format both Internal and External Memory regularly once
in 2-3 months as a way of properly managing the memory.
Move to [Option] Choose the memory
Press the center button and Confirm
Move to [Memory Set] Go back to
Press the center button Previous Screen
Move to [Format]
Press the center button
35
Others
Configuring other settings such as [External Monitor Type], [Auto Power OFF Time], [Vehicle Battery Time],
and [Default]
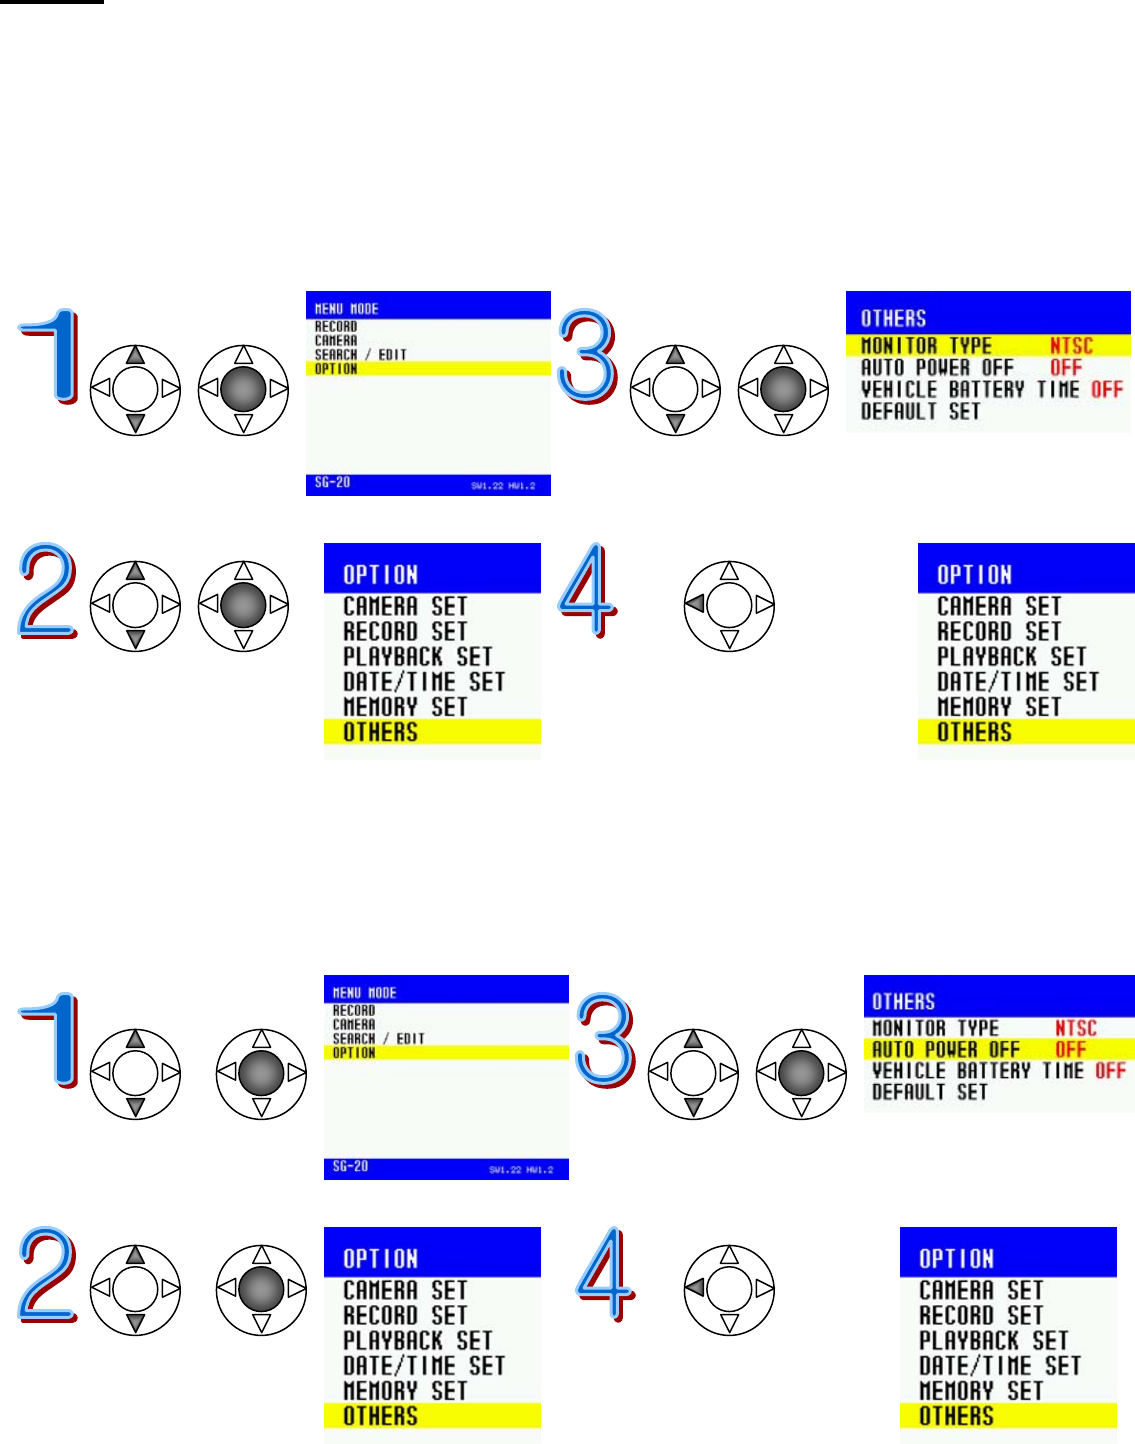
<External Monitor Type>
There are two types of Monitor: NTSC and PAL. Choose the correct monitor type before connecting it to
the CamBall unit. For example, in the USA and Korea, the external monitor type is NTSC and for most
countries in Europe, they use PAL type monitors.
Move to [Option] Move to [Monitor Type]
Press the center button Change to [NTSC] or [PAL]
Move to [Others] Go back to
Press the center button Previous Screen
<Auto Power OFF Time>
The CamBall automatically turns off the power if you don’t press any button for a certain amount of time you set
between 1-9 minutes. This power off does not indicate malfunction of the system. If you don’t want to use this
function, set this to [OFF]. You can’t activate this function in [Record] mode or playback. Even if you set
this to on, it will not turn off the power in while recording or playback.
Move to [Option] Move to [Auto Power Off]
Press the center button Change the value
Move to [Others] Go back to
Press the center button Previous Screen
36
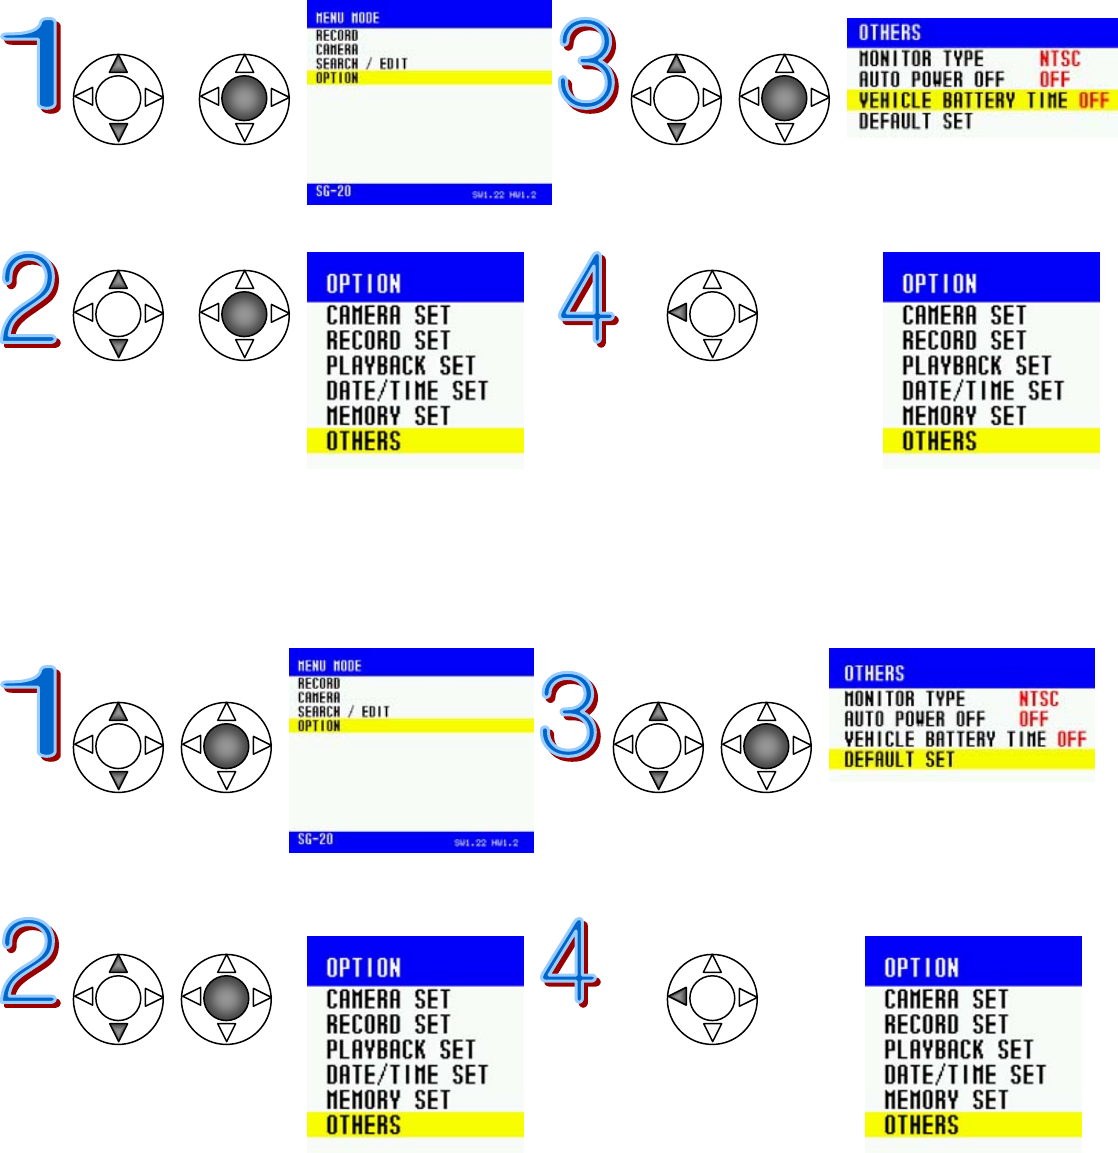
<Vehicle Battery Time>
When you set Recording Type to Vehicle Recording, you can change the battery recording time from 1
minute to 120 minutes. Turn it OFF to stop recording when the vehicle ignition is off. Or turn ON to record
until the battery is exhausted. The default set value is 1 minute.
Move to [Option] Move to [Vehicle Battery Time]
Press the center button Change the value
Move to [Others] Go back to
Press the center button Previous Screen
<Default>
This function is to change the values set in all the menus back to its default state. Note that all the values changed
by the user will be deleted once you apply this function.
Move to [Option] Move to [Default Set]
Press the center button and Confirm
Move to [Others] Go back to
Press the center button Previous Screen
37
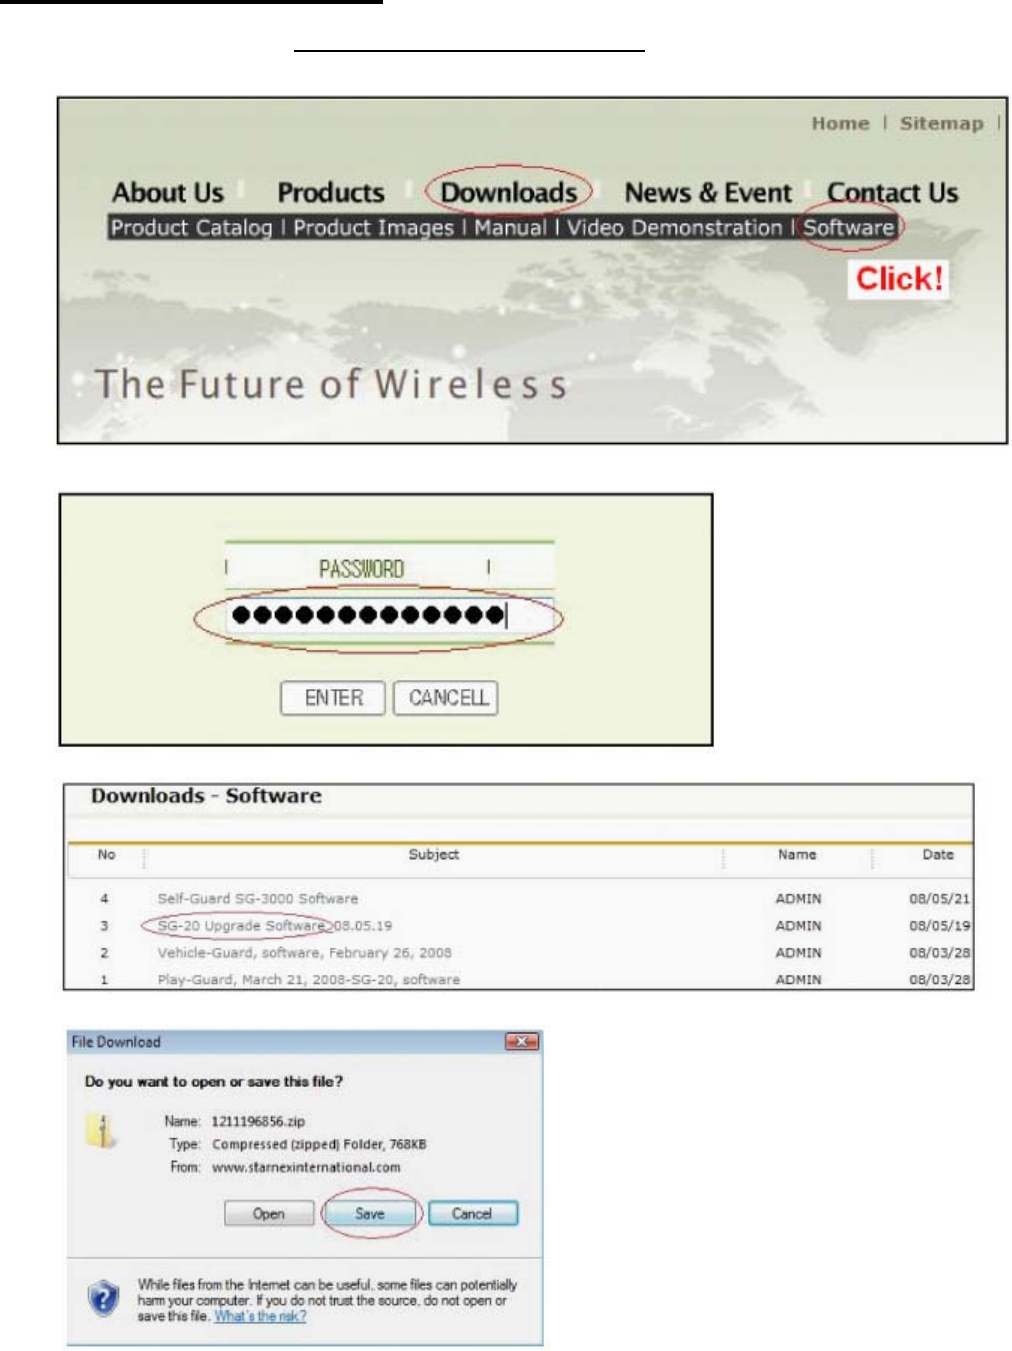
How to Upgrade CamBall
Visit STARNEX Website, www.STARNEXinternational.com to download the file for Upgrade.
Input the product serial number.
38
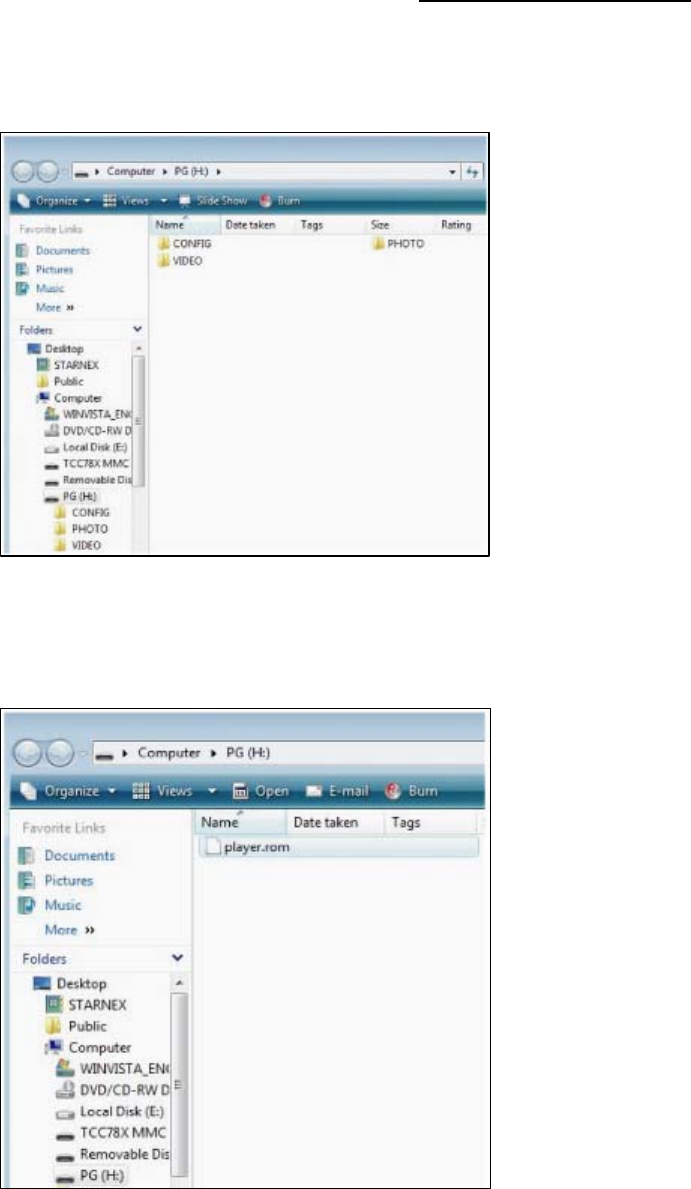
1. When CamBall is connected to PC, regardless of existence of Micro SD Card, 2 disks will be created.
The disk name for the Built-in memory is [PG] and the name for the micro SD card is [PG SD]. In the [PG]
drive, there are 3 folders of CONFIG, PHOTO, and VIDEO. You must delete the CONFIG folder from the
Drive. Please note that you have to format the Micro SD card at least once in the menu mode to see the
disk name to read [PG SD], otherwise it will display a different disk name.
2. Copy the upgrade file into this Drive and disconnect CamBall from PC. In about 5 seconds, the unit
turns off the power for you to turn on again for upgrade.
3. You can find the new version number from the [Menu Mode] to check for the successful upgrading.

39
Warranty Guide
This product has passed through quality control and testing. If this product shows any manufacturer’s defects during
normal use, then there is a 12 months warranty service period from the date of purchase. Check this warranty sheet
first. Please contact the distributor or dealer after checking out any problems with the product. The standard for
repairing, replacement or reimbursement follows Customer.
Warranty Content
Any defects under normal use within the warranty service period guarantee you free repair service according to the
warranty sheet.
In the event of one or more of the following, the service fee and parts will be paid by the owner.
1. Any breakage resulting from negligence.
2. Breakage or problems caused by natural disaster.
3. Breakage or trouble made by breaking the product guide or manual.
4. Breakage or trouble made by wrong power voltage or frequency.
5. When you want to resemble for full system or replace parts within warranty service period.
6. When an unauthorized engineer modified or damaged the product trying to repair it, we may charge you with the
fees.
We don’t support the breakage after the warranty service period. If the customer wants to get it repaired, we charge
them with the fee.
Product Warranty Service Registration
Product & Model name
Product serial number
Distributor or Agency
Date you purchased
Warranty period 12 months
Name
Customer Address
* This warranty registration will not be provided again.
* Please fill out the warranty as soon as you purchase the product.
* You should show this warranty service sheet when you get any type of warranty service.

40
FCC NOTICE
•
The
device
complies
with
Part
15
of
the
FCC
Rules.
Operation
is
subject
to the
following
two
conditions:
(1)
this
device
may
not
cause
harmful
interfer-
ence,
and
(2)
this
device
must
accept
any
interference
received,
including interference
that
may
cause
undesired
operation.
•
This
equlpment
has
been
tested
and
found
to
comply
with
the
limits
for
a Class
B
digital
device,
pursuant
to
part
15
of
the
FCC
Rules.
These
limits
are
designed
to
provide
reasonable
protection
agalnst
harmful
interference
in
a residential
installation.
Cautions
Modifications
not
expressly
approved
by
the
party
responsible
for
compliance could
vold
the
user’s
authority
to
operate
the
equlpment.
Note
This equipment has been tested and found to comply with the limits for a Class B digital device, pursuant to Part 15 of the FCC Rules.
These limits are designed to provide reasonable protection against harmful interference in a residential installation.
This equipment generates, uses and can radiate radio frequency energy and, if not installed and used in accordance with the instructions, may cause harmful
interference to radio communications. However, there is no guarantee that interference will not occur in a particular installation.
If this equipment does cause harmful interference to radio or television reception. which can be determined by turning the equipment off and on, the user is
encouraged to try to correct the interference by one or more of the following measures:
-- Reorient or relocate the receiving antenna.
-- Increase the separarion between the equipment and receiver.
-- Connect the equipment into an outlet on a circuit different from that to which the receiver is connecntd.
-- Consult the dealer or an experienced radio/TV technician for help.