Stormblue MP-500 MP3 Player User Manual Manual eng
Stormblue Co., Ltd. MP3 Player Manual eng
Users Manual
Table of Contents
Cautions
List of Items
Product Introduction
-Feature
-Name of Parts
-Menu Structure
Software Installation
-Installing software to PC
-How to use manager program
(Firmware Upgrade & Font Download)
-X-manager for MP3
-Driver Installation
File Download/Upload
-Connecting to a Computer
-File Download /Upload
-Formatting
-Disconnecting from PC
<Function of MP3 Player>
Basic Function
Play Mode
-Playing Audio Files (MP3/WMA)
-Listening voice and recorded FM file
Recording
-Voice Recording
-Line-IN Recording
FM Radio mode (Listening & Recording)
-Searching FM Frequencies
-FM Preset
-FM Recording
Delete
-Delete File or Folder
<Additional Function>
-Repeat Mode
-Select EQ
-Folder Menu
-Play Speed
-FM BAND Setting
-Navigation Mode
-Repeat A-B Mode
-System Setup
Production Specification
Product Specification
Troubleshooting
Warranty
Digital Audio Player, Xuke
XUKE is a PLUG & PLAY type portable digital audio player that supports MP3 and WMA multi
file formatting, FM Radio, Voice Recording and encoding function. Xuke uses Li-polymer
rechargeable battery which allows for more than 11hours non-stop play from 2 hour USB
Charge. Xuke also provides GUI (Graphic User Interface) and Firmware Upgrade that allow the
user operate various functions more easily and quickly. Please visit our worldwide web-site at
www.stormblue.co.kr and upgrade your firm-ware with the newest firmware function.
This equipment has been tested and found to comply with the limits for a class B digital
device, pursuant to Part 15 of the FCC Rules.
These limits are designed to provide reasonable protection against harmful interference in a
residential installation. This equipment generates, uses and can radiate radio frequency
energy and if not installed and used in accordance with the instructions, may cause harmful
interference to radio communications. However, there is no guarantee that interference will
not occur in a particular installation. If this equipment does cause harmful interference to radio
or television reception, which can be determined by turning the equipment off and on, the user
is encouraged to try to correct the interference by one or more of the following measures:
-Reorient or relocate the receiving antenna
-Increase the separation between the equipment and receiver
-Connect the equipment into an outlet on a circuit different from that to which the receiver is
connected
-Consult the dealer or an experienced radio/TV technician for help
This device complies with Part 15 of the FCC Rules. Operation is
subject to the following two conditions: (1) this device may not cause
harmful interference, and (2) this device must accept any interference
received, including interference that may cause undesired operation.
**CAUTION: Changes or modifications not expressly approved by the party responsible
for compliance could void the user's authority to operate the equipment.
To maintain good performance
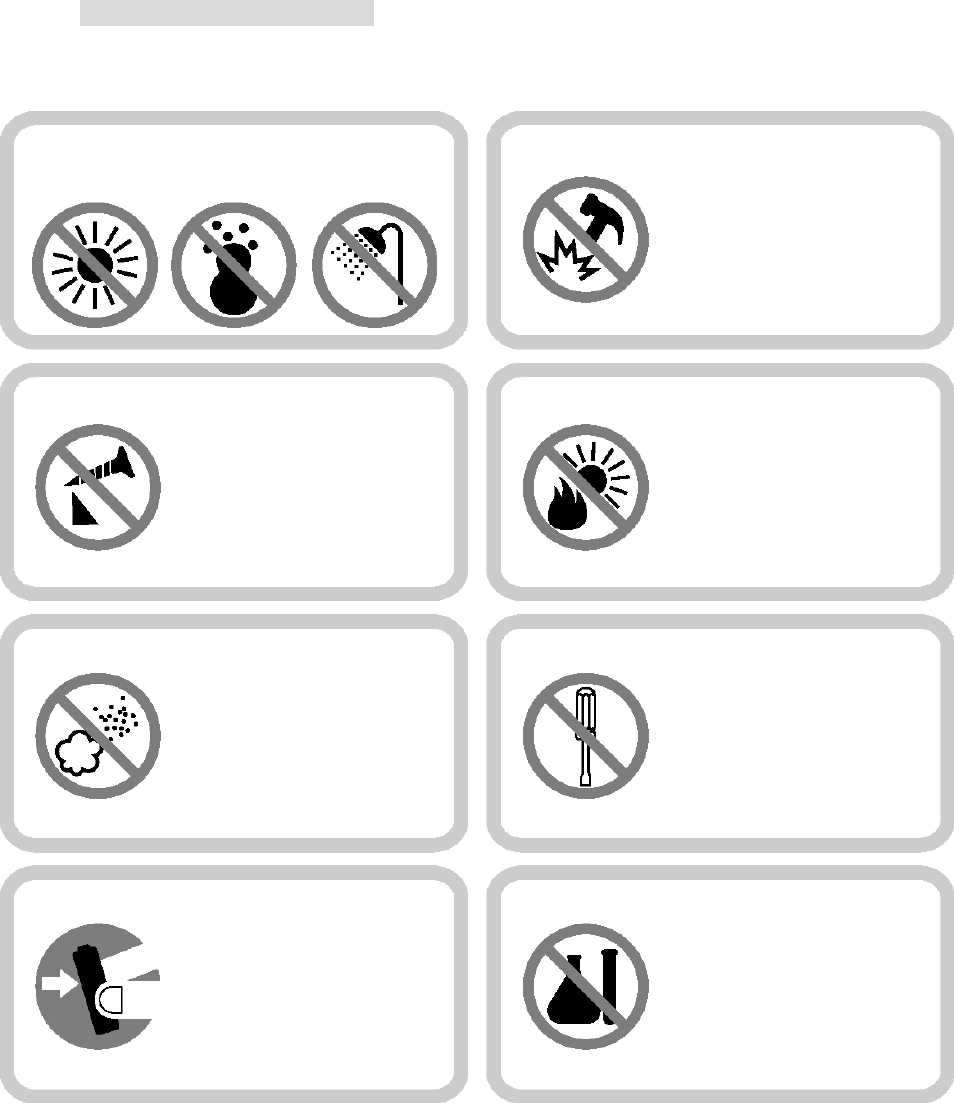
<To maintain good performance>
Do not drop or cause
impact the product.
Avoid high or cold temperature and
moisture.
Do not have other
different things in the
product.
Avoid direct sunlight, high
temperature from heating
device.
Avoid placing the
product under high
moisture or dust level
Never disassemble,
repair or rebuild
Do not place an
y
magnetic device
near the product.
Do not use thinner,
alcohol, or benzene
when cleaning the
product
<Safety >
- Do not shake or apply heavy shocks on the product
It might be the cause of malfunction or damaged
-Avoid contacting the product with water
This may cause serious damage to the product. If the player gets wet, wipe with a soft
towel or rag as soon as possible.
<Using your headphones/earphones>
-Do not wear earphones while driving an automobile, bicycle, or motorcycle. Not only it is
dangerous, but it is also illegal in some jurisdictions.
-Listening to the player at full volume level for extended periods result in hearing damage.
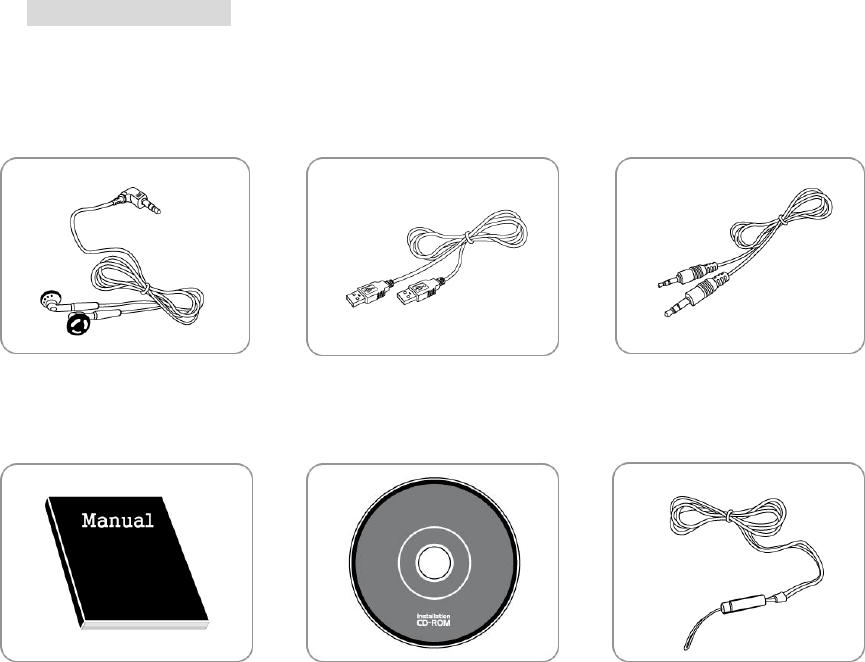
Included Accessories
* Items can be changed without notice to increase the performance or quality of the product.
Earphones USB Cable
User’s Manual Install CD
Arm Band
(Optional)
Neck Strap
Audio Cable
Carrying Case
(Optional)

Product Introduction
-Feature
Multi-Codec Player
Supports both MP3 and WMA file format
Firmware Upgrade
Firmware download are available to easily upgrade the newest functions on this product.
Multi Languages Support with Graphic LCD
Display localized file names in 35 languages with graphic LCD screen.
FM Radio Listen and Record
Worldwide range/Auto-search/user defined pre-set frequencies
7-Mode EQ
Supports a 7-Mode EQ for best listening: FLAT, POP, ROCK, LIVE, CLASSIC, VOCAL, DBASS
Support (Graphic User Interface) MENU
Enjoy GUI and well structured MENU tree.
Support Direct Encoding
Supports direct encoding features that accepts output from external audio sources.
Easy Navigation
All files can be stored in folders for easier access and organization.

-Name of Parts
(Front)
(Side)
(LCD Display)
`
Microphone
Earphone Jack
Volume +
Power ON/OFF
(MODE SW)
Volume -
LCD Display
USB Connector
CAP
A-B
REC
HOLD KEY
LINE IN
①
①
④ ⑤ ⑥ ⑦
⑪
②
③
⑧
⑨ ⑩
① Play Mode
② Artist & Music Title
③Played Time Display
④ EQ
⑤ Play Speed
⑥ Lock
⑦ Total Number of Music File
⑧ Current Track Number
⑨ File Name
⑩ SAMPLE RATE
⑪ BIT RATE
⑫ Display Battery charge status
⑫
Reset Button

(Button Table)
Function Key Operation Activation
☞ If the music files selected, play the selected music file
If the folder is selected, move to the selected folder
Click
☞ Move to the MENU Mode
▶/■
(Play/Stop)
Long Click ☞ Power OFF
Volume +/- Click ☞ Move up/down and select the desired folder or song
FF Click ☞ Move to the selected folder, if the file is selected
REW Click ☞ Move to the upper folder
☞ Set up the block repeat mode
Click ☞ Stop the block repeat mode AB/REC
Long Click ☞ Delete the selected folder or file
☞ Select the mode
Click (Play → FM → Line - in)
Power On
(MODE SW)
Long Click ☞ Move to the MENU mode

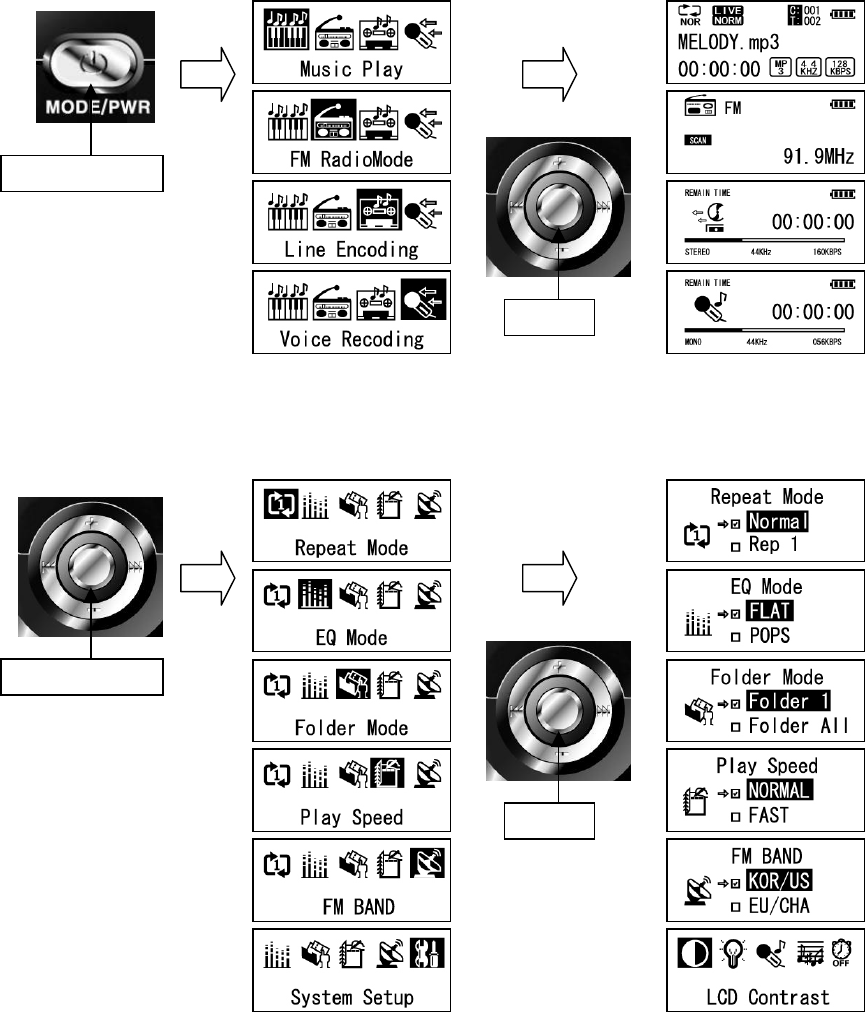
-MENU Structure
EQ Repeat Folder
Play Speed FM BAND System Setup
-Normal
-Rep 1
-Rep All
-RANDOM
-Intro
-FLAT
-POP
-ROCK
-LIVE
-CLASSIC
-VOCAL
-DBASS
-FOLDER 1
-FOLDER ALL
-SLOW
-NORMAL
-KOR/US
-EU/CHA
-JAPAN
-LCD Contrast
-Backlight Time
-VOICE REC Setup
-AUDIO REC Setu
p
-OFF Time Setup
-Format
-Language Select
-F/W Upgrade
-EXIT

Software Installation
1) For Windows 98/SE
The software should be installed before using the product. For Firmware Upgrade, install
Upgrade program after installing Windows 98/SE driver.
2) For Windows 2000/ME/XP
The software only needs to be installed for format the player
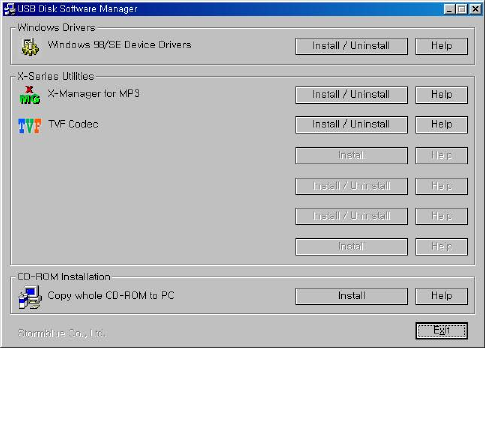
-Installing Software to PC
- Insert the provided CD in the CD-ROM of PC and follow the below instructions. Below screen
will be appear.
If it does not run automatically, run “Setup.exe” file from the install CD
* For Windows 98/SE
In Windows 98/SE, USB MP3 Disk cannot be recognized in the PC without USB Drive installation.
(How to Install)
- Click Install/uninstall button from ‘Windows 98/SE USB Drive installation from the manager
program. (Cannot be installed in Windows ME/2000/XP)
[Manager program]
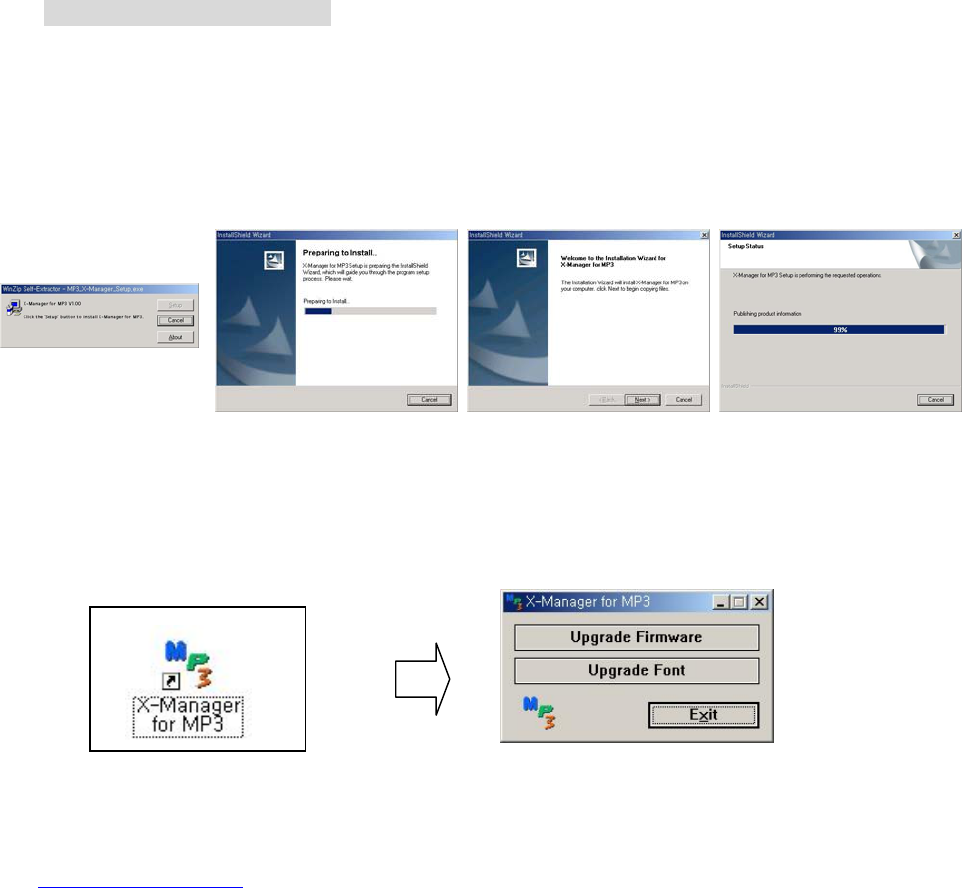
How to use Manager Program
* X-Manager for MP3
- This is an exclusive program to upgrade the newest firmware and the font for MP3 Player.
You may install this program with the sequence as follows.
-Click Install/uninstall from ‘X-Manager for MP3’ from the manager program.
(Upgrade Firmware)
1. When the installation is finished, ‘X-Manager for MP3’ icon is created in the Window and the
following program appears.
2. The newest Firmware / Font Data download is available from the web-site
( www.stormblue.co.kr).
3. ① Firmware download : Click ‘Upgrade Firmware’ button and download the upgrade file to a
folder you want.
[Finish][Step2][Step1]
[ICON] [X-Manager Program]
[Start]
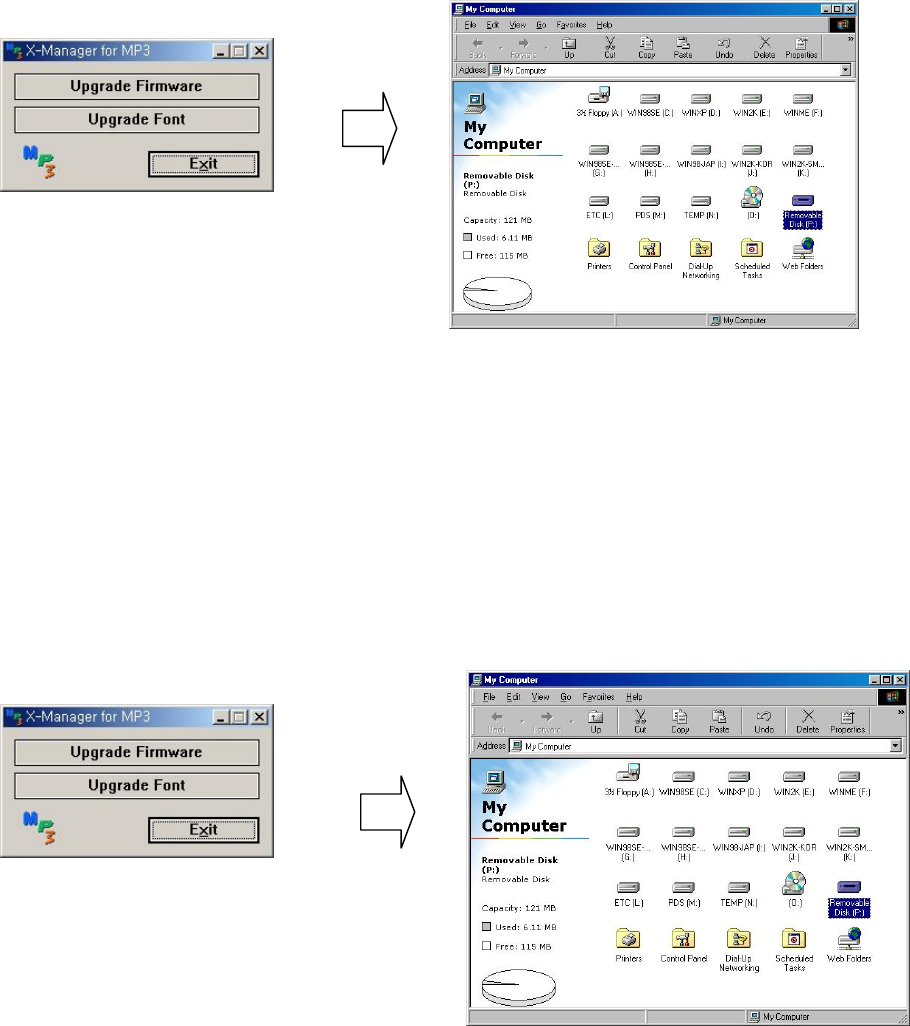
*Warning) During the upgrade work, do not disconnect or execute other programs on the same PC.
If so, fetal errors may occur in the PC or product.
②Font Upgrade: For font upgrading, click ‘Upgrade Font’ button and download the upgrade
file to a folder you want.
Connect to PC & File Download/Upload
-Connecting to PC
(Notice)
Turn the player on before connecting to PC.
If so not, the PC cannot recognize the player as the removable disk.
Earphone should not be inserted into the Player when the player is connected to PC.
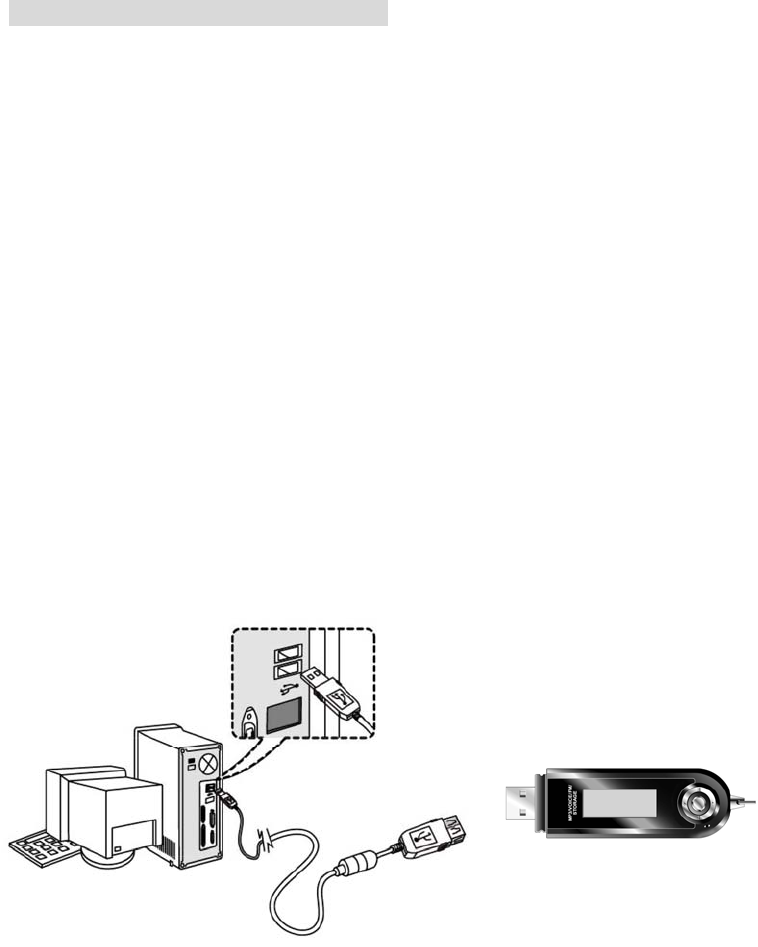
1.Connecting the player to a PC directly
Open the cap of the player and connect the USB Port to the USB Port on PC.
2. Connecting the player to a PC using a USB Cable
Connect one end of the provided USB Cable to one of the USB Port on the PC, and connect the
other end of the player.
- File Download / Upload
Turn the player on and connect to PC. The Player supports PLUG & PLAY. The product will be
automatically recognized as removable disk on.
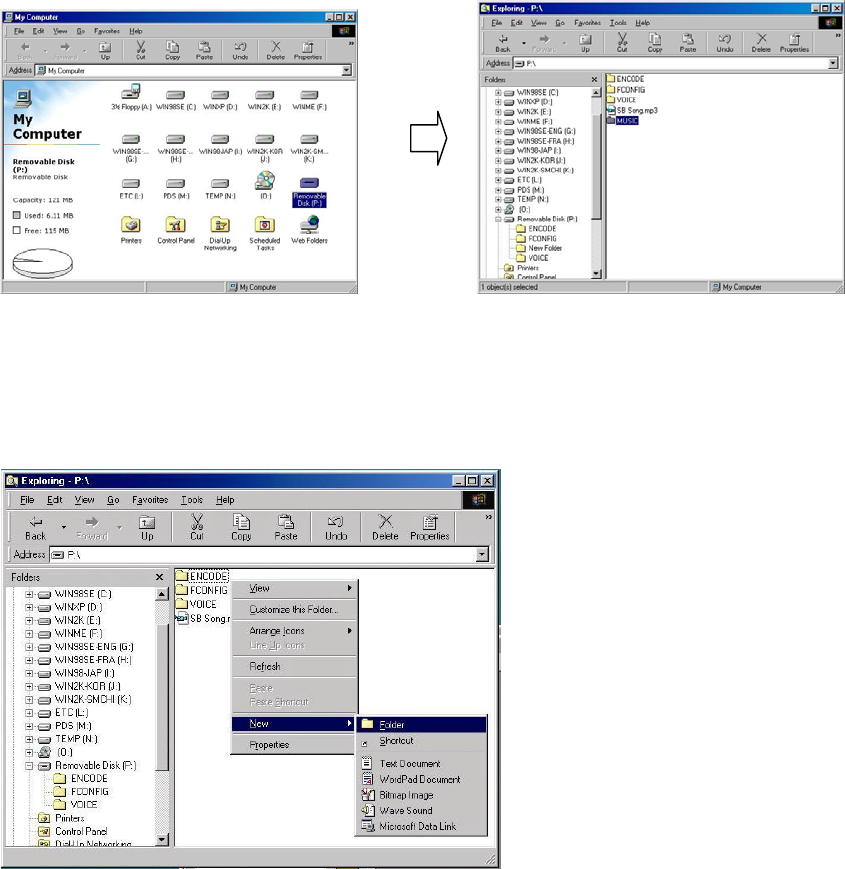
* Making new folder on the player
1. Open Windows Explorer and select the removable disk.
2. Select the new folder with Right click on mouse.
3. New folder is created. Try the desired name in the new folder.
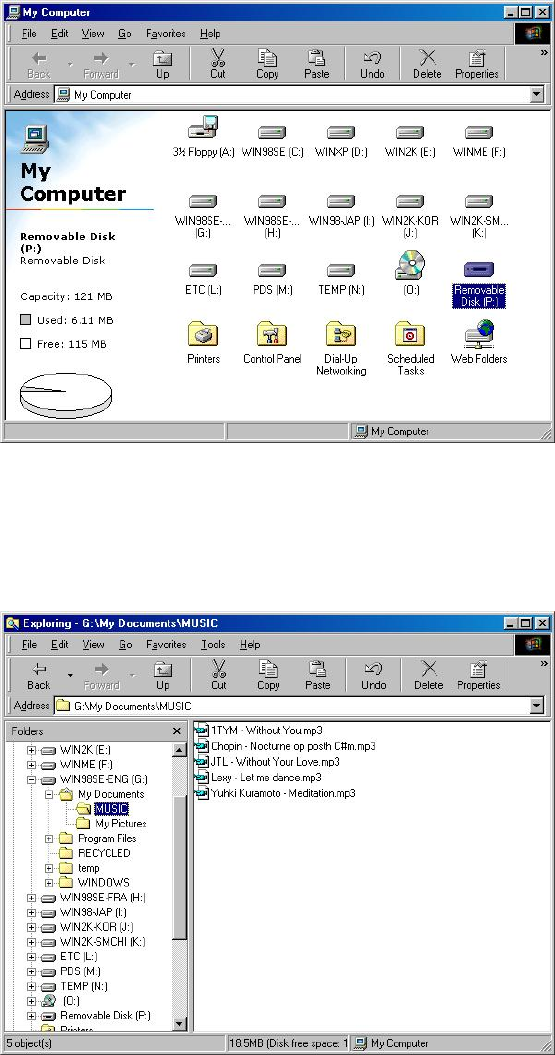
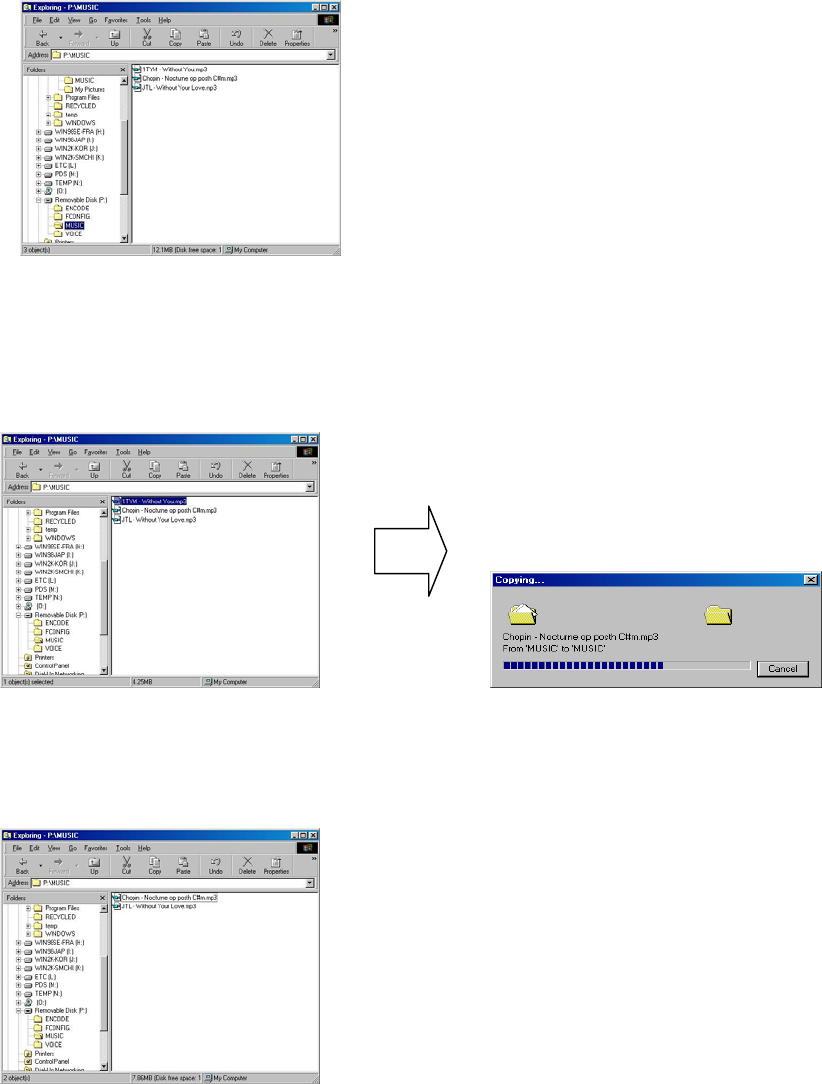
* Downloading the files or folders from PC to the player
1. Select the files or folders on the PC to transfer to the player.

2. Select the desired folders or files on the player.
3. Download is completed to the player.
Transferring
*Deleting the files or folders on the player
1.Select the files to delete.
2.Select “DELETE” from MENU mode. A warning message “Are you sure?” is displayed on the
LCD. Choose “YES” to delete.
3.Deleted is completed.
-Formatting
Move to the Windows Explorer and select the removable disk to click file formatting.
Note: Format will delete all files in the player. Back-up the important data before formatting and
format with only FAT16 region. FAT32 is not supported.
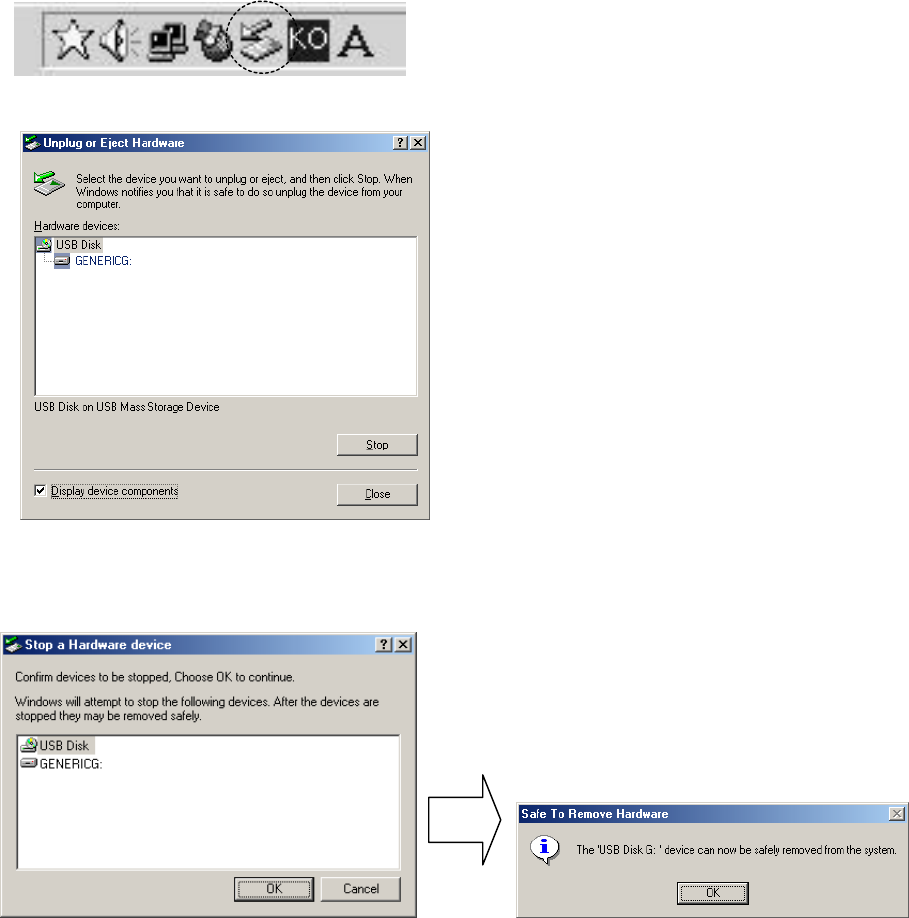
-Disconnecting from the PC
Before disconnecting the player from the PC, double click on the green arrow icon the toolbar
located at the bottom right of the screen.
Click on the stop USB Mass Storage Device. ,
When the dialogue box “ Safe Removable of the hardware” displayed on LCD, click “OK” to
disconnect the player from PC.
*NOTE: Fatal error may occur in the PC or the player if the player is removed during the above
procedures.
<Function>
Basic Operation
1. Power On/Off
- Press Power ON/OFF (MODE SW) button over 1 second will turn the power on. Press the
same button again over 1 second will turn the power off.
* NOTE: The power will turn off automatically if there is no action in Stop mode within
the configured Auto Off time
2. Music Playing
- Press ▶/■ (Play/Stop) button and select Play mode at the main Menu to play Audio File.
Press the same button for Pause function. Moving forward or backward the file, use the jog
key to FF(►►) or REW(◄◄) shortly.
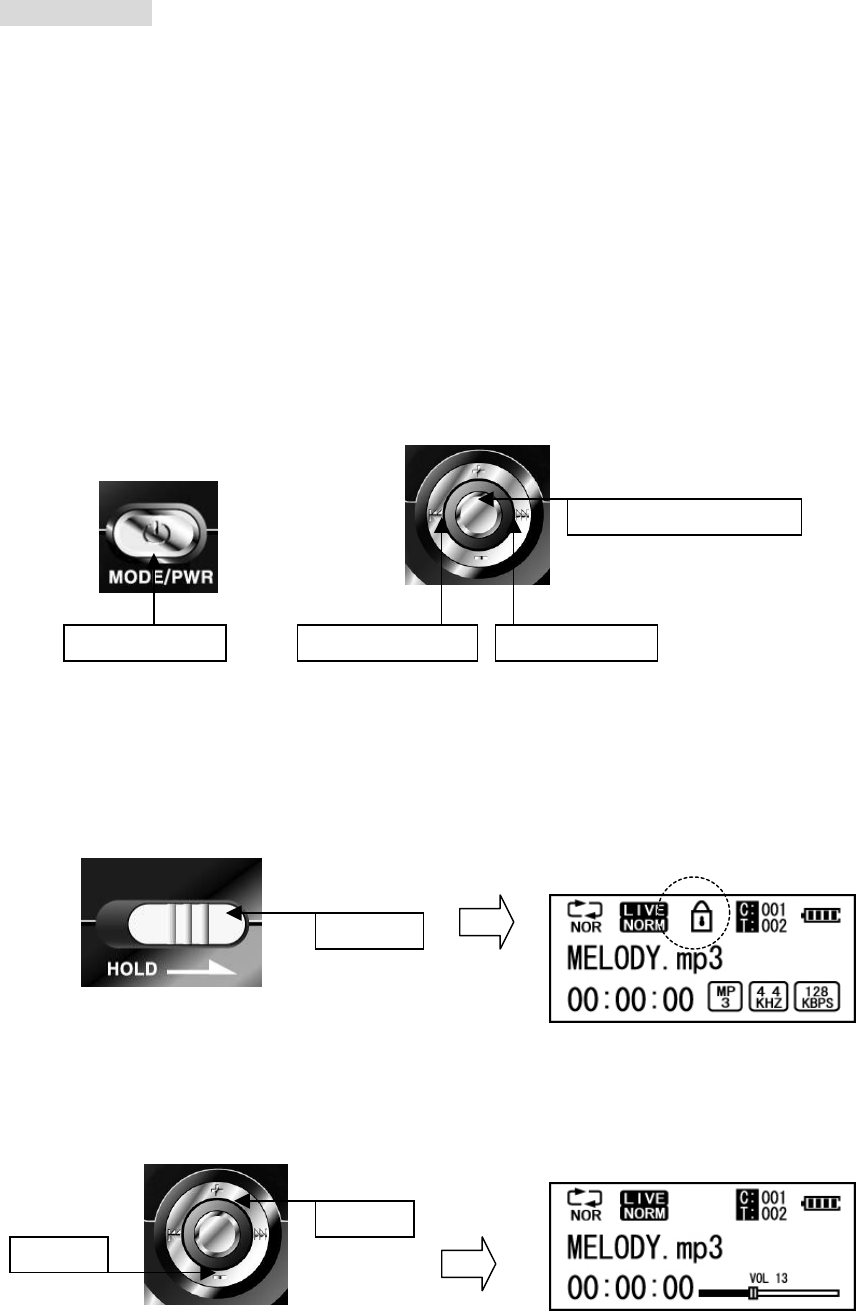
2. Configuring the lock function
The function disables all the product’s buttons to avoid unintentional button operation.
Hold is set with a padlock icon displaying for 3 second on the LCD
3. Volume Control
Use the jog key to ◄◄ or ►► to increase or decrease the volume level.
(31 Steps from 0 to 30 are available)
Power/OFF REW(◄◄) FF(►►)
▶/■ (Play/Stop)
HOLD
(+) Up
(-) Down
4. Entering MENU
- Press Power ON (MODE SW) button shortly to enter the MODE (Play, FM, Encoding,
Voice Recording)
- Press and hold the ▶/■ (Play/Stop) button and move to Setup Menu.
Click
Long Click
Click
Click
Play Mode
-Listening MP3 File
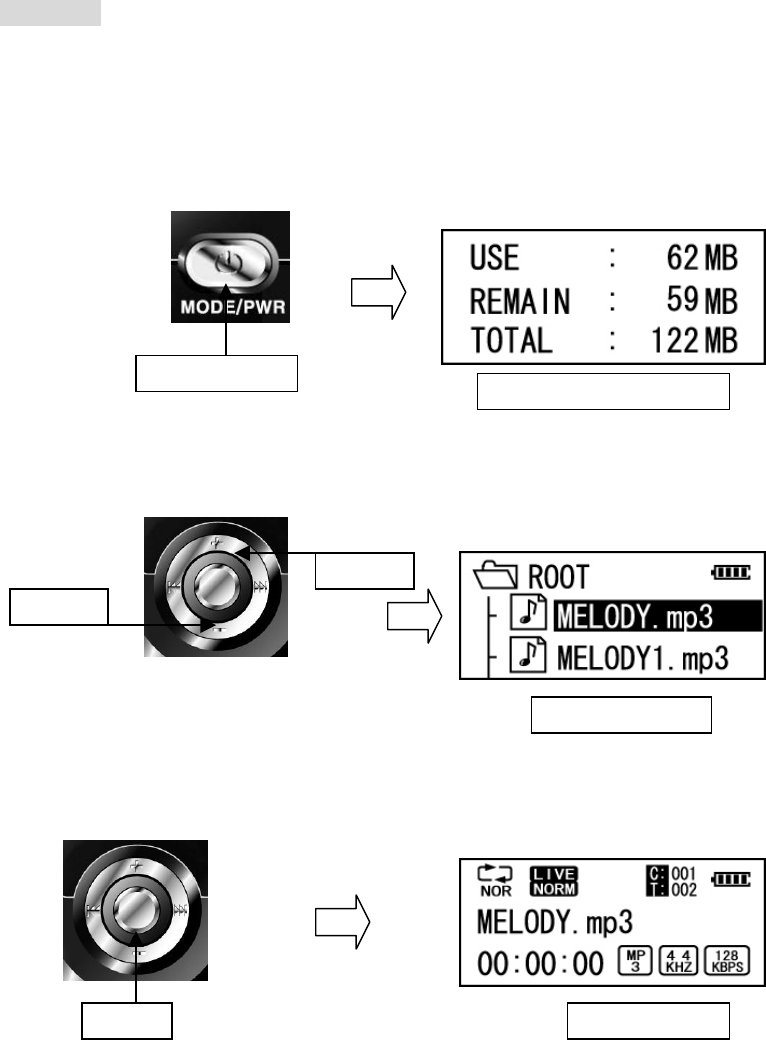
1. Press and hold the Power ON (MODE SW) button to turn the player on.
* NOTE: The capacity will be displayed as shown below. The player will be started at the
last position.
2. Select the desired file to listen by using the jog key to ◄◄ or ►►
3. Press the ▶/■ (Play/Stop) button and the selected file will be played.
Long Click
(+) Up
(-) Down
Click
Select the file
Play the file
Display the Capacity

4. Key Function in the play mode
Key Press length Activation
Briefly ☞ Pause the playing file and move to Navigation Mode
▶/■
(Play/Stop) Over 1 Sec ☞ Move to MENU Mode
Briefly ☞ Increase or decrease the volume level step by step
Volume +/- Over 1 Sec ☞ Increase or decrease the volume level faster
Briefly ☞ Move to the next file
FF
Over 1 Sec ☞ Fast Forward
Briefly ☞ Move to the previous file
REW Over 1 Sec ☞ Fast Rewind
☞ Set up the block repeat mode
☞ Stop the block repeat mode
AB/REC Briefly
Repeatedly play only the setting block
☞ Select the desired Mode Briefly
(PLAY→ FM →Line-in Encoding→ Voice Recording)
Power ON
(MODE SW)
Over 1 Sec ☞ Power OFF
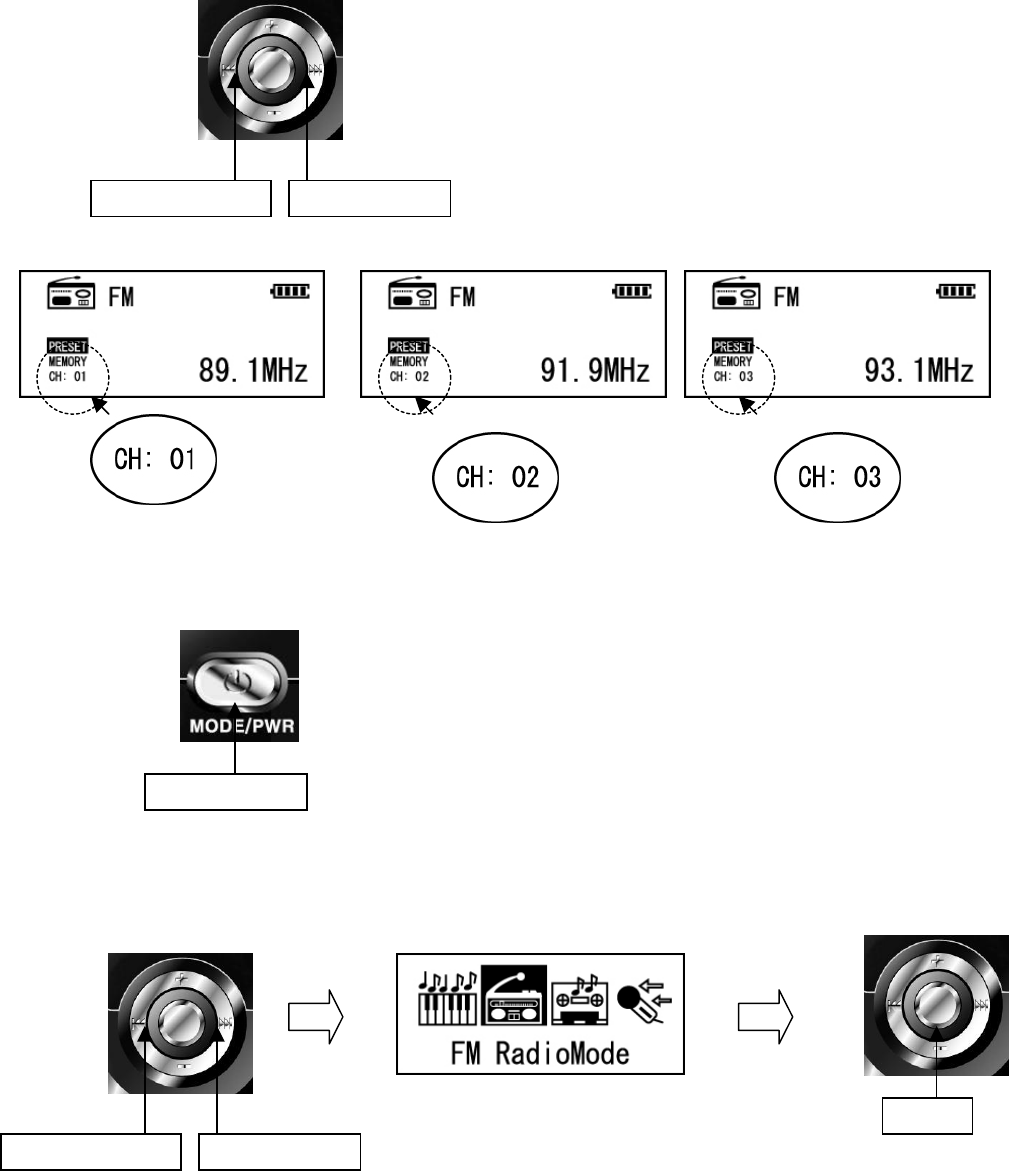
FM Radio Mode
NOTE: Earphone should be inserted into the Player to receive FM frequency since the earphone
works as an antenna
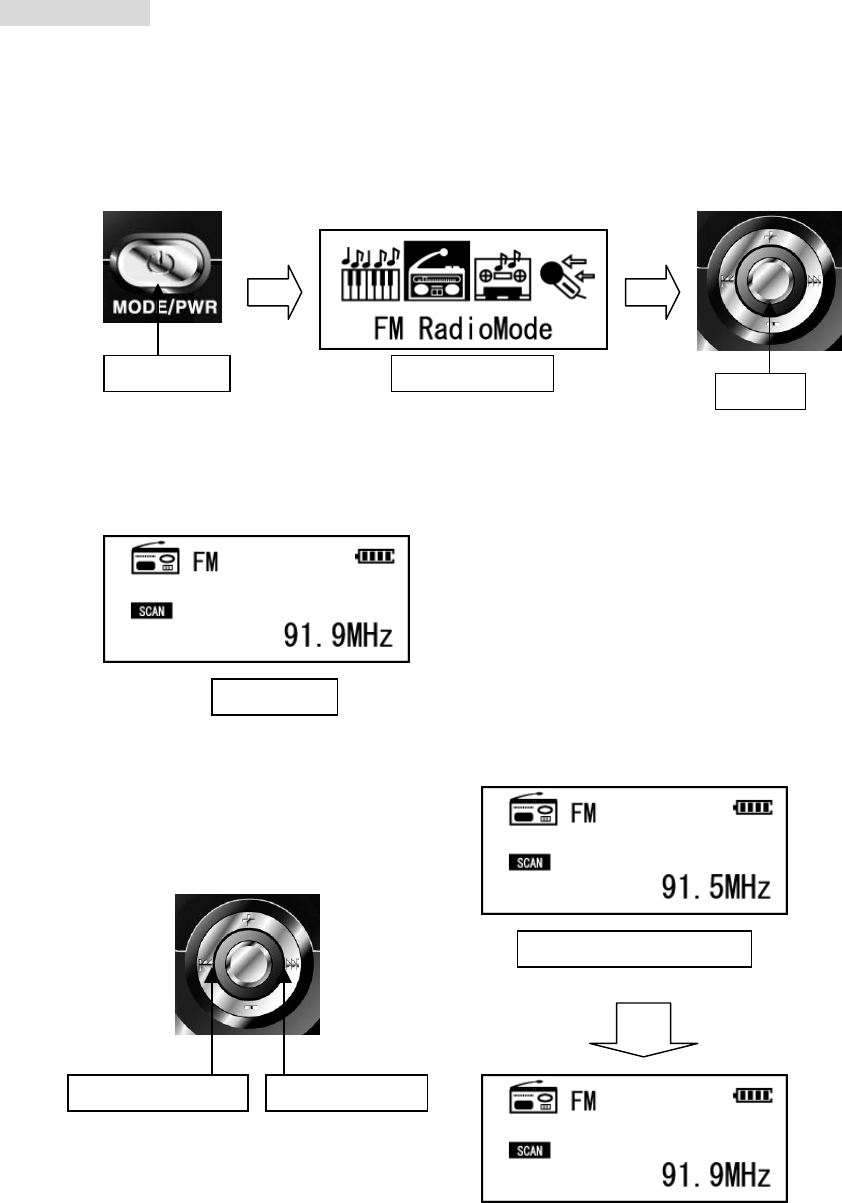
1. Press the Power ON/OFF (MODE SW) button to select FM Mode.
2. FM frequency is displayed as below.
3. Use the jog key to ◄◄ or ►► to search the desired channel.
Click Click
REW(◄◄) Down FF(►►) Up
Mode Select
FM Mode
Adjust the frequency
4. Key Function in FM Mode
Key Press length Mode Activation
☞ Select the SCAN Mode/ PRESET Mode Short
Record ☞ Pause the current FM recording
▶/■
(Play/Stop)
Long ☞ Move to MENU Mode
Short ☞ Increase or Decrease the Volume level
Volume +/- Long ☞ Increase or Decrease the Volume level faster
SCAN ☞ Increase the frequency one by one
SAVE ☞ Save the selected channels
Short
PRESET ☞ Save the selected channels from PRESET 01 to 20
FF
Long SCAN ☞ Search the next channel automatically
SCAN ☞ Decrease the frequency one by one
SAVE ☞ Save the selected channel
Short
PRESET ☞ Save the selected channels from PRESET 20 to 01
REW
Long SCAN ☞ Search the previous channel automatically
SCAN ☞ Save the selected channel
Save ☞ Save the selected channels with the Memory number
Short
녹음 ☞ Pause the current FM recording
AB/REC
Long ☞ Record FM Radio
☞ Select the mode
Short
(Play→FM→Line-in→Voice)
Power ON
(MODE SW)
Long ☞ Power OFF
Select the frequency
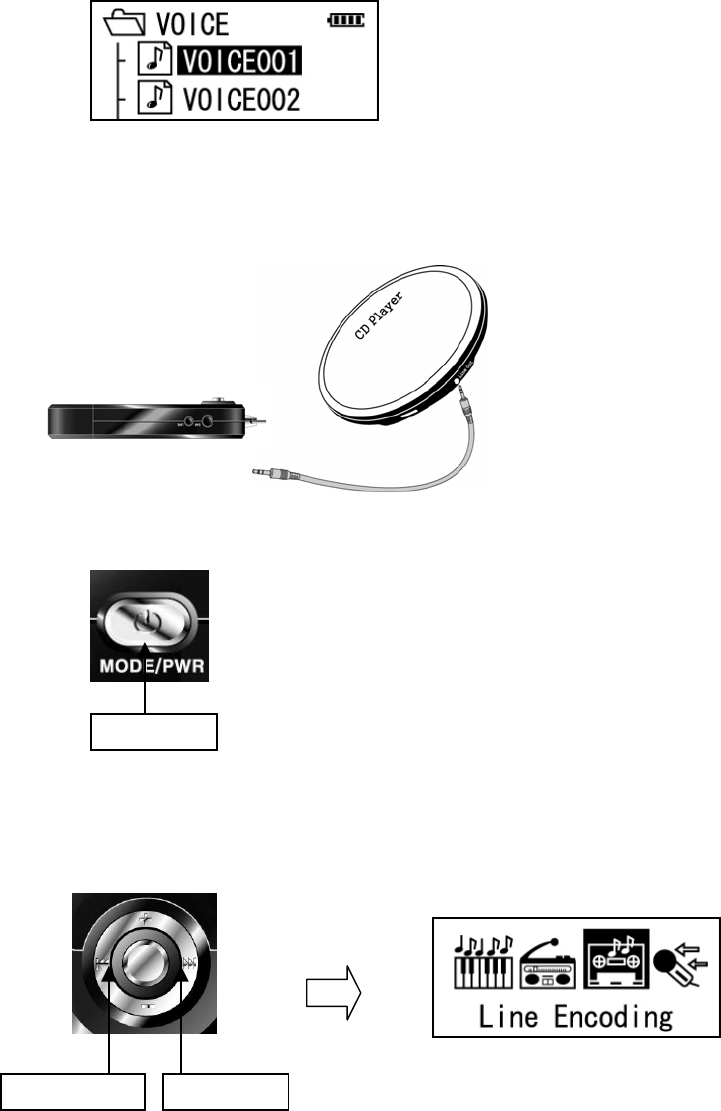
-Playing Voice and recorded FM file
(Playing Voice file)
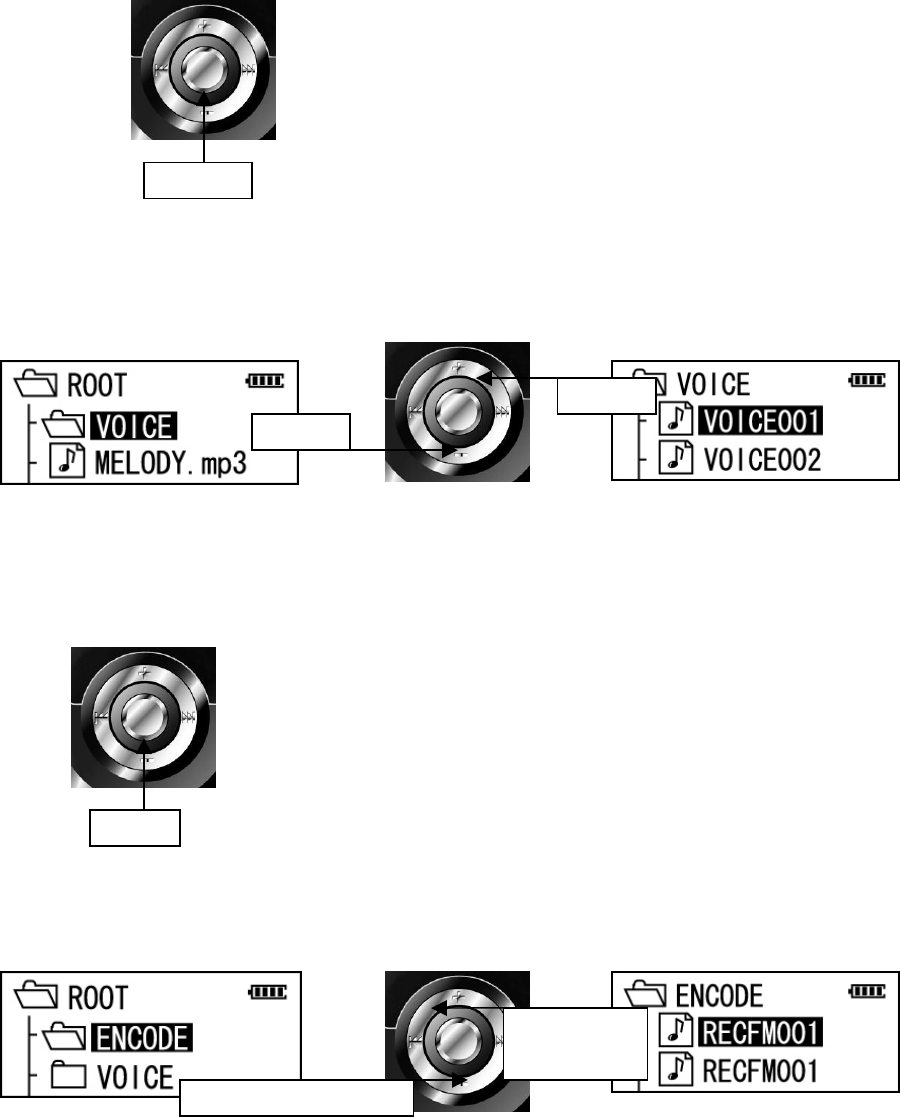
1. Press the ▶/■ (Play/Stop) button to stop the current operation.
2. Move to the VOICE folder and select the file to listen by using the Volume(+/-) jog key.
Note: The recorded file is stored as “VOICE001” “VOICE002” in the Voice folder.
3. Press the ▶/■ (Play/Stop) button and play the recorded file.
(Listen to the recorded FM Radio file)
1. Press the ▶/■ (Play/Stop) button to stop the current operation.
2. Move to the ENCODE folder and select the file to listen with Volume(+/-) jog.
Note: The recorded file is stored as “RECFM001.MP3” “RECFM002.MP3” in the ENCODE
folder.
Click
(+)Up
(-)Down
Click
(+)Select
folder or file
(-) Select upper folder
3. Press the ▶/■ (Play/Stop) button and listen the recorded FM Radio file.
Recording
-Voice Recording
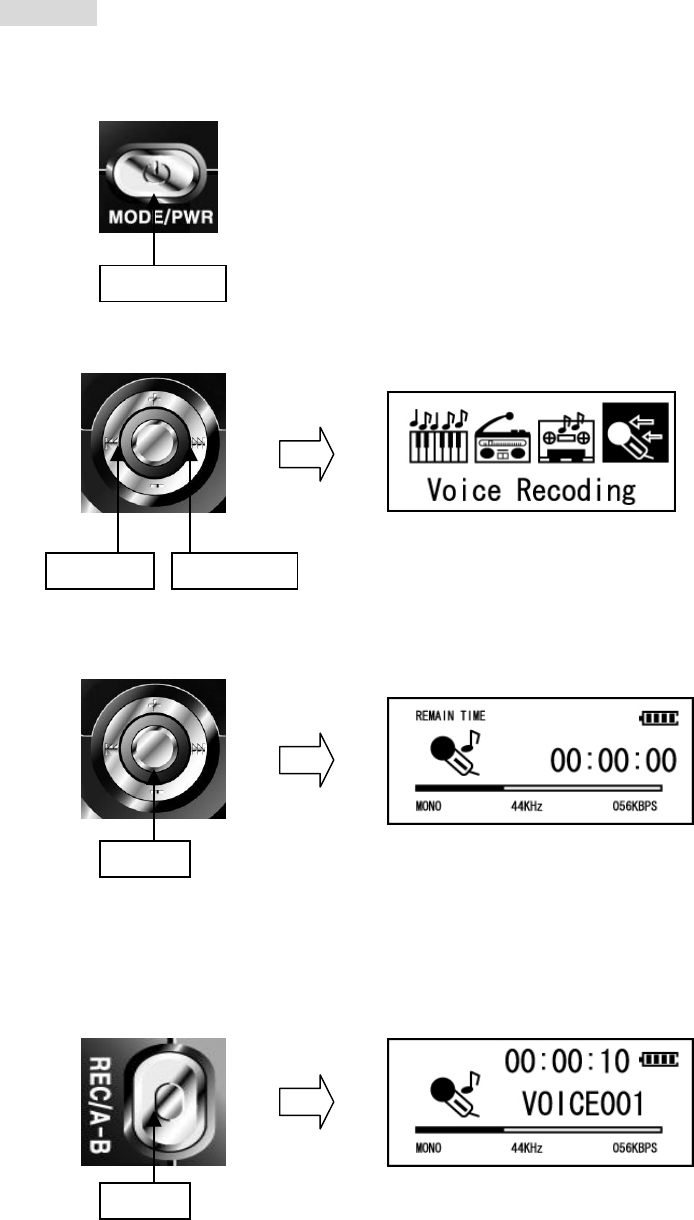
1. Press the Power ON (MODE SW) button.
2. Select Voice Recording Mode by using the jog key to ◄◄ or ►►
3. Press the ▶/■ (Play/Stop) button and move to Recording Mode.
4. Press the AB/REC button and voice recording starts.
NOTE: Press the AB/REC button to pause the recording process.
Press the AB/REC button again to restart recording.
Click
REW(◄◄) FF(►►)
Click
Click
5. Press the ▶/■ (Play/Stop) button to stop recording.
(The recorded file is stored as “VOICE001” “VOICE002” in the VOICE folder)
-Line-in Recording
1.Connect LINE OUT jack of the external audio source and the Line-IN jack of the player with a
audio cable as below.
2. Press the Power ON (MODE SW) button.
3. Select Line encoding mode by using the jog key to ◄◄ or ►►
Click
REW(◄◄) FF(►►)
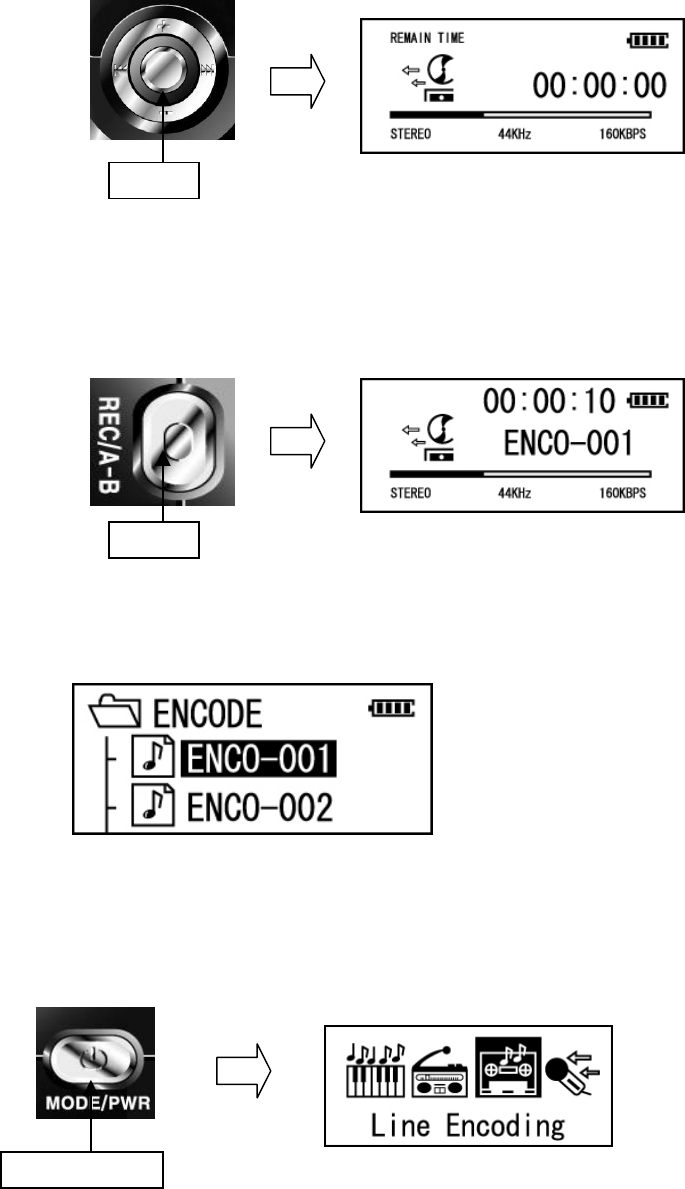
4. Press the ▶/■ (Play/Stop) button and enter Line Encoding mode.
5. Press the AB/REC button and voice recording starts.
*NOTE: Press the AB/REC button to pause the recording process.
Press the AB/REC button again to restart recording.
6. Press the ▶/■ (Play/Stop) button to stop recording.
(The recorded file is stored as “ENCO-001” “ENCO-002” in the ENCODE folder)
7. To play or move to the previous mode, press the Power ON (Menu SW) button. The
below screen will be displayed.
Click
Click
Click
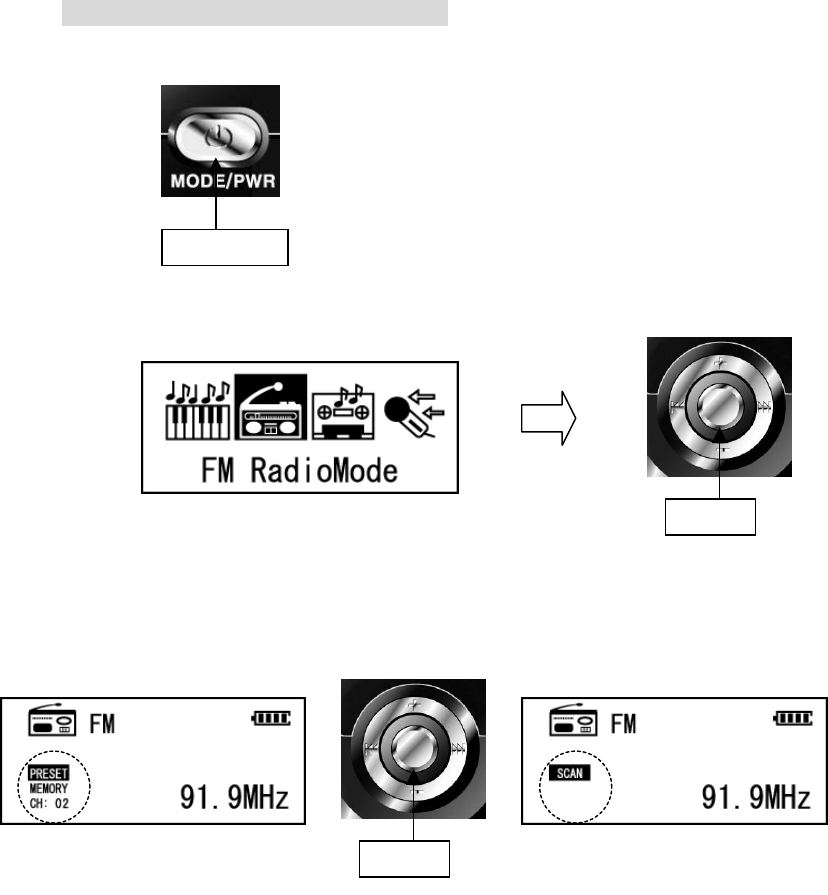
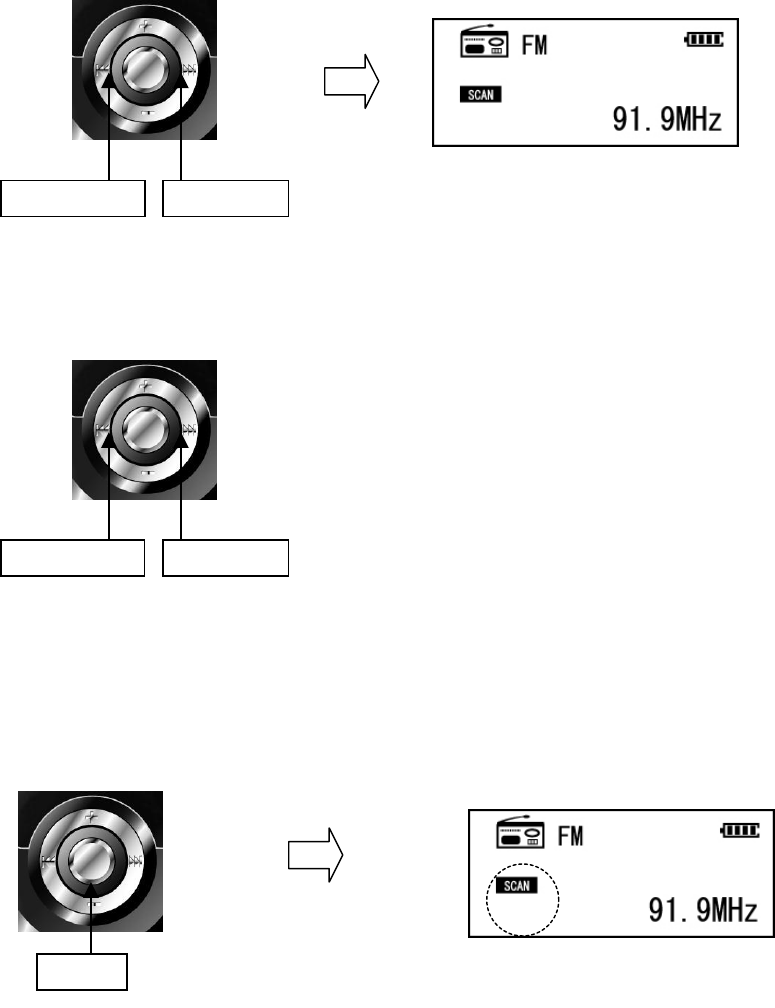
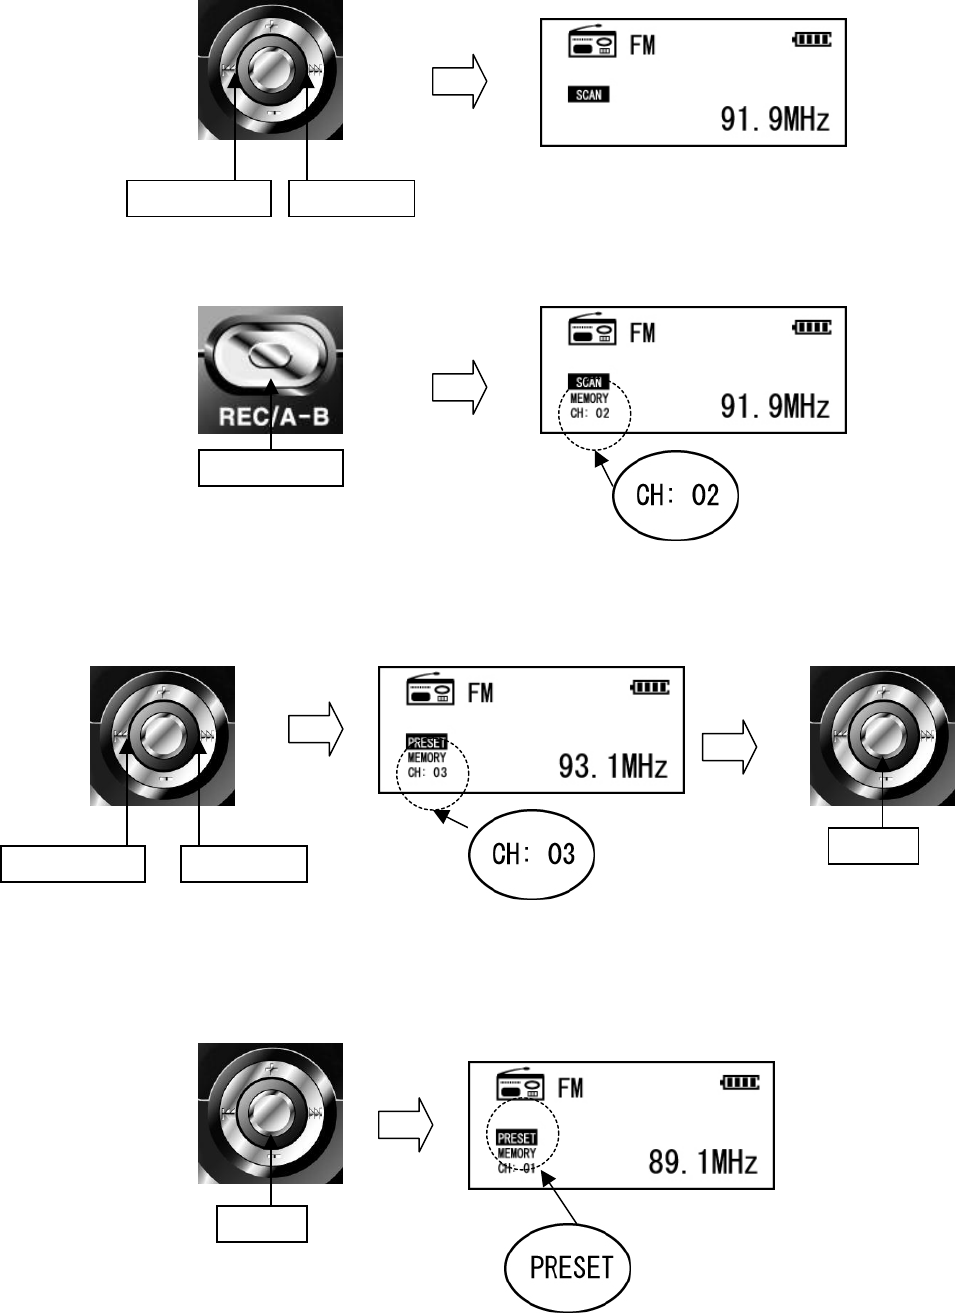
FM Radio Mode (Listening & Recording)
1. Press the MODE/PWR button.
2. Select the FM Radio Mode and press the ▶/■ (Play/Stop) button.
Press the ▶/■ (Play/Stop) button once more and choose the scan or preset mode.
2. Use the jog key to ◄◄ or ►► to select the channel or frequency.
NOTE: Earphone should be inserted into the Player to receive FM frequency since the earphone
works as an antenna
Click
Click
Click
[PRESET Mode] [Scan Mode]
-Turn to the desired frequency
Use the jog key to search the desired frequency to listen.
Auto Scan function: Press and hold the jog key to ◄◄ or ►►. The nearest channel is automatically
sought.
-Save FM Channels
1. Press the ▶/■ (Play/Stop) button and select the scan mode.
(Saving FM channel is not available in the Preset Mode.)
REW (◄◄) FF(►►)
REW (◄◄) FF (►►)
Click [Scan Mode]
2. Use the jog key to ◄◄ or ►► to select the frequency to save.
3. Press the REC/A-B button to save the selected frequency.
4. Search the desired Channel to save the selected frequency by using the jog key to ◄◄ or ►
►.
Press the ▶/■ (Play/Stop) button to store the selected frequency as the desired channel.
NOTE) This function may not work within weak transmission areas.
- Change the PRESET channels
1. Press the ▶/■ (Play/Stop) button and select the Preset mode.
REW(◄◄) FF(►►)
Long Click
REW(◄◄) FF(►►)
Click
Click
2. The saved channels are displayed as shown below by using the jog key to ◄◄ or ►►.
-Record FM Radio
1. Press the MODE/PWR button.
2. Select the FM Radio Mode by pressing the ▶/■ (Play/Stop) button to ◄◄ or ►►.
Click
REW(◄◄) FF(►►)
REW(◄◄) FF(►►)
Click
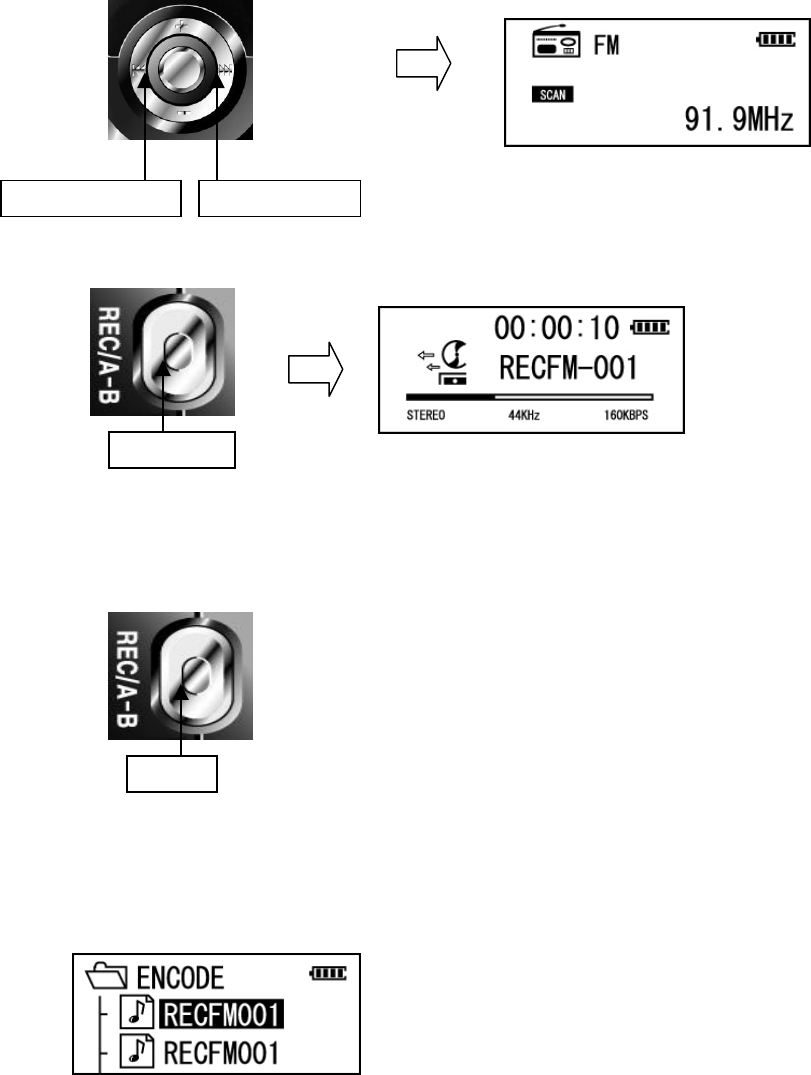
3. Search the desired FM Frequency.
4. Press and hold the REC/AB button and the recording starts.
5. Press the REC/AB button to pause the recording process.
Press the REC/AB button again to restart recording.
6. Press the ▶/■ (Play/Stop) button again to stop recording.
(The recorded file is stored as “RECFM001.MP3” or “RECFM002.MP3” in the
ENCODE folder)
Long Click
Click
REW(◄◄) FF(►►)
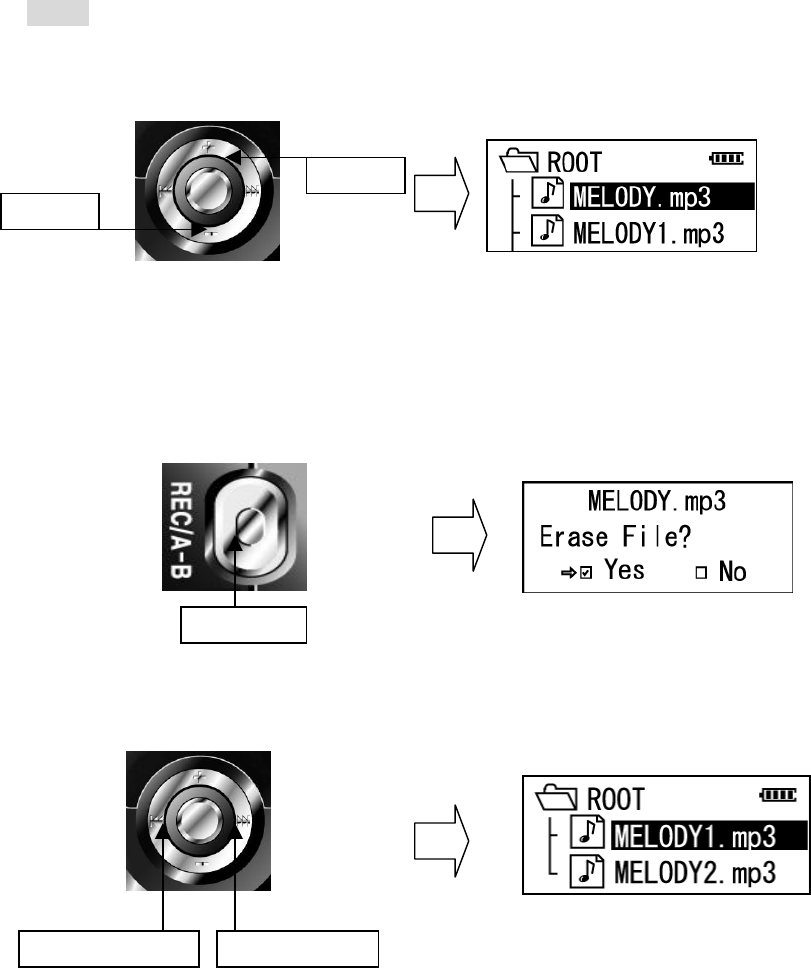
Delete
- Delete Files or Folders of the player
1. Select the files or folders to delete by using the Volume(+/-) buttons.
2. Press and hold the AB/REC button to delete.
“Erase?” is displayed on the LCD.
3. Use the jog key to ◄◄ or ►► to select “Yes” and press the Power ON (Menu SW)
button to delete the selected file or folder.
Notice) All music or voice files in the folder will be deleted. But if the text or other files exist
there, the folder is not deleted.
(+) Up
(-) Down
REW(◄◄) FF(►►)
Long Click
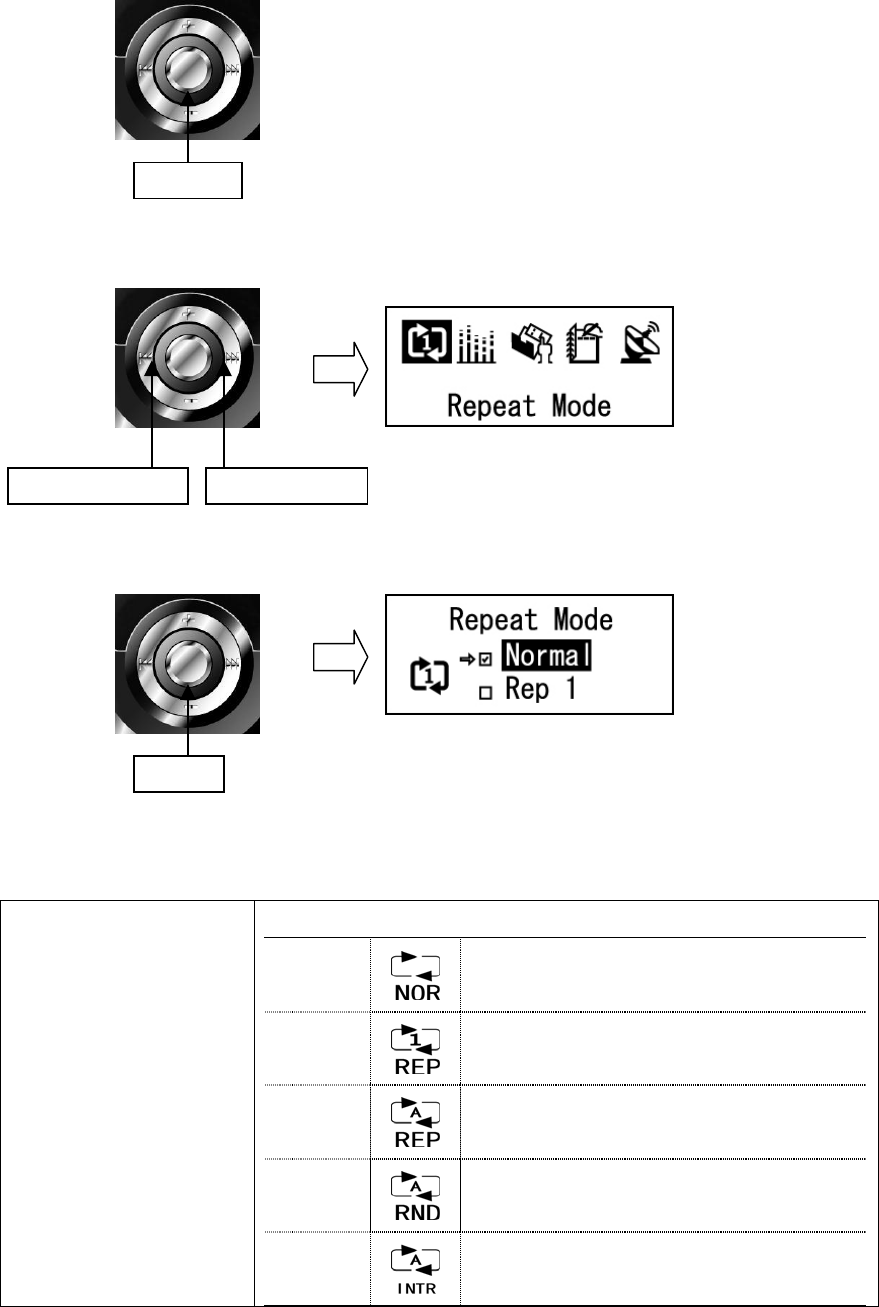
<Additional Function>
-REPEAT Mode
1. Press and hold the ▶/■ (Play/Stop) button.
2. Use the jog key to ◄◄ or ►► to select the Repeat Mode.
3. Press the ▶/■ (Play/Stop) button to select the Repeat Mode.
Repeat Mode
Select the desired Repeat Mode.
Normal Plays all files once sequentially.
Rep 1 Plays the selected file repeatedly.
Rep All Plays all stored files repeatedly.
RANDOM
Randomly play all files in the Player
repeatedly.
Intro
Plays only the intros of all files
sequentially.
Long Click
REW(◄◄) FF(►►)
Click
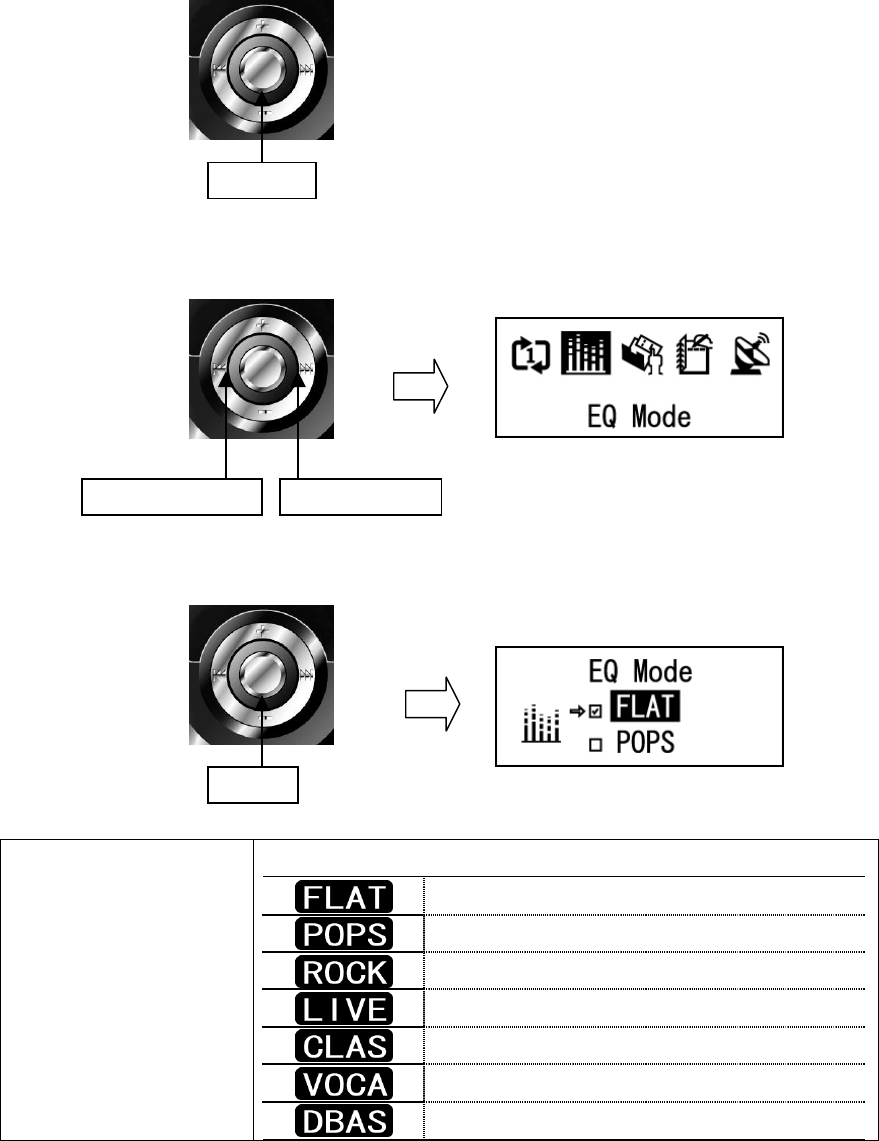
-Select EQ
1. Press and hold the ▶/■ (Play/Stop) button.
2. Use the jog key to ◄◄ or ►► to enter the EQ Mode.
3. Press the ▶/■ (Play/Stop) button to select the EQ type.
EQ Mode
Select the desired EQ type
Play the music file with Flat Mode
Play the music file with Pop Mode
Play the music file with Rock Mode
Play the music file with Live Mode
Play the music file with Classic Mode
Play the music file with Vocal Mode
Play the music file with DBass Mode
REW(◄◄) FF(►►)
Click
Long Click
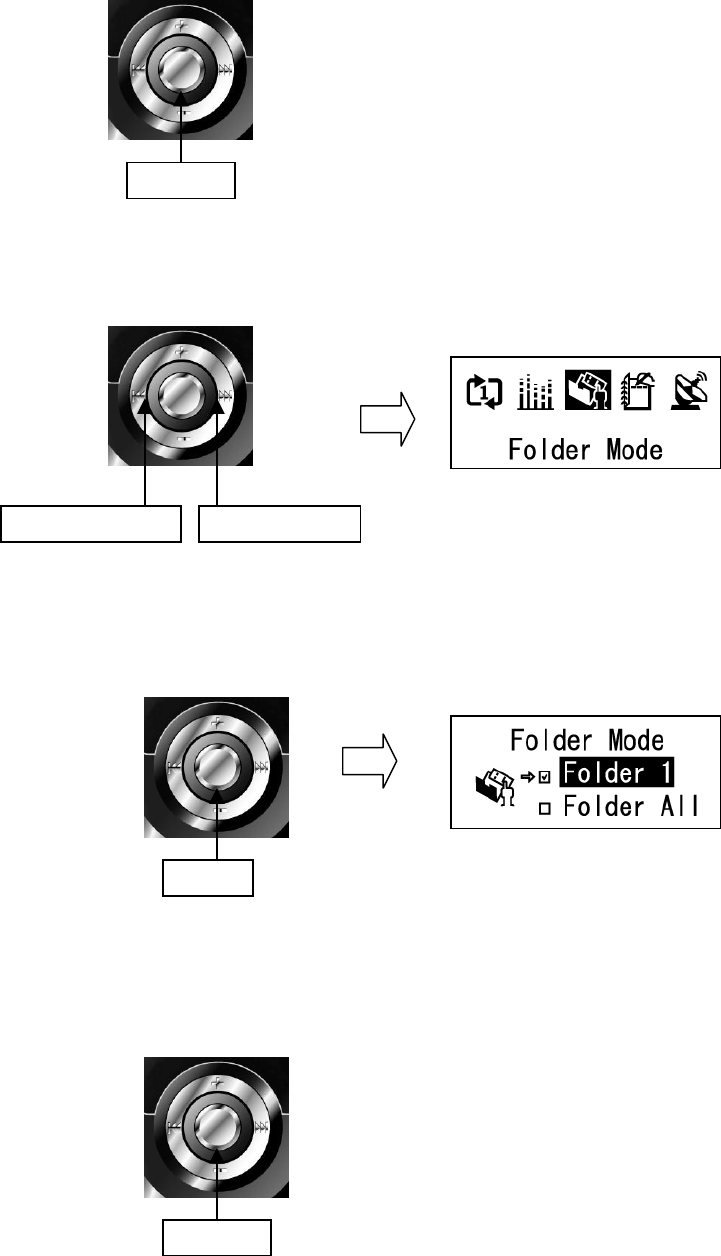
-Folder Mode
1. Press and hold the ▶/■ (Play/Stop) button.
2. Use the jog key to ◄◄ or ►► to enter the Folder mode.
3. Press the ▶/■ (Play/Stop) button to select the folder mode type.
-Play Speed
1. Press and hold the ▶/■ (Play/Stop) button.
REW(◄◄) FF(►►)
Click
Long Click
Long Click
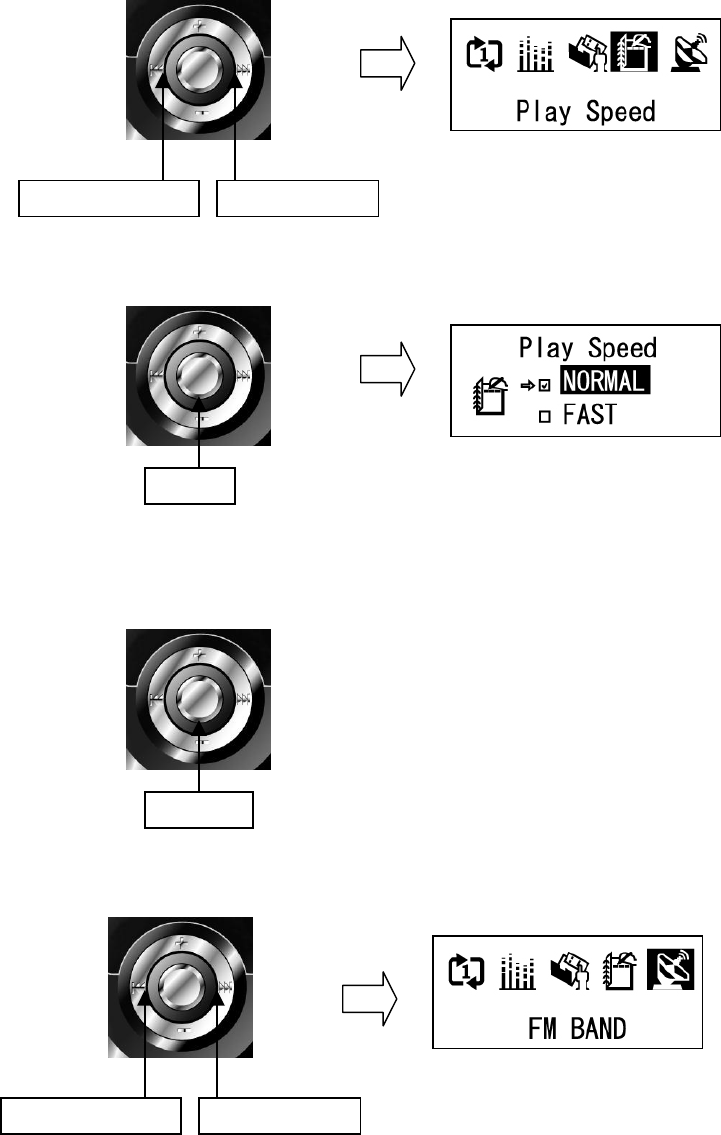
2. Use the jog key to ◄◄ or ►► to enter the Play Speed Mode.
3. Press the ▶/■ (Play/Stop) button and select the Play Speed type.
-FM BAND Setting
1. Press and hold the ▶/■ (Play/Stop) button.
2. Use the jog key to ◄◄ or ►► to enter the FM BAND Mode.
REW(◄◄) FF(►►)
Click
REW(◄◄) FF(►►)
Long Click
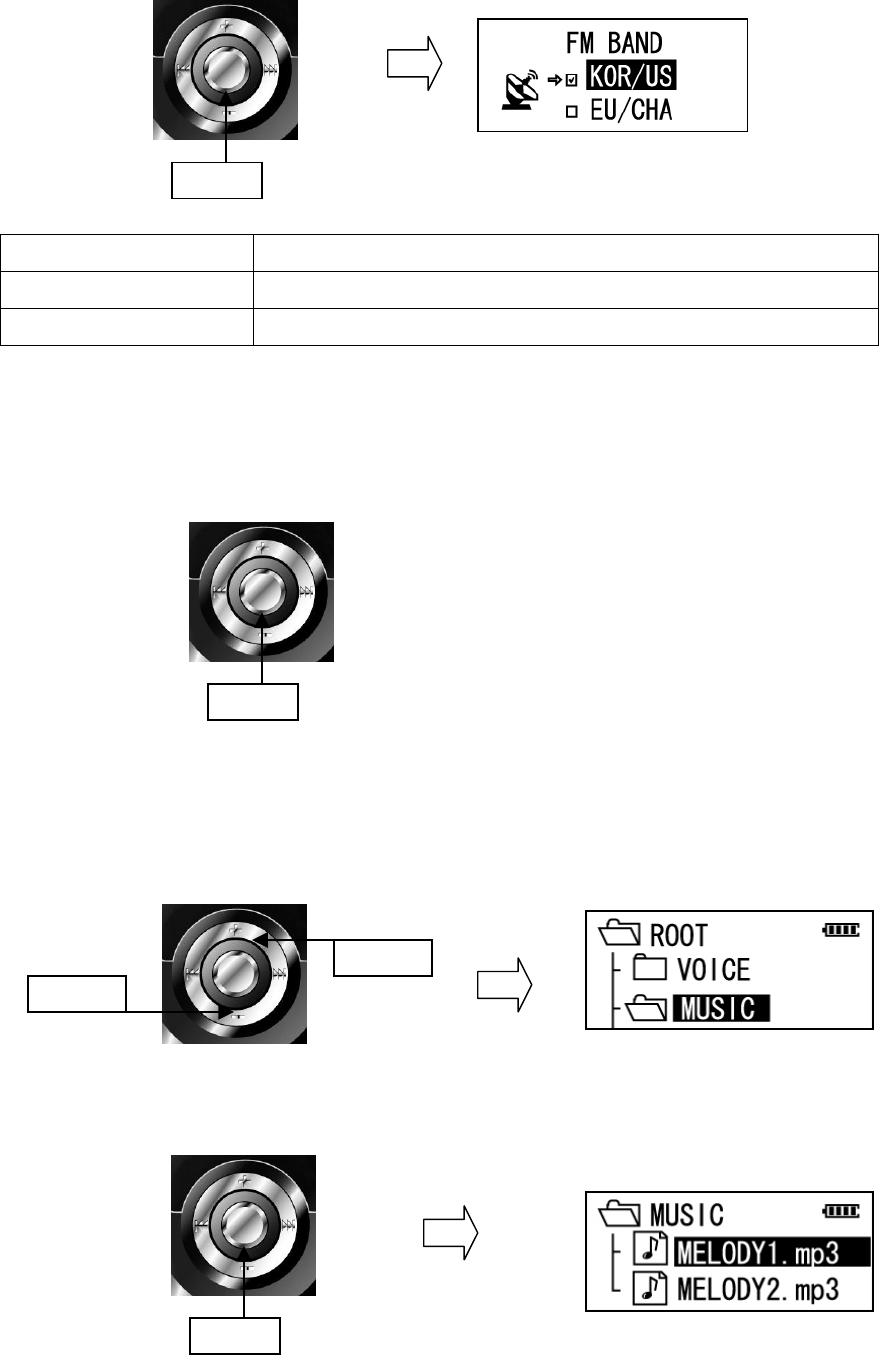
3. Press the ▶/■ (Play/Stop) button and select the suitable FM Band type.
KOR/US Korea, USA (87.5MHz~108MHz)
EU/CHA Europe
JPN Japan (76MHz~90MHz)
-Navigation Mode
1. Press the ▶/■ (Play/Stop) button to stop the current operation.
2. Select the desired folder by using the Volume(+/-) buttons.
3. Press the ▶/■ (Play/Stop) button and listen the selected song.
Click
(+)up
(-)Dwon
Click
Click
4. Move to the upper or sub folder by using the jog key to ◄◄ or ►►
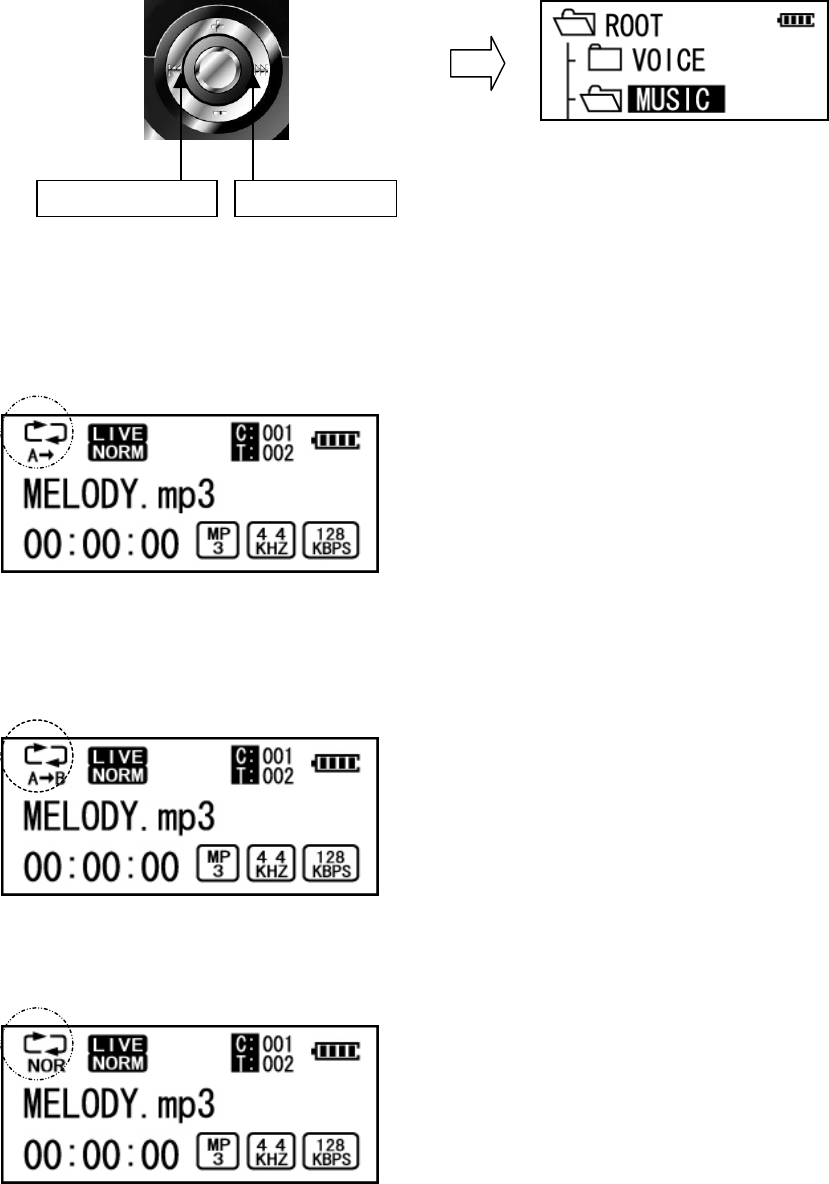
-Repeat A-B Mode
Play a particular section of the current file repeatedly.
1. Press the AB/REC button at the beginning position of the block to be repeated. The “A” icon is
displayed as shown below.
2. Press the AB/REC button again at the ending position of the repeat block, and the icon changes as
shown below.
* A-B block is played repeatedly.
3. To disable this function, press the AB/REC button once again.
REW(◄◄) FF(►►)
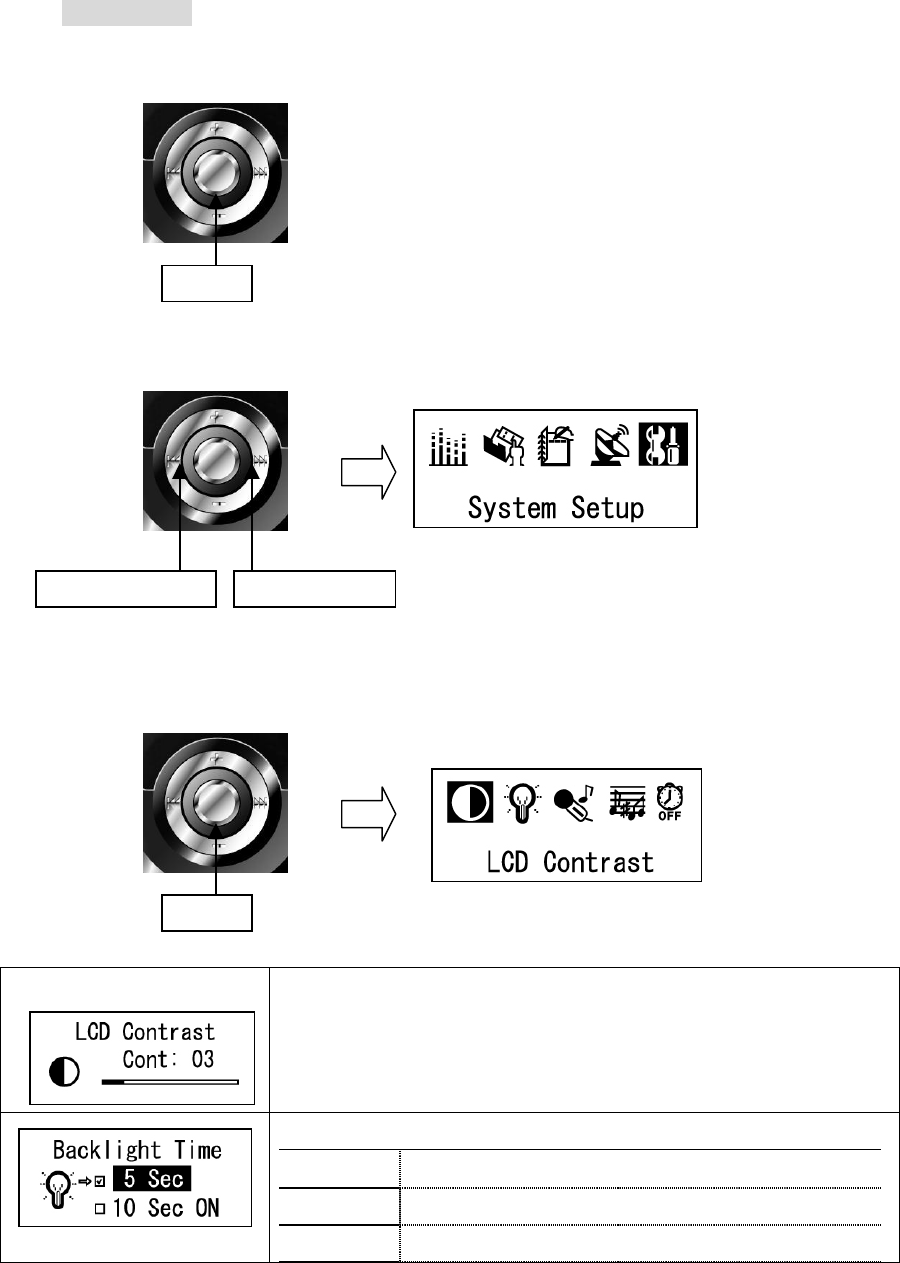
System Setup
1. Press and hold the ▶/■ (Play/Stop) button.
2. Select the System Setup Mode by using the jog key to ◄◄ or ►►
3. Press the ▶/■ (Play/Stop) button and choose the Mode to change.
Set the time for which the backlight is turned on
Backlight control has five mode
5 Sec Backlight is turned on for 5 Seconds
10 Sec Backlight is turned on for 10 Seconds
20 Sec Backlight is turned on for 20 Seconds
Long clik
REW(◄◄) FF(►►)
Click
Always On Backlight is always turned on
Always Off Backlight is always turned off
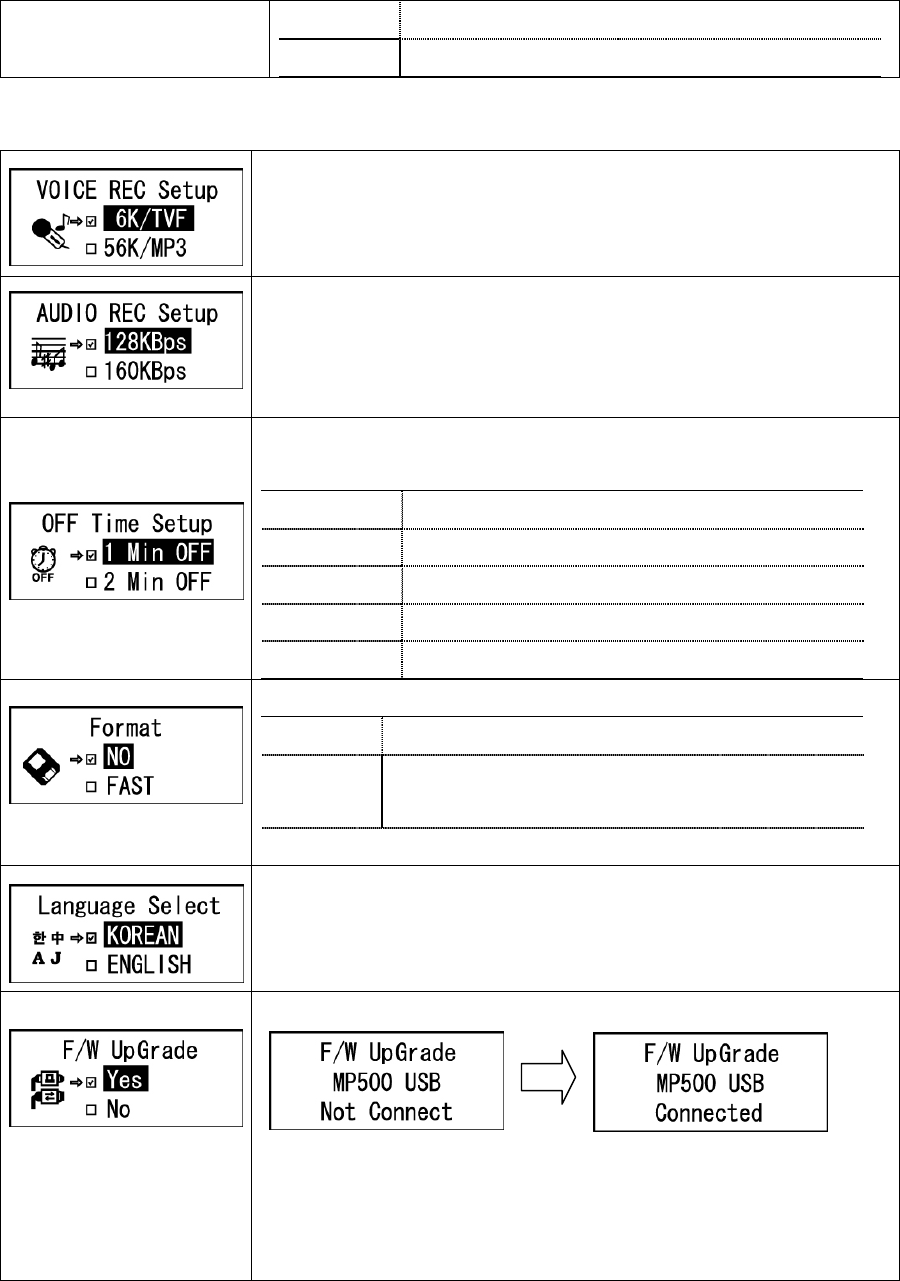
Set the transmission rate of the recorded voice files
- 6Ks/TVF, 56K/MP3, 64K/MP3, 80K/MP3,
96K/MP3, 112K/MP3, 128K/MP3
Set the transmission rate of the recorded file from
external audio sources.
- 128KBps, 160KBps, 192KBps
When the operation is paused or stopped, System turns
off power automatically.
1 Min OFF Turns off power after 1min
2 Min OFF Turns off power after 2min
5 Min OFF Turns off power after 5min
10 Min OFF Turns off power after 10min
Disable Does not apply to Auto Power saving
Format the player.
Fast All files in the track will be deleted
Low level
All memory will be deleted
( Including Font Delete)
*After Low level format, the Font file should be installed
Select the suitable language for OS
Upgrade Firmware or Font file.
* NOTE: Install the program on the PC before upgrading.
Do not remove the Player during upgrading process. If
so, fatal errors may occur with the Player.
[Before connecting to USB Port] [After connecting to USB]

Move the upper MENU.
Product Specifications
Item Detail Specification
Supported Audio Format MPEG 1/2/2.5 Layer 3, WMA
Mp3/Encoding
Equalizer POP / ROCK / CLASSIC / VOCAL/LIVE/FLAT/DBASS
FM Frequency range 76 ~108 MHz
FM Signal band noise ratio 50dB
FM Tuner
Frequency storage Preset 20 units
Compression Bit Rate 32kbps ~ 224kbps
Sampling frequency 32KHz / 44.1kHz / 48KHz
Voice Recording
Voice recording TVF・MP3 Format
Windows 98SE/2000/Me/XP/2003
Mac Up V8.6
Operating
system
support
Linux Up Kernel 2.4.18
Power Rechargeable battery Li-Polymer 420mA
Size 16.8 * 26 * 89 ( H x W x L ) mm
Weight 38g
Type Plug & Play (USB Flash Disk type)
Operational Conditions 0℃ ~ 45℃
Basic Memory 128MB, 256MB, 512MB
PC interface USB 1.1
General
Playing time Upper 11 hours
File transmission speed MAX 500Kbyte/sec ( At device format)
LCD Full Graphic LCD Blue EL Backlight
Troubleshooting
- Check the following list before requesting A/S.
The Player does not
power on
- Lock is in the HOLD position? (Release the hold)
- The batteries are exhausted? (Recharge the batteries)
No sound is heard from
player or distortion is
heard during playback
- Check whether VOLUME is set to “0” .
- Make sure that there are MP3 files in the memory
- Check whether plug is dirty.
- Corrupted MP3 or WMA files may make a static noise
and the sound may cut off. Try with other files.
Characters on LCD are
abnormal
Check the language is setting to “English” in MENU
FM Radio does not work
- Adjust the position of the player and earphones.
(The earphones works as antenna, they must plugged
in for best reception)
- Turn off the power of other electric devices near the
player.
Failed download - Make sure the USB Cable is connected properly.
- Check the condition of the battery.
Memory is full and the
player works abnormally
or does not play
- Initialize the player and leave a free space.

Product Warranty
1. This product has been manufactured under strict quality and control inspections.
2. If the product breaks down during normal usage, our dealer/or service center will fix the
product for the period free listed in the warranty as below.
3. A service fee may apply after the warranty period or in case of the following.
- If the problem was caused by the customer’s misuse.
- If any internal modification was done by the customer.
4. We do not reissue warranty certificate. Please store it in a safe space.
Product Model
Name
Name Tel
Customer Address
Name Tel
Purchaser Address
Date of Purchase Month____/Day____/Year______ Period of
Warranty
* For more warranty information and RMA service, please visit our web-site at http://
www.stormblue.co.kr