Stryker Endoscopy WUF iSWITCH - Wireless Medical Remote Control System User Manual 1000400700
Stryker Endoscopy iSWITCH - Wireless Medical Remote Control System 1000400700
Users Manual
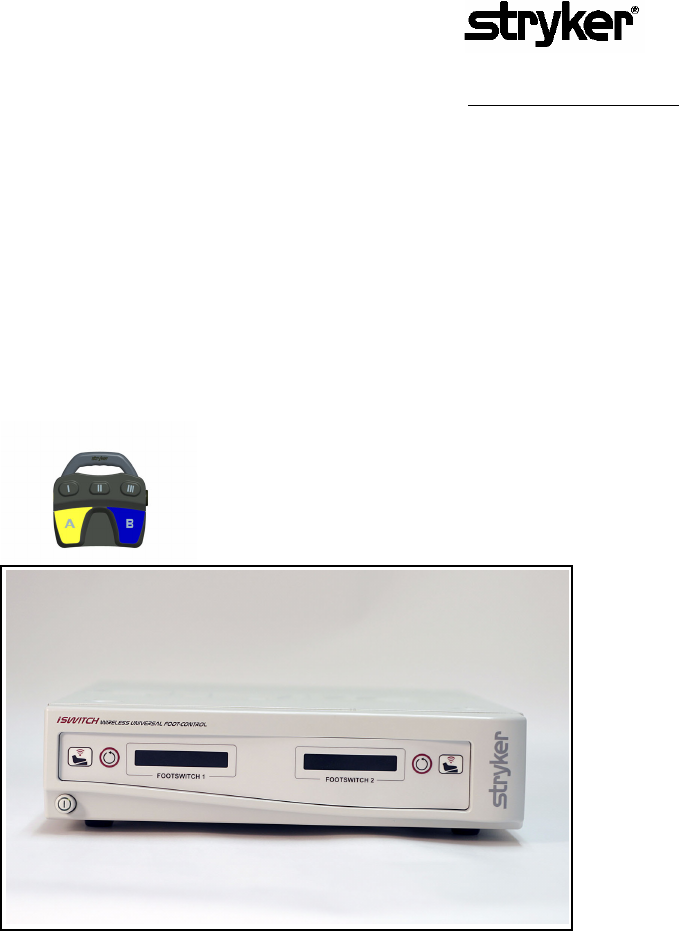
iSwitch
Operation and Maintenance Manual
Endoscopy
Wireless Universal
Foot Control
PATENTS PENDING
1
Table of Contents
Table of Contents............................................................................................. 1
Warnings and Cautions.................................................................................. 2
Symbol Definitions ......................................................................................... 3
Product Description / Intended Use............................................................ 4
The Footswitch ............................................................................................. 5
The Receiver ................................................................................................. 6
Front Panel............................................................................................... 6
Rear Panel ................................................................................................ 7
Setting Up the Footswitch System................................................................ 8
Setting Up the Receiver ................................................................................ 8
Setting Up the Footswitch ............................................................................ 9
System Settings .............................................................................................. 10
Operating the Footswitch System............................................................... 11
Using the Footswitch Controls................................................................... 11
TPS Mode .............................................................................................. 11
SERFAS Mode ........................................................................................ 12
Using the Receiver Controls....................................................................... 12
Selecting which device the footswitch will control ................................. 12
Unsychronizing footswitches.................................................................. 12
Merging Footswitches ............................................................................ 12
Monitoring battery life ........................................................................... 12
Cleaning and Maintenance.......................................................................... 13
Cleaning...................................................................................................... 13
Maintenance ............................................................................................... 13
Replacing the Batteries............................................................................... 13
Troubleshooting ............................................................................................ 14
Technical Specifications............................................................................... 15
Electromagnetic Compatibility ................................................................. 17
Warranty Statement...................................................................................... 21
Service and Claims........................................................................................ 21
Other Service ................................................................................................. 22

2
Warnings and Cautions
Please read this manual and follow its instructions carefully. The words warning,
caution, and note carry special meanings and should be carefully reviewed:
WARNING To avoi d injur y to th e user and the patient and/or damage to
this device, the user must:
1. Read this operating manual thoroughly and be familiar with its contents
prior to using this equipment.
2. Carefully unpack the unit and check if any damage occurred during
shipment. If damage is detected, please refer to the Service section in this
manual.
3. Avoid removing covers on the unit and attempting internal repairs or
adjustments not specifically detailed in this operating manual.
4. Pay close attention to the care and cleaning instructions in this manual.
A deviation may cause damage to the device.
5. Never sterilize the Wireless Universal footswitch components.
6. Be completely familiar and comfortable with the operation of the
Wireless Universal footswitch. Training may be required before some
operators are thoroughly familiar with how to properly operate the
footswitch.
WARNING The personal safety of the patient or physician may be
involved. Disregarding this information could result in
injury to the patient or physician.
Caution Special service procedures or precautions must be followed to
avoid damaging the instrument.
Note Special information to make maintenance easier or important
information more clear.
An exclamation mark within a triangle is intended to alert the
user to the presence of important operating and maintenance
instructions in the literature accompanying the product.
A lightning bolt within a triangle is intended to warn of the
presence of hazardous voltage. Refer all service to authorized
personnel.

3
7. When the Receiver is interconnected with other medical electrical
equipment, leakage currents may be additive. Ensure all systems are
installed according to the requirements of IEC 60601-1-1.
The Wireless Universal footswitch warranty is void if any of these warnings are
disregarded.
WARNING
Federal law (United States of America) restricts this device to use
by, or on order of, a physician.
Stryker Endoscopy reserves the right to make improvements to the product
described herein. The product therefore may not agree in detail to the published
design or specifications. All specifications are subject to change without notice.
Please contact your local Stryker Endoscopy Distributor listed in the Other
Service section or phone your local Stryker Endoscopy sales representative or
agent for information on changes and new products.
Symbol Definitions
Protective Earth Ground
Equipotentiality
Denotes compliance to CSA 22.2 No.601.1-M90 and UL60601-1.

4
Product Description and
Intended Use
The Stryker Wireless Universal footswitch system is a wireless remote-control
system that centralizes control of the various footswitch-operated devices found
in the operating room.
The iSwitch is intended for use in surgical procedures where footswitch-operated
devices, such as the Stryker TPS or SERFAS systems, are normally used. The
iSwitch consolidates the functions of these devices into one wireless footswitch,
freeing the operating room from excessive cables and foot controls.
The iSwitch consists of two main components:
1. A wireless footswitch, which provides pedals similar to those found on
other footswitches and transmits radio signals to a radio receiver console
2. A radio receiver console, which routes commands from the footswitch
to devices that connect to the receiver’s rear panel.
Each component and its functions are described in the following pages.
Note The iSwitch is a wireless footswitch designed to replace multiple
wired footswitches that surgeons are accustomed to using.
Operators should ensure that they are completely familiar and
comfortable with the operation of the device. Training may be
required before some operators are thoroughly familiar with how
to properly operate the footswitch. Users should be sure that they
have received adequate training before using this device in
surgical practice.
Note It is recommended to have a wired footswitch available in case of
electromagnetic interference problems with the wireless
connection.
This device includes RF transmitters and emits non-ionizing radiation.
This device complies with Part 15 of the FCC rules. Operation is subject to the following
two conditions: (1) this device may not cause harmful interference, and (2) this device
must accept any interference received, including interference that may cause undesired
operation. See the “Electromagnetic Compatibility” section of this manual for more infor-
mation.
To prevent radio interference with any licensed service, this device is intended to be oper-
ated indoors and away from windows to provide maximum shielding.
This device complies with FCC RF exposure limits set for indoor use only. Do not co-
locate this device in close proximity to another transmitter antenna.
5
The Footswitch
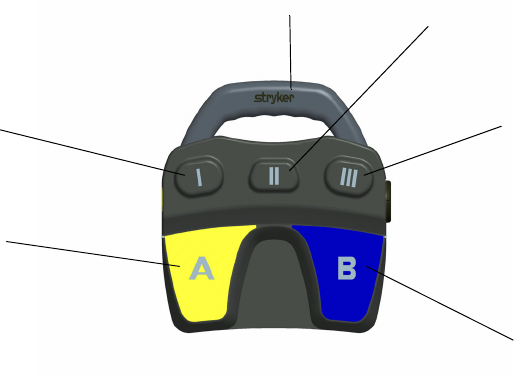
The footswitch rests on the operating-room floor and provides foot control of all
devices connected to the iSwitch system. The footswitch houses three buttons
and two pedals, which enable the user to alternate between operating-room
devices and perform device-specific functions. When a button or pedal is pressed,
the footswitch transmits a radio signal to the receiver, where the command is then
routed to the appropriate device.
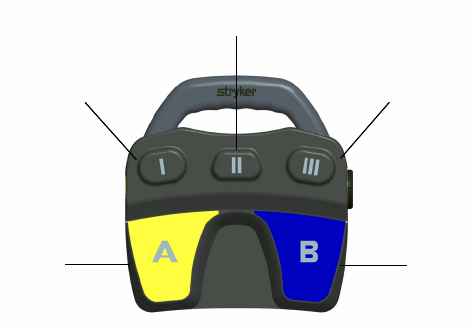
The footswitch and its features are described in Figure 2 below.
Figure 2: The footswitch
1. Footswitch Handle
2. Button II (Mode Button): Selects which device the footswitch will
control. See the “System Settings” section of this manual for Mode
options.
Note Button/pedal function for all other buttons and pedals depends
on which operating-room device, or “mode,” is selected. See the
“Using the footswitch controls” section in this manual for device-
specific button functions.
3. Button III
4. Pedal B
5. Pedal A
6. Button I
12
4
5
63
6
The Receiver
The receiver connects to the devices that will be controlled by the iSwitch system.
It receives commands sent from the footswitch and routes them to the appropriate
device. The receiver also determines how footswitches are used and which devices
they will control.
The features of the receiver are listed in Figures 4 and 5.
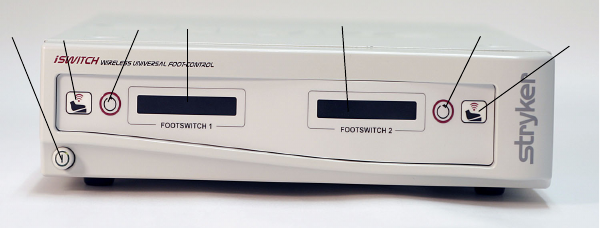
Figure 4: The receiver front panel
Front Panel
1. Power Switch: Powers on and off the receiver. The switch will illuminate
when the unit is on.
2. Synchronize port 1: Enables a footswitch to work with the receiver
when aligned with the synchronize logo on that footswitch. The
footswitch will be designated as “footswitch 1.”
3. Mode button 1: Selects which device footswitch 1 will control (which
“mode” the footswitch is in). Pressing and holding this button will clear
the Footswitch.
4. Active-device display 1: Displays which device is currently active and
can be controlled by footswitch 1 (which “mode” footswitch 1 is in).
5. Active-device display 2: Displays which device is currently active and
can be controlled by footswitch 2 (which “mode” footswitch 2 is in).
6. Mode button 2: Selects which device footswitch 2 will control (which
“mode” the footswitch is in). Pressing and holding this button will clear
the Footswitch
7. Synchronize port 2: Enables a second footswitch to work with the
receiver when aligned with the synchronize logo on that footswitch. The
footswitch will be designated as “footswitch 2.”
123456
7
7
Rear Panel
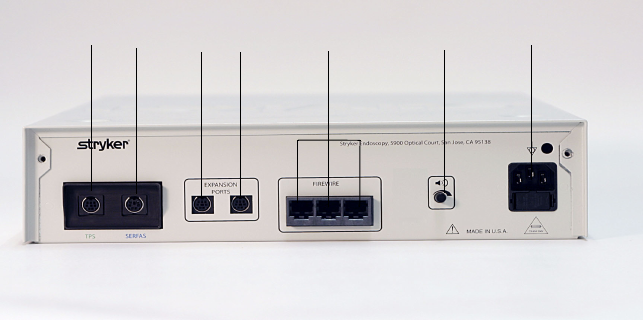
Figure 5: The receiver rear panel
1. TPS output: Provides a dedicated connection to the TPS console,
enabling the commands issued from the footswitch to be routed to the
TPS console.
2. SERFAS output: Provides a dedicated connection to the SERFAS
console, enabling the commands issued from the footswitch to be routed
to the SERFAS console.
3. Expansion port: Provides a generic connection to addition devices,
enabling the commands issued from the footswitch to be routed to the
console.
4. Expansion port: Provides a generic connection to addition devices,
enabling the commands issued from the footswitch to be routed to the
console.
5. SFB Serial Connectors: Enables firewire connection with newer
devices, such as CORE and SERFAS Energy, eliminating the need for
multiple connection cables.
6. Volume control: Controls the output volume.
7. AC-power input: Connects to the AC Power cord, which connects to a
hospital-grade power outlet.
12 34567
8
Setting up the iSwitch
Setting Up the Receiver
1. Position the receiver on a Stryker cart or other sturdy platform.
2. Connect the AC Power.
• Connect the AC power cord to the AC input on the rear receiver
panel.
• Connect the other end to a hospital-grade receptacle.
3. Connect the devices that will be controlled by the footswitch System.
• For older TPS and SERFAS consoles, connect a device cable to the
appropriate port on the rear receiver panel, and then connect the
other end to the footswitch port on the front console panel.
• For newer CORE and SERFAS Energy consoles, connect a firewire
cable to the firewire port on the rear receiver panel, and then connect
the other end to the firewire port on the console rear panel.
Contact your local Stryker Representative for applicable device cable
part numbers.
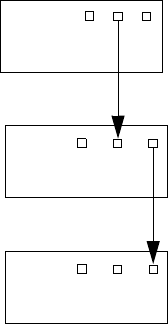
Note When connecting devices to the footswitch receiver SFB serial
cable, connect the devices in series (see Figure 6 below).
Figure 6: Connecting devices in series to the footswitch receiver
4. Power on the receiver and all devices connected to it.
footswitch Receiver
TPS Console
SERFAS Console
NOTE: Devices may also
be connected
directly to the
iSwitch Receiver.
9
Setting Up the Footswitch
1. Insert the Stryker Battery Pack (P/N 277-300-100).
Note It is recommended to use the Stryker Battery Pack to achieve
maximum battery life and prevent improper insertion.
• Twist off the cap on the side of the footswitch by turning 1/2 turn
counterclockwise.
• Insert the batteries.
• Replace the cap and lock in place by turning 1/2 turn clockwise.
2. Synchronize the footswitch with the receiver.
• Press buttons I and III simultaneously and release.
• Align the footswitch synchronize logo with the footswitch 1
synchronize logo on the receiver.
• Hold the footswitch one inch away from the receiver. The LED will
appear red while synchronization is in process, and will change to
green when the footswitch has been synchronized.
3. Synchronize a second footswitch if needed.
• Press buttons I and III simultaneously and release.
• Align the second footswitch synchronize logo with the footswitch 2
synchronize logo on the receiver.
• Hold the footswitch one inch away from the receiver. The LED
indicator will change to green when the footswitch has been
synchronized.
Note A single footswitch cannot be synchronized to two channels.
4. Position the footswitch on the floor where it can be comfortably
accessed.
Note The Footswitch needs to be synchronized when a Receiver is
powered on or when the Footswitch enters a new room. A
Footswitch is disconnected from the Receiver by powering off the
Receiver or pressing and holding the Receiver Mode button.
10
System Settings
Using the 2 mode buttons on the Receiver, the system Settings may be modified as
listed below:
To enter the Settings mode
Press and hold both mode buttons on the Receiver for 5 seconds
• In this mode, the left (Footswitch 1) mode button toggles among
options.
• In this mode, the right (Footswitch 2) button enables or disables the
settings.
Settings
Speed Mode (Default: Enabled)
• When enabled, a single press of button II on the Footswitches changes
the mode.
• When disabled, press and hold to select the device.
Note If using 2 handpieces in Speed Mode, press and hold the Mode
button to change handpieces.
Teacher Mod e (Default: Disabled)
• When enabled, 2 Footswitches may select the same device. Pressing
button II on either Footswitch will give it primary control. To transfer
control, simply press button II on the second Footswitch.
• When disabled, the Footswitch will function as normal. Only one
Footswitch will control the selected device.
Global Merge (Default: Disabled)
• When enabled, two Footswitches may select the same device. The
Footswitch pressed first will receive primary control. Control may
then alternate between Footswitches when the pedals on the primary
Footswitch are not pressed and the pedals on the second Footswitch
are depressed.
• When disabled, the Footswitch will function as normal. Only one
Footswitch will control the selected device.
Exiting Settings Mode
To exit the Settings Mode, press and hold both Mode buttons for 5 seconds. The
selected settings will remain unchanged.
11
Operating the iSwitch System
Note Using Stryker disposable bags (P/N 277-500-100) is
recommended to keep the footswitch clean during use. Contact
your local Stryker representative for ordering information.
The iSwitch system is operated through the controls on the footswitch and the
controls on the receiver.
Using the Footswitch Controls
1. Press the mode button to select which device the footswitch will control.
The footswitch buttons will perform according to the mode selected.
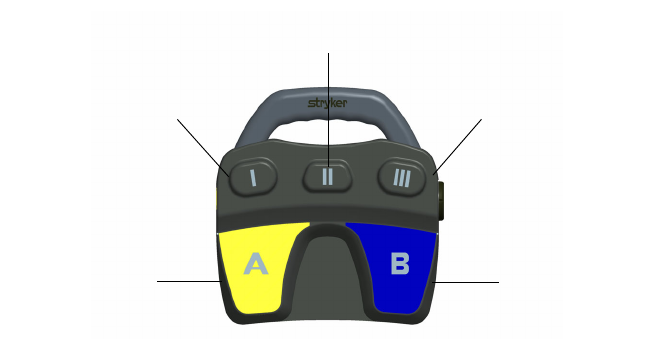
TPS Mode
Note The Wireless Universal footswitch can be programmed like the
TPS Wired footswitch. Default controls are shown.
*In Speed Mode, press to select the device. Press and hold to change the
handpiece.
Reverse
Select Device*
(SERFAS, TPS, etc.)
Reverse
High/Low
Oscillate/Forward
or Reverse
Forward
12
SERFAS Mode
Using the Receiver Controls
While the footswitch controls the devices connected to the iSwitch system, the
receiver controls how the footswitch functions. Receiver controls are used for
selecting which device the footswitch will control, unsynchronizing footswitches,
and merging footswitches.
Selecting which device the footswitch will control
Press the mode button to toggle through the connected devices. The selected
device will appear on the display screen.
Note Mode button 1 selects the devices footswitch 1 will control; mode
button 2 selects the devices footswitch 2 will control.
Note The device can also be selected by pressing the mode button on
the footswitch.
Unsychronizing footswitches
Press and hold the mode button to disable communication between a footswitch and
the receiver. After the footswitch has been unsynchronized, the footswitch will not
function again until it is resynchronized with the receiver.
Monitoring battery life
The receiver will provide feedback to alert the user when the footswitch has
approximately two days of battery life remaining. The receiver will emit an
audible warning and the receiver LED will flash red.
Note It is recommended to use the Stryker Battery Pack (P/N 277-300-
100).
Cut Coag
Increase Cut Level
Select Device*
(SERFAS, TPS, etc.)
Decrease Cut Level

13
Cleaning and Maintenance
Cleaning
WARNING Unplug the receiver from the electrical outlet before cleaning
the unit.
Caution Do not immerse the footswitch in any liquid, as product
damage may result.
Caution Do not use solvents, such as alcohol, or cleaning solutions that
contain ammonia to clean the footswitch, as product damage
may result.
Caution Do not sterilize the footswitch or receiver, as product damage
will result.
1. Wipe the footswitch with a soft cloth dampened in a mild cleaning
solution.
2. Clean the footswitch with disinfectant if needed.
Maintenance
The Wireless Universal footswitch™ system requires no preventative or periodic
maintenance.
WARNING Remove the batteries if the Footswitch is not in use for an
extended period of time.
WARNING To reduce the risk of electrical shock, do not open the
footswitch. There are no user-serviceable components
inside. Should service be needed, notify your local Stryker
representative.
Replacing the Batteries
WARNING Replace the batteries only when outside the patient’s vicinity.
Caution The batteries may explode or leak if recharged, inserted
improperly, or disposed of by fire.
Note Replace the battery pack with a Stryker Battery Pack (P/N 277-
300-100) for optimal battery performance.
Battery Disposal
The batteries must be disposed of according to local laws and hospital practices.

14
Troubleshooting
Problem Possible Solution
No results when the
Footswitch is pressed.
• Press buttons I or III to wake Footswitch.
• Synchronize the Footswitch.
•Replace batteries.
The Footswitch will not
synchronize with the
receiver.
• Hold the Footswitch synchronization icon
within one inch of the receiver synchroni-
zation icon.
• Press buttons I and III simultaneously and
release.
• Replace batteries and try again.
The receiver does not
indicate that an attached
device is attached upon
startup.
• Ensure the device is connected to the cor-
rect input on the rear receiver panel.
Footswitch 2 is stuck using
the same device as
Footswitch 1.
• Press the mode button to unmerge the
Footswitches.
Cannot hear audio
messages.
• Increase volume using control on rear of
receiver.
When synching the
Footswitch, the LED on the
Receiver does not change
color and synching fails.
• If another Footswitch is already synched to
this channel, press and hold the Mode but-
ton on the Receiver for 5 seconds to clear
the existing Footswitch.
•Synch the new Footswitch.
The Footswitch will not
synchronize with the
Receiver. An adjacent
Receiver is present.
• Press buttons I and III simultaneously and
release to disconnect the Footswitch from
the adjacent Receiver.
• Synch the Footswitch to the new Receiver.
The Receiver displays
“Replace batteries” even
though new batteries have
been inserted
• Batteries may be inserted incorrectly. Rein-
sert batteries.
15
Technical Specifications
Environmental Specifications
Shipping/Storage
System Input Power Requirements
Classifications
Operating Temperature:
Humidity:
10° to 40°C
35% to 75% RH
Voltage:
Frequency:
Current:
Fuse Rating:
100-240 VAC
50/60 Hz
0.6 Amps
1.0A/250V
Receiver: Class I Equipment
•No Applied Parts
• Water Ingress Protection,
IPXO
• Continuous Operation
Footswitch
•Internally powered
•No Applied Parts
• Water Ingress Protection,
IPX7
• Continuous Operation
Operating Temperature:
Humidity:
10° to 40°C
35% to 75% RH
16
Wireless USB Specifications
RFID Specifications
FCC ID
SSH-WUF
IC ID
4919C-WUF
Standards Compliance
IEC 60601-1:1988 + A1:1991 + A2:1995
IEC 60601-1-2: 2001
IEC 60601-2-2:1998
CAN/CSA C22.2 No. 601.1-M90
UL 60601-1:2003
AS 3200.1.0:1998
Frequency range:
Modulation:
Power:
2.402 Hz -- 2.478 GHz
Direct Sequence Spread
Spectrum (DSSS)
0 dBm
Frequency:
Modulation:
Power:
125 KHz
Binary Pulse Length Modulation
(BPLM)
<0.001W

17
Electromagnetic Compatibility
Like other electrical medical equipment, the iSwitch requires special precautions
to ensure electromagnetic compatibility with other electrical medical devices. To
ensure electromagnetic compatibility (EMC), the iSwitch must be installed and
operated according to the EMC information provided in this manual.
Note The iSwitch has been designed and tested to comply with IEC
60601-1-2:2001 requirements for EMC with other devices.
Caution The iSwitch may be interfered with by other equipment,
including portable and mobile RF communication equipment,
even if such equipment meets the applicable emissions
requirements.
WARNING Do not use cables or accessories other than those provided
with the iSwitch, as this may result in increased
electromagnetic emissions or decreased immunity to such
emissions.
WARNING If the iSwitch is used adjacent to or stacked with other
equipment, observe and verify normal operation of the
iSwitch in the configuration in which it will be used prior to
using it in a surgical procedure. Consult the tables below for
guidance in placing the iSwitch.
Guidance and Manufacturer's Declaration: Electromagnetic Emissions
iSwitch is intended for use in the electromagnetic environment specified below. The customer or the user of
iSwitch should ensure that it is used in such an environment.
Emissions test Compliance Electromagnetic Environment - guidance
RF emissions
CISPR11
Group 1 The iSwitch must emit electromagnetic energy in
order to perform its intended function. NEarby elec-
tronic equipment may be affected.
RF emissions
CISPR11
Class B iSwitch is suitable for use in all establishments,
including domestic establishments and those directly
connected to the public low-voltage power supply
network that supplies buildings used for domestic
purposes.
Harmonic emissions
IEC61000-3-2
Class A
Voltage Fluctuation s/
flicker emissions
IEC61000-3-3
Complies

18
Guidance and Manufacturer's Declaration: Electromagnetic Immunity
iSwitch is intended for use in the electromagnetic environment specified below. The customer or
the user of iSwitch should ensure that it is used in such an environment.
Immunity Test IEC 60601 Test
Level Compliance Level
Electromagnetic
Environment:
Guidance
Electrostatic Discharge (ESD)
IEC61000-4-2
±6kV contact
±8kV air
±2,4,6kV contact
±2,4,8kV air
Floors should be
wood, concrete, or
ceramic tile. If floors
are covered with syn-
thetic material, the rel-
ative humidity should
be at least 30%.
Electrical fast transient/burst
IEC61000-4-4
±2kV for power sup-
ply lines
±1kV for input/out-
put lines
±2kV line to ground
±1kV line to line
Mains power quality
should be that of a typ-
ical commercial or
hospital environment.
Surge
IEC61000-4-5
±1kV differential
mode
±2kV common mode
±0.5, 1kV differential
mode
±0.5, 1, 2kV common
mode
Mains power quality
should be that of a typ-
ical commercial or
hospital environment.
Voltage dips, short interrup-
tions and voltage variations on
power supply input lines
IEC61000-4-11
<5% Ut (>95% dip in
Ut) for 0.5 cycle
40% Ut (60% dip in
Ut) for 5 cycles
70% Ut (30% dip in
Ut) for 25 cycles
<5% Ut (>95% dip in
Ut) for 5 sec.
<5% Ut (>95% dip in
Ut) for 0.5 cycle
40% Ut (60% dip in
Ut) for 5 cycles
70% Ut (30% dip in
Ut) for 25 cycles
<5% Ut (>95% dip in
Ut) for 5 sec.
Mains power quality
should be that of a typ-
ical commercial or
hospital environment.
If the user of iSwitch
requires continued
operation during
power mains interrup-
tions, it is recom-
mended that iSwitch
be powered from an
uninterruptible power
supply or a battery.
Power frequency (50/60Hz)
magnetic field
IEC 61000-4-8
3 A/m
3 A/m
Power-frequency mag-
netic fields should be
at levels characteristic
of a typical location in
a typical commercial
or hospital environ-
ment.
NOTE: Ut is the a.c. mains voltage prior to application of the test level.
19
Guidance and Manufacturer's Declaration: Electromagnetic Immunity
iSwitch is intended for use in the electromagnetic environment specified below. The customer or
the user of iSwitch should ensure that it is used in such an environment.
Immunity Test IEC 60601 Test Level Compliance
Level Electromagnetic Environment: Guidance
Conducted RF
IEC 61000-4-6
Radiated RF
IEC 61000-4-3
3 Vrms
150 kHz to 80 MHz
3 V/m
80MHz to 2.5 GHz
3 V
3 V/m
Portable and mobile RF communications
equipment should be used no closer to any
part of the iSwitch system, including its cables,
than the recommended separation distance
calculated from the equation applicable to the
frequency of the transmitter.
Recommended Separation Distance
80 MHz to 800 MHz
800 MHz to 2.5 GHz
where P is the maximum output power rating
of the transmitter in watts (W) according to
the transmitter manufacturer and d is the rec-
ommended separation distance in meters (m).
Field strengths from fixed RF transmitters, as
determined by an electromagnetic site survey
(a), should be less than the compliance level in
each frequency range(b).
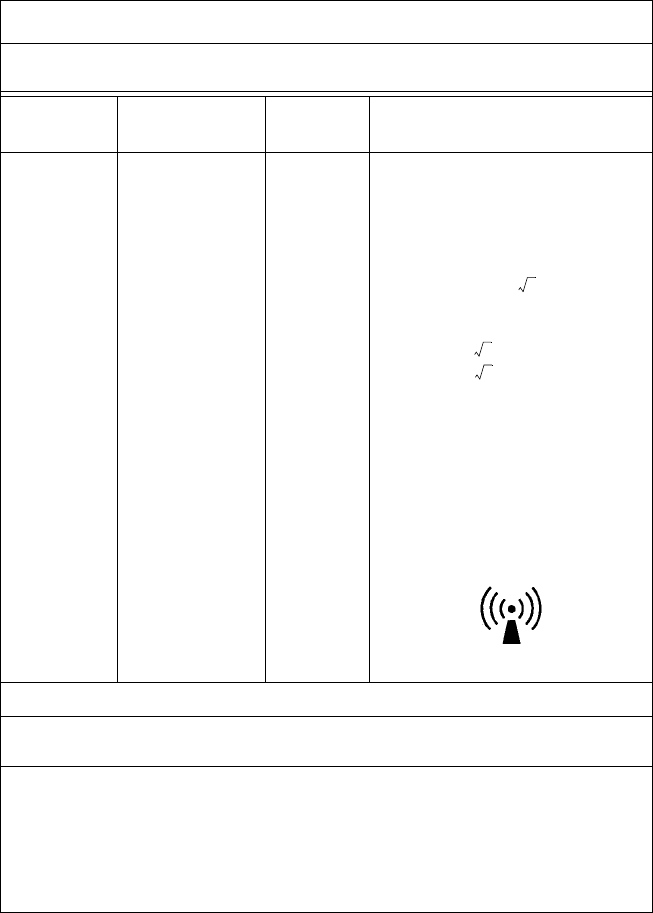
Interference may occur in the vicinity of
equipment marked with the following symbol:
NOTE 1: At 80 MHz and 800 MHz, the higher frequency range applies.
NOTE 2: These guidelines may not apply in all situations. Electromagnetic propagation is affected by absorption
and reflection from structures, objects, and people.
(a) Field strengths from fixed transmitters, such as base stations for radio (cellular/cordless) telephones and land
mobile radios, amateur radio, AM and FM radio broadcast, and TV broadcast, cannot be predicted theoretically
with accuracy. To assess the electromagnetic environment due to fixed RF transmitters, an electromagnetic site
survey should be considered. If the measured field strength in the location in which the iSwitch system is used
exceeds the applicable RF compliance level above, the iSwitch system should be observed to verify normal opera-
tion. If abnormal performance is observed, additional measures may be necessary, such as reorienting or relocat-
ing the iSwitch unit.
(b) Over the frequency range 150 kHz to 80 MHz, field strengths should be less than 3 V/m.
d1.17P=
d1.17P=
d2.33P=
20
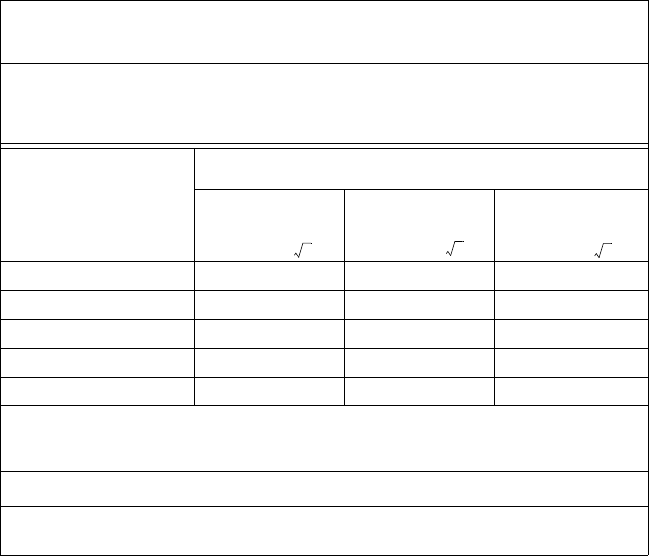
Recommended Separation Distances Between Portable and Mobile RF Communications
Equipment and the iSwitch System
The iSwitch system is intended for use in an electromagnetic environment in which radiated RF disturbances are
controlled. The user of the iSwitch system can help prevent electromagnetic interference by maintaining a mini-
mum distance between portable and mobile RF communications equipment (transmitters) and the iSwitch sys-
tem as recommended below, according to the maximum output power of the communications equipment.
Rated maximum output
power (W) of transmitter
Separation distance (m) according to frequency of transmitter
150 kHz to 80
MHz
80 MHz to 800
MHz
800 MHz to 2.5
GHz
0.01 0.12 0.12 0.23
0.1 0.37 0.37 0.74
11.17 1.17 2.33
10 3.70 3.70 7.37
100 11.70 11.70 23.30
For transmitters rated at a maximum output power not listed above, the recommended separation distance (d) in
meters (m) can be estimated using the equation applicable to the frequency of the transmitter, where P is the
maximum output power rating of the transmitter in watts (W) according to the transmitter manufacturer.
NOTE 1: At 80 MHz and 800 MHz, the separation distance for the higher frequency range applies.
NOTE 2: These guidelines may not apply in all situations. Electromagnetic propagation is affected by absorption
and reflection from structures, objects, and people.
d1.17P=d2.33P=
d1.17P=

21
Warranty
This Stryker Endoscopy product is warranted to the original purchaser for a
period of one year from the date of purchase to be free from defects in material
and workmanship. This warranty extends to all purchases and is limited to the
repair or replacement of the product without charge when returned to:
Stryker Endoscopy
5900 Optical Court
San Jose, CA 95138
Stryker Endoscopy cannot accept responsibility for returns or replace-ments
which have not been authorized. This warranty does not cover damages caused by
misuse (i.e. neglect, dropping, or denting) or by failure to follow the procedures
outlined in this manual or demonstrated by Stryker Endoscopy representatives.
Unauthorized repair or modifications to the iSwitch may void the warranty and
invalidate the user’s authority to use the product.
There are no other expressed warranties.
Service and Claims
Caution Do not attempt to service this product yourself. If service is
needed either during or after the warranty period:
1. Contact Stryker Endoscopy at 1-800-624-4422, or phone your local
Stryker Endoscopy sales representative.
2. Clean and sterilize all parts that will be returned for service. Follow the
instructions provided in this manual.
3. Package all the components carefully in the original shipping container
if possible.
4. Ship the unit, pre-paid and insured to:
Stryker Endoscopy Customer Service
Attention: Repair Department
5900 Optical Court
San Jose, CA 95138
Note The product described in this manual is continually being
reviewed, and improvements may be made without notice.
Stryker and Stryker Endoscopy are registered trademarks of Stryker Corporation.
22
Other Service
For service in the U.S.A., call your Stryker Endoscopy representative or call
Stryker Endoscopy Customer Service at 1-800-624-4422. Outside of the U.S.A.,
please contact your Stryker Endoscopy distributor at one of the following
locations:
Stryker Corporation
2725 Fairfield Road
Kalamazoo, MI 49002
USA
Phone:1-269-385-2600
Telex:224464 STRYKER KMZ
Fax:1-269-385-1996
Stryker European Rep - RA/QA Manager
ZAC Satolas Green Pusignan
Av. De Satolas Green
69881 MEYZIEU Cedex, France
Phone:33-1-48175000
Fax:33-1-48632175
Stryker Canada
45 Innovation Drive
Hamilton, Ontario, Canada
L9H 7L8
Phone: (905) 690-5700
(800) 668-8323 (toll free)
Fax: +1(905) 690-5698
Stryker India Private Limited
First Floor
C-5, SDA Commercial Complex
New Delhi 110 017
INDIA
Phone:91-11-686-6740
Fax:91-11-696-6020
Stryker Deutschland GmbH
Gewerbeallee 18, D-45478
Mulheim an der Ruhr
GERMANY
Phone:49-208-999-060
Fax:49-208-999-0666
Stryker Australia
No. 50 Broughton Road
Artarmon, NSW 2064
AUSTRALIA
Phone:61-2-9415-5100
Fax:61-29-4294127
Stryker Latin America
15100 N.W. 67th Ave. Suite 210
Miami, Florida 33014
USA
Phone:1-305-821-1888
Fax:1-305-826-0067
Stryker Singapore PTE/LTD
70 Bendemeer Road
#03-32 Hiap Huat House
SINGAPORE 339940
Phone:65-293-0119
Fax:65-293-7028
Stryker B.V.
Marinus van Meelweg 17
P.O. Box 8747
5657 En Eindhoven
THE NETHERLANDS
Phone:31-40-2922522
Fax:31-40-2922555
Stryker Pacific Ltd.
Suite 2501, Citibank Tower
Citibank Plaza
3 Garden Road, Central
HONG KONG
Phone:61-2-9415-5100
Fax:61-29-4294127
Stryker Osteonics, SA
5, Chemin des Aulx 5
1228 Plan-les-Ouates
Case Postale 725
1212 Grand-Lancy 1
Geneve, SWITZERLAND
Phone:41-22-884-0111
Fax:41-22-884-0199
Stryker Mexico, S.A. de C.V.
Calle Sacramento 410
Col. Insurgentes San Borja
C.P. 03100
Mexico, D.F.
MEXICO
Phone:525-488-0890
Fax:525-488-0891

Stryker Finland
PL 80 (Makelankatuz)
FIN 00501 Helsinki
FINLAND
Phone:358 (0) 9 7744 680
Fax:358 (0) 9 7744 6820
Stryker Middle East / Africa
Via Della Posta
6934 Bioggio
Switzerland
Phone:(4021) 212-1122
Fax:(4021) 212-1133
Stryker Korea
11F Dong Sung Bldg.
154-24 Samsung-dong
Kangnam-ku
Seoul, KOREA 135-090
Phone:82-2-34517572
Fax:82-2-552-4156
NV Stryker SA (Belgium)
Ikaros Business Park Fase III
Ikaroslaan 12
1930 Zaventem
Brussels, BELGIUM
Phone:32-2-717-92-10
Fax:32-2-717-92-49
Stryker China Limited
Room 903-905, Office Tower 2
Beijing Sun Dong An Plaza
138 Wang Fu Jing Da Jie
Beijing 100006, P.R. China
Phone:86-10-65136183
Fax:86-10-83913571
Stryker Chile
Avenida Nueva Tajamar 481
Oficina 805 Piso 8 Torre Norte Santiago,
CHILE
Phone:562-244-3600
Fax:562-244-3696
Stryker Japan
Dai Tokyo Kasai Shinjuku Bldg.
3-25-3, Yoyogi
Shibuya-ku, Tokyo 151-0053
Phone:813-535-29106
Fax:813-535-21789
Stryker Spain
Manuel Tovar 35
28034 Madrid
SPAIN
Phone:34-91-7283500
Fax:34-91-3580748
Stryker Europe Headquarters
Cite-Centre, Grand Rue 92
CH-1820 Montreux
SWITZERLAND
Phone:41-21-966-1201
Fax:41-21-966-1200
Stryker AB Scandinavia
Krossverksgatan 3
S-216 10 Malmö
SWEDEN
Phone:46 40-69-18-100
Fax:46 40-69-18-190
Stryker Taiwan
5F-1,23 Pa Te Road
Section 1, Taipei, TAIWAN, R.O.C.
Phone:886-2-2322-2895
Fax:886-2-2357-8543
Stryker AB Denmark
Sankt Annae Plads 9
1021 Copenhagen, Denmark
Phone:45 33 9360 99
Fax:45 33 9320 69
Stryker U.K. Ltd.
Hambridge Road
Newbury
Berkshire RG14 5 EG
United Kingdom
Phone:44-1635-262400
Fax:44-1635-262464
MANUFACTURER
Stryker Endoscopy Inc.
5900 Optical Court
San Jose, CA 95138
USA
Phone:408-754-2000
Fax:408-754-2505
5900 Optical Ct.
San Jose, CA 95138
408-754-2000
1-800-624-4422 1000-400-700 Rev. B