Summer Infant 0223T Baby Monitor with Internet Device (Camera) User Manual Peek Plus Internet Monitor 5 17 11 2
Summer Infant, Inc. Baby Monitor with Internet Device (Camera) Peek Plus Internet Monitor 5 17 11 2
Users Manual
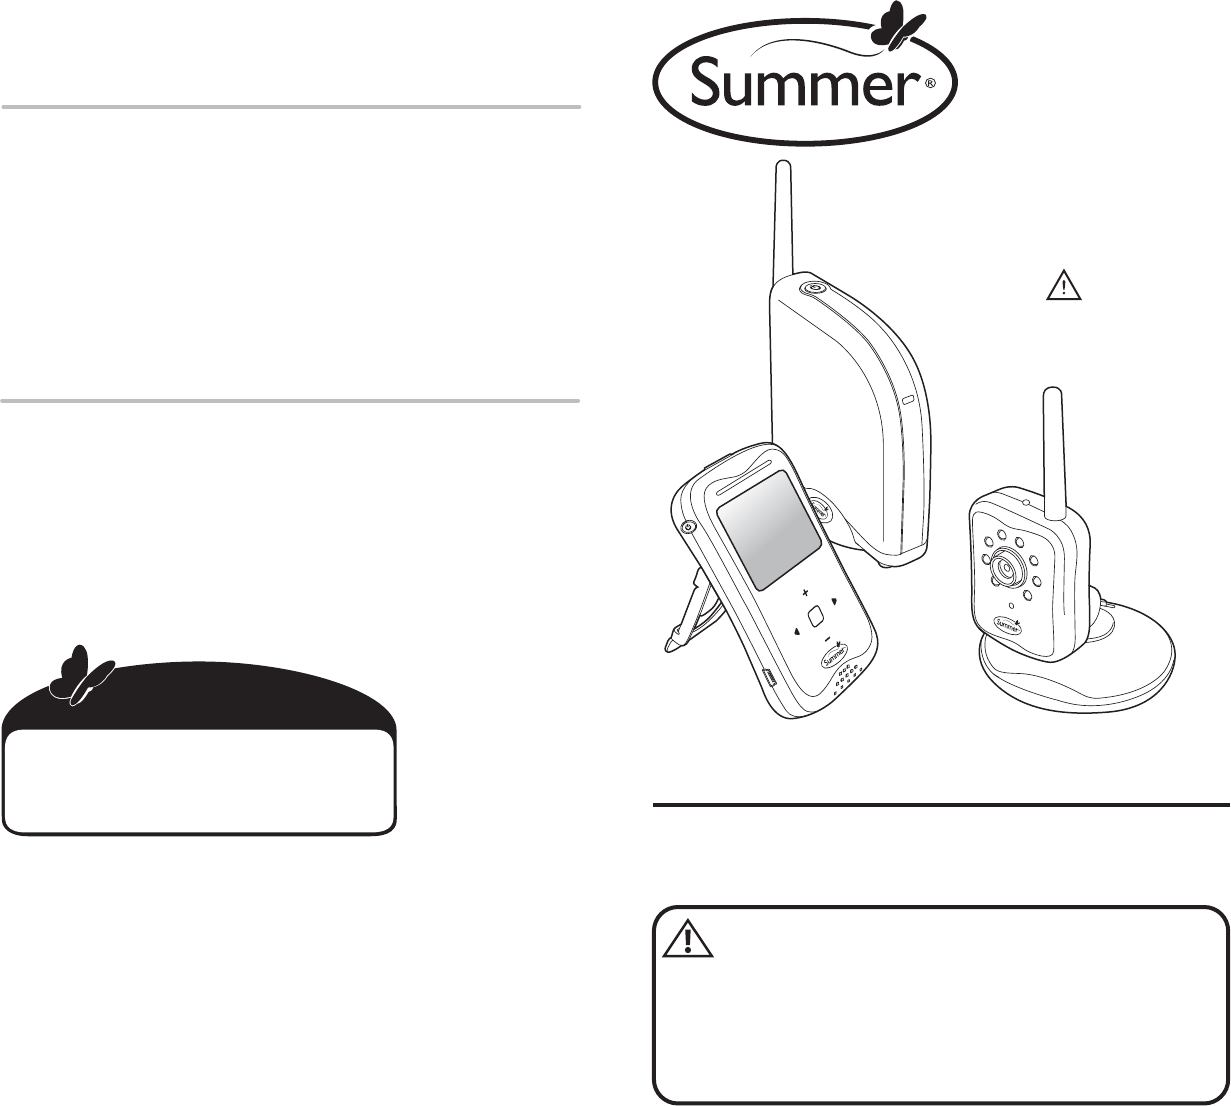
PEEK PLUS
™
INTERNET BABY
MONITOR SYSTEM
INSTRUCTION MANUAL
Please read the
following instructions
and warnings carefully.
Keep this instruction manual
for future reference.
Tools required:
screwdriver (not included)
For technical support see back page.
For use with children from birth and up.
WARNING:
Adult assembly required.
Keep small parts away from
children when assembling
.
02230T
STRANGULATION HAZARD - Keep cord out of baby’s reach.
NEVER place camera or cords within 3 feet of the crib.
Use enclosed Security Clips to help secure cord away from
baby’s reach. Never use extension cords with AC Adapters.
Only use the AC Adapters provided.
WARNING:
20
Summer Infant Europe, LTD.
Office Suite 6, Second Floor
Bournehall House, Bournehall Road
Bushey, Hertfordshire WD23 3HP UK
+44 (0) 208 420 4429
Summer Infant
Canadian Office
1055 Middlegate Road
Mississauga, Ontario,
Canada L4Y3Y4
905-848-2424
Summer Infant, Inc.
1275 Park East Drive
Woonsocket, RI 02895 USA
1-800-268-6237
© 2011 Summer Infant, Inc.
Colors and styles may vary.
Please retain information
for future reference.
MADE IN CHINA.
5/11
www.summerinfant.com
We LOVE our customers!
Get to know us at:
We at Summer Infant stand behind all of our products. If
you are not completely satisfied or have any questions,
please contact our customer service department at
1-800-268-6237 or customerservice@summerinfant.com
(For Europe call +44 (0)208 420 4429 or
customerserviceuk@summerinfant.com)
Summer Infant, Inc. Monitor Warranty Policy
Summer Infant, Inc. will repair or replace (at our option) your unit free of
charge for 12 months from the date of purchase if the unit is defective in
workmanship or materials. To claim your repair/replacement, the product
must be returned to Summer Infant along with a copy of the original
purchase receipt. In the absence of the purchase receipt, the warranty will
be 12 months from the date of manufacture. This warranty does not apply to
normal wear or damage from misuse, abuse, improper storage and
handling, installation, accident, unauthorized repair or alteration. Please
contact our Customer Service Department by phone at 1-800-268-6237
or via e-mail at customerservice@summerinfant.com for details.
If you experience a problem that is not noted in this manual,
please do not return the product to the store. Our Customer
Service Department may have a simple solution to your problem.
Please contact us at 1-800-268-6237 or email us at
customerservice@summerinfant.com.
FCC Information
This device complies with part 15 of the FCC Rules. Operation is subject to
the following two conditions: (1) This device may not cause harmful
interference, and (2) this device must accept any interference received,
including interference that may cause undesired operation.
CAUTION: Changes or modifications not expressly approved by Summer
Infant may void the users authority to operate this equipment.
CAUTION: 1. To comply with FCC RF exposure compliance requirements, a
separation distance of at least 20 cm must be maintained between the
antenna of this device and all persons. 2. This transmitter must not be
co-located or operating in conjunction with any other antenna or
transmitter.
PAGE 20
System Requirements: At the installation location of your gateway, you need a
broadband Internet connection (cable/DSL) with recommended upload speed of 300
bps and/or a wireless router or a cable/DSL modem with an available ethernet/LAN port
to properly access and view your cameras, you must have a required browser version
Internet Explorer 7.0 or higher, Mozilla Firefox 3.0 or higher, Safari 4.0 or higher, or
Google Chrome. Make sure you have the latest version of Adobe Flash Player which you
can download at http://www.adobe.com/support/flashplayer/downloads.html.
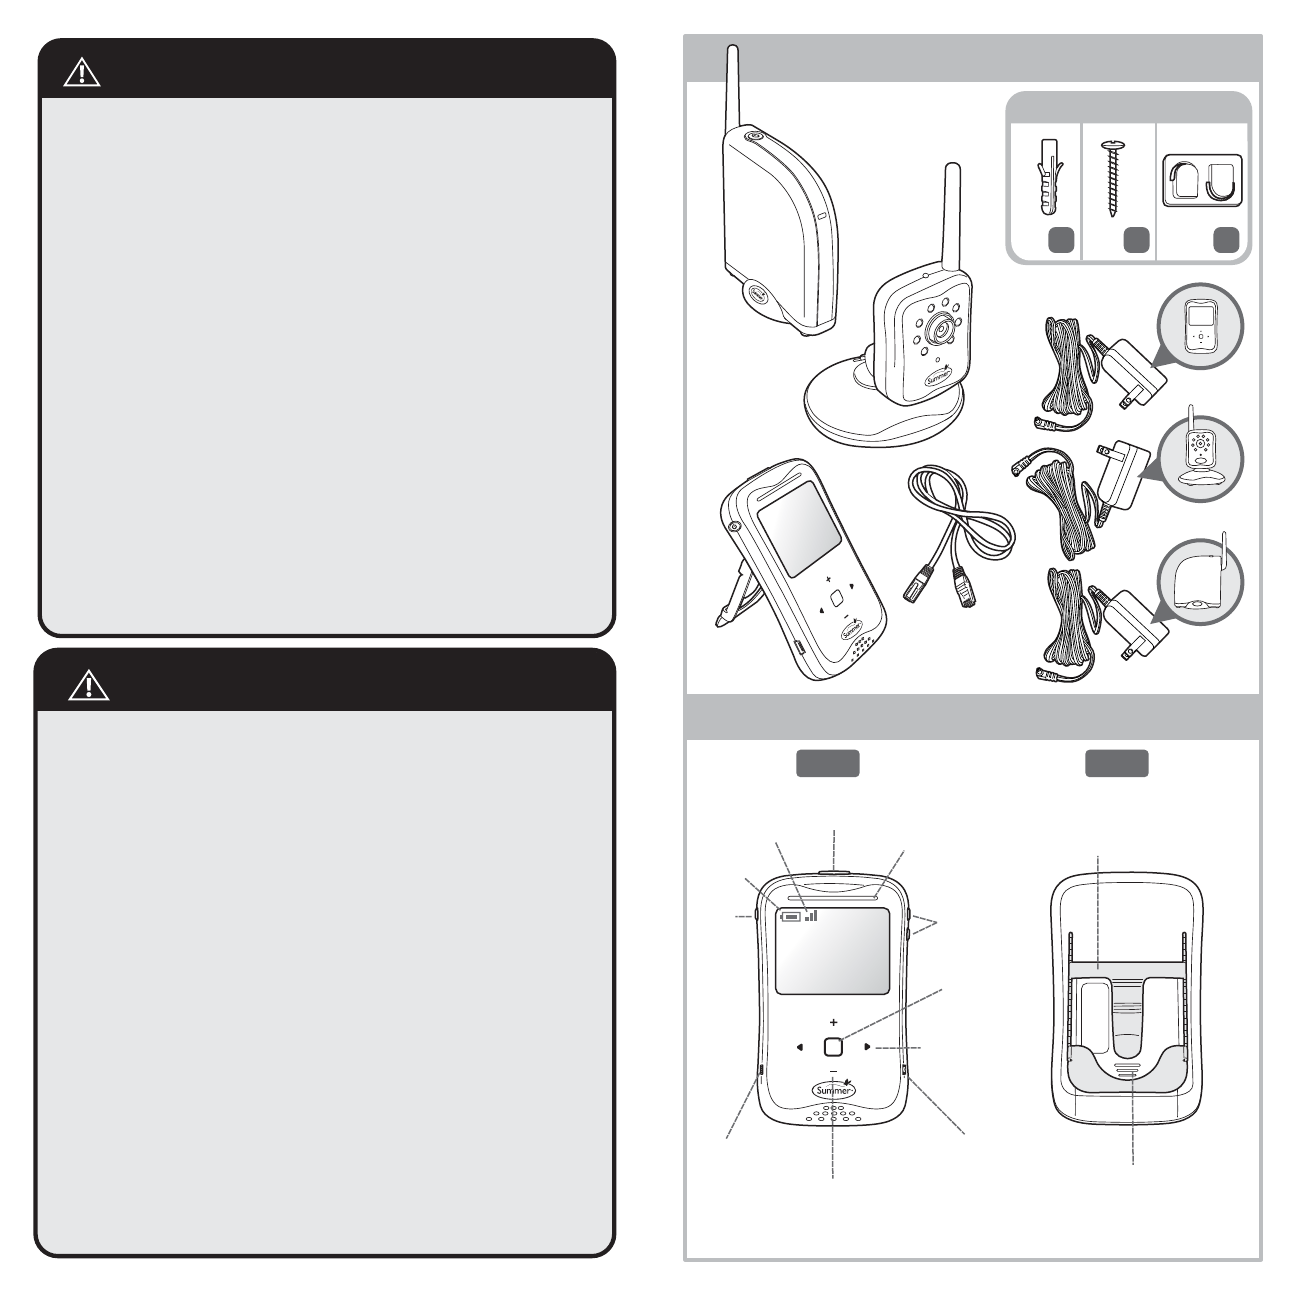
components:
features (monitor):
BATTERY WARNING:
• Use only the original rechargeable batteries provided. Please
contact Summer Infant, Inc. for replacement batteries. Contact
information can be found on bottom of these instructions or on
the battery itself.
• Do not mix old and new batteries.
• Do not mix alkaline, standard,
or rechargeable batteries.
• Batteries are to be inserted with correct polarity.
• Clean battery and product contacts prior to
battery installation.
• Do not short-circuit supply terminals.
• Only the recommended batteries or equivalent are to be used,
volts and size.
• Remove batteries when product is stored for long periods of
time or when batteries are exhausted.
• Dispose of exhausted batteries properly.
• Do not recharge non-rechargeable batteries.
• Rechargeable batteries are only to be charged under adult
supervision.
• Keep all batteries away from children.
WARNING:
THIS PRODUCT CANNOT REPLACE RESPONSIBLE
ADULT SUPERVISION.
• STRANGULATION HAZARD - Keep cord out of baby’s reach.
NEVER place camera or cords within 3 feet of the crib. Use enclosed
Security Clips to help secure cord away from baby’s reach. Never use
extension cords with AC Adapters. Only use the AC Adapters provided.
• When an AC Adapter is plugged into an electrical outlet,
do not touch the exposed end.
• Test monitor before first use, periodically, and when changing location of
the Camera.
• Do not use monitor near water (such as bathtub, sink, etc.).
• Keep monitor away from heat sources (such as stoves, radiators, etc.).
• Make sure there is proper ventilation around all monitor components. Do
not place on sofas, cushions, beds, etc. which may block ventilation.
• Nursery monitors use public airwaves to transmit signals. This monitor
may pick up signals from other monitors or similar devices and signals
broadcast by this monitor may be picked up by other receivers.
• This product is not a toy. Do not allow children to play with it.
• This product contains small parts. Adult assembly required.
Exercise care when unpacking and assembling the product.
hardware:
x6 x1 x1
Video
On/Off
Menu
Battery
Indicator
Power
On Volume
Control
AV Output
Scrolling
Up & Down/Brightness
Icons
Left & Right
Scroll Arrows
Sound
Lights
Signal
Strength
Battery
Compartment
Adjustable
Kickstand
AC Adapter
Jack
front back
(Gateway)
(Camera)
(Ethernet Cable)
(Monitor)
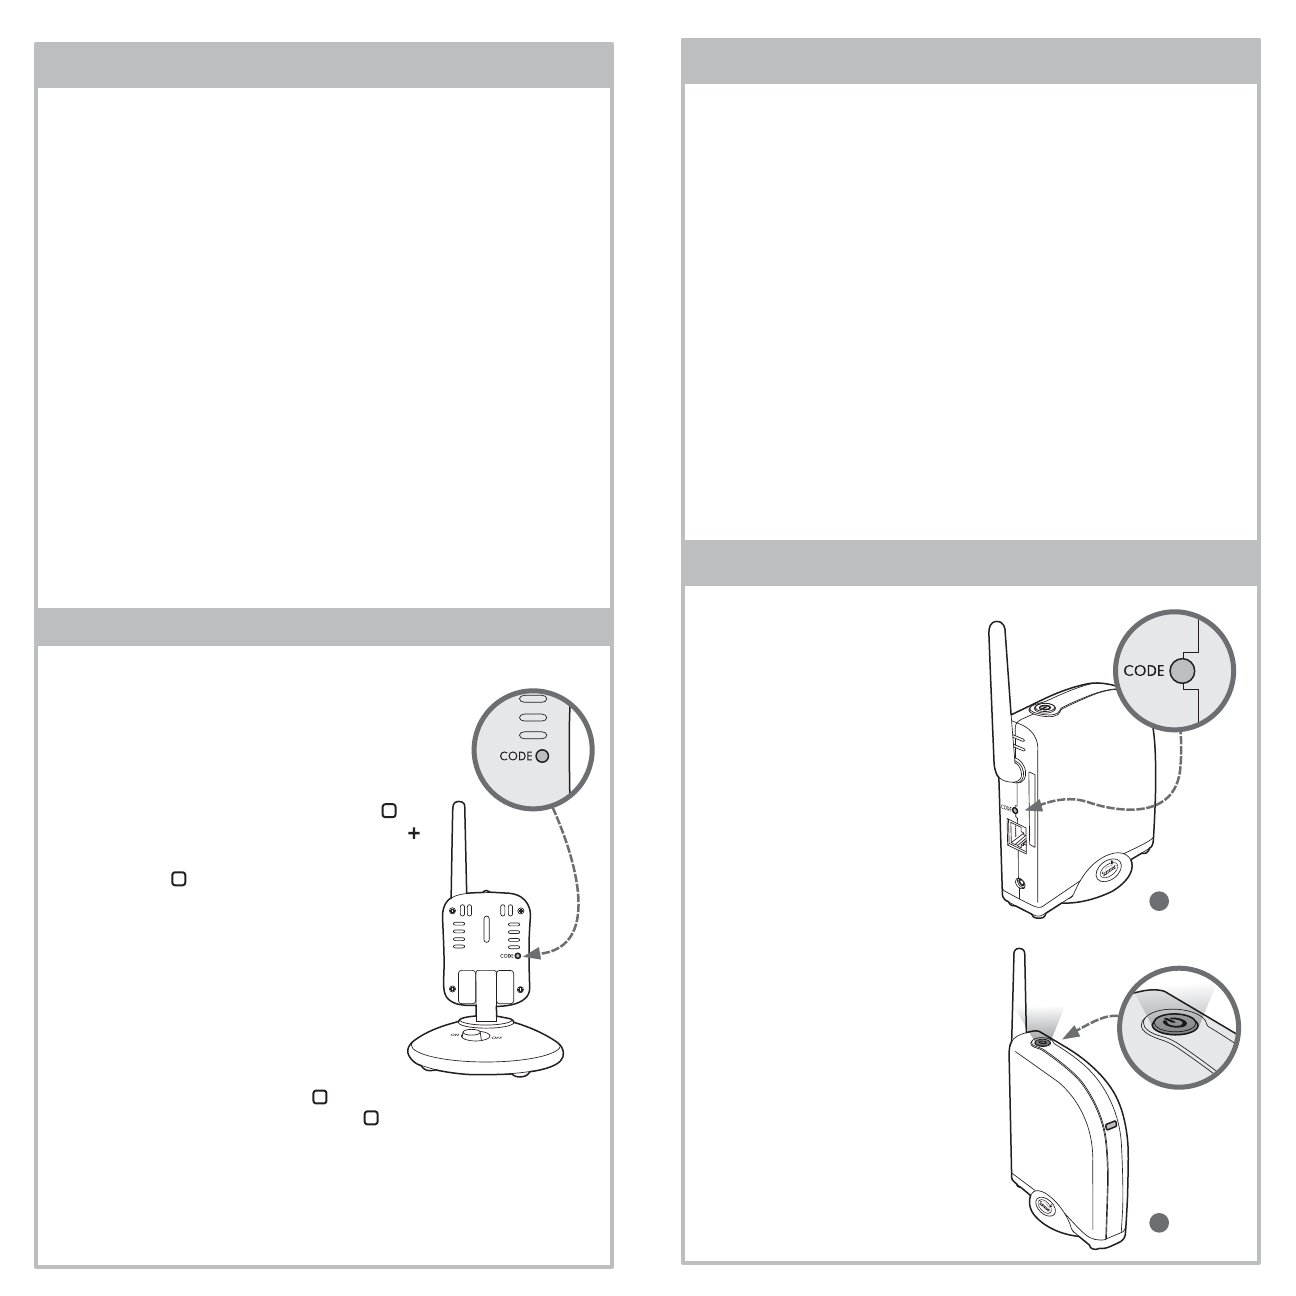
features (camera):
features (gateway):
Code
Button
Power
On/Off
Power & Sync
Indicator Light
Internet
Connection
Indicator Light
Antenna
front
AC Adapter
Jack
Serial Number and
Activation Code
Ethernet/LAN
Port
Code
Button
AntennaPower On LED
Nighttime Led’s
Microphone
Camera Lens
AC Adapter
Jack
camera set-up (table top):
Be sure to test reception and
CAMERA positioning.
at least
3ft.
back
front back
plug in!
plug in!
turn on!
Determine a location
for the CAMERA that
will provide the best
view of your baby in
the crib. Place the
CAMERA on a flat
surface, such as a
dresser, bureau or
shelf. NEVER place
camera or cords within
3 feet of the crib.
2
3
1
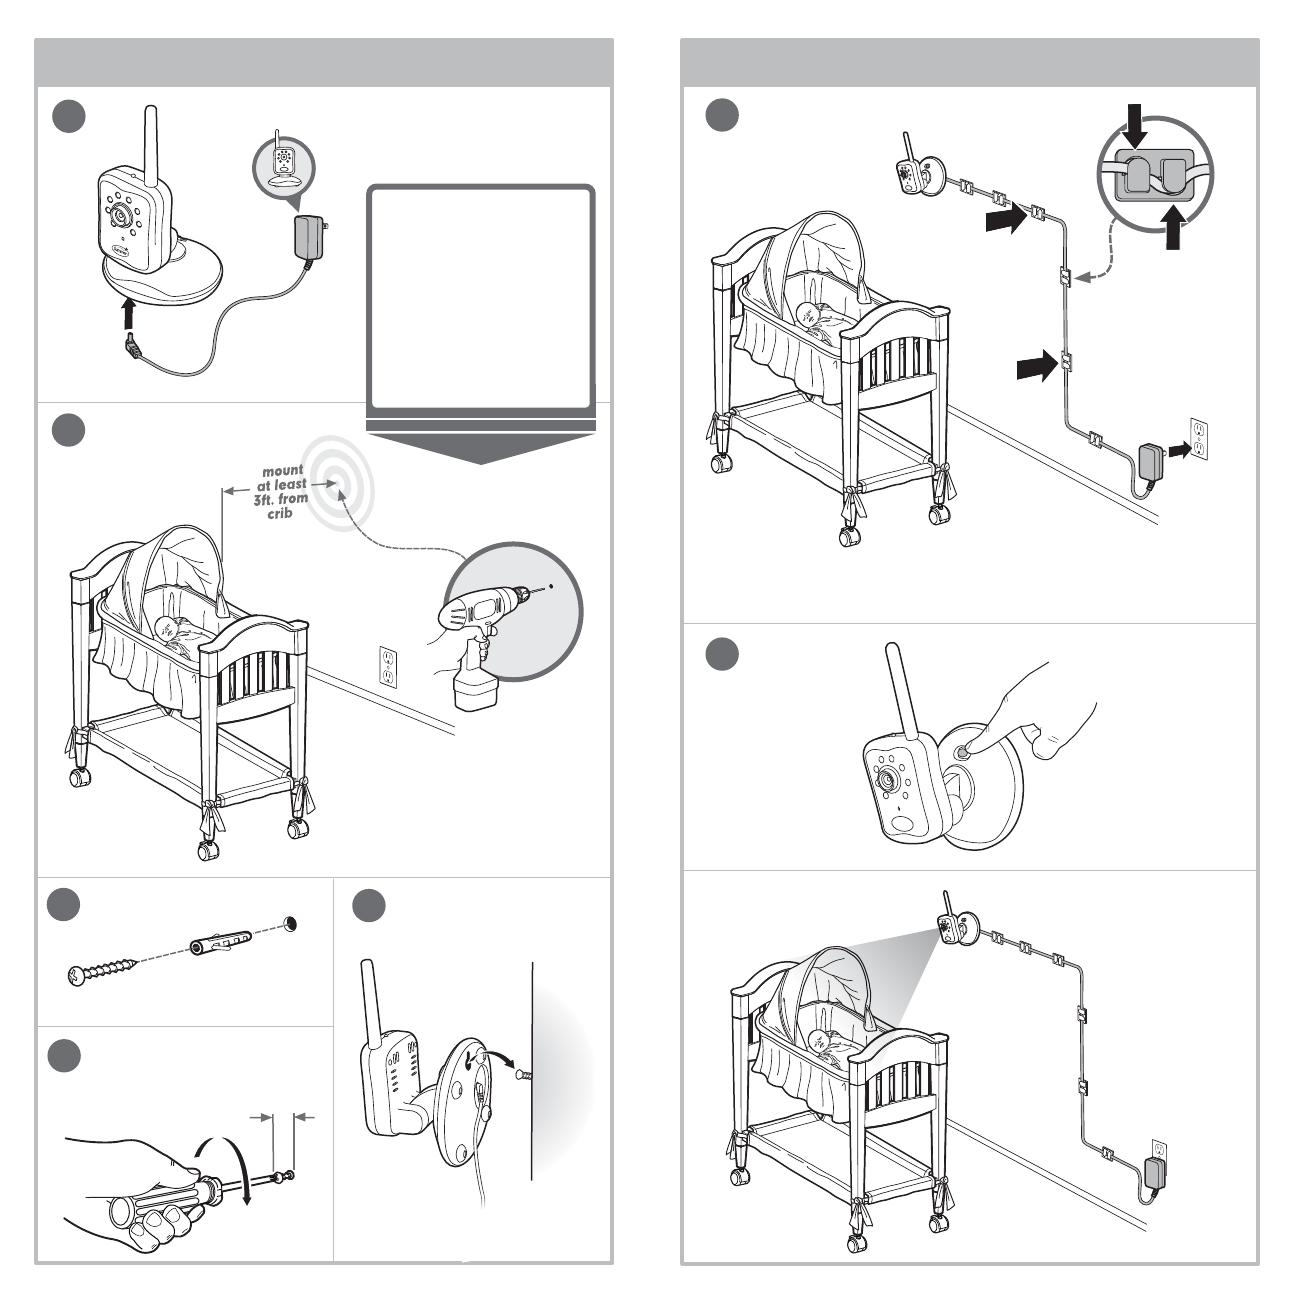
camera set-up (wall mount): camera set-up (wall mount):
Be sure to test
reception and
CAMERA
positioning.
1/4”
plug in!
turn on!
plug in!
Determine a location
to mount the
CAMERA to the wall
that will provide the
best view of your
baby in the crib.
NEVER place camera
or cords within 3 feet
of the crib.
Secure the cord to the wall using the 6 Security Clips included
to keep cord away from baby's reach.
Pre-drill a hole in the
wall using 3/16",
4.8mm, drill bit(not
included).
Tighten screw until only
1/4" (6.2mm) of the screw
is exposed.
2
35
6
4
1
7
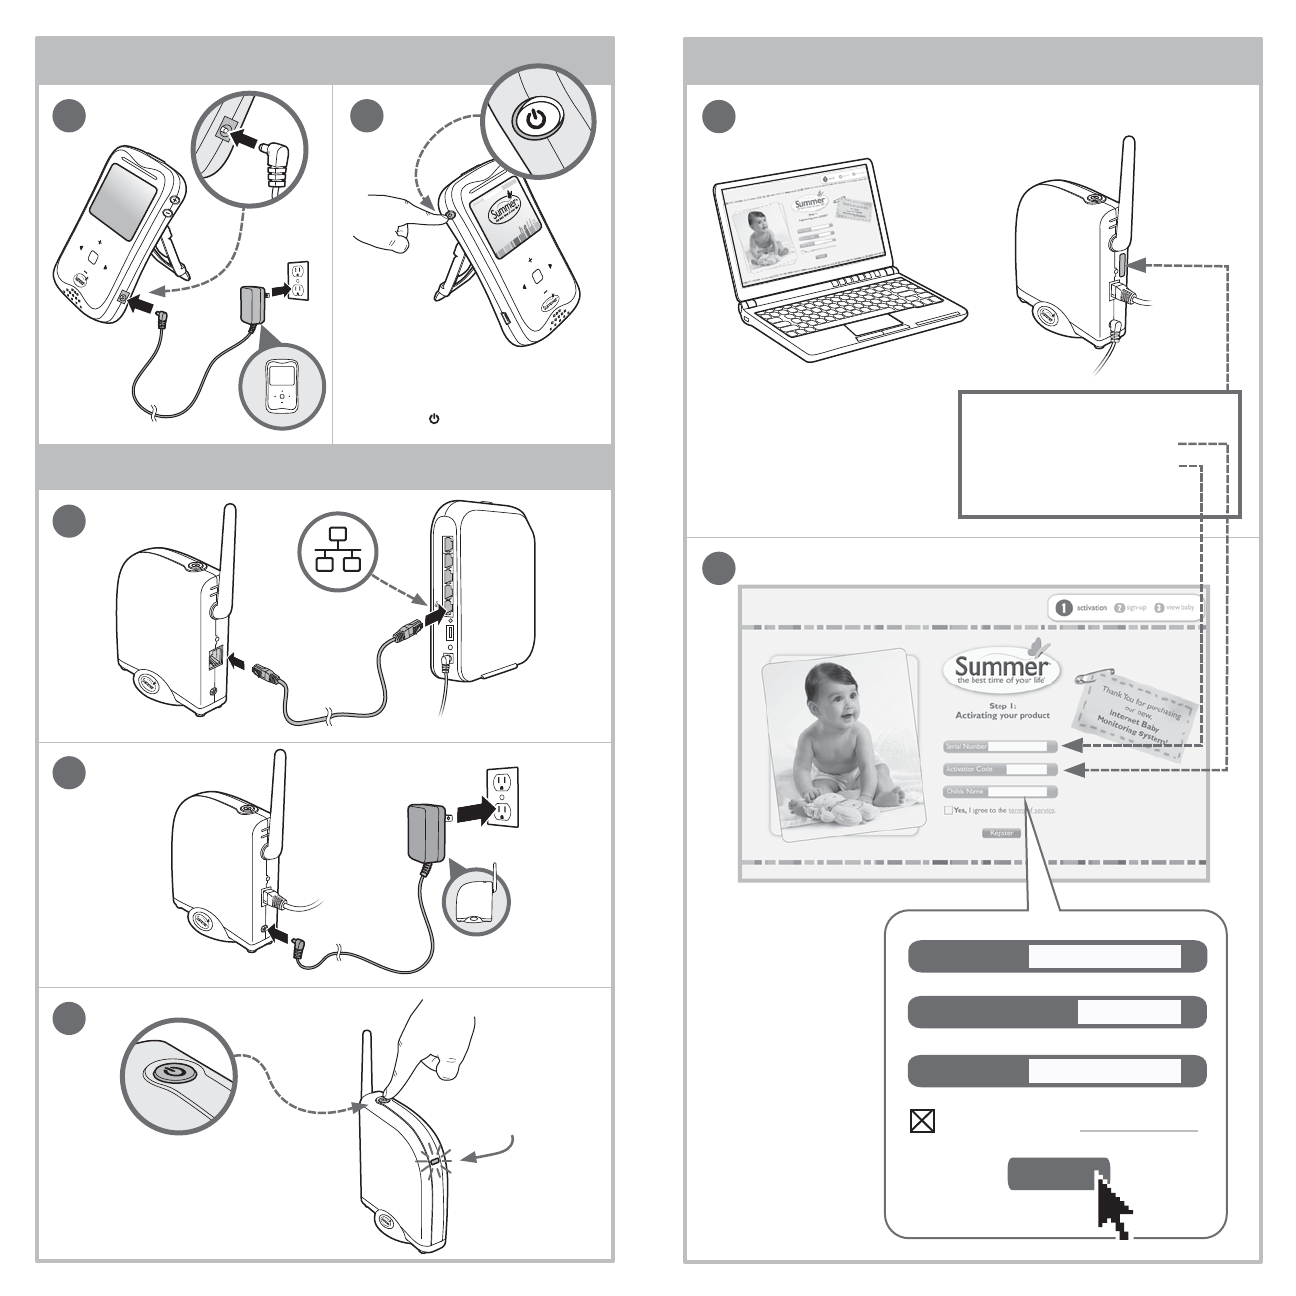
getting started online:
1
image of Serial Number
Sticker
click!
All fields are
required to be
filled in.
Serial Number
Activation Code
Childs Name
Yes, I agree to the terms of service.
Register
......
......
......
Visit www.summerinfant.com/internetviewable/activate.
2
3
blinking green
light shows
internet
connection!
green light
shows a
successful sync!
plug
into
LAN
(gateway)
1
(wireless router)
2
Locate your product’s
Serial Number and
Activation code located
on the back of your
gateway. You will use this
to activate your account.
testing your initial setup:
monitor set-up:
testing your initial setup:
gateway set-up:
plug in!
plug in!
For audio and no video, press the VIDEO
ON/OFF button on top of the unit. To turn the
monitor of completely, press and hold the
“POWER ” button for 4 seconds.
2
1
press and
hold for
3 seconds!
understanding user icons:
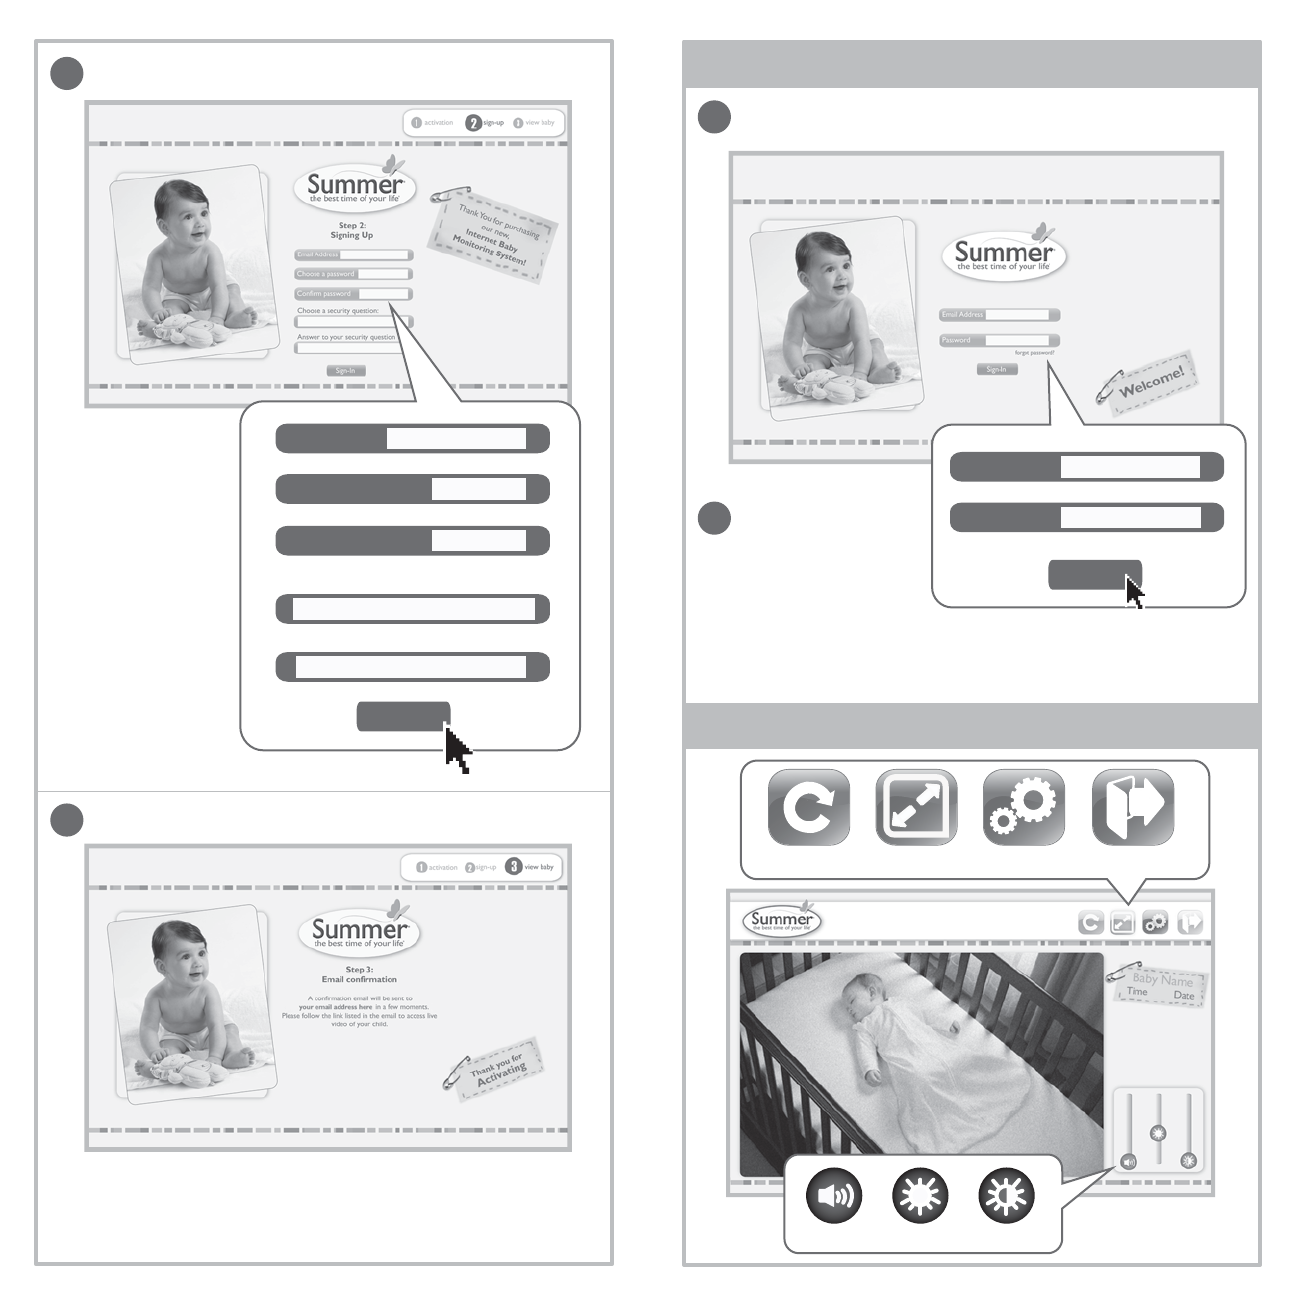
signing in after activation:
Refresh Full Screen Settings Logout
3
4
click!
2
1
Email Address
Choose a password
Confirm password
Choose a security question:
Answer to your security question:
Sign-In
......
......
......
......
Email Address
Password
forgot password?
Sign-In
click!
......
......
All fields are
required to be
filled in.
Visit www.summerinfant.com/internetviewable
Enter email
address and
password then
click “sign-in”
What was your childhood nickname?
COMPLETE ACTIVATION AND BEGIN LIVE VIEWING
OF YOUR CHILD! A confirmation email will be sent to
you in a few moments. Please follow the link listed in the
email to access live video of your child. Volume Brightness Contrast
Share log-in information with friends and family for live viewing
enjoyment. Peek Plus allows up to three people to be logged
into internet viewing at one time.
testing your initial setup:
Be sure to test your Monitor’s reception before initial use. We also
recommend testing your Monitor’s reception periodically.
PLEASE KEEP IN MIND THAT THE PEEK PLUS™ INTERNET BABY
MONITORING SYSTEM WILL NOT PROVIDE THE SAME LEVEL OF
PICTURE QUALITY AS YOUR TELEVISION WITH CABLE, SATELLITE
DISH, OR DIGITAL SERVICE.
To test reception you will need two adults. One adult should view the
picture on the Monitor while the other is in the nursery to adjust the
Camera. Often the quality of the reception can be improved by slightly
repositioning the Camera, Monitor, or both. Make sure to move monitor
away from other monitors, cordeless phones, walkie-talkies, ect. It may
help to place a stuffed animal or doll in the crib to simulate the position
and size of your baby. Adjust the picture quality on the Monitor as
needed by using the Brightness Adjustment “ ” and “ ” on the front of
the Monitor.
To test sound quality, have one adult speak in both a normal tone and a
whisper near the crib. Adjust volume on the Monitor’s Volume Adjustment
as needed.
viewing on smart phone:
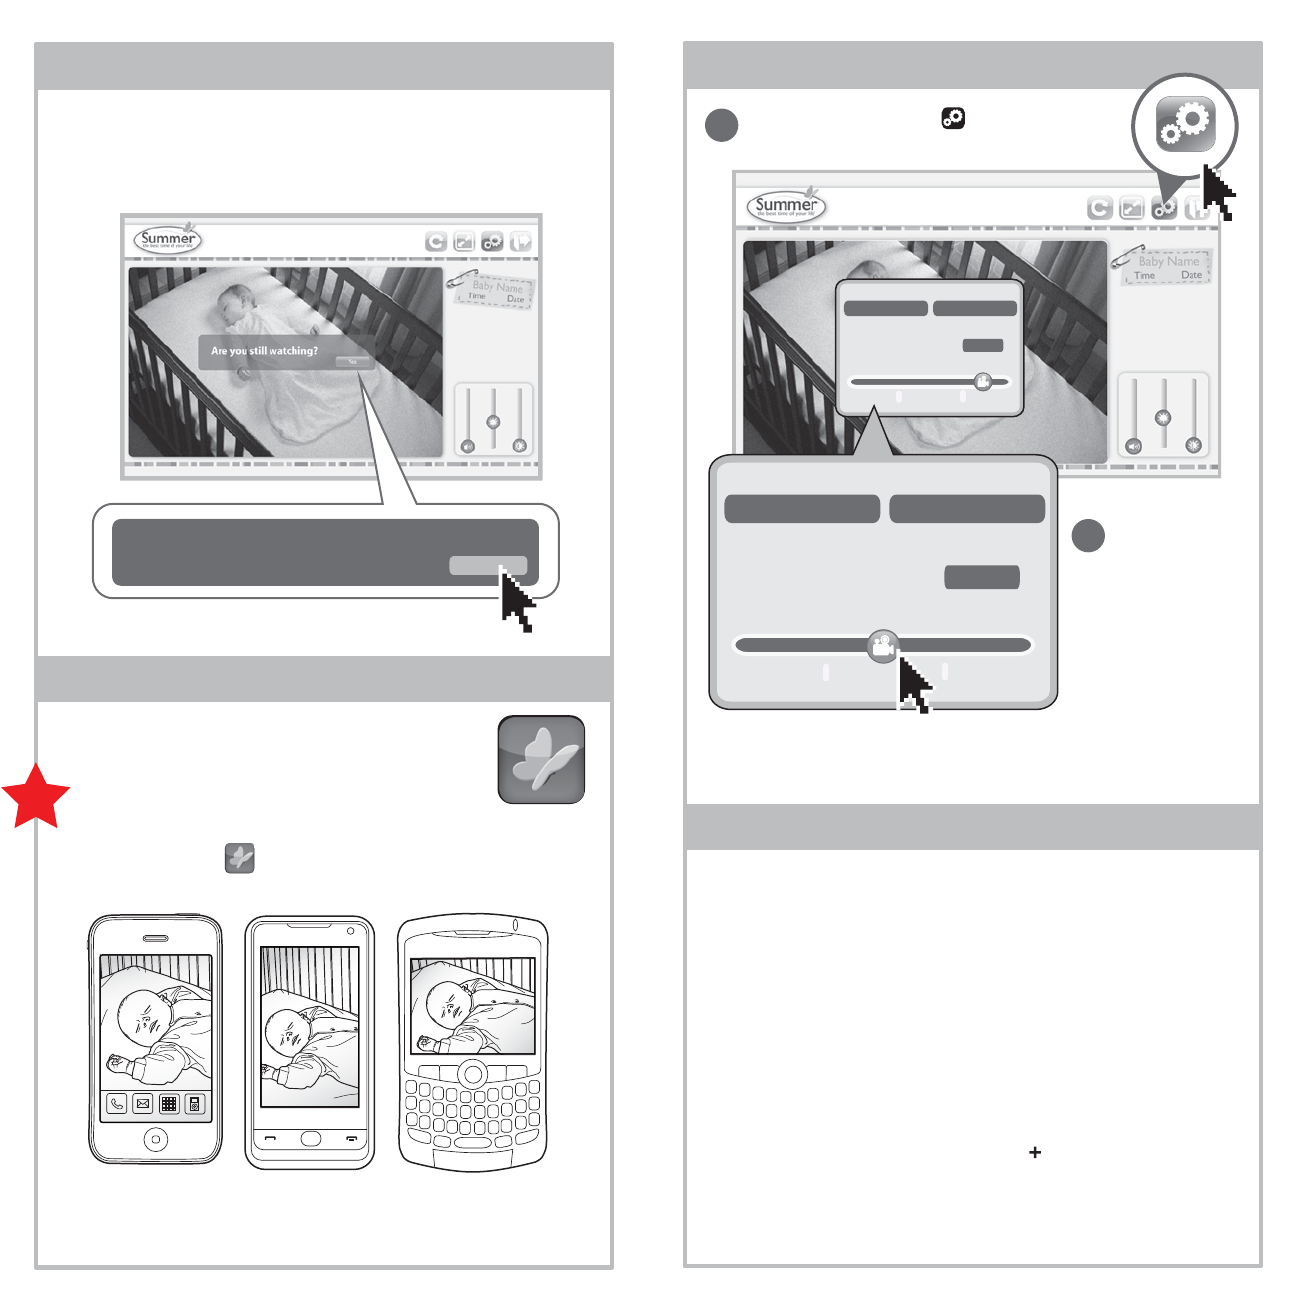
automatic logout: adjusting video quality:
Click the “Settings Icon ” to change your
user settings.
Click the “low,
medium, or high”
button.
1
2
click!
Are You Still Watching? Ye s
Internet Viewing System will automatically logout after 5 minutes
of inactivity. You will recieve a visual and audible indicator to
alert you one minute prior to logout. Click “yes” to continue
normal viewing.
Your default video quality will be set to high. If you experience
freezing or delays you can adjust your video quality to medium
or low.
Look for our app in the Apple (iphone®), Google
(Android®), and Blackberry (Blackberry®) marketplaces.
Might want a little info about smart phone usage.
Settings
Submit
Change Email Address Change Password
low medium high
Video Quality
Settings
Submit
Change Email Address Change Password
low medium high
Video Quality
Apple Google Blackberry
(iphone®)(Android®) (Blackberry®)
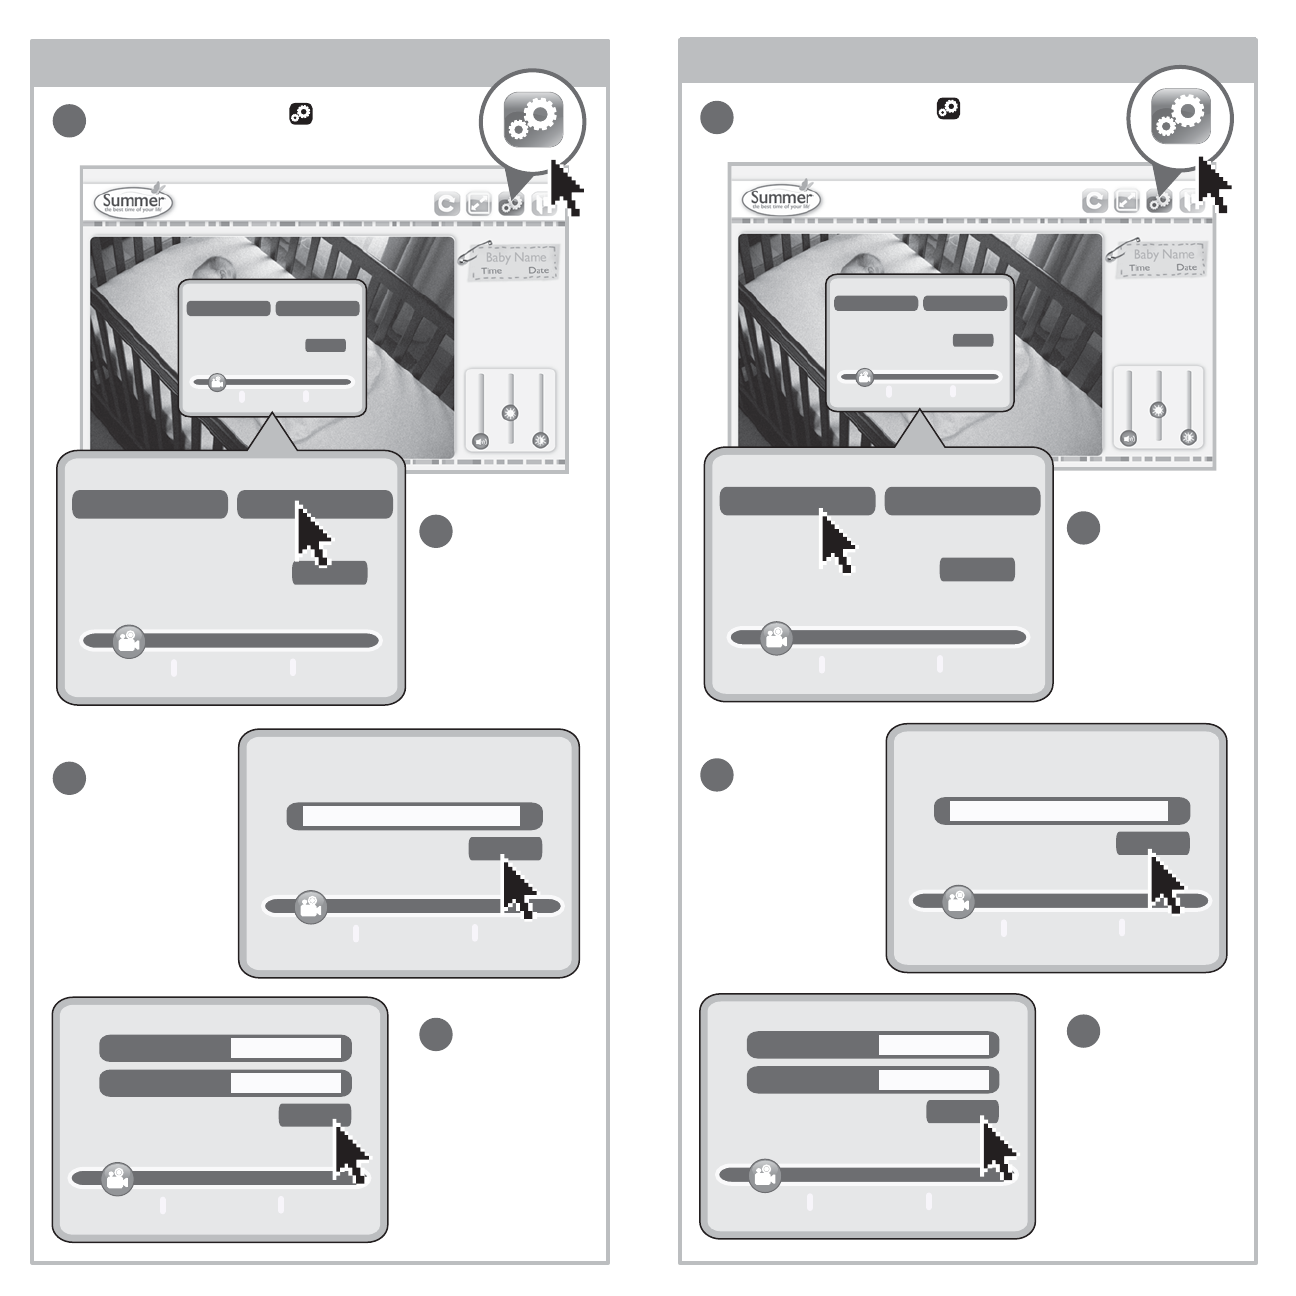
Settings
Submit
New password
Confirm password
low medium high
Video Quality
resetting your password:
Click the “Settings Icon ” to change your
user settings.
Click the “Change
Password” button.
Enter the answer
to your security
question then
click “Submit”.
Enter the answer
to your security
question then
click “Submit”.
Enter new
password.
Re-enter
password in the
space below
then click
“Submit”.
1
2
3
4
low medium high
Video Quality
Settings
What is your paternal grandmothers
middle name?
Submit
Settings
Submit
New email
Confirm email
low medium high
Video Quality
resetting you email:
Click the “Settings Icon ” to change your
user settings.
Click the
“Change Email
Address” button.
Enter new email
address.
Re-enter email
in the space
below then click
“Submit”.
1
2
3
4
low medium high
Video Quality
Settings
What is your paternal grandmothers
middle name?
Submit
......
......
...... ......
......
......
Settings
Submit
Change Email Address Change Password
low medium high
Video Quality
Settings
Submit
Change Email Address Change Password
low medium high
Video Quality
Settings
Submit
Change Email Address Change Password
low medium high
Video Quality
Settings
Submit
Change Email Address Change Password
low medium high
Video Quality
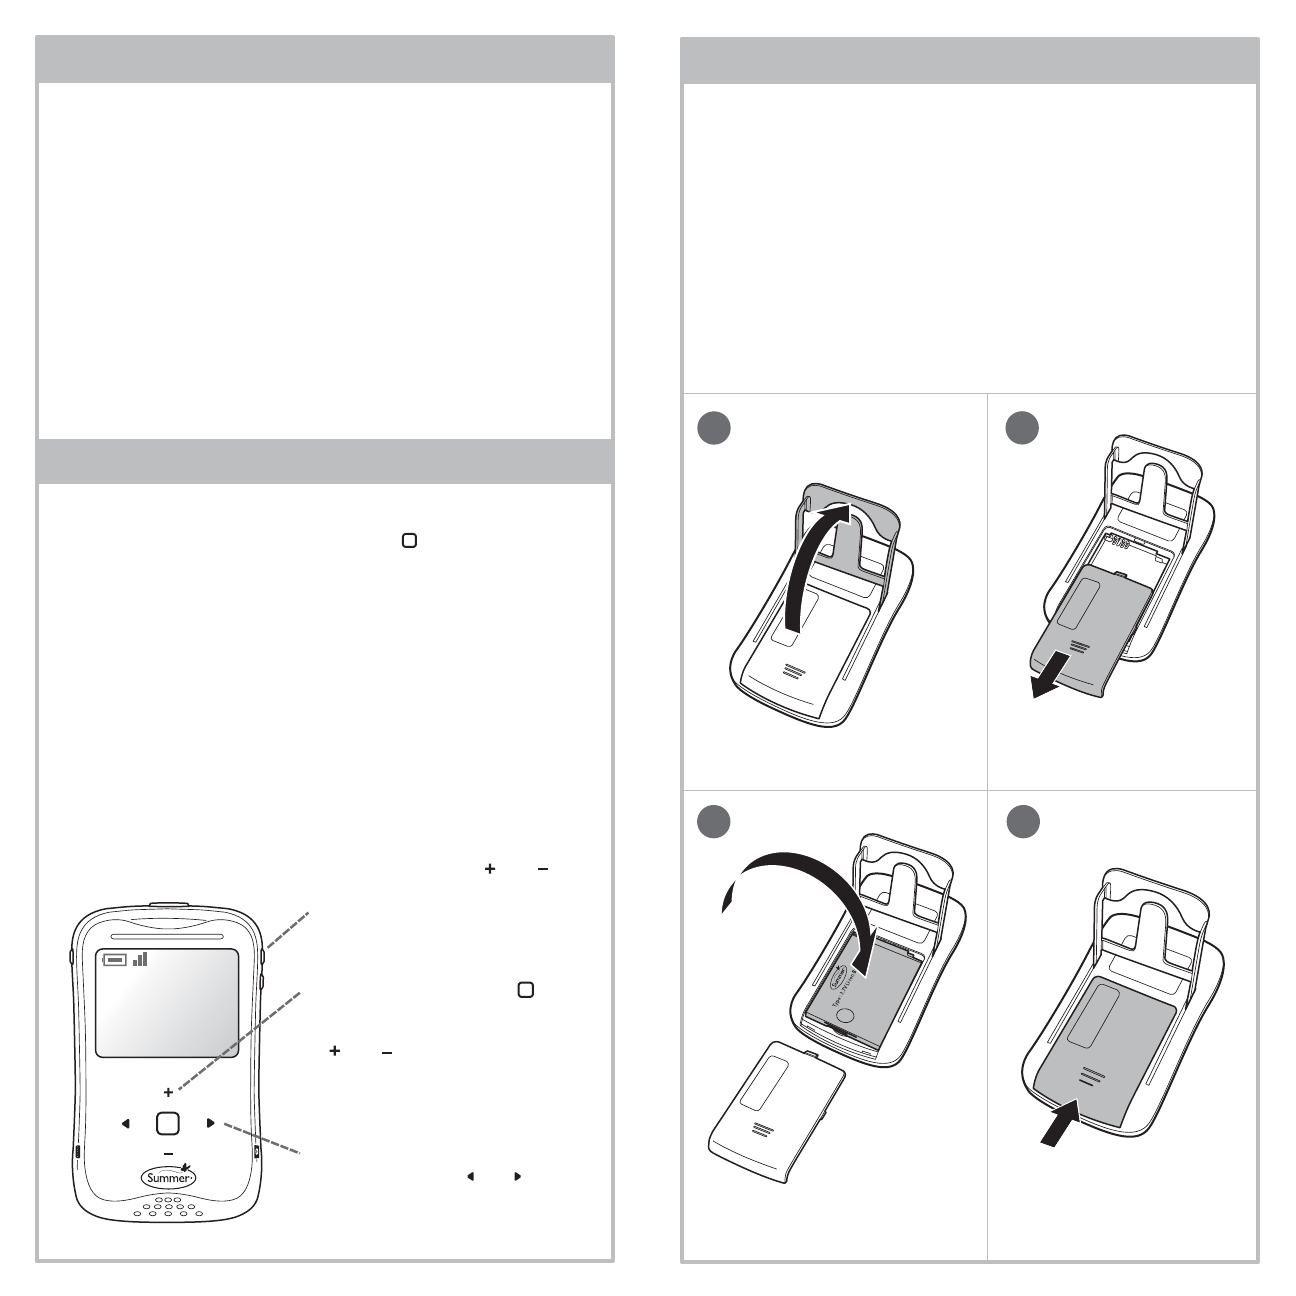
battery use and installation:
special features for camera:
special features for monitor:
Monitor: This step is only
needed if replacing
battery.
Insert battery. Ensure correct
connection.
Slide battery door back in
place.
Slide open battery door.
Locate the battery compartment
door on back of monitor.
• To charge battery, plug the AC Adapter into the
Monitor’s AC Adapter Jack. Plug the other end into a standard
electrical outlet.
• To achieve optimal battery life, charge battery (12-16 hours) and
leave unplugged until power LED turns amber, indicating low battery.
• Note: constant recharging of your battery before low battery
indicator comes on will decrease the life of your batteries.
• Remove battery during long periods of non-use.
• If battery is no longer recieving optimal charge (i.e. decreased
monitor life), remove and replace with a new battery by visiting
www.summerinfant.com.
To Use the Video Monitor in Portable Mode:
For use in portable mode, the Monitor requires 1 3.7V LITHIUM-ION
rechargeable battery (included).
• Touch-Sensitive Control Pad: The monitor is equipped with a
touch-sensitive control panel. Tap “menu ” button on the
monitor to activate control panel. Control panel illumination will
turn off after 2 seconds.
• Video On/Off Button: While operating on battery power, the
video screen will go to sleep, to conserve battery power. Audio
and sound lights will function normally. Press the Video On/Off
button to resume viewing.
•
Kickstand: The monitor has a built in kickstand for table top
convience. Simply flip out the kickstand and place the monitor on a
flat, even surface for easy viewing.
•
Belt Clip: For convenience and portability, you can clip the Monitor to
your belt or waistband.
• Scrolling Arrows: Use the
scrolling arrows “ and ” to
navigate through the menu.
• Volume: Press the “ and ”
buttons, located on the
monitor’s side, to increase and
decrease volume levels.
• Brightness: Tap “menu ”
button on the monitor to
activate control panel. Use the
“ and ” buttons on the
touch-senstive control pad to
adjust the screen’s brightness.
• Sound Lights: The five Sound Lights will illuminate on the
Monitor depending on the level of your baby’s sounds. For
example, if your child is just cooing, only one or two lights will
illuminate. If your baby is crying, several will illuminate,
depending on how loud she is crying. This feature is particularly
helpful if you are in a noisy room.
• Night Vision: In a darkened room, the Camera will
automatically use its infrared LED’s to transmit a black and white
image of your baby, so you can see your child at night.
• Multi-Position Camera/Microphone: The Camera/Microphone
should be positioned so it is facing baby as directly as possible.
The multi-directional microphone, a feature unique to Summer
Infant monitors, will automatically focus on the baby’s voice
while filtering out ambient noise.
12
3 4
No picture or sound on Monitor
• Make sure the Monitor is turned on
• Make sure the AC Adapters are plugged in
• Make sure the outlets are working
• Make sure Monitor and Camera are SYNCHED up.
Sound but no picture on Monitor
• Press the Video On/Off Button once to turn on video mode
• Try adjusting the Brightness Control on the Monitor
• Test reception by moving the Monitor and/or CAMERA to
different locations
Picture but no sound
• Turn up the volume on the Monitor using the Volume
Control
Picture not clear
• Position the Monitor closer to the CAMERA if necessary
•
Move Monitor away from other monitors, cordless
phones, walkie-talkies, etc.
• Try adjusting the Brightness Control on the Monitor
• Test reception by moving the Monitor and/or CAMERA to
different locations
Squealing sound
• Move the CAMERA and the Monitor further away from
each other
Step 1:
Delete your camera by tapping the
control panel to activate. Press menu “ ”
button to enter the camera menu. Press “ ”
to highlight “del cam”.
Step 2:
Press “ ” to confirm selection.
Step 3:
When camera has been sucessfully
deleted, the Summer logo will appear with a
“no signal” message.
To Resync Camera:
To Delete Camera:
To Resync Gateway:
The Monitor and Camera are synched at the
factory for privacy reasons. If the Monitor and
Camera are not synching with each other for any
reason, please sync them as described below.
problem solving/troubleshooting for monitor:
deleting and resyncing camera:
Make sure you meet system requirements
• At the installation location of your gateway, you need a
broadband Internet connection (cable/DSL) with
recommended upload speed of 300 bps and a wireless router
and or a cable/DSL modem with an available ethernet/LAN
port to properly access and view your cameras, you must
have a required browser version Internet Explorer 7.0 or
higher, Mozilla Firefox 3.0 or higher, Safari 4.0 or higher, or
Google Chrome. Make sure you have the latest version of
Adobe Flash Player which you can download at:
http://www.adobe.com/support/flashplayer/downloads.html
Gateway is not connecting to the internet
• Make sure that your gateway Ethernet cable is plugged into
the LAN port of your router and confirm that the green internet
light on the front of the gateway is blinking. The power light
should be green to show that your gateway is powered on
and successfully synced with your camera. If the power light is
red, this indicates that your gateway is no longer synced with
your camera. Refer to synching monitor and gateway section
below.
problem solving/troubleshooting for gateway:
nonresponsive gateway resyncing:
Step 1: Move the Monitor to the same area
as the Camera. Make sure that both the
Camera and Monitor are powerd on.
Step 2: To add a camera, tap the control
panel to activate. Press the “menu ”
button to enter the camera menu. Press “ ” again to select “Add
Cam”. Power LED will begin to blink rapidly.
Step 3: Press the code button on back of Camera to synch (see
illustration).
Step 4: Once synched, a picture from the newly added Camera will
appear on Monitor screen. Camera’s power LED will stop blinking.
Step 1: Move the Monitor to
the same area as the
Gateway. Make sure that
both the Gateway and
Monitor are powerd on.
Step 2: Press the code button
on back of gateway to synch
(Figure A).
Step 3: Once synched
successfully, synced power
LED on gateway will turn
green (Figure B)
The Camera and Gateway
are synched at the factory for
privacy reasons. If the
Camera and Gateway are
not synching with each other
for any reason, please sync
them as described below.
A
B