Sun Communications DECT34-S37TAM Digital Cordless Phone - Base Unit User Manual
SunCorp Communications Limited Digital Cordless Phone - Base Unit
Users Manual

Product Definition Document SunCorp Communications (Europe) Ltd.
PD343
Product Definition Document
Version 1.1
Customer: XACT Country: USA
Model: XD6451 / XHB401
Roadmap Number: DECT 34-2
Cabinet Reference: T21

FCC INTERFERENCE INFORMATION
x
FCC Interference Information
This device complies with part 15 of the FCC Rules. Operation is subject to the following
two conditions: (1) This device may not cause harmful interference; and (2) This device must
accept any interference received, including interference that may cause undesired operation.
This equipment has been tested and found to comply with the limits for a Class B digital
device, pursuant to Part 15 of the FCC rules.These limits are designed to provide reasonable
protection against harmful interference in a residential installation.
This equipment generates, uses, and can radiate radio frequency energy and, if not installed
and used in accordance with the instructions, may cause harmful interference to radio com-
munications. However, there is no guarantee that interference will not occur in a particular
installation.
If this equipment does cause harmful interference to radio or television reception, which can
be determined by turning the equipment off and on, the user is encouraged to try to correct
the interference by one or more of the following measures:
• Reorient or relocate the receiving antenna (that is, the antenna for radio or television that
is “receiving” the interference.
• Reorient or relocate and increase the separation between the telecommunications equip-
ment and receiving antenna.
• Connect the telecommunications equipment into an outlet on a circuit different from that
to which the receiving antenna is connected.
•Consult the dealer or an experienced radio/TV technician for help.
FCC RF Radiation Exposure Statement
The installation of the base unit should allow at least 20 centimeter between the base and
persons in compliance with FCC RF exposure guidelines. For body worn operation, the
portable part (handset) has been tested and meets FCC RF exposure guidelines.
This device must not be co-located or operating in conjunction with any other antenna or
transmitter.The changes or modifications not expressly approved by the party responsible for
compliance could void user’s authority to operate the equipment.
FCC Part 15.19
FCC Part 15.21
FCC Part 15.105(b)
FCC Part 2.1091
FCC Part 2.1093

Consumer Information:
a) This equipment complies with Part 68 of the FCC rules and the requirements
adopted by the ACTA. On the bottom of this equipment is a label that
contains, among other information, a product identifier in the format
US:AAAEQ##TXXXX. If requested, this number must be provided to the
telephone company.
b) An applicable certification jacks Universal Service Order Codes (USOC) for
the equipment is provided (i.e., RJ11C) in the packaging with each piece of
approved terminal equipment.
c) A plug and jack used to connect this equipment to the premises wiring and
telephone network must comply with the applicable FCC Part 68 rules and
requirements adopted by the ACTA. A compliant telephone cord and modular
plug is provided with this product. It is designed to be connected to a
compatible modular jack that is also compliant. See installation instructions
for details.
d) The REN is used to determine the number of devices that may be connected
to a telephone line. Excessive RENs on a telephone line may result in the
devices not ringing in response to an incoming call. In most but not all areas,
the sum of RENs should not exceed five (5.0). To be certain of the number of
devices that may be connected to a line, as determined by the total RENs,
contact the local telephone company. [For products approved after July 23,
2001, the REN for this product is part of the product identifier that has the
format US:AAAEQ##TXXXX. The digits represented by ## are the REN
without a decimal point (e.g., 03 is a REN of 0.3). For earlier products, the
REN is separately shown on the label.]
e) If this equipment XD6451;XHB401 causes harm to the telephone network,
the telephone company will notify you in advance that temporary
discontinuance of service may be required. But if advance notice isn't
practical, the telephone company will notify the customer as soon as possible.
Also, you will be advised of your right to file a complaint with the FCC if you
believe it is necessary.
f) The telephone company may make changes in its facilities, equipment,
operations or procedures that could affect the operation of the equipment. If
this happens the telephone company will provide advance notice in order for
you to make necessary modifications to maintain uninterrupted service.

g) Should you experience trouble with this equipment, please contact:
Company name: XACT COMMUNICATION,LLC.
Address: 105 Madison Avenue New York, NY 10016
Telephone: 212 481 7950
for repair or warranty information. If the equipment is causing harm to the
telephone network, the telephone company may request that you disconnect
the equipment until the problem is resolved.
h) Please follow instructions for repairing if any (e.g. battery replacement
section); otherwise do not alternate or repair any parts of device except
specified.
i) Connection to party line service is subject to state tariffs. Contact the state
public utility commission, public service commission or corporation
commission for information.
j) NOTICE: If your home has specially wired alarm equipment connected to the
telephone line, ensure the installation of thisXD6451;XHB401 does not
disable your alarm equipment. If you have questions about what will disable
alarm equipment, consult your telephone company or a qualified installer.
k) This equipment is hearing aid compatible.

''This product meets the applicable Industry Canada technical specifications.”
Before installing this equipment, users should ensure that it is permissible to be connected to the
facilities of the local telecommunications company. The equipment must also be installed using an
acceptable method of connection. In some cases, the company’s inside wiring associated with a single
line individual service may be extended by means of a certified connector assembly (telephone
extension cord). The customer should be aware that compliance with the above conditions may not
prevent degradation of service in some situations.
Repairs to certified equipment should be made by an authorized Canadian maintenance facility
designated by the supplier. Any repairs or alterations made by the user to this equipment, or
equipment malfunctions, may give the telecommunications company cause to request the user to
disconnect the equipment.
Users should ensure for their own protection that the electrical ground connections of the power utility,
telephone lines and internal metallic water pipe system, if present, are connected together. This
precaution may be particularly important in rural areas.
Caution: Users should not attempt to make such connections themselves, but should contact the
appropriate electric inspection authority, or electrician, as appropriate.
''The Ringer Equivalence Number is an indication of the maximum number of terminals allowed
to be connected to a telephone interface. The termination on an interface may consist of any
combination of devices subject only to the requirement that the sum of the Ringer Equivalence
Numbers of all the devices does not exceed five.''
"Privacy of communications may not be ensured when using this phone.
This Class B digital apparatus complies with Canadian ICES-003.
Cet appareil numérique de la classe B est conforme à la norme NMB-003 du Canada."
Product Definition Document SunCorp Communications (Europe) Ltd.
PD343 9
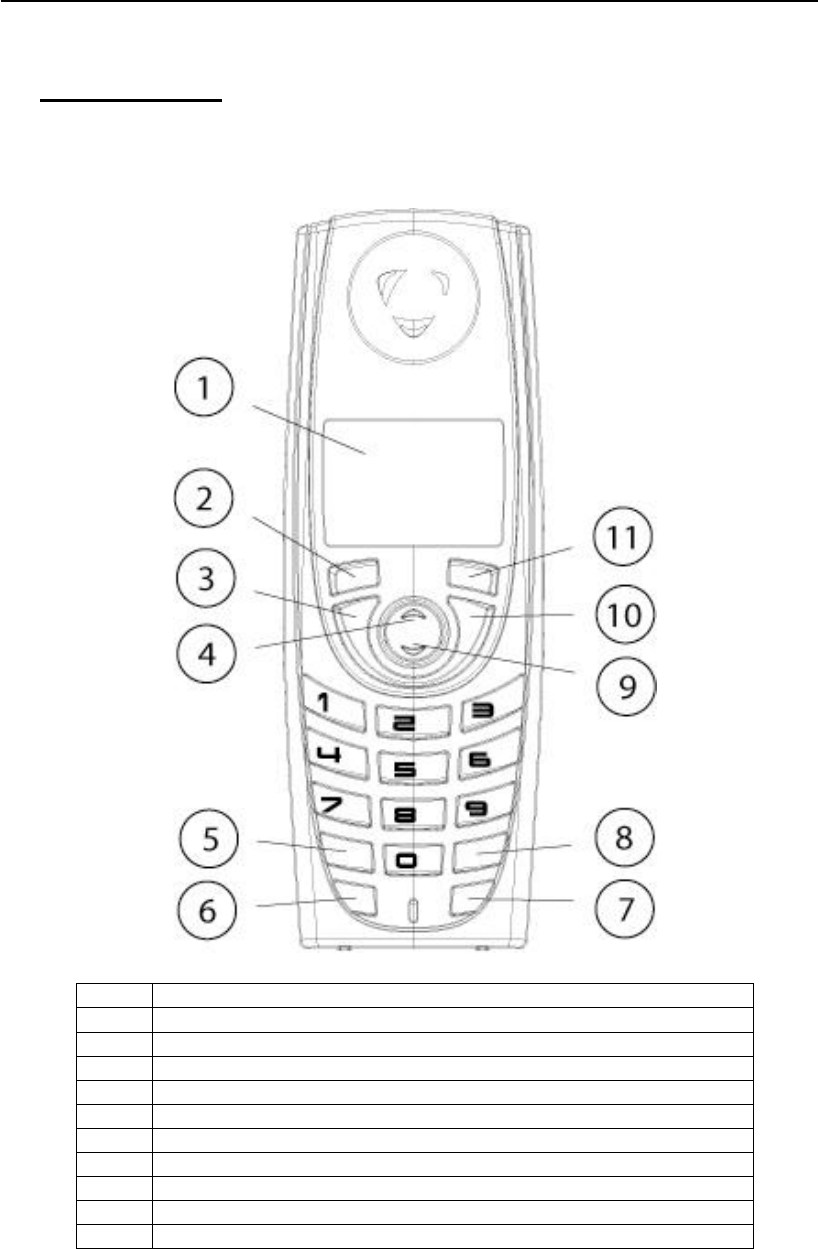
2 Panel Layout
2.1 Handset Front
1 4096 Colour; Full Graphic (1.4 inch), 128 x 128 pixels LCD
2 Softkey 1
3 Talk On / Handsfree (switch between talk and handsfree mode)
4 Enter Redial List / Pause / Volume Up
5 * / Switch from Pulse to Tone mode
6 Flash (Recall)
7 Intercom
8 #
9 Enter Names List / Volume Down
10 Talk Off
11 Softkey 2
Product Definition Document SunCorp Communications (Europe) Ltd.
PD343 10
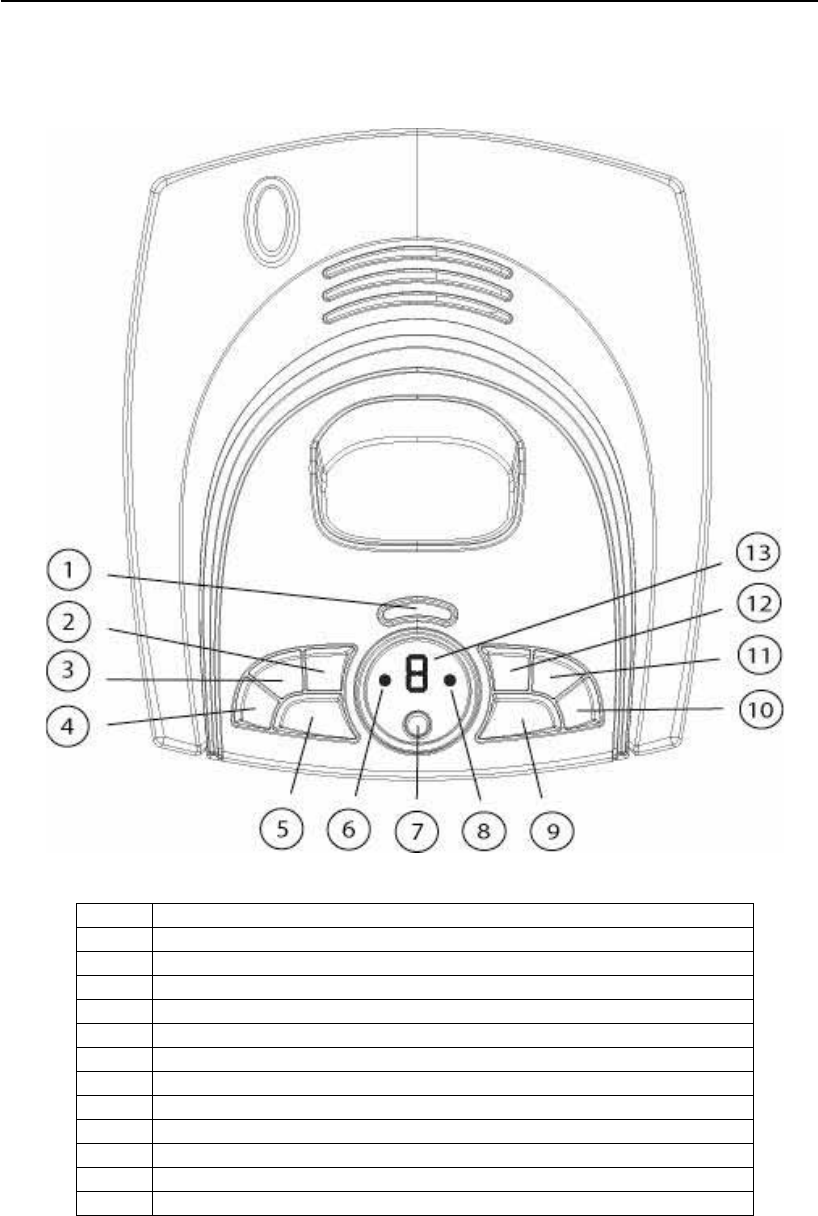
2.2 Base Unit
1 Page Key
2 Volume Up
3 Volume Down
4 OGM Key
5 Answer On/Off
6 Power / In Use Indicator LED
7 Delete
8 Charging Indicator
9 Play
10 Skip Forwards / Set Ringer Delay
11 Stop
12 Skip Backwards / Record Memo
13 Message Indicator LED
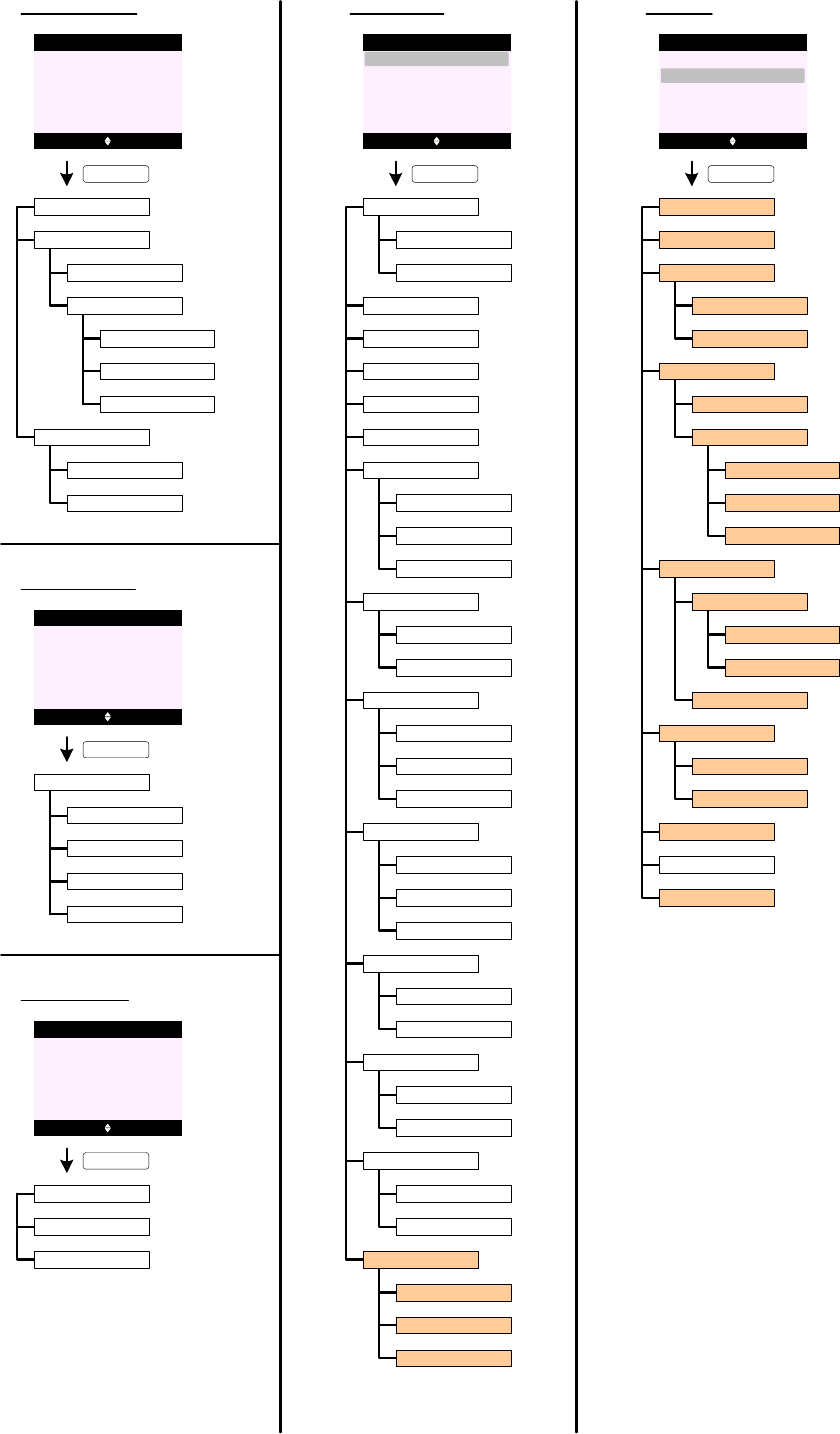
Text Messaging
Answer Machine
Calls List
Reminders
Useful Numbers
Settings
Registration
Silent
Alarm
Once
Annually
Add Event
Show Details
Edit Event
Send as a Text
Delete Event
At event time
30 min before
Del. All Events
Clock & Alarm
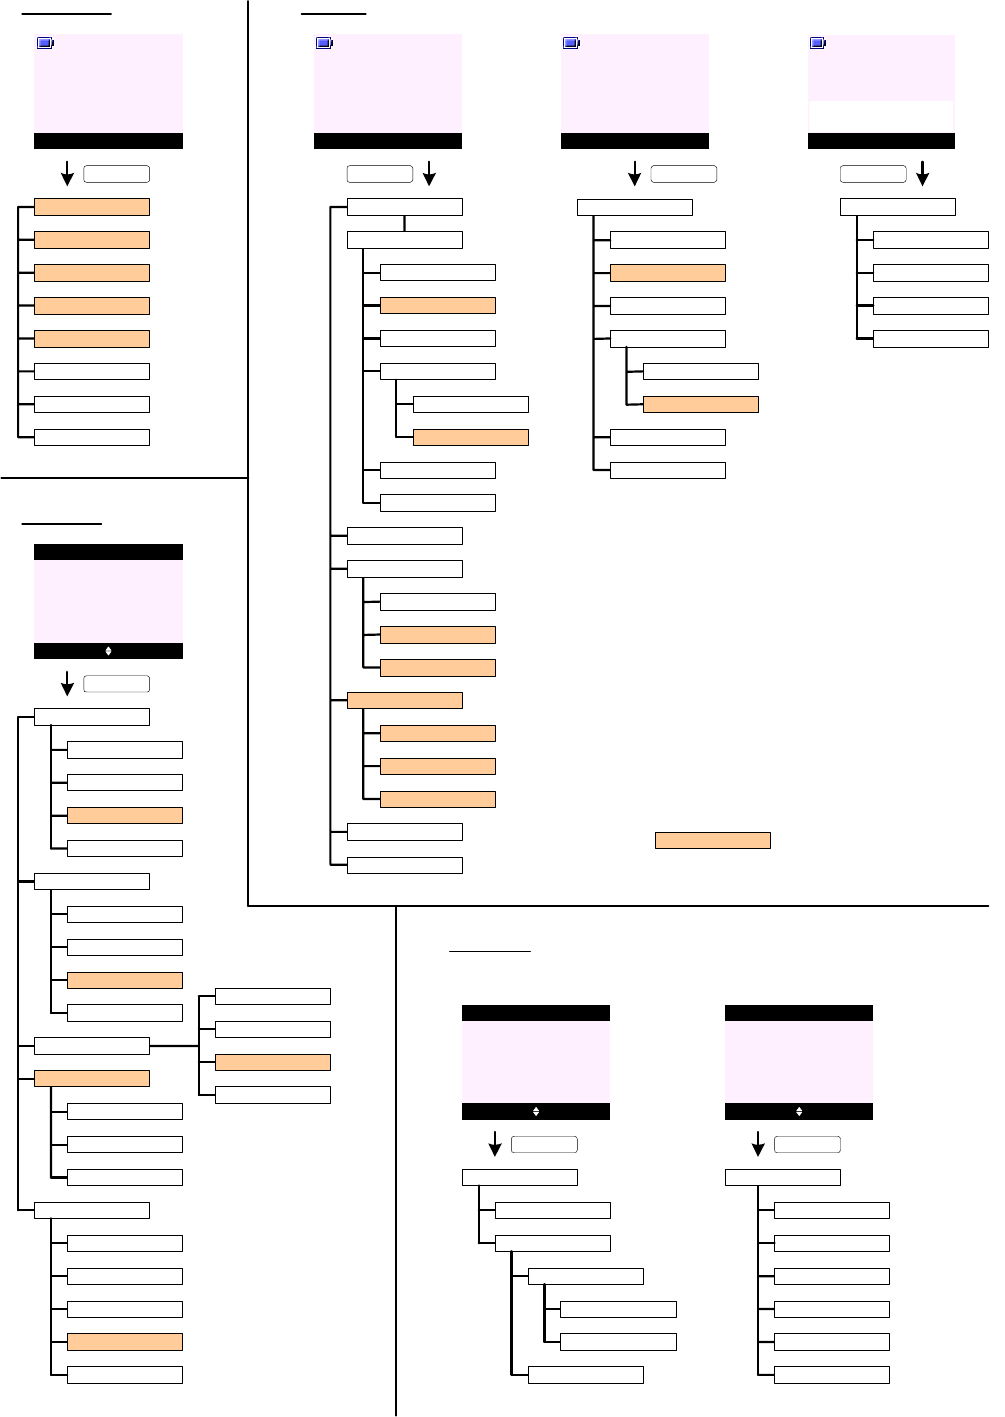
PRODUCT - MENU TREE
Menu Contact
Handset 1
KEY_SOFT_1
Search
Add Entry
Copy Phonebook
Menu Contact
Handset 1
KEY_SOFT_2
<< Names List >>
Show Details
Send Message
Edit Entry
Copy Entry
Ringtone
Delete Entry
To Handset
To SIM
MAIN MENUS
Dialling Codes
Memory Status
Delete Phonebook
To Handset
From SIM
To SIM
International
Country
Local
CONTACT
<< Names List >>
Add Entry
Show Details
Edit Entry
Delete Entry
Mute Contact
Handset 1
SunCorp UK
05:55
KEY_SOFT_2
CALLS LIST
<< Icon >>
Select Back
Calls List
Missed Calls
Dialled Calls
Voicemail Calls
Delete Calls
Show Details
Save Number
Send Message
Delete Call
Show Details
Save Number
Delete Call
Missed Calls
Received Calls
Dialled Calls
Voicemail Calls
All Calls
REMINDERS
When there is no even t stored: When there is event stored:
KEY_SOFT_1
<< Icon >>
Select Back
Reminders
KEY_SOFT_1
Add Entry
Menu Contact
Handset 1
KEY_DOWN
<< Icon >>
Select Back
Reminders
KEY_SOFT_1
<< Event >>
Menus can be hidden i n EEPROM
<< Names List >>
Show Details
Send Message
Edit Entry
Copy Entry
Ringtone
Delete Entry
To Handset
To SIM
Show Details
Save Number
Send Message
Delete Call
Received Calls
Show Details
Save Number
Send Message
Delete Call
<< Icon >>
Write Message
Templates
Delete Messages
Text Settings
PRODUCT - MENU TREE (cont.)
KEY_SOFT_1
TEXT MESSAGING
Select Back
Text Messaging
Reply
Forward
Message Details
Use Number
Delete
Call
Save
<< Message >>
Send
Save
Insert Symbol
Insert Emoticon
Insert Template
Message Type
Text
E-mail
Fax
Drafts
Outbox
Send
Save
Insert Symbol
Insert Emoticon
Insert Template
Message Type
Text
E-mail
Fax
Inbox
Forward
Delete
<< Message >>
<< Template 1 >>
Forward
Delete
Inbox
Drafts
Outbox
All Messages
Service Centres
Mailbox Number
Message Type
Delivery Report
Off
On
Set Send Centre
Receive Centres
Send Centres
Message Alert
Users
Text
E-mail
Fax
Off
On
User 1
User 2
User 3
User 4
Receive Centre 1
Receive Centre 2
Send Centre 1
Send Centre 2
Send Centre 1
Send Centre 2
Message Size
160 Characters
612 Characters
Edit
Delete
Play All
Answer On/Off
Record Memo
Off
On
Outgoing Message
Record
Play
Answer Settings
Answer Mode
Answer Delay
Message Alert
Remote Access
Off
On
Answer & Record
Answer Only
2 Rings
3 Rings
4 Rings
9 Rings
Time Saver
Pre-recorded OGM
Personal OGM
Delete Messages
Play
Pause
Repeat Message
Skip Forward
Skip Backward
Delete
OGM Language
Off
On
Set Remote PIN
ANSWERING MACHINE
<< Icon >>
KEY_SOFT_1
Select Back
Answer Machine
Answer & Record
Answer Only
Pre-recorded OGM
Personal OGM
Answer & Record
Answer Only
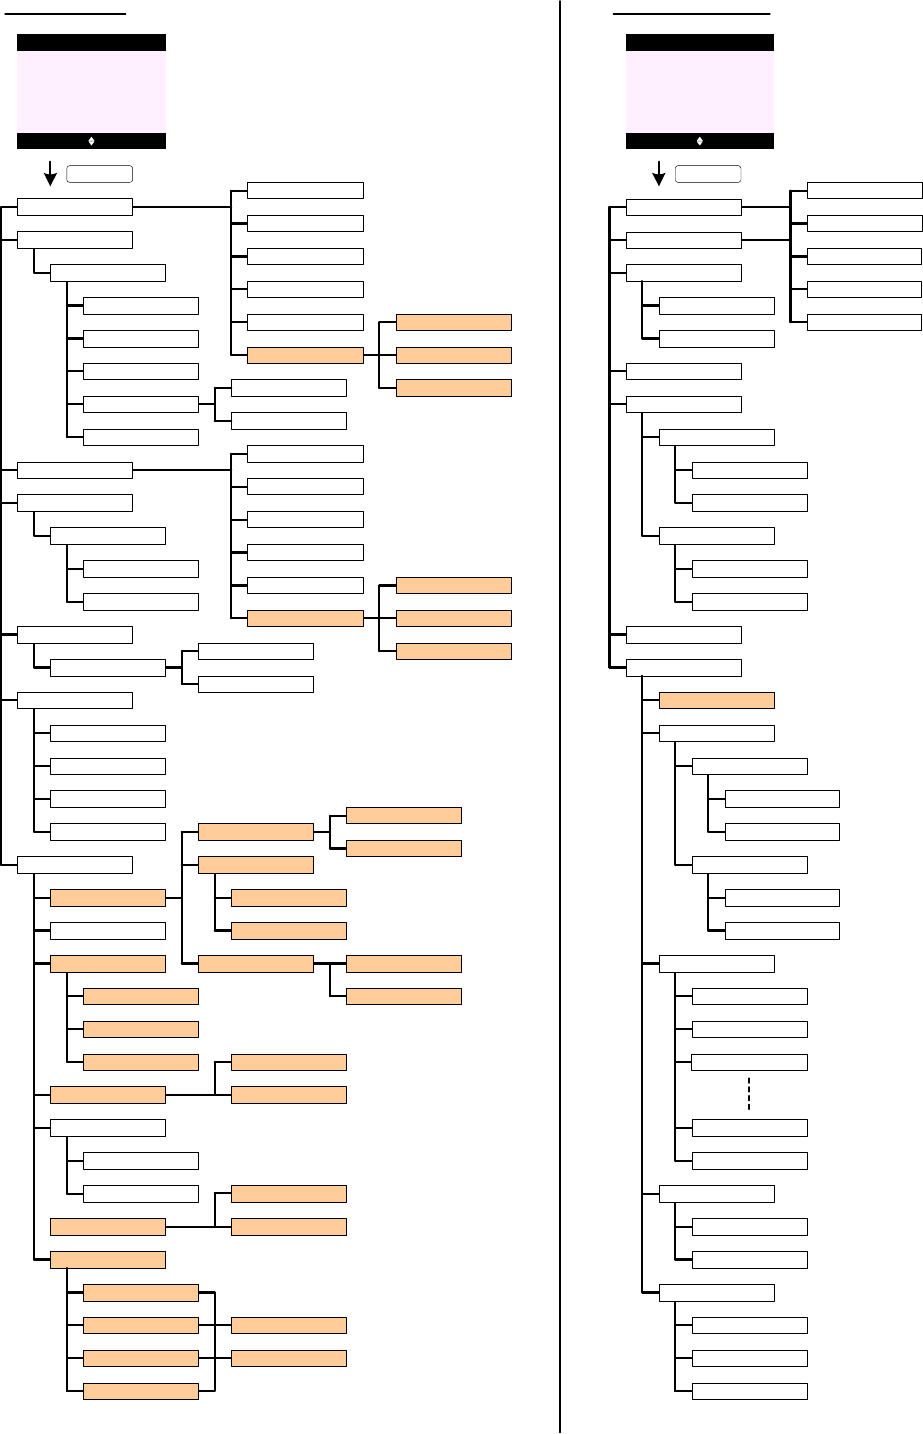
PRODUCT - MENU TREE (cont.)
KEY_SOFT_1
SET HANDSET
Ringtone
Show Details
Edit Entry
Delete Entry
Delete All
<< Icon >>
KEY_SOFT_1
USEFUL NUMBER
Select Back
Useful Number
<< Entry >>
Select Back
Set Handset
Settings
Set Base
Ringer Volume
Handset Name
Language
Wallpaper
Screensaver
Light Timeout
Auto Talk
Key Beep
Redial Length
PBX Access Code
Clock
Off
15 Seconds
30 Seconds
45 Seconds
Off
On
Set Code
Long
Short
External Calls
Internal Calls
Display Contrast
Low
Medium
High
Off
On
Off
On
Receiver Volume
Menu Colour
Blue
Orange
Pink
Ringtone
Ringer Volume
Ring Priority
Dialling Mode
Recall Mode
Pulse
Tone
First Ring
System PIN
Factory Reset
All Handsets
Select Handset
Timed Break
Earth
Recall 1
Recall 2
Off
On
2 Rings
4 Rings
6 Rings
Area Code
KEY_SOFT_1
SET BASE
Select Back
Set Handset
Settings
Set Base
<< Icon >>
Select Back
Clock & Alarm
CLOCK & ALARM
Date & Time
Alarm
Time Format
Off
On
12 Hour
24 Hour
Once
Mon - Fri
On Daily
<< Icon >>
Select Back
Registration
REGISTRATION
Register Handset
Select Base
De-register
KEY_SOFT_1
KEY_SOFT_1
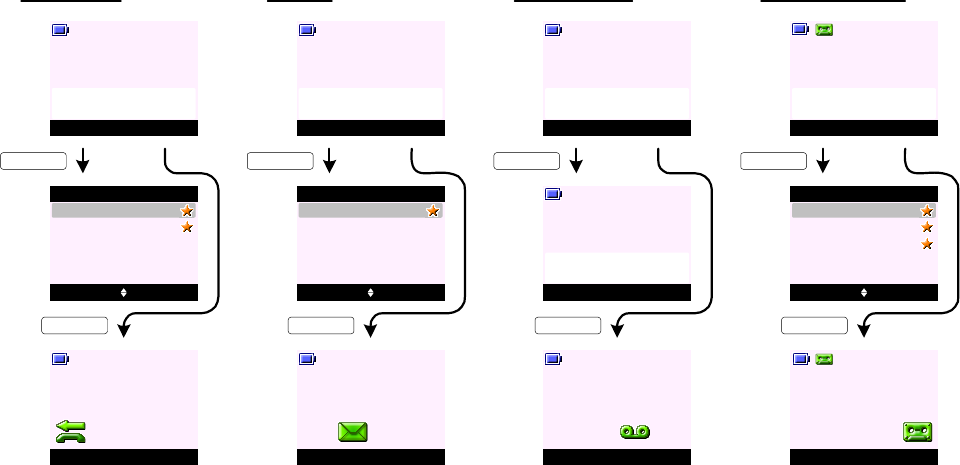
1. When there is/are (a ) new missed call(s) - the display prompts "You have (a) new missed call(s)" (see screen A0).
To view missed call(s) press View (KEY_SOFT_1) - the user is taken directly to the list of new missed calls.
To view the call(s) at later time press Back (KEY_SOFT_2) at screen A0 - the display returns to idle with relevant reminder icon(s)
remian on the display (see screen A2).
Only missed/unanswered calls will trigger the new calls indication/missed call reminder icon on the idle screen. Answered calls are
added to the received calls list with no new call indication.
2. When there is/are (a ) new text message(s) - the display prompts "You have (a) new message(s)" (see screen A3).
To read message(s) press Read (KEY_SOFT_1) - the user is taken directly to the list of new messages. The user can selectively
read messsages by pressing KEY_UP and KEY_DOWN to highlight the message then press Read (KEY_SOFT_1) to read the
message (see screen A4).
To read the message(s) at later time press Back (KEY_SOFT_2) at screen A3 - the display returns to idle with relevant reminder
icon(s) remian on the display (see screen A5).
3. When there is/are (a ) new VMWI message(s) - the display prompts "You have new voicemail" (see screen A6).
To listen to message(s) press Listen (KEY_SOFT_1) - the handset will dial out to the voicemail server number. If the voicemail
server number received is different to the preset number on the handset - the number received will overwrite the preset number.
To listen the message(s) at later time press Back (KEY_SOFT_2) at screen A6 - the display returns to idle with relevant reminder
icon(s) remian on the display (see screen A8).
4. When there is/are (a ) new TAM message(s) - the display prompts "You have (a) new message(s)" (see screen A9).
To play message(s) press Play (KEY_SOFT_1) - the user is taken directly to the list of new messages. The user can selectively play
messsages by pressing KEY_UP and KEY_DOWN to highlight the message then press Play (KEY_SOFT_1) to play the message (see
screen A10).
To play the message(s) at later time press Back (KEY_SOFT_2) at screen A9 - the display returns to idle with relevant reminder
icon(s) remian on the display (see screen A11).
5. In situation where there are many event logs - the order of priority (from most important) is TAM messages, VMWI messages, text
messages and then missed calls.
For example, in a situation where there are three TAM messages, one missed call and two text messages - the display will prompt
"You have 3 new messages" with the KEY_SOFT_1 labelled Play.
6. If KEY_SOFT_1 is pressed to access relevant events from Idle. For example, if Play (KEY_SOFT_1) is pressed from idle to play new
messages, the rest of the MMI interaction is the same as if the user had accessed the functionality via the menu.
7. By entering the missed call, inbox or messages list will switch off the reminder icon without each entry having to be viewed
individually.
8. In addition to the information displayed on screen, the event LED on the base will flash. By entering the Missed call, Inbox or
messages list will stop the event LED flashing without each entry having to be viewed individually.
9. Whilst the status information is being presented on the idle screen, when a new call is received, the appropriate CLI or answering
machine screens are presented and then the handset returns to idle showing the appropriate status information.
10 . If the user takes a call which has caused the status information to be removed from the screen, when the call ends the display
returns to idle with the new messaging icons presented and the standard soft labels presented, rather than the shortcut access.
REMINDER ICONS
View Back
Handset 1
You have 2
new missed calls
Menu Contact
Handset 1
KEY_SOFT_1
Options Back
SunCorp UK
Missed Calls
02074030201
KEY_SOFT_2
Read Back
Handset 1
You have a
new message
Menu Contact
Handset 1
KEY_SOFT_1
Read Back
Jcoolza
Inbox
Nush
KEY_SOFT_2
A0
A1
A2
Mama
Listen Back
Handset 1
You have
new voicemail
Menu Contact
Handset 1
KEY_SOFT_1
KEY_SOFT_2
A3
A4
A5
A6
A7
A8
Mute Contact
Handset 1
Calling
Voicemail
Play Back
Handset 1
You have 3
new messages
Menu Contact
Handset 1
KEY_SOFT_1
KEY_SOFT_2
A9
A10
A11
Play Back
SunCorp UK
Play Messages
02074030201
Mama
MISSED CALLS NEW SMS NEW VOICEMAIL NEW TAM MESSAGES
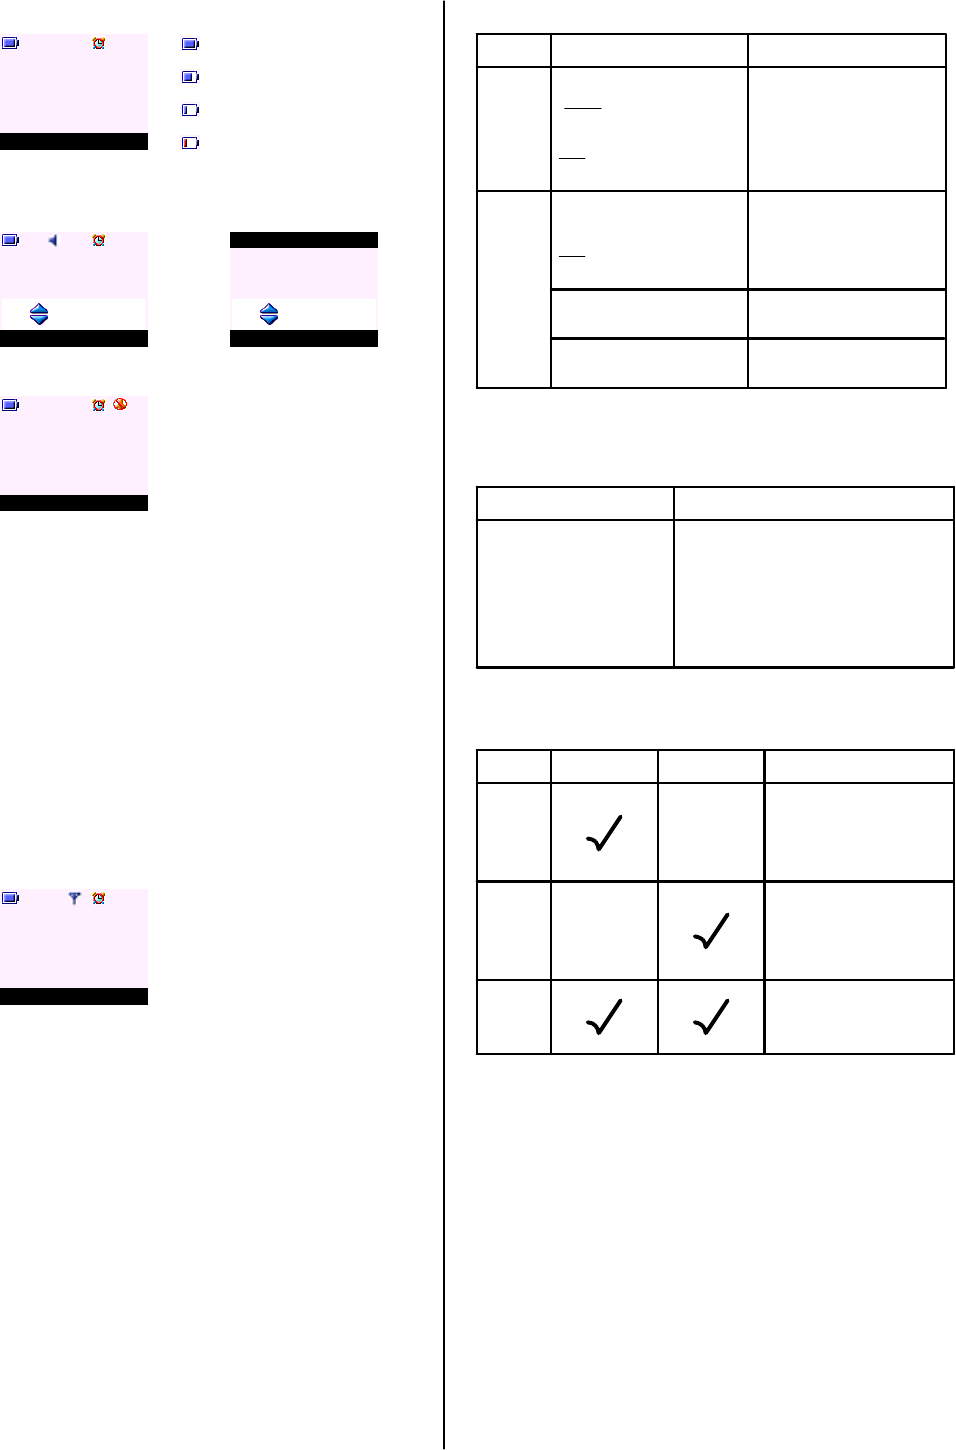
BATTERY INDICATIONS
Menu Contact
Handset 1
G0
Battery is fully charged
Battery is partially charged
Battery is running low
Battery is almost discharged
VOLUME INDICATIONS
Mute Contact
Handset 1
G1
Volume 5
G2 Save Back
Ringer Volume
Ringer Off
Name Contact
Handset 1
G3
1. Volume bars are presented whenever the in-call, receiver,
or ringer volume is changed (see screen G1 and G2).
2. When changing your receiver volume during call, the first
press of the up or down navigation button presents the
volume bar on the display showing the current setting.
Subsequent presses change the setting. When the
minimum or maximum setting is displayed, further presses
of the relevant navigation button are ignored.
3. When the handset ringer volume is set to off - the display
prompts "Ringer Off" (see screen G2) and the ringer off
icon is displayed on the dashboard when the display
returns to the idle screen (see screen G3).
4. When the base ringer volume is set to off - the display
prompts "Ringer Off" (see screen G2) but there will be no
indication on the idle screen.
DISPLAY CHARACTERISTICS
Long press during on-hook
will dial number stored.
LEDS
In Use / Ringing / Events
(Events: Missed Calls, SMS
Note: Missed Calls can be
LED INDICATORS
LED State
VMWI, TAM Messages)
disabled
Handset In Use
* Same constant flashing rate for all events
TAM
HS on cradle
HS off cradle
- Steady ON
Ringing - Flashing*
Events - Flashing*
Base Power /In Use / Ringing /
Events
Note: Missed Calls and TAM
Messages can be disabled
In Use - Flashing*
Ringing - Flashing*
Events - Flashing*
Power - Steady On
Answer On - Steady ON
New Messages - Flashing*
Charging - Steady ON
- OFF
Handset Display
1.4 inch
128*128 pixels
4K colour
5 lines + 1 line softkeys + 1 line dashboard
Copy 10_65
At least 16
Display Size
Display Resolution
Colour
Number of Rows
Font Package
Characters (per rows)
HOT KEYS
ON-HOOK OFF-HOOK ACTIONS
Case 1
will dial 1.
will dial number stored.
Long/short press during calls
Case 2
also dial the number stored.
Subsequent long presses will
Long press during off-hook
Note: A long press on KEY_1, 2 and 3 is dialled out in off or on hook
mode or both can be definded in EEPROM.
Long presses will dial the
Case 3
mode it is in.
number stored whichever
OUT OF RANGE
1. When a handset is out of range - the handset name and
number is replaced by "Searching ..." (see screen G4).
2. In addition to "Searching ..." the range icon on the
dashboard (if the range icon is enabled) will flash along
with an out of range / warning tone.
3. When a handset is out of range - the user can access the
handset Contact list, and functions local to the handset
(Calls List,Set Handset,Clock & Alarm,Reminders,Useful
Numbers and Registration).
If the user tries to access something that is resident on
the base (Set Base,Answering Machine,Text Messaging),
the display will prompt "Not available" for 2 seconds along
with the error tone and returns to the previous screen.
Menu ContactG4
Searching ...
PAGING CALL
1. To locate a missing handset press KEY_PAGE on the base
- all handsets will ring and the display will prompt "Paging
Call".
2. To cancel the paging request - press KEY_PAGE again on
the base.
3. To stop the paging call - press Stop (KEY_SOFT_1) or any
key on the handset. All handsets will stop ringing and the
displays will revert to idle.
Stop
Handset 1
Paging Call
G5
1. To activate keypad lock, press and hold KEY_HASH - the
display prompts "Keypad Locked" along with a
confirmation tone (see screen G6).
2. When keypad lock is activated, the idle screen is
presented with a small key icon on the dashboard with
Unlock on KEY_SOFT_1 (see screen G7).
3. To deactivate keypad lock, press Unlock (KEY_SOFT_1) -
the display prompts "Press # to Unlock Keys" (see screen
G8).
If KEY_HASH is not pressed within 2 seconds - the
display returns to idle screen (screen G7).
If KEY_HASH is pressed within 2 seconds - the display
prompts "Keypad Unlocked" (see screen G9) and returns
to idle screen with small key icon removed from the
dashboard.
4. Incoming calls can still be answered when keypad lock is
activated, either by lifting the handset from the base (if
Auto Talk is set to ON) or pressing KEY_TALK.
The user can interact with the in-call functionality as
normal, e.g., Quite option during incoming ringing,
phonebook access during call. Once the call is ended and
the idle screen is presented again, keypad lock is re-
activated.
5. Alarm can also be stopped when keypad lock is activated.
Once the alarm is stopped and the idle screen is
presented again, keypad lock is re-activated.
6. Emergency Calls can be made when the keylock is on.
Up to 3 emergency number can be stored in the eeprom,
each with maximum 6 digits.
KEYPAD LOCK
UnlockG7
Handset 1
G8
G6
Keypad Locked
Press # to
Unlock Keys
G9
Keypad Unlocked
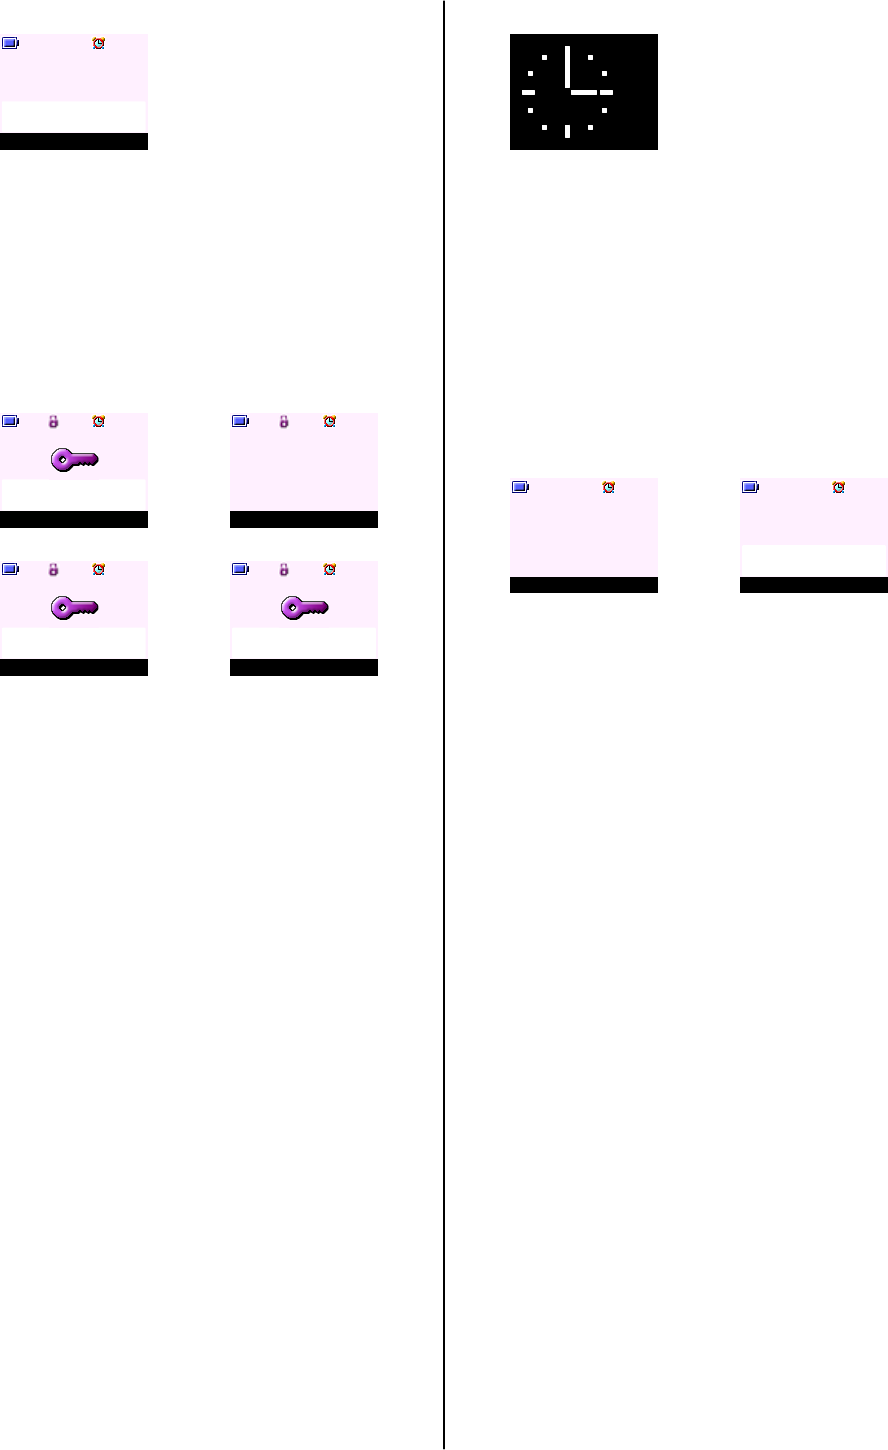
1. When Screensaver is set to Clock - an analogue clock
together with the time and date are displayed (see screen
G10). The screensaver will come on when the screen
backlight times out (depending on the time set for light
timeout under handset settings).
2. Screensaver should only come on in idle mode not during
the call.
3. Handset screen (with backlight) will reactive when the
handset is placed on the base and when it is removed from
the base.
4. The minute hand ticks approximately every two and a half
minute.
12:00
Jan 01
SCREENSAVER
G10
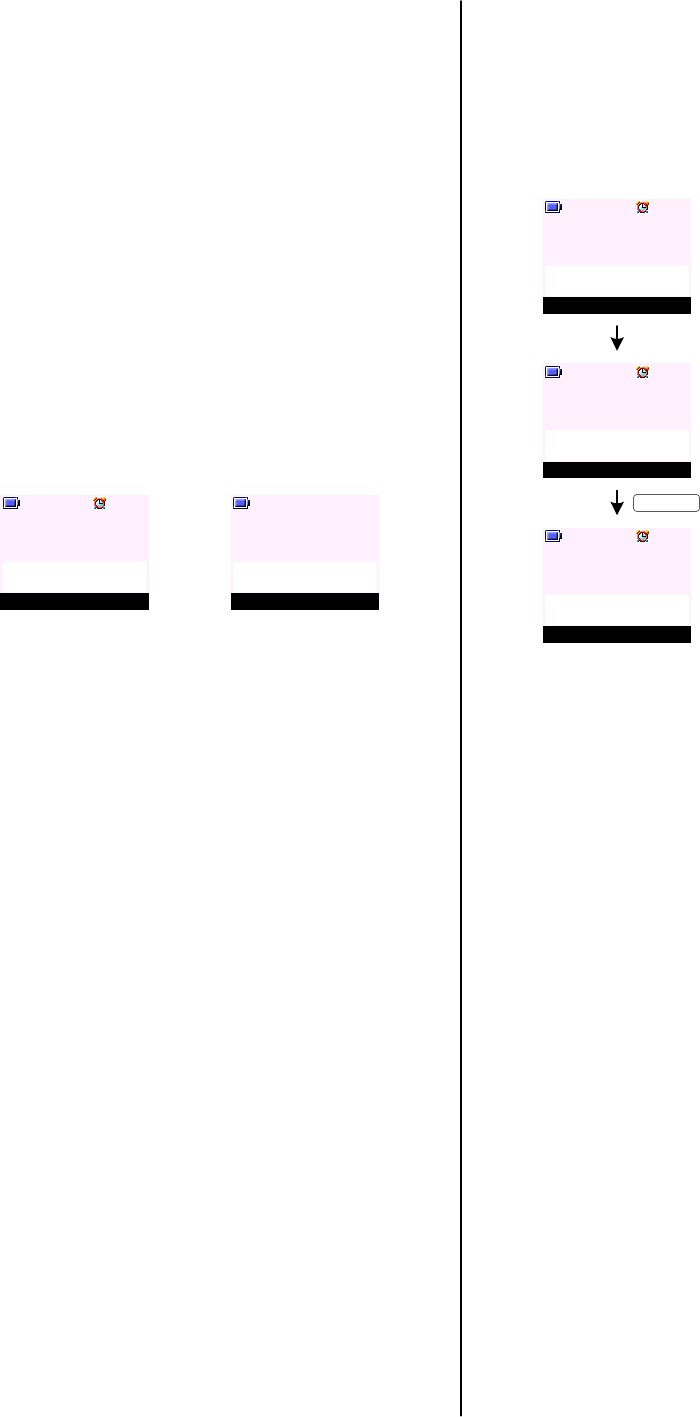
ALARM CLOCK
Menu ContactG11
Handset 1
StopG12
Handset 1
Alarm
06:00 am
1. When an alarm is set to ON, a small alarm clock icon will
appear on the dashboard in idle (see screen G11).
2. When the alarm sounds at the preset time (see screen
G12) - press Stop (KEY_SOFT_1) to stop the alarm .
3. If no button is press the alarm will continue to sound for 1
minute.
4. If the alarm is set to on Once - the alarm clcok icon will
disappear after the alarm is stopped or after the ringing
times out.
5. If the alarm is set to On Daily or on Mon - Fri - the alarm
clock icon will stay on the dashboard after it is stopped or
after the ringing times out.
6. If the handset is off hook when the alarm is due - the small
alarm on the dash board will flash and a beep is played at
the handset earpiece.
WELCOME MODE
G13
G14 Sélect. Retour
UK (BT)
UK (Abc)
Pays
France
G15
Réinit. terminée
Pays
Menu Noms
Combiné 1
G16
KEY_SOFT_1
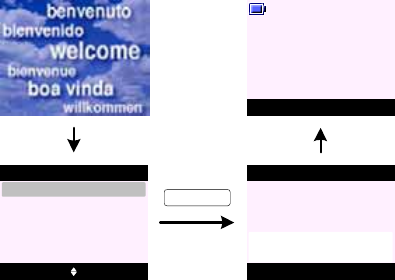
1. A welcome mode is presented when a product is powered on for the first time and after a factory reset.
A welcome mode enables automatic configuration of the line interface, CLI, SMS and TAM parameters stored in EEPROM / flash when
the user selects their country of origin and operator.
This feature can be hidden in EEPROM.
2. A welcome screen (see screen G13) is presented for 5 seconds before user is asked to select a country (operator).
3. On the select Country screen (see screen G14) as user scrolls through the country listing the menu title changes to the country
native language.
4. If Back (KEY_SOFT_2) is pressed any time during country selection - the handset will return to the welcome screen (screen G13).
5. Once a country (operator) is selected. Both the handset and base will reset to enable correct settings. Further screens will be
presented in that country default language setting.
6. The end user has the possibility to change the display language in the handset menu without affecting the country settings.
7. User can make and receive calls withour first selecting the country and operator. However, the Welcome screen will re appear until
the phone has been configured with a country setting.
8. The timing of the Welcome screen re appearing when it is not set can be defined in EERPOM.
9. Once welcome mode is set on one handset - registering additional handset will not prompt the welcome screen. Once registered,
additional handset will communicate with the base to ensure correct settings is applied.
10 . If the language is changed after the Welcome mode has been set and another handset is registered - the handset language is not
changed but will take the default language set for the country selected.
CALL HANDLING
MAKING CALLS
To make a call (Pre Dialling):
1. Enter your destination number and press KEY_TALK.
If you make a mistake, press Clear (KEY_SOFT_2).
2. Press KEY_TALK to dial out.
To make a call (Manual Dialling):
1. Press KEY_TALK to get the dial tone.
2. Enter your destination number.
Options Clear
Handset 1
D0
02074030201
D1 Select Back
Save
Send Message
Options
KEY_SOFT_1
Options Clear
Handset 1
D4
08000
54468911455894460
Mute Contact
Handset 1
D5
Calling
. . . 11455894460
KEY_TALK
Mute Contact
Handset 1
D6
. . . 11455894460
00:01
Mute Contact
Handset 1
D2
Calling
SunCorp UK
KEY_TALK
Mute Contact
Handset 1
D3
02074030201
00:05
Note:
- If KEY_TALK is not pressed to dial the digits and no further
digit is dialled - when the display timeouts it returns to idle
with no dialled digits.
- In both manual and preparatory dialling, digits are dialled
as they are entered. No cursor is presented.
- To insert a pause in pre-dial mode, press and hold K E Y _UP
and a Pwill appear on the screen.
- Recall, * and # can be entered with a short press on
relevant key.
- During preparatory dialling, press Options (KEY_SOFT_1) -
user can choose to save the number to phonebook, or, send
a text message to the number dialled (see screen D1).
- In preparatory dialling the number being entered for dialling
is presented over two lines. Once the in call screen is
presented, only one line is used to display the number, with
the three dots displayed at the beginning of the number to
indicate more of the number scrolling off to the left (see
screen D5 and D6).
- If the number dialled matches an entry in the phonebook
the name is displayed (see screen D2).
If there is no name match, a single line of digits is
displayed with three dots to the left of the number to
highlight there are more digits at the beginning of the
number.
- If entering digits takes the content up to the maximum of
32 allowed in the field, further CCITT button presses are
ignored, along with the error tone.
- The call timer will be displayed 2 seconds after KEY_TALK
is pressed starting at 00:01 (see screen D6).
- If the call timer is replaced by other screens during a call,
the timer will continue to count in the background. When
the timer is displayed again, the incremented time is
displayed.
To make a call in Handsfree Mode:
1. Press KEY_TALK twice to get the dial tone.
2. Enter your destination number. Your call can be heard
over the handset's loudspeaker.
Note: A small speaker icon will appear on display dashboard
(see screen D3).
To make a call from local Contact List:
1. Press KEY_DOWN to enter your local contact.
2. Press KEY_UP or KEY_D OWN to highlight the contact
you want to call.
3. Press KEY_TALK to dial out.
To make a call from Calls List:
1. Press Menu (KEY_SOFT_1) to enter the menu list.
Text Messaging is highlighted.
2. Press KEY_DOWN to Calls List menu and press Select
(K EY _ S O F T _1 ).
3. Press KEY_UP or KEY_DOWN to highlight the calls
list you want.
4. Press KEY_UP or KEY_DOWN to highlight the entry
you want to call.
5. Press KEY_TALK to dial out.
ANSWERING CALLS
To answer an incoming call:
1. Press KEY_TALK to answer, or
2. If Auto Talk is set to ON you can simply pick up your
handset from the cradle to take the call.
Quite
Handset 1
D7
External Call
Quite
Handset 1
D9
External Call
SunCorp UK
Mute Contact
Handset 1
D8
External Call
00:19
Mute Contact
Handset 1
D10
SunCorp UK
00:19
KEY_TALK KEY_TALK
Note:
- During the ringing of an incoming call - it is possible to
silent the ringer on your handset by pressing Quiet
(K E Y _ S O F T _ 1 ).
If Quiet (KEY_SOFT_1) is selected on an incoming call
screen (see screen D7 or D9), the handset ringer for that
handset is temporarily switched off and the Quiet
(KEY _SOF T _1) label is removed. The call continues to be
displayed on the screen and will still be announced
audibly at any other handsets and the base. Once the
handset reverts to idle, the ringer is switched back on.
- If the user subscribes to caller display - the handset will
prompt both name and number for all incoming calls (see
screen D10).
- The name or number of the call for either an incoming or
external call is retained on the display in-call screen. If the
user does not subscribe to caller display, "External Call" is
displayed instead of the name or number (see screen D8).
ENDING CALLS
To end a call:
1. Press KEY_END will end current active call, or
2. Putting the handset back on the cradle will end all
calls.
CALL HANDLING (cont.)
Handset 1
D11
Call Duration
10:59
Note:
- When the call is ended - the call duration is displayed and
this remains on the display for 5 seconds (see screen
D11). It can be cleared off the screen by pressing any
button.
IN-CALL OPTIONS
To adjust earpiece volume during call:
1. Press KEY_UP to increase the volume or KEY_DOWN
to decrease the volume. The volume bars remains on
screen for 2 seconds before returning to the in-call
screen.
Note:
- The in-call volume cannot be changed during dialling,
either manual or preparatory, or when viewing the
phonebook online.
- The handset and handsfree volumes share one common
setting. If the user changes the volume during a call the
new setting is retained.
To mute a microphone during call:
1. Press Mute (KEY_SOFT_1) during call to mute your
handset microphone (see screen D12).
2. Press UnMute (KEY_SOFT_1) to turn the microphone
back on (see screen D13).
Mute Contact
Handset 1
D12
SunCorp UK
00:05
UnMute Contact
Handset 1
D13
Mute On
00:05
Note:
- There should be no mute activation or deactivation
indication given to the caller, i.e. no key beeps and no on
hold beeps or music.
To switch between handset and handsfree talk mode:
1. Press KEY_TALK during call to switch your handset
to handsfree mode.
2. Press KEY_TALK again to switch back to handset
mode.
To view your local contact list during call:
1. To access contact list during call, press Contact
(KEY_SOFT_2).
OTHER CALL HANDLING NOTES
1. If the base is in use either on a call or by one of the other
handsets, if another handset user tries to access base
functionality, the display prompts "Not Available" for 2
seconds, along with the error tone before reverting to idle.
2. When one of the handsets (handset 1) is engaged on an
external call, the other handsets still show the idle screen.
If one of the other handsets tries to make an external call
by whatever means, the handset emits an error tone and
the display prompts "Line In Use" for 2 seconds and
returns to idle (see screen B25).
3. If when a call is in progress either in handset or handsfree
mode and the headset (if available) is plugged in the call is
transferred to the headset and the speakers on the
handset are muted. Whilst a headset call is in progress
pressing KEY_TALK to activate handsfree will be ignored.
4. With some incoming calls, if the telephone number is not
available and therefore cannot be displayed - the handset
may prompt one of the following:
Unavailable - when the number is not available
Private/Witheld - when the call has witheld their number
Ringback - when it is a ringback call
Operator - if the call has been made via the operator
Payphone - if the call is ringing from a payphone
International - when it is an international number
INTERNAL CALLS
To make an internal call:
1. On your handset (handset 1), press KEY _ I N T
followed by the handset number you want to call.
2. Press OK (KEY_SOFT_1), the call attempt is made
immediately.
3. "Internal Call Handset X" is displayed on handset 1
where X is the called handset number, in this case
it is handset 2.
On handset 1:
4. To answer the call on handset 2, press K EY _T ALK.
5. If you try to make an internal call to a handset which
is already engaged on an internal call, or is not
available, the handset will emit an error beep before
returning to the standby screen.
6. If two handsets are engaged on an internal call and an
external call is received, any handsets that are
available will ring. The handsets involved in the
internal call will present beeps in the earpiece. The
caller information or name match to your local contact
list will be presented on all handset displays.
7. The internal call must be ended before the external
call can be taken.
Once the internal call has ended the external call will
be presented on the handset again for the user to take
the external call.
TRANSFER CALLS
To transfer a call to another handset:
1. On your handset (handset 1), press KEY_INT
followed by the handset number you want to call.
2. Press OK (KEY_SOFT_1), the call attempt is made
immediately.
Or press Back (KEY_SOFT_2) to cancel the call
request.
3. "Internal Call Handset X" is displayed on handset 1
where X is the called handset number, in this case it
is handset 2.
4. To answer the call on handset 2, press KEY_TALK.
5. Once handset 2 has answered the call, the softkeys
on handset 1 will change to Join (KEY_SOFT_1) and
End (KEY_SOFT_2).
6. If the user replaces the handset in the base/cradle,
both calls are ended. If the external call was an
incoming call, this will cause the call to be presented
(as an incoming call) again.
7. To toggle between external and internal call on
handset 1, press KEY_INT.
8. To transfer the call to handset 2, on handset 1 press
End (KEY_SOFT_1) or KEY_END.
The call is transferred to handset 2.
OK
Handset 1
D14
Internal Call
Handset 2
On handset 2:
Mute Contact
Handset 1
D15
Internal Call
Handset 2
Quite
Handset 2
D16
Internal Call
Handset 1
KEY_SOFT_1
CALL HANDLING (cont.)
On handset 1:
Mute Contact
Handset 1
D17
02074030201
00:12
KEY_INT KEY_2
OK End
Handset 1
D18
Internal Call
Handset 2
End
Handset 1
D19
Internal Call
Handset 2
On handset 2:
Quite
Handset 2
D22
Internal Call
Handset 1
KEY_SOFT_1
KEY_TALK
Join End
Handset 1
D20
Internal Call
Handset 2
Mute Contact
Handset 2
D23
Internal Call
Handset 1
KEY_TALK KEY_SOFT_2
Handset 1
D21
Call Duration
02:01
Mute Contact
Handset 2
D24
02074030201
00:01
When handset 1 ends
the call ...
9. When a handset transfers a call to another handset,
the CLI or any contact name/number information from
the sending handset is transferred to the receiving
handset that is now controlling the external call.
CALL HANDLING (cont.)
CONFERENCE CALLS
To start a conference call:
1. On your handset (handset 1), press KEY_INT
followed by the handset number you want to call.
2. Press OK (KEY_SOFT_1), the call attempt is made
immediately.
Or press Back (KEY_SOFT_2) to cancel the call
request.
3. "Internal Call Handset X" is displayed on handset 1
where X is the called handset number, in this case it
is handset 2.
4. To answer the call on handset 2, press KEY_TALK.
5. Once handset 2 has answered the call, the softkeys
on handset 1 will change to Join (KEY_SOFT_1) and
End (KEY_SOFT_2).
6. Press Join (KEY_SOFT_1) or long press on
KEY_HASH on handset 1 to join the two calls.
Handset 1 will display "Conference Call" follow by the
call timer initiated from the first call (see screen
D25).
Handset 2 will display "Conference Call" follow by the
call timer initiated from the time the call is answered.
On handset 1:
Mute Contact
Handset 1
D25
Conference Call
02:34
On handset 2:
Mute Contact
Handset 2
D26
Conference Call
00:01
CALL WAITING
1. While you are engaged on an external call if another
call arrives - you will hear a beep sound and the
display is presented as screen D27 and D28. If the
number matches an entry in the contact list - the
name will alternate with the number on the display.
2. To swap between two calls, press KEY_R (or KEY_R +
KEY_2 depending on your network) to speak to
second caller while your first call is put on hold.
On handset 1:
Mute Contact
Handset 1
D27
Call Waiting
02074030201
Mute Contact
Handset 1
D28
Call Waiting
SunCorp UK
KEY_TALK
Mute Contact
Handset 1
D29
SunCorp UK
05:30
3. When second call is answered - the caller's number
(or name if the number matches an entry in the
phonebook) is displayed together with the call timer of
the first call on hold.
4. If KEY_END is pressed at any time - the line reverts
back to the first caller on hold.
Menu Contact
Handset 1
P0
P6 Select Back
Search
Contact
Copy Phonebook
Memory Status
Add Entry
P1
P2 Select Back
Show Details
Alex
Edit Entry
Copy Entry
Ringtone
Delete Entry
Options Back
Alex
Contact
Charles
David
Bill
_
Delete Phonebook
Dialling Codes
PHONEBOOK/CONTACT
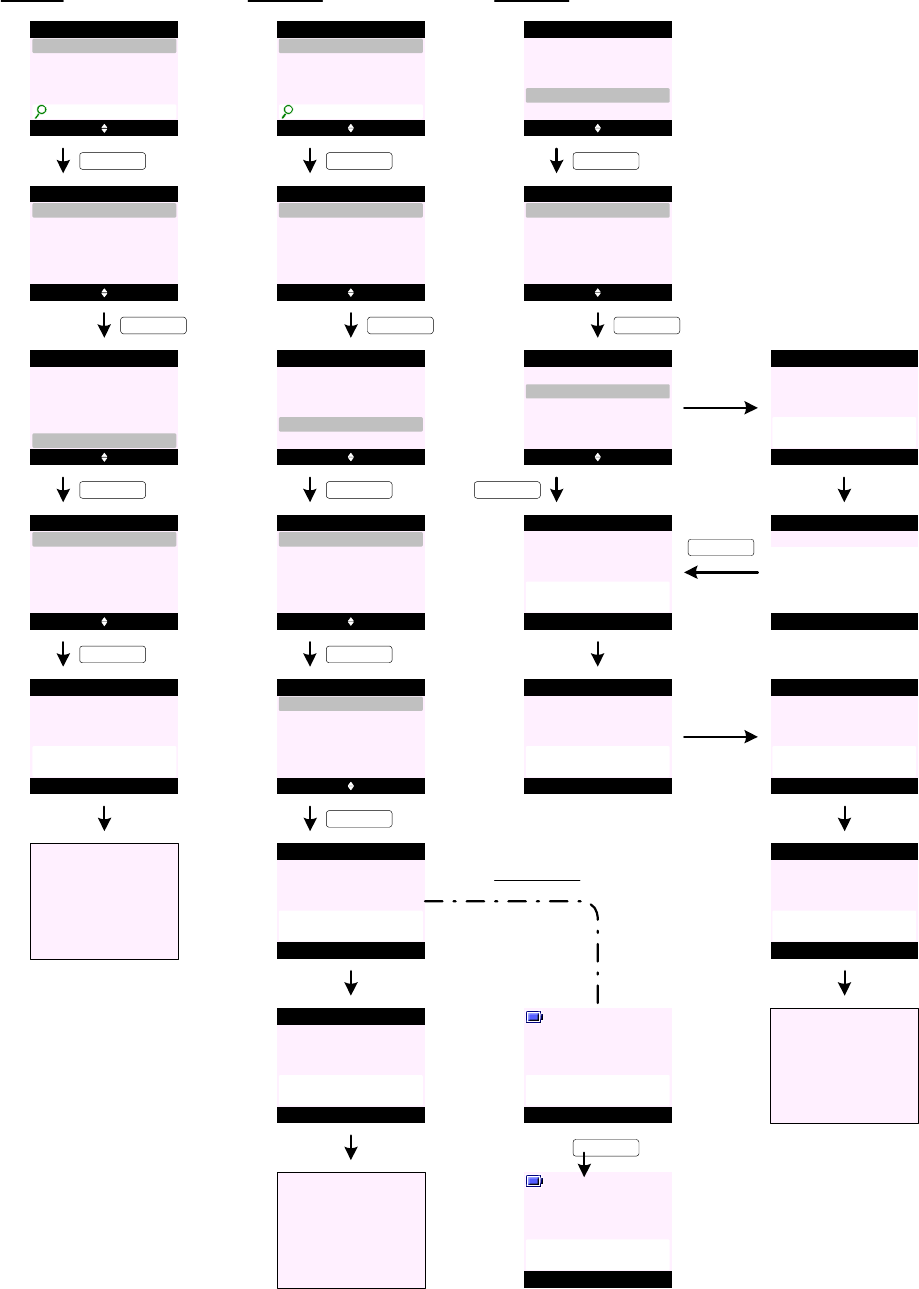
To access your contact list from idle display:
KEY_DOWN
P3
Phonebook Empty
Contact
KEY_DOWN
Send Message
KEY_SOFT_1
Menu Contact
Handset 1
P4
To access your contact list menu:
Menu Contact
Handset 1
P5
KEY_SOFT_2
Search Contact
P7
Go to P1 or P3
KEY_SOFT_1
Menu Contact
Handset 1
P8
P9 Options Back
Alex
Contact
Charles
Clive
Bill
_
KEY_DOWN
KEY_2 three times
P10 Options Clear
Contact
Charles
Clive
C_
Add Entry
P12 Select Back
Search
Contact
Copy Phonebook
Memory Status
Add Entry
Dialling Codes
Menu Contact
Handset 1
P11
KEY_SOFT_2
KEY_DOWN
P13 Select Back
Search
Contact
Copy Phonebook
Memory Status
Add Entry
Dialling Codes
P17
P15 OK Clear
Add Entry
Enter Name:
Abc 2
SunCorp UK_
Save Clear
Add Entry
Enter Number:
02074030201_
P18
P19
SunCorp UK
Saved
Add Entry
Select Back
Ringtone 1
Add Entry
Ringtone 3
Default Ringtone
Ringtone 2
Ringtone 4
P14 Back
Add Entry
Enter Name:
Abc 12
_
KEY_SOFT_1
P16 Back
Add Entry
Enter Number:
_
Go to P13
P20
KEY_SOFT_1
KEY_SOFT_1
KEY_SOFT_1
Copy Phonebook (To Handset)
P24 Select Back
Copy Phonebook
KEY_SOFT_1
To Handset
To SIM
From SIM
P25 Select Back
To Handset
KEY_SOFT_1
Handset 2
Handset 4
Handset 3
P22 Select Back
Search
Contact
Copy Phonebook
Memory Status
Add Entry
Dialling Codes
Menu Contact
Handset 1
P21
KEY_SOFT_2
KEY_DOWN
P23 Select Back
Search
Contact
Copy Phonebook
Memory Status
Add Entry
Dialling Codes
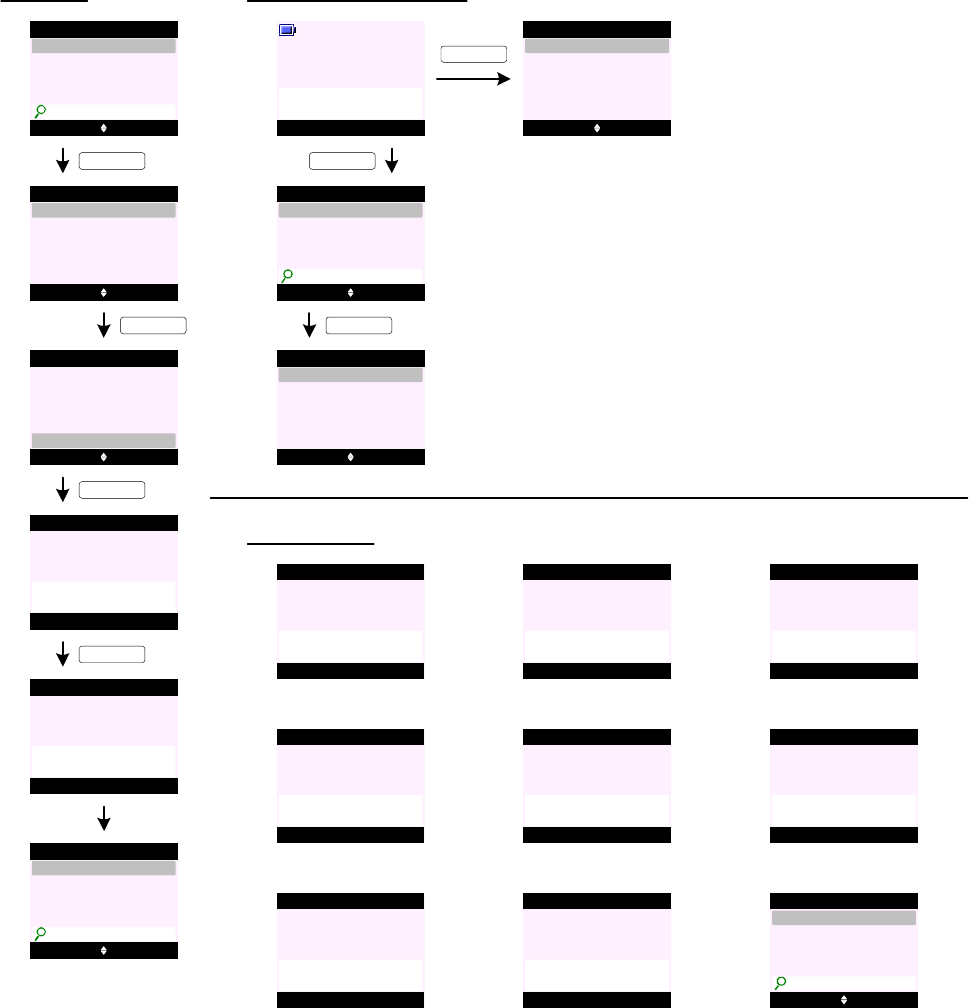
PHONEBOOK/CONTACT (cont.)
P26
Please wait ...
To Handset
Yes No
Handset 2
P30
Copy Phonebook ?
KEY_SOFT_1
Handset 2
P31
Copying from
Handset 1
On handset 2:
KEY_SOFT_1
P27 Back
Copying
<Name>
To Handset
P28 Back
X Entries
Copied
To Handset
Go to P24
P29
Copy Phoneboo k (From SIM)
P32 Select Back
Copy Phonebook
To Handset
To SIM
From SIM
P33
Please wait ...
Copy Phonebook
P34 Back
Copying
<Name>
Copy Phonebook
P35
If SIM is not PIN protected ...
KEY_SOFT_1
P36
Back
X Entries
Copied
Copy Phonebook
Go to P32
If SIM is PIN
protected ...
P37 OK Back
Copy Phonebook
Enter SIM PIN:
P38 OK Clear
Copy Phonebook
Enter SIM PIN:
****
KEY_SOFT_1
KEY_SOFT_1
P39
Incorrect
SIM PIN
Copy Phonebook
P40 OK Back
Copy Phonebook
Enter SIM PIN:
P41 OK Clear
Copy Phonebook
Enter SIM PIN:
****
KEY_SOFT_1
P42
Incorrect
SIM PIN
Copy Phonebook
P43 Select Back
Copy Phonebbok
To Handset
To SIM
From SIM
P44
Access Denied
Copy Phonebook
KEY_SOFT_1
Copy Phonebook (To SIM)
PHONEBOOK/CONTACT (cont.)
P45 Select Back
Copy Phonebook
To Handset
To SIM
From SIM
P46 Back
Please wait ... 2%
Copy Phonebook
P48 Back
Copying
<Name>
Copy Phonebook
P49
If SIM is not PIN protected ...
KEY_SOFT_1
P50
Back
X Entries
Copied
Copy Phonebook
Go to P45
If SIM is PIN
protected ...
P51 OK Back
Copy Phonebook
Enter SIM PIN:
P52 OK Clear
Copy Phonebook
Enter SIM PIN:
****
KEY_SOFT_1
P47 Back
Please wait ... 100%
Copy Phonebook
Dialling Codes (International)
P54 Select Back
Search
Contact
Copy Phonebook
Memory Status
Add Entry
Dialling Codes
Menu Contact
Handset 1
P53
KEY_SOFT_2
KEY_DOWN
P55 Select Back
Search
Contact
Copy Phonebook
Memory Status
Add Entry
Dialling Codes
KEY_SOFT_1
P56 Select Back
International
Dialling Codes
Local
Country
KEY_SOFT_1
P57 Save Back
International
Enter Code:
_
P58 Save Clear
International
Enter Code:
00_
P59 Back
Code Saved
International
KEY_SOFT_1
P61 Select Back
International
Dialling Codes
Local
Country
KEY_SOFT_1
P62 Save Back
Country
Enter Code:
_
P63 Save Clear
Country
Enter Code:
44_
P64 Back
Code Saved
Country
KEY_SOFT_1
Dialling Codes (Country)
P65 Select Back
International
Dialling Codes
Local
Country
KEY_SOFT_1
P66 Save Back
Local
Enter Code:
_
P67 Save Clear
Local
Enter Code:
0_
P68 Back
Code Saved
Local
KEY_SOFT_1
Dialling Codes (Local)
Memory Status
P69 Select Back
Search
Contact
Copy Phonebook
Memory Status
Add Entry
Dialling Codes
P70 Back
Memory Used:
Memory Status
Memory Free:
5
95
KEY_SOFT_1
KEY_SOFT_2
Go to P69
P71
P60
Go to P56

Delete Phonebook
PHONEBOOK/CONTACT (cont.)
P72 Select Back
Search
Contact
Copy Phonebook
Memory Status
Add Entry
Dialling Codes
KEY_UP
P73 Select Back
Delete Phonebook
Contact
Copy Phonebook
Memory Status
Add Entry
Dialling Codes
KEY_SOFT_1
P74 Yes No
Delete Phonebook
Delete
All Entries ?
KEY_SOFT_1
P75
Delete Phonebook
Deleting
Entries ...
P76
Delete Phonebook
All Entries
Deleted
P77
Go to P73
Send Message
Menu Contact
Handset 1
P83
P84
P85 Select Back
Show Details
Alex
Edit Entry
Copy Entry
Ringtone
Options Back
Alex
Contact
Charles
David
Bill
_
KEY_DOWN
Send Message
KEY_SOFT_1
P86 Select Back
Show Details
Alex
Edit Entry
Copy Entry
Ringtone
Send Message
KEY_DOWN
P89
P88 Options Clear
Write Message
Abc 139
See you in Angel
KEY_SOFT_1
P90P91
Select Back
Write Message
KEY_SOFT_1
@6pm_
Insert Template
Save
Insert Emoticon
Send
Insert Symbol
Send Clear
Send to
Enter Number:
01234567890_
Handset 1
Sending
Message ...
P87 Options Back
Write Message
Abc 160
_
KEY_SOFT_1
KEY_SOFT_1
Edit Entry
P92
P93 Select Back
Show Details
Alex
Edit Entry
Copy Entry
Ringtone
Options Clear
SunCorp UK
Contact
S_
Send Message
KEY_SOFT_1
P94 Select Back
Show Details
Alex
Edit Entry
Copy Entry
Ringtone
Send Message
KEY_DOWN
KEY_SOFT_1
P96
P95 OK Clear
Edit Entry
Enter Name:
Abc 2
SunCorp UK_
Save Clear
Edit Entry
Enter Number:
02074030201_
P97
P98
SunCorp UK
Saved
Edit Entry
Select Back
Ringtone 1
Edit Entry
Ringtone 3
Default Ringtone
Ringtone 2
Ringtone 4
KEY_SOFT_1
KEY_SOFT_1
KEY_SOFT_1
P99
Go to P94
P78
P79 Select Back
Show Details
Alex
Edit Entry
Copy Entry
Ringtone
Options Back
Alex
Contact
Charles
David
Bill
_
Send Message
KEY_SOFT_1
Show Details
KEY_SOFT_1
Show Details
Dial Back
Alex
01234567890
Default Ringtone
P80
P81 Mute Contact
Handset 1
Calling
Alex
KEY_SOFT_1
KEY_SOFT_2
P82
Go to P79
PHONEBOOK/CONTACT (cont.)
Copy Entry (To Handset)
P106
P107 Select Back
Show Details
Alex
Edit Entry
Copy Entry
Ringtone
Options Clear
SunCorp UK
Contact
S_
Send Message
KEY_SOFT_1
P108 Select Back
Show Details
Alex
Edit Entry
Copy Entry
Ringtone
Send Message
KEY_DOWN
KEY_SOFT_1
P109 Select Back
Copy Entry
To Handset
To SIM
P110 Select Back
To Handset
KEY_SOFT_1
Handset 2
Handset 4
Handset 3
P111
Please wait ...
To Handset
Yes No
Handset 2
P114
Copy Phonebook ?
KEY_SOFT_1
Handset 2
P115
Copying from
Handset 1
KEY_SOFT_1
P112 Back
<Name>
Copied
To Handset
P113
Go to P109
Ringtone
P100
P101 Select Back
Show Details
Alex
Edit Entry
Copy Entry
Ringtone
Options Clear
SunCorp UK
Contact
S_
Send Message
KEY_SOFT_1
P102 Select Back
Show Details
Alex
Edit Entry
Copy Entry
Ringtone
Send Message
KEY_DOWN
KEY_SOFT_1
P103
P104
Ringtone
Saved
Alex
Select Back
Ringtone 1
Alex
Ringtone 3
Default Ringtone
Ringtone 2
Ringtone 4
KEY_SOFT_1
P105
Go to P102
On handset 2:
Copy Entry (To SIM)
P116 Select Back
Show Details
Alex
Edit Entry
Copy Entry
Ringtone
Send Message
KEY_SOFT_1
P117 Select Back
Copy Entry
To Handset
To SIM
KEY_DOWN
P118 Select Back
Copy Entry
To Handset
To SIM
KEY_SOFT_1
P119
Please wait ... 2%
Copy Entry
P120
Please wait ... 100%
Copy Entry
P121 Back
Copying
<Name>
Copy Entry
P122
P123
Back
X Entries
Copied
Copy Entry
Go to P118
If SIM is PIN
protected ...
P124
Please wait ...
Copy Entry
P125 OK Clear
Copy Entry
Enter SIM PIN:
****
KEY_SOFT_1
If SIM is not PIN protected ...
Delete Entry
PHONEBOOK/CONTACT (cont.)
P129 Yes No
Delete Entry
Delete
Jane ?
KEY_SOFT_1
P130
P131
Delete Entry
Jane
Deleted
P126
P127 Select Back
Show Details
Alex
Edit Entry
Copy Entry
Ringtone
Options Back
Jane
Contact
_
Send Message
KEY_SOFT_1
P128 Select Back
Delete Entry
Alex
Edit Entry
Copy Entry
Ringtone
Send Message
KEY_UP
KEY_SOFT_1
Nush
Tom
SunCorp UK
Options Back
Contact
_
Nush
Tom
SunCorp UK
Vickie
P132 Mute Contact
Handset 1
Calling
Alex
Access to Phonebook during call:
P133 Options Back
Jane
Contact
_
Nush
Tom
SunCorp UK
P134 Select Back
Contact
Show Details
Delete Entry
Add Entry
Edit Entry
KEY_SOFT_2
KEY_SOFT_1
P135 Select Back
Contact
Add Entry
KEY_SOFT_2
P136
Please
Insert SIM
Additional screens:
P137
SIM Format
Not Supported
P138
No Entries
On SIM
P139
Copying
Unsuccessful
P140
Memory Full
Not All Copied
P141
Phonebook
Memory Full
P142
Not Available
P143
PIN has not
been disabled
P144 Options Back
Tom
Contact
_
02074030201
07799111111
07782305989

1. Up to 250 entries can be stored on the handset depending
on the handset EEPROM size.
2. Each contact consists of a name of up to 12 characters
and a number up to 24 digits.
3. Both a name and a number have to be entered for an entry
to be saved. Save (KEY_SOFT_1) is not presented until
there is content in the name and number field.
4. The user can enter the same name more than once in the
phonebook but can only enter the number once. If the user
tries to enter a number that has already been stored he will
hear an error beep.
5. When names are entered, the first character is upper case
and then the case switches to lower. The user can
manually change the case using KEY_HASH. If the user
changes the case it remains in the case selected until
they save the entry and return to idle.
6. Recall can be stored in the number of a phonebook entry
using a short press on KEY_R.
7. Pause can be stored in the number of a phonebook entry
using a long press on KEY_UP.
8. During a call, the user can access the contact list by
pressing Contact (KEY_SOFT_2).
If there are entries when phonebook is accessed during
conversation - only Add Entry,Show Details,Edit Entry
and Delete Entry options are available (see screen P134).
9. If the phonebook is empty when it is accessed during
conversation - only Add Entry option is available (see
screen P135).
10 . Characters entered on the search bar should follow the
character table specified in "(SunCorp)
Character_table_v11_03NOV2006" file.
Suppose there are the following names: Ben
Bill
Cecily
David
Malcolm
Mel
Parag
If the user types in L (for Lisa) as there is no entry with L
the cursor will go to the next available entry - in this case
it will go to Malcolm.
If the user wants to search for Michael - when I press
KEY_6 once for M the cursor will move to Malcolm and now
if the user types in the second character "i" (press KEY_4
three times) it should go to Parag (assuming there is no
further entry after Parag).
If the user wants to search for Sue - the cursor will stay at
Parag (assuming there is no further entry after Parag.
11 . When accessing an empty phonebook names list from idle
(press KEY_DOWN from idle) - the display prompts
"Phonebook Empty" (see screen P3).
12. If Send Message is selected, this is a shortcut to the
"Write Message" functionality in Text Messaging. The
number is pre-entered in the "Send To" field.
13 . When copying an entry or phonebook to another handset,
the entry is added to the existing phonebook on the new
handset.
14 . SIM card transfer can only work when the base is in idle. If
the base is in use when the handset tries to access SIM
copy feature - the display prompts "Not Available" (see
screen P142).
15 . If the user selects Copy to Handset feature when there is
only one handset registered to the base - the handset
displays "Not Available" for 2 seconds and returns to the
previous screen (see screen P142).
16 . While copying an entry or phonebook between handsets,
other handsets registered to the base can still make
external calls or internal calls to each other. Any attempt
to make an internal call to pne of the handsets during the
copying - the handset will prompt "Not Available" along
with the error tone (see screen P142).
17. While the SIM is being copied, other handsets can still
make internal calls to each other. If a handset tries to
make a call to the handset carrying out the copy - the
handset will prompt "Not Available" along with the error
tone (see screen P142).
18 . When copying an entry or phonebook to and from SIM card
if SIM card is not detected in the SIM drawer - the display
prompts "Please Insert SIM" (see screen P136).
19 . When copying an entry or phonebook to and from SIM card
if SIM card format is not supported - the display prompts
"SIM Format Not Supported" (see screen P137).
20 . The handset must be able to handle SIM PIN code up to 8
digits.
21. When copying the SIM card, the SIM PIN is only
requested when the SIM has the PIN activated. If it is not
activated, it is not requested.
22. It must be possible to disable SIM PIN feature. In other
words, if a SIM card is PIN protected it must be possible
to alert the user that the "PIN has not been disabled". In
this case the user has to disable SIM PIN via his GSM.
23 . When copying an entry or phonebook to and from SIM card
if SIM card PIN code is entered incorrectly - the handset
prompts "Incorect SIM PIN" and returns to Enter SIM PIN:
screen.
24 . If SIM PIN is entered incorrectly for the second time - the
handset prompts "Incorect SIM PIN" and returns to
previous menu options screen.
If the user tries to access SIM copy feature again - the
display prompts "Access Denied" (see screen P44).
25 . If there are no entries on the SIM card when the handset is
initiating the copy from SIM - the display prompts "No
Entries On SIM" (see screen P138).
26 . During SIM card check and buffering of SIM card entries -
the display prompts "Please wait ..." or "Please wait ...
2%".
27. If the user attempts to copy an entry from one handset to
another and the phonebook on the receiving handset is full
- the receiving handset prompts "Phonebook Memory Full"
for 2 seconds and then returns to idle (see screen P141).
The sending handset prompts "Copying Unsuccessful" for 2
seconds and then returns to the previous screen (see
screen P139).
28 . When copying an entry or phonebook to another handset
and the receiving handset is not available (out of range or
phonebook memory full) - the sending handset prompts
"Copying Unsuccessful" and returns to the previous screen
(see screen P139).
29. If the user attempts to save a number to the phonebook
from the calls lists or a text message and the phonebook
is full - the display prompts "Phonebook Memory Full" for 2
seconds and returns to the previous screen (see screen
P141).
30. If the memory becomes full during copying phonebook from
SIM - the display prompts "Memory Full Not All Copied"
(see screen P140).
31 . When copying an entry or phonebook to another handset -
only registered handsets, except the handset being used
are listed.
32 . Ringtones assigned to phonebook entries are handset
specific and it is acceptable for the same entry to have
different tones assigned to it on different handsets.
33. While two handset are being used to copy directories, if
another handset begins to make an external call, the copy
process is interrupted. The failed copy screen (see P139)
is presented and then the handsets involved in the copy
revert to idle. Any entries already copied are retained.
34 . If an incoming call is received while an entry or phonebook
is being copied from one handset to another, or from SIM,
or to SIM, the copy is abandoned and the incoming call is
presented. Those entries, which have already been copied
at the time of the interruption, are retained.
35. When copying an entry or phonebook - the copy process
can be cancelled at any time by pressing Back
(KEY_SOFT_2) or KEY_END. Any entries already copied
are retained.
Notes:
PHONEBOOK/CONTACT (cont.)

Notes:
PHONEBOOK/CONTACT (cont.)
36 . Some SIM cards can save up to 20 characters in the name
field and some 12 characters.
If the maximum character allowed for the name field on the
handset is 12 - then the first 12 characters are copied.
The same applies to the number field.
37. There is no indication that a SIM is inserted, but during
phonebook transfer the Power In Use / Event LED will
flash.
38 . During the transfer it is not possible to use the base
functionality.
All base button presses are ignored. The SIM copy can
only be stopped at the controlling handset.
39 . When copying entries from SIM to phone, if a SIM contact
contains only the number fields - the number field will be
copied to both the name and number field on the handset.
The unnamed contacts will appear at the end of the list
(see screen P144).
40 . It is permissible for duplicate entries with the same name
NOT number to be stored as a result of SIM copying (or
even with manual input). In other words, it is possible to
stored two or more entries with the same contact name.
41 . Multiple SIM card transfer can be carried out. When
copying SIM card in either direction, entries are appended
to the existing list of contacts, rather than overwriting the
contents.
Contact with same name but different number will be copied.
Contact with different name and different number will be copied.
Contact with same name and same number will not be copied.
Contact with different name but same number will not be copied.
42. Dialling Codes feature allows correct conversion of SIM
contacts beginning with international codes.
For example, a contact saved on SIM with +442074030201
where: (+) is the international code, and
(44) is the country code
On the DECT phone, the settings will be:
International Code = 00
Country Code = 44
Local Code = 0
After SIM copy, + and 44 will be stripped off and replaced
by the local area code (0) - the entry copied will then
appear on the handset as 02074030201.
This feature can be hidden in EEPROM.
TEXT MESSAGING
Write Message (Send)
S0 Select Back
Write Message
Text Messaging
Drafts
Templates
Inbox
Outbox
KEY_SOFT_1
Text Settings
Delete Messages
S3
S2
KEY_SOFT_1
S6
S7
Select Back
Write Message
KEY_SOFT_1
Insert Template
Save
Insert Emoticon
Send
Insert Symbol
Send Clear
Send to
Enter Number:
02074030201_
Office 1
Sending
Message ...
KEY_SOFT_1
Options Clear
Write Message
Abc 139
See you in Angel
@6pm_
S1 Options Back
Write Message
Abc 160
_
Message Type
S4 Search Back
Send to
Enter Number:
_
KEY_SOFT_1
S5 Select Back
Alex
Contact
Charles
David
Bill
_
KEY_SOFT_1
S8
Office 1
Message Sent
Write Message (Save)
S10
S9
KEY_SOFT_1
Select Back
Write Message
KEY_DOWN
Insert Template
Save
Insert Emoticon
Send
Insert Symbol
Options Clear
Write Message
Abc 139
See you in Angel
@6pm_
S11 Select Back
Write Message
Insert Template
Save
Insert Emoticon
Send
Insert Symbol
S12
Saving
Message ...
Write Message
KEY_SOFT_1
S13
Message
Saved
Write Message
S14
Go to S0
Write Message (Insert Symbol)
S16
S15
KEY_SOFT_1
Select Back
Write Message
KEY_DOWN
Insert Template
Save
Insert Emoticon
Send
Insert Symbol
Options Clear
Write Message
Abc
See you in Angel
@6pm_
S17 Select Back
Write Message
Insert Template
Save
Insert Emoticon
Send
Insert Symbol
KEY_SOFT_1
S18 Insert Back
. , - ? ! ¡ ¿ ' @ : ; / "
( ) _ + & % * = <
>
.
Insert Symbol
£ € $ ¥ ¤ \ ~ # §
KEY_SOFT_1
S19
KEY_SOFT_1
Options Clear
Write Message
Abc
See you in Angel
@6pm._
S20
Go to S16
Write Message (Insert Symbol)
S22
S21
KEY_SOFT_1
Select Back
Write Message
KEY_DOWN
Insert Template
Save
Insert Emoticon
Send
Insert Symbol
Options Clear
Write Message
Abc
See you in Angel
@6pm_
S23 Select Back
Write Message
Insert Template
Save
Insert Emoticon
Send
Insert Symbol
KEY_SOFT_1
S24 Insert Back
Insert Emoticon
KEY_SOFT_1
S25
KEY_SOFT_1
Options Clear
Write Message
Abc
See you in Angel
@6pm. _
S26
Go to S22
139 139
138 134
TEXT MESSAGING (cont.)
Write Message (Insert Template)
S34
S33
S35
S36
S37
S38
S28
S27
KEY_SOFT_1
Select Back
Write Message
KEY_DOWN
Insert Template
Save
Insert Emoticon
Send
Insert Symbol
Options Back
Write Message
Abc
_
S29 Select Back
Write Message
Insert Template
Save
Insert Emoticon
Send
Insert Symbol
KEY_SOFT_1
S30 Insert Back
Insert Template
KEY_SOFT_1
S31
KEY_SOFT_1
Options Clear
Write Message
Abc
See u at _
S32
Go to S28
Happy Birthday
See u at
When will u b ho . . .
Write Message (Message Type)
KEY_SOFT_1
Select Back
Write Message
KEY_DOWN
Insert Template
Save
Insert Emoticon
Send
Insert Symbol
Options Back
Write Message
Abc
_
Select Back
Write Message
Insert Template
Save
Insert Emoticon
Message Type
Insert Symbol
KEY_SOFT_1
Select Back
Message Type
Text
Fax
Email
KEY_SOFT_1
Back
Message Type
Please wait ...
Go to S33
Inbox (Reply)
S39 Select Back
Write Message
Text Messaging
Drafts
Templates
Inbox
Outbox
KEY_SOFT_1
S40
KEY_SOFT_1
Read Back
Jcoolza
Inbox
Nush
KEY_SOFT_1
Options Back
Inbox
See you in Angel
S41
@6pm.
S42 Select Back
Inbox
Use Number
Reply
Message Details
Delete
Forward
S43
Go to S33
KEY_SOFT_1
Inbox (Forward)
S44 Select Back
Write Message
Text Messaging
Drafts
Templates
Inbox
Outbox
KEY_SOFT_1
S45
KEY_SOFT_1
Read Back
Jcoolza
Inbox
Nush
KEY_SOFT_1
Options Back
Inbox
See you in Angel
S46
@6pm.
S47 Select Back
Inbox
Use Number
Reply
Message Details
Delete
Forward
KEY_DOWN
S48 Select Back
Inbox
Use Number
Reply
Message Details
Delete
Forward
KEY_SOFT_1
S49 Options Clear
Write Message
Abc
See you in Angel
@6pm. _
S50
Go to S33
KEY_SOFT_1
160 160
151
134
TEXT MESSAGING (cont.)
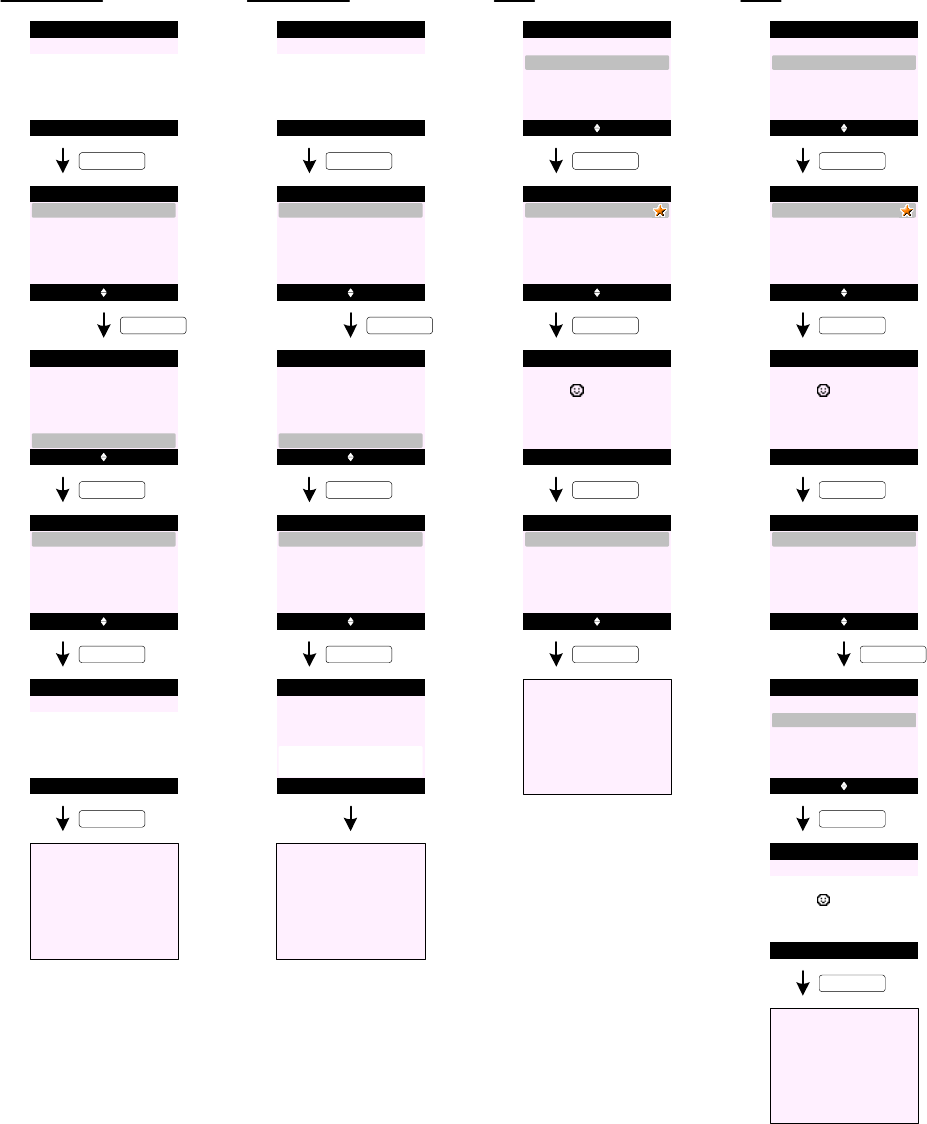
Inbox (Message Details)
S52
S51
S53
S54
S55
S56
Select Back
Write Message
Text Messaging
Drafts
Templates
Inbox
Outbox
KEY_SOFT_1
KEY_SOFT_1
Read Back
SunCorp UK
Inbox
Nush
KEY_SOFT_1
Options Back
Inbox
Meeting is cancelled!
Select Back
Inbox
Use Number
Reply
Message Details
Delete
Forward
KEY_DOWN
Select Back
Inbox
Use Number
Reply
Message Details
Delete
Forward
KEY_SOFT_1
Dial Back
Sender:
SunCorp UK
12/21 06:27 pm
Mute Contact
Handset 1
Calling
SunCorp UK
KEY_SOFT_1
Message Details
S57
Inbox (Use Number - Call)
S59
S58
S60
S61
S62
S63
Select Back
Write Message
Text Messaging
Drafts
Templates
Inbox
Outbox
KEY_SOFT_1
KEY_SOFT_1
Read Back
SunCorp UK
Inbox
Nush
KEY_SOFT_1
Options Back
Inbox
Select Back
Inbox
Use Number
Reply
Message Details
Delete
Forward
KEY_DOWN
Select Back
Inbox
Use Number
Reply
Message Details
Delete
Forward
KEY_SOFT_1
Select Back
KEY_SOFT_1
Use Number
S64
Save
Call
Mute Contact
Handset 1
Calling
SunCorp UK
02074030201
Inbox (Use Number - Save)
S66
S65
S67
S68
S69
S70
Select Back
Write Message
Text Messaging
Drafts
Templates
Inbox
Outbox
KEY_SOFT_1
KEY_SOFT_1
Read Back
0207999999
Inbox
Nush
KEY_SOFT_1
Options Back
Inbox
See you in Angel
@6pm.
Select Back
Inbox
Use Number
Reply
Message Details
Delete
Forward
KEY_DOWN
Select Back
Inbox
Use Number
Reply
Message Details
Delete
Forward
KEY_SOFT_1
Select Back
KEY_DOWN
Use Number
Save
Call
S71 Select Back
KEY_DOWN
Use Number
Save
Call
Meeting is cancelled!
S74
S72 Back
Add Entry
Enter Name:
Abc 12
_
Save Clear
Add Entry
Enter Number:
02074030201_
Select Back
Ringtone 1
Add Entry
Ringtone 3
Default Ringtone
Ringtone 2
Ringtone 4
S75
KEY_SOFT_1
S73 OK Clear
Add Entry
Enter Name:
Abc 8
Jane_
S76
SunCorp UK
Saved
Add Entry
S77 Read Back
Jane
Inbox
Nush
KEY_SOFT_1
KEY_SOFT_1
S79
S78
S80
S81
S82
S83
Select Back
Write Message
Text Messaging
Drafts
Templates
Inbox
Outbox
KEY_SOFT_1
KEY_SOFT_1
Read Back
SunCorp UK
Inbox
Nush
KEY_SOFT_1
Options Back
Inbox
Meeting is cancelled!
Select Back
Inbox
Use Number
Reply
Message Details
Delete
Forward
KEY_DOWN
Select Back
Inbox
Use Number
Reply
Message Details
Delete
Forward
KEY_SOFT_1
Yes No
KEY_SOFT_1
Inbox
TEXT MESSAGING (cont.)
Inbox (Delete)
Delete
Message ?
S84
Inbox
Deleted
S85 Read Back
Nush
Inbox
S87
S86
S88
S89
Select Back
Write Message
Text Messaging
Drafts
Templates
Inbox
Outbox
KEY_SOFT_1
KEY_SOFT_1
Edit Back
I am not going . . .
Drafts
Drafts
KEY_SOFT_1
Options Clear
Write Message
Abc
I am not going 2nite
_
S91
S90
S92
S93
Select Back
Write Message
Text Messaging
Drafts
Templates
Inbox
Outbox
KEY_SOFT_1
KEY_SOFT_1
Read Back
SunCorp UK
Outbox
Nush
KEY_SOFT_1
Options Back
Outbox
I am not going . . .
Select Back
Outbox
Forward
Delete
KEY_SOFT_1
Outbox (Forward)
S94
S95
KEY_SOFT_1
Options Clear
Write Message
Abc
I am not going 2nite
_
Go to S3
Go to S3
S97
S96
S98
S99
Select Back
Write Message
Text Messaging
Drafts
Templates
Inbox
Outbox
KEY_SOFT_1
KEY_SOFT_1
Read Back
SunCorp UK
Outbox
Nush
KEY_SOFT_1
Options Back
Outbox
I am not going . . .
Select Back
Outbox
Forward
Delete
KEY_DOWN
Outbox (Delete)
S100 Select Back
Outbox
Forward
Delete
S101
KEY_SOFT_1
Yes No
KEY_SOFT_1
Outbox
Delete
Message ?
S102
Outbox
Deleted
S103 Read Back
Nush
Outbox
140
140
S105
S104
S107
Select Back
Write Message
Text Messaging
Drafts
Templates
Inbox
Outbox
KEY_SOFT_1
TEXT MESSAGING (cont.)
Templates (Edit)
Options Back
Templates
Empty
Empty
Empty
KEY_SOFT_1
S106 Select Back
Templates
Delete
Edit
KEY_SOFT_1
Back
Templates
Abc 32
_
S108
KEY_SOFT_1
Save Clear
Templates
Abc
How r u_
S109
Templates
Template
Saved
S110 Options Back
Templates
Empty
How r u
Empty
KEY_SOFT_1
S111 Select Back
Templates
Delete
Edit
Go to S108
KEY_SOFT_1
S112
S114
S113 Select Back
Write Message
Text Messaging
Drafts
Templates
Inbox
Outbox
KEY_SOFT_1
Templates (Delete)
Options Back
Templates
Happy Birthday!
How r u
Empty
KEY_SOFT_1
S115 Select Back
Templates
Delete
Edit
KEY_DOWN
S116 Select Back
Templates
Delete
Edit
S117 Yes No
KEY_SOFT_1
Templates
Delete
Template ?
S118
Templates
Template
Deleted
S119 Options Back
Templates
Happy Birthday!
Empty
Empty
S121
S120 Select Back
Delete Messages
Text Messaging
Drafts
Templates
Inbox
Outbox
KEY_SOFT_1
Delete Messages (Inbox)
Select Back
Delete Messages
Drafts
Inbox
Outbox
KEY_SOFT_1
All Messages
S122 Yes No
KEY_SOFT_1
Inbox
Delete
Messages ?
S124
Go to S121
S126
S125
Delete Messages (Drafts)
Select Back
Delete Messages
Drafts
Inbox
Outbox
KEY_DOWN
All Messages
S127 Yes No
KEY_SOFT_1
Drafts
Delete
Messages ?
S129
Go to S126
Select Back
Delete Messages
Drafts
Inbox
Outbox
All Messages
KEY_SOFT_1
S123
Inbox
Deleted
S128
Drafts
Deleted
KEY_SOFT_1
25
S131
S130
Delete Messages (Outbox)
Select Back
Delete Messages
Drafts
Inbox
Outbox
KEY_DOWN
All Messages
S132 Yes No
KEY_SOFT_1
Outbox
Delete
Messages ?
S134
Go to S131
Select Back
Delete Messages
Drafts
Inbox
Outbox
All Messages
KEY_SOFT_1
S136
S135
Delete Messages (All Messages)
Select Back
Delete Messages
Drafts
Inbox
Outbox
KEY_DOWN
All Messages
S137 Yes No
KEY_SOFT_1
All Messages
Delete
All Messages ?
S139
Select Back
Delete Messages
Drafts
Inbox
Outbox
All Messages
KEY_SOFT_1
TEXT MESSAGING (cont.)
S133
Outbox
Deleted
S138
All Messages
Please wait ...
Select Back
Delete Messages
Text Messaging
Drafts
Templates
Inbox
Outbox
All Messages
All Messages
Deleted
S140
S142
S141 Select Back
Text Messaging
KEY_SOFT_1
Select Back
Text Settings
Mailbox Number
Service Centres
Message Type
KEY_SOFT_1
Delete Messages
Drafts
Templates
Text Settings
Outbox
Text Settings (Set Send Centre)
Message Size
Message Alert
Delivery Report
Users
S143 Select Back
Service Centres
Receive Centres
Set Send Centre
Send Centres
KEY_SOFT_1
S144 Select Back
Set Send Centres
Send Centre 2
Send Centre 1
KEY_SOFT_1
S145
Set Send Centres
Saved
S146
Go to S143
S147 Options Back
Text Settings
Mailbox Number
Service Centres
Message Type
KEY_SOFT_1
Text Settings (Receive Centres)
Message Size
Message Alert
S148 Select Back
Service Centres
Receive Centres
Set Send Centre
Send Centres
KEY_DOWN
S149
KEY_SOFT_1
Select Back
Receive Centres
Receive Centre 2
Receive Centre 1
S150
Select Back
Service Centres
Receive Centres
Set Send Centre
Send Centres
S152 Save Back
Receive Centre 1
Enter Number:
_
KEY_SOFT_1
S151
No Service
Numbers Stored !
Receive Centre 1
S153 Save Clear
Receive Centre 1
Enter Number:
080058752_
KEY_SOFT_1
S154
Saved
S155
Go to S150
Receive Centre 1
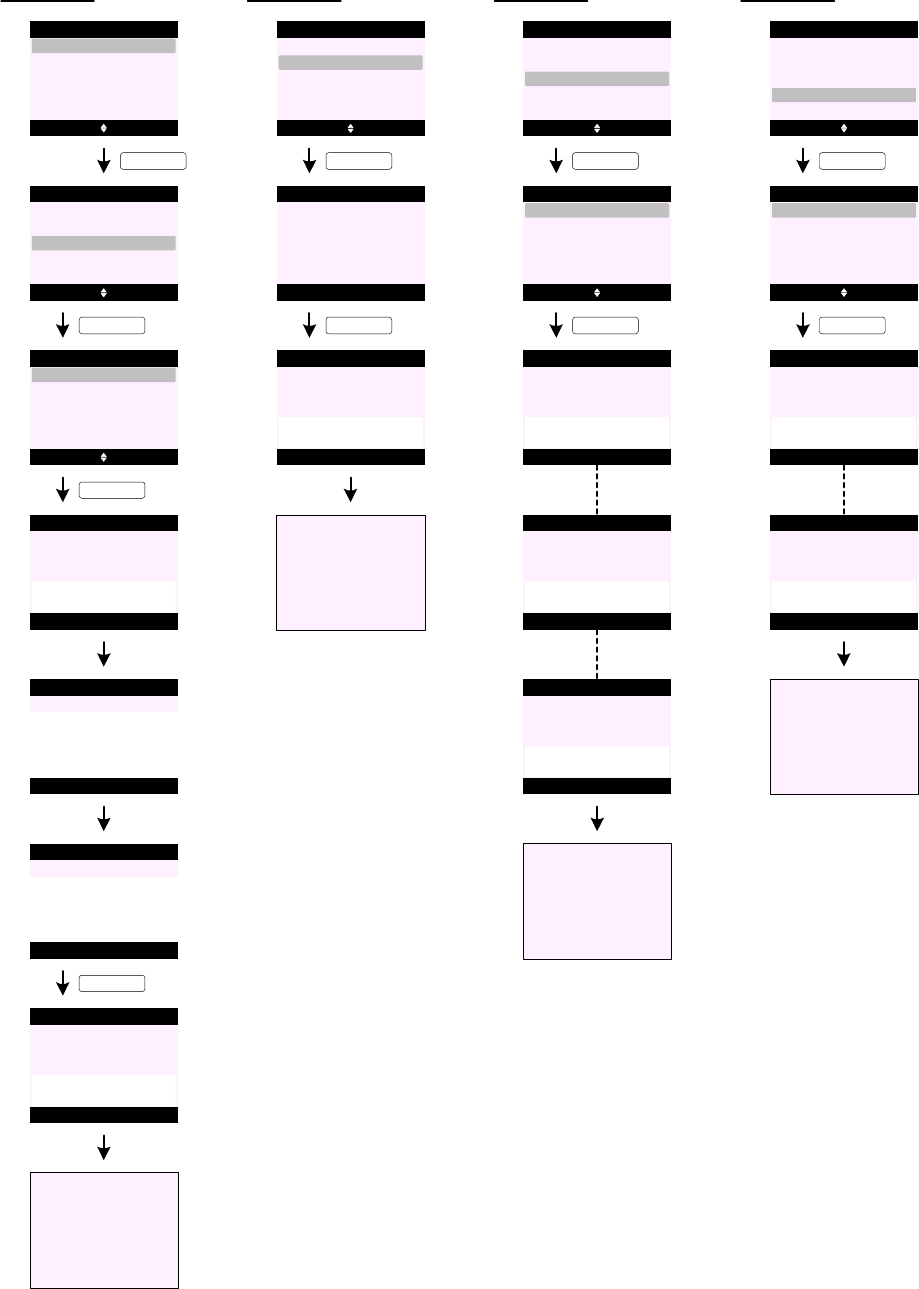
TEXT MESSAGING (cont.)
S156 Select Back
Service Centres
Receive Centres
Set Send Centre
Send Centres
KEY_DOWN
S157
KEY_SOFT_1
Select Back
Send Centres
Send Centre 2
Send Centre 1
S158
Select Back
Service Centres
Receive Centres
Set Send Centre
Send Centres
S160 Save Back
Send Centre 1
Enter Number:
_
KEY_SOFT_1
S159
No Service
Numbers Stored !
Send Centre 1
S161 Save Clear
Send Centre 1
Enter Number:
1470P1709400_
KEY_SOFT_1
S162
Saved
Send Centre 1
Text Settings (Send Centres)
S163
Go to S158
S164 Select Back
Text Settings
Mailbox Number
Service Centres
Message Type
KEY_SOFT_1
Message Size
Message Alert
S165 Save Back
Mailbox Number
KEY_SOFT_1
Text Settings (Mailbox Number)
Enter Number:
(9)
S166
Saved
Mailbox Number
S167
Go to S164
S168 Select Back
Text Settings
Mailbox Number
Service Centres
Message Type
KEY_SOFT_1
Message Size
Message Alert
Text Settings (Message Type)
Select Back
Message Type
Email
Text
S169
KEY_SOFT_1
S170
Set to Text
Message Type
Fax
S171
Set to Email
Message Type
S172
Set to Fax
Message Type
or
or
S173
Go to S168
S174 Select Back
Text Settings
Mailbox Number
Service Centres
Message Type
KEY_SOFT_1
Message Size
Message Alert
Text Settings (Message Size)
Select Back
Message Size
612 Characters
160 Characters
S175
KEY_SOFT_1
S176
Set to
160 Characters
Message Size
S177
Set to
612 Characters
Message Size
or
S178
Go to S174
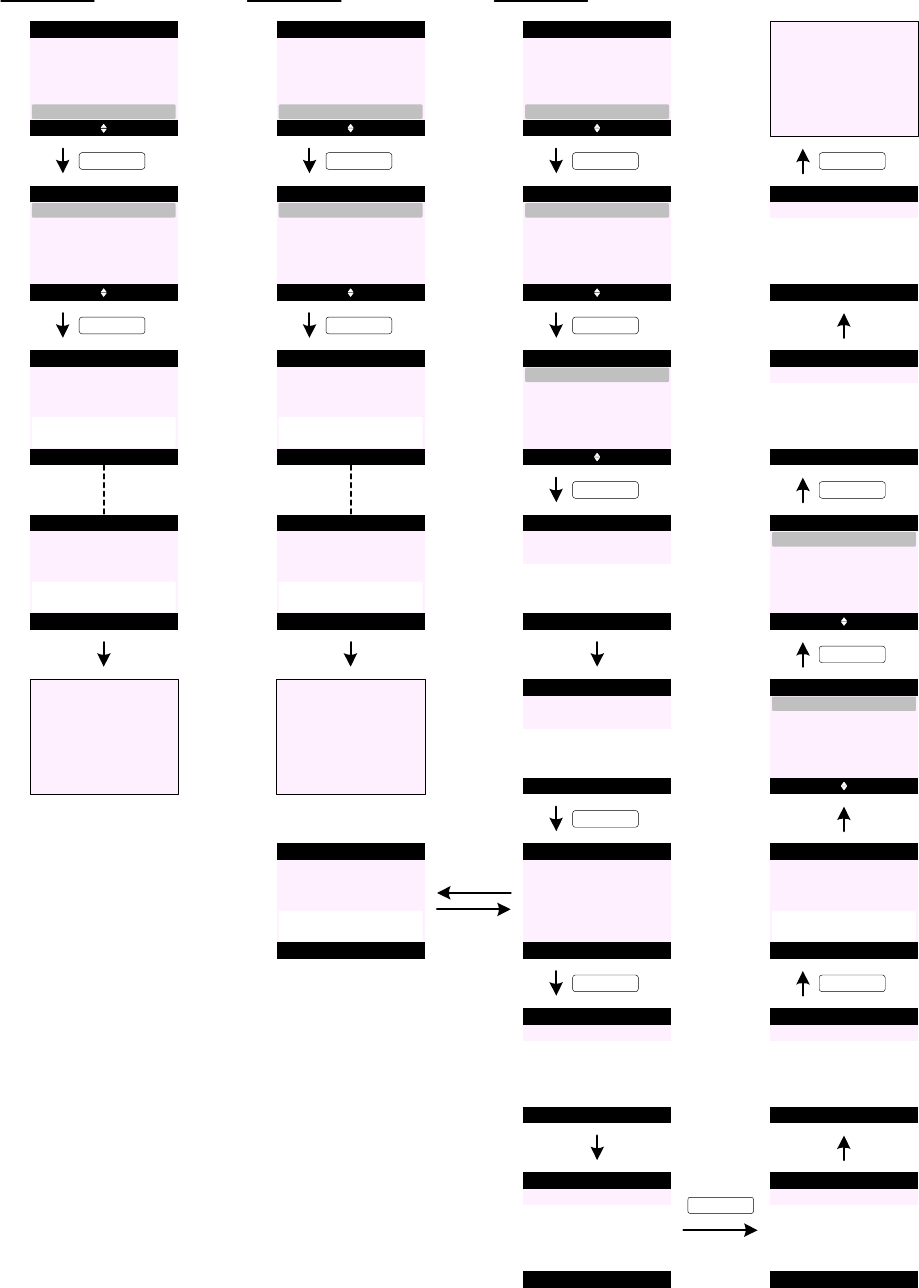
TEXT MESSAGING (cont.)
Text Settings (Message Alert)
S179 Select Back
Text Settings
Mailbox Number
Service Centres
Message Type
Message Size
Message Alert
S184 Select Back
Text Settings
Mailbox Number
Message Type
Message Size
Message Alert
Delivery Report
Text Settings (Delivery Report)
KEY_SOFT_1
Select Back
Message Alert
On
Off
S180
KEY_SOFT_1
S181
Set to OFF
Message Alert
S182
Set to ON
Message Alert
or
S183
Go to S179
KEY_SOFT_1
Select Back
Delivery Report
On
Off
S185
KEY_SOFT_1
S186
Set to OFF
S187
Set to ON
or
S188
Go to S184
Delivery Report
Delivery Report
S189 Select Back
Text Settings
Users
Message Type
Message Size
Message Alert
Delivery Report
Text Settings (Edit User)
KEY_SOFT_1
Options Back
Users
User 2
User 1
S190
KEY_SOFT_1
Select Back
User 1
Delete
Edit
S191
User 3
User 4
S192 Back
User 1
Enter Name:
Abc 8
_
S193 Save Clear
User 1
Enter Name:
Abc 4
Nush_
KEY_SOFT_1
KEY_SOFT_1
S194 Save Back
User 1
KEY_SOFT_1
Mailbox Number:
(1)
S195 Back
User 1
Mailbox PIN:
_
S196 Save Clear
User 1
Mailbox PIN:
****
S197 Back
User 1
Re-enter PIN:
_
S198 Save Clear
User 1
Re-enter PIN:
****
S199
User 1
Nush
Saved
KEY_SOFT_1
Options Back
Users
User 2
Nush
S200
User 3
User 4
Select Back
User 1
Delete
Edit
S201
S202 Back
User 1
Mailbox PIN:
_
S203 OK Clear
User 1
Mailbox PIN:
****
S204
Go to S193
KEY_SOFT_1
KEY_SOFT_1
KEY_SOFT_1
KEY_SOFT_1
S194a
User 1
Mailbox Number
already used
TEXT MESSAGING (cont.)
Text Settings (Delete User)
<< Icon >>
Select Back
Text Messaging
S205
KEY_SOFT_1
S206 Select Back
Users
General User
Nush
KEY_SOFT_1
S207 Select Back
Write Message
Text Messaging
Drafts
Templates
Inbox
Outbox
KEY_DOWN
S209
S208 Select Back
Text Messaging
KEY_SOFT_1
Select Back
Text Settings
Mailbox Number
Service Centres
Message Type
Delete Messages
Drafts
Templates
Text Settings
Outbox
Message Size
Message Alert
KEY_UP
S210 Select Back
Text Settings
Users
Message Type
Message Size
Message Alert
Delivery Report
KEY_SOFT_1
Options Back
Users
User 2
Nush
S211
User 3
User 4
KEY_DOWN
Select Back
User 1
Delete
Edit
S212
KEY_SOFT_1
Select Back
User 1
Delete
Edit
S213
KEY_SOFT_1
Yes No
User 1
S214
KEY_SOFT_1
Delete Nush
and Messages ?
S215 Back
User 1
Mailbox PIN:
_
S216 OK Clear
User 1
Mailbox PIN:
****
KEY_SOFT_1
User 1
S217
Nush
Deleted
Options Back
Users
User 2
User 1
S218
User 3
User 4
KEY_SOFT_1
Select Back
User 1
Delete
Edit
S219
Personal Messages received
S220
S223
Read Back
Handset 1
You have 2
new messages
KEY_SOFT_1
Read Back
Jcoolza
Inbox
Nush
02074030201
Mama
S221 Select Back
Users
General User
Nush
KEY_DOWN
S222 Select Back
Users
General User
Nush
KEY_SOFT_1
Back
Nush
Mailbox PIN:
_
S224 OK Clear
Nush
Mailbox PIN:
****
S225
Read Back
Handset 1
You have 2
new messages
Menu Contact
Handset 1
KEY_SOFT_2
S226
S227
<< Icon >>
Select Back
Text Messaging
S228
KEY_SOFT_1
S229 Select Back
Users
General User
Nush
KEY_SOFT_1
KEY_SOFT_1
S231
KEY_DOWN
S230 Select Back
Users
General User
Nush
KEY_SOFT_1
Back
Nush
Mailbox PIN:
_
S232 OK Clear
Nush
Mailbox PIN:
****
KEY_SOFT_1
S233 Select Back
Write Message
Text Messaging
Drafts
Templates
Inbox
Outbox
KEY_DOWN
S234 Select Back
Write Message
Text Messaging
Drafts
Templates
Inbox
Outbox

TEXT MESSAGING (cont.)
Additional screens:
S235
Memory Full
Delete Message
S236
No Messages
S237
Incorrect PIN !
S238
Office 1
Message
Sending Failed
1. A total of 50 short messages can be stored across all users inbox and outbox. The memory is fully dynamic over all users inboxes.
2. Only 5 messages can be stored across all user outboxes. New sent messages replace old sent messages.
3. Saved message is stored in the Drafts folder. Only 1 draft message can be stored per each mailbox.
When editing a message in Drafts folder and Save is selected again from options list - the message saved is the most recently saved
message.
4. If SMS mailboxes are full when Write Message is selected - the display prompts "Memory Full Delete Messages" for 2 seconds and
returns to the previous screen (see screen S235).
5. When accessing empty folders (Inbox,Drafts, or Outbox) - the display prompts "No Messages" for 2 seconds and returns to the
previous screen (see screen S236).
6. When accessing the Inbox, the most recent message is highlighted at the top of the screen (see screen S40).
Pressing KEY_DOWN will move backwards chronologically through the messages.
Pressing KEY_UP will move forward chronologically. When the most recent message is displayed, pressing KEY_UP will display the
oldest message.
7. Only new / unread messages will trigger the new SMS reminder icon on the idle screen (see screen S227).
8. New messages are marked with a yellow star (see screen S40). Once a message has been read, its "new message" tag will be
removed.
9. When browsing the Inbox, if the sender's number matches an entry in the phonebook , the name is displayed. If there is no name
match, the number of the sender is displayed.
10. There is no looping within a message, i.e. when reading (or writing) a message and the bottom of the message is reached, pressing
KEY_DOWN again will not display the beginning of the message. The user has to use KEY_UP to scroll back to the beginning of the
message.
11 . When writing a message, if Clear (KEY_SOFT_2) is pressed and held for 1.5 seconds, all text to the left and right of the cursor will be
deleted.
12 . When a message is sent, a copy of it is stored in the Outbox.
13 . When manually entering a recipient number it can be displayed over two lines. The maximum number of digits which can be entered is
24.
14 . When an emoticon is included in a message it is displayed within the text in its graphical format rather than just the punctuation
symbols. The graphical representation of emoticons is also shown in incoming messages rather than punctuation.
15 . When forwarding a message, if the original message is longer than four lines, the last four lines of the message are displayed on the
first three lines of the message screen and the cursor is displayed after the last character in the message.
16 . Concatenation is supported. When a long message is received it will be included in the Inbox as a single message and will be
displayed as a single message.
17. Message Size menu can be hidden in EEPROM.
18 . If the user sets the Message Size to 612 characters the counter will start from 612 and reduces as more characters are entered.
19 . If the user sets the Message Size to 160 characters the counter will start from 160 and reduces as more characters are entered.
20 . When the counter is 0 entering a further character will receive an error tone.
2 1 If the message is longer than 160 characters it will automatically be sent as linked messages. Up to 4 messages can be linked
together allowing up to 612 characters to be sent.
22 . Word wrap is used when receiving messages.
23 . When a message is sent the product goes online to send the message and "Sending Message..." is displayed on the sending handset
(see screen S7).
Once the message has been successfully sent - the display prompts "Message Sent" for 2 seconds and returns to the idle display.
24. If the attempt to send the message fails, the display prompts "Message Sending Failed" for 2 seconds and then the handsets revert to
the relevant screen (see screen S238).
25. If the line is in use when the product attempts to send the message, the display prompts "Line In Use" for 2 seconds and returns to
the relevant screen. The unsent message is stored in the Outbox folder.
26 . If the user is part way through writing a message when an incoming call is received, the incoming call is presented. If a sub-address /
mailbox user is writing a message, the message should be stored to handset temporary buffer so the next time user enters Write
Message - he will see his last typed message.
27. If the user is part way through writing a message and the handset times out - the message is automatically saved in the Drafts
folder. The timeout when writing a message is 30 seconds.

TEXT MESSAGING (cont.)
28 . The emoticons included on the product are:
Press KEY_UP and KEY_DOWN to highlight the emoticons you want and press Insert (KEY_SOFT_1) to insert selected emoticon.
29 . When an emoticon is selected from the table it is shown in the message. If the user enters the same combination of symbols
manually, they are converted to the emoticon.
30 . The maximum length of a template is 32 characters. In the list view, if the entire template can be displayed on a single line it is all
displayed. If there is more than can be displayed on a single line, 3 dots are displayed at the end of the template to indicate more of
the message scrolling off to the right.
31 . Once a template is deleted - it is replaced by Empty.
32 . When an "Empty" template is selected, its Delete option is greyed out (see screen S106).
33 . When inserting a template, if "Empty" template is selected - the handset will present an error beep.
34. All templates are reset to default when the product is reset.
35 . When saving SMS sender number, if the number already exists in the phonebook - Save option will be greyed out (see screen S63).
36 . When accessing the phonebook to send a text message to a number stored, if the phonebook is empty, the display prompts
"Phonebook Empty" for 2 seconds and returns to the previous screen.
37. If Save is selected on screen X70 when the phonebook memory is full - the display prompts "Phonebook Memory Full" for 2 seconds
and return to the previous screen (see screen S70).
38 . When saving a number, the name and a number field have to be entered for a Phonebook entry to be saved. Save is not presented
until there is content in the name and one of the number fields.
39. Service Centres menu can be hidden in EEPROM.
40 . There are 2 send and 2 receive centre numbers (one of each of the send and receive numbers can be hidden in EEPROM).
41 . Service centre numbers shall not be stored in the calls list or the redial list.
42 . The send and receive centre number can be up to 24 digits long.
43 . SMS service centre numbers can be set to empty.
44. If the product is reset, the default service centre numbers are restored.
45 . If the user has deleted both service centre numbers and then selects Set Send Service from Text Settings menu, or selecting an
"empty" send or receive centre number - the display prompts "No Service Numbers Stored !" for 2 seconds and returns to the
previous screen.
46. Message Type menu can be hidden in EEPROM.
47 . If message type is Fax - when writing the message, in the write message field:
(1) type in email destination address
(2) add a SPACE
(3) write your email content
For example:
abc@email.com hello! how are you?
The content before the first SPACE will be used as the email destination address.
(4) to send the message, press Options (KEY_SOFT_1)
(5) Send is highlighted, press Select (KEY_SOFT_1) to send the message.
48 . Email messages will not be saved in the Outbox.
49. Delivery Report menu can be hidden in EEPROM.
50. Users menu can be hidden in EEPROM.
51 . SMS multi-users can add up to 4 users. Therefore, there can be 5 mailboxes; one public / general mailbox + 4 users’ mailboxes.
52 . SMS username can be up to 8 characters long.
53 . When using password protection on SMS user mailboxes, once four digits have been entered on the "Mailbox PIN" entry screen any
further button presses are ignored and the error tone is presented. If the user attempts to press Save (SOFT_KEY_1) before 4 digits
have been entered the button press is ignored and the error tone is presented.
54 . If the user mailbox PIN is incorrectly entered at any time - the display prompts "Incorrect PIN" for 2 seconds and returns to the
previous screen (see screen S237).
55. User 1, 2, 3 and 4 have mailbox numbers 1, 2, 3 and 4 pre-assigned to them by default. The general mailbox number is pre-set to 0.
56 . When the user changes the user's mailbox number, only unassigned mailbox numbers between 0-9 can be used. If the mailbox
number entered is in use by another user - the display prompts "Mailbox Number already used" and returns to enter mailbox number
screen (see screen S194a).
57 . Each personal mailbox has an Inbox,Outbox and Drafts folder which are password protected (if switched on).
58. Any user accounts created are reset to default when the product is reset.
59 . If a user account is deleted, any stored text messages associated with that account are also deleted.
:-) :-( :-* ;-o :-s;-) :-D :-u :-p:-l
TEXT MESSAGING (cont.)
60. If an SMS is received with incorrect sub-address - after checking the FSK data and determining that the SMSC number is correct but
the subaddress that has been sent is incorrect, subsequent ring bursts will be audible.
61 . User master reset via Set Base menu will not clear SMS data including users’ mailboxes.
Full factory reset (press and hold KEY_STAR) while inserting the battery) will clear all SMS data including users’ mailboxes.
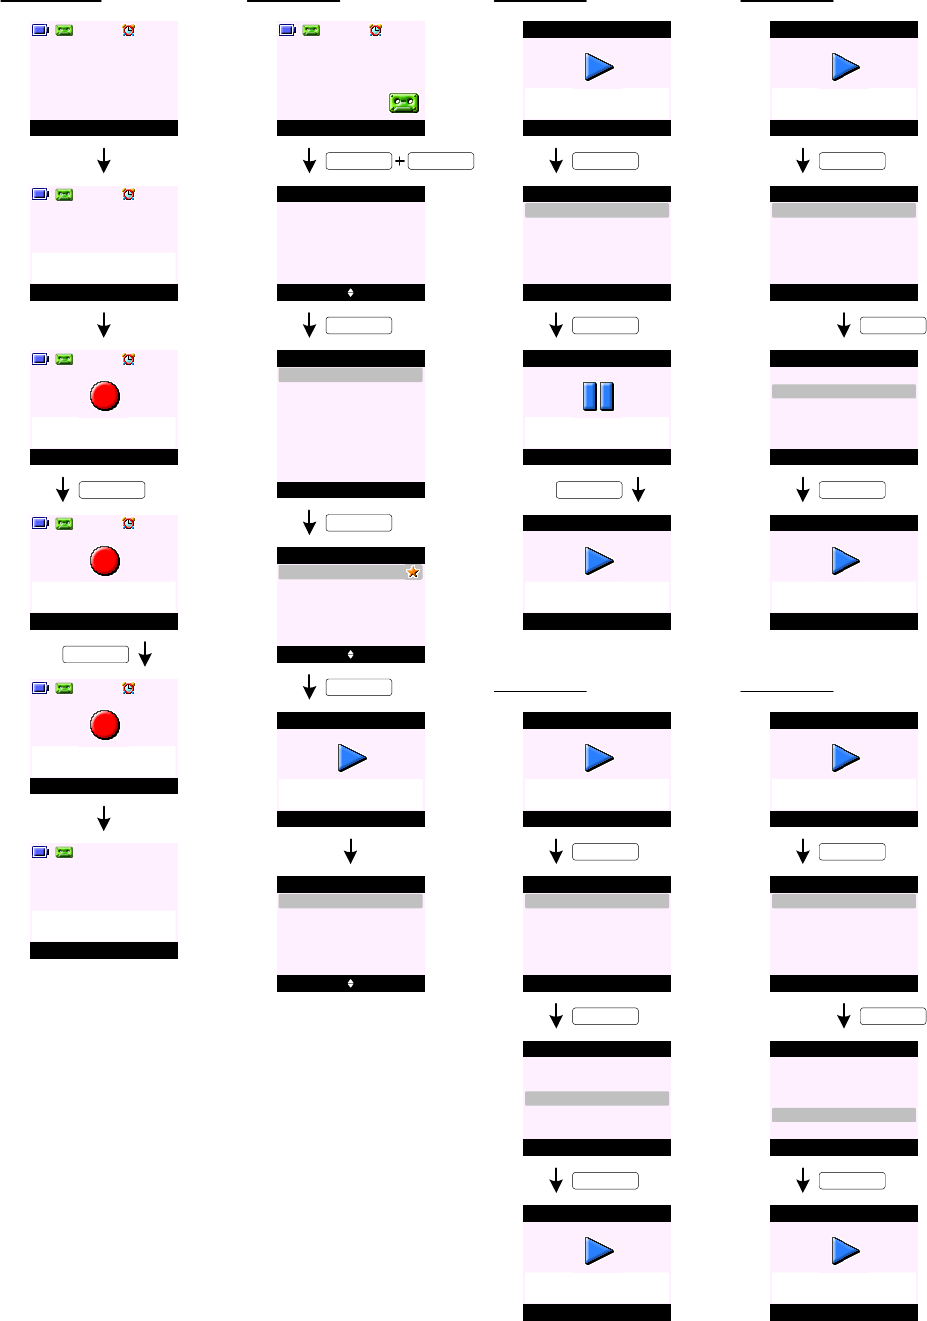
ANSWERING MACHINE
E0
E1
TAM Screening
Menu Contact
Handset 1
Quiet
Handset 1
External Call
SunCorp UK
Screen
Recording
SunCorp UK
E2
an incoming call arrives ...
KEY_SOFT_1
End
Recording
SunCorp UK
E3
Screen
Recording
SunCorp UK
E4
KEY_SOFT_2
Play Back
Handset 1
You have 1
new message
E5
when the recording ends ...
Play Message
E6
E7
Play Back
SunCorp UK
Play Messages
02074030201
Jane
KEY_SOFT_1
Menu Contact
Handset 1
KEY_SOFT_1 KEY_UP
<< Icon >>
Select Back
Answering Machine
KEY_SOFT_1
Select Back
Answering Machine
Outgoing Message
Play All
Record Memo
Play
Answer On/Off
E8
Answer Settings
Delete Messages
E9
Options Back
SunCorp UK
01/16 08:30 pm
E10
Play Messages
KEY_SOFT_1
Play Back
SunCorp UK
Play Messages
02074030201
Jane
E11
when the playback ends ...
Options Back
SunCorp UK
01/16 08:30 pm
E12
Play Messages
Play Message (Pause)
KEY_SOFT_1
KEY_SOFT_1
Select Back
Play Messages
Delete
Repeat Message
Play Previous
Pause
Play Next
E13
Resume
Message Paused
E14
Play Messages
KEY_SOFT_2
Options Back
SunCorp UK
01/16 08:30 pm
E15
Play Messages
Options Back
SunCorp UK
01/16 08:30 pm
E16
Play Messages
Play Message (Repeat Message)
KEY_SOFT_1
KEY_SOFT_1
Select Back
Play Messages
Delete
Repeat Message
Play Previous
Pause
Play Next
E17
Options Back
SunCorp UK
01/16 08:30 pm
E19
Play Messages
KEY_DOWN
Select Back
Play Messages
Delete
Repeat Message
Play Previous
Pause
Play Next
E18
Options Back
SunCorp UK
01/16 08:30 pm
E20
Play Messages
Play Message (Skip Forward)
KEY_SOFT_1
KEY_SOFT_1
Select Back
Play Messages
Delete
Repeat Message
Play Previous
Pause
Play Next
E21
E22
E23
Options Back
Jane
01/14 09:30 pm
E24
Play Messages
Play Message (Skip Backward)
KEY_SOFT_1
KEY_SOFT_1
Select Back
Play Messages
Delete
Repeat Message
Play Previous
Pause
Play Next
E25
Options Back
02074030201
01/15 11:30 pm
E27
Play Messages
KEY_DOWN
Select Back
Play Messages
Delete
Repeat Message
Play Previous
Pause
Play Next
E26
KEY_SOFT_1
Options Back
02074030201
01/15 11:30 pm
Play Messages
Select Back
Play Messages
Delete
Repeat Message
Play Previous
Pause
Play Next
ANSWERING MACHINE (cont.)
Play Message (Delete)
Options Back
Jane
01/14 09:30 pm
E28
Play Messages
KEY_SOFT_1
KEY_SOFT_1
Select Back
Play Messages
Delete
Repeat Message
Play Previous
Pause
Play Next
E29
Deleted
E31
Play Messages
KEY_DOWN
Select Back
Play Messages
Delete
Repeat Message
Play Previous
Pause
Play Next
E30
Play Back
SunCorp UK
Play Messages
02074030201
Jane
KEY_SOFT_1
E32
E33 Play Back
SunCorp UK
Play Messages
02074030201
E34
Go to E8
KEY_SOFT_2
Play All Messages
KEY_SOFT_1
Select Back
Answering Machine
Outgoing Message
Play All
Record Memo
Play
Answer On/Off
E35
Options Back
Jane
01/14 09:30 pm
E36
Play Messages
KEY_SOFT_1
Select Back
Play Messages
Delete
Repeat Message
Play Previous
Pause
Play Next
E37
End of Messages
E38
Play Messages
E39
Go to E35
Answer On/Off
KEY_SOFT_1
Select Back
Answering Machine
Outgoing Message
Play All
Record Memo
Play
Answer On/Off
E40
E41 Select Back
Off
Answer Machine
On
E42
KEY_SOFT_1
Go to E40
Set to OFF
Answer Machine
E44
E43
Set to ON
Answer Machine
or
Record Memo
KEY_SOFT_1
Select Back
Answering Machine
Outgoing Message
Play All
Record Memo
Play
Answer On/Off
E45
Please speak
after the tone
E46
Record Memo
Save
Recording ...
E47
Record Memo
Save Delete
Playing ...
E48
Record Memo
KEY_SOFT_1
Memo
Saved
E49
Record Memo
KEY_SOFT_1
Go to E41
E51
E50
Memo
Deleted
Record Memo
or
ANSWERING MACHINE (cont.)
Record OGM (Answer & Record)
KEY_SOFT_1
Select Back
Answering Machine
Outgoing Message
Play All
Record Memo
Play
Answer On/Off
E52
E53 Select Back
Record
Outgoing Message
Play
KEY_SOFT_1
Please speak
after the tone
E55
Answer & Record
Save
Recording ...
E56
Answer & Record
Save Delete
Playing ...
E57
Answer & Record
KEY_SOFT_1
Outgoing Message
Saved
E58
Answer & Record
KEY_SOFT_1
E54 Select Back
Answer & Record
Record
Answer Only
KEY_SOFT_1
Go to E54
E60E59
Outgoing Message
Deleted
Answer & Record
or
Record OGM (Answer Only)
E61
Please speak
after the tone
E63
Answer Only
Save
Recording ...
E64
Answer Only
Save Delete
Playing ...
E65
Answer Only
KEY_SOFT_1
Outgoing Message
Saved
E66
Answer Only
KEY_SOFT_1
E62
Select Back
Answer & Record
Record
Answer Only
KEY_SOFT_1
E67
Outgoing Message
Deleted
Answer Only
or
Go to E61
Play OGM (Answer & Record) - if there is a Personal OGM saved
E68 Select Back
Record
Outgoing Message
Play
KEY_SOFT_1
E69 Select Back
Answer & Record
Play
Answer Only
KEY_SOFT_1
E70 Select Back
Default OGM
Answer & Record
Personal OGM
E71 OK Back
Playing ...
Answer & Record
KEY_SOFT_1
E72
KEY_SOFT_1
KEY_SOFT_2
Go to E70
Go to E69
E73
E74 Select Back
Default OGM
Answer & Record
Personal OGM
KEY_DOWN
OK Delete
Playing ...
E75
Answer & Record
Outgoing Message
Deleted
E76
Answer & Record
KEY_SOFT_2
KEY_SOFT_1
Go to E69
E77
Play OGM (Answer & Record) - if there is no Personal OGM saved
E78 Select Back
Record
Outgoing Message
Play
KEY_SOFT_1
E79 Select Back
Answer & Record
Play
Answer Only KEY_SOFT_1
E80 OK Back
Playing ...
Answer & Record
E81
KEY_SOFT_1
Go to E79
ANSWERING MACHINE (cont.)
Play OGM (Answer Only) - if there is a Personal OGM saved
E82 Select Back
Answer & Record
Play
Answer Only
KEY_DOWN
E83 Select Back
Answer & Record
Play
Answer Only
KEY_SOFT_1
E84 Select Back
Default OGM
Answer Only
Personal OGM
E85 OK Back
Playing ...
Answer Only
KEY_SOFT_1
E86
KEY_SOFT_1
KEY_SOFT_2
Go to E84
Go to E83
E87
E88 Select Back
Default OGM
Answer Only
Personal OGM
KEY_DOWN
OK Delete
Playing ...
E89
Answer Only
Outgoing Message
Deleted
E90
Answer Only
KEY_SOFT_2
KEY_SOFT_1
Go to E83
E91
Play OGM (Answer & Record) - if there is no Personal OGM saved
E92
E93 Select Back
Answer & Record
Play
Answer Only KEY_SOFT_1
E94 OK Back
Playing ...
Answer Only
E95
KEY_SOFT_1
Go to E93
Select Back
Answer & Record
Play
Answer Only
KEY_DOWN
Delete Messages
KEY_SOFT_1
Select Back
Answering Machine
Outgoing Message
Play All
Record Memo
Delete Messages
Answer On/Off
E96
Yes No
Delete All
Old Messages ?
KEY_SOFT_1
Back
Deleting
Old Messages ...
E97
E98
E99
Answering Machine
Answering Machine
Go to E96
E100
All Old Messages
Deleted
Answering Machine
KEY_SOFT_1
Please wait ...
E101
Answering Machine
No Old
Messages
E102
Answering Machine
Go to E96
E103

ANSWERING MACHINE (cont.)
OGM Language
KEY_SOFT_1
Select Back
Answering Machine
Outgoing Message
Answer Settings
Record Memo
Delete Messages
Answer On/Off
E104
KEY_SOFT_1
Select Back
Answer Settings
Remote Access
Answer Mode
Message Alert
OGM Language
Answer Delay
E105
E106 Select Back
OGM Language
English
Español
Français
E107
Go to E105
Saved
OGM Language
KEY_SOFT_1
E108
KEY_SOFT_1
Select Back
Answer Settings
Remote Access
Answer Mode
Message Alert
OGM Language
Answer Delay
E109
E110 Select Back
Answer Mode
Answer & Record
Answer Only
E111 Select Back
Answer & Record
KEY_SOFT_1
Answer Mode (Answer & Record)
Default OGM
Personal OGM
E112
Answer Mode
Set to
Answer & Record
KEY_SOFT_1
Select Back
Answer Settings
Remote Access
Answer Mode
Message Alert
OGM Language
Answer Delay
E114
E115 Select Back
Answer Mode
Answer & Record
Answer Only
E117 Select Back
Answer Only
KEY_SOFT_1
Answer Mode (Answer Only)
Default OGM
Personal OGM
E118
Answer Mode
Set to
Answer Only
KEY_DOWN
E116 Select Back
Answer Mode
Answer & Record
Answer Only
KEY_SOFT_1
if there is no Personal OGM saved ...
KEY_SOFT_1
if there is no Personal OGM saved ...
KEY_SOFT_1
Select Back
Answer Settings
Remote Access
Answer Mode
Message Alert
OGM Language
Answer Delay
Select Back
Answer Delay
2 Rings
3 Rings
Answer Mode (Answer Only)
E120
E121
4 Rings
5 Rings
6 Rings
7 Rings
8 Rings
9 Rings
Time Saver
E122
Set to
2 Rings
Answer Delay
KEY_SOFT_1
E123
Set to
Time Saver
Answer Delay
or
Go to E109
E113
Go to E114
E119
Go to E120
E124
ANSWERING MACHINE (cont.)
Message Alert
KEY_SOFT_1
Select Back
Off
Message Alert
On
KEY_SOFT_1
Go to E125
Set to OFF
Message Alert
Set to ON
Message Alert
or
E125
E126
E128
E127
Select Back
Answer Settings
Remote Access
Answer Mode
Message Alert
OGM Language
Answer Delay
E129
Remote Access
KEY_SOFT_1
Select Back
Off
Remote Access
On
KEY_SOFT_1
E130
E131
Select Back
Answer Settings
Remote Access
Answer Mode
Message Alert
OGM Language
Answer Delay
Set Remote PIN
Go to E130
Set to OFF
Remote Access
Set to ON
Remote Access
or
E133
E132
E134
KEY_DOWN
Select Back
Off
Remote Access
On
E135
Set Remote PIN
E136
E137
E139
Save Back
Remote PIN
KEY_SOFT_1
Enter Old PIN:
Save Clear
Remote PIN
Enter Old PIN:
****
E138
KEY_SOFT_1
Save Back
Remote PIN
Enter New PIN:
Save Clear
Remote PIN
Enter New PIN:
****
E141 Save Clear
Remote PIN
Re-enter PIN:
****
E140 Save Back
Remote PIN
Re-enter PIN:
KEY_SOFT_1
KEY_SOFT_1
E142
Saved
Remote PIN
KEY_SOFT_1
Go to E135
E143
Additional screens:
No Messages
E144
E145
Handset 1
Remote Access
In Progress
E147 Play Back
Message 5
Play Messages
Message 4
Message 3
Message 2
Message 1
KEY_SOFT_1
Select Back
Answering Machine
Outgoing Message
Play All
Record Memo
Play
Answer On/Off
E146
Options Back
Message 5
01/16 08:30 pm
E148
Play Messages
KEY_SOFT_1
KEY_SOFT_1
Select Back
Play Messages
Delete
Repeat Message
Play Previous
Pause
Play Next
E149
Answer Machine
In Use
E150
Memory Full
E151

ANSWERING MACHINE (cont.)
Notes:
1. When the answering machine takes the line (see screen E2) pre-set OGM is played. This can be default / personal answer and record,
or default / personal answer only OGM. At this time the TAM recording icon (red dot) will flash on the display.
2. Incoming messages can be up to 3 minutes in length. If a message being left fills the 3 minutes, the answering machine will end the
call.
3. Press Screen (KEY_SOFT_1) on the handset to listen to the message being left by the caller - this activates the earpiece but not the
microphone (see screen E2). Once one of the handsets is screening the call, the other handsets revert to idle.
4. Call screening can only be carried out at the handset in handsfree mode. Whilst the user is screening the call, pressing KEY_TALK
when the OGM is playing or the caller is leaving a message will answer the call.
5. To exit call screening without speaking to the caller, press End (KEY_SOFT_2) on the display (see screen E3).
6. To speak to the caller, press KEY_TALK. Message recording is stopped and the in call screen is presented.
7. If the memory becomes full when a caller is leaving a message, "Memory Full" or v14 voice prompt will be played and the call ended.
The answering machine does a soft switch to answer only mode, playing the answer only OGM and showing memory full indication on
the idle screen until messages are deleted and space becomes available. Once when memory becomes available the answering
machine switches back to answer and record mode.
8. User can play all or selective play messages.
9. To selective play message - select Play from screen E8 or E146 and press KEY_UP and KEY_DOWN to highlight the message then
press Play (KEY_SOFT_1) to play the messages (see screen E9 or E147).
10. If Play is selected from screen E146, the handset will list all messages with the most recent message highlighted on the first line of
the display. Press KEY_DOWN will move the highlight down the list - backward chronologically.
11 . New messages are marked with a yellow star (see screen E9). Once a message has started to play, its "new message" tag will be
removed and it will become an old message when the session ends.
12. If Play (KEY_SOFT_1) is pressed on E147, the handset will start to play Message 5.
During message playback, the TAM play icon (green triangle) will flash on the display (as per screen E10).
13. If available the number or name (if the number matches an entry in the phonebook) of the caller is displayed during message
playback.
If the user does not subscribe to caller display, the message number is displayed in place of the CLI or name, e.g. "Message 1".
When a memo is playing, the word "Memo" replaces the name or number of the caller. The time and date that the memo was recorded
is displayed beneath it.
14 . The time and date that the call/message was received are also displayed.
The format of the time and day stamps played at the beginning of each message is the number or name (if available), the day (DD/MM
or MM/DD depending on EEPROM configuration) and then the time (HH:MM am/pm or HH:MM depending on EEPROM configuration).
If the date the message was recorded is the same as the current date, "Today" is played instead of the day and date. If the date of
the message is the day before the current date, "Yesterday" is played instead of the day and date.
15. During message playback, press KEY_UP or KEY_DOWN to adjust volume (see screen E10). When no further button is pressed for 2
seconds the display returns to the relevant message screen.
16. During message playback, press KEY_TALK to switch between handset and handsfree playback mode.
In this case the line is not seized. If the user wants to make a call they have to stop message playback first.
17. During Play or Play All messages - press Options (KEY_SOFT_1) for the following options:
Pause - to pause current message. Press Resume (KEY_SOFT_1) to resume playback (see screen E14)
Repeat Message - to replay current message
Play Next - to play next message
Play Previous - to play previous message
Delete - to delete current message - the display prompts "Deleted" (see screen E32). Message is deleted
immediately.
18. During Play or Play All messages - press the following keys for the following options:
KEY_1 - to pause current message
KEY_2 - to resume playback of current paused message
KEY_3 - to replay current message
KEY_4 - to play next message
KEY_5 - to delete current message - the display prompts "Deleted". Message is deleted immediately.
KEY_6 - to play previous message
19 . On screen E149, if Play Next is selected via the Options (KEY_SOFT_2) menu - the next message down the list is played. In this
case it is Message 4.
If Message 5 is the first message received on the base (or last message on the list), when Play Next is selected the handset will
return to the message list.
20 . On screen E149, if Play Previous is selected via the Options (KEY_SOFT_2) menu - the next message up the list is played.
If Message 5 is the last message received on the list, the handset will start to play Message 5 again.
21 . If there are no messages when Play / Play All messages is selected:
For product without voice prompts:
The handset will prompt "No Messages" (see screen E144) and return to Answer Machine sub menus.
For product with voice prompts:
"You have no messages" or v7 voice prompt is played and the display prompts "No Messages" and returns to Answer Machine sub
menus.

22. If Play All is selected from screen E146: -
For product without voice prompts:
On screen E147, there are three new and two old messages, Message 3,4, and 5 will be played first and then old messages, Message
1, and 2. Once all messages have been played - the display prompts "End of Messages" and returns to Answer Machine sub menus
(see screen E38).
For product with voice prompts:
From screen E147, again all new messages are played first and then the old messages with numbering starting from 1 for each set of
messages.
In this case there are 5 messages - three new and two old, "You have 3 new messages" or v1b will be played and then messages 3, 4,
and 5 would be played (announced as Message 1,2, and 3), "Message 1, date and time stamp including Today and Yesterday where
relevant" or v2. The voice prompt "You have 2 old messages" or v6b would then be played and messages 1 and 2 would be played
(again announced as Message 1 and 2), "Message 1, date and time stamp including Today and Yesterday where relevant" or v2. Once
all messages have been played - "End of Messages" or v4 voice prompt will be played and the display prompts "End of Messages" and
returns to Answer Machine sub menus (see screen E38).
23. Similarly, if there are only old messages stored, when Play All is selected the handset goes straight to the "You have one(N) old
message(s)" or v6a/b and old message(s) is/are played, "Message 1, date and time stamp including Today and Yesterday where
relevant" or v2. Once all messages have been played - "End of Messages" or v4 voice prompt will be played and the display prompts
"End of Messages" and returns to Answer Machine sub menus (see screen E38).
24. During Play All messages, if Pause is selected either through Options (KEY_SOFT_1) menu or by pressing KEY_1 - the playback is
paused, the TAM pause icon (two blue bars) will flash on the display and the display prompts "Message Paused" (see screen E14).
The handset will remain in the paused state for 60 seconds. If playback is not resumed within 60 seconds the display returns to idle
reflecting any changes on new message status.
25. During Play All messages, if Play Next is selected either through Options (KEY_SOFT_1) menu or by pressing KEY_4:
For product without voice prompts:
The handset will play next message. If the message played is the last message on the base - the display prompts "End of Messages"
and returns to Answer Machine sub menus (see screen E38).
For product with voice prompts:
The handset will play next message. If the message played is the last message on the base - "End of Messages" or v4 voice prompt
will be played and the display prompts "End of Messages" and returns to Answer Machine sub menus (see screen E38).
26. During Play All messages, if Play Previous is selected either through Options (KEY_SOFT_1) menu or by pressing KEY_4:
For product without voice prompts:
The handset will play previous message. If the message played is already the first message on the base - the handset will replay the
current message.
For product with voice prompts:
The handset will play previous message. If the message played is already the first message on the base - the handset will replay the
current message, "Message 1, date and time stamp including Today and Yesterday where relevant" or v2.
27. During message playback, when messages are deleted, the remaining messages are not renumbered until playback is completed and
the product returns to idle.
For product without voice prompts:
If message is deleted during playback, either through Options (KEY_SOFT_1) menu or by pressing KEY_5 - the display prompts
"Deleted" (see screen E32). Message is deleted immediately. If all messages have been individually delete - the display prompts
"End of Messages" and returns to Answer Machine sub menus (see screen E38).
For product with voice prompts:
If message is deleted during playback, either through Options (KEY_SOFT_1) menu or by pressing KEY_5 - "Message deleted" or v3
voice prompt will be played and the display prompts "Deleted" (see screen E32). Message is deleted immediately. If all messages
have been individually delete - "End of Messages" or v4 voice prompt will be played and the display prompts "End of Messages" and
returns to Answer Machine sub menus (see screen E38).
28 . Pressing KEY_END during message playback will stop the playback and the display will return to idle.
29 . Once the user has interacted with the new messages and returned to idle any changes in the number or status of messages is
reflected on the reminder icon (if available). For example, if all messages were played - the TAM message reminder icon will
disappear from the idle display.
30 . When TAM is in use by one handset. If another handset tries to access the TAM functionality - the display prompts "Answer Machine
In Use" (see screen E150).
31 . To switch the answering machine on/off, select Answer On/Off on screen E40.
For product without voice prompts:
If Off is selected - the display prompts "Set to OFF" and returns to Answer Machine sub menus (see screen E42).
If On is selected - the display prompts "Set to ON" and returns to Answer Machine sub menus (see screen E43).
For product with voice prompts:
If Off is selected - "Answer Off" or v15 voice prompt is played and the display prompts "Set to OFF" and returns to Answer Machine
sub menus (see screen E42).
If On is selected - "Answer On" or v16 voice prompt is played and the display prompts "Set to ON" and returns to Answer Machine
sub menus (see screen E43).
ANSWERING MACHINE (cont.)

ANSWERING MACHINE (cont.)
32 . To record memo, select Record Memo on screen E45.
For product without voice prompts:
When Record Memo is selected on screen E45 - the display prompts "Please speak after the tone" (see screen E46). When the
recording starts the TAM recording icon will flash on the display (see screen E47).
For product with voice prompts:
When Record Memo is selected on screen E45 - "Please speak after the tone. To end recording, press Save" or v8 voice prompt is
played and the display prompts "Please speak after the tone" (see screen E46). When the recording starts the TAM recording icon
will flash on the display (see screen E47).
33 . When recording a memo, press Save (KEY_SOFT_1) to save the recorded memo.
For product without voice prompts:
Press Save (KEY_SOFT_1) or KEY_HASH to stop the recording - the handset starts to play recorded memo. Press Save
(KEY_SOFT_1) again to save the memo - the display prompts "Memo Saved" and returns to Answer Machine sub menus (see screen
E49).
For product with voice prompts:
Press Save (KEY_SOFT_1) or KEY_HASH to stop the recording - the handset starts to play recorded memo. Press Save
(KEY_SOFT_1) again to save the memo, "Your memo is <<Memo>>" or v13 voice prompt is played and the display prompts "Memo
Saved" and returns to Answer Machine sub menus (see screen E49).
34. To delete recorded memo, during the playback press Delete (KEY_SOFT_2) - the display prompts "Memo Deleted" and returns to
Answer Machine sub menus (see screen E50).
35 . If the memory becomes full during recording a memo:
For product without voice prompts:
The recording will stop and the handset prompts "Memory Full" (see screen E151) and starts to play recorded memo.
For product with voice prompts:
The recording will stop and the handset prompts "Memory Full" (see screen E151) and "Memory Full" or v14, "Your memo is
<<Memo>>" or v13 voice prompt are played and the handset returns to Answer Machine sub menus.
36 . There are two default OGMs and the base can have two user recorded / Personal OGMs.
37 . The answer and record OGM is limited to 3 minutes. The answer only OGM can fill any available memory.
38 . To record an OGM, select the type of OGM to record (see screen E54):
For product without voice prompts:
When Answer & Record or Answer Only is selected on screen E54 - the display prompts "Please speak after the tone" (see screen
E55). When the recording starts the TAM recording icon will flash on the display (see screen E56).
For product with voice prompts:
When Answer & Record or Answer Only is selected on screen E54 - "Please speak after the tone. To end recording, press Save" or v8
voice prompt is played and the display prompts "Please speak after the tone" (see screen E55). When the recording starts the TAM
recording icon will flash on the display (see screen E56).
39 . When recording an OGM, press Save (KEY_SOFT_1) to save the recorded memo.
For product without voice prompts:
Press Save (KEY_SOFT_1) or KEY_HASH to stop the recording - the handset starts to play recorded OGM. Press Save
(KEY_SOFT_1) again to save the OGM - the display prompts "Outgoing Message Saved" and returns to E54 or E61 (see screen E58
and E65).
For product with voice prompts:
Press Save (KEY_SOFT_1) or KEY_HASH to stop the recording - the handset starts to play recorded OGM. Press Save
(KEY_SOFT_1) again to save the OGM, "Your outgoing message is <<Personal OGM>>" or v9 voice prompt is played and the display
prompts "Outgoing Message Saved" and returns to E54 or E61 (see screen E58 and E65).
40. To delete recorded OGM, during the playback press Delete (KEY_SOFT_2).
For product without voice prompts:
Press Delete (KEY_SOFT_2) to delete recorded OGM - the display prompts "Outgoing Message Deleted" and returns to E54 or E61
(see screen E59 and E66).
For product with voice prompts:
Press Delete (KEY_SOFT_2) to delete recorded OGM - "Message deleted" or v3, "Your outgoing message is <<Default OGM>>" or
v9 voice prompts are played and the display prompts "Outgoing Message Deleted" and returns to E54 or E61 (see screen E59 and
E66).
41. If the memory becomes full during recording an OGM:
For product without voice prompts:
The recording will stop and the handset prompts "Memory Full" (see screen E151) and starts to play recorded OGM.
For product with voice prompts:
The recording will stop and the handset prompts "Memory Full" (see screen E151) and "Memory Full" or v14, "Your outgoing
message is <<Personal OGM>>" or v9 voice prompt is played and the handset starts to play recorded OGM.

41 . To play an OGM, select the type of OGM to play (see screen E69). Screen E70 is only offered if there is a Personal OGM saved.
42. Playback of voice prompts and OGMs are in handsfree mode and can be switched to handset mode at any time by pressing
KEY_TALK.
43. During the playback of Personal OGM - it is possible to delete the OGM by pressing Delete (KEY_SOFT_2) or pressing OK
(KEY_SOFT_1) to return to previous screen (see screen E75 and E89).
44. During the playback of Default OGM - "Delete" is not offered (see screen E71 and E85).
45 . If there are no old messages when Delete Messages is selected on screen E96 - the display prompts "No Old Messages" for 2
seconds then returns to Answer Machine sub menus (see screen E102).
46. Only old message(s) can be deleted. Once old messages have been deleted:
For product without voice prompts:
The handset prompts "All Old Messages Deleted" and returns to Answer Machine sub menus (see screen E99).
For product with voice prompts:
"All old messages deleted" or v5 voice prompt is played and the display prompts "All Old Messages Deleted" and returns to Answer
Machine sub menus (see screen E99).
47. OGM Language menu can be hidden in EEPROM.
48 . When setting the answer mode, screen E111 and E117 are only offered if there are personal OGMs saved.
49 . The remote PIN is 4-digit long and it does not need to be changed from the default (0000) before the feature can be used.
50 . There should be two settings in EEPROM where the number of rings for timer saver feature can be defined.
For example, the TAM answers calls after 6 rings if there are no new messages stored, and after 2 rings if there are new messages
stored. Or the TAM answers calls after 4 rings if there are no new messages stored, and after 2 rings if there are new messages
stored.
ANSWERING MACHINE (cont.)
Voice Prompts List:
1. a: You have one new message
b: You have N new messages
2. Message N, date and day stamp (e.g 12th September,
11.30am) including Today and Yesterday where relevant
3. Message deleted
4. End of messages
5. All old messages deleted
6. a: You have one old message
b: You have N old messages
7. You have no messages
8. Please speak after the tone. To end recording, press Save
9. Your outgoing message is <<OGM>>
10. Hello, your call cannot be taken at the moment so please
leave your message after the tone
(This is default answer & record OGM)
11. Hello, your call cannot be taken at the moment and you
cannot leave a message, so please call later
(This is default answer only OGM)
12. Messages saved
13. Your Memo is <<Memo>>
14. Memory full
15. Answer off
16. Answer on
17. Incorrect security code, please enter your security code
18. Incorrect security code
19. To hear main menu, press one
20. To play messages, press two
21. To play new messages, press three
22. To skip back during messages, press four
23. To delete during messages, press five
24. To skip forward during messages, press six
25. To set to answer only, press seven
26. To set to answer and record, press seven
27. To record a new outgoing message, press eight
28. To set answer off, press nine
29. To set answer on, press zero
30. Please speak after the tone. To end recording, press
square
31. Please enter your security code
32. Please complete your message within 10 seconds
33. To delete all messages, press five
34. Set to answer only
35. Set to answer and record
36. You have no new messages
37. All messages deleted

ANSWERING MACHINE (cont.)
DTMF Code
Operations
with Voice Prompts without Voice Prompts
To enter remote access mode* To enter remote access mode
To hear main menu No acti on1
2 To play all messages To play all messages
To record a new OGM
To play new messages
To skip back during messages To skip back during messages
To delete during messages To delete during messages
To skip forward during messages To skip forward during messages
To set answer mode No action
No action
To play new messages3
4
5
6
7
8
9
0
To switch answer machine off
To switch answer machine on
To switch answer machine off
To switch answer machine on
Remote operation with voice prompts:
1. When the answering machine is off - the answering machine is remotely switched on after X seconds (time is EEPROM adjustable).
2. Access to the remote interrogation feature shall be via a break-in (break-in code DTMF code_*) instruction at any time following the
start of the outgoing message.
3. A maximum of two attempts at entering the correct security code shall be allowed in one call.
4. Following acceptance of the DTMF code_*, the unit shall suspend its current operation, play v31. and prepare to accept the first digit
of the code (default code is 0000) .
5. If no further digits are entered within a further 8-second period, or less than four digits are entered within an 8-second period,
following any DTMF code_*, the unit shall play v17. It shall then prepare to accept the whole code again, within a further 8-second
period as on the first attempt. The process is as for the first attempt but if the second attempt is unsuccessful then the unit shall
announce v18 and release the line.
6. When the unit recognises the fourth DTMF digit the unit shall check the validity of the code. If the code entered is incorrect, (and if
this is the first attempt), the unit shall announce v17. It shall then prepare to accept the first digit of the code again, within an 8-
second period as on the first attempt. The process is as for the first attempt but if the second attempt is unsuccessful then the unit
shall announce v18 and release the line.
7. One security code has been entered during remote interrogation - the display prompts "Remote Access In Progress" (see screen
E145).
8. If the code was correct and the unit has new messages, the unit announces v1a/v1b and the new messages, v2 are played.
9. After message play, all messages may be deleted if DTMF 5 is keyed within 8 seconds of the end of the prompt v4,v33,v19. If DTMF
5 is detected at this stage, v5 and v19 shall be announced and all the messages just played shall be deleted (new messages only
when only new messages have been played).
If no instruction is received within 8 seconds the unit shall and send two beeps and release the line.
10 . If there are no new messages then the unit announces v36,v19 and waits 8 seconds and if no DTMF instructions are received the
unit sends a long beep before releasing the line.
11. During remote interrogation, if DTMF code_1 is detected, it shall cause the unit to stop its current action and play the main menu
v20,v21,v22,v23,v24,v25/v26,v27,v28,v29, then v19.
12. If DTMF code_2 is detected, if there are new messages v1a/v1b shall be announced and messages played. If there are old messages,
v6a/v6b shall be announced and messages played.
At the end of the playback the unit shall offer the opportunity to delete all messages as above (this is the annoucement of v4,v33,
then v19). v37 and v19 shall be announced and all the messages new and old messages shall be deleted.
If there is no messages to play the unit shall announce v7, then v19.
13. If DTMF code_3 is detected, v1a/v1b shall be announced and messages played. At the end of the playback the unit shall offer the
opportunity to delete all messages as above (this is the annoucement of v4,v33, then v19). v5 and v19 shall be announced and all
the messages just played shall be deleted (new messages only when only new messages have been played).
If there is no messages to play the unit shall announce v7, then v19.
14 . If DTMF code_2 is detected during message playback, the unit shall pause the playback. The confirmation tone will be heard after 10
seconds, which is repeated every 10 seconds.
While the message playback is paused, it will resume if DTMF code_2 is recognised. Confirmation that the DTMF code_2 has been
detected will be by the user hearing the messages.
If a message is left paused for more than 60 seconds, all messages shall be saved (except those deleted before the last v4 prompt),
and send long beep and then line released.
15 . If DTMF code_4 is detected during message playback, the unit shall skip back to the start of the previous message.

ANSWERING MACHINE (cont.)
16 . Messages will be selectively deleted if DTMF 5 is received. Confirmation that the message has been deleted will be by the unit
announcing v3 and skipping forward to play the next message, or to the end of message sequence described above.
Messages are marked for deletion at this stage but are only actually deleted after the line is released.
If all messages have been individually deleted, v4,v33, then v19 shall be announced after the DTMF code_5 is recognised.
17 . If DTMF code_6 is detected during message playback, the unit shall skip forward to the start of the next message.
If the end of messages is reached during skip forwards, v4,v33, then v19 shall be announced after the DTMF code_6 is recognised.
18 . When DTMF code_7 is detected, the unit shall announce v9,<<Personal OGM>> or <<Default OGM>>, then v19.
19 . When DTMF code_8 is detected, the unit shall announce v30 and after DTMF code_# is recognised the unit shall announce v9,
<<Personal OGM>>, then v19.
20 . When DTMF code_9 is detected, the unit shall announce v15, then v19.
21 . When DTMF code_0 is detected, the unit shall announce v16,v9,<<Personal OGM>> or <<Default OGM>>, then v19.
22. Any valid message recorded before remote interrogation is attempted (successfully or not) shall be saved and indicated after the line
is released (unless deleted during remote interrogation).
23 . If the caller clears the line during remote interrogation, the unit will not hold the line indefinitely. If the caller has cleared - the unit
shall clear after the 8-second period at the end of message playback.
After the line is released any messages that have not been deleted shall be saved and indicated on the message counters (if
available).
24. It shall be possible to interrupt an operation or the remote interrogation menus by sending an appropriate DTMF signal. If the remote
menu is being playback, pressing invalid DTMF shall emit an error beep.
If the main menu is played to end without any interruption, it waits for 8 seconds for the user to enter the DTMF, if a DTMF instruction
is received which is not valid, then 4 short beeps will be played to line and the count down counter (8 seconds) keeps counting down.
After 8 seconds time out, the unit will send a long beep and then release the line.
Remote operation with voice prompts:
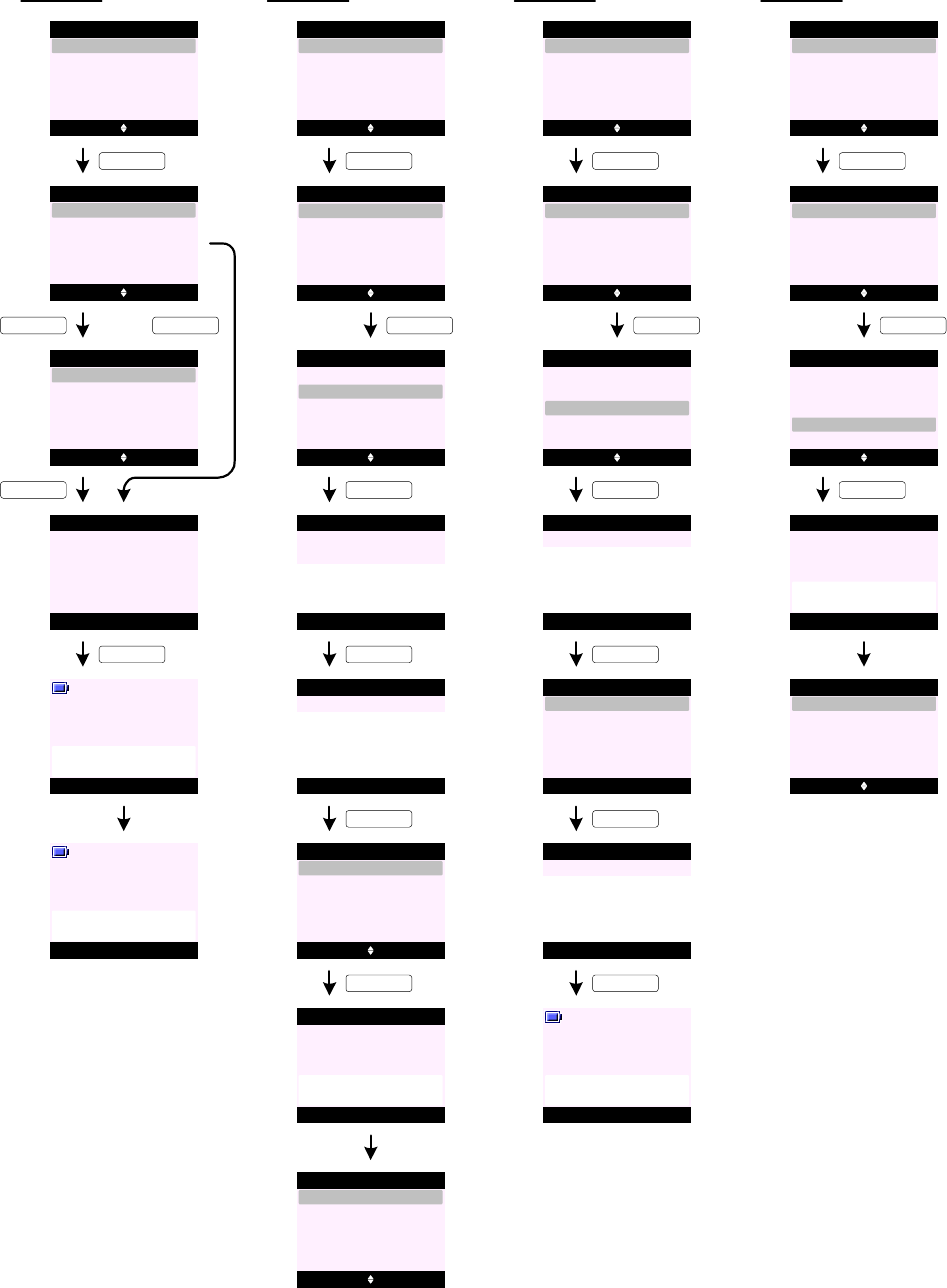
CALLS LIST
Missed Calls (Show Details)
C0
C1
C2
Missed Calls (Save Number)
C6
C7
C8
C10C4
C3
Select Back
Delete Calls
Calls List
Received Calls
Voicemail Calls
Missed Calls
Dialled Calls
Options Back
02074030201
Missed Calls
Nush
Missed Calls
KEY_SOFT_1
KEY_SOFT_1
C9
Mama
Select Back
Save Number
Delete Call
Show Details
Send Message
Missed Calls
KEY_SOFT_1
Dial Back
Caller:
02074030201
12/21 06:27 pm
Mute Contact
Handset 1
Calling
02074030201
KEY_SOFT_1
C5 Mute Contact
Handset 1
02074030201
00:05
KEY_HASH
Options Back
02074030201
Missed Calls
Nush
Missed Calls
Mama
Select Back
Save Number
Delete Call
Show Details
Send Message
KEY_SOFT_1
KEY_DOWN
Missed Calls
Select Back
Save Number
Delete Call
Show Details
Send Message
KEY_SOFT_1
OK Clear
Add Entry
Enter Name:
Abc 2
SunCorp UK_
KEY_SOFT_1
Save Clear
Add Entry
Enter Number:
02074030201_
Select Back
Ringtone 1
Add Entry
Ringtone 3
Default Ringtone
Ringtone 2
Ringtone 4
C11
KEY_SOFT_1
C12
SunCorp UK
Saved
Add Entry
KEY_SOFT_1
Missed Calls (Send Message)
C14
C15
C16
C18
C17
Options Back
SunCorp UK
Missed Calls
Nush
Missed Calls
Mama
Select Back
Save Number
Delete Call
Show Details
Send Message
KEY_SOFT_1
KEY_DOWN
Missed Calls
Select Back
Save Number
Delete Call
Show Details
Send Message
KEY_SOFT_1
Options Clear
Write Message
Abc 139
See you in Angel
KEY_SOFT_1
C19
C20
Select Back
Write Message
KEY_SOFT_1
@6pm_
Insert Template
Save
Insert Emoticon
Send
Insert Symbol
Send Clear
Send to
Enter Number:
02074030201_
Handset 1
Sending
Message ...
KEY_SOFT_1
Missed Calls (Delete Call)
C21
C22
C23
Options Back
SunCorp UK
Missed Calls
Nush
Missed Calls
Mama
Select Back
Save Number
Delete Call
Show Details
Send Message
KEY_SOFT_1
KEY_DOWN
Missed Calls
Select Back
Save Number
Delete Call
Show Details
Send Message
KEY_SOFT_1
C24
Call Deleted
Missed Calls
C25 Options Back
Missed Calls
Nush
Mama
C13 Options Back
SunCorp UK
Missed Calls
Nush
Mama

CALLS LIST (cont.)
Received Calls (Show Details)
C26
C27
C28
Received Calls (Save Number)
C32
C33
C34
C36C30
C29
Select Back
Delete Calls
Calls List
Received Calls
Voicemail Calls
Missed Calls
Dialled Calls
Options Back
02074030201
Received Calls
Nush
KEY_SOFT_1
KEY_SOFT_1
C35
Mama
Select Back
Save Number
Delete Call
Show Details
Send Message
KEY_SOFT_1
Dial Back
Caller:
02074030201
12/21 06:27 pm
Mute Contact
Handset 1
Calling
02074030201
KEY_SOFT_1
C31 Mute Contact
Handset 1
02074030201
00:05
KEY_HASH
Options Back
02074030201
Nush
Mama
Select Back
Save Number
Delete Call
Show Details
Send Message
KEY_SOFT_1
KEY_DOWN
Select Back
Save Number
Delete Call
Show Details
Send Message
KEY_SOFT_1
KEY_SOFT_1
Save Clear
Add Entry
Enter Number:
02074030201_
C37
KEY_SOFT_1
C38
SunCorp UK
Saved
Add Entry
KEY_SOFT_1
Received Calls (Send Message)
C40
C41
C42
C44
C43
Options Back
SunCorp UK
Nush
Mama
Select Back
Save Number
Delete Call
Show Details
Send Message
KEY_SOFT_1
KEY_DOWN
Select Back
Save Number
Delete Call
Show Details
Send Message
KEY_SOFT_1
KEY_SOFT_1
C45
C46
Select Back
Write Message
KEY_SOFT_1
Insert Template
Save
Insert Emoticon
Send
Insert Symbol
Send Clear
Send to
Enter Number:
02074030201_
Handset 1
Sending
Message ...
KEY_SOFT_1
Received Calls (Delete Call)
C47
C48
C49
Options Back
SunCorp UK
Nush
Mama
Select Back
Save Number
Delete Call
Show Details
Send Message
KEY_SOFT_1
KEY_DOWN
Select Back
Save Number
Delete Call
Show Details
Send Message
KEY_SOFT_1
C50
Call Deleted
C51 Options Back
Nush
Mama
Received Calls
Received Calls
Received Calls Received Calls
Received Calls Received Calls
Received Calls Received Calls
Received Calls
Received Calls
Received Calls
Received Calls
Received Calls
C39 Options Back
SunCorp UK
Nush
Mama
Received Calls
Select Back
Ringtone 1
Add Entry
Ringtone 3
Default Ringtone
Ringtone 2
Ringtone 4
OK Clear
Add Entry
SunCorp UK_
Options Clear
Write Message
@6pm_
Enter Name:
Abc 2
Abc 139
See you in Angel
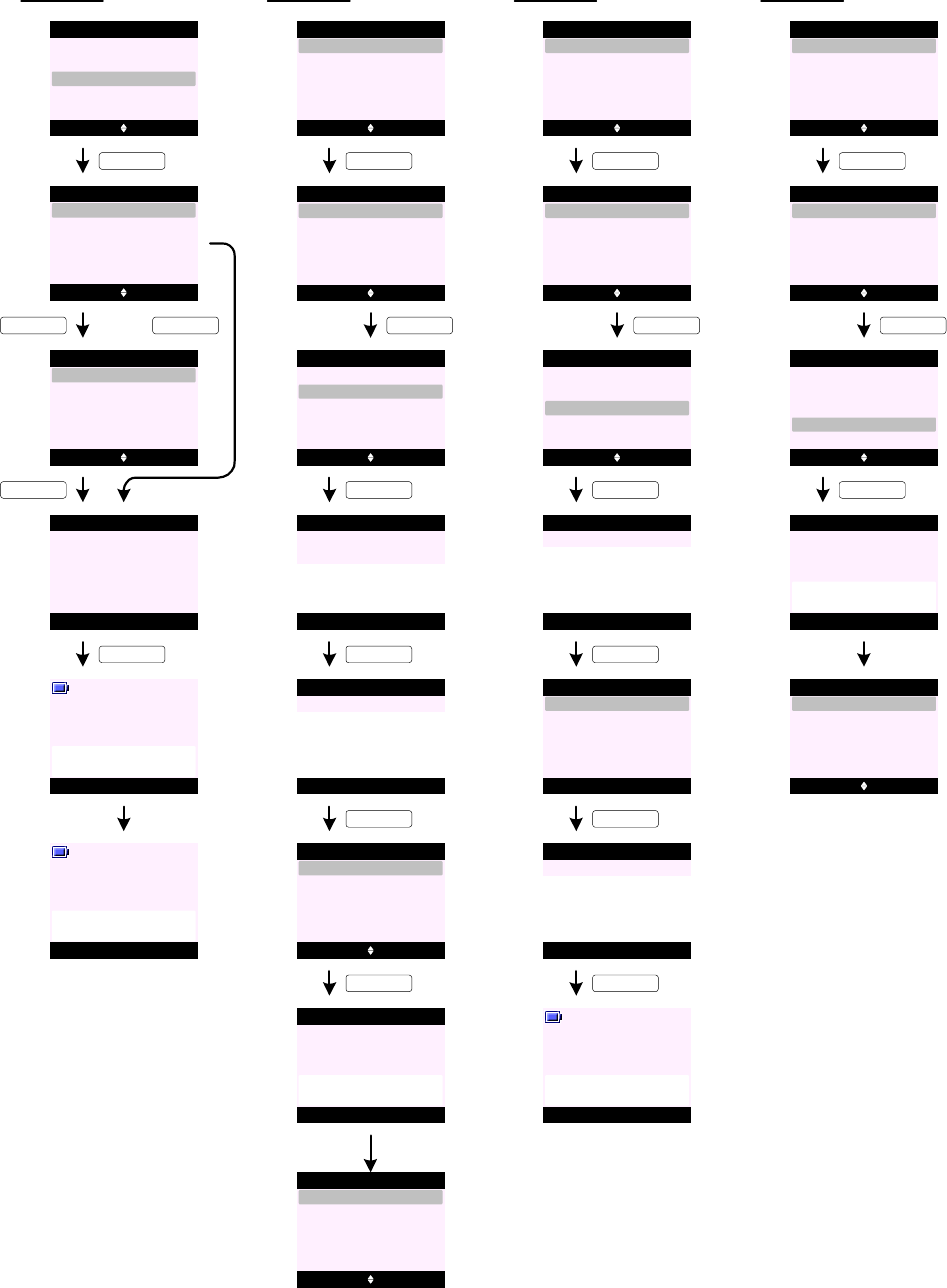
CALLS LIST (cont.)
Dialled Calls (Show Details)
C52
C53
C54
Dialled Calls (Save Number)
C58
C59
C60
C62C56
C55
Select Back
Delete Calls
Calls List
Received Calls
Voicemail Calls
Missed Calls
Dialled Calls
Options Back
02074030201
Nush
KEY_SOFT_1
KEY_SOFT_1
C61
Mama
Select Back
Save Number
Delete Call
Show Details
Send Message
KEY_SOFT_1
Dial Back
Dialled:
02074030201
12/21 06:27 pm
Mute Contact
Handset 1
Calling
02074030201
KEY_SOFT_1
C57 Mute Contact
Handset 1
02074030201
00:05
KEY_HASH
Options Back
02074030201
Nush
Mama
Select Back
Save Number
Delete Call
Show Details
Send Message
KEY_SOFT_1
KEY_DOWN
Select Back
Save Number
Delete Call
Show Details
Send Message
KEY_SOFT_1
KEY_SOFT_1
Save Clear
Add Entry
Enter Number:
02074030201_
C63
KEY_SOFT_1
C64
SunCorp UK
Saved
Add Entry
KEY_SOFT_1
Dialled Calls (Send Message)
C66
C67
C68
C70
C69
Options Back
SunCorp UK
Nush
Mama
Select Back
Save Number
Delete Call
Show Details
Send Message
KEY_SOFT_1
KEY_DOWN
Select Back
Save Number
Delete Call
Show Details
Send Message
KEY_SOFT_1
KEY_SOFT_1
C71
C72
Select Back
Write Message
KEY_SOFT_1
Insert Template
Save
Insert Emoticon
Send
Insert Symbol
Send Clear
Send to
Enter Number:
02074030201_
Handset 1
Sending
Message ...
KEY_SOFT_1
Dialled Calls (Delete Call)
C73
C74
C75
Options Back
SunCorp UK
Nush
Mama
Select Back
Save Number
Delete Call
Show Details
Send Message
KEY_SOFT_1
KEY_DOWN
Select Back
Save Number
Delete Call
Show Details
Send Message
KEY_SOFT_1
C76
Call Deleted
C77 Options Back
Nush
Mama
Dialled Calls
C65 Options Back
SunCorp UK
Nush
Mama
Select Back
Ringtone 1
Add Entry
Ringtone 3
Default Ringtone
Ringtone 2
Ringtone 4
Dialled Calls
Dialled Calls Dialled Calls
Dialled Calls Dialled Calls
Dialled Calls
Dialled Calls Dialled Calls
Dialled Calls Dialled Calls
Dialled Calls Dialled Calls
Dialled Calls
Dialled Calls
OK Clear
Add Entry
SunCorp UK_
Options Clear
Write Message
@6pm_
Enter Name:
Abc 2
Abc 139
See you in Angel
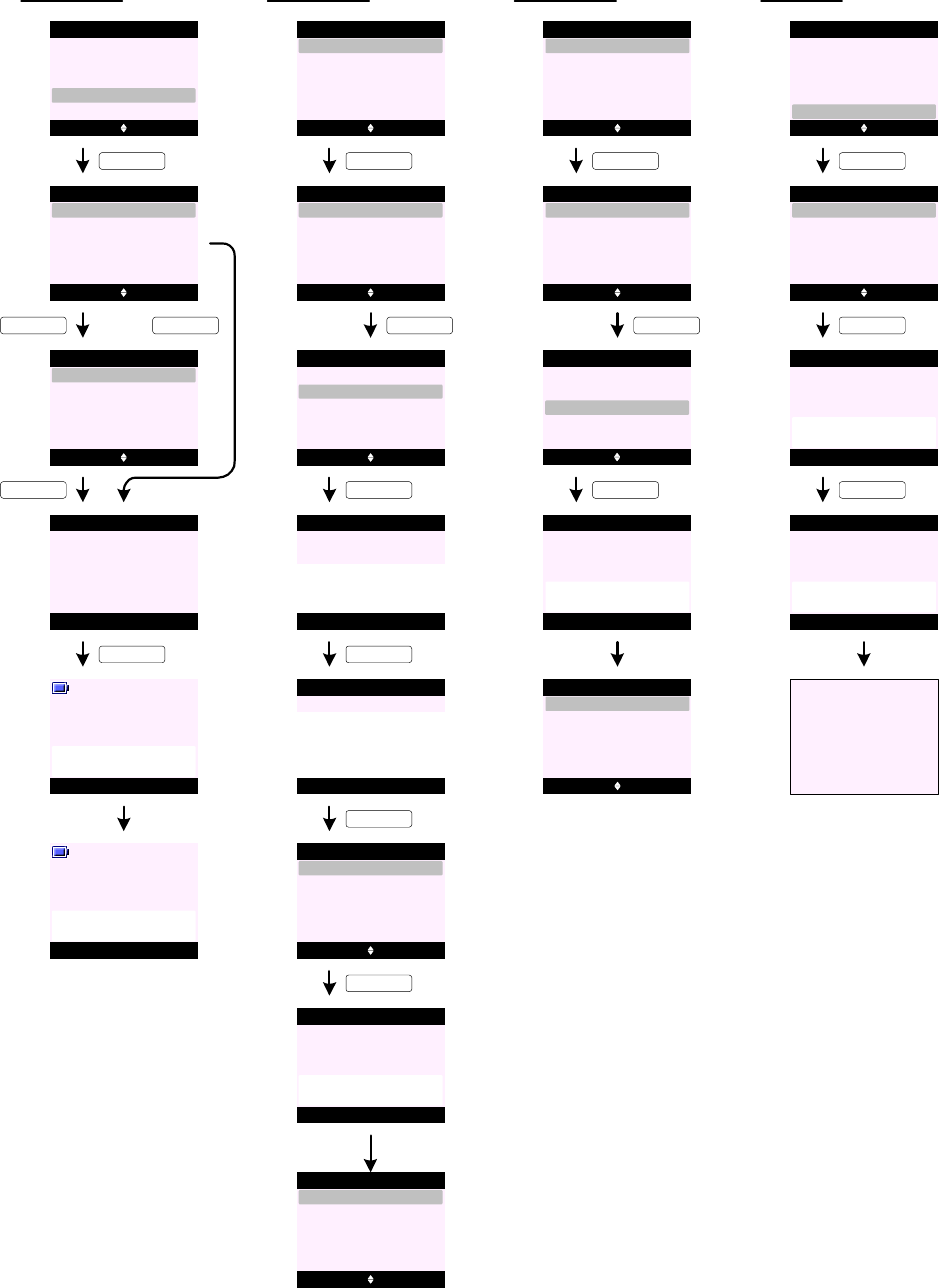
CALLS LIST (cont.)
Voicemail Calls (Show Details)
C78
C79
C80
Voicemail Calls (Save Number)
C84
C85
C86
C88C82
C81
Select Back
Delete Calls
Calls List
Received Calls
Voicemail Calls
Missed Calls
Dialled Calls
Options Back
3105
31089
KEY_SOFT_1
KEY_SOFT_1
C87
31083
Select Back
Save Number
Delete Call
Show Details
KEY_SOFT_1
Dial Back
Caller:
3105
12/21 06:27 pm
Mute Contact
Handset 1
Calling
3105
KEY_SOFT_1
C83 Mute Contact
Handset 1
3105
00:05
KEY_HASH
KEY_SOFT_1
KEY_DOWN
Select Back
Save Number
Delete Call
Show Details
KEY_SOFT_1
OK Clear
Add Entry
Voicemail_
KEY_SOFT_1
Save Clear
Add Entry
Enter Number:
3105_
C89
KEY_SOFT_1
C90
Voicemail
Saved
Add Entry
KEY_SOFT_1
Voicemail Calls (Delete Call)
C92
C93
C94
KEY_DOWN
KEY_SOFT_1
C95
Call Deleted
C96 Options Back
31089
31083
C91 Options Back
Voicemail
31089
31083
Select Back
Ringtone 1
Add Entry
Ringtone 3
Default Ringtone
Ringtone 2
Ringtone 4
Dialled Calls
Voicemail Calls
Voicemail Calls
Dialled Calls Voicemail Calls
Voicemail Calls
Options Back
3105
31089
31083
Voicemail Calls
Select Back
Save Number
Delete Call
Show Details
Voicemail Calls
Voicemail Calls
KEY_SOFT_1
Options Back
3105
31089
31083
Voicemail Calls
Select Back
Save Number
Delete Call
Show Details
Voicemail Calls
Select Back
Save Number
Delete Call
Show Details
Voicemail Calls
Delete Calls (Missed Calls)
C97
C98
C99
Select Back
Delete Calls
Calls List
Received Calls
Voicemail Calls
Missed Calls
Dialled Calls
Options Back
Delete Calls
Missed Calls
KEY_SOFT_1
KEY_SOFT_1
Yes No
All Calls
Received Calls
Voicemail Calls
Missed Calls
Dialled Calls
Delete
All Calls ?
C100
Missed Calls
KEY_SOFT_1
All Calls
Deleted
C101
Go to C98
Enter Name:
Abc 3
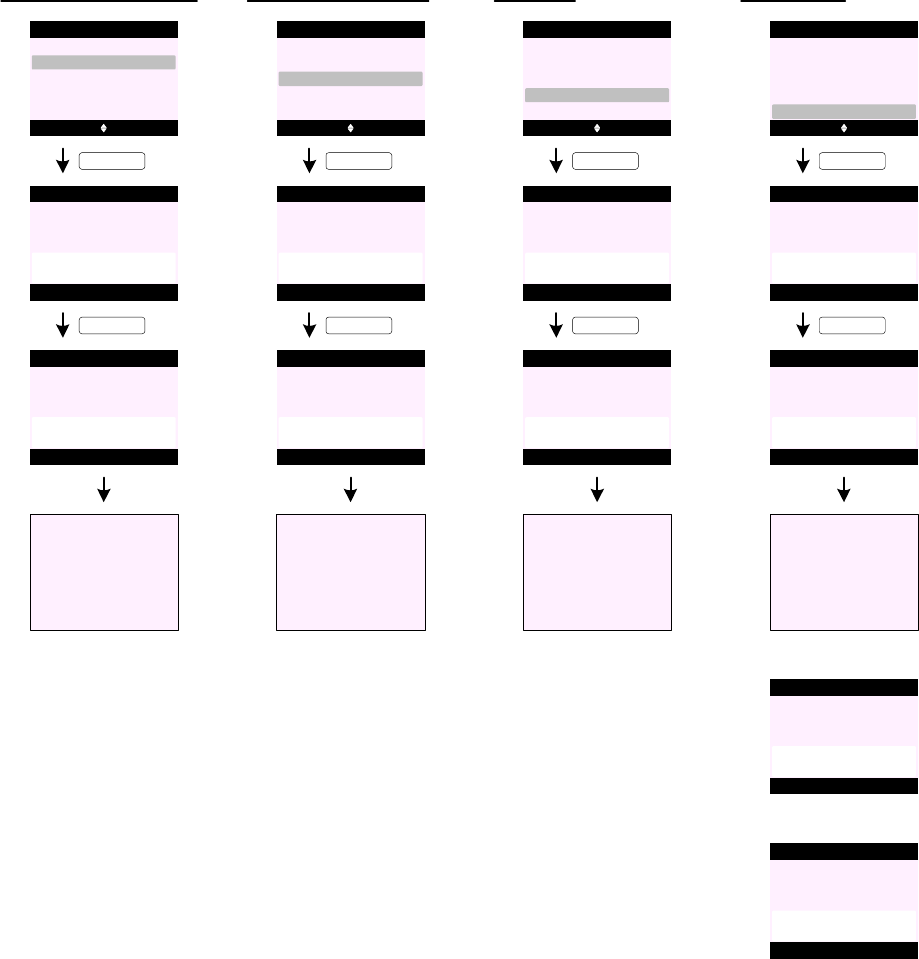
CALLS LIST (cont.)
Delete Calls (Received Calls)
C102
C103
C104
Options Back
Delete Calls
Received Calls
KEY_SOFT_1
Yes No
All Calls
Received Calls
Voicemail Calls
Missed Calls
Dialled Calls
Delete
All Calls ?
C105
Received Calls
KEY_SOFT_1
All Calls
Deleted
Go to C102
Delete Calls (Dialled Calls)
C106
C107
C108
Options Back
Delete Calls
Dialled Calls
KEY_SOFT_1
Yes No
All Calls
Received Calls
Voicemail Calls
Missed Calls
Dialled Calls
Delete
All Calls ?
C109
Dialled Calls
KEY_SOFT_1
All Calls
Deleted
Go to C106
Delete Calls (Voicemail Calls)
C110
C111
C112
Options Back
Delete Calls
Voicemail Calls
KEY_SOFT_1
Yes No
All Calls
Received Calls
Voicemail Calls
Missed Calls
Dialled Calls
Delete
All Calls ?
C113
Voicemail Calls
KEY_SOFT_1
All Calls
Deleted
Go to C110
Delete All Calls
C114
C115
C116
Options Back
Delete Calls
All Calls
KEY_SOFT_1
Yes No
All Calls
Received Calls
Voicemail Calls
Missed Calls
Dialled Calls
Delete
All Calls ?
C117
All Calls
KEY_SOFT_1
All Calls
Deleted
Go to C114
C118
Phonebook
Memory Full
C119
Calls List
Empty
1. The Received Calls list will store answered calls and the Missed Calls list will store unanswered
calls.
2. Assignment of incoming calls to either the missed or received calls list cannot take place unti
the call is ended and the status of the call is known.
3. Calls with no number associated with them are also stored in the calls list, i.e. withheld numbers,
international calls, etc.
4. When viewing the calls list the most recent call will be highlighted on the first line of the display.
Press KEY_DOWN will move the highlight down the list - backward chronologically.
5. When viewing the calls list the name is displayed if the number matches an entry in the
phonebook.
Each handset may show different names associated with the same number stored on different
handsets.
6. The handset can store up to 40 answered or unanswered calls and up to 20 last dialled calls
depending on EEPROM size.
7. To call an entry from any calls list, highlight the entry and press KEY_TALK on the handset to dial out.
8. The time format used on "Show Details" screen is according to the user setting of the handset.
9. Save Number option is greyed out if the number already exists in the phonebook.
10 . When saving a number, both a name and a number have to be entered for an entry to be saved. Save (KEY_SOFT_1) is not presented
until there is content in the name and at least one digit in the number field.
11 . If the phonebook is full when "Save Number" is selected - the display prompts "Phonebook Memory Full" (see screen C118) and
returns to the previous screen.
12. Send Message option is greyed out if there is no number associated with the entry.
13. Send Message option is not offered if SMS feature is not available or disabled.
14. If Send Message is selected, this is a shortcut to the "Write Message" functionality in Text Messaging. The number is pre-entered in
the "Send To" field.
15 . Once the received calls list is full, when another call is received, the oldest call in the list is deleted.
16 . Once the dialled calls list is full, when another call is made, the oldest call in the list is deleted.
17 . If a call is made to a number already in the list, the number will be re-located to the top of the list and the previous occurrence
deleted.
18 . If the received, missed, voicemail or dialled calls list is empty when accessed, or when the user attempts to delete all calls lists, the
display prompts "Calls List Empty" for 2 seconds and return to the previous screen or the idle display, if the dialled calls list is
accessed from idle (see screen C119).
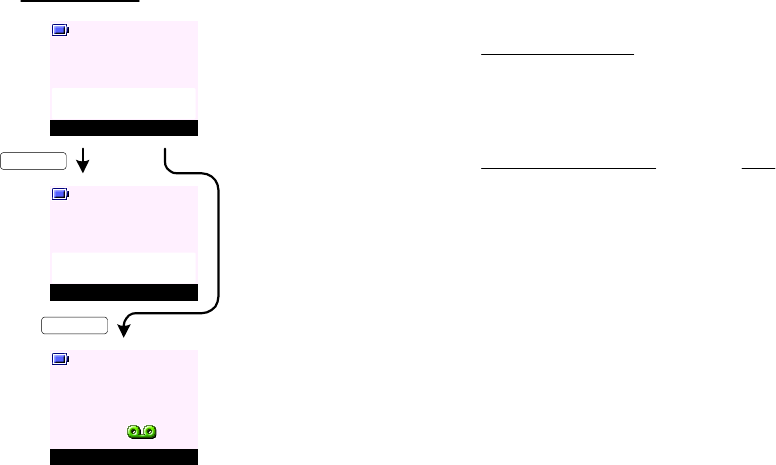
1. When a VMWI call arrives with name and number the entry is stored in Missed and Voicemail Calls
list. If Voicemail Calls list is disabled the entry will be stored in the Missed Calls list.
The handset will display the name or number if available. If the user prefers that it displays
"Voicemail" or "Voicemail Box 5"then this can be done by creating entries for "Voicemail" and
"Voicemail Box 5" in the phonebook so incoming VMWI CID can match to the entry in the
phonebook and display "Voicemail" or "Voicemail Box 5".
2. When a VMWI call arrives without name and number the entry is N O T stored in the Missed and
Voicemail Calls list.
3. The entry or record of specific VMWI is deleted when a matching de-notification for that specifc
entry is received.
4. The handset should not store VMWI de-notification number.
5. The handset should be able to manage call repeat of VMWI entries with the same CID. In other
words, it does not show two entries for 3105.
6. In event of the network failing to de-notify the terminal - the user can perform a manual de-
notification to switch off event indications by deleting all VMWI calls via the Delete Calls >
Voicemail Calls menu option. All VMWI calls will be deleted from Missed and Voicemail Calls list on
his handset.
The handset will inform the base that all VMWI entries have been deleted and all handset and
base event LED will stop flashing and reminder icon removed from the display. This is only the
case for VMWI with CID.
Alternatively, a long press on KEY_1 when in the Delete Calls menu list will switch off all VMWI
indication, the handset and base event LED will stop flashing and the VMWI reminder icon
removed from the display.
7. VMWI calls are personal to each handset, if one handset deletes a VMWI entry from the calls
list, the same entry is not deleted on the other handset.
8. There should be no automatic deletion of VMWI entries when the calls list memory becomes full.
9. When a VMWI call arrives, all handsets will display "You have new voicemail" and the handset
and base LED flashes, if Back (KEY_SOFT_2) is pressed the handset will show VMWI reminder
icon (at this time handset and base LED continues to flash) until VMWI OFF is received or if the
entry is deleted from Missed or Voicemail Calls list.
10 . If a VMWI call is received without CID or the VMWI number received is the same as the
voicemail number stored in EEPROM, say 3105, pressing Listen (KEY_SOFT_1) will dial 3105.
If the number of the last VMWI call arrived is different to the number stored in EEPROM, say
3108, pressing Listen (KEY_SOFT_1) will dial the last VMWI number received - in this case it
will dial 3108.
11 . If there is one VMWI ON, for example, from 3105, and the user deletes this entry or when a
VMWI OFF is received, the handset and base event LED will stop flashing and the reminder icon
removed from the handset display.
12 . When two or more VMWI ON is received, for example, from 3105 and 3108 - if 3108 VMWI OFF
is received it should only delete 3108 VMWI ON from all handsets. The handset event LED and
the reminder icon should remain flashing until 3105 VMWI OFF is received but the base event
LED will stop flashing once one VMWI off is received.
Voicemail Calls Management
Listen Back
Handset 1
You have
new voicemail
Menu Contact
Handset 1
KEY_SOFT_1
KEY_SOFT_2
A6
A7
A8
Mute Contact
Handset 1
Calling
Voicemail
NEW VOICEMAIL
1. This feature "Area Code" is added to Set Base menu and can be hidden in EEPROM.
2. For the are code, the maximum code length is 3 digits and cannot be set to <EMPTY>.
If the user attempts to save an area code that is less than 3 digits or <EMPTY>, the handset
will emit an error beep.
3. When this feature is enabled, the switching of the number format will work on the missed and
received calls lists.
4 . At the missed or received c alls list, KEY _ H A S H will take the user directly to the Show Details
screen.
5. At "Show Details" screen, a press on KE Y _ HA S H will change the number format in a cyclical
manner: -
7 > 10 (adding "555") > 11 (adding "1") > 7 > 10 > ...
For example, if the area code is set to 555:
- an incoming call with 7-digit caller ID, 1234567, first press on KEY_HASH will
change the number format to 10-digit, by adding the area code 555. Another
press on KEY_HASH will change the number format to 11-digit, by adding a "1"
in front of the number. A further press on KEY_HASH will change the number
format back to 7-digit, 1234567.
In other words, the number is changed in the following sequence:
1234567 > 5551234567 > 15551234567 > 1234567 > ... .
- an incoming call with 10-digit caller ID, 4441234567, first press on KEY_HASH
will change the number format to 11-digit, by adding a "1" in front of the number.
Another press on KEY_HASH will change the number format to 7-digit, by
removing 1444 from the number string. A further press on KEY_HASH will
change the number format back to 10-digit, 4441234567.
In other words, the number is changed in the following sequence:
4441234567 > 14441234567 > 1234567 > 4441234567 > ... .
- an incoming call with 11-digit caller ID, 13331234567, first press on KEY_HASH
will change the number format to 7-digit, by removing 1333 from the number
string. Another press on KEY_HASH will change the number format to 10-digit,
by adding back its area code 333. A further press on KEY_HASH will change the
number format back to 11-digit, 13331234567.
In other words, the number is changed in the following sequence:
13331234567 > 1234567 > 3331234567 > 13331234567 > ... .
6. If the number format is other than the 7 / 10 / 11-digit, pressing KEY_HASH will emit an error
tone and no change is made the number string.
US CallBack - Area Code Management
Switching between number format:
View Back
Handset 1
You have 2
new missed calls
KEY_SOFT_1
Options Back
1234567
Missed Calls
02074030201
C120
C121
Mama
C122
Missed Calls
Dial Back
Caller:
1234567
12/21 06:27 pm
KEY_HASH
C123
Missed Calls
Dial Back
Caller:
5551234567
12/21 06:27 pm
KEY_HASH
C124
Missed Calls
Dial Back
Caller:
15551234567
12/21 06:27 pm
KEY_HASH
C125
Missed Calls
Dial Back
Caller:
1234567
12/21 06:27 pm
KEY_HASH
KEY_HASH
C126
Missed Calls
Dial Back
Caller:
5551234567
12/21 06:27 pm
C128
KEY_SOFT_1
Options Back
1234567
Missed Calls
02074030201
Mama
KEY_SOFT_1
C127 Mute Contact
Handset 1
Calling
5551234567
REMINDERS
<< Icon >>
Select Back
Reminders
Add Event (Silent)
R0
R1 Select Back
Add Entry
Reminders
KEY_SOFT_1
R2
KEY_SOFT_1
Save Back
Add Event
Subject:
Abc
_
R3
KEY_SOFT_1
Save Clear
Add Event
Subject:
Abc 10
Mum's Birthday_
R4 Save Back
Add Event
R5
Enter Date:
12/22/06
Enter Time:
23:59
Save Back
Add Event
Enter Date:
12/22/06
Enter Time:
11:59 pm
or in 12-hour format ...
KEY_SOFT_1
R6
R7
Saved
Add Event
KEY_SOFT_1
Select Back
Silent
Add Event
Alarm
KEY_SOFT_1
R8 Options Back
Mum's Birthday
Reminders
R9 Select Back
Add Event
Reminders
Edit Event
Delete All Events
Show Details
Send as a Text
Delete Event
R10
Go to R2
Add Event (Alarm)
R11 Select Back
Add Entry
Reminders
R12
KEY_SOFT_1
Save Back
Add Event
Subject:
Abc
_
R13
KEY_SOFT_1
Save Clear
Add Event
Subject:
Abc
Mum's Birthday_
R14 Save Back
Add Event
Enter Date:
12/22/06
Enter Time:
23:59
KEY_SOFT_1
KEY_SOFT_1
R15
KEY_DOWN
Select Back
Silent
Add Event
Alarm
KEY_SOFT_1
R16 Select Back
Silent
Add Event
Alarm
R17 Select Back
Once
Add Event
Annually
KEY_SOFT_1
KEY_SOFT_1
R18 Select Back
At event time
Add Event
30 min before
KEY_SOFT_1
R19
Saved
Add Event
KEY_SOFT_1
KEY_DOWN
R20 Select Back
Once
Add Event
Annually
R21
Saved
Add Event
KEY_SOFT_1
R22 Options Back
Mum's Birthday
Reminders
R23
Go to R9
KEY_SOFT_1
10 24
24
Show Details
R24 Options Back
Conference Call
Reminders
Pay Visa Bill
KEY_SOFT_1
R25 Select Back
Add Event
Reminders
Edit Event
Show Details
Send as a Text
Delete Event
KEY_DOWN
R26 Select Back
Add Event
Reminders
Edit Event
Show Details
Send as a Text
Delete Event
R27 Back
Conference Call
12/21 10:30 am
Reminders
KEY_SOFT_1
R28 Back
Conference Call
12/21 10:30
Reminders
or in 12-hour format ...
R29
Go to R26
KEY_SOFT_2
REMINDERS (cont.)
Edit Event
R30 Options Back
Conference Call
Reminders
Pay Visa Bill
KEY_SOFT_1
R31 Select Back
Add Event
Reminders
Edit Event
Show Details
Send as a Text
Delete Event
KEY_DOWN
R32 Select Back
Add Event
Reminders
Edit Event
Show Details
Send as a Text
Delete Event
KEY_SOFT_1
R33 Save Clear
Add Event
Subject:
Abc
Conference Call_
R34 Save Back
Add Event
Enter Date:
09/05/06
Enter Time:
10:30
KEY_SOFT_1
R35
R36
Saved
Add Event
KEY_SOFT_1
Select Back
Silent
Add Event
Alarm
KEY_SOFT_1
R37 Options Back
Conference Call
Reminders
Pay Visa Bill
Send as a Text
R38 Options Back
Conference Call
Reminders
Pay Visa Bill
KEY_SOFT_1
R39 Select Back
Add Event
Reminders
Edit Event
Show Details
Send as a Text
Delete Event
KEY_DOWN
R40 Select Back
Add Event
Reminders
Edit Event
Show Details
Send as a Text
Delete Event
KEY_SOFT_1
R42
R41 Options Clear
Write Message
Abc 132
Conference Call
KEY_SOFT_1
R43
R44
Select Back
Write Message
KEY_SOFT_1
09/05 10:30_
Insert Template
Save
Insert Emoticon
Send
Insert Symbol
Send Clear
Send to
Enter Number:
02074030201_
Menu Contact
Handset 1
Sending
Message ...
KEY_SOFT_1
Delete Event
R45 Options Back
Conference Call
Reminders
Pay Visa Bill
KEY_SOFT_1
R46 Select Back
Add Event
Reminders
Edit Event
Show Details
Send as a Text
Delete Event
KEY_DOWN
R47 Select Back
Add Event
Reminders
Edit Event
Show Details
Send as a Text
Delete Event
KEY_SOFT_1
R48 Yes No
Reminders
Delete Event ?
KEY_SOFT_1
R49
Reminders
Event Deleted
R50 Options Back
Reminders
Pay Visa Bill
R51
Go to R46
KEY_SOFT_1
9
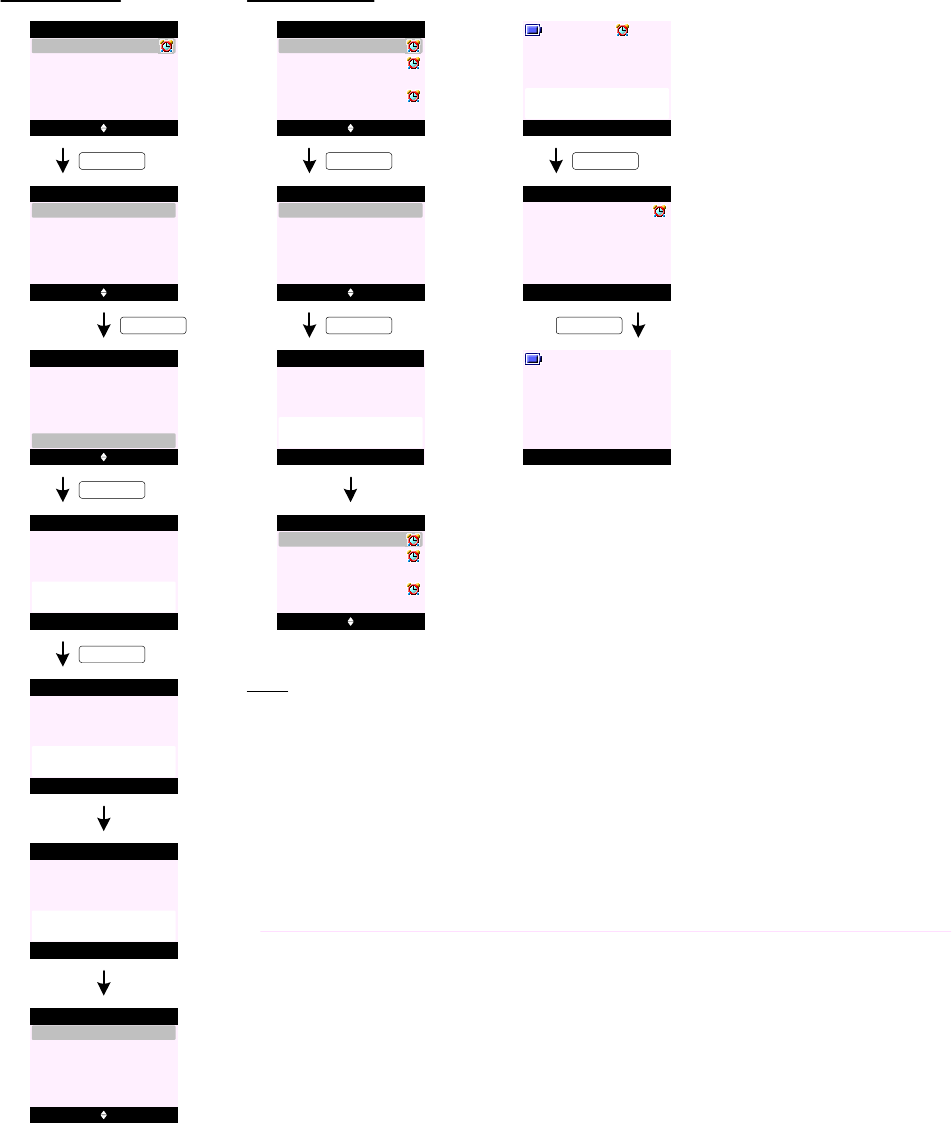
REMINDERS (cont.)
Delete All Events
R52 Options Back
Conference Call
Reminders
Pay Visa Bill
KEY_SOFT_1
R53 Select Back
Add Event
Reminders
Edit Event
Show Details
Send as a Text
Delete Event
KEY_UP
R54 Select Back
Reminders
Delete All Events
KEY_SOFT_1
R55 Yes No
Reminders
Delete
All Event s?
KEY_SOFT_1
R57
Reminders
All Events
Deleted
Edit Event
Show Details
Send as a Text
Delete Event
R56
Reminders
Deleting
Events ...
R58 Select Back
Add Entry
Reminders
Additional screens:
R59 Options Back
Conference Call
Reminders
Pay Visa Bill
KEY_SOFT_1
R60 Select Back
Add Event
Reminders
Edit Event
Show Details
Send as a Text
Delete Event
KEY_SOFT_1
Christmas Dinner ...
Pay Phone Bill
Dinner with June
R61
Reminders
Memory Full
R62 Options Back
Conference Call
Reminders
Pay Visa Bill
Christmas Dinner ...
Pay Phone Bill
Dinner with June
View Back
Handset 1
Conference Call
R63
R64 Back
Conference Call
12/21 10:30 am
Reminders
KEY_SOFT_1
Menu Contact
Handset 1
R65
KEY_SOFT_2
1. Up to 5 events can be stored in Reminders.
2. Reminders entries are stored in the handset.
3. The event subject can be up to 24 characters long.
4. When sending an event as a text - the event details and time are pre-entered in to the "Write
Message" screen (see screen R41).
5. When appointment time is reached, the display is presented as per screen R63 whether an
alarm has been set for the event or not.
If no alarm is set - the reminder subject will be turned on at the appointment time.
If an alarm is set - the reminder subject will be turned on with the alarm icon on the dashboard
flashing and the alarm tone emitted.
At this time the softkeys are labelled as View (SOFT_KEY_1) and Back (SOFT_KEY_2), see
screen R63.
As per alarm clock - the alarm will continue to sound for 1 minute. Pressing either View
(SOFT_KEY_1) and Back (SOFT_KEY_2) will stop the ringing alarm.
6. Pressing View (SOFT_KEY_1) will take the user directly to the event details screen (see
screen R64).
7. Pressing Back (SOFT_KEY_2) at screen R63 will take the user back to the idle display.
8. When the alarm sounds if no attempt was made to stop the ringing - the ringing will timeout
after 1 minute leaving the reminder subject on handset display.
Notes:
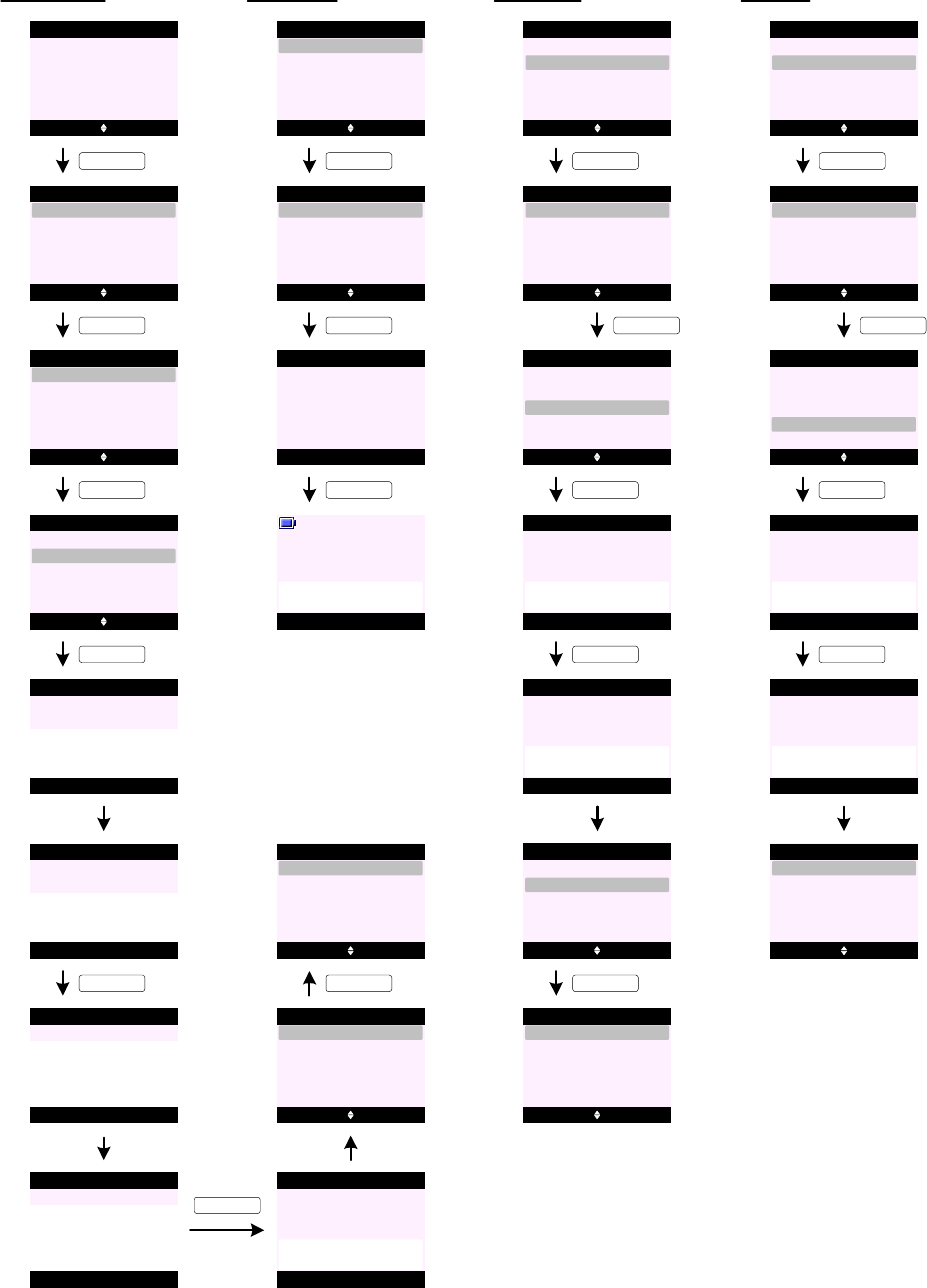
USEFUL NUMBERS
<< Icon >>
Select Back
Useful Numbers
Add/Edit Entry
U0
U1 Options Back
Empty
Useful Numbers
KEY_SOFT_1
KEY_SOFT_1
Empty
Empty
Empty
Empty
U2 Select Back
Show Details
Useful Numbers
KEY_DOWN
Edit Entry
Delete Entry
Delete All
U3 Select Back
Show Details
Useful Numbers
KEY_SOFT_1
Edit Entry
Delete Entry
Delete All
U7
U5 Save Clear
Useful Numbers
Enter Name:
Abc 4
Helpline_
Save Clear
Useful Numbers
Enter Number:
08706058047_
U4 Back
Useful Numbers
Enter Name:
Abc 12
_
U6 Back
Useful Numbers
Enter Number:
_
KEY_SOFT_1
U8
Helpline
Saved
Useful Numbers
U9 Options Back
Helpline
Useful Numbers
Empty
Empty
Empty
Empty
KEY_SOFT_1
U10 Select Back
Show Details
Useful Numbers
Edit Entry
Delete Entry
Delete All
U11 Options Back
Helpline
Useful Numbers
Empty
Empty
Empty
Empty
U12 Select Back
Show Details
Useful Numbers
Edit Entry
Delete Entry
Delete All
KEY_SOFT_1
Show Details
Dial Back
Helpline
08706058047
U13
KEY_SOFT_1
U14 Mute Contact
Handset 1
Calling
08706058047
KEY_SOFT_1
Show Details
U15 Options Back
Helpline
Useful Numbers
Customer Services
Empty
Empty
Empty
U16 Select Back
Show Details
Useful Numbers
Edit Entry
Delete Entry
Delete All
KEY_SOFT_1
KEY_DOWN
Delete Entry
U17 Select Back
Show Details
Useful Numbers
Edit Entry
Delete Entry
Delete All
KEY_SOFT_1
U18 Yes No
Useful Numbers
Delete
Customer Services ?
KEY_SOFT_1
U19
U20
Useful Numbers
Customer Services
Deleted
Options Back
Helpline
Useful Numbers
Empty
Empty
Empty
Empty
U21
KEY_SOFT_1
Select Back
Show Details
Useful Numbers
Edit Entry
Delete Entry
Delete All
U22 Options Back
Helpline
Useful Numbers
Customer Services
Empty
Empty
Empty
U23 Select Back
Show Details
Useful Numbers
Edit Entry
Delete Entry
Delete All
KEY_SOFT_1
KEY_UP
Delete All
U24 Select Back
Show Details
Useful Numbers
Edit Entry
Delete Entry
Delete All
KEY_SOFT_1
U25 Yes No
Useful Numbers
Delete
All Entries ?
KEY_SOFT_1
U26
Useful Numbers
All Entry
Deleted
U27 Options Back
Empty
Useful Numbers
Empty
Empty
Empty
Empty
KEY_SOFT_1

1. Users can store up to 22 entries in Useful Numbers depending on the EEPROM size used.
2. Each useful number name field can store up to 12 characters and 24 digits for the number field.
3. Useful Numbers entries are stored in the handset.
4. When viewing Useful Numbers list - use KEY_UP and KEY_DOWN to scroll through the list. Press KEY_TALK to dial highlighted
name.
5 . When an entry is empty but all entries are empty - only Edit Entry option is offered (see screen U2). All other options are greyed
out.
6. When an entry is empty but not all entries are empty - only Edit Entry and Delete All options are offered (see screen U21). All
other options are greyed out.
7. Users can restore default Useful Numbers when the product is reset. Any new entries added are deleted.
8. There is no alphabetic listing in Useful Numbers menu but once an entry is deleted - it is replaced by Empty.
Notes:
USEFUL NUMBERS (cont.)
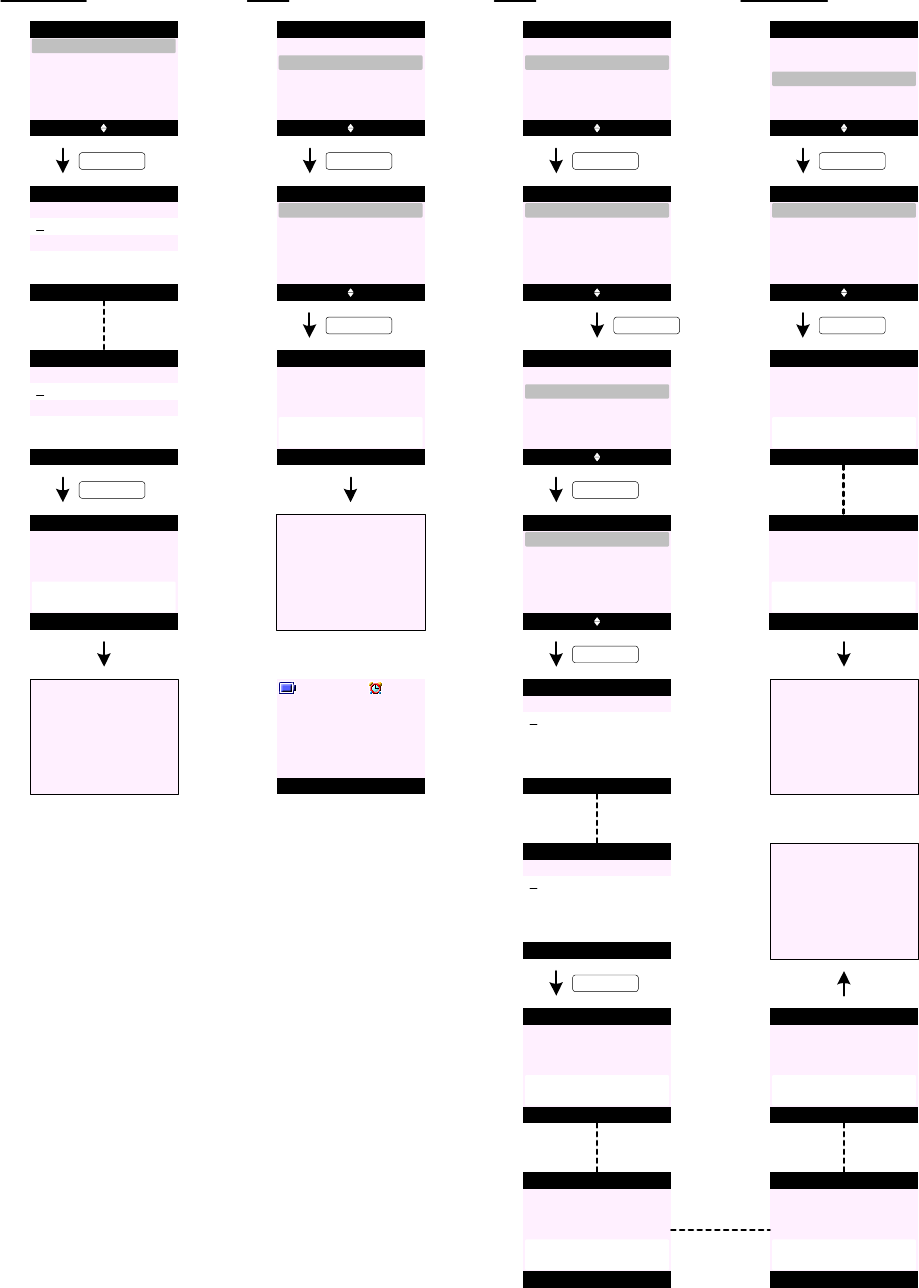
1. Date and time information is held on both handset and base.
2. If the base loses its power, any available handset with the
latest time will update the base clock when the base power
comes back on.
3. If the handset loses its power and the date and time
information is reset, once it has power and is linked to the
base - the base will update the handset clock.
4. The time and date is transferred to the handsets as part of
the registration protocol.
5. All handset in range clock is updated whenever an incoming
CLI call is received.
6. The user can manually set the time and date if they do not
subscribe to CLI via Clock & Alarm menu on one of the
handsets.
The time and date on any other handsets is updated the next
time the handset is in communication with the base.
7. Time Format menu can be hidden in EEPROM.
8. The time format setting is personal to each handset.
9. The time and date is also used for the answering machine
functionality.
10. Alarm setting is personal to each handset.
11 . When the alarm is set, the alarm set icon is presented on the
dashboard on the idle screen (see screen T25).
12 . The base does not ring when the alarm goes off.
CLOCK & ALARM
Date & Time
T0 Select Back
Date & Time
Time Format
Alarm
T1 Save Back
Date & Time
KEY_SOFT_1
T2
T3
T4
Saved
Date & Time
KEY_SOFT_1
Go to T0
Alarm (OFF)
T5
T6
KEY_SOFT_1
T7
T8
Set to OFF
Alarm
KEY_SOFT_1
Go to T5
Select Back
Off
Alarm
On
T9
T10
T12
T13
KEY_DOWN
T11
Time Format
T20
T21
T23
T24
T22
Clock & Alarm
Enter Date:
12/22/06
Enter Time:
23:59
Save Back
Date & Time
Enter Date:
12/22/06
Enter Time:
11:59 pm
or in 12-hour format ...
Select Back
Date & Time
Time Format
Alarm
Clock & Alarm
Alarm (ON)
KEY_SOFT_1
Select Back
Off
Alarm
On
Select Back
Date & Time
Time Format
Alarm
Clock & Alarm
Select Back
Off
Alarm
On
Select Back
Once
On Daily
Mon - Fri
Alarm
Save Back
Alarm
Enter Time:
06:00 am
KEY_SOFT_1
KEY_SOFT_1
or in 24-hour format ...
Save Back
Alarm
Enter Time:
06:00
T14
Alarm
T15
KEY_SOFT_1
Once
06:00
or in 12-hour format ...
Alarm
T16
Once
06:00 am
Alarm
T17
Mon - Fri
06:00 am
or (if set to Mon - Fri)
or (if set to On Daily)
Alarm
T18
On Daily
06:00 am
KEY_SOFT_1
Set to
12 Hour
Time Format
KEY_SOFT_1
Select Back
12 Hour
Time Format
24 Hour
Select Back
Date & Time
Time Format
Alarm
Clock & Alarm
Go to T19
Set to
24 Hour
Time Format
or
T19
Go to T9
Name Contact
Handset 1
T25
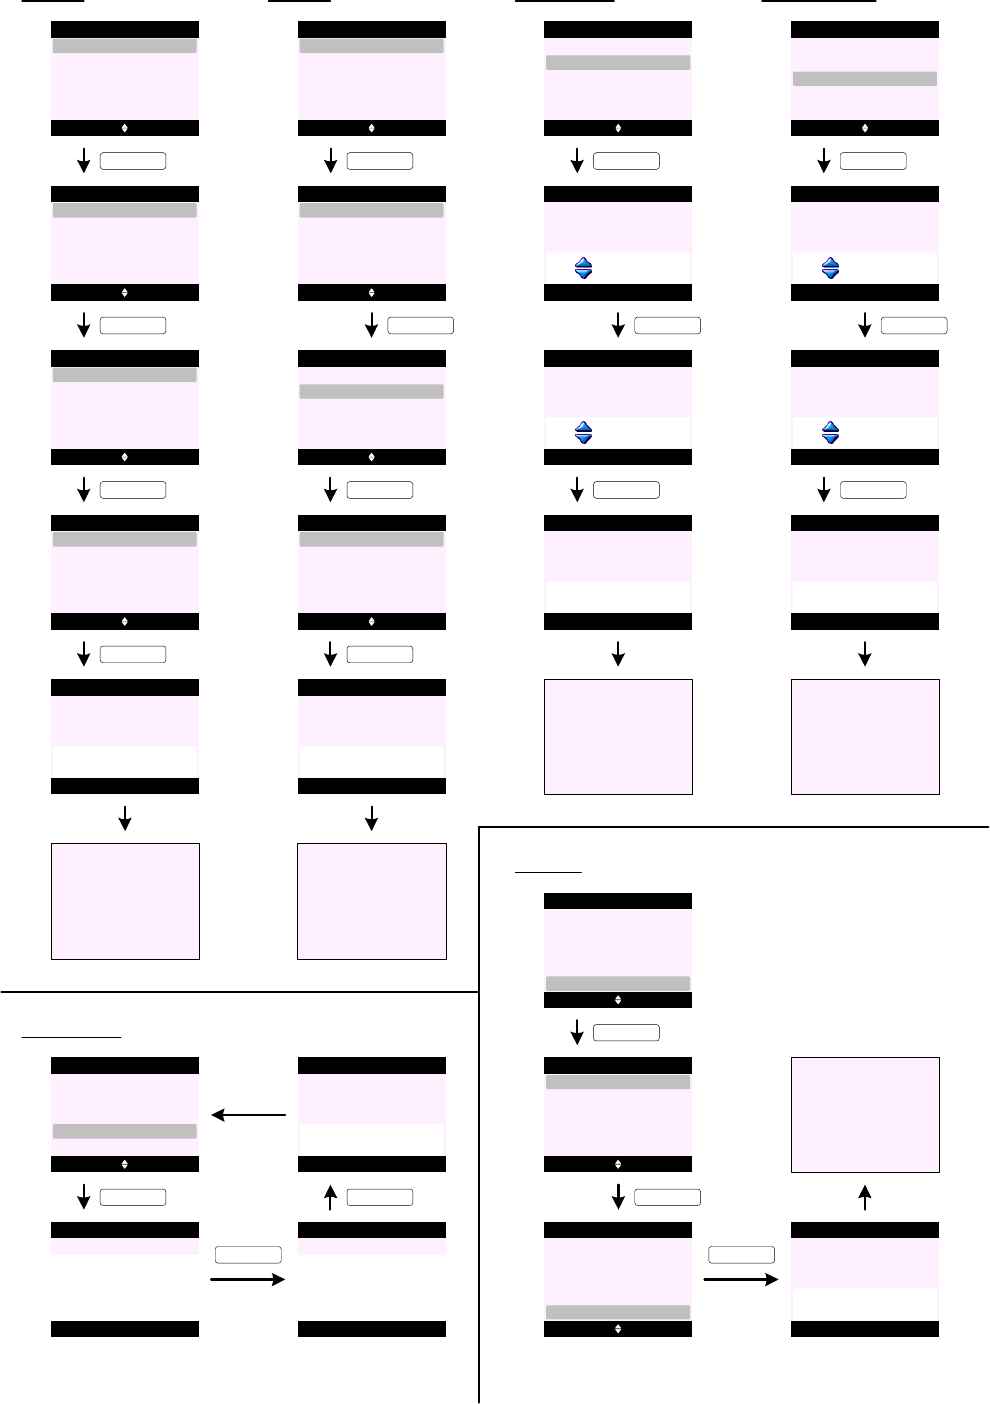
HANDSET SETTINGS
Select Back
Set Handset
Settings
Set Base
Ringtone (External Call)
H0
Select Back
Ringtone
Set Handset
Receiver Volume
Language
Ringer Volume
Handset Name
KEY_SOFT_1
H1
Select Back
External Call
Ringtone
Internal Call
KEY_SOFT_1
H2
Select Back
Ringtone 1
External Call
Ringtone 3
Ringtone 5
Ringtone 2
Ringtone 4
KEY_SOFT_1
H3
H4
Ringtone
Saved
External Call
KEY_SOFT_1
Go to H2
H5
Ringtone (Internal Call)
H6 Select Back
Ringtone
Set Handset
Receiver Volume
Language
Ringer Volume
Handset Name
H7
Select Back
External Call
Ringtone
Internal Call
KEY_SOFT_1
H8
Select Back
Ringtone 1
Internal Call
Ringtone 3
Ringtone 5
Ringtone 2
Ringtone 4
KEY_SOFT_1
H9
H10
Ringtone
Saved
Internal Call
KEY_SOFT_1
Go to H8
H11
Select Back
External Call
Ringtone
Internal Call
KEY_DOWN
Ringer Volume
H12 Select Back
Ringtone
Set Handset
Receiver Volume
Language
Ringer Volume
Handset Name
H13
KEY_SOFT_1
H15
H16
Saved
Ringer Volume
KEY_DOWN
Go to H12
Save Back
Ringer Volume
Volume 5
H14
KEY_SOFT_1
Save Back
Ringer Volume
Ringer Off
Receiver Volume
H17 Select Back
Ringtone
Set Handset
Receiver Volume
Language
Ringer Volume
Handset Name
H18
KEY_SOFT_1
H20
H21
Saved
Receiver Volume
KEY_UP
Go to H17
Save Back
Receiver Volume
Volume 5
H19
KEY_SOFT_1
Save Back
Receiver Volume
Volume 8
Handset Name
H22 Select Back
Ringtone
Set Handset
Receiver Volume
Language
Ringer Volume
Handset Name
KEY_SOFT_1
H23 Save Back
Handset Name
_
Abc 10
H24 Save Clear
Handset Name
Bedroom_
Abc 3
H25
Saved
Handset Name
KEY_SOFT_1
Language
H26 Select Back
Ringtone
Set Handset
Receiver Volume
Language
Ringer Volume
Handset Name
H27 Select Back
Language
KEY_SOFT_1
H28
English
Español
Italiano
Français
Português
Selez. Indietro
Lingua
KEY_DOWN
English
Español
Italiano
Français
Português
H29
Salvato
Lingua
KEY_SOFT_1
H30
Go to H26
KEY_SOFT_1
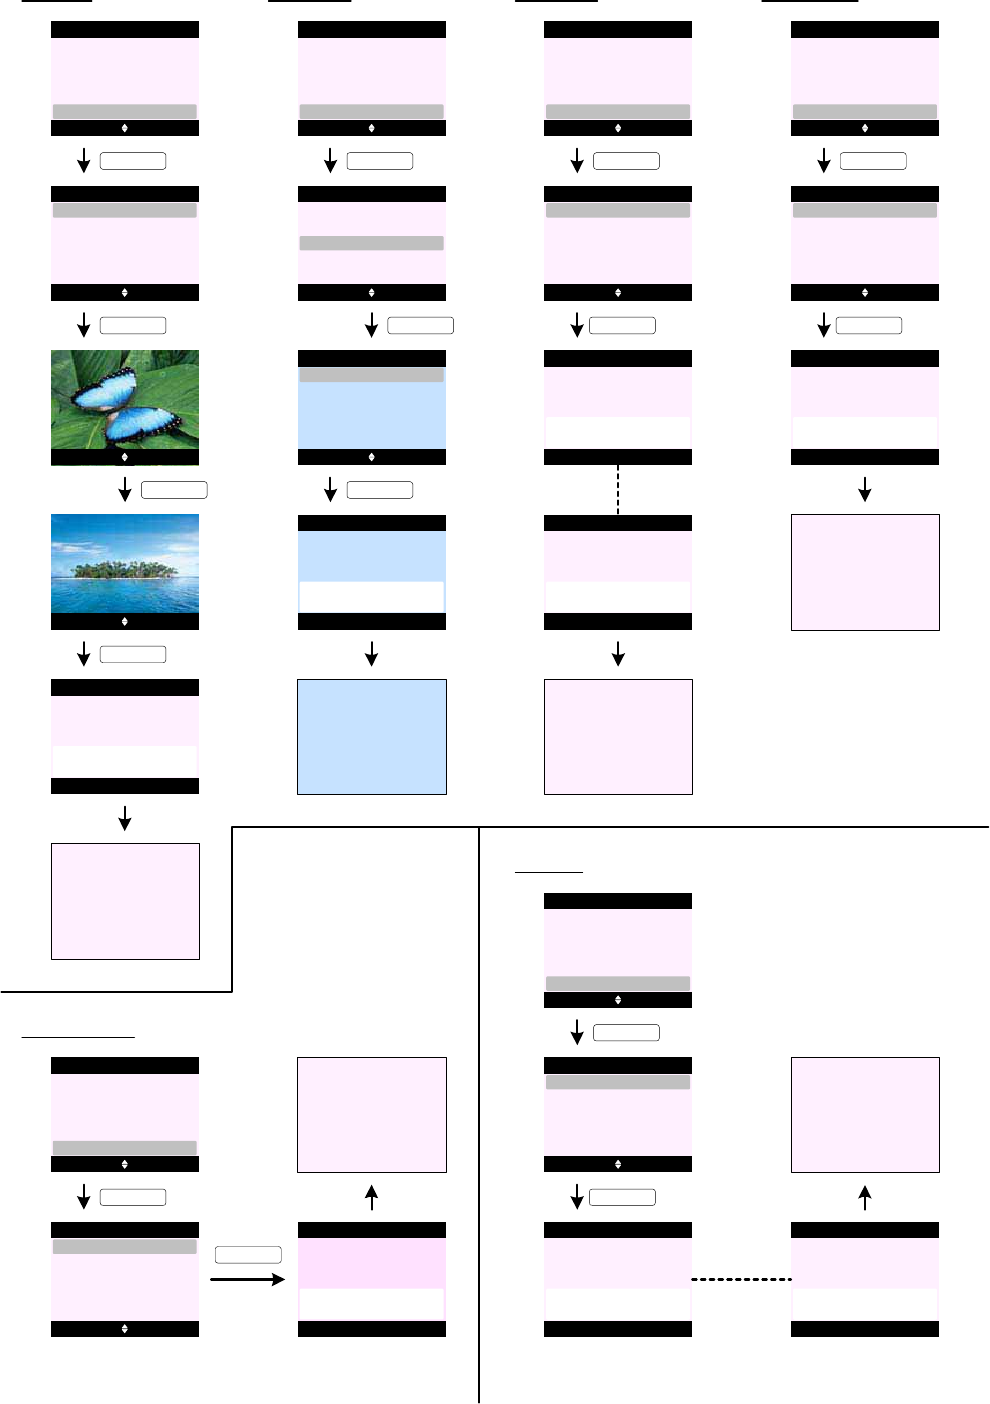
HANDSET SETTINGS (cont.)
Wallpaper
H31 Select Back
Wallpaper
Set Handset
Receiver Volume
Language
Ringer Volume
Handset Name
H32 View Back
Butterfly
Wallpaper
Island
KEY_SOFT_1
H33 Use Back
KEY_SOFT_1
H34
H35
KEY_DOWN
Go to H31
Menu Colour
H37
H38
H39
H40
H41
Sunset
Use Back
Saved
Wallpaper
KEY_SOFT_1
H36
Select Back
Wallpaper
Set Handset
Receiver Volume
Language
Handset Name
Select Back
Blue
Menu Colour
Orange
KEY_SOFT_1
KEY_UP
Pink
Menu Colour
Select Back
Blue
Menu Colour
Orange
Pink
Go to H37
Saved
Menu Colour
KEY_SOFT_1
Screensaver
H42
H43
Select Back
Wallpaper
Set Handset
Language
Handset Name
Select Back
Clock
Screensaver
Off
KEY_SOFT_1
KEY_SOFT_1
Menu Colour
Screensaver
H44
Set to Clock
Screensaver
or
H45
Set to OFF
Screensaver
H46
Go to H42
Light Timeout
H47
H48
Select Back
Wallpaper
Set Handset
Language
Light Timeout
Select Back
15 Seconds
Light Timeout
30 Seconds
KEY_SOFT_1
KEY_SOFT_1
Menu Colour
Screensaver
H49
Set to
15 Seconds
Light Timeout
45 Seconds
H50
Go to H47
Display Contrast
H51
H52
Select Back
Wallpaper
Set Handset
Display Contrast
Light Timeout
Select Back
Low
Display Contrast
Medium
KEY_SOFT_1
Menu Colour
Screensaver
H53
Set to Low
Display Contrast
High
H54
Go to H51
KEY_SOFT_1
Auto Talk
H55
H56
Select Back
Wallpaper
Set Handset
Language
Auto Talk
Select Back
Off
Auto Talk
On
KEY_SOFT_1
KEY_SOFT_1
Menu Colour
Screensaver
H57
Set to OFF
Auto Talk
H58
Set to ON
Auto Talk
or
H59
Go to H55

HANDSET SETTINGS (cont.)
Key Beep
H60
H61 Select Back
Off
Key Beep
On
KEY_SOFT_1
H62
KEY_SOFT_1
Go to H60
Redial Length
H65
H66
H67
H68
H69
Set to OFF
Key Beep
PABX Access Code
Select Back
Wallpaper
Set Handset
Key Beep
Auto Talk
Menu Colour
Screensaver
H64
H63
Set to ON
Key Beep
Select Back
Long
Redial Length
Short
KEY_SOFT_1
KEY_SOFT_1
Go to H65
Set to Long
Redial Length
Select Back
Redial Length
Set Handset
Key Beep
Auto Talk
Menu Colour
Screensaver
Set to Short
Redial Length
H70
H71
H72
H73
H74
Select Back
Off
PABX Access Code
On
KEY_SOFT_1
KEY_SOFT_1
Go to H70
Set to OFF
PABX Access Code
Select Back
Redial Length
Set Handset
Key Beep
Auto Talk
PABX Access Code
Screensaver
Set to ON
PABX Access Code
Set Code
KEY_DOWN
H75 Select Back
Off
PABX Access Code
On
Set Code
Back
Set Code
_
Save Clear
Set Code
9_ 3
H76
H77
H78
H79
Go to H75
Code Saved
Set Code
or or or

1. There are 10 (8 channel polyphonic) handset ringtones and these are stored in flash.
2. When changing the handset ringtone, if a different ringtone is highlighted, a sample of the ringtone begins to play and loops at the
handset at the current volume setting (or minimum volume if the volume is set to off) until user intervention or the handset times out.
3. There are 5 levels for handset ringer volume.
4. When changing the handset ringer volume, if a different volume level is highlighted, the current handset external ringtone begins to
play at the highlighted volume and loops until user intervention or the handset times out.
5. If the user turns the handset ringer volume to "Off", when the handset returns to idle the ringer off icon is presented on the dashboard
in the idle state.
6. There are 8 levels for handset / handsfree earpiece volume levels.
7. Handset Name can be up to 10 characters long. The user can save an empty handset name.
8. There can be up to 5 languages and these languages are stored in flash.
9. There are 3 wallpapers and these are stored in flash.
10 . On screen H33, press KEY_UP and KEY_DOWN to scroll through pictures in preview mode.
11 . It is not possible for the user to turn off the audible tones for confirmation, error, low battery or out of range.
12. PABX Access Code menu can be hidden in EEPROM.
13 . PABX access code can be up to 4 digits long.
14. The user can set the access code (including pauses) to be placed before any number dialled from that handset from the phonebook or
calls lists when the product is used behind a switchboard or an alternative carrier is used.
When dialling via the keypad, the code has to be dialled manually.
15 . When PABX access code is set to ON, the access code should not be stored as part of the number in any of the calls lists, dialled or
received.
16 . When the access code is being used, it should be displayed at the beginning of any number being dialled on the dialling screen.
17. The light timeout setting applies to both the keypad and display backlight together.
HANDSET SETTINGS (cont.)
Notes:
BASE SETTINGS
Ringtone
B0
B1
B2
Ringer Volume
B5
B6
B7
B8
B9
Dialling Mode
B4
B3
Select Back
Set Handset
Settings
Set Base
Select Back
Ringtone
Set Base
Dialling Mode
First Ring
Ringer Volume
Ring Priority
KEY_SOFT_1
Select Back
Ringtone 1
Ringtone
Ringtone 3
Ringtone 5
Ringtone 2
Ringtone 4
Ringtone
Saved
Ringtone
KEY_SOFT_1
Go to B1
KEY_SOFT_1
Saved
Ringer Volume
KEY_DOWN
Go to B5
Save Back
Ringer Volume
Volume 5
KEY_SOFT_1
Save Back
Ringer Volume
Ringer Off
Select Back
Ringtone
Set Base
Dialling Mode
First Ring
Ringer Volume
Ring Priority
KEY_SOFT_1
B10 Select Back
Ringtone
Set Base
Dialling Mode
First Ring
Ringer Volume
Ring Priority
KEY_SOFT_1
B11
B12
B13
B14
Select Back
Pulse
Dialling Mode
Tone
KEY_SOFT_1
Go to B10
Set to Pulse
Dialling Mode
Set to Tone
Dialling Mode
Select Back
All Handsets
Ring Priority
Select Handset
KEY_SOFT_1
Go to B15
Set to
All Handsets
Ring Priority
Select Back
Ring Priority
Ring Priority (All Handsets)
B15 Select Back
Ringtone
Set Base
Dialling Mode
First Ring
Ringer Volume
Ring Priority
KEY_SOFT_1
or
Handset 1
Handset 2
B16
B17
B20
B18
Ring Priority (Select Handset)
Select Back
All Handsets
Ring Priority
Select Handset
KEY_SOFT_1
B19
Select Back
Ring Delay
2 Rings
4 Rings
B21
KEY_SOFT_1
6 Rings
KEY_SOFT_1
Set to
Handset 1
Ring Priority
B22
Recall Mode (Timed Break)
B23 Select Back
Ringtone
Set Base
Dialling Mode
Recall Mode
Ringer Volume
Ring Priority
KEY_SOFT_1
B24
B27
B28
B29
Select Back
Timed Break
Recall Mode
Earth
KEY_SOFT_1
Go to B23
Set to
Recall 1
Recall Mode
Set to
Recall 2
Recall Mode
or
B26 Select Back
Recall 1
Recall Mode
Recall 2 KEY_SOFT_1
Recall Mode (Earth)
B30 Select Back
Timed Break
Recall Mode
Earth
B31
Set to
Earth
Recall Mode
KEY_SOFT_1
B25
Set to
Timed Break
Recall Mode
BASE SETTINGS (cont.)
First Ring
B32
B33
B34
System PIN
B37
B38
B39
B41B36
B35
Select Back
First Ring
Set Base
Dialling Mode
Recall Mode
Ringer Volume
Ring Priority
Select Back
Off
First Ring
On
Set to OFF
First Ring
KEY_SOFT_1
Go to B32
KEY_SOFT_1
Set to ON
First Ring
or
Select Back
First Ring
Set Base
Dialling Mode
Recall Mode
System PIN
Ring Priority
OK Back
System PIN
KEY_SOFT_1
Enter Old PIN:
OK Clear
System PIN
Enter Old PIN:
****
B40
KEY_SOFT_1
OK Back
System PIN
Enter New PIN:
OK Clear
System PIN
Enter New PIN:
****
B43 OK Clear
System PIN
Re-enter PIN:
****
B42 OK Back
System PIN
Re-enter PIN:
KEY_SOFT_1
KEY_SOFT_1
B44
Saved
System PIN
Factory Reset
B46
B47
Select Back
First Ring
Set Base
Factory Reset
Recall Mode
System PIN
Ring Priority
Yes No
Factory Reset
KEY_SOFT_1
KEY_SOFT_1
B45
Go to B37
Are you sure ?
B48 OK Back
Factory Reset
Enter System PIN:
B49 OK Clear
Factory Reset
Enter System PIN:
****
B50
Please wait ...
Factory Reset
KEY_SOFT_1
B51
Reset Complete
Factory Reset
KEY_SOFT_1
Menu Contact
Handset 1
B52
Handset will restart ...
Area Code
B53
B54
B55
Select Back
First Ring
Set Base
Area Code
Recall Mode
System PIN
Ring Priority
Save Back
Area Code
KEY_SOFT_1
Enter Code:
Save Clear
Area Code
Enter Code:
555_
_
B56
B57
Saved
Area Code
Go to B5
KEY_SOFT_1

1. Base Ringtone and Ringer Volume menus can be hidden in EEPROM.
2. There are 5 (monophonic) base ringtones and these are stored in ROM.
3. When changing the base ringtone, if a different ringtone is highlighted, a sample of the ringtone begins to play and loops at the base at
the current volume setting (or minimum volume if the volume is set to off) until user intervention or the handset times out.
4. There are 5 levels + OFF for base ringer volume.
5. When changing the base ringer volume, if a different volume level is highlighted, the current base ringtone begins to play at the
highlighted volume and loops until user intervention or the handset times out.
6. Dialling Mode menu can be hidden in EEPROM.
7. Ring Priority menu can be hidden in EEPROM.
8. When setting Ring Priority - only registered handsets are offered on screen B20).
If the Ring Priority is set to Handset 3 with two rings delay. Handset 3 will ring twice before other handsets start to ring.
Ring Priority only applies to handsets not base.
9. Recall Mode menu can be hidden in EEPROM.
10. It must be possible to hide the Earth option in EEPROM.
If Earth option is hidden - Recall 1 and Recall 2 are offered when Recall Mode is selected.
If the two recall times set under Recall 1 and Recall 2 are the same - only Timed Break and Earth are offered (there is no sub-menus
for Recall 1 and Recall 2).
When Earth option is hidden and the two recall times are the same - the Recall Mode menu is hidden.
11. First Ring menu can be hidden in EEPROM.
12. System PIN can be preset and the menu can be hidden in EEPROM.
13 . If the system PIN code is entered incorrectly at any time - the display prompts "Incorrect System PIN" (see screen B 58 ).
14 . When the product is reset it has the effect of returning all settings back to factory defaults. This does not affect the phonebook, calls
list, or users' data and handset registrations.
15. Area Code menu can be hidden in EEPROM. This feature is related to US callback area code management.
BASE SETTINGS (cont.)
Notes:
B58
Incorrect
System PIN !
REGISTRATION
Register Additional Handset
Y0
KEY_SOFT_1
Menu Contact
Please register
KEY_UP
<< Icon >>
Select Back
Registration
Y1
KEY_SOFT_1
Select Back
Register Handset
Registration
Select Base
KEY_SOFT_1
Y2
De-register
Select Back
Base 1
Select Base
Base 2
KEY_SOFT_1
Y3
Base 3
Base 4
Y4 OK Back
Base 1
Enter System PIN:
Y5 OK Clear
Base 1
Enter System PIN:
****
KEY_SOFT_1
Back
Registration
Y6
Searching
Base 1 ...
Registration
Y7
Handset
Registered
Menu Contact
Handset 1
Y8
KEY_SOFT_1
Register Handset (replacing base)
Y9
KEY_SOFT_1
Menu Contact
Handset 1
KEY_UP
<< Icon >>
Select Back
Registration
Y10
KEY_SOFT_1
Select Back
Register Handset
Registration
Select Base
KEY_SOFT_1
Y11
De-register
Select Back
Base 1 (In Use)
Select Base
Base 2
KEY_SOFT_1
Y12
Base 3
Base 4
Yes No
Registration
Y13
Replace
Base 1 ?
KEY_SOFT_1
If wrong PIN
is entered ...
Back
Registration
Y14
Registration
Unsuccessful !
Y15
Go to Idle Display
Select Base
Y16
KEY_SOFT_1
Menu Contact
Handset 1
KEY_UP
<< Icon >>
Select Back
Registration
Y17
KEY_SOFT_1
Select Back
Register Handset
Registration
Select Base
KEY_DOWN
Y18
De-register
Select Back
Base 1 (In Use)
Select Base
Base 2 (In Use)
KEY_DOWN
Y19
Base 3
Base 4
Y20
Select Back
Register Handset
Registration
Select Base
KEY_SOFT_1
De-register
Select Back
Base 1 (In Use)
Select Base
Base 2 (In Use)
KEY_SOFT_1
Base 3
Base 4
Y21
Back
Set Base
Y22
Searching
Base 2 ...
Set Base
Y23
Registered to
Base 2
KEY_SOFT_1
Menu Contact
Handset 1
Y24

De-register Handset
Y25
KEY_SOFT_1
Menu Contact
Handset 1
KEY_UP
<< Icon >>
Select Back
Registration
Y26
KEY_SOFT_1
Select Back
Register Handset
Registration
Select Base
KEY_DOWN
Y27
De-register
Y28 Select Back
Register Handset
Registration
Select Base
KEY_SOFT_1
De-register
Y29 OK Back
De-register
Enter System PIN:
Y30 OK Clear
De-register
Enter System PIN:
****
KEY_SOFT_1
Yes No
De-register
Y33
REGISTRATION (cont.)
De-register
Y36
KEY_SOFT_1
Incorrect
System PIN !
De-register
Handset 4 ?
Select Back
Handset 2
De-register
Handset 3
Handset 4
Y31
KEY_SOFT_1
Select Back
Handset 2
De-register
Handset 3
Handset 4
Y32
KEY_SOFT_1
KEY_SOFT_1
De-register
Y34
Handset 4
De-registered
Y35
Go to Y28
1. P ress and hold down KEY_PAGE for 3 seconds to put the base in subscription mode, the
subscription period is offered for 1 minute. The Power In Use / Event LED on the base flashes
for the duration of the registration period.
2. When registering a handset - all base numbers are presented on the select base screen (see
screen Y3 and Y12).
"(In Use)" is appended to the base number currently in use.
3. If user select a base already in use - the display prompts "Replace Base X ?" where X is the
base number (see screen Y13) and the registration is overwritten with the new one.
4. When an additional handset is first powered up, "Please register" is flashing on the display in
place of the handset name and number (see screen Y0). The range icon (if enabled) also
flashes.
5. If registration process failed (e.g, if wrong system PIN was entered) - the display prompts
"Registration Unsuccessful !" along with a warning tone and returns to the idle screen (see
screen Y14).
6. If there are already 5 handsets registered to the base, the registration will fail and the display
will prompt "Registration Unsuccessful !" along with a warning tone and returns to the idle
screen (see screen Y14).
7. When de-registering a handset - all registered handsets accept the one being used are offered
(see screen Y31).
8. When de-registering a handset if wrong system PIN is entered - the display prompts "Incorrect
System PIN !" along with an error tone and return to "Enter System PIN" screen so the user
can retry.
9. To stop the registration process at any time press Back (KEY_SOFT_2) or KEY_END.
10 . When a handset is unregistered - the user can access the handset Contact list, and functions
local to the handset (Calls List,Set Handset,Clock & Alarm,Reminders,Useful Numbers and
Registration).
11 . If any of the handsets are registered to another manufacturers or non compatible base, any
attempt to access functionality which is not local to the handset will result in the "Not
Available" error message being presented.