Sun Communications USADECT-S37 US DECT PHONE-BASE User Manual 5200 5200a indd
SunCorp Communications Limited US DECT PHONE-BASE 5200 5200a indd
UserManual.wiki
>
Sun Communications
>
USADECT S37 User Manual
USERS MANUAL
Navigation menu
Upload a User Manual
Namespaces
Wiki Guide
HTML
PDF
Info
Views
User Manual
Discussion / Help
Navigation
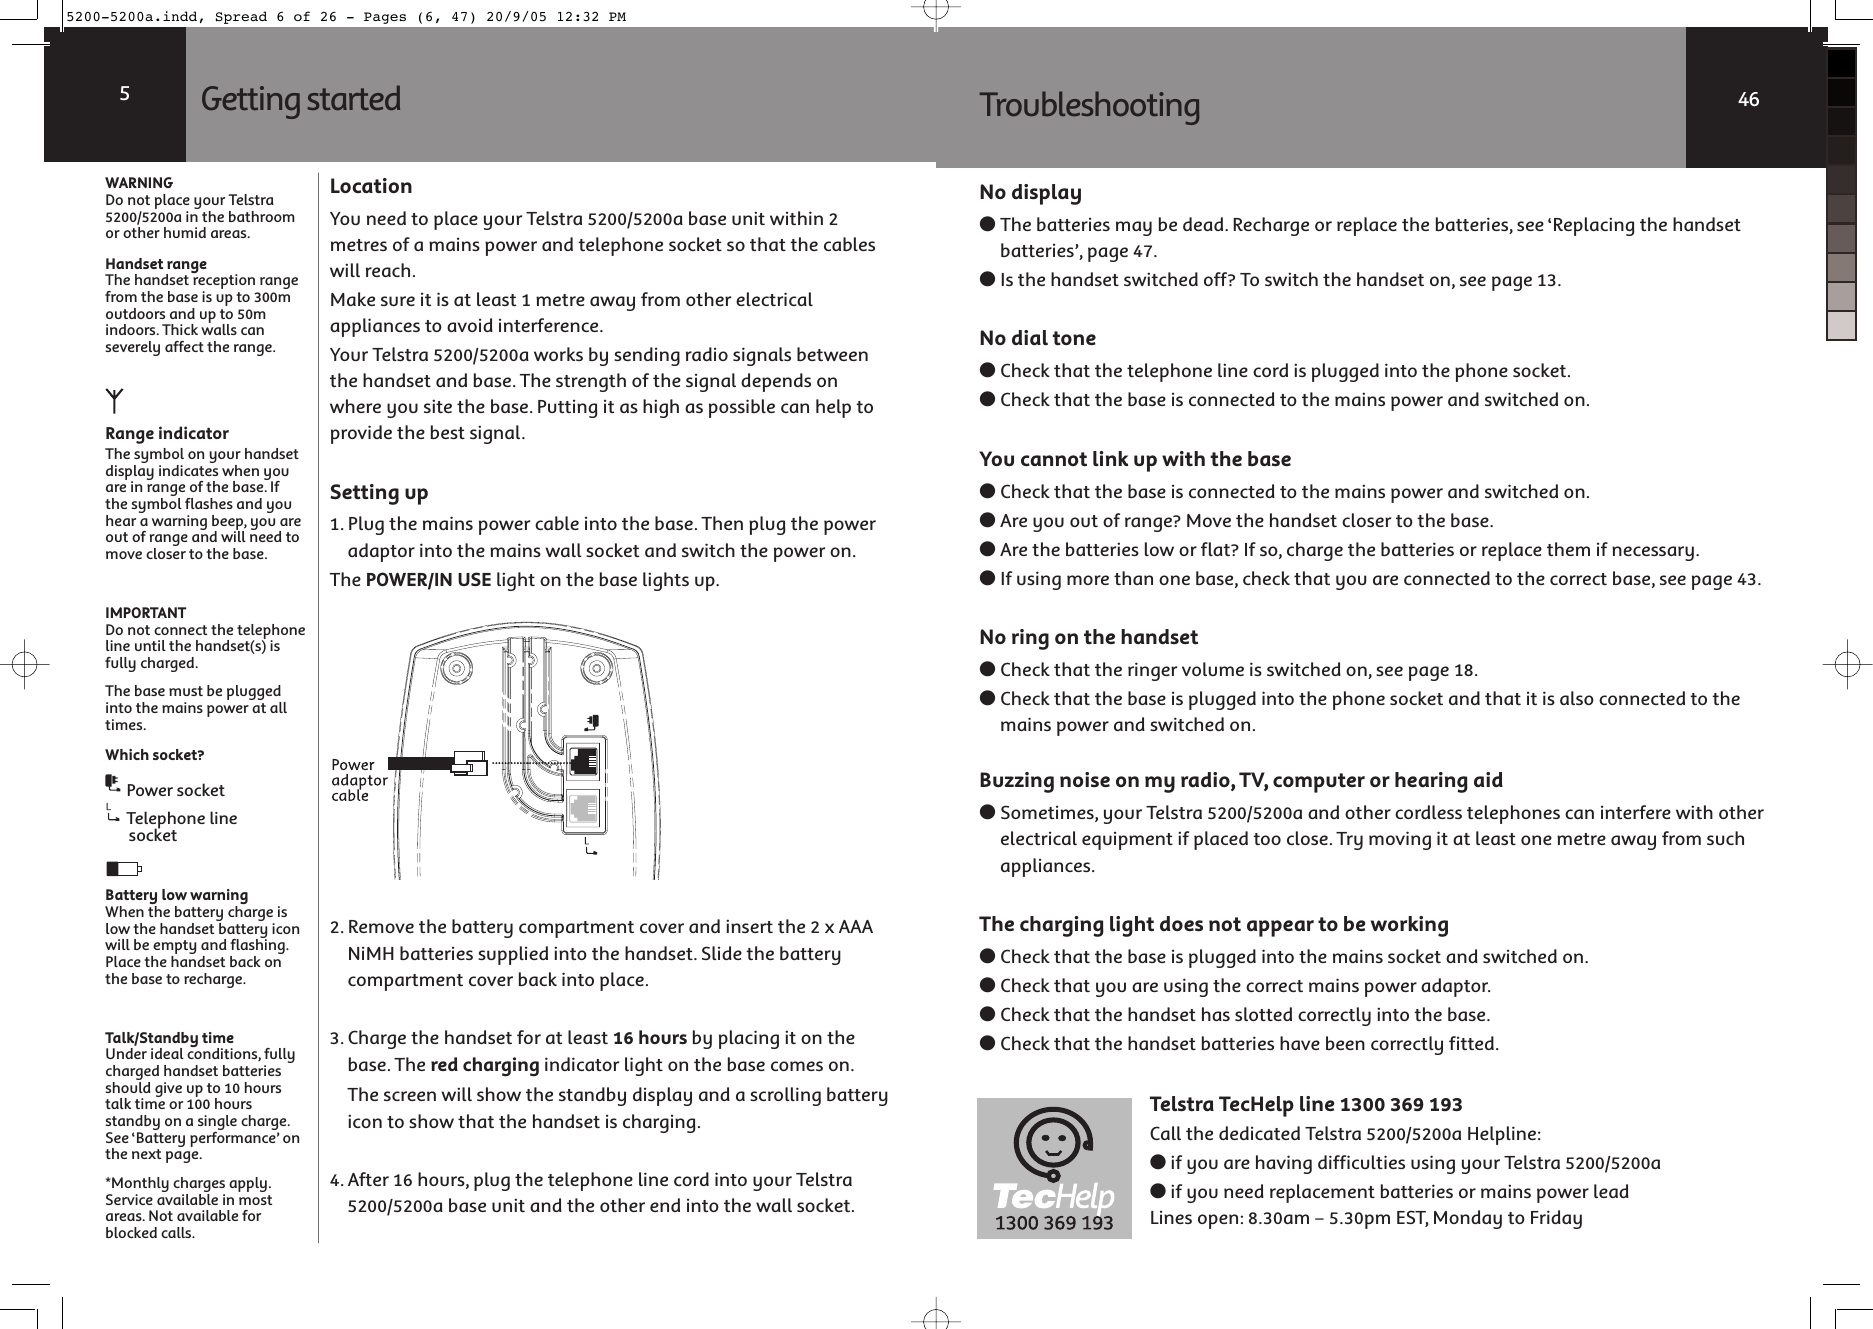
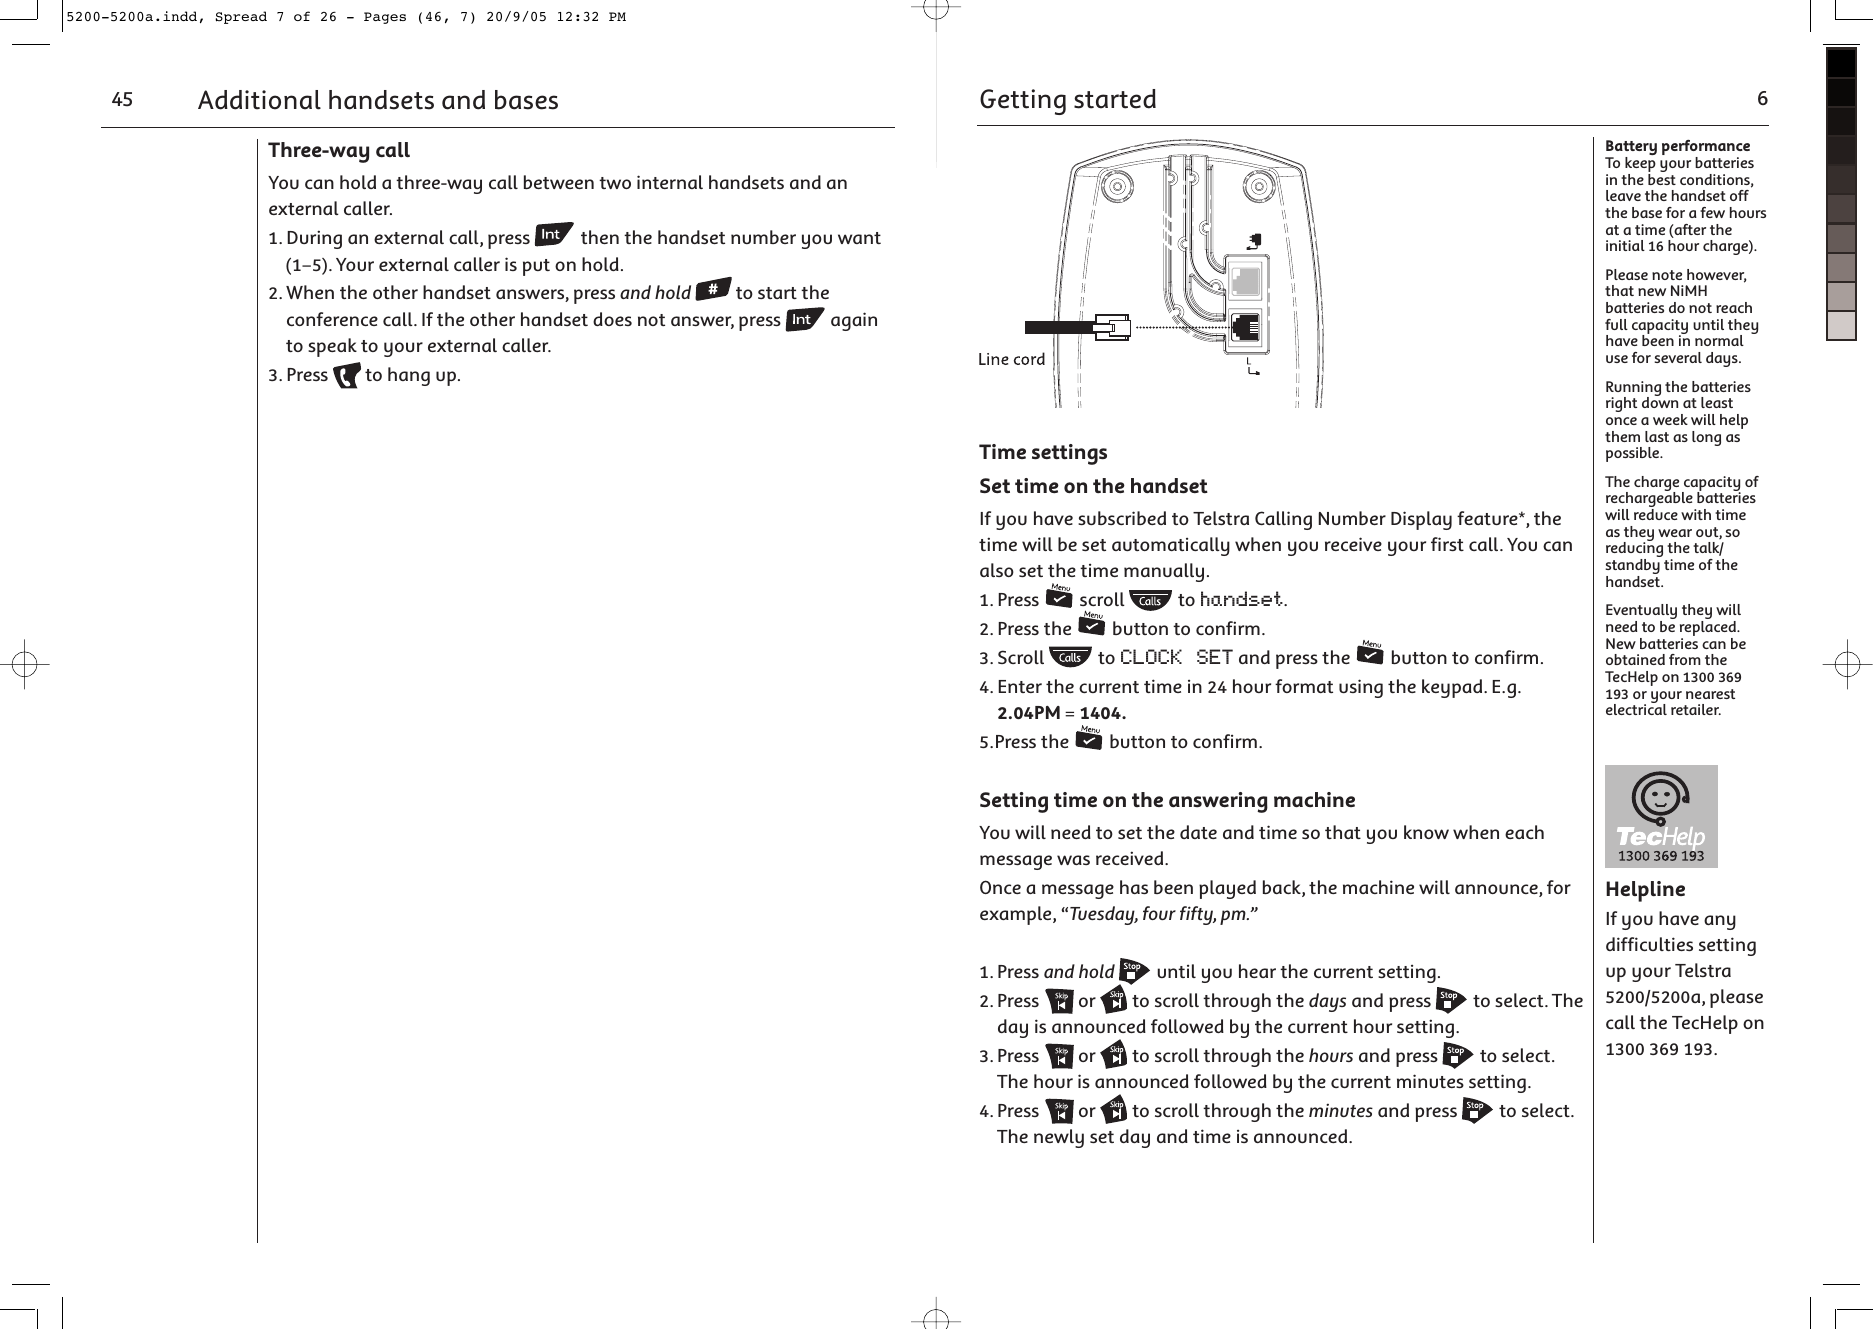
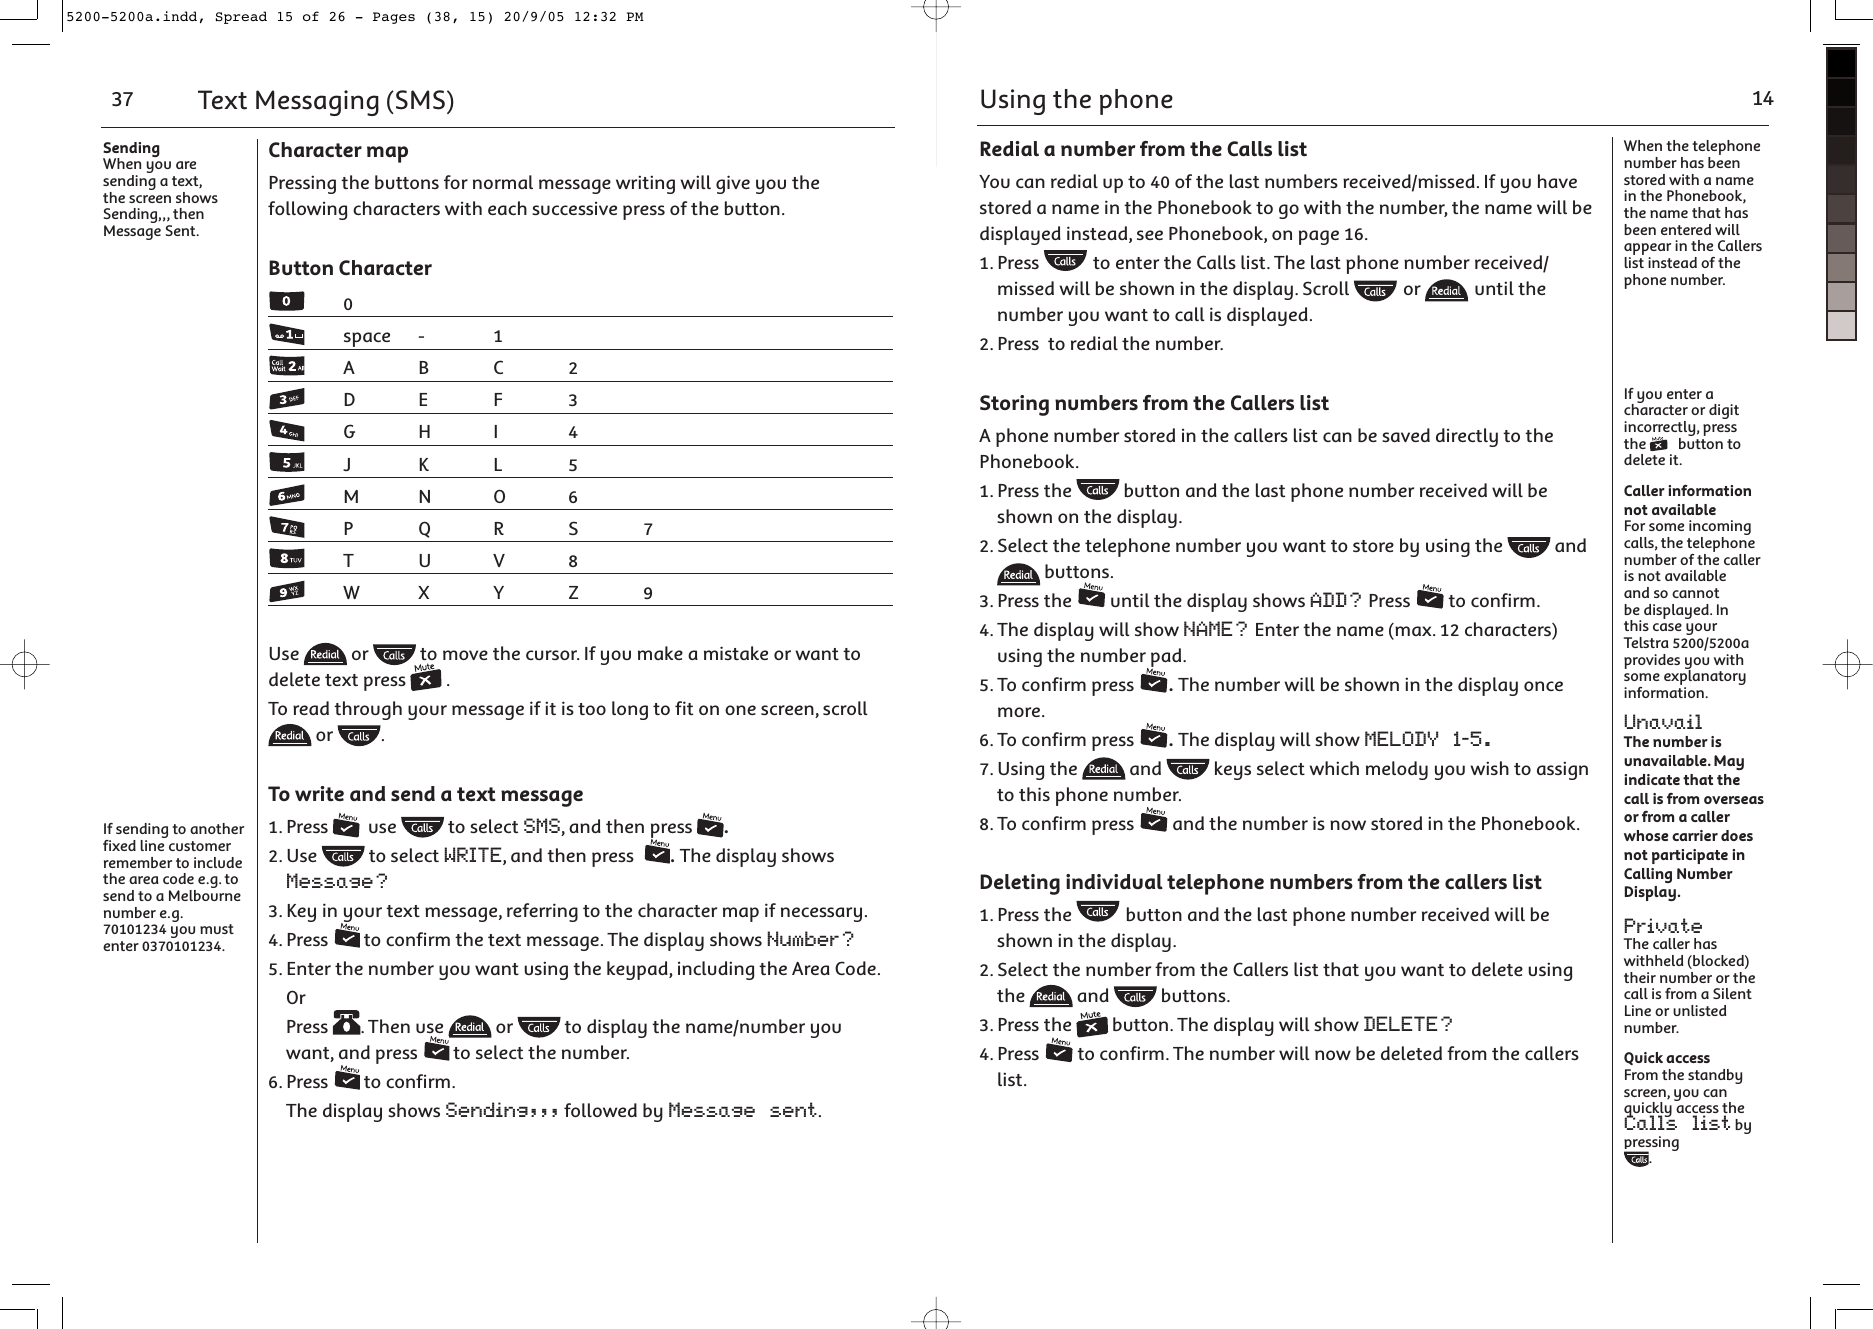
![Menu/ ✓ buttonPress to access menu or activate an operation.Redial/Scroll up/VolumeSelection button to choose an operation. Scroll through options. During a call, press to increase volume.Phonebook/Exit menuUsed to recall names and numbers from the Phonebook, page 16.Also used to exit Menu operations.Scroll down/Missed Calls list/Received calls/VolumeScroll through options. Press to open Missed Calls/Received calls list, page 13. During a call, press to decrease volume.IntLets you make calls between handsets registered to the base, page 44.Handset buttonsHandsfreePress to hold conversation via the handset loudspeaker.Mute/ClearPress to mute callers, page 15. Used to delete characters from a name or number, page 16.Talk/EndPress to make call and end a call, page 13.R (Recall)/PowerFor use with a PABX and Telstra Calling Features, page 23. Power on/off.! "$#=3X^.SQS^KV-VK\S^c+,-456>?@./0789ABCD123:;<=<ONSKV-KVV]-KVVAKS^7_^O7OX_Getting to know your Telstra 5200/5200a7 De-register a handsetUse one handset to de-register another handset from the same base.1. Press the button and scroll to SETUP.2. Press the button to confirm.3. Scroll to DEL HANDSET and press the button to confirm.4. Enter the PIN code of the base station and press the button to confirm.5. Now select the internal number of the handset to be logged off.Using additional handsetsMake an internal call to another handsetIf you have two or more handsets registered to your base, you can make internal calls between handsets.Two handsets can be holding an internal call while a third is on an external call.2. Press the button then the handset number (1–5). The receiving handset displays your number.3. To accept the call press the button. 4. Press to hang up.Transfer callsYou can transfer an external caller to another handset.1. During an external call, press . Your caller is put on hold.2. Dial the number of the handset you want (1–5).3. When the other handset answers you can tell them they have a call, then press . The external caller is transferred. If the other handset does not answer or you decide not to transfer the call, press to talk to your caller again.If you use a handset with two or more bases you can select Automatic from the Select Base Menu so that you handset will automatically link to the base with the strongest signal.If another handset is already using the external line, the indicator light will illuminate on all handsets. In this case, it is not possible to make a further external call.Additional handsets and bases 445200-5200a.indd, Spread 8 of 26 - Pages (8, 45) 20/9/05 12:32 PM](https://usermanual.wiki/Sun-Communications/USADECT-S37/User-Guide-691625-Page-8.png)
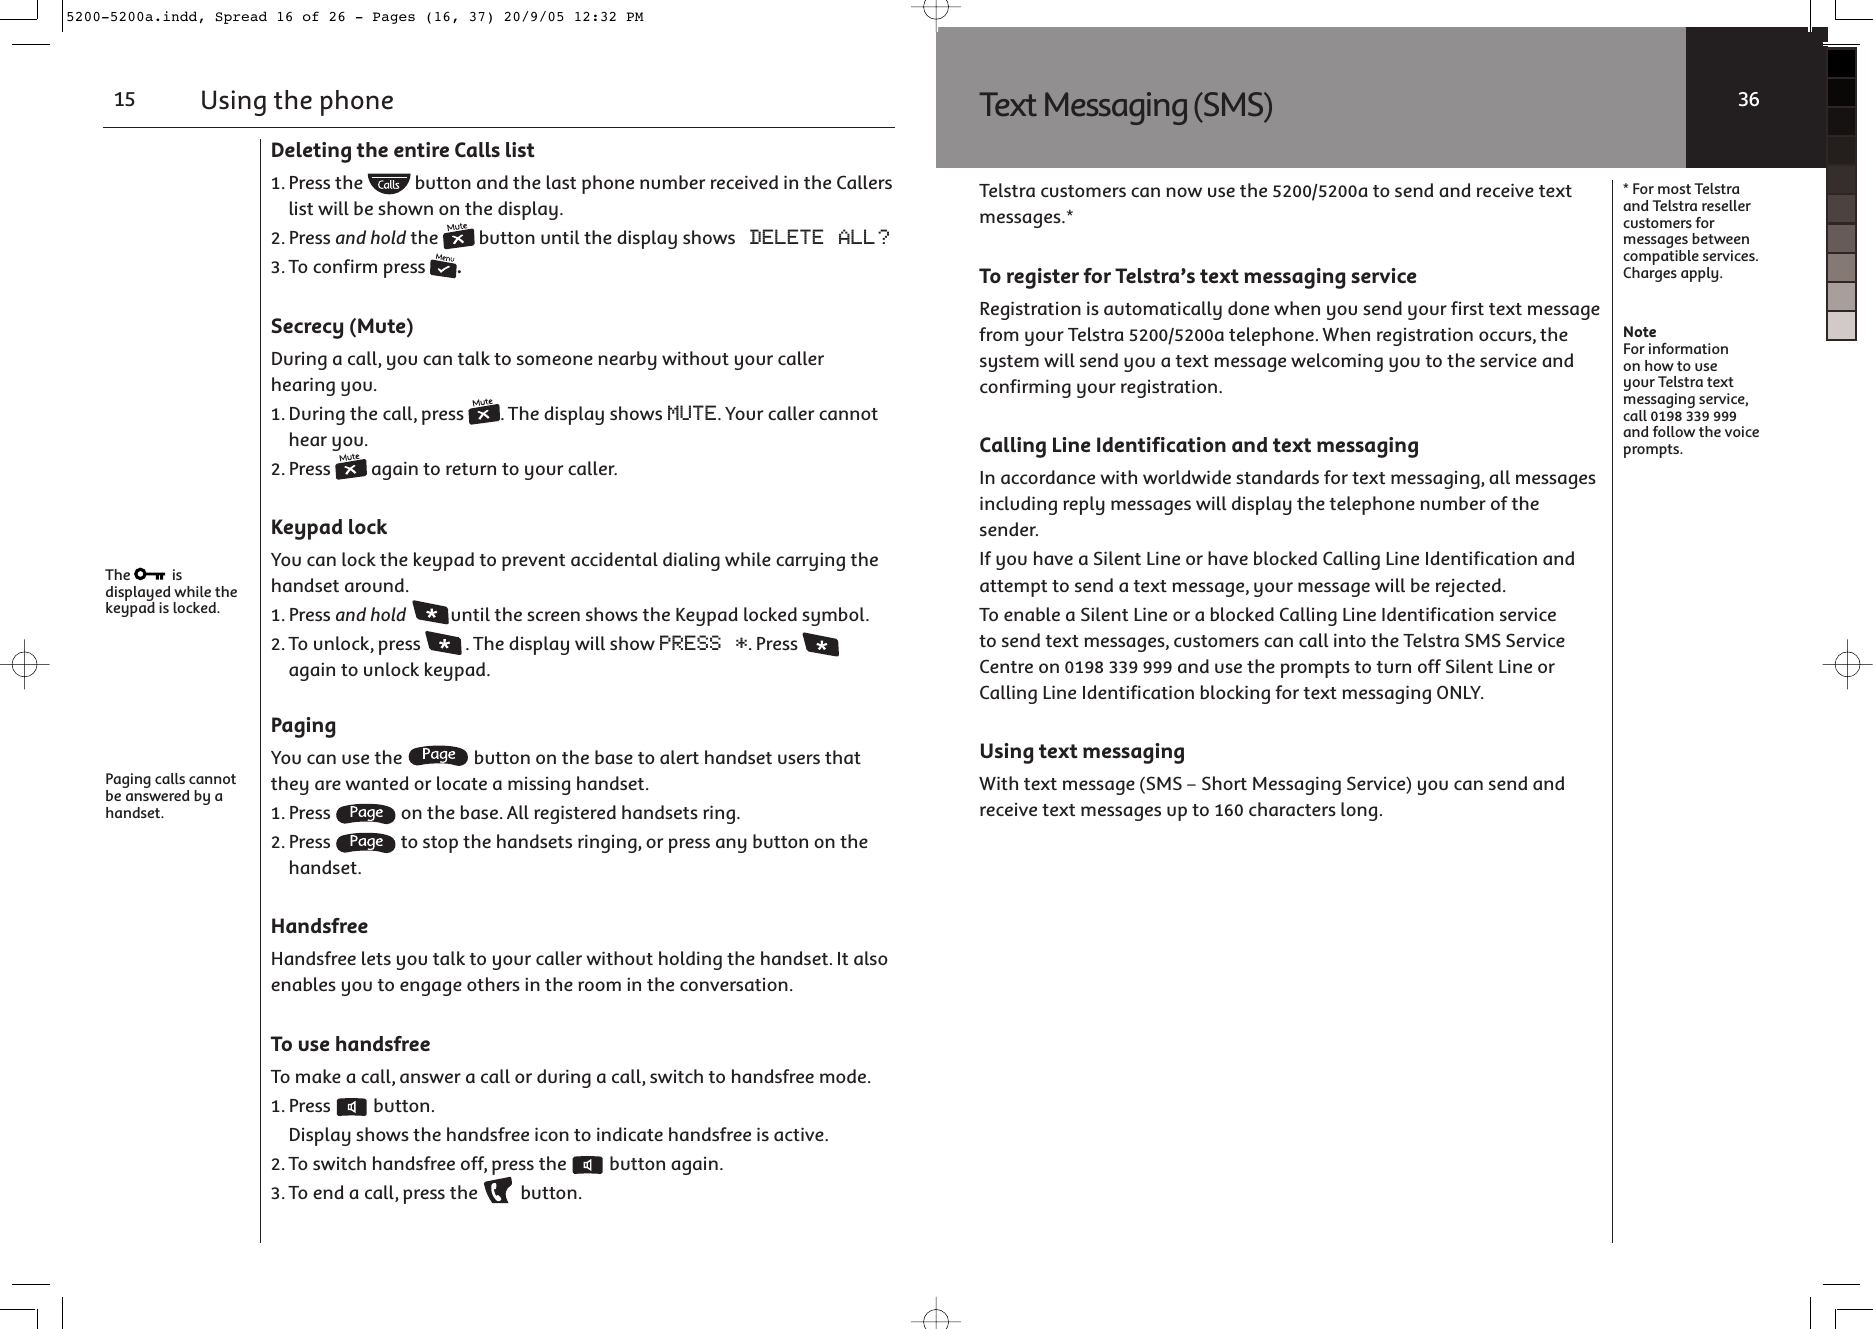
![IMPORTANTBefore registration, make sure the handset batteries are fully charged and that you are close to the base.If the handset is already connected to a base station, the corresponding numbers will flash.The factory setting PIN is set to 0000.An internal number will be allocated to the handset once registered. The first handset registered (main handset) has the internal number 1. Any further handsets that are registered are allocated internal numbers (2-5) in the order of registration. The internal number is shown in the display on the right side.With auto setting, the handset changes automatically to the nearest base station when the connection to the current base station breaks off.You can use up to five handsets with your Telstra 5200/5200a. To do this you need to register each additional handset with the base following the simple steps given below. Each handset can be registered on up to four bases.Register a Telstra 5200/5200a handset to a baseOn the base, press and hold until you hear two beeps. You have 90 sec. to complete the following steps.On the handset, press scroll to Register, then press the button to confirm.1. Scroll to REG BASE and press the button to confirm.2. Enter the number of the base station (1-4) using the keypad. Press the button to confirm.3. After the base station has been found, you must enter the PIN code.4. Press the button to confirm. After a few seconds you will hear a signal tone. The handset is now logged on and can be used for external and internal calls.Select baseIf your handset is registered to more than one base, for example, one at work and one at home, you can quickly select which base it takes its signal from.1. Press the button and scroll to REGISTER.2. Press the button to confirm.3. Scroll to SELECT BASE and press the button to confirm. The display will now show all base stations that the handset is already logged on to. The number of the currently active base station will flash. Select the required base station to which the handset is to be switched by using the keypad. Or4. Change to the AUTO setting using the and buttons.5. Press the button to confirm.Additional handsets and bases43Getting to know your Telstra 5200/5200a 8Handset display iconsCY_RK`OKXOaWO]]KQOSXcY_\>OV]^\K2YWO7O]]KQO]Y\7O]]KQO,KXU]O\`SMOCY_K\OWKUSXQKXOb^O\XKVMKVV0VK]RSXQ$CY_K\O\OMOS`SXQKXSX^O\XKVMKVV=^OKNc$CY_K\OWKUSXQKXSX^O\XKVMKVV=^OKNc$CY_K\OSX^ROMKVVO\VS]^0VK]RSXQ$>RO\OK\OXOaMKVV]]^Y\ONSX^ROMKVV]VS]^-8.>RS]X_WLO\SX^ROMKVVO\VS]^S]KWS]]ONMKVV>RS]X_WLO\SX^ROMKVVO\VS]^aK]KV\OKNc^KUOX0VK]RSXQ$:VOK]OMRK\QO^RORKXN]O^=^OKNc$3XNSMK^SYXYPLK^^O\cMKZKMS^c-cMVSXQ^R\Y_QR^RO]OQWOX^]$>RORKXN]O^S]LOSXQMRK\QONAROX^RO:RYXOLYYUS]LOSXQ_]ONAROXSXWOX_YZO\K^SYX>ROUOcZKNVYMUS]KM^S`K^ON=^OKNc$>ROMYXXOM^SYX^Y^ROLK]O_XS^S]]K^S]PKM^Y\c0VK]RSXQ$,K]O_XS^S]Y_^YP\KXQO>ROX_WLO\S]VYXQO\^RKXNSQS^]CY_RK`OKXOa^Ob^=7=WO]]KQOCY_K\OSXRKXN]P\OOWYNO7_^OP_XM^SYXS]LOSXQ_]ON* Monthly charges apply. Message retrieval is free from Telstra fixed phones anywhere in Australia. Retrieval charges apply from mobiles, Payphones and for calls using a Telstra Telecard™5200-5200a.indd, Spread 9 of 26 - Pages (44, 9) 20/9/05 12:32 PM](https://usermanual.wiki/Sun-Communications/USADECT-S37/User-Guide-691625-Page-9.png)
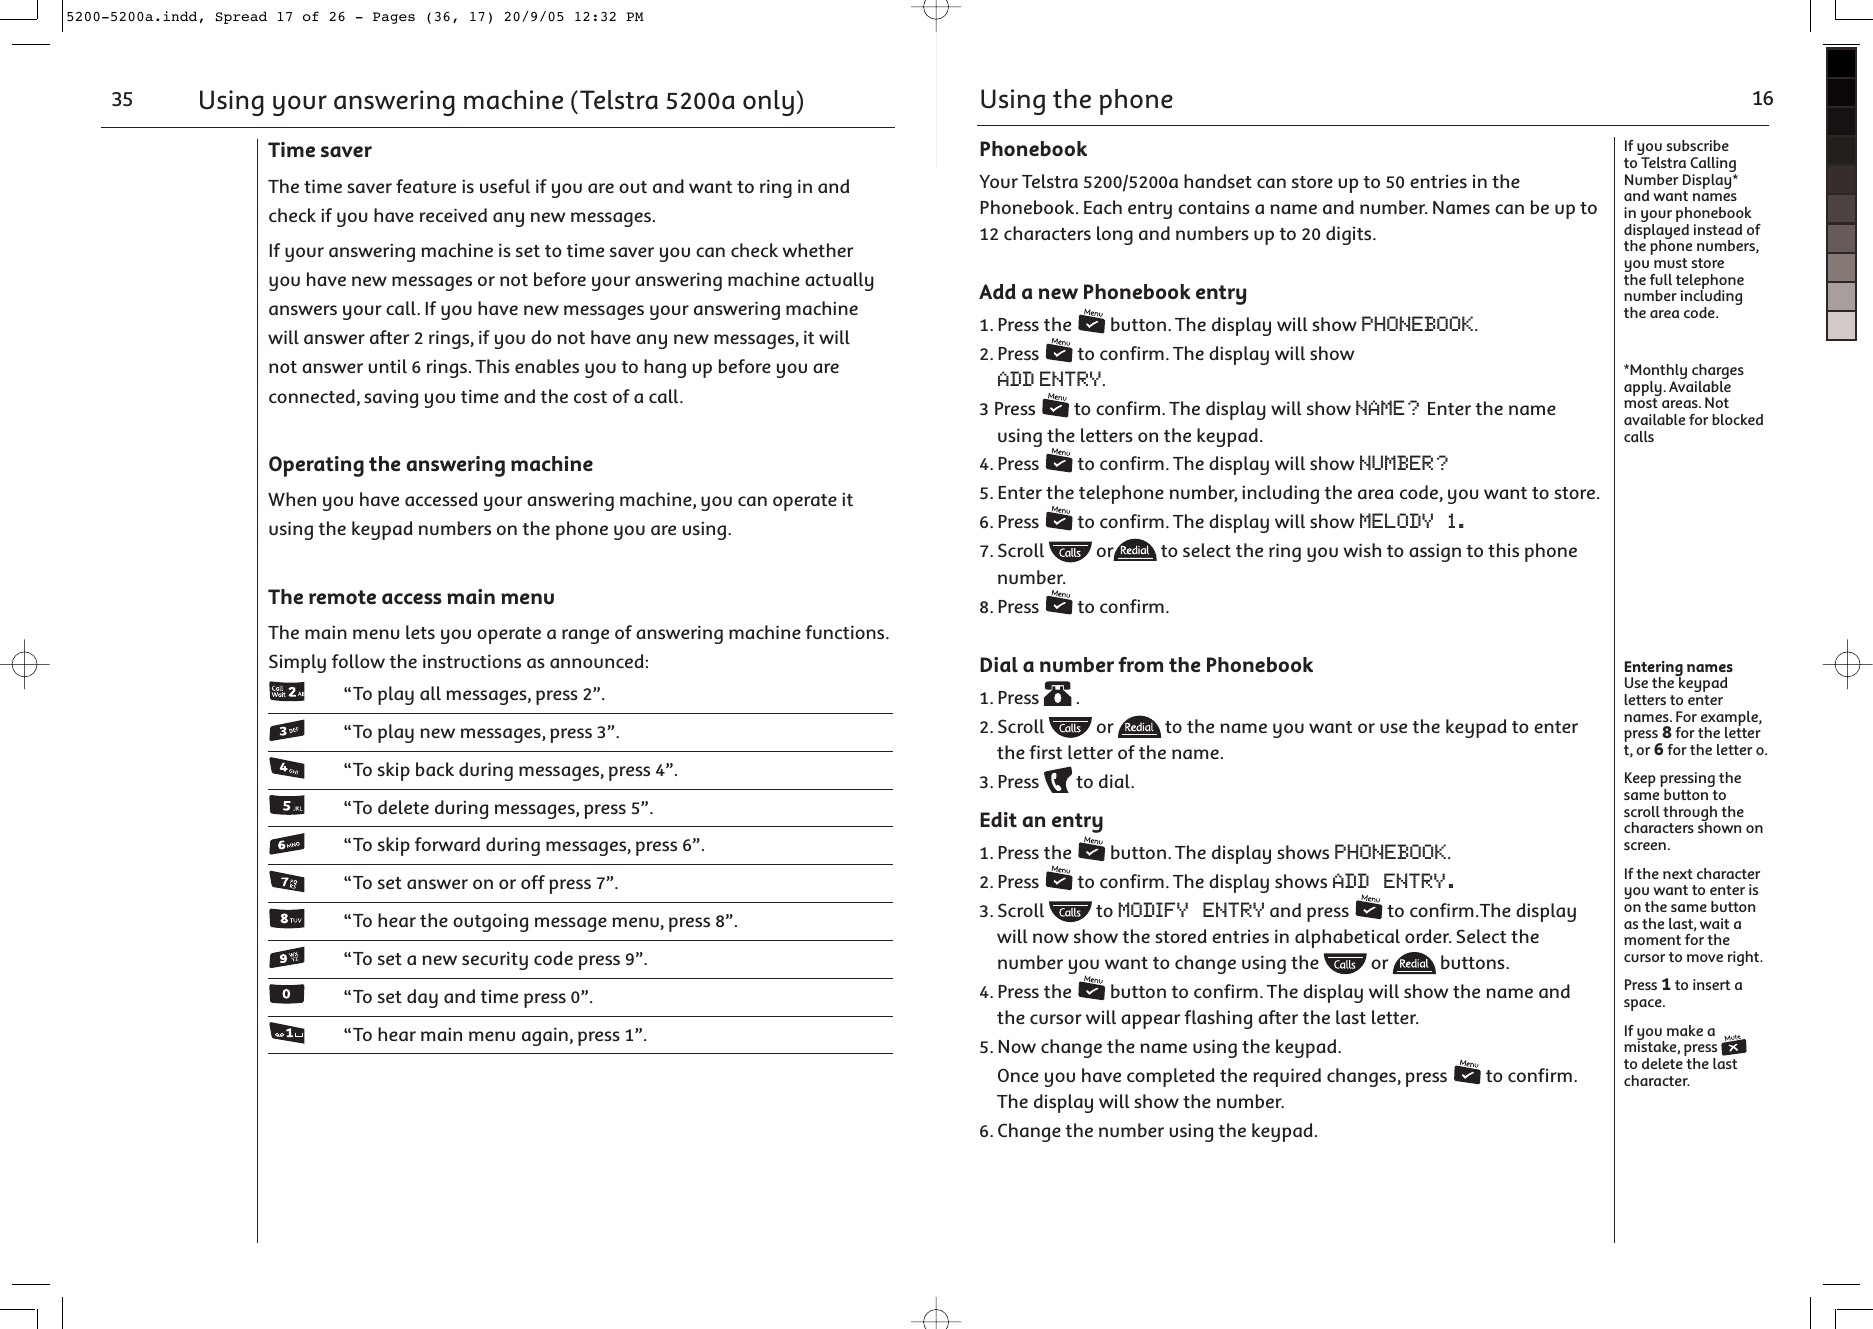
![Getting to know your Telstra 5200/5200aNavigating the menusYour Telstra 5200/5200a has a menu system which is easy to use. Each menu leads to a list of options. You’ll find a menu map on the following page. When the handset is switched on and in standby, press the option button under Menu to open the main menu.Use the and buttons to scroll to the menu option you want. Then select OK to select further options or confirm the setting displayed.For example, to change the handset ringer volume:1. Press then scroll to Handset. Confirm by pressing the button. Scroll to EXT Ring Vol or INT Ring VOL and press to confirm.2. Use and to select the required volume level, or choose Volume off to switch the ringer off.3. Press the button to confirm.Exit or go back one level in the menuTo go to the previous level in the menu, press .9! +,-456./0789123<ONSKV-KVV]-KVVAKS^7_^O7OX_Sending sub-addressed text messagesTo send a sub-addressed text message to another user, simply add an additional digit corresponding to their sub-address to the number you are sending to. Only a text message (SMS) phone set-up with that sub-address on the service will automatically answer the call and receive the text message.Default settings for text messaging (SMS)Receiving Service Centre 01983391Sending Service Centre 01983391Set SMS Alert OnSub-address 1. Common Inbox subaddress=0, for incoming and outgoing SMS. 2. Additionally, each handset 1-5 automatically setup for subaddress 1-5, for incoming SMS calls. All sent SMS’s will be from the Public Mailbox (sub-address ‘0’). They will not have a sub-address corresponding to the handset number.Default system PIN 0000Note:Multiple users can only be set up on fixed line services. You cannot send a sub-addressed message to a mobile service.Text Messaging (SMS) 425200-5200a.indd, Spread 10 of 26 - Pages (10, 43) 20/9/05 12:32 PM](https://usermanual.wiki/Sun-Communications/USADECT-S37/User-Guide-691625-Page-10.png)
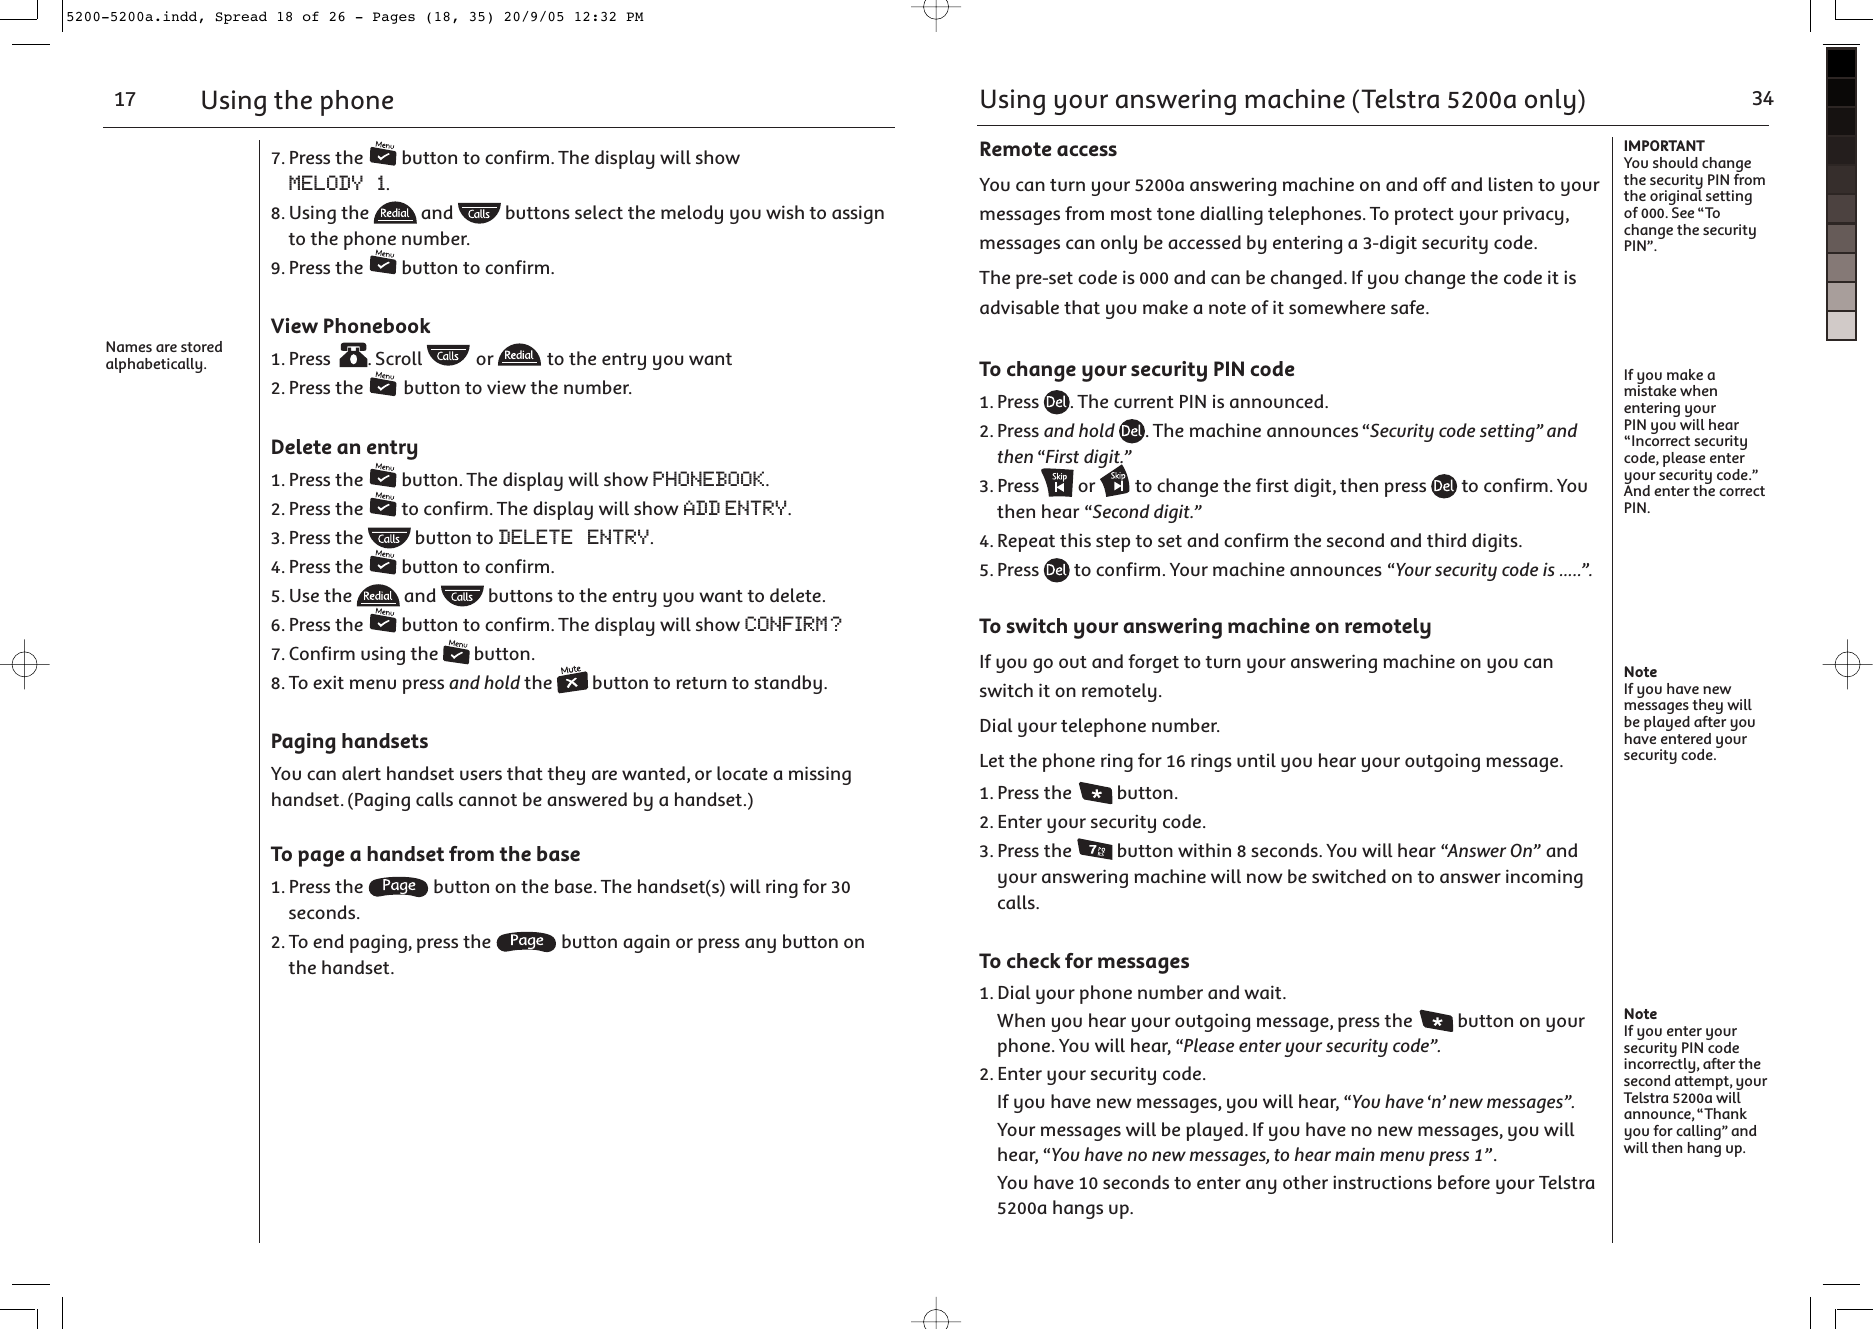
![Note If connecting more than one text message (SMS) phone to a service then each device must have a different terminal number to ensure successful receipt of incoming text messages.Receiving sub-addressed text messagesThe receiving text message (SMS) phone must be set for multiple users to receive sub-addressed text messages.If a sub-addressed text message is sent to a text message (SMS) phone that does not have a particular sub-address set up then the text message (SMS) phone will not automatically answer the call. If the call is answered by a person, an answering machine or Telstra MessageBank® or Telstra Home Messages 101® service, the Telstra server will then attempt to deliver the message as Talking Text®.Both the sender and receiver must be aware of the sub-addressing arrangements on a particular service. Messages that are sent without sub-addressing will be directed to the default terminal address of 0. For this reason we recommend you leave the common inbox terminal number in the SMS SETTINGS menu set to 0.Setting up sub-addresses for multiple usersEach 5200/5200a handset automatically has its own sub-address, corresponding to its handset number. For example, Handset Number 1 has sub-address 1 Handset Number 2 has sub-address 2, etc. Up to 5 handsets in total can be registered to an 5200/5200a base unit. Reading sub-addressed text messagesWhen you have a new text messages the ENVELOPE symbol is displayed, and NEW MSGS is shown on the standby screen.1. Press to open the inbox and view any new text messages. New messages have a * indicator. New text messages that have been sent to a sub-address will also show a KEY icon above the sender’s number.2. Press to scroll to the text message you want to open and press to select it.Text Messaging (SMS)41Getting to know your Telstra 5200/5200a 10Menu mapThese are the options under each menu heading.:RYXO ,YYU +NN /X^\c7YNSPc /X^\c.OVO^O /X^\c<OQS]^O\2KXN]O^ ,OOZ6Ya ,K^^O\c9_^ <KXQO5Oc^YXO9X 9PP9X 9PP9X 9PP9X 9PP@YV_WO 9PP@YV_WO 9PP/b^ <SXQ @YV3X^ 7OVYNc 7OVYNc 7OVYNc 7OVYNc /b^ 7OVYNc+_^Y +X]aO\8KWO5Oc 6YMU6KXQ_KQO /XQVS]R1O\WKX0\KXMKS]3^KVSKXY=O^ ?Z ,K]O @YV_WO,K]O 7OVYNc.OV 2KXN]O^ :SX ):38 )2KXN]O^ ):SX -YNO :SX ) 8Oa :SX <O^cZO.OPK_V^<OMKVV=OVOM^ ,K]O<OQ ,K]O<OMKVV ,K]O I I I,K]O <OMKVV -YXPS\W)=7= 3XLYb:O\]YXKV=7=A\S^O 7O]]KQO)<OMOS`O-OX^\O.OVO^O+VV 3XLYb -YXPS\W)=7==O^^SXQ] 7O]]KQO+VO\^=OXN=O\`SMO<OMOS`O>O\WSXKV8_WLO\=OXN-OX^\O #3X^ <SXQ @YV @YV_WO 9PP+M^_KV^SWO-VYMU=O^+M^_KVKVK\W^SWO+VK\W=O^9X 9PP+_^Y/]ZKXYV8O^RO\VKXN].KX]U8Y\NQO=`OX]UK:YV]US-O]Uc=VY`OXMSXK:Y\^_Q_O]7KQcK\:cMMUK/RXSUK:O\]YXKV=7= -YXPS\W)9X9PP=OXN=OXN5200-5200a.indd, Spread 11 of 26 - Pages (42, 11) 20/9/05 12:32 PM](https://usermanual.wiki/Sun-Communications/USADECT-S37/User-Guide-691625-Page-11.png)
![Page buttonPress to page the handset(s), page 17. Also used when registering additional handsets, page 43.Power in use/ FMI indicatorLights up when the power is on.- Flashes when making or receiving a call (approx. once every second)- Flashes when a text (SMS) message has been left (approx once every second). page 36.Battery charging lightLights up when the handset is charging on the base.>OV]^\KONQO]O\SO]Getting to know your Telstra 5200/5200a11Telstra 5200 Base UnitTo change the SMS Service Centre phone numbers1. Press use to select SMS, and then press .2. Use to select SMS SETTINGS, and then press .3. Use to select SEND SERVICE, RCV CENTRE or SEND CENTRE, and then press .RCV Centre – lets you set the number of the message receiving service.Send Centre – lets you set the number of the message sending service.Send Service - lets you set Send 1 or Send 2 as the message sending service.Terminal No – lets you change the common inbox terminal number.See previous page for the pre-set Service Centre numbers.Set SMS text alertYour handset can play a tone to announce a new text message.The default setting is ON.1. Press use to select SMS, and then press .2. Use to select SMS SETTINGS.3. Press then MSG ALERT is shown.4. Press again, and use to set the alert on or off.5. Press to confirm the setting.6. Press and hold to return to standby.Sub-addressing for multiple usersTelstra’s fixed text messaging service provides the ability to sub-address text messages sent to fixed services. Your Telstra 5200/5200a can be set up with up to five individual handsets, each handset with its own Personal SMS box. Senders can direct a message to a particular 5200/5200a handset simply by adding an extra digit, corresponding to that handset’s sub-address, to the telephone number. For example, a message sent to sub-address 1 will only be received by handset 1 a message sent to sub-address 2 will only be received by handset 2 etc. Messages that are not sub-addressed will be received by all 5200/5200a handsets.Text Messaging (SMS) 405200-5200a.indd, Spread 12 of 26 - Pages (12, 41) 20/9/05 12:32 PM](https://usermanual.wiki/Sun-Communications/USADECT-S37/User-Guide-691625-Page-12.png)
![DeletingYou can delete all messages from the Inbox or Personal SMS box.1. Press then scroll to select SMS, and then press .2. Use to select DELETE ALL, and then press .3. Use to select INBOX or PERSONAL SMS, and then press .4. Press again to confirm.5. Press and hold to return to standby.SMS settingsThe SMS settings menu lets you:• Select alternative Service Centres.• Set the common inbox terminal number.• Switch SMS Alert on or off.SMS Service Centre numbersTo send and receive text messages you need the telephone number of your network’s SMS Service Centre.The Telstra numbers are preset in your Telstra 5200/5200a.If you accidentally delete the Send or Receive SMS Service Centre numbers you will need to re-enter them in order for your SMS Service to work.The Send Service is Send 1.The Send Centre Send 1 number is: 01983391(Send 2 number is blank)The RCV Centre Receive 1 number is: 01983391(Receive 2 number is blank)The common inbox Terminal No is normally set to 0.Text Messaging (SMS)39>OV]^\KONQO]O\SO]Getting to know your Telstra 5200/5200a 12Telstra 5200a base unitPage buttonPress to page handset(s), page 17.Or use to register additional handsets to the Telstra 5200a base unit.Vol + & Vol – buttonsTo increase or decrease the speaker volume.OGM buttonTo record your out going message, page 29.Answer On/off buttonTo turn your answering machine on or off, page 26.Delete buttonTo delete messages received, page 32.Power/In use indicatorOn = Power onFlashes when making or receiving a call (approx once every second) Flashes when a text (SMS) has been received (approx once every second).Play/Pause buttonTo playback or pause messages, page 31.Charging indicatorOn = Handset chargingSkip < & Skip > buttonsTo skip forward or back when listening to your messages, page 32. Stop buttonStops messages being played.5200-5200a.indd, Spread 13 of 26 - Pages (40, 13) 20/9/05 12:32 PM](https://usermanual.wiki/Sun-Communications/USADECT-S37/User-Guide-691625-Page-13.png)