Sunitec Enterprise BC008 Bluetooth Speakerphone User Manual
Sunitec Enterprise Co., Ltd. Bluetooth Speakerphone
user manual
1 3
2
5
4
7
6
User Manual
1. About
Bluetooth
Speakerphone
This versatile Bluetooth speakerphone is specially designed for user to enjoy convenience
and freedom of wireless communication. Dual capacity of use on desk-top like a
Conference Speakerphone and in-car like a Hands-free car kit. Advanced built-in
microphone with D.S.P. solution for Echo Cancellation & Noise Suppression that gives you
impeccable full duplex sound quality.
2. About
Bluetooth
Technology
Bluetooth wireless technology is set to revolutionize the personal connectivity by providing
freedom from wired connections-enabling links and connectivity between notebook/laptop,
mobile phones, portable handheld devices and other Bluetooth enabled devices within
10 meters. Utilizing global sound & digital data 2.4GHz ISM transmission, it makes global
communication in the way you’ve never dreamed of!
3. Appearance and Function
(1) Speaker
(2) Microphone
(3) LED
(4) Charging Socket (5-pin USB)
(5) Mute Button
(6) MFB Button (Multi-Function Button)
(7) Volume Increase (V+)
(8) Volume Decrease (V-)
(9) Solar Panel
(10)
Windshield Mount
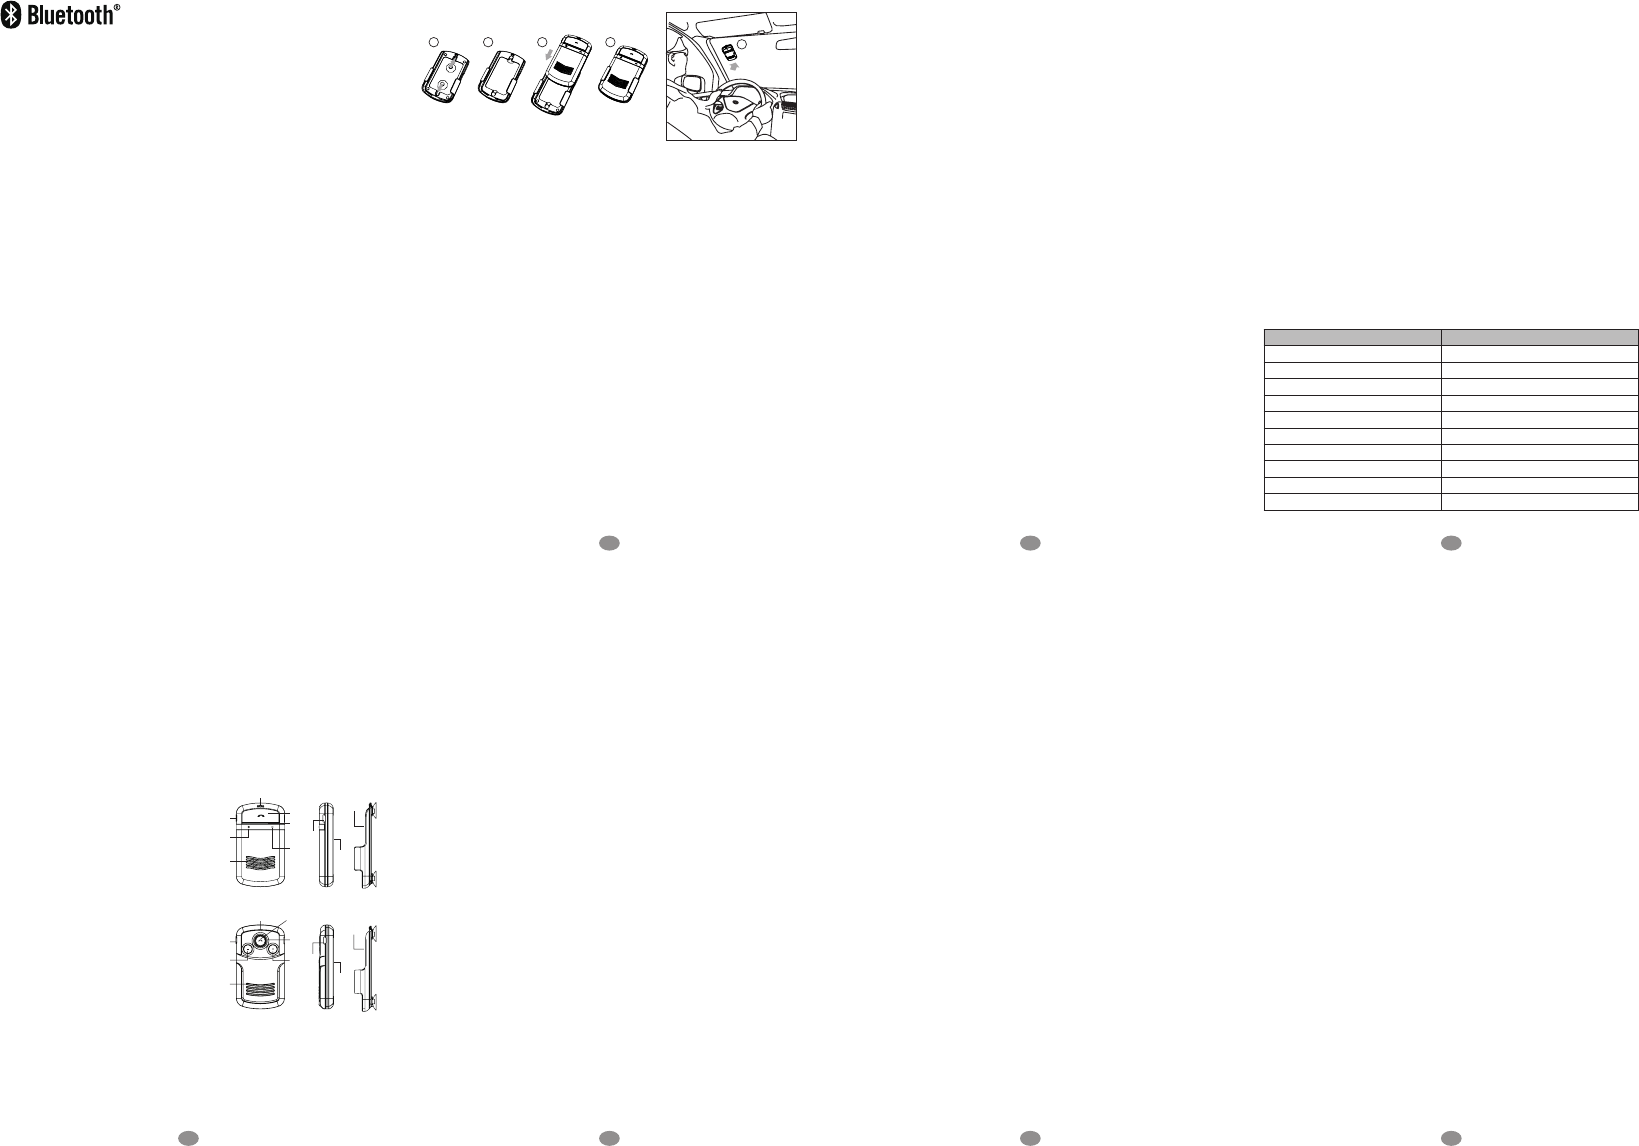
4. Recommend Installation
Position
It is recommended that the
speakerphone is positioned on
to the top of the left side of the
windshield as shown in the pictures below:
WARNING: Do not place or store the speakerphone over the area of the automobiles
safety airbag deployment, or it may cause serious injury when a safety airbag deploys.
5. Charging Your Bluetooth Speakerphone
The Bluetooth speakerphone comes with a built-in rechargeable battery. Prior to using the
speakerphone, it is recommended to charge the battery fully for the rst time.
Using the car charger
• Insert the car charger completely into the charging slot until the LED ash red.
• Normal full charge time is 3 hours. (approx.), and the LED will ash off when charge is
completed.
Using solar power
• Direct the solar panel on the back side of the speakerphone toward sun. (Please refer
to the recommended installation position, as mentioned above.)
• If the speakerphone receives sufcient sunlight for 2 hours, you can talk for duration
of up to 1 hour. Using solar power charge, the operation time (the talk time and the
standby time) will be extended continuously without any additional charge required by
the car charger.
WARNING: Do not attempt to charge the speakerphone with any charger other than the
one provided. Using another charger may damage or destroy the speakerphone.
6. Turning ON/OFF the Speakerphone
Power On: When speakerphone is under off mode, press and hold the “MFB” for 4 seconds
until you hear a short beep. The blue LED will ash 5 times, and then the speakerphone
will automatically connect to the last connected mobile phone.
Power Off: Speakerphone is under standby mode, press and hold the “MFB” button for 4
seconds until you hear a short beep. The red LED will ash 5 times before power off.
7. Pairing
Prior to using the speakerphone for the first time, you must pair it with a Bluetooth
enabled mobile phone. The steps below describe pairing instructions for a typical Bluetooth
enabled mobile phone.
(1) Place the speakerphone and mobile phone no more than 1 meter (3 feet) apart.
(2) Ensure the speakerphone is turned off.
(3) Press and hold the “MFB” button for 6 seconds until the LED flash red and blue
alternatively, it is now ready for pairing.
(4) Activate the Bluetooth function on your mobile phone and search for accessible
Bluetooth device by referring to your mobile phone user guide for details.
(5) Select “BT Speaker” from the list of searched devices.
(6) Enter the pre-programmed code “0000” and press “OK” to pair the speakerphone and
the phone.
(7) When pairing is completed, the speakerphone is under the standby mode with the blue
LED ashes in every 3 seconds. Please place the mobile phone and the speakerphone
within 10 meters (32 feet) sensing distance.
NOTE: If the pairing cannot be completed within 2 minutes after the pairing mode is
activated, the speakerphone will power off automatically. Please repeat steps above to pair
the speakerphone and mobile phone again.
8. Connection/Link between Speakerphone and Mobile Phone
After pairing is completed, speakerphone is always under standby mode. Before you
place or answer a call, if the headset icon is not shown on phone screen, please follow
the steps below to activate the Bluetooth connection/link through your mobile phone or
speakerphone until the headset icon is on the screen.
• On phone: Select the “BT Speaker” from the paired list on your mobile phone’s
Bluetooth menu.
• On speakerphone: Short press “MFB” and select “Accept” on phone screen to accept
connection.
9. Disconnection between Speakerphone and Mobile Phone
When you need to connect your speakerphone with another Bluetooth enabled mobile
phone, please follow the steps below to disconnect the speakerphone with the pre-paired
mobile phone.
• On phone: Select “Disconnecting” on the Bluetooth device list of your mobile phone’s
Bluetooth menu to remove the connection.
• On speakerphone: Power off the speakerphone.
NOTE: When losing the connection/link, the speakerphone will turn off automatically in 15
minutes. The blue LED will ash twice in every 3 seconds when the speakerphone is not
connected with mobile phone.
10.
Using the Speakerphone
(1) Answering a Call
When receiving a phone call, short press the “MFB” button to answer the call.
(2) Ending a Call
Short press the “MFB” button to end a call.
(3) Reject a Call
When you hear the ringing tone, press and hold the “MFB” button for 2 seconds to
reject the call.
(4) Voice Dial
If your mobile phone is voice dialing enabled, under standby mode, short press the
“MFB” button and say the voice tag after you hear a beep.
Note: Please make sure to record voice tag into the mobile phone before using voice
dial function. Functionality varies depending on the mobile phone models. Please refer
to your mobile phone user guide for details.
(5) Last Number Re-Dialing
Under standby mode, short press the “MFB” button twice for last number redials.
(6) Adjusting the Volume
During a call, press the “V+” or “V-” buttons repeatedly until you reach the desired
volume level.
(7) Mute & Un-Mute
a. Mute: During a call, short press the “MUTE” button to mute the speakerphone. The
red LED will ash on during mute mode.
b. Un-Mute: Short press the “MUTE” button during mute mode to un-mute the
speakerphone.
(8) Transferring Calls
a. Speakerphone to Mobile Phone: During a call, press both of “V+” and “V-” buttons,
and the call is routed to your mobile phone.
b. Mobile Phone to Speakerphone: Press both of “V+” and “V-” buttons to route the
call to speakerphone.
11. MultiPoint Feature
(1) Activate Multipoint Connection
The default setting of the speakerphone’s multipoint function is OFF. You can activate
the multipoint function for connecting with 2 mobile phones at the same time.
a. Multipoint ON: Under standby mode, press and hold “V+” button for 3 seconds
until you hear a beep.
b. Multipoint OFF: Under standby mode, press and hold “V-” button for 3 seconds
(2) Press and hold both of “V+” and “V-” buttons for 10 seconds until the blue and
red LED flash 5 times, then the speakerphone will resume standby mode. The
speakerphone is now back to original setting, and after power on the speakerphone
again, it will enter pairing mode automatically.
NOTES: If the speakerphone is connected with a mobile phone before restore to
default setting, it will enter pairing mode automatically after restored to default. If the
speakerphone is not connected with the mobile phone before restore to default setting, it
will be under standby mode after restored to default setting.
14. Safety Information
(1) Check local laws regarding use of a mobile phone and speakerphone while driving. If
you use the speakerphone while driving, ensure your attention and focus remain on
your responsibility of driving safely.
(2) Never allow children to play with the speakerphone. Small parts may be a choking
hazard.
(3) Observe all signs that require an electrical device or RF radio product to be switched
off in the designated areas. These could include hospitals, blasting areas, and
potentially explosive atmospheres.
(4) Turn off your speakerphone prior to boarding an aircraft. Do not use your
speakerphone in an aircraft.
(5) Never place or store the speakerphone over the area of the automobile's safety airbag
deployment, or it may cause serious injury when a safety airbag deploys.
15. LED Light Indicators
Speakerphone Status LED Indicator
Power OFF Mode OFF
Power ON Blue LED ash 3 seconds
Power OFF Red LED ash 3 seconds
Standby Mode Blue LED ash once every 3 seconds
Standby (Disconnect Bluetooth Device) Blue LED ash twice every 3 seconds
Standby-Low Voltage Red LED ash once every 3 seconds
Talk in progress Blue LED ash once every 6 seconds
Pairing in progress The red and blue LED ash on alternatively
Charging in progress Red LED steady on
Charging completed Off
until you hear a beep. The speakerphone will turn off the multipoint function and
power off automatically. When power on the speakerphone again, it will only
connect to the last connected Bluetooth device.
(2) Multipoint Pairing
a. First mobile phone: Pair the speakerphone with one of the Bluetooth-enabled
mobile phones.
b. Second mobile phone: Power OFF the speakerphone. Press and hold the “MFB”
button for 5 seconds to enter pairing mode again to pair and connect with the
second mobile phone.
c. Connect with the rst paired mobile phone to the speakerphone.
(3) Multipoint Connection/Link with 2 Mobile Phones
After the multipoint function is activated, please follow the steps below to connect
with 2 Bluetooth enabled mobile phones at the same time.
When power on the speakerphone, it will automatically search and connect the last 2
mobile phones that have been connected before.
(4) Answer the Second Call during a Call (3 way call or two link function)
When receiving a second call, press “MFB” button twice to hold the rst call on line
and answer the second call.
(5) Reject the Second Call during a Call (3 way call or two link function)
When receiving a second call, press and hold the “MFB” button for 3 seconds to reject
the second mobile phone call.
(6) Switch between 2 Phone Calls (3 way call or two link function)
a. When having 2 calls on the line, press “MFB” button twice to switch between these
2 phone calls.
b. When having 2 calls on the line, short press the “MFB” button once to end the
current call and stay with the other call.
NOTES: When the multipoint feature using, the device can not support three-
way calling
feature.
.
12. Low Voltage Protection of Battery
When the voltage of battery decreased to 3.3V, the red LED will ash in every 3 seconds,
and the speakerphone will be power off automatically when the voltage under 3.0V.
13. Restore to Default Setting
Please follow the steps below to reset the speakerphone to its original setting and remove
all the previous pairing and connection.
(1) Ensure the speakerphone is under standby mode.
16.ProductSpecication
Bluetooth Compliance: Bluetooth V2.1+EDR
Operating Frequency Band: 2.4GHz ~ 2.48GHz unlicensed ISM band
Output Power: Class 2, up to 10 meters
Support Proles: Headset and Handsfree 1.5 proles
Support Multiple Paired Devices: Memorize paired data of 8 Bluetooth phones
Stand-by Time: Up to 1400 hours
Talk Time: Up to 11~13 hours
Battery Charging Time: Using charger about 3 hours, Using solar power about 18 hours
Charger Voltage: DC5.0V, 400mA
Battery: 3.7V 550mAH, (Rechargeable Lithium-ion Battery)
Size: 92.5 x 54 x 15.5 mm
Weight: 60g (without windshield mount), 69g (with windshield mount)
NOTES: This speakerphone is in compliance with the specied Bluetooth version. It does
not guarantee compatibility of all functions on every Bluetooth enabled device. Please
check with your mobile phone's user manual for compatibility and functionality.
41 2 3 5
"SOLAR-POWERED"
MULTIPOINT
SPEAKERPHONE
(5) (6)
(3)
(4)
(2)
(7)
(8) (9)
(10)
(1)
BC903M
(5)
(6)
(3)
(4)
(2)
(8) (7)
(9)
(10)
(1)
BC903BM
This device complies with Part 15 of the FCC Rules. Operation is subject to the following
two conditions:(1) this device may not cause harmful interference, and (2) this device
must accept any interference received, including interference that may cause undesired
operation.
Changes or modications not expressly approved by the party responsible for compliance
could void the user’s authority to operate the equipment