Suunto 23391 Sporting watch with GPS User Manual Userguides
Suunto Oy Sporting watch with GPS Userguides
UserManual.wiki
>
Suunto
>
23391 User Manual
>
Userguides
Contents
1.
Module assembly
2.
Userguides
Userguides
Navigation menu
Upload a User Manual
Namespaces
Wiki Guide
HTML
PDF
Info
Views
User Manual
Discussion / Help
Navigation


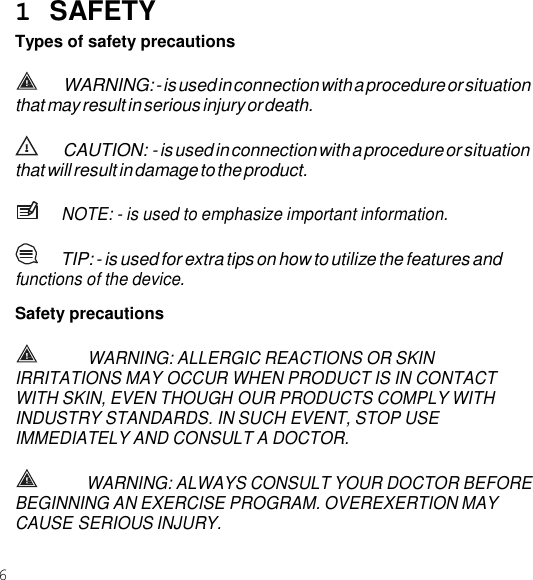
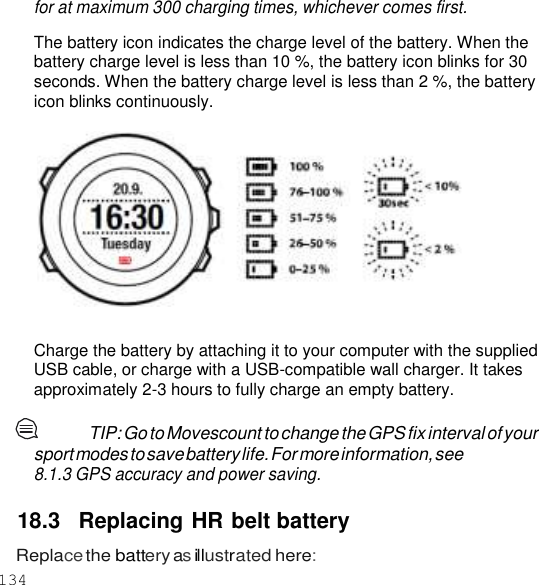
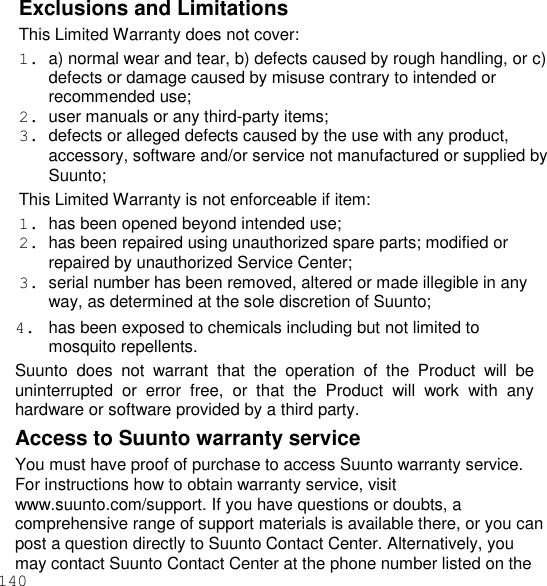
![8 2 USING BUTTONS Suunto Ambit3 Peak has five buttons which allow you to access all the features. 2sec 2sec [Start Stop]: • access the start menu • pause or resume an exercise or timer • keep pressed to stop and save an exercise • increase a value or move up in the settings [Next]: • change between displays • keep pressed to access/exit the options menu • keep pressed to access/exit the options menu in sport modes • accept a setting [Light Lock]:](https://usermanual.wiki/Suunto/23391.Userguides/User-Guide-2371075-Page-8.png)
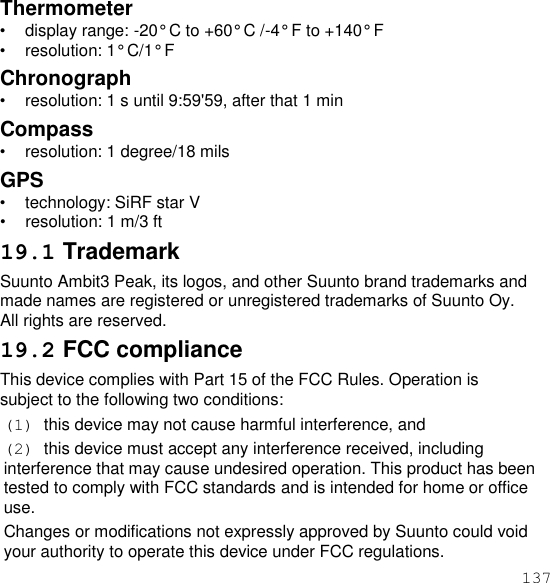
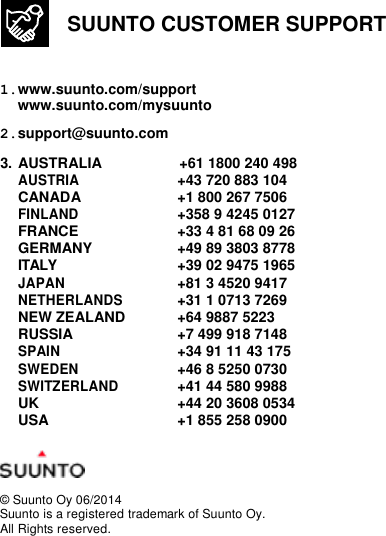
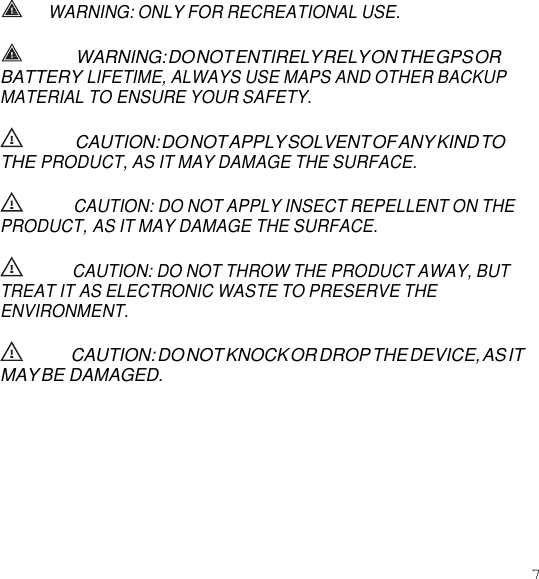
![9 • activate the backlight • keep pressed to lock/unlock the buttons • decrease a value or move down in the settings [View]: • change views in TIME mode and during exercise • keep pressed to toggle the display between light and dark • keep pressed to access context-sensitive shortcuts (see below) [Back Lap]: • return to the previous step • add a lap during exercise TIP: When changing the values, you can increase the speed by keeping [Start Stop] or [Light Lock] pressed until the values start to scroll faster. Defining shortcuts By default, when you keep [View] pressed in TIME mode, you toggle the display between light and dark. This button push can be changed to instead access a specific menu option. To define a shortcut: 1. Keep [Next] pressed to enter the options menu. 2. Browse to the menu item to which you want create a shortcut. 3. Keep [View] to create the shortcut. NOTE: Shortcuts cannot be created to all possible menu items, such as individual logs. In other modes, keeping [View] pressed accesses predefined shortcuts.](https://usermanual.wiki/Suunto/23391.Userguides/User-Guide-2371075-Page-9.png)
![10 For example, when the compass is active, you can access the compass settings by keeping [View] pressed. 3.1 Using backlight and button lock Pressing [Light Lock] activates the backlight. You can change the backlight behavior in the watch settings under GENERAL / Tones/ display / Backlight. Keeping [Light Lock] locks and unlocks buttons. You can change the button lock behavior in the watch settings under GENERAL / Tones/ display / Button lock. TIP: Select the Actions only button lock setting for sport modes to avoid accidentally starting or stopping your log. When the [Back Lap] and [Start Stop] buttons are locked, you can still activate the backlight by pressing [Light Lock], change between the displays by pressing [Next] and views by pressing [View].](https://usermanual.wiki/Suunto/23391.Userguides/User-Guide-2371075-Page-10.png)
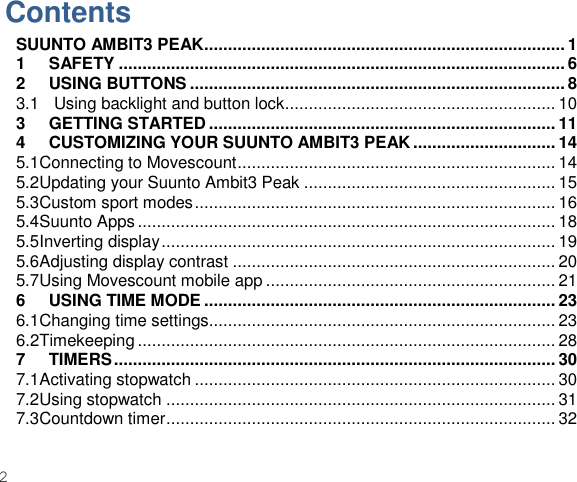
![11 3 GETTING STARTED Your Suunto Ambit3 Peak wakes up automatically when you attach it to your computer or a USB charger using the supplied USB cable. To start using your watch: 1. Wake up your sports watch by shortly connecting it to your computer or other power source with the supplied USB cable. 2. Press [Start Stop] or [Light Lock] to scroll to the desired language and press [Next] to select. 3. Pair with Movescount mobile app by pressing [Start Stop] or skip to next step by pressing [Light Lock]. 4. Follow the startup wizard to complete initial settings. Set values with [Start Stop] or [Light Lock] and press [Next] to accept and go to the next step. 5. Reconnect USB cable and charge until battery indicator is 100%.](https://usermanual.wiki/Suunto/23391.Userguides/User-Guide-2371075-Page-11.png)

![13 computer. You can exit the startup wizard at any time by keeping [Next] pressed. The startup wizard takes you through the following settings: Units Time Date Personal settings (gender, age, weight) NOTE: If you pair with the mobile app, some initial settings are skipped. Values are retrieved from the app.](https://usermanual.wiki/Suunto/23391.Userguides/User-Guide-2371075-Page-13.png)
![15 NOTE: A Moveslink icon is visible on your computer's display when Moveslink is active. To connect with the moble app: 1. If you have a compatible mobile phone, install the Movescount mobile from the App Store. 2. On your watch, keep [Next] pressed to enter the options menu. 3. Press [Light Lock] to scroll to Connectivity and press [Next]. 4. Press [Start Stop] to pair with the mobile app. 5. Activate the mobile app if it is not already. 6. Enter the passkey shown your watch in the app and tap Pair. To register to Movescount: 1. Go to www.movescount.com. 2. Create your account. NOTE: The first time your Suunto Ambit3 Peak is connected to Movescount all information (including the watch settings) is transferred from the watch to your Movescount account. The next time you connect your Suunto Ambit3 Peak to your Movescount account, the changes in settings and sport modes you made in Movescount and in the watch will be synchronized. 5.2 Updating your Suunto Ambit3 Peak You can update your Suunto Ambit3 Peak software automatically in Movescount.](https://usermanual.wiki/Suunto/23391.Userguides/User-Guide-2371075-Page-15.png)

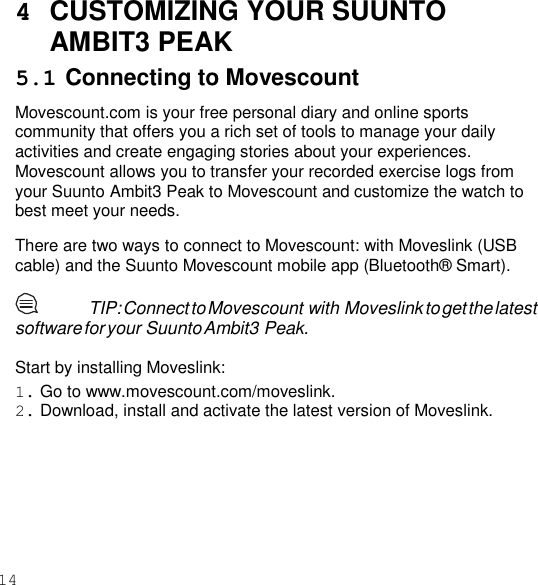
![17 Any sport mode with GPS activated can also use the Quick Navigation option. By default, this option is off. When you select POI or Route, you get a pop-up list of the POIs or routes you have defined in your watch at the start of your exercise. You can transfer up to 10 different sport modes created in Movescount to your Suunto Ambit3 Peak. Only one sport mode can be active at a time. TIP: You can also edit the default sport modes in Movescount. You can set your watch to automatically scroll through your sport mode displays using Autoscroll. Activate the feature and define how long the displays are shown on your custom sport mode in Movescount. You can turn Autoscroll on or off during exercise without any effect on your Movescount settings. To set Autoscroll on/off during exercise: 1. While you are in a sport mode, keep [Next] pressed to access the options menu. 2. Scroll to ACTIVATE with [Light Lock] and select with [Next]. 3. Scroll to Autoscroll with [Start Stop] and select with [Next]. 4. Press [Start Stop] or [Light Lock] to set AutoscrollOn/Off and accept with [Next].](https://usermanual.wiki/Suunto/23391.Userguides/User-Guide-2371075-Page-17.png)
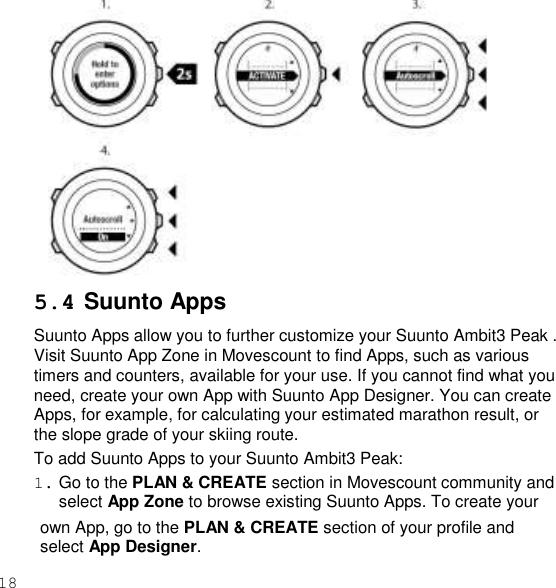
![19 2. Add Suunto App to a sport mode. Connect your Suunto Ambit3 Peak to your Movescount account to synchronize Suunto App to the watch. The added Suunto App will show the result of its calculation while you exercise. NOTE: You can add up to five Suunto Apps to each sport mode. 5.5 Inverting display You can invert the display of your Suunto Ambit3 Peak from light to dark or vice versa. To invert the display in the settings: 1. Keep [Next] pressed to enter the options menu. 2. Press [Next] to enter the GENERAL settings. 3. Press [Next] to enter Tones/display. 4. Scroll to Invert display with [Start Stop] and accept with [Next].](https://usermanual.wiki/Suunto/23391.Userguides/User-Guide-2371075-Page-19.png)
![20 TIP: You can also invert the display of your Suunto Ambit3 Peak by keeping [View] pressed while you are in TIME mode, a sport mode, navigating, or using the stopwatch and timers. 5.6 Adjusting display contrast You can increase or decrease the display contrast of your Suunto Ambit3 Peak. To adjust the display contrast in the settings: 1. Keep [Next] pressed to enter the options menu. 2. Press [Next] to enter the GENERAL settings.](https://usermanual.wiki/Suunto/23391.Userguides/User-Guide-2371075-Page-20.png)
![21 3. Press [Next] to enter Tones/display. 4. Scroll to Display contrast with [Light Lock] and enter with [Next]. 5. Increase the contrast with [Start Stop], or decrease it with [Light Lock]. 6. Go back to the settings with [Back Lap], or keep [Next] pressed to exit the options menu. 5.7 Using Movescount mobile app With the Suunto Movescount mobile app, you further enrich your Ambit3 Peak. Pair with the mobile app to get notifications on your Ambit3 Peak, change settings on the go, and take pictures with data from your move as wells as create Suunto Movies of your moves.](https://usermanual.wiki/Suunto/23391.Userguides/User-Guide-2371075-Page-21.png)
![22 To get notification on your watch: 1 If you haven’t already, go to the App Store and install the mobile app on your phone. 2 Pair your Suunto Ambit3 Peak with the mobile app. 3 Enter options menu and go to CONNECTIVITY. 4 Got to Settings and select Notifications. 5 Toggle Notifications On/Off with [View] and press [Next] 6 Exit by keeping [Next] pressed. When your Suunto Ambit3 Peak is paired with the mobile app, you can change settings as well as create or modify sport modes in the app. The app sync changes with your watch and your Movescount.com account. With any move that is stored in Movescount.com, you can add pictures as well as create a Suunto Movie of the move using Movescount app. For more information, please refer to the Movescount app user guide.](https://usermanual.wiki/Suunto/23391.Userguides/User-Guide-2371075-Page-22.png)
![23 6 USING TIME MODE TIME mode shows you the following information: • top row: date • middle row: time • bottom row: toggle between weekday, seconds, dual time and other information with [View]. 6.1 Changing time settings To access the time settings: 1. Keep [Next] pressed to enter the options menu. 2. Press [Next] to enter GENERAL. 3. Scroll to Time/date using [Start Stop] and enter with [Next].](https://usermanual.wiki/Suunto/23391.Userguides/User-Guide-2371075-Page-23.png)
![24 Setting time The current time is shown in the middle row of the TIME mode display. To set the time: 1. In the options menu, go to GENERAL, then to Time/date and Time. 2. Change the hour and minute values with [Start Stop] and [Light Lock]. Accept with [Next]. 3. Go back to the settings with [Back Lap], or keep [Next] pressed to exit the options menu.](https://usermanual.wiki/Suunto/23391.Userguides/User-Guide-2371075-Page-24.png)
![25 Setting date The current date is shown on the top row of the TIME mode display. To set the date: 1. In the options menu, go to GENERAL, then to Time/date and Date. 2. Change the year, month and day values with [Start Stop] and [Light Lock]. Accept with [Next]. 3. Go back to the settings with [Back Lap], or keep [Next] pressed to exit the options menu. Setting dual time Dual time allows you to keep track of the current time in a second time zone, for example, when travelling. Dual time is displayed on the bottom row of the TIME mode display and you can access it by pressing [View]. To set the dual time: 1. In the options menu, go to GENERAL, then to Time/date and Dual time.](https://usermanual.wiki/Suunto/23391.Userguides/User-Guide-2371075-Page-25.png)
![26 2. Change the hour and minute values with [Start Stop] and [Light Lock]. Accept with [Next]. 3. Go back to the settings with [Back Lap], or keep [Next] pressed to exit the options menu. Setting alarm You can use your Suunto Ambit3 Peak as an alarm clock. To access the alarm clock and set the alarm: 1. In the options menu, go to GENERAL, then to Time/date and Alarm. 2. Set the alarm on or off with [Start Stop] or [Light Lock]. Accept with [Next]. 3. Set the hours and minutes with [Start Stop] and [Light Lock]. Accept with [Next]. 4. Go back to the settings with [Back Lap], or keep [Next] pressed to exit the options menu.](https://usermanual.wiki/Suunto/23391.Userguides/User-Guide-2371075-Page-26.png)
![27 When the alarm is switched on, the alarm symbol is shown on most of the displays. When the alarm sounds, you can: • Select Snooze by pressing [Light Lock]. The alarm stops and restarts every 5 minutes until you stop it. You can snooze up to 12 times for a total of 1 hour. • Select Stop by pressing [Start Stop]. The alarm stops and restarts the same time the following day, unless you switch the alarm off in the settings. NOTE: When snoozing, the alarm icon blinks in TIME mode.](https://usermanual.wiki/Suunto/23391.Userguides/User-Guide-2371075-Page-27.png)
![29 timekeeping corrects it to the closest quarter hour. Your time zone is not changed. GPS timekeeping is activated by default. To deactivate it: 1. In the options menu, go to GENERAL, then to Time/date and GPS timekeeping. 2. Set the GPS timekeeping on or off with [Start Stop] and [Light Lock]. Accept with [Next]. 3. Go back to the settings with [Back Lap], or keep [Next] pressed to exit the options menu.](https://usermanual.wiki/Suunto/23391.Userguides/User-Guide-2371075-Page-29.png)
![30 7 TIMERS 7.1 Activating stopwatch The stopwatch allows you to measure time without starting an exercise. After you have activated the stopwatch, it is shown as an additional display in TIME mode. To activate/deactivate the stopwatch: 1. Press [Start Stop] to enter the start menu. 2. Scroll to TIMERS with [Light Lock] and enter with [Next]. 3. Press [Next] to select Stopwatch.](https://usermanual.wiki/Suunto/23391.Userguides/User-Guide-2371075-Page-30.png)
![31 7.2 Using stopwatch To use the stopwatch: 1. In the activated stopwatch display, press [Start Stop] to start measuring time. 2. Press [Back Lap] to make a lap, or press [Start Stop] to pause the stopwatch. To view the lap times, press [Back Lap] when the stopwatch is paused. 3. Press [Start Stop] to continue. 4. To reset the time, keep [Start Stop] pressed when the stopwatch is paused.](https://usermanual.wiki/Suunto/23391.Userguides/User-Guide-2371075-Page-31.png)
![32 While the stopwatch is running, you can: • press [View] to switch between the time and lap time shown on the bottom row of the display. • switch to TIME mode with [Next]. • enter the options menu by keeping [Next] pressed. 7.3 Countdown timer You can set the countdown timer to count down from a preset time to zero. After you have activated the countdown timer, it is shown as an additional display after the TIME mode. The timer makes a short sound every second during the last 10 seconds and sounds an alarm when zero is reached. To set the countdown time: 1. Press [Start Stop] to enter the start menu. 2. Scroll to TIMERS with [Light Lock] and select with [Next]. 3. Scroll to Countdown with [Light Lock] and select with [Next]. 4. Press [View] to adjust the countdown time. 5. Set the hours and minutes with [Start Stop] and [Light Lock]. Accept with [Next]. 6. Press [Start Stop] start the countdown.](https://usermanual.wiki/Suunto/23391.Userguides/User-Guide-2371075-Page-32.png)
![33 After the countdown has stopped, the countdown timer display disappears after a one-hour timeout. To deactivate the timer, go to TIMERS in the start menu and select END countdown. TIP: You can pause/continue the countdown by pressing [Start Stop].](https://usermanual.wiki/Suunto/23391.Userguides/User-Guide-2371075-Page-33.png)
![37 8.1.3 GPS accuracy and power saving When customizing sport modes, you can define the GPS fix interval using the GPS accuracy setting in Movescount. The shorter the interval, the better the accuracy during exercise. By increasing the interval and lowering the accuracy, you can extend the battery life. The GPS accuracy options are: • Best: ~ 1 sec fix interval, highest power consumption • Good: ~ 5 sec fix interval, moderate power consumption • OK: ~ 60 sec fix interval, lowest power consumption • Off: no GPS fix 8.2 Checking your location Suunto Ambit3 Peak allows you to check the coordinates of your current location using GPS. To check your location: 1. Press [Start Stop] to enter the start menu. 2. Scroll to NAVIGATION using [Start Stop] and enter with [Next]. 3. Press [Next] to select Location. 4. Press [Next] to select Current. 5. The watch starts searching for a GPS signal and displays GPS found after acquiring the signal. After that your current coordinates are shown on the display.](https://usermanual.wiki/Suunto/23391.Userguides/User-Guide-2371075-Page-37.png)
![38 TIP: You can also check your location while you are recording an exercise by keeping [Next] pressed to access the options menu. 8.3 POI navigation 8.3.1 Adding your location as a point of interest (POI) Suunto Ambit3 Peak allows you to save your current location or define a location as a POI. You can navigate to a saved POI anytime, for example, during your exercise.](https://usermanual.wiki/Suunto/23391.Userguides/User-Guide-2371075-Page-38.png)
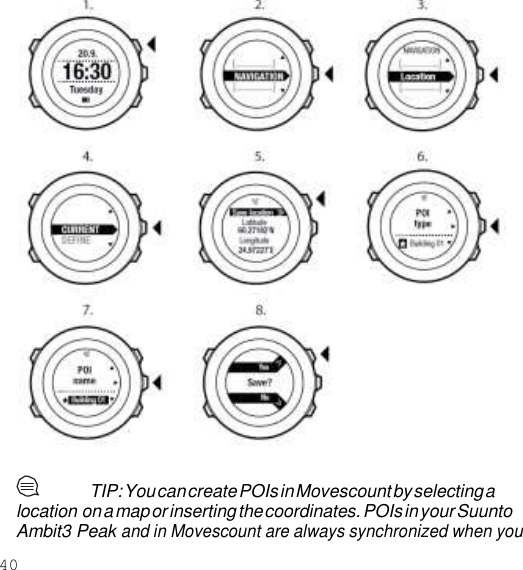
![39 You can store up to 100 POIs in the watch. Note that also routes take up this quota. For example, if you have a route with 60 waypoints, you can additionally store 40 POIs in the watch. You can select a POI type (icon) and POI name from a pre-defined list, or freely name the POIs in Movescount. To save a location as a POI: 1. Press [Start Stop] to enter the start menu. 2. Scroll to NAVIGATION using [Start Stop] and enter with [Next]. 3. Press [Next] to select Location. 4. Select CURRENT or DEFINE to manually change longitude and latitude values. 5. Press [Start Stop] to save the location. 6. Select a suitable POI type for the location. Scroll through the POI types with [Start Stop] or [Light Lock]. Select a POI type with [Next]. 7. Select a suitable name for the location. Scroll through the name options with [Start Stop] or [Light Lock]. Select a name with [Next]. 8. Press [Start Stop] to save the POI.](https://usermanual.wiki/Suunto/23391.Userguides/User-Guide-2371075-Page-39.png)
![41 connect the watch to Movescount. 8.3.2 Navigating to a point of interest (POI) Suunto Ambit3 Peak includes GPS navigation which allows you to navigate to a pre-defined destination stored as a POI. NOTE: You can also navigate when you are recording an exercise, see 11.6.7 Navigating during exercise. To navigate to a POI: 1. Press [Start Stop] to enter the start menu. 2. Scroll to NAVIGATION using [Start Stop] and enter with [Next]. 3. Scroll to POIs (Points of interest) using [Light Lock] and select with [Next]. The watch displays the number of saved POIs and free space available for new POIs. 4. Scroll to the POI you wish to navigate to with [Start Stop] or [Light Lock] and select with [Next]. 5. Press [Next] to select Navigate. If you are using the compass for the first time, you need to calibrate it. For more information, see 10.1 Calibrating compass. After activating the compass, the watch starts searching for a GPS signal and displays GPS found after acquiring the signal.](https://usermanual.wiki/Suunto/23391.Userguides/User-Guide-2371075-Page-41.png)
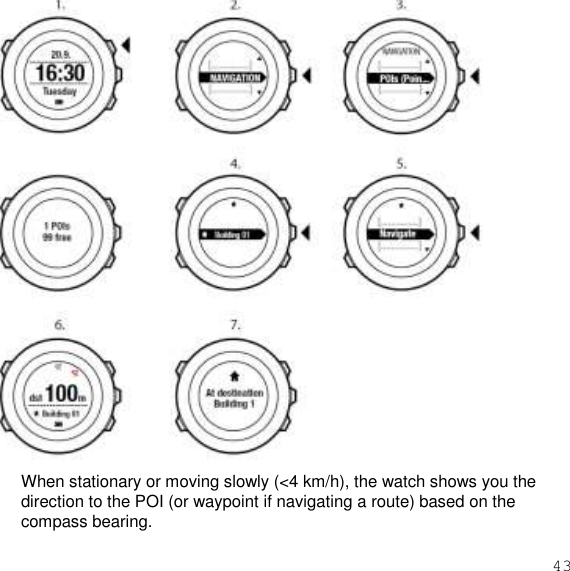
![44 While moving (>4 km/h), the watch shows you the direction to the POI (or waypoint if navigating a route) based on GPS. The direction to your target, or bearing, is shown with the empty triangle. Your direction of travel, or heading, is indicated by the solid lines at the top of the display. Aligning these two ensures you are moving in the correct direction. 8.3.3 Deleting a point of interest (POI) To delete a POI: 1. Press [Start Stop] to enter the start menu. 2. Scroll to NAVIGATION using [Start Stop] and enter with [Next]. 3. Scroll to POIs (Points of interest) using [Light Lock] and](https://usermanual.wiki/Suunto/23391.Userguides/User-Guide-2371075-Page-44.png)
![45 select with [Next]. The watch displays the number of saved POIs and free space available for new POIs. 4. Scroll to the POI you wish to delete with [Start Stop] or [Light Lock] and select with [Next]. 5. Scroll to Delete with [Start Stop]. Select with [Next]. 6. Press [Start Stop] to confirm](https://usermanual.wiki/Suunto/23391.Userguides/User-Guide-2371075-Page-45.png)
![47 8.4.2 Navigating a route You can navigate a route you have downloaded to your Suunto Ambit3 Peak from Movescount, see 8.4.1 Adding a route. NOTE: You can also navigate as a sport mode, see 11.6.7 Navigating during exercise. To navigate a route: 1. Press [Start Stop] to enter the start menu. 2. Scroll to NAVIGATION with [Start Stop] and enter with [Next]. 3. Scroll to Routes with [Start Stop] and enter with [Next]. The watch displays the number of saved routes and after that a list of all your routes. 4. Scroll to the route you want to navigate with [Start Stop] or [Light Lock]. Select with [Next]. 5. The watch displays all the waypoints on the selected route. Scroll to the waypoint you want to use as the starting point with [Start Stop] or [Light Lock]. Accept with [Next].](https://usermanual.wiki/Suunto/23391.Userguides/User-Guide-2371075-Page-47.png)
![48 6. Press [Next] to select Navigate. 7. If you selected a waypoint in the middle of the route, Suunto Ambit3 Peak prompts you to select the direction of the navigation. Press [Start Stop] to select Forwards or [Light Lock] to select Backwards. If you selected the first waypoint as the starting point, Suunto Ambit3 Peak navigates the route forward (from the first to the last waypoint). If you selected the last waypoint as the starting point, Suunto Ambit3 Peak navigates the route backwards (from the last to the first waypoint). 8. If you are using the compass for the first time, you need to calibrate it. For more information, see 10.1 Calibrating compass. After activating the compass, the watch starts searching for a GPS signal and displays GPS found after acquiring the signal. 9. Start navigating to the first waypoint on the route. The watch informs you when you are approaching the waypoint and automatically starts navigating to the next waypoint on the route. 10. Before the last waypoint on the route the watch informs you that you have arrived at your destination.](https://usermanual.wiki/Suunto/23391.Userguides/User-Guide-2371075-Page-48.png)

![50 To skip a waypoint on a route: 1. While you are navigating a route, keep [Next] pressed to access the options menu.](https://usermanual.wiki/Suunto/23391.Userguides/User-Guide-2371075-Page-50.png)
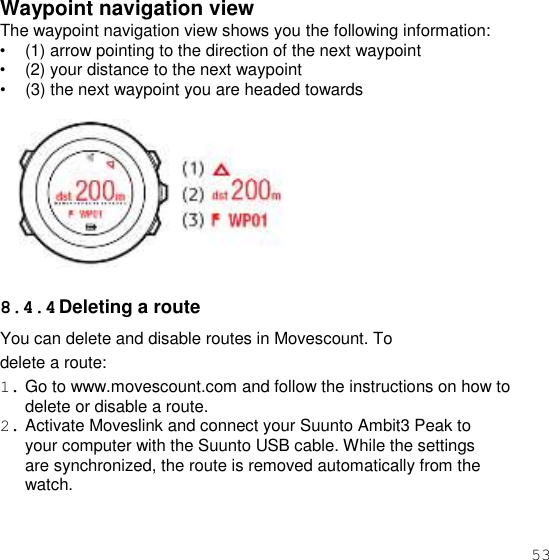
![51 2. Press [Next] to select NAVIGATION. 3. Scroll to Skip waypoint with [Start Stop] and select with [Next]. The watch skips the waypoint and starts navigating directly to the next waypoint on the route. 8.4.3 During navigation During navigation, press [View] to scroll the following views: 1. the full track view showing the whole route 2. zoomed-in view of the route. By default, the zoomed-in view is scaled to a 200 m/0.125 mi scale, or larger if you are far away from the route. You can change the map orientation in the watch settings under GENERAL / Map. 3. waypoint navigation view](https://usermanual.wiki/Suunto/23391.Userguides/User-Guide-2371075-Page-51.png)


![58 1. Keep [Next] pressed to enter the options menu. 2. Scroll to ALTI-BARO with [Light Lock] and enter with [Next]. 3. Press [Next] to select Profile. 4. Scroll the profile options (Automatic, Altimeter, Barometer) with [Start Stop] or [Light Lock]. Select a profile with [Next]. 9.4.2 Setting reference values To set the sea level pressure and altitude reference values: 1. Keep [Next] pressed to enter the options menu. 2. Scroll to ALTI-BARO with [Light Lock] and enter with [Next]. 3. Scroll to Reference with [Light Lock] and enter with [Next]. 4. The following setting options are available: • FusedAlti: GPS is switched on and the device starts calculating altitude based on FusedAlti. For more information, see 9.8 FusedAlti. • Manual altitude: Set your altitude manually. • Sea level pressure: Set the sea level pressure reference value manually. 5. Set the reference value using [Start Stop] and [Light Lock].](https://usermanual.wiki/Suunto/23391.Userguides/User-Guide-2371075-Page-58.png)
![59 Accept the setting with [Next]. TIP: You can access the Reference setting by keeping [View] pressed when in ALTI & BARO mode. You can also set your altitude during your exercise, see 11.6.4 Setting altitude during exercise. 9.5 Using Altimeter profile The Altimeter profile calculates altitude based on reference values. The reference value can either be sea level air pressure value or altitude reference value. When the Altimeter profile is activated,](https://usermanual.wiki/Suunto/23391.Userguides/User-Guide-2371075-Page-59.png)
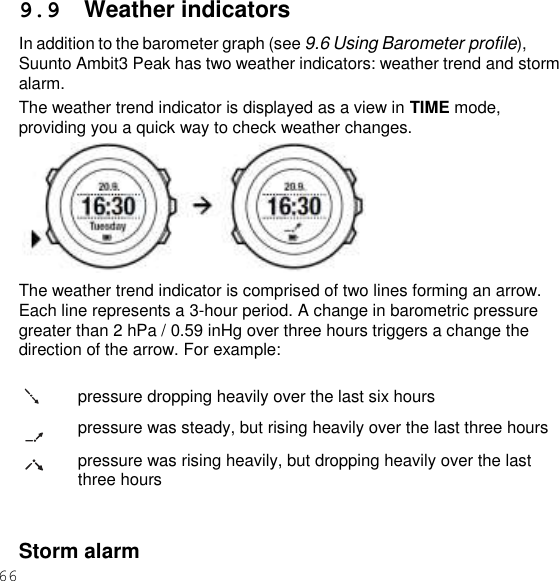
![60 the altimeter icon is shown on the display. For information on setting the profile, see 9.4.1 Setting profiles. When the Altimeter profile is activated, you can access the following views: • top row: your current altitude • middle row: altitude information on a 12-hour timeline in graph form • bottom row: toggle between time and temperature with [View] NOTE: If you are wearing your Suunto Ambit3 Peak on your wrist, you will need to take it off in order to get an accurate temperature reading because your body temperature will affect the initial reading. 9.6 Using Barometer profile The Barometer profile shows the current sea level air pressure. This is based on the reference values added in the settings and the constantly measured absolute air pressure. For information on setting the reference values, see 9.4.2 Setting reference values. Changes in the sea level air pressure are presented graphically in the middle row of the display. The display shows the recording of the last 26 hours with a recording interval of 15 minutes.](https://usermanual.wiki/Suunto/23391.Userguides/User-Guide-2371075-Page-60.png)
![61 When the Barometer profile is activated, the barometer icon is shown on the display. For information on setting the ALTI & BARO profile, see 9.4.1 Setting profiles. When the Barometer profile is activated, Suunto Ambit3 Peak shows you the following barometric information: • top row: the current sea level air pressure • middle row: a graph displaying sea level pressure data from the past 27 hours (1h recording interval) • bottom row: toggle between temperature, time and altitude reference value with [View] Altitude reference is the latest altitude used in ALTI & BARO mode. It can be: • the altitude you have set as altitude reference in the Barometer profile, or • the latest altitude logged in the Automatic profile before changing to the Barometer profile.](https://usermanual.wiki/Suunto/23391.Userguides/User-Guide-2371075-Page-61.png)
![63 If you are moving in altitude (more than 5 meters of vertical movement within 3 minutes), Suunto Ambit3 Peak interprets all pressure changes as movements in altitude. Depending on which profile is active, you can access the Altimeter or Barometer profile views with [View]. NOTE: When you are using the Automatic profile, barometer or altimeter icons are not shown on the display. 9.8 FusedAlti FusedAltiTM provides an altitude reading that is a combination of GPS and barometric altitude. It minimizes the effect of temporary and offset errors in the final altitude reading. NOTE: By default, altitude is measured with FusedAlti during exercises that use GPS and during navigation. When GPS is switched off, altitude is measured with the barometric sensor. If you do not want to use FusedAlti in altitude measurement, you can disable it in the options menu. To disable FusedAlti: 1. Keep [Next] pressed to access the options menu. 2. Scroll to ALTI-BARO with [Light Lock] and enter with [Next].](https://usermanual.wiki/Suunto/23391.Userguides/User-Guide-2371075-Page-63.png)
![64 3. Scroll to FusedAlti with [Start Stop] and select with [Next]. 4. Set FusedAlti Off with [Start Stop] or [Light Lock] and accept with [Next]. When the device is in TIME mode, you can search a new reference for barometric altitude with FusedAlti. This activates the GPS for a maximum of 15 minutes. To search a new reference for barometric altitude with FusedAlti: 1. Keep [Next] pressed to enter the options menu. 2. Scroll to ALTI-BARO with [Light Lock] and enter with [Next].](https://usermanual.wiki/Suunto/23391.Userguides/User-Guide-2371075-Page-64.png)
![65 3. Scroll to Reference with [Light Lock] and enter with [Next]. 4. Scroll to FusedAlti with [Start Stop] and select with [Next]. GPS is switched on and the device starts calculating altitude based on FusedAlti. NOTE: In good conditions it takes 4 – 12 minutes for the FusedAlti to activate. During that time, Suunto Ambit3 Peak shows barometric altitude and ~ is shown with the altitude reading to indicate that the altitude may not be correct.](https://usermanual.wiki/Suunto/23391.Userguides/User-Guide-2371075-Page-65.png)
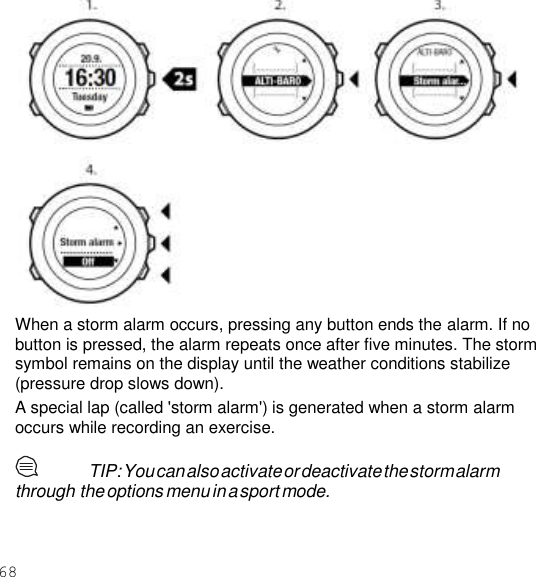
![67 A significant drop in barometric pressure typically means a storm is coming and you should take cover. When the storm alarm is active, Suunto Ambit3 Peak sounds an alarm and flashes a storm symbol when the pressure drops 4 hPa / 0.12 inHg or more during a 3-hour period. NOTE: The storm alarm does not work if you have altimeter profile activated. See 9.4.1 Setting profiles. To activate Storm alarm: 1. Keep [Next] pressed to enter the options menu. 2. Scroll to ALTI-BARO with [Light Lock] and enter with [Next]. 3. Press [Next] to select Storm alarm. 4. Set the storm alarm On or Off with with [Start Stop] or [Light Lock] and accept with [Next].](https://usermanual.wiki/Suunto/23391.Userguides/User-Guide-2371075-Page-67.png)
![69 10 USING 3D COMPASS Suunto Ambit3 Peak has a 3D compass that allows you to orient yourself in relation to magnetic north. The tilt-compensated compass gives you accurate readings even if the compass is not horizontally level. COMPASS mode includes the following information: • middle row: compass heading in degrees • bottom row: toggle between the current heading in cardinal (N, S, W, E) and half-cardinal (NE, NW, SE, SW) points, time and empty view with [View] The compass will switch itself to power saving mode after one minute. Reactivate it with [Start Stop]. For information on using compass during exercise, see 11.6.5 Using compass during exercise. 10.1 Calibrating compass COMPASS mode asks you to calibrate the compass before you start using it. If you have already calibrated the compass and want to re- calibrate it, you can access the calibration option in the options menu.](https://usermanual.wiki/Suunto/23391.Userguides/User-Guide-2371075-Page-69.png)
![70 To calibrate the compass: 1. Keep [Next] pressed to enter the options menu. 2. Scroll to GENERAL using [Light Lock] and enter with [Next]. 3. Scroll to Compass using [Start Stop] or [Light Lock] and enter with [Next]. 4. Press [Next] to select Calibration. 5. Turn and tilt the watch in multiple directions until the watch beeps, indicated calibration is complete. If the calibration is successful, the text CALIBRATION SUCCESSFUL is displayed. If the calibration does not succeed, the text CALIBRATION FAILED is displayed. To retry the calibration, press [Start Stop].](https://usermanual.wiki/Suunto/23391.Userguides/User-Guide-2371075-Page-70.png)
![71 10.2 Setting declination value To ensure correct compass readings, set an accurate declination value. Paper maps point to true north. Compasses, however, point to magnetic north – a region above the Earth where the Earth’s magnetic fields pull. Because magnetic North and true North are not at the same location, you must set the declination on your compass. The angle in between magnetic and true north is your declination. The declination value appears on most maps. The location of magnetic north changes yearly, so the most accurate and up-to-date declination value can be obtained from the internet (for example www.magnetic-declination.com). Orienteering maps, however, are drawn in relation to magnetic north. This means that when you are using orienteering maps you need to turn the declination correction off by setting the declination value to 0 degrees. To set the declination value: 1. Keep [Next] pressed to enter the options menu. 2. Press [Next] to enter GENERAL. 3. Scroll to Compass using [Light Lock] and select with [Next]. 4. Scroll to Declination with [Light Lock] and select with [Next]. 5. Turn the declination off by selecting --, or select W (west) or E (east). 6. Set the declination value with [Start Stop] or [Light Lock]. 7. Press [Next] to accept the setting.](https://usermanual.wiki/Suunto/23391.Userguides/User-Guide-2371075-Page-71.png)
![72 TIP: You can also enter the compass settings by keeping [View] pressed in COMPASS mode. 10.3 Setting bearing lock You can mark the direction to your target in relation to North with the bearing lock feature. To lock a bearing: 1. With the compass active, hold the watch in front of you and turn yourself towards your target.](https://usermanual.wiki/Suunto/23391.Userguides/User-Guide-2371075-Page-72.png)
![73 2. Press [Back Lap] to lock the current degree displayed on the watch as your bearing. 3. An empty triangle indicates the locked bearing in relation to the North indicator (solid triangle). 4. Press [Back Lap] to clear the bearing lock. NOTE: While using the compass in an exercise mode, the [Back Lap] button only locks and clears the bearing. Exit the compass view to make a lap with [Back Lap].](https://usermanual.wiki/Suunto/23391.Userguides/User-Guide-2371075-Page-73.png)
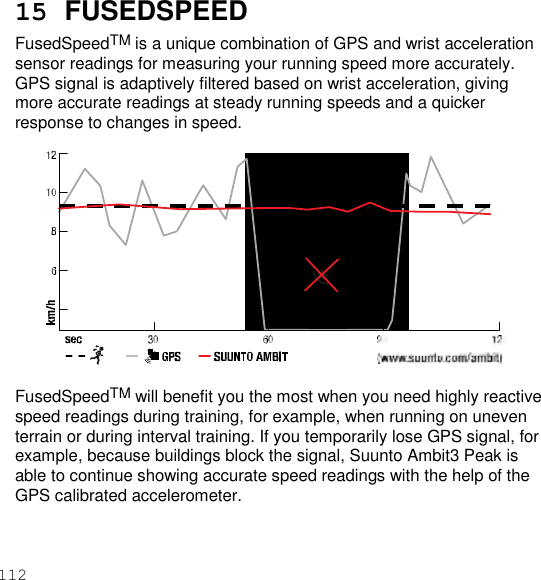
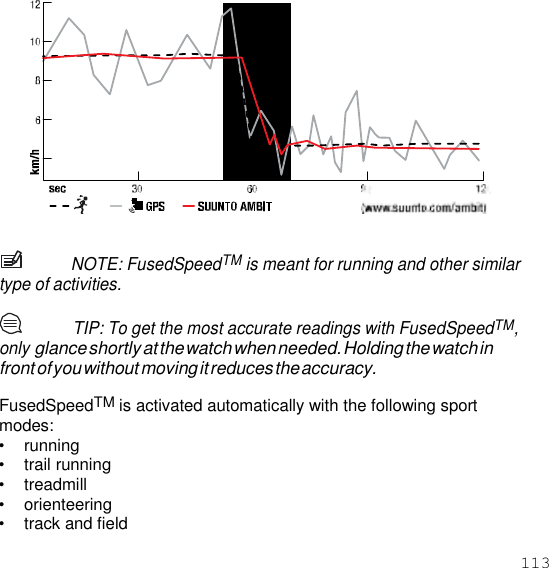
![74 11 USING SPORT MODES Use the sport modes to record exercise logs and view various information during your exercise. You can access the sport modes by pressing [Start Stop] in the TIME or ALTI & BARO mode, or in the COMPASS mode after the compass has been calibrated. 11.1 Sport modes You can select a suitable sport mode from the predefined sport modes. Depending on the sport, different information is shown on the display during exercise. For example, the sport mode specifies whether FusedSpeedTM or plain GPS speed is used. (For more information, see 14 FusedSpeed.) The selected sport mode also affects exercise settings, such as HR limits, autolap distance, ALTI & BARO mode and recording rate. In Movescount you can create more custom sport modes, edit the predefined sport modes and download them to your device. During exercise the predefined sport modes give you information that is useful for that particular sport:](https://usermanual.wiki/Suunto/23391.Userguides/User-Guide-2371075-Page-74.png)
![75 • Cycling: speed, distance, cadence and heart rate related information • Mountaineering: altitude, distance and speed related information (60 sec GPS fix) • Alpine skiing: altitude, descent and time related information • Trekking: distance, altitude, heart rate and chronograph related information (60 sec GPS fix) • Triathlon: combination of outdoor swimming, cycling and running related information • Running: pace, heart rate and chronograph related information • Pool swimming: average stroke rate, max. pace, average SWOLF • Openwater swim: average stroke rate, max. pace • Other sports: speed, heart rate and altitude related information • Indoor training : heart rate related information (without GPS) NOTE: SWOLF is used to calculate swimming efficiency. It is a combination of swim time and number of strokes over a specific pool length. 11.2 Additional options in sport modes When a sport mode is selected, keep [Next] pressed to access additional options to be used during your exercise:](https://usermanual.wiki/Suunto/23391.Userguides/User-Guide-2371075-Page-75.png)

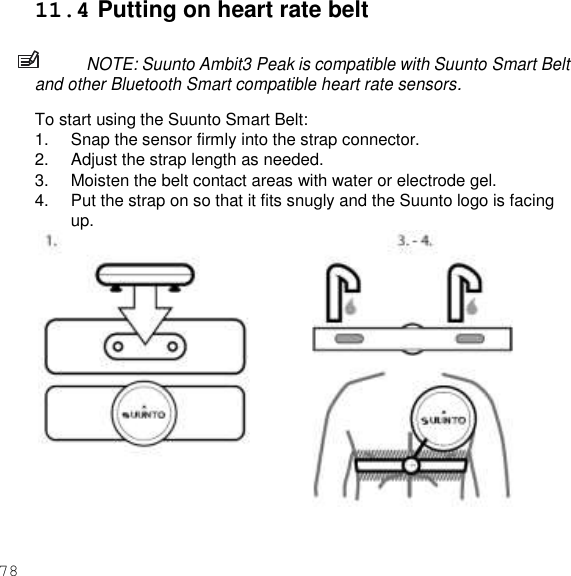
![79 WARNING: People who have a pacemaker, defibrillator, or other implanted electronic device use the heart rate belt at their own risk. Before starting the initial use of the heart rate belt, we recommend an exercise test under a doctor’s supervision. This ensures the safety and reliability of the pacemaker and heart rate belt when being used simultaneously. Exercise may include some risk, especially for those who have been inactive. We strongly advise you to consult your doctor prior to beginning a regular exercise program. NOTE: Suunto Ambit3 Peak cannot receive the heart rate belt signal under water. TIP: Machine-wash the heart rate belt regularly after use to avoid unpleasant odor and to ensure good data quality and functionality. Only wash the textile strap. Suunto Ambit3 Peak supports Bluetooth® Smart compatible heart rate belts and certain PODs. Visit www.suunto.com for a list of compatible products. 11.5 Starting exercise To start exercising: 1. Moisten the contact areas and put on the heart rate belt (optional). 2. Press [Start Stop] to enter the start menu. 3. Press [Next] to enter EXERCISE.](https://usermanual.wiki/Suunto/23391.Userguides/User-Guide-2371075-Page-79.png)
![80 4. Scroll the sport mode options with [Start Stop] or [Light Lock] and select a suitable mode with [Next] 5. The watch automatically starts searching for a heart rate belt signal, if the selected sport mode uses a heart rate belt. Wait for the watch to notify that the heart rate and/or GPS signal have been found, or press [Start Stop] to select Later. The watch continues to search the heart rate/GPS signal. Once the heart rate/GPS signal has been found, the watch starts showing and recording heart rate/GPS data. 6. Press [Start Stop] to start recording your exercise. To access the options menu, keep [Next] pressed (see 11.2 Additional options in sport modes).](https://usermanual.wiki/Suunto/23391.Userguides/User-Guide-2371075-Page-80.png)

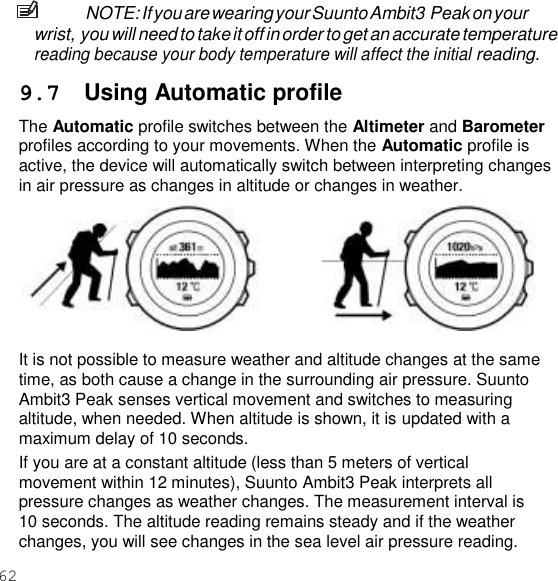
![82 11.6 During exercise Suunto Ambit3 Peak gives you additional information during your exercise. The additional information varies depending on the sport mode you have selected, see . You will also get more information, if you use a heart rate belt and GPS during exercise. Suunto Ambit3 Peak allows you to define what information you want to see on the display. Here are some ideas on how to use the watch during exercise: • Press [Next] to see additional displays. • Press [View] to see additional views. • To avoid accidentally stopping your log recording or making unwanted laps, lock the buttons by keeping [Light Lock] pressed. • Press [Start Stop] to pause recording. The pause will be shown in your log as a lap mark. To resume recording, press [Start Stop] again. 11.6.1 Second display on phone If you are using the Suunto Movescount mobile app, you can use your mobile phone as a second display for your watch. To use your mobile phone as a second display: 1. Open the Movescount app and tap Move. 2. Select Ambit3 from the list of sport modes and tap Next. 3. Tap on each of the display areas – middle, upper left, upper right – to select what values you want displayed.](https://usermanual.wiki/Suunto/23391.Userguides/User-Guide-2371075-Page-82.png)
![83 4. Start your exercise in your watch. 11.6.2 Recording tracks Depending on the sport mode you have selected, your Suunto Ambit3 Peak records various information during exercise. If you are using GPS while recording a log, Suunto Ambit3 Peak will also record your track and you can view it in Movescount. When you are recording your track, the recording icon and the GPS icon are shown on the upper part of the display. 11.6.3 Making laps During your exercise, you can make laps either manually or automatically by setting the autolap interval in Movescount. When you are making laps automatically, Suunto Ambit3 Peak records the laps based on the distance you have specified in Movescount. To make laps manually, press [Back Lap] during the exercise. Suunto Ambit3 Peak shows you the following information: • top row: split time (duration from the start of the log) • middle row: lap number • bottom row: lap time](https://usermanual.wiki/Suunto/23391.Userguides/User-Guide-2371075-Page-83.png)
![84 NOTE: The exercise summary always shows at least one lap, your exercise from start to finish. The laps you have made during the exercise are shown as additional laps. 11.6.4 Recording altitude Your Suunto Ambit3 Peak stores all your movements in altitude between the start and stop time of the log. If you are engaged in an activity in which your altitude changes, you can record the altitude changes and view the stored information later. NOTE: By default, altitude measurement is based on FusedAlti. For more information, see 9.8 FusedAlti. To record altitude: 1. Make sure that the Altimeter profile is activated. 2. Press [Start Stop] to enter the start menu. 3. Press [Next] to select EXERCISE. 4. Scroll the sport modes with [Start Stop] or [Light Lock] and select a suitable mode with [Next].](https://usermanual.wiki/Suunto/23391.Userguides/User-Guide-2371075-Page-84.png)
![85 5. Wait for the device to notify that the heart rate and/or GPS signal have been found, or press [Start Stop] to select Later. The device continues to search the heart rate/GPS signal. Press [Start Stop] to start recording the log.](https://usermanual.wiki/Suunto/23391.Userguides/User-Guide-2371075-Page-85.png)
![86 11.6.5 Setting altitude during exercise Most of the sport modes allow you to set your altitude manually during exercise. To set your altitude during exercise: 1. While you are in a sport mode, keep [Next] pressed to access the options menu. 2. Scroll to ALTITUDE with [Start Stop] and select with [Next]. 3. Set your altitude using [Start Stop] and [Light Lock]. 4. Accept with [Next]. 11.6.6 Using compass during exercise You can activate the compass and add it to a custom sport mode during your exercise. To use the compass during exercise: 1. While you are in a sport mode, keep [Next] pressed to access the](https://usermanual.wiki/Suunto/23391.Userguides/User-Guide-2371075-Page-86.png)
![87 options menu. 2. Scroll to ACTIVATE with [Light Lock] and select with [Next]. 3. Scroll to Compass with [Light Lock] and select with [Next]. 4. The compass is shown as the last display on the custom sport mode. To deactivate the compass, go back to ACTIVATE in the options menu and select End compass. 11.6.7 Using interval timer You can add an interval timer to each custom sport mode in Movescount. To add the interval timer to a sport mode, select the](https://usermanual.wiki/Suunto/23391.Userguides/User-Guide-2371075-Page-87.png)
![88 sport mode and go to Advanced settings. The next time you connect your Suunto Ambit3 Peak to your Movescount account, the interval timer will be synchronized to the watch. You can specify the following information in the interval timer: • interval types (HIGH and LOW interval) • the duration or distance for both interval types • the number of times the intervals are repeated NOTE: If you do not set the number of repetitions for the intervals in Movescount, the interval timer will continue until it has been repeated 99 times. To activate/deactivate the interval timer: 1. While you are in a sport mode, keep [Next] pressed to access the options menu. 2. Scroll to ACTIVATE with [Light Lock] and select with [Next]. 3. Scroll to Interval with [Start Stop] and select with [Next]. 4. Press [Start Stop] or [Light Lock] to set the interval timer On/Off and accept with [Next]. When the interval timer is active, the interval icon is shown on the top of the display.](https://usermanual.wiki/Suunto/23391.Userguides/User-Guide-2371075-Page-88.png)
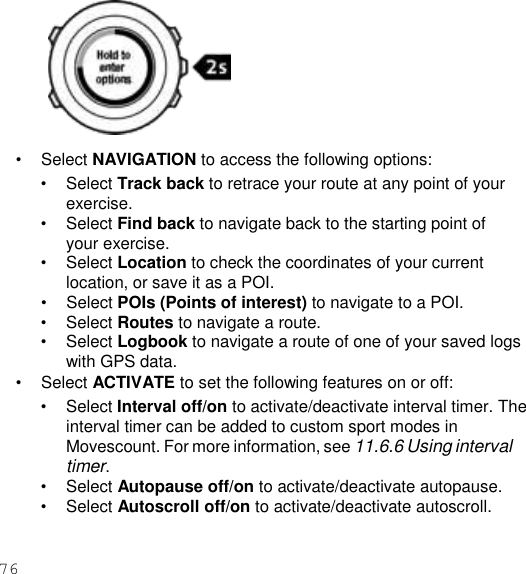
![89 11.6.8 Navigating during exercise If you want to run a route or to a point of interest (POI), you can select the respective default sport mode (Run a Route, Run a POI) from the EXERCISE menu to begin navigating immediately. You can also navigate a route or to a POI during your exercise in other sport modes that have GPS activated. To navigate during exercise: 1. While you are in a sport mode with GPS activated, keep [Next] pressed to access the options menu. 2. Press [Next] to select NAVIGATION.](https://usermanual.wiki/Suunto/23391.Userguides/User-Guide-2371075-Page-89.png)
![90 3. Scroll to POIs (Points of interest) or Routes with [Light Lock] and select with [Next]. The navigation guidance is shown as the last display on the selected sport mode. To deactivate navigation, go back to NAVIGATION in the options menu and select End navigation. 11.6.9 Finding back during exercise Suunto Ambit3 Peak automatically saves the starting point of your exercise, if you are using GPS. During exercise, Suunto Ambit3 Peak guides you back to the starting point (or to the location where the GPS](https://usermanual.wiki/Suunto/23391.Userguides/User-Guide-2371075-Page-90.png)
![91 fix was established) with the Find back functionality. To find back to the starting point during exercise: 1. While you are in a sport mode, keep [Next] pressed to access the options menu. 2. Press [Next] to select NAVIGATION. 3. Scroll to Find back with [Start Stop] and select with [Next]. The navigation guidance is shown as the last display on the selected sport mode. 11.6.10 Using Track back](https://usermanual.wiki/Suunto/23391.Userguides/User-Guide-2371075-Page-91.png)
![92 With Track back, you can retrace your route at any point during an exercise. Suunto Ambit3 Peak creates temporary waypoints to guide you back to your starting point. To track back during exercise: 1. While you are in a sport mode, keep [Next] pressed to access the options menu. 2. Press [Next] to select NAVIGATION. 3. Scroll to Track back with [Start Stop] and select with [Next]. You can now start navigating your way back the same way as during route navigation. For more information about route navigation, see 8.4.3 During navigation . Track back can also be used from the logbook with exercises that include GPS data. Follow the same procedure as in 8.4.2 Navigating a route. Scroll to LOGBOOK instead of Routes, and select a log to start navigating. 11.6.11 Autopause Autopause pauses the recording of your exercise when your speed is less than 2 km/h. When your speed increases to more than 3 km/h, the](https://usermanual.wiki/Suunto/23391.Userguides/User-Guide-2371075-Page-92.png)
![93 recording continues automatically. You can set autopause to on/off for each sport mode in Movescount. Alternatively, you can activate autopause during exercise. To set autopause on/off during exercise: 1. While you are in a sport mode, keep [Next] pressed to access the options menu. 2. Scroll to ACTIVATE with [Light Lock] and select with [Next]. 3. Scroll to Autopause with [Start Stop] and select with [Next]. 4. Press [Start Stop] or [Light Lock] to set autopause On/Off and accept with [Next].](https://usermanual.wiki/Suunto/23391.Userguides/User-Guide-2371075-Page-93.png)
![94 11.7 Viewing logbook after exercise You can view the summary of your exercise after you have stopped recording. To stop recording and view the summary information: 1. Keep [Start Stop] pressed to stop and save the exercise. Alternatively, you can press [Start Stop] to pause the recording. After pausing the log, confirm stopping by pressing [Back Lap], or continue recording by pressing [Light Lock]. After stopping the exercise, save the log by pressing [Start Stop]. If you do not want to save the log, press [Light Lock]. 2. Press [Next] to view the exercise summary. You can also view the summaries of all your saved exercises in the logbook. In the logbook the exercises are listed according to time and the latest exercise is shown first. The logbook can store approximately 15 hours of exercises with the best GPS accuracy and 1 second recording interval. To view the summary of your exercise in the logbook: 1. Press [Start Stop] to enter the start menu.](https://usermanual.wiki/Suunto/23391.Userguides/User-Guide-2371075-Page-94.png)
![95 2. Scroll to LOGBOOK with [Light Lock] and enter with [Next]. Your current recovery time is shown. 3. Scroll the exercise logs with [Start Stop] or [Light Lock] and select a log with [Next]. 4. Browse the summary views of the log with [Next]. 11.7.1 Memory left indicator If more than 50 % of the watch memory has not been synchronized, Suunto Ambit3 Peak displays a reminder when you enter the logbook.](https://usermanual.wiki/Suunto/23391.Userguides/User-Guide-2371075-Page-95.png)
![96 The reminder is not displayed once the unsynced memory is full and Suunto Ambit3 Peak begins overwriting old logs. NOTE: If paired with Movescount mobile app, your move are synced automatically wit Movescount with the move is saved. Automatic syncing can be turned off under CONNECTIVITY settings. 11.7.2 Dynamic exercise summary The dynamic exercise summary shows the active fields from your exercise as a summary. You can browse the summary views with [Next]. The information shown on the summary depends on the sport mode you used, and whether you used a heart rate belt or GPS. By default, all the sport modes include the following information: • sport mode name • time • date • duration](https://usermanual.wiki/Suunto/23391.Userguides/User-Guide-2371075-Page-96.png)

![100 NOTE: If you select cumulative ascent/decent as a display option, the data will only be shown if you have also selected best GPS accuracy. For more information about GPS accuracy, see 8.1.3 GPS accuracy and power saving. TIP: You can access more detailed data in Movescount. 11.7.3 Recovery time Suunto Ambit3 Peak always shows your current cumulative recovery time from all your saved exercises. The recovery time indicates how long it takes for you to fully recover and be ready to exercise with full intensity. As your recovery time decreases or increases, the watch updates it in real time. To view your current recovery time: 1. Press [Start Stop] to enter the start menu. 2. Scroll to LOGBOOK with [Light Lock] and select with [Next]. 3. The recovery time is shown on the display.](https://usermanual.wiki/Suunto/23391.Userguides/User-Guide-2371075-Page-98.png)
![101 NOTE: The recovery time is shown only if it is longer than 30 minutes. 11.8 Using planned moves You can plan individual moves or use training programs and download them to your Suunto Ambit3 Peak. With planned moves, your Suunto Ambit3 Peak guides you to reach your training targets. Store up to 60 planned moves in your watch. To use a planned move: 1. Plan individual moves under MY MOVES or use (or create) a training program under PLAN & CREATE in Movescount.com and add the program to your planned moves. 2. Resync with Movescount.com to download planned moves to your watch. 3. Follow daily guidance as well as the guidance during your planned moves to reach your targets. To start a planned move: 1. Press [Next] to check your watch to see if you have a planned target for the day. 2. If you have multiple planned moves for the day, press [View] to see each move target.](https://usermanual.wiki/Suunto/23391.Userguides/User-Guide-2371075-Page-99.png)
![100 3. Press [Start Stop] to start a planned move or press [Next] again to return to TIME mode. During a planned move, your Suunto Ambit3 Peak provides guidance based on speed or heart rate: Your Suunto Ambit3 Peak also indicates when 50% and 100% of your planned target is complete. When your target is complete or you have a rest day, future targets are indicated by weekday if the next planned move is within a week or by date of it is more than a week away:](https://usermanual.wiki/Suunto/23391.Userguides/User-Guide-2371075-Page-100.png)
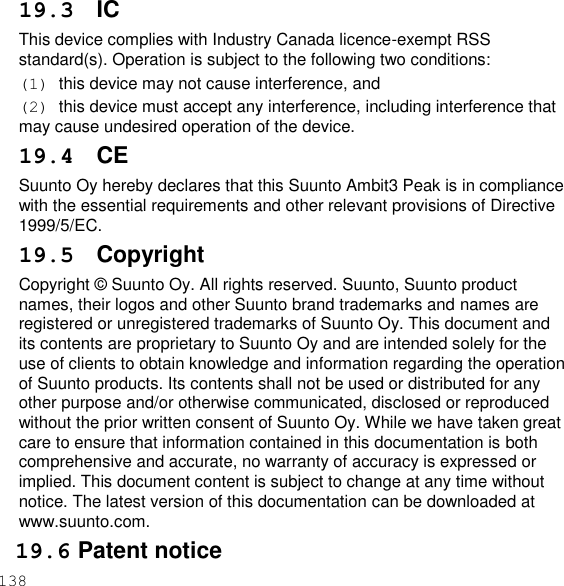
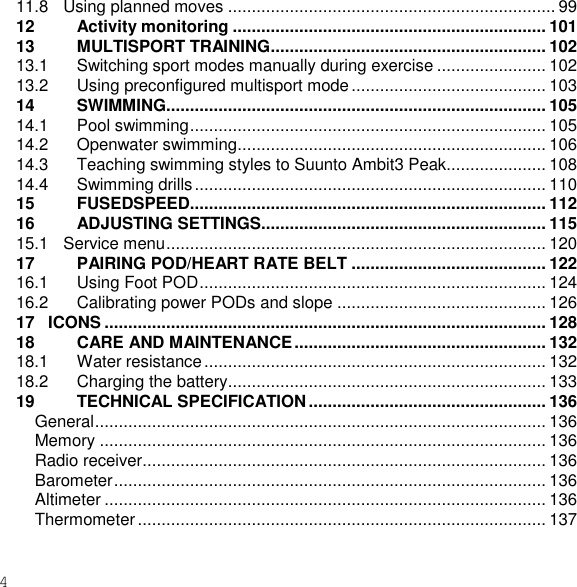
![101 12 Activity monitoring In addition to the recovery time shown in your exercise log, Suunto Ambit3 Peak monitors you overall activity, both exercise and daily activity, to give you a complete picture of your activity level and its affect on your recovery time. Activity monitoring is available as a default display in Time mode. You can access the display by pressing [Next]. The activity monitoring display has three views: recovery time, daily activity, and weekly activity. 13.10 15 km 75 min Friday 35 min Running](https://usermanual.wiki/Suunto/23391.Userguides/User-Guide-2371075-Page-101.png)
![100 13 MULTISPORT TRAINING Suunto Ambit3 Peak offers multisport support; you can easily switch between different sports and constantly see relevant data during your exercise. You can change the sport manually during the exercise, or create a multisport mode in advance in Movescount and download it to your Suunto Ambit3 Peak. You can set an interval timer in Movescount for each sport mode included in the multisport mode. The interval timer restarts when the sport changes. 13.1 Switching sport modes manually during exercise Suunto Ambit3 Peak allows you to switch to another sport mode during exercise without having to stop recording. All the sport modes you have used during the exercise are included in the log. To switch the sport mode manually during exercise: 1. While you are recording your exercise, keep [Back Lap] pressed to access the sport modes. 2. Scroll the list of sport mode options with [Start Stop] or [Light Lock]. 3. Select a suitable sport mode with [Next]. Suunto Ambit3 Peak continues recording the log and the data for the selected sport mode.](https://usermanual.wiki/Suunto/23391.Userguides/User-Guide-2371075-Page-102.png)
![103 NOTE: Suunto Ambit3 Peak makes a lap each time you switch to another sport mode. NOTE: The log recording is not paused when you switch to another sport mode. You can pause the recording manually by pressing [Start Stop]. 13.2 Using preconfigured multisport mode You can create your own multisport mode in Movescount and download it to your Suunto Ambit3 Peak. The multisport mode can comprise a number of different sport modes in a specific order. Each sport included in the multisport mode has its own interval timer. You can select Multisport, Adventure racing or Triathlon as the multisport mode. To use a preconfigured multisport mode: 1. Press [Start Stop] to enter the start menu. 2. Press [Next] to enter EXERCISE. 3. Scroll to the preconfigured multisport mode and select with](https://usermanual.wiki/Suunto/23391.Userguides/User-Guide-2371075-Page-103.png)
![104 [Next]. Wait for the device to notify that the heart rate and/or GPS signal have been found, or press [Start Stop] to select Later. The device continues to search the heart rate/GPS signal. 4. Press [Start Stop] to start recording the log. 5. Keep [Back Lap] pressed to change to the next sport in your multisport mode.](https://usermanual.wiki/Suunto/23391.Userguides/User-Guide-2371075-Page-104.png)
![105 14 SWIMMING You can use your Suunto Ambit3 Peak to record various data while swimming. The watch also recognizes your swimming style. You can log your exercise in a swimming pool or outdoors and analyze the data afterwards in Movescount. When used together with the Suunto Smart Belt, you can also record your heart rate while you are swimming. The heart rate data is automatically uploaded to your Suunto Ambit3 Peak once you get out of the water and stop/save your exercise. 14.1 Pool swimming When using the pool swimming sport mode, Suunto Ambit3 Peak measures your swimming speed based on the pool length. Each pool length creates a lap that is shown in Movescount as part of the log. To record a swimming log in a pool: 1. Press [Start Stop] to enter the start menu. 2. Press [Next] to enter EXERCISE. 3. Scroll to Pool swimming using [Light Lock] and select with [Next]. 4. Select the pool size. You can select the pool length from the predefined values, or select the custom option to specify the pool length. Scroll the options with [Start Stop] and [Light Lock] and accept the value with [Next]. 5. Press [Start Stop] to start recording your swimming log.](https://usermanual.wiki/Suunto/23391.Userguides/User-Guide-2371075-Page-105.png)
![106 14.2 Openwater swimming When using the openwater swimming mode, Suunto Ambit3 Peak measures your swimming speed using GPS and shows you real-time data during the swim. To record an outdoor swimming log: 1. Press [Start Stop] to enter the start menu. 2. Press [Next] to enter EXERCISE. 3. Scroll to Openwater swim with [Light Lock] and select with](https://usermanual.wiki/Suunto/23391.Userguides/User-Guide-2371075-Page-106.png)
![107 [Next]. 4. The device automatically starts searching for GPS signal. Wait for the device to notify that GPS signal has been found, or press [Start Stop] to select Later. The device continues to search for a GPS signal and once it has been found, the device starts showing and recording GPS data. 5. Press [Start Stop] to start recording your swimming log. TIP: Press [Back Lap] to add laps manually during the swim.](https://usermanual.wiki/Suunto/23391.Userguides/User-Guide-2371075-Page-107.png)
![108 14.3 Teaching swimming styles to Suunto Ambit3 Peak You can teach your Suunto Ambit3 Peak to recognize your swimming style. After teaching the swimming styles, Suunto Ambit3 Peak detects them automatically when you start swimming. To teach swimming styles: 1. While you are in the Pool swimming sport mode, keep [Next] pressed to enter the options menu. 2. Press [Next] to select SWIMMING. 3. Press [Next] to select Teach swim style. 4. Scroll the swimming style options with [Light Lock] and [Start Stop]. Select a suitable swimming style with [Next]. You can exit the setting and continue your exercise by selecting END. The available swimming style options are: • FLY (butterfly) • BACK (backstroke) • BREAST (breaststroke) • FREE (freestyle) 5. Swim the pool length in the swimming style you selected. 6. After you have finished swimming, press [Start Stop] to save the style. If you do not want to save the style, press [Light Lock] to return to the swimming style selection.](https://usermanual.wiki/Suunto/23391.Userguides/User-Guide-2371075-Page-108.png)
![109 TIP: You can exit teaching swimming styles any time by keeping [Next] pressed. To reset taught swimming styles back to defaults: 1. In the Pool swimming mode, keep [Next] pressed to enter the options menu. 2. Press [Next] to select SWIMMING. 3. Scroll to Reset taught styles with [Start Stop] and select with [Next].](https://usermanual.wiki/Suunto/23391.Userguides/User-Guide-2371075-Page-109.png)
![110 14.4 Swimming drills You can do swimming drills any time during your swimming workout. If you do a drill with a non-standard swimming style (for example, using only your legs), you can adjust the drill distance by adding pool lengths manually after the drill, if necessary. NOTE: Do not add the drill distance until you have finished your drill. To do a drill: 1. While you are recording your pool swimming log, keep [Next] pressed to access the options menu. 2. Press [Next] to enter SWIMMING. 3. Press [Next] to select Drill and start swimming your drill. 4. After you have finished your drill, press [View] to adjust the total distance, if necessary.](https://usermanual.wiki/Suunto/23391.Userguides/User-Guide-2371075-Page-110.png)
![111 To end the drill, go back to SWIMMING in the options menu and select End drill. TIP: You can pause the drill by pressing [Start Stop].](https://usermanual.wiki/Suunto/23391.Userguides/User-Guide-2371075-Page-111.png)

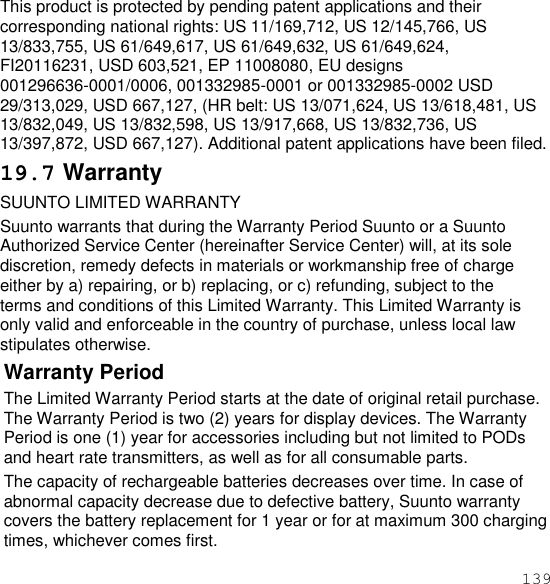
![115 16 ADJUSTING SETTINGS To access and adjust the settings: 1. Keep [Next] pressed to enter the options menu. 2. Scroll the menu with [Start Stop] and [Light Lock]. 3. Press [Next] to enter a setting. 4. Press [Start Stop] and [Light Lock] to adjust the setting values. 5. Press [Back Lap] to return to the previous view in the settings, or keep [Next] pressed to exit the options menu. You can access the following options: PERSONAL • BIRTH YEAR • Weight • Max HR • GENDER GENERAL FORMATS • LANGUAGE](https://usermanual.wiki/Suunto/23391.Userguides/User-Guide-2371075-Page-115.png)

![118 • Date: year, month, day TONES/DISPLAY • Invert display: inverts the display coloring • Button lock o Time mode lock: Button lock in TIME mode. • Actions only: Start and options menus are locked. • All buttons: All buttons are locked. Backlight can be activated in Night mode. o Sport mode lock: Button lock in sport modes. • Actions only: [Start Stop], [Back Lap] and the options menu are locked during exercise. • All buttons: All buttons are locked. Backlight can be activated in Night mode. • Tones: o All on: button tones and system tones are activated o Buttons Off: only system tones are activated o All off: all tones are off Backlight: Mode: • Normal: The backlight is switched on for a few seconds when you press [Light Lock] and when the alarm sounds. • Off: The backlight is not switched on by pressing a button or when the alarm sounds. • Night: The backlight is switched on for a few seconds when you press any button and when the alarm sounds. Using the Night mode significantly reduces battery duration.](https://usermanual.wiki/Suunto/23391.Userguides/User-Guide-2371075-Page-118.png)
![119 • Toggle: The backlight is switched on when you press [Light Lock]. It stays on until you press [Light Lock] again. o Brightness: Adjust backlight brightness (percentage). • Display contrast: Adjust the display contrast (in percentages). Compass • Calibration: Start compass calibration. • Declination: Set the compass declination value. Map • Orientation o Heading up: Displays the zoomed-in map with the heading pointing up. o North up: Displays the zoomed-in map with the north pointing up. NOTE: The alarm will sound even when all tones are off. ALTI-BARO • FusedAlti: Set FusedAlti on/off. • Profile: altimeter, barometer, automatic. • Reference: altitude, sea level. PAIR • Bike PODs: Pair a bike POD. • Power POD: Pair a power POD. • HR belt: Pair a HR belt. • Foot POD: Pair a foot POD. • Cadence POD: Pair a cadence POD.](https://usermanual.wiki/Suunto/23391.Userguides/User-Guide-2371075-Page-119.png)
![120 15.1 Service menu To access the service menu, keep [Back Lap] and [Start Stop] pressed simultaneously until the device enters the service menu. The service menu includes the following items: • INFO: o Air pressure: shows the current absolute air pressure and temperature. o Version: shows the current software and hardware version of your Suunto Ambit3 Peak . • TEST: o LCD test: allows you to test that the LCD works properly. • ACTION: o Power off: allows you to put the watch into deep sleep. o GPS reset: allows you to reset GPS.](https://usermanual.wiki/Suunto/23391.Userguides/User-Guide-2371075-Page-120.png)
![121 NOTE: POWER OFF is a low power state. Connect the USB cable (with power source) to wake up the watch. The initial setup wizard starts. However, prior values are not erased, so you just need to confirm each step. NOTE: The watch switches to power saving mode when it is static for 10 minutes. The watch re-activates when moved. NOTE: Service menu content is subject to change without notice during updates. Resetting GPS In case the GPS unit cannot find a signal, you can reset GPS data in the service menu. To reset GPS: 1. In the service menu, scroll to ACTION with [Light Lock] and enter with [Next]. 2. Press [Light Lock] to scroll to GPS reset and enter with [Next]. 3. Press [Start Stop] to confirm GPS reset, or press [Light Lock] to cancel. NOTE: Resetting GPS resets GPS data, compass calibration values and recovery time. Saved logs are not removed.](https://usermanual.wiki/Suunto/23391.Userguides/User-Guide-2371075-Page-121.png)
![123 2. Keep [Next] pressed to enter the options menu. 3. Scroll to PAIR with [Light Lock] and enter with [Next]. 4. Scroll the accessory options Bike POD, Power POD, HR belt, Foot POD and Cadence POD with [Start Stop] and [Light Lock]. 5. Press [Next] to select a POD or heart rate belt and start pairing. 6. Hold your Suunto Ambit3 Peak close to the POD/belt (<30 cm) and wait for the device to notify that the POD/belt has been paired. If the pairing fails, press [Start Stop] to retry or [Light Lock] to return to the pairing setting. NOTE: You can pair different types of power PODs with your](https://usermanual.wiki/Suunto/23391.Userguides/User-Guide-2371075-Page-123.png)

![125 manually calibrate the foot POD. Perform the calibration on an accurately measured distance, for instance, on a 400 meter running track. To calibrate foot POD with Suunto Ambit3 Peak: 1. Attach foot POD to your shoe. For more information, see user guide for the foot POD you are using. 2. Choose a sport mode (for example Running) in the start menu. 3. Start running at your usual pace. When you cross the starting line, press [Start Stop] to start the recording. 4. Run a distance of 800–1000 meters (about 0.500–0.700 miles) at your usual pace (for example two laps on a 400 meter track). 5. Press [Start Stop] when you reach the finish line to pause the recording. 6. Press [Back Lap] to stop recording. After stopping the exercise, save the log by pressing [Start Stop]. If you do not want to save the log, press [Light Lock]. Scroll with [Next] through summary views, until you reach the distance summary. Adjust the distance shown on the display to the actual distance you ran with [Start Stop] and [Light Lock]. Confirm with [Next]. 7. Confirm the POD calibration by pressing [Start Stop]. Your foot POD has now been calibrated. NOTE: If the foot POD connection was unstable during the calibration exercise, you might not be able to adjust the distance in the distance summary. Make sure that foot POD is attached properly according to instructions and try again. If you are running without a foot POD, you can still get running cadence](https://usermanual.wiki/Suunto/23391.Userguides/User-Guide-2371075-Page-125.png)
![126 from the your wrist. Running cadence measured from wrist is used together with FusedSpeed and is always on for specific sport modes including running, trail running, treadmill, orienteering, and track and field. If a foot POD is found at start of an exercise, running cadence measured from wrist is overwritten by foot POD cadence. 16.2 Calibrating power PODs and slope Suunto Ambit3 Peak automatically calibrates your power POD when it finds the POD. You can also calibrate the power POD manually at any time during an exercise. To manually calibrate a power POD: 1. While you are in a sport mode, keep [Next] pressed to access the options menu. 2. Stop pedaling and lift your feet off the pedals. 3. Scroll to CALIBRATE POWER POD with [Light Lock] and select with [Next]. Suunto Ambit3 Peak starts calibrating the POD and indicates if the](https://usermanual.wiki/Suunto/23391.Userguides/User-Guide-2371075-Page-126.png)
![127 calibration succeeded or failed. The bottom row of the display shows the current frequency used with the power POD. The previous frequency is shown in parentheses. If your power POD has an auto zero feature, you can turn this on/off through your Suunto Ambit3 Peak. To set auto zero on/off: 1. After the calibration is completed, press [Start Stop]. 2. Set auto zero On/Off with [Light Lock] and accept with [Next]. 3. Wait until the setting is completed. 4. Repeat procedure if setting fails or power POD is lost.](https://usermanual.wiki/Suunto/23391.Userguides/User-Guide-2371075-Page-127.png)
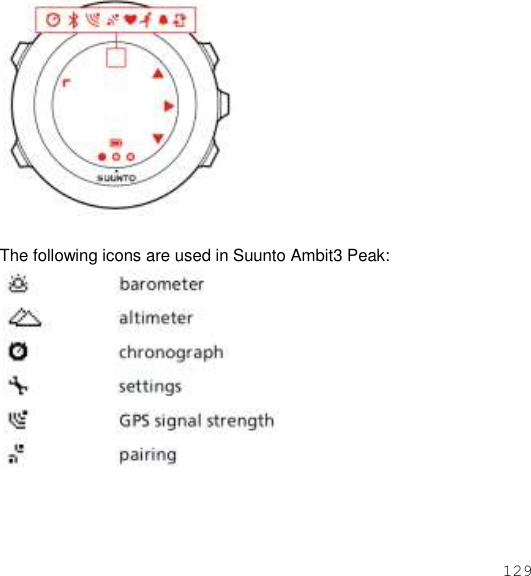
![128 You can calibrate the slope for power PODs that use Crank Torque Frequency (CTF). To calibrate the slope: 1. After the power POD calibration is complete, press [Start Stop]. 2. Set the correct value according to your power POD manual with [Light Lock] and accept with [Next]. 3. Wait until the setting is completed. 4. Repeat procedure if setting fails or power POD is lost. 17 ICONS](https://usermanual.wiki/Suunto/23391.Userguides/User-Guide-2371075-Page-128.png)