9093116 Pacer 30 Illustrated Parts Book Nss Wide Area Vacuum Manual
2016-12-22
: Sweepscrub Nss-Pacer-30-Wide-Area-Vacuum-Parts-Manual nss-pacer-30-wide-area-vacuum-parts-manual 1670 file product_file
Open the PDF directly: View PDF ![]() .
.
Page Count: 20

PARTS LIST
PACER 30 VACUUM
Original Instructions
Instructions D'origine

2
IMPORTANT SAFETY INSTRUCTIONS
READ AND UNDERSTAND ALL INSTRUCTIONS
BEFORE OPERATING OR SERVICING MACHINE
WARNING
When using an electrical appliance, basic
precautions should always be followed, including
the following:
NEVER attempt to operate machine unless you
have been trained in its operation.
NEVER allow an untrained person to operate this
machine.
Use this machine ONLY as described in this
manual.
This vacuum cleaner is designed for DRY pickup
only. DO NOT use on wet surfaces or for wet
pickup. DO NOT USE OUTDOORS. Electric
shock could occur.
NEVER operate machine with a damaged,
broken, cut, abraded, or taped cord or plug.
ALWAYS connect machine to a properly
grounded electrical outlet. See the following
pages for grounding instructions and wiring
diagram.
NEVER leave machine unattended when
plugged in. Unplug machine from electrical outlet
when not in use end before attempting repairs or
maintenance.
ALWAYS turn machine OFF before unplugging
from electrical outlet.
NEVER operate machine in the presence of
flammable or combustible liquids, such as
gasoline, fumes or dusts.
NEVER attempt to pick up flammable or
combustible liquids, such as gasoline, fumes or
dusts.
NEVER handle machine, cord or plug with wet
hands.
NEVER drop or insert any object into any
machine opening.
ALWAYS keep face, fingers, hair or any body
part, or loose clothing away from any machine
opening or moving part; revolving brush.
NEVER pick up anything that is burning or
smoking, such as cigarettes, matches or hot
ashes.
ALWAYS use extreme care when cleaning on
stairs or when machine is placed on stairs.
NEVER operate machine if it is not working
properly, if it has been dropped, damaged,
exposed to weather, or dropped into water,
Return machine to service center for
examination and repair.
NEVER operate machine with any air opening
blocked. Keep all air openings free of dust, lint,
hair and the like.
NEVER operate machine without dust bag
and/or filters in place.
DO NOT pull or carry machine by electrical
supply cord, use cord as a handle, close door
on cord, pull cord around sharp edges or
corners, expose to heated surfaces, or set
heavy or sharp objects on cord.
NEVER disconnect plug by pulling on cord. To
disconnect from outlet, grasp the plug, not the
cord.
DO NOT allow to be used as a toy. Close
attention is necessary when used by or near
children.
SAVE THESE INSTRUCTIONS
Failure to Observe These Instructions Can Cause Fire, Electrical
Burn, Shock or Electrocution to Machine Operator or By-standers.

3
WARNING
Follow grounding sequence of assembly as
shown to ground machine and ensure safety to
operator.
FAILURE TO DO SO MAY CAUSE
ELECTROCUTION due to improper connection of
ground.
Replacement cords must be UL Listed/CSA
approved and be of the identical electrical
specifications as the original equipment cord.
Check nameplate on machine to be sure voltage
and cycle stated on nameplate is the same as
voltage and cycle of electrical outlet. DO NOT
attempt to plug a 115 volt machine into a 240 volt
outlet or a 240 volt machine into a 115 volt outlet.
The grounding blade on the plug must remain
intact if the machine is to be properly grounded
when plugged in and operated. An ungrounded
machine can cause shock to the operator. See
Figure A.
If connecting to an outlet that accepts only two
blades use an adapter as in Figure B. NEVER
REMOVE THE GROUNDING BLADE.
When grounding blade on plug is broken, it is
preferable to replace the whole cord.
If you choose to replace 3-wire plug for 115 Volt
use only UL Listed/CSA approved plug with rating
of 125 Volt 15 amps (for 240 Volt use a 3-wire
plug with rating consistent with voltage and amps
required). Be sure that the green wire of the cord
is connected to the green screw, and the black
wire to gold screw of the replacement plug.
ALWAYS remember when replacing plug, that if
the grounding wire (green) is connected to a live
terminal at the machine or plug, the machine will
become electrically charged and will result in
electrical shock or electrocution.
If it is necessary to use the adapter shown in
Figure B, the machine is only properly grounded if
the adapter’s green colored clip is tied under a
metal screw that holds electrical outlet cover to
the wall.
Figure C. Machine used on 240 volt may or may
not have the grounding (earthed) plug attached to
the cord. For USA 240 volt 60 HZ, the plug is
already supplied with cord. For use outside the
USA, it may be up to the purchaser to have a
proper grounding (earthed) plug attached.
Always use a properly grounded 3-wire extension
cord which has male and female plugs. Use only
14-3ST or SO type extension cord for a total cord
length up to 100 feet [30.5m].
NOTE: IN CANADA, THE USE OF A TEMPORARY ADAPTOR IS NOT PERMITTED BY CANADIAN ELECTRICAL CODE.
SAVE THESE INSTRUCTIONS
DO NOT ATTEMPT MAINTENANCE OR REPAIRS BEFORE
DISCONNECTING CORD FROM ELECTRICAL POWER SOURCE.
READ ALL INSTRUCTIONS AND FOLLOW ALL ILLUSTRATIONS
CAREFULLY.
ALL REPAIR SERVICE MUST BE PERFORMED BY AN NSS AUTHORIZED DISTRIBUTOR /
SERVICE STATION USING ONLY NSS ORIGINAL EQUIPMENT PARTS.

4
WIRING DIAGRAM 115 VOLT

5
WIRING DIAGRAM 220-240 VOLT

6
BRUSH AND SHOE
ITEM PART NO. DESCRIPTION QTY
1013190182BEARINGBLOCK–MACHINED 2
102912246717
/
32I.D.X1‐1
/
4O.D.X1
/
32THICKFLATWASHER‐ PACKOF22
1033490731THRUSTSPRING2
1041099921BEARING2
1053190611BEARINGSPACER‐PLATED 2
1063190191STRINGGUARD–PLATED 2
1073190601NYLINER
,
3
/
4”SHAFT
,
3
/
4"LONG 2
1083190591WARNINGLABEL1
1093190161BRUSH1
3190169BRUSHASSEMBLY
(
INCLUDESITEMS104‐107
,
109
,
128‐130
)
1
1108891180GASKET‐1X1
/
4NEOPRENE
(
Soldin1footincrements
)
6
1113193151GASKET
,
TPU
,
OUTBOARDBELTCHAMBER 2
1123190051SHOE1
3190669BRUSHWITHSHOEASSEMBLY 1
(
INCLUDESITEMS101‐107
,
109‐111
,
117
,
128‐130
)
11391209701
/
4EXTERNALSTARLOCKWASHER –PACKOF10 10
11491210901
/
4‐20X1
/
2TRUSSHEADPHILLIPSMACHINESCREW –PACKOF510
1159120340#10COUNTERSUNKEXTERNALSTARLOCKWASHER –PACKOF54
1169120550#10‐24X5
/
8FLATHEADPHILLIPSMACHINESCREW –PACKOF104
1173190211BRUSHPULLEY1
1183290261PACER28
/
30BELT
,
POLYV‐GROOVE 1
1193190713MOTORSUPPORTPLATE–PAINTED 1
1203191551BRUSHDRIVEMOTOR‐ 1
/
3H.P.‐ 115VOLT 1
3190671BRUSHDRIVEMOTOR‐ 1
/
3H.P.‐ 230 VOLT 1
12191208401
/
4‐20X3
/
16SETSCREW‐ KNURLPOINT –PACKOF5 2
1223191561CORD‐BRUSHDRIVEMOTOR 1
1233291046MOTORTAPPINGPLATE–PLATED 2
12491214003
/
8I.D.X7
/
8O.D.X.064
/
.104THICKWROUGHTWASHER
(
5
/
16
)
–PKOF104
12591215205
/
16SPLITLOCKWASHER –PACKOF10 4
12691216805
/
16‐18X1HEXBOLT–PACKOF5 4
12791209801
/
4‐20X1SOCKETHEADCAPSCREW –PACKOF5 2
1283190201BRUSHSPACER–PLATED 2
1293190178BRUSHSHAFT–COMPLETE 1
1303193131BRUSHSHAFT“O”RING 1
1313193141GASKET
,
TPU
,
INBOARDBELTCHAMBER 1
1323191531MOTORPULLEY1

7
BODY
ITEM PART NO. DESCRIPTION QTY
2013190261HANDLEANDLIDPIVOT 2
2020690661PIVOTSPACER–PLATED 2
20391220453
/
8‐16X21
/
4”FLATROUNDHEADSCREW –PACKOF 1 2
20491219503
/
8X1‐5
/
8CLEVISPINW
/
RETAINER 2
20591220433
/
8‐16X1OVALHEADSCREW 2
2063192081BRACKET‐LEFT
,
HANDLEADJUSTMENT 1
2073192071BRACKET‐RIGHT
,
HANDLEADJUSTMENT 1
2083193021HEPAFILTERLABEL
,
CLEAR 1
2093190021LID1
2107692561LABEL–LID1
2118891100GASKETMATERIAL‐1
/
2X1" 7.5
2123193091LABEL
,
115VOLTWIREDIAGRAM 1
3193101LABEL
,
230VOLTWIREDIAGRAM 1
2133290291CLOTHFILTERBAG1
2143190041INTAKE1
2153190431GASKETSET–NEOPRENE 1
2169120790#10X5
/
8PANHEADPHILLIPSSHEETMETALSCREW –PACKOF108
2179120810#10X1
/
2PANHEADPHILLIPSSHEETMETALSCREW –PACKOF104
218869101021
/
4"X3
/
8"FELT.PSA 7
2193190011BODY1
2203190591WARNINGLABEL1
2213190511SPRING‐LEFTCASTER 1
3190521SPRING‐RIGHTCASTER
(
NOTSHOWN
)
1
22291208601
/
4‐20X3
/
8SETSCREW‐ CUPPOINT –PACKOF5 2
2233190371CASTER2
2244492791PIVOTBUSHING–PLATED 2
22591224507
/
16I.D.X11
/
16O.D.X.074
/
.121THICKSAEFLATWASHER
(
1
/
2
)
–PKOF5 4
22691224201
/
2SPLITLOCKWASHER –PACKOF5 2
22791225401
/
2‐13X11
/
4HEXHEADBOLT –PACKOF1 2
2299122496RETAININGRING–PACKOF8 2
23091224655
/
16I.D.X.813O.D.X.027
/
.030THKFLATWASHER –PACKOF24
2314892731WHEEL‐10"WHITEPLASTIC 2
2325091711WHEELSPRING2
2333190101LEFTPIVOTASSEMBLYWITHSCREW 1
3190111RIGHTPIVOTASSEMBLYWITHSCREW
(
NOTSHOWN
)
1
2343190226AXLEASSEMBLY–COMPLETE 1
23591225401
/
2‐13X11
/
4HEXHEADBOLT –PACKOF1 2
23691224201
/
2SPLITLOCKWASHER –PACKOF5 2
23791224507
/
16I.D.X11
/
16O.D.X.074
/
.121THICKSAEFLATWASHER
(
1
/
2
)
–PKOF5 4
2384492791PIVOTBUSHING–PLATED 2
2393190541FOOTPEDALGRIP2
2404894071CLAMP
,
.437DIA.CABLE 1
2413190481HEIGHTINDICATORROD 1
24291209451
/
4RETAININGRING 1
2430190901WARNINGLABEL1
2449120530#10‐24X7
/
8TRUSSHEADPHILLIPSMACHINESCREW –PACKOF103
2453190421LABEL‐BRUSHHEIGHT 1
2460190911GROUNDINGLABEL1
247869101021
/
4X3
/
8"FELT
,
PSA 7
2483190093BAFFLEPLATE–PAINTED 1
2493190331FOAMFILTER1
2520690761PLUGBUTTON2
2539120810#10X1
/
2PANHEADPHILLIPSSHEETMETALSCREW –PACKOF104
2543190271LIDHINGE2
25531907916‐PACKPAPERFILTERBAGS 1

8
BODY

9
LID WITH TOOLS
ITEM PART NO. DESCRIPTION QTY
5013191101LIDSUPPORT1
5023191091LID1
5035790321WAND
(
HI‐UPTUBE
)
2
5047691921SPRINGCLIP3
5052391751POPRIVET6
5065790311REDUCERTUBE
,
1.75TO1.375 1
50757901112.5ROUNDBRUSH 1
5085790291CREVICETOOL1
5093193091115VWIRINGDIAGRAMLABEL 1
3193101230VWIRINGDIAGRAMLABEL 1

10
HANDLE
ITEM PART NO. DESCRIPTION QTY
6013190621CABLETIE2
6023192061HANDLE 1
6033193081HANDLECORD1
6049120480#10‐24X1‐3
/
4ROUNDHEADPHILLIPSMACHINESCREW –PACKOF56
6053190151HANDLEGRIP–BLACK 2
6063190411LABEL
,
SWITCHBOX1
6079120530#10‐24X7
/
8TRUSSHEADPHILLIPSMACHINESCREW –PACKOF102
6083190381STRAINRELIEF
,
NON–FLEXIBLE 3
6095294381171
/
2AMP.CIRCUITBREAKER
(
115VOLT
)
1
52945818AMPCIRCUITBREAKER
(
240VOLT
)
1
6109120360#10‐24HEXNUTWITHSTARLOCKWASHER –PACKOF10 2
6113190571STRAINRELIEF‐TYPE530 1
6120299531STRAINRELIEF1
6133190501WALLCORD‐75FT.
(
115VOLT
)
1
0299671SHUKOCORD75FT.16‐3
(
240VOLTW
/
SHUKO
)
1
0396281WALLCORDWITHTYPEIPLUG
(
220V
,
CHINA
)
1
6145390211SWITCH1
6159120040#6EXTERNALSTARLOCKWASHER –PACKOF10 2
6169120090#6‐32X7
/
8PANHEADPHILLIPSMACHINESCREW –PACKOF102
6173190351CONTROLPANELPLATE 1
6189120355#10‐24CAPNUT
/
ACORNHEX –PACKOF1 6
61991203707
/
32I.D.X1
/
2O.D.X.032
/
.065THICKSAEFLATWASHER
(
#10
)
–PKOF106
6209120360#10‐24HEXNUTWITHSTARLOCKWASHER –PACKOF10 6
62191203707
/
32I.D.X1
/
2O.D.X.032
/
.065THICKSAEFLATWASHER
(
#10
)
–PKOF102
6229120360#10‐24HEXNUTWITHSTARLOCKWASHER –PACKOF10 2
6233190321SWITCHBRACKET–PLATED 1
6249120315ROLLPIN1
/
8DIA.
,
11
/
4LONG –PACKOF5 2
6253190313SWITCHLEVER–PAINTED 1
6265390171SWITCHLEVERSPRING 2
6273190531ROLLPINGUIDE1
6283190341CONTROLPANEL1
6299120510#10‐24X1
/
2TRUSSHEADPHILLIPSMACHINESCREW –PACKOF102
6300393411GRIP
,
SWITCHLEVER2
11
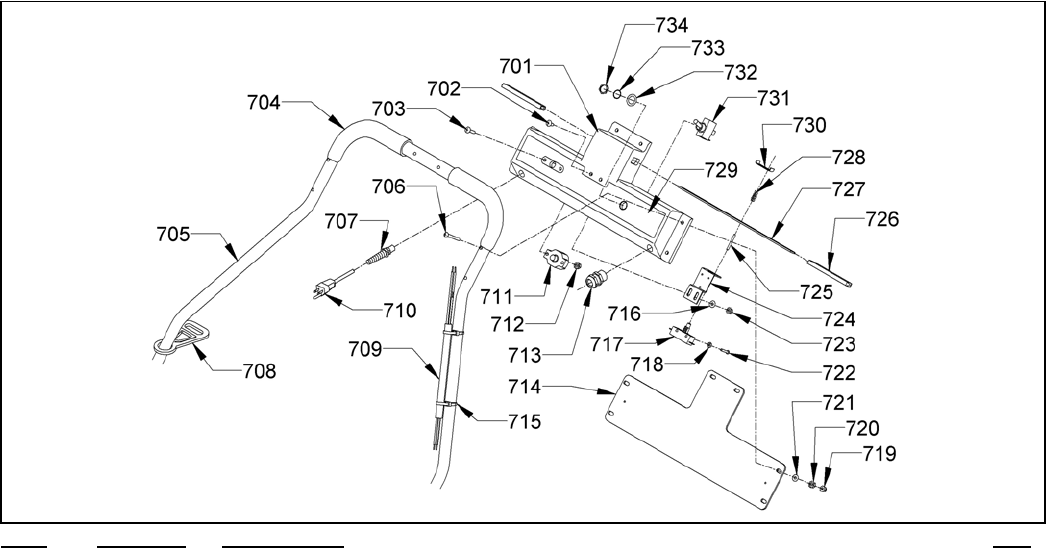
HANDLE FOR WAND
ITEMPARTNO.DESCRIPTIONQTY
7013190341CONTROLPANEL1
7029120510#10‐24X1
/
2TRUSSHEADPHILLIPSMACHINESCREW –PACKOF102
7039120530#10‐24X7
/
8TRUSSHEADPHILLIPSMACHINESCREW –PACKOF102
7043190151HANDLEGRIP–BLACK 2
7053192061HANDLE1
7069120430#10‐24X3
/
4ROUNDHEADPHILLIPSMACHINESCREW –PACKOF106
7070299531STRAINRELIEF1
7083190571STRAINRELIEF‐TYPE530 1
7093191071HANDLECORD1
7103190501WALLCORD‐75FT.
(
115VOLT
)
1
0299671SHUKOCORD75FT.16‐3
(
240VOLTW
/
SHUKO
)
1
0396281WALLCORDWITHTYPEIPLUG
(
220V
,
CHINA
)
1
7115294381171
/
2AMP.CIRCUITBREAKER
(
115VOLT
)
1
52945818AMPCIRCUITBREAKER
(
240VOLT
)
1
7129120360#10‐24HEXNUTWITHSTARLOCKWASHER –PACKOF10 2
7133190381STRAINRELIEF
,
NON–FLEXIBLE 1
7143190351CONTROLPANELPLATE 1
7153190621CABLETIE2
71691203707
/
32I.D.X1
/
2O.D.X.032
/
.065THICKSAEFLATWASHER
(
10
)
–PACKOF10 2
7175390211SWITCH1
7189120040#6EXTERNALSTARLOCKWASHER –PACKOF10 2
7199120355#10‐24CAPNUT
/
ACORNHEX–PACKOF1 6
7209120360#10‐24HEXNUTWITHSTARLOCKWASHER –PACKOF10 6
72191203707
/
32I.D.X1
/
2O.D.X.032
/
.065THICKSAEFLATWASHER
(
10
)
–PKOF106
7229120090#6‐32X7
/
8PANHEADPHILLIPSMACHINESCREW –PACKOF102
7239120360#10‐24HEXNUTWITHSTARLOCKWASHER –PACKOF10 2
7243190321SWITCHBRACKET–PLATED 1
7259120315ROLLPIN1
/
8DIA.
,
11
/
4LONG –PACKOF5 2
7260393411GRIP
,
SWITCHLEVER 2
7273190313SWITCHLEVER–PAINTED 1
7285390171SWITCHLEVERSPRING 2
7293191061LABEL
,
SWITCHBOX 1
7303190531ROLLPINGUIDE1
7314491101TOGGLESWITCH1
73291224655
/
16I.D.X.813O.D.X.027
/
.030THKFLATWASHER –PACKOF21
73391219751
/
2INTERNALSTARLOCKWASHER –PACKOF5 1
73407988215/8"HEXNUT(LARGENUT)1

12
VACUUM MOTORS
ITEM PART NO. DESCRIPTION QTY
8019120320#10SPLITLOCKWASHER
–
PACKOF10 2
8029120440#10‐24X7
/
16ROUNDHEADPHILLIPSMACHINESCREW
–
PKOF102
8034894321TERMINALBLOCK1
8073190431GASKETSET
,
NEOPRENE
(
VACMOTORPLATE
)
1
8089120610#10‐24X5
/
8PANHEADPHILLIPSTHREADCUTTINGSCREW
–
PACKOF10 8
8093193063VACMOTORPLATE
,
PAINTED 1
8104690101VACMOTOR
/
FLOATGASKET 2
8110299331CARBONBRUSH4
8123291131VACMOTOR115VOLT
,
PACER30
/
28 2
3290851VACMOTOR230VOLT
,
PACER30
/
28 2
8136790351FANFILTER
(
NON‐HEPAONLY
)
2
81491203707
/
32I.D.X1
/
2O.D.X.032
/
.065THICKSAEFLATWASHER
(
10
)
–
PKOF10 2
8159120420#10‐24X5
/
8ROUNDHEADPHILLIPSMACHINESCREW
–
PACKOF102
8169120320#10SPLITLOCKWASHER
–
PACKOF10 2
8173290726BAGGUARD‐PLATED
(
NON‐ HEPAONLY
)
1
8183290671PUSHONTERMINAL4
8193190381STRAINRELIEF
,
NON‐ FLEXIBLE 1
8203190011BODY1
8219120520#10‐24X5
/
8TRUSSHEADPHILLIPSMACHINESCREW
–
PACKOF109
8220891131PLASTICSTRAINRELIEFNUT 1

13
HEPA FILTER RETROFIT ASSEMBLY 3190739
WARNING
ITEM PART NO. DESCRIPTION QTY
A
3290726 BAG GUARD
–
PLATED 1
- 9120520 #10-24 X 5/8 TRUSS HEAD PHILLIPS MACHINE SCREW
(
DISCARD
)
4
B 9120530 #10-24 X 7/8 TRUSS HEAD PHILLIPS MACHINE SCREW 4
C 6790351 FOAM FILTERS 2
D 4690101 VAC MOTOR/FLOAT GASKET 2
E 6793111 HEPA FILTER 2
F 3193051 HEPA FILTER MOUNTING BRACKET 2
G 9120370 7/32 I.D. X 1/2 O.D. X .032/.065 THICK SAE FLAT WASHER
(
#10
)
4
H 9120320 #10 SPLIT LOCK WASHER 4
I 3193021 HEPA FILTER LABEL, CLEAR 1
1. Disconnect the machine power cord from the electrical outlet.
2. Open the lid and remove the cloth filter bag, set aside.
3. Remove the 2 screws that hold the bag guard rod (A), discard the rod. Reinstall both of the screws in order to
secure the motor mount plate.
4. Remove the foam filters (C), from each motor, and discard the filters.
5. Remove one screw (B) from above and one from below for each vacuum motor, discard the screws. Replace
the four screws (B) with the (4) #10-24 x 7/8 Truss head Phillips screws provided in the kit.
6. Remove the protective paper from the gaskets (D), to expose the self-adhesive strip. Center one gasket on
the face of each vacuum motor and press firmly in place.
7. Center the HEPA filter (E) on the gasket and hold in place. Slide the mounting bracket (F) over the filter and
align with the screws (B). Secure the bracket with the washer (G) and hex nut (H).
8. Repeat this step for the second vacuum motor.
9. Reinstall the cloth filter bag and close the lid.
10. Apply the HEPA filter label to the lid label between the “NSS” logo and the “PACER 30” logo.
THIS MACHINE OPTION IS NOT FOR USE IN
A
SBESTOS OR HAZARDOUS WASTE REMOVAL
RETROFIT PROCEDURE:

14
LISTE DES PIÈCES
PACER 30 VACUUM
Translation from Original Instructions
Une Traduction Des Instructions Originales

15
CONSIGNES DE SÉCURITÉ IMPORTANTES
LIRE ET COMPRENDRE TOUTES LES INSTRUCTIONS
AVANT D'UTILISER OU ENTRETIEN DE LA MACHINE.
AVERTISSEMENT
Lorsque vous utilisez un appareil électrique, des
précautions de base devraient toujours être
respectées, y compris les suivantes:
JAMAIS essayer de faire fonctionner cette
machine, sauf si vous avez été formé dans son
fonctionnement.
JAMAIS permettre à une personne non formée à
utiliser la machine.
Utiliser cette machine uniquement comme décrit
dans ce manuel.
Cet aspirateur est conçu pour le ramassage sec
seulement. NE PAS utiliser sur des surfaces
humides ou pour le ramassage humide. NE PAS
utiliser à l'extérieur. Un choc électrique peut se
produire.
NE JAMAIS utiliser la machine avec un
endommagé, cassé, coupure, abrasion, ou le
cordon ou la fiche est enregistrée.
Toujours brancher la machine sur une prise
électrique correctement mise à la terre. Voir les
pages suivantes pour les instructions de mise à
la terre et le schéma de câblage.
NE JAMAIS laisser la machine sans surveillance
lorsqu'il est branché. Débranchez la machine de
la prise électrique lorsqu'il ne sert pas fin avant
de tenter des réparations ou de l'entretien.
TOUJOURS mettre la machine hors tension
avant de le débrancher de la prise électrique.
NE JAMAIS utiliser la machine en présence de
liquides inflammables ou combustibles, comme
l'essence, les vapeurs ou poussières.
NE JAMAIS tenter de ramasser des liquides
inflammables ou combustibles, comme l'essence,
les vapeurs ou poussières.
Ne jamais manipuler la machine, cordon ou la
fiche avec les mains mouillées.
NE JAMAIS laisser tomber ou insérer un objet
dans les ouvertures de la machine.
TOUJOURS garder le visage, les doigts, les
cheveux ou toute partie du corps, ou des
vêtements amples loin de toute ouverture de la
machine ou de la partie mobile; brosse
tournante.
NE JAMAIS ramasser tout ce qui brûle ou fume,
comme les cigarettes, allumettes ou cendres
chaudes.
TOUJOURS utiliser extrême prudence lors du
nettoyage des escaliers ou lorsque la machine
est placé sur les escaliers.
NE JAMAIS utiliser la machine si elle ne
fonctionne pas correctement, si elle a été
échappé, endommagé, exposé aux intempéries,
ou tombé dans l'eau, la machine au centre de
service Retour pour examen et réparation.
NE JAMAIS utiliser la machine avec toute
ouverture de l'air bloqué. Gardez toutes les
ouvertures d'air exempt de poussière, les
peluches, les cheveux et autres.
NE JAMAIS utiliser la machine sans sac à
poussière et / ou les filtres en place.
NE PAS tirer ou porter la machine par le cordon
d'alimentation électrique, utiliser le cordon
comme une poignée, fermer la porte sur le
cordon, tirer le cordon autour de coins aigus,
exposer à des surfaces chauffées, ou d'objets
lourds ou tranchants sur cordon.
NE JAMAIS débrancher la fiche en tirant sur le
cordon. Pour débrancher, saisir la fiche, pas le
cordon.
Ne laissez pas d'être utilisé comme un jouet.
Une attention particulière est nécessaire
lorsqu'il est utilisé par ou à proximité
d'enfants.
CONSERVER CES INSTRUCTIONS
Non respect de ces instructions peut entraîner un incendie,
de brûlure électrique, d'électrocution ou d'opérateur de
machine et les tiers.

16
AVERTISSEMENT
Suivez la séquence de mise à la terre électrique
de l'assemblage comme indiqué à la machine de
masse électriquement et assurer la sécurité à
l'opérateur.
PANNE DE LE FAIRE PEUT causer une
électrocution due à une mauvaise connexion de
terrain.
Cordons de remplacement doivent être
homologués UL / CSA approuvé et être des
caractéristiques électriques identiques que le
cordon de l'équipement d'origine.
Vérifiez la plaque signalétique sur la machine
pour être sûr que la tension et le cycle indiqué sur
la plaque signalétique est la même que la tension
et le cycle de la prise électrique. NE PAS tenter
de brancher une machine de 115 volts dans une
prise de 240 volts ou une machine de 240 volts
dans une prise de 120 volts.
La lame de mise à la terre sur la fiche doit rester
intact si la machine doit être mise à la terre
lorsqu'il est branché et exploité. Une machine
sans terre peut causer un choc à l'opérateur. Voir
Figure A.
Si la connexion à une prise qui accepte
seulement deux lames utilisent un adaptateur
comme dans la figure B. NE JAMAIS RETIRER
LA LAME DE LA TERRE.
Lorsque la terre lame sur bouchon est cassé, il
est préférable de remplacer l'ensemble du
cordon.
Si vous choisissez de remplacer la bougie 3-
conducteurs pour 120 Volt utilisation ne UL / CSA
approuvé plug Listed avec l'estimation de 125
Volt 15 ampères (240 volts pour utiliser une fiche
à 3 conducteurs avec notes en accord avec la
tension et ampères requis). Assurez-vous que le
fil vert du cordon est relié à la vis verte, et le fil
noir à la vis de l'or de la fiche de remplacement.
ALWAYS remember when replacing plug, that if
the grounding wire (green) is connected to a live
terminal at the machine or plug, the machine will
become electrically charged and will result in
electrical shock or electrocution.
Si il est nécessaire d'utiliser l'adaptateur
représenté dans la figure B, la machine est
seulement la terre correctement si vert Clip de
couleur de l'adaptateur est lié en vertu d'une vis
en métal qui détient une couverture de prise
électrique pour le mur.
Figure C. Machine utilisée sur 240 volts peuvent
ou peuvent ne pas avoir la mise à la terre (la
terre) prise attachée à la corde. Pour les USA 240
volts, 60 HZ, le bouchon est déjà fourni avec
cordon. Pour une utilisation en dehors des USA, il
peut être à l'acheteur d'avoir une mise à la terre
(la terre) prise jointe.
Toujours utiliser un 3 fils rallonge mise à la terre
qui a prises mâles et femelles. Utilisez
uniquement 14-3ST ou SO Type rallonge pour
une longueur de cordon totale jusqu'à 100 pieds
[30,5 m].
NOTE: IN CANADA, THE USE OF A TEMPORARY ADAPTOR IS NOT PERMITTED BY CANADIAN ELECTRICAL CODE.
CONSERVER CES INSTRUCTIONS
NE PAS TENTER ENTRETIEN OU DE RÉPARATION AVANT
DÉBRANCHER CORDON D'ALIMENTATION ÉLECTRIQUE
SOURCE. LIRE TOUTES LES INSTRUCTIONS ET SUIVEZ
TOUTES LES ILLUSTRATIONS ATTENTIVEMENT.
ALL REPAIR SERVICE MUST BE PERFORMED BY AN NSS AUTHORIZED DISTRIBUTOR /
SERVICE STATION USING ONLY NSS ORIGINAL EQUIPMENT PARTS.

17
SCHEMA DU CIRCUIT ELECTRIQUE 115 VOLT

18
SCHEMA DU CIRCUIT ELECTRIQUE 220-240 VOLT
19
BLANK PAGE
PAGE BLANCHE

20
NSS® Enterprises, Inc.
3115 Frenchmens Road
Toledo, Ohio 43607
PHONE (419) 531-2121
FAX (419) 531-3761
mailus@nss.com
www.nss.com
PACER 30 VACUUM ORIG. 04-96 REV. T 06-16 9093116
