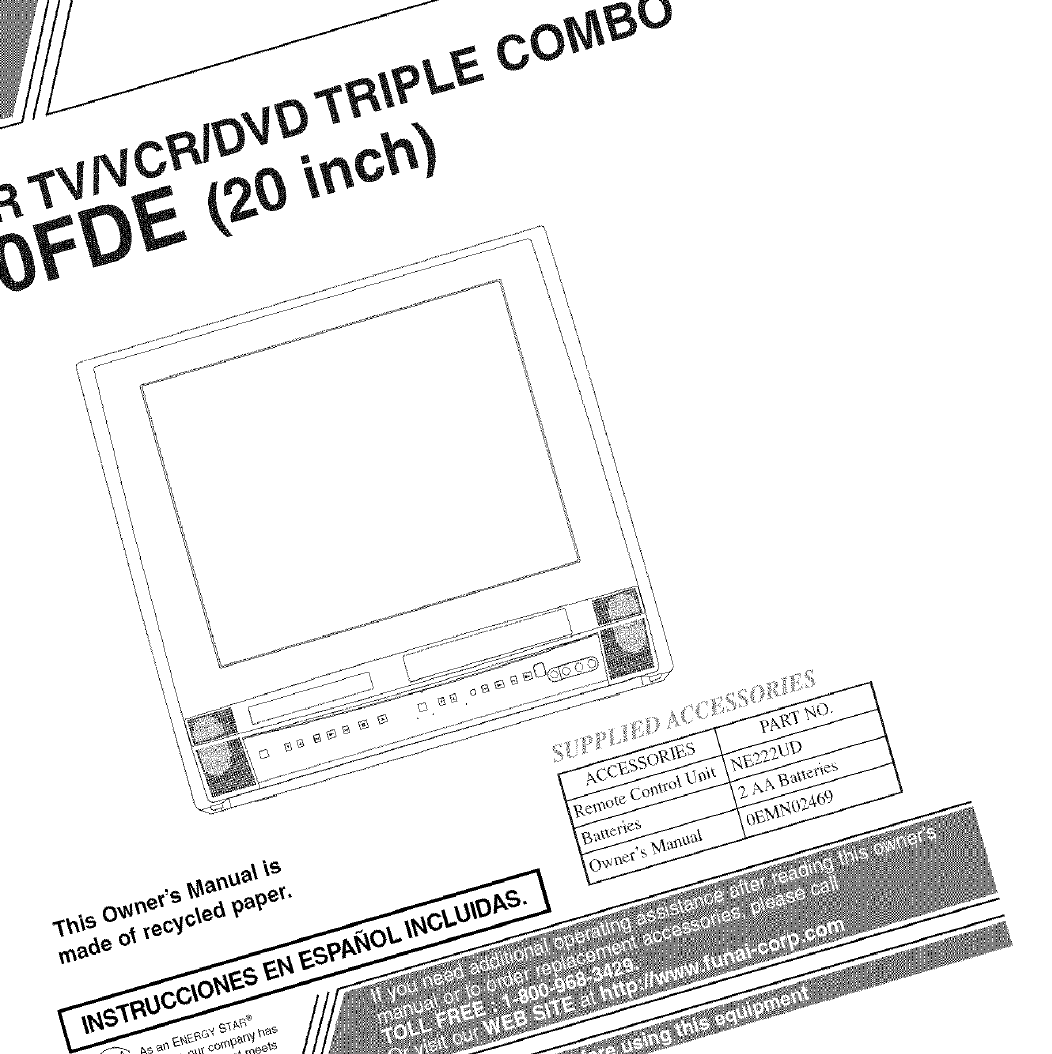
Sylvania 6720FDE User Manual TV/VCR/DVD COMBO Manuals And Guides L0610388
SYLVANIA TV/VCR or DVD Combo Manual L0610388 SYLVANIA TV/VCR or DVD Combo Owner's Manual, SYLVANIA TV/VCR or DVD Combo installation guides
User Manual: Sylvania 6720FDE 6720FDE SYLVANIA TV/VCR/DVD COMBO - Manuals and Guides View the owners manual for your SYLVANIA TV/VCR/DVD COMBO #6720FDE. Home:Electronics Parts:Sylvania Parts:Sylvania TV/VCR/DVD COMBO Manual
Open the PDF directly: View PDF ![]() .
.
Page Count: 56
\
\
\\\
\\\
WARNING: TO REDUCE THE RISK OF FIRE OR ELECTRIC SHOCK, DO NOT EXPOSE THIS APPLIANCE [
!
TO RAIN OR MOISTURE.
CAUTION
CAUTION: TO REDUCE THE RISK OF ELECTRIC
SHOCK, DO NOT REMOVE COVER (OR BACK).
NO USER SERVICEABLE PARTS INSIDE. REFER
SERVICING TO QUALIFIED SERVICE PERSON-
NEL.
The caution marking is located on the rear of the cabinet.
THIS SYMBOL INDICATES THAT DAN-
GEROUS VOLTAGE CONSTITUTING A
RISK OF ELECTRIC SHOCK 1S PRESENT
WITHIN THIS UNIT.
THIS SYMBOL INDICATES THAT THERE
ARE IMPORTANT OPERATING AND
MAINTENANCE INSTRUCTIONS IN THE
LITERATURE ACCOMPANYING THE
APPLIANCE.
IMPORTANT SAFEGUARDS
l°Read instructions-All the safety and operating instructions
should be read before the appliance is operated.
2°Retain Instructions-The salety and operating instructions
should be retained for future relereuce.
3.Heed Warnhlgs-All warnings on the appliance and in the
operating instructions should be adhered to.
4.Follow Instructions-All operating and use instructions
should be lollowed.
5.Cleaning-Unplug TV/VCR/DVD from the wall outlet be%re
cleaning. Do not use liquid cleaners or aerosol cleaners. Use
a dalnp cloth lot cleaning.
EXCEPTION: A product that is meant for uninterrupted
service and, that for some specific reason, such as the possi-
bility of the loss of an authorization code lbr a CATV con-
verter, is not intended to be unplugged by the user for clear>
ing or any other purpose, may exclude the reference to
unplugging the appliance in the cleaning description other-
wise required in item 5.
6.Attachments-Do not use attachlnents not recomlneuded by
the TV/VCR/DVD manufacturer as they may cause hazards.
7.Water and Moisture-Do not use this TV/VCR/DVD near
water4i)r example, near a bath tub, wash bowl, kitchen sink,
or laundry tub, in a wet basement, or near a swimming pool,
and the like.
8.Accessories-Do not place this TV/VCR/DVD on an unstable
cart, stand, tripod, bracket, or table. The TV/VCR/DVD may
fall, causing serious injury to someone, and serious dalnage
to the appliance. Use only with a cart, stand, tripod, bracket,
or table recommended by the lnanulacturer, or sold with the
TV/VCR/DVD. Any lnountiug of
tile appliance should follow the PORTABLE_CARTWARNING
manufacturer's iustructious and ,,_J'_
should use a mounting accessory
recolmneuded by tile Ulal_lufacturer.
An appliance and cart combination
should be moved with care.Quick
stops, excessive force, and uneven
surfaces may cause the appliance
and cart combination to overturn.
AMEUBLES- Cet appareil ne doit SYMBOLE D'AVERTISSEMENT POUR
_ti'e plac_ que SL!I'UUuleuble (aveL' LESCOMPOSANTES
APPAREIL ET MEUBLE A ROULETTES
OL! saus roL!lettes) recolnmaud_ par
le labricaut. Si vous l'iustallez sur
uu meuble tt roulettes, d@lacez les
deux ensembles avec pr0cautiou.
Uu alwOtbrusque, l'utilisatiou
d'uue force excessive et des SUl'-
faces irl'Ogulibres risquent de d&ta-
biliser l'ensemble et de le renverser.
9. Ventilation-Slots and openings in the cabinet and the back
or bottom are provided for ventilation and to ensure reliable
operation of the TV/VCR/DVD and to protect it froln over-
heating, and these openings must not be blocked or cov-
ered. The openings should never be blocked by placing the
TV/VCR/DVD on a bed, sofa, rug, or other similar surface.
This TV/VCR/DVD should never be placed near or over a
radiator or heat register. This TV/VCR/DVD should not be
placed in a builtqu installation such as a bookcase or l'ack
Lmless proper ventilation is provided or the lnanLifacturer's
instructions have been adhered to.
I0.Power Sources-This TV/VCR/DVD should be operated
only h'oln the type of power source indicated on the mark-
ing label. II you are not sure of the type of pow'er supply to
your home, consult your appliance dealer or local power
company. For TV/VCR/DVDs intended to operate from
battery power, or other sources, reler to the operating
instructions.
II.Groundhlg or Polarization-This TV/VCR/DVD is
equipped with a polarized alternating-current line plug(a
plug having one blade wider than the other). This plug will
fit into the power outlet only one way. This is a safety fea-
ture. If you are unable to insert the plug fully into the out-
let, try reversing the plug. If the plug should still fail to fit,
contact your electrician to replace your obsolete outlet. Do
not defeat the safety purpose of the polarized plug.
12.Power-Cord Protection-Power-supply cords should be
routed so that they are not likely to be walked on or
pinched by items placed upon or against them, paying par-
ticular attention to cords at plugs, convenience receptacles,
and the point where they exit lrom the appliance.
- 2 - EN
IBI5
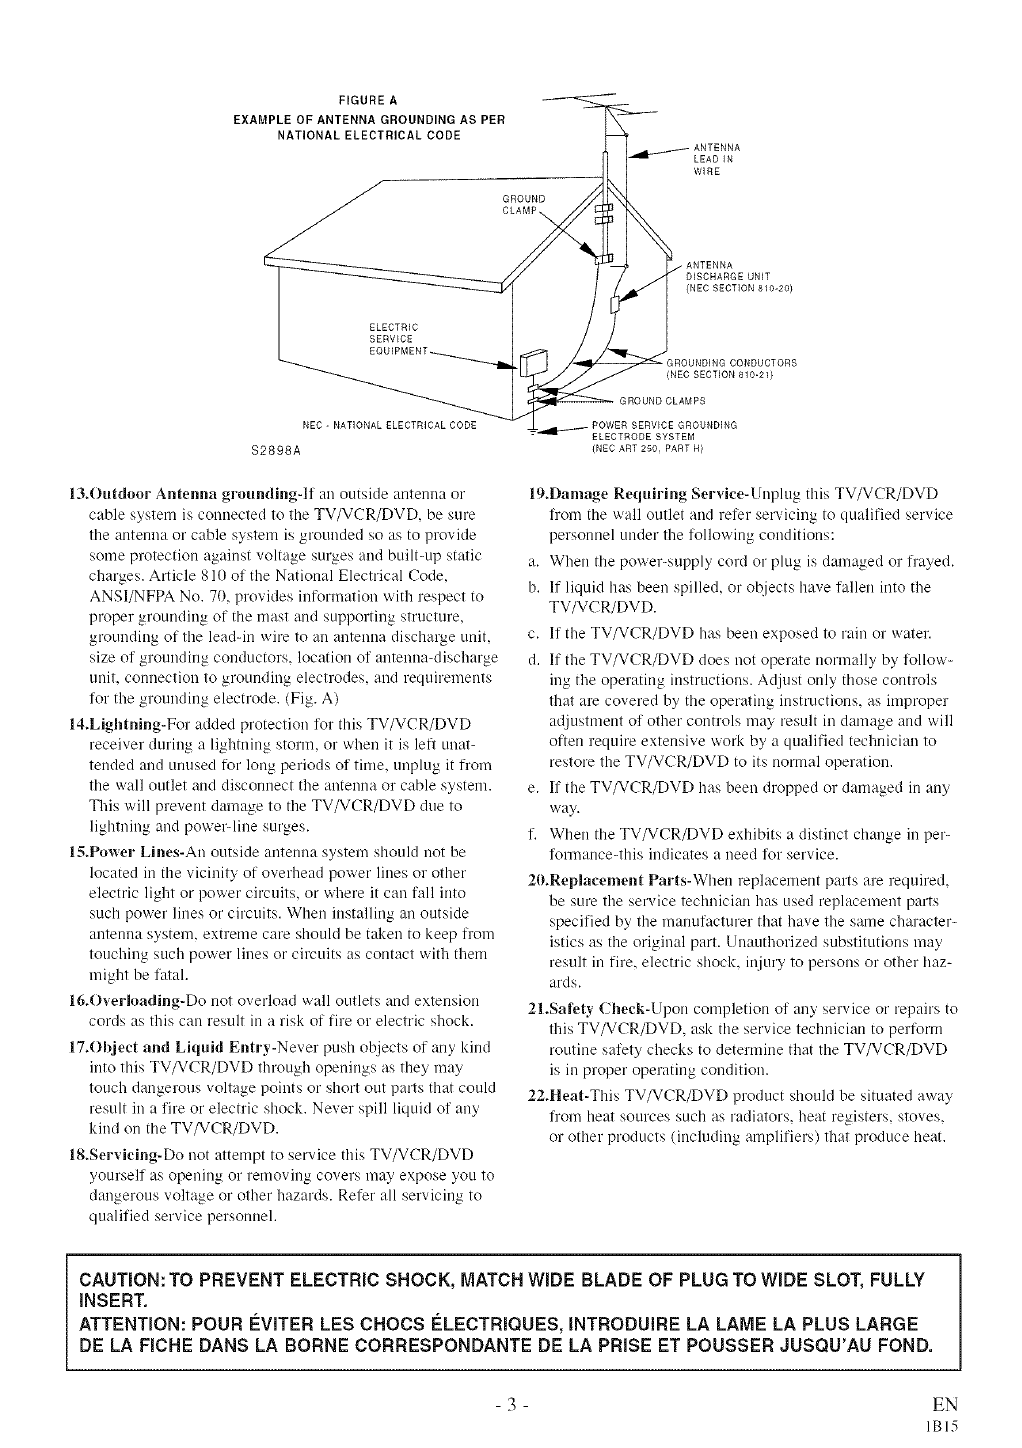
FIGURE A
EXAMPLE OF ANTENNA GROUNDING AS PER
NATIONAL ELECTRICAL CODE
GROUND
CLAMP_
LEAD IN
WIRE
ELECTRIC
SERVICE
EOUIPMENT_.
ANTENNA
DISCHARGE UNIT
(NEC SECTION 810-20)
(NEC SECTION 810-21)
NEC - NATIONAL ELECTRICAL CODE
$2898A
13.Outdoor Antenna grounding-If an outside antenna or
cable system is conuected to the TV/VCR/DVD, be sure
the auteuna or cable system is grounded so as to provide
some pl_)tection against voltage surges and built-up static
charges. Article 810 of the Ntdional Electrical Code,
ANSI/NFPA No. 70, provides information with respect to
proper grounding of the lnast and supporting structure,
grounding of the lead-in wire to an antenna discharge unit,
size of grounding conductors, location of antenna-discharge
unit, connection to grounding elect]_)des, and requirements
lk)r the grounding electrode. (Fi X. A)
14.Lightning-For added protection lk)r this TV/VCR/DVD
receiver during a lightning storm, or when it is left unat-
tended and unused flar long periods of time, unplug it from
the wall outlet and disconnect the antenna or cable systeln.
This will prevent damage to the TV/VCR/DVD due to
lightning and poweMine surges.
15.Po_er Lines-An outside antenna system should not be
loc_lted in the vicinity of overhezld power lines or other
electric light or power circuits, or where it can fidl into
such power lines or circuits. When installing an outside
antenna system, extreme care should be taken to keep from
touching such power lines or cil_'uits as contact with them
might be fatal.
16.Overloading-Do not overload wall outlets and extension
cords as this can result in a risk of fire or electric shock.
17.Object and Liquid Entry-Never push objects of any kind
into this TV/VCR/DVD through openings as they may
touch dangel_us voltage points or short out parts that could
result in a fire or electric shock. Never spill liquid of any
kind on the TV/VCR/DVD.
18.ServMng-Do uot attempt to service this TV/VCR/DVD
yourself as opening or removing covers may expose you to
dangerous voltage or other hazards. Refer all servicing to
qualified service personnel.
POWER SERVICE GROUNDING
_411---- ELECTRODE SYSTEM
(NEC ART 250, PART R)
19.Damage Reqnking Servke-Uuplug this TV/VCR/DVD
tl"om the wall outlet and refer sexwicing to qualified service
persormel under the liAlowing conditions:
a. When the power-supply cord or plug is damaged or frayed.
b. If liquid has been spilled, or objects have fallen iuto the
TV/VCR/DVD.
c. If the TV/VCR/DVD has been exposed to rain or watel_
d. If the TV/VCR/DVD does uot operate normally by tLqlow-
iug the operating instructions. Adjust only those controls
that are covered by the operating instructions, as improper
adjustment of other controls may result in damage and will
otteu require extensive work by a qualified technician to
restore the TV/VCR/DVD to its normal operation.
e. If the TV/VCR/DVD has been dropped or dalnaged in any
way.
f. When the TV/VCR/DVD exhibits a distinct change in per-
li_)nnance-this indicates a need li_)rservice.
20.Replacement Parts-When replacelnent parts are required,
be sure the service technician has used replacement parts
specified by the manufacturer that have the same character-
istics as the original part. Uuauthorized substitutions may
result in fire, electric shock, injury to persons or other haz_
ards.
21.Saii_ty Cheek-Upon completiou of any service or repairs to
this TV/VCR/DVD, ask the service technician to pert_)rm
routine saIety checks to detennine that the TV/VCR/DVD
is in proper operating condition.
22.1lear-This TV/VCR/DVD product should be situated away
ll"om heat sources such as radiators, heat registers, stoves,
or other products (including amplifiers) that produce heat.
CAUTION: TO PREVENT ELECTRIC SHOCK, MATCH WIDE BLADE OF PLUG TO WiDE SLOT, FULLY
INSERT.
ATTENTION: POUR I_VITER LES CHOCS leLECTR[QUES, INTRODUIRE LA LAME LA PLUS LARGE
DE LA FICHE DANS LA BORNE CORRESPONDANTE DE LA PRISE ET POUSSER JUSQU'AU FOND.
- 3 - EN
IBI5
IMPORTANT COPYRIGHT INFORMATION
Unauthorized copying, broadcasting, public perfof
m_mce and lending of discs are prohibited.
FCC WARNING- This equipment may gener-
ate or use radio frequency energy. Changes or
modifications to this equipment may cause
harmful interference unless the modifications
are expressly approved in the instruction man-
ual. The user could lose the authority to oper-
ate this equipment if an unauthorized change
or modification is made.
RADIO-TV INTERFERENCE
This equipment has been tested trod found to com-
ply with the limits for a Class B digital device, pur-
surest to Part 15 of the FCC Rules, These limits are
designed to provide reasonable protection against
harmful interference in a residential installation,
This equipment generates, uses, trod can radiate
radio frequency energy and, if not installed and
used in accor&mce with the instructions, may cause
harmful interference to radio communications.
However, there is no guartmtee that interference
will not occur in a particular installation. If this
equipment does cause harmful interference to
radio or television reception, which can be deter-
mined by turning the equipment off and on, the
user is encouraged to try to correct the interfer-
ence by one or more of the following measures:
1) Reorient or relocate the receiving antenna.
2) Increase the separation between the equipment
and receiver.
3) Connect the equipment into an outlet on a cir-
cuit different from that to wlfich the receiver is
connected.
4) Consult the dealer or an experienced radio/TV
technician for help.
LASER SAFETY
This unit employs a laser. Only a qualified service
person should remove the cover or attempt to ser-
vice this device, due to possible eye injuU.
CAUTION: USE OF CONTROLS OR ADJUST-
MENTS OR PERFORMANCE OF PROCE-
DURES OTHER THAN THOSE SPECIFIED
HEREIN MAY RESULT IN HAZARDOUS
RADIATION EXPOSURE.
CAUTION: VISIBLE AND INVISIBLE LASER
RADIATION WHEN ()PEN AND INTERLOCK
DEFEATED. DO NOT STARE INTO BEAM.
LOCATION: INSIDE, NEAR THE DECK
MECHANISM.
This Class B digital apparatus complies with
Canadian ICES-003.
Cet appareil num_rique de la classe B est con-
forme 'a la norme NMB-003 du Canada.
CAUTION: TO PREVENT ELECTRIC SHOCK,
MATCH WIDE BLADE OF PLUG TO WIDE
SLOT, FULLY INSERT.
ATTENTION: POUR I_VITER LES CHOCS
I_LECTRIQUES, INTRODUIRE LA LAME LA
PLUS LARGE DE LA FICHE DANS LA
BORNE CORRESPONDANTE DE LA PRISE
ET POUSSER JUSQU'AU FOND.
- 4 - EN
IBI5
For safe operation and satisfactory performance of
your TV/VCR/DVD, keep the following in mind
when selecting a place for its installation:
® Shield it from direct sunlight and keep it away from
sources of intense heat.
• Avoid dusty or hmnid places.
• Avoid places with insufficient ventilation for proper
heat dissipation. Do not block the ventilation holes at
the top mid bottom of the unit. Do not place the unit
on a carpet because this will block the ventilation
holes.
• Install unit in a horizontal position.
,, Avoid locations subject to strong vibration.
® Do not place the TV/VCR/DVD nero strong magnefic
fields.
• Avoid moving TV/VCR/DVD to locations where
temperature differences am extreme.
• Do not htmdle the power coM with wet hands.
,, Do not pull on the power cord when disconnecting
it from maAC wall outlet. Grasp it by the plug.
®If, by accident, water is spilled on your unit, unplug
the power coM hnmediately mid take the unit to our
Authorized Service Center for servicing.
,, Do not put your fingers or objects into the
TV/VCR/DVD disc loading tray.
,, Do not place anything directly on top of the unit.
Moisture condensation may occur inside the unit
when it is moved fiom a cold place to a warm place,
or after heating a cold room or under conditions of
high humidity. If a DVD is played in a TV/DVD/
VCR which has moisture, it may damage the DVD
and TV/VCR/DVD. Therefore when the condensation
occurs inside the unit, turn the POWER on mid allow
at least 2 hours for the unit to dry out.
The following symbols below appear in some head-
ings and notes in this manual, with the following
meanings
[TV/VCR 1
: Description refers to TV/VCR operation (in the
TV/VCR mode).
: Description refers to playback of DVD video discs
(in the DVD mode).
: Description refers to playback of audio CDs
(in the DVD mode).
: Description refers to playback of MP3 discs
(in the DVD mode).
: Description refers to the items to be set by the
QUICK mode (in the DVD mode).
A NOTE ABOUT RECYCLING
This product's packaging materials are recyclable gradcan be reused. Please dispose of any materials in
accordm_ce with your local recycling regulations.
Batteries should never be thrown away or incinerated but disposed of in accor&mce with your local regula-
tions concerning chemical wastes.
The serial number of this product may be found on the back of the unit. No other TV/VCR/DVD has the same
serial number as yours. You should record the nmnber gradother vital information here and retain this book as
a permtment record of your purchase to aid identification in case of theft. Serial numbers are not kept on file.
Date of Purchase
Dealer Purchase from
Dealer Address
Dealer Phone No.
Model No.
Serial No.
- 5 - EN
IC29
] ( ......... ,
[ABLE ))iC )NIENIS
mIMPORTANT SAFEGUARDS ...2, 3
mPRECAUTIONS ................ 4
LOCATION ................... 5
AVOID THE HAZARDS OF
ELECTRICAL SHOCK AND FIRE .5
WARNING .................... 5
SYMBOLS USED 1N THIS
MANUAL ..................... 5
mTABLE OF CONTENTS .......... 6
mFEATURES .................... 7
m OPERATING CONTROLS AND
FUNCTIONS ................ 9, 10
mPREPARATION FOR USE ....... 11
ANTENNA/CABLE
CONNECTION ................ 11
CONNECTING TO EXTERNAL
INPUT JACKS ................ 12
INSTALLING THE BATTERIES . .12
EXTERNAL INPUT MODE ...... 12
CONNECTING TO A STEREO
AMPLIFIER EQUIPPED WITH DIGI-
TAL INPUT JACKS SUCH AS MD
DECK OR DAT DECK (for DVD) .13
CONNECTING TO A DOLBY
DIGITAL DECODER (tot DVD) . .14
TV/VCR SECTION
m SET UP FOR USE ............. 15
SELECTING THE LANGUAGE . .15
CLOCK SET UP
(AUTO /MANUAL) ......... 15. 16
DAYLIGHT-SAVING TIME ...... 17
CHANNEL SET i Jp ............ 18
DELETING (OR ADDING)
CHANNEL ................... 18
mTV OPERATION" ............... 19
WATCHING A TV PROGRAM ...19
DEGAUSSING ................ 19
PICTURE CONTROL ........... 19
CLOSED CAPTION SYSTEM .... 20
V-CHIP SET UP ............... 21
mMTS(Multi-Channel Television
sound) SYSTEM ................ 23
CHECKING THE SELECTED
MTS MODE .................. 23
MTS RECORDING/MONITOR
MODE ...................... 23
SELECTING THE MTS SYSTEM .24
mVIDEO CASSETTE ............. 25
mPLAYBACK ................... 26
NORMAL PLAYBACK ......... 26
TRACKING ADJUSTMENT ..... 26
SLOW MOTION .............. 26
PICTURE SEARCH ............ 26
STILL PICTURE .............. 26
VERTICAL HOLD CONTROL ...26
mSPECIAL PLAYBACK .......... 27
RENTAL PLAYBACK .......... 27
AUTO REPEAT PLAYBACK ..... 27
mSEARCH ..................... 28
ZERO RETURN ............... 28
TIME SEARCH ............... 28
INDEX SEARCH .............. 29
m SPECIAL FEATURES .......... 29
REAL TIME TAPE COUNTER ...29
AUTO REWIND-EJECT ........ 29
mRECORDING ................. 30
NORMAL RECORDING ........ 30
SKIPPING UNWANTED SCENES
DURING
RECORDING ................. 30
OTR (One Touch Recording) ...... 31
COPYING A VIDEO CASSETTE
(Requires a VCR or camcorder) . . .31
mTIMER ...................... 32
AUTOMATIC
TIMER RECORDING .......... 32
TIMER PROGRAM EXTENSION .33
HINTS FOR AUTOMATIC TIMER
RECORDING ................. 34
AUTO RETURN ............... 34
SLEEPT1MER ................ 34
m ON SCREEN" DISPLAY ......... 35
mCABLE CHANNEL
DESIGNATIONS .............. 35
DVD SECTION
mABOUT THE DISCS ............ 36
PLAYABLE DISCS ............ 36
DISC TYPES ................. 36
mPLAYING A DISC .............. 37
BASIC PLAYBACK ............ 37
GENERAL FEATURES ......... 37
DISC MENU ................. 37
TITLE MENU ................. 37
RESUME .................... 38
PAUSE ...................... 38
STEP BY STEP PLAYBACK ..... 3g
FAST FORWARD/REVERSE
SEARCH .................... 3g
SLOW FORWARD /SLOW
REVERSE .................... 38
mSEARCH FUNCTION. .......... 39
TRACK SEARCH ............. 39
TITLE /CHAPTER SEARCH .... 39
TIME SEARCH ............... 39
MARKER SETUP SCREEN ...... 39
m SPECIAL PLAYBACK FUNCTION ...40
REPEAT ..................... 40
PROGRAM ................... 40
RANDOM PLAYBACK ......... 40
mPLAYING A MP3 DISC .......... 41
MP3 PLAYBACK .............. 41
TRACK SELECTION ........... 41
PROGRAM ................... 41
RANDOM PLAYBACK ......... 41
mCHANGING THE SETTINGS .... 42
SUBTITLE LANGUAGE ........ 42
AUDIO LANGUAGE ........... 42
STEREO SOUND MODE ........ 42
CAMERA ANGLE ............. 42
BLACK LEVEL SETTING ....... 42
VIRTUAL SURROUND ......... 42
mTHE ON-SCREEN INFORMATION...43
mCHANGING THE DVD SETUP
ITEMS ....................... 44
LANGL]AGE SETTING ......... 44
DISPLAY SETTING ............ 45
AUDIO SETTINGS ............ 45
PARENTAL CONTROL ......... 46
mTROUBLESHOOTING GUIDE ...47
mMAINTENANCE ............... SO
DISC HANDLING ............. 50
m SPEC1FICAI70NS . ............ S1
mWARRANTY ........... Back Cover
- 6 - EN
IC29
[ TV/VCR Mode ]
• Hi-Fi system-The Hi-Fi stereo recording system
offers you excellent sound quality with a dynamic
range of 80dB, frequency response from 20Hz to
20kHz, trod 0,005% wow and fluttm:
•Rotary4-head Record/PlaybackSystem-Four heads
ensure excellent picture quality and special effects playback.
,_ Index Search-Fast-forwards to start of next recording.
®Slow Motion-View recoNed program at slower
than normal speed.
• Infrared remote control
®Trilingual on screen TV/VCR setup display
selectable in English or Spanish or French
•Real time counter-This shows the elapsed recording
or playback time in hours, minutes, and seconds. The
"-" indication will appear when the tape is rewound
fmlher thgm the tape counter position "0:00:00".
• 181 channel capability PLL frequency synthesiz-
er tuner with direct station call-(A convener may
be necessary to view scrambled cable ch_umels.)
•Auto Clock Setting-Allows you to set the clock
function from a PBS broadcast station.
®Closed caption system-You may view specially
labeled (cc) TV programs, movies, news, prere-
corded tapes, etc. with either a dialogue caption or
text display added to the program.
•Auto power on and off system-Automatically
turns on the TV/VCR/DVD when you insert the
cassette, turns off after auto-rewind, and ejects
when the beginning of the tape is reached.
•Auto rewind when the end of a tape is
reached-This function doesn't occur when using
timer recording.
,_ Smooth mode change-TV/VCR mode, DVD
mode automatically changes without control.
• 2 Step picture search operation-You can view a
video program at a high speed or super high speed
in either a forward or reverse direction in LP _md
SLP mode. For SP mode only high speed.
•Three different playback tape speeds : SP/LP/SLP
• Two different recording tape speeds : SP/SLP
•Auto Head Cleaner-Automatically cleans video
heads as you instal or remove a cassette.
,_ Zero Return-The tape returns to counter of
0:00:00 by rewinding or fast forwarding.
®Still-"Freeze" the picture at any time, for close
viewing of a pallicular scene.
•Digital Auto Tracking (DTR)-Automatically
adjusts the tracking for each tape you play.
•Rental play mode-Improves playback picture
quality from worn tapes, such as rental tapes.
®Auto repeat-Allows you to repeat the playing of a
tape indefinitely without pressing the PLAY button.
,_ Time seamh-Let you set the TV/VCR/DVD to
advance the tape by entering the desired playback
time you w_mt to skip,
•OTR (One Touch Recording)-Instant timed
recording from 30 to 480 minutes is possible at the
push of the REC/OTR button.
®1Year, 8 events (including Daily and Weekly
Timer Recording)-The built-in timer allows you to
record up to 8 programs at different thnes on dif-
ferent channels up to I year in advance. The Daily
timer allows recordings to be made of daily broad-
casts, and the Weekly timer allows recording to be
made once a week up to the end of the tape.
,_ Auto return-After timer recoNing is finished, the
TV/VCR/DVD can return to the beginning of the
recording.
®Sleep timer-Allows you to have the TV/VCR/DVD
automatically turn off at a desired time.
Timer Program Extension-Allow you to shift the
time schedule for automatic timer recording.
,_ V-CHiP-Enables parents to prevent their children
from watching inappropriate material on TV.
A NOTE ABOUT RECYCLING
This product's packaging materials are recyclable and cgm be reused. Please dispose of any materials in
accor&mce with your local recycling regulations.
Batteries should never be thrown away or incinerated but disposed of in accordance with your local regula-
tions concerning chemical wastes.
- 7 - EN
IC29
lDVD Mode ]
•Dolby Digital sound
This TV/VCR/DVD cm_ hmldle Dolby Digital sur-
round sound having 5.1 channels when connected
to a Dolby Digital decoder.
•Still/fast/slow/step playback
Various playback modes are available including still
pictures, fast forwaN/reverse, slow motion _md step
frames.
•Randomplayback for audio CD and MP3
This TV/VCR/DVD can shuffle the order of tracks
to play them in rmldom order.
•Program playback for audio CD and MP3
You c_m program the order of tracks to play them in
troy desired ordm:
•DVD menus in adesired language
You can display DVD menus in adesired language,
if available on a DVD.
•Screen saver/Auto power-off functions
The screen saver program starts when there is no
input from the TV/VCR/DVD for five mhmtes in the
stop mode. When the screen saver program is activated
for 15 minutes, the power automatically turns off.
•Subtitles in adesired language
You can select a desired language for the display
subtitles, if that language is available on a disc.
•Selecting acamera angle
You can select the desired camera angle, if a disc
contains sequences recoNed from different angles.
•Choices for audio language and sound mode
You can select the desired audio language mM sound
mode, if different languages trod modes are available
on a disc,
•Parental lock
You can set the control level to limit playback of
discs which may not be suitable for children.
•Automatic detection of discs
This TV/VCR/DVD automatically detects if the
loaded disc is DVD, audio CD or MP3 on disc.
• Playback MP3 disc
• On-screen display
hfformation about the current operation can be dis-
played on a TV screen, allowing you to confirm the
currently active functions (such as program play-
back), on the TV screen using the remote control.
•Search
Chapter search /Title search /Track search /Time
search
• Repeat
Chapter /Title /Track /Group /All /A-B
•Marker
The part designated by user cml be called back.
• Resume Play
User cgm resume to playback from the part at which
the play was stopped.
• Virtual Surround
• Bit rate indication
• DRC (Dynamic range control)
You can control the range of sound volume.
NOTE:
• We do not recommend the use of universal remote controls. Not all of the functions may be controlled with
a universal remote control.
If you decide to use a universal remote control with this TV/VCR/DVD, please be aware that the code nmn-
ber given may not operate this TV/VCR/DVD. In this case, please call the manufacturer of the universal
remote control.
- 8 - EN
IC29

( .... ........ ': ..... ,)PERA I IN{= C()NTROI=S AND F IN{., I I )HI
-TV/VCR/DVD FRONT PANEL - [Fig.l]
DVD bu oos
2 3 4 3 5 6 7 8 9 10 11 1213 14 4 15 16 17 18 19 20 21
- REMOTE CONTROL - [Fig. 2]
1
22
SPEED CRESET VSURR MUTE
25 C,_ C:::_
(UVU)3 -
(TV/VCR)
31
32
........ 5
............. 4
.......11
.....
-,,,,,,,43
42
,,, 3 (DVD)
,15 (TVNCR)
5
-,-41
40
.......39
-" 38
-"-37
......36
35
..... 4
1. POWER Button [TV/VCRP.15/DVDP.371
Press to turn the power on and off.
2.VOLUME _/V Buttons
Press to control the volume level for the DVD and TV.
3.SKIP Buttons (for DVD)[R3Sl
Press once to skip chapters or tracks to a desired
point.
Press and hold to change forward or reverse play-
back speed.
4. PLAY Button [TV/VCRR26/DVDR37]
Stalls playback of the disc or tape contents.
-9-
5. STOP Button [TV/VCRP.26/DVDP.371
Stops operation of the disc. (or front panel)
Stops operation of the disc or tape contents.
(remote control)
6.OPEN/CLOSE Button [DVDR371
Press to insert discs into or remove them from the
tray.
7. Disc loading tray
8. DVD indicator
Lights on during DVD mode.
9. SELECT Button
Press to change to TV/VCR mode, external input
mode or DVD mode.
IO.TV/VCR indicator
Lights on during TV/VCR mode.
11. CHANNEL A/V Buttons
Press to select memorized channel.
12. Recording indicator
Flashes during recording. Lights up in the Stmld-
by mode for Timer Recording.
13. REC/OTR (RECORD)Button [TV/VCRR30.311
Press for m_mual recording. Activates One Touch
Recording. (OTR is only during TV/VCR mode.)
14. REW Button (for TWVCR) [TV/VCRP.26]
Press to rewind the tape, or to view the picture
rapidly in reverse during playback mode. (Rewind
Search)
15. F.FWD Button (for TV/VCR) [TV/VCRP.26]
Press to rapidly adwmce the tape, or to view the
picture rapidly in forward during playback mode.
(Forward Seamh)
16. STOP/EJECT Button [TV/VCRR281
Press to stop the tape motion. Press in the Stop
mode to remove tape from the TV/VCR/DVD.
17. Remote sensor window
18. HEADPHONE Jack
To connect headphone (not supplied) for personal
listening.
19. VIDEO input Jack
Connect to the video output jack of a video
camera or VCR. EN
IC29
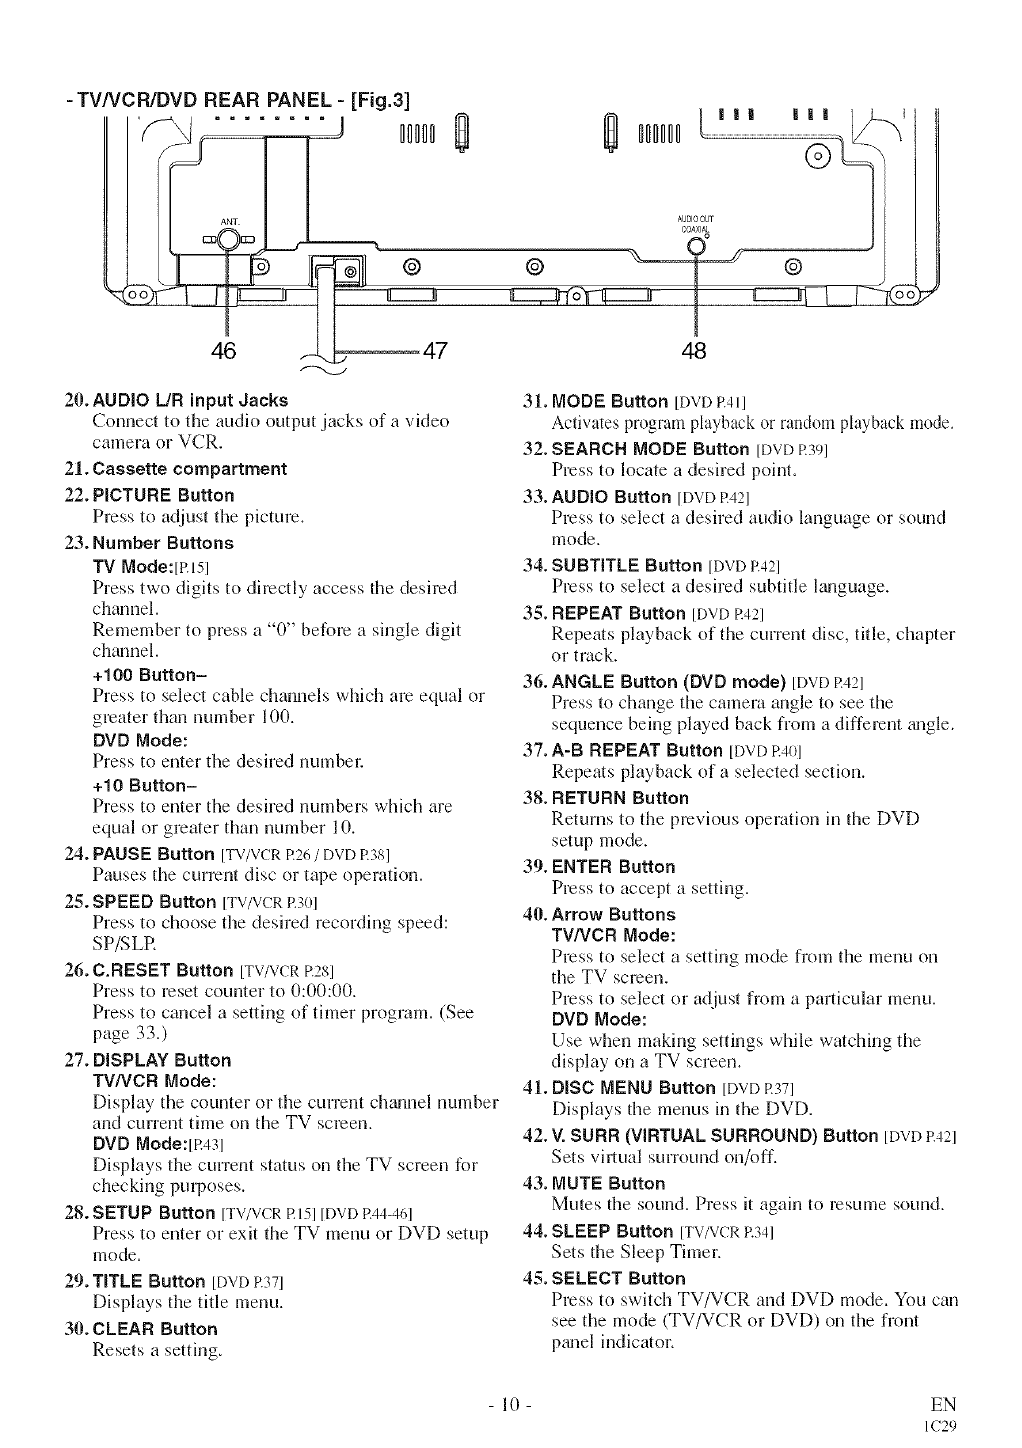
- TV/VCR/DVD REAR PANEL - [Fig.3]
,= = = = = = ==00000
\@
L......J
46 _ 47
0I Ill Ill /_
I
48
20. AUDIO L/R input Jacks
Connect to the audio output jacks of a video
camera or VCR.
21. Cassette compartment
22. PICTURE Button
Press to adjust the picture.
23. Number Buttons
TV Mode:[Rl5l
Press two digits to directly access the desired
chmmel,
Remember to press a "0" before a single digit
channel.
+100 Button-
Press to select cable channels which are equal or
greater than number 100.
DVD Mode:
Press to enter the desired numbel:
+10 Button-
Press to enter the desired numbers whMl are
equal or greater than number 10.
24. PAUSE Button [TV/VCRR26/DVD R381
Pauses the current disc or tape operation.
25. SPEED Button [TV/VCRR30]
Press to choose the desired recording speed:
SP/SLR
26. C.RESET Button [TV/VCRR281
Press to reset counter to 0:00:00.
Press to cancel a setting of timer program. (See
page 33.)
27. DISPLAY Button
TV/VCR Mode:
Display the counter or the current chwmel number
and current thne on the TV screen.
DVD Mode:[R431
Displays the current status on the TV screen for
checking purposes.
28. $ETUP Button [TV/VCRR15][DVDR44-46]
Press to enter or exit the TV menu or DVD setup
mode.
29. TITLE Button [DVD R371
Displays the title menu.
30. CLEAR Button
Resets a setting.
31. MODE Button [DvD P.411
Activates program playback or random playback mode.
32. SEARCH MODE Button [DVD R391
Press to locate a desired point.
33. AUDIO Button [DVD R421
Press to select a desired audio language or sound
mode.
34. SUBTITLE Button [DVD R421
Press to select a desired subtitle kmguage.
35. REPEAT Button [DVD R421
Repeats playback of the current disc, title, chapter
or track.
36. ANGLE Button (DVD mode) [DVD R421
Press to change the camera angle to see the
sequence being played back from a different wlgle.
37. A-B REPEAT Button [DVDR40]
Repeats playback of a selected section.
38. RETURN Button
Returns to the previous operation in the DVD
setup mode.
39. ENTER Button
Press to accept a setting.
40. Arrow Buttons
TV/VCR Mode:
Press to select a setting mode from the menu on
the TV screen.
Press to select or adjust from a particular menu.
DVD Mode:
Use when making settings while watching the
display on a TV screen.
41. DiSC MENU Button [DVD R371
Displays the menus in the DVD.
42. V. SURR (VIRTUAL SURROUND) Button [DVD R421
Sets virtual surround on/off.
43. MUTE Button
Mutes the sound. Press it again to resume sound.
44. SLEEP Button [TV/VCRR341
Sets the Sleep Timer.
45. SELECT Button
Press to switch TV/VCR and DVD mode. You can
see the mode (TV/VCR or DVD) on the front
pwlel indicator.
10 EN
IC29
46. ANT. in Jack
Connect to an antenna, cable system, or satellite
system.
47. Power cord
Connect to a stmMaM AC outlet (120V/60Hz).
NOTE: Remove the power coM from the hook to
avoid breaking a wire before you connect
to a standard AC outlet.
48. COAXIALdigital audio out Jack
Connect tu the digital input of an external
amplifier or decoder for DVD audio only.
PRLPARA [ }R [!SE
Sa_llelit_B°(XN;rtsupplied) _ _ _/2F/UL_lLdt)enna
_/'---_ From .Cable System or :VHF Antenna (Not supplied)
"[ UHF Antenna
From Cable -- [[=_H |
,_ ,H (Not supplied)
System /
I/Combiner I qt
Cable(Not Crl IL_V_ I --_ [Fig. 4]
supplied)<::C]}_ _ or Flattwin-leadcable
][n some areas it will be necessary to use an outdoor
antenrla.
(,S}VLE W?H :;'Of'FT C .Ut W}U+_77iJTff
[ U(,_(.FL,_ !U'#SL#<,77_J7'0%
Use this connection if your cable system connects
directly to your TV/VCR/DVD without a converter
box.
By using this connection you ctm:
1) Use the TV/VCR/DVD remote to select chgmnels.
2) Program one or morn unscrambled channels for
Automatic Timer Recording.
NOTE: This TV/VCR/DVD will ONLY record and
view the same chtmnel.
:_[,_t':;'_4'[ ( (?f_(VfT#('Tk,7/
....... ,........................ v, #_ > ', *a ',
If your cable service supplies you with a converter
box or if you use a satellite system, you cgm use the
basic connection shown in the illustration.
By using this connection you can also record scram-
bled channels. However, channel selection must be
made with the converter box or satellite box. This
means that channels cannot be changed using the
TV/VCR/DVD Remote Control. Unattended timer
recording is limited to one channel at a time.
Antenna/Cable Connections
Continued on the Next Page.
11 EN
IC29
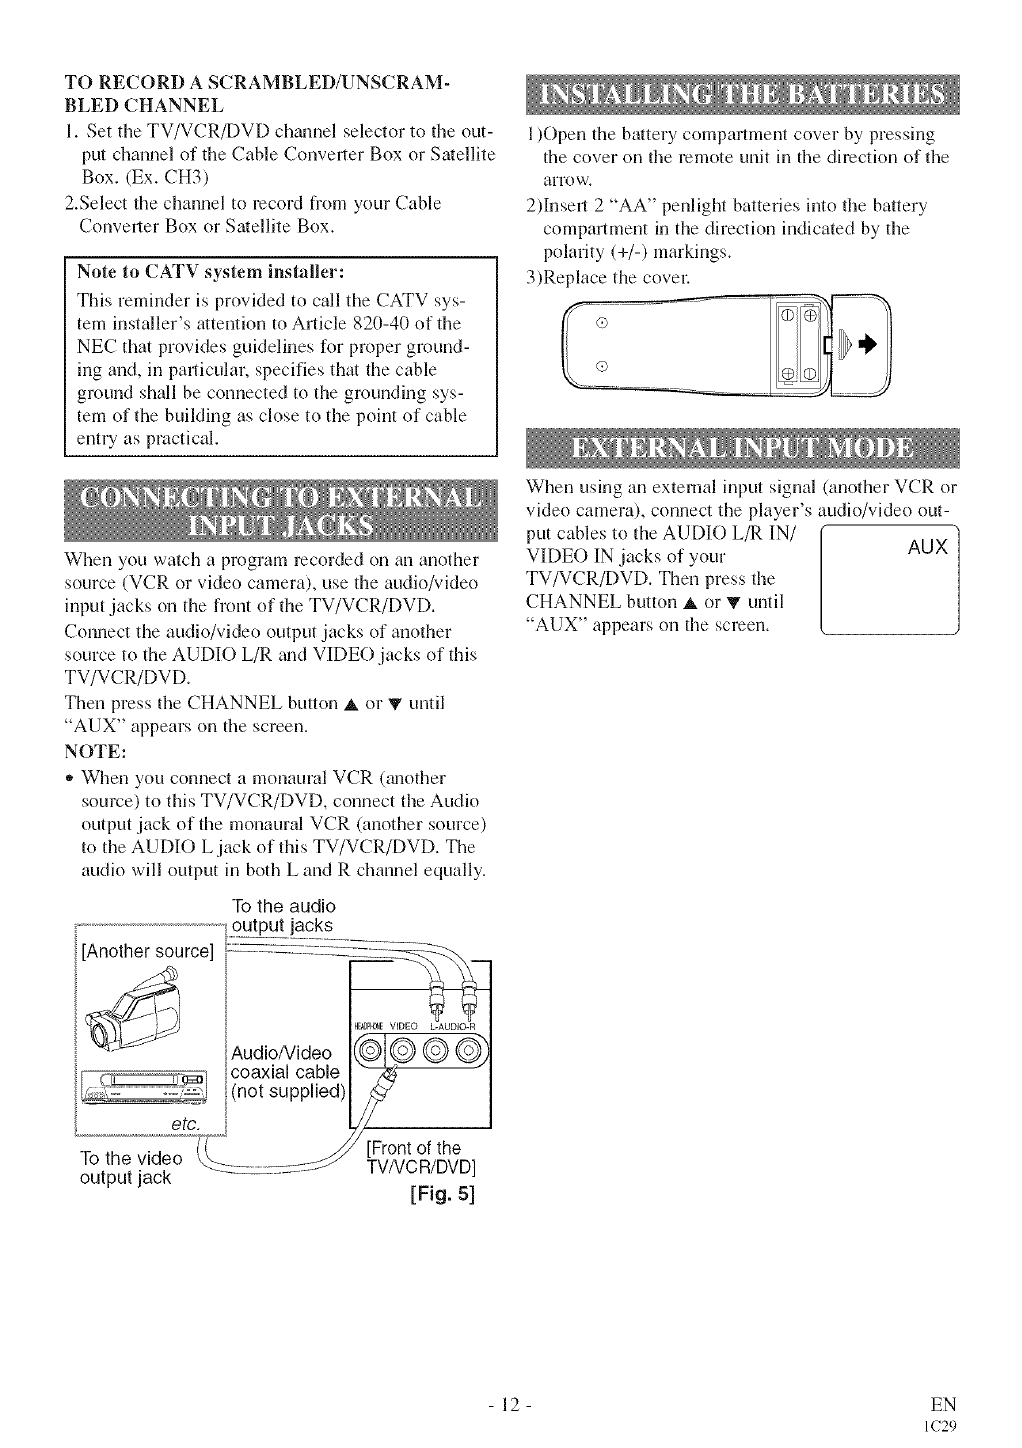
TO RECORD A SCRAMBLED/UNSCRAM-
BLED CHANNEL
1. Set the TV/VCR/DVD channel selector to the out-
put channel of the Cable Converter Box or Satellite
Box. (Ex. CH3)
2.Select the channel to record from your Cable
Converter Box or Satellite Box.
Note to CATV system installer:
This reminder is provided to call the CATV sys-
tem installer's attention to Article 82(I-4(I of the
NEC that provides guidelines for proper ground-
ing and, in pallicular, specifies that the cable
ground shall be connected to the grounding sys-
tem of the building as close to the point of cable
entUas practical.
When you watch a program recorded on an another
source (VCR or video camera), use the audio/video
input jacks on the front of the TV/VCR/DVD.
Connect the audio/video output jacks of another
source to the AUDIO L/R gradVIDE() jacks of this
TV/VCR/DVD.
Then press the CHANNEL button _, or _" until
"AUX" appears on the screen.
NOTE:
,, When you connect a monaural VCR 0mother
source) to this TV/VCR/DVD, connect the Audio
output jack of the monaural VCR (another source)
to the AUDIO L jack of this TV/VCR/DVD. The
audio will output in both L and R channel equally.
To the audio
,;output jacks
[Another source] _
AudloNideo
ii I coaxial cable
(not supplied)
outputjack
HDDPF_E VIDEO L-AUDIO-R
-[Front of the
TVNC R/DVD]
[Fig. 51
1)Open the battery compartment cover by pressing
the cover on the remote unit in the dhection of the
afro w.
2)Inser_ 2 "AA" penlight batteries into the battery
compartment in the direction indicated by the
polarity (+/-) markings.
3)Replace the covel:
When using an external input signal (another VCR or
video camera), connect the player's audio/video out-
put cables to the AUDIO L/R IN/
VIDEO IN jacks of your AUX
TV/VCR/DVD. Then press the
CHANNEL button _, or _r until
"AUX" appears on the screen.
12 EN
IC29
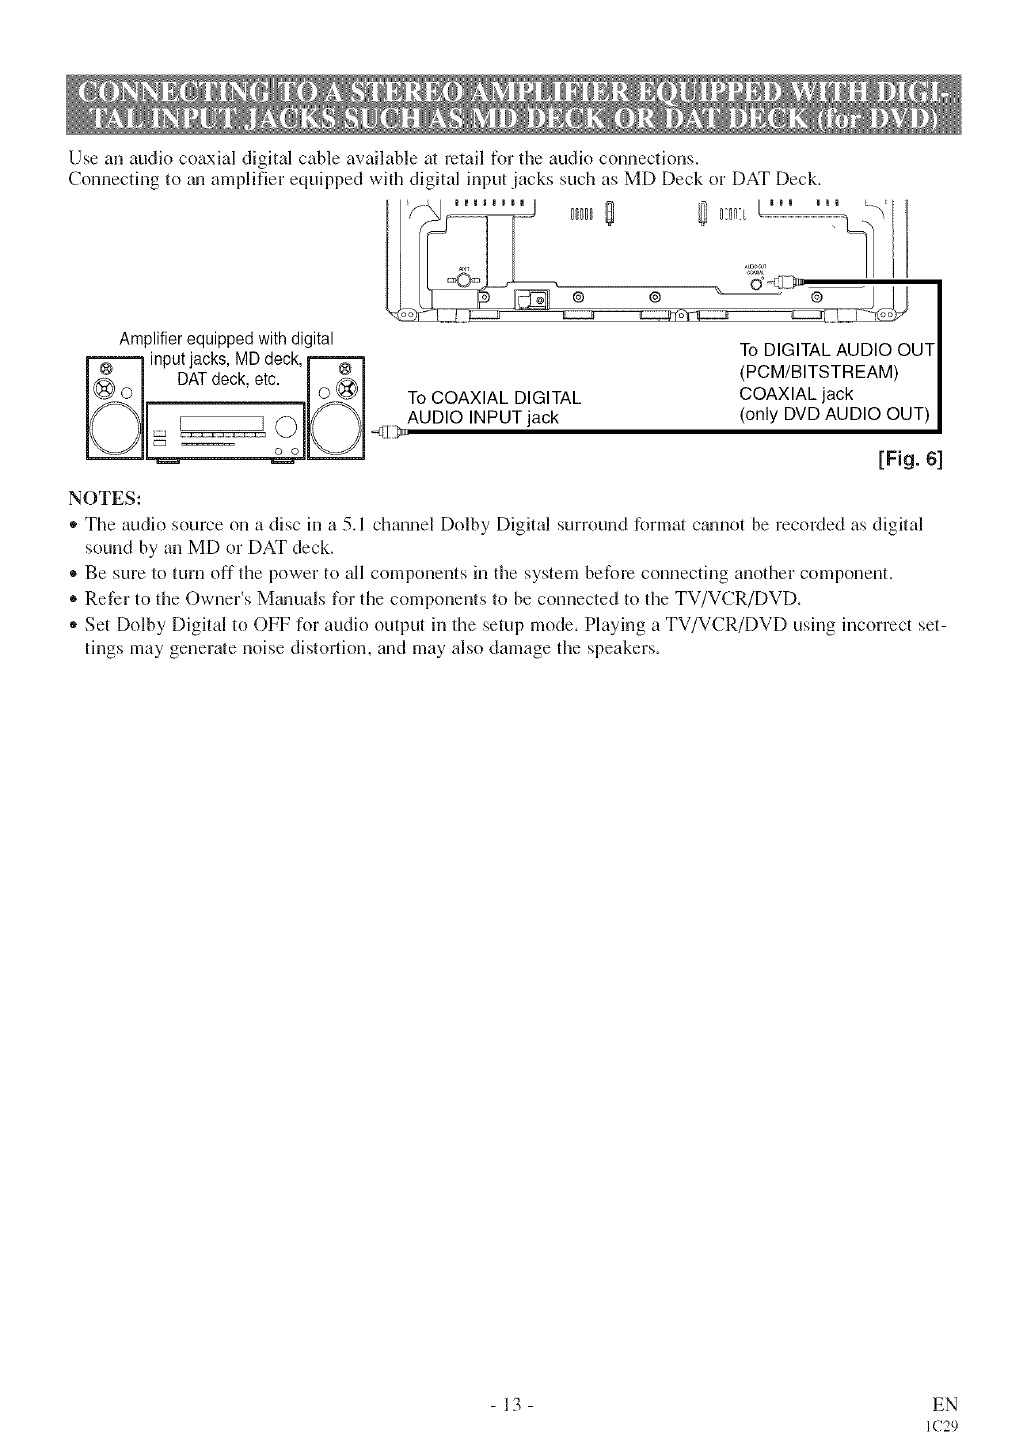
Use an audio coaxial digital cable available at retail for the audio connections,
Connecting to tm amplifier equipped with digital input jacks such as MD Deck or DAT Deck,
Amplifierequippedwithdigital
_ inputjacks,MDdeck,
DATdeck,etc. ] _ _ ]
! u _! To COAXIAL DIGITAL
_ ,4]z>AUDIO INPUTjack
To DIGITAL AUDIO OUT
(PCM/BITSTREAM)
COAXIAL jack
(only DVD AUDIO OUT)
[Fig. 61
NOTES:
,, The audio source on a disc in a 5.1 channel Dolby Digital surround format cgmnot be recoMed as digital
sound by ml MD or DAT deck.
• Be sure to turn off the power to all components in the system before connecting another component.
• Refer to the Owner's Mgmuals for the components to be connected to the TV/VCR/DVD.
,, Set Dolby Digital to OFF for audio output in the setup mode. Playing a TV/VCR/DVD using incorrect set-
tings may generate noise distortion, and may also damage the speakers.
13 EN
IC29
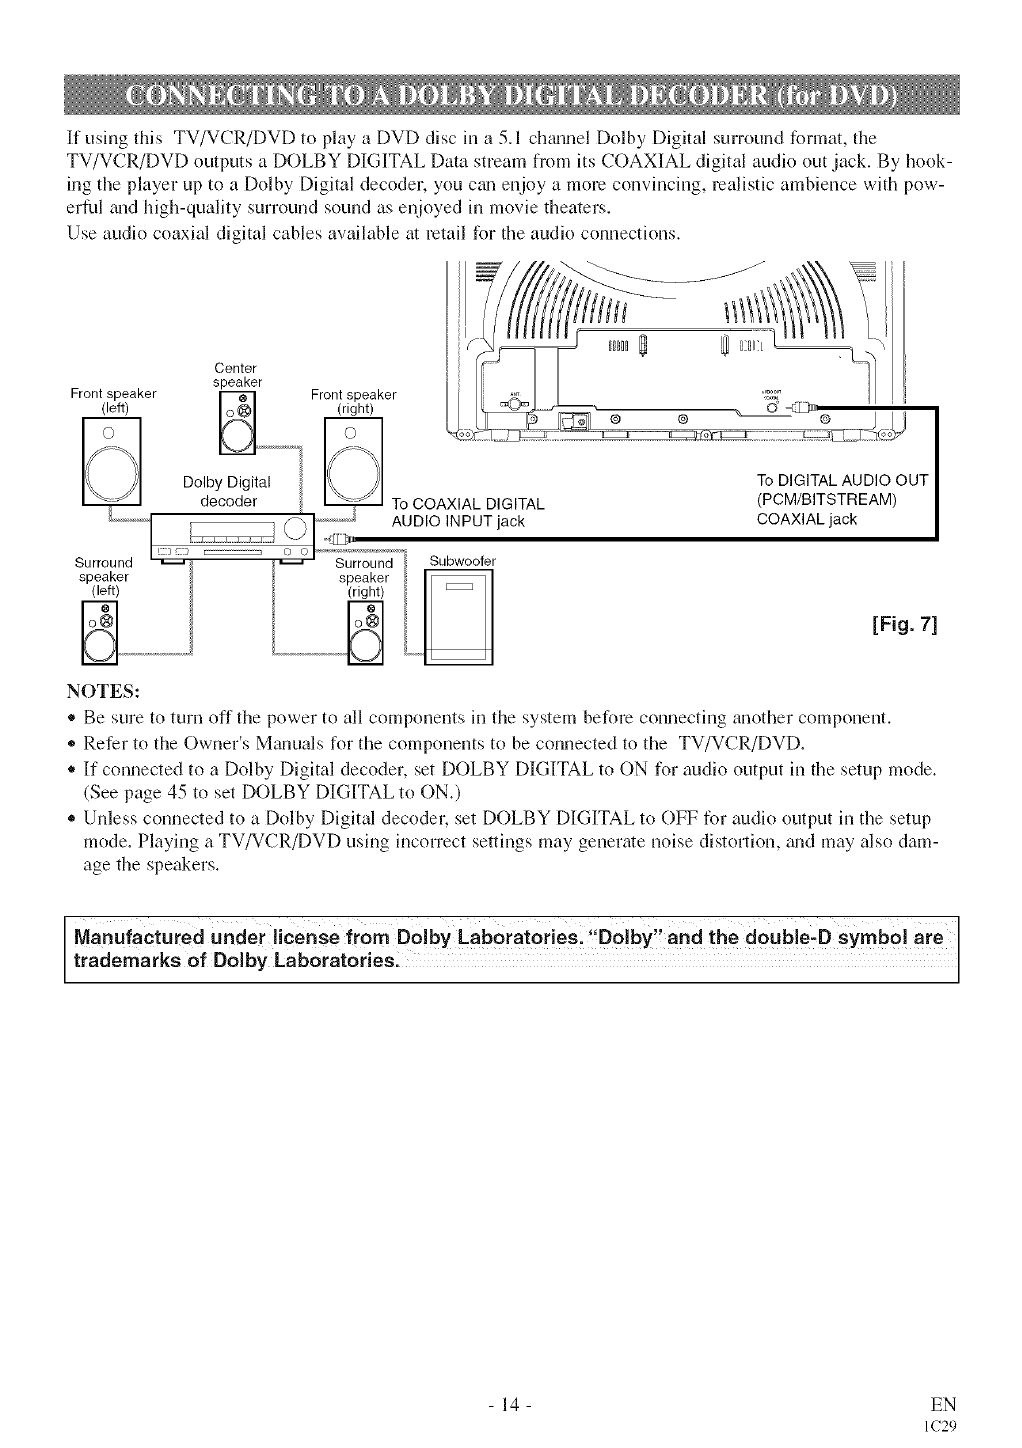
If using this TV/VCR/DVD to play a DVD disc in a 5.1 ch_umel Dolby Digital surround format, the
TV/VCR/DVD outputs a DOLBY DIGITAL Data stream from its COAXIAL digital audio out jack. By hook-
ing the player up to a Dolby Digital decoder, you ctm enjoy a more convincing, realistic ambience with pow-
erful and high-quality surround sound as enjoyed in movie theaters.
Use audio coaxial digital cables available at retail for the audio connections.
speaker
Front speaker _) Front speaker _ @a_ _
(left) (right) _lB_© • J m
Dolby Digital To DIGITAL AUDIO OUT
decoder To COAXIAL DIGITAL (PCM/BITSTREAM)
l _ 24'_412_ AUDIO INPUT jack COAXIAL jack
Surround _l._:_ Surround '} Subwoofer
(left) (right)
_, l, [Fig. 71
NOTES:
®Be sure to turn off the power to all components in the system before connecting another component.
,, Refer to the Owner's Manuals for the components to be connected to the TV/VCR/DVD.
* If connected to a Dolby Digital decoder, set DOLBY DIGITAL to ON for audio output in the setup mode.
(See page 45 to set DOLBY DIGITAL to ON.)
,, Unless connected to a Dolby Digital decoder, set DOLBY DIGITAL to OFF for audio output in the setup
mode. Playing a TV/VCR/DVD using incorrect settings may generate noise distortion, _mdmay also dam-
age the speakers.
Manufactured under license from Dolby Lab0ratoriesl "Dolby" and the double-D symbol are
trademarks of Dolby LabOratories:
- 14 - EN
IC29
SE[ [!P )R[!SE
[TV/VCR]
Plug the TV/VCR/DVD power cord into a
standard AC outlet.
NOTE:
®If some digits appear in the comer of
the screen, press the POWER button without
unplugging the power cord.
Make sure ...
• Pless select bu_on to select TV/VCR mode, or m_d<e
sure TV/VCR lights on.
,, Press the POWER buttonto turn on the TV/VCR/DVD.
NOTE: This function effects only the language on
the semen menu _mdnot the audio source.
Press the SETUP button on the _,o,_................oo,_o_
SETTENGCL©GK
remote control, c_a set vp
USER'S S_T UP
V CHIP 8_T U_
Press the Arrow button A or 'V to _'_ _'_"_ ......
GAPTION [O_F] S
ZERO _SIURN
point to "LANGUAGE". ..........
Sect/E_,GLS[.' ESPANOL o FRAN<AS"
Select "ENGLISH", "ESPAlqOL"= Spanish or
"FRAN(_AIS"= French using the ENTER button.
_Ext t!'e La_g{mge _®d®
Press the SETUP button on the remote control to
return to TV mode.
NOTE: If for some reason the menu is in Spanish or
French, press the SETUP button on the remote con-
trol, press the Arrow button _, or V to point to
"IDIOMA [ESPAlqOLI" or "LANGAGE
[FRAN_AIS]", then press the ENTER button, then
press the SETUP button on the remote control.
[TV/VCR]
The TV/VCR/DVD clock must be set correctly before
VCR timer recording is possible. It is suggested that
the clock be set mmmally when first setting up the
TV/VCR/DVD. Then, set to [ONIthe auto clock set-
ring which will periodically correct the setting if nec-
essa U.
NOTE: If you cannot receive a smfion with time
signals, auto clock setting cannot be performed. Use
manual setting only.
MANFAt (}/?C£ SETT ,iVG
Make sure ...
*The TV/VCR/DVD is turned on.
hz tke example below, the clock is to be set to:
DATE May 6th, 2004
SETTING TIME 5:40PM
,,<_e. 9}!!!7'N<;',CL,O,';.K'
Press the SETUP button on the ....
remote control.
Press the Arrow button _, or V to
point to "SETTING CLOCK".
Then, press the ENTER button.
9 Se®:_ _i/AN/A Ct,OCK _:;_r'
£YL ,,
Press the Arrow- button _, or Y to s_<,._o_oo_
point to "MANUAL CLOCK _........ _o._
AUTO CLOGK CH SEARCH
SET". _o,oo_oo_o._o_
MANUAL GEOGK SET
Then, press the ENTER button.
,3 Seect the _so_th
Press the Arrow button _, or V MAN/IAL GLOGK S_T
until your desired month appears. _...........
(Example: May --+ (15) ?
Then, press the Arrow button I1_..........
(Or press the Arrow button "_1to
go back one step.)
S®ec hed'}y
MANUAL GLOGK 8_T
Press the Arrow button A or 'V
until your desired day appears. M...........
(Example: 6th --_ 06)
Then, press the Arrow button I1_,
15 EN
IC29
Pressthe Arrow button A or Y MONTH DAy ¥EA_
H
until your desh'ed year appears, o............. _oo:_
(Example: 2004) ..........
Then, press the Arrow button _.
Press the Arrow button A or Y _o_ o_ _
until your desired hour appears ..............
(Example: 5, PM) _oy......
Then. press the Arrow button _. ......................,,
S®e s:tthe .............. )
1
Press the Arrow button A or ? ............
until the desired minute appears. °...........
(Example: 4(I) ..........
0s :i
_i_ S :_:t_tthe cock
Press the SETUP button on the ...... 1
remote control. /
Although seconds are not displayed,
the}: begin counting from 00 when
you press the SETUP button on the
remote control. Use this feature to
synchronize the clock with the correct time.
NOTE:
When unplugging the AC cord or if there is a power
failure for more than 3 seconds, you may have to
reset the clock.
7?? C::,$is, Y;£ [LO:£ S£':7 :%(;
If you want to change the clock,
l)Follow steps Ill _md[2].
2)Select where you want to change using the Arrow
button _.
3)Enter correct numbers using the Arrow- button
or Y.
4)Press the SETUP button on the remote control to
stm_ the clock.
PLEASE NOTE:
If there is no local PBS station in your area or on
your cable system, select "AUTO CLOCK" and
press the ENTER button to turn [OFFI this function.
Then you can manually adjust the clock.
A U?,#;dATIC C:OC£ S£77iU /G
Make sure ...
• The TV/VCR/DVD is turned on.
• Confirm the TV/VCR/DVD is receiving a RF
(Radio Frequency) signal from either an antenna or
cable system connection using the ANT. terminal
on the mar of the TV/VCR/DVD.
NOTE:
• If a cable converter box is being used, make sum it
is powered on.
®You must use the TV/VCR/DVD remote control to
perform the clock setting procedure.
-If the TV/VCR/DVD is connected directly to a
cable converter box or satellite box, the local PBS
station must be selected on the cable box itself, and
the TV/VCR/DVD must be set to the output chan-
nel of the cable converter box or satellite box (usu-
ally channel 3 or 4), to be able to set up or correct
the clock automatically.
S®ec SETTNGCLOCK'
Press the SETUP button on the
remote control.
Press the Arrow button _ or T to
select "SETTING CLOCK".
Press the ENTER button to enter
"SETTING CLOCK" menu.
MENU
T_ER P_O_RAMMIN_
CHANNEL SET UP
USER'S SET UP
V CHIP SET UP
tANaUAGE [ENC_L_SH]
CAPTEON /OFF]
ZErO RETURN
T_MESEARCH
>®/A}TOCLOCK to ON/
<%
Press the Arrow button _ until
"AUTO CLOCK tONI" appears.
3 B_:_,g_sAUTO OLO©K C/{ SEARCH
Press the Arrow button V to select _<,._o_oo_
"AUTO CLOCK CH SEARCH". AUTO CLOCK [ON]
Press the ENTER button. _................
MANUALCLOCK SET
* The TV/VCR/DVD is now o_, _o<
seamhing for the station which
contain the auto clock set signal.
The search for a signal may take up to 2(I
seconds per channel.
* "_ _" appears at the lower left of ............ _o.
the screen when the search has ......
ended.
-Auto Clock station- write down
the number(s) that appear on the
screen. These are the auto clock
station(s) in your area. See step [41 on page 17.
-If no number(s) appear on the TV screen, them am
no stations in your area which contain the Auto
Clock signal. Auto Clock Setting is not possible.
Please use Manual Clock Setting on page 17.
Press the SETUP button to exit the screen.
16 EN
IC29
NOTE: During Auto Clock CH Search, the picture
may be distorted, This is normal,
4F E_®__t_÷ char'me _m'_be/'sat costa r_9tse
Auroras cCockS®h_gS{_sa
Press the SETUP button on the remote control.
Press the Arrow button at or 'V to
select "SETTING CLOCK". ....
TIMER pR©GIqAMMIN@
Press the ENTER button to entel ...............
SETTING CLOCK
CHANNEL SET UP
"SETTING CLOCK" menu. o_.......
V-CHtp SET UP
LANGUAGE [ENGU$H]
Press the Arrow button _" to select o_,o, to<
ZERO R ETtiIqN
"AUTO CLOCK CH". ..........
Press the ENTER button or the .............
Arrow button "ql or _ until you 2_;ogkO_o_£%
locale Auto Clock Set station num- _2_o_'_%Tt _
ber. See step [31on page 16. o_, Eo_
Press the SETUP button to exit the
screen.
5r -r c he _V/VC_{CNL}
Once the TV/VCR/DVD is turned off, it will period-
ically check and set the correct date and time.
[TV/VCR]
Select this feature and the TV/VCR/DVD's clock
automatically will advance one hour in April, then
reverse one hour in Octobec
When Daylight-Saving Time is ON, the clock will
chwlge automatically as follows:
,, First Sunday of April : At 2 AM the clock imme-
diately changes to 3 AM. Any timer programming
you have set to occur between 2 AM and 3 AM
will not record.
,, Last Sunday of October : At 2 AM the clock
hnmediately changes to I AM.
Make sure ...
,, Press the POWER button to tuna on the TV/VCR/DVD.
' S_,es S_;:/',G CL,OCK
Press tl_e SETUP button on tile ....
T_M EI:t pRO° RAMMING
renlote contrc, l. PICTURE CONTROL
S_]7[NG CL©OK
CHANNEL S_T tip
Press the Arrow button at or V to ti_'°_
V-°HIp SET UP
LANGUAC_E{ENGLISH]
point to "SETTING CLOCK". ....... _o_
ZERO RETURN
Then, press the ENTER button. ' .........
Press the Arrow button at or V to (_,,_o_oo_
point to "D.S.T.". _[ ......... _o_
AUTO CLOCK CIq S EARGlq
Then, press the ENTER button until [ ........... _0_
MANUAL CLOCK 8_
[ONI appears. [" ............. *°_....
t
_ii,_Ex the 3ay g:_Sav _9S _se_o<:e
Press tile SETUP button on the renlote control to
return to TV mode.
?'(_ (' kA;( £f ?'W/, _/£SJ_£SGHXsSAW/Y{/
T/Wli
Repeat steps [11to I21, select [OFFI using the
ENTER button.
17 EN
IC29

]TV/VCR ]
You can program the tuner to scan all the channels
you receive in your area.
NOTE: Channel memo Uprogramming is NOT
needed when connected to a cable box or satelfite
box. Just select the TV/VCR/DVD channel selector
to the output channel of the cable box or satellite box
(Ex CH3). Then select tile chzumel to be viewed on
tile Cable Box or Satellite Box.
Make sure ...
* Pless the POWER bulon to mm on the TV/VCR/DVD.
]/, ..... ............. I;=. £,_o,,,,Is.=JP
Press the SETUP button on tile ....
T_M Ilq pROGRAMMING
relnote control, prcruR=coNsRoc
8ETTING CLOCK
CHANNEL SET kip
Press the Arrow button _, or V to ki=_===_o_
v CSHIpSET UP
)'' • _, LANOUAGE IENGLFIIq]
point t( CHANNEL SET UP ........ to_
ZERO IETIRN
Then, press the ENTER button. •.........
2 [),egis g>,Io ch p_ogi',_ n_r_it'_g
Press tile Arrow- button _ or T to o=_===_==•ki_
point to "gUT() CH PROGRAM ............. _o_,_
MING". .................
Then, press tile ENTER button.
The tuner sczms and memorizes all
the active chmmels in your area.
The tuner stops on tile lowest memorized channel.
,, When AUTO CH PROGRAMMING is actiwfed
where them is no TV signal input, "NO TV SIG-
NALS" will appear on the display after the com-
pletion of the channel scanning.
* Tile TV/VCR/DVD may recognize TV chzmnels to
be CATV chzmnels by the receiving conditions. ][n
this case, try auto ch programming again in the fine
receiving conditions.
[TV/VCR
The channels you no longer receive or seldom watch
can be deleted from the memory. (Of course, you
c_madd tile deleted channel into tile memory again.)
............. ,g]=i =
Press the SETUP button on the ....
T_IdER I_IOG]RAMMIII
remote control. _o•kia_oo_r_o_
SE•TING CLOCK
GIqANNEL SET LIp
Press the Arrow button A or T to u_=,_s_,ki_
v CHtP SET kip
point to "CHANNEL SET UP". o_,,o=........._o<_.......
ZErO RETtlRN
Then, press the ENTER button. ,.........
Press the Arrow button _, or V to I" _°°'°===_=°<°_'_
point to "ADD/DELETE CH". .................
Press the ENTER button.
Press the Arrow button _, or V (
until your desired channel number
appears. (You can also use tile 0s
number buttons or the CHANNEL ..........
•, or _ button to enter it)
(Example: CH8)
,, When selecting cable channels which are higher
thgm 99, press the +100 button first, then, press the
last two digits. (Example: to select chmmel 125,
first press the +100 button then press "'2" and "5").
,, You must proceed single-digit ch_umel numbers
with a zero (Example: 02 ... 09).
Press tile ENTER button. The channel number
chmlges to light red. The ch_mnel is deleted fiom
memory.
* To delete another channel, repeat steps [3] and [41.
,, If you press the ENTER button again, tile ch_mnel
is memorized again.
Added channel: Light blue.
Deleted channel: Light red.
_Exi _e c_s_sse/ se'{up _so<e
Press the SETUP button on tile remote control to
returns to TV mode.
NOTE: To confirm that channel(s) has been deleted
or added, press the CHANNEL _ or V button.
18 EN
IC29
FV ()PERATION
ITV/VCRI
:Y"ul_ 'l'e _:V/VC_'/DVII/)
Press the POWER button to mm on the TV/VCR/DVD.
2 Se®c_, becba<;_e mmb®f
Press the CHANNEL button A or V to select your
desired channel number or press the number on the
remote control.
Note for using the Number button on the remote
control:
• When selecting cable channels which are higher
thzm 99, press +100 first, then, press the last two
digits. (Example: to select cham_el 125, first press
"+100" then press "'2" and "5").
• You must preced single-digit chzumel numbers with
a zero (For example: 02, 03, 04 _md so on).
Remember: If the TV/VCR/DVD is connected to a
cable box or satellite box, the TV/VCR/DVD must
be on CH3 or CH4, then the channel to be viewed
must be selected on the cable box or satellite box.
Press the VOLUME button/', or V
to adjust the volume.
VOLUME 20
|||||Nnnm
NOTES:
• If you press the CHANNEL button _. or 'V in the
DVD mode, you czmchange the TV channels.
Even if you turn off the TV/VCR/DVD in the
DVD mode, when you turn it on again, it will go
into the TV/VCR mode.
ITV/VCRI
Magnetism from nearby appliances and speakers
might affect the color of the TV picture.
If this happens, move this TV/VCR/DVD away from
the appliance. If the color is still not correct, unplug
the power cord, then plug it in again 30 minutes later
or SO.
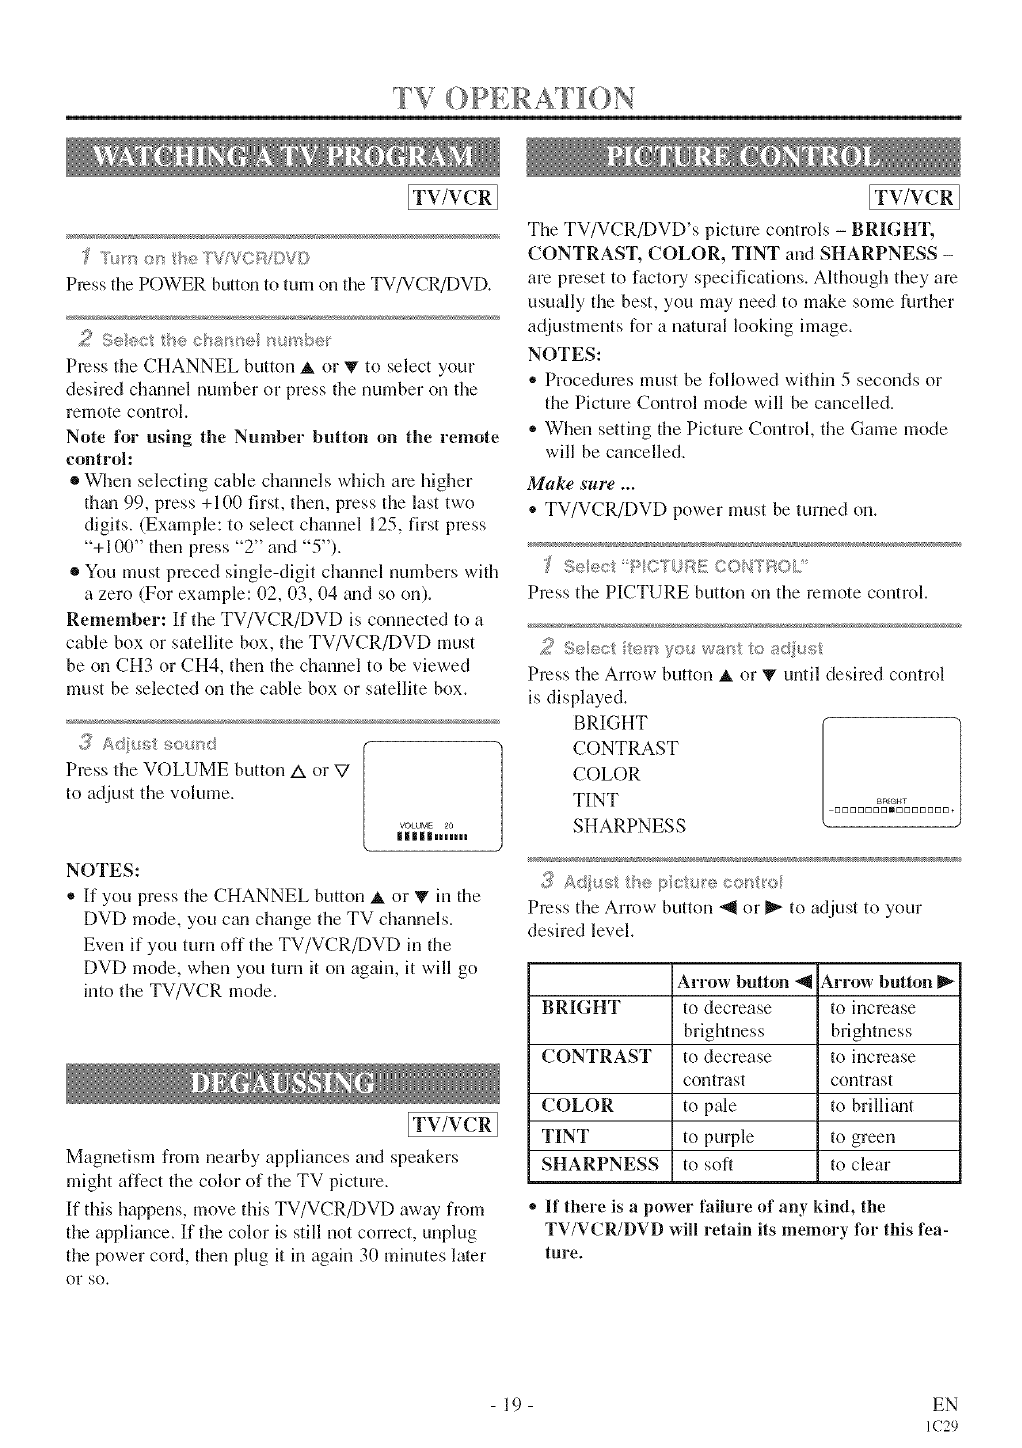
[TV/VCR ]
The TV/VCR/DVD's picture controls - BRIGHT,
CONTRAST, COLOR, TINT and SHARPNESS -
are preset to factory specifications. Although they are
usually the best, you may need to make some further
adjustments for a natural looking image.
NOTES:
• Procedures must be followed within 5 seconds or
the Picture Control mode will be cancelled.
,_When setting the Picture Control, the Game mode
will be cancelled.
Make sure ...
,_TV/VCR/DVD power must be turned on.
J _, _s_* _ :_ ..... _ _ ,_
,>e, '_: (V_. :I!!I!CON'_R L
Press the PICTURE button on the remote control.
Press the Arrow button _ o1 V until desired control
is displayed.
BRIGHT
CONTRAST
COLOR
TINT DDDDDDD_DDDDDDD*
SHARPNESS
Press the Arrow button -_ 1271_ to adjust to your
desired level.
Arrow button -_ Arrow button
BRIGHT to decrease to increase
brightness brightness
CONTRAST to decrease to increase
contrast contrast
COLOR to pale to brilli_mt
TINT to puqfle to green
SHARPNESS to soft to clear
* If there is apower failure of any kind, the
TV/VCR/DVD will retain its memory for this fea-
ture.
- 19- EN
IC29
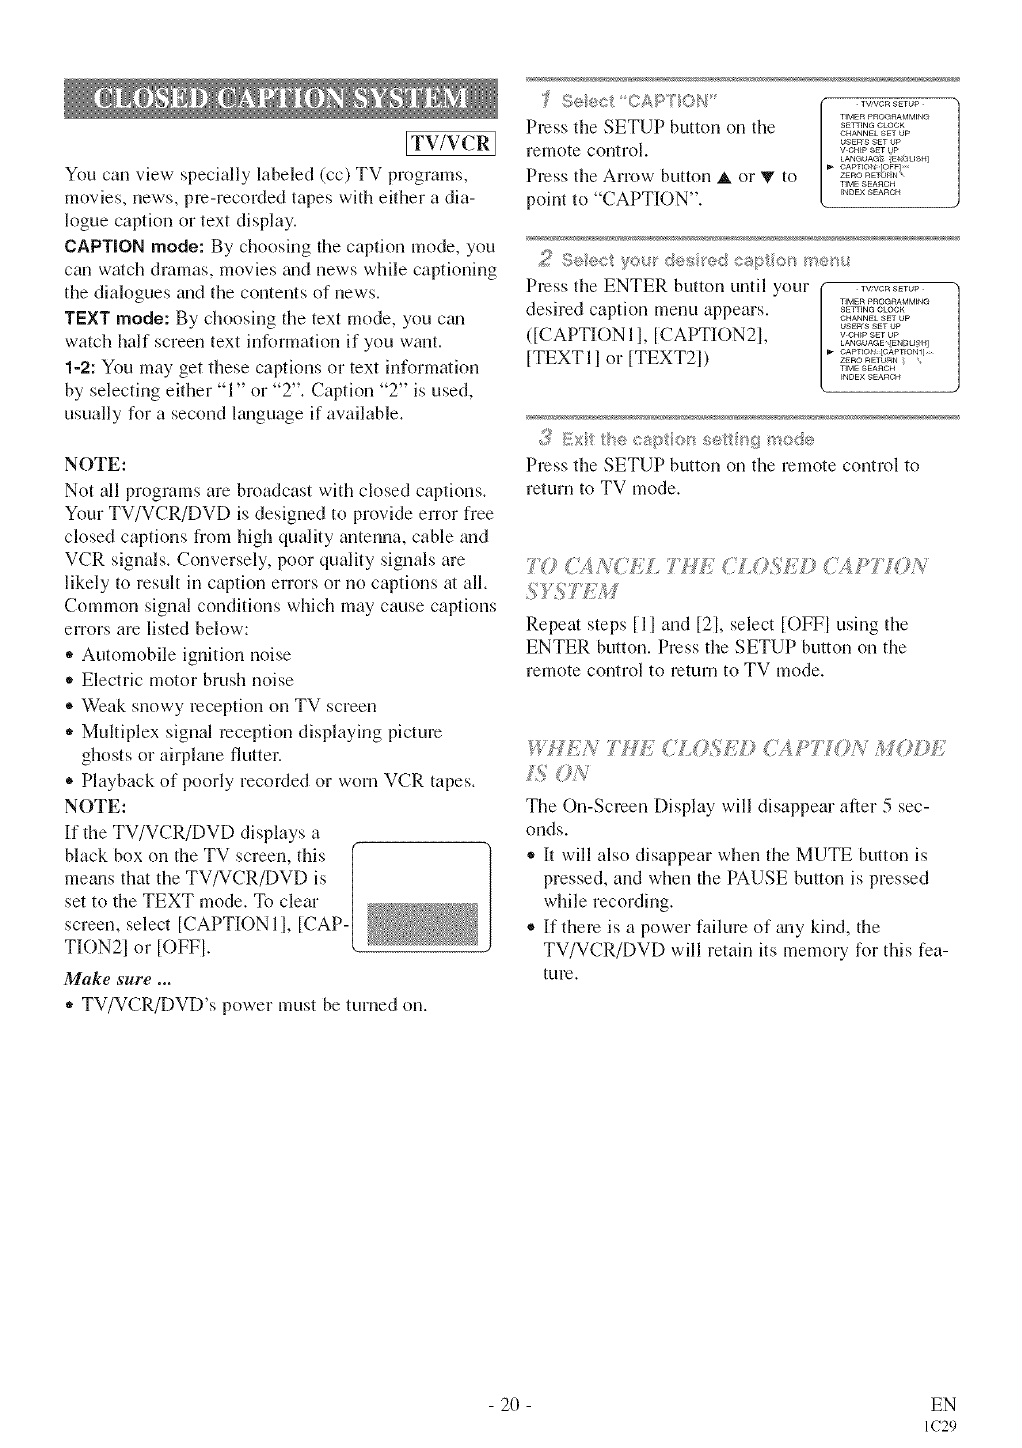
[TV/VCR]
You can view specially labeled (cc) TV programs,
movies, news, pm-mcoMed tapes with either a dia-
logue caption or text display.
CAPTION mode: By choosing the caption mode, you
can watch dramas, movies mid news while captioning
the dialogues and the contents of news.
TEXT mode: By choosing the text mode, you ctm
watch half screen text hfformation if you want.
1-2: You may get these captions or text information
by selecting either "1" or "2". Caption "2" is used,
usually for a second ltmguage if available.
NOTE:
Not all programs are broadcast with closed captions.
Your TV/VCR/DVD is designed to provide error free
closed captions from high quality antenna, cable mid
VCR signals. Conversely, poor quality signals are
likely to result in caption errors or no captions at all.
Common signal conditions which may cause captions
errors are listed below:
* Automobile ignition noise
,, Electric motor brush noise
®Weak snowy reception on TV screen
,, Multiplex signal reception displaying picture
ghosts or ahplmle flutter.
* Playback of poorly recoNed or worn VCR tapes.
NOTE:
If the TV/VCR/DVD displays a
black box on the TV screen, this (
meals that the TV/VCR/DVD is /1
set to the TEXT mode. To clear /
screen, select [CAPTION I l, [CAP-/
TION21 or [oFF]. [
Make sure ...
,, TV/VCR/DVD's power must be turned on.
Seec CAPT O_, •..........
TIMER PROGRAMM_N@
Press the SETUP button on the ...........
CHANNEL SET UP
USER'S SET UP
remote control, v-oHtpsmUP
LANG L/AG_ EN@ U ,qH]
GAPT_©_ OgF ....
Press the Arrow button A or 'V to _=o=_o_=
TIME SEARCH
point to "CAPTION". .........
2 Sect/, you desk<s: csp_ o_ _
Press the ENTER button until your •..........
TIMER pROGP_AMr_t*,_Q
desired captk)rl menu appears, s..........
CHANNEL SET LIp
LIS Elgrs SET t_p
([CAPTIONI l, [CAPT][ON21, v.........
LANGLIAGE EN_LI It]
[TEXTI 1 or [TEXT21) _=o...........=_-_,_...... N_....
TIME ,q EA_qGH
_NDEX SEARCH
3 Ii!xi }:l e <:_rl)Ilo/_ _:el?lilsg y_t=oce
Press the SETUP button on the remote control to
return to TV mode.
Repeat steps [11and [21, select [OFFI using the
ENTER button. Press the SETUP button on the
remote control to return to TV mode.
WHEN TMA'( CLOSED C_PT O/I/ MODE
5 ON
The On-Semen Display will disappear aler 5 sec-
onds.
* l/will also disappear when the MUTE button is
pressed, and when the PAUSE button is pressed
while recording.
®If them is a power failure of _mykind, the
TV/VCR/DVD will retain its memo Ufor this fea-
ture.
- 20 - EN
IC29
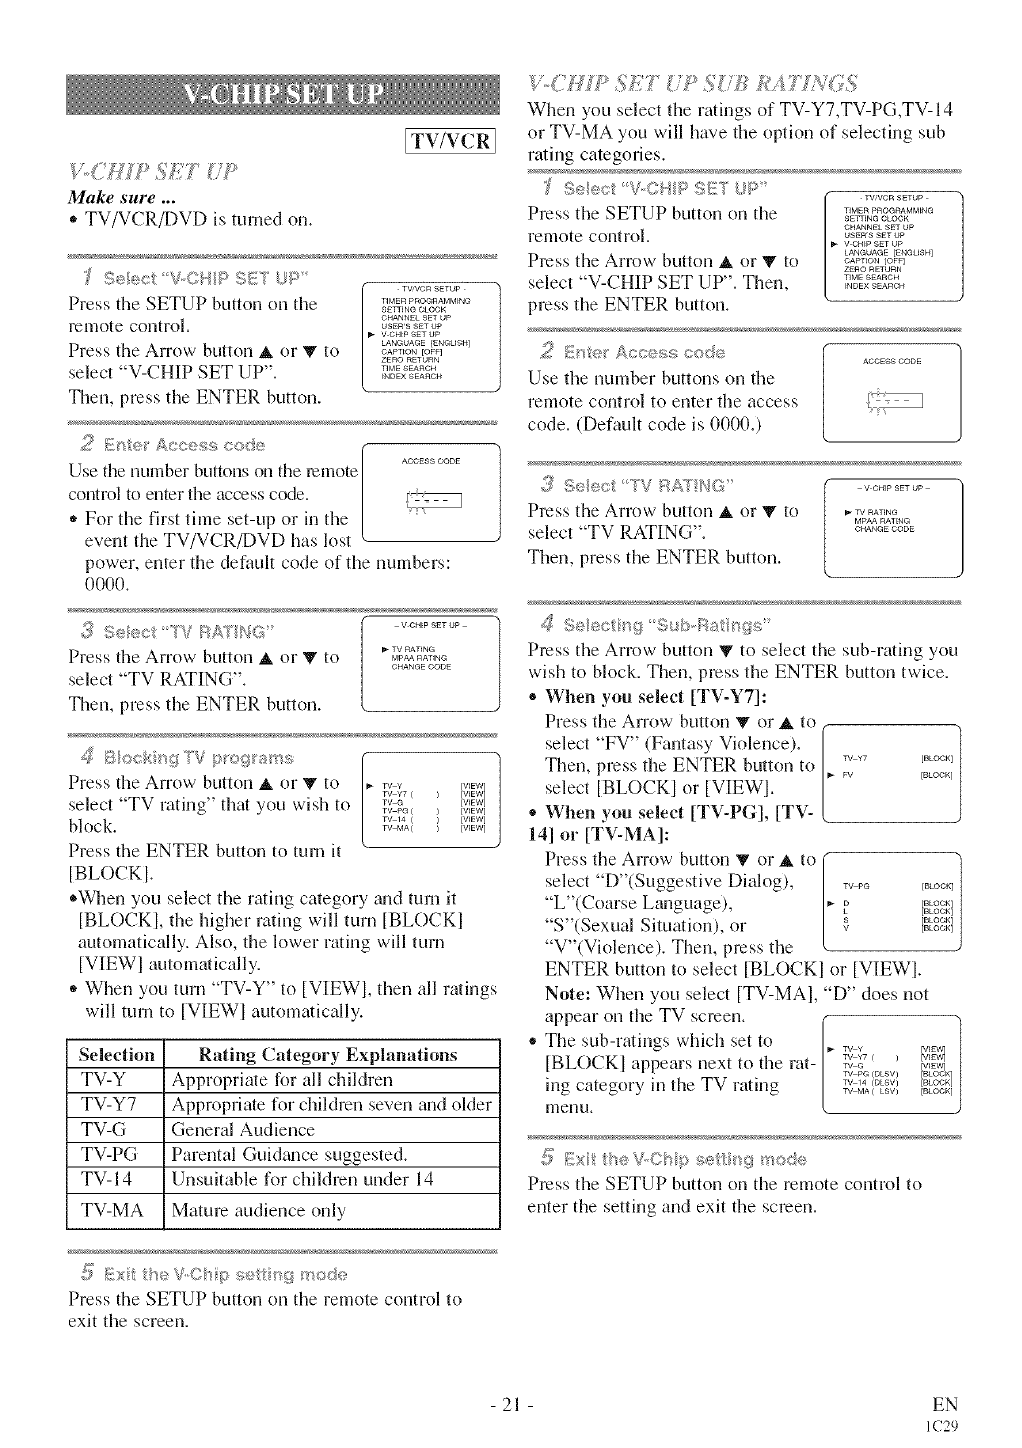
Make sure ...
• TV/VCR/DVD is turned on.
ITV/VCRI
TV!VC R SETUP
Press the SETUP button on the ................
SET_INQ CLOCK
CHAN_qEL gET UP
renlote control, ussR,sset up
t_ v-cHtp SET UP
LANGUAGE ]ENeUSH]
Press the Arrow button A or _" to CApTiONEO<
ZERO RETURN
select V-CHIP SET UP". ..........
_NDEXSEAnOH
Then, press the ENTER button.
2 s_ccs,_i_scoe (..........
Use the uumber buttons on tile remote [
control to enter the access code. l
*For the first time set-up or in the /L
event the TV/VCR/DVD has lost
power, enter the default code of the numbers:
0000.
J
_1_TV RATING
Press the Arrow button _. or V to _,_AT,,_
CHANGE OO{)E
select "TV RATING".
Then, press the ENTER button.
_$ Bockn{sTV :_e_Srams
Press the Arrow- button _, or _v to
select "TV rating" that you wish to
block.
Press the ENTER button to turn it
[BLOCKI.
1
TV ¥ [WEW] /
TV ¥7 [ ) [WEW]
TV _ [VIEW]
TV p_ ( [viEw]
TV 14 ( [VIEW]
TV MA( [WEW]
*When you select the rating category _mdturn it
[BLOCK], the higher rating will turn [BLOCK]
automatically. Also, the lower rating will turn
[VIEWl automatically.
,, When you turn "TV-Y" to [VIEW], then all ratings
will turn to [VIEWl automatically.
Selection Rating Category Explanations
TV-Y Appropriate for all children
TV-Y7 Appropriate for children seven and older
TV-G General Audience
TV-PG Parental Gui&mce suggested.
TV-14 Unsuitable for children under 14
TV-MA Mature audience only
Press the SETUP button on the remote control to
exit the screen.
y,,( 9P s£7 s£/i
When you select the r*ings of TV-Y7,TV-PG,TV-14
or TV-MA you will have the option of selecting sub
rating categories,
TV/VCR SETUP -
Press the SETUP button on the .................
S NS_glN G CLOCK
CHANNEL SNT UP
remote control, user's SETUP
V-CHtP SET Up
LANGUAGE [ENGUSH]
Press the Arrow button A or Y to OA_T_O__om
ZERO RETURN
select "V-CHIP SET UP". Then, '.........
FqDEX SEARCH
press the ENTER button.
ACCESS CODE
Use the number buttons on the
remote control to enter the access
code. (Default code is 0000.)
_ii}See<; TV RA3' qG (..........
Press the Arrow button _ o1"V to , ,-_A_,,_
MpAA RAT[N_
select "TV RATING". ..........
Then, press the ENTER button.
S*_ect ng Sub,Rat _9s,'
Press the Arrow button T to select the sub-rating you
wish to block. Then, press the ENTER button twice.
®When you select [TV-Y7]:
Press the Arrow button V or _ to
select "FV" (Fantasy Violence).
Then, press the ENTER button to
select [BLOCK] or [VIEW].
*When yon select [TV-PG], [TV-
141 or [TV-MA]:
Press the Arrow button V or _, to
select "D"(Suggestive Dialog),
"L"(Coarse Language),
"S"(Sexual Situation), or
"V"(Violence). Then, press the
TV Y7 [BLOCK]
FV [BLOCK]
TV pG [BLOCK]
D [BLOCK]
[BLOCK]
[BLOCK]
[BLOCK]
ENTER button to select [BLOCKI or [VIEWI.
Note: When you select [TV-MA], "D" does not
appear on the TV screen. [_ "l
The sub-ratings which set to ,_ ¥ _,_a
TV Y7 ( ] [V_EW]
[BLOCK] appears next to the rat- _ _ _,_
TV p_ (DLSV] [BLOCK]
ing category in the TV rating _...._<<°_)L_,tBLOC_B_OO_
lnenu,
;_ Ex the V-Cbp :;;eft_'{{:}mode
Press the SETUP button on the remote control to
enter the setting and exit the screen.
21 EN
IC29
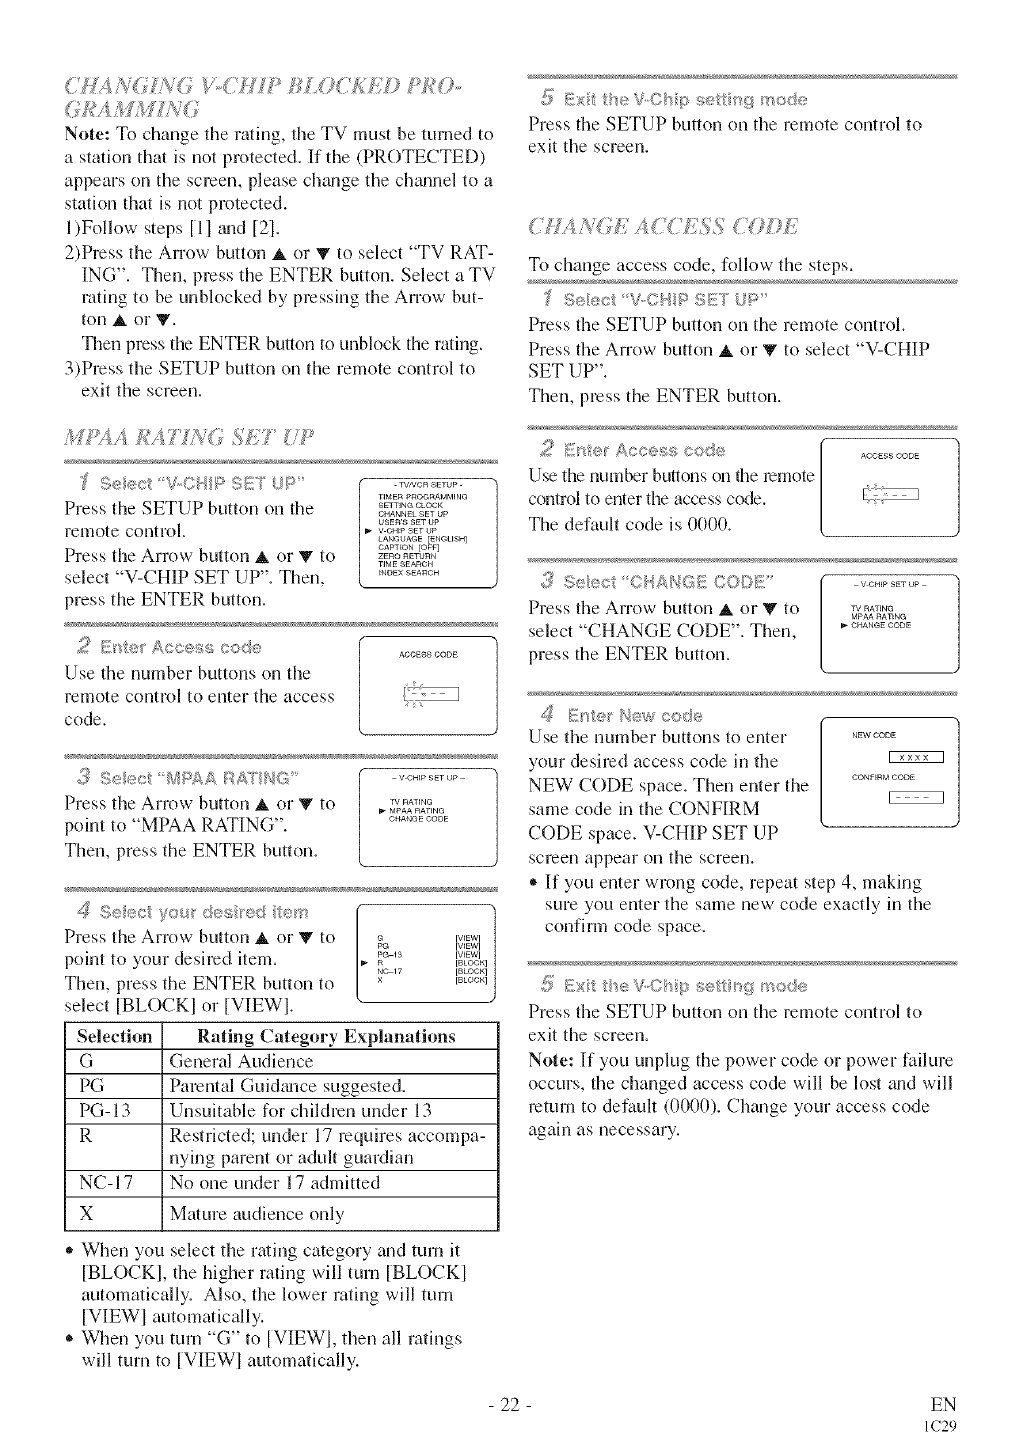
Note: To change the rating, the TV must be turned to
a station that is not protected. If the (PROTECTED)
appears on the screen, please chtmge the chtmnel to a
station that is not protected.
l)Follow steps Ill _md [2].
2)Press the Arrow button _, or T to select "TV RAT-
ING". Then, press the ENTER button. Select a TV
rating to be unblocked by pressing the Arrow but-
ton A or T.
Then press the ENTER bution to unblock the rating.
3)Press the SETUP button on the remote control to
exit the screen.
A£AT] _'_( ,%7":7'
Se}®c V_C{{PSETUP'
Press the SETUP button on the
remote control.
Press the Arrow button A or V to
select "V-CHIP SET UP". Then,
press the ENTER button.
TV/VCR SETUP -
TIMER PROGRAMMING
SETTING CLOCK
CHANNEL gET UP
USER'S SET UP
V CHIn SET UP
LANGUAGE [ENGUSH]
CAPTEON /OFF]
ZERO RETURN
TIME SEARCH
_NDEX SEARCH
2 []Y_[@_ ACCESS {ode ACCESSCODE
Use the number buttons on the
remote control to enter the access
code.
,3 Seec_: b//¢V_A R£3NG _.........
Press the Arrow button ,t or V to _,,_
MpAA RATING
CHAtqGE CODE
point to "MPAA RATING".
Then, press the ENTER button.
>;_ o;<, yO$ de9 ed ®sS
Press the Arrow- button j or V to _ Ev,_
[wEwl
[wEw]
point tu your desired item. _ '_ [BLOCK]
NO 17 [BLOCK]
Then, press the ENTER button to E_oo_
select [BLOCK] or [VIEW].
Selection Rating Category Explanations
G General Audience
PG Parental Gui&mce suggested.
PG- 13 Unsuitable for children under 13
R Restricted; under 17 requires accompa-
wing parent or adult guardian
NC-17 No one under 17 admitted
X Mature audience only
,, When you select the rating category and turn it
[BLOCK], the higher rating will turn [BLOCK]
automatically. Also, the lower rating will turn
[VIEW] automatically.
• When you tm-n "G" to [VIEW], then all ratings
will turn to [VIEW] automatically.
Press the SETUP button on the remote control to
exit the screen.
CN,!;AGE AC<ESS CODE
To change access code, follow the steps.
'_ Seect VCHP S_f27IjR'
Press the SETUP button on the remote control.
Press the Arrow- button _, or _" to select "V-CHIP
SET UP".
Then, press the ENTER button.
Use the number buttons on the remote
control to enter the access code.
The default code is 0000.
3 S_;_ect © A/',GE 2ODE' _ ..........
Press the Arrow button _ or _ to [ _4_._
select "CHANGE CODE". Then, . ..........
press the ENTER button.
/_ Bser New code
Use the number buttons to enter ,_wooo_
your desired access code in the [ZXXXX_
NEW CODE space. Then enter the ............
same code in the CONFIRM
CODE space. V-CHIP SET UP
screen appear on the screen.
• If you enter wrong code, repeat step 4, making
sure you enter the same new- code exactly in the
confirm code space.
;5; _i! tt'_eV©_[._sett_9 r ode
Press the SETUP button on the remote control to
exit the screen.
Note: If you unplug the power code or power failure
occurs, the changed access code will be lost and will
return to default (0000). Change your access code
again as necessary.
- 22 - EN
IC29
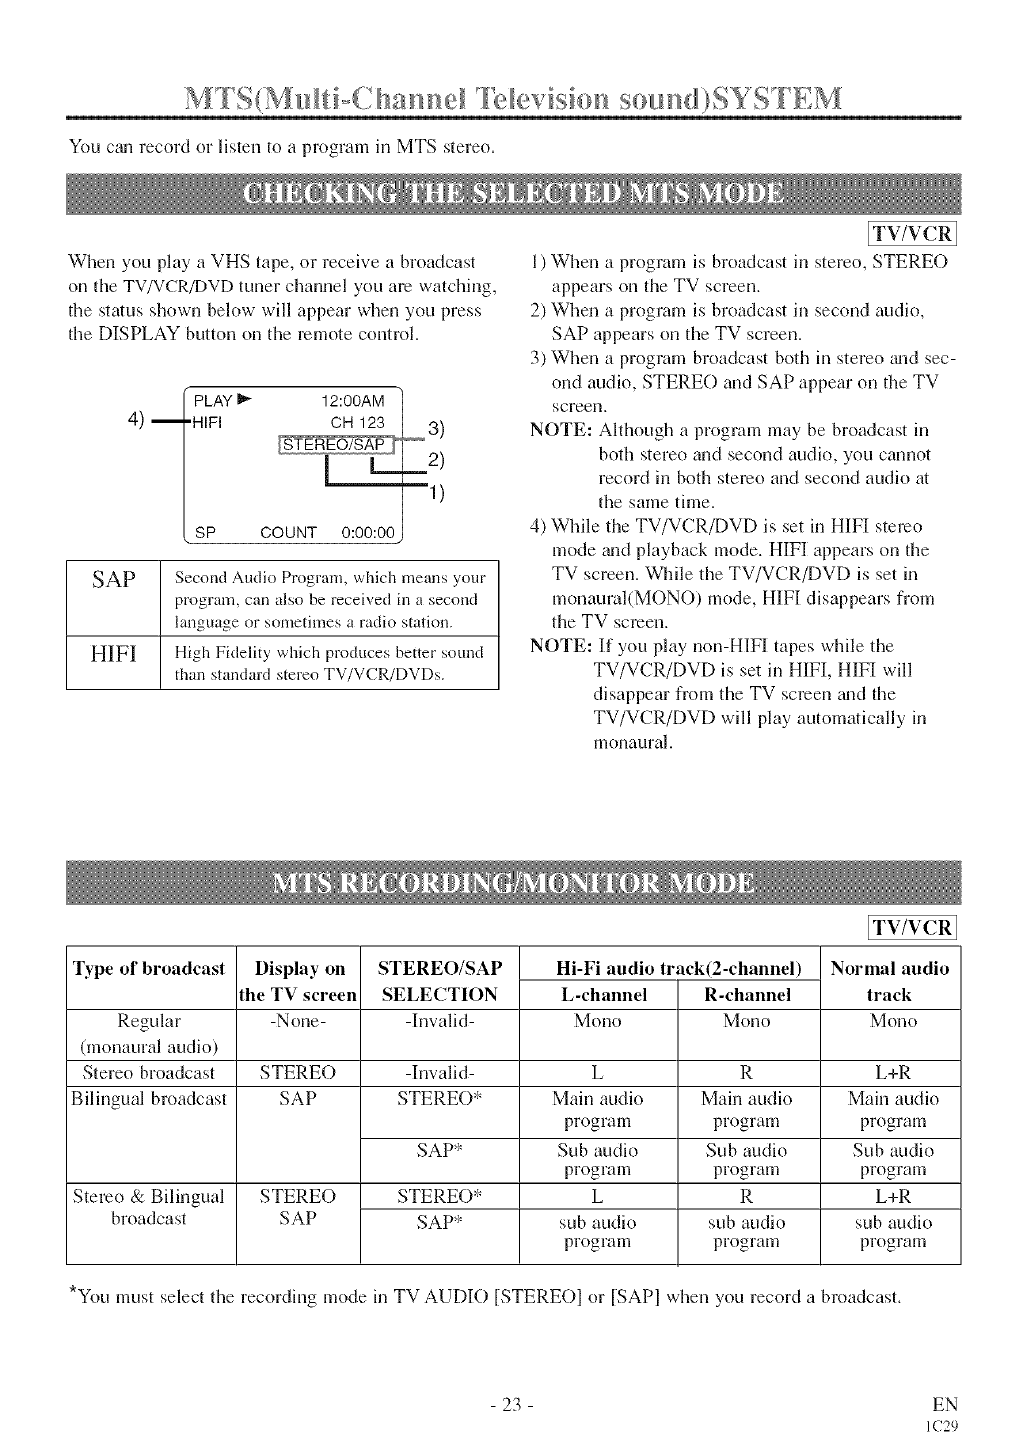
You ctm record or listen to a program in MTS stereo.
When you play a VHS tape, or receive a broadcast
on the TV/VCR/DVD tuner channel you are watching,
the status shown below will appear when you press
the DISPLAY button on the remote control.
4) m
¢PLAY I_ 12:00AM
-HIFI OH 123
m 2)
1)
,SP COUNT 0:00:00,
SAP Second Audio Program, which means your
program, can also be received in a second
language or sometimes a radio station.
HIFI High Fidelity which produces better sound
than standard stereo TV/VCR/DVDs.
[TV/VCR 1
1) When a program is broadcast in stereo, STEREO
appears on the TV screen.
2) When a program is broadcast in second audio,
SAP appears on the TV screen.
3) When a program broadcast both in stereo mid sec-
ond audio, STERE() and SAP appear on the TV
screen.
NOTE: Although a program may be broadcast in
both stereo and second audio, you cannot
record in both stereo and second audio at
tile same time.
4) While the TV/VCR/DVD is set in HIFI stereo
mode mid playback mode. HIFI appears on the
TV screen. While the TV/VCR/DVD is set in
monaural(MONO) mode, HIFI disappears from
the TV screen.
NOTE: If you play non-HIFI tapes while the
TV/VCR/DVD is set in HIFI, HIFI will
disappear from the TV screen _mdthe
TV/VCR/DVD will play automatically in
monaural.
Type of broadcast Display on
the TV screen
-None-
STEREO/SAP
SELECTION
-Invalid-
Hi-Fi audio track(2-channel)
L-channel R-channel
Regular Mono Mono
(monaural audio)
Stereo broadcast STEREO -Invalid-
Bilingual broadcast SAP STERE()"
Stereo & Bilingual
broadcast
SAP*
STEREO
SAP
L
Main audio
program
Sub audio
program
L
sub audio
program
R
Main audio
program
Sub audio
program
R
sub audio
program
[TV/VCR
Normal audio
track
Mono
L+R
Main audio
program
Sub audio
program
L+R
sub audio
program
*You must select the recording mode in TV AUDIO [STERE()] or [SAP] when you record a broadcast.
23 EN
IC29
Make sure ...
• TV/VCR/DVD power must be turned on.
??) SL/ C H__' MODk
Press the SETUP button on the ...._.......
TIM ffFt pROGRAMMING
SETTING CLOCK
re mote control. CHA"NELSETU_'
USER'S SET UP
V-CHIp SET UP
Press the Arrow button A or 'V to _A_OA__._u_._
CAPTION [OFF]
ZERO RETURN
point to "USER'S SET UP". Then. T.........
INDEX SEARCH
press the ENTER button.
,,_ ........ _ i- _ ,
Press tile Arrow button A or Y to _.TA_ iota
point to VCRAUDI ) . =......... Eo<
AUTO RETURN [OIF]
VOR AUDIO ...... HIF_ -
TV/_UD_O [S_-REq
>eect us_n,ss_ru_ /
Press tile ENTER button until ...... _om
[HIFII appears. =......... _om
AUTO RETURN _OpF]
VCR AUDIO {H_Fq
TV AUDIO {s_En_9]
4_ R;_ {'e _m ®TV mode
Press the SETUP button on the remote control to
return to TV mode.
7Y) 5E£E( 7 MONO MODE
ITV/VCR]
You cgmchange the selection to "MONO" if you
want to listen to HIFI tapes in normal audio play-
back.
1) Press the SETUP button on the remote control.
Press the Arrow button a, or '_ to point to "USER'S
SET UP".Then, press the ENTER button.
2) Press the Arrow button _, or 'V to point to
"VCR AUDIO".
3) Press the ENTER button until [MONOI appears.
4) Press the SETUP button on the remote control to
return to TV mode.
?Y? 5L'?,E( T STt;£h;O 5A 0£ MOh,<O
i_iiiIiiiI/£Ii_@!ii!iiii@ii_
t' _'=_<-'_ <f_;:_"<S!'/ /P
,y;; .., ,,,.., ,,, .......
Press tile SETUP button on the ............
TIMNR PROGFtAMM_NG
remote control, s_rns_cmc_
CHANNEL S_T UP
USER'S SET UP
Press the Arrow button _. or V to ........._A,_OA__,%_,_._
CAPT[©N [OFF]
point to "USER'S SET UP". T,.=_EA=O_
_NDEX SEARCH
_Se/ec TV AL/DO u_=,......
Press the Arrow button _, or T to
point to"TV AUDIO".
NOTES:
_'Normally, "HIFF' should be selected for playback
with HIFI sound.
®When you play non-HIF[ tapes, the TV/VCR/DVD
will play automatically in the monaural mode.
" The TV/VCR/DVD records automatically MTS
broadcasts in HIFI stereo sound unless you select
SAP mode recording before you begin recording.
((_ Select [SI'EREO} [SAP] o_ [I4:0DIO]
Press the ENTER button until [STEREOI, [SAP], or
[MONOI appears.
_ To,_e{_ > toTV mo<e
Press the SETUP button on the remote control to
return to TV mode.
NOTES:
" You must select the recording mode,either TV
AUDIO [STEREOI or [SAPI when you record a
broadcast.
Refer to "MTS RECORDING/MONITOR
MODE".
_' If you select second audio when second audio is
not available, the TV/VCR/DVD will record nor-
mal audio.
" The TV/VCR/DVD records automatically MTS
broadcasts in HIFI stereo sound unless you select
SAP mode recording before you begin recording.
- 24 - EN
IC29
7 i_{ ..... _ _i_ _ _
IDa,, )(.,,ASS[,, F 1E
This TV!VCR/DVD will operate with any cassette that has the [_aiNmark. For best results,
we recommend the use of high-quality tapes. Do not use poor quality or damaged tapes.
• Avoid moisture. Moisture condensation may occur
on the tape if it is moved fiom a cold place to a
warm place or visa versa. Before using a tape with
these conditions, to avoid damage of the tape _md
your TV/VCR/DVD, wait until the tape has
warmed to room temperature and the moisture has
evaporated.
• Avoid extreme heat, high humidity and magnetic
fields.
®Do not tamper with tile cassette mechanism.
• Do not touch the tape with your fingers.
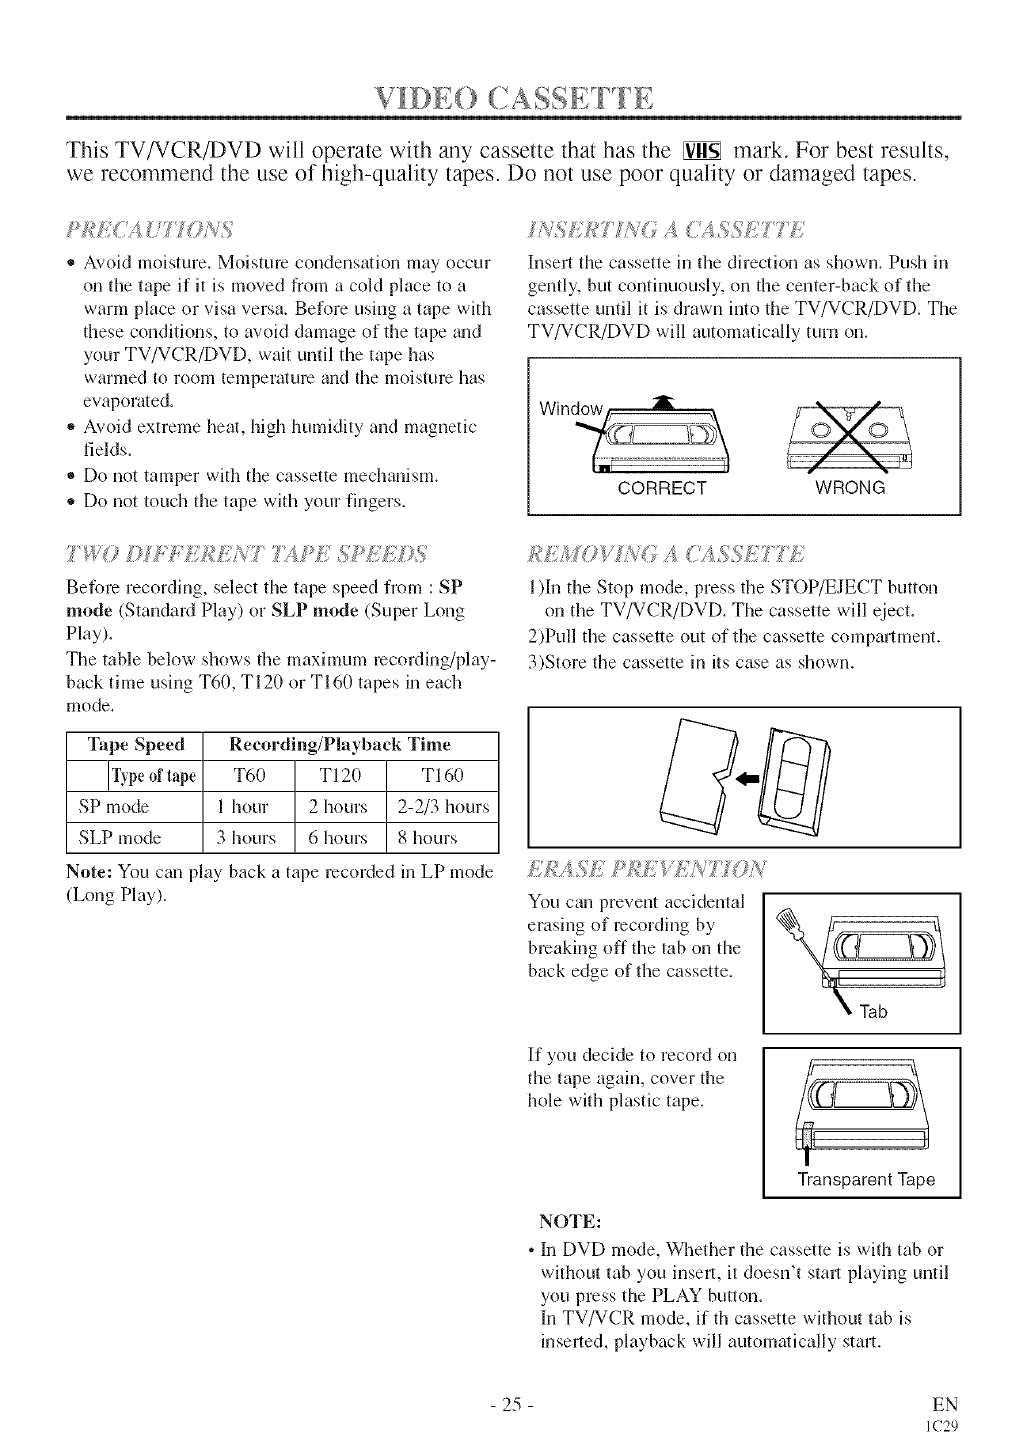
UV_E]_IqT/_<_Ad%SSETT/¢
Insert the cassette in tile direction as shown. Push in
gently, but continuously, on the center-back of tile
cassette until it is drawn into the TV/VCR/DVD. The
TV/VCR/DVD will automatically turn on.
:IL
CORRECT WRONG
7_/%Y?©//:/ /:/'J_gENT7;_PESREEf}S
Before recording, select the tape speed from : SP
mode (Standard Play) or SLP mode (Super Long
Play).
The table below shows tile maximum recording/play-
back time using T60, T120 or T160 tapes in each
mode.
Tape Speed Recording/Playback Time
]Typeof T60 T120 T160
tape
SP mode 1 hour 2 hours 2-2/3 hours
SLP mode 3 hours 6 hours 8 hours
Note: You can play back a tape recorded in LP mode
(Long Play).
!2EMOY_>,<A_AS_ET/Ti
1)In the Stop mode, press the STOP/EJECT button
on the TV/VCR/DVD. The cassette will eject.
2)Pull tile cassette out of the cassette compartment.
3)Store the cassette in its case as shown.
E]#ASE P/{_EV£iW fON
You can prevent accidental
erasing of recording by
breaking off the tab on the
back edge of the cassette.
\ Tab
If you decide to record on
the tape again, cover tile
hole with plastic tape.
TransparentTape
NOTE:
• In DVD mode, Whether the cassette is with tab or
without tab you insell, it doesn't stml playing until
you press the PLAY button.
Ill TV/VCR mode, if th cassette without tab is
inserted, playback will automatically start.
25 EN
IC29
ITV/VCR]
Make sure ._
•TV/VCR/DVD power must be turned on,
If the erase-protection tab has been removed, the
TV/VCR/DVD will stari playback automatically.
[TV/VCR 1
Press the PAUSE button, then press F.FWD button to
start the playback in slow motion. The TV/VCR/DVD
mutes the sound during slow motion. Press the PLAY
button to return to normal playback.
NOTE: If it is left in the Slow mode for more them
five minutes, the TV/VCR/DVD will automatically
go into the Stop mode.
Press the STOP button when play-
back is completed.
NOTES:
'_ If you press tile PLAY button (of the TV/VCR side)
in the DVD mode, you can start tile VCR playback.
'_ If you press tile SELECT button during tile VCR
playback, it will stop and tile mode will clmnge to
the DVD mode. ]Inaddition, the same function
operates with tl_e DVD side PLAY button or the
OPEN/CLOSE button.
[TV/VCR]
This feature is very useful in finding or skipping over
a particular scene on a tape. In this mode, the sound
will be muted.
1)You may view a video tape at a high speed in
either a forward or reverse direction by pressing
the EFWD or REW button during playback. (in the
SP /LP /SLP modes)
NOTE:
'qf you press the EFWD or REW button on the
front panel in the DVD mode, the VCR forward
or reverse will start. Please press the STOP /
EJECT button once to stop it, twice to eject it.
2)Press it again and the TV/VCR!DVD will now search
in super high speed. (in the LP /SLP modes only)
NOTE:
®Tapes recorded in the SP or LP mode will dis-
play a noise bar on the TV screen and the picture
may revert to Black a_d White. This is normal.
3)Press the PLAY button to return to normal speed.
[TV/VCR]
,_Tracking adjustment will be set automatically
(Digital Tracking function) when you stm_,play-
back.
However when playing pre-recorded tapes or tapes
recorded on other VCR, noise lines (black trod
white streaks) may appear on the playback picture.
If this occurs, you can adjust the tracking control
m_mually by pressing the CHANNEL button _ or
V until the streaks disappear: To return to the DTR
function, stop the tape once and stm_,playback
again.
You cgm reduce the noise lines by pressing the
CHANNEL button _, or T in slow mode, too.
Tracking adjustment in Slow mode will not be set
automatically.
[TV/VCR]
You can view a still picture on the TV screen during playback
(the Still mode). Press the PAUSE button during playback.
Only tapes recorded in the SLP mode will show the least
amount of lines.Press the PLAY button to return to playback.
NOTES:
You can advance the picture one frame at a thne by
pressing the PAUSE button during the Still mode.
,, If it is left in the Pause mode for more than five
minutes, the TV/VCR/DVD will automatically
switch to the Stop mode.
[TV/VCR]
In the Pause/Still mode only, when the picture begins
to vibrate vet_,ically, stabilize the picture by pressing
the CHANNEL button _ or V.
NOTE:
If there are video noise lines on the screen, see Tracking
Adjustment section.
- 26 - EN
IC29
SPECIAL PI.AYBACk
Make sure ...
• TV/VCR/DVD's power must be turned on.
®Insell a prerecorded tape.
ITV/VCRI
This functk)n enables you to improve the picRue
quality when playing back worn cassettes such as
rented tapes.
TVNCR SETUP
TIMER pIq©GRAMMING
Press the SETUP button on the .............
CHANNEL SaT UP
remote control, VUSER'SCH_PsETSETUPUP
LANGUAGE [ENGLISH]
CAPTION /©FF]
Press the Arrow button _. or V to =_o,F,,,
TIME SEARCH
point to "USER'S SET UP". ...........
Then, press the ENTER button.
.::;, AIN IXI,,,£' 1Otl .... .......
Press the Arrow button _. or V to .:
RENTAL .... [ON]
point to "RENTAL". ............ _°_
AUTO RE'tURN [OFF]
VCR AUD_© [HIFq
Press the ENTER button until [ONI ....... _...... ]
appears.
Press the SETUP button on the remote control to
reRm_ to the TV mode.
Press the PLAY button to start playback. "RENTAL
PLAY _" appears.
®Once you select the Rental mode, it stays in effect
even after you turn off the TV/VCR/DVD.
7?:) ('A/_+(/£L 77t£ Ji/tfi'i%i't;4L .UO£)/(
Repeat steps 111and 12], select [OFF] using the
ENTER button on the remote control. Press the
SETUP button on the remote control to return to TV
mode.
If there is a power failure of any kind, the
TV/VCR/DVD will retain its memory for this fea-
ture.
[TV/VCR ]
The TV/VCR/DVD has the auto repeat function that
allows you to repeat a tape indefinitely without
touching the PLAY button.
ALL Ill=PEAT: Repeat playback from the beginning
to the end of the tape.
BLANK F1EPEAT: Repeat playback from the begin-
ning to a blank part, which is blank for more them
10 seconds.
Seect USERS SET UP
Press the SETUP button on the
remote control.
Press the Arrow button _ or T to
point to "USER'S SET UP".
Then, press the ENTER button.
i - TV_CR SETUP -
TIMER PROGP_t,MMING
SBTr_NG CLOCk<
CHANNEC SET UP
USER'S SET UP
V CH_P SET UP
£ANGUAGE [ENG£_SH]
CAPTEON /OF_]
ZERO RBTURN
TIME SEARCH
_NDEX SEARCH
2 Beect ALU' ®_:BLANK'
Press the Arrow button _, or V to
point to "REPEAT PLAY".
Press the ENTER button repeatedly
until your desired selection [ALLI
or [BLANKI appears.
i useR's SET UP
RENTAL , O E!
REPEAT PLAY [ALL]" ....
AUTO RETURN _iO_F_
VCR AUDIO [H_FI]
TV AUOIO [_TEREO
Press the SETUP button on the remote control to
return to the TV mode.
_{f8_:/[a,/bac
Press the PLAY button to start the Repeat Play.
"REPEAT PLAY _" appears.
,, Once you select the Repeat Play mode, it stays in
effect even after you turn off the TV/VCR/DVD.
®If the Rental mode is set IONI, the "RENTAL
PLAY _" display has priority.
7'# CA/',,#:7£'L':'HA b :i ;F'£%AF M©DA
Repem steps [11 and [2], select [OFFI using the
ENTER button on the remote control. Press the
SETUP button on the remote control to mtum to TV
mode.
If there is apower failure of any kind, the
TV/VCR/DVD will retain its memory for this fea-
ture.
- 27 - EN
IC29
Make sure ...
• TV/VCR/DVD power must be turned on,
®Insert a tape.
ITV/VCR]
This function allows you to search easily a beginning
point that you want to review by rewinding or fast
forwarding.
NOTE:
Zero Return WILL NOT work on a blank tape or a
blank polion of a tape.
_ S, s,,x >©'/
Rewind or fast forward the tape to the beginning
point at which you wgmt to review.
Press the (_'.RESET button repeatedly.
,,,} Begi_ /÷;o ;/i g ol p/ayba:',k
Press the RECORD or PLAY button.
Press the STOP button when recording or playback is
completed.
_5"i']}ac ivse ZE/::_O I_II[YLFI#I s%o@s:_
Press the SETUP button on the (.........
I
TIMER plROGRAIdMIIG
retllote control, s_w_ c_oc_<
GHANNEL _T tip
tiSE_'S SET UP
Press the Arrow button at or V to _o=,_o_
LAN_UAQ_ [EN_USH]
point to "ZERO RETURN". z_=o.......=Fu==_°_
T_MESEARCH
Then, press the ENTER button. '..........
The counter will appear on the TV screen.
The tape will automatically stop when the counter
returns to 0:00:00.
* This function will not operate in recoMing mode.
,, This function is not opemfive when a cassette tape
is not inserted in the TV/VCR/DVD.
In the example below: To watch a program before/
after 2 hour 50 minutes from the present position, in
either direction.
'I /_se_ a apo
2.......... ;_£ _.,,_,........... 'rode
Press the SETUP butt(m or_the ............
TIDIE_ pFtOG_AMMING
renlote control, sew_sec_oc_
GIqANNNL S_r tip
OSCars _BT UP
Press the Arrow button at or V to _o.,_,ti_
LANGUAG_ [_N@L_SH]
point to "TIME SEARCH". _=o........=_,o_°<
T_MESE_C_
_NI)EXSEA_CH
Then, press the ENTER button.
Press the Arrow button at or 'V unfilI,%{:{_U=
!
your desire(J time appears. [
(Example: 2:50" stands for 2 hours/
50 minutes) [
If you wish to cancel the Time
Search at this point, press the SETUP button on the
remote control.
4_ Beg_ Ti'_;e Sea_c/
By pressing the Arrow- button "9 or _, the
TV/VCR/DVD will rewind or fast forward to the
specified point.
The time counts down as the searching progresses.
When 0:00 is reached, the tape will start playback
automatically.
I/I ' 2" 7HI' ¢ ;4£_ _,_ II'L,;
+,i, ; .... gI
ITV/VCR]
The Time Search function makes it possible to quick-
ly adwmce the tape to your desired position shnply
by entering the exact amount of playback time you
want to skip.
NOTES:
,, Time Search cgm be set up to a maximum of 9
hours 5(1minutes (9:50) by 10 minutes at a time.
Press the STOP/EJECT button on the TV/VCR/DVD
or the STOP button on the remote control. This will
delete the selected time.
- 28 - EN
IC29
ITWVCRI
This feature provides a method of indexing the start-
ing point so that it can be easily returned to in either
fast forward or rewind mode.
,, The index mark will be made automatically when
the REC button is pressed. It will also be marked at
the starting point of Timer recording mid OTR.
*The index mark will not be recorded if the PAUSE
button is pressed and released during recording.
,, The time gap between making the index marks on
the tape should be greater than 1 minute for SP
recording, 2 mhmtes for LP recording and 3 min-
utes for SLP recording.
,, In some cases, the index mark at the beginning of
video tape cannot be detected.
Example: You are watching program number 4 and
want to fast forward to program number 7. You
must skip three programs.
CURRENT PLAYBACK PROGRAM
m
Beginning of tape ! End of tape
r4 3 2 1 1 2 3
INDEX MARK
'_ '¢ "
i,_ TVNCR ,qETUp
Press the SETUP button on the ................
SETTING CLOCK
remote contrc, l. CHaNNELUSER.SsetSErupUO
V-GHtp SET UP
LANGUAGE [ENGUSH]
Press the Arrow button A or _' to o_,,o_co<
ZERO RETUIqN
point to "INDEX SEARCH". Then, •.........
_NDEX SEARCH
press the ENTER button.
_.; >u: *:¢,,A_ _,v,/'gbeg
Press the Arrow button A. or V until(/'_°_ ....
the number of programs that you | ;
wanttoski!,a!?pears. /
(Example: 03 ' for 3 programs) /
,_ The Index Search mode will be [
canceled if the procedures are not activated in 30
seconds.
,3 }3eg _nde× S®_:)_,ch
Press the Arrow button _1 or _. The TV/VCR/DVD
begins rewinding or fast forwarding to the beginning
of desired program.
NOTE: Every time an index signal is skipped, the
number in the program indicator decreases by one.
When the preset program is reached, the
TV/VCR/DVD will start playback automatically.
* A video cassette must be inserted in the
TV/VCR/DVD for this function to work.
The number of Index Searches can be set up to 2(1.
This function will not operate in the recording mode.
When you want to cm_cel the Index Search while
in progress, press the STOP button.
SPEC[A FEAT[!RES
ITV/VC I
This shows the elapsed recording or playback thne in
hours, minutes, and seconds. (The displayed time will
not change on a blank tape or blank portions on the
tape.)The "-" indication will appear when the tape has
rewound fmlher than "0:00:00" on the tape counter.
[TV/VCR ]
,, When the end of a tape is reached during record-
ing, playback, or fast-forward, the tape will auto-
matically rewind to the beginning. After rewinding
finishes, the TV/VCR/DVD will eject the tape and
turn itself to off.
,, This function is operative when Repeat Play is set
to the [OFFI position.
®The tape will not auto-rewind during timer record-
ing or One Touch Recording.
- 29 - EN
IC29
Make sure ...
• TV/VCR/DVD power must be turned on.
®Insert a cassette tape with its erase prevention tab in place. (If necessary, rewind or fast forward the tape to
the point at which you want to begin recording.)
NOTES:
• This TV/VCR/DVD will ONLY record and view the same channel.
®This TV/VCR/DVD cannot record the contents from the built-in DVD.
ETv/vcR]
You can ONLY watch the same TV program that is
being recorded.
Press the number buttons ml the
remote control or the CHANNEL
button _, o1 V.
Remember: If the TV/VCR/DVD is connected to a
cable box or satellite box, the TV/VCR/DVD must
be on CH3 or CH4, then the channel to be recorded
must be selected on the cable box or satellite box.
xs_:Seect t'_e ta:}e s/:Hi:,ed [
Press the SPEED button to select
the desired tape speed (SP/SLP).
sp
S ,_ , [_Ec
Press the RECORD button.
sp
Press the STOP button when recording is completed.
[TV/VCR 1
Press the PAUSE button to tem- (.....
porarily stop recording.
Press the PAUSE or RECORD but-
ton to resume recording.
NOTES: _
®After five minutes, the
TV/VCR/DVD will automatically switch to the
Recording mode to prevent tape damage.
®If "CLOSED CAPTION (ON)" is selected, the On-
Screen Display will appear for 5 seconds, then dis-
appeal:
-30 -EN
IC29

ITV/VCRI
This function enables you to set a recoMing length
simply by pressing the REC/OTR button on tile
TV/VCR/DVD.
Make sure ...
• TV/VCR/DVD power must be turned on.
• Insert a cassette tape with its erase prevention tab in
place. (If necessary,, rewind or fast forward the tape
to the point at which you want to begin recording.)
NOTES:
®This function CANNOT be done from the remote
control.
•RecoMing starts immediately when tile REC/OTR
button is pressed.
• When the REC/OTR button is pressed 18times, the
TV/VCR/DVD returns to the Normal Recording mode.
®To stop the OTR operation, press the STOP button
on tile TV/VCR/DVD or on the remote control.
•To show the remaining time, press the DISPLAY
button on the remote control so that "OTR"
appears on the TV screen. (It will show up
momentarily then disappear.)
,, Recording stops when 0:00 is reached.
• Please note that in the SLP mode maximum recoM-
ing time, assuming the tape is started at the begin-
ning, is 8 hours using T-160 (or 6 hours using T-120).
•If the tape runs out before the end time, the
TV/VCR/DVD will switch to the Stop mode
immediately, ejects the tape and tm-ns itself off.
,, If you press the POWER button during OTR, the
TV/VCR/DVD continues recording until the select-
ed length is reached.
Press the number buttons on the remote control or
the CHANNEL button A or V.
Remember: If the TV/VCR/DVD is connected to a
cable box or satellite box, the TV/VCR/DVD must
be on CH3 or CH4, then the channel to be recorded
is selected on the cable box or satellite box.
Press the SPEED button to select the desired tape
speed (SP/SLP).
_3 I>!@ ';
+,I I {
Press the REC/OTR buttOllOllthe (o,=<=:=0_
TV/VCR/DVD as many times as /
needed. The recording length will be
determined by the number of times
you press the REC/OTR button. Each _
additional push will increase the
recording time by 30 minutes, it is set up to 8 hours.
31
Push(es) Display Recording length
1 push "normal recording)
2 pushes 0:30 30 minutes
3 pushes 1:00 6(1minutes
4, 4,
17 pushes 8:00 480 minutes
[TV/VCR ]
You can make copies of video tapes made by friends
or relatives for your enjoyment.
You can not copy a DVD to a videotape.
WARNING: Unauthorized recordings of
copyrighted video tapes may be an
infringement of copyright laws.
Connect your TV/VCR/DVD grada Source (Playing)
VCR using the following diagram.
[Fig.e1
Audio/Video
adapter cable
(not supplied)
[Ex: Source (playing)
rder]
)Inser_ a pro-recorded video cassette into the Source
(Playing) VCR or camcorder.
2)Instal a blank video cassette, or one you wm_tto
record over, into the TV/VCR/DVD's cassette
compartment.
3)Press the SPEED button on remote control for the
TV/VCR/DVD to select the desired recording
speed (SP/SLP).
4)Press the CHANNEL button _, or '_' on the
TV/VCR/DVD until "AUX" appears on the screen.
5)Press the RECORD button on the TV/VCR/DVD.
6)Begin playback of the tape in the source (Playing)
VCR or camcorder.
NOTE: For best results during copying, use the
TV/VCR/DVD's front panel controls whenever pos-
sible. The remote control might affect the source
(Playing) VCR's playback operation.
7)To stop copying, press STOP/EJECT button on the
TV/VCR/DVD, then stop the tape on the source
VCR or camcorder.
EN
IC29
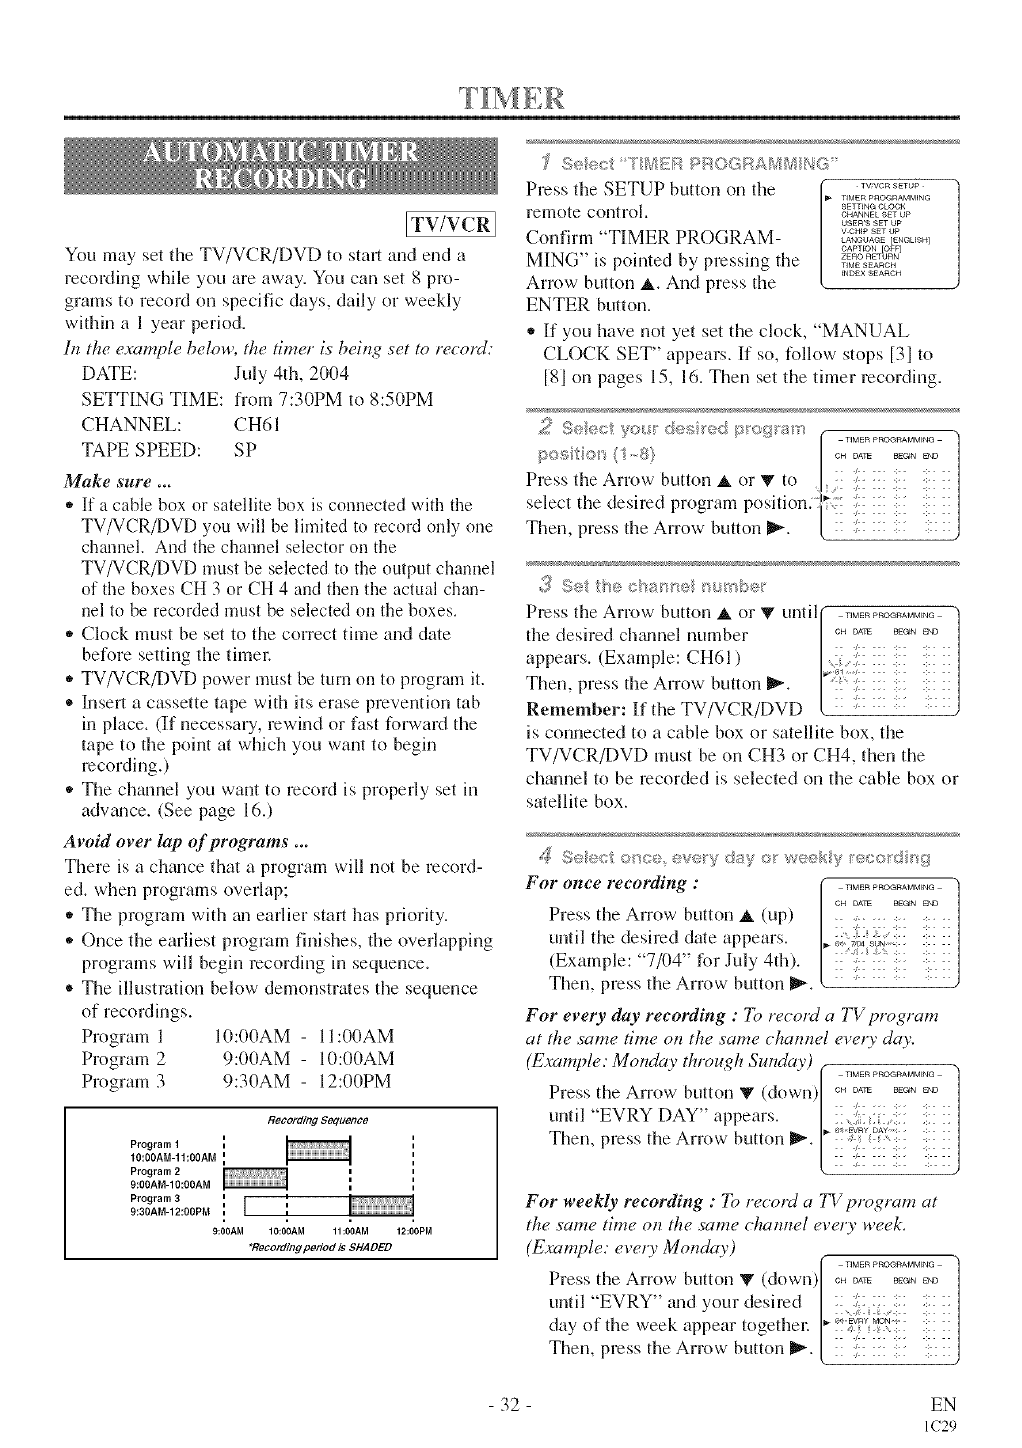
ITV/VCR]
You may set the TV/VCR/DVD to stal and end a
recoMing while you are away. You can set 8 pro-
grams to record on specific days, daily or weekly
within a 1 year period.
lt_ the examl)le below, the timer is being set to record:
DATE: July 4th, 2004
SETTING TIME: from 7:30PM to 8:50PM
CHANNEL: CH61
TAPE SPEED: SP
Make sure ...
• If a cable box or satellite box is connected with the
TV/VCR/DVD you will be limited to record only one
channel. And the channel selector on the
TV/VCR/DVD must be selected to the output channel
of the boxes CH 3 or CH 4 and then the actual chan-
nel to be recorded must be selected on the boxes.
• Clock must be set to the correct time and date
before setting the fimm:
,, TV/VCR/DVD power must be turn on to program it.
• Insert a cassette tape with its erase pmvenfion tab
in place. (If necessau, rewind or fast forward the
tape to the point at which you want to begin
recording.)
,, The channel you want to record is properly set in
adwmce. (See page 16.)
Avoid over lap of programs ...
There is a chmlce that a program will not be record-
ed. when programs overlap;
,, The program with an earlier start has priority.
,, Once the earliest program finishes, the overlapping
programs will begin recording in sequence.
• Tile illustration below demonsmfes the sequence
of recordings.
Program 1 10:00AM - 11:()()AM
Program 2 :):()()AM - 10:00AM
Program 3 :):30AM - 12:00PM
RecordingSequence
Program 1
10:00AM-11:00AM
Program 2=
g:00AM-10:00AM =
Program 3=I=
9:30AM-12:00PM i I =
9:00AM 10:00AM 11:00AM
"Recordlngpedod /s SHADED
12:00PM
'J S_J<< T EV_PROGI_:$AA{@NG
Pressthe SETUP button on the ............
TIMER p£©GRAMMING
remote control, s_,_ oLoo,<
CHANNEL SET kip
UsEnrs SET UP
Confirm "TIMER PROGRAM- _.........
LANekiA@E [EIqr_LFSH]
CAPTEOTq [OFF]
MING" is pointed by pressing the ,,=_,_=o.
_NDEXSEAnC:H
Arrow button a,. And press the
ENTER button.
,, If you have not yet set the clock, "MANUAL
CLOCK SET" appears. If so, follow stops [31 to
[8] on pages 15, 16. Then set the timer recording.
_2, 9clio{ VOlll desllfe s}o_l'81s ,
? .... ITIMI R IROQIAMI_I,_G
_O, ==,O= I _, ='-@,. /........... /
Press the Arrow button _. or_ to ]/ ;--:: - /
select the desired program position.:]:! iliiii i_ i::iiii/
Then, press the Arrow- button_. [ x :£::x :x x:xj
Press tile Arrow button _. or _ unfil( ................ )
the desired ch_mnel number / ........... /
appears (Example CH61) / ; :: !:: : ]
_:; ;[_K X[ ilk fix iS
Then, press the Arrow button _. [!=! !!!!!! !! :!i:iiI
Remember: If theTV/VCR/DVD i ': : )
is connected to a cable box or satellite box, the
TV/VCR/DVD must be on CH3 or CH4, then the
chzulnel to be recorded is selected on the cable box or
satellite box.
S_'l!s:<:..... o'_c_s ,, ,_[v.... tag <t >/eekl%, H_c< 'di/'g
For once recording : TIMER PROQ_A_M_G
CH _AT_ E_@N _3 1
Press the Arrow button _. (up) " i " :: :
until the desired (late appears. _..............
(Example: "7/04" for July 4th). ii i :
Then, press the Arrow button _,_.
For every day recording : To record a TV program
at the same time on the same channel every day.
(Example: Monday through Sunday) ................ 1
Press the Arrow button , (down) °=_:.:.:_ i="_ii="|j
until "EVRY DAY" appears. :: :,7:: :i :: ::
Then, press tile Arrow button _. ! :_;?i!_'::
X _JX 111 ill] [iX X
For weekly recording : To record a TV program at
the same time on the same c'hamwl every week.
(Example: every Monday)
Press the Arrow button T (down)
until "EVRY" zuld your desired
day of the w-eek appeal togethel:
Then, press the Arrow button _.
CH IAI_ _@_ _NO
,/i !i.% >=:.. i
- 32 - EN
IC29
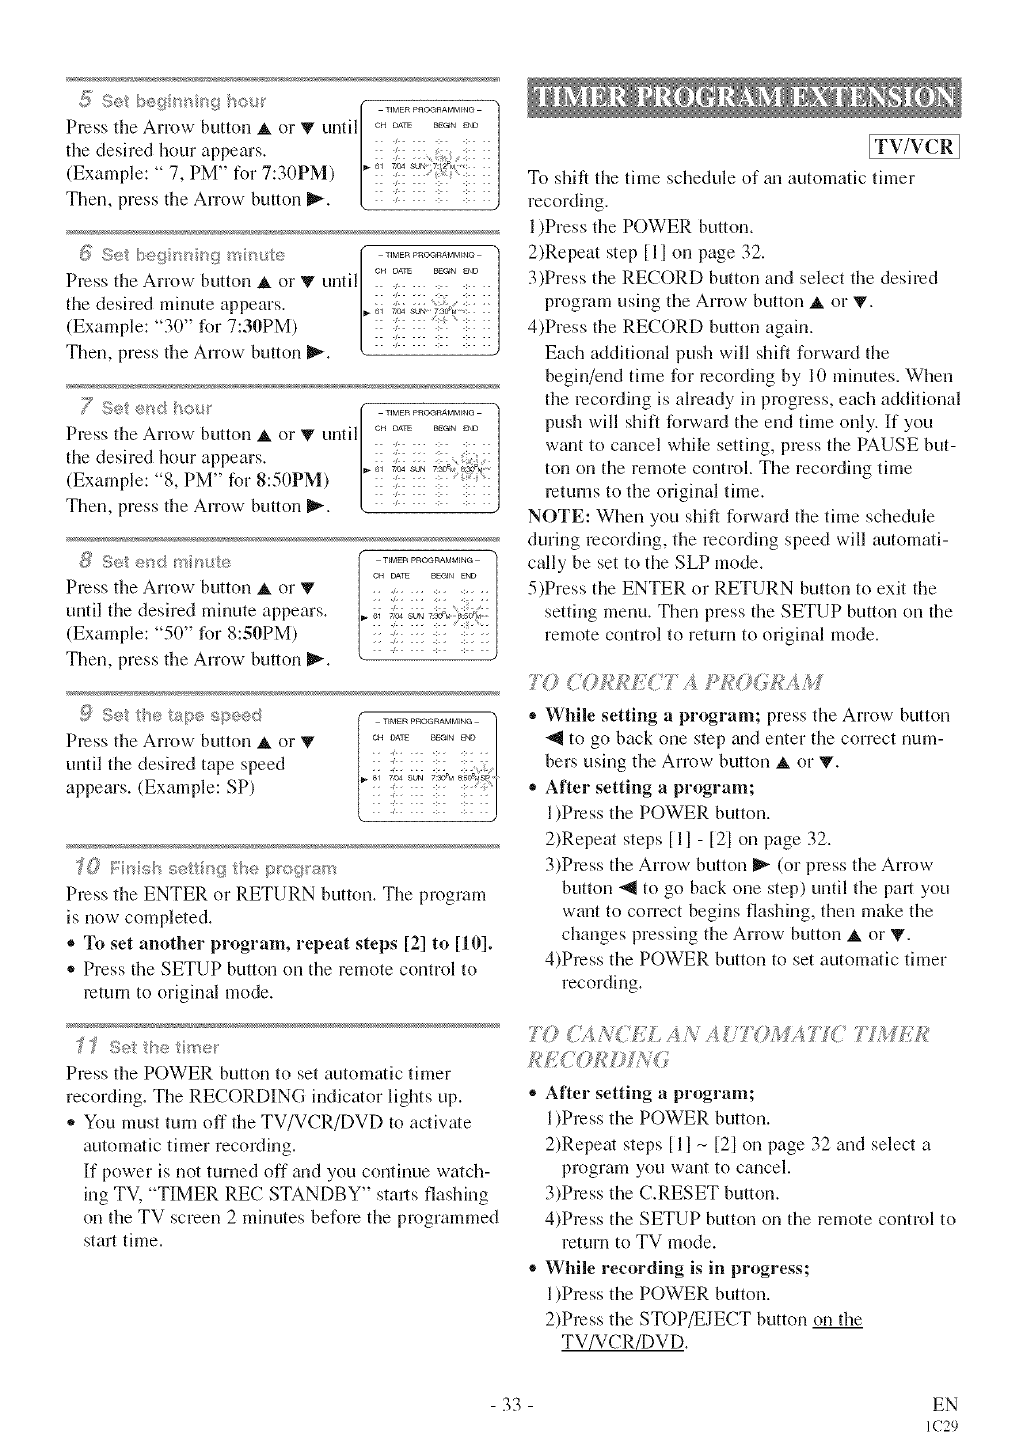
.:) :e D_3{_:DF_I<¢::::_ h©t Ir"r:MERPnOGnAMM_.Q h
|
Press the Arrow button A or T until[ ........... /
tile desiredhourappears. II :: :;:: ::/"
,, _ - _ 61 7,q34 SU_ 7:igPM :
(Example: 7, PM for7:30PM) I':::i::::::::::/
Then, pressthe Arrow button !_. [ :: :;::::: ::: ::: ::j
_;; Setbe_hr "/D <ire ( ................ "]
Press the Arrow button, orT until / :? t:r: _:" !_ ::/
the desired minute appears. I. :::]
(Example: "30" for 7:30PM) /!! !!!!!! !i ]
Then press tile Arrow button _ t _ :
Press the Arrow button A orT until| °" t?- ?t" :": /
the (es red lotr appears /:: ::: ::: ::: ,: :/
_ - I_,_ 61 7,q34 SUN 7:3f?_ 8_ /
(Exanple 8. PV' for8 50PM) /:: :; :
Then. press tl_e Arrow button I_. /k :: :;!! !:! !!! !!! !!j/
Pressthe Arrow button A or V
until the desired minute appears.
(Example: "50" for 8:50PM)
Then, press tile Arrow button _.
C;_";; _;; _ T_MER pI:tOGRAMMING
Press the Arrow button A or V _ _'T_ _!_'"_°
until the desired tape speed :: :'::::: :::: ::::::
IY0 _::>shse/t 9thep_og<ar_
Press the ENTER or RETURN button. The program
is now completed.
®To set another program, repeat steps [2] to [10].
,_Press the SETUP button on the remote control to
return to original mode.
Press tile POWER button to set automatic timer
recording. The RECORDING indicator lights up.
,_You must turn off the TV/VCR/DVD to activate
automatic timer recording.
If power is not turned off and you continue watch-
ing TV, "TIMER REC STANDBY" starts flashing
on tile TV screen 2 minutes before the programmed
start time,
[TV/VCR ]
To shift tile time schedule of _mautomatic timer
recording.
1)Press the POWER button.
2)Repeat step Ill on page 32.
3)Press the RECORD button and select tile desired
program using the Arrow button _ or '!v.
4)Press the RECORD button again.
Each additional push will shift forward tile
begin/end time for recording by 10 mflmtes. When
the recording is already in progress, each additional
push will shift forward the end time only. If you
want to cancel while setting, press the PAUSE but-
ton on the remote control. Tile recording time
returns to tile original time.
NOTE: When you shift forward the time schedule
during recording, the recording speed will automati-
cally be set to tile SLP mode.
5)Press the ENTER or RETURN button to exit the
setting menu. Then press the SETUP button on the
remote control to return to original mode.
7'{}CO££E T A ]'ROO,:£AM
,_While setting aprogram; press the Arrow button
-_ to go back one step and enter the correct num-
bers using the Arrow button _. or T.
,_After setting a program;
l)Press the POWER button.
2)Repeat steps [11 - [21 on page 32.
3)Press the Arrow button _ (or press tile Arrow
button _1 to go back one step) until the pail you
want to correct begins flashing, then make the
changes pressing the Arrow button _ or '!v,
4)Press the POWER button to set automatic timer
recording.
77/ <;Ai/q(:E£ A?V AUT(?kL4TC TSJE£
®After setting aprogram;
l)Press the POWER button.
2)Repeat steps Ill _[21 on page 32 and select a
program you want to cancel.
3)Press the C.RESET button.
4)Press the SETUP button on the remote control to
return to TV mode.
®While recording is in progress;
l)Press the POWER button.
2)Press file STOP/EJECT button on the
TV/VCR/DVD.
33 EN
IC29
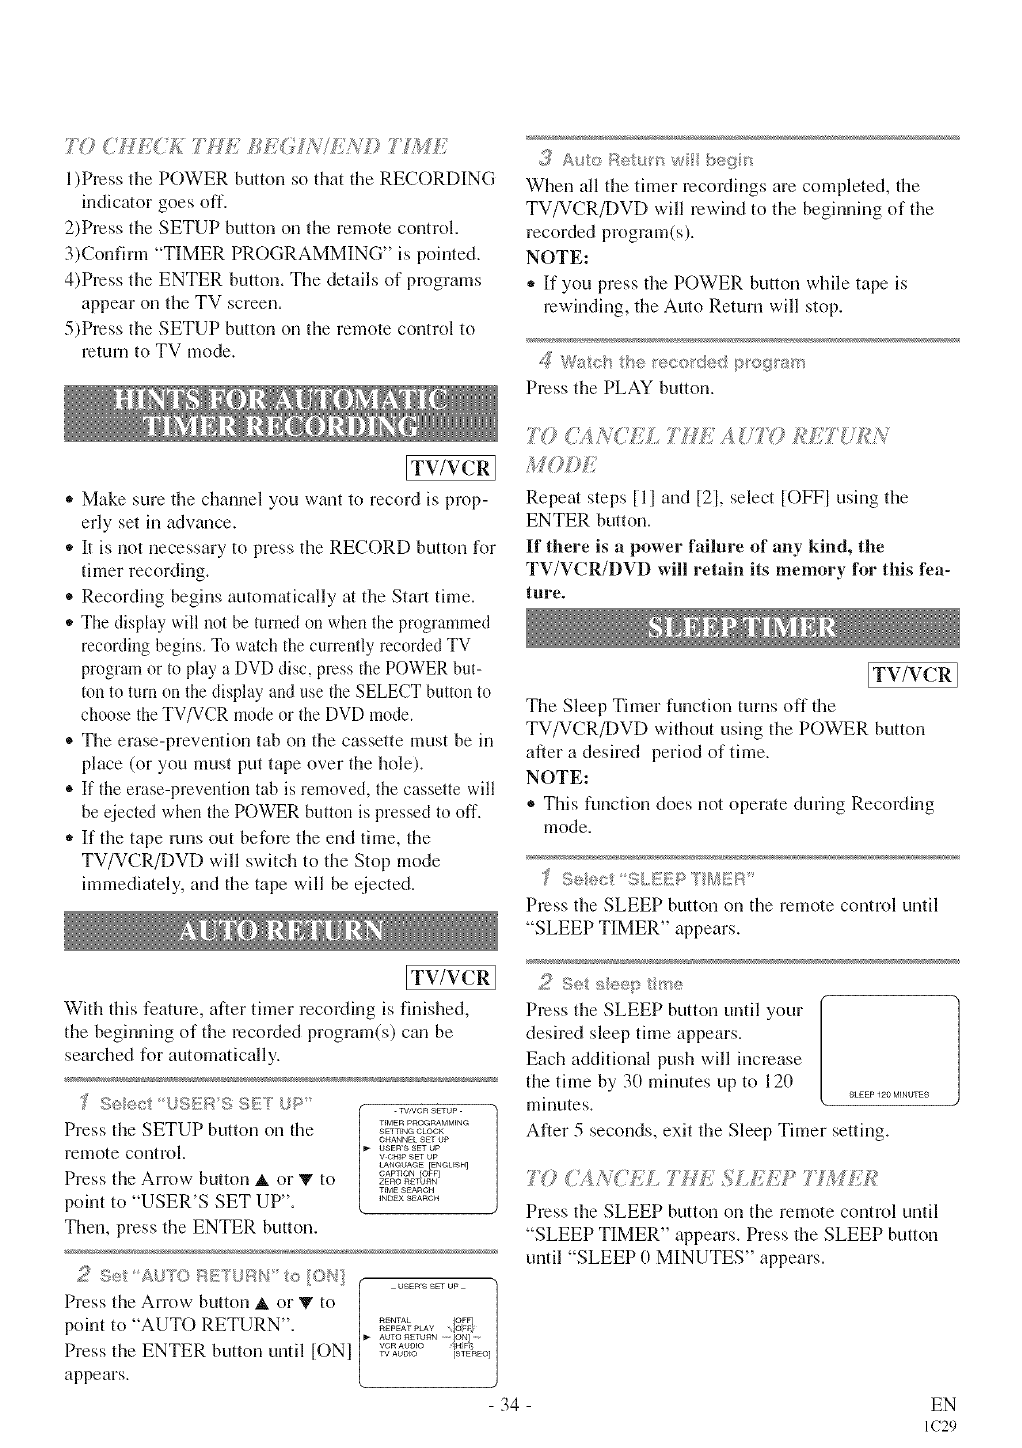
7'0 (' L!';C'£:I M£ J@;(./.?<i/ii_,]_l ]/i3E
l)Pmss the POWER button so that the RECORDING
indicator goes off.
2)Press the SETUP button on the remote control.
3)Confirm "TIMER PROGRAMMING" is pointed.
4)Press the ENTER button. The details of programs
appear on the TV screen.
5)Press the SETUP button on the remote control to
return to TV mode.
_!_Auto _:_÷t_s w b_:g_:_
When all the timer recordings are completed, the
TV/VCR/DVD will rewind to the beginning of the
recorded program(s).
NOTE:
,, If you press the POWER button while tape is
rewinding, the Auto Return will stop.
dWa<h th<_record_?d <;@rs_"_
Press the PLAY button.
[TV/VCR]
,, Make sure the channel you want to record is prop-
erly set in advance.
,, It is not necessary to press the RECORD button for
timer recording.
• Recording begins automatically at the Start time.
• The display will not be turned on when the programmed
recording begins. To watch the currently recorded TV
program or to play a DVD disc, press the POWER but-
ton to turn on the display and use the SELECT button to
choose the TV/VCR mode or the DVD mode.
® The erase-prevention tab on the cassette must be in
place (or you must put tape over the hole).
® If the erase-prevention tab is removed, the cassette will
be ejected when the POWER button is pressed to off.
,, If the tape runs out before the end time, the
TV/VCR/DVD will switch to the Stop mode
immediately, and the tape will be ejected.
[TV/VCR]
With this feature, after timer recording is finished,
the beginning of the recorded program(s) can be
searched for automatically.
'f S®ect /2SEF'SSET/JP
Press the SETUP button on the
remote control.
Press the Arrow button _, or V to
point to "USER'S SET UP".
Then, press the ENTER button.
f TVA/CR SETUP
TEMERPnOGRAMMING
SETTENG CLOCk<
CHANNEL SET UP
USER'S SET UP
V CHIP SET UP
tAtqC_UAGE [ENGLISH]
OAPTION [OFF]
ZERO RETURN
T_MESEARCH
_NOEX SEARCH
Press the Arrow button _ or _" to [1
point to "AUTO RETURN". [.!!;_%% {og!_,,
Press the ENTER button until ION] / _-_Og'g I_'A_o_
appears. (
- 34 -
70 7H£ A
Repeat steps Ill and [21, select [OFFI using the
ENTER button.
If there is a power failure of any kind, the
TV/VCR/DVD will retain its memory for this fea-
ture.
[TV/VC ]
The Sleep Timer function turns off the
TV/VCR/DVD without using the POWER button
after a desired period of time.
NOTE:
This function does not operate during Recording
mode.
<_;>., <? 2};21''¢" ,_,_
Press the SLEEP button on the remote control until
"SLEEP TIMER" appears.
PresstheSLEEP buttonuntilyour
desiredsleeptime appears.
Each additionalpush willincrease
thetime by 30 minutesup to 120 SLEEP 120 MINUTB
mhmtes.
After 5 seconds, exit the Sleep Timer setting.
7Y} ?{<TEL77/];SLE]i TLt 7;]{
PresstheSLEEP buttonon theremote controluntil
"SLEEP TIMER" appears. Press the SLEEP button
until "SLEEP 0 MINUTES" appears.
EN
IC29

ON D SPLAY
To check the Counter, Clock and Chtmnel number on the TV screen, press the DISPLAY button on the remote
control. Each thne you press the DISPLAY button on the remote control, the TV screen will change as follows:
* Counter mode: After 5 seconds, only the counter
remains. To clear it, press the DISPLAY button.
* Clock mode: After 5 seconds, only the clock and
the chgumel number remain. To clear them, press
the DISPLAY button.
* The On Screen Display disappear after 5 seconds.
,, This is true even if the MUTE button is pressed, or
the PAUSE button is pressed while recording.
OFF mode Counter mode Clock mode
i STOP 5_0P_
; _ OH2
SP COUNT 0:12:34 SP
.........................................................After5 seconds "_; J After5 seconds
Ti............... i ..........................................
Counter Clock& Channel
OFF mode Clock/Counter mode
{ SP C©/INT 0:12:34
CABLE CHANNEL DESiGNATiONS
If you subscribe to cable TV, the channels are displayed as 1-125. Cable compm_ies often designate channels
with letters or letter-number combinations. Please check with your local cable comp_my. The following is a
chart of common cable channel designations.
CATVchannel
TVDisplay
CATVchannel
TVDisplay
CATVchannel
TV Display
CATVchannel
TVDisplay
CATVchannel
TVDisplay
CATVchannel
TVDisplay
CATVchannel
TVDisplay
CATVchannel
TVDisplay
CATVchanne
TVDisplay
5A 2 3 4 5 6 7 8 9 10 11 12 13 A B
1 2 3 4 5 6 7 8 9 10 11 12 13 14 15
C D E F G H I J K L M N O P Q
16 17 18 19 20 21 22 23 24 25 26 27 28 29 30
R S T U V W W+I W+2 W+3 W+4 W+5 W+6 W+7 W+8 W+9
31 32 33 34 35 36 37 38 39 40 41 42 43 44 45
W+10 W+11 W+12 W+13 W+14 W+15 W+16 W+17 W+18 W+19 W+20 W+21 W+22 W+23 W+24
46 47 48 49 50 51 52 53 54 55 56 57 58 59 60
W+25 W+26 W+27 W+28 W+29 W+30 W+31 W+32 W+33 W+34 W+35 W+36 W+37 W+38 W+39
61 62 63 64 65 66 67 68 69 70 71 72 73 74 75
W+40 W+41 W+42 W+43 W+44 W+45 W+46 W+47 W+48 W+49 W+50 W+51 W+52 W+53 W+54
76 77 78 79 80 81 82 83 84 85 86 87 88 89 90
W+55 W+56 W+57 W+58 A-5 A-4 A-3 A-2 A-1 W+59 W+60 W+61 W+62 W+63 W+64
91 92 93 94 95 96 97 98 99 100 101 102 103 104 105
W+65 W+66 W+67 W+68 W+69 W+70 W+71 W+72 W+73 W+74 W+75 W+76 W+77 W+78 W+79
106 107 108 109 110 111 112 113 114 115 116 117 118 119 120
W+80 W+81 W+82 W+83 W+84
121 122 123 124 125
35 EN
IC29
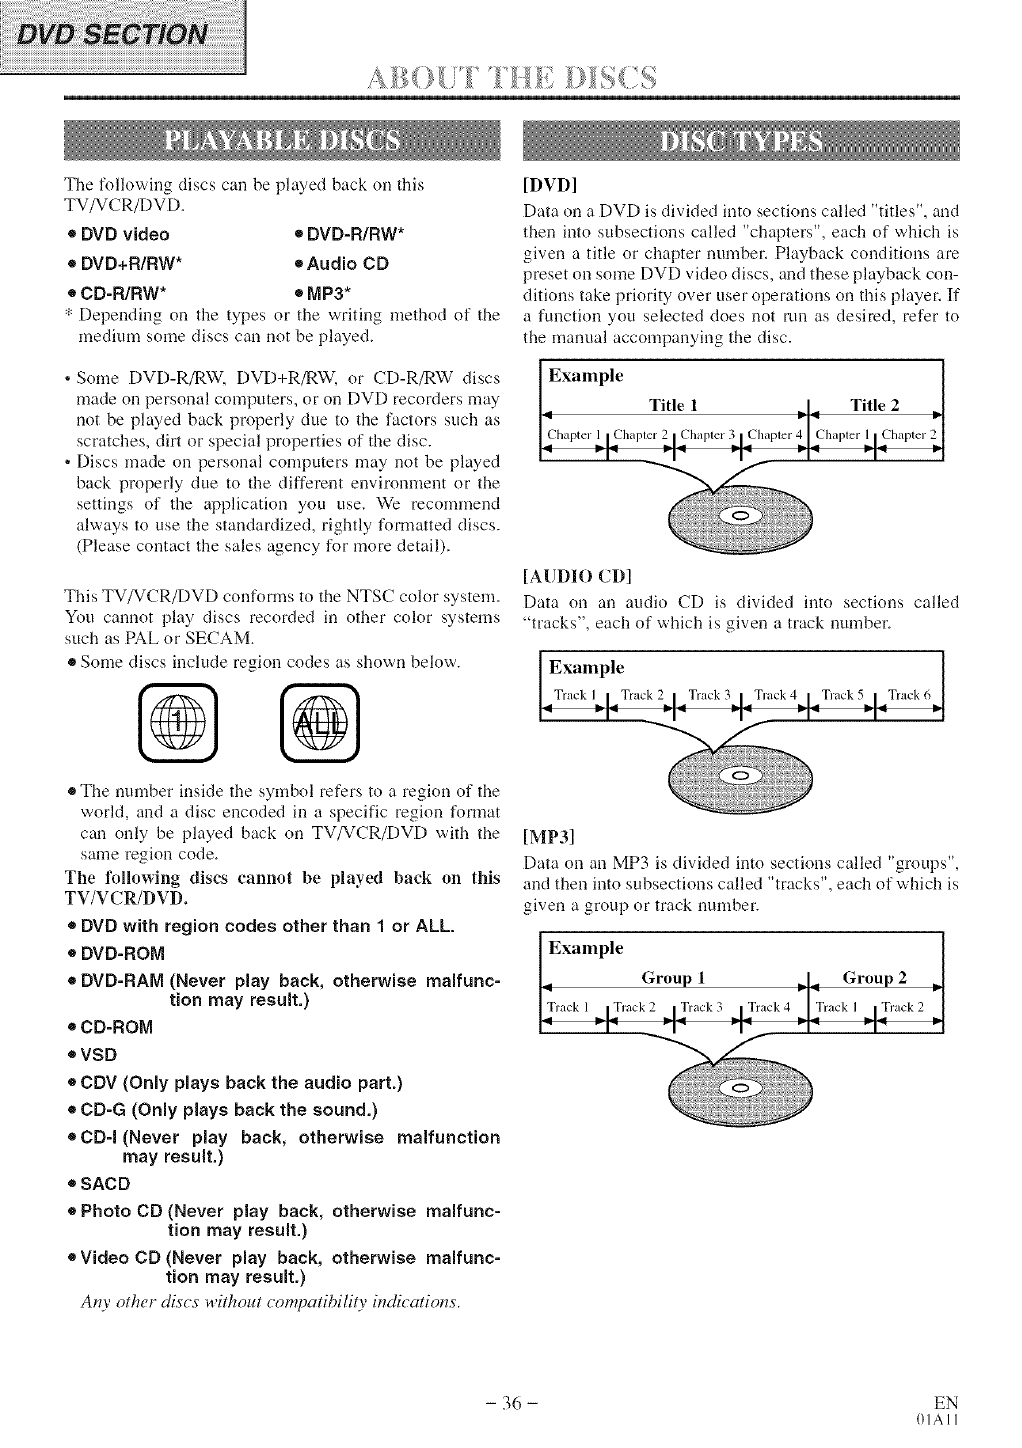
........... ............._
The following discs can be played back on this
TV/VCR/DVD.
• DVD video • DVD-RIRW*
• DVD+RIRW* • Audio CD
e CD-R/RW* ® MP3*
"_Depending on the types or the writing method of the
medium some discs can not be played.
• Some DVD-R/RW, DVD+R/RW, or CD-R/RW discs
made on personal computers, or on DVD recorders may
not be played back properly due to the factors such as
scratches, dirt or special properties of the disc.
, Discs made on personal computers may not be played
back properly due to the different environment or the
settings of the application you use. We recommend
always to use the standardized, rightly formatted discs.
(Please contact the sales agency for more detail).
This TV/VCR/DVD conforms to the NTSC color system.
You cannot play discs recorded in other color systems
such as PAL or SECAM.
•Some discs include region codes as shown below.
eThe number inside the symbol refers to a region of the
world, and a disc encoded in a specific region format
can only be played back on TV/VCR/DVD with the
same region code.
The following discs cannot be played back on this
TV/VCR/DVD.
eDVD with region codes other than 1 or ALL.
e DVD-ROM
e DVD-RAM (Never play back, otherwise malfunc-
tion may result.)
e CD-ROM
eVSD
e CDV (Only plays back the audio part.)
e CD-G (Only plays back the sound.)
e CD-I (Never play back, otherwise malfunction
may result.)
e SACD
ePhoto CD (Never play back, otherwise malfunc-
tion may result.)
e Video CD (Never play back, otherwise malfunc-
tion may result.)
Any other discs without compatibility indications.
[DVD]
Data on a DVD is divided into sections called "titles", and
then into subsections called "chapters", each of which is
given a title or chapter number. Playback conditions are
preset on some DVD video discs, and these playback con-
ditions take priority over user operations on this player. If
a function you selected does not run as desired, refer to
the manual accompanying the disc.
[AUDIO CD]
Data on an attdio CD is divided into sections called
"tracks", each of which is given a track number.
Example
[MP3]
Data on an MP3 is divided into sections called "groups",
and then into subsections called "tracks", each of which is
given a group or track number.
- 36 - EN
01All
I)I i_?' >,>6" IrI¢_U
• Turn on the power of amplifier and :uly other com-
ponents, if necessary.
Pess _eP_6)g_{b_. on
®The power will turn on.
2P es_:; ILe OREH OkO£i_E b_*t'_o/_ to open disc
osdog 8'a?
{_ Plsce L,(_ <;ho_s_mdisc n _he>:y, wih be
,II]¢I <:,I I_i Ip
4P®ss the PLAY button.
• The tray will close automaically, and playback will
then start from the first chapter or track of the disc.
If the playback does not start automatically, press
the PLAY button.
• When you playback the DVD which a title menu is
recorded, it may appear on the semen. In this case,
refer to "TITLE MENU".
{_ P_ess }@STOP t:_Ao/s o sq;; paybsck,-.
DVD may contain menus to navigate the disc and
access special features. Press the appropriate number
buttons or use the Arrow buttons (V/A/'_I/I_) to high-
light your selection in the DVD main menu and press
the ENTER button to confirm.
NOTES
• Select DVD mode by pressing the SELECT button on
the mmnte control. Then, operate the DVD functions.
®Unless stated, all operations described are based on
remote control use. Some operatkms cm_ be carried
out using the menu bar on the TV screen.
Pies_; he DISC/\A{!HU bt_ on
• Tile DVD nlahl menu will appear.
2/ tie les_<_es not ava abe _ _;_y_'_bo
_'say appea' os theTV sceen
3_dsc_nes_: says abeosd"_et_so audo
asg(aqe sebt'/e opt ons chapters Ion"/he
t'/easdobet opIossw appest/ofseec,
or>
,<,_(AQCla,_ ite[_ :st@lhc INTER b_£lo/: Io
co_?li_m sel odom
NOTES
®When fl:e DVD mode has been switched to the
TV/VCR mode, the DVD mode shuts down first _md
then TV picture and sound appears in about 4 seconds.
Similarly, when the P()WER button is pressed to tmn
off in the DVD mode, this mode shuts down first grad
then the TV/VCR/DVD's power is turned off.
®A "prohibited icon" may appear at (_)
the top-right on the TV screen dur- /
ing operation, warning that a prn-|
hibited operation has been encnun- |
tered by the DVD or the disc. (.
With DVDs that use titles for playback program sig-
nals, playback may start from the second title, or it
may skip these titles.
During the playback of a two layered disc, pictures
may stop for a moment. This happens when the 1st
layer switches to the 2nd layer. This is not a mal-
function.
Press the TITLE bqtior
®The title menu will appear.
_"_a}/appes ' on the °fV sctee_'_
' e,:;, , :5 AI'Iow s _" '}_s < _s' £I,#_1/s>,]_ o
I+--a_l >Ii lal=l -- 11 ....
selecl a_ iler% s_d the IHTll b_, ton to
coy} s,wsseectos
(S tS*dG UP+i 5 /N 75 '['SSLI V
For DVD-Vs
®Press the DISC MENU butnn to call up the DVD menu.
®Press the TITLE button to call up the title menu.
NOTE
Contents of menus and corresponding menu opera-
tions may vaWbetween discs. Refer to the manual
accomptmying the disc for details.
- 37 - EN
01All
©u_gpayhsck pesslheSTOPb_iou
• Resmne nlessage will appear oil the TV screen.
Po_s h_) pr/; _ a whet pa book w;;_s s_opp,¢d.
• To cancel resume, press the STOP button twice.
®If turn off the TV/VCR/DVD, resume function will
be cancelled.
7+ D!.'isg l>Iybi_ck t_'®s_stl"e PALS{Y: I _tIon,
Playback will pause and sound will be reefed.
, . i,+L l*.i_I O1,
©u_ sIil p ayback p_ess the?PAUSE b_£to_s
Playback will pause and sound will be muted.
PLAY buttot_
Note [or using buttons on the main unit:
Press the PAUSE button, then, press {u_dhold down the
SKIP I_1_1/SEARCH _ buttons or the SKIP I'_I/
SEARCH -_1-_bulons on the TV/VCR/DVD for a few
seconds to begin Search in 1/16 speed of the normal
playback. Press m_dhold down again to ch_mge speed
to 1/8. Repeat this procedm'e to ch+u_geto 1/2.
)_ /}_+w'i_gplayback, press a_d hold dovs__the
S@OoIsds
,, _ s#y,S Eats _,_}..... mS "od <lows h® F:,FW:')I_@_
o_ 1IV ._,!,,_/b_tto_¢ _'#pestedty to s<t_t_;:cthe
/equ_ed sp®ed: x2, x8 xS0 x 00
For audio CDs, the speed is fixed {it xl6.
For MP3, the speed is fixed at xd.
1_ }<o_e _ntosossa playback ptessthe
I:'Litt x_tIos
Note for using buttons on tie main unit:
During playback, press and hold down the SKIP I_t_1/
SEARCH I_!_ buttons or the SKIP I'_'_/SEARCH _
buttollS on the TV/VCR/DVD for a few seconds to begin
Search in x2 speed. Press and hold down again to ch_mge
speed to xS. Repeat this procedure to change to xS0 and
xl00.
-38- EN
OIAll
SEARCI[
There are three ways to begin playback on an Audio
CD at a specific Track,
Using the Number buttons on the remote control
P_ess/'ed,/_,m->be_ bu o s_®es/e_the
des edS_ack m 'sbe_
• Playback will start at tile selected track.
• For single digit tracks (1-9), press a single number
(eg. track 3, press 3).
oTo play track 26, press +10, 2, 6.
;_ [}/,x ¢_g/s aybsck, press he SEAACht ri/iO{}_[i
bu or_ b_eet_"_es(C/}: wee od[spayt[se
T _seSesrcbos seTVseees
,? H s. 3{ seconds ®s_, sales <_;fdisc
tsse ss _9 tse N( tuber bu /®ss o_ {se
(_I?IO_¢) It:O_'A:tO
• Playback will stari at the specified time.
®Press the CLEAR button to erase the incorrect input.
Using the SEARCH MODE button
':ess I'_: 91i!iAl:C,, 14()Ill{{:i, Use markers to memorise your favorite places on a
The track search display appears, disc.
2Wi HiT_30 seco_ds _e/ec a desired _'aok
_4eber _4si_9 the ?,L_mbe but o_ss o_s}he
_er_,sote 0o_ !re,
For single digits press 0 first.
Playback will start at the selected track.
Using the SKIP I_ _4 buttons
During playback, press the SKIP I_l_l button to move
the next track. Press it repeatedly to skip subsequent
tracks. Press the SKIP I'_"_ button to go back to begin-
ning of the current track. Press it repeatedly to go to
the previous tracks.
If the SKIP button is pressed while the playback is
paused, the playback will be paused again after skip-
ping to the next track.
NOTE
The SKIP I_1"_ l_l buttons are not available when
playback is stopped.
/'silo sp/er se_'c ,tws( o hew e
se..,x_,......du'_'g :)svba:(
_; Ite desired cba/', /:e /G Ie s"_A)e" _;i"_
l_t, , ,s,, _= u
_.; bbfiI_ si,e_ be 'e_tx_oeco 1"eL
Playback will start at tl_e selected Chapter or Track.
Press the CLEAR button to erase the incorrect input.
For single digits press 0 first.
p,=,,_,,.......,u,>,,:_:._>._,<*<:a:_O,s,,I£<)©IE b, t; _ fou l['_e};;
_,,.,,,_ ,.;<,,Yes c%, _g payb_ck
®The display screen and Markers will appear on the
TV screen.
2,3 4 5,;; ')* <'_"9, ""
:_, ,,= Or @ 81d bl'ISi,lrl:) Ibat ',- ,_
!! +_7_ iI g= i=_ 6
° ° ,=-,- 8!p_IIIS A tl ,_ ,,_=:ul=l_:lI
122222221/II%IWIIIWI!£1/@I[/!@ II_I4_I/_II/(IIW_I;
_" i,+0
?;g' ' _)
1{,' I::.l b-_t(
The Title or Track and elapsed playing time will
appear in the TV screen.
1112 I'*+ I Y_"I';7 >, I _ ' :_, ,
,.,;,_.i¢:[_,A [ll,,,Jl L I _>l,I(rl I_,=l I I I,,> (<CD; three
tilI"/e;5} d/Iril'l<t_ 'It *_="" t_" # it _:= l;iil°Pd!,_ A( .......... AI OW
ler_; (.Iii-} to cl oese II' de_,i ed m_;;'ke'
,l,i, I i _=
= I' @
tt'e_ _ ,:,,........I. EfgliI t utters,
NOTES
Opening the disc tray or turning off the power or
select AC at step 2 _md press the ENTER button will
erase all Markers.
To clear a marker, using the Arrow buttons ('_I/_'Q,
position the cursor on to the marker number to be
cleared and press the CLEAR button.
You can mark up to 10 points.
i i >),It,l _i 11 *,, i wii<< r R_<}= +Bi _ Ill Z*i/, i_/ii¢l
el to exit,
- 39 - EN
01All
SPECIAL PI,AYBACK F{!NCTI()N
REPEAT is available only during playback.
B£'PE;_ T 77TL_)!i'/ C_PTffT:_"
Tosc vaetberepea_/'q'_c obpres_,_ _e
RK[BAT b/_to_ @mi_g psybsc .
• The repeat mode changes as described below every
time you press the button.
[] CHAPTER _ [] TITLE _[] OFF
curr_nt chapter repeat current t t erepeat repeit off
L .=
NOTES
®Repeat Title/Chapter is not available with some
scenes.
®The REPEAT setting will be cleared when moving
to other title or chapter.
B£'P E}4T"_V_ CAf
Tosc vaetl:_erepea_/'q'_c obpres,,_ _e
RK[BAT b/_to_ @mi_g psybsc .
• The repeat mode changes as described below every
time you press the button.
[] TRACK _ []ALL _[] OFF
curr_nt track repeat ent re d sc repeat repeit off
l JI
NOTES
•Repeat setting will be cleared when moving to other
track.
• Repeat playback does not [unction during repeat A-B
playback.
BEB+E_iT A-B
Press t°<_/;:;_£:Pg/_/Ti>,8 b_ <::,_a our :ho..
se_ ,+}>a_'t}_9pod&
• [] A- appears briefly on the TV screen.
¢bos®Ys®_ p®_t
®[] A-B appears briefly on the TV screen, and the
repeat sequence begins.
B bel:!o_'_
NOTES
®The repeat A-B section cm, only be set within the cur-
rent title (for DVDs), or current track (for audio CDs).
®Repeat A-B is not available with some scenes in DVD.
Tu cancel the A point which was set, press the
CLEAR button.
Repeat A-B playback does not function during title,
chapter, track or all repeat playback.
You may determine the order in which tracks will play.
D <>a _, ......... ]U {{0_'/
l The PROGRAM screen will appear.
t/'r,_ k,, b®r t's,_s>s _e
KB/'Efq _ I:sl',
• Press the CLEAR button to
erase the most recelltly elltered
program.
#_ ",'t _¢" }'d/V¢¢ " t}'@
3_4':_,_ .....J_ ,,40, seeced a
÷ms the PIRY b_4tto_s to P_7 the p_ ,,
NOTES
®Whte the program is being played back, the STOP
wnrks as follows.
Press the STOP button ouce and then the PLAY but-
ton again, playback will resta]l from the point where
the STOP button was pressed. (Program continued)
Press the STOP button twice a_d then the PLAY button
again, playback will restarl flv)mthe track in the usual
way. (Program cleaed)
Up to 99 programs can be entered.
If you like to repeat the current track in the program,
press the REPEAT button repeatedly until []
TRACK appears during playback. If you like to
repeat the entire _]0£ogrampress the REPEAT buttou
repeatedly until IC;IALL appears during playback.
This shuffles the playing order of tracks instead of
playback in the sequence.
_ sop mode p'e:_,_s_ e MODE/su{,::_ wee
RANDOM screen appears.
29_'_:_ssthe P_,)/bu to_/1o s_>M _a_do> p/_syback
NOTE
If you like to repeat the currant track in the random
selection, press the REPEAT button repeatedly until
[] TRACK appears during playback. If you like to
repeat the entire random selection press the
REPEAT button repeatedly until [] ALL appears
- 40 - during playback. EN
01AI 1
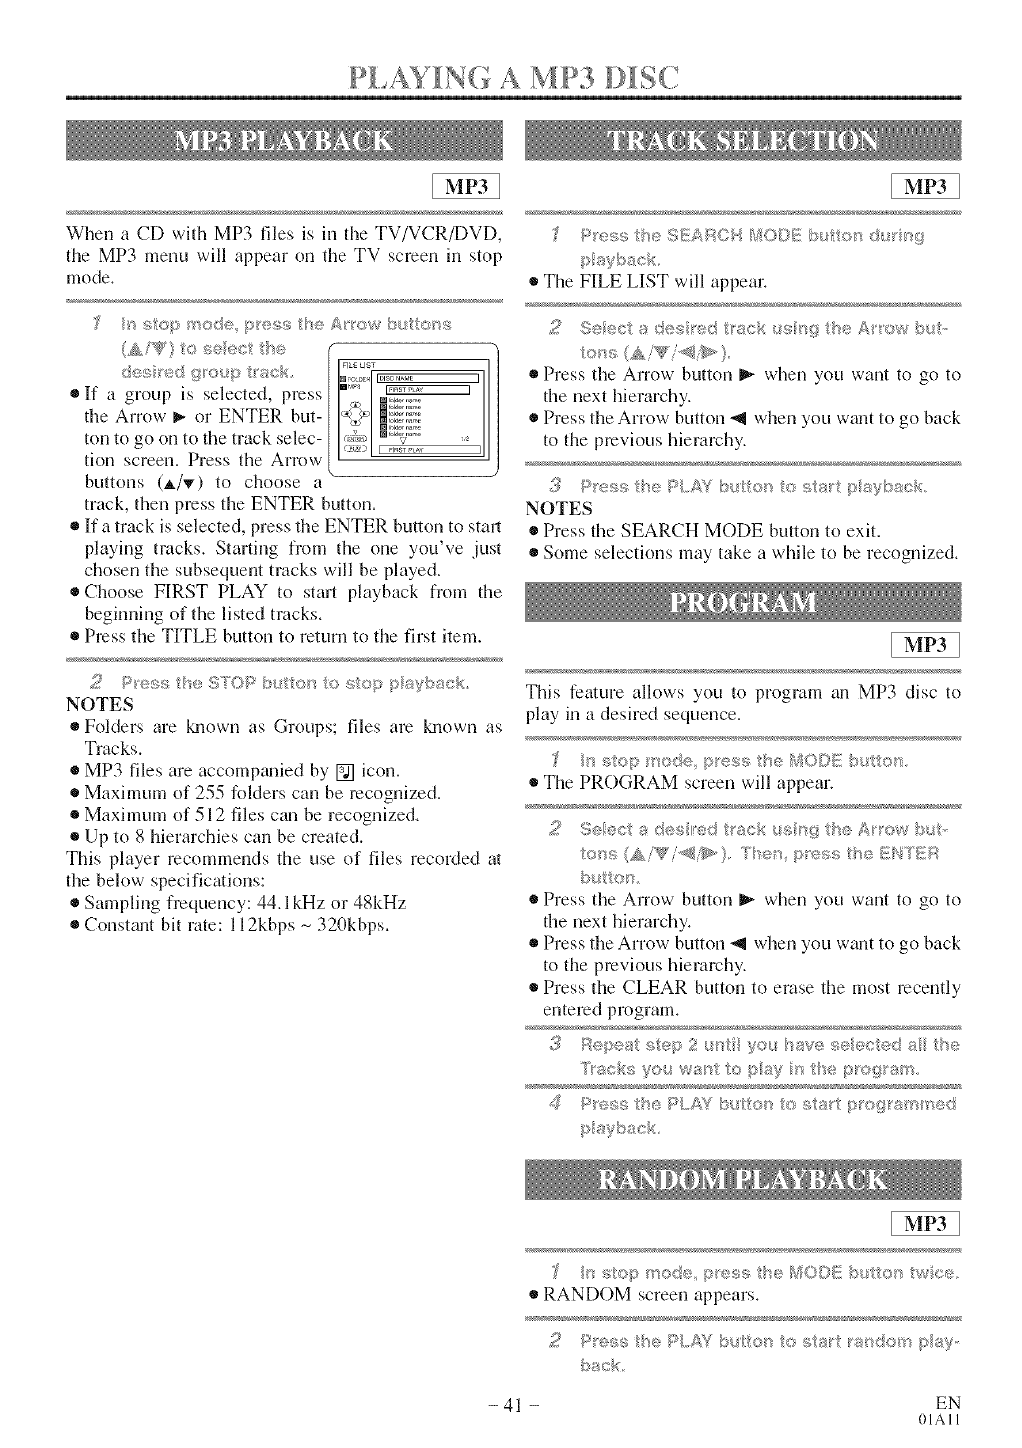
PI,AYING A MP3 DISC
When a CD with MP3 files is in the TV/VCR/DVD,
the MP3 menu will appear on the TV screen in stop
mode.
(&F%'} o s¢iecI @e
If a group is selected, press ]
the Arrow _. or ENTER but-
ton to go on to the track selec ....
tion screen. Press the Arrow
buttons (_/_') to choose a
track, then press the ENTER button.
If a track is selected, press the ENTER button to stag
playing tracks. Starting from the one you've just
chosen the subsequent tracks will be played.
®Choose FIRST PLAY to start playback from the
beginning of the listed tracks.
Press the TITLE button to return to the first item.
PressdteSEAHO!,, MODEbu o_@sdng
> ayback
Tile FILE LIST will appear.
2 Seec adesred 'so us_%g }cA ow bu/',
®Press the Arrow button _ when you want to go to
the next hierarchy.
®Press the Arrow- button _ when you want to go back
to the previous hierarchy.
NOTES
®Press the SEARCH MODE button to exit.
Some selections may take a while to be recognized.
2P_'ess5eSTOPb_ tos os_oppayback
NOTES
®Folders are ka_own as Groups; files are ka_own as
Tracks.
®MP3 files are accomDmied by [] icon.
Maximum of 255 folders can be recognized.
Maximum of 512 files can be recognized.
Up to 8 hierarchies can be created.
This player recommends the use of files recorded at
the below specifications:
®Sampling frequency: 44. l kHz or 48kHz
®Const_mt bit rate: 112kbps _ 320kbps.
This feature allows you to program an MP3 disc to
play in a desired sequence.
The PROGRAM screen will appear.
29_, ect ;s des red tack us<!? h_>/&r_ow }::,_._-
®Press the Arrow button _ when you want to go to
the next hierarchy.
®Press the Arrow- button _ when you want to go back
to the previous hierarchy.
Press the CLEAR button to erase the most recently
entemd program.
_8_>p,,;_,_4sep 2ps._ _>e seecled s/%'
Tr_fmks you wan c pay >t_u p_gram
4Press she PLAY bs tos_o s/_s_{ p_og am'ned
p aybsck
so/:/; so6 "_........ _>es......... IseMODf£b_ to'_ 4£<,e
• RANDOM screen appears.
:_ cR
- 41 - EN
01All
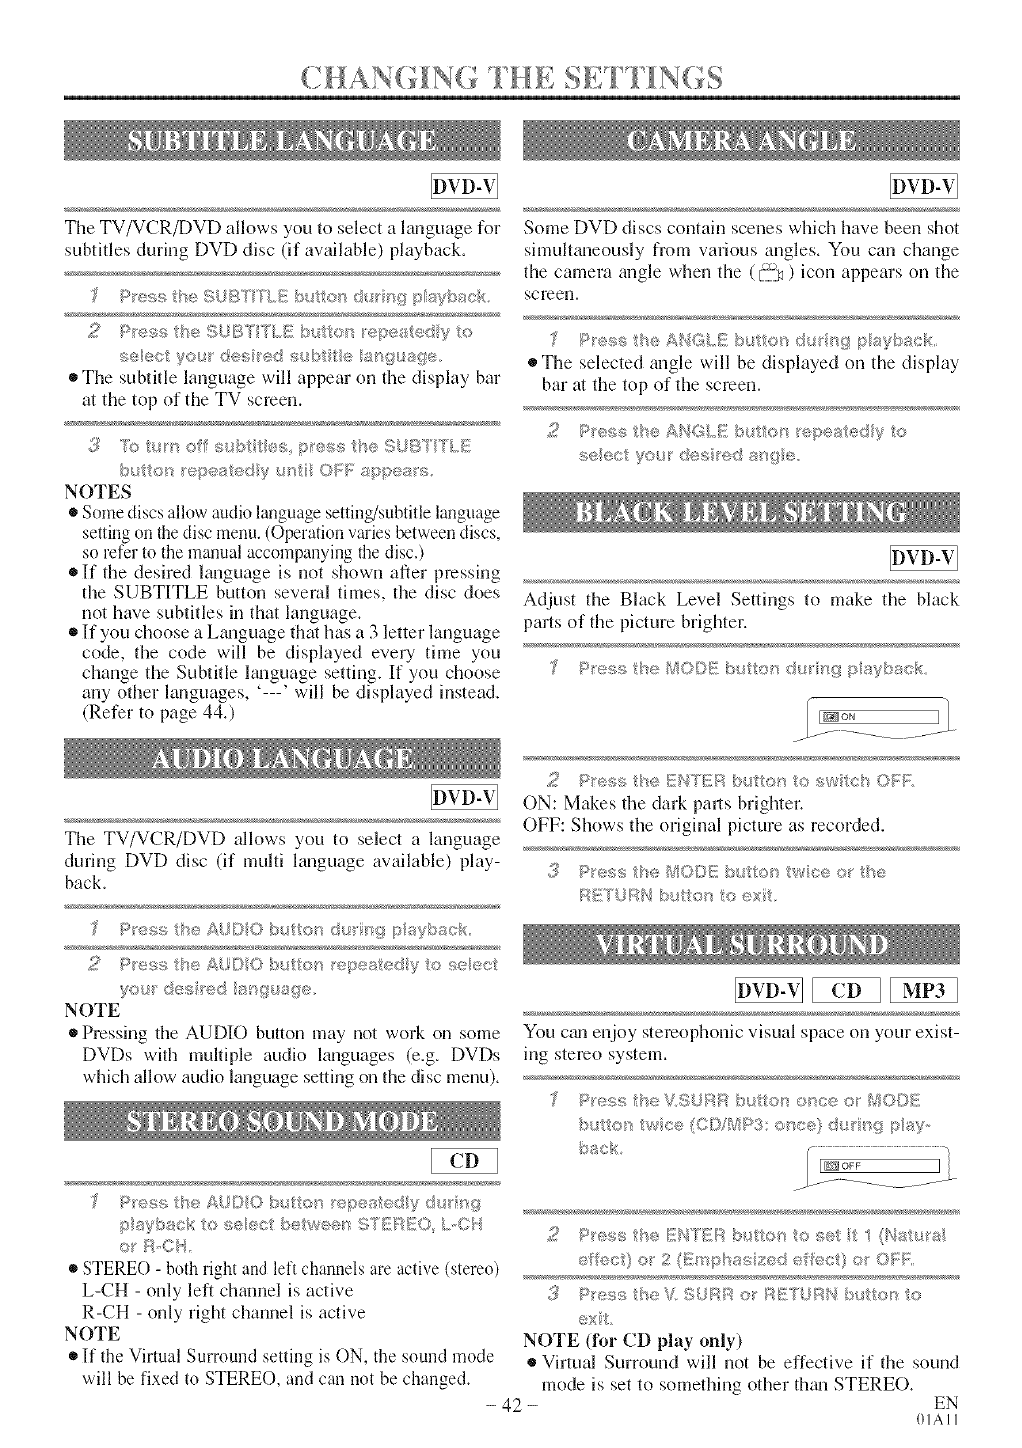
"_ T "N "! "4 "7 _ _" _ _ 1
(, H AN ( [NG H/i; S E [ 1[NGS
The TV/VCR/DVD allows you to select a language for
subtitles during DVD disc (if available) playback.
'I P_e_<:__he 5UU/_i&E/%te_ d_ >{_U8 /x_ck
eeeet your deehed s_,,_bt[te am/_uage.
®The subtitle language will appear on the display bar
at the top of the TV screen.
but®n e estedyu_;sf O_:Faupea_%
NOTES
®Some discs allow audio language settin_subtitle language
setting on the disc menu. (Operation varies I_tween discs,
so refer to the manual accompanying the disc.)
®If the desired language is not shown after pressing
the SUBTITLE button several times, the disc does
not have subtitles in that language.
®If you choose a Lmiguage that has a 3 letter language
code, the code will be displayed every time you
change the Subtitle hmguage setting. If you choose
any other languages, '---' will be displayed instead.
(Refer to page 440
The TV/VCR/DVD allows you to select a language
during DVD disc (if multi language available) play-
back.
Press _/'_>AUD© b_ h>> d< _g p ayback,
y©u_ dee_'ed sngu_ge
NOTE
®Pressing the AUDIO button may not work on some
DVDs with multiple audio languages (e.g. DVDs
which allow audio language setting on the disc menu).
Some DVD discs contain scenes which have been shot
simultaneously from various angles. You can change
the camera angle when the (r_) icon appears on the
screen,
The selected angle will be displayed on the display
bar at the top of the screen.
sr_)/ec yo_r de_:; ed _mge.
Adjust the Black Level Settings to make the black
parts of the picture brighter.
;_ Pe+_s heMODEb_,_/end_ '_g pay u:k
it/ --- ................
2P'_>w_ he ENTEI;'{ bu _or_ io swch O_;:f:
ON: Makes the dan pals brighter.
OFF: Shows the original picture as recorded.
SPp::<;_;; MO[)E b<_,_ou_!wee or he
RES/JRf4 bet[on to ext
You cm, enjoy stereophonic visual space on your exist-
ing stereo system.
b_! to/_ twce (CD/BI{F_3:or/ce} d_i_'i g pay,-
back
P_e_:',5the AUDIO b_, los _epeated y d_xd[sg
p ayback _0 seect be/ween S' {!};BEO L,OH
o _,Ofq
STEREO -both right and left chalmels are active (stereo)
L-CH - only left charnel is active
R-CH - only right channel is active
NOTE
If the Virtual Surround setting is ON, the sound mode
will be fixed to STEREO, and can not be changed.
- 42-
2Peas the E_,/TE[1 bb4to_:_ to set it 1 (P4ate_'a
effect) <>_'2 (E_s pbasgzed effect} 0_ OFR
3Press the V SURR 0_ F!U'UF@,£b_sttocs to
ext
NOTE (lbr CD play" only)
® Vhlual Surround will not be effective if the sound
mode is set to something other thzm STERE(). EN
01AI 1

y x ...._ y
F H E 0 N -SC R EE N I Nli"0 R M AS'I () N
EEi3
You cwl check the infnrmatinn about the current disc by pressing the DISPLAY button on the remote control.
For DVD-Vs For audio CDs
The elapsed wid remaining playing time of the cur-
rant track will be displayed.
*The elapsed w_d remahfing (.....................................................................................................................
playing time of the current I_0, ................ ,-I
chapter will be displayed, jc.-------_...... -_-
2Pes9 the © S/;_LA)( butte_" ags_ to _&:ew
cu_ en/Tte
Tile elapsed and remaining playing time of the cur-
rant title will be displayed.
®The BIT RATE w_d the current repeat setting will be
displayed.
If you am playing a dual layered disc, the layer num-
ber will also be displayed (L0: Layer 0 is playing.
LI: Layer 1 is playing).
_ }>H!;_:_she DSRLAY buIo/s sgc_ '_e <?,_;/_e
dsBay
2P_ess the ©tSPLAV bu tes_ sgs_ to show
c_ '_est '_bts/%ack
The elapsed and remainin 8 playin 8 time of the cur-
rent total track will be displayed.
{7 91'ess be ©SgSLS_Ybuses aga e ex he
dspay
For MP3
I The llame of the file currently in play will be dis-
played.
2>_,<, _>, '_%¢ /_,Vbyteq_>peeiedyto
sPe_t"e :ack> mb?_ /e 'e'>eats_att_,_
a_s;/_e IaT_ s,,,sk:-Astusat he top o the
93 eel1
[] will be displayed when repeat play has been
selected.
[] T - indicates Track repeat
[] G - indicates Group (RAder) repeat
[] A - indicates Disc repeat
- 43 - EN
01All
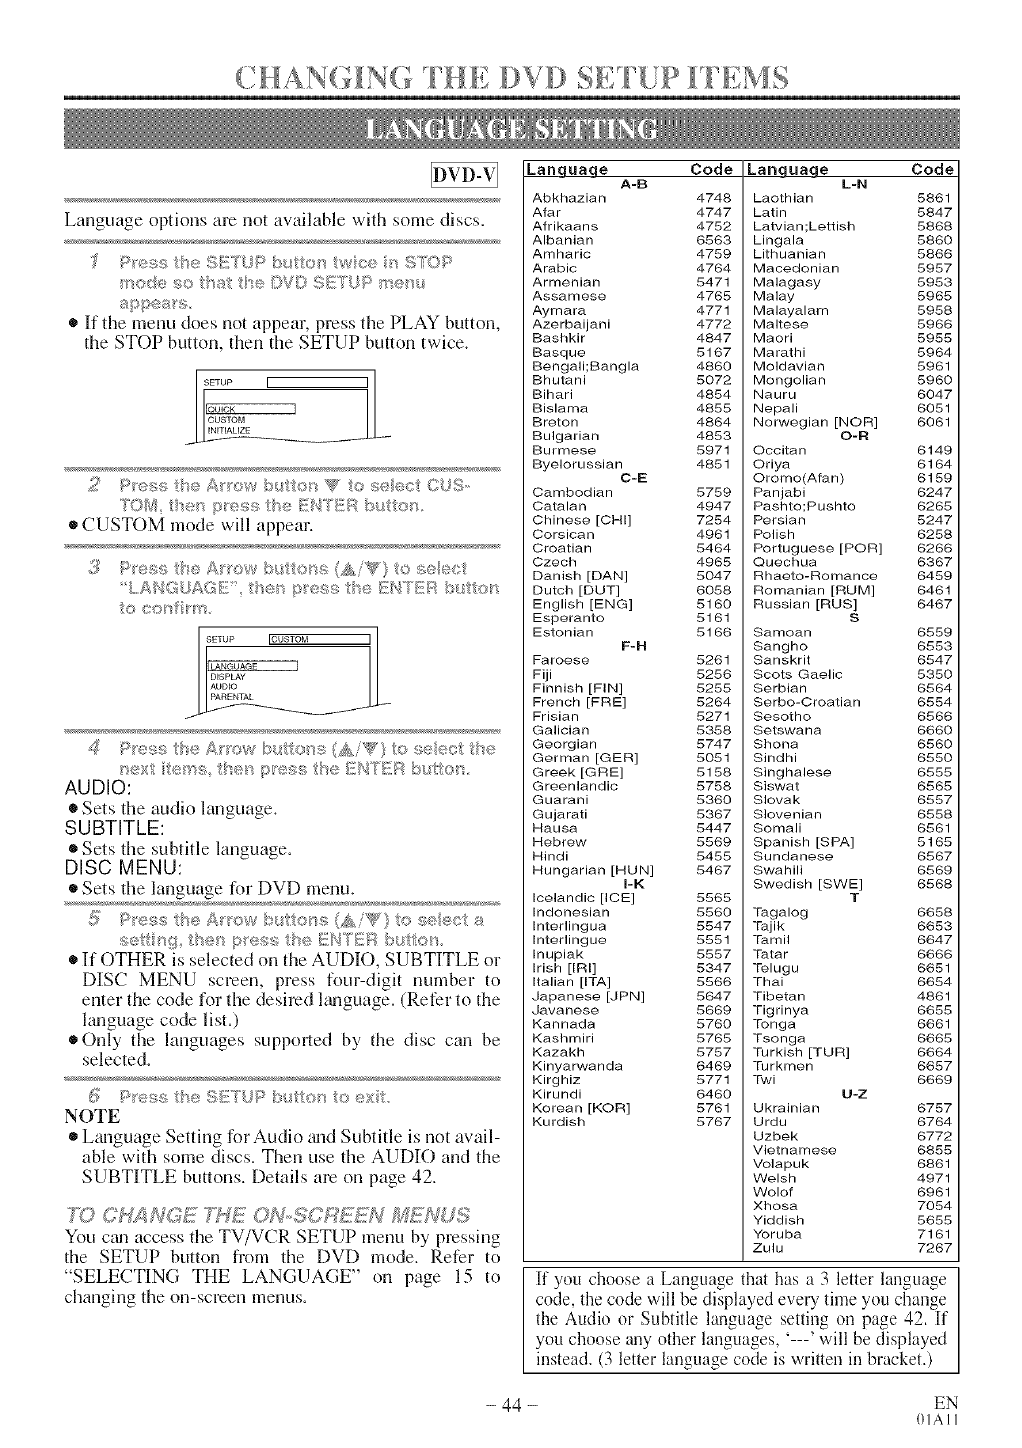
"_ T "-4 "! "1 "7 _ _ _ _ "1
Language options are not available with some discs.
P'esg; "e SE:TU > 1%{o _wc< _",!!NO
t-®d so/"_ e DV© SEYUP s/_e _
s > ses_'s
• If the menu does not appear, press the PLAY button,
the STOP button, then the SETUP button twice.
2P_ess he A_'ow butto< _//:o sees!t ©iS,,
TO_@ _se> pess the/£N'fER b_sttos
®CUSTOM mode will appean
3P'es_>;d'÷ £_'ow by te_8 (,&_'W t_>see<:{
,ANGUAGK Bes br®ss he/!£WY_}]_';/bs o_
® cots _r_
S_TUP [CUSTOM I
D_SpLAy
_AUD_O
Hext e_ns se_'_/s_esst el£N'(/!{igl bs ©H
AUDIO:
Sets the audio htnguage.
SUBTITLE:
Sets the subtitle language.
DISC MENU:
Sets the language for DVD menu.
3Pes, s _e A_'pow b h>,/"<:_(,£i_g} to see<_ s
set _'_g _se> F ess _e ENTEF%but/o_
If OTHER is selected on the AUDIO, SUBTITLE or
DISC MENU semen, press four-digit number to
enter the code for the desired Emguage. (Refer to the
hmguage code list.)
Only the languages supported by the disc can be
selected.
NOTE
®Language Setting for Audio gradSubtitle is not avail-
able with some discs. Then use the AUDIO and the
SUBTITLE buttons. Details am on page 42.
7Y? CHANGE ?WE _s/-SCR US
You ctm access the TV/VCR SETUP menu by pressing
the SETUP button from the DVD mode. Refer to
"SELECTING THE LANGUAGE" on page 15 to
changing the on-semen menus.
Language Code
A-B
Abkhazian 4748
Afar 4747
Afrikaans 4752
Albanian 6563
Amharic 4759
Arabic 4764
Armenian 5471
Assamese 4765
Aymara 4771
Azerbaijani 4772
Bashkir 4847
Basque 5167
Bengali;Bangla 4860
Bhutani 5072
Bihari 4854
Bislarna 4855
Breton 4864
Bulgarian 4853
Burmese 5971
Byelorussian 4851
C-E
Cambodian 5759
Catalan 4947
Chinese [CHI] 7254
Corsican 4961
Croatian 5464
Czech 4965
Danish [DAN] 5047
Dutch [DBT] 6058
English [ENG] 5160
Esperanto 5161
Estonian 5166
F-H
Faroese 5261
Fiji 5256
Finnish [FIN] 5255
French [FRE] 5264
Frisian 5271
Galician 5358
Georgian 5747
German [GER] 5051
Greek [GRE] 5158
Greenlandic 5758
Guarani 5360
Gujarati 5367
Hausa 5447
Hebrew 5569
Hindi 5455
Hungarian [HUN] 5467
I-K
Icelandic [ICE] 5565
Indonesian 5560
Interlingua 5547
Interlingue 5551
Inupiak 5557
Irish [IRI] 5347
Italian [ITA] 5566
Japanese [JPN] 5647
Javanese 5669
Kannada 5760
Kashmiri 5765
Kazakh 5757
Kinyarwanda 6469
Kirghiz 5771
Kirundi 6460
Korean [KOR] 5761
Kurdish 5767
Language Code
L-N
Laothian 5861
Latin 5847
Latvian;Lettish 5868
Lingala 5860
Lithuanian 5866
Macedonian 5957
Malagasy 5953
Malay 5965
Malayalam 5958
Maltese 5966
Maori 5955
Marathi 5964
Moldavian 5961
Mongolian 5960
Nauru 6047
Nepali 6051
Norwegian [NOR] 6061
O-R
OccUan 6149
Oriya 6164
Oromo(Afan) 6159
Panjabi 6247
Pashto;Pushto 6265
Persian 5247
Polish 6258
Portuguese [POR] 6266
Quechua 6367
Rhaeto-momance 6459
Romanian [RUM] 6461
Russian [RUS] 6467
S
Samoan 6559
Sangho 6553
Sanskrit 6547
Scots Gaelic 5350
Serbian 6564
Serbo-Oroatian 6554
Sesotho 6566
Setswana 6660
Shona 6560
Sindhi 6550
Singhalese 6555
Siswat 6565
Slovak 6557
Slovenian 6558
Somali 6561
Spanish [SPA] 5165
Sundanese 6567
Swahili 6569
Swedish [SWE] 6568
T
Tagalog 6658
Tajik 6653
Tamil 6647
Tatar 6666
Telugu 6651
Thai 6654
Tibetan 4861
Tigrinya 6655
Tonga 6661
Tsonga 6665
Turkish [TUR] 6664
Turkmen 6657
Twi 6669
U-Z
Ukrainian 6757
Urdu 6764
Uzbek 6772
Vietnamese 6855
Volapuk 6861
Welsh 4971
Wolof 6961
Xhosa 7054
Yiddish 5655
Yoruba 7161
Zulu 7267
[f you choose a Language that has a 3 letter language
code, the code will be displayed eveUtime you change
the Audio or Subtitle language setting on page 42. [f
you choose any other languages, '---' will be displayed
instead. (3 letter language code is written in bracket.)
- 44 - EN
(HAll
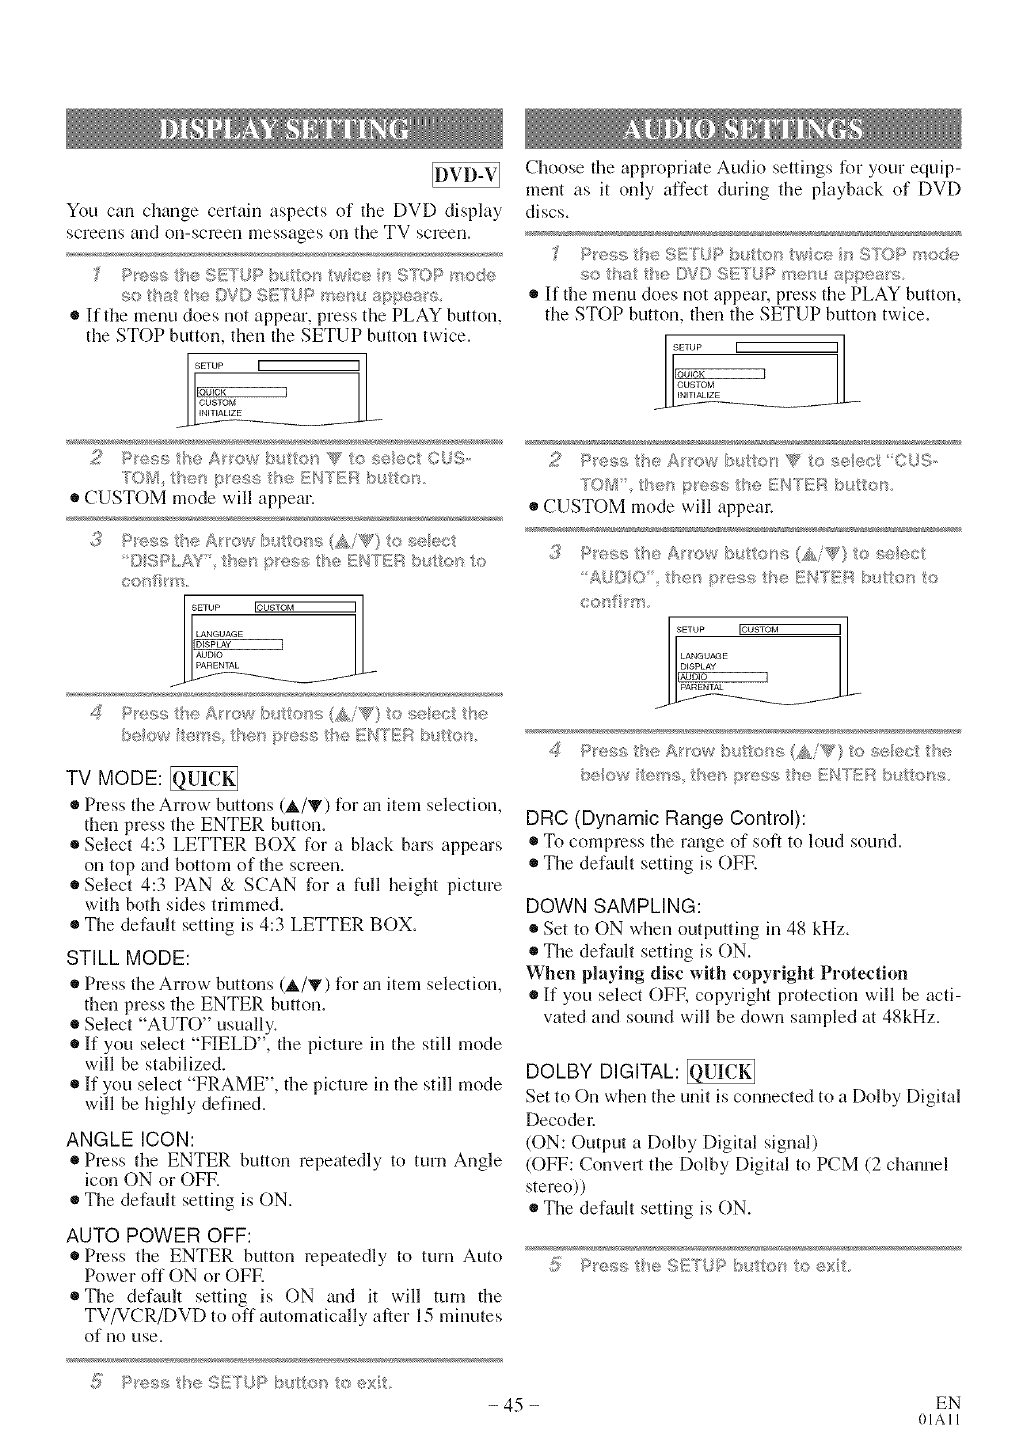
You can change certain aspects of the DVD display
screens and on-screen messages on the TV screen.
£ P_'ess Be S_'YOP b_A/'oq _wce ,_ S_OP mode
9o thss he DV© S@SP men(i appes_'s
• If the menu does not appear, press the PLAY button,
the STOP button, then the SETUP button twice.
.....' il
I_ _- I
70M then p_es<,;the IH',I'Y'E[:_b_ tof
• CUSTOM mode will appear.
©IgP/AY' he_ f>'ess he I3_}!;"EAb_lto_ _o
confir _"_
[
LANGUAGE
1DISPLAY I
AUDIO
becw e/<_q he_ I';#e£,{; the [:!NTI}27:/b_st%c,m
TV MODE:
• Press the An'ow buttons (_,/'V) for an item selection,
then press the ENTER button.
Select 4:3 LETTER BOX for a black bars appears
on top and bottom of the screen.
Select 4:3 PAN & SCAN for a full height picture
with both sides trimmed.
®The default setting is 4:3 LETTER BOX.
STILL MODE:
Press the Arrow buttons (_,/Y) for _uiitem selection,
then press the ENTER button.
Select "AUTO" usually.
If you select "FIELD", the picture in the still mode
will be stabilized.
If you select "FRAME", the picture in the still mode
will be highly defined.
ANGLE ICON:
Press the ENTER button repeatedly to tm'n Angle
icon ON or OFE
The default setting is ON.
AUTO POWER OFF:
Press the ENTER button repeatedly to turn Auto
Power off ON or OFE
*The default setting is ON and it will turn tile
TV/VCR/DVD to off automatically after 15 minutes
of no use.
P e_s the SUrUP b_ to_ to exit.
Choose tile appropriate Audio settings for your equip-
ment as it only affect during the playback of DVD
discs.
Pess the SI_°[IJP b ,£to_stwice i_:_STO> _s'ode
so ths_ t'_e CA/©SETUP me_m sppem's
If tile menu does not appear, press tile PLAY button,
the STOP button, then the SETUP button twice.
SETUP I ]I,
tO!k, ther_ p x_ss th_; IN'TEA b_Atou
• CUSTOM mode will appeac
"Ak,_© O' the_'_ p_e<;s the [}!N'T'Ei_ bm_to/q to
or_ ;'m
I..... ro_=_o= I[
IL
LANGUAGE
_ _DISPLAY
4P_'ese the Ar'ow bu to_ss 6&/Y/} to select the
below items thewsp_ess tke ENTER b_ tons,
DRC (Dynamic Range Control):
To compress the range of soft to loud sound.
The default setting is OFE
DOWN SAMPLING:
Set to ON when outputting in 48 kHz.
The default setting is ON.
When playing disc with copyright Protection
®If you select OFF, copyright protection will be acti-
vated and sound will be down sampled at 48kHz.
DOLBY DIGITAL:
Set to On when the unit is connected to a Dolby Digital
Decode_:
(ON: Output a Dolby Digital signal)
(OFF: Convert tile Dolby Digital to PCM (2 channel
stereo))
• The default setting is ON.
_ Press t_e S_1ITUPbuttor_ to exit
- 45 - EN
01All

Parental Control limits the disc viewing that exceed
your settings. (with a password or playback will stop.)
This feature allows you to prevent discs with alterna-
tive scenes from being played by your children.
7_4R_,_/71X2,,,L E V_7L
Parental Level allows you to set the rating level of
your DVD discs. Playback will stop if the disc's rat-
ings exceed the level you set.
Press !u_ S_FY'LP b_ or_ iwce STOP med_;_
so tat t_e ©UCK S{{TbP me>L appe¢£,_,_;,
• If the menu does not appear, press the PLAY button,
the STOP button, then the SETUP button twice.
OON_:_OL LE_TLS
oALL
All parental lock is cancelled.
•Level 8
DVD software of any grade (adult/general/children)
can be played back.
•Levels 7 to 2
Only DVD software intended for general use and
children ctm be played back.
•Level 1
Only DVD software intended for clfildren can be
played back, with those intended for adult and
general use prohibited.
NOTES
®When doing this for the first time, enter any 4 digits.
(except for 4737) That number will be used as the
password.(in the event you forget the password, see
below)
To change the password, press the Arrow buttons
(_,/_') to select CHANGE at step 5, then press the
ENTER button. Enter the four-digit pass-word, then
press the ENTER button.
®With some DVDs, it may be difficult to find if they
are compatible with parental lock. Be sure to check
if the parental lock function operates in the way that
you have set.
®Record the password in case you forget it.
- 46 - EN
(HAIl
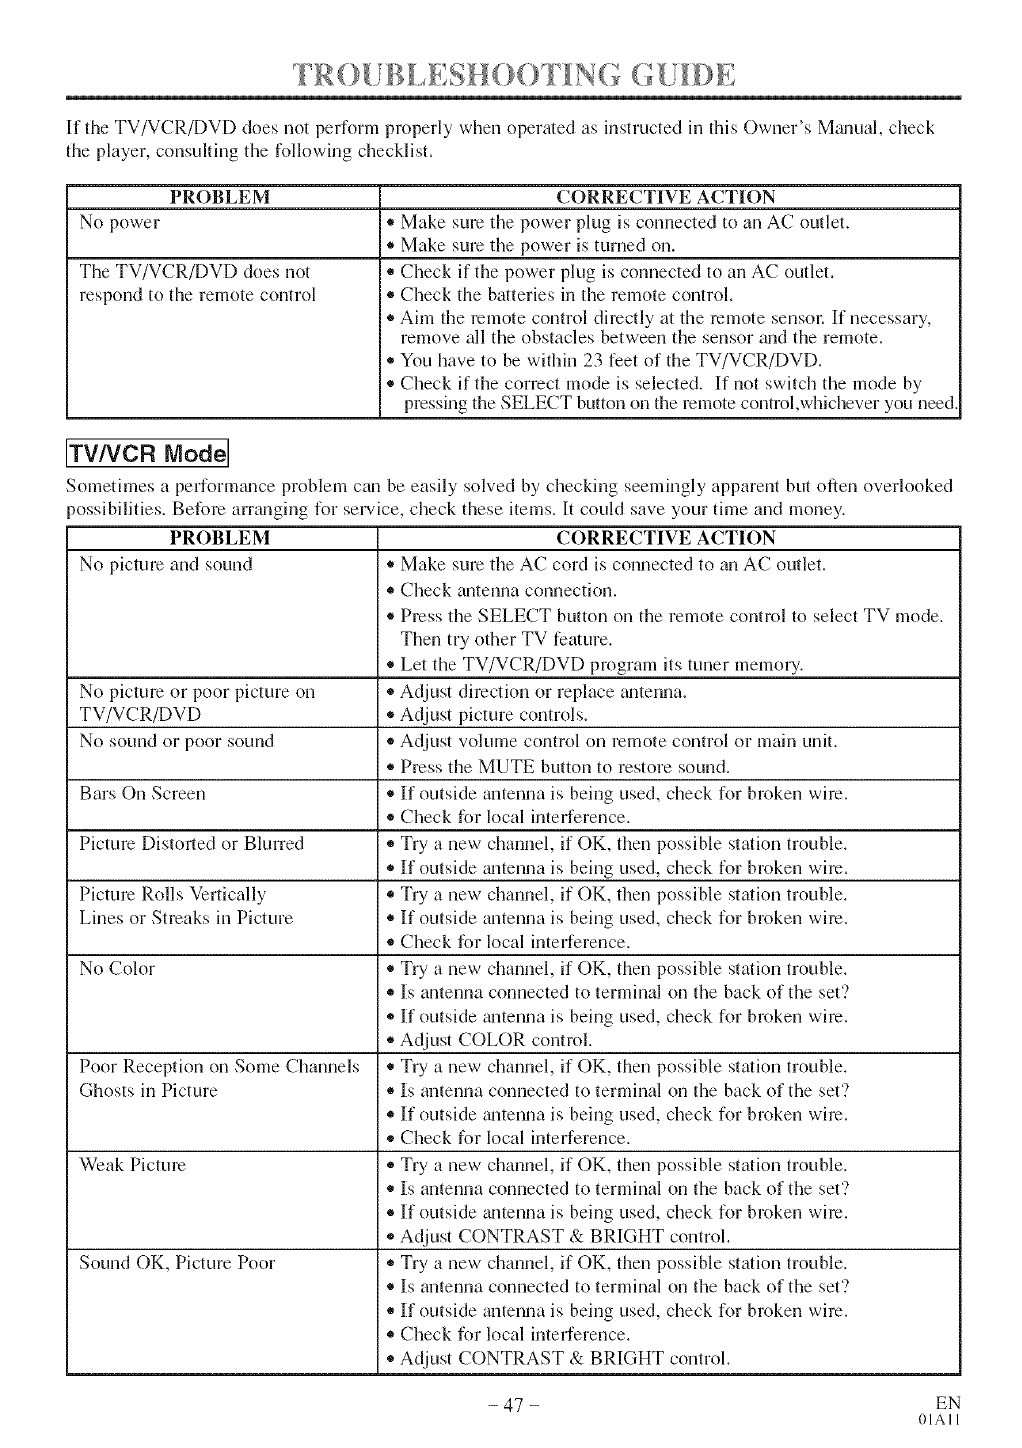
FRo[JBLEsHooF H{o<o[H)E
If the TV/VCR/DVD does not perform properly when operated as instructed in this Owner's M_mual, check
the player, consulting the following checklist.
PROBLEM
No power
The TV/VCR/DVD does not
respond to the remote control
CORRECTIVE ACTION
* Make sure the power plug is connected to an AC outlet.
®Make sure the power is turned on.
. Check if the power plug is connected to an AC outlet.
* Check the batteries in the remote control.
. Aim the remote control directly at the remote sensm: If necessary,
remove all the obstacles between the sensor mid the remote.
. You have to be within 23 feet of the TV/VCR/DVD.
®Check if the correct mode is selected. If not switch the mode by
pressing the SELECT button on the remote control,whichever you need.
No picture or poor picture on
TV/VCR/DVD
No sound or poor sound
Bars On Screen
Picture Distorted or Blurred
Picture Rolls Vertically
Lines or Streaks in Picture
[TVNCR Mode]
Sometimes a perform_mce problem can be easily solved by checking seemingly apparent but often overlooked
_ossibilities. Before arranging for service, check these items. It could save your time and money.
PROBLEM CORRECTIVE ACTION
No picture and sound * Make sure the AC cord is connected to an AC outlet.
,, Check antenna connection.
®Press the SELECT button on the remote control to select TV mode.
Then try other TV feature.
®Let the TV/VCR/DVD program its tuner memory.
• Adjust direction or replace _mtenna.
• Adjust picture controls.
,, Adjust volume control on remote control or main unit.
• Press the MUTE button to restore sound.
®If outside antenna is being used, check for broken wire.
,, Check for local interference.
• Try a new channel, if OK, then possible station trouble.
• If outside _mtenna is being used, check for broken wire.
• Try a new channel, if OK, then possible station trouble.
• If outside antenna is being used, check for broken wire.
• Check for local interference.
No Color ®Try a new channel, if OK, then possible station trouble.
,, Is antenna connected to terminal on the back of the set'?
,, If outside mltenna is being used, check for broken wire.
®Adjust COLOR control.
Poor Reception on Some Channels * Try a new channel, if OK, then possible station trouble.
Ghosts in Picture ®Is antenna connected to terminal on the back of the set'?
,, If outside _mtenna is being used, check for broken wire.
*Check for local interference.
Weak Picture ,, Try a new channel, if OK, then possible station trouble.
* Is antenna connected to terminal on the back of the set'?
®If outside mltenna is being used, check for broken wire.
* Adjust CONTRAST & BRIGHT control.
Sound OK, Picture Poor ,, Try a new channel, if OK, then possible station trouble.
®Is antenna connected to terminal on the back of the set'?
. If outside antenna is being used, check for broken wire.
,, Check for local interference.
,, Adjust CONTRAST & BRIGHT control.
- 47 - EN
01All
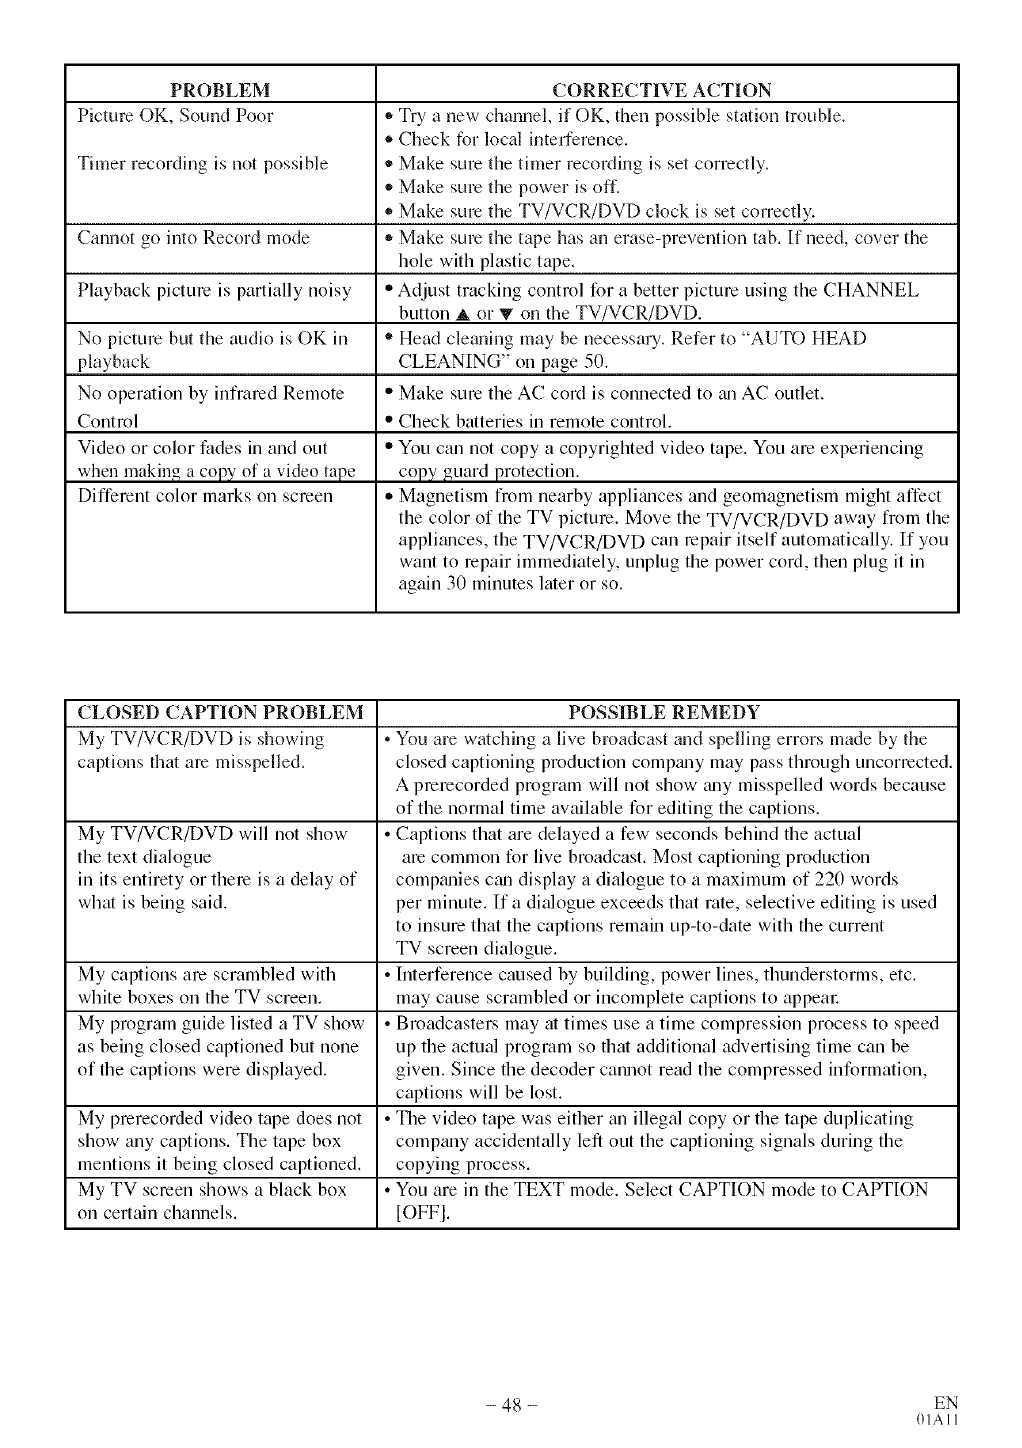
PROBLEM
Picture OK, Sound Poor
Timer recording is not possible
Cannot go into Record mode
Playback picture is partially noisy
No picture but the audio is OK in
playback
No operation by infrared Remote
Control
Video or color fades in and out
when making a copy of a video tape
Different color marks on screen
CORRECTIVE ACTION
,, Try a new channel, if OK, then possible station trouble.
®Check for local interference.
• Make sure the timer recording is set correctly.
,, Make sure the power is off.
•Make sure the TV/VCR/DVD clock is set correctly.
,, Make sure the tape has an erase-prevention tab. If need, cover the
hole with plastic tape.
• Adjust tracking control for a better picture using the CHANNEL
button _. or V on the TV/VCR/DVD.
" Head cleaning may be necessary. Refer to °°AUTO HEAD
CLEANING" on page 50.
" Make sure the AC cord is connected to tm AC outlet.
" Check batteries in remote control.
" You can not copy a copyrighted video tape. You are experiencing
copy guard protection.
,, Magnetism t¥om nearby applimlces and geomagnetism might affect
the color of the TV picture. Move the TV/VCR/DVD away from the
applimlces, the TV/VCR/DVD can repair itself automatically. If you
want to repair immediately, unplug the power cord, then plug it in
again 30 minutes later or so.
CLOSED CAPTION PROBLEM
My TV/VCR/DVD is showing
captions that are misspelled.
My TV/VCR/DVD will not show
the text dialogue
in its entirety or there is a delay of
what is being said.
My captions are scrambled with
white boxes on the TV screen.
My program guide listed a TV show
as being closed captioned but none
of the captions were displayed.
My prerecorded video tape does not
show any captions. The tape box
mentions it being closed captioned.
My TV screen shows a black box
on certain channels.
POSSIBLE REMEDY
• You are watching a live broadcast and spelling errors made by the
closed captioning production company may pass through uncorrected.
A prerecorded program will not show may misspelled words because
of the normal time available lk)r editing the captions.
•Captions that are delayed a few seconds behind the actual
are common for live broadcast. Most captioning production
compm_ies cm_ display a dialogue to a maximum of 220 words
per minute. If a dialogue exceeds that rote, selective editing is used
to insure that the captions remain up-to-date with the current
TV screen dialogue.
• Interference caused by building, power lines, thunderstorms, etc.
may cause scrambled or incomplete captions to appear.
• Broadcasters may at times use a time compression process to speed
up the actual program so that additional advertising time can be
given. Since the decoder cannot read the compressed information,
captions will be lost.
• The video tape was either an illegal copy or the tape duplicating
comp_my accidentally left out the captioning signals during the
copying process.
• You are in the TEXT mode. Select CAPTION mode to CAPTION
[OFFI.
- 48 - EN
01AI 1
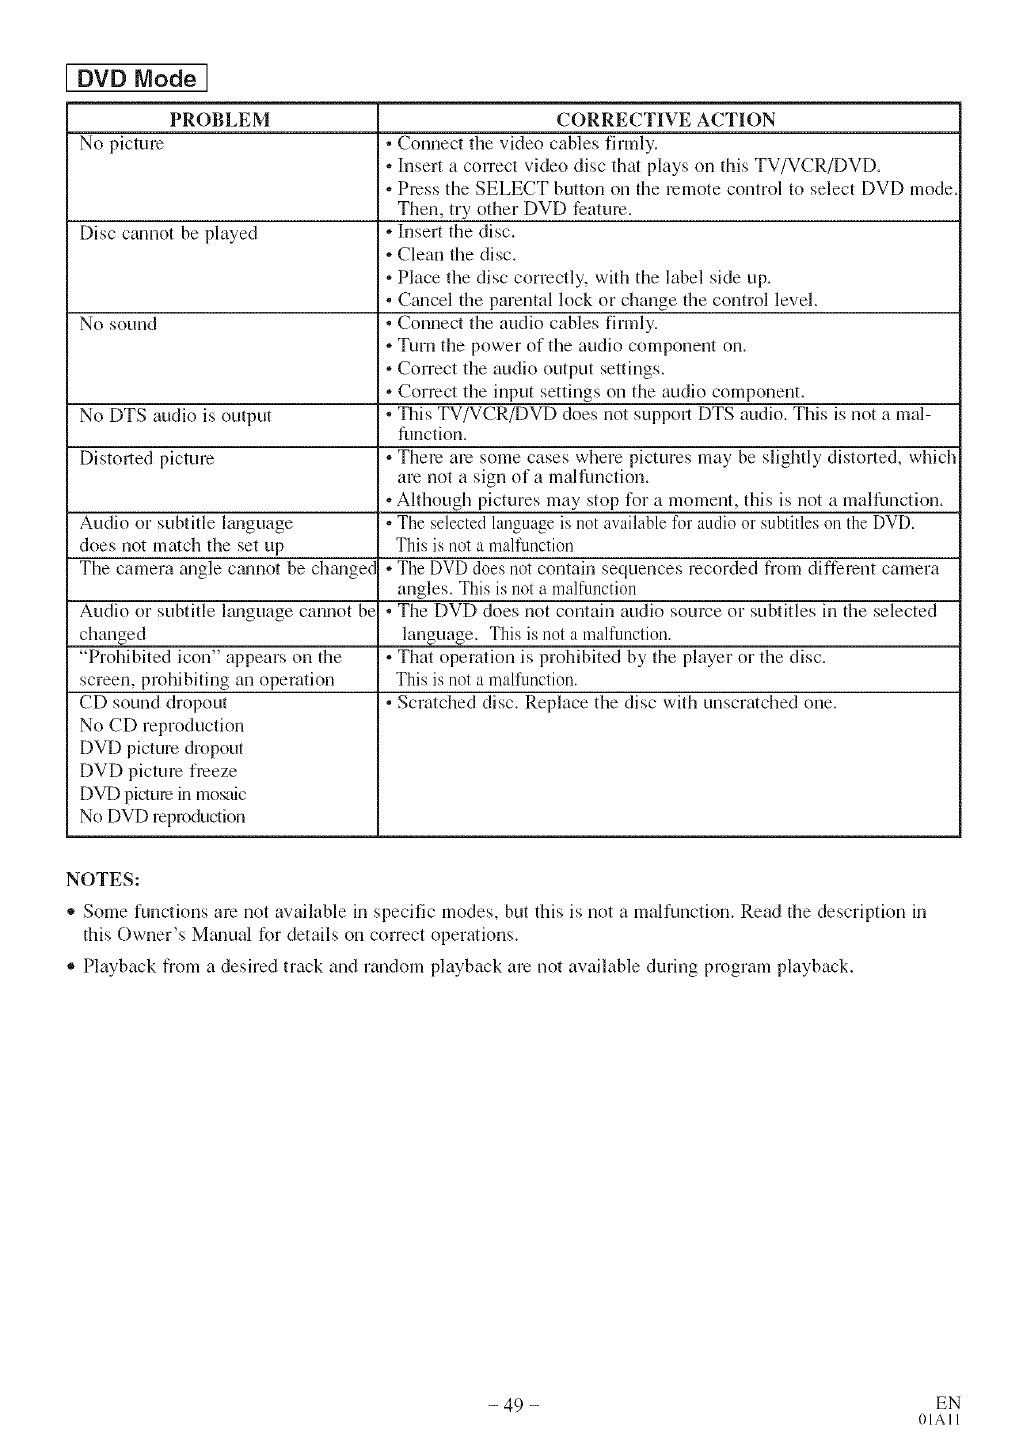
DVD Model
PROBLEM
No picture
Disc cannot be played
No sound
No DTS audio is output
Distorted picture
Audio or subtitle hmgnage
does not match the set up
The camera mlgle cmmot be chmlgec
Audio or subtitle lmlguage cannot be
changed
"Prohibited icon" appears on the
screen, prohibiting an operation
CD sound dropout
No CD reproduction
DVD picture dropout
DVD picture freeze
DVD picturein mosaic
No DVD reproduction
CORRECTIVE ACTION
• Connect the video cables firmly.
• Insert a correct video disc that plays on this TV/VCR/DVD.
• Press the SELECT button on the remote control to select DVD mode.
Then, try other DVD feature.
• Insert the disc.
•Clean the disc.
• Place the disc correctly, with the label side up.
• C_mcel the parental lock or change the control level.
• Connect the audio cables firmly.
• Turn the power of the audio component on.
• Correct the audio output settings.
•Correct the input settings on the audio component.
• This TV/VCR/DVD does not suppoll DTS audio. This is not a mal-
function.
• There are some cases where pictures may be slightly distorted, which
are not a sign of a malfunction.
• Although pictures may stop for a moment, this is not a malfunction.
• The selected language is not available l\_r attdio or subtitles on the DVD.
This is not a malfunction
• The DVD does not contain sequences recorded from different camera
angles. This is not a malfunction
• The DVD does not contain audio source or subtitles in the selected
language. This is not a malfunction.
• That operation is prohibited by the player or the disc.
This is not a malfunction.
• Scratched disc. Replace the disc with unscratched one.
NOTES:
,, Some functions are not available in specific modes, but this is not a malfunction. Read the description in
this Owner's Mgmual for details on correct operations.
®Playback from a desired track and random playback are not available during program playback.
- 49 - EN
01All
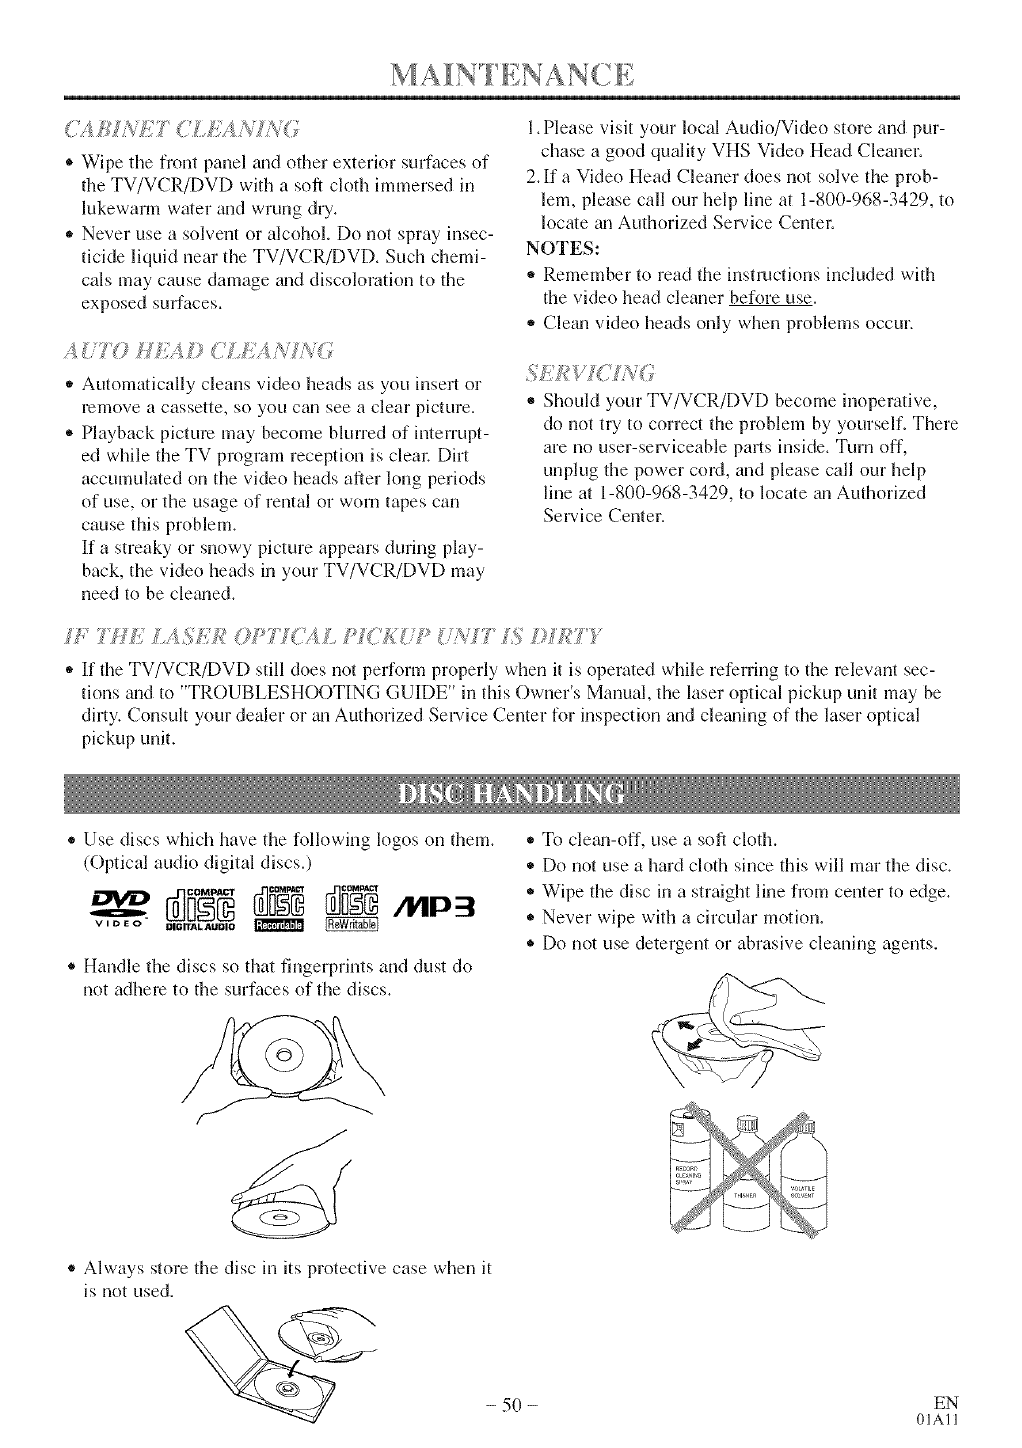
C;_/iG'i++,/;+_ C;/:2 !. N?+_(J
®Wipe the front panel and other exterior surfaces of
the TV/VCR/DVD with a soft cloth immersed in
lukewarm water and wrung dry.
- Never use a solvent or alcohol. Do not spray insec-
ticide liquid near the TV/VCR/DVD. Such chemi-
cals may cause damage graddiscoloration to the
exposed surfaces.
A[:7Y} lllF_ Z) (Lk;¢ J_,,'I/_((;
+ Automatically cleans video heads as you insel o1
remove a cassette, so you can see a clear picture.
* Playback picture may become blurred of interrupt-
ed while the TV program reception is cleal: Dirt
accumulated on the video heads after long periods
of use, or the usage of rental or worn tapes can
cause this problem.
If a streaky or snowy picture appears during play-
back, the video heads in your TV/VCR/DVD may
need to be clegmed.
l.Please visit your local Audio/Video store and pur-
chase a good quality VHS Video Head Clemler.
2.If a Video Head Cleaner does not solve the prob-
lem, please call our help line at 1-800-968-3429, to
locate gul Authorized Service Centel:
NOTES:
,_ Remember to read the instructions included with
the video head cleaner before use.
- Cletm video heads only when problems occur.
* Should your TV/VCR/DVD become inoperative,
do not try to correct the problem by yourself. There
are no user-serviceable parts inside. Turn off,
unplug the power cord, and please call our help
line at 1-8(1(I-968-3429, to locate an Authorized
Service Center.
H _771k LAS_7+L_?P77C#L I(_I<_/9 > [/#+_17 15 ++)/J(TT
+ If the TV/VCR/DVD still does not perform properly when it is operated while referring to the relevant sec-
tions m_dto "TROUBLESHOOTING GUIDE" in this Owner's Manual, the laser optical pickup unit may be
dirty. Consult your dealer or an Authorized Service Center for inspection and clegming of the laser optical
pickup unit.
- Use discs which have the following logos on them.
(Optical audio digital discs.)
v I DE0"[IIG ITAL AUDIO
® Handle the discs so that fingerprints and dust do
not adhere to the surfaces of the discs.
- To clegm-off, use a soft cloth.
- Do not use a hard cloth since this will mar the disc.
• Wipe the disc in a straight line from center to edge.
- Never wipe with a circular motion.
®Do not use detergent or abrasive cleaning agents.
®Always store the disc in its protective case when it
is not used.
- 50 - EN
01All
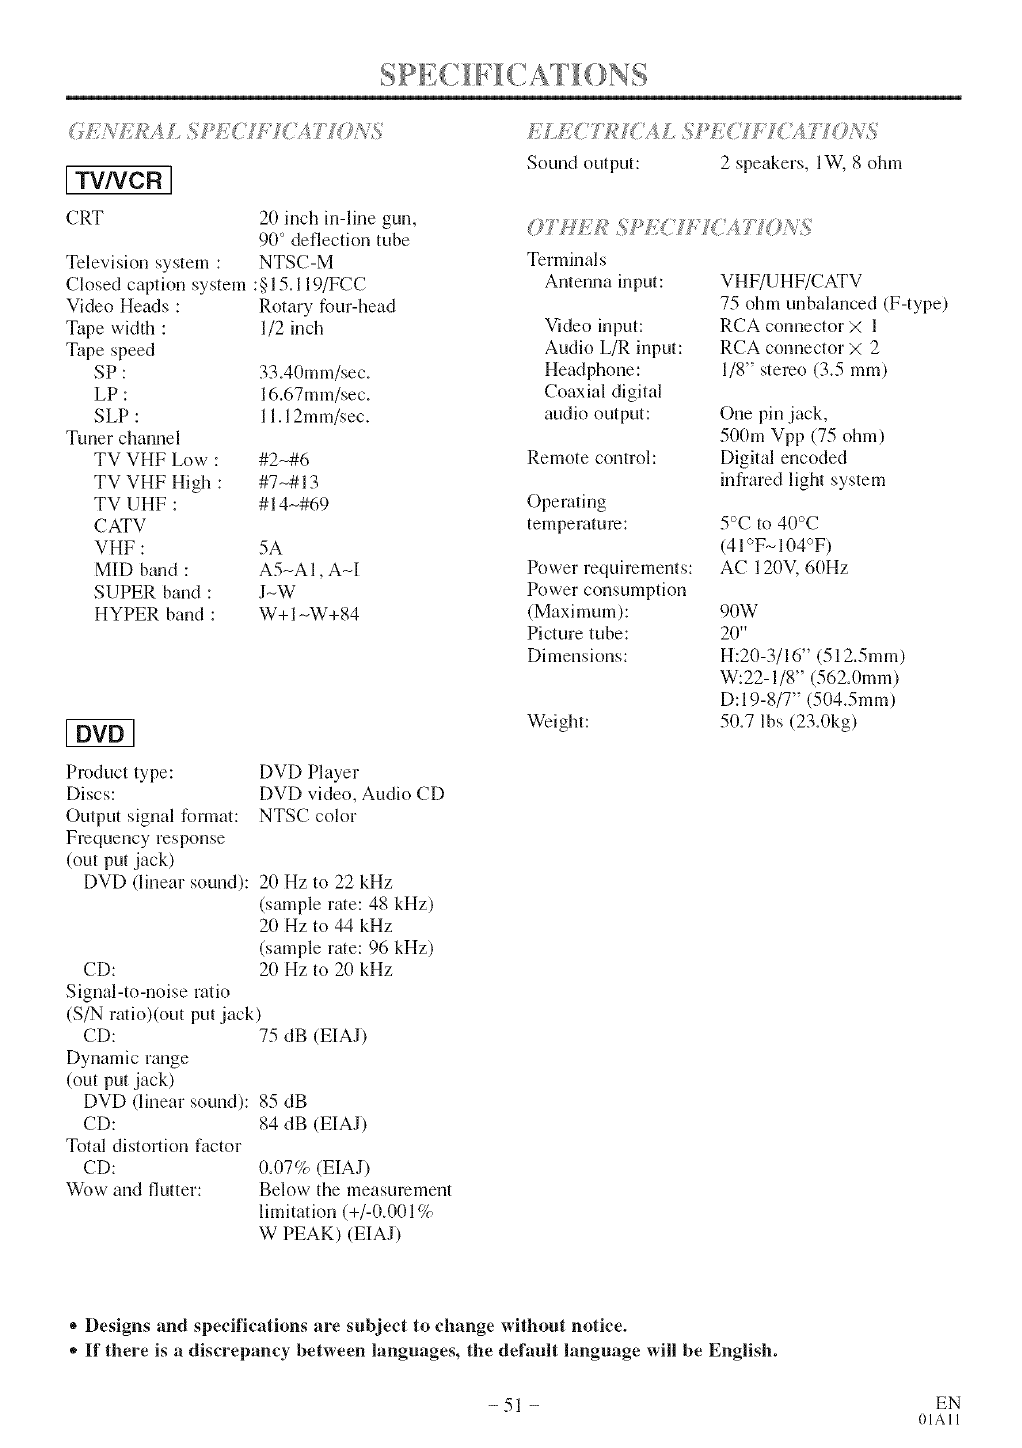
F;/;is, F/i_A L SfSL_]IFI<#_ 7"I07_/%
[ TVNCR I
CRT
Television system :
Closed caption system
Video Heads :
Tape width :
Tape speed
SP:
LP:
SLP :
Tuner channel
TV VHF Low :
TV VHF High :
TV UHF :
CATV
VHF :
MID braid :
SUPER band :
HYPER band :
20 inch in-line gun,
90° deflection tube
NTSC-M
:§15.119/FCC
Rotary four-head
1/2 inch
33.40mm/sec.
16.67mm/sec.
11.12mm/sec.
#2-#6
#7-# 13
#14-#69
5A
A5-A 1, A-I[
J-W
W+ 1-W+ 84
Product type:
Discs:
Output signal format:
Frequency response
(out put jack)
DVD (linear sound):
CD:
Signal-to-noise ratio
DVD Player
DVD video, Audio CD
NTSC color
20 Hz to 22 kHz
(sample rate: 48 kHz
2(1Hz to 44 kHz
(sample rate: 96 kHz
20 Hz to 2(1kHz
(S/Nratio)(out putjack)
CD:
Dynamic range
(out put jack)
DVD (linear sound):
CD:
Total distortion factor
CD:
Wow and flutter:
75 dB (EIAJ)
85 dB
84 dB (EIAJ)
0.07% (EIAJ)
Below the measurement
limitation (+/-0.001%
W PEAK) (EIAJ)
ELE(777,;hqJAL S EdZFICAT ION%
Sound output: 2 speakers, IW. 8 ohm
Terminals
Antenna input:
Video input:
Audio L/R input:
Head phone:
Coaxial digital
audio output:
Remote control:
Operating
temperature:
Power requirements:
Power consumption
(Maximum):
Picture tube:
Dimensions:
Weight:
VHF/UHF/CATV
75 ohm unbalanced (F-type)
RCA connector X 1
RCA connector X 2
1/8" stereo (3.5 ram)
One pin jack,
500m Vpp (75 ohm)
Digital encoded
infrared light system
5°C to 40°C
(41°F- 104°F)
AC 120V, 60Hz
90W
20"
H:20-3/16" (512.5mm)
W:22-1/8" (562.0mm)
D:I 9-8/7" (504.5mm)
50.7 lbs (23.0kg)
®Designs and specifications are subject to change without notice.
,_If there is a discrepancy between languages, the default language will be English.
- 51 - EN
01All
II CONTROLES DE OPERACION Y FUNCIONES ..... 52
PANEL FRONTAL DEL TELEVISOR/DVD .......... 52
MANDO ADISTANCIA ......................... 52
VISTA POSTERIOR ............................ 52
II PREPARACION PARA LA UITLIZACION .......... 53
CONEXIONES DE ANTENA/CABLE .............. 53
CONEXI()N A TOMAS DE ENTRADA EXTERNA .... 53
PARA INSERTAR LAS PILAS .................... 54
MODO DE ENTRADA EXTERNA ................ 54
CONEXI()N A UN SISTEMA ESTt_REO ............ 54
CONEXION A UN AMPL1FICADOR ESTI_REO
EQUIPADO CON TOMAS DE ENTRADA DIGITAL,
PLATINA MD O PLATINA DAT (Para DVD) ......... 54
CONEXI()N A UN DECODIFICADOR DOLBY DIGITAL
(para DVD) ................................... 54
SECCION DE TV/VCR
II PREPARACION PARA LA UTILIZACION .......... 54
SELECCION DE IDIOMA ....................... 54
AJUSTE DE CANALES ......................... 55
AJUSTE DEL RELOJ ........................... 55
SECCION DE OVO
REPRODUCCION BitSICA ...................... 55
ON'FROLES DE
Y [. N(ffON ].S
[ Consulte la figura 1 de la pglgina 9 ]
[ Consulte la figura 2 de la phgina 9 ]
[ Consulte la figura 3 de la pfigina 10 ]
1. Bot6n POWER
Plvsione este bot6n para conectar y desconectar la ali-
lnel_taci6n.
2. Botones VOLUME A/V
Presioue estos botones para coutrohtr el nivel de volumen
del DVD y el televisor.
3. Botones SKIP (para DVD)
Presione el bot6n correspondiente una vez para omitir
capftulos o pistas y desplazarse a un punto especffico.
Mantenga el bot6n presionado pare cambiar la veloci-
dad de reproducci6n en avarice o retroceso.
4. Botdn PLAY
Inicia la reproduccidn del contenido del disco o cinta.
5. Bot6n STOP
Detiene la reproducci6n del disco.
6. Bot6n OPEN/CLOSE
Presione este bot6n para insertar discos en la bandcja o
retirarlos de ella.
7. Bandeja de carga del disco
8. Indicador DVD
Se ilumina durante el modo DVD.
9. Bot6n SELECT
Presione este bot6n para cambiar al modo TV/VCR,
modo de entrada externa o modo de DVD.
10. Indicador TV/VCR
Se ilumina durante el modo TV/VCR.
11. Botones CHANNEL A/T
Utilice estos botones para seleccionar canales memorizados. -52-
12. Indicador de grabacion
Parpadea durante la grabaci6u. Se ilulnina durante el
modo de espera de grabacidn controlada por telnporizador.
13. Botbn REC/OTR (RECORD)
Presione este bot6n para grabar manuahnente. Este
bot6n tambi6n activa la funci6n de grabaci6n instan-
tfinea (OTR). (La funci6n OTR s61o est_ disponible
durante el modo TV/VCR.)
14. Boton NEW (para TV/VCR)
Presione este bot6n para rebobinar la cinta o para ver
la imagen r@idamente en direccidn de retroceso
durante el modo de reproduccidn. (Bdsqueda en direc-
ci6n de retroceso)
15. Botbn F.FWD (para TWVCR)
Presione este bot6n para adelantar r@idamente la cinta
o para vet la imagen r@idamente en direcci6n de
avance durante el modo de reproduccidn. (BOsqueda en
direccidn de awmce)
16. Boton STOP/EJECT
Presione este bot6n para detener In cinta. Presi6nelo en
el modo de parada para retirar la cinta del
televisoffDV D/videograbadora.
17. Ventanilla del sensor de mando adistancia
18. Toma HEADPHONE
Para couectar auriculares (no suministrados) y escuchar
en priw@o.
19. Toma de entrada VIDEO
Conecte aquf la toma de salida de vfdeo de una
videoc_hnara o de una videograbadora.
20. Tomas de entrada AUDIO L!R
Conecte aquf las tomas de salida de audio de una
videoctimara o de una videograbadora.
21. Compartimiento del cassette
22. Boton PICTURE
Presione este bot6n para ajustar la imagen.
23. Botones numericos
Modo TV:
Presione (los botones pare acceder directamente al
canal deseado.
No olvide presionar "0" antes de elegir un canal de un
solo dfgito.
Boton +100
Presione este botdu para seleccionar canales de tele-
visidn por cable cuyo ndmero sea igual o superior a 100.
Modo DVD:
Presione este bot6n para introducir el ndn_ero deseado.
Boton +10
Presione este bot6n para introducir mimeros iguales o
mayores que 10.
24. Boton PAUSE
Hate una pausa en la reproducci6n del disco o cinta.
25. Boton SPEED
Presione este bot6n para seleccionar la velocidad de
grabacidn deseada: SP/SLR
26. Boton C.RESET
Presione este bot6n para poner el contador en 0:00:00.
Presidnelo tambi6n para cancelar un ajuste de progra-
ma de temporizador.
27. Boton DISPLAY
Modo TV/VCR:
Pare visualizar el contador o el ndmero del canal y la
fccha actual en la pantalla del televisor.
Modo DVD:
Indica el estado actual en la pantalla del televisor para
fines de comprobaci6n.
28. Boton SETUP
Presione este bot6n para activar o salir del modo de
men6s de televisor o configuraci6n de DVD.
29. Botdn TITLE
Para visualizar el menfi de tftulos.
ES
0C28
30. Boton CLEAR
Para cancelar ajustes.
31. Bot6n MODE
Activa el modo de reproduccidn programada o el modo de
reproduccidn aleatoria.
32. Boton SEARCH MODE
Presione este bot6n lmra localizar un punto deseado.
33. Bot6n AUDIO
Presione este bot6n para seleccionar un idioma de
audio o el modo de sonido deseado.
34. Bot6n SUBTITLE
Presione este bot6n para seleccionar el idioma de subtf-
tulos deseado.
35. Botdn REPEAT
Repite la rcproduccidn del disco, tftulo, capltulo o pista actual.
36. Botdn ANGLE (modo DVD)
Presione este botdu para cambiar el fingulo de ]a c_imara
y ver la secuencia que se est;t reproduciendo desde un
_ingulo dffcrente.
37. Boton A-B REPEAT
Repite la reproduccidn de una seccidn seleccionada.
38. Botdn RETURN
Permite volver a la operaci6n anterior en el modo de
configuracidn de DVD.
39. Botdn ENTER
Presione este bot6n para establecer un ajuste.
40. Botones de flechas
Modo TV/VCR:
Presione estos botone_ para seleccionar nil ulodo de
ajuste en el lnenfi que aparece en la pantalla del televisor.
Presidnelos tambidn para seleccionar opciones o
establecer ajustes en un menfi en particular.
Modo DVD:
Use estos botoiles para hacer ajustes irlientras observa
la imagen en la pantalla del televisor.
41. Botdn DISC MENU
Muestra los mends contenidos en el DVD.
42. Botbn V.SURR
Activaffdesactivar el envolvente virtal.
43. Botdn MUTE
Suprime la salida de sonido. Presi6nelo de nuevo para
restablecer el sonido.
44. Botbn SLEEP
Utilice este botdn para ajustar el temporizador de dormir.
45. Bot6n SELECT
Presione este bot6n para cambiar entre los modos
TV/VCR y DVD. E1 modo seleccionado (TV/VCR o
DVD) se visualiza en el indicador del panel delantero.
46. Toma de entrada ANT.
Condctela a una antena, sistema de televisidn por cable
o sistema de satdlite.
47. Cable de alimentacidn
Con@telo auna toma de CA est_ndar (120 V,/60 Hz).
NOTA: Antes de conectar el cable de alimentacidn a
una toma de CA estfindar, reffrelo del gancho
para evimr dafiarlo.
48. Toma de salida de audio digital COAXIAL
Con@tela solamente a la entrada digital de un amplifi-
cador externo o decodificador de audio de DVD.
/
PREPARA(,K)N PARA LA
Consulte la figura 4 de la pSgina 11 I
A/'_J77>I_/_SSk S:;k'k >kS ©t(" Y _:'/ULU
En algunas zonas serd necesario utilizar una antena
exterior.
CONVk'RT ) ('ADOB
Utilice esta conexidn si su sistema de televisi6n por
cable se conecta directamente a su televisor/DVD/
videograbadora, sin una caja de convertidm:
Con esta conexi6n podrfi:
1) Utilizar el m_mdo a dista_cia del televisor/DVD/
videograbadora para seleccionar canales.
2) Programar uno o mils canales decodificados para
grabacidn automfi6ca controlada pot temporizador.
NOTA: Este televisor/DVD/videograbadora SOLO
puede grabar e! canal que se estfi viendo.
DE g<_N_, IrIRT I_O_OR/DEC(}] M: h<',_ DO)
0 C/i,IA l_E SAITiLIT];"
Si su cotnDuSfa de televMdn por cable le sutnhdsm_
una caja de convelidor o si utilza un sistema de
satilite, podri utilizar la conexidn bisica que se
muestra en la ilusmmidn.
AI utilizar esta conexidn, tambidn podrfi grabar calmles
codificados. Sin embargo, la seleccidn de los canales
deberfi hacerse con la caia de converlidor o con la caja
de satElite. Esto significa qne no es posible cambiar de
canal utilizando el mando a distancia del televisor/DVD/
videograbadora. La grabaci6n en ausencia (controlada
por temporizador) estfi limitada aun canal a la vez.
PARA GRABAR UN CANAL
CODIFICADO/DECODIFICADO
l.Ajuste el selector de cgmales del
televisor/DVD/videograbadora al c_mal de salida de
la caja de convertidor de televisi6n por cable o caja
de satdlite. (Ej., CH3)
2.Seleccione el cgutalque desea grabar en la caja de
converfidor de televisi6n por cable o caja de satdlite.
Nora para el instalador de sistemas CATV
Esta nota tiene la finalidad de llamar la atencidn
del insta]ador de sistemas CATV para que tenga
en cuenta el Arrfculo 82(I-4(I de la NEC, que pro-
porciona recomendaciones para hacer una conex-
i6n a tierra apropiada y, en particular, especifica
que la tierra de] cable debe conectarse al sistema
de puesta a tierra del edificio, tan cerca del punto
de entrada del cable como sea posible.
Cuando yea uu programa grabado eu otra fuente (videograbado-
ra o videoclmara), utilice las tomas de entrada de audio/vfdeo
de la parte delantera del televisor/DVD/videograbadora.
Conecte las tomas de salida de audio/video de otra flmnte a
las tomas AUD10 L/R y VIDEO de este
televisor/DVD/videograbadora. Luego, presione los botones
CHANNEL A/V hasta que aparezca "AUX" en la pantalla.
NOTA:
.Cuando conecte una videograbadora mouof6nica (otra
fuente) a este televisoffDVD/videograbadora, conecte la
toma de salida de audio de la videograbadora monof6nica
(otra fliente) a la toma AUDIO L de este
televisoffDVD/videograbadora. El audio saldrfi igual-
mente pot los canales izquierdo y derecho.
IConsulte la Iigura 5 de la p_igina 12 I
I I
- 53 - ES
0C28
1) Abra la cubierta del compariimiento de las pflas
empujando la cubierta del mgmdo a _%
distancia ell el sentido de la fiecha.
2) Inserte 2 pflas "AA" ell el
compartimiento de las pilas, ell el
sentido indicado por las marcas de polaridad (+/-).
3) Vuelva a poner la cubierta.
AI usar una serial de entrada externa (otra videograbado-
ra o una videocfimara), conecte los cables de salida de
audio/vfdeo del equipo extemo alas tomas AUDIO L/R
[N/V[DEO IN de su televisor/DVD/videograbadora.
Luego, presione los botones CHANNEL A/T hasta que
aparezca "AUX" en la pantalla.
la figura de la pfigina I
Consulte 7 14
NOTAS:
• AsegOrcse de desconectar la alimentacidn de todos
los componentes del sistema antes de conectar otto
componente.
• Consulte los manuales de instrucciones de los
componentes que va a conectar al
televisor/DVD/videograbadora.
,, Si conecta un decodificador Dolby Digital, ajuste
la funcidn DOLBY DIGITAL a ON para salida de
audio en el modo de configuracidn.
• A menos que se haga la conexidn a un decodffi-
cador Dolby Digital, ajuste la funcidn Dolby
Digital a OFF para salida de audio en el modo de
configuracidn. La reproduccidn en un
televisor/DVD/videograbadora utilizando ajustes
incorrectos puede generar ruido y distorsidn, y
tambidn puede causar dafios a los altavoces.
Fabricado bajo licenc, ia de DoIby I
Laboratories, !Dolby y el simbolo de la DI
done son mamas de f_brica de Dolby
Laboratories,
Utilice un cable digital coaxial de audio de venta en el
comercio especializado para hacer las conexiones de audio.
Conexidn a un amplificador equipado con tomas de
entrada digital, platina MD o platina DAT.
IConsulte la figura 6 de la pfigina 13 I
I I
NOTA$:
* La fuente de audio de un disco grabado en formato de
sonido envolvente Dolby Digital de 5,1 canales no se
puede grabar como sonido digital mediante una plati-
na MD o DAT.
" Asegfirese de desconectar la alimentacidn de todos
los componentes del sistema antes de conectar otto
componente.
® Consulte los manuales de instrucciones de los compo-
nentes que va a conectar al
televisor/DVD/videograbadora.
® Ajuste la funcidn Dolby Digital a OFF para salida de
audio ell el lnodo de configuracidn. La reproduccidn
en un televisor/DVD/videograbadora utilizando
aiustes incorrectos puede generar ruido y distorsidn, y
tambidn puede causar darios a los altavoces.
Si utiliza este televisoffDVD/videograbadora para
reproducir un disco DVD grabado en formato de
sonido envolvente Dolby Digital de 5,1 canales, el
televisor/DVD/videograbadora emitird un flujo de
datos DOLBY DIGITAL desde su toma de salida de
audio digital COAXIAL. Si conecta el reproductor a
un decodificador Dolby Digital, podr_ disfrutar de
una tonalidad mils convincente y real, con un sonido
envolvente potente y de alta calidad similar al de los
cines.
Utilice cables digitales coaxiales de audio
disponibles en el comercio especializado para hacer
las conexiones de audio.
- 54 -
/
PRLPARA(.K}N PARA LA
[TV/VCR ]
Enchufe el corddn de alimentacidn del
televisor/videograbadora en una toma de CA est_ndar.
NOTA:
, Si aparecen algunas cifras en la esquina de la pan-
talla, pulse el botdn POWER sin desenchufar el
corddn de alimentacidn.
Aseg_rese de que ...
® Pulse el botdn POWER para encender el
televisor/videograbadora.
NOTA: Esta funcidn afecta s61o el idioma en el men_
de la pantalla y no la fuente de audio.
Pulse el bot6n SETUP en el mando a distancia.
Pulse el bot6n _, o T para serialar "LANGUAGE".
Seleccione "ENGLISH", "ESPAlqOL" o "FRANtTAIS"
con el bot6n ENTER.
ES
0C28
Pulse el botdn SETUP en el lnando a distancia para
volver al modo del televisor.
NOTA: Si, pot alguna razdn, el mend estfi en ingl& o
franc&, pulse el botdn SETUP en el mando a distancia,
pulse el botdn A para sefialar el "LANGUAGE
[ESPANOL]" o "LANGAGE [FRAN(_AI[S]", a contin-
uacidn, pulse el botdn ENTER y pulse el botdn SETUP
en el mando a distancia.
[TV/VCR ]
Puede programar el sintonizador para buscar todos
los ctmales que recibe en su localidad.
NOTA: E1 canal preparado NO es necesario cuando
est6 conectado auna caja de cable o caja de sat61ite.
S61o tiene que seleccionar con el selector de canal
del televisor/videograbadora al canal de salida de la
caja de cabe o caja de sat61ite (por ejemplo el c_mal
CH3). Seleccione el ctmal a vet en la caja de cable o
caja de sat61ite.
Asegdrese de que ...
* Pulse el bot6n POWER para encender el televi-
sor/videograbadora.
Pulse el botdn SETUP en el mando a distancia.
Pulse el botdn _, o T para serialar "AJUSTE DE
CANAL".
A continuacidn, pulse el botdn ENTER.
1)Pulse el bot6n SETUP en el mando a distancia.
Pulse el botdn _, o T para indicar "AJUSTE
RELOJ".
Luego, pulse el bot6n ENTER.
2)Pulse el botdn _, o T para indicar "AJUSTE
MANUAL RELOJ".
Luego, pulse el bot6n ENTER.
3)Pulse el botdn A. o V basra que aparezca el mes
deseado. (Ejemplo: Mayo - 05)
Luego, pulse el bot6n J_.
4)Pulse el bot6n _, o V hasta que aparezca el d/a
del mes deseado. (Ejemplo: 6 - 06)
Luego, pulse el bot6n _.
5)Pulse el botdn _, o V hasta que aparezca el ario
deseado. (Ejemplo: 2004)
Luego, pulse el bot6n _.
6)Pulse el botdn A o V hasta que aparezca la hora
deseada. (Ejemplo: 5, PM)
Lnego, pulse el bot6n l_,_.
7)Pulse el bot6n A o V basra que apamzca el minu-
to deseado. (Ejemplo: 4(1)
8)Pulse el bot6n SETUP en el mgmdo a distancia.
Aunque los segundos no se visualizan, 6stos
empiez_m a contar des& 00 cuando se pulsa
SETUP en el ma_do a distancia. Utilice esta fun-
ci6n para sincronizar el reloj con la hora cormcta.
Pulse el botdn A o T para serialar "AUTOPROGRA-
MACION DE CA".
A continuaci6n, pulse el bot6n ENTER.
El sintonizador busca y memoriza todos los canales
activos en su localidad.
El sintonizador se detiene en el c_mal memorizado
m_s bajo.
• Cuando se activa AUTOPROGRAMACION DE
CA, donde no hay entrada de serial del televisor,
aparecer4 "NO HAY SEI'_AL DE TV" en la pan-
talla despu6s de terminar la b6squeda de canales.
,, El televisor/videograbadora puede mconocer los
canales de TV para que sean canales de TV de
tmtena de cable con las condiciones de mcepci6n.
En este caso, pruebe nuevamente con el pmfijado
automfifico en las condiciones de recepci6n fina.
[TV/VCR ]
Cercidrese...
• La alimentacidn del televisor/videograbadora
deberfi estar conectada.
En el ejemplo de abajo, el reloj va a ajustarse as[:
FECHA: 6 de mayo de 2(104
HORA: 5:4(I PM
• Conecte la alimentaci6n del amplificador y otros
componentes, si es necesario.
®La alimentacidn se conectar&
s@ qqes _;:_cs_,_,r' :,>
dP/'eso_'e e bods_ _0:_/;Y
La ba'_deja se cerrar4 automdticamente y la repro-
ducci6n comenzarfi desde el prhner cap/mlo o pista
deJ disco. Si la reproducci6n no comienza automfiti-
camente, presione el bot6n PLAY.
Cuando reproduzca un DVD que tenga grabado un
menfi de tftulos, el menO podrfi aparecer en la pan-
talla.
-55 - ES
0C28
SYLVANIA
LIMITED WARRANTY
FUNAI CORP. will repair this SYLVANIA product, free of charge in the USA in the event of defect in materials or
workmanship as follows:
DURATION:
PARTS: FUNAI CORR will provide parts to replace defective parts without charge for one (1) year fi'om the
date of original retail purchase. Two (2) years for Picture Tube. Certain parts are excluded fl'om this
warranty.
LABOR: FUNAI CORR will provide the labor without charge for a period of ninety (90) days from the date of
original retail purchase.
LIMITS AND EXCLUSIONS:
THIS WARRANTY IS EXTENDED ONLY TO THE ORIGINAL RETAIL PURCHASER. A PURCHASE
RECEIPT OR OTHER PROOF OF ORIGINAL RETAIL PURCHASE WILL BE REQUIRED TOGETHER WITH
THE PRODUCT TO OBTAIN SERVICE UNDER THIS WARRANTY.
This warranty shall not be extended to any other person or transf)ree.
This warranty is void and of no eff)ct if any serial numbers on the product are altered, replaced, defaced, missing
or if service was attempted by an unauthorized service center. This SYLVANIA Limited warranty does not apply to
any product not purchased and used in the United States.
This warranty only covers f'ailures due to defects in material or workmanship which occurs (luring normal use. It
does not cover damage which occurs in shipment, or f'ailures which are caused by repairs, alterations or product not
supplied by FUNA1 CORR, or damage which results from accident, misuse, abuse, mishandling, misapplication,
alteration, faulty installation, improper maintenance, commercial use such as hotel, rental or office use of this
product or damage which results from fire, flood, lightning or other acts of God.
THIS WARRANTY DOES NOT COVER PACKING MATERIALS, ANY ACCESSORIES (EXCEPT REMOTE
CONTROL), ANY COSMETIC PARTS, COMPLETE ASSEMBLY PARTS, DEMO OR FLOOR MODELS.
FUNAI CORR AND ITS REPRESENTATIVES OR AGENTS SHALL IN NO EVENT BE LIABLE FOR ANY
GENERAL, INDIRECT OR CONSEQUENTIAL DAMAGES ARISING OUT OF OR OCCASIONED BY THE
USE OF OR THE INABILITY TO USE THIS PRODUCT. THIS WARRANTY IS MADE 1N LIEU OF ALL
OTHER WARRANTIES, EXPRESS OR IMPLIED, AND OF ALL OTHER LIABILITIES ON THE PART OF
FUNAI, ALL OTHER WARRANTIES INCLUDING THE WARRANTY OF MERCHANTABILITY, AND
FITNESS FOR A PARTICULAR PURPOSE, ARE HEREBY DISCLAIMED BY FUNA1 AND ITS
REPRESENTATIVES IN THE UNITED STATES.
ALL WARRANTY INSPECTIONS AND REPAIRS MUST BE PERFORMED BY A FUNAI AUTHORIZED
SERVICE CENTER. THIS WARRANTY IS VALID WHEN THE UNIT IS CARRIED-IN TO FUNAI
AUTHORIZED SERVICE FACILITY.
IMPORTANT:
THIS LIMITED WARRANTY GIVES YOU SPECIFIC LEGAL RIGHTS, YOU MAY HAVE OTHER RIGHTS
THAT VARY FROM STATE TO STATE, 1E AT ANY TIME DURING THE WARRANTY PERIOD, YOU ARE
UNABLE TO OBTAIN SATISFACTION WITH THE REPAIR OF THIS PRODUCT. PLEASE CONTACT FUNAI
CORR
ATTENTION:
FUNAI CORR RESERVES THE RIGHT TO MODIFY ANY DESIGN OF THIS PRODUCT
WITHOUT PRIOR NOTICE.
To locate your nearest SYLVANIA Authorized Service Center or for general service procedure,
please caffl-800-968-3429 or write to the following:
FUNAI C/)RPORATION, INC.
SERVICE (;ENTER
19900 Van Ness Avenue, Torrance, CA 90501
Tel :1-800-968-3429
http://www.funai-corp.com
Head Office: 100 North Street. Teterboro. NJ07608
PLEASE DO NOT SHIP YOUR UNIT T() THE TETERBORO ADDRESS.
Printed in China 0EMN02469
TI000UA _
