Sylvania LD195SL8 User Manual LCD TELEVISION/DVD Manuals And Guides L0804305
SYLVANIA TV/VCR or DVD Combo Manual L0804305 SYLVANIA TV/VCR or DVD Combo Owner's Manual, SYLVANIA TV/VCR or DVD Combo installation guides
User Manual: Sylvania LD195SL8 LD195SL8 SYLVANIA LCD TELEVISION/DVD - Manuals and Guides View the owners manual for your SYLVANIA LCD TELEVISION/DVD #LD195SL8. Home:Electronics Parts:Sylvania Parts:Sylvania LCD TELEVISION/DVD Manual
Open the PDF directly: View PDF ![]() .
.
Page Count: 96

q,_ Jr I-I_dr-illwIdr.il
19" Digital LCDTV
built-in DVD Player
Owner's Manual
LD195SL8 A
LD195SL8
NEED HELPT
PLEASE CALL TOLL FREE!
1.800-968-3429
ORVISIT OURWEB SITE AT
,co.Ly g,__
_VE DIGITAL/ANALOG SIGNAL,
Y/_U ML/STCONNECTANTENNA. l
_) 2008 Funai Electric Co., Ltd,
Themodelandserialnumbersofthisunitmaybefoundonthecabinet.
Youshouldrecordandretainthosenumbersforfuturereference. ModelNo.:
SerialNo.:
[] Precautions
WARNING: TO REDUCETHE RISKOF FIREOR ELECTRICSHOCK, DO NOT EXPOSETHIS APPARATUS
TO RAIN OR MOISTURE.
APPARATUS SHALL NOT BEEXPOSEDTO DRIPPING OR SPLASHING AND NO OBJECTS
FILLED WITH LIQUIDS, SUCH AS VASES, SHALL BEPLACED ON THE APPARATUS.
CAUTION
CAUTION: TO REDUCE THE RISK OF ELECTRIC
SHOCK, DO NOT REMOVE COVER (OR BACK). NO USER
SERVICEABLE PARTS INSIDE. REFER SERVICING TO
QUALIFIED SERVICE PERSONNEL.
The lightning flash with arrowhead symbol, within an
equilateral triangle, is intended to alert the user to the
presence of uninsulated "dangerous voltage"within the
apparatus's enclosure that may be of sufficient magnitude
to constitute a risk of electric shock to persons.
The exclamation point within an equilateral triangle is
intended to alert the user to the presence of important
operating and maintenance (servicing) instructions in
the literature accompanying the apparatus.
The caution marking is located on the rear or bottom of the cabinet.
Important Safety Instructions
1. Read these instructions. 10. Protect the power cord from being walked on or
2. Keep these instructions.
3. Heed all warnings.
4. Followall instructions.
5. Do not use this apparatus near water.
6. Clean onlywith drycloth.
7. Do not block any ventilation openings. Install in
accordance with the manufacture's instructions.
8. Do not install near any heat sources such as radiators,
heat registers, stoves, or other apparatus (including
amplifiers) that produce heat.
9. Do not defeat the safety purpose of the polarized or
grounding-type plug. A polarized plug has two blades
with one wider than the other. A grounding type plug
has two blades and a third grounding prong. The wide
blade or the third prong are provided for your safety. If
the provided plug does not fit into your outlet, consult
an electrician for replacement of the obsolete outlet.
pinched particularly at plugs, convenience receptacles,
and the point where they exit from the apparatus.
11. Only use attachments/accessories specified by the
manufacturer.
12. Use only with the cart, stand, tripod, bracket,
or table specified by the manufacturer, or _'_
sold with the apparatus. When a cart is used, _ _ m
use caution when moving the cart/apparatus _ _
combination to avoid injury from tip-over.
1:3. Unplug this apparatus during lightning storms or when
unused for long periods of time.
14. Refer all servicing to qualified service personnel.
Servicing is required when the apparatus has been
damaged in any way, such as power-supply cord or
plug is damaged, liquid has been spilled or objects
have fallen into the apparatus, the apparatus has
been exposed to rain or moisture, does not operate
normally, or has been dropped.
FCC WARNING
This apparatus may generate or use radio frequency energy. Changes or modifications to this apparatus may cause
harmful interference unless the modifications are expressly approved in the manual. The user could lose the authority to
operate this apparatus if an unauthorized change or modification is made.
RADIO-TV INTERFERENCE
This apparatus has been tested and found to comply with the limits for a Class B digital device, pursuant to Part 15 of
the FCC Rules. These limits are designed to provide reasonable protection against harmful interference in a residential
installation. This apparatus generates, uses, and can radiate radio frequency energy and, if not installed and used in
accordance with the instructions, may cause harmful interference to radio communications. However, there is no
guarantee that interference will not occur in a particular installation. If this apparatus does cause harmful interference to
radio or television reception, which can be determined by turning the apparatus off and on, the user is encouraged to
try to correct the interference by one or more of the following measures:
1) Reorient or relocate the receiving antenna.
2) Increase the separation between the apparatus and receiver.
3) Connect the apparatus into an outlet on a circuit different from that to which the receiver is connected.
4) Consult the dealer or an experienced radio/TV technician for help.
This Class B digital apparatus complies with Canadian ICES-O03.
Cet appareil num_rique de la classe B est conforme _la norme NMB-O03 du Canada.
EN
Thisapparatusshouldnotbeplacedinabuilt-ininstallationsuchasabookcaseorrackunlessproperventilationisprovided.
Makesuretoleaveaspaceof2.8inches(7cm)ormorearoundthisapparatus.
Disconnectthemainsplugtoshutoffwhenfindtroubleornotinuse.Themainsplugshallremainreadilyoperable.
CAUTION: Danger of explosion if battery is incorrectly replaced. Replace only with the same or equivalent type.
WARNING: Batteries (battery pack or battery installed) shall not be exposed to excessive heat such as sunshine, fire or the like.
_) LAMP IN LCD CONTAINS MERCURY, DISPOSE ACCORDING TO LOCAL, STATE OR FEDERAL LAW.
WARNING: To prevent injury, this apparatus must be securely attached to the floor/wall in accordance with the instructions.
LASER SAFETY
This apparatus employs a laser. Only a qualified service person should remove the cover or attempt to service this
apparatus, due to possible eye injury.
CAUTION: Use of controls or adjustments or performance of procedures other than those specified herein may result in
hazardous radiation exposure.
CAUTION: Visible and invisible laser radiation when open and interlock defeated. Do not stare into beam.
LOCATION: Inside, near the deck mechanism.
IMPORTANT COPYRIGHT INFORMATION
Unauthorized copying, broadcasting, public performance and lending of discs are prohibited. This product incorporates
copyright protection technology that is protected by U.S. patents and other intellectual property rights. Use of this
copyright protection technology must be authorized by Macrovision, and is intended for home and other limited
viewing uses on y un ess otherwise authorized by Macrovision. Reverse engineering or disassemb y is prohibited.
TO AVOID THE HAZARDS OF ELECTRICAL SHOCK AND FIRE
• Do not handle the power cord with wet hands.
• Do not remove this unit cabinet. Touching parts inside the cabinet could result in electric shock and/or damage to this
unit. For service and adjustment inside the cabinet, call a qualified dealer or an authorized service center.
• Do not pull on the power cord when disconnecting it from an AC outlet. Grasp it by the plug.
• Do not put your fingers or objects into the unit.
LOCATION AND HANDLING
• The openings should not be blocked by placing the unit on a bed, sofa, carpet, rug, or other similar surface.
• Do not install the unit near or over a radiator or heat register.
• Do not install the unit in direct sunlight, near strong magnetic fields, or in a place subject to dust or strong vibration.
• Avoid a place with drastic temperature changes.
• Install the unit in a horizontal and stable position. Do not place anything directly on top or bottom of the unit.
Depending on your external devices, noise or disturbance of the picture and/or sound may be generated if the unit is
placed too close to them. In this case, please ensure enough space between the external devices and the unit.
• Depending on the environment, the temperature of this unit may increase slightly. This is not a malfunction.
DEW CONDENSATION WARNING
• Dew condensation may form inside the unit in the following conditions. If so, do not use this unit at least for a few
hours until its inside gets dry.
- The unit is moved from a cold place to a warm place.
- Under conditions of high humidity.
- After heating a cold room.
NOTE ABOUT RECYCLING
• This unit's packaging materials are recyclable and can be reused. Please dispose of any materials in accordance ,_"_
with your local recycling regulations.
• Batteries should never be thrown away or incinerated but disposed of in accordance with your local
regulations concerning chemical wastes.
ii i_ii:!i
EN
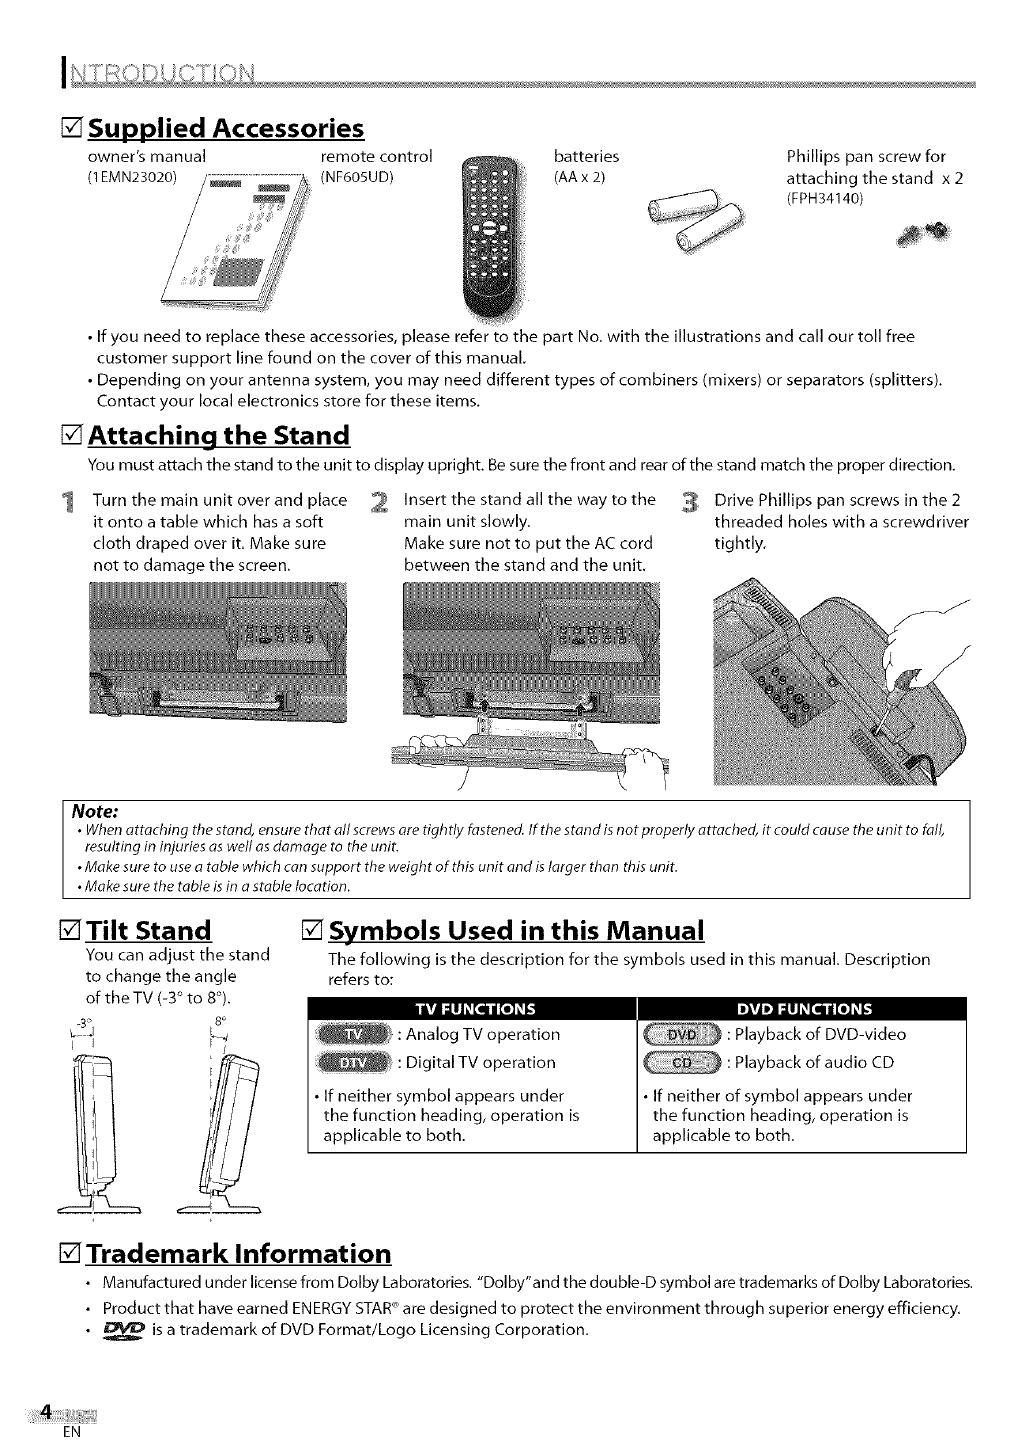
[] Supplied Accessories
owner's manual remote control batteries Phillips pan screw for
(1EMN23020) /_ _ (NF605UD) (AAx2) attaching the stand x2
/_ (FPH34140)
• If you need to replace these accessories, please refer to the part No. with the illustrations and call our toll free
customer support line found on the cover of this manual.
• Depending on your antenna system, you may need different types of combiners (mixers) or separators (splitters).
Contact your local electronics store for these items.
[]Attaching the Stand
You must attach the stand to the unit to display upright. Be sure the front and rear of the stand match the proper direction.
Turnthemainunitoverandplace 2 Insert the stand all the way to the _ Drive Phillips pan screws in the 2
it onto a table which has a soft main unit slowly, threaded holes with a screwdriver
cloth draped over it, Make sure Make sure not to put the AC cord tightly,
not to damage the screen, between the stand and the unit,
Note:
•Whenattaching the stand, ensure that all screws ore tightly fastened. If the stand is not properly attached, it could cause the unit to fail,
resulting in injuries as well as damage to the unit.
•Make sure to use atable which can support the weight of this unit and islarger than this unit.
•Make sure the table is in astable location.
[]Tilt Stand
You can adjust the stand
to change the angle
of theTV (-3 ° to 8°).
8o
E
IJl
[] Symbols Used in this Manual
The following is the description for the symbols used in this manual, Description
refers to:
i ill liiJ _ [lil {ill _ _ Illl l] l[IJ _ [li d[I] _ _
: Analog TV operation
: Digital TV operation
• If neither symbol appears under
the function heading, operation is
applicable to both.
: Playback of DVD-video
: Playback of audio CD
• If neither of symbol appears under
the function heading, operation is
applicable to both.
[] Trademark Information
• Manufactured under license from Dolby Laboratories "Dolby"and the double-D symbol are trademarks of Dolby Laboratories
• Product that have earned ENERGY STAR_'are designed to protect the environment through superior energy efficiency,
• _ is a trademark of DVD Format/Logo Licensing Corporation,
EN
[] Features
TV DVD
•DTV/TV/CATV
- You can use your remote control to select channels which
are broadcast in digital format and conventional analog
format. Also, cable subscribers can access their cable TV
channels.
•Information Display (DTV only)
- You can display the title, contents and other information
of the current DTV program on the TV screen.
•Auto Channel Scan
-This unit automatically scans and memorizes channels
available in your area, eliminating difficult setup
procedures.
•V-chip
-This feature allows you to block children's access to
inappropriate programs.
•Closed Caption Decoder
- Built-in closed caption decoder displays text for closed
caption supported programs.
•MTS/SAP Tuner
- Audio can be selected from the remote control.
•Auto Shut Off Function
- If there is no signal input from the antenna terminal and
no operation for 15 minutes, the unit will turn itself off
automatically.
•Sleep Timer
-This feature will automatically turned off the power of the
unit at a specific time.
•Choices for On-screen Language
- Select your on-screen language:
English, Spanish or French.
•Stereo Sound Function
•PLL Frequency Synthesized Tuning
- Provides free and easy channel selection and lets you tune
directly to any channel using the channel number buttons
on the remote control.
•PC Input
•Component Video Input
•S-video Input
•AV Input
•Digital Audio Coaxial Output
•Dolby Digital Sound
- Enjoy Dolby Digital multi-channel surround sound
when you connect the unit to your Dolby Digital
decoder.
•Still /Fast /Slow /Step Playback
-Various playback modes are available including still
pictures, fast forward/reverse, slow motion and step
frames.
•DVD Menus in a Desired Language
- You can display DVD menus in a desired language, if
available on a DVD-video.
•Auto Power Off
- If there is no operation for 20 minutes, the unit will turn
itself off automatically.
•Parental Lock
- Block the viewing of DVD-video unsuitable for children.
•Resume Playback
- Lets you resume playback from the point at which
playback was stopped.
•Bit Rate Indication
•DRC (dynamic range control)
-You can control the range of sound volume.
"_ Accessing from [MODE] button
During playback
•Subtitles in a Desired Language
- You can select a desired language for displaying
subtitle, if that language is available on a DVD-video.
•Selecting a Camera Angle
-You can select the desired camera angle, if a DVD
contains sequences recorded from different angles.
•Zoom i
- Allows you to enlarge the size of picture image.
•Black Level Adjustment
•Virtual Surround
•Search
- chapter search /title search /track search /time search
•Marker
-The part on the disc designated by user can be called i
back.
•Repeat
- chapter /title /track /all /A-B
In stop mode
•Program Playback for audio CD
- You can program the order of tracks to play them back
in designated order.
•Random Playback for audio CD
- This unit can shuffle the order of tracks to play them
back in randomly.
•_Accessing from [AUDIO._ ] button
During playback
•Choices for Audio Language and Stereo Sound
Function
- Select your desired languages or stereo sound function
when different options are available on your disc.
EN
[] Contents
/N FRODUCT ON
Precautions...................................................... 2
SuppliedAccessories.............................................. 4
AttachingtheStand............................................... 4
TiltStand........................................................ 4
TrademarkInformation ........................................... 4
SymbolsUsedinthisManual....................................... 4
Features......................................................... S
Buttonson theRemoteControl..................................... 7
Installingthe Batteries............................................ 7
ControlPanel..................................................... 8
RearPanel....................................................... 8
PREPARAT ON
BasicConnection.................................................. 9
ExternalDeviceConnection....................................... 10
AttachingaWallMount Bracket(soldseparately)................... 12
:TV Functions ;
/N T/AL SE1 T NG
InitialSetup..................................................... 13
MainMenu...................................................... 13
AutoChannelScan............................................... 14
LanguageSelection.............................................. 14
W/"4 CH NG TV
ChannelSelection................................................ 1S
VolumeAdjustment.............................................. 1S
SwitchingEachInputMode....................................... 1S
SwitchingAudioMode ........................................... 16
SleepTimer..................................................... 16
ScreenInformation .............................................. 17
TVScreenDisplayMode........................................... 18
OPT ONAL SETT NG
ChannelAdd/Delete.............................................. 20
PictureAdjustment .............................................. 21
ClosedCaption................................................... 21
DTVClosedCaption............................................... 22
DTVCCStyle ..................................................... 23
BackLightSetting ............................................... 24
ColorTemperature............................................... 24
V<hip .......................................................... 25
PCSettings...................................................... 28
OPERA YNG DVD
PlayableMedia.................................................. 29
UnplayableMedia............................................... 29
Playback........................................................ 30
DiscMenu....................................................... 30
ResumePlayback................................................ 30
Skip............................................................ 30
FastForward/FastReverse....................................... 30
SlowForward/SlowReverse...................................... 31
PausedandStep-by-stepPlayback................................. 31
Zoom........................................................... 31
SearchFunctions................................................. 32
RepeatPlayback................................................. 33
RepeatA-BPlayback............................................. 33
RandomPlayback................................................ 33
ProgrammedPlayback........................................... 34
0n-screenDisplay................................................ 35
SpecialSettings.................................................. 36
DVD SETT NG
DVDLanguageSetting........................................... 39
DVDAudioSetting............................................... 40
ParentalSetting................................................. 41
Others.......................................................... 42
Resettothe DefaultSetting....................................... 43
LanguageCodeList.............................................. 43
_ROUBLESHOOT NG
TroubleshootingGuide........................................... 44
FAQ............................................................ 45
INFORMATION
Glossary........................................................ 46
Maintenance.................................................... 46
CableChannelDesignations....................................... 47
GeneralSpecifications............................................ 47
ElectricalSpecification............................................ 47
OtherSpecifications.............................................. 47
Limited Warranty ........................................ Backcover
© 2008 Funai Electric Co., Ltd.
All rights reserved. No part of this manual may be reproduced, copied, transmitted, disseminated, transcribed, downloaded or stored in
any storage medium, in any form or for any purpose without the express prior written consent of Funai.
Furthermore, any unauthorized commercial distribution of this manual or any revision hereto is strictly prohibited.
Information in this document is subject to change without notice. Funai reserves the right to change the content herein without the
obligation to notify any person or organization of such changes.
FUN_ with the _ design is a registered trademark of Funai Electric Co., Ltd and may not be used in any way without the express written
consent of Funai. All other trademarks used herein remain the exclusive property of their respective owners. Nothing contained in this
manual should be construed as granting, by implication or otherwise, any license or right to use any of the trademarks displayed herein.
Misuse of any trademarks or any other content in this manual is strictly prohibited. Funai shall aggressively enforce its intellectual property
rights to the fullest extent of the law.
EN
[] Buttons on the Remote Control
1.
2.
3.
4.
11
12
13
14
15
16
17
18
19
20
21
22
23
24
25
POWER (p. 13)
Press to turn the unit on and off.
MUTE D_<(p. 15)
Press to turn the sound on and off.
SLEEP _,t (p. 16)
Press to activate the sleep timer.
Number buttons (p. 15)
• Press to select channels.
• Press to select chapter, title (DVD), or track
(CD) directly.
-lENT.
• Press to shift the minor channel from the
major channel.
+10/+100
• Press to select 100 or higher channels. (CAW)
• Press to search if there are minor channels on
the currently selected major channel. (D_/)
S• VOL. (p. 15)
Press to adjust the volume.
6• PAUSE II (p. 31)
Press to pause disc playback.
7. SKIP II1_1/I_H (p. 30)
• Pressto skip forward or backward
chapters, titles (DVD) or tracks (CD).
REV _ (p. 30)
• Pressand hold to begin slow reverse
playback during the pause mode (DVD)
and search backward through a disc
(DVD, CD).
PWD _ (p. 3O)
• Pressand hold to begin slow forward
playback during the pause mode (DVD)
and search forward through a disc
(DVD, CD).
8. SETUP (p. 13 /p. 39)
Press to display the main menu.
9• RETURN _-_ (p. 21)
Press to return to the previous menu
operation.
10. CLEAR (p. 32)
• Press to clear the numbers entered
incorrectly.
• Press to cancel the point A for A-B
repeat (DVD, CD).
• Press to remove the track number in
program input (CD).
11• MODE (p. 5)
• Press to arrange the playing order or
playback randomly (CD).
•Press to set the black level (DVD) and
the virtual surround (DVD, CD) on or off.
• Press to change the camera angle to
see the sequence being played back
from different angle (DVD).
• Press to search chapter, title (DVD),
time (DVD, CD) or track (CD).
• Press to set the marker (DVD, CD).
• Press to repeat playback chapter, title
(DVD), track disc (CD) repeatedly or
between designated point A and B
(DVD, CD).
• Press to magnify the part of picture
(2x and 4x : DVD).
• Press to select the subtitles on a disc
(DVD).
[] Installing the Batteries
Install the batteries (AA x 2) matching the polarity indicated inside battery compartment of the remote control.
12. EJECT_ (p. 30)
Press to eject the disc.
13. INPUT(p. 15)
Pressto switch the input modes.
14• DISPLAY i (P. 17 /p. 35)
DigitalModeCDTV
• Press to display the channel number i
and the program information.
Analog Mode (TV)
• Press to display the channel number.
External Input Mode
• Press to display the currently selected [
external input mode.
DVD Mode [
• Press to display the current status of
the disc,
15• AUDIO._ (p. 16 /p. 36)
Digital Mode {DTV)
• Press to select the audio language.
Analog Mode (TV)
• Press to select the audio mode.
DVD Mode
• Press to select the audio language
(DVD), or sound mode (CD).
16• SCREEN MODE[!_ 3 (p. 18)
Press to select aspect ratio available for
the TV screen.
17. PICTURE (p. 21)
Press to adjust the picture quality.
18. CH. RECALL_(p. 15)
Press to return to the previously viewed
channel.
19. CH, A/V (p. 15)
Press to select channels.
20. PLAYI_ (p. 30)
Press to begin disc playback.
21. STOP II (p. 30)
Press to stop disc playback.
22. _III_ IA IV (p. 13)
Press to move left/right/up/clown
through the items.
23• ENTER (p. 13)
Press to confirm your selection.
24• MENU (p. 30)
Press to display the menu on a disc.
25. TOP MENU (p. 30) !
Press to display the top menu on a disc
(DVD).
i
\
Battery Precautions:
•Be sure to follow the correct polarity as indicated in the battery compartment. Reversed batteries may cause damage to the device.
•Do not mix different types of batteries together (e.g., Alkaline and Carbon-Zinc) or old batteries with fresh ones.
•If the device is not to be used for along period of time, remove the batteries to prevent damage or injury from possible battery leakage.
•Do not try to recharge batteries; they can overheat and rupture.
i i!i:!i
EN
[] Control Panel
13
I
[] Rear Panel
side of the unit
10
11
12
1. POWER (p. 13)
Press to turn the unit on and off,
2. INPUT SELECT (p. 15)
Press to switch the input modes.
3. CHANNELA/V (p. 15)
Press to select channels or move up/down through the
main menu items.
4. VOLUME _/ (p, 15)
Press to adjust the volume.
5. SETUP (p. 13)
Press to display the main menu.
6. EJECT_i (p. 30)
Press to eject the disc.
7. PLAY I_ (p. 30)
Press to begin disc playback.
8. STOP • (p. 30)
Press to stop disc playback.
9. SKIP I_1_ /I_IH (p, 30)
Press to skip forward or backward chapters, titles (DVD)
or tracks (CD).
SEARCH _ /I_ buttons (p, 30)
Press and hold to begin slow forward or slow reverse
playback during the pause mode (DVD) and search
forward or backward through a disc (DVD, CD).
10. infrared sensor window
Receives infrared rays transrnitted from the rernote
control.
1 1. power on indicator
Lights up when power is on.
12. DVD indicator
Lights up when the disc is inserted,
13. disc loading slot (p, 30)
Insert the disc with label facing forward.
-2 1. PC input jack (p, 12)
VGA cable connection for PC,
2, audio input jack for PC connection (p, 12)
Mini-plug audio cable connection for PC,
3. antenna input jack (p, 9)
RF coaxial cable connection for your antenna or
cable/satellite box,
4. headphone jack
Headphone connection for personal listening.
5. componentvideoandaudioinputjack(p. 10)
,3 RCA component video and RCA audio connection for
external devices.
6. audio input jack (p. 10)
,4 RCA audio connection for external devices,
7. video input jack (p. 11)
RCA video connection for external devices.
8. S-videoinputjack(p, 10)
5S-video connection for external devices.
69. coaxial digital audio output jack (p, 11)
7 Coaxial digital audio connection for a decoder or an
audio receiver.
10. AC power cord
8 Connect to a standard AC outlet to supply power to
,9 this unit.
IO
EN
iiiiiiii
[] Basic Connection
Thissection describes how to c0nnect the unit to an antenna, cable/satellite box,etc.
Note:•Besure your an tenna or other device is connected properly before plugging in the power cord.
[Antenna Connection]
Connect the RF coaxial cable on your home outlet to the antenna input jack of this unit.
e.g.)
VHF/UHF_
antenna _ "
RF coaxial cable
rear of this unit
cableTV
company
2
* Once connections are completed, turn on the unit and begin initial setup.
Channel scanning is necessary for the unit to memorize all available channels in your area.
(Refer to "Initial Setup" on page 13,)
i ii_i;¸
Note:
• For your safety and to avoid damage to this unit, please unplug the RF coaxial cable from the antenna input jack before moving the
unit.
• Ifyou use an antenna to receive analog TV, it should also work for DTV reception. Outdoor or attic antennas will be more effective than
settop versions.
• To switch your reception source easily between antenna and cable, install an antenna selector.
• Ifyou connect to the cable system directly, contact the CATVinstaller.
[Connection to Cable Box or Satellite Box]
Use an RF coaxial cable to connect the antenna input jack of the unit to the antenna output jack of the cable/satellite box.
_.g.)
satellite dish i
i iii
rear of this unit
[[[[[ _ ANTIN
,_ RF coaxial cable
co0x 0 c0b e m
'c b eW
company
cable/satellite box
*Required cables and connecting methods differ depending on the cable/satellite box.
For more information, please contact your cable/satellite provider.
i ii:!i
EN
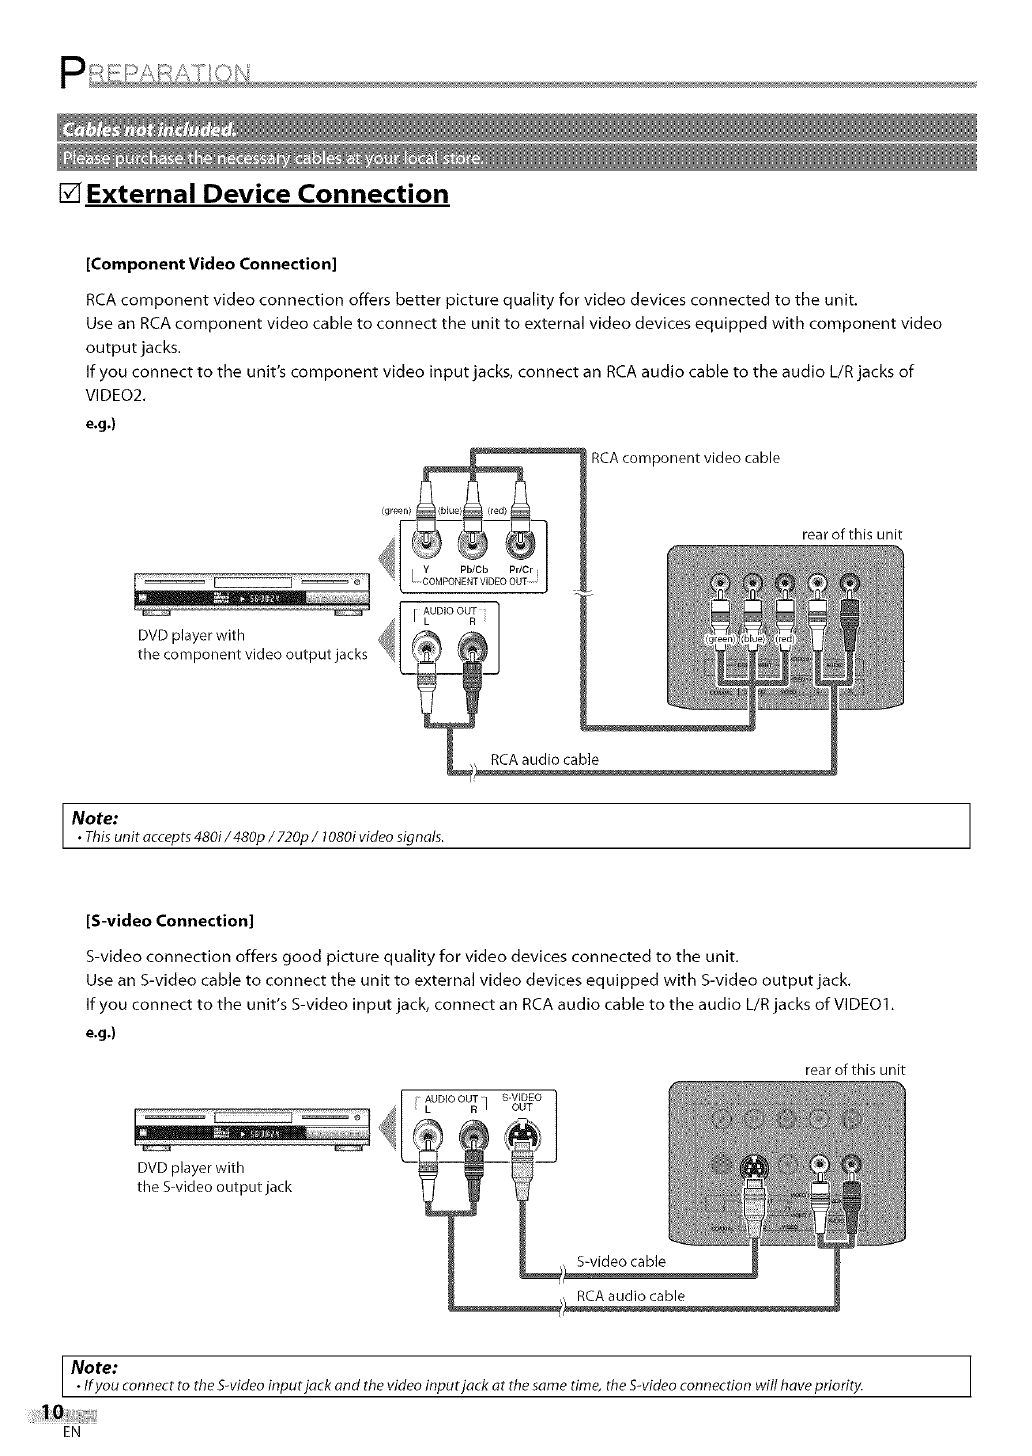
[] External Device Connection
[Component Video Connection]
RCA component video connection offers better picture quality for video devices connected to the unit.
Use an RCA component video cable to connect the unit to external video devices equipped with component video
output jacks.
If you connect to the unit's component video input jacks, connect an RCA audio cable to the audio L/R jacks of
VIDEO2.
e.g.)
RCA component video cable
rear of this unit
DVD player with
the component video output jacks
AUDIO OUT
I L R
Note:
•This unit eccepts 480i/480p /720p / 1080i video signels.
[S-video Connection]
S-video connection offers good picture quality for video devices connected to the unit.
Use an S-video cable to connect the unit to external video devices equipped with S-video output jack.
If you connect to the unit's S-video input jack, connect an RCA audio cable to the audio L/R jacks of VIDE01.
e,g,)
AUDIO OUT S-VIDEO
L R ] OUT
DVD player with
the S-video output jack
rear of this unit
Note:• If you connect to the S-video input jack and the video input jack at the same time, the S-video connection will have priority. ]
EN
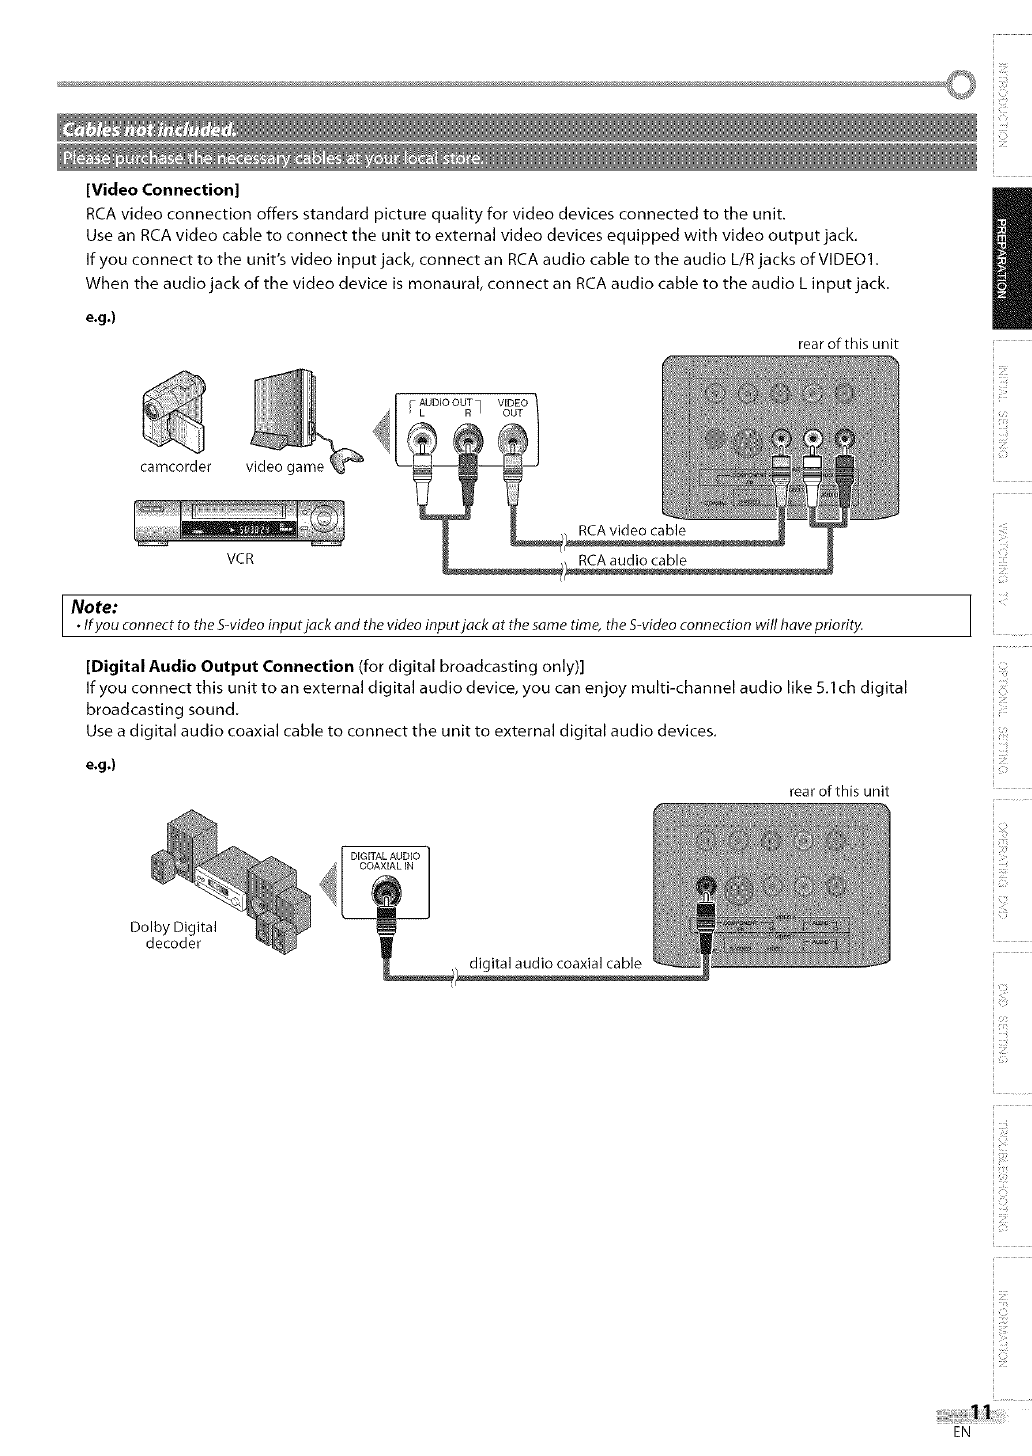
[Video Connection]
RCA video connection offers standard picture quality for video devices connected to the unit.
Use an RCA video cable to connect the unit to external video devices equipped with video output jack.
If you connect to the unit's video input jack, connect an RCA audio cable to the audio L/R jacks of VIDEO1.
When the audio jack of the video device is monaural, connect an RCA audio cable to the audio L input jack.
e.g.)
VCR
rear of this unit
AUDIO OUT VIDEO
L R _ OUT
camcorder
Note:•If you connect to the S-video input jack and the video input jack at the same time, the S-video connection will have priority. ]
[Digital Audio Output Connection (for digital broadcasting only)]
If you connect this unit to an external digital audio device, you can enjoy multi-channel audio like 5.1 ch digital
broadcasting sound.
Use a digital audio coaxial cable to connect the unit to external digital audio devices.
e.g.)
rear of this unit
DIGITAL AUDIO
COAXIAL IN
Dolby Digital
decoder
digital audio coaxial cable
iiiiiiii
Z
2
iii<
i _il¸
ic:
} ii_!i!!i
_i_ii,iiiii
_Lb
ii ii:!i
EN
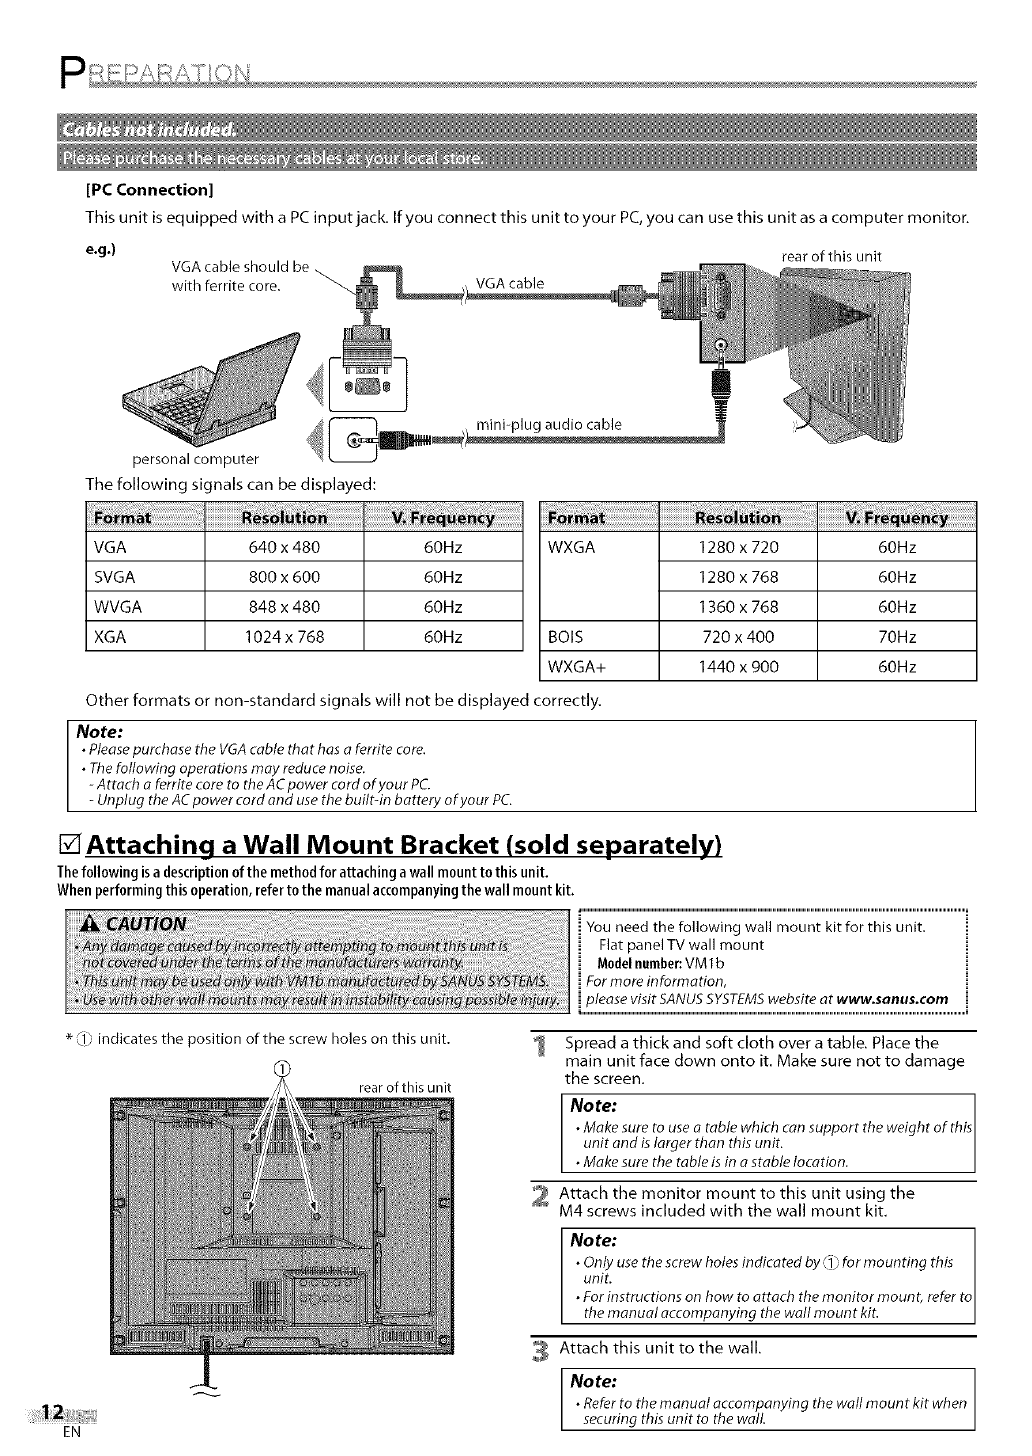
[PC Connection]
This unit is equipped with a PC input jack. If you connect this unit to your PC,you can use this unit as a computer monitor.
e.g.) VGA cable should be
with ferrite core. _ VGA cable
rear of this unit
mini-plug audio cable
personal computer
The following signals can be displayed:
VGA 640 x 480 60Hz
SVGA 800 x 600 60Hz
WVGA 848 x 480 60Hz
XGA 1024 x 768 60Hz
iiiii i: i ii ii ii ii ii ii ii ii ii ii ii ii ii ii ii ii ii ii ii ii ii ii ii ii ii ii ii ! ! ¸ I II!
WXGA 1280 x 720
1280 x 768
1360 x 768
BOIS 720 x 400
WXGA+ 1440 x g00
i
60Hz
60Hz
60Hz
70Hz
60Hz
Other formats or non-standard signals will not be displayed correctly.
Note:
•Pleasepurchase the VGAcable that has aferrite core.
• Thefollowing operations may reduce noise.
-Attach aferrite core to the AC power cord ofyour PC.
-Unplug the AC power cord and usethe builtqn battery ofyour PC.
Attaching a Wall Mount Bracket (sold separately)
Thefollowingisadescriptionofthe methodforattaching a wallmountto thisunit.
Whenperformingthisoperation,refertothe manualaccompanyingthewall mountkit.
You need the following wall mount kit for this unit.
Flat panel TV wall mount
Modelnumber:VM 1b
For more information,
please visit SANUSSYSTEMSwebsite at WWWoSanus.com
_1_indicates the position of the screw holes on this unit.
rear of this unit
EN
Spread a thick and soft cloth over a table. Place the
main unit face clown onto it. Make sure not to damage
the screen.
Nore:
•Make sure to useatable which can support the weight of this
unit and islarger than this unit.
• Make sure the table is in a stable location.
Attach the monitor mount to this unit using the
M4 screws included with the wall mount kit,
No te: 1
• Only usethe screw holes indicated by (_ for mounting this I
unit. I
• For instructions on how to attach the monitor mount, refer to
the manual accompanying the wall mount kit.
Attach this unit to the wall.
Note:
• Referto the manual accompanying the wall mount kit when
securing this unit to the waiL
[] Initial Setup
Thissectionwill guideyouthroughthe unit'sinitialsettingwhichincludes
selectingalanguageforyouron-screenmenuandautochannelscan,
whichautomaticallyscansandmemorizesviewablechannels,
Before youbegin:
Makesureifthe unitisconnectedto antenna orcables.
1 After making all the necessary connections,
press [POWER] to turn on the unit.
• This operation may take a few moments.
2 Use [Cursor • /V) to select the on-screen language
from the choices on the right side of the TV screen.
(ENGLISH /ESPANOL /FRAN(_AIS)
or _-SELECTLANGUAGE ENGLISH
• "INITIAL SETUP" menu on step 3 will be displayed in
the selected language after you press [ENTER].
No te:
•If you connect the cable system directly, contact the CATV
installer.
•lfyou press[POWER] or [SETUP]during auto channel scan,
this setting will be canceled.
•Theinitial auto channel scan function can be executed for
either TV/DTVor CATVonly once. If you wan t to scan both
TV/DTVand CATV,you need to select "CHANNELSETUP"in
the main menu to scan and memorize other channels after
initial presetting iscompleted. (Referto page 14.)
•Youcan cancel or exit the initial auto channel scan menu by
pressing [SETUP].
•When no channel can be received by auto channel scan,
"NOTVSIGNALS"is displayed on the TV screen.
•If there isno signal input from the antenna terminal and
no operation for severalseconds after you turn on the unit,
"HELPFULHINTS"appears. Follow the instructions listed on
the TVscreen.
- HELPFUL HINTS-
1PLEASECHECK TOSEE IF THE
ANTENNA _CABLE ,'SATELLITEIS
PROPER_ CONNECTER
2 RID YOUPERFORM¸'AUTOPRESET CH"?
3 PLEASE REFER TO FRONT PAGEOFTHE
OWNER'S MANUALOR REAR PANELFOR
SUPPORT LINE INFORMATION¸
[] Main Menu
Thissectiondescribesthe overview of the mainmenu displayedwhen you
press[SEI"UP].Formoredetails, seethe referencepagefor eachitem.
Themain menuconsistsof the function setting items below.
Use [Cursor •/V) to select "AUTO PRESET CH(TV/DTV)"
for TV channels or"AUTO PRESETCH(CATV)" for CATV
channels, then press [ENTER].
or
- iNITIAL SETUP-
PLEASECONNECTANTENNA OR CABLE
OR SATELLITETOTHIS UNIT
_- AUTO PRESETCH (TV_DTV)
AUTO PRESETGH (RAW)
• Scanning and memorizing of channels start
automatically.
25
AUTO PRESETCH(TV_BT_
I :
• When the scanning and memorizing of channels are
completed, the lowest memorized channel will be
displayed.
Press [SETUP].
e.g.) digital TV mode
i!!!!
- TVSETUP -
CHANNELSETUP
V-CHIP SETUP
LANGUAGE [ENGLISH]
CAPTION [OFF]
BACK LIGHT [BRIGHT]
COLOR TEMR [NORMAL]
DTVCC
iC:
ilii_!i!!i
_i_ii,iiii
iiIL[
CHANNEL SETUP
You can automatically scan the viewable channels and
remove the undesired channels.
(Refer to"Auto Channel Scan"on page 14.)
V-CHIP SETUP
You can set the viewing limitations,
(Refer to "V-chip" on page 25,)
i
LANGUAGE
You can change the language (English, Spanish,
French) displayed on the main menu.
(Refer to "Language Selection" on page 14.)
CAPTION
You can change the display format for closed caption,
which displays the dialogue of a TV program or other
information across the TV screen.
(Refer to "Closed Caption" on page 21 .)
EN
BACK LIGHT
You can set the desired brightness mode.
(Refer to "Back Light Setting"on page 24.)
COLOR TEMR
You can adjust color temperature.
(Refer to "Color Temperature" on page 24.)
DTVCC
In addition to the basic closed caption described
on page 21, DTV has its own closed caption called
DTVCC.
(Refer to "DTV Closed Caption" on page 22.)
PC SETTING
You can adjust the position, stability and clarity of the
PC screen.
This menu will appear only in PC mode, and can only
be set when the unit detects the PC input signal.
(Refer to"PC Settings" on page 28.)
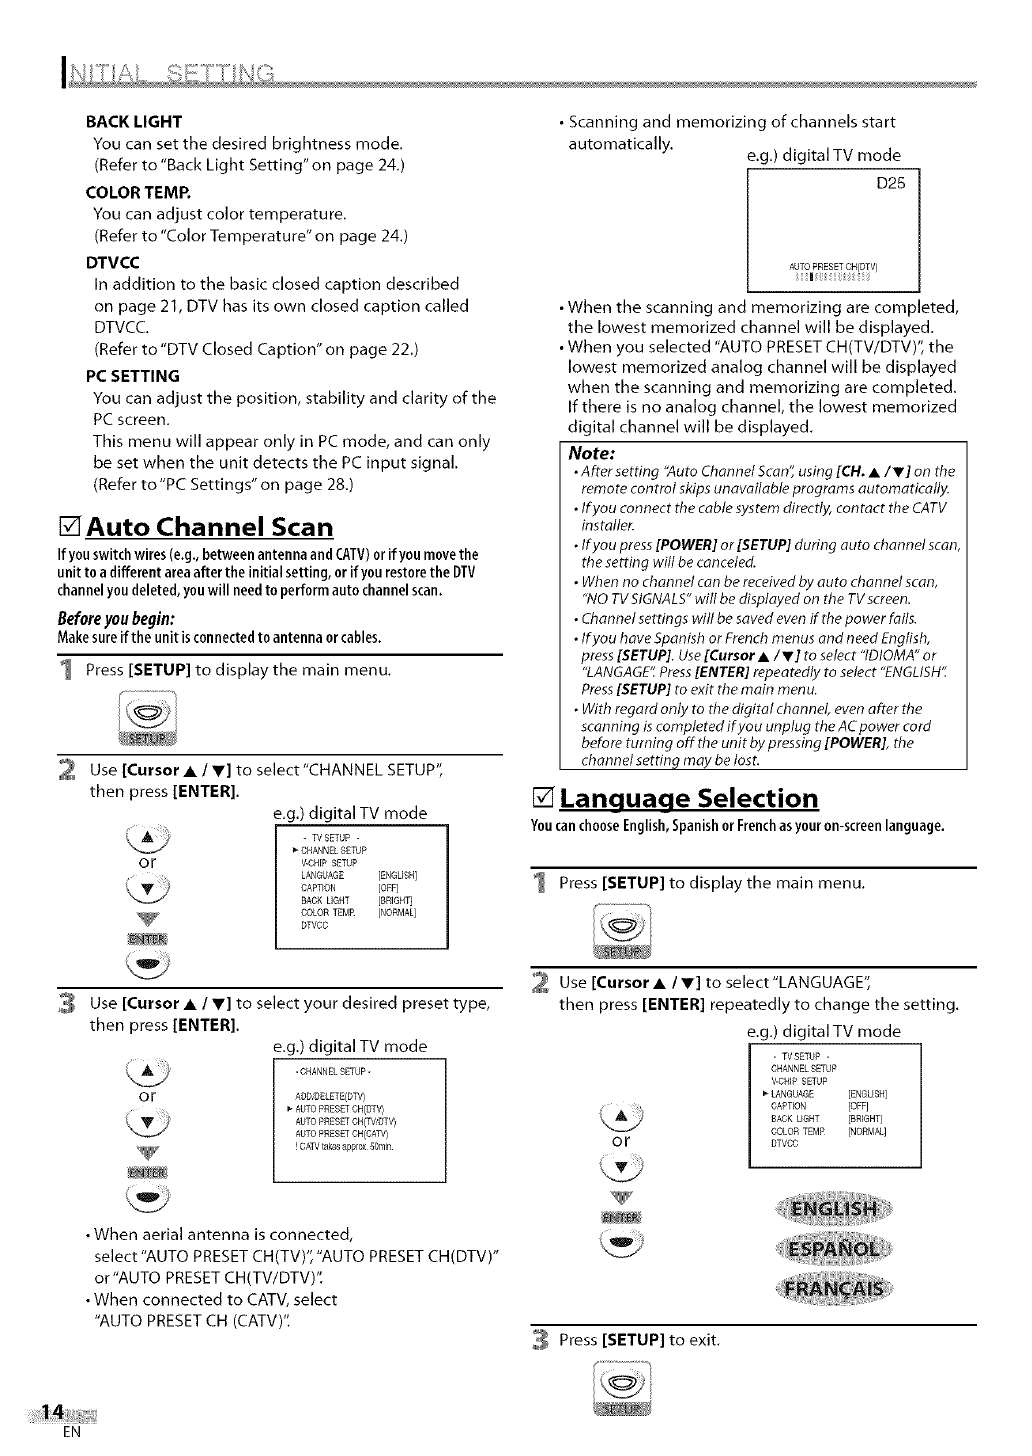
[]Auto Channel Scan
Ifyouswitchwires(e.g.,betweenantennaandCAW)orifyoumovethe
unit toa differentareaafter the initialsetting,or ifyourestorethe DTV
channelyoudeleted,youwill needto performauto channelscan.
Before youbegin:
Makesureifthe unitisconnectedto antenna orcables,
1 Press [SETUP] to display the main menu.
or
2 Use [Cursor •/V] to select"CHANNEL SETUP",
then press [ENTER].
e.g.) digital TV mode
-WSETUP -
CHANNEL SETUP
V-CHIP SETUP
LANGUAGE [ENGLISH]
CAPTION [OFF]
BACK LIGHT [£RIGH_
COLOR TEMR [NORMAL]
DTVCC
3 Use [Cursor • /V] to select your desired preset type,
then press [ENTER].
e.g.) digital TV mode
- CHANNELSETUP-
or ACD_gELETE(DTV)
AUTO PRESETOH(DTV)
AUTO PRESETOH(WOT_
AUTO PRESETCH(CATV)
! CAW takes apl)r0x _Omin
•When aerial antenna is connected,
select "AUTO PRESET CH(TV)', "AUTO PRESET CH(DTV)"
or"AUTO PRESET CH(TV/DTV)".
• When connected to CATV, select
"AUTO PRESET CH (CATV)'t
• Scanning and memorizing of channels start
automatically, e.g.) digital TV mode
D25
• When the scanning and memorizing are completed,
the lowest memorized channel will be displayed.
• When you selected "AUTO PRESETCH(TV/DTV)", the
lowest memorized analog channel will be displayed
when the scanning and memorizing are completed.
If there is no analog channel, the lowest memorized
digital channel will be displayed.
Note:
•After setting "Auto Channel Scarf', using [CH. •iV] on the
remote control skips unavailable programs automatically.
•If you connect the cable system directly, contact the CATV
installer.
•Ifyou press[POWER] or [SETUP] during auto channel scar
the setting will be canceled.
•When no channel can be received by auto channel scan,
"NOTVSIGNALS"will be displayed on the TV screen.
• Channel settings will be saved even if the power fails.
•Ifyou have Spanish or French menus and need English,
press[SETUP]. Use[Cursor • iV] to select "IDIOMA" or
"LANGAGE'_Press[ENTER] repeatedly to select "ENGLISH".
Press[SETUP] to exit the main menu.
•With regard only to the digital channel, evenafter the
scanning is completed if you unplug the AC power cord
before turning off the unit by pressing [POWER], the
channel setting may be lost.
[] Language Selection
YoucanchooseEnglish,Spanishor Frenchasyour0n-screenlanguage.
1 Press [SETUP] to display the main menu.
Use [Cursor• Iv] to select"LANGUAGE",
then press [ENTER] repeatedly to change the setting,
e.g.) digital TV mode
- W SETUP -
CHANNEL SETUP
V-CHIP SETUP
LANGUAGE [ENGL[SR]
GAPTEON [OFF]
SACK LIGHT [BREGHT]
COLOR TEM£ [NORMAL]
0 r CTVCC
Press [SETUP] to exit.
EN
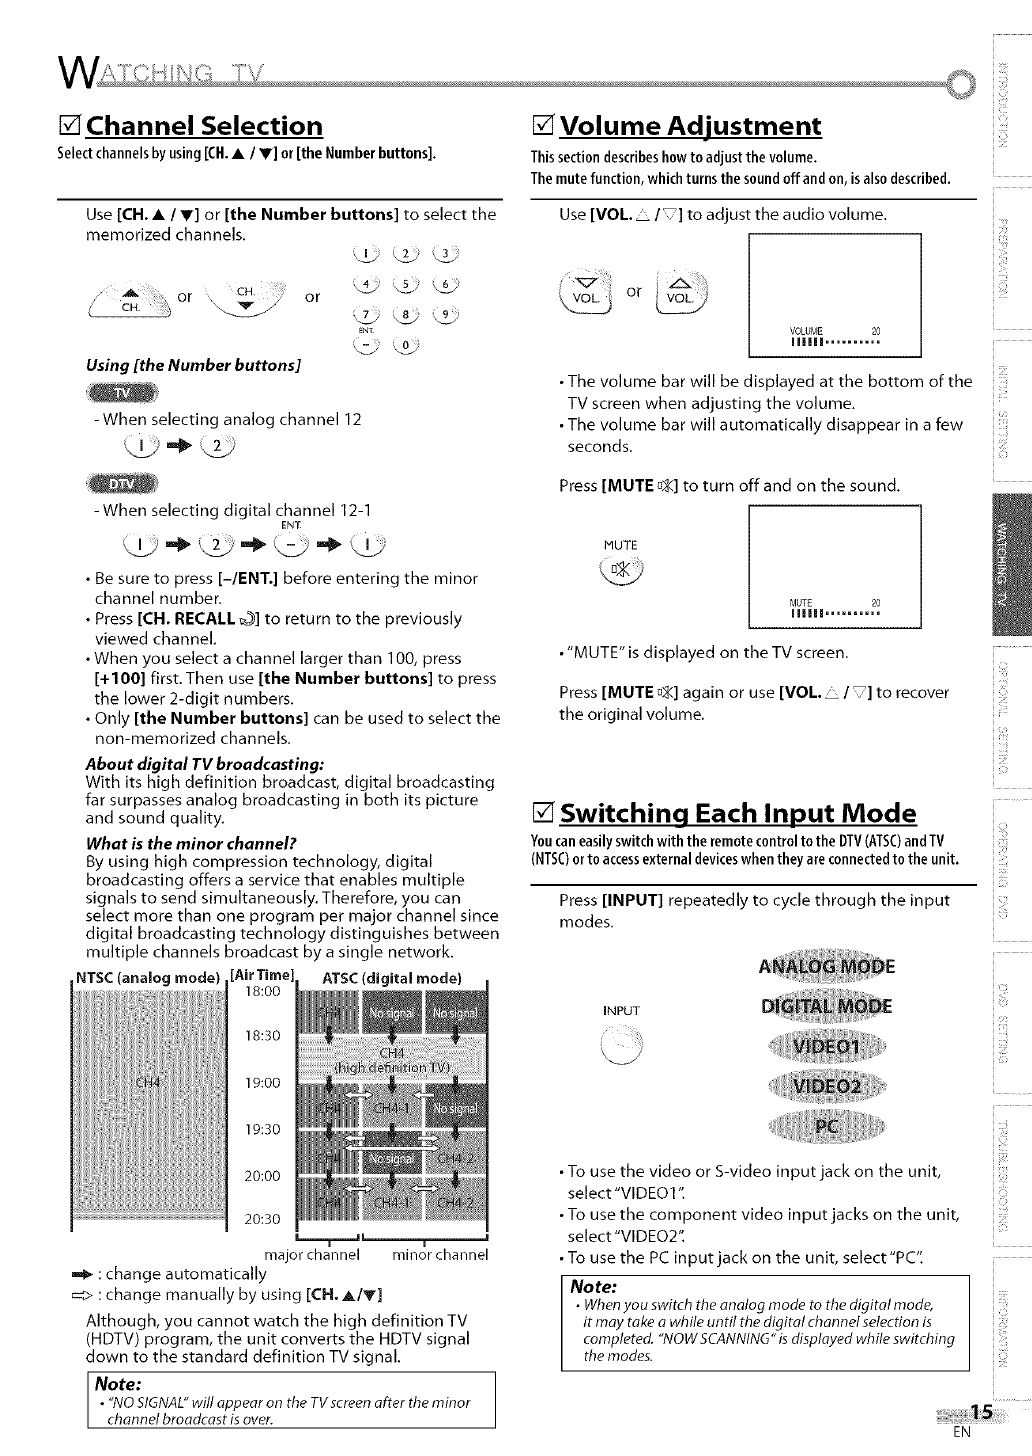
[] Channel Selection
Selectchannelsbyusing[CH.•/V] or [the Numberbuttons].
Use [CH.• IV] or [the Number buttons] to select the
memorized channels.
....... cH. _ _
or ___z /or _ _ _9_t_
ENT
Using [the Number buttons]
-When selecting analog channel 12
-When selecting digital channel 12-1
EN_
•Be sure to press [-lENT.] before entering the minor
channel number.
• Press [CH. RECALL _] to return to the previously
viewed channel.
• When you select a channel larger than 100, press
[+100] first.Then use [the Number buttons] to press
the lower 2-digit numbers.
• Only [the Number buttons] can be used to select the
non-memorized channels.
About digital TV broadcasting:
With its high definition broadcast, digital broadcasting
far surpasses analog broadcasting in both its picture
and sound quality.
What is the minor channel?
By using high compression technology, digital
broadcasting offers a service that enables multiple
signals to send simultaneously. Therefore, you can
select more than one program per major channel since
digital broadcasting technology distinguishes between
multiple channels broadcast by a single network.
NTSC(analog mode) [AirTime] ATSC (digital mode)
18:00
18:30
19:00
19:30
20:00
20:30
major channel minor channel
:change automatically
_> :change manually by using [CH,A/V]
Although, you cannot watch the high definition TV
(HDTV) program, the unit converts the HDTV signal
down to the standard definition TV signal.
Note:
• "NOSIGNAL"will appear on the TVscreen after the minor
channel broadcast is over.
[] Volume Adjustment
Thissectiondescribeshowto adjust the volume.
Themutefunction,whichturnsthesoundoffand on,isalsodescribed.
Use[VOL. /] toadjust the audio volume,
or
VOLUME 20
IIIIII ..........
• The volume bar will be displayed at the bottom of the
TV screen when adjusting the volume.
• The volume bar will automatically disappear in a few
seconds.
Press [MUTE u_] to turn off and on the sound.
MUTE
MUTE 20
IIIIII ..........
• "MUTE" is displayed on the TV screen.
Press [MUTE u;g] again or use [VOL. _ /] to recover
the original volume.
[] Switching Each Input Mode
Youcaneasilyswitchwiththe remotecontroltothe DTV(ATSC)and TV
(NTSC)orto accessexternal deviceswhentheyare connectedto the unit.
Press [INPUT] repeatedly to cycle through the input
modes.
INPUT
• To use the video or S-video input jack on the unit,
select "VIDEO1 't
• To use the component video input jacks on the unit,
select "VlDEO 2't
• To use the PC input jack on the unit, select"PC't
Noto:
•Whenyou switch the analog mode to the digital mode,
it may take awhile until the digital channel selection is
completed. "NOWSCANNING"isdisplayed while switching
the modes.
EN
i :_ii_¸
i i<
i ii:_i
ii i_i_il
ic:
} ii_!i!!i
_i_ii,iill
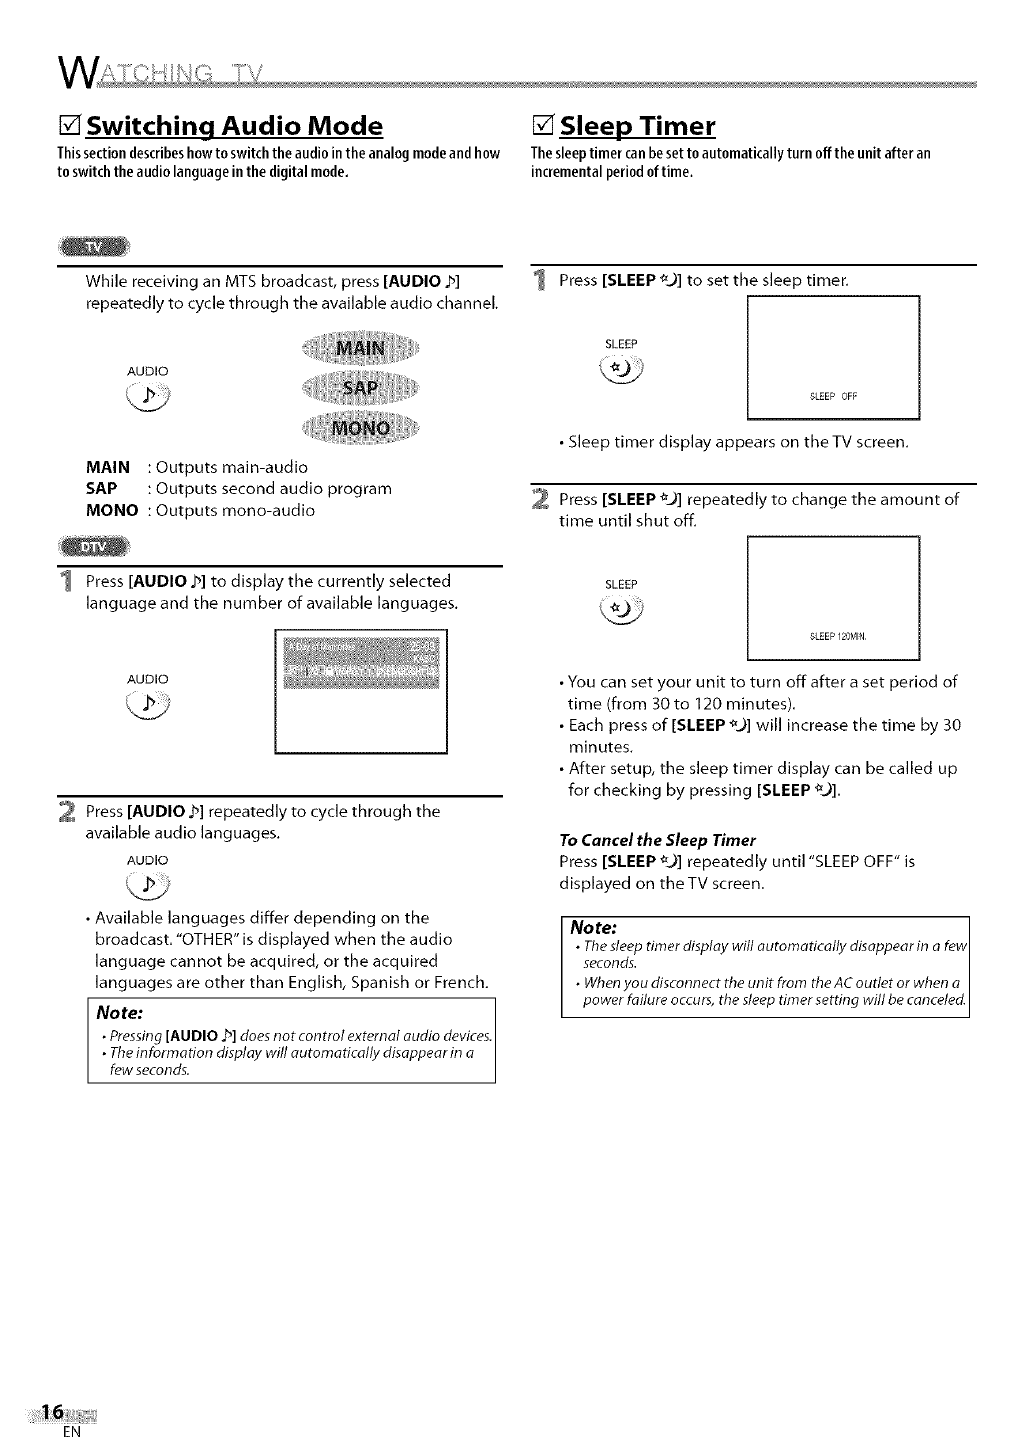
[] Switching Audio Mode [] Sleep Timer
Thissectiondescribeshowto switchthe audiointhe analogmodeandhow Thesleeptimercanbesettoautomaticallyturnoffthe unit afteran
to switchthe audiolanguageinthe digitalmode. incrementalperiodoftime.
While receiving an MTSbroadcast, press [AUDIO b]
repeatedly to cycle through the available audio channel.
AUDIO
MAIN :Outputs main-audio
SAP :Outputs second audio program
MONO : Outputs mono-audio
1
SLEEP
Press [SLEEP ¢.)] to set the sleep timer.
SLEEP OFF
•Sleep timer display appears on theTV screen.
2 Press [SLEEP _J] repeatedly to change the amount of
time until shut off.
1 Press [AUDIO 2] to display the currently selected
language and the number of available languages.
AUDIO
Press [AUDIO b] repeatedly to cycle through the
available audio languages.
AUDIO
• Available languages differ depending on the
broadcast. "OTHER" is displayed when the audio
language cannot be acquired, or the acquired
languages are other than English, Spanish or French.
Note:
•Pressing[AUDIO J_]doesnot control external audio devices.
•Theinformation display will automatically disappear in a
few seconds.
SLEEP
SLEEP 120MIN
• You can set your unit to turn off after a set period of
time (from 30 to 120 minutes).
• Each press of [SLEEP _._] will increase the time by 30
minutes.
• After setup, the sleep timer display can be called up
for checking by pressing [SLEEP _._].
To Cancel the Sleep Timer
Press [SLEEP %)] repeatedly until "SLEEP OFF" is
displayed on the TV screen.
No te:
•Thesleep timer display will automatically disappear in a few
seconds.
•Whenyou disconnect the unit from the AC outlet or when a
power failure occurs, the sleep timer setting will be canceled.
EN
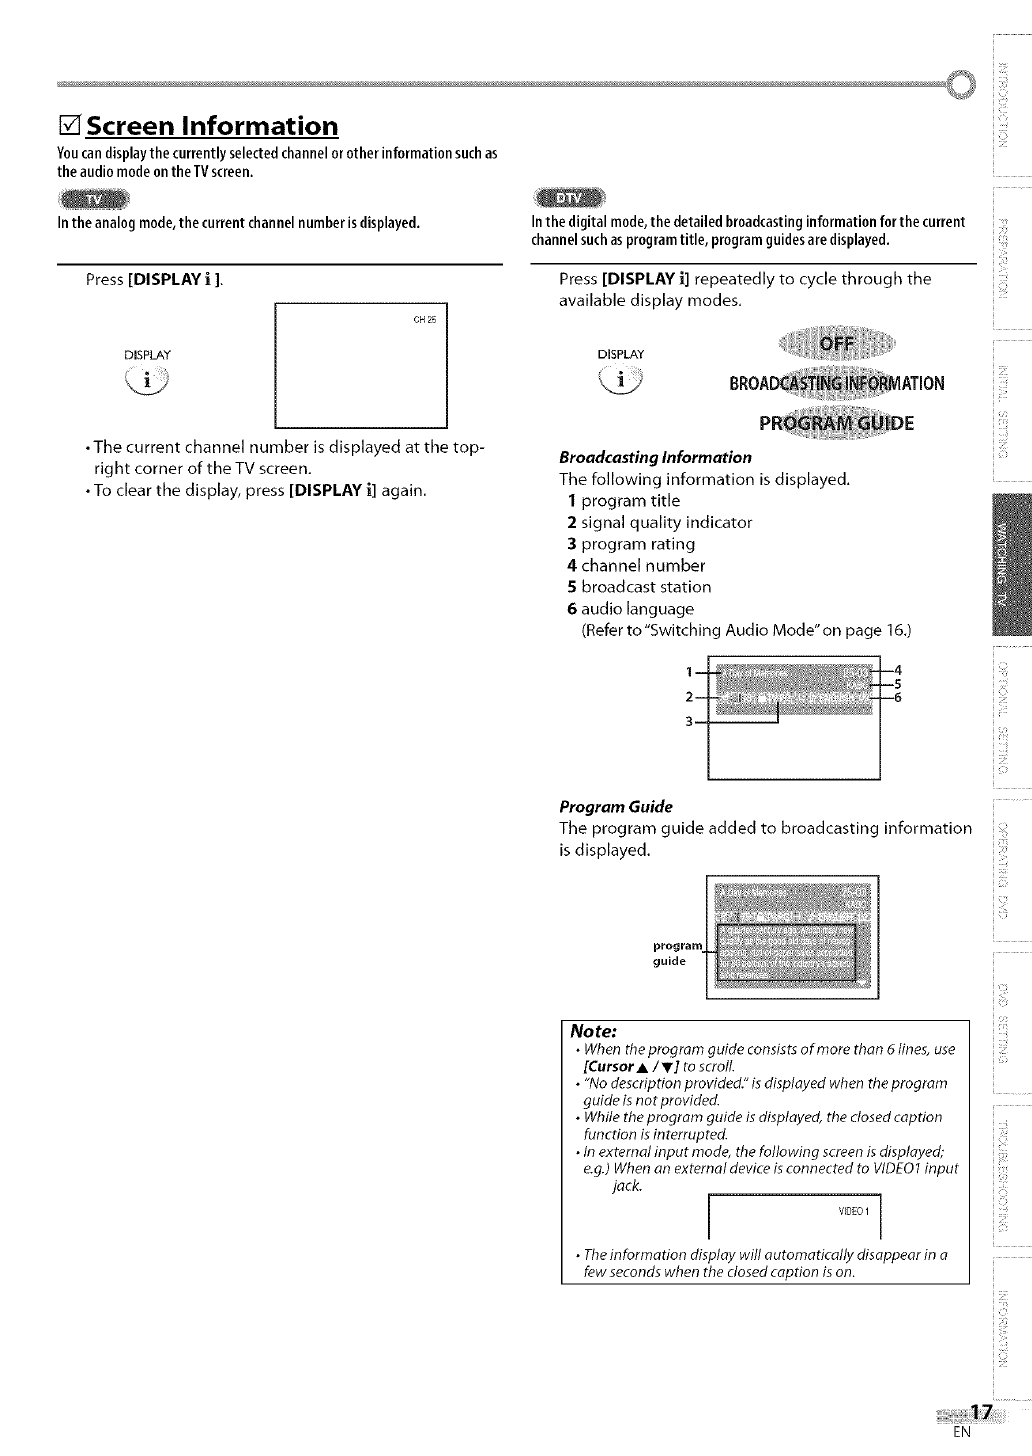
[] Screen Information
Youcandisplaythe currently selectedchannelorotherinformationsuchas
the audiomodeonthe TVscreen.
Inthe analogmode,the currentchannelnumberis displayed.
Press [DISPLAY i ],
CB 25
DISPLAY
• The current channel number is displayed at the top-
right corner of the TV screen.
•To clear the display, press [DISPLAY i] again.
In the digital mode,the detailed broadcastinginformation for the current
channelsuchas programtitle, programguidesaredisplayed.
Press [DISPLAY i] repeatedly to cycle through the
available display modes.
DISPLAY
Broadcasting Information
The following information is displayed.
1 program title
2signal quality indicator
3program rating
4channel number
Sbroadcast station
6audio language
(Refer to"Switching Audio Mode"on page 16.)
Program Guide
The program guide added to broadcasting information
is displayed.
guide
No to:
•When the program guide consists of more than 6lines, use
[CursorA/T] to scroll.
• "No description provided." isdisplayed when the program
guide isnot provided.
•While the program guide is displayed, the closedcaption
function is interrupted.
•In external input mode, the following screen isdisplayed;
e.g.) Whenan external device isconnected to VIDEO1input
jack,.
[VIDE01]
•Theinformation display will automatically disappear in a
few seconds when the dosed coption is on.
i 111;
i _il¸
ic:
} ii_!i!!i
EN
[]TV Screen Display Mode
3-5typesofdisplaymodescanbeselectedwhenthe unit receives4:3 or
16:9video signaloranexternaldeviceisconnectedto the unit.Thereare3
typesofdisplaymodesaccordingto PCinputsignals.
Press [SCREEN MODE _] repeatedly to switch the TV
aspect ratio.
SCREEN
HODE
For 4:3 video signal
Q 0
© o =>NO ON
i
-I°÷°1oo
For 16:9 video signal
: digital mode
=_>: analog/external input mode
SIDEBAR
Select to display a 4:3 picture at its original size.
The black bars appear on the left and right sides of the
screen.
FULL
Select to display a 4:3 picture to fill the screen,
Select to reduce the black bars on top and bottom.
WIDE
Digital mode:
Select to display a 4:3 picture to fill the screen and
shrink"FULL" picture horizontally.
Analog/external input mode:
Select to display a 4:3 picture to fill the screen and
stretch "FULL" picture horizontally.
,,_ :digital mode
_> :analog /external input mode
FULL
Select to display a 16:9 picture to fill the screen,
SIDE CUT
Select to display a 16:9 picture to fill the screen and
stretch "FULL" picture horizontally, The left and right
sides of the picture will be cropped out.
ZOOM _'_vaiP_i_I_i_h _/_c'_ xl I_-_I/)_ _od_orfly
Select to enlarge a 16:9 picture without distorting the
aspect ratio.
MOVIE
Select to reduce the black bars on top and bottom.
EXPAND _',u_iP_b,_ ,_ _/oO' x_m_4 _,_d <:>ly
Select to reduce the black bars on the left and right
sides.
Note:
•Youmay not switch the display mode depending on the
program.
EN
For PC input signal
800 x 600 SVGA
1,024 x 768 XGA
Display a vertically stretched picture without distortinc
the aspect ratio.
The black bars appear on the left and right sides of the
screen.
848 x 480 WVGA
1,280 x 720
1,280 x 768 WXGA
1,360 x 768
720 x 400 BIOS
Display a horizontally stretched picture without
distorting the aspect ratio.
The black bars appear on the top and bottom sides of
the screen.
1,440 x 900 WXGA+
Display a picture in its original size.
Note:
•You can change the screen resolution on yourPC.
i _il¸
ilii_!i!!i
_i_ii,iiiii
ii i_ii:!i
EN
[] Channel Add/Delete
Thechanneladd/deletefunctionletsyouaddthechannelthat wasnot
addedbyautochannelscanduetothe receptionstatusatthe initial
setting.Youcanalsodeletetheunnecessarychannels.
1 Press [SETUP] to display the main menu. Press [SETUP] to exit.
2 Use [Cursor •/V] to select"CHAN NEL SETUP",
then press [ENTER].
e.g.) digital TV mode
or
-WSETUP -
CHANNEL SETUP
V-CHIP SETUP
LANGUAGE [ENGLISH]
CAPTION [OFF]
BACK LIGHT [gRIGH_]
COLOR TEMR [NORMAL]
DTVCC
Note:
• '`ADD/DELETE(DTV)"or "ADD/DELETE"menu will disappear
automatically in a few seconds.
• In the digital mode (DTV),you can add or delete channels
only for major channel
•Once you delete a DTV channel, you cannot recover the
channel without performing auto channel scan again.
(Referto "Auto Channel Scan" on page 14.)
• By using [CH. A/V], you can select the memorized
channels only.
Use [Cursor • /Y] to select "ADD/DELETE(DTV)" or
"ADD/DELETE', then press [ENTER].
e.g.) digital TV mode
-CHANNEL SETUP-
or ADD_DELETE(CTV)
AUTO PRESETCH(DTV)
AUTO PRESETCH(TV_DTV_
AUTO PRESETCH(CATV)
! CAW takes approx 50rnin
Select the channel you want to add or delete.
(Refer to "Channel Selection" on page 15.)
e.g.) digital TV mode
D25
ADDCELETE:DTV
Use [Cursor _1 /I_] to select"ADD" or"DELETE't
_) or
•To add or delete another channels, repeat steps 4 to 5.
•Color of channel number displayed at the right top of
the TV screen indicates;
- Blue: The selected channel will be added.
- Red: The selected channel will be deleted.
EN
[] Picture Adjustment
Youcanadjustbrightness,contrast,color,tint and sharpness.
Press [PICTURE] to adjust the picture quality.
PICTURE
2 Use [Cursor • /V] to select the picture quality type
you want to adjust.
or
3 Use [Cursor _1/1_] to adjust the quality.
Cursor <1 Cursor I_
BRIGHTNESS to decreasebrightness to increasebrightness
CONTRAST to decreasecontrast to increase contrast
COLOR to decreasecolor to brighten color
TINT to add red to add green
SHARPNESS to makesoft to make clear
Press [RETURN _ ]to exit.
No te:
•Thepicture adjustmentserting display will automatically
disappear in a few seconds.
• In PCmode, you can select only "BRIGHTNESS"or
CONTRAST".
[] Closed Caption
Youcanview closedcaptioning (co)for TVprograms,moviesand news.
Closedcaptionrefer to text of dialogue ordescriptionsdisplayed0n-screen
for the hearing impaired.
Press [SETUP] to display the main menu.
Use [Cursor A IV] to select"CAPTlON", then press
[ENTER] repeatedly to change the setting.
e.g.) digital TV mode
or
- TVSETUP -
CHANNEL SETUP
V-CHIP SETUP
LANGUAGE [ENGLISH]
,>CAPTION [OFF]
SACK LIGHT [BRIGHT]
COLOR TEMP [NORMAL]
DTVC¢
i i!¸¸¸
_iii!i!!i
i iS
2
Caption Mode
CAPTION1 and TEXT1;
are the primary caption and text services.
The captioning or text is displayed in the same
language as the program's dialogue .....
(up to 4 lines of script on the TV screen, where it does
not obstruct relevant parts of the picture).
CAPTION3 and TEXT3;
serve as the preferred data channels.
The captioning or text is often a secondary language.
CAPTION2, CAPTION4, TEXT2 and TEXT4;
are rarely available and broadcasters use them
only in special conditions, such as when "CAPTION 1"
and "CAPTION 3" or "TEXT1" and "TEXT3" are not
available.
• There are 3 display modes according to programs:
Paint-on mode: Displays input characters on the TV
screen immediately.
Pop-on mode: Once characters are stored in
memory, they are displayed all at
once.
Roll-up mode: Displays the characters continuously
by scrolling (max. 4 lines).
!¸¸%¸
_i!ii!iii
EN
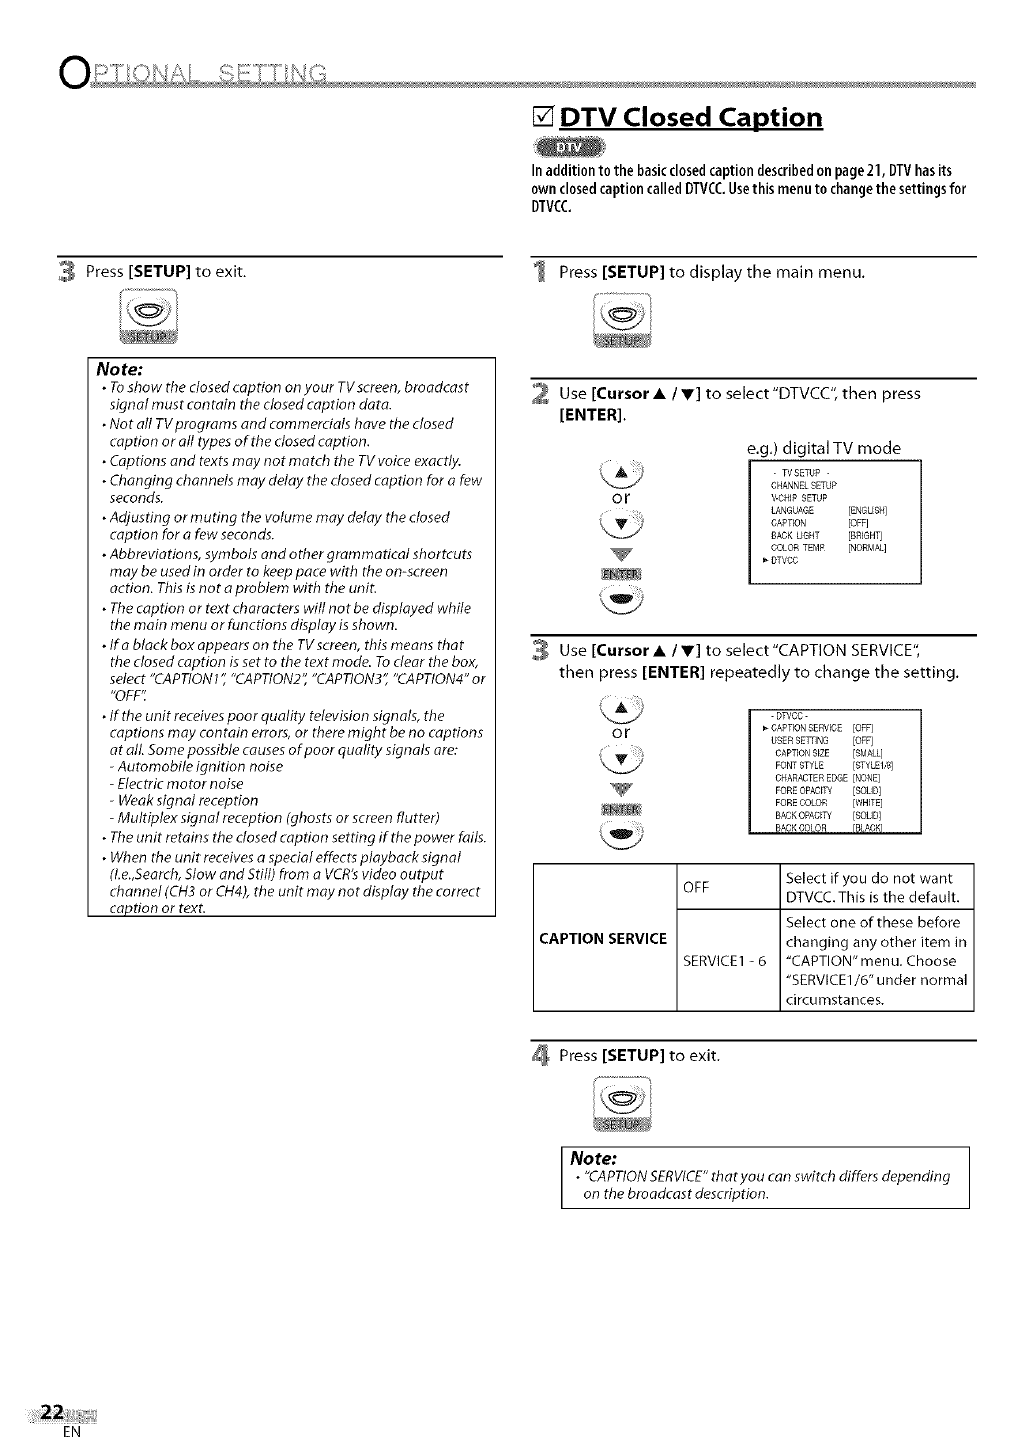
[] DTV Closed Caption
Inaddition to the basicclosedcaptiondescribedon page21, DTVhasits
ownclosedcaptioncalledDTVCCUsethismenuto changethe settings for
DTVCC,
3 Press [SETUP] to exit. 1 Press [SETUP] to display the main menu.
No re:
•To show the dosed caption on your TVscreen, broadcast
signal must contain the closed caption data.
• Not all TVprograms and commerdals have the closed
caption or all types of the dosed caption.
•Captions and texts may not match the TV voice exactly.
•Changing channels may delay the dosed caption for a few
seconds.
• Adjusting ormuting the volume may delay the closed
caption for afew seconds.
• Abbreviations, symbols and other grammatical shortcuts
may be used in order to keep pace with the on-screen
action. This is not a problem with the unit.
• The caption or text characters will not be displayed while
the main menu or functions display is shown.
• Ifo black box appears on the TVscreen, this means that
the closed caption is set to the text mode. To dear the box,
select "CAPTION 1" "CAPTION2'[ "CAPTION3" "CAPTION4" or
"OFF".
• If the unit receives poor quality television signals, the
captions may contain errors, or there might be no captions
at alL Some possible causes of poor quality signals are:
-Automobile ignition noise
-Electric motor noise
-Weak signal reception
-Multiplex signal reception (ghosts or screen flutter)
• The unit retains the closed caption setting if the power fails.
• When the unit receives aspecial effects playback signal
(I.e.,Search, Slow and Still) from aVCR's video output
channel (CH3 or CH4), the unit may not display the correct
caption or text.
2 Use [Cursor A/Y] to select"DTVCC", then press
[ENTER].
or
e.g,) digital TV mode
- TV SETUP -
CHANNEL SETUP
V-CHIP SETUP
LANGUAGE [ENGLISH]
CAPTION [OFF]
BACK LIGHT [BRIGHT]
GOLOR TEMR [NORMAL]
_-DTVCO
Use [Cursor A/V] to select'CAPTION SERVICE",
then press [ENTER] repeatedly to change the setting.
OF
-DWCC
CAPTIONSERVICE [OFF]
USER SETTING [OFF]
CAPTION SIZE [SMALL]
FONT STYLE [STYLEU8]
CHARACTEREDGE [NONE]
FORE OPACITY [SOUD]
FORE COLOR [WHITE]
BACKOPACITY [SOLID]
BACK COLOR BLACK
CAPTION SERVICE
OFF
SERVICE1 - 6
Select if you do not want
DTVCC. This is the default.
Select one of these before
changing any other item in
"CAPTION" menu. Choose
"SERVICE1/6" under normal
circumstances.
Press [SETUP] to exit.
Note:
•"CAPTIONSERVICE"thatyou can switch differs depending
on the broadcast description.
EN
[] DTVCC Style
Youcanchangethe DTVCCstylesuchasfont,coloror size,etc,
1 Press [SETUP] to display the main menu.
2 Use [Cursor • /V] to select"DTVCC",
then press [ENTER].
or
e,g.) digital TV mode
- TV SETUP -
CHANNEL SETUP
V-CHIP SETUP
LANGUAGE [ENGLISH]
CAPTION [OFF]
BACK LIGHT [BRIGHT]
COLOR TEMR [NORMAL]
DWCC
3 Use [Cursor •/V] to select"USER SETTING",
then press [ENTER] repeatedly to set to "ON".
• Items in the dotted box are available only when
"USER SETTING" is "ON".
or
-DTVCC-
CAPTION SERVICE [SERVICE16]
PONT STYLE [STYLEBB]
CHARACTER EDGE [NONE]
PORE OPACITY [SOLID]
PORE COLOR [WHITE] i
i BACK OPACITY [SOUD]
_BACK COLOR [BLACK]
Use [Cursor • /V] to select an item, then press
[ENTER] repeatedly to change the setting for the item.
or - DTVCC
CAPTION SERVICE [SERVlCEI_]
USER SETTING [ON]
_- CAPTION SIZE [SMALL]
PONT STYLE [STYLEB8]
CHARACTER EDGE [NONE]
PORE OPACITY [SOLID]
PORE COLOR [WHITE]
BACK OPACITY [SOLID]
BACK COkOR BLACK
CAPTION SIZE
FONT STYLE
CHARACTER EDGE
FORE OPACITY
FORE COLOR
BACK OPACITY
BACK COLOR
Press [SETUP] to exit.
CAPTION SIZE
Closed captioning font size can be changed as below.
FONT STYLE
Font style of the displayed caption can be switched as
below.
CHARACTER EDGE
Edge type of the displayed caption can be switched
as below.
FORE COLOR, BACK COLOR
Font and background color of the displayed caption
can be switched as below.
FORE OPACITY, BACK OPACITY
Text and background opacity of the displayed caption
can be switched as below.
SMALL, MIDDLE, LARGE
STYLE1/8 Proportional font used in the
menu screen
STYLE2/8 Monospaced with serifs
Proportionally spaced with
STYLE3/8 serifs
STYLE4/8 Monospaced with serifs
Proportionally spaced
STYLES/8 without serifs
STYLE6/8 Casual font type
STYLE7/8 Cursive font type
STYLEB/8 Small capitals
NONE,RAISED,DEPRESSED,UNIFORM,
SHADOW LEFT,SHADOW RIGHT
SOLID,TRANSLUCENT,FLASH
WHITE,BLACK,RED,GREEN,BLUE,
YELLOW,MAGENTA,CYAN,TRANSPARENT
SOLID,TRANSLUCENT,FLASH
BLACK,RED,GREEN,BLUE,YELLOW,
MAGENTA,CYAN,TRANSPARENT,WHITE
i i!¸¸¸
iiii[ii
i i!i:!i
i ii!ii':
EN
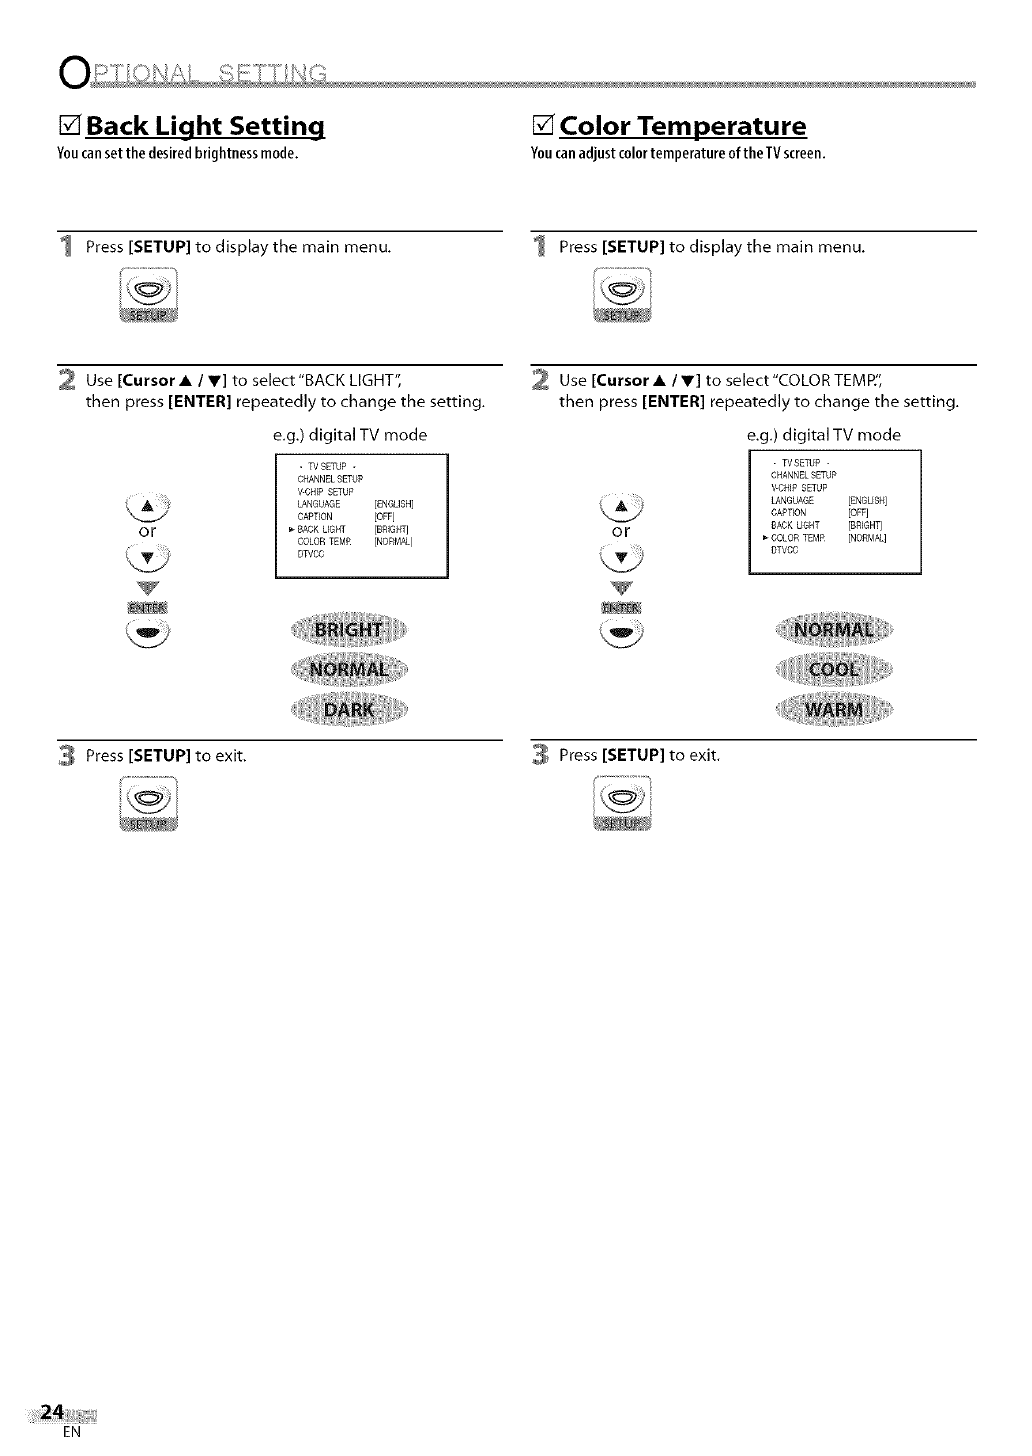
[] Back Light Setting
Youcansetthe desiredbrightnessmode,
[] Color Temperature
YoucanadjustcolortemperatureoftheTVscreen.
1 Press [SETUP] to display the main menu. Press [SETUP] to display the main menu.
2 Use [Cursor •/V] to select"BACK LIGHT",
then press [ENTER] repeatedly to change the setting.
e.g.) digital TV mode
OF
-TV SETUP -
CHANNEL SETUP
V-CHFPSETUP
LANGUAGE [ENGLISH]
CAPTION [OFF]
SACK UGHT [BRIGht]
COLOR TEMP [NORMAL]
DWCC
Use [Cursor •/V] to select"COLOR TEM P:',
then press [ENTER] repeatedly to change the setting,
e.g.) digital TV mode
- W SETUP -
CHANNEL SETUP
V-CHIP SETUP
LANGUAGE [ENOL[SH]
CAPTEON [OFF]
SACK LIGHT [BREGHT]
0 i_ _ COLOR TEMP [NORMAL]
DTVCC
Press [SETUP] to exit. Press [SETUP] to exit.
EN
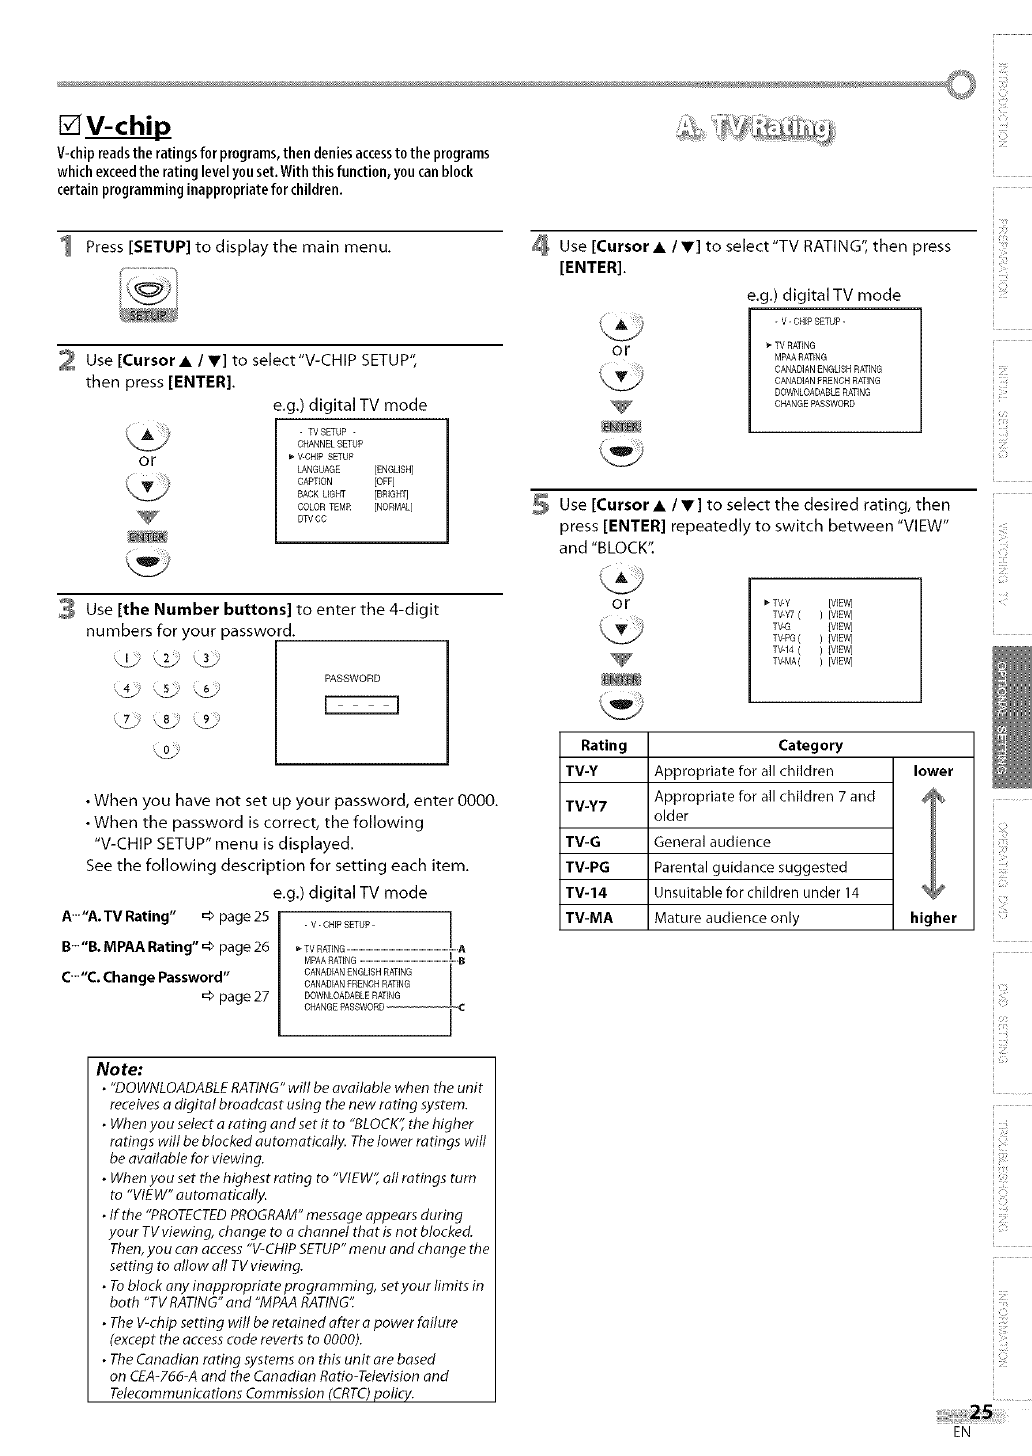
[]V-chil
V-chip reads the ratings for programs, then denies access to the programs
which exceed the rating level you set. With this function, you can block
certain programming inappropriate for children.
1 Press [SETUP] to display the main menu.
2 Use [Cursor • /V] to select"V-CHIP SETUP",
then press [ENTER].
e.g.) digital TV mode
or
-TV SETUP -
CHANNEL SETUP
V-CHIP SETUP
LANGUAGE [ENGLISH]
CAPTION [OFF]
SACK LIGHT [BRIGHT]
CDLDR TEMP [NORMAL]
DW CC
3 Use [the Number buttons] to enter the 4-digit
numbers for your password.
PASSWORD
_0
•When you have not set up your password, enter 0000.
• When the password is correct, the following
"V-CHIP SETUP" menu is displayed.
See the following description for setting each item.
e.g.) digital TV mode
A'""A. TV Rating" =_ page 25
B-'"B. MPAA Rating" _ page 26 MPAARATING ...............................................................................!,B
C'""C. Change Password" CANADIANENGLISHRATING
CANADIANFRENCHRATING
=b page 27 _C
No re:
• "DOWNLOADABLE RATING" will be available when the unit
receives adigital broadcast using the new rating system.
•When you select arating and set it to "BLOCK" the higher
ratings will be blocked automatically. The lower ratings will
be available for viewing.
•When you set the highest rating to "VIEW" all ratings turn
to "VIEW" automatically.
•If the "PROTECTED PROGRAM" message appears during
your TV viewing, change to a channel that is not blocked.
Then, you can access "V-CHIP SETUP" menu and change the
setting to allow all TV viewing.
•To block any inappropriate programming, setyour limits in
both "TV RATING" and "MPAA RATING".
•The V-chip setting will be retained after a power failure
(except the access code reverts to 0000).
•The Canadian rating systems on this unit are based
on CEA-766-A and the Canadian Ratio-Television and
Telecommunications Commission (CRTC) policy.
or
Use [Cursor•/V] to select"TV RATING", then press
[ENTER].
e.g.) digital TV mode
- V- CHiP SETUP-
_" TV RATING
MPAARATING
CANADIANENGLISHRATING
CANADIANFRENCHRATING
DDWNLDADABLE RATING
CHANGEPASSWORD
Use [Cursor• Iv] to select the desired rating, then
press [ENTER] repeatedly to switch between "VIEW"
and "BLOCK".
or TV-Y (VIEW]
TV-Y7 ( ) (VIEW]
TV-G IVIEW]
TV-PG ( ) IVIEW]
TV-14 ( ) IVIEW]
TV-MA( ) (VIEW]
Rating Category
TV-Y Appropriate for all children lower
TV-Y7 Appropriate for all children 7 and 4
older
TV-G General audience
TV-PG Parental guidance suggested
TV-14 Unsuitable for children under 14 _ P
TV-MA Mature audience only higher
ilii_!i!!i
_i_ii'iill
!3
i ii:!i
_iii!i_ill
EN
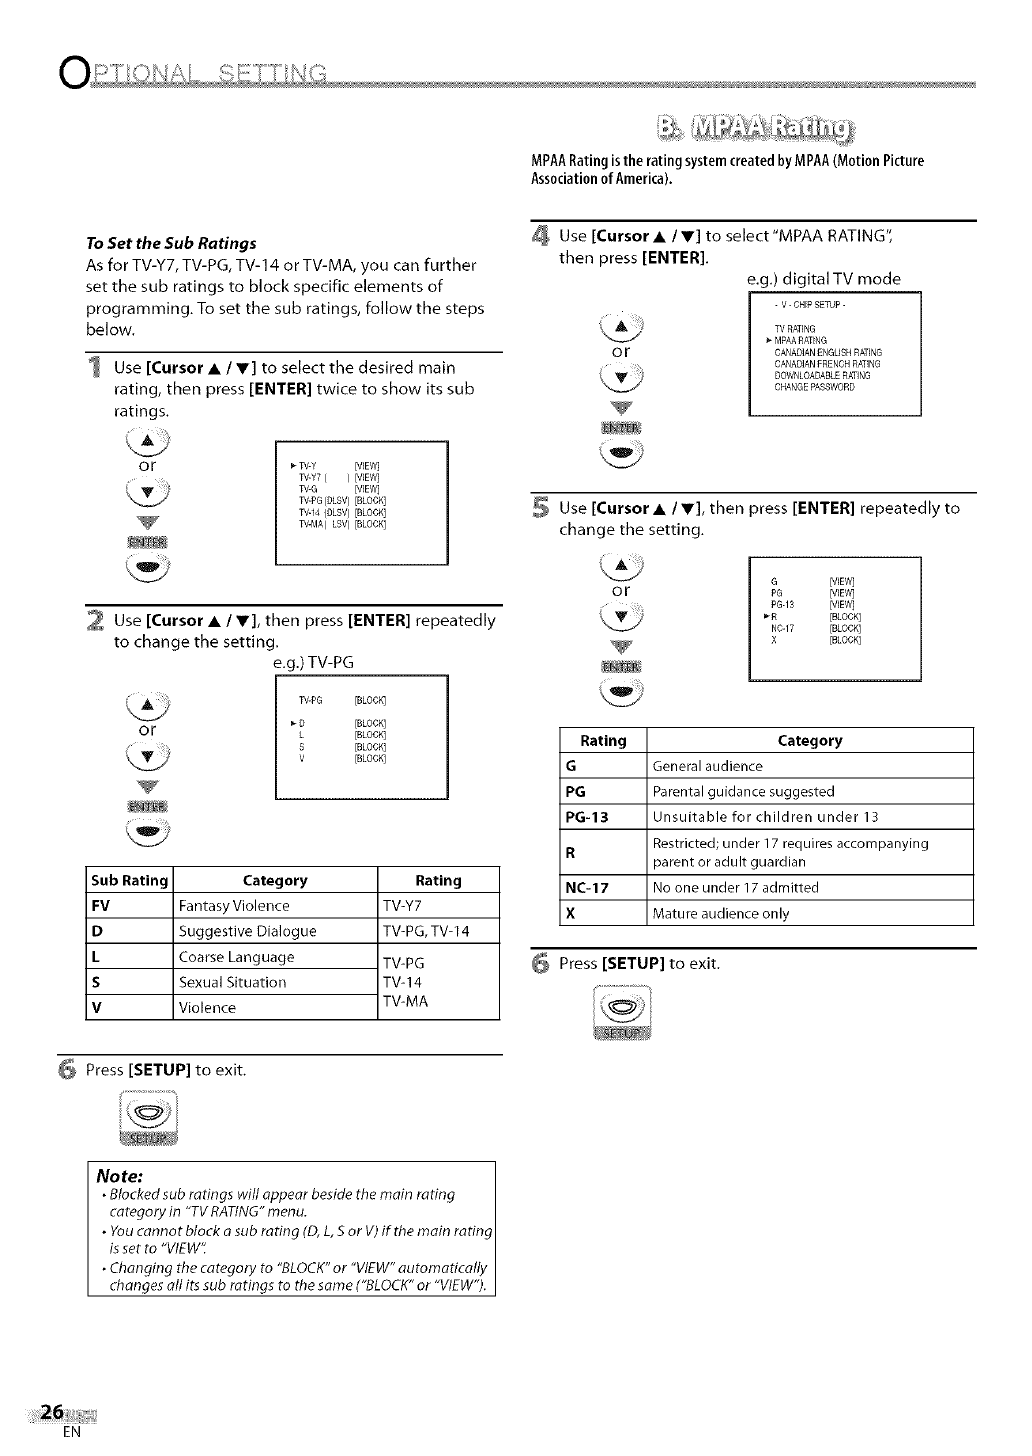
MPAARatingisthe ratingsystemcreatedby MPAA(Motion Picture
Association0fAmerica).
To Set the Sub Ratings
As for TV-Y7, TV-PG, TV-14 or TV-MA, you can further
set the sub ratings to block specific elements of
programming. To set the sub ratings, follow the steps
below.
1 Use [Cursor • /V] to select the desired main
rating, then press [ENTER] twice to show its sub
ratings.
or W-Y [VIEW]
TV-Y7 ( ) [VIEW]
W-G [VIEW]
W-PC (DLSV) [BLOCK]
W-14 (OLSV) [BLOCK]
W-MA(LSV) [BLOCK]
2 Use [Cursor •/V], then press [ENTER] repeatedly
to change the setting.
e.g.) TV-PG
or
TV-PG [BLOCK]
C [BLOCK]
L [BLOCK]
S [BLOCK]
V [BLOCK]
Sub Rating
FV
D
L
S
V
Category
FantasyViolence
Suggestive Dialogue
Coarse Language
Sexual Situation
Violence
Rating
TV-Y7
TV-PG, TV-14
TV-PG
TV-14
TV-MA
Use [Cursor• IV] to select'MPAA RATING",
then press [ENTER].
e.g.) digital TV mode
-V- CHFPSETUP-
TV RATING
MPAARATING
CANADIANENGLISHRATING
CANADIANFRENCHRATING
BOWNLOADABLERATING
CHANGEPASSWORD
or
Use [Cursor• IV], then press [ENTER] repeatedly to
change the setting.
or G [VIEW]
PG [VIEW]
PG-13 [VIEW]
_R [BLOCK]
N0-17 [BLOCK]
X [BLOCK]
Rating Category
GGeneral audience
PG Parental guidance suggested
PG-13 Unsuitable for children under 13
R Restricted; under 17 requires accompanying
aarent or adult guardian
NC-17 No one under 17 admitted
X Mature audience only
6 Press [SETUP] to exit.
Press [SETUP] to exit.
No re: I
•Blocked sub ratings will appear beside the main rating
category in "TV RATING" menu. I
• You cannot block a sub rating (D, L, S or V) if the main rating
is set to "VIEW". I
•Changing the category to "BLOCK" or "VIEW" automatically
changes all its sub ratings to the same ("BLOCK" or "VIEW").
EN
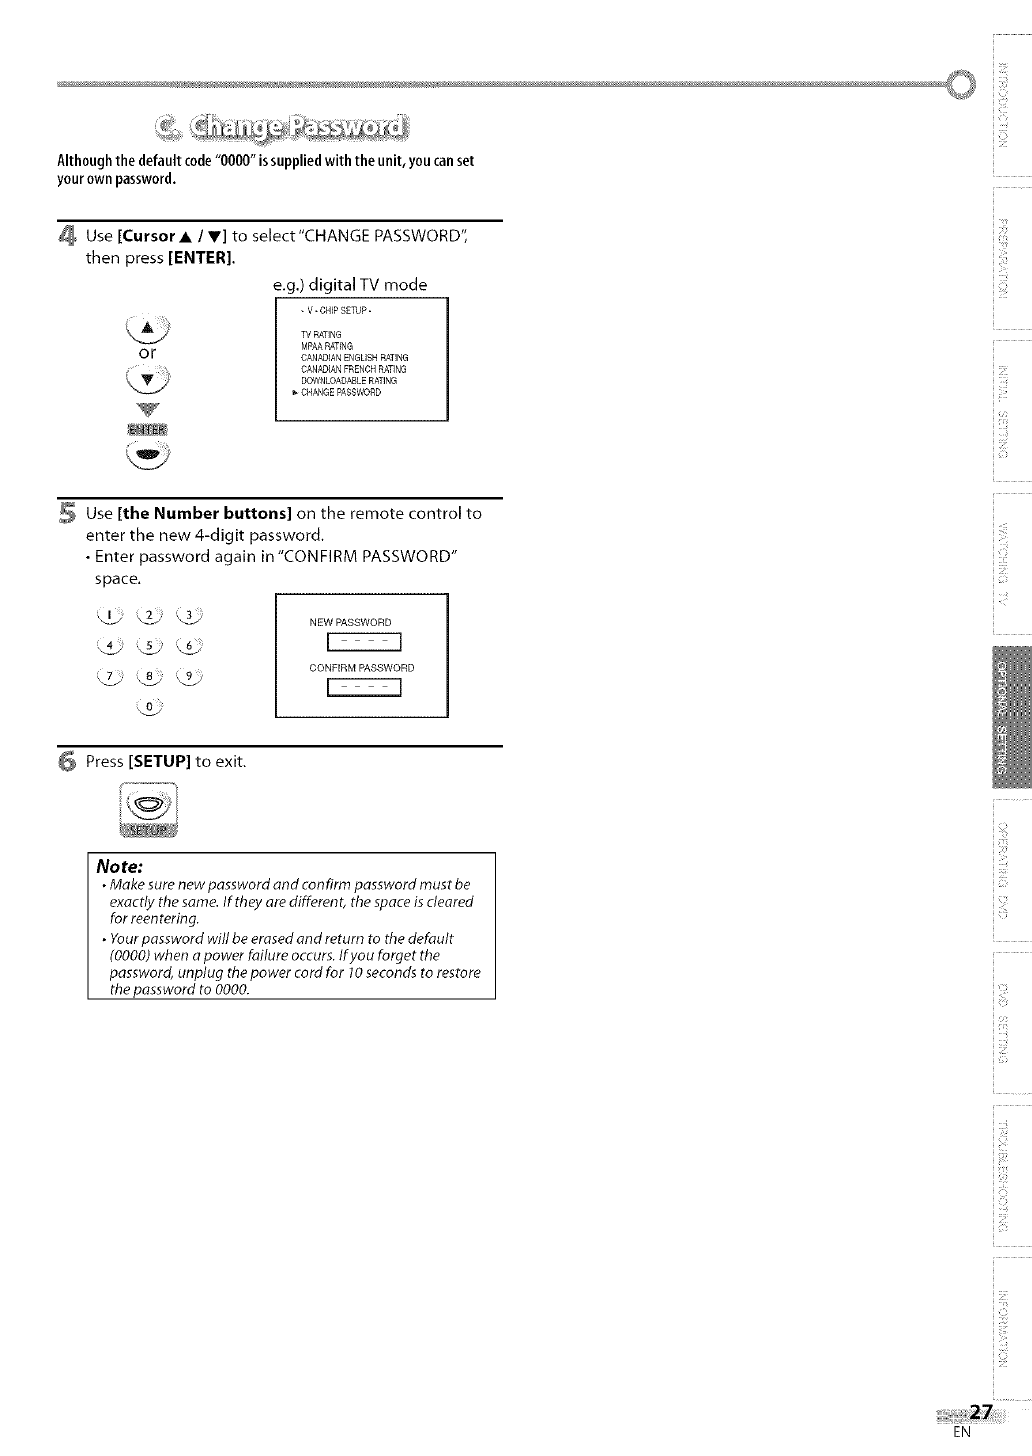
Althoughthe default code"0000" issuppliedwith the unit, youcanset
your own password.
oK
Use [Cursor •/V] to select"CHANGE PASSWORD",
then press [ENTER].
e.g.) digital TV mode
- V - CHIP SETUP-
W RATING
MPAA RATENG
CANADIANENGUSH RATING
CANADIANFRENCH RATING
DOWNLOADABLERATING
CHANGE PASSWORD
Use [the Number buttons] on the remote control to
enter the new 4-digit password.
• Enter password again in "CONFIRM PASSWORD"
space.
Press [SETUP] to exit.
Nore:
•Make surenew password and confirm password must be
exactly the same. If they are different, the space is cleared
for reentering.
•Your password will be erased and return to the default
(0000)when apower failure occurs. If you forget the
password, unplug the power cord for 10seconds to restore
the password to 0000.
i _il¸
ilii_!i!!i
_i_ii,iiiii
ii i_ii:!i
iii!!i:iii
EN
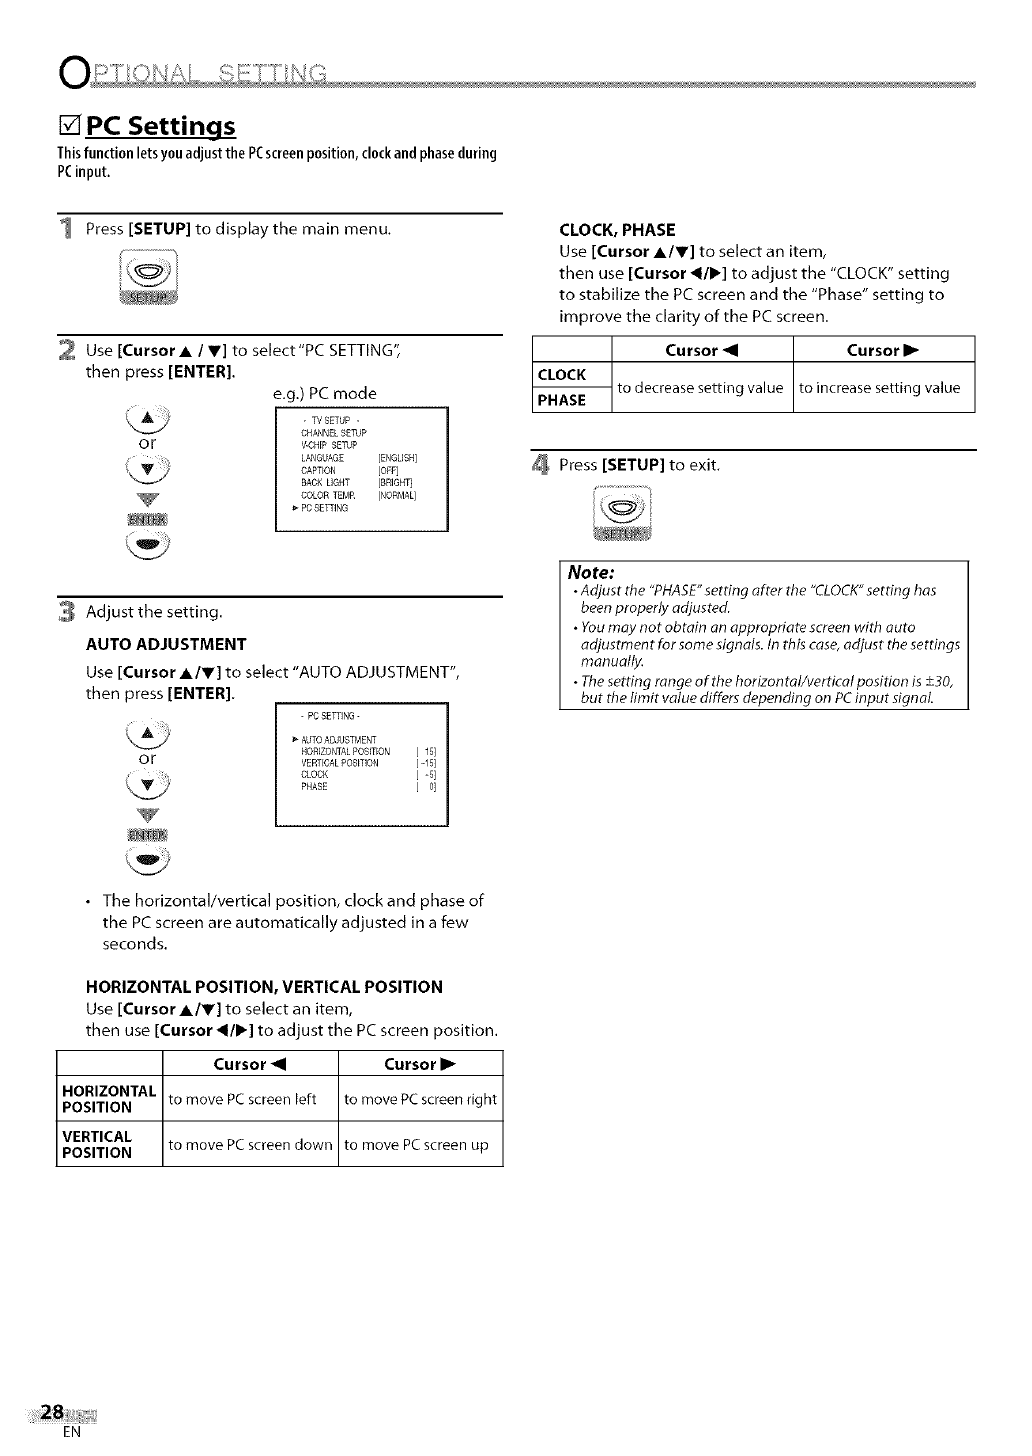
[] PC Settings
Thisfunctionletsyouadjustthe PCscreenposition,clockand phaseduring
PCinput,
1 Press [SETUP] to display the main menu.
2 Use [Cursor • /V] to select"PC SETTING",
then press [ENTER].
e.g.) PC mode
or
-WSETUP -
CHANNEL SETUP
V-CHIP SETUP
LANGUAGE [ENGLISH]
CAPTION [OFF]
BACK LIGHT [BRIGH_
COLOR TEMR [NORMAL]
_"PCSETTING
CLOCK, PHASE
Use [Cursor •Iv] to select an item,
then use [Cursor _II_] to adjust the "CLOCK" setting
to stabilize the PC screen and the "Phase" setting to
improve the clarity of the PC screen.
Cursor _1 Cursor I1_
CLOCK to decrease setting value to increase setting value
PHASE
Press [SETUP] to exit.
3 Adjust the setting.
AUTO ADJUSTMENT
Use [Cursor •Iv] to select "AUTO ADJUSTMENT",
then press [ENTER].
or
- PC SETTING -
AUTOADJUSTMENT
HORIZONTALPOSmON [ 15]
VERTICALPOSITION [ -15]
CLOCK [ -_]
PHASE [ 0]
Note:
•Adjust the "PHASE"setting after the "CLOCK"setting has
been properly adjusted.
• Youmay not obtain on appropriate screen with auto
adjustment for some signals. In this case,adjust the settings
manually.
• Thesetting range oftbe horizontot/vertiealposition is +-30,
but the limit value differs depending on PCinput signal.
•The horizontal/vertical position, clock and phase of
the PC screen are automatically adjusted in a few
seconds,
HORIZONTAL POSITION, VERTICAL POSITION
Use [Cursor •Iv] to select an item,
then use [Cursor _II_] to adjust the PC screen position.
Cursor _1 Cursor I_
HORIZONTAL to move PC screen left to move PCscreen right
POSITION
VERTICAL to move PC screen down to move PC screen up
POSITION
EN

[] Playable Media
DVD-VIDEO DVD-RW
_w
DVD-R DVD+RW DVD+R CD-DA CD-RW
digital video (MPEG2) digital audio
5 inches (12 cm)
CD-R
[] Unplayable Media
NEVER play back the following discs. Otherwise, malfunction may result!
3 inch (8 cm) disc, DVD-RAM, DVD-audio, CD-i, photo CD, video CD, DVD with region codes other than 1 or ALL, DTS-CD,
DVD-ROM for personal computers, CD-ROM for personal computers, the discs with labels, scratches, stains, blemishes, etc.,
HD DVD, Blu-ray Disc, CD-RW/-R with MP3 files.
On the following disc, the sound MAY NOT be heard.
super audio CD
Any other discs without compatibility indications
i !!)_
!?)
i i]iii
iIL[
ii ]i]_
Note=
•Unfinolized discscannot be played back.
• For DVD-RW/R,discsrecorded in the VR(video recording) format cannot beplayed back. Only the finalized video format discscan beplayed
back.
• Some discs cannot be played back becauseof incompatible recording conditions, characteristics of the recorder or special properties of
discs.
• Only the sound recorded on the normal CDlayer can be delivered. Thesound recorded on the high density super audio CDlayer cannot be
delivered.
• Do not usea single CD adaptor which makes 3inch (8cm) to 5 inch (12 cm) disc.
• You can play back discs which bear the marks listed in "Playable Media". Ifyou usenon-standardized discs, this unit may not play them
back. Evenif they are played back, the sound or video quality will be compromised.
• If the recorded portion oftbe disc is too small (less than 2-3/16 inches (55 mm) across), it may not play back properly.
This unit has been designed to play back DVD
with region 1. DVD must be labeled for ALL
regions or for region 1 in order to play back on
the unit. You cannot play back DVD that are
labeled for other regions. Look for the symbols [_
on your DVD. If these region symbols are not on J
your DVD, you cannot play back the DVD in this
unit.
The number inside the globe refers to region of the world.
A DVD labeled for a specific region can only be played
back on the unit with the same region code.
_i_iiiiii
DVD is recorded in different color systems throughout the
world. The most common color system is NTSC (which is
used primarily in the United States and Canada).
This unit uses NTSC, so DVD you play back must be
recorded in the NTSC system. You cannot play back DVD
recorded in PAL color systems.
!]i]
ii [:!i
_iii!)ill
ii :i_
EN
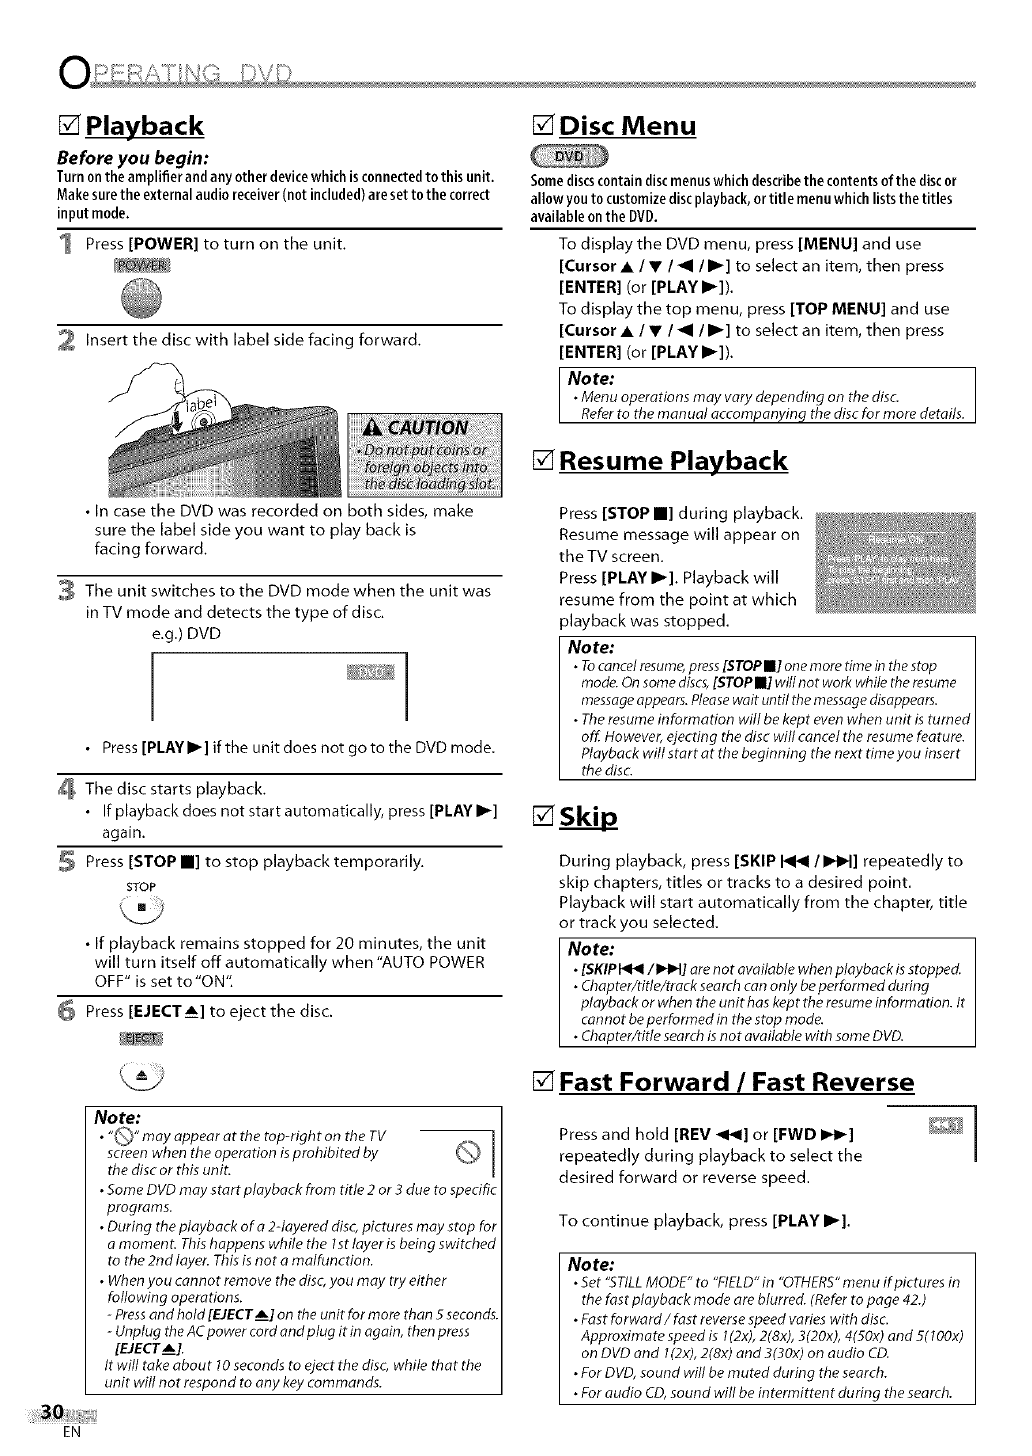
[] Playback
Before you begin:
Turnontheamplifierandanyotherdevicewhichisconnectedto thisunit,
Makesurethe external audioreceiver(notincluded)aresettothe correct
inputmode,
1 Press [POWER] to turn on the unit,
2 Insert the disc with label side facing forward.
[] Disc Menu
Somediscscontain discmenuswhichdescribethe contentsof the discor
allow you to customizediscplayback,or title menuwhich liststhe titles
availableon the DVD.
To display the DVD menu, press [MENU] and use
[Cursor A/V/_1 111_]to select an item, then press
[ENTER] (or [PLAY I_]).
To display the top menu, press [TOP MENU] and use
[Cursor A/V/_1 111_]to select an item, then press
[ENTER] (or [PLAY I_]).
Note:
•Menu operations may vary depending on the disc.
Referto the manual accompanying the disc for more details.
[] Resume Playback
• In case the DVD was recorded on both sides, make
sure the label side you want to play back is
facing forward.
3 The unit switches to the DVD mode when the unit was
in TV mode and detects the type of disc.
e.g.) DVD
I I
• Press [PLAY I_] if the unit does not go to the DVD mode.
The disc starts playback.
• If playback does not start automatically, press [PLAY I_]
again.
Press [STOP II] to stop playback temporarily.
STOP
• If playback remains stopped for 20 minutes, the unit
will turn itself off automatically when "AUTO POWER
OFF" is set to "ON".
Press [EJECTIi] to eject the disc.
Press [STOP II] during playback.
Resume message will appear on
the TV screen.
Press [PLAY I_]. Playback will
resume from the point at which
playback was stopped.
Note:
• Tocancelresume,press[STOPII] one more timein the stop
mode.On somediscs,[STOPII] will not work whilethe resume
messageappears.Pleasewait until the messagedisappears.
• Theresume information will be kept even when unit is turned
off. However, ejecting the disc will cancel the resumefeature.
Playback will start at the beginning the next time you insert
the disc.
[] Skil
During playback, press [SKIP _/I_IH] repeatedly to
skip chapters, titles or tracks to a desired point.
Playback will start automatically from the chapter, title
or track you selected.
Note:
•[SKIP_/llqH] are not available when playback is stopped.
•Chapter/title/track searchcan only beperformed during
playback or when the unit haskept the resume information. It
cannot beperformed in the stop mode.
•Chapter/title searchisnot available with some DVD.
Nore:
•"Q" may appear at the top-right on the TV _% ]
screen when the operation is prohibited by _) [
the disc or this unit. [
• Some DVD may start playback from title 2 or 3 due to specific
programs.
• During the playback of a 2-layered disc,pictures may stop for
a moment. Thishappens while the 1stlayer is being switched
to the 2nd layer. Thisis not a malfunction.
• When you cannot remove the disc, you may try either
following operations.
-Press and hold [EJECTA] on the unit for more than 5 seconds.
-Unplug the AC power cord and plug it in again, then press
[EJECTS].
It will take about 10 seconds to eject the disc, whRe that the
unit will not respond to any key commands.
[] Fast Forward /Fast Reverse
Press and hold [REV _1<] or [FWD IH_]
repeatedly during playback to select the
desired forward or reverse speed.
To continue playback, press [PLAY I1_].
Nore:
• Set "STILLMODE" to "FIELD"in "OTHERS"men u if pictures in
the fast playback mode are blurred. (Refer to page 42.)
• Fastforward/fast reversespeed varies with disc.
Approximate speed is I(2x), 2(8x), 3(20x), 4(50x) and 5( IOOx)
on DVD and 1(2x),2(8x) and 3(30x) on audio CD.
• For DVD,sound will be muted during the search.
• For audio CD,sound will be intermittent during the search.
EN
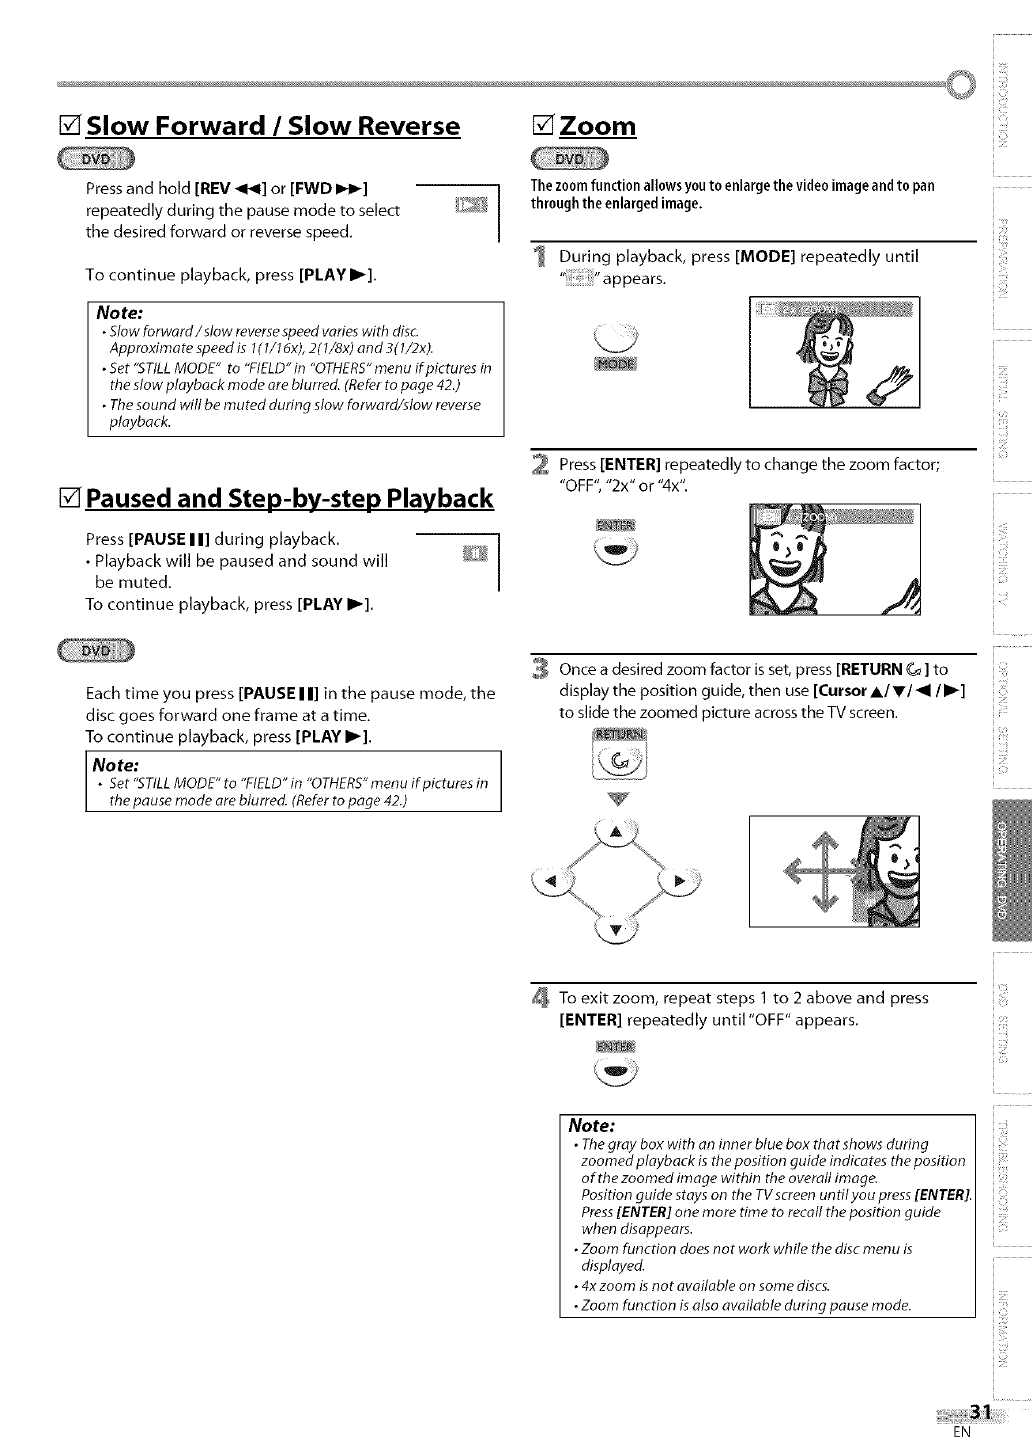
[] Slow Forward /Slow Reverse [] Zoom
Press and hold [REV <<] or [FWD IH_] 1
repeatedly during the pause mode to select _ /
the desired forward or reverse speed.
To continue playback, press [PLAY I1_],
Note:
•Slow forward/slow reversespeed varies with disc.
Approximate speed is I(1/16x), 2(1/8x) and 3(l/2x).
• Set "STILLMODE" to "FIELD"in "OTHERS"menu if pictures in
the slow playback mode are blurred. (Referto page 42.)
• Thesound will be muted during slow forward/slow reverse
playback.
[] Paused and Step-by-step Playback
Press [PAUSE I I] during playback. ]
• Playback will be paused and sound will _ /be muted.
To continue playback, press [PLAY I1_].
Each time you press [PAUSE I I] in the pause mode, the
disc goes forward one frame at a time.
To continue playback, press [PLAY I1_].
Note:
•Set "STILLMODE" to "FIELD"in "OTHERS"menu if pictures in
the pause mode are blurred. (Referto page 42.)
Thezoomfunction allows youto enlargethe video image and to pan
through the enlargedimage.
1 During playback, press [MODE] repeatedly until
2 Press [ENTER] repeatedly to change the zoom factor;
"OFF", "2x" or "4x".
3 Once a desired zoom factor isset, press [RETURN G_] to
display the position guide, then use [Cursor J,/,/_l/1_]
to slide the zoomed picture across the TV screen.
2
To exit zoom, repeat steps 1 to 2 above and press
[ENTER] repeatedly until "OFF" appears.
Note:
•Thegray box with an inner blue box that shows during
zoomed playback is the position guide indicates the position
of the zoomed image within the overall irnage.
Position guide stays on the TV screen until you press[ENTER].
Press[ENTER] one more time to recall the position guide
when disappears.
•Zoom function does not work while the disc menu is
displayed.
•4x zoom isnot available on some discs.
•Zoom function isalso available during pause mode.
EN
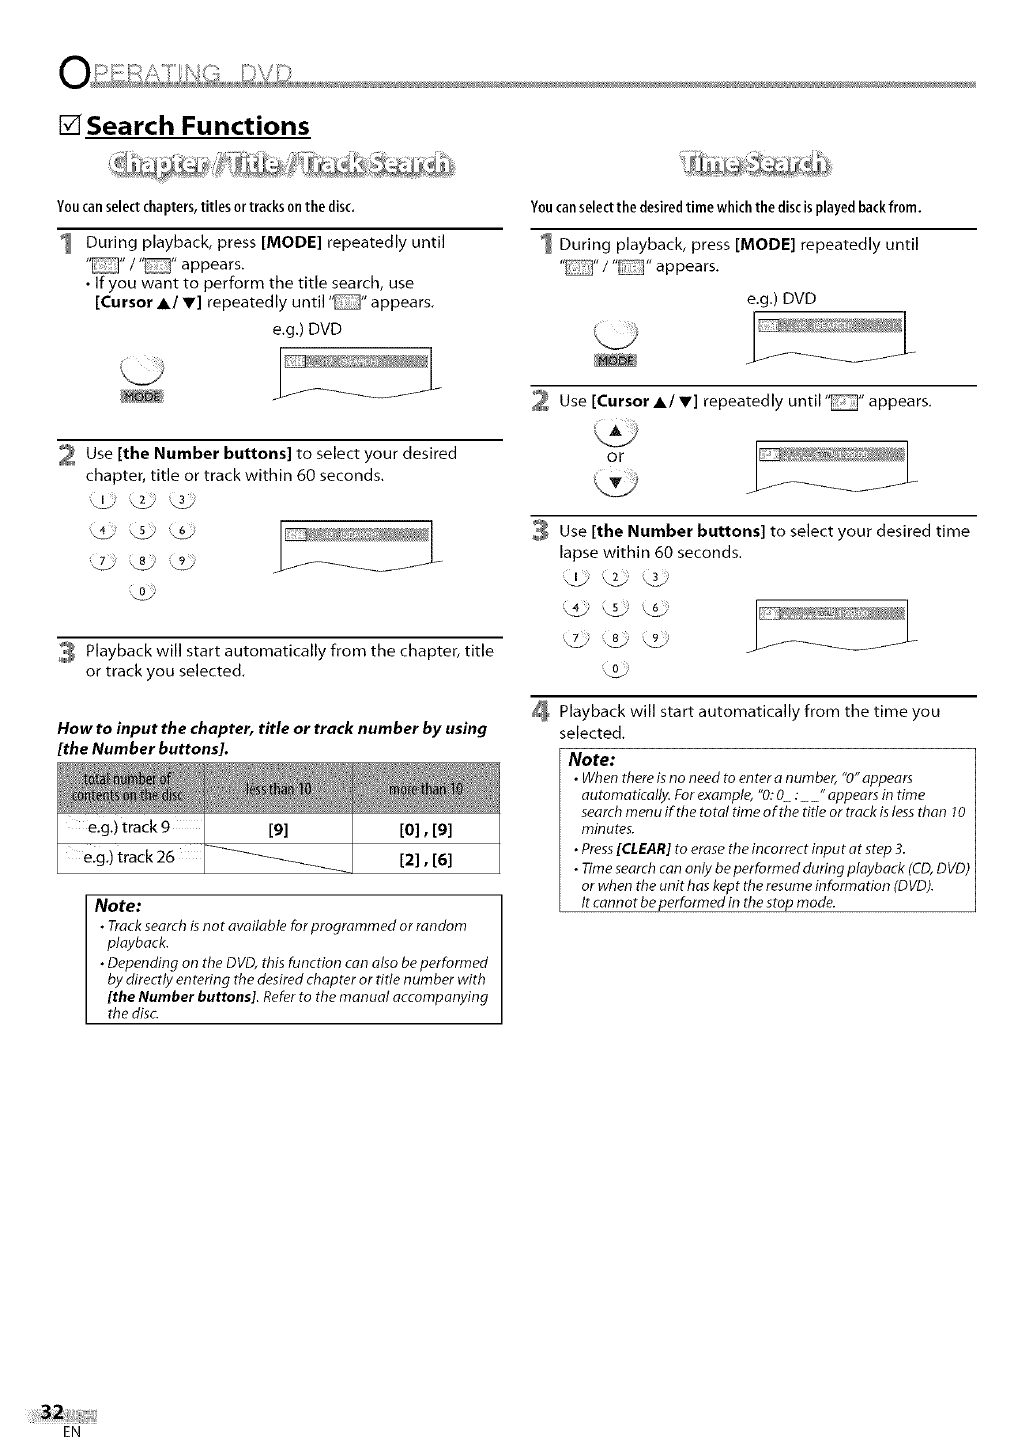
[] Search Functions
Youcanselectchapters,titlesor trackson the disc.
During playback, press [MODE] repeatedly until
" "/'" appears.
• If you want to perform the title search, use
[Cursor A/V] repeatedly until" "appears.
e.g.) DVD
2 Use [the Number buttons] to select your desired
chapter, title or track within 60 seconds.
3 Playback will start automatically from the chapter, title
or track you selected.
How to input the chapter, title or track number by using
[the Number buttons].
[0], [9]
e.g.) track 26 [2], [6]
Note:
•Tracksearch isnot available for programmed or random
playback.
•Depending on the DVD, this function con also be performed
by directly entering the desired chapter or title number with
[the Number buttons]. Refer to the manual accompanying
the disc.
Youcanselectthe desiredtimewhichthediscisplayedbackfrom.
During playback, press [MODE] repeatedly until
"" /"" appears.
e.g.) DVD
Use [Cursor A/V] repeatedly until "_" appears.
or
Use [the Number buttons] to select your desired time
lapse within 60 seconds.
Playback will start automatically from the time you
selected.
Note:
•When there is no need to enter a number, "0" appears
automatically. For example, "0:0 :_" appears in time
search menu if the total time of the title or track is less than 10
minutes.
•Press [CLEAR] to erase the incorrect input at step 3.
•Time search can only be performed during playback (CD, DVD)
or when the unit has kept the resume information (DVD).
It cannot be performed in the stop mode.
EN
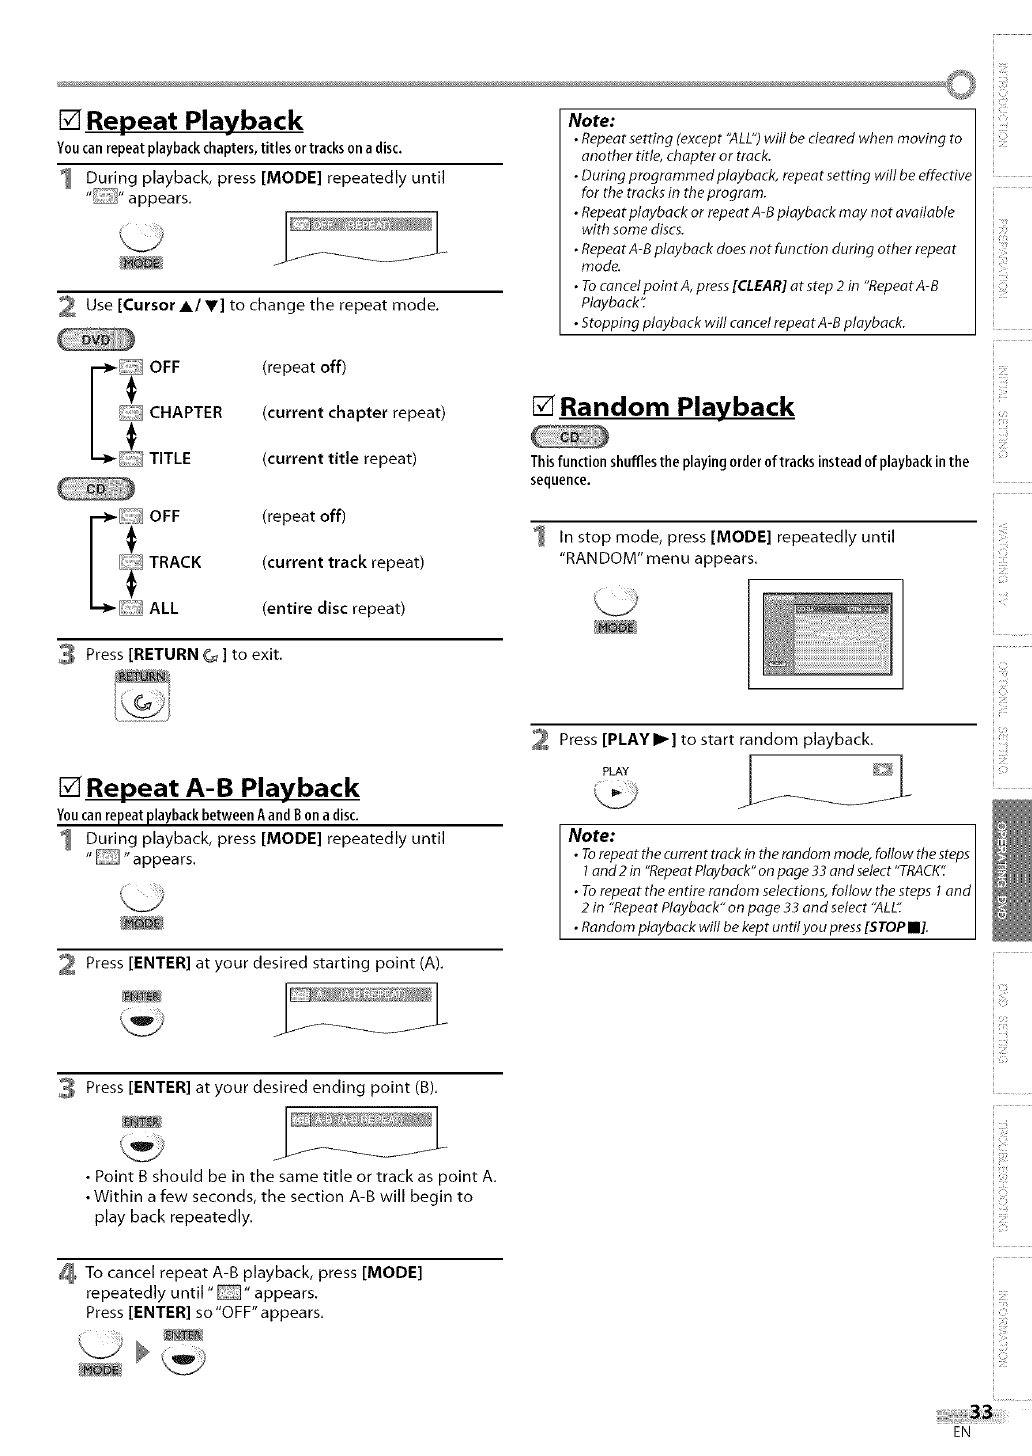
[] Repeat Playback
Youcanrepeatplaybackchapters,titlesortracksona disc.
1 During playback, press [MODE] repeatedly until
" "appears.
2 Use [Cursor A/V] to change the repeat mode.
_OFF (repeat off)
_ CHAPTER (current chapter repeat)
TITLE (current title repeat)
_J OFF (repeat off)
_TRACK (current track repeat)
ALL (entire disc repeat)
Press [RETURN C,_]to exit.
[] Repeat A-B Playback
YoucanrepeatplaybackbetweenAandBona disc.
1 During playback, press [MODE] repeatedly until
""appears.
Press [ENTER] at your desired starting point (A).
Press[ENTER]atyour desired ending point (B).
•Point B should be in the same title or track as point A.
•Within a few seconds, the section A-B will begin to
play back repeatedly.
To cancel repeat A-B playback, press [MODE]
repeatedly until" "appears.
Press [ENTER] so "OFF" appears.
Note:
•Repeat setting (except"ALL")will be cleared when moving to
another title, chapter or track.
•During programmed playback, repeat setting will be effective
for the tracks in the program.
•Repeat playback or repeat A-B playback may not available
with some discs.
•Repeat A-Bplayback does not function during other repeat
mode.
•TocancelpointA, press[CLEAR] atstep 2 in "RepeatA-B
Playback".
•Stopping playback will cancel repeat A-B playback.
[] Random Playback
Thisfunction shuffles the playingorder 0f tracksinsteadof playbackin the
sequence.
1 In stop mode, press [MODE] repeatedly until
"RAN DOM" men u appears.
Press [PLAY I1_] to start random playback.
PLAY _J_
/
Note: 1
•Torepeat the current trackin the random mode, follow the steps I
land 2 in "RepeotPlayback" on page 33 and select"TRACK': I
•Torepeat the entire random selections,follow the steps 1and I
2in "RepeatPlayback" on page 33 and select "ALL".
•Random playback will be kept untilyou press[STOP I].
iii_iiii!
2
ilii_!i!!i
_i_ii,iiiii
ii i_ii:!i
_i!i!iii
EN
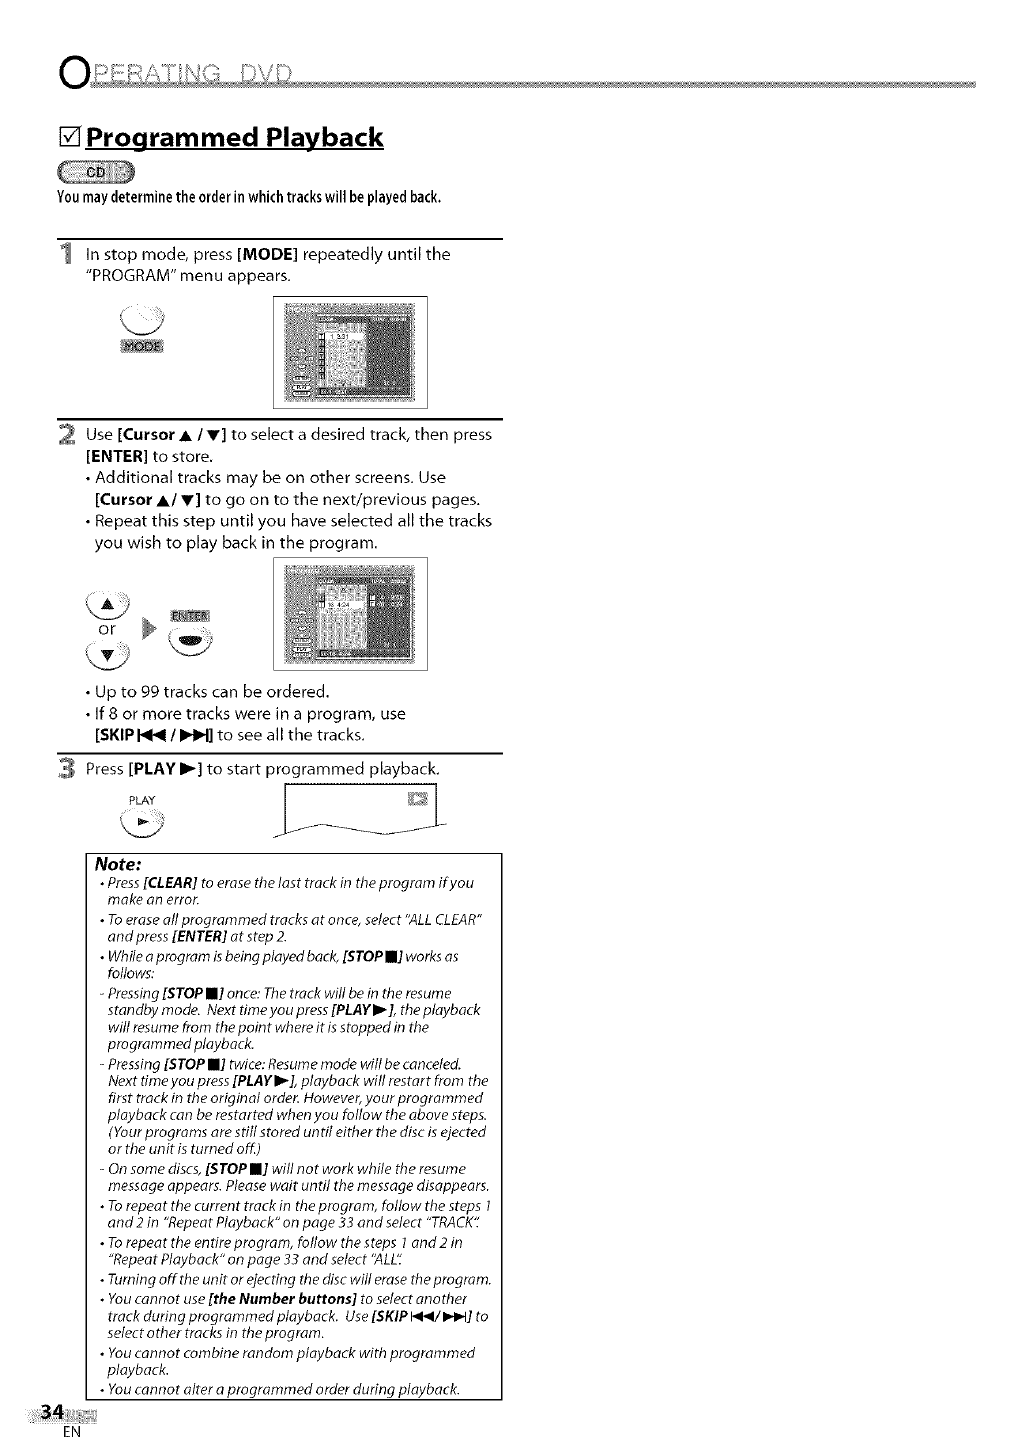
[] Programmed Playback
You may determine the order in which tracks will be played back,
In stop mode, press [MODE] repeatedly until the
"PROGRAM" menu appears.
2 Use [Cursor • /Y] to select a desired track, then press
[ENTER] to store.
•Additional tracks may be on other screens. Use
[Cursor •/V] to go on to the next/previous pages.
• Repeat this step until you have selected all the tracks
you wish to play back in the program.
• Up to 99 tracks can be ordered.
• If8 or more tracks were in a program, use
[SKIP I_1_ /IHIH] to see all the tracks.
3 Press [PLAY I1_] to start programmed playback.
Note:
•Press [CLEAR] to erase the last track in the program ifyou
make an error.
•To erase all programmed tracks at once, select "ALL CLEAR"
and press [ENTER] at step 2.
•While a program is being played back, [STOP m] works as
follows:
-Pressing [STOP m] once: The track will be in the resume
standby mode. Next time you press [PLAY I_], the playback
will resume from the point where it is stopped in the
prograrnmed playback.
-Pressing [STOP m] twice: Resume mode will be canceled.
Next time you press [PLAYI_], playback will restart from the
first track in the original order. However, your programmed
playback can be restarted when you follow the above steps.
(Your programs are still s tored until either the disc is ejected
or the unit is turned off)
-On some discs, [STOP m] will not work while the resume
message appears. Please wait until the message disappears.
•To repeat the current track in the program, follow the steps I
and 2 in "Repeat Playback" on page 33 and select "TRACK".
•To repeat the entireprograrn, follow the steps 1and2 in
"Repeat Playback" on page 33 and select "ALL'_
•Turning off the unit or ejecting the disc will erase the program.
•You cannot use [the Number buttons] to select another
track during prograrnmed playback. Use [SKIPl_/l_q] to
select other tracks in the program.
•You cannot combine random playback with programmed
playback.
•You cannot alter a programmed order during playback.
EN
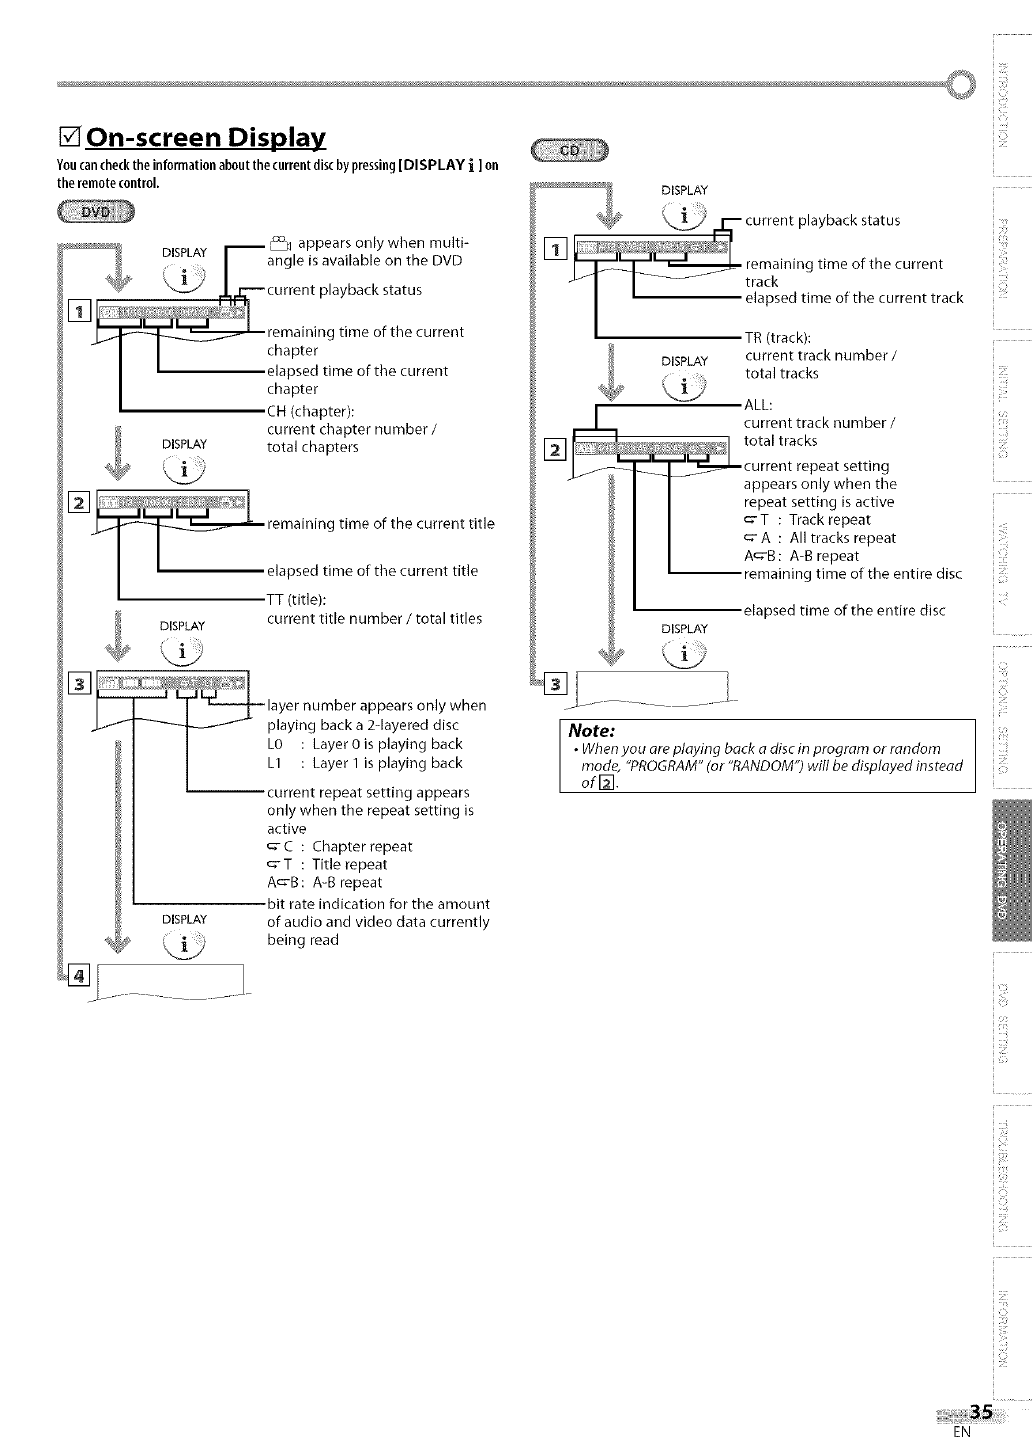
[] On-screen Display
You cancheckthe informationabout the current discby pressing[DISPLAY i[on
the remotecontrol.
DISPLAY appears only when multi-
angle is available on the DVD
flayback status
• " g time of the current
chapter
elapsed time of the current
chapter
,CH (chapter):
current chapter number /
DISPLAY total chapters
[]
_ emaimng time of the current title
I I, ;,:PlSi_de)iime of the current title
current title number /total titles
DISPLAY
-- _-q_layer number appears only when
playing back a 2-layered disc
L0 : Layer0is playing back
L1 : Layer 1 is playing back
current repeat setting appears
only when the repeat setting is
active
_- C : Chapter repeat
_-T : Title repeat
A_-B : A-B repeat
bit rate indication for the amount
DISPLAY of audio and video data currently
being read
O kjj current playbaekstatu,
FiqI l_L" _ remaining time of the current
>_1 I _ track
I I elapsed time of the current track
TR (track):
DISPLAY current track number /
total tracks
ALL:
current track number /
tota} tracks
current repeat setting
appears only when the
repeat setting is active
_-T : Track repeat
_'A : All tracks repeat
A_'B: A-B repeat
remaining time of the entire disc
elapsed time of the entire disc
DISPLAY
Note:
•When you ore playing back adisc in progrom or random
mode, "PROGRAM" (or "RANDOM") will be displayed instead
of F_.
:Z
if ••
z
i 2
ic:
}ii_!i!!i
i _i!,iiii
_Lb
!_i!i
iil,il!
iiiii_i
EN
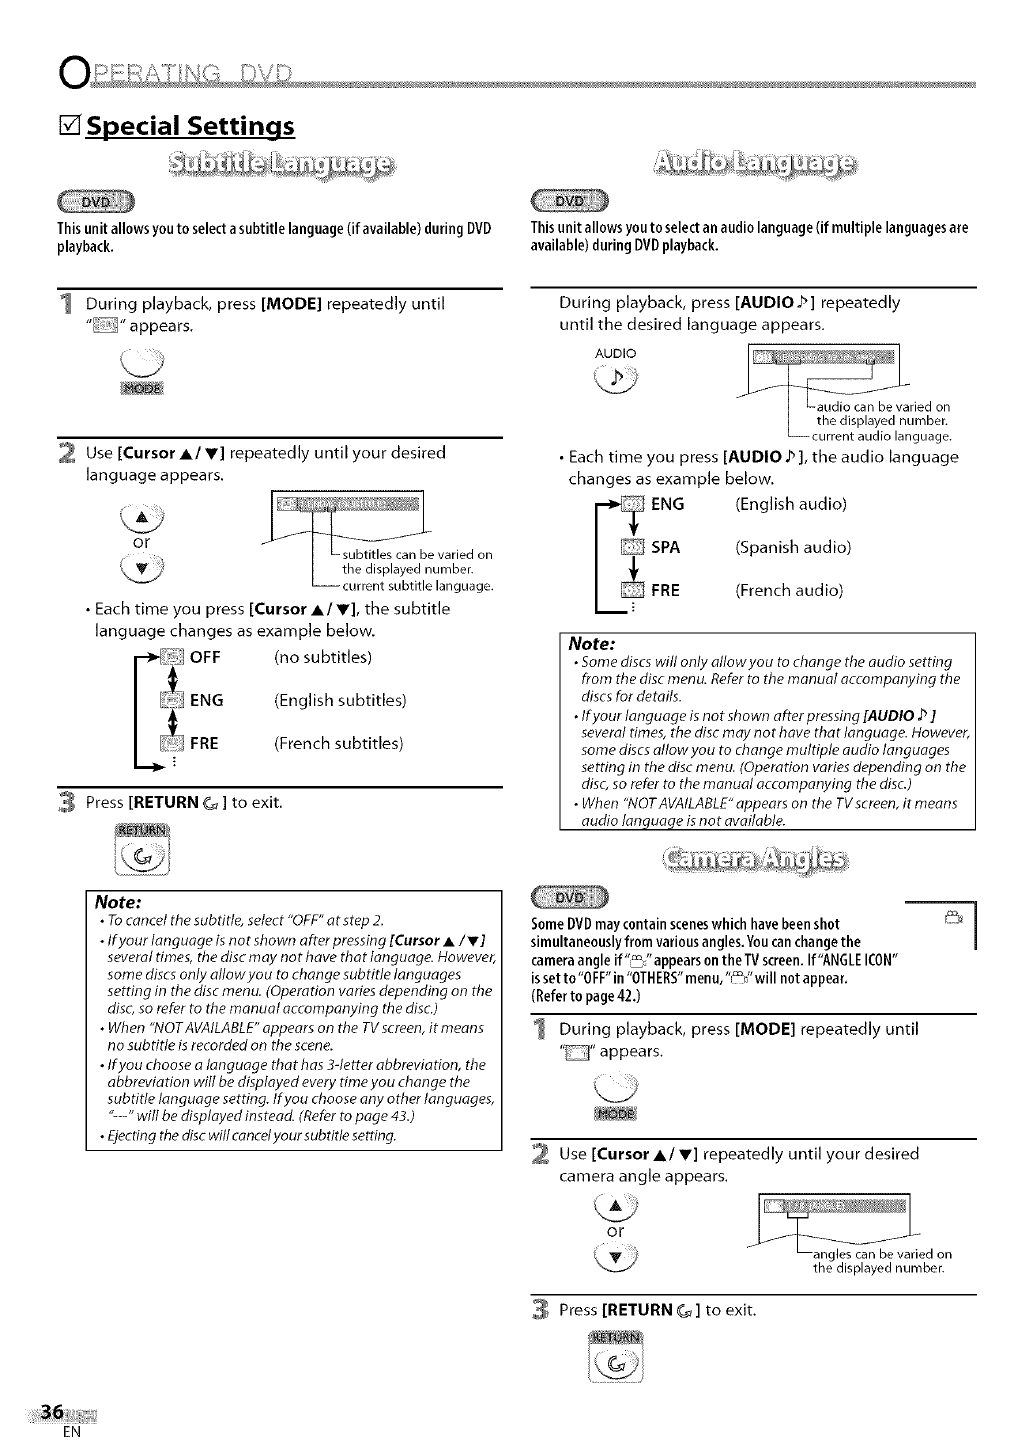
[] Special Settings
Thisunit allows youto selecta subtitle language(if available) duringDVD
playback. Thisunit allowsyouto selectan audio language(if multiple languagesare
available)duringDVDplayback.
1 During playback, press [MODE] repeatedly until
"" appears.
During playback, press [AUDIO J_] repeatedly
until the desired language appears.
AUDIO
2 Use [Cursor A/Y] repeatedly until your desired
language appears.
or
•Each time you press [Cursor A/V], the subtitle
language changes as example below.
OFF (no subtitles)
ENG (English subtitles)
FRE (French subtitles)
3 Press [RETURN _ ] to exit.
• Each time you press [AUDIO J_], the audio language
changes as example below.
ENG (English audio)
SPA (Spanish audio)
FRE (French audio)
Note:
•some discs will only allowyou to change the audio setting
from the disc menu. Referto the manual accompanying the
discsfor details.
•If your language is not shown after pressing [AUDIO b]
several times, the discmay not have that language. However,
some discsallow you to change multiple audio languages
setting in the disc menu. (Operation varies depending on the
disc, so refer to the manual accompanying the disc.)
•When "NOTAVAILABLE"appears on the TVscreen, it means
audio language is not available.
Note:
•Tocancel the subtitle, select "OFF"at step 2.
•If your language is not shown after pressing [Cursor •/,]
several times, the disc may not have that language. However,
some discsonly allow you to change subtitle languages
setting in the discmenu. (Operation varies depending on the
disc, so refer to the manual accompanying the disc.)
•When "NOTAVAILABLE"appears on the TVscreen, it means
no subtitle is recorded on the scene.
•If you choose alanguage that has 3-letter abbreviation, the
abbreviation will be displayed every time you change the
subtitle language setting. If you choose any other languages,
"--" will be displayed instead. (Referto page 43.)
•Ejectingthe discwill cancelyoursubtitle setting.
SomeDVDmaycontainsceneswhichhavebeenshot
simultaneouslyfromvariousangles.Youcanchangethe
cameraangleif"_'appears ontheTV screen.If'ANGLEICON"
issetto"OFF"in"OTHERS"menu,"_%'will not appear.
(Referto page42.)
1 During playback, press [MODE] repeatedly until
"E_]" appears.
Use [Cursor A/V] repeatedly until your desired
camera angle appears.
or
Press [RETURN _] to exit.
the displayed numben
EN
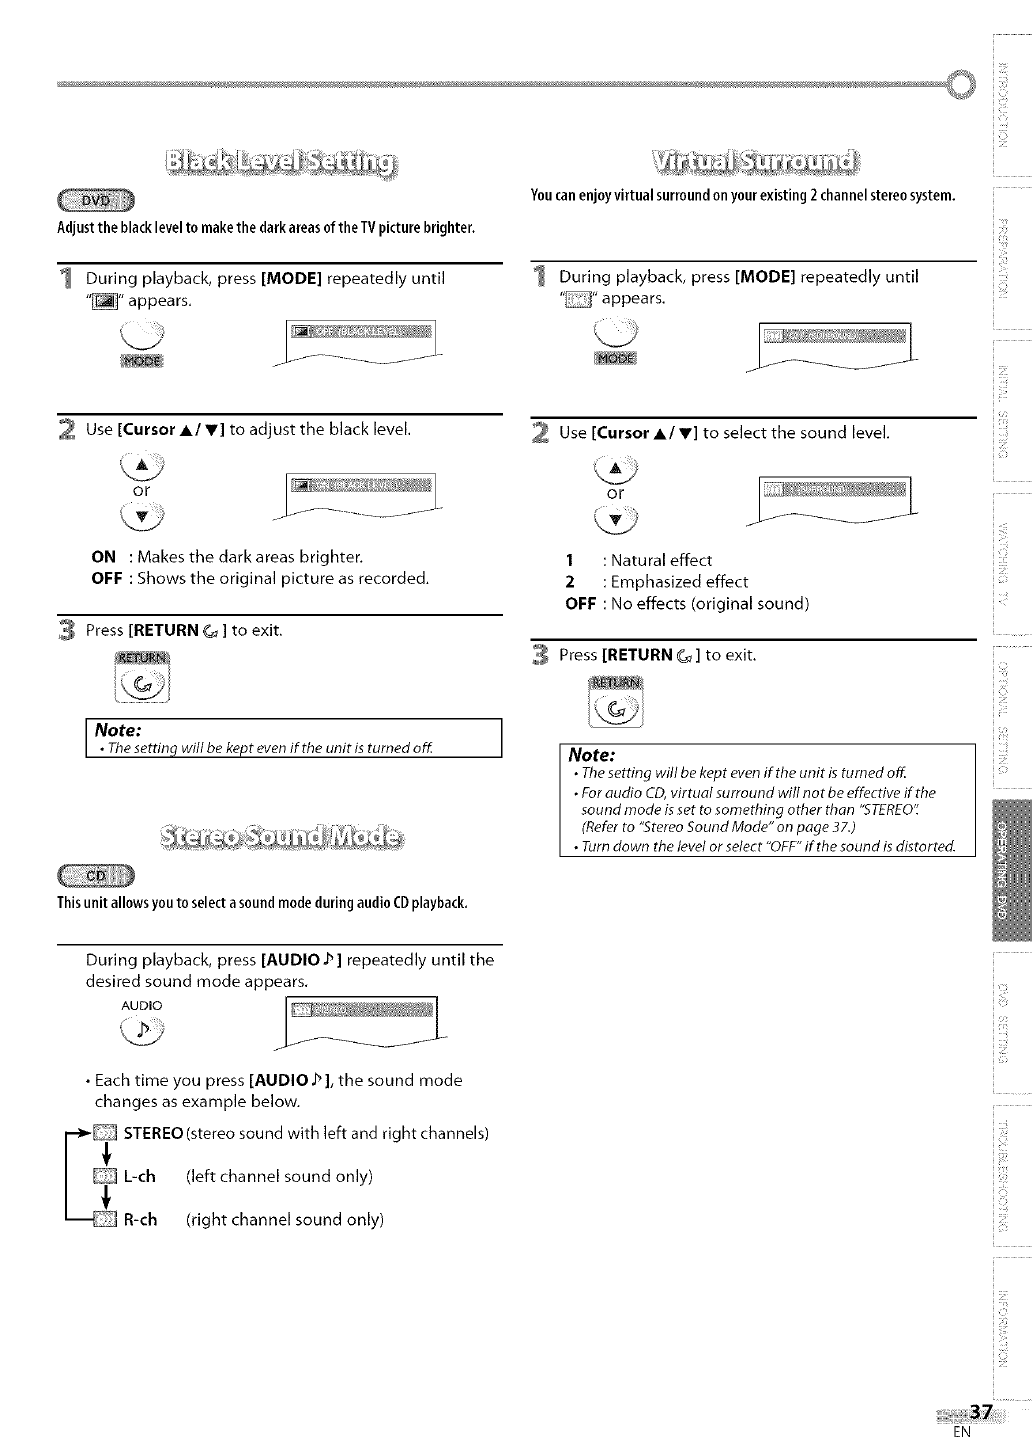
Adjustthe blacklevelto makethedarkareasof theTVpicturebrighter.
1 During playback, press [MODE] repeatedly until
"_" appears.
2 Use [Cursor A/V] to adjust the black level.
ON : Makes the dark areas brighter.
OFF : Shows the original picture as recorded.
3 Press [RETURN _ 1to exit.
Note:
•Thesetting will be kept evenif the unit is turned off
Youcanenjoyvirtual surroundon yourexisting 2 channelstereosystem.
During playback, press [MODE] repeatedly until
"" appears.
J
Use [Cursor A/V] to select the sound level.
or
J
I : Natural effect
2: Emphasized effect
OFF : No effects (original sound)
Press [RETURN G_] to exit.
1Note"
• The setting will be kept evenif the unit is tumed oK
• For audio CD,virtual surround will not be effective if the
sound mode isset to something other than "STEREO".
(Refer to "StereoSound Mode" on page 3Z)
• Turn down the level or select "OFF" if the sound isdistorted.
j
2
Thisunit allowsyou to selecta soundmodeduringaudioCDplayback.
During playback, press [AUDIO2] repeatedly until the
desired sound mode appears.
AUDIO
•Each time you press [AUDIO J_], the sound mode
changes as example below.
_ TEREO (stereo sound with left and right channels)
L-ch (left channel sound only)
_R-ch (right channel sound only)
ilii!i!!i
i _;i,iiiii
i !_i!i
ii i_ii:!i
EN
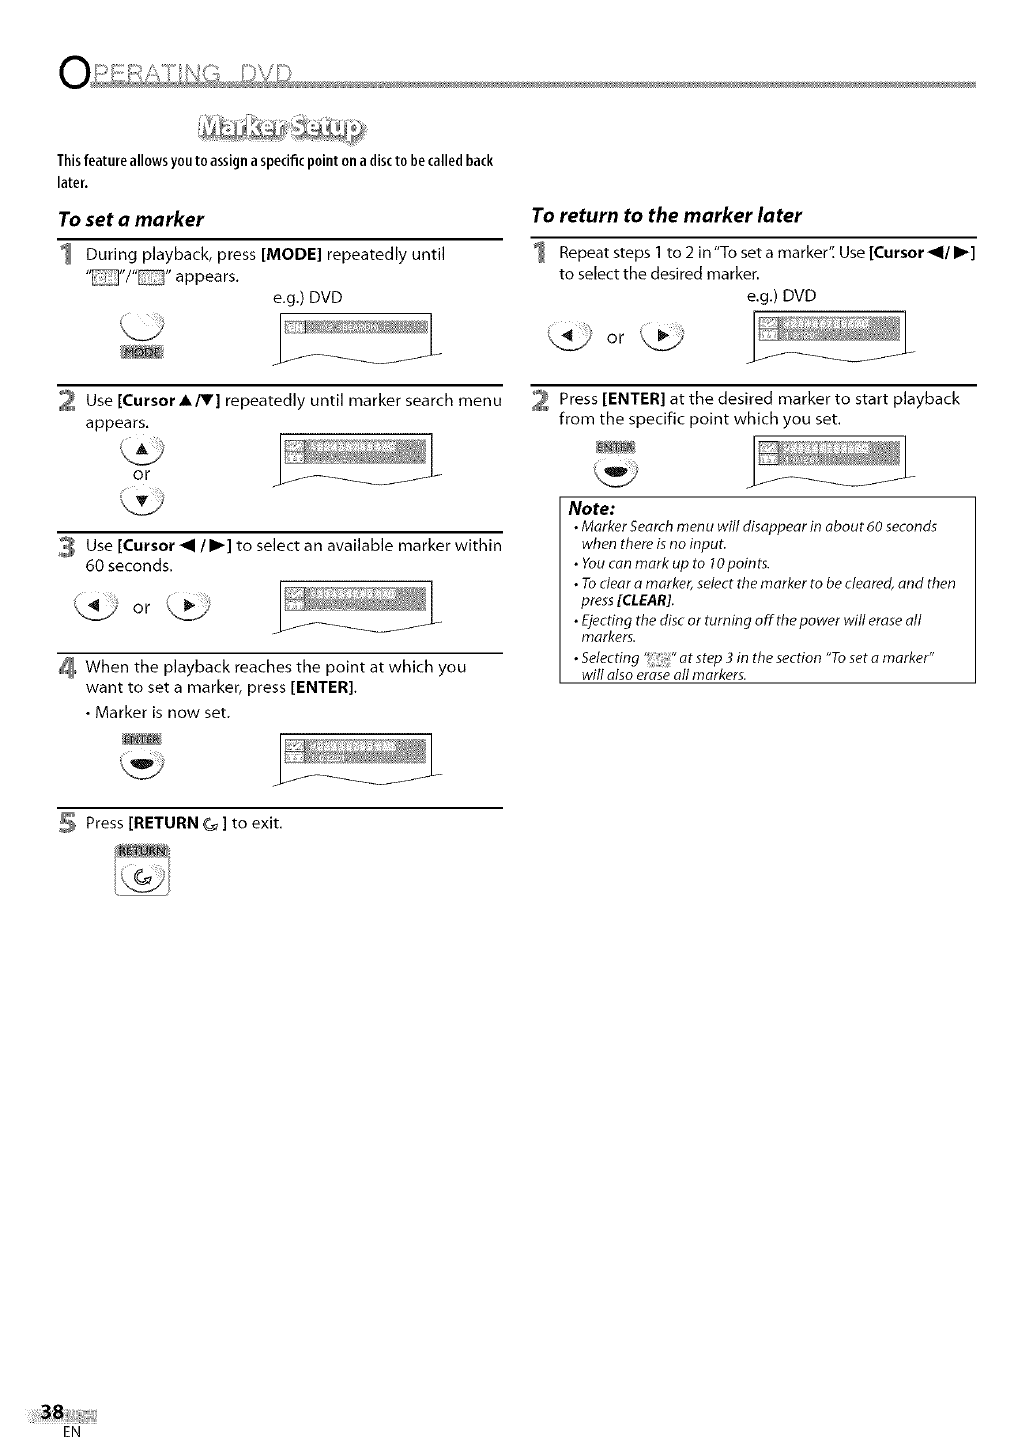
Thisfeature allows youto assigna specificpointon a discto becalledback
later.
To set amarker
During playback, press [MODE] repeatedly until
""/'" appears.
e.g.) DVD
2 Use [Cursor A[V] repeatedly until marker search menu
appears.
or
3 Use [Cursor _1 /I1_] to select an available marker within
60 seconds.
When the playback reaches the point at which you
want to set a marker, press [ENTER].
•Marker is now set.
To return to the marker later
Repeat steps 1 to 2 in"To set a marker". Use [Cursor _1/I1_]
to select the desired marker.
e.g.) DVD
Press [ENTER] at the desired marker to start playback
from the specific point which you set.
Note:
•Marker Search menu will disappear in about 60 seconds
when there isno input.
•Youcan mark up to lOpoints.
•Toclear a marker, select the marker to be cleared, and then
press[CLEAR].
•Ejecting the disc or turning off the power will eraseall
markers.
•Selecting "at step 3 in the section "To set amarker"
will also eraseall markers.
Press [RETURN G_]to exit.
EN
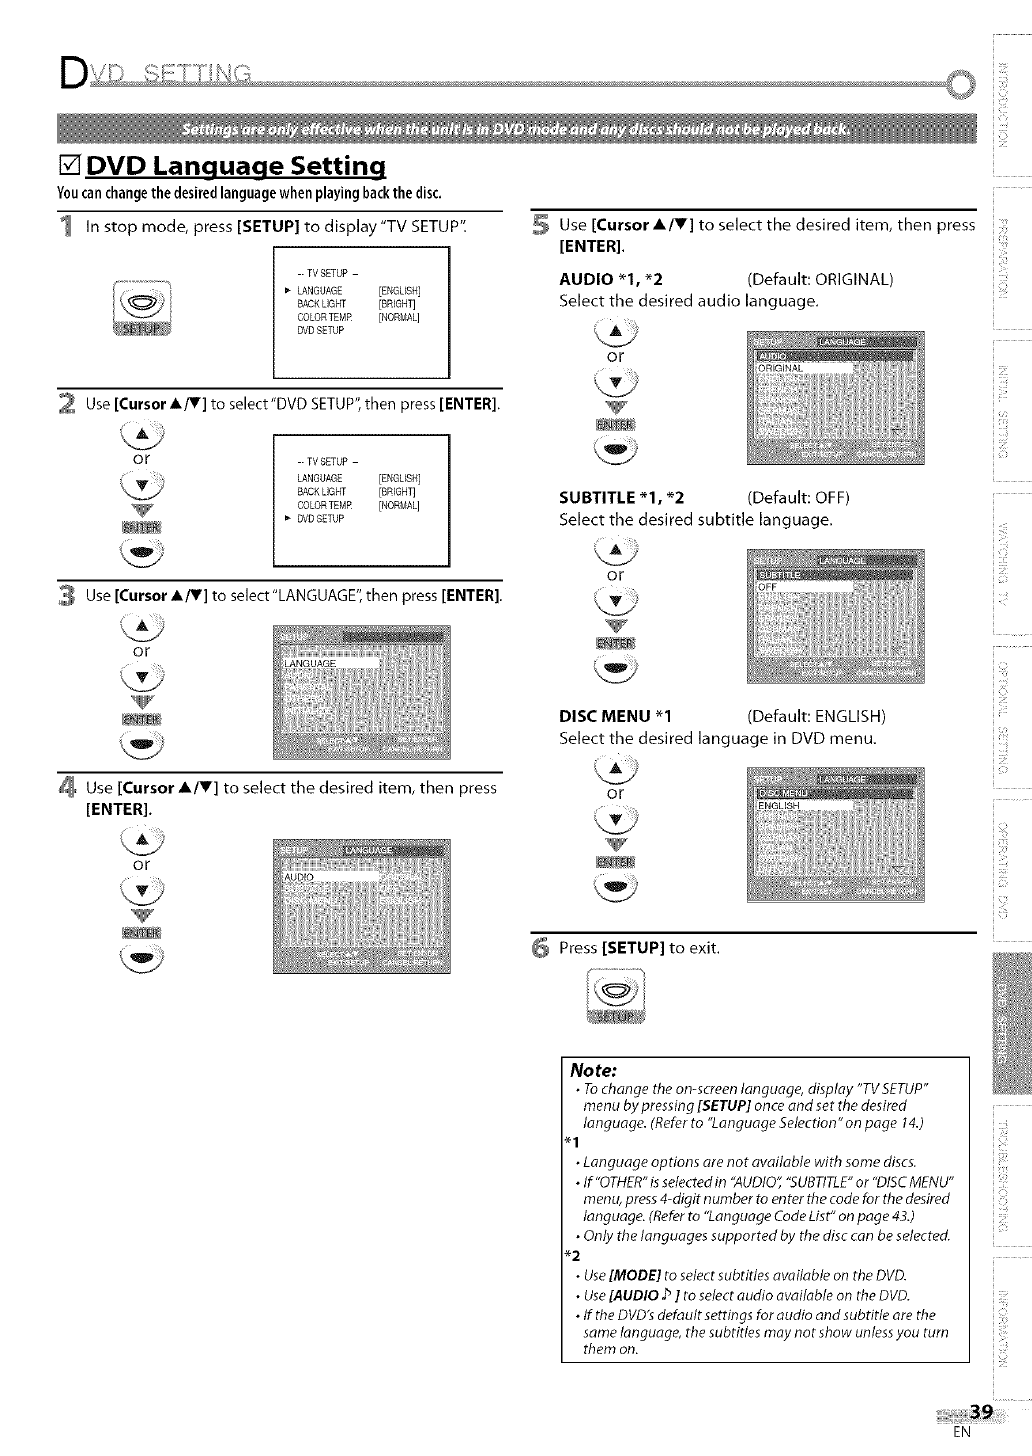
[] DVD Language Setting
Youcan change the desired language when playing back the disc,
1 In stop mode, press [SETUP] to display"TV SETUP".
-- TV SETUP -
_" LANGUAGE [ENGLISH]
BACK LIGHT [BRIGHT]
COLORTEMR [NORMAL]
SVB SETUP
Use [Cursor A/V] to select the desired item, then press
[ENTER].
AUDIO "1, "2 (Default: ORIGINAL)
Select the desired audio language.
or
2 Use [Cursor A_] to select"DVD SETUP",then press [ENTER].
or -- TV SETUP -
LANGUAGE [ENGLISH]
BACK LIGHT [BRIGHT]
COLORTEMR [NORMAL]
DVD SETUP
SUBTITLE *% "2 (Default: OFF)
Select the desired subtitle language.
3 Use [Cursor A/T] to select"LANGUAGE", then press [ENTER].
or
Use [Cursor A/V] to select the desired item, then press
[ENTER].
OF
or
DISC MENU "1 (Default: ENGLISH)
Select the desired language in DVD menu.
or
Press [SETUP] to exit.
iii i!i!!
iiiii_!iii
ii i]Ti
ii iii:_
ii ]]_i
No re"
•To change the on-screen language, display "TV SETUP"
menu by pressing [SETUP] once and set the desired
language. (Refer to "Language Selection"on page 14.)
"1
• Language options are not available with some discs.
• If "OTHER" is setectedin "AUDIO" 'SUBTITLE" or "DISC MENU"
menu, press 4-digit number to enter the code for the desired
language. (Refer to "Language Code List" on page 43.)
• Only the languages supported by the disc can be selected.
"2
• Use ]MODE] to select subtitles available on the DVD.
• Use ]AUDIO .b ]to select audio available on the DVD.
• If the DVD's default settings for audio and subtitle are the
same language, the subtitles may not show unless you turn
them on.
EN
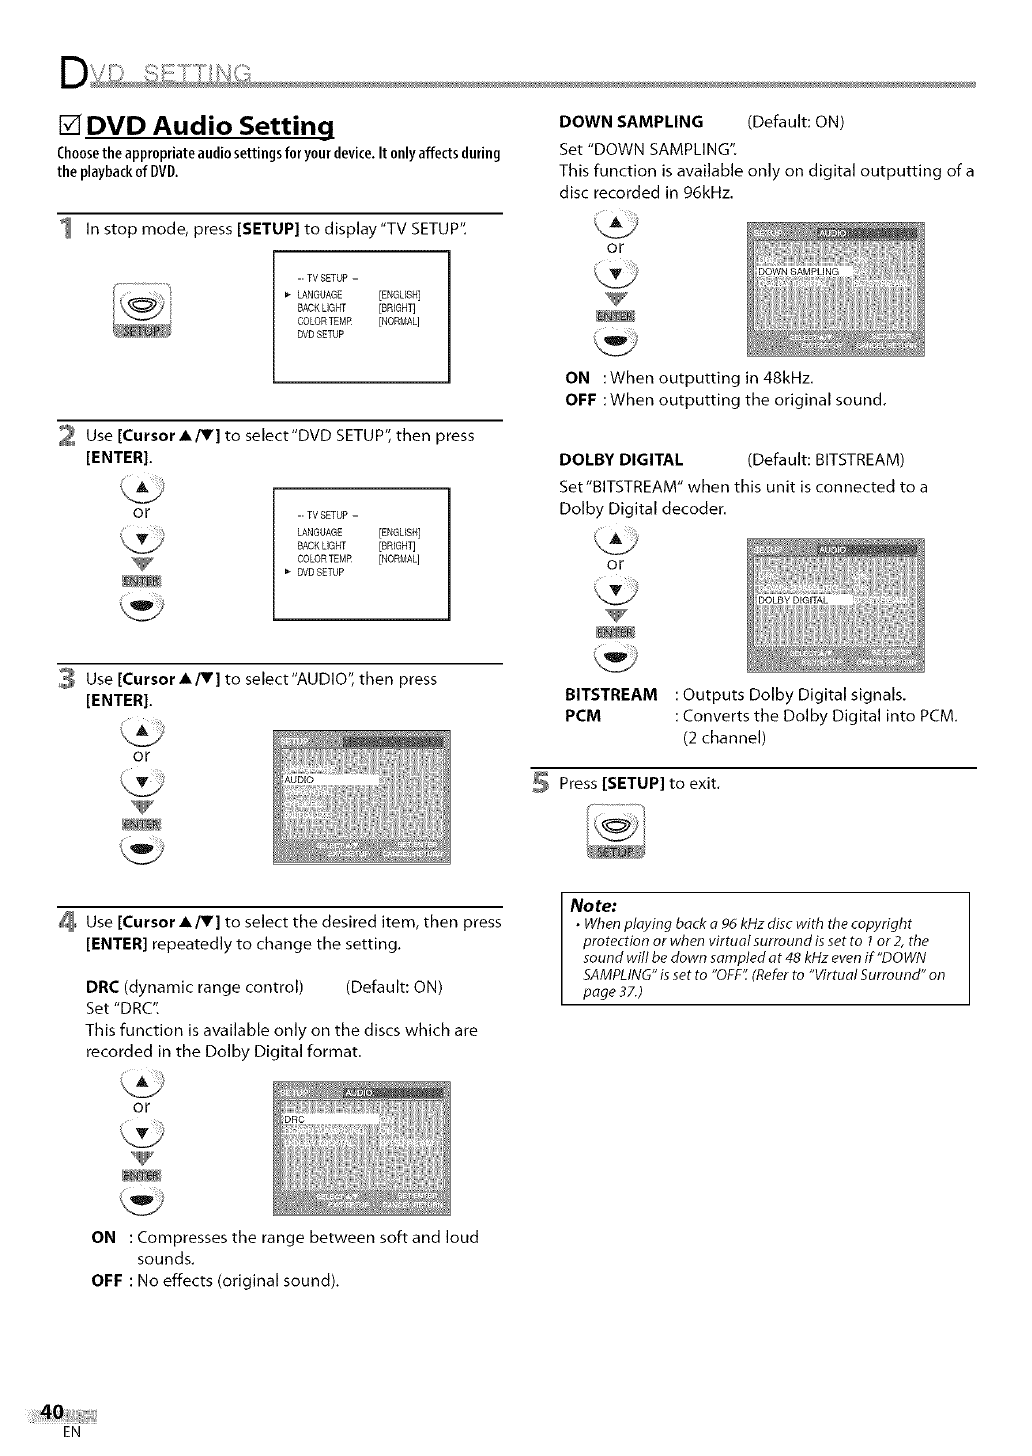
[] DVD Audio Setting
Choosethe appropriateaudiosettingsforyourdevice,It onlyaffectsduring
the playbackof DVD.
1 In stop mode, press [SETUP] to display"TV SETUP".
-- TV SETUP -
I_ LANGUAGE [ENGLISH]
SACK LIGHT [BRIGHT]
COLORTEMR [NORMAL]
DVD GETUP
2 Use [Cursor A/V] to select'DVD SETUP", then press
[ENTER].
or --TV SETUP -
LANGUAGE [ENGLISH]
SACK LIGHT [SRIGNT]
COLORTEMR [NORMAL]
DVD SETUP
3 Use [Cursor A/V] to select"AUDlO", then press
[ENTER].
or
DOWN SAMPLING (Default: ON)
Set "DOWN SAMPLING".
This function is available only on digital outputting of a
disc recorded in 96kHz.
or
ON :When outputting in 48kHz.
OFF :When outputting the original sound.
DOLBY DIGITAL (Default: BITSTREAM)
Set"BITSTREAM" when this unit is connected to a
Dolby Digital decoder.
or
BITSTREAM : Outputs Dolby Digital signals.
PCM : Converts the Dolby Digital into PCM.
(2 channel)
Press [SETUP] to exit.
Use [Cursor A/V] to select the desired item, then press
[ENTER] repeatedly to change the setting.
DRC (dynamic range control) (Default: ON)
Set "DRC".
This function is available only on the discs which are
recorded in the Dolby Digital format.
No te:
•Whenplaying back a 96 kHz disc with the copyright
protection or when virtual surround isset to 1 or 2, the
sound will be down sampled at 48 kHzevenif "DOWN
SAMPLING"is set to "OFF".(Referto "Virtual Surround" on
page 37.)
or
ON : Compresses the range between soft and loud
sounds,
OFF : No effects (original sound),
EN
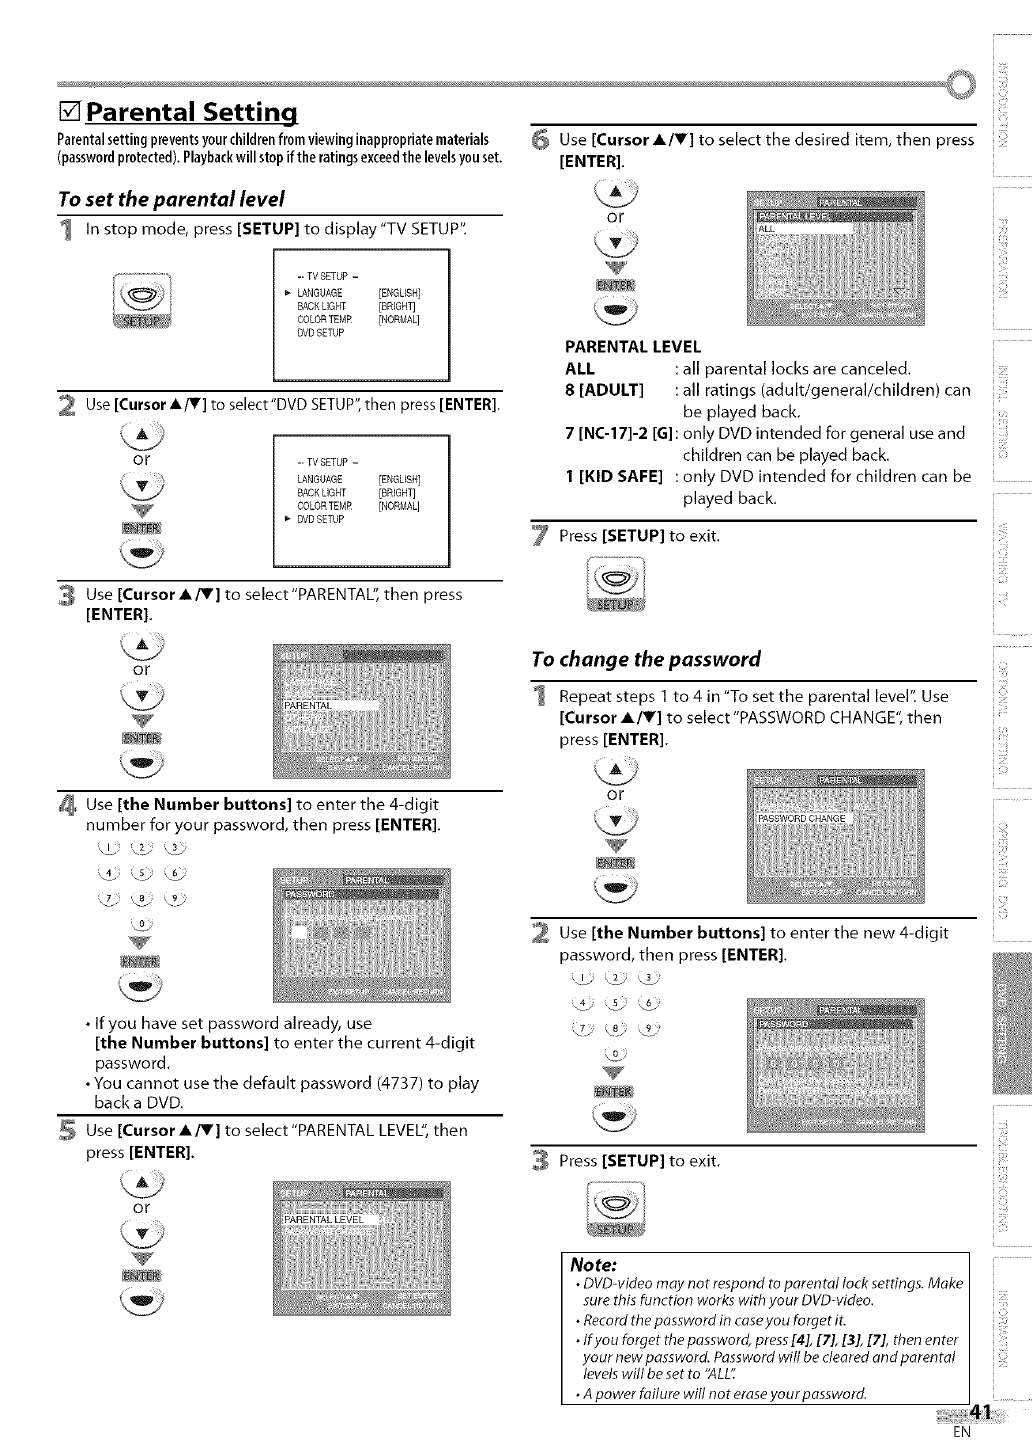
[] Parental Setting
Parentalsettingpreventsyourchildrenfrom viewinginappropriatematerials
(passwordprotected),Playbackwillstopiftheratingsexceedthelevelsyouset,
To set the parental level
1 In stop mode, press [SETUP] to display"TV SETUP".
-- TV SETUP -
b- LANGUAGE [ENGLISH]
SACK LIGHT [BRIGHT]
COLORTEMR [NORMAL]
SVS SETUP
2 Use [Cursor A/V] to select"DVD SETUP",then press [ENTER].
or -- TV SETUP -
LANGUAGE [ENGLISH]
SACK LIGHT [BRIGHT]
COLORTEMR [NORMAL]
SVS SETUP
3 Use [Cursor A/V] to select"PARENTAL'_ then press
[ENTER],
or
Use [the Number buttons] to enter the 4-digit
number for your password, then press [ENTER].
\3, '_
• If you have set password already, use
[the Number buttons] to enter the current 4-digit
password.
• You cannot use the default password (4737) to play
back a DVD.
Use [Cursor A/V] to select"PARENTAL LEVEL",then
press [ENTER].
or
Use [Cursor A/r] to select the desired item, then press
[ENTER].
or
V
PARENTAL LEVEL
ALL : all parental locks are canceled.
8 [ADULT] : all ratings (adult/general/children) can
be played back.
7[NC-17]-2 [G]: only DVD intended for general use and
children can be played back.
1 [KID SAFE] : only DVD intended for children can be
played back.
Press [SETUP] to exit.
To change the password
1 Repeat steps 1 to 4 in "To set the parental level". Use
[Cursor A/V] to select"PASSWORD CHANGE", then
press [ENTER].
or
ii]]_i
Use [the Number buttons] to enter the new 4-digit
password, then press [ENTER].
Press [SETUP] to exit.
i !_i!i
ii i]i:!i
No re"
•DVD-video may not respond to parental lock settings. Make
sure this function works with your DVD-video.
•Record the password in caseyou forget it.
•lfyou forget the password, press[4], [7], [3], [7], then enter
your new password. Password will be cleared and parental
levels will be set to "ALL"
•A power failure will not eraseyour password. .........
i4_::
EN
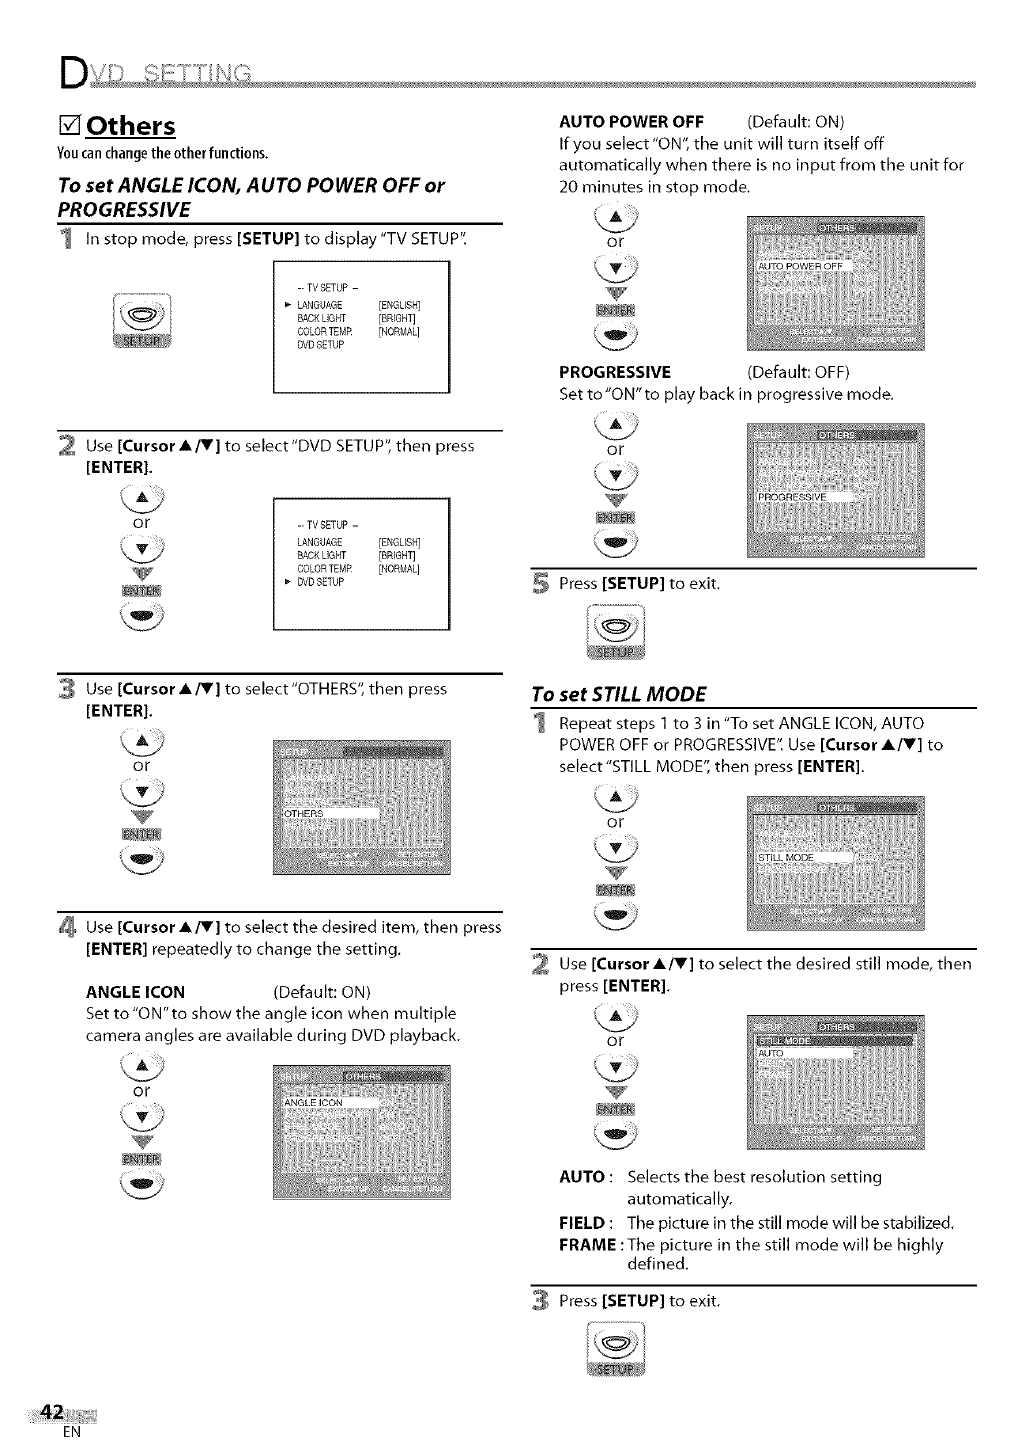
[] Others
Youcanchangetheother functions.
To set ANGLE ICON, AUTO POWER OFF or
PROGRESSIVE
1 In stop mode, press [SETUP] to display"TV SETUP".
-- TV SETUP -
I_ LANGUAGE [ENGLISH]
BACK LIGHT [BRIGHT]
COLORTEMR [NORMAL]
BVB SETUP
2 Use [Cursor A/V] to select"DVD SETUP", then press
[ENTER].
or -- TV SETUP -
LANGUAGE [ENGLISH]
BACK LIGHT [BRIGHT]
COLORTEMR [NORMAL]
BVB SETUP
AUTO POWER OFF (Default: ON)
If you select "ON", the unit will turn itself off
automatically when there is no input from the unit for
20 minutes in stop mode.
or
(Default: OFF)
PROGRESSIVE
Set to"ON"to play back in progressive mode.
or
Press [SETUP] to exit,
Use [Cursor A/V] to select"OTHERS", then press
[ENTER].
or
Use [Cursor A/V] to select the desired item, then press
[ENTER] repeatedly to change the setting.
ANGLE ICON (Default: ON)
Set to "ON"to show the angle icon when multiple
camera angles are available during DVD playback.
To set STILL MODE
1 Repeat steps 1 to 3 in"To set ANGLEICON,AUTO
POWEROFFor PROGRESSIVE".Use [Cursor A/r] to
select"STILL MODE",then press [ENTER].
or
V
Use [Cursor A/V] to select the desired still mode, then
press [ENTER].
or
or
AUTO : Selects the best resolution setting
automatically.
FIELD : The picture in the still mode will be stabilized.
FRAME :The picture in the still mode will be highly
defined.
Press [SETUP] to exit,
EN
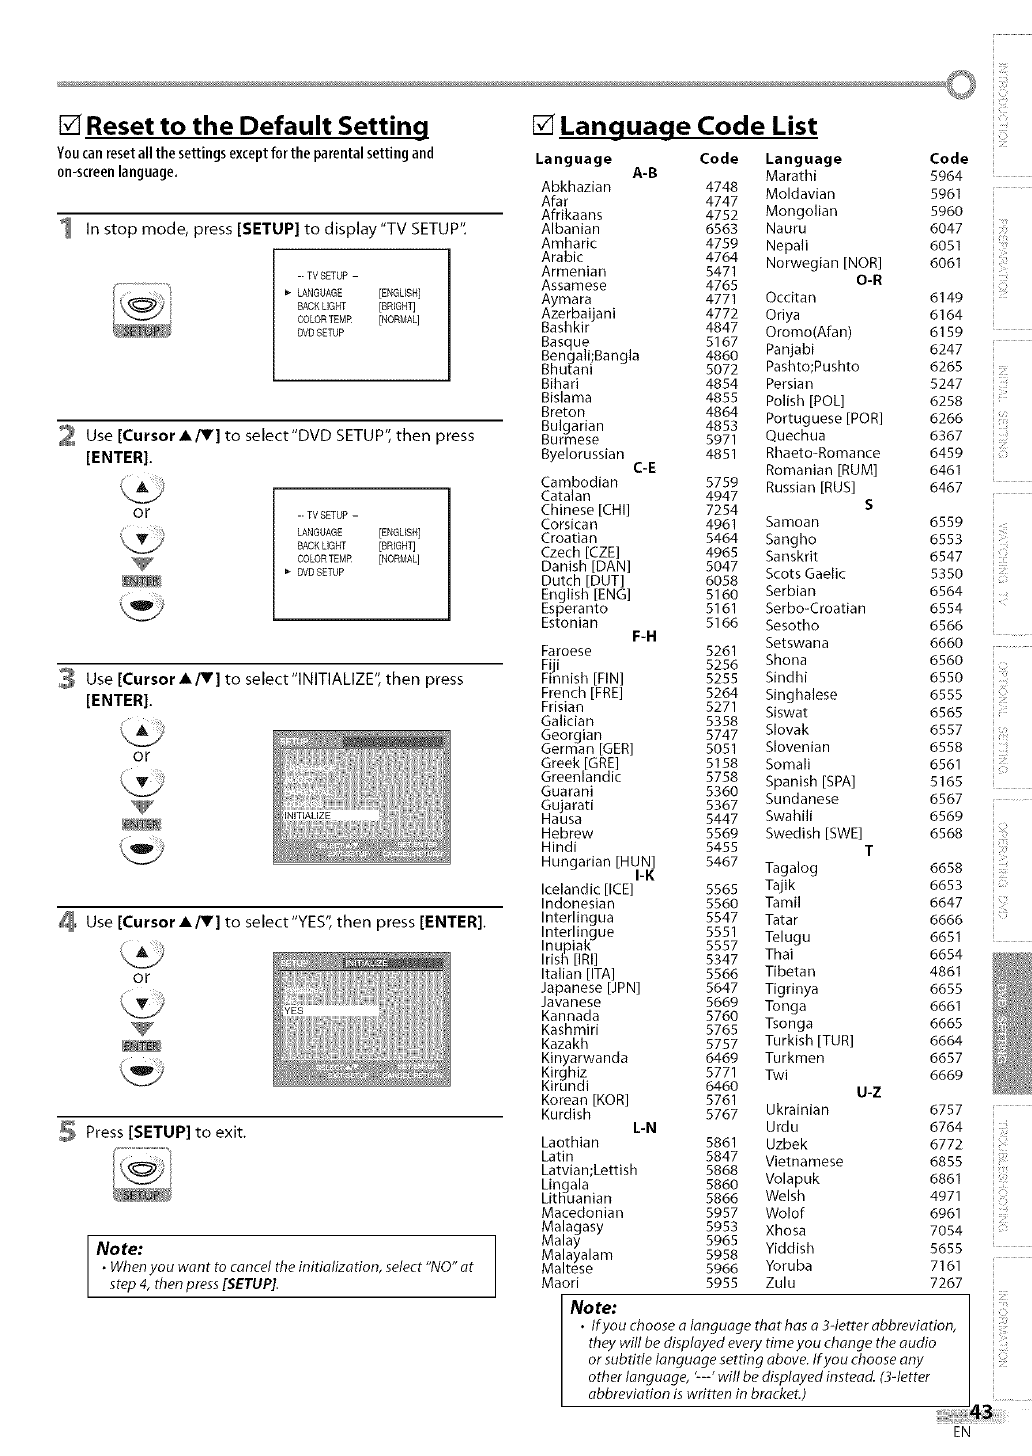
[] Reset to the Default Setting
You can reset all the settings except for the parental setting and
0n-screen language,
1 In stop mode, press [SETUP] to display"TV SETUP",
-- TV SETUP -
LANGUAGE [ENGLISH]
BACK LIGHT [BRIGHT]
COLORTEMR [NORMAL]
DVD SETUP
2 Use [Cursor A/V] to select"DVD SETUP", then press
[ENTER].
or -- TV SETUP -
LANGUAGE [ENGLISH]
SACK LIGHT [BRIGHT]
COLORTEMR [NORMAL]
DVD SETUP
3 Use [Cursor A/V] to select"lNITIALIZE", then press
[ENTER].
or
Use [Cursor A/V] to select"YES", then press [ENTER].
or
Press [SETUP] to exit.
Note:
•When you want to cancel the initialization, select "NO" at
step 4, then press [SETUP].
[] Language Code List
Language Code Language
A-B Marathi
Abkhazian 4748 Moldavian
Afar 4747
Afrikaans 4752 Mongolian
Albanian 6563 Nauru
Amharic 4759 Nepali
Arabic 4764 Norwegian [NOR]
Armenian 5471
Assamese 4765 O-R
Aymara 4771 Occitan
Azerbaijani 4772 Oriya
Bashkir 4847 Oromo(Afan)
Basque 5167 Panjabi
Bengali;Bangla 4860
Bhutani 5072 Pashto;Pushto
Bihari 4854 Persian
Bislama 4855 Polish [POL]
Breton 4864
4853 Portuguese [POR]
Bulgarian
Burmese 5971 Quechua
Byelorussian 4851 Rhaeto-Romance
C-E Romanian [RUM]
Cambodian 5759 Russian [RUS]
Catalan 4947
Chinese [CHI] 7254 S
Corsican 4961 Samoan
Croatian 5464 Sangho
Czech [CZE] 4965 Sanskrit
Danish [DAN] 5047 Scots Gaelic
Dutch [DUT] 6058
English [ENG] 5160 Serbian
Esperanto 5161 Serbo-Croatian
Estonian 5166 Sesotho
F-H Setswana
Faroese 5261
Fiji 5256 Shona
Finnish [FIN] 5255 Sindhi
French [FRE] 5264 Singhalese
Frisian 5271 Siswat
Galician 5358
Georgian 5747 Slovak
German [GER] 5051 SIovenian
Greek [GRE] 5158 Somali
Greenlandic 5758 Spanish [SPA]
Guarani 5360 Sundanese
Gujarati 5367
Hausa 5447 Swahili
Hebrew 5569 Swedish [SWE]
Hindi 5455 T
Hungarian [HUN] 5467
I-K Tagalog
Icelandic lICE] 5565 Tajik
Indonesian 5560 Tamil
Interlingua 5547 Tatar
Interlingue 5551 Telugu
Inupiak 5557
Irish [IRI] 5347 Thai
Italian [ITA] 5566 Tibetan
Japanese [JPN] 5647 Tigrinya
Javanese 5669 Tonga
Kannada 5760
Kashmiri 5765 Tsonga
Kazakh 5757 Turkish [TUR]
Kinyarwanda 6469 Turkmen
Kirghiz 5771 Twi
Kirundi 6460 U-Z
Korean [KOR] 5761
Kurdish 5767 Ukrainian
L-N Urdu
Laothian 5861 Uzbek
Latin 5847 Vietnamese
Latvian;Lettish 5868
Lingala 5860 Volapuk
LitHuanian 5866 Welsh
Macedonian 5957 Wolof
Malagasy 5953 Xhosa
Malay 5965
Malayalam 5958 Yiddish
Maltese 5966 Yoruba
Maori 5955 Zulu
i i!¸¸¸
Code
5964
5961
5960
6047
6051
6061
6149
6164
6159
6247
6265
5247
6258
6266
6367
6459
6461
6467
6559 ......
6553
6547
5350
6564
6554
6566
6660
6560
6550
6555
6565
6557
6558
6561
5165
6567
6569
6568
6658
6653
6647
6666
6651
6654
4861
6655
6661
6665
6664
6657
6669
6757 i
6764 i_
6772 iT
6855
6861 i_
4971
6961
7054 i _i
5655 '
7161
7267
No,e, I iii!!ili
• lfyou choose alanguage that has a3qetter abbreviation, ]
they will be displayed every time you change the audio ]
or subtitle language setting above. Ifyou choose any ]
other language, '--' will be displayed instead. (3qetter ]
abbreviation is written in bracket.) ] .........
EN
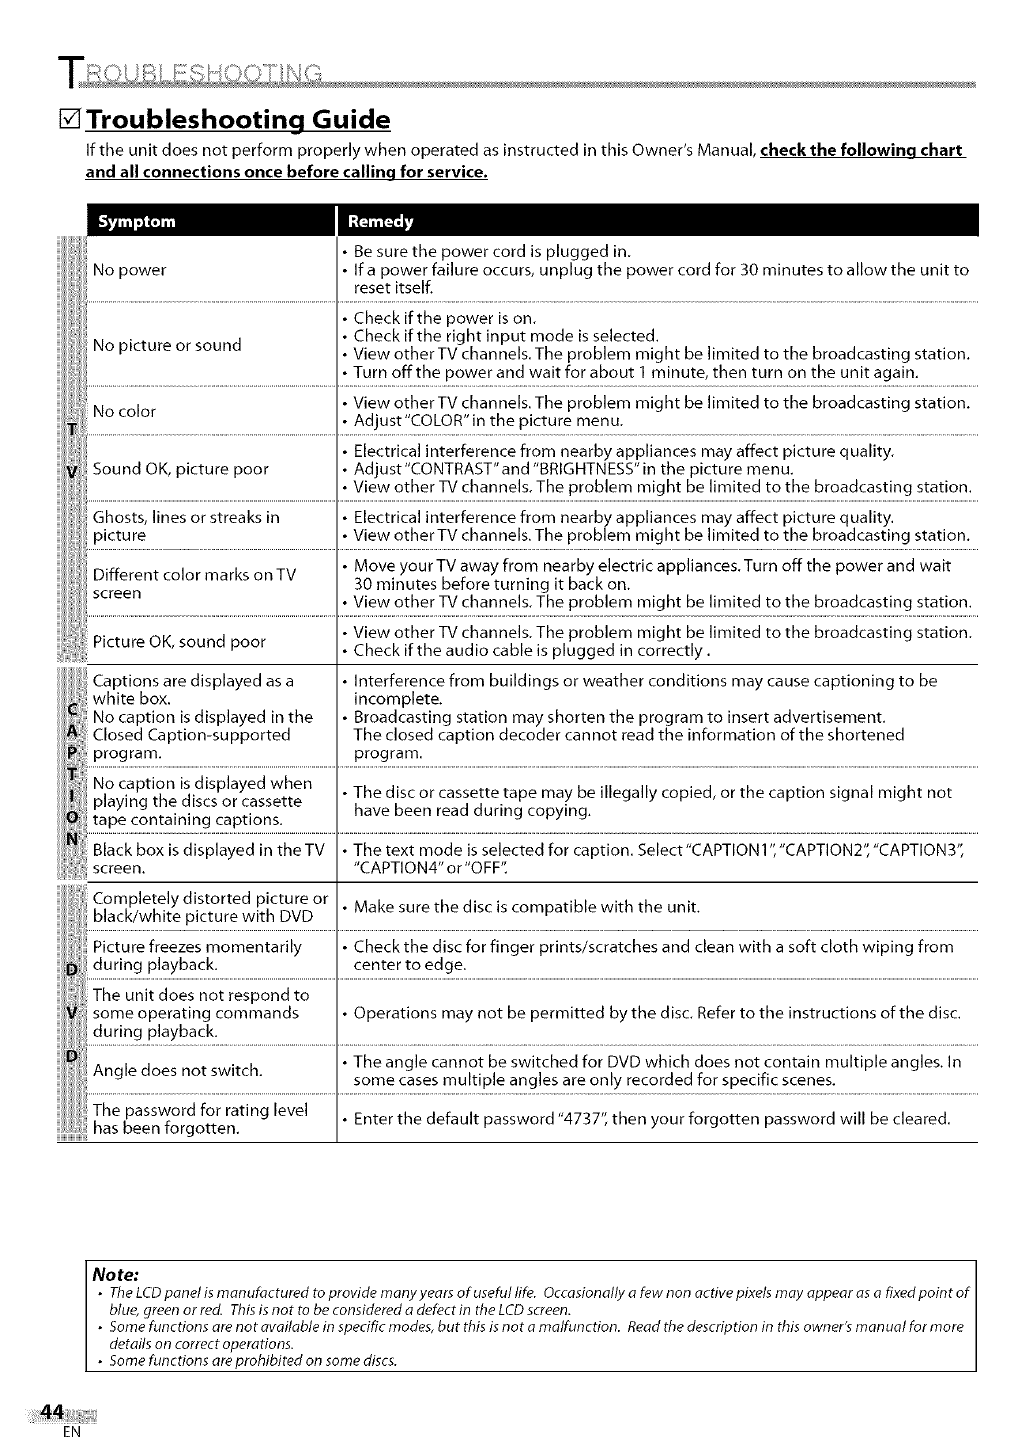
[]Troubleshooting Guide
If the unit does not perform properly when operated as instructed in this Owner's Manual, check the following chart
and all connections once before calling for service.
!liP, tureOK,soun pooriCheck ftheau ,ocab, ,sp, ge ,nco ect,yg
Captions are displayed as a • Interference from buildings or weather conditions may cause captioning to be
white box. incomplete.
No caption is displayed in the • Broadcasting station may shorten the program to insert advertisement.
C osed Capt on-supported The c osed capt on decoder cannot read the nformat on of the shortened
program, program.
No caption is displayed when I
i la in the discs or cassette t• The disc or cassette tape may be illegally copied, or the captton stgnal mtght not
FJS 2................. I havebeenreadduring copying
tat_.......... U_°_...... I
Black box is displayed in the TV • The text mode is selected for caption. Select"CAPTION1 ","CAPTION2", "CAPTION3",
screen. "CAPTION4" or"OFF".
Completely distorted picture or
black/white picture with DVD
Picture freezes momentarily
during playback.
The unit does not respond to
some operating commands
during playback.
Angle does not switch.
The password for rating level
has been forgotten.
• Make sure the disc is compatible with the unit.
• Check the disc for finger prints/scratches and clean with a soft cloth wiping from
center to edge.
• Operations may not be permitted by the disc. Refer to the instructions of the disc.
• The angle cannot be switched for DVD which does not contain multiple angles. In
some cases multiple angles are only recorded for specific scenes.
• Enter the default password "4737", then your forgotten password will be cleared.
No te: 1
•TheLCDpanelismanufacturedtoprovidemanyyearsofusefullife. Occasionallyafewnonactivepixelsmayappearasafixedpointof I
blue, green or red. This is not to be considered a defect in the LCD screen. I
•Some functions are not available in specific modes, but this is not a malfunction. Read the description in this owner's man ual for more I
details on correct operations. I
•Some functions are prohibited on some discs. J
EN
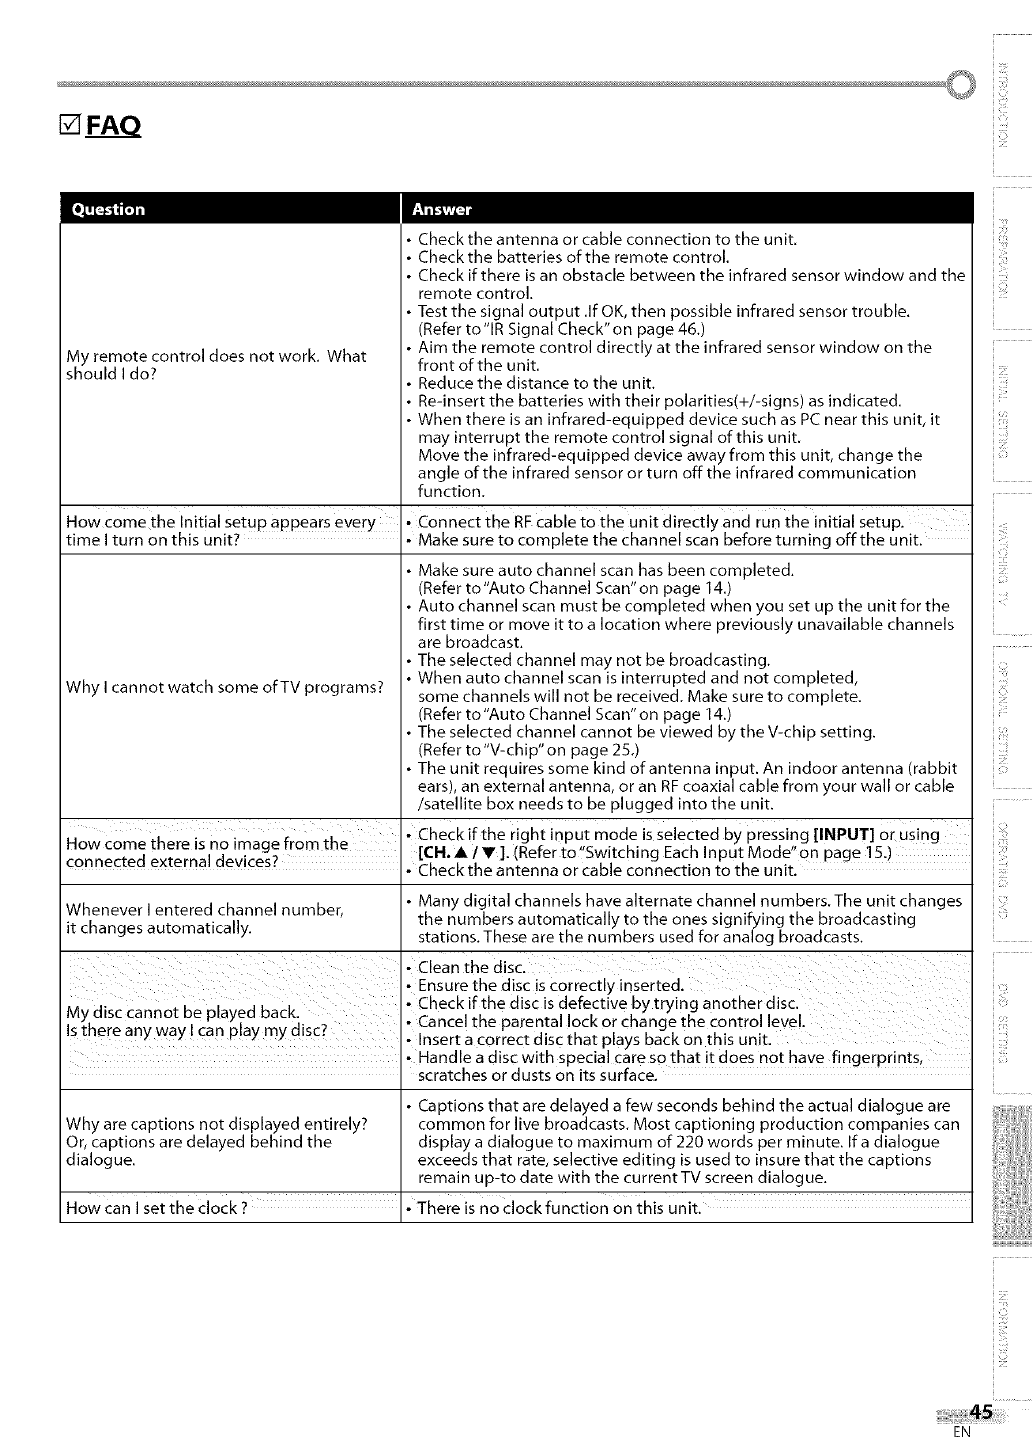
[] FAQ
Check the antenna or cable connection to the unit.
Check the batteries of the remote control.
Check if there is an obstacle between the infrared sensor window and the
remote control.
Test the signal output .If OK, then possible infrared sensor trouble.
(Refer to"lR Signal Check"on page 46.)
Aim the remote control directly at the infrared sensor window on the
My remote control does not work. What
should I do? front of the unit.
Reduce the distance to the unit.
Re-insert the batteries with their polarities(+/-signs) as indicated.
When there is an infrared-equipped device such as PC near this unit, it
may interrupt the remote control signal of this unit.
Move the infrared-equipped device away from this unit, change the
angle of the infrared sensor or turn off the infrared communication
function.
Howcomethe Initial setuP appears every •Connectthe RFcabletothe unit directly and run the initial setup.
time I turn on this unit? • Make sure to complete the channel scan before turning off the unit.
• Make sure auto channel scan has been completed.
(Refer to"Auto Channel Scan"on page 14.)
• Auto channel scan must be completed when you set up the unit for the
first time or move it to a location where previously unavailable channels
are broadcast.
• The selected channel may not be broadcasting.
• When auto channel scan is interrupted and not completed,
Why I cannot watch some of TV programs? some channels will not be received. Make sure to complete.
(Refer to"Auto Channel Scan"on page 14.)
• The selected channel cannot be viewed by the V-chip setting.
(Refer to"V-chip" on page 25.)
• The unit requires some kind of antenna input. An indoor antenna (rabbit
ears), an external antenna, or an RF coaxial cable from your wall or cable
/satellite box needs to be plugged into the unit.
'. Check if the right input mode is Selected by pressing [INPUT] 0[ Using
How come there is no image from the [CH, A/V].(Referto Switching Each Input Mode on page 15.)
connected external devices? • Check the antenna or Cable connection to the unit.
Whenever I entered channel number, • Many digital channels have alternate channel numbers. The unit changes
it changes automatically, the numbers automatically to the ones signifying the broadcasting
stations. These are the numbers used for analog broadcasts.
• Clean the disc.
,. Ensure the disc is Correctly inserted.
,_ 4, Ji , ,, , .Checkifthediscisdefectivebytryinganotherdisc.
Jwymsc canno_ De playea DaCK...........
. .. ? •Lance the parenta OcKor cnange the contro eve
is there any way i can play my alsc. • Insert a €orrect disc that plays back on this unit.
• Handle a disc with special care so that it does not have fingerprints,
scratches or dusts on its surface.
• Captions that are delayed a few seconds behind the actual dialogue are
Why are captions not displayed entirely? common for live broadcasts. Most captioning production companies can
Or, captions are delayed behind the display a dialogue to maximum of 220 words per minute. Ira dialogue
dialogue, exceeds that rate, selective editing is used to insure that the captions
remain up-to date with the current TV screen dialogue.
How can I set the Clock ? • There is no clock function on this unit.
i i_!i
EN
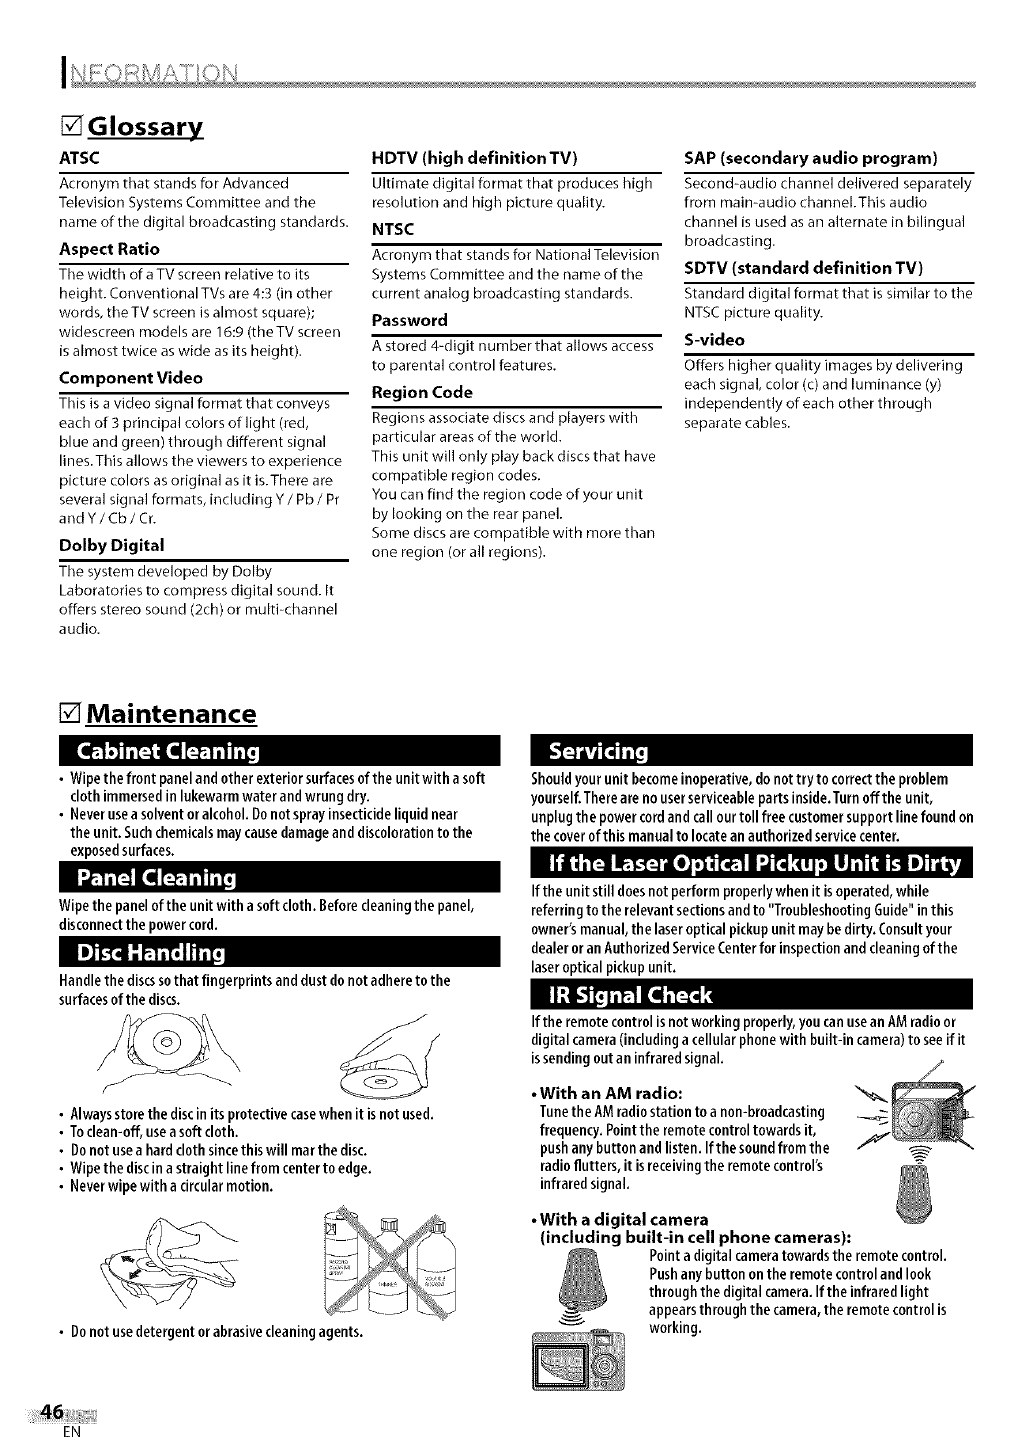
[] Glossary
ATSC
Acronym that stands for Advanced
Television Systems Committee and the
name of the digital broadcasting standards.
Aspect Ratio
The width of a TV screen relative to its
height. Conventional TVs are 4:3 (in other
words, theTV screen is almost square);
widescreen models are 16:9 (the TV screen
is almost twice aswide as its height).
Component Video
This is a video signal format that conveys
each of 3 principal colors of light (red,
blue and green) through different signal
lines.This allows the viewers to experience
picture colors as original as it is.There are
several signal formats, including Y /Pb /Pr
andY/Cb/Cr.
Dolby Digital
The system developed by Dolby
Laboratories to compress digital sound. It
offers stereo sound (2ch) or multi-channel
audio.
HDTV (high definition TV)
Ultimate digital format that produces high
resolution and high picture quality.
NTSC
Acronym that stands for National Television
Systems Committee and the name of the
current analog broadcasting standards.
Password
A stored 4-digit nunnber that allows access
to parental control features.
Region Code
Regions associate discs and players with
particular areas of the world.
This unit will only play back discs that have
compatible region codes.
You can find the region code of your unit
by looking on the rear panel.
Some discs are compatible with more than
one region (or all regions).
SAP (secondary audio program)
Second-audio channel delivered separately
from main-audio channel.This audio
channel is used as an alternate in bilingual
broadcasting.
SDTV (standard definition TV)
Standard digital format that is similar to the
NTSC picture quality.
S-video
Offers higher quality images by delivering
each signal, color (c) and luminance (y)
independently of each other through
separate cables.
[] Maintenance
• Wipethe front paneland other exterior surfacesof the unit with a soft
clothimmersedin lukewarmwater and wrung dry.
• Neverusea solvent or alcohol. Donot spray insecticideliquid near
the unit. Suchchemicalsmaycausedamageand discolorationto the
exposedsurfaces.
Wipe the panelof the unitwith a soft cloth. Beforecleaningthe panel,
disconnectthe powercord.
Handlethe discssothat fingerprints and dust donot adhereto the
surfacesof the discs.
/
• Alwaysstore the disc in its protective case when it is not used.
•Toclean-off, usea soft cloth.
•Donot usea hard cloth sincethis will marthe disc.
• Wipethe discina straight line from centerto edge.
• Neverwipe with a circularmotion.
• Donot usedetergent orabrasivecleaningagents.
Shouldyour unitbecomeinoperative,do not try to correctthe problem
yourself.Thereare no userserviceablepartsinside.Turnoff the unit,
unplugthe powercordand callour toll free customer supportline found on
the cover of this manualto locatean authorized servicecenter.
If the unit still doesnotperform properlywhen it isoperated,while
referringto the relevantsectionsand to "TroubleshootingGuide"in this
owner's manual,the laseroptical pickupunit may bedirty. Consultyour
dealeror anAuthorizedServiceCenterfor inspectionand cleaning of the
laseropticalpickup unit.
If the remotecontrol isnot workingproperly,youcanusean AMradioor
digitalcamera(includingacellular phonewithbuilt-incamera)to seeif it
issendingoutan infraredsignal.
• With an AM radio: "_
TunetheAMradiostation to a non-broadcasting .._
frequency.Pointthe remotecontroltowardsit,
pushany buttonandlisten.Ifthe soundfromthe f
radioflutters,it isreceivingthe remotecontrol's
infraredsignal.
•With a digital camera
(including built-in cell phone cameras):
Pointadigitalcameratowardsthe remotecontrol,
Pushanybuttonontheremotecontrolandlook
throughthe digitalcamera,Ifthe infraredlight
appearsthroughthe camera,the remotecontrolis
working,
EN

[] Cable Channel Designations
Ifyousubscribeto cableTV,the channelsaredisplayedas1-135.Cablecompaniesoftendesignatethannelswithlettersorletter-numbercombinations.
Pleasecheckwith your localcablecompany.Thefollowing isa chart of common cablechanneldesignations.
1 2 3 4 5 6 9 11 12 13 16 17 18 19 20 21
22 23 24 25 26 27 28 29 30 31 32 33 34 35 36 37 38 39 40
TVDisplay 43 44 45 46 47 48 49 50 51 52 53 54 55 56 57 58 59 60 61 62 63
W+41
TVDisplay 64 65 66 67 68 69 70 71 72 73 74 75 76 77 78 79 80 81 82 83 84
w+sl w+_o
TVDisplay 85 86 87 88 89 C90 91 92 93 94 95 96 97 98 99 1O0 1O1 102 103 104 105
W+73
TVDisplay 100 107 108 109 110 111 112 113 114 115 116 117 118 119 120 121 122 123 124 125 126
w_ w+_
127 128 129 130 131 132 133 134 135
[] General Specifications
TV format: ATSC/NTSC-MTVstandard
Closed caption system:
§15.122/FCC(digitalCC) §15.119/FCC(analogCC)
Channel coverage (ATSC/NTSC):
Terrestrial VHF:2~13 UHF: 14~69
CATV 2~13, A~W, W+l ~W+94 (analogW+l ~W+84),
A-S~A-1,SA
Tuning system: Channelfrequencysynthesizedtuning system
Channel access: Directaccesskeyboard,
Programmablescan,and up/down
Discs (Playback compatibility):
DVDvideo, DVD-RW/-R,
DVD+RW/+R,audioCD,CD-RW/-R
Frequency response:
DVD (linear sound): 20 Hzto20 kHz(samplerate:48 kHz)
20 Hzto44 kHz(samplerate:96 kHz)
CD: 20 Hzto 20 kHz
Signal-to-noise ratio (S/N ratio):
CD: 75 dB(JEITA)
Total distortion factor:
DVD: 1KHz0.07% (JEITA)
CD: 1KHz0.07% (JEITA)
[] Electrical Specification
Sound Output: lW,8 [1x 2
[] Other Specifications
Terminals:
Antennainput: VHF/UHF/CATV 7511unbalanced(F-type)
S-videoinput: Mini DIN4-pin jackx1Y:1Vp-p(75D)
C:286mVp-p(7511)
Video input: RCAjack x1 1Vp-p(7511)
Audio input: RCAjackx4 SOOmVrms
Componentvideoinput:
RCAjack x 3
PCinput: D-Sub1Spinx 1 (RGB)
Y: 1Vp-p(7511)
Pb:700mVp-p(7511)
Pr: 700mVp-p(7511)
Minijacko3.5mm x1(audio)
Coaxialdigital audiooutput:
RCAjack xl 500mVp-p(7511)
Headphone: 1/8inches(3.5mm)
Remote Control: Digitalencodedinfraredlightsystem
Operating Temperature:
41°F(S°C)to 104°F(40°C)
Power Requirements:
120V~AC+/- 10%,60 Hz+/- 0.5%
Power Consumption (Maximum):
6SW
LCD: 19 incheswideXGApluspanel
Dimensions: <without stand> <with stand>
H: 14.4inches (364mm) 16.0inches (404.Smm)
W: 19.3inches (490mm) 19.3inches (490mm)
D: 5.1 inches (128mm) 7.7inches (194.5mm)
Weight: 11.1Ibs. (S.Okg)
•Designsandspecificationsaresubjectto changewithoutnotice and
without ourlegal obligation.
• If thereis a discrepancybetween languages,the default languagewill
beEnglish.
i_iiii!
_i!!!il
ii t_!_
ii i_i!:!i
i _il¸
<>
i <
EN

SYLVANIA
LIMITED WARRANTY
FUNAI CORP.will repair this product, free of charge in the USA in the event of defect in materials or
workmanship as follows:
DURATION:
PARTS: FUNAI CORP.will provide parts to replace defective parts without charge for one (1) year
from the date of original retail purchase. Certain parts and LCD image burn-in are excluded
from this warranty.
LABOR: FUNAI CORP.will provide the labor without charge for a period of ninety (90) days from the
date of original retail purchase.
LIMITS AND EXCLUSIONS:
THIS WARRANTY IS EXTENDED ONLYTOTHE ORIGINAL RETAIL PURCHASER. A PURCHASE RECEIPT OR
OTHER PROOF OF ORIGINAL RETAIL PURCHASE WILL BE REQUIRED TOGETHER WITH THE PRODUCTTO
OBTAIN SERVICE UNDER THIS WARRANTY.
This warranty shall not be extended to any other person or transferee.
This warranty is void and of no effect if any serial numbers on the product are altered, replaced, defaced,
missing or if service was attempted by an unauthorized service center.This limited warranty does not
apply to any product not purchased and used in the United States.
This warranty only covers failures due to defects in material or workmanship which occur during
normal use. It does not cover damage which occurs in shipment, or failures which are caused by repairs,
alterations or products not supplied by FUNAI CORP.,or damage, which results from accident, misuse,
abuse, mishandling, misapplication, alteration, faulty installation, improper maintenance, commercial use
such as hotel, rental or office use of this product, or damage which results from fire, flood, lightning or
other acts of God.
THIS WARRANTY DOES NOT COVER PACKING MATERIALS, ANY ACCESSORIES (EXCEPT REMOTE CONTROL),
ANY COSMETIC PARTS,COMPLETE ASSEMBLY PARTS, DEMO OR FLOOR MODELS.
FUNAI CORR AND ITS REPRESENTATIVESOR AGENTS SHALL IN NO EVENT BE LIABLE FOR ANY GENERAL,
INDIRECT OR CONSEQUENTIAL DAMAGES ARISING OUT OF OR OCCASIONED BYTHE USE OF OR THE
INABILITY TO USE THIS PRODUCT. THIS WARRANTY IS MADE IN LIEU OF ALL OTHER WARRANTIES, EXPRESS
OR IMPLIED, AND OF ALL OTHER LIABILITIES ON THE PART OF FUNAI, ALL OTHER WARRANTIES INCLUDING
THE WARRANTY OF MERCHANTABILITY AND FITNESS FOR A PARTICULAR PURPOSE, ARE HEREBY
DISCLAIMED BY FUNAI AND ITS REPRESENTATIVESIN THE UNITED STATES.
ALL WARRANTY INSPECTIONS AND REPAIRSMUST BE PERFORMED BY AN AUTHORIZED SERVICECENTER.
THIS WARRANTY IS ONLY VALID WHEN THE UNIT IS CARRIED-IN TO AN AUTHORIZED SERVICECENTER.
THE PRODUCT MUST BE ACCOMPANIED BY A COPY OF THE ORIGINAL RETAIL PURCHASE RECEIPT. IF NO
PROOF OF PURCHASE IS ATTACHED, THE WARRANTY WILL NOT BE HONORED AND REPAIRCOSTS WILL BE
CHARGED.
IMPORTANT:
THIS LIMITED WARRANTY GIVES YOU SPECIFIC LEGAL RIGHTS. YOU MAY HAVE OTHER RIGHTS THAT VARY
FROM STATETO STATE.IF,AT ANYTIME DURING THE WARRANTY PERIOD, YOU ARE UNABLE TO OBTAIN
SATISFACTION WITH THE REPAIR OF THIS PRODUCT, PLEASECONTACT FUNAI CORP.
ATTENTION:
FUNAI CORR RESERVESTHE RIGHT TO MODIFY ANY DESIGN OF THIS PRODUCT
WITHOUT PRIOR NOTICE.
WARRANTY STATEMENT REGARDING NON AUTHORIZED REPAIRS:
To obtain warranty service, you must take the product, or deliver the product freight prepaid, in either its
original packaging or packaging affording an equal degree of protection, to any AUTHORIZED SERVICE
CENTER. FUNAI CORP.will not reimburse you for any service done by unauthorized service providers
without prior written approval.
To locate your nearest AUTHORIZED SERVICE CENTER or for general service inquiries,
please contact us at: FUNAI CORPORATION
Customer Service
Tel : 1-800-968-3429
http://www.sylva nia-ce.co m
19900 Van Ness Avenue, Torrance, CA 90501
Printed in China A84N2UH /A84NOUH
1EMN23020A ****
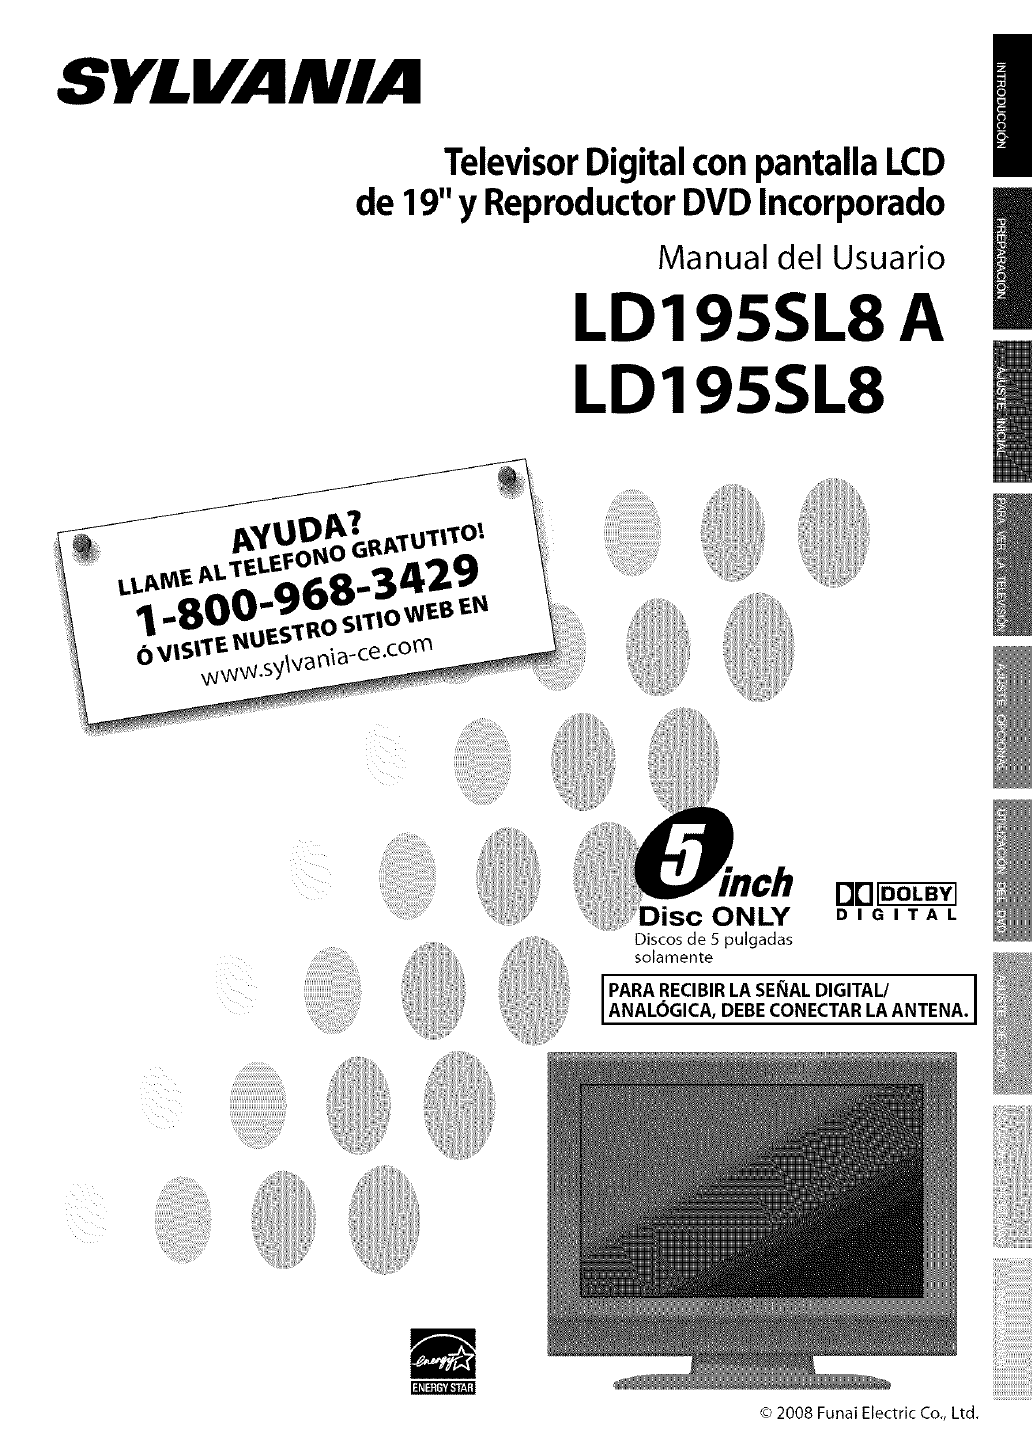
de...,,Te_viso_oigitalcon
_YReproduct n_,,, Pantalla L
Or ... VU lll¢o.__
v. iJora
Manual del Usuar
LD195SL8
LDI95SL8
AYUDA?
LLAME AL TELEFONO GRATUTITO!
1-800-968-3429
0 VISITE NUESTRO SITIO WEB EN
www.sylvania-ce.com
ii_i,_:;_
_ii_i_:_ Disco
soil
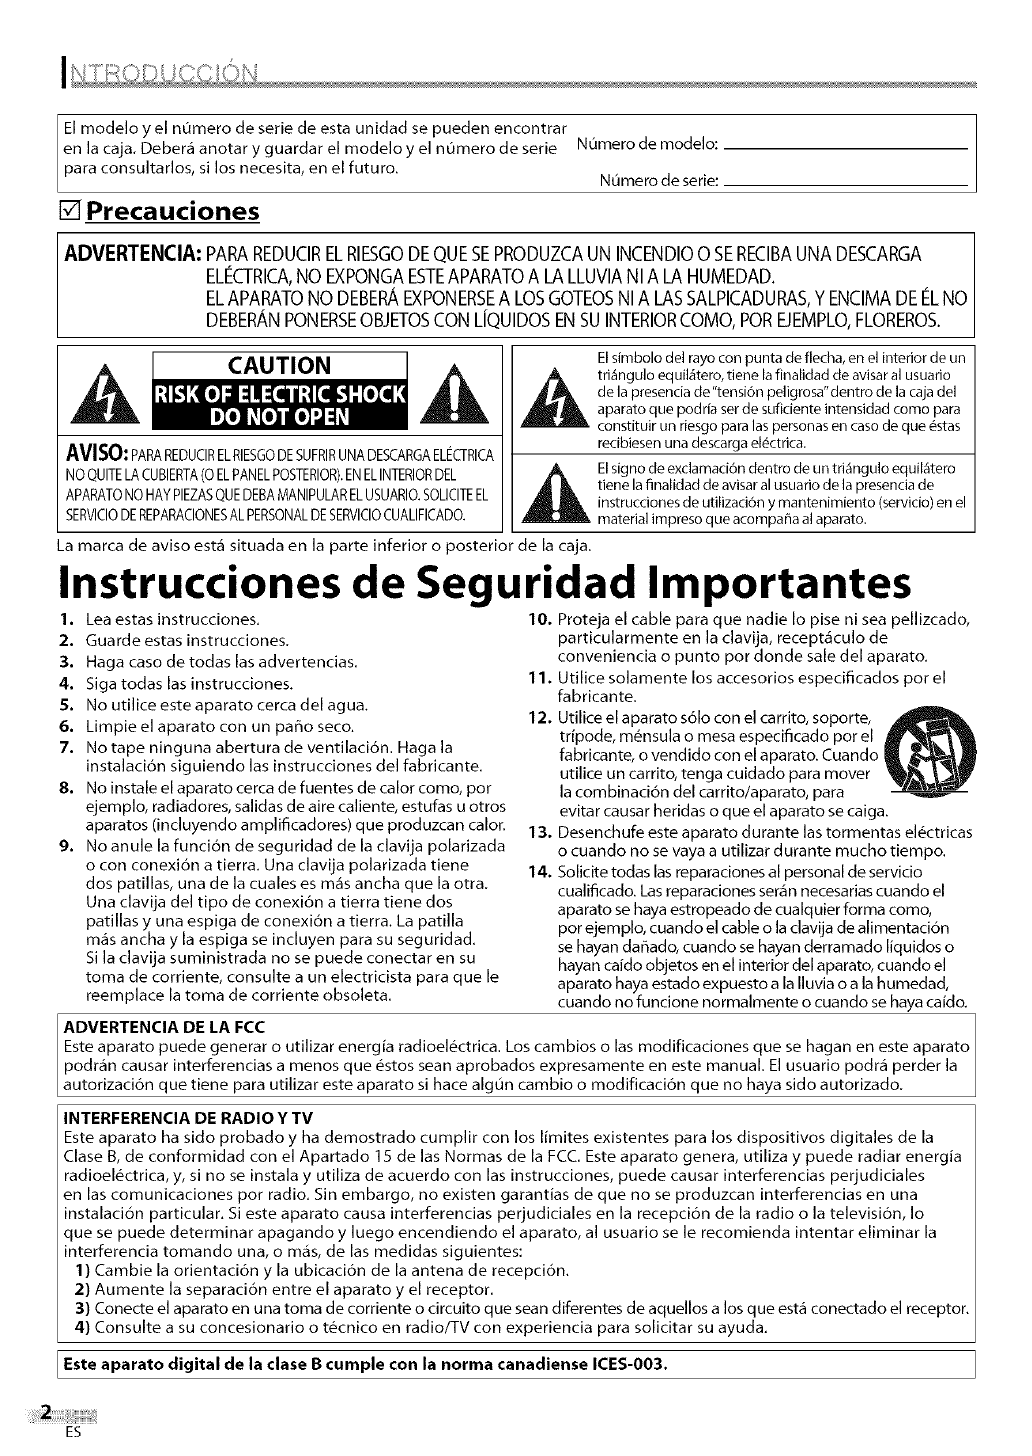
El modelo y el nOmero de serie de esta unidad se pueden encontrar
en la caja. Deber_ anotar y guardar el modelo y el nOmero de serie
para consultarlos, si los necesita, en el futuro.
[] Precauciones
NOmero de modelo:
Numero de serie:
ADVERTENCIA: PARAREDUClRELRIESGODEQUESEPRODUZCAUN INCENDIO0 SEREClBAUNADESCARGA
ELIeCTRICA,NO EXPONGAESTEAPARATOA LALLUVlANIA LAHUMEDAD.
ELAPARATONODEBERAEXPONERSEA LOSGOTEOSNIA LASSALPICADURAS,Y ENClMADEleLNO
DEBERANPONERSEOBJETOSCONLIQUlDOSENSUINTERIORCOMO,POREJEMPLO,FLOREROS.
CAUTION
AVISO'PARAREDUCIRELRIESGODESUFRIRUNADESCARGAEU_CTRICA
NOQUITELACUBIERTA(0 ELPANELPOSTERIOR).ENELINTERIORDEL
APARATONOHAYPIEZASQUEDEBAMANIPULARELUSUARIO.SOLICITEEL
SERVICIODEREPARACIONESALPERSONALDESERVlCIOCUALIFICADO.
La marca de aviso est_ situada en la parte inferior o posterior de la caja.
El simbolo del rayo con punta de flecha, en el interior de un
tri_ngulo equil_tero, tiene la finalidad de avisar al usuario
de la presencia de"tensi6n peligrosa"dentro de la caja del
aparato que podria ser de suficiente intensidad como para
constituir un riesgo para las personas en caso de que _stas
recibiesen una descarga el_ctrica.
El signo de exclamaci6n dentro de un tri_ngulo equil_tero
tiene la finalidad de avisar al usuario de la presencia de
instrucciones de utilizacidn y mantenimiento (servicio) en el
material impreso que acompa_a al aparato.
Instrucciones de Seguridad Importantes
1. Lea estas instrucciones. 10. Proteja el cable para que nadie Io pise ni sea pellizcado,
2. Guarde estas instrucciones.
3. Haga caso de todas las advertencias.
4. Siga todas las instrucciones.
5. No utilice este aparato cerca del agua.
6. Limpie el aparato con un pa6o seco.
7. No tape ninguna abertura de ventilaci6n. Haga la
instalaci6n siguiendo las instrucciones del fabricante.
8. No instale el aparato cerca de fuentes de calor como, por
ejemplo, radiadores, salidas de aire caliente, estufas u otros
aparatos (incluyendo amplificadores) que produzcan calor.
9. No anule la funci6n de seguridad de la clavija polarizada
o con conexi6n a tierra. Una clavija polarizada tiene
dos patillas, una de la cuales es m_s ancha que la otra.
Una clavija del tipo de conexi6n a tierra tiene dos
patillas y una espiga de conexi6n a tierra. La patilla
m_s ancha y la espiga se incluyen para su seguridad.
Si la clavija suministrada no se puede conectar en su
toma de corriente, consulte a un electricista para que le
reemplace la toma de corriente obsoleta.
particularmente en la clavija, recept_culo de
conveniencia o punto por donde sale del aparato.
11. Utilice solamente los accesorios especificados por el
fabricante.
12. Utilice el aparato s61ocon el carrito, soporte,
tripode, m6nsula o mesa especificado por el
fabricante, o vendido con el aparato. Cuando
utilice un carrito, tenga cuidado para mover
la combinaci6n del carrito/aparato, para
evitar causar heridas o que el aparato se caiga.
13. Desenchufe este aparato durante las tormentas el6ctricas
o cuando no se vaya a utilizar durante mucho tiempo.
14. Solicite todas las reparaciones al personal de servicio
cualificado. Las reparaciones ser_n necesarias cuando el
aparato se haya estropeado de cualquier forma como,
por ejemplo, cuando el cable o la clavija de alimentaci6n
se hayan da_ado, cuando se hayan derramado liquidos o
hayan caido objetos en el interior del aparato, cuando el
aparato haya estado expuesto a la Iluvia o a la humedad,
cuando no funcione normalmente o cuando se haya caido.
ADVERTENCIA DE LA FCC
Este aparato puede generar o utilizar energia radioel@ctrica. Los cambios o las modificaciones que se hagan en este aparato
podr_n causar interferencias a menos que @stos sean aprobados expresamente en este manual. El usuario podr_ perder la
autorizaci6n que tiene para utilizar este aparato si hace algun cambio o modificaci6n que no haya sido autorizado.
INTERFERENCIA DE RADIO Y TV
Este aparato ha sido probado y ha demostrado cumplir con los limites existentes para los dispositivos digitales de la
Clase B, de conformidad con el Apartado 15 de las Normas de la FCC. Este aparato genera, utiliza y puede radiar energia
radioel_ctrica, y, si no se instala y utiliza de acuerdo con las instrucciones, puede causar interferencias perjudiciales
en las comunicaciones por radio. Sin embargo, no existen garantias de que no se produzcan interferencias en una
instalaci6n particular. Si este aparato causa interferencias perjudiciales en la recepci6n de la radio o la televisi6n, Io
que se puede determinar apagando y luego encendiendo el aparato, al usuario se le recomienda intentar eliminar la
interferencia tomando una, o m_s, de las medidas siguientes:
1) Cambie la orientaci6n y la ubicaci6n de la antena de recepci6n.
2) Aumente la separaci6n entre el aparato y el receptor.
3) Conecte el aparato en una toma de corriente o circuito que sean diferentes de aquellos a los que est_ conectado el receptor.
4) Consulte a su concesionario o t&cnico en radio/TV con experiencia para solicitar su ayuda.
Este aparato digital de la clase B cumple con la norma canadiense ICES-003.
ES
7
Este aparato no deber_ colocarse en una instalaci6n empotrada como, pot ejemplo, una libreria o estanteria, a menos que [
disponga de una ventilaci6n apropiada. J
Aseg0rese de dejar un espacio ibre de unos 2,8 pu gadas (Tcm) a rededor de este aparato.
Desconecte la clavija de alimentaci6n de la toma de corriente cuando busque un problema o no utilice el aparato. La ]
c avija de a a imentaci6n deber_ estar siempre ista para ser conectada. J
AVISO: Si la pila se sustituye incorrectamente existe el riesgo de que se produzca una explosi6n. Sustit0yala siempre por
otra de tipo equivalente.
ADVERTENCIA: Las baterias y las pilas (la bateria o la pila que est_ instalada) no deber_n exponerse a un calor excesivo como, por
ejemplo, el del sol, el de un incendio u otro similar.
LA LUZ (_ DE LA LCD CONTIENE MERCURIO, DESHAGASE DE ELLA CUMPLIENDO LA LEY LOCAL, ESTATAL OFEDERAL.
ADVERTENCIA: Para impedir lesiones, este aparato deber_ fijarse firmemente al suelo/pared siguiendo las instrucciones.
SEGURIDAD CON EL LASER
Este aparato utiliza un I_ser. Dado que se pueden producir lesiones oculares, s61o personal calificado en servicio t6cnico
debe quitar la cubierta o intentar reparar el aparato.
AVISO: El uso de controles o ajustes, o la realizaci6n de procedimientos diferentes a los especificados aqui pueden
causar exposici6n a radiaciones peligrosas.
AVISO: Hay radiaci6n laser visible e invisible cuando se abre y se anula el enclavamiento. No mire fijamente el haz de luz.
UBICACION: En el interior, cerca del mecanismo de bandeja.
INFORMACION IMPORTANTE SOBRE DERECHOS DE AUTOR
La copia, transmisi6n, interpretaci6n p0blica y el pr6stamo de discos sin autorizaci6n est_n prohibidos. Este producto
contiene tecnologJa con protecci6n de derechos de autor y est,] protegido pot derechos de patente y demos derechos
de propiedad intelectual de los EE. UU. El uso de esta tecnologia con protecci6n de derechos de autor debe set
autorizado pot Macrovision, y s61o est_ pensado para el hogar y otros usos de visualizaci6n limitados a menos que
Macrovision autorice o contrario. Se prohJbe e desarmado o a ingenierJa inversa.
PARA EVITAR PELIGROS DE DESCARGA ELI_:CTRICA O INCENDIO
• No maneje el cable de alimentaci6n con las manos mojadas.
• No retire la caja de este aparato. Tocar las piezas del interior de la caja puede causar una descarga el6ctrica y/o da_os
en este aparato. Para realizar reparaciones y ajustes en el interior de este aparato, Ilame a un concesionario cualificado o
a un centro de reparaciones autorizado.
• No tire del propio cable cuando Io desconecte de una toma de CA. Sujete la clavija y tire de ella.
• No meta sus dedos ni otros objetos en la unidad.
COLOCACION Y MANEJO
• Las aberturas no deber_n taparse colocando la unidad en una cama, sof_, alfombra u otra superficie similar.
• No instale la unidad cerca de un radiador o salida de aire caliente.
• No instale la unidad expuesta a la luz solar directa, cerca de campos magn6ticos o en lugares expuestos al polvo o a
vibraciones fuertes.
• Evite colocar la unidad donde se produzcan cambios extremos de temperatura.
• Instale la unidad en una posici6n horizontal y estable. No ponga nada directamente encima o debajo de la unidad.
Dependiendo de los dispositivos externos, es posible que se produzcan ruidos y alteraciones en la imagen y/o sonido si la
unidad se coloca demasiado cerca de ellos. En este caso, deje un buen espacio entre los dispositivos extemos y la unidad.
• Dependiendo del medio ambiente, la temperatura de esta unidad puede aumentar un poco, pero esto no indica
ning0n fallo de funcionamiento.
ADVERTENCIA SOBRE CONDENSACION
• En las siguientes condiciones se puede crear condensaci6n en el interior de la unidad. Si esto sucede, no utilice la
unidad al menos durante unas horas hasta que se seque su interior.
- La unidad se traslada de un lugar frio a un lugar c_lido.
- Bajo condiciones de alta humedad.
- Luego de calefaccionar una habitaci6n fria.
NOTA ACERCA DEL RECICLADO
• Los materiales de embalaje de esta unidad son reciclables y pueden volver a utilizarse. Disponga de ellos
segun los reglamentos de reciclado locales.
Las baterias y las pilas nunca deber_n tirarse a la basura ni incinerarse, sino que se deber_ disponer de elias
seg0n los reglamentos locales relacionados con la basura quimica.
i •
i _i_
_i!!_iiiii!
ES
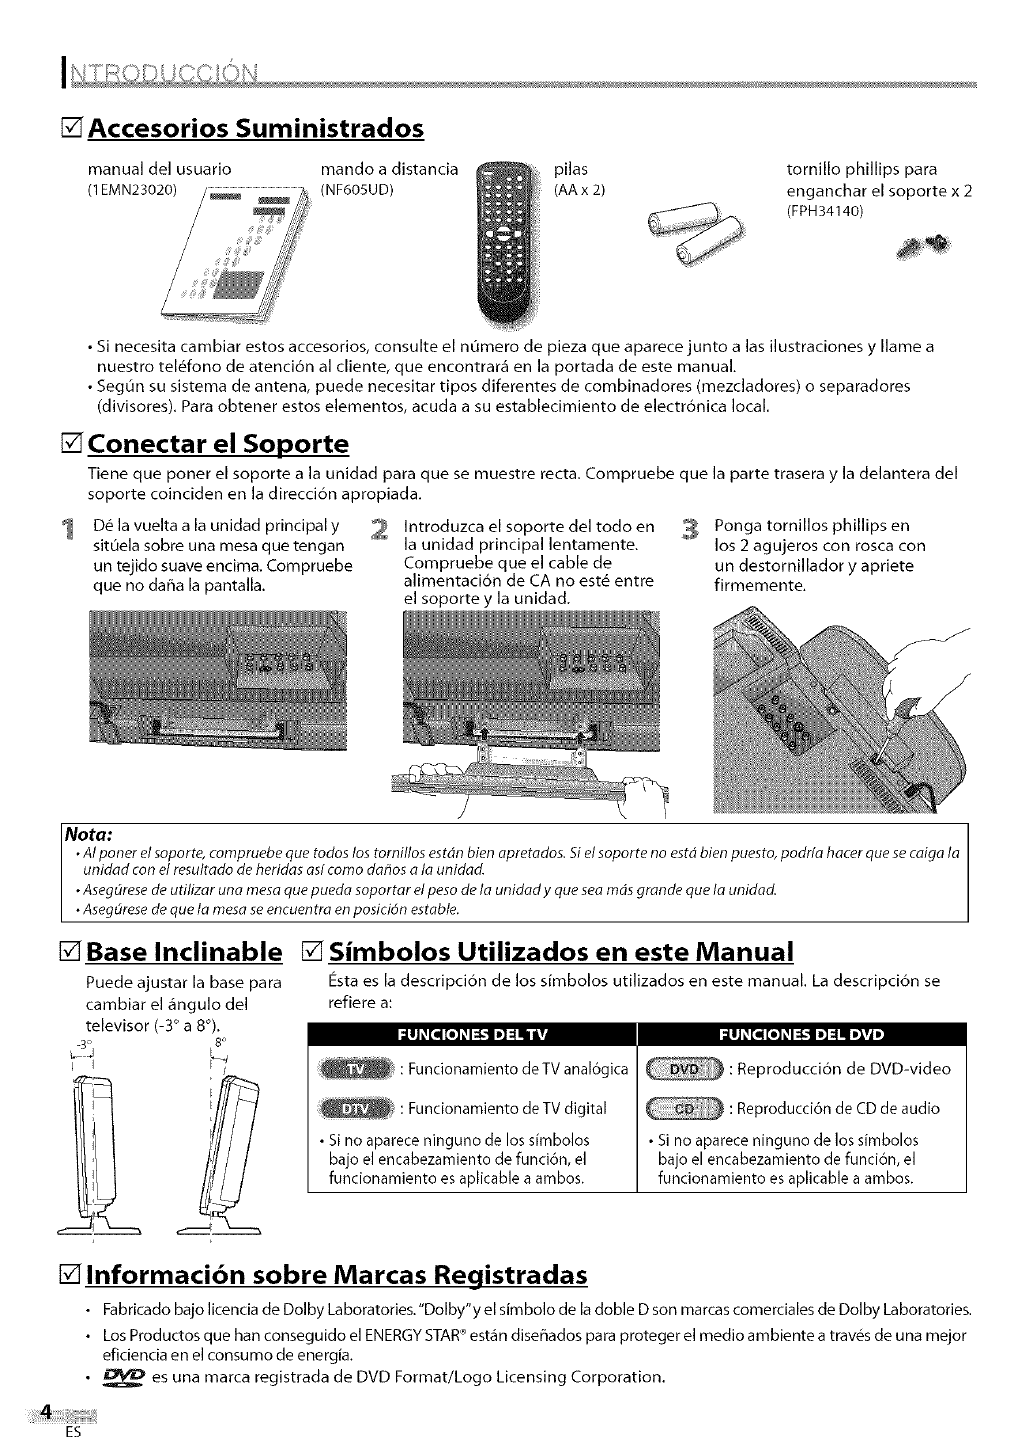
[] Accesorios Suministrados
manual del usuario
(1EMN23020) /_ _
/
mando a distancia
(NF605UD)
pilas
(AAx 2)
tornillo phillips para
enganchar el soporte x 2
(FPH34140)
• Si necesita cambiar estos accesorios, consulte el nOmero de pieza que aparece junto alas ilustraciones y Ilame a
nuestro tel6fono de atenci6n al cliente, que encontrar_ en la portada de este manual.
• Segun su sistema de antena, puede necesitar tipos diferentes de combinadores (mezcladores) o separadores
(divisores). Para obtener estos elementos, acuda a su establecimiento de electr6nica local.
[] Conectar el Soporte
Tiene que poner el soporte a la unidad para que se rnuestre recta, Compruebe que la parte trasera y la delantera del
soporte coinciden en la direcci6n apropiada,
D6 la vuelta a la unidad principal y
sitOela sobre una mesa que tengan
un tejido suave encima, Compruebe
que no daffa la pantalla.
2 Introduzca el soporte del todo en 3
la unidad principal lentamente,
Compruebe que el cable de
alimentaci6n de CA no est_ entre
el soporte y la unidad,
Ponga tornillos phillips en
los 2 agujeros con rosca con
un destornillador y apriete
firmemente,
Nota:
•AI porter el soporte, compruebe que todos los tornillos estdn bien apretados. Si el soporte no estd bien puesto, podr/a hacer que se caiga la
unidad con el resultado de heridas as[ corno da_os ala unidad.
•Asegdrese de utilizar una mesa que pueda soportar el peso de la unidad yque sea rods grande que la unidad.
•AsegClrese de que la mesa se encuentra en posici6n estable.
[] Base Inclinable
Puede ajustar la base para
cambiar el _ngulo del
televisor (-3° a 8°).
8°
_1 _ _1_
[] Simbolos Utilizados en este Manual
Esta es [a descripci6n de los simbolos utilizados en este manual. La descripci6n se
refiere a:
Funcionamiento deTV anal6gica
: Funcionamiento de TV digital
• Si no aparece ninguno de los simbolos
bajo el encabezamiento de funci6n, el
funcionamiento es aplicable a ambos.
: Reproducci6n de DVD-video
: Reproducci6n de CD de audio
• Si no aparece ninguno de los simbolos
bajo el encabezamiento de funci6n, el
funcionamiento es aplicable a ambos.
[] Informaci6n sobre Marcas Registradas
• Fabricado bajo licencia de Oolby Laboratories."Dolby"y el simbolo de la doble D son marcas comerciales de Dolby Laboratories.
• Los Productos que han conseguido el ENERGYSTAR®est_n diseffados para proteger el medio ambiente a traves de una mejor
eficiencia en el consumo de energia,
• _ es una marca registrada de DVD Format/Logo Licensing Corporation,
ES
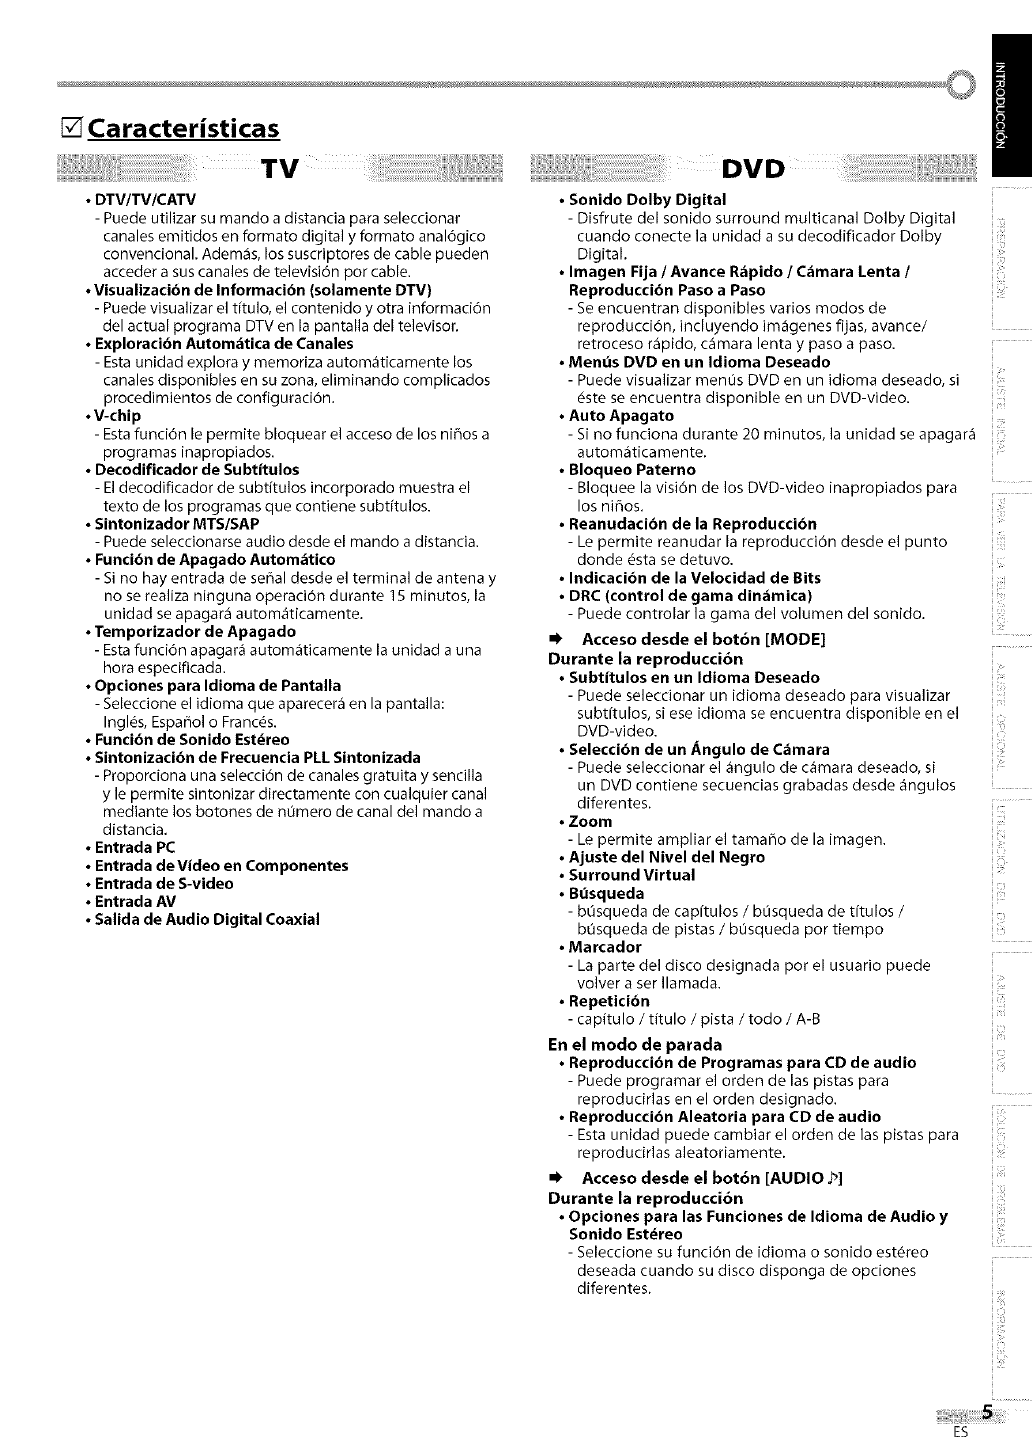
[] Caracteristicas
TV
•DTV/TV/CATV
- Puede utilizar su mando a distancia para seleccionar
canales emitidos en formato digital y formato anal6gico
convencional. Ademas, los suscriptores de cable pueden
acceder a sus canales de televisi6n por cable.
•Visualizacibn de Informacibn (solamente DTV)
- Puede visualizar el titulo, el contenido y otra informaci6n
del actual programa DTV en la pantalla del televisor.
•Exploraci6n Autom_tica de Canales
- Estaunidad explora y memoriza autorn_ticamente los
canales disponibles en su zona, eliminando complicados
procedimientos de configuraci6n.
•V-chip
- Esta funci6n le permite bloquear el acceso de los nihos a
programas inapropiados.
•Decodificador de Subtitulos
- Eldecodificador de subtitulos incorporado rnuestra el
texto de los programas que contiene subtitulos.
•Sintonizador MTS/SAP
- Puede seleccionarse audio desde el mando a distancia.
•Funci6n de Apagado Autom_tico
- Si no hay entrada de sehal desde el terminal de antena y
no se realiza ninguna operacion durante 15 minutos, la
unidad se apagara autom_iticamente.
•Temporizador de Apagado
- Esta funci6n apagar_ autom_iticamente la unidad a una
hora especificada.
•Opciones para Idioma de Pantalla
- Seleccione el idiorna que aparecera en la pantalla:
Ingl6s, Espahol o Franc_s.
•Funci6n de Sonido Est_reo
•Sintonizaci6n de Frecuencia PLLSintonizada
- Proporciona una selecci6n de canales gratuita y sencilla
y le permite sintonizar directamente con cualquier canal
mediante los botones de n0mero de canal del mando a
distancia.
•Entrada PC
•Entrada de Video en Componentes
•Entrada de S-video
•Entrada AV
•Salida de Audio Digital Coaxial
•Sonido Dolby Digital
- Disfrute del sonido surround multicanal Dolby Digital
cuando conecte la unidad a su decodificador Dolby
Digital. '
•Imagen Fija /Avance R_pido /C_mara Lenta /
Reproducci6n Paso a Paso
- Se encuentran disponibles varios modos de
reproducci6n, incluyendo im_genes fijas, avance/
retroceso rapido, camara lenta y paso a paso.
•Mends DVD en un Idioma Deseado
- Puede visualizar men0s DVD en un idioma deseado, si
_ste se encuentra disponible en un DVD-video.
•Auto Apagato ....
s,no,unc,onadorante20m,nutos,,aun,dadseapagara
automaticarnente. i
•Bloqueo Paterno
- Bloquee la visi6n de los DVD-video inapropiados para ....
los ni_os.
•Reanudacibn de la Reproduccibn
- Le permite reanudar la reproducci6n desde el punto
donde #sta se detuvo.
•Indicaci6n de la Velocidad de Bits
•DRC (control de gama din,_mica)
-Puede controlarlagama delvolumen delsonido.
•Accesodesde el bot6n [MODE]
Durante la reproducci6n
•Subtitulos en un Idioma Deseado
- Puede seleccionar un idioma deseado para visualizar
subtitulos, si ese idioma se encuentra disponible en el
DVD-video.
•Selecci6n de un Angulo de Camara
- Puede seleccionar el _ngulo de c_mara deseado, si
un DVD contiene secuencias grabadas desde _ngulos
diferentes.
•Zoom
- Le permite ampliar el tamaho de la imagen.
•Ajuste del Nivel del Negro
•Surround Virtual
•Bdsqueda
- bOsqueda de capitulos /bOsqueda de titulos /
bOsqueda de pistas /bOsqueda por tiempo
•Marcador
- La parte del disco designada pot el usuario puede
volver a ser Ilamada.
•.epo.c,6n
- capitulo /titulo /pista /todo /A-B
En el modo de parada
•Reproducci6n de Programas para CD de audio
- Puede prograrnar el orden de las pistas para
reproducirlas en el orden designado.
•Reproducci6n Aleatoria para CD de audio
- Esta unidad puede cambiar el orden de las pistas para
reproducirlas aleatoriamente.
•Acceso desde el bot6n [AUDIO 2]
Durante la reproducci6n
•Opciones para las Funciones de Idioma de Audio y
Sonido Est_reo
- Seleccione su funci6n de idiorna o sonido estereo
deseada cuando su disco disponga de opciones
diferentes.
i iiii:i_
ES
lndice
Precauciones..................................................... 2
AccesoriosSuministrados.......................................... 4
ConectarelSoporte............................................... 4
BaseInclinable................................................... 4
Informaci6nsobreMarcasRegistradas.............................. 4
SimbolosUtilizadosenesteManual................................. 4
Caracteristicas.................................................... 5
Botonesen elMandoa Distancia................................... 7
Instalaci6ndelasPilas............................................. 7
PaneldeControl.................................................. 8
PanelTrasero..................................................... 8
Conexi6nB_isica.................................................. 9
Conexi6nde DispositivoExterno................................... 10
Instalaci6ndeun SoporteparaelMontajeen Pared
(sevendeporseparado).......................................... 12
Funciones de| TV
!",,;USTE /NCAL
Configuraci6nInicial ............................................. 13
Men_Principal.................................................. 13
Exploraci6nAutom_iticadeCanales................................ 14
Selecci6nde Idioma.............................................. 14
PARA VER LA TELEVSC)_,J
Selecci6ndeCanal............................................... 15
Ajustede Volumen............................................... 15
ParaCambiarEntreCadaMododeEntrada.......................... 15
ParaCambiarelModode Audio ................................... 16
TemporizadordeApagado........................................ 16
Informaci6nde Pantalla.......................................... 17
MododeVisualizaci6nde PantalladelTelevisor..................... 18
/",_/USTE OPC ObJAL
Agregar/BorrarCanales........................................... 20
Ajustede Imagen................................................ 21
Subtffulos....................................................... 21
SubtitulosenDTV................................................ 22
EstiloDI"VCC..................................................... 23
Ajustede Luzde Fondo........................................... 24
TemperaturadeColor............................................ 24
V-chip .......................................................... 25
Ajustesde PC.................................................... 28
UT/LZAC/({)b_: DEL E}_VD
MediosquesePuedenReproducir................................. 29
MediosquenosePuedenReproducir.............................. 29
Reproducci6n................................................... 30
Ment_delDisco.................................................. 30
Reanudaci6nde la Reproducci6n.................................. 30
Saltar........................................................... 30
AvanceR_ipido/RetrocesoR_pido................................. 30
AvanceLento/RetrocesoLento................................... 31
Pausay Reproducci6ny Pasoa Paso................................ 31
Zoom........................................................... 31
FuncionesdeBusqueda........................................... 32
Repetici6ndeReproducci6n....................................... 33
Repetici6ndeReproducci6nA-B................................... 33
Reproducci6nAleatoria........................................... 33
Reproducci6nProgramada........................................ 34
Visualizaci6nen Pantalla......................................... 35
AjustesEspeciales................................................ 36
AJUSTE DE DVD
Ajustede Idiomaen DVD.......................................... 39
AjustedeAudiode DVD........................................... 40
AjustePaterno .................................................. 41
Otros........................................................... 42
ReposicJ6ndelosAjustesPredeterminados......................... 43
LJstadeC6digosdeIdJomas....................................... 43
Guiade Solucionde Problemas.................................... 44
PreguntasFrecuentes............................................ 45
Glosario......................................................... 46
MantenJmiento.................................................. 46
DenominacionesdeCanalesde Cable.............................. 47
EspecificacionesGenerales........................................ 47
Especificaci6nEl_ctrica........................................... 47
OtrasEspecificaciones............................................ 47
GarantiaLimitada...................................... Tapatrasera
© 2008 Funai Electric Co., Ltd.
Todos los derechos reservados. No se permite la reproducci6n total o parcial de este manual, ni su copia, transmisi6n, difusi6n,
transcripci6n, descarga o almacenamiento en ningOn soporte de almacenamiento, en forma alguna o con fin alguno sin la
autorizaci6n expresa y previa por escrito de Funai. Adem4s, toda distribuci6n comercial no autorizada de este manual o toda
revisi6n del mismo queda estrictamente prohibida.
La informaci6n contenida en este documento puede ser objeto de cambios sin previo aviso. Funai se reserva el derecho de
cambiar el contenido de este documento sin la obligaci6n de notificar dichos cambios a ninguna persona u organizaci6n.
_LINAIcon el dise6o _ es una marca comercial registrada de Funai Electric Co., Ltd y no se puede utilizar en modo alguno sin la
autorizaci6n expresa por escrito de Funai.Todas las restantes marcas comerciales utilizadas en este documento siguen siendo
propiedad exclusiva de sus respectivos propietarios. Nada de Io contenido en este manual debe set entendido como concesi6n,
implicita o de otro tipo, de cualquier licencia o derecho de uso de cualquiera de las marcas comerciales en 61visualizadas. El uso
indebido de cualquier marca comercial o de cualquier otro contenido de este manual queda estrictamente prohibido. Funai hard
cumplir energicamente sus derechos de propiedad intelectual dentro de los limites maximos establecidos por la ley.
ES

[] Botones en el Mando a Distancia
11
12
13
14
15
16
17
18
19
20
21
22
23
24
25
1. POWER(p. 13)
Presione para activar y desactivar la unidad.
2. MUTE_(p. 15)
Presione para activar y desactivar el sonido.
3. SLEEP _ (p. 16)
Presione para activar el temporizador de
apagado.
4. Botones num_ricos (p. 15)
• Presione para seleccionar los canales.
• Presione para seleccionar capitulo, titulo (DVD)
o pista (CD).
-lENT.
• Presione para cambiar de canal inferior a
superior.
+10/+100
• Presione para seleccionar el canal 100 o
superiores. (CATV)
• Presione para buscar si hay los canales
menores en el canal mayor actualmente
seleccionado. (DTV)
5. VOL. (p. 15)
Presione para ajustar el volumen.
[] Instalacibn de las Pilas
6. PAUSE II (p. 31)
Presione para hacer pausa en la
reproduccion del disco.
7. SKIP I,ql_l /IH_t (p. 3O)
• Presione para saltar hacia delante o
hacia atras capitulos, titulos (DVD) o
pistas (CD).
REV _ (p. 30)
• Presione y mantenga presionado
comenzar la reproduccion de retroceso
lento durante el modo pausa (DVD) y
la b0squeda hacia atr_s en un disco
(DVD,CD).
FWD _ (p. 30)
• Presione y mantenga presionado
comenzar la reproduccion de avance
lento durante el modo pausa (DVD) y
la b0squeda hacia delante en un disco
(DVD,CD).
8. SETUP (p. 13 /p. 39)
Presione para visualizar el menu
principal.
9. RETURN _ (p. 21)
Presione para volver a la operacion
anterior en el menU.
10. CLEAR (p. 32)
• Presione para borrar los n_meros
introducidos incorrectamente.
• Presione para cancelar el punto A para
repeticion A-B (DVD, CD).
• Presione para eliminar el n0mero de pista
en la introduccion de programas (CD).
11. MODE (p. 5)
• Presione para establecer el orden
de reproduction o reproducir
aleatoriamente (CD).
• Presione para activar o desactivar el
nivel de negro (DVD) yel surround
virtual (DVD, CD).
• Presione para cambiar el _ngulo de
camara para ver la secuencia reproducida
desde un 6ngulo diferente (DVD).
• Presione para buscar capitulo, titulo
(DVD), tiempo (DVD, CD) o pista (CD).
• Presione para establecer el marcador
(DVD, CD).
• Presione para repetir la reproduction
de capitulo, titulo (DVD), pista, disco
(CD), repetidamente o entre los puntos
designados A yB (DVD, CD).
• Presione para ampliar una parte de la
imagen (2x y4x : DVD).
• Presione para seleccionar los subtitulos
en un disco (DVD).
12. EJECTA (p. 30)
Presione para expulsar el disco.
13. INPUT(p. 15)
Presione para cambiar los modos de
entrada.
14. DISPLAYI(p. 17/p. 35)
Modo digital (DTV)
• Presione para visualizar el n_mero de
canal y la informaci6n de programa.
Modo anal6gico (TV)
• Presione para visualizar el n_mero de
canal.
Modo de entrada externa
• Presione para visualizar el modo
de entrada externa actualmente
seleccionado.
Modo DVD
• Presione para mostrar el estado actual
del disco.
15. AUDIO _b(p. 16 /p. 36)
Modo Digital (DTV)
• Presione para seleccionar el idioma de
audio.
Modo Analogico (TV)
• Presione para seleccionar el modo de
audio.
Modo DVD
• Presione para seleccionar el idioma de
audio (DVD) o el modo de sonido (CD).
16. SCREEN MODE _ (p. 18)
Presione para seleccionar las relaciones
de aspecto disponibles para la pantalla
del televisor.
17. PICTURE (p. 21)
Presione para ajustar la calidad de imagen.
18. CH. RECALL _'_ (p. 15)
Presione para volver al canal
anteriormente visualizado.
19. CH•AIv (p. 15)
Presione para seleccionar los canales.
20. PLAYI_ (p. 30)
Presione para comenzar la reproduccion
del disco.
21. STOPII (p. 30)
Presione para detener la reproduccion
del disco.
22. _I II_ IAI_' (p. 13) ....
Presione para desplazarse por los
elementos a izquierda/derecha/arriba/
abajo.
23 ENTER (p. 13) [
Presione para confirmar su seleccion.
24. MENU (p. 30)
Presione para visualizar el menu del disco.
25. TOP MENU (p. 30)
Presione para visualizar el men0 superior
del disco (DVD).
Instale las pilas (AA x 2) de manera que coincida la polaridad indicada en el interior del compartimento de las pilas del mando
a distancia.
Precauciones Sobre las Pilas:
i O
i Zi
•Asegdrese de seguJr la polafidad correcta segdn Io indicado en et compartimento de las pilas. Unas pilas en posici6n invertida pueden
causar dahos en el disposidvo.
•No mezcle diferentes tipos de pilas (por ejemplo, alcalJnas y de carbono-zJnc) ni pilas viejas con pilas nuevas.
•Si el dispositivo no se va a user durante un pefiodo prolongado de tiempo, quite las pilas pare evitar dahos o lesiones por posibles fugas de las pilas.
•No intente recargar las pilas; podrfan sobrecalentarsey romperse.
iiiiiii_ii_
ES
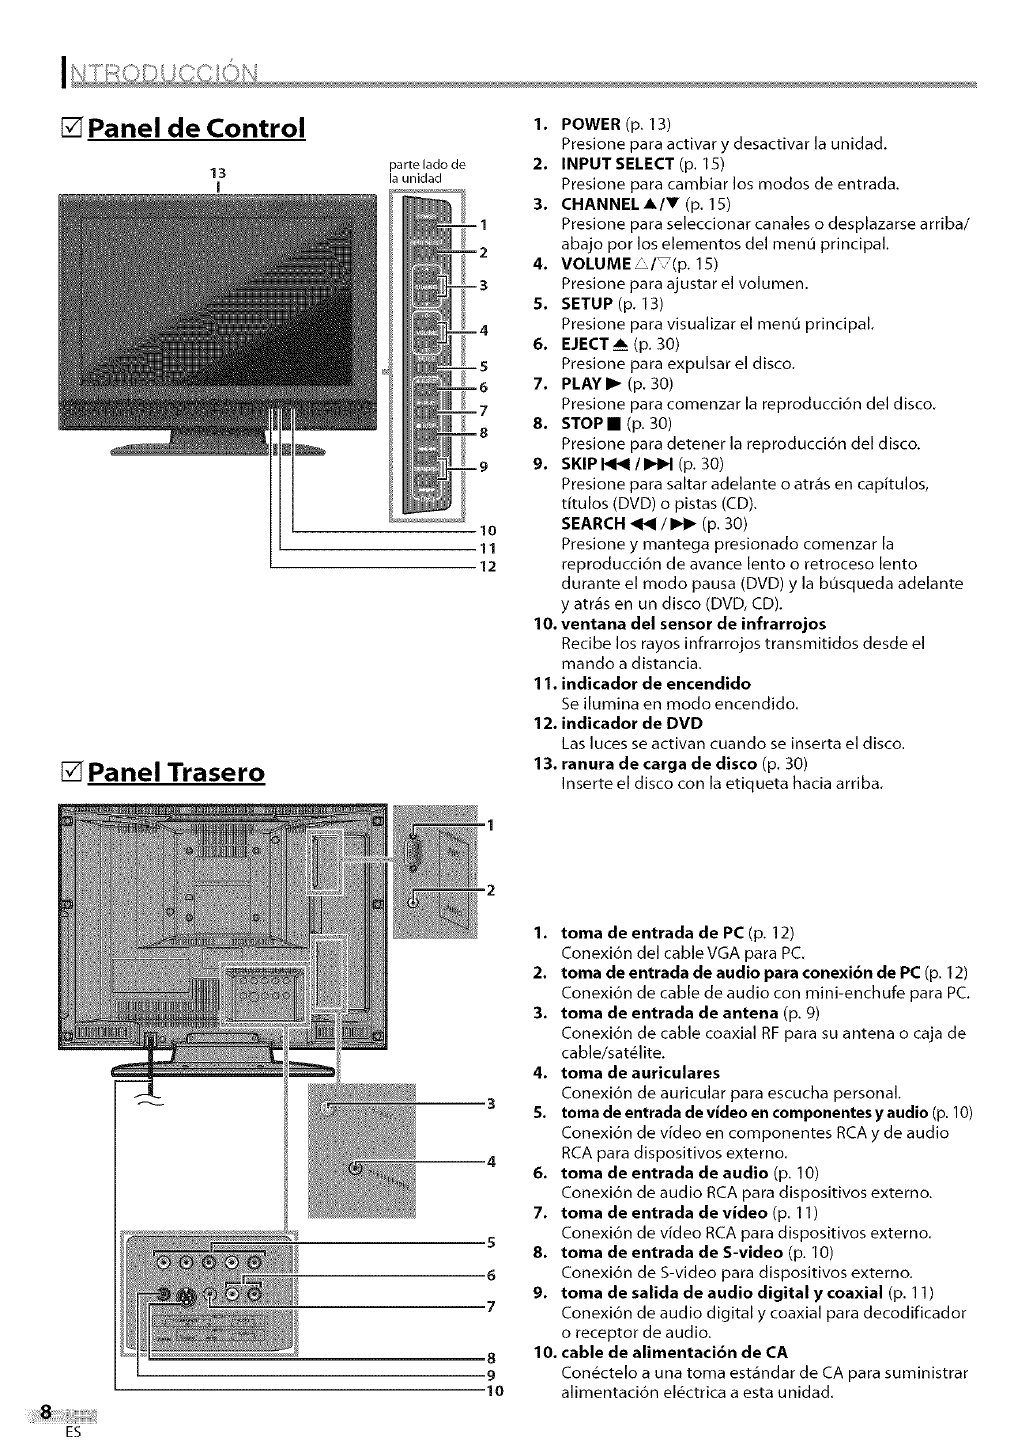
[] Panel de Control
13
I
[] Panel Trasero
parte lado de
la unidad
10
11
12
1. POWER (p. 13)
Presione para activar y desactivar la unidad.
2. INPUT SELECT (p. 15)
Presione para cambiar los modos de entrada.
3. CHANNELA/V (p. 15)
Presione para seleccionar canales o desplazarse arriba/
abajo por los elementos del menu principal.
4. VOLUME _/ (p. 15)
Presione para ajustar el volumen.
5. SETUP (p. 13)
Presione para visualizar el menO principal.
6. EJECT___ (p. 30)
Presione para expulsar el disco.
7. PLAY I_ (p. 30)
Presione para comenzar lareproducci6ndel disco.
8. STOP • (p. 30)
Presione para detener la reproducci6n del disco.
9. SKIPI_<I/IHIH (p. 30)
Presione para saltar adelante o atr_s en capitulos,
titulos (DVD) o pistas (CD).
SEARCH _/_ (p. 30)
Presione y mantega presionado comenzar la
reproducci6n de avance lento o retroceso lento
durante el modo pausa (DVD) y la busqueda adelante
y atr_s en un disco (DVD, CD).
10. ventana del sensor de infrarrojos
Recibe los rayos infrarrojos transmitidos desde el
mando a distancia.
11. indicador de encendido
Se ilumina en modo encendido.
12. indicador de DVD
Las luces se activan cuando se inserta el disco.
13. ranura de carga de disco (p. 30)
Inserte el disco con la etiqueta hacia arriba.
-2
1. toma de entrada de PC (p. 12)
Conexi6n del cable VGA para PC.
2. toma de entrada de audio para conexi6n de PC (p. 12)
Conexi6n de cable de audio con mini-enchufe para PC.
3. toma de entrada de antena (p. 9)
Conexi6n de cable coaxial RF para su antena o caja de
cable/sat@lite,
4. toma de auriculares
Conexi6n de auricular para escucha personal,
35. toma de entrada de video en componentes yaudio (p. 10)
Conexi6n de video en componentes RCA y de audio
4 RCA para dispositivos externo.
6. toma de entrada de audio (p. 10)
Conexi6n de audio RCA para dispositivos externo.
7. toma de entrada de video (p. 11)
Conexi6n de video RCA para dispositivos externo.
S8. toma de entrada de S-video (p, 10)
6 Conexi6n de S-video para dispositivos externo,
9. toma de salida de audio digital y coaxial (p. 11)
,7 Conexi6n de audio digital y coaxial para decodificador
o receptor de audio.
8 10. cable de alimentaci6n de CA
9 Con_ctelo a una toma est_ndar de CA para suministrar
|0 alimentaci6n el@ctrica a esta unidad.
ES
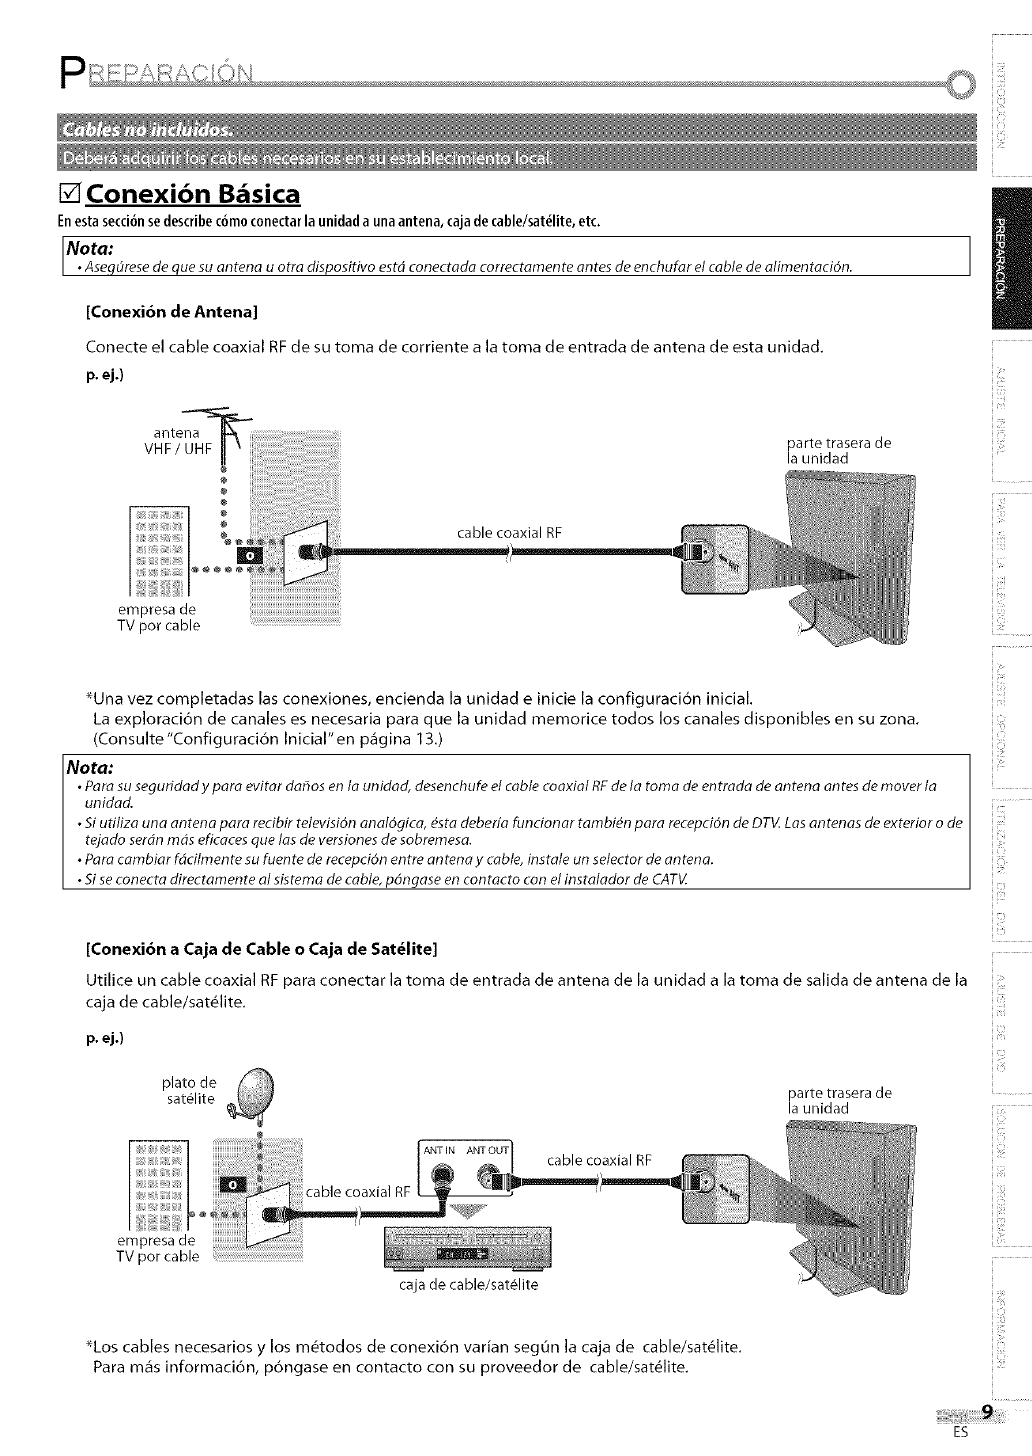
[] Conexi6n B6sica
Enestasecci6nsedescribec6m0c0nectarla unidadaunaantena,cajadecable/sat_lite,etc.
Nota:
•Aseqdresede que su antena u otra di__ositivo estd conectada correctamente antes de enchufar el cable de alirnentaci6n.
[Conexi6n de Antena]
Conecte el cable coaxial RF de su toma de corriente a la toma de entrada de antena de esta unidad.
p. ej.)
empresa de
TV por cable
anten-_'_
VHF/UHF _ _
@
iiii!iiiiiiiii!ii!iiiii!i!!!i!i!i!!_!i;!iiiiliJ cablecoaxial RF
m)))i))))) ))))))))) U
iii iiiiiii!i:)iii
parte trasera de
la unidad
_Una vez completadas las conexiones, encienda la unidad e inicie la configuraci6n inicial.
La exploraci6n de canales es necesaria para que la unidad memorice todos los canales disponibles en su zona.
(Consuhe"Configuraci6n Inicial"en p_gina 13.)
Nota:
• Para su seguridady para evitar dafios en la unidad, desenchufe el cable coaxial RFde la torna de entrada de antena antes de mover la
unidad.
• Siutiliza una antena para recibir televisi6n anal6gica, _sta deberfa funcionar tambi_n para recepci6n de DTV.Las antenas de exterior ode
tejado serdmmds eficacesque las de versiones de sobremesa.
• Para cambiar f4cilmente su fuente de recepci6n entre antena y cable, instale un selector de antena.
• Siseconecta directamente al sistema de cable, pdngase en contacto con elinstalador de CATV.
[Conexi6n a Caja de Cable o Caja de Sat_lite]
Utilice un cable coaxial RF para conectar la toma de entrada de antena de la unidad a la toma de salida de antena de la
caja de cable/sat&lite.
p. ej.)
plato de
sat_.lite parte trasera de
la unidad
ANT N ANTOUT RF
( _ cab e coax a
cable coaxial RF _ _ _!_11_
o
TV por cable
caja de cable/sat_lite
_Los cables necesarios y los m6todos de conexi6n varian segOn la caja de cable/sat_lite.
Para m_s informaci6n, p6ngase en contacto con su proveedor de cable/sat61ite.
i!ii!il
{t
i:i_7
b, )
iii!!_ii,i_i
ES
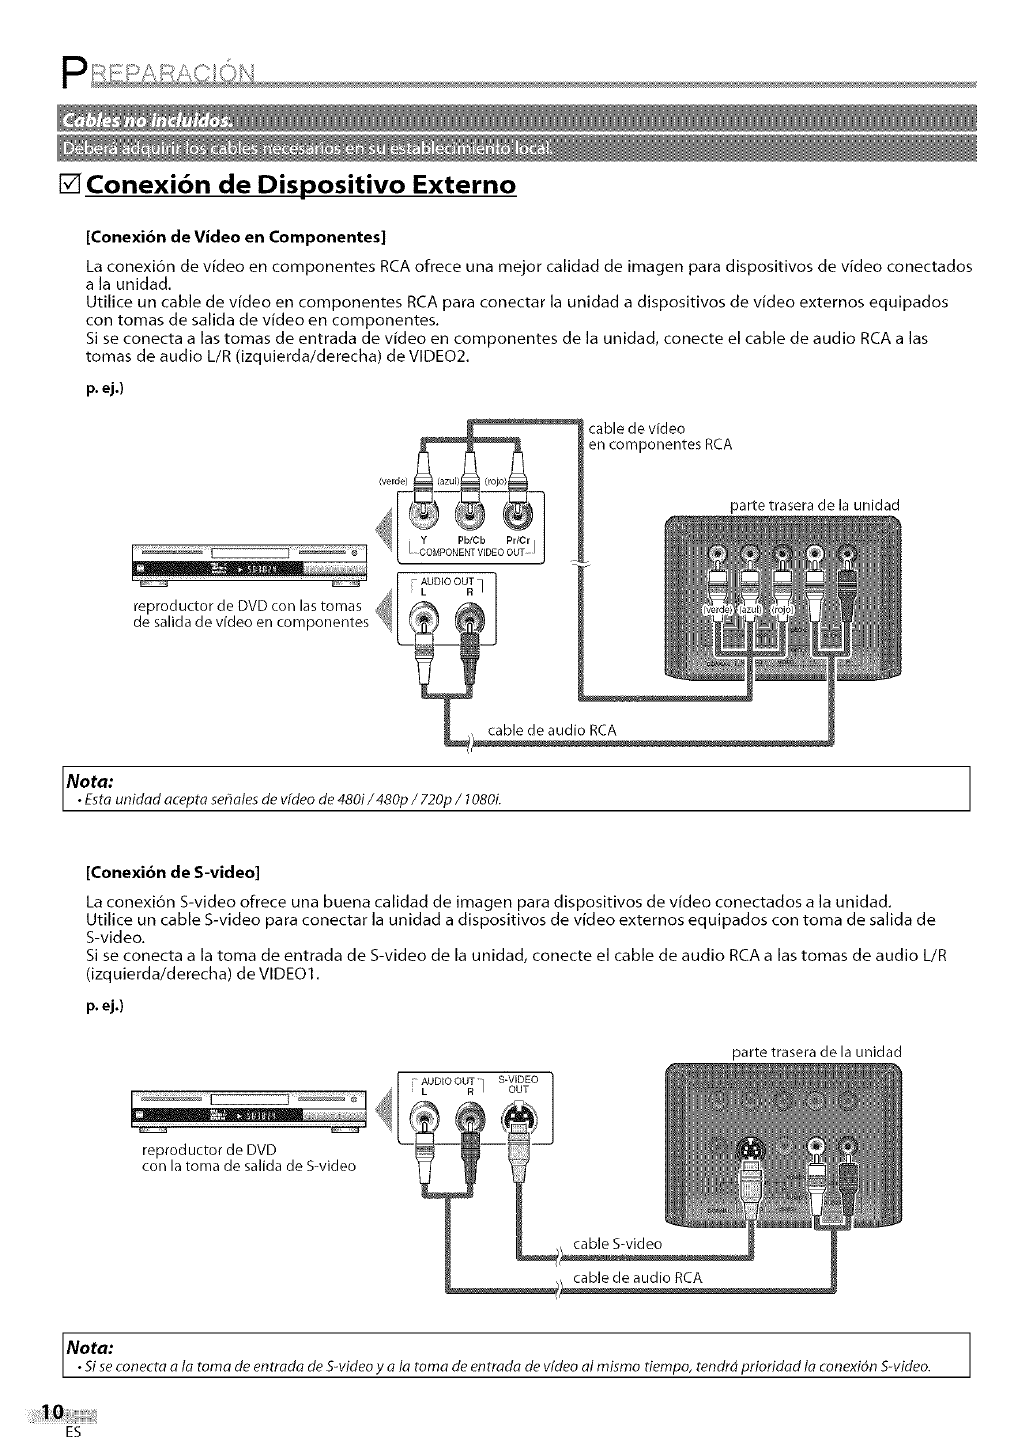
[] Conexi6n de Dispositivo Externo
[Conexi6n de Video en Componentes]
La conexi6n de video en componentes RCA ofrece una mejor calidad de imagen para dispositivos de video conectados
a la unidad.
Utilice un cable de video en componentes RCA para conectar la unidad a dispositivos de video extemos equipados
con tomas de salida de video en componentes.
Si se conecta alas tomas de entrada de video en componentes de la unidad, conecte el cable de audio RCA alas
tomas de audio L/R (izquierda/derecha) de VIDE02.
p. ej.)
cable de video
en componentes RCA
parte trasera de la unidad
F AUDIO OUT
reproductor de DVD con lastomas _ LR_
de salida de video en componentes
Noto:
•Estaunidad acepta sehalesde vfdeo de 480i / 480p / 720p / 1080L
[Conexi6n de S-video]
La conexi6n S-video ofrece una buena calidad de imagen para dispositivos de video conectados a la unidad.
Utilice un cable S-video para conectar la unidad a dispositivos de video extemos equipados con toma de salida de
S-video.
Si se conecta a la toma de entrada de S-video de la unidad, conecte el cable de audio RCA a las tomas de audio L/R
(izquierda/derecha) de VIDE01.
p. ej.)
reproductor de DVD
con la toma de salida de S-video
: AUDIO OUT S-VIDEO
; L R ] OUT
parte trasera de la unidad
Nota:
• si seconecta a la toma de entrada de S-videoy a la toma de entrada de Wdeoal mismo dempo, tendrd priofidad la conexi6n S-video.
ES
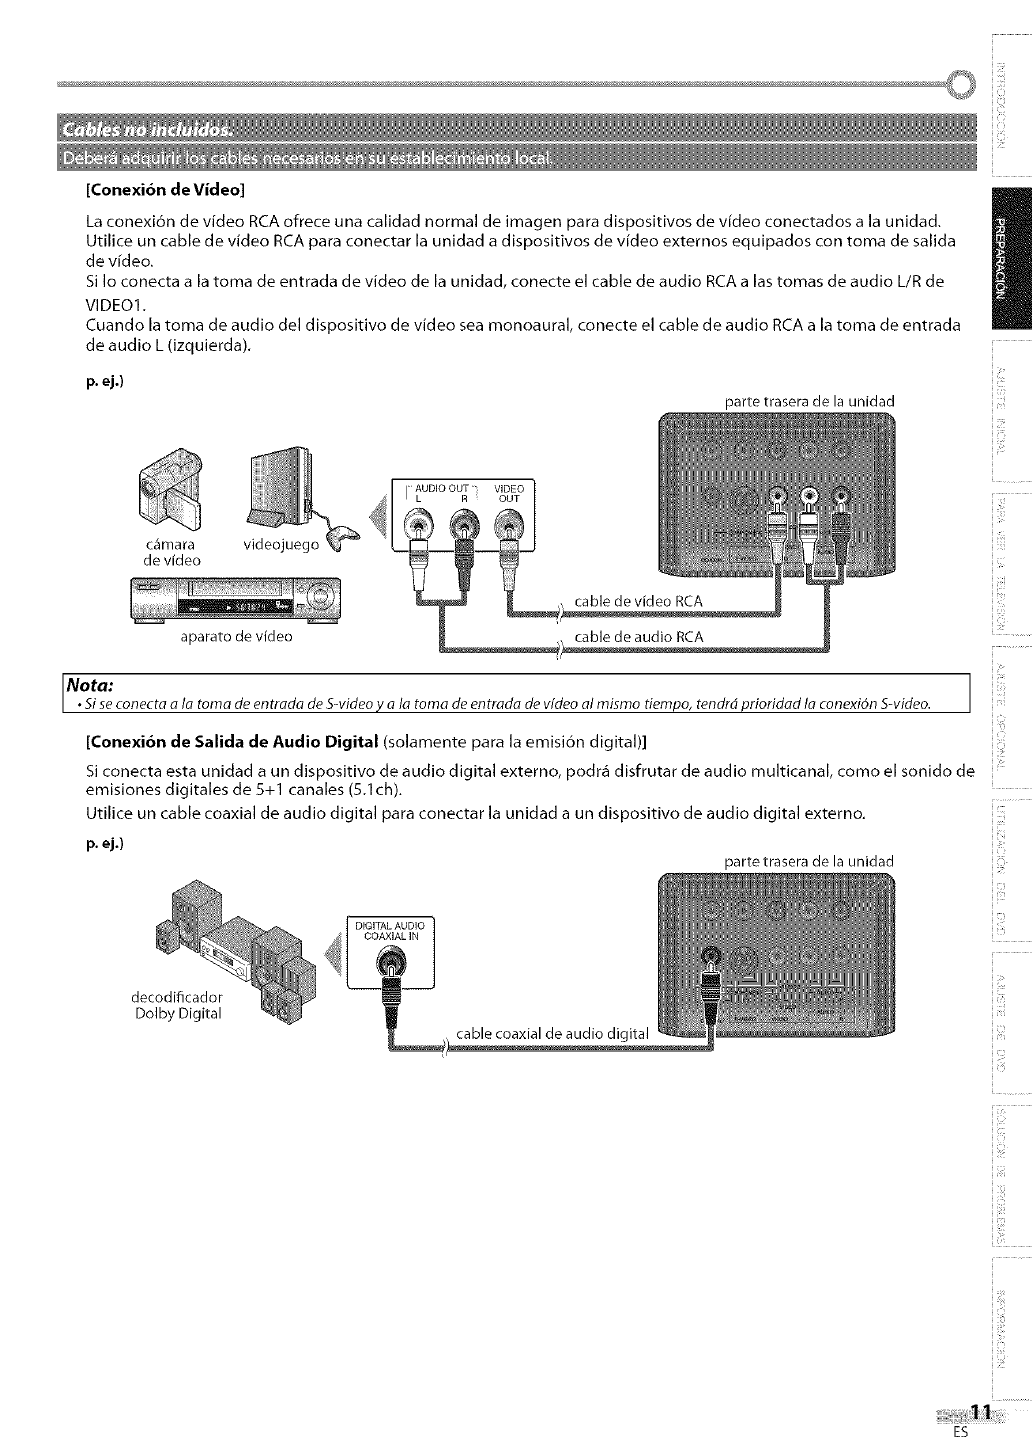
©
[Conexi6n de Video]
i!i, i!il
La conexi6n de video RCA ofrece una calidad normal de imagen para dispositivos de video conectados a la unidad.
Utilice un cable de video RCA para conectar la unidad a dispositivos de video externos equipados con toma de salida
de video.
Si Io conecta a la toma de entrada de video de la unidad, conecte el cable de audio RCA a las tomas de audio L/R de
VIDE01.
Cuando la toma de audio del dispositivo de video sea monoaural, conecte el cable de audio RCA a la toma de entrada
de audio L (izquierda).
parte trasera de la unidad
c_mara
de video
aparato de video
I AUDIO OUT VIDEO
I L R OUT
p. ej.)
IVota:
•Siseconecta a ia toma de entrada de S-video v a ia toma de entrada de Wdeoai mismo tiempo, tendrd prioridad ia conexi6n S-video.
[Conexi6n de Salida de Audio Digital (solamente para la emisi6n digital)]
Si conecta esta unidad a un dispositivo de audio digital externo, podr_ disfrutar de audio multicanal, como el sonido de
emisiones digitales de 5+1 canales (5.1ch).
Utilice un cable coaxial de audio digital para conectar la unidad a un dispositivo de audio digital externo.
parte trasera de la unidad
decodiflcador
Dolby Digital
DIGITAL AUDIO
COAXIAL IN
cable coaxial de audio digital
p. ej.)
i;ii:
i:ii/
ii>
b ;
i F_
i!!iiiii!
i!i:il
iu,
ES
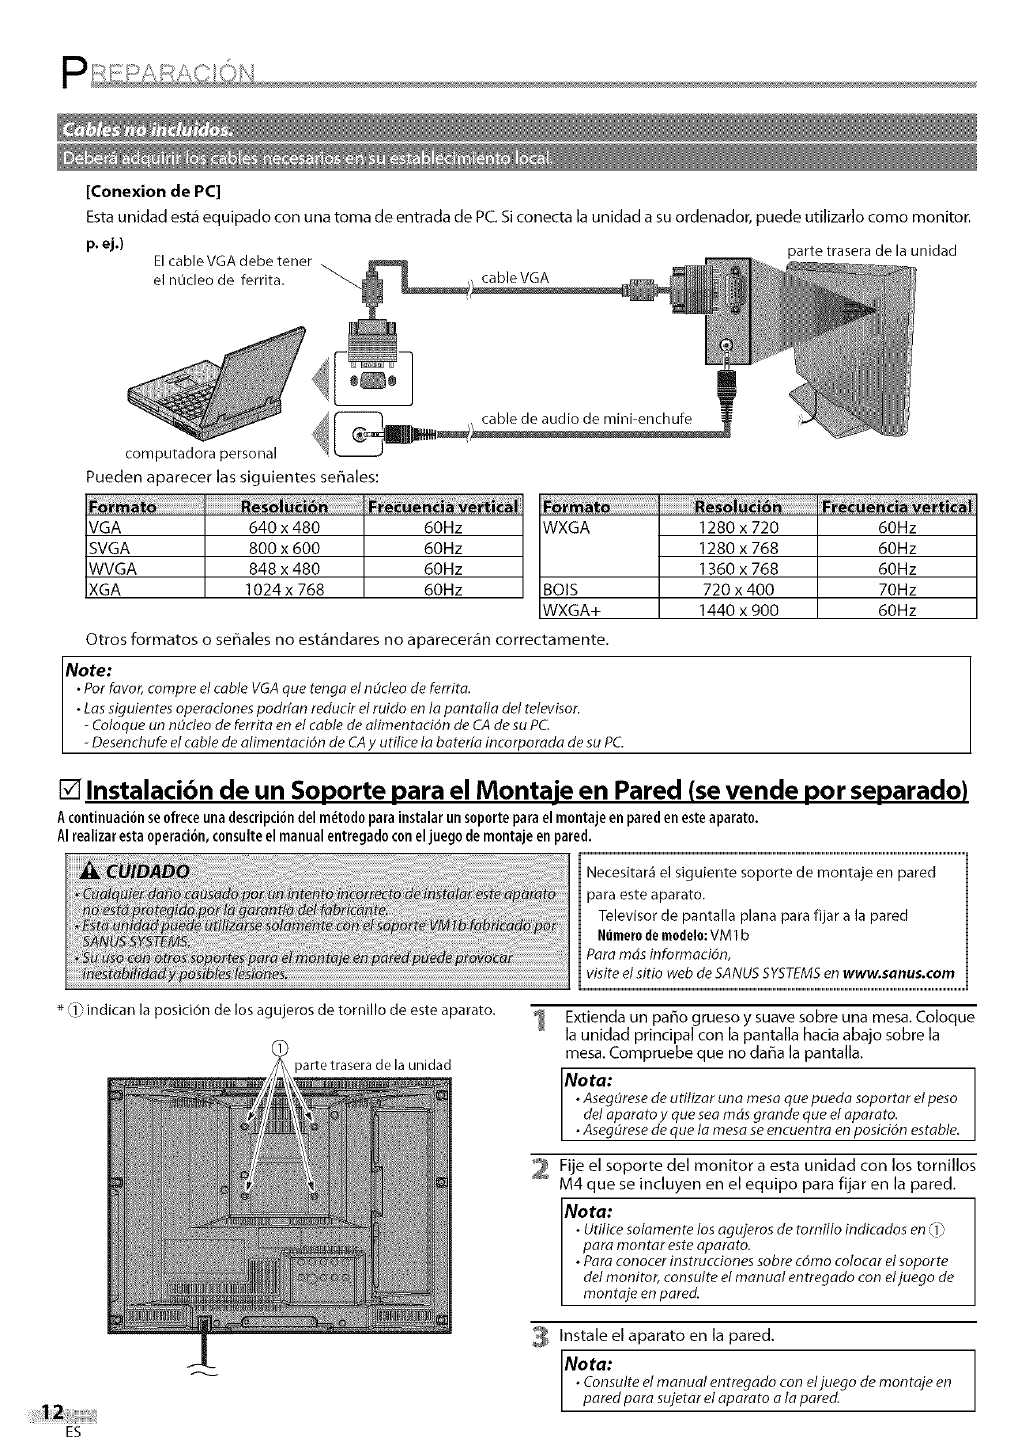
[Conexionde PC]
Esta unidad esta equipado con una toma de entrada de PC, Si conecta la unidad a su ordenador, puede utilizarlo como monitor.
p,ej.) parte trasera de la unidad
Elcable VGA debe tener
el nOcleo de ferrita. _ cable VGA
computadora personal
Pueden aparecer las siguientes sefiales:
VGA 640 x 480 60Hz WXGA
SVGA 800 x 600 60Hz
WVGA 848 x 480 60Hz
XGA 1024 x 768 60Hz BOIS
WXGA+
Otros formatos o seffales no esbindares no aparecercin correctamente.
Note:
•Per favor, compre el cable VGA qua tango el ndcleo de ferrita.
•Las siguientes operaciones podrfan reducir el ruido en ta pontalla del televisor.
- Coloque un nOcleo de ferrita en et cable de alimentaci6n de CAde suPC.
-Desenchufe el cable de alirnentaci6n de CAy utilice la bateria incorporada de su PC.
1280 x 720
1280 x 768
1360 x 768
720 x400
1440 x 900
60Hz
60Hz
60Hz
70Hz
60Hz
[] Instalacibn de un Soporte pare el Montaje en Pared (se vende per separado)
Ac0ntinuad6n seofreceunadescripd6ndelm_tod0parainstalarunsoporteparaelmontajeenparedenesteaparato.
AIrealizarestaoperad6n,consulteel manualentregadoc0neljuegodemontajeenpared.
!i Necesitar_ el siguiente soporte de montaje en pared
para este aparato.
Televisor de pantalla plana para fijar ala pared
Numerodemodelo:VM I b
Para rrlds informacidn,
visite elsitio web de SANUSSYSTEMSen www.sanus.cem
* (1) indican la posici6n de los agujeros de tornillo de este aparato.
_arte trasera de la unidad
Extienda un paffo grueso y suave sobre una mesa. Coloque
la unidad principal con la pantalla hacia abajo sobre la
mesa. Compruebe que no daffa la pantalla,
No to:
•Aseg(_resede utitizar una mesa qua pueda soportar el peso
del eparato y qua sea mds grande qua el operate.
• Aseg_rese de que ta mesa se encuentra en posici6n estable.
2 Fije el soporte del monitor a esta unidad con los tornillos
M4 que se incluyen en el equipo para fijar en la pared,
Note:
• Utilice solamente los agujeros de tornillo indicados en_1__
para montar este aparato.
•Para conocer instrucciones sobre c6mo colocar el soporte
del monitor, consulte el manual entregado con eljuego de
montaje en pared.
3 Instale el operate en la pared.
No to:
•Consulte el manual entregado con eljuego de rnonteje en
pared pare sujetar el operate ala pared.
ES
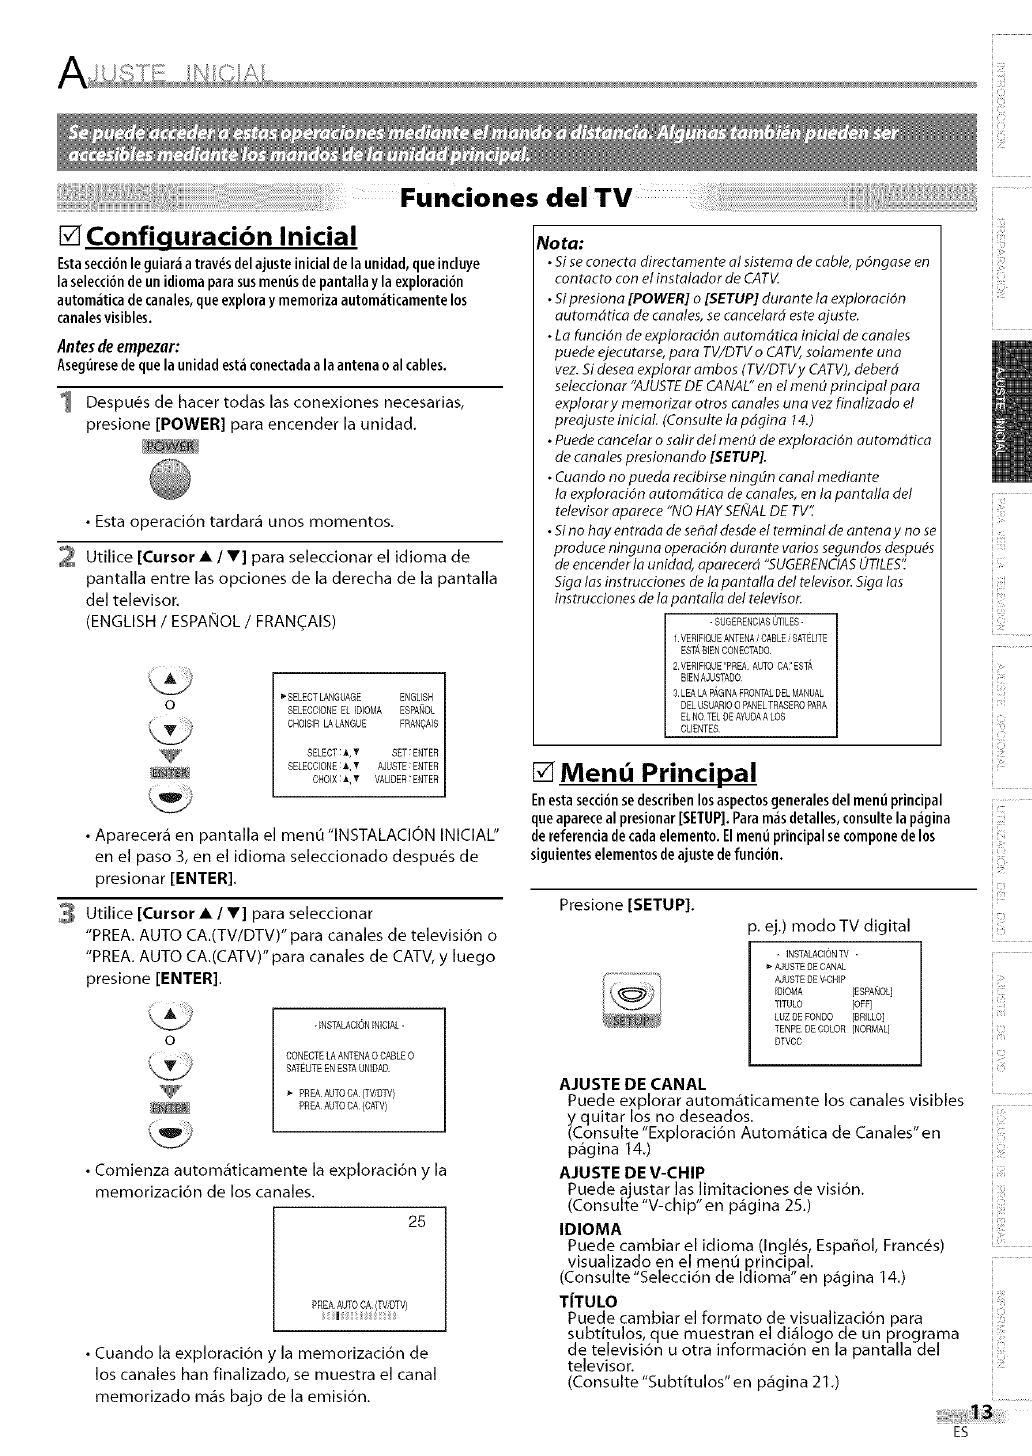
[] Configuraci6n Inicial
Estasecci6nle guiar_a tray,s delajusteinitialde la unidad,queincluye
la selecci6nde un idiomaparasusmenis depantallay la exploraci6n
autom_iticadecanales,queexploray memorizaautom_iticamentelos
canalesvisibles.
Antesdeempezar:
Asegiresedequelaunidadest_conectadaalaantenao alcables.
1 Despu@s de hacer todas las conexiones necesarias,
presione [POWER] para encender la unidad.
• Esta operaci6n tardar_ unos momentos.
Utilice [Cursor • /_] para seleccionar el idioma de
pantalla entre las opciones de la derecha de la pantalla
del televisor.
(ENGLISH /ESPANOL /FRAN(_AIS)
o_'SELECTLANGUAGE ENGLISH
SELECCIONE EL ]DIOMA ESPAf_OL
CHOISIR LA LANGUE FRANOA]S
SELECT:&,_ SET:ENTER
SELECCIONE:&,_ AJUSTE:ENTER
CHOIX:_,_ VALIDER:ENTER
• Aparecer_ en pantalla el menO "INSTALACION INICIAL"
en el paso 3, en el idioma seleccionado despu6s de
presionar [ENTER].
Utilice [Cursor • /_] para seleccionar
"PREA. AUTO CA.(TV/DTV)" para canales de televisi6n o
"PREA. AUTO CA.(CATV)" para canales de CATV, y luego
presione [ENTER].
o
-INSTALAQON INICiAL-
CONECTE LA ANTENAO CASLE O
EATEUTEENESTA UNIDAD
•> PREA AUTO CA (FV;DW)
PREA AUTO CA (CAW)
• Comienza autom_ticamente la exploraci6n y la
memorizaci6n de los canales.
25
PREA AUTO CA (W OTV)
|
• Cuando la exploraci6n y la memorizaci6n de
los canales han finalizado, se muestra el canal
memorizado m_s bajo de la emisi6n.
Noto:
•Siseconecta directarnent_ al sistema de cabl_, pOn_ase en
contacto con el ins talador de CATV.
•Sipresiona [POWER] o [SETUP] duran te la exploration
automddca de canales,secancelard es_eajuste.
•La fund_n de exploration automdtica initial de canales
puede ejecu_arse,para TV/DTV o CATV,solarnen te una
vez.Si deseaexplorar ambos (TV/DTVy CATV),deberd
seleccionar "AJUSTEDE CANAL"en el rnen_ principal para
explorar y memorizar otros canales una vez finalizado el
preajuste initiaL (Consul_ela pdqina 14.)
•Puedecancelar o salir det men_ de exploration automd_tica
de canales presionando [SETUP].
• Cuando no pueda recibirse ning(m canal mediante
la exploraciSn autorndtica de canales, en la pantalla del
televisor aparece "NO HAYSE_JALDE TV':
•Sino hay entrada de sepal desdeel terminal de an_enay no se
produce ninguna operaciOndurante varios segundos despu_s
de encenderla unidad, aparecerd "SUGERENCIASUTILES':
Siva las instrucciones de la pantalla del televisor.Siva las
instrucciones de la pantalla det televisor.
-SUGERENOIASOTILES -
1 VERIFIQUEANTENA GABLE SATEUTE
EST,_BIEN CONECTADO
2 VERIEIQUE"PREA AUTO CA'ESTA
BIEN AJUSTADO
3 LEALA P,_GINAFRONTALDELMANUAL
GELUSUARIOO PANELTRASERO PARA
ELNO TEL DEAYUGAALOS
CLIENTES
[] Mend Principal
Enestasecci6nsedescribenlos aspectosgeneralesdelmeni principal
queapareceal presionar[SETUP].Param_isdetalles,consultela p_igina
dereferenciadecadaelemento. Elment_principalsecomponedelos
siguienteselementosdeajuste defuncion.
Presione [SETUP].
p. ej,) modo TV digital
- INSTALACIONTV
AJUSTE DE CANAL
AJUSTE DE V-CHIP
[D]OMA [ESPA_(JOL]
TITULO [OFE]
LUZ[}E FONOO [tRILLO]
TENPE DECOLOR [NORMAL]
DTVCC
_ili:i!!i
) [i,,,
_i'!i_ii__
i,, i
ill,
i c]
ES
AJUSTE DE CANAL
Puede explorar autom_ticamente los canales visibles
y quitar los no deseados.
(Consulte "Exploraci6n Automc_tica de Canales" en
p_gina 14.)
AJUSTE DE V-CHIP
Puede ajustar las limitaciones de visi6n.
(Consulte "V-chip" en p_gina 25.) i iili
IDIOMA
Puede cambiar el idioma (Ingl6s, Espaffol, Franc6s)
visualizado en el menu principal.
(Consulte"Selecci6n de Idioma"en p_gina 14.)
TiTU LO
Puede cambiar el formato de visualizaci6n para
subtitulos, que muestran el di_logo de un programa
de televisi6n u otra informaci6n en la pantalla del
televisor.
(Consulte"Subtitulos"en p_gina 21.)
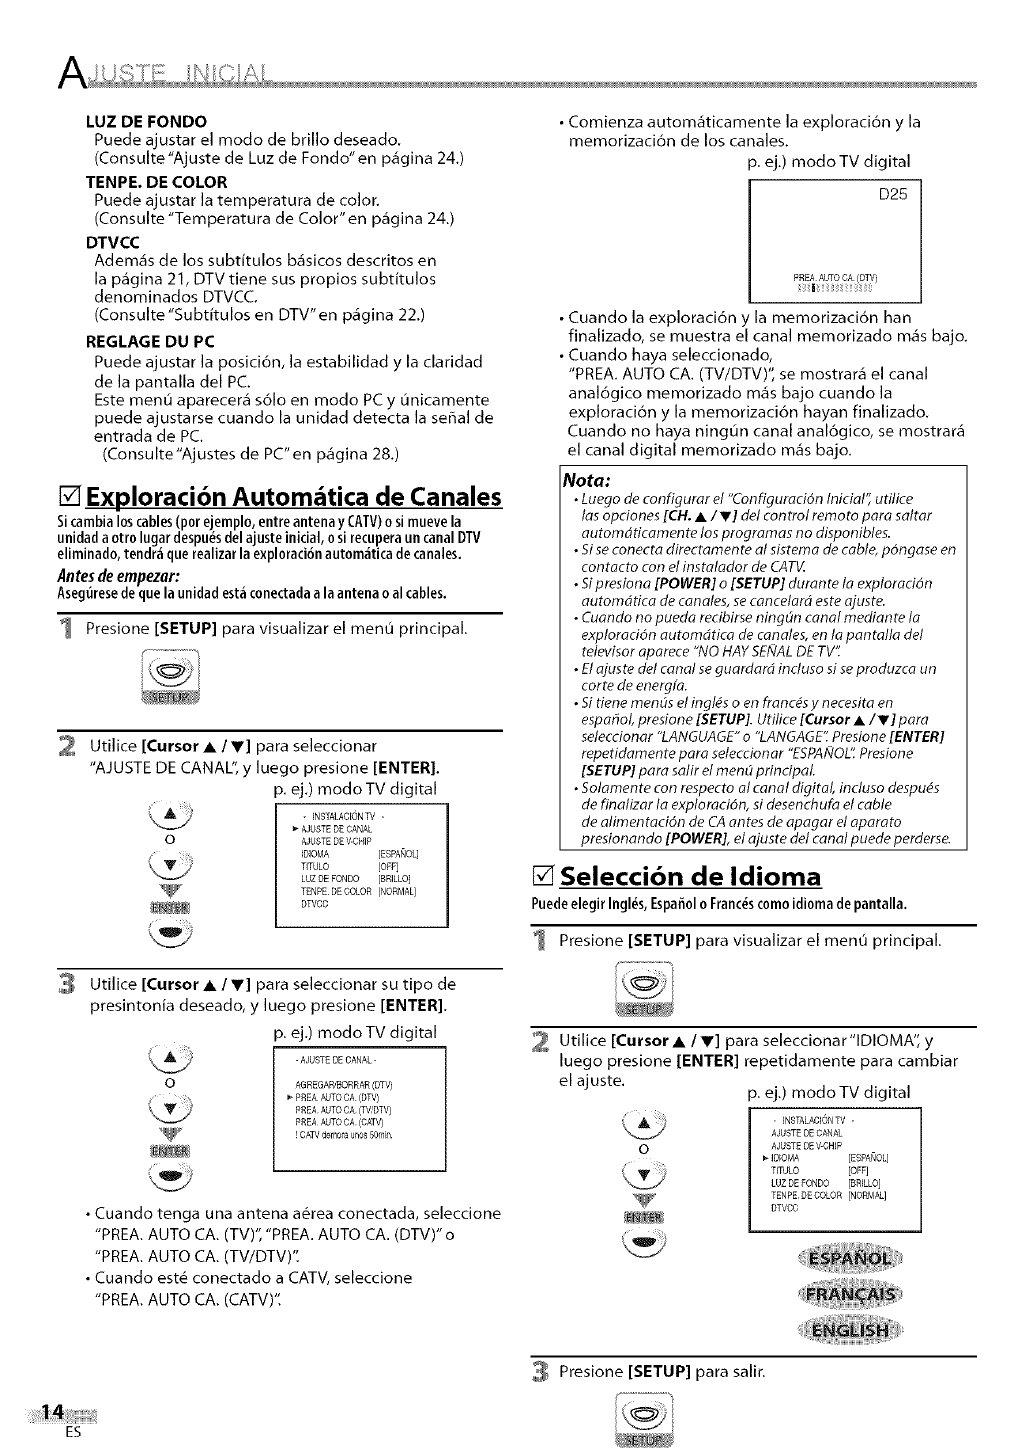
LUZ DE FONDO
Puede ajustar el modo de brillo deseado.
(Consulte"Ajuste de Luz de Fondo"en p_gina 24.)
TENPE. DE COLOR
Puede ajustar la temperatura de color.
(Consulte "Temperatura de Color" en p_gina 24.)
DTVCC
Adem_s de los subtitulos b_sicos descritos en
la p_gina 21, DTV tiene sus propios subtitulos
denominados DTVCC.
(Consulte'Subtitulos en DTV"en p,_gina 22.)
REGLAGE DU PC
Puede ajustar la posici6n, la estabilidad y la claridad
de la pantalla del PC.
Este men0 aparecer_ s61o en modo PC y unicamente
puede ajustarse cuando la unidad detecta la seffal de
entrada de PC.
(Consulte'Ajustes de PC"en p_gina 28.)
[] Exploracibn Autom&tica de Canales
Sicambialos cables(por ejemplo, entreantenay CATV)o si muevela
unidad a otto lugar despu_sdelajuste initial, o si recuperaun canalDTV
eliminado, tendr_ que realizarla exploraci6nautom_iticadecanales.
Antes de empezar:
Asegtiresedeque launidad est_conectadaa la antenao al cables.
1 Presione [SETUP] para visualizar el men0 principal.
2 Utilice [Cursor •/V] para seleccionar
"AJUSTE DE CANAL", y luego presione [ENTER].
p. ej.) modo TV digital
o
- INSTALACEONW -
AJUSTE DE CANAL
AJUSTE DE V-CHIP
DIOMA [ESPANOL]
TITULO [OFF]
LUZDE FONDO [gR]LLO]
TENPE DECOLOR [NORMAL]
DTVCC
Utilice [Cursor •/V] para seleccionar su tipo de
presintonia deseado, y luego presione [ENTER].
p. ej.) modo TV digital
o
-AJUSTEOECANAL-
AGREGAPJBORRAR(DT_
£REA AUTOCA (DTV)
£REA AUTOCA (TV,DTV/
PREA AUTOCA (CAW)
! CAW demofa u_os50rain
• Cuando tenga una antena a#rea conectada, seleccione
"PREA. AUTO CA. (TV)", "PREA. AUTO CA. (DTV)" o
"PREA. AUTO CA. (TV/DTV)".
• Cuando est# conectado a CATV, seleccione
"PREA. AUTO CA. (CATV)".
• Comienza autom&ticamente la exploraci6n y la
memorizaci6n de los canales.
p. ej.) modo TV digital
D25
• Cuando la exploraci6n ,la memorizaci6n han
finalizado, se muestra el canal memorizado m_s bajo.
• Cuando haya seleccionado,
"PREA. AUTO CA. (TV/DTV)", se mostrar_ el canal
anal6gico memorizado m_s bajo cuando la
exploraci6n y la memorizaci6n hayan finalizado.
Cuando no haya ningun canal anal6gico, se mostrar_
el canal digital memorizado m_s bajo.
Nota:
•Luego de configurar el "ConfiguratiOn Inicial', utilice
las opciones [CH. •iV] det control remoto para saltar
automdticamente los programas no disponibles.
•Siseconecta directamen teal sistema de cable, pOngase en
contacto con elinstalador de CAT_Z
•Sipresiona [POWER] o [SETUP] duran te la exploraddn
automdtica de canales, secancetard esteajuste.
• Cuando no pueda recibirse ningdn canal mediante la
exploraddn automdtica de canales,en la pantalla del
televisor aparece "NO HAYSEfVALDETV'_
•Elajuste del canal seguardard induso si seproduzca un
corte de energfa.
•Si tiene mends el ingl#s o en franc#sy necesita en
espaSol' presione [SETUP]. Utilice [Cursor • iV] para
seleccionar "LANGUAGE"o"LANGAGE'_Presione [ENTER]
repetidamente para seteccionar "ESPAiqOL'_Presione
[SETUP]para salir el mend principal
•Solarnente can respecto al canal digital' induso despu_s
de finalizar la exploraci6n, si desenchufa el cable
de alimentaci6n de CA antes de apagar el aparato
presionando [POWER], el ajuste del canal puede perderse.
[] Selecci6n de Idioma
Puedeelegir Ingles,EspaEolo Franc_scomoidioma de pantalla.
1 Presione [SETUP] para visualizar el menO principal.
o
V
Utilice [Cursor• IV] para seleccionar"IDlOMA", y
luego presione [ENTER] repetidamente para cambiar
el ajuste, p. ej.) modo TV digital
- [NSTALACIONTV -
AJUSTE DE CANAL
AJUSTE DE V-CHIP
IOlOMA [ESPANOL]
TITULO [OFF]
LUZDE FONDO [BRILLO]
TENPE DECOLOR [NORMAL]
DTVCC
Presione [SETUP] para salir.
ES
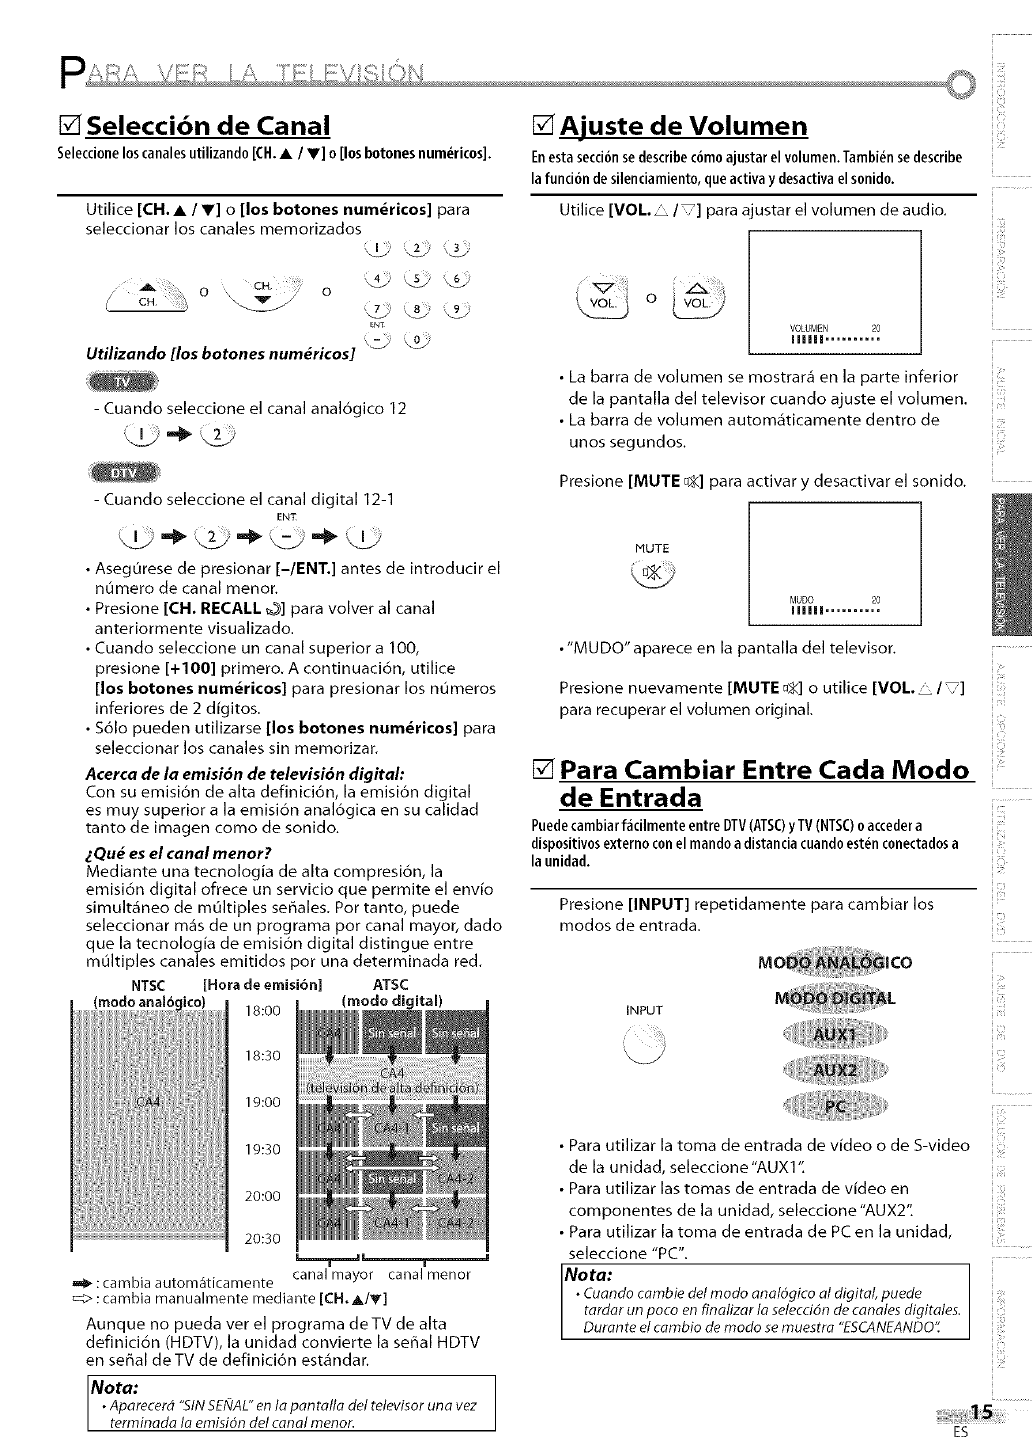
[] Selecci6n de Canal
Seleccioneloscanalesutilizando[CH.•/V] o[losbotonesnumericos].
Utilice [CH.• IV] o[los botones num_ricos] para
seleccionar los canales memorizados
o \_ o_, '_ '_
ENd"
Utlllzando [los botones num_rlcos]
- Cuando seleccione el canal anal6gico 12
[] Ajuste de Volumen
Enestasecci6nsedescribec6moajustarelvolumen.Tambi_nsedescribe
la funci6nde silenciamiento,queactivay desactivael sonido.
Utilice [VOL I] para E ustar el volumen de audio,
o
VOLUMEN 20
IIIIII ..........
• La barra de volumen se mostrar_ en la parte inferior
de la pantalla del televisor cuando ajuste el volumen.
• La barra de volumen autom_ticamente dentro de
unos segundos,
- Cuando seleccione el canal digital 12-I
ENT
• AsegOrese de presionar [-IENT.] antes de introducir el
numero de canal menor,
• Presione [CH. RECALL O] para volver al canal
anteriormente visualizado.
• Cuando seleccione un canal superior a 100,
presione [+100] primero. A continuaci6n, utilice
[los botones num_ricos] para presionar los numeros
inferiores de 2 dfgitos.
• $61o pueden utilizarse [los botones num_ricos] para
seleccionar los canales sin memorizar.
Acerca de la emisi6n de televisi6n digital:
Con su emisi6n de alta definici6n, [a emisi6n digital
es muy superior a la emisi6n anal6gica en su calidad
tanto de imagen como de sonido,
zQu_ es el canal menor?
Mediante una tecnologia de alta compresi6n, la
emisi6n digital ofrece un servicio que permite el envfo
simult_neo de mOltiples se_ales. Por tanto, puede
seleccionar m_s de un programa pot canal mayor, dado
que la tecnologia de emisi6n digital distingue entre
multiples canales emitidos pot una determinada red.
NTSC [Hora de emisi6n] ATSC
(modo digital)
18:00
18:30
19:00
19:30
20:00
20:30
[""llm"_ ! i n
canal mayor canalmenor
,,_ : cambia autom_ticamente
_;> :cambia manualmente mediante [CN,A/T]
Aunque no pueda ver el programa deTV de aha
definici6n (HDTV), la unidad convierte la seflal HDTV
en seSal deTV de definici6n est,_ndar,
Nota: ..
•Aparecerd "SINSENAL"en la pan talla del televisor una vez
terminada la emisidn del canal menor.
Presione [MUTE D_<]para activar y desactivar el sonido,
MUTE
MUDO 20
IIIIII ..........
• "MUDO"aparece en la pantalla del televisor,
Presione nuevamente [MUTE u:_] o utilice [VOL • I]
para recuperar el volumen original,
!
)y,
[] Para Cambiar Entre Cada Modo
de Entrada
Puedecambiarf_icilmenteentre DTV(ATSC)y TV(NTSC)oaccedera
dispositivosexterno conel mandoadistanciacuandoest_nconectadosa
la unidad.
Presione [INPUT] repetidamente para cambiar los
modos de entrada,
INPUT
• Para utilizar la toma de entrada de video o de S-video
de la unidad, seleccione "AUXI ",
• Para utilizar las tomas de entrada de video en
componentes de la unidad, seleccione "AUX2",
• Para utilizar la toma de entrada de PC en la unidad,
seleccione "PC".
No ta:
• Cuando carnbie del modo analdgico al digital, puede
tardar un poco en finalizar la selecciOnde canales digitales.
Durante el cambio de modo semuestra ESCANEANDO
ES
iu,
iiTi
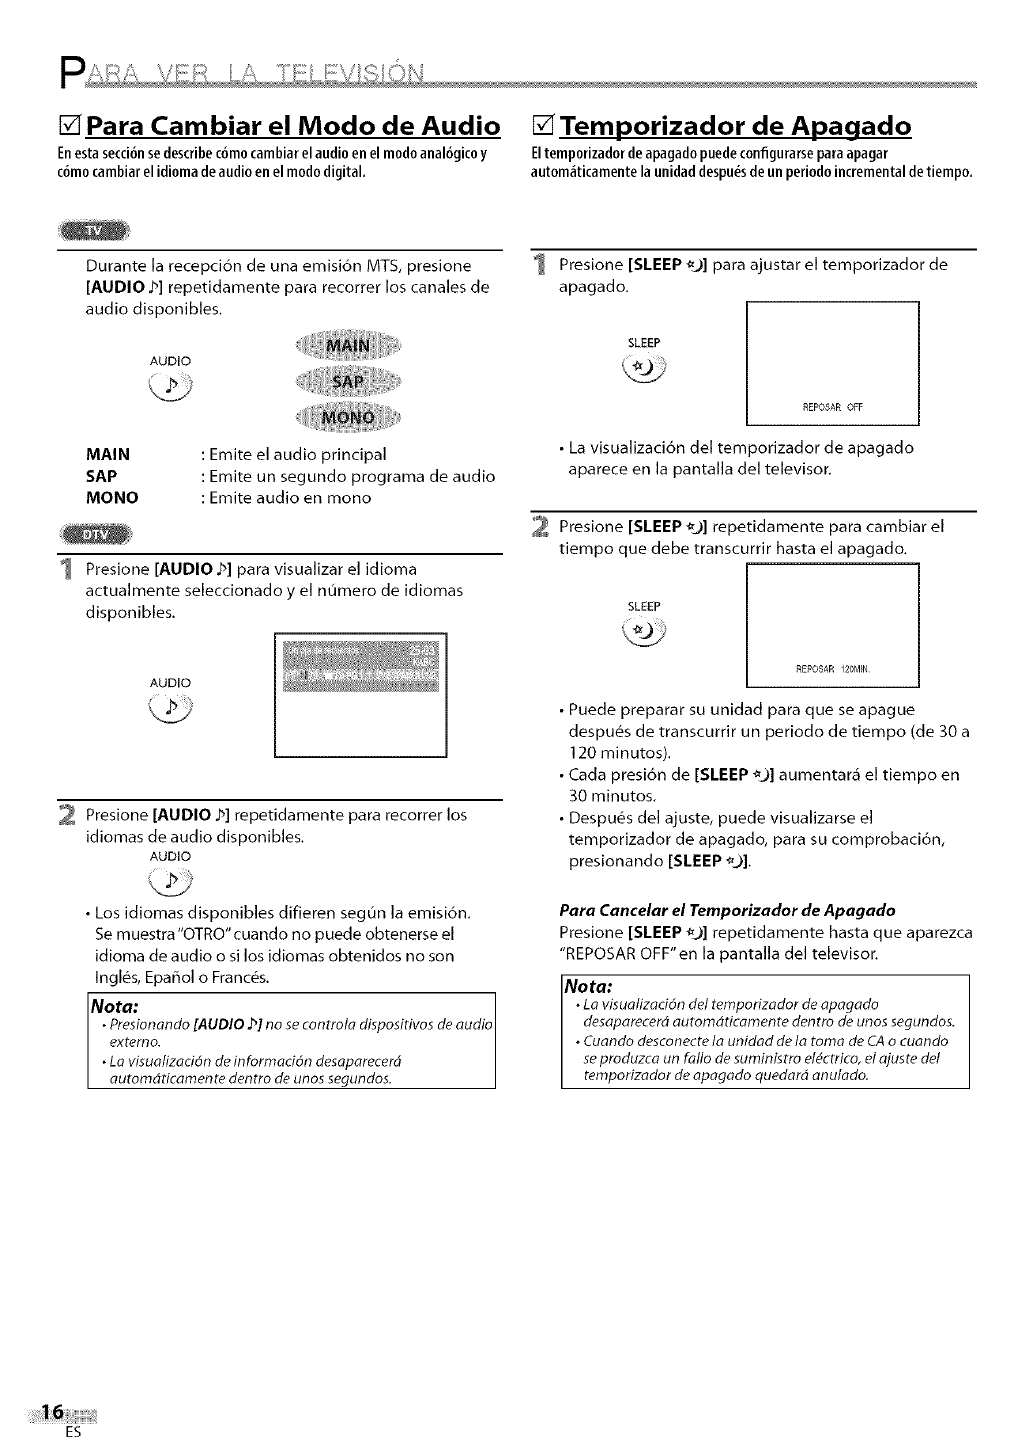
[] Para Cambiar el Modo de Audio []Temporizador de Apagado
Enestasecci6nsedescribec6mocambiarel audio en el modoanal6gicoy Eltemporizadorde apagadopuedeconfigurarsepara apagar
c6mocambiarel idiomadeaudio en el mododigital, autom_ticamente la unidaddespu_sdeun periodoincrementaldetiempo.
Durante la recepci6n de una emisi6n MTS, presione
[AUDIO 2] repetidamente para recorrer los canales de
audio disponibles.
AUDIO
MAIN
SAP
MONO
: Emite el audio principal
: Emite un segundo programa de audio
: Emite audio en mono
1 Presione [AUDIO b] para visualizar el idioma
actualmente seleccionado y el numero de idiomas
disponibles.
AUDIO
2 Presione [AUDIO b] repetidamente para recorrer los
idiomas de audio disponibles.
AUDIO
• Los idiomas disponibles difieren seg0n la emisi6n.
Se muestra'OTRO"cuando no puede obtenerse el
idiorna de audio osi los idiomas obtenidos no son
Ingles, Epaflol oFranc@s.
Nota:
•Presionando [AUDIO b] no se controla disposidvos de audio
externo.
•La visualizacidn de inforrnacidn desaparecerd
automddcamente dentro de unos segundos.
1 Presione [SLEEP _9] para ajustar el temporizador de
apagado.
SLEEP
REPOSAR OFF
•La visualizaci6n del temporizador de apagado
aparece en la pantalla del televisor.
Presione [SLEEP _.)] repetidamente para cambiar el
tiempo que debe transcurrir hasta el apagado.
SLEEP
REPOSAR 120MIN
• Puede preparar su unidad para que se apague
despu6s de transcurrir un periodo de tiempo (de 30 a
120 minutos).
•Cada presi6n de [SLEEP _)] aumentar,_ el tiempo en
30 minutos.
• Despu&s del ajuste, puede visualizarse el
temporizador de apagado, para su comprobaci6n,
presionando [SLEEP _)].
Para Cancelar el Temporizador de Apagado
Presione [SLEEP ._] repetidamente hasta que aparezca
"REPOSAR OFF'en la pantalla del televisor.
No ta:
•La visualizaci6n del ternporizador de apagado
desaparecerd automddcamente dentro de unos segundos.
• Cuando desconecte la unidad de la toma de CAo cuando
seproduzca un fallo de suministro el_ctrico, el ajuste det
temporizador de apagado quedard anulado.
ES
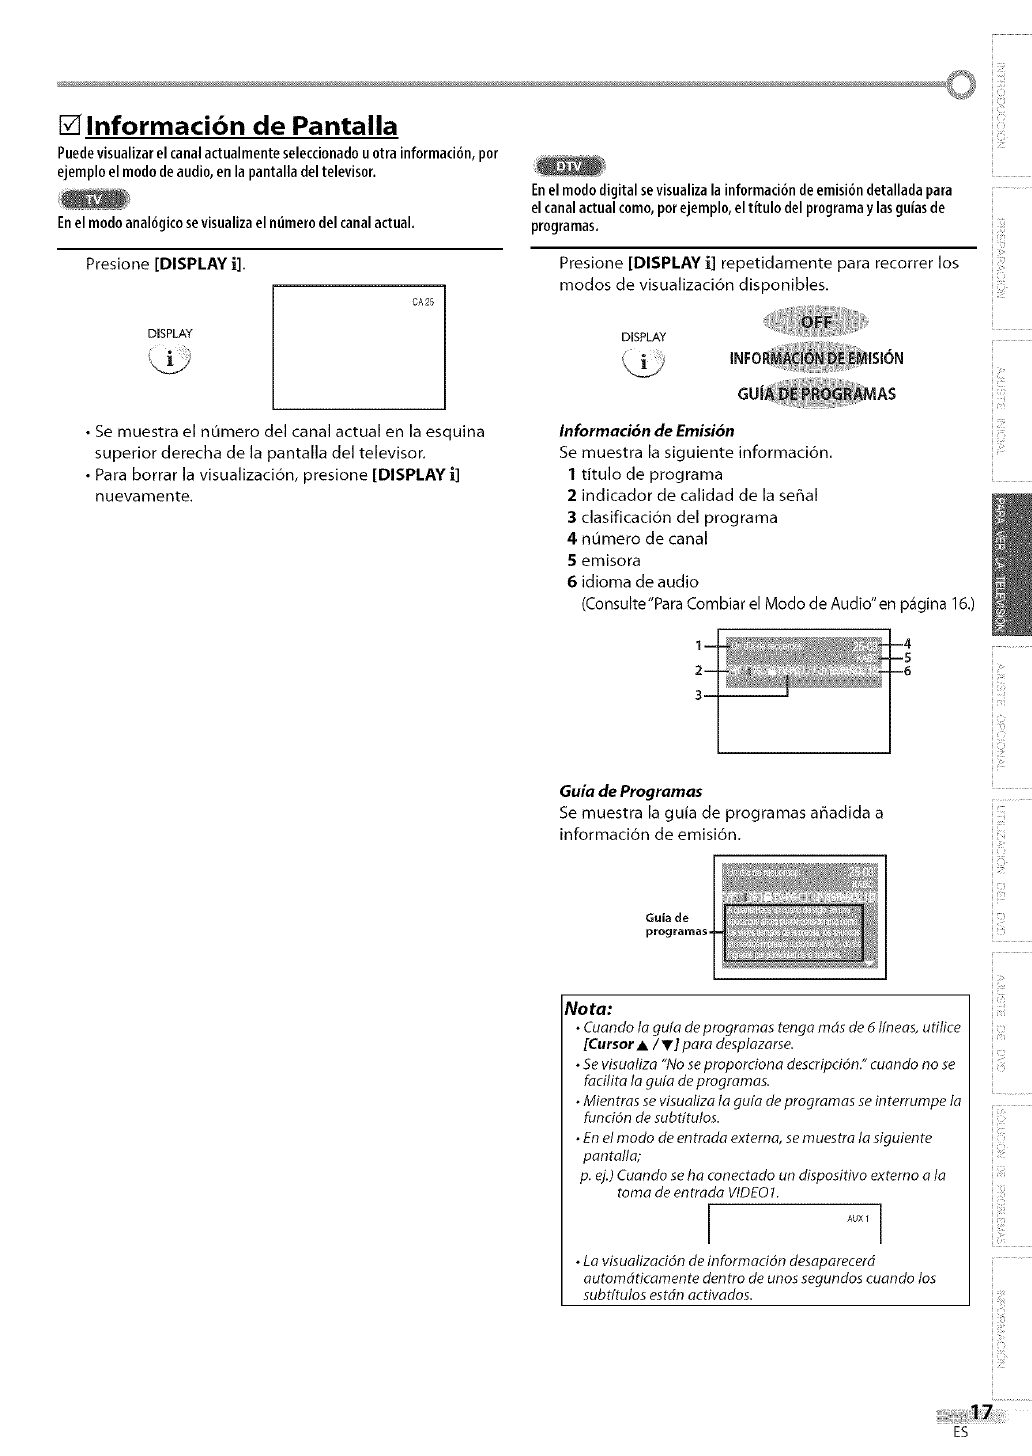
©
[] Informacibn de Pantalla
Puedevisualizarel canalactualmenteseleccionadouotrainformaci6n,por
ejemplo el mododeaudio,en la pantalladeltelevisor,
Enel modeanaldgicosevisualizael nt_merodelcanalactual.
Enel modedigitalsevisualiza la informaci6nde emisi6n detalladapara
el canalactual come,perejemplo, eltitulo del programay lasguiasde
programas.
Presione [DISPLAY _1.
DISPLAY
CA 25
Presione [DISPLAY i] repetidamente pare recorrer los
modos de visualizaci6n disponibles.
DISPLAY
• Se muestra el n0mero del canal actual en la esquina
superior derecha de la pantalla del televisor.
•Para borrar la visualizaci6n, presione [DISPLAY i]
nuevamente.
Informaci6n de Emisi6n
Se muestra la siguiente informaci6n.
1titulo de programa
2indicador de calidad de la se6al
3 clasificaci6n del programa
4 numero de canal
S emisora
6 idioma de audio
(Consulte"Para Combiar el Modo de Audio" en p_gina 16.)
2-
3i
Guia de Programas
Se muestra la guia de programas aFladida a
informaci6n de emisi6n.
Guia de
programas,
Not=z:
• Cuando le gufa deprogremas tenga mds de 6 tfneas, utilice
[Cursor •/V] pare desplezarse.
•Sevisualize "No seproporciona description." cuando no se
facilita la gufa de programas.
•Mientras sevisualize la gufe de programas se interrumpe ta
funci6n de subtitulos.
•En el mode de entrada externa, semuestra la siguiente
pantalla;
p. ej.) Cuando seha conectedo un dispositivo externo ala
tome de entrada VIDE01.
•Le visualizaddn de informeddn desaparecerd
automdticamente dentro de unos segundos cuando los
subtftulos estdn activados.
ilii:
b, :
JC_
ii!i_:il
iu,
ES
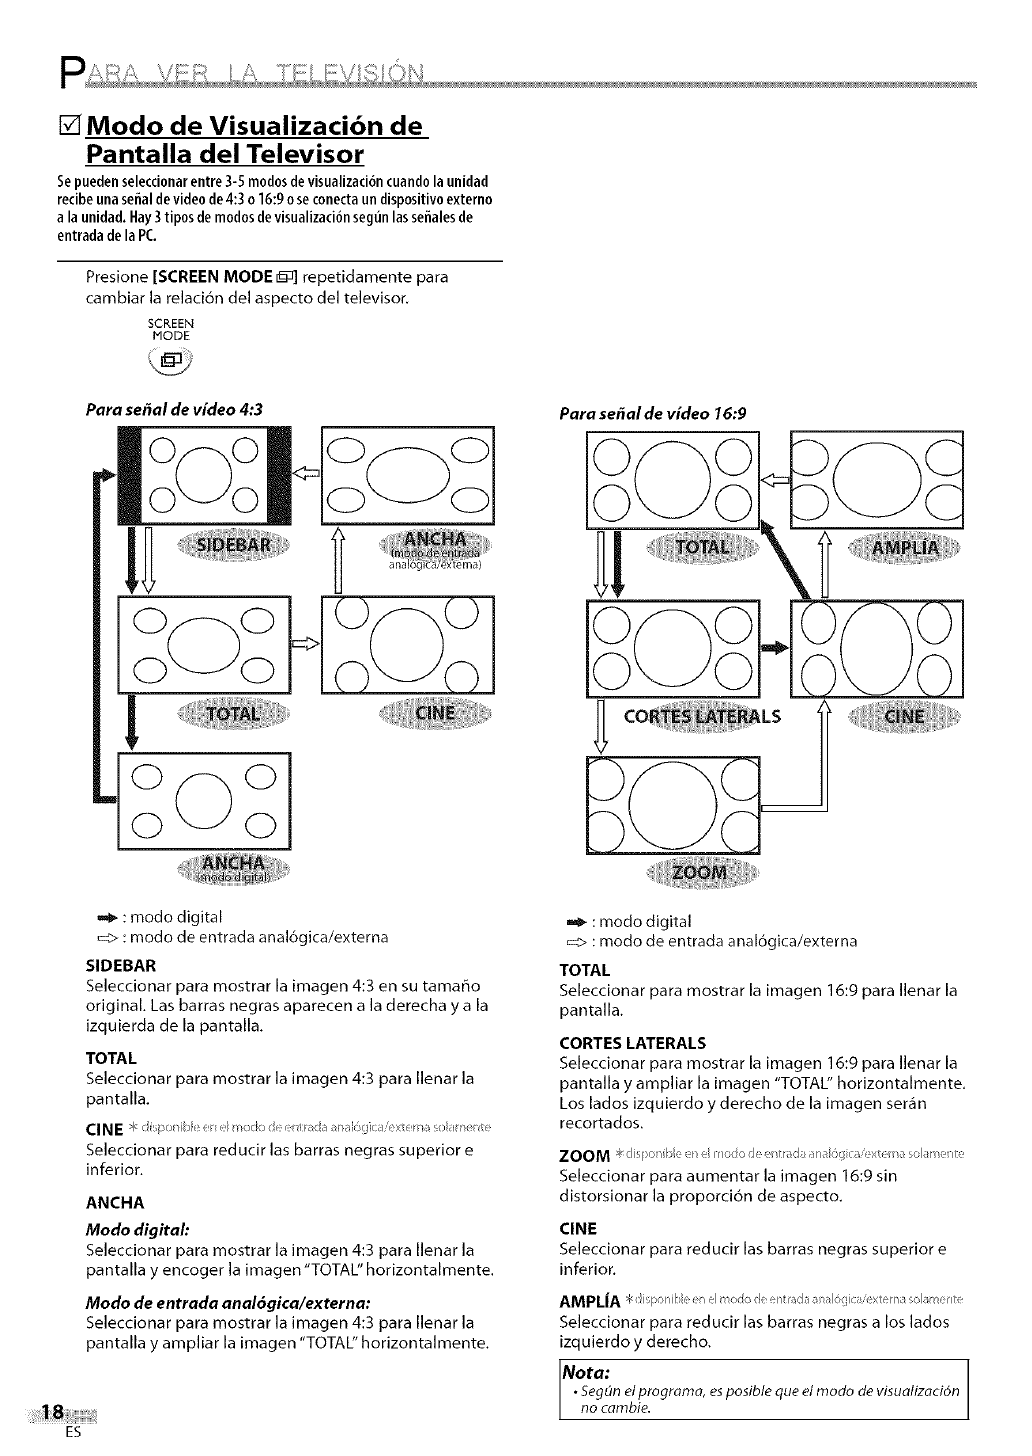
[] Modo de Visualizacibn de
Pantalla del Televisor
Sepuedenseleccionarentre3-5 modosdevisualizaci6ncuandola unidad
recibeunaserialdevideode4:3 o16:9oseconectaun dispositivoexterno
a la unidad.Hay3 tiposdemodosdevisualizacionsegtinlassehalesde
entrada dela PC,
Presione [SCREEN MODE _] repetidamente para
cambiar la relaci6n del aspecto del televisor.
SCREEN
MODE
Para seffal de video 4:3
Q 0
0 0=>0 OI
!
-1°o o°l
Para seffal de video 16:9
© ©
,,_ : modo digital
_> : modo de entrada anal6gica/externa
SIDEBAR
Seleccionar para mostrar la imagen 4:3 en su tamaffo
original. Las barras negras aparecen a la derecha ya la
izquierda de la pantalla.
TOTAL
Seleccionar para mostrar la imagen 4:3 para llenar la
pantalla.
Seleccionar para reducir las barras negras superior e
inferior,
ANCHA
Modo digital:
Seleccionar para mostrar la imagen 4:3 para llenar la
pantalla y encoger la imagen "TOTAL" horizontalmente.
Modo de entrada anal6gica/externa:
Seleccionar para mostrar la imagen 4:3 para llenar la
pantalla y ampliar la imagen "TOTAL" horizontalmente.
ES
,,_ :modo digital
_:> :modo de entrada anal6gica/externa
TOTAL
Seleccionar para mostrar la imagen 16:9 para llenar la
pantalla.
CORTES LATERALS
Seleccionar para mostrar la imagen 16:9 para llenar la
pantalla y ampliar la imagen "TOTAL" horizontalmente.
Los lados izquierdo y derecho de la imagen ser_n
recortados.
ZOOM _"c :>o/ e d rodo de e _t,u:ta a _al6yic iex e _asol_ ne te
Seleccionar para aumentar la imagen 16:9 sin
distorsionar la proporci6n de aspecto,
CINE
Seleccionar para reducir [as barras negras superior e
inferior.
AMPL|A #: Ispo_ >1 el ododee _1:idaa sa(6ica,¢xte__asda e te
Seleccionar para reducir las barras negras a los lados
izquierdo y derecho.
Nota:
•SegOnelprograrna, esposible que el modo de visualizaci6n
no cambie.
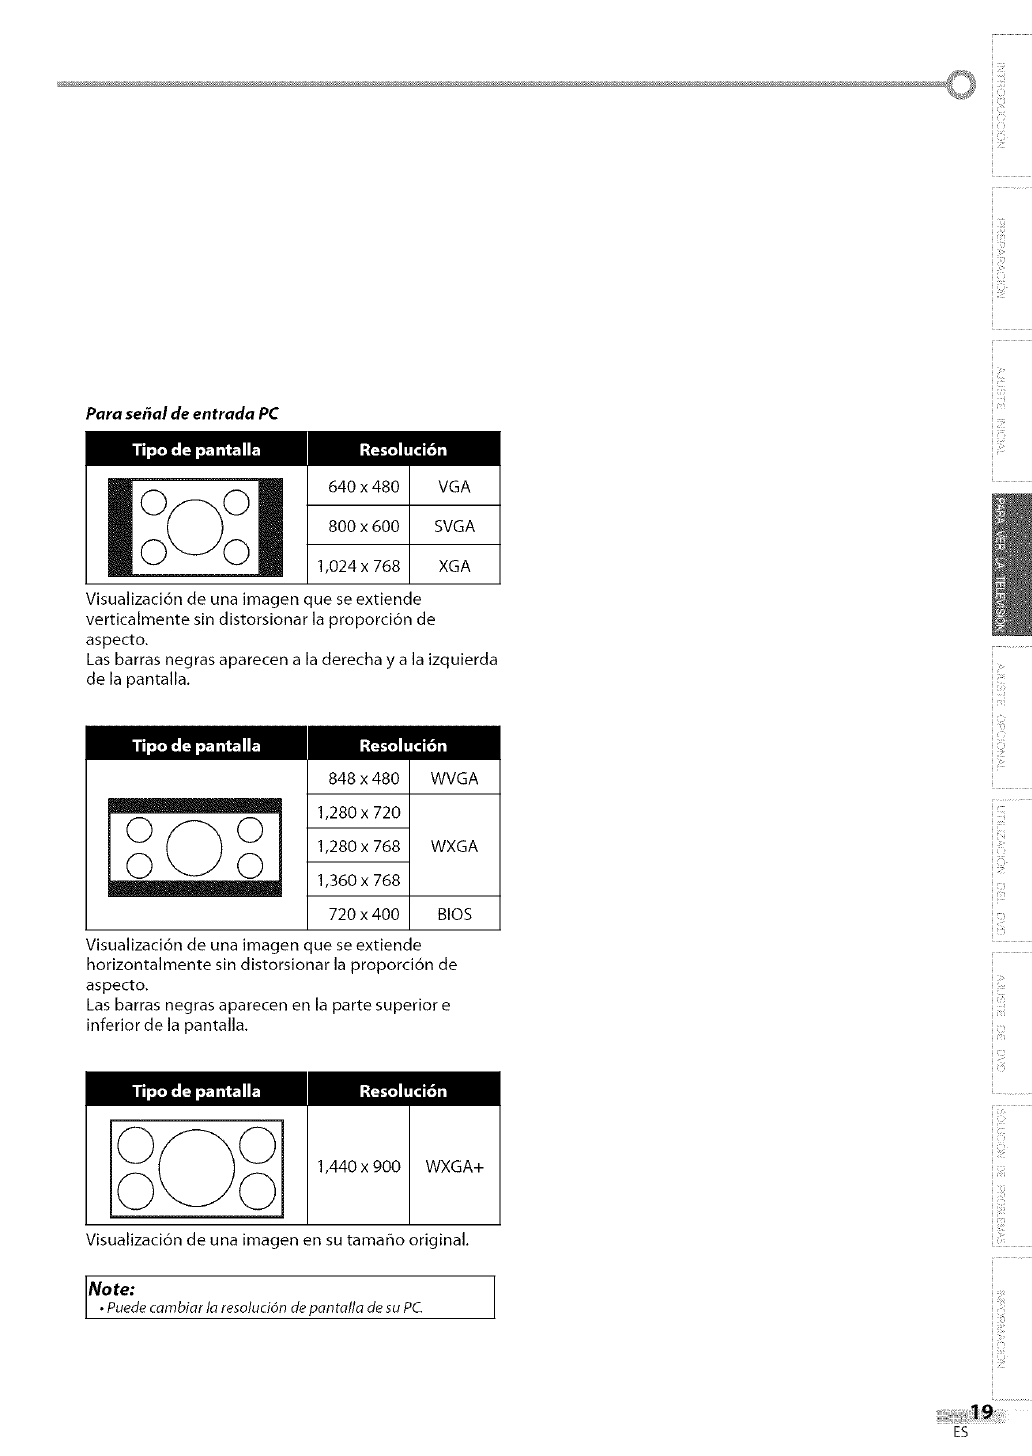
©
Para sepal de entrada PC
+40x +0WA
800 x 600 SVGA
1,024 x 768 XGA
Visualizaci6n de una imagen que se extiende
verticalmente sin distorsionar la proporci6n de
aspecto+
Las barras negras aparecen a la derecha y a la izquierda
de la pantalla+
848 x 480 WVGA
1,280 x 720
1,280 x 768 WXGA
1,360 x 768
720 x 400 BIOS
Visualizaci6n de una imagen que se extiende
horizontalmente sin distorsionar la proporci6n de
aspecto.
Las barras negras aparecen en la parte superior e
inferior de la pantalla.
1,440 x 900 WXGA+
Visualizaci6n de una imagen en su tama_o original.
Note:
•Puedecambiar la resoluci6n de pantalla de su PC.
Jc>
iu,
!CI_,
ES

[] Agregar/Borrar Canales
Lafunci6nde agregar/borrar canalesle permiteagregarel canalqueno
sehayaagregarmediante la exploraci6nautombticade canalesdebido
al estadode la recepci6nen elajuste initial.Tambi_npuedeeliminar los
canalesinnecesarios.
I Presione [SETUP] para visualizar el menO principal.
2 Utilice [Cursor • IV] para seleccionar
"AJUSTE DE CANAU', yluego presione [ENTER].
p. ej.) modo TV digital
o
- INSTALACIONTV -
_" AJUSTE DECANAL
AJUSTE DE V-CHIP
IDIOMA [ESPAt_OL]
TITULO [OFF]
LUZDE FONDO [BRILLO]
TENPE DECOLOR [NORMAL]
DTVCC
Presione [SETUP] para salir.
Nota:
•El men_ "AGREGAR/BORRAR (DTV)" o "AGREGAR/BORRAR"
desaparecerd automdticamente dentro de unos segundos.
• En el modo digital (DTV), podrd agregar o borrar canales
solamente en el canal mayor.
• Una vez borrado un canal DTV, no podrd recuperar el canal
sin realizar nuevamente la explorad6n automdtica de
canales.
(Consutte "Exploracidn Automdtica de Canales" en pdgina 14.)
• Si utiliza [CH. A/V], podrd selecdonar s6lo los canales
memorizados.
3 Utilice [Cursor •IV] para seleccionar
"AGREGAR/BORRAR(DTV)" o "AGREGAR/BORRAR", y
luego presione [ENTER].
p. ej.) modo TV digital
o
V
-AJUSTEDECANAL-
_"AGREGAR_BORRAR(DTV)
PREA AUTO CA (DT_
PREA AUTO CA (TV_DTV)
PREA AUTO CA (CAW)
! CATVdemoraunos 50rain
4Seleccione el canal que desea agregar o borrar.
(Consulte "Selecci6n de Canal" en p,_gina 15.)
p. ej.) modo TV digital
D25
AGREGAR_BORRAR:DTV
Utilice [Cursor _1/1_] para seleccionar"AGREGAR"o
"BORRAR".
•Para agregar o borrar otros canales, repita los pasos
4-5.
• El color del nOmero de canal visualizado en la parte
superior derecha de la pantalla del televisor indica,
- Azul: Se agregar_ el canal seleccionado.
- Rojo: Se borrar_ el canal seleccionado.
ES
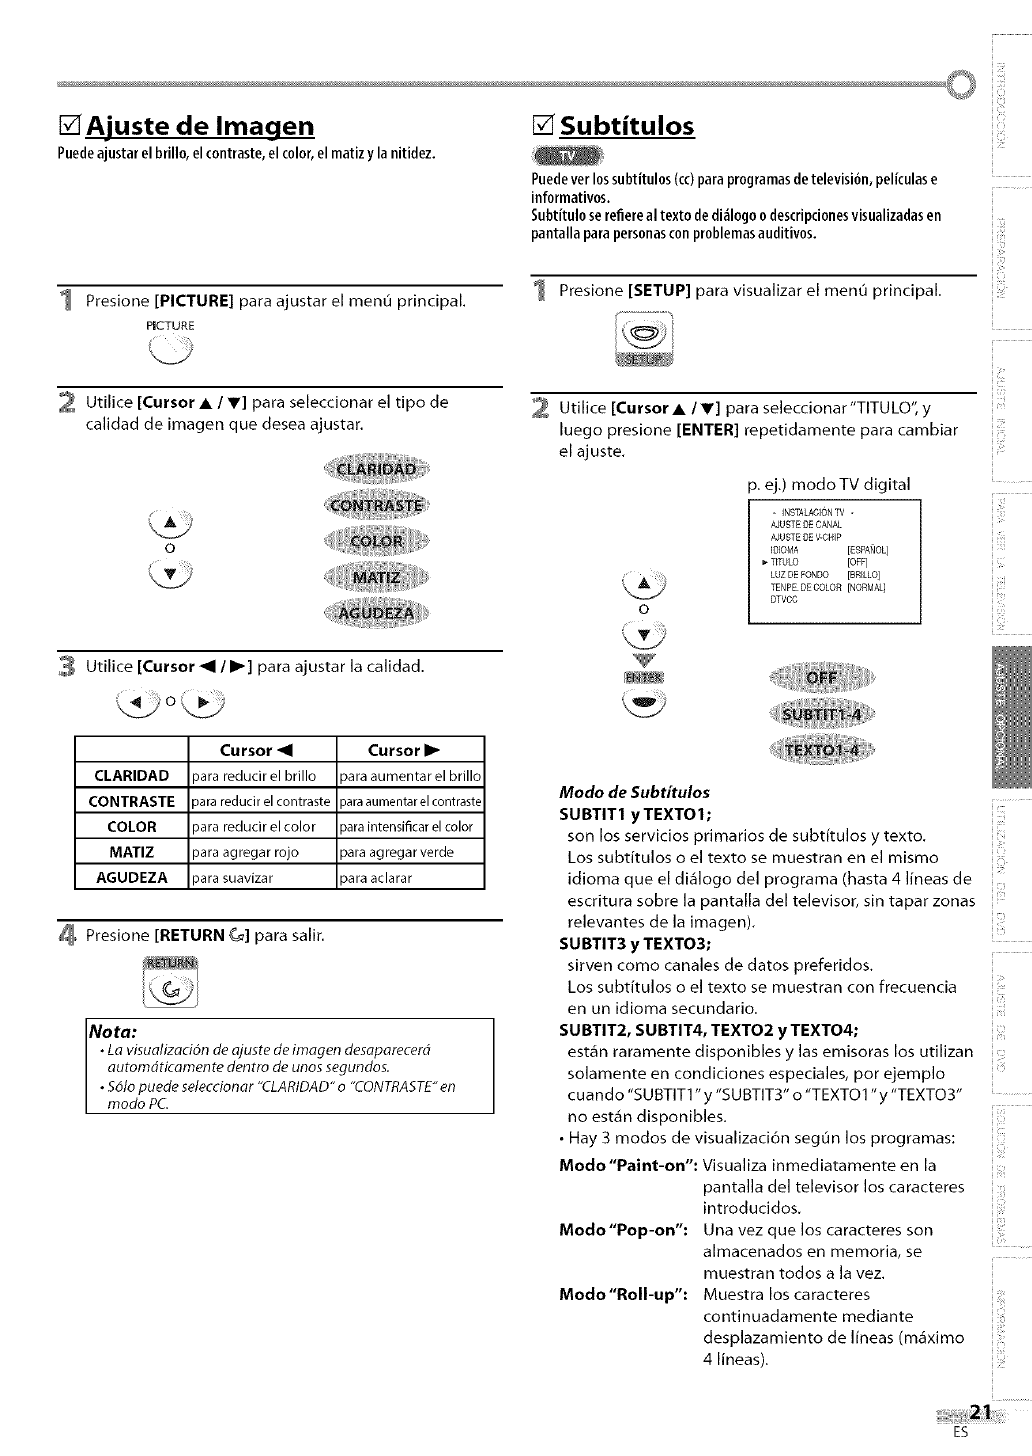
[]Ajuste de Imacjen
Puedeajustar el brillo, el contraste,el color,el matiz y la nitidez.
v il
[] Su bt it u Ios
Puedevet lossubtitulos (cc)paraprogramasde television,peliculase
informativos.
Subtituloserefiereal texto dedi_ilogoo descripcionesvisualizadasen
pantallaparapersonasconproblemasauditivos.
I Presione [PICTURE] para ajustar el menu principal.
PICTURE
Presione [SETUP] para visualizar el menu principal.
2 Utilice [Cursor • IV] para seleccionar el tipo de
calidad de imagen que desea ajustar.
3 Utilice [Cursor _I I I_] para ajustar la calidad.
CLARIDAD
CONTRASTE
COLOR
MATIZ
AGUDEZA
_ara reducir el brillo
_ara reducir el contraste
_ara reducir el color
para agregar rojo
_ara suavizar
Cursor I_
aara aumentar el brillo
_araaumentar el contrast_
_ara intensificar el color
aara agregar verde
aara aclarar
Presione [RETURN _] para salir.
No ta"
•La visualizaci6n de ajuste de imagen desaparecerd
automdticamente dentro de unos segundos.
•Sdlo puede seleccionar "CLARIDAD" o"CONTRASTE" en
modo PC.
Utilice [Cursor • /V] para seleccionar"TITULO", y
luego presione [ENTER] repetidamente para cambiar
el ajuste.
p. ej,) modo TV digital
- INSTALACIONTV -
AJUSTE DE CANAL
AJUSTE DE V-CHIP
ID[OMA [ESPANOL]
TITULO [OFF]
LUZDE FONDO [BR[LLO]
TENPE DECOLOR [NORMAL]
CTVCC
_/{ill
_, _,_ }'!i_ii__
Modo de Subtitulos
SUBTIT1 y TEXT01; i
son los servicios primarios de subtitulos y texto.
Los subtitulos o el texto se muestran en el mismo
idioma que el di_logo del programa (hasta 4 lineas de
escritura sobre la pantalla del televisor, sin tapar zonas
relevantes de la imagen).
SUBTIT3 y TEXTO3;
sirven como canales de datos preferidos.
Los subtitulos o el texto se muestran con frecuencia
en un idioma secundario.
SUBTIT2, SUBTIT4, TEXT02 y TEXT04;
est,_n raramente disponibles y las emisoras los utilizan
solamente en condiciones especiales, por ejemplo
cuando "SUBTITI" y "SUBTIT3" o "TEXTOI"y "TEXT03"
no est,_n disponibles.
• Hay 3 modos de visualizaci6n segun los programas:
Modo"Paint-on": Visualiza inmediatamente en la
pantalla del televisor los caracteres
introducidos. i iii_
Modo"Pop-on": Una vez que los caracteres son
almacenados en memoria, se
muestran todos a la vez.
Modo"Roll-up": Muestra los caracteres
continuadamente mediante
desplazamiento de lineas (m,_ximo
4 lineas).
ES
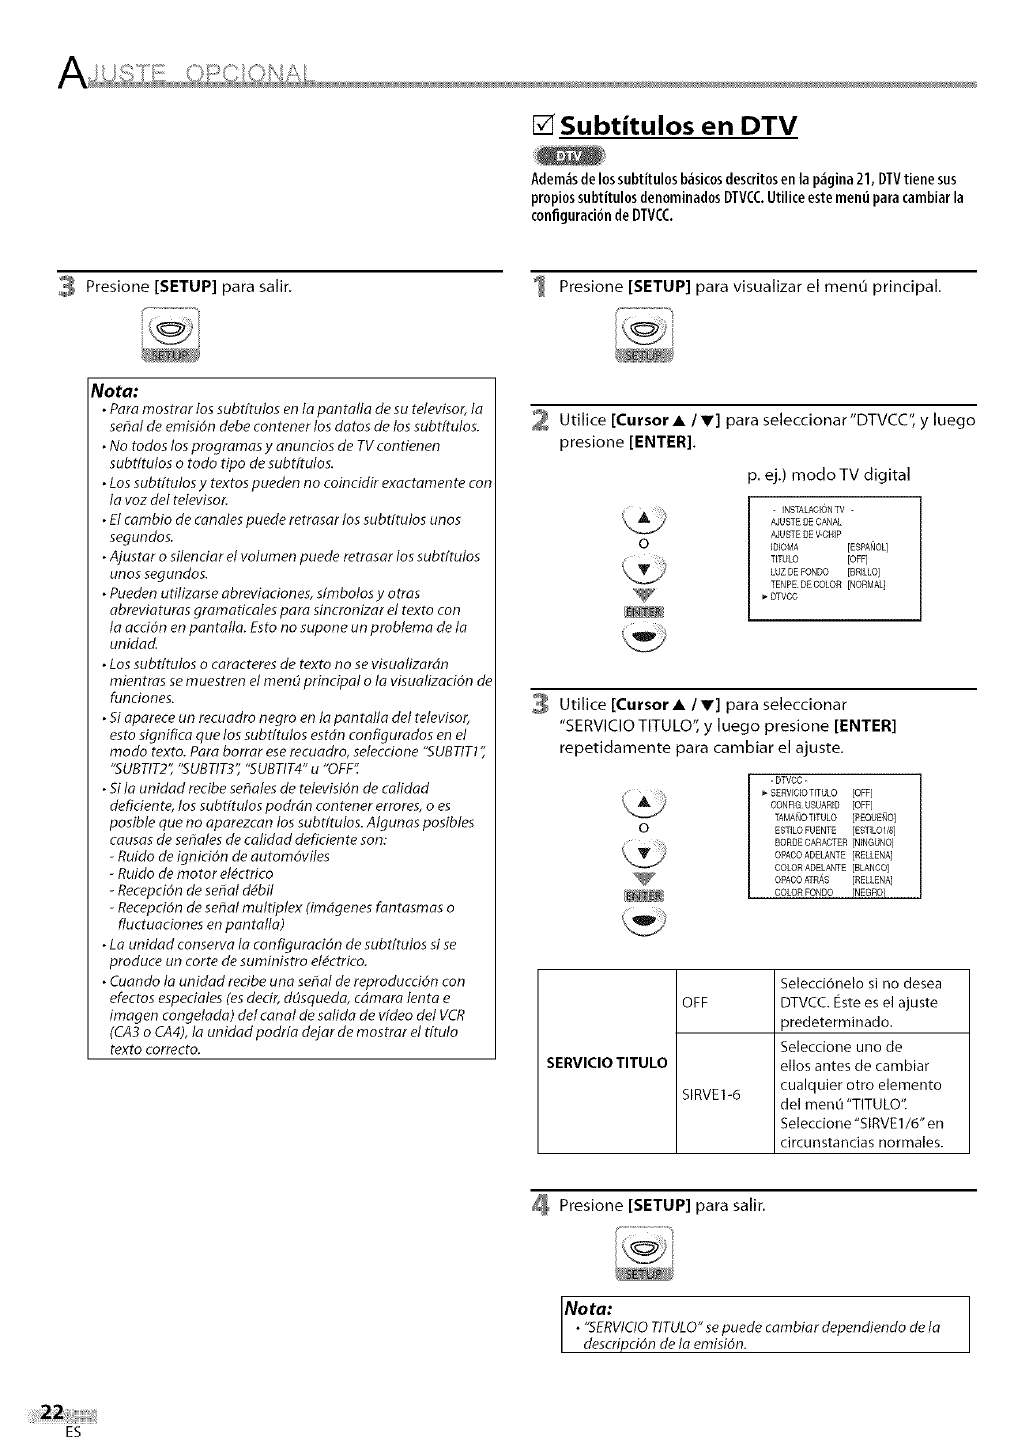
[] Subtitulos en DTV
Adem_sde lossubtitulos b_isicosdescritosen la p_gina21, DTVtiene sus
propi0ssubtitul0s denominadosDTVCC.Utiliceestementi paracambiarla
configuraci0nde DTVCC.
3 Presione [SETUP] para salir, I Presione [SETUP] para visualizar el menO principal.
Nora:
•Para mostrar los subtftulos en ta pontolla de su televisor, la
sehal de emisi6n debe contener los dotos de los subtftulos.
• No todos los programas y anuncios de TV contienen
subt[tulos o todo tipo de subt[tulos.
• Los subt[tulos y textos pueden no coincidir exactamen te con
la voz del televisor
•El carnbio de canales puede retrosar los subdtulos unos
segundos.
• Ajustar o silendar et volumen puede retrasar los subdtulos
unos segundos.
• Pueden utilizarse obreviaciones, s[rnbolos y otros
abreviaturas gramoticales para sincronizar el texto con
la accidn en pantalla. Esto no supone un problema de la
unidad.
• Los subdtulos o carocteres de texto no se visualizardn
mientras se muestren el men_ principal o lo visualizad6n de
fundones.
• Si aparece un recuodro negro en la pantalla del televisor,
esto significa que los subtftulos estdn configurados en el
modo texto. Pora horror ese recuadro, selecdone "SUBTIT1 ;'
"SUBTIT2", "SUBTIT_'; "SUBTIT4" u"OFF".
• Si lo unidad recibe sefales de televisi6n de cotidad
defidente, los subt[tulos podrdn contener errores, o es
posible que no aparezcan los subdtulos. Algunas posibles
causas de sehales de calidad deficiente son:
-Ruido de ignici6n de automdviles
-Ruido de motor el_ctrico
-Recepci6n de serial d_bil
-Recepd6n de seSal multiplex (irrldgenes fantasmas o
fluctuaciones en pantalla)
• Lo unidad conserva lo configuraddn de subt[tulos si se
produce un torte de suministro el_ctrico.
•Cuando lo unidad redbe una seSal de reproduccidn con
efectos especiates (es dedr, d_squedo, cdmara lento e
imagen congelada) del canal de salida de video det VCR
(CA3 o CA4), la unidad podria dejar de mostrar el t[tulo
texto correcto.
2 Utilice [Cursor AIV] para seleccionar'DTVCC", y luego
presione [ENTER],
p. ej,) modo TV digital
o
- INSTALACIONTV -
AJUSTE DE CANAL
AJUSTE DE V-CHIP
IDIOMA [ESPAt_OL]
TITULO [OFF]
LUZDE FONDO [BRILLO]
TENPE DECOLOR [NORMAL]
_- OTVCC
Utilice [Cursor A IV] para seleccionar
"SERVICIO TITULO", y luego presione [ENTER]
repetidamente para cambiar el ajuste,
_k_S
-DTVCC -
SERVECIOTITULO [OFF]
CONRG USUARID [OFF]
TAMA_IOTITULO [PEOUE_IO]
ESTILO FUENTE [ESTILOI/8]
BORDE CARACTER [NINGUNO]
OPACOADELANTE [RELLENA]
COLOR ADELANTE [BLANCO]
OPACOATRAS [RELLENA]
COLOR FONO0 FNEGRO]
SERVICIO TITULO
OFF
SIRVE1-6
Selecci6nelo si no desea
DTVCC. Este es el ajuste
predeterminado.
Seleccione uno de
ellos antes de cambiar
cualquier otro elemento
del menO "TITU LO"
Seleccione "SIRVE1/6" en
circunstancias normales.
Presione [SETUP] para salir,
No ta:
•"SERVICIOTITULO"sepuede cambiar dependiendo de la
descripci6n de la ernisi6n.
ES
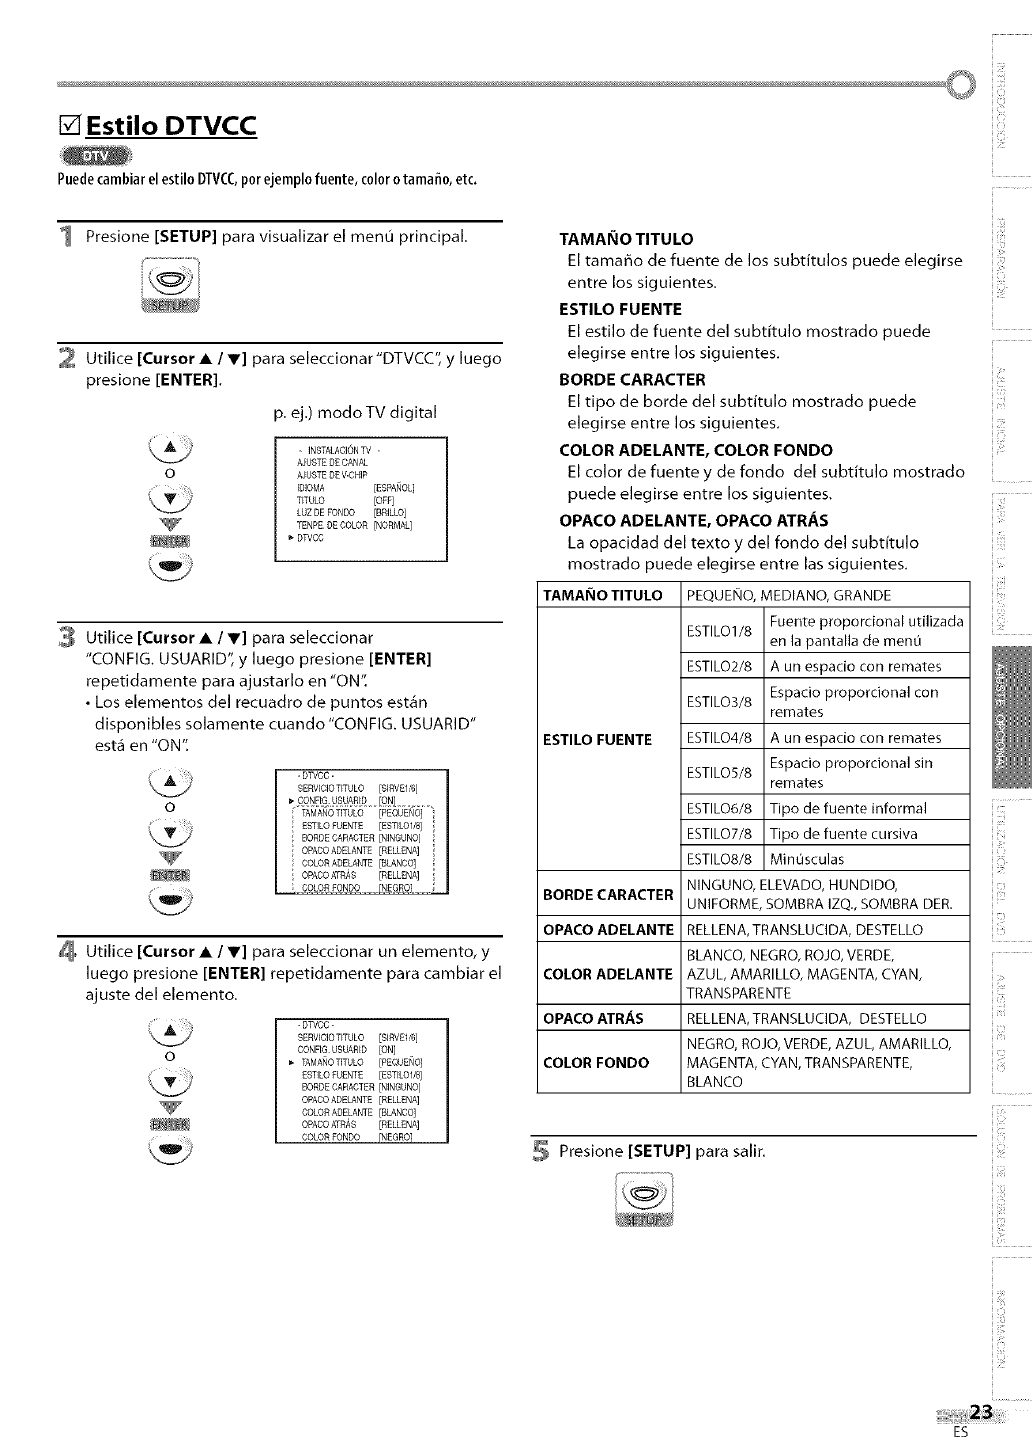
[] Estilo DTVCC
Puedecambiarelestilo DTVCC,porejemplo fuente,coloro tama_o,etc.
I Presione [SETUP] para visualizar el menu principal,
2 Utilice [Cursor •IV] para seleccionar"DTVCC", y luego
presione [ENTER].
p, ej.) modo TV digital
o
- INSTALAC]ONTV -
AJUSTE DE CANAL
AJUSTE DE V-CHIP
IDIOMA [ESPA_]OL]
TITULO [OFF]
LUZDE FONOO [BRILLO]
TENPE DECOLOR [NORMAL]
DTVCC
3 Utilice [Cursor • IV] para seleccionar
"CONFIG, USUARID", y luego presione [ENTER]
repetidamente para ajustarlo en "ON".
• Los elementos del recuadro de puntos est_n
disponibles solamente cuando'CONFIG. USUARID"
est_ en "ON".
o
-DTVCC-
SERVICIOTITULO [SIRVEI '6]
ESTILO FUENTE [ESTILOI/8]
BORCE CARACTER [NINGUNO] ',
OPACOADELANTE [RELLENA]
COLOR ADELANTE [BLANCO]
OPACOATRAS [RELLENA]
¢QLpR _ON})_ __IN_GROL
Utilice [Cursor • IV] para seleccionar un elemento, y
luego presione [ENTER] repetidamente para cambiar el
ajuste del elemento.
-DTVCC-
SERVlC]OTITULO [SIRVEI '6]
CONRG USUARED [ON]
_- TAMANOTITULO [P£OUENO]
ESTILO FUENTE [£STILOI/8]
BORCE CARACTER [NINGUNO]
OPACOADELANTE [N£LLENA]
COLOR ACELANTE [BLANCO]
OPACOATRAS [RELLENA]
COLOR FONDO ENEGRO]
TAMAI_IO TITULO
El tamaEo de fuente de los subtitulos puede elegirse
entre los siguientes,
ESTILO FUENTE
El estilo de fuente del subtitulo mostrado puede
elegirse entre los siguientes,
BORDE CARACTER
El tipo de borde del subtitulo mostrado puede
elegirse entre los siguientes,
COLOR ADELANTE, COLOR FONDO
El color de fuente y de fondo del subtitulo mostrado
puede elegirse entre los siguientes,
OPACO ADELANTE, OPACO ATRAS
La opacidad del texto y del rondo del subtitulo
mostrado puede elegirse entre las siguientes,
TAMAI_IO TITULO PEQUENO,MEDIANO, GRANDE
ESTILO FUENTE
ESTILOI/8 Fuente proporcional utilizada
en la pantalla de menu
ESTILO2/8 A un espacio con remates
ESTILO3/8 Espacio proporcional con
remates
ESTILO4/8 A un espacio con remates
ESTILOS/8 Espacio proporcional sin
remates
ESTILO6/8 Tipo de fuente informal
ESTILO7/8 Tipo de fuente cursiva
ESTILO8/8 Min0sculas
NINGUNO, ELEVADO, HUNDIDO,
UNIFORME, SOMBRA IZQ., SOMBRA DER.
RELLENA, TRANSLUCIDA, DESTELLO
BLANCO, NEGRO, ROJO, VERDE,
AZUL, AMARILLO, MAGENTA, CYAN,
TRANSPARENTE
RELLENA, TRANSLUCIDA, DESTELLO
NEGRO, ROJO, VERDE, AZUL, AMARILLO,
MAGENTA, CYAN, TRANSPARENTE,
BLANCO
BORDE CARACTER
OPACO ADELANTE
COLOR ADELANTE
OPACO ATRAS
COLOR FONDO
Presione [SETUP] para salir.
_/ilill
_ii!i!!ii
ES
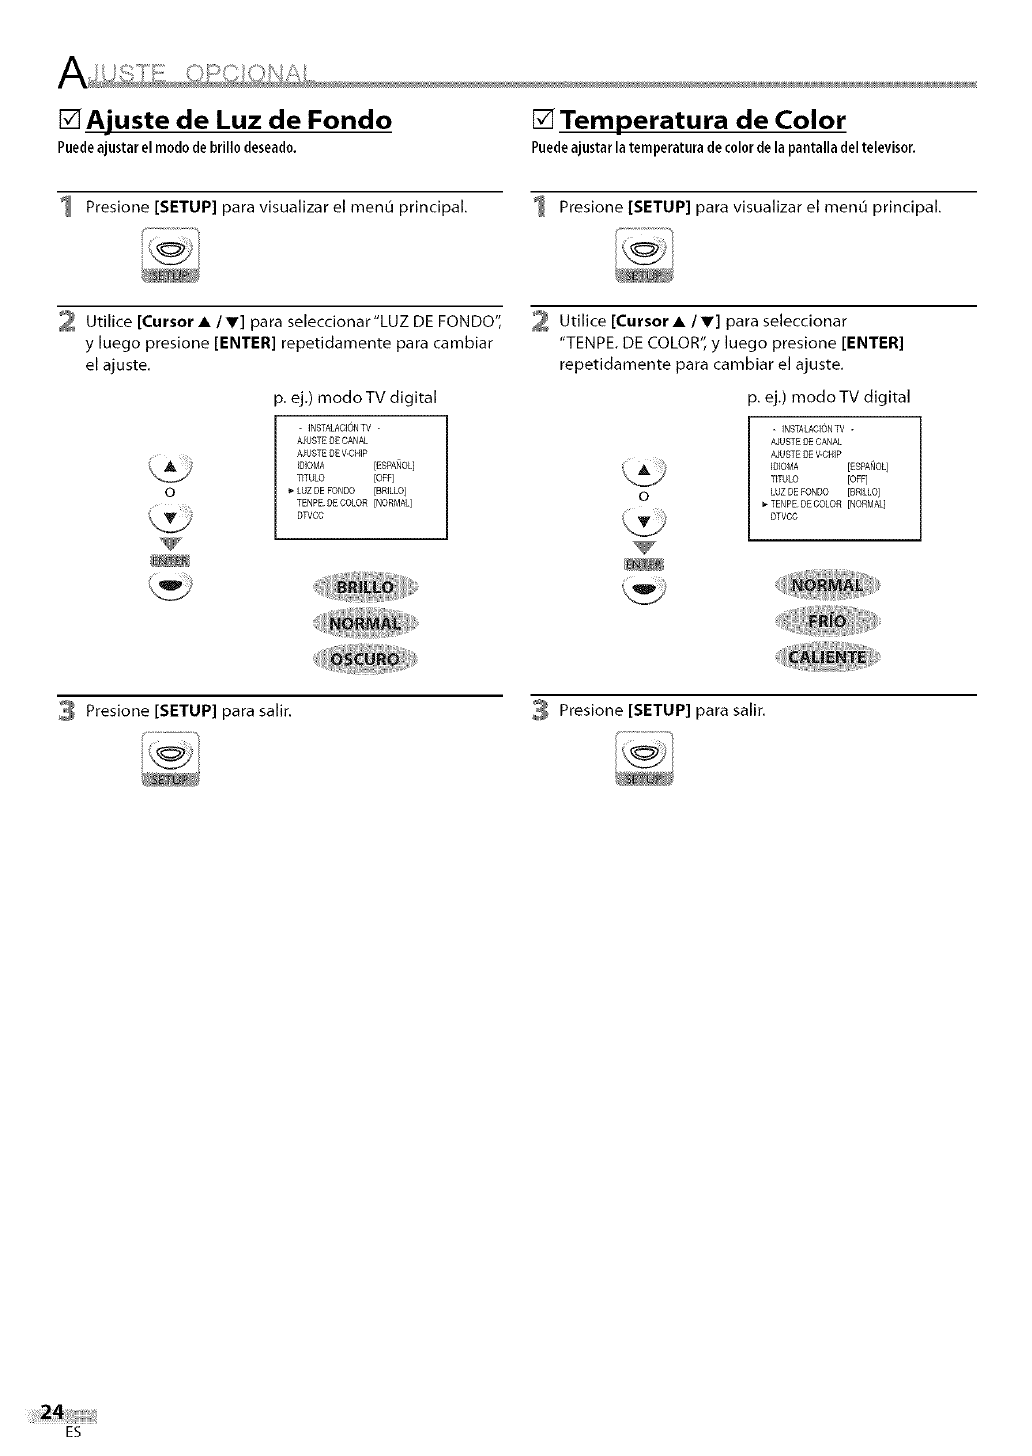
F_Ajuste de Luz de Fondo
Puedeajustarel mododebrillodeseado.
[] Temperatura de Color
Puedeajustarla temperaturade colordelapantalladeltelevisor,
Presione [SETUP] para visualizar el menu principal. _ Presione [SETUP] para visualizar el menu principal.
2 Utilice [Cursor •/V] para seleccionar"LUZ DE FONDO",
y luego presione [ENTER] repetidamente para cambiar
el ajuste.
p. ej.) modo TV digital
- INSTALACI{_NTV -
AJUSTE DE CANAL
AJUSTE DE V-CHIP
ICIOMA [ESPANOL]
TITULO [OFF]
_"LUZDE FONOO [BRILLOj
TENPE DEOOLOR [NORMAL]
DTVCC
Utilice [Cursor• Iv] para seleccionar
"TENPE. DE COLOR", y luego presione [ENTER]
repetidamente para cambiar el ajuste.
p. ej.) modo TV digital
- INSTALACI6NTV -
AJUSTE DE CANAL
AJUSTE DE V-CHIP
IDIOMA [ESPANOL]
TITULO [OFF]
LUZDE FONDO [BRILLO]
_- TENPE DE COLOR [NORMAL]
OTVCC
3 Presione [SETUP] para salir. Presione [SETUP] para salir.
ES
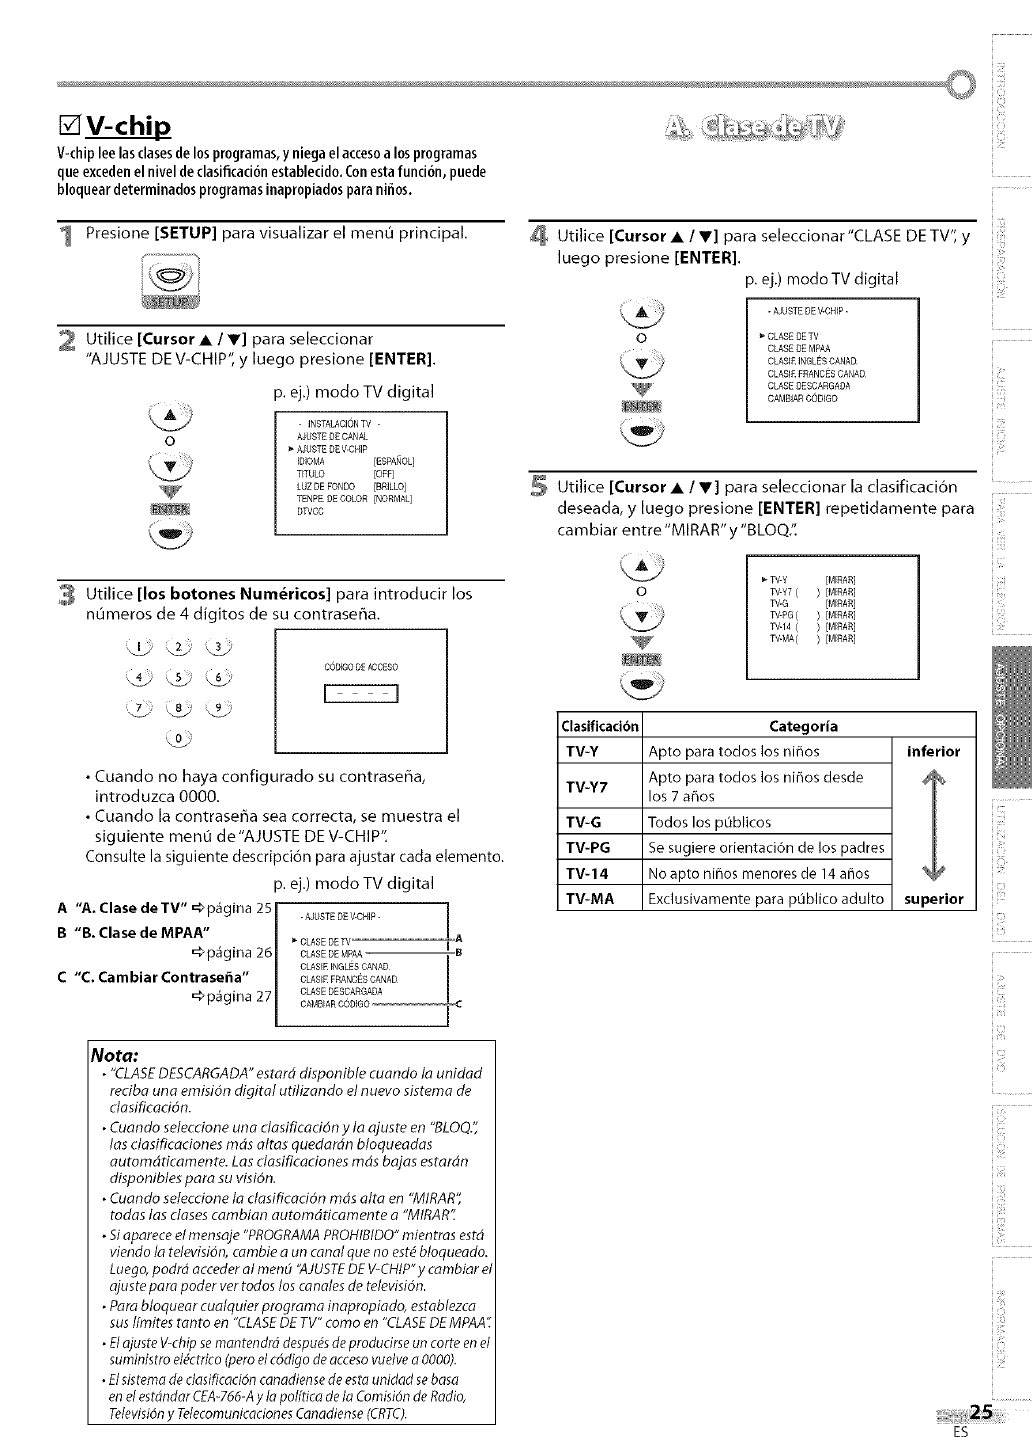
F V-chil2
V-chip lee las clasesde los programas, yniega el acceso a los programas
que exceden el nivel de clasificaci6n establecido. Con esta funci6n, puede
bloquear determinados programas inapropiados para nifios.
I Presione [SETUP] para visualizar el menO principal.
2 Utilice [Cursor •IV] para seleccionar
"AJUSTE DE V-CHIP", y luego presione [ENTER].
p. ej.)modo TV digital
o
- INSTALACIONTV -
AJUSTE DE CANAL
AJUSTE DE V-CHIP
IDIOMA [ESPA_IOL]
TITULO [OFF]
LUZDE FONDO [BR]LLOj
TENPE OECOLOR [NORMAL]
DTVCC
4 Utilice [Cursor •IV] para seleccionar"CLASE DE TV", y
luego presione [ENTER].
p. ej.) modo TV digital
- AJUSTE DE V-CHIP -
_"CLASE DETV
CLASE DE MPAA
CLASI£ INGLES CANAD
CLASI£ FRANCES CANAD
CLASE DESCARGADA
CAMBIAR CODIGO
o
3 Utilice [los botones Num@ricos] para introducir los
nOmeros de 4 digitos de su contraseEa,
COD[GO DE ACCE$O
• Cuando no haya configurado su contrase_a,
introduzca 0000.
• Cuando la contrase6a sea correcta, se muestra el
siguiente menO de"AJUSTE DE V-CHIP",
Consulte la siguiente descripci6n para ajustar cada elemento.
p. ej.) modo TV digital
A"A. Clase de TV" =bp_gina 25 -AJUSTEDEV-CHIP- ]
B"B. Clase de MPAA" _ CLASEDEW | -A
_p_gina 26
C"C. Cambiar Contrase_a"
,=>p_gina 27
Utilice [Cursor • /V] para seleccionar la clasificaci6n
deseada, y luego presione [ENTER] repetidamente para
cambiar entre "MIRAR" y"BLOQ.".
TV-Y [MIRAR]
TV-Y7 ( ) [MIRAR]
TV-G [MIRAR]
TV-PG ( ) [MIRAR]
TV-14 ( ) [MIRAR]
TV-MA( ) [MIRAR]
o
Nora:
•"CLASE DESCARGADA" estard disponible cuando la unidad
reciba una emisidn digital utilizando el nuevo sistema de
dasificaddn.
• Cuando seleccione una clasificaddn y ta ajuste en "BLOQ.",
los clasificaciones rods altos quedardn bloqueadas
automdticamente. Los ctasificadones mds bajas estardn
disponibles para su visi6n.
• Cuando setecdone la ctasificacidn rnds attaen "MIRAR',
todas tas doses cambian automdticamente a "MIRAR'[
•Si aparece el rnensaje "PROGRAMA PROHIBIDO" mientras estd
viendo la televisidn, carnbie aun canal que no est# bloqueado.
Luego, podrd acceder al mend "AJUSTEDE V-CHIP" y cambiar et
ajuste para poder ver todos los canales de televisi6n.
•Para bloquear cualquier prograrna inapropiado, estabtezca
sus I[mites tanto en "CLASE DE TV" como en "CLASE DE MPAA"
•Elojuste V-chip se nrantendrd despu_s de producirse un torte en el
suministro el_ctrico (pero el c6digo de acceso vuelve a0000).
•Elsistema de dasificacidn canadiense de esto unidad se basa
en el estdndar CEA-766-Ay Io polftica de la Comisidn de Radio,
Televisidn yTelecomunicaciones Conadiense (CRTC).
Clasificaci6n Categoria
TV-Y Apto para todos los ni_ios inferior
TV-Y7 Apto para todos los niffos desde F %
los 7athos
TV-G Todos los pOblicos
TV-PG Se sugiere orientaci6n de los padres
TV-14 No apto niflos menores de 14 afios %P
TV-MA Exclusivamente para pOblico adulto superior
ES
_i'!i_ii__
_ii!i!_!ii
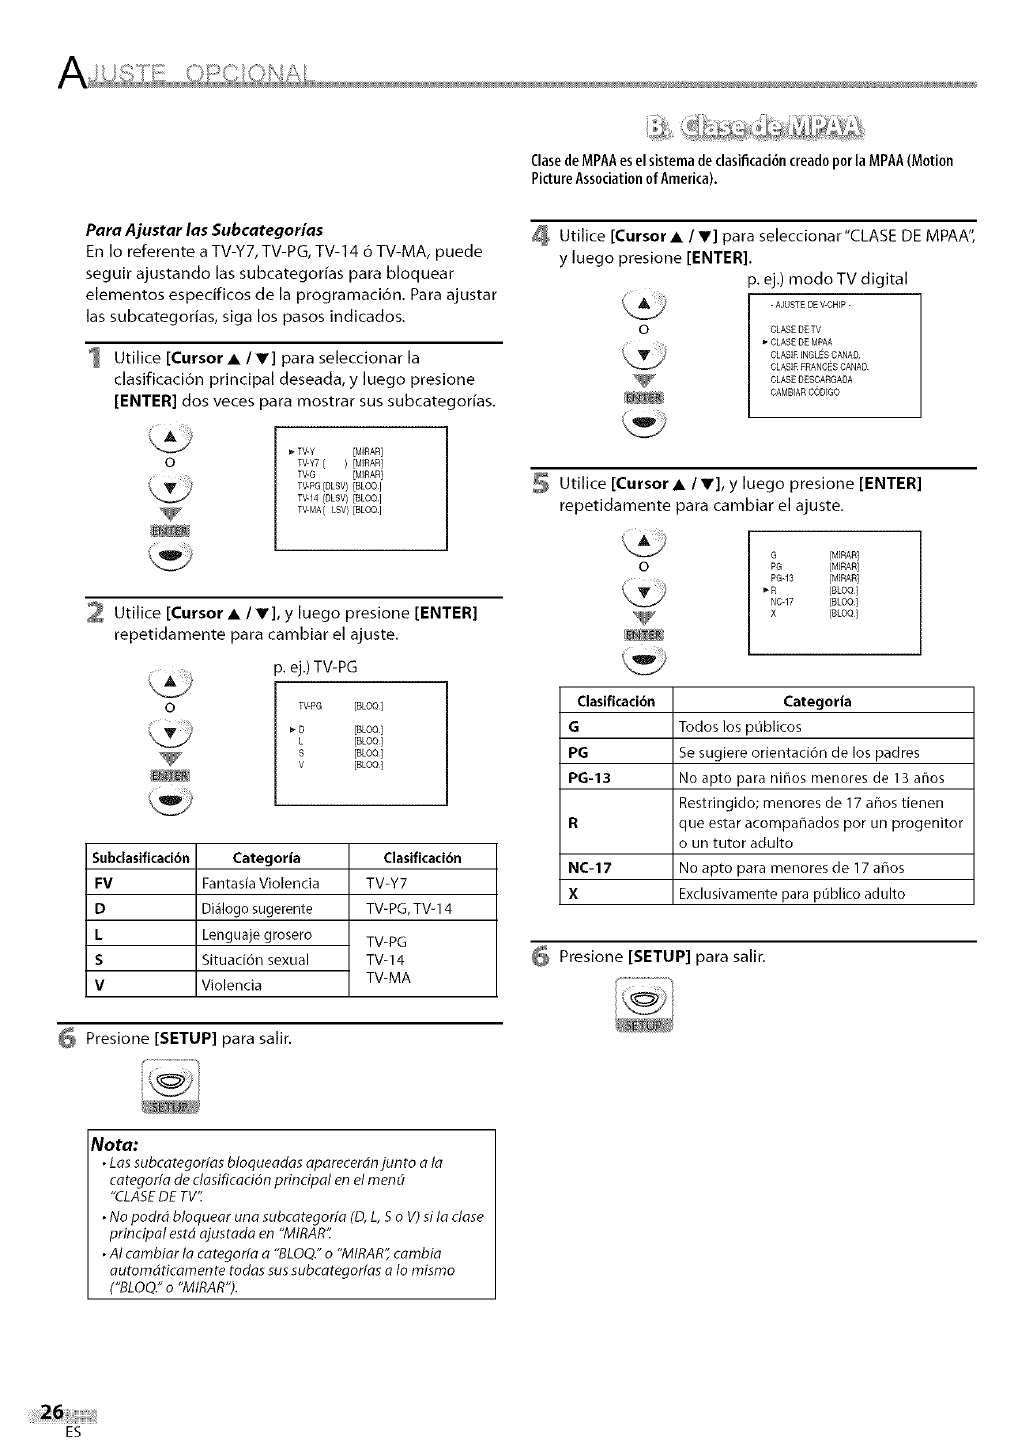
ClasedeMPAAesel sistemade clasificaci6ncreadoporla MPAA(Motion
PictureAssociationof America).
Pora Ajustor los Subcotegor/os
En Io referente a TV-Y7, TV-PG, TV-14 6TV-MA, puede
seguir ajustando los subcategor(as para bloquear
elementos especificos de la programaci6n. Para ajustar
los subcategorias, siga los pasos indicados.
1 Utilice [Cursor •/V] para seleccionar la
clasificaci6n principal deseada, y luego presione
[ENTER] dos veces para mostrar sus subcategofias,
Utilice [Cursor• IV] para seleccionar"CLASE DE MPAA",
y luego presione [ENTER].
p. ej.) modo TV digital
- AJUSTE DE V-CHIP-
0 CLASEDETV
_* CLASEDE MPAA
CLASI£ INGLESCANAD
CLASI£ FRANCESCANAD
CLAS£DESCARGADA
CAMBIARCODIGO
o_TV-Y [M]RAR]
TV-Y7( )[MiRAR]
TV-G [MRAR]
TV-PG (DLSV) [BLOQ]
TVq4 (DLSV) [BLOQ]
TV-MA(LSV) [BLOQ]
2 Utilice [Cursor • IV], y luego presione [ENTER]
repetidamente para cambiar el ajuste.
p. ej.) TV-PG
oTV-PG [BLOQ]
D [BLOQ]
L [BLOQ]
S [BLOQ]
V [BLOQ]
SubclasificaciOn
FV
D
L
S
V
Categoria
Fantasia Violencia
Di_logo sugerente
Lenguaje grosero
Situaci6n sexual
Violencia
Clasificaci6n
TV-Y7
TV-PG,TV-14
TV-PG
TV-14
TV-MA
Utilice [Cursor• Iv], y luego presione [ENTER]
repetidamente para cambiar el ajuste.
G [MiRAR]
PG [MiRAR]
PGq3 [MiRAR]
_R [BLOO]
NCq7 [BLOO]
x[sLoo]
Clasificaci6n Categoria
GTodos los pOblicos
PG Se sugiere orientaci6n de los padres
PG-13 No apto para nifros menores de 13 afros
Restringido; menores de 17 afros tienen
R que estar acompafrados por un progenitor
o un tutor adulto
NC-17 No apto para menores de 17 afos
X Exclusivarnente para pOblico adulto
6 Presione [SETUP] para salir.
Presione [SETUP] para salir.
_oto:
•Las subcategorias bloqueadas aparecerdnjunto a la
categoria de ctasificaciOn principal en el mend
"CLASE DE TV'_
•No podrd bloquear una subcategoria (D, L, S o V) si la dase
principal estd ajustada en "MIRAR'_
• AI carnbiar la categoria a"BLOQ." o "MIRAR', cambia
automdticamente todas sus subcategorias a Io mismo
("BLOQ." o "MIRAR").
ES
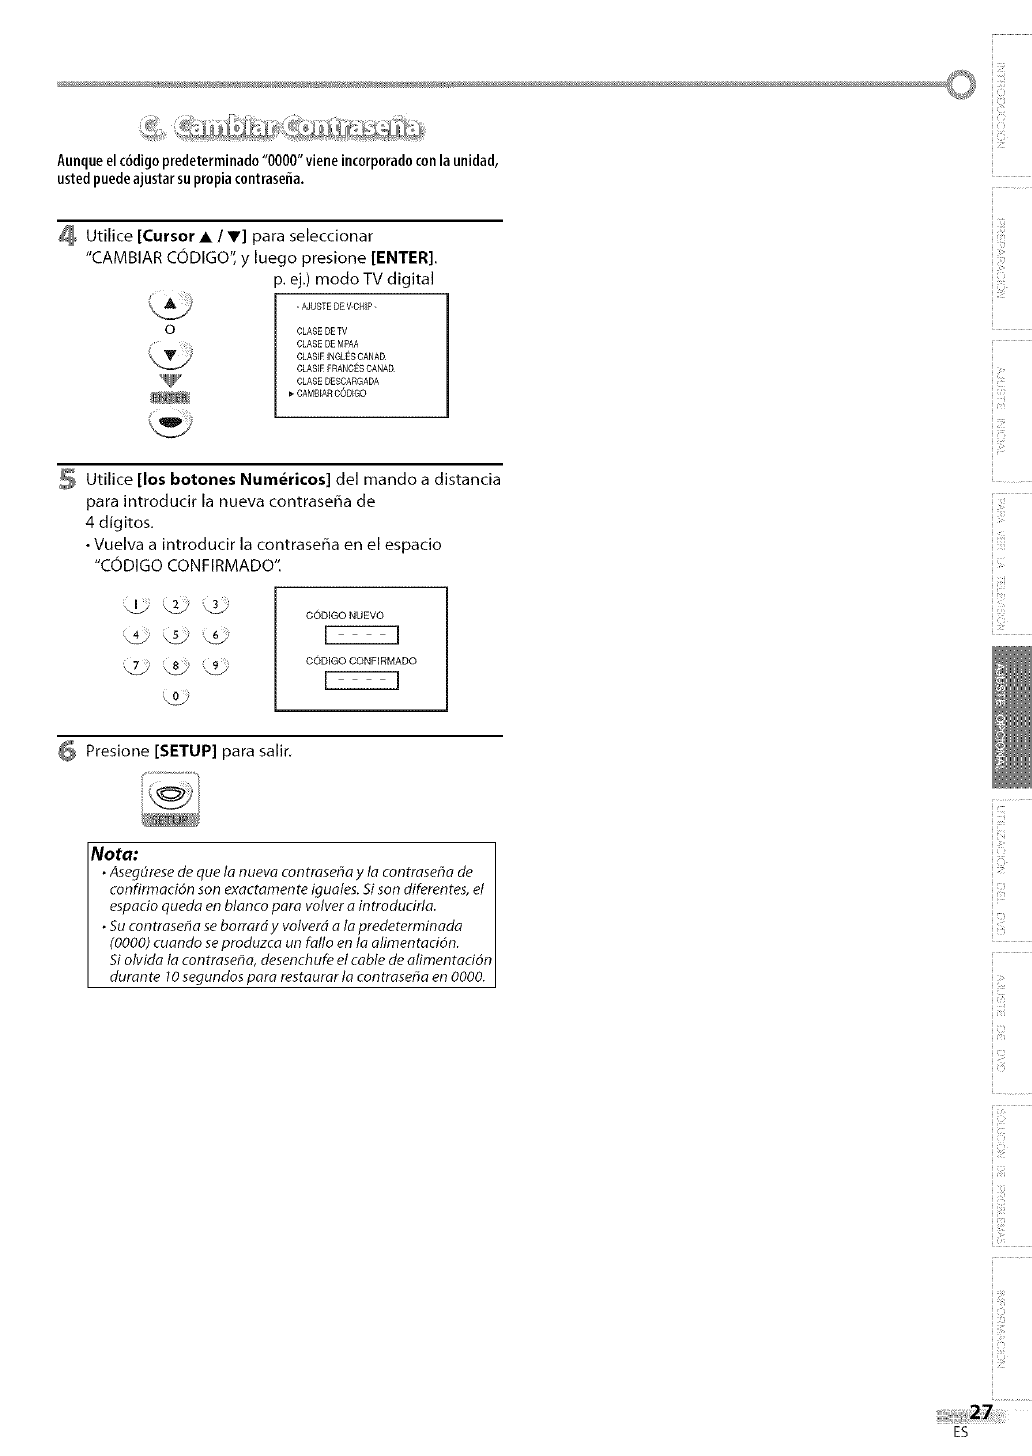
Aunqueelc6digo predeterminado"0000"viene incorporadoconla unidad,
ustedpuedeajustarsu propiacontrasefia.
Utilice [Cursor •/V] para seleccionar
"CAMBIAR CODIGO", y luego presione [ENTER].
p. ej.) modo TV digital
o
- AJUSTE DE V-CHIP-
CLASE DETV
CLASE DEMPAA
CLASIE INGLESCANAD
CLASEEFRANCESCANAEk
OLASE DE$CARGADA
CAMSIAR CO01GO
Utilice [los botones Num_ricos] del mando a distancia
para introducir la nueva contraseEa de
4 digitos.
• Vuelva a introducir la contraseEa en el espacio
"CODIGO CON FIRMADO".
CODIGO NUEVO
CODIGO CONHRMADO
Presione [SETUP] para salir,
IVota:
•AsegOrese de que la nueva contraseSay la contraseha de
confirmaci6n son exactamente iguales. Si son diferentes, el
espacio queda en blanco para volver aintrodudfla.
• Su con trase#a se borrard y volverd ala predeterminada
(0000) cuando se produzca un fallo en la alimentaci6n.
Si olvida la contrasef_a, desenchufe el cable de atirnentad6n
durante 10 segundos para restaurar la contraseha en 0000.
Jc_
ES
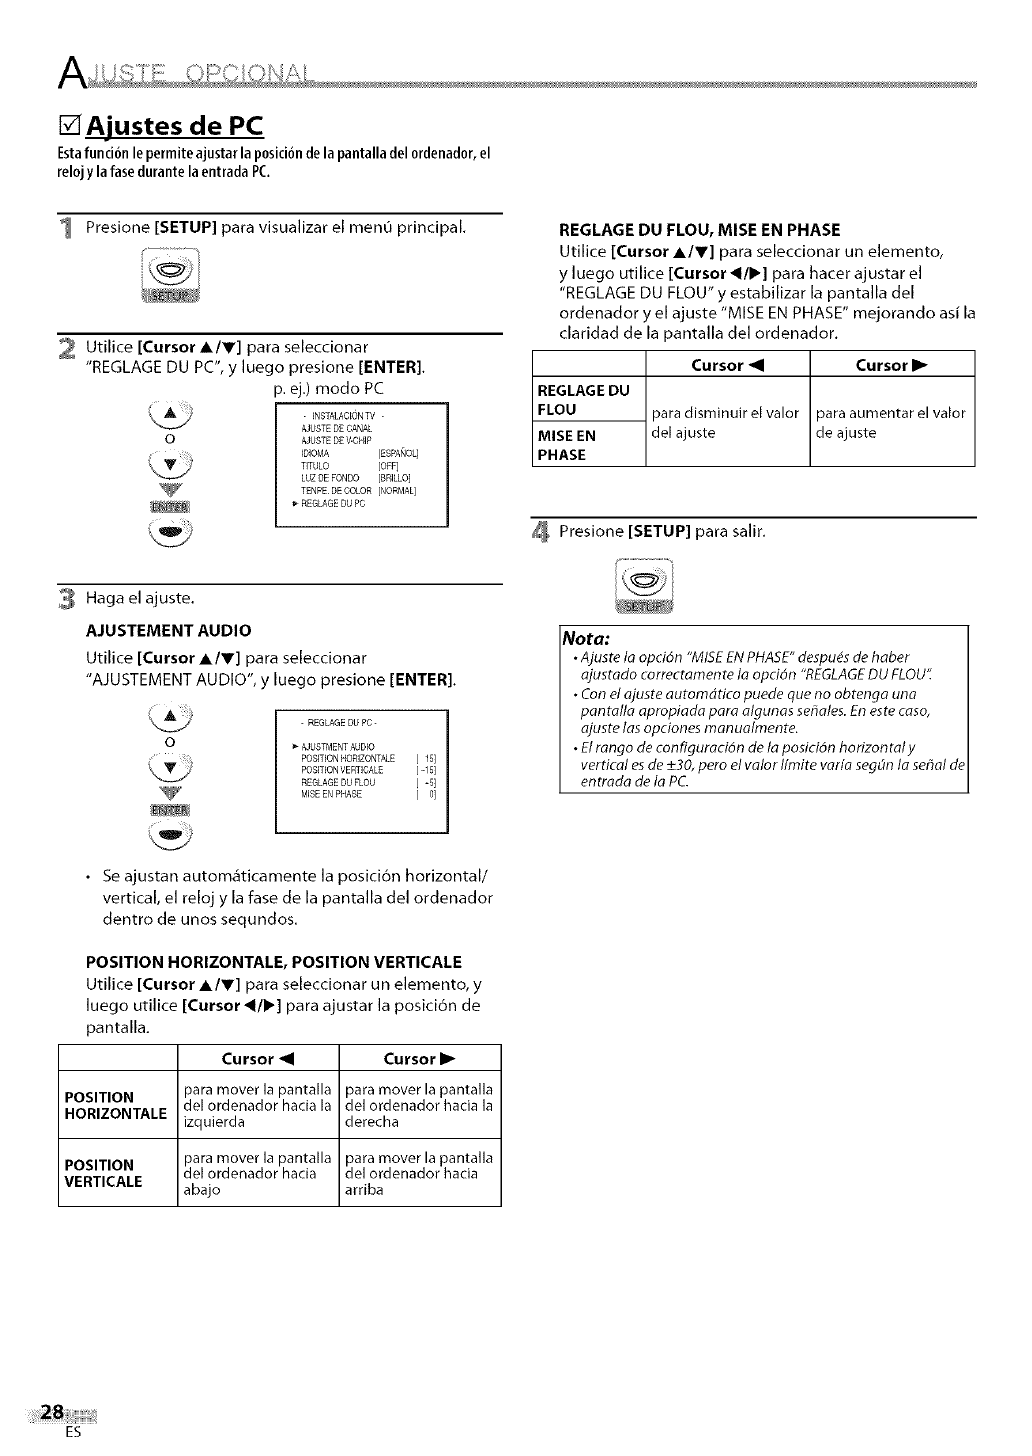
[]Ajustes de PC
Estafuncionle perrniteajustarla positionde la pantalladelordenador,el
reloj y la fasedurantelaentrada PC.
I Presione [SETUP] para visualizar el menO principal.
2 Utilice [CursorA/V] para seleccionar
"REGLAGE DU PC", y luego presione [ENTER].
p. ej.) modo PC
o
-INSTALACEONTV -
AJUSTE DE CANAL
AJUSTE DE V-CHIP
DIOMA [ESPANOL]
TITULO [OFF]
LUZDE FONDO [gRILL{)]
TENPE DECOLOR [NORMAL]
REGLAGE DU PC
REGLAGE DU FLOU, MISE EN PHASE
Utilice [Cursor A/V] para seleccionar un elemento,
y luego utilice [Cursor _/1_] para hater ajustar el
"REGLAGE DU FLOU" y estabilizar la pantalla del
ordenador y el ajuste "MISE EN PHASE" mejorando asi la
claridad de la pantalla del ordenador.
Cursor _1 Cursor I1_
REGLAGE DU
FLOU _aradisminuir el valor para aumentar el valor
MISE EN del ajuste de ajuste
PHASE
Presione [SETUP] para salir.
Haga el ajuste.
AJUSTEMENT AUDIO
Utilice [Cursor A/V] para seleccionar
"AJUSTEMENT AUDIO", y luego presione [ENTER].
o
V
-REGLAGEDU PC-
_"AJUSTMENTAUDIO
PosmoN HORIZONTALE [ 15]
POSmON VERT]CALE [ -15]
REGLAGE DU FLOU [ _5]
MISE ENPHASE [ 0]
Nora:
•Ajuste le opci6n "MISE EN PHASE" despu#s de haber
ajustado correctamente la opcidn "REGLAGE DU FLOU':
• Con el ajuste automdfico puede que no obtengo uno
pantalla apropiada para algunas sehales. En este caso,
ajuste las opciones manualmente.
• El rango de configuraci6n de la posici6n horizontaly
vertical es de +_30,pero el valor Ifmite varfa segdn ta sehal de
entrada de la PC.
• Se ajustan autom_ticamente la posici6n horizontal/
vertical, el reloj y la fase de la pantalla del ordenador
dentro de unos sequndos.
POSITION HORIZONTALE, POSITION VERTICALE
Utilice [Cursor A/V] para seleccionar un elemento, y
luego utilice [Cursor _/1_] para ajustar la posici6n de
pantalla.
Cursor _1 Cursor I_
para mover la pantalla para mover la pantalla
POSITION del ordenador hacia la del ordenador hacia la
HORIZONTALE izquierda derecha
para mover la pantalla para mover la pantalla
POSITION del ordenador hacia del ordenador hacia
VERTICALE abajo arriba
ES
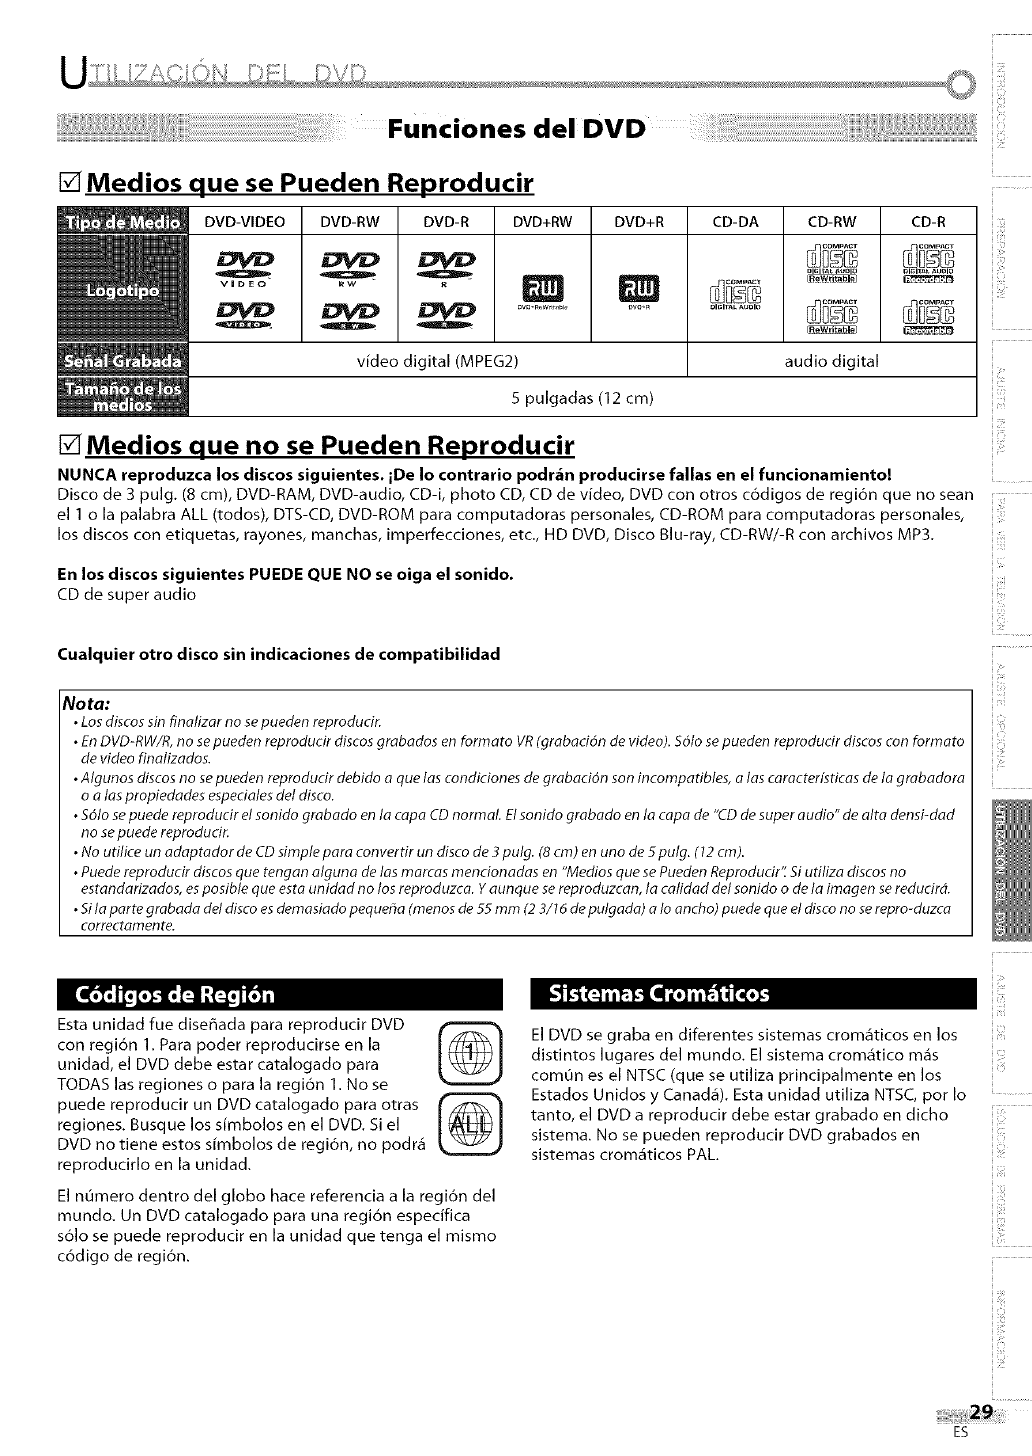
Funciones del DVD
[] Medios que se Pueden Reproducir
DVD-VIDEO DVD-RW
QRw
o
DVD-R
QR
DVD+RW
D
ovD-_w t_b_
DVD+R
D
_w_R
video digital (MPEG2)
5 pulgadas (12 cm)
CD-DA
DIGIT_LA.DIO
CD-RW
audio digital
CD-R
DIGII_L _UDID
[] Medios que no se Pueden Reproducir
NUNCA reproduzca los discos siguientes, iDe Io contrario podr_n producirse fallas en el funcionamientoi
Disco de 3 pulg. (8 cm), DVD-RAM, DVD-audio, CD-i, photo CD, CD de video, DVD con otros c6digos de regi6n que no sean
el I o la palabra ALL (todos), DTS-CD, DVD-ROM para computadoras personales, CD-ROM para computadoras personales,
los discos con etiquetas, rayones, manchas, imperfecciones, etc., HD DVD, Disco Blu-ray, CD-RW/-R con archivos MP3.
En los discos siguientes PUEDE QUE NO se oiga el sonido.
CD de super audio
Cualquier otro disco sin indicaciones de compatibilidad
Nora:
•Los discos sin finalizar no se pueden reprodudr
• En DVD-RW/R, no se pueden reproducir discos grabados en formato VR (grabaddn de video). $6Io se pueden reprodudr discos con formato
de video finalizados.
• Algunos discos no se pueden reprodudr debido a que las condiciones de grabaci6n son incompatibles, alas caracteristicas de la grabadora
o a los propiedades espedales del disco.
• $6Io se puede reproducir el sonido grabado en la capa CD normal Elsonido grabado en la capa de "CD de super audio" de alta densi-dad
no se puede reprodudr
• No utilice un adaptador de CD simple para convertir un disco de 3pulg. (8 cm) en uno de 5 pulg. (12 cm).
• Puede reproducir discos que tengan alguna de los marcas mencionadas en "Medios que se Pueden Reprodudr'f Si utiliza discos no
estandafizados, es posible que esta unidad no los reproduzca. Y aunque se reproduzcan, la catidad del sonido o de la imogen se redudrd.
• Si la parte grabada de/disco es demasiado pequef_a (menos de 55 mm (2 3/16 de pulgada) a lo ancho) puede que el disco no se repro-duzca
correctamente.
[_'_._ _ I:_il
Esta unidad fue dise_ada para reproducir DVD
con regi6n I. Para poder reproducirse en la
unidad, el DVD debe estar catalogado para
TODAS las regiones o para la regi6n I. No se
puede reproducir un DVD catalogado para otras
regiones. Busque los simbolos en el DVD. Si el
DVD no tiene estos simbolos de regi6n, no podr,_
reproducirlo en la unidad.
El numero dentro del globo hace referencia a la regi6n del
mundo. Un DVD catalogado para una regi6n especifica
s61o se puede reproducir en la unidad que tenga el misrno
c6digo de regi6n.
eoe
El DVD se graba en diferentes sistemas crom_ticos en los
distintos lugares del rnundo. El sistema crom,_tico m_s
comOn es el NTSC (que se utiliza principalmente en los
Estados Unidos y Canad&). Esta unidad utiliza NTSC, por Io
tanto, el DVD a reproducir debe estar grabado en dicho
sistema. No se pueden reproducir DVD grabados en
sistemas crom,_ticos PAL.
}
}
_iii_!_
i:,I_Y
iiii'i_i!i
_ii_ii{,}!
ii'iiii_i!
ES
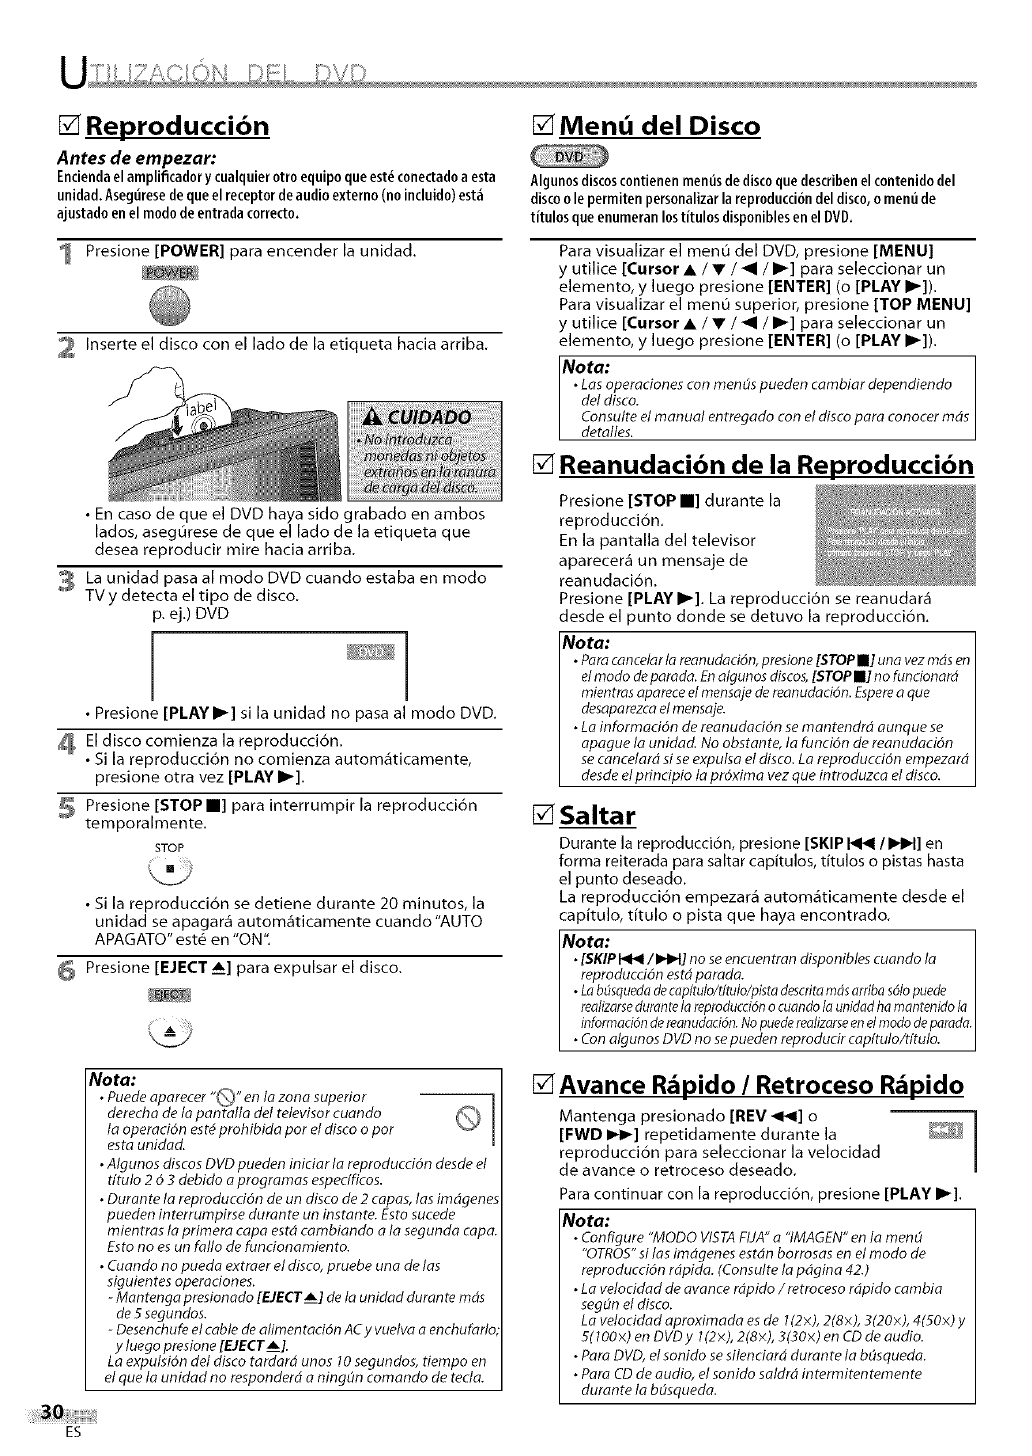
[] Reproducci6n
Antes de empezar:
Encienda el amplificador y cualquier otto equipo que est_ conectado aesta
unidad. Asegtirese de que el receptor de audio externo (no incluido) est_
ajustado en el modo de entrada correcto.
Presione [POWER] para encender la unidad.
2 Inserte el disco con el lado de la etiqueta hacia arriba.
iiiiii iiii iii ,i!ii i!ii!ii!ii!ii!ii!ii!ii!ii!ii!i!!ii!iiiiiiiii!i
extra_ enla_ran ra
• En caso de que el DVD haya sido grabado en ambos
lados, asegurese de que el lado de la etiqueta que
desea reproducir mire hacia arriba.
3 La unidad pasa al modo DVD cuando estaba en modo
TVy detecta el tipo de disco.
p. ej.) DVD
i i
• Presione [PLAY _1 si la unidad no pasa al modo DVD.
_ Eldisco comienza la reproduccidn.
• Si la reproduccidn no comienza autom_ticamente,
presione otra vez [PLAY I1_1.
Presione [STOP II] para interrumpir la reproducci6n
temporalmente.
STOP
• Sila reproducci6n se detiene durante 20 minutos, la
unidad se apagar& autom_ticamente cuando"AUTO
APAGATO" est_ en "ON".
Presione [EJECT _i] para expulsar el disco.
Nota:
•Puede aparecer "_" en lo zona superior 1
derecha de Io pantallo del televisor cuando _'_ I
la operaci6n est_ prohibida por el disco o por
esta unidad.
•Algunos discos DVD pueden iniciar la reproducddn desde el
tftulo 26 3 debido o programas especfficos.
•Durante la reproduccidn de un disco de 2capas, las imdgenes
pueden interrumpirse durante un instante. Esto sucede
mientras lo primera capa estd cambiando a la segunda capa.
Esto no es un folio de fundonamiento.
• Cuando no pueda extraer el disco, pruebe uno de las
siguientes operaciones.
-Montenga presionodo [EJECTS[ de la unidad durante rnds
de 5segundos.
-Desenchufe el cable de alirnentaci6n ACy vuelva o enchufarlc
y luego presione [E.IECTA[.
La expulsi6n del disco tardord unos 10 segundos, tiempo en
el que la unidad no responderd a ning_n comando de redo.
[] Mend del Disco
Algunosdiscoscontienenmentisdediscoquedescribenelcontenido del
discoole permitenpersonalizarla reproducci6ndel disco,omentide
titulosqueenumeranlostitulosdisponiblesen elDVD.
Para visualizar el menO del DVD, presione [MENU]
yutilice [Cursor •/• /_1 /I1_] para seleccionar un
elemento, y luego presione [ENTER] (o [PLAY I1_]).
Para visualizar el menO superior, presione [TOP MENU]
y utilice [Cursor • /• /_1 /I_] para seleccionar un
elemento, y luego presione [ENTER] (o [PLAY I_]).
Noto:
•Los operaciones con rnen(is pueden cambiar dependiendo
det disco.
Consulte el manual entregado con el disco para conocer mds
detalles.
[] Reanudaci6n de la Reproducci6n
Presione [STOP II] durante la
reproducci6n.
En la pantalla del televisor
aparecer_ un mensaje de
reanudaci6n.
Presione [PLAY I1_]. La reproducci6n se reanudar_
desde el punto donde se detuvo la reproducci6n.
Nota:
•Poracancelarlo reanudaci6n,presione[STOPII] una vez mdsen
etmodo deparoda. Enatgunosdiscos,[STOPII] no funcionard
mientros apareceel rnensojedereanudaci6n. Espereaque
desaporezcaet mensaje.
•La information de reanudadOn semantendrd aunque se
apague la unidad. No obstante, ta funcidn de reanudaciOn
secancelard sise expulsa el disco.La reproduccifn empezard
desdeel pfincipio ta pr6xima vezque introduzca el disco.
[] Saltar
Durante la reproducci6n, presione [SKIP _/IHH] en
forma reiterada para saltar capitulos, titulos o pistas hasta
el punto deseado.
La reproducci6n empezar_ autom_ticamente desde el
capitulo, titulo o pista que haya encontrado.
rNota: 1
•[SKIP _/I_IH] no se encuentran disponibles cuando la I
reproduccidn estd parada. I
•La bdsqueda de capitulo/tftulo/pisto descrito rods arriba s61opuede I
reolizorse durante la reproducci6n ocuondo Io unidad ha montenido la I
infom_oci6n de reonudoci6n. No puede reolizorse en el modo de parada.
• Con algunos DVD no se pueden reproducir capftulo/t/tulo.
[] Avance Rdpido /Retroceso Rdpido
Mantenga presionado [REV _1<] o
[FWD IH_] repetidamente durante la _J_
reproducci6n para seleccionar la velocidad
de avance o retroceso deseado.
Para continuar con la reproducci6n, presione [PLAY II_].
Nota:
• Configure "MODO VISTA FIJA" a "IMAGEN" en la mend
"OTROS" si los imdgenes estdn borrosas en el modo de
reproduccidn rdpida. (Consulte la pdgina 42.)
•La velocidad de avance rdpido/retroceso rdpido cambia
seg(m el disco.
La vetocidad aproximada es de 1(2×), 2(8)<), 3(20)<), 4(50x) y
5( l OOx) en DVD y 1(2×), 2(8×), 3(30x) en CD de audio.
•Para DVD, el sonido se silenciard duran te la b_squeda.
•Para CD de audio, el sonido saldrd intermitentemente
durante la b(ssqueda.
ES
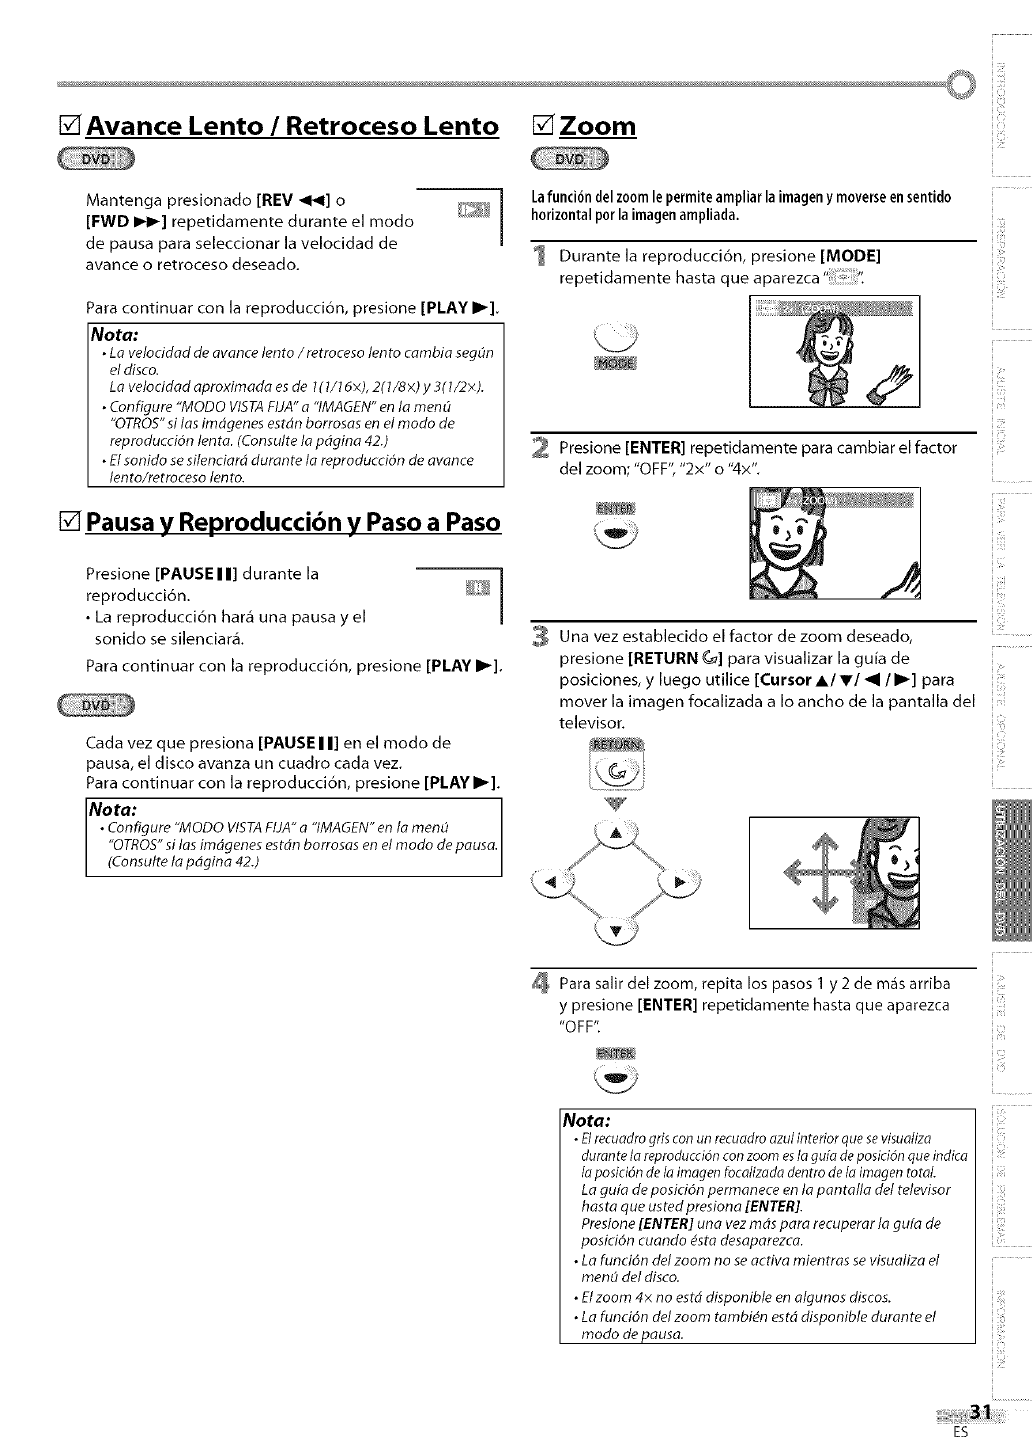
u"il
[]Avance Lento /Retroceso Lento []Zoom
Mantenga presionado [REV _1<] o
[FWD IH_] repetidamente durante el mode
de pause pare seleccionar la velocidad de
avance o retroceso deseado.
Pare continuer con la reproduccion, presione [PLAY I1_].
Nota:
•La veloddad de avance lento/retroceso lento cembie segOn
eldisco.
La vetocidad aproximede es de 1(1/15x), 2(1/8x) y 3(1/2×).
•Configure "MODO VISTAFUA"e "IMAGEN"en le menQ
"OTROS"si losimdgenes estdn borroses en el mode de
reproduction lento. (Consulte la pdgine 42.)
• Elsonido se sflencierd durente la reproduction de evance
lento/retroceso lento.
[] Pausa y Reproduccibn y Paso a Paso
Presione [PAUSE I I] durante la
reproducci6n.
•La reproducci6n hare1 una pause y el
sonido se silenciar&
Para continuer con la reproducci6n, presione [PLAY I1_].
Coda vez que presiona [PAUSE I I] en el mode de
pause, el disco avanza un cuadro coda vez.
Pare continuer con la reproducci6n, presione [PLAY I1_].
No ta: ]
•Configure "MODO VISTAFIJA"a"IMAGEN"en lo men_ I
"OTROS"si las imdgenes estdn borrosas en el mode de pause.I
(Consulteta pdgina 42.) J
Lafuncion delzoomlepermiteampliar la imageny moverseen sentido
horizontalpar laimagenampliada.
1 Durante la reproducci6n, presione [MODE]
repetidamente hasta que aparezca "".
2 Presione[ENTER] repetidamenteparacambiarelfactor
del zoom; "OFF", "2x" o "4x".
3 Una vez establecido el factor de zoom deseado,
presione [RETURN G] para visualizar la guia de
posiciones, y luego utilice [Cursor AI vl _I l I_] para
mover la imagen focalizada a Io ancho de la pantalla del
televisor.
_i'!i_ii__
Para salir del zoom, repita los pasos I y 2 de mas arriba
y presione [ENTER] repetidamente hasta que aparezca
"OFF".
Nota:
•Elrecuodrogrisconun recuodroozul interiorquasevisuolizo
duronteIo reproduccidnconzoom esIo gufodeposicidnqua indico
Ioposicidnde Io imogenfocolizodadentrode Io imogen total
Le gufa de posici6n permanece en la pantalla dot televisor
haste qua usted presione [ENTER].
Presione[ENTER] une vez mds pare recuperar la gufe de
posici6n cuendo #sta desaperezco.
•Le funci6n delzoorn no se active mientras se visualize el
rnenOdel disco.
•Elzoom 4x no estd disponible en olgunos discos.
•Le funci6n delzoorn tambi)n estd disponible durante el
modo de pause.
ES
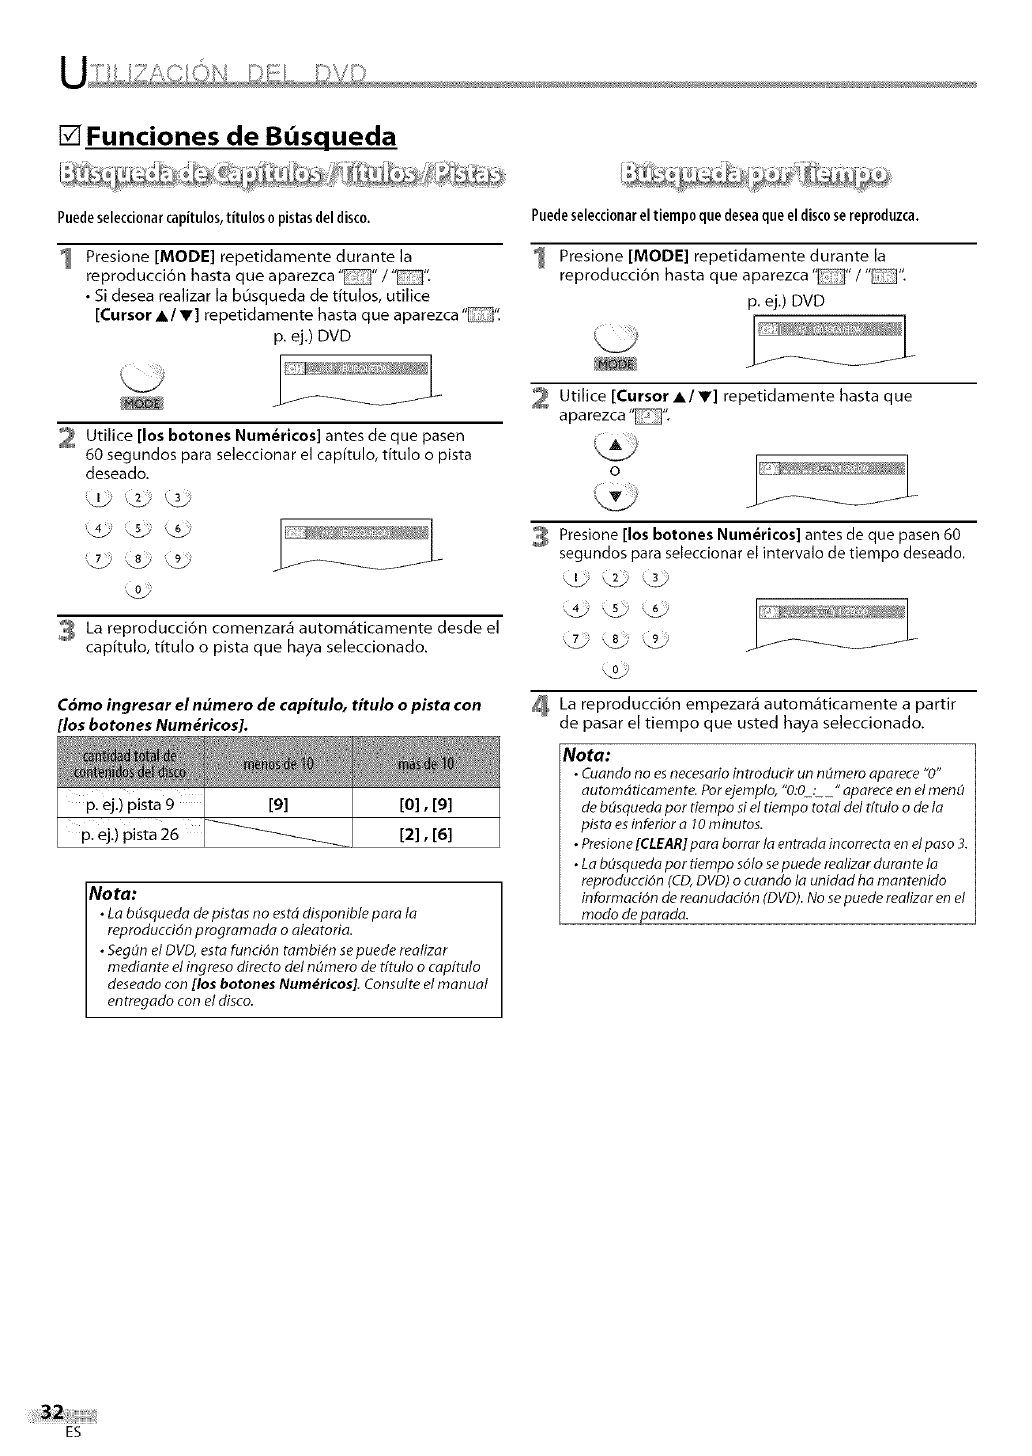
[] Funciones de B squeda
Puedeseleccionarcapitulos,titulosopistasdeldisco.
1 Presione [MODE] repetidamente durante la
reproducci6n hasta que aparezca "EZ]"/' ".
• Si desea realizar la busqueda de titulos, utilice
[Cursor A/V] repetidamente hasta que aparezca "".
p. ej.) DVD
2 Utilice [los botones Num_ricos] antes de que pasen
60 segundos para seleccionar el capftulo, titulo o pista
deseado.
La reproducci6n comenzar_ autom&ticamente desde el
capitulo, titulo o pista que haya seleccionado.
Puedeseleccionarel tiempo que deseaque el discosereproduzca.
Presione [MODE] repetidamente durante la
reproducci6n hasta que aparezca "_" /"'.
p, ej.) DVD
Utilice [Cursor A/V] repetidamente hasta que
aparezca "D".
3Presione [los botones Num_ricos] antes de que pasen 60
segundos para seleccionar el intervalo de tiempo deseaclo.
Cdmo ingresar el n#mero de capitulo, titulo opista con
[los botones Num_ricos].
[o],[9]
pl ej.) pista 26 [21, [61
No ta:
•La b(ssqueda de pistas no estd disponible para la
reproducci6n prograrnada o aleatoria.
•Seg(m el DVD, esta funci6n tambi#n se puede realizar
mediante el ingreso directo det n(_mero de tftulo o capftulo
deseado con [los botones Num#.ricos]. Consulte el manual
entregado con el disco.
La reproducci6n empezar_ autom_ticamente a partir
de pasar el tiempo que usted haya seleccionado.
Nora:
• Cuando no esnecesario introducir un n(imero aparece "0"
automdticamente. Por ejemplo, "0:O L__"apareceen elmen(i
de b(ssquedapor tiempo siel tiempo total del tftulo o de ta
pista esinferior a10minutos.
•Presione[CLEAR]para borrar la entrada incorrecta en elpaso 3.
•La b(_squedapor tiernpo solo sepuede realizar duran te la
reproducci6n (CD,DVD) o cuando la unidad ha mantenido
informad6n de reanudaci6n (DVD).No sepuede realizar en el
rnodo de parada.
ES
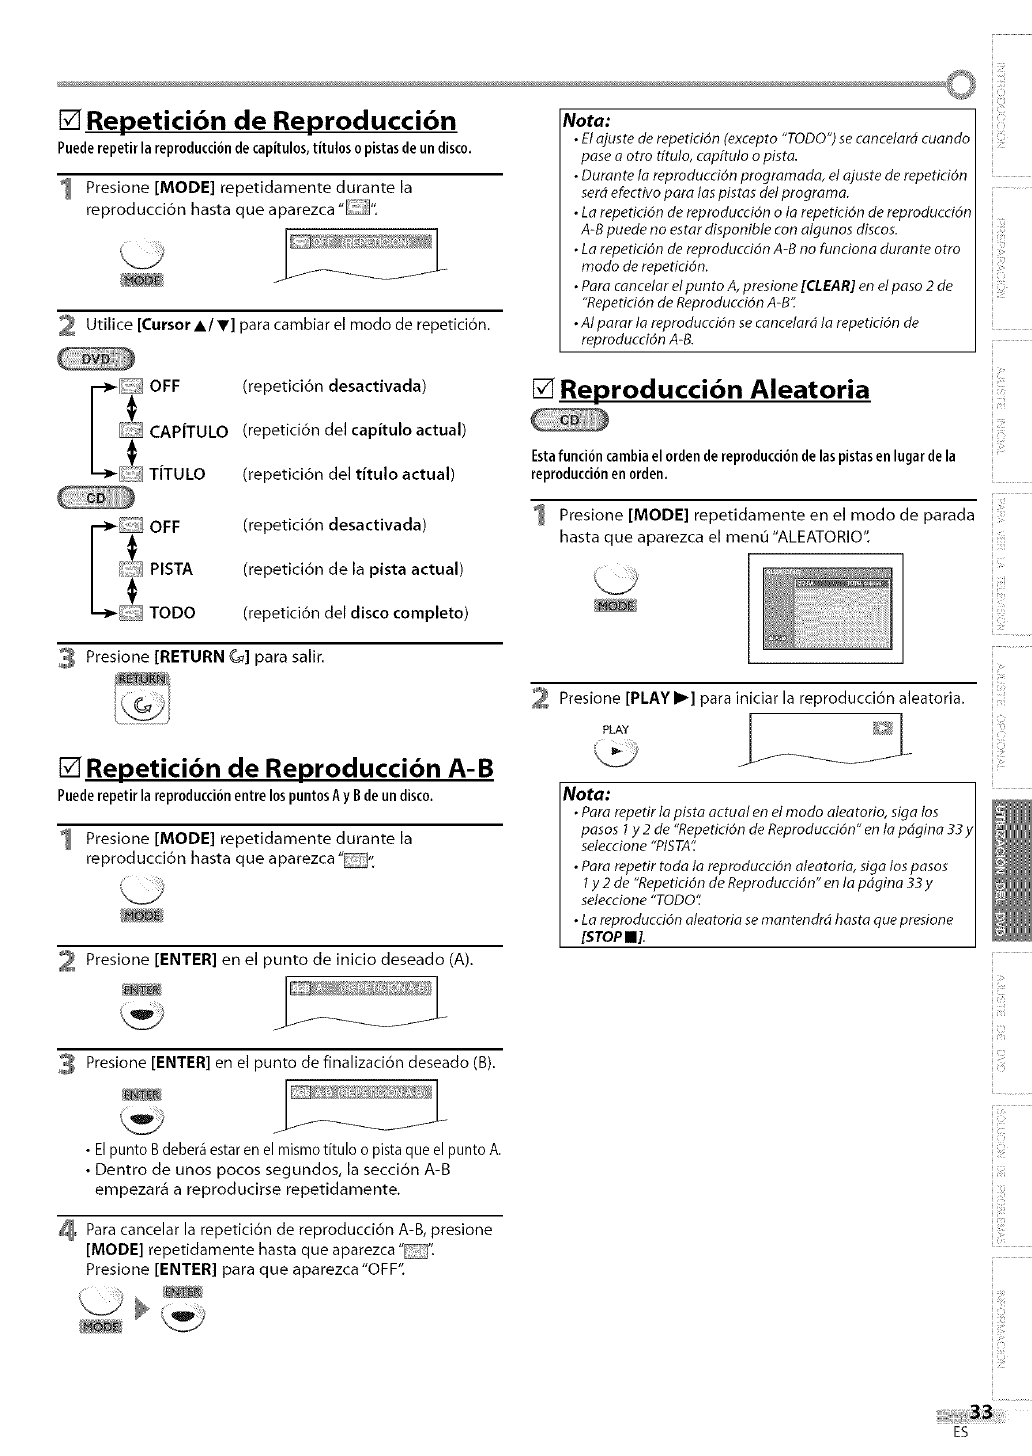
©
[] Repeticibn de Reproducci6n Nota:
•Elajuste de repetici6n (excepto "TODO") secancelar6 cuando
Puederepetir la reproducci6nde capitulos,titulos o pistasdeun disco, pase a otro tftulo, cap[tulo o pista.
1 Presione [MODE] repetidamente durante la
reproducci6n hasta que aparezca "".
2 Utilice [Cursor A/V] para cambiar el modo de repeticidn.
• Durante la reproducci6n programada, el ajuste de repetici6n
serd efectivo para las pistas det prograrna.
• La repeticidn de reproducci6n o la repetici6n de reproducd6n
A-B puede no estar disponible con algunos discos.
• La repetici6n de reproduccidn A-B no fundona durante otro
rnodo de repetid6n.
• Para cancelar el pun to A, presione [CLEAR] en el paso 2de
"Repetici6n de Reproducci6n A-B'_
• AI parar la reproduction se cancelard la repetici6n de
reproducci6n A-B.
OFF (repetici6n desactivada)
CAPiTULO (repeticidn del capitulo actual)
TiTULO (repeticibn del titulo actual)
F]"''']OFF
[_l PISTA
_TODO
(repetici6n desactivada)
(repetici6n de la pista actual)
(repetici6n del disco completo)
3 Presione [RETURN G_] para salir.
[] Repetici6n de Reproducci6n A-B
Puederepetir la reproducci6nentre10spunt0sAy Bdeun disco.
Presione [MODE] repetidamente durante la
reproducci6n hasta que aparezca" -.
Presione [ENTER]en el punto de inicio deseado (A).
[] Reproduccibn Aleatoria i
Estafuncidn cambiael orden de reproduccidnde las pistasen lugar de la
revrouuCC,un,a :a enorden.
Presione [MODE] repetidamente en el modo de parada
hasta que aparezca el menO "ALEATORIO".
Presione [PLAY I_] para iniciar la reproducci6n aleatoria.
/
Presione [ENTER] en el punto de finalizaci6n deseado (B).
•El punto B deber_ estaren el mismo titulo o pista que el punto A.
• Dentro de unos pocos segundos, la secci6n A-B
empezar_ a reproducirse repetidamente.
Para cancelar la repetici6n de reproducci6n A-B, presione
[MODE] repetidamente hasta que aparezca" ".
Presione [ENTER] para que aparezca"OFF".
Nora:
• Para repetir la pista actual en el modo aleatofio, siGalos
pasos I y 2de "Repetici6n de Reproducci6n" en ta pdGina 33 y
seteccione "PISTA'_
• Para repetir toda ta reproducci6n aleatofia, siGalos pasos
I y 2de "Repeticidn de Reproduccidn" en la pdgina 33y
seteccione "TODO'_
• La reproducci6n aleatofia semantendrd hasta que presione
[STOPII].
_i!i_ii__
ES
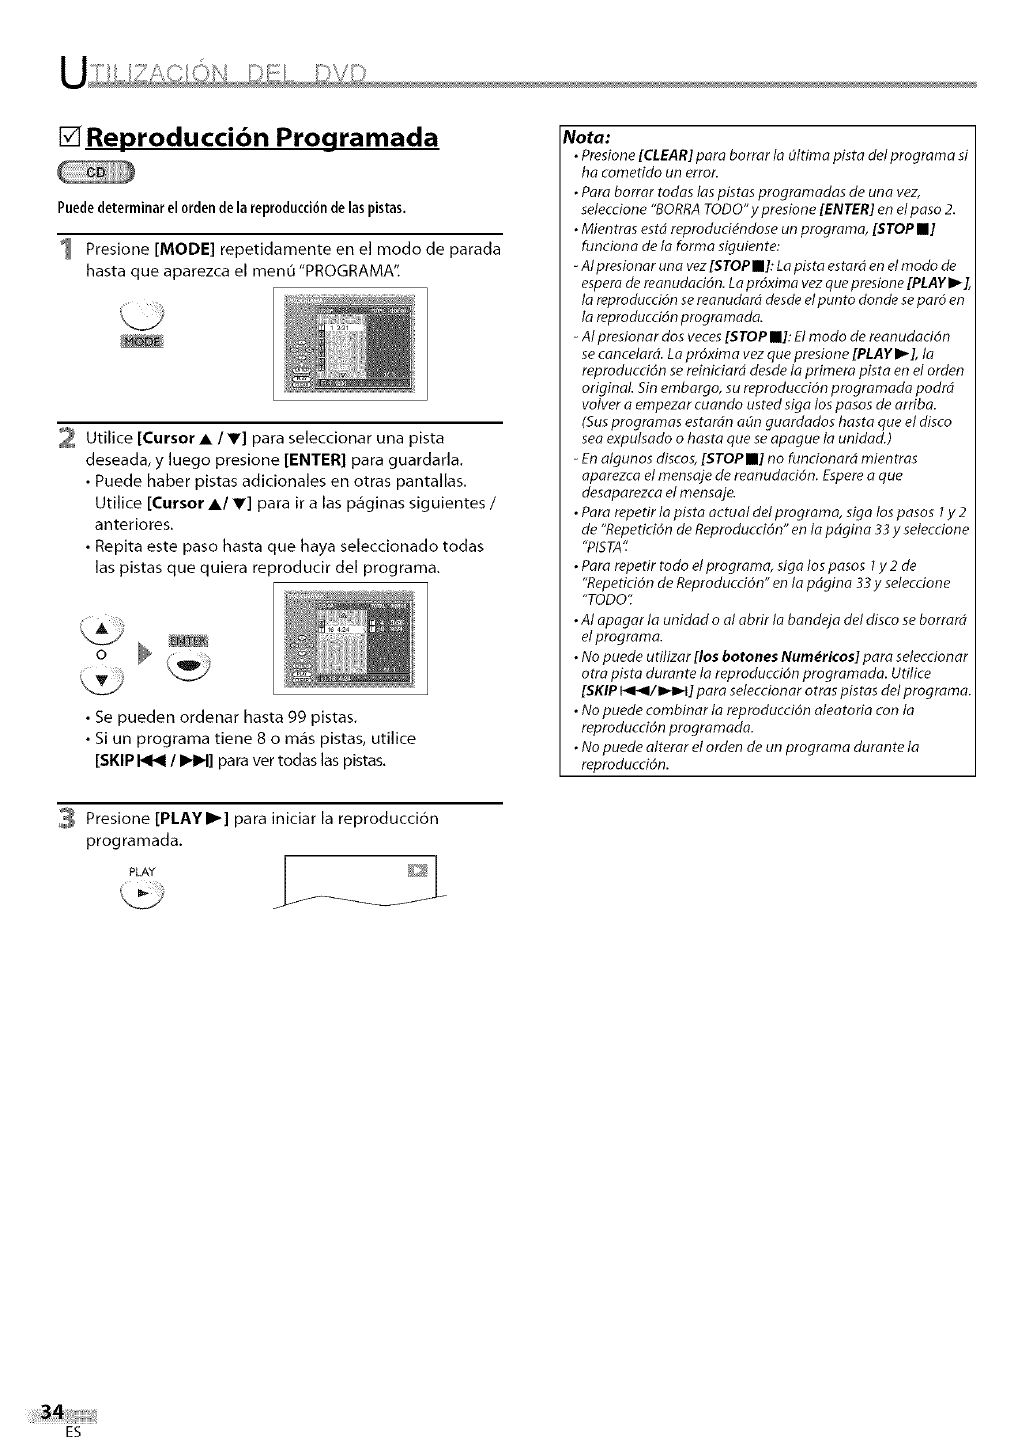
[] Reproducci6n Programada
Puededeterminar el orden dela reproducciondelaspistas.
Presione [MODE] repetidamente en el modo de parade
hasta que aparezca el menO "PROGRAMA".
2 Utilice [Cursor • IV] para seleccionar una pista
deseada, y luego presione [ENTER] pare guardarla.
• Puede haber pistas adicionales en otras pantallas.
Utilice [Cursor •l V] para ir a las p_ginas siguientes /
anteriores.
• Repita este paso hasta que haya seleccionado todas
las pistas que quiera reproducir del programa.
• Se pueden ordenar hasta 99 pistas.
• Si un programa tiene 8 o m_s pistas, utilice
[SKIP _ l INN] pare ver todas las pistas.
3 Presione [PLAYII_] para iniciar la reproducci6n
programada.
i
Nota:
•Presione [CLEAR] pore borrer Io Oldma pista del programo si
ha cometido un error.
•Pore borrar todos Ias pistas progrornodas de una vez,
seteccione "BORRA TODO" ypresione [ENTER] en el paso 2.
•Mientros estd reproduci_ndose un programa, [STOP II]
funciono de Io forrna siguiente:
-AI presionar una vez [STOP II]: La pisto estord en el modo de
espero de reenudocidn. La pr6xima vez que presione [PLAY I_],
Ie reproducci6n se reonudord desde el punto donde separ6 en
Ie reproducci6n progromode.
-AI presionar dos veces [STOP II]: El modo de reonudocidn
se cancelard. La pr6xima vez que presione [PLAYI_], lo
reproducd6n se reiniciard desde lo primera pisto en el orden
origineL Sin embargo, su reproducddn progrornado podrd
volver a empezar cuando usted siga los pesos de orfibo.
(Sus prograrnas estar6n odn guardados haste que el disco
sea expulsado o haste que se apogue Io unidad.)
-En algunos discos, [STOP II] no fundonord mientros
aporezca el menso]e de reanudacidn. Espere a que
desapomzca et mensoje.
•Pare repetir lo pista actual del progromo, siga los pesos I y2
de "Repetici6n de Reproducddn" en la pdgina 33 yselecdone
"PISTA':
•Pore repedr todo el progroma, siga los pesos I y 2de
"Repedddn de Reproducddn" en Ia pdgina 33 y seleccione
"TODO".
•AI opogar Ia unidad o al abrir la bandeja del disco se borrard
et progreme.
•No puede utilizer [los botones Numdricos] pare seleccionar
otra pista duronte Ia reproducci6n programada. Udlice
[SKIP I_1_1/1_t] paro seteccionor otras pistas dot programa.
•No puede cornbinor lo reproducci6n oleatoria con la
reproducd6n progrornoda.
•No puede olterar el orden de un programo durante Io
reproducd6n.
ES
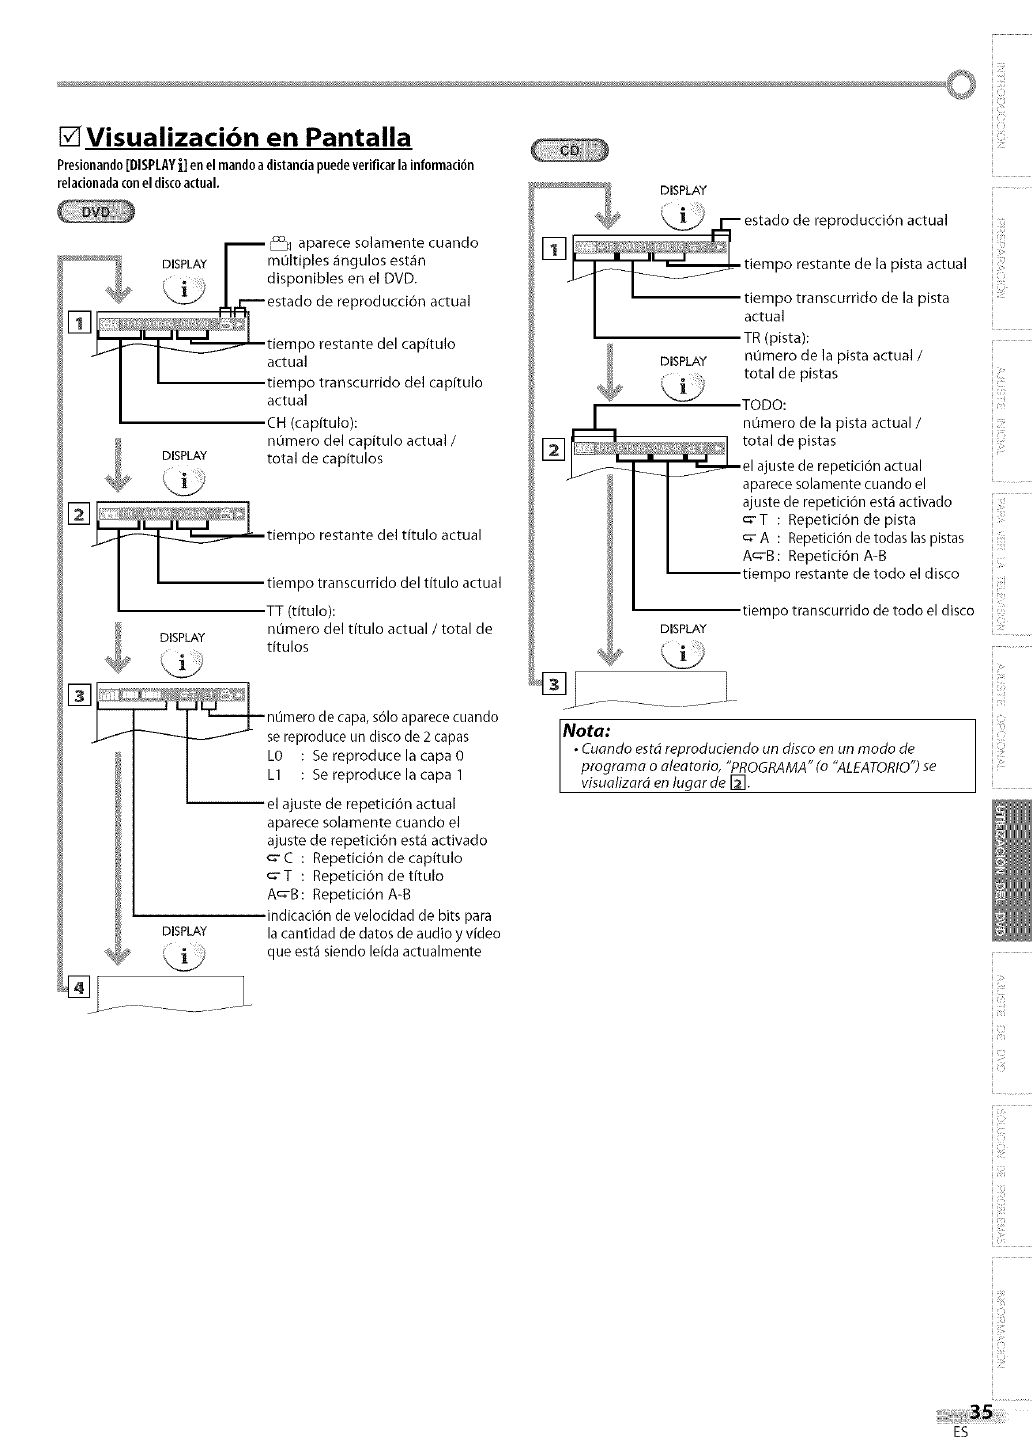
[]Visualizacibn en Pantalla
Presionando[DISP[AYI] en el mandoa distandapuedeverifkar la information
reladonadacon el discoactual.
I'_ _ aparece solamente cuando
DISPLAY |m01tiples _ngulos est_n
./disponibles en el DVD.
/
/..k_estado de reproducci6n actual
[] ,.,,
_tiempo restante del capitulo
-I I actual
I I tiempo transcurrido del cap[tulo
_actual
_CH (capftulo):
n0mero del capitulo actual /
DISPLAY total de capitulos
[]
tiempo restante del titulo actual
i i tiempo transcurrido del titulo actual
_TT (titulo):
DISPLAY nOmero del titulo actual /total de
_7' t\_ titulos
I _namero de capa, s61o aparece cuando
_---_'_ se reproduce un disco de 2capas
_1_0 : Se reproduce la capa 0
1.1 : Sereproducelacapa 1
el ajuste de repetici6n actual
aparece solamente cuando el
ajuste de repetici6n esta activado
_- C : Repeticidn de capitulo
_-T : Repetici6n de tffulo
A_-B: Repetici6n A-B
indicaci6n de velocidad de bits para
DISPLAY la cantidad de datos de audio y video
que est_ siendo leida actualmente
_J_ DISPLAY
_¢_ _\ 1_/ i._ estado de reproducci6n actual
IT1
--_ tiempo restante de la pista actual
I I
I _ tiempo transcurrido de la pista
_ actual
_ TR (pista):
DISPLAY nOmero de la pista actual /
total de pistas
TODO:
nOmero de la pista actual /
I total de pistas
el ajuste de repetici6n actual
_aparece solamente cuando el
_ajuste de repetici6n est_ activado
__-T : Repetici6n de pista
__" A : Repetici6n de todas las pistas
_A_'B: Repetici6n A-B
_tiempo restante de todo el disco
tiempo transcurrido de todo el disco
DISPLAY
Nota:
•Cuando estd reproduciendo un disco en un modo de
programa o aleutorio, "PROGRAMA" (o "ALEATORIO") se
visualizard en lugar de F_.
i i!!:
_ii!i!_!ii
ES
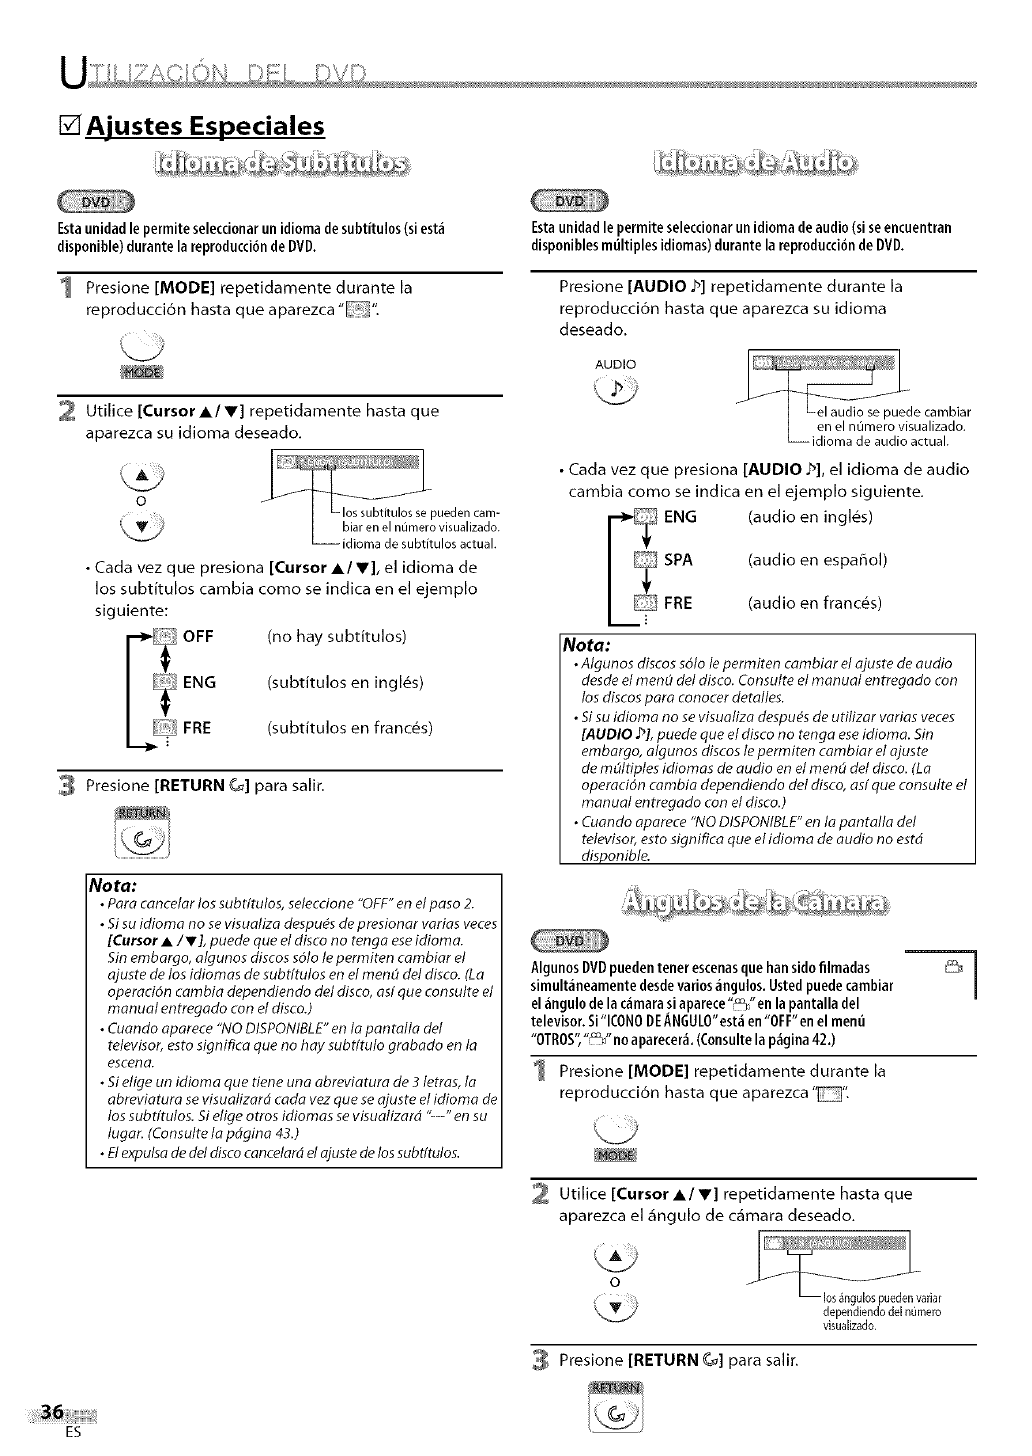
[] Ajustes Especiales
Estaunidadle permite seleccionarunidioma desubtitulos (siest_i
disponible) durantela reprodocci6nde DVD.
1 Presione [MODE] repetidamente durante la
reproducci6n hasta que aparezca "_".
Utilice [Cursor A/V] repetidamente hasta que
aparezca su idioma deseado,
• Cada vez que presiona [Cursor A/V], el idioma de
los subtitulos cambia como se indica en el ejemplo
siguiente:
OFF
ENG
FRE
(no hay subtitulos)
(subtitulos en ingl&s)
(subtitulos en franc_s)
Presione [RETURN G_] para salir.
Nota:
•Poro cancelar los subt[tulos, selecdone "OFF" en el paso 2.
•Si su idioma no se visualiza despu_s de presionor vorias veces
[Cursor •iV], puede que el disco no tengo ese idioma.
Sin embargo, algunos discos sdlo le permiten cambiar el
ajuste de los idiornas de subtitolos en el men(_ det disco. (La
operaci6n cambia dependiendo del disco, as/ que consulte el
manual entregado con el disco.)
•Cuando oporece "NO DISPONIBLE" en lo pantallo del
televisor, esto significa que no hay subt[tolo grabado en la
escena.
•Si elige un idioma que tiene uno obreviatura de 3 letras, la
abreviatura se visoalizard coda vez que se ajuste el idiorna de
los subt/tulos. Si elige otros idiornas se visoalizard "--" en so
logar. (Consulte la pdgina 43.)
•El expulsa de del disco cancetard el ajuste de los subt[tulos.
Estaunidadle permite seleccionarun idiomadeaudio(si seencuentran
disponiblesmlJltiples idiomas)durantela reproduction deDVD.
Presione [AUDIO 2,] repetidamente durante la
reproducci6n hasta que aparezca su idioma
deseado,
AUDIO
• Cada vez que presiona [AUDIO Z_], el idioma de audio
cambia como se indica en el ejemplo siguiente,
__. ENG (audio en ingl6s)
SPA (audio en espa_ol)
FRE (audio en franc6s)
Nota:
•Algunos discos s61o le permiten cambiar el ajuste de audio
desde el men(_ det disco. Consulte el manual entregado con
los discos poro conocer detalles.
•Si su idiomo no se visoatiza despu_s de utilizor varias veces
[AUDIO J_], puede que el disco no tenga ese idioma. Sin
embargo, olgunos discos te permiten cambiar el ajuste
de mdltiples idiomos de audio en el mend det disco. (La
operaci6n cambio dependiendo del disco, as[ que consulte el
manual entmgado con el disco.)
• Cuando oparece "NO DISPONIBLE" en lo pantalla det
televisor, esto significa que el idioma de audio no estd
disponible.
Algun0sDVDpuedentenerescenasquehansid0fllmadas
simult_ineamentedesdevari0s_ingul0s.Ustedpuedecambiar
el iingul0 de la c_imarasiaparece"_"en la pantalla del
televisor.Si"ICON0DEANGUL0"est_ien"0FF"en el menu
"0TROS'_"_" no aparecer& (C0nsultela p_gina42.)
Presione [MODE] repetidamente durante la
reproducci6n hasta que aparezca '_".
2 Utilice [Cursor AI V] repetidamente hasta que
aparezca el _ngulo de c_mara deseado,
Presione [RETURN G_] para salir.
dependiendodel numero
visualizado.
ES
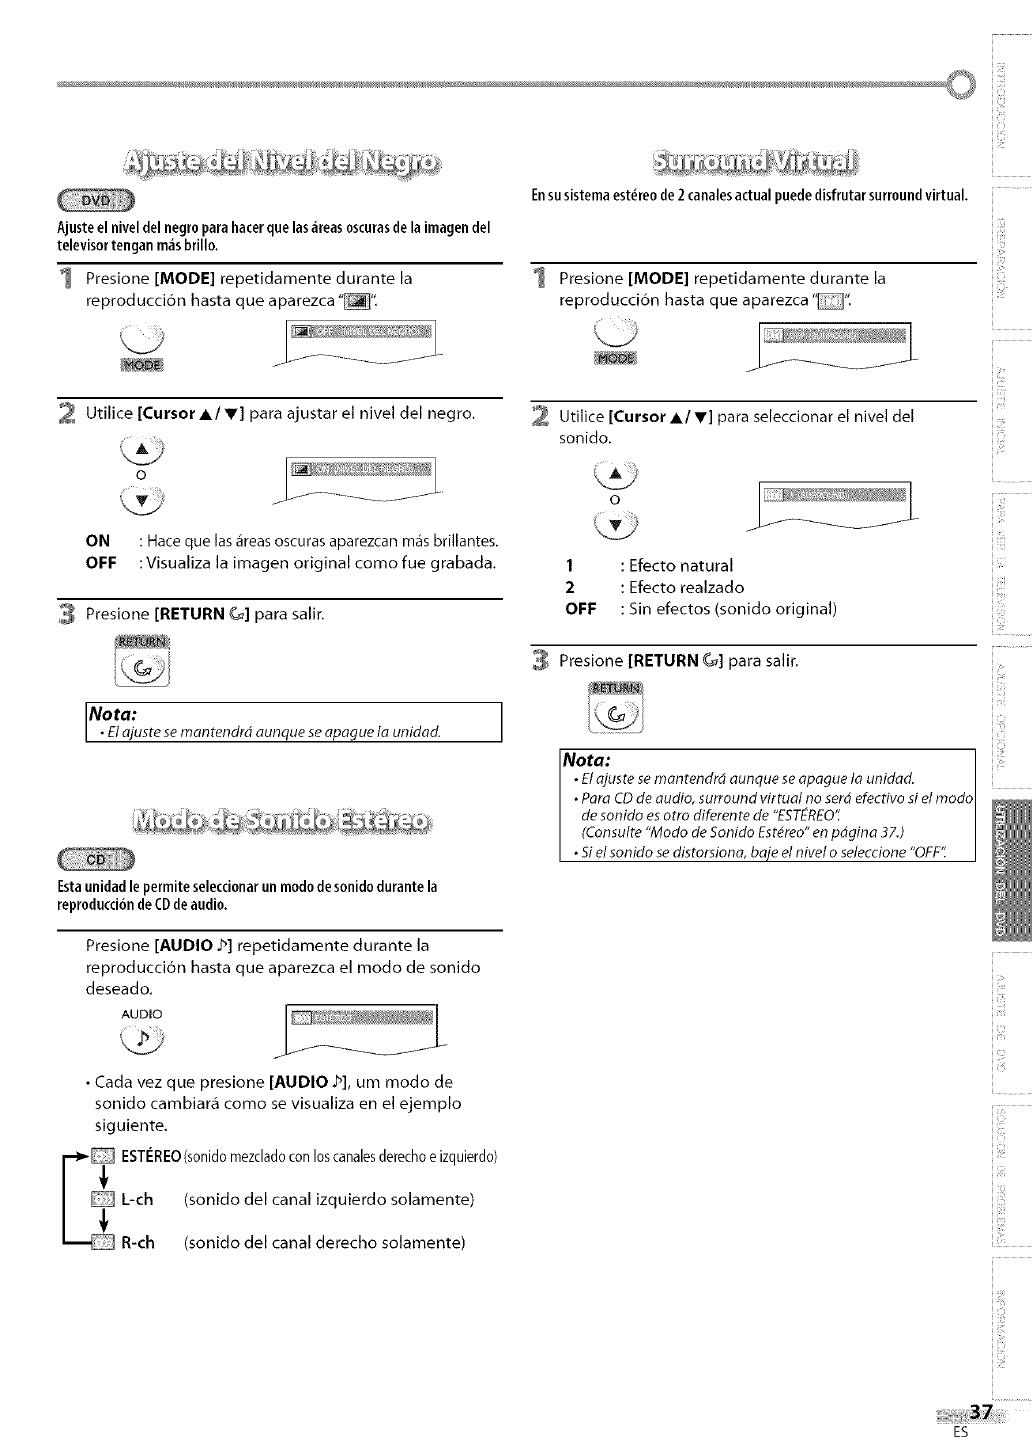
Ajusteel nivel del negro parahacerque las_ireasoscurasde la imagendel
televisortengan m_isbrillo.
1 Presione [MODE] repetidamente durante la
reproducci6n hasta que aparezca "_",
2 Utilice [Cursor AIr] para ajustar el nivel del negro.
ON : Hace que las _reas oscuras aparezcan mas brillantes.
OFF : Visualiza la imagen original como fue grabada.
3 Presione [RETURN G_] para salir.
Nota: 1
•El ajuste se mantendrd aunque se apague la unidad. J
Estaunidad le permite seleccionarun mododesonidodurantela
reproducci6nde CDde audio.
Presione [AUDIO J_]repetidamente durante la
reproducci6n hasta que aparezca el modo de sonido
deseado,
AUDIO
Ensusistema est_reode2 canalesactual puededisfrutar surroundvirtual.
1 Presione [MODE] repetictamente durante la
reproducci6n hasta que aparezca '".
iiil)ii
Utilice [Cursor A/.] para seleccionar el nivel del
f
o
sonido.
1 : Efecto natural
•Cada vez que presione [AUDIO J_], um modo de
sonido cambiar,] como se visualiza en el ejemplo
siguiente.
_ STCREO(s0nid0mezclad0con 10scanalesderech0e izquierd0)
L-ch (sonido del canal izquierdo solamente)
R-ch (sonido del canal derecho solamente)
2 : Efecto realzado
OFF :Sin efectos (sonido original)
Presione [RETURN _] para salir,
Nota:
• Elajuste semantendr5 aunque se apague la unidad.
• Para CDde audio, surround virtual no serd efectivo si el modo
de sonido esotro diferente de "ESTEREO':
(Consulte "Modo de Sonido Est#reo" en pdgina 37.)
• Siel sonido se distorsiona, baje el nivel o seleccione "OFF'_
_i!i_ii__
) iiii!',
ES
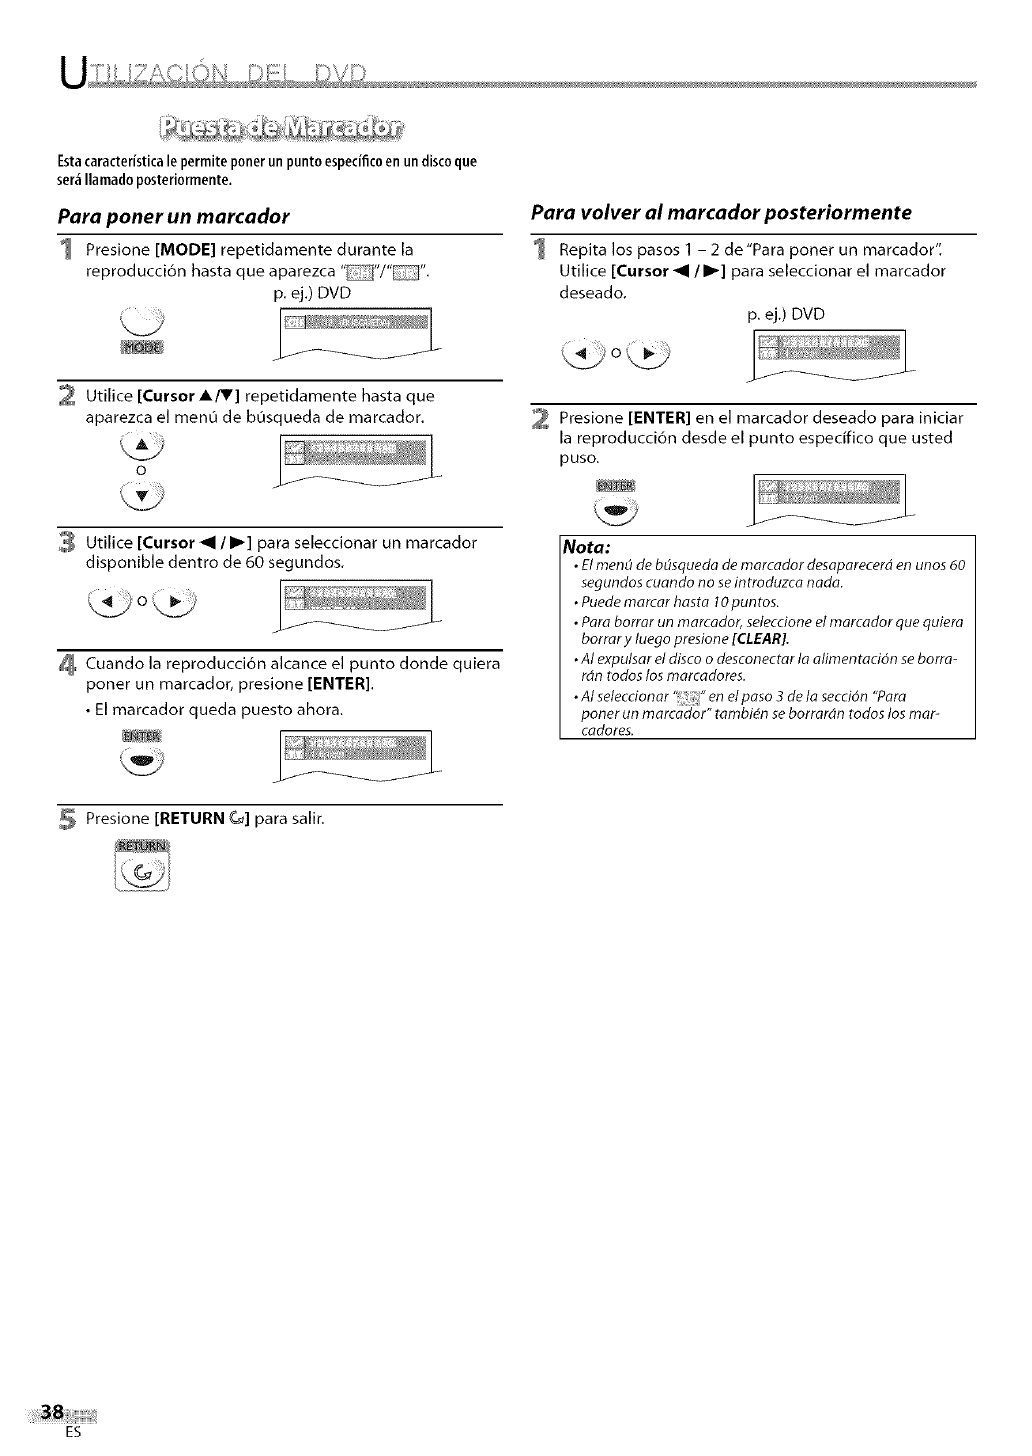
Estacaracteristicalepermiteponerunpuntoespecificoenundiscoque
ser_iIlamadoposteriormente.
Para poner un marcador
Presione [MODE] repetidamente durante la
reproducci6n hasta que aparezca "E_]"/"".
p. ej.) DVD
2 Utilice [Cursor A/V] repetidamente hasta que
aparezca el men0 de b0squeda de marcador.
Utilice [Cursor _1 /I_] para seleccionar un marcador
disponible dentro de 60 segundos.
Cuando la reproducci6n alcance el punto donde quiera
poner un marcador, presione [ENTER].
• El marcador queda puesto ahora.
Presione [RETURN _] para salir.
Para volver al marcador posteriormente
Repita los pasos 1 - 2 de"Para poner un marcador".
Utilice [Cursor _1 /I1_] para seleccionar el marcador
deseado.
p. ej.) DVD
Presione [ENTER] en el marcador deseado para iniciar
la reproducci6n desde el punto especffico que usted
puso.
_/T _:_%_" _*'_'*_
Nota:
•El rnen(i de b(lsqueda de marcador desaparecerd en unos 60
segundos cuando no se introduzca nada.
•Puede marcar hasta 10 puntos.
•Para borrar an marcador, seleccione el marcador que quiera
borrar y luego presione [CLEAR].
•AI expulsar el disco o desconectar la alimentad6n se borra-
rdn todos los rnarcadores.
•AI seteccionar "" en el paso 3 de la secd6n "Para
poner an marcador" tambi_n se borrardn todos los mar-
cadores.
ES
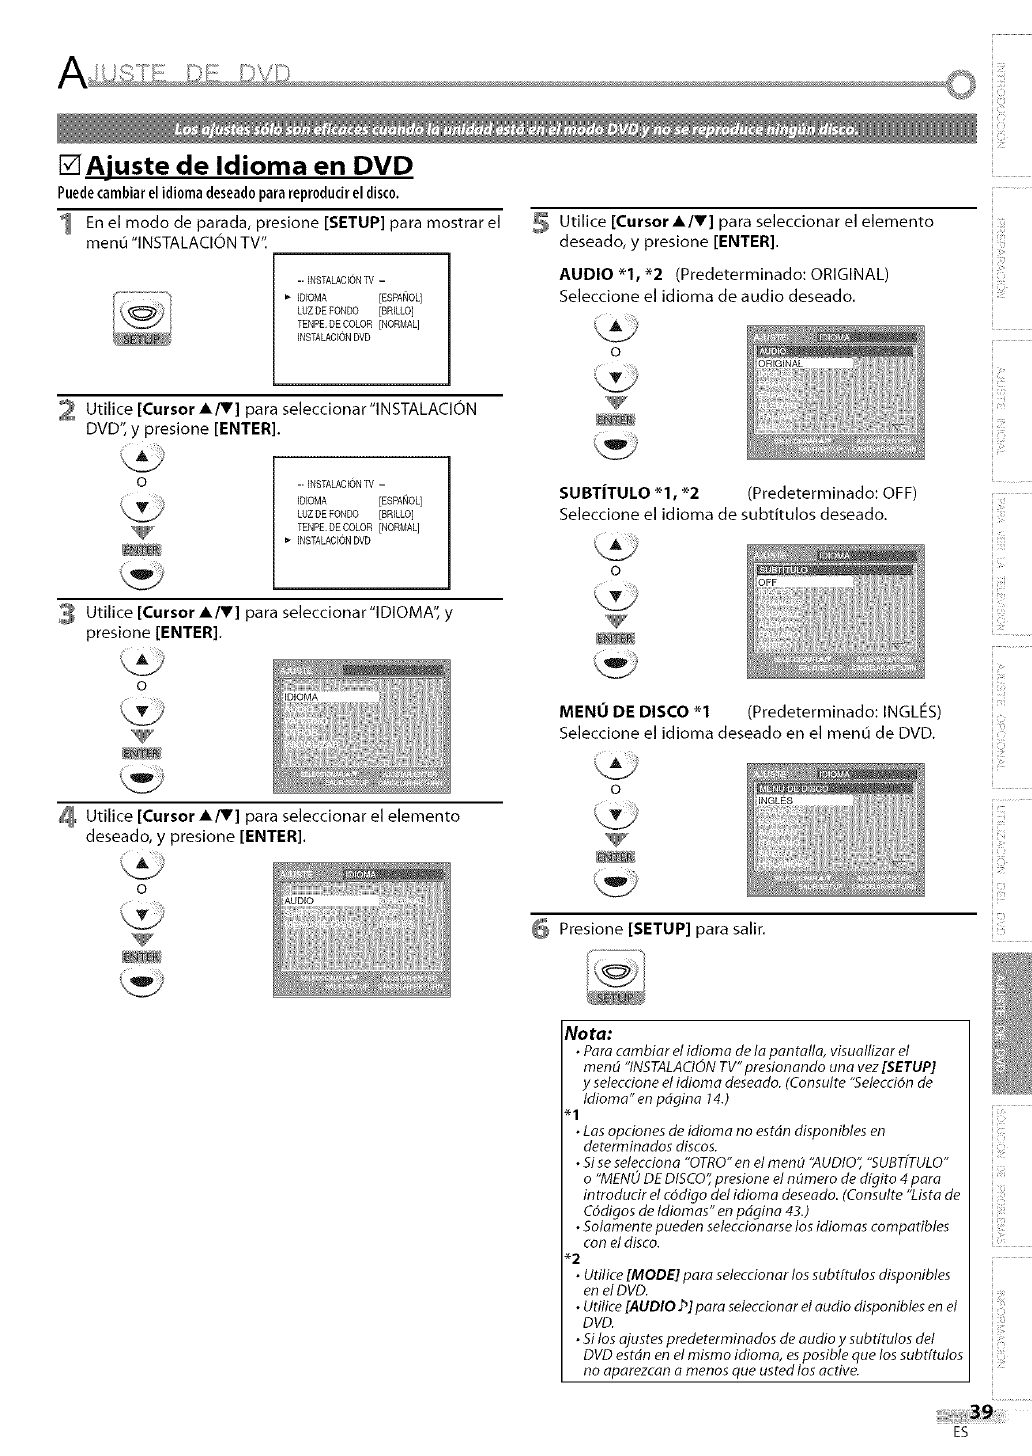
A I,- I °- JI 0
[]Ajuste de Idioma en DVD
Puedecambiarelidiomadeseadoparareproducirel disco,
1 En el modo de parada, presione [SETUP] para mostrar el _ Utilice [Cursor A/V] para seleccionar el elemento
men0 "INSTALACI()N TV". deseado, y presione [ENTER].
-1INSTALACIONTV -
ID[OMA [ESPANOL]
LUZDEFONDO [£RILLO]
TENPEDECOLOR[NORMAL]
INSTALACIONDVD
2 Utilice [Cursor A/V] para seleccionar"lNSTALACION
DVD", y presione [ENTER].
AUDIO *% *2 (Predeterminado: ORIGINAL)
Seleccione el idioma de audio deseado.
o
_iii:i!i
_S
o-1INSTALACIONTV -
IDIOMA [ESPA_OL]
LUZDE FONDO [£RILLO]
TENPE DE COLOR [NORMAL]
_"INSTALACI6NDVD
Utilice [Cursor A/V] para seleccionar"lDIOMA", y
presione [ENTER].
Utilice [Cursor A/V] para seleccionar el elemento
deseado, y presione [ENTER].
SUBTiTULO *1, *2 (Predeterminado: OFF
Seleccione el idioma de subtitulos deseado.
MENU DE DISCO *1 (Predeterminado: INGLES)
Seleccione el idioma deseado en el menÙ de DVD.
Presione [SETUP] para salir.
_i!i_ii__
i,, i
! i
i _i_
D)ii!
Nota:
• Para cambiar et idioma de la pantalla, visuallizar el
mend "INSTALACIONTV"presionando una vez [SETUP]
y seleccioneel idioma deseado. (Consulte "5elecci6n de
Idiorna" en pdgina 14.)
"1
• Lasopciones de idioma no estdn disponibles en
determinados discos.
• Siseselecciona "OTRO"en el men_ 'AUDIO" "SUBTfTULO"
o"MENODE DISCO"presione el nOmero de digito 4 para
introdudr el cddigo del idioma deseado. (Consulte "Lista de
C6digos de Idiomas" en pdgina 43.)
• Solarnente pueden seleccionarse los idiomas compatibles
con el disco.
*2
• Utilice[MODE] para seleccionar los subt[tulos disponibles
en el DVD.
• Utilice [AUDIO _] para seleccionar el audio disponibles en el
DVD.
• Silos ajustespredeterminados de audio y subtitulos det
DVD estdn en el mismo idioma, esposible que los subdtulos
no aparezcan amenos que usted los active.
ES
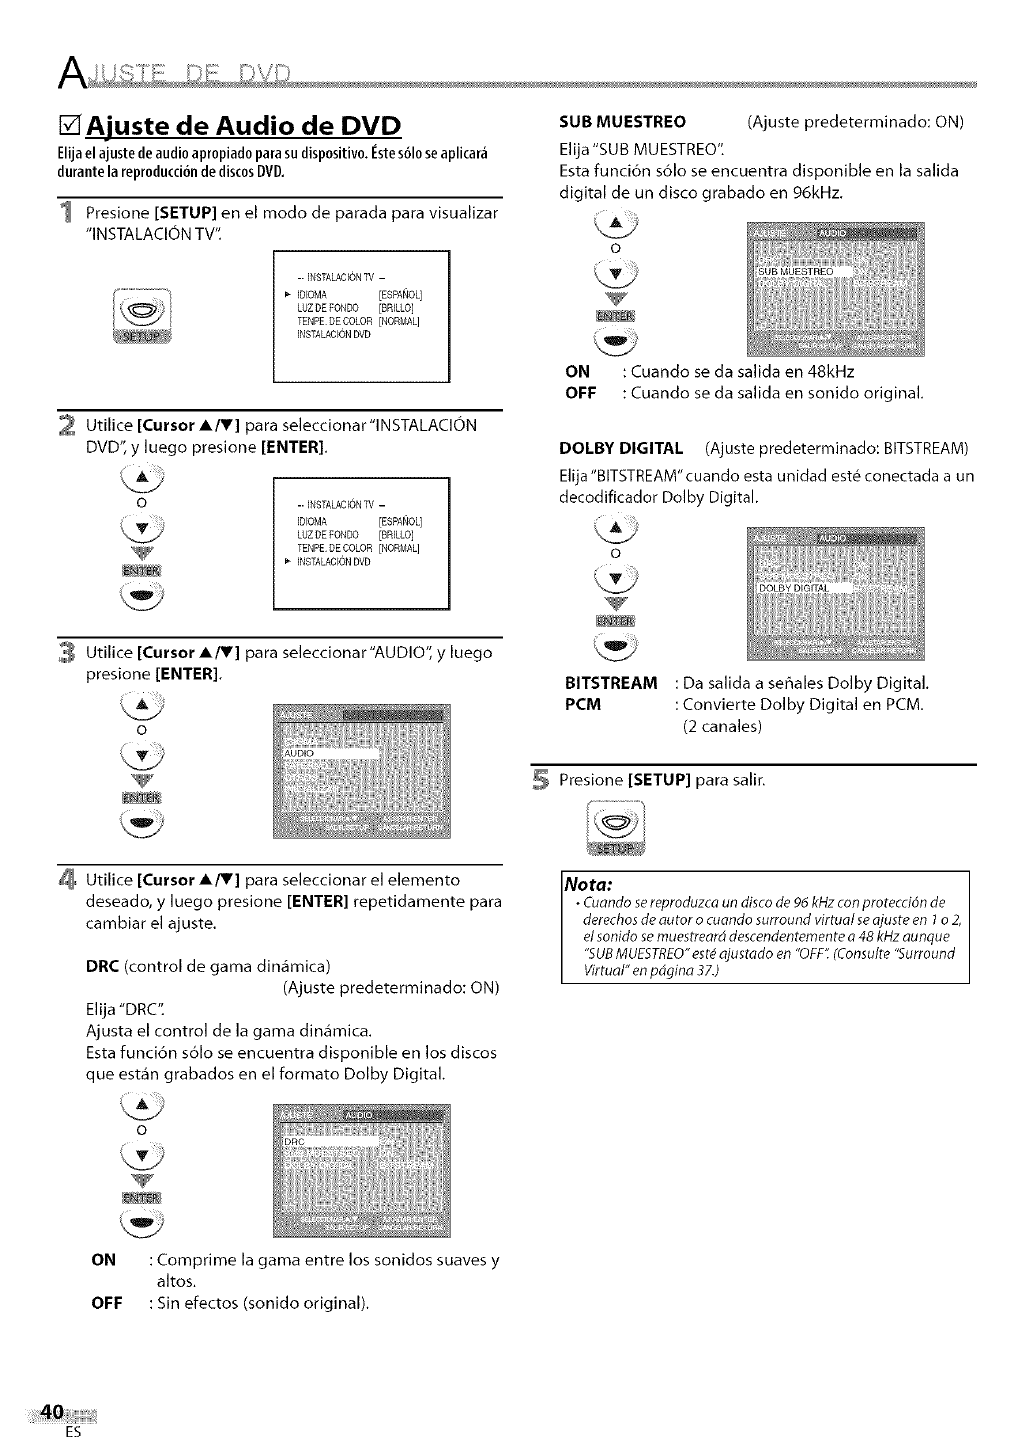
[]Ajuste de Audio de DVD
Elijael ajustedeaudioapropiadoparasudispositivo.[_stes61oseaplicar_i
durantela reproducci6ude discusDVD.
Presione [SETUP] en el modo de parada para visualizar
"INSTALACI()N TV".
II INSTALACIONTV -
DIOMA [ESPA_OL]
LUZDEFONDO [BRILLO]
TENP£DECOLOR[NORMAL]
INSTALACI6NDVD
2 Utilice [Cursor A/V] para seleccionar"lNSTALACION
DVD", y luego presione [ENTER].
o-1INSTALACIONTV -
DIOMA [ESPA_OL]
LUZDE FON_ [BRILLO]
TENPE DE COLOR [NORMAL]
INSTA_CI6NDVD
3 Utilice [Cursor A/V] para seleccionar"AUDIO", yluego
presione [ENTER].
SUB MUESTREO (Ajuste predeterminado: ON)
Elija "SUB MU ESTREO",
Esta funci6n s61o se encuentra disponible en la salida
digital de un disco grabado en 96kHz.
ON : Cuando se da salida en 48kHz
OFF : Cuando se da salida en sonido original.
DOLBY DIGITAL (Ajuste predeterminado: BITSTREAM)
EIija'BITSTREAM" cuando esta unidad est_ conectada a un
decodificador Dolby Digital.
o
BITSTREAM : Da salida a seffales Dolby Digital.
PCM : Convierte Dolby Digital en PCM.
(2 canales)
Presione [SETUP] para salir.
Utilice [Cursor AfV'] para seleccionar el elemento
deseado, y luego presione [ENTER] repetidamente para
cambiar el ajuste.
DRC (control de gama din_mica)
(Ajuste predeterminado: ON)
Elija "DRC".
Ajusta el control de la gama din_mica.
Esta funci6n s61o se encuentra disponible en los discos
que est_n grabados en el formato Dolby Digital.
Nota:
•Cuando sereproduzca un discode 96 kHz conprotection de
derechosde autor o cuando surround virtual seajusteen 1 o 2,
et sonido semuestrearddescendentementea48 kHzaunque
"SUBMUESTREO"est_ajustado en "OFF'_(Consulte"Surround
Virtual" enpdgina 37.)
V
ON : Comprime la gama entre los sonidos suaves y
altos.
OFF : Sin efectos (sonido original).
ES
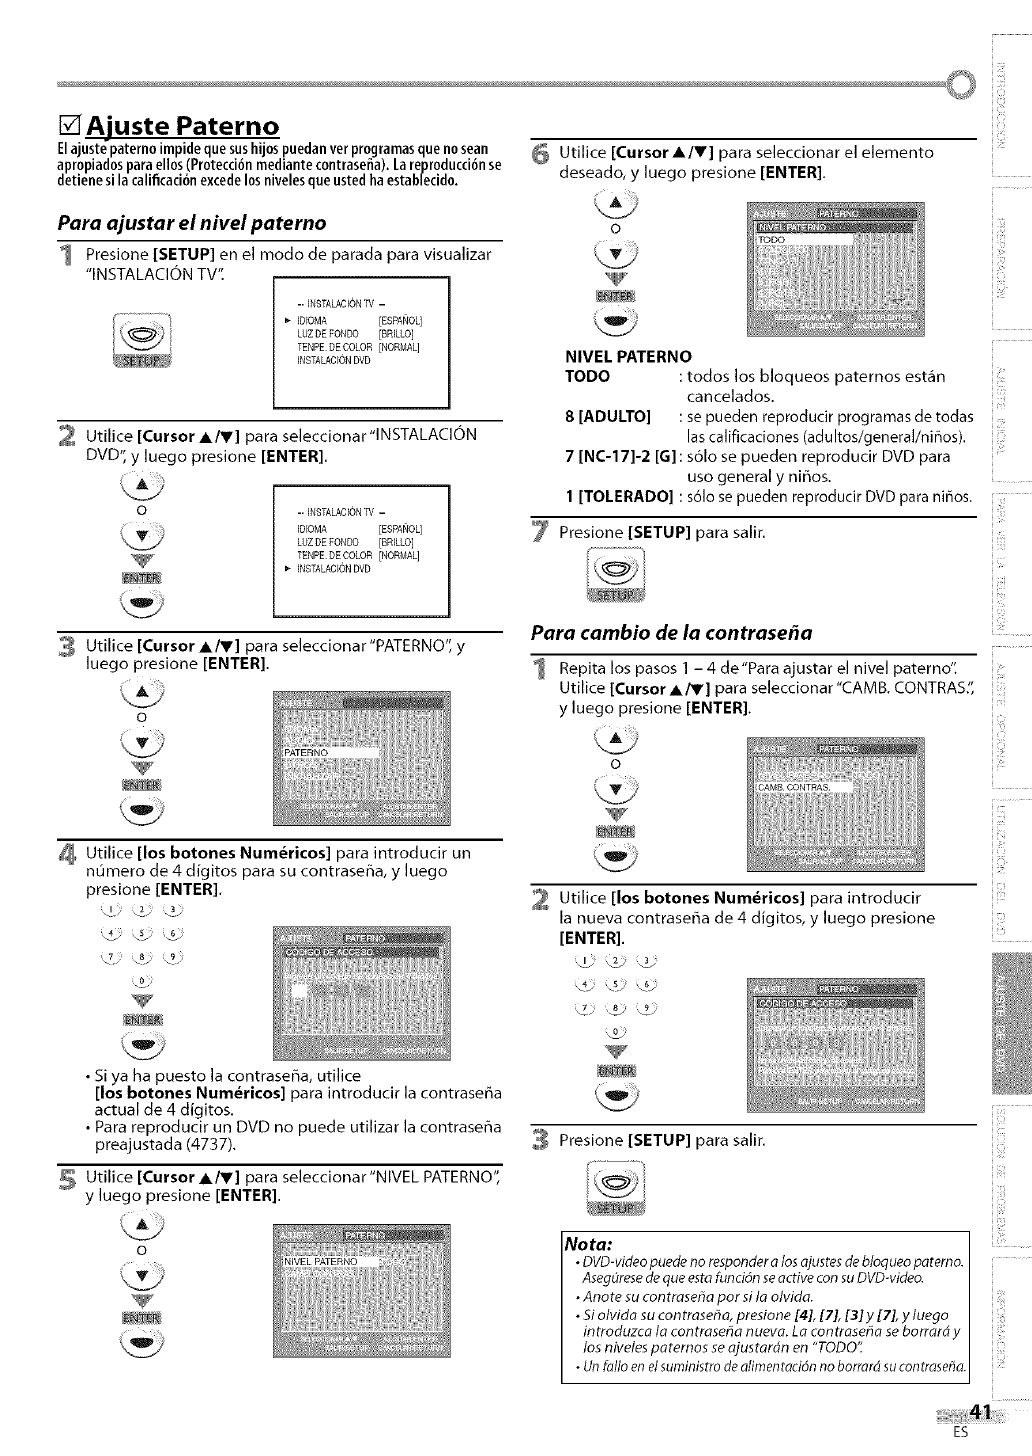
©
[] Ajuste Paterno
Elajuste paterno impidequesushijospuedanverprogramasqueno sean _ Utilice [Cursor •/V] para seleccionar el elemento
apr0piad0sparaellos(Protecci0nmediantecontraseEa).Lareproducci0nse deseado, y luego presione [ENTER].
detienesi lacalificaci6nexcede10snivelesqueusted ha establecido.
Para ajustar el nivel paterno
1 Presione [SETUP] en el modo de parada para visualizar
"INSTALACION TV'.
-1INSTALACIONTV -
ID[OMA [ESPANOq
LUZDEFONDO [SRILLO]
TENPEDECOLOR[NORMAL]
INSTALAClONOVD
Utilice [Cursor •/V] para seleccionar'lNSTALAClON
DVD", y luego presione [ENTER].
o-1INSTALACIONTV -
IDIOMA [ESPANOq
LUZDEFONDO [SRILLO]
TENPEDECOLOR[NORMAL]
INSTALAClONOVD
3 Utilice [Cursor A/V] para seleccionar"PATERNO", y
luego presione [ENTER].
Utilice [los botones Num_ricos] para introducir un
numero de 4 digitos para su contraseSa, y luego
presione [ENTER].
\!. 4. 3
,7: j._
,9_
•Si ya ha puesto la contraseSa, utilice
[los botones Num_ricos] para introducir la contraseSa
actual de 4 digitos.
• Para reproducir un DVD no puede utilizar la contraseSa
preajustada (4737).
Utilice [Cursor A/V] para seleccionar'NIVEL PATERNO",
y luego presione [ENTER].
o
V
NIVEL PATERNO
TODO : todos los bloqueos paternos est_n
can elaaos.
8 [ADULTO] : se pueden reproducir programas de todas
las calificaciones (adultos/general/nir_os).
7 [NC-17]-2 [G]: s61o se pueden reproducir DVD para
uso general y ni_os.
1 [TOLERADO] : s61ose pueden reproducir DVD para ni6os.
Presione [SETUP] para salir.
Para cambio de la contrase_a
o
V
1 Repita los pasos 1 - 4 de"Para ajustar el nivel paterno".
Utilice [Cursor •/V] para seleccionar"CAM& CONTRAS",
y luego presione [ENTER].
Utilice [los botones Num_ricos] para introducir
la nueva contrase_a de 4 digitos, y luego presione
[ENTER].
Presione [SETUP] para salir.
Nora:
•DVD-videopuedeno responderalosajustesdebloqueo patemo.
Aseg_resede queestafuncidn seactive consuDVD-video.
•Anote su contraseF_apor si la olvida.
•Siolvida su contrasef_a,presione [4], [7], [3]y [7], y luego
introduzca la contraseSa nueva. La contrase#a se borrard y
los niveles paternos seajustardn en "TODO'[
•Un fallo en elsuministrode alimentadOnno borrardsucontraseSa.
! i
i _i_
i,c_,
ES
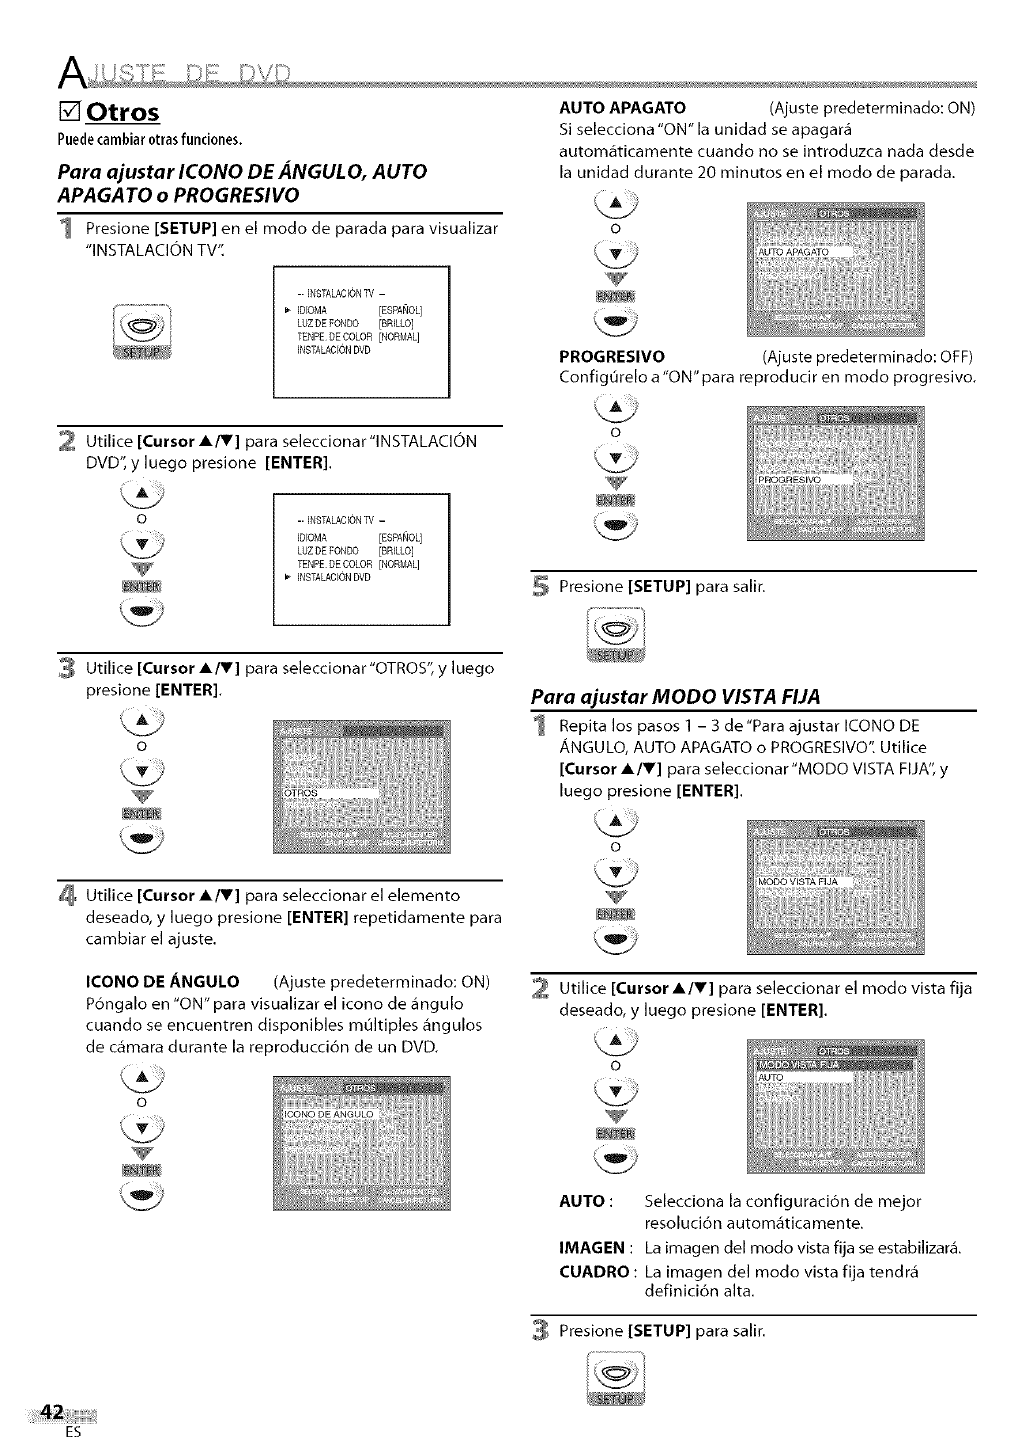
[] Otros
Puedecambiar 0trasfunci0nes.
Para ajustar ICONO DE ANGULO, AUTO
APAGA TO o PROGRESIVO
1 Presione [SETUP] en el modo de parada para visualizar
"INSTALACION TV".
-1INSTALACIONTV -
IDIOMA [ESPANOq
LUZDEFONDO [£RILLO]
TENPEDECOLOR[NORNAL]
INSTALACF6NDVD
AUTO APAGATO (Ajuste predeterminado: ON)
Si selecciona "ON" la unidad se apagar_
autom,_ticamente cuando no se introduzca nada desde
la unidad durante 20 minutos en el modo de parada.
PROGRESIVO (Ajuste predeterminado: OFF)
ConfigQrelo a "ON" para reproducir en modo progresivo.
2 Utilice [Cursor AfV] para seleccionar'lNSTALACION
DVD", y luego presione [ENTER].
o-1INSTALACIONTV -
IDIOMA [ESPA_Oq
LUZDEFONDO [£RILLO]
TENPEDECOLOR[NORMAL]
INSTALACI6NDVD
o
Presione [SETUP] para salir.
Utilice [Cursor A/V] para seleccionar'OTROS", y luego
presione [ENTER].
o
Utilice [Cursor A/V] para seleccionar el elemento
deseado, y luego presione [ENTER] repetidamente para
cambiar el ajuste.
ICONO DE ANGULO (Ajuste predeterminado; ON)
P6ngalo en "ON" para visualizar el icono de _ngulo
cuando se encuentren disponibles muhiples _ngulos
de o_mara durante la reproducci6n de un DVD.
o
Para ajustar MODO VISTA FIJA
1 Repita los pasos 1 - 3 de"Para ajustar ICONO DE
ANGULO, AUTO APAGATO o PROGRESIVO". Utilice
[Cursor A/V] para seleccionar'MODO VISTA FIJA", y
luego presione [ENTER].
o
Utilice [Cursor A/V] para seleccionar el modo vista fija
deseado, y luego presione [ENTER].
o
AUTO : Selecciona la configuraci6n de mejor
resoluci6n autom_ticamente,
IMAGEN :La imagen del modo vista fija se estabilizar&
CUADRO ; La imagen del modo vista fija tendr,_
definici6n aha.
Presione [SETUP] para salir.
ES
[] Reposici6n de los Ajustes
Predeterminados
Puede reponer todos los ajustes, a excepci6n del ajuste patern0 y el idioma
de pantalla.
1 Presione [SETUP] en el modo de parada para visualizar
"INSTALACION TV".
-1INSTALACIONTV -
IDIOMA [ES_NOq
LUZDEFONDO [£RILLO]
TENPEDECOLOR[NORMAL]
INSTALACIONDVD
2 Utilice[CursorA/V] para seleccionar"lNSTALACION
DVD", y luego presione [ENTER].
oII INSTALACIONTV -
IDIOMA [ES_NOq
LUZDEFONDO [£RILLO]
TENPEDECOLOR[NORMAL]
INSTALACF6NDVD
3 Utilice [Cursor A/V] para seleccionar"lNICIALIZAR", y
luego presione [ENTER].
Utilice [Cursor Air] para seleccionar"Sf", y luego
presione [ENTER].
Presione [SETUP] para salir.
Nota:
• Cuando quiera cancelar la inJcializaciOn,seleccione "NO" en
elpaso 4, y luego presiane [SETUP].
[] Lista de C6digos de Idiomas
Idioma C6digo Idioma C6digo
A-B
Abcaciano 4748 Malay_lam 5958
Afari 4747 Malaya 5965
Afrikaans 4752 Malgache 5953
Albanes 6563 Malt,s 5966
Alem_n [GER] 5051
America 4759 Maori 5955
Arabe 4764 Marathi 5964
Armenia 5471 Moldavo 5961
Assames 4765 Mongol 5960
Aymar& 4771 Nauru 6047
Azeri 4772
Bashkirio 4847 Nepali 6051
Bengali;Bangla 4860 Noruego [NOR] 6061
Bielorruso 4851 O-R
Bihari 4854 Occitano 6149
Birmano 5971
Bislama 4855 Oriya 6164
Bret6n 4864 aroma (Afan) 6159
B01garo 4853 Pashto;Pushto 6265
Butanes 5072 Persa 5247
C-E Polaco [PAL] 6258
Cachemir 5765
Camboyano 5759 Portuges [POR] 6266
Catal&n 4947 Punjabi 6247
Checo [CZE] 4965 Quechua 6367
Chino [CHI] 7254 Rhaeto-Romance 6459
Cingal6s 6555
Coreano [KOR] 5761 Rumano [RUM] 6461
Corso 4961 Ruso [RUS] 6467
Croata 5464 S
Dan6s [DAN] 5047 Samoano 6559
Eslovaco 6557 Sangho 6553
Esloveno 6558
Espaffol [SPA] 5165 S_nscrito 6547
Esperanto 5161 Serbia 6564
Estonia 5166 Serbocroata 6554
F-H Sesotho 6566
Feroe 5261
Finland,s [FIN] 5255 Setswana 6660
Fiyiano 5256 Shona 6560
Franc_s [FRE] 5264 Sindhi 6550
Frisio 5271 Siswat 6565
Gaelico escoces 5350 Somali 6561
Gales 4971
Gallego 5358 Suahili 6569
Georgiano 5747 Sueco [SWE] 6568
Griego [GRE] 5158 Sundanes 6567
Groenlano6s 5758 T
Guarani 5360
Gujarati 5367 Tagalo 6658
Hausa 5447 Tailandes 6654
Hebreo 5569 Tajik 6653
Hindi 5455 Tamil 6647
Holand6s [DUT] 6058 T&rtaro 6666
H0ngaro [HUN] 5467
I-K Telugo 6651
Indonesia 5560 Tibetano 4861
Ingles [ENG] 5160 Tigriffa 6655
Inteningua 5547 Tonga 6661
Interlingue 5551
Inupiak 5557 Tsonga 6665
Irland6s [IRI] 5347 Turco [TUR] 6664
Island,s lICE] 5565 Turcomano 6657
Italiano [ITA] 5566 Twi 6669
Japones [JPN] 5647
Javan_s 5669 O-Z
Kannada 5760 Ucraniano 6757
Kazako 5757 Urdu 6764
Kinyarwanda 6469 Uzbeco 6772
Kirguiz 5771 Vascuence 5167
Kirundi 6460
Kurdo 5767 Vietnamita 6855
L-N Volapuk 6861
Laosiano 5861 Wolof 6961
Latin 5847 Xhosa 7054
Latvio;Let6n 5868 Yidish 5655
Lingala 5860
Lituano 5866 Yoruba 7161
Macedonia 5957 ZulO 7267
i
i
_S
i ,_
i•
j ,,
i:
Z_ii'!
_iilji
i•
i
Nota:
•SI etige un idioma que tiene abreviatura de 3 letras, elias
vJsualizard cada vez que usted cambJe el ajuste dese
idioma de audio o de subtftulos indicado mds arriba. Si
elige cualquier otro idJorna se vJsualizard '---' en su lugar.
(Abreviatura de 3 letras estd escfito entre corchetes.)
iiii:ii:ii:
ES
[]Guia de Solucibn de Problemas
Si la unidad no funciona correctamente cuando se siguen las instrucciones de este manual del usuario, compruebe la
siquiente tabla antes de Ilamar al servicio t_cnico.
•Aseg0rese de que el cable de alimentaci6n est_ enchufado,
• Si se produce un corte de alimentaci6n, desenchufe el cable de alimentaci6n
durante 30 minutos para permitir que la unidad se reinicie,
No hay corriente
• Compruebe si la unidad est_ encendido,
No hay imagen ni sonido • Compruebe la conexi6n el6ctrica,
• Vea otros canales de televisi6n, El problema podria limitarse a una emisora.
• Apague la unidad y espere aproximadamente I minuto para volver a encenderlo,
• Vea otros canales de televisi6n, El problema podrfa limitarse a una emisora,
No hay color • Ajuste el "COLOR"en el men0 de imagen,
• La interferencia el6ctrica de aparatos cercanos puede afectar a la calidad de la
Sonido correcto, imagen imagen,
deficiente • Ajuste el "CONTRASTE"y"CLARIDAD"en el men0 de imagen,
• Vea otros canales de televisi6n, El problema podria limitarse a una emisora,
• La interferencia el6ctrica de aparatos cercanos puede afectar a la calidad de la
Im_genes fantasma, lineas o imagen,
rayas en la imagen • Vea otros canales de televisi6n, El problema podria limitarse a una emisora,
Marcas de diferente color en la • Separe la unidad de los aparatos el6ctricos cercanos, Apague la unidad y espere
pantalla del televisor aproximadamente 30 minutos para volver a encenderla,
• Vea otros canales de televisi6n, El problema podria limitarse a una emisora.
Imagen correcto, sonido • Vea otros canales de televisi6n, El problema podria limitarse a una emisora,
deficiente • Verifique que el cable de audio est6 enchufado correctamente,
Los subtftulos aparecen en un
recuadro blanco. • Las interferencias procedentes de edificios o condiciones climatol6gicas pueden
No aparece ning0n subtitulo hacer que los subtitulos aparezcan incompletos,
• La emisora puede acortar el programa para insertar publicidad. El decodificador de
en el programa de soporte de subtitulos no puede leer la informaci6n del programa acortado,
subtitulos.
No aparece ning0n subtitulo • Es posible que la cinta de video se haya copiado ilegalmente o que la sepal de
cuando se reproduce una cinta
de video con subtftulos, subtftulos no se haya leido durante la copia,
Aparece un recuadro negro en • Se ha seleccionado el modo texto para subtitulos, Seleccione"SUBTITI","SUBTIT2",
la pantalla del televisor, "SUBTIT3", "SUBTIT4"6"OFF".
mecomemee
distorsionada o imagen blanco • Aseg0rese de que el disco sea compatible con la unidad,
y negro con DVD
La imagen se congela
moment neamenteduranteVeri.quequed,sconotengahue asd,gita esorayonesy mp,e oconunpaso
reproducci6n, suave desde el centro hasta los bordes,
Laun,dadnorespondea Espos,b ed,sconoperm,taoperac,onesHonsu te,nstrucdones
ciertos comandos operativos disco.
durante la reprod ucci6n,
El _ngulo no cambia, • No se puede cambiar el _ngulo en DVD que no contienen _ngulos m01tiples, En
algunos casos s61o se graban _ngulos m01tiples para escenas especificas,
Ha olvidado la contrase_a para
el nivel de clasificaci6n, • Ingrese la contrase_a de fabrica "4737"y se borrar_ la contrase_a olvidada.
Nota:
•Elpanel LCDha sido fabricado de manera que puede tener muchos afios de vida _til. Ocasionalrnente, pueden aparecer pfxeles
inactivos, corno un punto fijo de color azul, verde o rojo. Estono debe considerarse un defecto de la pan talla LCD.
•Algunas funciones no estdn disponibles en rnodos especfficos,pero esto no esun fallo de funcionamiento. Para rnds detalles sobre las
operaciones correctas, lea la descripci6n de estemanual del usuario.
•Algunas funciones estdn prohibidas en algunos discos.
ES
[] Preguntas Frecuentes
Mi control remoto no funciona. LQu_ debo
hacer?
Compruebe la conexi6n de antena o de cable con la unidad principal.
Compruebe las pilas del rnando a distancia.
Compruebe si hay algOn obst_culo entre la ventana del sensor de
infrarrojos y el mando a distancia.
Pruebe la salida de la seffal. Si es correcta, es posible que haya algOn
problema con el sensor de infrarrojos.
(Consulte"Comprobaci6n de la Seffal de Infrarrojos (IR)"en la p_gina 46.)
Con el mando a distancia, apunte directarnente hacia la ventana del
sensor de infrarrojos en la parte delantera de la unidad.
Reduzca la distancia con respecto a la unidad.
Reinserte las pilas con sus polaridades (signos +/-) como indicadas.
Cuando hay un dispositivo provisto de infrarrojos como un ordenador
cerca de esta unidad, puede interferir con la seffal del mando a distancia
de esta unidad.
Retire dicho dispositivo con infrarrojos alej_ndolo de la unidad, carnbie
el _ngulo del sensor de infrarrojos y desactive la funci6n que habilita la
comunicaci6n por infrarrojos.
• conecte e! Cable RF directamente a la unidad y ejecute la €0nfiguraci6 n
ZP0r qu_ aparece la configuraci6n inicia! inicial.
cada vez que enciendo esta unidad? • Aseg0rese de completar la exploraci6n de canales antes de apagar la
unidad.
• Aseg0rese de que la exploraci6n autom_tica de canales ha finalizado.
(Consulte"Exploraci6n Autom_tica de Canales"en la p_gina 14.)
• La exploraci6n autom_tica de canales debe haberse finalizado cuando
configure la unidad por primera vez o cuando la traslade a un lugar
donde se emitan canales anteriormente no disponibles,
• Es posible que el canal seleccionado no se est_ emitiendo,
zPor que no puedo vet algunos programas • Cuando la exploraci6n autom_tica de canales se interrumpe y no se
de televisi6n? finaliza, algunos canales no se recibir_n. Asegurese de finalizar,
(Consulte"Exploraci6n Autom_tica de Canales"en la p_gina 14.)
• El canal seleccionado no puede visualizarse debido a la configuraci6n
V-chip, (Consulte"V-chip"en la p_gina 25.)
• La unidad necesita alg0n tipo de entrada de antena, Se debe conectar
una antena interna (tipo orejas de conejo), una antena externa o un cable
coaxial RF que provenga de la pared o caja de cable/sat_lite a la unidad.
• Verifique que est_ Seleccionado el modD de entrada €0rrecte
zPor qu_ no veo las im_genes de los presionando [INPUT] o utilizando [CH•_ /Y].
d!spositivos externos conectados? (Consulte"Para Cambiar Entre Cada Modo de Entrada"en la p_gina 1S.)
• Compruebe la conexi6n de antena o de cable con la unidad principal.
• Muchos canales digitales tienen n0meros de canal alternativos. La unidad
Cada vez que selecciono un n0mero de cambia dichos n0meros autom_ticamente a los correspondientes alas
canal, _ste se cambia autom_ticamente, emisoras activas.
Estos son los n0meros utilizados para emisiones anal6gicas.
•Aseg0rese de que el d sco este insertadoc0rrectamente.Limpieel disco,
No puedo reproducir un disco. LExiste •Pruebe €on otro disco paraverificar que noest_defectuos O.
•Cancele el bloqueo infantil 0cambie el nivel de control.
alguna forma en que pueda hacerlo? .inserte un disco €orrecto que Se reproduzca en esta unidad.
• Manipule el disco con sumo cuidado Par a n0 dejar huellas digitales,
rayones o polvo en la superficie.
• Los subt[tulos que se retrasan unos segundos con respecto al di_logo real
son habituales en las emisiones en directo, La mayoria de las empresas de
zPor que no aparecen los subtitulos producci6n de subt[tulos pueden mostrar un di_logo hasta un m_ximo
completos? O: los subt[tulos est_n de 220 palabras pot minuto, Si un di_logo supera ese limite, se utiliza
retrasados con respecto al di_logo, una edici6n selectiva para garantizar que los subtitulos se mantienen
actualizados con el di_logo de la pantalla del televisor en cada momento,
zC6mo puedo ajustar el reloj? •Esta unidad no cuenta Con funci6n de reloj.
ES
[] Glosario
ATSC
Acr6nimo de "Advanced Television Systems
"(Comit6 de sistemas avanzados de
televisi6n) y el nombre de unas normas de
emisi6n digital.
C6digo de Regi6n
Las regiones asocian los discos y los
reproductores con _reas concretas del
mundo.
Esta unidad s61oreproduce discos clue
tengan c6digos regionales compatibles.
Usted puede encontrar el c6digo de regi6n
de su equipo mirando en el panel trasero.
Algunos discos son compatibles con m&s
de una regi6n (o todas las regiones).
Contrase_a
Un nOmero almacenado de 4 digitos que
permite el acceso a lasfunciones de control
parental.
Dolby Digital
El sistema desarrollado por Dolby
Laboratories para comprimir el sonido
digital. Ofrece un sonido estereo (2 canales)
o audio multicanal.
HDTV (televisi6n de alta definici6n)
Reciente formato digital que produce una alta
resoluci6n y una elevada calidad de imagen.
NTSC
Acr6nimo de"National Television Systems
Committee"(Comit_ de sistemas nacionales
de televisi6n) y el nombre de unas normas
de emisi6n anal6gica.
Relaci6n del aspecto
La anchura de una l_antalla de televisi6n
con respecto a su altura. Los televisores
convencionales son de 4:3 (en otras
palabras, la pantalla del televisor es casi
cuadrada); los modelos de pantalla ancha
son de 16:9 (la pantalla del televisor es casi
dos veces m_s ancha que alta).
SAP (programa de sonido secundario)
Segundo canal de audio transmitido por
separado del canal de audio principal. Este
canal de audio se utiliza como alternativo
en la emisi6n bilingiJe.
SDTV (televisi6n de definici6n est6ndar)
Formato digital est_ndar similar a la calidad
de imagen de NTSC.
S-video
Ofrece imagenes de mayor calidad al
transmitir cada serial, color (c) y luminancia
(y) de manera independiente entre sf a
trav6s de cables separados.
Video en Componentes
Se trata de un formato de sehal de video
que transmite cada uno de los 3 colores
principales de luz (rojo, azul y verde) a
trav_s de diferentes lineas de serial. Esto
permite a los espectadores experimentar
colores de imagen muy similares a los
originales. Existen diversos formatos de
seFial, incluidos el denominado Y/Pb/Pr y el
denominado Y/Cb/Cr.
[] Mantenimiento
•Limpieelpanel delanteroyotras superficiesexterioresdella unidadcon
un trapo suaveinmersoen aguatemplada y bien escurrido.
• No utilice nunca disolventeni alcohol.Nosuelte liquido insecticidaen
aerosolcercadella unidad.Estosproductosquimicospuedencausar
datiosy decoloracionen lassuperficiesexpuestas.
Limpieel panelconun patio blando.Antesde limpiarel paneldesconecte
el cabledela alimentaci6n.
Sisuunidad dejadefuncionar,no intentecorregir el problemausted
mismo.Ensuinterior no contienepiezasque puedanserreparadasporel
usuario.Apaguela unidad, desenchufeelcablede alimentaciony Ilame
a nuestrotel_fonogratuito deatenci6nal cliente,que encontrar_en la
portada deestemanual paraIocalizarun centrodeservicioautorizado.
Maneje losdiscosconcuidadode no mancharsussuperficiesconhuellas
dactilaresy polvo.
J
• Guardesiempre los discosensuscajasdeprotecci6n cuandono los utilice.
• Paralimpiarlos,utilice un patiosuave.
• No utilice un patioduroporqueestropear_iel disco.
• Limpie eldiscopasandoel patioen linearectadesdeel centrohaciael
borde.
• No pasenuncael patioen sentido circular.
• No utilice detergente niagentesde limpiezaabrasivos.
Sila unidad siguesinfuncionar correctamenteal utilizarla, mientras se
consultanlasseccionespertinentes y la'GuiadeSoluci6nde Problemas"
delManualdel usuario,puedeque la unidaddel lector6ptico deI_iserest_
sucia.Consultea suconcesionarioo centrodeservicioautorizado para
inspeccionarylimpiarla unidad del lectoroptico deI_iser.
Siel mandoa distanciano funcionacorrectamente,puedeutilizar una
radioAMo una c6maradigital(inclusoun tel_fono m6vil conc_imara
incorporada)para comprobarsi est_ienviando unasetialde infrarrojos.
• Conuna radioAM:
Sintonicela emisoraderadioAMen una
frecuenciadeno emision.Apunteconel mando
adistanciahaciaella, presionecualquierbot6n --_
y escuche.Sielsonido de la radioflucttia, f
significaqueest_irecibiendola setialde
infrarrojosdel mandoa distancia.
• Conunacamaradigital
(induyendo lasc_imarasintegradasentel_fonos
m6viles):
Apunteconla c_maradigitalhaciael mandoa
distancia.Presionecualquierbot6ndel mandoa
distanciaymireen elvisorde la c_imaradigital.Silaluz
infrarrojaapareceen la c_imara,el mandoa distancia
funciona.
ES
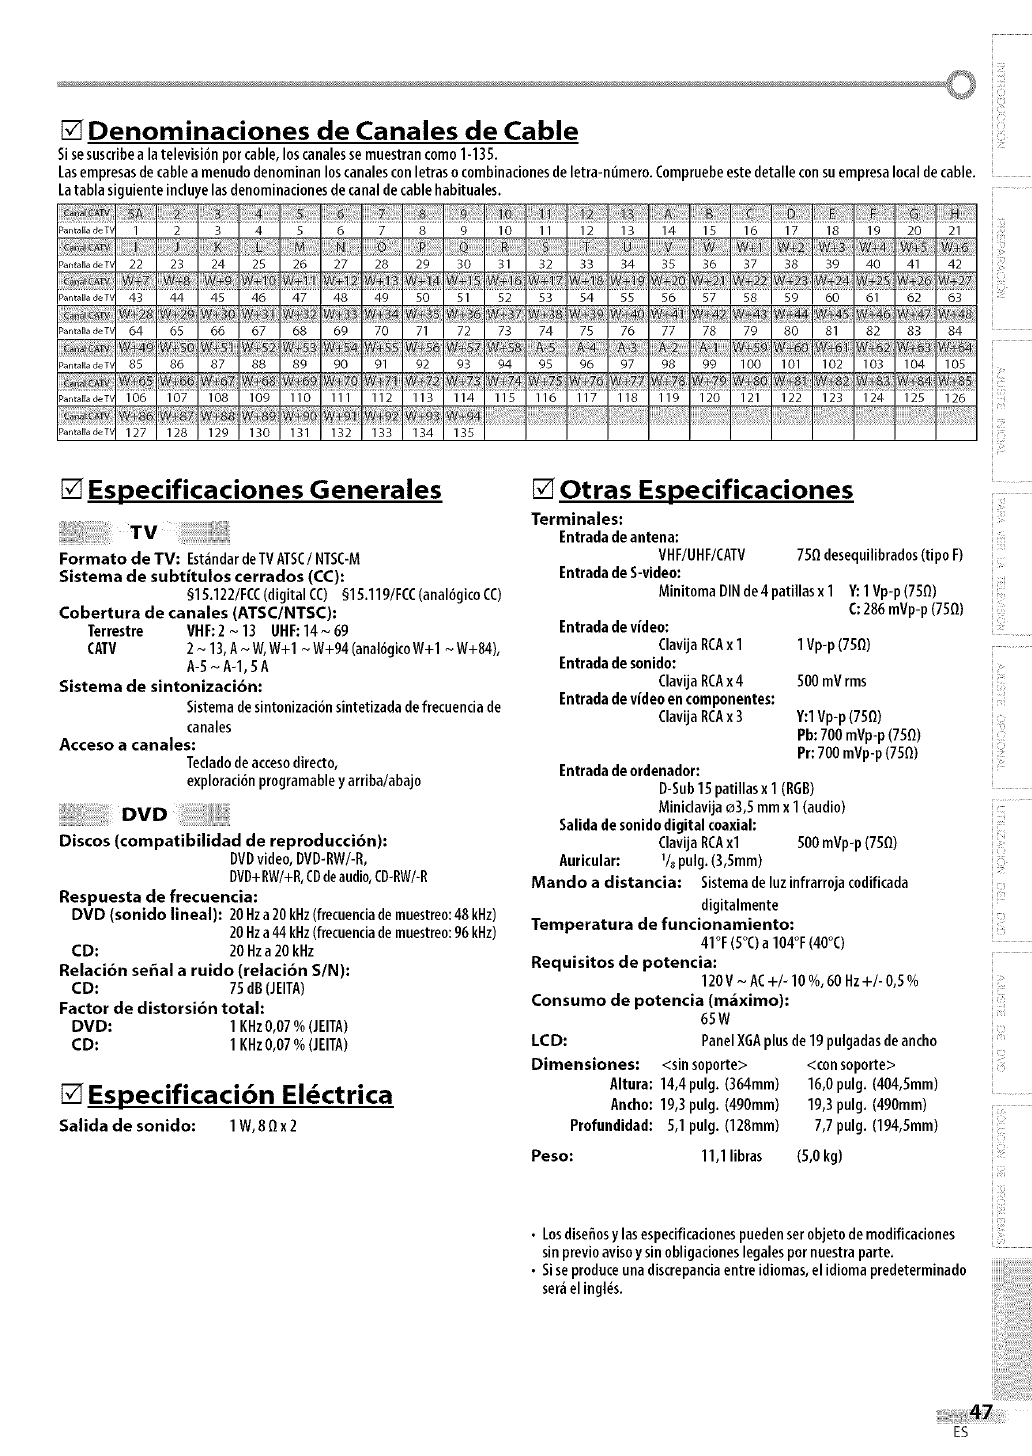
[] Denominaciones de Canales de Cable
Sisesuscribea latelevisibnporcable,loscanalessemuestrancomo1-13£
_asempresasdecab_eame_ud_de__mi_a___sca_a_esc___etras_c_mbi_aci__esde_etra-_(Jmer____mpruebeestedeta__ec__suempresa__ca_decab_e_
Latablasiguienteinduyelasdenominacionesdecanaldecablehabituales.
I
_ZII_J_ _..... 3 4 s 6..... 7 " g _...... _i 12 =1_ _6.... i8..... i_ 2o ....
[ i[ [[_[[ [[[_ [[_ W+3 @_ [
_antalladeT_ 22 23 24 25 26 27 28 29 30 32 33 34 35 36 37 38 39 40 41 42 [
w+_ W+l W+11 W+l
_antalladeT_ 43 44 45 46 47 48 49 50 51 52 53 54 55 56 57 58 59 60 61 62 63
_antaffadeT' 64 65 66 67 68 69 70 71 72 73 74 75 76 77 78 79 80 81 82 83 84
...... Ila deT' 5g 5¢ 90 9i ¢3 ¢4 ¢€ 99 )0_ i02
_antalladeT' 106 107 108 109 110 111 112 113 114 115 116 117 118 119 120 121 122 123 124 125 126
_iii_!_
! ,,i
[] Especificaciones Generales
Formato de TV: Est_ndardeTVATSC/NTSC-M
Sistema de subtitulos cerrados (CC):
§15.122/FCC(digitalCC) §15.119/FCC(anal6gicoCC)
Cobertura de canales (ATSC/NTSC):
Terrestre VHF:2~13 UHF:14 ~69
(ATV 2 ~ 13,A ~ W,W+l ~ W+94(analdgicoW+l ~ W+84),
A-5~A-1,5A
Sistema de sintonizaci6n:
Sistemadesintonizaci6nsintetizadadefrecuenciade
canales
Acceso a canales:
Tedadodeaccesodirecto,
exploraci6nprogramableyarriba/abajo
Discos (compatibilidad de reproducci6n):
DVDvideo,DVD-RW/-R,
DVD+RW/+R,CDdeaudio,CD-RW/-R
Respuesta de frecuencia:
DVD (sonido lineal): 20 Hza 20kHz(frecuenciademuestre0:48kHz)
20 Hza44 kHz(frecuenciademuestre0:96kHz)
CD: 20 Hza 20 kHz
Relaci6n seEal a ruido (relaci6n S/N):
CD: 75 dB(JEITA)
Factor de distorsi6n total:
DVD: 1KHz0,07% (JEITA)
CD: 1 KHz0,07% (JEITA)
[] Especificaci6n El ctrica
Salida de sonido: 1W,811x2
[] Otras Especificaciones
Terminales:
Entradadeantena:
VHF/UHF/CATV 7511desequilibrados(tipo F)
Entradade S-vide0:
MinJt0maDINde4patillasx 1Y:1Vp-p(7511)
C:286 mVp-p(7511)
Entradadevideo:
ClavijaRCAx 1
Entradadesonido:
ClavijaRCAx 4
Entradadevideoencomponentes:
ClavijaRCAx 3
Entradadeordenador:
1Vp-p (7511)
500mVrms
Y:IVp-p(7511)
Pb:700mVp-p(7511)
Pr:700 mVp-p(7511)
D-Sub15 patillas x 1 (RGB)
Minidavija o3,5 mmx 1 (audio)
Salida desonidodigital coaxial:
ClavijaRCAxl 500mVp-p (7511)
Auricular: V8pulg.(3,Smm)
Mando a distancia: Sistemadeluzinfrarr0jac0dificada
digitalmente
Temperatura de funcionamiento:
41°F(5°C)a 104°F(40°C)
Requisitos de potencia:
120V ~AC+/- 10 %,60 Hz+/- 0,5 %
Consumo de potencia (m6ximo):
65W
LCD: PanelXGAplusde19 pulgadasdeancho
Dimensiones: <sinsoporte> <consoporte>
Altura: 14,4pulg. (364mm) 16,0 pulg. (404,5mm)
Ancho: 19,3pulg. (490ram) 19,3 pulg. (490ram)
Profundidad: 5,1 pulg. (128mm) 7,7 pulg. (194,5mm)
Peso: 11,1libras (5,0kg)
• Losdisefiosy las especificacionespuedenserobjetode modificaciones
sinprevioavisoy sin obligacioneslegalespornuestra parte.
• Siseproduceunadiscrepanciaentre idiomas,el idiomapredeterminado
ser_iel ingles.
i:ii/
i!i¸¸
ii=
Zii!
i:7'
ES
SYLVANIA
GARANT|A LIMITADA
FUNAI CORR reparar_ este producto, de forma gratuita en Estados Unidos, en caso de defecto de materiales o
fabricaci6n, del modo siguiente:
DURACION:
PIEZAS: FUNAI CORP. suministrar_ piezas de repuesto de las piezas defectuosas de forma gratuita
durante un (1) afro desde la fecha de compra minorista original. Determinadas piezas y el
efecto de persistencia de la imagen en la pantalla LCD est_n excluidas de esta garantfa.
MANO DEOBRA:FUNAI CORP. suministrar_ la mano de obra de forma gratuita durante un periodo de
noventa (90) dfas desde la fecha de compra minorista original.
L|MITES Y EXCLUSIONES:
ESTA GARANT[A SE EXTIENDE SOLAMENTE AL COMPRADOR MINORISTA ORIGINAL. UN RECIBO
DE COMPRA U OTRA PRUEBA DE COMPRA MINORISTA ORIGINAL SERA EXIGIDA JUNTO CON EL
PRODUCTO PARA OBTENER SERVIClO BAJO ESTA GARANT[A.
Esta garantfa no se extender_ a ninguna otra persona o beneficiario.
Esta garantfa quedarg invalidada y sin efecto en caso de alteraci6n, sustituci6n, borrado o p_rdida de
los nOmeros de serie del producto o si se intent6 una reparaci6n pot parte de un centro de servicio no
autorizado. Esta garantfa limitada no se aplica a ningOn producto no comprado y utilizado en Estados Unidos.
Esta garantfa solamente cubre los fallos debidos a defectos de material o fabricaci6n que se produzcan
durante su uso normal. No cubre dafos producidos durante el transporte, ni dafos ocasionados pot
reparaciones, alteraciones o productos no suministrados pot FUNAI CORP.,o dafos resultantes de accidente,
uso indebido, abuso, trato indebido, aplicaci6n indebida, alteraci6n, instalaci6n defectuosa, mantenimiento
inadecuado, uso comercial (pot ejemplo, el uso de este producto en hoteles, establecimientos de alquiler u
oficinas)o dafos resultantes de incendio, inundaci6n, tormenta el_ctrica o cat_strofes naturales.
ESTAGARANT[A NO CUBRE LOS MATERIALES DE EMBALAJE, NINGON TIPO DE ACCESORIOS (EXCEPTO EL
MANDO A DISTANCIA), NINGUNA PIEZA DE ADORNO, PIEZAS DE MONTAJE COMPLETAS, MODELOS DE
DEMOSTRACION 0 DETALLER.
FUNAI CORP.Y SUS REPRESENTANTES0 AGENTESNO SERAN EN NINGON CASO CONSIDERADOS RESPONSABLES
DEDANOS GENERALES,INDIRECTOS0 CONSECUENClALES,RESULTANTESDE0 PROVOCADOS POR EL USO 0
LA IMPOSIBILIDAD DE USO DE ESTEPRODUCTO.ESTAGARANT{A SUSTITUYEA CUALQUIER OTRA GARANT{A,
EXPRESA0 IMPL{ClTA, Y CUALQUIER OTRA RESPONSABILIDADCIVIL PORPARTEDE FUNAI, CUALQUIEROTRA
GARANT{A QUE INCLUYA LA GARANT{A DE COMERClABILIDAD E IDONEIDAD PARA UN FIN CONCRETO,QUEDAN
PORLA PRESENTEEXCLUIDASPOR DE FUNAI Y SUS REPRESENTANTESEN ESTADOSUNIDOS.
TODAS LAS INSPECCIONES Y REPARAClONES BAJO GARANT[A DEBEN SER EFECTUADAS POR UN CENTRO
DE SERVICIO AUTORIZADO.
ESTAGARANT[A ESVALIDA EXCLUSIVAMENTE CUANDO EL APARATO SEA ENTREGADO A UN CENTRO DE
SERVICIO AUTORIZADO.
EL PRODUCTO DEBE IRACOMPANADO POR UNA COPIA DEL RECIBO DE COMPRA MINORISTA ORIGINAL. SI
NO SE ADJUNTA PRUEBA DE COMPRA, LA GARANT[A NO SE APLICARA Y SE COBRARAN LOS COSTES DE LA
REPARACION.
IMPORTANTE:
ESTAGARANT[A LIMITADA LE OTORGA DERECHOS LEGALES ESPEC[FICOS.ES POSIBLE QUE SEA USTED
BENEFIClARIO DE OTROS DERECHOS QUE VAR[EN DE UN ESTADO A OTRO. SI, EN CUALQUIER MOMENTO
DURANTE EL PERIODO DE GARANT[A, NO PUEDE USTED OBTENER SATISFACCION CON RESPECTOA LA
REPARACION DE ESTE PRODUCTO, LE ROGAMOS QUE SE PONGA EN CONTACTO CON FUNAI CORP.
ATENCION:
FUNAI CORR SE RESERVA EL DERECHO DE MODIFICAR CUALQUIER DISENO DE ESTE
PRODUCTO SIN PREVlO AVlSO.
DECLARACION DE GARANT|A CON RESPECTO A REPARACIONES NO AUTORIZADAS:
Para obtener servicio de garantfa, debe usted aceptar el producto, o hacer entrega del producto con
portes pagados, ya sea en su embalaje original o en un embalaje que proporcione el mismo grado de
protecci6n, a cualquier CENTRO DE SERVICIO AUTORIZADO. FUNAI CORP. no efectuar_ reembolso pot
ningOn servicio realizado pot proveedores de servicio no autorizados sin autorizaci6n previa pot escrito.
Para Iocalizar su CENTRO DE SERVlCIO AUTORIZADO m_s pr6ximo o para solicitudes generales
de servicio, puede ponerse en contacto con nosotros en:
FUNAI CORPORATION
Servicio de atenci6n al cliente
Tel : 1-800-968-3429
www.sylvania-ce.com
19900 Van Ness Avenue, Torrance, CA 90501
A84N2UH /A84NOUH
