Symbol Technologies MC3504 EDA (Enterprise Digital Assistant) User Manual MC35 UG EN
Symbol Technologies Inc EDA (Enterprise Digital Assistant) MC35 UG EN
Contents
User manual rev2 3
6 Customizing Your MC35
Adjusting settings
91
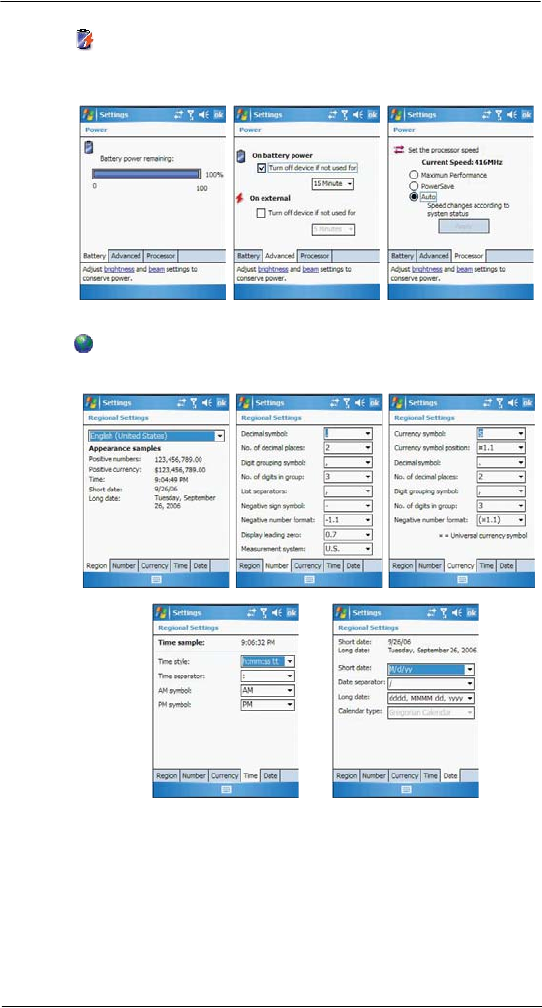
Power
View power level for both the main and backup battery. To minimize power consumption,
you can define settings for the auto-off function and the processor’s operation speed.
Regional Settings
Set default number and time display formats and other related options.
6 Customizing Your MC35
Adjusting settings
92
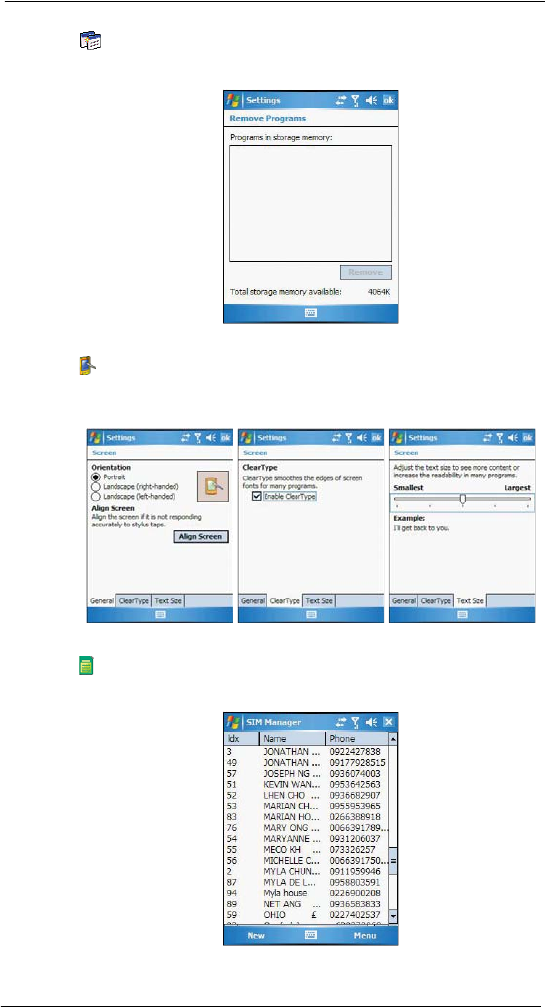
Remove Programs
Remove programs from storage memory.
Screen
Set the viewing orientation and text size setting. You can also recalibrate screen and
enable the ClearType feature.
SIM Manager
Manage all contacts stored on your SIM card.
6 Customizing Your MC35
Adjusting settings
93
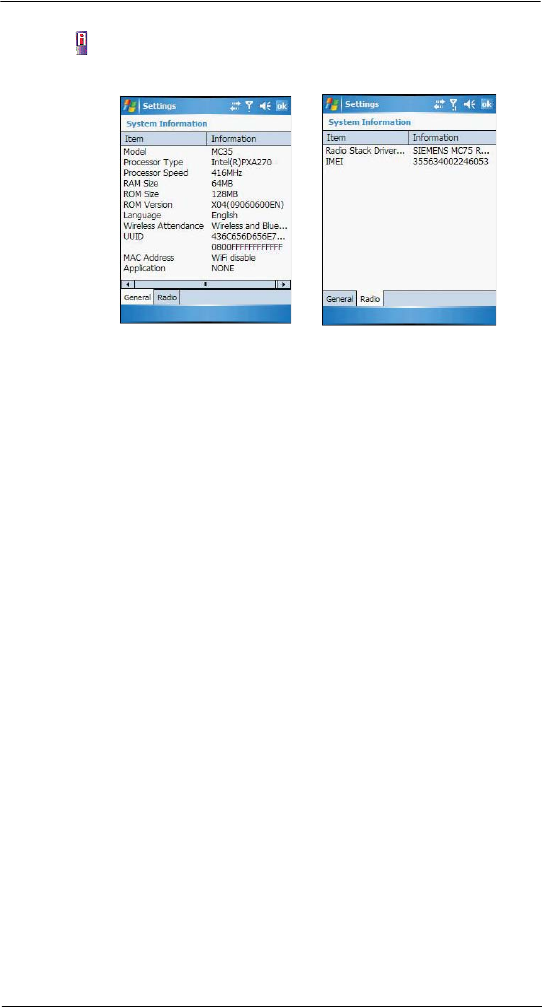
System Information
Displays your device’s hardware and software information.
6 Customizing Your MC35
Adjusting settings
94
Connections tab
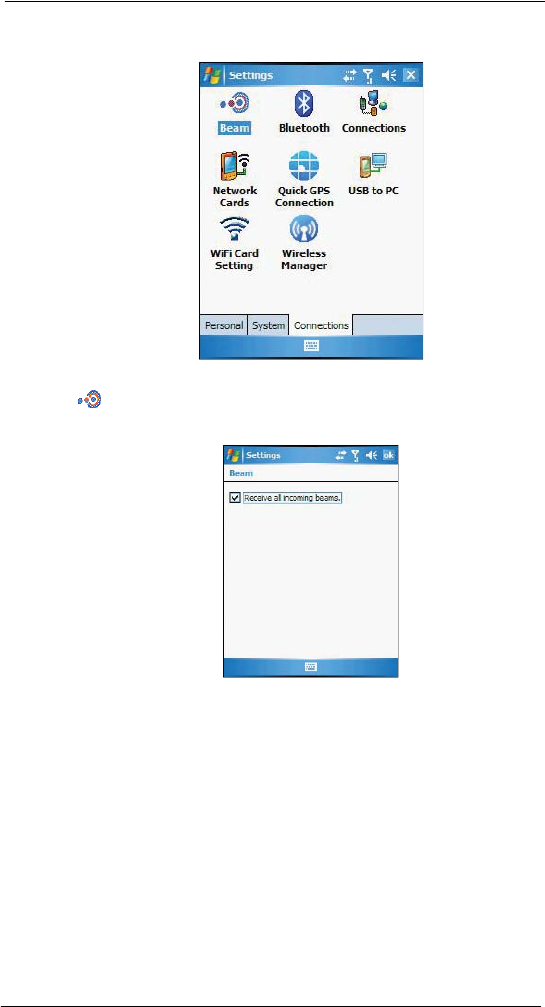
Beam
Define settings for the beam function.
6 Customizing Your MC35
Adjusting settings
95
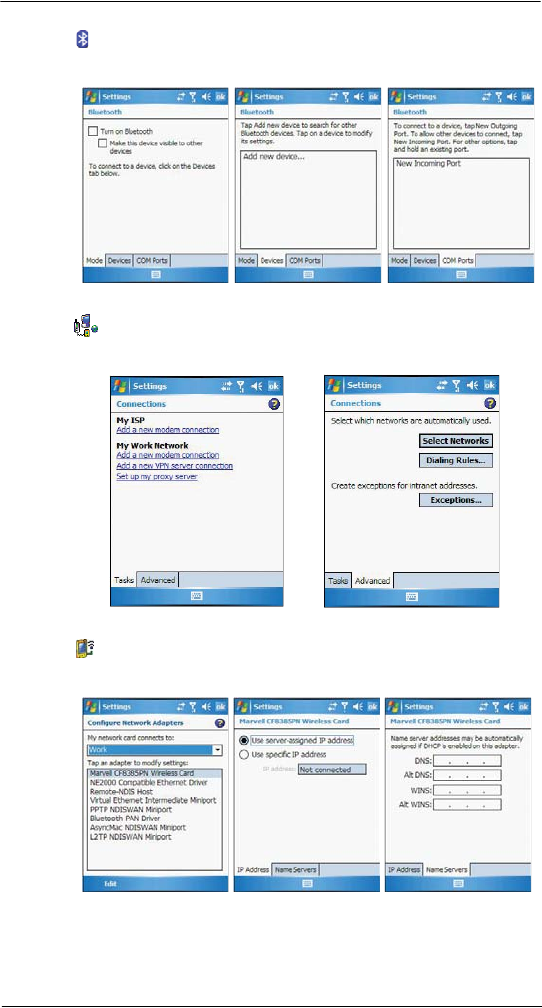
Bluetooth
Use this option to configure the device’s Bluetooth settings.
Connections
Adjust settings for connecting your ISP or to a local network.
Network Cards
Customize settings for your device’s network adapter.
6 Customizing Your MC35
Adjusting settings
96
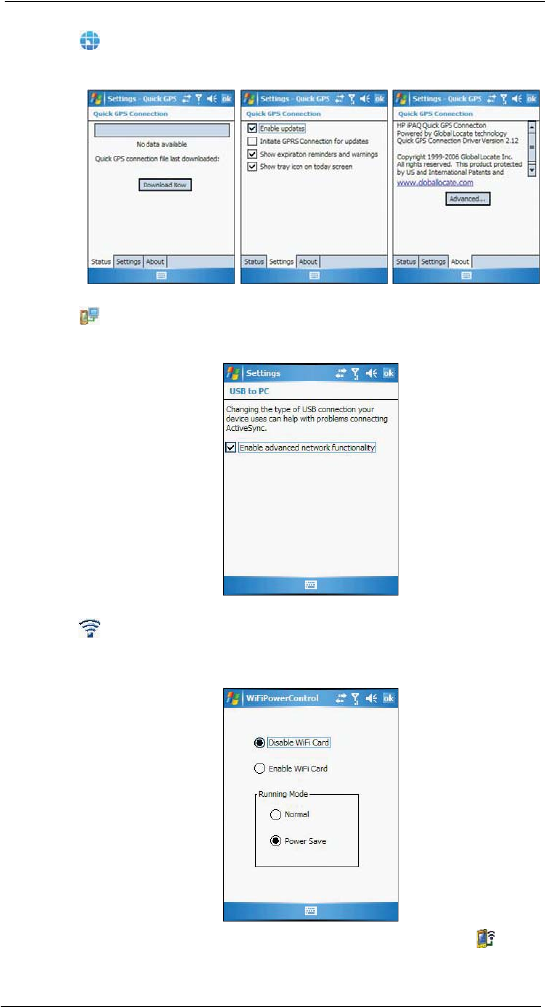
Quick GPS Connection
Enable and customize settings for the GPS connection utility.
USB to PC
Enable or disable the enhanced network connectivity.
Wireless Control
Available for MC3574 models, allow you to customize wireless network connection
settings and enable the WiFi (Wireless Fidelity) networking.
To configure the wireless network connection settings, tap Network Cards .
6 Customizing Your MC35
Adding programs
97
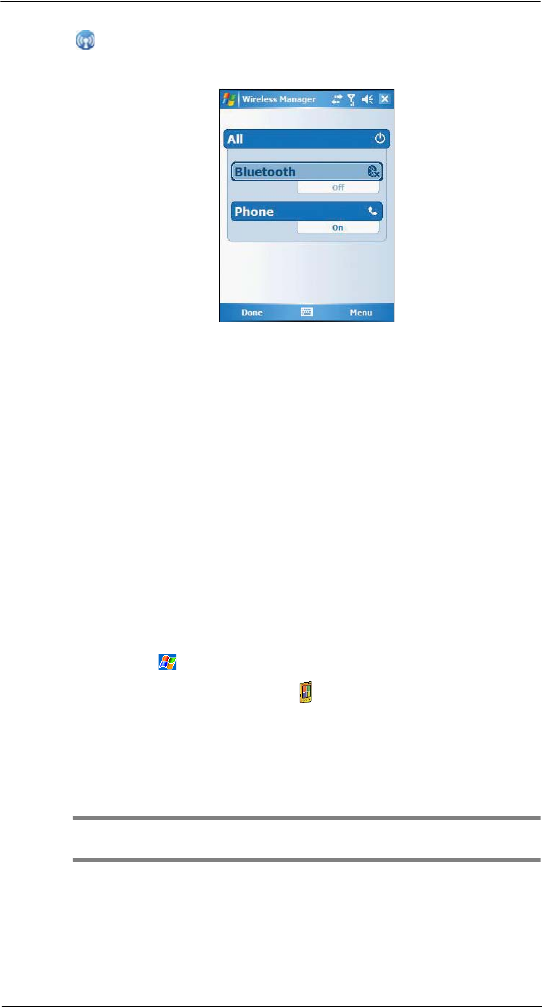
Wireless Manager
Enable or disable wireless features and customize device Bluetooth and phone settings.
Adding programs
Adding programs to your device
Programs bundled with your device at the factory are stored in ROM (read-only memory).
You cannot remove these programs, and you'll never accidentally lose ROM contents.
ROM programs can be updated using special installation programs with a *.xip
extension. All other programs and data files installed to your device after factory
installation are stored in RAM (random access memory). You can install any program
created for your device, as long as it has enough memory. The most popular place to find
software for your device is on the Pocket PC Web site http://www.microsoft.com/
windowsmobile/pocketpc/default.mspx. You can add programs to your device either by
using ActiveSync or by downloading the program from the Internet.
To add programs using ActiveSync:
Before installing a program on your device, you must first install the appropriate software
for your device on your computer.
1 Determine your device and processor type so that you know which version of the
software to install.
(a) Tap , then Settings.
(b) On the System tab, tap About .
(c) On the Version tab, make a note of the processor information.
2 Download the program to your computer (or insert the CD or disk that contains the
program into your computer).
You may see a single *.xip, *.exe, or *.zip file, a Setup.exe file, or several versions
of files for different device types and processors. Be sure to select the program
designed for a Pocket PC and your device’s processor type.
NOTE: Read any installation instructions, Read Me files, or documentation that come with the program.
Many programs provide special installation instructions.
3 Connect your device to your computer.
6 Customizing Your MC35
Adding programs
98
4 Double-click the *.exe file.
•If the file is an installer, the installation wizard will begin. Follow the
directions on the screen. Once the software has been installed on your
computer, the installer will automatically transfer the software to your
device.
•If the file is not an installer, you will see an error message stating that
the program is valid but it is designed for a different type of computer.
You will need to move this file to your device. If you cannot find any
installation instructions for the program in the Read Me file or
documentation, use the ActiveSync Explore button to copy the program
file to the Program Files folder on your device. For more information on
copying files using ActiveSync, see page 28.
5 Once installation is complete, tap , Programs, then the program icon to launch
it.
To add a program directly from the Internet:
1 Determine your device and processor type so that you know which version of the
software to install.
(a) Tap , then Settings.
(b) On the System tab, tap About .
(c) On the Version tab, make a note of the processor information.
2 Download the program to your device straight from the Internet using Internet
Explorer Mobile.
You may see a single *.xip, *.exe or *.zip file, a Setup.exe file, or several versions of
files for different device types and processors. Be sure to select the program
designed for a Pocket PC and your device’s processor type.
NOTE: Read any installation instructions, Read Me files, or documentation that comes with the program.
Many programs provide special installation instructions.
3 Tap the file, such as a *.xip or *.exe file. The installation wizard will begin.
4 Follow the onscreen instructions.
Adding a program to the Start menu
You can choose what program icons should appear on the menu based on which ones
you use most often.
To add a program to the Start menu program using Settings:
1 Tap , then Settings.
2 On the Personal tab, tap Menus .
3 Select the check box for the programs you wish to add.
If you do not see the program you want, you can either use File Explorer on your
device to move the program to the Start Menu folder, or use ActiveSync on your
computer to create a shortcut to the program and place the shortcut in the Start
Menu folder.
To add a program to the Start menu program using File Explorer on your
device:
1 Tap , Programs, then File Explorer .
2 Tap the My Device icon (tap the folder list, labeled My Documents by default, and
then My Device to see a list of all folders on your device).
3 Open the path: Windows | Start | Programs.
4 Tap and hold the program you want to add to the menu, then tap Cut on the pop-up
menu.
5 Open the path: Windows | Start Menu.
6 Tap and hold a blank area of the window, then tap Paste on the pop-up menu.
6 Customizing Your MC35
Adding programs
99
7 The program will now appear on the menu.
To add a Start menu program using ActiveSync on your computer:
1 In the ActiveSync on your computer, click Explore to explore your device’s files and
locate the program.
2 Right-click the program, and then click Create Shortcut.
3 Move the shortcut to the Start Menu folder in the Windows folder.
The shortcut now appears on the menu.
For more information on using ActiveSync, see ActiveSync Help on your computer.
Removing programs
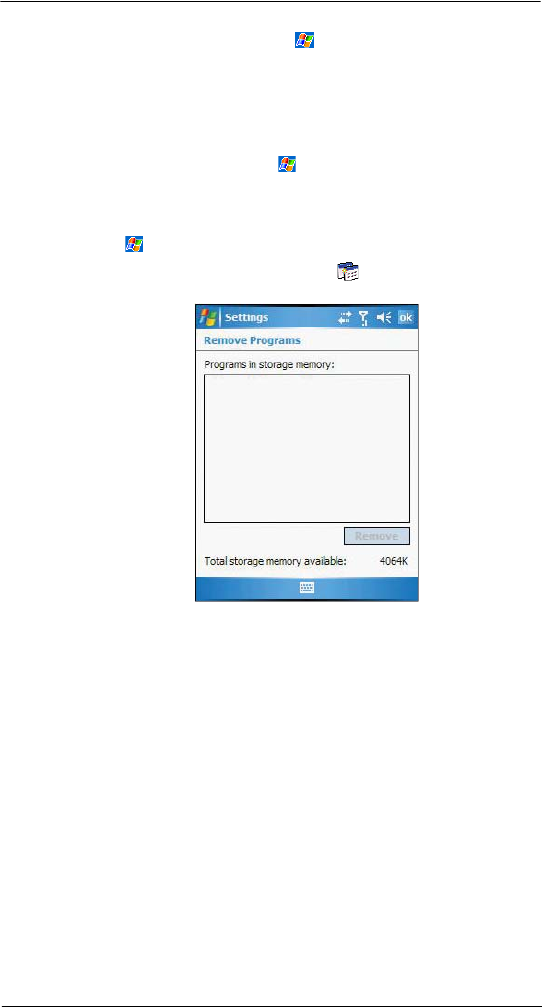
1 Tap , then Settings.
2 On the System tab, tap Remove Programs .
3 Tap the program you wish to remove.
4 Tap the Remove button.
If the program does not appear in the list of installed programs, use File Explorer on your
device to locate the program:
1 Tap and hold the program.
2 Tap Delete on the pop-up menu.

6 Customizing Your MC35
Adding programs
100

7 Getting Connected
Infrared connection
101
7 Getting Connected
You can use your MC35 to exchange information with other mobile devices and connect
to your computer, a network, or the Internet. You have the following connection options:
•Use the infrared (IR) port on your device to send and receive files from
another IR-enabled device.
•Use Bluetooth to beam information such as files, appointments, tasks,
calendar events and contacts, between devices that have Bluetooth
capabilities. You can also use Bluetooth to print to a Bluetooth printer and
create a connection between your device and a Bluetooth phone to use the
phone as a modem.
Once connected to the another Bluetooth enabled device or computer, you
can locate and use any of the services available on the device.
•Use WiFi networking to connect to a computer, access the Internet, send
and receive email and files.
Your wireless service provider will provide the needed information for a
successful connection.
•Connect to your mobile Internet service provider (ISP). Once connected, you
can send and receive email messages by using Messaging and view Web or
WAP pages by using Internet Explorer Mobile.
The communication software for creating an ISP connection is already
installed on your device. Your service provider will provide software needed
to install other services, such as paging and fax services.
•Connect to the virtual private network (VPN) at the company or organisation
where you work. Once connected, the added security of a VPN means that
you can access the full resources of your company’s network. For example,
you can use File Explorer to access the files of computers on that network.
1 Infrared connection
2 Bluetooth connection
3 WiFi connection
4 Internet connection
5 Network connection
6 Email server connection
Infrared connection
Using infrared, you can send and receive information, such as contacts and
appointments from another IR-enabled device.
Activating the IR connection
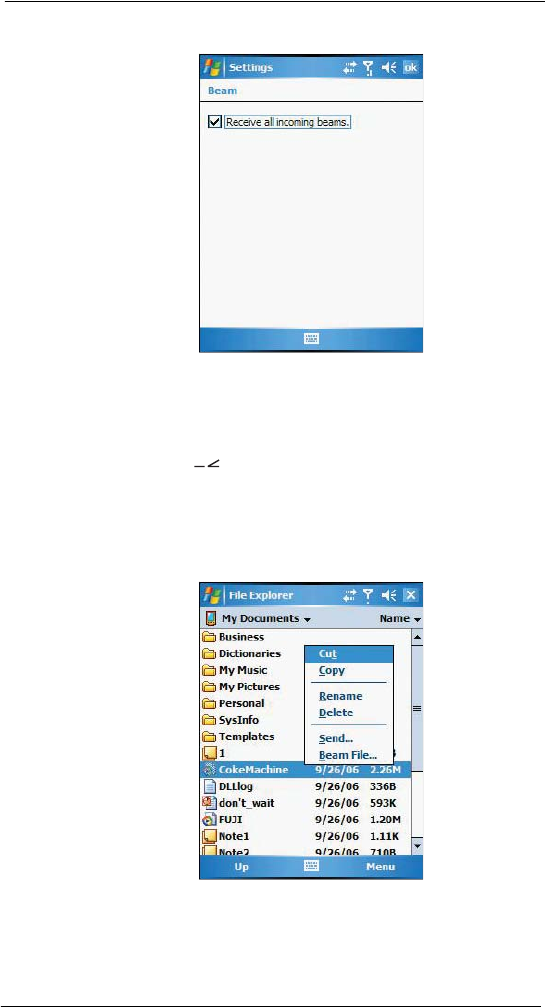
1 Tap , then Settings.
2 On the Connections tab, tap Beam .
7 Getting Connected
Infrared connection
102
3 Tap the Receive all incoming beams check box.
4 Tap OK.
Sending information
1 Switch to the program where you created the item you want to send and locate the
item in the list.
2 Align the IR port of your device with that of the IR-enabled device so that they
are unobstructed and within a close range.
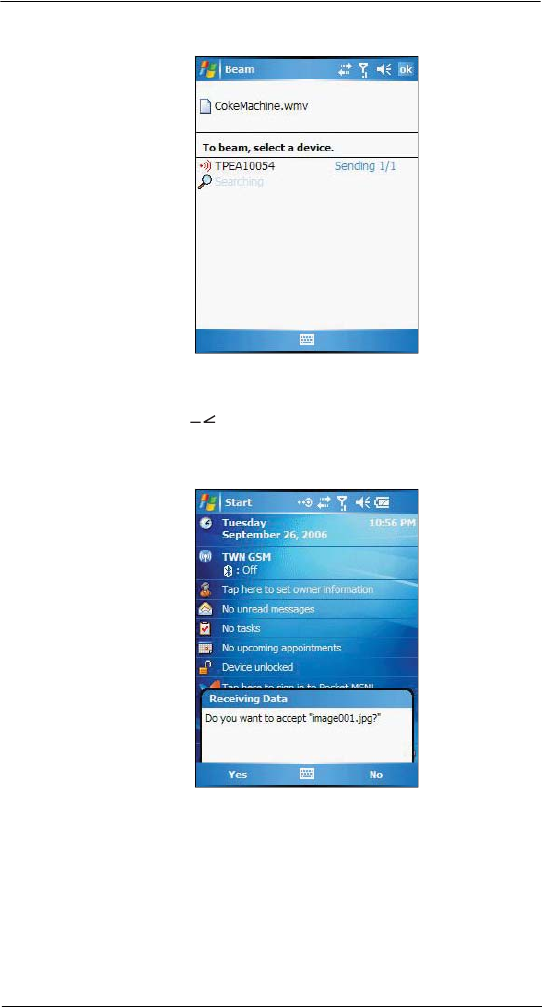
3 Tap and hold the item, then tap Beam File on the pop-up menu.
-or-
Send items (but not folders) using File Explorer.
•Tap and hold the item you want to send, then tap Beam File on the
pop-up menu.
7 Getting Connected
Infrared connection
103
4 Select the device, then tap the Tap to send link.
Receiving information
1 Align the IR port of your device with that of the IR-enabled device so that they
are unobstructed and within close range.
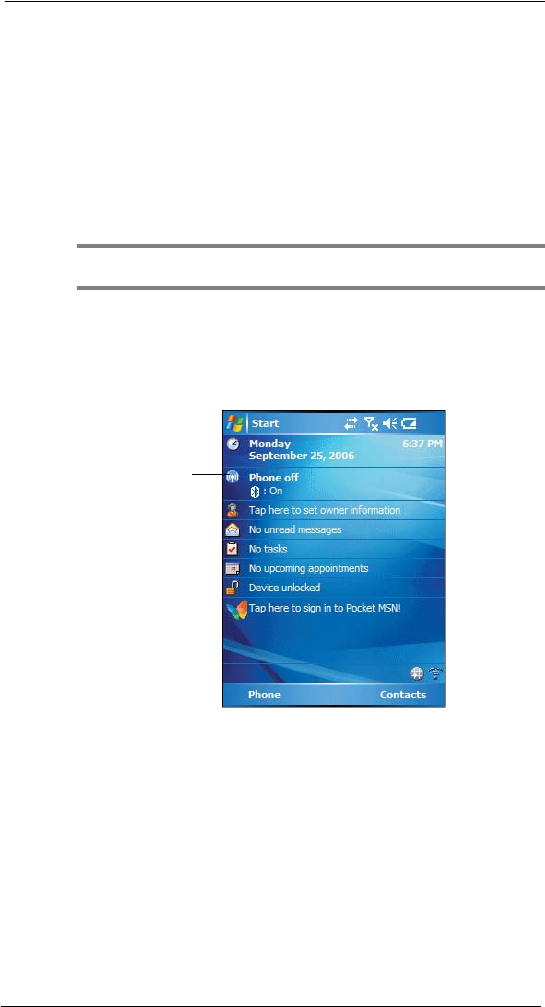
2 Have the owner of the other device send the information to you. Your device will
automatically receive it.
3 On the Receiving Data callout, tap Yes.
7 Getting Connected
Bluetooth connection
104
Bluetooth connection
Your device allows you to connect to a Bluetooth-enabled device, such as a handheld,
headset, computer, or GPS accessory. Once connected you can do the following:
•Beam files and information in Calendar, Contacts, Notes, Tasks, Excel
Mobile, Word Mobile, PowerPoint Mobile, and Pictures & Videos programs ,
to other Bluetooth-enabled device.
•Transfer an outgoing call to a Bluetooth-enabled headset.
•Wirelessly print files from a Bluetooth-enabled printer.
An additional software needs to be installed on your device to enable you to
print files to a Bluetooth-enabled printer. Contact your local dealer for more
information.
•Wirelessly listen to audio files or locate and use services on a Bluetooth-
enabled device.
IMPORTANT: Ensure that the two devices have Bluetooth turned on, discoverable, and within close
range.
To activate Bluetooth connection
You can activate Bluetooth connection by using the followings ways:
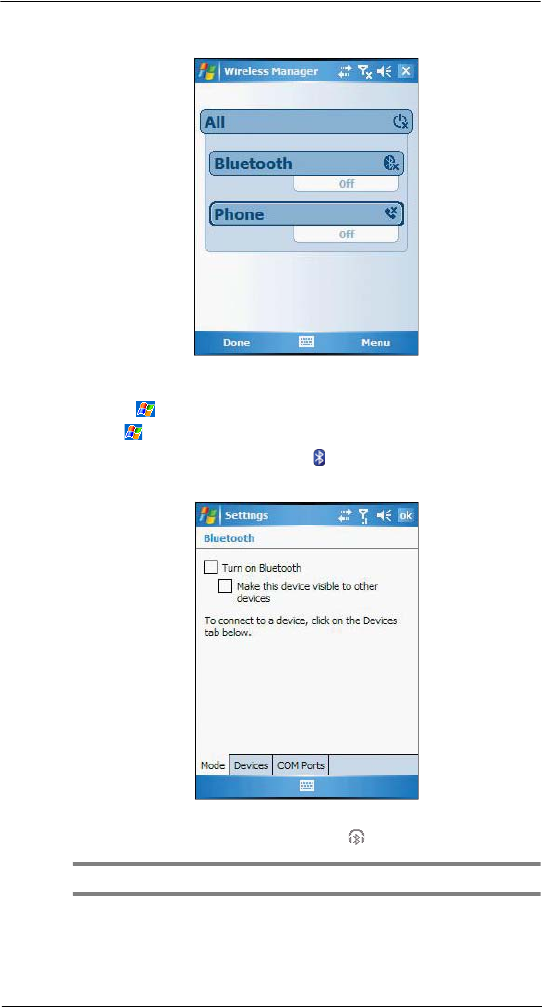
Using Wireless Manager:
1 On the Today screen, tap the Wireless Manager icon.
Tap to launch the
Wireless Manager.
7 Getting Connected
Bluetooth connection
105
2 On the Wireless Manager screen, tap Bluetooth to turn on the Bluetooth function.
You can tap Menu on the command bar to configure the Bluetooth settings.
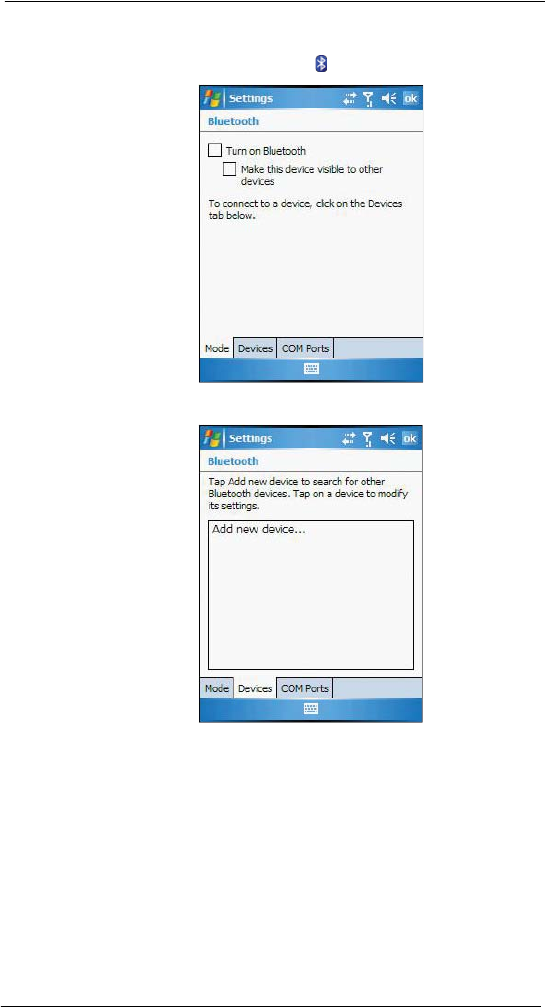
Using the menu:
1 Tap , then Settings.
2 On the Connections tab, tap Bluetooth .
3 On the Mode tab, select all the check boxes.
4 Tap OK.
An active Bluetooth connection is indicated by at the top of the screen.
NOTE: Deactivate the Bluetooth feature when you do not plan to use it for an extended time.
7 Getting Connected
Bluetooth connection
106
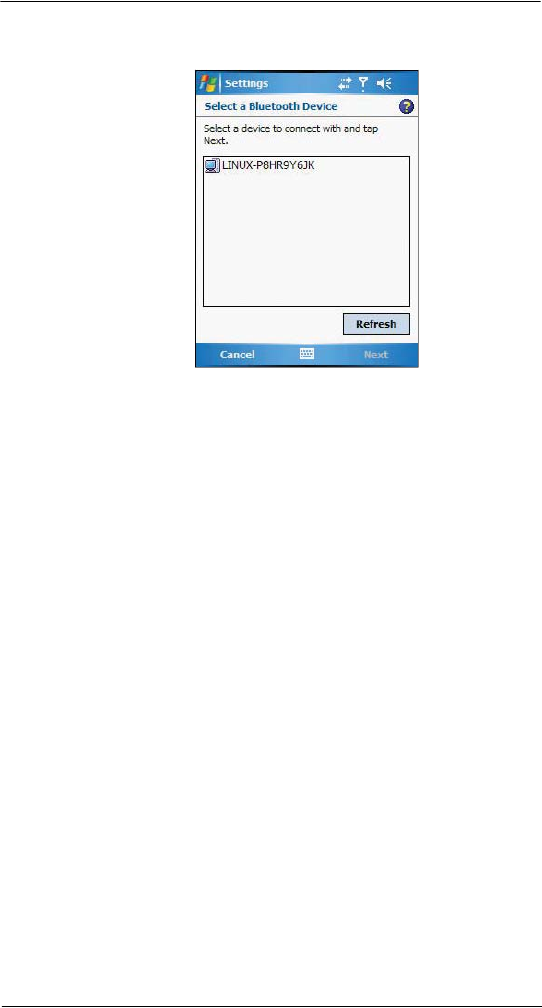
Creating a partnership
1 On the Connections tab, tap Bluetooth .
2 On the Devices tab, tap Add new device.
7 Getting Connected
Bluetooth connection
107
Your device will search for other devices with Bluetooth capabilities and displays
them in the device list.
3 Tap the name of the device in the list, then tap Next.
4 In the “Select services to use from this device” list, select a service.
5 If you want to use a passkey, enter the alphanumeric passkey , then tap Next.
The passkey is recommended for enhanced security. Your passkey must be
between 1 to 16 alphanumeric characters.
-or-
You can leave the passkey blank, then tap Next.
6 Enter the same passkey on the other device.
7 In the Display Name, enter a new name for the device.
8 Tap Finish.
9 Tap OK.
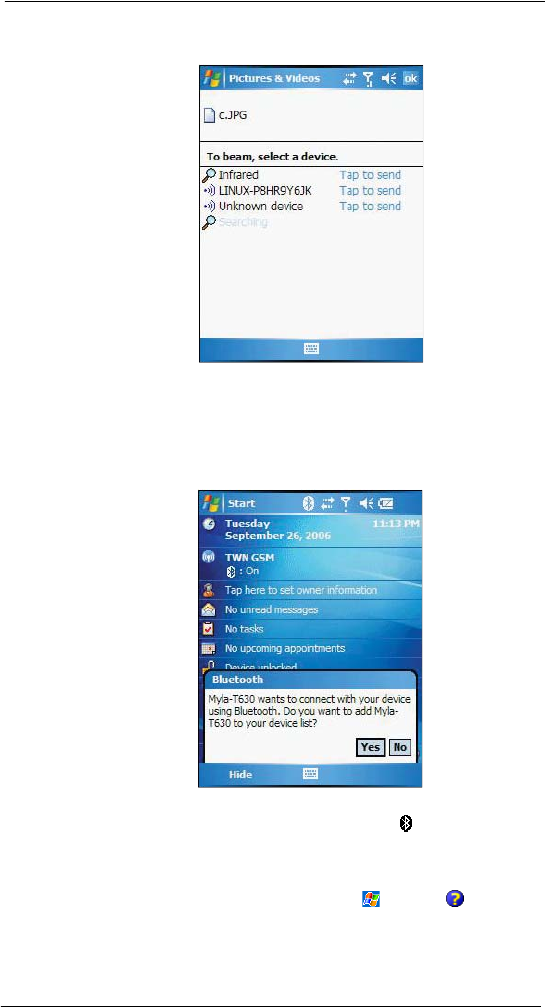
Sending information
1 Switch to the program where you created the item you want to send and locate the
item in the list.
2 Do any one of the following:
•Tap and hold the item, and then tap Beam File on the pop-up menu.
•Using Pictures & Videos, tap and hold a thumbnail to display a pop-up
menu of available actions, then tap Send Image via Bluetooth.
7 Getting Connected
Bluetooth connection
108
•Using File Explorer, tap and hold an item (but not folders), select Beam
File on the pop-up menu.
3 Select the Bluetooth device, then tap the Tap to send link.
Receiving information
1 Turn on the Bluetooth function.
2 Have the owner of the other device send the information to you. Your device will
automatically receive it.
3 On the Bluetooth callout, tap Yes.
A Bluetooth connection with your device is indicated by at the top of the screen.
Making a call from a headset
For detailed instructions, refer to page 59.
For detailed information on how to use Bluetooth, tap , then Help .
7 Getting Connected
WiFi connection
109
WiFi connection
With the device’s integrated WiFi (available for MC3574 models), you can scan for
existing wireless network access points or hot spots. Wireless network access points or
hot spots can be found in homes and office or public areas such as inside airports,
restaurants, coffee shops, hotels, or other public areas. Using WiFi networking, you can
connect to a computer, access the Internet, send and receive email and files.
A wireless network can be added either when the network is detected or by manually
entering settings information.
NOTE: WiFi access in some areas may require a separate purchase of a service contract with a
wireless service provider. You can check with a WiFi service provider for detailed information.
Enabling WiFi connection
Do either of the following:
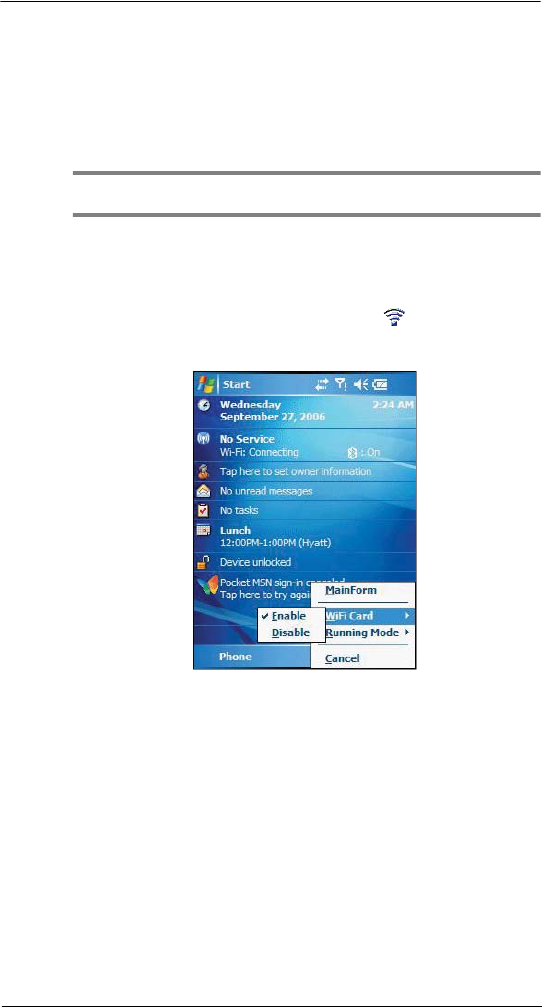
Using the Wireless Control icon on the Today screen.
1 On the Today screen, tap and hold Wireless Control , located on the lower
right corner of the screen.
2Select WiFi Card, then tap Enable.
7 Getting Connected
WiFi connection
110
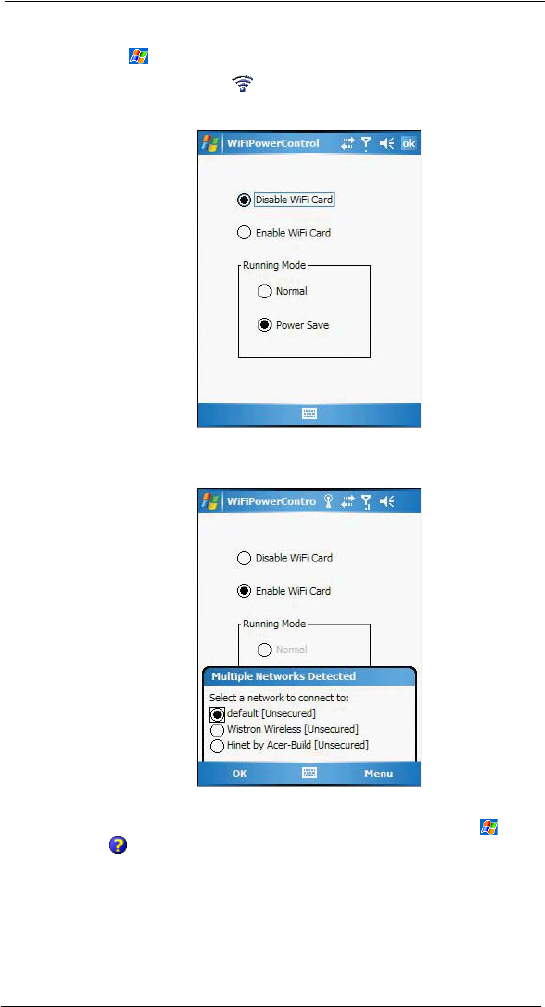
Using the Settings menu
1 Tap , Settings, then Connections tab.
2 Tap WiFi Card Setting .
3Select Enable WiFi Card, then tap OK.
If you are in a hot spot, the detected Wireless service will be displayed on the
device.
4 Select the network you want to connect to.
For more information on how to configure the wireless network settings, tap , then
Help .
7 Getting Connected
WiFi connection
111
Setting up a wireless network connection
A wireless network can be added either when the network is detected or by manually
entering settings information. Before doing these steps, determine if authentication
information is needed.
Before performing this procedure, make sure you have the following:
•Make sure that the Internet Protocol (TCP/IP) is installed on your computer.
•Make sure the network system and remote access server in your workplace
supports TCP/IP protocol
•Make sure you have remote access account. Ask your network administrator
for assistance on setting up a wireless connection.
•First establish ActiveSync partnership with the MC35 using USB or
Bluetooth connection.
1 Enable wireless connection. Refer to “Enabling WiFi connection” on page 109 for
more information.
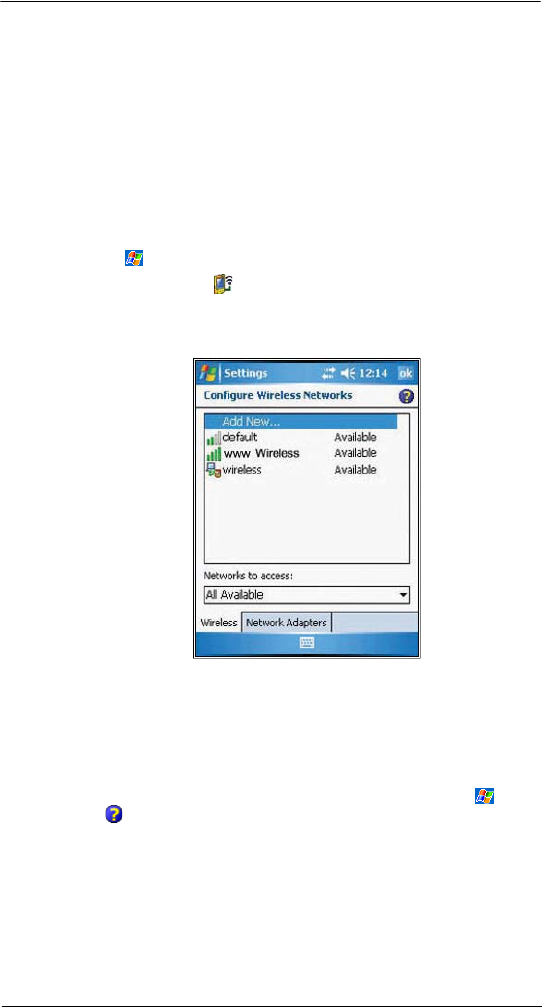
1 Tap , Settings, then Connections tab.
2 Tap Network Cards .
3 Tap the Wireless tab.
4 If there are networks already detected, tap and hold network name, then select
Connect.
If none, tap Add New and follow all onscreen instructions.
5 In the Network to access drop-down list, select from the following network
connection options:
•All available
•Only access points
•Only computer-to-computer
6 When finished, tap OK.
For more information on how to configure the wireless network settings, tap , then
Help .

7 Getting Connected
Internet connection
112
Internet connection
Your MC35 EDA allows you to connect to the Internet via GPRS (General Packet Radio
Service). Once connected you can:
•Use Inbox to send and receive email messages
•Use Internet Explorer Mobile to access Web or WAP pages
•Use Windows Media Player 10 Mobile for Pocket PC to listen to streaming
media
For more information on configuring your device’s GPRS setting, contact your mobile
ISP.
Network connection
If you have access to a network at work, you can send email messages, view Intranet
pages, synchronize your device, and possibly access the Internet. You can connect to a
network by creating a modem connection via a RAS account or use a network card to
connect directly to an Ethernet network and access Internet, Intranet or download
emails. Before you can create these connections, your network administrator will need to
set up a RAS account for you. Your network administrator may also give you VPN
settings.
Creating a modem connection to a network
1 Ask your network administrator for the following information:
•Dial-up access telephone number
•User name and password
•Domain name
•TCP/IP settings
2 Tap , then Settings.
3 On the Connections tab, tap Connections .
4 In the Connections window, tap the Add a new modem connection link, either in
the My ISP or My Work Network list.
5 In the Make New Connection window, enter a name for the connection.
6 In the Select a modem list, select your modem type.
If your modem type does not appear, try re-inserting the modem card. If you are
using an external modem that is connected to your device with a cable, select
Hayes Compatible on COM1.
7 Tap Next to continue configuring your modem connection depending on the modem
type you selected.
You need not change any settings in Advanced. Most ISPs now use a dynamically
assigned address. If the ISP you are connecting to does not use a dynamically-
assigned address, tap Advanced, then the TCP/IP tab, and enter the address.
When finished, tap OK.
8 Tap Finish to create the new modem connection.
Email server connection
You can set up a connection to an email server so that you can send and receive email
messages by using a modem or network connection and Inbox on your device. You can
use multiple email accounts to receive your messages. For each email account you
intend to use, first set up and name the email service. If you use the same service to
connect to different mailboxes, set up and name each mailbox connection.
There are two types of email account that can be managed using your device.
•Microsoft Outlook
Using Microsoft Outlook, your Inbox is updated each time you sync with your
computer or corporate email server.

7 Getting Connected
Email server connection
113
•POP3/IMAP4
This includes email service from providers. These email accounts can be
managed remotely using a wireless connection.
To set up an email account:
For an explanation on any of the setup screens, tap , then Help .
1 Tap , then Messaging .
2 Tap Menu, Tools, then New Account.
3 Select the email type from the Your e-mail provider drop-down list and tap Next.
4 Fill out the email address field, then tap Next.
This will initiate auto-configuration which attempts to connect your device to your
email server and automatically download the necessary email connection settings.
If auto-configuration is successful you can begin sending/receiving emails straight
away. If unsuccessful you will need to manually enter the settings.
5 Fill out the following fields: Your Name, User name, Password.
6 Select the Save Password check box unless you want to be prompted when you get
your mail.
7 Tap Next.
8 From the Account type drop-down menu, select the service type that your email
provider supports (POP3 or IMAP4).
9 Fill out the Name field for your email account, then tap Next.
10 Enter your email provider’s server name information for incoming and outgoing
mail.
11 Tap Finish.

7 Getting Connected
Email server connection
114
8 Microsoft Pocket Outlook
Pocket Outlook Overview
115
8 Microsoft Pocket
Outlook
This chapter describes the Microsoft Pocket Outlook programs.
•Pocket Outlook Overview
•Calendar
•Contacts
•Tasks
•Notes
Pocket Outlook Overview
Microsoft Pocket Outlook includes Calendar, Contacts, Inbox, Notes and Tasks. You can
use these programs individually or in tandem with each other. For example, email
addresses stored in Contacts can be used to address email messages in Messaging.
Using ActiveSync, you can synchronize information from Microsoft Outlook or Microsoft
Exchange on your PC with your device. You can also synchronize this information directly
with a Microsoft Exchange server. Each time you synchronize, ActiveSync compares the
changes you made on your device and PC or server and updates both locations with the
latest information. For information on using ActiveSync, see ActiveSync Help on your
computer.
Calendar
Calendar enables you to conveniently manage your schedules and appointments or any
other activities associated with a time and date. You can schedule appointments,
including meetings and other events. Checking your appointments is easy using one of
several views—Agenda, Day, Week, Month, and Year. Switch display views by tapping
any of the view icons on the command bar.
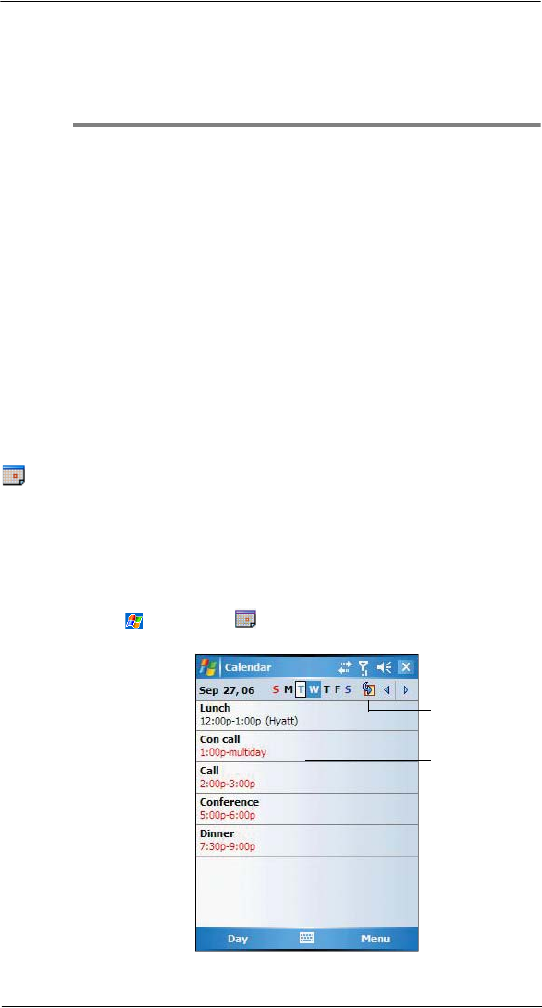
To open Calendar:
•Tap , then Calendar .
Calendar opens to today’s schedule.
Tap to go to
current date.
Tap to display or edit
the appointment details.
8 Microsoft Pocket Outlook
Calendar
116
NOTE: You can customize the Calendar display, such as changing the first day of the week, by
tapping Menu, then Options.
Scheduling an appointment
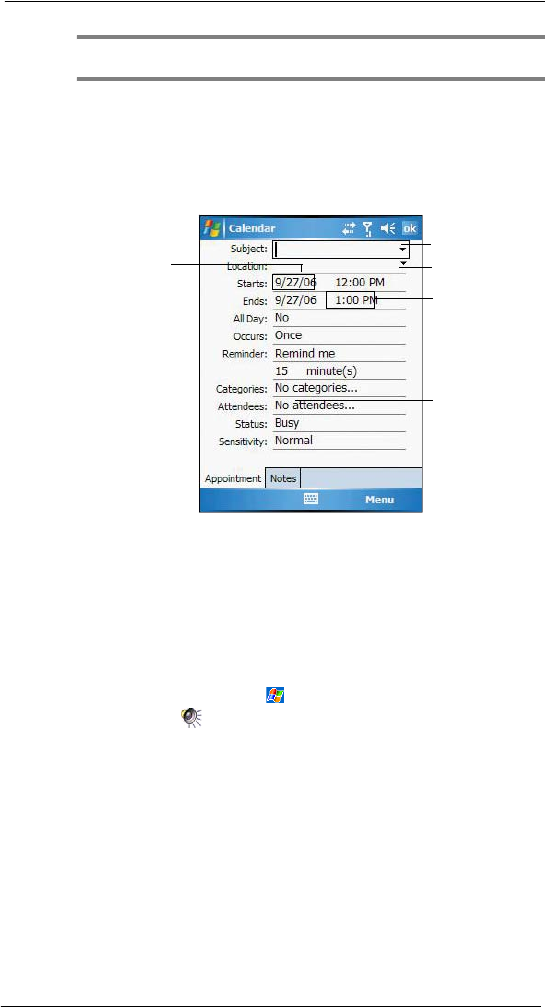
You can use Calendar to create an appointment schedule.
To create an appointment
1 If you are in Day or Week view, tap the desired date and time for the appointment.
2 Tap Menu, then New Appointment.
3 Using the soft keyboard, enter a description and a location.
To select a field, tap it.
4 If needed, tap the date and time to change them.
5 Enter other desired information.
Hide the input panel to see all available fields.
6 To add notes, tap the Notes tab.
You can enter text, draw, or create a recording.
7 After completing the details, tap OK.
If you select “Remind me” in an appointment, your device reminds you
according to the options set in , Settings, Personal tab, Sounds &
Notifications .
Viewing an appointment
You can view an appointment schedule in all views except for Year and Agenda view.
•To see the details of an appointment, tap the appointment.
•To see a pop-up menu of available actions for an appointment, tap and hold
the appointment.
•In Agenda view, upcoming appointments are displayed in bold text.
•In Month view, the time of appointments are indicated by symbols. An
upward triangle means a morning appointment; a downward triangle means
an afternoon appointment. A solid square indicates an appointment that
overlaps the noon day border.
Notes is a good place
for maps, directions,
or meeting reminders.
Tap to choose a
previously entered
location.
Tap to select a time.
Tap to choose from a
predefined text.
Tap to select a
date.
8 Microsoft Pocket Outlook
Calendar
117
Finding an appointment
There are two ways to find an appointment:
•Tap , Programs, then Search , enter the appointment name, select
Calendar for the type, then tap Search.
•In Calendar, tap Menu, Filter, All Appointments, then select the check box
opposite the type of appointment you want displayed.
Beaming an appointment
You can send an appointment to another IR or Bluetooth-enabled device by beaming it.
1 In Agenda, Day or Month view, tap and hold the appointment.
2 Tap Menu, then Beam Appointment on the pop-up menu.
3 Do either one of the following:
•Select a Bluetooth-enabled device, then tap the Tap to send link.
•Align the IR port of your device with that of the other IR-enabled
device so that they are unobstructed and within close range, then select
the IR-enabled device and tap the Tap to send link.
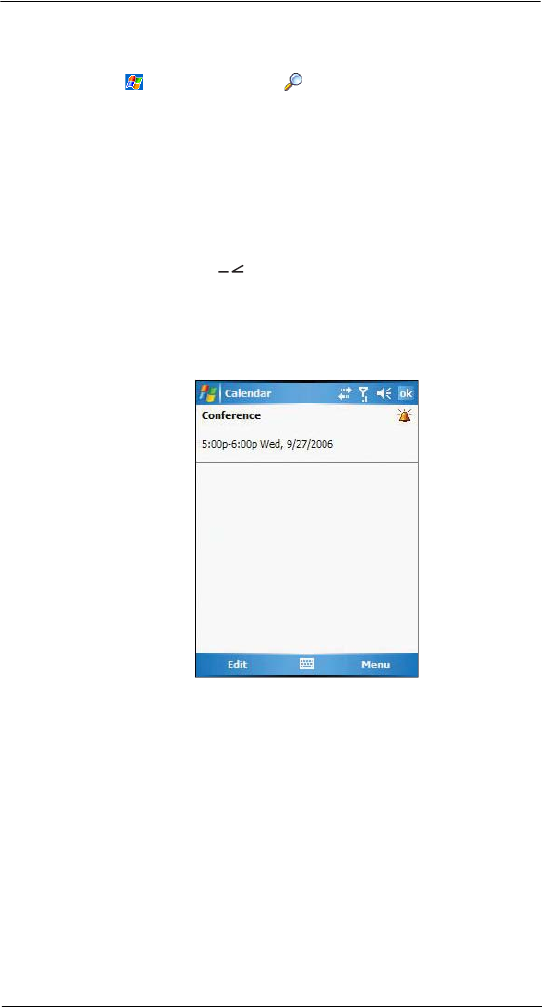
Using the Calendar summary screen
When you tap an appointment in Agenda or Day view, a summary screen is displayed. To
change the appointment, tap Edit.
Creating a meeting request
You can use Calendar to set up meetings with users of Outlook or Pocket Outlook. The
meeting request is created automatically and is sent when you synchronize Inbox or
when you connect to your email server. Indicate how you want meeting requests sent by
tapping Menu, then Options.
To schedule a meeting:
1 Create an appointment.
2 In the appointment details, hide the input panel, then tap Attendees.
3 Select the check box before the email address of the contacts you want to send a
meeting request to.
4 Tap OK twice—once to return to the appointment details page and another to save
the appointment.
The meeting request is created automatically and placed in the Outbox folder.
5 Tap OK.
8 Microsoft Pocket Outlook
Contacts
118
Contacts
Keeping track of friends and colleagues
Contacts maintains a list of your friends’ and colleagues’ contact information. Using your
device’s infrared (IR) port, you can quickly share this list with other Windows-based, IR-
enabled device users.
To open Contacts:
Do either of the following:
•On the Today screen, press the right soft button or tap Contacts.
•Tap , then Contacts .
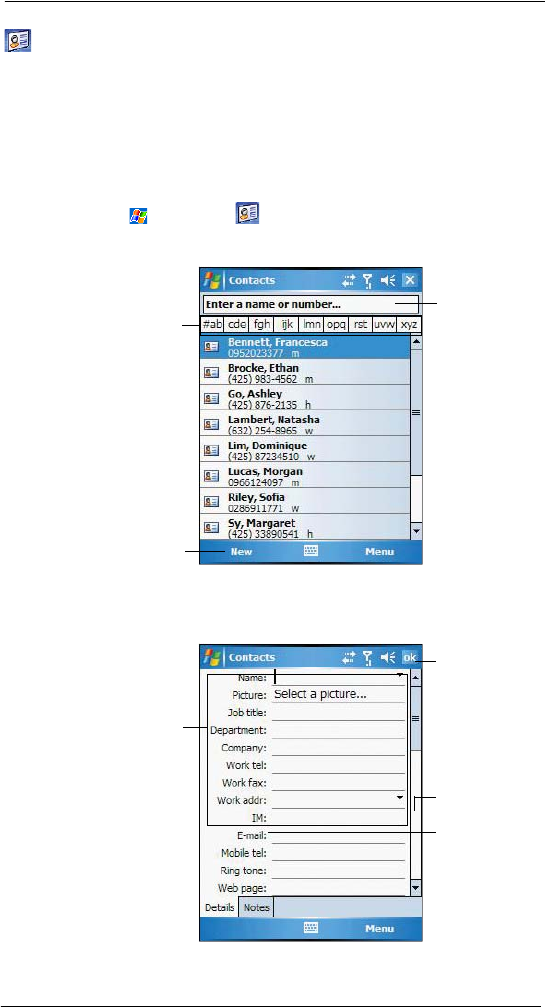
Contacts opens to the contact list. To change the way information is
displayed in the list, tap Menu, then Options.
Creating a contact
1 Tap New.
Enter the name of the
contact you’re
searching for.
Tap to create a new
contact.
Tap one of the letter
blocks to display only
contact names
starting with such
letters.
Tap a field to enter
contact information.
Notes is a good
place for additional
contact information.
Scroll to see more
fields.
Tap to return to the
Contacts list (the
new contact is saved
automatically).
8 Microsoft Pocket Outlook
Contacts
119
2 Using the soft keyboard, enter a name and other contact information.
Scroll down to see all available fields.
3 To assign the contact to a category, scroll down, tap Categories, then select a
category from the list.
4 In the contact list, you can display contacts by category by tapping the pick list on
the top-left corner of the screen.
5 To add notes, tap the Notes tab.
6 After completing the details, tap OK.
Finding a contact
There are several ways to find a contact. You can do any of the following. In the contact
list:
•Using the QWERTY keypad, press the starting letter of the contact name
•Tap one of the letter blocks displayed across the top of the screen.
•Use the Smart Lookup function by entering the first few letters of the contact
you’re looking for in the search box under the navigation bar. To show all
contacts again, clear text from the box or tap the button to the right of the
box.
•Tap the category pick list on the top-left corner of the screen and select the
type of contact that you want displayed.
•To show all contacts, tap Menu, Filter, then All Contacts.
•To view a contact that is not assigned to a category, tap Menu, Filter, then
No Categories.
•To view the names of companies your contacts work for, in the command
bar, tap View By, then Company.
The number of contacts that work for that company displays to the right of
the company name.
•Tap , Programs, then Search , enter the contact name, select
Contacts for the type, then tap the Go button.
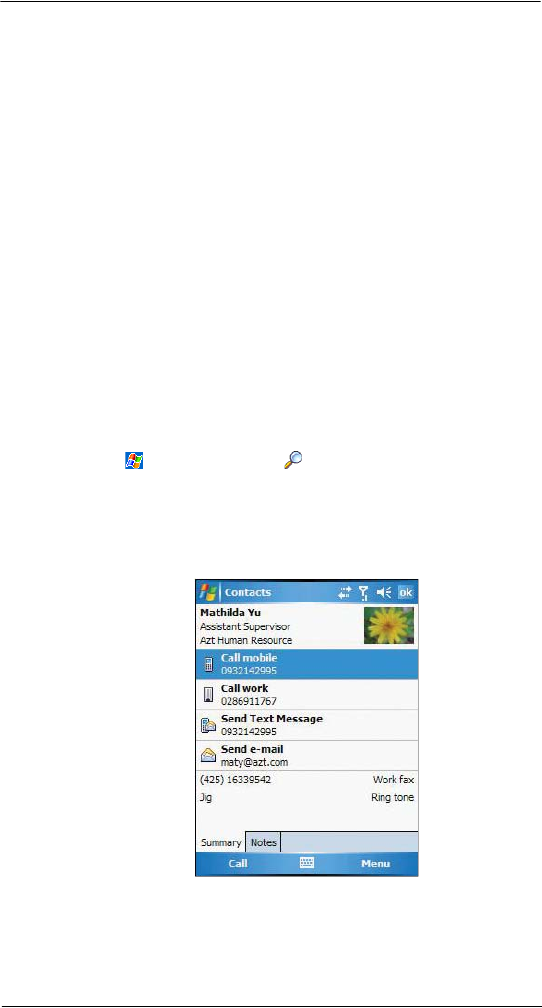
Using the Contacts summary screen
When you tap a contact in the contact list (or select it using the joystick), a summary
screen displays. This is referred to as a contact card. To change the contact information,
tap Menu, then Edit.
8 Microsoft Pocket Outlook
Contacts
120
Calling a contact
You can make a call to a contact using either the contact list or the contact card.
To make a call from the contact list:
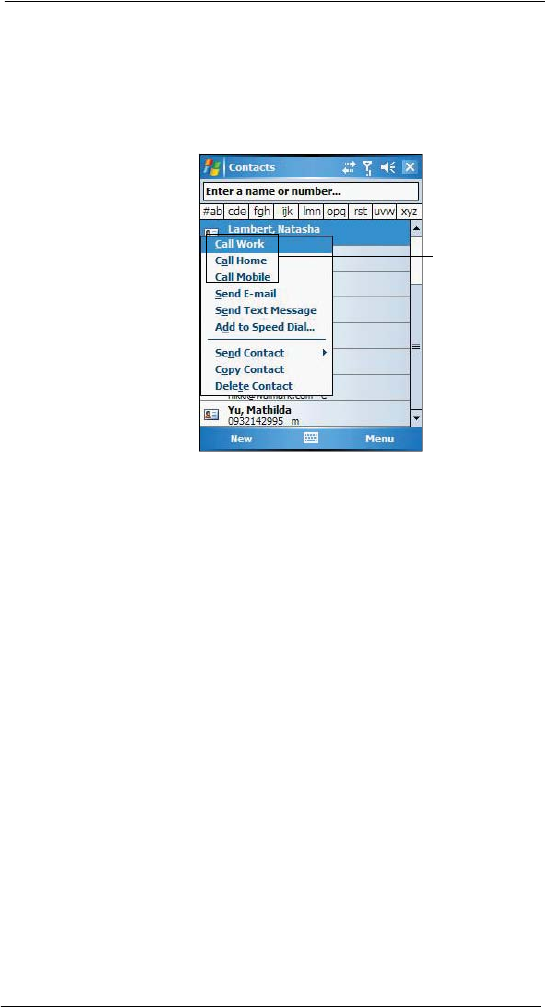
There are several ways to make a call from the contact list.
•Using commands in the pop-up menu
(a) Tap and hold a contact to display a pop-up menu of actions.
(b) Tap any of the Call options to make a call.
•Using the Contact list abbreviation
(a) Tap the letter in the right column next to the contact you want to call. The
contact’s summary screen appears.
(b) Tap which number to call or send email/text messages.
The letter that appears opposite a contact entry corresponds to a particular
contact information. These are as follows:
•e — Email address
•e2 — Second email address
•e3 — Third email address
•h — Home phone number
•h2 — Second home phone number
•m — Mobile phone number
•pgr — Pager phone number
•sms — SMS address
•w — Work phone number
•w2 — Second work phone number
•web — Web page
•Using the hardware buttons
(a) Move the joystick up or down to scroll through the contact list and select the
contact you want to call.
(b) Press the Send button twice—once to launch Phone and another to make the
call. The call will be made to that contact’s priority number.
To make a call from a contact card:
•Tap any of the listed phone numbers.
•Move the joystick up or down to scroll through the listed numbers and select
one, then press the joystick or Send button to make the call.
Tap any call options
to make a call.
8 Microsoft Pocket Outlook
Contacts
121
Sending a Message to a contact
You can send an email or text message to a contact either from the contact list or from a
contact card window.
To send a message from the contact list:
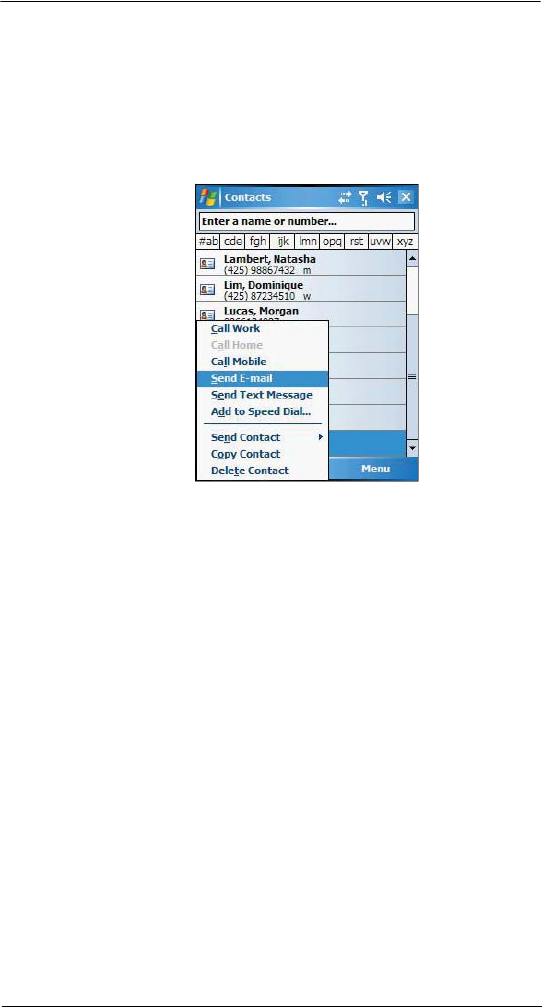
1 Tap and hold a contact to display a pop-up menu of actions.
- or -
Move the joystick up or down to scroll through the list and select a contact, then
press the joystick to display a pop-up menu of actions.
2 Tap Send E-mail or Send Text Message.
- or -
Move the joystick up or down to select either Send option, then press the joystick to
enable it.
Inbox opens to a new message window with the To field automatically filled out with
the selected contact’s email/text address.
3 Proceed to composing the message.
To send a message from a contact card:
1 Tap any of the listed email/text addresses.
- or -
Move the joystick up or down to scroll through the listed email/text addresses and
select one, then press the joystick.
Inbox opens to a new message window with the To field automatically filled out with
the selected contact’s email/text address.
2 Proceed to composing the message.
Beaming a Contact Card
You can send a contact card to another IR or Bluetooth-enabled device either from the
contact list or from a contact card window.
To beam a contact card from the contact list:
1 Tap and hold a contact to display a pop-up menu of actions.
- or -
Move the joystick up or down to scroll through the list and select a contact, then
press the joystick to display a pop-up menu of actions.
2 Tap Beam Contact.
3 Do either one of the following:
8 Microsoft Pocket Outlook
Tasks
122
•Select a Bluetooth-enabled device, then tap the Tap to send link.
•Align the IR port of your device with that of the other IR-enabled
device so that they are unobstructed and within close range, then select
the IR-enabled device and tap the Tap to send link.
To beam an open contact card:
1 Tap Menu, then Beam Contact.
2 Do either one of the following:
•Select a Bluetooth-enabled device, then tap the Tap to send link.
•Align the IR port of your device with that of the other IR-enabled
device so that they are unobstructed and within close range, then select
the IR-enabled device and tap the Tap to send link.
Tasks
Keeping a to do list
Use Tasks to keep track of what you have to do and prioritize them based on their
importance and urgency.
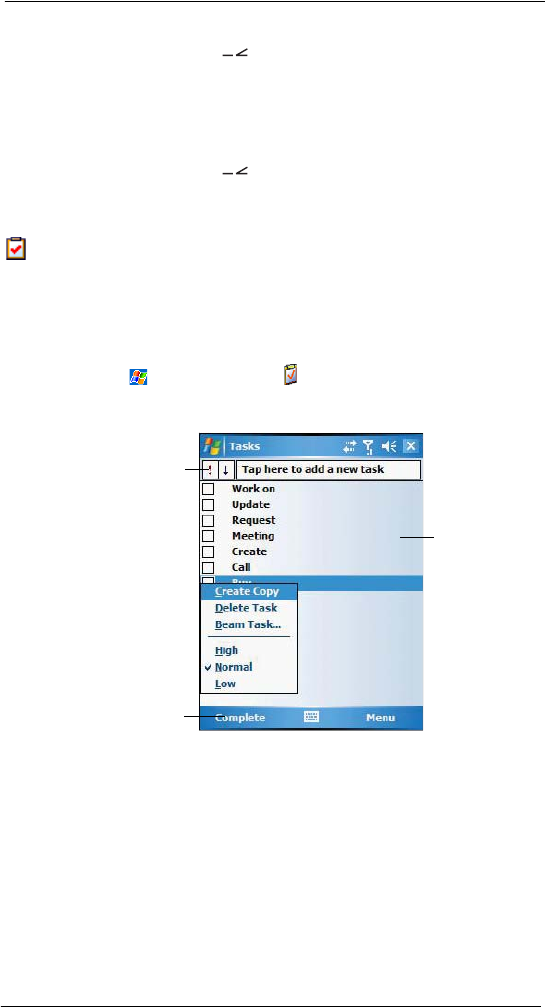
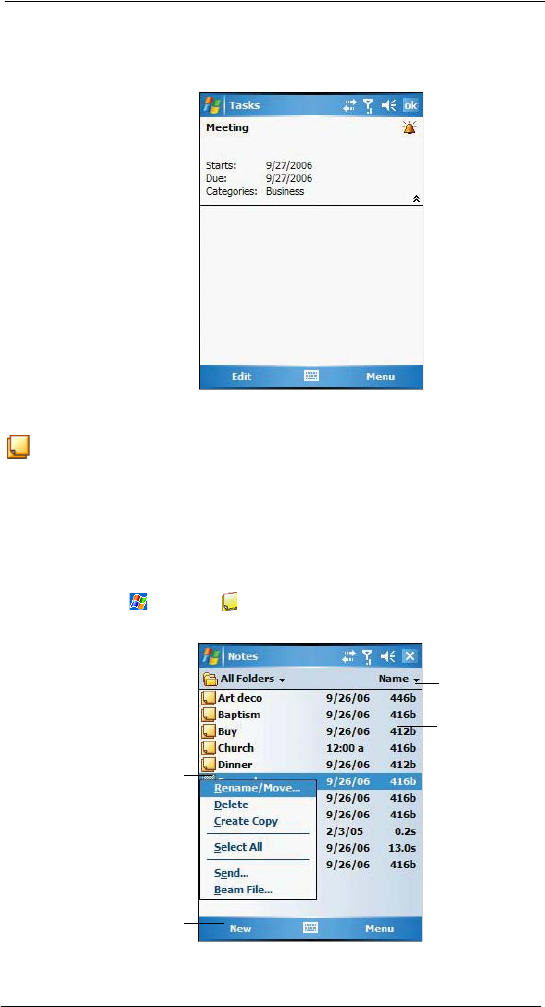
To open Tasks:
•Tap , Programs, then Tasks .
Tasks opens to the tasks list. To change the way information displays in the
list, tap Menu, then Options.
Tap to display or edit
task details.
Tap and hold to dis-
play a pop-up menu
of actions.
Indicates high priority.
Tap to create a new
task.
8 Microsoft Pocket Outlook
Tasks
123
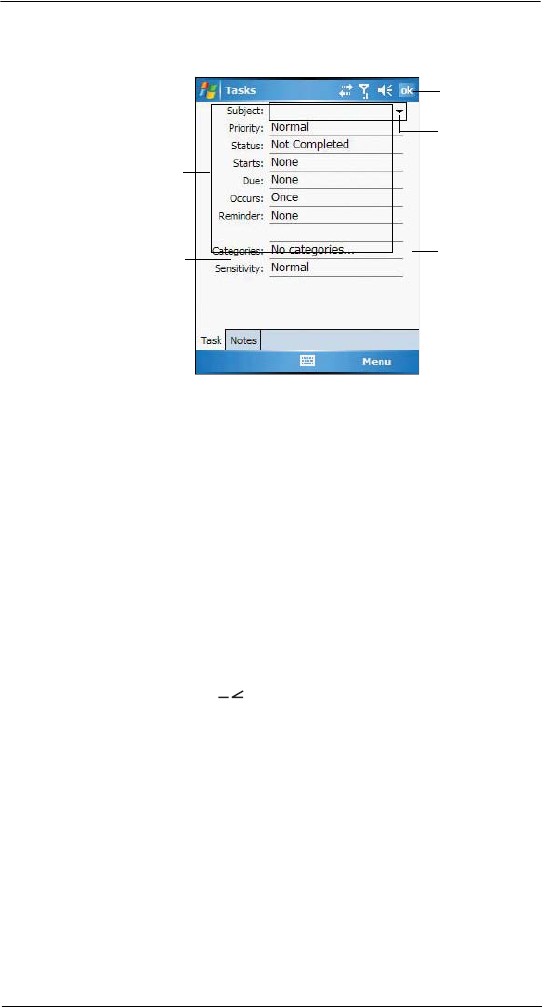
Creating a task
1 Tap New.
2 Using the input panel, enter a description.
3 You can enter a start date and due date or enter other information by first tapping
the field.
If the soft keyboard is open, hide it to see all available fields.
4 To assign the task to a category, tap Categories and select a category from the list.
In the task list, you can display tasks by category by tapping the pick list on the top-
left corner of the screen.
5 To add notes, tap the Notes tab.
You can enter text, draw, or create a recording.
6 After completing the details, tap OK.
Beaming a Task
You can send a task to another IR or Bluetooth-enabled device by beaming it.
1 Tap and hold the task item.
2 Tap Beam Task on the pop-up menu.
3 Do either one of the following:
•Select a Bluetooth-enabled device, then tap the Tap to send link.
•Align the IR port of your device with that of the other IR-enabled
device so that they are unobstructed and within close range, then select
the IR-enabled device and tap the Tap to send link.
Tap to return to the
Tasks list (the new
task is saved
automatically.
Scroll to see more
fields.
Tap to choose
predefined subjects.
Tap a field to enter a
task information.
Notes is a good
place for additional
task information.
8 Microsoft Pocket Outlook
Notes
124
Using the Tasks summary screen
When you tap a task in the task list, a summary screen displays. To change the task, tap
Edit.
Notes
Capturing thoughts and ideas
Quickly capture thoughts, reminders, ideas, drawings, and phone numbers with Notes.
You can create a written note or a recording. You can also include a recording in a note.
If a note is open when you create the recording, it is included in the note as an icon. If the
note list displays, it is created as a stand-alone recording.
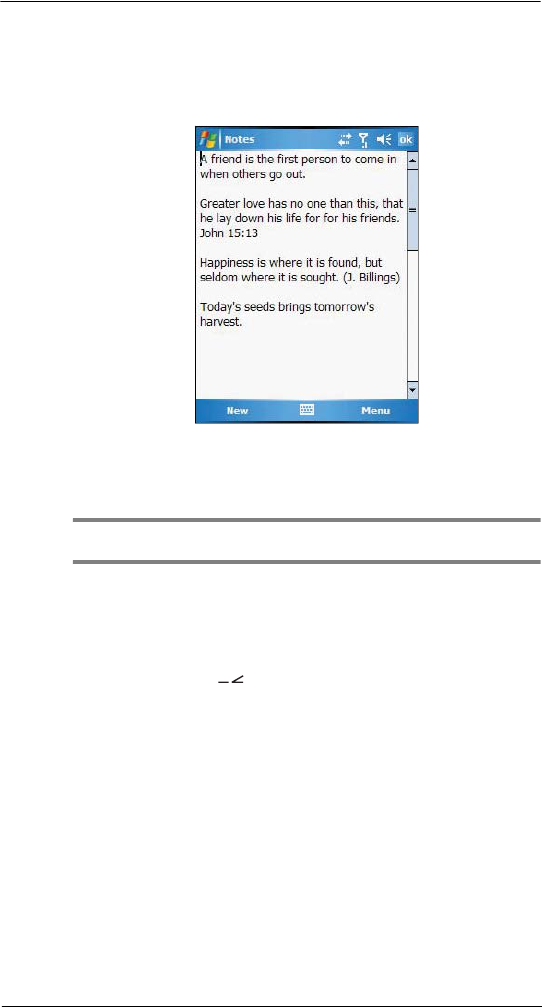
To open Notes:
•Tap , then Notes .
Notes opens to the note list.
Tap to change the
sort order of the list.
Tap to open a note or
play a recording.
Tap to create a new
item.
Tap and hold to
display a pop-up
menu of actions.
8 Microsoft Pocket Outlook
Notes
125
Creating a note
1 Tap New.
2 Create the note by writing, drawing, typing, or recording.
For more information about using the input panel, writing and drawing on the
screen, and creating a recording, go to page 45.
Sending a Note
You can send a note to another person either by email or by beaming it to that person’s
IR or Bluetooth-enabled device.
NOTE: You must first set up an email account on your device before you can send a note by email.
Go to page 113 for instructions on setting up an email account.
To send a note by beaming:
1 In the task list, tap and hold the note.
2 Tap Beam File on the pop-up menu.
3 Do either one of the following:
•Select a Bluetooth-enabled device, then tap the Tap to send link.
•Align the IR port of your device with that of the other IR-enabled
device so that they are unobstructed and within close range, then select
the IR-enabled device and tap the Tap to send link.
To send a note by email:
1 In the task list, tap and hold the note.
2 Tap Send via E-mail on the pop-up menu.
A new message window in Inbox displays with the selected note shown as an
attachment (*.pwi).
3 Proceed to completing the email message.

8 Microsoft Pocket Outlook
Notes
126

9 Companion Programs
Word Mobile
127
9 Companion Programs
This chapter describes the companion programs available on your device— Word
Mobile, Excel Mobile, PowerPoint Mobile and Windows Media Player 10.1 Mobile for
Pocket PC.
•Word Mobile
•Excel Mobile
•PowerPoint Mobile
•Windows Media Player 10.1 Mobile for Pocket PC
Word Mobile
With Word Mobile you can:
•Create new documents on your device or you can copy documents from
your PC to your device.
•Synchronize documents between your PC and your device so that you have the
most up-to-date content in both locations.
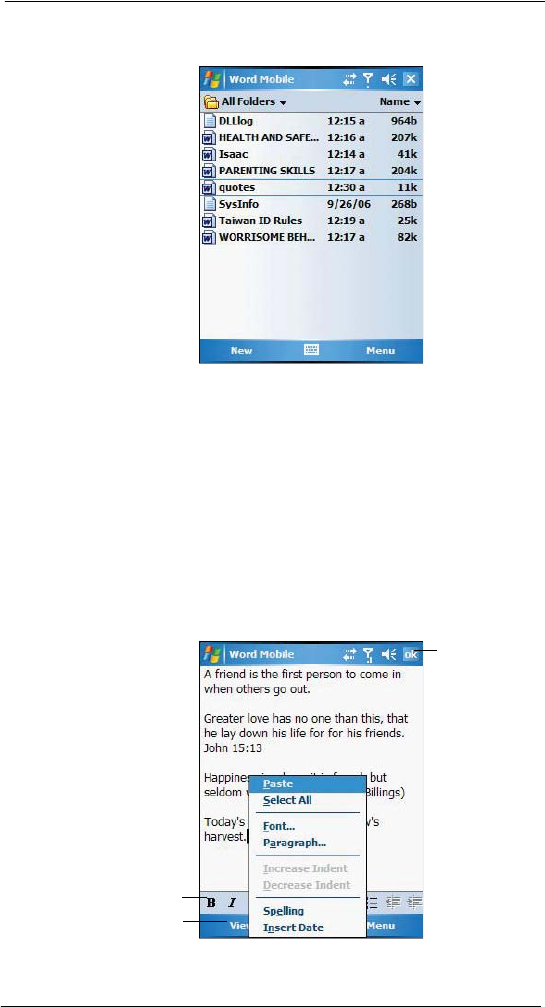
To open Word:
•Tap , Programs, then Word Mobile .
Word opens to the Pocket Word file list.
Creating a new Document
•In the document list window, tap New.
A blank document appears. Or, if you've selected a template for new
documents in the Options dialog box, that template appears with appropriate
text and formatting already provided.
You can save a document you create or edit in a variety of formats, including:
•Word (.doc)
•Document Template (.dot)
•Rich Text Format (.rtf)
•Plain Text (.txt)
Word Mobile provides basic formatting options, such as font style, paragraph alignment,
and bullet options, in its toolbar. You can show and hide this toolbar by tapping View,
then Toolbar on the command bar.
Using the Word Mobile file list
Word Mobile contains a list of the files stored on your device. The file list is the default
window when you open Word Mobile. Every time you tap OK in an open document, the
file list displays.
•Tap a file in the list to open it. You can open only one document at a time;
when you open a second document, you'll be asked to save the first.
9 Companion Programs
Word Mobile
128
•To delete, make copies of, and send files, tap and hold a file in the list, then
select the appropriate action on the pop-up menu.
Entering information
You can enter information in Word Mobile in one of four modes—typing, writing, drawing,
and recording—which are displayed on the View menu.
If you're opening a Word document created on a computer, select Wrap to Window on
the View menu so that you can see the entire document.
You can change the zoom magnification by tapping View, Zoom, then select the
percentage you want. Select a higher percentage to enter text and a lower one to see
more of your document.
Typing Mode
•Using the input panel, enter typed text into the document.
•To format existing text and to edit text, first select the text. You can select
text as you do in a Word document, using your stylus instead of the mouse
to drag through the text you want to select.
•To find text in a document, tap Menu, Edit, then Find/Replace.
Tap to return to the
document list
(changes are saved
automatically).
Tap to select
formatting options.
Tap to show or hide
toolbar.

9 Companion Programs
Word Mobile
129
Recording Mode
In recording mode, you can embed a recording into your document. Recordings are
saved as .wav files. For more information on recording, see page 45.
Sending a document
You can send a Word document to another person either by email or by beaming it to that
person’s IR or Bluetooth-enabled device.
NOTE: You must first set up an email account on your device before you can send a note by email.
Go to page 113 for instructions on setting up an email account.
To send a document by beaming:
1 In the Word document list, tap and hold the document.
2 Tap Beam File on the pop-up menu.
3 Do either one of the following:
•Select a Bluetooth-enabled device, then tap the Tap to send link.
•Align the IR port of your device with that of the other IR-enabled
device so that they are unobstructed and within close range, then select
the IR-enabled device and tap the Tap to send link.
To send a document by email:
1 In the Word document list, tap and hold the document.
2 Tap Send via E-mail on the pop-up menu.
A new message window in Inbox displays with the selected note shown as an
attachment (*.pwi).
3 Proceed to completing the email message.
Printing a document
Your device supports printing of documents on a Bluetooth-enabled printer. An additional
software needs to be installed on your device to enable you to print files to a Bluetooth-
enabled printer. Contact your local dealer for more information..
9 Companion Programs
Excel Mobile
130
Excel Mobile
With Excel Mobile you can:
•Create new spreadsheets on your device or you can copy spreadsheets
from your PC to your device.
•Synchronize spreadsheets between your PC and your device so that you
have the most up-to-date content in both locations.
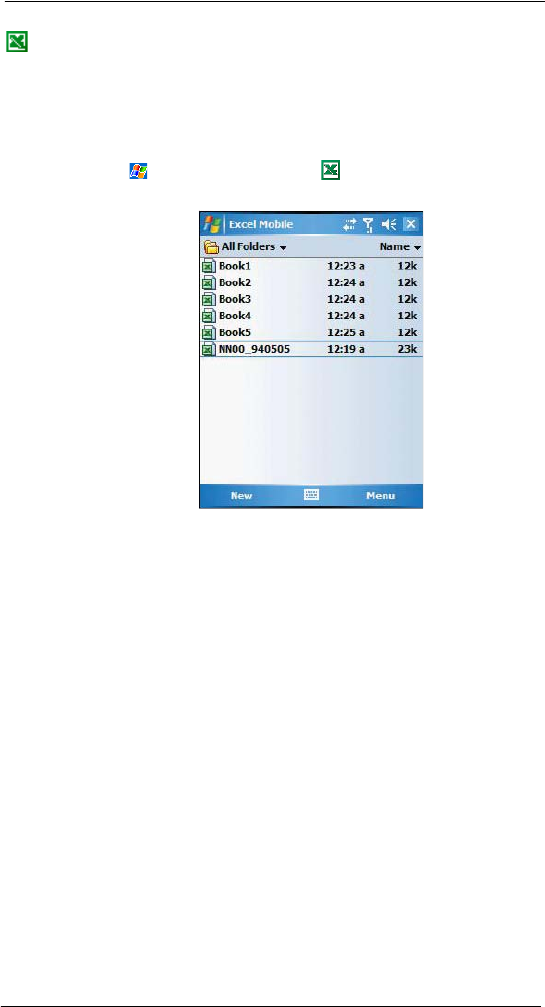
To open Excel:
•Tap , Programs, then Excel Mobile .
Excel opens to the Pocket Excel file list.
Creating a new spreadsheet
•In the Excel Mobile file list, tap New.
A blank spreadsheet appears. Or, if you've selected a template for new
spreadsheets in the Options dialog box, that template appears with
appropriate text and formatting already provided.
You can save a workbook you create or edit it in a variety of formats, including:
•Excel Workbook (.xls)
•Excel Template (.xlt)
9 Companion Programs
Excel Mobile
131
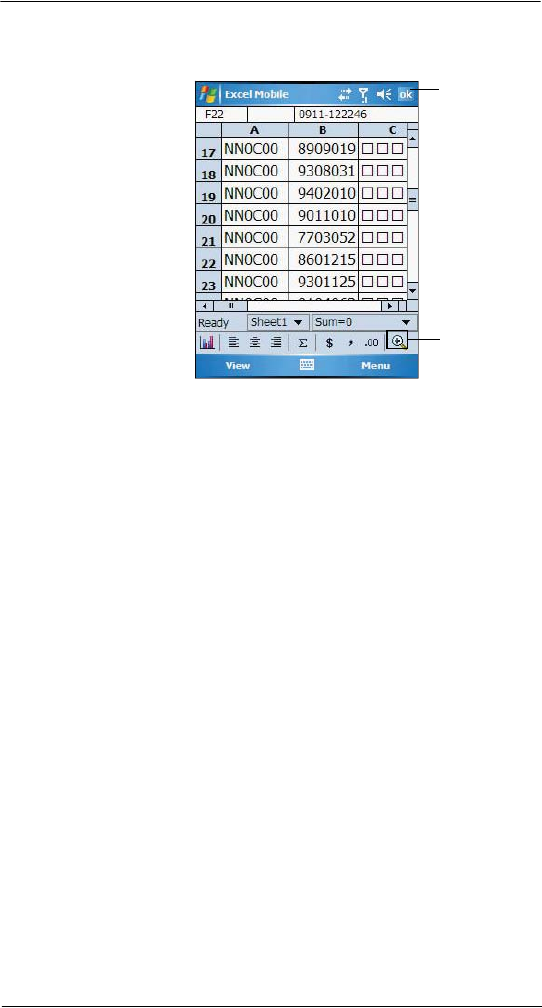
Pocket Excel provides fundamental spreadsheet tools, such as formulas, functions,
sorting, and filtering, in its toolbar. You can show and hide this toolbar by tapping the
View, then Toolbar.
Using the Excel Mobile file list
Excel Mobile contains a list of the files stored on your device. The file list is the default
window when you open Excel Mobile. Every time you tap OK in an open workbook, the
file list displays.
•Tap a file in the list to open it. You can open only one workbook at a time;
when you open a second workbook, you'll be asked to save the first.
•To delete, make copies of, and send files, tap and hold a file in the list, then
select the appropriate action from the pop-up menu.
Tips for working in Excel Mobile
Note the following when working in large worksheets in Excel Mobile:
•View in full-screen mode to see as much of your worksheet as possible.
•Tap View, then Full Screen.
•To exit full screen mode, tap Restore.
•Show and hide window elements.
•Tap View, then tap the elements you want to show or hide.
•You might want to freeze the top and left-most panes in a worksheet to keep
row and column labels visible as you scroll through a sheet.
(a) Select the cell where you want to freeze panes.
(b) Tap View, then Freeze Panes.
•Split panes to view different areas of a large worksheet.
(a) Tap View, then Split.
(b) Drag the split bar to where you want it.
To remove the split, tap View, then Remove Split.
•Show and hide rows and columns.
•To hide a row or column:
(a) Select a cell in the row or column you want to hide.
(b) Tap Menu, Format, Row or Column, then Hide.
•To show a hidden row or column:
(a) Tap Menu, then Undo Row Height.
(b) Type a reference that is in the hidden row or column.
(c) Tap Menu, Format, Row or Column, and then Unhide.
Tap to return to the
spreadsheet list
(changes are saved
automatically).
Zoom button

9 Companion Programs
PowerPoint Mobile
132
Beaming a worksheet
You can send a worksheet to another person either by email or by beaming it to that
person’s IR or Bluetooth-enabled device.
NOTE: You must first set up an email account on your device before you can send a note by email.
Go to page 113 for instructions on setting up an email account.
To send a worksheet by beaming:
1 In the Excel book list, tap and hold the file.
2 Tap Beam File on the pop-up menu.
3 Do either one of the following:
•Select a Bluetooth-enabled device, then tap the Tap to send link.
•Align the IR port of your device with that of the other IR-enabled
device so that they are unobstructed and within close range, then select
the IR-enabled device and tap the Tap to send link.
To send a worksheet by email:
1 In the Excel book list, tap and hold the file.
2 Tap Send via E-mail on the pop-up menu.
A new message window in Inbox displays with the selected note shown as an
attachment (*.pwi).
3 Proceed to completing the email message.
PowerPoint Mobile
Use PowerPoint Mobile to view slide show presentations. You can download slide show
presentations from a storage card, company network, internet, email attachment or
obtained by synchronizing with your personal computer.
To open PowerPoint Mobile:
•Tap , Programs, then PowerPoint Mobile .
Getting slide shows onto your device
You can download PowerPoint files from a memory card or the Web to your computer,
then synchronize them with your device. To do so, you need to activate your device (you
only need to activate it once), then set up synchronization for files in ActiveSync.
To get slide show presentation onto your device:
1 Open ActiveSync on your computer.
2 Use Windows Explorer on your computer to locate the PowerPoint Mobile folder
and the Pocket_PC My Documents folder.
3 Use ActiveSync to download the files from your computer to your device as
described in the Read Me file in the PowerPoint Mobile folder.
Using PowerPoint Mobile
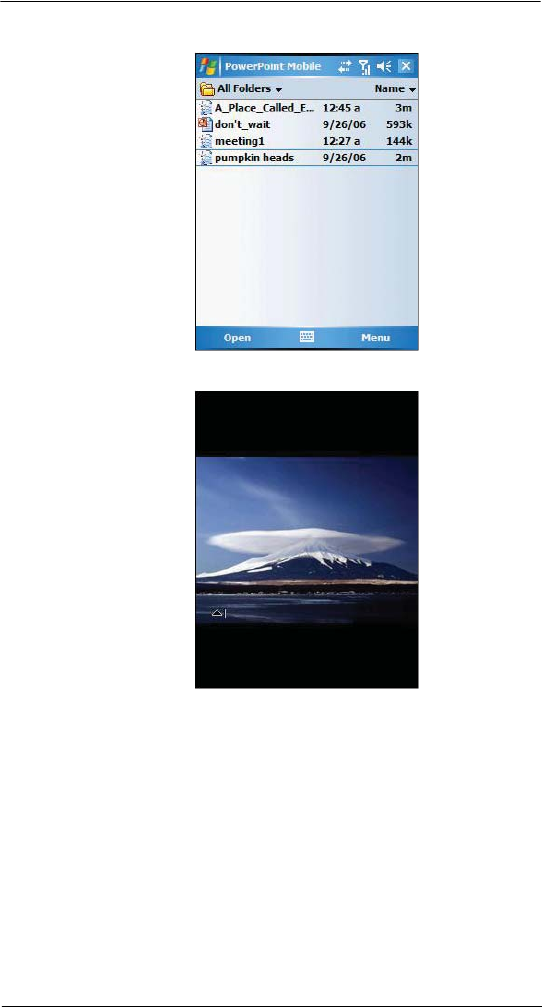
PowerPoint Mobile contains a list of files stored on your device. The file list is the default
window when you open PowerPoint Mobile.
To open a PowerPoint presentation:
1 Tap , Programs, then PowerPoint Mobile .
9 Companion Programs
PowerPoint Mobile
133
2 Tap the slide show you want to view.
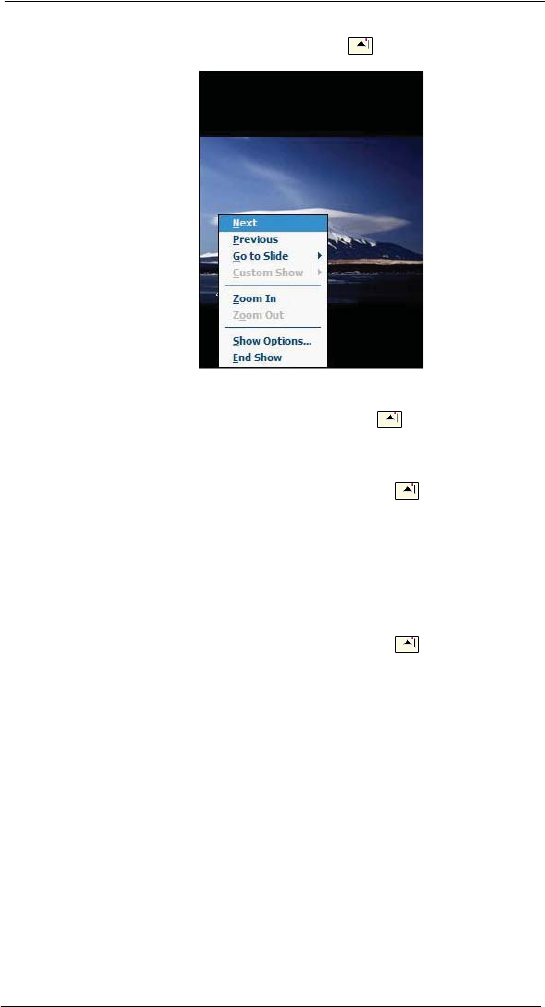
3 Tap the current slide to advance to the next slide.
9 Companion Programs
PowerPoint Mobile
134
To stop a slide show presentation:
In a PowerPoint Mobile presentation, tap and hold , then tap End Show.
To change the slide show presentation:
1 In a PowerPoint Mobile presentation, tap and hold , then tap Show Options.
2 Tap the Orientation tab, then select the orientation.
To navigate between slides
1 In a PowerPoint Mobile presentation, tap and hold the , then tap
Go to Slide.
2 Tap the slide you want to view.
Setting the slide show playback options
You can change the PowerPoint presentation settings to turn off animation, prevent slide
show transitions from playing, or set time interval between each slide.
To set the slide show playback options:
1 In a PowerPoint Mobile presentation, tap and hold the , then tap
Show Options.
2 Tap the Playback tab, select the Override playback options for all files check box.
3 Do any of the following:
•Select “Show without animation” check box to turn off builds and other
animations.
•Select “Show withour slide transition” check box to prevent slide
transitions from playing.
•Select “Use slide timings, if present” check box to use the timings
recorded with each slide in a presentation.
•Select “Loop continuously” check box to automatically advance to the
first slide after the last slide in a presentation.
4 Tap OK.

9 Companion Programs
Windows Media Player
135
Sending a PowerPoint file
You can send a PowerPoint file to another person either by email or by beaming it to that
person’s IR or Bluetooth-enabled device.
NOTE: You must first set up an email account on your device before you can send a note by email.
Go to page 113 for instructions on setting up an email account.
To send a PowerPoint file by beaming:
1 In the PowerPoint document list, tap and hold the document.
2 Tap Beam File on the pop-up menu.
3 Do either one of the following:
•Select a Bluetooth-enabled device, then tap the Tap to send link.
•Align the IR port of your device with that of the other IR-enabled
device so that they are unobstructed and within close range, then select
the IR-enabled device and tap the Tap to send link.
To send a PowerPoint file by email:
1 In the PowerPoint document list, tap and hold the document.
2 Tap Send via E-mail on the pop-up menu.
A new message window in Inbox displays with the selected note shown as an
attachment (*.pwi).
3 Proceed to completing the email message.
Windows Media Player
Enjoy your favorite music and movies on the road, online or offline, with the new
Windows Media Player 10 Mobile for Pocket PC. The Player provides you with the
highest quality audio and video experience for your mobile entertainment and it works
seamlessly with Windows Media Player 10 on your Windows XP-based computer.
Program enhancements
A lot of new features are added to the new Windows Media Player 10 Mobile for Pocket
PC.
Improved playback support
•Supports Windows Media Audio and Video 9 Series codecs, which gives 20
percent improvements in audio compression and as much as 50 percent for
video compared with previous versions.
•Better MP3 playback support lets your enjoy MP3 music files more.
•Smoother video playback improves playback of broadband content from the
Web as well as local video content that is processor-intensive.
•Multiple bit-rate (MBR) support enhanced your music experience with
automatic sensing and selection of the bit rate that is best suited for your
device and connection.
•Variable Bit Rate (VBR) support lets you play content that has been
optimized for quality to give you optimum playback experience.
Enhanced broadband playback support
•Significant improvements in performance now allows you to play back nearly
any content from the web. Supports up to 300 Kbps content played back
directly from the Web over either a wired or Wi-Fi connection.
•Improved networking support for new IPv6 protocols lets you enjoy easier
Internet connection for enhanced Web streaming, providing you with a
seamless browsing and media playback experience.

9 Companion Programs
Windows Media Player
136
Friendlier playback controls
•The button mapping function allows you to assign hardware buttons on your
device to perform standard playback functions such as Play, Pause, Stop or
Fast Forward. You can also assign a button to toggle off the screen to help
minimize power consumption while continuing to listen to music.
•The Player volume control is now separate from the system sounds control
allowing you to adjust the level of your media playback while retaining the
volume level set for system sounds.
Better media management
•Supports auto-discovery of supported media content means that the Player
now automatically scans your device‘s main memory and storage cards for
all supported digital media types including WMA, MP3, WAV, WMV and
ASF.
•Direct support in Windows Media Player 10 on your computer lets you chose
your playlists and easily transfer them to your device.
•Supports recording of your favorite TV shows to your computer. With the
Auto Sync feature in Windows Media Player 10 on your computer, you can
plug your device into your computer, and your favorite TV programs can be
automatically converted and synchronized to your device.
Customized entertainment experience
•Match the Player’s look with your style and mood by downloading a variety of
custom skins ranging from cute rubber duckies to retro Elvis themes.
•Use your favorite WMA music to create and apply your own custom WMA
ring tones.
Copying files to your device
Use the Windows Media Player on your computer to copy your digital media files to your
Pocket PC. Doing this, instead of simply copying files using the Explore button in
ActiveSync, ensures that licences are copied with protected files.
1 In Windows Media Player on your computer, click Copy to CD or Device.
-or-
On the File menu, point to Copy, and then click Copy to Portable Device (you
must first connect your device to your computer).
2 In the Items to Copy pane, in the drop-down list, click the playlist, category, or other
item that you want to copy.
3 Clear the check boxes next to any files you do not want to copy.
4 In the Items on Device pane, in the drop-down list, click the name of your device.
5 Click the Copy button.
The device Player verifies that there is sufficient storage space on your device to
copy the selected files. If there is sufficient space, the files are converted (if
necessary) and copied.
6 Repeat steps 2-5 for any other items that you want to copy to your device.
NOTE: To facilitate faster copying of audio files to your device, it is recommended that you configure
Windows Media Player 10 on your computer to automatically determine the quality level settings
applicable to your MC35 EDA.
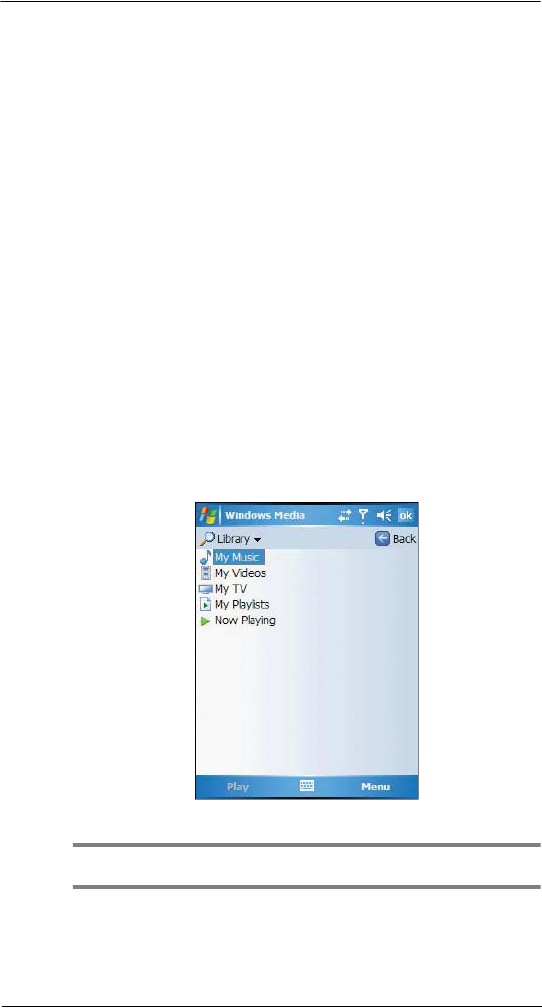
To open Windows Media Player 10 Mobile for Pocket PC:
•Tap , then Windows Media .
The Player displays the last open window from your previous session.
9 Companion Programs
Windows Media Player
137
The library
The library contains links to your playlists and audio or video files. You can sort content
by criteria such as artist name, album title or genre. By default, Windows Media Player 10
Mobile automatically searches your device for compatible digital media files and adds
them to the My Device library. Similarly, when you insert a storage card into your device,
Windows Media Player 10 Mobile automatically detects the files and adds them to the
Storage Card library.
If the Player does not detect new files that you copy to your device, you can manually
update the library by tapping Menu, then Update Library.
The playlist
A playlist is a customized list of digital media files that you want to watch or listen to.
Using a playlist lets you group various digital media files together and specify the order
you want the files to play in. You can also use playlists to copy files to your computer.
You can create a playlist based on:
•Source - For example, tracks from various CDs of your favorite artist or
streaming media from an online music site.
•Personal preferences - For example, a playlist of tracks belonging to your
favored music genre or video clips from your funny movie collection.
•Mood or activities - For example, a playlist of tracks you want to listen while
travelling or during your R&R periods.
The Player has two default playlists:
•Local Content - Consists of all compatible audio and video files stored on
your device and/or storage card.
•Web Favorites - Consists of your favorite streaming media files. This playlist
is empty until you add items to it.
Adding items to the Now Playing playlist
1 In the Player window, tap Menu, then Library.
2 Select a library in the Library pick list (for example a storage card).
TIP: If the Player does not detect new files that you copy to your device, you can manually update
the library by tapping Menu, then Update Library. After the files have been added, then tap Done.
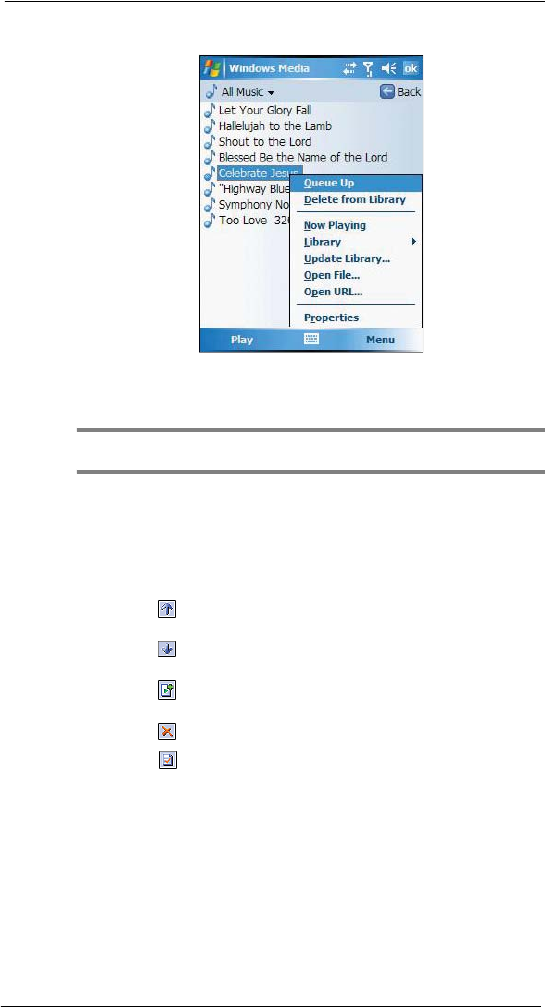
3 Select a category, then tap and hold the item that you want to add in the Now
Playing folder.
9 Companion Programs
Windows Media Player
138
4 Tap Menu, then Queue Up.
5 Tap Menu, then Now Playing.
6 On the Now Playing window, tap the Add button to switch to the Library window and
find items to add to the Now Playing playlist.
NOTE: To quickly add a group of files to the Now Playing playlist, tap and hold an item in the library
(such as an album name, artist name or genre), then tap Queue Up.
Editing the Now Playing playlist
1 In the Player window, tap Now Playing on the command bar.
- or -
Tap Menu, then Library, then tap Now Playing, then the playlist you want to edit.
2 Do any of the following:
•Tap to move the selected item up in the playlist. You can also tap
and drag an item to move it up in the playlist.
•Tap to move the selected item down in the playlist. You can also
tap and drag an item to move it down in the playlist.
•Tap to display the Library window and add items to the Now
Playing playlist.
•Tap to delete the selected item from the playlist.
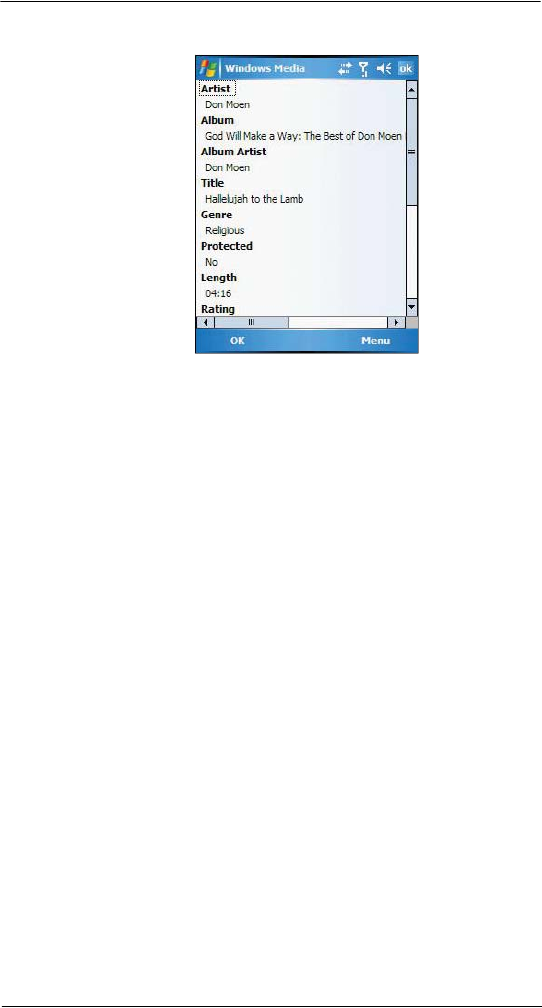
•Tap to view track properties of the selected item.
Viewing track properties
You can check the file properties of a track for your reference. You can do this either in a
playlist window or in the Player window.
To view track properties from a playlist window:
1 In the Player window, tap Now Playing.
- or -
Tap Menu, Library, then Now Playing.
9 Companion Programs
Windows Media Player
139
2 Tap a file or Play a file, then tap Menu, then Properties.
3 Tap the scroll bar to view more fields.
To view track properties from the Player window:
•Tap Menu, then Properties.
Tap the scroll bar to view more fields.
Deleting an item in the Now Playing playlist
1 In the Player window, tap Now Playing.
2 Tap a library.
3 Tap and hold the playlist name, then tap Remove from Playlist from the pop-up
menu.
- or -
Tap the playlist name, tap Menu, then Remove from Playlist.
File Playback
The Player supports playback of the following file formats:
•Windows Media - Including .asf, .asx, .wax, .wm, .wma, .wmv, .wmx, and
.wvx files.
•MPEG - .mp3 files
You can play files stored in your device, a storage card, or a network.
Playing a file stored in your device or in a storage card
If you want to use files stored in a storage card, install the card to your device. Go to
page 36 for instructions.
1 In the Player window, tap Now Playing.
2 Tap the library, then the playlist/location where the file you want to play is assigned/
located.
3 Tap Play.
Screen shifts to the Player window. Unless you selected the last listed track in a
playlist or location, the rest of the tracks will automatically be played.
Playing a streaming media file
You can play files located on a network. Your device must first be connected to the
network before you can do this.
1 Tap Menu, then Library in the Player window.
9 Companion Programs
Windows Media Player
140
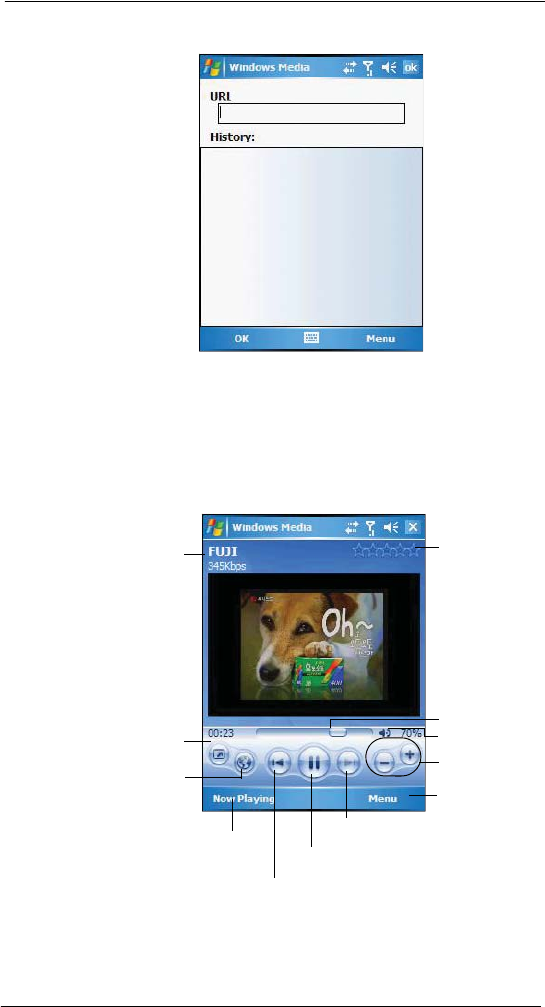
2 Tap Menu, then Open URL.
3 Enter a URL.
4 Tap OK.
Screen shifts to the Player window.
Playback controls
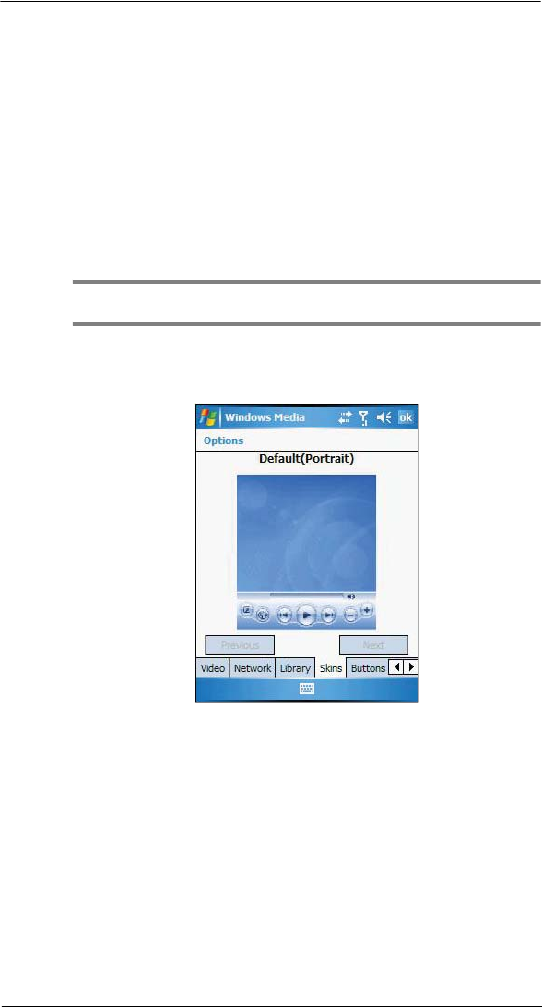
The user interface of the Player window lets you easily manage all aspects of the track
playback. The screenshot below shows the functions of the Player control buttons, as
well as all available menus.
Displays the rating
current file
Displays the track
title, artist name,
and/or genre.
Adjust the progress
of the current track.
Tap to adjust
volume.
Tap to toggle the
sound on or off.
Tap to skip to next track.
Tap to play or pause.
Tap to skip to previous track.
Tap to shift to full
screen mode.
Tap to go to http://
windowsmedia.com.
Tap to display the
Now Playing playlist.
Tap to select
playback mode and
program settings.
9 Companion Programs
Windows Media Player
141
To play a playlist in random order:
•Tap Menu, then Shuffle.
To repeat playback of a playlist:
•Tap Menu, then Repeat.
Customizing the Player
You can change the appearance and functionality of the Player to suit your personal style
and preferences.
Using skins to change the Player look
Change the appearance of the Player by using skins. To download skins and learn
related information, go to http://www.microsoft.com/windows/windowsmedia/.
To download skins from your computer to your device, follow the procedures described in
the “Using ActiveSync to exchange files” section on page 36.
NOTE: To make sure that downloaded skins appear in the Skin Chooser panel, do not store the skin
files in the Windows folder of your device.
To apply a skin:
1 In the Player window, tap Menu, then Options.
2 Tap the Skins tab, then tap the Previous or Next button to locate a skin.
3 Tap OK.
The Player switches to skin mode.
Changing your audio and video settings
You can change the audio and video settings of the Player to suit your listening
preferences.
To set audio and video preferences:
1 In the Player window, tap Menu, then Options.
2 Tap the Playback tab, then do any of the following:
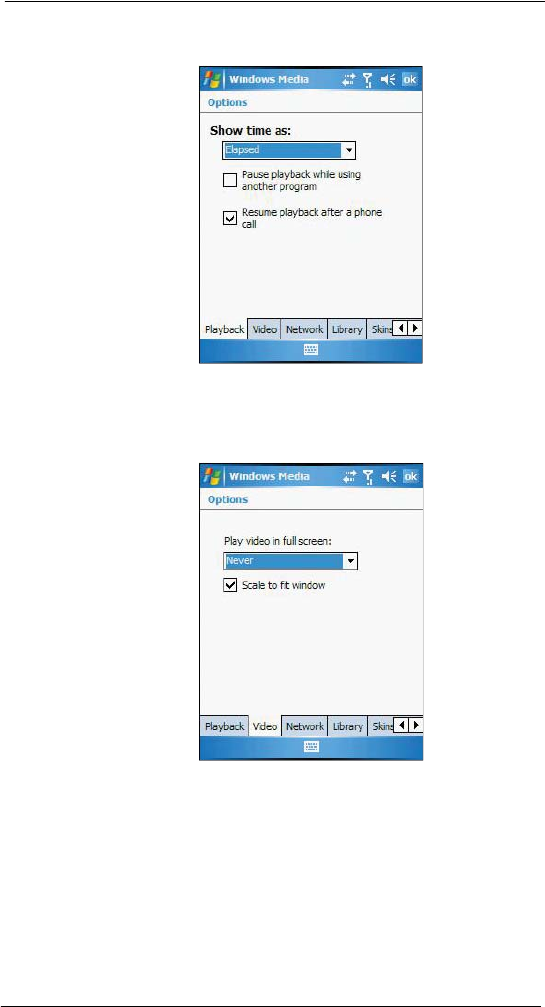
•In the “Show time as” pick list, select whether to show how much time
has elapsed or remaining on the Player window.
•Tap the “Pause playback while using another program” check box, to
pause or continue playback when another program window is
displayed.
9 Companion Programs
Windows Media Player
142
•Tap the “Resume playback after a phone call” check box, to continue
playback after a phone call.
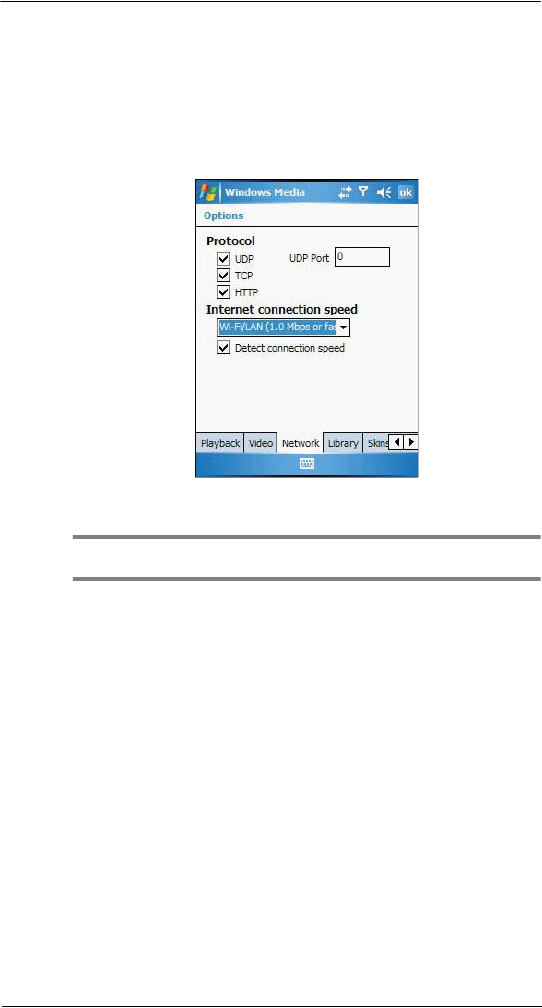
3 Tap the Video tab, then do any of the following:
•In the “Play video in full screen” pick list, select a screen size for video
playback.
•Tap the “Scale to fit in window” check box to scale down oversized
video files (typically over 240 x 176 pixels).
4 Tap OK.
9 Companion Programs
Windows Media Player
143
Changing your network settings
You can define Player settings for connecting to a network to optimized playback of
streaming media.
To set network settings:
1 Tap Menu, then Options.
2 Tap the Network tab, then select the check box opposite each network protocol you
want to enable.
You must select at least one protocol.
3 Select the speed of your network connection.
4 Tap OK.
NOTE: Some networks use a firewall that prevents users from receiving streams. Contact your
network administrator for more information.
Changing the startup screen
You can define the startup screen when you start the Windows Media Player Mobile.
To change the startup screen:
1 Tap Menu, then Options.
2 Tap the Library tab.
3 Do either one of the following:
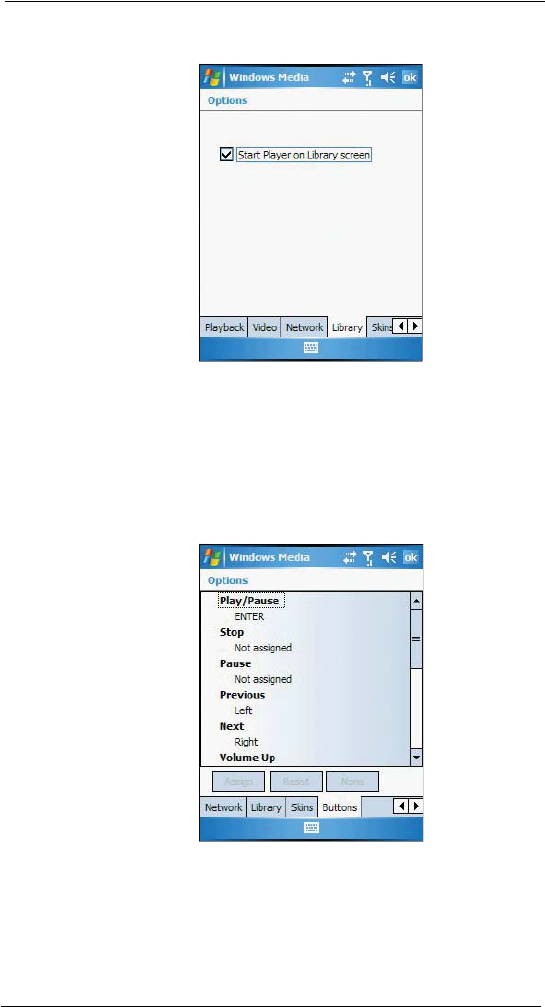
•Select the “Start Player on Library screen” check box, to show the
Library window when you start the Windows Media Player Mobile.
9 Companion Programs
Windows Media Player
144
•Clear the “Start Player on Library screen” check box, to show the Player
window when you start the Windows Media Player Mobile.
4 Tap OK.
Setting hardware playback controls
The button mapping function allows you to assign hardware buttons on your device to
perform standard playback functions. You can also assign a button to toggle off the
screen to help minimize power consumption while continuing to listen to music.
To map a button:
1 Tap Menu, then Options.
2 Tap the Buttons tab.
3 In the list of controls, tap a control name.
4 Tap the Assign button, then press the hardware button on your device.
5 Tap OK.

9 Companion Programs
Windows Media Player
145
Licenses and Protected files
Some digital media content from the Internet, CD tracks, and videos have associated
licenses that protect them from being unlawfully distributed or shared.
Licenses are managed and created using digital rights management (DRM), which is the
technology for securing content and managing the rights for its access.
Some licenses may prevent you from playing files that are copied to your device. Files
that have licenses associated with them are called protected files.
Use the Windows Media Player on your computer to copy your digital media files to your
device. Doing this, button in ActiveSync, ensures that licences are copied with protected
files.
For more information on using Windows Media Player for Pocket PC, tap , then tap
Help .

9 Companion Programs
Windows Media Player
146
10 Wireless Data Programs
Internet Explorer Mobile
147
10 Wireless Data
Programs
Your MC35 has built-in support for a range of wireless data communication programs:
•Use Internet Explorer Mobile to browse the Web and view WAP-enabled sites.
•Use Messaging to send and receive email/text messages.
•Use MSN Messenger to send and receive instant messages.
•Use MSN Hotmail to send and receive email.
•Use Terminal Services Client to wirelessly log onto a Windows NT server type PC
that is running Terminal Services software
•Use ActiveSync to remotely synchronize with your computer.
This chapter describes how to use Internet Explorer Mobile, Messaging, MSN
Messenger, and Terminal Services Client.
•Internet Explorer
•Messaging
•MSN Messenger
•Terminal Services Client
Internet Explorer Mobile
Use Internet Explorer Mobile to view Internet or Intranet sites from your device. You can
download files and programs when browsing these sites. During synchronization with
your computer, you can choose to download your favorite links and mobile favorites that
are stored in the Mobile Favorites subfolder of Internet Explorer on your computer.
Internet Explorer Mobile includes support for:
•XHTML Basic
•Cascading Style Sheets
•WML 2.0
•JScript 5.5
•IPv6
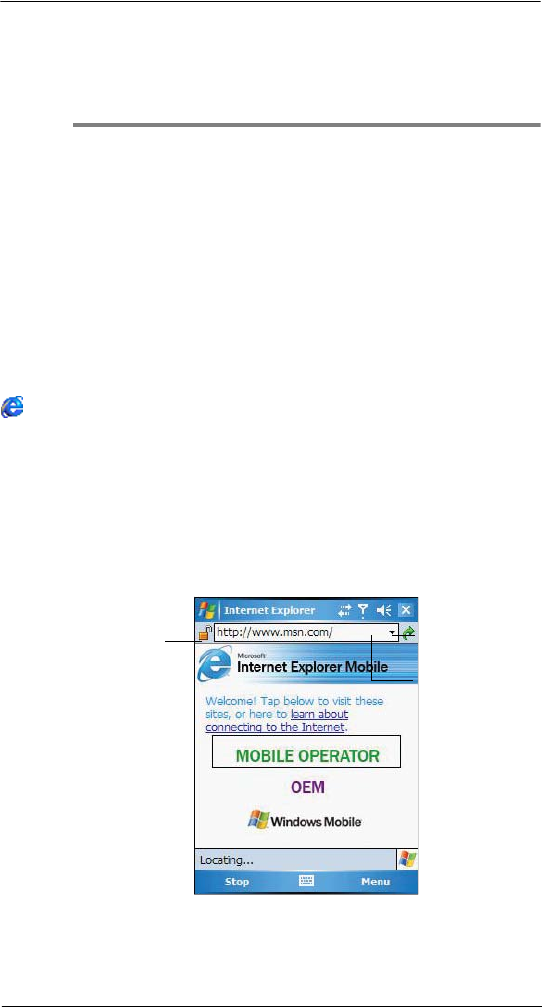
Go button
Tap to select a previ-
ously selected site.
Enter the web
address you want to
visit.
10 Wireless Data Programs
Internet Explorer Mobile
148
To open Internet Explorer Mobile:
•Tap , then Internet Explorer.
Browsing the Internet
To connect and start browsing, do either one of the following:
•Tap Menu, Favorites , then tap the favorite you want to view.
•In the address bar that appears at the top of the screen, enter the Web
address you want to visit, then tap .
•Tap the Address Bar pick list to choose from previously entered addresses.
Viewing the History list
•Tap Menu, then History.
To change the number of days of links stored in the History list and clear
the History list:
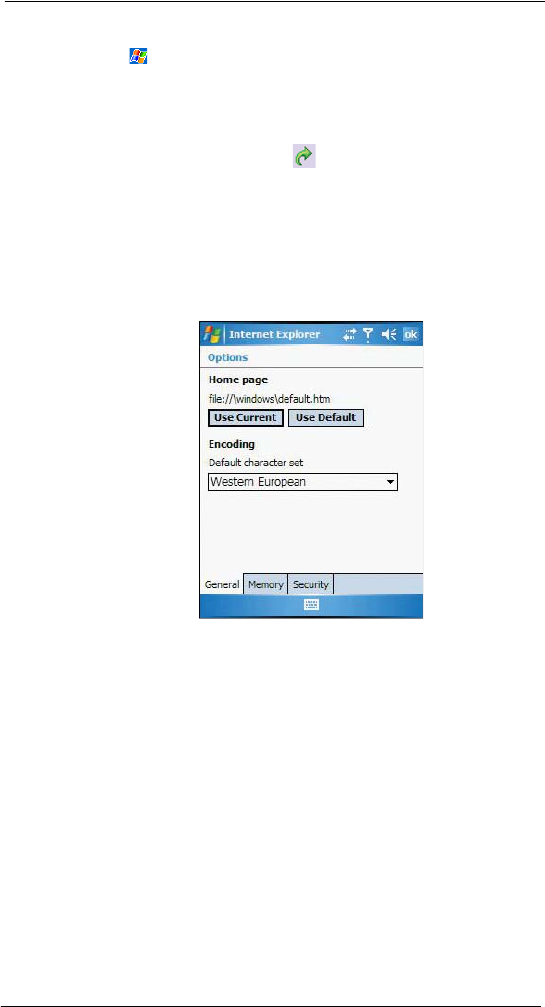
1 In the Internet Explorer Mobile main window, tap Menu, Tools, then Options.
2 Tap Memory tab.
3 Tap the pick list under “Save links to pages visited in the past” to set the number of
days of links.
4 Tap Clear History to delete the stored links.
5 Tap OK.
10 Wireless Data Programs
Internet Explorer Mobile
149
Mobile favorites
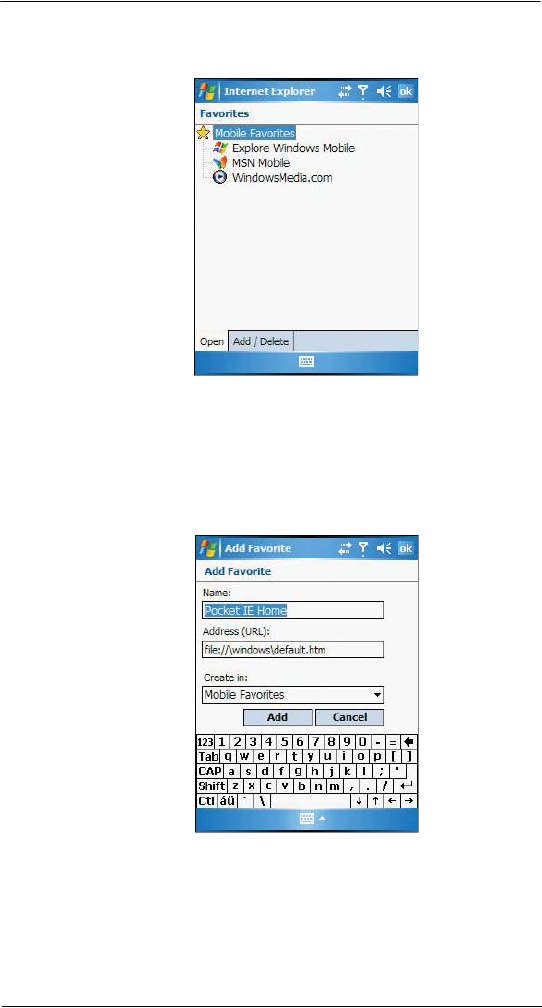
1 To display the Mobile Favorites navigation window, tap Menu, then Favorites .
2 Tap the page you want to view.
The page that was downloaded the last time you synchronized with your computer
displays. If the page is not on your device, the favorite is dimmed. Synchronize with
your computer again to download the page to your device, or connect to the Internet
to view the page.
To add a favorite link:
1 While on the page you want to add, tap and hold on the page.
2 Tap Add to Favorites from the pop-up menu.
3 Make the changes you want on the Name and Address fields
4 In the Create in pick list, select the folder where you want the link to be stored.
5 Tap Add, then tap OK.

10 Wireless Data Programs
Internet Explorer Mobile
150
Mobile Favorites folder
Only items stored in the Mobile Favorites subfolder of the Favorites folder of Internet
Explorer on your computer are synchronized with your device. This folder was created
when you selected the Favorites information type for ActiveSync synchronization with
your computer.
Favorite Links
During synchronization, the list of favorite links in the Mobile Favorites folder on your
computer is synchronized with Internet Explorer Mobile on your device. Both locations
are updated with changes made to either list each time you synchronize. Unless you
mark the favorite link as a mobile favorite, only the link will be downloaded to your device,
and you will need to connect to your ISP or network to view the content.
Mobile Favorites
If you are using Microsoft Internet Explorer 5.0 or later on your computer, you can
download mobile favorites to your device. Synchronizing mobile favorites downloads
Web content to your device and enables you to view pages while you are disconnected
from your ISP and computer. To quickly create mobile favorites, use the Internet Explorer
plug-in installed with ActiveSync.
To create a mobile favorite:
1 In Internet Explorer on your computer, click Tools, then Create Mobile Favorite.
2 To change the link name, enter a new name in the Name box.
3 Optionally, in Update, select a desired update schedule.
If you did not specify an update schedule, you need to manually download content
to keep the information updated on both your computer and device. Before
synchronizing with your device, in Internet Explorer on your computer, click Tools,
then Synchronize. You will see the last time content was downloaded to the
computer, and you can manually download content if needed.
4Click OK.
Internet Explorer downloads the latest version of the page to your computer.
TIP: You can add a button to the Internet Explorer toolbar for creating mobile favorites. In Internet
Explorer on your computer, click View, Toolbars, then Customize.
To download a mobile favorite:
1 Right-click the mobile favorite, then click Properties.
2 In the Download tab, specify the number of links deep you want to download.
To conserve device memory, go only one level deep.
3 Synchronize your device and computer.
Mobile favorites that are stored in the Mobile Favorites folder in Internet Explorer
are downloaded to your device.
To save device memory in downloading mobile favorites:
Mobile favorites take up storage memory on your device. To minimize the amount of
memory used, observe the following:
•In the settings for the Favorites information type in ActiveSync options, turn
off pictures and sounds, or top some mobile favorites from being
downloaded to your device.
•Limit the number of downloaded linked pages. In Internet Explorer on the
computer, right-click the mobile favorite you want to change, then click
Properties. In the Download tab, specify 0 or 1 for the number of linked
pages you want to download.