Symbol Technologies MC3574 EDA (Enterprise Digital Assistant) User Manual MC35 UG EN
Symbol Technologies Inc EDA (Enterprise Digital Assistant) MC35 UG EN
Contents
User manual 2
5 Using The Phone Function
Making phone calls
56
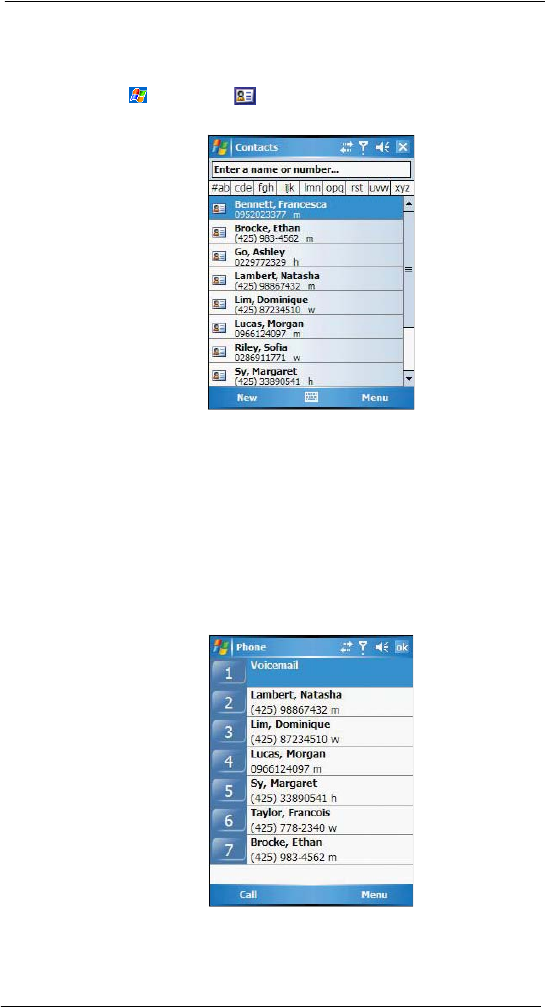
Making a call using Microsoft Contacts
There are several ways to make a call in Contacts. In this section, only the method using
the hardware buttons is described. For instructions on other methods, see page 120.
1 Tap , then Contacts .
Contacts opens to the contact list.
2 Type a name or number, or move the joystick up or down to scroll through the
contact list and select the contact you want to call.
3 Press the Send button twice—once to launch Phone and another to make the call.
The call will be made to that contact’s priority number.
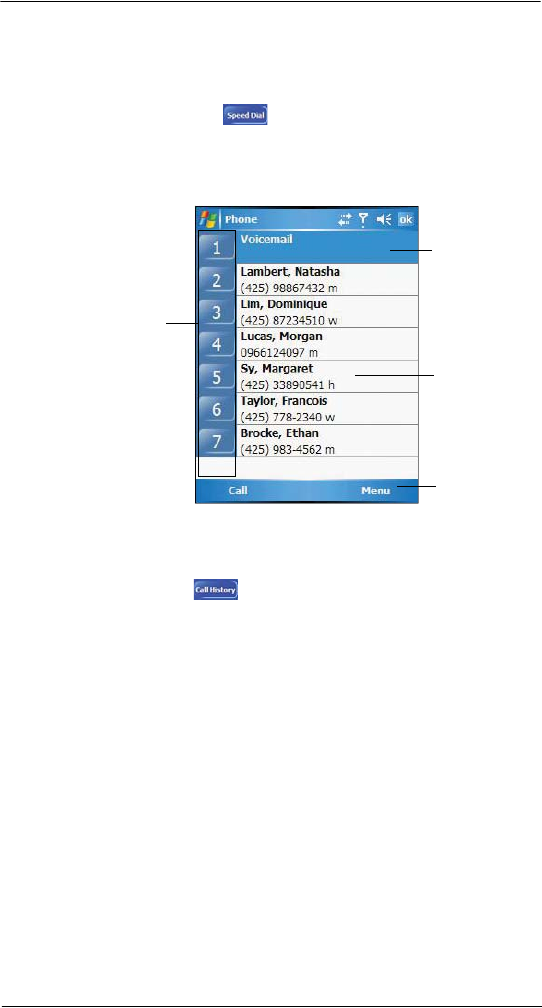
Making a call using Speed Dial
Speed Dial is a list you create for numbers you call regularly. Only numbers stored in
Microsoft Contacts can be added to this list.
To make a call using Speed Dial:
You can make a call in two ways:
•By memorizing a phone number’s position in the Speed Dial list, you can dial
the number by entering its location number.
In the picture above, Natasha Lambert is at position 2. To dial her number,
tap and hold 2 on the Dialer keypad until you hear a beep.
5 Using The Phone Function
Making phone calls
57
If a number holds a position of 10 or higher tap the first number, and then tap
and hold the second to dial. For instance, to call the number in position 12,
tap 1 then tap and hold 2.
•Alternatively, if you don’t remember the position of a number in the Speed
Dial list follow the steps below:
(a) Tap Speed Dial .
(b) On the Speed Dial window, press the joystick to go through the list to find the
number you want to call.
(c) Once the number is selected, you can either press the joystick or the Send
button to initiate the call.
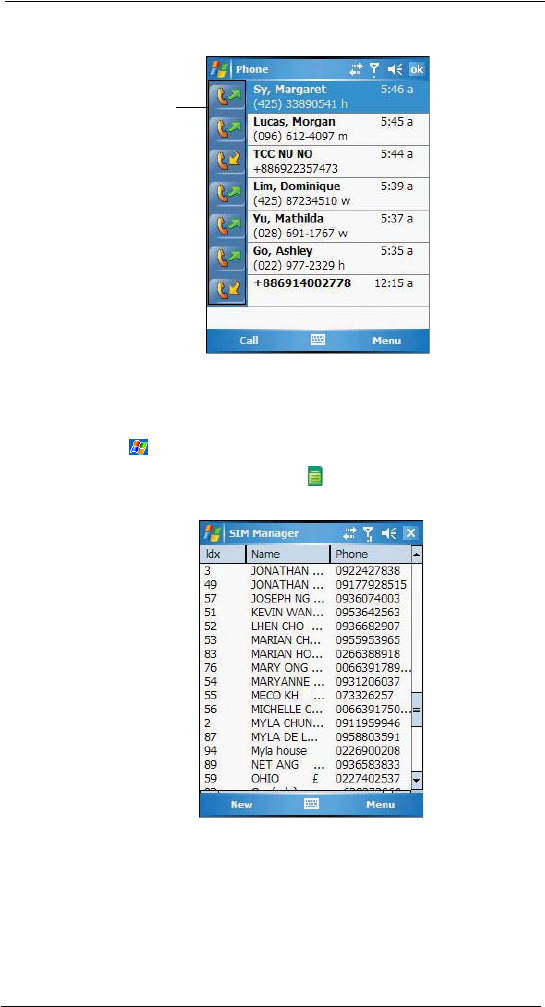
Making a call using Call History
Call History is a record of all incoming, outgoing, and missed calls.
1 Tap Call History .
2 Find the number you want to call. You can select a call category—All Calls, Missed,
Outgoing, Incoming, and By Caller—by tapping the pick list in the top-left corner of
the screen.
3 Once the number has been selected, make the call by doing any of the following:
•Press the joystick.
•Press the Send button .
Tap to adjust voice
mail settings.
Tap to edit contact
details.
Tap to add a
contact to the
Speed Dial list.
Tap a Speed Dial
number to call that
contact.
5 Using The Phone Function
Making phone calls
58
•Tap the category icon on the left of the selected number.
Making a call using SIM Manager
SIM Manager is a program you can use to view and manage the contents of your SIM
card.
1 Tap , then Settings.
2 On the System tab, tap SIM Manager .
Wait for the SIM card contents to load.
3 Select the number you want to call.
4 Once the number has been selected, make the call by doing any of the following:
•Press the joystick.
•Press the Send button.
•Tap and hold the selected number, then select Call from the pop-up
menu.
Tap a category icon
to call the number
opposite it.
5 Using The Phone Function
Making phone calls
59
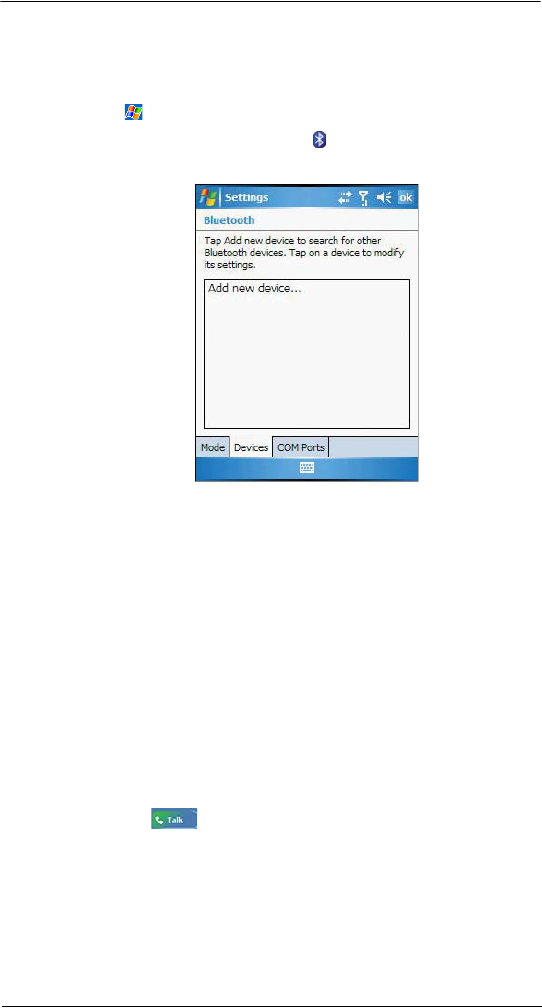
Making a call from a Bluetooth-enabled headset
You can use a Bluetooth-enabled headset with your device when you create a
partnership between your device and the headset.
1 Make sure that the two devices are turned on, discoverable, and within close range.
2 Tap , then Settings.
3 On the Connections tab, tap Bluetooth .
4 On the Devices tab, tap Add new device.
Your device will search for other Bluetooth devices and displays them in the device
list.
5 Tap the name of the Bluetooth-enabled hands-free device in the list, then tap Next.
6 If you want to use a passcode, enter the alphanumeric passcode for the Bluetooth-
enabled hands-free device, then tap Next.
You can find the passcode in the manufacturer’s documentation for your hands-free
device.
7 Tap Finish.
8 Select the check box for the Hands Free service, and tap Finish.
Making an International call
For making a call to an overseas number that is not stored either in your SIM card or on
your device, follow the steps below.
1 Tap and hold the 0 key until the ‘+’ sign appears.
‘‘+’ replaces the international number prefix ‘00’.
2 Enter the full phone number you want to dial.
It includes the country code, area code (without the leading zero), and phone
number.
3 Tap Talk or press the Send button.
Making an emergency call
MC35 supports the international emergency number 112, and for US/Canada residents,
the emergency number 911 as well. You can call these numbers for emergency police,
fire, and medical assistance.
5 Using The Phone Function
Phone features
60
NOTE: In some cases, additional local emergency numbers may be provided by your mobile phone
service provider.
Generally, you can make a call to these emergency numbers, with or without a SIM card
installed on your device, as long as a mobile phone service network is available in your
area. However, some mobile phone service providers may require that a SIM card is
inserted, and in some cases that the PIN has been entered as well, before an emergency
call can be made. Contact your mobile service provider for the requirements applicable
to your mobile subscription.
To make an emergency call:
1 Dial the emergency number by using Dialer.
•For international emergency calls, dial 112.
•For US/Canada emergency calls, dial 911.
2 Tap Talk or press the Send button.
Phone features
Flexibility is a hallmark of your device’s phone function. This is best exemplified in such
features as Call Notification, Call Hold and Conference Call, which allows you to attend
to more than one call simultaneously—all with a simple tap of your stylus.
Variety is another hallmark of your device’s phone function. This is implemented in such
range of features as Call Notes, text/email messaging, Voice Mail, and Contacts
Integration.
NOTE: The availability of some of the phone features described in this section may depend on your
mobile service subscription. Contact your mobile service provider for information.
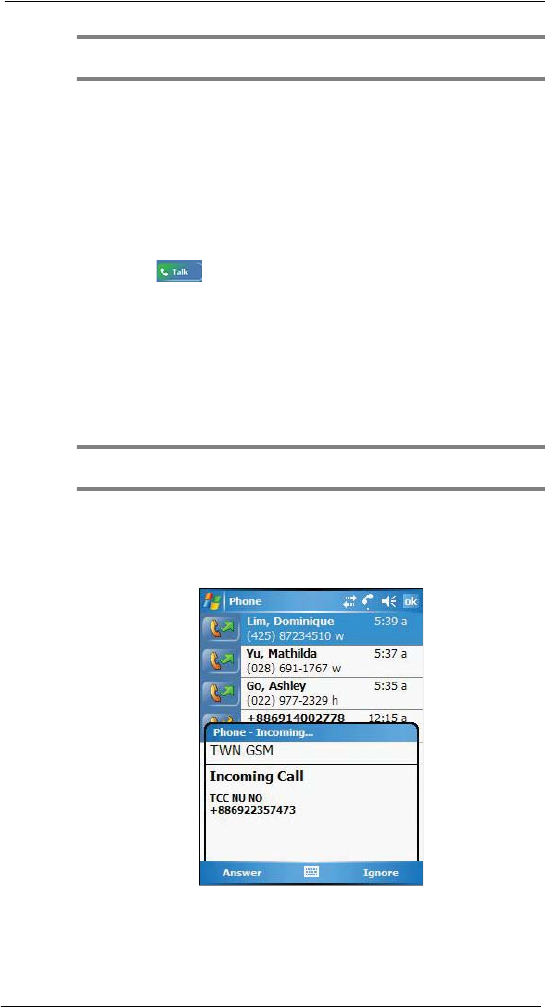
Call notification and identification
The Call Notification feature lets you know if another person is trying to call you when you
are talking on the phone. When this happens the following callout appears.
The Caller Identification feature matches the incoming call number with those stored in
Contacts so you know who is calling you.
5 Using The Phone Function
Phone features
61
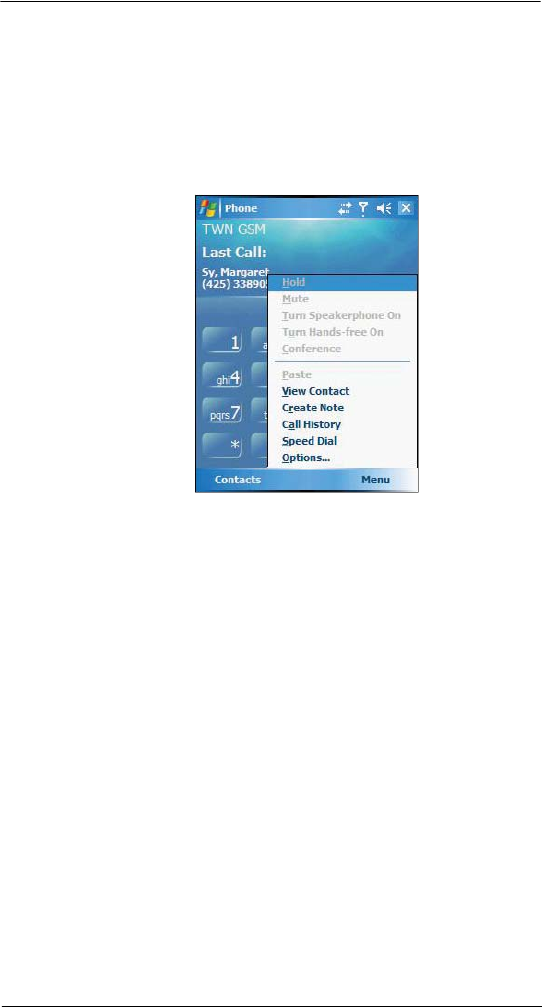
Call hold
After being notified of an incoming call while already on the phone, you can choose to
reject a call by tapping the Ignore button on the Call Notification callout, or you can use
the Call Hold feature to attend to both calls.
To put a call on hold:
•On the Call Notification callout, tap Answer to take the incoming call and put
the original one on hold.
To swap between calls:
•To shift between two callers tap Menu, then Hold.
Conference call
With the Conference Call feature you can create a conversation line between several
callers. You can either, put a call on hold, then dial another number and wait for it to be
picked up; or accept an incoming call when you already have one in progress.
To set up a conference call:
•During a call with two active numbers, tap Menu, then Conference.
If the conference connection is successful the word Conference will appear
in the input area of the Dialer screen.
To add additional people to a conference call:
You can connect up to six (6) callers at a time in a conference call.
1 During an active conference call, tap Menu, then Hold.
2 Key in the new number.
3 Tap Resume to return and continue with the conference call.
4 Repeat steps 1-3 to add more people in the conference call.

5 Using The Phone Function
Phone features
62
Call notes
The Call Notes feature allows you to create a written or recorded note during a call. The
call note will be saved as an attachment to your call as viewed in Call History.
To create a call note:
1 During an active call, tap Note on the command bar.
2 In the Notes window, use any of the input methods to compose your call note.
3 After you finished your call note, tap OK.
To view a call note:
You can view call notes either from the Call History window or from the Notes program.
•From the Call History window:
(a) Tap Call History .
(b) Select a log item marked with this icon .
(c) Tap and hold the selected log item, then tap View Note from the pop-up
menu.
5 Using The Phone Function
Phone features
63
•From Notes:
In the Notes window, tap the call note from the list.
A call note’s label corresponds to the name or phone number of the related
contact.
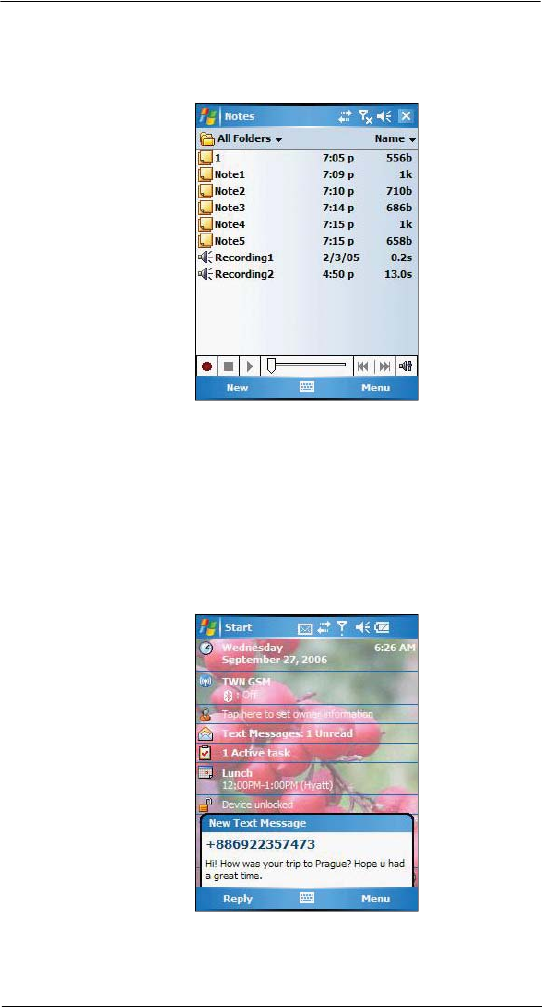
Text messaging service
Just like a regular mobile phone, you can send and receive text messages using your
device. Your account is automatically setup in Inbox when you activated your mobile
service subscription.
To view a text message:
You can view a text message whether the phone function is on or off.
•When the phone function is on, you can view a text message from its
notification callout:
Tap the text message notification icon on the navigation bar to display the
message.

5 Using The Phone Function
Phone features
64
The Caller Identification feature matches incoming text message numbers with
those stored in Contacts so you know who is sending you a message. Furthermore,
the “New Text Message” callout gives you the option to call the sender or save,
dismiss, or delete the message.
•When the phone function is off, you can still view received text message in
Messaging:
(a) Tap , then Messaging .
(b) Tap the pick list on the top-left corner to display the navigator panel.
(c) Tap Inbox.
5 Using The Phone Function
Phone features
65
(d) In the message list, tap a text message.
NOTE: If the phone function is turned off and you tried to call the sender, send a reply, or forward
the message, you will be prompted to turn the phone function on.
To send a text message:
1 On the Dialer screen, tap Menu , then View Contact.
Tap to reply the
message.
Tap to
display the
navigator
panel.
5 Using The Phone Function
Phone features
66
The contact’s information is displayed.
2 Tap the Summary tab, then tap Send Text Message.
Or, tap Menu, then Send Text Message.
3 In the To field, enter the SMS number of one or more recipients, separating them
with a semicolon. You can do this in two ways:
•Manually enter the SMS number using any of the input panel options.
•Tap the To field or Address Book to display the contact list, then tap a
contact from the list.
Tap the To field or Address Book again to hide the contact list.
4 Compose your message.
The auto-correct feature automatically fixes common spelling errors as you type so
your messages are more accurate.
The character counter lets you see and control the size of the message as you
compose.

5 Using The Phone Function
Phone features
67
If you want to know if your text message was received, tap Menu, Message
Options, then select the Request SMS text message delivery notification check
box.
5 Tap Send when you've finished the message.
If the phone function is turned on, your text message will be immediately sent out. If
it’s off, you will be prompted to turn on the phone function. If you do so, the
message will sent out; otherwise when you tap OK, the message will be saved in
the Drafts folder and you can send it out later.
Voice mail
With the voice mail service you need not miss a message when you miss a call.
Unattended calls (i.e., no answer, phone function is turned off or is out of network
service) or a busy line will automatically forward callers to your voice mailbox where they
can leave their messages.
When you insert your SIM card into your device, it will automatically detect and set as
default the voice mailbox number provided by your mobile service provider. By default,
the first Speed Dial location is assigned to your voice mailbox.
To retrieve your voice mails:
•Tap and hold the button on the Dialer keypad.
Your voice mail retrieval number is automatically dialed.

5 Using The Phone Function
Phone features
68
•Tap the New Text Message Notification icon informing you of the new
voice mail, then tap Menu, then Call sender from the “New Text message”
callout.
Contacts integration
Your device’s phone function is integrated with other applications making it easy for you
to share contacts—phone numbers—between programs. Listed below are the places
where contacts can be stored on your device:
•Microsoft Contacts
Your contacts list contains phone numbers that you can use in Phone.
•Your SIM card
You interchange your SIM card between your MC35 and another device;
while using the other device you can create new contacts on the SIM card.
•Call History
New contact numbers can be found in incoming or missed calls.
Sharing contacts in Microsoft Contacts
Below are several advantages for exporting contact information to Microsoft Contacts:
•As a backup in case you lose your SIM card while using it with another
device.
•If you are using your SIM with another device, you may need the numbers
stored in Microsoft Contacts.
•Exporting phone numbers to Microsoft Contacts allows you to create a more
detailed record.
To add contacts to Microsoft Contacts:
You can choose to create new contacts or add contacts from SIM Contacts or from Call
History.
•For instructions on creating new contacts, see page 120.
•For instructions on adding Call History items, see page 69.
•For instruction on adding SIM contacts, see page 69.
To export contacts from Microsoft Contacts:
1 Do either of the following:
•Tap and hold a contact to display the pop-up menu.
•Tap a contact to select it, then tap Menu.
If you do not select a contact, the first entry on the list will be exported.
5 Using The Phone Function
Phone features
69
2 Select the location where to export the contact.
•To export a contact to Speed Dial:
(a) Tap Add to Speed Dial.
A screen appears to display the export status.
(b) In the next screen add the contact details.
(c) Select a location. You can either:
•Accept the default location which is the first available position in the
Speed Dial list.
•Use the up and down arrows in the Location field to scroll and select
the desired location. If you want to put a number in a position that is
already occupied, the new number will overwrite the number
already there.
(d) Tap OK.
Sharing contacts in SIM Contacts
SIM Contacts enable you to manage all contacts stored in your SIM card with the option
to export this information to Microsoft Contacts.
To export SIM contacts:
You can choose to export individual or all SIM Manager contacts to Microsoft Contacts.
Sharing contacts in call history
Call History is a record of all incoming, outgoing, and missed calls. You have the option to
export new numbers under the Incoming and Missed categories to Microsoft Contacts.
To export Call History entries to Microsoft Contacts:
1 On the Dialer screen, tap Call History .
The Incoming or Missed categories appear.
2 Tap and hold the number you want to export.
3 In the pop-up menu that appears select Save to Contacts.
4 On the Contact screen add additional contact details.
5 Tap OK or press the joystick.
The call details in the Call History for the transferred number will change to display
the contact name specified.
5 Using The Phone Function
Phone features
70
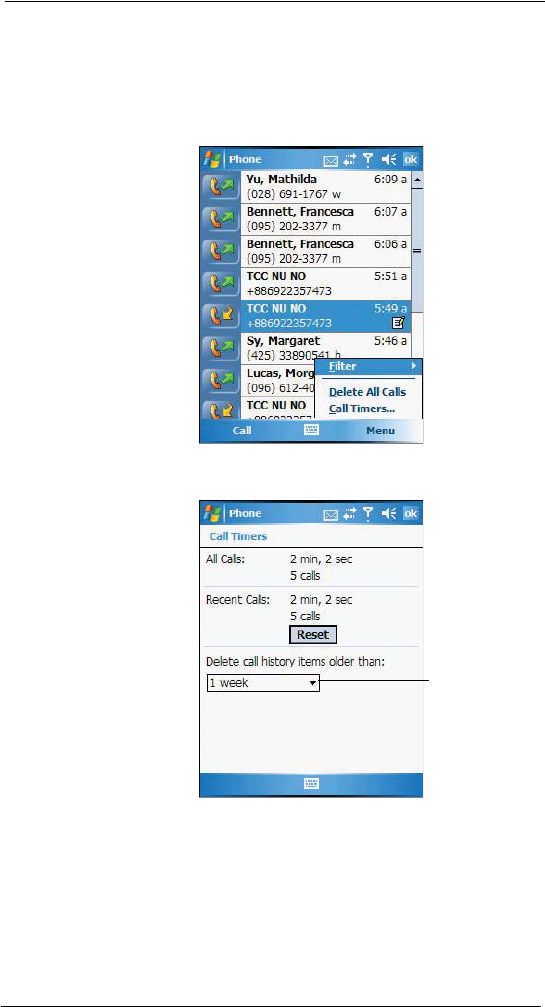
Call History
All calls made on your device are recorded in Call History. It provides the time and
duration of all incoming, outgoing, and missed calls, and a summary of total calls. You
can refer to it to access any notes taken during a call. You can also set a limit on the
number of entries or delete them as necessary to save memory space.
To view Call History:
On the Dialer screen, tap Call History .
To change the Call History view:
You can limit the number of entries that appear on the Call History list according to
specific criteria, such as All Calls, Missed, Outgoing, Incoming, or By Caller.
1 On the Dialer screen, tap Call History .
2 Tap Menu, Filter, then select a different view. For example, you can view only
missed or incoming calls. When you filter By Caller, you see a list of all contacts on
your device who have a phone number assigned to them.
5 Using The Phone Function
Phone features
71
The Call History list can be filtered according to the following criteria.
Call details
Call History allows you to check the date and time a call was made, as well as the
duration.
To view call details:
•Find the call you are interested in, then tap it once.
Category Description
All Calls Shows all calls made to and from your device in a chrono-
logical order.
Missed Shows calls made to your device that were not answered.
Outgoing Shows all calls made from your device.
Incoming Shows all calls made to your device.
By Caller Shows all calls made to and from your device in an alpha-
betical order based on caller ID.
5 Using The Phone Function
Phone features
72
Call history limit
To minimize the memory space occupied by the Call History items, you can set a limit for
the number of entries retained after a specific period of time. You can also delete items
that you no longer need.
To set the Call History limit:
1 From the command bar, tap Menu, then Call Timers.
2 On the Call Timers window, tap the ”Delete call history items older than” pick list,
then, tap a time period option.
3 Tap OK.
To delete individual Call History entries:
•Tap and hold the entry you want to delete, then from the pop-up menu,
select Delete.
To delete all Call History entries:
•From the command bar, tap Menu, then Delete All Calls.
Tap to select a basis
for the call history limit.
5 Using The Phone Function
Phone profiles
73
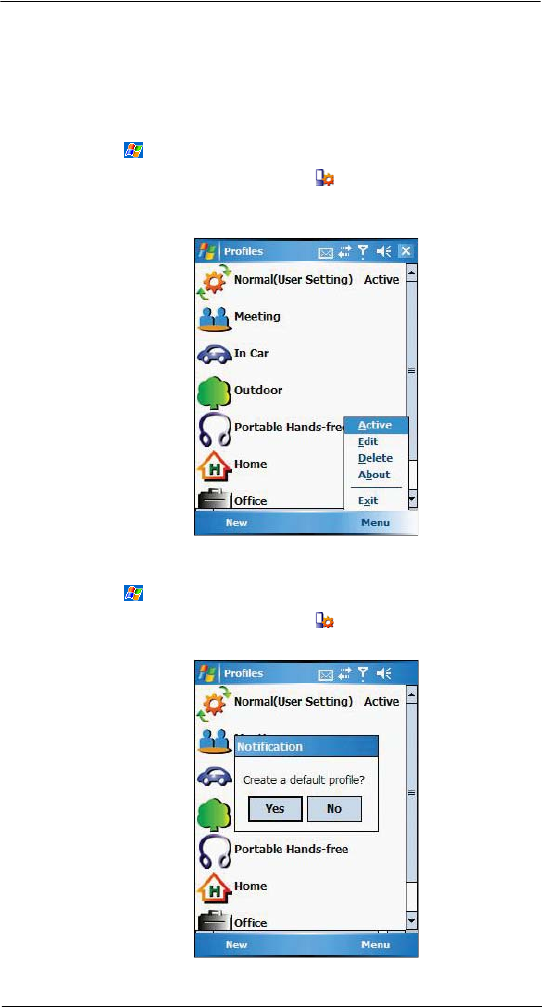
Phone profiles
Your device supports five types of preset profiles. These preset profiles allow you to
personalize the tone, image, and profile expiration time settings of your device, and to
activate a profile for different events and environments.
To activate a profile:
1 Tap , then Settings.
2 On the System tab, tap Phone Profiles .
3 Select a profile setting.
4 Tap Menu, then tap Active.
To create a new phone profile:
1 Tap , then Settings.
2 On the System tab, tap Phone Profiles .
3 Tap New, then tap Yes.
5 Using The Phone Function
Phone profiles
74
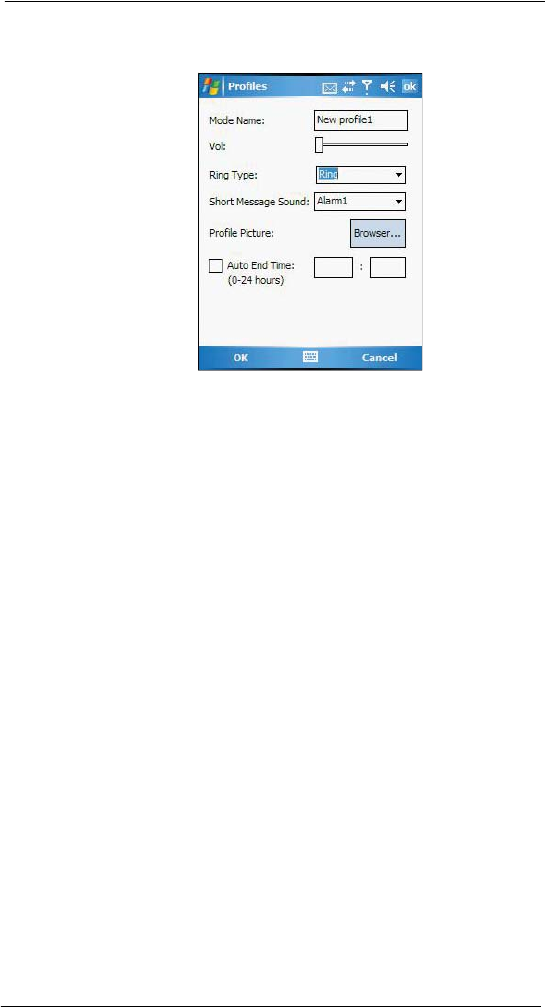
4 In the next screen, define the phone profile settings.
5 In the next screen, define the phone profile settings.
•Enter a profile name.
•To set the ring volume for incoming voice calls and messages, press
the Volume key up or down.
•To select a ringing option for incoming voice calls, tap the Ring Type
drop-down menu.
•To select a ringing option for incoming messages, tap the Short
Message Sound drop-down menu.
•To set a phone profile image, tap Browse.
•To activate a profile for a certain amount of time, up to 24 hours, enter
the hours and minutes in the text box.
•To select a ring tone for incoming calls and messages, tap Advance,
then on the Incoming tab, select a ring tone.
•To activate a profile for a certain amount of time, up to 24 hours, enter
the hours and minutes in the text box.
•To set an alarm, display message, phone to vibrate or flash indicator for
incoming voice calls and messages, tap Advance, then on the
Reminders/Message tab, select all check boxes.
6 Tap Ok, then Ok again.
5 Using The Phone Function
Phone preferences
75
To personalize the profile:
1 Tap a profile setting that you want to change.
2 Tap Menu, then tap Edit.
3 Define settings for the new profile.
4 Tap OK.
To delete a profile:
1 Tap a profile setting.
2 Tap Menu, then tap Delete.
3 Tap Yes, then OK.
Phone preferences
You can configure most features of the phone function to suit your preferences. You do
this by accessing the Phone option under Settings.
To access Phone settings:
•From the Dialer screen’s command bar, tap Menu, then Options.
- or -
From any other screen, tap , Settings, Personal tab, then tap Phone.
The Phone Settings window has three tabs—Phone, Services, and Network.
Refer to the following sections for the configuration options available for
each tab.

5 Using The Phone Function
Phone preferences
76
Phone tab
Configure sound and security settings in this tab.
Configuring ring type, ring tone, and keypad sounds
•Under the Sounds option, tap the pick list for each field, then select your
choice from the drop-down menu.
To download ring tones:
For a more personalized ring tone, you can choose to download additional sound files to
your device. File formats supported include .wav and mono .midi formats. You can
download sound files in several ways, including:
•Via synchronization using ActiveSync
•Via Internet access using Internet Explorer Mobile
•Via IR transfer
•Via Bluetooth
•Via WiFi
To listen to a ring tone:
•Select the ring tone file you want to play, then tap the Play button. To stop
ring tone playback, tap the Stop button.
Configuring your PIN
Under the Security options, you can change your PIN and have it enabled or disabled.
To enable your PIN:
•Select the “Require PIN when phone is used” check box.
Ring Type Ring Tone Keypad Sounds
5 Using The Phone Function
Phone preferences
77
To disable your PIN:
•Deselect the “Require PIN when phone is used” check box.
To change your PIN:
1 Tap the Change Pin button. The Dialer screen will be displayed.
2 Enter the old PIN, input a new one, then retype it for confirmation.
Services tab
Configure the different phone services in this tab—Call Barring, Caller ID, Call
Forwarding, Call Waiting, Voice Mail and Text Messages, and Fixed Dialing.
NOTE: The availability of some of the phone services described in this section may depend on your
mobile service subscription. Contact your mobile service provider for information.
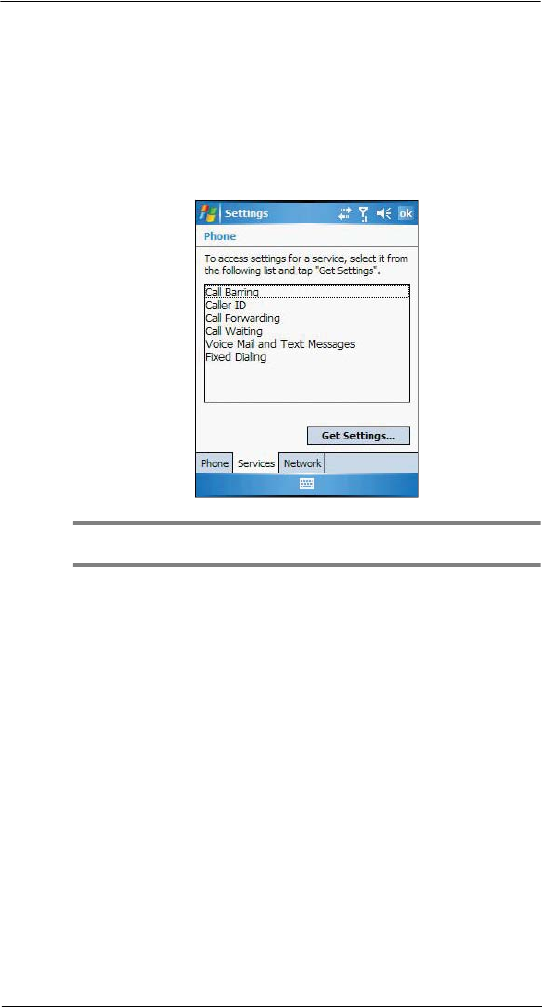
Call barring
You have the option to block calls in specific situations.
To enable or disable call barring:
1 Tap Call Barring from the services list.
2 Tap the Get Settings button (retrieving settings may take a few minutes).
3 In the next screen, define the call barring settings.
•Block incoming calls
•All calls - to prevent any calls from coming through
•When roaming - to block incoming calls when in phone service is in
roaming status
•Off - to accept all incoming calls
•Block outgoing calls
•All calls - to prevent any calls from being made from your device
•International - to block outgoing international calls
•International except to home country - to block all outgoing international
calls other than those being made to the set home country
5 Using The Phone Function
Phone preferences
78
•Off - to disable call barring for all outgoing calls
4 Tap OK.
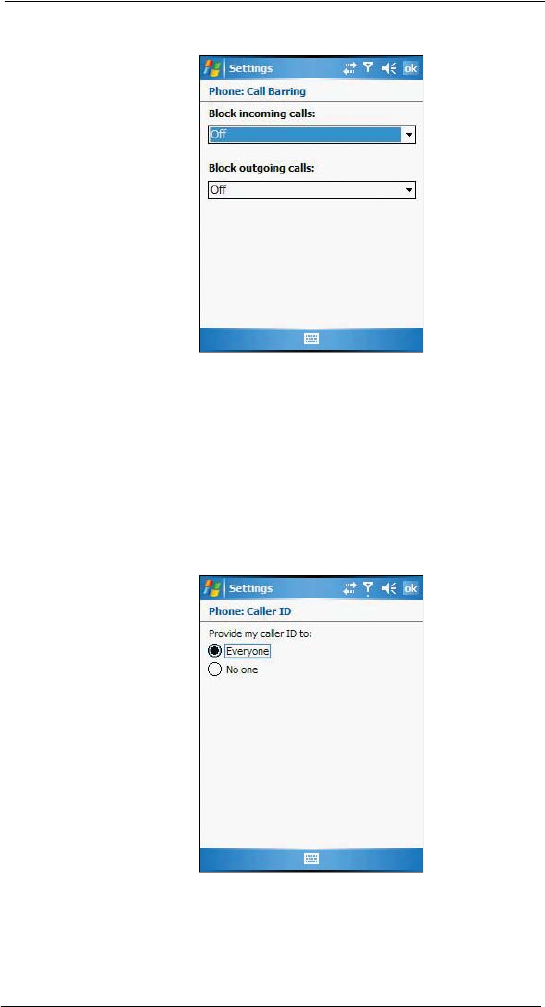
Caller ID
When this service is enabled and you make a call, your phone number will be displayed
on the phone screen of the person you’re calling.
To enable or disable Caller ID:
1 Tap Caller ID from the services list.
2 Tap the Get Settings button (retrieving settings may take a few minutes).
3 In the next screen, define the caller ID settings.
•Everyone - to enable Caller ID, or
•No one - to disable Caller ID
4 Tap OK.
5 Using The Phone Function
Phone preferences
79
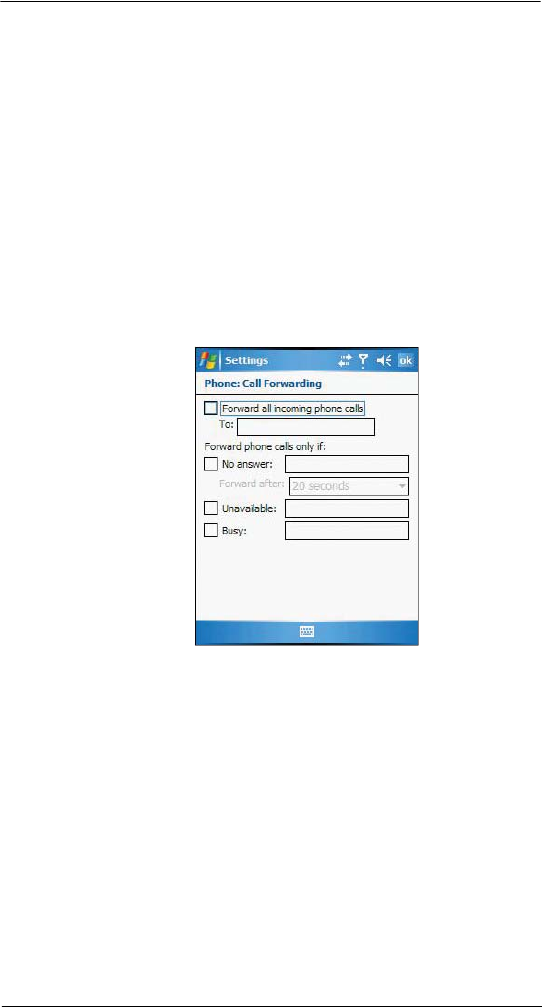
Call forwarding
This service allows you to forward incoming calls to another phone number. You can
choose to forward all calls to the same number or specify a number based on the
following conditions:
•Unavailable - the phone function is turned off or is out of network service
•Busy - when you are attending to a phone call
•No answer - when you are not answering your phone calls
To enable or disable call forwarding:
1 Tap Call Forwarding from the services list.
2 Tap the Get Settings button (retrieving settings may take a few minutes).
3 In the next screen, follow these steps to enable or disable call forwarding:
•To enable call forwarding:
•Tap the “Forward all incoming calls” check box, then specify the call
forward phone number on the To field.
- or -
•Tap the check box for one or all particular conditions, then specify the call
forward phone number on the box opposite it.
•To disable call forwarding, deselect all the check boxes.
4. Tap OK.
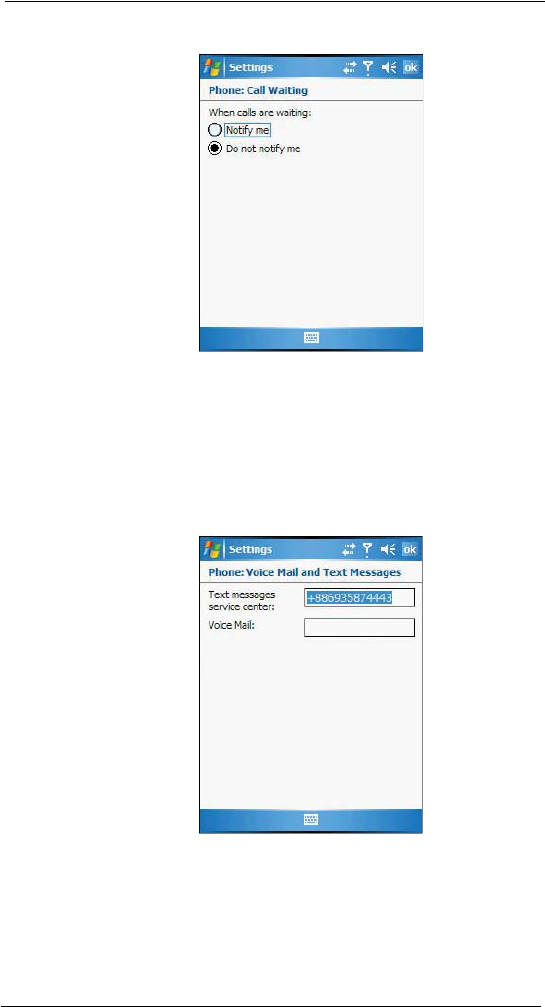
Call waiting
This service allows you to receive another call during an active call.
To enable or disable call waiting:
1 Tap Call Waiting from the services list.
2 Tap the Get Settings button (retrieving settings may take a few minutes).
3 In the next screen, define the call waiting settings.
•Notify me - to enable call waiting, or
5 Using The Phone Function
Phone preferences
80
•Do not notify me - to disable call waiting
4 Tap OK.
Voice mail and text messages
By default your device will automatically detect and set the voice mail and text messages
access numbers provided by your mobile service provider. You can view these numbers
for your reference.
To view voice mail and text messages numbers:
1 Tap Voice Mail and Text Messages from the services list.
2 Tap the Get Settings button (retrieving settings may take a few minutes).
5 Using The Phone Function
Phone preferences
81
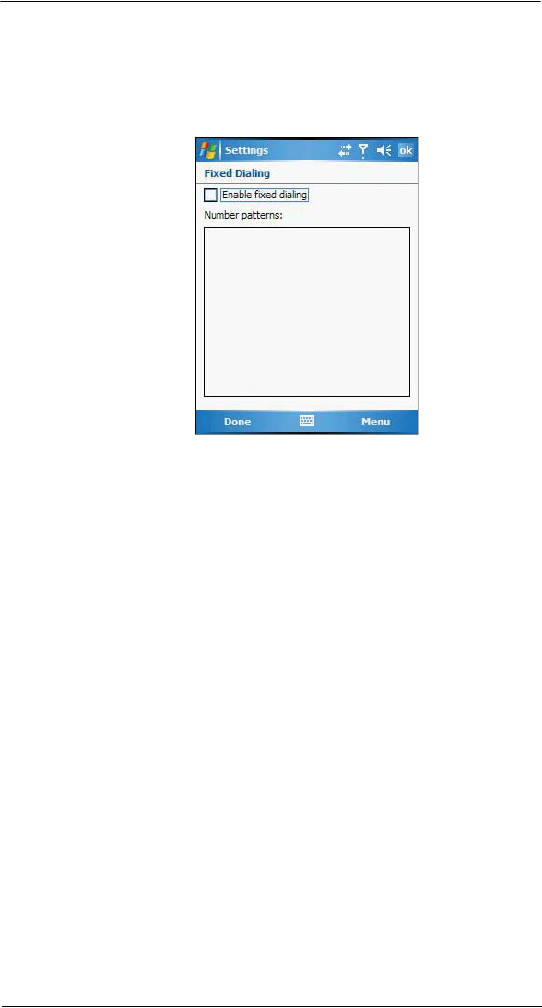
Fixed dialing
This service allows you to set predefined numbers or prefixes that you would like to call.
To create fixed number entries:
1 Tap Fixed Dialing from the services list.
2 Tap the Get Settings button (retrieving settings may take a few minutes).
3 Tap the Enable fixed dialing check box, then tap Done.
4 Enter the PIN2, then tap Done.
5 Enter the phone number, then tap Done.
6 Enter a new name, then tap Done.
7 Enter a position, then tap Done.
To edit entries:
1 Tap Fixed Dialing from the services list.
2 Tap the Get Settings button (retrieving settings may take a few minutes).
3 Select the number pattern, then tap Menu.
4 Tap Edit, then enter PIN2 and tap Done.
5 Enter the new number, name, and position, then tap Done.

5 Using The Phone Function
Phone preferences
82
Network tab
This tab allows you to configure settings related to mobile service networks. The
currently activated network is indicated on the first line of this tab.
To find a network:
Do this when the network status is currently out of network service and you want to
conduct a search.
•Tap the Find Network button (search process may take a few minutes).
To select a network:
Set the mode for conducting a network search.
•Under the Network selection drop-down menu, tap either Automatic or
Manual. Rete rieving network settings may take a few minutes if you select
Manual.
To set preferred networks:
If there are many mobile phone service providers available in your area, you can
configure this function to select your preferred ones and set its priority level.
1 Under the Preferred networks list, tap the Set Networks button.
2 To include a listed network as a preferred network, tap the check box opposite it.
3 To set the priority level, tap a preferred network, then tap the Move Up or
Move Down buttons.
6 Customizing Your MC35
Adjusting settings
83
6 Customizing Your
MC35
You can customize your MC35 EDA based on your personal requirements and
preferences as well as depending on your usual work modes. Customize your device by
either adjusting the device settings or by adding/removing programs.
•Adjusting settings
•Adding programs
•Removing programs
Adjusting settings
You can adjust the settings of your device to suit the way you work. Adjusting certain
settings, such as backlight, auto power off timer, system volume, and processor speed,
from the factory default settings may decrease your standby time.
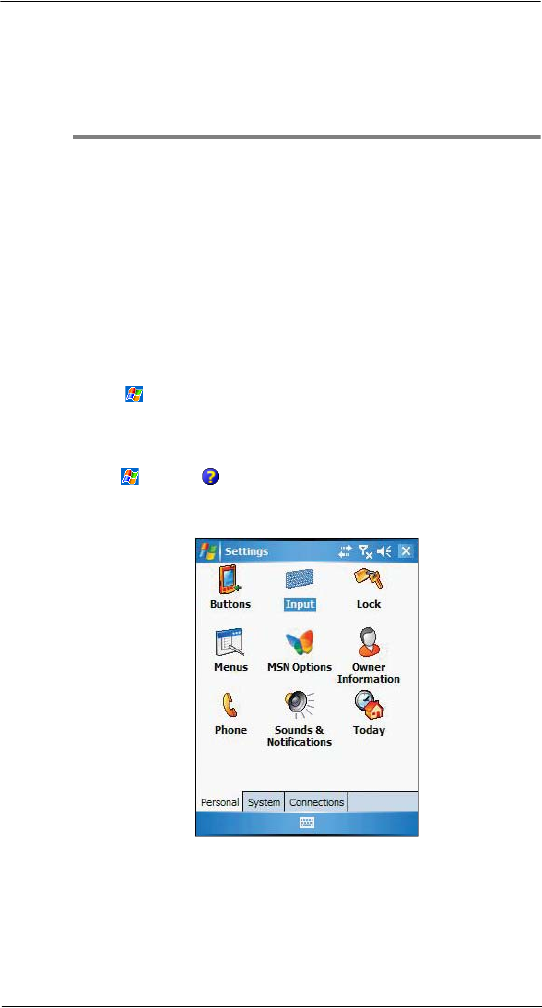
To access Settings:
•Tap , then Settings.
The Settings window has three tabs—Personal, System, and Connections,
each of which has its own set of options.
The following sections show the configuration page for each Settings option.
For detailed instructions on these pages, access the page from your device,
tap , then Help .
Personal tab
6 Customizing Your MC35
Adjusting settings
84
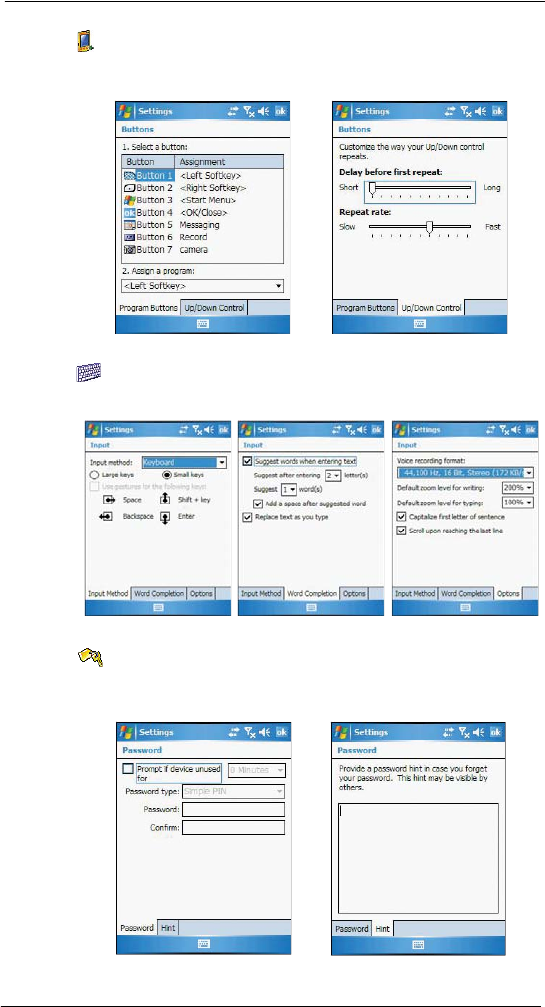
Buttons
Assign the Send/End button on the stereo headset/single earbud headset to commonly-
used programs. You can also adjust the onscreen scrolling speed here.
Input
Select an input method, options for word completion and other related settings.
Lock
Set a password to prevent unauthorized access to your device. You also have the option
to set a password hint to serve as a reminder in case you forget your password.
6 Customizing Your MC35
Adjusting settings
85
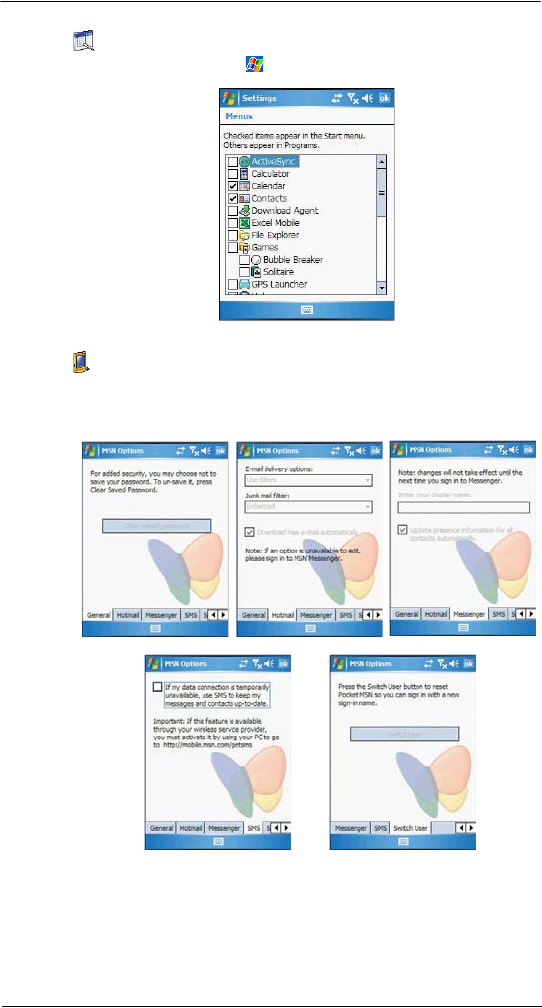
Menus
Customize what appears on the menu.
MSN Options
Set up the password and log-in setting in the MSN services. It also provides instant
access to the MSN Hotmail’s Inbox, MSN Messenger’s Contact list, and options for
customizing your Pocket MSN experience.
6 Customizing Your MC35
Adjusting settings
86
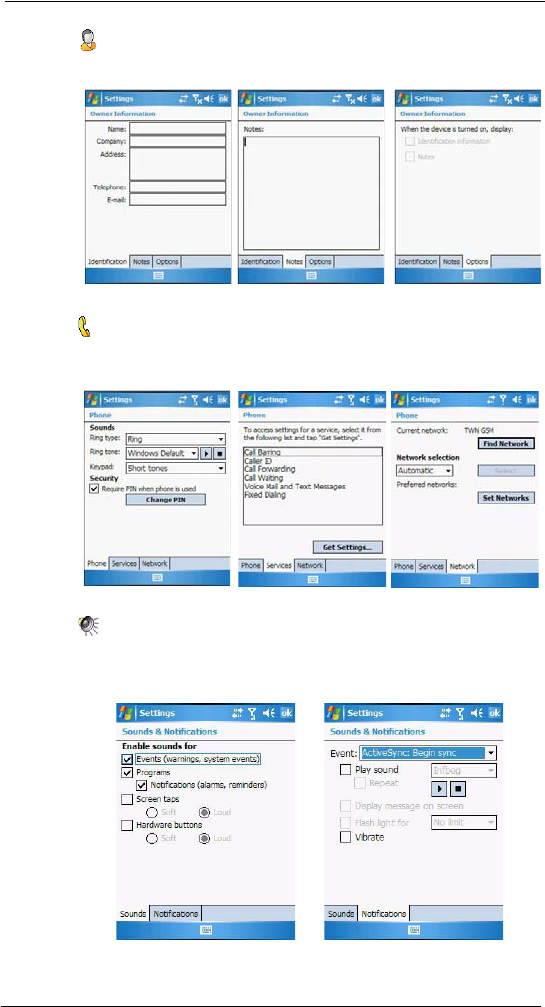
Owner Information
Enter personal information and customize text display when device is turned on.
Phone
Set up the phone function of your device. For more information on this Settings option,
refer to page 47.
Sounds & Notification
Set the volume level for system sounds and select the types of action you want to hear
sounds for. You can also define how you want to be notified about different events.
Options for personalizing sound notifications are also available.
6 Customizing Your MC35
Adjusting settings
87
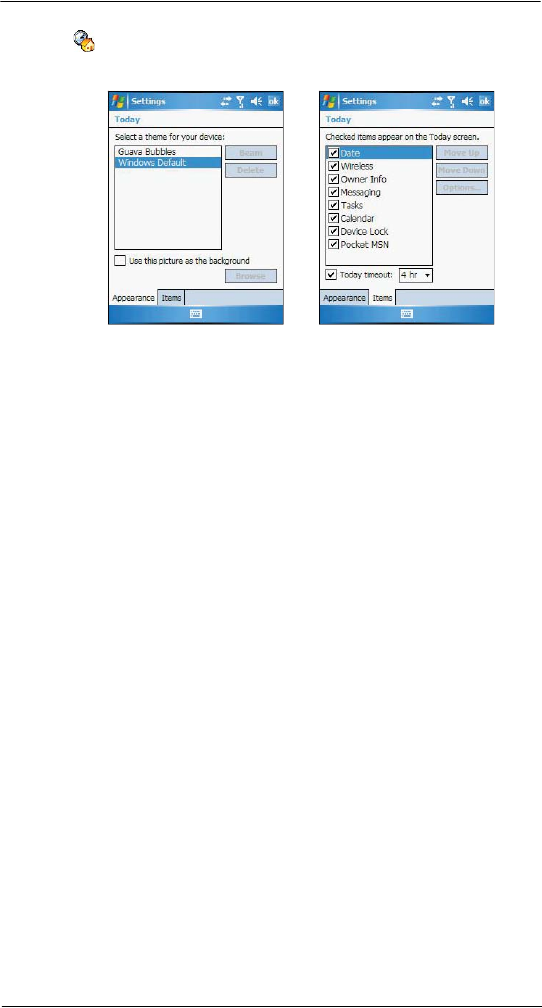
Today
Customize the look and the information that is displayed on the Today screen.
6 Customizing Your MC35
Adjusting settings
88
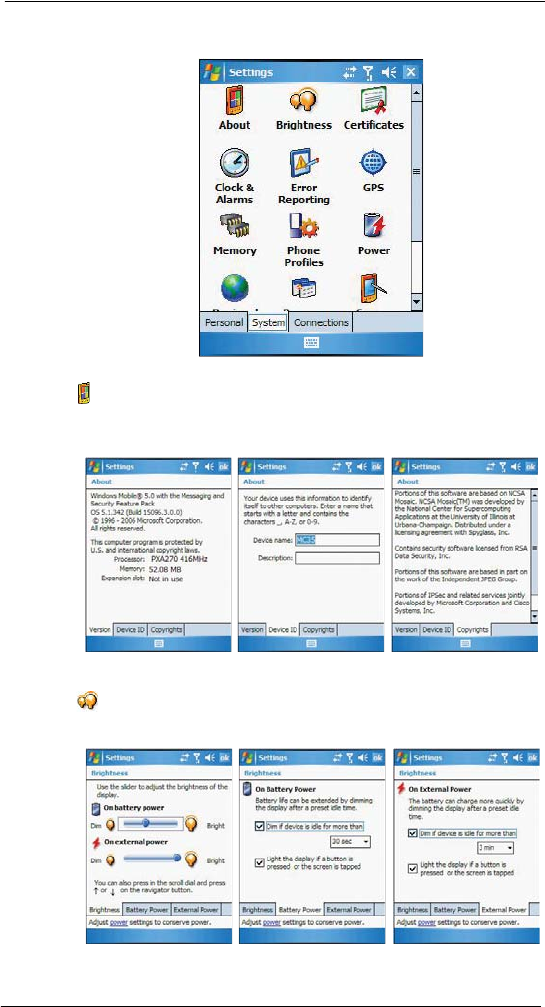
System tab
About
Displays your device’s version and copyright information; includes an option to define a
device ID.
rightness
Define settings for the display brightness and backlight control.
6 Customizing Your MC35
Adjusting settings
89
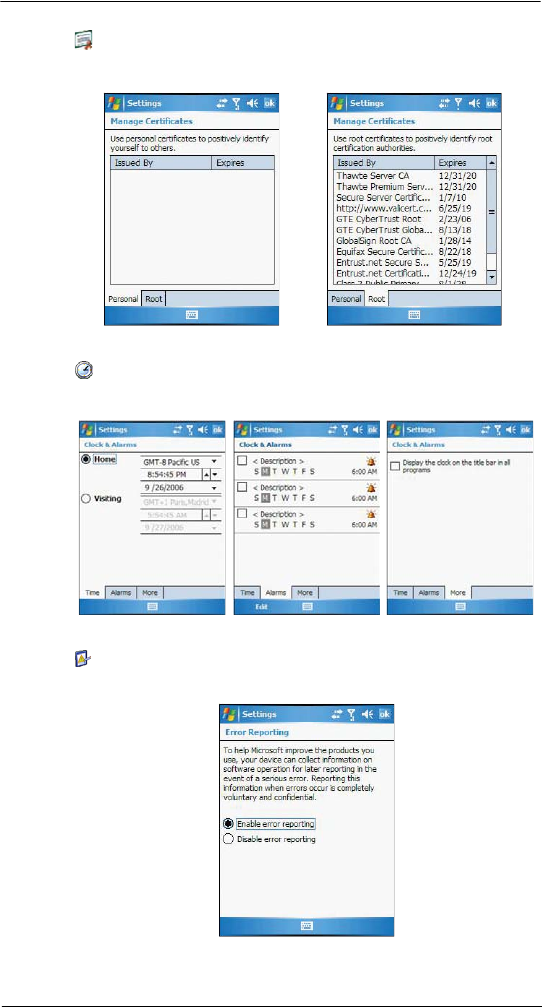
Certificates
View and manage the public key certificates available on your device.
Clock & Alarms
Change the time or set alarms.
Error reporting
Enable or disable error reporting.
6 Customizing Your MC35
Adjusting settings
90
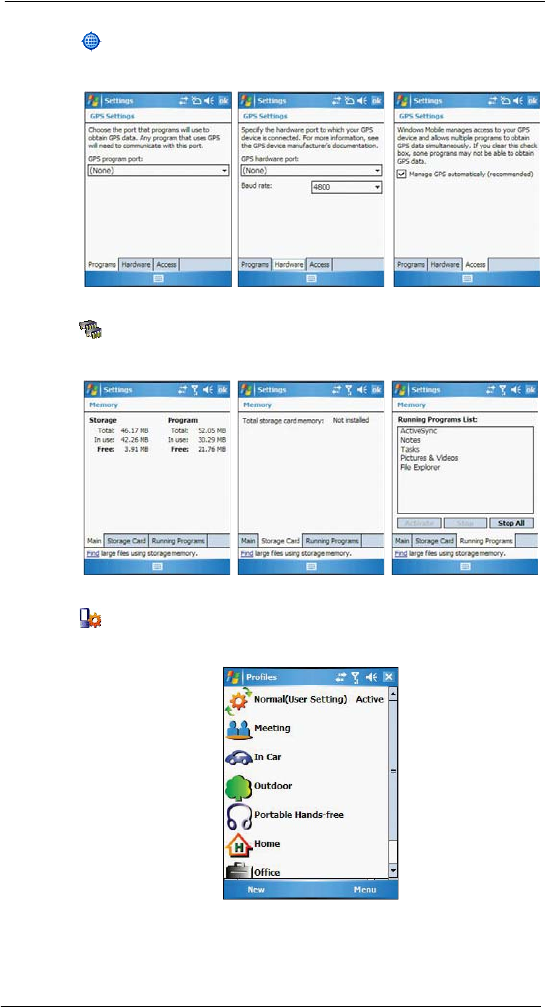
GPS
Adjust the GPS settings.
Memory
Adjust allocation of storage and main memory.
Phone Profiles
View and edit the Phone function’s preset profiles for different operations mode.
6 Customizing Your MC35
Adjusting settings
91
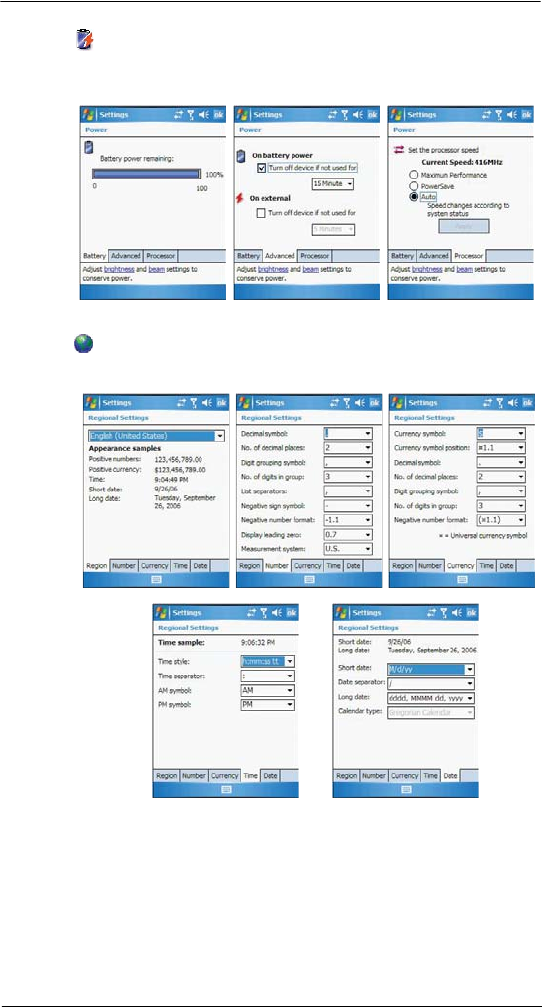
Power
View power level for both the main and backup battery. To minimize power consumption,
you can define settings for the auto-off function and the processor’s operation speed.
Regional Settings
Set default number and time display formats and other related options.
6 Customizing Your MC35
Adjusting settings
92
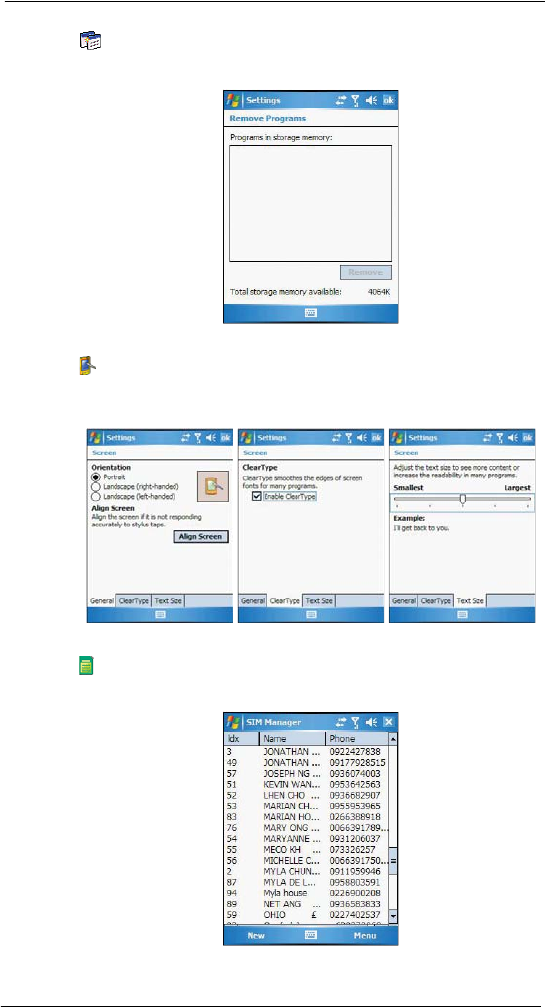
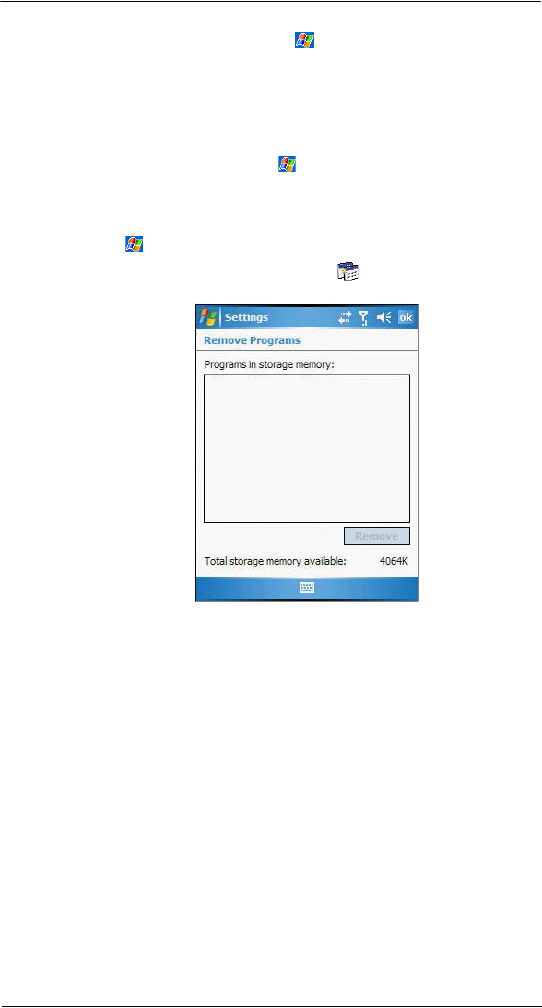
Remove Programs
Remove programs from storage memory.
Screen
Set the viewing orientation and text size setting. You can also recalibrate screen and
enable the ClearType feature.
SIM Manager
Manage all contacts stored on your SIM card.
6 Customizing Your MC35
Adjusting settings
93
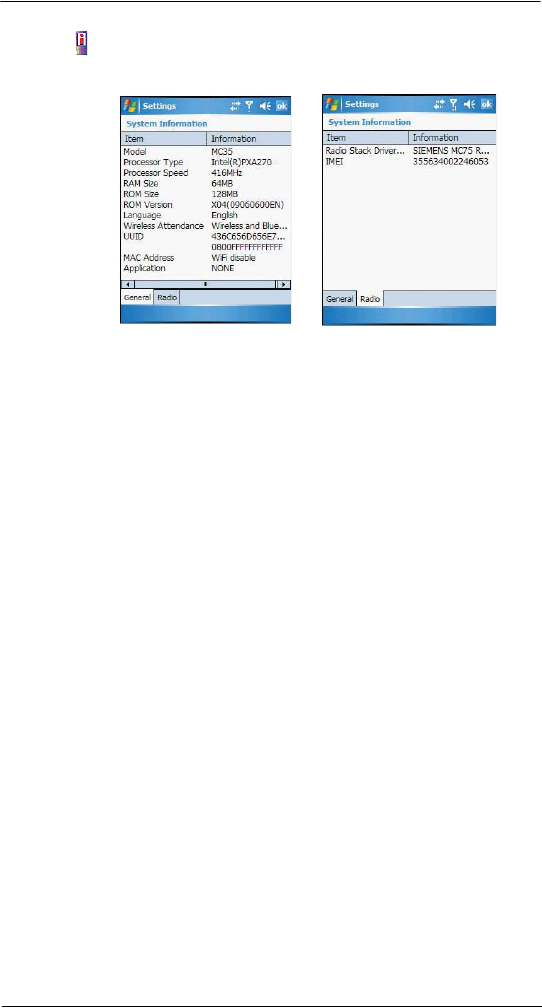
System Information
Displays your device’s hardware and software information.
6 Customizing Your MC35
Adjusting settings
94
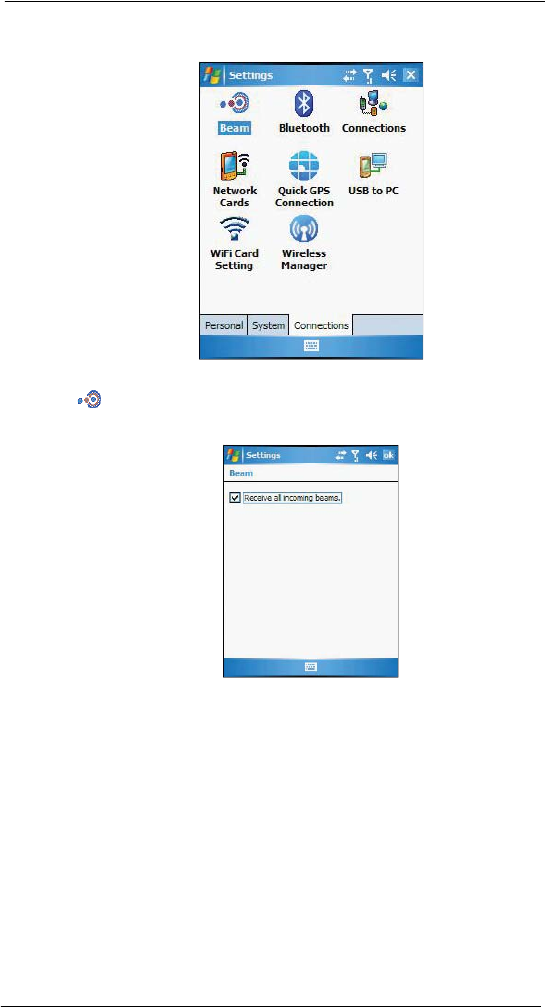
Connections tab
Beam
Define settings for the beam function.
6 Customizing Your MC35
Adjusting settings
95
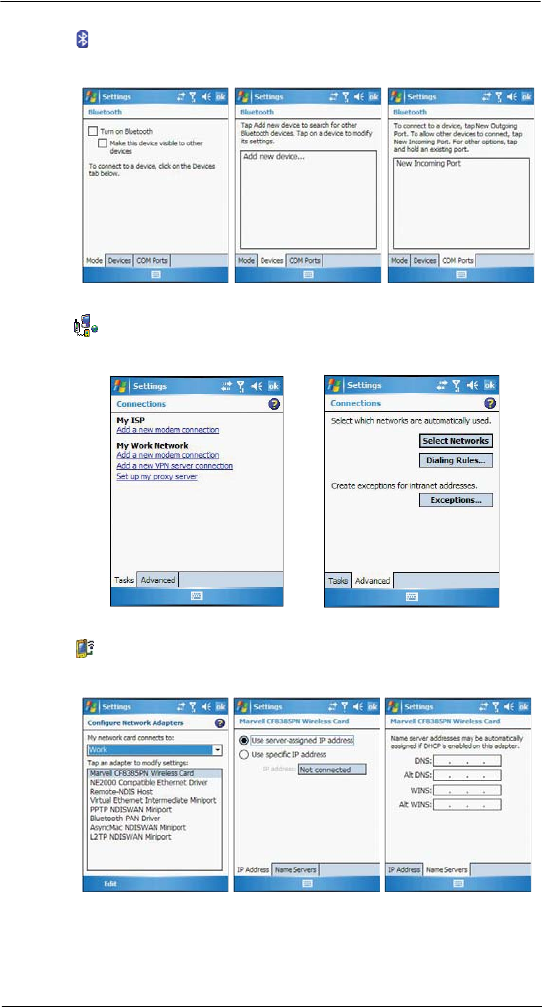
Bluetooth
Use this option to configure the device’s Bluetooth settings.
Connections
Adjust settings for connecting your ISP or to a local network.
Network Cards
Customize settings for your device’s network adapter.
6 Customizing Your MC35
Adjusting settings
96
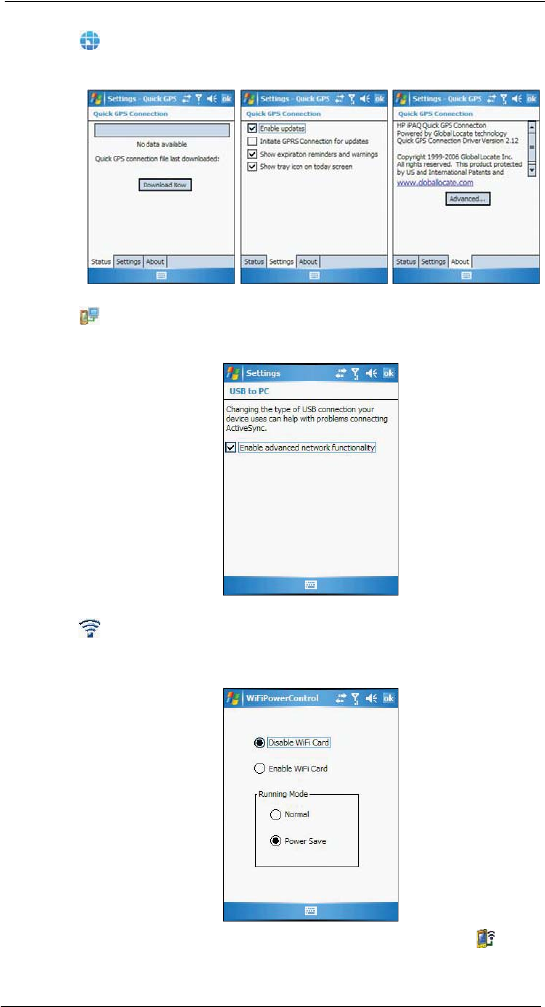
Quick GPS Connection
Enable and customize settings for the GPS connection utility.
USB to PC
Enable or disable the enhanced network connectivity.
Wireless Control
Available for MC3574 models, allow you to customize wireless network connection
settings and enable the WiFi (Wireless Fidelity) networking.
To configure the wireless network connection settings, tap Network Cards .
6 Customizing Your MC35
Adding programs
97
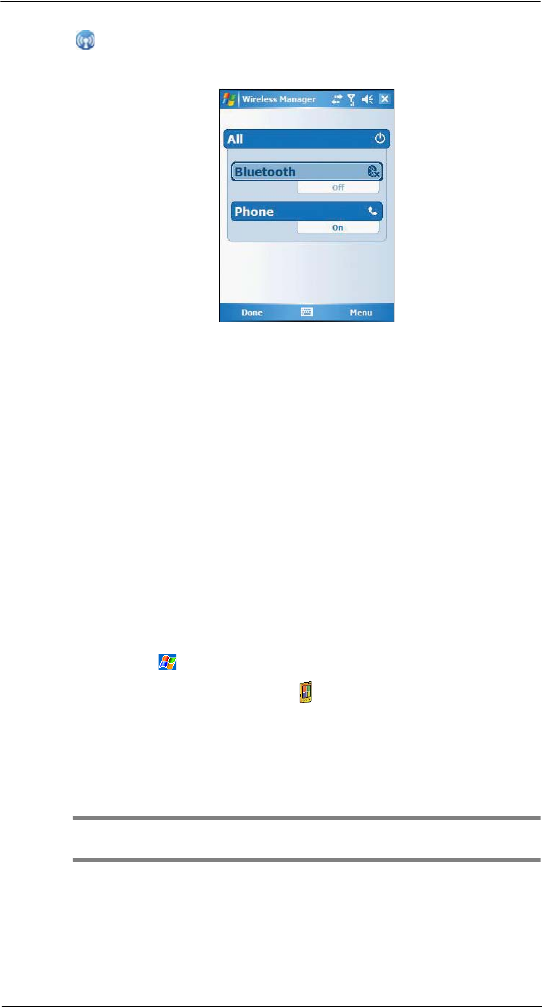
Wireless Manager
Enable or disable wireless features and customize device Bluetooth and phone settings.
Adding programs
Adding programs to your device
Programs bundled with your device at the factory are stored in ROM (read-only memory).
You cannot remove these programs, and you'll never accidentally lose ROM contents.
ROM programs can be updated using special installation programs with a *.xip
extension. All other programs and data files installed to your device after factory
installation are stored in RAM (random access memory). You can install any program
created for your device, as long as it has enough memory. The most popular place to find
software for your device is on the Pocket PC Web site http://www.microsoft.com/
windowsmobile/pocketpc/default.mspx. You can add programs to your device either by
using ActiveSync or by downloading the program from the Internet.
To add programs using ActiveSync:
Before installing a program on your device, you must first install the appropriate software
for your device on your computer.
1 Determine your device and processor type so that you know which version of the
software to install.
(a) Tap , then Settings.
(b) On the System tab, tap About .
(c) On the Version tab, make a note of the processor information.
2 Download the program to your computer (or insert the CD or disk that contains the
program into your computer).
You may see a single *.xip, *.exe, or *.zip file, a Setup.exe file, or several versions
of files for different device types and processors. Be sure to select the program
designed for a Pocket PC and your device’s processor type.
NOTE: Read any installation instructions, Read Me files, or documentation that come with the program.
Many programs provide special installation instructions.
3 Connect your device to your computer.

6 Customizing Your MC35
Adding programs
98
4 Double-click the *.exe file.
•If the file is an installer, the installation wizard will begin. Follow the
directions on the screen. Once the software has been installed on your
computer, the installer will automatically transfer the software to your
device.
•If the file is not an installer, you will see an error message stating that
the program is valid but it is designed for a different type of computer.
You will need to move this file to your device. If you cannot find any
installation instructions for the program in the Read Me file or
documentation, use the ActiveSync Explore button to copy the program
file to the Program Files folder on your device. For more information on
copying files using ActiveSync, see page 28.
5 Once installation is complete, tap , Programs, then the program icon to launch
it.
To add a program directly from the Internet:
1 Determine your device and processor type so that you know which version of the
software to install.
(a) Tap , then Settings.
(b) On the System tab, tap About .
(c) On the Version tab, make a note of the processor information.
2 Download the program to your device straight from the Internet using Internet
Explorer Mobile.
You may see a single *.xip, *.exe or *.zip file, a Setup.exe file, or several versions of
files for different device types and processors. Be sure to select the program
designed for a Pocket PC and your device’s processor type.
NOTE: Read any installation instructions, Read Me files, or documentation that comes with the program.
Many programs provide special installation instructions.
3 Tap the file, such as a *.xip or *.exe file. The installation wizard will begin.
4 Follow the onscreen instructions.
Adding a program to the Start menu
You can choose what program icons should appear on the menu based on which ones
you use most often.
To add a program to the Start menu program using Settings:
1 Tap , then Settings.
2 On the Personal tab, tap Menus .
3 Select the check box for the programs you wish to add.
If you do not see the program you want, you can either use File Explorer on your
device to move the program to the Start Menu folder, or use ActiveSync on your
computer to create a shortcut to the program and place the shortcut in the Start
Menu folder.
To add a program to the Start menu program using File Explorer on your
device:
1 Tap , Programs, then File Explorer .
2 Tap the My Device icon (tap the folder list, labeled My Documents by default, and
then My Device to see a list of all folders on your device).
3 Open the path: Windows | Start | Programs.
4 Tap and hold the program you want to add to the menu, then tap Cut on the pop-up
menu.
5 Open the path: Windows | Start Menu.
6 Tap and hold a blank area of the window, then tap Paste on the pop-up menu.
6 Customizing Your MC35
Adding programs
99
7 The program will now appear on the menu.
To add a Start menu program using ActiveSync on your computer:
1 In the ActiveSync on your computer, click Explore to explore your device’s files and
locate the program.
2 Right-click the program, and then click Create Shortcut.
3 Move the shortcut to the Start Menu folder in the Windows folder.
The shortcut now appears on the menu.
For more information on using ActiveSync, see ActiveSync Help on your computer.
Removing programs
1 Tap , then Settings.
2 On the System tab, tap Remove Programs .
3 Tap the program you wish to remove.
4 Tap the Remove button.
If the program does not appear in the list of installed programs, use File Explorer on your
device to locate the program:
1 Tap and hold the program.
2 Tap Delete on the pop-up menu.

6 Customizing Your MC35
Adding programs
100

7 Getting Connected
Infrared connection
101
7 Getting Connected
You can use your MC35 to exchange information with other mobile devices and connect
to your computer, a network, or the Internet. You have the following connection options:
•Use the infrared (IR) port on your device to send and receive files from
another IR-enabled device.
•Use Bluetooth to beam information such as files, appointments, tasks,
calendar events and contacts, between devices that have Bluetooth
capabilities. You can also use Bluetooth to print to a Bluetooth printer and
create a connection between your device and a Bluetooth phone to use the
phone as a modem.
Once connected to the another Bluetooth enabled device or computer, you
can locate and use any of the services available on the device.
•Use WiFi networking to connect to a computer, access the Internet, send
and receive email and files.
Your wireless service provider will provide the needed information for a
successful connection.
•Connect to your mobile Internet service provider (ISP). Once connected, you
can send and receive email messages by using Messaging and view Web or
WAP pages by using Internet Explorer Mobile.
The communication software for creating an ISP connection is already
installed on your device. Your service provider will provide software needed
to install other services, such as paging and fax services.
•Connect to the virtual private network (VPN) at the company or organisation
where you work. Once connected, the added security of a VPN means that
you can access the full resources of your company’s network. For example,
you can use File Explorer to access the files of computers on that network.
1 Infrared connection
2 Bluetooth connection
3 WiFi connection
4 Internet connection
5 Network connection
6 Email server connection
Infrared connection
Using infrared, you can send and receive information, such as contacts and
appointments from another IR-enabled device.
Activating the IR connection
1 Tap , then Settings.
2 On the Connections tab, tap Beam .

7 Getting Connected
Infrared connection
102
3 Tap the Receive all incoming beams check box.
4 Tap OK.
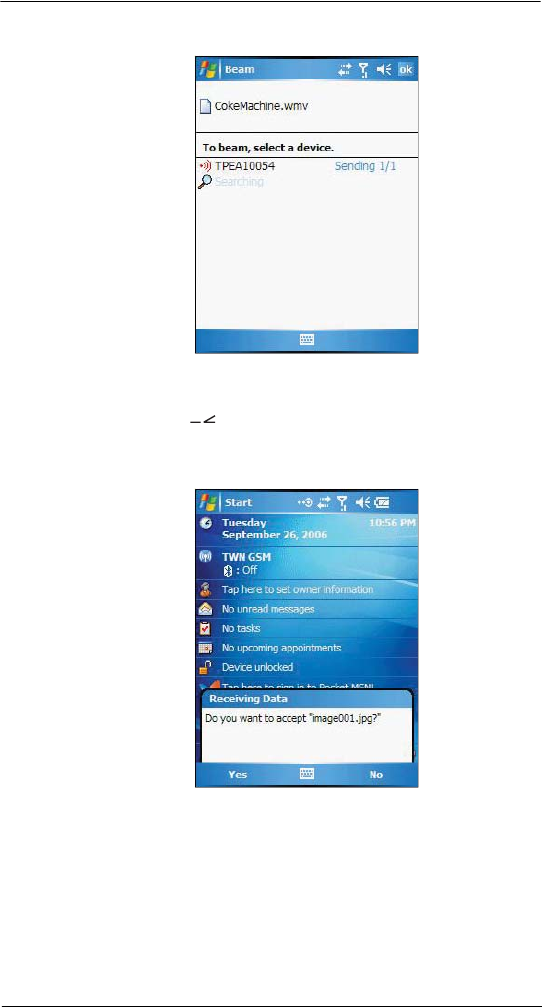
Sending information
1 Switch to the program where you created the item you want to send and locate the
item in the list.
2 Align the IR port of your device with that of the IR-enabled device so that they
are unobstructed and within a close range.
3 Tap and hold the item, then tap Beam File on the pop-up menu.
-or-
Send items (but not folders) using File Explorer.
•Tap and hold the item you want to send, then tap Beam File on the
pop-up menu.
7 Getting Connected
Infrared connection
103
4 Select the device, then tap the Tap to send link.
Receiving information
1 Align the IR port of your device with that of the IR-enabled device so that they
are unobstructed and within close range.
2 Have the owner of the other device send the information to you. Your device will
automatically receive it.
3 On the Receiving Data callout, tap Yes.
7 Getting Connected
Bluetooth connection
104
Bluetooth connection
Your device allows you to connect to a Bluetooth-enabled device, such as a handheld,
headset, computer, or GPS accessory. Once connected you can do the following:
•Beam files and information in Calendar, Contacts, Notes, Tasks, Excel
Mobile, Word Mobile, PowerPoint Mobile, and Pictures & Videos programs ,
to other Bluetooth-enabled device.
•Transfer an outgoing call to a Bluetooth-enabled headset.
•Wirelessly print files from a Bluetooth-enabled printer.
An additional software needs to be installed on your device to enable you to
print files to a Bluetooth-enabled printer. Contact your local dealer for more
information.
•Wirelessly listen to audio files or locate and use services on a Bluetooth-
enabled device.
IMPORTANT: Ensure that the two devices have Bluetooth turned on, discoverable, and within close
range.
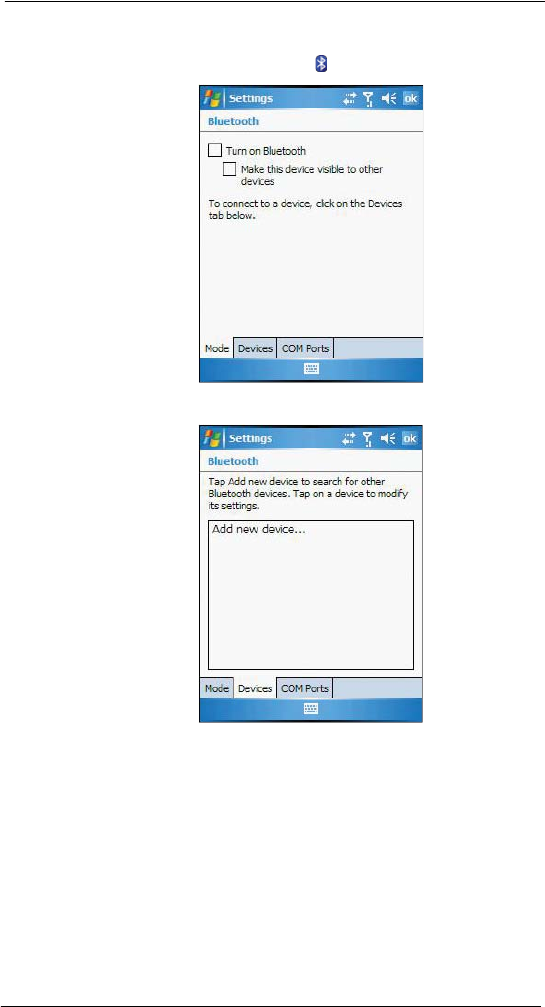
To activate Bluetooth connection
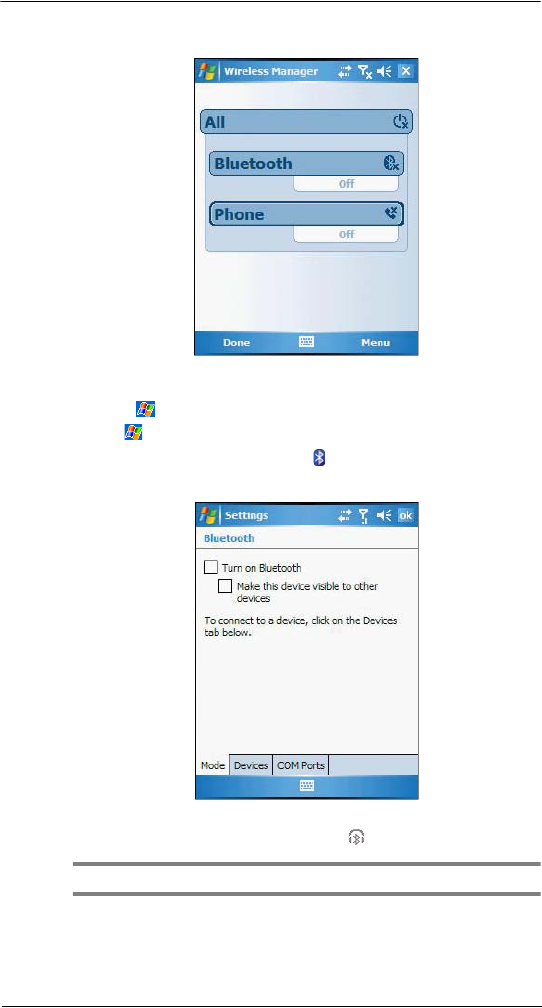
You can activate Bluetooth connection by using the followings ways:
Using Wireless Manager:
1 On the Today screen, tap the Wireless Manager icon.
Tap to launch the
Wireless Manager.
7 Getting Connected
Bluetooth connection
105
2 On the Wireless Manager screen, tap Bluetooth to turn on the Bluetooth function.
You can tap Menu on the command bar to configure the Bluetooth settings.
Using the menu:
1 Tap , then Settings.
2 On the Connections tab, tap Bluetooth .
3 On the Mode tab, select all the check boxes.
4 Tap OK.
An active Bluetooth connection is indicated by at the top of the screen.
NOTE: Deactivate the Bluetooth feature when you do not plan to use it for an extended time.
7 Getting Connected
Bluetooth connection
106
Creating a partnership
1 On the Connections tab, tap Bluetooth .
2 On the Devices tab, tap Add new device.

7 Getting Connected
Bluetooth connection
107
Your device will search for other devices with Bluetooth capabilities and displays
them in the device list.
3 Tap the name of the device in the list, then tap Next.
4 In the “Select services to use from this device” list, select a service.
5 If you want to use a passkey, enter the alphanumeric passkey , then tap Next.
The passkey is recommended for enhanced security. Your passkey must be
between 1 to 16 alphanumeric characters.
-or-
You can leave the passkey blank, then tap Next.
6 Enter the same passkey on the other device.
7 In the Display Name, enter a new name for the device.
8 Tap Finish.
9 Tap OK.
Sending information
1 Switch to the program where you created the item you want to send and locate the
item in the list.
2 Do any one of the following:
•Tap and hold the item, and then tap Beam File on the pop-up menu.
•Using Pictures & Videos, tap and hold a thumbnail to display a pop-up
menu of available actions, then tap Send Image via Bluetooth.
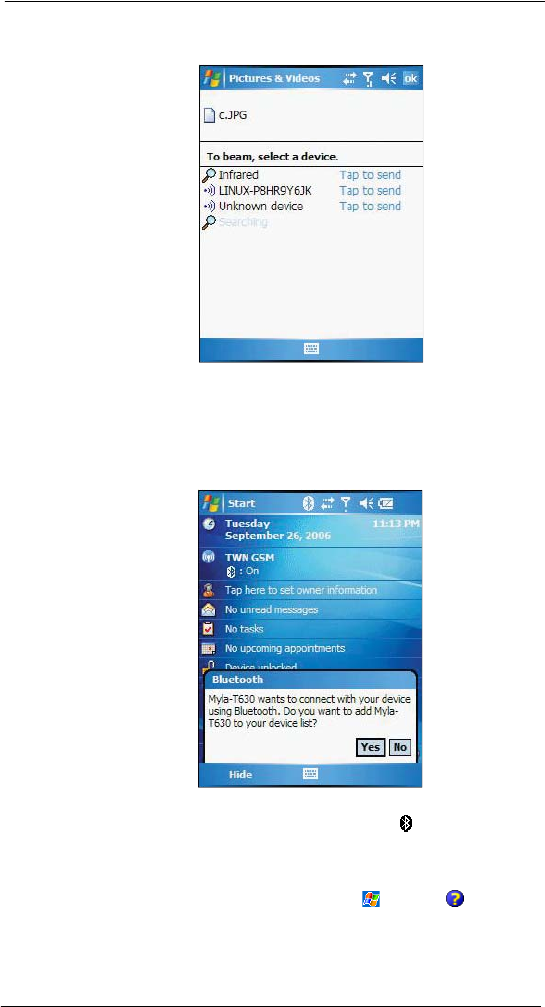
7 Getting Connected
Bluetooth connection
108
•Using File Explorer, tap and hold an item (but not folders), select Beam
File on the pop-up menu.
3 Select the Bluetooth device, then tap the Tap to send link.
Receiving information
1 Turn on the Bluetooth function.
2 Have the owner of the other device send the information to you. Your device will
automatically receive it.
3 On the Bluetooth callout, tap Yes.
A Bluetooth connection with your device is indicated by at the top of the screen.
Making a call from a headset
For detailed instructions, refer to page 59.
For detailed information on how to use Bluetooth, tap , then Help .
7 Getting Connected
WiFi connection
109
WiFi connection
With the device’s integrated WiFi (available for MC3574 models), you can scan for
existing wireless network access points or hot spots. Wireless network access points or
hot spots can be found in homes and office or public areas such as inside airports,
restaurants, coffee shops, hotels, or other public areas. Using WiFi networking, you can
connect to a computer, access the Internet, send and receive email and files.
A wireless network can be added either when the network is detected or by manually
entering settings information.
NOTE: WiFi access in some areas may require a separate purchase of a service contract with a
wireless service provider. You can check with a WiFi service provider for detailed information.
Enabling WiFi connection
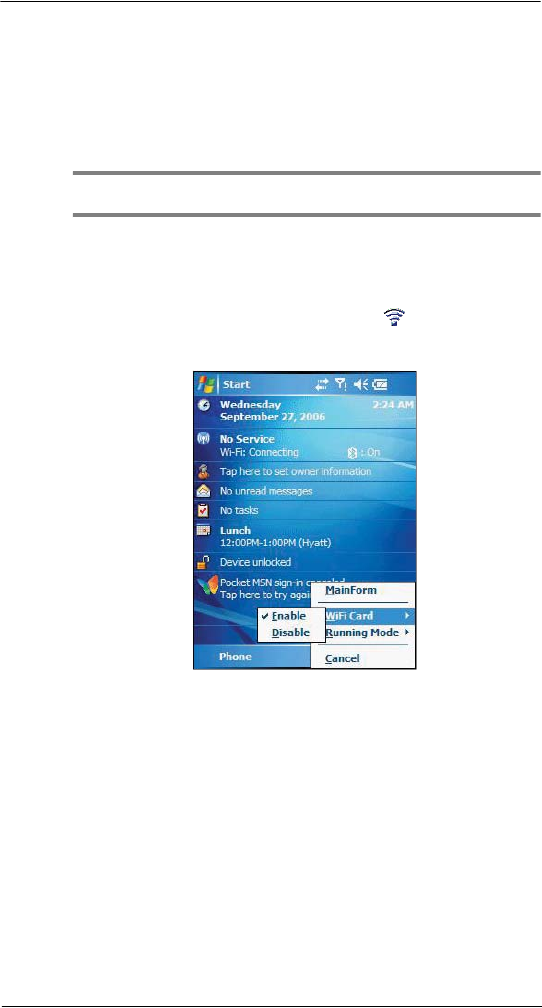
Do either of the following:
Using the Wireless Control icon on the Today screen.
1 On the Today screen, tap and hold Wireless Control , located on the lower
right corner of the screen.
2Select WiFi Card, then tap Enable.
7 Getting Connected
WiFi connection
110
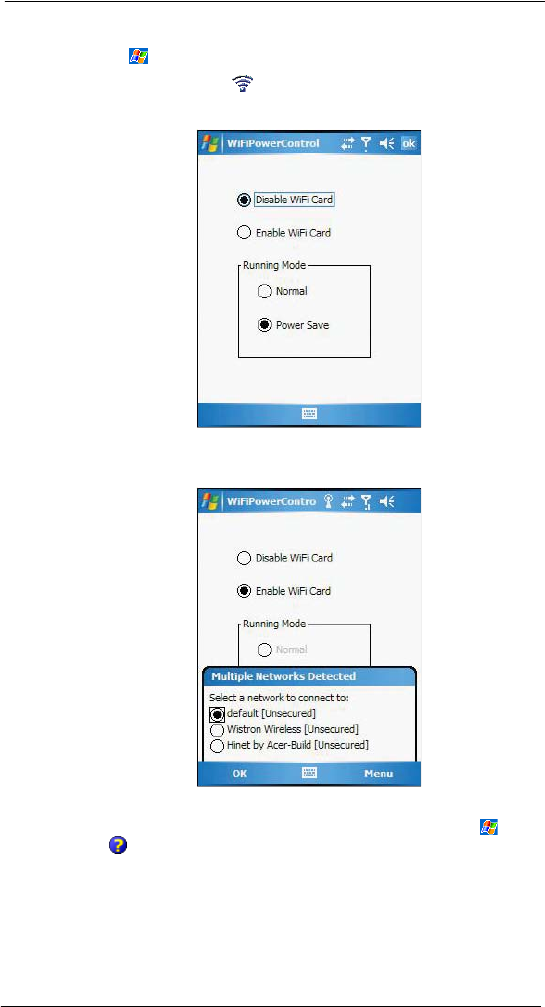
Using the Settings menu
1 Tap , Settings, then Connections tab.
2 Tap WiFi Card Setting .
3Select Enable WiFi Card, then tap OK.
If you are in a hot spot, the detected Wireless service will be displayed on the
device.
4 Select the network you want to connect to.
For more information on how to configure the wireless network settings, tap , then
Help .
7 Getting Connected
WiFi connection
111
Setting up a wireless network connection
A wireless network can be added either when the network is detected or by manually
entering settings information. Before doing these steps, determine if authentication
information is needed.
Before performing this procedure, make sure you have the following:
•Make sure that the Internet Protocol (TCP/IP) is installed on your computer.
•Make sure the network system and remote access server in your workplace
supports TCP/IP protocol
•Make sure you have remote access account. Ask your network administrator
for assistance on setting up a wireless connection.
•First establish ActiveSync partnership with the MC35 using USB or
Bluetooth connection.
1 Enable wireless connection. Refer to “Enabling WiFi connection” on page 109 for
more information.
1 Tap , Settings, then Connections tab.
2 Tap Network Cards .
3 Tap the Wireless tab.
4 If there are networks already detected, tap and hold network name, then select
Connect.
If none, tap Add New and follow all onscreen instructions.
5 In the Network to access drop-down list, select from the following network
connection options:
•All available
•Only access points
•Only computer-to-computer
6 When finished, tap OK.
For more information on how to configure the wireless network settings, tap , then
Help .

7 Getting Connected
Internet connection
112
Internet connection
Your MC35 EDA allows you to connect to the Internet via GPRS (General Packet Radio
Service). Once connected you can:
•Use Inbox to send and receive email messages
•Use Internet Explorer Mobile to access Web or WAP pages
•Use Windows Media Player 10 Mobile for Pocket PC to listen to streaming
media
For more information on configuring your device’s GPRS setting, contact your mobile
ISP.
Network connection
If you have access to a network at work, you can send email messages, view Intranet
pages, synchronize your device, and possibly access the Internet. You can connect to a
network by creating a modem connection via a RAS account or use a network card to
connect directly to an Ethernet network and access Internet, Intranet or download
emails. Before you can create these connections, your network administrator will need to
set up a RAS account for you. Your network administrator may also give you VPN
settings.
Creating a modem connection to a network
1 Ask your network administrator for the following information:
•Dial-up access telephone number
•User name and password
•Domain name
•TCP/IP settings
2 Tap , then Settings.
3 On the Connections tab, tap Connections .
4 In the Connections window, tap the Add a new modem connection link, either in
the My ISP or My Work Network list.
5 In the Make New Connection window, enter a name for the connection.
6 In the Select a modem list, select your modem type.
If your modem type does not appear, try re-inserting the modem card. If you are
using an external modem that is connected to your device with a cable, select
Hayes Compatible on COM1.
7 Tap Next to continue configuring your modem connection depending on the modem
type you selected.
You need not change any settings in Advanced. Most ISPs now use a dynamically
assigned address. If the ISP you are connecting to does not use a dynamically-
assigned address, tap Advanced, then the TCP/IP tab, and enter the address.
When finished, tap OK.
8 Tap Finish to create the new modem connection.
Email server connection
You can set up a connection to an email server so that you can send and receive email
messages by using a modem or network connection and Inbox on your device. You can
use multiple email accounts to receive your messages. For each email account you
intend to use, first set up and name the email service. If you use the same service to
connect to different mailboxes, set up and name each mailbox connection.
There are two types of email account that can be managed using your device.
•Microsoft Outlook
Using Microsoft Outlook, your Inbox is updated each time you sync with your
computer or corporate email server.

7 Getting Connected
Email server connection
113
•POP3/IMAP4
This includes email service from providers. These email accounts can be
managed remotely using a wireless connection.
To set up an email account:
For an explanation on any of the setup screens, tap , then Help .
1 Tap , then Messaging .
2 Tap Menu, Tools, then New Account.
3 Select the email type from the Your e-mail provider drop-down list and tap Next.
4 Fill out the email address field, then tap Next.
This will initiate auto-configuration which attempts to connect your device to your
email server and automatically download the necessary email connection settings.
If auto-configuration is successful you can begin sending/receiving emails straight
away. If unsuccessful you will need to manually enter the settings.
5 Fill out the following fields: Your Name, User name, Password.
6 Select the Save Password check box unless you want to be prompted when you get
your mail.
7 Tap Next.
8 From the Account type drop-down menu, select the service type that your email
provider supports (POP3 or IMAP4).
9 Fill out the Name field for your email account, then tap Next.
10 Enter your email provider’s server name information for incoming and outgoing
mail.
11 Tap Finish.

7 Getting Connected
Email server connection
114
8 Microsoft Pocket Outlook
Pocket Outlook Overview
115
8 Microsoft Pocket
Outlook
This chapter describes the Microsoft Pocket Outlook programs.
•Pocket Outlook Overview
•Calendar
•Contacts
•Tasks
•Notes
Pocket Outlook Overview
Microsoft Pocket Outlook includes Calendar, Contacts, Inbox, Notes and Tasks. You can
use these programs individually or in tandem with each other. For example, email
addresses stored in Contacts can be used to address email messages in Messaging.
Using ActiveSync, you can synchronize information from Microsoft Outlook or Microsoft
Exchange on your PC with your device. You can also synchronize this information directly
with a Microsoft Exchange server. Each time you synchronize, ActiveSync compares the
changes you made on your device and PC or server and updates both locations with the
latest information. For information on using ActiveSync, see ActiveSync Help on your
computer.
Calendar
Calendar enables you to conveniently manage your schedules and appointments or any
other activities associated with a time and date. You can schedule appointments,
including meetings and other events. Checking your appointments is easy using one of
several views—Agenda, Day, Week, Month, and Year. Switch display views by tapping
any of the view icons on the command bar.
To open Calendar:
•Tap , then Calendar .
Calendar opens to today’s schedule.
Tap to go to
current date.
Tap to display or edit
the appointment details.