Symbol Technologies NP4046 WLAN DS Radio Phone User Manual Quick Reg Guide NP4046
Symbol Technologies Inc WLAN DS Radio Phone Quick Reg Guide NP4046
Contents
- 1. Quick Reg Guide NP4046
- 2. Regulatory Addenum
Quick Reg Guide NP4046

Setting up the Phone
1. Press MENU.
2. Scroll down to using the #> key to System Setup, press SND.
3. Press SND when the screen highlights Network.
4. For Net ID, enter the S24 AP Net_ID, press SND.
5. For IP Address, enter the IP address assigned to Phone, press SND.
To write over existing IP addresses use CLR.
6. For Subnet mask, enter the network subnet mask, press SND.
7. For the DFT GTW ADR (default gateway address), enter the IP gateway
address used to access the phone systems and gatekeeper, press SND.
8. For the POTS GTW ADR (plain old telephone service gateway address),
enter the IP gateway address for accessing POTS lines directly,
press SND.
9. For the FTP IP ADR (FTP IP address), enter the IP FTP server address
from which the phone can download its configuration file.
((Press SND??))
Dialing
The NetVISION Phone features include dialing by:
· a complete IP addressee entry
· a partial IP addressee entry
· an extension
· a speed-dial key
· a previous-number redial
· names internally mapped to an IP address
· dialing 9 to access an outside line.
The dialing process begins by pressing any dialing-related key, including:
· the numeric keys, *, and #
· the RCL key
· the scroll keys
· the NAME key.
To dial by extension number, enter the number and press SND. To dial by
complete or partial IP Address, enter * followed by the IP address or last
three digits, press SND. To use the redial feature, press RCL to display
last number entered, press SND.
To dial by name, press NAME. A list of names display on the screen.
Scroll through the names until the desired name appears, press the
Select or SND. If the user presses Select, the selected name and IP
address display. Pressing SND, with or without first pressing Select, call
setup processing begins. The user can move to names beginning with
other letters by pressing a numeric key after pressing the NAME key.
Cancel the dialing sequence at any time by pressing END.
Speed Dial Numbers
The NetVISION Phone provides 100, two-digit speed-dial locations for
frequently dialed numbers. To enter a speed-dial number, type in the
number and press STO. Enter a two-digit access number, press STO. To
use the speed dial numbers, press RCL and enter the two-digit access
number. Press SND to dial a stored number.
Receiving calls
The NetVISION phone provides three methods to respond to a call:
· Auto answer
· Single key answer/refuse
· Any key answer
The NetVISION Phone notifies users of incoming calls by sounding
ringing tones. The caller name and address display on the phone screen.
The user can refuse a call by pressing END. When refused, the call
appears to the caller as unanswered.
Users can configure the phone to answer calls automatically. The Auto
Answer mode answers calls after a single ring. The call activates
immediately.
The Single-Key answer mode requires users to press the SND key to
accept a call. Pressing any key other than END has no effect.
The Any-Key answer mode allows users to press any key except END to
accept a call.
Setting User Options
When selecting optional features, use SND as the enter key. Use END to
scroll back one selection on the menu. To Navigate through the menus,
use the *< Key to scroll up and #> to scroll down.
Press the Menu key. A choice between User Options, Maintenance,
System Setup and Mfg Test displays. Select User Options, press SND. To
access specific user options, highlight a selection and press SND.
User Options include:
· Phone Ring: a choice between six tones, vibration or LED display.
· Phone Aswr: set the phone to answer automatically (Auto), by pressing
one key (SND), or pressing any key.
· Ring Volume: press *< to turn the ringer volume down. Press #> to turn
the ringer volume up.
· Play Volume: set volume level press *< to turn down #> to turn up.
· Contrast: press *< to turn the contrast down. Press #> to turn the
contrast up.
· Clear SD: clear speed dial numbers programmed into the phone.
Push SND to select. The system prompts the user to indicate if
clearing the speed dial is correct. Press SND again to clear
speed-dial numbers.
Broadcast/Intercom Mode
The Phone supports broadcast or intercom-style
calls. In this mode, the user can send a message
to several other phones. ((How many??)) The
message transmits immediately to the
intended receivers. Configure
each receiving Phone to
allow broadcast messages
to preempt existing
calls if desired.
Multiple
Conversations
The Phone supports two
concurrent
conversations. The user
can switch between calls
using the HOLD key.
The user can put one
caller on hold while
placing another call.
Phone Features
· Three-line display
· Headset port
· Ear tone for call waiting/incoming call
· Ringer on/off switch
· Vibrating, visual and audio ring signals
· Volume control
· Call forwarding/transfer
· Redial key
· Roaming
· External calls using gateway
· Unidirectional broadcast message
· Paging
· Dial by name
· Speed dial/address book
· External serial port
· Caller ID
· Battery strength meter
· Signal strength meter
Alpha Keys
FCT Key: ((TBD??))
MENU Key: access set up.
RCL Key: functions as a speed dial and redial key,
listing the last eight numbers dialed.
NAME Key: used to access the directory for dialing
by name.
CLR Key: deletes previous entered characters. Press and
hold for two seconds and entire entry deletes.
STO Key: used to store numbers in the Recall function.
HOLD key: used to put the caller on hold, and call
waiting access.
Getting Started
The battery included with the NetVISION Phone needs to be charged.
Charge the battery using the dual-slot charging cradle accompanying
the Phone before engaging in continuous use.((Does the battery come
attached and fully charged??))
Charging the Battery
The charging cradle allows users to charge the battery separately or
while attached to the phone. The cradle recharges one battery at a time.
For the quickest charge, remove the battery from the Phone and place in
the rear slot of the cradle. The red LED indicator lights while the battery
charges. The green LED indicator lights for a fully charged battery.
Turning the Phone On
Press and hold SND until an image appears on the screen, about
two seconds.
Turning the Phone Off
Press and hold END until the screen clears, about three seconds.
Indicator Descriptions
The first screen of the NetVISION Phone displays the IP address assigned
to the Phone. The second screen automatically appears after a few
seconds and displays:
· the Phone user name at the top of the display
· the word Idle below the user name if the Phone has associated with a
Spectrum24 (S24) access point (AP) or the words No Network if the
Phone has not associated with an AP
· the signal strength icon on the left side of the display
· the battery strength icon on the right side of the display
· two telephone icons at the bottom representing the two available lines.
The icons highlight when in use.
The second menu displays: NV Phone
(Status)
Signal Strength Lines Battery Strength
For Warranty & Service
Information, Call:
1-800-653-5350
Outside North America, contact
your local Symbol representative
FCC Requirements
This device must operate in compliance with
Federal Communications Commission (FCC)
Rules and Regulations Parts 15. See FCC
registration label (located on bottom of
equipment) for FCC registration.
This equipment has been tested and found to
comply with the limits for Class A or Class B
digital device, pursuant to Part 15 of the FCC
Rules. These limits are designed to provide
reasonable protection against harmful
interference when the equipment is operated in
a commercial environment. This equipment
generates, uses, and can radiate radio
frequency energy and, if not installed and
used in accordance with the instruction manual,
may cause harmful interference to radio com-
munications. Operation of this equipment in a
residential area is likely to cause harmful
interference in which case the user will be
required to correct the interference at his
own expense.
However, there is no guarantee that
interference will not occur in a particular
installation. If this equipment does cause
harmful interference to radio or television
reception, which can be determined by turning
the equipment off and on, the user is
encouraged to try to correct the interference by
one or more of the following measures:
- Reorient or relocate the receiving antenna.
- Increase the separation between the
equipment and receiver.
- Connect the equipment into an outlet on a
circuit different from that to which the receiver
is connected.
- Consult the dealer or an experienced
radio/TV technician for help.
RF Notice
Any changes or modifications to Symbol
Technologies equipment not expressly approved
by Symbol Technologies could void the user's
authority to operate the equipment.
70-XXXXX-01
Copyright © 1998 by Symbol Technologies, Inc. All
Rights Reserved.Symbol and Spectrum24 are
registered trademarks of Symbol Technologies, Inc.
Symbol Technologies, Inc.
One Symbol Plaza
Holtsville, NY 11742-1300
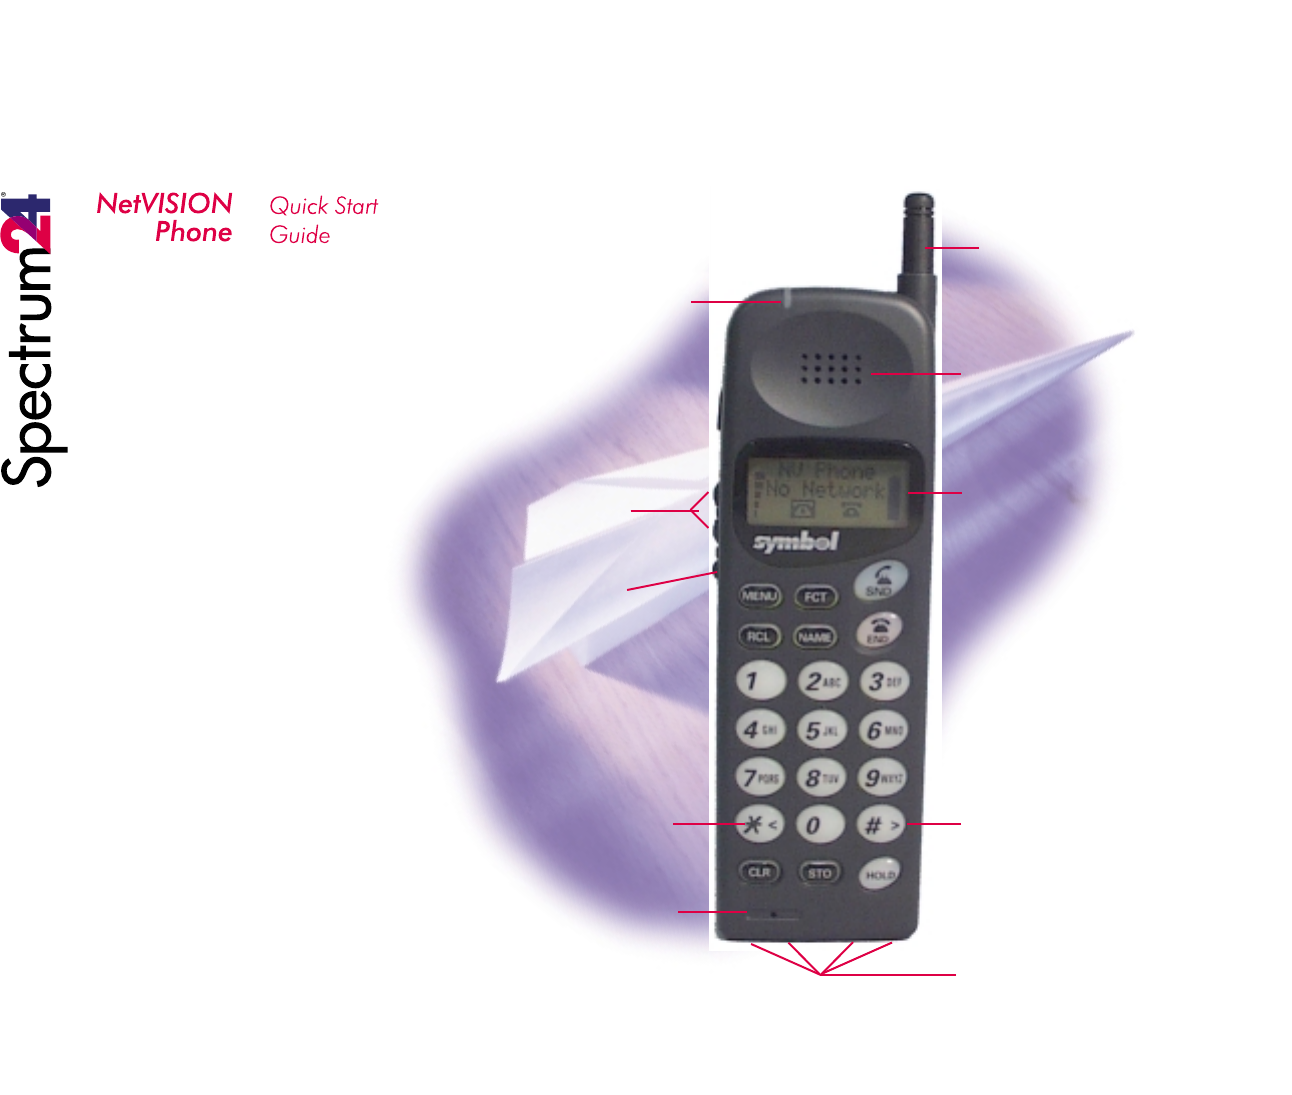
Antenna
Earpiece
3 Line
10 Character
LCD Display
Right/Down
Scroll Button
Charging
Contacts
LED Indicator
Volume
(Alternate Scroll
Buttons)
Select
(Alternate Send
Button)
Left/Up
Scroll Button
Microphone