TAIDOC TECHNOLOGY 3140ABEM2 Blood Pressure Monitoring System User Manual P80 owner s manual
TAIDOC TECHNOLOGY CORP. Blood Pressure Monitoring System P80 owner s manual
owners manual_v1
A2.1‐1of30
Fora Care
Blood Pressure Monitoring System
Model number: P80
Owner’s Manual
Version 1.0
2013-06

A2.1‐2of30
Dear FORA Blood Pressure Monitoring System Owner:
Thank you for purchasing the FORA Blood Pressure Monitoring System.
This manual provides important information to help you operate this system
correctly. Before using this product, please read the following contents
thoroughly and carefully.
With the compact size and easy operation of this system, you can easily
monitor your blood pressure by yourself at any time or place. In addition, this
system can help you and your healthcare professionals to monitor and adjust
your treatment plans, and keep your blood pressure under control.
If you have other questions regarding this product, please contact the place of
purchase.

A2.1‐3of30
IMPORTANT SAFETY PRECAUTIONS
READ BEFORE USE
1. Use this device ONLY for the intended use described in this manual.
2. Do NOT use the device if it is not working properly or damaged.
3. Do NOT use the equipment where aerosol sprays are being used, or where
oxygen is being administered.
4. Do NOT use under any circumstances on newborns.
5. This device does NOT serve as a cure for any symptoms or diseases. The
data measured are for reference only. Always consult your doctor to have
the results interpreted.
6. Keep the equipment away from hot surfaces.
7. Do NOT apply the cuff to areas other than the place directed.
8. Use of this instrument in a dry environment, especially if synthetic materials
are present (synthetic clothing, carpets etc.) may cause damaging static
discharges that may cause erroneous results.
9. Do not use this instrument in close proximity to sources of strong
electromagnetic radiation, as these may interfere with the accurate
operation.
KEEP THESE INSTRUCTIONS IN A SAFE PLACE

A2.1‐4of30
TABLE OF CONTENTS
BEFORE YOU BEGIN
Intended Use
Test Principle
Contents of System
Meter Overview
Display Screen
HOW TO INSTALL AND UPDATE THE TDLink BP
BLUETOOTH PAIRING
IMPORTANT INFORMATION ABOUT PERFORMING YOUR BLOOD
PRESSURE TEST
Before Measurement
Fitting the Cuff Properly
Proper Measurement Position
HOW TO TEST YOUR BLOOD PRESSURE
Taking Measurement by the Device Itself
Taking Measurement with the TDLink BP App
VIEWING PAST TEST RESULTS
Data
Analysis
FAQ
MAINTENANCE
Battery
Caring for Your Meter
DETAILED INFORMATION
SYSTEM TROUBLESHOOTING
Result Readings of App
Error Messages of Meter
Troubleshooting
SPECIFICATIONS
A2.1‐5of30
BEFORE YOU BEGIN
Intended Use
FORA Blood Pressure Monitoring System is a system designed to measure
the systolic and diastolic blood pressure and pulse rate by using a non-invasive
technique in which an inflatable cuff is wrapped on the upper arm. It is intended
for individuals age 18 and above use at home and in clinical settings. The
device is not to be used for the diagnosis of hypertension or for testing on
newborns.
Test Principle
Blood pressure is measured non-invasively at the arm based on oscillometric
method.
This device is NOT able to take measurements in the presence of common
arrhythmia, such as atrial or ventricular premature beats or atrial fibrillation. It
may produce reading error.
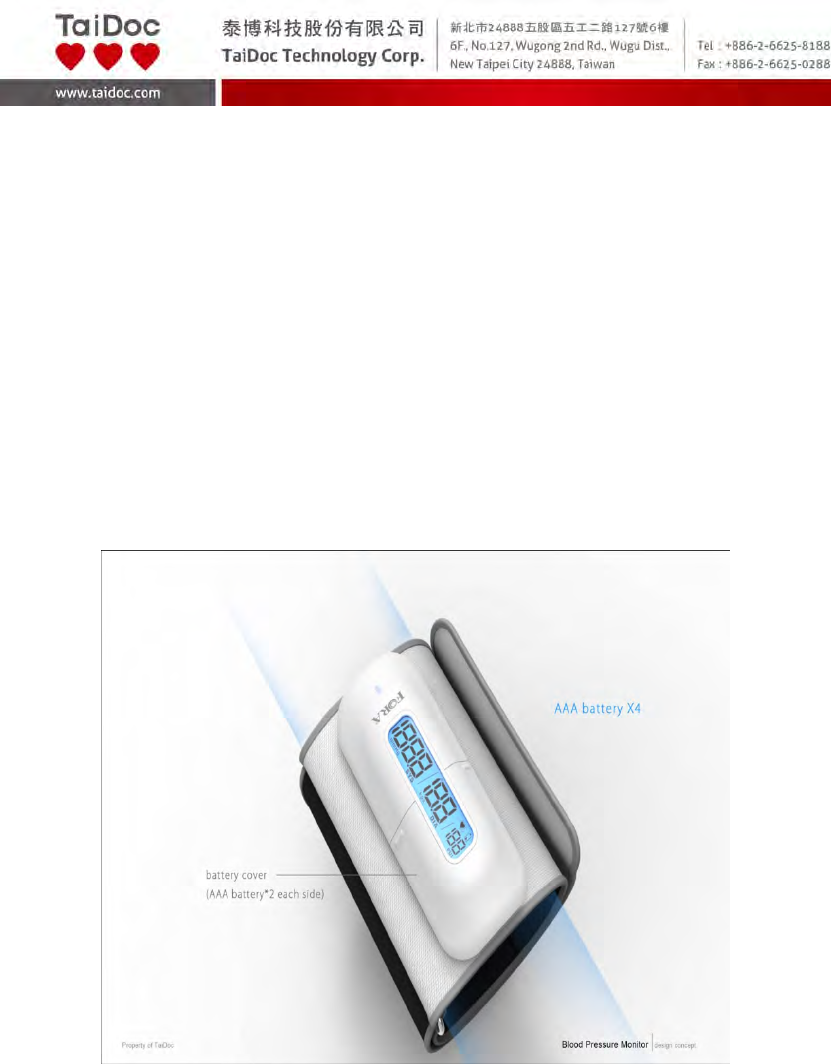
Contents of System
Your new FORA Blood Pressure Monitoring System includes:
(1) Meter with cuff
(2) Owner's manual
(3) Warranty card
(4) 4 x AAA batteries
(5) Protective Wallet
A2.1‐6of30
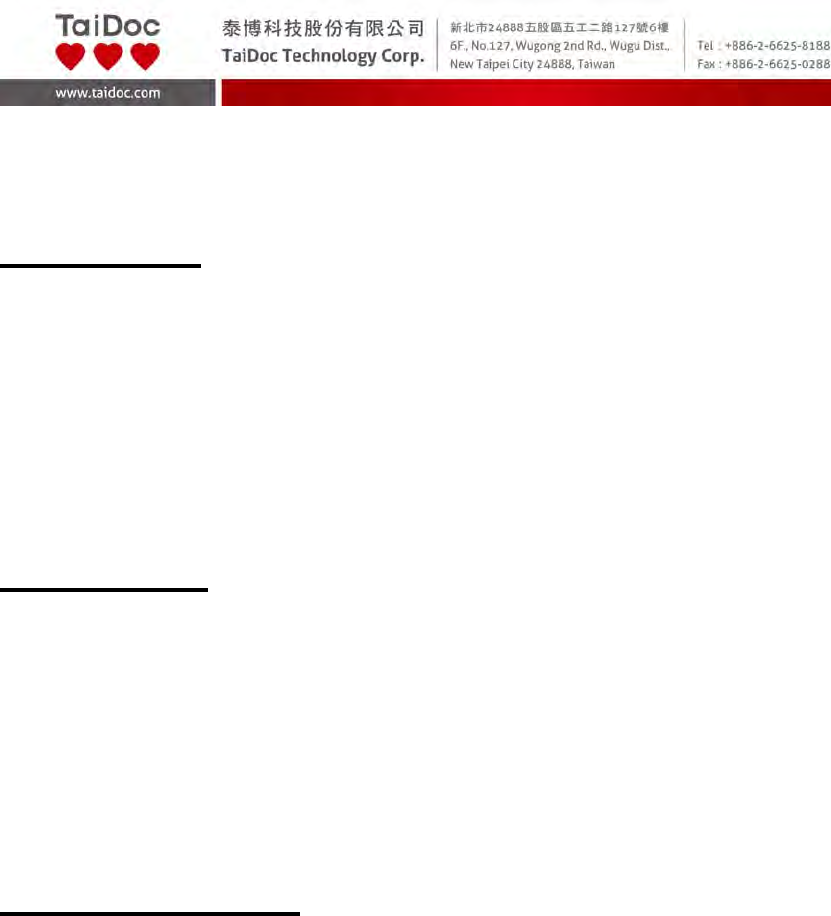
Meter Overview
1. CUFF
2. BT INDICATOR
Download test results with a Bluetooth connection.
3. DISPLAY SCREEN
4. BATTERY COMPARTMENT
5. ON/OFF BUTTON
6. BT PAIRING BUTTON
1.
2.
3.
4.
5. 6.
A2.1‐7of30
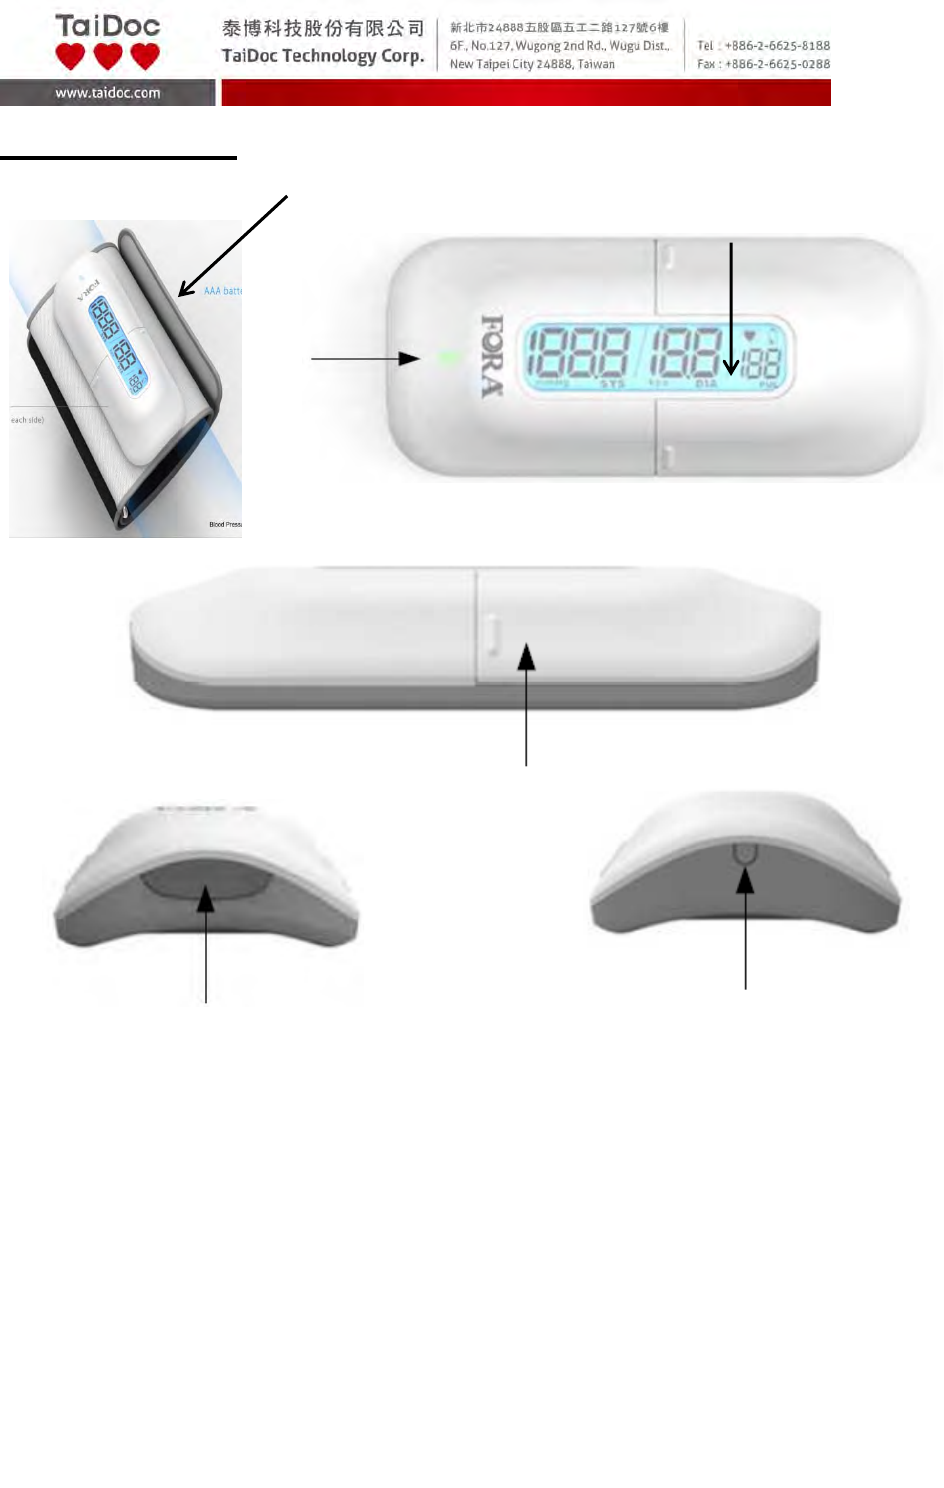
Display Screen
1. Systolic Pressure Value 5. Pulse Rate
2. Diastolic Pressure Value 6. Diastolic Pressure Symbol
3. Pulse Rate Symbol 7. Systolic Pressure Symbol
4. Low Battery Symbol 8. Units of Blood Pressure
1. 2. 3.
4.
5.
6.
7.
8.

A2.1‐8of30
HOW TO INSTALL AND UPDATE THE
TDLink BP
. You can use the device, FORA Blood Pressure Monitoring System, by itself or
with the TDLink BP App. TDLink BP App is available on the App Store/Play
Store for free download. You must be connected to the internet to download
the App.
TDLink BP App is designed to assist you in easy blood pressure testing,
recording, tracking and monitoring.
It is simple and intuitive to use, for better understanding of your current
condition and to achieve better hypertension control.
System Requirement
iOS version 5.0.1 or higher.
Updating
When new features are added to the TDLink BP App, the App Store will notify
you automatically. Please perform the updates accordingly to provide you with
the latest features that we have developed in your best interest.

A2.1‐9of30
BLUETOOTH PAIRING
Please note that you must complete the pairing between meter and
Bluetooth receiver before transmitting data.
NOTE:
This step is recommended when the user needs to pair this meter to a
Bluetooth receiver for the first time, or when user needs to pair this meter to
another new Bluetooth receiver.
1. Installing the TDLink BP app
For more information, please refer to the section” HOW TO INSTALL AND
UPDATE THE TDLink BP”.
2. Connecting blood pressure meter with your mobile device
Turn on the Bluetooth on both your blood pressure meter and your mobile
device (iOS with 5.0.1 or higher and Android with 2.3.3 or higher). “PCL” will
appear on the meter display and the BT indicator will start to flash.
Your mobile device will now begin searching for the Bluetooth signal to pair
with.
Once the mobile device has found the blood pressure meter; the name of the
meter will appear on the pairing list. Please select and add to the list.
On the mobile phone, the blood pressure meter will be shown as a paired
device and on the blood pressure meter the Bluetooth Indicator LED will light
solid, indicating that the devices have been successfully paired.
3. Data transmission
The data transmission will begin spontaneously right after the measurement
when the Bluetooth is turn on.
A2.1‐10of30
Bluetooth indicator on the blood pressure meter:
BluetoothIndicator Status
Flashfast ThemeterissearchingthedeviceofBluetooth
signal.
Flashslowly ThemeterispairingwiththedeviceofBluetooth.
Litsolid Themeteristransmittingthedatanowthe
connectionisestablished.
Mobile Phone Compatibility Issues
The Bluetooth functionality is implemented in different ways by the various
mobile phone manufacturers. Unfortunately, in some mobile phone models,
even with Bluetooth functionality, they may be compatible only with certain
types of devices. If a problem occurs in the connection between your mobile
phone and the blood pressure meter, or if you are uncertain regarding your
mobile phone’s Bluetooth capabilities, please consult your mobile phone
manual or blood pressure meter manual or alternatively contact your local
customer service for assistance.
A2.1‐11of30
IMPORTANT INFORMATION ABOUT
PERFORMING YOUR BLOOD PRESSURE TEST
Before Measurement
Avoid caffeine, tea, alcohol and tobacco for at least 30 minutes before
measurement.
Wait 30 minutes after exercising or bathing before measurement.
Sit or lie down for at least 10 minutes before measurement.
Do not measure when feeling anxious or tense.
Take a 5-10 minute break between measurements. This break can be
longer if necessary, depending on your physical condition
Keep the records for your doctor as reference.
Blood pressure naturally varies between each arm. Always measure your
blood pressure on the same arm.
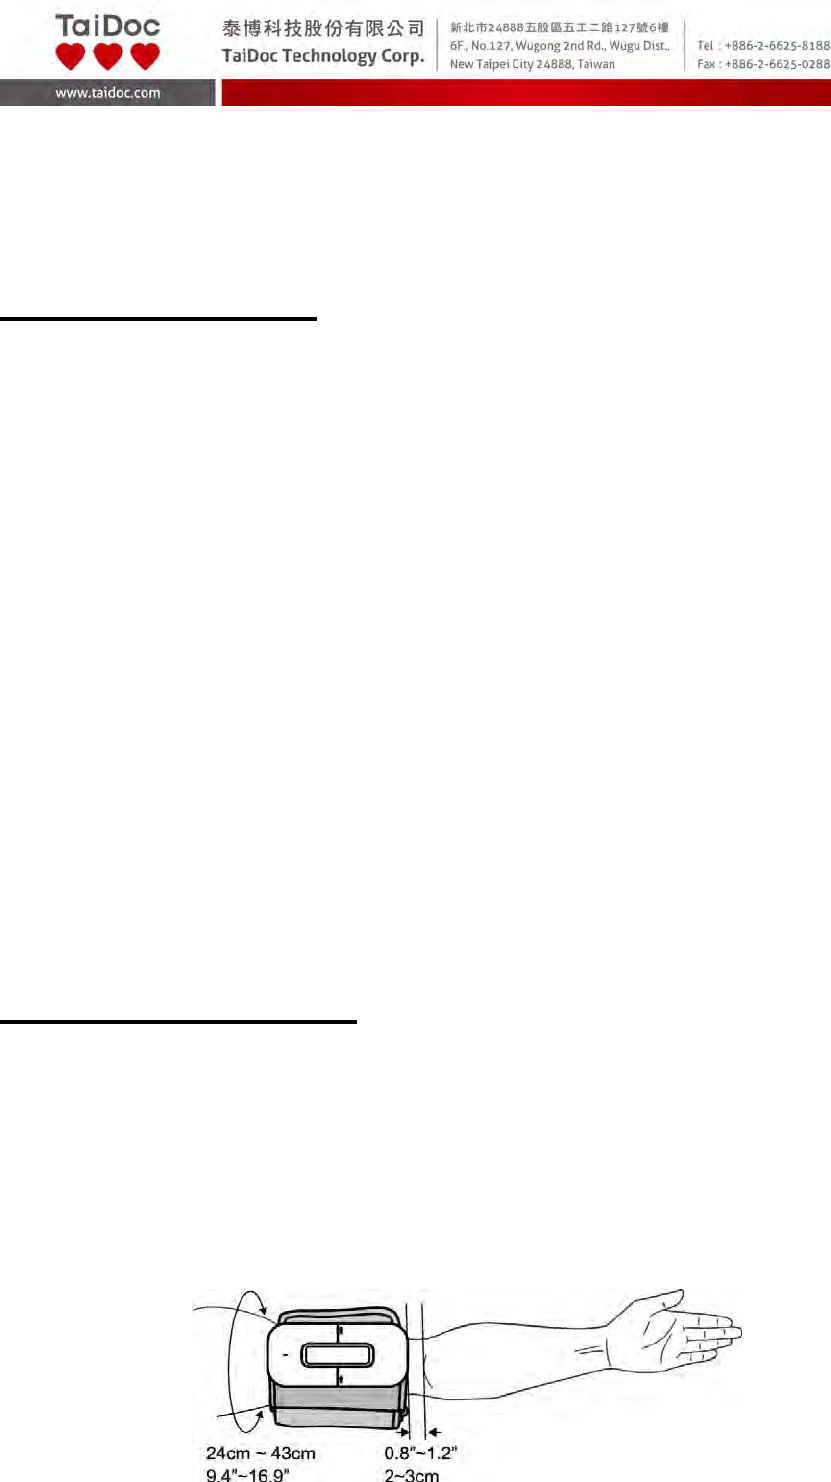
Apply the Cuff Properly
1. Stretch your left (right) arm in front of you with your palm facing up. Slide and
place the cuff onto your arm, the arrow should point toward the upper arm.
2. Wrap and tighten the cuff above your elbow. The red line on the edge of the
cuff should be approximately 0.8ʺ to 1.2ʺ (2 cm to 3 cm) above your elbow.

A2.1‐12of30
3. Leave a little free space between the arm and the cuff; you should be able to
fit two fingers between them. Clothing must not restrict the arm. Remove all
clothing covering or constricting the measurement arm.
4. Press the hook material firmly against the pile material. The top and bottom
edges of the cuff should be tightened evenly around your upper arm.
Proper Measurement Position
1. Sit down for at least 10 minutes before measuring.
2. Place your elbow on a flat surface. Relax
your hand with the palm facing up.
3. Make sure the cuff is about the same height
as the location of your heart.
4. Press ON/OFF Button. Remain still and do not talk or move during the
measurement.
WARNING:
► If the cuff is relatively lower (higher) than the heart, the obtained blood
pressure value could be higher (lower) than the actual value. A 15 cm
difference in height may result in an error around 10 mmHg.
5. Measurement is in progress.
After the meter is turned on, the cuff will begin to inflate automatically.
A2.1‐13of30
HOW TO TEST YOUR BLOOD PRESSURE
Taking Measurement by the Device Itself
Always apply the pressure cuff before turning on the meter.
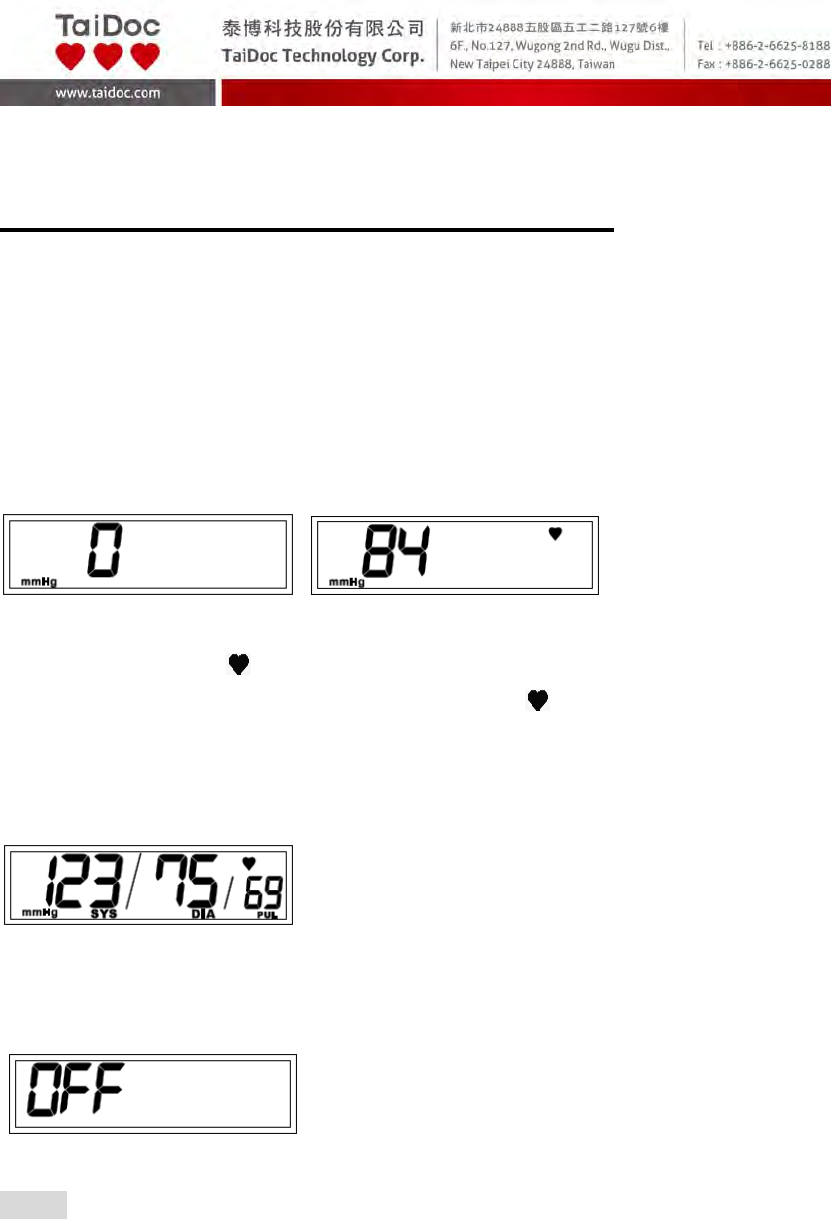
1. Press ON/OFF Button. All the LCD symbols will appear with a long
“beeping” sound. Then the cuff will begin to inflate automatically.
2. Pump starts to inflate and pressure in cuff increases to working pressure.
3. The heart symbol “ ” will show silently when pulse is detected during the
deflation. When signal of pulse becomes strong, “ ” icon starts to flash.
4. After the measurement, the meter displays the systolic pressure, diastolic
pressure and pulse rate.
5. Press ON/OFF Button to switch off. Or it will switch off automatically after
being idle for 3 minutes.
NOTE
If you press ON/OFF Button during measurement, the meter will be turned
off.
A2.1‐14of30
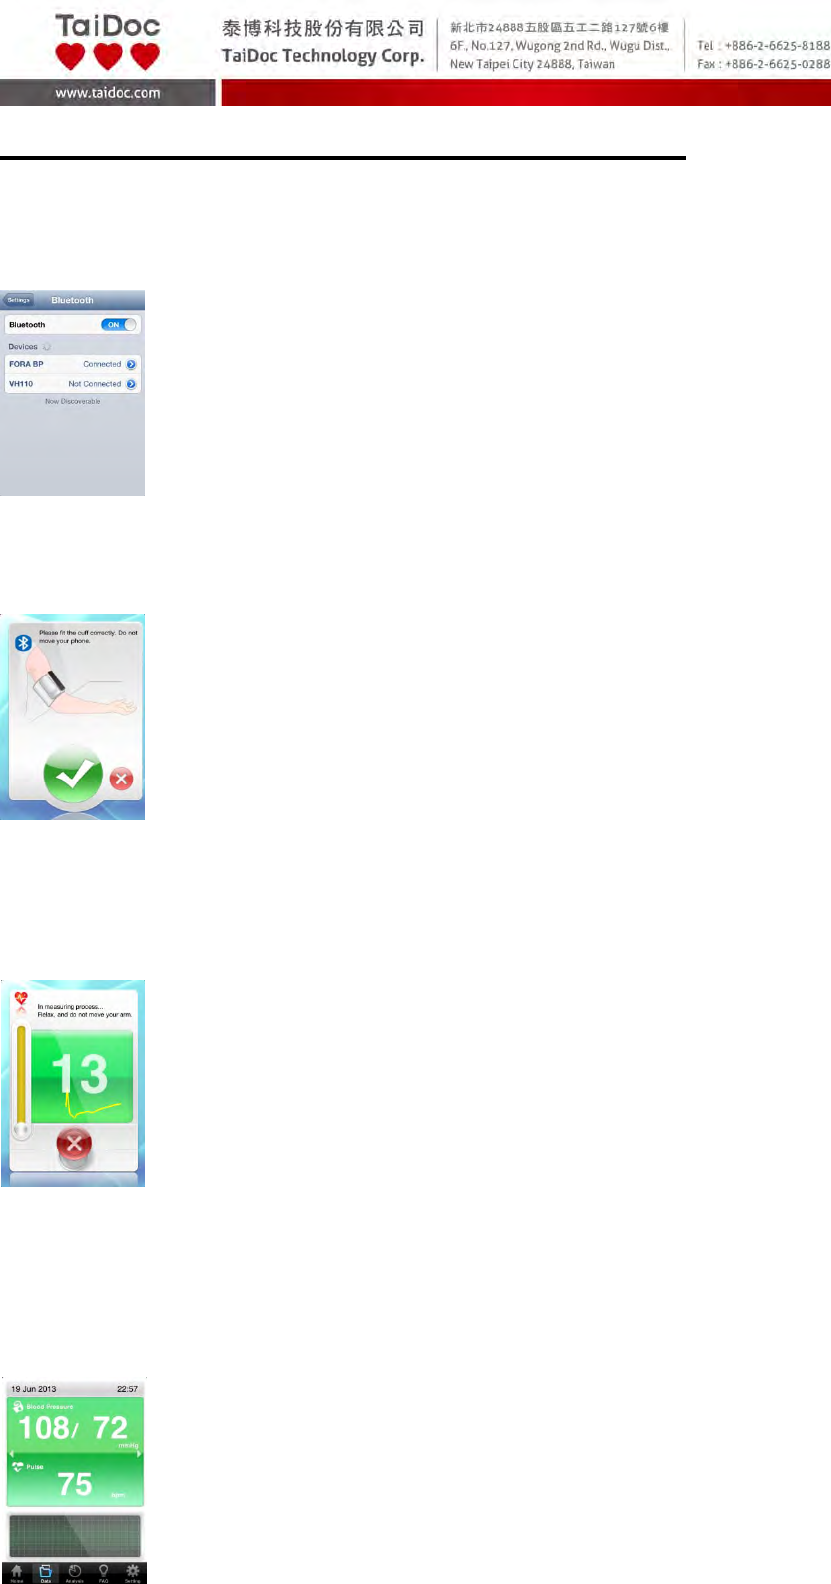
Taking Measurement with the TDLink BP App
1. Turn on the Bluetooth switch on your mobile and connect with “FORA Blood
Pressure Monitoring System” before doing the test.
2. Turn on TDLink BP App; always apply the pressure cuff before turning on
the meter.
3. Press ON/OFF Button. All the LCD symbols will appear with a long
“beeping” sound on the device monitor. Then the cuff will begin to inflate
automatically until it reaches the working pressure.
4. Pulse rate is detected during the deflation.
5. After the measurement, the meter displays the systolic pressure, diastolic
pressure and pulse rate.
A2.1‐15of30
6. Press ON/OFF Button to switch off. Or it will switch off automatically after
being idle for 3 minutes.
NOTE
If you press ON/OFF Button during measurement, the meter will be turned
off.
A2.1‐16of30
VIEWING PAST TEST RESULTS
Data
Reviewing Data Record
The meter stores the blood pressure test results along with respective dates
and times in memory under the mobile device.
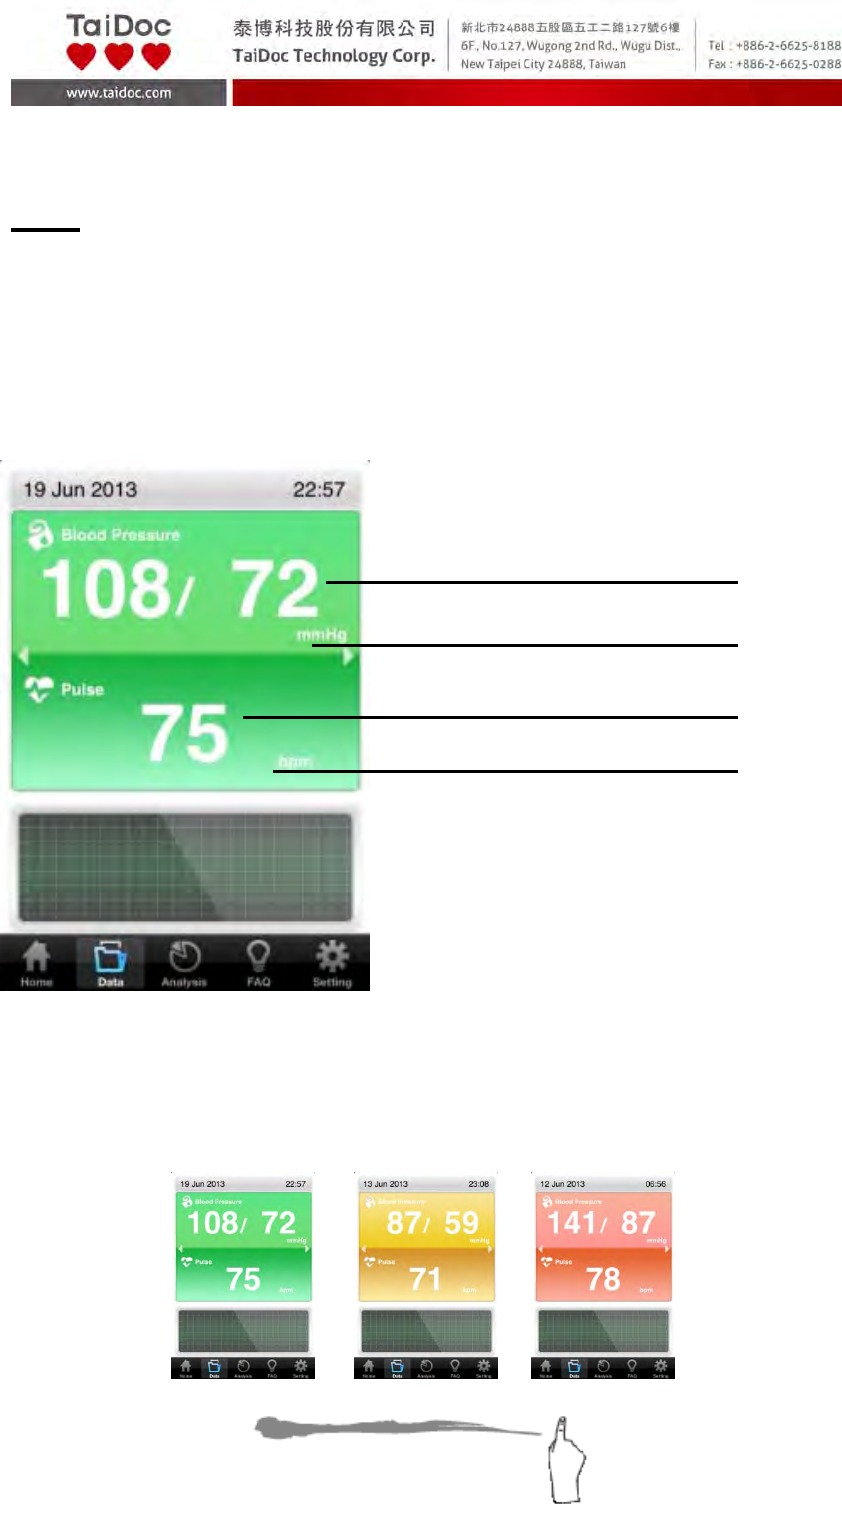
Data Record Screen
1. Press “Data” on the main menu bar to review the records. The first reading
you see is the last blood pressure result.
2. Swipe left or right to recall the previous test results stored in the memory.
Blood Pressure Test Result
Blood Pressure unit
Pulse Rate Test Result
Pulse Rate Unit
A2.1‐17of30
VIEWING PAST TEST RESULTS
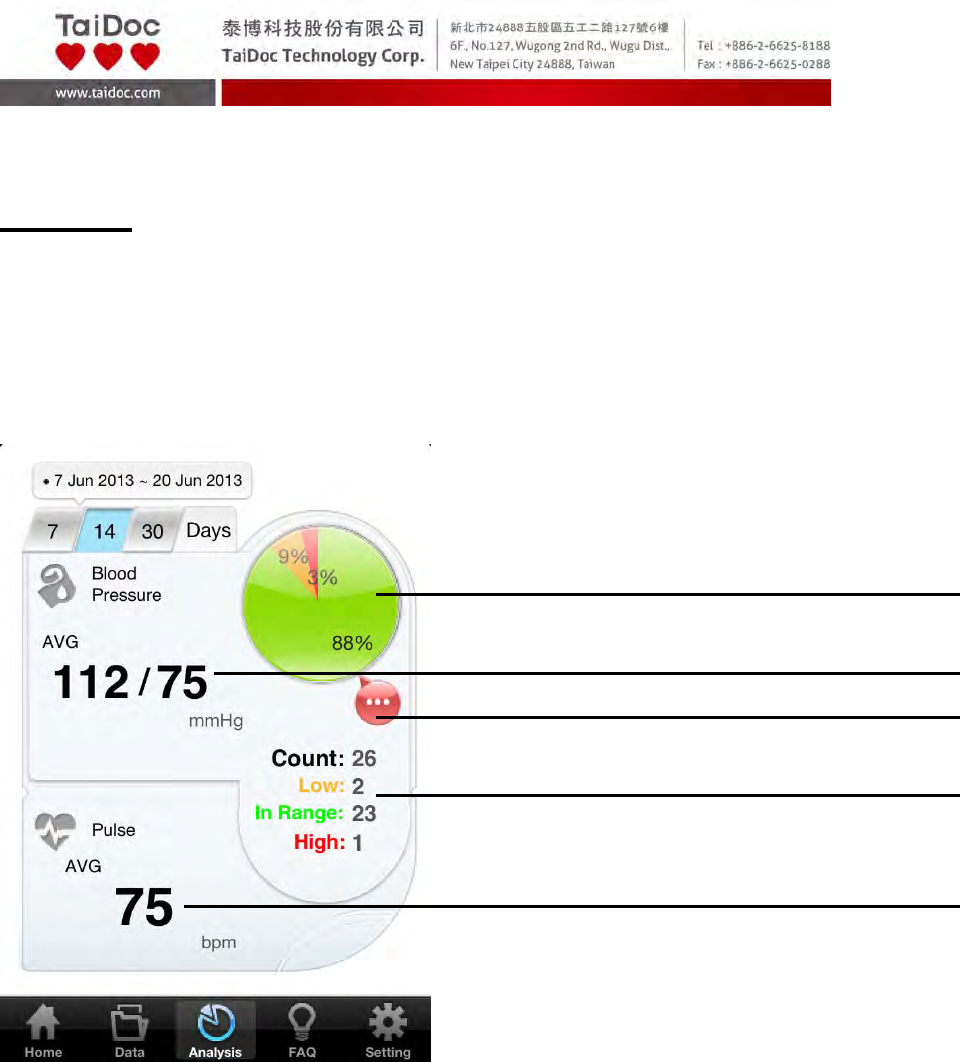
Analysis
Reviewing Blood Pressure Day Average Results
The TDLink BP App offers you 7-, 14-, and 30- day average results and Pie
Chart to assist you to monitoring your blood pressure.
Day Average Screen
1. Press “Analysis” on the main menu bar to enter the Day AVG records.
2. You will see the current 7 Days of blood pressure control ratio in
percentage and the distribution of all the results.
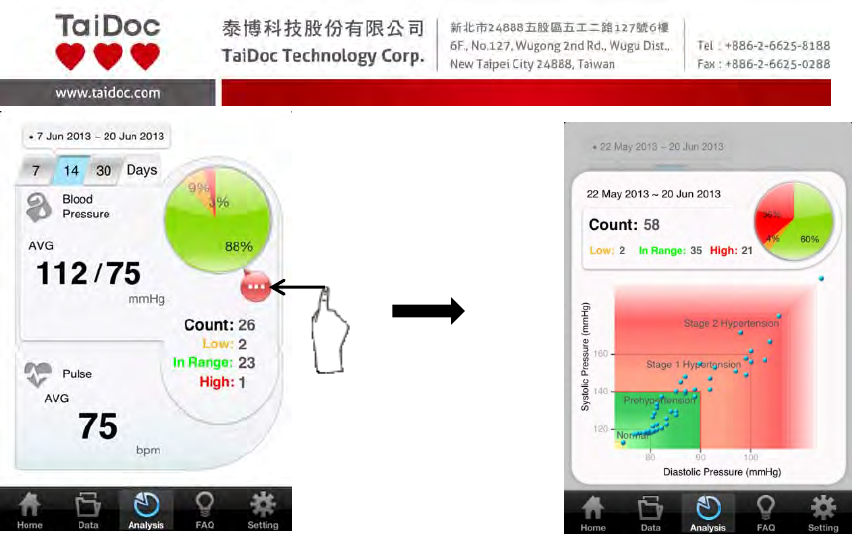
3. Click at Detail Information (red circle) to find out more information.
4. To quickly switch between, simply press “7”, “14” and “30” icon on the
top.
7-Days of Blood Pressure Control Ratio
in Percentage
Detail Information
Blood Pressure Day AVG Result
Distribution of 14 Days Blood Pressure Results
Pulse Rate Day AVG Result
A2.1‐18of30

A2.1‐19of30
FAQ
1. Select the FAQ mode from the Main Menu Bar.
Select FAQ in the Main Menu Bar to enter, and then the Sub Menu will appear.
You will see the information categorized into different sections, such as
Self-Monitoring, Diet Control, Exercise, Medication and Overview.
If you wish to find the specific information much quicker, you can also search
by typing key words in the search bar on the top of each section page.
A2.1‐20of30
MAINTENANCE
Battery
Your meter comes with four (4)1.5V AAA size alkaline batteries.
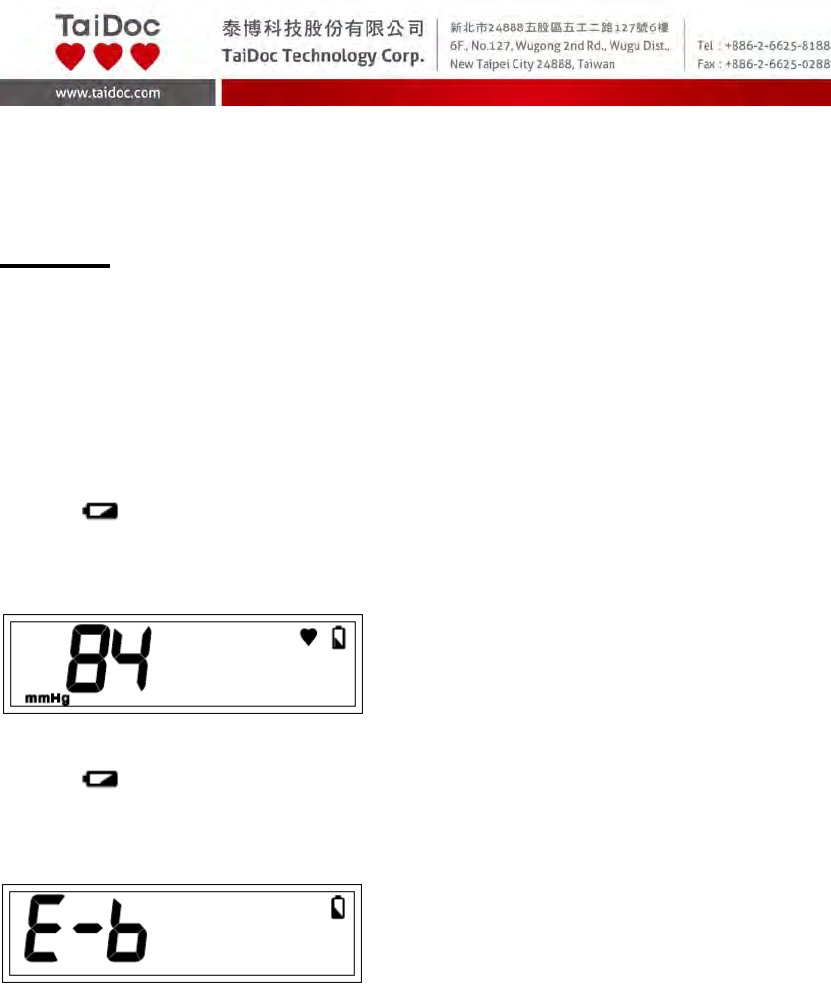
Low Battery Signal
The meter will display either of the two messages below to alert you when the
meter power is getting low.
1. The symbol appears along with display messages: The meter is
functional and the result remains accurate, but it is time to change the
batteries.
2. The symbol appears with E-b:
The power is not enough to do a test. You must change the batteries
immediately.

A2.1‐21of30
Replacing the Battery
To replace the batteries, make sure the meter is turned off.
1. Press the edge of the battery cover and lift it up to remove.
2. Remove the old batteries and replace with four 1.5V AAA size alkaline
batteries.
3. Close the battery cover.
NOTE:
As with all small batteries, these batteries should be kept away from small
children. If swallowed, promptly seek medical assistance.
Batteries might leak chemicals if unused for a long time. Remove the
batteries if you are not going to use the device for an extended period
(i.e., 3 months or more).
Properly dispose of the batteries according to your local environmental
regulations.

A2.1‐22of30
Caring for Your Meter
To avoid the meter attracting dirt, dust or other contaminants, wash and dry
your hands thoroughly before use.
Cleaning
To clean the meter exterior, wipe it with a cloth moistened with tap water or a
mild cleaning agent, then dry the device with a soft dry cloth. Do NOT flush
with water.
Do NOT use organic solvents to clean the meter.
Do NOT wash the pressure cuff.
Do NOT iron the pressure cuff.
Meter Storage
Storage condition: -25oC to 70oC (-13℉ to 158℉), 10% to 95% relative
humidity.
Always store or transport the meter in its original storage case.
Avoid dropping or heavy impact.
Avoid direct sunlight and high humidity.
A2.1‐23of30
DETAILED INFORMATION
Reference Values
Clinical studies show that adult diabetes is often accompanied by elevated
blood pressure. People with diabetes can reduce their heart risk by managing
their blood pressure along with diabetes treatment*4.
Monitoring your routine blood pressure trend helps you to know your body
condition. Human blood pressure naturally increases after reaching middle age.
This symptom is a result of continuous ageing of the blood vessels. Further
causes include obesity, lack of exercise and cholesterol (LDL) adhering to the
blood vessels. Rising blood pressure accelerates hardening of the arteries,
and the body becomes more susceptible to apoplexy and coronary infarction.
The recommended blood pressure range is as below:
Classification Systolic Pressure
(mmHg)
Diastolic Pressure
(mmHg)
Hypotension*2 Less than 90 Less than 60
Normal*3 Less than 120 Less than 80
Pre-hypertension*3 120 – 139 80 – 89
Stage 1
Hypertension*3
140 – 159 90 – 99
Stage 2
Hypertension*3
160 or more 100 or more
*2: National Heart, Lung, and Blood Institute, Diseases and Conditions
*3: The Seventh Report of the Joint National Committee on Prevention, Detection, Evaluation,
and Treatment of High Blood Pressure. NIH Publication. 2003. No. 03-5233

A2.1‐24of30
*4: American Diabetes Association: The Diabetes-Heart Disease Link Surveying Attitudes,
A2.1‐25of30
SYSTEM TROUBLESHOOTING
If you follow the recommended action but the problem persists, or error
messages other than the ones below appear, please call your local customer
service. Do not attempt to repair by yourself and never try to disassemble the
meter under any circumstances.
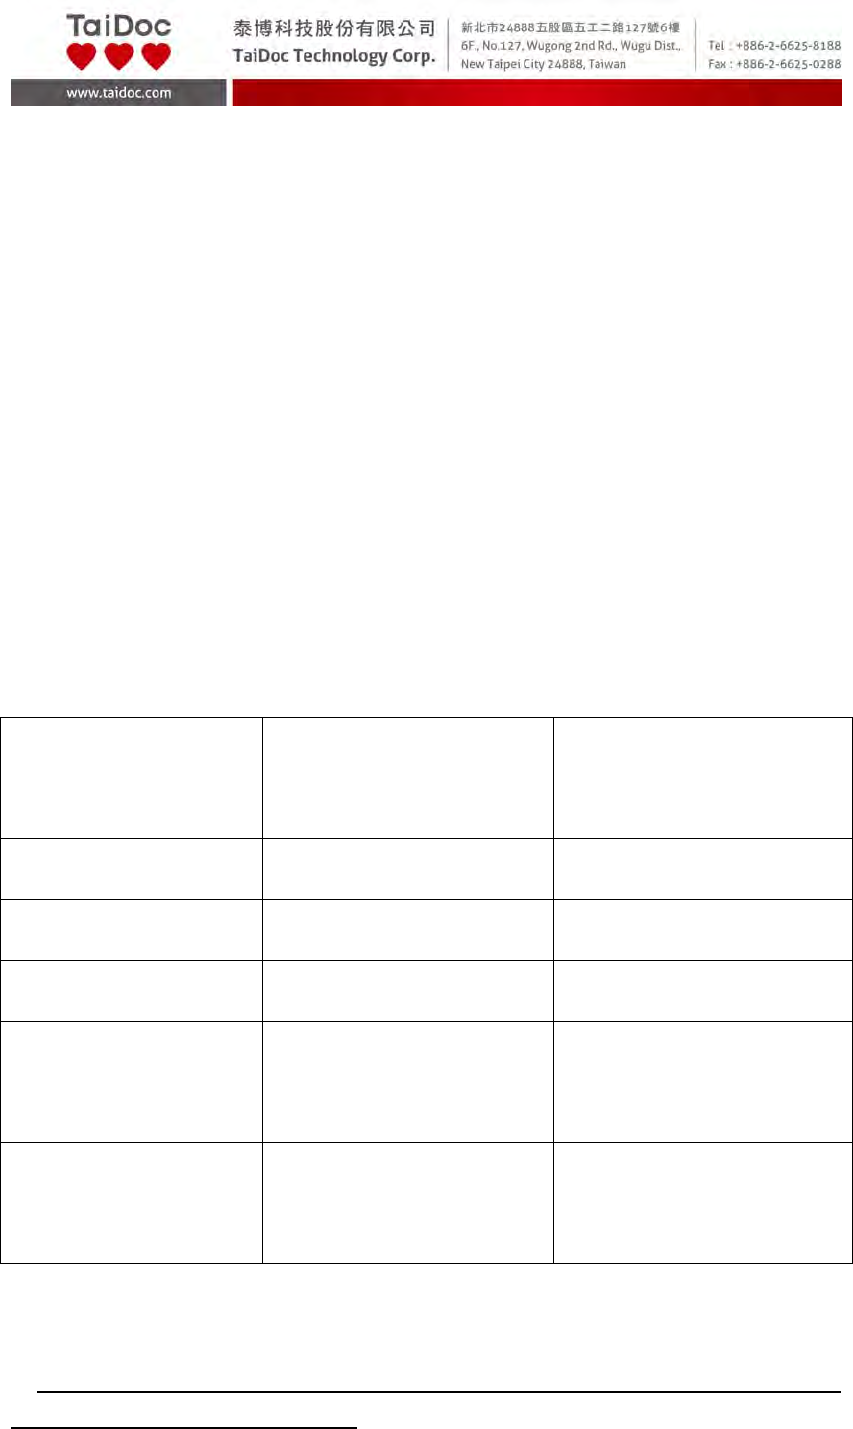
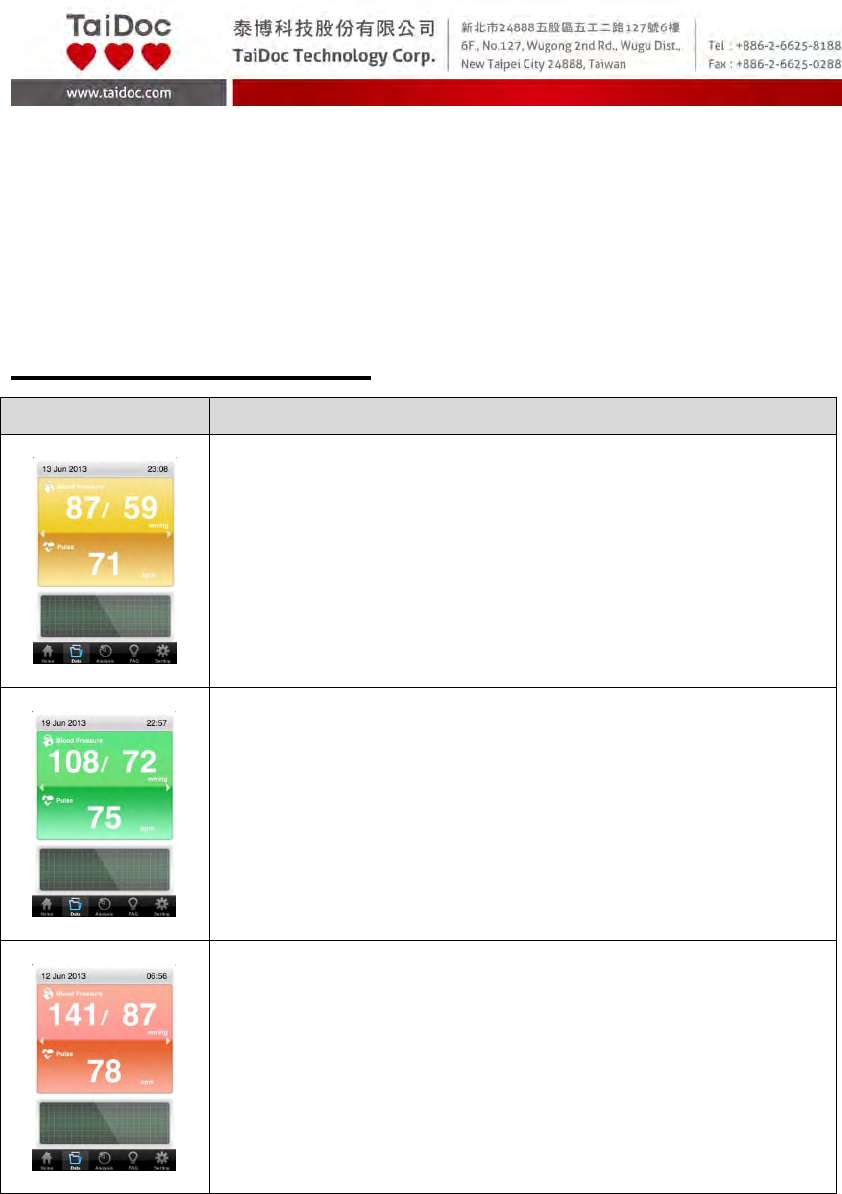
Result Readings of App
MESSAGE WHAT IT MEANS
Reading in yellow when blood pressure is low.
Reading in green when blood pressure is normal.
Reading in red when blood pressure is high.
A2.1‐26of30
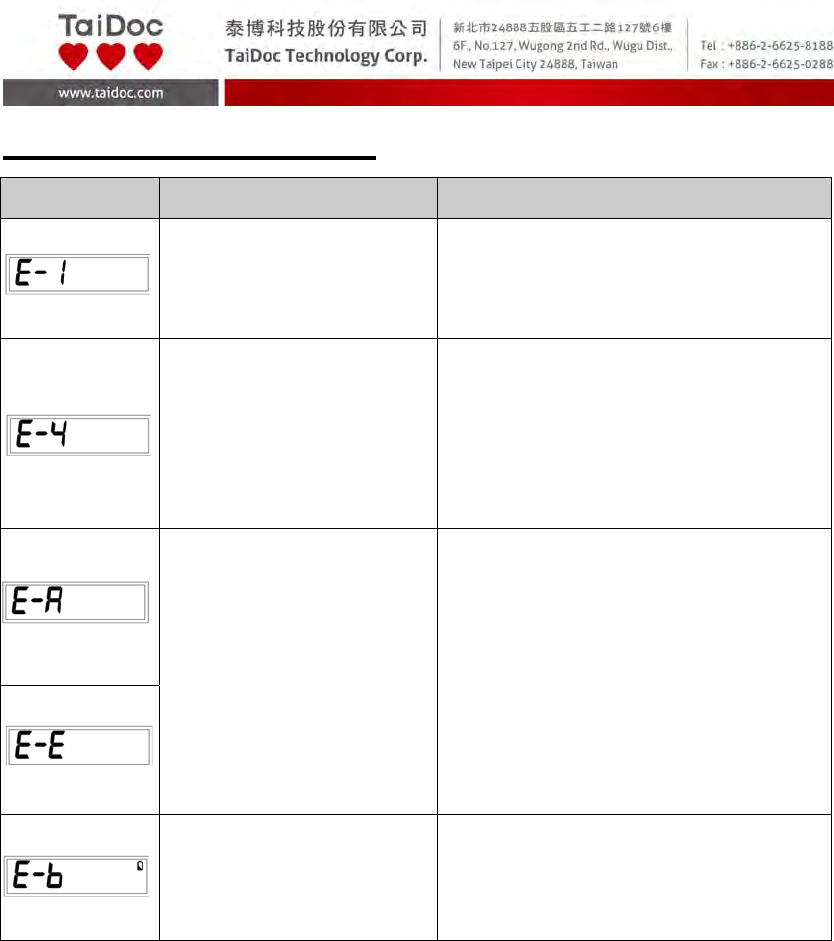
Error Messages of Meter
MESSAGE CAUSE WHAT TO DO
Inflation or pressure error Please contact local customer
service for help.
Blood pressure
measurement error.
Refit cuff tightly and correctly. Relax
and repeat the measurement. If
error still remains, contact local
customer service for help.
Problems with the meter.
Review the instructions and repeat
the test. If the meter still does not
work, please contact the local
customer service for help.
Battery is too low. Repeat with new batteries.
A2.1‐27of30
Troubleshooting
1. If no display appears after pressing ON/OFF Button:
POSSIBLE CAUSE WHAT TO DO
Batteries exhausted. Replace the batteries.
Batteries incorrectly installed or
absent.
Check that the batteries are correctly
installed.
2. If the heart rate is higher/lower than user’s average:
POSSIBLE CAUSE WHAT TO DO
Movement during measurement. Repeat measurement.
Measurement taken just after exercise. Rest at least 30 minutes before
repeating measurement.
3. If the result is higher/lower than user’s average measurement:
POSSIBLE CAUSE WHAT TO DO
May not be in correct position while
measuring.
Adjust to the correct position to
measure.
Blood pressure naturally varies from
time to time.
Keep in mind for next measurement.
4. If the cuff inflates again while measuring:
POSSIBLE CAUSE WHAT TO DO
Cuff is not fastened. Fasten the cuff again.
If user’s blood pressure is higher than the pressure the device has inflated, the
device will automatically increase the pressure and start to inflate again. Stay
relaxed and wait for the measurement.

A2.1‐28of30
SPECIFICATIONS
System performance
Power source: Four 1.5V AAA alkaline batteries
Size of meter w/o cuff:
145 (L) x 64.5 (W) x 29.6 (H)mm,
240g without batteries.
Power saving: Automatic power off if system idle for 3 minutes.
System operating condition: 5℃ to 40℃ (41℉ to 104℉), 15% to 93% RH,
700 hPa to 1060 hPa
Meter storage condition: -25℃ to 70℃ (-13℉ to 158℉), 10% to 95% RH
Waterproof grade IP22
The expected service life 2 years
Blood pressure measurement performance
Pressure range: 0 - 300 mmHg
Heart rate range: 40 - 199 beat per minute
Systolic Measurement Range: 50 mmHg -250 mmHg
Diastolic Measurement Range: 30 mmHg -180 mmHg
Pulse Rate Measurement Range: 40 -199 beats / minute
Maximum inflation pressure: 280 mmHg
Accuracy of Pressure: ±3 mmHg or ±2% of reading
Accuracy of Pulse rate: ±4% of reading
Measurement unit: mmHg
This device has been tested to meet the electrical and safety requirements of: IEC 60601-1,
and IEC 60601-1-2
Reference to Standards:
• IEC60601-1 General requirement for safety
• IEC60601-1-2 Requirements for EMC
IP22:
• Object size protected against: >12.5 mm (Fingers or similar objects)
• Protected against: Dripping water when tilted up to 15°

A2.1‐29of30
FEDERAL COMMUNICATIONS COMMISION (FCC) STATEMENT
15.21
You are cautioned that changes or modifications not expressly approved
by the part responsible for compliance could void the user’s authority to
operate the equipment.
15.105(b)
Federal Communications Commission (FCC) Statement
This equipment has been tested and found to comply with the limits for a Class
B digital device, pursuant to part 15 of the FCC rules. These limits are
designed to provide reasonable protection against harmful interference in a
residential installation. This equipment generates, uses and can radiate radio
frequency energy and, if not installed and used in accordance with the
instructions, may cause harmful interference to radio communications.
However, there is no guarantee that interference will not occur in a particular
installation. If this equipment does cause harmful interference to radio or
television reception, which can be determined by turning the equipment off and
on, the user is encouraged to try to correct the interference by one or more of
the following measures:
-Reorient or relocate the receiving antenna.
-Increase the separation between the equipment and receiver.
-Connect the equipment into an outlet on a circuit different from that to which
the receiver is connected.
-Consult the dealer or an experienced radio/TV technician for help.
This device complies with Part 15 of the FCC Rules. Operation is subject
to the following two conditions:
1) This device may not cause harmful interference and
2) This device must accept any interference received, including interference
that may cause undesired operation of the device.
FCC RF Radiation Exposure Statement:
1. This transmitter must not be co-located or operating in conjunction with any
other antenna or transmitter.
2. This equipment complies with FCC RF radiation exposure limits set forth
for an uncontrolled environment. End users must follow the specific

A2.1‐30of30
operating instructions for satisfying RF exposure compliance.
Distributed by:
Fora Care Inc.
893 Patriot Dr., Suite D
Moorpark, CA 93021 U.S.A.
Toll Free: 1-866-469-2632
Hours of Operation: 24 hours, 7 days/week