TAIDOC TECHNOLOGY 8201BEM2 Handheld Pulse Oximeter User Manual
TAIDOC TECHNOLOGY CORP. Handheld Pulse Oximeter Users Manual
Users Manual
Ver 2.0 12, 2013
311-8201000-XXX
Owner’s Manual

4
About the Manual
The precautions, warnings and notes throughout this manual are very important.
Please read this entire manual carefully before using the V-TRUST Handheld
Pulse Oximeter.
The information in the manual has been carefully checked and is believed to
be accurate.

5
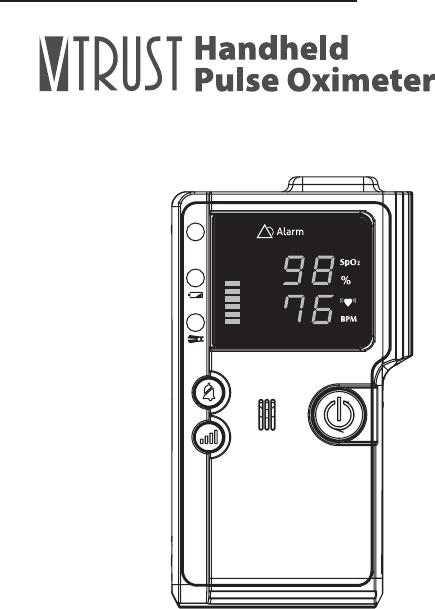
Handheld Pulse Oximeter
Table of Content
SAFETY INFORMATION 06
Warnings 06
Cautions 07
INTRODUCTION 08
Intended Use 08
General Description 08
Principle of Measurement 08
Meter Appearance and Key Function 09
Content of the System 11
BEFORE USE 12
Battery Replacement 12
Connecting the Probe 13
Power On/Off 13
Set up the Oximeter 14
Power On Self-Test 19
OPERATION 20
DATA TRANSMISSION VIA BLUETOOTH 23
CLEANING THE OXIMETER 25
TROUBLESHOOTING 26
SYMBOL INFORMATION 28
SPECIFICATION 29

6
SAFETY INFORMATION
Warning
● Federal law (USA) restricts this device to sale by or on the order of a
physician.
● Do not use the oximeter in an MRI environment.
● The use of accessories, probes, and cables other than those listed
in this manual may result in increased emission and/ or decreased
immunity of the device.
● The oximeter is intended only as an adjunct in subject assessment. It
must be used in conjugation with other methods of assessing clinical
signs and symptoms.
●
Explosion Hazard: Do not use the oximeter in an explosive atmosphere.
● If subjects’ monitoring sites have trauma, disability or other medical
status that make inaccurate results, operators should consult doctors
before use.
● Use probe manufactured by manufacturer. Using other manufacturers’
probes may cause improper oximeter performance. Also, do not use a
damaged probe.
● When a system fault occurs, the subject will no longer be monitored.
● The oximeter has to measure the pulse properly to obtain accurate
SpO2 measurement. Blood flow restrictors (e.g., blood pressure
cuffs) may hinder pulse measurements. Remove any objects that
may hinder the performance of the oximeter.

7
Handheld Pulse Oximeter
Cautions
● The oximeter is not an apnea monitor.
● The oximeter determines the percentage of arterial oxygen saturation
of functional hemoglobin. Significant levels of dysfunctional
hemoglobin such as carboxyhemoglobin or methemoglobin may
affect the accuracy of the measurement.
● Cardiogreen and intravascular dyes, depending on the concentration,
may affect the accuracy of SpO2 measurements.
● The performance of the oximeter might be affected by the presence
of a debrillator.
● The oximeter may not work on all subjects. If you are unable to
achieve stable readings, discontinue use.
● The oximeter has monition tolerant software that minimizes the
likelihood of motion artifact being misinterpreted as good pulse
quality. In some circumstances, however, the oximeter may still
interpret motion as good pulse quality. Minimize subject motion as
much as possible.
● Verify that all visible indicators illuminate during the startup
(initialization) sequence, if any indicator is not lit do not use the
oximeter. Please contact your agent for help.
● Do not immerse the oximeter or probes in liquid to clean, and also
do not expose them to excessive moisture or liquids.
●
Do not use caustic or abrasive cleaning agents on the oximeter or probes.
● Do not mix new and old batteries at the same time. It may cause the
batteries to leak. Disposed of batteries properly.
● Batteries might leak chemicals if unused for a long period of time.
Remove the batteries if the oximeter is going to be stored for more
than one month.
● Batteries may leak or explode if used or disposed of improperly.
● The oximeter is a precision electronic instrument and must be
repaired by trained personnel only.
● Follow local governing ordinances and recycling instructions regards
disposal or recycling of the device and device components.

8
INTRODUCTION
►Intended for Use
The V-TRUST Handheld Pulse Oximeter is indicated for use in measuring and
displaying functional oxygen saturation of arterial hemoglobin (SpO2) and pulse
rate. It is intended for patients during no-motion condition. The oximeter is suitable
for use in hospital and clinical sites.
This device is indicated for non-invasive spot checking or continuous monitoring.
►General Description
The oximeter is a digital handheld that displays numerical values for blood oxygen
saturation. It provides visual alarm for medium priority conditions. The range of the
peak wavelengths and maximum optical output power of the light emitted by the
oximeter probe and the reading result can be especially useful to clinicians.
The oximeter with reusable SpO2 probe accessories operates on battery power for
up to 40 hours. The oximeter requires no routine calibration or maintenance other
than replacement of alkaline batteries. When the batteries are low, the indicator will
blink to warn users to replace the batteries.
►Principle of Measurement
The V-TRUST Handheld Pulse Oximeter determines functional oxygen saturation
of arterial hemoglobin (SpO2) by measuring the absorption of red and infrared light
passing through perfused tissue. Changes in absorption caused by the pulsation of
blood in the vascular bed are used to determine oxygen saturation and pulse rate.
9
Handheld Pulse Oximeter
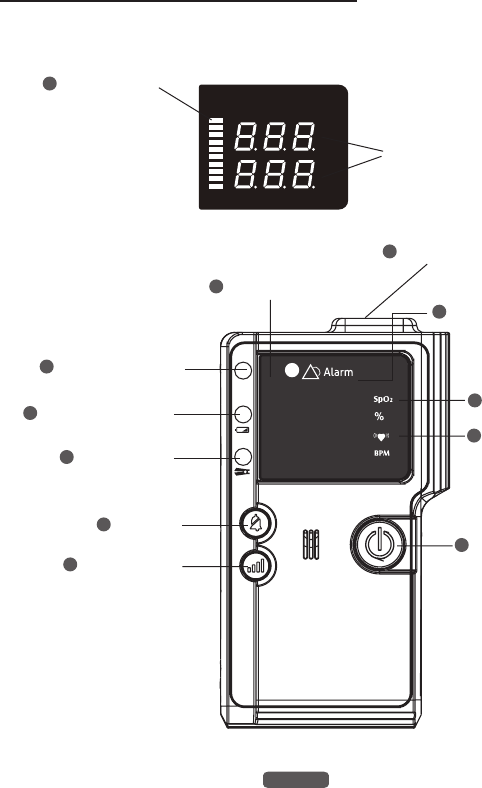
►Meter Appearance and Key Function
Reading Value Display Area
1
2
3
4
9
10
6
7
5
8 Pulse Amplitude
8
Low Battery Indicator
SpO2 indicator
LED Screen
Set Button
Advance Button
On/Off Button
SpO2%
Pulse Rate
Oximeter Sensor Port
12 Alarm Indicator
11 Bluetooth Indicator

10
1. Low Battery Indicator
Red light appears when power is insufcient to the oximeter.
2. SpO2 Indicator
Red light appears when probe disconnects from oximeter. Green light appears
when nger insert probe sensor from oximeter.
3. Set Button
Is used to set up settings.
4. Advance Button (Bluetooth Key)
Is used to review status. For Bluetooth transmission, press and hold the Advance
Button (Bluetooth key) for 3 seconds to enter pairing mode.
5. On/Off Button
Is used to turn on or turn off the oximeter by pressing On/Off button.
6. SpO2 %
The measurement result of oxygen saturation in percentage.
7. Pulse Rate
The measurement result of pulse rate.
8. Pulse Amplitude
The strength of the signal is detected by the oximeter.
9. LED Screen
Display measurement results.
10. Oximeter Sensor Port
Connect the probe and the oximeter.
11. Bluetooth Indicator (for TD-8201B only)
Blue light appears when turn on bluetooth.
12. Alarm Indicator
Red light appears when oxygen saturation value upper or below the setting ranges.
11
Handheld Pulse Oximeter
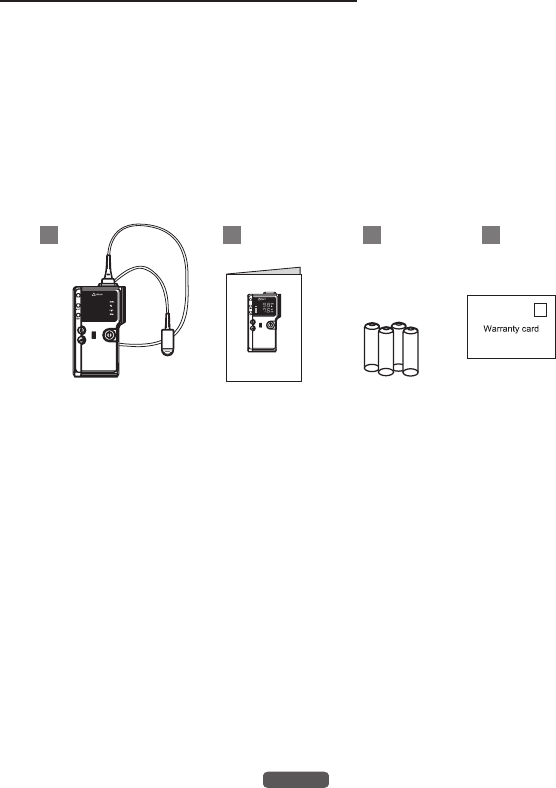
►Content of the System
The V-TRUST Handheld Pulse Oximeter includes the following items:
A. Handheld Pulse Oximeter with Probe
B. Owner's Manual x 1
C. AA
Alkaline Batteries x 4
D. Warranty Card
Confirm that the items listed are packed with the V-TRUST Handheld Pulse
Oximeter. If any item on this list is missing or damaged, contact your distributor.
All of the system with accessories is provided non-sterile.
Owner's Manual
A B C D
12
BEFORE USE
Low battery capacity is indicated with a ashing red light. We recommend that you
replace the new batteries if the low battery indicator turns red.
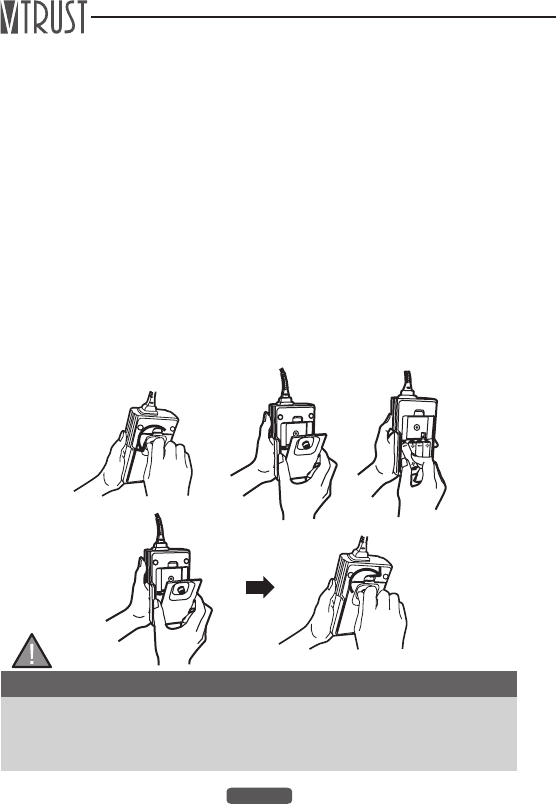
►Battery Replacement
Make sure the oximeter is switched off when replacing the batteries.
The oximeter is powered by 4 AA alkaline batteries. Replace new batteries by the
following steps.
STEP1. Loosen the screw at the back of the oximeter and remove the battery cover.
STEP2. Remove the old batteries from battery compartment.
STEP3. Insert four new AA alkaline batteries. Correctly align the polarities (+ and -)
with battery indication marks on the oximeter.
STEP4. Replace the battery cover and tighten the screw.
CAUTION!
1.Use only 1.5 AA new batteries with this device. Replace the batteries as soon
as possible after a low battery indicator appears.
2.If the oximeter does not work after installed the batteries. Reinstall the batteries.
STEP1
STEP4
STEP2 STEP3
13
Handheld Pulse Oximeter
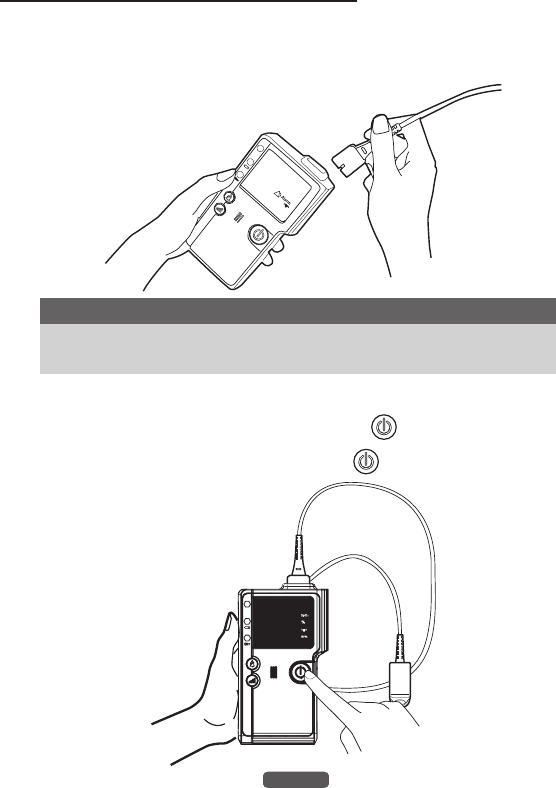
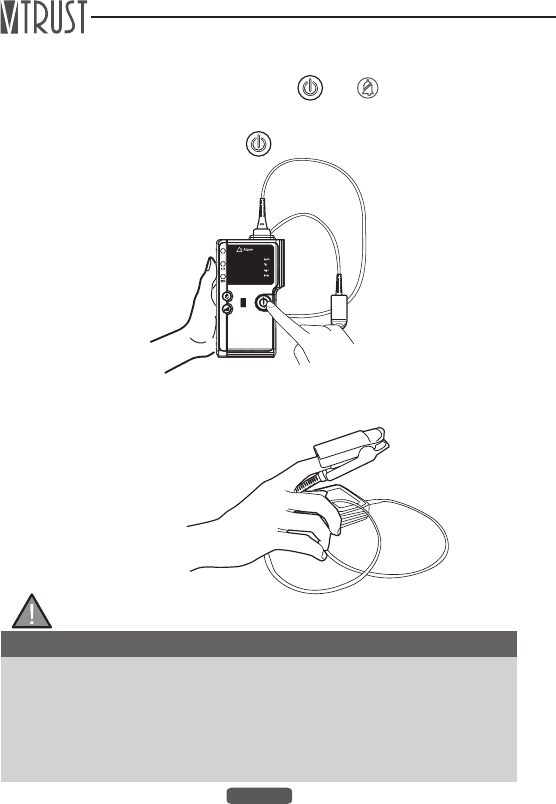
►Connecting the Probe
Connect the probe to the top of the oximeter as shown below. Make sure that the
probe is rmly plugged into the oximeter.
►Power On/Off
• Turn on the oximeter by pressing and releasing the button.
• Turn off the oximeter by pressing and holding the button for about 3 seconds.
Spo
2
%
BPM
NOTE
Please make sure to connect the probe properly. If not, the SpO2 indicator will light
up with reminding voice while the probe fell off.
14
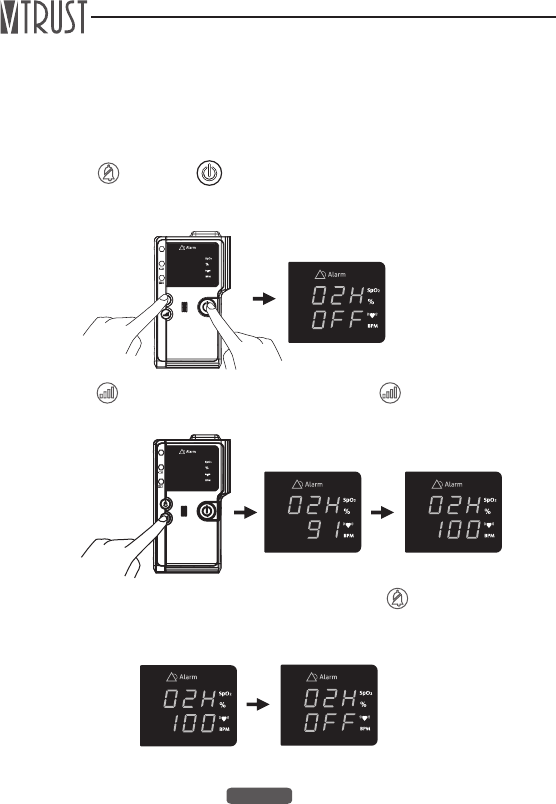
►Set up the Oximeter
Your oximeter comes with the alarm function including the upper/lower limit of SpO2
and heart rate, and the brightness of LED backlight preset. If you need to set these
parameters, please follow below steps.
Start with the oximeter is off.
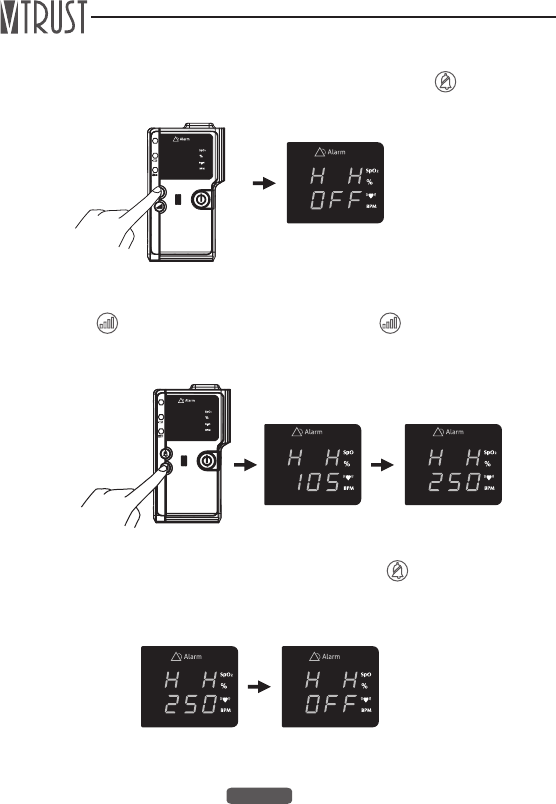
STEP 1. Press Button and button at the same time to enter setting mode.
The rst screen shows SpO2 upper limit settings. The factory default is off.
STEP 2. Press button to change settings. You can press button to increase
the number from 91% to 100%.
When the setting value goes to the upper limit, press button again and
the screen will turn back “OFF” setting.
15
Handheld Pulse Oximeter
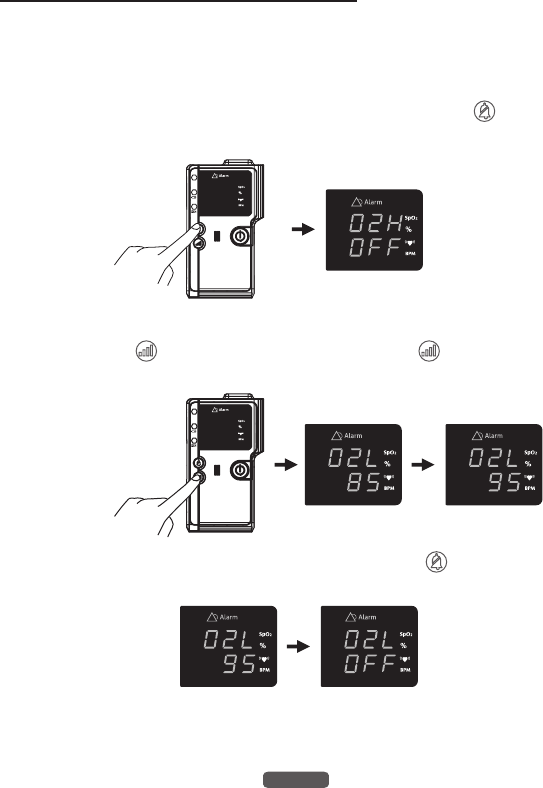
When the setting value goes to the upper limit, press button again and
the screen will turn back “OFF” setting.
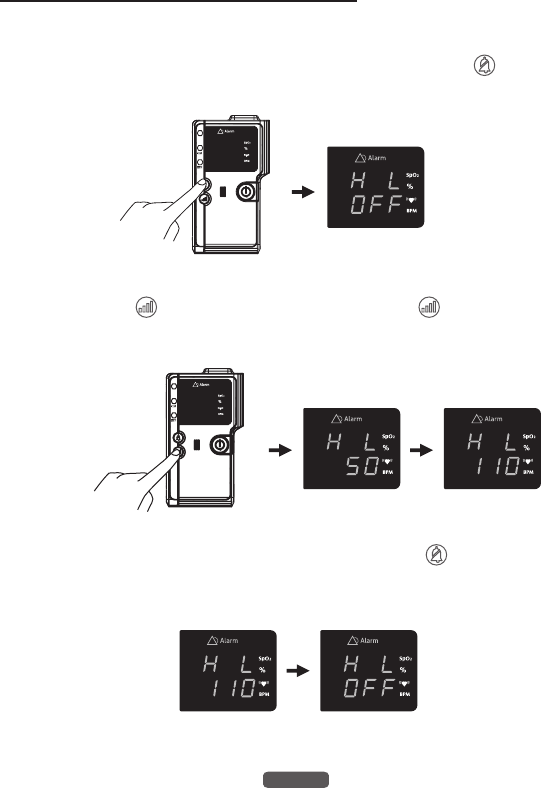
STEP 4. Press button to change settings. You can press button to increase
the number from 85% to 95%.
STEP 3. When the desired setting is displayed on the screen, press button to
enter SpO2 lower limit setting. The factory default is off.
16
STEP 6. Press button to change settings. You can press button to increase
the number from 105 BPM to 250 BPM.
When the setting value goes to the upper limit, press button again and
the screen will turn back “OFF” setting.
STEP 5. When the desired setting is displayed on the screen, press button to
enter heart rate upper limit setting. The factory default is off.
17
Handheld Pulse Oximeter
STEP 8. Press button to change settings. You can press button to increase
the number from 50 BPM to 110 BPM.
When the setting value goes to the upper limit, press button again and
the screen will turn back “OFF” setting.
STEP 7. When the desired setting is displayed on the screen, press button to
enter heart rate lower limit setting. The factory default is off.

18
STEP 10. Press button to change settings. L1 setting is brighter than L2
setting. Press button to turn off the oximeter.
(For TD-8201B )
STEP 11. Press to change settings. Press button to turn on Bluetooth.
STEP 9. When the desired setting is displayed on the screen, press button to
enter LED backlight setting mode.

19
Handheld Pulse Oximeter
Setting Table
Item Default Adjustment Options Increments
SpO2 High Off Off, 91-100 1%
SpO2 Low Off Off, 85-95 1%
Pulse Rate High Off Off, 105-250 5 BPM
Pulse Rate Low Off Off, 50-110 5 BPM
Brightness L1 L1 and L2 N/A
Bluetooth F-b_1 F-b_1 and F-b_2 N/A
►Power On Self-Test
When the oximeter is turned on for normal operation, the unit will check if the
oximeter is ready for use. If probe does not connect to oximeter, the SpO2 indicator
will appear red light. If probe does not touch the subject’s measurement site or the
signal is unstable, the SpO2 indicator will turn orange light.
20
OPERATION
All functions of the oximeter are controlled by and buttons found on the
front of the unit.
STEP 1. Turn on the oximeter by press Button.
STEP 2. Clip subject’s nger as below:
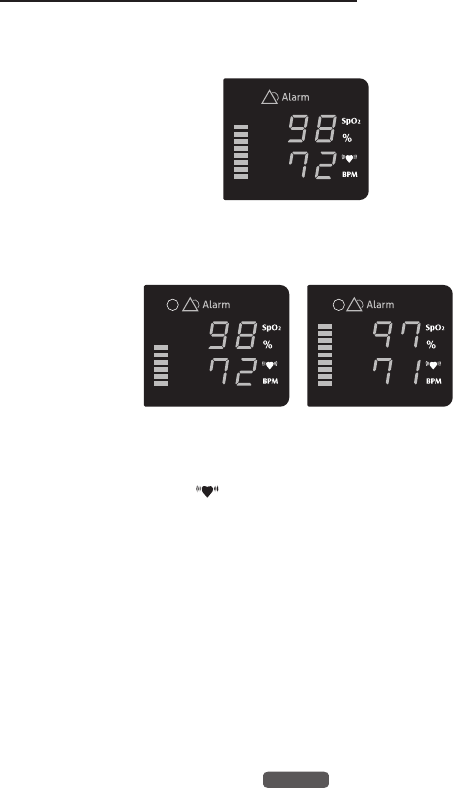
The LED Screen shows as above to indicate the oximeter is ready to use.
CAUTION!
1. Consult health professional before you start to use the oximeter.
2. The oximeter probe might not work on cold extremities due to reduced circulation.
Warm or rub the finger to increase circulation, or reposition the probe.
3.
Check the probe application site frequently to determine circulation, positioning
and skin sensitivity. The recommended maximum application time at a single
site is 4 hours.
21
Handheld Pulse Oximeter
STEP 3. After detecting the pulse signal, the oximeter shows the readings of SpO2
and pulse rate on LED.
(For TD-8201B)
STEP 5. Two modes can be selected for Bluetooth communication.
(a) F-b 1 : With the meter turned off, start Bluetooth communication via
control of host device to upload SpO2 readings. The transmission
frequency is fixed to one reading per minute. You can upload those
readings within one hour prior to the meter turned off.
(b) F-b 2 : With the meter turned on, the meter will initiate Bluetooth
transmission during measurement to upload the instant readings via
control of host device. The host device can control the time tempo for
transmission in a maximum of one reading per minute.
STEP 4. The alarm indicator will light up if the readings out of the limit setting.
► SpO2 Symbol (%SpO2)
The SpO2 symbol shows the current oxygen saturation in percentage .
► Pulse Rate Symbol ( )
The pulse rate symbol shows pulse rate in beats per minute.
► Pulse Amplitude
The strength of signal is detected by the oximeter.

22
► Visual Alarm
The alarm turns off unless the alarm function is cancelled or the status is normal.
To turn off alarm, please refer to "Set up the Oximeter" section for details.
Adjusting alarm settings is only possible when the oximeter is in setting mode. For
every power on in which alarm settings have not been recalled or adjusted in Setup
mode, the default alarm settings remain in effect.
Refer to the table below for detailed information about alarm conditions, activation criteria.
Condition Alarm Activation Criteria
SpO2 High Activates when displayed SpO2 is equal to or greater than
the SpO2 upper limit setting.
SpO2 Low Activates when displayed SpO2 is equal to or less than
the SpO2 lower limit setting.
Pulse Rate High Activates when the displayed pulse rate is equal to or
greater than the pulse rate upper limit setting.
Pulse Rate Low Activates when the displayed pulse rate is equal to or less
than the pulse rate lower limit setting.
Response for the operator after the most Alarm is Triggered
Medium priority alarm
The operator may not be interrupted, but the operator is able to describe the cause
of the alarm status as early as possible after the urgent task is done.
Alarm Message List
Information Signal List
Alarm Priority Description
Pulse
Rate
visual alarm Medium The pulse rate value is lower/higher than the
value set in the menu.
SpO2 visual alarm Medium The SpO2 value is lower/higher than the value
set in the menu.
Information signal Description
SpO2 Probe OFF Warning Tone The connection of probe is not
connected well.
Law Battery Warning Tone The batteries are low.
Improper Insertion
of Patient’s Finger
Warning Tone The patient’s finger is not inserted well.

23
Handheld Pulse Oximeter
DATA TRANSMISSION VIA BLUETOOTH
You can transmit your SpO2 and pulse rate data from the meter to your device
(e.g. smart phone, tablet, PC…) via Bluetooth. Please contact your local customer
service or place of purchase for assistance.
Please note that you must complete the pairing between meter and Bluetooth
receiver before transmitting data.
1. With the meter off, press and hold the Advance Button (Bluetooth key) for 3
seconds. The meter enters pairing mode.
2. Turn on the Bluetooth function of your device so that it can begin searching for
the meter. When the name of the meter appears on the pairing list, select and
add it to the list.
3. On your device, the meter will be shown as a paired device, suggesting
successful pairing.
* For Android system, it’s suggested to turn off the meter while the meter is in
pairing mode. And then turn it on again to accelerate the speed for connection.
Bluetooth indicator on the blood glucose monitor:
BLUETOOTH INDICATOR STATUS
Flash Fast The meter is pairing and connecting.
Lit Solid The connection is established. The meter is
transmitting data now.
NOTE
(a)F-b 1 : With the meter turned off, start Bluetooth communication via control of
host device to upload SpO2 readings. The transmission frequency is fixed to
one reading per minute. You can upload those readings within one hour prior to
the meter turned off.
(b)F-b 2 : With the meter turned on, the meter will initiate Bluetooth transmission
during measurement to upload the instant readings via control of host device.
The host device can control the time tempo for transmission in a maximum of
one reading per minute.

24
MOBILE PHONE COMPATIBILITY ISSUES
The Bluetooth functionality is implemented in different ways by the various mobile
phone manufacturers.
Unfortunately, in some mobile phone models, even with Bluetooth functionality, they
may be compatible only with certain types of devices. If a problem occurs in the
connection between your mobile phone and the blood glucose monitor, or if you are
uncertain regarding your mobile phone’s Bluetooth capabilities, please consult your
mobile phone manual or contact your local customer service for assistance.
WARNING:
• While the meter is in transmission mode, it will be unable to perform a test.
• Make sure your device has the Bluetooth function turned on and the meter is
within the receiving range before transmitting the data.

25
Handheld Pulse Oximeter
CLEANING THE OXIMETER
Cleaning oximeter is just as important as proper use. For surface-cleaning and
disinfecting the oximeter and reusable SpO2 probes we recommend the following
procedures:
► Turn off the oximeter before cleaning.
► Wipe exposed surfaces with a soft or a pad moistened with a mild detergent
solution or medical alcohol (70% isopropyl alcohol solution).
► Clean your oximeter whenever you see any type of soil, dirt or obstruction in it.
► Ensure that no dirt or blood is on the optical components.
► SpO2 probes can be cleaned and disinfected with same solutions. Let the probe
dry before using it again. The rubber inside of the SpO2 probe belongs to medical
rubber, which has no toxin and no harmful to the skin of human being.
► Replace the batteries timely when battery indication is low. Please follow the law
of the local government to deal with used batteries.
► Remove the batteries inside the battery cassette if the oximeter will not be
operating for a long time.
► It is recommended that the oximeter should be kept in a dry environment
anytime. A wet ambient might affect its lifetime and even might damage the
oximeter.
► Caution: Do not spray, pour, or spill any liquid on the oximeters, their
accessories, switches or openings.

26
TROUBLESHOOTING
Problem Possible Cause Possible Solution
The oximeter won’t turn on.
The batteries are out. Replace all batteries.
The batteries are
installed incorrectly.
Verify correct battery
orientations.
A dash appears in the LED.
A probe fault exists.
The probe may have
become dislodged
from the oximeter or
from the subjects.
Verify that the probe
is correctly connected
to the oximeter and
the subject. Try a new
probe if the condition
persists.
The displayed pulse rate
does not correlate to the
pulse rate displayed on
the ECG monitor connects
to patient.
Excessive motion
at the probe site
may be prohibiting
the oximeter from
acquiring a consistent
pulse signal.
Eliminate or reduce the
cause of the motion
artifact or reposition
the probe to a new
probe site where
motion is not present.
The subject may
have an arrhythmia
resulting in some
heart beats that do
not yield a pulse
amplitude signal at
the probe site.
Examine the subject:
the condition may
persist even though
both monitors are
functioning properly
if the subject's
arrhythmia persists.
A non-oximeter probe
is being used.
Replace the probe with
a oximeter probe.
The ECG monitor may
not be functioning
properly.
Examine the subject:
replace the ECG
monitor or refer to the
operator's manual for
the ECG monitor.
27
Handheld Pulse Oximeter
Problem Possible Cause Possible Solution
Segments of the SpO2 or
pulse rate displays are
missing.
Defective LED
displays.
Displayed values may not
be reliable; discontinue
use of the oximeter.
Disruption in the oximeter
performance.
Electromagnetic
interference (EMI).
Remove the oximeter from
the EMI environment.
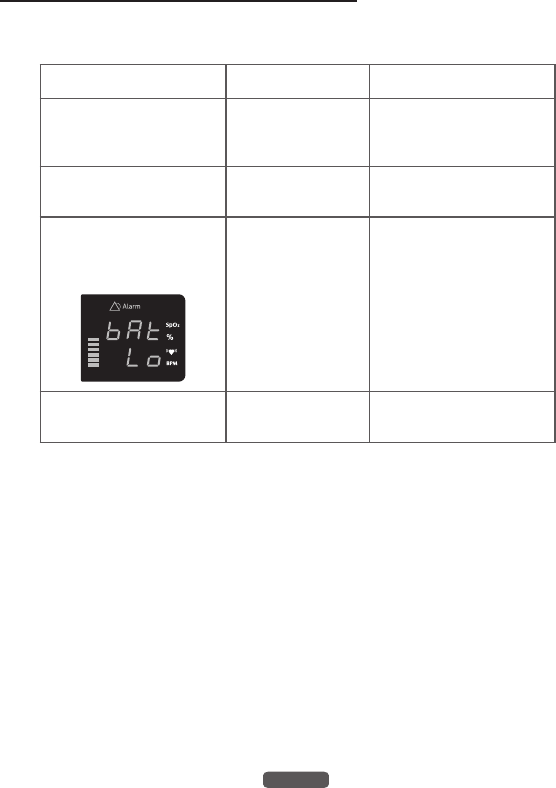
Red light battery indicators
appears accompanying
the message displayed on
LED as shown below:
The batteries are low.
Replace the batteries.
The message display
shown” E01” Probe fail Replace the Probe
If you have followed the actions recommended above but the problem keeps
unsolved, please contact your local dealer for assistance.
28
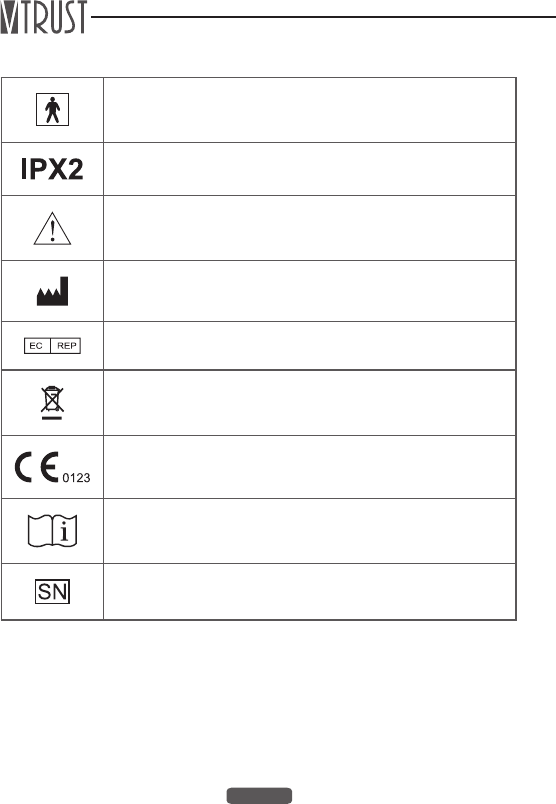
SYMBOL INFORMATION
Type BF applied part Part- not debrillator proof
Resistant to liquid ingress
Caution, consult accompanying documents
Manufacturer
Authorised representative in the European Community
Indicates separate collection for electrical and electronic
equipment (WEEE).
CE Marking indicating conformance to EC directive No. 93/42/
EEC concerning medical device
Consult instructions for use
Serial number (located under the battery cover)

29
Handheld Pulse Oximeter
SPECIFICATION
Pulse Oximetry
Range: 35% to 100%
Resolution: 1%
Accuracy: 70% to 79% ± 3%, 80% to 100% ± 2%, others are undened
Method: Dual wavelength LED (660nm/905nm)
Neonate mode Not Available
Heart (pulse) Rate
Range: 30 to 250bpm
Resolution: 1bpm
Accuracy: ±1bpm or ±1%, whichever is greater
Displays
Type: 7-Segment LED
Parameters: SpO2; pulse rate; pulse bar (can also indicate low perfusion)
Status:
Indicate a stable reading is taken;
Probe fall-off detection indication;
Battery status indication
Data
Memory Store SpO2 & Heart Rate readings every minute
Uploading Instant uploading or to upload after switching off
Keys
On/Off key One button
Functional key Two buttons
Warning
Medium Priority
Alarm
SpO2 value is higher/lower than predened setting, or pulse too
high/low
Information Signal Low battery , improper insertion of patient’s nger, or probe fall
off
Setting
SpO2 high/low value Alarm level setting
Pulse high/low
value Alarm level setting

30
Battery
Type: 4 AA alkaline battery
Usage life: 40 hrs typical operation
Environmental
Operating
Temperature: 10ºC to 40ºC (50ºF to 104ºF)
Storage
Temperature: -20ºC to 60ºC (-4ºF to 140ºF)
Operating
Humidity: Below 95%, non-condensing
Classication
Degree of
Protection: Type BF applied part
Mode of
operation: Continuous
Safety: IEC60601-1
EMC: IEC60601-1-2
Harmonized
standard: ISO 80601-2-61
Water-resistance: IPX2
Bluetooth: EN300 328, EN301 489
Mechanical
Weight: With batteries: 240g
Size: Reference dimension 14cm (H) x 7cm (W) x 3.2cm (D);
Water-resistance Against water splash
Impact-resistance Against repeat impact from 1 meter height
Transmission Bluetooth(TD-8201B)

31
Handheld Pulse Oximeter
FEDERAL COMMUNICATIONS COMMISSION (FCC)
STATEMENT
15.21
You are cautioned that changes or modifications not expressly approved by
the part responsible for compliance could void the user’s authority to operate
the equipment.
15.105(b)
Federal Communications Commission (FCC) Statement
This equipment has been tested and found to comply with the limits for a Class
B digital device, pursuant to part 15 of the FCC rules. These limits are designed
to provide reasonable protection against harmful interference in a residential
installation. This equipment generates, uses and can radiate radio frequency
energy and, if not installed and used in accordance with the instructions, may cause
harmful interference to radio communications. However, there is no guarantee that
interference will not occur in a particular installation. If this equipment does cause
harmful interference to radio or television reception, which can be determined
by turning the equipment off and on, the user is encouraged to try to correct the
interference by one or more of the following measures:
-Reorient or relocate the receiving antenna.
-Increase the separation between the equipment and receiver.
-Connect the equipment into an outlet on a circuit different from that to which the
receiver is connected.
-Consult the dealer or an experienced radio/TV technician for help.
This device complies with Part 15 of the FCC Rules. Operation is subject to the
following two conditions:
1) This device may not cause harmful interference and
2) This device must accept any interference received, including interference that
may cause undesired operation of the device.
FCC RF Radiation Exposure Statement:
This equipment complies with FCC radiation exposure limits set forth for an
uncontrolled environment.
End users must follow the specific operating instructions for satisfying RF exposure
compliance.
This transmitter must not be co-located or operating in conjunction with any other
antenna or transmitter.

MedNet GmbH
Borkstraβe 10, 48163 Mϋnster,Germany
B1-7F., No. 127, Wugong 2nd Rd., Wugu
Dist., New Taipei City 248,
Taiwan (R.O.C.)
www.vtrustmed.com