TAIYO YUDEN EYSF2CSUU Bluetooth USB Dongle User Manual
Taiyo Yuden Co., Ltd. Bluetooth USB Dongle
Preliminary Uncorrected Manual
Taiyo Yuden
Page 1 Rev 1.29_30Aug02
Getting Started
With the Bluetooth Software BTW and USB Adaptor
Trademark Information
BTW is a product of Widcomm Inc.
Windows, Windows 98, Windows NT, Windows Millennium, Windows XP are trademarks of Microsoft
Corporation. Internet Explorer is a product of Microsoft Corporation.
The BLUETOOTH trademarks are owned by Bluetooth SIG and used by Taiyo Yuden under license.
T39 handset is a product of Ericsson.
All other trade names mentioned in this document or the other documentation provided with Bluetooth USB
Dongle are trademarks or registered trademarks of their respective holders.

Taiyo Yuden
Page 2 Rev 1.29_30Aug02
Getting Started
With the Bluetooth Software BTW and USB Adaptor
Table of Contents
Item Page
System Requirement 3
Bluetooth Software Install step by Step 3 -9
Start Connection Over The Bluetooth Airwaves – File Transfer 10-13
Connecting Over The Bluetooth Airwaves – Security 14 - 15
Start Connection Over The Bluetooth Airwaves – Dial Up Networking Profile 16 - 18
Taiyo Yuden
Page 3 Rev 1.29_30Aug02
Getting Started
With the Bluetooth Software BTW and USB Adaptor
System Requirements
BTW runs under:
- Windows 98 (Second edition)
- Millennium (Windows 98 ME)
- Windows 2000
- Windows XP
During the installation, you need a CD-ROM driver for access to the bundle software.
Note: This Getting Started is a simple guide , for more Users Guide please see the ‘BTW Users
Guide.pdf’ in BTW CD.
Or you can click the Help Topics in the Help Menu of the Tool Bar.
Bluetooth Software Install step by step
Step 1 Insert the Widcomm BTW CD into the PC’s CDROM drive. Installation proceeds automatically.
Since Windows NT does not support USB, the installation of the CD should be done on
systems with Windows ’98 or Windows 2000.
Step 2 An InstallShield box appears to inform you the installation Wizard is being set up. Please wait.
Taiyo Yuden
Page 4 Rev 1.29_30Aug02
Getting Started
With the Bluetooth Software BTW and USB Adaptor
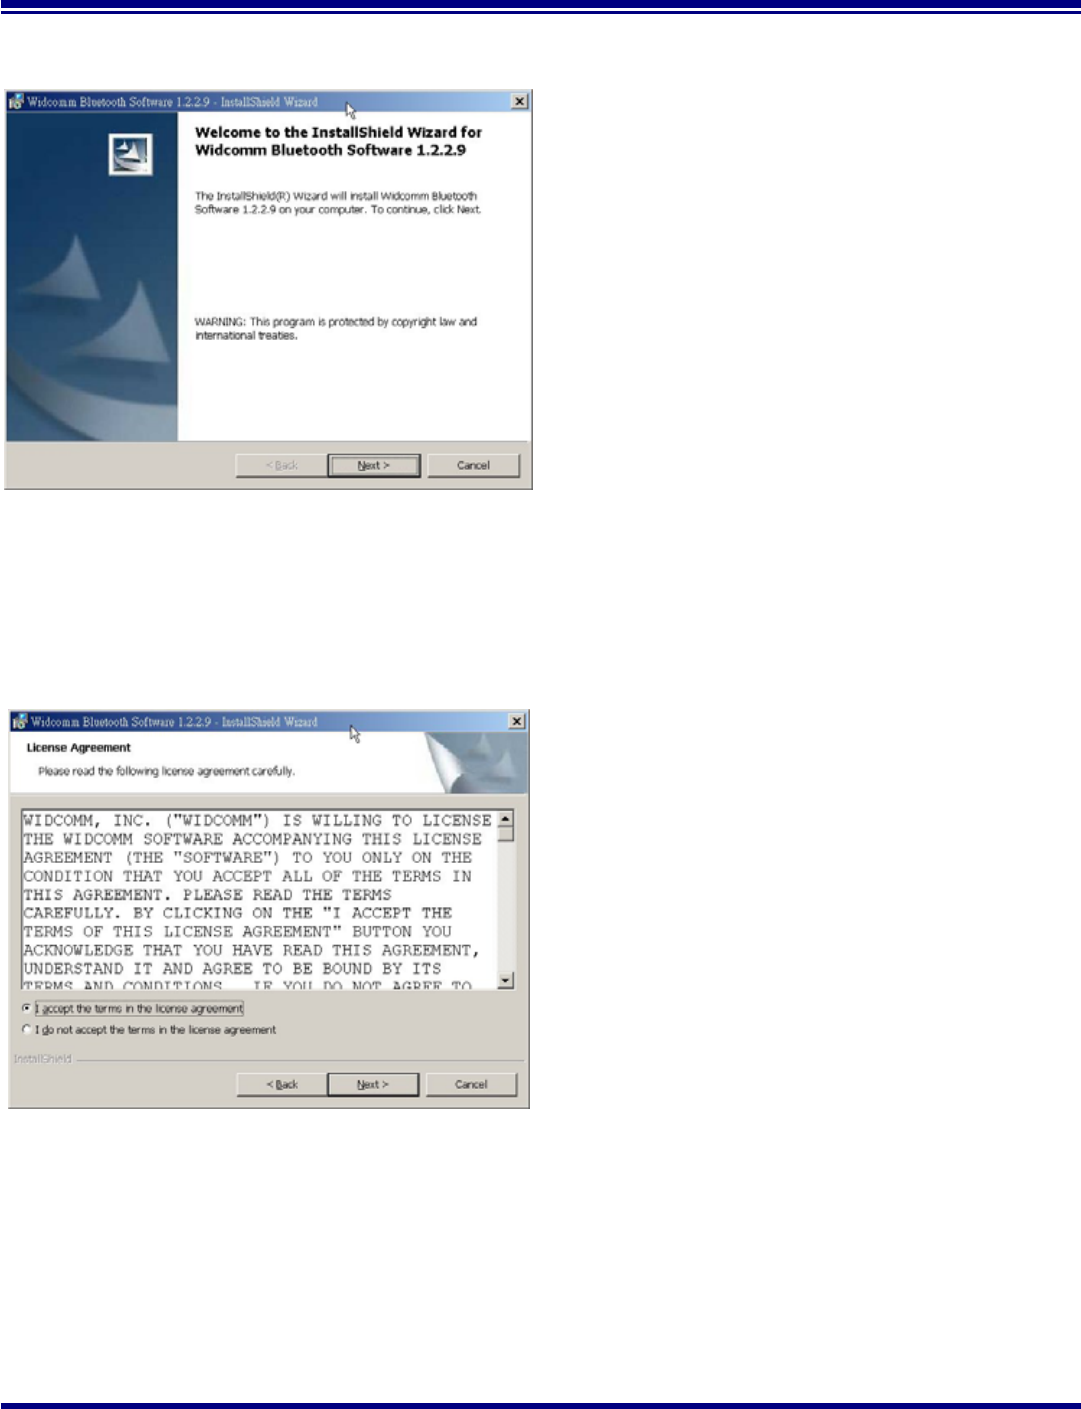
Figure 2. Welcome Window
Note: These images were captured from a
Windows 2000 system. Your images may
look slightly different.
Step 3 A Welcome To The Installation Wizard
window appears as shown in Figure 2.
Select Next to continue the installation
proccess.
Figure 3. License Agreement Window
Step 4 The license agreement window appears as
shown in Figure 3. If you accept, mark the “I
accept the terms in the license agreement”
option and click on Next. The installation will
proceed. If you do not accept the conditions of
the agreement, the installation process will
terminate.
Taiyo Yuden
Page 5 Rev 1.29_30Aug02
Getting Started
With the Bluetooth Software BTW and USB Adaptor
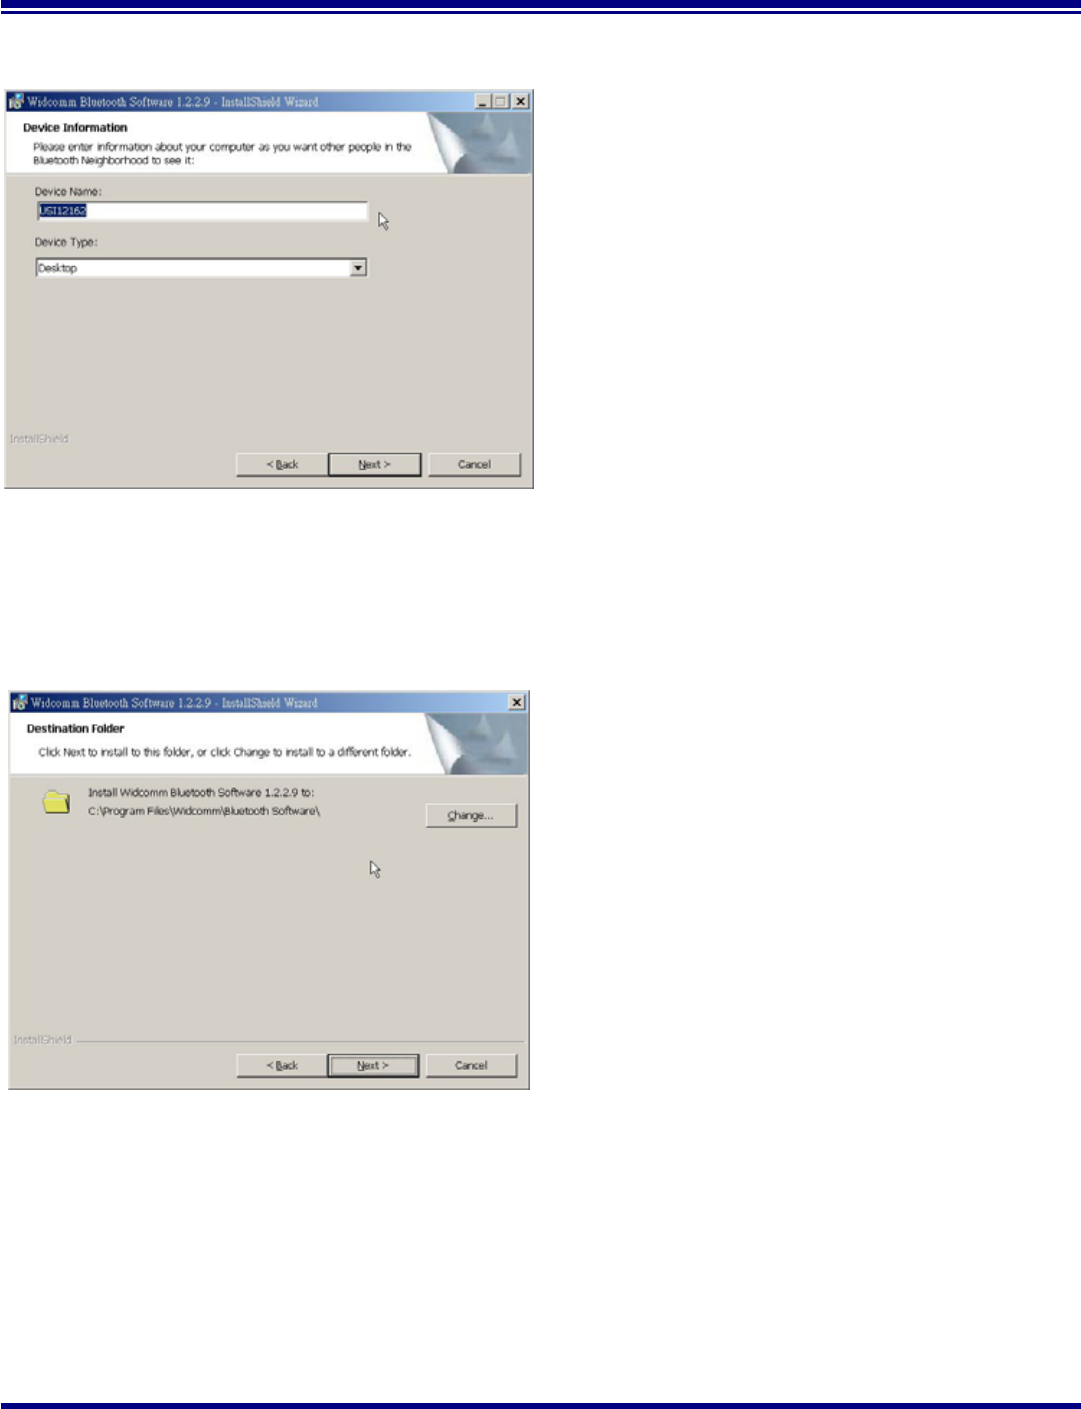
Figure 4. Device Information Window
Step 5 A Device Information window opens as shown in
Figure 4. Enter a device name and choose a
device type. These options will not affect the
functionality. The device information is used to
inform the master device what kinds of other
devices are within range to connect to so the
user can identify which device is the one they
need to connect to if there is more than one
device within range. Select the Next Button.
Figure 5. Destination Folder Window
Step 6 A Destination Folder window appears as shown
in Figure 5, which states the default location and
gives you the opportunity to choose an
alternative folder. When the location is
acceptable, select Next.
Taiyo Yuden
Page 6 Rev 1.29_30Aug02
Getting Started
With the Bluetooth Software BTW and USB Adaptor
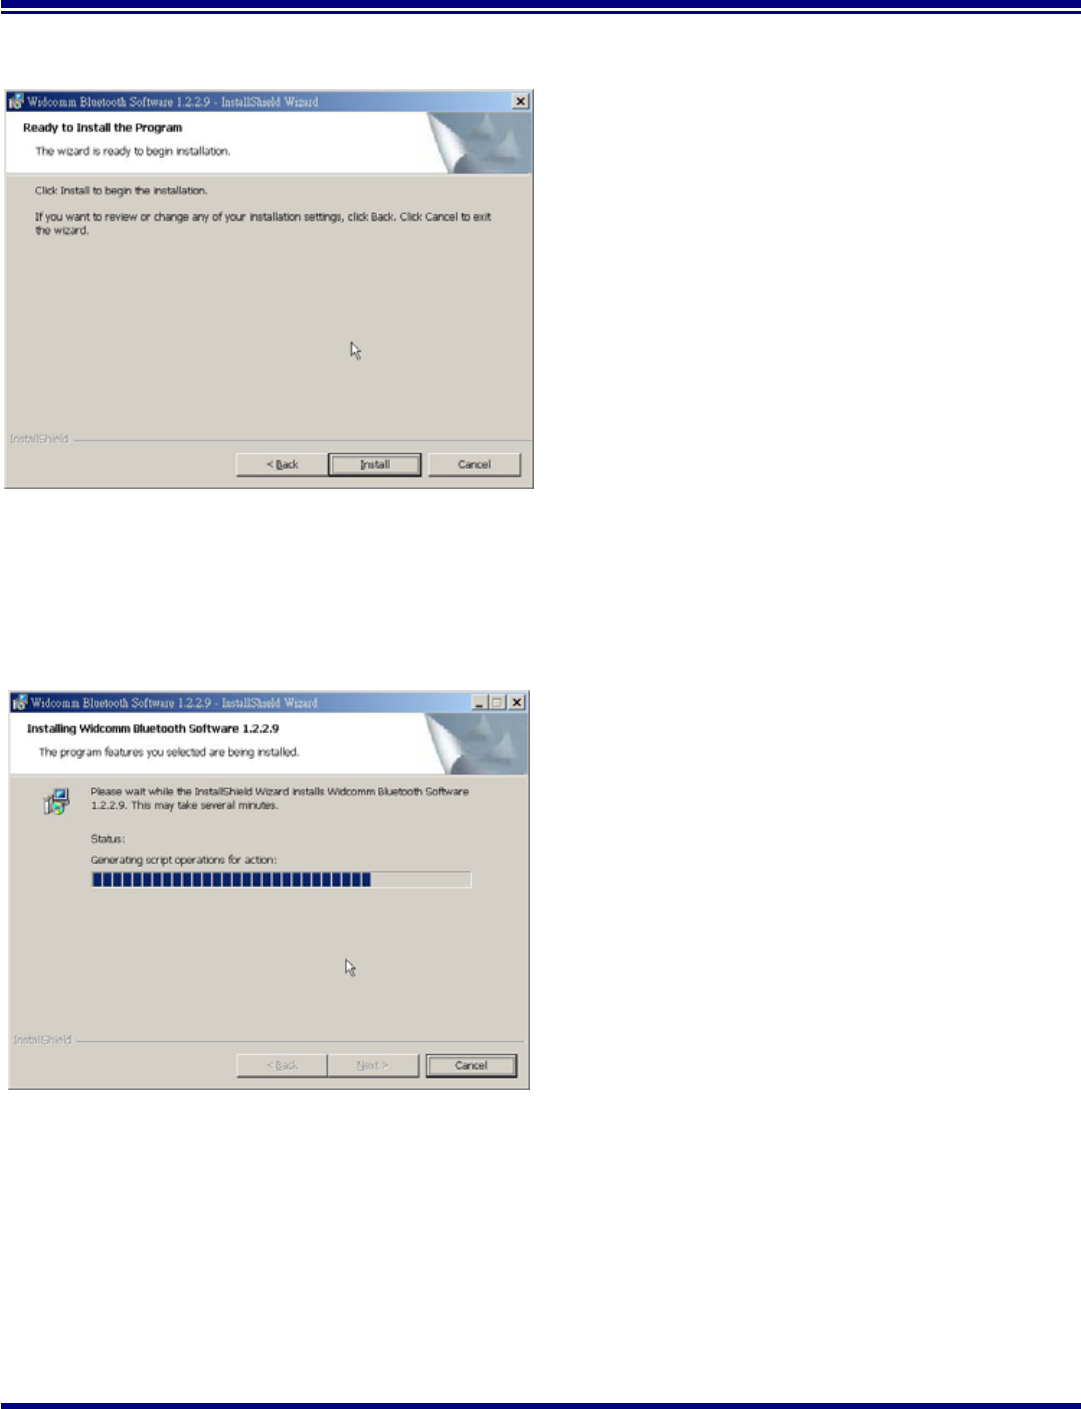
Figure 6. Ready to Install Window
Step 7 A Ready to Install Program window appears as
shown in Figure 6. Select Install when you are
ready to proceed.
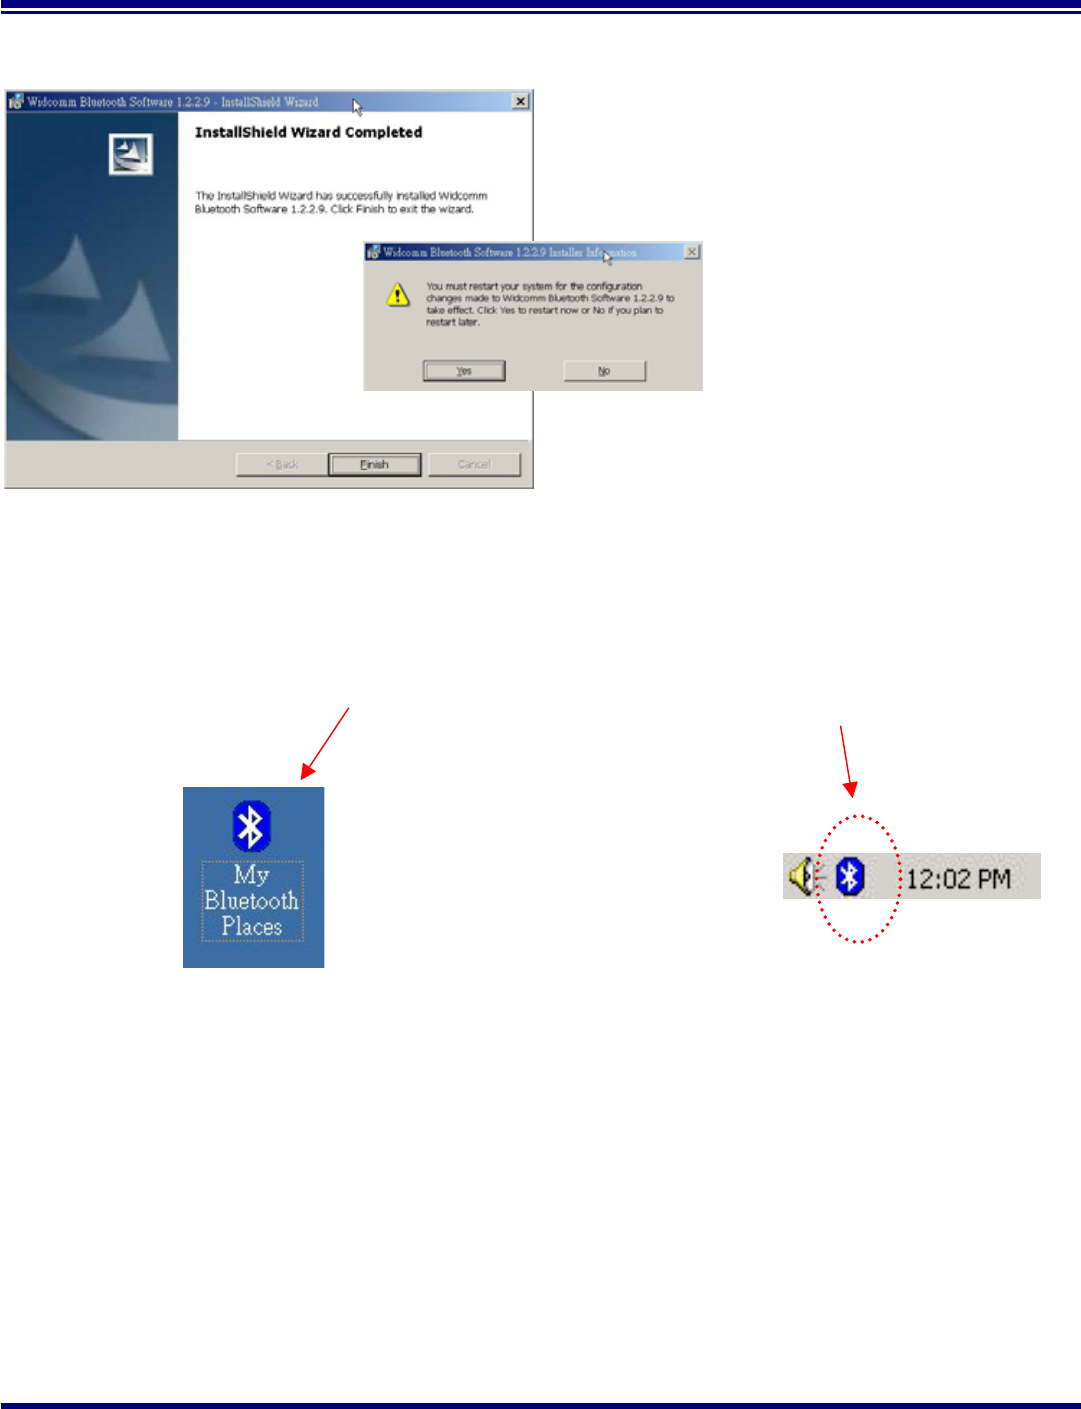
Figure 7. Installing Window
Step 8 An Installing Widcomm Status window appears.
Please be patient, this may take up to 5 minutes.
Step 9 A notification window appears asking you to
restart your system. Select Yes to proceed.
Taiyo Yuden
Page 7 Rev 1.29_30Aug02
Getting Started
With the Bluetooth Software BTW and USB Adaptor
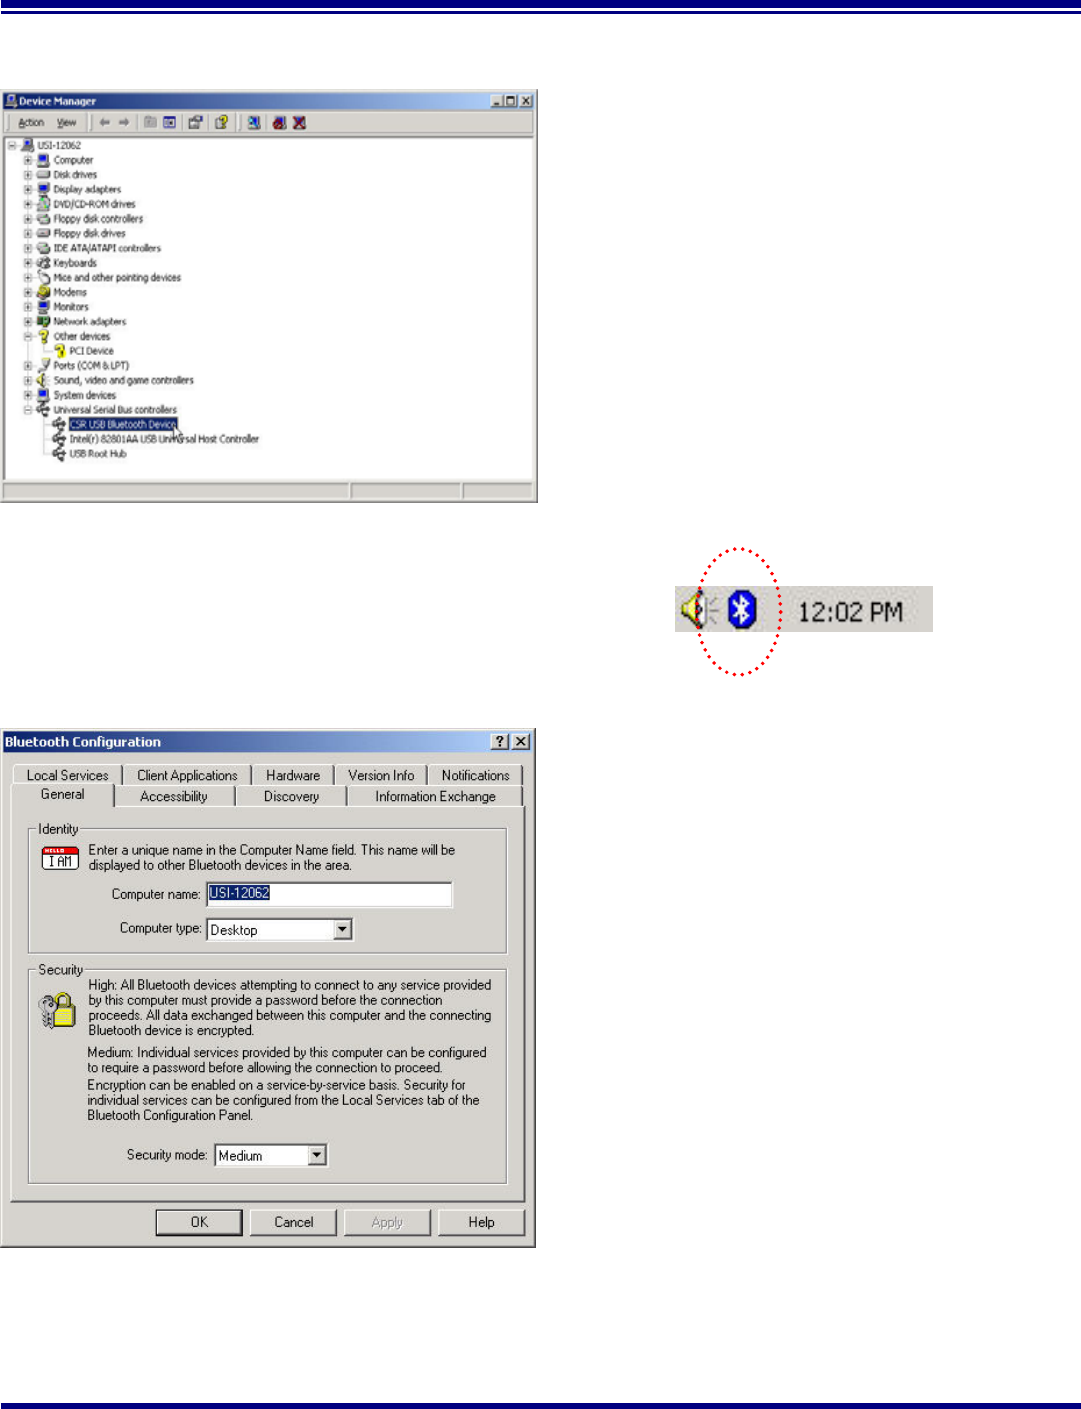
Figure 8. Install Complete Window
Step 10 You will be informed when the installation is
complete. Select Finish. Follow the
instructions thereafter. You may be asked to
restart the computer after the installation
completes. In that case click OK and restart
the computer.
Step 11 A Bluetooth Neighborhood logo has appeared on your desktop and a small Bluetooth icon has
appeared on your icon tray (lower right-hand side of the screen).
Taiyo Yuden
Page 8 Rev 1.29_30Aug02
Getting Started
With the Bluetooth Software BTW and USB Adaptor
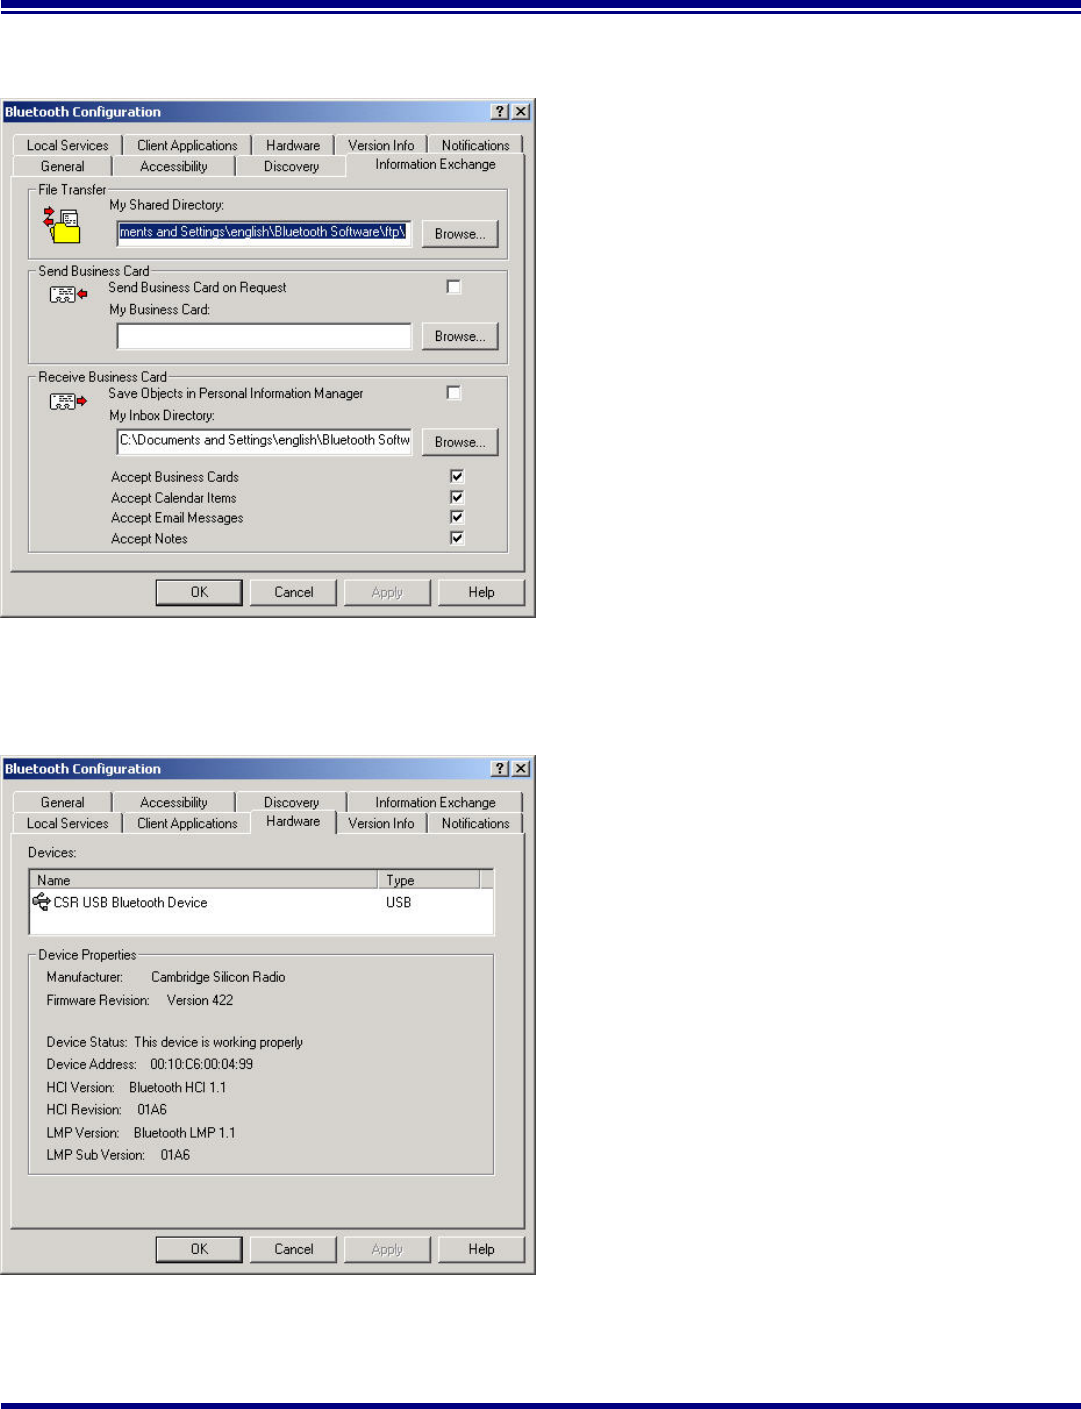
Figure 9. Device Manager Window
Step 12 Plug the Bluetooth USB Dangle into you
usb port ,The OS will install the usb Driver auto.
And you can check it in the My computer -
> Device Manager.
You may now remove the Widcomm CD from
your CD drive.
Step 13 Let’s configure your devices. On your icon tray (lower right-hand side of the screen), right click on
the small Bluetooth Neighborhood icon on your icon tray.
Figure 10. Bluetooth Configuration Window -
General Tab
Step 14 A pull down window appears with two words,
Security (which we will discuss later) and
Configuration. Choose Configuration.
Step 15 A Bluetooth Configuration window appears as
shown in Figure 10. In this document, there are
three tabs-of-interest: General, Information
Exchange, and Hardware. Select the General
tab.
Step 16 Type in a name for your device and choose
either Laptop or Desktop. The security
option’s default is medium; leave that as it is
for now. Select OK.
Taiyo Yuden
Page 9 Rev 1.29_30Aug02
Getting Started
With the Bluetooth Software BTW and USB Adaptor
Figure 11. Bluetooth Configuration Window –
Information Exchange Tab
Step 17 Now choose the Information Exchange tab
as shown in Figure 11. The My Shared
Directory window allows you to determine
where you would like to locate files you want
to share with other devices. The default is
called File Transfer. My Inbox Directory is the
dialogue window that allows you to determine
where you wish to put incoming files.
Configure the many choices on this tab now
or leave them at the default settings and then
select OK.
Figure 12. Bluetooth Configuration Window -
Hardware Tab
Step 18 Now choose the Hardware tab. Once you
have established a connection, you will see
the BD Address and other interesting
information about the device.
Taiyo Yuden
Page 10 Rev 1.29_30Aug02
Getting Started
With the Bluetooth Software BTW and USB Adaptor
Start Connecting Over The Bluetooth Airwaves – File Transfer
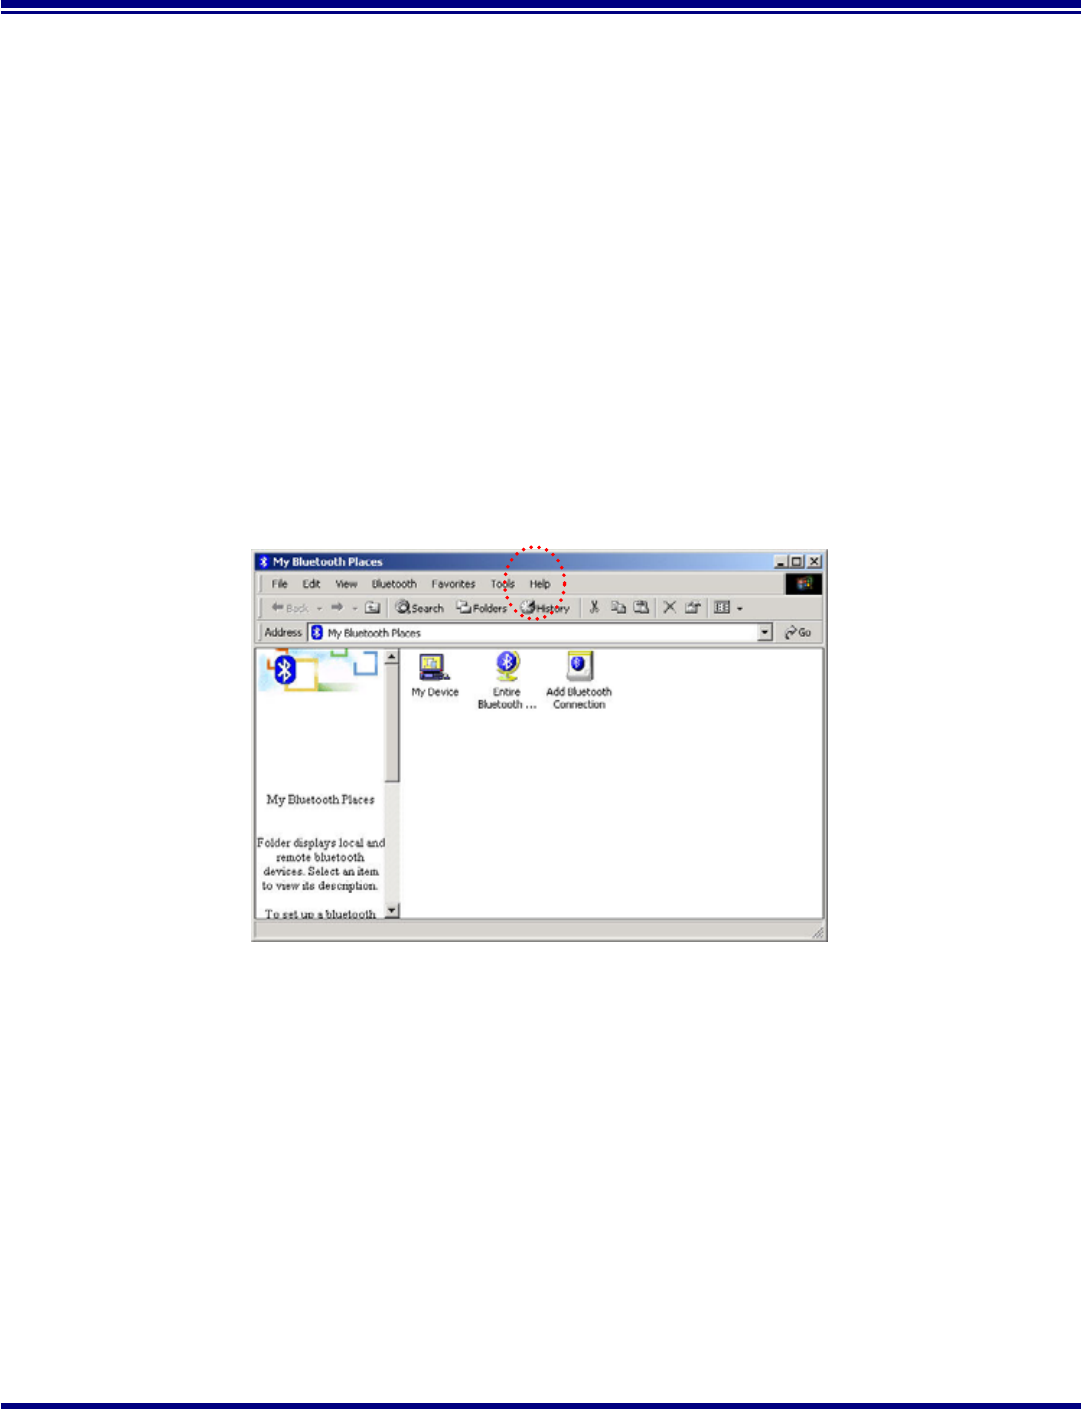
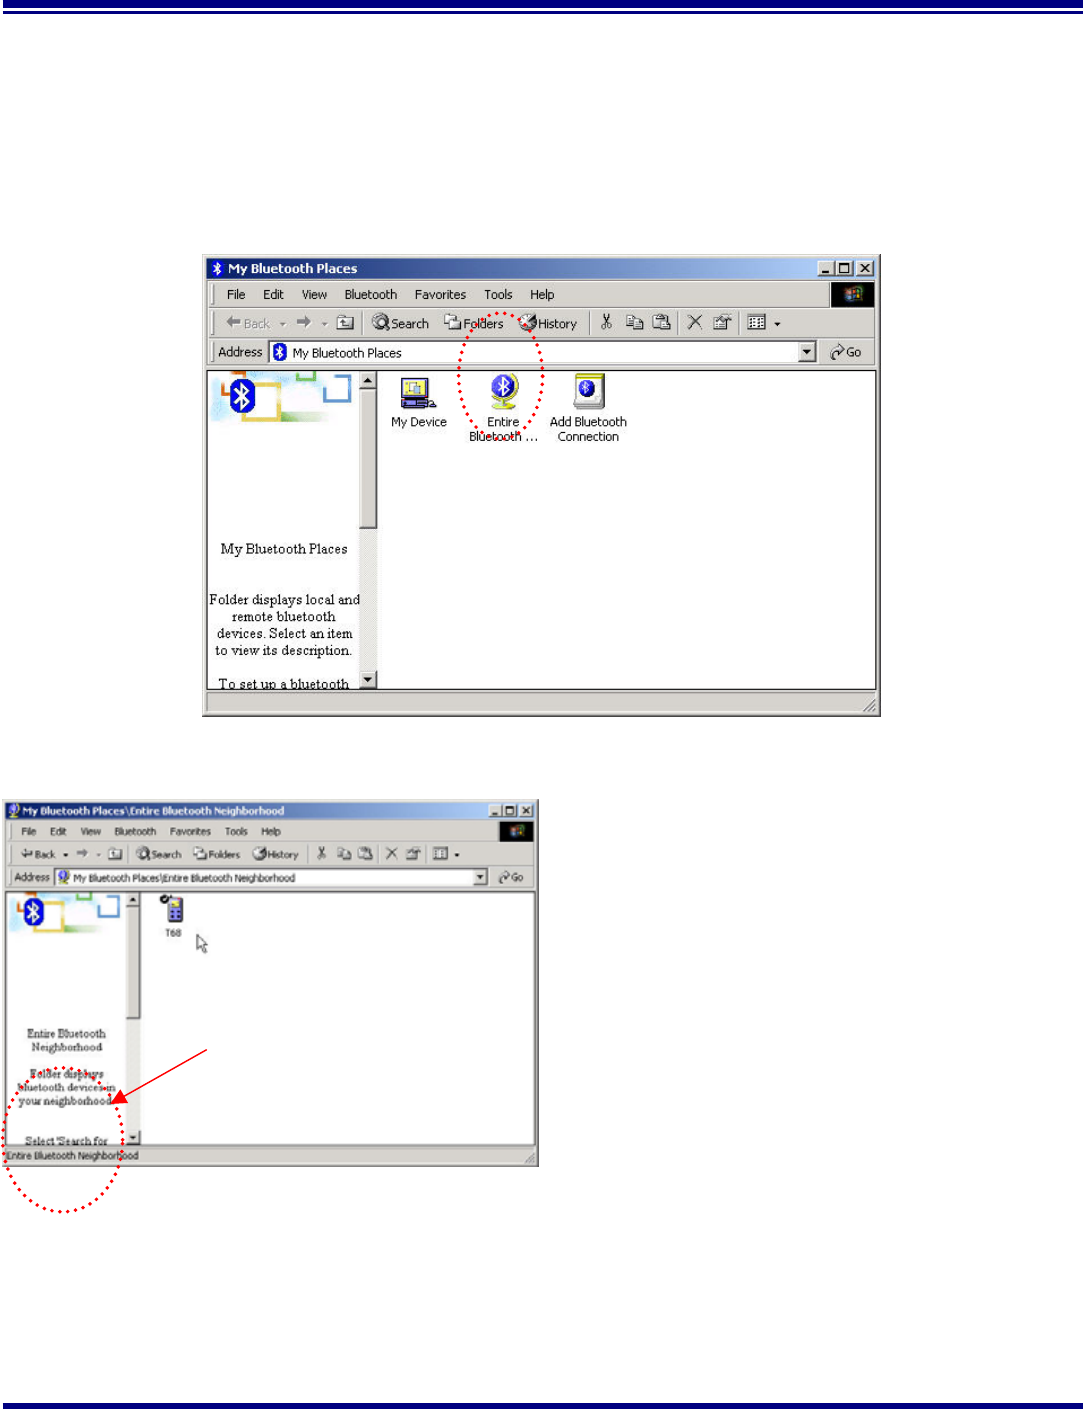
Step 1 Double click on the Bluetooth Neighborhood icon located on your desktop. A Bluetooth Neighborhood
window appears as shown in Figure 13. Double click on the Entire Bluetooth… icon. This will
perform an inquiry and search for other nearby devices.
Figure 13. Bluetooth Neighborhood Window
Figure 14. Found Configured Device
Note: Because of over-the-air interference and
if you have a lot of devices in the
evaluation area, then you might have to
click on Search for Devices a few times .
Step 2 Then, Double click on the Search For Devices
icon. It will find your other bluetooth device
as shown in Figure 14. If you have other
Bluetooth devices in the area, they will be
located and appear on your screen as
Unknown. Only the devices that you have
configured will have a name.
Double click here
Taiyo Yuden
Page 11 Rev 1.29_30Aug02
Getting Started
With the Bluetooth Software BTW and USB Adaptor
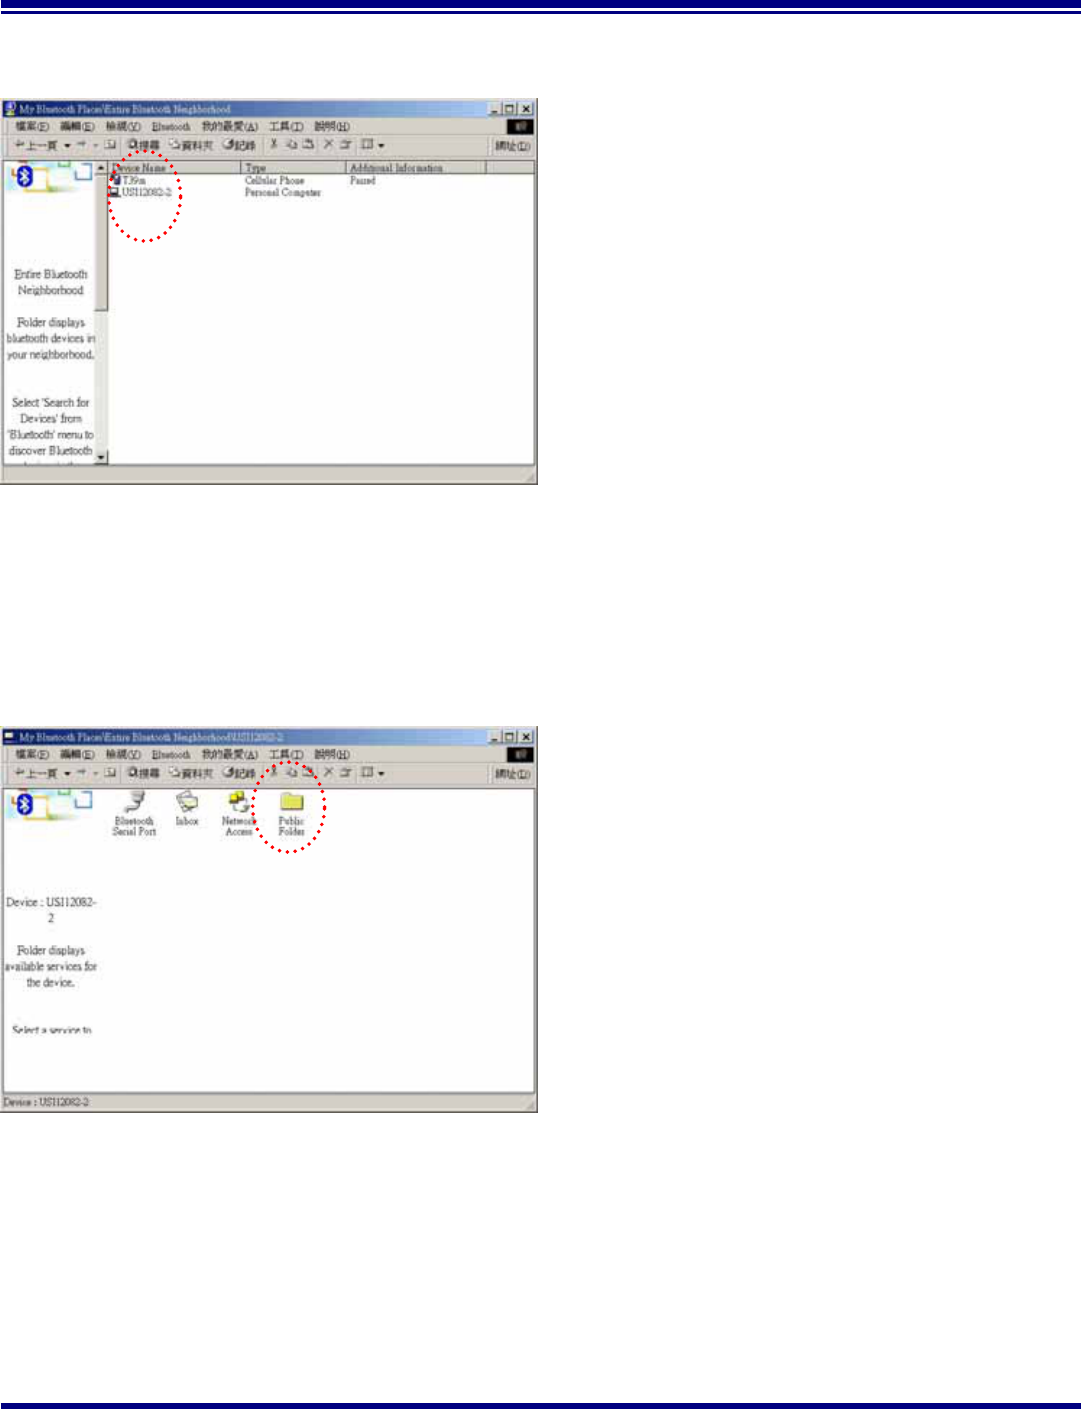
Figure 15. Found Configured Device
Step 3 On your master device, double click on the
icon named after your slave device as shown
in Figure 15. It will show all profile that the
slave support as shown in Figure 16.
Figure 15. Explore Series window
Step 4 Double click on the icon Public Folder. It will
connect to the Shared Directory of the slave
device (See the step 17). And show all the files
in the Share Directory.
Taiyo Yuden
Page 12 Rev 1.29_30Aug02
Getting Started
With the Bluetooth Software BTW and USB Adaptor
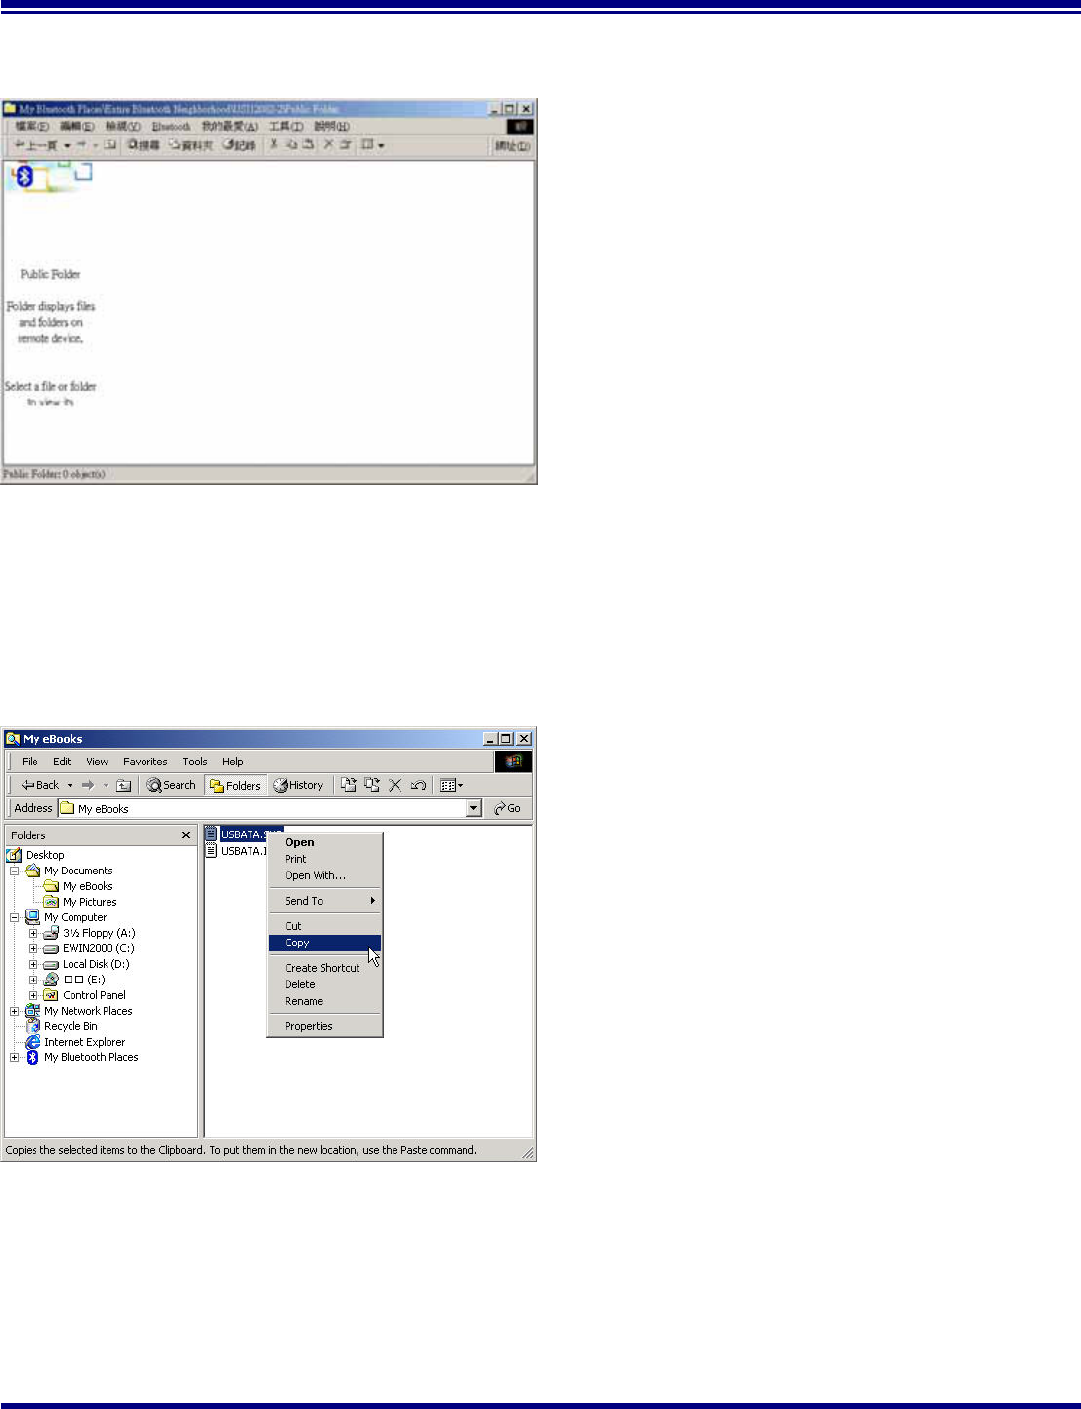
Figure 17. Explore files window
Step 5 Figure 17 show there are no files in the Share
Directory.
Figure 18. Windows 2000 Files Manager
Step 6 Now, you can copy files from the Files Manager
master device.
Taiyo Yuden
Page 13 Rev 1.29_30Aug02
Getting Started
With the Bluetooth Software BTW and USB Adaptor
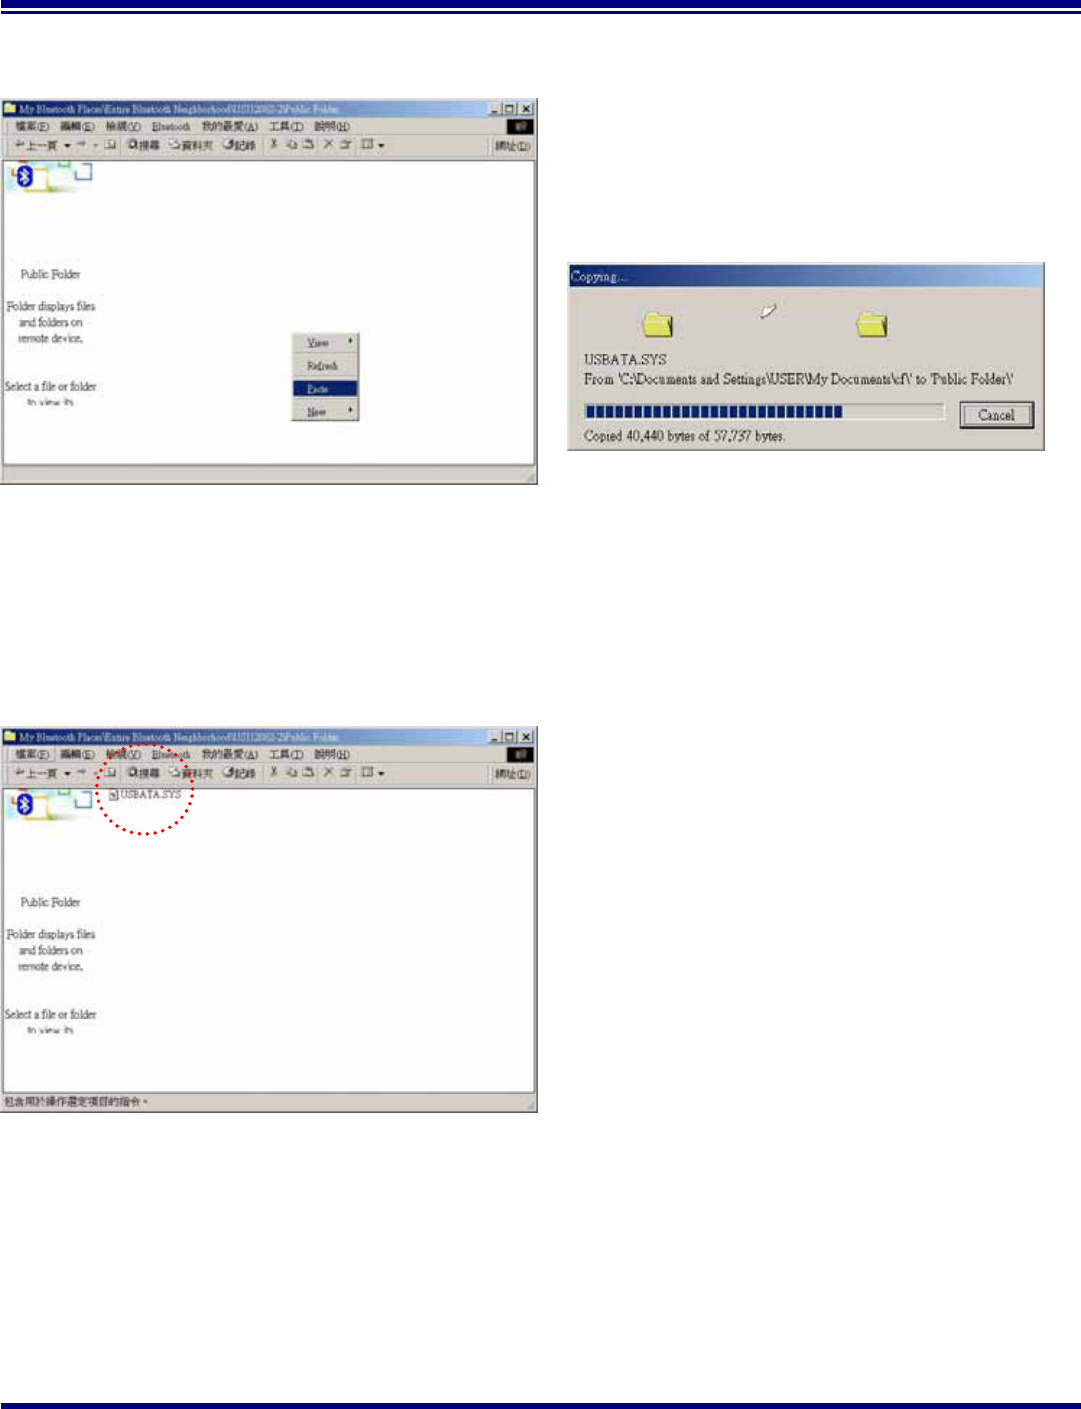
Figure 19. Paste files to Public Folder
Step 7 Then, Paste this file into Public Folder,
A Copying Window appears as shown in Figure
20.
Figure 21. Copy completed window
Step 8 When the copy is completed, you will see the file
name listed in the Public Folder.
Figure 20. Copying…
Taiyo Yuden
Page 14 Rev 1.29_30Aug02
Getting Started
With the Bluetooth Software BTW and USB Adaptor
Connecting Over The Bluetooth Airwaves – Security
Step 1 Go back to the icon tray (lower right-hand side of the screen) and right click on the small Bluetooth
Neighborhood icon. Highlight Configuration on the pull down window.
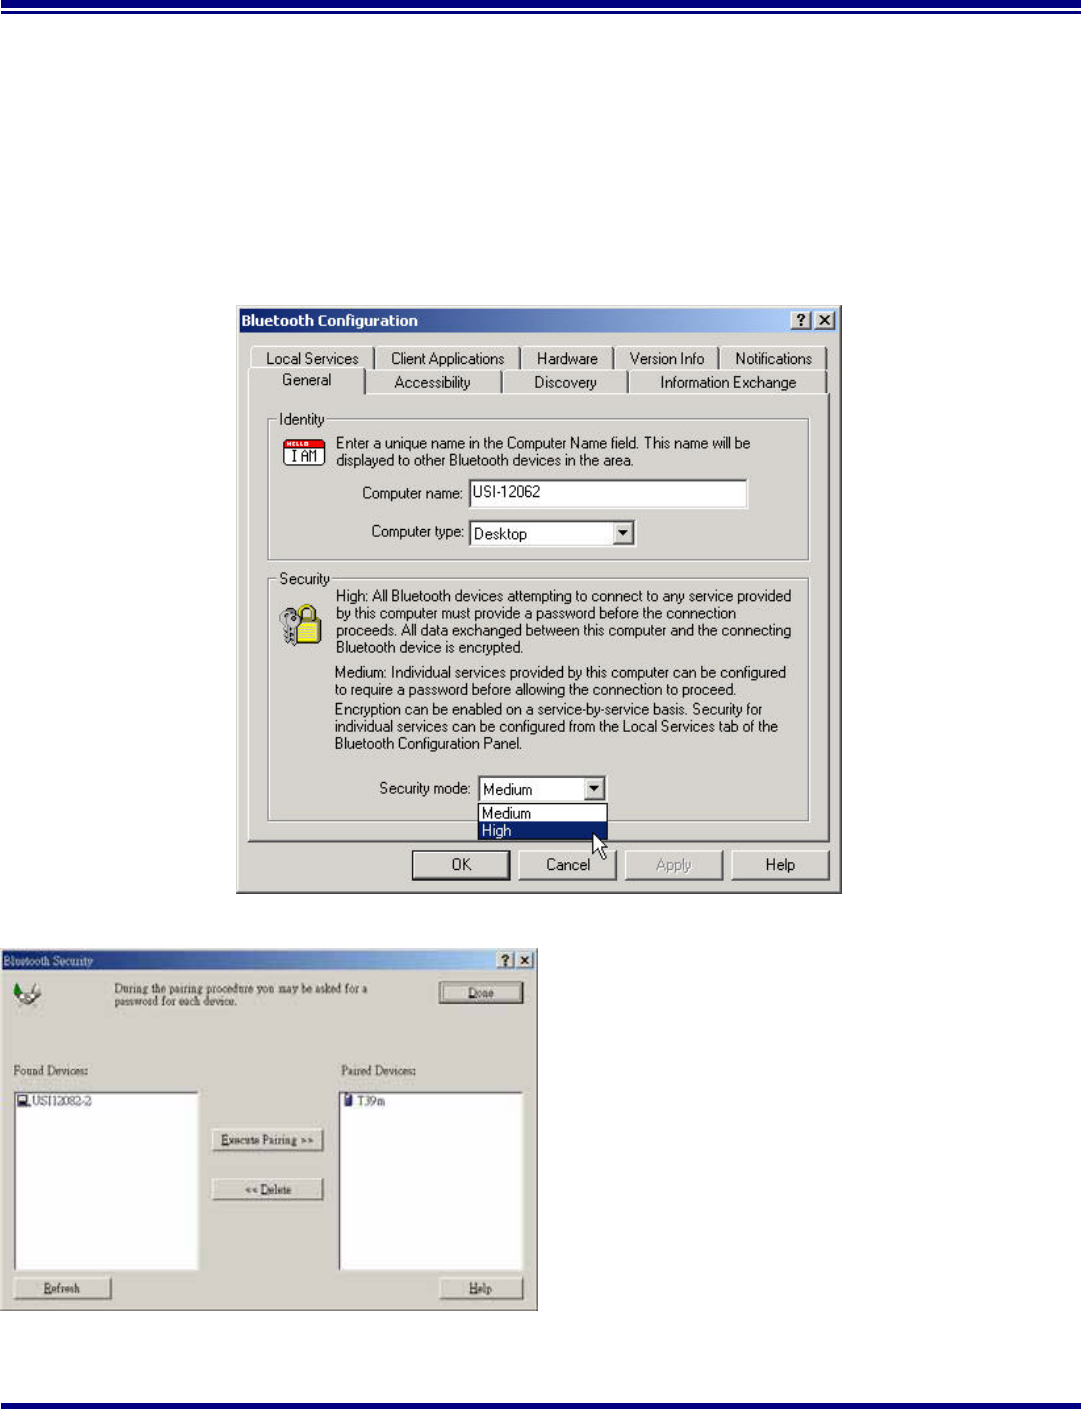
Step 2 The Bluetooth Configuration window opens as shown in Figure 22. Select the General tab. Under
Security, choose the High option. This will enable encryption. Click OK. (If you choose the Medium
option, encryption will be disabled.)
Figure 22. Bluetooth Configuration Window – Encryption Enabled
Figure 23. Bluetooth Security Window
Step 3 Send any file(s) in encrypted mode by repeating
Step 2.
Step 4 For additional security, right click on the icon
tray’s small Bluetooth Neighborhood icon
again. On the pull down window, highlight
Security. The window shown in Figure 23
opens with two sections. All of your found
devices will be on the left-hand side.

Taiyo Yuden
Page 15 Rev 1.29_30Aug02
Getting Started
With the Bluetooth Software BTW and USB Adaptor
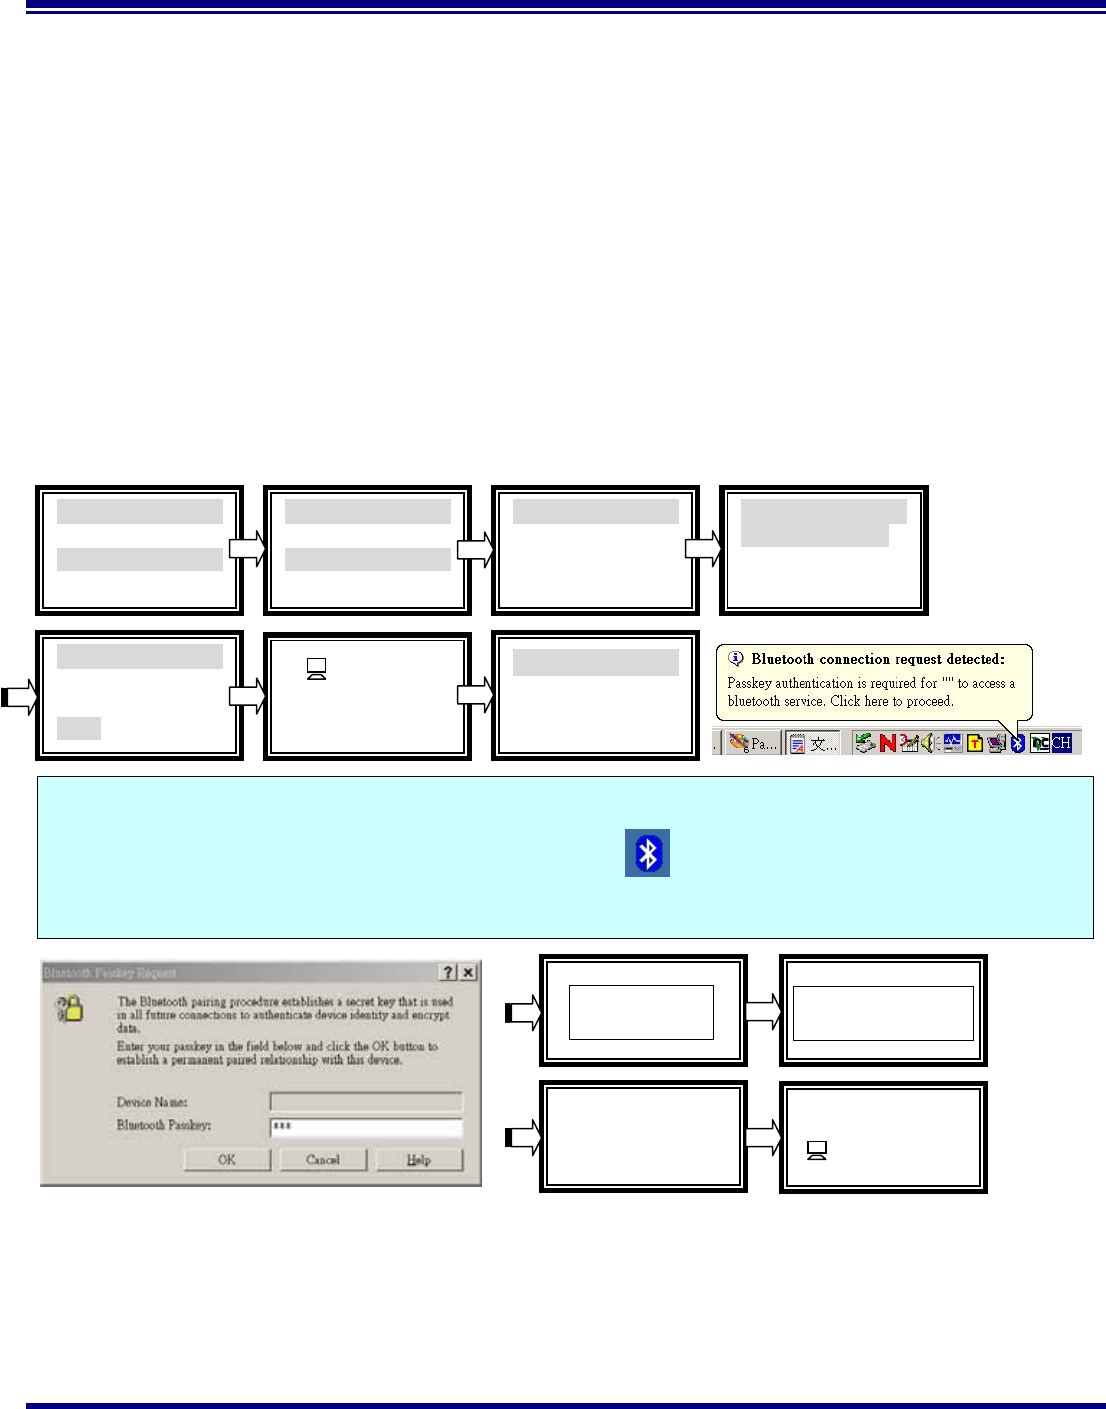
Figure 24. Bluetooth Passkey Request
Step 5 Highlight a device and click on the Execute
Pairing button. Now this is the only device(s)
that can connect to your computer. The user is
asked for a passkey. The Bluetooth Passkey
Request window opens as shown in Figure
24.
Step 6 Click on the OK button after entering the
passkey in the Bluetooth Passkey window.
Step 7 On the other device, the Bluetooth icon on the
icon tray (lower right-hand side of the screen)
will blink. On clicking the icon a Bluetooth
passkey request window pops up requesting
the user to enter passkey. Enter the same
passkey as given on the first device. Click on
OK button.Successfully finding the Available
services on the second device will Be an
indication that we are in connection using
pairing. If there is any Security Error message,
make sure that the passkeys given on both
devices are the same.
Taiyo Yuden
Page 16 Rev 1.29_30Aug02
Getting Started
With the Bluetooth Software BTW and USB Adaptor
Start Connecting Over The Bluetooth Airwaves –Dial-up Networking Profile
Example 1 : Use the ERICSSON T39mc mobile ( with the Bluetooth module and GPRS service
and provide Dial-up Networking Profile)
Step 1 Plug on the Bluetooth USB Dangle, Execute the BTW program。
Step 2 Before you using this application you must to pair the master device and T39mc,
After pairing successfully at the first time, the PC and T39mc will recognize each other,
Then, you can use the all services of the T39mc without being recognized again。
Step 3 Make pair from T39mc。
T39mc setting :
Figure 25 Bluetooth Passkey Request
Extras
5 Synchronization
6 Bluetooth
7 Time
Bluetooth
1 Discoverable
2 Paired devices
3 Discover
Paired devices
Add device
A
dd to paired
1 Phone initiates
2 Phone accepts
A
dd types
1 All types
2 Headset
3 PC
Add to paired
Passkey:xxx
USI12162
Add to paired
devices?
Name tag :
USI12162
Pairing …
Pairing successful
Add device
USI12162
In this step you must enter the Passkey : xxx (for wmample: 123) on the T39mc side,and then you will see a Bluetooth
connection request detected message on the PC screen,click the icon and enter the same passkey(123) into the
column。
Enter tag name Completed
Taiyo Yuden
Page 17 Rev 1.29_30Aug02
Getting Started
With the Bluetooth Software BTW and USB Adaptor
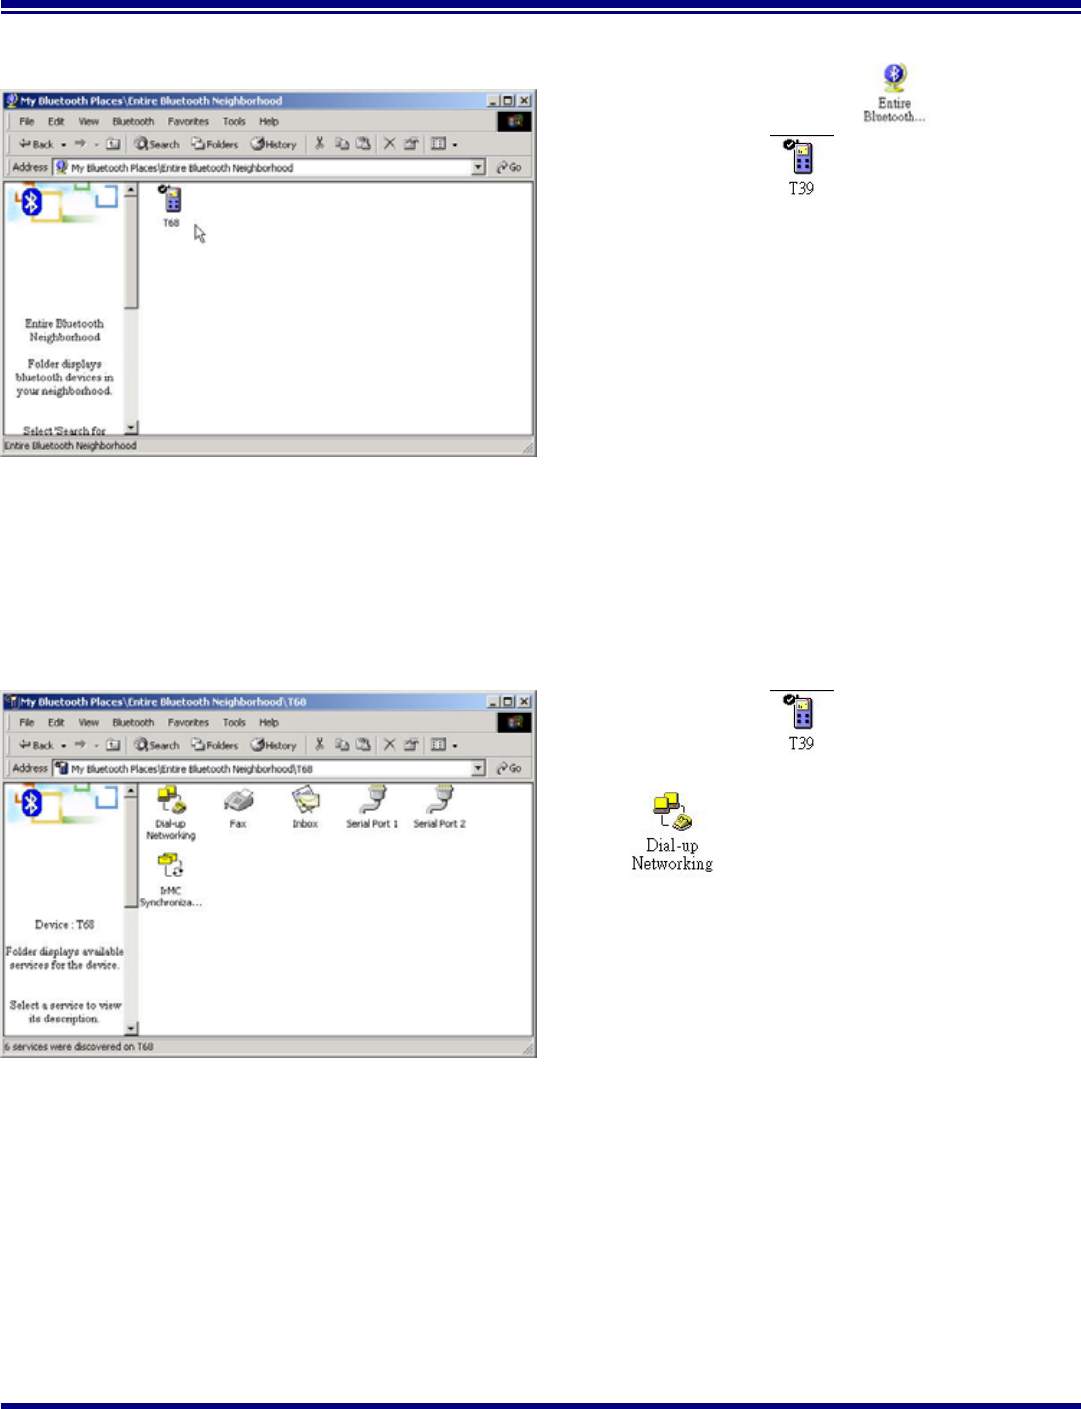
Figure 26. Found Configured Device
Step 4 After pairing finished, click and you
can see the icon .
Figure 27. Explore Series window
Step 5 Double click icon ,you can see what are
the services T39mc support, click icon
.
Taiyo Yuden
Page 18 Rev 1.29_30Aug02
Getting Started
With the Bluetooth Software BTW and USB Adaptor
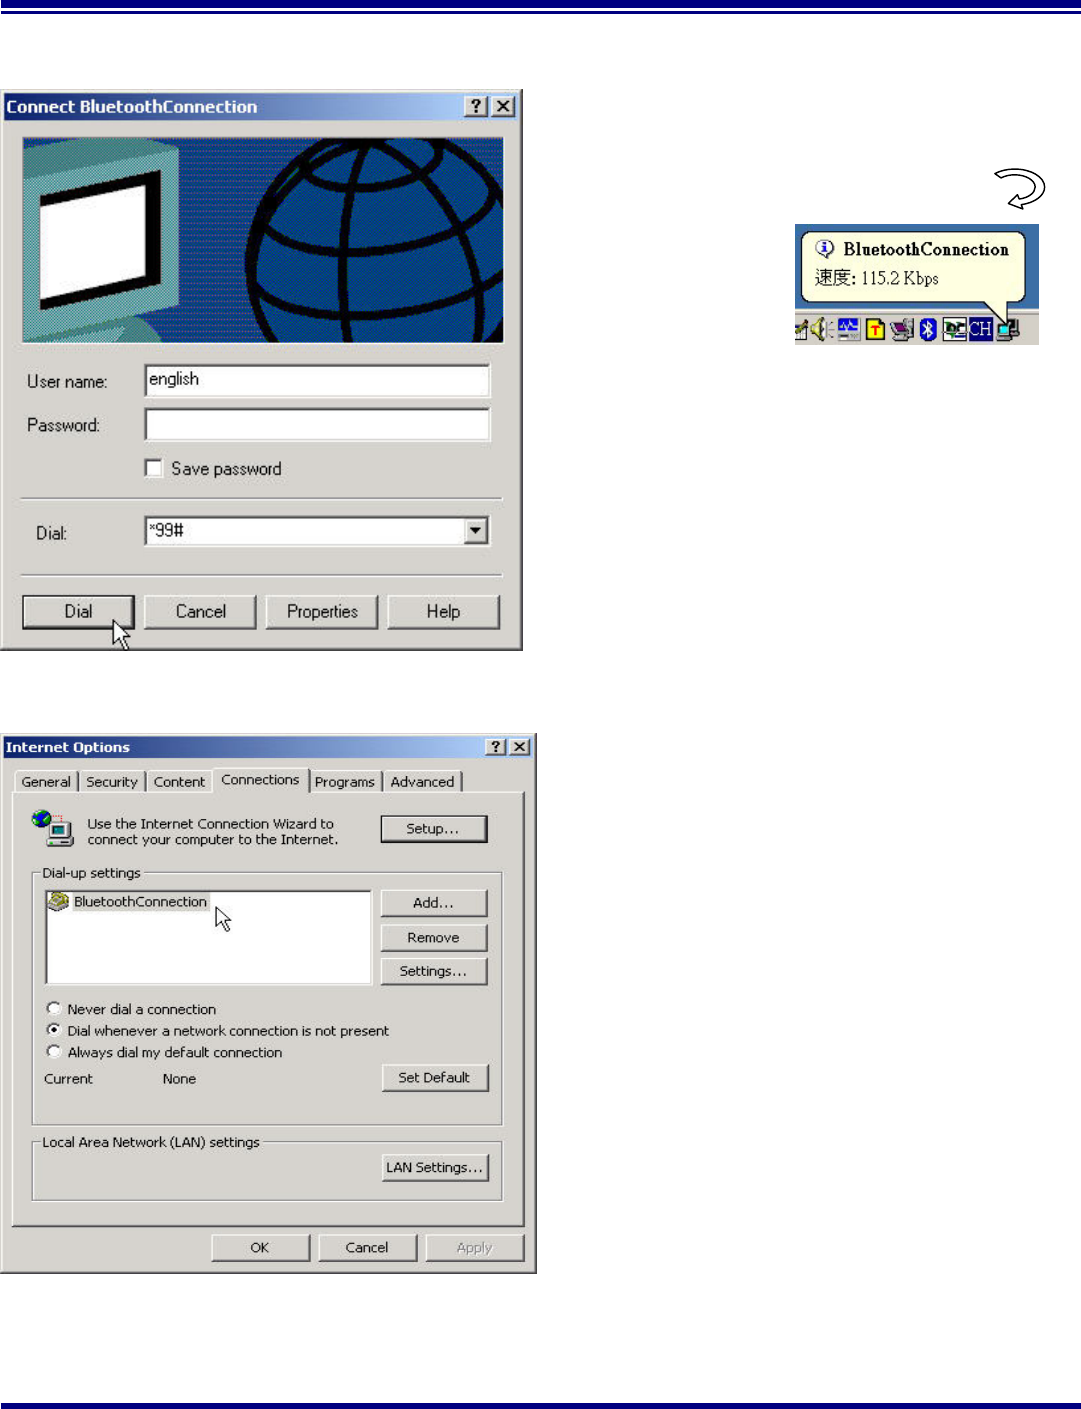
Figure 28. Bluetooth Dial_up Window
Step 6 Enter the username、password and Dial_up
number, then click Dial.
If it connect successful you see the Message
BluetoothConnection .
Figure 29. Internet Option Window
Step 7 Before you connect to web side, be sure to
set the BluetoothConnection device to be
your default connection.
Now, you can connect to web.
Taiyo Yuden
Page 19 Rev 1.29_30Aug02
Getting Started
With the Bluetooth Software BTW and USB Adaptor
CAUTION: To maintain compliance with FCC’s RF exposure guidelines, this equipment should be installed and
operated with minimum distance 20cm between the radiator and your body. Use on the supplied antenna.
Unauthorized antenna, modification, or attachments could damage the transmitter and may violate FCC regulations.
This device complies with Part 15 of the FCC Rules. Operation is subject to the following two conditions:
(1) This device may not cause harmful interference.
(2) This device must accept any interference received, including interference that may Cause undesired operation.
Canadian Radio Interference Regulations: This digital apparatus does not exceed Class B limits for radio noise
emissions from a digital apparatus as set out in the interference-causing equipment standard entitled “Digital
Apparatus”, ICES-003 of the Industry Canada.
Cet appareil numérique respecte les limites de bruits radio éléctiques applicables aux appareils numériques de
Classe B prescrites dans la norme sur le matériel brouilleur: "Appareils Numériques", NMB-003 édictée par
l'Industrie Canada.
Operation is subject to the following two conditions: (1) this device may not cause interference, and (2) this
device must accept any interference, including interference that may cause undesired operation of the device.
L'utilisation de ce dispositif est autorisée seulement aux conditions suivantes : (1) il ne doit pas produire de
brouillage et (2) l'utilisateur du dispositif doit être prêt à accepter tout brouillage radioélectrique reçu, même si ce
brouillage est susceptible de compromettre le fonctionnement du dispositif.