TCL Communication A002 HSUPA/HSDPA/UMTS triband / GSM quadbands/LTE triband mobile phone User Manual Alto4 5 TMO 5042T UM Eng USA rev1 17 32
TCL Communication Ltd. HSUPA/HSDPA/UMTS triband / GSM quadbands/LTE triband mobile phone Alto4 5 TMO 5042T UM Eng USA rev1 17 32
Contents
Alto4.5 TMO_5042T_UM_Eng_USA_rev1-17-32
31 32
To hang up a call, touch or the Power key(1).
International call
To dial an international call, touch and hold to enter “+”, then enter the international country prefix
followed by the full phone number and finally touch .
Emergency call
If your phone has network coverage, dial emergency number and touch to make an emergency
call. This works even without a SIM card and without typing the PIN code.
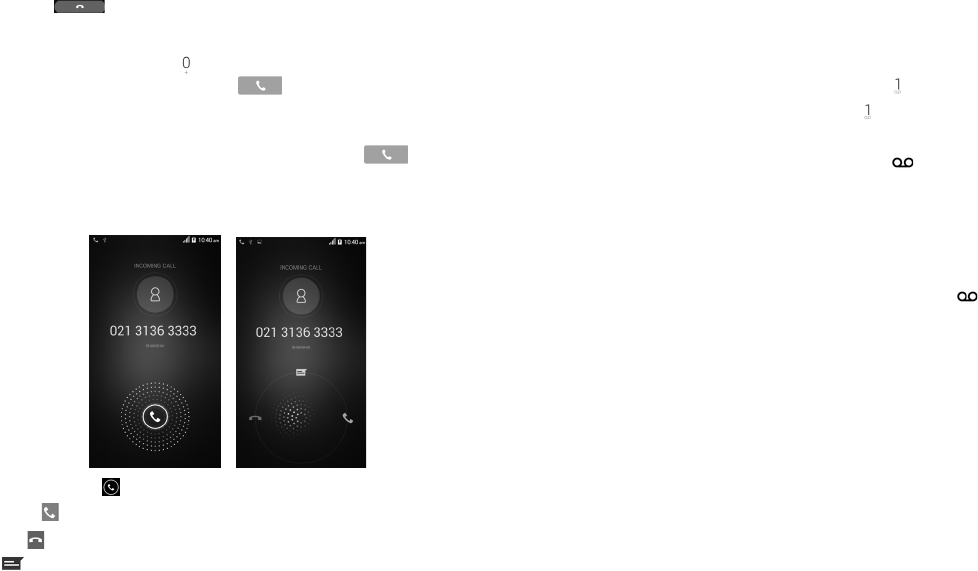
3.1.2 Answering or rejecting a call
When you receive a call, touch .
• Slide the green icon rightward to answer;
• Slide the red icon leftward to reject;
• Slide the icon upward to reject a call and send a preset text message.
To mute incoming calls, press the Volume up/down key or make the phone facing down(2).
(1) Touch Settings/Accessibility and select check box to activate Power button ends call option.
(2) Touch Settings/Gestures and select check box to activate Turn over to mute option.
3.1.3 Accessing your voicemail
Voicemails are recorded messages left by incoming callers when calls are missed or forwarded to
voicemail.
To access your voicemail, touch and hold on Phone Keypad.
• To set up voicemail touch and hold to call voicemail. Follow the prompts to set up your voicemail
account.
If you receive a voicemail, a voicemail icon appears on the Status bar. Open the Notifications panel,
touch New voicemail to access.
3.1.4 Visual Voicemail
Visual Voicemail allows users to view, listen and save all voicemails in any order directly from the phone,
without the need of calling the voicemail system.
• From the Home screen or Applications menu, tap .
• The inbox with all voicemail messages will be displayed.
• Tap on voicemail to listen to it.

33 34
3.1.5 During a call
To adjust the volume during a call, press the Volume up/down key on right side of phone.
Touch to end the current call.
Touch to display keypad.
Touch to activate speaker mode during a call. Touch this icon again to deactivate speaker
mode.
Touch to mute the current call. Touch this icon again to unmute the call.
Touch to hold the current call. Touch this icon again to retrieve the call.
Touch to add contacts.
Touch to access other settings.
To avoid misoperation on touch screen during a call, screen will be locked automatically when
you put the phone close to your ear; touch screen will be unlocked when phone is taken away
from your ear.
3.1.6 Voice call
•Voicemail
Provides you with Service and Voicemail settings information.
•Call forwarding
Displays the following forwarding options: Always forward, Forward when busy, Forward if unanswered
and Forward if unreachable options.
•Additional settings
Displays the following forwarding options: Caller ID, Call waiting and Call waiting status options.
3.1.7 Call settings
When in the Phone screen, touch the Menu key to access the following options:
Speed Dial Gives you access to dial your contact by touching and holding number 2-9 on
dial pad. You can set speed dial for certain contact in this menu.
Settings Gives you quick access to Voice call (Voice call related settings) or Other
settings.
3.1.8 Other settings
•Fixed Dialing Numbers
Fixed Dialing Number (FDN) is a service mode of SIM, where outgoing calls are restricted to a set of
phone numbers. These numbers are added to the FDN list. The most common application of FDN is
for parents to restrict the phone numbers which their children can dial.
35 36
For security reasons, you’ll be prompted to enable FDN by entering SIM PIN2 which is usually acquired
from your service provider or SIM maker.
Minute reminder
Mark the check box to enable minute reminder at 50s of every minute during a call.
Vibrate reminder
Mark the checkbox to enable vibration when the call is connected.
Dual mic noise reduction
Mark the checkbox to suppress background noise during calls.
Quick responses
Touch to edit preset responses which will be used when you reject a call using message icon.
TTY mode
Turn on TTY mode to enable deaf or mute delete to communicate by typing in the phone.
International dialing assist
Mark the checkbox to turn on international dialing assist.
Hearing aids
Mark the checkbox to turn on hearing aid compatibility.
Wi-Fi Calling
Touch to activate or inactivate Wi-Fi calling.
3.2 Wi-Fi Calling
Wi-Fi Calling lets you make and receive voice calls and text /multimedia messages over your Wi-Fi
network when your phone is connected to a Wi-Fi network and registered with your wireless carrier's
network for Wi-Fi Calling.
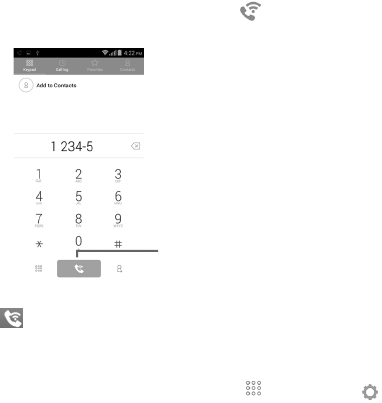
When your phone is connected to Wi-Fi network, you will see at the top of your screen. Now you
are able to use your device for calling and messaging even if you have no cellular coverage.
Touch to make calls over
Wi-Fi when connected to
Wi-Fi network.
Enter the desired number into dial pad or select a contact from People or History by sliding or
touching tabs, then touch to place the call.
When the handset loses Wi-Fi coverage, any active call will drop and the phone will connect to the
cellular network if available.
To make Wi-Fi Calling a default setting on your phone, touch then Settings and toggle Wi-Fi
Calling button to right On position, bar will light up in blue when active.
To see available Wi-Fi networks and link to Wi-Fi calling, click Wi-Fi text and all Wi-Fi networks available
will be listed.
For additional Wi-Fi options select Settings/More.../Wi-Fi Calling/Connection preferences.
37 38
For more information you can find tutorial and top questions by Settings\More...\Wi-Fi Calling\
Help.
Calls and messages made over Wi-Fi will be charged like cellular calls.
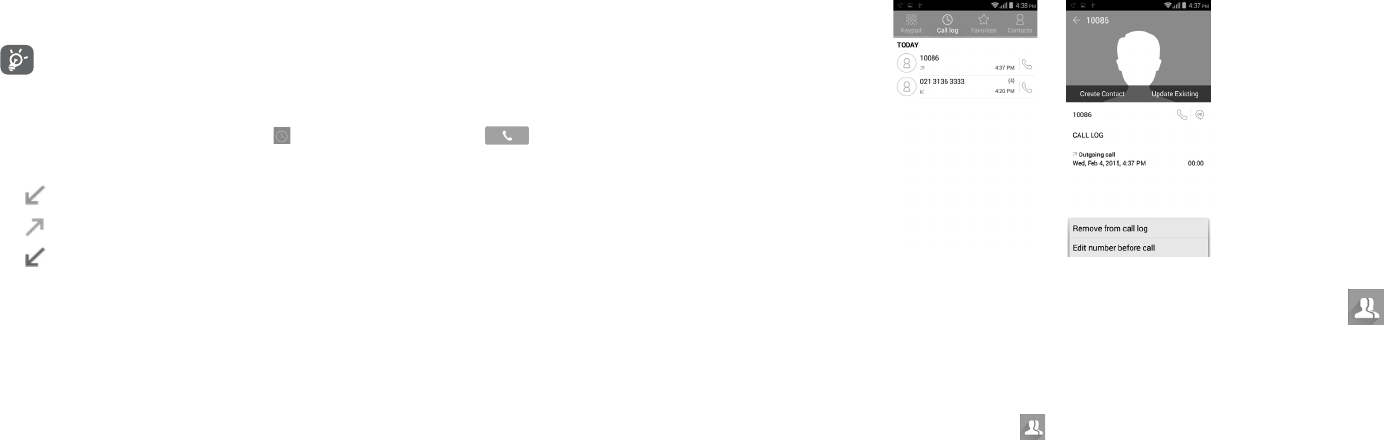
3.3 Call log
You can access your call log by touching from the Dial screen. Touch on the right side of
contact/number to place a call directly. There are three kinds of calls in Call log:
Incoming calls (blue arrows)
Outgoing calls (green arrows)
Missed calls (red arrows)
Touch a contact or number to view information or further operations.
You can view detailed call information, launch a new call, send messages, or add numbers to People
(only available for unsaved phone numbers), etc.
To delete some or all of your call log entries, touch the call log tab touch the Menu key and select
Clear call log, a new screen will display showing all call history log entries and you can select the
entries you would like to delete. Once delete selections are complete, touch OK at top right corner
of screen and then confirm deletion by selecting OK again, entries will then be deleted.
3.4 Contacts.........................................................................................
The People app provides you with quick access to all your contacts.
3.4.1 Accessing your contacts
To access your contacts, touch the People icon located in your Favorite applications tray or
Applications menu.
39 40
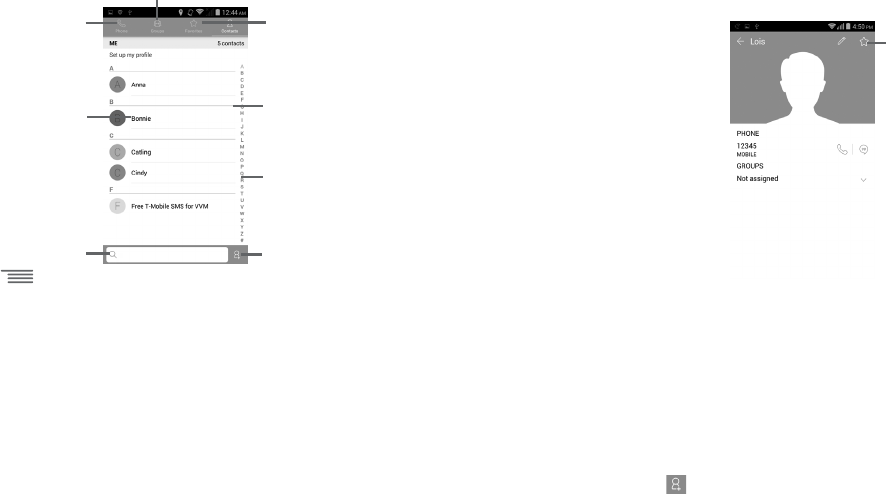
Touch icon to make
call to contact.
Touch to view the
contact’s detailed
information.
Touch to view your
contact groups.
Touch to
access Phone.
Touch to search in
Contacts Touch to add a new
contact.
• Touch The Menu key in Contacts screen to display contacts list option below.
• New Create a new contact/group
• Delete contact Select and delete unwanted contacts.
• Import/Export Import, export or share contacts between phone, SIM card , microSD card,
Gmail account or Facebook account.
• Contacts to display Choose contacts to display.
• Accounts Manage the synchronization settings for different accounts.
• Settings Touch to sort list, and view contact names.
• Sort list by Touch to display contact information by Given name or Family name.
• View contact
names
Touch to view contact names by Given name or Family name.
• Share visible
contacts
Share contacts with others by sending the contact's vCard to them via
Bluetooth, Email, MMS, etc.
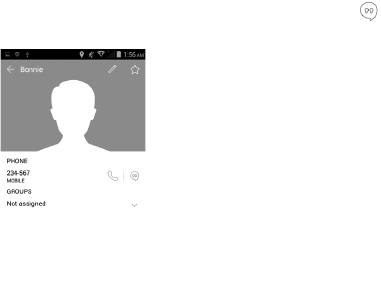
3.4.2 Accessing Favorites
Touch one contact and access contact detail screen.
Touch to add this
contact to your Favorite,
touch again to remove
this contact from your
Favorite.
3.4.3 Managing contact groups
Contact groups help you organize your contacts. You can add, remove and view groups in the Contact
group screen.
Touch the Groups tab to view local groups. To create a new group, touch the Menu key and select
New, enter the new name and touch DONE to confirm.
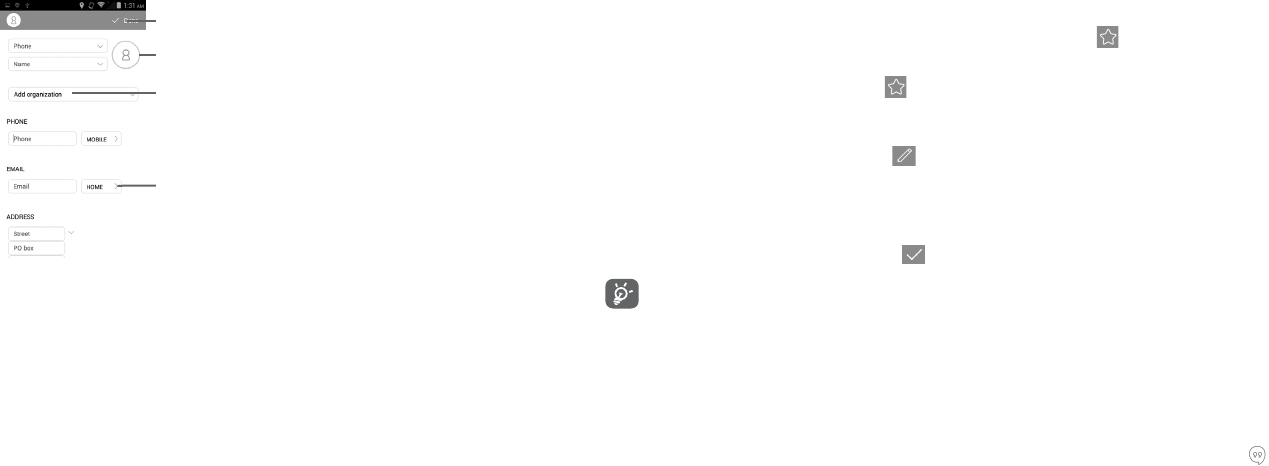
3.4.4 Adding a contact
Touch the icon in the contact list to create a new contact.
You are asked to enter contact's name and other contact information. By scrolling up and down the
screen, you can move from one field to another.
Touch to view your
favorite contacts.
Touch letter to scroll
to contacts starting
with same letter.
41 42
Touch to select a picture for the contact.
Touch to view other predefined
category labels.
Touch to save.
Touch to add a new label.
If you want to add more information, touch Add another field to add a new category.
When finished, touch DONE to save.
To exit without saving, you can touch the Menu key and then touch Discard.
Add to/remove from Favorites
To add a contact to favorites, touch a contact to view details then touch to add the contact to
favorites.
To remove a contact from favorites, touch in contact details screen.
3.4.5 Editing your contacts
To edit contact information, touch the icon in the contact details screen, or touch the Menu key
and select Edit. When finished, touch DONE.
Delete a contact
To delete a contact, touch the Menu key and Delete contact from contact (details) screen. Pick the
contact you want to remove and touch icon to confirm. Touch Select all to delete all contacts.
The contact you have deleted will also be removed from other applications on the phone or
web the next time you synchronize your phone.
3.4.6 Communicating with your contacts
From the contacts list, you can communicate with your contacts by making a call or exchanging
messages.
To launch a call to a contact, touch the contact to enter the detail screen, then touch the number.
To send a message to a contact, touch the contact to enter the detail screen, then touch the icon
on the right side of the number.
43 44
Using Contact screen
Touch a contact’s name to open Contact screen, then you can touch the number or the icon for
the way you want to connect.
The icons available on Contacts screen depend on the information you have for the contact and the
applications and accounts on your phone.
3.4.7 Contacts importing, exporting and sharing
This phone enables you to import contacts from SIM/microSD/Gmail & Fackbook account card and
export contacts to a microSD card which can then be used to back up your information.
From Contacts screen, touch the Menu key to open options menu, touch Import/export, then select
Phone, SD Card, Phone Storage, account.
To import/export a single contact from/to SIM card or account, choose a target storage device, select
the contact you want to import/export, touch OK to confirm.
To import/export all contacts from/to SIM card, choose an account and target SIM card(s), select ALL,
touch OK to confirm.
You can share a single contact or contacts with others by sending the contact's vCard to them via
Bluetooth, Gmail, etc.
Touch a contact you want to share, touch the Menu key and Share from contact details screen, then
select the application to perform this action.
3.4.8 Displaying contacts
You can configure which group of contacts, for each account, you want to display in the Contacts list.
Touch the Menu key and touch Contacts to display from contacts list screen, then you can choose
contacts to display.
Touch the Menu key and Settings, you can sort list by first or last name, as well as view contact names
by Given name or Family name.
3.4.9 Joining/Separating contacts
To avoid duplication, you can add any new contact information to existing contacts in a single action.
Touch the contact which you want to add information to, touch the Menu key and touch Edit, then
touch the Menu key again and touch Join.
At this time, you are required to select the contact whose information you want to join with the first
contact. The information from the second contact is added to the first one, and the second contact will
no longer be displayed in the Contacts list.
To separate contact information, touch the contact whose information you want to separate, touch the
Menu key and touch Edit, then touch the Menu key again and touch Separate, touch OK to confirm.
45 46
3.4.10 Accounts
Contacts, data or other information can be synchronized from multiple accounts, depending on the
applications installed on your phone.
To add an account, drag down the Notifications panel touch and touch to enter Settings, then
touch Add account; or from Contacts screen, touch and select Add new account; also you can
choose the account directly from home screen.
You are required to select the kind of account you are adding, like Google, Corporate, etc.
As with other account set-ups, you need to enter detailed information, like username, password, etc.
You can remove an account to delete it and all associated information from the phone.Open the
Settings screen, touch the account you want to delete, touch the the Menu key and Remove
account, then confirm.
Turn on/off the sync & Auto-sync
Touch an account to enter the account screen, mark/unmark the checkbox(s) to turn on/off the
account’s Auto-sync app data. When activated, all changes to information on the phone or online will
be automatically synchronized to each other.
Sync manually
You can also synchronize an account manually on Account screen, touch an account in the list, then
touch the Menu key and Sync now.
4 Messaging, Email ........................................
4.1 Messaging ......................................................................................
You can create, edit and receive SMS and MMS messages with this phone.
To access this feature, touch Messaging icon in Favorite applications tray or Applications menu.
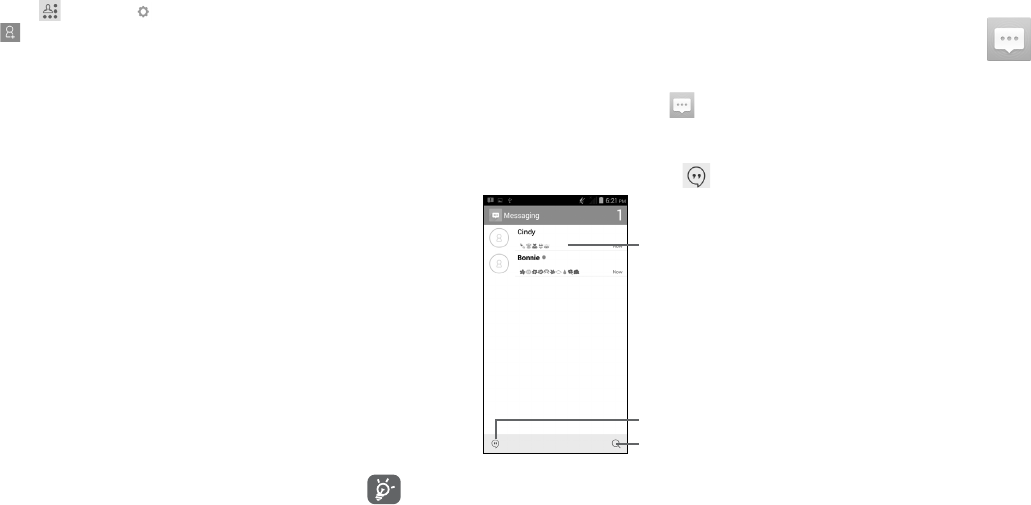
4.1.1 Write message
In message screen, touch the new message icon to write text/multimedia messages.
Touch to create a new message.
Touch to search in all messages.
Touch to view the whole message thread.
To communicate with a saved contact, touch contact name to open Contact screen. For
unsaved contacts, touch phone number to add the number to your Contacts.
47 48
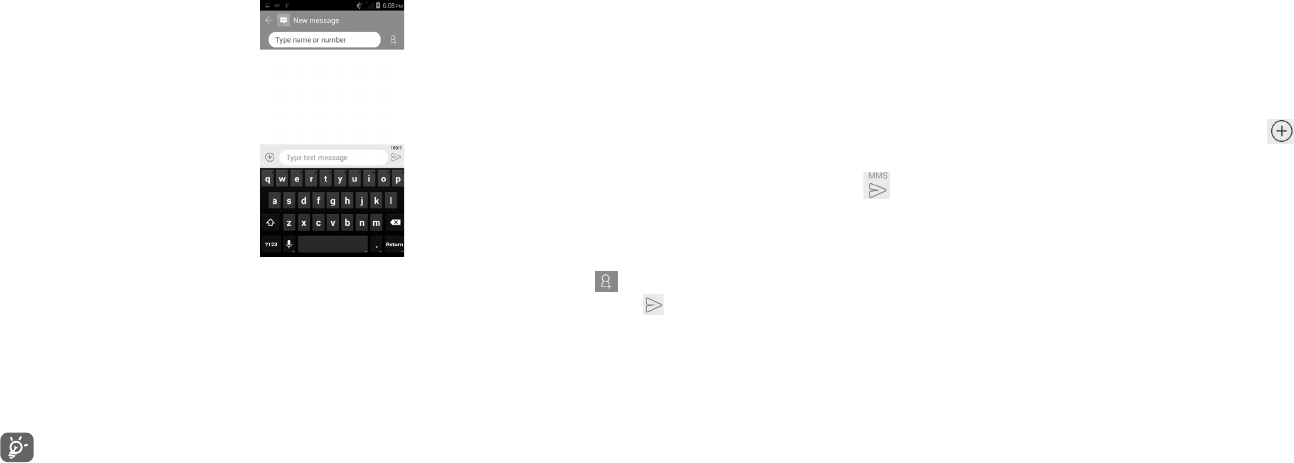
Sending a text message
Enter the mobile phone number of the recipient on Type name or number bar or touch to add
recipients, touch Type text message bar to enter the text of the message. When finished, touch
to send the text message.
An SMS message of more than 160 characters will be charged as several SMS. When the total number
of characters you have entered is approaching the 160-character limit, a counter will appear on the
lower right corner below Send option of the text box to remind you how many characters are allowed
to be entered in one message.
Specific letters (accent) will increase the size of the SMS, which may cause multiple SMS to be
sent to your recipient.
Sending a multimedia message
MMS enables you to send video clips, images, photos, animations, slides and sounds to other compatible
mobiles and e-mail addresses.
An SMS will be converted to MMS automatically when media files (image, video, audio, slides, etc.) are
attached or subject or email addresses are added.
To send a multimedia message, enter the recipient's phone number in the Type name or number
bar, touch Type text message bar to enter the text of the message. Touch icon to select the
subject, touch one of them to attach picture, video, audio or file.
When finished, touch to send the multimedia message.
Attach options:
• Take picture Provides access to Camera to capture a new picture to attach.
• Capture video Provides access to Video Camera to record a new video to attach.
• Record audio Launches voice message recorder to record a voice message to attach.
• Contact Provides access to People application to select one or more contact(s) to
attach.
• Pictures Provides access to Gallery application to select a picture as attachment.
• Videos Provides access to Gallery application or File manager to select a video as
attachment.
• Audio Provides access to Ringtones or Audio to select a ringtone, music track or
audio file as attachment.
• Calendar Provides access to Calendar to select events to attach.
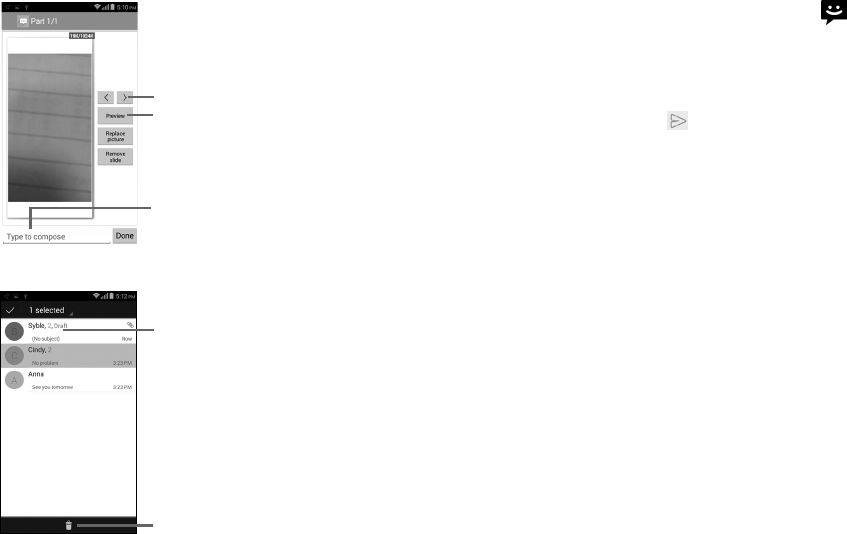
• Slideshow Launches Slide show edit screen, touch Add slide to create a new slide,
and touch currently existing slide to edit it (see following picture). Touch the
Menu key to get more actions, like setting the slide duration, add music, etc.
49 50
Slide show edit screen
Touch to go to previous or next slide.
Touch to preview the current slide.
Touch to edit the title of this slide.
Delete text messages
Touch & hold message to activate
delete mode. Touch message threads
to choose deleted ones, and touch the
trash bin to confirm.
Touch to delete selected message.
4.1.2 Managing messages
When receiving a message, an icon will appear on status bar as notification. Drag down the status
bar to open the Notifications panel, touch the new message to open and view. You can also access
messages using Messaging application, touch message to open for viewing.
Messages are displayed in conversational order.
To reply to a message touch the current message to enter message-composing screen, enter the text,
then touch to send.
Touch an SMS message in message details screen, then touch the Menu key the following message
options are available:
• Select message Use this option to select message to forward the message to another recipient
or delete the selected message.
• Insert quick text Touch to select quick text to insert.
• Insert contact Touch to select contact to insert.
• Add subject Touch to add subject.
• Add to contacts Touch to add to contacts.
• Chat settings Use this option to set Chat wallpaper and Message notifications.
51 52
4.1.3 Adjust message settings
Adjust message settings from Messaging application screen, touch the Menu key and touch Settings.
SMS Enabled
• Airplane mode Mark the checkbox to active airplane mode.
• Default SMS app Mark the checkbox to choose Hangouts or Messaging.
• Tethering &
Mobile HotSpot
Touch to active Mobile HotSpot, Mobile HotSpot settings and Help.
• VPN Touch to set VPN.
• Mobile networks Touch to active Network settings.
• Voice over LTE Provide IP multimedia subsystem services.
• Wi-Fi Calling Touch to open or close Wi-Fi Calling mode.
Text Message(SMS)
• Delivery reports Select to request a delivery report for each text message you send.
• Long SMS to MMS Manage messages stored on your SIM card.
• Manage SIM card
messages
Touch to manage the messages stored in SIM card.
• Edit quick text Touch to add or edit message templates.
• SMS service
center
Touch to view SMS service center number.
• SMS storage
location
Touch to select phone or SIM card to store messages.
• Alphabet
management
Touch to select GMS alphabet, Unicode or Automatic.
• SMS signature Select to enable SMS signature or edit your signature.
Multimedia Message(MMS)
• Group messaging Select to use MMS to send single message when there are multiple recipients.
• Delivery report Select to request a delivery report for each multimedia message you send.
• Read report Select to request a report on whether each recipient has read a multimedia
message sent by you.
• Send read report Select to request a report on whether the multimedia message is sent out.
• Auto-retrieve Select to download the full MMS message (including message body and
attachment) automatically to your phone. Otherwise, download only the
MMS message header.
• Roaming auto-
retrieve
Select to download the full MMS message (including message body and
attachment) automatically when roaming. Otherwise, download only the MMS
message header to avoid extra charges.
• Creation mode Select creation mode as restricted, warning or free.
• Maximum
message size
Select to edit the message size, but it should not be more than 1024KB.
• Validity period Select to set Validity period as 1 hour, 6 hours, 12 hours, 1 day, 7 days and
Maximum.
• Priority Select message priority as high, normal or low.
Wireless emergency alerts
• Wireless
emergency alerts
Touch to enable alerts which will be shown.
• Alert tone settings Touch to select audio or vibrate of alert. You can preview alert tone settings.

53 54
Notifications
• Notifications Select to display message notifications in status bar.
• Mute Touch to select mute for 1 hour, 4 hours, 8 hours or off.
• Select ringtone Touch to select a ringtone as a new message notification tone.
• Vibrate When a message comes, select as always vibrate, only vibrate when silent or
never vibrate.
General
• Chat wallpaper Touch to select wallpaper for message background.
• Message font size Touch to select message font size.
• Show email
address
Mark the checkbox to include email address in contact results.
• Delete old
messages
Select to delete old messages when the maximum number of stored messages
is reached.
• Text message limit Touch to set the number of text messages to be saved per conversation.
• Multimedia
message limit
Touch to set the number of multimedia messages to be saved per
conversation.
• Enable WAP
PUSH
Mark the checkbox to enable reception of WAP PUSH.
4.2 Gmail/Email
The first time you set up your phone, you can select to use an existing Gmail or to create a new Email
account.
4.2.1 Gmail ........................................................................................................
As Google's web-based email service, Gmail is configured when you first set up your phone. Gmail
on your phone can be automatically synchronized with your Gmail account on the web. Unlike other
kinds of email account, each message and its replies in Gmail are grouped in your inbox as a single
conversation; all emails are organized by labels instead of folders.
To access Gmail
From the Home screen, touch the Applications icon and then touch Gmail .
To create and send emails
• Touch the icon from Inbox screen.
• Enter recipient(s)’s email address in To field, and if necessary, touch the Menu key and touch Add
Cc/Bcc to add a copy or a blind copy to the message.
• Enter the subject and the content of the message.
• Touch the Menu key and select to add an attachment.
• Finally, touch the icon to send.
• If you do not want to send the mail out right away, you can touch the Menu key and Save draft or
touch Back key to save a copy. To view the draft, select Drafts.
If you do not want to send or save the mail, you can touch the Menu key and then touch Discard.

55 56
To receive and read your emails
When a new email arrives, you will be notified by a ringtone or vibration, and an icon will appear
on Status bar.
Touch and drag down the Status bar to display the Notifications panel, touch the new email to view.
Or you can also access the Gmail Inbox label and touch the new mail to view.
You can search for an email by sender, subject, label, etc.
• Touch the Menu key , then Select Search from Inbox screen.
• Enter the keyword you want to search for in the searching box and touch the in the software
keyboard.
To reply or forward emails
When viewing an email, you will see three icons offering further options at the center of the
conversation.
• Reply When viewing an email, touch to reply to this mail.
• Reply all Touch the Menu key and select Reply all to send messages to all people in a
mail loop.
• Forward Touch the Menu key and select Forward to forward the received mail to
other people.
Managing Gmails by Labels
To conveniently manage conversations and messages, you can organize them using a Label.
To label a conversation when reading a conversation’s messages, touch the Menu key and Change
labels to assign a label for the conversation.
To view conversations by labels when viewing your inbox or another conversation list, touch your
account name, then touch a label to view a list of conversations within that label.
To manage labels, touch the Menu key and Settings, then touch your account and select Manage
labels.
Touch and hold a message thread to display the following options:
• Touch to archive the email message.
• Touch to delete the email message.
• Touch to mark an email message as read or unread.
• Add star/Remove star To assign a star or remove the star from the conversation. You can also
add or delete a star mark by touching the or icons at the end of
each message thread.
• Mark important To Mark the email as important or not important.
• Mute To mute the entire conversation. When muted, new mails related to this
conversation will not be displayed in the Inbox, but archived.
• Report spam To report the email message/conversation as spam.
• Report phishing To report the email message/conversation as phishing.
57 58
Gmail settings
To manage Gmail settings, touch the Menu key and select Settings in the Inbox screen.
General settings
• Archive & delete actions Touch to Show archive only, Show delete only or to Show
archive & delete.
• Swipe to archive Mark the checkbox to swipe left or right when viewing
conversations.
• Sender image Mark the checkbox to display a photo beside the name in the
conversation list.
• Reply all Touch to mark the checkbox to make this default response
to messages.
• Auto-fit messages Touch to mark the checkbox to zoom in/out of the message,
so that it fits on the screen.
• Auto-advance Touch to select which screen to show after you delete or
archive a conversation.
• Message actions Touch to show/hide message actions.
• Confirm before deleting Mark the checkbox to request confirmation before deleting
emails.
• Confirm before archiving Mark the checkbox to request confirmation before archiving
emails.
• Confirm before sending Mark the checkbox to request confirmation before sending
emails.
Touch an account, the following settings will show:
• Inbox type To set this inbox as the default one.
• Inbox categories Touch to set inbox Primary, Social, Promotions, etc.
• Notifications Select to activate notification when a new email arrives.
• Inbox sound &
vibrate
Touch to set Ringtone, Vibrate and Notify once.
• Signature To add a signature text to the end of each mail you send.
• Vacation
responder
Touch to turn on/off Vacation responder.
• Sync Gmail Touch to turn on/off Gmail sync.
• Days of mail to
sync
Touch to set the duration of days for mail sync.
• Manage labels Touch to open the Label screen, where you can manage synchronization and
notifications.
• Download
attachments
Mark the checkbox to auto download attachments to recent messages via
Wi-Fi.
• Images Touch to select images Always show or Ask before showing.

59 60
4.2.2 Email .......................................................................................................
In addition to your Gmail account, you can also set-up external POP3, IMAP or Exchange email
accounts in your phone.
To access this function, touch Applications icon from the Home screen, then select Email .
An email wizard will guide you through the steps to set-up an email account.
• Enter the email address and password of the account you want to set-up and touch Next.
• If the account you entered is not provided by your service provider, you will be prompted to go to the
email account settings screen to enter settings manually. Or you can touch Manual setup to directly
enter the incoming and outgoing settings for the email account you are setting up.
• Enter the account name and display name in outgoing emails.
• To add another email account, you can touch the Menu key and Settings. Touch ADD ACCOUNT
on the right of the title to create.
To create and send emails
• Touch to compose.
• Enter recipient(s) email address(es) in To field.
• If necessary, touch the Menu key and touch Add Cc/Bcc to add a copy or a blind copy to the
message.
• Enter the subject and the content of the message.
• Touch the Menu key, touch Attach file to add an attachment.
• Finally, touch to send.
• If you do not want to send the mail right away, you can touch the Menu key and Save draft or
touch Back key to save a copy.
4.3 Hangouts........................................................................................
Google's instant messaging service, Hangouts, lets you communicate with your friends whenever they
are connected to this service.
To access this feature and sign in, touch the Applications icon from the Home screen, then touch
Hangouts . All friends added by using Hangouts from the web or phone will be displayed in your
friends list.
To sign out, touch the Menu key from the Friends list screen to display options, then touch Settings\
Sign out.
4.3.1 Chatting with your friends
To start a chat, touch the name of a friend in your Friends list, then type your message and finally
touch .
You can invite other friends to join in a group chat by touching the Menu key then selecting the friend
you want to add.
4.3.2 To add a new friend
From the Friends list, touch the icon to add a new friend. Type the name, email or number of the
friend you want to add, and then touch Video call to start a chat.
A notification of this invitation will be received by the friend. By touching the invitation, the friend can
select Decline or Reply in response.
61 62
4.3.3 To manage your friends
Besides adding new friends to your friends list, touching the Menu key and selecting People &
options from your Chatting screen will make the following actions available:
• Touch to add the person to a new group Hangout.
• Notifications Mark the checkbox to be notified of new messages.
• Touch to add the person to your circles of Friends, Family,
Acquaintances or Following.
4.3.4 Settings
A series of settings are available for your selection by touching the Menu key from the Friends list
screen.
• Invites Touch to view your invitation from others.
• Snooze notifications Touch and select how long you'd like to go without receiving Hangouts
notifications. This setting will temporarily disable notifications about
new messages and video calls.
• Archived Hangouts Touch to display all archived Hangouts that have been prevented from
displaying in the Hangouts list. To unarchive a Hangout, touch and
hold it until appears, touch and select Unarchive.
• Settings Touch to open further personal settings for every Hangout you have.
• Help and feedback Touch to view Hangouts help through your selected app.
5 Calendar, Alarm clock & Calculator ........
5.1 Calendar .......................................................................................
Use Calendar to keep track of important meetings, appointments, etc.
To access this function, touch Applications icon from the Home screen, then touch Calendar .
The Calender main menu icon will show date and update automatically with system time in your phone.
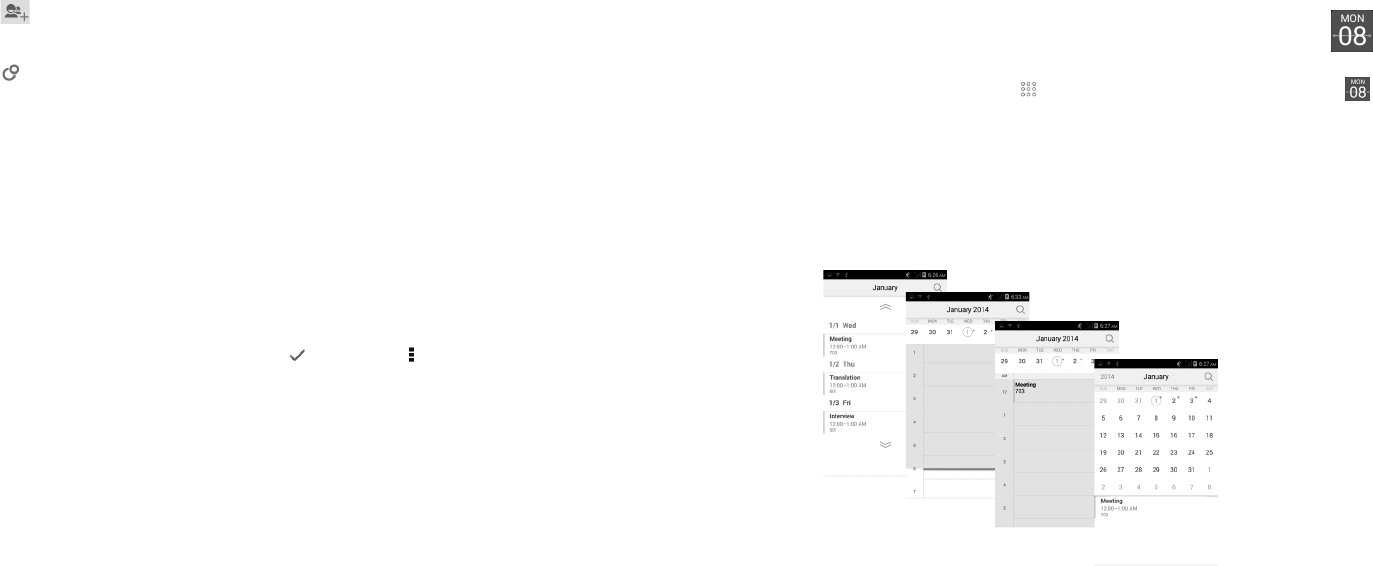
5.1.1 Multimode view
You can display the Calendar in daily, weekly, monthly or agenda view.
Touch the date to change your Calendar view, a drop-down menu will show for you to choose. Touch
Today to return to Today's view.
In Agenda, Day or Week view
touch an event to view its details.
Touch a day in Month view to
open that day's events.
Agenda view
Day view
Week view
Month view