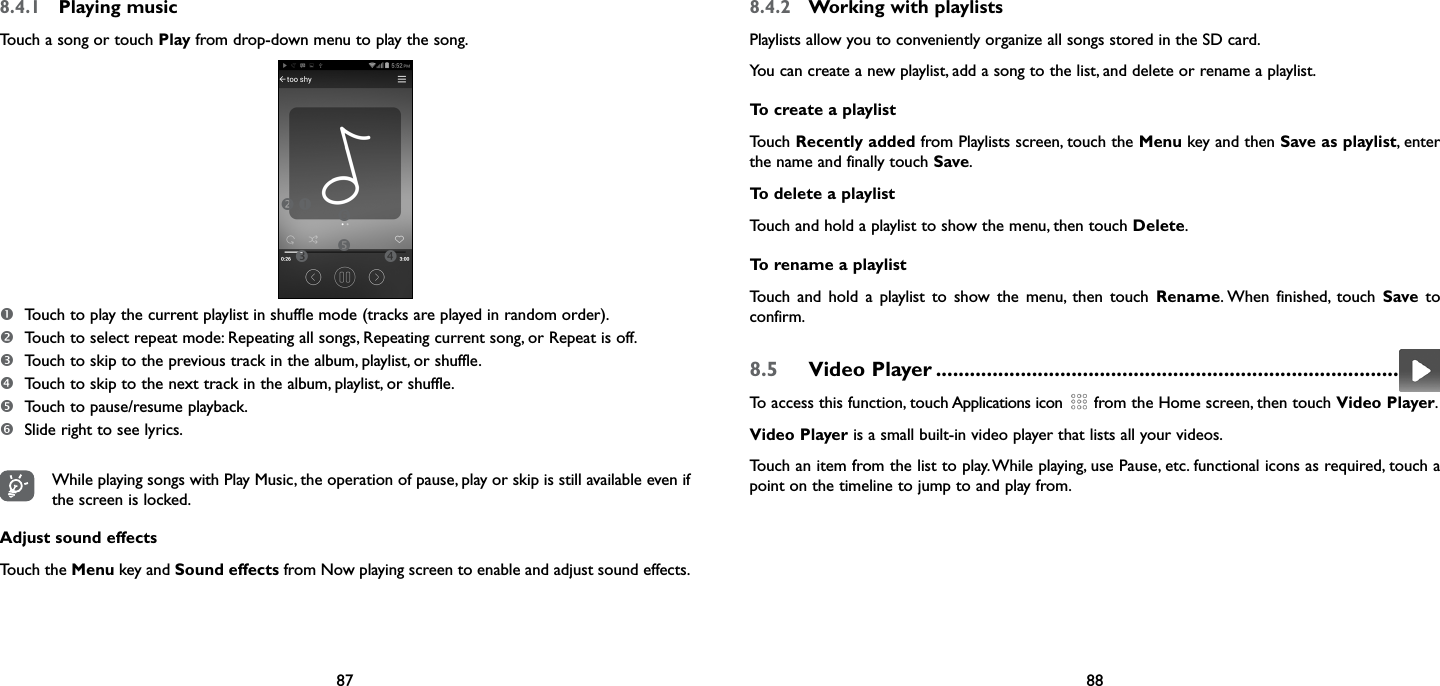
TCL Communication A002 HSUPA/HSDPA/UMTS triband / GSM quadbands/LTE triband mobile phone User Manual Alto4 5 TMO 5042T UM Eng USA rev1 33 48

TCL Communication Ltd. HSUPA/HSDPA/UMTS triband / GSM quadbands/LTE triband mobile phone Alto4 5 TMO 5042T UM Eng USA rev1 33 48

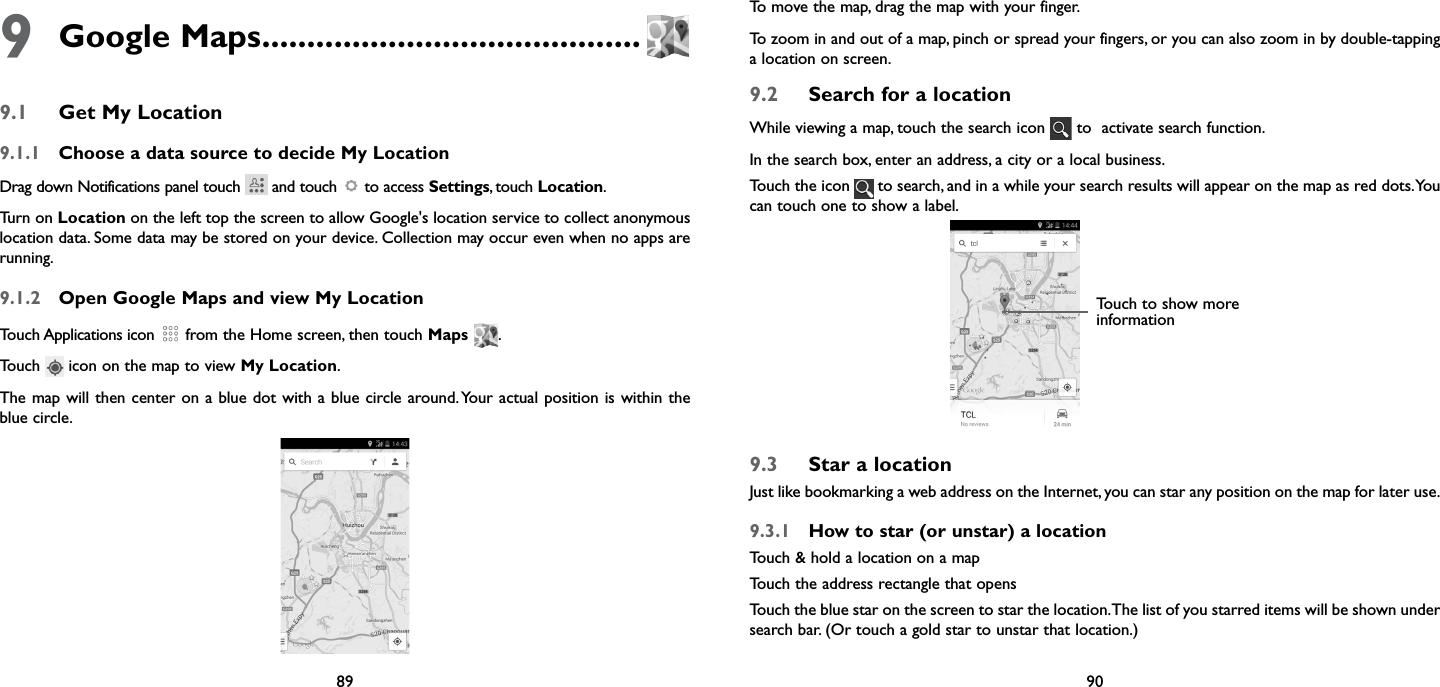
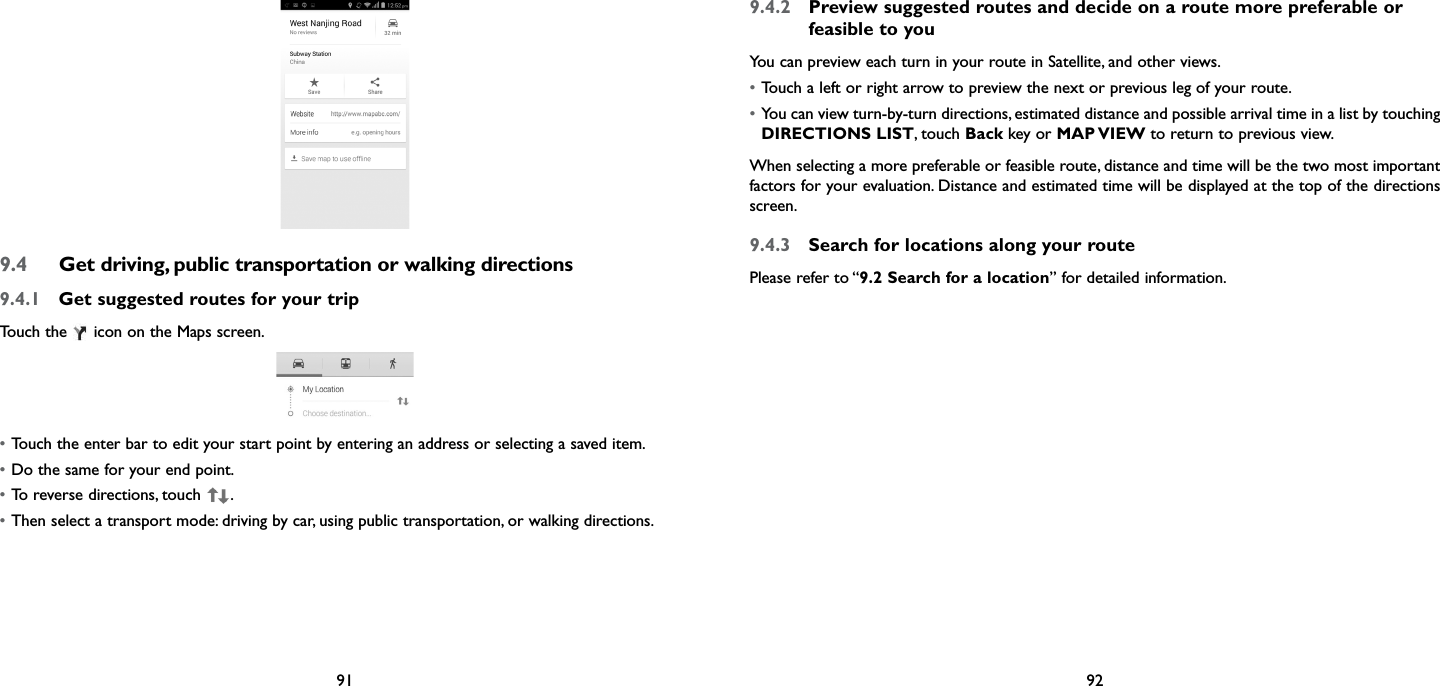
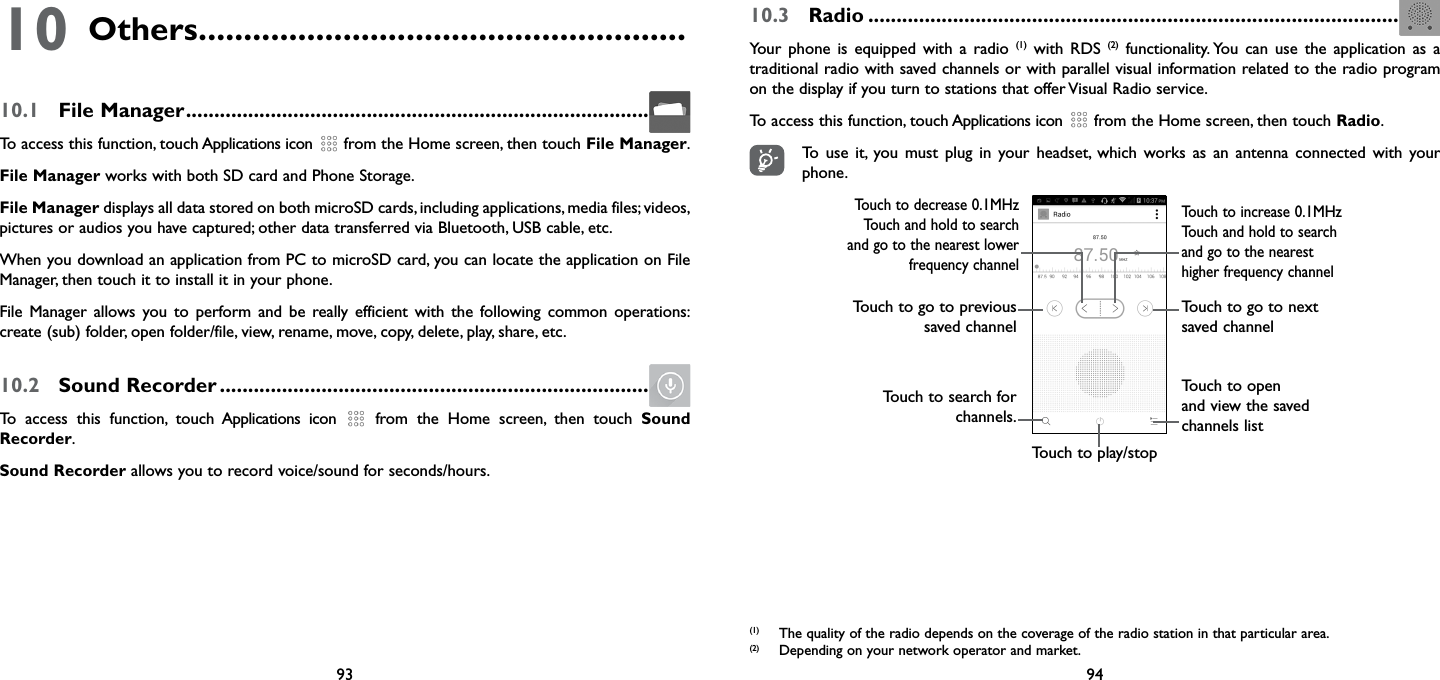
Alto4.5 TMO_5042T_UM_Eng_USA_rev1-33-48

63 645.1.2  To create new eventsYou can add new events from any Calendar view. • In portrait mode, touch the icon   to create new event from Calendar screen.• Fill in all required information for this new event. If it is a whole-day event, you can select All day.• Invite guests to the event. Enter the email addresses of the guests you want to invite with commas to separate. The guests will receive an invitation from Calendar and Email.• When finished, touch DONE from the top of the screen.To quickly create an event from Day, Week view screen, touch and hold an empty spot or an event to open Option menu, then touch icon   to enter the event details screen of the time you have previously selected. Or you can also touch the empty spot to select the target area which will turn blue, and tap again to create the new event.5.1.3  To delete or edit an eventTo share, delete or edit an event, touch the event to enter the details screen, touch the   icon to share the event with other people by Bluetooth, Email and messaging, etc., touch the icon   to edit the event, and touch the icon   to delete.5.1.4  Event reminderIf a reminder is set for an event, the upcoming event will appear on the lock screen when the reminder time arrives. Touch and drag down the status bar to open the Notifications panel, touch event name to view Calendar notification list.Touch Snooze to turn off all event reminders for 5 minutes.Touch Back key to keep the reminders pending in the status bar and the Notifications panel.Access important options by touching the Menu key from Calendar main screen:• Search To search in the calendar• Refresh To refresh the calendar• Calendars to display To show or hide, remove or add calendars• Clear events To clear events in the calendar.• Go to To select date and go to review.• Settings To set a series of Calendar settings5.2  Clock ..............................................................................................Your mobile phone has a built-in clock. Time application includes four applications – World clock, Alarm, Timer and Countdown.To access this function, touch the Applications icon   from the Home screen, then touch Clock  .Touch   Alarm to add or set an alarm.5.2.1  To set an alarmFrom the Clock screen, touch   to enter the Alarm screen, touch   to add a new alarm. The following options will appear:• Label Touch to set a name for the alarm.• Repeat Touch to select days when you want the alarm to work.• Volume Slide to adjust the volume for the alarm ringtone.• Vibrate Select to activate vibration.• Ringtone Touch to select a ringtone for the alarm.• Time Scroll up or down to select the time for your alarm.
65 66When finished, touch OK to confirm.Touch and hold an already existing alarm and touch icon   to delete the selected alarm.5.2.2  To adjust alarm settingsTouch icon   from the Alarm screen. The following options will be available:• Alarm in silent modeSelect to play alarm with sound or vibration even when the phone is in Silent mode• Snooze duration Touch to set temporary turn off time of an alarm• Volume buttons Touch to set side Volume up/down key behaviors when alarm sounds: None, Snooze or Dismiss• Turn over to activateSelect to turn on/off snooze mode5.3  Calculator ......................................................................................With Calculator, you can solve many mathematical problems.To access this function, touch Applications icon   from the Home screen, then touch Calculator  .There are two panels available: Basic calculator and Scientific calculator.To switch between panels, touch the Menu key from the basic panel to open the option menu and touch  Scientific calculator; or under auto rotation mode, rotate screen automatically to switch between Basic calculator and Scientific calculator.Enter a number and the arithmetic operation to be performed, enter the second number, then touch "=" to display the result. Touch   to delete digits one by one, touch   to delete all at one time. When some numbers or operations have been entered, touch and hold the entering bar to open a menu offering these further operations:(1)• Cut  To cut selected text• Copy  To copy selected text• Paste(1) To paste what you have previously copied to the entering bar(1)  Option will not appear unless copy or cut operation has been made.
67 686 Getting connected .....................................To connect to the internet with this phone, you can use GPRS/EDGE/3G networks or Wi-Fi.6.1  Connecting to the Internet6.1.1  2G/3GTo activate/deactivate Data roamingWhen roaming, you can decide to connect/disconnect to a data service. • Drag down Notifications panel touch   and touch   to access Settings.• Mobile networks\Data roaming.• Mark/Unmark the Data roaming checkbox to activate or deactivate data roaming.• When Data roaming is deactivated, you can still perform data exchange with a Wi-Fi connection (refer to “6.1.2 Wi-Fi”).6.1.2  Wi-FiUsing Wi-Fi, you can connect to the Internet when your phone is within range of a wireless network. Wi-Fi can be used on your phone even without a SIM card inserted.To turn Wi-Fi on and connect to a wireless network• Drag down Notifications panel touch   and touch   to access Settings.• Touch the switch   beside Wi-Fi to turn on/off Wi-Fi.• Touch Wi-Fi, the detailed information of detected Wi-Fi networks is displayed in the Wi-Fi networks section.• Touch a Wi-Fi network to connect. If the network you selected is secured, you are required to enter a password or other credentials (you may contact your network operator for details). When finished, touch Connect. To activate notification when a new network is detectedWhen Wi-Fi is on and the network notification is activated, the Wi-Fi icon will appear on the status bar whenever the phone detects an available wireless network within range. The following steps activate the notification function when Wi-Fi is on:• Drag down Notifications panel touch   and touch   to access Settings.• Touch Wi-Fi. Then  touch the Menu key and Advanced from Wi-Fi screen.• Mark/Unmark the Network notification checkbox to activate/deactivate this function. To add a Wi-Fi networkWhen Wi-Fi is on, you may add new Wi-Fi networks according to your preference. • Drag down Notifications panel touch   and touch   to access Settings.• Touch Wi-Fi, and then touch  to add network.• Enter the name of the network and any required network information.• Touch Save.When successfully connected, your phone will be connected automatically the next time you are within range of this network.To forget a Wi-Fi networkThe following steps prevent automatic connections to networks which you no longer wish to use.• Turn on Wi-Fi, if it’s not already on.• In the Wi-Fi screen, touch & hold the name of the saved network.• Touch Forget network in the dialog that opens.
69 706.2  Chrome .........................................................................................Using Chrome, you can enjoy surfing the Web.To access this function, touch Applications icon   from the Home screen, then touch Chrome  .6.3  Connecting to Bluetooth® devices(1)Bluetooth is a short-range wireless communication technology that you can use to exchange data, or connect to other Bluetooth devices for various uses. To access this function, drag down Notifications panel touch   and touch   to access Settings. Then touch Bluetooth, your device and other available ones will show on the screen.To turn on Bluetooth• Drag down Notifications panel touch   and touch   to access Settings.• Touch  to activate/deactivate this function.(1)  You are recommended to use ALCATEL ONETOUCH Bluetooth headsets, which have been tested and proved compatible with phone. You can go to www.alcatelonetouch.com for more information about ALCATEL ONETOUCH Bluetooth headset.To make your phone more recognizable, you can change your phone name which is visible to others.• Drag down Notifications panel touch   and touch   to access Settings.• Touch Bluetooth.• Touch the Menu key and Rename phone.• Enter a name, and touch Rename to confirm.To make device visible• Drag down Notifications panel touch   and touch   to access Settings.• Touch Bluetooth• Touch your device to make it visible or invisible.• Touch the Menu key and Visibility timeout to select the visible time.To pair/connect your phone with a Bluetooth device To exchange data with another device, you need to turn Bluetooth on and pair your phone with the Bluetooth device with which you want to exchange data.• Drag down Notifications panel touch   and touch   to access Settings.• Touch Bluetooth• Touch SEARCH FOR DEVICES• Touch a Bluetooth device you want to be paired with in the list.• A dialog will popup, touch Pair to confirm.• If the pairing is successful, your phone connects to the device.To disconnect/unpair from a Bluetooth device• Touch the Settings icon   beside the device you want to unpair.• Touch Unpair to confirm.
71 726.4  Connecting to a computerWith the USB cable, you can transfer media files and other files between micro SD card/internal storage and a computer. Before using MTP or PTP, first mark USB debugging. • To access this function, touch Settings\About phone, then touch Build number 7 times. Then touch Settings\Development\USB debugging.To connect your phone to the computer:• Use the USB cable that came with your phone to connect the phone to a USB port on your computer. You will receive a notification that the USB is connected.• If you use MTP or PTP, your phone will be automatically connected.Before using MTP, make sure that the driver (Windows Media Player 11 or above version) has been installed. To format a microSD card• Drag down Notifications panel touch   and touch   to access Settings.• Touch Storage.• Touch Format SD card. On the screen a popup warns you that formatting the microSD card will erase its contents, touch Format SD card.6.5  Sharing your phone's mobile data connectionYou can share your phone's mobile data connection with a single computer via a USB cable (USB tethering) or with up to five devices at once by turning your phone into a portable Wi-Fi hotspot.The functions below may incur additional network charges from your network operator. Extra fees may also be charged in roaming areas.To share your phone's data connection via USBUse the USB cable that along with your phone to connect the phone to a USB port on your computer.• Drag down Notifications panel touch   and touch   to access Settings.• Touch More...\Tethering & Mobile Hotspot.• Mark\unmark the checkbox of USB tethering to activate/deactivate this function.To share your phone's data connection as a portable Wi-Fi hotspot• Drag down Notifications panel touch   and touch   to access Settings.• Touch More...\Tethering & Mobile Hotspot.• Mark\unmark the checkbox of Mobile Hotspot to activate/deactivate this function.To rename or secure your portable hotspotWhen Portable Wi-Fi hotspot is activated, you could change the name of your phone's Wi-Fi network (SSID) and secure its Wi-Fi network.• Drag down Notifications panel touch   and touch   to access Settings.• Touch More...\Tethering & Mobile Hotspot\Mobile Hotspot settings.• Touch Configure Mobile HotSpot to change the network SSID or set your network security.• Touch Save.6.6  Connecting to virtual private networksVirtual private networks (VPNs) allow you to connect to the resources inside a secured local network from outside network. VPNs are commonly deployed by corporations, schools, and other institutions so that their users can access local network resources when not inside that network, or when connected to a wireless network.To add a VPN• Drag down Notifications panel touch   and touch   to access Settings.• Touch More...\VPN settings and then touch   .
73 74• In the screen that opens, follow the instructions from your network administrator to configure each component of the VPN settings.• Touch Save.The VPN is added to the list on the VPN settings screen.Before adding a VPN, you should set a lock screen pattern, PIN code or password for your phone.To connect/disconnect to a VPNTo connect to a VPN:• Drag down Notifications panel touch   and touch   to access Settings.• Touch More...\VPN Settings.• VPNs you have added are listed; touch the VPN you want to connect with.• In the dialog that opens, enter any requested credentials and touch Connect.To disconnect:• Open the Notifications panel and touch the resulting notification for the VPN disconnection.To edit/delete a VPNTo edit a VPN:• Drag down Notifications panel touch   and touch   to access Settings.• Touch More...\VPN Settings.• VPNs you have added are listed; touch & hold the VPN you want to edit.• Touch Edit profile.• After finished, touch Save.To delete:• Touch and hold the VPN you want to delete, in the dialog that opens, touch Delete profile.7 Google Play Store(1) ..............................Google Play Shop is an online software store, where you can download and install applications and games to your Android Powered Phone.To open Google Play Shop, touch Applications icon   from the Home screen, then touch Play Store .Touch the top left corner, then touch HELP & FEEDBACK to enter Google Play Shop help page for more information on this function.7.1  Locate the item you want to download and installGoogle Play Shop home page provides several ways to find applications. It showcases applications and games in categorized listings. Touch the top left corner and select My apps to see all your downloads.Touch to search in Play Store.Slide left and right to see all categories.(1)  Depending on your country and operator.
75 76Touch a category on Google Play Shop screen to browse its contents. You can also select a subcategory if there is any. Within each category you can select to view items sorted by Top paid, Top free, Top grossing, etcTouch the Google Play Shop icon   on the top left of the screen or touch Back key to return to the previous screen. 7.2  Download and installTo download & install:• Navigate to the item you want to download, and select to enter the details screen from which you can read its description, overall rating or comments, view developer’s information, etc.• Touch INSTALL to preview the functions and data the application can access on your phone if you install it.• Touch ACCEPT.• The progress of the download will show on the details screen, touch   to stop downloading the item. You can also access this screen through Notificaiton panel.• After download and installation have finished, you will see a notification icon   on the status bar.Be especially cautious with applications that have access to many functions or to a significant amount of your data. Once you accept, you are responsible for results of using this item on your phone.To open the application you have downloaded:• On the Google Play Store Apps screen, touch the top left corner and select My apps.• Touch the installed application in the list, then touch OPEN.To buy an application(1)On Google Play Shop, some applications are labeled as free, while some of them are to be paid for before downloading and installing.• Touch the application you want to buy.• Touch the price on the up-right of the screen to preview the functions and data the application can access on your phone if you install it.• Touch CONTINUE to confirm.• When making your first purchase, you are required to input your credit card information and to log in to Google payment and billing service.• If your account has multiple credit card accounts, select one to proceed.• Select the Terms of service link and read the document. When finished, touch Back key.• Mark the checkbox if you agree with the terms of service.• Touch Buy now at the bottom of the screen.When finished, Android downloads the application.(1)  Google Paid applications may not be available to users in some countries.
77 78To request a refundIf you are not satisfied with the application, you can ask for a refund within 15 minutes of the purchase. Your credit card will not be charged and the application will be removed. If you change your mind, you can install the application again, but you will not be able to request a refund.• Touch the top left corner and touch My apps from the Google Play Store Apps screen.• Touch the application that you want to uninstall and refund.• Touch Refund to uninstall the application and refund. If the button becomes Uninstall, your trial period has expired.• In the survey form, select the answer that best matches your reason, and touch OK.7.3  Manage your downloadsAfter you downloaded and installed an application, the following further operations are available for your selection. ViewOn the Google Play Store Apps screen, touch the top left corner and touch My apps.UninstallOn the Google Play Store Apps screen, touch the top left corner and touch My apps. Touch the application you want to uninstall to enter the details screen, touch UNINSTALL, and finally touch OK to confirm.RefundOn the Google Play Store Apps screen, touch the top left corner and touch My apps. Touch the application you want to uninstall for a refund, touch REFUND, and finally touch OK to confirm.Update notificationOn Google Play Shop screen, touch the top left corner and Settings\Notifications to enable update notification.Auto updateTo auto update all installed applications, touch the top left corner and Settings\Auto-update apps to enable this function.Rate and reviewOpen the details screen for an application, touch the stars   under Rate this app to award  and input comments, touch OK to confirm.FlagYou can report an inappropriate application to Google Play Shop by flagging it. Open the details screen for the application, scroll to the bottom and touch Flag as inappropriate, enter the reason and finally touch Submit.
79 808 Multimedia applications8.1  Camera .........................................................................................Your phone is fitted with a Camera for taking photos and shooting videos.Before using the Camera, please ensure that a microSD card, where all pictures and videos are stored, is correctly installed. To access this function, touch Applications icon   from the Home screen and then touch Camera  .Drag up and down to switch between Camera and Video  mode.Touch to take a picture or record a video. Touch & hold to enable burst shoot. Touch to show settings.Touch to switch between front/back cameraTo take a pictureThe screen acts as the viewfinder. First position the object or landscape in the viewfinder, touch   icon to take picture, picture will save automatically.  To shoot a videoSwitch Camera mode to Video mode. First position the object or landscape in the viewfinder, and touch  icon to start recording. Touch   icon to stop recording. The video will be automatically saved. Further operations when viewing a picture/video you have taken• Touch Gmail, Bluetooth, MMS, etc to share the photo or video you have taken.• Touch the photo to access Gallery.• Touch the Back key to return to Camera or Camcorder.8.1.1  Settings in framing modeBefore taking a photo/shooting a video, touch the   icon to adjust a number of settings in framing mode.Back camera shooting mode• Sports Touch to switch to sports mode.• Filter Touch to switch to filter mode.• Panorama Touch to switch to panorama mode.• Night Touch to switch to night mode.• Shutter sound Touch to turn on/off shutter sound.• GPS location info Touch to turn on/off GPS location info.• Face detection Touch to turn on/off face detection.• Full screen Touch to turn on/off full screen.• Picture size Touch to select picture size.• Timer Touch to select pause duration before capturing pictures.
81 82Front camera shooting modeSwitch to front camera, touch   to access camera settings and the following options will display for you to choose from:• Beauty 4 Touch to turn on expression (4-shot) function: once four photos taken, the phone will automatically synthesize and save them as one picture.• Face beauty Touch to turn/off Face beauty mode.• Preview size Touch to turn on/off preview size.Camcorder settings• Video quality Touch to set Video quality.8.2  Gallery ...........................................................................................Gallery acts as a media player for you to view photos and playback videos. In addition, a set of further operations to pictures and videos are available for your choice.To access this function, touch Applications icon   from the Home screen, then touch Gallery  . Touch to stitch and edit pictures.Touch the album to spread it apart.Touch to select categories: Albums, Locations and Times.
83 84To view a picture/play a videoPictures and videos are displayed by albums in Gallery.Touch to open camera. Slide left or right to view more pictures.Touch to return to gallery's main screen• Touch an album and all pictures or videos will spread the screen.• Touch the picture/video directly to view or play it.• Slide left/right to view previous or next pictures/videos.Working with picturesYou can work with pictures by rotating or cropping them, sharing them with friends, setting them as contact photo or wallpaper, etc.Locate the picture you want to work on, touch the picture from full-screen picture view. Slide the picture bar below left and right to select one, touch icon   to share the picture, touch icon   and delete to delete the picture.Touch   from the full-screen picture view. More options will display for you to choose from.  Touch to save the picture when the edit is done. Touch to add beauty and effects, adjust color, etc.  Touch to choose frame, add mosaics and text, etc.After activating the crop mode, the cropping square appears in the middle of the picture. Select the portion to crop, touch   to Save, touch Back key to exit without saving.Batch operationGallery provides a multi-select function, so that you can work with pictures/videos in batches.Open the main Gallery window or an album, touch the Menu key and Select album or Select item to activate batch operation mode (you can also touch and hold one album/picture), then touch albums/pictures you want to work on. Touch the Menu key to perform further actions, like delete and rotate. Touch   to share selected ones.Touch to switch between filmstrip view and grid view.
85 868.3  YouTube ......................................................................................YouTube is an online video-sharing service where the user can download, share and view videos. It supports a streaming function that allows you to start watching videos almost as soon as they begin downloading from the Internet.To access this function, touch Applications icon   from the Home screen, then touch YouTube  .As an online video service, your phone must have a network connection to access YouTube.All videos in YouTube are grouped into several categories, like Most Popular, Most Discussed, Featured Videos, etc.Touch to play the video and to show more informationTouch to search for a video.By touching the Menu key   from YouTube screen, you can set General settings and Search settings for YouTube.For details about these features, please visit the YouTube website: www.YouTube.com.8.3.1  Watch videosTouch a video to play it. In the Playing screen, you can view information and video comments, and also browse links to related videos.You can also rate, share, label as favorite, create a new playlist, etc from this screen.To exit video playing screen, touch Back key to return to the video list.8.4  Music ..............................................................................................Using this menu, you can play music files stored on the microSD card in your phone. Music files can be downloaded from computer to microSD card using a USB cable.To access this function, touch Applications icon   from the Home screen, then touch Music  . You will find four categories in which all songs are classified: Artists, Albums, Songs and Playlists. Slide left and right to view all. Touch   and Shuffle all to shuffle all songs,
87 888.4.1  Playing musicTouch a song or touch Play from drop-down menu to play the song.   Touch to play the current playlist in shuffle mode (tracks are played in random order).  Touch to select repeat mode: Repeating all songs, Repeating current song, or Repeat is off.   Touch to skip to the previous track in the album, playlist, or shuffle. Touch to skip to the next track in the album, playlist, or shuffle. Touch to pause/resume playback.  Slide right to see lyrics.While playing songs with Play Music, the operation of pause, play or skip is still available even if the screen is locked.Adjust sound effectsTouch the Menu key and Sound effects from Now playing screen to enable and adjust sound effects.8.4.2  Working with playlistsPlaylists allow you to conveniently organize all songs stored in the SD card.You can create a new playlist, add a song to the list, and delete or rename a playlist.To create a playlistTouch Recently added from Playlists screen, touch the Menu key and then Save as playlist, enter the name and finally touch Save. To delete a playlistTouch and hold a playlist to show the menu, then touch Delete. To rename a playlist Touch and hold a playlist to show the menu, then touch Rename. When finished, touch Save to confirm.8.5  Video Player ..................................................................................To access this function, touch Applications icon   from the Home screen, then touch Video Player.Video Player is a small built-in video player that lists all your videos.Touch an item from the list to play. While playing, use Pause, etc. functional icons as required, touch a point on the timeline to jump to and play from.
89 909 Google Maps ..........................................9.1  Get My Location9.1.1  Choose a data source to decide My LocationDrag down Notifications panel touch   and touch   to access Settings, touch Location.Turn on Location on the left top the screen to allow Google's location service to collect anonymous location data. Some data may be stored on your device. Collection may occur even when no apps are running.9.1.2  Open Google Maps and view My LocationTouch Applications icon   from the Home screen, then touch Maps  . Touch   icon on the map to view My Location. The map will then center on a blue dot with a blue circle around. Your actual position is within the blue circle.To move the map, drag the map with your finger. To zoom in and out of a map, pinch or spread your fingers, or you can also zoom in by double-tapping a location on screen.9.2  Search for a locationWhile viewing a map, touch the search icon   to  activate search function. In the search box, enter an address, a city or a local business. Touch the icon   to search, and in a while your search results will appear on the map as red dots. You can touch one to show a label. Touch to show more information9.3  Star a locationJust like bookmarking a web address on the Internet, you can star any position on the map for later use. 9.3.1  How to star (or unstar) a locationTouch & hold a location on a mapTouch the address rectangle that opensTouch the blue star on the screen to star the location. The list of you starred items will be shown under search bar. (Or touch a gold star to unstar that location.)
91 92 9.4  Get driving, public transportation or walking directions9.4.1  Get suggested routes for your tripTouch the   icon on the Maps screen.• Touch the enter bar to edit your start point by entering an address or selecting a saved item.• Do the same for your end point. • To reverse directions, touch  .• Then select a transport mode: driving by car, using public transportation, or walking directions. 9.4.2  Preview suggested routes and decide on a route more preferable or feasible to youYou can preview each turn in your route in Satellite, and other views.• Touch a left or right arrow to preview the next or previous leg of your route. • You can view turn-by-turn directions, estimated distance and possible arrival time in a list by touching DIRECTIONS LIST, touch Back key or MAP VIEW to return to previous view.When selecting a more preferable or feasible route, distance and time will be the two most important factors for your evaluation. Distance and estimated time will be displayed at the top of the directions screen. 9.4.3  Search for locations along your routePlease refer to “9.2 Search for a location” for detailed information.
93 9410 Others ......................................................10.1  File Manager ..................................................................................To access this function, touch Applications icon   from the Home screen, then touch File Manager.File Manager works with both SD card and Phone Storage. File Manager displays all data stored on both microSD cards, including applications, media files; videos, pictures or audios you have captured; other data transferred via Bluetooth, USB cable, etc. When you download an application from PC to microSD card, you can locate the application on File Manager, then touch it to install it in your phone.File Manager allows you to perform and be really efficient with the following common operations: create (sub) folder, open folder/file, view, rename, move, copy, delete, play, share, etc.10.2  Sound Recorder ............................................................................To access this function, touch Applications icon   from the Home screen, then touch Sound Recorder.Sound Recorder allows you to record voice/sound for seconds/hours.10.3  Radio ..............................................................................................Your phone is equipped with a radio (1) with RDS (2) functionality. You can use the application as a traditional radio with saved channels or with parallel visual information related to the radio program on the display if you turn to stations that offer Visual Radio service.  To access this function, touch Applications icon   from the Home screen, then touch Radio.To use it, you must plug in your headset, which works as an antenna connected with your phone.Touch to go to previous saved channelTouch to search for channels.Touch to open and view the saved channels listTouch to play/stopTouch to go to next saved channelTouch to decrease 0.1MHzTouch and hold to search and go to the nearest lower frequency channelTouch to increase 0.1MHzTouch and hold to search and go to the nearest higher frequency channel(1)  The quality of the radio depends on the coverage of the radio station in that particular area.(2)  Depending on your network operator and market.

Navigation menu