TCL Communication B011 Mobile phone with CDMA 800/1900, LTE Band 25, 26, 41, 802.11b/g/n, Bluetooth. User Manual
TCL Communication Ltd. Mobile phone with CDMA 800/1900, LTE Band 25, 26, 41, 802.11b/g/n, Bluetooth.
UserManual.wiki
>
TCL Communication
>
B011 User Manual
User Manual
Navigation menu
Upload a User Manual
Namespaces
Wiki Guide
HTML
PDF
Info
Views
User Manual
Discussion / Help
Navigation
![User Guide [UG template version 15a] [Boost_Alcatel_ONETOUCH Elevate_5017B_UG_EN_20150521_Draft3]](https://usermanual.wiki/TCL-Communication/B011/User-Guide-2646624-Page-1.png)
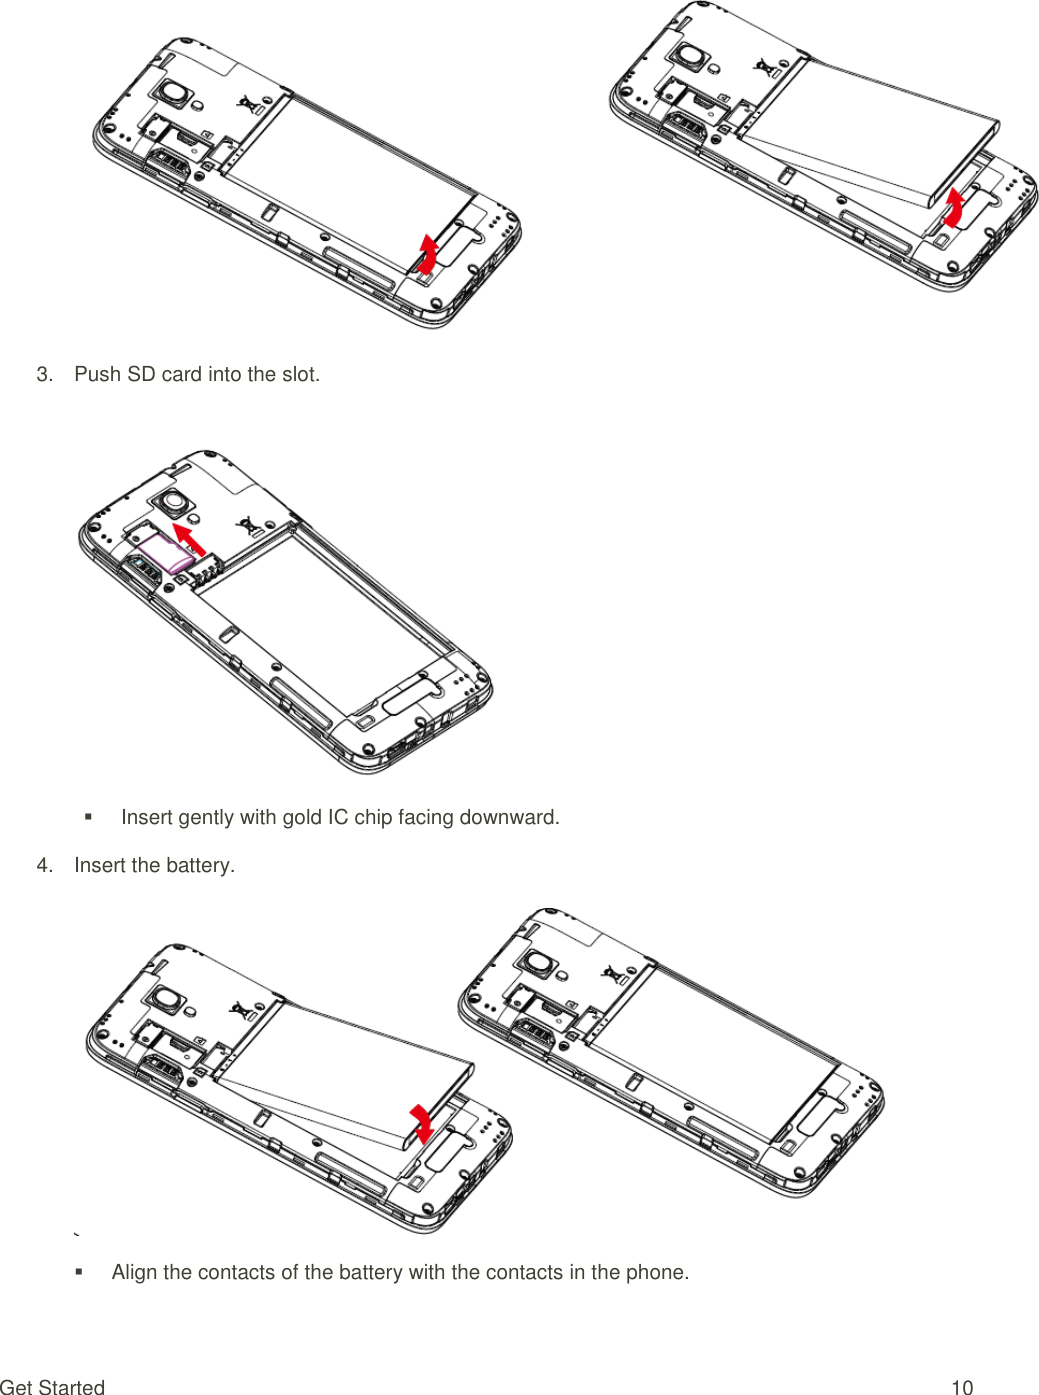
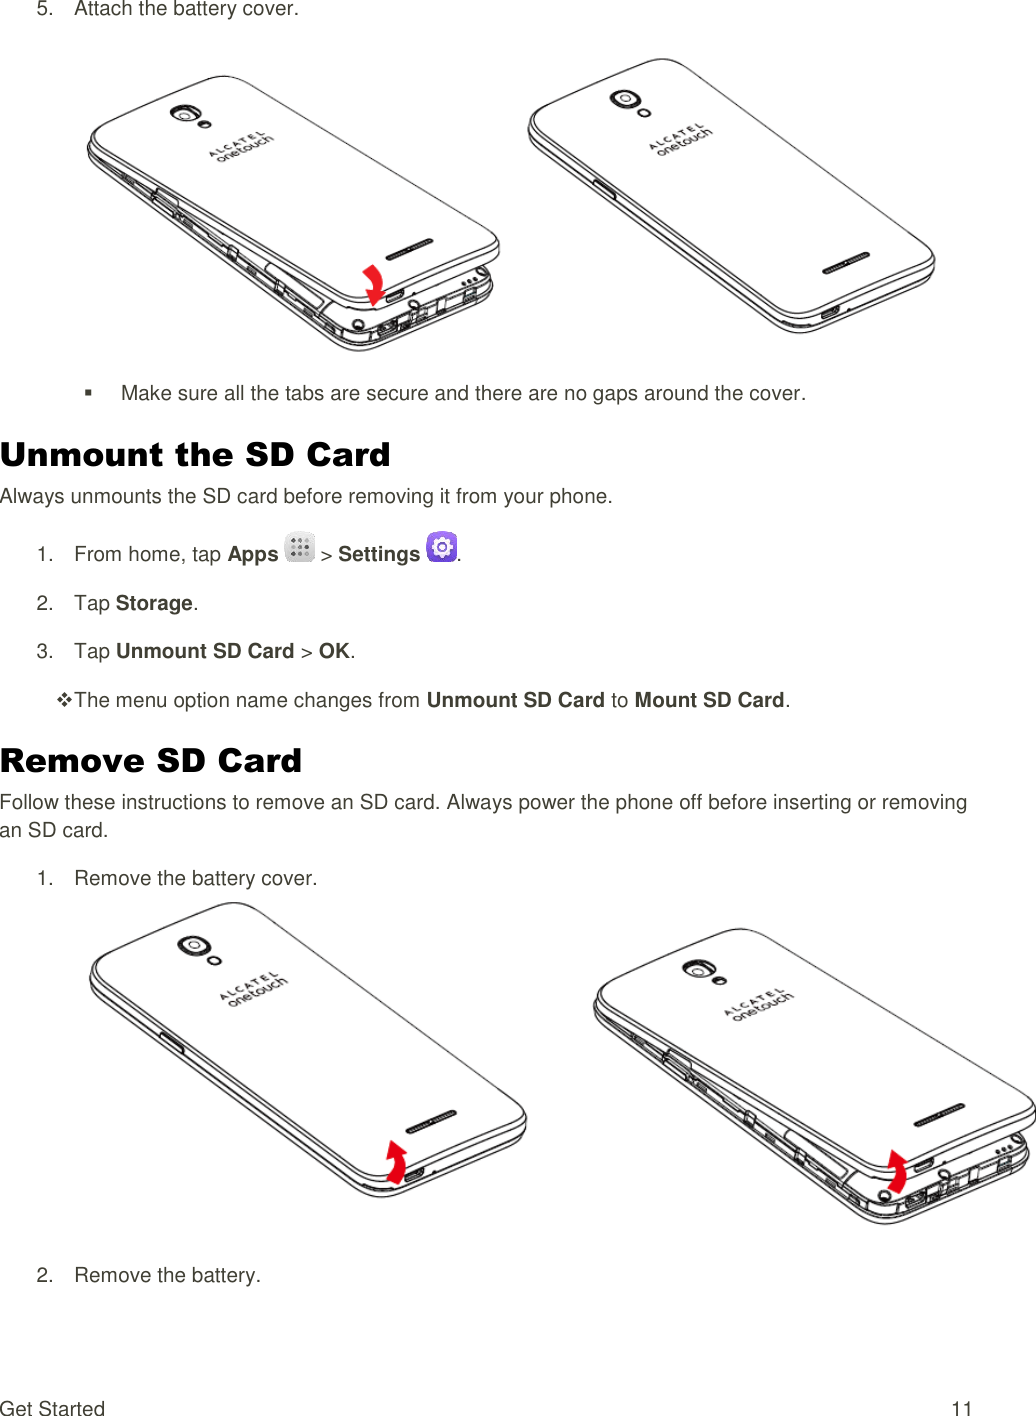
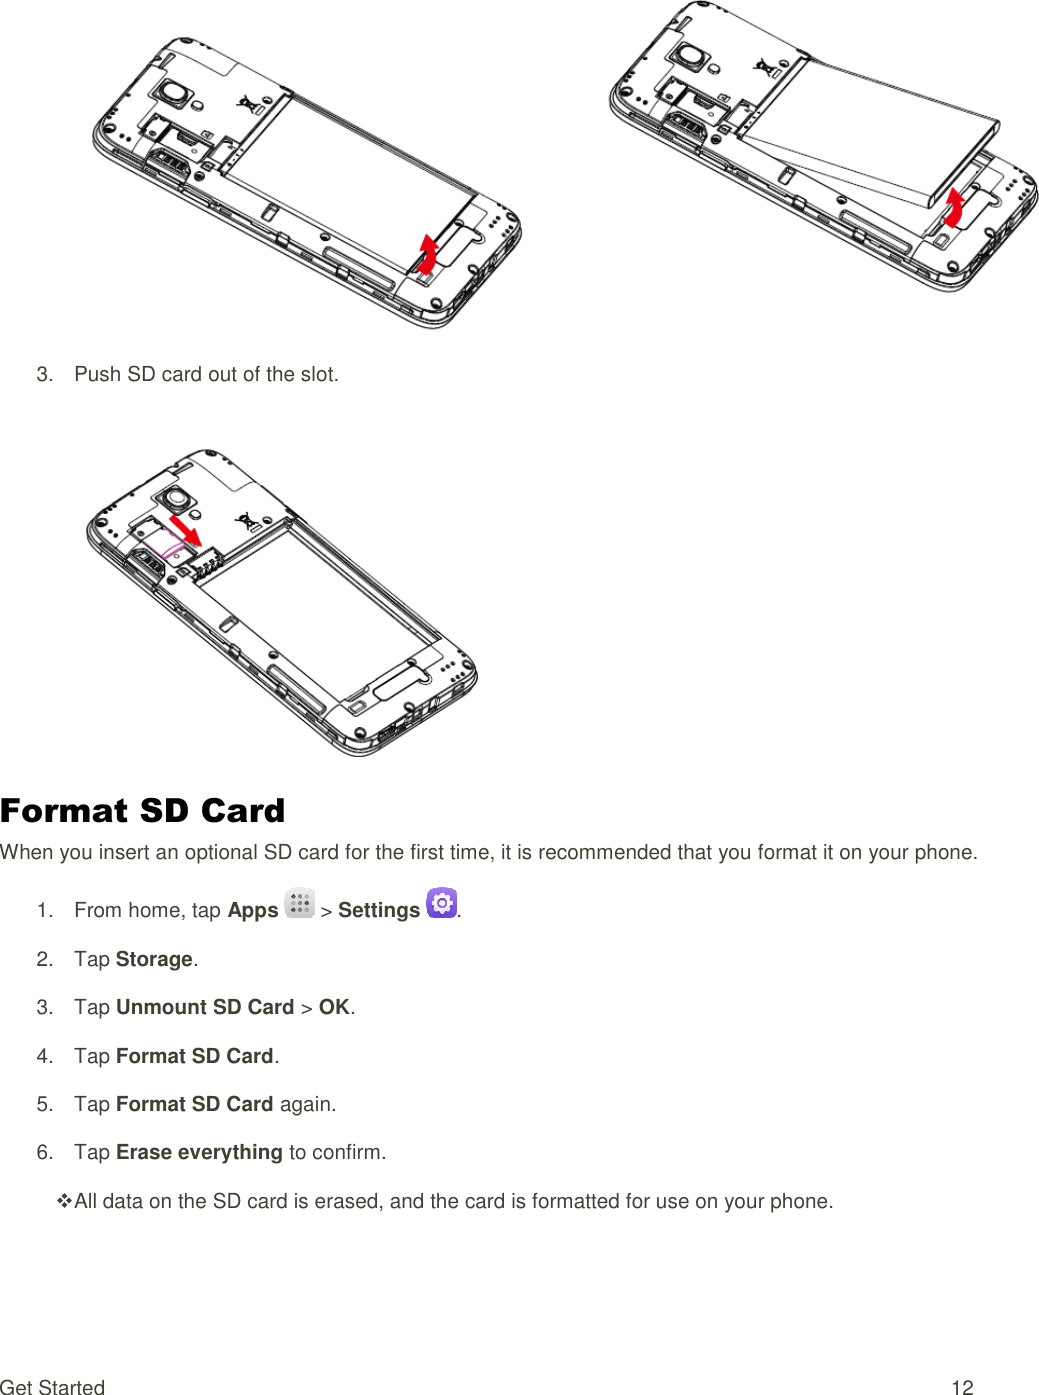
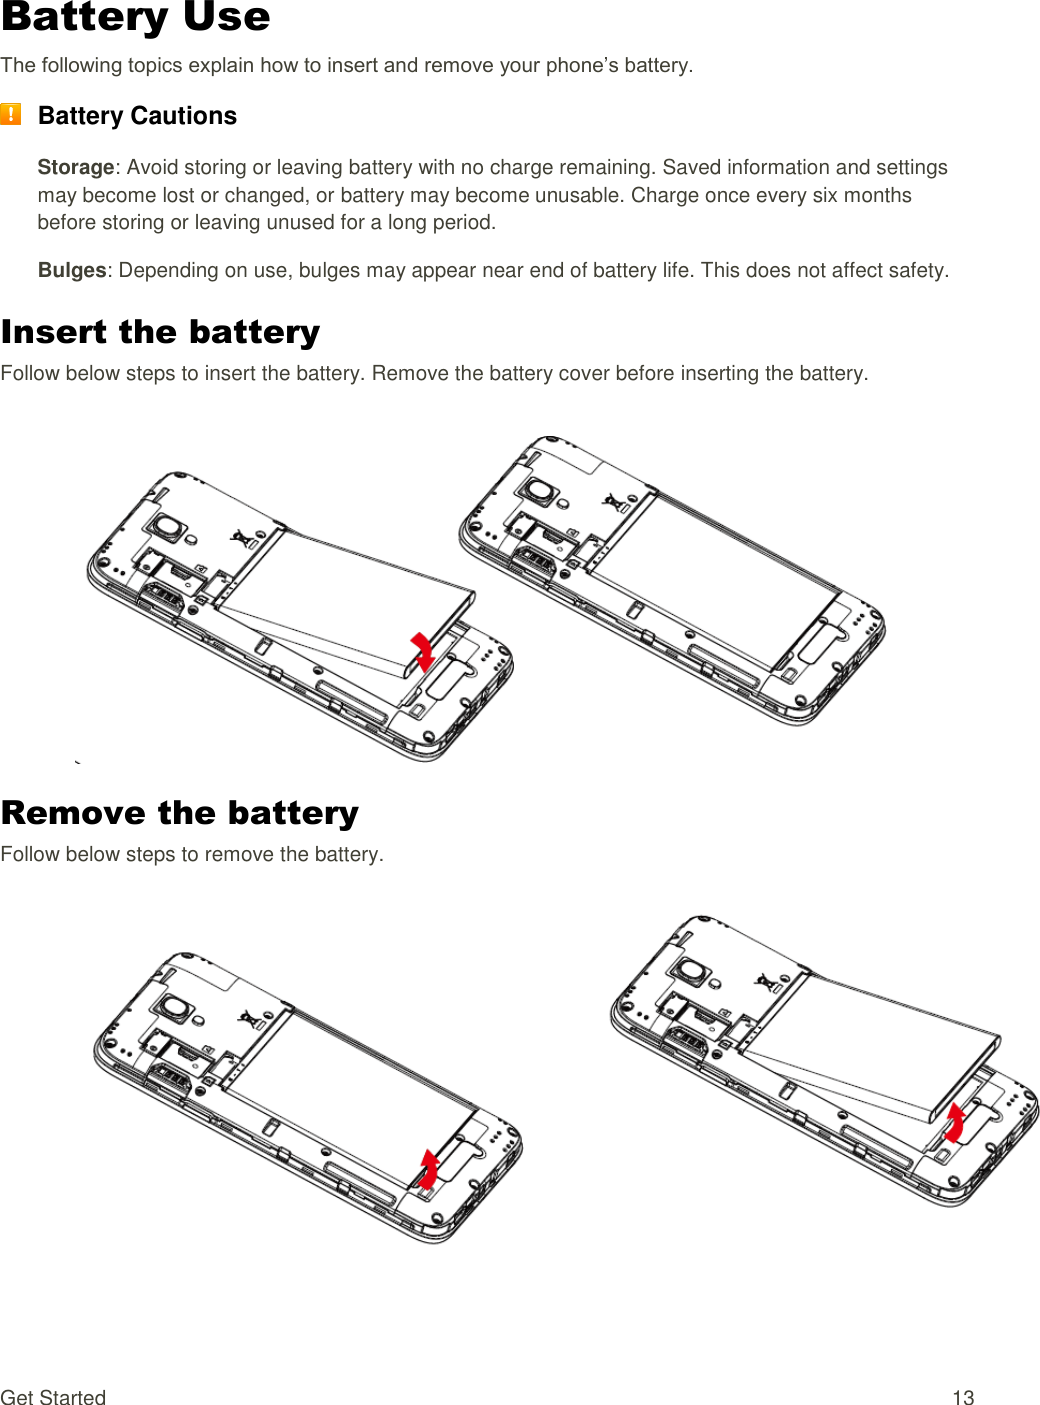
![TOC i Table of Contents Introduction.................................................................................................................................................... 1 About the User Guide............................................................................................................................ 1 How to Use This Guide [Prepaid Only] ................................................................................................. 1 Header and Toolbar Areas ............................................................................................................ 1 Search This Guide ........................................................................................................................ 1 Topic Area ..................................................................................................................................... 2 Contents and Index Area .............................................................................................................. 2 Resizing Areas .............................................................................................................................. 2 Access Instructions on Phone ............................................................................................................... 2 Launch the Guide .......................................................................................................................... 2 Launch the Guide from the Notifications Window ......................................................................... 2 Hide Status Bar Indicators ............................................................................................................ 2 Using the Phone Guide ................................................................................................................. 2 Check Basic Operations ............................................................................................................... 2 Screen Use for First-Time Users .................................................................................................. 2 Get Started .................................................................................................................................................... 3 Parts and Functions .............................................................................................................................. 3 SIM Card ............................................................................................................................................... 5 Handling a SIM Card ..................................................................................................................... 5 Insert SIM Card ............................................................................................................................. 5 Remove SIM Card ........................................................................................................................ 7 SD Card ................................................................................................................................................ 9 Insert SD Card .............................................................................................................................. 9 Unmount the SD Card ................................................................................................................. 11 Remove SD Card ........................................................................................................................ 11 Format SD Card .......................................................................................................................... 12 Battery Use ......................................................................................................................................... 13 Insert the battery ......................................................................................................................... 13 Remove the battery ..................................................................................................................... 13 Charge the Battery ...................................................................................................................... 14 Turn Your Phone On and Off .............................................................................................................. 15 Use the Touchscreen .......................................................................................................................... 16](https://usermanual.wiki/TCL-Communication/B011/User-Guide-2646624-Page-2.png)
![TOC ii Activation and Service ........................................................................................................................ 17 Complete the Setup Screens .............................................................................................................. 18 Basic Operations ......................................................................................................................................... 22 Basics .................................................................................................................................................. 22 Home Screen and Applications (Apps) List ................................................................................ 22 Select Options and Navigate Screens ........................................................................................ 22 Recent Applications .................................................................................................................... 22 Phone Settings Menu .................................................................................................................. 22 Portrait and Landscape Screen Orientation ................................................................................ 22 Capture Screenshots .................................................................................................................. 23 Applications ......................................................................................................................................... 23 Launch Applications .................................................................................................................... 24 Silent Mode/Airplane Mode ................................................................................................................. 25 Silent Mode ................................................................................................................................. 25 Vibrate Mode ............................................................................................................................... 26 Airplane Mode ............................................................................................................................. 26 Enter Text [Prepaid Only] .................................................................................................................... 26 Touchscreen Keyboards [Prepaid Only] ..................................................................................... 27 Swype [Sprint or Prepaid Only] ................................................................................................... 28 Android Keyboard [Prepaid Only] ............................................................................................... 29 Google Voice Typing [Prepaid Only] ........................................................................................... 30 Tips for Editing Text [Prepaid Only] ............................................................................................ 31 Google Account ................................................................................................................................... 32 Create a Google Account ............................................................................................................ 32 Sign In to Your Google Account.................................................................................................. 33 Google Play Store ............................................................................................................................... 33 Find and Install an App ............................................................................................................... 34 Request a Refund for a Paid App ............................................................................................... 35 Update an App ............................................................................................................................ 35 Uninstall an App .......................................................................................................................... 36 Get Help with Google Play .......................................................................................................... 36 Lock and Unlock Your Screen ............................................................................................................ 36 Update Your Phone............................................................................................................................. 37 Update Your Phone Software ..................................................................................................... 37 Your Phone Interface .................................................................................................................................. 40](https://usermanual.wiki/TCL-Communication/B011/User-Guide-2646624-Page-3.png)
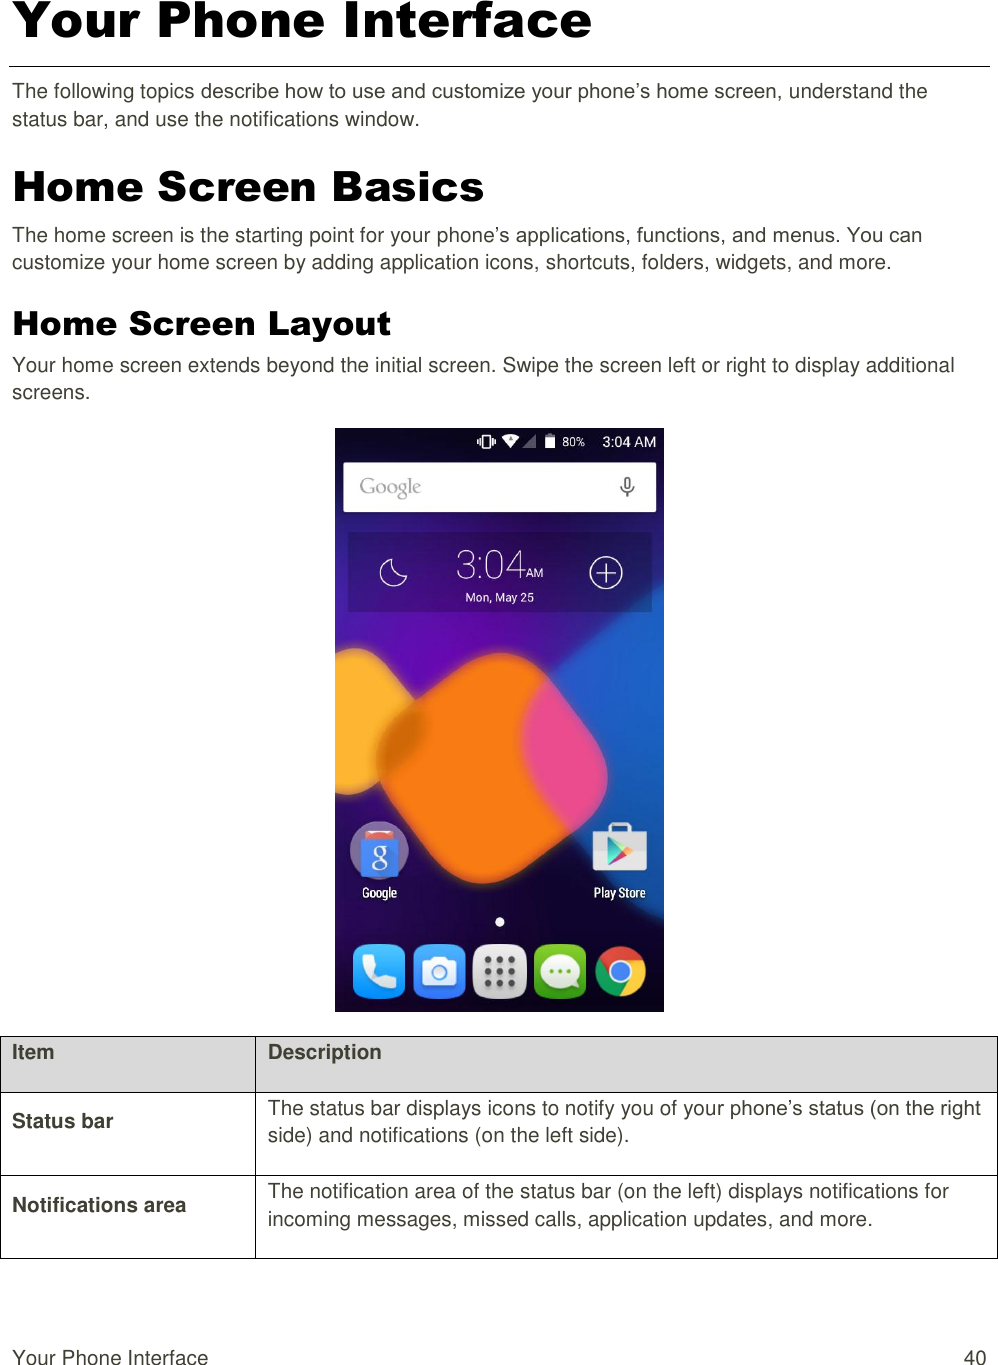
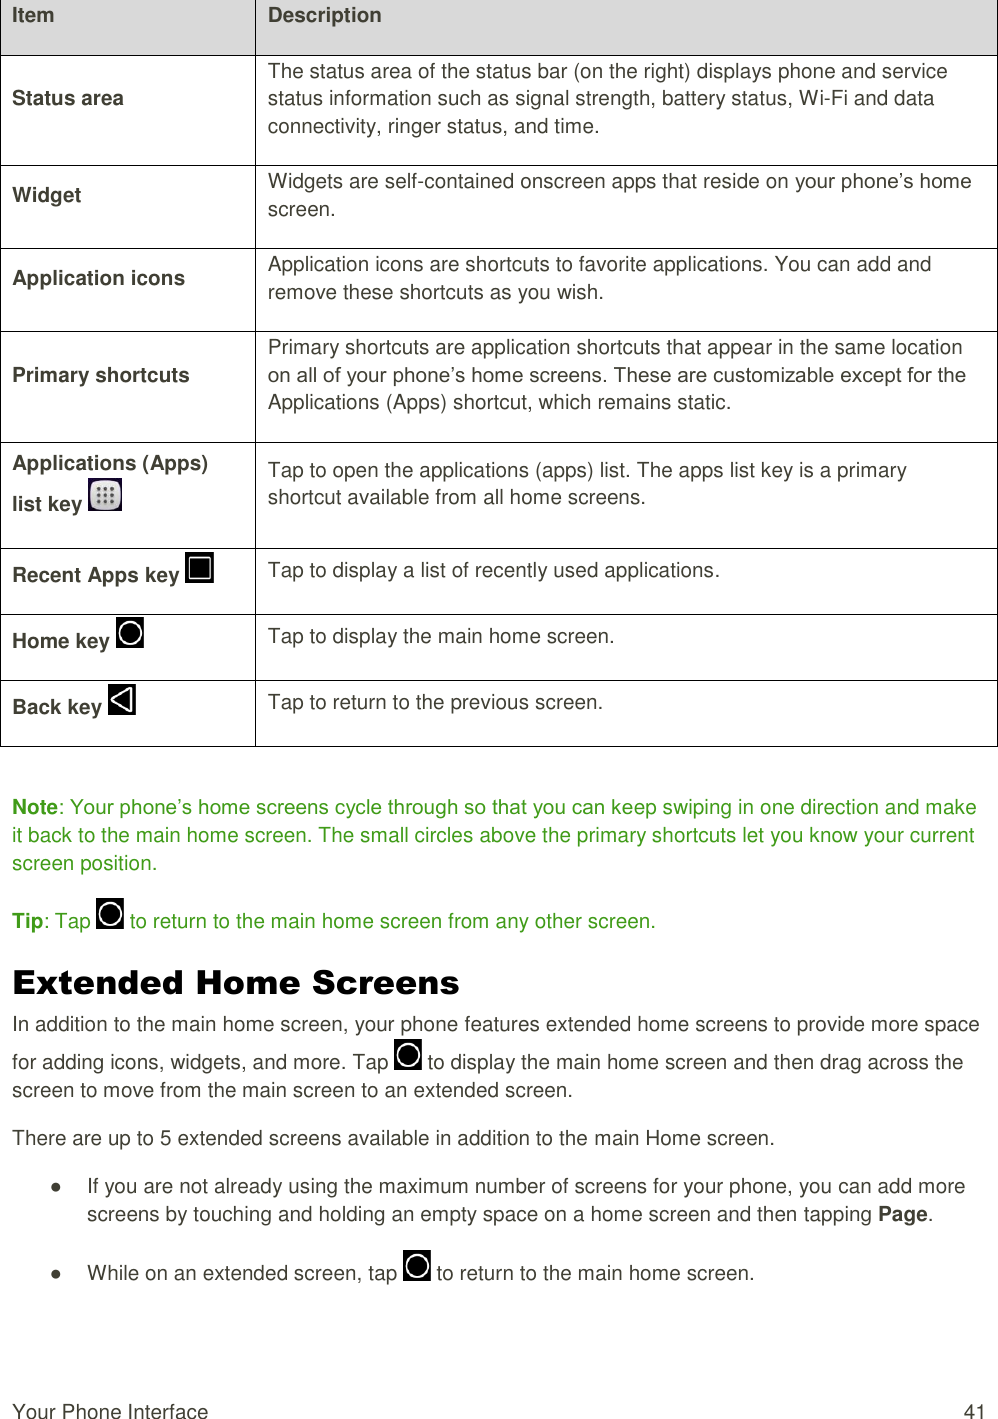
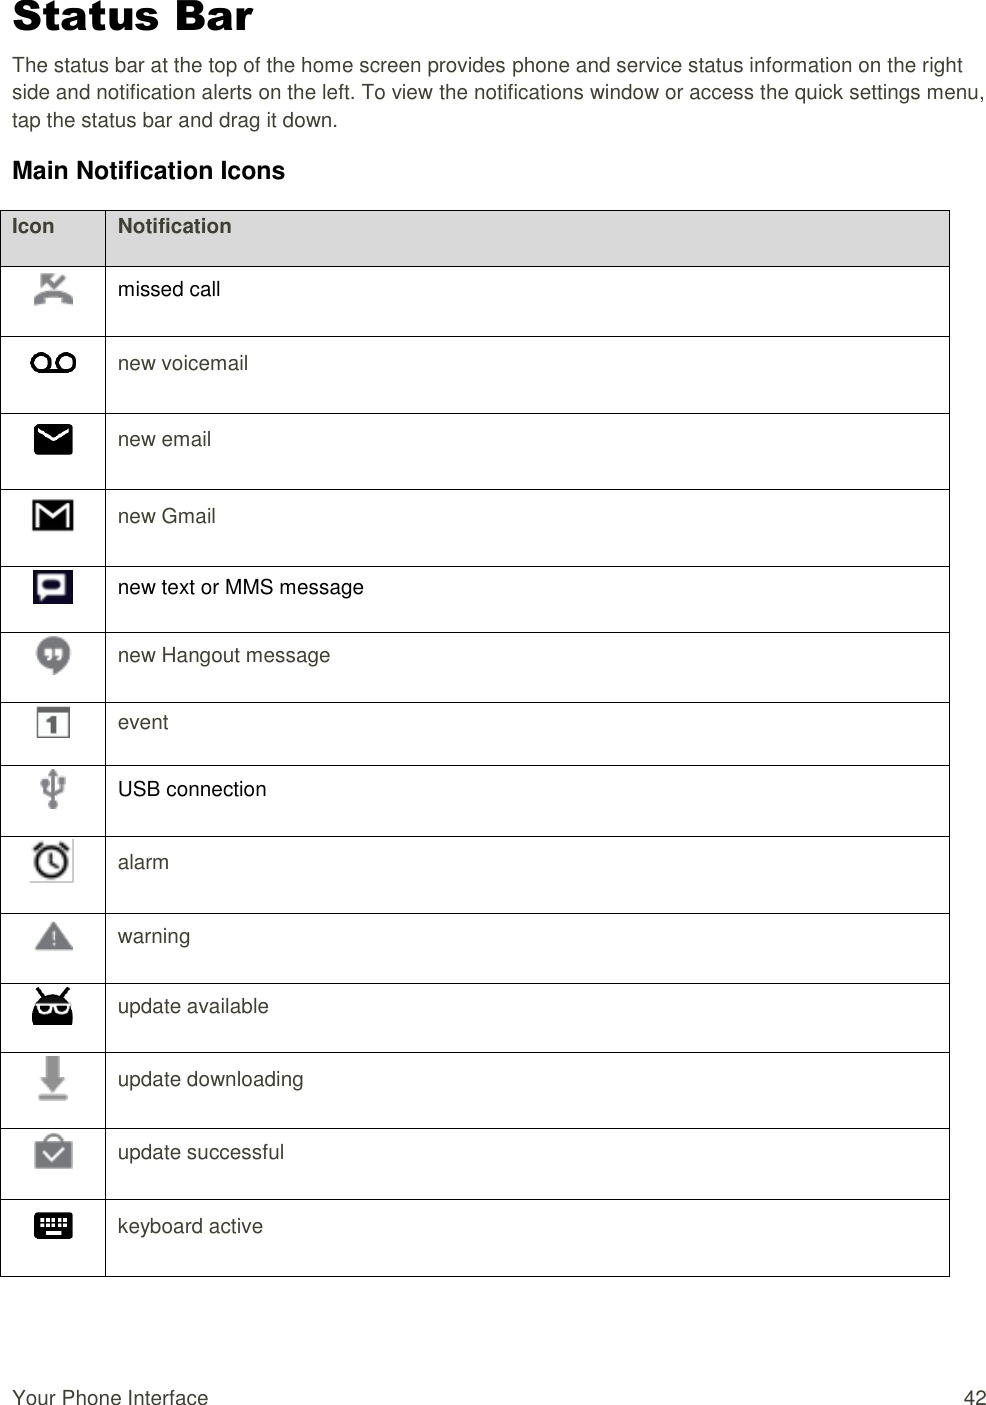
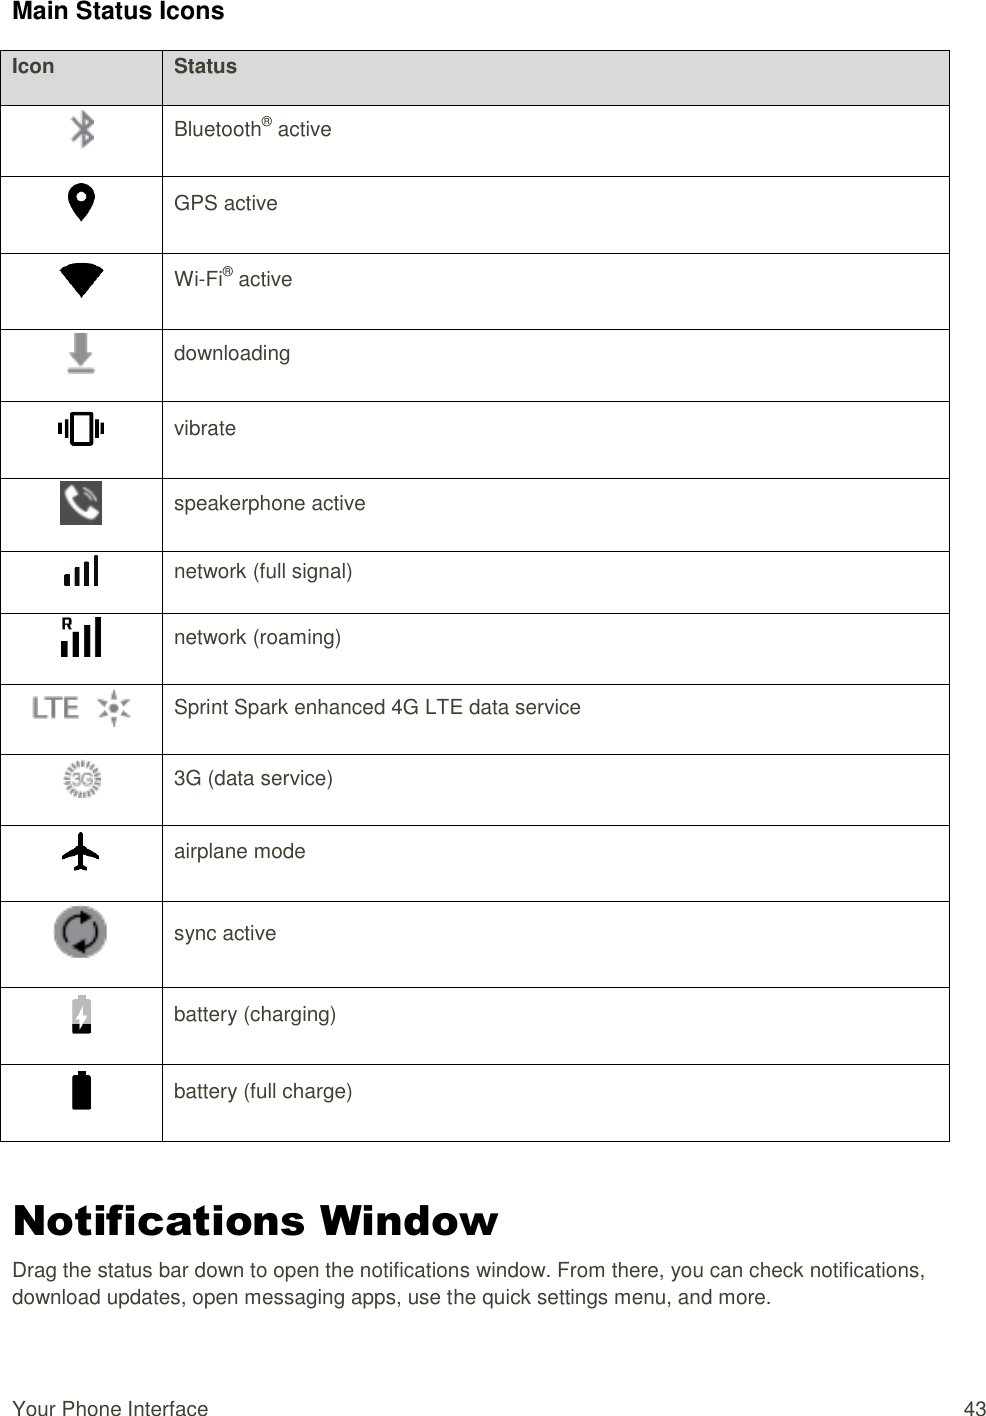
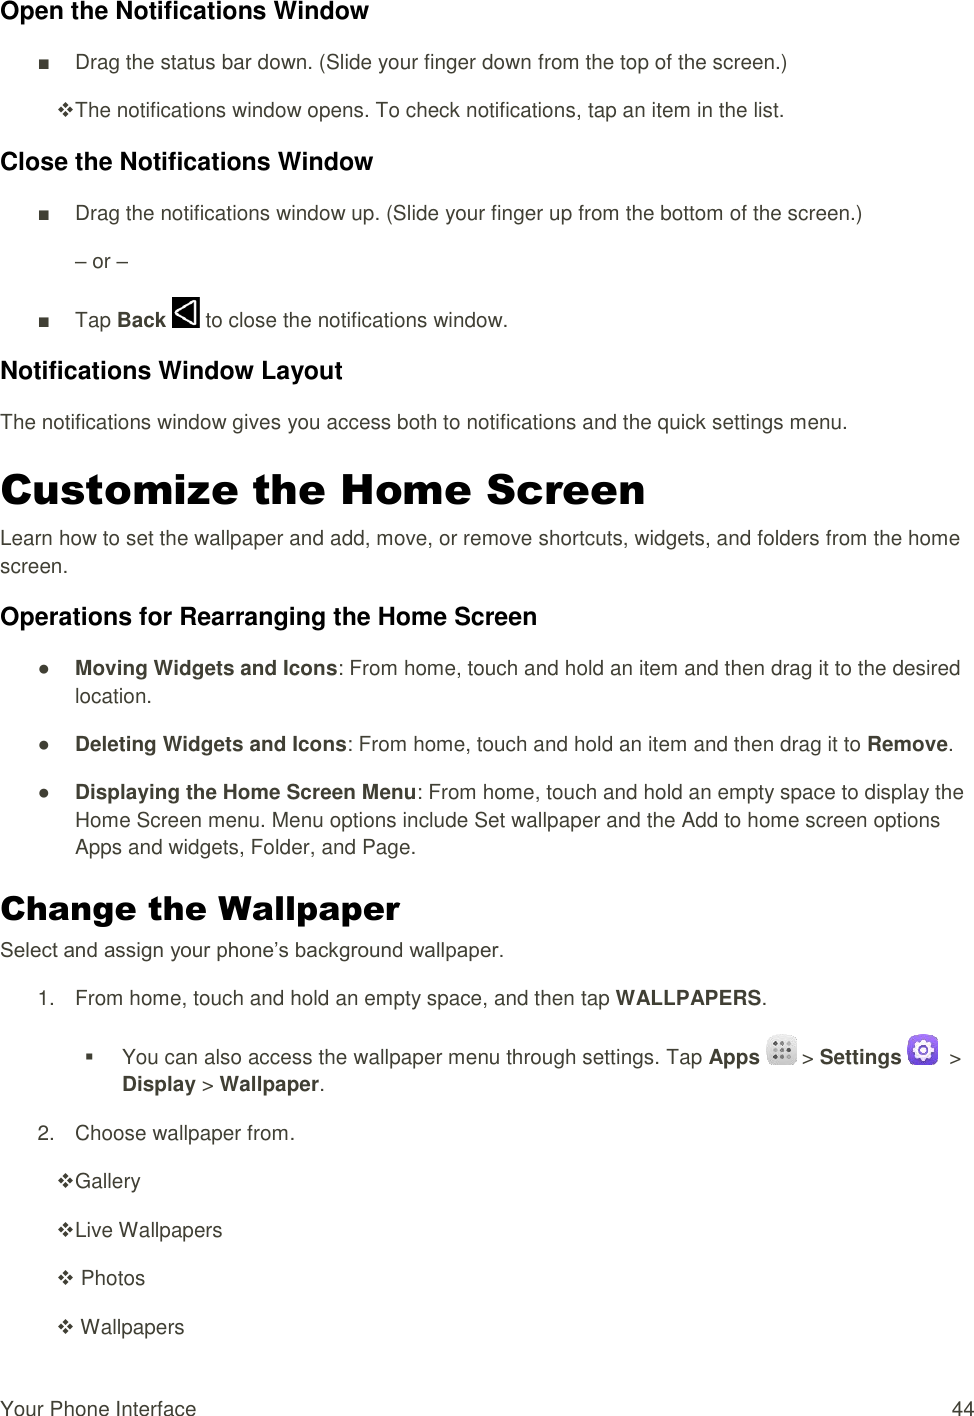
![TOC iii Home Screen Basics........................................................................................................................... 40 Home Screen Layout .................................................................................................................. 40 Extended Home Screens ............................................................................................................ 41 Status Bar ........................................................................................................................................... 42 Notifications Window ........................................................................................................................... 43 Customize the Home Screen .............................................................................................................. 44 Change the Wallpaper ................................................................................................................ 44 Add Shortcuts to the Home Screen ............................................................................................ 45 Add Widgets to the Home Screen .............................................................................................. 45 Add Folders to the Home Screen................................................................................................ 45 Phone App................................................................................................................................................... 47 Place and Answer Calls ...................................................................................................................... 47 Call Using the Phone Dialer ........................................................................................................ 47 Answer Phone Calls .................................................................................................................... 49 In-Call Screen Layout and Operations ........................................................................................ 51 Place Calls from Contacts/Call Logs ................................................................................................... 52 Place a Call from Contacts ......................................................................................................... 53 Call from Call Logs ...................................................................................................................... 53 Optional Services ................................................................................................................................ 53 Voicemail Setup [Prepaid Only] .................................................................................................. 54 Listen to Multiple Voicemail Messages [Prepaid Only] ............................................................... 55 Caller ID Blocking [Prepaid Only] ............................................................................................... 56 Call Waiting [Prepaid Only] ......................................................................................................... 56 Conference Calling [Prepaid Only] ............................................................................................. 56 Call Forwarding [Prepaid Only] ................................................................................................... 58 Call Settings ........................................................................................................................................ 58 Contacts .............................................................................................................................................. 60 Add a Contact ............................................................................................................................. 60 Check Contacts ........................................................................................................................... 62 Contacts Screen Layout .............................................................................................................. 63 Edit a Contact.............................................................................................................................. 64 Delete a Contact ......................................................................................................................... 64 Import Contacts from an SD Card or Storage ..................................................................................... 65 Back Up Contacts to an SD Card ....................................................................................................... 65 Messaging and Internet ............................................................................................................................... 67](https://usermanual.wiki/TCL-Communication/B011/User-Guide-2646624-Page-4.png)
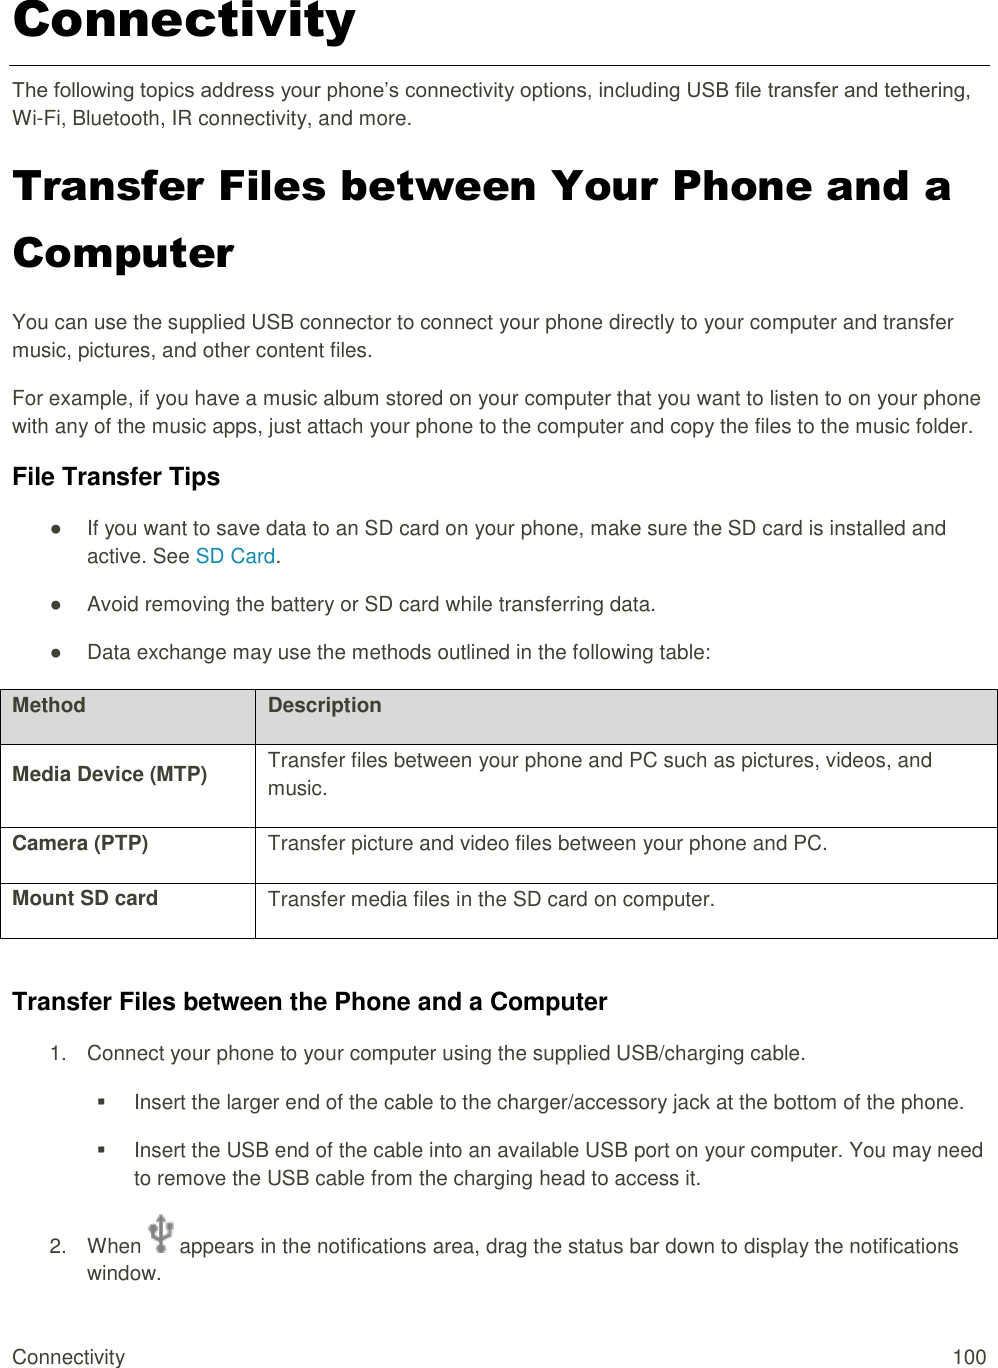
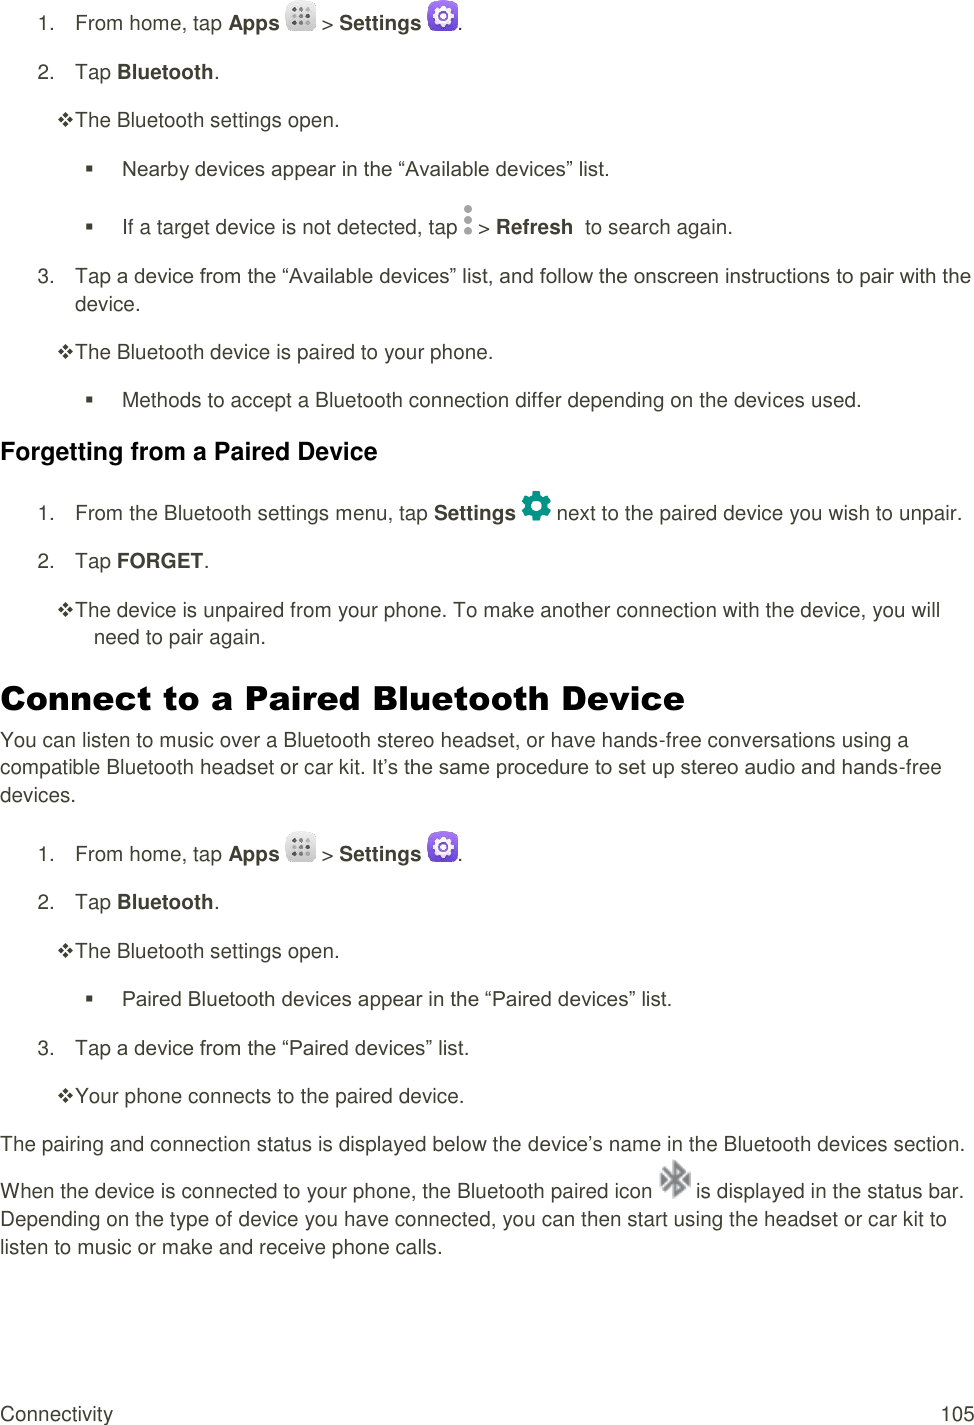
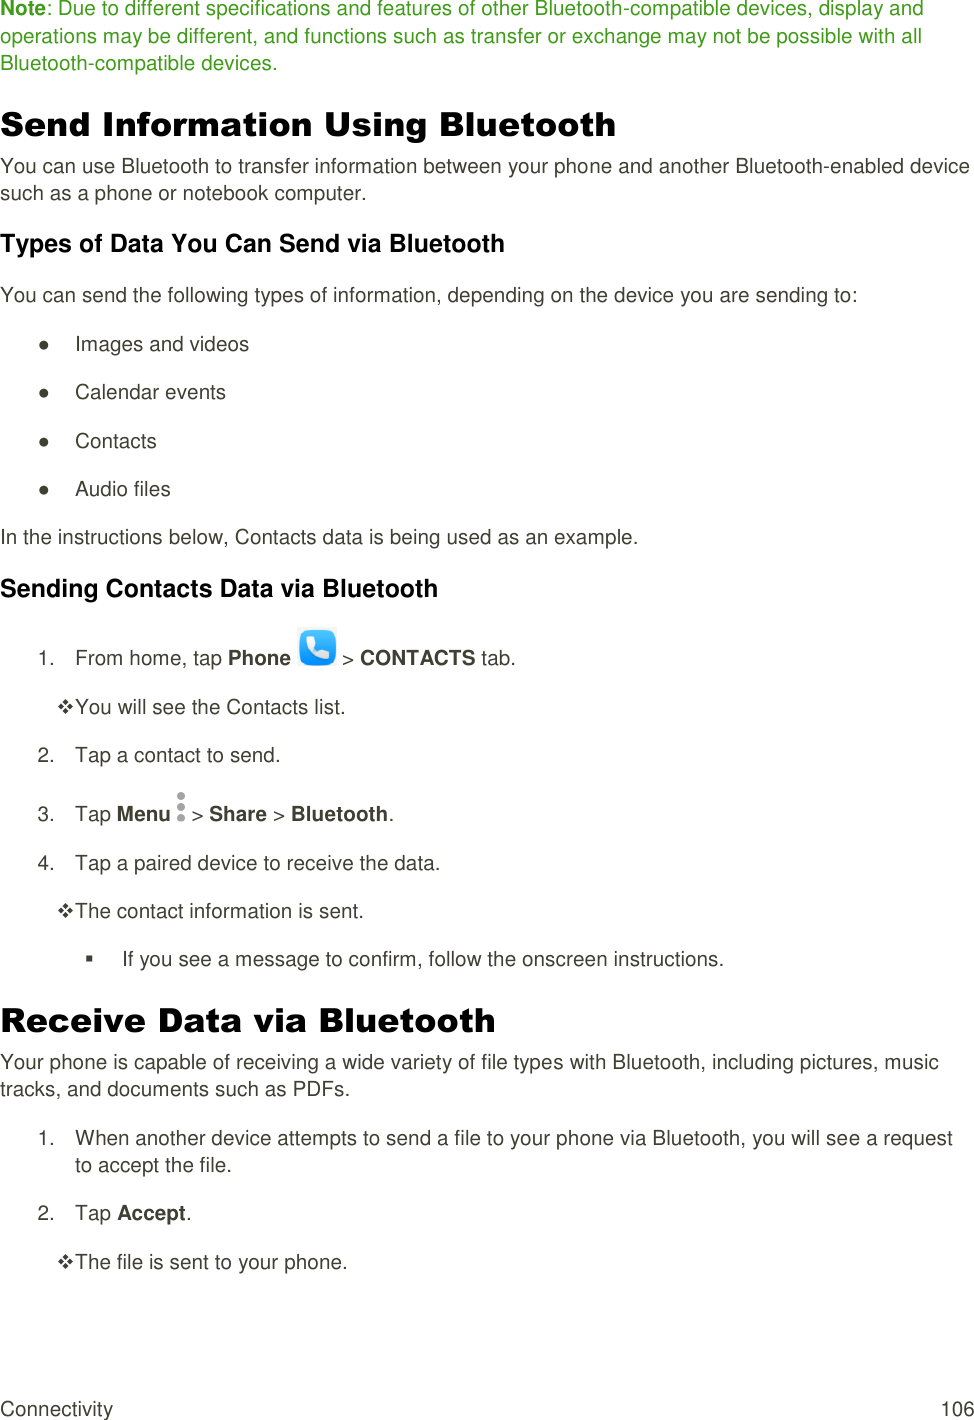
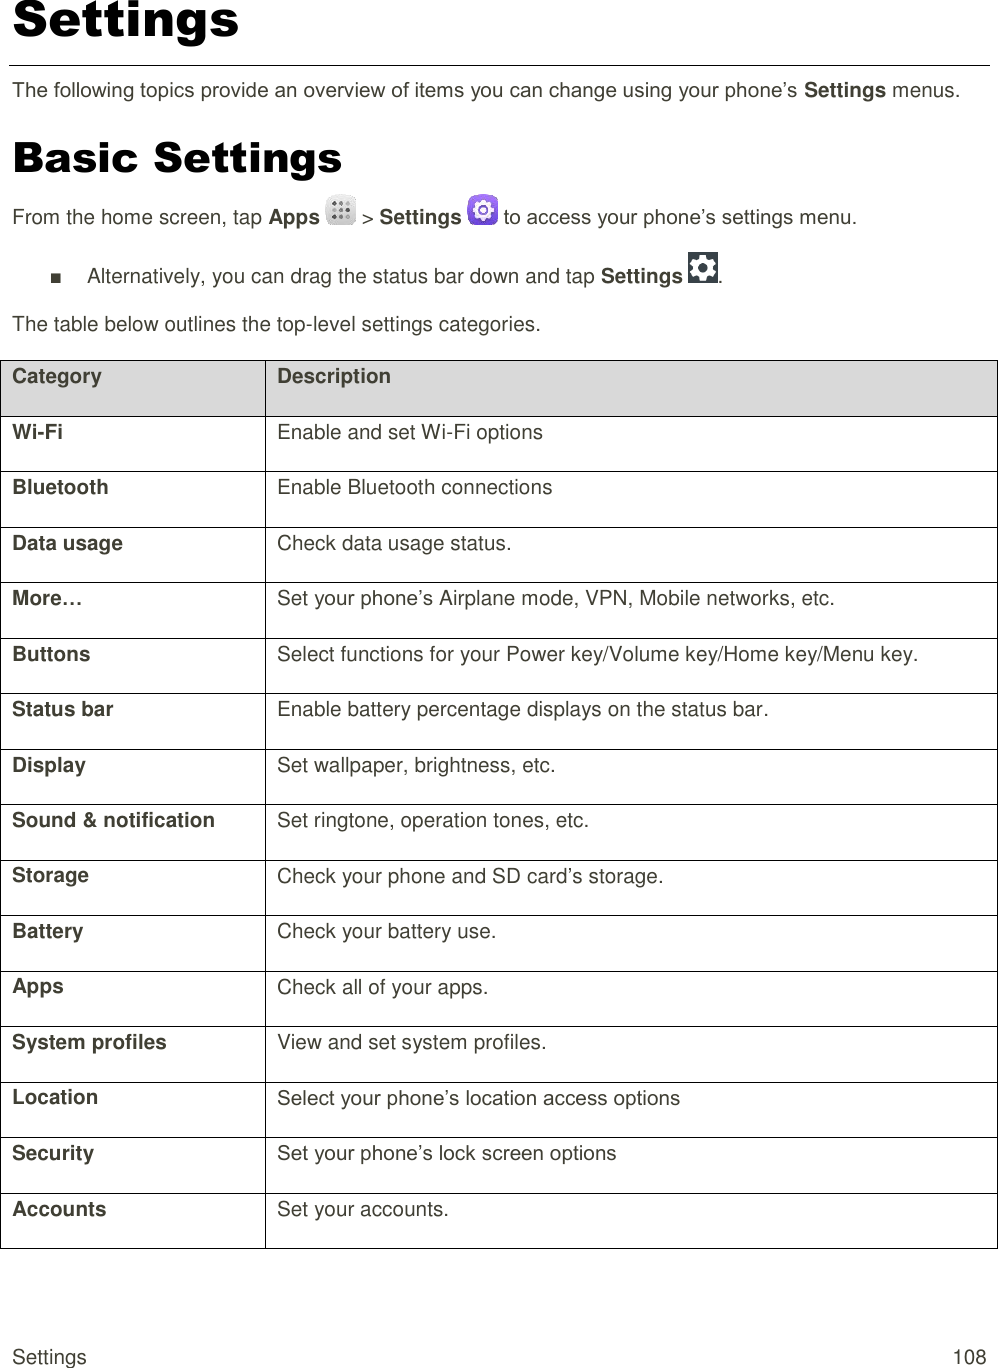
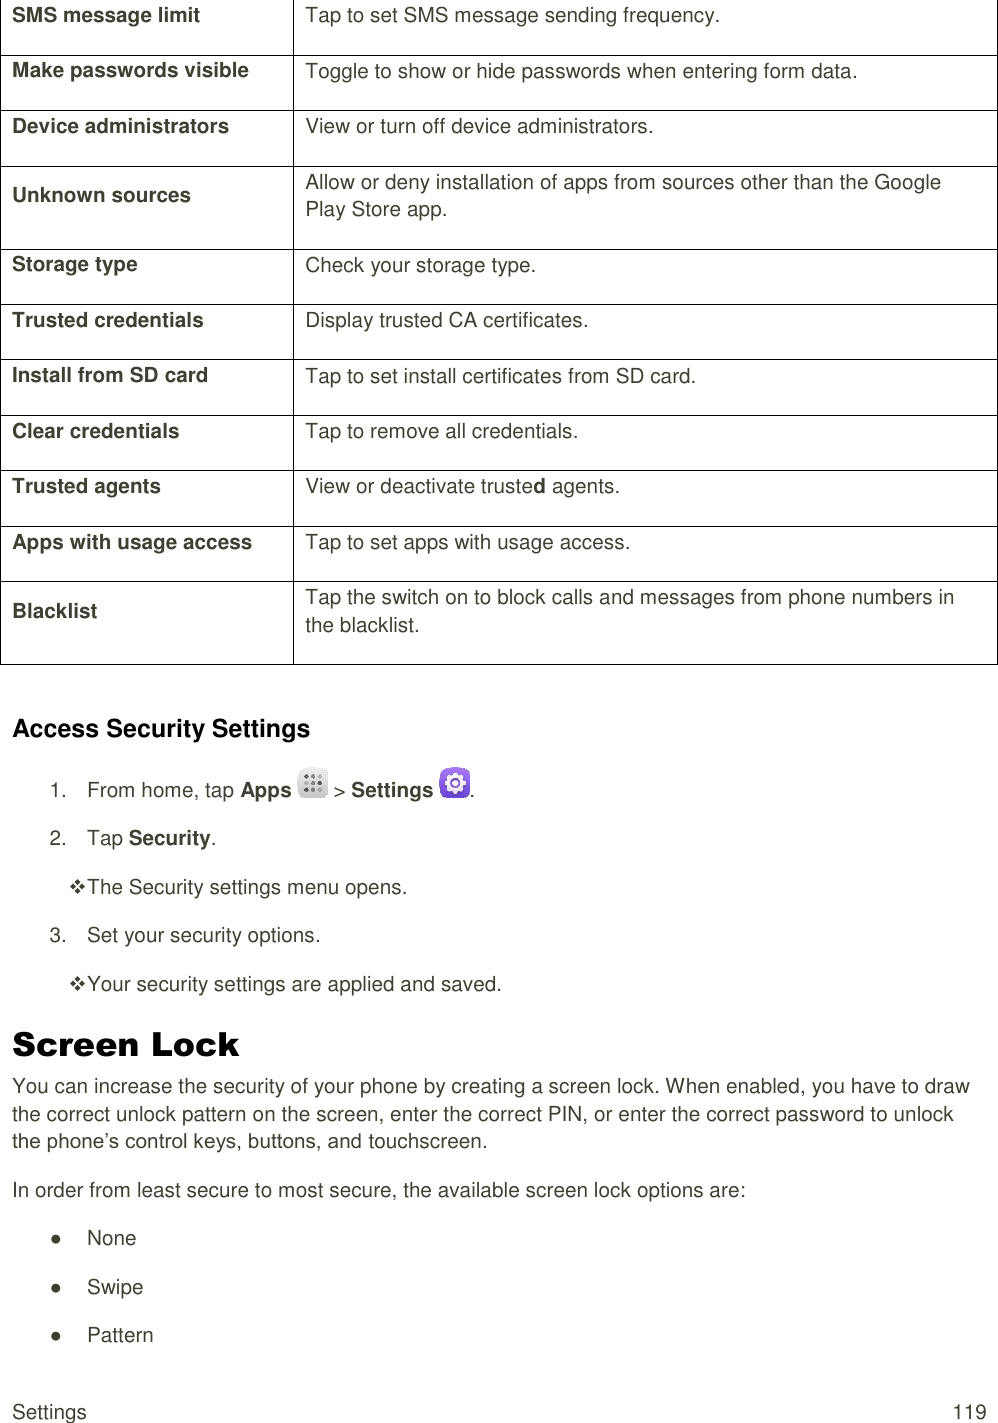
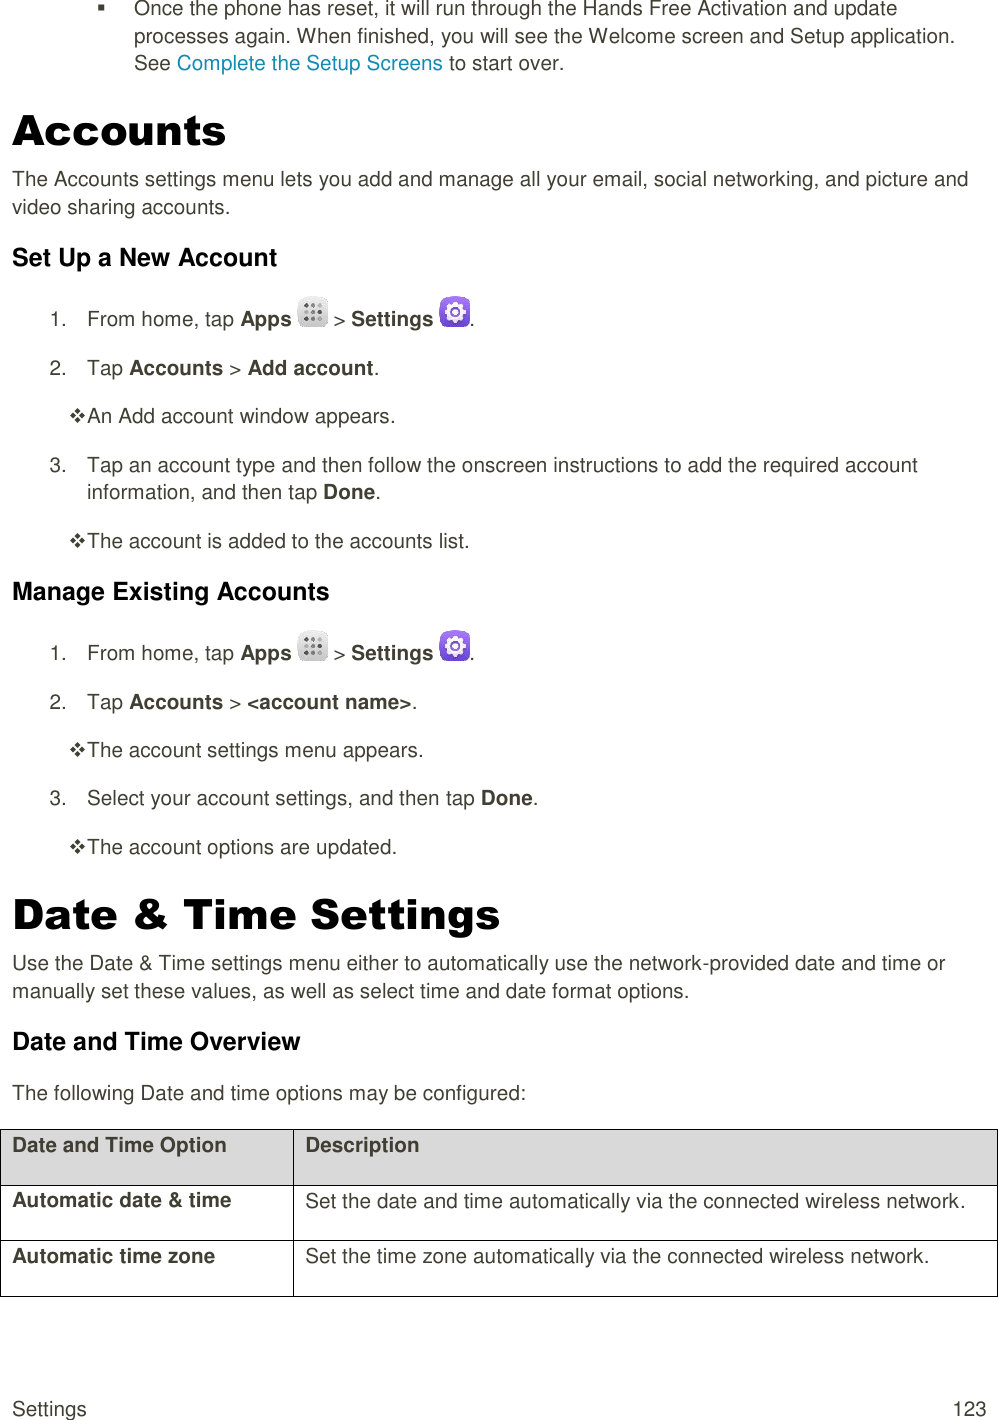
![TOC vi Wi-Fi Direct ............................................................................................................................... 103 Bluetooth ........................................................................................................................................... 103 Bluetooth Information ................................................................................................................ 104 Enable the Bluetooth Feature ................................................................................................... 104 Pair Bluetooth Devices .............................................................................................................. 104 Connect to a Paired Bluetooth Device ...................................................................................... 105 Send Information Using Bluetooth ............................................................................................ 106 Receive Data via Bluetooth ....................................................................................................... 106 Settings ..................................................................................................................................................... 108 Basic Settings ................................................................................................................................... 108 Wi-Fi Settings Menu .......................................................................................................................... 109 Bluetooth Settings ............................................................................................................................. 111 Data Usage Settings ......................................................................................................................... 112 More Settings .................................................................................................................................... 113 Default Messaging App Settings ....................................................................................................... 113 Sound & notification Settings ............................................................................................................ 114 Display Settings ................................................................................................................................ 115 Storage Settings ................................................................................................................................ 116 Battery Settings ................................................................................................................................. 116 Apps Settings .................................................................................................................................... 117 Location Settings ............................................................................................................................... 117 Security Settings ............................................................................................................................... 118 Screen Lock .............................................................................................................................. 119 Disable the Screen Lock ........................................................................................................... 120 Language & Input Settings ................................................................................................................ 120 Backup and Reset ............................................................................................................................. 121 Accounts ........................................................................................................................................... 123 Date & Time Settings ........................................................................................................................ 123 Accessibility Settings......................................................................................................................... 124 Printing .............................................................................................................................................. 125 Activate this Device ........................................................................................................................... 125 System updates ................................................................................................................................ 126 About Phone ..................................................................................................................................... 126 Copyright Information [Prepaid Only] ................................................................................................ 127 For Assistance .......................................................................................................................................... 128](https://usermanual.wiki/TCL-Communication/B011/User-Guide-2646624-Page-7.png)
![Introduction 1 Introduction The following topics describe the basics of using this guide and your new phone. About the User Guide Thank you for purchasing your new ALCATEL ONETOUCH Elevate. The following topics explain how best to use this guide to get the most out of your phone. Before Using Your Phone Read "XXXXX" and "XXXXX" thoroughly for proper usage. Accessible services may be limited by subscription contract conditions. Descriptions in the User Guide Note that most descriptions in this guide are based on your phone's setup at the time of purchase. Unless otherwise noted, instructions begin from the phone's home screen, which is displayed by pressing . Some operation descriptions may be simplified. Screenshots and Key Labels Screenshots in the user guide may appear differently on your phone. Key labels in the user guide are simplified for description purposes and differ from your phone's display. Other Notations In the user guide, the phone may be referred to either as "phone," "device," or "handset." A microSD™ or microSDHC™ card is referred to as an "SD Card" or a "memory card." How to Use This Guide [Prepaid Only] [This topic and subtopics are part of the HTML guide conversion. They are not part of the OEM UG development process. Please ignore.] You can easily navigate this user guide, which is displayed in a browser window that is divided into three areas. These topics will teach you how to navigate the guide and use the features for each area. Header and Toolbar Areas [content from Flare project] Search This Guide [content from Flare project]](https://usermanual.wiki/TCL-Communication/B011/User-Guide-2646624-Page-9.png)
![Introduction 2 Topic Area [content from Flare project] Contents and Index Area [content from Flare project] Resizing Areas [content from Flare project] Access Instructions on Phone [content per instructions of each carrier] These topics will help you find help on your new phone and will introduce the basics of using your phone's touchscreen if you are a new user. Launch the Guide [customize content] Launch the Guide from the Notifications Window [customize content] Hide Status Bar Indicators [customize content] Using the Phone Guide [customize content] Check Basic Operations [customize content] Screen Use for First-Time Users [customize content]](https://usermanual.wiki/TCL-Communication/B011/User-Guide-2646624-Page-10.png)

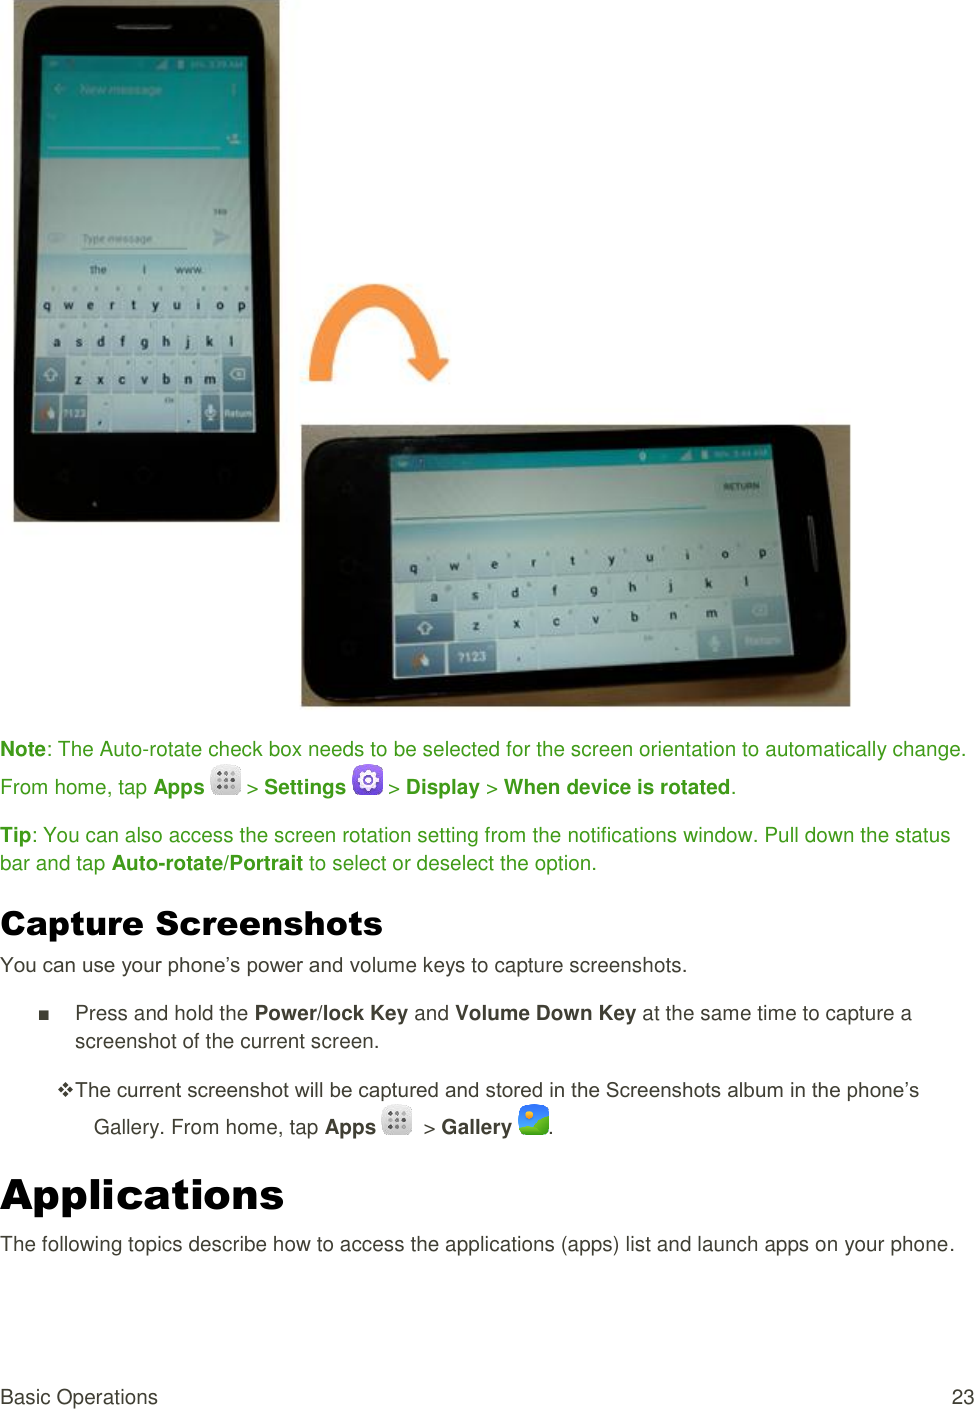
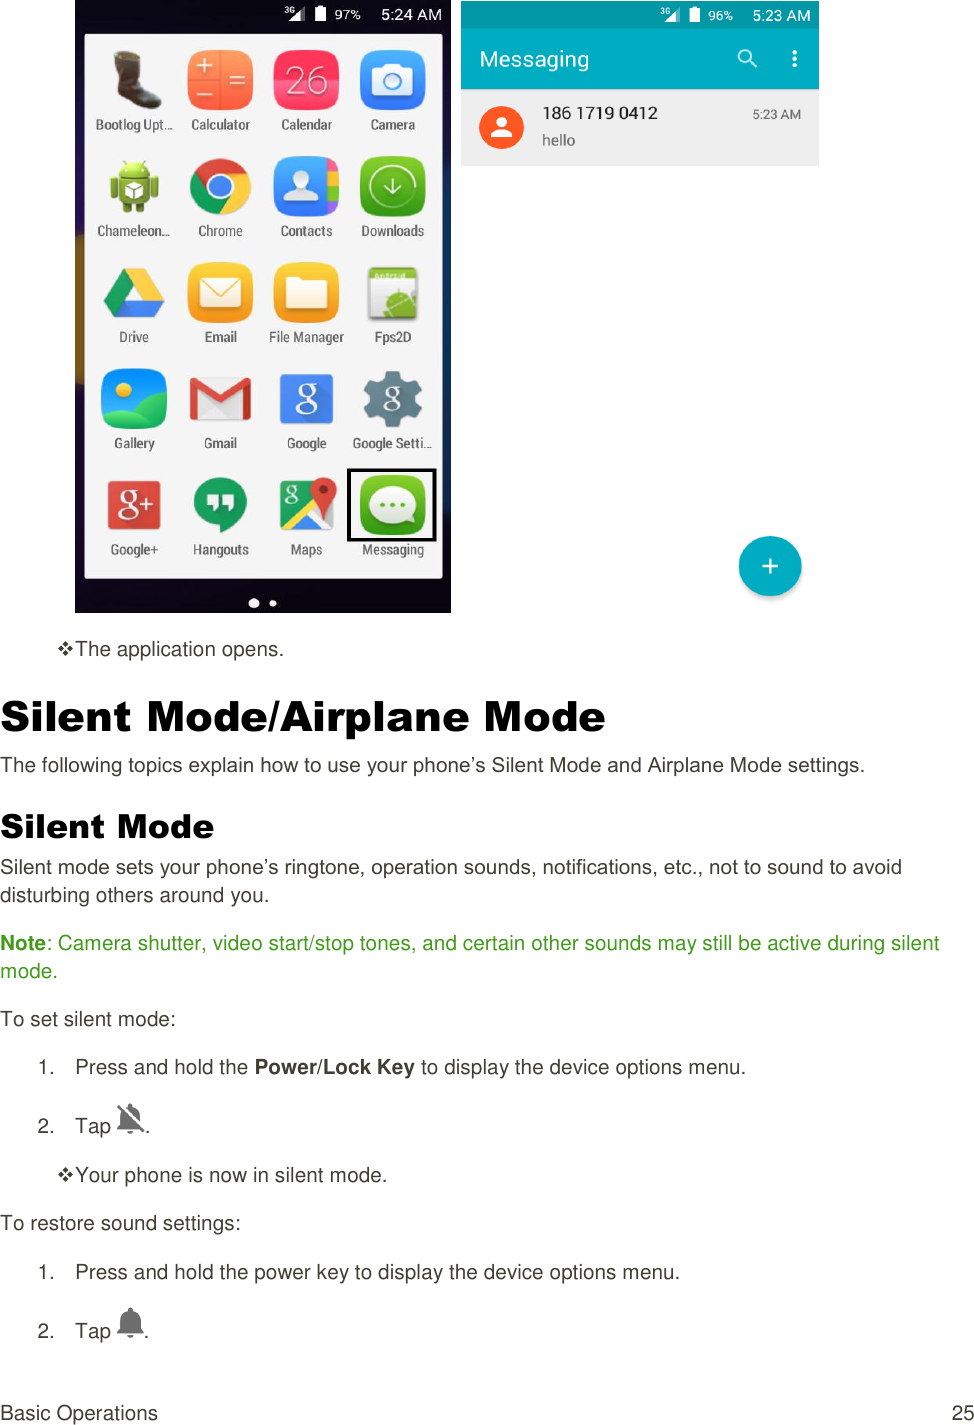
![Basic Operations 26 Your phone’s sound settings are now restored. Vibrate Mode Vibrate mode sets your phone’s ringtone, operation sounds, notifications, etc., not to sound to avoid disturbing others around you. Note: Camera shutter, video start/stop tones, and certain other sounds may still be active during silent mode. To set vibrate mode: 1. Press and hold the power key to display the device options menu. 2. Tap . Your phone is now in vibration mode. To restore vibrate settings: 1. Press and hold the power key to display the device options menu. 2. Tap . Your phone’s vibrate settings are now restored. Airplane Mode Airplane mode turns off all functions that emit or receive signals, while leaving your phone on so you can use apps that don’t require a signal or data. To turn on airplane mode: 1. Press and hold the power key to display the device options menu. 2. Tap Airplane mode. Your phone is now in airplane mode. You will see the airplane mode icon in the status bar. To turn off airplane mode: 1. Press and hold the power key to display the device options menu. 2. Tap Airplane mode. Your phone’s wireless connection features are now restored. Enter Text [Prepaid Only] You can type on your phone using one of the available touchscreen keyboards or Google voice typing.](https://usermanual.wiki/TCL-Communication/B011/User-Guide-2646624-Page-34.png)
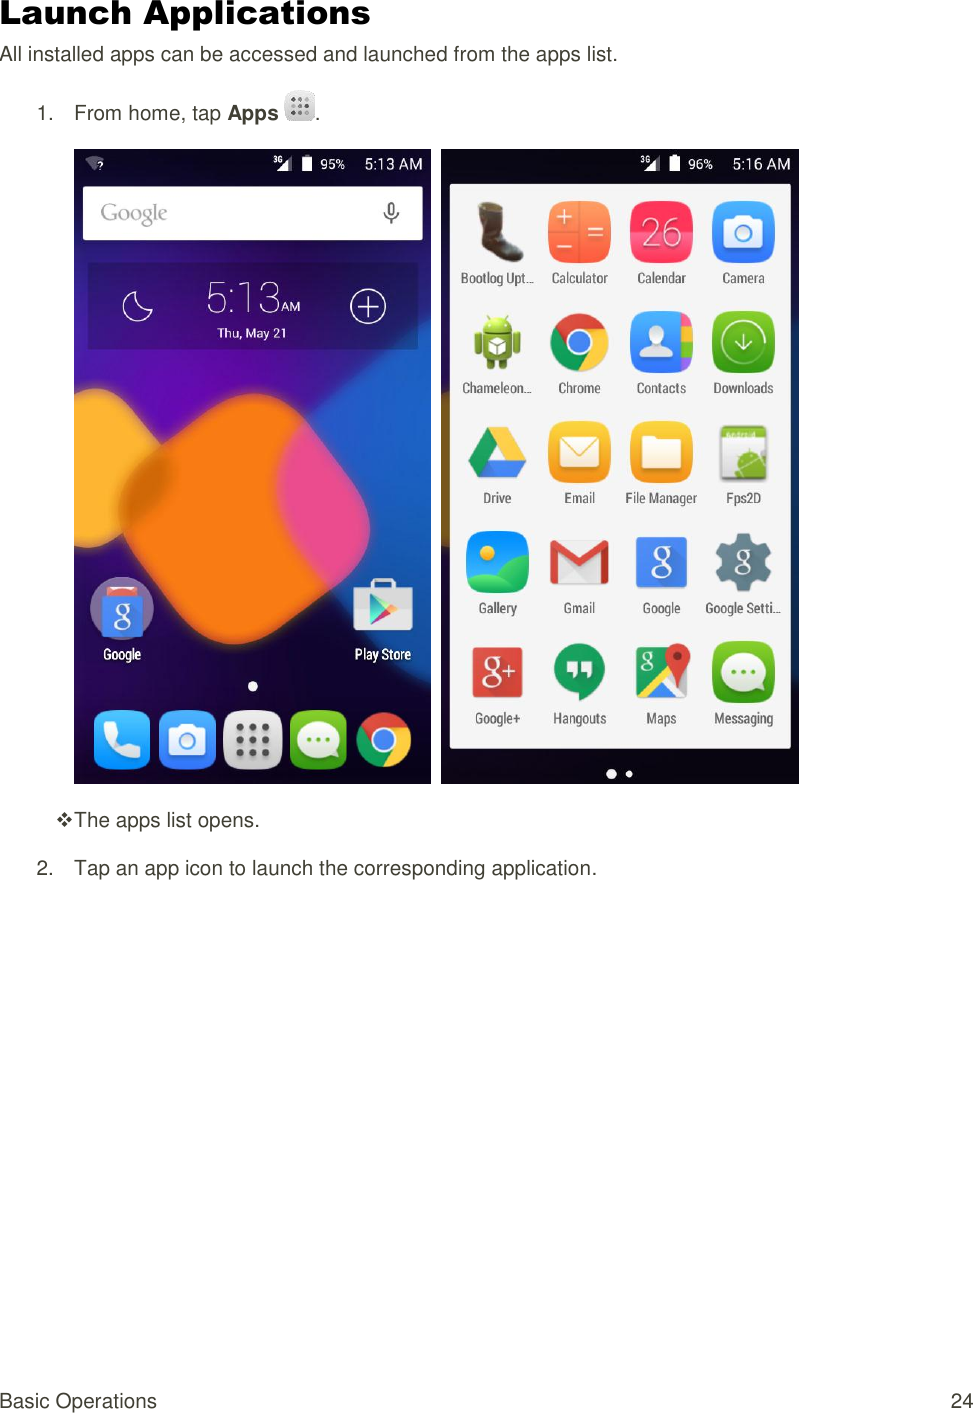
![Basic Operations 27 Touchscreen Keyboards [Prepaid Only] Your phone offers you a choice of Swype touchscreen keyboards for entering text. The keyboard appear automatically onscreen when you tap a text entry field, and they can be used in either portrait or landscape mode. You can also use the Google Voice typing option to enter text using your voice (see Google Voice Typing for details). The methods available include: ● Swype lets you enter letters and words in one continuous motion by swiping your finger across the letters. See Swype for details. ● Android keyboard lets you use a traditional QWERTY setup to enter text. Additional options expand your ability to enter text faster and more accurately. See Android Keyboard for details.](https://usermanual.wiki/TCL-Communication/B011/User-Guide-2646624-Page-35.png)
![Basic Operations 28 Note: Keyboard layouts and options may change depending on where you’re using them. For example, if you’re entering text to do a Web search, a search icon may be available instead of an enter key. Swype [Sprint or Prepaid Only] The Swype™ keyboard lets you enter words by drawing a path from letter to letter in one continuous motion. When you lift your finger after the last letter of a word, a space is automatically added. Assigning Swype for Text Entry Swype is typically the default entry type. ■ From home, tap Apps > Settings > Language & input > Current keyboard > Swype. Using Swype Swype lets you enter a word with one continuous motion: just drag your finger over the letters in the word. ■ Place your finger on the key with the first letter of the word and drag your finger to each subsequent letter without lifting your finger off the screen. ■ Continue until you have finished the word. Lift your finger after the last letter. ■ If Swype cannot clearly determine your word, the word choice window opens. Select an alternative word from the list.](https://usermanual.wiki/TCL-Communication/B011/User-Guide-2646624-Page-36.png)
![Basic Operations 29 For more information about using Swype and its additional capabilities, including using voice entry and personalizing your Swype dictionary, touch and hold from the Swype keyboard display. You can also visit swype.com for more information. Android Keyboard [Prepaid Only] The Android keyboard offers a traditional QWERTY keyboard setup for entering text by tapping keys (like on a computer), along with enhancements and options that allow you to enter text faster and more accurately, such as continuous key input, personalized usage dictionaries, and more. Assigning Android Keyboard for Text Entry ■ From home, tap Apps > Settings > Language & input > Current keyboard > Android Keyboard (AOSP). Using Android Keyboard Below illustration clearly describe how to use Android Keyboard. Touch to enter numbers. Touch to enter text. Touch and hold to enter multiple choices. Touch to switch "abc/Abc/ABC" input mode. Touch and hold for Swype settings and additional information. Touch to enter numbers, symbols, etc. Touch to change from numbers input to text input. Touch to enter Google voice typing. Touch to add attachment.](https://usermanual.wiki/TCL-Communication/B011/User-Guide-2646624-Page-37.png)
![Basic Operations 30 Google Voice Typing [Prepaid Only] Google Voice typing uses Google voice recognition to convert speech to text. ● Touch from the Search bar to display a dialog screen. ● Speak the word/phrase you want to search for. A list of search results will display for you to select from. Touch to enter numbers. Touch to enter text. Touch to enter Google voice typing. Touch to switch "abc/Abc/ABC" input mode. Touch to enter numbers, symbols, etc. Touch to change from numbers input to text input. Touch to add attachment.](https://usermanual.wiki/TCL-Communication/B011/User-Guide-2646624-Page-38.png)
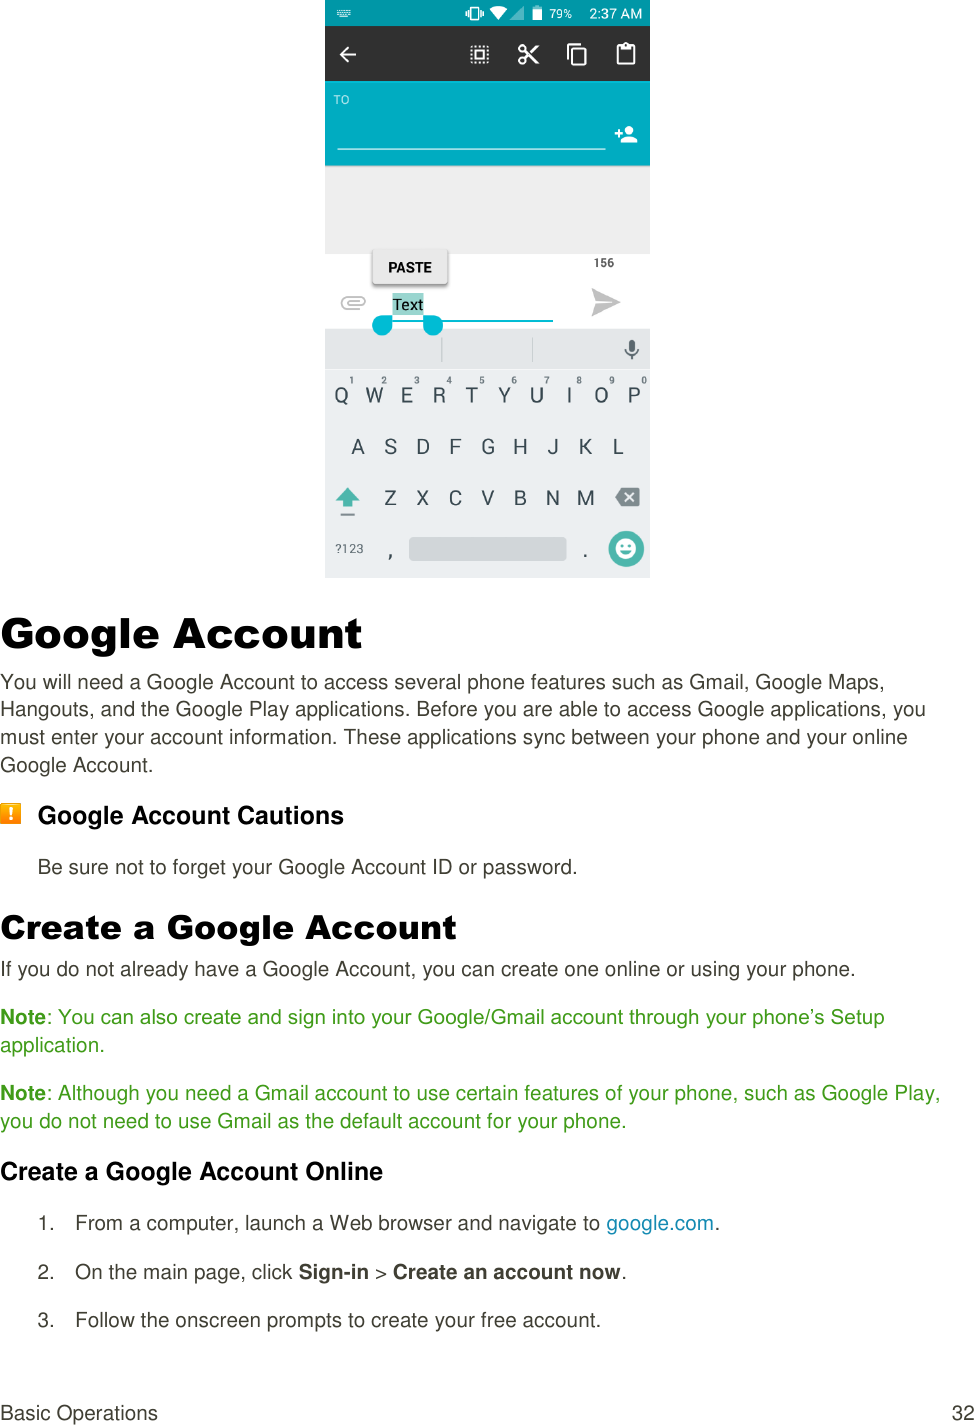
![Basic Operations 31 Tips for Editing Text [Prepaid Only] Your phone gives you many options to make entering text easier, including copying, cutting, and pasting text, using voice-to-text input, customizing the user dictionary, using predictive text, and more. You can edit the text you have entered. 1. Touch and hold or double-tap within the text you would like to edit. 2. Drag the tabs to change the highlighted selection. 3. The following options will appear: Select all , Cut , Copy and Paste . You can also insert new text. 1. Touch where you want to type, or touch and hold a blank space, the cursor will blink and the tabs will show. Drag the tab to move the cursor. 2. If you have selected any text, touch the tab to show PASTE icon which allows you to paste any text you have previously copied.](https://usermanual.wiki/TCL-Communication/B011/User-Guide-2646624-Page-39.png)
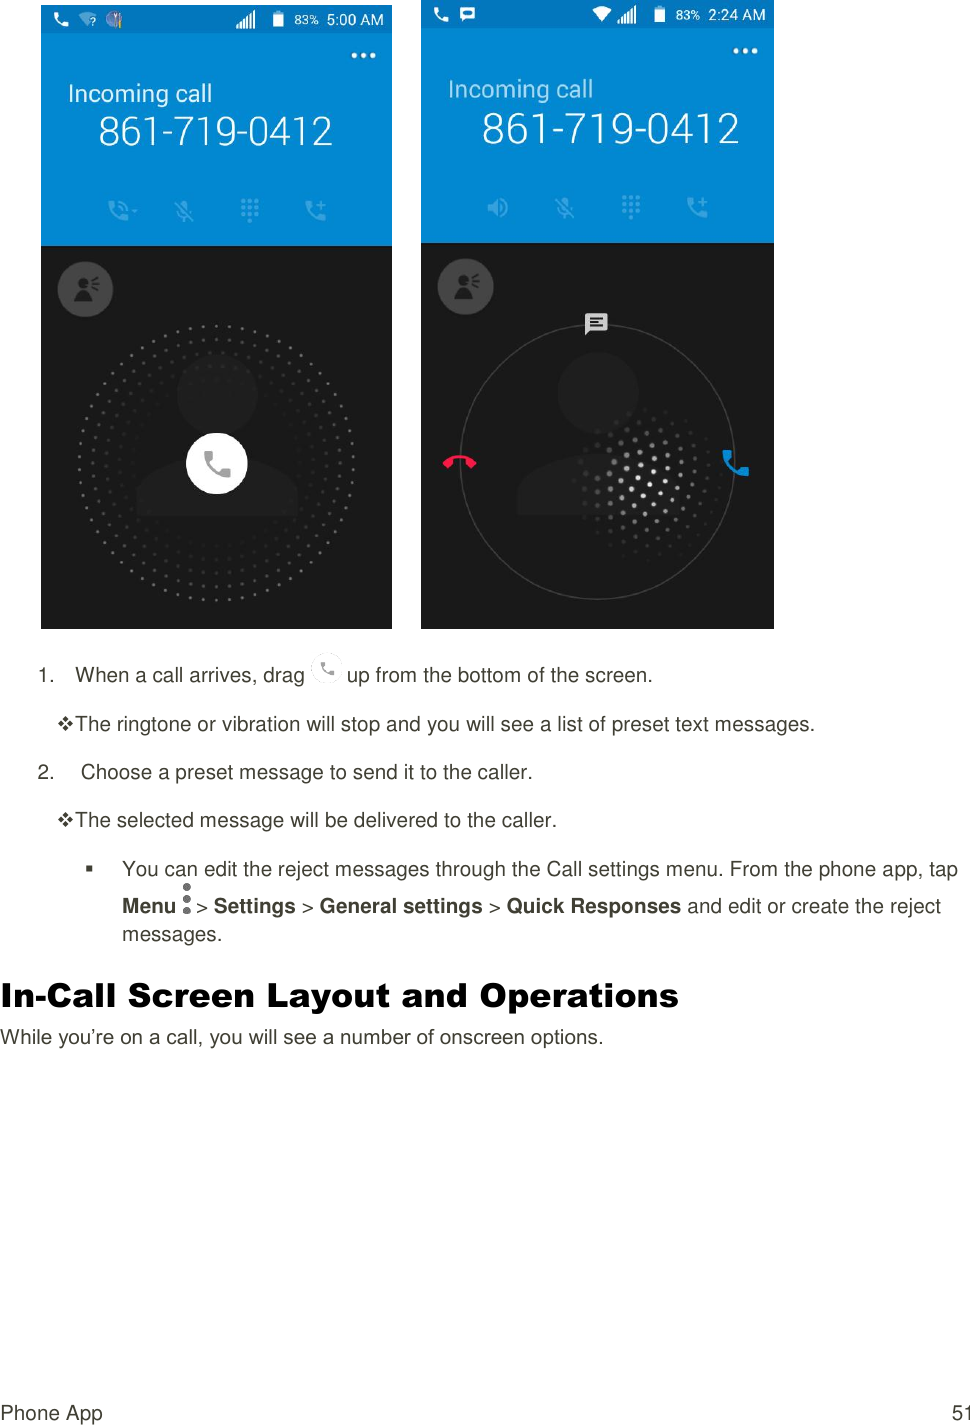
![Phone App 49 2. From home, tap Phone > . 3. Tap . As long as you are in an area covered by wireless service, the emergency call is placed. Enhanced 9-1-1 (E9-1-1) Information This phone features an embedded Global Positioning System (GPS) chip necessary for utilizing E9-1-1 emergency location services where available. When you place an emergency 9-1-1 call, the GPS feature of your phone seeks information to calculate your approximate location. Depending on several variables, including availability and access to satellite signals, it may take up to 30 seconds or more to determine and report your approximate location. Important: Always report your location to the 9-1-1 operator when placing an emergency call. Some designated emergency call takers, known as Public Safety Answering Points (PSAPs), may not be equipped to receive GPS location information from your phone. Answer Phone Calls The following information lets you know how to answer incoming calls, mute the ringer on incoming calls, reject incoming calls, and more. When you receive a phone call from a contact, the Incoming call screen appears and displays the caller ID icon, name, and phone number of the calling party. When you receive a phone call from someone who is not stored in People, only the default caller ID icon and phone number appear on the Incoming call screen. Note: If your phone is turned off, all calls automatically go to voicemail. Answer an Incoming Call [When unlock the phone] 1. When a call arrives, tap ANSWER or DISMISS to answer or dismiss it. The call begins. 2. To end the call, tap . The call ends.](https://usermanual.wiki/TCL-Communication/B011/User-Guide-2646624-Page-57.png)
![Phone App 50 Mute the Ringing Sound To mute the ringer without rejecting the call, you can do any of the following: ■ Press the Volume Key. Reject a Call and Send a Text Message [When lock the phone] You can reject an incoming call and automatically send a text message to the caller.](https://usermanual.wiki/TCL-Communication/B011/User-Guide-2646624-Page-58.png)

![Phone App 54 Voicemail Setup [Prepaid Only] You should set up your voicemail and personal greeting as soon as your phone is activated. Always use a password to protect against unauthorized access. Your phone automatically transfers all unanswered calls to your voicemail, even if your phone is in use or turned off. 1. From home, tap Phone > > Settings > Call settings > Voicemail.](https://usermanual.wiki/TCL-Communication/B011/User-Guide-2646624-Page-62.png)
![Phone App 55 2. Touch Setup to set for voicemail. Important: Voicemail Password – It is strongly recommended that you create a password when setting up your voicemail to protect against unauthorized access. Without a password, anyone who has access to your phone is able to access your voicemail messages. Listen to Multiple Voicemail Messages [Prepaid Only] When you are done listening to a voicemail message you can easily access other voicemail messages without returning to the main voicemail screen. 1. Listen to the current voicemail message. 2. Swipe your finger left or right to display the next or previous message. [illustration] The next or previous message will begin playing automatically. You can navigate through voicemail messages as frequently as you'd like. You can even move to the next or previous message before you're finished listening to the current one.](https://usermanual.wiki/TCL-Communication/B011/User-Guide-2646624-Page-63.png)
![Phone App 56 Caller ID Blocking [Prepaid Only] Caller ID identifies a caller before you answer the phone by displaying the number of the incoming call. If you do not want your number displayed when you make a call, follow these steps. 1. From home, tap Phone > . 2. Tap . 3. Enter a phone number. 4. Tap . Your caller information will not appear on the recipient’s phone. To permanently block your number, call Sprint Customer Service. Call Waiting [Prepaid Only] When you’re on a call, Call Waiting alerts you to incoming calls by sounding two beeps. Your phone’s screen informs you that another call is coming in and displays the caller’s phone number (if it is available). To respond to an incoming call while you’re on a call: ■ Slide to the right. (This puts the first caller on hold and answers the second call.) To switch back to the first caller: ■ Tap Swap. Note: For those calls where you don’t want to be interrupted, you can temporarily disable Call Waiting by pressing before placing your call. Call Waiting is automatically reactivated once you end the call. Conference Calling [Prepaid Only] With conference calling, also known as 3-way calling, you can talk to two people at the same time. When using this feature, the normal airtime rates will be charged for each of the two calls. 1. On the Phone screen, enter a number and tap (or place a call from Log or Contacts).](https://usermanual.wiki/TCL-Communication/B011/User-Guide-2646624-Page-64.png)
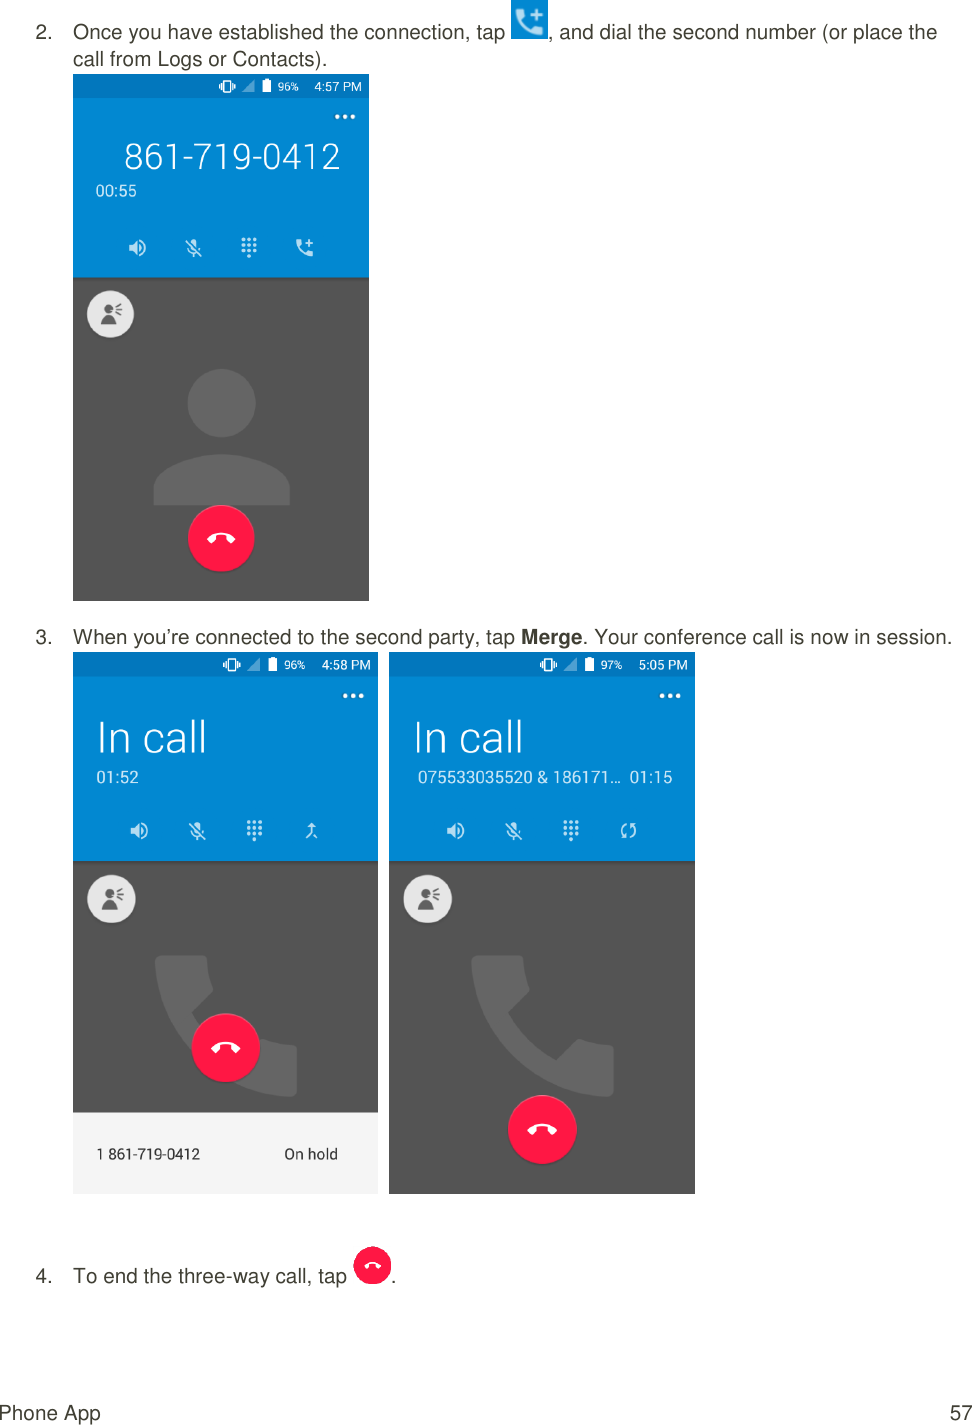
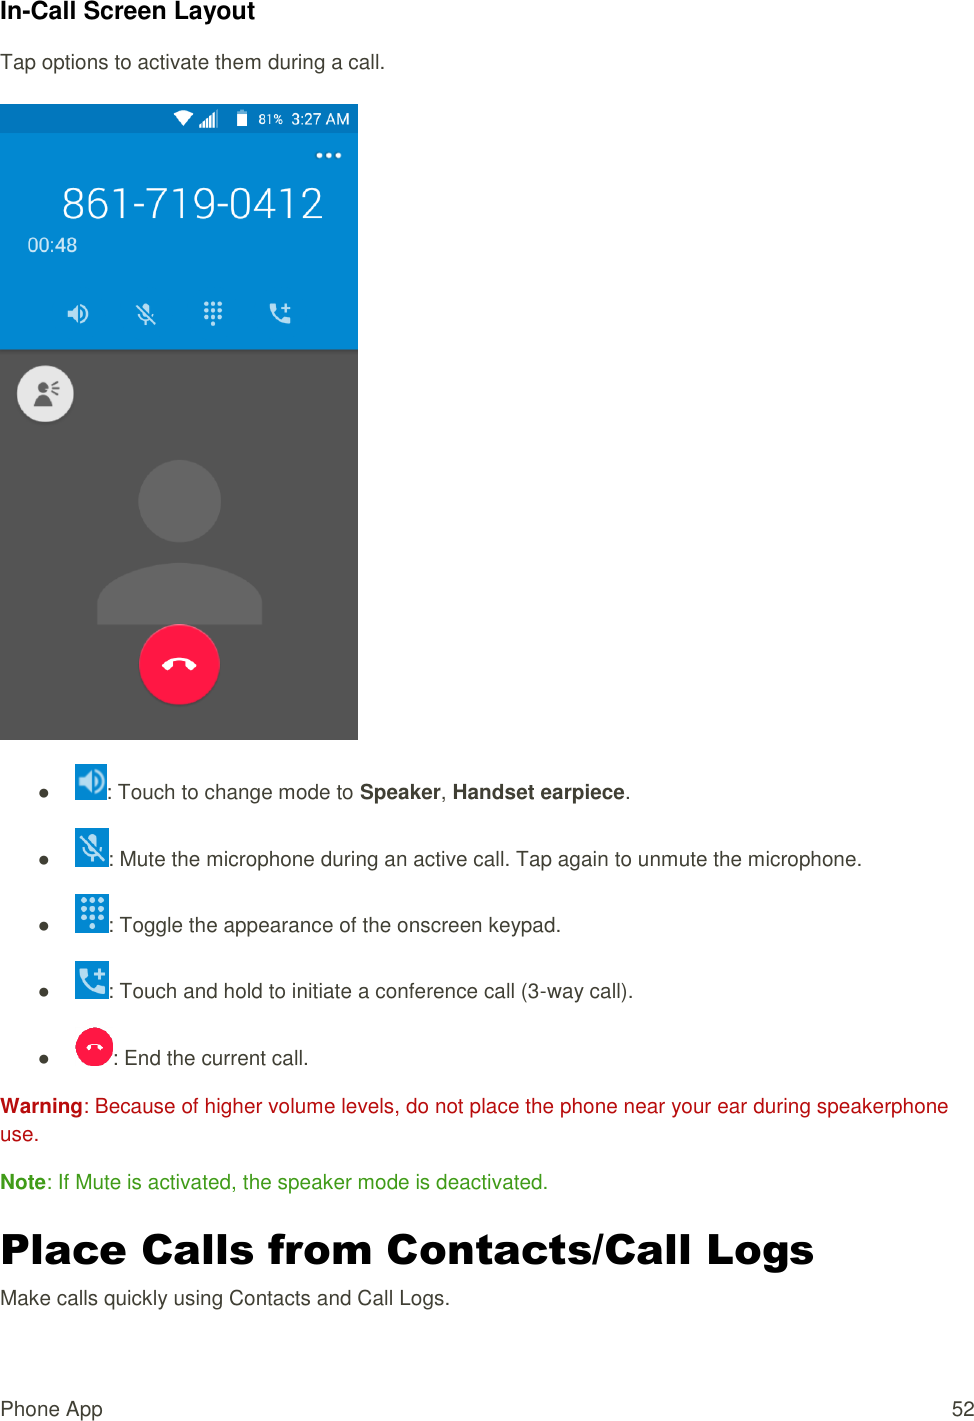
![Phone App 58 Note: If one of the people you called hangs up during your call, you and the remaining caller stay connected. If you initiated the call and are the first to hang up, all callers are disconnected. Call Forwarding [Prepaid Only] Call Forwarding lets you forward all your incoming calls to another phone number – even when your phone is turned off. You can continue to make calls from your phone when you have activated Call Forwarding. Note: You are charged a higher rate for calls you have forwarded. To activate Call Forwarding: 1. From home, tap Phone > . 2. Tap . 3. Enter the area code and phone number to which you want your calls forwarded. 4. Tap . You will hear a tone to confirm the activation of Call Forwarding. All calls to your wireless number will be forwarded to the designated phone number. To deactivate Call Forwarding: 5. From home, tap Phone > . 6. Tap . 7. Tap . You will hear a tone to confirm the deactivation. Call Settings Your phone’s Call Settings menu lets you configure your voicemail options and a number of other settings for the phone application. Call Settings Options Use the Call Settings menu to adjust the following settings: Setting Description](https://usermanual.wiki/TCL-Communication/B011/User-Guide-2646624-Page-66.png)
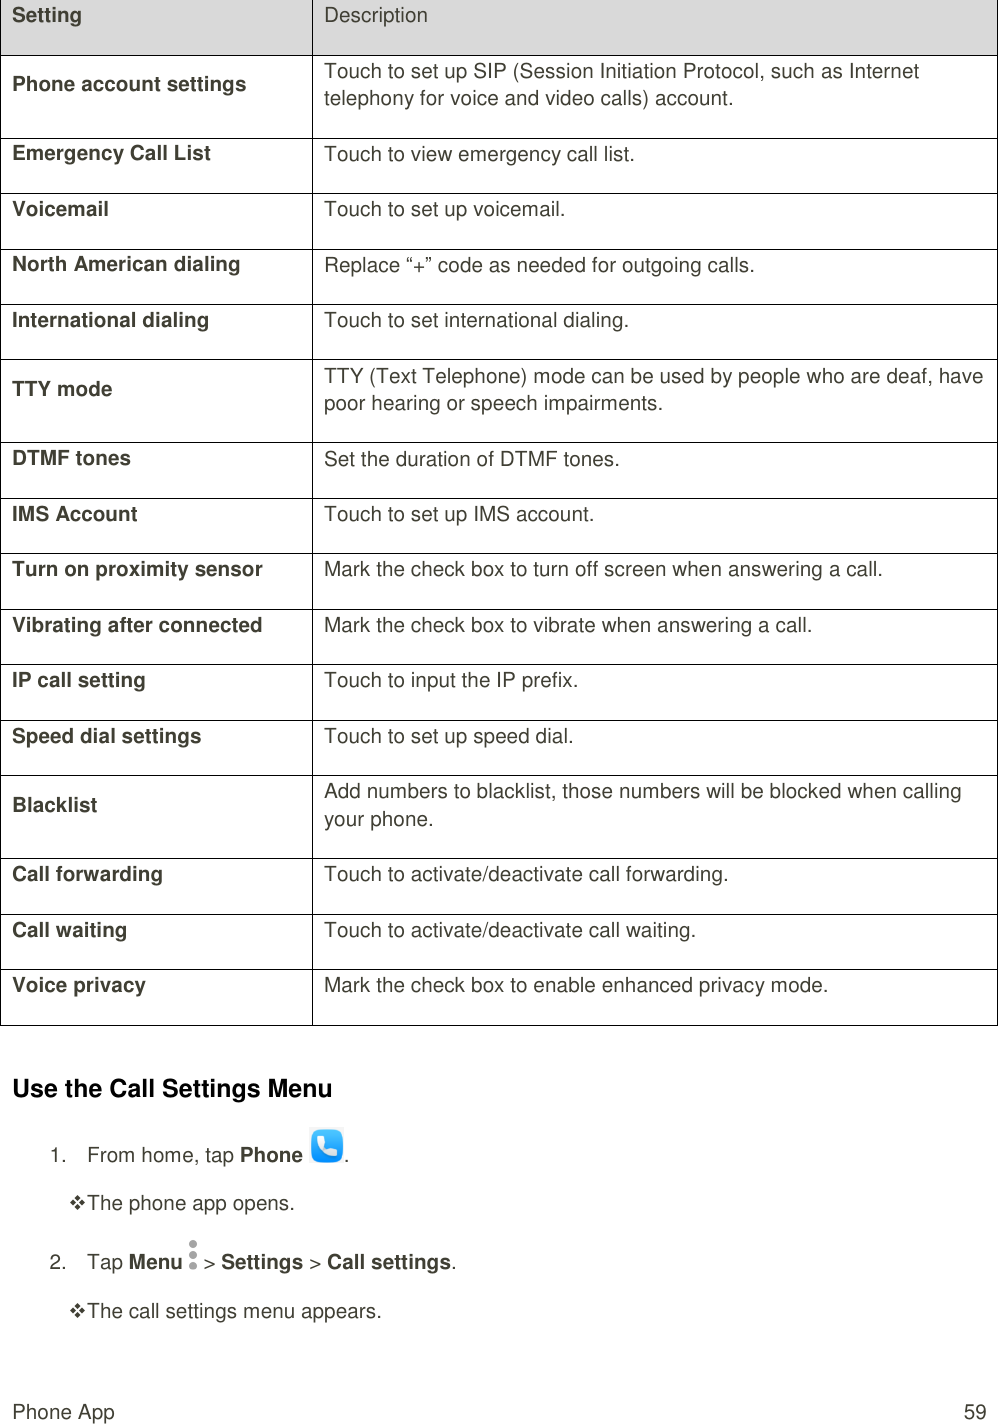
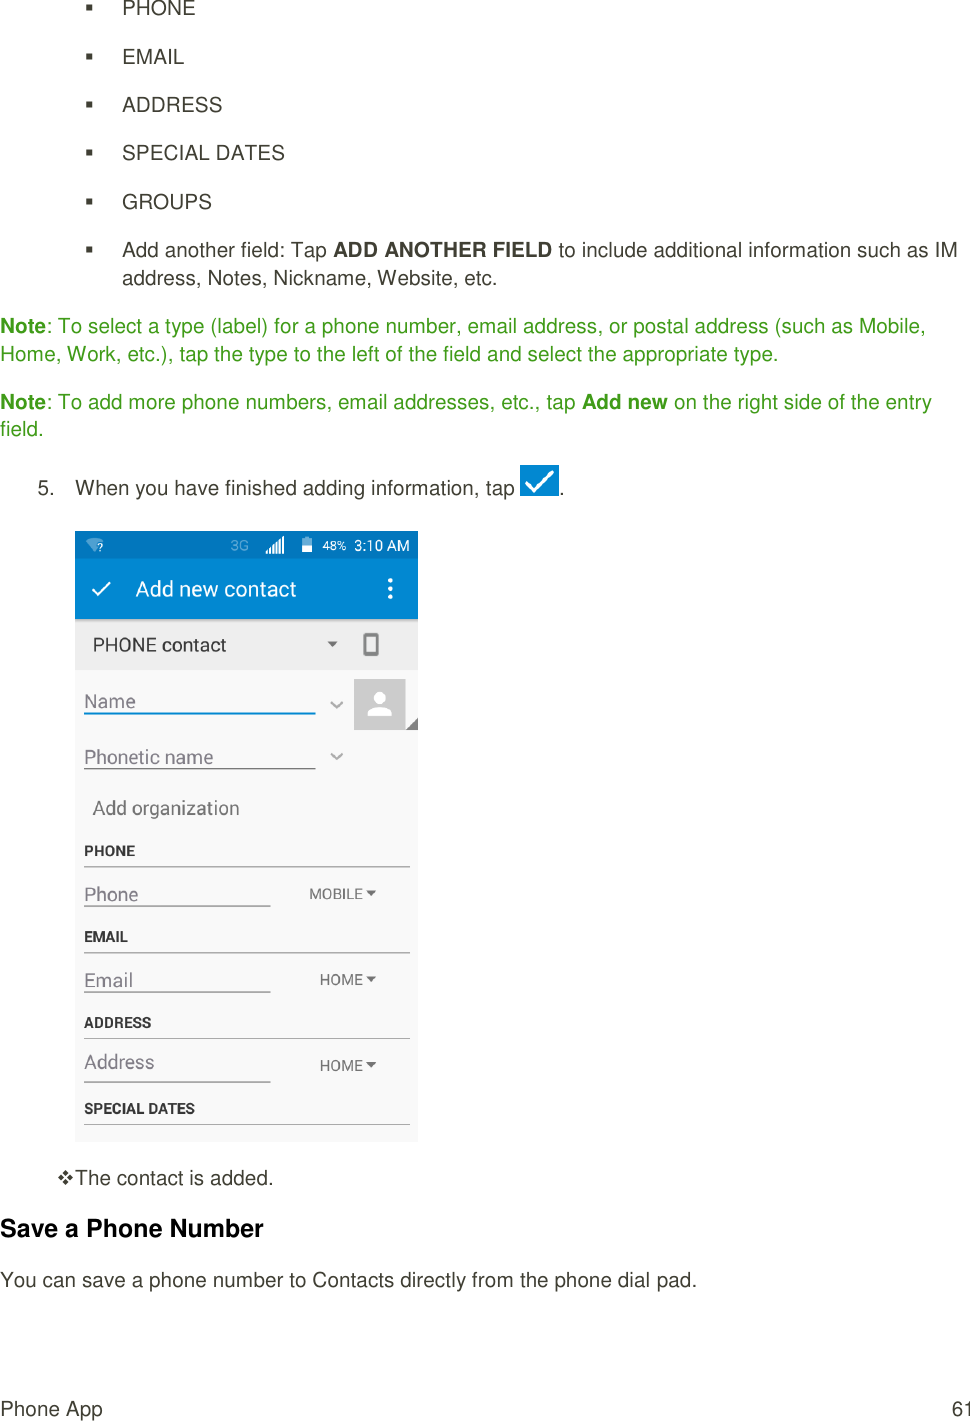
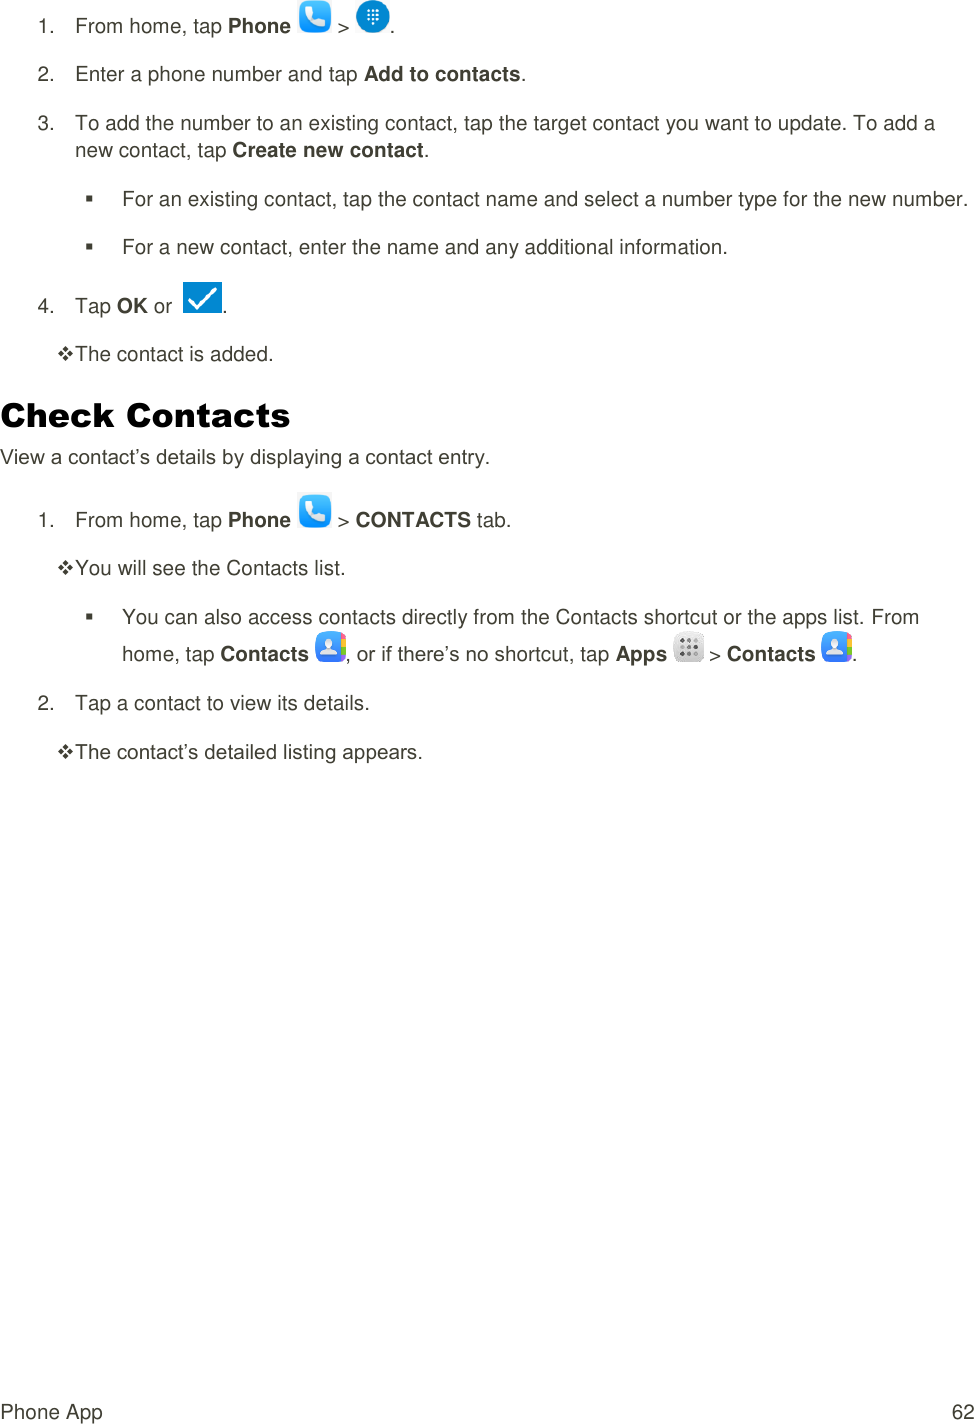
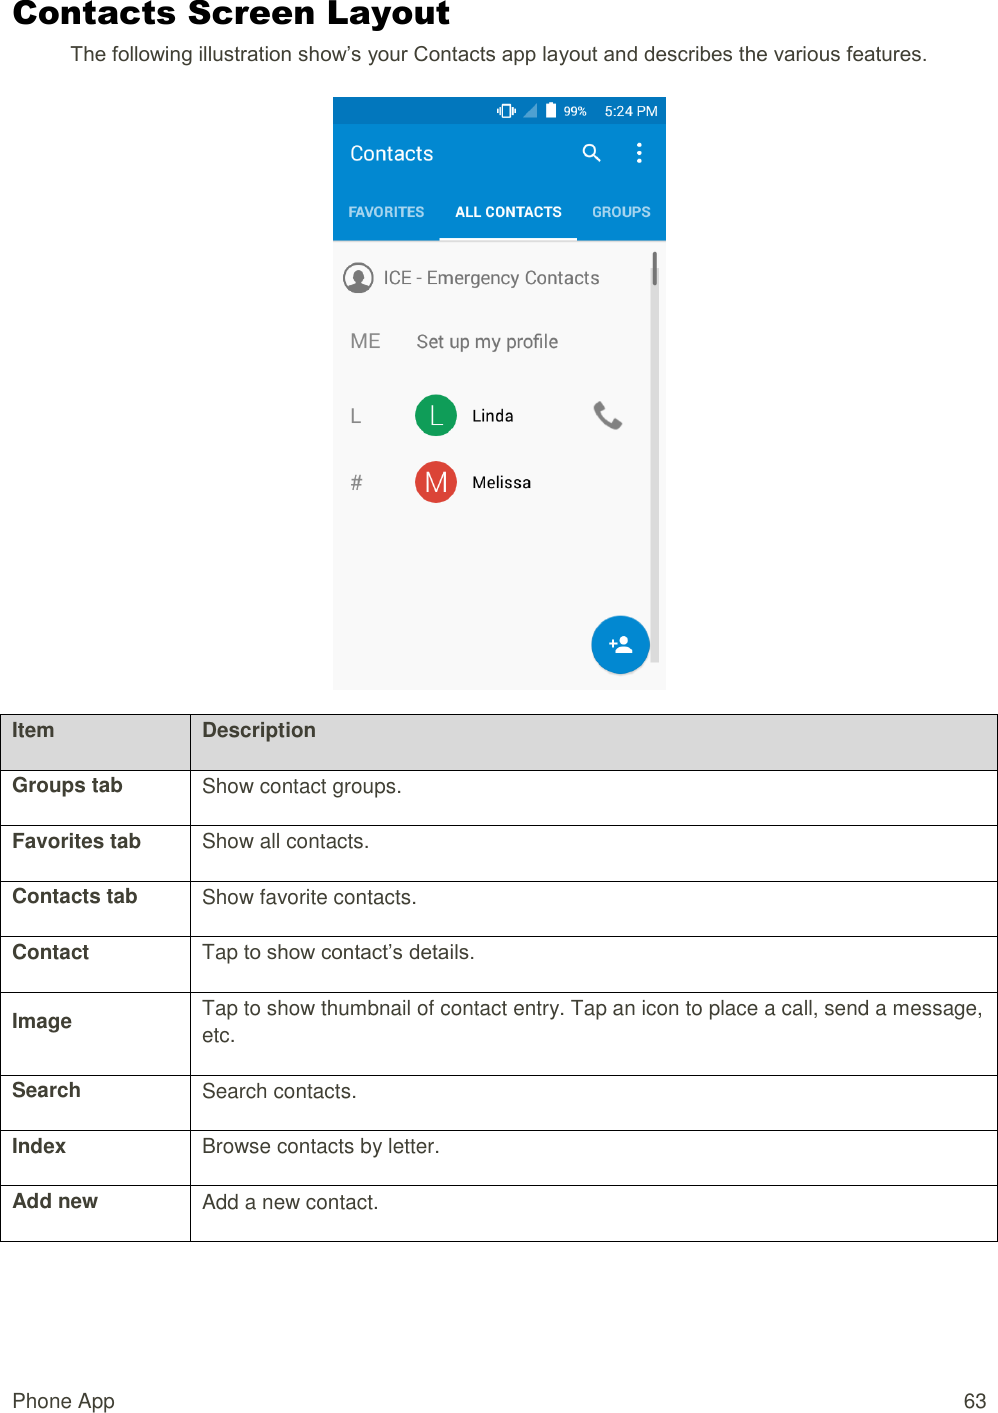
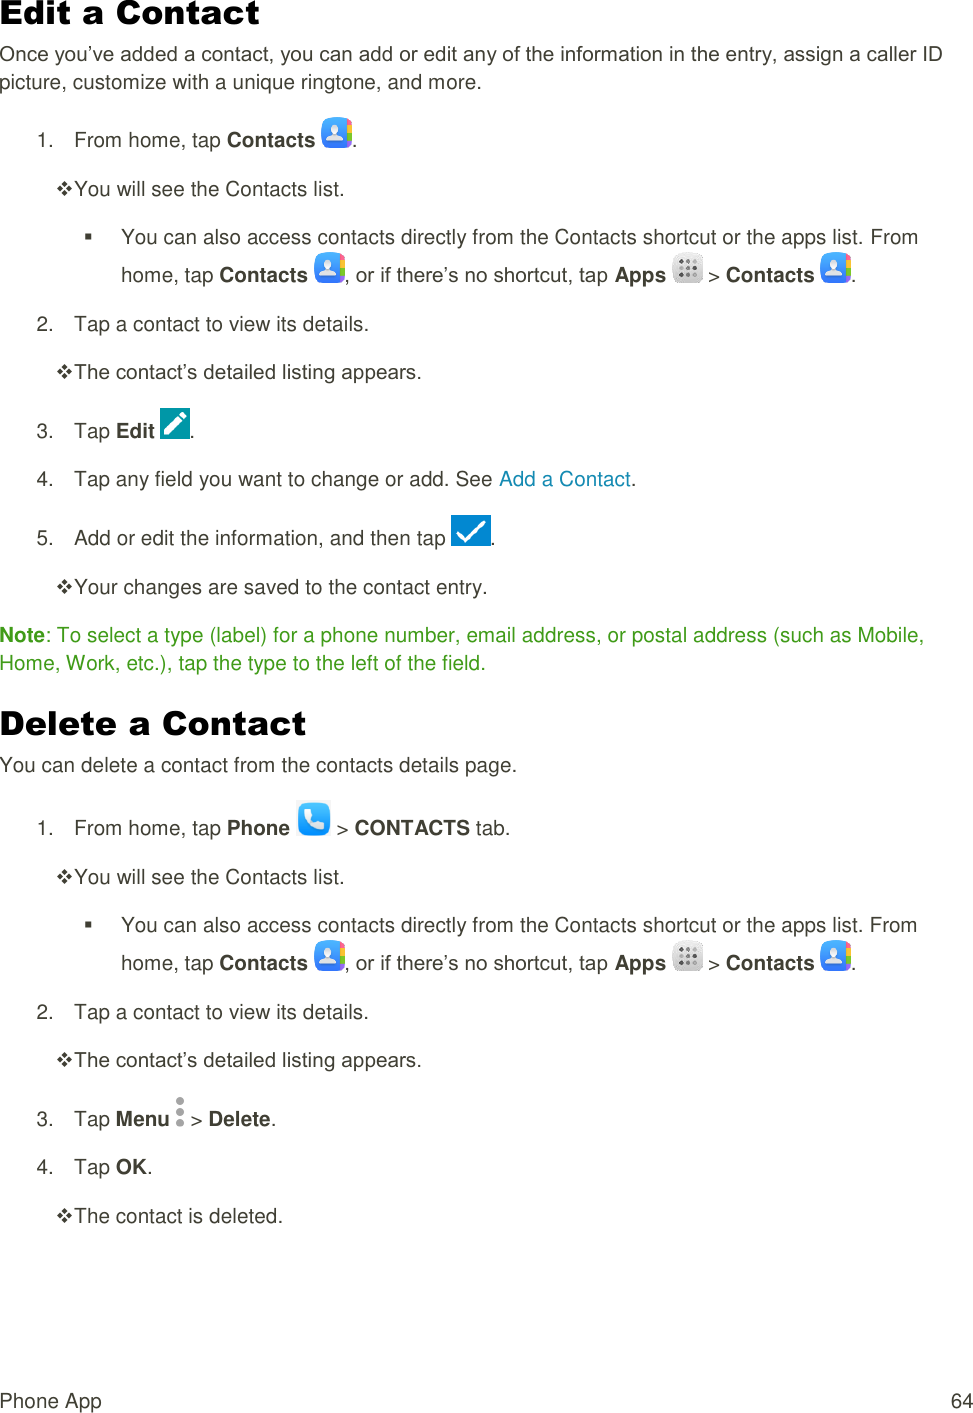
![Phone App 60 3. Configure your options. Tap a menu item to display its options. Select your options and follow the prompts to set them. Your call settings options are set. Contacts The Contacts application lets you store and manage contacts from a variety of sources, including contacts you enter and save directly in your phone as well as contacts synchronized with your Google Account, your PC, compatible email programs (including Exchange Server), and your Facebook friends. Contacts Cautions Information saved in Contacts may be lost or changed if the battery is removed for a long period or not charged. Accident or malfunction may also cause loss or change to information. It is recommended that you keep a separate copy of contacts and other important information. The company is not responsible for any damages from lost or changed contacts. Add a Contact You can add contacts from your phone’s Phone application. Enter details such as name, phone numbers, email addresses, mailing addresses, and more. 1. From home, tap Phone > CONTACTS tab. You will see the Contacts list. You can also access contacts directly from the Contacts shortcut or the apps list. From home, tap Contacts , or if there’s no shortcut, tap Apps > Contacts . 2. Tap to add a contact. The Add Contact screen appears. 3. If you have multiple account types associated with your phone, select a contact type. Select Google if you want to save contacts to your Google Account; these will be synced automatically with your Google Account online. Select PHONE as the sync account if you want your contacts on your phone only; they will not be synced with your Google Account. 4. Use the keyboard to enter as much information as you want. [Picture]: Tap the picture icon to assign a picture to the contact. Name](https://usermanual.wiki/TCL-Communication/B011/User-Guide-2646624-Page-68.png)


![Useful Apps and Features 91 ● Check Route to Destination: From the Maps app, tap the search bar, enter your current location and your destination, tap a method of transport (car, public transit, bicycle, or on foot), and then tap Search for route. Route candidates appear in a list. ● Check Detailed Operation for Maps: From the Maps app, tap Menu > Help. Hangouts Hangouts is Google's instant messaging service. Use to communicate with other Hangout users, and also use video calling. Log in to a Google account beforehand (see Google Account). Using Hangouts 1. From home, tap Apps > Hangouts . The Hangouts app will open. 2. Tap Add to start a new Hangout. 3. Type a name, email, number, or circle, or select a contact from the list. 4. Type a message start a call to chat. A chat window or a video chat window opens. Each time text is entered, the corresponding friend appears. If a friend is not in a Hangout, you will see a message. Tap Send invitation to invite them to join the Hangout. Hangouts Operations ● Ending a Chat: In the Hangouts window, flick the chat from left to right. ● Ending a Video Chat: In the video chat window, tap [red phone icon]. ● Disabling Chat History: If you don’t want to keep chat history, in the chat window, tap Menu > Turn history off. ● Delete Chat History: To delete all your chat history in the chat window, tap Menu > Delete > Delete. Note: You can use Hangouts as your phone’s default messaging app, or as a standalone IM app. If you set Hangouts as the default messaging app, the Messages app will be disabled. For more information, see Default Messaging App Settings.](https://usermanual.wiki/TCL-Communication/B011/User-Guide-2646624-Page-99.png)


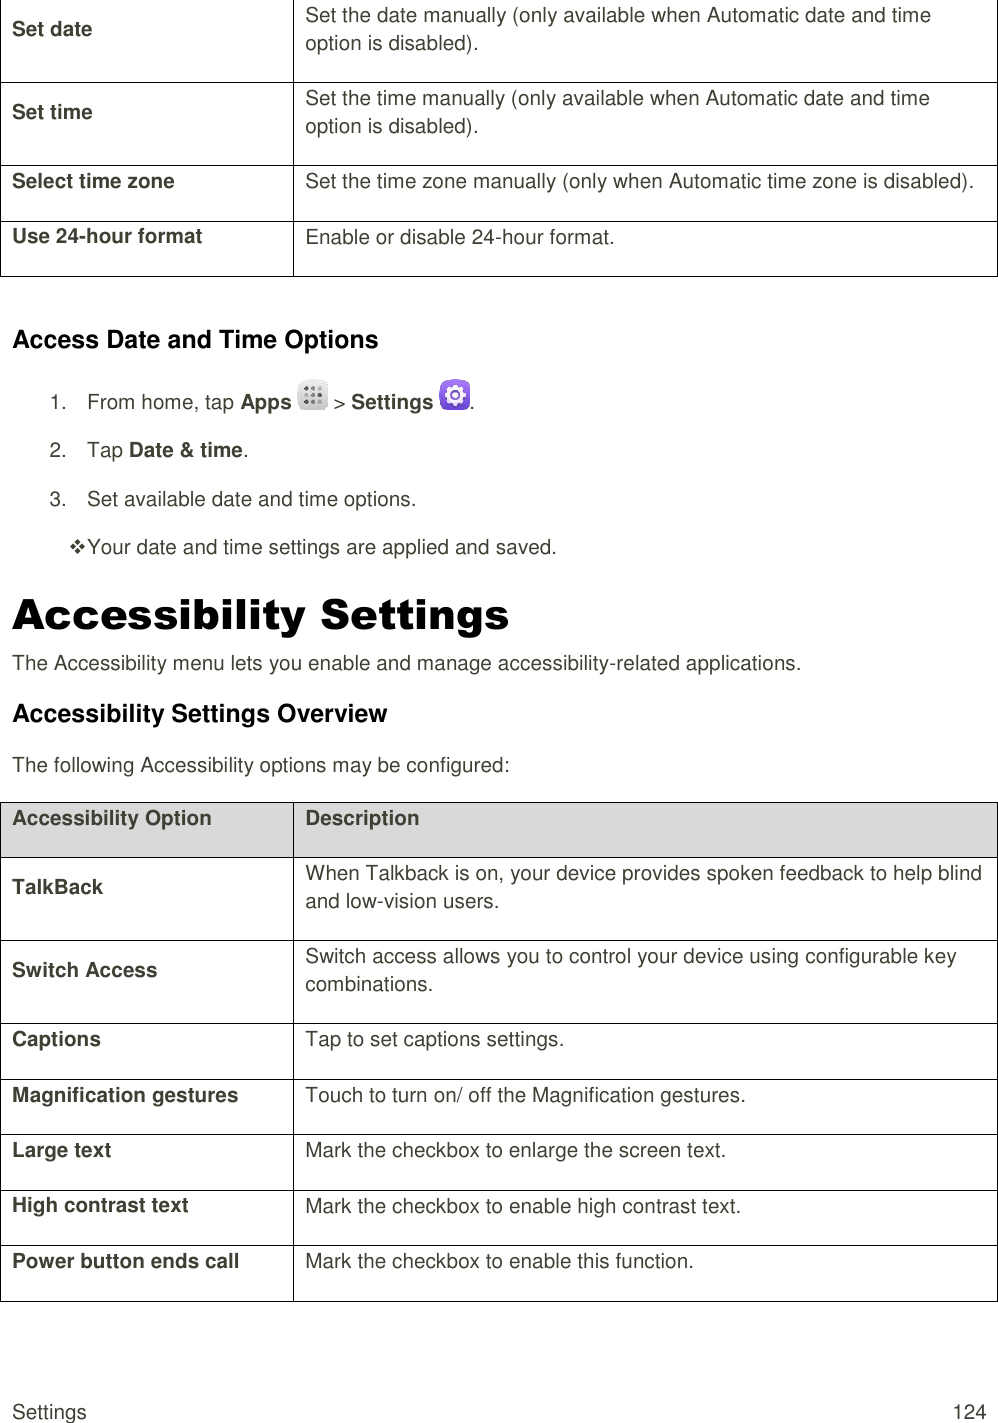
![Settings 127 Legal information Check copyright information, terms of use, etc. 4G settings Check the network provider and IP address. Model number Check the phone’s model number. HW version Check the phone’s hardware version. SW version Check the phone’s software version. Processor info Check the phone’s processor info. Android version Check the Android version number. Baseband version Check the phone’s baseband version. Kernel version Check the phone’s kernel version. Build number Check the current phone build number. Access About phone Options 1. From home, tap Apps > Settings . 2. Tap About phone. 3. Select or view available options. Your phone information is displayed. Copyright Information [Prepaid Only] ©2015 Sprint. Sprint and the logo are trademarks of Sprint. Other marks are trademarks of their respective owners.](https://usermanual.wiki/TCL-Communication/B011/User-Guide-2646624-Page-135.png)