TCL Communication B028 Car Wifi Hotspot User Manual
TCL Communication Ltd. Car Wifi Hotspot Users Manual
Users Manual

[Ride-Fi]
User Guide
[UG template version 15b_mbb
[draft version for review control]
[Sprint_TCL_Y856UB_UG_EN_092515_D1]

TOC i
Before You Begin .................................................................................................................................. 1
Table of Contents
Compatible Operating Systems (OS).................................................................................................... 1
Package Contents ................................................................................................................................. 2
SSID and Security Key ......................................................................................................................... 2
Additional Information ........................................................................................................................... 3
Parts and Functions .............................................................................................................................. 4
LED Indicators ....................................................................................................................................... 5
LED Indicator Layout .................................................................................................................... 5
LED Indicator Description ............................................................................................................. 5
Sleep Mode ................................................................................................................................... 6
SIM Card ............................................................................................................................................... 7
Handling a SIM Card ..................................................................................................................... 7
Insert a SIM Card .......................................................................................................................... 8
Remove the SIM Card .................................................................................................................. 9
Check the SSID and Security Key .............................................................................................. 10
Turn Your Device On and Off ............................................................................................................. 11
Wi-Fi (WLAN) Overview ...................................................................................................................... 15
Activate Wi-Fi (WLAN) Function ......................................................................................................... 15
Connect Windows PCs with Wi-Fi ...................................................................................................... 16
Windows 10 ................................................................................................................................. 16
Windows 8................................................................................................................................... 19
Windows 7................................................................................................................................... 22
Connect Mac Computers with Wi-Fi ................................................................................................... 24
Connect iDevice/iPod Touch/iPad ...................................................................................................... 27
Connect an iDevice or an iPod Touch ........................................................................................ 27
Connect an iPad ......................................................................................................................... 31
Connect an Android™ Device ............................................................................................................. 36
USB Port Layout ......................................................................................................................... 42
Web UI Overview ................................................................................................................................ 44
Web UI Window .................................................................................................................................. 45
Home ................................................................................................................................................... 46
Connected Devices ............................................................................................................................. 46
TOC ii
Settings Tab ........................................................................................................................................ 48
Wi-Fi Basic Settings .................................................................................................................... 48
Wi-Fi Advanced Settings ............................................................................................................. 51
Mobile Network Settings ............................................................................................................. 52
Device Settings ........................................................................................................................... 55
Advanced Router Settings .......................................................................................................... 58
Notification .......................................................................................................................................... 63
About ................................................................................................................................................... 64
Support Tab ........................................................................................................................................ 65
Troubleshooting .................................................................................................................................. 66
Specifications ...................................................................................................................................... 68
Safety Precautions .............................................................................................................................. 70
Specific Absorption Rates (SAR) for Wireless Device ........................................................................ 71
FCC Radio Frequency Emission ......................................................................................................... 71
FCC Notice .......................................................................................................................................... 72
Index ............................................................................................................................................................ 74

1
Introduction
The following topics describe the basics of using this guide and your new mobile broadband device.
Before You Begin
Thank you for purchasing your new Ride-Fi. The following topics explain how best to use this guide to get
the most out of your mobile broadband device.
Before Using Your Device
Read Safety and Notices thoroughly for proper usage.
Accessible services may be limited by subscription contract conditions.
Guide Usage Notes
Note that most descriptions in this guide are based on your device's default settings at the time of
purchase.
Screenshots and Key Labels
Screenshots and Key labels are provided for reference only. Actual windows, menus, etc. may differ in
appearance.
Other Notations
In the user guide, the mobile broadband device may be referred to either as "mobile broadband device,"
"hotspot," "device," or "Wi-Fi router."
Compatible Operating Systems (OS)
The table below outlines the compatible operating systems (OS) for your device. Use outside these
environments may affect performance. Additional factors (hardware, connected peripherals, installed
applications, etc.) may also affect performance.
● For computer support, OS version upgrade information, etc., see the corresponding
manufacturer's product support documentation.
● The information for operating system (compatible OS) listed below is the current information for
your device sold as of March 2016.
Item
Description

2
Item Description
Compatible operating systems (OS)
Microsoft Operating Systems Vista 32 and 64 bit
Microsoft Operating Systems Windows7 32 and 64
bit
Microsoft Operating Systems Windows8 32 and 64
bit
Macintosh Operating Systems OSX 10.4 and later
Linux Operating Systems Ubuntu LTS versions
12.04 and later
Google Operating System for Chrome OS
Available hard disk capacity 50 MB required (100 MB+ recommended)
(common to all Operating Systems listed above)
Recommended resolution
1024 x 768 or higher
Compatible browsers
Internet Explore 8 and later
Safari 5.1 and later
Chrome 36 and later
FireFox 31 and later
Package Contents
See below for details on everything you will find in the box for your Ride-Fi
●
●
Ride-Fi
●
Get Started guide
SSID and Security Key
Important Information booklet
Before connecting Wi-Fi devices to your Ride-Fi, you will need to confirm the SSID (network name) and
security key.
3
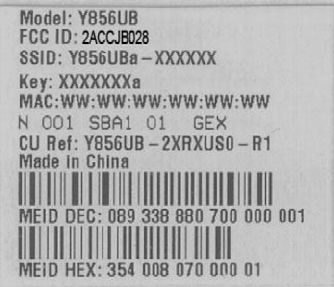
■ Open the back cover of the device, and you will see the MEID label.
You will see the SSID (network name) and Key.
Note: There are two SSIDs set for your Ride-Fi. By default, [SSID and Key] is set for [Main Wi-Fi]
Additional Information
.
The following list describes additional information useful to know before you begin using your Ride-Fi.
● Your mobile broadband device accommodates software updates. Always use the latest software.
● Note that connection speeds may drop or connections may be disabled depending on line traffic
or connection environments.
● When using WLAN overseas, change the settings according to the laws of those countries.
● To enhance security, it is recommended that you set apasscode for unlocking the screen.
4
Get Started
The following topics give you all the information you need to set up your device and wireless service the
first time.
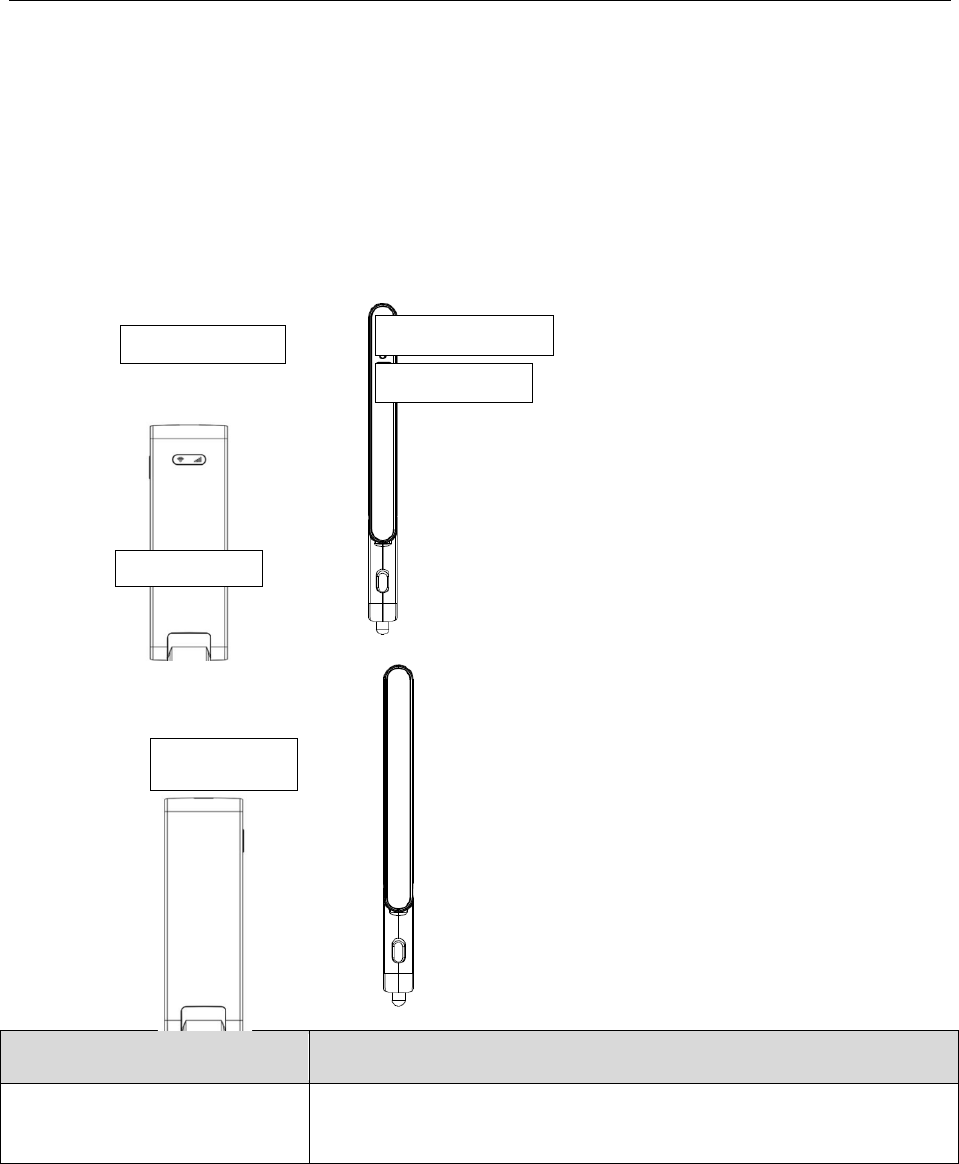
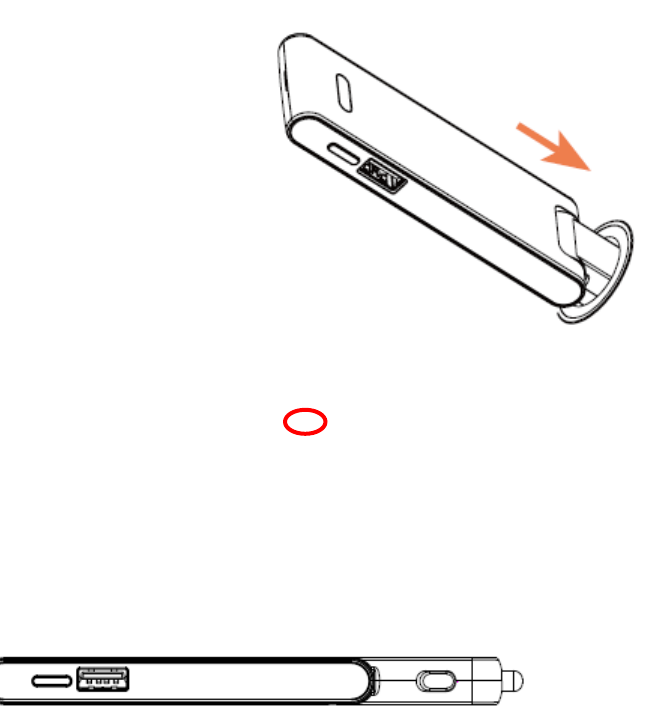
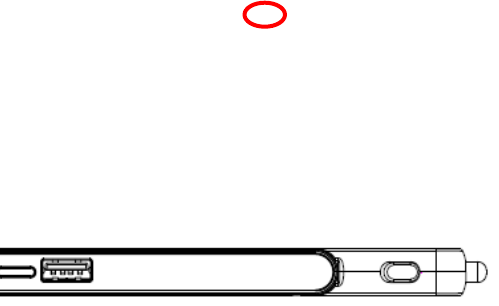
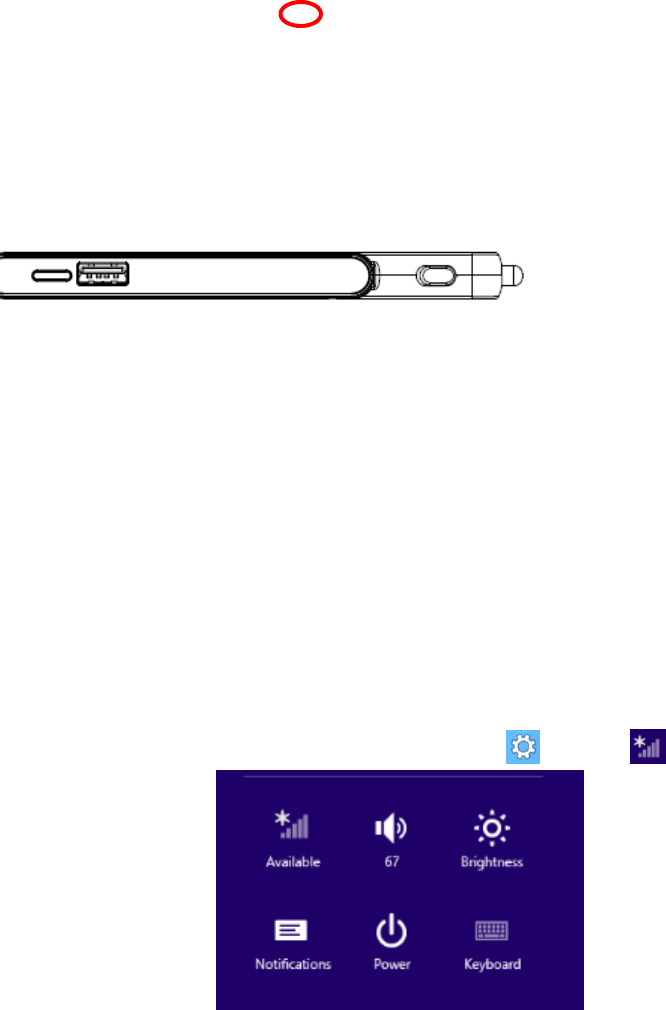
Parts and Functions
Learn your device's primary parts and functions.
Device Layout
The following illustration outlines your device's primary external features and buttons.
Part Description
Wi-Fi indicator to displays Wi-Fi signal status, and network indicator to
display network connection status.
LED Indicators
Back Cover
Power button
USB port
Car charger
LED Indicators
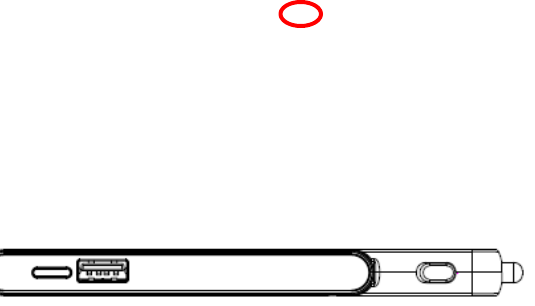
5
Part Description
Power input of the device, to be plugged into the car’s 12V or 24V
power socket to get power for the device.
Car Charger
USB 2.0 for charging other devices.
USB port
Remove the cover to remove or insert the SIM card.
Backcover
Push to power on or off, reboot or wake up from sleep mode.
Power button
LED Indicators
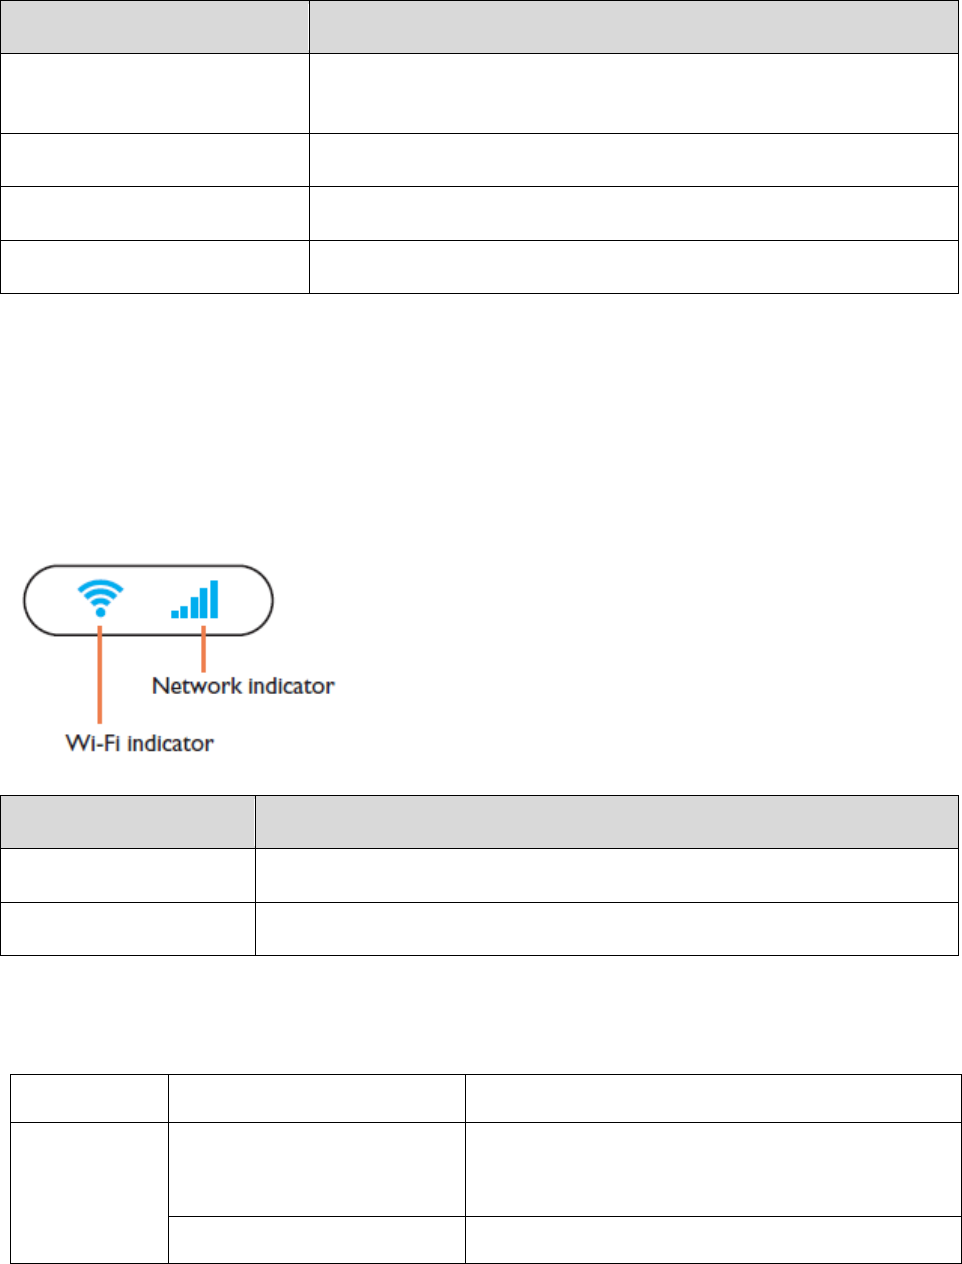
The following topics describe the details of your device's LED indicators.
LED Indicator Layout
Explore your device's LED Indicator layout.
Part
Description
Displays Wi-Fi signal status
Wi-Fi indicator
Display network connection status
Network indicator
LED Indicator Description
The description for the LED as bellow:
Indicator LED status Description (state)
Network Signal
LED
Off
1,Device power off
2,Power saving mode
Flashing Red(0.5s)
1,Network searching
6
Flashing Blue (1s)
1,Registered and dialing into 4G(LTE) network
Solid Blue
1, Dialed to 4G network
2, During power on/off (3s)
Flashing Lilac (1s)
Registered and dialing into 1X or 3G (EVDO) network
Solid Lilac Dialed to 3G/2G network
Solid Red
1,No signal (such as No Service, Limited Service, No
Sim, Invalid Sim, Pin Lock etc)
Flashing Red(1s)
1, Roaming to other networks, need user to confirm
on WebUI.
WIFI LED
Off
1,Device power off
2,Power saving mode
Blue
1,During power on/off (3s)
2,WiFi active
Sleep Mode
If your mobile broadband device is not used for a while, the device enters sleep mode and LED turns off
automatically.
■ Press the Power key to wake the LED indicator.
7
The LED indicators will light on indicate current status.
If there have been no Wi-FI access or operation of your device, your device enters sleep
mode to save power.
There are two layers ofsleep mode:
If no transmissions or operation of your device in 10mins, LED indicators will be OFF, but
WLAN is still enabled; LED indicatorturn and exit sleep mode when Wi-Fi access begin or
operate your device. .
If no transmissions or operation of your device in 30mins, WLAN will be disabled.
Pressthe Power key to turn on LED indicatorand exit sleep mode. WLAN function is enabled
and Wi-Fi devices can reconnect to the Ride-Fi
The time required to recover the network connection varies by environment, settings, etc.
.
SIM Card
The SIM card is an IC card containing your device's device number and other customer information.
Note
Handling a SIM Card
: Your device's SIM card is preinstalled.
Keep the following in mind when handling a SIM card.
● Customer is responsible for any damage caused by inserting the SIM card in another-brand IC
card reader, etc. The company is not responsible in such case.
● Always keep the IC chip clean.
● Wipe clean with a dry, soft cloth.
● Avoid applying labels. May damage the SIM card.
● See instructions included with the SIM card for handling.
● The SIM card is the property of the company.
● The SIM card is replaceable (at cost) in case of loss/damage.
● Return the SIM card to the company when cancelling subscription.
● Returned SIM cards are recycled for environmental purposes.
● Note that SIM card specifications and performance may change without notice.
● It is recommended that you keep a separate copy of information that is stored on the SIM card.
The company is not responsible for damages from stored information that is lost.
● Always follow emergency procedures to suspend service if your SIM card or device (SIM card
inserted) is lost or stolen. For details, contact Customer Service.
8
● Always power off the mobile broadband device before inserting or removing the SIM card.
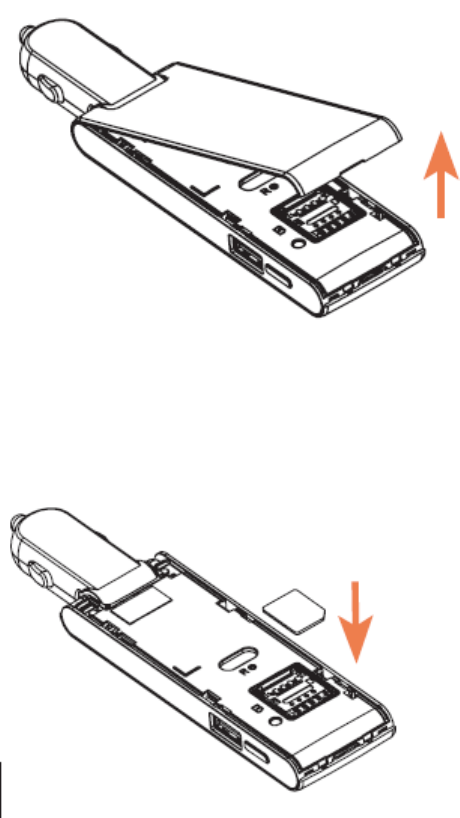
Insert a SIM Card
Follow these instructions to insert a SIM card. Remember to power off your device before inserting a SIM
card.
Note
1. Remove the back cover.
: Your device's SIM card is preinstalled. These instructions are for reference only.
2. Open the SIM card holder and put in the SIM card
[illustration]
3. Close the back cover
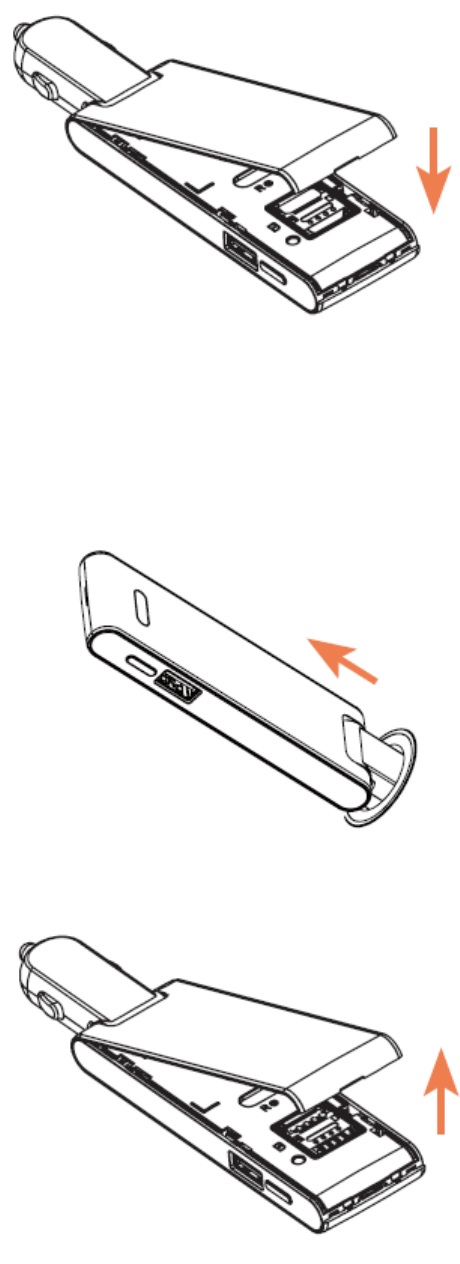
9
Removethe SIM Card
Follow these instructions to remove the device's SIM card.
1. Plug out the device from the car's power socketto power off the device before removing the SIM
card.
2. Remove the back cover.
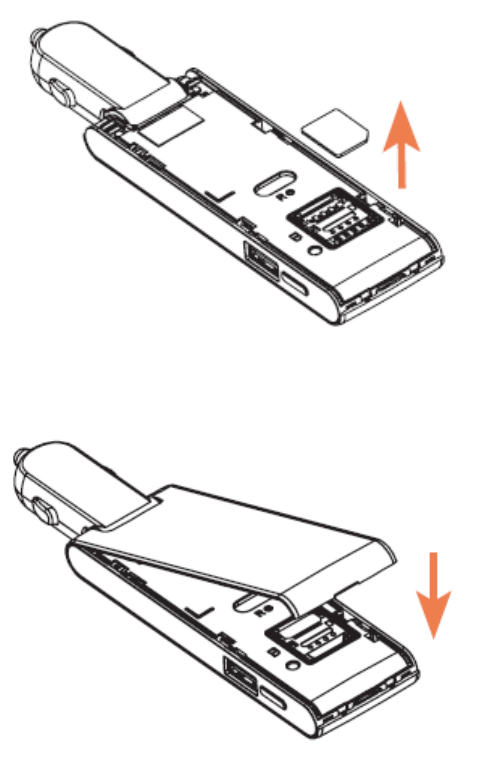
10
3. Open the SIM card cover and remove the SIM card.
4. Attach the back cover.
Check the SSID and Security Key
Your device's default SSID (network name) and security key are printed on a label beneath the device's
battery. Turn the device off and remove the battery to access this information.

11
1. Remove the back cover.
2. Check the SSID (network name) and security key printed on the label beneath the battery.
3. Replace the back cover.
Turn Your Device On and Off
The instructions below explain how to turn your device on and off, or to restart your device if it cannot be
powered on and off using the Power key
Turn Your Device On
■ Insert the device into the 12v or 24v power socket of the car
12
■ Press and hold the Power
Your device's Wi-Fi function activates and automatically connects to the Internet.
keyfor 3 seconds.
Turn YourDevice Off
■ Press and hold the Power key for 3 seconds, or plug out the device from the 12v or 24v power
socket

13
Your device will power off.
Restart Your Device
If your device will not turn on or off using the Power key, use the action below to restart it.
1. Press and holdpower key for 10 seconds.
14
Your device will restart.
2. Release the keys after Wi-Fi has restarted.
3. You can also restart your device by plug out and plug in the device from the 12v or 24v power
socket.
Note: Restarting your device does not reset the device settings.

15
Connect with Wi-Fi (WLAN)
The following topics outline basic features and operations of your device's Wi-Fi (WLAN) connections,
including connecting with various OS and device types.
Wi-Fi (WLAN) Overview
Below are some basics of your device's Wi-Fi (WLAN) function.
Wi-Fi (WLAN) Information
● Advanced Settings
●
: Change your devices Wi-Fi (WLAN) settings as required.
Simultaneous Connection
●
: Use your device to connect up to 15Wi-Fi devices simultaneously.
Automatic Updates for Optimizing Wi-Fi Connection: When connected by Wi-Fi, connection
optimizing settings may be automatically received and updated.
Wi-Fi (WLAN) Usage Cautions
For added security, it is recommended that you change the default network name (SSID) and security
key (WPA) after setting up your device.
Wi-Fi (WLAN) Overview
● Your device supports IEEE 802.11 b/g/n standards. Connect Wi-Fi devices (PC, game console,
etc.) via Wi-Fi for wireless data transfers.
● Enter Wi-Fi router's SSID and WPA keys to connect Wi-Fi devices.
These settings should be performed when the device is connected the first time to another
Wi-Fi device. Thereafter, simply activate Wi-Fi (WLAN) to automatically connect your mobile
broadband device to the Wi-Fi (WLAN) device.
Activate Wi-Fi (WLAN) Function
Follow the instructions below to activate your device's Wi-Fi function and connect to the Internet via an
available 4G LTE, 4G, or 3G connection. Your device searches for and makes a connection automatically
upon powering up. Use the Web UI to select a network.
■ Insert the device into the 12v or 24v power socket of the car
16
■ Press and hold the Power
Your device's Wi-Fi function activates and automatically connects to the Internet.
key for 3 seconds
Connect Windows PCs with Wi-Fi
The following topics describe how to connect your device with various versions of Windows PCs via Wi-Fi.
[add OS instructions, such as for Windows 10, as necessary]
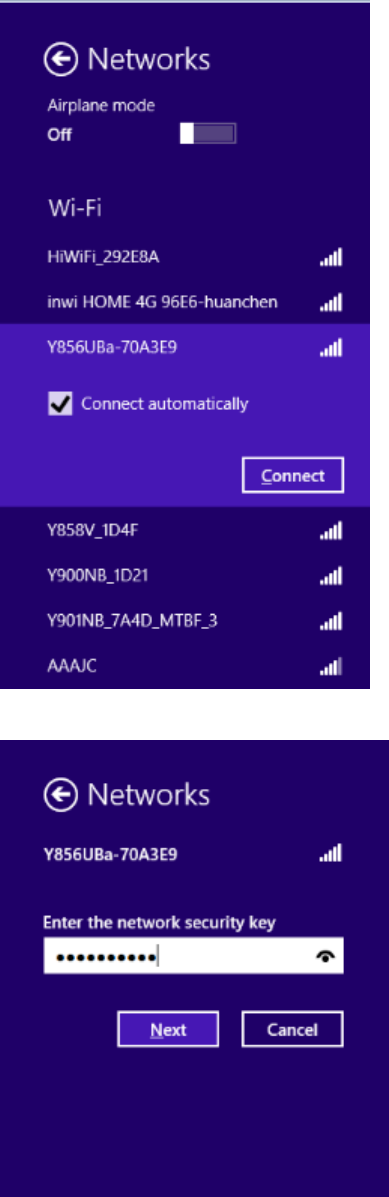
Windows10
Connect Windows 10 PCs to your device with Wi-Fi.
4. Insert the device into the 12v or 24v power socket of the car

17
5. Press and hold the Power
Your device's Wi-Fi function activates and automatically connects to the Internet.
key for 3 seconds
6. Activate your PC's Wi-Fi function.
Consult your PC's operation manual for details on activating Wi-Fi.
7. On your PC, click Start>Settings>Network &Internet
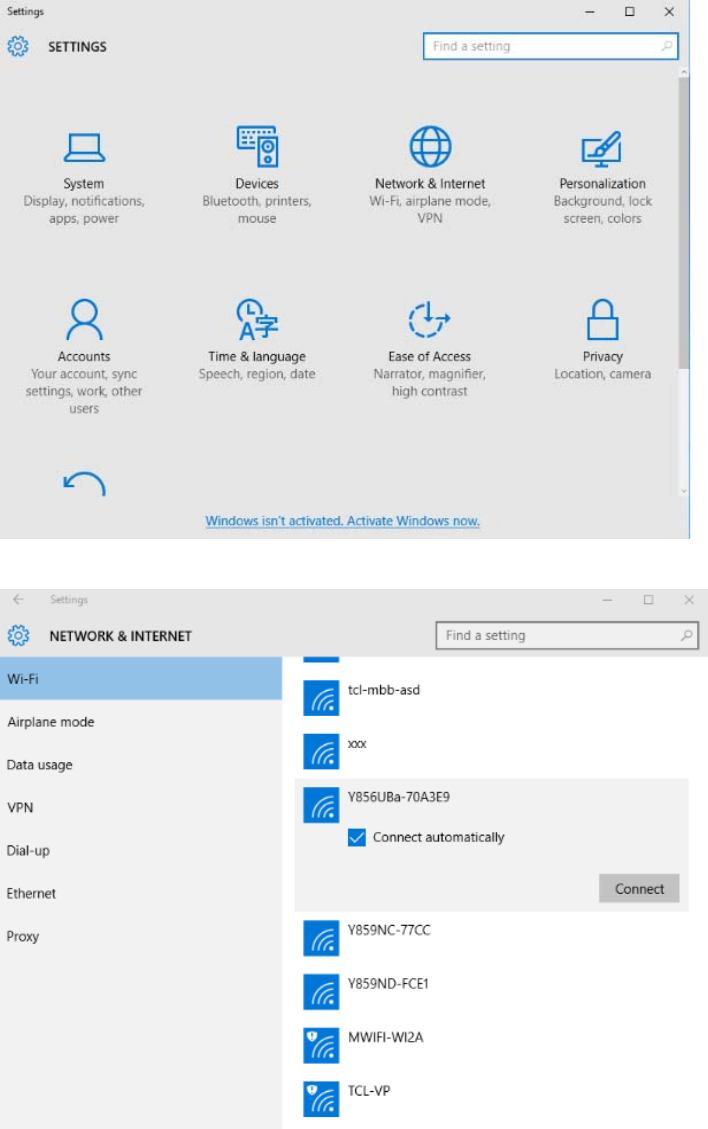
18
8. Select your device's SSID from the list, and click Connect.
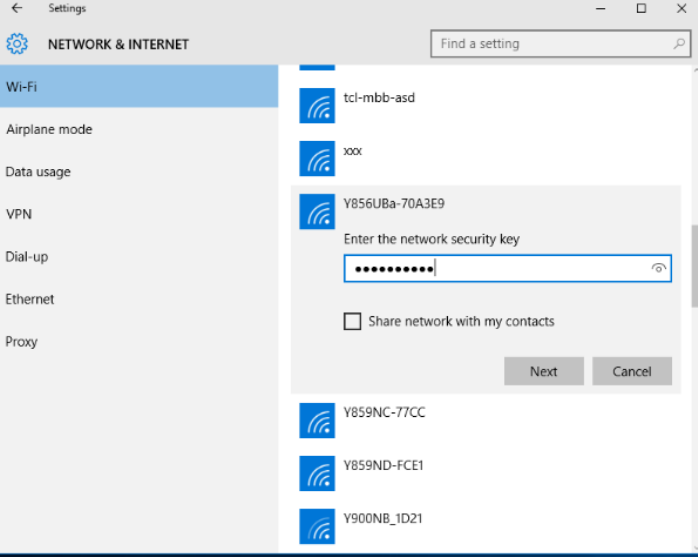
19
9. Enter the security key (WPA) and then click Next
The PC connects to your device. The connected status icon on your device will show an
additional device has been connected.
.
Windows 8
Connect Windows 8 PCs to your device with Wi-Fi.
1. Insert the device into the 12v or 24v power socket of the car
20
2. Press and hold the Power
Your device's Wi-Fi function activates and automatically connects to the Internet.
key for 3 seconds
3. Activate your PC's Wi-Fi function.
Consult your PC's operation manual for details on activating Wi-Fi.
4. On your PC, move the cursor to the upper-right or lower-right corner (or swipe from the right side
on a touchscreen PC) and select >Network .
21
5. Select your device's SSID from the list, and click Connect
6. Enter the security key (WPA) and then click
.
Next
The PC connects to your device. The connected status icon on your device will show an
additional device has been connected.
.

22
Windows 7
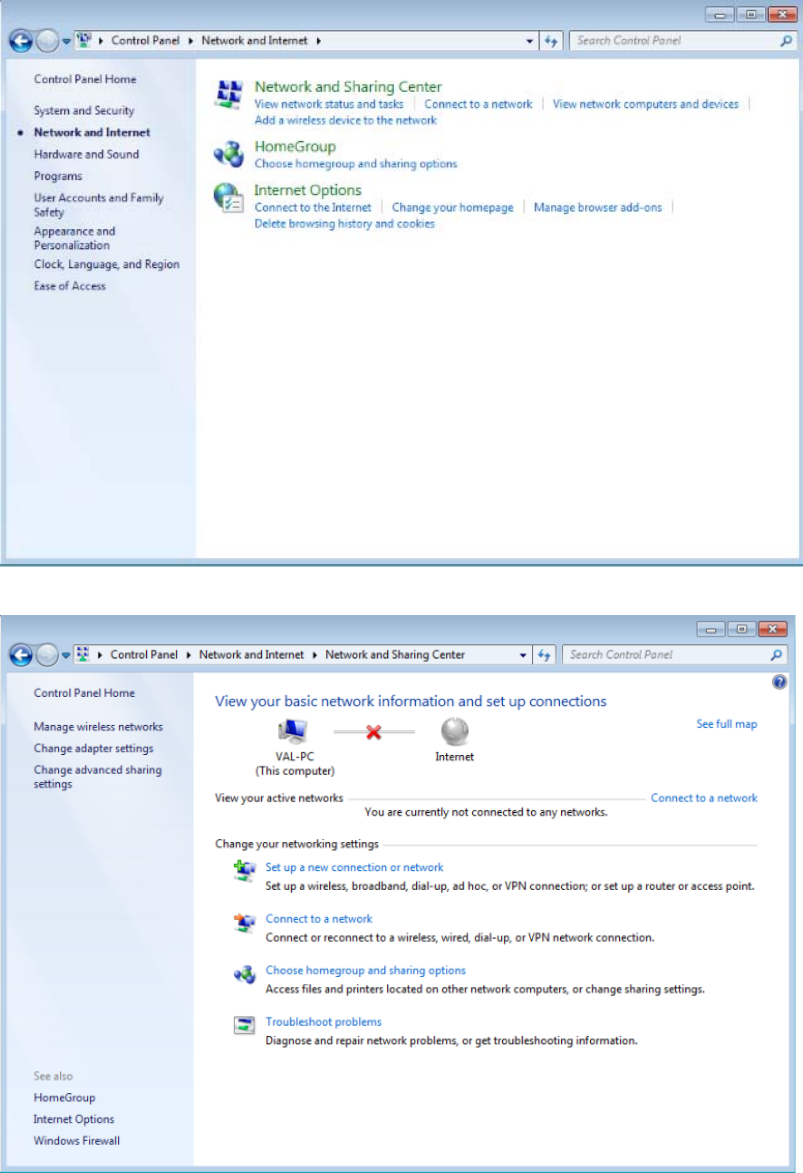
Connect Windows 7 PCs to your device with Wi-Fi.
1. Insert the device into the 12v or 24v power socket of the car.
2. Press and hold the Power
Your device's Wi-Fi function activates and automatically connects to the Internet.
key for 3 seconds.
3. Activate your PC's Wi-Fi function.
Consult your PC's operation manual for details on activating Wi-Fi.
23
4. On your PC, click Start>Control Panel>Network and Internet>Network and Sharing Center
5. Click
.
Connect to a network.
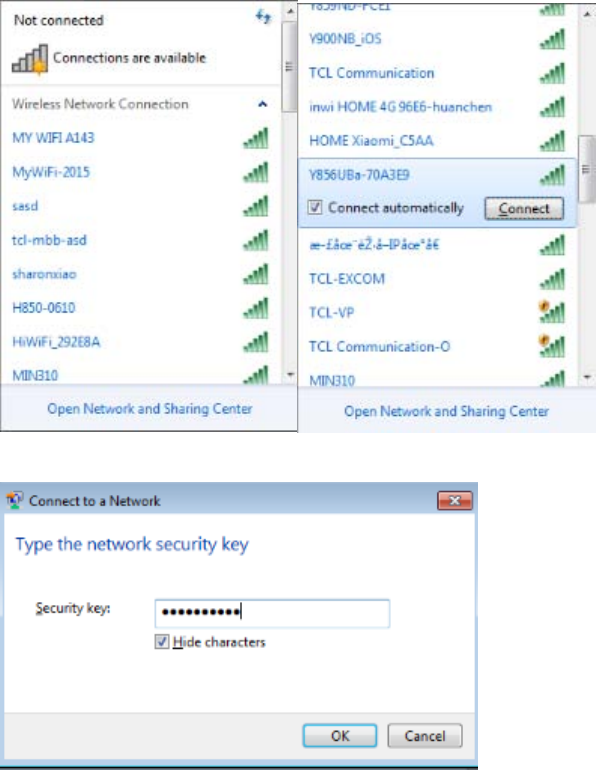
24
6. Select your device's SSID from the list, and click Connect
7. Enter the security key (WPA) and then click
.
OK
The PC connects to your device. The connected status icon on your device will show an
additional device has been connected.
.
Connect Mac Computers with Wi-Fi
Follow the instructions below to connect a Mac computer to your device via Wi-Fi.
Note
1. Insert the device into the 12v or 24v power socket of the car.
: The operations depicted are based on Mac OS X 10.10.5, with Wi-Fi security set to WAP2.
25
2. Press and hold the Power
Your device's Wi-Fi function activates and automatically connects to the Internet.
key for 3 seconds.
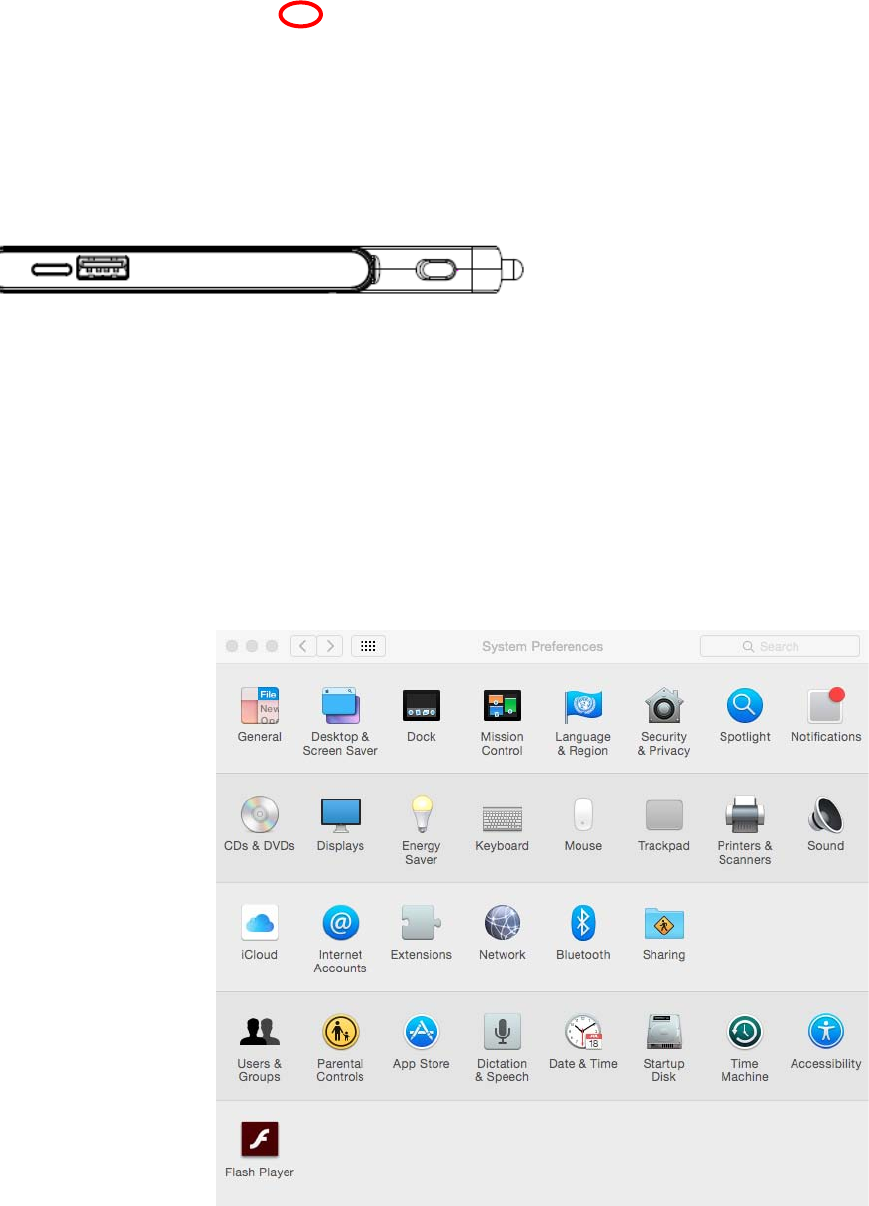
3. On your Mac, in the Apple menu, click System Preferences…>Network.
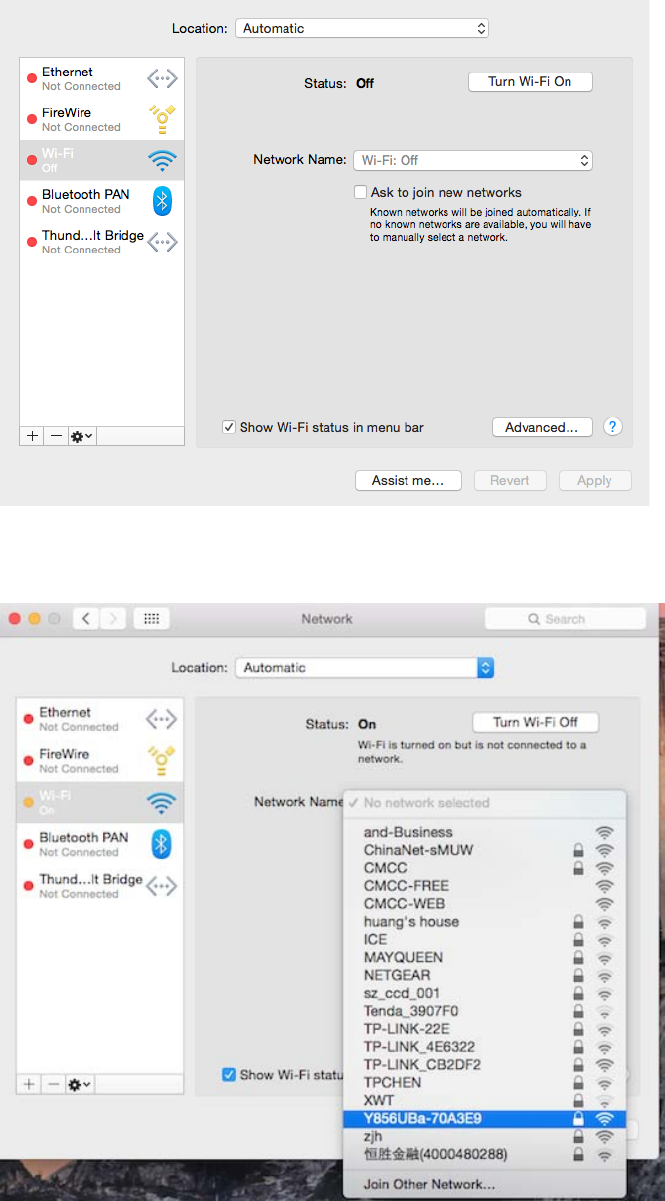
26
4. Click Wi-Fi>Turn Wi-Fi On
Your computer's Wi-Fi function activates.
.
5. Select your device's SSID from the Network Name pulldown list.
27
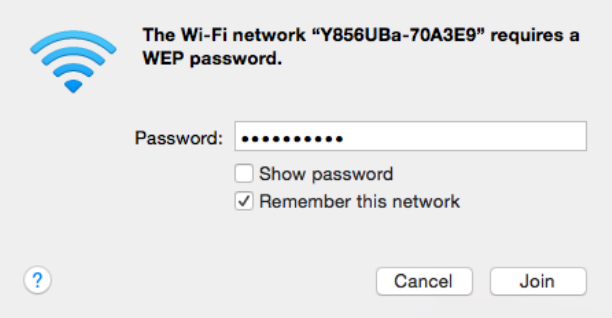
6. Enter the security key (WPA) in the Password field, check Remember this network, and then
click Join
The computer connects to your device. The connected status icon on your device will show an
additional device has been connected.
.
Connect iDevice/iPod Touch/iPad
The following topics outline how to connect your iDevice, iPod Touch, or iPad to your device via Wi-Fi.
Connect an iDevice or an iPod Touch
Follow the instructions to connect your iDevice or iPod Touch to your device using Wi-Fi.
Note: The operations below are based on your iDevice or iPod Touch Wi-Fi security set to [xxx]
1. Insert the device into the 12v or 24v power socket of the car.
.
28
2. Press and hold the Power
Your device's Wi-Fi function activates and automatically connects to the Internet.
key for 3 seconds.
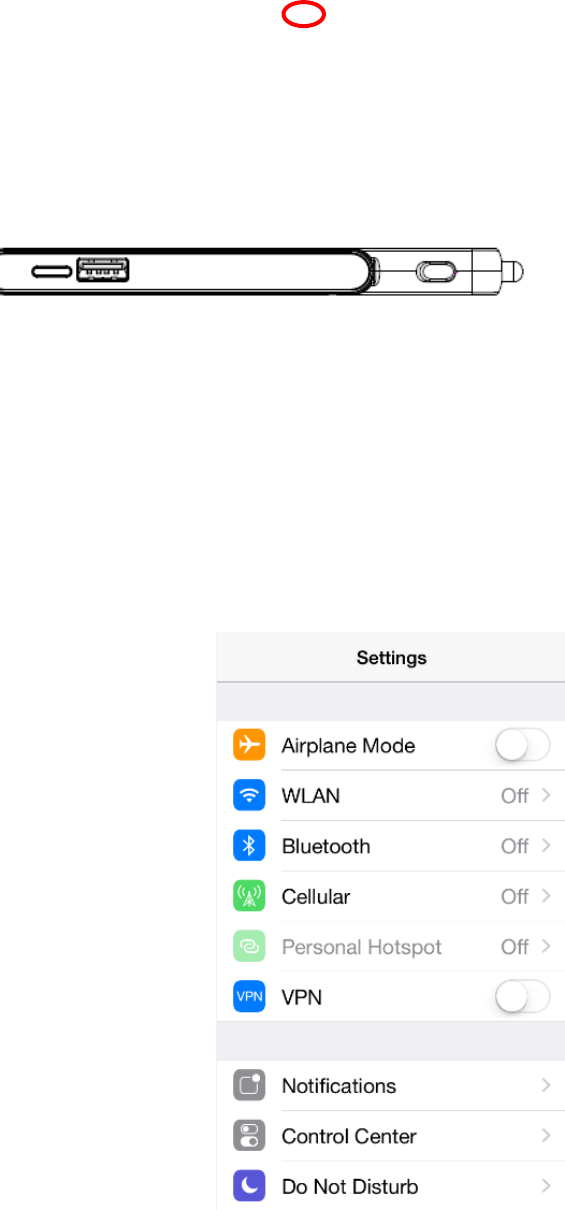
3. Select Settings>Wi-Fi.
29
4. Select Turn on Wi-Fi
The iDevice or iPod Touch's Wi-Fi function activates.
.
Y856UBa
30
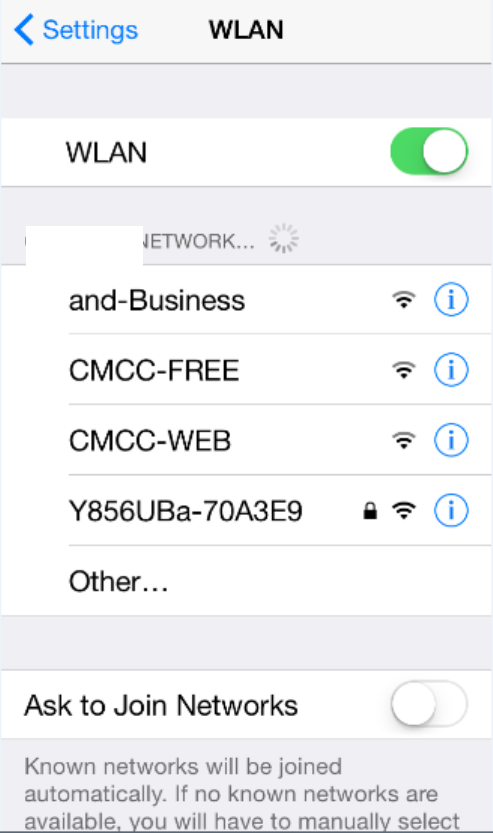
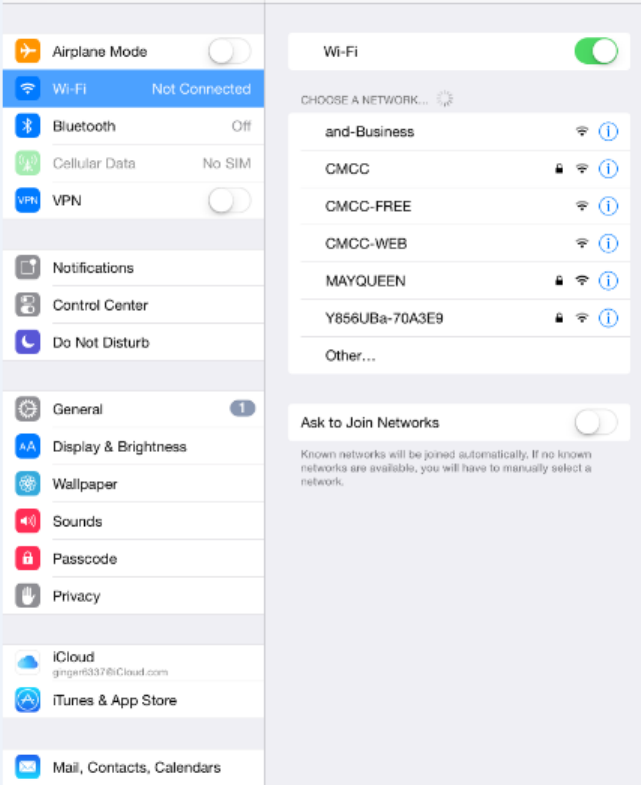
5. In the Choose a Network list, tap the device's SSID.
31
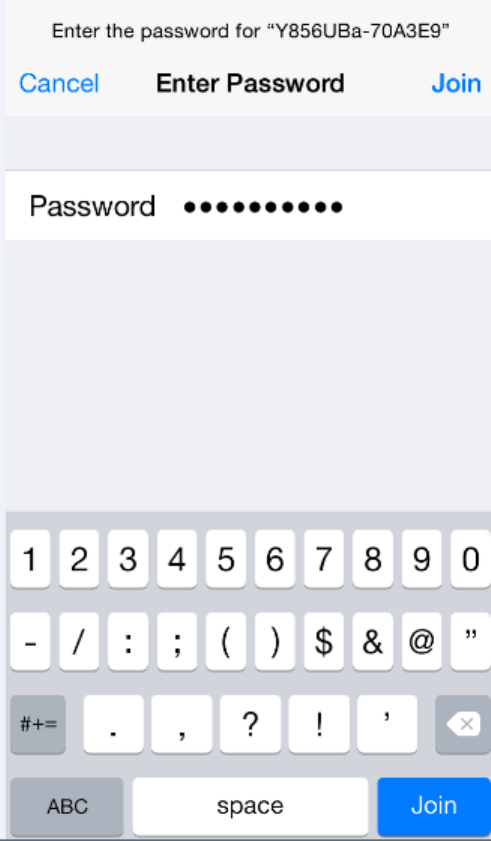
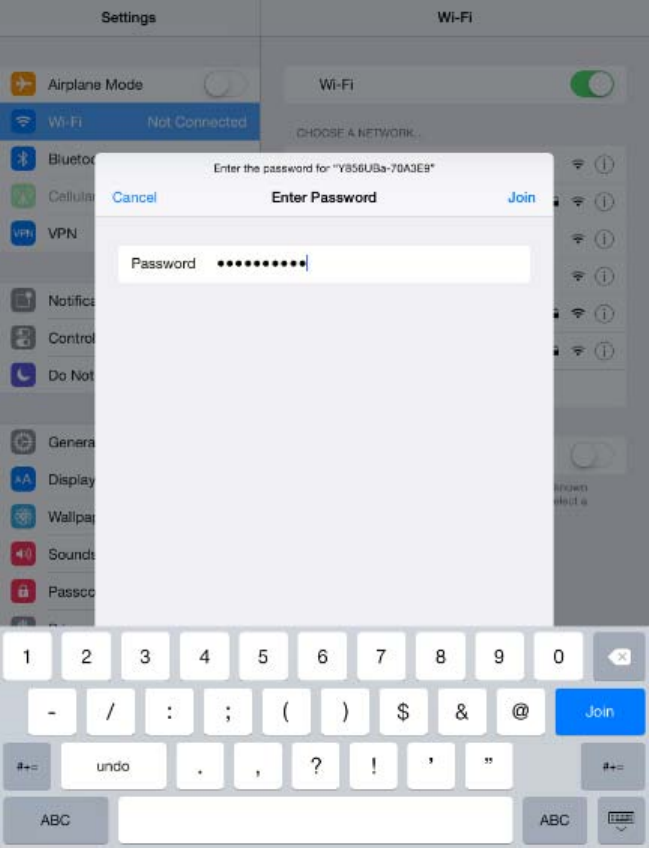
6. Enter the security key (WPA) and then tap Join
The iDevice or iPod Touch connects to your device. The connected status icon on your device
will show an additional device has been connected.
.
Connect an iPad
Follow the instruction to connect your iPad to your device using Wi-Fi.
Note: The operations below are based on your iPad Wi-Fi security set to [xxx]
1. Insert the device into the 12v or 24v power socket of the car.
.

32
2. Press and hold the Power
Your device's Wi-Fi function activates and automatically connects to the Internet.
key for 3 seconds

33
3. Select Settings>Wi-Fi.
34
4. Select Turn on Wi-Fi
The iDevice or iPod Touch's Wi-Fi function activates.
.
35
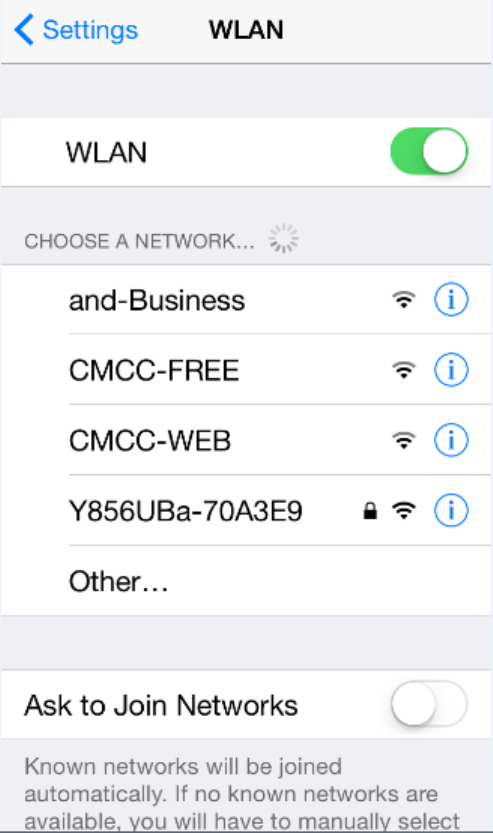
5. In the Choose a Network list, tap the device's SSID.
36
6. Enter the security key (WPA) and then tap Join
The iPad connects to your device. The connected status icon on your device will show an
additional device has been connected.
.
Connect an Android™ Device
You can share your device's connection with compatible Android devices, such as wireless devices,
tablets, and Chromebook computers.
Note: The operations below are based on generic Android devices with Wi-Fi security set to [xxx]
1. Insert the device into the 12v or 24v power socket of the car.
.
Operation may vary depending on Android device type. See your Android device user guide for details.

37
2. Press and hold the Power
Your device's Wi-Fi function activates and automatically connects to the Internet.
key for 3 seconds.
38
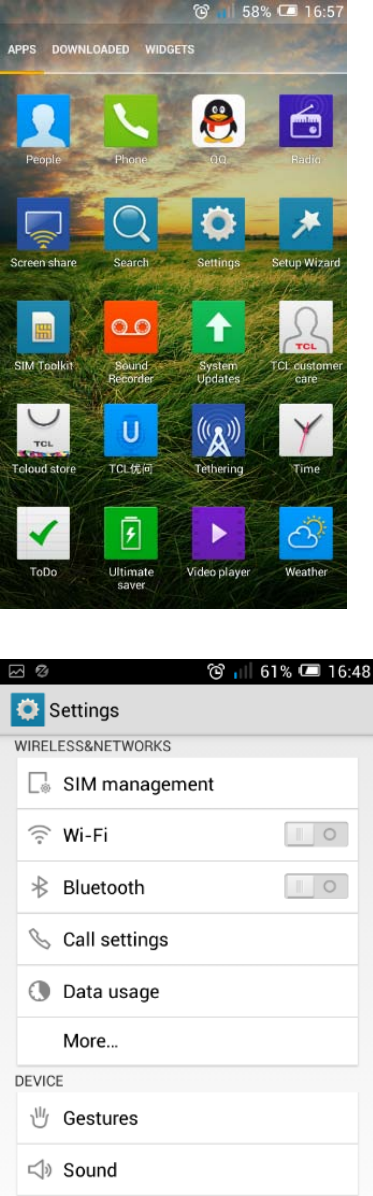
3. On your Android device, from home, select Menu>Settings
4. Tap or click
.
Wi-Fi
The Wi-Fi settings menu appears.
.
39
5. Tap or click the Wi-Fi slider to turn Wi-Fi on.
Wi-Fi is enabled on the Android device.
40
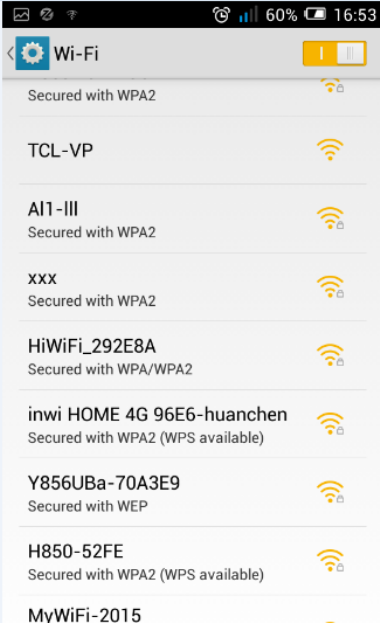
6. Tap or click your device's SSID from the list.
41
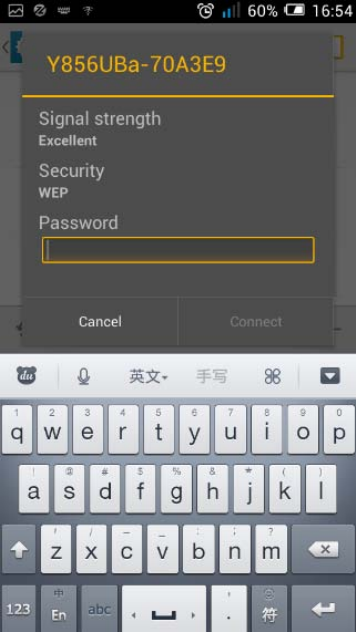
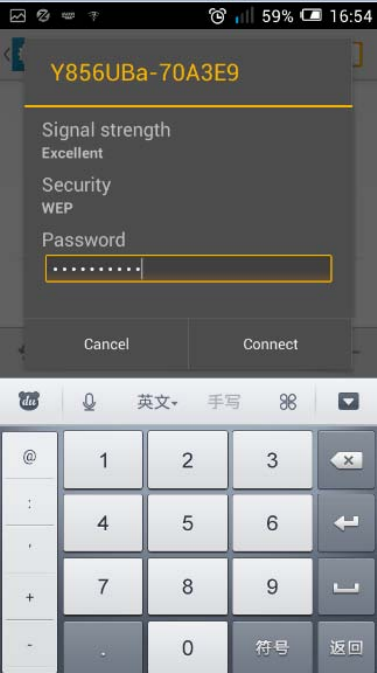
7. Enter the security key (WPA) and then tap or click Connect
The Android device connects to your mobile broadband device. The connected status icon on
your device will show an additional device has been connected.
.

42
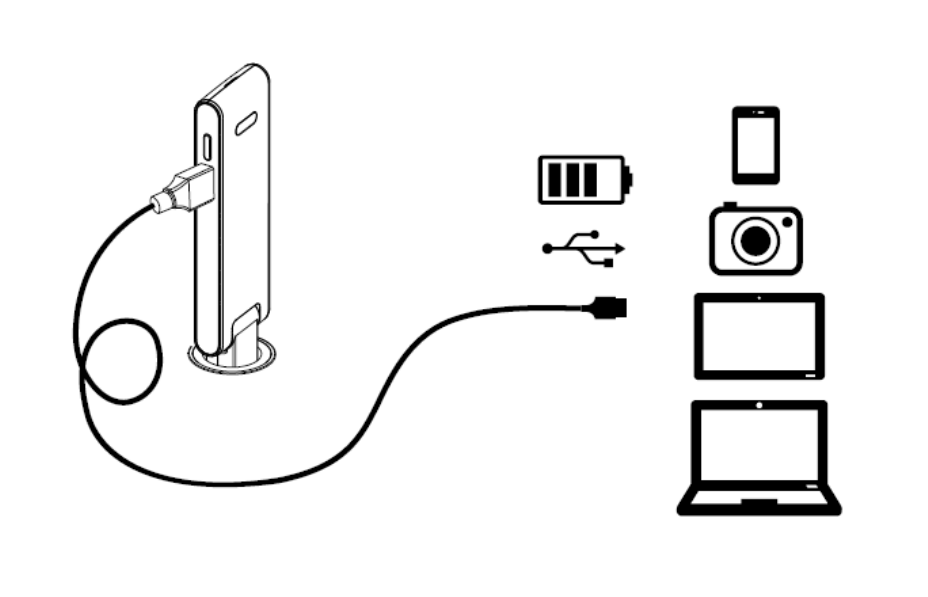
Charging Your Personal Device
The following topics describe how to charge your other personal devicesvia USB port of [Ride-Fi].
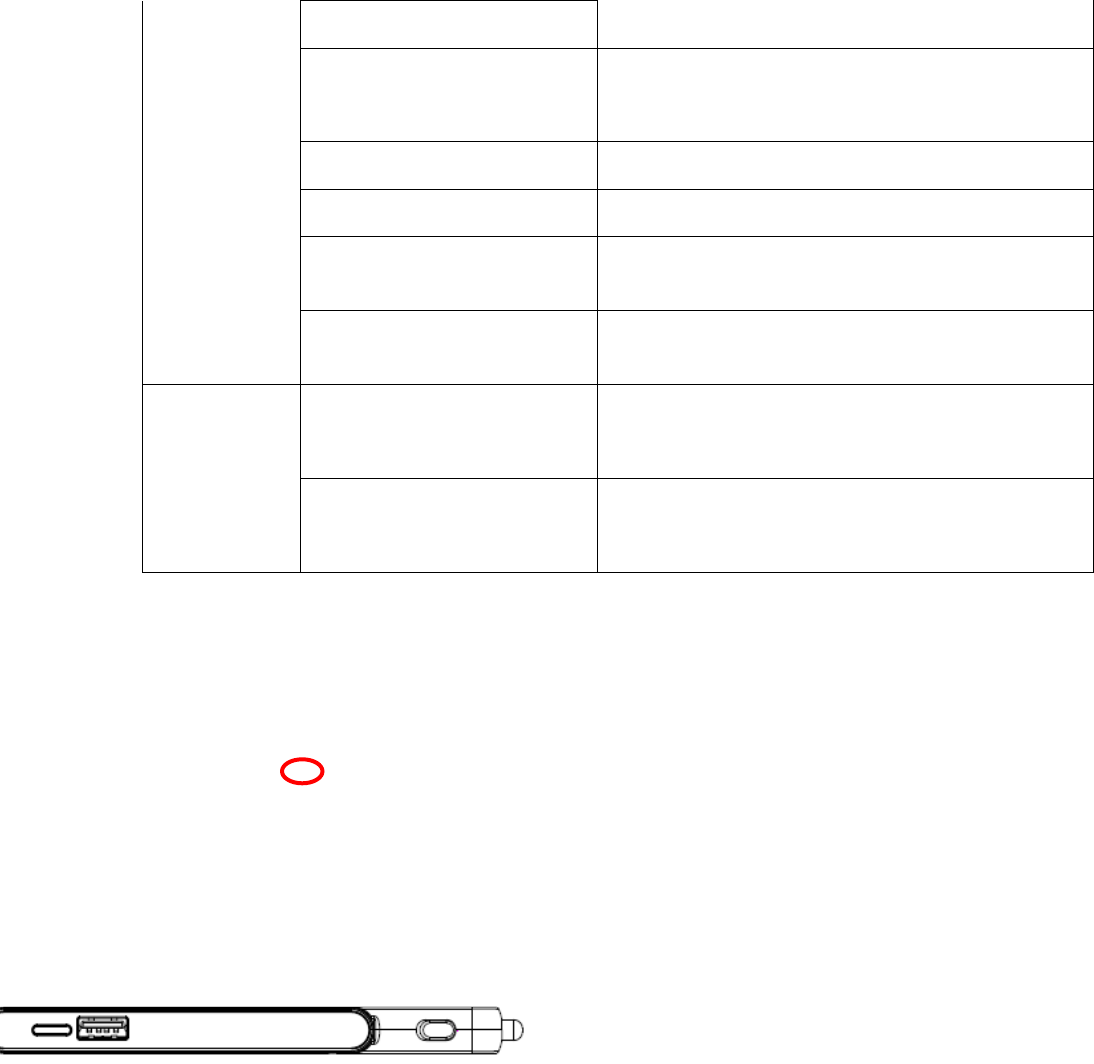
USB Port Layout
Explore your device's USBportlayout.
Output of theUSB port is 5V1A, you can charge your personal device such as device, tablet, camera, etc,
once you plugged the device into the 12V or 24V socket of the car, as in below.
43
44
Settings
The following topics provide an overview of items you can change using your device'sSettings menus,
accessed primarily through the Web UI.
Web UI Overview
Use the device Web UI in a browser to check or change your mobile broadband device settings from a
device connected via Wi-Fi.
Launch the Web UI
1, Connect your device and your client via Wi-Fi.
2, Launch the internet browser on your client and enter http://192.168.128.1 or http://myhotspot in the
address bar. The login page appears as followed. The following figure is only for your reference.
3, Click the Login button at the top right of the page and then enter the Web UI password (the default
password is password).
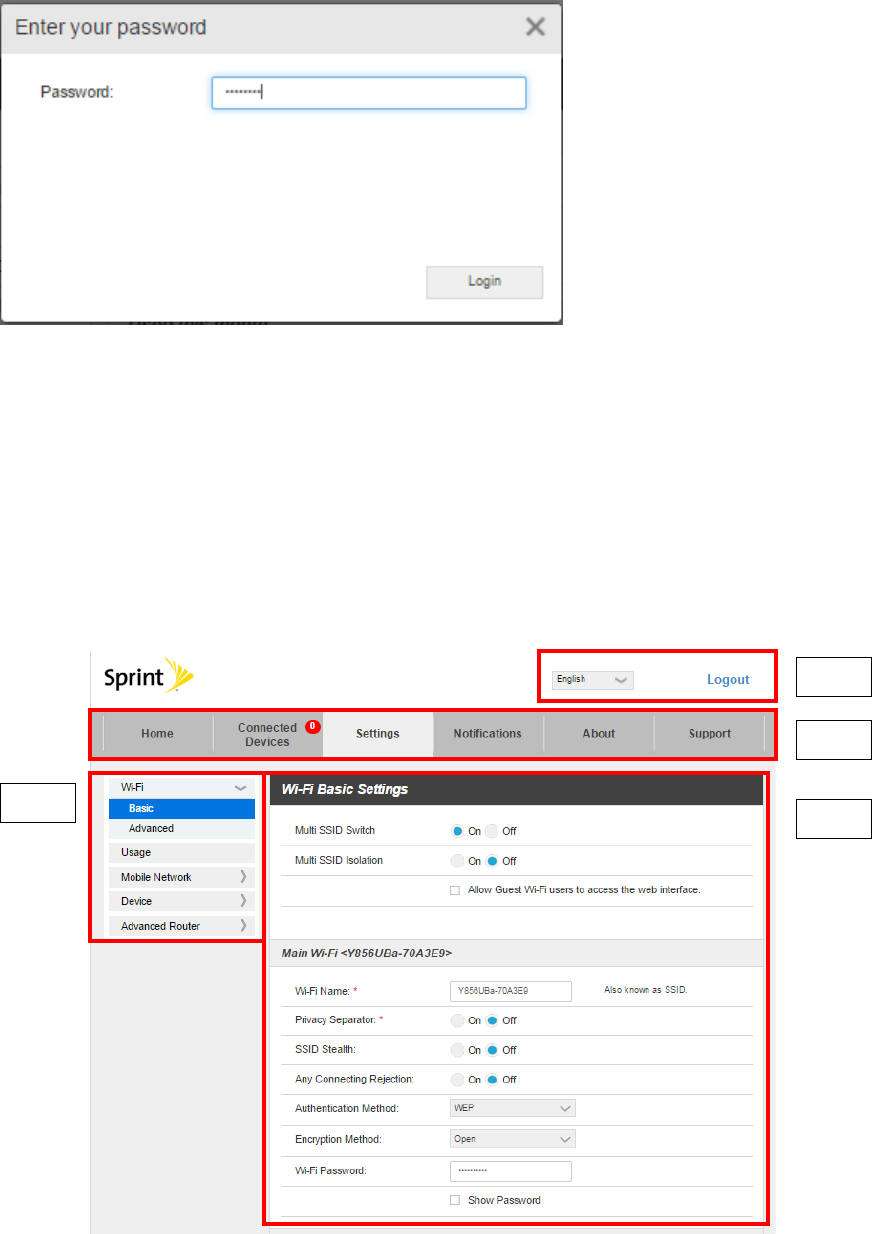
45
4, Click Login to access the WebUI
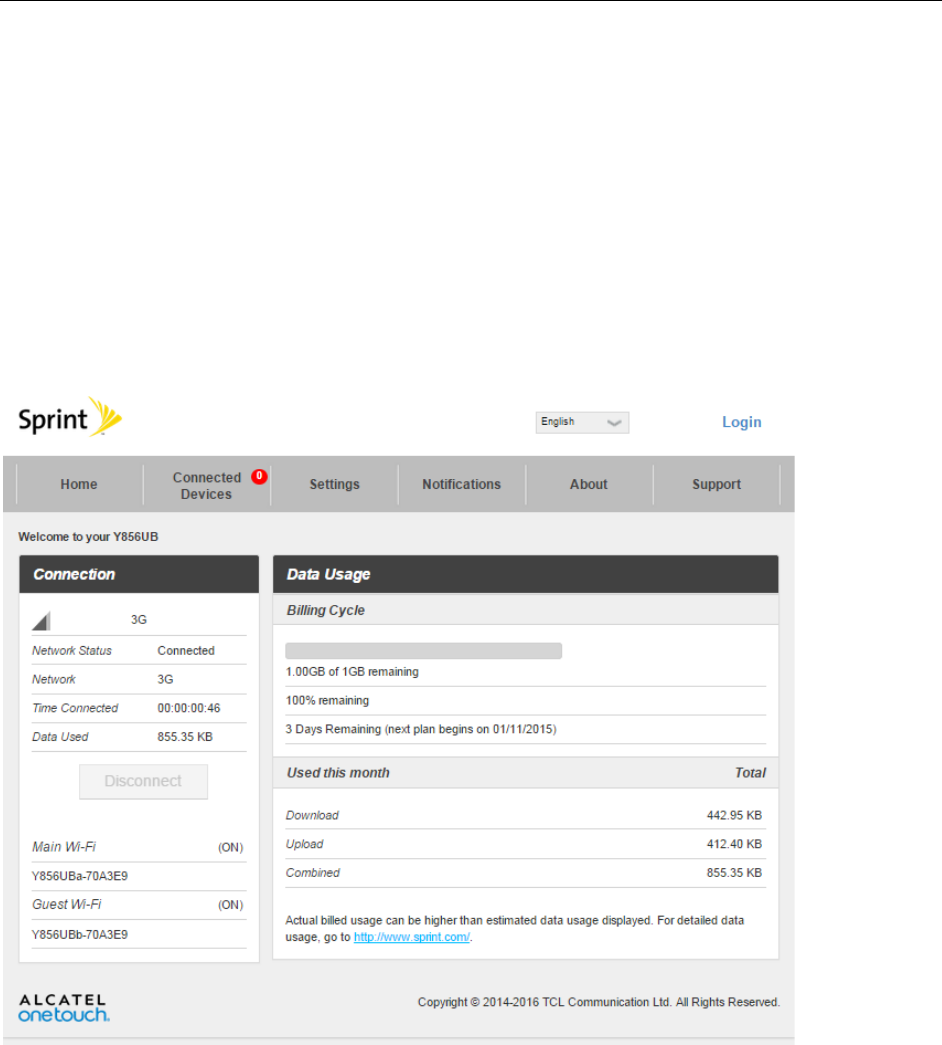
Web UI Window
Explore the options available through the device's Web UI window.
1. Connect your mobile broadband device to an external device via a Wi-Fi connection.
2. Launch a browser and access the Web UI by entering http://192.168.128.1or http://myhotspot in
the address bar.
The Web UI launches and displays the main window.
1
2
3
4
46
Item Description
Language and logout
Select language and Login/out webui
Tab menu
Show the main configuration menu of the device
Sub menu Show the corresponding sub menu of main menu.
Setting area
Show the detailed settings for corresponding sub menu.
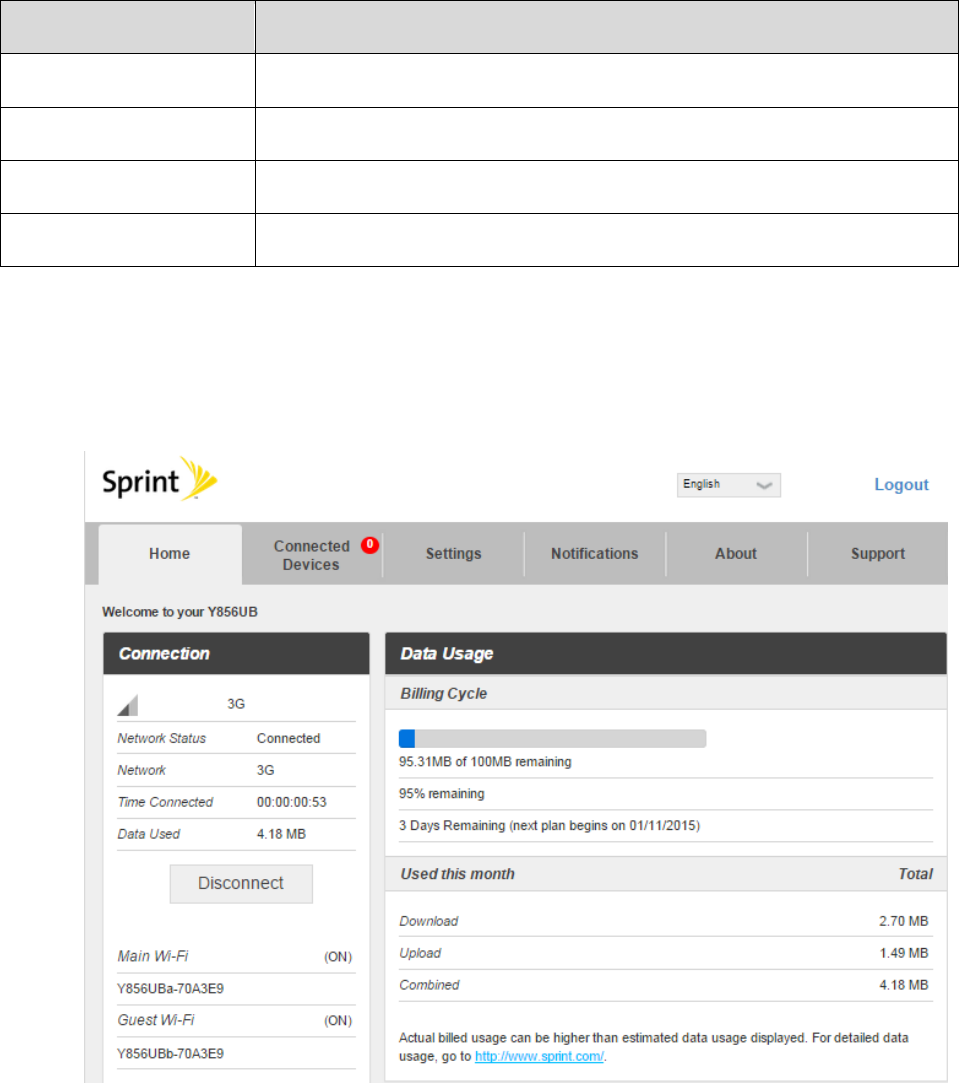
Home
Check current status of network connection and data usage on the Home page.
■ From the Web UI, click the Home tab. (For connection information, see Web UI Overview.)
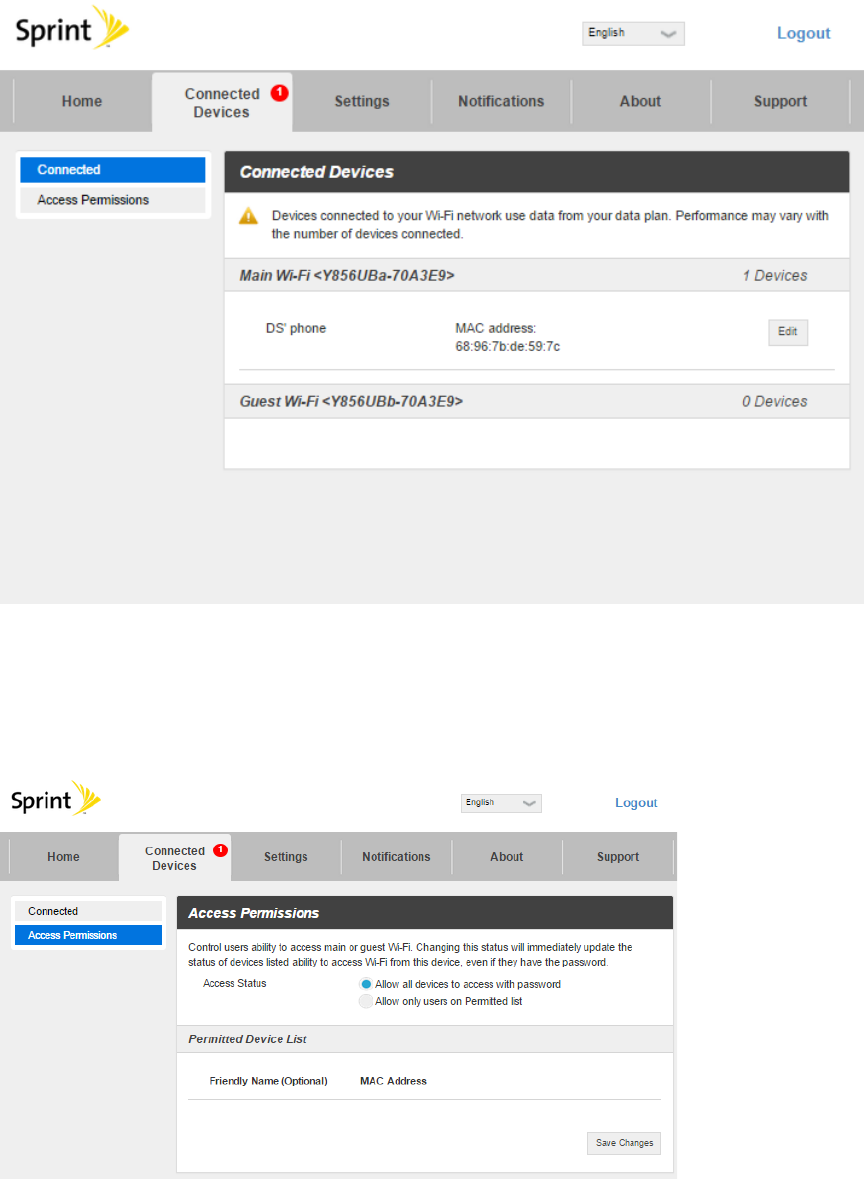
Connected Devices
The Connected Devices tab lets you confirm the names and MAC addresses of devices currently
connected to your device and set access permissions.
47
Check the Connected Devices
■ From the Web UI, click Connected Devices>Connected
Set Access Permissions
Control user's ability to access main or guest Wi-Fi. Changing this status will immediately update the
status of devices listed ability to access Wi-Fi from this device, even if they have the password.
to display the list of connected devices.
1. From the Web UI, click Connected Devices>Access Permissions.
48
2. Select an access status and then click Save Changes
Add Permitted Devices
The Access Permissions menu allows you to restrict access only to specific users, instead of anyone who
enters the password. To restrict access in this manner, you need to add permitted users from the menu.
.
1. From the Access Permissions menu, select Allow only users on Permitted list
The Add Devices option will appear onscreen.
.
2. Click > next to Add Devices to open the Add Devices menu, and then click Add More
3. Enter a Friendly Name (optional) and the MAC address of the permitted device.
.
A sample MAC address might be 00:1D:0F:10:2D:D9.
4. Click Add More
5. When you are finished adding permitted devices, click
to add more permitted devices.
Save Changes
Access to your device will be restricted to the devices in your list.
.
Settings Tab
Set your device options, including Wi-Fi, Mobile Network, Device and Advance Router.
Wi-Fi Basic Settings
Set the basic Wi-Fi settings for your device.
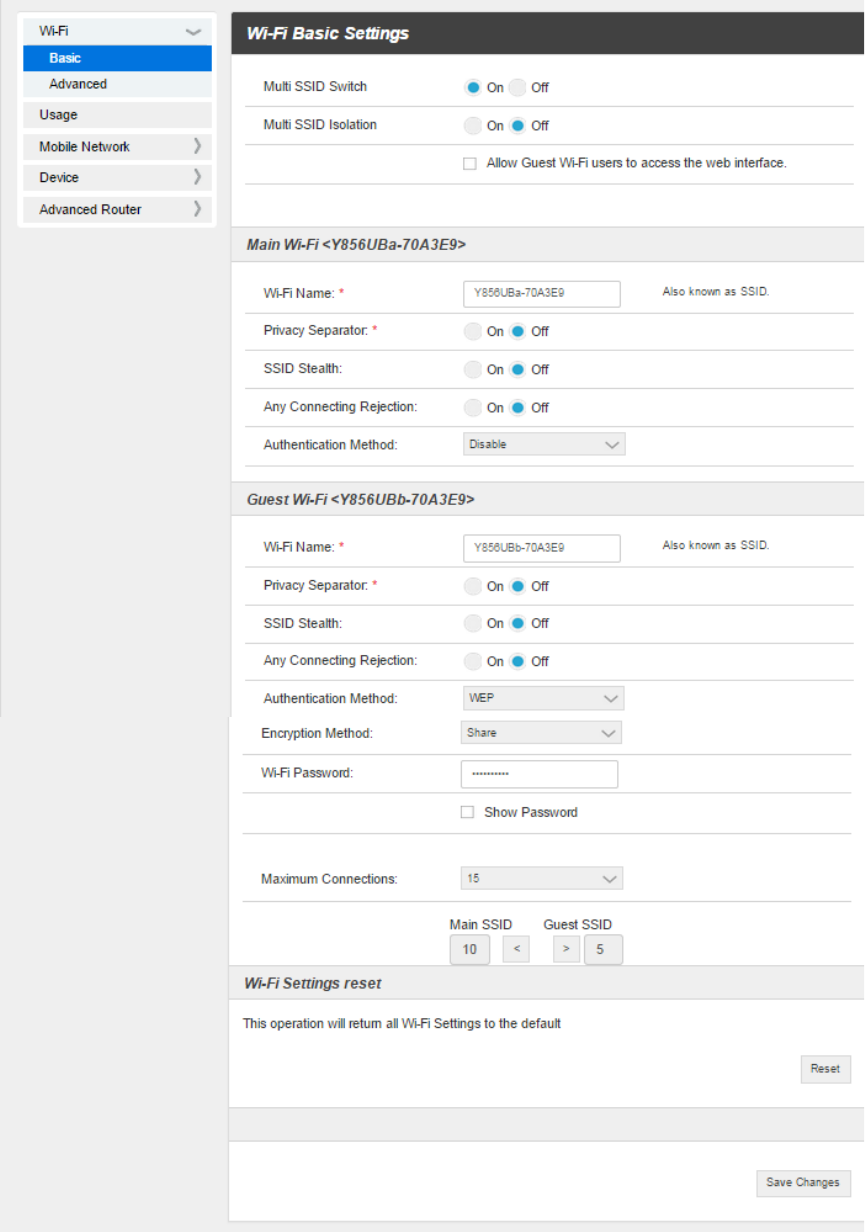
49
From the Web UI, click Settings>Wi-Fi>Basic to display the basic wireless network paramete

50
Multi SSID Switch
: Enable or disable this function. If On is selected, your device will
broadcast two SSIDs including main SSID and guest SSID.
Wi-Fi Broadcast Isolation
: Enable or disable this function. If On is selected, it will prevents
your device from communicating across the different Wi-Fi's.
Wi-Fi Name
: Service Set Identifier (SSID). Enter a string less than 32 characters as the
name for your wireless local area network (WLAN).
Privacy Separator
: Enable or disable this function. If On is selected, users connected to the
device can’t communicate via the device.
Hide SSID
: Enable or disable this function. If Off is selected, your device's name will be
broadcast.
Any Connecting Rejection
: Enable or disable this function. If On is selected, then only the
specific client can connect to the device..
Authentication Method: The authentication methods are described below.
Mode
Description
Authentication and encryption won't be performed. There are
risks that private info will be intercepted or network will be
used by unauthorized individuals.
OPEN
Authentication via Shared Key protocol.
SHARED
WPA-PSK is the securer version of WPA with implementation
of the 802.11i standard.
WPA2-PSK
Apply both the WPA-PSK and WPA2-PSK scheme.
WPA-PSK/WPA2-PSK
Encryption Method
: Select an encryption method from the drop-down list.
Wi-Fi Password
: Enter the Wi-Fi password.
Show Password:
Enable or disable this function. If On is selected, your device's name will
be displayed on the device.
Maximum Connections
: Choose the maximum number of the devices which connect to your
device simultaneously. You can also click the right or left arrow to distribute the maximum
number of the connected devices between the Main Wi-Fi and the Guest Wi-Fi.
Wi-Fi Settings Reset: Click the Reset
6. Click
button to reset all Wi-Fi settings to the default.
Save Changes to save your settings.
51
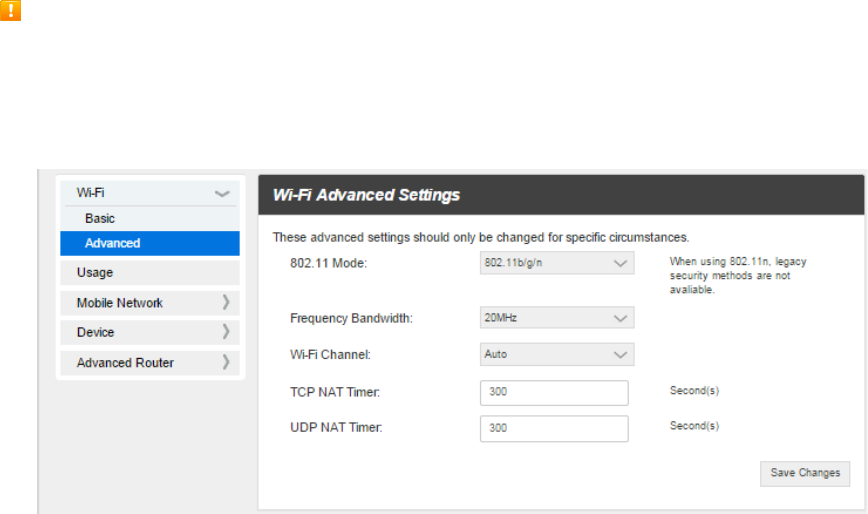
Wi-Fi Advanced Settings
Configure your device's advanced Wi-Fi settings.
Caution for Using Wi-Fi Advanced Settings
These advanced settings should only be changed for specific circumstances.
1. From the Web UI, click Settings>Wi-Fi>Advanced
to view the wireless network advanced
parameters and the WPS settings shown in the following figure.
802.11 Mode
: Select an 802.11 mode from the drop-down list.
Frequency Bandwidth
: Select a frequency bandwidth from the drop-down list.
Wi-Fi Channel
: Select a Wi-Fi channel from the drop-down list.
TCP NAT Timer
: Set TCP NAT time.
UDP NAT Timer
2. Click
: Set UDP NAT time.
Save Changes
Usage Settings
Configure your device's usage settings.
to save your settings.
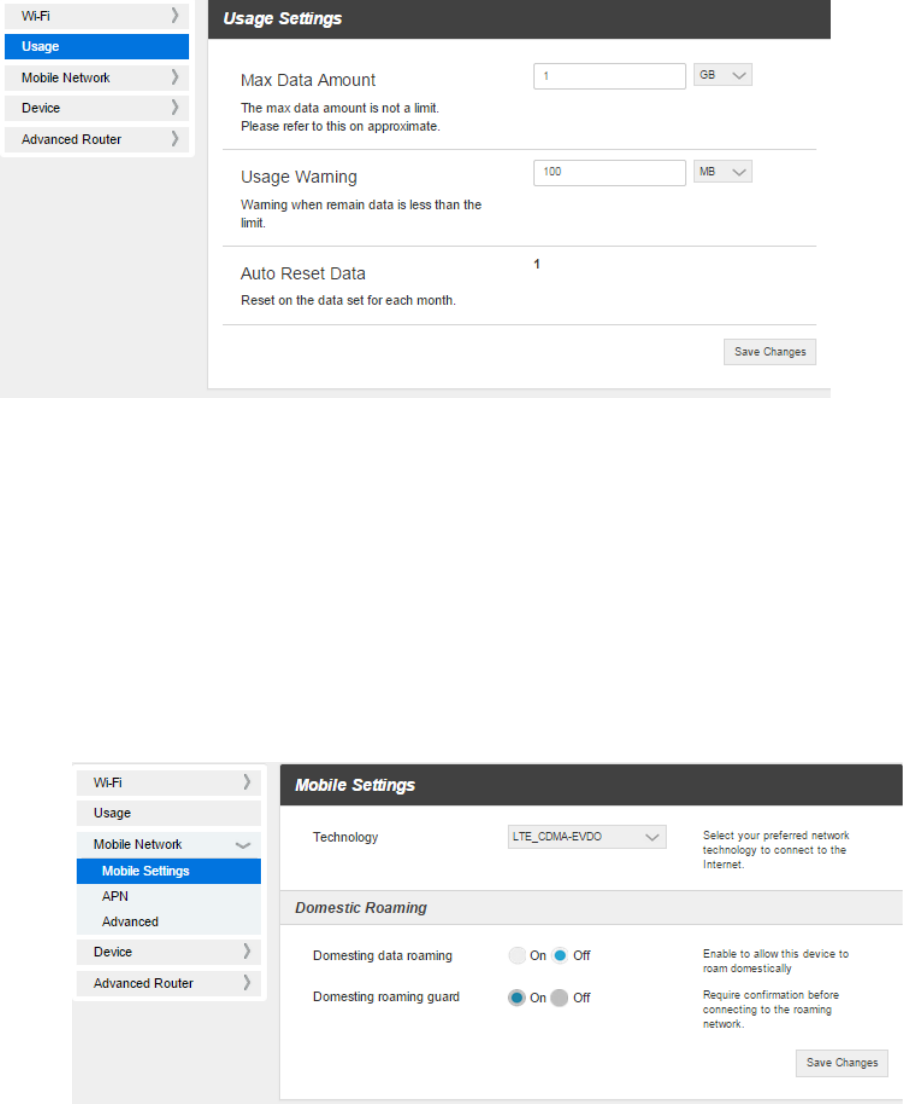
52
● Max Data Amount
●
: Set the maximum data plan for each month.
Usage Warning
●
: Set a warning guard of the data consumption.
Auto Reset Data
Mobile Network Settings
: Not settable, you data plan will be reset in this day of each month.
Manage your mobile network settings.
Mobile Settings
1. From the Web UI, click Settings>Mobile Network>Mobile Settings
. The Mobile Settings page is
shown in the following figure.
Technology
: Select your preferred network technology to connect to the Internet.
Domestic data roaming: Turn domestic data roaming on or off. Turn it on to enable
domestic data roaming.
53
Domestic roaming guard
2. Click
: Enable or disable this function. Turn it on to enable domestic
roaming guard and require confirmation before connecting to the roaming network.
Save Changes
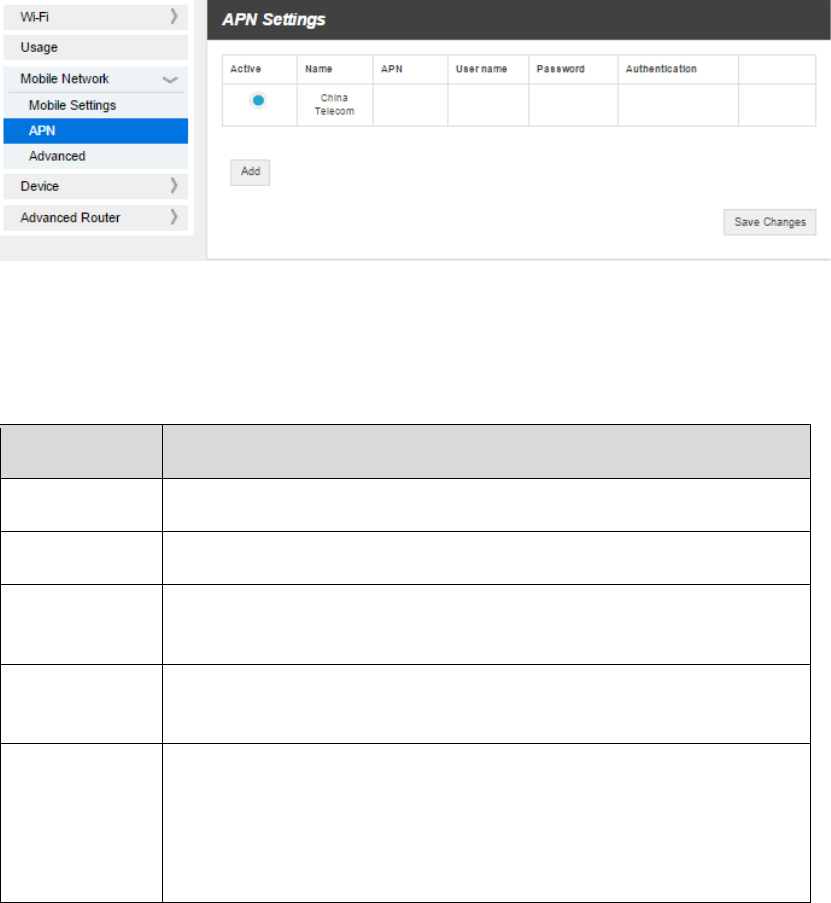
APN
to save your settings.
■ From the Web UI, click Settings>Mobile Network>APN
To add a new APN, follow the steps below:
. The default APN parameters are shown
in the following figure. You can use the default APN to connect to the Internet. You can also add
new APNs.
1. Click Add
2. Enter the related parameters as described in the following table.
to access the following page.
Parameters
Description
Type the profile name.
Profile name
Type the APN string.
APN
User name is used to obtain authentication from the ISP when the
connection is established.
User name
Password is used to obtain authentication from the ISP when the
connection is established.
Password
Password Authentication Protocol (PAP) provides a simple method
without encryption for the peer to establish its identity using a 2-way
handshake. Challenge-Handshake Authentication Protocol (CHAP) is
used to periodically verify the identity of the peer using a 3-way
handshake.
Authentication
3. Click Save
Additional APN Options
to add the new APN.

54
■ To activate the new APN, check the circle in front of it and then click Save Changes
■ To edit the new APN, click
.
Edit, change the settings, and then click Save
■ To delete the new APN, click
.
Delete.
Note: The default APN cannot be edited or deleted.
Advanced Mobile Network Settings
Caution for Using Advanced Mobile Network Settings
Advanced Mobile Network Settings should only be used as directed by Sprint Customer Service
personnel. Certain advanced options will reset your device's connections and programming and will
require reactivation.
■ From the Web UI, click Settings>Mobile Network>Advanced
to set the mobile network
advanced settings on this interface.
Update PRL: Click Update PRL
to update PRL,
Update Profile: Click Update Profile
to update profile.
Factory Reset: Click Factory Reset to reset the modem to the factory default value.
55
Clear Programming: Click Renew Device
to clear all account information.
Data Profile: Click View/Edit Data Profile
Device Settings
to view and edit your Data Profile information.
The Device settings menu lets you set display brightness, manage account password, update software,
back up, restore and check system log.
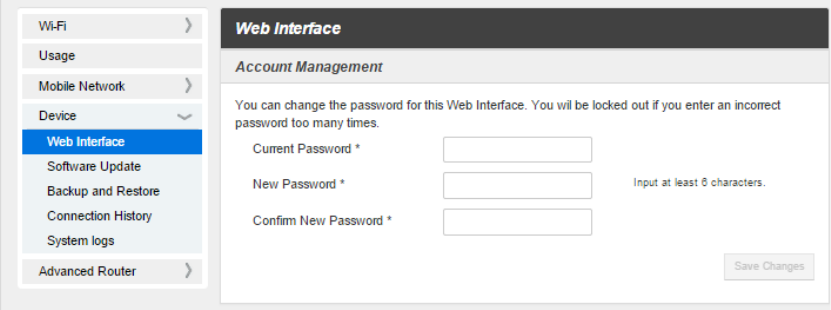
Web Interface
1. From the Web UI, click Settings>Device>Web Interface
. You can manage your account
password on this page.
Current Password
: Enter the current password.
New Password
: Enter the new password.
Confirm New Password
2. Click
: Enter the new password again.
Save Changes to save your settings.
56
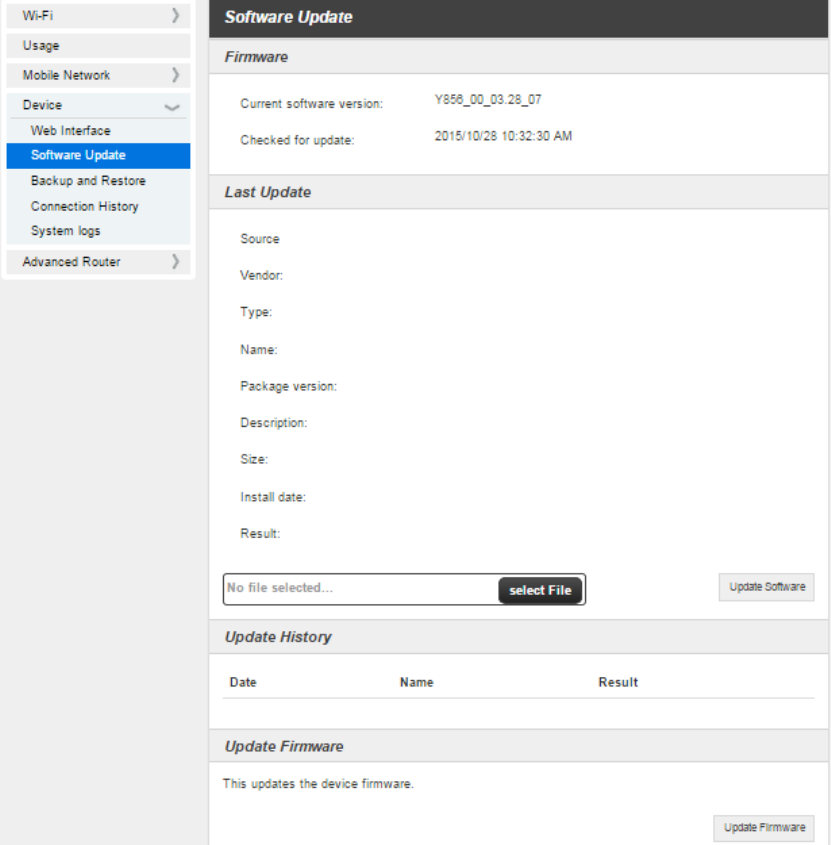
Software Update
1. From the Web UI, click Settings>Device>Software Update
2. Click
. You can update the software on this
page.
Update Firmware
Back up and Restore
to update your device's firmware (software version).
■ From the Web UI, click Settings>Device>Back up and Restore to access menus to back up
your device settings to your computer, restore from the backup and restore your device to its

57
factory default settings.
To back up your device settings to your computer, follow the steps below:
1. Click Back up now
2. Click
.
Save
3. Choose a location on your computer to save the backup file.
on the pop-up window.
4. Click Save
To restore from the backup, follow the steps below:
.
1. Click Select File
2. Click
to select the backup file in your computer.
Restore now
To restore your device to its factory default settings, follow the steps below:
.
1. Click Restore factory default
2. Click
.
Yes to confirm the command.
58
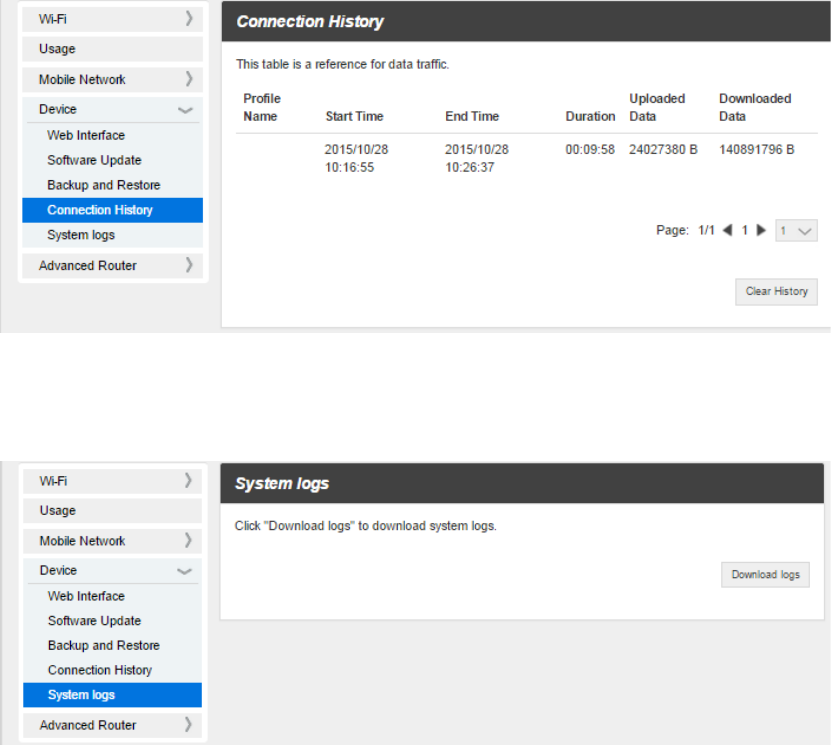
Connection History
■ From the Web UI, click Settings>Device>Connection History
System Logs
to view your data connection
traffic on this page.
■ From the Web UI, click Settings>Device>System logs, and then click Download logs
Advanced Router Settings
to
download the system logs on this page.
Set LAN settings, Firewall and Customization.
59
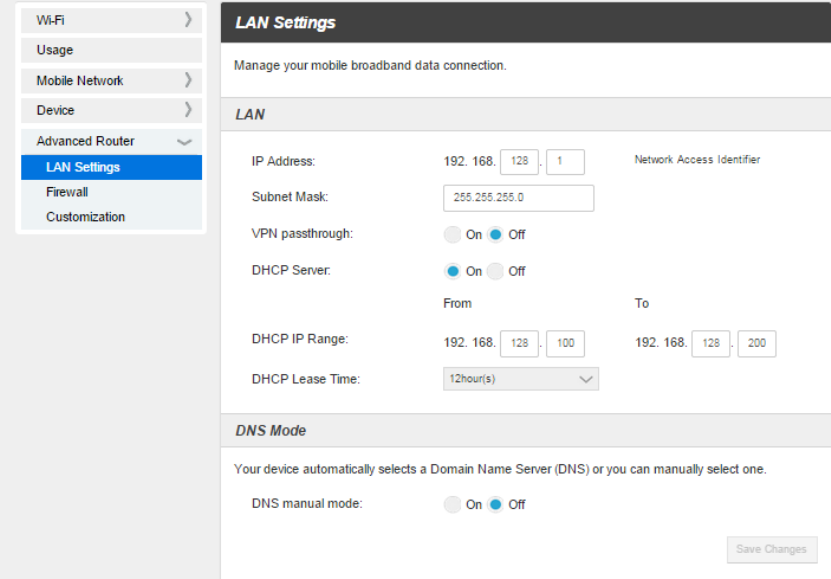
LAN Settings
1. From the Web UI, click Settings>Advanced Router>LAN Settings
to display the router
information shown in the following figure.
IP Address
: IP address for LAN interface.
Subnet Mask
: Subnet mask for the IP address.
VPN passthrough
: VPN passthrough must be enabled if you want to allow VPN tunnels to
pass through your device’s firewall.
DHCP Server
: Enable or disable DHCP Server function.
DHCP IP Pool
: Allocate begin and end IP address for IP pool.
DHCP Lease Time
: Define how long the leased IP address will be expired. The new IP
address will be relocated after the IP address is expired.
DNS manual mode
2. Click
: Turn DNS manual modeon or off.
Save Changes to save your settings.
60
Firewall
■ From the Web UI, click Settings>Advanced Router>Firewall
IP Address Filtering
To set IP Address Filtering rules, follow the steps below:
. You may set up firewall rules to
protect your network from virus and malicious activity on the Internet.
1. Turn on the IP Address Filtering.
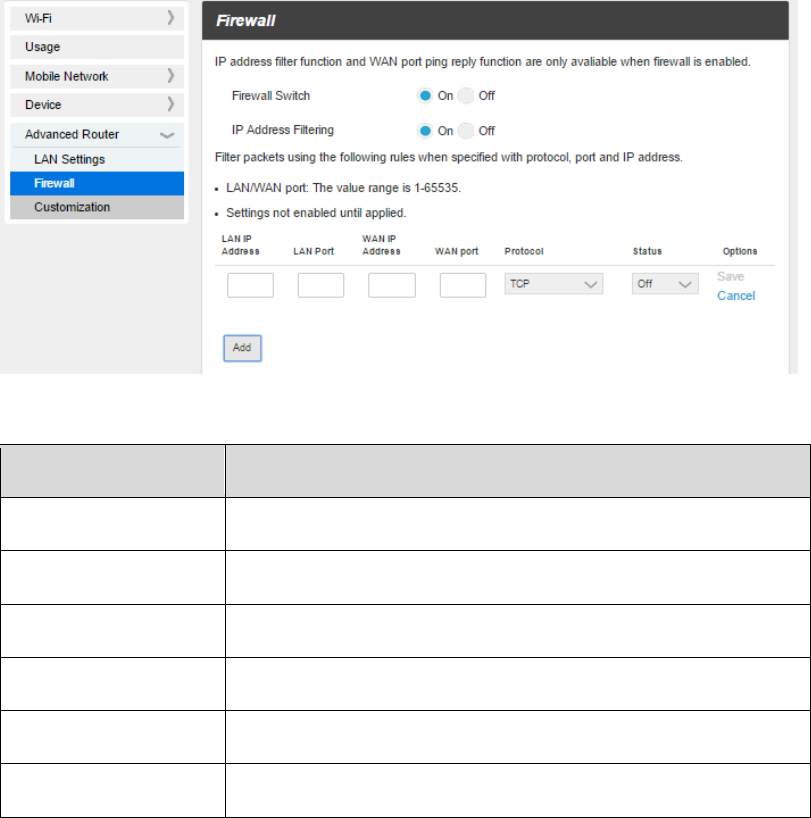
61
2. Click Add
3. Enter the related parameters as described in the following table.
.
Parameters
Description
Enter the LAN IP address.
LAN IP address
Set the LAN port.
LAN port
Enter the WAN IP address.
WAN IP address
Set the WAN port.
WAN port
Set which protocol will be used for filtering.
Protocol
Set how to handle the packet if it matches with the rule.
Status
4. Click Save Changes
Portmapping
To set portmapping rules, follow the steps below:
to add the new filtering rule.
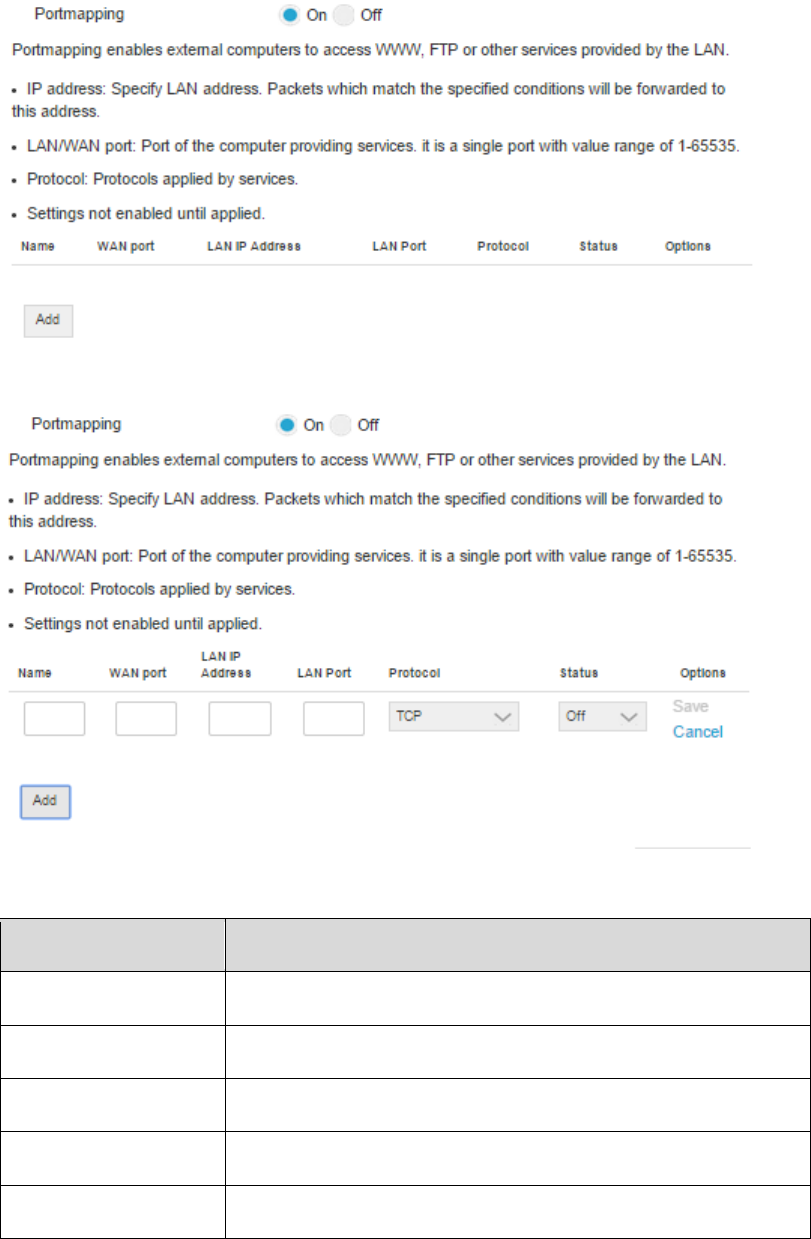
62
1. Turn on Portmapping.
2. Click Add
3. Enter the related parameters as described in the following table.
.
Parameters
Description
Enter a name for the rule.
Name
Set the WAN port.
WAN port
Enter the LAN IP address.
LAN IP address
Set the LAN port.
LAN port
Set which protocol will be used for filtering.
Protocol
63
4. Click Save Changes
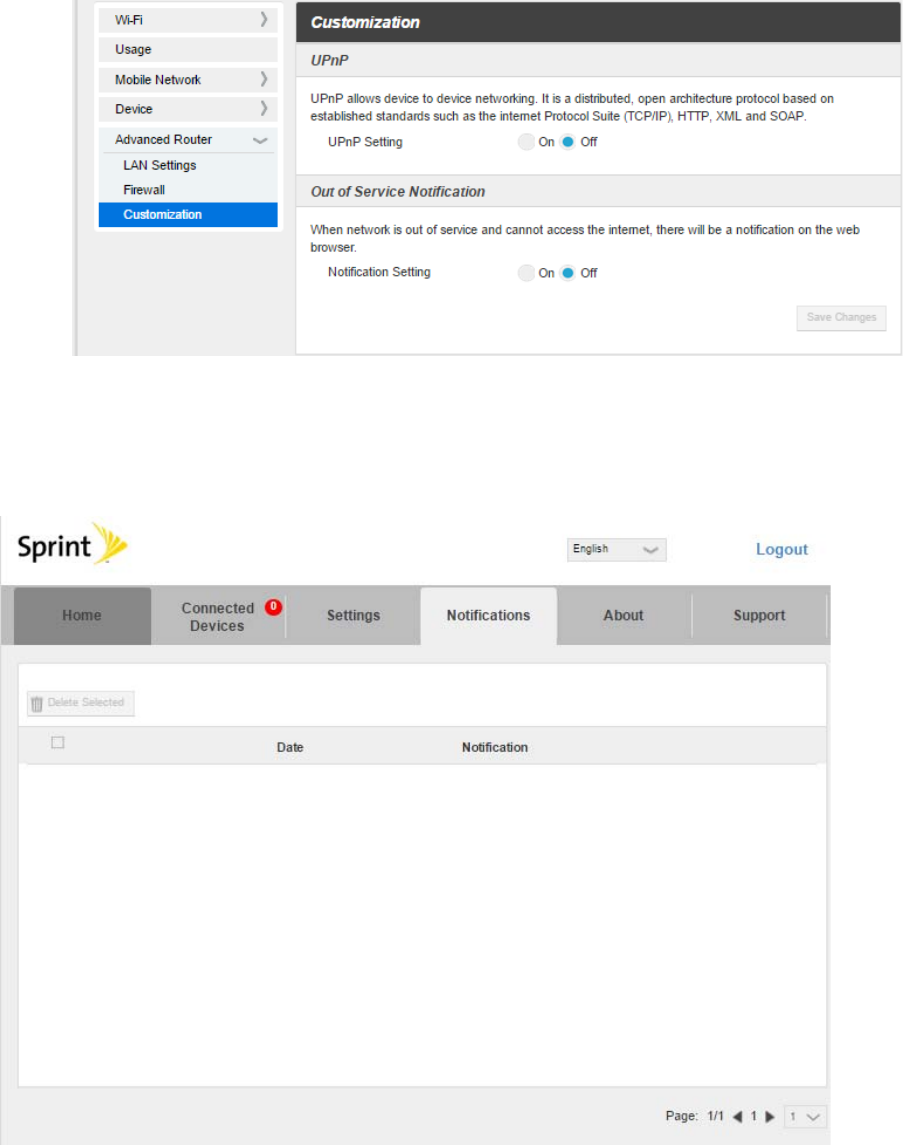
Customization
to add the new portmapping rule.
1. From the Web UI, click Settings>Advanced Router>Customization
2. Click
to enable or disable UPnP
and Out of Service Notification on this interface.
Save Changes
Notification
to save your settings.
Show the notification your device's get from the network.


66
Appendix
The following topics cover items such as troubleshooting, device specifications, applicable warranty and
service information, customer service contacts, and applicable trademark and copyright notices.
Troubleshooting
Check the questions and answers below for troubleshooting solutions for common device issues.
Check Here First
Question: Unable to connect via Wi-Fi (WLAN)
Answer 1: Check whether the mobile broadband device is properly connected to the computer or
other external device.
Answer 2: If OPEN WEP is the security method being used, check whether the correct WEP key is
entered. If the WEP key is unknown, see to reset the WEP key and reconnect the device.
Answer 3: Check whether the correct WPA key is set. If the WPA key is unknown, see to reset the
mobile broadband device or see the WLAN Initialization Sticker to reset the WPA key, and then
reconnect the device. WPA/WPA2 security may not be supported depending on the Wi-Fi device. See
the Wi-Fi device user guide for information.
Question: Internet connection fails.
Answer 1: Make sure that you are within the service area.
Answer 2: If signal reception is poor, move to where signal reception is good and then reconnect.
Answer 3: The access point might be busy depending on the time of day. Wait a little and then
reconnect.
Answer 4: Activate the Web UI and make sure that network settings are correct.
Question: Transmission fails quickly.
Answer 1: Make sure that the mobile broadband device is properly connected to PC or other device
via Wi-Fi. .
Answer 2: Signal reception might be poor. Check transmission where signal reception is good.
Answer 3: Restart the mobile broadband device.
Question: Transmissions are slow.
Answer 1: Signal reception might be poor. Check transmission where signal reception is good.
Answer 2: Connection might be poor. Try again after a while.

67
Question: Forgot PIN / Unknown PIN Unblocking Key (PUK) / SIM card is locked.
Answer: Contact Customer Service.
Question: SIM card is not recognized.
Answer 1: Check whether the SIMcard is properly installed. For details, see Insert a SIM Card.
Answer 2: Check theSIMcard for damage.
Answer 3: Check the SIMcard IC chip for scratches/corrosion.
Answer 4: Dirty SIMcard (particularly IC chip) may prevent recognition. Clean gently with a soft cloth.
Answer 5: Contact Customer Service.
Question: Unsure if logged on as an Administrator.
Answer 1
Move the pointer into the upper-right or lower-right corner and then click or tap >
: For Windows 8, follow these steps to check.
Control
Panel. Click Change your account type in User Accounts, and then check that the type of
account currently logged on to is "Administrator".
Answer 2
Click
: For Windows 7, check by following these steps.
Start menu>Control Panel>User Account and Family Safety>User Account
Question: "Out of service area" indication appears when outside USA.
, and
then check that the type of account currently logged on to is "Administrator".
Answer: Power off and restart the device.
Question: How do I return the mobile broadband device to the default settings (reset)?
Answer 1: Use the device Reset key.
Answer 2: Use the Web UI to reset the device..
Question: An old device number appears on the Web UI.
Answer: The Web UI may display an old device number depending on subscription terms or
cancellation method.
Question: The mobile broadband device operation is unstable.
Answer 1: Avoid extremely high/low temperatures, high humidity, direct sunlight, dusty areas, etc.
Read "Safety Precautions" for use in a proper environment.
Answer 2: Avoid invalid software. Operation is unguaranteed for Internet connection, etc., using
other-party software.
Question: The connection suddenly failed.

68
Answer 1: The connection method may have been changed. Check connection mode on the mobile
broadband devicedisplay.
Answer 2
Specifications
: Restart the mobile broadband device.
The following tables list the specifications for the mobile broadband device, and the materials.
Mobile Broadband Device Specifications
Item
Description
Ride-Fi (Y856UB)
Model name
Dimensions
136.4mm (H) x 34mm (W) x
1
12mm (D)
52g
Weight
LED
Interface
24W
Maximum power consumption
Linux
Operating system
FDD LTE B25/26
TDD LTE B41
CDMA BC0/1/10
Network Frequency
FDD LTE,TDD LTE, CDMA2000 1xEV-DO Rev. A
Compatible networks
FDD LTE, DL 150Mbps/UL 50Mbps,
TDD LTE, DL 112Mbps/UL 10Mbps,
CDMA2000 1xEV-DO Rev. A. DL:3.1Mbps/UL:1.8Mbps
Communication speed
Materials Specifications
Parts
Materials/Finishing
Y856UB front cover
conditions
Y856UB back cover conditions
Y856UB car charger
conditions

69
Parts Materials/Finishing
Y856UB car charger contact pin
conditions
Y856UB SIM tray
conditions
Y856UB power key conditions
conditions
conditions
conditions
conditions
conditions
conditions
70
Safety and Notices
The following topics address important safety precautions, general notes, and required RF exposure
information for your mobile broadband device.
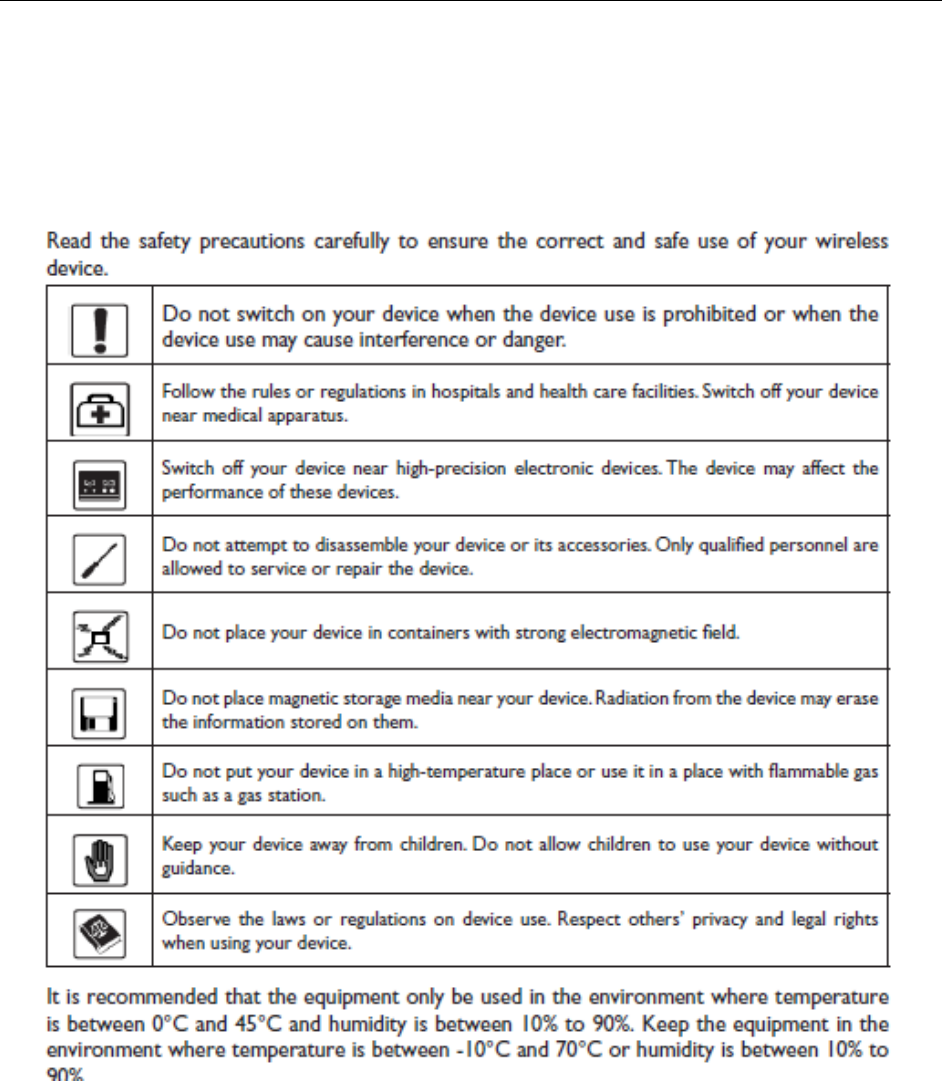
Safety Precautions
The following topics outline important safety precautions that must be observed when using your mobile
broadband device.

71
Regulatory Information
The following topics provide important regulatory information.
Specific Absorption Rates (SAR)
forWireless Device
The SAR value corresponds to the relative amountof RF energy absorbed into the head of a user of
awireless device.
The SAR value of a device is the result of anextensive testing, measuring and calculationprocess. It does
not represent how much RF thedevice emits. All device models are tested attheir highest value in strict
laboratory settings.But when in operation, the SAR of a device canbe substantially less than the level
reported tothe FCC. This is because of a variety of factorsincluding its proximity to a base station
antenna,device design and other factors. What is importantto remember is that each device meets
strictfederal guidelines. Variations in SARs do notrepresent a variation in safety.
All devices must meet the federal standard, whichincorporates a substantial margin of safety. Asstated
above, variations in SAR values betweendifferent model devices do not mean variationsin safety. SAR
values at or below the federalstandard of 1.6 W/kg are considered safe for useby the public.
The highest reported SAR values of the Ride-Fi are:
Simultaneous : 1.483W/Kg
Body-worn: 1.349W/Kg
For body-worn operation, this device has been tested and meets the FCC RF exposure guidelines when
used with an accessory that contains no metal and that positions the handset a minimum of 20 cm from
the user’s body.
FCC Radio Frequency Emission
This device meets the FCC Radio FrequencyEmission Guidelines.
FCC ID number: 2ACCJB028
More information on the device’s SAR can befound from the following FCC website:
http://fcc.gov/oet/ea/
72
FCC Notice
This device complies with Part 15 of the FCC Rules. Operation is subject to the following two conditions:
(1) this device may not cause harmful interference, and (2) this device must accept any interference
received, including interference that may cause undesired operation. Changes or modifications not
expressly approved by the party responsible for compliance could void the user’s authority to operate the
equipment.
Note: This equipment has been tested and found to comply with the limits for a Class B digital device,
pursuant to Part 15 of the FCC Rules.
These limits are designed to provide reasonable protection against harmful interference in a residential
installation. This equipment generates, uses and can radiate radio frequency energy and, if not installed
and used in accordance with the instructions, may cause harmful interference to radio communications.
However, there is no guarantee that interference will not occur in a particular installation. If this equipment
does cause harmful interference to radio or television reception, which can be determined by turning the
equipment off and on, the user is encouraged to try to correct the interference by one or more of the
following measures:
Reorient the direction of the internal antenna.
Increase the separation between the equipment and receiver.
Connect the equipment into an outlet on a circuit different from that to which the receiver is connected.
Consult the dealer or an experienced radio/TVtechnician for help.
Changes or modifications made to this equipment not expressly approved by (manufacturer name) may
void the FCC authorization to operate this equipment.

73

Index 74
Index
Android Device
Connect Wi-Fi, 23
Battery
Charge, 15
Install, 14
Remove, 14
Customer Service, 48
Data Transfer Speed, 9
Device Driver Installation
Windows PC, 27
Device Layout (illustration), 4
Drag, 9
Electromagnetic Safety, 57
Enter Text, 9
Flick, 8
Home Screen, 5
iPad
Connect Wi-Fi, 22
iDevice
Connect Wi-Fi, 22
iPod Touch
Connect Wi-Fi, 22
Mac
Connect Wi-Fi, 21
Network setup, 31
Remove USB connection, 30
USB connection, 29
Memory Card, 12
Install, 12
Remove, 13
Network Name, 3
Operating System, 1
OS, 1
Package Contents, 2
Power Key, 4
Power Off, 17
Power On, 16
RF Exposure Information, 58
Safety Precautions, 49
Security Key, 3, 15
Services, 48
Settings, 32
SIM Card, 10
Insert, 11
Remove, 11
Sleep Mode, 7
Specific Absorption Rate (SAR), 57
Specifications
AC charger, 46
Materials, 47
Micro USB cable, 47
Mobile broadband device, 46
SSID, 3, 15
Status Bar Icons, 5
Swipe, 8
Tap, 8
Text Entry, 9
Touch Menu Icons, 6
Touchscreen, 7
Transfer Speed, 9
Troubleshooting, 43
Turn Device Off, 17
Turn Device On, 16
USB Connection
Mac, 29
Remove Mac, 30
Remove Windows PC, 26
Windows, 25
USIM Card, 10
Insert, 11
Remove, 11
Warranty, 48
Web UI
Overview, 32
Window, 32
Wi-Fi
Activate, 18
Connect Mac, 21
Connect Windows 7, 20
Connect Windows 8, 19
Connect Windows Vista, 20
Overview, 18
Wi-Fi Network Name, 3
Windows 7
Connect Wi-Fi, 20
Windows 8
Connect Wi-Fi, 19
Windows PC
Index 75
Remove USB connection, 26
Software Installation, 27
USB connection, 25
Windows Vista
Connect Wi-Fi, 20
WLAN
Activate, 18
Overview, 18
WPS
Connect Wi-Fi, 24