TCL Communication B079 GSM Quad band/UMTS 3 Band/LTE 4 Band Mobile phone User Manual TempConfidential QG 5044R 20161227
TCL Communication Ltd. GSM Quad band/UMTS 3 Band/LTE 4 Band Mobile phone TempConfidential QG 5044R 20161227
Contents
- 1. TempConfidential_QG_5044R_20161227
- 2. TempConfidential_Safety_Leaflet_US_20161227
- 3. TempConfidential_TempConfidential_Buzz6T TF UMTS_A574BL_UM_English 20170515
TempConfidential_QG_5044R_20161227
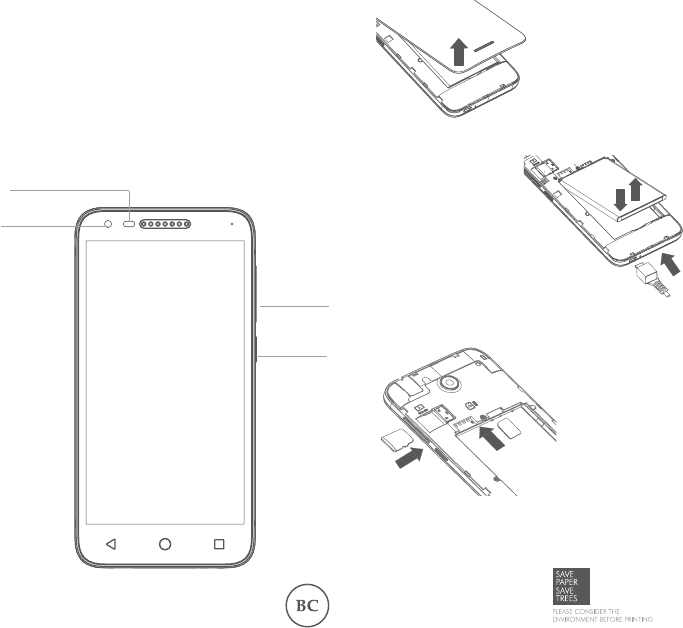
QUICK START GUIDE
Insert or remove
the battery cover
Insert or remove
the SIM card
Install or remove
the microSD card
Power key
Front
camera
Volume
up/down
LED indicator/
Front ashlight
5.0”
www.alcatelonetouch.ca
User guide and FAQ are available online
English
5044R
Insert or remove the
battery.
Charge the battery
1 2
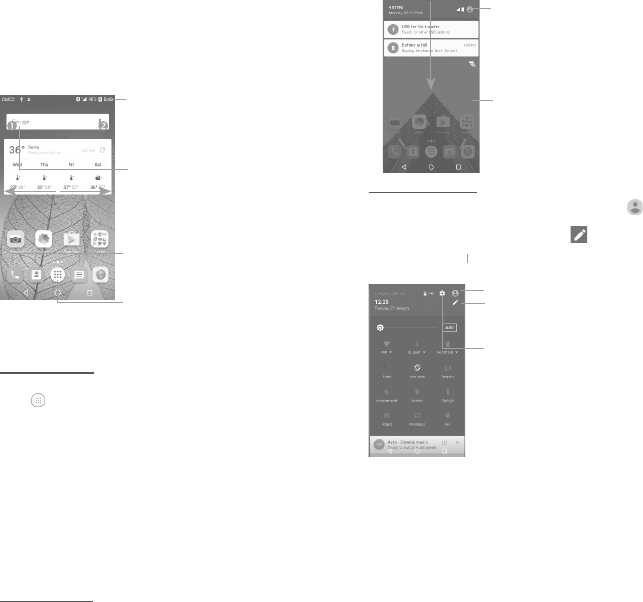
1 Home screen
You can bring all the items (applications, shortcuts, folders and
widgets) you love or use most frequently to your Home screen for
quick access. Touch the Home key to switch to the Home screen.
Touch to enter application list.
Status bar
• Status/Notification indicators
• Touch and drag down to open the
notification panel.
Favorite tray applications
• Touch to enter the application.
• Long press to move or remove
applications.
Search bar
• Touch to enter text search screen.
• Touch to enter voice search screen.
The Home screen is provided in extended format to allow more space
for adding applications, shortcuts etc. Slide the Home screen left to
get a complete view.
Reversible screen
The phone supports the reversible screen. From the Home screen,
touch to open the applications list, then touch Settings\Display\
Reversible rotate. Switch the toggle to enable the function.
Please note that the reversible screen function will not apply during
phone calls.
1.1 Status bar
From the status bar, you can view both phone status (to the right
side) and notification information (to the left side).
Drag the status bar down to view notifications and drag again to enter
the quick settings panel.
Drag up to close it. When there are notifications, you can touch them
to access notifications.
Notification panel
When there are notifications, touch and drag the Status bar down to
open the Notification panel to read more detailed information.
Touch to clear all event–based
notifications (other ongoing notifications
will remain).
Touch to switch to the quick settings
panel.
Quick settings panel
Touch and drag the Notification panel down or touch to open the
Quick settings panel. You can enable or disable functions or change
modes by touching the icons. Touch the icon to customize your
Quick settings panel.
Touch to enter user screen to edit and save
owner's name, phone number, and other
information.
Touch to customize your Quick
settings panel.
Touch to access Settings, where you
can set more items.
3 4
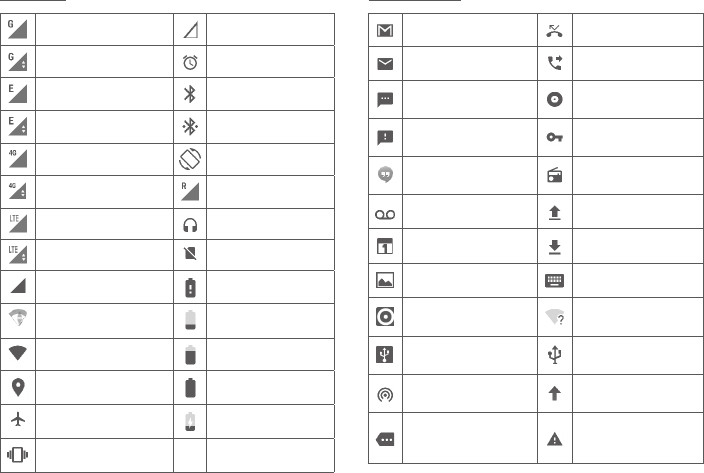
Status icons
GPRS connected No signal
GPRS in use Alarm is set
EDGE connected Bluetooth is on
EDGE in use Connected to a
Bluetooth device
HSPA, WCDMA, HSPA+,
3G connected Rotation is on
HSPA, WCDMA, HSPA+,
3G in use Roaming
LTE connected Headset connected
LTE in use No SIM card installed
Signal strength Battery is very low
Connected to a Wi-Fi
network Battery is low
Wi-Fi is on Battery is partially
drained
GPS is on Battery is full
Airplane mode Battery is charging
Vibrate mode
Notification icons
New Gmail message Missed call
New Email message Call forwarding is on
New text or multimedia
message Song is playing
Problem with SMS or
MMS delivery Connected to VPN
New Google Hangouts
message Radio is on
New voicemail Uploading data
Upcoming event Download finished
Screenshot captured Select input method
Both USB tethering and
portable hotspot are on
An open Wi-Fi network is
available
USB tethering is on Phone is connected via
USB cable
Portable Wi-Fi hotspot
is on System update available
More notifications are
hidden
Carrier data use
threshold approaching or
exceeded
5 6
1.2 Lock/Unlock your screen
To protect your phone and privacy, you can lock the phone screen by
creating a pattern, PIN or password etc.
1.3 Personalize your Home screen
Add
You can long press a folder, an application or a widget to activate
Move mode, and drag the item to your preferred Home screen.
Reposition
Long press the item to be repositioned to activate Move mode, drag
the item to the desired position and then release. You can move
items both on the Home screen and the Favourite tray. Hold the icon
on the left or right edge of the screen to drag the item to another
Home screen.
Remove
Long press the item to be removed to activate Move mode, drag the
item up to the top of the X icon, and release after the item turns red.
Create folders
To improve the organization of items (shortcuts or applications) on
the Home screen and the Favourite tray, you can add them to a folder
by stacking one item on top of another. To rename a folder, open it
and touch the folder’s title bar to input the new name.
Wallpaper customization
Long press the empty area in the Home screen, then touch
WALLPAPERS to customize your wallpaper.
1.4 Volume adjustment
You can set the ringer, media and phone ringtone volumes to your
preference by pressing the Volume up/down key, or touching
Settings\Sound & notification\Media volume to set the volume.
2 Text input ..........................
2.1 Using Onscreen Keyboard
Onscreen Keyboard settings
Touch Settings\Language & input, touch the keyboard you want to
set up and a series of settings will become available.
Adjust the Onscreen Keyboard orientation
Turn the phone sideways or upright to adjust the onscreen keyboard
orientation. You can adjust it by changing the settings (Touch
Settings\Display\Auto-rotate screen). Also your phone screen is
reversible. (Touch Settings\Display\Reversible rotate).
2.1.1 Keyboard
Touch to switch to
symbol and numeric
keyboard.
Long press to
select symbols.
Touch to enter
text or numbers.
Long press to show input
options.
Touch to switch
between "abc/Abc"
mode;
Long press to switch to
"abc/ABC" mode.
2.2 Text editing
You can edit the texts you entered.
• Long press or double touch within the texts you want to edit.
• Drag the tabs to change the checked texts.
The following options will show: SELECT ALL, CUT, COPY SHARE,
and ASSIST.
7 8
You can also insert new texts if preferred
Touch where you want to type, or long press the blank, the cursor will
blink and the tab will show. Drag the tab to move the cursor.
If you have cut or copied any text, touch the tab to show the PASTE
icon which allows you to complete pasting immediately.
3 Phone call ....................
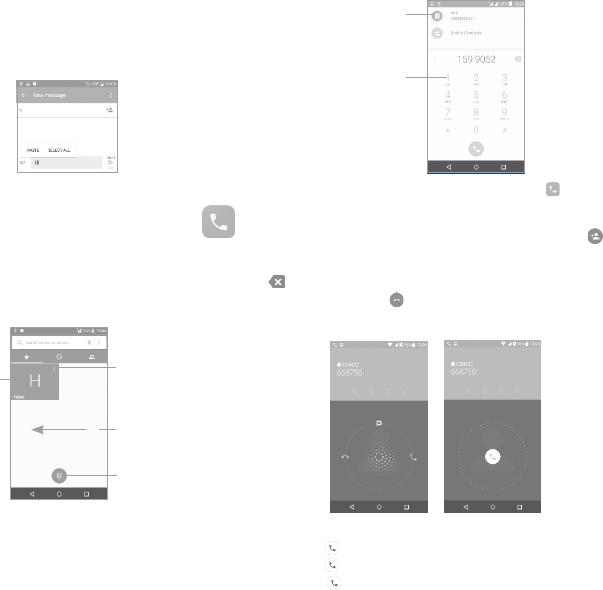
3.1 Making a call
You can easily make a call using Call. Touch the Application tab from
the Home screen and select Call.
Touch to enter the
contact details screen.
You can choose to
edit, delete, share
the contact, or send
a message to the
contact.
Touch to call the
previewed number.
Slide to access recent
calls and Contacts.
Touch to display
keyboard.
Display the
suggested
number(s).
Long press
to access
voicemail.
Enter the desired number from the keyboard and touch to place
the call or select a contact from Contacts or Recent calls by sliding
or touching tabs, then to make the call.
The number you entered can be saved to Contacts by touching
and then touching Create new contact.
If you make a mistake, you can delete the incorrect digits by touching
.
To hang up a call, touch .
3.2 Answering or rejecting a call
When you receive a call:
• Slide the icon to the right to answer;
• Slide the icon to the left to reject;
• Slide the icon upwards to reject the call by sending a preset
message.
To mute the ringtone volume of an incoming call, press the Volume
up/down key, or turn the phone over (when the Settings\Gestures\
Turn over to mute option is activated).
9 10
3.3 Consulting your call memory
You can access your call memory from the Call screen to view
Missed calls, Outgoing calls and Incoming calls.
4 Contacts ......................
You can view and create contacts on your phone and synchronize
these with your Gmail contacts or other applications on the web or
on your phone.
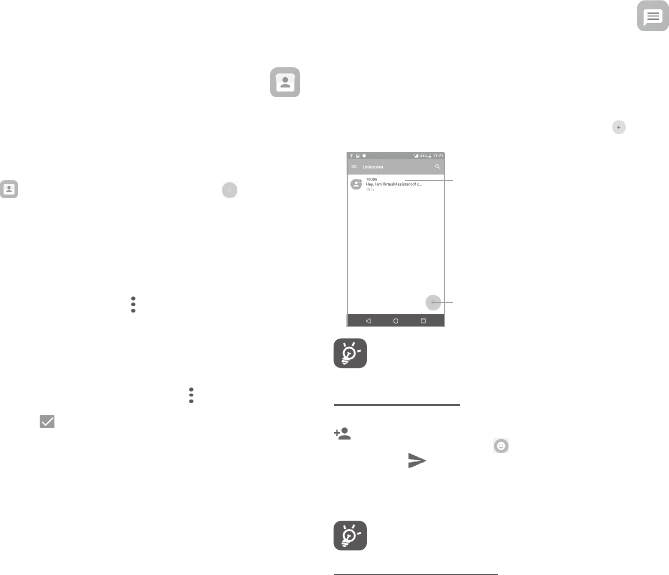
4.1 Adding a contact
Touch on the Home screen, then touch the icon in the
contacts list to create a new contact.
4.2 Importing, exporting and sharing
contacts
This phone enables you to import or export contacts between your
phone, SIM card and phone storage.
From the Contacts screen, touch to open the options menu, touch
Import/Export, then select Import from SIM card, Export to SIM
card, Import from phone storage, Export to phone storage or
Share visible contacts.
You can share a single contact or contacts with others by sending the
contact's vCard to them via Bluetooth, Gmail, etc.
Touch a contact you want to share, touch the icon and Share from
the contact details screen. Select the number you want to share
and touch the icon, and then select the application to perform
this action.
4.3 Synchronizing contacts in multiple
accounts
Contacts, data or other information can be synchronized from
multiple accounts, depending on the applications installed on your
phone.
5 Messaging ...................
You can create, edit and receive SMS and MMS with this phone.
To access this feature, touch the Application tab from the Home
screen, then select Messaging.
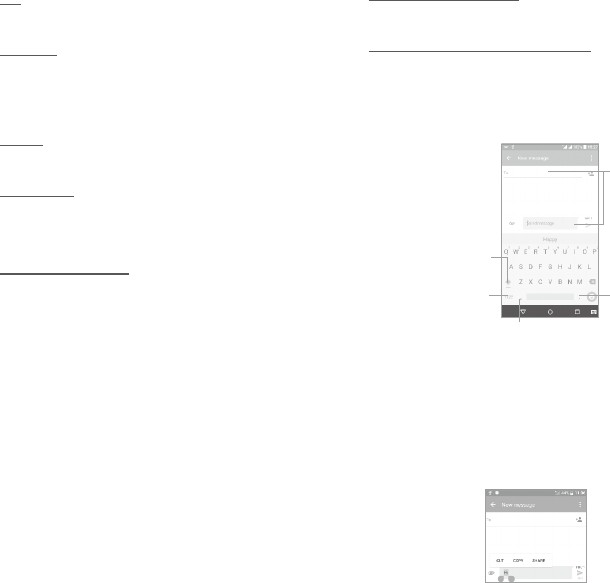
5.1 Write message
On the message screen, touch the new message icon to write
text/multimedia messages.
Touch to create a new message.
• Touch to view the whole message
thread.
• Long press to activate delete mode.
For saved contacts, touch the photo to open the Quick
contact panel to communicate with the contact. For unsaved
contacts, touch the photo to add the number to your
Contacts.
Sending a text message
Enter the mobile phone number of the recipient in the To bar or touch
to add recipients. Touch the Send message bar to enter the
text of the message. Touch the icon to insert emoticons. When
finished, touch to send the text message.
An SMS message of more than 160 characters will be charged as
several SMS. A counter will be on the right of the text box to remind
you how many characters are allowed to be entered in one message.
Specific letters (accented) will also increase the size of the
SMS, this may cause multiple SMS to be sent to your
recipient.
Sending a multimedia message
MMS enables you to send video clips, images, photos, animations,
slides and sounds to other compatible mobiles and e-mail addresses.
An SMS will be converted to MMS automatically when media files
(image, video, audio, slides, etc.) are attached or subject or email
addresses are added.
11 12
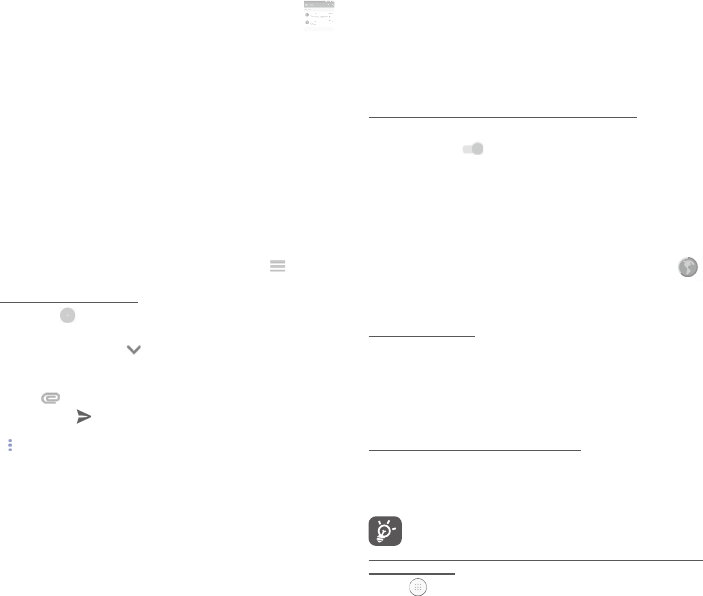
6 Email ............................
Besides your Gmail account, you can also set up external POP3,
IMAP or Exchange email accounts in your phone.
To access this feature, touch the Application tab from the Home
screen, then select Email.
An email setup wizard will guide you through the steps to set up an
email account.
• Enter the email address and password of the account you want
to set up.
• Touch NEXT. If the account you entered is not provided by your
service provider in the phone, you will be prompted to go to
the email account settings screen to enter settings manually.
Alternatively, you can touch MANUAL SETUP to directly enter
the incoming and outgoing settings for the email account you are
setting up.
• Enter the account name and display name in outgoing emails.
• To add another email account, you can touch the icon and
Settings. Touch Add account to create.
To create and send emails
• Touch the icon from the Inbox screen.
• Enter recipient(s) email address (es) in the To field.
• If necessary, touch the icon beside To field to add Cc/Bcc to
add a copy or a blind carbon copy to the message.
• Enter the subject and the content of the message.
• Touch to add an attachment.
• Finally, touch to send.
• If you do not want to send the mail right away, you can touch the
icon and Save draft keys or touch the Back key to save a copy.
7 Getting connected ...........
To connect to the Internet with this phone, you can use GPRS/EDGE/
HSPA/LTE networks or Wi-Fi, whichever is most convenient.
7.1 Connecting to the Internet
7.1.1 GPRS/EDGE/HSPA/LTE
The first time you turn on your phone with your SIM card inserted,
it will automatically configure your network service: GPRS, EDGE,
HSPA or LTE.
To check the network connection you are using, touch Settings\
More\Cellular networks, and touch Access Point Names or
Network operators.
7.1.2 Wi-Fi
Using Wi-Fi, you can connect to the Internet when your phone is
within range of a wireless network. Wi-Fi can be used on your phone
even without a SIM card inserted.
To turn Wi-Fi on and connect to a wireless network
• Touch Settings\Wi-Fi.
• Touch the switch to turn on/off Wi-Fi.
• The detailed information of detected Wi-Fi networks is displayed in
the Wi-Fi networks section.
• Touch a Wi-Fi network to connect. If the network you selected is
secured, you are required to enter a password or other credentials
(you can contact the network carrier for details). When finished,
touch CONNECT.
7.2 Browser ...........................................
Using the Browser, you can enjoy surfing the Web.
To access this feature, touch the Application tab from the Home
screen, then select Browser.
To go to a web page
On the Browser screen, touch the URL box at the top, enter the
address of the web page, and then confirm.
7.3 Connecting to a computer
With the USB cable, you can transfer media files and other files
between your internal storage and the computer.
To connect your phone to the computer:
• Use the USB cable that came with your phone to connect the phone
to a USB port on your computer. You will receive a notification that
the USB is connected.
• If you use MTP or PTP, your phone will be automatically connected.
Before using MTP, make sure that the driver (Windows
Media Player 11 or higher version) has been installed.
To locate data you have transferred or downloaded in your
internal storage:
• Touch to open the applications list.
• Touch Files.
All data you have downloaded is stored in the Files. Here you can
view media files (videos, photos, music and others), rename files,
install applications into your phone, etc.

13 14
7.4 Sharing your phone's cellular data
connection
You can share your phone's cellular data connection with a single
computer via USB cable (USB tethering) or with up to eight devices at
once by turning your phone into a portable Wi-Fi hotspot.
To turn on USB tethering or Portable Wi-Fi hotspot
• Touch Settings\More\Mobile Hotspot and Tethering.
• Touch the switch of USB tethering or Mobile Hotspot to
activate this function.
These functions may incur additional network charges from
your network carrier. Extra fees may also be charged in
roaming areas.
8 Find my location using
GPS satellites ...................
To activate your phone’s global positioning system (GPS) satellite
receiver:
• Touch Settings\Location.
• Touch the switch to turn on Google's location service.
You can then open Maps to find your location:
Use your phone’s GPS satellite receiver to pinpoint your location
within an accuracy as close as several meters (“street level”). The
process of accessing the GPS satellite and setting your phone's
precise location for the first time will only take a few minutes. You
will need to stand in a place with a clear view of the sky and avoid
moving. After this, GPS will only need 20-40 seconds to identify your
precise location.
9 Data backup .....................
This phone enables you to back up your phone’s settings and other
application data to Google servers, with your Google account.
If you replace your phone, the settings and data you’ve backed up
are restored onto the new phone the first time you sign in with your
Google account.
To activate this function:
• Touch Settings\Backup & reset
• Touch Back up my data and then the switch .
When this function is activated, a wide variety of settings and data
is backed up, including your Wi-Fi passwords, bookmarks, a list
of the applications you’ve installed, the words you’ve added to the
dictionary used by the onscreen keyboard, and most of the settings
that you configure with the Settings application. If you deactivate this
option, you stop backing up your settings, and any existing backups
are deleted from Google servers.
10 Factory data reset
To activate factory data reset:
• Touch Settings\Backup & reset\Factory data reset.
• Touch RESET PHONE.
Resetting the phone will erase all of your personal data from internal
phone storage, including information about your Google account,
any other accounts, your system and application settings, and any
downloaded applications. If you reset the phone in this way, you’re
prompted to re-enter the same kind of information as when you first
started Android.
When you are unable to power on your cellphone, you can perform
a factory data reset by pressing the Power key and the Volume up
key at the same time until the screen lights up.

15 16
11 Applications &
Internal storage ..........
11.1 Applications
With this phone, some built-in Google applications and other third
party applications are available for your convenience.
With the built-in applications, you can
• Communicate with friends.
• Exchange messages or emails with friends.
• Track your location, view traffic situations, search for locations and
get navigation information to your destination.
• Download more applications from the Google Play Store and more.
For more information about these applications, please check the
online user manual at: www.alcatel-mobile.com.
11.2 Internal storage
Touch Settings\Storage and USB to display the amount of internal
phone storage used by the operating system, its components,
applications (including those you downloaded), permanent and
temporary data.
If a warning message comes up saying that phone memory
is limited, you are required to free up space by deleting
some unwanted applications, downloaded files, etc.
12 Making the most of
your phone .................
You can use the Over-the-air Upgrade tool to update your phone's
software.
Over-the-air Upgrade
Using the Over-the-air Upgrade tool you can update your phone's
software.
To access System updates, touch Settings\About phone\System
updates. Or you can touch icon to open the applications list.
Then touch Updates. Touch and the phone will search for the
latest software. If you want to update the system, touch the
button, and when that’s finished, touch to complete the upgrade.
Now your phone will have the latest version of the software. You
should turn on data connection or Wi-Fi before searching for updates.
Settings for auto-check frequency are also available once you
restart the phone. If you have chosen auto-check, when the system
discovers the new version, a dialog will pop up to choose download
or ignore, the notification will also appear in status bar.
During over-the-air downloading or updating, to avoid errors in
locating the correct update packages, do not change your default
storage location.
All functions including emergency calls will not be active
during over-the-air installation.