User Manual
D01252920A
Z
NT-503
USB DAC/ Network Player
OWNER’S MANUAL
MODE D’EMPLOI
MANUAL DEL USUARIO
ENGLISH
FRANÇAIS
ESPAÑOL
2
IMPORTANT SAFETY INSTRUCTIONS
CAUTION: TO REDUCE THE RISK OF ELECTRIC SHOCK,
DO NOT REMOVE COVER (OR BACK). NO USER-
SERVICEABLE PARTS INSIDE. REFER SERVICING TO
QUALIFIED SERVICE PERSONNEL.
<The lightning flash with arrowhead symbol, within an
equilateral triangle, is intended to alert the user to the
presence of uninsulated “dangerous voltage” within the
product’s enclosure that may be of sufficient magni-
tude to constitute a risk of electric shock to persons.
BThe exclamation point within an equilateral triangle is
intended to alert the user to the presence of important
operating and maintenance (servicing) instructions in
the literature accompanying the appliance.
WARNING: TO PREVENT FIRE OR SHOCK
HAZARD, DO NOT EXPOSE THIS APPLIANCE TO
RAIN OR MOISTURE.
CAUTION
oDO NOT REMOVE THE EXTERNAL CASES OR CABINETS TO EXPOSE
THE ELECTRONICS. NO USER SERVICEABLE PARTS ARE INSIDE.
oIF YOU ARE EXPERIENCING PROBLEMS WITH THIS PRODUCT,
CONTACT THE STORE WHERE YOU PURCHASED THE UNIT FOR
A SERVICE REFERRAL. DO NOT USE THE PRODUCT UNTIL IT HAS
BEEN REPAIRED.
oUSE OF CONTROLS OR ADJUSTMENTS OR PERFORMANCE OF
PROCEDURES OTHER THAN THOSE SPECIFIED HEREIN MAY RESULT
IN HAZARDOUS RADIATION EXPOSURE.
1) Read these instructions.
2) Keep these instructions.
3) Heed all warnings.
4) Follow all instructions.
5) Do not use this apparatus near water.
6) Clean only with dry cloth.
7) Do not block any ventilation openings. Install in accordance
with the manufacturer's instructions.
8) Do not install near any heat sources such as radiators, heat
registers, stoves, or other apparatus (including amplifiers) that
produce heat.
9) Do not defeat the safety purpose of the polarized or grounding-
type plug. A polarized plug has two blades with one wider than
the other. A grounding type plug has two blades and a third
grounding prong. The wide blade or the third prong are pro-
vided for your safety. If the provided plug does not fit into your
outlet, consult an electrician for replacement of the obsolete
outlet.
10) Protect the power cord from being walked on or pinched par-
ticularly at plugs, convenience receptacles, and the point where
they exit from the apparatus.
11) Only use attachments/accessories specified by the
manufacturer.
12) Use only with the cart, stand, tripod,
bracket, or table specified by the man-
ufacturer, or sold with the apparatus.
When a cart is used, use caution when
moving the cart/apparatus combination
to avoid injury from tip-over.
13) Unplug this apparatus during lightning storms or when unused
for long periods of time.
14) Refer all servicing to qualified service personnel. Servicing is
required when the apparatus has been damaged in any way,
such as power-supply cord or plug is damaged, liquid has been
spilled or objects have fallen into the apparatus, the apparatus
has been exposed to rain or moisture, does not operate nor-
mally, or has been dropped.
oThe apparatus draws nominal non-operating power from the
AC outlet with its POWER or STANDBY/ON switch not in the ON
position.
oThe power plugs are used as disconnect devices; the disconnect
devices shall remain readily operable.
oCaution should be taken when using earphones or headphones
with the product because excessive sound pressure (volume)
from earphones or headphones can cause hearing loss.
EN
3
CAUTION
oDo not expose this apparatus to drips or splashes.
oDo not place any objects filled with liquids, such as vases, on
the apparatus.
oDo not install this apparatus in a confined space such as a
book case or similar unit.
oThe apparatus should be located close enough to the AC
outlet so that you can easily reach the power cord plug at any
time.
oIf the product uses batteries (including a battery pack or
installed batteries), they should not be exposed to sunshine,
fire or excessive heat.
oCAUTION for products that use replaceable lithium batter-
ies: there is danger of explosion if a battery is replaced with
an incorrect type of battery. Replace only with the same or
equivalent type.
WARNING
Products with Class ! construction are equipped with a power
supply cord that has a grounding plug. The cord of such a prod-
uct must be plugged into an AC outlet that has a protective
grounding connection.
IN USA/CANADA, USE ONLY ON 120 V SUPPLY.
VPrecautions concerning batteries
Misuse of batteries could cause them to rupture or leak leading to
fire, injury or the staining of nearby things. Please read and observe
the following precautions carefully.
oBe sure to insert the batteries with correct positive (¥) and
negative (^) orientations.
oUse batteries of the same type. Never use different types of bat-
teries together.
oIf the remote control is not used for a long time (more than a
month), remove the batteries to prevent them from leaking.
oIf the batteries leak, wipe away the leakage inside the battery
compartment and replace the batteries with new ones.
oDo not use batteries of types other than those specified. Do not
mix new batteries with old ones or use different types of batter-
ies together.
oDo not heat or disassemble batteries. Never throw batteries into
fire or water.
oDo not carry or store batteries with other metallic objects. The
batteries could short circuit, leak or explode.
oNever recharge a battery unless it is confirmed to be a recharge-
able type.
For European Customers
Disposal of electrical and electronic equipment
and batteries and/or accumulators
a) All electrical/electronic equipment and waste batteries/
accumulators should be disposed of separately from the
municipal waste stream via collection facilities designated by
the government or local authorities.
b) By disposing of electrical/electronic equipment and waste
batteries/accumulators correctly, you will help save valuable
resources and prevent any potential negative effects on
human health and the environment.
c) Improper disposal of waste electrical/electronic equipment
and batteries/accumulators can have serious effects on the
environment and human health because of the presence of
hazardous substances in the equipment.
d) The Waste Electrical and Electronic Equipment (WEEE)
symbols, which show wheeled bins that have been
crossed out, indicate that electrical/electronic equip-
ment and batteries/accumulators must be collected
and disposed of separately from household waste.
If a battery or accumulator contains more than the
specified values of lead (Pb), mercury (Hg), and/or
cadmium (Cd) as defined in the Battery Directive
(2006/66/EC), then the chemical symbols for those
elements will be indicated beneath the WEEE symbol.
e) Return and collection systems are available to end users. For
more detailed information about the disposal of old electri-
cal/electronic equipment and waste batteries/accumulators,
please contact your city office, waste disposal service or the
shop where you purchased the equipment.
Pb, Hg, Cd
DECLARATION OF CONFORMITY
We, TEAC AUDIO EUROPE, Liegnitzer Straße 6, 82194
Gröbenzell, Germany declare in own responsibility,
the TEAC product described in this manual is in
compliance with the corresponding technical standards.
The nameplate is located on the bottom of the unit as shown below.
Front side
Nameplate
4
Wireless equipment precautions
Compliance of radio transmitter and
interference
Model for USA
Declaration of Conformity
Responsible party:
TEAC AMERICA, INC.
Address: 1834 Gage Road, Montebello, California, U.S.A.
Telephone number : 1-323-726-0303
This device complies with Part.15 of FCC Rules.
Operation is subject to the following two conditions:
1) This device may not cause interference
2) This device must accept any interference, including interfer-
ence that may cause undesired operation of the device.
Labeling of authorization
FCC ID: XEG-NT503
Model for Canada
Compliance of radio transmitter
This device complies with Industry Canada RSS standard(s).
Operation is subject to the following two conditions:
1) This device may not cause interference
2) This device must accept any interference, including interfer-
ence that may cause undesired operation of the device.
Labeling of authorization
IC: 1559C-NT503
Compliance of interference
This Class B digital apparatus complies with Canadian ICES-003.
Model for EEA (European Economic Area)
This equipment complies with the harmonised standards of
DIRECTIVE 1999/5/EC (R&TTE).
Labeling of conformity
CE marking:
CAUTION
Authorization of wireless devices are different in countries or
regions. Please use only in the country where you purchased the
product.
oDepending on the country, restrictions on the use of Bluetooth
wireless technology might exist.
Confirm the laws and regulations of the country or region where
you want to use the unit before use.
Radiation Exposure requirements
This equipment meets the regulation, which is recognized interna-
tionally, for the case of human exposure to radio waves generated
by the transmitter.
Statement of compliance
Model for USA
This equipment complies with FCC radiation exposure limits set
forth for an uncontrolled environment and meets the FCC radio fre-
quency Exposure Guidelines.
Model for Canada
This equipment complies with IC RSS-102 radiation exposure limits set
forth for an uncontrolled environment.
Model for EEA (European Economic Area)
This equipment complies with EN.62311; Assessment of electronic
and electrical equipment related to human exposure restrictions
for electromagnetic fields; the harmonised standard of DIRECTIVE
1999/5/EC.
CAUTION
Changes or modifications not expressly approved by the party
responsible for compliance could void the user’s authority to
operate the equipment.
Information for interference
(FCC requirements)
This equipment has been tested and found to comply with the lim-
its for a Class B digital device, pursuant to Part 15 of the FCC Rules.
These limits are designed to provide reasonable protection against
harmful interference in a residential installation.
This equipment generates, uses, and can radiate radio frequency
energy and, if not installed and used in accordance with the instruc-
tions, may cause harmful interference to radio communications.
However, there is no guarantee that interference will not occur in a
particular installation.
If this equipment does cause harmful interference to radio or televi-
sion reception, which can be determined by turning the equipment
off and on, the user is encouraged to try to correct the interference
by one or more of the following measures.
oReorient or relocate the equipment and/or the receiving
antenna.
oIncrease the separation between the equipment and receiver.
oConnect the equipment into an outlet on a circuit different from
that to which the receiver is connected.
oConsult the dealer or an experienced radio/TV technician for
help.

EN
5
Trademarks and other legal statement
MPEG Layer-3 audio coding technology licensed from Fraunhofer IS
and Thomson.
"DSD" is a registered trademark.
The Bluetooth® word mark and logos are registered trademarks
owned by Bluetooth SIG, Inc. and any use of such marks by TEAC
CORPORATION is under license.
© 2013 CSR plc and its group companies. The aptX® mark and the
aptX logo are trade marks of CSR plc or one of its group companies
and may be registered in one or more jurisdictions.
This product is protected by certain intellectual property rights of
Microsoft. Use or distribution of such technology outside of this
product is prohibited without a license from Microsoft.
Windows and Windows Media are either registered trademarks or
trademarks of Microsoft Corporation in the United States and/or
other countries.
Mac, Mac OS and OS X are trademarks of Apple Inc., registered in the
U.S. and other countries.
IOS is a trademark or registered trademark of Cisco in the U.S. and
other countries and is used under license.
Android is a trademark of Google Inc.
SiriusXM Internet Radio subscriptions are sold separately and are
governed by the Sirius Terms and Conditions (see www.sirius.com).
Be sure to read this agreement before you purchase your subscrip-
tion. Sirius, XM and all related marks and logos are trademarks of
Sirius XM Radio Inc. and its subsidiaries. All rights reserved.
Slacker and the Slacker Logo are registered trademarks of Slacker,
Inc.
DLNA®, the DLNA Logo and DLNA CERTIFIED® are trademarks,
service marks, or certification marks of the Digital Living Network
Alliance.
Other company names and product names in this document are
the trademarks or registered trademarks of their respective owners.
Information about copyrights and licensing related to open-source
software is provided in the separate “Important Notice Regarding
Software” document.
Listening to SiriusXM Internet Radio
To listen to SiriusXM Internet Radio, you’ll need to subscribe
to SiriusXM Internet Radio service and obtain a username and
password. SiriusXM Internet Radio is available to residents of the
United States and Canada.
SiriusXM Internet Radio delivers a variety of commercial-free
music including Pop, Rock, Country, R&B, Hip-Hop, Jazz, Classical
and much more, plus expert sports talk and analysis. You also get
exclusive entertainment, talk, comedy, family programming, local
traffic and weather and news from your most trusted sources.
Once you’ve purchased a SiriusXM Internet Radio compatible
tuner you’ll need to subscribe to the service to listen to SiriusXM
Internet Radio. There are a variety of programming packages
available, including the option of adding “The Best of XM” pro-
gramming to the
SiriusXM Internet Radio service. “The Best of XM” service is not
available to Sirius Canada subscribers at this time.
Please check with Sirius Canada for any updates using the num-
bers and web address below.
Family friendly packages are also available to restrict channels
that feature mature programming.
To subscribe to SiriusXM Internet Radio, U.S. customers should
visit www.sirius.com or
call
1-888-539-SIRI (1-888-539-7474).
Canadian customers should visit
www.siriuscanada.ca.
Current XM Radio Online subscribers will need to log into the XM
online account manager and update their password in order for
their credentials to work on a SiriusXM Internet Radio compat-
ible device. If the username is over 20 characters or their device
doesn’t
support the “@” character in the username, subscribers need to
update the username on the same screen.

6
Contents
Check to be sure the box contains all the included items shown
below.
Please contact the store where you purchased this unit if any
of these items are missing or have been damaged during
transportation.
Power cord × 1
RCA conversion (RCA to mini plug) cable × 1
Remote control (RC-1320) × 1
Batteries for remote control (AAA) × 2
Owner’s manual (this document) × 1
oKeep this manual in a safe place for future reference.
Warranty card × 1 (for users in the USA and Canada only)
oUsers in Europe and other countries and regions should see the
back of this document for information about the warranty.
Included items
Included items ....................................................6
Before use .........................................................7
Maintenance ......................................................7
Using the TEAC Global Site .........................................7
Product registration ...............................................7
USB flash drives and Networks .....................................8
Downloading the remote app .....................................9
Connections ......................................................10
Connections (front panel) .........................................12
Connecting headphones .........................................13
Upconversion ....................................................13
Names and functions of parts (main unit) .........................14
Using the remote control .........................................15
Names and functions of parts (remote control) ....................16
Basic operation ...................................................17
Display ...........................................................18
Bluetooth® wireless technology ...................................20
Settings ..........................................................22
Playing back music on a computer ................................27
Troubleshooting ..................................................29
Specifications .....................................................31
Thank you for choosing TEAC.
Read this manual carefully to get the best performance from this
unit. After reading it, keep it in a safe place with the warranty card
for future reference.

EN
7
VPrecautions for use
oDo not install this unit in a location that could become hot.
This includes places that are exposed to direct sunlight or near
a radiator, heater, stove or other heating equipment. Moreover,
do not place it on top of an amplifier or other equipment that
generates heat. Doing so could cause discoloration, deformation
or malfunction.
oAvoid locations that are extremely cold or exposed to excessive
humidity or dust.
oWhen installing this unit, leave a little space (at least 3 cm or 8")
between it and walls and other devices in order to allow good
heat dissipation. If you put it in a rack, for example, leave at least
5 cm (2") open above it and at least 10 cm (4") open behind it.
Failure to provide these gaps could cause heat to build up inside
and result in fire.
oPlace the unit in a stable location near the audio system that you
will use with it.
oDO NOT place anything, not even CDs, CD-Rs, LP records or cas-
sette tapes, on top of the units. Doing so could cause damage.
oThe voltage supplied to the unit should match the voltage
printed on the rear panel. If you are in any doubt regarding this
matter, consult an electrician.
oDo not move the unit during use.
oDo not open the body of the unit because this could result in
damage to the circuitry or cause electric shock. If a foreign object
should enter the unit, contact your dealer.
oWhen removing the power plug from the wall outlet, always pull
directly on the plug; never yank on the cord.
Wipe dirt from the top cover and other panel surfaces using a
soft cloth that has been slightly dampened with a diluted neutral
cleanser.
Do not wipe with chemical cleaning cloths, thinner or other chemi-
cal agents. Doing so could damage the surface.
VFor your safety, disconnect the power cord from
the socket before cleaning.
Using the TEAC Global Site
You can download updates for this unit from the TEAC Global Site:
http://teac-global.com/
1) Open the TEAC Global Site.
2) In the TEAC Downloads section, click the desired language to
open the Downloads website page for that language.
NOTE
If the desired language does not appear, click Other Languages.
3) Click the “Search by Model Name” section to open the Downloads
page for that product. (Users in Europe should click the product
name in the “Products” section instead.)
4) Select and download the updates that are needed.
Product registration
Customers in the USA, please visit the following TEAC website to
register your TEAC product online.
http://audio.teac.com/support/registration/
Before use Maintenance

8
USB flash drives and Networks
Audio files playable by this unit
This unit can play the following types of audio files from USB flash
drives or over a network connection.
MP3
File extension .mp3, .MP3
Standard MPEG-1/MPEG-2 Audio Layer-3
Sampling frequency 8kHz, 11.025kHz, 12kHz, 16kHz, 22.05kHz,
24kHz, 32kHz, 44.1kHz, 48kHz
Bit rate 8 kpbs – 320 kbps or VBR
WMA
File extension .wma, .WMA
Sampling frequency 8kHz, 11.025kHz, 16kHz, 22.05kHz, 32kHz,
44.1kHz, 48kHz
Bit rate 5 kpbs – 320 kbps or VBR
oThis unit might not be able to play audio files with copyright
protection from a USB or network source.
oWMA Pro/Voice not supported
WMA Lossless
File extension .wma or .WMA
Sampling frequency 44.1 kHz, 48 kHz, 88.2 kHz, 96 kHz
Quantization bit
depth
16-bit, 24-bit
WAV
File extension .wav, .WAV
Sampling frequency 8kHz, 11.025kHz, 12kHz, 16kHz, 22.05kHz,
24kHz, 32kHz, 44.1kHz, 48kHz, 64kHz,
88.2kHz, 96kHz, 176.4kHz, 192kHz
Quantization bit
depth
8-bit, 16-bit, 24-bit
oWAV files include uncompressed PCM digital audio.
AAC
File extension .aac, .m4a, .mp4, .3gp, .3g2,
.AAC, .M4A, .MP4, .3GP, .3G2
Standard MPEG-2/MPEG-4 Audio
Sampling frequency 8kHz, 11.025kHz, 12kHz, 16kHz, 22.05kHz,
24kHz, 32kHz, 44.1kHz, 48kHz, 64kHz,
88.2kHz, 96kHz
Bit rate 8 kpbs – 320 kbps or VBR
FLAC
File extension .flac, .FLAC
Sampling frequency 8kHz, 11.025kHz, 16kHz, 22.05kHz, 32kHz,
44.1kHz, 48kHz, 64kHz, 88.2kHz, 96kHz,
176.4kHz, 192kHz
Quantization bit
depth
8-bit, 16-bit, 24-bit
Ogg Vorbis
File extension .ogg, .OGG
Sampling frequency 8kHz, 11.025kHz, 16kHz, 22.05kHz, 32kHz,
44.1kHz, 48kHz, 64kHz
Bit rate 48 kpbs – 500 kbps or VBR
oIncompatible files cannot be played back.
Apple Lossless
File extension .m4a, .mp4, .M4A, .MP4
Sampling frequency 8kHz, 11.025kHz, 12kHz, 16kHz, 22.05kHz,
24kHz, 32kHz, 44.1kHz, 48kHz, 64kHz,
88.2kHz, 96kHz
Quantization bit
depth
16-bit, 24-bit
DSD
File extension .dsf, .DSF
Sampling frequency 2.8MHz, 5.6MHz
ATTENTION
oThis unit does not support the following formats when using the
Play To feature of Windows Media Player.
FLAC, Ogg Vorbis, DSD
oWhen playing back audio files over a network, the types of
file formats that can be played back also depend on the soft-
ware running on the network server. For example, when using
Windows Media Player, not all audio files on the computer can
be played back. Only audio files that have been added to the
Windows Media Player library can be played back.
oWhen playing back files that have been recorded at variable bit
rate (VBR), the playback time might not be shown correctly.
Notes about USB flash drives
This unit can use USB flash drives.*
Connect USB flash drives to the USB port (front).
* The USB ports on this unit only support USB flash drives (also
known as “thumb drives” and “jump drives”). They do not support
standard USB hard drives.
oFAT16 and FAT32 formats are supported for USB flash drives.
oIf a USB flash drive is divided into multiple partitions, this unit will
recognize them as separate volumes.
oThis unit supports up to 20,000 files and 16 folder levels within a
single folder.
oThis unit does not support USB hubs or devices with USB hub
functions. Never connect such devices to this unit.
ATTENTION
oIf the connected media is not supported, "Not Connected"
appears on this unit's display.
oThis unit cannot play back audio files if copyright protection is
used.
oDo not connect this unit's USB port (front) to a computer.
Sound from a computer cannot be input through this unit's USB
port (front).
oThis unit might not be able to use media that is loaded into a
USB card reader.
oDepending on the USB flash drive and its contents, reading data
from it might take some time.
EN
9
oDepending on the USB flash drive, the unit might not be able to
read its data correctly or supply power properly.
oDuring the use of USB flash drives, please be aware that our com-
pany will take no responsibility should data be lost or changed, a
USB flash drive become damaged or other harm occur.
oWe recommend backing up data saved on a USB flash drive
before using it with this unit.
oThis unit does not support USB flash drives with security
functions.
Note about DLNA
The Digital Living Network Alliance (DLNA) is a group that is advanc-
ing the standardization of reciprocal connections and the exchange
of audio, image, video and other data among computers, game
devices and digital household appliances over ordinary home
networks (LAN). This unit complies with version 1.5 of the DLNA
guidelines.
Note about servers
This unit supports the following version of Windows Media Player.
uWindows Media Player 12
uServers that comply with DLNA
A network server must be connected to the same network as this
unit.
This unit supports up to 20,000 files and 16 folder levels within a
single folder.
ATTENTION
Depending on the type of media server, this unit might not recog-
nize it or be able to play audio files saved on it.
Note about network services
The network services that can be used will differ according to the
region.
Network services and contents that you can use through this unit
could become unusable without warning if the service provider
stops service.
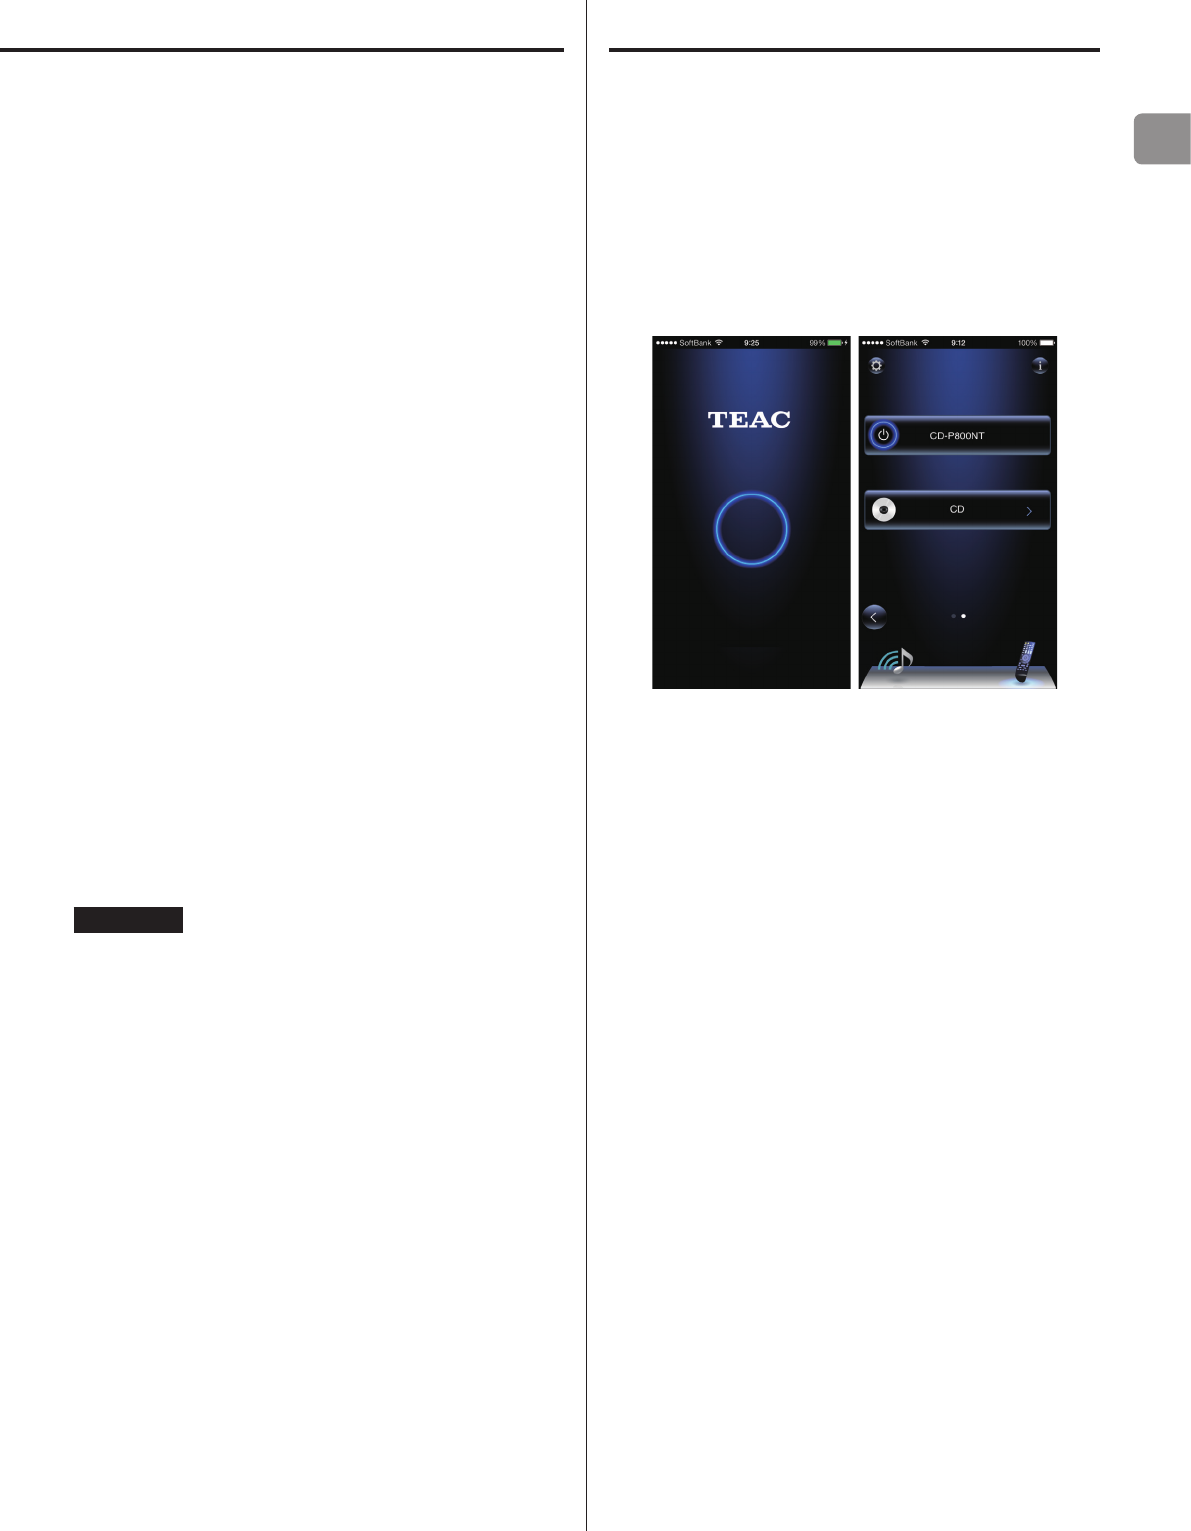
Downloading the remote app
To play back files on USB flash drives and to use the unit connected
to a network, install the dedicated app (free) on a smartphone, and
connect it to the same network as the unit.
If you install the app on an iPod touch/iPhone or Android device,
you can use it over a wireless network for basic control of the unit.
oYou can download and use the app for free.
How to download the iPod touch/iPhone app
Search for "TEAC HR Remote" in the App Store.
How to download the Android app
Search for "Teac Avr Remote" on the Google play website (https://
play.google.com/store).
10
LRLR
A B
G
C D
FE
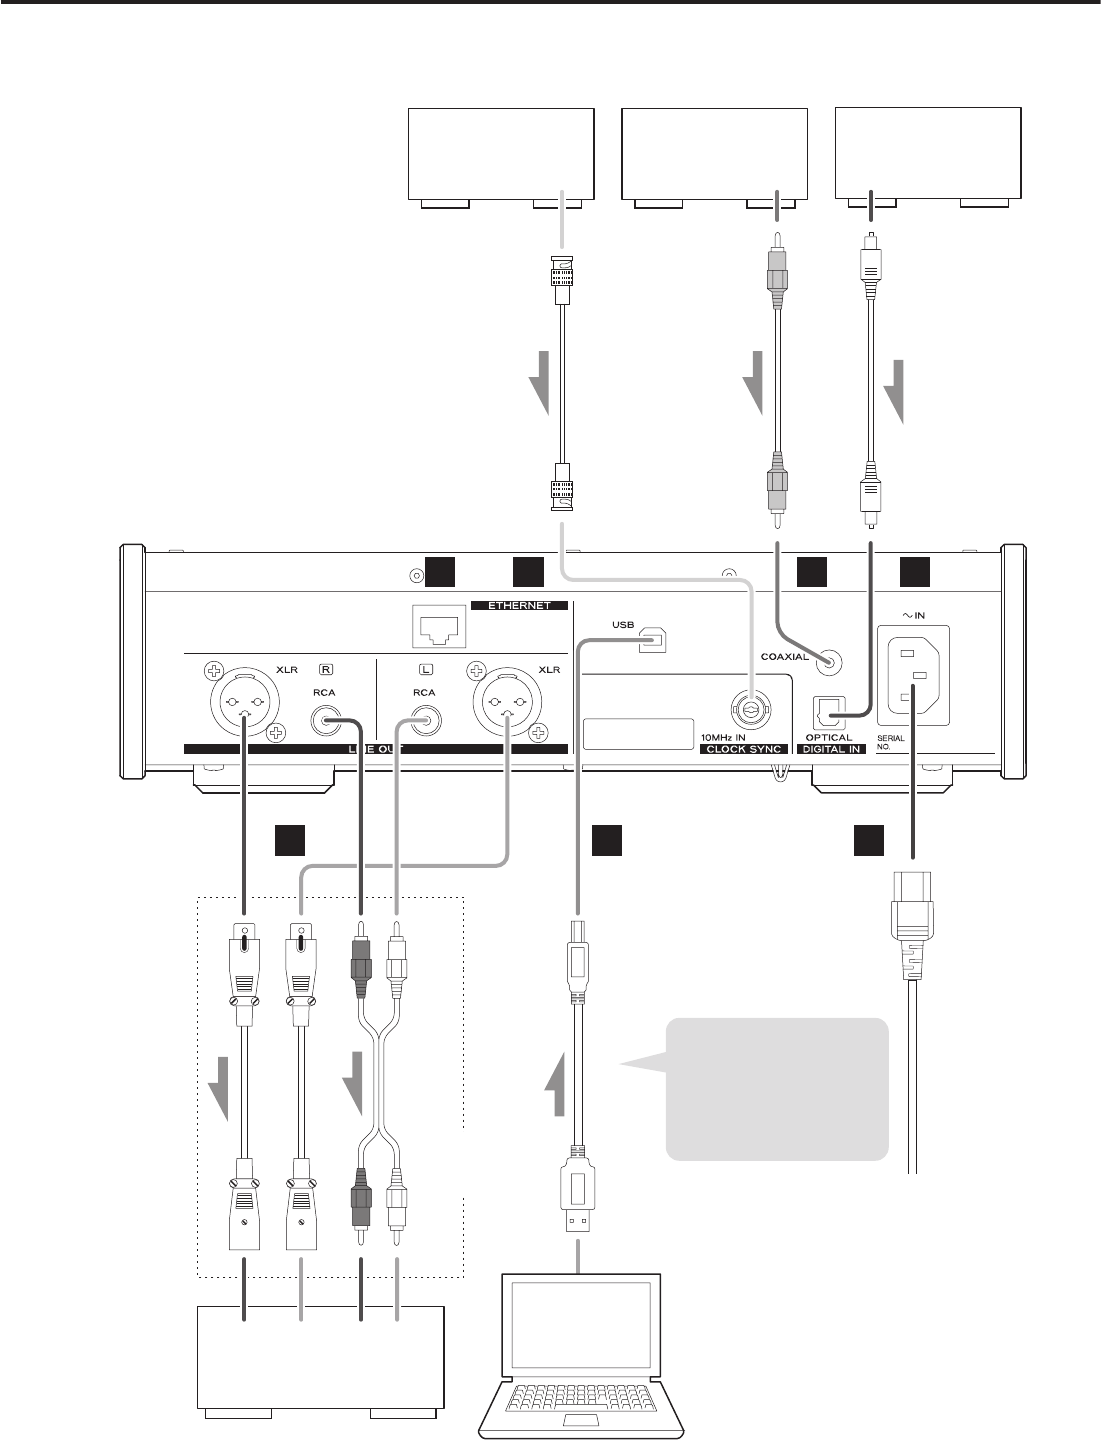
Connections
Device that outputs
clock signal
Digital audio output
device
Digital audio output
device
CLOCK SYNC OUT DIGITAL OUT
(COAXIAL)
DIGITAL OUT
(OPTICAL)
RCA coaxial digital cable
50Ω BNC coaxial cable
Optical digital cable
RCA audio cables
XLR cables
USB cable
Included power cord
Audio input
(LINE IN, etc.)
Stereo amplifier or
powered speakers Computer
Connect cables for the
pair set for line output
(page 23).
Sound will only be output
from the selected pair.
If headphones are
connected, sound will
stop being output from
the rear panel connectors.
The polarity of the XLR
connectors can be set so
that either 2 or 3 is HOT
(page 23).
Connect a set
of cables of one
type or the other.
If using a Windows OS,
install the dedicated driver
on the computer before
connecting this unit to it
(page 27).
c
Wall outlet

EN
11
A ETHERNET port
Connect a commercially-available LAN cable to this port
when you want to connect this unit to a wired network or the
Internet.
oWhen switching input sources, this port is labeled "NET".
B CLOCK SYNC input connector (10MHz IN)
Input a synchronization signal (clock sync) here.
To input a 10MHz oscillator signal (sine wave output), connect
the oscillator output here.
oUse a commercially-available BNC coaxial cable (50 Ω) for
connection.
oClock sync is only possible when the input source is USB,
USBf or NET.
C RCA COAXIAL digital audio input connector
Use this to input digital audio. Connect the coaxial digital audio
output connector of a digital audio device to it.
Use a commercially-available RCA coaxial digital cable
for connection.
D OPTICAL digital audio input connector
Use this to input digital audio. Connect the optical digital audio
output connector of a digital audio device to it.
Use a commercially-available optical digital cable for
connection.
E Analog audio output connectors (LINE OUT)
These output 2 channels of analog audio. Connect these XLR or
RCA connectors to a stereo amplifier or powered speakers.
Use commercially available cables for connections.
XLR: balanced XLR cables
RCA: RCA audio cables
Connect this unit's R connector to the R connector of the
amplifier and its L connector to the L connector of the amplifier.
F USB port (rear)
Use to input digital audio from a computer. Connect it to a
computer's USB port.
Use a commercially-available USB2.0 cable (A-B type) for
this connection.
ATTENTION
Before connecting a computer that is running a Windows OS,
you must install the dedicated driver on the computer (page
27).
Proper connection is not possible with a computer that does
not have this driver installed.
G Power inlet (~IN)
Insert the included power cord here.
After completing all other connections, insert the power plug
into a power outlet.
VUse only the included power cord. Use of other
power cords could result in fire or electric shock.
Unplug the cord from the outlet when not using
the unit for a long time.
VComplete all other connections before turning
the unit on.
oCarefully read the manuals of the devices that you are
connecting and follow their instructions when making
connections.
oDo not bundle connecting cables with power cords. Doing so
could cause noise.
oConnect all plugs completely.
12
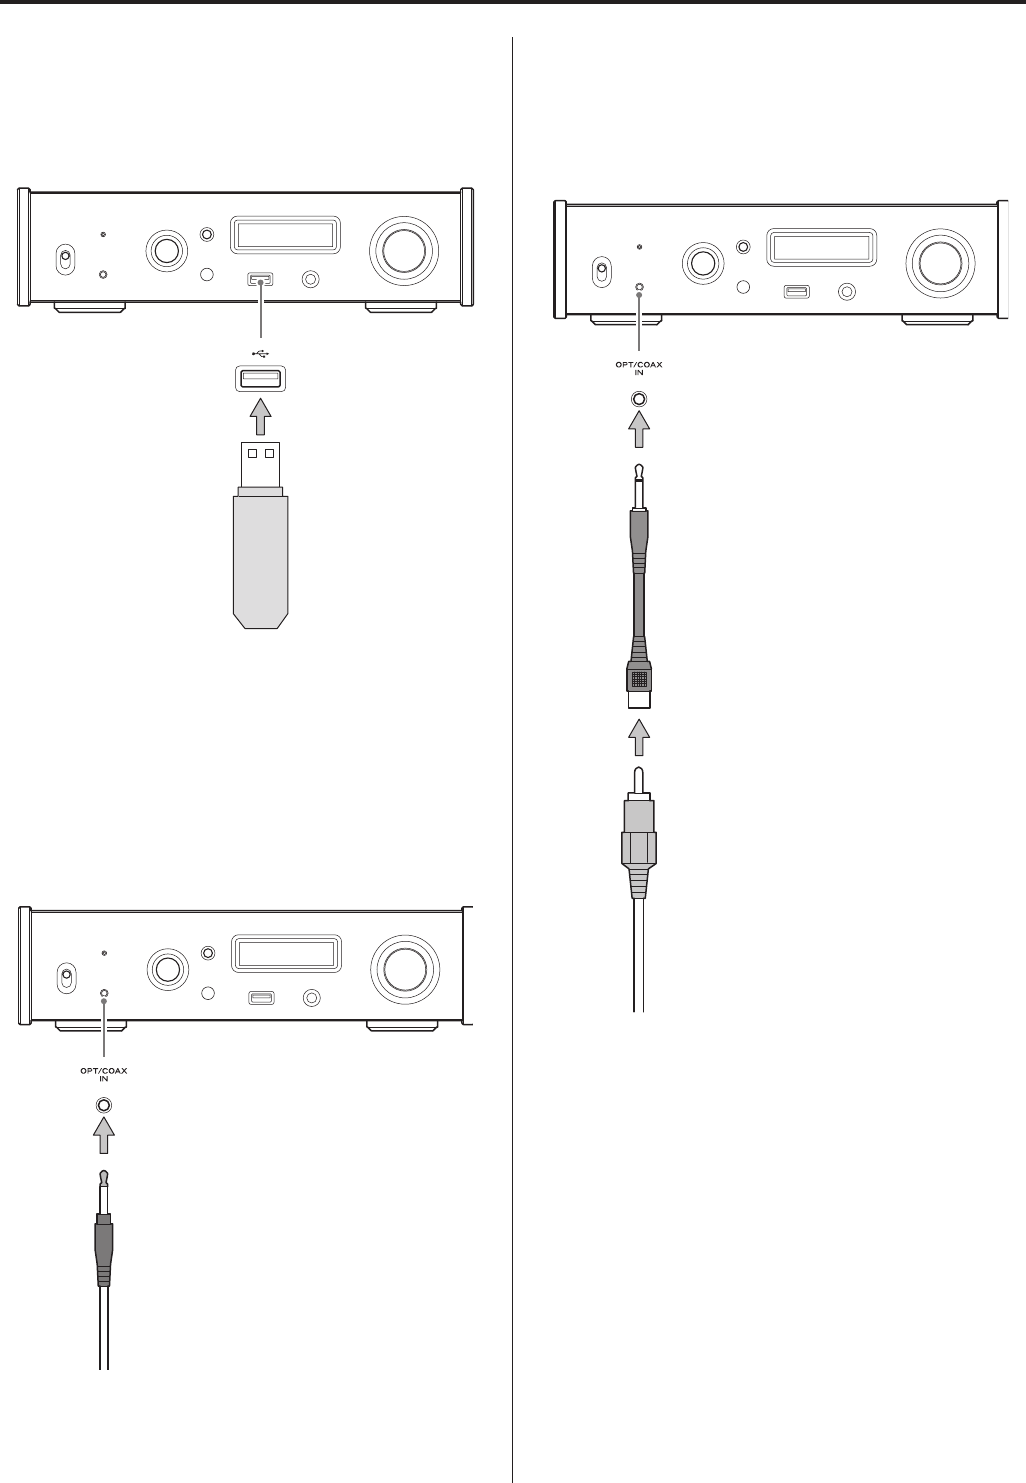
Connections (front panel)
USB flash drives
Connect USB flash drives to the USB port on the front of the unit.
To play music files on a USB flash drive, set the input source to NET
and use the app for playback.
oThe “f” indicates the front panel.
Digital audio input (OPT/COAX IN)
This input connector can be used for both optical (OPT) and coaxial
(COAX) connections.
Optical (OPT) connection
Use a commercially-available optical cable with a mini plug.
To enable this input, turn the INPUT SELECTOR knob to select OPTf.
oThe “f” indicates the front panel.
Optical mini plug
Coaxial (COAX) connection
Use the included RCA conversion cable and a commercially-avail-
able RCA coaxial digital cable.
To enable this input, turn the INPUT SELECTOR knob to select COAXf.
oThe “f” indicates the front panel.
RCA conversion cable
RCA coaxial digital cable
EN
13
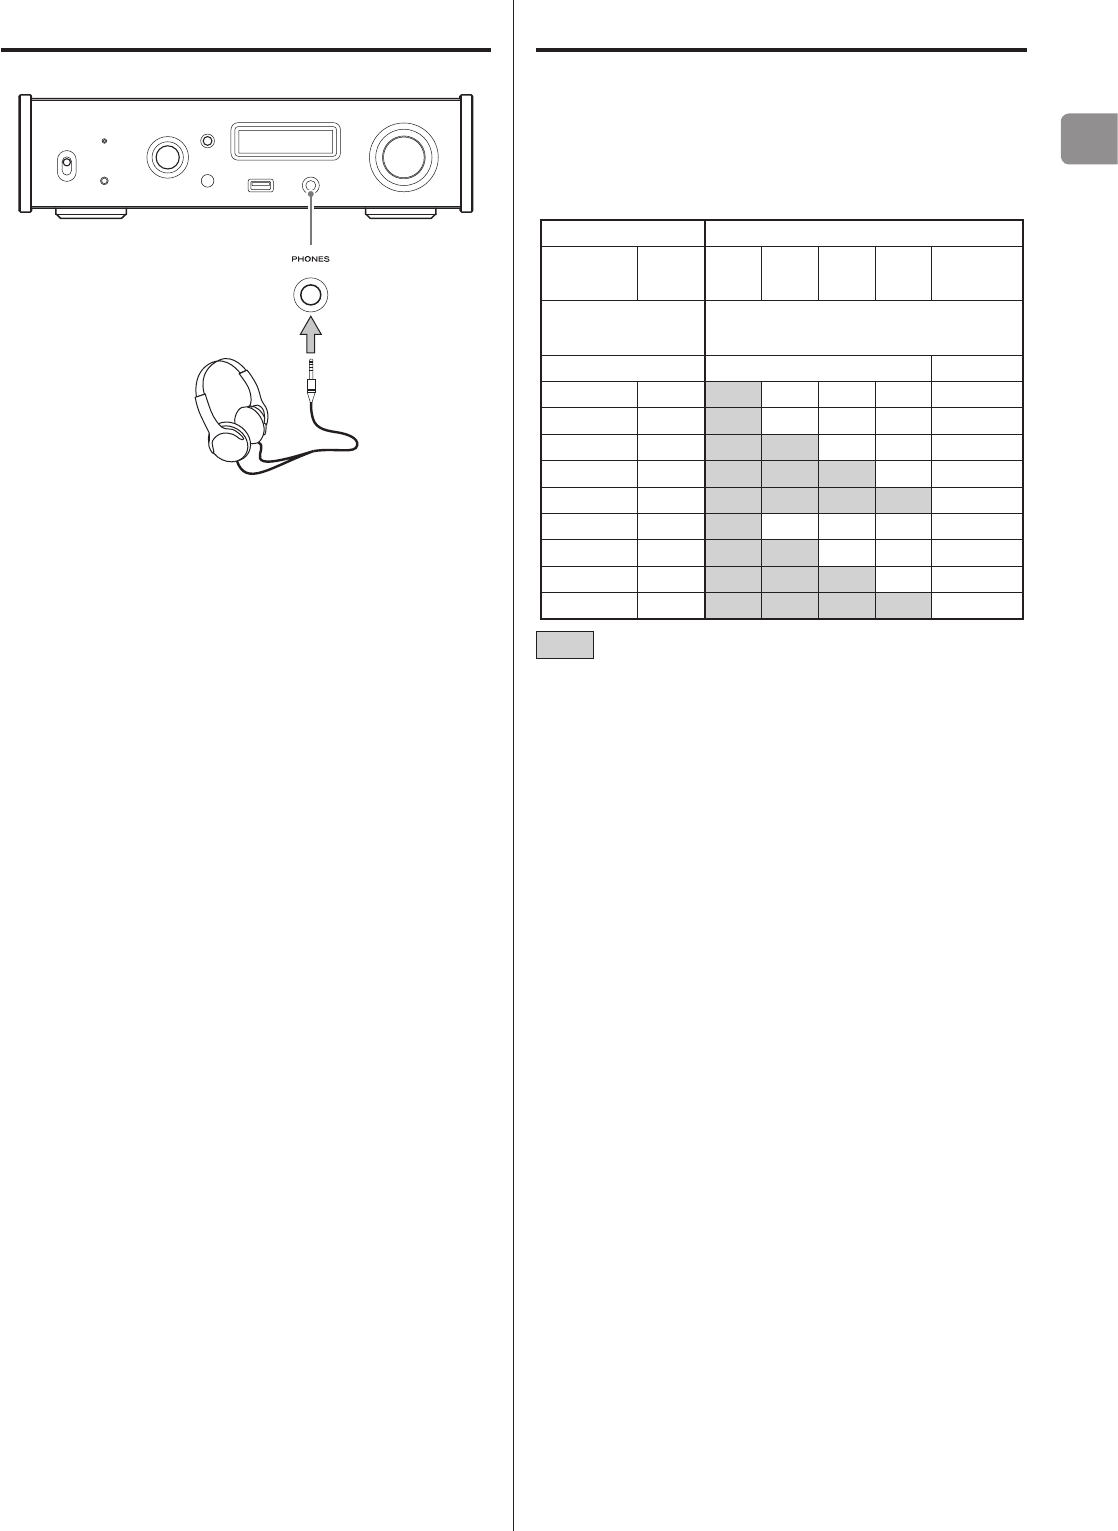
Connecting headphones
VCAUTION
While wearing headphones, do not connect or disconnect them or
turn the unit on or off.
Doing so could result in a sudden loud noise that could harm your
hearing.
Always set the volume to minimum (−∞ dB) before putting head-
phones on (page 17).
Upconversion
You can use the upconversion function with digital input, includ-
ing the OPT/COAX IN connector, and the USB (front) and USB (rear)
ports. (page 23).
The relationships between input sampling frequencies and sam-
pling frequencies after upconversion are as follows.
Input source Upconversion setting
Digital
audio input USB OFF 2Fs 4Fs 8Fs DSD
Input sampling
frequency Sampling frequency after upconversion
[kHz] [kHz] [MHz]
32 − 32 64 128 256 8.0
44.1 44.1 44.1 88.2 176.4 352.8 11.2
88.2 88.2 88.2 88.2 176.4 352.8 11.2
176.4 176.4 176.4 176.4 176.4 352.8 11.2
− 352.8 352.8 352.8 352.8 352.8 11.2
48 48 48 96 192 384 12.2
96 96 96 96 192 384 12.2
192 192 192 192 192 384 12.2
− 384 384 384 384 384 12.2
Values indicated by are unchanged.
14
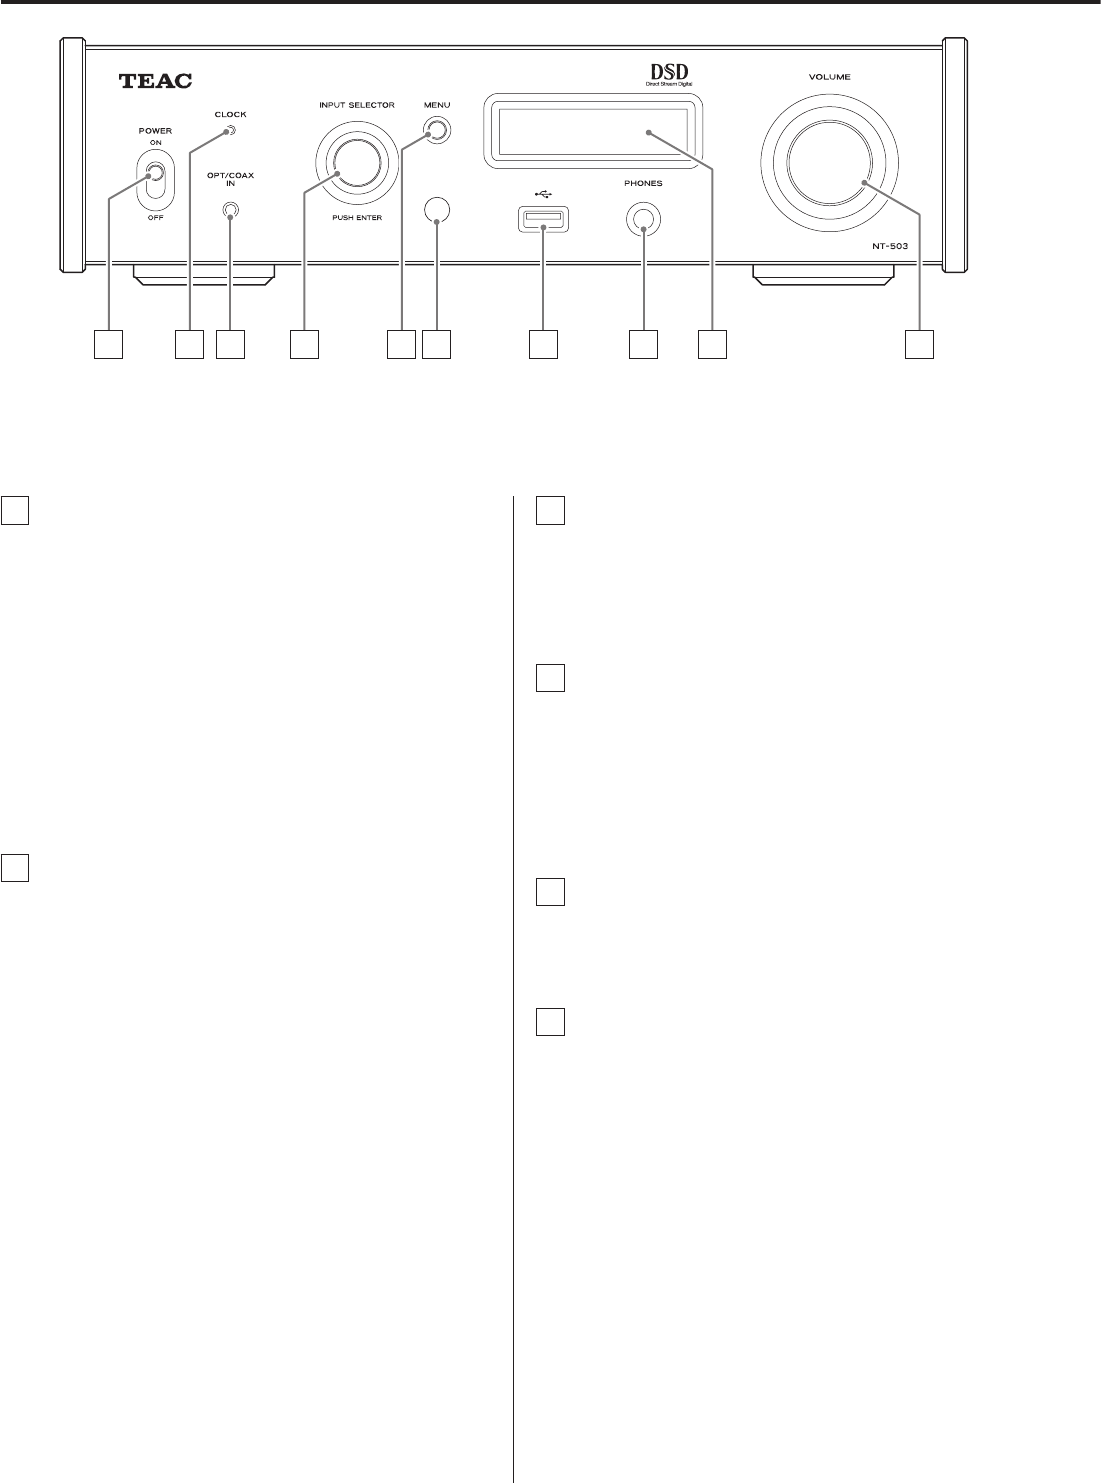
Names and functions of parts (main unit)
A POWER switch
Use to turn the unit on and off.
oIf the display is dark even though the POWER switch is set to
ON, the cause is usually one of the following.
• The power is on, but DIMMER (display brightness) is set to
OFF (page 24).
• The automatic power saving function has put the unit into
standby.
• The power cord is disconnected.
To turn the unit on, press the STANDBY/ON button on the
remote control, or set the power switch to OFF once and
then back to ON.
B CLOCK indicator
This shows the clock synchronization status.
Lit: The unit is synchronized with the clock from the
CLOCK SYNC input connector (10MHz IN).
Blinking: No clock is being input or the unit is not being
synchronized.
Unlit: No clock sync is occurring.
oSee page 23 for clock sync settings.
C Digital audio input (OPT/COAX IN)
Use this to input digital audio (page 12).
Optical connection: Use an optical cable with a mini plug.
Coaxial connection: Use the included RCA conversion cable.
D INPUT SELECTOR knob
Use to select the input source.
Use to change setting values when a menu item is shown.
Press to use as an ENTER button.
Turn when the menu is open to change the item shown or the
setting value.
E MENU button
Press to enter setting mode (page 22).
Press when in setting mode to return to the previous screen.
F Remote control signal receiver
This receives signals from the remote control. When operating
the remote control, point it at the remote control signal receiver.
A B C D E F G H I J
EN
15
G USB port (front)
Connect USB flash drives here.
oTo play music files on a USB flash drive, set the input source
to NET and use the app for playback.
oDo not connect this unit's USB port (front) to a computer.
Sound from a computer cannot be input through this unit's
USB port (front).
H PHONES jack
Connect headphones with a standard 6.3 mm (1/4") stereo
plug here (page 13).
oIf headphones are connected to this unit, audio will not be
output from the analog audio outputs on the rear panel.
I Display
This display shows information about the audio playing back
and menu screens.
J VOLUME knob
Use to adjust the headphones output volume. Turn right to
increase and left to decrease the volume.
oTo enable adjustment of this unit's analog audio output
volume, set LINE OUT LEVEL to VARIABLE (“Line output level”
on page 24). This will enable adjustment of the analog
output level using this unit's VOLUME knob.
oVolume settings are retained separately for analog audio
output and headphone output.
Using the remote control
Precautions for use
VMisuse of batteries could cause them to rupture or
leak, which might result in fire, injury or the stain-
ing of nearby materials. Please carefully read and
observe the precautions on page 3.
oWhen using the remote control, point it toward the remote con-
trol signal receiver on the main unit from a distance of 5 m (16 ft)
or less. Do not place obstructions between the main unit and the
remote control.
oThe remote control might not work if the remote control signal
receiver on the unit is exposed to direct sunlight or bright light. If
this occurs, try moving the unit.
oBeware that use of this remote control could cause the unin-
tentional operation of other devices that can be controlled by
infrared rays.
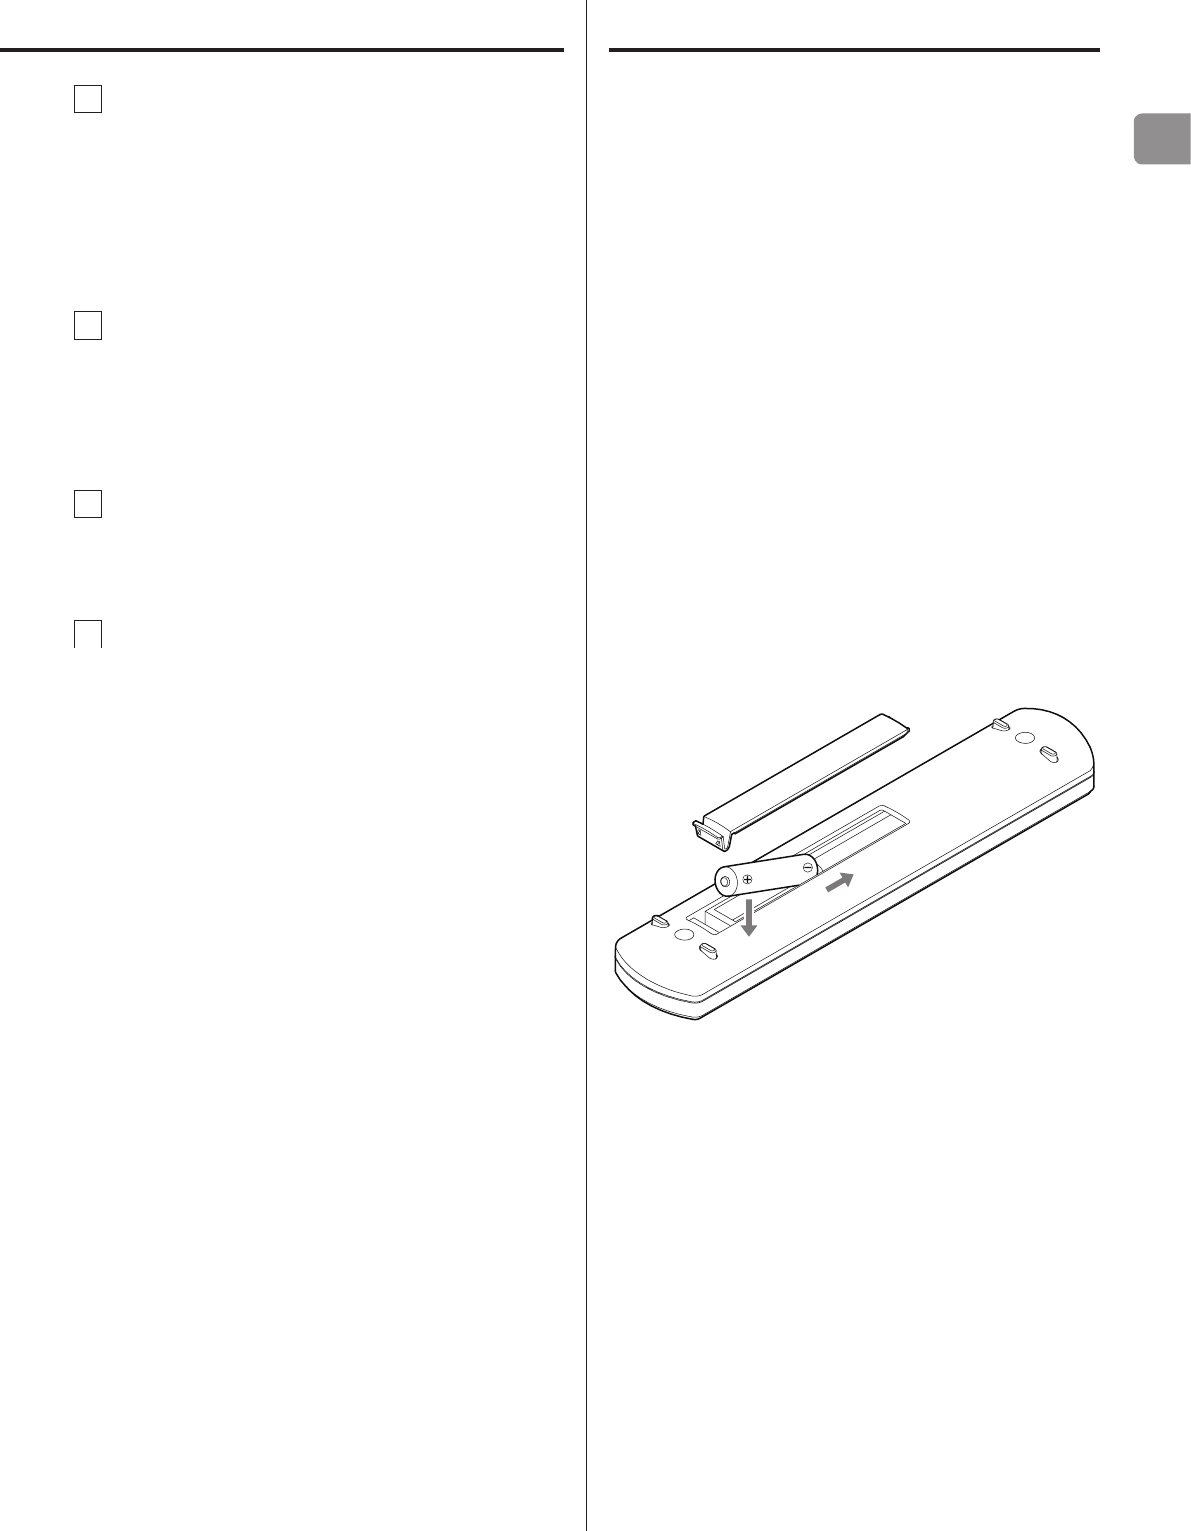
Installing batteries
Remove the cover from the back of the remote control and insert
two AAA batteries with their ¥/^ ends oriented in the case as
shown. Replace the cover.
When to replace batteries
If the distance required between the remote and the main unit
decreases or if the unit stops responding to the remote buttons,
replace both batteries with new ones.
Dispose of the used batteries according to the instructions on them
or requirements set by your local municipality.
16
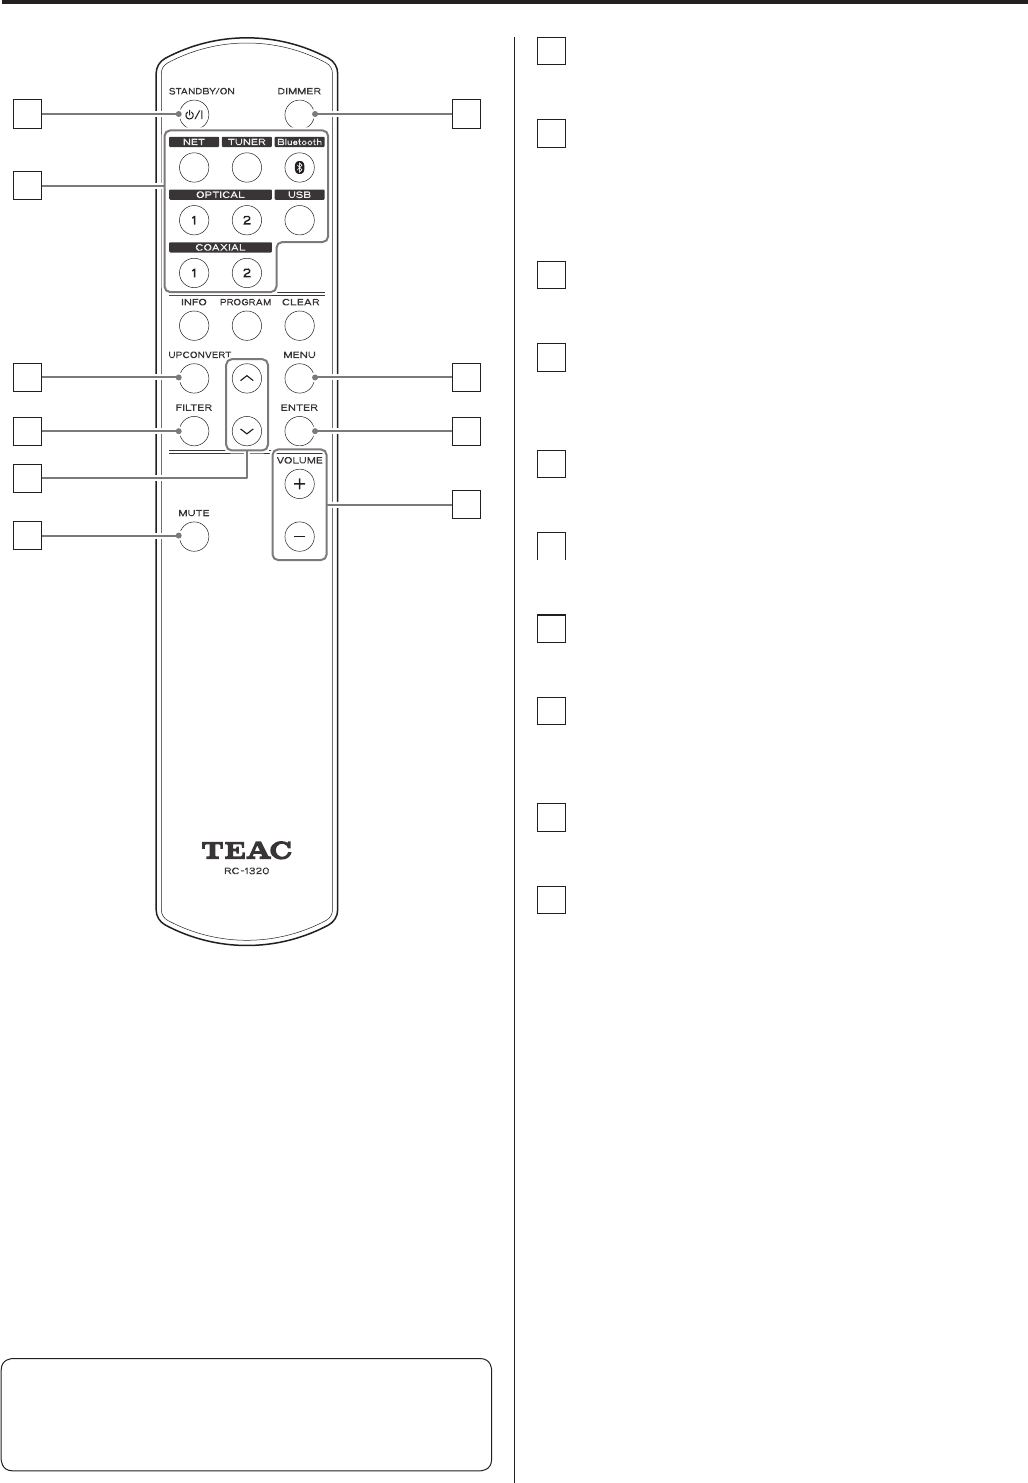
a STANDBY/ON button
A Press to put the unit into standby mode or turn it on.
b INPUT buttons
Use to select the playback source.
oThe USB button selects the rear USB port.
oThe TUNER button is not used with this unit.
c UPCONVERT button
Use to change the upconversion setting.
d FILTER button
Use to change the filter setting.
This changes the filter according to the input (PCM or DSD).
e Up/down (k/j) buttons
Use to select setting items.
f MUTE button
Press to minimize the volume.
g DIMMER button
Use to adjust the brightness of the main unit's display.
h MENU button
Press to enter setting mode (page 22).
Press when in setting mode to return to the previous screen.
i ENTER button
Press to confirm the selected item.
j VOLUME (+/−) buttons
Use these buttons to adjust the volume.
Names and functions of parts (remote control)
When the main unit and the remote control both have buttons
with the same functions, this manual explains how to use one of
the buttons. The other corresponding button can be used in the
same manner.
e
d
c
a
f
b
g
h
i
j
EN
17
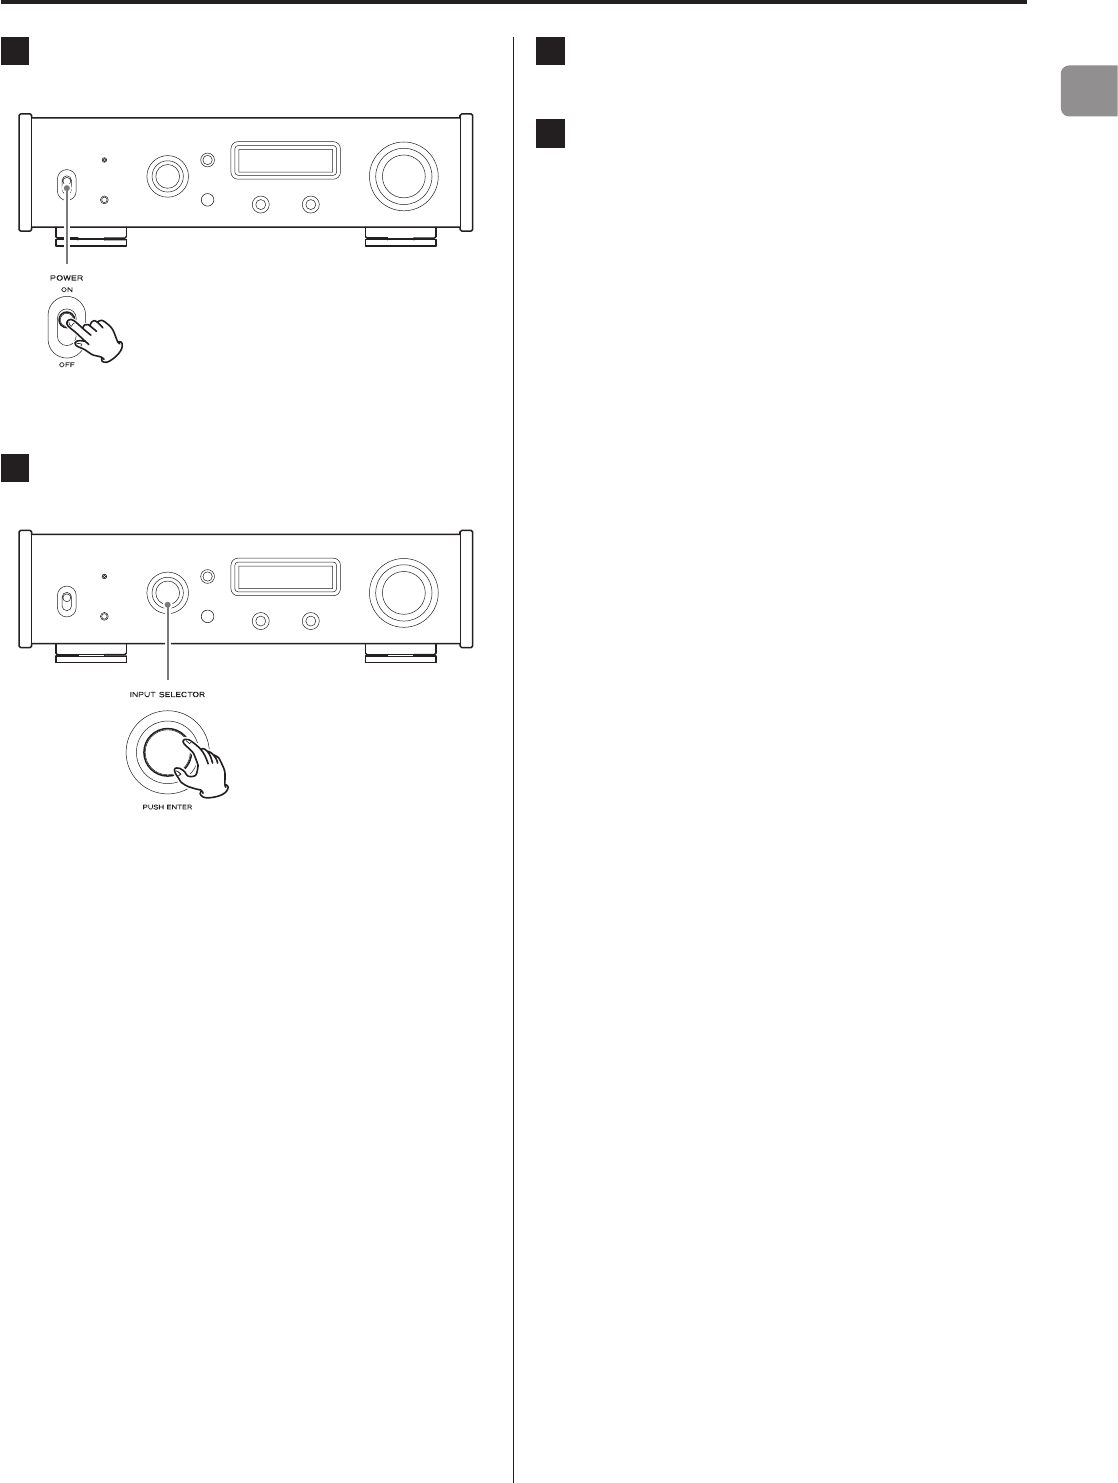
Basic operation
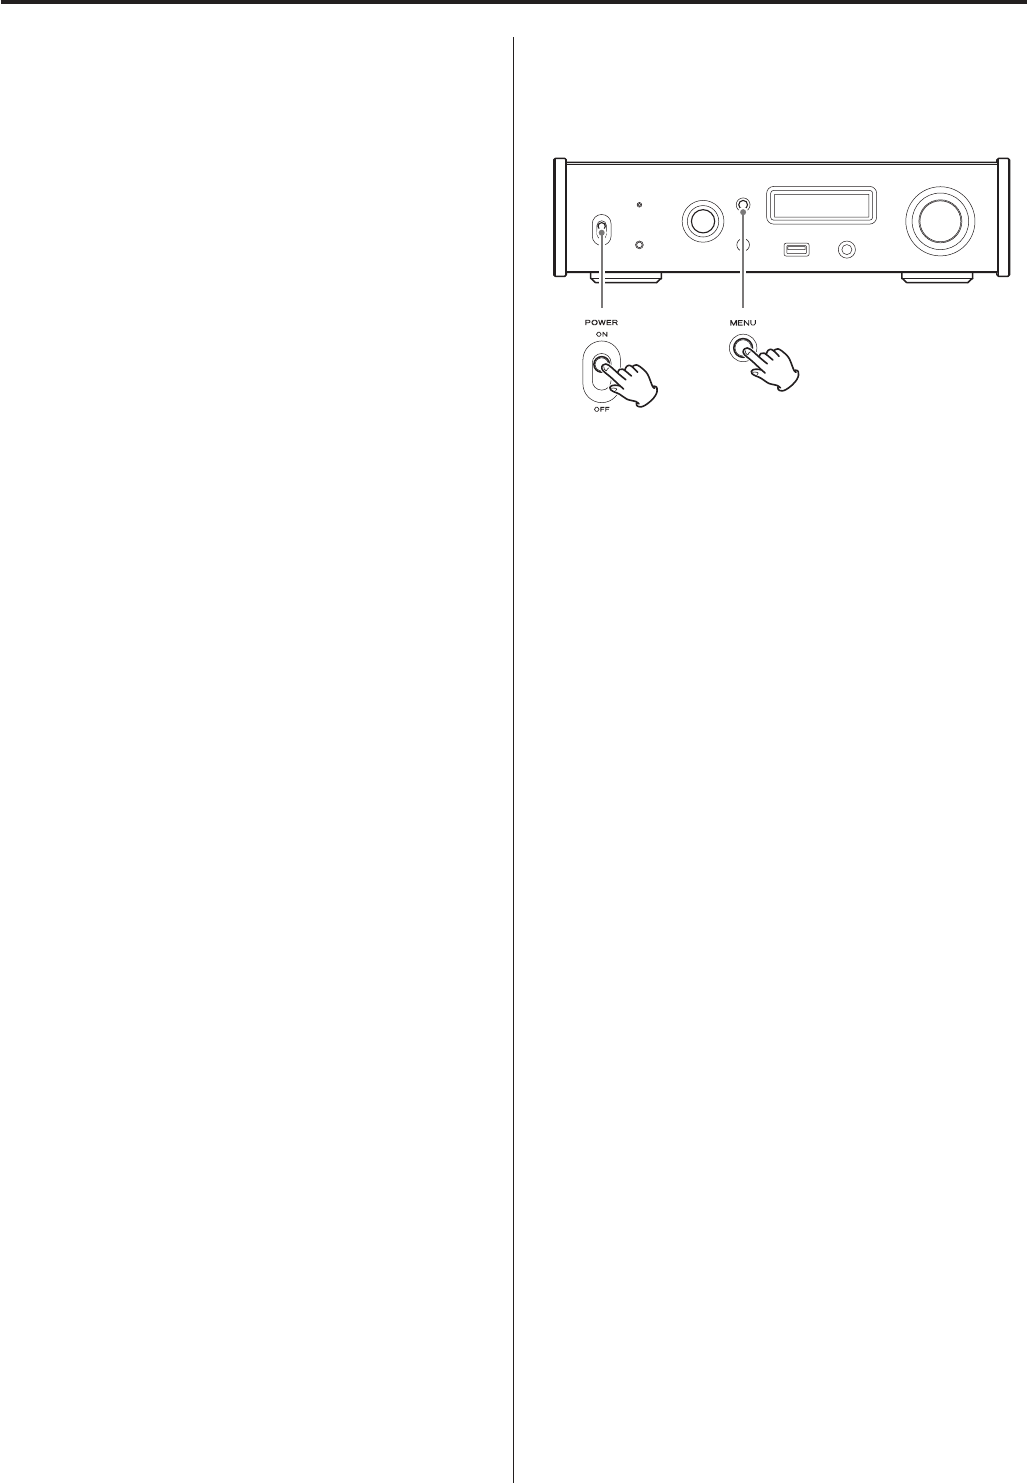
1 Shift the POWER switch to its ON position to turn
the unit on.
oIf a stereo amplifier is connected to this unit, always turn its
power ON very last.
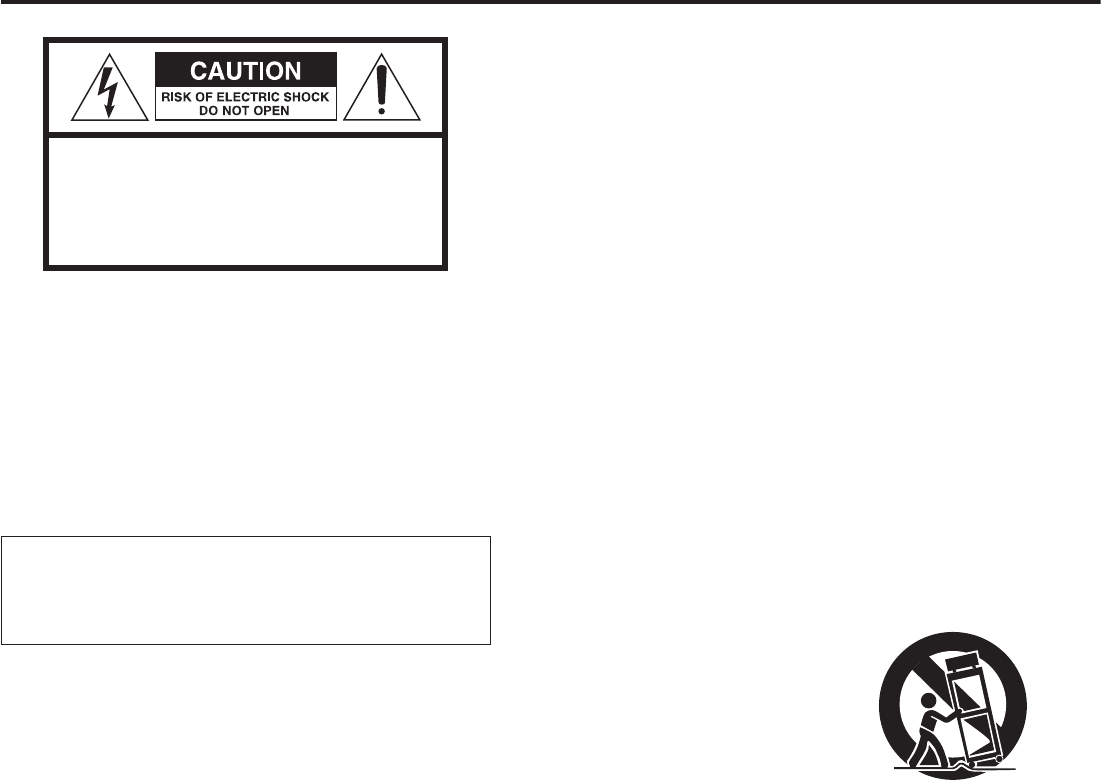
2 Turn the INPUT SELECTOR knob to select the input
source.
The selected source appears on the display.
oYou can also use the up and down (k, j) buttons on the
remote control.
oIf the input signal is not a digital audio signal or is an audio
signal format that is not supported by this unit, such as
Dolby Digital or DTS, “NOT AUDIO!” will appear on the screen
and no audio will be output. Set the digital output of the
connected device to PCM audio output.
oTo use a computer running a Windows OS to play back
audio files when this unit is set to USB, you must first install a
dedicated driver on the computer before connecting them
(page 27).
oDSD data can only be played back using the front and rear
USB ports or a DoP format digital input.
oTo use NET or the front USB port, install the dedicated app
(free) on a smartphone, and connect it to the same network
as the unit.
3 Operate the playback device.
Refer to the operation manual of that device.
4 Adjust the volume.
When using the line outputs
When LINE OUT LEVEL is set to VARIABLE, turn this unit's
VOLUME knob to adjust the volume.
When LINE OUT LEVEL is set to any other setting, the volume
cannot be adjusted from this unit. Use the stereo amplifier or
other device connected to this unit to adjust the volume.
When headphones are connected to this unit
Turn this unit's VOLUME knob to adjust the volume.
oWhen this unit's VOLUME knob is enabled, the volume set-
ting will be shown.
18
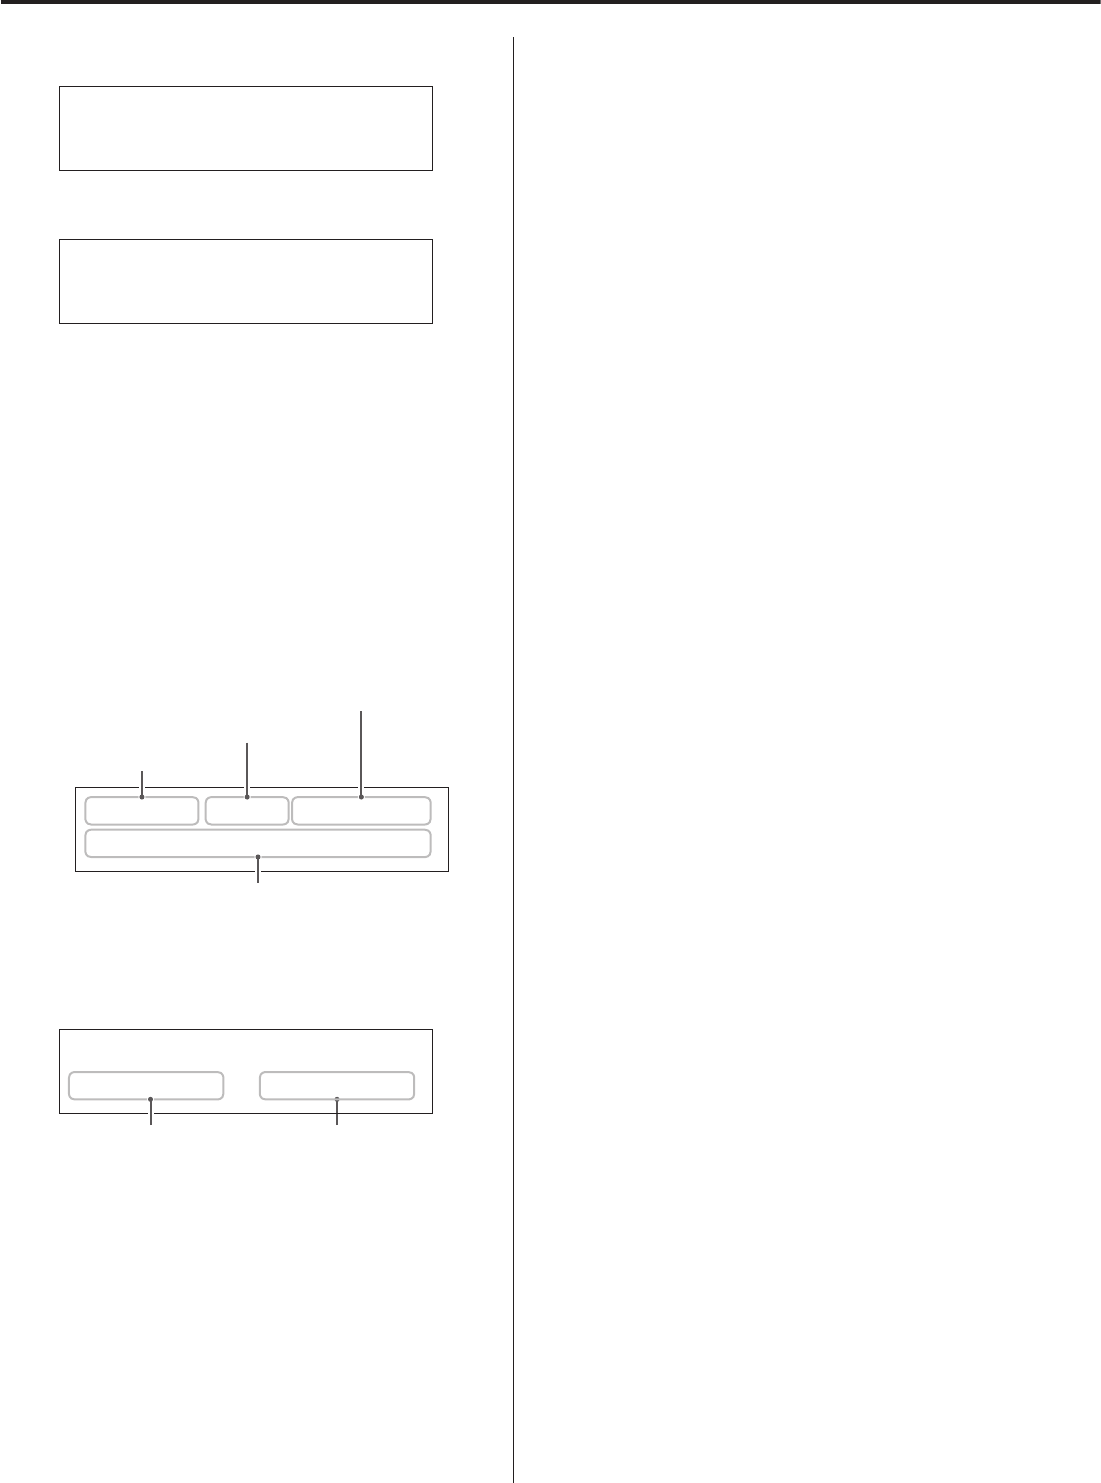
Display
When on
WELCOME
c
TEAC
NT-503
After the above messages appear, the input source will be shown on
the display.
Input source information display
The input source information display will appear after turning the
unit on as well as when about 10 seconds pass without operation
when a setting screen is open.
Display example
When headphones are not connected and LINE OUT LEVEL is
set to FIX or OFF
USB ORG DF OFF
PCM 44.1kHz
Input source name
Audio data processing method
Digital filter setting
Input signal status
oTurning the VOLUME knob will not change the volume.
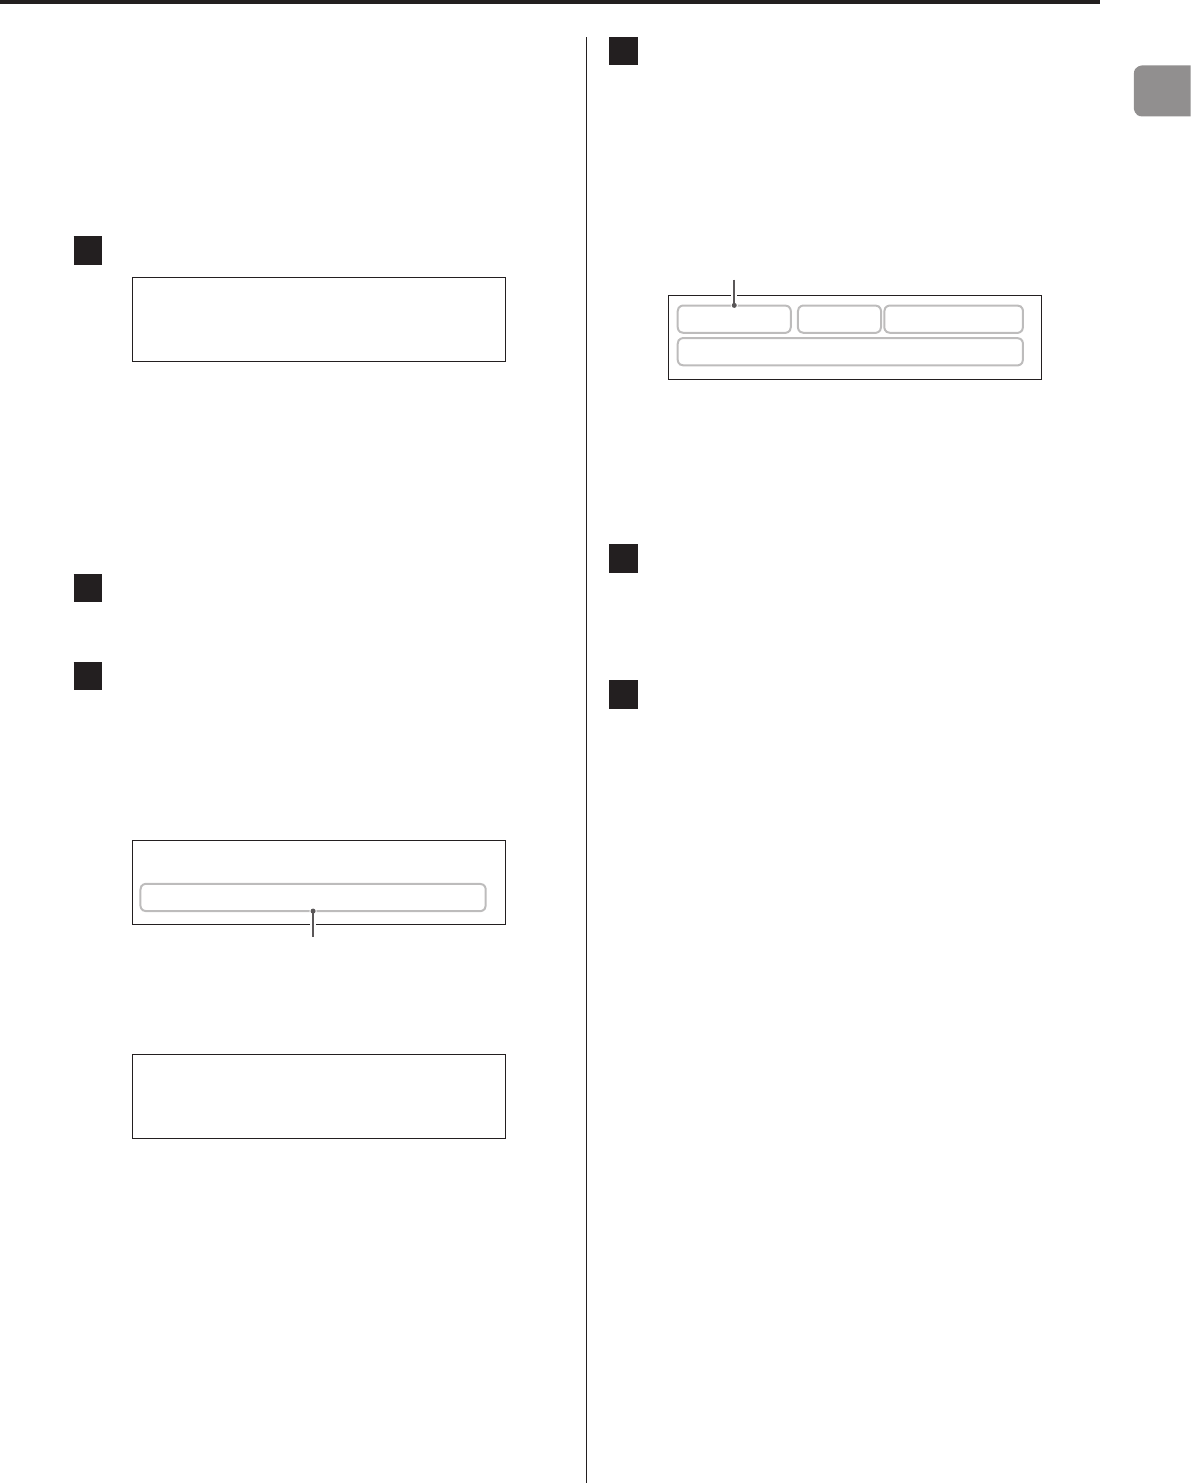
When headphones are connected or LINE OUT LEVEL is set to
VARIABLE
USB ORG DF OFF
PCM 44k -41.5dB
Input signal status Volume
oTurning the VOLUME knob will change the volume, and the vol-
ume will appear to the right of the input signal status.
Input source name
This shows the name of the selected source.
The names shown on the display correspond to the selected con-
nectors as follows.
USB
USB port (rear)
COAX
RCA COAXIAL digital audio input connector on the rear panel
COAXf
Coaxial connection with the digital audio input (OPT/COAX IN)
on the front panel
OPT
OPTICAL digital audio input connector on the rear panel
OPTf
Optical connection with the digital audio input (OPT/COAX IN)
on the front panel
NET
ETHERNET port
USBf
USB port (front)
oSet the input source to NET and then select this with the app.
Bluetooth
Bluetooth device
Audio data processing methods
ORG
The original input signal is sent directly to the D/A converter
without upconversion.
2Fs
4Fs
8Fs
DSD
The upconversion shown will be used (page 23).
DoP
DSD signal is received by DoP (DSD over PCM) method.
Digital filter setting
This shows the digital filter setting (page 23).

EN
19
Input signal status
This shows the input source signal status.
UNLOCK!
The unit cannot synchronize with the input signal.
NOT AUDIO!
A signal with a format that cannot be played is being received.
UNCONNECTED!
The input source is USB (rear USB port), but no USB cable is con-
nected to the unit.
The input source is NET, but no USB cable is connected to the
unit.
The input source is USBf (front USB port), but no USB flash drive is
connected to the unit.
READY
The input source is USB (rear USB port), NET or USBf (front USB
port) and a device is connected, but no audio signal is being
received.
ANALOG
The input source is the analog audio inputs.
PCM 32kHz
PCM 44.1kHz
PCM 48kHz
PCM 88.2kHz
PCM 96kHz
PCM 128kHz
PCM 176.4kHz
PCM 192kHz
PCM 256kHz
PCM 352.8kHz
PCM 384kHz
DSD 2.8MHz
DSD 5.6MHz
DSD 11.2MHz
These show the input signal type and sampling frequency.
SBC
AAC
aptX
When the input source is Bluetooth, the codec type is shown.
Volume display
The volume setting will be shown when you turn this unit's VOLUME
knob.
Display example
Volume -60.0dB

20
Bluetooth® wireless technology
Bluetooth® notes
When using this unit with a mobile phone or other Bluetooth
devices, they should be no more than about 10 m (33 ft) apart.
Depending on the circumstances of use, however, the effective
transmission distance might be shorter.
Wireless communication with every device that supports Bluetooth
wireless technology is not guaranteed.
To determine the compatibility between this unit and another
device that supports Bluetooth wireless technology, refer to that
device's operation manual or contact the shop where you pur-
chased it.
Profiles
This unit supports the following Bluetooth profiles.
oA2DP (Advanced Audio Distribution Profile)
oAVRCP (Audio/Video Remote Control Profile)
In order to transfer audio using Bluetooth wireless transmission, the
Bluetooth device must support A2DP.
In order to control playback on the Bluetooth device, it must sup-
port AVRCP.
Even if a Bluetooth device supports the same profiles, though, its
functions might differ according to its specifications.
Codecs
This unit supports the following codecs. It will automatically select
one of them during audio transfer.
oSBC
oAAC
oaptX
The unit will select the appropriate codec to use according to the
codec compatibility of the other Bluetooth device and communica-
tion conditions.
NOTE
You cannot select the codec to be used by pressing a button, for
example.
Due to characteristics of Bluetooth wireless technology, playback
from a Bluetooth device will be slightly delayed compared to play-
back from this unit.
Content protection
This unit supports SCMS-T as a form of content protection when
transmitting audio, so it can play protected audio.
Transmission security
This unit supports security functions during Bluetooth wireless
transmission in accordance with the Bluetooth standard specifica-
tions, but it does not guarantee the privacy of such transmissions.
TEAC CORPORATION will bear no responsibility should an informa-
tion leak occur during Bluetooth wireless transmission.
Pairing with another Bluetooth device
Pairing this unit with another Bluetooth device is necessary the first
time you connect with that Bluetooth device.
1 Turn the INPUT SELECTOR knob to select Bluetooth.
Bluetooth
UNCONNECTED
2 Enable Bluetooth transmission on the other
Bluetooth device.
3 Press and hold the INPUT SELECTOR knob to enter
pairing mode.
Bluetooth
PAIRING
o“PAIRING” blinks when pairing.
4 On the other Bluetooth device, select "NT-503" (this
unit).
After this unit enters pairing mode, pair with it from the other
Bluetooth device.
For details, refer to the operation manual of that Bluetooth
device.
After connection, the display will show the input source.
oIf a request for a passcode appears on the screen of the
Bluetooth device, enter “0000” (four zeros).
EN
21
Playback from a Bluetooth device
oPair this unit the first time you use it and when you want to con-
nect it with a new Bluetooth device (page 20).
oWhen pairing or connecting with another Bluetooth device,
they should be within a few meters of each other. If they are
too far apart, pairing and connection afterwards might become
impossible.
5 Turn the INPUT SELECTOR knob to select Bluetooth.
Bluetooth
UNCONNECTED
This sets the source to Bluetooth.
oYou can also use the up and down (k, j) buttons on the
remote control.
oThe unit retains the same source mode even when in
standby.
So, this step can be skipped if the unit had already been in
Bluetooth mode when it was put into standby.
6 Enable Bluetooth transmission on the other
Bluetooth device.
7 Press the INPUT SELECTOR knob to show already
paired Bluetooth devices.
The bottom line of the display shows the name of the last con-
nected device.
oYou can also use the ENTER button on the remote control.
Display example
Bluetooth
> Player_1
Name of last connected device
oThe first 14 characters of the device name are shown.
oIf no paired device is available, the display will appear as
follows.
Bluetooth
PAIRING?
Press and hold the INPUT SELECTOR knob to enter pairing
mode (page 20).
8 Press the INPUT SELECTOR knob to connect.
oIf there are multiple paired devices, turn the INPUT
SELECTOR knob to show other devices. When the name of
the device that you want to connect is shown, press the
INPUT SELECTOR knob.
After connection, the display will show the input source.
Display example
Playe ORG DF-OFF
PCM 44k -41.5dB
Device name
oThe first 5 characters of the device name are shown.
VATTENTION
Regardless of the connection status of this unit and the other
Bluetooth device, if the input source is not shown, restart both
this unit and the other device and then connect them again.
9 Start playback on the other Bluetooth device.
oConfirm that the volume is turned up on the other
Bluetooth device. If you do not turn up the volume on the
playback device, no sound might be output from this unit.
10
Turn this unit's VOLUME knob to adjust the volume.
oYou can also use the VOLUME buttons on the remote
control.
oDepending on the connected Bluetooth device, you might
not be able to adjust the volume. For details, refer to the
operation manual of that Bluetooth device.
Muting playback
If you want to temporarily mute the volume of this unit, press the
MUTE button on the remote control.
Press the MUTE button on the remote control again to return to the
previous volume level.
Putting the unit into standby mode
Press the standby/on (¤) button on this unit or the remote con-
trol to put the unit into standby. Then, turn off the other Bluetooth
device.
22
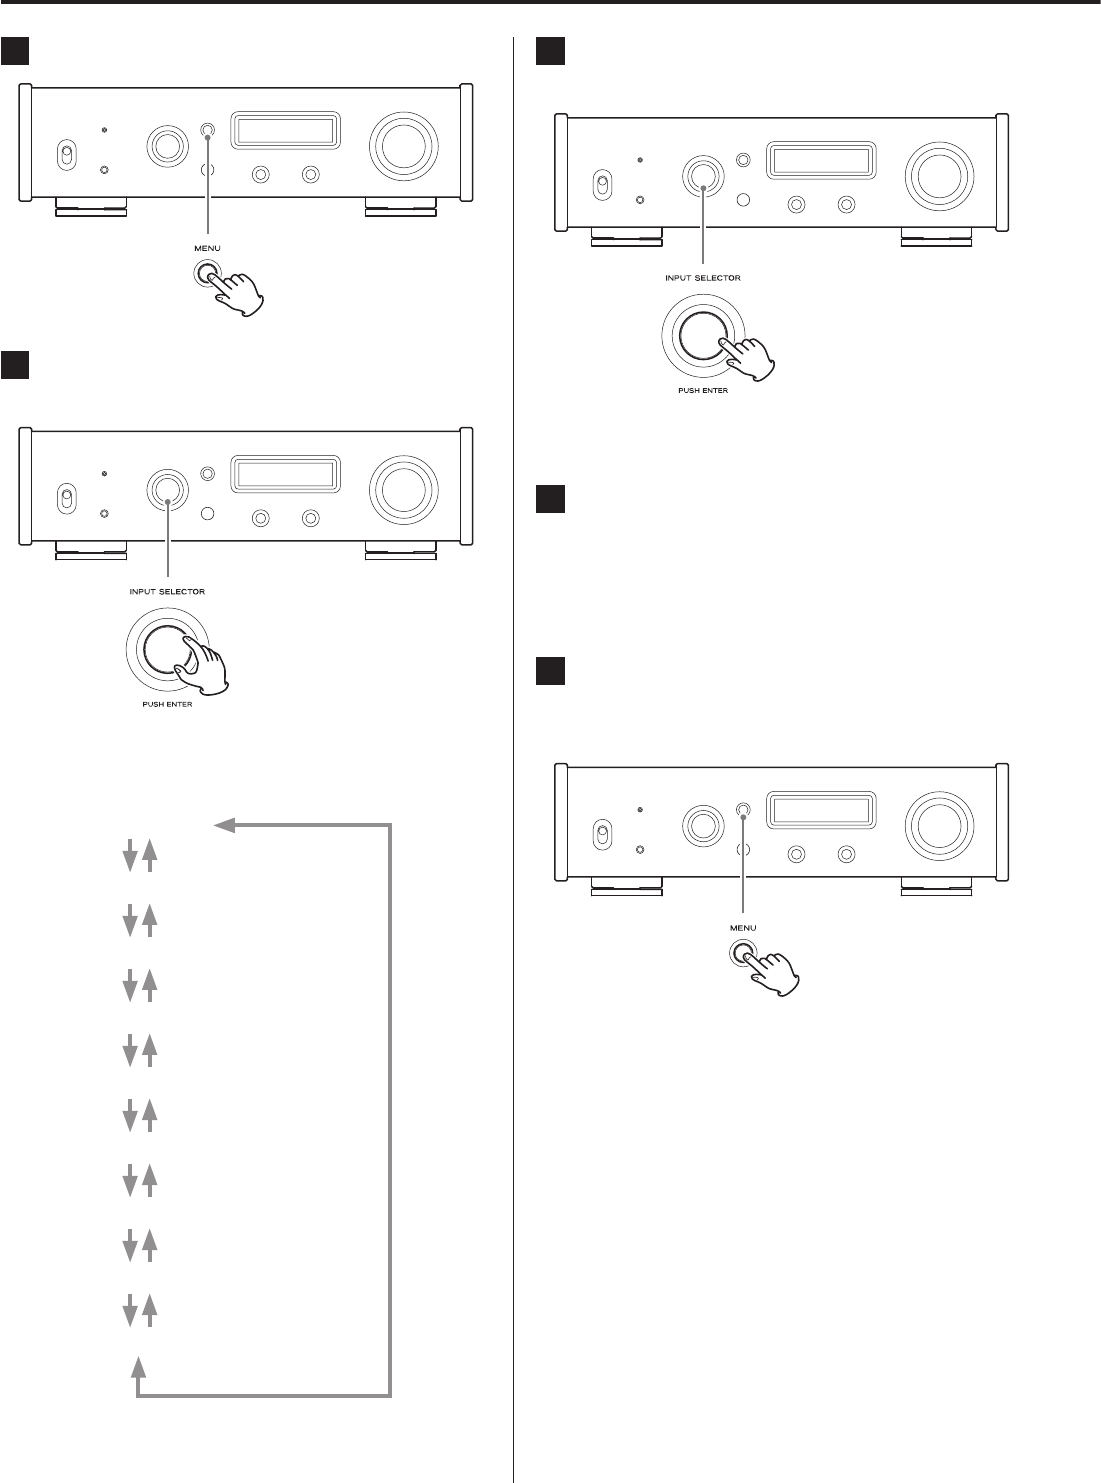
Settings
1 Press the MENU button to show the setting items.
2 Turn the INPUT SELECTOR knob to show the setting
to be changed.
oYou can also use the up and down (k, j) buttons on the
remote control.
The menu items appear in the following order.
UPCONVERT
PCM D-FILTER
DSD D-FILTER
CLOCK SYNC
LINE OUT
LINE OUT LEVEL
DIMMER
AUTO POWER SAVE
NETWORK SETUP*
*Shown only when the input source is NET/USBf
3 Press the INPUT SELECTOR knob to confirm the
selection.
oYou can also press the ENTER button on the remote control.
oThe currently set value is shown on the display.
4 Turn the INPUT SELECTOR knob to change the set-
ting value.
oYou can also use the up and down (k, j) buttons on the
remote control.
oPress the MENU button to return to setting item selection.
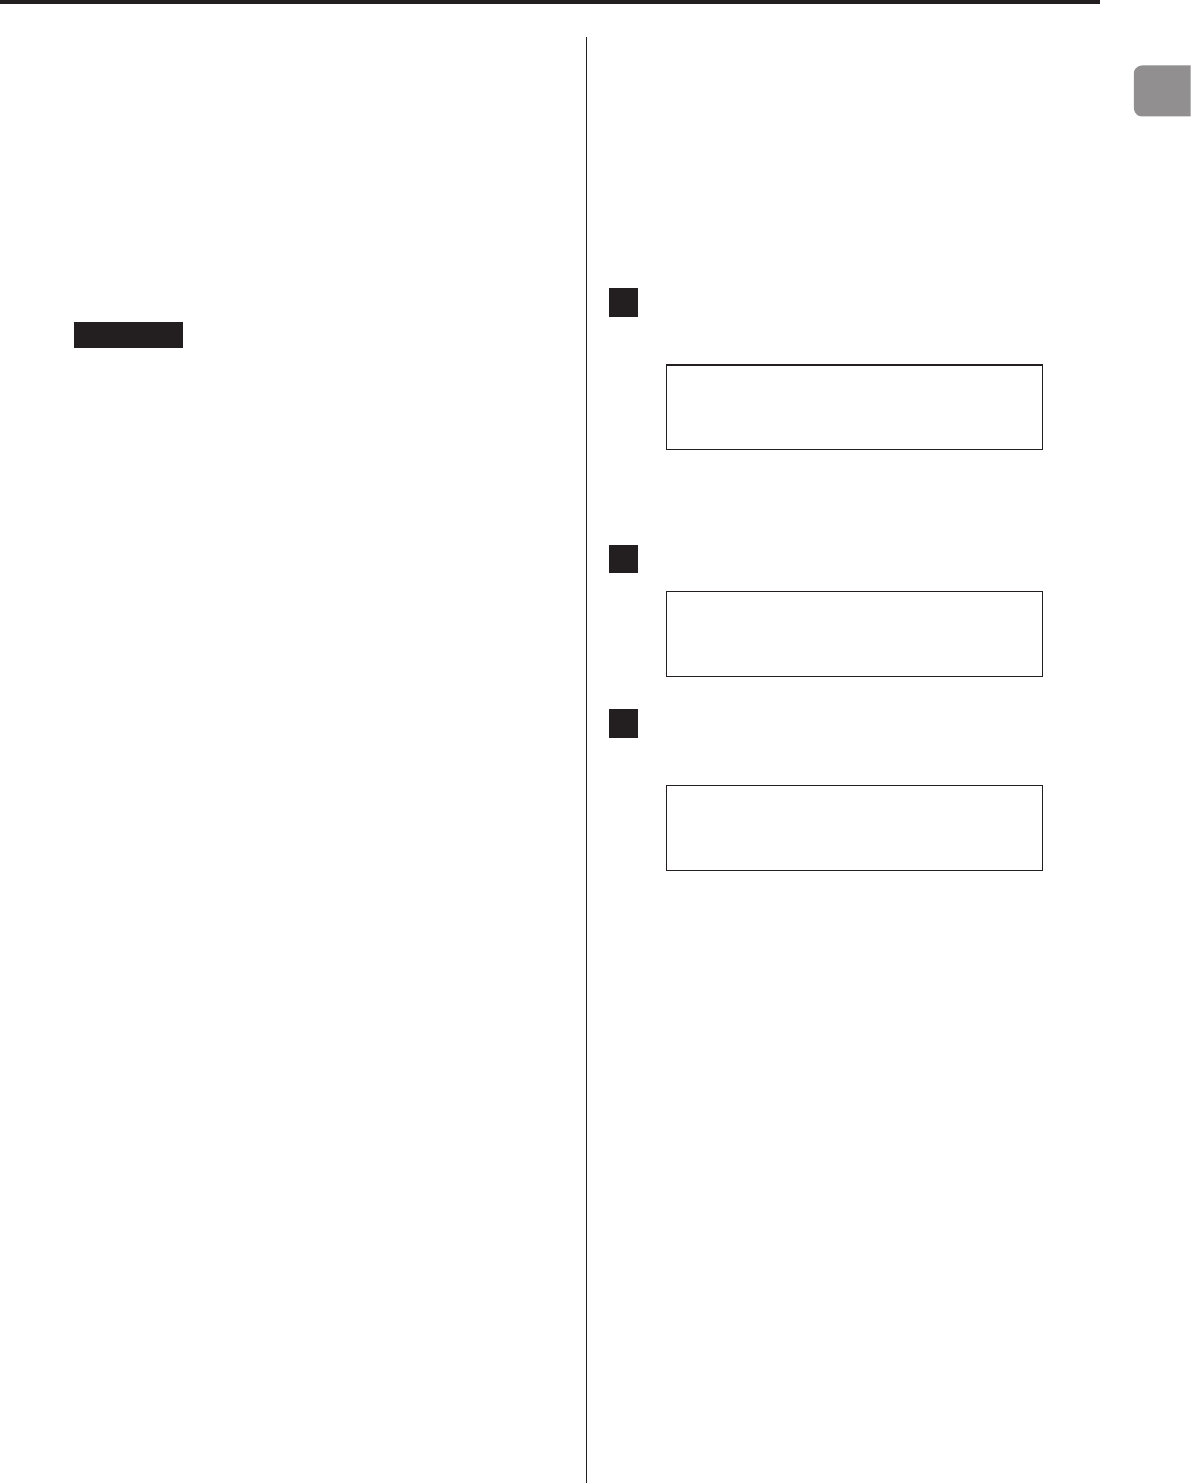
5 When you are done changing settings, press the
MENU button to show the input source status
again.
oIf you do not do anything for about 10 seconds, the display
will return to showing the input source status.

EN
23
Upconversion
Use to activate the upconversion circuit when receiving PCM format
signals.
oSee page 13 for the relationships between input sampling fre-
quencies and sampling frequencies after upconversion.
*UPCONVERT
> OFF
OFF
The original input signal is sent directly to the D/A converter
without upconversion.
2Fs
If the input audio signal is less than 2× a standard sampling fre-
quency, it is upconverted 2× and then sent to the D/A converter.
4Fs
If the input audio signal is less than 4× a standard sampling fre-
quency, it is upconverted 4× and then sent to the D/A converter.
8Fs
If the input audio signal is less than 8× a standard sampling fre-
quency, it is upconverted 8× and then sent to the D/A converter.
DSD
The input source is converted to DSD digital format, and then
sent to the D/A converter.
PCM digital filter
Use to set the digital filter when receiving PCM format signals.
*PCM D-FILTER
> OFF
OFF
The digital filter is disabled.
FIR SHARP
An FIR filter with a steep roll-off is used to sharply cut signals out-
side the audio band.
FIR SLOW
An FIR filter with a slow roll-off is used to gently cut signals out-
side the audio band.
SDLY SHARP
A short delay filter with a steep roll-off is used to sharply cut sig-
nals outside the audio band.
SDLY SLOW
A short delay filter with a slow roll-off is used to gently cut signals
outside the audio band.
oWhen receiving signals at 352.8 kHz or 384 kHz, the digital filter
will be disabled during playback regardless of this setting.
DSD digital filter
Use to set the digital filter when receiving DSD format signals.
*DSD D-FILTER
> CUTOFF 50kHz
CUTOFF 50kHz
50kHz cutoff frequency
CUTOFF 150kHz
150kHz cutoff frequency
Clock sync
oClock sync is only possible when the input source is USB (rear
USB port), NET or USBf (front USB port).
*CLOCK SYNC
> OFF
OFF
No clock sync is used.
ON
This unit's master clock will be synchronized to the 10MHz clock
input through the clock sync input (10MHz IN) connector.
Line output
*LINE OUT
> RCA
Use to select the connectors that output analog audio.
oOutput through both the RCA connectors and the XLR connec-
tors at the same time is not possible.
RCA
Output through the RCA connectors.
XLR2
Output through the XLR connectors with 2: HOT polarity.
XLR3
Output through the XLR connectors with 3: HOT polarity.

24
Line output level
*LINE OUT LEVEL
> FIX 0dB
Use to select audio level output from the analog audio output con-
nectors (LINE OUT).
FIX 0dB
A maximum of 2 Vrms is output. Select this if you want to adjust
the volume using an amplifier.
oNo sound will be output if headphones are connected.
FIX +6dB
A maximum of 4 Vrms is output. Select this if you want to adjust
the volume using an amplifier.
oNo sound will be output if headphones are connected.
oIf the sound distorts, set this to FIX 0dB.
VARIABLE
This will enable adjustment of the analog output level using the
VOLUME knob. Select this if you want to adjust the volume using
this unit.
oNo sound will be output if headphones are connected.
OFF
No sound is ever output.
Display brightness
*DIMMER
> DIMMER 3
DIMMER 3
Ordinary brightness
DIMMER 2
Slightly dim
DIMMER 1
Even dimmer
OFF
Display off
oThe display stays unlit even when the unit is on.
Automatic power saving function
This unit has an automatic power saving function.
oThe automatic power saving function is on when the unit is
shipped new from the factory.
*AUTO POWER SAVE
> ON
OFF
The automatic power saving function is disabled.
ON
If no input signal is locked for about 30 minutes, the unit will
automatically enter standby mode.
Settings (continued)
EN
25
Network setup
To use network services, make network settings on this unit in
advance.
Make the settings according to the characteristics of the network to
which it is being connected.
oAn Internet connection is necessary to use Internet radio, DLNA
and other network services.
oThe "NET STANDBY" setting is not necessary for connecting this
unit to a network.
ATTENTION
oIf DHCP is set to ENABLE (default), "IP ADDRESS", "SUBNET MASK",
"GATEWAY" and "DNS SERVER" settings will appear, but cannot be
changed.
If DHCP is set to Disable, "IP ADDRESS", "SUBNET MASK",
"GATEWAY" and "DNS SERVER" will appear and must be set.
oWhen you press the MENU button when viewing the "NETWORK
SEUP" submenu, "NETWORK SETTING SAVE?" will appear. After
changing a setting, press the ENTER button to save it. If you
close a menu screen without pressing the ENTER button, setting
changes will not be applied.
The submenus appear in the following order.
IP ADDRESS
View/set the IP address.
MAC ADDRESS
View this unit's MAC address.
DHCP
ENABLE (default setting)
DHCP is enabled.
DISABLE
DHCP is disabled.
SUBNET MASK
View/set the subnet mask.
GATEWAY
View/set the default gateway.
DNS SERVER
View/set the DNS server address.
PROXY URL
Set the proxy server address.
PROXY PORT
Set the proxy port number.
oThis only appears when a proxy URL has been set.
NET STANDBY
This sets whether or not the unit can be controlled over a net-
work when the unit is in standby.
DISABLE (default setting)
When the unit is in standby, it cannot be controlled over a
network.
ENABLE
When the unit is in standby, it can be controlled over a
network.
oWhen set to "ENABLE", more power will be consumed when
the unit is in standby.
Inputting numbers
Follow the procedures below to input IP addresses and other
numbers.
1 When the input screen is open, press the INPUT
SELECTOR knob.
*IP ADDRESS
>255 255 255 255
The number to the right of the > will be changed.
oYou can also press the ENTER button on the remote control.
2 Turn the INPUT SELECTOR knob to select the value.
*IP ADDRESS
>192 255 255 255
3 Press the INPUT SELECTOR knob to select the next
digit for input.
*IP ADDRESS
192>255 255 255
After inputting all the digits, press the INPUT SELECTOR knob to
complete input and return to the original screen.
26
Inputting characters
Follow the procedures below to input characters for a PROXY server
address.
1 When the input screen is open, press the INPUT
SELECTOR knob.
*PROXY URL
>_
The character to the right of the > will be changed.
oYou can also press the ENTER button on the remote control.
2 Turn the INPUT SELECTOR knob to select a charac-
ter, and press the INPUT SELECTOR knob to input
that character.
*PROXY URL
>
Turn the INPUT SELECTOR knob to show the icons below, fol-
lowed by ASCII characters in character code order.
: Enter
Confirm an input character
: Insert
Insert a character at the cursor position
: Delete
Delete the character to the left of the cursor
: Back
Move the cursor one character to the left
: Forward
Move the cursor one character to the right
3 When done inputting characters, select the
icon and the press the INPUT SELECTOR knob to
conrm.
Update
You can update the firmware of this unit. Do not put the unit in
standby during an update.
oSee the document included with the firmware for update
procedures.
CURRENT F/W Ver
This shows the current firmware version.
F/W UPDATE via USBf
You can update the firmware using a USB flash drive.
Settings (continued)

EN
27
Playing back music on a computer
Installing the driver on a computer
This unit can be connected with computers running the following
operating systems. Operation with other operating systems is not
guaranteed. (As of January, 2015)
When using Mac OS
The driver works with the following versions.
OS X Lion (10.7)
OS X Mountain Lion (10.8)
OS X Mavericks (10.9)
OS X Yosemite (10.10)
This unit will run with the standard OS driver, so there is no need to
install a special driver.
When using Windows
The driver works with the following versions.
Windows 7 (32/64-bit)
Windows 8 (32/64-bit)
Windows 8.1 (32/64-bit)
Installing the driver on the computer
In order to play audio files stored on a computer through this unit,
you must install a dedicated driver on that computer beforehand.
Download the dedicated driver from the TEAC Global Site:
TEAC Global Site
http://teac-global.com/
ATTENTION
Install the dedicated driver before connecting the unit with
the computer by USB.
If you connect this unit with a computer before installing the driver,
it will not work properly.
oFor instructions about driver installation procedures, access the
Downloads page from the TEAC Global site (http://teac-global.
com/).
oDepending on the combination of hardware and software,
proper operation might not be possible even with the above
operating systems.
About the transmission mode
This unit connects using high-speed asynchronous mode.
The sampling frequencies that can be transmitted are 32, 44.1, 48,
88.2, 96, 176.4, 192, 352.8 and 384 kHz.
When properly connected, you will be able to select “TEAC USB
AUDIO DEVICE” as an audio output from the computer OS.
oIn asynchronous mode, the audio data sent from the computer
will be processed using this unit's clock, enabling the amount of
jitter that occurs during data transmission to be reduced.
Downloading playback application TEAC
HR Audio Player
You can download Mac and Windows versions of our free TEAC HR
Audio Player application that supports playback of DSD files from
the TEAC Global Site (http://teac-global.com/).
TEAC HR Audio Player setting note
To play 11.2MHz DSD recordings with TEAC HR Audio Player, open
the Configure window and set the “Decode mode” to “DSD Native.”
To play formats other than 11.2MHz DSD, you can set this to either
“DSD over PCM” or “DSD Native” as you like.
For details, see “Selecting DSD decoding mode” in the TEAC HR
Audio Player Owner’s Manual.
28
Playing back audio files from a computer
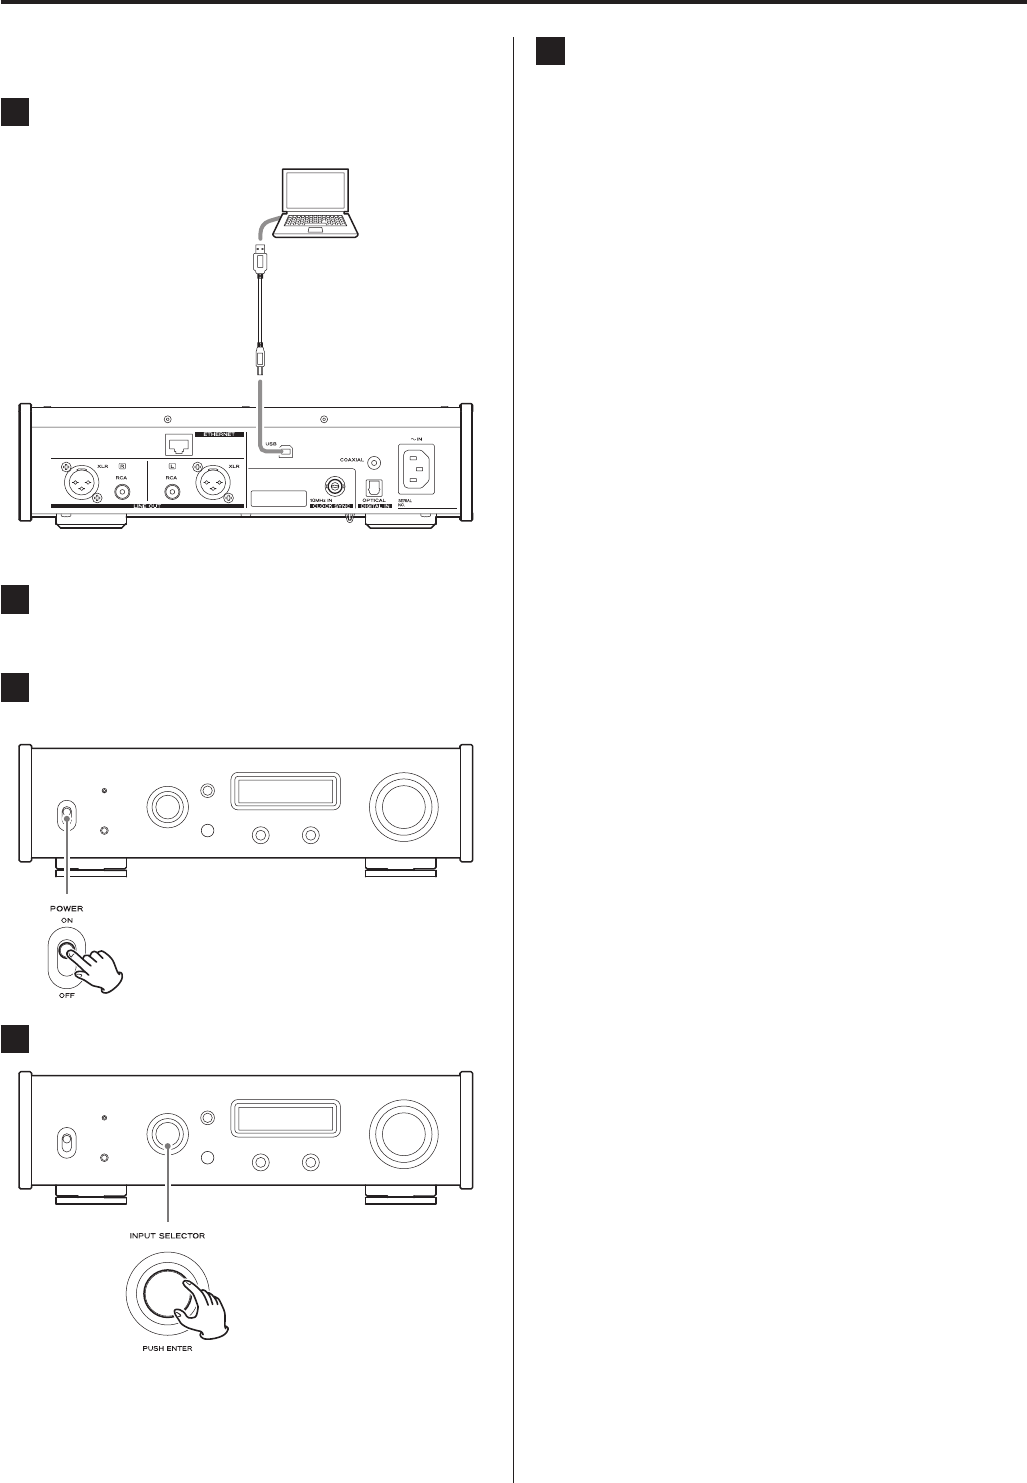
1 Connect the USB port on the rear of this unit to the
computer using a USB cable.
USB cable
oUse a cable with a connector that matches that of this unit.
2 Turn the computer on.
oConfirm that the operating system has started properly.
3 Shift the POWER switch to its ON position to turn
the unit on.
4 Turn the INPUT SELECTOR knob to select USB.
5 Start playback of an audio le on the computer.
By maximizing the output volume from the computer and
adjusting the volume output from the stereo amplifier, better
sound quality can be achieved.
Minimize the stereo amplifier volume before beginning play-
back. Then, gradually increase it.
When using headphones connected to this unit, turn the
VOLUME knob counterclockwise to minimize the volume
before putting them on. Then, gradually increase it.
oThe computer and this unit cannot control each other.
oDo not do any of the following when playing back an audio file
via USB. Doing so could cause the computer to malfunction.
Always quit the audio playback software before doing any of the
following.
- Unplugging the USB cable
- Turning this unit off
- Changing the current input selection
oWhen playing back an audio file via USB, computer operation
sounds will also be output. If you do not want these sounds to
be output, make appropriate settings on the computer to turn
them off.
oIf you connect this unit with the computer or change its input to
USB after starting the audio playback software, audio files might
not play back correctly. If this should occur, restart the audio
playback software or restart the computer.
Playing back music on a computer (continued)

EN
29
If you experience a problem with the unit, please take a moment
to review the following information before requesting service. If it
still does not operate correctly, contact the retailer where you pur-
chased the unit.
General
The unit does not turn on.
eCheck that the power cord is completely plugged into the
power outlet. If the outlet is switched, confirm that the switch
is in the ON position.
eConnect a different electrical device to the outlet to confirm
that it is supplying power.
eIf the automatic power saving function has caused the unit to
enter standby, press the remote control STANDBY/ON button
to turn the unit on again.
No sound is output.
eIf a stereo amplifier is connected to this unit, adjust its volume.
eIf you are using headphones connected to this unit, use the
VOLUME knob to adjust the volume.
eUse the INPUT SELECTOR knob to select the input that is con-
nected to the source that you want to hear.
eReconfirm the connections with other equipment.
There is a humming noise.
eIf a connecting cable is near a power cord, fluorescent light or
similar cause of interference, increase the distance between
them as much as possible.
There is no sound from one side of the headphones.
eConfirm that the headphones plug is inserted completely.
Clock sync
The CLOCK indicator does not stop blinking.
eSet clock synchronization to OFF when not using it.
eSynchronization with the clock signal being input might not
be possible. Check the connections of the clock sync connec-
tors and the settings of the connected device.
Troubleshooting
Connections with a computer
Computer does not recognize this unit.
eThis unit can be connected with computers running the fol-
lowing operating systems. Operation with other operating
systems is not guaranteed. (As of January, 2015)
Mac OS
OS X Lion (10.7)
OS X Mountain Lion (10.8)
OS X Mavericks (10.9)
OS X Yosemite (10.10)
oThis unit can be used with the standard OS driver.
Windows
Windows 7 (32/64-bit)
Windows 8 (32/64-bit)
Windows 8.1 (32/64-bit)
oRequires installation of a dedicated driver (page 27).
Noise occurs.
eStarting other applications during playback of a music file
may interrupt playback or cause noise. Do not start other
applications during playback.
When the unit is connected to a computer via a USB hub, for
example, noise might be heard. If this occurs, connect the
unit directly to the computer.
Audio files cannot be played back.
eConnect this unit to the computer, and set this unit’s input to
USB before launching music playback software.
If you connect this unit to the computer or set its input to USB
after launching audio playback software, music files might not
play back properly.
Audio files
Playback is not possible.
eCheck the file format. See “Audio files playable by this unit” on
page 8.
30
Internet radio
Cannot connect to the Internet.
eConfirm that a computer can connect to the Internet using
the same network.
eEnter a correct network connection password.
eCheck the settings of the network’s firewall.
eConfirm that the radio station is currently sending a signal.
eConfirm that the address for the station has not changed.
eThe number of registered users for the station might have
already reached a limit, making it unavailable to the public.
eIf the Internet connection speed is too slow, searching might
take time.
Since this unit uses a microcontroller, external noise and other inter-
ference can cause the unit to malfunction. If this occurs, unplug the
power cord, wait for a while, and then turn the unit on again and
restart operations.
Restoring default settings
While pressing and holding the MENU button, set the POWER
switch to ON.
oRelease the MENU button when the “SETUP CLEAR” message
appears.
The factory default settings are the setting values shown in the
screen images used in the explanations in this manual.
Troubleshooting (continued)

EN
31
Specifications
Quantization bit depth
COAXIAL digital/OPTICAL digital ........................16/24-bit
USB ................................................ 16/24/32-bit
DSD data sampling frequency
COAXIAL digital/OPTICAL digital .........................2.8 MHz
(supported using 176.4kHz/24-bit DoP transmission)
USB ................................. 2.8 MHz, 5.6 MHz, 11.2 MHz
* See “USB flash drives and Networks” on page 8 for details about USB
flash drives and networks,
** This input connector can be used for both optical and coaxial connections.
Clock sync input
Connector ......................................................BNC
Input sampling frequency ...................................10 MHz
Input impedance ...............................................50 Ω
Input level ..................Rectangle wave: equivalent to TTL levels
Sine wave: 0.5 to 1.0 Vrms
General
Power supply
Model for Europe ........................... AC 220–240 V, 50/60 Hz
Model for U.S.A./Canada ............................ AC 120 V, 60 Hz
Power consumption ........................................... 18 W
Standby power .............................0.4 W (in standby mode)
3 W (in network standby mode)
External dimensions ............... 290 mm × 81.2 mm × 248.7 mm
(11 1/2” × 3 1/4” × 9 7/8”)
(W × H × D including protrusions)
Weight ............................................. 3.9 kg (8 5/8 lb)
Operating temperature range ....................... +5°C to +35°C
Operating humidity range .............. 5 to 85% (no condensation)
Storage temperature range ......................... −20°C to +55°C
Included accessories
Power cord × 1
RCA conversion (RCA to mini plug) cable × 1
Remote control (RC-1320) × 1
Batteries for remote control (AAA) × 2
Owner’s manual (this document) × 1
Warranty card × 1 (for users in the USA and Canada only)
oDesign and specifications are subject to change without notice.
Weight and dimensions are approximate.
oIllustrations in this manual might differ slightly from production
models.
Analog audio outputs
Connectors ................................. XLR connectors × 1 pair
RCA connectors × 1 pair
Output impedance ...................................... XLR: 188 Ω
RCA: 150 Ω
Maximum output level (1 kHz/full-scale, into 10 kΩ)
FIX 0dB ........................................XLR/RCA: 2.0 Vrms
FIX +6dB ......................................XLR/RCA: 4.0 Vrms
Variable .............................................XLR: 12 Vrms
RCA: 6 Vrms
Frequency response ....................5 Hz – 80 kHz (+1 dB/−3 dB)
S/N ratio ................................... 110 dB (A-Weight, 1 kHz)
Distortion ......................0.0015% (1 kHz, LPF: 20 Hz – 20 kHz)
Headphones output
Connector .................... Standard 6.3mm (1/4") stereo jack × 1
Effective maximum output ...........500 mW + 500 mW (into 32 Ω)
Compatible impedance range .............................16–600 Ω
Digital audio inputs*
COAXIAL digital .................................. RCA connector × 1
3.5mm mini jack × 1
(3.5mm mini plug connection also possible
using RCA-mini plug adapter cable)
(0.5 Vp-p, 75 Ω)
OPTICAL digital ..........................Rectangular connector × 1
3.5mm mini jack** × 1
(–24.0 to –14.5 dBm peak)
USB flash drive ...........................USB Type A port (front) × 1
(USB 2.0 compliant)
USB .......................................USB Type B port (rear) × 1
(USB 2.0 compliant)
LAN ......................................................100BASE-T
PCM data sampling frequency
COAXIAL digital
32 kHz, 44.1 kHz, 48 kHz, 88.2 kHz, 96 kHz, 176.4 kHz, 192 kHz
OPTICAL digital
32 kHz, 44.1 kHz, 48 kHz, 88.2 kHz, 96 kHz, 176.4 kHz, 192 kHz
USB ........44.1 kHz, 48 kHz, 88.2 kHz, 96 kHz, 176.4 kHz, 192 kHz,
352.8 kHz, 384 kHz
32
INSTRUCTIONS DE SÉCURITÉ IMPORTANTES
ATTENTION : POUR RÉDUIRE LE RISQUE
D'ÉLECTROCUTION, NE RETIREZ PAS LE CAPOT (OU
L'ARRIÈRE). AUCUNE PIÈCE INTERNE N'EST RÉPARABLE
PAR L'UTILISATEUR. CONFIEZ TOUTE RÉPARATION À
UN SERVICE APRÈS-VENTE QUALIFIÉ.
<Le symbole d'éclair à tête de flèche dans un triangle
équilatéral sert à prévenir l'utilisateur de la présence
dans l'enceinte du produit d'une «tension dangereuse»
non isolée d'une grandeur suffisante pour constituer un
risque d'électrocution pour les personnes.
BLe point d'exclamation dans un triangle équila-
téral sert à prévenir l'utilisateur de la présence
d'instructions importantes de fonctionnement et de
maintenance (entretien) dans les documents accom-
pagnant l'appareil.
AVERTISSEMENT: POUR PRÉVENIR LES RISQUES
D'INCENDIE ET D'ÉLECTROCUTION, N'EXPOSEZ
PAS CET APPAREIL À LA PLUIE NI À L'HUMIDITÉ.
ATTENTION
oNE RETIREZ PAS LES CAPOTS EXTERNES OU BOÎTIERS POUR
EXPOSER L'ÉLECTRONIQUE. AUCUNE PIÈCE INTERNE N'EST
RÉPARABLE PAR L'UTILISATEUR.
oSI VOUS RENCONTREZ DES PROBLÈMES AVEC CE PRODUIT,
CONTACTEZ LE MAGASIN OÙ VOUS AVEZ ACHETÉ L'UNITÉ.
N'UTILISEZ PAS LE PRODUIT TANT QU'IL N'A PAS ÉTÉ RÉPARÉ.
oL'UTILISATION DE COMMANDES, DE RÉGLAGES OU LE SUIVI
DE PROCÉDURES AUTRES QUE CE QUI EST DÉCRIT DANS CE
DOCUMENT PEUT PROVOQUER UNE EXPOSITION À UN
RAYONNEMENT DANGEREUX.
1) Lisez ces instructions.
2) Conservez ces instructions.
3) Tenez compte de tous les avertissements.
4) Suivez toutes les instructions.
5) N'utilisez pas cet appareil avec de l'eau à proximité.
6) Ne nettoyez l'appareil qu'avec un chiffon sec.
7) Ne bloquez aucune ouverture de ventilation. Installez-le confor-
mément aux instructions du fabricant.
8) N'installez pas l'appareil près de sources de chaleur telles que
des radiateurs, bouches de chauffage, poêles ou autres appa-
reils (y compris des amplificateurs) dégageant de la chaleur.
9) Ne neutralisez pas la fonction de sécurité de la fiche polarisée
ou de terre. Une fiche polarisée a deux broches, l'une plus large
que l'autre. Une fiche de terre a deux broches identiques et une
troisième broche pour la mise à la terre. La broche plus large ou
la troisième broche servent à votre sécurité. Si la fiche fournie
n'entre pas dans votre prise, consultez un électricien pour le
remplacement de la prise obsolète.
10) Évitez de marcher sur le cordon d'alimentation et de le pincer,
en particulier au niveau des fiches, des prises secteur, et du
point de sortie de l'appareil.
11) N'utilisez que des fixations/accessoires spécifiés par le fabricant.
12) Utilisez-le uniquement avec des chariots,
socles, trépieds, supports ou tables spé-
cifiés par le fabricant ou vendus avec
l'appareil. Si un chariot est utilisé, faites
attention à ne pas être blessé par un
renversement lors du déplacement de
l'ensemble chariot/appareil.
13) Débranchez cet appareil en cas d'orage ou de non utilisation
prolongée.
14) 14 Confiez toute réparation à des techniciens de mainte-
nance qualifiés. Une réparation est nécessaire si l'appareil a été
endommagé d'une quelconque façon, par exemple si le cor-
don ou la fiche d'alimentation est endommagé, si du liquide a
été renversé sur l'appareil ou si des objets sont tombés dedans,
si l'appareil a été exposé à la pluie ou à l'humidité, s'il ne fonc-
tionne pas normalement, ou s'il est tombé.
oL’appareil tire un courant nominal de veille de la prise secteur
quand son interrupteur POWER ou STANDBY/ON n’est pas en
position ON.
oLa fiche secteur est utilisée comme dispositif de déconnexion et
doit donc toujours rester disponible.
oDes précautions doivent être prises en cas d'utilisation d'écou-
teurs ou d'un casque avec le produit car une pression sonore
excessive (volume trop fort) dans les écouteurs ou dans le
casque peut causer une perte auditive.

FR
33
ATTENTION
oN'exposez pas cet appareil aux gouttes ni aux éclaboussures.
oNe placez pas d'objet rempli de liquide sur l'appareil, comme
par exemple un vase.
oN’installez pas cet appareil dans un espace confiné comme
une bibliothèque ou un meuble similaire.
oL’appareil doit être placé suffisamment près de la prise de
courant pour que vous puissiez à tout moment attraper facile-
ment la fiche du cordon d'alimentation.
oSi le produit utilise des piles/batteries (y compris un pack de
batteries ou des piles installées), elles ne doivent pas être
exposées au soleil, au feu ou à une chaleur excessive.
oPRÉCAUTION pour les produits qui utilisent des batteries rem-
plaçables au lithium: remplacer une batterie par un modèle
incorrect entraîne un risque d'explosion. Remplacez-les uni-
quement par un type identique ou équivalent.
AVERTISSEMENT
Les produits ayant une construction de Classe ! sont équipés
d'un cordon d'alimentation avec une fiche de terre. Le cordon
d'un tel produit doit être branché dans une prise secteur avec
terre de sécurité.
AUX USA/CANADA, UTILISEZ UNIQUEMENT UNE TENSION
D'ALIMENTATION DE 120 V.
VPrécautions concernant les piles
Un mauvais emploi des piles peut entraîner leur rupture ou leur
fuite, avec pour conséquence un incendie, des blessures ou la
salissure des objets proches. Veuillez lire et suivre attentivement les
précautions suivantes.
oVeillez à insérer les piles avec leurs pôles positif (¥) et négatif
(^) correctement orientés.
oUtilisez des piles du même type. N’utilisez jamais des types de
pile différents ensemble.
oSi la télécommande doit rester inutilisée durant une période
prolongée (plus d’un mois), retirez ses piles pour éviter qu’elles
ne coulent.
oSi les piles coulent, essuyez le liquide dans le compartiment des
piles et remplacez les piles par des neuves.
oN'utilisez pas de piles d'un type autre que celui spécifié. Ne
mélangez pas des piles neuves avec des anciennes et n’utilisez
pas ensemble des types de pile différents.
oNe chauffez pas et ne démontez pas les piles. Ne jetez jamais les
piles dans un feu ou dans de l’eau.
oNe conservez et ne transportez pas les piles avec d’autres objets
métalliques. Les piles pourraient entrer en court-circuit, couler ou
exploser.
oNe rechargez jamais une batterie sans avoir vérifié qu’elle peut
l’être.
Pour les consommateurs européens
Mise au rebut des équipements électriques et élec-
troniques et des piles et/ou accumulateurs
(a) Tout équipement électrique/électronique et pile/accumula-
teur hors d'usage doit être traité séparément de la collecte
municipale d'ordures ménagères dans des points de collecte
désignés par le gouvernement ou les autorités locales.
(b) En vous débarrassant correctement des équipements élec-
triques/électroniques et piles/accumulateurs hors d'usage,
vous contribuerez à la sauvegarde de précieuses ressources
et à la prévention de potentiels effets négatifs sur la santé
humaine et l'environnement.
(c) Le traitement incorrect des équipements électriques/électro-
niques et piles/accumulateurs hors d'usage peut avoir des
effets graves sur l'environnement et la santé humaine en rai-
son de la présence de substances dangereuses dans les
équipements.
(d) Le symbole de déchets d'équipements électriques et
électroniques (DEEE), qui représente une poubelle à
roulettes barrée d'une croix, indique que les équipe-
ments électriques/électroniques et piles/
accumulateurs doivent être collectés et traités séparé-
ment des déchets ménagers.
Si une pile ou un accumulateur contient plus que
les valeurs de plomb (Pb), mercure (Hg) et/ou cad-
mium (Cd) spécifiées dans la directive sur les piles
et accumulateurs (2006/66/CE), alors les symboles
chimiques de ces éléments seront indiqués sous le symbole
DEEE.
(e) Des systèmes de retour et de collecte sont disponibles
pour l'utilisateur final. Pour des informations plus détaillées
sur la mise au rebut des vieux équipements électriques/
électroniques et piles/accumulateurs hors d'usage, veuillez
contacter votre mairie, le service d'ordures ménagères ou le
magasin dans lequel vous avez acquis l'équipement.
Pb, Hg, Cd
DÉCLARATION DE CONFORMITÉ
Nous, TEAC AUDIO EUROPE, Liegnitzer Straße 6,
82194 Gröbenzell, Allemagne, déclarons sous notre
propre responsabilité que le produit TEAC décrit
dans ce mode d’emploi est conforme aux normes techniques lui
correspondant.
34
Précautions pour les équipements sans fil
Conformité de l'émetteur radio et
brouillage
Modèle pour le Canada
Conformité de l'émetteur radio
Ce dispositif est conforme à la norme CNR-210 d'Industrie Canada
applicable aux appareils radio exempts de licence. Son fonctionne-
ment est sujet aux deux conditions suivantes:
1) Le dispositif ne doit pas produire de brouillage préjudiciable, et
2) Ce dispositif doit accepter tout brouillage reçu, y compris
un brouillage susceptible de provoquer un fonctionnement
indésirable.
Étiquetage d'autorisation
IC: 1559C-NT503
Conformité de brouillage
CET APPAREIL NUMÉRIQUE DE LA CLASSE B EST CONFORME À LA
NORME NMB-003 DU CANADA
Modèle pour l'EEE
(Espace Économique Européen)
Cet équipement est conforme aux normes harmonisées de la
Directive 1999/5/CE (R&TTE).
Étiquetage de conformité
Marquage CE:
ATTENTION
L'autorisation des dispositifs sans fil varie avec les pays ou régions.
Veuillez n'utiliser cet appareil que dans le pays où il a été acheté.
oSelon le pays, des restrictions d'usage de la technologie sans fil
Bluetooth peuvent exister.
Vérifiez avant utilisation les lois et réglementations en vigueur dans
le pays ou la région dans lequel vous voulez employer l'unité.
Exigences pour l'exposition aux
rayonnements
Cet équipement est conforme à la réglementation reconnue inter-
nationalement en matière d'exposition humaine aux ondes radio
générées par l'émetteur.
Déclaration de conformité
Modèle pour le Canada
Cet équipement est conforme avec les limites d'exposition aux
radiofréquences établies pour un environnement non contrôlé par le
CNR-102 de l'IC.
Modèle pour l'EEE
(Espace Économique Européen)
Cet équipement est conforme à la norme EN.62311: Évaluation des
équipements électroniques et électriques en relation avec les res-
trictions d'exposition humaine aux champs électromagnétiques; la
norme harmonisée de la Directive 1999/5/CE.
ATTENTION
Les changements ou modifications non expressément approu-
vés par la partie responsable de la conformité peuvent invalider
le droit de l'utilisateur à faire fonctionner l'équipement.
La plaque signalétique se trouve sous l'unité comme repré-
senté ci-dessous.
Façade
Plaque signalétique

FR
35
Trademarks and other legal statement
MPEG Layer-3 audio coding technology licensed from Fraunhofer IS
and Thomson.
"DSD" is a registered trademark.
The Bluetooth® word mark and logos are registered trademarks
owned by Bluetooth SIG, Inc. and any use of such marks by TEAC
CORPORATION is under license.
© 2013 CSR plc and its group companies. The aptX® mark and the
aptX logo are trade marks of CSR plc or one of its group companies
and may be registered in one or more jurisdictions.
This product is protected by certain intellectual property rights of
Microsoft. Use or distribution of such technology outside of this
product is prohibited without a license from Microsoft.
Windows and Windows Media are either registered trademarks or
trademarks of Microsoft Corporation in the United States and/or
other countries.
Mac, Mac OS and OS X are trademarks of Apple Inc., registered in the
U.S. and other countries.
IOS is a trademark or registered trademark of Cisco in the U.S. and
other countries and is used under license.
Android is a trademark of Google Inc.
DLNA®, the DLNA Logo and DLNA CERTIFIED® are trademarks,
service marks, or certification marks of the Digital Living Network
Alliance.
Les autres noms de société et de produit cités dans ce document
sont des marques commerciales ou déposées de leurs détenteurs
respectifs.
Information about copyrights and licensing related to open-source
software is provided in the separate “Important Notice Regarding
Software” document.
Listening to SiriusXM Internet Radio
To listen to SiriusXM Internet Radio, you’ll need to subscribe
to SiriusXM Internet Radio service and obtain a username and
password. SiriusXM Internet Radio is available to residents of the
United States and Canada.
SiriusXM Internet Radio delivers a variety of commercial-free
music including Pop, Rock, Country, R&B, Hip-Hop, Jazz, Classical
and much more, plus expert sports talk and analysis. You also get
exclusive entertainment, talk, comedy, family programming, local
traffic and weather and news from your most trusted sources.
Once you’ve purchased a SiriusXM Internet Radio compatible
tuner you’ll need to subscribe to the service to listen to SiriusXM
Internet Radio. There are a variety of programming packages
available, including the option of adding “The Best of XM” pro-
gramming to the
SiriusXM Internet Radio service. “The Best of XM” service is not
available to Sirius Canada subscribers at this time.
Please check with Sirius Canada for any updates using the num-
bers and web address below.
Family friendly packages are also available to restrict channels
that feature mature programming.
To subscribe to SiriusXM Internet Radio, U.S. customers should
visit www.sirius.com or
call
1-888-539-SIRI (1-888-539-7474).
Canadian customers should visit
www.siriuscanada.ca.
Current XM Radio Online subscribers will need to log into the XM
online account manager and update their password in order for
their credentials to work on a SiriusXM Internet Radio compat-
ible device. If the username is over 20 characters or their device
doesn’t
support the “@” character in the username, subscribers need to
update the username on the same screen.
36
INSTRUCCIONES IMPORTANTES DE SEGURIDAD
1) Lea estas instrucciones.
2) Conserve estas instrucciones.
3) Cumpla con lo indicado en los avisos.
4) Siga todas las instrucciones.
5) No utilice este aparato cerca del agua.
6) Límpielo solo con un trapo seco.
7) No bloquee ninguna de las ranuras de ventilación. Instale este
aparato de acuerdo con las instrucciones del fabricante.
8) No instale este aparato cerca de fuentes de calor como radia-
dores, calentadores, hornos u otros aparatos (incluyendo
amplificadores) que produzcan calor.
9) No elimine el sistema de seguridad que supone el enchufe
polarizado o con toma de tierra. Un enchufe polarizado tiene
dos bornes, uno más ancho que el otro. Uno con toma de tierra
tiene dos bornes iguales y una tercera lámina para la conexión
a tierra. El borne ancho o la lámina se incluyen para su segu-
ridad. Si el enchufe que venga con la unidad no encaja en su
salida de corriente, haga que un electricista cambie su salida
anticuada.
10) Evite que el cable de corriente quede de forma que pueda
ser pisado o quedar retorcido o aplastado, especialmente en
los enchufes, receptáculos o en el punto en el que salen del
aparato.
11) Use solo accesorios / complementos especificados por el
fabricante.
12) Utilice este aparato solo con un soporte,
trípode o bastidor especificado por el
fabricante o que se venda con el propio
aparato. Cuando utilice un bastidor con
ruedas, tenga cuidado al mover la com-
binación de aparato/bastidor para evitar
que vuelque y puedan producirse daños.
13) Desconecte este aparato de la corriente durante las tormentas
eléctricas o cuando no lo vaya a usar durante un periodo de
tiempo largo.
14) Dirija cualquier posible reparación solo al servicio técnico
oficial. Este aparato deberá ser reparado si se ha dañado de
alguna forma, como por ejemplo si el cable de corriente o el
enchufe están rotos, si ha sido derramado algún líquido sobre
la unidad o algún objeto ha sido introducido en ella, si ha
quedado expuesto a la lluvia o la humedad, si no funciona nor-
malmente o si ha caído al suelo en algún momento.
oEste aparato libera corriente nominal no válida para el fun-
cionamiento a través de la toma de corriente, aún cuando el
interruptor de encendido y activación (POWER o STANDBY/ON)
no esté en la posición de encendido (ON).
oEl enchufe que se conecta a la red es el dispositivo de desco-
nexión, por lo que deberá permanecer siempre en prefecto
estado de uso.
oDeberá llevar cuidado si utiliza auriculares con este producto, ya
que una excesiva presión sonora (volumen) procedente de los
mismos puede causar perdidas de audición.
PRECAUCIÓN: PARA REDUCIR EL RIESGO DE
DESCARGA ELÉCTRICA, NO QUITE LA CUBIERTA
(NI EL PANEL POSTERIOR). NO HAY PIEZAS
INTERNAS QUE EL USUARIO PUEDA REPARAR. PARA
REPARACIONES, REMÍTASE A UN SERVICIO TÉCNICO
CUALIFICADO.
<El símbolo del rayo acabado en flecha dentro de un trián-
gulo equilátero alerta al usuario de la presencia de un
“voltaje peligroso” sin aislar dentro de la carcasa del pro-
ducto que puede ser de magnitud suficiente como para
constituir riesgo de descarga eléctrica para las personas.
BEl signo de exclamación dentro de un triángulo equi-
látero alerta al usuario de la presencia de importantes
instrucciones de funcionamiento y mantenimiento en
la literatura que acompaña al aparato.
ADVERTENCIA: PARA EVITAR RIESGO DE INCENDIO
O DESCARGAS ELÉCTRICAS, NO EXPONGA ESTE
APARATO A LA LLUVIA NI A LA HUMEDAD.
PRECAUCIÓN
oNO QUITE LAS CARCASAS EXTERNAS NI DEJE AL AIRE LA
ELECTRÓNICA. ¡EN EL INTERIOR NO HAY PIEZAS QUE EL USUARIO
PUEDA MANIPULAR!
oSI EXPERIMENTA PROBLEMAS CON ESTE PRODUCTO, PÓNGASE
EN CONTACTO CON EL ESTABLECIMIENTO DONDE ADQUIRIÓ
LA UNIDAD PARA SOLICITAR SERVICIO TÉCNICO. NO UTILICE EL
APARATO HASTA QUE HAYA SIDO REPARADO.
oEL USO DE CONTROLES, AJUSTES O PROCEDIMIENTOS QUE NO
SEAN LOS ESPECIFICADOS EN ESTE MANUAL PUEDE CAUSAR
EXPOSICIÓN A RADIACIONES PELIGROSAS.
La placa de identificación está situada en la parte inferior de
la unidad como muestra la ilustración.
Frontal
Placa de identificación
37
ESPAÑOL
PRECAUCIÓN
oNo exponga este aparato a salpicaduras ni goteras.
oNo coloque objetos que contengan líquidos, como por ejem-
plo jarrones, sobre el aparato.
oNo instale este aparato en lugares cerrados tales como estan-
terías o similares.
oEste aparato debe situarse lo suficientemente cerca de una
toma de electricidad como para poder alcanzar fácilmente el
cable de corriente en cualquier momento.
oSi el producto utiliza pilas (esto incluye las pilas instaladas y
los “packs” de pilas), se evitará su exposición directa al sol, al
fuego o a cualquier otra fuente de calor excesivo.
oPRECAUCIÓN con los productos que emplean baterías de
litio reemplazables: existe peligro de explosión si la batería se
reemplaza por otra de tipo incorrecto. Reemplácela sólo por
otra igual o de tipo equivalente.
AVISO
Los productos con construcción de Clase ! están equipados con
un cable de alimentación que tiene conexión de tierra. El cable
de estos productos deberá conectarse a una toma de corriente
que tenga conexión de protección de tierra.
EN EE. UU./CANADÁ, UTILICE SOLO ALIMENTACIÓN CON
CORRIENTE DE 120 V.
VPrecauciones con respecto a las pilas
Un mal uso de las pilas puede hacer que se rompan o que ten-
gan fugas y ello causar fuego, lesiones u oxidación en los objetos
cercanos. Por favor, lea y observe las siguientes precauciones
cuidadosamente.
oAsegúrese de introducir las pilas siempre con la correcta orienta-
ción de los polos positivo (¥) y negativo (^).
oUse pilas del mismo tipo. Nunca utilice juntas pilas de tipos
diferentes.
oSi no va a utilizar el mando a distancia durante mucho tiempo
(más de un mes), quite las pilas para evitar que se sulfaten y ten-
gan fugas.
oSi las pilas presentan fugas, limpie el líquido que haya caído en el
compartimento y sustituya las pilas por otras nuevas.
oNo utilice pilas que no sean del tipo especificado. No mezcle
pilas nuevas con viejas ni utilice juntas pilas de tipos distintos.
oNo caliente ni desarme las pilas. Nunca tire pilas al fuego ni al
agua.
oNo transporte ni almacene pilas con otros objetos metálicos. Las
pilas podrían producir cortocircuitos, perder líquido o explotar.
oNunca recargue una pila si no está completamente seguro de
que es una pila recargable.
Para consumidores europeos
Deshacerse de aparatos eléctricos, electrónicos,
pilas/baterías y acumuladores
a) Todos los aparatos eléctricos y electrónicos, y pilas/baterías y
acumuladores gastados, deben ser eliminados separados del
resto de basura común y únicamente en los “puntos limpios”
o bajo los procedimientos especificados por el gobierno o
autoridades municipales locales.
b) Con la eliminación correcta de los equipos eléctricos y elec-
trónicos, y de pilas/baterías y acumuladores gastados, estará
ayudando a conservar recursos muy valiosos y a evitar los
posibles efectos negativos en la salud humana y en el medio
ambiente.
c) La eliminación incorrecta de los equipos eléctricos y electró-
nicos, y pilas/baterías y acumuladores, puede producir
efectos muy dañinos en el medio ambiente y en la salud
humana a causa de las sustancias peligrosas que pueden
encontrarse en estos equipos.
d) El símbolo de Eliminación de Aparatos Eléctricos y
Electrónicos (WEEE en inglés), identificado por cubos
de basura con ruedas tachados, indican que los equi-
pos eléctricos y electrónicos, y las pilas/baterías y
acumuladores, deben ser eliminados de forma total-
mente independiente con respecto a la basura doméstica.
Si una pila/batería o un acumulador contienen más
cantidad de los valores especificados de plomo (Pb),
mercurio (Hg), y/o cadmio (Cd) según está definido
en la Directiva relativa a las pilas (2006/66/EC), enton-
ces los símbolos químicos correspondientes a estos
elementos estarán indicados debajo del símbolo WEEE.
e) Existen sistemas para la eliminación y recogida a disposición
del usuario final. Si necesita más información sobre cómo
deshacerse de aparatos eléctricos y electrónicos antiguos, así
como de pilas/baterías y acumuladores, póngase en contacto
con su ayuntamiento, con la correspondiente empresa del
servicio de recogida de residuos o con el establecimiento
donde adquirió ese aparato.
Pb, Hg, Cd
DECLARACIÓN DE CONFORMIDAD
TEAC AUDIO EUROPE, Liegnitzer Straße 6, 82194
Gröbenzell, Alemania, declara bajo su plena res-
ponsabilidad que el producto TEAC descrito en este
manual cumple con las normas técnicas correspondientes.
38
Precauciones con los equipos inalámbricos
Cumplimiento de las normas de interfe-
rencias y transmisión de radio
Modelo para EE. UU.
Declaración de conformidad
Parte responsable:
TEAC AMERICA, INC.
Dirección: 1834 Gage Road, Montebello, California, U.S.A.
Número de teléfono: 1-323-726-0303
Este dispositivo cumple con el apartado 15 de las Normas de
la FCC. Su funcionamiento está sujeto a las dos siguientes con-
diciones: (1) este dispositivo no puede causar interferencias
perjudiciales y (2) este dispositivo debe aceptar cualquier inter-
ferencia recibida, incluyendo aquellas que puedan producir un
funcionamiento no deseado.
Etiquetado de autorización
ID de la FCC: XEG-NT503
Modelo para el Espacio Económico Europeo (EEE)
Este equipo cumple con el estándar armonizado de la DIRECTIVA
1999/5/EC ( R&TTE ).
Etiquetado de conformidad con la
indicación CE:
PRECAUCIÓN
La autorización de dispositivos inalámbricos son diferentes según
los países o regiones. Por favor, utilice el producto solamente en el
país donde lo adquirió.
oDependiendo del país, podrían existir restricciones para el uso de
la tecnología inalámbrica Bluetooth.
Verifique las leyes y regulaciones del país o región donde vaya a uti-
lizar la unidad antes de hacerlo.
Requerimientos acerca de la exposición
a radiaciones
Este equipo cumple con la regulación internacionalmente reco-
nocida para los casos de exposición humana a ondas de radio
generadas por un transmisor.
Declaración de cumplimiento
Modelo para EE. UU.
Este equipo cumple con los límites de exposición a radiación esta-
blecidos por la FCC para entornos no controlados y cumple las
directrices de la FCC en materia de exposición a radiofrecuencia.
Modelo para el Espacio Económico Europeo (EEE)
Este equipo cumple con la valoración EN.62311 de equipos electró-
nicos y eléctricos relativa a las restricciones de exposición humana a
campos electromagnéticos, el estándar armonizado de la DIRECTIVA
1999/5/EC.
PRECAUCIÓN
Cualquier cambio o modificación efectuada en este equipo que
no haya sido expresamente aprobada por la parte responsable
del cumplimiento de los requisitos exigidos podría invalidar el
derecho del usuario a utilizar el equipo..
Información sobre interferencias
(requerimientos de la FCC)
Se ha comprobado que este equipo cumple con los límites estable-
cidos para los dispositivos digitales de Clase B, de acuerdo con el
apartado 15 de las Normas de la FCC. Estos límites están diseñados
para proporcionar una protección razonable contra interferencias
perjudiciales en instalaciones residenciales.
Este equipo genera, utiliza y puede irradiar energía de radiofrecuen-
cia y, si no se instala y se utiliza de acuerdo con las instrucciones,
puede causar interferencias perjudiciales en las comunicaciones por
radio. Sin embargo, no se puede garantizar que dichas interferencias
no se produzcan en instalaciones particulares. Si este equipo causa
interferencias perjudiciales en la recepción de radio o televisión,
que se comprueban apagando y encendiendo el equipo, se reco-
mienda al usuario que intente corregirla mediante una o varias de
las siguientes medidas.
oReoriente o recoloque el equipo y/o la antena receptora.
oAumente la separación entre el equipo y el receptor.
oConecte el equipo a una toma de electricidad situada en un cir-
cuito eléctrico diferente al del receptor.
oConsulte al distribuidor o solicite ayuda a un técnico de radio/TV
con experiencia.

39
ESPAÑOL
MPEG Layer-3 audio coding technology licensed from Fraunhofer IS
and Thomson.
“DSD” is a registered trademark.
The Bluetooth® word mark and logos are registered trademarks
owned by Bluetooth SIG, Inc. and any use of such marks by TEAC
CORPORATION is under license.
© 2013 CSR plc and its group companies. The aptX® mark and the
aptX logo are trade marks of CSR plc or one of its group companies
and may be registered in one or more jurisdictions.
This product is protected by certain intellectual property rights of
Microsoft. Use or distribution of such technology outside of this
product is prohibited without a license from Microsoft.
Windows and Windows Media are either registered trademarks or
trademarks of Microsoft Corporation in the United States and/or
other countries.
Mac, Mac OS and OS X are trademarks of Apple Inc., registered in the
U.S. and other countries.
IOS is a trademark or registered trademark of Cisco in the U.S. and
other countries and is used under license.
Android is a trademark of Google Inc.
DLNA®, the DLNA Logo and DLNA CERTIFIED® are trademarks,
service marks, or certification marks of the Digital Living Network
Alliance.
Los nombres de otras compañías y de productos que aparecen en
este documento son marcas comerciales o registradas de sus res-
pectivos propietarios.
Information about copyrights and licensing related to open-source
software is provided in the separate “Important Notice Regarding
Software” document.
Trademarks and other legal statement
Listening to SiriusXM Internet Radio
To listen to SiriusXM Internet Radio, you’ll need to subscribe
to SiriusXM Internet Radio service and obtain a username and
password. SiriusXM Internet Radio is available to residents of the
United States and Canada.
SiriusXM Internet Radio delivers a variety of commercial-free
music including Pop, Rock, Country, R&B, Hip-Hop, Jazz, Classical
and much more, plus expert sports talk and analysis. You also get
exclusive entertainment, talk, comedy, family programming, local
traffic and weather and news from your most trusted sources.
Once you’ve purchased a SiriusXM Internet Radio compatible
tuner you’ll need to subscribe to the service to listen to SiriusXM
Internet Radio. There are a variety of programming packages
available, including the option of adding “The Best of XM” pro-
gramming to the
SiriusXM Internet Radio service. “The Best of XM” service is not
available to Sirius Canada subscribers at this time.
Please check with Sirius Canada for any updates using the num-
bers and web address below.
Family friendly packages are also available to restrict channels
that feature mature programming.
To subscribe to SiriusXM Internet Radio, U.S. customers should
visit www.sirius.com or
call
1-888-539-SIRI (1-888-539-7474).
Canadian customers should visit
www.siriuscanada.ca.
Current XM Radio Online subscribers will need to log into the XM
online account manager and update their password in order for
their credentials to work on a SiriusXM Internet Radio compat-
ible device. If the username is over 20 characters or their device
doesn’t
support the “@” character in the username, subscribers need to
update the username on the same screen.

0515.MA-2153A
TEAC CORPORATION 1-47 Ochiai, Tama-shi, Tokyo 206-8530 Japan Phone: +81-42-356-9156
TEAC AMERICA, INC. 1834 Gage Road, Montebello, California 90640 U.S.A. Phone: +1-323-726-0303
TEAC AUDIO EUROPE Liegnitzer Straße 6, 82194 Gröbenzell, Germany Phone: +49-8142-4208-141
This device has a serial number located on its rear panel. Please record the serial number
and retain it for your records.
Model name: NT-503 Serial number:
Z
WARRANTY/GARANTIE/GARANTÍA
Europe/Europa
This product is subject to the legal warranty regulations of
the country of purchase. In case of a defect or a problem,
please contact the dealer where you bought the product.
Ce produit est sujet aux réglementations concernant la
garantie légale dans le pays d’achat. En cas de défaut ou de
problème, veuillez contacter le revendeur chez qui vous avez
acheté le produit.
Las condiciones de garantía de este aparato están sujetas a
las disposiciones legales sobre garantía del país en el que ha
sido adquirido. En caso de garantía, debe dirigirse al estable-
cimiento donde adquirió el aparato.
In countries/regions other than the
USA, Canada and Europe
This warranty gives you specific legal rights, and you may
also have other rights that vary by country, state or province.
If you have a warranty claim or request, please contact the
dealer where you bought the product.
该保证书赋予了顾客特定的合法权利,并且因国家,州
或省等地域的不同,顾客可能拥有其他权利。如需申请
或要求保修,请与购买本产品的销售店进行联系。