TECHSCAN KOREA TSK2000KRU Bar code Scanner User Manual
Techscan Korea Co., Ltd. Bar code Scanner
User Manual


1. Ge tting sta rte d
2. Setup p ro c e d ure
3. Defa ult se tting
4. Interfa c e se le c tion
5. Ke yb o a rd inte rfa c e
5- 1. Device sele c tion
5- 2. Func tion c o de se lec tion
5- 3. Language
5- 4. Sc anc ode delay
6. RS- 232C setting
6- 1. Baud rate
6- 2. Pa rity
6- 3. Data b its
6- 4. Sto p bit
6- 5. Hand sha king
7. Wand Emula tion
7- 1. Output Level
7- 2. Outp ut polarity
7- 3. Sc an sp eed
7- 4. Che c k digit
8. Da ta forma t
8- 1. Terminator
8- 2. Co de ID
8- 3. Co de ID setting
8- 4. Custom e d iting
8- 5. Data length
8- 6. Prea mble / Postamb le
9. Ba rc od e se tting
9- 1. Code 39
9- 2. Interlea ve d 2 o f 5
9- 3. Sta nd a rd 2 of 5
9- 4. Ind ustrial 2 of 5
9- 5. Matrix 2 of 5
9- 6. Co de 128
9- 7. UPC- A
9- 8. UPC- E
9- 9. EAN- 8
9- 10. EAN- 13
9- 11. UPC/EAN Sup pleme nts
9- 12. Co d abar
9- 13. MSI / Ple ssesy
10. Re a d ing mod e
11. Be ep to ne s
12. Interc ha ra c te r d e la y
13. Intermessa g e d e la y
14. Set ma x. & min. Le ng th
15. Ba rc od e sp a c e se tting
16. Minimum b a r numb ers
17. Show sta tus
18. Ap p e nd ix
18- 1. Pin a ssig nment
18- 2. ASCII TABLE
18- 3. FULL ASCII TABLE
....................................
.....................................
.................................
.................................
.........................................
.........................................
.....................................
.......................................
..................................
..................................
...............................
..................................
..................................
........................
......................................
..........................................
.........................................
....................................
.......................................
.......................................
.......................................
.........................
......................
......................
.......................
..........................
..................................
..................................
.................................
.............................................
...........................................
..............................................
..............................................
..........................
.......................................
.......................................
...........................................
........................................
............................................
...................................
...........................................
.............................................
......................................
................................................
.................................
..............................
.......................
2
3
4
4
5
5
6
6
7
8
8
8
9
10
10
10
10
11
11
12
14
15
15
16
17
19
20
21
22
23
24
25
26
27
28
29
30
30
31
32
33
35
36
37
38
40
42
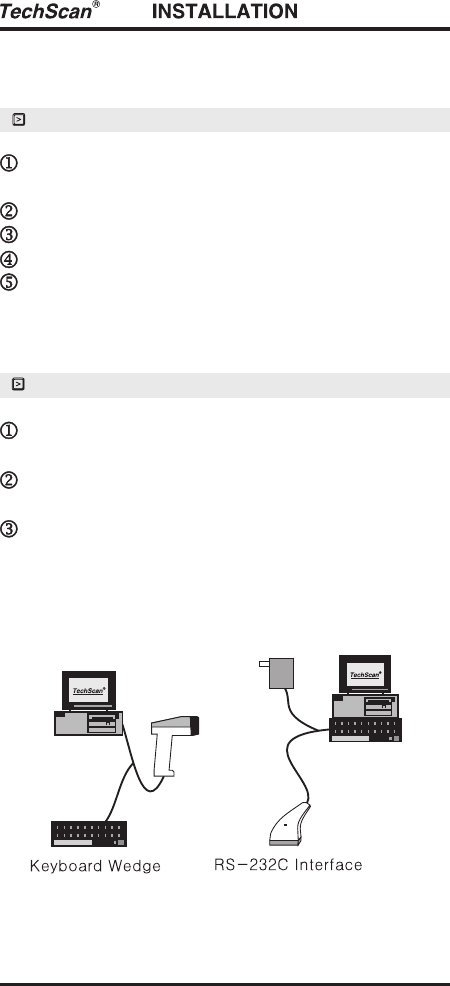
Make sure that the scanner has the correct cable
for your system.
Turn off the power of the system. ( or PC )
Unplug the keyboard from the system.
Connect Y cable to the system and keyboard.
Turn on the power of the system.
If the indicator LED lights up, Buzzor sounds,
the scanner is ready for reading.
Make sure that there is a power supply to the
scanner. ( If necessary)
Connect the cable to the RS-232C port of the
device.
Make sure the host device should have
communication program ( Xcom, procomm,
Hyperterminal ) before transmitting data.
Installing a Keyboard Wedge ScannerInstalling a Keyboard Wedge Scanner
Installing an RS- 232C interface scannerInstalling an RS- 232C interface scanner
1. Getting started1. Getting started
Power
adapter
- 2 -
( * ) denotes default setting
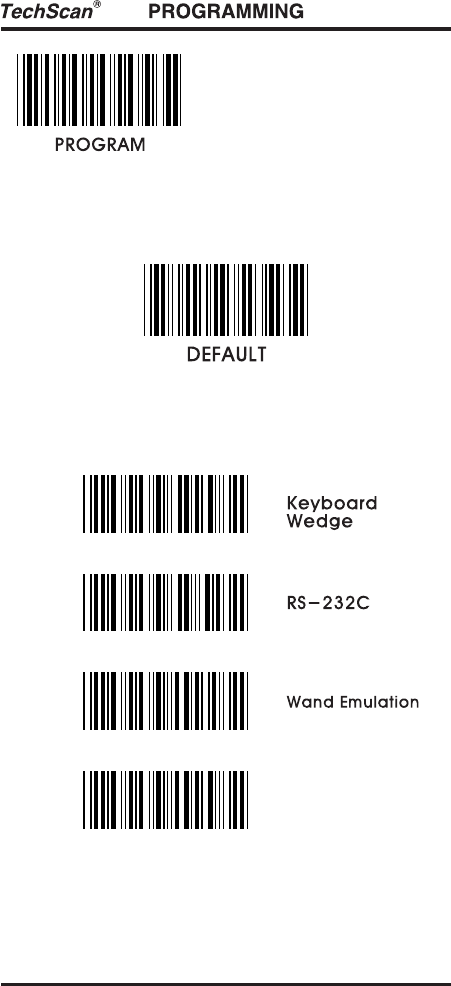
4. Interface Selection4. Interface Selection
3. Default setting3. Default setting
USB
- 4 -
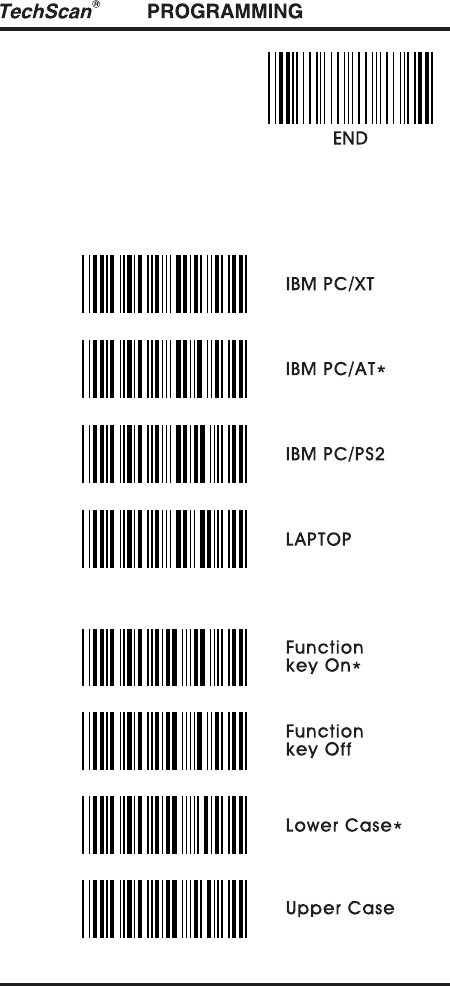
5- 1. Devic e se le c tio n
5- 2. Func tio n Co d e Sele c tio n
5. Keyboard Interface5. Keyboard Interface
- 5 -
- 6 -
5- 3. La ng uag e
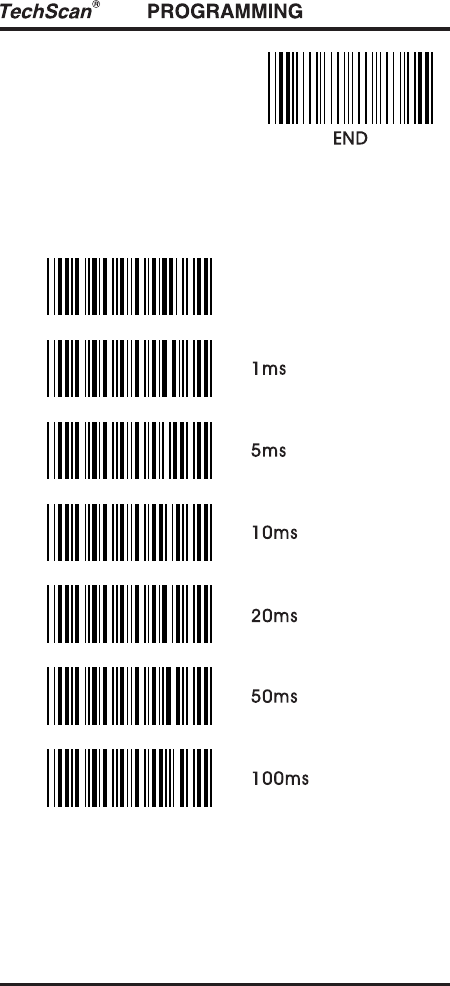
5- 4. Sc a nc od e d e la y
QWERTZ
AZERTY
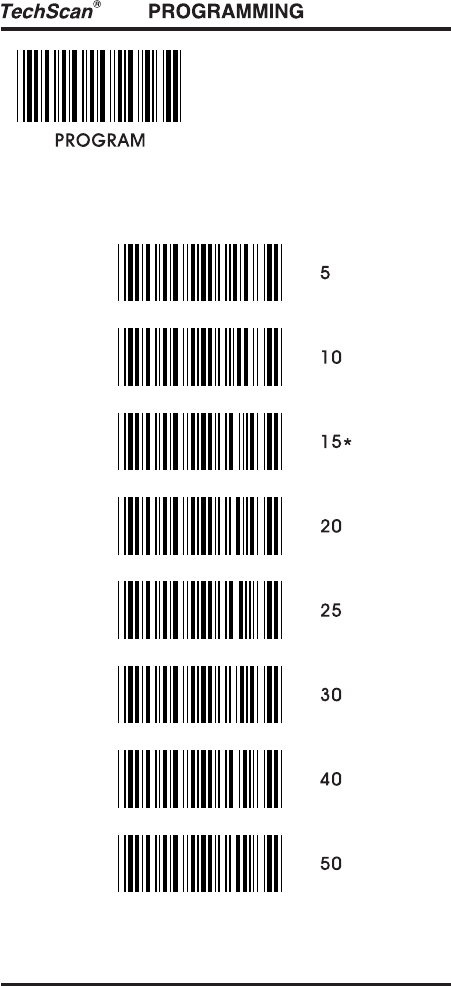
Ex) If scanner needs 15ms of delay, scan
"Program" "AT Delay" "1" "5" "AT Delay" "End"
XT Dela y
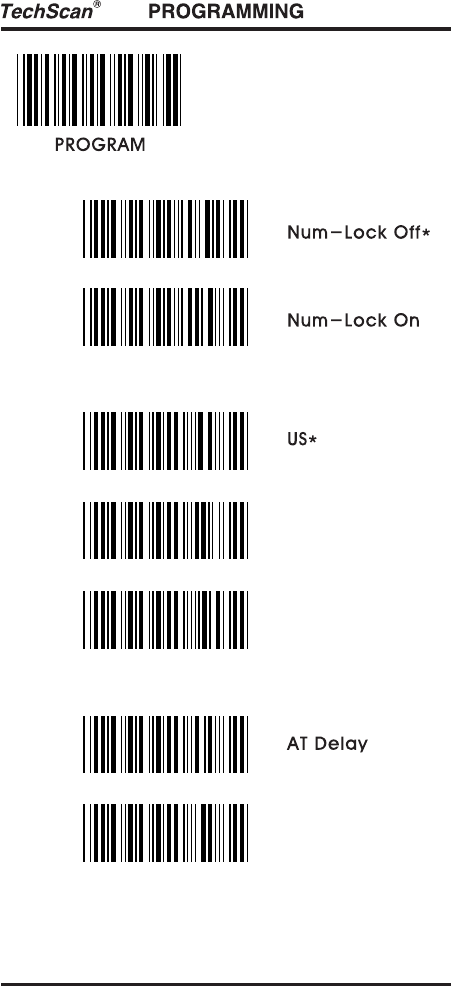
6. RS- 232C setting6. RS- 232C setting
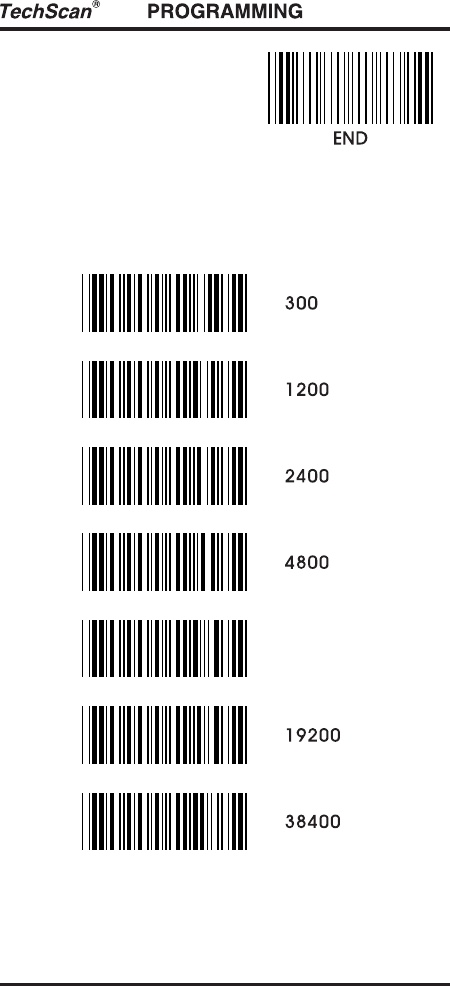
6- 1. Ba ud Ra te
- 7 -
9600*
- 8 -
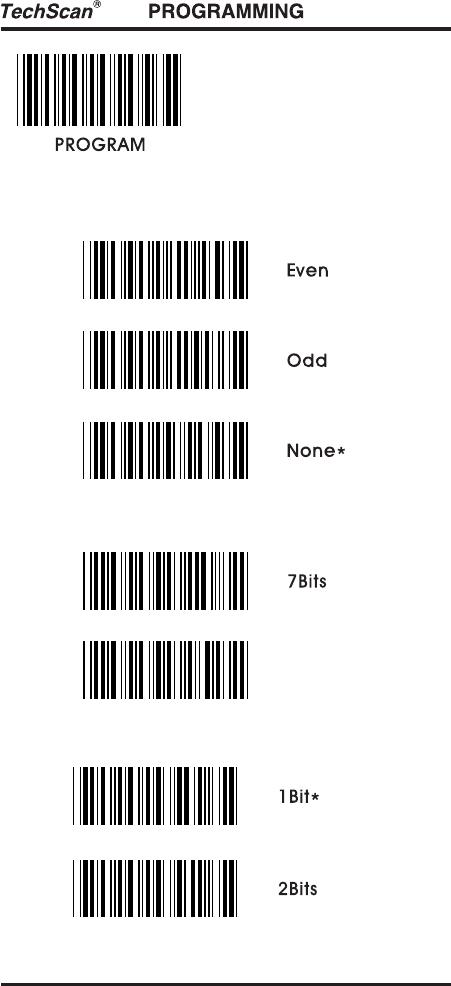
6- 2. Pa rity
6- 3. Da ta Bits
6- 4. Sto p Bit
8Bits*
- 9 -
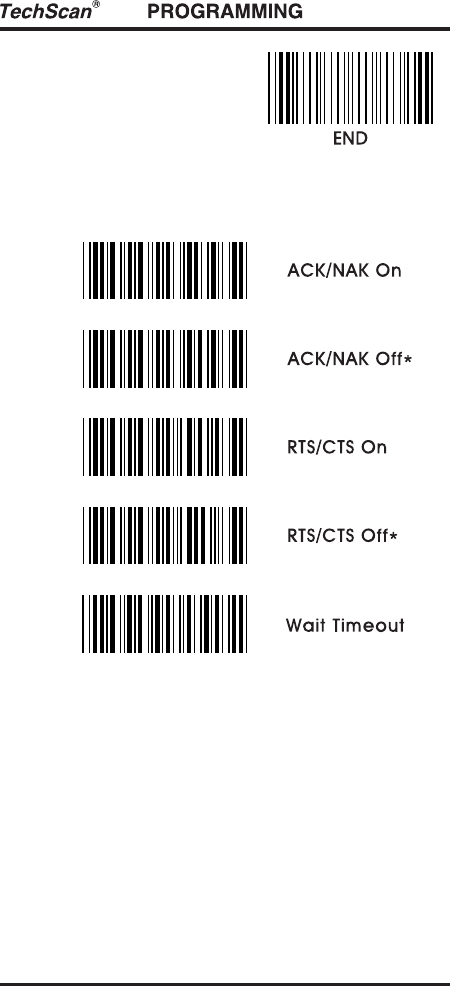
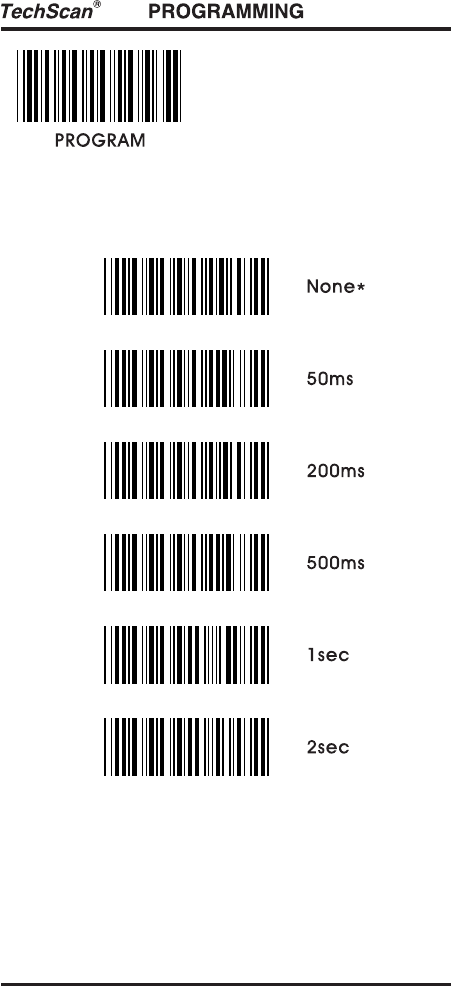
6- 5. Ha nd sha king
Ex) If delay time of 30ms is required, scan "Program"
"Wait timeout" "3" "0" "Wait timeout" "End"

7. Wand Emulation7. Wand Emulation
7- 1. Outp ut Le ve l
7- 2. Outp ut p ola rity
7- 3. Sc a n Sp ee d
7- 4. Che c k Dig it
- 10 -
*
White High
Bla c k hig h*
- 11 -
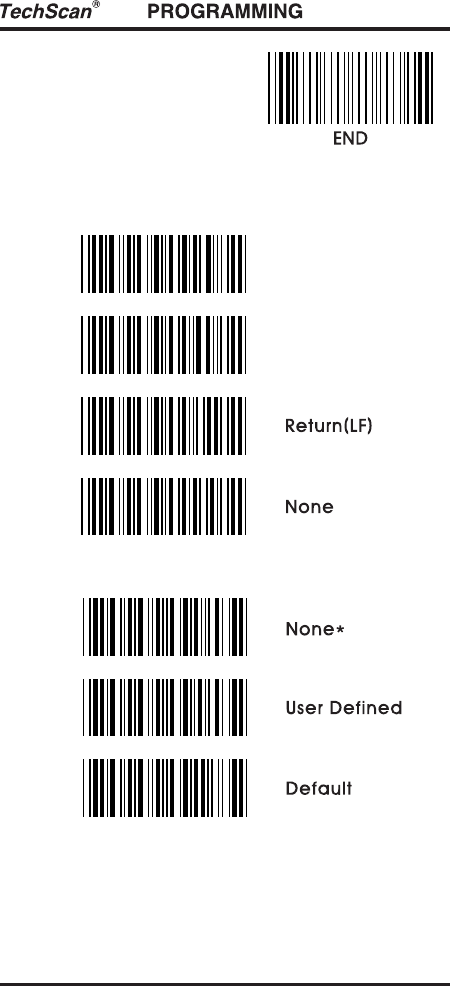
8. Data Format8. Data Format
8- 1. Te rminato r
8- 2. Cod e ID
Ex) If bacode ID for code39 (standard) is defined
as "U", scan
"Program" "User Defined" "Define Code ID"
"Code39(standard)" "U" "Code39(standard)"
"Define Code ID" "End"
Enter(CR)*
TAB(CR/LF)
- 12 -
8- 3. Cod e ID Se tting
(M)
(M)
(F)
(A)
(F)
(E)
(L)
- 13 -
(N)
(K)
(I)
(H)
(H)
(H)
(P)
(O)
(J)
- 14 -
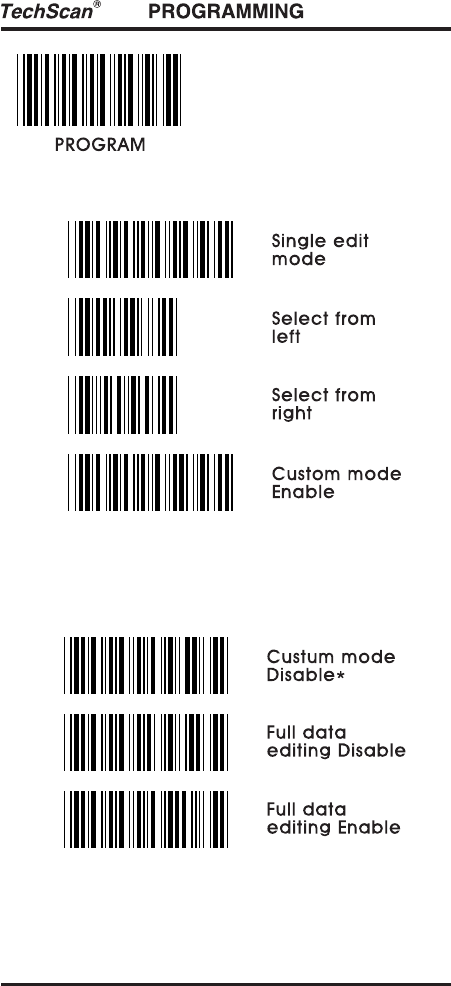
8- 4. Custo m Ed iting
Ex) If 5 digits from left are required, scan
"Program" "Single edit mode" "Select from left"
"0" "5" "Select from left" " "
"Custom mode enable" "End"
Single edit mode
Ex) If 5 digits from the second position are required
scan as below,
"Program" "Full editing Enable" "0" "2" "5"
"Full editing Enable" "Custom mode Disable" "End"
"." "0"

- 15 -
8- 5. Da ta le ng th
8- 6. Prea mb le / Posta mb le
Ex) If preamble "SN" before data is required, Scan
"Program" "Preamble" "S" "N" "Preamble" "End"
- 16 -
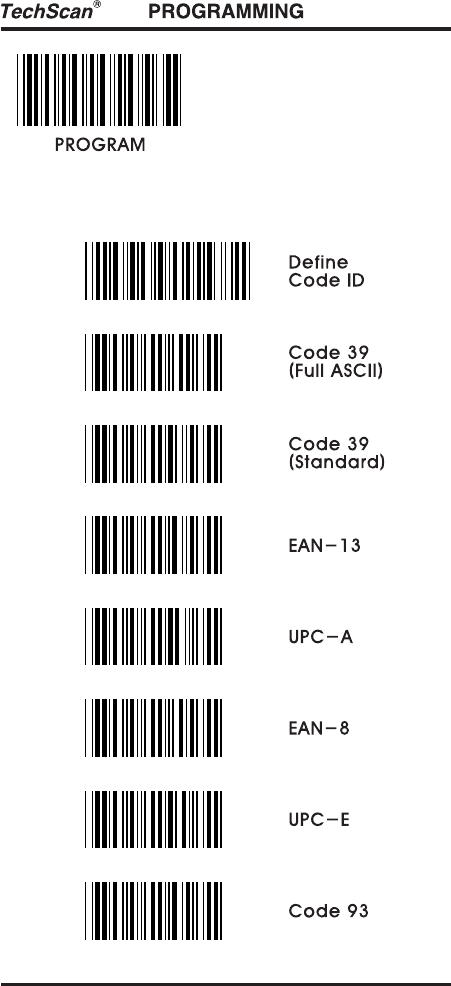
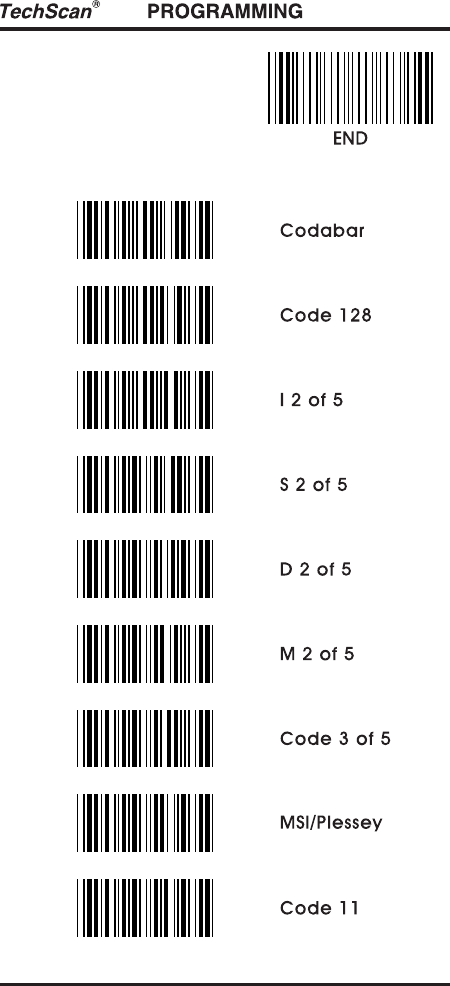
9. Barcode setting9. Barcode setting
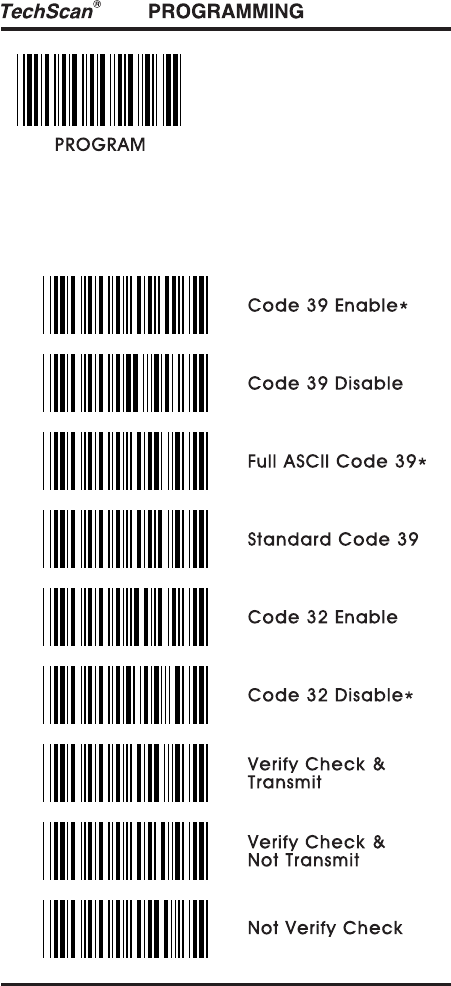
9- 1. Cod e 39
*
- 17 -
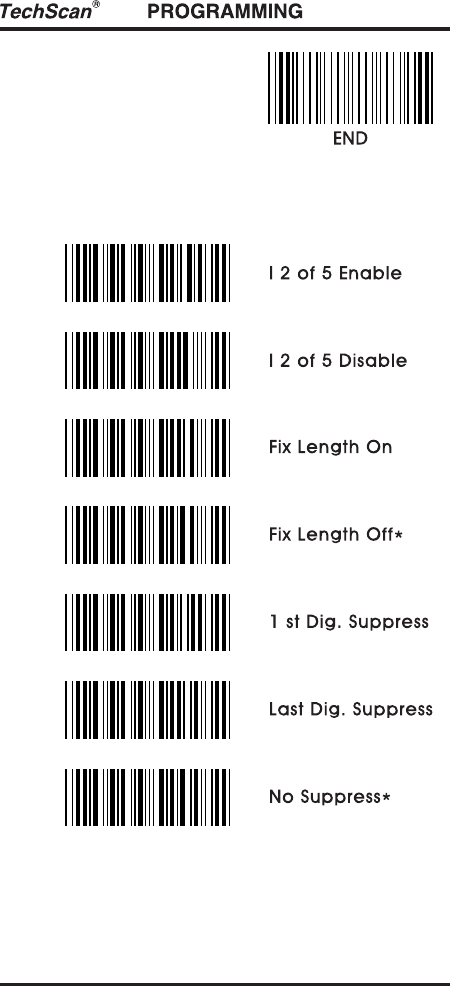
9- 2. Inte rlea ved 2 of 5
Ex) If barcode length needs to be fix, scan "Program"
"Fix Length On" "End" and scan barcode that you
apply twice.
*
- 18 -
I 2 o f 5
Verify Che c k &
Tra nsm it
I 2 o f 5
Verify Che c k &
No t Tra nsmit
I 2 o f 5
No t Verify Che c k
*
- 19 -
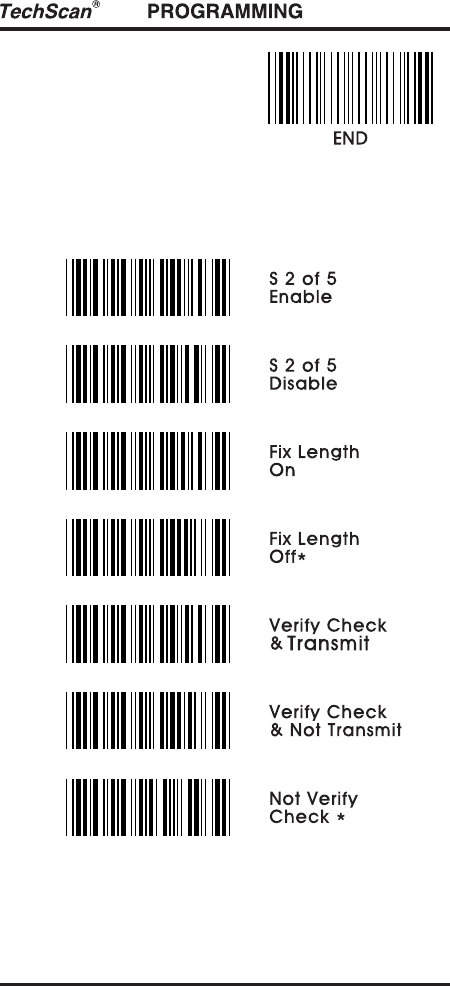
9- 3. Sta nd a rd 2 of 5
*
- 20 -
9- 4. Ind ustria l 2 of 5
*
- 21 -
9- 5. Ma trix 2 of 5
*
- 22 -
9- 6. Cod e 128
*
- 23 -
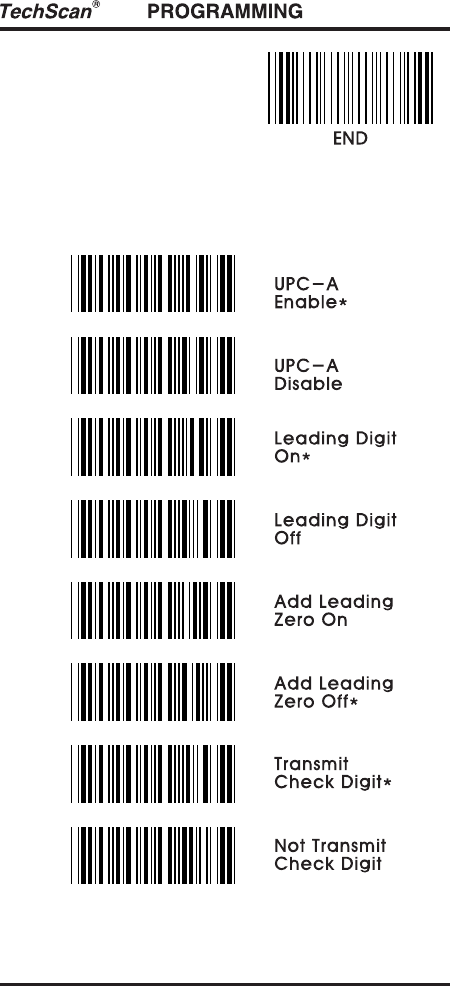
9- 7. UPC- A
- 24 -
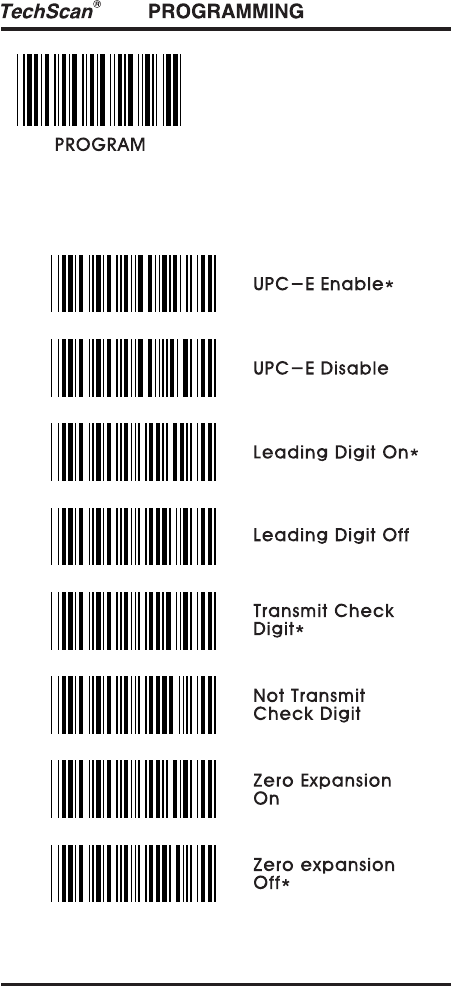
9- 8. UPC- E
- 25 -
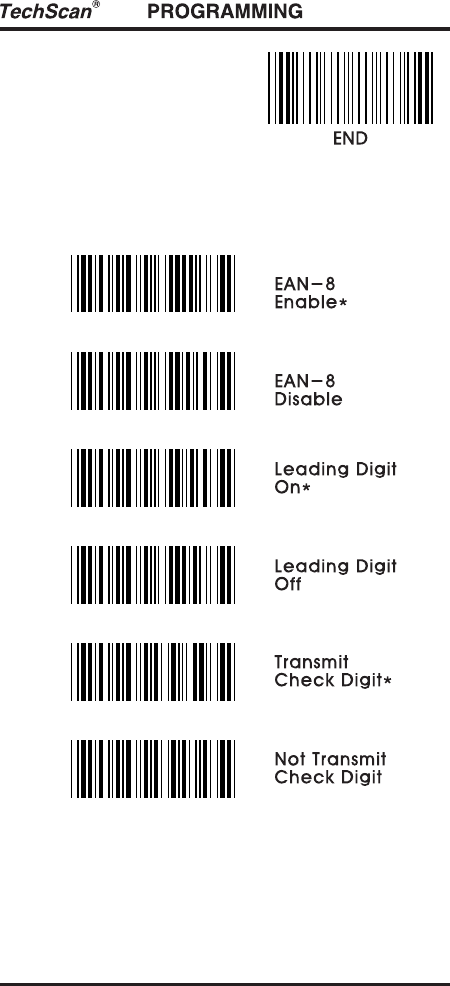
9- 9. EAN- 8
- 26 -
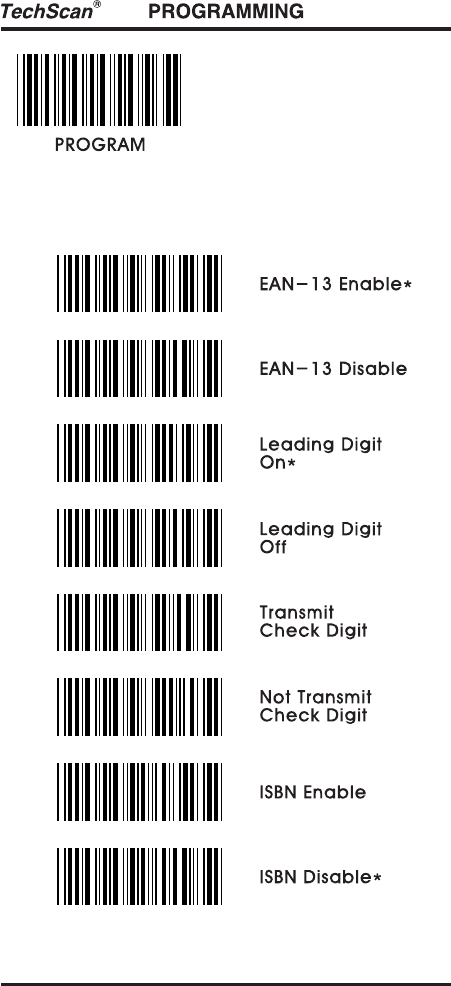
9- 10. EAN- 13
*
- 27 -
9- 11. UPC / EAN Sup p le me nts
ISBN Ad d e nd a
Ena b le
ISBN Ad d e nd a
Disa b le*
- 28 -
9- 12. Cod a b a r
- 29 -
9- 13. MSI / Ple ssesy
*
10. Reading mode 10. Reading mode
11. Beep tones11. Beep tones
- 30 -
*
Hig h*
12. Intercharacter delay12. Intercharacter delay
- 31 -
No ne *
13. Intermessage delay13. Intermessage delay
- 32 -
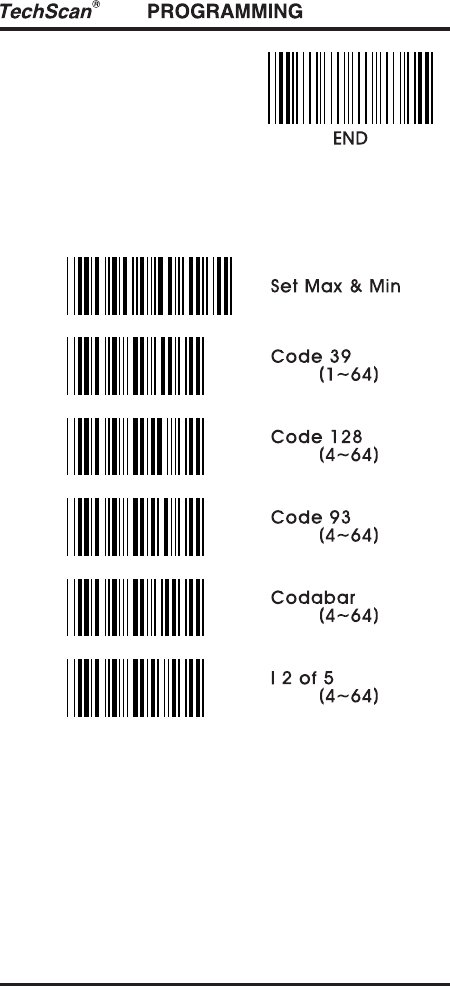
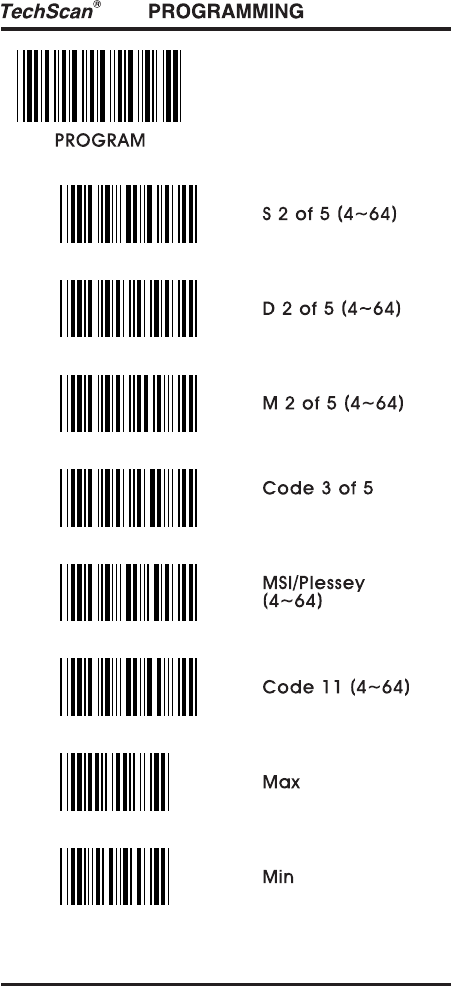
14. Se t ma x. & min. le ngth14. Se t ma x. & min. le ngth
- 33 -
Ex) If max. leng h of code 39 is to be set 15 digits t
Scan "Program" "Set Max & Min" "Code39(1~64)" "Max"
"1" "5" "Max" "Set Max & Min" "End"
- 34 -
(6~ 7)

- 35 -
15. Barcode space setting15. Barcode space setting
6X*
8X
10X
12X
14X
15X
16. Minimum bar numbers16. Minimum bar numbers
- 36 -

17. Show status17. Show status
- 37 -
- 38 -
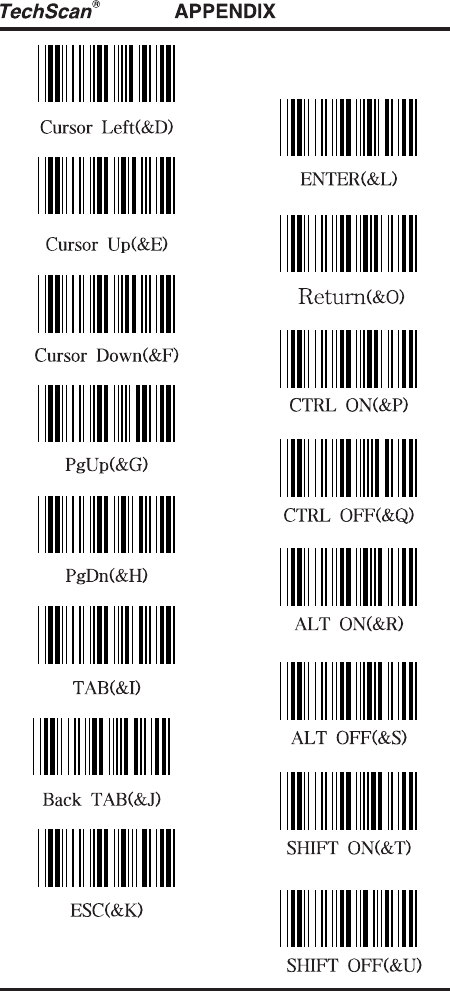
18. Appendix18. Appendix
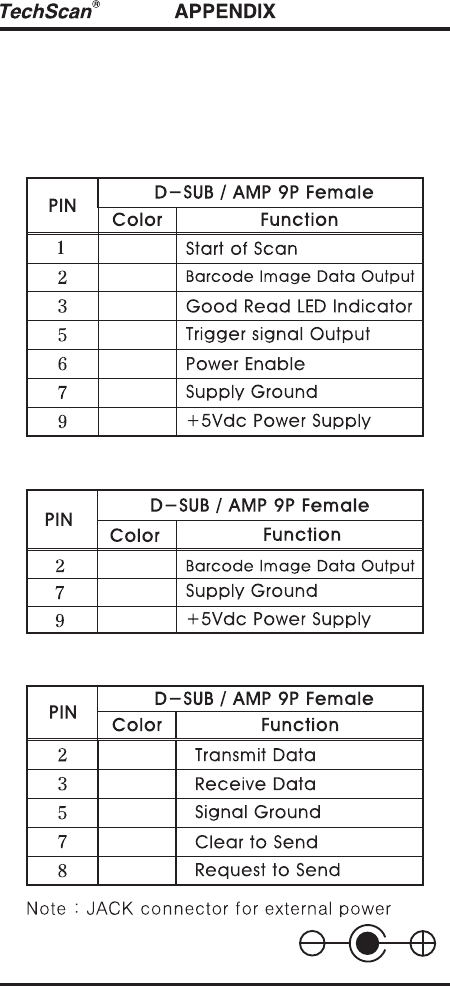
18- 1. Pin a ssignment
TTL Sig na l Outp ut
Wand Emula tio n sig na l Outp ut
RS- 232C Outp ut
(Regulated +5Vdc / 300mA)

- 39 -
Ke ybo a rd We d g e Sig na l outp ut
USB
SERIES "A" PLUG
VBUS
D-
D+
GND
- 40 -
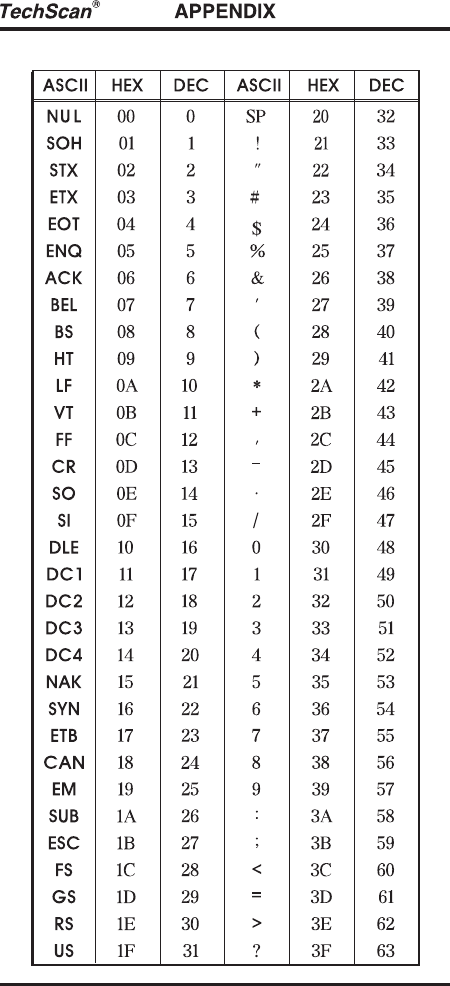
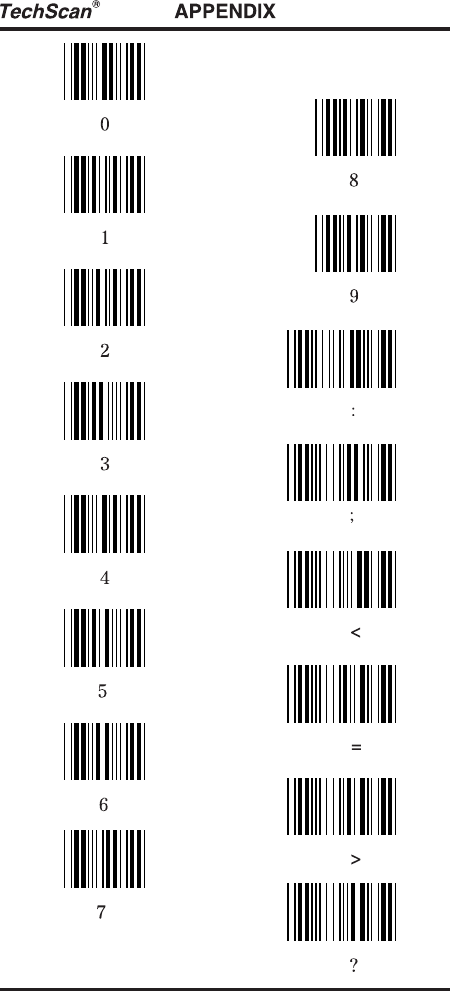
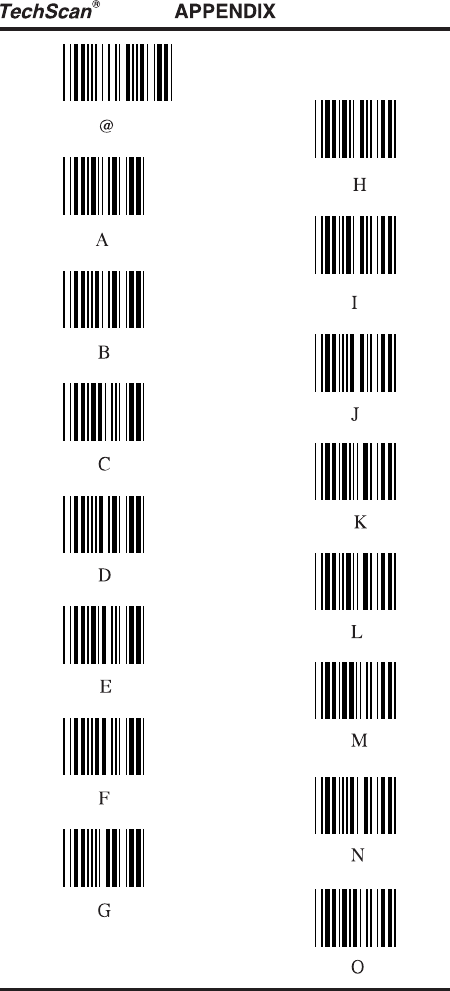
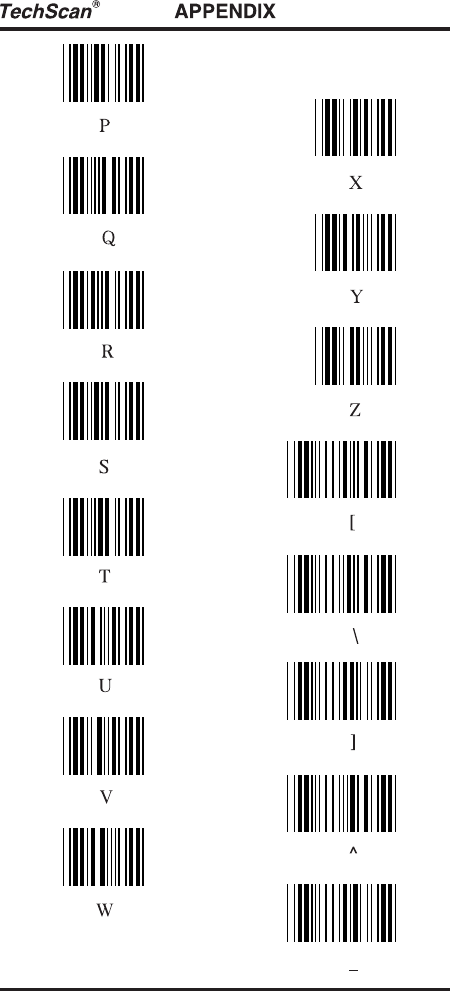
18- 2. ASCII TABLE
- 41 -
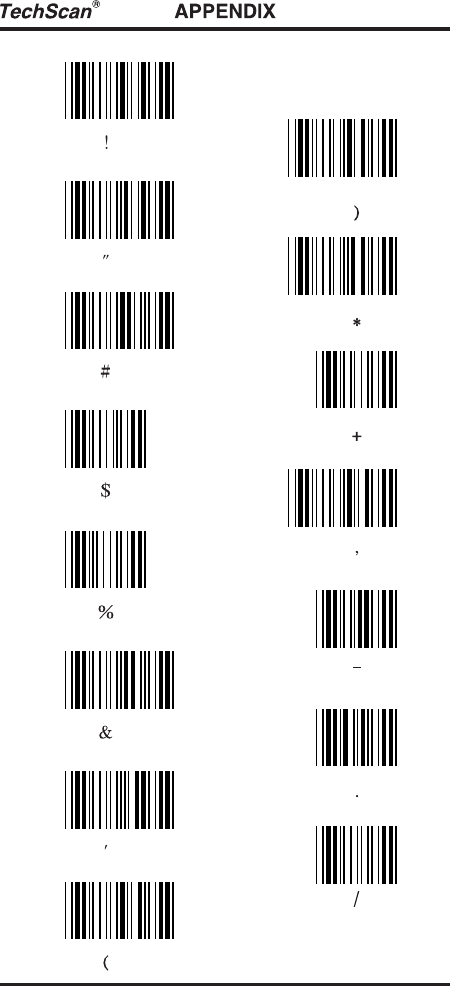
- 42 -
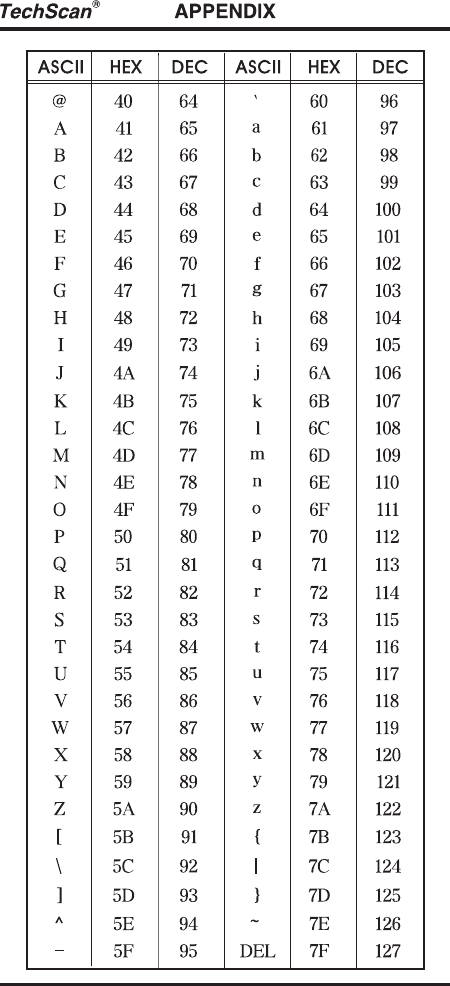
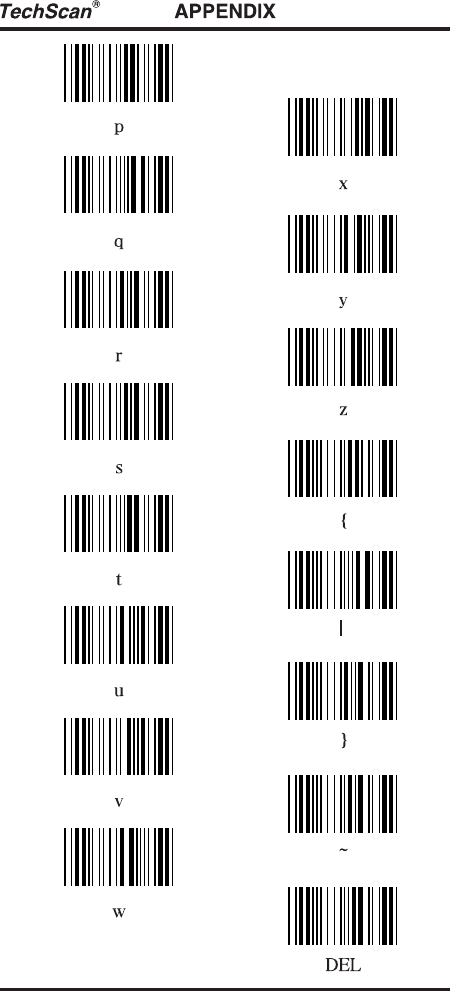
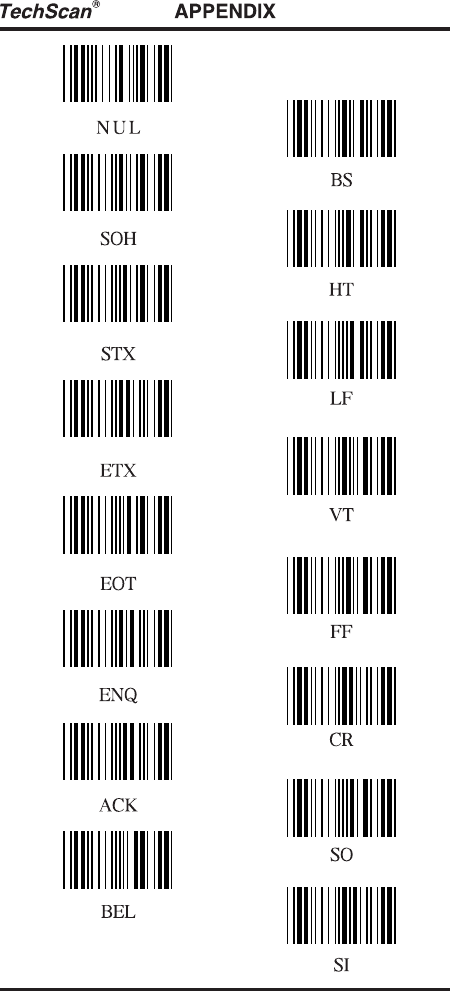
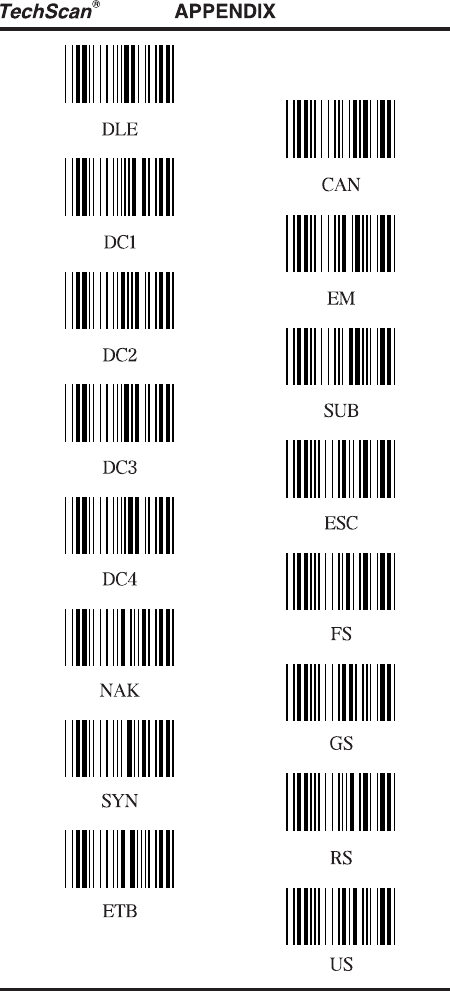
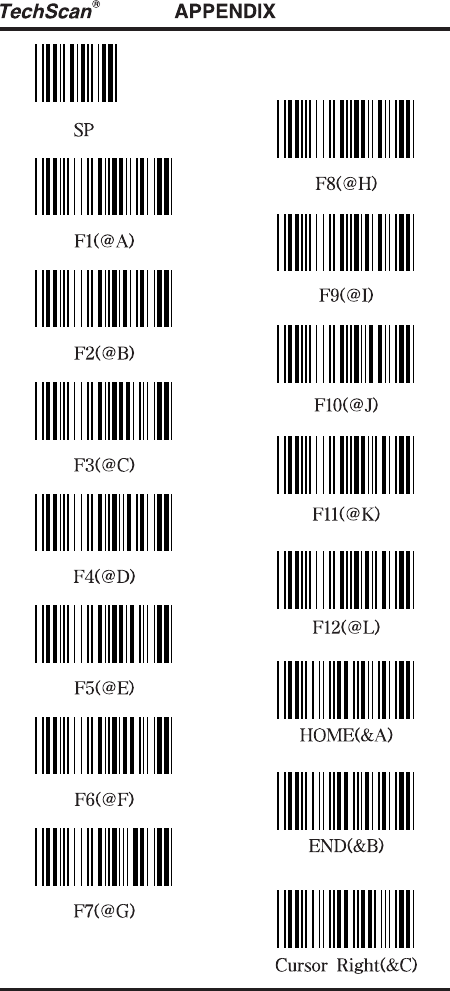
18- 3. FULL ASCII TABLE
- 43 -
- 44 -
- 45 -

- 46 -
- 47 -
- 48 -
- 49 -
- 50 -
- 51 -